

Kenwood HTB-503 Owners Manual
Congratulations!
The HTB-503 Home Theater System will make watching movies at
home more fun than ever. To connect your speakers to the receiver
follow the instructions on this sheet. To learn how to operate your
receiver please read and follow the instruction manual included in
the receiver’s box. If you’re also connecting other equipment, such
as a TV, VCR, DVD player, CD player or other source component, use
the receiver’s manual in combination with the manuals that came
with those components.
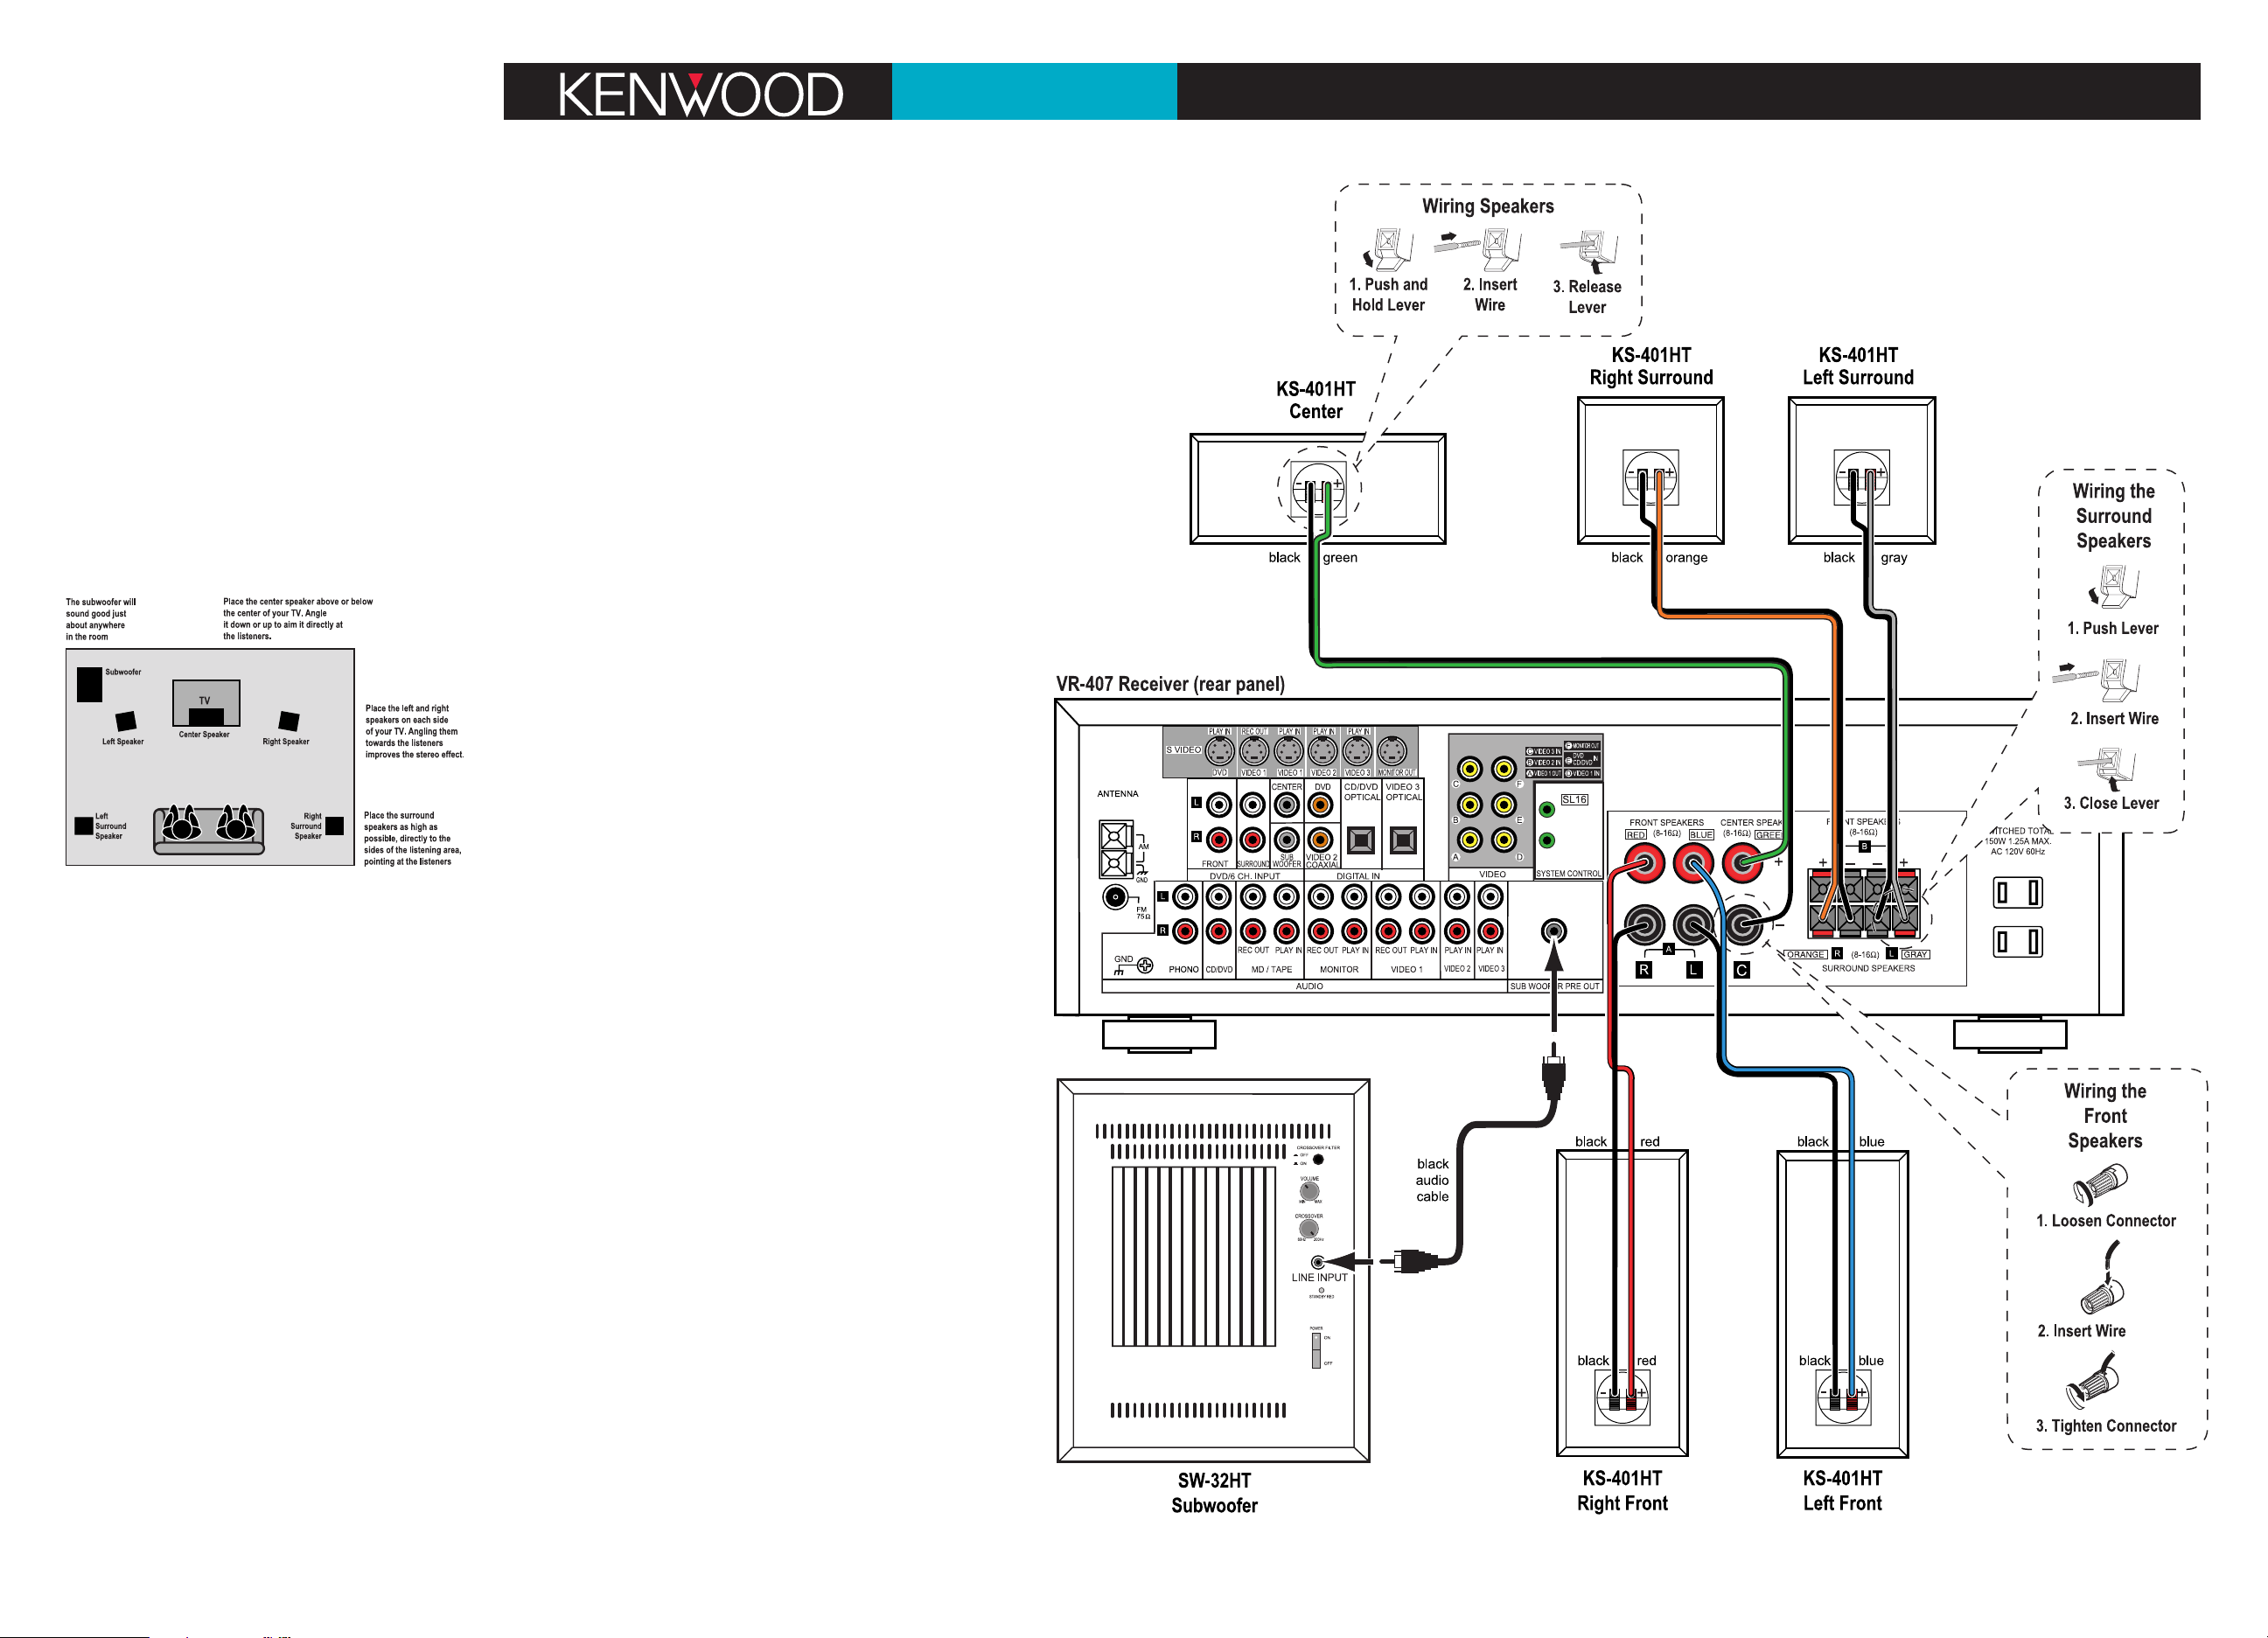
Placing Your Speakers
Place the speakers as shown in the diagram below. While you’re setting the speakers up, keep these points in mind:
• If the subwoofer causes discoloration of the TV picture, move it
away from the TV until the discoloration disappears.
• Since the center speaker is magnetically shielded, you can place it
right on top of the TV without worrying about picture
discoloration.
• You can hang the surround speakers on the wall using heavy-duty
picture-hangers.
• Placing the subwoofer next to a wall yields more deep bass output than placing it away from a wall. Placing the subwoofer in a
corner yields the deepest bass output overall.
Connecting Your Speakers
Important: Do not plug the receiver and subwoofer’s power
cords into AC outlets until you have properly connected all of
the speakers.
Connect the speakers as shown in the main diagram.
In each case, connect the colored speaker wire to the red
terminals, and the black speaker wire to the black terminals on the
speaker and receiver.
To make connecting the speakers easier, we have color-coded the
speaker wire and the terminals on the speakers, labeled the terminals on the receiver, and pre-stripped the insulation from the ends of
the wire.
The subwoofer connects to the receiver using the black audio cable:
• Connect one end of the black audio cable to the connector on
the subwoofer labeled LINE INPUT, and connect the other end to
the connector on the receiver labeled SUBWOOFER PRE OUT.
Using your Subwoofer
Your SW-32HT subwoofer has features that make it easy to set up
and use.
Auto Power On/Off
After you turn the subwoofer’s power switch On for the first time,
the subwoofer’s Auto Power On/Off feature will put the subwoofer
into Standby when you’re not using it and turn it On again when
you use your system. (When the subwoofer is On the indicator on its
rear panel glows green. When the subwoofer is in Standby the indicator glows red.) If you will not be using your system for an extended period of time we recommend that you turn the subwoofer’s
power switch Off.
Quick Connect Guide
HTB-503
Crossover Filter Switch
Since your receiver has a built-in crossover (circuitry that separates the bass from
the rest of the sound) on its subwoofer output, set the subwoofer’s Crossover Filter
switch to Off.
Volume Control
Initially, set the subwoofer’s volume knob to the 11 o’clock position. During normal
operation you will use the receiver’s subwoofer volume control to change the subwoofer volume. (This is much more convenient than having to reach behind the
subwoofer to turn its volume knob every time you want to adjust its volume.) If
the receiver’s subwoofer volume control won’t go loud or soft enough, re-adjust
the subwoofer’s volume knob to compensate. See the receiver’s instruction manual
for details on using the receiver’s subwoofer volume control.
Balancing the Speakers
You can use your ears to balance the volume levels of all the system’s speakers for
your room and listening position. When all of the speakers are set at the same volume level, your system will create a more realistic, spacious surround sound environment.
1. Sit in the place where you will be watching movies. Eliminate as many external
noises as possible.
2. Turn the receiver’s volume control up to between -20dB and -15dB. For greatest
accuracy, the level balancing should be done at a moderately loud listening level.
3. Press the SETUP button on the remote twice. The display will read FRNT LRG.
Press either of the MULTI CONTROL buttons once so the display reads FRNT NML.
This sends the bass from the front speakers to the subwoofer.
4. Press the SETUP button 3 more times until the display reads Lch 0dB, the left
speaker icon flashes and you hear test noise circulate from speaker to speaker.
(The display will change and the speaker icons will flash to indicate which
speaker is playing the test noise.)
5. Using the left front speaker as a reference, carefully listen to the volume level of
the noise through the different speakers. If the noise is much louder or softer
through one speaker than it is through the left front speaker, wait until the display shows that speaker and press the upper MULTI CONTROL button on the
remote. The test noise will stay in that speaker. Using the MULTI CONTROL buttons,
adjust the speaker’s volume until it’s the same as the left front speaker.
6. Repeat Step 5 for each speaker except the subwoofer until they all play at the
same volume level.
7. Due to the way humans hear, the test noise through the subwoofer will not
sound as loud as it really is. Because of this, you cannot use the test noise to
properly set the level of the subwoofer. To set the subwoofer level, listen to
familiar music or films that have strong bass content and adjust the subwoofer
level until it sounds balanced with the rest of the speakers. (The subwoofer test
noise is designed to be used with a sound pressure level meter for balancing.)
8. Do not be concerned with the volume setting readout on the display while
you’re doing the balancing: this is for reference purposes only. Once you have
balanced all the speakers you should write each speaker’s volume setting down
for reference.
Setting the Speaker Distances
This last step adjusts the timing of all the speakers so that their sound arrives at
the listening location at the proper time.
1. Measure the distance from each speaker to the seat you will be sitting in. Write
the distances down.
2. Press the SETUP button on the remote one more time. The display will read 10FT
3.0M, and the left and right speaker icons will be flashing.
3. Press the MULTI CONTROL buttons until the display matches the distance from your
left and right speakers to your listening position.
4. Repeat Steps 2 and 3 for each speaker in your system.
5. When you’ve finished setting the speaker distances, press the
SETUP button
again. The display will show the tuner readout.
(HTB-403 Quick-Connect Guide on other side)
If you have any questions about your new system please contact our Stage 3 Customer Service Department at (800) KENWOOD or visit our Internet Web site at www.kenwoodusa.com
Congratulations!
The HTB-403 Home Theater System will make watching movies at
home more fun than ever. To connect your speakers to the receiver
follow the instructions on this sheet. To learn how to operate your
receiver please read and follow the instruction manual included in
the receiver’s box. If you’re also connecting other equipment, such
as a TV, VCR, DVD player, CD player or other source component, use
the receiver’s manual in combination with the manuals that came
with those components.
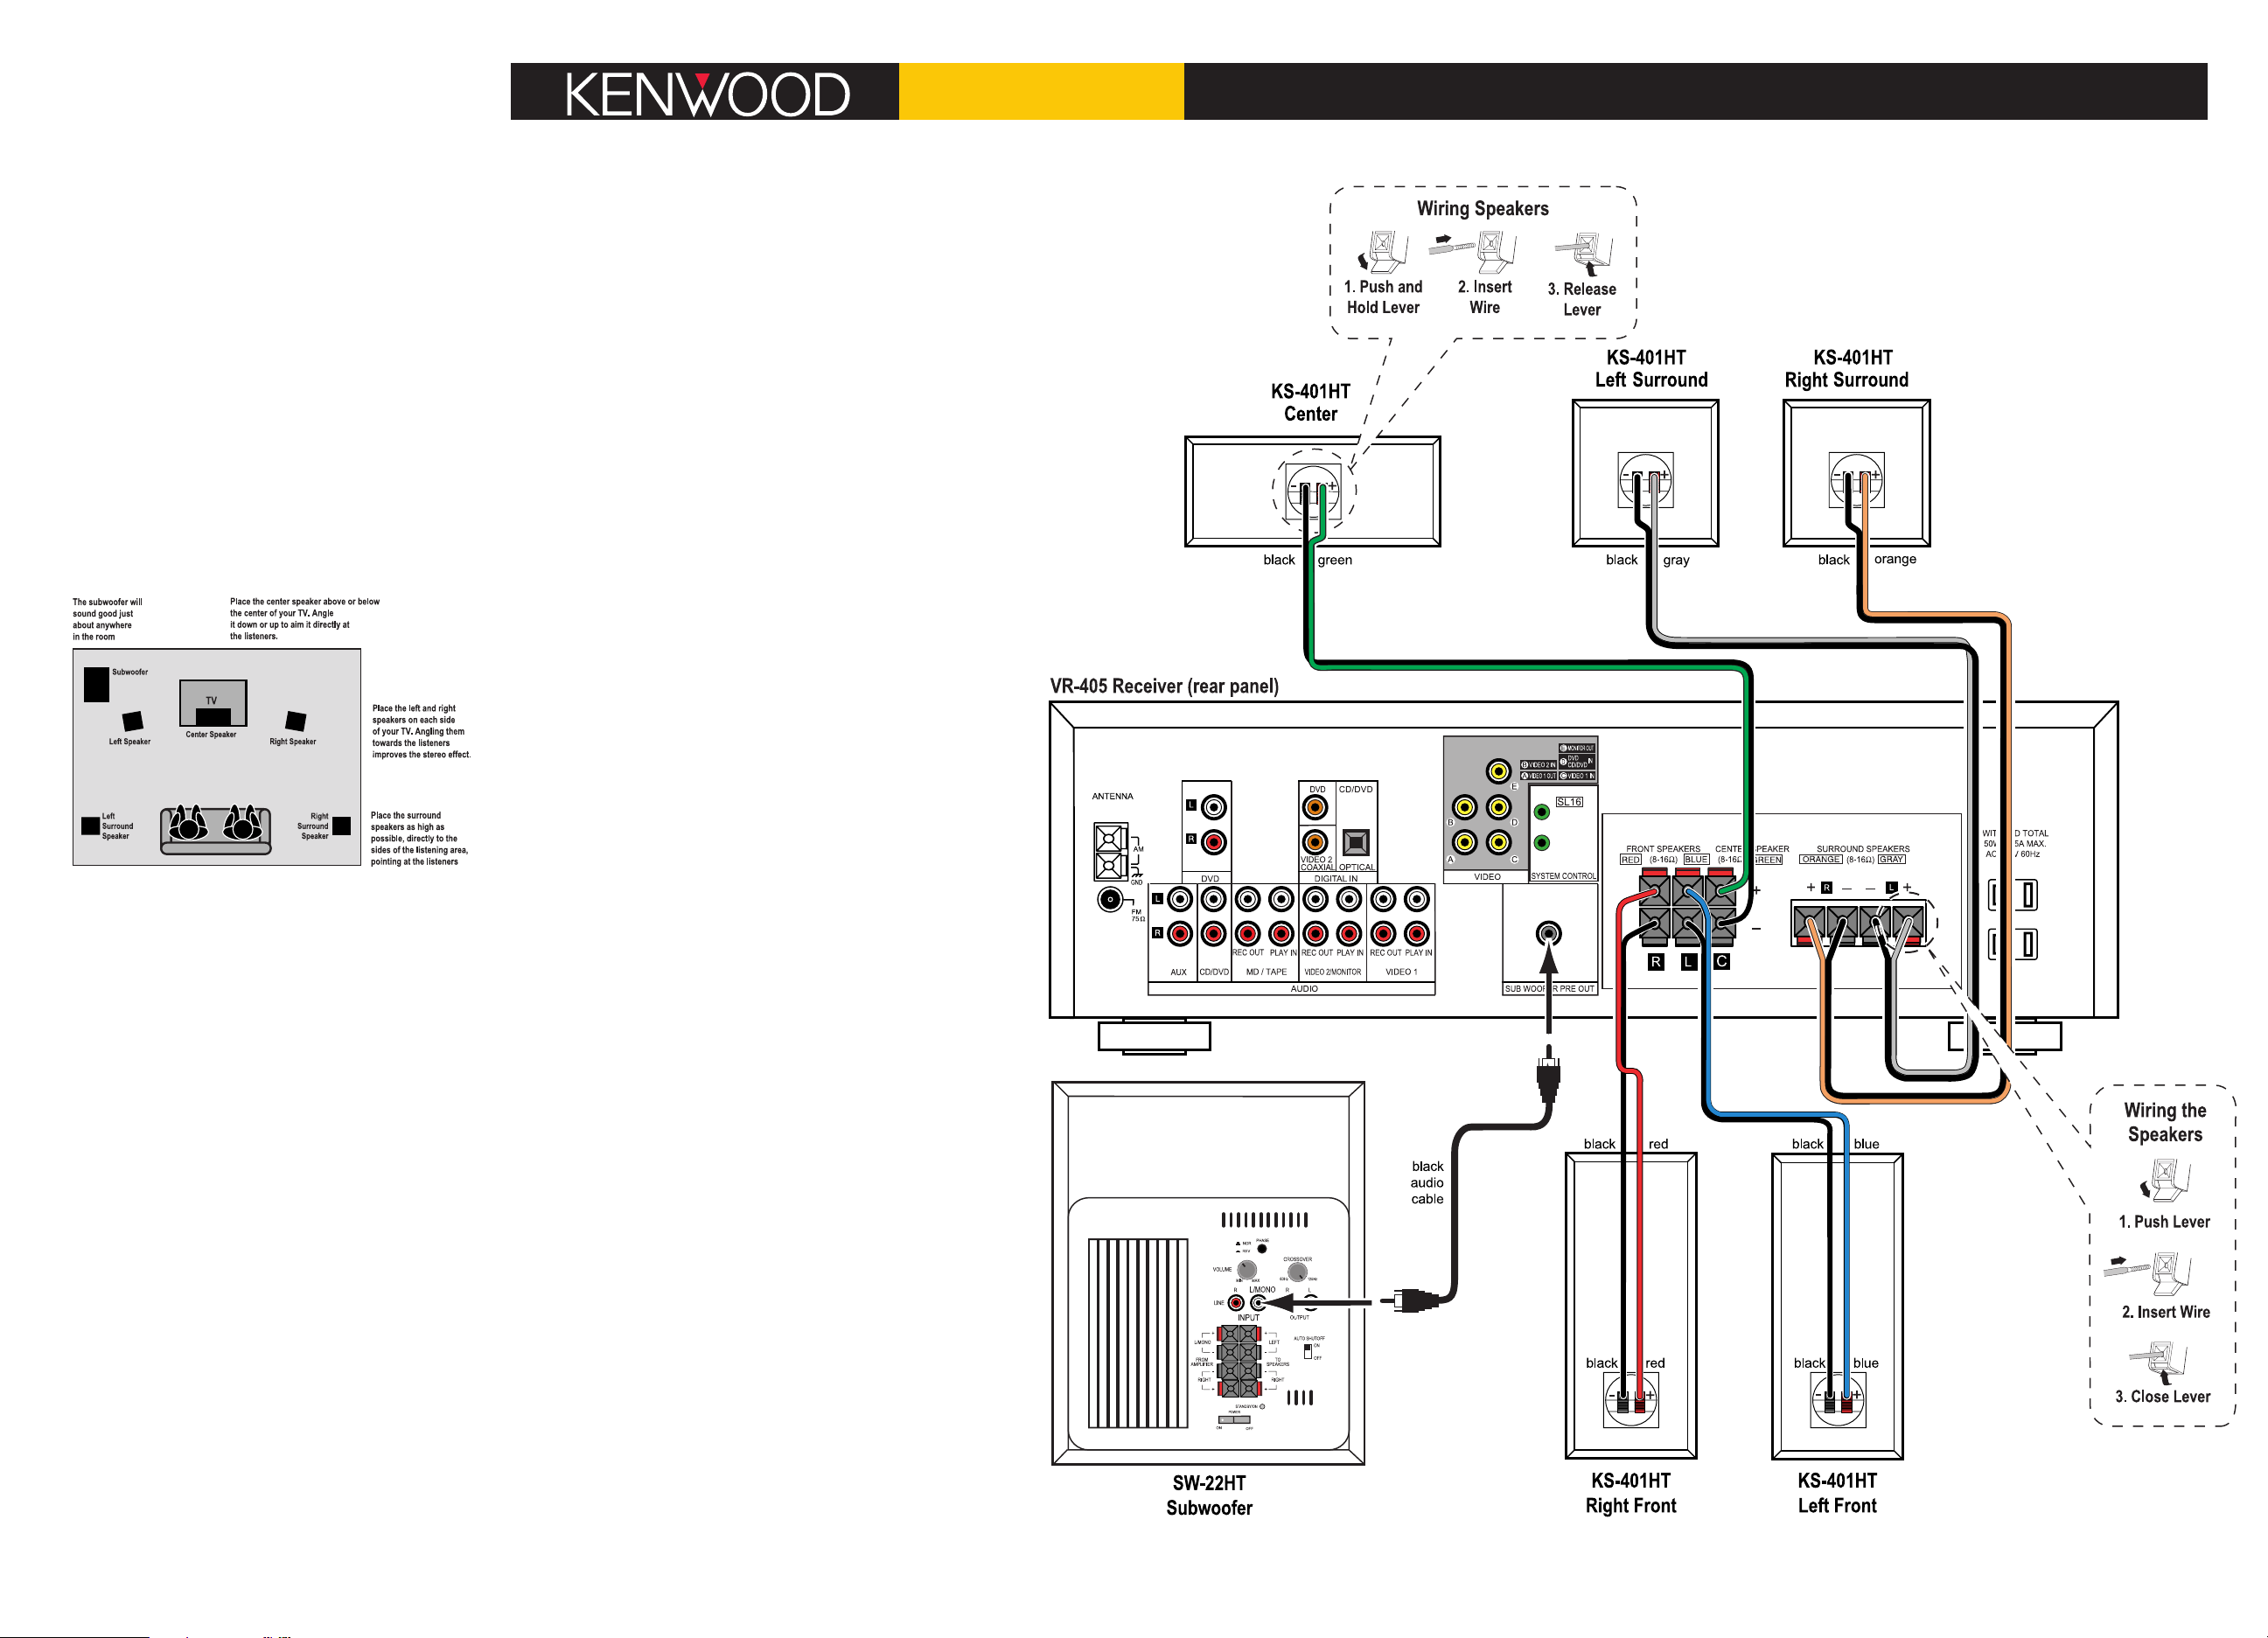
Placing Your Speakers
Place the speakers as shown in the diagram below. While you’re setting the speakers up, keep these points in mind:
• If the subwoofer causes discoloration of the TV picture, move it
away from the TV until the discoloration disappears.
• Since the center speaker is magnetically shielded, you can place it
right on top of the TV without worrying about picture
discoloration.
• You can hang the surround speakers on the wall using heavy-duty
picture-hangers.
• Placing the subwoofer next to a wall yields more deep bass output than placing it away from a wall. Placing the subwoofer in a
corner yields the deepest bass output overall.
Connecting Your Speakers
Important: Do not plug the receiver and subwoofer’s power
cords into AC outlets until you have properly connected all of
the speakers.
Connect the speakers as shown in the main diagram.
In each case, connect the colored speaker wire to the red
terminals on the speaker and receiver, and connect the black speaker wire to the black terminals on the speaker and receiver.
To make connecting the speakers easier, we have color-coded the
speaker wire and the terminals on the speakers, labeled the terminals on the receiver, and pre-stripped the insulation from the ends of
the wire.
The subwoofer connects to the receiver using the black audio cable:
• Connect one end of the black audio cable to the input connector
on the subwoofer labeled L/MONO, and connect the other end to
the connector on the receiver labeled SUBWOOFER PRE OUT.
Using your Subwoofer
Your SW-22HT subwoofer has features that make it easy to set up
and use.
Auto Shutoff switch
The subwoofer’s Auto Shutoff feature will put the subwoofer into
Standby when you’re not using it and turn it On again when you
use your system. (When the subwoofer is On the indicator on its
rear panel glows green. When the subwoofer is in Standby the indicator glows red.) If you want the subwoofer to be on all the time,
set the Auto Shutoff switch to Off. If you will not be using your system for an extended period of time we recommend that you turn
the subwoofer’s power switch Off.
Quick Connect Guide
HTB-403
Crossover Knob
Since your receiver has a built-in crossover (circuitry that separates the bass from
the rest of the sound) on its subwoofer output, set the subwoofer’s Crossover
knob to 125Hz. This will minimize any interference between the two crossovers.
Volume Control
Initially, set the subwoofer’s volume knob to the 11 o’clock position. During normal
operation you will use the receiver’s subwoofer volume control to change the subwoofer volume. (This is much more convenient than having to reach behind the
subwoofer to turn its volume knob every time you want to adjust its volume.) If
the receiver’s subwoofer volume control won’t go loud or soft enough, re-adjust
the subwoofer’s volume knob to compensate. See the receiver’s instruction manual
for details on using the receiver’s subwoofer volume control.
Balancing the Speakers
You can use your ears to balance the volume levels of all the system’s speakers for
your room and listening position. When all of the speakers are set at the same volume level, your system will create a more realistic, spacious surround sound environment.
1. Sit in the place where you will be watching movies. Eliminate as many external
noises as possible.
2. Turn the receiver’s volume control up to between -20dB and -15dB. For greatest
accuracy, the level balancing should be done at a moderately loud listening level.
3. Press the SETUP button on the remote twice. The display will read FRNT LRG.
Press either of the MULTI CONTROL buttons once so the display reads FRNT NML.
This sends the bass from the front speakers to the subwoofer.
4. Press the SETUP button 3 more times until the display reads Lch 0dB, the left
speaker icon flashes and you hear test noise circulate from speaker to speaker.
(The display will change and the speaker icons will flash to indicate which
speaker is playing the test noise.)
5. Using the left front speaker as a reference, carefully listen to the volume level of
the noise through the different speakers. If the noise is much louder or softer
through one speaker than it is through the left front speaker, wait until the display shows that speaker and press the upper MULTI CONTROL button on the
remote. The test noise will stay in that speaker. Using the MULTI CONTROL buttons,
adjust the speaker’s volume until it’s the same as the left front speaker.
6. Repeat Step 5 for each speaker except the subwoofer until they all play at the
same volume level.
7. Due to the way humans hear, the test noise through the subwoofer will not
sound as loud as it really is. Because of this, you cannot use the test noise to
properly set the level of the subwoofer. To set the subwoofer level, listen to
familiar music or films that have strong bass content and adjust the subwoofer
level until it sounds balanced with the rest of the speakers. (The subwoofer test
noise is designed to be used with a sound pressure level meter for balancing.)
8. Do not be concerned with the volume setting readout on the display while
you’re doing the balancing: this is for reference purposes only. Once you have
balanced all the speakers you should write each speaker’s volume setting down
for reference.
Setting the Speaker Distances
This last step adjusts the timing of all the speakers so that their sound arrives at
the listening location at the proper time.
1. Measure the distance from each speaker to the seat you will be sitting in. Write
the distances down.
2. Press the SETUP button on the remote one more time. The display will read 10FT
3.0M, and the left and right speaker icons will be flashing.
3. Press the MULTI CONTROL buttons until the display matches the distance from your
left and right speakers to your listening position.
4. Repeat Steps 2 and 3 for each speaker in your system.
5. When you’ve finished setting the speaker distances, press the
SETUP button
again. The display will show the tuner readout.
(HTB-503 Quick-Connect Guide on other side)
If you have any questions about your new system please contact our Stage 3 Customer Service Department at (800) KENWOOD or visit our Internet Web site at www.kenwoodusa.com
 Loading...