

Page 1
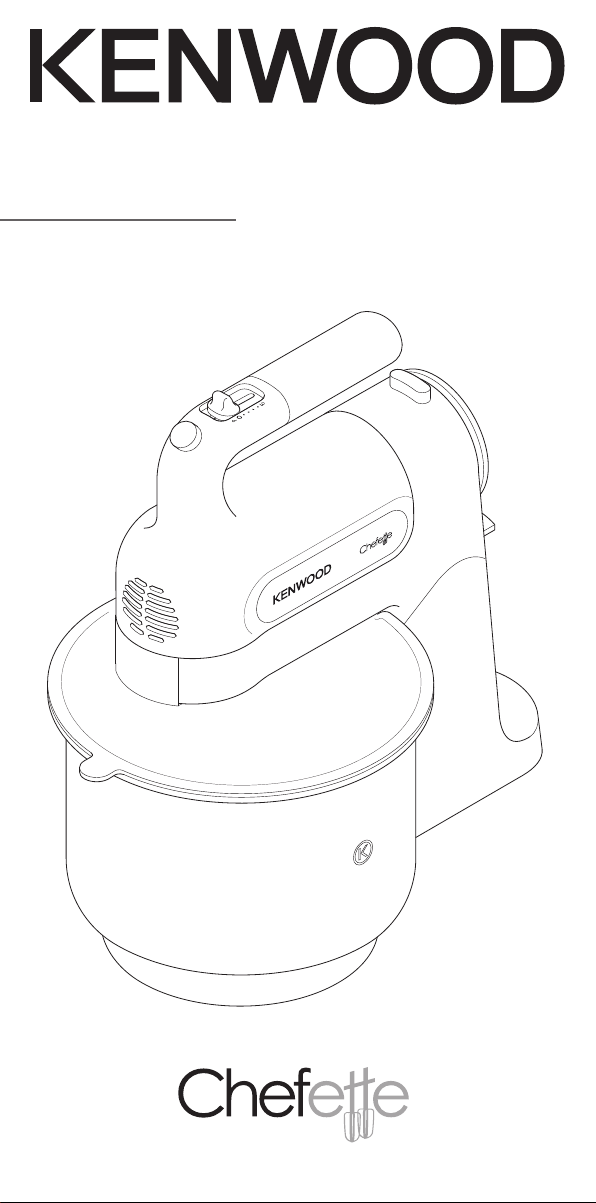
HM670 series
HM680 series
instructions
Page 2

English 3 - 9
´¸∂w
01 - 41
Page 3
햲
햳
햴
햵
햸
햹
햶
햷
햾
햿
햺
햻
햽
Page 4
Page 5

English
safety
●
Read these instructions carefully and retain
for future reference.
●
Remove all packaging and any labels.
●
Ensure the cord is fully unwound from the
cord wrap before using the handmixer.
●
Never put the handmixer body in water or let
the cord or plug get wet.
●
Keep fingers, hair, clothing and utensils away
from moving parts.
●
Never let the cord touch hot surfaces or
hang down where a child could grab it.
●
Never use a damaged handmixer. Get it
checked or repaired: see 'service and
customer care'.
●
Never use an unauthorised attachment.
●
Always unplug the appliance when not in
use, before fitting or removing parts or before
cleaning.
●
Appliances can be used by persons with
reduced physical, sensory or mental
capabilities or lack of experience and
knowledge if they have been given
supervision or instruction concerning use of
the appliance in a safe way and if they
understand the hazards involved.
●
Children should be supervised to ensure that
they do not play with the appliance.
●
This appliance shall not be used by children.
Keep the appliance and its cord out of reach
of children.
●
Only use the appliance for its intended
domestic use. Kenwood will not accept any
liability if the appliance is subject to improper
use, or failure to comply with these
instructions.
3
Page 6

efore plugging in
b
●
Make sure your electricity supply is
he same as the one shown on the
t
ear of your handmixer.
r
Important – UK only
●
he wires in the cord are coloured
T
s follows:
a
Blue = Neutral, Brown = Live.
●
he appliance must be protected by
T
3A approved (BS1362) fuse.
a
Note:
●
For non-rewireable plugs the fuse
cover MUST be refitted when
replacing the fuse. If the fuse cover
is lost then the plug must not be
used until a replacement can be
obtained. The correct fuse cover is
identified by colour and a
replacement may be obtained from
your Kenwood Authorised Repairer
(see Service).
●
If a non-rewireable plug is cut off it
must be DESTROYED
IMMEDIATELY. An electric shock
hazard may arise if an unwanted
non-rewireable plug is inadvertently
inserted into a 13A socket outlet.
●
This appliance conforms to EC
directive 2004/108/EC on
Electromagnetic Compatibility and
EC regulation no. 1935/2004 of
27/10/2004 on materials intended
for contact with food.
before using your handmixer
for the first time
●
Wash the parts (see 'cleaning').
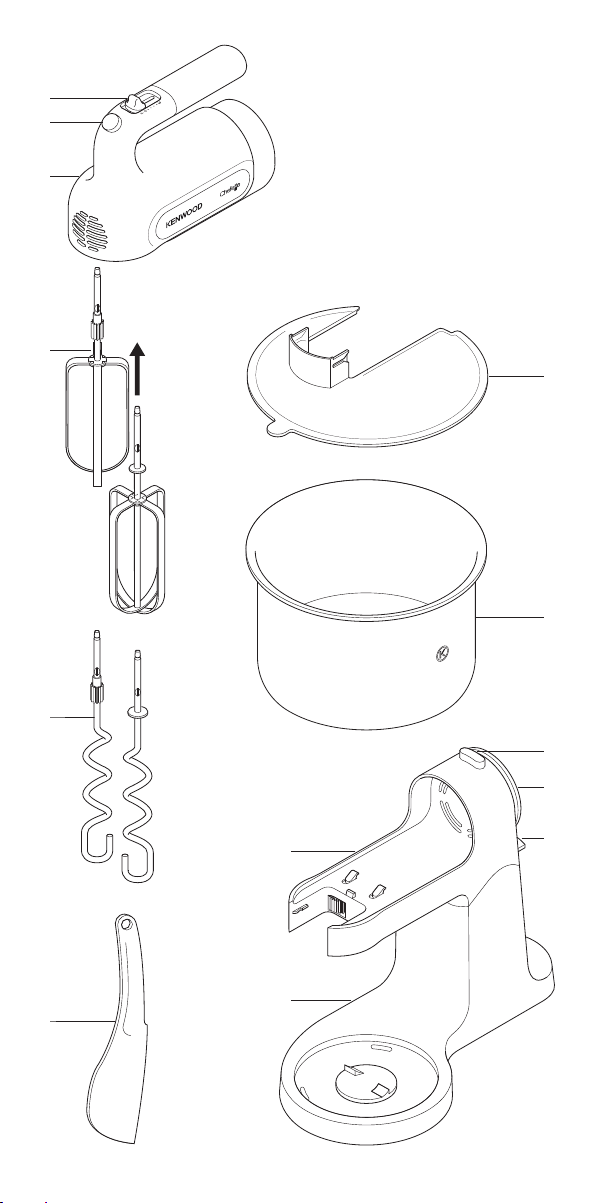
key
speed switch
tool release button
mixer
beaters
kneaders
spatula
splash guard
mixing bowl
mixer release switch
cord wrap
cradle release switch
cradle
stand
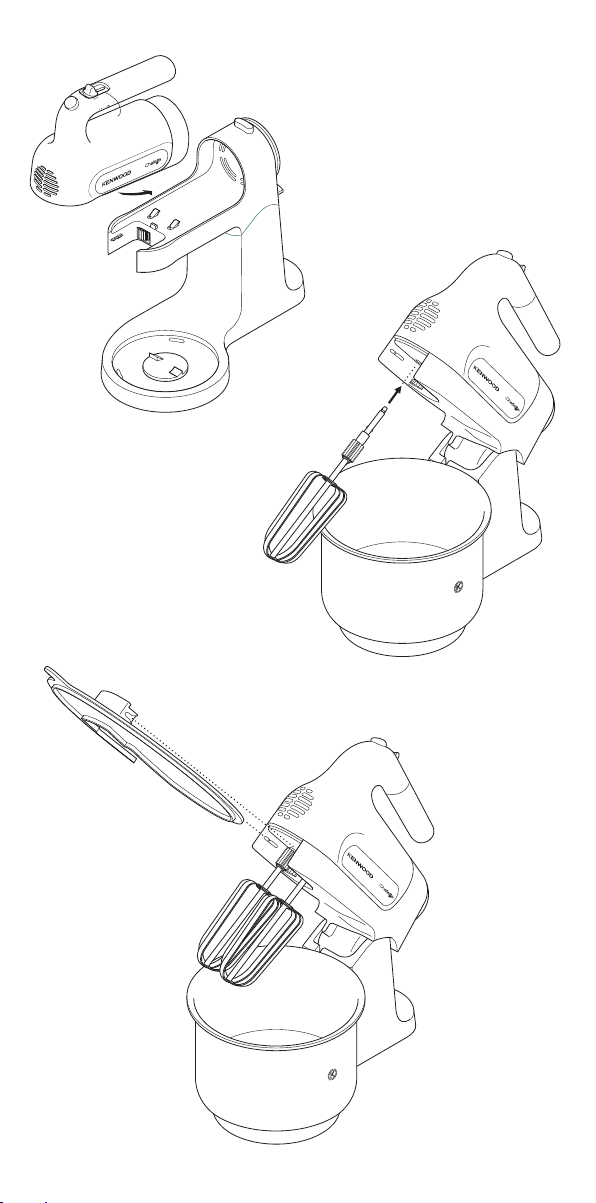
to use your handmixer
●
Unwrap the cord from the cord wrap
before use.
Insert the mixer into the cradle and
1
push down to locate .
●
To remove, press the mixer release
witch whilst lifting the mixer out
s
of the cradle.
2 Push down the cradle release switch
and swing the mixer upwards on
the stand .
3 Place the ingredients into the mixing
bowl and then place the bowl on to
the stand.
4 Insert the beaters or kneaders into
the mixer – turn until a positive click
is felt .
●
If using the mixer with stand, insert
the beater/kneader with the plastic
gear ensuring it aligns with the drive
gear on the cradle.
●
If using the mixer without the stand,
the beater/kneader with the plastic
gear must be inserted into the
socket with the metal ring.
●
The beaters/kneaders can only be
removed when the speed switch
is in the off “O” position.
5 Attach the splash guard, if desired
. With the cradle raised, slide the
splashguard into the front until fully
located.
6 Steady the stand with one hand and
lower the cradle/mixer with the other.
Do not use the cradle release
switch.
7 Plug in.
8 Pull the speed switch backwards to
reach the desired speed (the first dot
on the mixer is the slowest speed
setting). Line up the dot on the side
of the speed switch with the
corresponding speed.
●
As the mixture thickens, increase the
speed.
●
If the machine starts to slow or
labour, increase the speed.
●
Move the switch forwards to the
pulse “P” position to operate the
motor at maximum speed. The
motor will operate for as long as the
pulse is held in position.
4
Page 7

ints
When the mixture has reached the
9
desired consistency, return the
peed switch to the off “O” position
s
nd raise the mixer/cradle.
a
●
It may be necessary to scrape down
he sides of the bowl and along the
t
ottom at regular intervals to assist
b
the mixing operation.
0 To remove the tools, make sure the
1
peed switch is in the off “O”
s
position and unplug the mixer. Hold
on to the tool shafts and press the
tool release button .
h
●
When creaming for cake mixtures,
se butter or margarine at room
u
emperature or soften before use.
t
●
For best results with small quantities,
se the handmixer without the
u
tand.
s
●
Large quantities and thick mixtures
ay require a longer mixing time.
m
●
f you wish to mix larger quantities or
I
heavier mixes, remove the mixer
from the stand and use a bowl of an
appropriate size.
●
To re-knead bread doughs
remove the mixer from the
stand and use hand held.
Recommended speeds for beaters and kneaders
Please note that these are recommendations for using the stand and supplied
mixing bowl. If using the mixer by hand, the speed you select may depend upon
the bowl size (if not using the bowl supplied), quantities, the ingredients you are
mixing and personal preference.
Gradually increase to the recommended speeds below.
Food type Recommended Recommended Approximate
Beaters
Egg whites 10 4 – 5 2 - 4 minutes
Cream 500ml/171⁄2 fl.oz. 1 – 5 4 minutes
All-in-one cake mixes 600g/1 lb 5 oz.
Batter 800ml/1 pt 8 fl.oz. 4 – 5 1 minute
Rubbing fat into flour 250g/9 oz. flour 1 – 2 4 minutes
Adding water to combine 1 1 minute
pastry ingredients
Fruit cake 900g/2 lb total
Creaming fat and sugar mix 5 4 minutes
Folding in flour, fruit, etc. 1 – 2 1 minute
Royal icing 4 egg mix 1 – 5 5 – 6 minutes
Kneaders
Bread 450g/1 lb flour 1 – 5 2 – 3 minutes
maximum speeds times
quantities
total mix 1 – 5 11⁄2 - 2 minutes
5
Page 8

cleaning
●
Always switch off, unplug and
remove the beaters or kneaders
efore cleaning.
b
●
Never put the handmixer body in
water or let the cord or plug get wet.
●
ever use abrasives to clean parts.
N
andmixer body
h
●
Wipe with a damp cloth, then dry.
cradle/stand
●
Wipe with a damp cloth, then dry.
●
Never immerse in water or
use abrasives.
all other parts
●
Wash by hand, then dry.
●
Alternatively they are dishwasher
safe and can be washed on the top
rack of your dishwasher. Avoid
placing items on the bottom rack
directly over the heating element. A
short low temperature (Maximum
50°C) programme is recommended.
bowl (HM680 series)
●
Never use a wire brush, steel wool
or bleach to clean your stainless
steel bowl. Use vinegar to remove
limescale. Keep away from heat
(cooker tops, ovens, microwaves).
service and customer
care
●
If the cord is damaged it must, for
afety reasons, be replaced by
s
KENWOOD or an authorised
KENWOOD repairer.
K
U
If you need help with:
●
using your handmixer or
●
servicing or repairs (in or out of
guarantee)
call Kenwood customer care on
023 9239 2333. Have your
model number
(HM670/HM680) and date
code (5 digit code i.e. 13H26)
ready. They are located on the rear
of the power unit.
●
spares and attachments
call 0844 557 3653.
other countries
●
Contact the shop where you bought
your handmixer.
●
Designed and engineered by
Kenwood in the UK.
●
Made in China.
storage
●
Wrap the cord around the end of the
cradle .
6
Page 9

MPORTANT INFORMATION FOR
I
CORRECT DISPOSAL OF THE
RODUCT IN ACCORDANCE
P
ITH EC DIRECTIVE
W
2002/96/EC.
At the end of its working life, the product
must not be disposed of as urban
waste.
It must be taken to a special local
authority differentiated waste collection
centre or to a dealer providing this
service.
Disposing of a household appliance
separately avoids possible negative
consequences for the environment and
health deriving from inappropriate
disposal and enables the constituent
materials to be recovered to obtain
significant savings in energy and
resources. As a reminder of the need to
dispose of household appliances
separately, the product is marked with
a crossed-out wheeled dustbin.
guarantee (UK only)
If your handmixer goes wrong within
one year from the date you bought
it, we will repair or replace it free of
charge provided:
●
you have not misused, neglected or
damaged it;
●
it has not been modified (unless by
Kenwood);
●
it is not second-hand;
●
it has not been used commercially;
●
you have not fitted a plug incorrectly;
and
●
you supply your receipt to
show when you bought it.
This guarantee does not affect your
statutory rights.
7
Page 10

Beater Recipes
coconut puff
akes about 30
m
2 egg whites, medium
150g/5 oz. caster sugar
120g/4 oz. desiccated coconut
tbsp lemon zest
2
2 tsp vanilla extract
2 tsp cornflour
1 Preheat the oven to
150°C/300°F/Gas mark 2
2 Place the egg whites into the mixing
bowl whisk on speed 5, gradually
adding the sugar until the mixture
thickens (about 3 minutes).
3 Reduce to speed 2, add the
remaining ingredients and mix until
combined.
4 Place a teaspoon of the mixture onto
a lined baking tray.
5 Bake in the oven for 20 minutes,
until the outside starts to turn golden
in colour.
chocolate ‘cream’
mousse.
serves 4
250ml/9 fl.oz. whipping cream
2 tbsp cocoa powder
3 tbsp caster sugar
1 Place all the ingredients into the
mixing bowl. Mix on speed 4 until
the mousse thickens and the beaters
leave a ribbon trail when lifted out.
2 Transfer the mixture into serving
glasses and chill in the fridge for at
least 12 hours to set.
banana bread
akes 1 loaf
m
2 bananas, very ripe
315g/11 oz. plain flour
220g/8 oz. brown sugar
1
25ml/4
1
60g/2 oz. unsalted butter, melted
2 tsp baking powder
1 tsp vanilla extract
½ tsp bicarbonate of soda
½ tsp salt
½ tsp ground cinnamon
¼ tsp ground nutmeg
1 Preheat the oven to
160°C/320°F/Gas mark 3.
2 Cut the banana up into small pieces
and place in the mixing bowl. Add
the remaining ingredients. Fit the
splash guard, and then mix on
speed 1. As the mixture starts to
come together increase the speed.
Mix until the ingredients are fully
combined.
3 Transfer the mixture into a non-stick
loaf tin (23cm x 6cm/9” x 2 ½”) and
bake for 40 to 50 minutes. When
ready, a skewer placed in the centre
of the loaf will come out clean.
4 Remove from the oven and leave to
rest for 10 minutes.
5 Then turn out onto a cooling rack
and allow to cool before serving.
l.oz. semi-skimmed milk
⁄2 f
8
Page 11

Kneader Recipe
white bread dough
0ml/2 tsp dried yeast (the type that
1
requires reconstituting)
5ml/1 tsp sugar
250ml/9 fl.oz. warm water
50g/1 lb bread flour
4
5ml/1 tsp salt
1
15g/
⁄2 oz. lard
1 Place the dried yeast, with the sugar
and water, in a mixing bowl and
leave to froth. The correct water
temperature should be 43°C and
can be achieved by mixing one third
boiling water with two thirds cold
water.
2 Add the remaining ingredients.
Combine the ingredients together on
a low speed until the flour is
incorporated. Then increase the
speed and knead for approximately
2-3 minutes, until the dough is
smooth and elastic. Cover with oiled
cling film and leave the dough to rise
in a warm place for 45-60 minutes.
3 With the mixer removed from the
stand and hand held re-knead the
dough on maximum speed for
30 – 45 seconds, keeping the
kneaders in the mix.
4 Shape the dough into a loaf, or rolls,
and place on greased baking trays.
Cover with oiled cling film and leave
somewhere warm until it has
doubled in size.
5 Bake in a preheated oven at
230°C/450°F/Gas mark 8 for 20-25
minutes (for a loaf) or 10-15 minutes
(for rolls). When ready, the dough
should sound hollow when tapped
on the base.
9
Page 12

ËÅHU‹ «∞∑∫COd «∞ªUÅW
°U∞FπU≤W
´πOs «∞ª∂e «_°Oi
01 ±q/2±KFIW ÅGOd… îLOd… §U≠W («∞MuŸ
«∞cÍ ¥∫∑Uà ≈´Uœ… ¢AJOq)
5 ±q/±KFIW ÅGOd… ßJd
052 ±q ±U¡ œ«≠T
054 ¨d«Â œÆOo î∂e
5 ±q/±KFIW ÅGOd… ±K`
51 ¨d«Â œ≥s •Ou«≤w
1 {Fw «∞ªLOd… «∞LπHHW ±l «∞ºJd Ë«∞LU¡
œ«îq ßKDU≤OW «∞ªKj Ë«¢dØONU ∞∫Os ¢JuÊ
¸¨u…. œ¸§W «∞∫d«¸… «∞B∫O∫W ¥πV √Ê
¢JuÊ 34 œ¸§W ±µu¥W Ë¥LJs «∞∫Bu‰ ´KONU
´s ©d¥o îKj £KY ±Ib«¸ ±U¡ ±GKw ±l £K∏w
±Ib«¸ ±U¡ °U¸œ.
2 √{OHw «∞LJu≤U‹ «∞L∑∂IOW. ¸Ø∂w «∞FπU≤W
≠w «∞ªö◊ «∞ObËÍ £r «îKDw «∞LJu≤U‹ ´Kv
ßd´W °DOµW ∞∫Os ¢πU≤f «∞bÆOo. £r «¸≠Fw
«∞ºd´W ËË«ÅKw «∞Fπs ∞Lb… 2 ≈∞v 3
œÆUzo •∑v ¥B∂` «∞FπOs ≤U´LUΠ˱d≤UÎ.
¨Dw «∞FπOs °HOKr ±s «∞∂öß∑Op ±b≥uÊ
°D∂IW “¥X Ë«¢dØw «∞FπOs •∑v ¥ªLd
(¥d¢Hl) ∞Lb… 54 ≈∞v 06 œÆOIW.
3 √£MU¡ ≈“«∞W «∞ªö◊ ±s «∞∫U±q Ë≈±ºUØt
°U∞Ob, √´ObÍ ´πs «∞FπOs ´Kv «∞ºd´W
«∞FU∞OW ∞Lb… 03 ≈∞v 54 £U≤OW ±l «ù°IU¡ ´Kv
«∞FπU≤W œ«îq «∞FπOs.
4 ®JKw «∞FπOs ≠w Åu¸… √¸¨HW √Ë ∞HUzn
Ë{FOt ≠u‚ ÅOMOW î∂e ±b≥uÊ °D∂IW ±s
«∞e¥X. ¨Dw «∞FπOs °HOKr ±s «∞∂öß∑Op
±b≥uÊ °D∂IW “¥X Ë«¢dØOt ≠w ±JUÊ œ«≠T
•∑v ¥∑CU´n •πLt.
5 «î∂eÍ œ«îq ≠dÊ ßU°o «∞∑ºªOs ´Kv
•d«¸… 032 œ¸§W ±µu¥W - ´ö±W «∞GU“ 8 ∞Lb… 02 ≈∞v 52 œÆOIW (°U∞Mº∂W ∞Kd¨On) √Ë
01 ≈∞v 51 œÆOIW (°U∞Mº∂W ∞KHUzn). ´Mb±U
¥MCZ «∞FπOs ßOB∂` ±Hd¨UÎ ±s «∞b«îq
Ëß∑AFd¥s °c∞p ´Mb ®It ±s «∞IU´b….
î∂e «∞Lu“
∞∑∫COd 1 ¸¨On
2 £Ld… ±u“ ≤U{π∑UÊ ¢LU±UÎ
513 ¨d«Â œÆOo ´UœÍ
022 ¨d«Â ßJd °Mw
521 ±q •KOV ≤Bn œßr
06 ¨d«Â “°b… ¨Od ±LK∫W, ±c«°W
2 ±KFIW ÅGOd… ±º∫u‚ î∂Oe
1 ±KFIW ÅGOd… îöÅW «∞HU≤Oö
≤Bn ±KFIW ÅGOd… °OJd°u≤U‹ «∞Buœ«
≤Bn ±KFIW ÅGOd… ±K`
≤Bn ±KFIW ÅGOd… Æd≠W ±D∫u≤W
¸°l ±KFIW ÅGOd… §u“… «∞DOV ±D∫u≤W
1 ߪMw «∞HdÊ ≈∞v œ¸§W 061 œ¸§W
±µu¥W/œ¸§W «∞GU“ 3.
2 ÆDFw «∞Lu“ ≈∞v ÆDl ÅGOd… £r {FONU ≠w
ßKDU≤OW «∞ªKj. √{OHw °UÆw «∞LJu≤U‹.
¸Ø∂w «∞LCd» ËË«Æw «∞d–«– £r «îKDw ´Kv
«∞ºd´W 1. ØKLU °b√ «∞ªKOj ≠w «ô≤b±UÃ
«¸≠Fw «∞ºd´W. «îKDw •∑v «ô≤b±Uà «∞∑UÂ
∞KLJu≤U‹.
3 «≤IKw «∞ªKOj ≈∞v ÆU∞V î∂Oe ¨Od ôÅo
(32 ßr - 6 ßr) Ë«î∂eÍ ∞Lb… 04 ≈∞v 05
œÆOIW. ´Mb±U ¥MCZ «∞d¨On, ´Mb Ë{l
ßJOs ≠w Ëßj «∞d¨On ¥ªdà ≤EOHUÎ.
4 √îd§w «∞d¨On ±s «∞HdÊ Ë«¢dØOt ¥Nb√ ∞Lb…
01 ϮUzo.
5 √îd§w «∞d¨On ±s «∞IU∞V Ë{FOt ´Kv ¸·
«∞∑∂d¥b Ë«¢dØOt ∞O∂dœ Æ∂q «∞∑Ib¥r.
41
Page 13

ËÅHU‹ «∞∑∫COd «∞ªUÅW
°U∞LCd»
≤HªU‹ (°n) §u“ «∞NMb
∞∑∫COd ±U ¥Id» ±s 03 ÆDFW
°OU÷ °OC∑UÊ, °∫πr ±∑ußj
051 ¨d«Â ßJd °uœ¸…
021 ¨d«Â §u“ ≥Mb ±πHn
2 ±KFIW Ø∂Od… ÆAd ∞OLuÊ
2 ±KFIW ÅGOd… îöÅW «∞HU≤Oö
2 ±KFIW ÅGOd… ≤AU
1 ߪMw «∞HdÊ ≈∞v œ¸§W 051 œ¸§W
±µu¥W/œ¸§W «∞GU“ 2.
2 {Fw °OU÷ «∞∂OC∑Os ≠w ßKDU≤OW «∞ªKj.
«∞ªb±W ˸´U¥W «∞FLö¡
●
≠w •U∞W ¢Kn «∞ºKp «∞JNd°w, ¥πV
«ß∑∂b«∞t _ß∂U» ±∑FKIW °U∞ºö±W ±s Æ∂q
DOOWNEK √Ë ±dØe ÅOU≤W ±F∑Lb ±s Æ∂q
DOOWNEK.
●
≈–« √¸œ‹ «∞∫Bu‰ ´Kv ±ºU´b… °AQÊ:
●
«ß∑ªb«Â «∞πNU“ ´LKOU‹ ÅOU≤W
Ë≈Åö•U‹
●
«¢BKw °U∞L∑πd «∞cÍ «®∑d¥∑w ±Mt «∞πNU“.
● ¢BLOr Ë¢Du¥d doowneK ≠w «∞LLKJW
«∞L∑∫b….
● ÅMl ≠w «∞BOs.
¸Ø∂w «∞LCd» £r «îHIw ´Kv «∞ºd´W 5 £r
√{OHw «∞ºJd ¢b¸¥πOUÎ •∑v ¥B∂` Æu«Â
«∞ªKOj £ªOMUÎ (•u«∞w 3 œÆUzo).
3 «îHCw «∞ºd´W ≈∞v 2, £r √{OHw °UÆw
«∞LJu≤U‹ Ë«îKDw •∑v «∞Leà «∞∑UÂ.
4 {Fw ±KFIW ÅGOd… ±s «∞ªKOj ´Kv ÅOMOW
«∞ª∂Oe «∞L∂DMW.
5 «î∂eÍ œ«îq «∞HdÊ ∞Lb… 02 œÆOIW •∑v ¥∂b√
«∞πU≤V «∞ªU¸§w ≠w «∞∑∫u‰ ≈∞v «∞KuÊ
«∞c≥∂w.
CE/69/2002.
±u” "Ød¥LW" «∞AJuô¢W.
ØLOW ¢JHw 4
052 ±q ÆAb… ±ªHuÆW
2 ±KFIW Ø∂Od… ±º∫u‚ ØUØUË
3 ±KFIW Ø∂Od… ßJd °uœ¸…
1 {Fw Øq «∞LJu≤U‹ ≠w ßKDU≤OW «∞ªKj.
¸Ø∂w «∞LCd» Ë«îKDw ´Kv «∞ºd´W 4
•∑v ¥B∂` Æu«Â «∞Lu” £ªOMUΠ˥∑d„
«∞LCd» √£d«Î ´Mb ¸≠Ft ´s ßKDU≤OW «∞ªKj.
2 «≤IKw «∞ªKOj ≈∞v √Øu«» «∞∑Ib¥r Ë°dœ¥NU ≠w
«∞∏ö§W ∞Lb… 21 ßU´W ´Kv «_Æq.
±FKu±U‹ ≥U±W •u‰ ØOHOW «∞∑ªKh
«∞B∫O∫W ±s «∞LM∑Z Ë≠IU ∞∑u§Ot
«ô¢∫Uœ «_˸˰w
≠w ≤NU¥W «∞FLd «∞∑AGOKw ∞KπNU“, ¥πV ´bÂ
«∞∑ªKh ±s «∞πNU“ ≠w ≤HU¥U‹ «∞LMU©o
«∞∫Cd¥W.
°q ¥πV √îcÁ ≈∞v ±dØe ¢πLOl îU’ °πNW
±∫KOW ±∑ªBBW ≠w «∞∑ªKh ±s ≥cÁ «∞MHU¥U‹
√Ë ≈∞v ¢U§d ¥Ib ≥cÁ «∞ªb±W.
«∞∑ªKh ±s «_§Ne… «∞LMe∞OW ´Kv ≤∫u
±MHBq, ¥πMV «ü£U¸ «∞ºK∂OW «∞L∫∑LKW ´Kv
«∞∂OµW Ë«∞B∫W Ë«∞∑w ¢M∑Z ´s «∞∑ªKh ±s ≥cÁ
«∞MHU¥U‹ °Dd¥IW ¨Od ±MUß∂W, ØLU √Ê ≥cÁ
«∞FLKOW ¢ºL` °Uß∑dœ«œ «∞Lu«œ «∞LJu≤W «_±d
«∞cÍ ¥∑O` «∞∫Bu‰ ´Kv Ë≠u¸«‹ Ø∂Od… ≠w
±πU‰ «∞DUÆW Ë«∞Lu«¸œ. ∞K∑cØOd °Cd˸…
«∞∑ªKh ±s «_§Ne… «∞LMe∞OW ´Kv ≤∫u
±MHBq, ¥u§b ´Kv «∞πNU“ Åu¸… ±ADu°W
∞ºKW ÆLU±W –«‹ ´πö‹.
31
Page 14

«∞ºd´U‹ «∞LuÅv °NU ∞KªHUÆW Ë«∞FπU≤W
¥d§v «∞Lö•EW °QÊ ≥cÁ ≥w ¢uÅOU‹ ≠OLU ¥∑FKo °Uß∑ªb«Â «∞LMBW ËßKDU≤OW «∞ªKj «∞LeËœ…. ≠w
•U∞W «ß∑ªb«Â «∞ªö◊ ¥bË¥UÎ, Æb ¢F∑Lb «∞ºd´W «∞Lº∑ªb±W ´Kv •πr «∞ºKDU≤OW (≠w •U∞W ´bÂ
«ß∑ªb«Â «∞ºKDU≤OW «∞LeËœ…) Ë«∞JLOU‹ Ë«∞LJu≤U‹ «∞∑w ¢Iu±Os °ªKDNU Ë√¥CUÎ Ë≠IUÎ ∞∑HCOö¢p
«∞AªBOW.
«¸≠Fw «∞ºd´W ¢b¸¥πOUÎ •∑v «∞uÅu‰ ≈∞v «∞ºd´W «∞LuÅv °NU «∞LAU¸ ≈∞ONU √œ≤UÁ.
≤uŸ «∞DFU «∞∫b «_ÆBv ∞KJLOU‹ «∞ºd´U‹ « «∞e±s
«∞LuÅv °NU ∞LuÅv °NU «∞∑Id¥∂w
«∞ªHUÆW
°OU÷ «∞∂Oi 01 4 - 5 2 - 4 œÆUzo
«∞IAb… 005 ±q 5-1 4 œÆUzo
îKDU‹ «∞JFJU‹ «∞πU≥e… îKDW 006 ¨d«Â ≈§LU∞OUÎ 1 - 5 5.1 - 2 œÆOIW
«∞LªHuÆU‹ 008 ±q 4 - 5 1 œÆOIW
≥d” «∞ºLs ±l «∞bÆOo 052 ¨d«Â œÆOo 1 - 2 4 œÆUzo
≈{U≠W «∞LU¡ ∞b±Z ±Ju≤U‹ «∞LFπMU‹ 1 1 œÆOIW
ØFJW «∞Hu«Øt
±eà «∞ºLs ±l «∞ºJd îKDW 009 ¨d«Â ≈§LU∞OUÎ 5 4 œÆUzo
©wÒ «∞bÆOo Ë«∞HUØNW..«∞a 1 - 2 1 œÆOIW
ßJd «∞e¥MW îKOj 4 °OCU‹ 1 - 5 5 - 6 œÆUzo
«∞FπU≤W
«∞ª∂e 054 ¨d«Â œÆOo 1 - 5 2 - 3 œÆUzo
§LOl «ô§e«¡ «ôîdÈ
● ¢Gºq °U∞Ob £r ¢πHn.
●
•OY √≤t ±s «ü±s ¨ºq ≥cÁ «∞LJu≤U‹ ≠w
¨ºU∞W «_©∂U‚ ≠∂Dd¥IW √îdÈ ¥LJs ¨ºKNU
´Kv «∞d· «∞FKuÍ ≠w ¨ºU∞W «_©∂U‚. ¢πM∂w
Ë{l «∞FMUÅd ´Kv «∞d· «∞ºHKw ±∂U®d…
≠u‚ ´MBd «∞∑ºªOs. ¥uÅv °Uß∑ªb«Â
°d≤U±Z ÆBOd ±l œ¸§W •d«¸… ±MªHCW
«∞∑MEOn
●
√ËÆHw œ«zLUÎ ¢AGOq «∞πNU“, «≠BKOt ´s
±Bb¸ «∞∑OU¸ «∞JNd°w Ë√“¥Kw «∞LCd» √Ë
«∞FπU≤W Æ∂q ≈§d«¡ ´LKOU‹ «∞∑MEOn.
●
¥∫c¸ ¨Ld §ºr «∞ªHUÆW «∞ObË¥W ≠w «∞LU¡ √Ë
¢Fd÷ «∞ºKp «∞JNd°w √Ë «∞IU°f ∞K∂Kq.
●
¥∫c¸ «ß∑ªb«Â ±u«œ ØU®DW ∞∑MEOn «_§e«¡.
(05 œ¸§W ±µu¥W Ø∫b √ÆBv).
)086MH(
«∞u´U¡,
●
ô ¢º∑ªb ≠d®U… ßKJOW, Ëô Åu≠ÎU ±Fb≤OÎU
Ëô ±∂OCÎU ∞∑MEOn Ë´U¡ «∞º∑U≤Kf ß∑Oq.
«ß∑ªb «∞ªq ù“«∞W «∞πOd. √°Fb «∞πNU“ ´s
«∞∫d«¸… (√´Kv «∞LuÆb, «∞HdÊ, «∞LOJdËË¥n).
§ºr «∞ªö◊ «∞ObËÍ
●●
±º` °IDFW ÆLU‘ ¸©∂W £r «∞∑πHOn.
«∞∫U±q/«∞LMBW
●●
±º` °IDFW ÆLU‘ ¸©∂W £r «∞∑πHOn.
●
¥∫c¸ «∞GLd ≠w «∞LU¡ √Ë «ß∑ªb«Â «∞Lu«œ
«∞JU®DW.
«∞∑ªe¥s
●●
∞Hw «∞ºKp «∞JNd°w •u‰ ≤NU¥W «∞∫U±q .
21
Page 15

●●
≠w •U∞W «ß∑ªb«Â «∞ªö◊ °bËÊ «∞LMBW,
¥πV ¢dØOV «∞LCd»/«∞FπU≤W «∞LeËœ…
°∑d” ¢FAOo °öß∑OJw œ«îq «∞∑πu¥n
«∞LeËœ °∫KIW ±Fb≤OW.
●●
¥LJs ≈“«∞W «∞LCd»/«∞FπU≤W ≠Ij ´s
«∞ªö◊ ´Mb±U ¥JuÊ ±H∑UÕ «∞ºd´W ´Kv
±u{l ≈¥IU· «∞∑AGOq "O".
5 ¸Ø∂w Ë«Æw «∞d–«– •ºV ¸¨∂∑p , √£MU¡
002/5391
¸≠l «∞∫U±q, ¸Ø∂w Ë«Æw «∞d–«– °∫dØW
«∞BUœ¸… °∑U¸¥a
4
«≤eôÆOW ≈∞v «_±U •∑v ¥º∑Id ¢LU±UÎ.
6 «±ºJw «∞LMBW °S•bÈ ¥b¥p £r √îHCw
Æ∂q ¢uÅOq «∞πNU“ °LBb¸ «∞∑OU¸
«∞JNd°w
●●
¢QØbÍ ±s ¢LU£q ±u«ÅHU‹ «∞LBb¸
«∞JNd°w ±l «∞Lu«ÅHU‹ «∞Lu{∫W ´Kv
«∞πU≤V «∞ªKHw ∞Kªö◊ «∞ObËÍ.
●
¥∑u«≠o ≥c« «∞πNU“ ±l ¢u§ONU‹ «ô¢∫Uœ
«_˸˰w
CE/801/4002 °AQÊ «∞∑u«≠o
«∞JNd˱GMU©Oºw Ë¢MEOLU‹ «ô¢∫Uœ
«_˸˰w ¸Ær
72/01/4002 Ë«∞L∑FKIW °U∞Lu«œ «∞L∑ö±ºW
±l «_©FLW.
«∞∫U±q/«∞ªö◊ °U∞Ob «_îdÈ. ô
¢º∑ªb±w ±H∑UÕ ¢∫d¥d «∞∫U±q.
7 ËÅKw «∞πNU“ °LBb¸ «∞∑OU¸ «∞JNd°Uzw.
8 «ß∫∂w ±H∑UÕ «∞ºd´U‹ ∞KªKn ∞∫Os
Æ∂q «ß∑ªb«Â «∞ªHUÆW «∞ObË¥W ∞KLd…
«_Ë∞v
●
«¨ºKw «_§e«¡ (¸«§Fw ƺr "«∞∑MEOn").
«∞∫Bu‰ ´Kv «∞ºd´W «∞LDKu°W (√ˉ ≤IDW
´Kv §ºr «∞ªö◊ ¢L∏q «∞ºd´W «∞∂DOµW).
•U–Í «∞MIDW «∞Lu§uœ… ´Kv §U≤V ±H∑UÕ
«∞ºd´U‹ ±l «∞ºd´W «∞LIU°KW.
●●
ØKLU ØU≤X Ø∏U≠W «∞ªKOj Ø∏OHW ¥LJMp “¥Uœ…
«∞ºd´W.
●●
≈–« °b√ «∞πNU“ ≠w «∞FLq °∂j¡ √Ë °FMU¡,
«¸≠Fw «∞ºd´W.
●●
•dØw ±H∑UÕ «∞ºd´U‹ ∞ú±U •∑v ±u{uŸ
«∞∑AGOq «∞M∂Cw "P" ∞∑AGOq «∞Lu¢u¸ ´Kv
«∞ºd´W «∞IBuÈ. ¥FLq «∞Lu¢u¸ ≠w Ë{l
«∞∑AGOq «∞M∂Cw ©U∞LU °Iv ±H∑UÕ
«∞ºd´U‹ ±u§NUÎ ≠w ≥c« «∞Lu{l.
9 ´Mb ËÅu‰ «∞ªKOj ≈∞v «∞Iu«Â «∞LDKu»,
√´ObÍ ±H∑UÕ «∞ºd´U‹ ≈∞v ±u{l «ù¥IU·
O" £r «¸≠Fw «∞ªö◊/«∞∫U±q.
"
●●
Æb ¥JuÊ ±s «∞CdË¸Í ØAj §u«≤V ËÆUŸ
«∞ºKDU≤OW ∞KLºU´b… ≠w ´LKOW «∞ªKj.
01 ù“«∞W «_œË«‹, ¢QØbÍ ±s ¢u§Ot ±H∑UÕ
O" £r
«∞ºd´U‹ ≠w ±u{l ≈¥IU· «∞∑AGOq "
«≠BKw «∞∑OU¸ «∞JNd°w ´s «∞ªö◊. «±ºJw
±∫u¸Í «_œ«… Ë«{GDw ´Kv ±H∑UÕ ¢∫d¥d
«_œ«… .
¢KLO∫U‹
●●
´Mb îKj «∞ºLs °U∞ºJd ≠w îKDU‹
«∞JFJU‹, «ß∑ªb±w «∞e°b… ≠w œ¸§W •d«¸…
«∞Gd≠W √Ë ∞OMONU Æ∂q «ôß∑ªb«Â.
●●
∞K∫Bu‰ ´Kv √≠Cq ≤∑OπW ±l «∞JLOU‹
«∞BGOd…, «ß∑ªb±w «∞ªö◊ «∞ObËÍ °bËÊ
«∞LMBW.
●●
«∞JLOU‹ «∞J∂Od… Ë«∞ªKDU‹ «∞∏ªOMW Æb ¢∑DKV
≠∑d… îKj √©u‰.
●●
≈–« √¸œ¢w îKj ØLOU‹ √Ø∂d √Ë îKDU‹ √Ø∏d
Ø∏U≠W, √“¥Kw «∞ªö◊ ±s «∞∫U±q Ë«ß∑ªb±w
ßKDU≤OW °∫πr ±MUßV.
●●
ù´Uœ… ´πs «∞FπOs, √“¥Kw «∞ªö◊ ±s
«∞∫U±q Ë«±ºJOt ≠w ¥b„ √£MU¡
«∞b∞Oq
±H∑UÕ «∞ºd´U‹
±H∑UÕ ¢∫d¥d «_œ«…
«∞ªö◊
«∞LCd»
«∞FπU≤W
±KFIW °öß∑OJOW
Ë«Æw «∞d–«–
ßKDU≤OW «∞ªKj
±H∑UÕ ¢∫d¥d «∞ªö◊
±uÆl ∞n «∞ºKp
±H∑UÕ ¢∫d¥d «∞∫U±q
«∞∫U±q
«∞LMBW
ôß∑ªb«Â «∞ªHUÆW «∞ObË¥W
●●
≠Jw «∞ºKp «∞JNd°w ´s ±u{l ∞n «∞ºKp
Æ∂q «ß∑ªb«Â «∞πNU“.
1 ¸Ø∂w «∞ªö◊ ≠w «∞∫U±q Ë«{GDw ´KOt
∞Oº∑Id ≠w ±u{Ft .
●●
ù“«∞W «∞ªö◊, «{GDw ´Kv ±H∑UÕ ¢∫d¥d
«∞ªö◊ √£MU¡ ¸≠l «∞ªö◊ ≈∞v îU¸Ã
«∞∫U±q.
2 «{GDw ´Kv ±H∑UÕ ¢∫d¥d «∞∫U±q _ßHq
Ë√¸§∫w §ºr «∞ªö◊ √´Kv «∞LMBW
.
3 {Fw «∞LJu≤U‹ œ«îq ßKDU≤OW «∞ªKj £r
{Fw «∞ºKDU≤OW ´Kv «∞LMBW.
4 ¸Ø∂w «∞LCd» √Ë «∞FπU≤W ≠w «∞ªö◊ - ∞Hw
•∑v «∞AFu¸ °U∞∑FAOo «∞πOb .
●●
≠w •U∞W «ß∑ªb«Â «∞ªö◊ ´Kv «∞LMBW,
¸Ø∂w «∞LCd»/«∞FπU≤W «∞LeËœ… °∑d”
¢FAOo °öß∑OJw ±l «∞∑QØb ±s «∞L∫U–«…
¢d” «∞L∫d„ «∞Lu§uœ ≠w «∞∫U±q.
«∞∑AGOq.
11
Page 16

´d°w
∂q «∞Id«¡…, «∞d§U¡ ÆKV «∞BH∫W «_Ë∞v ∞Fd÷ «∞Bu¸
Æ
∞ºö±∑p
●
«Æd√ ≥cÁ «∞∑FKOLU‹ °∫d’ Ë«•∑Hk °NU ∞∑d§l ∞NU ≠w
«∞Lº∑I∂q
●
«îKl Øq ±u«œ «∞∑GKOn Ë√Í ±KBIU‹.
●
¢QØbÍ ±s ≠p ØU±q «∞ºKp «∞JNd°w ´s ±u{l ∞n «∞ºKp
Æ∂q «ß∑ªb«Â «∞ªHUÆW «∞ObË¥W.
●
¥∫c¸ ¨Ld §ºr «∞ªHUÆW «∞ObË¥W ≠w «∞LU¡ √Ë ¢Fd÷ «∞ºKp
«∞JNd°w √Ë «∞IU°f ∞K∂Kq.
●
«°FbÍ «_ÅU°l, «∞AFd, «∞Lö°f Ë√œË«‹ «∞LUzb… °FOb«Î ´s
«_§e«¡ «∞L∑∫dØW.
●
«•c¸Í ±ö±ºW «∞ºKp ∞ºD` ßUîs √Ë ¢dØt ±∑b∞OUÎ ≠w
•U∞W ˧uœ ©Hq ≠Ib ¥M∑e´t.
●
ô ¢º∑ªb±w «∞ªHUÆW «∞ObË¥W ≠w •U∞W ¢KHNU. ¥πV ≠∫h
«∞πNU“ √Ë ≈Åö•t: ¸«§Fw ƺr "«∞ªb±W ˸´U¥W «∞FLö¡".
●
ô ¢º∑ªb±w √¥W ±K∫IU‹ ¨Od ±F∑Lb….
●
«≠BKw «∞πNU“ ´s ±Bb¸ «∞∑OU¸ «∞JNd°w œ«zLUÎ ≠w •U∞W
´b «ß∑ªb«±t, Æ∂q ¢dØOV √Ë ≠p «_§e«¡ √Ë Æ∂q «∞∑MEOn.
●
¥LJs «ß∑ªb«Â «_§Ne… ±s Æ∂q √®ªU’ –ËÍ Æb¸«‹
§ºb¥W √Ë •ºOW √Ë ´IKOW ±MªHCW ˱Ls ≥r œËÊ î∂d… √Ë
±Fd≠W °Uß∑ªb«Â «_§Ne… ≠w •U∞W ±M∫Nr «∞∑FKOLU‹
«∞ªUÅW °Uôß∑ªb«Â √Ë «ù®d«· ´KONr °∫OY ¥LJMNr
«ß∑ªb«±t °Dd¥IW ¬±MW ±l ≈œ¸«„ «∞LªU©d «∞∑w ¢MDuÍ ´Kv
«ß∑ªb«Â «∞πNU“.
●
ô ¥πu“ «ß∑ªb«Â ≥c« «∞πNU“ ±s Æ∂q «_©HU‰. «•∑HEw
°U∞πNU“ Ë«∞ºKp «∞JNd°w °FOb«Î ´s ±∑MUˉ «_©HU‰.
●
¥πV ±ö•EW «_©HU‰ ∞K∑QØb ±s ´b ´∂∏Nr °U∞πNU“.
●
«ß∑ªb «∞πNU“ ≠w «ôß∑ªb«Â «∞LMe∞w ≠Ij. ô ¢∑∫Lq
doowneK √¥W ±ºµu∞OW ≠w •U∞W ¢Fd÷ «∞πNU“
∞öß∑ªb«Â ¨Od «∞B∫O` √Ë ´b «ô∞∑e«Â °NcÁ «∞∑FKOLU‹.
01
Page 17

Page 18

HEAD OFFICE: Kenwood Limited, 1-3 Kenwood Business Park, New Lane, Havant, Hampshire PO9 2NH
121488/2
 Loading...