


HM-537MP
COMPACT Hi-Fi COMPONENT SYSTEM
INSTRUCTION MANUAL
KENWOOD CORPORATION
B60-5469-18 01 C (E, M, X) 0402
Before applying power
Caution : Read this page carefully to ensure safe operation.
Units are designed for operation as follows.
Australia ....................................... AC 240 V only
Europe .......................................... AC 230 V only
Other countries ......... AC 110 - 120 / 220 - 240 V
switchable*
The marking of products using lasers
CLASS 1 LASER PRODUCT
LASER KLASSE 1
APPAREIL A LASER DE CLASSE 1
LUOKAN 1 LASERLAITE
KLASS 1 LASERAPPARAT
The marking this product has been classified as Class 1. It
means that there is no danger of hazardous radiation outside the product.
Location: Bottom
Except for the Europe and Australia
*
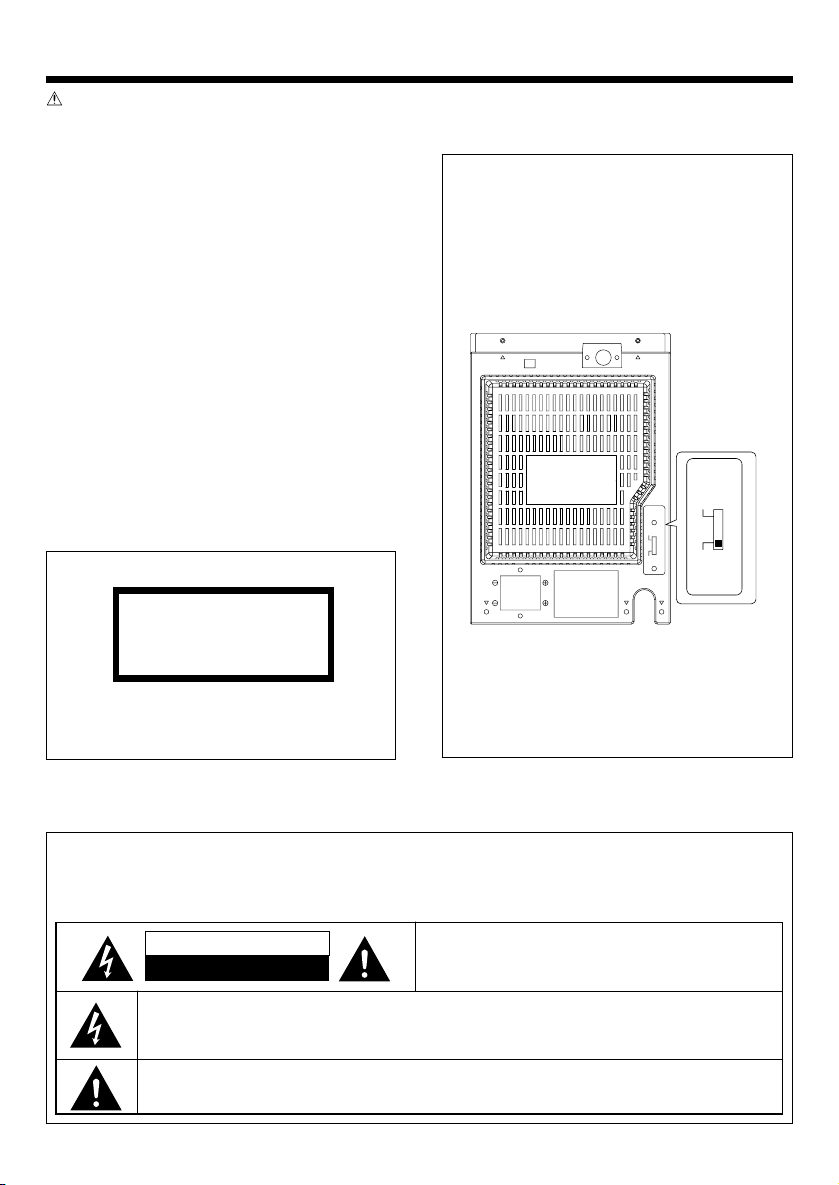
AC voltage selection
The AC voltage selector switches on the rear
panel are set to the voltage that prevails in the
area to which the unit is shipped. Before
connecting the power cord to your AC outlet,
make sure that the setting positions of these
switches match your line voltage. If not, they
must be set to your voltage in accordance with
the following direction.
AC voltage
selector
switches
VOLTAGE
SELECTOR
110-120V
VOLTAGE
SELECTOR
110-120V
220-240V
220-240V
Move switch lever to match your line voltage
with a small screwdriver or other pointed tool.
Note: Our warranty does not cover damage
caused by excessive line voltage due to improper setting of the AC voltage selector switch.
Safety precautions
WARNING : TO PREVENT FIRE OR ELECTRIC SHOCK, DO NOT
EXPOSE THIS APPLIANCE TO RAIN OR MOISTURE.
CAUTION
RISK OF ELECTRIC SHOCK
DO NOT OPEN
THE LIGHTNING FLASH WITH ARROWHEAD SYMBOL, WITHIN AN EQUILATERAL TRIANGLE, IS INTENDED TO ALERT THE USER TO THE PRESENCE OF UNINSULATED “DANGEROUS VOLTAGE” WITHIN
THE PRODUCT’S ENCLOSURE THAT MAY BE OF SUFFICIENT MAGNITUDE TO CONSTITUTE A RISK
OF ELECTRIC SHOCK TO PERSONS.
THE EXCLAMATION POINT WITHIN AN EQUILATERAL TRIANGLE IS INTENDED TO ALERT THE USER
TO THE PRESENCE OF IMPORTANT OPERATING AND MAINTENANCE (SERVICING) INSTRUCTIONS
IN THE LITERATURE ACCOMPANYING THE APPLIANCE.
EN
2
CAUTION: TO REDUCE THE RISK OF ELECTRIC SHOCK,
DO NOT REMOVE COVER (OR BACK). NO USER-SERVICEABLE PARTS INSIDE. REFER SERVICING TO QUALIFIED SERVICE PERSONNEL.

Before applying power
Unpacking
Unpack the unit carefully and make sure that all
accessories are present.
AM loop antenna ......................................... (1)
FM indoor antenna ......................................(1)
Remote control unit .................................... (1)
Batteries(R6/AA) ..........................................(2)
AC plug adapter* .........................................(1)
* Except for the Europe, Australia
Use to adapt the plug on the power cord to
the shape of the wall outlet.
If any accessories are missing, or if the unit is
damaged of falls to operate, notify your dealer
immediately. If your unit was shipped to you directly, notify your shipper immediately.
KENWOOD recommend that you retain the original carton and packing materials in case you need
to move or ship the unit in the future.
Keep this manual handy for future reference.
Discs for playback
This system can playback all digital audio CD, finalized digital audio CD-Recordable (CDR) discs
and finalized digital audio CD-Rewritable(CDRW)
discs. This system can also playback CD-DA format digital audio CD.
Support following MP3-CD formats:
• ISO 9660 format - Max. 20 characters.
• Max. track number plus album is 896.
• Max. nested directory is 8 levels.
•The max. ALB number is 256 including root
ALB (directory).
•The max. MP3 program track number is 60.
•This player can play mixed mode disc:
MP3+CDDA can only play the MP3 tracks in
the first block.
• Supported VBR bit-rate.
• Supported sampling frequencies for MP3 disc:
32kHz, 44.1kHz, 48kHz.
• Supported bit-rates of MP3 disc are: 32, 64,
96, 128, 192, 256 (kbps).
Following formats can’t be supported
•The files like *.AAC, *.DLF, *.M3U, *.PLS.
• Chinese name.
•The non-session closed discs.
•The discs recorded under UDF format.
Contents
Caution : Read the pages marked carefully
to ensure safe operation.
Before applying power ................................ 2
Safety precautions ................................. 2
Unpacking ................................................... 3
Discs for playback ....................................... 3
Preparing the remote control ...................... 4
Connections ................................................ 4
Names and functions of parts .......................... 5
Remote control unit .................................... 5
Main unit ..................................................... 6
Basic function................................................... 8
Demonstration mode .................................. 8
Switching the system on ............................. 8
Switching the system to standby mode ...... 8
Volume control ............................................ 8
Sound control .............................................. 8
Headphones ................................................ 8
Using the CD/MP3-CD ..................................... 9
Loading a disc ............................................. 9
Playing a normal disc................................... 9
Selecting a desired track/passage ............... 9
Selecting a desired album/file
(For MP3-CD only).................................. 9
Programming tracks .................................. 10
Programming tracks (For MP3-CD only) .... 10
Random ...................................................... 11
Repeat ........................................................ 11
Intro scan .................................................. 12
Using the DISPLAY button ........................ 12
Using the radio ............................................... 12
Tuning in radio stations ............................. 12
Storing preset ........................................... 12
Tuning to a preset radio station ................. 13
Using RDS (Radio Data System)
(For the Europe only)............................ 13
Using the RDS/DISPLAY button
(For the Europe only)............................ 13
Tuning by Program TYpe (PTY search)
(For the Europe only)........................... 13
Using the cassette ......................................... 14
Playing a cassette tape ............................. 14
Recording on a cassette tape.................... 14
Clock/timer operation ..................................... 16
View clock ................................................. 16
Clock setting .............................................. 16
Timer setting ............................................. 16
To activate/deactivate the timer ................ 17
Sleep timer setting .................................... 17
General information ........................................ 18
Maintenance ............................................. 18
In case of difficulty ......................................... 19
Specifications ................................................. 20
EN
3
Before applying power
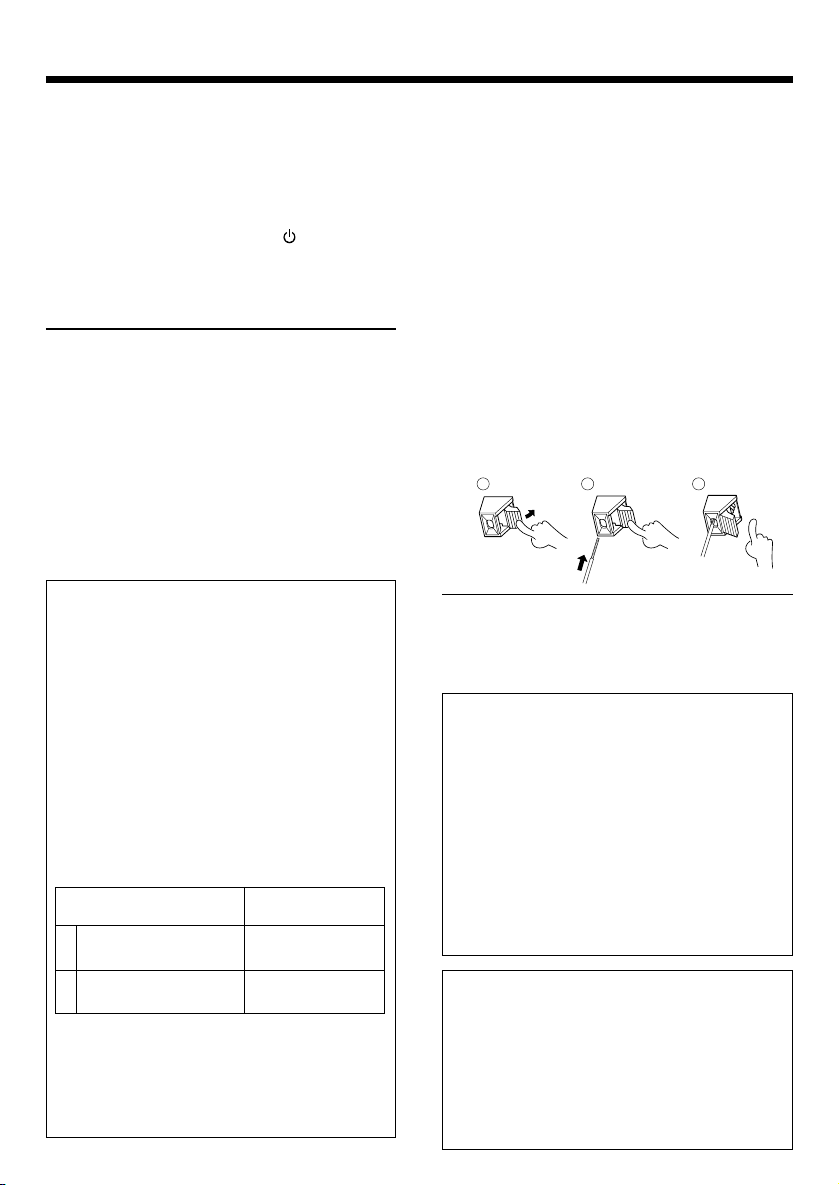
Preparing the remote control
Insert batteries type R6/LR6 (“AA” size) into the
remote control.
Operation
When the standby indicator is lit, the power turns
ON when you press the POWER
remote control. When the power comes on, press
the button you want to operate.
Notes:
•The supplied batteries may have shorter lives than
ordinary batteries due to use during operation
checks.
•When the remote-controllable distance gets shorter
than before, replace both batteries with new ones.
• Placing the remote sensor in direct sunlight, or in
direct light from a high frequency fluorescent lamp
may cause a malfunction.
In such a case, change the location of the system
installation to prevent malfunction.
Channel space switching
(except for the Europe and Australia)
The space between radio channels has been
set to the one that prevails in the area to which
the system is shipped. However, if the current
channel space setting does not match the setting in the area where the system is to be used,
for instance when you move from area 1 or
area 2 shown in the following table or vice
versa, proper reception of AM/FM broadcasts
cannot be expected. In this case, change the
channel space setting for each AM and FM
broadcast in accordance with your area by referring to the following table.
Area
U.S.A., Canada and South
1
American countries
2
Other countries
When the system is on, press TUNER band
button to select TUNER mode and waveband
of which you wish to set the channel space.
Then, while pressing 6 button, press 4
button to switch the channel space.
EN
4
button on the
CHANNEL
Space frequency
FM: 100 kHz
AM: 10 kHz
FM: 50 kHz
AM: 9 kHz
Connections
Connecting the FM antenna
Adjust the position of the FM antenna for the best
reception.
Connecting the AM antenna
Set up the AM loop antenna, and then connect it.
Speakers connection
• Connect the right speaker to terminal marked
“R” , with the red wire to + and the black wire
to –.
• Connect the left speaker to terminal marked
“L” , with the red wire to + and the black wire
to –.
• Clip the stripped portion of the speaker wire
as shown.
1 2
Notes:
•For optimal sound performance, it is recommended
to use the supplied speakers.
• Do not connect more than one speaker to any one
pair of +/– speaker terminal.
CAUTION
Be sure to adhere to the following, or proper
ventilation will be blocked causing damage
or fire hazard.
• Do not place any objects impairing heat radiation onto the top of the unit.
•Leave some space around the unit (from the
largest outside dimension including projection) equal to or greater than, shown below.
Top panel : 50 cm
Back panel : 10 cm
CAUTION
• Place the unit where the AC power cord can
be easily unplugged.
•The power in this unit will not be completely
cut off from the AC wall outlet when the
power switch is turned OFF. To cut off the
power completely, unplug the AC power
cord from the AC wall outlet.
3
Names and functions of parts
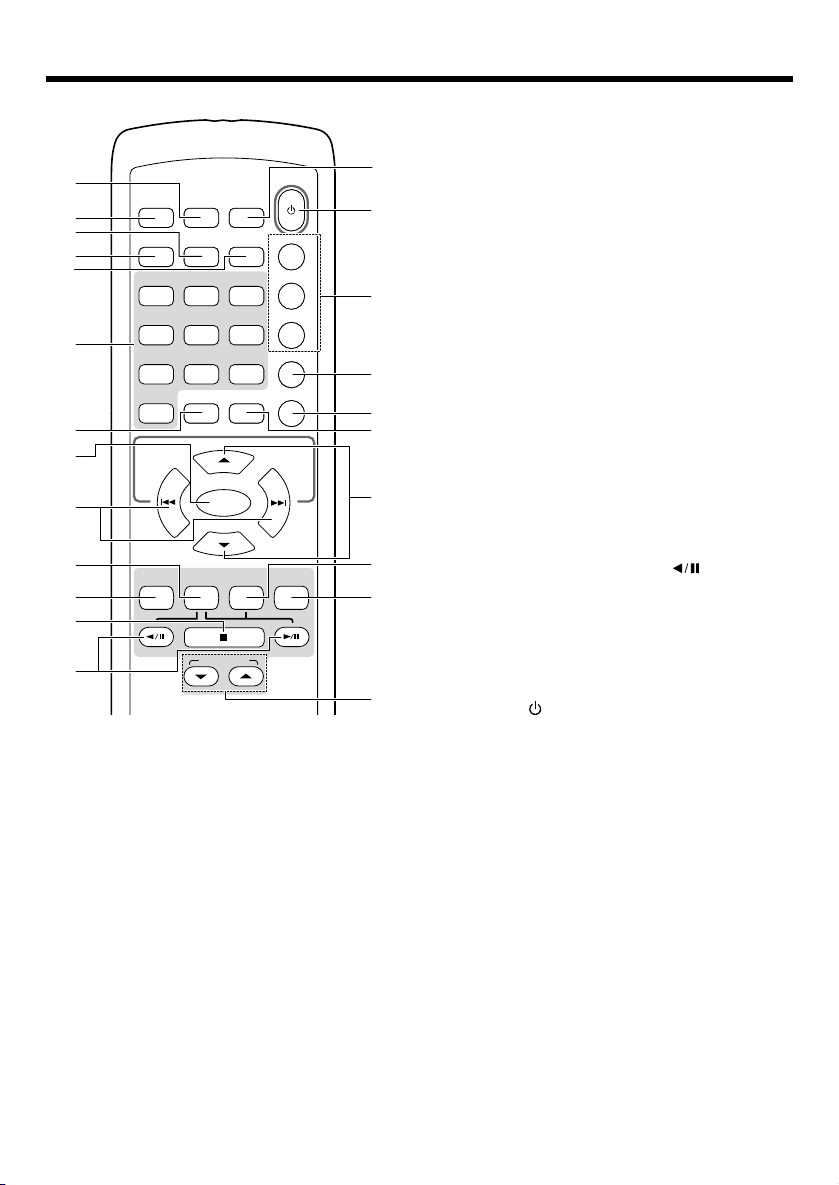
Remote control unit
1
2
3
4
5
6
PTY
INTRO
1
4/GHI
7/PQRS
0
RDS/
DISPLAY
RANDOM
2/ABC
5/JKL
8/TUV
PROGRAM
7
8
9
0
SEARCH
/TUNING
–
TUNER
/BAND
VOLUME UP
ENTER
VOLUME DOWN
TAPE
/MODE
!
@
RVS PL AY
#
–
P.CALL
1 RDS/DISPLAY button (the Europe only)
To c hange the display for RDS; to view the current status of the system; to change the time
display for CD; to change the information display for MP3-CD.
DISPLAY button (except for the Europe)
To view the current status of the system; to
change the time display for CD; to change the
information display for MP3-CD.
2 PTY button
To carry out PTY search. (the Europe only)
3 RANDOM button
To carry out random playback for CD.
4 INTRO button
To play first several seconds for each track of CD.
5 REPEAT button
To repeat one track or all tracks for CD.
6 digit (0 ~ 9/WXYZ) buttons
To select a track number for CD; to select a
preset radio station for TUNER; to enter file
names in file search mode for MP3-CD.
7 PROGRAM button
To program disc tracks for CD; to program pre-
STEREO
/MONO
REPEAT
3/DEF
6/MNO
9/WXYZ
FILE SEARCH
CD
+
POWER
TIMER SET
TIMER
SLEEP
EQ/X-BASS
MUTE
SEARCH
/TUNING
REC
FWD PLAY
ON/OFF
+
set radio stations for TUNER; to set or reset
clock for clock; to set or reset timer for timer.
8 ENTER button
$
%
To confirm the selection in file search mode
for MP3-CD.
9 SEARCH/TUNING +/– ¢ / 4 buttons
To search forward/backward to next/previous track
for CD; to skip tracks for CD; to search forward/backward or to skip to the next/previous album for MP3;
to fast forward or rewind a tape; to tune to higher/
^
lower radio frequency or search radio stations for
TUNER; to set the hour and minutes for clock; to
set timer function for timer.
0 TAPE/MODE button
&
To select TAPE input or turn the system on to
TAPE input. When in TAPE input, press to se-
*
(
lect a tape reverse mode.
! TUNER/BAND button
To select TUNER input or turn the system on
to TUNER input. When in TUNER input, press
)
the select the waveband: FM or AM.
@ 7 button
To stop playback for CD or TAPE. To stop program for CD.
¡
™
# FWD PLAY 6 / RVS PLAY
To start or interrupt playback for CD. (FWD
PLAY 6 button only)
buttons
To start or interrupt playback for TAPE.
$ STEREO/MONO button
To switch between stereo mode and mono
£
mode (on FM band only) for TUNER.
% POWER
button
To switch the system on or to standby mode.
^ Clock and timer related buttons
TIMER SET button to view the clock or set the clock.
TIMER ON/OFF button to switch the timer on/off.
& EQ/X-BASS button
To select the desired sound effect: POP, CLASSIC, ROCK, JAZZ or FLAT; to switch on/off XBASS mode.
* MUTE button
To interrupt and resume sound reproduction.
( FILE SEARCH button
To select a desired file in an MP3 disc.
) VOLUME UP/DOWN 5/∞ buttons
To increase or decrease the volume.
¡ CD button
To select CD input or turn the system on to CD input.
™ REC button
To record from TUNER or CD to a cassette tape.
£ P.CALL +/– 5/∞ buttons
To select a preset radio stations for TUNER.
EN
5
Names and functions of parts
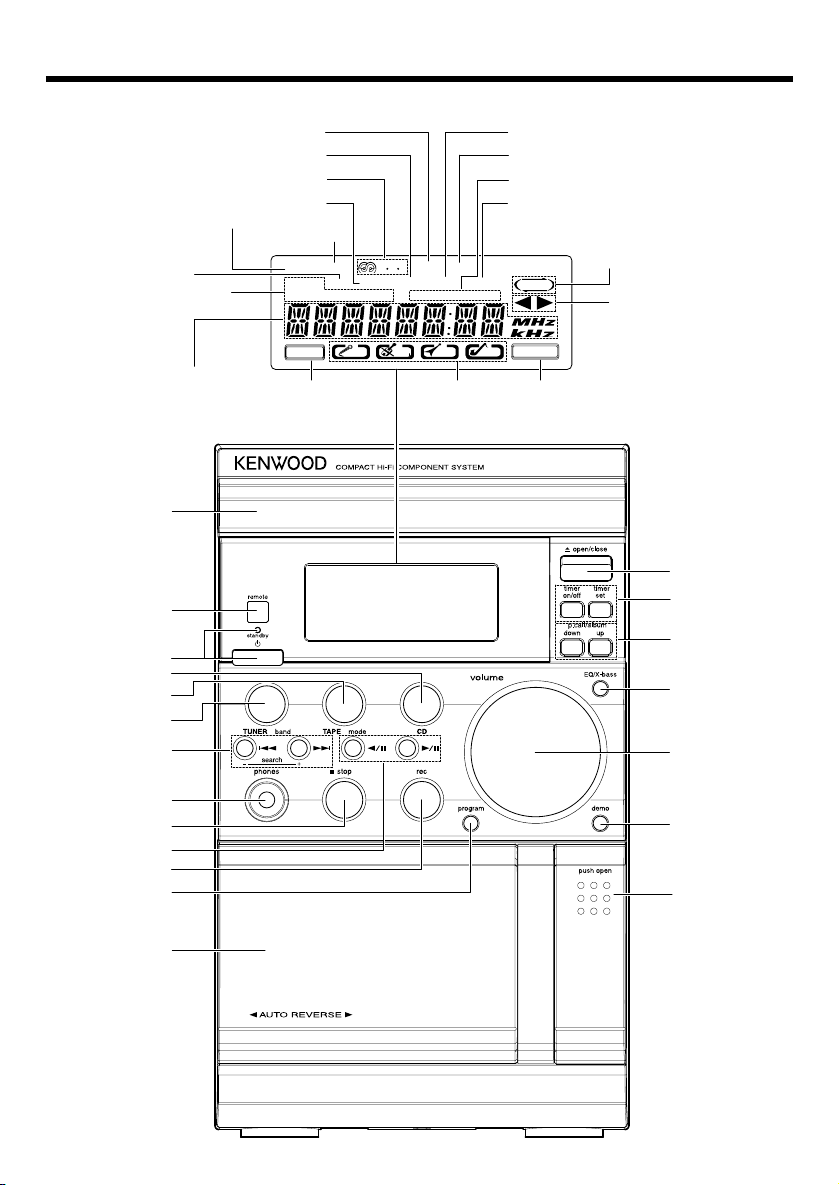
Main unit
RDS
ALB. icon
Play mode icons
Frequency display
Preset channel display
Playback time display etc.
icon
(the Europe only)
INTRO icon
1
2
3
4
5
6
7
SYNC icon
SLEEP
icon
ALL icon
MP3 icon
INTRO
REPEAT ALB. ALL
PROGRAM RANDOM
STEREO
STEREO
icon
MP3
R D S
POP
SYNC REC.
TOTAL REMAIN
SLEEP
TIMER ON OFF
CLASSIC
ROCK
Sound effect
icons
TOTAL icon
REC. icon
TIMER icons
REMAIN icon
JAZZ
X-BASS
X-BASS
icon
Reverse mode icon
Play icons
$
%
^
&
*
8
9
(
0
!
@
)
#
EN
6

Names and functions of parts
1 CD tray
2 Remote sensor
button
3
To switch the system on or to standby mode.
standby indicator
4 CD button
To select CD input or turn the system on to CD
input.
5 TAPE mode button
To select TAPE input or turn the system on to
TAPE input. When in TAPE input, press to select a tape reverse mode.
6 TUNER band button
To select TUNER input or turn the system on
to TUNER input. When in TUNER input, press
the select the waveband: FM or AM.
7 search +/– ¢ / 4 buttons
To search forward/backward to next/previous
track for CD; to skip tracks for CD; to search
forward/backward or to skip to the next/previous album for MP3; to fast forward or rewind
a tape; to tune to higher/lower radio frequency
or search radio stations for TUNER; to set the
hour and minutes for clock; to set timer function for timer.
8 phones jack
9 7 stop button
To stop playback for CD or TAPE; to stop program for CD.
0 6
To start or interrupt playback for CD. (6 button only)
To start or interrupt playback for TAPE.
! rec button
To record from TUNER or CD to a cassette tape.
@ program button
To program disc tracks for CD; to program preset radio stations for TUNER. To set or reset
clock for clock. To set or reset timer for timer.
buttons
# Cassette tape compartment
$ 0 open/close button
To open the CD tray.
% Clock and timer related buttons
timer on/off button
To switch the timer on/off.
timer set button
To view the clock or set the clock.
^ p.call/album down/up buttons
To select a preset radio stations for TUNER.
To select an album of MP3.
& EQ/X-bass button
To select the desired sound effect: POP, CLASSIC, ROCK, JAZZ or FLAT; to switch on/off XBASS mode.
* VOLUME knob
To increase or decrease the volume.
( demo button
To activate/deactivate the demonstration in
STANDBY mode.
) push open button
To open the cassette tape compartment.
Standby mode
While the standby indicator is lit, a small amount
of power is supplied to the system to back up the
memory. This is called standby mode. Under the
condition, the system can be turned ON by the
remote control unit.
EN
7

Basic function
Demonstration mode
The system is equipped with a demonstration
function (only display). The demonstration consists
of sequential change of display and indicators
showing the operations, but the audio itself does
not change. The demonstration function can be
cancelled as follows.
To deactivate the demonstration
Press demo button during demonstration.
To activate the demonstration
After turning the power on, press demo button.
Note:
The demonstration operates automatically when a
power failure has occurred, or the plug of the power
cable has been pulled out while the power was on.
Switching the system on
Press button on the unit or POWER button
on the remote control; or CD, TUNER band
(TUNER/BAND on the remote control), or TAPE
mode button (TAPE/MODE on the remote control).
The standby led will go out.
•The system will switch to the last selected
source or the selected source.
Switching the system to standby
mode
Press button on the unit or POWER button
on the remote control.
To switch off the volume temporarily
Press MUTE button on the remote control.
Playback will continue without sound only system
speaker output and the icon “MUTE” appears on
the display.
To restore the volume, press MUTE button on the
remote control again or adjust the volume.
Sound control
EQ/X-BASS
The sound control system feature enables you to
enjoy special sound effects that have preset equalizer settings, providing the best music reproduction.
Press EQ/X-BASS button
To select the desired sound effect: POP, CLASSIC, ROCK, JAZZ or FLAT.
To switch the X-BASS on/off
Press and hold the EQ/X-bass button on the unit
(EQ/X-BASS button on the remote control).
If X-BASS is switched on, “BASS ON” will appear
then disappear on the display and the icon “XBASS” will appear on the display. If X-BASS is
switched off, “BASS OFF” will appear then disappear on the display and the icon “X-BASS” will
disappear.
Note:
EQ and X-BASS functions are not applied to the recording sound.
•The clock will be displayed.
Volume control
Turn volume knob to the right (press VOLUME
UP 5 button on the remote control) to increase,
or turn volume knob to the left (press VOLUME
DOWN ∞ button on the remote control) to de-
crease the volume level.
“VOL XX” will be displayed. “VOL XX” denotes
the volume level.
The volume can be adjusted in 30 steps from
minimum to maximum.
EN
8
Headphones
To listen to your stereo with headphones (not included), use the 3.5 mm phones jack on the top
of the unit.

Using the CD/MP3-CD
Loading a disc
1 Press CD button to select CD/MP3 mode.
2 Press 0 open/close button to open the CD
tray.
3 Place a CD/MP3 into the tray with the label
facing up.
4 Press 0 open/close button to close the CD
tray.
The total playtime and total number of tracks
will appear in the display.
5 To remove the CD, press 0 open/close but-
ton, grasp the CD by its edges, and carefully
pull it out.
For MP3-CD only
Load a MP3 format music disc on the disc tray.
•The total album number and total track number
will appear on the display.
Notes:
•To ensure good system performance; wait until the
unit completely reads the disc before proceeding.
• If the CD tray is not loaded with a CD/MP3-CD or
the CD/MP3-CD is unreadable, the message “NO
DISC” will be shown.
•For MP3-CD, the disc reading time may exceed 10
seconds due to the large number of songs compiled into one disc.
•For MP3-CD, “A” on the display represents ALBUM.
•For MP3-CD, the total album number on the display
indicates the number of all the albums recorded in
the MP3-CD.
Playing a normal disc
1 Press 6 button to start playback.
The track number and elapsed playing time of
the current track appear on the display.
To interrupt playback, press 6 button.
The playing time will start flashing.
To resume playback press 6 button again.
Selecting a desired track/passage
To select a desired track
Press 4 or ¢ button (4 or ¢ SEARCH/
TUNING button on the remote control) repeat-
edly until the desired track appears on the display.
•If playback is stopped, press 6 button to start
playback.
•The digit buttons (0~9) on the remote control
can also be used to select a track.
Press the digit buttons as shown below:
To select track 2 : 2 and ENTER
To select track 23 : 2, 3 and ENTER
To select track 120 (MP3-CD only) : 1, 2 and 0
To search for a particular passage during
playback
Press and hold 4 or ¢ button (4 or ¢
SEARCH/TUNING button on the remote control)
and released it when the desired passage is located for CD.
Selecting a desired album/file
MP3-CD only)
To select a desired album
Press p.call/album up or down button on the
unit until the desired album number appears on
the display.
•“Axxx xxx” will appear on the display.
To select a desired file
Press 4 or ¢ button (4 or ¢ SEARCH/
TUNING button on the remote control) repeat-
edly until the desired file from the current album
appears on the display.
•“Axxx xxx” will appear on the display.
•The digit buttons (0~9) on the remote control
can also be used to select a file.
(For
2 To stop playback, press 7 stop button.
continued to next page
EN
9

Using the CD/MP3-CD
To search a desired file by file name
1 Press FILE SEARCH button on the remote
control.
2 Press the digit buttons to enter the first char-
acter of the file name you wish to search and
press ENTER button.
Repeat this procedure to enter the rest of the
file name.
3 Press FILE SEARCH button on the remote
control.
4 Press 6 button to start playback.
Programming tracks
Programming tracks of a disc is possible when
playback is stopped. Up to 60 tracks can be stored
in the memory in any order.
1 In stop mode, press program button on the
unit (PROGRAM button on the remote control)
to enter program setting.
The icon “PROGRAM” and “– – P–01” will
appear on the display. “– –” indicates track
number of the CD and “P–01” indicates program number.
2 Press 4 or ¢ button (4 or ¢ SEARCH/
TUNING button on the remote control) to se-
lect the desired track.
The digit buttons (0~9) on the remote control
can also be used to select tracks.
The icon “PROGRAM” and program number
will start flashing.
3 Press program button on the unit ( PROGRAM
button on the remote control) to store the selected track.
The track number returns to “– –” and the next
program number will appear on the display.
4 Repeat steps 2 to 3 to select and store other
desired tracks in this way.
The icon “PROGRAM” will appear on the display and “FULL” will start flashing if you attempt
to program more than 60 tracks.
Press program button on the unit ( PROGRAM
button on the remote control) in stop mode to
review the program sequence.
5 Press 6 button to play the programmed
tracks.
If you press REPEAT button on the remote
control during programmed playback, the current track or all programmed tracks will be
played repeatedly.
The icon “REPEAT” or “REPEAT ALL” and the
icon “PROGRAM” will appear on the display.
6 Press 7 stop button once to stop program play-
back or twice to clear the program.
The icon “PROGRAM” will disappear from the
display.
Programming tracks
Programming tracks of a disc is possible when
playback is stopped. Up to 60 tracks can be stored
in the memory in any order.
1 In stop mode, press program button on the
unit (PROGRAM button on the remote control)
to enter program setting.
The icon “PROGRAM” and “– – – P–01” will
appear on the display. “– – –” indicates track
number of the MP3-CD and “P–01” indicates
program number.
2 Press p.call/album up or down button to se-
lect the desired album and press 4 or ¢
button (4 or ¢ SEARCH/TUNING button
on the remote control) to select the desired
track.
The digit buttons (0~9) on the remote control
can also be used to select tracks.
The icon “PROGRAM” and program number
will start flashing.
(For MP3-CD only)
10
EN

Using the CD/MP3
3 Press program button on the unit ( PROGRAM
button on the remote control) to store the selected track.
The track number returns to “– – –” and the
next program number will appear on the display.
4 Repeat steps 2 to 3 to select and store other
desired tracks in this way.
The icon “PROGRAM” will appear on the display and “FULL” will start flashing if you attempt
to program more than 60 tracks.
Press program button on the unit ( PROGRAM
button on the remote control) in stop mode to
review the program sequence.
5 Press 6 button to play the programmed
tracks.
If you press REPEAT button on the remote
control during programmed playback, the current track or all programmed tracks will be
played repeatedly.
The icon “REPEAT” or “REPEAT ALL” and the
icon “PROGRAM” will appear on the display.
6 Press 7 stop button once to stop program play-
back or twice to clear the program.
The icon “PROGRAM” will disappear from the
display.
Notes:
• “P” represents PROGRAM.
•The program is automatically cleared as soon as the
CD tray is opened.
•The function of program setting is disabling in PLAY/
PAUSE mode.
Random
You can play all the tracks in random order.
1 During playing, pause or stop mode, press
RANDOM button on the remote control to
enable random play mode.
The icon “RANDOM” will appear on the display.
2 To exit random mode, press RANDOM button
again. The icon “RANDOM” will disappear
from the display.
Note:
If the program function enabled, and the repeat function is set on, will disable the random play mode.
Repeat
You can play the current track or the whole disc
repeatedly.
To repeat all the tracks
Press REPEAT button on the remote control once
in play or pause mode.
The icon “REPEAT ALL” will appear on the display.
• All tracks will be repeated continuously.
•To cancel repeat play, repress REPEAT button
on the remote control twice for a normal CD
and 3 times for a MP3-CD .
To repeat a single track
Press REPEAT button twice for a normal CD and
3 times for a MP3-CD in play or pause mode.
The icon “REPEAT” will appear on the display.
•To cancel repeat play, repress REPEAT button
on the remote control once.
To repeat one album (For MP3-CD only)
Press repeat button (REPEAT button on the re-
mote control) twice in play or pause mode.
The icon “REPEAT ALB.” will appear on the display.
continued to next page
EN
11

Using the CD/MP3-CD
Using the radio
•To cancel repeat play, repress REPEAT button
on the remote control twice.
Note:
In program mode, you can only select repeat one or
repeat all function.
Intro scan
This function let you listen to the first 10 seconds
of each track throughout the disc.
Press INTRO button on the remote control to start
scanning, and the icon “INTRO” will appear on
the display.
To stop the intro scan
Press INTRO button on the remote control again.
The unit enters normal play mode and starts playing from where you stop the scanning.
Using the DISPLAY button
Pressing DISPLAY button on the remote control
shows various display information of the disc, such
as time information of the current track or a whole
disc, program number during program play, file and
artist name during MP3 mode, and etc.
Tuning in radio stations
1 Press TUNER band button (TUNER/BAND
button on the remote control) to select TUNER
mode.
The current radio frequency will be displayed.
2 Press TUNER band button (TUNER/BAND
button on the remote control) to select the
desired waveband: FM or AM.
3 Press and hold 4 or ¢ button (4 or ¢
SEARCH/TUNING button on the remote control).
Repeat this procedure until the desired station
is reached.
To t une to a weak station briefly press 4 or
¢ button (4 or ¢ SEARCH/TUNING
button on the remote control) repeatedly until
the display shows the desired frequency or
when the best reception has been obtained.
Storing preset
You can store up to 20 for FM and 20 for AM radio
stations in the memory. When a preset radio stations selected. The preset number appears on the
display.
1 Press TUNER band button (TUNER/BAND
button on the remote control) to select TUNER
mode.
12
2 Press TUNER band button (TUNER/BAND
button on the remote control) to select the
desired waveband: FM or AM.
3 Press 4 or ¢ button (4 or ¢ SEARCH/
TUNING button on the remote control) to tune
to the desired frequency.
4 Press program button (PROGRAM button on
the remote control) so that “– –” will start flashing.
5 If you wish to store the radio station to another
preset number, p.call/album up button (P.
CALL + button on the remote control) or p.call/
album down button (P. CALL – button on the
remote control) to select the desired preset
number.
EN

Using the radio
6 Press program button (PROGRAM button on
the remote control) again to store the radio
station.
Repeat steps 3 to 6 to store other preset radio stations.
Note:
During program, if no button is press within 20 seconds, the system will exit program mode automatically.
Tuning to a preset radio station
Press p.call/album up button (P. CALL + button
on the remote control) or p.call/album down
button (P. CALL – button on the remote control) or
digit buttons (0~9) on the remote control to select the desired preset number.
•The preset number and radio frequency will
appear on the display.
STEREO/MONO
Press the STEREO/MONO button on the remote
control to select mono or stereo mode.
• When stereo mode is selected, the icon
“STEREO” will appear on the display (if current station is FM stereo).
Note:
You are able to select stereo or mono mode in FM band
only.
Using RDS (Radio Data System)
(For the Europe only)
RDS is a system that transmits useful information (in the form of digital data) for FM broadcasts
along with the broadcast signal. Tuners and receivers designed for RDS reception can extract the
information from the broadcast signal for use with
various functions, such as automatic display of the
station name.
RDS functions:
PTY (Program TYpe Identification) Search
Automatically tunes to a station that is currently
broadcasting the specified program type (genre).
PS (Program Service Name) Display:
Automatically displays the station name transmitted by the RDS station.
Radio Text function:
Displays the radio text data transmitted by some
RDS stations when you press the RDS/DISPLAY
button. There is “NO TEXT” display if no text data
is transmitted.
•The icon “R·D·S” appears on the display when
an RDS broadcast (signal) is received.
Note:
Some functions and function names may differ certain
countries and areas.
Using the RDS/DISPLAY button
(For the Europe only)
While receiving a RDS station, pressing the RDS/
DISPLAY button on the remote control changes
the contents of the display.
• PS (Program Service name) display:
The station name such as BBC is displayed
automatically when an RDS station is received.
If no PS data was sent, “NO PS” is displayed.
•RT (Radio Text) display:
Te xt data accompanying the RDS broadcast
scrolls across the display. “NO TEXT” or “RT -
---” is displayed if the current RDS station does
not provide any RT data.
•Frequency display:
Displays the frequency of the current station.
Tuning by Program TYpe (PTY
search)
This function lets you set the tuner to automatically search for stations which are currently broadcasting the type of program (genre) you want to
listen to.
1 Press TUNER band button (TUNER/BAND
button on the remote control) to TUNER mode.
2 Press TUNER band button (TUNER/BAND
button on the remote control) to select FM.
3 Press PTY button on the remote control.
If the current station is with RDS, the program
type of the station is displayed.
(For the Europe only)
continued to next page
13
EN

Using the radio
Using the cassette
4 Press PTY button on the remote control to
select your desired program type.
Program type table
Program Type Name Display
News NEWS
Current Affairs AFFAIRS
Information INFO
Sport SPORT
Education EDUCATE
Drama DRAMA
Culture CULTURE
Science SCIENCE
Varied Speech VARIED
Pop Music POP M
Rock Music ROCK M
Easy Music EASY M
Light Classical Music LIGHT M
Serious Classical Music CLASSICS
Other Music OTHER M
Weather WEATHER
Finance FINANCE
Children’s Program CHILDREN
Social Affairs SOCIAL
Religion RELIGION
Phone In PHONE IN
Travel TRAVEL
Leisure LEISURE
Jazz Music JAZZ
Country Music COUNTRY
National Music NATION M
Oldies Music OLDIES
Folk Music FOLK M
Documentary DOCUMENT
5 Press 4 or ¢ button (4 or ¢ SEARCH/
TUNING button on the remote control) to start
searching.
Notes:
• Under certain receiving conditions, it may take more
than 1 minute to complete the search.
• If the desired program type cannot be found, “NO
MATCH” is displayed, then after several seconds
the display returns to the original display.
Playing a cassette tape
1 Press TAPE mode button (TAPE/MODE but-
ton on the remote control) to TAPE.
2 Press push open button to open the cassette
compartment door.
3 Insert cassette tape into the compartment with
the open edge facing down.
4 Close the door securely.
5 Press TAPE mode button (TAPE/MODE but-
ton on the remote control) to select the desired reverse mode.
icon : plays only one side of the tape
and stops.
icon : plays both side and stops.
icon : plays both side endlessly.
6 Press 4 or ¢ button to move tape to the
desired starting point.
7 Press 6 or
ning direction and begin playing the tape.
8 Turn volume knob (press VOLUME UP or
DOWN button on the remote control) and press
EQ/X-bass button (EQ/X-BASS on the remote
control) to desired listening level.
button to select the tape run-
Recording on a cassette tape
You can record from the radio or the CD player.
For best recording, use a normal bias tape (Type 1
only).
Recording from the radio
1 Insert a cassette tape into the tape compart-
ment and close door.
2 Press TUNER band button (TUNER/BAND
button on the remote control) to TUNER and
select a radio station.
3 Press rec button (REC button on the remote
control) to set the unit into recording standby
mode.
14
The icon “REC.” appears on the display.
EN

Using the cassette
4 Press 6 or button to begin recording.
5 Press 7 stop button to end recording.
6 To t urn off radio, press TAPE mode button to
TAPE.
Radio recording tip
•To temporarily pause the recording, press rec
button (REC button on the remote control).
Press 6 or
button to resume recording.
Recording from a CD/MP3-CD
1 Insert a blank cassette tape into the tape deck.
2 Press CD button to CD.
3 Insert a CD/MP3-CD and select the first track
you want to record.
4 Press rec button (REC button on the remote
control) to set the unit into recording standby
mode.
The icon “REC.” appears on the display.
5 Press 6 or
The icon “REC.” and the icon “SYNC” will appear on the display.
button to begin recording.
Notes:
•To ensure good system performance, wait until the
unit completely reads the disc before recording.
• During recording, it is not possible to listen to another source.
•You can program tracks and record onto a cassette
tape. If you wish to record only one track, program
that track first, and then record it. (See page 10)
• If you perform the step 4 and 5 during the playback of a normal CD, the recording will start from
the beginning of the current track.
During the playback of a MP3-CD, the recording will
start from the point where the step 4 and 5 are
performed.
The track you have selected in the step 3 will
be played from the beginning.
6 Press rec button (REC button on the remote
control) to interrupt or edit recording. Press 6
or
button to resume recording.
7 Press 7 stop button to end recording.
15
EN

Clock/timer operation
View clock
The clock (if it is set) will be shown in standby
mode.
To view the clock in any source mode (CD, TUNER
or TAPE), press timer set button (TIMER SET
button on the remote control). The clock will be
displayed.
If the clock has not been set, “0:00” will start flashing.
Clock setting
Before carrying out the clock setting, ensure
that the system is in standby mode.
1 Press program button (PROGRAM button on
the remote control) to enter the hour setting
mode.
The hour indication will start flashing.
2 Press 4 or ¢ button (4 or ¢ SEARCH/
TUNING button on the remote control) to set
the hours.
3 Press program button (PROGRAM button on
the remote control) to enter the minute setting mode.
The minute indication will start flashing.
4 Press 4 or ¢ button (4 or ¢ SEARCH/
TUNING button on the remote control) to set
the minutes.
5 Press program button (PROGRAM button on
the remote control) to store the setting.
The clock will start working.
To e xit without storing the setting, turn on the
system.
Timer setting
The system can switch on to CD, TUNER or TAPE
mode automatically at a preset time, serving as
an alarm to wake you up.
The timer recording of radio programs onto a cassette tape is also possible.
Important!
Before setting the timer, ensure that the clock
is set correctly.
When setting the timer (playback or recording) for TUNER, be sure to select the station
you wish to tune in beforehand.
1 Turn the system on.
2 Press timer set button (TIMER SET button on
the remote control) twice to enter timer setting mode.
The icon “TIMER ON” will start flashing on the
display.
3 Press program button (PROGRAM button on
the remote control).
The hour indication will start flashing.
4 Set the time to start playback.
Press 4 or ¢ button (4 or ¢ SEARCH/
TUNING button on the remote control) to set
timer start hours and press program button
(PROGRAM button on the remote control) to
store the setting.
Repeat the same procedure to set the minutes.
5 Press timer set button (TIMER SET button
on the remote control).
The icon “TIMER OFF” will start flashing.
Notes:
•The clock setting will be erased when the power
cord is disconnected or a power failure occurred.
•The clock can be set in either 12 or 24-hour mode.
To change the mode : When the system is in standby
mode, press TUNER band button while pressing
6 button.
EN
16
6 Repeat the step 3 and 4 to set the time to
stop the timer (off time).
7 Press timer set button (TIMER SET button on
the remote control).
The icon “TIMER” will flash and the source
display will appear.

Clock/timer operation
8 Press program button (PROGRAM button on
the remote control).
9 Press 4 or ¢ button (4 or ¢ SEARCH/
TUNING button on the remote control) to se-
lect the desired source and press program
button (PROGRAM button on the remote con-
trol) to store the setting.
The source switches as follows :
“CD” → “TUNER” → “TAPE” → “REC TU”
(recording tuner)
0 Press timer set button (TIMER SET button
on the remote control).
The icon “TIMER” will flash and the volume
display will appear.
! Press program button (PROGRAM button on
the remote control).
@ Press 4 or ¢ button (4 or ¢ SEARCH/
TUNING button on the remote control) to set
volume level and press program button (PRO-
GRAM button on the remote control) to store
the setting.
# Press timer set button (TIMER SET button
on the remote control).
$ Press timer on/off button (TIMER ON/OFF
button on the remote control) to activate timer
mode.
The icon “TIMER” changes from flashing to
steadily lit.
The timer is now set.
% Switch the system to standby mode.
When reached the preset timer, the selected
source will play or switch to standby mode if
the timer has been activated.
To activate / deactivate the timer
Press timer on/off button (TIMER ON/OFF button on the remote control). If activated, the icon
“TIMER” will appear on the display.
Notes:
•The timer off will not be activated if the starting and
stopping time are the same.
• If the selected source (“CD”, “TAPE” or “REC TU”)
is not available when preset timer is reached, TUNER
will be selected automatically.
• During timer setting, if no button is press within 7
seconds, the system will exit timer setting mode
automatically.
Sleep timer setting
If the sleep timer is activated, the system will
switch to standby mode after the selected time
has expired.
Each press of the SLEEP button on the remote
control decreases the timer period by 10 minutes.
The sleep timer can be set up to 90 minutes.
The display will change to sleep time display and
change as follows:
90 min - 80 min -70 min - 60 min - 50 min - 40 min
- 30 min - 20 min - 10 min - OFF - 90 min - 80 min...
The icon “SLEEP” will appear on the display.
While sleep mode is in active:
To deactivate the sleep timer
Press SLEEP button on the remote control or press
button to turn the power off.
the
Note:
If timer off and the sleep off are all activated, the system will switch to standby mode by the earlier timer
set.
17
EN

General information
Maintenance
Cleaning the cabinet
• Use a soft cloth slightly moistened with a mild
detergent solution. Do not use a solution containing alcohol, spirits, ammonia or abrasive.
Cleaning discs
• When a disc becomes dirty, clean it with a
cleaning cloth, wipe the disc from the center
out. Do not wipe in circular motion.
• Do not use solvents such as benzene, thinner
commercially available cleaners, or antistatic
spray intended for analogue records.
Cleaning the heads and tape path
•To ensure good recording and playback quality, clean the heads, the capstans and pressure rollers after every 50 hours of tape operation.
• Use a cotton swab slight moistened with cleaning fluid.
•You also can clean the heads by playing a cleaning tape once.
Caution on condensation
Condensation (of dew) may occur inside the unit
when there is a great difference in temperature
between this unit and the outside. This unit may
not function properly if condensation occurs. In
this case, leave the unit for a few hours and restart the operation after the condensation has dried
up.
Be specially cautious against condensation in the
following circumstances:
When this unit is carried from one place to another across a large difference in temperature,
when the humidity in the room where this unit is
installed increases, etc.
Warning notice
In most cases it is an infringement of copyright to
make copies of tapes or discs without the permission of the copyright owners. Anyone wishing
to copy commercially available tapes or disc should
contact the mechanical copyright protection society limited or the performing rights society limited.
18
EN

In case of difficulty
Resetting the Microcomputer
The microcomputer may malfunction (unit cannot be operated, or shows an erroneous display) if the power cord is unplugged while the
power is ON, or due to some other external
factor. If this happens, execute the following
procedure to reset the microcomputer and return the unit to its normal operating condition.
Plug in the AC power cord to the wall outlet, and within 5 seconds, press and hold
down the 7 button and press CD button.
• Please note that resetting the microcomputer
will clear the contents of the memory and
return the unit to the state it was in when it
left the factory.
Check that following guide for problem resolution.
General
No sound.
\ Plug in AC cord securely.
\ Set the VOLUME control to proper
sound level.
\ Make sure the source is set to the
source you wish to operate.
\ Pull out the headphones plug from the
headphones jack.
The left and right sound outputs are reverse.
\ Check the speaker connections and
location.
The system displays features automatically.
\ Switch off the demo operation.
CD player operation
“NO DISC” is displayed.
\ Insert a disc correctly (label side up).
\ Clean the disc.
\ Use a new or readable disc.
\ Wait until the moisture condensation
at the lens has cleared.
\ Plug in AC cord securely.
Radio reception
Noise in radio.
\ Tune to a correct frequency.
\ Adjust the direction of the FM antenna.
\ AM antenna is built in; rotate the sys-
tem to face a new direction.
\ Increase the distance between the sys-
tem and TV or VCR.
Cassette deck operation
Cannot record.
\ Replace the tape or cover tabs with
adhesive tape.
\ Clean the head.
\ Use only NORMAL (IEC I) tape.
Timer / Clock
The timer is not working.
\ Set the correct clock.
\ Press the TIMER ON/OFF button to
switch on the timer.
\ Switch the system to standby mode.
The timer/clock is erased.
\ Power has been interrupted or power
cord has been disconnected. Set it
again.
Remote control
Does not function properly.
\ Replace the batteries.
\ Remove the obstacles.
\ Move closer to the system when us-
ing the remote control and make sure
that you are pointing at unit’s remote
sensor.
19
EN

Specifications
Main unit
Amplifier section
Rate output power
...25 W + 25 W (1 kHz, 10% T.H.D., at 4 Ω)
X-BASS ...................................... +4 dB (60 Hz)
Tuner section
FM tuner section
Tuning frequency range
................................. 87.5 MHz ~ 108 MHz
AM tuner section
Tuning frequency range
(For the Europe and Australia)
................................. 531 kHz ~ 1,602 kHz
(For other countries)
..................................530 kHz ~ 1,610 kHz
CD player section
Laser .............................. Semiconductor laser
Over sampling ......................... 8 fs (352.8 Hz)
Laser wave length .................... 760 ~ 800 nm
Laser power class ...................... Class 1 (IEC)
D/A conversion ........................................ 1 Bit
Cassette deck section
Track .........................4-track, 2-channel stereo
Speakers
Enclosure .............................. Bass-reflex type
Speaker configuration
Woofer ........................100 mm, cone type
Impedance ................................................ 4 Ω
Maximum input level................................ 5 W
Dimensions .................. W : 160 mm (6-5/16”)
............................... H : 268 mm (10-9/16”)
................................. D : 218 mm (8-9/16”)
Weight (net) ............... 2.2 kg (4.9 lb) (1 piece)
Notes:
• KENWOOD follows a policy of continuous advance-
ments in development. For this reason specifica-
tions may be changed without notice.
• Sufficient performance may not be exhibited at ex-
tremely cold locations (where water freezes).
General
Power consumption ............................... 70 W
Dimensions ................... W : 160mm (6-5/16”)
............................... H : 268 mm (10-9/16”)
............................. D : 354 mm (13-15/16”)
Weight (net) ............................. 5.3 kg (11.7 lb)
EN
20
For your records
Record the serial number, found on the back of the
unit, in the spaces designated on the warranty card,
and in the space provided below. Refer to the model
and serial numbers whenever you call upon your dealer
for information or service on this product.
Model _____________ Serial Number ____________
 Loading...