

Page 1

Kenwood Limited, New Lane, Havant, Hampshire PO9 2NH, UK
www.kenwood.co.uk
2501/2
Page 2
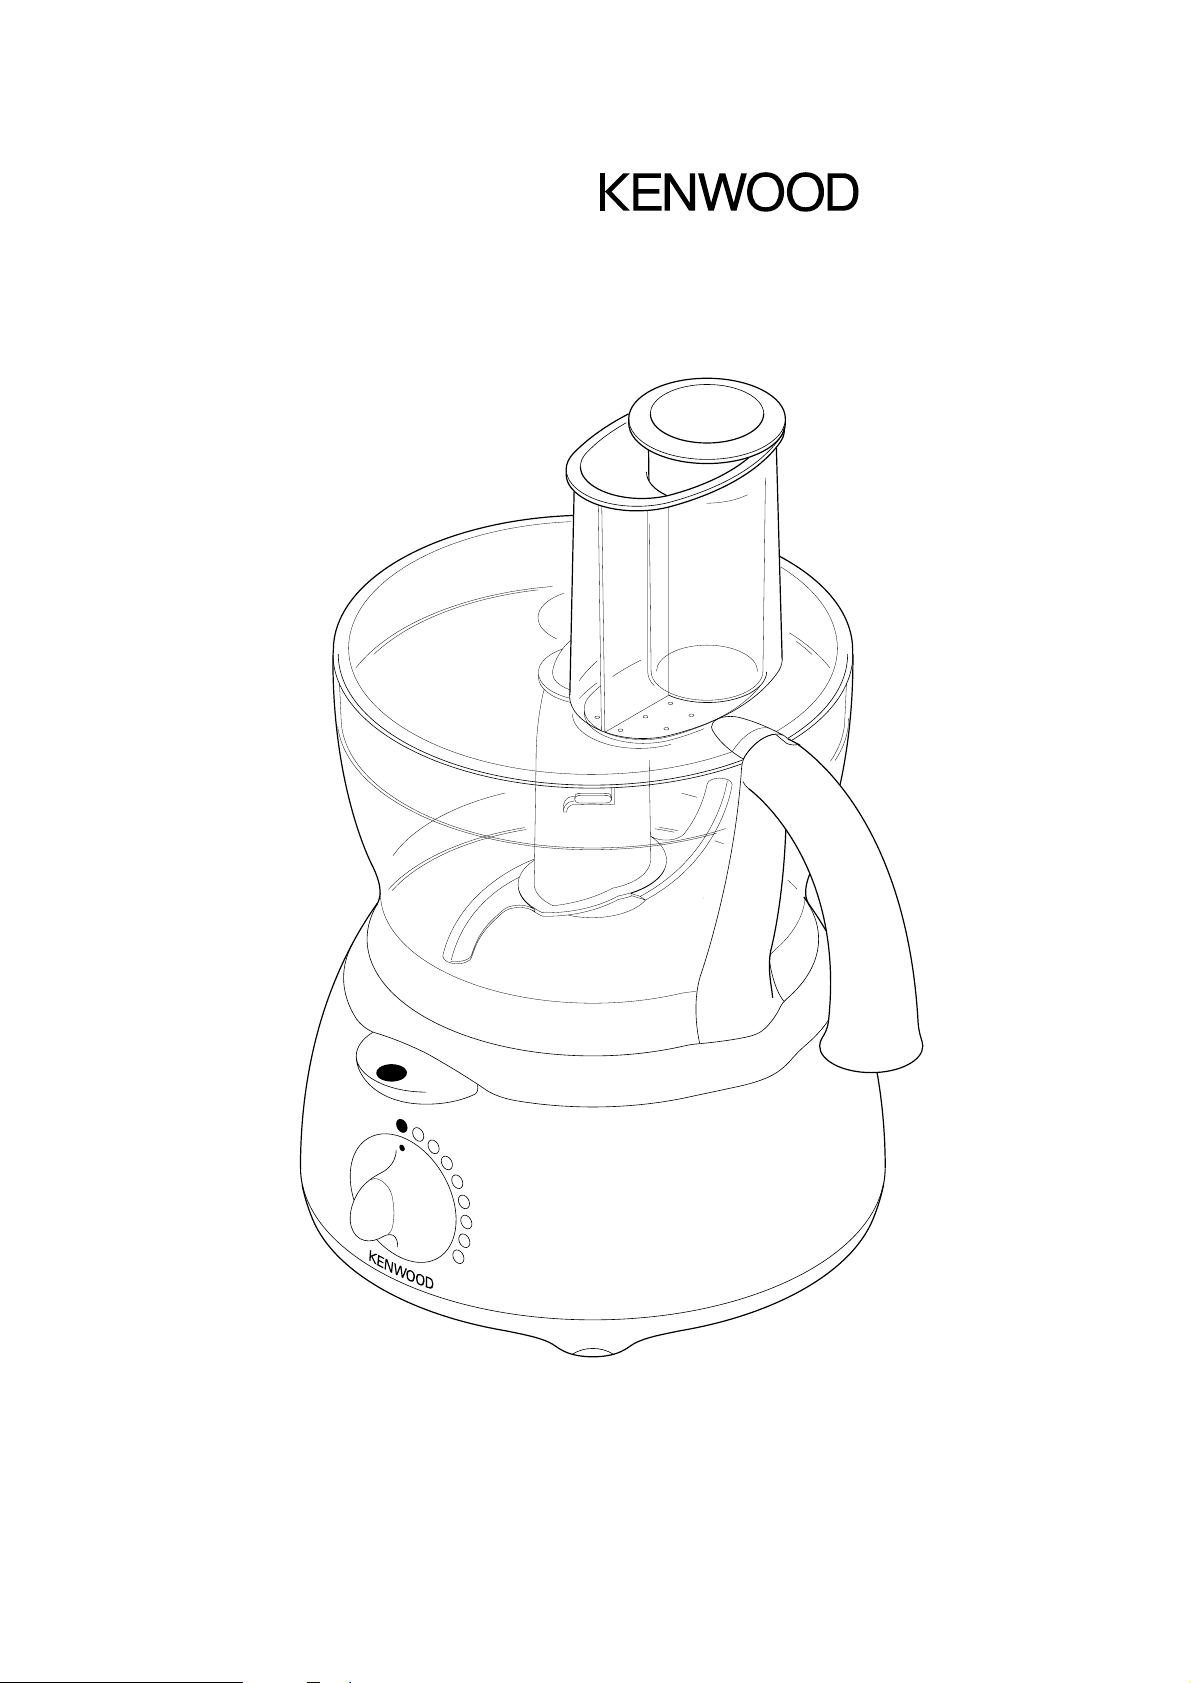
FP680, FP690,
FP780 series
00
8
1
2
3
4
5
6
7
P
Page 3

English 2 - 5
Nederlands 6 - 9
Français 10 - 13
Deutsch 14 - 17
Italiano 18 - 21
Dansk 22 - 25
Svenska 26 - 29
Norsk 30 - 33
Suomi 34 - 37
UNFOLD
Page 4
1
P
00
8
1
2
3
4
5
6
7
P
00
1
2
3
4
5
6
7
8
P
00
1
2
3
4
5
6
7
8
Page 5

2
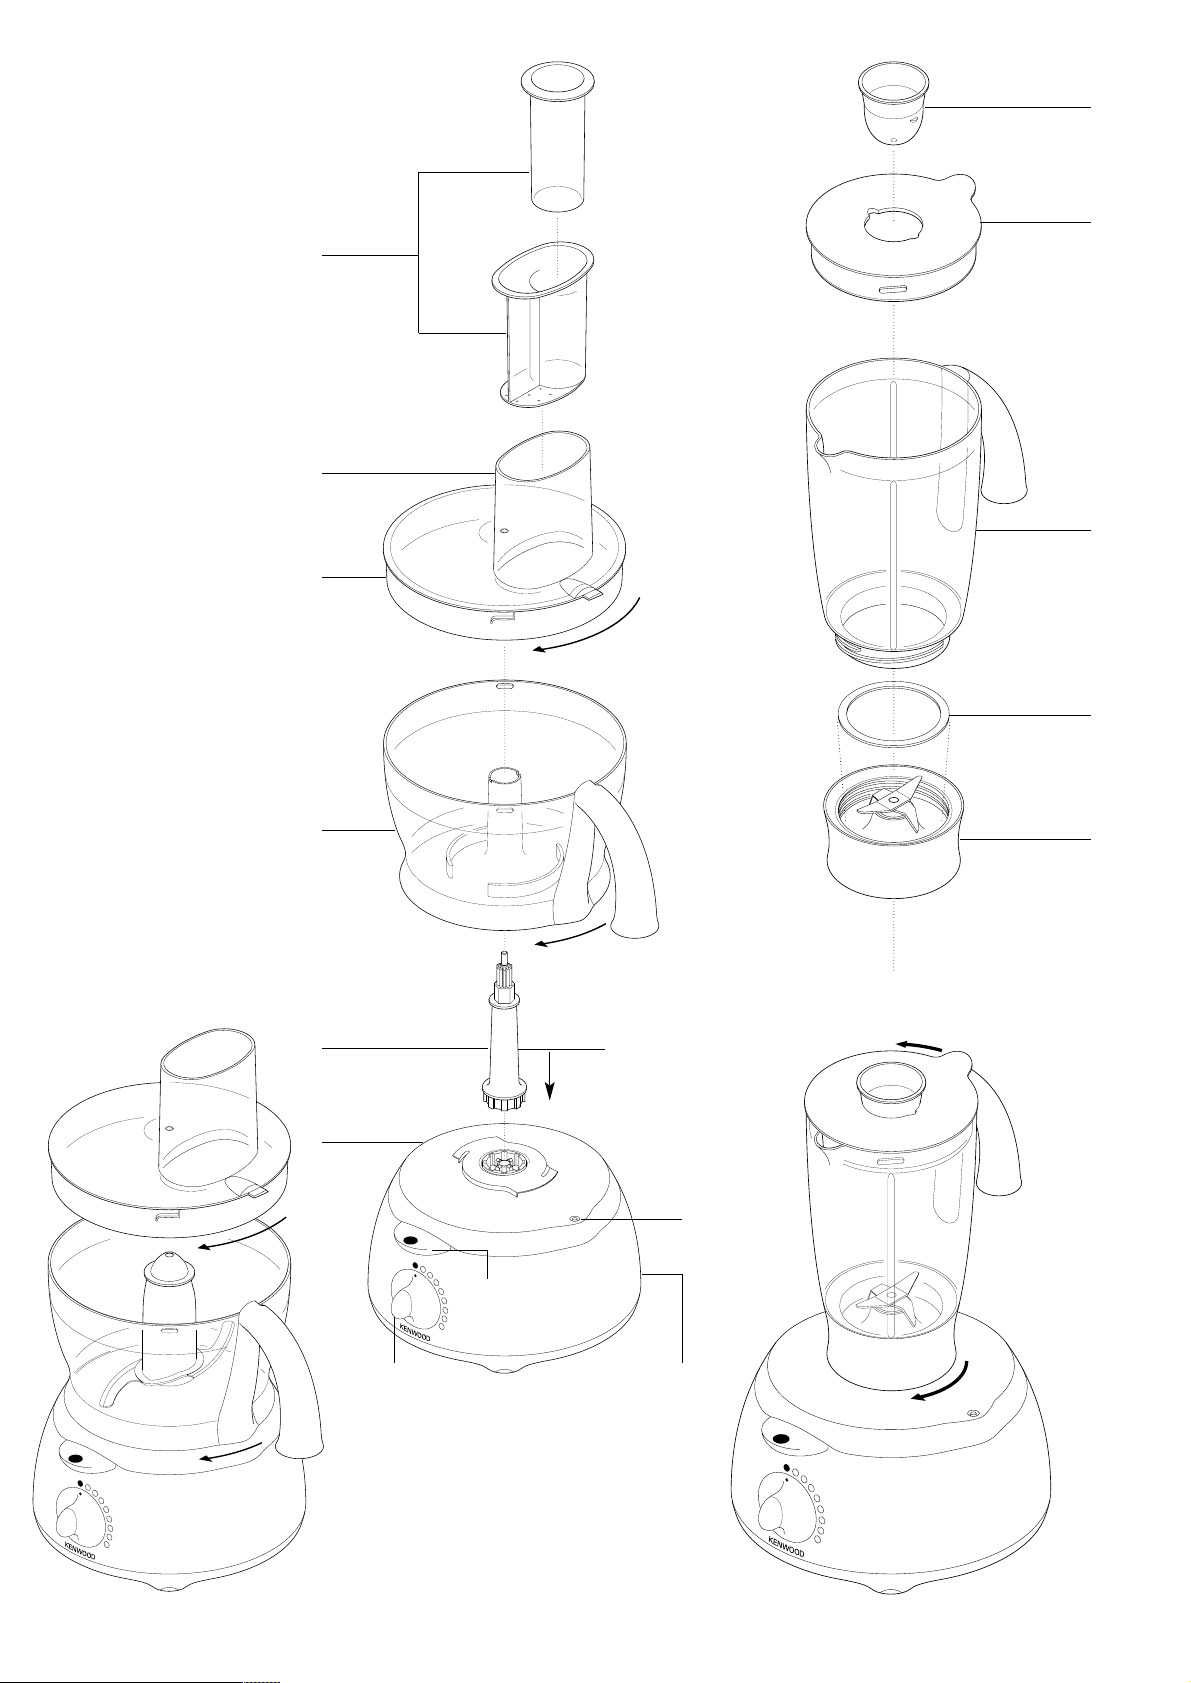
liquidiser
filler cap
lid
jug
sealing ring
blade unit
additional attachments
Not all of these attachments listed below will be included with your food
processor. Please refer to your content list supplied. To buy an attachment not
included in your pack, contact the dealer from whom you purchased your
appliance.
knife blade
dough tool
twin beater geared whisk
maxi-blend canopy
thick slicing/coarse shredding disc
thin slicing/fine shredding disc
fine (Julienne style) chipper disc
extra coarse shredding disc
rasping disc
standard chipper disc
geared citrus press
spatula
disc storage box
multi mill
centrifugal juicer
recipe book
to use your food processor
1 Fit the detachable shaft onto the power unit .
2 Then fit the bowl. Place the handle towards the back and turn clockwise until it
locks .
3 Fit an attachment over the drive shaft.
●
Always fit the bowl and attachment onto the machine before adding ingredients.
4 Fit the lid - ensuring the top of the drive shaft locates into the centre of the lid.
●
Do not use the lid to operate the processor, always use the on/off
speed control.
5 Switch on and select a speed.
●
The processor won’t work if the bowl and lid are fitted
incorrectly.
●
Use the pulse control for short bursts. The pulse will operate for as long as the
lever is held down.
6 Reverse the above procedure to remove the lid, attachments and bowl.
●
Always switch off before removing the lid.
important
●
Your processor is not suitable for crushing or grinding coffee beans, or
converting granulated sugar to caster sugar.
●
When adding almond essence or flavouring to mixtures avoid contact with the
plastic as this may result in permanent marking.
to use your liquidiser
1 Fit the sealing ring into the blade unit .
2 Screw the jug onto the blade unit.
3 Put your ingredients into the jug.
4 Put the filler cap in the lid, then turn.
5 Lock the lid onto the jug so that the thumb tab is over the handle (To unlock the
lid, push the thumb tab .)
6 Place the liquidiser onto the power unit and turn to lock .
7 Select a speed or use the pulse control.
21
22
23
24
25
26
27
28
29
30
31
a
safety
●
The blades and discs are very sharp, handle with care.
Always hold the knife blade by the finger grip
at the top, away from the cutting edge, both
when handling and cleaning.
●
Always remove the knife blade before pouring contents from the bowl.
●
Keep hands and utensils out of the processor bowl and liquidiser jug whilst
connected to the power supply.
●
Switch off and unplug:
●●
before fitting or removing parts
●●
after use
●●
before cleaning
●
Never use your fingers to push food down the feed tube. Always use the
pusher/s supplied.
●
Before removing the lid from the bowl or liquidiser/mill from the power unit:-
●●
switch off;
●●
wait until the attachment/blades have completely stopped;
●●
Be careful not to unscrew the liquidiser jug or mill from the blade unit.
●
Allow hot liquids to cool before blending in the liquidiser - if you haven’t fitted
the lid securely and it comes off, you could get splashed.
●
Do not use the lid to operate the processor, always use the on/off speed control.
●
This machine will be damaged and may cause injury if the
interlock mechanism is subjected to excessive force.
●
This machine is not intended for use by young children or infirm persons without
supervision.
●
Never use an unauthorised attachment.
●
Don’t let children play with this machine.
●
Never leave the machine on unattended.
●
Never use a damaged machine. Get it checked or repaired: see ‘service’.
●
Never let the power unit, cord or plug get wet.
●
Don’t let excess cord hang over the edge of a table or worktop or touch hot
surfaces.
●
Never misuse your food processor and only use it for its intended domestic use.
before plugging in
●
Make sure your electricity supply is the same as the one shown on the
underside of your machine.
important- UK only
●
The wires in the cord are coloured as follows:
Blue = Neutral
Brown = Live
●
This appliance complies with European Economic Community Directive
89/336/EEC.
before using for the first time
1 Remove all packaging including the plastic blade covers from the knife blade.
Take care the blades are very sharp. These covers should be discarded
as they are to protect the blade during manufacture and transit only.
2 Wash the parts see ‘cleaning’
3 Push excess cord into the back of the machine.
key
processor
power unit
detachable drive shaft
bowl
lid
feed tube
pushers
safety interlock
cord storage
pulse control
speed control
a
Page 6
hints
●
When making mayonnaise, put all the ingredients, except the oil into the liquidiser.
Then with the machine running, pour the oil into the filler cap and let it run through.
●
Thick mixtures, eg pates and dips, may need scraping down. If it’s difficult to
process, add more liquid.
●
When crushing ice, add 15mls (1tbsp) water to 6 ice cubes. Use the pulse control.
important
●
Allow hot liquids to cool before blending in the liquidiser – if you haven’t fitted
the lid securely and it comes off, you could get splashed.
●
To ensure the long life of your liquidiser, never run it for longer than 60 seconds.
Switch off as soon as you’ve got the right consistency.
●
Don’t process spices - they may damage the plastic.
●
The machine won’t work if the liquidiser is fitted incorrectly.
●
Don’t put dry ingredients into the liquidiser before switching on. If necessary, cut
them into pieces; remove the filler cap; then with the machine running, drop
them through one by one.
●
Don’t use the liquidiser as a storage container. Keep it empty before and after
use.
●
Never blend more than 11⁄2 litres (2pts 12floz) - less for frothy liquids like
milkshakes.
choosing a speed for all functions
tool/attachment function speed
knife blade Cake making 1 – 8
Rubbing fat into flour 5 – 8
Adding water to combine
pastry ingredients 1 – 5
Chopping/pureeing/pates 6 – 8
whisk egg whites 8
egg & sugar for fatless sponges 8
cream 5 – 8
dough tool yeasted mixes 5 – 8
discs - slicing/ Firm food items such as carrots,
shredding/ hard cheeses 5 – 8
chipping Softer items such as cucumbers,
tomatoes 1 – 5
citrus press Citrus fruits 1
centrifugal juicer Fruit and vegetables 8
liquidiser Lighter blending eg. batters, milkshakes
Soups, sauces, pate and mayonnaise 8
multi mill All processing 8
maximum capacities
●
Shortcrust pastry Flour wt 340g/12oz
●
Yeast dough Flour wt 500g/1lb 2oz
●
One Stage Cake Total wt 1.5Kg/3lb 5oz
●
Chopping meat Total wt 600g/1lb 6oz
●
liquid with canopy 1.5litres/2pts 12fl.oz
●
Twin geared whisk 6 egg whites
using the attachments
see chart above for speed of each attachment.
knife blade/ dough tool
The knife blade is the most versatile of all the
attachments. The length of the processing time will
determine the texture achieved. For coarser textures use
the pulse control.
Use the knife blade for cake and pastry making,
chopping raw and cooked meat, vegetables, nuts, pate,
dips, pureeing soups and to also make crumbs from
biscuits and bread. It can also be used for yeasted
dough mixes if the dough tool is not supplied.
Use the dough tool for yeasted mixes.
hints
knife blade
●
Cut food such as meat, bread, vegetables into cubes
approximately 2cm/3/4in before processing.
●
Biscuits should be broken into pieces and added down
the feed tube whilst the machine is running.
●
When making pastry use fat straight from the fridge cut into 2cm/3/4in.cubes.
●
Take care not to over-process.
dough tool
●
Place the dry ingredients in the bowl and add the liquid down the feed tube
whilst the machine is running. Process until a smooth elastic ball of dough is
formed this will take 60 - 90 secs.
●
Re-knead by hand only. Re-kneading in the bowl is not recommended as it may
cause the processor to become unstable.
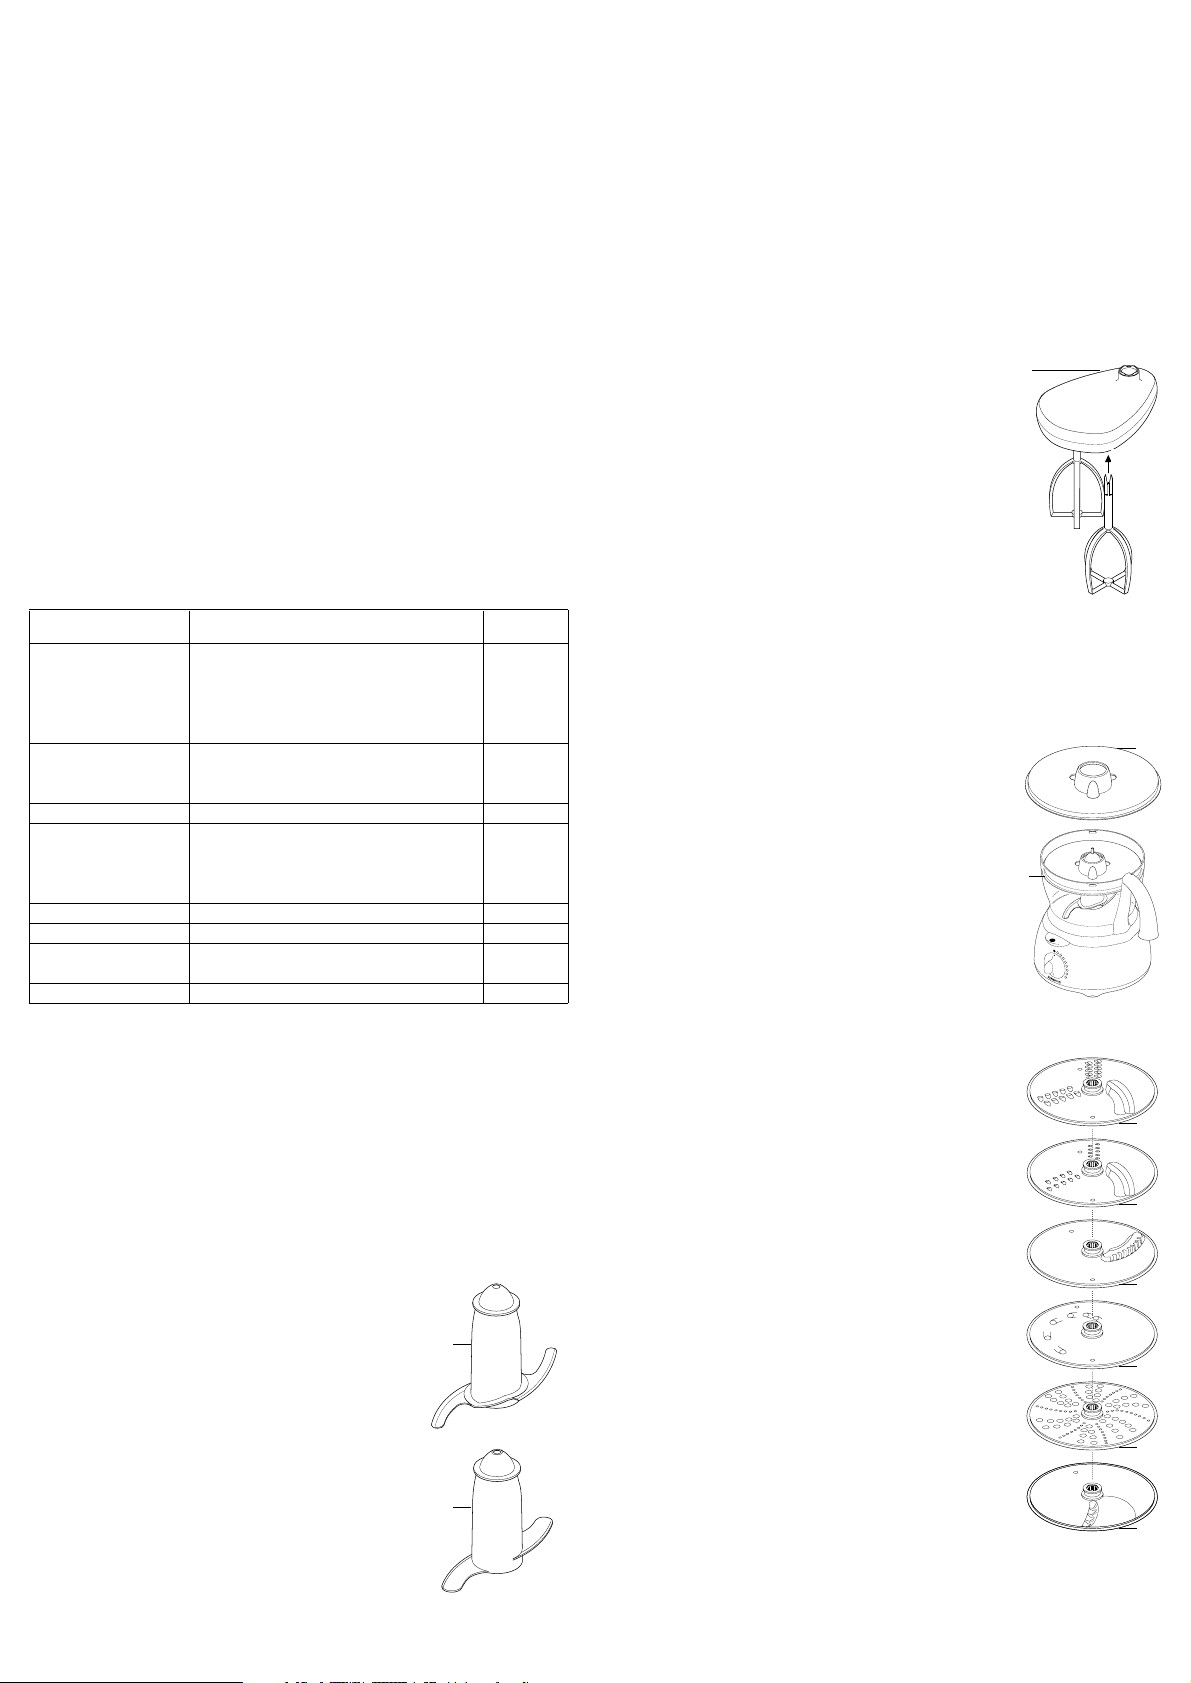
twin beater geared whisk
Use for light mixtures only eg egg whites, cream,
evaporated milk and for whisking eggs and sugar for
fatless sponges. Heavier mixtures such as fat and flour
will damage it.
using the whisk
1 Fit the drive shaft and bowl onto the power unit.
2 Push each beater securely into the drive head .
3 Fit the whisk by carefully turning until it drops over the
drive shaft.
4 Add the ingredients.
5 Fit the lid - ensuring the end of the shaft locates into the
centre of the lid.
6 Switch on.
hints
●
Best results are obtained when the eggs are at room temperature.
●
Ensure the bowl and whisks are clean and free from grease before whisking.
maxi-blend canopy
When blending liquids, use the maxi-blend canopy with
the knife blade. It allows you to increase the liquid
processing capacity from 1 litre to 1.5 litres, prevents
leaking and improves the chopping performance of the
blade.
1 Fit the drive shaft and bowl onto the power unit.
2 Fit the knife blade.
3 Add ingredients to be processed.
4 Fit the canopy over the top of the blade ensuring it sits
on the ledge inside the bowl . Do not push down on
the canopy, hold by the centre grip.
5 Fit the lid and switch on.
slicing/shredding discs
reversible slicing/shredding discs - thick ,
thin
Use the shredding side for cheese, carrots, potatoes
and foods of a similar texture.
Use the slicing side for cheese, carrots, potatoes,
cabbage, cucumber, courgette, beetroot and onions.
fine (Julienne style) chipper disc
Use to cut: potatoes for Julienne style French fries; firm
ingredients for salads, garnishes, casseroles and stir
fries (eg carrot, swede, courgette, cucumber).
extra coarse shredding disc
Coarsely shreds cheese and carrots.
rasping disc
Grates Parmesan cheese and potatoes for German
potato dumplings.
standard chipper disc
Use to Cut: potatoes for thin French fries; firm
ingredients for salads and dips (eg carrot, cucumber).
safety
●
Never remove the lid until the cutting disc has
completely stopped.
●
Handle the cutting discs with care - they are
extremely sharp
21
22
23
24
25
20
21
22
23
24
25
b
b
c
c
3
P
00
1
2
3
4
5
6
7
8
Page 7

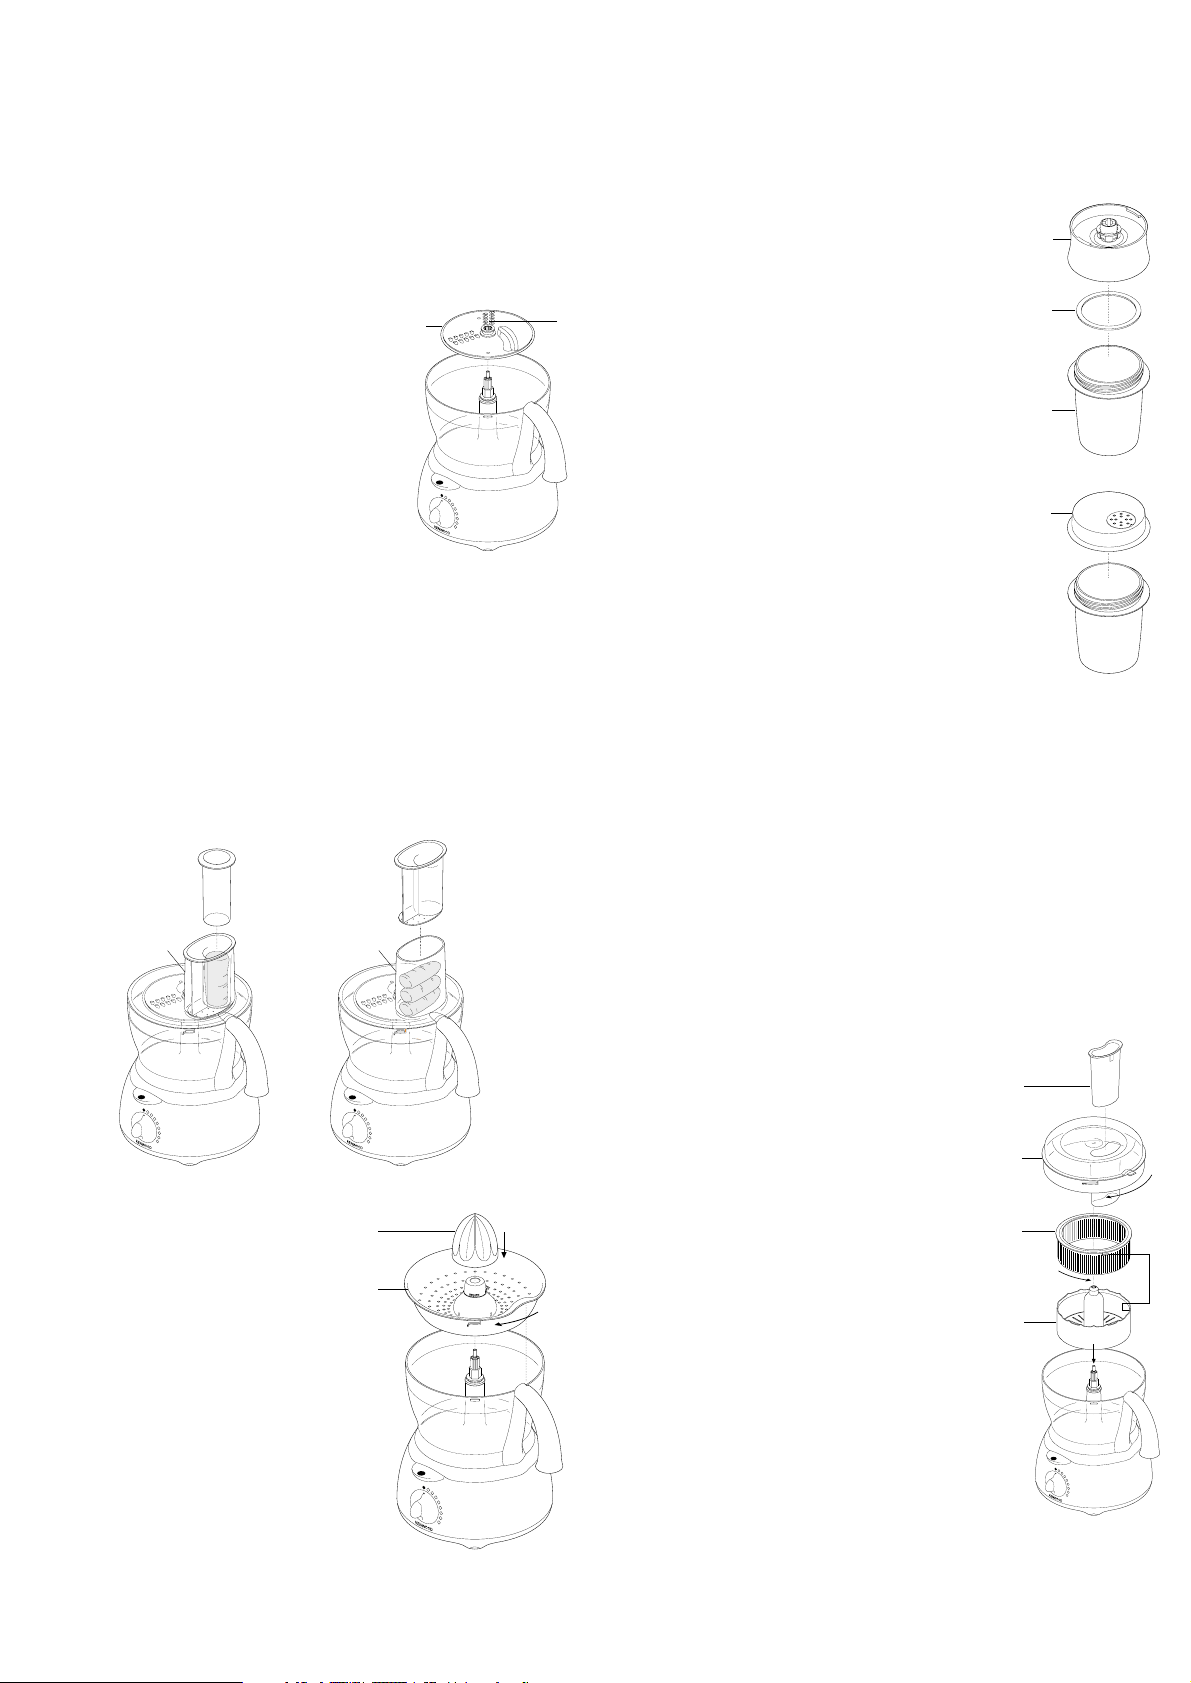
to use the cutting discs
1 Fit the drive shaft and bowl onto the power unit.
2 Holding by the centre grip , place the disc onto the
drive shaft with the appropriate side uppermost .
3 Fit the lid.
4 Choose which size feed tube you want to use. The
pusher contains a smaller feed tube for processing
individual items or thin ingredients.
To use the small feed tube - first put the large pusher
inside the feed tube.
To use the large feed tube - use both pushers
together.
5 Put the food in the feed tube.
6 Switch on and push down evenly with the pusher -
never put your fingers in the feed tube.
hints
●
Use fresh ingredients
●
Don’t cut food too small. Fill the width of the large feed tube fairly full. This
prevents the food from slipping sideways during processing. Alternatively use
the small feed tube.
●
When using the chipper disc, place ingredients horizontally.
●
When slicing or shredding: food placed upright comes out shorter than food
placed horizontally .
●
There will always be a small amount of waste on the plate or in the bowl after
processing.
citrus press
Use the citrus press to squeeze the juice
from citrus fruits (eg oranges, lemons, limes
and grapefruits).
cone
sieve
to use the citrus press
1 Fit the drive shaft and bowl onto the power
unit.
2 Fit the sieve into the bowl - ensuring the sieve
handle is locked into position directly over
the bowl handle .
3 Place the cone over the drive shaft turning
until it drops all the way down .
4 Cut the fruit in half. Then switch on and
press the fruit onto the cone.
●
The citrus press will not operate if
the sieve is not locked correctly.
mill
Use the mill for milling herbs, nuts and coffee beans.
blade unit
sealing ring
jar
sprinkler lid
safety
●
Never fit the blade unit to your machine without the jar fitted.
●
Never unscrew the jar while the multi-mill is fitted to your
machine.
●
Don’t touch the sharp blades. Keep the blade unit away
from children.
●
Never remove the multi-mill until the blades have completely
stopped.
important
●
To ensure long life of your mill, never run for longer than 30
seconds. Switch off as soon as you’ve got the right consistency.
●
Don’t process spices - they may damage the plastic.
●
The machine won’t work if the mill is fitted incorrectly.
●
Use for dry ingredients only.
to use your mill
1 Put your ingredients into the jar. Fill it no more than half full.
2 Fit the sealing ring into the blade unit.
3 Turn the blade unit upside down. Lower it into the jar, blades down.
4 Screw the blade unit onto the jar until it is finger tight.
5 Place the mill onto the power unit and turn to lock (see “to use your liquidiser”).
6 Switch on to maximum speed or use the pulse control.
7 After milling, you can replace the blade unit with the sprinkler lid and shake out
your food.
●
The sprinkler lid is not airtight.
hints
●
Herbs are best milled when clean and dry.
centrifugal juicer
Use the centrifugal juice for making juice from firm fruit and
vegetables.
pusher
lid
strainer
inner bowl
to use the centrifugal juicer
1 Fit the drive shaft and bowl onto the power unit.
2 Lock the strainer into the inner bowl .
3 Fit the inner bowl into the processor bowl .
4 Place the attachment lid onto the bowl, turn until it locks
and the feed tube sits over the handle .
5 Cut the food into small pieces to fit the feed tube.
6 Switch on and push down evenly with the pusher - never
put your fingers in the feed tube. Process fully
before adding more.
7 After adding the last piece, let the machine run for a further
20 seconds to extract all the juice from the strainer.
important
●
If the processor vibrates, switch off and empty the strainer
(The processor vibrates if the pulp becomes unevenly
distributed).
●
Process small amounts at a time (450g maximum) and
empty the strainer and inner bowl regularly.
●
Before processing remove stones and pips (eg pepper, melon, plum) and tough
skins (eg melon, pineapple). You don’t need to peel or core apples and pears.
hints
●
Use firm, fresh fruit and vegetables.
●
Citrus juice will be bitter and frothy because its peel and pith get processed
too. Use the citrus juicer instead.
4
d
e
d
e
f
g
f
g
26
h
i
29
30
h
i
j
k
l
j
k
l
P
00
1
2
3
4
5
6
7
8
P
00
1
2
3
4
5
6
7
8
P
00
1
2
3
4
5
6
7
8
P
00
1
2
3
4
5
6
7
8
P
00
1
2
3
4
5
6
7
8
Page 8

care & cleaning
●
Always switch off and unplug before cleaning.
●
Handle the blades and cutting discs with care - they are
extremely sharp.
●
Store your slicing/shredding discs in the storage box
supplied .
●
Some foods may discolour the plastic. This is perfectly
normal and won’t harm the plastic or affect the flavour of
your food. Rub with a cloth dipped in vegetable oil to
remove the discolouration.
power unit
●
Wipe with a damp cloth, then dry. Ensure that the interlock area is clear of food
debris.
●
Store excess cord in the storage area at the back of the machine.
liquidiser/mill
1 Empty the jug/jar before unscrewing it from the blade unit.
2 Wash the jug/jar by hand.
3 Remove and wash the sealing ring.
4 Don’t touch the sharp blades - brush them clean using hot soapy water, then
rinse thoroughly under the tap. Don’t immerse the blade unit in water.
5 Leave to dry upside down.
twin beater geared whisk
●
Detach the beaters from the drive head by gently pulling them free. Wash in
warm soapy water.
●
Wipe the drive head with a damp cloth, then dry. Do not immerse the
drive head in water.
all other parts
●
Wash by hand, then dry.
●
Alternatively they can be washed on the top rack of your dishwasher.
service & customer care
●
If the cord is damaged it must, for safety reasons, be replaced by Kenwood or
an authorised Kenwood repairer.
If you need help with:
●
Using your machine
●
Servicing or repairs
Contact the shop where you brought the food processor.
5
28
28
Page 9

Vouw voor het lezen a.u.b. de voorpagina met illustraties uit
blender
vulkap
deksel
kan
afsluitring
messeneenheid
extra hulpstukken
Niet alle hieronder genoemde hulpstukken zijn bij uw keukenmachine geleverd.
Raadpleeg de bijgeleverde onderdelenlijst. Neem contact op met de leverancier
van het apparaat om een hulpstuk te kopen dat niet bij uw apparaat is geleverd.
snijmes
deeggereedschap
aangedreven dubbele garde
blenderkap
schijf voor dik snijden/grof raspen
schijf voor dun snijden/fijn raspen
schijf voor fijn hakken (Julienne)
schijf voor extra grof raspen
schijf voor raspen
schijf voor standaard hakken
aangedreven citruspers
spatel
opbergdoos voor schijven
molen
centrifugale fruitpers
gebruik van uw keukenmachine
1 Plaats de afneembare as op het motorblok .
2 Breng vervolgens de kom aan. Richt de handgreep eerst naar achteren en draai
deze vervolgens met de klok mee totdat deze vastklikt .
3 Plaats een hulpstuk op de aandrijfas.
●
Breng altijd eerst de kom en het hulpstuk aan op het apparaat voordat u
ingrediënten toevoegt.
4 Breng het deksel aan - verzeker u ervan dat de bovenkant van de aandrijfas
zich in het midden van het deksel bevindt.
●
Gebruik nooit het deksel om de keukenmachine te bedienen,
maar altijd de aan/uit snelheidsregelaar.
5 Zet het apparaat aan en kies een snelheid.
●
De keukenmachine werkt niet wanneer de kom en het deksel niet
correct zijn aangebracht.
●
Gebruik de pulsknop voor korte pulsen. De puls duurt zolang als de knop
ingedrukt gehouden wordt.
6 Volg de bovenstaande procedure in omgekeerde volgorde om het deksel, de
hulpstukken en de kom te verwijderen.
●
Zet het apparaat altijd uit voordat u het deksel verwijdert.
belangrijk
●
Deze keukenmachine is niet geschikt voor het persen of malen van koffiebonen
of voor het vermalen van kristalsuiker tot basterdsuiker.
●
Wanneer u amandelessence of -smaakstof aan mengsels toevoegt, dient u het
contact met kunststof te vermijden, aangezien dit permanente vlekken kan geven.
gebruik van uw blender
1 Bevestig de afsluitring in de messeneenheid .
2 Schroef de kan op de messeneenheid.
3 Plaats uw ingrediënten in de kan.
4 Plaats de vulkap in het deksel en draai deze.
5 Bevestig het deksel op de kan zodat het lipje zich boven de handgreep bevindt
(Om het deksel los te maken, drukt u op het lipje .)
6 Plaats de blender op het motorhuis en draai deze vast .
7 Kies een snelheid of gebruik de pulsknop.
Nederlands
21
22
23
24
25
26
27
28
29
30
veiligheid
●
De messen en schijven zijn scherp: u dient ze voorzichtig te
behandelen. Houd het snijvlak altijd bij de
vingergreep vast aan de bovenzijde, van de
snijkant af, zowel bij het werken als het
schoonmaken.
●
Voordat u de inhoud uit de kom giet, dient u altijd eerst het mes te verwijderen.
●
Haal altijd de stekker uit het stopcontact, voordat u met uw handen of
gereedschappen in de kom van de machine of de blenderkan komt.
●
Zet het apparaat uit en trek de stekker uit het stopcontact:
●●
alvorens onderdelen aan te brengen of te verwijderen
●●
na gebruik
●●
voor het schoonmaken
●
Gebruik nooit uw vingers om voedsel in de invoerkoker te duwen. Gebruik altijd
de bijgeleverde stamper.
●
Doe het volgende, voordat u het deksel van de kom of de mengbeker/molen
van het motorblok verwijdert:
●●
zet het apparaat uit;
●●
wacht totdat de hulpstukken / messen helemaal tot stilstand zijn gekomen;
●●
Pas ervoor op dat u niet de mengbeker of molen van de eenheid met snijmes
schroeft.
●
Laat hete vloeistoffen afkoelen voordat u ze mengt in de blender - indien u het
deksel niet stevig heeft aangebracht kan het loskomen zodat u wordt besproeid.
●
Gebruik nooit het deksel om de keukenmachine te bedienen, maar altijd de
aan/uit-knop.
●
Deze machine wordt beschadigd en kan letsel veroorzaken
wanneer er te veel kracht wordt uitgeoefend op het
veiligheidsmechanisme.
●
Dit apparaat mag niet zonder toezicht door jonge kinderen of personen met
een handicap gebruikt worden.
●
Gebruik nooit een niet bij het apparaat behorend hulpstuk.
●
Laat kinderen niet met dit apparaat spelen.
●
De machine mag nooit op de stroom aangesloten zijn als er niemand bij is.
●
Gebruik nooit een beschadigde machine. Laat een beschadigd apparaat
nakijken of repareren: zie onder ‘service’.
●
Laat het motorhuis, het netsnoer of de stekker nooit nat worden.
●
Laat het snoer nooit over de rand van een tafel of werkblad hangen of in
aanraking komen met hete oppervlakken.
●
Gebruik de keukenmachine nooit voor iets anders dan waarvoor deze is bedoeld.
alvorens het apparaat aan te sluiten
●
Controleer of de netspanning overeenkomt met het op de onderkant van het
apparaat aangegeven voltage.
●
Dit apparaat voldoet aan de richtlijn van de Europese Economische
Gemeenschap 89/336/EEG.
voordat u het apparaat voor het eerst gebruikt
1 Verwijder al het verpakkingsmateriaal, inclusief de kunststof beschermhoezen
van de messen. Wees voorzichtig, de messen zijn erg scherp. Deze
hoezen zijn alleen bedoeld om de messen tijdens de fabricage en het transport
te beschermen; u kunt deze weggooien.
2 Reinig de onderdelen: zie onder ‘reinigen’.
3 Berg het overbodige snoer in de speciale opbergruimte aan de achterkant van
het apparaat op.
sleutel
keukenmachine
motorhuis
losmaakbare aandrijfas
kom
deksel
invoerkoker
stampers
veiligheidsmechanisme
opbergvak snoer
pulsknop
snelheidsknop
a
a
6
Page 10

handige tips
●
Bij het maken van mayonaise, plaatst u alle ingrediënten behalve de olie in de
blender. Schenk vervolgens de olie in de vulkap terwijl de machine draait en laat
deze vermengen.
●
Bij dikke mengsels, bijvoorbeeld patés of dipsauzen, kan het nodig zijn om te
schrapen. Wanneer de verwerking moeilijk gaat, voeg dan meer vloeistof toe.
●
Bij het fijnmalen van ijs, voegt u 15 ml (1 eetlepel) water toe per 6 ijsblokjes.
Gebruik de pulsknop.
belangrijk
●
Laat hete vloeistoffen afkoelen voordat u ze mengt in de blender - indien u het
deksel niet stevig heeft aangebracht kan het loskomen zodat u wordt besproeid.
●
Gebruik de blender nooit langer dan 60 seconden achter elkaar om de
levensduur van uw blender te verlengen. Schakel het apparaat uit zodra u de
gewenste consistentie heeft verkregen.
●
Verwerk geen kruiden - deze kunnen het plastic beschadigen.
●
Het apparaat werkt niet wanneer de blender onjuist is aangebracht.
●
Zet de blender niet aan met alleen droge ingrediënten. Indien nodig, snijdt u de
ingrediënten in stukken; verwijdert u de vulkap; en laat u ze er vervolgens één
voor één invallen terwijl het apparaat aanstaat.
●
Gebruik de blender niet om voeding in te bewaren. Zorg dat deze zowel voor
als na gebruik leeg is.
●
Meng nooit meer dan 11/2 liter - of minder voor schuimende vloeistoffen zoals
milkshakes.
een snelheid kiezen voor elke functie
werktuig/hulpstuk functie snelheid
snijmes Taarten bakken 1 - 8
Vet in bloem wrijven 5 - 8
Water toevoegen om te combineren
Ingrediënten voor gebak 1 - 5
Hakken/pureren/patés 6 - 8
garde eiwitten 8
ei & suiker voor vetvrije biscuits 8
room 5 - 8
deeggereedschap gistmengsels 5 - 8
schijven - snijden/ Stevige voedingsproducten zoals wortels,
raspen/ harde kazen 5 - 8
hakken Zachtere producten zoals komkommers,
tomaten 1 – 5
citruspers Citrusvruchten 1
centrifugale fruitpers Fruit en groenten 8
blender Zachter blenden, bijvoorbeeld
opkloppen, milkshakes
Soepen, sauzen, paté en mayonaise 8
veelzijdige molen Alle verwerking 8
maximum capaciteit
●
Kruimeldeeg Bloem gewicht 340 g
●
Gistdeeg Bloem gewicht 500 g
●
Biscuitgebak Totaalgewicht 1,5 Kg
●
Gehakt vlees Totaalgewicht 600 g
●
Vloeistof met deksel 1,5 liter
●
Aangedreven dubbele garde 6 eiwitten
het gebruik van de hulpstukken
zie de bovenstaande tabel voor de snelheid van ieder
hulpstuk.
snijmes/ deeggereedschap
Het snijmes is het meest veelzijdige van alle
hulpstukken. De verwerkingstijd bepaalt de verkregen
structuur. Gebruik de pulsknop voor een grovere
structuur.
Gebruik het snijmes voor het bakken van taarten en
gebak, het hakken van rauw en gekookt vlees,
groenten, noten, paté, dipsauzen, gepureerde soepen
en verder om biscuits en brood te verkruimelen. Het kan
ook worden gebruikt om gegiste deegmengsels te
maken indien het deeggereedschap niet is bijgeleverd.
Gebruik het deeggereedschap voor gegiste
deegmengsels.
nuttige tips
snijmes
●
Snijd producten zoals vlees, brood en groenten in blokjes van ongeveer 2 cm
voor verwerking.
●
Biscuits moeten in stukken worden gebroken en in de invoerkoker ingebracht
terwijl de machine draait.
●
Bij het bereiden van gebak, gebruik vet dat direct uit de ijskast in blokjes van 2
cm is gesneden.
●
Zorg ervoor de producten niet te fijn te bewerken.
deeg gereedschap
●
Plaats de droge ingrediënten in de kom en giet de vloeistof in de invoerkoker
terwijl de machine draait. Ga door totdat er zich een elastische deegbal heeft
gevormd. Dit duurt 60 - 90 seconden.
●
Kneed het opnieuw, alleen met de hand. Het wordt niet aanbevolen om het
herkneden in de kom uit te voeren aangezien de keukenmachine daar instabiel
van kan worden.
aangedreven dubbele garde
Gebruik voor de lichte mengsels en het kloppen van
eieren bijvoorbeeld alleen eiwitten, room, poedermelk en
suiker voor vetvrije biscuits. Zwaardere mengsels zoals
vet en bloem beschadigen de garde.
het gebruik van de garde
1 Bevestig de aandrijfas en de kom op het motorhuis.
2 Druk iedere menger stevig in de aandrijfkop .
3 Breng de garde aan door deze zorgvuldig te draaien
totdat zij over de aandrijfas valt.
4 Voeg de ingrediënten toe.
5 Breng het deksel aan - controleer of de bovenkant van de aandrijfas zich in het
midden van het deksel bevindt.
6 Zet het apparaat aan.
handige tips
●
De beste resultaten worden verkregen wanneer de eieren op kamertemperatuur zijn.
●
Controleer of de kom en de gardes schoon en vetvrij zijn voordat u gaat kloppen.
blenderkap
Gebruik de blenderkap en het snijmes bij het mengen
van vloeistoffen. Hiermee kunt u de capaciteit voor het
verwerken van vloeistoffen vergroten van 1 liter tot 1,5
liter, lekken voorkomen en de hakprestaties van het mes
vergroten.
1 Bevestig de aandrijfas en de kom aan het motorhuis.
2 Plaats het snijmes.
3 Voeg de te bewerken ingrediënten toe.
4 Plaats de kap over de bovenzijde van het mes en
controleer dat deze rust op de rand aan de binnenkant
van de kom . Druk niet op de kap, houd deze
vast aan de centrale handgreep.
5 Plaats het deksel en zet het apparaat aan.
schijven voor snijden/raspen
omkeerbare schijven voor snijden/raspen - dik
, dun
Gebruik de raspzijde voor kaas, wortels, aardappels en
producten met een vergelijkbare structuur.
Gebruik de snijzijde voor kaas, wortels, aardappels,
kool, courgette, bieten en uien.
schijf voor fijn hakken (Julienne)
Gebruik: aardappels snijden voor frieten à la Julienne;
stevige ingrediënten voor salades, garneringen,
stoofschotels en roerbakgroenten (bv. wortels, koolraap,
courgette, komkommer).
extra grove raspschijf
Raspt kaas en wortels grof.
raspschijf
Raspt Parmezaanse kaas en aardappelen voor Duitse
aardappelknoedels.
schijf voor standaard hakken
Gebruik: aardappels snijden voor dunne frieten; stevige
ingrediënten voor salades en dipsauzen (b.v. wortels,
komkommer).
21
22
23
24
25
20
21
22
23
24
25
b
b
c
c
7
P
00
1
2
3
4
5
6
7
8
Page 11
veiligheid
●
Verwijder het deksel nooit voordat de snijschijf geheel tot
stilstand is gekomen.
●
De snijschijven zijn scherp - u dient ze voorzichtig te
behandelen.
gebruik van de snijschijven
1 Bevestig de aandrijfas en de kom op het motorhuis.
2 Houd de schijf bij de handgreep in het midden vast
en plaats de schijf op de aandrijfas met de juiste zijde
naar boven .
3 Breng het deksel aan.
4 Kies het formaat invoerkoker dat u wilt gebruiken. De
stamper bevat een kleinere invoerkoker voor het
verwerken van losse producten of dunne ingrediënten.
Om de kleine invoerkoker te gebruiken - plaatst u
eerst de grote stamper in de invoerkoker.
Om de grote invoerkoker te gebruiken - gebruikt u
beide stampers tegelijk.
5 Plaats het voedsel in de invoerkoker.
6 Zet het apparaat aan en druk de stamper gelijkmatig naar beneden - steek
nooit uw vingers in de invoerkoker.
nuttige tips
●
Gebruik verse ingrediënten
●
Snij het voedsel niet te klein. Vul de grote invoerkoker behoorlijk en over de hele
breedte. Dit voorkomt dat het voedsel opzij glipt tijdens de verwerking. U kunt
ook de kleine invoerkoker gebruiken.
●
Wanneer u de hakschijf gebruikt, plaats de ingrediënten dan horizontaal.
●
Bij het snijden of raspen: verticaal geplaatste producten worden korter
gesneden dan horizontaal geplaatste producten .
●
Er zal na verwerking altijd een kleine hoeveelheid afval overblijven op de plaat of
in de kom.
citruspers
Gebruik de citruspers om het sap van
citrusvruchten uit te persen (b.v.
sinaasappels, citroenen, limoenen en
grapefruits).
kegel
zeef
het gebruik van de citruspers
1 Bevestig de aandrijfas en de kom op het
motorhuis.
2 Plaats de zeef in de kom - verzeker u ervan
dat de handgreep van de zeef direct boven
de handgreep van de kom is vastgezet .
3 Plaats de kegel over de aandrijfas totdat
deze geheel naar beneden valt .
4 Snijd het fruit in tweeën. Zet het apparaat
vervolgens aan en druk het fruit op de kegel.
●
De citruspers werkt niet als de zeef
niet correct is vastgezet.
molen
Gebruik de molen voor het malen van kruiden, noten en
koffiebonen.
messeneenheid
afdichtring
pot
strooideksel
veiligheid
●
Breng nooit de eenheid met snijmes op het apparaat aan
zonder dat de beker is aangebracht.
●
Schroef de pot nooit los terwijl de multimolen op uw apparaat
is aangebracht.
●
Raak de scherpe messen niet aan. Houd de messeneenheid
uit de buurt van kinderen.
●
Verwijder de multimolen pas als de messen volledig tot
stilstand zijn gekomen.
belangrijk
●
Om te zorgen dat de molen lang meegaat, moet u hem nooit
langer dan 30 seconden laten draaien. Zet hem uit, zodra u de
juiste consistentie heeft bereikt.
●
Verwerk geen kruiden - deze kunnen het plastic beschadigen.
●
Het apparaat zal niet werken, als de molen verkeerd is
aangebracht.
●
Uitsluitend gebruiken voor droge ingrediënten.
het gebruik van uw molen
1 Doe uw ingrediënten in de pot. Vul de pot maximaal tot de helft.
2 Plaats de afdichtring in de messeneenheid.
3 Zet de messeneenheid ondersteboven en laat deze met de messen naar
beneden in de pot zakken.
4 Schroef de messeneenheid op de pot tot hij losvast zit.
5 Plaats de molen op het motorgedeelte en draai hem om hem te vergrendelen.
6 Zet de molen aan op de hoogste snelheid of gebruik de pulsregelaar.
7 Na het malen kunt u de messeneenheid vervangen door de strooideksel en uw
voedsel uit de pot schudden.
●
De strooideksel is niet luchtdicht
tips
●
Kruiden kunnen het best worden gemalen, als ze schoon en droog zijn.
centrifugale fruitpers
Gebruik de centrifugale fruitpers voor het persen van sap
uit stevig fruit en groenten.
stamper
deksel
zeef
inwendige bak
Hoe de centrifugale fruitpers moet
worden gebruikt
1 Breng de aandrijfas en kom aan op het motorblok.
2 Vergrendel de zeef in de inwendige bak .
3 Breng de inwendige bak aan in de beker .
4 Plaats het deksel op de beker en draai het tot het vastzit
en de vulbuis zich boven de handgreep bevindt .
5 Snijd het voedsel in kleine stukken, zodat ze in de vulbuis
passen.
6 Zet de fruitpers aan en druk de inhoud met de stamper
gelijkmatig omlaag - steek nooit uw vingers in de
vulbuis. Verwerk de gehele inhoud, voordat u meer
stukken toevoegt.
7 Laat het apparaat na de toevoeging van het laatste stuk
nog 20 seconden draaien om al het sap uit de zeef te verwijderen.
8
d
e
d
e
f
g
f
g
26
h
h
i
i
29
30
j
k
l
j
k
l
P
00
1
2
3
4
5
6
7
8
P
00
1
2
3
4
5
6
7
8
P
00
1
2
3
4
5
6
7
8
P
00
1
2
3
4
5
6
7
8
P
00
1
2
3
4
5
6
7
8
Page 12

belangrijk
●
Als de fruitpers gaat trillen, zet hem dan uit en leeg de zeef (de fruitpers gaat
trillen, als de moes ongelijkmatig verdeeld raakt).
●
Verwerk kleine hoeveelheden tegelijk (maximaal 450 g) en leeg de zeef en
inwendige bak regelmatig.
●
Verwijder vóór het verwerken pitten (bv. peper, meloen, pruimen) en harde
schillen (bv. meloen, ananas). Het is niet nodig appels of peren te schillen en
van hun klokhuis te ontdoen.
tips
●
Gebruik stevige, verse vruchten en groenten.
●
Het sap van citrusvruchten zal bitter en schuimig zijn, omdat de schil, het wit
en de velletjes ook worden verwerkt. Gebruik daarvoor een citrusvruchtenpers.
onderhoud & reiniging
●
Zet het apparaat altijd uit en trek de stekker uit het
stopcontact voordat u het gaat schoonmaken.
●
Messen en snijschijven zijn zeer scherp - ga er voorzichtig
mee om.
●
Bewaar uw schijven voor het snijden/raspen in de
bijgeleverde opbergdoos .
●
Het plastic kan verkleuren door sommige
voedselproducten. Dit is normaal, levert geen schade op
aan het plastic en beïnvloedt de smaak van uw voedsel
niet. U kunt deze verkleuringen verwijderen met een doek
die licht bevochtigd is met plantaardige olie.
Motorhuis
●
Veeg af met een vochtige doek, en droog dan af. Controleer of het
veiligheidsmechanisme vrij is van voedselresten.
●
Berg het overbodige snoer op in het opbergvak aan de achterzijde van het
apparaat.
mengbeker/molen
1 Leeg de beker, voordat u hem van de eenheid met snijmes afschroeft.
2 Was de beker met de hand.
3 Verwijder en was de afsluitring.
4 Raak de scherpe messen niet aan - borstel ze schoon met heet water en zeep,
en spoel ze zorgvuldig af onder de kraan. Dompel de messeneenheid
niet onder in water.
5 Laat het ondersteboven opdrogen.
aangedreven dubbele garde
●
Maak de gardes los van de aandrijfkop door ze voorzichtig los te trekken.
Wassen in warm water met zeep.
●
Veeg de aandrijfkop af met een vochtige doek, en droog deze dan af. Dompel
de aandrijfkop niet onder in water.
alle andere onderdelen
●
Met de hand afwassen, en dan afdrogen.
●
Ze kunnen ook worden gewassen op het bovenste rek van uw afwasmachine.
28
28
service & ondersteuning
●
Als het snoer beschadigd is, moet het om veiligheidsredenen door Kenwood of
een door Kenwood erkende monteur worden vervangen.
Als u hulp nodig heeft bij het volgende:
●
Het gebruik van uw apparaat
●
Service of reparatie
Neem dan contact op met de winkel waar u het apparaat heeft gekocht.
9
Page 13

Veuillez déplier les illustrations de la première page
mélangeur
bouchon
couvercle
récipient
joint d’étanchéité
support de lame
accessoires supplémentaires
Tous les accessoires cités ci-dessous ne sont pas forcément fournis avec votre robot.
Reportez-vous à la liste des pièces jointe à votre appareil. Pour vous procurer l’un de ces
accessoires, contactez votre revendeur.
couteau
mélangeur
fouet à deux batteurs
accessoire récipient mélangeur maxi blend
disque éminceur / râpe épais
disque éminceur / râpe fin
disque frites fines (type Julienne)
disque râpe maxi
disque râpe
disque frites normales
presse-agrumes
spatule
casier à disques
moulin
centrifugeuse
utilisation du robot
1 Fixez l’axe d’entraînement amovible sur le bloc moteur .
2 Mettez le bol en place. Orientez la poignée vers l’arrière et tournez dans le sens des
aiguilles d’une montre jusqu’à ce qu’il s’enclenche en position .
3 Ajoutez un accessoire sur le manche du robot.
●
Fixez toujours le bol et l’accessoire sur l’appareil avant d’y ajouter les ingrédients.
4 Fixez le couvercle sur le bol - le haut du manche doit se trouver au centre du couvercle.
●
N’utilisez pas le couvercle pour faire fonctionner le robot ; utilisez
toujours le sélecteur de vitesse Marche / Arrêt.
5 Allumez l’appareil et sélectionnez la vitesse souhaitée.
●
Si le couvercle n’est pas fixé correctement, le robot ne fonctionnera pas.
●
Utilisez le bouton de fonctionnement par impulsion pour utiliser l’appareil en mode
d’impulsions. L’appareil fonctionne dans ce mode tout le temps que le bouton est
enfoncé.
6 Procédez de façon inverse pour retirer le couvercle, les accessoires et le bol.
●
Eteignez toujours l’appareil avant de retirer le couvercle.
important
●
Votre robot n’est pas conçu pour concasser ou moudre des grains de café ou
transformer du sucre cristallisé en sucre en poudre.
●
Si vous ajoutez de l’essence d’amandes ou un parfum aux préparations, évitez le contact
avec le plastique car il risquerait d’être tâché définitivement.
utilisation du mélangeur
1 Fixez le joint d’étanchéité sur le support de lame .
2 Fixez le récipient en le vissant sur le support de lame.
3 Introduisez les ingrédients dans le récipient.
4 Mettez le bouchon sur le couvercle, puis tournez.
5 Verrouillez le couvercle de façon à positionner la languette sur la poignée (Pour
déverrouiller le couvercle, appuyez sur la languette .)
6 Adaptez le mélangeur sur l’unité moteur et vissez-le pour le verrouiller .
7 Sélectionnez la vitesse voulue ou utilisez le bouton de fonctionnement par impulsion.
Français
21
22
23
24
25
26
27
28
29
30
sécurité
●
Les lames et lamelles sont très tranchantes, manipulez-les avec
précaution. Tenez systématiquement la lame du couteau à
l’emplacement prévu pour les doigts à l’opposé du
tranchant, durant la manipulation et le nettoyage.
●
Veillez toujours à retirer la lame avant de verser le contenu du bol.
●
Ne mettez jamais les mains dans le bol du robot ou dans le récipient du mélangeur quand
ils sont branchés.
●
Eteignez et débranchez l’appareil :
●●
avant l’assemblage ou le retrait d’accessoires
●●
après chaque utilisation
●●
avant le nettoyage
●
N’utilisez jamais vos doigts pour pousser la nourriture dans le tube d’alimentation. Utilisez
toujours le poussoir fourni.
●
Avant de retirer le couvercle du bol ou le mélangeur/moulin du bloc-moteur :
●●
éteignez l’appareil
●●
assurez-vous que les accessoires / lames sont complètement arrêtés
●●
Faites attention à ne pas dévisser le pichet du mélangeur ou le moulin et à
les désolidariser ainsi de l’unité porte-lames.
●
Laissez refroidir les liquides chauds dans le mélangeur avant d’allumer l’appareil - si le
couvercle n’est pas mis en place correctement, vous risquez d’être éclaboussé.
●
Ne vous servez pas du couvercle pour arrêter ou allumer le robot ; utilisez toujours le
sélecteur de vitesse Marche / Arrêt.
●
Veillez à ne pas forcer le mécanisme de verrouillage, l’appareil serait
alors endommagé et pourrait provoquer des blessures.
●
Cet appareil n’est pas destiné à être utilisé par de jeunes enfants ou des personnes
handicapées sans surveillance.
●
N’utilisez jamais un accessoire non autorisé.
●
Ne laissez pas les enfants jouer avec cet appareil.
●
Ne laissez jamais l’appareil sans surveillance quand il est en marche.
●
N’utilisez jamais un appareil endommagé. Faites-le vérifier ou réparer : voir la rubrique
« service après-vente ».
●
Ne mouillez jamais l’unité moteur, le cordon d’alimentaiton ou la prise.
●
Ne laissez pas le cordon d’alimentation dépasser du bord d’une table, du plan de travail
ou être en contact avec des surfaces chaudes.
●
N’utilisez jamais votre robot pour une autre utilisation que l’usage domestique auquel il est
destiné.
avant le branchement
●
Assurez-vous que le voltage est identique à celui indiqué sous votre appareil.
●
Cet appareil est conforme aux directives 89/336 de la CEE.
avant la première utilisation
1 Otez tous les emballages y compris le cache lame en plastique du couteau. Manipulez
avec précautions les lames car elles sont extrêmement coupantes. Ces
emballages doivent être jetés, ils sont uniquement destinés à protéger la lame durant le
processus de fabrication et de transport.
2 Lavez les différents éléments : voir la rubrique « Nettoyage »
3 Enroulez l’excès de cordon d’alimentation au dos de l’appareil.
robot
principal
unité moteur
manche amovible
bol
couvercle
tube d’alimentation
poussoirs
verrouillage de sécurité
enrouleur
bouton de fonctionnement par impulsion (pulse)
sélecteur de vitesse
a
a
10
Page 14

conseils
●
Pour une préparation de mayonnaise, introduisez tous les ingrédients dans le récipient, à
l’exception de l’huile. Une fois l’appareil en marche, versez l’huile dans le bouchon et
laissez-la s’écouler en filet.
●
Pour les texture épaisses, telles que les pâtes et pâtes à tartiner, il peut être nécessaire de
racler le récipient. En cas de difficulté à poursuivre la préparation, ajoutez d’avantage de liquide.
●
Pour compiler de la glace, ajoutez 15 ml d’eau pour 6 glaçons. Utilisez le bouton de
fonctionnement à impulsion.
important
●
Laissez les liquides chauds refroidir avant de procéder à leur mélange - si le couvercle n’a
pas été correctement inséré et qu’il s’enlève, vous risquez d’être éclaboussé.
●
Pour prolonger la durée de vie de votre mélangeur, ne le faites pas fonctionner plus de 60
secondes consécutives. Eteignez-le dès obtention de la consistance souhaitée.
●
N’utilisez pas d’épices - elles peuvent endommager le plastique.
●
L’appareil ne fonctionnera pas si le mélangeur n’est pas correctement installé.
●
N’introduisez pas d’ingrédients secs dans le mélangeur avant de l’allumer. Si nécessaire,
coupez-les en morceaux ; retirez le bouchon ; une fois l’appareil en marche, introduisez-
les un par un dans le récipient.
●
N’utilisez pas le mélangeur à des fins de stockage. Il doit rester vide avant et après
utilisation.
●
Ne mélangez pas plus de 11/2 litres - moins encore pour les liquides mousseux comme les
milkshakes.
sélection d’une vitesse pour toutes les fonctions
accessoire fonction vitesse
lame couteau Préparation de gâteau 1 - 8
Ajout de matière grasse à la levure 5 - 8
Ajout d’eau au mélange
ingrédients de pâte 1 - 5
Hachage/purée/pâtes 6 - 8
fouet blancs en neige 8
oeufs et sucre pour gâteaux mousseline légers 8
crème 5 - 8
mélangeur pâtes levées 1 - 2
disques - éminceur/ Ingrédients durs, tels que carottes,
râpe/ fromages fermes 5 - 8
frites Ingrédients plus tendres, tels que concombres,
tomates 1 - 5
presse-agrumes agrumes 1
centrifugeuse Fruits et légumes
8
mélangeur Mélanges plus léger, tels que pâtes
liquides, milkshakes
Potages, sauces, pâtes et mayonnaise 8
moulin Toutes préparations
8
capacités maximales
●
Pâte à tarte. Poids de farine maximum 340 g
●
Pâte à base de levure de boulanger. Poids de farine maximum 500 g
●
Gâteau mousseline. Poids de farine maximum 1,5 Kg
●
Viande à hacher. Poids total 600 g
●
Liquide dans le récipient mélangeur 1,5 litres
●
Fouet à deux batteurs 6 blancs d’oeufs
utilisation des accessoires
consultez le tableau ci-dessus pour connaître la vitesse adaptée à chacun des accessoires.
lame couteau / mélangeur
Cette lame est l’accessoire le plus polyvalent. La texture que
vous obtenez est déterminée par la durée de mixage. Pour les
textures plus granuleuses, utilisez le mode de fonctionnement
par impulsion (pulse).
Utilisez la lame couteau pour la préparation de gâteau et de
pâtes à tarte, pour hacher la viande fraîche et cuite, les
légumes, les noisettes, les pâtes, les pâtes à tartiner salées,
pour mixer les potages et aussi réduire les biscuits et le pain en
miettes. Elle peut également servir pour la préparation de pâtes
levées lorsque l’accessoire mélangeur n’est pas fourni.
Utilisez l’accessoire mélangeur pour la préparation de pâtes
levées.
conseils
lame couteau
●
Coupez les aliments, tels que la viande, le pain et les légumes en cubes de 2 cm avant la
préparation.
●
Les biscuits doivent être coupés en morceaux et introduits dans le tube d’alimentation
pendant que le moteur est en marche.
●
Pour la préparation de pâte à tarte, utilisez la matière grasse directement du réfrigérateur
et coupez-la en cubes de 2cm.
●
Prenez garde à ne pas mélanger trop longtemps.
mélangeur
●
Disposez les ingrédients secs dans le bol et versez le liquide dans le tube d’alimentation
pendant que le moteur est en marche. Mélangez jusqu’à ce que le tout forme une pâte et
soit lisse d’apparence et élastique au touché (cela prend 60 à 90 secondes).
●
Pétrissez la pâte à la main uniquement. Il est déconseillé de pétrir dans le bol car cela
peut entraîner une certaine instabilité du robot.
fouet à deux batteurs
Utilisez cet accessoire pour les mélanges légers uniquement,
tels que les blancs d’oeufs, la crème, le lait condensé non
sucré et pour le mélange d’oeufs et de sucre pour les gâteaux
mousseline légers. Les préparations plus lourdes, avec matière
grasse et levure, risquent d’endommager l’accessoire.
utilisation du fouet
1 Fixez le manche et le bol sur l’unité moteur.
2 Introduisez fermement chaque batteur dans la tête du fouet .
3 Mettez le fouet en place en le faisant délicatement tourner
jusqu’à ce qu’il s’enclenche sur le manche.
4 Ajoutez les ingrédients.
5 Mettez le couvercle - assurez-vous que l’extrémité du manche est correctement
positionnée au centre du couvercle.
6 Allumez l’appareil.
conseils
●
Pour de meilleurs résultats, utilisez des oeufs à température ambiante.
●
Assurez-vous que le bol et les fouets sont propres et exempts de graisse avant de battre
la préparation.
récipient mélangeur maxi blend
Pour mélanger les liquides, utilisez le récipient mélangeur maxi
blend avec la lame couteau. Il vous permet d’accroître la
capacité de traitement des liquides de 1 litres à 1,5 litres,
d’empêcher les écoulements et d’améliorer les performances de
hachage de la lame.
1 Adaptez le manche et le bol sur l’unité moteur.
2 Fixez la lame couteau.
3 Ajoutez les ingrédients à mélanger.
4 Fixez le récipient mélangeur sur la partie supérieure de la lame en
veillant à le stabiliser sur le socle à l’intérieur du bol .
N’enfoncez pas le récipient, maintenez-le par la
poignée centrale.
5 Adaptez le couvercle et allumez l’appareil.
disques éminceur / râpe
disque éminceur / râpe réversible - épais , fin
Utilisez la râpe pour les fromages, carottes, pommes de terre et
aliments de texture similaire.
Utilisez l’éminceur pour les fromages, carottes, pommes de
terre, choux, concombres, courgettes, betteraves et ognions.
disque frites fines (style Julienne)
Utilisez ce disque pour couper : les pommes de terre pour
l’obtention de frites (style Julienne) ; les ingrédients fermes pour
salades, garnitures, ragoûts et sautés (par exemple, carottes,
rutabaga, courgettes, concombre).
disque râpe maxi
Utilisez ce disque pour râper grossièrement fromages et carottes.
disque râpe
Ce disque râpe le Parmesan et les pommes de terre pour la
préparation de boulettes.
disque frites normales
Utilisez ce disque pour couper : les pommes de terre pour la
préparation de frites fines ; les ingrédients fermes pour les
salades et pâtes à tartiner (par exemple, les carottes,
concombres).
21
22
23
24
25
20
21
22
23
24
25
b
b
c
c
11
P
00
1
2
3
4
5
6
7
8
Page 15

moulin
Utilisez le moulin afin de moudre les herbes aromatiques,
noix et grains de café.
unité porte-lames
bague d'étanchéité
pot
couvercle saupoudreur
sécurité
●
N’installez jamais l’unité porte-lames sur votre appareil sans
avoir installé le bocal.
●
Ne dévissez jamais le bocal tant que le moulin est fixé à
l’appareil.
●
Ne touchez pas les lames tranchantes. Conservez l’unité
porte-lames hors de portée des enfants.
●
Ne retirez jamais le moulin tant que les lames ne sont pas
complètement à l’arrêt.
important
●
Afin de prolonger la durée de vie de votre moulin, ne
l’actionnez jamais pendant plus de 30 secondes. Éteignez-le
dès que vous avez obtenu la consistance souhaitée.
●
N’utilisez pas votre appareil pour transformer les épices – ces
aliments pourraient endommager le plastique.
●
Votre appareil ne fonctionne pas si le moulin n’est pas correctement installé.
●
Utilisez le moulin uniquement pour les ingrédients secs.
utilisation de votre moulin
1 Mettez vos ingrédients dans le bocal. Ne le remplissez pas à plus de la moitié.
2 Adaptez la bague d’étanchéité dans l’unité porte-lames.
3 Retournez l’unité porte-lames. Abaissez-la dans le bocal, lames vers le bas.
4 Vissez l’unité porte-lames sur le bocal jusqu’à ce qu’elle soit correctement
vissée et fixée.
5 Placez le moulin sur le bloc-moteur et tournez pour verrouiller.
6 Mettez en marche à vitesse maximum ou utilisez la commande par impulsion.
7 Après avoir moulu les ingrédients, vous pouvez remplacer l’unité porte-lames
par le couvercle permettant de les saupoudrer.
●
Le couvercle saupoudreur n’est pas hermétique.
conseils
●
Il est préférable de moudre les herbes aromatiques une fois nettoyées et
sèches.
centrifugeuse
Utilisez la centrifugeuse afin de préparer des jus à partir
de fruits et légumes fermes.
poussoir
couvercle
passoire
bol intérieur
utilisation de votre centrifugeuse
1 Installez l’arbre d’entraînement et le bol sur le bloc-
moteur.
2 Verrouillez la passoire dans le bol intérieur .
3 Installez le bol intérieur dans le bol du robot .
4 Placez le couvercle fourni sur le bol et tournez-le
jusqu’à ce qu’il s’enclenche, le tube d’introduction des
aliments étant situé au-dessus de la poignée .
5 Coupez les ingrédients en morceaux suffisamment petits
pour être introduits dans le tube.
6 Mettez en marche et enfoncez les ingrédients sans à-
coups à l’aide du poussoir ; n’introduisez jamais les
doigts dans le tube destiné aux aliments.
Extrayez tout le jus avant d’ajouter davantage de
morceaux.
7 Après avoir ajouté le dernier morceau, laissez l’appareil fonctionner pendant 20
secondes supplémentaires afin d’extraire tout le jus de la passoire.
sécurité
●
Ne retirez jamais le couvercle tant que les disques de coupe ne sont pas
complètement arrêtés.
●
Manipulez les disques de coupe avec précaution - ils sont extrêmement
tranchants
utilisation des disques de coupe
1 Fixez le manche et le bol sur l’unité moteur.
2 Tout en le maintenant par sa poignée centrale , placez le
disque sur le manche, face appropriée vers le haut .
3 Fixez le couvercle.
4 Choisissez la taille de tube d’alimentation à utiliser. Le
poussoir comprend un tube d’alimentation plus petit pour les
ingrédients individuels ou plus fins.
Pour utiliser le petit tube d’alimentation - introduisez tout
d’abord le grand poussoir dans le tube d’alimentation.
Pour utiliser le grand tube d’alimentation - utilisez
conjointement les deux poussoirs.
5 Introduisez les aliments dans le tube.
6 Allumez l’appareil et exercez à l’aide du poussoir une pression régulière - n’introduisez
jamais vos doigts à l’intérieur du tube d’alimentation.
conseils
●
Utilisez des ingrédients frais
●
Ne coupez pas les aliments en trop petits morceaux. Remplissez presque complètement
le grand tube d’alimentation pour empêcher les aliments de glisser sur les côtés pendant
que le robot fonctionne. Utilisez alternativement le petit tube d’alimentation.
●
Lorsque vous utilisez le disque frites, placez les aliments en position verticale.
●
Les aliments placés à la verticale sont émincés ou rapés plus menus que ceux placés
à l’horizontale .
●
Vous remarquerez toujours une petite quantité de résidus sur la lame ou dans le bol
lorsque vous cesserez d’utiliser un disque de coupe.
presse-agrumes
Le presse-agrumes sert à extraire le jus des agrumes (par exemple, les oranges, les
citrons, les citrons verts et les pamplemousses).
cône
passoire
utilisation du presse-agrumes
1 Fixez le manche et le bol sur l’unité moteur.
2 Fixez la passoire dans le bol - assurez-vous de
verrouiller la poignée de la passoire sur celle du
bol .
3 Fixez le cône sur le manche jusqu’à ce qu’il
descende à fond .
4 Coupez le fruit en deux. Mettez l’appareil en
marche et pressez le fruit sur le cône.
●
Si la passoire n’est pas correctement
verrouillée, le presse-agrumes ne
fonctionnera pas.
d
e
d
e
f
g
26
h
h
i
i
f
g
29
30
j
k
l
j
k
l
12
P
00
1
2
3
4
5
6
7
8
P
00
1
2
3
4
5
6
7
8
P
00
1
2
3
4
5
6
7
8
P
00
1
2
3
4
5
6
7
8
P
00
1
2
3
4
5
6
7
8
Page 16

important
●
Si le robot vibre, éteignez-le et videz la passoire (le robot vibre si la pulpe n’est
plus répartie de manière régulière).
●
Traitez des quantités limitées à chaque fois (450 g maximum) et videz
régulièrement la passoire et le bol intérieur.
●
Avant de centrifuger, retirez les noyaux et les pépins (ex. : poivron, melon,
prune), ainsi que les peaux dures (ex. : melon, ananas). Il est inutile de peler ou
d’évider les pommes et les poires.
conseils
●
Utilisez des fruits et légumes frais et fermes.
●
Les jus d’agrumes sont amers et mousseux, car leur écorce et leur peau
blanche sont également centrifugées. Utilisez de préférence le presse-agrumes.
nettoyage
●
Arrêtez et débrancher l’appareil avant de le nettoyer.
●
Manipulez les lames et les disques de coupe avec précaution -
ils sont extrêmement tranchants.
●
Rangez les disques éminceur / râpe dans le casier de rangement
fourni .
●
Certains aliments décolorent le plastique. Ce phénomène est
parfaitement normal. Cela n’endommage pas le plastique et
n’altère pas le goût des aliments. Frottez-le à l’aide d’un chiffon
imbibé d’huile végétale pour faire disparaître la décoloration.
unité moteur
●
Essuyez avec un chiffon humide, puis séchez. Assurez-vous que la zone de verrouillage
est exempte de résidus alimentaires.
●
Entourez le cordon d’alimentation autour de l’enrouleur qui se trouve à l’arrière de
l’appareil.
mélangeur/moulin
1 Videz le pichet/bocal avant de le dévisser de l’unité porte-lames.
2 Lavez le pichet/bocal à la main.
3 Retirez et lavez le joint d’étanchéité.
4 Ne touchez pas les lames tranchantes avec les doigts - brossez-les à l’aide d’eau
chaude savonneuse, puis rincez-les entièrement sous le robinet. N’immergez pas le
support de lame dans l’eau.
5 Retournez-le pour le faire sécher.
fouet à deux batteurs
●
Détachez les batteurs de la tête du fouet en tirant dessus délicatement. Lavez-les avec
de l’eau savonneuse tiède.
●
Nettoyez la tête du fouet à l’aide d’un chiffon humide, puis séchez. N’immergez pas
la tête du fouet dans l’eau.
autres éléments
●
Lavez à la main et séchez soigneusement.
●
Vous pouvez également les laver dans le compartiment supérieur de votre lave-
vaisselle.
28
28
service après-vente
●
Il est impératif, pour des raisons de sécurité, que Kenwood ou un réparateur agréé
Kenwood procède au remplacement du cordon d’alimentation si ce dernier est
endommagé.
Si vous avez besoin d’aide concernant :
●
l’utilisation de votre appareil
●
l’entretien, les pièces détachées ou les réparations
contactez le point de vente où vous avez acheté votre appareil.
13
Page 17

14
Bitte die Titelseite mit dem Abbildungen aufklappen.
Mixer
Füllaufsatz
Deckel
Krug
Dichtungsring
Klingenhalterung
Zusätzliches Zubehör
Nicht das gesamte unten aufgeführte Zubehör gehört zum Lieferumfang der
Küchenmaschine. Bitte lesen Sie dazu in der mitgelieferten Inhaltsliste nach. Zum Kauf
von nicht im Paket enthaltenem Zubehör sollten Sie sich an den Händler wenden, bei
dem Sie Ihr Küchengerät erworben haben.
Messerklinge
Teigkneter
Doppelschneebesen
Maxi-Fülldeckel
dicke Schneidescheibe/grobe Reibescheibe
dünne Schneidescheibe/feine Reibescheibe
feine Chip-Scheibe (für Julienne)
extra grobe Reibescheibe
Raspelscheibe
Standard-Chip-Scheibe
Zitruspresse
Spatel
Behälter zur Scheibenaufbewahrung
Mühle
Entsafter
Verwendung der Küchenmaschine
1 Die abnehmbare Welle auf die Antriebseinheit aufsetzen.
2 Setzen Sie dann die Schüssel auf. Positionieren Sie den Griff nach hinten und drehen Sie
ihn im Uhrzeigersinn, bis er einrastet .
3 Schließen Sie ein Zubehörteil an der Antriebswelle an.
●
Setzen Sie immer die Schüssel auf die Maschine und schließen Sie ein Zubehörteil an,
bevor Sie Zutaten in die Schüssel geben.
4 Setzen Sie den Deckel auf und achten Sie dabei darauf, dass sich die Spitze der
Antriebswelle in der Mitte des Deckels befindet.
●
Verwenden Sie zum Betreiben der Küchenmaschine niemals den Deckel,
sondern nur den Ein-/Aus-Geschwindigkeitsstufenschalter.
5 Schalten Sie das Gerät ein und wählen Sie eine Geschwindigkeit.
●
Wenn Schüssel und Deckel nicht ordnungsgemäß aufgesetzt wurden,
funktioniert die Küchenmaschine nicht.
●
Verwenden Sie für kurze Mixstöße die Impulsfunktion. Ein Impuls dauert so lange, wie der
Schalter gedrückt gehalten wird.
6 Führen Sie die obigen Schritte in umgekehrter Reihenfolge aus, um Schüssel,
Zubehörteile und Deckel zu entfernen.
●
Schalten Sie das Gerät vor dem Abheben des Deckels immer aus.
Achtung
●
Ihre Küchenmaschine eignet sich nicht zum Zerkleinern oder Mahlen von Kaffeebohnen
oder grobem Zucker bzw. Kristallzucker.
●
Wenn Sie der Mischung Mandelaroma oder andere Aromen hinfügen wollen, vermeiden
Sie bitte, dass diese auf den Kunststoff gelangen. Sie könnten zu permanenten
Verfärbungen führen.
Verwendung des Mixers
1 Setzen Sie den Dichtungsring in die Klingenhalterung ein .
2 Schrauben Sie den Krug auf die Klingenhalterung.
3 Füllen Sie die Zutaten in den Krug.
4 Setzen Sie den Füllaufsatz auf den Deckel und drehen Sie.
5 Rasten Sie den Deckel so am Krug ein, dass sich die Daumenzunge über dem Griff
befindet (Drücken Sie zum Lösen des Deckels die Daumenzunge .)
6 Setzen Sie den Mixer auf die Antriebseinheit und drehen Sie ihn, damit er einrastet .
7 Wählen Sie eine Geschwindigkeit bzw. verwenden Sie die Impulsfunktion.
Deutsch
21
22
23
24
25
26
27
28
29
30
Sicherheit
●
Die Klingen und Arbeitsscheiben sind sehr scharf, handhaben Sie sie
mit Vorsicht. Halten Sie die Messerklinge während des
Gebrauchs und der Reinigung stets an dem Griff am
oberen Rand fest und nicht an der Schneide.
●
Entfernen Sie immer erst die Messerklinge, bevor Sie die Schüssel entleeren.
●
Halten Sie Hände oder Küchengeräte nie in die Schüssel oder den Mixerkrug des Geräts,
solange es an die Steckdose angeschlossen ist.
●
Schalten Sie das Gerät aus bzw. ziehen Sie den Netzstecker:
●●
vor dem Anbringen bzw. Entfernen von Teilen
●●
nach dem Gebrauch
●●
vor der Reinigung
●
Drücken Sie niemals Lebensmittel mit den Fingern in den Einfüllschacht. Verwenden Sie
stets den/die mitgelieferten Stopfer.
●
Vor Abnehmen des Deckels von der Schüssel bzw. des Mixers/Mahlwerks vom
Antrieb:
●●
das Gerät ausschalten;
●●
warten, bis Zusatzgeräte/Klingen völlig zum Stillstand gekommen sind;
●●
Den Mixerbecher bzw. das Mahlwerk nicht vom Messerwerk abschrauben.
●
Lassen Sie heiße Flüssigkeiten vor der Verwendung im Mixer abkühlen - wenn Sie den
Deckel nicht richtig aufgesetzt haben und dieser nur lose sitzt, können Sie angespritzt
werden.
●
Verwenden Sie zum Betreiben der Küchenmaschine niemals den Deckel, sondern nur
den
Ein-/Aus-Geschwindigkeitsstufenschalter.
●
Das Gerät kann beschädigt werden und es kann zu Verletzungen
kommen, wenn der Verriegelungsmechanismus übermäßiger
Krafteinwirkung ausgesetzt wird.
●
Dieses Gerät darf von kleinen Kindern oder gebrechlichen Personen nicht ohne Aufsicht
verwendet werden.
●
Verwenden Sie nur zugelassenes Zubehör.
●
Lassen Sie niemals Kinder mit diesem Gerät spielen.
●
Lassen Sie das Gerät nie unbeaufsichtigt laufen.
●
Verwenden Sie niemals ein beschädigtes Gerät. Zu Überprüfung bzw. Reparatur siehe
‘Kundendienst und Kundenbetreuung’.
●
Lassen Sie die Antriebseinheit, das Netzkabel oder den Stecker niemals nass werden.
●
Lassen Sie nicht zu, dass lose Abschnitte des Netzkabels über die Tischkante oder
Arbeitsplatte hängen oder heiße Oberflächen berühren.
●
Verwenden Sie die Küchenmaschine nur für die vorgesehenen Zwecke im Haushalt.
Vor dem Einstecken des Netzsteckers
●
Überprüfen Sie, ob die Netzspannung in Ihrem Haushalt mit dem an der Unterseite des
Geräts angegebenen Wert übereinstimmt.
●
Dieses Gerät erfüllt die Anforderungen der EU-Direktive 89/336/EEC.
Vor der ersten Verwendung
1 Entfernen Sie alle Verpackungsmaterialien, einschließlich der Kunststoffabdeckungen der
Messerklinge. Seien Sie vorsichtig - die Klingen sind sehr scharf. Diese
Abdeckungen können Sie wegwerfen, da sie nur zum Schutz der Klinge während der
Herstellung und des Transports dienen.
2 Zum Abwaschen der Teile siehe ‘Reinigung’
3 Stecken Sie überschüssiges Kabel in das Kabelfach an der Rückseite des Geräts.
Gerätebeschreibung
Küchenmaschine
Antriebseinheit
abnehmbare Antriebswelle
Schüssel
Deckel
Einfüllschacht
Stopfer
Sicherheitsriegel
Netzkabelfach
Impulsfunktion
Geschwindigkeitsstufenschalter
a
a
Page 18

Tipps
●
Füllen Sie bei der Zubereitung von Mayonnaise alle Zutaten außer dem Öl in den Mixer.
Gießen Sie dann bei laufendem Gerät das Öl in den Füllaufsatz und lassen Sie es
durchlaufen.
●
Zähflüssige Mixturen wie z.B. Patés oder Dips müssen unter Umständen vom Rand nach
unten geschabt werden. Wenn sich die Zutaten schwer mixen lassen, müssen Sie mehr
Flüssigkeit zugeben.
●
Beim Zerkleinern von Eis sollten Sie für 6 Eiswürfel 15 ml (1 Esslöffel) Wasser zugeben.
Verwenden Sie die Impulsfunktion.
Achtung
●
Lassen Sie heiße Flüssigkeiten vor der Verwendung im Mixer abkühlen - wenn Sie den
Deckel nicht richtig aufgesetzt haben und dieser nur lose sitzt, können Sie angespritzt
werden.
●
Lassen Sie den Mixer nie länger als 60 Sekunden laufen, damit er lange funktionstüchtig
bleibt. Schalten Sie das Gerät aus, sobald die richtige Konsistenz erreicht wurde.
●
Zerkleinern Sie keine Gewürze - diese können den Kunststoff beschädigen.
●
Das Gerät funktioniert nicht, wenn der Mixer nicht ordnungsgemäß aufgesetzt wurde.
●
Füllen Sie trockene Zutaten nicht vor dem Einschalten in den Mixer. Schneiden Sie diese
in Stücke, falls notwendig. Entfernen Sie den Füllaufsatz. Lassen Sie die Stücke dann bei
laufendem Gerät eines nach dem anderen in den Mixer fallen.
●
Verwenden Sie den Mixer nicht zum Aufbewahren. Solange er nicht benutzt wird, sollte
er leer sein.
●
Mixen Sie niemals mehr als 11/2Liter - weniger, wenn es sich um schaumige Flüssigkeiten
wie Milch-Shakes handelt.
Geschwindigkeitsauswahl für verschiedene Funktionen
Werkzeug/Zubehör Funktion Geschwindigkeit
Messerklinge Kuchenteigzubereitung 1 - 8
Fett in Mehl einrühren 5 - 8
Zugabe von Wasser für
Teigzutaten 1 - 5
Hacken/Pürieren/Patés 6 - 8
Schneebesen Eiweiße 8
Eier & Zucker für fettfreie Biskuits 8
Sahne 5 - 8
Teigkneter Hefemischungen 5 - 8
Schneide-/ Feste Lebensmittel wie z.B. Karotten,
Reibe-/ Harte Käsesorten 5 - 8
Chip-Scheiben Weichere Lebensmittel wie z.B. Gurken,
Tomaten 1 - 5
Zitruspresse Zitrusfrüchte 1
Entsafter Früchte und Gemüse
8
Mixer Mixen von Eierkuchenteig, Milch-Shakes 8
Suppen, Soßen, Paté und Mayonnaise
Mahlwerk Verarbeitet alles
8
Höchstmengen
●
Mehl für Mürbeteig 340 g
●
Mehl für Hefeteig 500 g
●
Kuchenteig Höchstmenge 1,5 kg
●
Hackfleisch Höchstmenge 600 g
●
Flüssigkeit mit Maxi-Fülldeckel 1,5 Liter
●
Doppelschneebesen 6 Eiweiße
Verwendung der Zubehörteile
Geschwindigkeiten für jedes Zubehörteil entnehmen Sie bitte
obiger Tabelle.
Messerklinge/ Teigkneter
Die Messerklinge ist das vielseitigste Zubehörteil. Die
Verarbeitungsdauer bestimmt die erreichte Konsistenz.
Verwenden Sie die Impulsfunktion, um gröbere Konsistenzen
zu erreichen.
Verwenden Sie die Messerklinge zur Kuchen- und
Mürbeteigzubereitung, zum Hacken von rohem und
gekochtem Fleisch, Gemüse und Nüssen, zur Zubereitung von
Paté, Dips, zum Pürieren von Suppenzutaten und zur
Herstellung von Biskuit- und Semmelbröseln. Sie kann auch
zur Herstellung von Hefeteigmischungen verwendet werden,
wenn der Teigkneter nicht zur Verfügung steht.
Verwenden Sie den Teigkneter zur Herstellung von
Hefeteigmischungen.
Tipps
Messerklinge
●
Schneiden Sie Lebensmittel wie Fleisch, Brot oder Gemüse vor der Verarbeitung in
Würfel von ca. 2 cm Größe.
●
Biskuits sollten zuvor etwas zerkleinert und dann bei laufendem Gerät durch den
Einfüllschacht gegeben werden.
●
Zur Herstellung von Mürbeteig sollten Sie Fett direkt aus dem Kühlschrank, in ca. 2 cm
große Würfel geschnitten, verwenden.
●
Achten Sie darauf, dass Sie die Zutaten nicht zu lange verarbeiten.
Teigkneter
●
Geben Sie die trockenen Zutaten in die Schüssel und fügen Sie über den Einfüllschacht
bei laufendem Gerät Flüssigkeit zu. Lassen Sie solange kneten, bis sich eine elastische
Teigkugel formt. Dies dauert 60-90 Sekunden.
●
Kneten Sie noch einmal nur von Hand. Dieses nochmalige Kneten sollte nicht in der
Schüssel erfolgen, da die Küchenmaschine dabei ihren Halt verlieren kann.
Doppelschneebesen
Nur für nicht zähe Mischungen wie Eiweiß, Sahne,
Kondensmilch und zum Schlagen von Eiern und Zucker für
fettfreie Biskuits. Zähere Mixturen wie Fett und Mehl
beschädigen ihn.
Verwendung des Schneebesens
1 Setzen Sie Antriebswelle und Schüssel auf die Antriebseinheit.
2 Drücken Sie jeden Besen sicher in den Antriebskopf .
3 Setzen Sie den Schneebesen durch vorsichtiges Drehen ein,
bis er in die Antriebswelle rutscht.
4 Geben Sie die Zutaten zu.
5 Setzen Sie den Deckel auf und achten Sie dabei darauf, dass sich das Ende der
Antriebswelle in der Mitte des Deckels befindet.
6 Schalten Sie das Gerät ein.
Tipps
●
Die besten Ergebnisse werden erreicht, wenn die Eier Zimmertemperatur haben.
●
Achten Sie vor dem Schnee schlagen darauf, dass die Schüssel und der Schneebesen
frei von Fettspuren sind.
Maxi-Fülldeckel
Verwenden Sie beim Mixen von Flüssigkeiten den Maxi-
Fülldeckel zusammen mit der Messerklinge. Sie können damit
das Fassungsvermögen der Schüssel von 1 l auf 1,5 l erhöhen,
Auslaufen verhindern und die Effektivität der Klinge erhöhen.
1 Setzen Sie Antriebswelle und Schüssel auf die Antriebseinheit.
2 Setzen Sie die Messerklinge ein.
3 Geben Sie die zu verarbeitenden Zutaten hinein.
4 Setzen Sie den Fülldeckel über die Klinge und stellen Sie sicher,
dass er auf dem Absatz in der Schüssel aufsitzt .
Drücken Sie nicht auf den Fülldeckel - halten Sie ihn
am Mittelgriff.
5 Setzen Sie den Deckel auf und schalten Sie das Gerät ein.
Schneide-/Reibescheiben
Wendbare Schneide-/Reibescheiben - dick , dünn
Verwenden Sie die Reibescheibe für Käse, Karotten, Kartoffeln
und Lebensmittel ähnlicher Konsistenz.
Verwenden Sie die Schneidescheibe für Käse, Karotten,
Kartoffeln, Kohl, Gurke, Zucchini, rote Bete und Zwiebel.
Feine Chip-Scheibe (für Julienne)
Zum Schneiden von: Kartoffeln für Julienne Pommes frites;
feste Zutaten für Salate, Garnierungen, Kasserollen und “Stir
fry” (z.B. Karotten, Kohlrüben, Zucchini, Gurken)
Extra grobe Reibescheibe
Zum groben Reiben von Käse und Karotten
Raspelscheibe
Zum Reiben von Parmesankäse und Kartoffeln für Klöße
Standard-Chip-Scheibe
zum Schneiden von Kartoffeln für dünne Pommes frites; feste
Zutaten für Salate und Dips (z.B. Karotten, Gurken)
21
22
23
24
25
20
21
22
23
24
25
b
b
c
c
15
P
00
1
2
3
4
5
6
7
8
Page 19

Sicherheit
●
Entfernen Sie den Deckel erst, nachdem die Schneidescheibe
vollständig zum Stillstand gekommen ist.
●
Seien Sie bei der Handhabung der Schneidescheiben vorsichtig - sie
sind äußerst scharf.
Verwendung der Schneidescheiben
1 Setzen Sie Antriebswelle und Schüssel auf die
Antriebseinheit.
2 Fassen Sie die Scheibe am Mittelgriff und setzen Sie sie
mit der jeweils gewünschten Seite nach oben auf die
Antriebswelle .
3 Setzen Sie den Deckel auf.
4 Wählen Sie die Größe des zu verwendenden Einfüllschachts.
Der Stopfer besitzt zum Verarbeiten einzelner Stücke oder
dünner Zutaten einen kleineren Einfüllschacht.
Setzen Sie zur Verwendung des kleinen Einfüllschachts
zuerst den großen Stopfer in den Einfüllschacht.
Für den großen Einfüllschacht benötigen Sie beide Stopfer
zusammen.
5 Geben Sie die Lebensmittel in den Einfüllschacht.
6 Schalten Sie das Gerät ein und drücken Sie die Lebensmittel mit dem Stopfer
gleichmäßig nach unten - verwenden Sie dazu nie Ihre Finger.
Tipps
●
Verwenden Sie frische Zutaten
●
Schneiden Sie Lebensmittel nicht zu fein. Machen Sie den großen Einfüllschacht ziemlich
voll. Dies verhindert, dass die Lebensmittel während des Verarbeitens seitlich
wegrutschen. Verwenden Sie alternativ auch den kleinen Einfüllschacht.
●
Bei der Verwendung der Chip-Scheibe sollten Sie die Zutaten waagrecht in den
Einfüllschacht geben.
●
Beim Schneiden und Reiben: Lebensmittel, die aufrecht in den Schacht gegeben
werden, werden kürzer geschnitten als Lebensmittel, die waagrecht hineingegeben
werden .
●
Nach der Verarbeitung bleiben immer kleine Reste auf der Scheibe oder in der Schüssel zurück.
Zitruspresse
Die Zitruspresse wird zum Auspressen von
Zitrusfrüchten, wie z.B. Orangen, Zitronen,
Limonen und Grapefruits verwendet.
Kegel
Sieb
Verwendung der Zitruspresse
1 Setzen Sie Antriebswelle und Schüssel auf die
Antriebseinheit.
2 Setzen Sie das Sieb in die Schüssel - vergewissern
Sie sich, dass der Siebgriff direkt über dem
Schüsselgriff einrastet .
3 Setzen Sie den Kegel auf die Antriebswelle und
drehen Sie ihn, bis er ganz nach unten rutscht .
4 Schneiden Sie die Frucht in zwei Hälften. Schalten
Sie dann das Gerät ein und drücken Sie die Frucht
auf den Kegel.
●
Die Zitruspresse funktioniert nicht, wenn das Sieb nicht ordnungsgemäß
eingerastet ist.
Mahlwerk
Mit dem Mahlwerk können Sie Kräuter hacken sowie Nüsse
und Kaffeebohnen mahlen.
Messereinsatz
Dichtungsring
Behälter
Deckel mit Streuvorrichtung
●
Das Messerwerk nie ohne den Krug in die Maschine einsetzen.
●
Solange die Mühle auf der Maschine sitzt, Mixerglas nicht
abschrauben.
●
Messer nicht berühren und von Kindern fernhalten.
●
Mühle erst abnehmen, wenn die Messer zum Stillstand
gekommen sind.
Wichtig
●
Um die lange Lebensdauer des Mahlwerks zu erhalten, das
Mahlwerk nicht länger als 30 Sekunden ununterbrochen laufen
lassen. Sobald die gewünschte Konsistenz erreicht ist, das
Mahlwerk abschalten.
●
Keine Gewürze einfüllen – das Plastik könnte beschädigt werden.
●
Die Maschine läßt sich nicht einschalten, wenn das Mahlwerk
nicht richtig eingesetzt ist.
●
Nur trockene Zutaten verwenden.
Zusammensetzen der Mühle
1 Zutaten in den Behälter geben. Maximal bis zur Hälfte füllen.
2 Dichtungsring auf den Messereinsatz legen.
3 Komplette Messereinheit auf das gefüllte Glas legen.
4 Messereinheit fest auf den Behälter schrauben.
5 Mühle auf den Sockel aufsetzen und drehen bis diese einrastet.
6 Schalten Sie die Maschine mit maximaler Geschwindigkeit oder im Impulsbetrieb ein.
7 Nach dem Mahlvorgang kann die Messereinheit durch den Deckel mit
Streuvorrichtung ersetzt und der Behälter als Streuer verwendet werden.
●
Deckel ist nicht luftdicht.
Tipps
●
Saubere trockene Kräuter lassen sich am besten hacken.
Entsafter
Mit dem Entsafter können Sie festfleischige Früchte und
Gemüse entsaften.
Stopfer
Deckel
Sieb
Innere Schüssel
So verwenden Sie den Entsafter
1 Antriebswelle und Schüssel auf die Antriebseinheit
aufsetzen.
2 Das Sieb in die innere Schüssel einrasten lassen.
3 Die innere Schüssel in die Arbeitsschüssel einsetzen.
4 Den Vorsatzdeckel auf die Schüssel aufsetzen und
drehen, bis er einrastet und das Einfüllrohr über dem
Griff sitzt.
5 Früchte/Gemüse in Stücke schneiden, die in das
Einfüllrohr passen.
6 Die Maschine einschalten und mit dem Stopfer
gleichmäig nach unten drücken – nie die Finger in
das Einfüllrohr stecken. Erst eine Portion vollständig
verarbeiten, bevor das Einfüllrohr nachgefüllt wird.
7 Nach Einfüllen des letzten Stücks Frucht/Gemüse die
Maschine noch 20 Sekunden weiter laufen lassen, um
auch den restlichen Saft aus dem Sieb zu pressen.
Wichtig
●
Wenn die Maschine vibriert, ausschalten und das Sieb leeren. (Die Maschine
beginnt zu vibrieren, wenn das Fruchtfleisch ungleichmäßig über das Sieb
verteilt ist.)
16
d
e
d
e
f
g
f
g
26
h
i
h
i
29
30
j
k
l
j
k
l
P
00
1
2
3
4
5
6
7
8
P
00
1
2
3
4
5
6
7
8
P
00
1
2
3
4
5
6
7
8
P
00
1
2
3
4
5
6
7
8
P
00
1
2
3
4
5
6
7
8
Page 20

●
Immer nur kleinere Mengen auf ein Mal (maximal 450 g) entsaften und Sieb und
innere Schüssel regelmäßig leeren.
●
Vor dem Entsaften Kerne und Samen (z.B. bei Paprika, Melonen, Pflaumen)
und zähe Haut (z.B. bei Melonen oder Ananas) entfernen. Äpfel und Birnen
brauchen nicht geschält werden.
Tips
●
Möglichst nur feste frische Früchte und Gemüse verarbeiten.
●
Der Saft von Zitrusfrüchten wird bitter, weil auch die Schale und die weiße Haut
mit verarbeitet werden. Für Zitrusfrüchte die Zitruspresse verwenden.
Wartung & Reinigung
●
Schalten Sie das Gerät vor dem Reinigen immer aus und ziehen
Sie den Netzstecker.
●
Seien Sie bei der Handhabung der Klingen und
Schneidescheiben vorsichtig - sie sind äußerst scharf.
●
Bewahren Sie die Schneide-/Reibescheiben im mitgelieferten
Behälter auf .
●
Einige Lebensmittel verfärben den Kunststoff. Das ist völlig
normal - der Kunststoff wird dadurch weder beschädigt, noch
wird der Geschmack der Lebensmittel beeinträchtigt. Durch
Abreiben mit einem in Pflanzenöl getränktem Tuch können Verfärbungen entfernt
werden.
Antriebseinheit
●
Mit einem feuchten Tuch abwischen, dann abtrocknen. Vergewissern Sie sich, dass der
Bereich des Sicherheitsriegels frei von Lebensmittelrückständen ist.
●
Stecken Sie überschüssiges Kabel in das Kabelfach an der Rückseite des Geräts.
Mixer/Mahlwerk
1 Den Krug entleeren, bevor Sie ihn vom Messerwerk abschrauben.
2 Den Krug von Hand spülen.
3 Entfernen Sie den Dichtungsring und waschen Sie ihn.
4 Berühren Sie die scharfen Klingen nicht - bürsten Sie sie mit heißem Seifenwasser
sauber und spülen Sie sie dann unter fließendem Wasser gründlich ab. Tauchen Sie
die Klingenhalterung nicht in Wasser.
5 Lassen Sie die Teile umgekehrt stehend trocknen.
Doppelschneebesen
●
Entfernen Sie die Besen durch leichtes Ziehen aus dem Antriebskopf. Waschen Sie sie
in warmen Seifenwasser.
●
Wischen Sie den Antriebskopf mit einem feuchten Tuch ab, und trocknen Sie ihn dann.
Tauchen Sie den Antriebskopf nicht in Wasser.
Alle anderen Teile
●
Von Hand spülen, dann trocknen.
●
Sie können auch im oberen Korb der Geschirrspülmaschine gespült werden.
28
28
Kundendienst
●
Ist die Netzanschlußleitung des Gerätes beschädigt, muß sie durch den Hersteller oder
seinen autorisierten Kundendienst ersetzt werden, um Gefährdungen zu vermeiden. Ein
beschädigtes Gerät darf aus Sicherheitsgründen nicht weiter benutzt und nur vom
Hersteller oder seinen autorisierten Kundendienst repariert werden, um Gefährdungen zu
vermeiden.
●
Falls Sie Fragen zur Verwendung Ihres Gerätes haben, steht Ihnen die Kenwood Hot-
Line unter 0180 / 2000 422 (0,12 DM / Anruf) zur Verfügung. Im Falle einer Reklamation
wenden Sie sich bitte an Ihren Fachhändler.
17
Page 21

Si prega di aprire la prima pagina, al cui interno troverete le illustrazioni
frullatore
Tappo del coperchio
Coperchio
Bicchiere
Guarnizione
Unità lame
accessori
L’apparecchio non ha in dotazione tutti gli accessori del seguente elenco. Per
informazioni sugli accessori in dotazione, vedere l’elenco del contenuto specifico
dell’apparecchio. Per acquistare un accessorio non incluso in dotazione,
rivolgersi al proprio venditore.
Lama
Lama per impastare
Sbattitore a due fruste
Maxi calotta
Disco per sminuzzare/affettare (spesso)
Disco per sminuzzare/affettare (sottile)
Disco per sfilettare (stile Julienne)
Disco extra per sminuzzare (spesso)
Disco per grattugiare
Disco per sfilettare standard
Spremiagrumi
Spatola
Scatola per riporre i dischi
Macinino
Spremitutto a centrifuga
uso del robot
1 Montare l’alberino rimovibile sul corpo motore .
2 Quindi, inserire il recipiente. Posizionare il manico rivolto all’indietro e ruotare in
senso antiorario fino a bloccarlo in posizione .
3 Inserire un accessorio sopra l’alberino di rotazione.
●
Inserire sempre il recipiente e l’accessorio sull’apparecchio prima di aggiungere
gli ingredienti.
4 Inserire il coperchio accertandosi di introdurre la parte superiore dell’alberino
di rotazione al centro dello stesso.
●
Non utilizzare il coperchio per far funzionare l’apparecchio, ma
usare sempre l’interruttore on/off per il controllo della velocità.
5 Accendere e selezionare una velocità.
●
L’apparecchio non funziona se il recipiente e il coperchio non
sono inseriti correttamente.
●
Usare l’interruttore a impulsi per brevi azionamenti. Il motore funzionerà fintanto
che l’interruttore è premuto.
6 Rimuovere coperchio, accessori e recipiente eseguendo la procedura inversa.
●
Spegnere prima di rimuovere il coperchio.
importante
●
Questo apparecchio non è indicato per macinare caffè in grani o per ottenere
zucchero a velo da zucchero granulato.
●
Durante l’aggiunta di aromi o essenza di mandorle, evitare il contatto diretto con
la plastica in quanto può provocare macchie permanenti.
uso del frullatore
1 Inserire la guarnizione nell’unità lame .
2 Avvitare il bicchiere nell’unità lame.
3 Introdurre gli ingredienti nel bicchiere.
4 Chiudere il coperchio con il tappo, quindi girare.
5 Bloccare il coperchio sul bicchiere in modo che la levetta zigrinata si trovi sopra
il manico (per sbloccare il coperchio, premere la levetta zigrinata .)
6 Posizionare il frullatore sul motore e avvitare per bloccarlo in posizione .
7 Selezionare una velocità o utilizzare l’interruttore a impulsi.
Italiano
21
22
23
24
25
26
27
28
29
30
a
sicurezza
●
La lama e i dischi sono taglienti: maneggiare con cautela.
Tenere la lama per l’apposita presa
in alto, lontano dalla parte tagliente, sia durante
l’uso che nel corso della pulizia.
●
Rimuovere sempre la lama prima di svuotare il recipiente.
●
Non introdurre le mani o altri utensili nel recipiente e nel bicchiere del frullatore
mentre l’apparecchio è collegato alla rete elettrica.
●
Spegnere l’apparecchio e staccare la spina:
●●
prima di inserire o rimuovere parti accessorie
●●
dopo l’uso
●●
prima della pulizia
●
Non usare mai le dita per spingere gli alimenti nel tubo di riempimento. Servirsi
sempre dell’apposito accessorio (pressatore).
●
Prima di togliere il coperchio dalla vaschetta oppure il frullatore/macinino dal
corpo motore:
●●
spegnere l’apparecchio;
●●
attendere che le parti accessorie o la lama si siano fermate completamente;
●●
Fare attenzione a non svitare la caraffa del frullatore o del macinino dal
gruppo delle lame.
●
Far raffreddare i liquidi caldi prima di miscelarli nel frullatore; se il coperchio non
è stato chiuso correttamente e salta via, il liquido potrebbe schizzare.
●
Non usare il coperchio per far funzionare l’apparecchio, ma servirsi sempre
dell’interruttore di velocità on/off.
●
Nel caso in cui il meccanismo di sicurezza venga sottoposto a
forza eccessiva, l’elettrodomestico verrà danneggiato e potrà
essere causa di infortuni.
●
Non lasciare che bambini o persone inferme usino l’apparecchio senza
adeguata supervisione.
●
Non utilizzare l’apparecchio con accessori non autorizzati.
●
Non consentire ai bambini di giocare con questo apparecchio.
●
Non lasciare l’apparecchio incustodito.
●
Non utilizzare l’apparecchio se danneggiato. Rivolgersi ai tecnici per un controllo
ed eventuali riparazioni (consultare la sezione ‘Assistenza clienti’).
●
Non bagnare il motore, il cavo o la spina.
●
Non lasciar pendere il cavo elettrico dal piano di lavoro e non lasciare che tocchi
superfici calde.
●
Non usare l’apparecchio per usi diversi da quelli domestici indicati.
prima dell’uso
●
Accertarsi che la tensione della rete elettrica corrisponda a quella indicata sul
lato inferiore dell’apparecchio.
●
Questo apparecchio è conforme alla Direttiva Comunitaria 89/336/CEE.
prima di usare per la prima volta
1 Rimuovere l’imballaggio, comprese le protezioni di plastica delle lame. Fare
molta attenzione: le lame sono taglienti. Queste protezioni vengono
usate solo come misura protettiva durante la fabbricazione e il trasporto e
possono essere gettate.
2 Lavare i componenti (consultare la sezione ‘Pulizia’).
3 Avvolgere la lunghezza in eccesso del cavo elettrico nell’apposito vano sul retro
dell’apparecchio.
legenda
robot
Blocco motore
Alberino di rotazione rimovibile
Vaschetta
Coperchio
Tubo di riempimento
Pressatori
Dispositivo di sicurezza
Vano cavo elettrico
Interruttore a impulsi
Interruttore di velocità
a
18
Page 22

suggerimenti
●
Quando si prepara la maionese, introdurre tutti gli ingredienti, tranne l’olio, nel
frullatore. Quindi, con l’apparecchio in funzione, versare l’olio nel tappo e
lasciarlo fluire attraverso di esso.
●
Le miscele spesse, come paté e creme, possono richiedere l’uso della spatola.
Se la miscelazione risultasse difficoltosa, aggiungere altro liquido.
●
Per tritare il ghiaccio, aggiungere 15 ml di acqua ogni 6 cubetti. Usare
l’interruttore a impulsi.
importante
●
Fare raffreddare i liquidi caldi prima di miscelarli nel frullatore; se il coperchio non
è stato chiuso correttamente e salta via, il liquido potrebbe schizzare.
●
Per preservare il frullatore, non azionarlo più a lungo di 60 secondi. Spegnere
non appena si ottiene la consistenza desiderata.
●
Non introdurre spezie perché potrebbero danneggiare la plastica.
●
L’apparecchio non funzionerà se il frullatore non è inserito correttamente.
●
Non introdurre ingredienti secchi nel frullatore prima di accenderlo. Se
necessario, tagliarli a pezzi; rimuovere il tappo; quindi, con l’apparecchio in
funzione, versarli uno alla volta.
●
Non usare il frullatore per conservare alimenti. Mantenerlo vuoto prima e dopo
l’uso.
●
Non miscelare più di 11/2 litri, meno per liquidi schiumosi come i frappé.
scelta di una velocità per tutte le funzioni
strumento/Accessorio
funzione velocità
Lama Preparare dolci 1 - 8
Amalgamare burro alla farina 5 - 8
Aggiungere acqua per unire
gli ingredienti 1 - 5
Sminuzzare/purè/paté 6 - 8
Sbattitore Albumi 8
Uova e zucchero per pan di Spagna dietetico 8
Crema 5 - 8
Lama per impastare Miscele a lievitazione 5 - 8
Dischi - affettare/ Cibi solidi come carote,
sminuzzare/ formaggi duri 5 - 8
sfilettare Cibi più morbidi come cetrioli,
pomodori 1 - 5
Spremiagrumi Agrumi 1
spremitutto a centrifuga Frutta e verdutra 8
Frullatore Miscele più soffici, come pastella, frappé
Zuppe, salse, paté e maionese 8
macinatutto Lavora tutto 8
capacità massime
●
Pasta frolla, peso della farina 340 g
●
Impasti a lievitazione, peso della farina 500 g
●
Pan di Spagna, peso totale 1,5 Kg
●
Carne da macinare, peso totale 600 g
●
Liquidi (con calotta) 1,5 litri
●
Sbattitore a due fruste 6 albumi
uso degli accessori
vedere la tabella precedente per informazioni su ciascun accessorio.
lama/ lama per impastare
La lama è il più versatile di tutti gli accessori. La consistenza
ottenuta dipende dal tempo di lavorazione. Per ottenere
composti di consistenza meno omogenea, usare
l’interruttore a impulsi.
Utilizzare la lama per preparare torte e dolci, macinare
carne cruda e cotta, vegetali, noci, preparare pasticci,
creme, zuppe cremose e sbriciolare biscotti e pane.
Utilizzarla inoltre per preparare impasti a lievitazione se
la lama per impastare non è in dotazione.
Usare la lama per impastare per gli impasti a lievitazione.
suggerimenti
lama
●
Tagliare gli alimenti, come carne, pane o verdure, in
cubetti di circa 2 cm prima di lavorarli.
●
Spezzettare i biscotti e aggiungerli attraverso il tubo di
riempimento mentre l’apparecchio è in funzione.
●
Per la preparazione delle torte, usare burro appena estratto dal frigorifero e
tagliato in cubetti di 2 cm.
●
Non esagerare con il tempo di lavorazione.
lama per impastare
●
Introdurre gli ingredienti secchi nel recipiente e aggiungere il liquido attraverso il
tubo di riempimento mentre l’apparecchio è in funzione. Lavorare per 60 - 90
secondi fino a ottenere una palla di impasto omogenea ed elastica.
●
Reimpastare solo a mano. Si sconsiglia di rimpastare nel recipiente per non
compromettere la stabilità dell’apparecchio.
sbattitore a due fruste
Usare solo per miscele soffici, ad esempio albumi,
panna o latte evaporato e per montare le uova e lo
zucchero per il pan di Spagna dietetico. Le miscele più
consistenti, come farina e burro, danneggiano lo
sbattitore.
uso dello sbattitore
1 Inserire l’alberino di rotazione e il recipiente nel blocco
motore.
2 Spingere e assicurare un frullino alla volta nella testina di
rotazione .
3 Inserire lo sbattitore facendolo girare delicatamente sull’alberino di rotazione fino
a incastrarlo.
4 Aggiungere gli ingredienti.
5 Inserire il coperchio, accertandosi che la parte terminale dell’alberino sia infilata
al centro del coperchio.
6 Accendere l’apparecchio.
suggerimenti
●
I risultati migliori si ottengono quando le uova sono a temperatura ambiente.
●
Accertarsi che il recipiente e lo sbattitore siano puliti e privi di qualsiasi traccia di
burro prima di azionarli.
maxi calotta
Durante la miscelazione dei liquidi, usare la maxi calotta
insieme alla lama. Ciò consentirà di aumentare la
capienza del recipiente da 1 litri a 1,5 litri e di ottimizzare
le prestazioni di sminuzzamento della lama.
1 Inserire l’alberino di rotazione e il recipiente nel motore.
2 Inserire la lama.
3 Aggiungere gli ingredienti da lavorare.
4 Collocare la calotta sopra la lama, accertandosi che poggi
sul bordo interno del recipiente .
Non esercitare pressione sulla calotta, tenerla
per la presa centrale.
5 Inserire il coperchio e accendere l’apparecchio.
dischi per affettare e sminuzzare
dischi per affettare e sminuzzare reversibili:
spesso , sottile
Lato per sminuzzare: sminuzza formaggio, carote,
patate e alimenti di consistenza simile.
Lato per affettare: affetta formaggio, carote, patate,
cavolo, cetrioli, zucchine, barbabietola e cipolle.
disco per sfilettare sottile (stile Julienne)
Usare per tagliare patate a bastoncini; ingredienti solidi
per insalate, contorni, sughi e fritture miste (ad esempio,
carote, zucchine e cetrioli).
disco extra per sminuzzare (spesso)
Sminuzza grossolanamente formaggio e carote.
disco per grattugiare
Grattugia parmigiano e patate per gnocchi di patate alla
tedesca.
disco per sfilettare standard
Usare per tagliare patate a bastoncini sottili; ingredienti
solidi per insalate e creme (ad esempio, carote e
cetrioli).
21
22
23
24
25
20
21
22
23
24
25
b
b
c
c
19
P
00
1
2
3
4
5
6
7
8
Page 23

sicurezza
●
Assicurarsi che il disco affilato si sia fermato completamente
prima di rimuovere il coperchio.
●
Maneggiare i dischi affilati con cautela in quanto sono
estremamente taglienti
uso dei dischi affilati
1 Inserire l’alberino di rotazione e il recipiente nel
motore.
2 Tenendolo per la presa centrale, inserire il disco
sull’alberino di rotazione con il lato appropriato rivolto
verso l’alto .
3 Inserire il coperchio.
4 Scegliere il tubo di riempimento della dimensione
desiderata. Il pressatore contiene un tubo di
riempimento più piccolo per la lavorazione di alimenti
singoli o sottili.
Per utilizzare il tubo di riempimento piccolo: inserire il
pressatore grande nel tubo di riempimento.
Per utilizzare il tubo di riempimento grande: usare i
due pressatori insieme.
5 Introdurre gli alimenti nel tubo di riempimento.
6 Accendere l’apparecchio ed esercitare una pressione uniforme con il
pressatore. Non infilare le dita nel tubo di riempimento.
suggerimenti
●
Usare ingredienti freschi
●
Non ridurre gli ingredienti in pezzi di dimensioni eccessivamente ridotte.
Riempire il tubo più grande quasi fino al bordo. In tal modo si eviterà che i pezzi
scivolino di lato durante la lavorazione. In alternativa, usare il tubo piccolo.
●
Quando si usa il disco per sfilettare, introdurre gli ingredienti orizzontalmente.
●
Per affettare o sminuzzare, gli ingredienti inseriti verticalmente risulteranno
tagliati più corti rispetto a quelli posizionati orizzontalmente .
●
Dopo la lavorazione, rimarrà sempre un certo quantitativo di residui sul disco o
nel recipiente.
spremiagrumi
Lo spremiagrumi è indicato per spremere
arance, limoni, limoni verdi e pompelmi.
Cono
Filtro
per usare lo spremiagrumi
1 Inserire l’alberino di rotazione e il recipiente sul
blocco motore.
2 Inserire il filtro nel recipiente, accertandosi che il
manico del filtro sia bloccato in posizione
direttamente sopra il manico del recipiente .
3 Applicare il cono sull’alberino di rotazione,
ruotando fino al completo inserimento .
4 Tagliare il frutto a metà. Accendere e premere il
frutto sul cono.
●
Lo spremiagrumi non funzionerà se il
filtro non è bloccato correttamente.
macinino
Usare il macinino per erbe, frutta secca e chicchi di caffè.
complessivo delle lame
anello di tenuta
caraffa
coperchio con spolverizzatore
sicurezza
●
Non montare mai il gruppo delle lame sull’apparecchio senza
prima aver installato la vaschetta.
●
Non svitare mai la vaschetta quando è il macinatutto è ancora
inserito sull'apparecchio.
●
Non toccare le lame affilate. Tenere il complessivo delle lame
fuori della portata dei bambini.
●
Non togliere mai il macinatutto prima che le lame abbiano
smesso del tutto di girare.
importante
●
A garanzia di una lunga durata del macinino, non azionarlo mai
continuamente per più di 30 secondi. Spegnerlo non appena gli
alimenti hanno raggiunto la consistenza desiderata.
●
Non lavorare le spezie, che possono infatti danneggiare la
plastica.
●
L’apparecchio non funziona se si è installato incorrettamente il macinino.
●
Usare esclusivamente ingredienti secchi.
come usare il macinino
1 Versare gli ingredienti nella vaschetta, riempiendola per non più di metà.
2 Inserire l'anello di tenuta nel complessivo delle lame.
3 Capovolgere il complessivo delle lame. Abbassarlo sulla vaschetta, tenendo le
lame rivolte verso il basso.
4 Avvitare il complessivo delle lame sulla vaschetta, fino a stringerlo a mano.
5 Inserire il macinino sul corpo motore e girare per bloccarlo in posizione.
6 Impostare sulla velocità massima, oppure usare il controllo ad impulsi.
7 Dopo aver macinato gli ingredienti è possibile rimettere il complessivo delle
lame con il coperchio provvisto di spolverizzatore e spolverizzare gli ingredienti
come desiderato.
●
Si ricorda che il coperchio con spolverizzatore non è ermetico.
consigli
●
Le erbe si tritano meglio se sono pulite ed asciutte.
spremitutto a centrifuga
Usare lo spremitutto a centrifuga per estrarre il succo da
frutta e verdura di ferma consistenza.
pressatore
coperchio
filtro
vaschetta interna
per usare lo spremitutto a centrifuga
1 Montare l’alberino dell’apparecchio e la vaschetta sul
corpo motore.
2 Bloccare il filtro in posizione dentro la vaschetta
interna .
3 Montare la vaschetta interna dentro la vaschetta
dell’apparecchio .
4 Mettere il coperchio dell’accessorio sulla vaschetta, quindi
girarlo finché non si blocca e il tubo di riempimento non
va ad appoggiarsi sull’impugnatura .
5 Tagliare frutta o verdura a pezzetti, in modo che entri nel
tubo di riempimento.
6 Accendere l’apparecchio e premere uniformemente sugli
alimenti, usando lo spingitore. Non mettere mai le
dita nel tubo di riempimento. Lavorare completamente gli alimenti prima
di aggiungere altri pezzetti.
7 Dopo aver aggiunto l’ultimo pezzetto, lasciare l’apparecchio in funzione per altri
20 secondi, per estrarre tutto il succo presente nel filtro.
20
d
e
d
e
f
g
f
g
26
h
h
i
i
29
j
k
l
j
k
l
P
00
1
2
3
4
5
6
7
8
P
00
1
2
3
4
5
6
7
8
P
00
1
2
3
4
5
6
7
8
P
00
1
2
3
4
5
6
7
8
P
00
1
2
3
4
5
6
7
8
Page 24

importante
●
Se l’apparecchio vibra, spegnerlo e svuotare il filtro (si ha vibrazione se la polpa
della frutta o verdura va a distribuirsi in modo non uniforme).
●
Lavorare piccole quantità di cibo alla volta (450g al massimo) e svuotare ad
intervalli regolari il filtro e la vaschetta interna.
●
Prima di lavorare la frutta o la verdura, togliere semi e noccioli (es. da peperoni,
melone, prugne) e la buccia dura (es. da melone e ananas). Non occorre pelare
o togliere il torsolo a mele e pere.
consigli
●
Usare frutta e verdura fresche e di ferma consistenza.
●
Gli agrumi avranno un gusto aspro e un aspetto schiumoso a causa della
scorza e dell’albedo, che vengono anch’essi lavorati. Per gli agrumi utilizzare lo
spremiagrumi.
manutenzione e pulizia
●
Spegnere sempre e scollegare dalla rete prima di pulire.
●
Maneggiare le lame e i dischi affilati con cautela in quanto
sono estremamente taglienti.
●
Riporre i dischi per affettare e sminuzzare nell’apposita
scatola fornita in dotazione .
●
Alcuni alimenti possono scolorire la plastica. Ciò rientra
nella noma e non danneggia la plastica né pregiudica il
gusto degli alimenti. Sfregare con un panno imbevuto di
olio vegetale per eliminare la macchia.
gruppo motore
●
Pulire con un panno umido, quindi asciugare. Accertarsi che nell’area del
meccanismo di sicurezza non ci siano residui di alimenti.
●
Avvolgere la lunghezza in eccesso del cavo elettrico nell’apposito vano sul retro
dell’apparecchio.
frullatore/macinino
1 Svuotare la caraffa/vaschetta prima di svitarla dal gruppo delle lame.
2 Lavare a mano la caraffa/vaschetta.
3 Rimuovere e lavare la guarnizione.
4 Non toccare le lame affilate, utilizzare una spugna con acqua insaponata per
pulirle e sciacquarle abbondantemente con acqua corrente. Non immergere
l’unità lame nell’acqua.
5 Lasciare asciugare capovolta.
sbattitore a due fruste
●
Staccare le fruste dalla testa di azionamento tirandole delicatamente. Lavarle in
acqua tiepida e sapone.
●
Strofinare la testa di azionamento con un panno umido, quindi asciugare. Non
immergere la testa di azionamento nell’acqua.
tutti gli altri componenti
●
Lavare a mano, quindi asciugare.
●
Alternativamente, è possibile lavarli nel cestello superiore della lavastoviglie.
28
28
assistenza clienti
●
Se il cavo è danneggiato, per ragioni di sicurezza esso deve essere sostituito
da Kenwood o da un tecnico autorizzato Kenwood.
In caso di bisogno di aiuto:
●
Durante l’uso dell’apparecchio
●
Per assistenza o parti di ricambio
Contattare il punto vendita in cui è stato acquistato l’apparecchio.
21
Page 25

22
Fold forsiden med illustrationerne ud.
blender
påfyldningsdæksel
låg
kande
tætningsring
knivenhed
andet tilbehør
Ikke alle dele i denne liste følger med denne foodprocessor. Se venligst
medfølgende liste over indhold. Hvis du vil købe en tilbehørsdel, der ikke følger
med pakken: Henvend dig i den forretning, hvor maskinen er købt.
kniv
ælteredskab
piskersæt
maxi blenderindsats
grov snitte-/riveplade
fin snitte-/riveplade
fin bølge-snitteplade
ekstragrov riveplade
raspeplade
standard snitteplade
citruspresser
dejskraber
opbevaringsboks til plader
kværn
sådan anvendes saftcentrifugen
sådan bruges foodprocessoren
1 Sæt den aftagelige aksel på motorenheden .
2 Sæt så skålen fast. Lad håndtaget vende bagud og drej det med uret, til det
låses fast .
3 Sæt tilbehør ned over drivakslen.
●
Sæt altid skål og tilbehør fast på maskinen, inden der fyldes ingredienser i.
4 Påsæt låget - se efter, at toppen af drivakslen er på plads midt i låget.
●
Brug ikke låget til at betjene processoren; brug altid den
kombinerede afbryder/hastighedsknap.
5 Tænd maskinen og vælg en hastighed.
●
Foodprocessoren kan ikke starte, hvis skål og låg er sat forkert
på.
●
Brug start-/stop knappen til køre med afbrydelser. Maskinen kører, så længe
armen holdes nede.
6 Låg, tilbehør og skål fjernes i omvendt rækkefølge af den beskrevne procedure.
●
Sluk altid for maskinen, inden låget fjernes.
vigtigt
●
Processoren egner sig ikke til at knuse eller male kaffebønner, eller til at lave
stødt melis om til flormelis.
●
Når der tilsættes mandelessens eller krydderier: Undgå, at de kommer i berøring
med plastik. Det kan give misfarvning, der ikke kan fjernes.
sådan bruges blenderen
1 Sæt tætningsringen ind i knivdelen .
2 Skru kanden på knivdelen.
3 Put ingredienserne i kanden.
4 Sæt påfyldningsdækslet i låget og drej det.
5 Lås låget fast på kanden, så fingergrebet er over håndtaget (lås låget op ved at
trykke på fingergrebet .)
6 Sæt blenderen på motorenheden og drej den, til den låser .
7 Vælg en hastighed eller brug start-/stop knappen.
Dansk
21
22
23
24
25
26
27
28
29
30
sikkerhed
●
Knive og plader er meget skarpe og skal behandles forsigtigt.
Hold altid kniven ved fingergrebet i toppen,
bort fra skæret, både under brug og rengøring.
●
Tag altid kniven af, inden indholdet hældes ud af skålen.
●
Stik ikke hænder og køkkenredskaber ned i foodprocessorens skål, mens den
er tilsluttet lysnettet.
●
Sluk for den og tag stikket ud:
●●
inden der påsættes eller fjernes dele
●●
efter brugen
●●
før rengøring
●
Brug aldrig fingrene til at stoppe maden ned i påfyldningstragten. Brug altid
de(n) medfølgende nedstopper(e).
●
Før låget fjernes fra skålen eller blenderen/kværnen fra motorenheden:-
●●
sluk maskinen;
●●
vent til tilbehør/knive står helt stille;
●●
Pas på ikke skrue blenderkanden eller kværnen af knivenheden.
●
Lad varm væske køle af, inden den blendes i blenderglasset - hvis låget ikke
sidder rigtigt fast og går af, kan du blive oversprøjtet.
●
Brug ikke låget til at betjene processoren - brug altid den kombinerede
afbryder/hastighedsknap.
●
Maskinen bliver beskadiget, og du risikerer selv at komme til
skade, hvis du prøver at omgå sikkerhedslåsen med magt.
●
Uden opsyn bør denne maskine ikke bruges af mindre børn eller svagelige.
●
Brug aldrig uoriginalt tilbehør.
●
Lad ikke børn lege med maskinen.
●
Gå aldrig fra maskinen, mens den kører.
●
Brug aldrig en defekt maskine. Få den efterset eller repareret: Se under
‘service’.
●
Motorhus, ledning eller stik må aldrig blive våde.
●
Lad ikke ledningen hænge ned over bordkant, skærebræt o.lign. Undgå, at den
rører ved varme overflader.
●
Misbrug aldrig foodprocessoren; brug den kun i husholdningen og til de formål,
den er beregnet til.
før foodprocessoren tilsluttes
●
Se efter, at netspændingen svarer til angivelserne under maskinen.
●
Dette udstyr overholder bestemmelserne i direktiv 89/336/EØF, om
radiostøjdæmpning.
før ibrugtagning
1 Fjern al emballage, inkl. plastovertræk på knivene. Pas på - bladene er
meget skarpe. Plastovertrækkene bør kasseres - de er kun beregnet på at
beskytte knivene under produktion og transport.
2 Vask delene, se under ‘rengøring’
3 Skub overskydende ledning ind bag på maskinen.
forklaring
processor
motorhus
aftagelig drivaksel
skål
låg
påfyldningstragt
nedstoppere
sikkerhedslås
ledningsopbevaring
start-/stop knap
hastighedsknap
a
a
Page 26

tips
●
Til mayonnaise hældes alle ingredienserne i blenderen, undtagen olien. Hæld olien
ned i påfyldningsdækslet, mens maskinen kører, og lad den løbe igennem.
●
Tykke blandinger, f.eks. til postej og dip, skal måske skrabes ned. Tilsæt mere
væske, hvis blandingen er tung at bearbejde.
●
Knust is: Tilsæt 15 ml (1 spsk.) vand for hver 6 isterninger. Brug af start-/stop
knappen.
vigtigt
●
Lad varme væsker køle af, inden de blendes i blenderglasset - hvis låget ikke
sidder helt fast, kan det gå af, så du bliver oversprøjtet.
●
Lad aldrig blenderen køre mere end 60 sekunder. Det sikrer, at den holder
længe. Sluk, så snart konsistensen er rigtig.
●
Blend ikke krydderier - de kan beskadige plastikdelene.
●
Maskinen virker ikke, hvis blenderen er sat forkert på.
●
Læg ikke tørre ingredienser i blenderen, inden den startes. Skær dem eventuelt i
mindre stykker; fjern påfyldningsdækslet; put dem i én ad gangen, mens
maskinen kører.
●
Brug ikke blenderen som opbevaringsboks. Hold den tom før og efter brugen.
●
Blend aldrig mere end 11/2
liter - mindre ved væsker der skummer, f.eks.
milkshake.
valg af hastighed til alle funktioner
redskab/tilbehør funktion hastighed
kniv kager 1 - 8
Ælte fedtstof i mel 5 - 8
Tilsætte vand til blanding
kageingredienser 1 - 5
Hakning/purering/pateer 6 - 8
piske æggehvider 8
æg og sukker til sukkerbrødsdej 8
fløde 5 - 8
dejredskab gærdej 5 - 8
plader - snitte/ Faste madvarer, f.eks. gulerødder,
rive/ faste oste 5 - 8
finsnitte Blødere madvarer, f.eks. agurker,
tomater 1 - 5
citruspresser citrusfrugter 1
saftcentrifuge Frugt og grøntsager 8
blender
Lettere blendning, f.eks. pandekagedej, milkshakes
Supper, saucer, pate og mayonnaise 8
universalkværn Alt type arbejde 8
maks. kapacitet
●
Mel til mørdej 340 g
●
Mel til gærdej 500 g
●
Rørekager, vægt i alt 1,5 kg
●
Hakning af kød, vægt i alt 600 g
●
væske, med blenderindsats 1,5 liter
●
Piskersæt 6 æggehvider
brug af tilbehør
se ovenstående oversigt vedr. hastighed for det enkelte tilbehør.
kniv/ dejredskab
Kniven er den mest alsidige af alle tilbehørsdelene. Det
er forarbejdningstiden, der bestemmer konsistensen.
Brug start-/stop funktionen, hvis konsistensen skal være
lidt grov.
Kniven kan bruges til at lave kager og bagværk, hakke
råt og tilberedt kød, grøntsager, nødder, pate, dip, til at
purere saucer, og også til at lave rasp af kiks og brød.
Den kan også bruges til dejblandinger med gær, hvis
ælteredskabet ikke medfølger.
Brug ælteredskabet til blandinger med gær.
tips
kniv
●
Skær madvarer som kød, brød, grøntsager ud i 2 cm
tern, inden de forarbejdes.
●
Kiks bør brækkes i mindre stykker og tilsættes gennem
påfyldningstragten, mens maskinen kører.
●
Til bagværk bruges fedtstoffet direkte fra køleskabet og skæres i 2 cm tern.
●
Pas på ikke at lade det køre for længe.
ælteredskab
●
Læg de tørre ingredienser i skålen; tilsæt væsken gennem påfyldningstragten,
mens maskinen kører. Lad maskinen køre, indtil der dannes en blød, smidig
dejklump - dvs. 60-90 sekunder.
●
2. gang æltes kun i hånden. Det frarådes at ælte 2. gang i skålen, da
processoren kan komme ud af balance.
piskersæt
Må kun bruges til lette blandinger, f.eks. æggehvider, fløde, kondenseret mælk,
samt til at piske æg og sukker til sukkerbrødskager. Tungere blandinger med
f.eks. fedtstof og mel vil beskadige piskerne.
brug af piskeredskab
1 Sæt drivakslen og skålen på motordelen.
2 Tryk de to piskere godt op i drivhovedet .
3 Sæt piskeren godt fast ved forsigtigt at dreje den, til den
falder ned over drivakslen.
4 Tilsæt ingredienserne.
5 Sæt låg på - sørg for, at enden af akslen sidder i midten
af låget.
6 Tænd maskinen.
tips
●
Resultatet bliver bedst, hvis æggene har stuetemperatur.
●
Sørg for, at skål og piskere er rene og fri for fedtstof, inden der piskes.
maxi blenderindsats
Til blendning af væske bruger man maxi
blenderindsatsen sammen med kniven. Den øger den
mængde væske, der kan forarbejdes, fra 1 liter til 1,5
liter. Sivning undgås, og bladet findeler bedre.
1 Sæt drivaksel og skål på motordelen.
2 Sæt kniven på.
3 Tilsæt de madvarer, der skal forarbejdes.
4 Sæt blenderindsatsen ned over kniven og sørg for, at den
hviler på kanten indvendig i skålen . Tryk ikke
blenderindsatsen ned; hold den i grebet i
midten.
5 Sæt låg på og tænd maskinen.
snitte-/riveplader
dobbeltsidede snitte-/riveplader - tyk ,
tynd
Brug rive-siden til ost, gulerødder, kartofler og mad med lignende konsistens.
Brug snitte-siden til ost, gulerødder, kartofler, kål, agurk, squash, rødbeder og
løg.
plade til tynde bølgede skiver (f.eks.
kartoffelchips)
Bruges til at skære: kartofler til bølgechips; faste
ingredienser til salat, garniture, sammenkogte retter og
wok-retter (f.eks. gulerod, kålroe, squash, agurk).
ekstra grov riveplade
Skærer ost og gulerødder i grove strimler.
raspeplade
River parmesanost og kartofler til tyske
kartoffelfrikadeller.
standardplade til tynde skiver
Bruges til: kartofler til tynde pommes frites; faste
ingredienser til salater og dip (f.eks. gulerod, agurk).
sikkerhed
●
Tag aldrig låget af, før snittepladen står helt
stille.
●
Behandl skærepladerne forsigtigt - de er
særdeles skarpe
21
22
23
24
25
20
21
22
23
24
25
b
b
c
c
23
P
00
1
2
3
4
5
6
7
8
Page 27

sådan bruges skærepladerne
1 Sæt drivaksel og skål på motordelen.
2 Hold pladen i grebet i midten , sæt den ned over
drivakslen med den ønskede side opad .
3 Sæt låget på.
4 Vælg den størrelse påfyldningstragt, der skal bruges.
Nedstopperen indeholder en mindre påfyldningstragt,
der bruges til enkelte stykker eller tynde ingredienser.
Hvis den lille påfyldningstragt skal bruges - sæt først
den store nedstopper ned i påfyldningstragten.
Hvis den store påfyldningstragt skal bruges - brug
begge nedstoppere sammen.
5 Læg ingredienserne i påfyldningstragten.
6 Tænd maskinen og tryk jævnt med nedstopperen -
stik aldrig fingrene ned i påfyldningstragten.
tips
●
Brug friske madvarer
●
Lad være med at skære dem for fint ud. Fyld påfyldningstragten næsten op.
Det hindrer, at maden smutter ud til siden under bearbejdningen. Man kan
eventuelt bruge den lille påfyldningstragt.
●
Når snittepladen til tynde skiver bruges, lægges ingredienserne vandret.
●
Når maden skives eller strimles: de dele, der sættes på højkant bliver kortere
end dem, der lægges vandret .
●
Der bliver altid en lille smule tilbage på pladen eller i skålen efter
bearbejdningen.
citruspresser
Brug citruspresseren til at presse saften ud af
citrusfrugter (f.eks. appelsin, citron, lime og
grapefrugt).
riflet kegle
si
sådan bruges citruspresseren
1 Sæt drivakslen og skålen på motordelen.
2 Sæt sien ned i skålen - sørg for, at siens
håndtag låses på plads lige over håndtaget
på skålen .
3 Sæt keglen ned over drivakslen og drej den,
til den falder ned på plads .
4 Skær frugten midt over. Tænd for maskinen
og tryk frugten ned over keglen.
●
Citruspresseren kan ikke starte, hvis
sien ikke er låst rigtigt fast.
kværn
Kværnen anvendes til at male krydderurter, nødder og
kaffebønner.
knivenhed
tætningsring
glas
strølåg
sikkerhed
●
Sæt aldrig knivenheden på maskinen, uden at glasset sidder
på.
●
Skru aldrig glasset af, mens universalkværnen sidder på
maskinen.
●
Rør ikke ved de skarpe knive. Hold knivenheden væk fra
børn.
●
Fjern aldrig universalkværnen, før knivene er standset helt.
vigtigt
●
Lad aldrig kværnen arbejde længere end 30 sekunder ad
gangen, så holder den længst muligt. Sluk for maskinen, så
snart den rette konsistens er opnået.
●
Krydderier må ikke males i maskinen - de kan beskadige
plasticmaterialet.
●
Maskinen virker ikke, hvis kværnen ikke er sat korrekt på.
●
Må kun anvendes til tørre ingredienser.
sådan anvender du kværnen
1 Kom ingredienserne i glasset. Fyld det aldrig mere end halvt op.
2 Sæt tætningsringen i knivenheden.
3 Vend knivenheden på hovedet. Sænk den ned i glasset med knivene nedad.
4 Skru knivenheden på glasset, til den er fingerstram.
5 Anbring kværnen på motorenheden og drej låsen.
6 Tænd for maskinen på maximal hastighed eller brug impulsfunktionen.
7 Efter maling kan strølåget sættes på i stedet for knivenheden og ingredienserne
kan rystes ud.
●
Strølåget er ikke lufttæt.
tips
●
Det er bedst at male krydderurter, når de er rene og tørre.
saftcentrifuge
Saftcentrifugen anvendes til at lave saft af hårde typer
frugt og grøntsager.
nedskubber
låg
si
inderskål
sådan anvendes saftcentrifugen
1 Sæt drivakslen og skålen på motorenheden.
2 Lås sien fast på inderskålen .
3 Sæt inderskålen ind i processorskålen .
4 Sæt tilbehørslåget på skålen og drej det, indtil det
låser og tilførselsrøret sidder over håndtaget. .
5 Skær frugten/grøntsagerne i så små stykker, at de kan
komme ned i tilførselsrøret.
6 Tænd for maskinen og tryk jævnt ned med
nedskubberen – kom aldrig fingrene ned i
tilførselsrøret. Stykkerne skal behandles færdigt,
før der kommes flere i.
7 Når det sidste stykke er kommet i, skal maskinen køre
i endnu 20 sekunder for at presse al saften ud fra sien.
vigtigt
●
Hvis processoren vibrerer, skal der slukkes for maskinen, og sien skal tømmes.
(Processoren vibrerer, hvis pulpen bliver ujævnt fordelt).
●
Der må kun behandles små mængder ad gangen (450 g maximum), og sien og
inderskålen skal tømmes jævnligt.
24
d
e
d
e
f
g
f
g
26
h
h
i
i
29
j
k
l
j
k
l
P
00
1
2
3
4
5
6
7
8
P
00
1
2
3
4
5
6
7
8
P
00
1
2
3
4
5
6
7
8
P
00
1
2
3
4
5
6
7
8
P
00
1
2
3
4
5
6
7
8
Page 28

●
Før frugten/grøntsagerne kommes i, fjernes sten og kerner (f.eks. peberfrugt,
meloner, blommer) og hård skræl (f.eks. meloner, ananas). Du behøver ikke
skrælle æbler og pærer eller tage kernehuset ud.
tips
●
Brug faste, friske frugter og grøntsager.
●
Saft fra citrusfrugter vil blive bitter og skummende, hvis skrællen også bruges.
Anvend en citruspresser i stedet for.
vedligeholdelse og rengøring
●
Sluk altid for maskinen og tag stikket ud, inden den gøres
ren.
●
Behandl kniv og snitteplader forsigtigt - de er særdeles
skarpe.
●
Opbevar rive-/snitteplader i den tilhørende
opbevaringsboks .
●
Visse fødevarer misfarver plastdelene. Det er ganske
normalt og skader ikke plastikken eller giver afsmag i
maden. Misfarvninger kan fjernes ved at gnide dem med
en klud dyppet i spiseolie.
motordel
●
Aftørres med en fugtig klud; tør efter. Sørg for, at området omkring
sikkerhedslåsen er fri for madrester.
●
Opbevar overskydende ledning i rummet bag på maskinen.
blender/kværn
1 Tøm kanden/glasset, før den/det skrues af knivenheden.
2 Vask kanden/glasset i hånden.
3 Tag tætningsringen af og vask den.
4 Undgå at berøre de skarpe knive - børst dem rene med varmt sæbevand og
skyl grundigt efter under hanen. Kniven må ikke sænkes ned i vandet.
5 Lufttørrer med bunden opad.
piskersæt
●
Tag piskerne af drivhovedet ved forsigtigt at trække dem ud. Vask dem i varmt
sæbevand.
●
Aftør piskerdrevet med en fugtig klud; tør efter. Piskerens drivhoved må
ikke sænkes ned i vandet.
alle andre dele
●
Vaskes i hånden og tørres af.
●
Alternativt kan de vaskes på øverste stativ i opvaskemaskinen.
28
28
service og kundetjeneste
●
Hvis ledningen bliver beskadiget, skal den, af hensyn til sikkerheden, udskiftes
af Kenwood eller en autoriseret Kenwood-reparatør.
Hvis du har brug for råd om:
●
Brugen af maskinen
●
Service eller reparation
Henvend dig i den forretning, hvor maskinen er købt.
25
Page 29

26
Vik ut främre omslaget med bilderna.
mixer
påfyllningslock
lock
kanna
packningsring
knivhållare
ytterligare tillbehör
Alla tillbehören på listan medföljer inte matberedaren. Se efter i listan vad som
ska finnas med. Kontakta affären där du köpte apparaten om du skulle vilja ha
ett tillbehör som inte ingår i ditt paket.
kniv
degknådare
dubbelvisp
mixerkåpa
skiva för tjocka skivor/grova strimlor
skiva för tunna skivor/fina strimlor
skiva för fina strimlor av juliennetyp
skiva för extra grova strimlor
rivskiva
strimlingsskiva av standardtyp
citruspress
skrapa
förvaringslåda för skivor
kvarnen
råsaftcentrifug
använda matberedaren
1 Montera den borttagbara axeln på kraftenheten .
2 Sätt sedan fast skålen. Låt handtaget peka bakåt och vrid sedan medurs tills
skålen låses fast .
3 Sätt på ett tillbehör på drivaxeln.
●
Montera alltid ihop skål, tillbehör och själva matberedaren innan du lägger i
ingredienserna.
4 Sätt på locket - kontrollera att den översta delen av drivaxeln hamnar mitt i locket.
●
Använd inte locket för att reglera matberedaren utan använd
alltid hastighetsreglaget i av/på-vredet.
5 Slå på maskinen och välj hastighet.
●
Matberedaren fungerar inte om skål och lock inte är korrekt
monterade.
●
Använd momentanreglaget för att köra riktigt korta stunder. Då går motorn
precis så länge som du håller ner knappen.
6 Följ anvisningarna ovan i omvänd ordning för att ta loss skålen, locket och tillbehören.
●
Stäng alltid av beredaren innan du tar av locket.
viktigt
●
Matberedaren lämpar sig inte för att krossa eller mala kaffebönor eller göra
strösocker till florsocker.
●
När du tillsätter bittermandelessens eller andra smaktillsatser måste du undvika
att dessa kommer i direktkontakt med plasten, eftersom det kan orsaka
bestående missfärgningar.
använda mixern
1 Sätt fast packningsringen i knivhållaren .
2 Skruva på kannan på knivhållaren.
3 Lägg i ingredienserna i kannan.
4 Sätt på påfyllningslocket på locket och vrid.
5 Lås fast locket på kannan så att den utskjutande tungan hamnar över handtaget
(Lossa locket genom att trycka på tungan .)
6 Sätt mixern på strömenheten och vrid tills den låses fast .
7 Välj hastighet eller använd momentanreglaget.
Svenska
21
22
23
24
25
26
27
28
29
30
säkerhet
●
Var försiktig! Knivbladen och skivorna är mycket vassa. Håll
alltid i kniven i “handtaget” högst upp (så långt
bort som möjligt från själva eggen) både när du
använder och diskar den.
●
Ta alltid bort kniven innan du tömmer skålen.
●
Stick inte ner händer eller redskap i skålen eller mixerkannan när kontakten är i.
●
Stäng av apparaten och dra ur kontakten:
●●
innan du monterar eller tar bort delar
●●
efter användning
●●
före rengöring
●
Använd aldrig fingrarna för att trycka ner bitar i matarröret. Använd alltid
matarstaven (-arna) som levererades med matberedaren.
●
Innan du tar av locket från skålen eller mixern/kvarnen:
●●
stänga av;
●●
vänta tills tillbehören/knivbladen är helt stilla;
●●
Var försiktig så att du inte skruvar av mixerkannan eller kvarnen från
bladenheten.
●
Låt het vätska svalna innan du kör den i mixern - om locket inte sitter på
ordentligt utan flyger av, kan vätskan stänka ner dig.
●
Använd inte locket för att reglera matberedaren utan använd alltid
hastighetsreglaget i av/på-vredet.
●
Apparaten kan gå sönder och eventuellt orsaka personskada om
låsmekanismen utsätts för våld.
●
Apparaten får inte användas av barn eller förståndshandikappade utan tillsyn.
●
Använd endast tillbehör som är direkt avsedda för denna apparat.
●
Låt inte barn leka med maskinen.
●
Håll alltid ett öga på den när den är på.
●
Använd aldrig matberedaren om den är trasig. Lämna in den för genomgång
eller reparation: se “service”.
●
Låt aldrig strömenhet, sladd eller kontakt bli våta.
●
Låt inte överflödig sladd hänga ner över kanten på bordet eller arbetsbänken
eller komma åt en het yta.
●
Använd inte matberedaren till något annat än det normala hushållsbruk den är
avsedd för.
före inkoppling
●
Kontrollera att elektriciteten i din bostad överensstämmer med specifikationerna
på apparatens undersida.
●
Denna enhet uppfyller EU-direktivet 89/336/EEC.
före användning
1 Ta bort allt förpackningsmaterial, inklusive plastskydden på kniven.
Var försiktig! Knivbladen är mycket vassa. Kassera plastskydden,
eftersom de endast behövs under tillverkning och frakt.
2 Diska alla delar (se “rengöring”)
3 För att förhindra att det ligger för mycket sladd framme kan du skjuta in
överskottet på apparatens baksida.
förklaring till bilder
matberedare
strömenhet
löstagbar drivaxel
skål
lock
matarrör
matarstav
säkerhetslås
sladdförvaring
momentanreglage
hastighetsreglage
a
a
Page 30

tips
●
När du gör majonäs ska du hälla i samtliga ingredienser utom oljan i mixern. Kör
sedan igång maskinen och fyll på oljan genom påfyllningslocket.
●
Tjocka blandningar, t.ex. till paté och dippsås, måste du eventuellt skrapa ner.
Om blandningen är tungarbetad tillsätter du mera vätska.
●
När du krossar is tillsätter du 1 msk (15 ml) vatten till sex iskuber. Använd
momentanreglaget.
viktigt
●
Låt het vätska svalna innan du mixar den - om locket inte sitter på ordentligt
utan flyger av, kan vätskan stänka ner dig.
●
För att mixern ska hålla länge ska du aldrig köra den mer än 60 sekunder i
taget. Stäng av så snart blandningen har fått rätt konsistens.
●
Mixa aldrig kryddor - plasten kan skadas.
●
Apparaten fungerar inte om mixern inte är korrekt monterad.
●
Lägg inte i några torra ingredienser i mixern innan du slår på. Vid behov skär du
dem i bitar; tar bort påfyllningslocket och släpper sedan ner dem en i taget
medan apparaten är igång.
●
Använd inte mixern som förvaringskärl. Håll den tom före och efter användning.
●
Mixa aldrig mer än 11/2
liter - mindre för skummande vätskor som milkshake.
välja rätt hastighet
redskap/tillbehör funktion hastighet
kniv Baka kakor 1 - 8
Arbeta samman fett och mjöl 5 - 8
Tillsätta vatten för att hålla samman
pajdegsingredienser 1 - 5
Hacka/puréa/göra paté 6 - 8
visp äggvita 8
ägg och socker till lätt sockerkakssmet utan fett
8
grädde 5 - 8
degknådare jäsdegar 5 - 8
skivor - skära/ Fasta livsmedel, som morötter,
strimla/ hårdost 5 - 8
finstrimla Mjukare livsmedel, som gurka,
tomater 1 - 5
citruspress Citrusfrukter 1
Råsaftcentrifug Frukt och grönsaker 8
mixer Lättare blandningar, t.ex.
pannkakssmet, milkshake
Soppor, såser, patéer och majonnäs 8
Multikvarn All beredning 8
maximal kapacitet
●
Mördeg Mjölvikt 340 g
●
Jäsdeg Mjölvikt 500 g
●
Sockerkaka Totalvikt 1,5 kg
●
Köttfärs Totalvikt 600 g
●
Vätska med mixerkåpa 1,5 liter
●
Dubbelvisp 6 äggvitor
använda tillbehören
i tabellen ovan finns hastigheten angiven för varje tillbehör.
kniv/ degknådare
kniven är det mest mångsidiga tillbehöret. Konsistensen
avgörs av hur länge man kör. Använd
momentanreglaget för grövre konsistens.
Använd kniven när du gör mjuka kakor och pajdeg,
hackar grönsaker, nötter, och rått och kokt kött, gör
paté och dippsåser, puréar soppor och också när du
gör ströbröd av kakor och bröd. Den kan även
användas till jäsdeg om du inte har någon degknådare.
Använd degknådaren till jäsdeg.
tips
kniv
●
Skär livsmedel som kött, bröd och grönsaker i cirka 2
cm stora tärningar före körningen.
●
Bryt kakor i småbitar och släpp ner i matarröret medan
maskinen är igång.
●
När du gör pajdeg tar du fettet direkt från kylen och skär i 2 cm stora tärningar.
●
Var noga med att inte bearbeta degen för länge.
degknådare
●
Lägg de torra ingredienserna i skålen och tillsätt vätskan genom matarröret, när
apparaten är igång. Kör tills det bildats en slät och smidig degklump (60 - 90
sekunder).
●
Efter jäsning ska degen endast knådas för hand. Det är inte tillrådligt att knåda
den i skålen, eftersom det kan göra matberedaren instabil.
dubbelvisp
Vispen ska endast användas till lätta, t.ex. äggvita,
grädde, torrmjölk, och när du vispar ägg och socker till
sockerkaka. Den förstörs av tyngre blandningar, som fett
och mjöl.
använda vispen
1 Sätt fast drivaxeln och skålen på strömenheten.
2 Tryck in båda visparna stadigt i drivhuvudet .
3 Montera vispen genom att vrida den försiktigt tills den
faller ner över drivaxeln.
4 Tillsätt ingredienserna.
5 Sätt på locket - kontrollera att änden på axeln hamnar
mitt i locket.
6 Slå på.
tips
●
Du får bäst resultat om äggen har rumstemperatur.
●
Se till att skål och vispar är rena och fria från fett innan du vispar.
mixerkåpa
När du ska mixa vätskor använder du mixerkåpan
tillsammans med kniven. På det sättet kan du öka den
körda mängden vätska från 1 liter till 1,5 liter; läckage
förhindras och kniven fungerar effektivare.
1 Sätt fast drivaxeln och skålen på strömenheten.
2 Montera kniven.
3 Tillsätt ingredienserna.
4 Sätt på mixerkåpan över kniven och kontrollera att den
vilar mot listen på skålens insida . Tryck inte ner
mixerkåpan; ta tag i hållaren mitt på.
5 Sätt på locket och slå på apparaten.
skär- och strimlingsskivor
vändbara skär- och strimlingsskivor - tjock , tunn
Använd strimlingssidan till ost, morötter, potatis och
livsmedel med liknande konsistens.
Använd skärsidan till ost, morötter, potatis, vitkål, gurka,
zucchini, rödbetor och lök.
skiva för strimlor av juliennetyp
Används för att skära: potatis till extra finstrimlade
pommes frites; fasta ingredienser i sallader, garnityr,
grytor och “stir fry” (t.ex. morot, kålrot, zucchini, gurka).
skiva för extra grova strimlor
Grovstrimlar ost och morötter.
rivskiva
River Parmesan-ost eller potatis till raggmunk.
strimlingsskiva av standardtyp
Används för att skära: potatis till tunna pommes frites;
fasta ingredienser till sallader och dippsåser (t.ex. morot,
gurka).
säkerhet
●
Ta aldrig av locket förrän skärskivan är helt
stilla.
●
Var försiktig när du hanterar skärskivorna - de
är extremt vassa
21
22
23
24
25
20
21
22
23
24
25
b
b
c
c
27
P
00
1
2
3
4
5
6
7
8
Page 31

använda skärskivorna
1 Sätt fast drivaxeln och skålen på strömenheten.
2 Ta tag i hållaren mitt på och lägg skivan på drivaxeln
med rätt sida upp .
3 Sätt på locket.
4 Välj vilken storlek på matarrör du vill använda. I
matarstaven finns det ett mindre matarrör för
bearbetning av enskilda bitar eller tunna ingredienser.
När du vill använda det mindre matarröret placerar du
först den stora matarstaven i matarröret.
När du vill använda det stora matarröret använder du
båda matarstavarna tillsammans.
5 Lägg livsmedlen i matarröret.
6 Slå på matberedaren och tryck ner livsmedlen i jämn
takt med matarstaven - stoppa aldrig in fingrarna i matarröret.
tips
●
Använd färska ingredienser
●
Skär inte livsmedlen i alltför små bitar. Fyll på det stora matarröret så att det är
tämligen fullt även på bredden. Det gör att livsmedlen inte lägger sig på sidan
under körningen. Alternativt använder du det lilla matarröret.
●
När du använder strimlingsskivan lägger du ingredienserna vågrätt.
●
Om du ställer livsmedlet lodrätt när du strimlar eller skivar blir bitarna mindre
än om det läggs vågrätt .
●
Det kommer alltid att finnas lite rester på skivan eller i skålen efter körningen.
citruspress
Använd citruspressen för att pressa juice från
citrusfrukter (t.ex. apelsiner, citroner, lime och
grapefrukt).
kon
sil
använda citruspressen
1 Sätt fast drivaxeln och skålen på
strömenheten.
2 Passa in silen i skålen - kontrollera att
handtaget på silen är i låst läge, direkt
ovanför handtaget på skålen .
3 Sätt konen på drivaxeln och vrid runt tills den
har gått hela vägen ner .
4 Skär frukten i halvor. Slå sedan på apparaten
och tryck frukten mot konen.
●
Citruspressen fungerar inte om silen
inte är korrekt låst.
kvarnen
Använd kvarnen för att mala örtkryddor, nötter och
kaffebönor.
bladenhet
tätningsring
burk
ströarlock
säkerhet
●
Montera aldrig bladen på maskinen utan att kannan är
monterad.
●
Skruva aldrig bort burken medan multikvarnen sitter på
maskinen.
●
Vidrör inte de vassa bladen. Håll bladenheten utom räckhåll
för barn.
●
Tag aldrig bort multikvarnen förrän bladen har stannat helt.
viktigt
●
För att kvarnen ska hålla så länge som möjligt ska du aldrig
köra den längre än 30 sekunder. Stäng av så snart du fått
rätt konsistens.
●
Mixa/mal inte kryddor - de kan skada plasten.
●
Maskinen fungerar inte om kvarnen är felmonterad.
●
Använd kvarnen bara för torra ingredienser.
hur du använder kvarnen
1 Lägg ingredienserna i burken. Fyll den inte mer än till hälften.
2 Montera tätningsringen i bladenheten.
3 Vänd bladenheten upp-och-ner.
4 Skruva på bladenheten på burken så hårt det går för hand.
5 Ställ kvarnen på kraftenheten och vrid så den låses fast.
6 Koppla på på högsta hastighet eller använd momentanknappen.
7 Efter malningen kan du byta ut bladenheten mot ströarlocket och ströa det
malda.
●
Ströarlocket är inte lufttätt.
tips
●
Örtkryddor är lättast att mala när de är rena och torra.
råsaftcentrifug
Använd råsaftcentrifugen för att göra saft från fast frukt
och grönsaker.
stöt
lock
sil
innerskål
hur du använder råsaftcentrifugen
1 Montera drivaxeln och skålen på kraftdelen.
2 Lås fast silen i innerskålen .
3 Montera innerskålen i matberedarskålen .
4 Sätt tillbehörslocket på skålen, vrid tills det låses fast
och inmatningsröret kommer över handtaget .
5 Skär frukten och grönsakerna i små bitar som passar i
matarröret.
6 Koppla på och tryck ner stöten jämnt – sätt aldrig
fingrarna i matarröret. Låt allt gå genom innan du
lägger i mer.
7 När du har lagt i den sista biten kör du maskinen i
ytterligare 20 sekunder så att all saften kommer ut ur
silen.
viktigt
●
Om matberedaren vibrerar måste du stänga av och tömma silen. (Vibrationer
uppstår om fruktköttet är ojämnt fördelat.)
●
Kör små mängder i taget (högst 450 g) och töm silen och innerskålen
regelbundet.
●
Innan du börjar ska du ha tagit bort kärnor (t.ex. i paprikor, melon, plommon)
och hårt skal (t.ex. melon, ananas). Äpplen och päron behöver inte skalas eller
kärnas ur.
28
d
e
d
e
f
g
f
g
26
h
h
i
i
29
30
j
k
l
j
k
l
P
00
1
2
3
4
5
6
7
8
P
P
00
1
2
3
4
5
6
7
8
00
1
2
3
4
5
6
7
8
P
00
1
2
3
4
5
6
7
8
P
00
1
2
3
4
5
6
7
8
Page 32

Tips
●
Använd fasta färska ingredienser.
●
Saft från citrusfrukt blir besk och skummig av det vita på skalet. Använd
citrusfruktpressen i stället.
skötsel och rengöring
●
Stäng alltid av matberedaren och dra ur kontakten innan
du rengör den.
●
Hantera kniv och skärskivor försiktigt - de är extremt
vassa.
●
Förvara skär- och strimlingsskivorna i den medföljande
förvaringslådan .
●
Vissa livsmedel kan missfärga plasten. Detta är helt
normalt. Plasten skadas inte, och mat som du lagar
senare påverkas inte heller på något sätt. Om du gnuggar
med en trasa doppad i vegetabilisk olja försvinner
missfärgningen.
strömenhet
●
Torka med fuktig trasa och torka sedan torrt. Kontrollera att det inte finns några
matrester nära låsmekanismen.
●
Förvara överflödig nätsladd i förvaringsutrymmet på apparatens baksida.
mixer/kvarn
1 Töm kannan/kvarnen innan du skruvar bort den från bladenheten.
2 Diska kannan för hand.
3 Ta loss packningsringen och diska den.
4 Rör inte vid de vassa knivbladen - borsta dem rena med varmt diskvatten och
skölj sedan noga under rinnande vatten. Doppa aldrig ner knivhållaren i
vatten.
5 Ställ den uppochner och låt den torka.
dubbelvisp
●
Ta loss visparna från drivhuvudet genom att försiktigt dra ut dem. Diska i varmt
vatten.
●
Torka av drivhuvudet med fuktig trasa och torka sedan torrt. Doppa aldrig
ner drivhuvudet i vatten.
alla övriga delar
●
Diska för hand och torka.
●
Alternativt kan de maskindiskas i över korgen.
28
28
service och kundtjänst
●
Om nätsladden skadas måste den av säkerhetsskäl bytas ut av Kenwood eller
en auktoriserad Kenwood-reparatör.
Om du behöver hjälp med:
●
hur du ska använda matberedaren
●
service eller reparationer
Kontakta affären där du köpte matberedaren.
29
Page 33

Brett ut framsiden med illustrasjoner
hurtigmikser
påfyllingskopp
lokk
mugge
gummiring
knivenhet
ekstrautstyr
Ikke alle delene nedenfor følger med din foodprocessor. Se innholdslisten som
følger med maskinen din. Hvis du ønsker å kjøpe ekstrautstyr, kontakter du
forhandleren der du kjøpte maskinen.
stålkniv
eltekrok
stålvisp
maksi-blend sprutdeksel
tykk skjæreskive/grov raspeskive
tynn skjæreskive/fin raspeskive
fin kutteskive (Julienne-type)
ekstra grov raspeskive
raspeskive
standard potetkutter
sitruspresse
slikkepott
beholder for oppbevaring av skiver
multikvernen
saftsentrifuge
bruk av foodprocessoren
1 Sett den avtagbare drivakselen på strømenheten .
2 Sett bollen på strømenheten med hanken bakover, og vri den med klokken til
den klikker på plass .
3 Plasser ønsket redskap over drivakselen.
●
Sett alltid bollen på strømenheten og ønsket redskap i bollen før du tilsetter
ingredienser.
4
Sett lokket på bollen . Påse at toppen av drivakselen går inn i åpningen midt i lokket.
●
Start aldri foodprocessoren ved å vri på lokket. Bruk av/påbryteren.
5 Slå på maskinen, og velg ønsket hastighet.
●
Foodprocessoren starter ikke hvis bollen og lokket ikke sitter
skikkelig på plass.
●
Bruk momentknappen hvis du ønsker å starte og stoppe maskinen manuelt for
kortere operasjoner. Maskinen kjører så lenge knappen holdes nede.
6 Følg trinnene ovenfor i motsatt rekkefølge når du skal ta av lokket, redskapene
og bollen.
●
Slå alltid av maskinen før du tar av lokket.
viktig
●
Foodprocessoren egner seg ikke til knusing eller maling av kaffebønner, eller til
knusing av grovt sukker til strøsukker (farin).
●
Når du tilsetter mandelessens eller andre smakstilsetninger, må ikke disse
komme i kontakt med plastmaterialet da de kan lage merker.
bruk av hurtigmikseren
1 Legg gummiringen i knivenheten .
2 Vri muggen til den låses på plass på knivenheten.
3 Ha ingrediensene i muggen.
4 Sett påfyllingskoppen i lokket, og vri rundt.
5 Sett lokket på muggen slik at tappen er rett over hanken (press tappen oppover
for å ta av lokket ).
6 Sett hurtigmikseren på strømenheten, og vri rundt til den låses på plass .
7 Velg ønsket hastighet, eller bruk momentknappen.
Norsk
21
22
23
24
25
26
27
28
29
30
a
sikkerhet
●
Knivbladene og skivene er svært skarpe og må håndteres
med forsiktighet. Hold alltid kniven i fingergrepet
øverst, bort fra eggen, både når du bruker og
vasker kniven.
●
Ta alltid ut kniven før du tømmer bollen.
●
Stikk ikke hendene eller redskaper ned i bollen eller hurtigmikseren når
strømmen er tilkoblet.
●
Slå av maskinen og trekk ut støpselet i følgende tilfeller:
●●
før du setter inn eller tar ut deler
●●
etter bruk
●●
før rengjøring
●
Bruk aldri fingrene til å skyve ingrediensene ned i påfyllingstrakten. Bruk alltid
stapperne som følger med maskinen.
●
Før du tar lokket av bollen eller hurtigmikseren/kvernen av strømenheten:-
●●
slå av maskinen,
●●
vente til ekstrautstyret/stålkniven har stoppet helt opp,
●●
Pass på at du ikke skrur mikserglasset eller kvernen av knivenheten.
●
Varm væske må kjøles før den helles over i hurtigmikseren. Hvis du ikke har satt
lokket skikkelig på og det løsner, kan innholdet i hurtigmikseren sprute ut.
●
Start aldri maskinen ved å vri på lokket. Bruk av/på-bryteren.
●
Maskinen vil bli skadet og kan forårsake personskade hvis du
bruker for stor makt på låsemekanismen.
●
Maskinen må ikke brukes av barn eller uføre uten tilsyn.
●
Bruk kun originalt ekstrautstyr.
●
La ikke barn leke med maskinen.
●
Gå aldri fra maskinen mens den er på.
●
Bruk aldri en defekt foodprocessor. Defekte maskiner må til kontroll eller
reparasjon. Se “Vedlikehold og kundeservice”.
●
La aldri strømenheten, ledningen eller støpselet bli vått.
●
La ikke ledningen henge over kanten på bordet eller arbeidsbenken, eller ligge
inntil varme overflater.
●
Foodprocessoren må kun brukes til det den er beregnet for. Den er utelukkende
beregnet for bruk i private husholdninger.
før strømmen kobles til
●
Forviss deg om at nettspenningen er den samme som den som står oppført på
undersiden av maskinen.
●
Denne maskinen oppfyller bestemmelsene i EU-direktiv 89/336/EEC.
før første gangs bruk
1 Fjern all emballasje, og ta av plastbeskytterne på knivbladene. Vær forsiktig -
knivbladene er svært skarpe. Kast beskytterne. De er kun ment å
beskytte kniven under produksjon og transport.
2 Vask samtlige deler. Se “Rengjøring”.
3 Ledning som er til overs, kan legges i ledningsholderen på baksiden av
maskinen.
nøkkel
foodprocessor
strømenhet
avtakbar drivaksel
bolle
lokk
påfyllingstrakt
stappere
sikkerhetslås
ledningsholder
momentknapp
hastighetsbryter
a
30
Page 34

tips
●
Når du lager majones, har du alle ingrediensene, bortsett fra oljen, i hurtigmikseren.
Hell deretter oljen gradvis gjennom påfyllingskoppen mens maskinen kjører.
●
Tykke blandinger, som posteier og dip, må eventuelt skrapes ut av muggen.
Tilsett mer væske hvis det er vanskelig å bearbeide innholdet.
●
Når du knuser is, tilsetter du 15 ml vann (1 spiseskje) per seks isbiter. Bruk
momentknappen.
viktig
●
Varm væske må kjøles ned før den has over i hurtigmikseren. Hvis lokket ikke er
skikkelig festet og løsner, kan innholdet i mikseren sprute ut.
●
Hvis du bruker hurtigmikseren i mer enn ett minutt om gangen, vil maskinens
levetid forkortes. Slå av maskinen straks innholdet har ønsket konsistens.
●
Ha ikke krydder i hurtigmikseren, da dette kan skade plastmaterialet.
●
Maskinen virker ikke hvis hurtigmikseren er satt på feil.
●
Ikke ha tørre ingredienser i hurtigmikseren før den startes opp. Hvis du må
allikevel må bruke tørre ingredienser, kutter du disse opp i små biter, fjerner
påfyllingskoppen og slipper dem ned i mikseren en etter en mens maskinen går.
●
Hurtigmikseren egner seg ikke til oppbevaring. Den skal derfor alltid være tom
når den ikke er i bruk.
●
Ha aldri mer enn 11/2 liter væske i hurtigmikseren. Maks. mengde er noe mindre
for luftige væskeblandinger, som milkshake.
anbefalte hastigheter
redskap/ekstrautstyr
funksjon hastighet
Stålkniv Lage kakedeiger 1 - 8
Smuldre smør i mel 5 - 8
Tilsette vann i
mørdeig 1 - 5
Hakking/puréer/posteier 6 - 8
Visp Eggehviter 8
Egg og sukker til kakedeig uten fett 8
Fløte 5 - 8
Eltekrok Gjærdeig 5 - 8
Skiver - skjære/ Harde ingredienser som gulrøtter,
raspe/ harde oster 5 - 8
kutte Mykere ingredienser som agurk,
tomat 1 - 5
Sitruspresse Sitrusfrukter 1
Saftsentrifuge Frukt og grønnsaker 8
Hurtigmikser Lettere blandinger som rører, milkshake
Supper, sauser, posteier og majones 8
Multikvern All prosessering 8
maks. mengder
●
Mørdeig med melmengde inntil 340 g
●
Gjærdeig med melmengde inntil 500 g
●
Kakedeig totalt ikke over 1,5 kg
●
Hakke kjøtt, inntil 600 g
●
Væske med sprutdeksel 1,5 liter
●
Stålvisp 6 eggehviter
bruk av ekstrautstyr
i tabellen over finner du anbefalte hastigheter for alt utstyret.
stålkniv/ eltekrok
Stålkniven er det mest anvendelige av alt utstyret.
Ingrediensenes konsistens avhenger av hvor lenge de
bearbeides i maskinen. Hvis du ønsker en grovere
konsistens, kan du bruke momentknappen.
Bruk stålkniven til å lage kake- og brøddeiger, hakke rått
og kokt kjøtt, grønnsaker, nøtter, posteier, dip, puréer,
supper og til å hakke smuler fra kjeks og brød. Kniven
kan også brukes til å lage gjærdeig hvis du ikke har
eltekrok.
Bruk eltekroken til gjærdeiger.
tips
stålkniv
●
Skjær opp ingrediensene, f.eks. kjøtt, brød eller grønnsaker,
i terninger på ca. 2 cm før du har dem i bollen.
●
Kjeks brytes opp i mindre biter og tilsettes gjennom
påfyllingstrakten mens maskinen er i gang.
●
Når du skal lage deig, bruker du smør rett fra kjøleskapet, i terninger på ca. 2
cm.
●
Pass på at du ikke bearbeider deigen for lenge i maskinen.
eltekrok
●
Ha de tørre ingrediensene i bollen, og tilsett væsken gjennom påfyllingstrakten
mens maskinen er i gang. Bland ingrediensene i maskinen til du får en myk og
elastisk deigklump etter ca. 60-90 sekunder.
●
Elt deigen ytterligere for hånd. Du bør ikke elte deigen i bollen da dette kan skade
foodprocessoren.
stålvisp
Brukes kun til lette rører, f.eks. eggehviter, fløte,
kondensert melk og eggedosis til deiger uten fett.
Tykkere blandinger som inneholder smør og mel, vil
skade vispen.
bruk av vispen
1 Sett drivakselen og bollen på strømenheten.
2 Skyv begge vispene godt inn i drivhodene i
vispinnsatsen .
3 Tre vispen forsiktig nedover drivakselen.
4 Ha i ingrediensene.
5 Sett på lokket. Påse at toppen av drivakselen går inn i åpningen midt i lokket.
6 Slå på maskinen.
tips
●
Du oppnår best resultater hvis eggene har romtemperatur.
●
Påse at bollen og vispene er helt rene og fettfrie før du starter.
maksi-blend sprutdeksel
Sprutdekselet brukes sammen med stålkniven ved
blanding av væske i bollen. Dekselet gjør at du kan øke
væskemengden fra 1 liter til 1,5 liter, hindre at innholdet i
bollen spruter utover og bruke stålkniven mer effektivt.
1 Sett drivakselen og bollen på strømenheten.
2 Sett på stålkniven.
3 Ha i ingrediensene.
4 Sett sprutdekselet over knivinnsatsen, og påse at det
hviler
stabilt på kanten inne i bollen . Press ikke
sprutdekselet nedover, men ta tak i håndtaket i
midten.
5 Sett på lokket, og start maskinen.
skjære- og raspeskiver
vendbare skjære- og raspeskiver - tykk , tynn
Raspesiden brukes til ost, gulrøtter, poteter og lignende
matvarer.
Skjæresiden brukes til ost, gulrøtter, poteter, kål,
slangeagurk, squash, rødbeter og løk.
fin kutteskive (Julienne-type)
Brukes til å kutte poteter til ekstra tynne pommes frites,
og kutte faste ingredienser til salater, garnering,
gryteretter og kinamat (f.eks. gulrøtter, kålrot, squash,
agurk).
ekstra grov raspeskive
Brukes til grovrasping av ost og gulrøtter.
raspeskive
Brukes til riving av parmesanost og poteter til
raspeballer/komle.
standard potetkutter
Brukes til å kutte poteter til tynne pommes frites, og
kutte faste ingredienser til salater og dip (f.eks. gulrøtter,
agurk).
sikkerhet
●
Ta aldri av lokket før skjæreskiven har stoppet
helt opp.
●
Håndter skjæreskivene med forsiktighet - de
er svært skarpe.
21
22
23
24
25
20
21
22
23
24
25
b
b
c
c
31
P
00
1
2
3
4
5
6
7
8
Page 35

bruk av skjæreskivene
1 Sett drivakselen og bollen på strømenheten.
2 Hold skiven i fingergrepet i midten , og plasser den
på drivakselsen med ønsket side oppover .
3 Sett på lokket.
4 Velg stapperen med passende størrelse. Stapperen
har en smalere påfyllingstrakt på innsiden slik at du
kan mate én og én matvare eller tynne ingredienser
gjennom den.
Når du skal bruke den indre påfyllingstrakten, må du
først sette den store stapperen i den store
påfyllingstrakten.
Bruk begge stapperne samtidig når du bruker den
store påfyllingstrakten.
5 Legg ingrediensene i påfyllingstrakten.
6 Slå på maskinen, og press maten jevnt nedover ved hjelp av stapperen.
Stikk aldri fingrene ned i påfyllingstrakten.
tips
●
Bruk alltid ferske matvarer.
●
Skjær ikke opp matvarene i for små biter. Pakk alltid den store påfyllingstrakten
ganske full. Dette hindrer at matvarene glir ut til siden under bearbeidingen. Du
kan eventuelt bruke den lille påfyllingstrakten.
●
Legg ingrediensene vannrett i påfyllingstrakten når du bruker kutteskiven.
●
Ved skjæring og riving blir ingredienser som mates inn loddrett kortere enn
mat som legges vannrett .
●
Det vil alltid være igjen litt avfall på skiven eller i bollen etter bearbeidingen.
sitruspresse
Sitruspressen brukes til å presse ut saften fra
sitrusfrukter (appelsin, sitron, lime og
grapefrukt).
Kjegle
Sil
bruk av sitruspressen
1 Sett drivakselen og bollen på strømenheten.
2 Plasser silen i bollen, og påse at håndtaket
på silen låses på plass rett over hanken på
bollen .
3 Plasser kjeglen over drivakselen, og vri rundt
til den sitter på plass .
4 Del sitrusfrukten i to. Slå på maskinen, og
press frukten ned på kjeglen.
●
Sitruspressen virker ikke hvis silen
ikke sitter skikkelig på plass.
kvern
Bruk kvernen til å male urter, nøtter og kaffebønner.
knivenhet
tetningsring
kopp/glass
strølokk
sikkerhet
●
Sett aldri knivenheten i maskinen uten at glasset er montert.
●
Skru aldri av glasset/koppen mens multikvernen står på
maskindelen.
●
Ikke berør de skarpe knivene, og hold barn unna
knivenheten.
●
Ta aldri av multikvernen før knivene har stoppet helt.
Viktig
●
For å sikre lang levetid på kvernen skal den aldri kjøres i mer
enn 30 sekunder. Slå den av så snart du har oppnådd riktig
konsistens.
●
Ikke ha krydder i mikseren - de kan skade plasten.
●
Maskinen virker ikke hvis kvernen er satt feil på.
●
Må kun brukes til tørre ingredienser
Bruk av multikvernen
1 Fyll ingrediensene i glasset/koppen. Det skal ikke være mer enn halvfullt.
2 Sett gummipakningen på knivenheten.
3 Snu knivenheten opp ned. Sett den ned i glasset med bladene vendt ned.
4 Skru knivenheten fast i glasset med fingrene.
5 Sett multikvernen på motordelen og drei til den er låst på plass.
6 Slå på maksimal hastighet, eller bruk pulsfunksjonen.
7 Når du har malt ferdig kan du ta ut knivenheten og sette på strølokket hvis du
vil strø blandingen.
●
Strølokket er ikke lufttett.
Tips
●
Det er best å male urter når de er rene og tørre.
saftsentrifuge
Bruk saftsentrifugen til å lage saft av fast frukt og
grønnsaker.
stapper
lokk
sil
innvendig bolle
bruk av saftsentrifugen
1 Sett drivakselen og bollen på strømenheten.
2 Lås silen på plass i den innvendige bollen .
3 Sett den innvendige bollen ned i miksebollen .
4 Sett lokket på bollen, vri det til det låser seg og
påfyllingstrakten sitter over håndtaket .
5 Skjær maten i små biter slik at de passer i
påfyllingstrakten.
6 Slå maskinen på og skyv maten ned med et jevnt trykk
på stapperen - du må aldri stikke fingrene ned i
påfyllingstrakten. La dette kjøre seg ferdig før du
setter til mer.
7 Etter at du har hatt i den siste biten skal du la maskinen
gå i 20 sekunder til for å presse ut all saften fra silen.
viktig
●
Hvis maskinen vibrerer skal du slå den av og tømme silen (foodprocessoren
vibrerer hvis fruktkjøttet er ujevnt fordelt).
●
Kjør små mengder om gangen (450 g maksimum) og tøm silen og den
innvendige bollen med jevne mellomrom.
●
Før det kjøres i saftsentrifugen skal du fjerne steiner og kjerner (f.eks. paprika,
melon, plomme) og tykt skall (f.eks. melon, ananas). Du trenger ikke å skrelle
eller ta ut kjernehuset på epler og pærer.
32
d
e
d
e
f
g
f
g
26
h
h
i
i
29
30
j
k
l
j
k
l
P
00
1
2
3
4
5
6
7
8
P
00
1
2
3
4
5
6
7
8
P
00
1
2
3
4
5
6
7
8
P
00
1
2
3
4
5
6
7
8
P
00
1
2
3
4
5
6
7
8
Page 36

tips
●
Bruk fast, frisk frukt og grønnsaker.
●
Saft av sitrusfrukt blir bitter og skummer fordi både skallet og det hvite kjøttet
kjøres i maskinen. Bruk sitruspressen i stedet.
vedlikehold og rengjøring
●
Slå alltid av maskinen og trekk ut støpselet før rengjøring.
●
Håndter stålkniven og skjæreskivene med forsiktighet - de
er svært skarpe.
●
Oppbevar skjære- og raspeskivene i beholderen som
følger med maskinen .
●
Enkelte ingredienser kan føre til misfarging av
plastmaterialet. Dette er helt normalt og skader ikke
plasten. Det påvirker heller ikke smaken på maten. Fjern
misfarging med en klut fuktet i vegetabilsk olje.
strømenhet
●
Tørk av med en fuktig klut, og deretter med en tørr klut. Påse at det ikke er
matrester i eller rundt sikkerhetslåsen.
●
Ledning som er til overs, legges i ledningsholderen på baksiden av maskinen.
hurtigmikser/kvern
1 Tøm mikserglasset/glasset før du skrur det av knivenheten.
2 Vask mikserglasset/glasset for hånd.
3 Ta ut og vask gummiringen.
4 Ikke berør de skarpe knivbladene. Vask dem med en oppvaskkost og varmt
såpevann, og skyll dem under springen. Legg ikke knivenheten i vann.
5 Legg knivenheten opp ned, og la den lufttørke.
stålvisp
●
Trekk begge vispene forsiktig ut av drivhodene på vispinnsatsen. Vask dem i
varmt såpevann.
●
Tørk av drivhodet med en fuktig klut, og deretter med en tørr klut. Drivhodet
må ikke legges i vann.
alle andre deler
●
Vask delene for hånd, og tørk av.
●
Eller de kan vaskes på øverste hylle i oppvaskmaskinen.
28
28
kundeservice
●
Hvis ledningen er skadet, må den av sikkerhetsmessige grunner erstattes av
Kenwood eller en autorisert Kenwood-reparatør.
Hvis du trenger hjelp til
●
å bruke maskinen,
●
service eller reparasjon, kan du kontakte forhandleren der du kjøpte maskinen.
33
Page 37

34
Taita auki etusivun kuvitukset
tehosekoitin
täyttökansi
kansi
kannu
tiivisterengas
teräyksikkö
lisävälineet
Kaikki alla luetellut osat eivät tule monitoimikoneen mukana. Katso laitteen
mukana toimitetusta osaluettelosta, mitä osia monitoimikoneesi mukana on. Jos
haluat hankkia jonkun uuden osan, ota yhteys laitteen myyjään.
hienonnusterä
taikinan sekoitin
kaksoisvatkain
maksimisekoituskansi
paksu viipalointi/karkea raastinterä
ohut viipalointi/hieno raastinterä
ohut suikalointiterä
erittäin karkea raastinlevy
rouhintaterä
normaali suikalointiterä
sitruspuserrin
kaavin
terien säilytysrasia
mylly
mehulinko
monitoimikoneen käyttö
1 Aseta irrotettava akseli moottoriosan päälle .
2 Aseta kulho paikalleen. Aseta kulhon kahva taaksepäin ja pyöritä kulhoa
myötäpäivään, kunnes se naksahtaa paikalleen .
3 Kiinnitä haluamasi väline pyörityskappaleen päälle.
●
Aseta kulho ja työväline aina paikalleen laitteeseen ennen kuin kaadat kulhoon
valmistusaineita.
4 Kiinnitä kansi paikalleen - varmista, että pyörityskappaleen yläpää on kannen
keskellä.
●
Älä käytä monitoimikonetta kannesta pyörittämällä, vaan käytä
aina on/off-nopeuskytkintä.
5 Kytke virta päälle ja valitse nopeus.
●
Monitoimikone ei toimi, jos kulho ja kansi eivät ole kunnolla
paikallaan.
●
Paina sykäyspainiketta, kun haluat käyttää laitetta vain lyhyen ajan kerrallaan.
Laite toimii sen aikaa, kun painat vipua alas.
6 Kansi, työvälineet ja kulho irrotetaan päinvastaisessa järjestyksessä.
●
Kytke virta pois aina ennen kuin avaat kannen.
tärkeää
●
Monitoimikoneella ei voi rouhia tai jauhaa kahvinpapuja tai hienontaa palasokeria.
●
Kun käytät mausteena manteliesanssia tai -aromia, varo että aine ei kosketa
muoviosiin, sillä siitä jää pysyviä jälkiä.
tehosekoittimen käyttö
1 Kiinnitä tiivisterengas teräyksikköön .
2 Kierrä kannu kiinni teräyksikköön.
3 Pane valmistusaineet kannuun.
4 Aseta täyttökorkki kannen päälle ja käännä sitä.
5 Lukitse kansi kannun päälle siten, että kannen uloke on kahvan päällä (Kannen
lukitus vapautetaan painamalla uloketta .)
6 Aseta tehosekoitin virtayksikön päälle ja lukitse se paikalleen pyörittämällä .
7 Valitse nopeus tai paina sykäyspainiketta.
vinkkejä
●
Kun valmistat majoneesia, pane kaikki muut valmistusaineet paitsi öljy
tehosekoittimeen. Kaada öljy täyttökorkkiin koneen käydessä ja anna sen valua
muiden aineiden joukkoon.
●
Paksut seokset, esim. pateet ja dipit, joudutaan mahdollisesti kaapimaan. Jos
sekoittuminen ei ole helppoa, lisää nestettä.
●
Jäämurskan valmistuksessa tarvitaan 15 ml (1 rkl) vettä 6 jääkuutiota kohden.
Käytä konetta sykäyspainikkeesta.
Suomi
21
22
23
24
25
26
27
28
29
30
a
turvallisuus
●
Leikkuuterät ja raastinlevyt ovat erittäin teräviä: käsittele niitä
varoen. Tartu leikkuuterään aina sormien avulla
osan yläosasta siten, että sormet ovat kaukana
terästä käsitellessäsi ja puhdistaessasi terää.
●
Irrota leikkuuterä aina ennen kuin kaadat kulhon sisällön
astiaan.
●
Älä pane käsiä tai työvälineitä sekoituskulhoon tai tehosekoittimen kannuun
silloin kun virta on päällä.
●
Sammuta virta ja irrota pistoke rasiasta:
●●
ennen osien kiinnittämistä tai irrottamista
●●
käytön jälkeen
●●
ennen puhdistusta
●
Älä koskaan paina ruokaa syöttösuppiloon sormien avulla. Syötä ainekset
laitteen mukana toimitetun painimen avulla.
●
Ennen kannen irrottamista kulhosta tai tehosekoittimen/myllyn irrottamista
runko-osasta:
●●
kytke virta pois;
●●
odota, kunnes levy/terä on pysähtynyt kokonaan;
●●
Ole varovainen, ettet kierrä myllyä tai tehosekoittimen kannua irti teräosasta.
●
Jäähdytä kuuma neste ennen sekoittamista - jos kansi ei ole kunnolla kiinni,
nestettä saattaa roiskua päällesi kannen auetessa.
●
Älä pyöritä käyttölaitetta kannen avulla, vaan käytä aina on/off-kytkintä.
●
Laite rikkoutuu ja saattaa aiheuttaa vahinkoa, jos väännät
lukitusmekanismia liian voimakkaasti.
●
Laitetta ei ole tarkoitettu lasten tai sairaiden henkilöiden käyttöön ilman
valvontaa.
●
Älä koskaan kiinnitä laitteeseen muita kuin sen omia osia.
●
Älä anna lasten leikkiä laitteella.
●
Valvo aina laitteen toimintaa.
●
Jos laite on vahingoittunut, sitä ei saa käyttää. Tarkistuta tai korjauta laite ensin:
katso ‘huolto’.
●
Älä kastele virtayksikköä, sähköjohtoa tai pistoketta.
●
Varo, ettei virtajohto roiku pöydän tai työtason reunan alla tai kosketa kuumiin
pintoihin.
●
Älä käytä monitoimikonetta väärin: laite on tarkoitettu ainoastaan
kotitalouskäyttöön.
ennen kuin kiinnität pistokkeen pistorasiaan
●
Varmista, että asuntosi verkkovirta vastaa laitteen alla olevassa kilvessä
mainittua.
●
Laite on valmistettu Euroopan Talousyhteisön Direktiivin 89/336/EEC mukaisesti.
ennen kuin käytät laitetta ensimmäistä kertaa
1 Poista kaikki pakkausmateriaalit, myös leikkuuterän suojamuovit. Toimi
varoen, sillä terät ovat erittäin teräviä. Nämä suojukset voi heittää pois,
sillä ne on tarkoitettu ainoastaan valmistuksen ja kuljetuksen aikaiseksi
suojaukseksi.
2 Pese osat, katso ‘puhdistus’
3 Työnnä ylimääräinen virtajohto laitteen takana olevaan lokeroon.
osat
monitoimikone
virtayksikkö
irrotettava pyörityskappale
kulho
kansi
syöttösuppilo
painimet
turvalukitus
virtajohdon lokero
sykäyspainike
nopeuskytkin
a
Page 38

kaksoisvatkain
Käytä vatkainta vain kevyiden aineiden vatkaamiseen,
esim. munanvalkuaiset, kerma, maitotiiviste sekä munien
ja sokerin sekoittaminen valmistaessasi rasvattomia
kakkutaikinoita. Raskaammat aineet, esim. rasva ja
jauhot, rikkovat vatkaimen.
vatkaimen käyttö
1 Kiinnitä pyörityskappale ja kulho virtayksikköön.
2 Työnnä kumpikin vispilä tiukasti paikalleen käyttöpäähän
3 Aseta vatkain paikalleen kääntämällä varovasti, kunnes
se painuu pyörityskappaleen yli.
4 Lisää kulhoon valmistusaineet.
5 Kiinnitä kansi - varmista, että pyörityskappaleen pää on kannen keskellä.
6 Käynnistä kone.
vinkkejä
●
Kananmunat vatkautuvat parhaiten huoneenlämpöisinä.
●
Tarkista aluksi, että kulho ja vispilät ovat puhtaat eikä niissä ole rasvaa.
maksimisekoituskansi
Käytä nesteiden sekoittamiseen maksimisekoituskantta
ja hienonnusterää. Näin sekoitettavan nesteen määrä voi
olla jopa 1.5 l (1 l:n sijaan), neste ei vuoda yli, ja terä
leikkaa paremmin.
1 Kiinnitä pyörityskappale ja kulho virtayksikköön.
2 Kiinnitä hienonnusterä.
3 Lisää sekoitettavat ainekset.
4 Kiinnitä sekoituskansi terän päälle varmistaen, että se on
kunnolla paikallaan kulhon sisällä olevan ulkoneman
päällä . Älä paina kantta alaspäin, pidä kiinni
kannen keskellä olevasta ottimesta.
5 Kiinnitä kansi ja käynnistä kone.
viipalointi/raastinterät
käännettävät viipalointi/raastinlevyt - paksu
, ohut
Käytä terän raastinpuolta juuston, porkkanoiden,
perunoiden yms. raastamiseen.
Käytä terän viipalointipuolta juuston, porkkanoiden,
perunoiden, kaalin, kurkun, kesäkurpitsan, punajuurien ja
sipuleiden viipaloimiseen.
ohut suikaleterä
Käyttö: ranskalaisten perunoiden leikkaaminen; kiinteät
ainekset salaatteihin, koristeluun, pataruokiin ja öljyssä
kypsentämiseen (esim. porkkana, lanttu, kesäkurpitsa,
kurkku).
erittäin karkea raastinterä
Karkeat juusto- ja porkkanaraasteet.
hienoraastinterä
Parmesaanijuuston ja perunoiden raastaminen
(perunapyörykät).
normaali suikaleterä
ohuiden ranskalaisten perunoiden leikkaaminen; kiinteät
ainekset salaatteihin ja dippeihin (esim. porkkana,
kurkku).
turvallisuus
●
Älä koskaan poista kantta ennen kuin
leikkuulevy on pysähtynyt kokonaan.
●
Käsittele leikkuuteriä varoen - ne ovat erittäin teräviä
tärkeää
●
Jäähdytä kuuma neste ennen kuin sekoitat sen tehosekoittimessa - jos kansi ei
ole kunnolla kiinni, nestettä voi roiskua päällesi kannen auetessa.
●
Varmistaaksesi, että laite palvelee sinua pitkän aikaa, älä koskaan käytä
tehosekoitinta pitempään kuin 60 sekuntia kerrallaan. Sammuta virta heti kun
sakeus on sopiva.
●
Älä laita mausteita sekoittimeen - ne saattavat vahingoittaa muovia.
●
Laite ei toimi, jos tehosekoitin ei ole kunnolla paikallaan.
●
Älä pane sekoittimeen kuivia valmistusaineita ennen käynnistämistä. Paloittele
ainekset tarvittaessa; avaa täyttökorkki; pudota palaset täyttökorkin kautta yksi
kerrallaan koneen käydessä.
●
Älä käytä tehosekoitinta säilytysastiana. Säilytä se tyhjillään.
●
Älä koskaan sekoita suurempaa määrää kuin 11/2 litraa - vaahtoavien nesteiden,
esim. pirtelö, määrä on pienempi.
nopeuden valinta kaikissa toiminnoissa
väline/osa toiminto nopeus
hienonnusterä Kakkutaikinan valmistus 1 - 8
Rasvan ja jauhojen sekoittaminen 5 - 8
Veden lisääminen
taikinan joukkoon 1 - 5
Paloittelu/soseuttaminen/pateet 6 - 8
vatkaus munanvalkuaiset 8
munat ja sokeri rasvattomissa taikinoissa 8
kerma 5 - 8
taikinan sekoitin hiivataikinat 5 - 8
terät- viipalointi/Kiinteät aineet, esim. porkkanat,
raastaminen/ kovat juustot 5 - 8
silppuaminen Pehmeämmät aineet, esim. kurkku,
tomaatit 1 - 5
sitruspuserrin Sitrushedelmät 1
mehulinko Hedelmät ja kasvikset 8
tehosekoitin
Kevyt sekoittaminen, esim. vatkatut taikinat, pirtelöt
Keitot, kastikkeet, patee ja majoneesi 8
monitoimimylly Kaikki käsittely 8
maksimikapasiteetti
●
Murotaikina Jauhot 340 g
●
Hiivataikina Jauhot 500 g
●
Sekoituskakku Kokonaispaino 1,5 Kg
●
Jauheliha Kokonaispaino 600 g
●
nesteet kannen kanssa 1,5 litraa
●
Kaksoisvatkain 6 munanvalkuaista
välineiden käyttö
katso ylläolevasta taulukosta, millä nopeudella kutakin työvälinettä käytetään.
hienonnusterä/ taikinan sekoitin
Leikkuuterä on monipuolisin kaikista monitoimikoneen välineistä. Saavutettava
koostumus määräytyy käsittelyajan pituuden perusteella. Kun haluat karkean
lopputuloksen, käytä sykäyspainiketta.
Hienonnusterää käytetään kakkujen ja leivonnaisten valmistamiseen, raa’an ja
kypsennetyn lihan jauhamiseen, vihannesten pilkkomiseen, pähkinöiden
jauhamiseen, pateen, dippien ja sosekeittojen valmistamiseen sekä pikkuleipien
ja leipien murentamiseen.
Käytä taikinan sekoitinta hiivataikinan valmistamiseen.
vinkkejä
leikkuuterä
●
Leikkaa ainekset, esim. liha, leipä, vihannekset, noin
2cm:n kuutioiksi.
●
Paloittele pikkuleivät pienempiin osiin ja pudota
syöttösuppilon läpi koneen käydessä.
●
Käytä taikinan valmistuksessa jääkaappikylmää rasvaa,
jonka olet pilkkonut 2cm:n kuutioiksi.
●
Älä pyöritä konetta liian kauan.
taikinan sekoitin
●
Pane kuivat aineet kulhoon ja lisää neste syöttösuppilon
kautta koneen käydessä. Annan koneen käydä, kunnes
taikinasta on muodostunut tasainen ja joustava pallo
(noin 1 - 1 1/2 minuuttia).
●
Jos alustusta tarvitsee jatkaa, tee se käsin. Uudelleen
alustamista kulhossa ei suositella, sillä monitoimikone
saattaa alkaa täristä.
21
22
23
24
25
20
21
22
23
24
25
b
b .
c
c
35
P
00
1
2
3
4
5
6
7
8
Page 39

leikkuuterien käyttö
1 Aseta pyörityskappale ja kulho virtayksikön päälle.
2 Pidä kiinni terän keskeltä ja aseta se
pyörityskappaleen päälle haluamasi puoli päälle päin.
3 Aseta kansi paikalleen .
4 Valitse sopivan kokoinen syöttösuppilo. Painimessa on
pienempi syöttösuppilo yksittäisten palojen tai hienon
aineksen käsittelyä varten.
Kun haluat käyttää pientä syöttösuppiloa -aseta ensin
iso painin syöttösuppilon sisään.
Kun haluat käyttää isoa syöttösuppiloa - käytä
kumpaakin paininta yhdessä.
5 Pane ruoka syöttösuppiloon.
6 Käynnistä laite ja paina ruokaa painimen avulla
alaspäin - älä koskaan pane sormiasi
syöttösuppiloon.
vinkkejä
●
Käytä tuoreita valmistusaineita
●
Älä leikkaa ruokaa liian pieniksi paloiksi. Täytä iso syöttösuppilo melkein
täyteen. Näin ainekset eivät pääse liikkumaan sivusuunnassa käsittelyn aikana.
Käytä vaihtoehtoisesti pientä syöttösuppiloa.
●
Kun käytät suikaleterää, aseta ainekset vaakasuuntaisesti.
●
Viipalointi tai raastaminen: pystysuuntaan järjestetyistä aineksista tulee
pienempiä kuin vaakasuuntaisesti asetetuista .
●
Lautaselle tai kulhoon jää aina vähän hukka-ainetta.
sitruspuserrin
Sitruspuserrinta käytetään sitrushedelmien mehun puristamiseen
(esim. appelsiinit, sitruunat, limettihedelmät ja
greipit).
kartio
siivilä
sitruspusertimenkäyttö
1 Kiinnitä pyörityskappale ja kulho
virtayksikköön.
2 Aseta siivilä kulhoon - varmista, että siivilän
otin on kulhon kahvan kohdalla .
3 Aseta kartio pöyrityskappaleen päälle ja
käännä sitä, kunnes se painuu alas asti .
4 Leikkaa hedelmä kahtia. Käynnistä kone ja
purista hedelmä kartiota vasten.
●
Sitruspuserrin ei toimi, jos siivilä ei
ole kunnolla paikallaan.
mylly
Käytetään yrttien hienontamiseen ja pähkinöiden ja
kahvinpapujen jauhamiseen.
terä
tiivisterengas
astia
sirotuskansi
turvallisuus
●
Älä koskaan kiinnitä teräosaa koneeseen ilman
hienonnusastiaa.
●
Älä kierrä astiaa irti alustasta, jos monitoimimylly on laitteessa
kiinni.
●
Älä koske teräviä teriä. Älä päästä lapsia teräosan lähettyville.
●
Älä irrota monitoimimyllyä laitteesta ennen kuin terä on täysin
pysähtynyt.
tärkeää
●
Pitkän käyttöiän varmistamiseksi älä koskaan käytä myllyä 30
sekuntia kauempaa. Katkaise virta heti, kun hienonnettava
aine on koostumukseltaan oikeaa.
●
Älä jauha laitteessa mausteita, sillä ne saattavat vaurioittaa
muovipinnan.
●
Kone ei toimi, jos mylly on asennettu väärin.
●
Käytä vain kuivia aineksia.
myllyn käyttö
1 Laita ainekset hienonnusastiaan. Älä täytä sitä yli puolen välin.
2 Aseta tiivisterengas teräosaan.
3 Käännä teräosa ylösalaisin. Aseta se hienonnusastiaan terät alaspäin.
4 Kierrä teräosa hienonnusastiaan kiinni kiristäen sitä käsin.
5 Aseta mylly runko-osan päälle ja lukitse kääntämällä.
6 Kytke maksiminopeus päälle tai käytä pitokytkintä.
7 Jauhatuksen jälkeen voit vaihtaa teräosan sirotuskanteen ja sirotella
jauhetun/hienonnetun aineen.
●
Sirotuskansi ei ole ilmatiivis.
vihjeitä
●
Paras tulos saavutetaan, kun yrtit hienonnetaan puhtaina ja kuivina.
mehulinko
Käytetään hedelmien ja vihannesten mehustamiseen.
syöttöpainin
kansi
siivilä
sisempi kulho
mehulingon käyttö
1 Aseta pyörityskappale ja kulho runko-osan päälle.
2 Lukitse siivilä sisempään kulhoon .
3 Aseta sisempi kulho monitoimikoneen kulhoon .
4 Aseta mehulingon kansi kulhon päälle ja käännä
kulhoa, kunnes se lukkiutuu paikalleen ja syöttösuppilo
on kahvan päällä .
5 Leikkaa mehustettavat ainekset niin pieniksi paloiksi,
että ne mahtuvat syöttösuppiloon.
6 Kytke laite päälle ja työnnä tasaisesti paloja alaspäin
syöttöpainimella. Älä koskaan laita sormiasi
syöttösuppiloon. Anna ainesten mehustua kunnolla
ennen palojen lisäämistä.
7 Viimeisen palan jälkeen käytä konetta vielä 20 sekuntia,
jotta kaikki mehu irtoaisi siivilästä.
tärkeää
●
Jos laite tärisee, kytke laite pois päältä ja tyhjennä siivilä. (Laite tärisee, jos
kuitumassa on jakaantunut epätasaisesti.)
●
Mehusta pieni määrä kerrallaan (enintään 450 g) ja tyhjennä siivilä ja sisempi
kulho säännöllisesti.
●
Ennen mehustamista poista kivet ja siemenet (esim. paprikoista, melonista ja
luumuista) ja kovat kuoret (esim. melonista ja ananaksesta). Omenoita ja
päärynöitä ei tarvitse kuoria eikä siemenkotaa poistaa.
36
d
e
d
e
f
g
f
g
26
h
h
i
i
29
j
k
l
j
k
l
30
P
00
1
2
3
4
5
6
7
8
P
00
1
2
3
4
5
6
7
8
P
00
1
2
3
4
5
6
7
8
P
00
1
2
3
4
5
6
7
8
P
00
1
2
3
4
5
6
7
8
Page 40

vihjeitä
●
Käytä kiinteitä tuoreita hedelmiä ja vihanneksia.
●
Sitrushedelmistä saatu mehu on karvasta ja siinä on vaahtoa, sillä kuori
mehustetaan hedelmän mukana. Käytä sitrushedelmien mehustamiseen
mieluummin sitruspuserrinta.
huolto ja puhdistus
●
Sammuta laite ja irrota pistoke pistorasiasta aina ennen
puhdistamista.
●
Käsittele teriä ja leikkuulevyjä varoen - ne ovat erittäin
teräviä.
●
Säilytä viipalointi/raastinteriä laitteen mukana toimitetussa
säilytysrasiassa .
●
Jotkut elintarvikkeet saattavat värjätä muovia. Tämä on
täysin normaalia eikä vahingoita muovia tai vaikuta ruoan
makuun. Poista väri hankaamalla kasvisöljyyn kastetulla
kankaalla.
virtayksikkö
●
Pyyhi kostealla pyyhkeellä ja kuivaa. Varmista, että lukituskohdassa ei ole ruoan
jätteitä.
●
Säilytä ylimääräinen johto laitteen takana olevassa lokerossa.
tehosekoitin/mylly
1 Tyhjennä kannu/hienonnusastia ennen kuin kierrät sen irti teräosasta.
2 Pese kannu/hienonnusastia käsin.
3 Irrota ja pese tiivisterengas.
4 Älä koske teräviin teriin - pese ne puhtaaksi kuumassa pesuainevedessä harjan
avulla ja huuhtele sen jälkeen huolellisesti juoksevan veden alla. Älä upota
teräyksikköä veteen.
5 Anna kuivua ylösalaisin.
kaksoisvatkain
●
Irrota vispilät käyttöpäästä vetämällä niitä varovasti ulospäin. Pese lämpimällä
pesuainevedellä.
●
Pyyhi käyttöpää kostealla pyyhkeellä ja kuivaa sen jälkeen. Älä upota
käyttöpäätä veteen.
kaikki muut osat
●
Pese käsin ja kuivaa pesun jälkeen.
●
Ne voidaan myös pestä astianpesukoneen yläkorissa.
huolto ja asiakaspalvelu
●
Jos virtajohto vahingoittuu, sen vaihtaminen on turvallisuussyistä sallittua
ainoastaan Kenwoodin oman tai valtuuttaman korjausliikkeen toimesta.
Jos tarvitset apua:
●
Laitteen käytössä
●
Huollossa tai korjauksessa
Ota yhteys liikkeeseen, josta ostit monitoimikoneen.
28
28
37
 Loading...