

Specifications and Main Features
- Tape recording system: The DA T head system that has a rotating head.
- Tape speed: 8.15 mm a second.
- Sampling frequency: 48 kHz 44.1 kHz and 32 kHz.
- Number of quantization bits:16 bits linear.
- Frequency response: 5-22 hertz (EIAJ) (for digital recording) 22000 Hz.
- Signal-to-noise ratio: Follow up to the EIAJ specification of 90dB or greater.
- Dynamic range: It conforms to EIAJ specifications of 90dB or greater.
- Wow and flutter: With EIAJ measurement it comes below the measurement limit.
- Digital I/O terminal: It employs coaxial that is 3.5mm diameter 4 pin minijack.
- Analog output terminal: It functions from headphone that has a 3.5mm diameter stereo minijack.
- Other terminals: External power supply input (DC6V) x 1; Terminal for connecting separately sold A/D converter BP-A7.
- Battery life (continuous use): When one is in use with the BP A7 it lasts for about 1.5 hours EIAJ.
- Power supply - 6V DC: The use of External DC IN jack. -120 volts AC, using the supplied AC adapter in the U. S. and Canada.
- Dimensions (main unit): Consists of 91(WHTD) mm 34.9H 121.5D.
- Max. external dimensions: EIAJ from 91.7W 36.2H 121.9D mm which includes projections.
- Weight: The main unit weighs approximately 420 grams.
- Note: These specifications may vary without notice. there is continuous advancement in the development.
Frequently Asked Questions
- What cassettes work with the DX-7?
- The DX-7 cassette deck works with DAT (Digital Audio Tape) cassettes.
- What are the required inputs for the DX-7?
- It uses 120V AC, 50/60Hz in Canada and USA, and other countries can supply with 110V-120V/220V-240V AC thank to the AC converter which is provided in the box, or can use an external DC IN jack for 6V.
- Are you able to fast forward on the DX-7?
- You can fast forward the DX-7 to a certain range as the playback starts from the last place that was saved to solute this problem. The internal battery can withstand around 15hours of playback before running out.
- Is it possible to connect a DX-7 to my car's stereo system?
- Absolutely. You may connect/ plug your DX-7 to the car stereo with the use of a Car Audio Cassette adapter CAC-1 which will need to be purchased separately.
- Could you clarify the type of digital I/O terminal found on the DX-7?
- A coaxial 3.5 mm dia four-pin minijack is used as a digital I/O terminal.
- What is the process of cleaning the unit?
- The cabinet can be wiped with a dry cloth followed by a damp cloth as appropriate. Use the head cleaner tape designed for DAT use on the head.
- What actions do I have to take with respect to condensation?
- Condensation that may accumulate inside a unit because of humidity or temperature changes could result in abnormal unit functioning. Prior to use, remove the tape and leave the cassette holder open for about two hours.
User Manual
Page 1
m
DIGITAL AUDIO TAPE RECORDER
DX-7
INSTRUCTION MANUAL
KENWOOD CORPORATION
For your records
Record the serial number, found bottom
nated
on
the warranty card, and
the model and serial
mation or service
Model DX-7 Serial number
©PRINTED
IN
911121110987654321
JAPAN
~umbers
on
this product.
860·0410·08
in
the space provided below. Refer to
whenever you call your dealer for infor-
_____________
CK,M,U,UE,E,THTI
of
the unit
in
the spaces desig-
_
Page 2
Unpacking
Unpack the unit carefully and make sure
be
lost.
not
Examine the unit for any possibility of shipping damage. If your unit
notify your dealer immediately. If your unit was shipped
without
ny
against the carrier for shipping damage.
We
port or ship the unit
delay. Only the consignee (the person or company receiving the unitl can file a claim
recommend
that
you retain the original carton and packing materials for use should you trans-
in
the future.
that
all
accessories and cables are put aside
to
you directly, notify the shipping compa-
is
damaged or fails
so
they will
to
operate,
Before
applying
power
Important!
USA
and
Unit shipped to the above
with
discussion of such a switch that follows
should
All
AC
the above
selector switch on the top cover. Refer to
the following paragraph for the proper set-
ting
AC
AC
220-240
power cord to your
the setting position of this switch matches your
line voltage. If not,
tage
direction.
Note:---------------------------
Our warranty does not cover damage caused
by excessive line voltage due
ting of the
Canada
an
AC
voltage selector switch and the
be
disregarded.
other
countries
adaptor shipped to countries other than
are
equipped with
of
this switch.
are
not equipped
an
AC
voltage
voltage selection
adaptor operates on
volts AC. Before connecting the
in
accordance
AC
voltage selector switch.
110-
AC
outlet, make sure
it
must
be
set
with
the
to
120
volts
to
your vol-
following
improper set-
that
WARNING:
TO PREVENT FIRE
SHOCK,
APPLIANCE TO RAIN
DO
NOT
OR
ELECTRIC
EXPOSE
OR
MOISTURE.
THIS
or
of
AC
adaptor
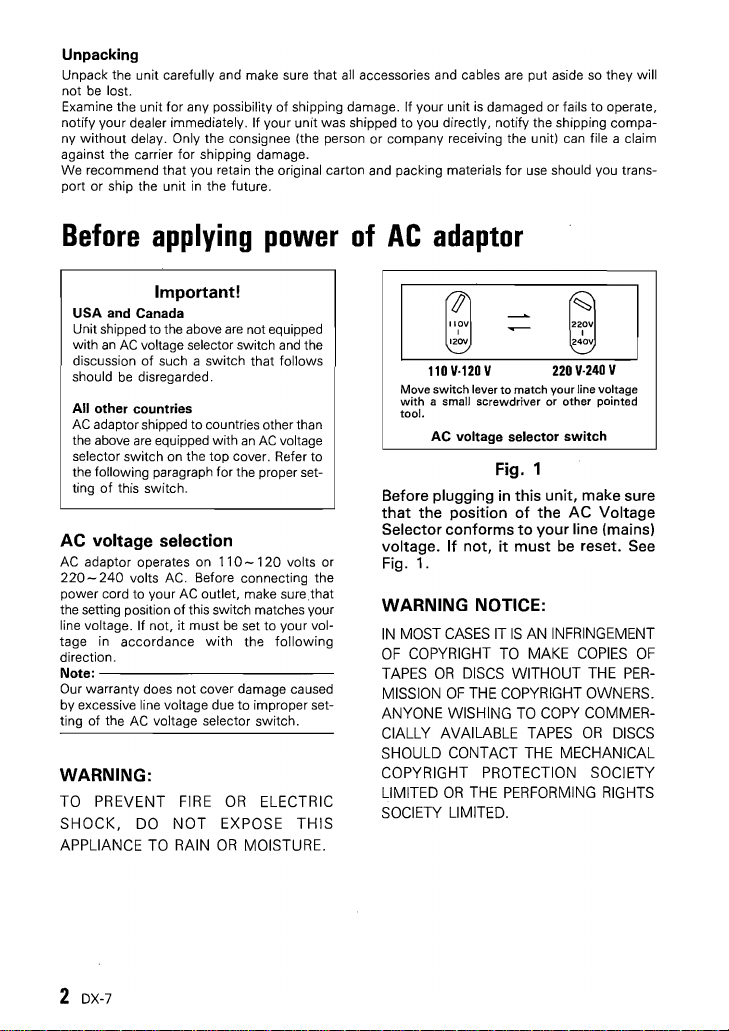
Move
switch
lever
to
match
your
with
tool.
a small
AC
screwdriver
voltage selector
or
other
line voltage
switch
Fig. 1
Before plugging in
that
the
Selector
voltage.
position
conforms
If
Fig. 1.
not,
it
this
of
to
must
unit,
make sure
the
AC
your
line (mains)
be reset. See
WARNING NOTICE:
IN
MOST
CASES
IT
IS
OF
COPYRIGHT
TAPES
OR
DISCS WITHOUT THE
MISSION
ANYONE WISHING
CIALLY AVAILABLE TAPES
SHOULD CONTACT THE MECHANICAL
COPYRIGHT PROTECTION SOCIETY
LIMITED
SOCIETY LIMITED.
OF
OR
AN INFRINGEMENT
TO
MAKE
COPIES
THE COPYRIGHT OWNERS.
TO
COpy
OR
THE PERFORMING RIGHTS
pointed
Voltage
OF
PER-
COMMER-
DISCS
2 DX-7
Page 3
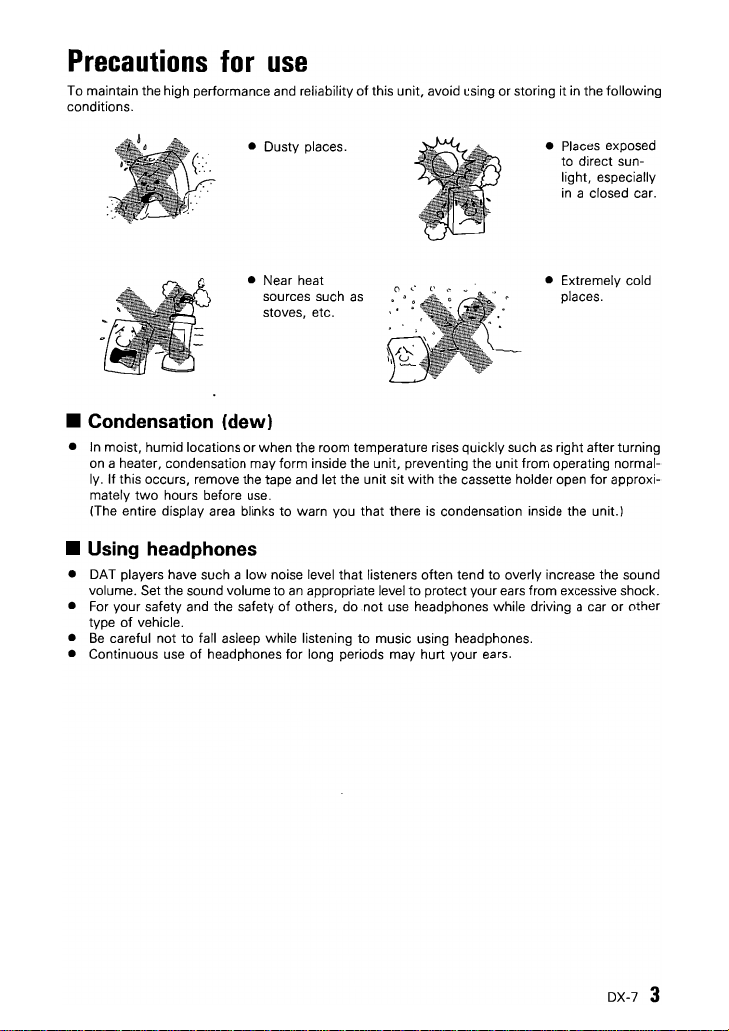
Precautions
To maintain the high performance and reliability
conditions.
for
use
of
this unit, avoid using or storing it
in
the following
• Dusty places.
• Near heat
sources such
stoves, etc.
as
• Places exposed
to direct sun-
light, especially
in
a closed car .
• Extremely cold
places.
• Condensation (dew)
•
In
moist, humid locations
on a heater, condensation may form inside the unit, preventing the unit from operating normal-
ly. If this occurs, remove the tape and let the unit sit with the cassette holder open
two
mately
(The entire display area blinks
hours before use.
or
when the room temperature rises quickly such
to
warn you
that
there
is
condensation inside the unit.)
as
right after turning
for
• Using headphones
• DAT players have such a
volume. Set the sound volume to
• For your safety and the safety
of
vehicle.
type
•
Be
careful not
• Continuous use
to
low
noise level
of
fall asleep while listening
of
headphones for long periods may hurt your ears.
that
an
appropriate level
others, do not use headphones while driving a car
listeners often tend to overly increase the sound
to
protect your ears from excessive shock.
to
music using headphones.
approxi-
or
other
DX-7
3
Page 4
Use
of
OAT
• Tapes cannot
• Tapes are manufactured
or pull the tape from the case, and never attempt to disassemble the tape case.
Do
not
•
• After use, completely rewind the tape and store it properly. The tape may
• Always place a tape
repeatedly insert and remove a tape without playing or recording the tape. The tape
may become slack or damaged.
without
being fully rewound.
cassette
be
turned over and played on the other side.
with
a sealed construction.
in
its case for storing .
tapes
Do
not try to forcefully open the tape cover
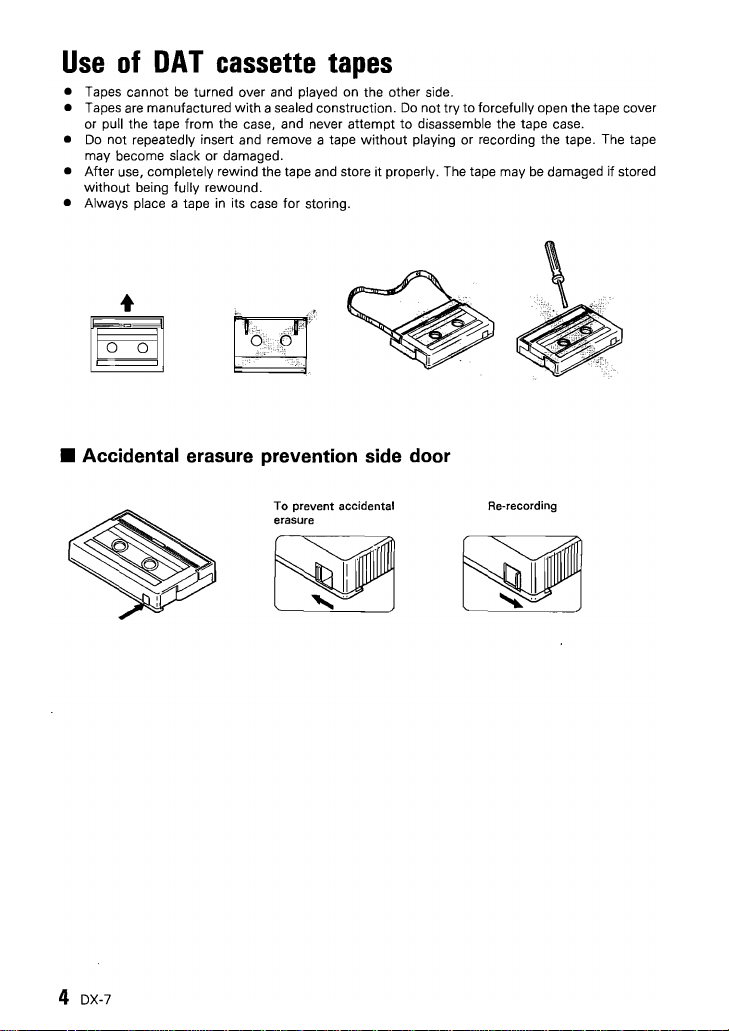
• Accidental erasure prevention side door
be
damaged
if
stored
4 DX-7
To prevent accidental
erasure
Re-recording
Page 5
•
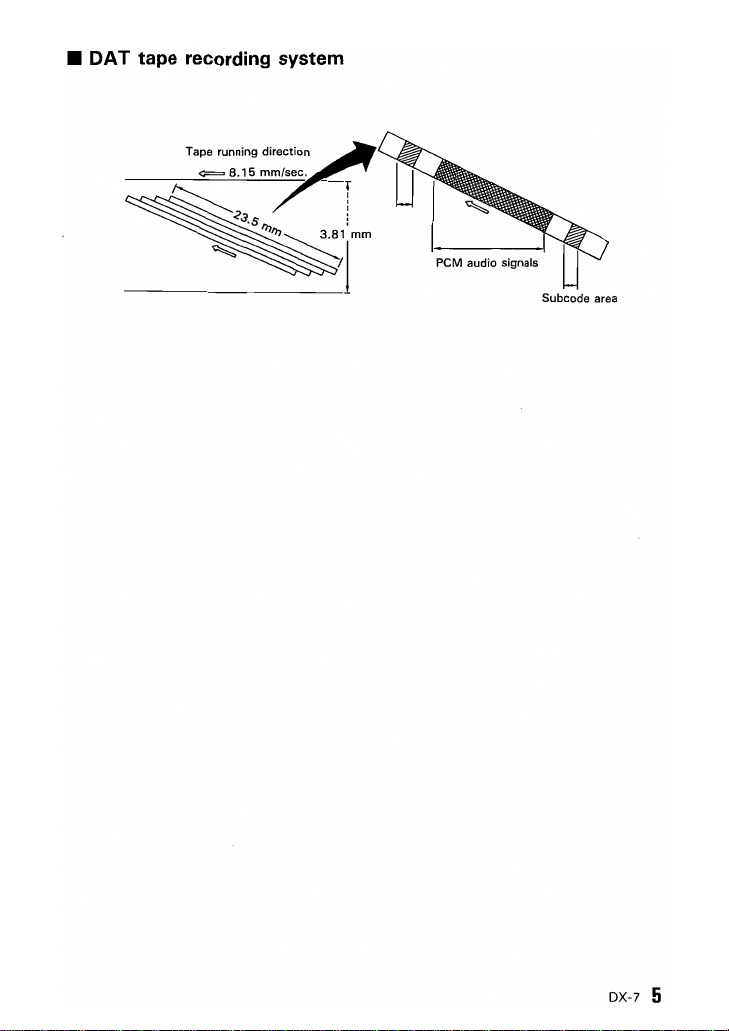
OAT
tape
recording
system
Tape running
direction
PCM audio signals
Subcode area
DX-7 5
Page 6
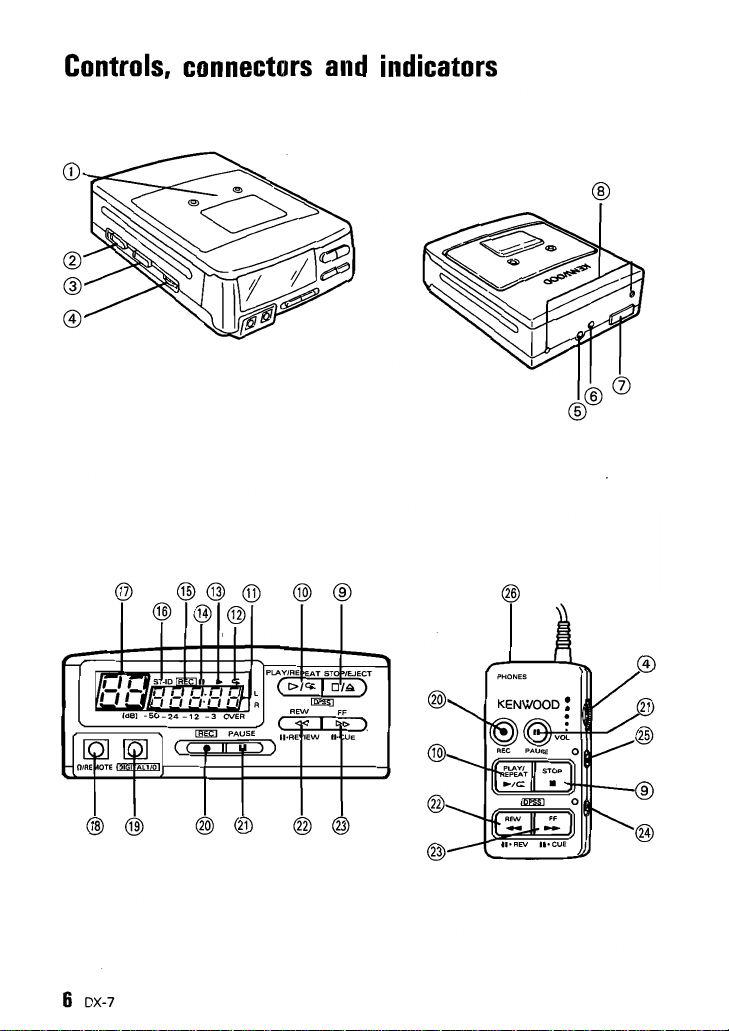
Controls,
connectors
and
indicators
®
®
f-
'VEl"S
-
,
I'
-,
:tR,
Ide]
-50-24
®@®
@
-10
Rm
, ,
'I
@
,-,.,-,
-12
Ilm:J
I
0'
,
3
@
, L
,-:1!-
OVER
PAUSE
R
PLAY/RE
(r>/<+
UoAE
)
@®
EAT
Im~)
Ilifm
REW
lEW
ST
II-
Uo,~jLJ
@@
6 DX-7
®@
@@
FF
lEJECT
UE
-
Page 7
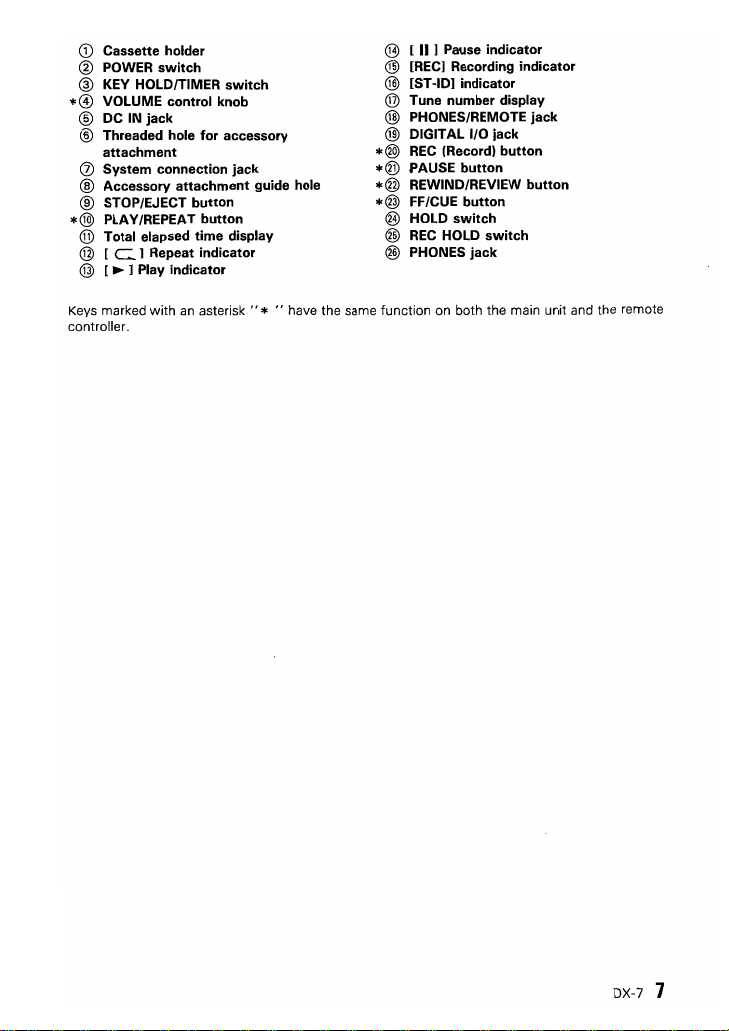
Cassette holder
CD
@
POWER
switch
KEY HOLD/TIMER
®
VOLUME control knob
*0
DC IN
®
®
(j)
®
®
*@)
®
®
@
Keys
controller.
jack
Threaded hole
attachment
System
connection
Accessory
STOP/EJECT
PLAY/REPEAT
Total elapsed
[
C]
Repeat
[ ~ ] Play
marked with
for
accessory
attachment
button
button
time
indicator
indicator
an
asterisk"
switch
jack
guide hole
display
* " have the same function
@
[
II
] Pause
@
[REC] Recording
@
[ST -10]
@
Tune
@
@
*@
*@
*®
*@
®
®
®
number
PHONES/REMOTE
DIGITAL I/O
REC
(Record)
PAUSE
REWIND/REVIEW
FF/CUE
HOLD
REC
HOLD
PHONES
on
indicator
indicator
indicator
display
jack
jack
button
button
button
button
switch
switch
jack
both the main unit and the remote
OX-7 7
Page 8
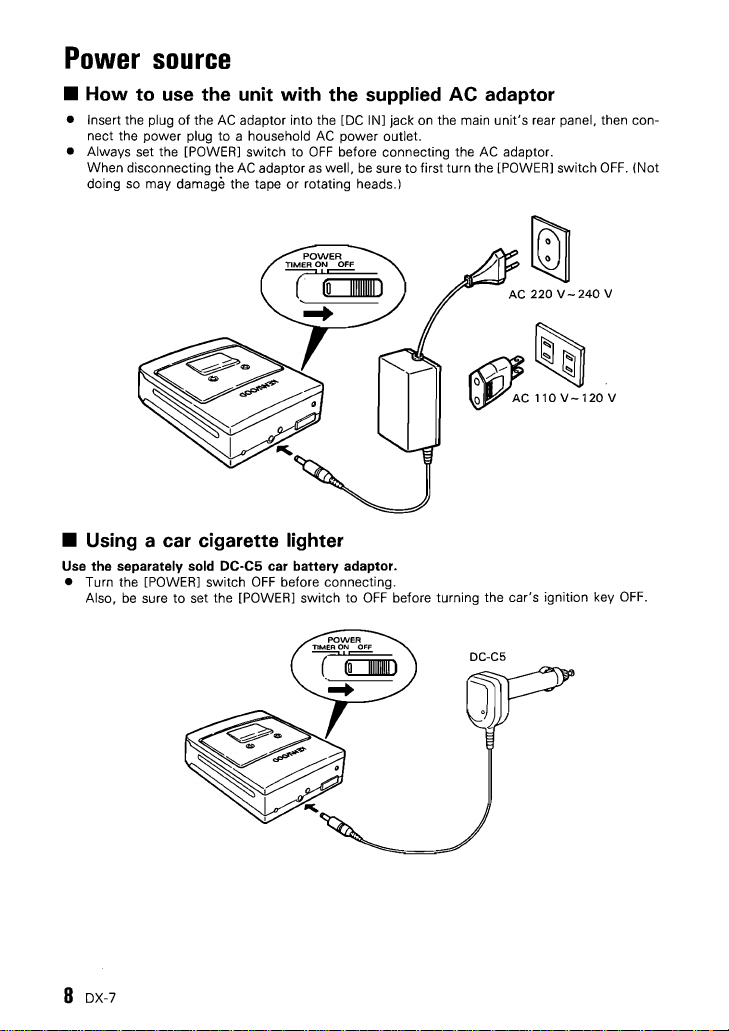
Power
•
How
• Insert the plug
nect the power plug
• Always set the [POWER] switch
When disconnecting the
doing
source
to
use
the unit with the supplied AC adaptor
of
the
AC
adaptor into the [DC IN] jack on the main
to
a household
AC
so
may damage the tape or rotating heads.)
adaptor
AC
power outlet.
to
OFF
before connecting the
as
well,
be
unit's
rear panel, then con-
AC
sure to first turn the [POWER] switch
adaptor.
OFF.
(Not
• Using a car cigarette lighter
Use
the
separately sold DC-C5
• Turn the [POWER] switch
be
sure
to
Also,
set the [POWER] switch
car
battery
OFF
before connecting.
o/.
o AC
~
adaptor.
to
OFF
before turning the car's ignition key
~
~
110
V -
120
V
OFF.
8 DX-7
Page 9
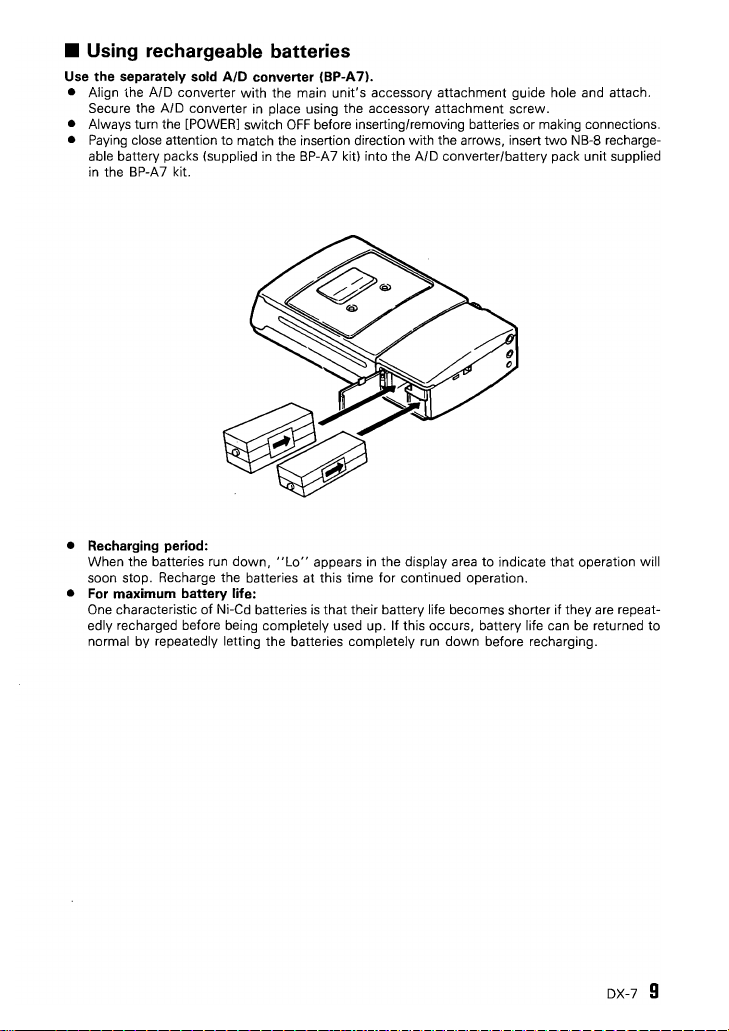
• Using rechargeable batteries
Use the separately
• Align the
Secure the AID converter
• Always turn the [POWER] switch
Paying
•
• Recharging period:
•
close attention to match the insertion direction with the arrows, insert
able battery packs (supplied
in
the BP-A 7 kit.
When the batteries run
soon stop. Recharge the batteries at this time for continued operation.
For
maximum battery life:
One characteristic
edly recharged before being completely used up.
normal by repeatedly letting the batteries completely run
sold
AID
AID
converter with the main
converter (BP-A7).
in
down,
of
Ni-Cd batteries
unit's
place using the accessory attachment screw.
OFF
in
the BP-A7 kit) into the AID converter/battery pack unit supplied
"Lo"
accessory attachment guide hole and attach.
before inserting/removing batteries or making connections.
appears
in
the display area to indicate that operation will
is
that their battery life becomes shorter if they are repeat-
If
this occurs, battery life can
down
two
NB-8 recharge-
before recharging.
be
returned to
OX-7
9
Page 10

Connections
• Headphone connection
• Connect separately sold headphones
miniplug) to the main unit's [
• Always turn the volume down before plugging or unplugging the headphones.
• Sound volume adjustment
Adjustment using the main unit:
Set the remote controller's [VOLl control to maximum
unit's [VOLUME] control.
Adjustment using the remote controller:
Set the main unit's [VOLUME] control to about
mote controller's [VOL] control .
• Connection to a car stereo
Use the separately
Insert the plug
[PHONES] jack.
• Adjust the sound volume using the car stereo's volume control.
Set the main unit's [VOLUME] control to about
trol to maximum.
of
sold
Car Audio Cassette adaptor
the
CAC-1
into the main unit's [ n IREMOTE] jack or the remote controller's
(use
n IREMOTE] jack or the remote controller's [PHONES] jack.
headphones equipped with a
and
"8"
and adjust the volume using the re-
(CAC-').
"8"
and set the remote controller's [VOLl con-
3.5
mm diameter stereo
adjust the volume using the main
10
IO-'~ol
t
,,=====~fl,
OX-7
Page 11

• Connection to a component equipped with digital 1/0 jacks
(coaxial)
• Turn
off
• Using the supplied digital connection cord, connect the 4-pin miniplug
• Make sure the plugs are inserted securely. Improper connection may cause sound dropouts or
• Connection
the power to both the amplifier and this unit before making connections.
1/0]
terminal.
Connect the red plug
white plug to the coaxial
noise.
to
the component's (amplifier, etc.) coaxial input jack and connect the
output
to
optical digital jacks
jack.
is
not possible.
to
this
unit's
[DIGITAL
[O"@]
DIGITAL
~
Red
• Connection to a portable CD player equipped with a digital out-
put jack
• When connecting
jack, use the supplied digital-use adaptor plug.
to
a portable
CD
player (such
as
the DPC-90) equipped with a digital output
DIGITALI/O
WHITE:TO OUTPUT
REO:TO INPUT
DX-7
11
Page 12

• Connection to
• Turn
off
• Using the supplied analog connection cord, connect the 3-pin miniplug to this unit's [
• Sound volume adjustment:
the power to both the amplifier and this unit before making connections.
REMOTE]
Connect the other end
jacks, etc.).
Connect the red plug to the
channell input jack.
Set the main unit's [VOLUME] control to about
When connecting to the supplied remote controller, turn the remote controller's
to maximum.
Adjust the sound volume using the amplifier's volume control.
terminal.
an
amplifier's analog input jacks
of
the cord to the amplifier's external input jacks (AUX jacks,
"R"
(right channel) input jack and the white plug to the
"S".
TAPE
[VOl]
"L"
control
n I
PLAY
(left
~JACK
Supplied analog _
plug
@@
----'
o II
,
___________
"
"'1
I I
~
___________________________
I :
I'
II
I
I
I
J
12
DX-7
Page 13

• Connection for analog recording
Use the separately sold
• Turn
off
• Connect the AID converter unit (supplied
• Connect the AID converter unit's [MIC/LINE IN] jack to
• Connect the AID converter unit's [LINE OUT] jack to
•
• Adjust the playback sound volume using the amplifier's volume control.
• When using a microphone, use a stereo microphone equipped
the power to both the amplifier and this unit before making connections.
stereo microphone.
jacks,
TAPE
Both input and output connections should
er's
"R"
Use
miniplug.
(right channell jack and the white plug connected to the
the AID converter unit's [MIC/LlNE] switch to MIC or LINE, depending
If
you
AID
converter (BP-A7).
PLAY
jacks, etc.).
use
a monaural microphone, the sound
REC
ouT
PLAY
1i:J\
in
be
BACK
the
made
@@
BP-A71
to this unit.
an
amplifier's [TAPE
an
amplifier's external input jacks (AU X
with
the
red
plug connected to the amplifi-
"L"
with a 3.5
will
be
recorded
r~H-I------d
REC]
jacks or a
(left channell jack.
on
the connection.
mm diameter stereo
on
the left channel only.
~
..
~
~~'\~
Separately sold BP-A 7
~~hite
_=:J
MIG/LINE
IN
Stereo microphone
J
-====")
DX-7
13
Page 14

Key
Hold
function
Setting this function prevents incorrect oper-
of
the unit even
ation
is
accidentally pressed.
• When you set the main
HOLD/TIMER] switch to
ignores any button operation.
• When you set the remote controller's
[HOLD] switch to the
that the white indicator appears). opera-
tion
of
any
is
ignored.
tons
• When you set the remote controller's
HOLD] switch to
the white indicator appears). operation
the remote controller's
ignored.
if
an
operation button
unit's
"HOLD",
"."
position (so
of
the remote controller's but-
the"
• " position
[REC]
button
[KEY
the unit
[REC
(so
that
of
is
14
DX-7
Page 15

To
playback a OAT
First load a tape into the unit (see page 141.
Operation
is
possible with ei!her the main unit or the remote controller.
11.-'
u-CoJ
Tune number
display time display
Totaf
elapsed
~
r
cassette
n,
U~,
(Basic
• To
playa
• Press the [PLAY/REPEAT] button.
• Tapes recorded
cannot
If you attempt to play such a tape,
PLAY"
•
If
the playback position
a tune when the tape
number for that tune will not
Tune numbers will
beginning
operation)
tape
in
be
appears on the display.
extended play mode
played.
be
of
the next tune.
is
in
the middle
is
loaded, the tune
be
displayed from the
"NO
displayed.
• To stop playback
• Press the [STOP/EJECT] button.
• To resume playback, press the [PLAY/
REPEAT]
button again.
When finished, remove the tape from the unit
and set the [POWER] switch to
OFF.
• To pause playback
• Press the [PAUSE] button.
• To resume playback, press the [PAUSE]
button again or press the [PLAY/REPEAT]
button.
• If five minutes
mode, the unit automatically enters stop
mode.
el~pse
with the unit
in
pause
of
DX-7
15
Page 16

"
-,
u~,
• To fast-forward
or
rewind
the tape
•
In
stop mode, press the [FF/CUE] button
to fast-forward the tape and press the
[REW/REVIEWl button to rewind the tape.
• Auto Rewind function:
When the last tune
playing, the tape automatically rewinds to
the beginning and then stops.
The same operation occurs even if
END-ID
is
recorded.
on
the tape finishes
(See
page 23.)
an
• To skip to a desired tune
(DPSS function)
By
pressing the IFF/CUE]
button one or more times, you can skip to
a subsequent or previous tune correspond-
ing to the number of presses.
• During playback, pressing the [FF/CUE]
button once skips to the beginning
next tune.
• During playback, pressing the [REW/
REVIEW] button once skips to the begin-
ning
of
the current tune.
or
IREW/REVIEW]
of
the
I Display example
When
the
tape
is
stopped
the
When
is
the
• When the beginning
• If the [PAUSE] button
16
at
beginning
the
tape
stopped at
end
is
reached, " ~ " appears on the display
and playback begins.
skip operation, the unit enters
at the beginning of the designated tune.
DX-7
r
end
of
the displayed tune
is
pressed
pause
during the
mode
The unit skips to a designated tune by
searching for the tune's
the subcode area. If the ST-ID
recorded
on
cannot
If pressed again while the "
is
blinking, the unit skips to a tune located
even further
the tape, therefore, skipping
be
carried out.
in
ST-ID recorded
~
" indicator
the skip direction.
is
not
in
Page 17

"
-,
u.:J
• Cue/Review function
This function allows you to fast-forward
(cue) or rewind (review) while listening to
the tape sound.
• To cue, press the [PAUSE] button and
then press the [FF/CUE] button.
• To review, press the [PAUSE] button and
then press the [REW/REVIEW] button.
• When you reach the location you want to
listen to, press the [PLAY/REPEAT] button.
• Repeat play
This function repeatedly plays the entire
tape from the first tune to the last.
• During playback, press the [PLAY/
REPEAT]
When the last tune finishes playing or
when
matically rewinds to the beginning and
playback starts again from the first tune.
The tape is repeated a maximum of 10
times until the [STOP/EJECT] button
pressed.
• To stop repeat playback:
Press
that the "
press the [STOP/EJECT] button to stop the
tape.
button again.
an
END-ID
is
found, the tape auto-
the [PLAY/REPEAT] button again
C+
"indicator
goes out, or
so
is
DX-7
17
Page 18

Digital
First load a tape into the unit (see page
Operation
recording
is
possible with either the main unit or the remote controller.
14).
""
LILI
~II
11.1111
U'LILI
Connect the unit (See page
•
Press
the
When starting recording from the begin-
ning of the
ates a 5-second blank section and then
enters record-standby mode.
•
Press
recording.
You can also start recording by pressing
the [PAUSE] button.
• To stop recording, refer
• Changing the [VOLUME] level during
.-
recording has no effect on the recorded
sound.
• If five seconds elapse after the
ton is pressed, the rotating head moves
away from the tape
(The
• A ST-ID
start of each tune.
• When carrying out digital recording from
another DAT deck using a tape recorded
with ST-IDs and SKIP-IDs, the same sub-
codes are recorded on the
[REC]
tape, the unit automatically cre-
the [PLAY/REPEAT] button
REC
indicator blinks.)
is
automatically recorded at the
button.
to
protect the tape.
(See
11.)
to
page 20.
[REC]
page 23.)
new
tape.
to
start
but-
18
DX-7
rl
LI
I
ST·ID
mill
•
11.11
ULI
:J
-,
I
Page 19

Analog
Use the separately
First load a tape into the unit (see page
Operation
1[1[/::
~~I~dB~I~-~5~O~24~'~2~3~O"'V"'ER~
recording
sold
AID converter (BP-A7),
is
possible with either the main unit or the remote controller,
~II
I~
MIC
OdB
l'fino)
(ATT]
20dB
+-+
LINE
14),
Connect the unit, (See page
Set the [MIG/LINE IN] switch to
recording from a
recording from a microphone.
• Press the
When starting recording from the begin-
ning of the tape, the unit automatically cre-
ates a 5-second blank section and then
enters record-standby mode.
• Adjust the recording level using the
converter unit.
If the microphone volume is too high, set
"MIG
the
• Press the [PLAY/REPEAT] button to start
recording.
You can also start recording by pressing
the [PAUSE] button.
• To stop recording, refer
• During record-standby mode, the record-
ing level
Set the level
"OVER"
loudest.
• When you
level, press the [PLAY/REPEAT] button.
Press the button again to return to the
elapsed time display.
• If the recording level enters the
area during recording, the time d'isplay
changes
about one second. If this occurs, lower the
recording level slightly.
13)
LINE
[REG]
button.
(ATT)' , switch
is
displayed.
so
that
area even when the sound
want
to
to
the recording level display for
"LINE"
input or to
"MIG"
to
"20
to
page 20.
it does not enter the
check the recording
"OVER"
when
when
dB".
is
AID
the
"
'_"
'ST.ID
[jjg]
U'U_'
nn
..
=,
DX-7
19
Page 20

Stopping/pausing
• Operation
is
possible
with
recording
either the main unit or the remote controller.
• To pause recording
•
Press
the [PAUSE] button.
If five minutes elapse
rotating head moves away from the tape
to protect the tape. (The
blinks.1
in
pause mode, the
REC
indicator
• To stop without recording
an
END-ID (See page
•
Press
the [STOP/EJECT] button or press
the remote controller's [STOP] button .
26)
• Erasing a recording
• To erase a tape, set the unit to record mode
Do
not attach the separately sold AID converter unit.
•
20
DX-7
• To stop after recording
END-ID (See page
• During recording, press the [FF/CUE] but-
ton for at least
EN
D-I D is
unit enters stop mode.1
with
nothing connected to the [DIGITAL I/O] jack.
two
recorded for nine seconds, the
seconds. (After the
an
26)
Page 21

Timer
recording/Timer
playback
• Before connecting the timer, insert a tape
into the unit.
• When carrying
sure the accidental erasure protection
"slide
closed
• Timer recording
o Set the [KEY HOLDITIMER] switch
"REC",
to
"TIMER"
out
timer recording, make
door"
of cassette tape (page
to
the right side .
then
fJ
set the [POWER] switch
.
41
is
to
• Timer playback
o Set the [KEY HOLDITIMER] switch to
"PLAY",
switch
• When using a timer, make sure the unit is
If condensation forms inside the unit, recording or playback will not start when the set time arrives.
• When carrying
the timer.
• When not using a timer, do not set the [POWER] switch
ing or playback
out
analog recording (page
to
start automatically when the AC adaptor
in
a location where condensation is unlikely to occur.
191,
adjust the recording level before connecting
to
"TIMER",
then
to
"TIMER".
is
connected.
fJ
set the [POWER]
as
this will cause record-
DX-7
21
Page 22

seMS
SCMS
SCMS is a
(CD,
Copy
Sources
available OAT music tapes.
When
etc.)
~
• FM
~ • OAT
o
• Other
g
II:
(Serial
new
standard
which
Copy
which
contain a copy
prohibition
which
contain a copy prohibition code include the following:
carrying
tuner
tape
out
~
I
t~Ok(Oyll
(15t
Management
allows you
to
prohibition
code
analog recording
generation)
n.
~
System)
make
only
first
code.
generation copies
COs
(2nd generation)
of
digital sources
and some commercially
t«o)~{oyll
When
carrying
• CD
• OAT music
tape
• Some OAT
music
tapes
• There are some cases where the above rules do
do
not
follow the SCMS standard.
22
OX-7
out
digital
I Digita)
t&
O~·O
(1
st
generation)
~
~t&JTIll
('{O)~{Oy) ~ ('{O)~{Oy) ~ ('{O)~{Oy)
(1
st
)
~
r;l'
generation)
recording
Digital)
~
t&>TIll
(3rd generation)
not
~f&Jml
apply, such
(2nd generation)
as
with
OAT
music tapes
which
Page 23

Subcodes
With OAT tapes.
the tape to
With commercially available OAT music tapes. subcodes are prerecorded on the tapes. With
blank tapes that you record yourself. subcodes are automatically recorded during recording
can also
in
addition to the recorded music signal. various subcodes are recorded
aid
in
music selection and editing.
be
recorded manually during editing.
on
and
• ST-IO (Start
This signal
cate the beginning
Also, the tune number
fore, if the ST-IO
• The ST-IO
• Depending on the contents
• A ST-IO cannot
is
1. When sound
recording.
2. When recording starts and sound
on the tape (in cases such as when there
between tunes
when
a tune contains a section
or
to edit the subcodes later. (See page
10)
recorded
at
the beginning
of
a designated tune.
for
each tune is
is
not
written
at
the proper pOSition, the tune number will not
is
automatically
is
is
be
written
detected again after a blank section
of
the source being recorded, ST-IOs may
short,
when
the sound stops and then starts again in the middle
written within 9 seconds after the previous ST-IO.
• ENO-IO
This signal
when
This signal
from the end
• If recording
is
recorded
to
this signal
is
also handy
of
elapsed time may
In
such a case, the total elapsed time
the tune search function may
recording.
indicate the end
is
detected during playback
for
the previously recorded contents.
is
continued from the end
quickly locating the end
not
continue into the
not
of
each tune.
written
on the tape during recording in the following cases:
is
detected after recording
of
extremely
24.)
of
of
for
operate correctly. Always
By
searching
on the tape
is
the recorded contents. The
or
a previous recording
newly
the newly recorded section will
at
excessive noise between tunes, when the interval
low
level sound!. In such cases, you will need
fast-forwarding.
of
a recording
recorded section.
for
this signal, the unit can lo-
the same position
of
2 seconds or longer occurs during
that
write
as
the ST-IO. There-
be
displayed correctly.
was
stopped or paused.
not
be written correctly
unit
stops automatically
when
continuing a recording
has no ENO-IO, the total
not
be
an
displayed and
ENO-IO at the end
Non-recorded
section
Next recording
of
a tune,
of
a
• Make sure there
END-ID
is
at least 9 seconds between the last ST-IO and the ENO-IO.
If a non-recorded section exists,
the total elapsed time signals
wilt not be connected.
OX-7
23
Page 24

Subcode
editing
• To manually write a ST-ID during recording
•
In
situations such
you can manually write ST -IDs
out.
as
when recording
an
in
audio source that has no space between tunes,
the appropriate locations while recording
• After writing a ST-ID, you must wait at
least 9 seconds before writing the next
ST-ID.
• You cannot write more than
numbers.
• If no tune number
ST-ID will not switch to the next tune num-
ber. Renumber the tunes after recording
is finished.
(See
page 25.)
is
is
displayed, writing a
• To add a ST-ID to a previously recorded tape
•
If
the displayed tune number does not change when tunes change during playback, no ST-
is
recorded
at
ID
sary ST-ID.
• The unit enters ST-ID
• After three seconds of
that location. In such a case, use the following procedure to add the neces-
Use
the
[REW]
and
record-standby mode
and the following oper-
ation occurs.
playback, the tape auto-
matically rewinds to a
position
two
is
repeated up
seconds
before the start position.
(This
10
times.)
• Each time one
buttons
position where the ST-
I D indicator lights is
moved forward or back-
ward by
to
(1.8 seconds max.)
buttons to move the tape
to the start position.
REW
of
is
pressed, the
0.3
second.
these
[FA
FF
• The
the tape and then play-
back continues.
At
the
tion, press the
(REGl
ST
-I D is
being carried
99
tune
start
posi-
button
again.
written on
Display example
• Leave
• Tune numbers
24
at
least 9 seconds between ST-IDs.
do
sary ST-IDs, renumber the tunes. (See page
DX-7
not change automatically when a ST-ID
TiT)
(REW)I-l-I
0.3
25.)
(FF)A
sec.C.3
sec.
is
added. After adding
(Lights) (Lights)
'~'ID~
/-
•
-,.-,
.J·C 0
all
neces-
,
Page 25

• To erase
•
If
the
tune
is
written
the
Erase
ST-ID using
an
unnecessary ST-ID from a recorded tape
number
changes
at
a place
other
than
between
on
the
tape.
the
following
procedure.
two
tunes. an unnecessary ST
-10
• The unit enters pause
mode after the unneces-
sary ST-ID.
~sttune
m)
(Pause)
Display
example
/1-'
!...J~I
• Renubmering tunes
•
After
adding
or
deleting
tune
numbers
Display
run
example
one
consecutively
• The unit enters record-
standby mode.
• The tape automatically
Unnecessary
I
~ndtu::ll
r+-+J
• The ST
(PAUSE)
to
rewinds
ning of the unnecessary
ST-ID.
then
tinues.
the begin-
-lOis
erased and
playback
con-
l.~(R~G)
"
B:
leI
or
more
ST
from
the
(Record-standby)
(Blinks)
"-,,.,.,"
!...J~I
-IDs.
first
you
to
B:le:
should
the
last
• :rhe tape automatically
• The tape automatically
pre~ioJs
is
renumber
tune
starting
rewinds to the begin-
ning and
forwards
the tunes.
rewinds to the begin-
ning again and stops.
(Blinks)
rl
-,
ST.ID~.
LIe
tu~e
the
tunes
with
Press
least 2 seconds.
then
to
renumber
number
so
"'''.
for at
fast-
all
displayed.
__
l:;:U:
that
the
(Lights
while
being renumbered.)
tunes are
DX-7
25
Page 26

•
To
write
•
If
a tape
the
following
Play
the
ISTOPI button
end
Verify
time
is still shown on
display.
I Display example
uj
""
at
• Leave
an END-ID on a recorded
was
stopped
at
the
end
procedure
the
tape and press
at
recording.
elapsed
,-'
='·C
'_I'_ILI
the
the
II
of
the
that
the'total
least 9 seconds between
of
to
write
the
'~iliC:::
the
last ST-ID and
tape
a recording
necessary END-ID.
the AID converter at-
tached and with nothing
connected to the
TAL
without
Set
the
unit
,oc::::
::,,'
jack.
[D[G[-
[/0]
writing
to
~
'-
~
I
While END-ID is
i'l-
'I"
leI
written
the
END-ID.
an END-ID,
Press
• After the END-[D
ten, the tape automati-
cally stops.
you
the IFF/CUE] button
for
at
least 2 seconds.
Press
least 2
L'
-,
'-I
""
(Stop mode)
=1:5
can use
is
writ-
for
at
seconds.
5
• To continue recording
•
When
you
want
to
the
following
•
[f
the next recording
Tune numbers
cally continued from the previous recording.
26
DX-7
continue recording on a
procedure
is
started using this procedure, the END-[D
are
automatically continued
from
to
continue
Press
the
IFF/CUE] button.
the END-ID position
tape
which
the
recording
(The
matically right before
the
in
sequence, and the total elapsed time
contains an END-ID,
without
tape
stops
END-ID.)
(Stops
automatically)
U::::"
,_,
""
interruption.
auto-
='·C C
'_"..J_'
is
you
can use
erased automatically.
is
automati-
Page 27

Cleaning
• Cleaning the cabinet
Clean the cabinet by wiping with a dry cloth. If
well with a dry cloth, wipe the area
dry cloth. (Do not use benzene, thinner, or other chemicals.1
Always keep terminals and plugs clean.
• Cleaning the head
If the head becomes dirty
Also, if the head becomes clogged during playback,
sound will stop.
In
such cases, clean the head with a commercially available OAT-use head cleaning tape.
•
Do
not inject oil into the unit. This will damage the unit.
If the head becomes worn after long use, it must
ment (fee required!,
"Error"
•
• If this unit
may appear on the display if a wrinkled or damaged tape
clogged. If this occurs, replace the tape or try cleaning the head
or misoperation, the unit may stop responding
In
then retry the operation.
is
subjected
such a case, disconnect the
or
covered with dust, sound dropouts or noise may occur.
to
a strong external disturbance (such
AC
adaptor plug,
• Accessories
(1) Remote controller
an
area
is
with
a cloth dampened with water, then wipe dry with a
particularly dirty and cannot
"Error"
will appear on the display and the
be
replaced. Contact your dealer for the replace-
is
used or if the head becomes
with
a cleaning tape.
a shock or abnormal voltagel
seconds, reconnect the plug,
about
AC
as
30
adaptor
to
button operations or operate abnormally.
wait
(2)
be
cleaned
(3) Digital connection Cord
(5) Digital-use adaptor plug
(4) Analog connection cord
Plug
adaptor (Except for USA,
(6)
and
UK)
Ca'nada
DX-7
27
Page 28

Specifications
Tape recording system
Tape
speed..........
Sampling frequency
No. of quantization bits
Frequency response
Signal-to-noise ratio
Dynamic range.. ..
Wow
and flutter
Digital I/O
Analog output terminal........ Headphone: 3.5 mm diameter stereo minijack
Other
Battery life (continuous use)
Power
Dimensions (main unit)
Max.
(EIAJ, including projections)
Weight.. ....................................
Note:----------------------------------------------------------------
We follow a policy
be
terminal..............
terminals..................
supply..............
external dimensions
changed without notice.
..................
..
.................
......................
......
..........
........
.............
.....................
......
of
continuous advancements
.......
.........
..................
...........
.........
..
.....
.. .... Coaxial:
..
.....
DAT rotating head system
8.15
mm/sec
48
kHz/44.1 kHz/32 kHz
16 bits, linear
5-22,000
90 dB or greater (EIAJI
90 dB or greater (EIAJI
Below measurable limit (EIAJ)
External power supply input: (OC6VI x 1
Terminal for connecting separately sold AID converter
BP-A7
Approx. 1.5 hours (EIAJI during playback
(when connected to separately sold AID converter
BP-A71
6V
120V
11
91.0
91.7
Approx.
Hz
(EIAJI (for digital recording I
3.5
mm diameter 4-pin minijack
DC:
Enternal
DC
IN
AC,
50/60
OV-120V/220V-240V AC,
(WI x
34.9
(WI x
36.2
420
gr (main unitl
in
development.
jack
Hz: USA and Canada, using the sup-
plied
All other countries, using the sup-
plied
(HI X
121.5
(HI x
121.9
For
AC
adaptor
50/60
Hz:
AC
adaptor
(DI mm
(0)
mm
this reason specifications may
28
DX-7
 Loading...