

Page 1

DVF-N7080
DVD/VCD/CD PLAYER
INSTRUCTION MANUAL
B60-5498-00 00 MA (E/X) OC 04/03
Page 2
2
Preparations
DVF-N7080 (EN/E,X)
CAUTION
RISK OF ELECTRIC SHOCK
DO NOT OPEN
CAUTION: TO REDUCE THE RISK OF ELECTRIC SHOCK, DO NOT REMOVE
COVER (OR BACK). NO USER-SERVICEABLE PARTS INSIDE. REFER SERVICING TO QUALIFIED SERVICE PERSONNEL.
THE LIGHTNING FLASH WITH ARROWHEAD SYMBOL, WITHIN AN EQUILATERAL TRIANGLE,
IS INTENDED TO ALERT THE USER TO THE PRESENCE OF UNINSULATED "DANGEROUS
VOLTAGE" WITHIN THE PRODUCT’S ENCLOSURE THAT MAY BE OF SUFFICIENT MAGNITUDE
TO CONSTITUTE A RISK OF ELECTRIC SHOCK TO PERSONS.
THE EXCLAMATION POINT WITHIN AN EQUILATERAL TRIANGLE IS INTENDED TO ALERT THE
USER TO THE PRESENCE OF IMPORTANT OPERATING AND MAINTENANCE (SERVICING) INSTRUCTIONS IN THE LITERATURE ACCOMPANYING THE APPLIANCE.
Units are designed for operation as follows.
Safety precautions
WARNING : TO PREVENT FIRE OR ELECTRIC SHOCK, DO NOT EXPOSE
THIS APPLIANCE TO RAIN OR MOISTURE.
Before applying power
Introduction
Caution : Read this page carefully to ensure safe operation.
The marking of products using lasers
(For countries other than U.S.A. and U.S.-Military)
Caution : Read this page carefully to ensure safe operation.
Europe and U.K. ............................................................ AC 230 V only
Australia ........................................................................ AC 240 V only
The marking this product has been classified as
Class 1. It means that there is no danger of hazardous radiation outside the product.
Location: Back panel
CLASS 1
LASER PRODUCT
CAUTION
VISIBLE LASER RADIATION
WHEN OPEN. DO NOT
STARE INTO BEAM .
Inside this laser product, a laser diode classified as
Class 2 laser radiation is contained as alerted by the
internal caution label shown above. Do not stare
into beam.
Location: DVD laser pick-up unit cover inside this
product
Page 3
3
Preparations
DVF-N7080 (EN/E,X)
123
456
7890
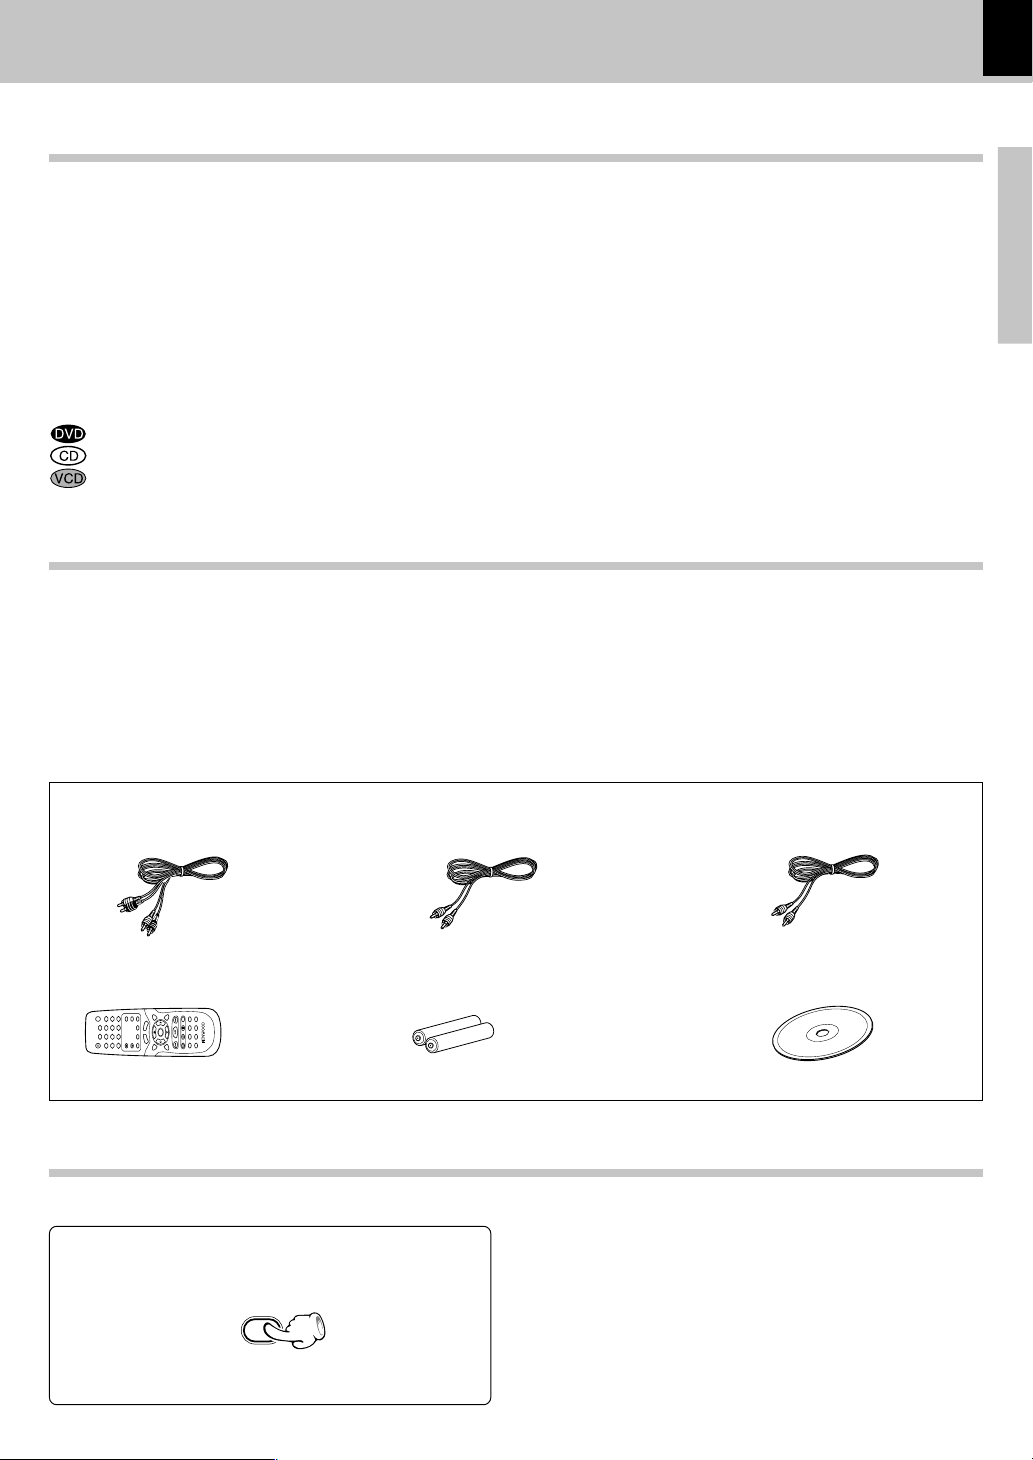
Unpack the unit carefully and make sure that all the accessories are present.
If any accessories are missing, or if the unit is damaged or fails to operate, notify your dealer immediately. If the unit
was shipped to you directly, notify your shipper immediately. Kenwood recommends that you retain the original
carton and packing materials in case you need to move or ship the unit in the future.
Keep this manual at hand for future reference.
Accessories
Please confirm that the following accessories are present.
Audio cord (Red, White) ...(1)
Batteries (R6/"AA" -size) ...(2)Remote control unit ...(1)
Video cord (Yellow) ...(1)
Introduction
Coaxial cord (Orange) ...(1)
CD-ROM (PC application) ...(1)
This document classifies the applications of each feature using the following marks.
: Description of a feature that can be used with DVD.
: Description of a feature that can be used with CD.
: Description of a feature that can be used with VCD.
♦
Transfer Movie , Music and Photo data from PC to TV
♦
Ethernet terminal for LAN access
♦
Graphical User Interface (G.U.I.)
♦
MPEG1 , MPEG2 files, DivX®video playback
♦
JPEG, BMP, GIF and PNG files playback
♦
PC card slot for still picture data ( JPEG file)
Special features
DIMMER
The display brightness of the main unit can be
changed.
Press the DIMMER key to switch the dim function
on and off.
DIMMER function
Unpacking
Page 4

4
Preparations
DVF-N7080 (EN/E,X)
Select Subtitle Language .................................................................... 25
Use P.B.C.(Playback Control) function ............................................. 25
Repeat play ............................................................................................. 26
A-B Repeat play .....................................................................................26
Random play ........................................................................................... 26
Select Camera angle ........................................................................... 27
Zoom function ........................................................................................ 27
On screen display .................................................................................. 27
Playback of Data disc ..................................................................... 28
Basic play ............................................................................................... 28
Skipping files .................................................................................. 30
Searching (except for still picture) ............................................ 30
Various playback functions (Data disc) ...................................... 31
Repeat play ............................................................................................. 31
Zoom function (only for JPEG files) ................................................... 31
Select Picture angle (only for JPEG files) ...................................... 31
Playback of a requested time. ............................................................32
On screen display .................................................................................. 32
Operating KENWOOD PC SERVER ................................................ 33
Playback of NETWORK SERVER ................................................... 39
Skipping files .................................................................................. 40
Searching .........................................................................................40
Repeat play ............................................................................................. 41
Zoom function ........................................................................................ 41
Select picture angle (only for still picture) .................................... 41
Slide show (only for still picture) ......................................................41
Playback of a requested file or time. ...............................................42
Playback of MEMORY CARD ......................................................... 43
Skipping files ......................................................................................... 45
Zoom function ........................................................................................ 45
Select picture angle ............................................................................ 45
On screen display .................................................................................. 45
Memory cards and PC card adaptors for which operation with
this unit has been confirmed ....................................................... 46
Firmware Update ............................................................................. 47
In case of difficulty.......................................................................... 48
Specifications .................................................................................. 51
Introduction......................................................................................... 2
Before applying power ................................................................... 2
Safety precautions ........................................................................... 2
Special features ...................................................................................... 3
Unpacking .................................................................................................3
DIMMER function .................................................................................... 3
Contents ............................................................................................... 4
Playable files with this unit ............................................................ 5
Discs information .............................................................................. 6
Types of playable discs ......................................................................... 6
Unplayable discs .....................................................................................6
Icons on the DVD VIDEO discs ............................................................. 6
Region Codes ...................................................................................... 7
Region codes in the world .................................................................... 7
Video formats...................................................................................... 8
Important items .................................................................................. 9
Maintenance ............................................................................................ 9
Reference ..................................................................................................9
System Connections ........................................................................ 10
Connecting to a TV with video input terminal ............................... 10
Connecting to a TV with SCART input terminal .............................. 10
Connecting to an Audio component ..................................................11
Connecting an ETHERNET cable ........................................................12
Connecting to a wireless LAN........................................................... 12
Controls and indicators .................................................................. 13
Operation of remote control unit .................................................. 14
Installing KENWOOD PC SERVER................................................. 15
Set Up functions ............................................................................... 17
Set up menu ............................................................................................ 17
"Main" Setup .......................................................................................... 18
"DVD Player" Setup ............................................................................... 19
"IP" Setup ................................................................................................ 20
Hierarchical structure of VCD menus (P.B.C. function) ................21
DVD language code list ....................................................................... 21
Playback of DVD-Video, CD-DA or VCD disc ............................. 22
Basic play ............................................................................................... 22
Skipping chapters or tracks ........................................................ 23
Searching .........................................................................................23
STEP (freeze frame and frame advance) ...................................24
Slow motion playback .................................................................. 24
Playback of a desired track,chapter or title ............................ 24
Playback of a requested title, chapter, track or time. ........... 24
Various playback functions ........................................................... 25
Select Audio Language ........................................................................25
Select Audio channel ...........................................................................25
Preparations
Other
DVD/CD/VCD operation
NETWORK SERVER operation
Memory Card operation
Contents
Caution : Read the pages marked carefully to ensure safe operation.
Knowledge
Page 5
5
Preparations
DVF-N7080 (EN/E,X)
Playable files with this unit
÷ Depending on the data recording condition and other factors, playback may not be possible.
÷ Depending on the orientation, still pictures may be cut off slightly in vertical or in horizontal direction.
* Official DivX Certified™ product. Plays DivX
®
5, DivX®4, DivX®3, and DivX®VOD video content (in compliance with
DivX Certified™ technical requirements)
Naming folders and files
Single-byte characters between A and Z, single-byte numerais between 0 and 9, and the single-byte underscore(_) can be
displayed. Ensure that the extension log is attached to all file names.
÷ Never add the wrong extension log to any files, the equipment will assume that they can be played back, and
this will produce loud noises in the speakers, resulting in damage of adverse effects.
File Specifications
MOVIE (file size up to 2GB)
Category/Item format extension detail (Audio)
÷ DATA DISC (ISO 9660 LEVEL 2)
÷ NETWORK
MPEG1 .MPG, .MPEG video resolution up to 720 x 576 Bit Rate up to 1.5Mbps Mpeg1 Layer1 & 2
MPEG2 .MPG, .MPEG video resolution up to 720 x 576 Bit Rate up to 8Mbps Mpeg1 Layer1 & 2
DivX®VIDEO* .AVI video resolution up to 720 x 576
WAV, MP3, Dolby Digital
XviD .AVI video resolution up to 720 x 576 Bit Rate up to 6Mbps
WAV, MP3, Dolby Digital
MUSIC (file size up to 2GB)
Category/Item format extension detail
÷ DATA DISC (ISO 9660 LEVEL 2)
÷ NETWORK
MPEG Audio MPEG1 Audio .MP1 Layer I Bit Rate 32 to 448 kbps, CBR/VBR FS 32k, 44.1k, 48k
.MP2 Layer II Bit Rate 32 to 384 kbps, CBR/VBR FS 32k, 44.1k, 48k
.MP3 Layer III Bit Rate 32 to 320 kbps, CBR/VBR FS 32k, 44.1k, 48k
WMA ver8 .WMA Bit Rate 48 to 192 kbps, CBR FS 32k, 44.1k, 48k
ver9 .WMA Bit Rate 48 to 192 kbps, CBR/VBR FS 32k, 44.1k, 48k
WAV.WAV 16 bit Stereo FS 44.1k, 48k
Ogg Vorbis
.OGG Bit Rate 64 kbps to 256 kbps FS 32k, 44.1k, 48k
PHOTO
Category/Item format extension detail
÷ DATA DISC (ISO 9660 LEVEL 2)
JPEG .JPG, .JPEG video resolution up to 2048 x 1536 24bit True color
file size up to 2MB
BMP .BMP video resolution up to 1024 x 768
file size up to 2MB
color 24bit colors (It displays in 256 colors)
PNG .PNG video resolution up to 1024 x 768
file size up to 1MB
color 24bit colors (It displays in 256 colors)
GIF .GIF video resolution up to 2048 x 1536 256 colors
file size up to 650 KB
÷ NETWORK
JPEG .JPG, .JPEG
file size up to 5MB
24bit True Color
BMP .BMP
file size up to 5MB
24bit True Color
PNG .PNG
file size up to 5MB
24bit True Color
GIF .GIF
file size up to 5MB
24bit True Color
÷ MEMORY CARD
JPEG .JPG, .JPEG video resolution up to 2048 x 1536 24 bit True color
file size up to 2MB
Page 6
6
Preparations
DVF-N7080 (EN/E,X)
Discs information
The system this unit is using does not only play music from CD but can also play the discs listed below to offer you
high-quality entertainment of video of movies and live concerts.
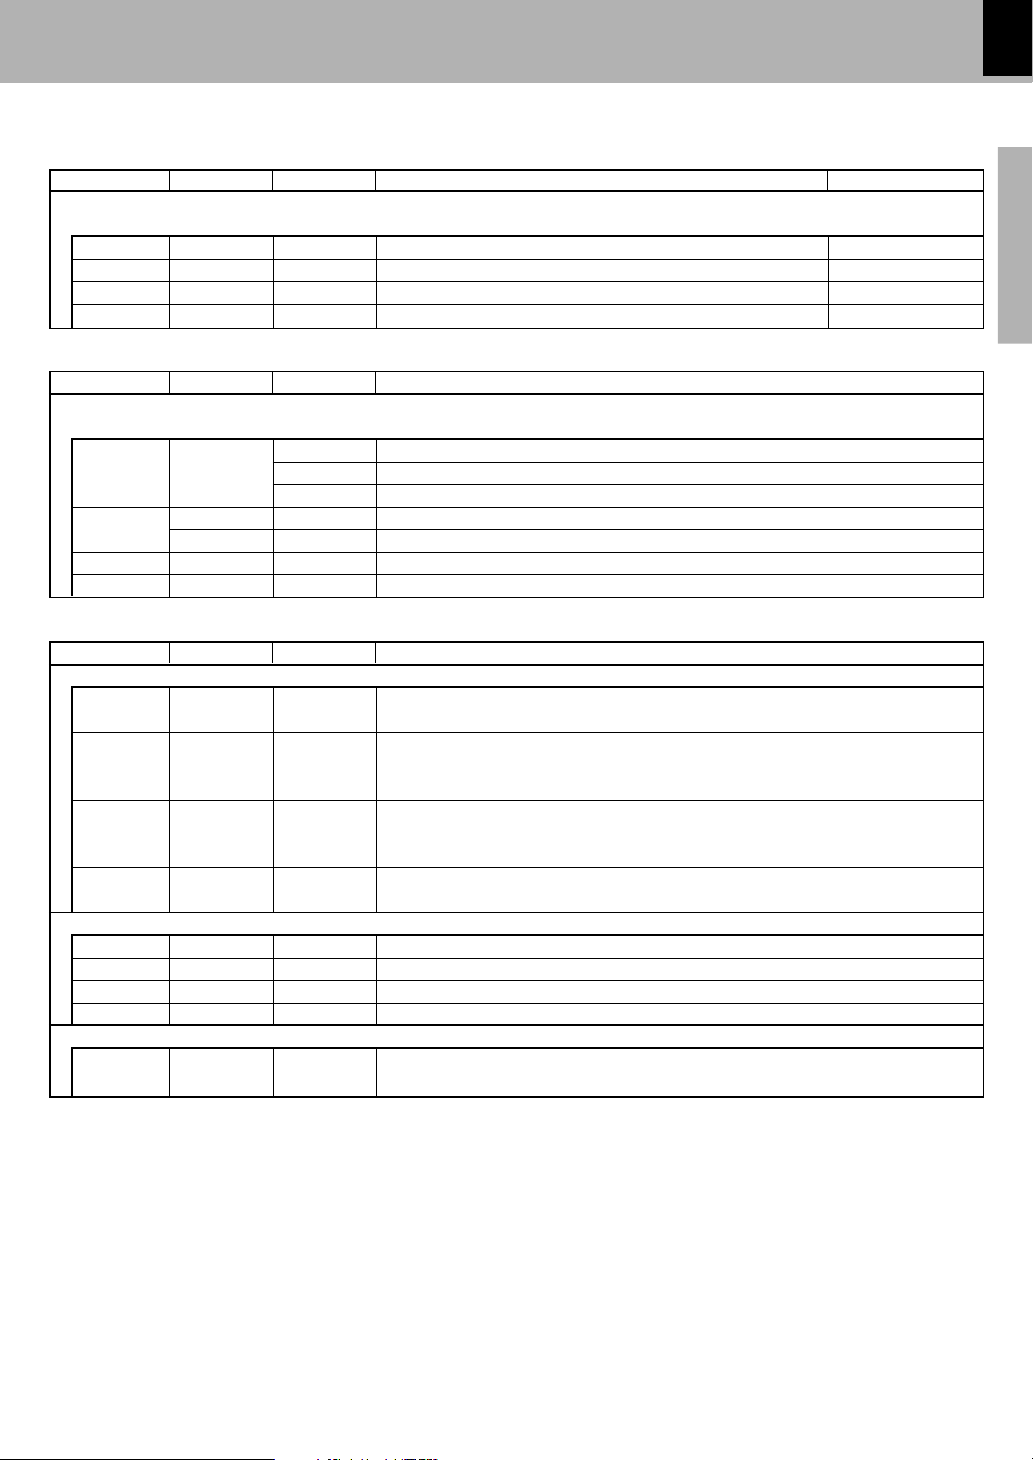
Types of playable discs
÷ Please refer to page 5 for the CD-R, CD-RW, DVD-R, and DVD-RW file formats which can be played back by this unit.
÷ * This unit can play SVCDs, but some functions will not work.
÷ This unit can play back DVD-R and DVD-RW discs recorded in the DVD VIDEO format and DVD+R and DVD+RW
discs, but depending on the recording unit, the disc manufacturer, etc., playback sometimes may not be possible.
÷ This unit may also be incapable of playing certain CD-R/RW discs depending on their properties, recording conditions, etc.
Video + Audio
Audio
Contents
Played sides
Disc size
One side only One side only
Max. 20 min., digital Max. 80 min., digital
One or both One or both
Approx. 41 min.
(1 side, 1 layer)
Approx. 75 min.
(1 side, 2 layers)
Approx. 82 min.
(2 sides, 1 layer)
Approx. 150 min.
(2 sides, 2 layers)
Approx. 133 min.
(1 side, 1 layer)
Approx. 242 min.
(1 side, 2 layers)
Approx. 266 min.
(2 sides, 1 layer)
Approx. 484 min.
(2 sides, 2 layers)
DVD VIDEO
(DVD-R/RW, DVD+R/RW)
CD (CD-R, CD-RW)
Logo mark on disc
Playable Disc
8cm
12cm
8cm
Max. 20 min.
VCD (SVCD*)
One side only
12cm
8cm
12cm
One side only
Max. 74 min.
(In case of an SVCD, the possible play-
back time becomes shorter.)
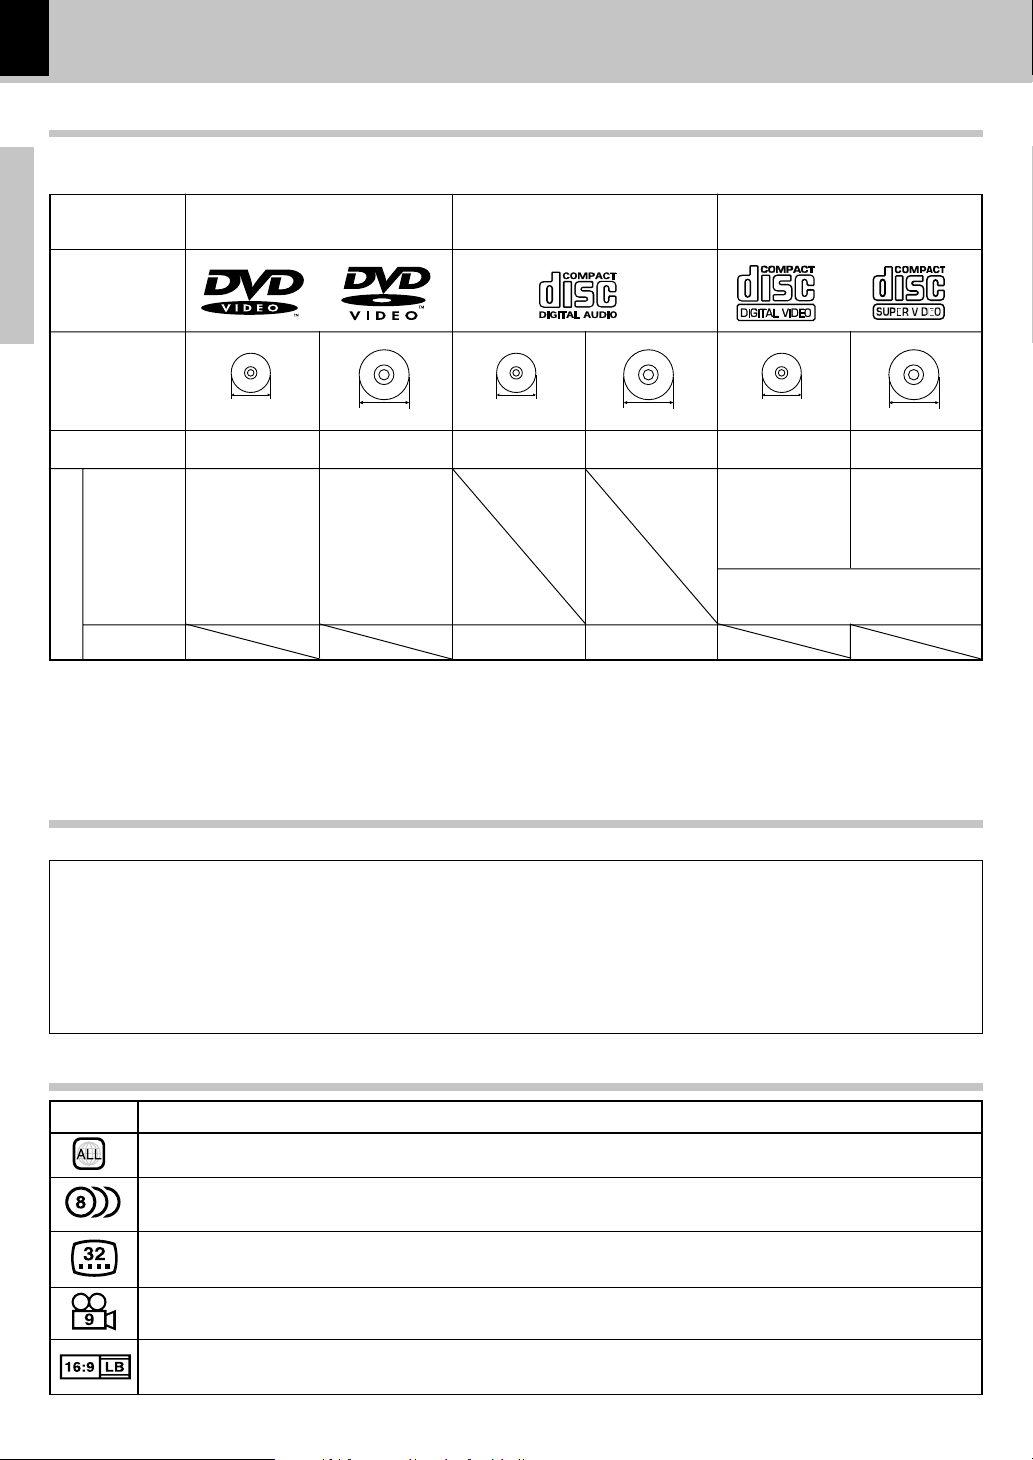
Indicates the region code where the disc can be played.
Number of voice languages recorded with the audio function. The number in the icon indicates the number of
voice languages. (Max. 8 languages)
Number of subtitle languages recorded with the subtitle function. The number in the icon indicates the number
of subtitle languages. (Max. 32 languages)
Number of angles provided by the angle function. The number in the icon indicates the number of angles. (Max.
9 angles)
Aspect ratios that can be selected. "4:3 Letter box" stands for Letter Box and "4:3 Panscan" for Pan/Scan. *
In the example on the left, the 16:9 video can be converted into letter box video.
Icon Description
Icons on the DVD VIDEO discs
Unplayable discs
This player cannot play back any of the following discs.
DVD AUDIO discs
DVD-RAM discs
SACD discs
VSD discs
÷ A DVD VIDEO disc with a region code which does not match this unit or without a region code. For details, see "Region
Codes". 7
÷ When the video format of a disc differs from that of the TV in use, the disc cannot be played normally. For details, see "Video
Formats". 8
CDV discs (Only the audio part can be reproduced.)
CD-G/CD-EG/CD-EXTRA discs (Only the audio can be
reproduced.)
Photo CD discs (Never attempt to play them.)
Page 7

7
Preparations
DVF-N7080 (EN/E,X)
Every player of this model has a certain region code assigned to it based on the country where the player is used.
When the player is used to play back DVD VIDEO discs, it can only play the DVD VIDEO discs carrying the region
codes matching the region code of the player.
The region code for this player is described on the rear panel of the player.
Region Codes
Region codes of the DVD VIDEO discs that can be played with this player
This player can play back a DVD VIDEO disc which carries the corresponding code to the region code of the player
shown in the table above, a marking containing the region code of the player or the "ALL" marking shown below.
Even when a DVD VIDEO disc does not carry any indication of the region code, it may sometimes unable to be played
on this player due to certain restrictions.
Region codes in the world
The DVD players are given a region code according to the country or area it is marketed, as shown in the following map.
Professional use disc
(Air Line cabin service)
Restrictions due to difference between discs
Invalid icon
Some DVD and VCD discs can be played only in certain playback modes according to the intentions
of the software producers. As this player plays discs according to their intentions, some functions
may not work as intended by you. Please be sure to read the instructions provided with each disc.
When an invalid icon is displayed on the TV screen connected to the player, it indicates that the disc
being played is under the restriction as described above.
Page 8
8
Preparations
DVF-N7080 (EN/E,X)
The TV picture display and disc signal systems can be
divided roughly into two TV formats (NTSC and PAL).
They are variable depending on countries and areas.
Video formats
TV formats in major countries
TV Format
NTSC
PAL
Major Countries & Areas
China, U.K., Germany, Australia, New
Zealand, Kuwait, Singapore, etc.
Japan, Taiwan, Korea, USA, Canada,
Mexico, Philippines, Chile, etc.
This unit has a function for changing the video format according to the TV type. Please confirm the type of your TV.
Check the video format of the TV to be used
Checking the Video Format
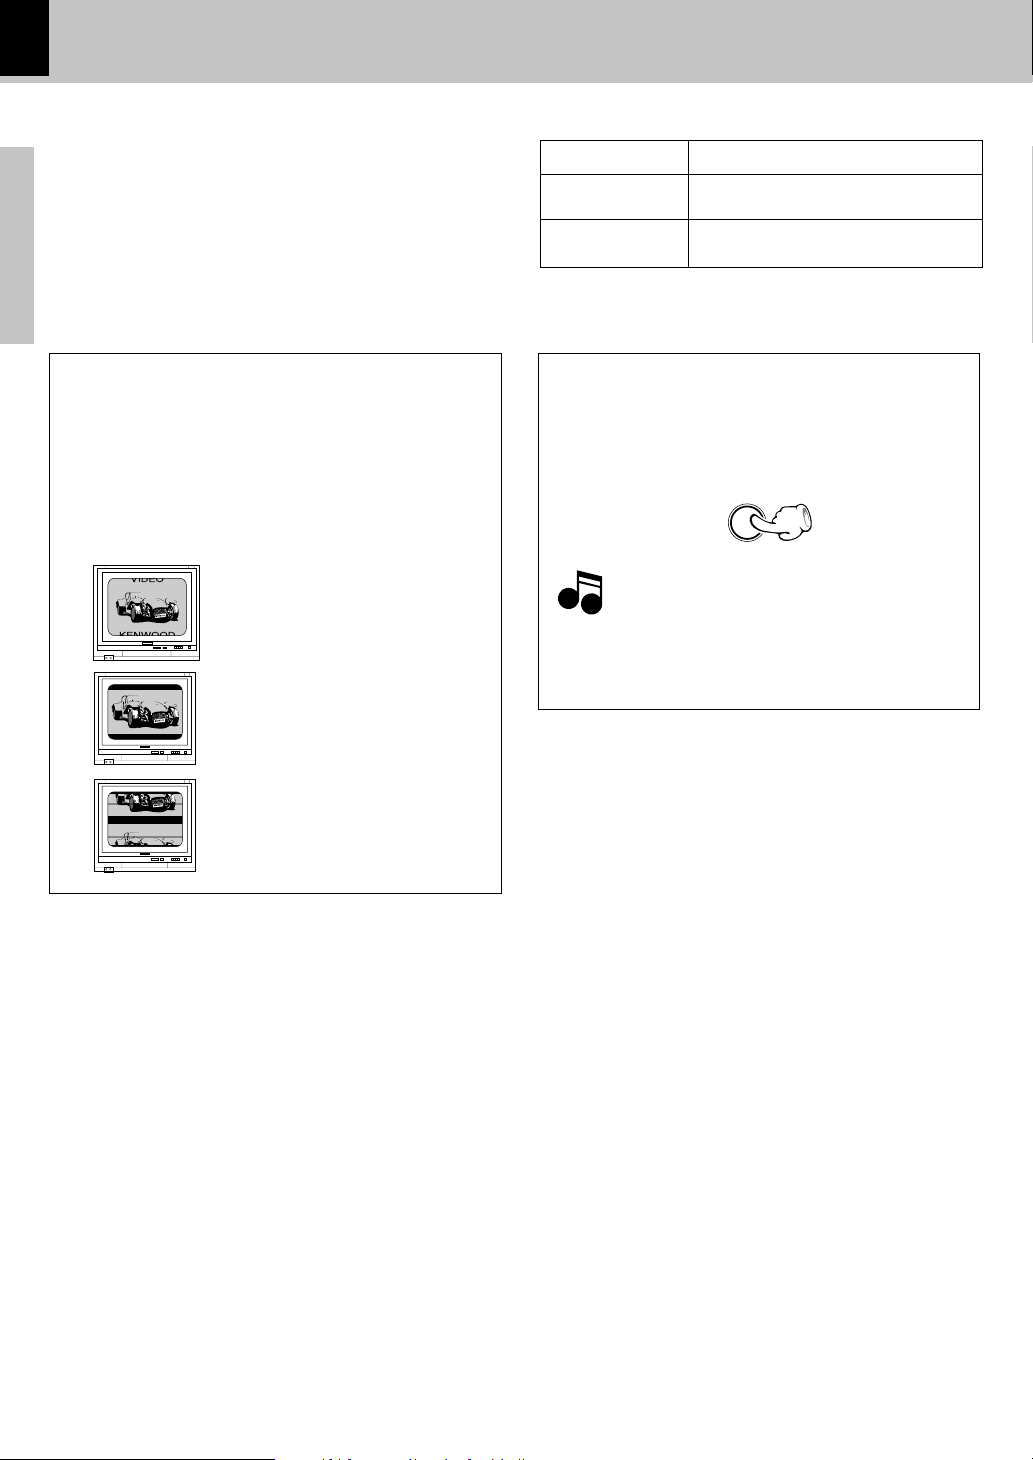
When the video formats are different :
Try playing the disc. If the video formats of the disc and TV
do not match, the played video may be black and white or
become as shown below.
Top and bottom areas are dark.
Top and bottom edges are not
displayed.
Picture turbulence due to sync
unmatching.
During stop, press the VIDEO OUT key on the re-
mote to select a TV type temporarily.
To select TV Type
VIDEO OUT
Note
Note
To change the initial setting, change the "Video Out"
setting in the "Main" settings on the Setup menu
screen. *
Page 9
9
Preparations
DVF-N7080 (EN/E,X)
Label side
Playing side
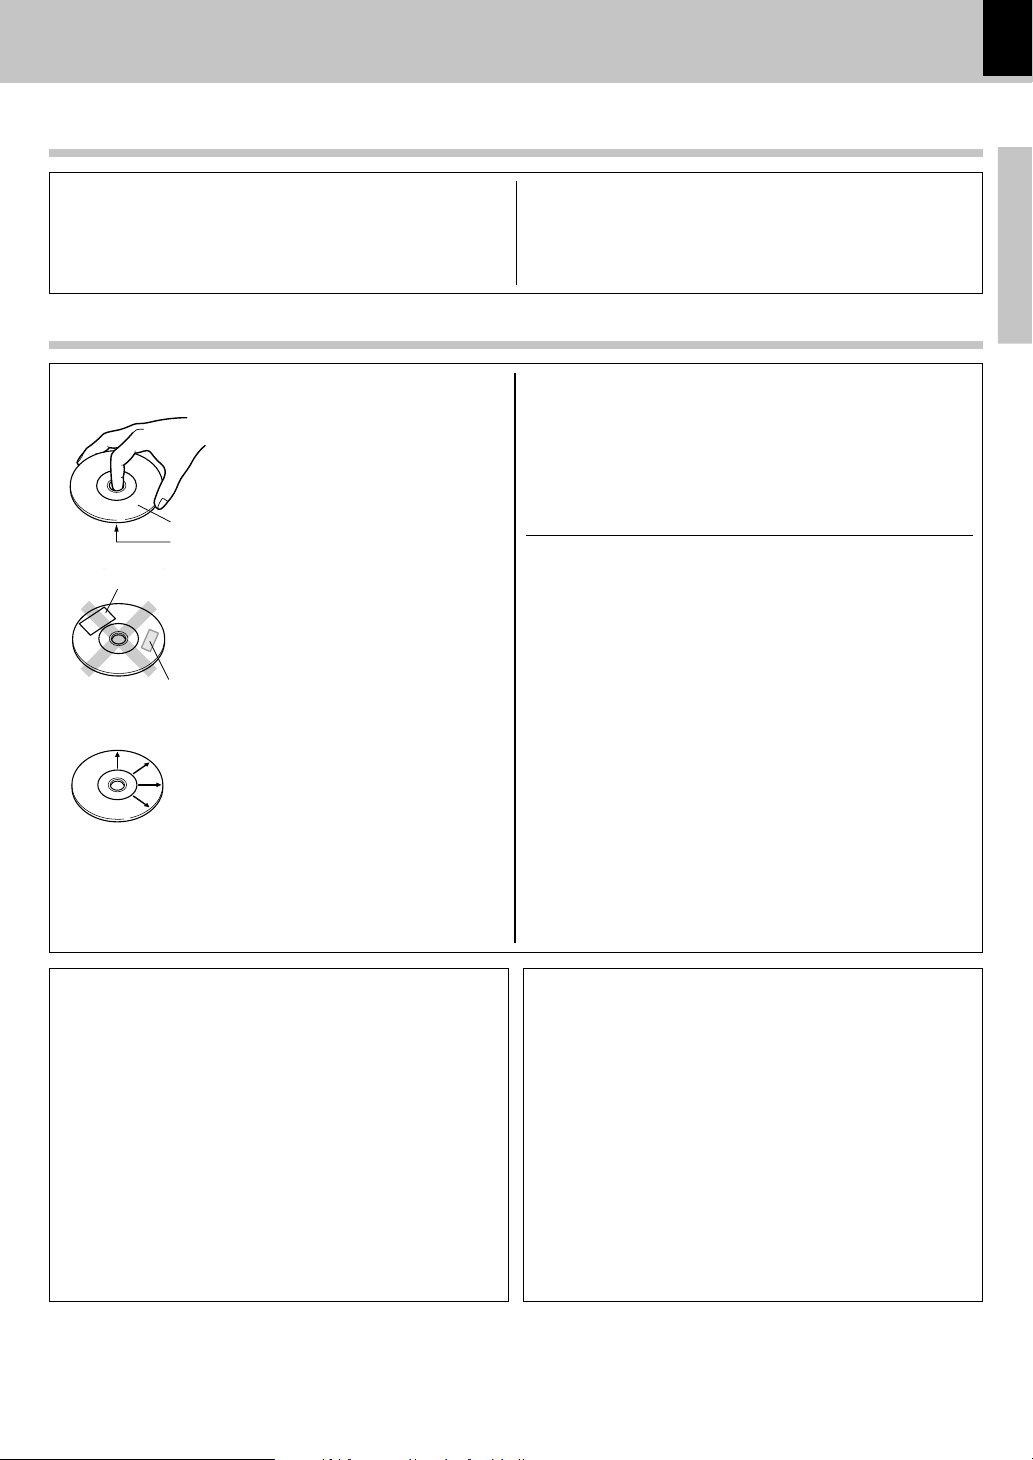
Cleaning
If there are fingerprint marks or foreign matter
found on the disc, lightly wipe the disc with a
soft cotton cloth (or similar) from the center of
the disc outwards in a radial manner.
Storage
When a disc is not to be played for a long pe-
riod of time, remove it from the player and
store it in its case.
Handling
Hold the disc so that you do not touch the
playing surface.
Disc handling precautions
Disc accessories
Do not attach paper or tape to either the
playing side or the label side of the disc.
Sticker
Sticky paste
Never play a cracked or warped disc
Important items
When the front panel or case becomes dirty, wipe with a soft,
dry cloth. Do not use thinner, benzine, alcohol, etc. for these
agents may cause discoloration.
In regard to contact cleaner
Maintenance
Reference
Caution on condensation
Before transporting or moving this unit, carry out the
following operations.
1. Set the ON/STANDBY switch to ON without
loading a disc.
2. Set the input selector to DVD.
3. Wait a few seconds and verify that the display
below appears.
"NO DISC"
4. Set the ON/STANDBY switch to OFF.
5. Remove the PC card adapter.
Maintenance of the unit
Do not use contact cleaners because it could cause a malfunction.
Be specially careful not to use contact cleaners containing oil, for
they may deform the plastic component.
During playback, the disc rotates at high speed in the player. Therefore,
to avoid danger, never use a cracked or deformed disc or a disc repaired
with tape or adhesive agent. Please do not use discs which are not
round because they may cause malfunction.
The disc accessories (stabilizer, protection sheet, protection ring, etc.)
which are marketed for improving the sound quality or protecting discs
as well as the disc cleaner should not be used with this system because
they may cause malfunction.
Note related to transportation and movement
Condensation (of dew) may occur inside the unit when there is a big
difference in temperature between this unit and the outside. This unit
may not function properly if condensation occurs. In this case, leave
the unit for a few hours and restart the operation after the condensa-
tion has dried up.
Be specially cautious against condensation in the following circum-
stances:
When this unit is carried from one place to another across a big
difference in temperature, when the humidity in the room where
this unit is installed increases, etc.
Page 10
10
Preparations
DVF-N7080 (EN/E,X)
YCBC
R
COMPONENT VIDEO
R L
AUDIO
VIDEO S VIDEO
OPTICAL COAXIAL
DIGITAL OUT
(BIT STREAM/PCM)
ETHERNET
COMPONENT VIDEO OUTPUT AV OUTPUT
YCBC
R
COMPONENT VIDEO
R L
AUDIO
VIDEO S VIDEO
OPTICAL COAXIAL
DIGITAL OUT
(BIT STREAM/PCM)
ETHERNET
COMPONENT VIDEO OUTPUT AV OUTPUT
Note
Note
System Connections
Caution:
Do not plug in the power lead until all connections are completed.
Make connections as shown below.
When connecting the related system components, refer also to the instruction manuals of the related components.
Malfunction of microcomputer
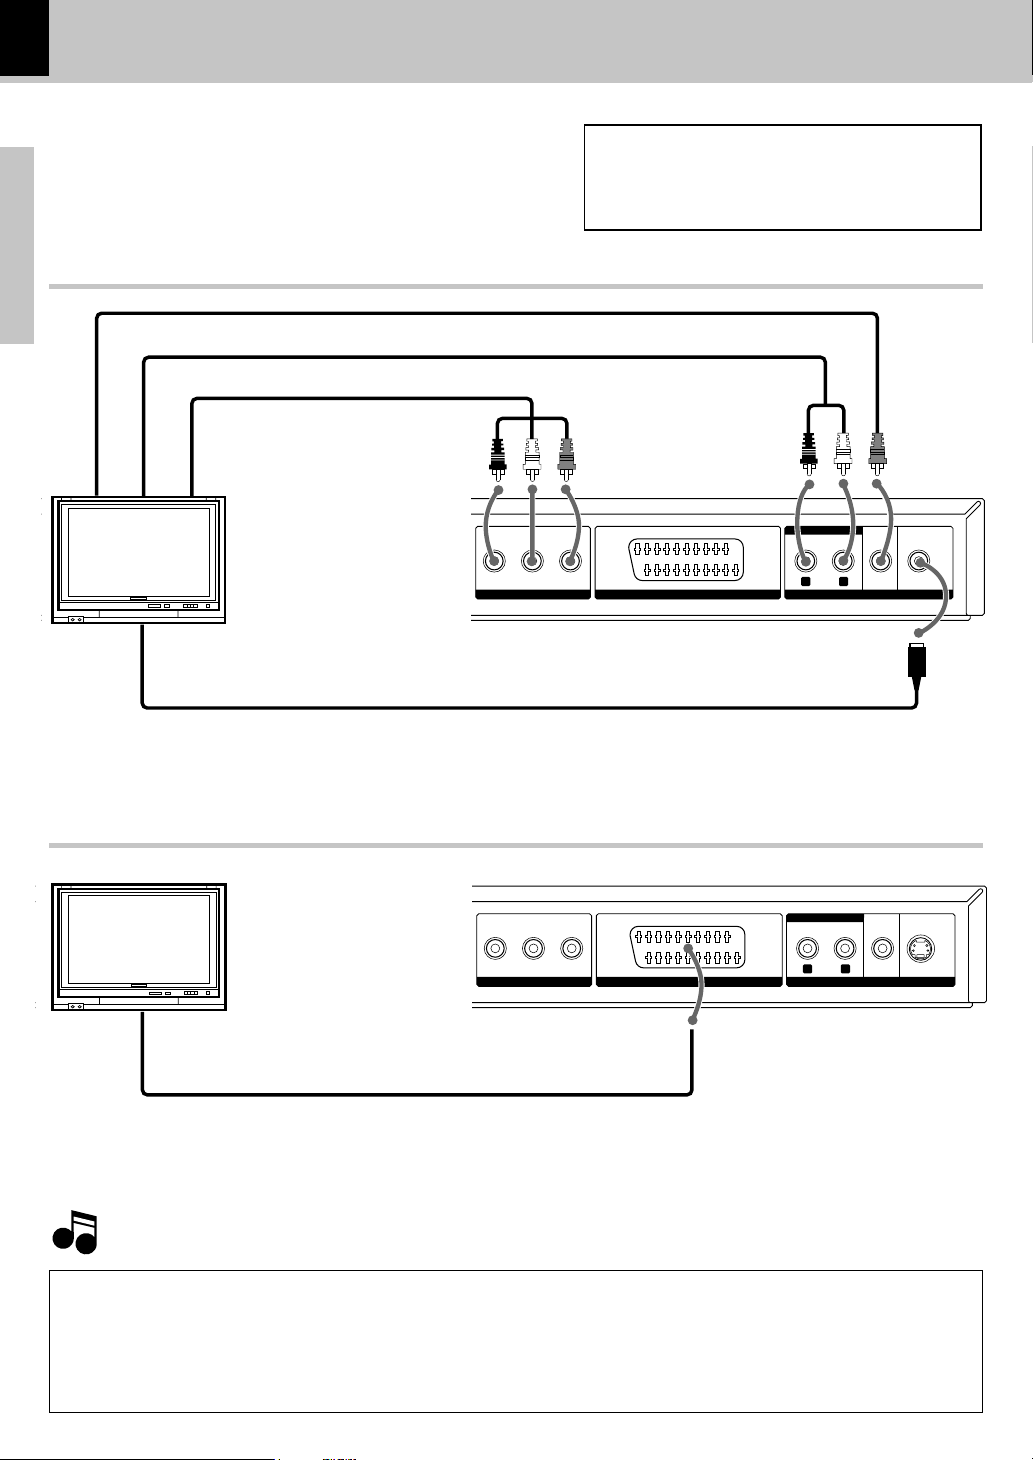
Connecting to a TV with video input terminal
Component video cords
(Commercially available)
TV
Connecting to a TV with SCART input terminal
TV
SCART cable (Commercially available)
DTS disclaimer clause
When playing DTS-encoded (CDs, DVDs), excessive noise will be exhibited from the analog stereo outputs. To avoid possible
damage to the audio system, the consumer should take proper precautions when the analog stereo outputs of the DVD player is
connected to an amplification system.
To enjoy DTS Digital Surround™ playback, an external 5.1 channel DTS Digital Surround™ decoder system must be connected to
the digital output (S/P DIF, AES/EBU, or TosLink) of the DVD player.
Make sure the DVD player is connected directly to the TV and not to a VCR, otherwise the DVD image could be distorted by the
copy protection system.
Audio cord
S-video cord (Commercially available)
* Connect only either the video (composite) cord or the S-video cord.
For connection with an audio cord, set the "Digital Audio" setting of the "Main" settings on the Setup menu screen
to "PCM (Analog on)". *
Video cord
If operation is not possible or erroneous display appears even
though all connections have been made properly, reset the microcomputer referring to "In case of difficulty". i
For connection with an audio cord, set the "Digital Audio" setting of the "Main" settings on the Setup menu screen
to "PCM (Analog on)". *
Page 11
11
Preparations
DVF-N7080 (EN/E,X)
Notes
Notes
YCBC
R
COMPONENT VIDEO
R L
AUDIO
VIDEO S VIDEO
OPTICAL COAXIAL
DIGITAL OUT
(BIT STREAM/PCM)
ETHERNET
COMPONENT VIDEO OUTPUT AV OUTPUT
INPUT DIGITAL INPUT
AUDI O
VIDEO
R
L
OPTICAL
COAXIAL
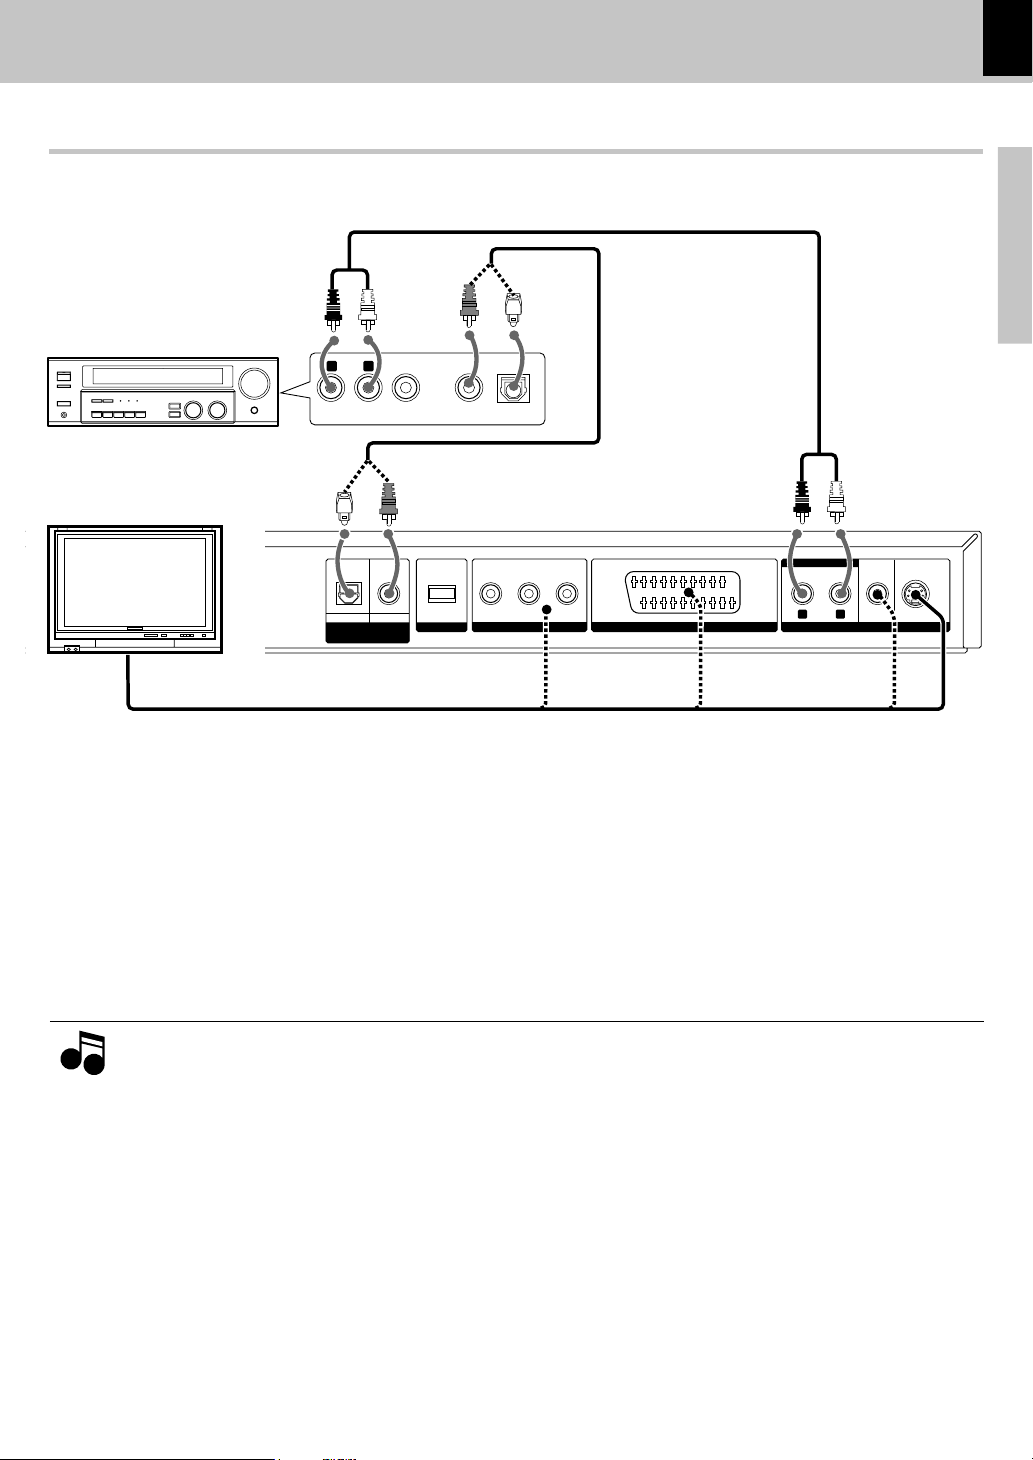
Connecting to an Audio component
Audio cord
Optical cable (Commercially
available) or Coaxial Cord
TV
AV receiver or
AV amplifier
Video cord, S-video cord (Commercially available) or Component video cords (Commercially available)
(0)
1. In case an associated system component is connected, also read the instruction manual of the component.
2. If the audio format of the digital output does not match the capabilities of your receiver (amplifier), the receiver produces
a strong, distorted sound or no sound at all.
3. Insert the optical-fiber cable straight into the connector until it clicks.
4. Never bend or bundle the optical-fiber cable.
5. Do not place TV sets or other heavy objects onto this unit.
6. When a 96 kHz signal is played back, it is put out from the DIGITAL OUT terminal after conversion to 48 kHz.
System Connections
For playback of DTS audio, please connect an AV receiver or an AV amplifier which can decode DTS by digital connection.
Amplifier equipped with 2-channel analog stereo or Dolby Pro Logic II / Pro Logic:
Connect the left and right AUDIO OUT jacks on the DVD player to the audio left and right IN jacks on your amplifier, receiver, or stereo
system, using the audio cables.
For connection with an audio cord, set the "Digital Audio" setting of the "Main" settings on the Setup menu screen
to "PCM (Analog on)". *
Amplifier equipped with 2-channel digital stereo (PCM) or a multi-channel decoder (Dolby Digital, MPEG 2, or DTS):
Connect one of the DVD Player's DIGITAL OUT jacks (COAXIAL or OPTICAL) to the corresponding in jack on your amplifier. Use a digital
(coaxial or optical) cable.
Page 12

12
Preparations
DVF-N7080 (EN/E,X)
YCBC
R
COMPONENT VIDEO
R L
AUDIO
VIDEO S VIDEO
OPTICAL COAXIAL
DIGITAL OUT
(BIT STREAM/PCM)
ETHERNET
COMPONENT VIDEO OUTPUT AV OUTPUT
YCB CR
COMPONENT VIDEO
R L
AUDIO
VIDEO S VIDEO
OPTICAL COAXIAL
DIGITAL OUT
(BIT STREAM/PCM)
ETHERNET
COMPONENT VIDEO OUTPUT AV OUTPUT
Connecting an ETHERNET cable
Connecting to a wireless LAN
Router
PC (Windows 2000 or XP)
*Ethernet cable (Commercially available)
Modem
To Internet
Modem
To Internet
Wireless Broadband Router
PC (Windows 2000 or XP)
When not using a router or a hub, connect directly to PC with a cross ethernet cable,
and the IP address must be set manually. ())
*Ethernet cable
(Commercially available)
Wireless Ethernet
Bridge
Connect a Wireless Ethernet Bridge to the Ethernet terminal at the rear and establish a wireless connection.
Note
Note
This unit does not have a function for connection to the Internet.
System Connections
* Please refer to the instruction manual of your router or hub. Depending on your router or hub they may in rare case
not work with a cross ethernet cable.
Page 13
13
Preparations
DVF-N7080 (EN/E,X)
123 4 5 6789
0!@
#
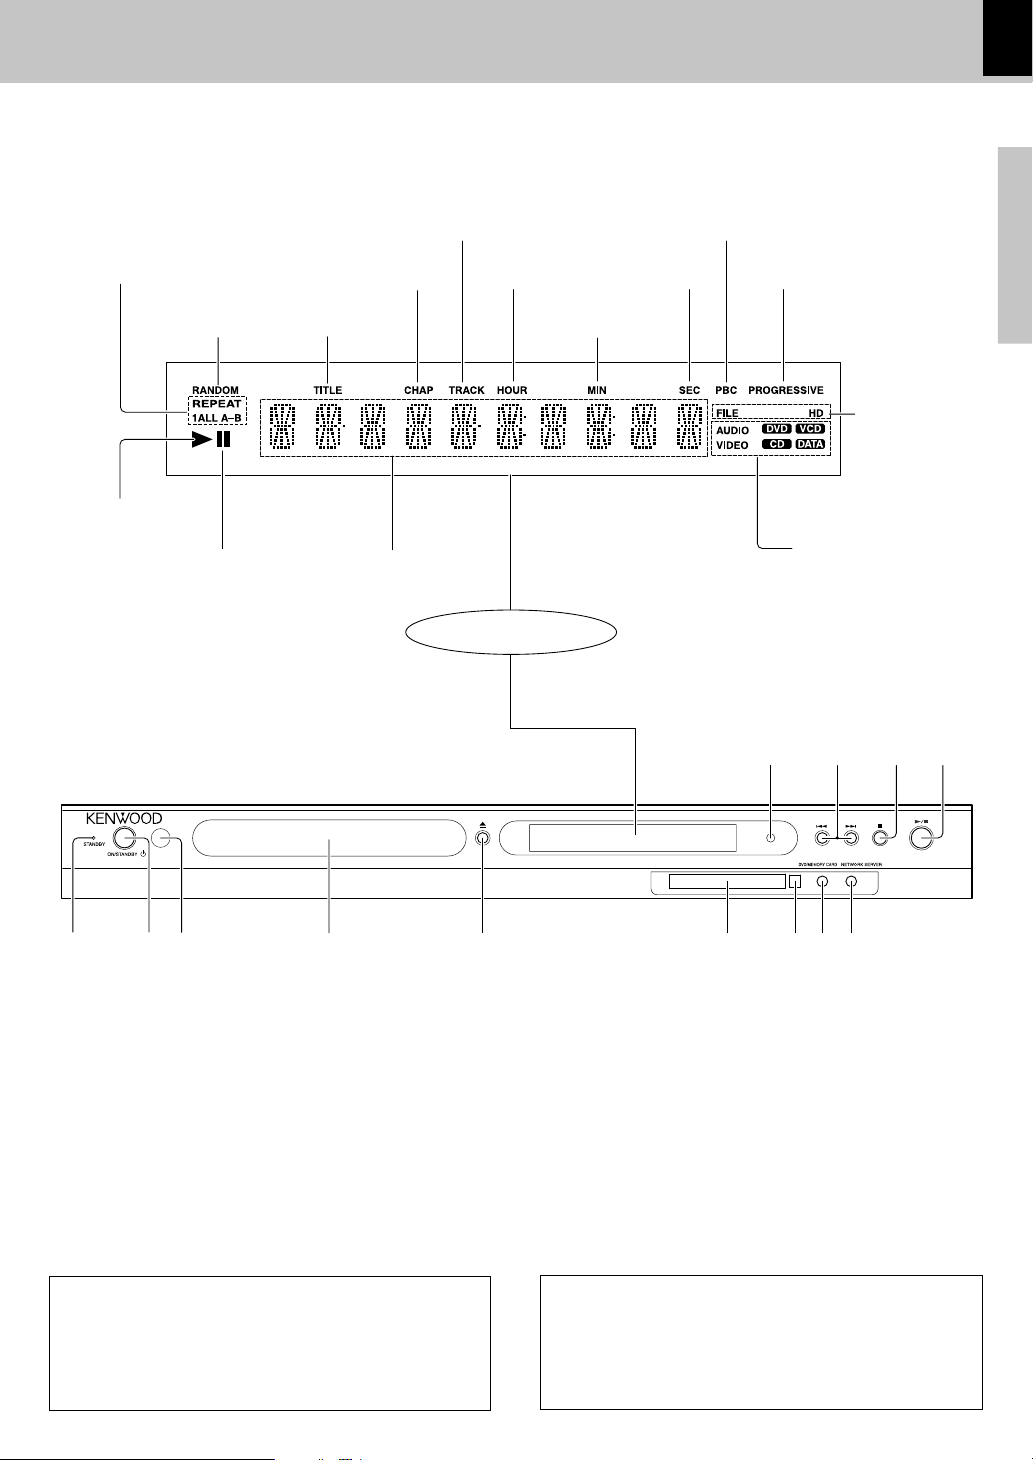
Controls and indicators
Play indicator
Display
1 STANDBY indicator
2 ON/STANDBY key
3 Remote sensor $
4 Disc tray ™•
5 0 (Open/Close) key ™•
6 PC card slot e
7 PC card eject button e
8 DVD/MEMORY CARD key
™•e
9 NETWORK SERVER key ·
0 6 (Play / Pause) key£ª‚
! 7 (Stop) key £º‚
@ 4(PREV.), ¢ (NEXT) (Skip) keys
£º‚
# NET LINK indicator
Disc information
AUDIO indicator
VIDEO indicator
DVD indicator
CD indicator
VCD indicator
DATA indicator
Repeat mode
indicators
STANDBY MODE
While the standby indicator is lit, a small amount of
power is supplied to the system. This is called standby
mode. Under this condition, the system can be turned
ON by the remote control unit.
Pause indicator
Character information
display section
RANDOM
indicator
TITLE indicator
CHAP (Chapter)
indicator
TRACK indicator
HOUR indicator
MIN (Minute)
indicator
SEC (Second)
indicator
P.B.C. indicator
FILE indicator
HD indicator
AT THE TIME OF POWER OFF
When the ON/STANDBY key is pressed, some time
(approx. 10 sec) may be required from lighting of the
STANDBY indicator and the display of this unit and the TV
OSD to switch off.
PROGRESSIVE
indicator
Page 14
14
Preparations
DVF-N7080 (EN/E,X)
Notes
Notes
6m
123
456
7890
POWER
SETUP
123
456
7890
ABC
GHI
PQRS TUV WXYZ
EXTEND 1
EXTEND 2
PHOTOMUSICMOVIE
HOME
PAGE
JKL MNO CLEAR
DEF SEARCH
DIMMER
VIDEO OUT
DVD/MEMORY CARD NETWORK SERVER
ENTER
TOP MENU MENU
P.B .C.
RETURN ON SCREEN
SLOW
AUDIO SUBTITLE ANGLE STEP
REPEAT A–B RANDOM ZOOM
1
3
4
5
6
7
8
9
0
!
@
#
™
¡
)
(
*
&
^
$
%
£
2
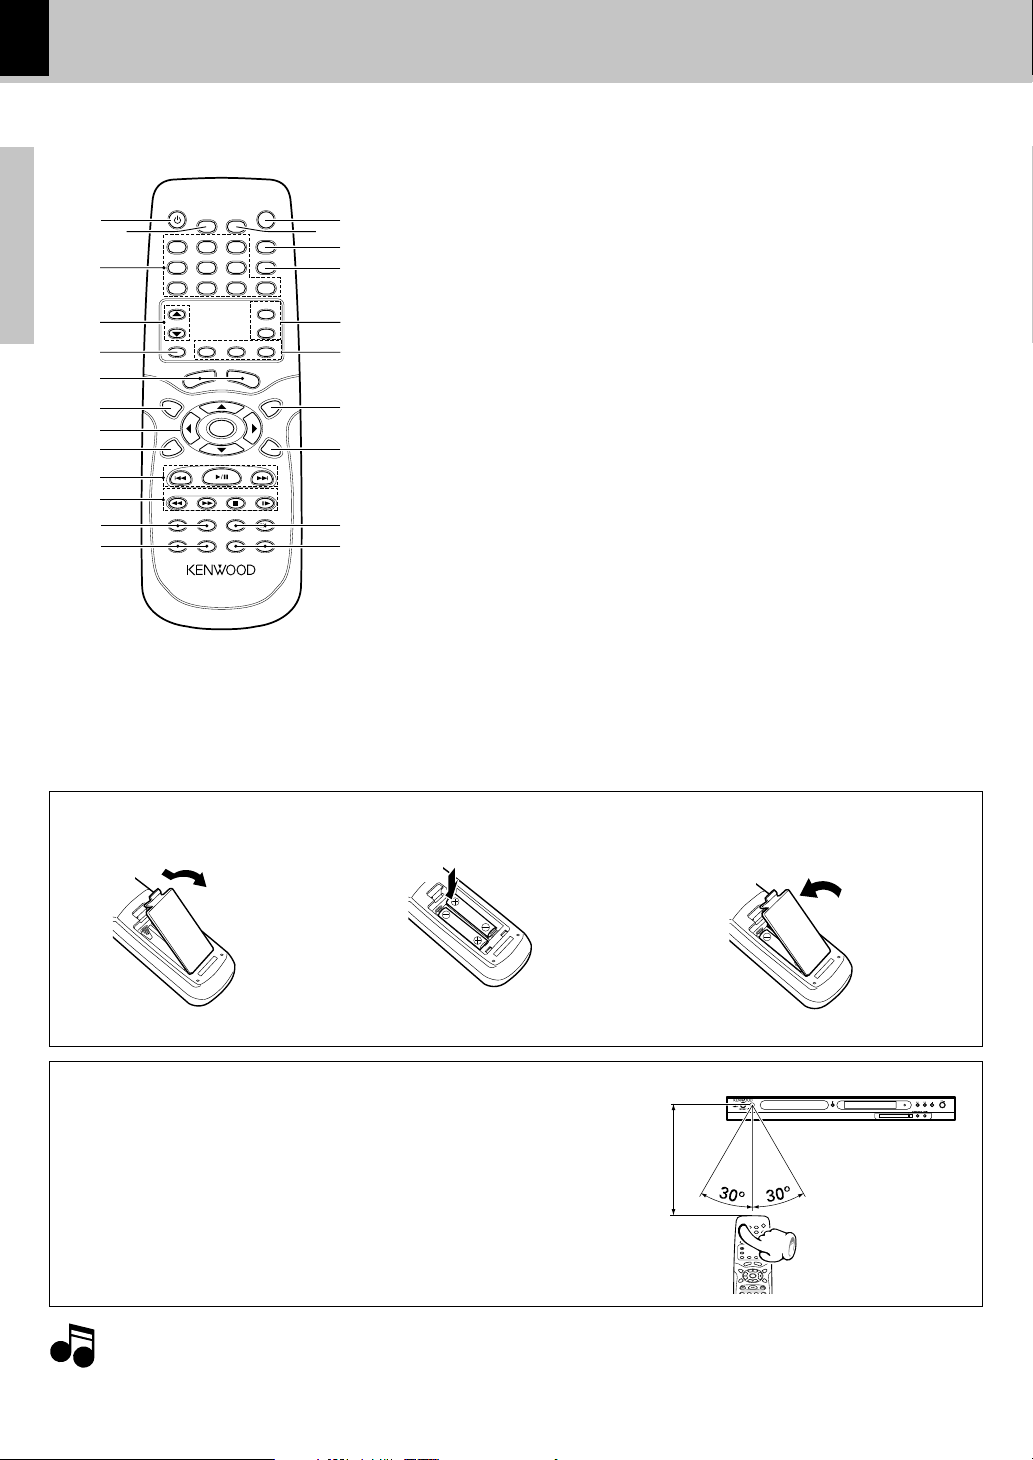
The keys on the remote control unit with the same names as on the main
unit have the same function as the keys on the main unit.
1
POWER key
2 SETUP key &
3 Numeric keys (character
input keys) ¢w
4 PAGE (5/∞) keys
ª‚r
5 HOME key
6 DVD/MEMORY CARD key
™•e
NETWORK SERVER key
·
7 TOP MENU/P.B.C. key
£∞
8 Cursor (5) Up, (∞) Down,
(2) Left and (3) Right keys
&
ENTER key &
9 RETURN key &
0 6 (play/pause) key
£ª‚
4/¢ keys (skip keys)
£º‚
! 1/¡ keys (search keys)
£º‚
Model : RC-D0712 (Infrared ray system)
Operation of remote control unit
Loading batteries
3 Close the cover.
÷ Insert two R6 (“AA”-size) batteries fol-
lowing the polarity indications.
Operation
Operating range
(approx.)
Remote
sensor
1. The provided batteries are intended for use in operation checking, and their service life may be short.
2. When the remote controllable distance becomes short, replace both of the batteries with new ones.
3. If direct sunlight or the light of a high- frequency fluorescent lamp (inverter type, etc.) is incident to the remote sensor,
malfunction may occur. In such a case, change the installation position to avoid malfunction.
1 Remove the cover.
2 Insert batteries.
÷ When pressing more than one remote control keys succes-
sively, press the keys securely by leaving an interval of 1 second or more between pressing of keys.
Insert the power plug into a power outlet, press the
POWER (ON/STANDBY) key of the main unit to on, then
press the desired remote control key.
7 (Stop) key
£º‚
SLOW key ¢
@ AUDIO key ∞
SUBTITLE key ∞
# REPEAT key
§⁄q
A-B (A-B repeat) key §
$ VIDEO OUT key 8
% DIMMER key 3
^ SEARCH key w
& CLEAR key
¢¤w
* EXTEND 1/2 key
(No function on this unit)
( MOVIE key ª·
MUSIC key ª·
PHOTO keyª·e
) MENU key £
¡ ON SCREEN key
¶¤t
™ ANGLE key ¶⁄t
STEP key ¢
£ RANDOM key §
ZOOM key ⁄qt
Page 15
15
Preparations
DVF-N7080 (EN/E,X)
By installing the application KENWOOD PC SERVER in a PC, the data
stored in the PC can be imported in the libraries for listening to or viewing
music, movie and photographic data in the PC on the libraries.
It is first necessary to connect the PC to this unit and set it up. @)
For the installation, log on using the user name with the Admin-
istrator authority.
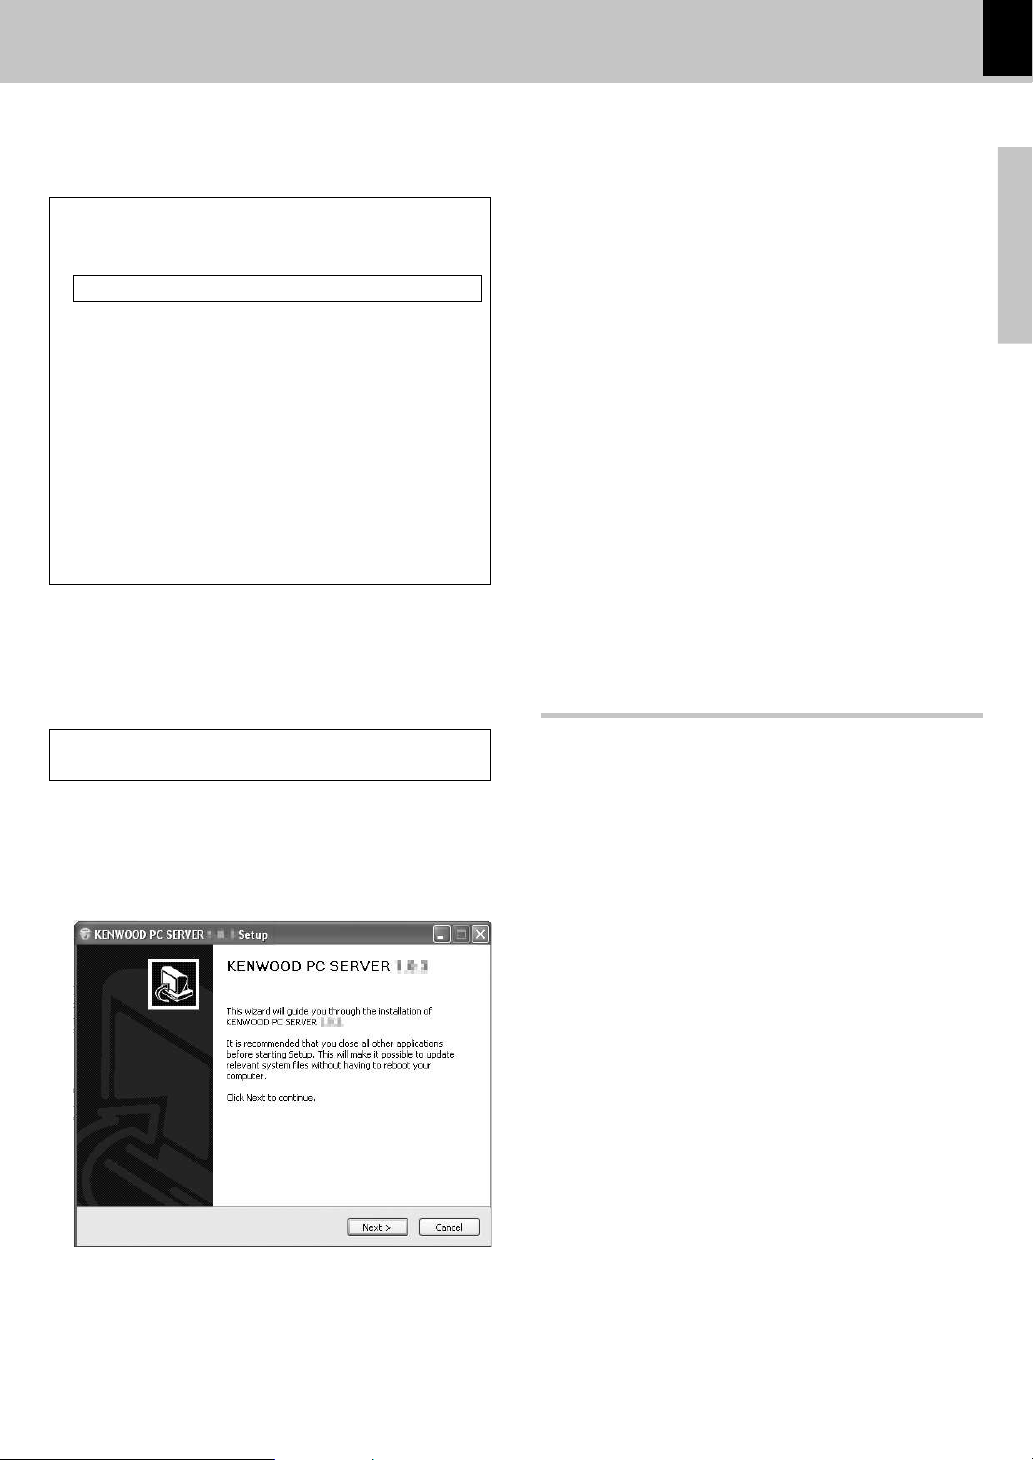
1
Place the ”KENWOOD PC SERVER Installation CD-ROM” in
the CD-ROM compatible drive connected to the PC.
The installer is launched automatically and the [Installer Language]
screen is displayed. After selecting the language, the installation wizard
is displayed.
÷ If the installer is not launched automatically, double-click on
the [My Computer] icon on the desktop and then double-
click on the CD-ROM drive in which the ”KENWOOD PC
SERVER Installation CD-ROM” is placed.
The installer may also be launched by double-clicking on
execution filename “SETUP.EXE”.
2
Continue the installation procedure by following the instructions displayed on the wizard.
The wizard display changes in the following sequence:
[License Agreement] screen
[Choose Components] screen
[Choose install Location] screen
÷ The installation destination folder is set to [Program Files].
If you want to change this default, select [Browse] and
specify the desired destination.
[Java2 Runtime Installer] screen
[KENWOOD PC SERVER Installer] screen
[Completing the KENWOOD PC SERVER Setup Wizard] screen
3
Reboot the PC.
÷ The following modules are added when the ”KENWOOD PC SERVER”
software is installed:
Microsoft® Data Access Components 2.5
©1981-1997 Microsoft Corporation.
All rights reserved.
Microsoft® DirectX® Media Runtime
©1998 Microsoft Corporation.
All rights reserved.
Java
TM
© Sun microsystems Corporation.
All rights reserved.
÷ The above modules are not deleted even when the “KENWOOD PC
SERVER” software is uninstalled.
KENWOOD PC SERVER application
÷ It is prohibited to duplicate, modify, add or otherwise alter a part
or the whole of this software.
÷ KENWOOD will not accept any liabilities for damages incurred by
the user or a third party due to the use of this software.
÷ The specifications of this software may be subject to change
without notice.
Installing KENWOOD PC SERVER
Minimum requirements
Operating system (OS): Windows XP Professional SP1, Windows
XP Home Edition SP1, Windows 2000 Professional SP4 or after.
Be sure to install the Service Pack for each OS.
PC: IBM PC/AT compatible model that supports one of the above-
listed OSs officially.
CPU: Intel Pentium III, 800 MHz or higher.
Memory: 128 MB or more.
Hard disc space: 160 MB or more.
Ethernet interface: 100Base-TX recommended.
Number of DVF-N7080 units connectable to network: 3 units.
÷ The operation is not guaranteed for all of the environments
matching the above requirements.
÷ Playback may be intermittent when 10Base-T is used as the
Ethernet interface or IEEE802.11b is used for the wireless
Ethernet bridge.
Before using the software, it should be installed in the PC with the
following procedure.
÷ Exit from all software that is currently running.
÷ Check the operating environment of the PC.
÷ The driver software will be installed automatically when the software
is launched for the first time after its installation.
Page 16
16
Preparations
DVF-N7080 (EN/E,X)
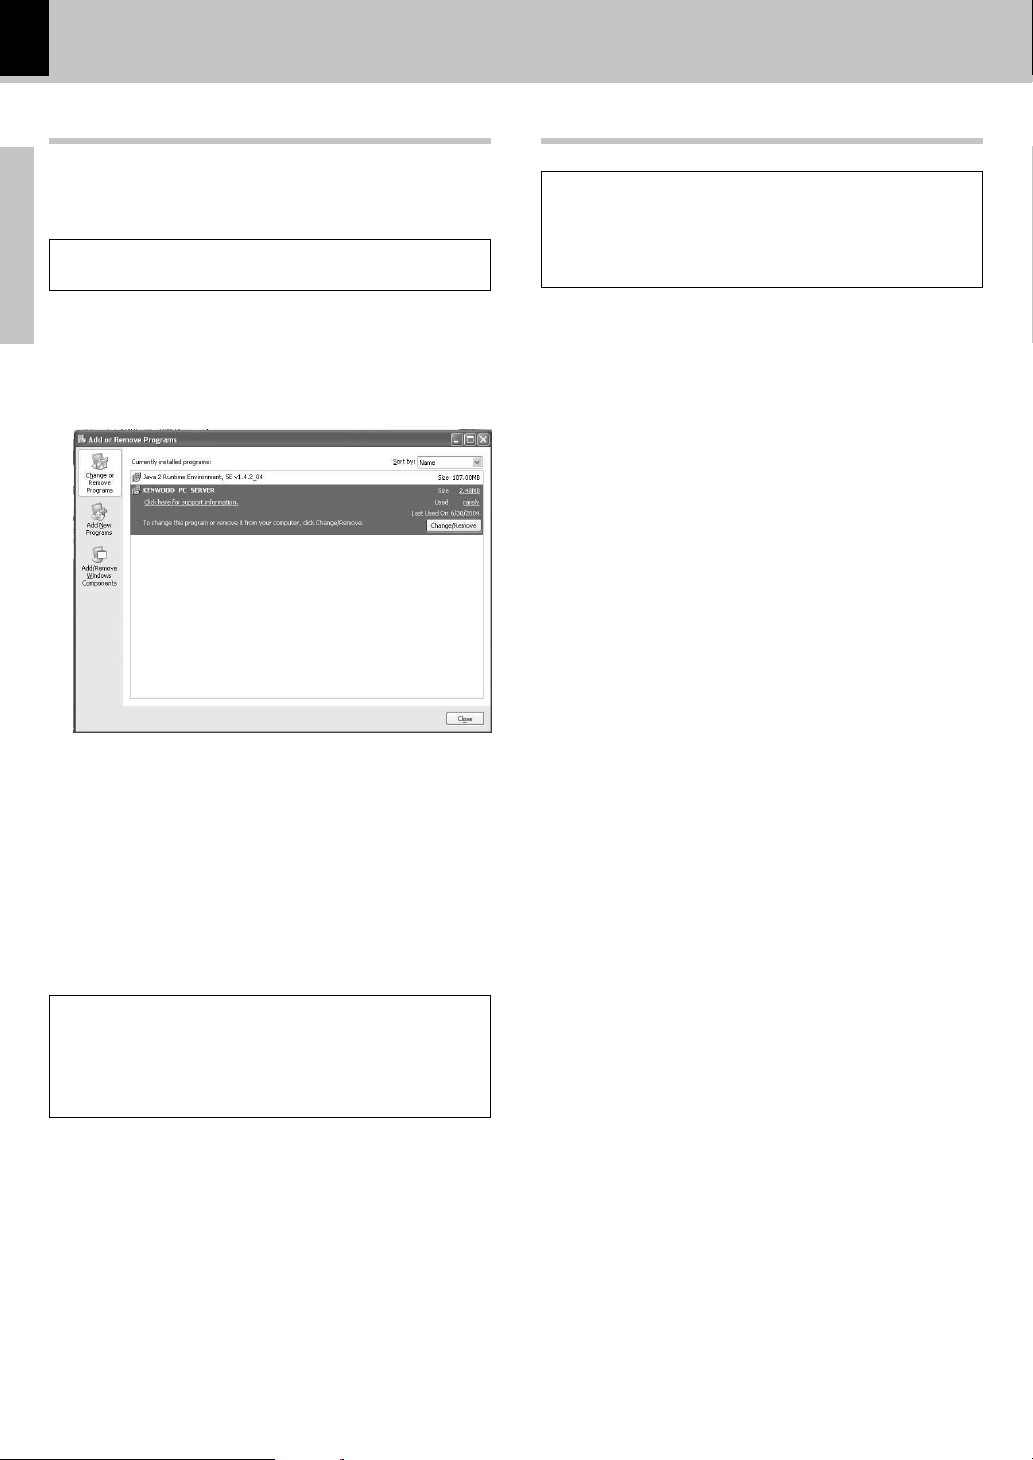
Uninstalling KENWOOD PC SERVER
When the software is no longer necessary, the software program can be
removed by executing uninstallation. Be sure to exit from the software
before proceeding to its uninstallation.
For the uninstallation, log on using the user name with the Admi-
nistrator authority.
1
Select [Start] \ [Control Panel]
\
[Add or Remove Programs].
2
In the [Change o r Remove Programs] dialog box, select
[KENWOOD PC SERVER] and click on the [Change/Remove]
button.
÷ The software can also be uninstalled by selecting [Program] \
[KENWOOD PC SERVER] and then clicking on [Uninstall].
3
Execute the uninstallation procedure by following the instructions displayed.
÷ Even after the “KENWOOD PC SERVER” software has been
uninstalled, the data edited with the software remains in the
KENWOOD folder set as the data save destination folder of
the software.
If you want to remove the software completely from the PC,
delete the “KENWOOD” folder after uninstallation.
To change the software
Uninstall the existing software, reboot the PC and install the new
software.
If the new software is installed immediately uninstalling the previous
software, the operation of the new software will be abnormal.
Installing KENWOOD PC SERVER
Updating KENWOOD PC SERVER
The latest information and procedure to update your KENWOOD
PC SERVER can be found in the "Technical Support" / "Service"
section on the website of your resident country (if necessary you
can find a link to your local website on www.kenwood.com <http:/
/www.kenwood.com>).
÷ How to check the current version of KENWOOD PC SERVER ;
Lanch the KENWOOD PC SERVER, select [Help] \ [Version
Infomatioin]
1 Uninstall the current KENWOOD PC SERVER and Java 2
Runtime, then reboot the PC.
2 Download the latest version of KENWOOD PC SERVER
and Java 2 Runtime.
3 Install the new version of KENWOOD PC SERVER and
Java 2 Runtime. %
Page 17

DVF-N7080 (EN/E,X)
Set Up functions
17
Preparations
SETUP
ENTER
ENTER
ENTER
ENTER
POWER
123
456
7890
Set up menu
Set Up functions
Initial Settings
By using the Setup menu, you can make various adjustments to items. For details on each Setup menu item, see
pages 18 to 20.
General Operation
2 Press SETUP key.
3 Use the Cursor up/down (5/∞) keys on the remote
to select the desired option, then press the ENTER
key to move to the second level.
4 Use the Cursor up/down (5/∞) keys on the remote
to select the second desired option, then press the
ENTER key to move to third level.
The Setup menu appears.
The possible setting items of the second level and the presently effective parameters are displayed.
÷ For return to the preceding level, press the RETURN key
or the Cursor left (2) key on the remote or select BACK
on the TV screen and press the ENTER key.
÷ For return to the preceding level, press the RETURN key
or the Cursor left (2) key on the remote or select BACK
on the TV screen and press the ENTER key.
During playback or pause, press STOP key.
1 Turn on the POWER
The power is switched on, but a little time is required until operation becomes possible.
÷ To exit the Setup menu, press the RETURN key or the
Cursor left (2) key on the remote or select BACK on the
TV screen and press the ENTER key.
SETUP
Cursor keys/
ENTER
RETURN
Page 18

DVF-N7080 (EN/E,X)
Set Up functions
18
Preparations
Menu Language
Select a language for the Setup menu and onscreen display.
TV Aspect
Select the aspect ratios
4:3 Letterbox: Select when a standard 4:3 TV is
connected. Displays a wide picture with bands on
the upper and lower portions of the screen.
4:3 Panscan: Select when a standard 4:3 TV is connected. Automatically displays the wide Picture on
the entire screen and cuts off the portions that do
not fit.
16:9: Select when a 16:9 wide TV is connected.
Video Out
"Main" Setup
Digital Audio
Select the Digital Audio format.
Bitstream (Analog off): Select "Bit stream" if you
connect the DVD Player’s DIGITAL OUT jack to an
amplifier or other equipment with a Dolby Digital or
DTS decoder.
PCM (Analog on): Select when connected to a twochannel digital stereo amplifier. DVDs encoded in
Dolby Digital or MPEG will be automatically converted
to two-channel PCM audio.
Select the video format put out to the VIDEO OUT
terminal. Select according to the format of the TV
display to be connected.
The output combinations of video format, composite output, S-video output, component output,
and SCART output are shown below.
When the setting for the video format at the time of DVDvideo playback is 480p, 720p or 1080i, the video format
temporarily is output as "5 PAL CVBS & YCbCr".
Note
Note
Note
Note
The video format can be switched temporarily by pressing the
VIDEO OUT key of the remote control unit.
Select "PCM" when not connecting to an AV
receiver or AV amplifier.
Screen Saver
Select Screen Saver on or off.
ON: The screen saver starts when you leave this
unit in stop mode for about 5 minutes.
The item in are the initial set values.
Video
Composite S-video Component SCART
format
1 NTSC CVBS Y/C CVBS
2 NTSC CVBS YCbCr CVBS
3 NTSC CVBS RGB
4 PAL CVBS Y/C CVBS
5 PAL CVBS YCbCr CVBS
6 PAL CVBS RGB
7 480p YCbCr
8 720p YCbCr
9 1080i YCbCr
"Main" Setup (Continued)
Auto Power Save
Select ON or OFF.
ON: Power will switch off automatically when you
leave this unit in stop mode for about 60 minutes.
Firmware Update
Refer to page 47 for Firmware update.
Progressive Scan and Interlace Scan
This is the TV screen scanning method. When an image is shown on the TV, the interlace scan method
scans only the odd lines in one frame and then the
even lines in the next frame, while the progressive
scan method shows the lines scanned sequentially
from the top. Progressive scan results in a picture with
less flicker than with interlace scan.
The number indicates the number of effective scan
lines.
Example:
720P : Progressive scan with 720 effective lines
1080i : Interlace scan with 1080 effective lines
Page 19

DVF-N7080 (EN/E,X)
Set Up functions
19
Preparations
Note
Note
Note
Note
"DVD Player" Setup
Disc Menu Language
Select the language you prefer for the Disc Menu
Audio Language
Select the language you prefer for the audio Track.
Subtitle Language
Select the language you prefer for the Subtitle.
Original: Refers to the original language in which
the disc was recorded.
Other: To select another language, press numeric
keys then press the ENTER key to enter the corresponding digit number according to the language code
list (¡) in the reference chapter. If You enter the
wrong Language code, press the CLEAR key.
"DVD Player" Setup (Continued)
Rating
This can restrict playback of adult-oriented DVD discs that
you do not want to be seen by children.
However, even when a DVD disc is marked "Adult-oriented" or so on the label, its viewing cannot be
restricted unless the restriction level is recorded in the
disc itself. ( 8 )
Parental lock level;
Level 8: All DVDs can be played back. (Factory pre-
set)
Level 7 to 2: DVDs for general audiences/children
can be played back. (DVDs for adults are prohibited.)
Level 1: DVDs for children can be played back.
(DVDs for adults/general audiences are prohibited.)
Change Password
You can enter or change password.
1 Select Change Password on the Rating menu
then press the ENTER key.
2 Enter the old password, then press the ENTER
key.
3 Enter the new 4-digit code, then press the EN-
TER key.
4 Press the SETUP key to exit the menu.
Temporary on/off switching is possible by pressing the
P.B.C. switch of the remote control unit. ∞
Depending on the disc, not the language set here,
but the language specified by the disc will have
priority.
VCD P.B.C.
Set Playback Control (PBC) to On or Off. ¡
on: Video CDs with PBC are played according to the
PBC.
off: Video CDs with PBC are played the same way as
Audio CDs.
Page 20

DVF-N7080 (EN/E,X)
Set Up functions
20
Preparations
"IP" Setup
While connecting to a network, networked devices are
assigned a unique identifier known as an IP address.
IP addresses are used to direct network traffic to the
correct destination.
Normally, connection is made to a network and automatic acquisition should be selected. When normal
connection to the network by automatic acquisition is
not possible, manual IP address setting etc. is required.
Confirm the IP addresses of all units connected to the
net and set the IP addresses and the subnet mask so that
there is no duplication.
The following settings exist at the time of shipping from
the factory.
IP Address : 192.168.1.1
Subnet Mask : 255.255.255.0
The range from 192.168.1.1 to 192.168.255.255 is recommended for the IP addresses and 255.255.255.0 is recommended for the subnet mask.
4 Select [Internet Protocol (TCP/IP)].
Note
Note
Obtaining Address
Auto: Assigns an IP address and provides other con-
figuration information automatically.
Manual: Assigns an IP address and Subnet Mask
manually.
When "Manual" is selected, the IP address and
the Subnet Mask can be set.
Before setting the IP address of this unit, confirm
the IP addresses of all connected PCs.
To confirm the IP address of a PC.
(In case of Windows XP)
1 Log on with a user name with administrator
privilege.
2 Select [Start] \ [Control Panel] \ [Network
and Internet Connections] \ [Network Connections].
3 Right-click [Local Area Connection] and select
[Properties].
5 Click on the [Properties] button.
Confirm the IP addresses of the other PCs in the
same way.
To input IP address
1 Select IP Address on the IP menu then press the
ENTER key.
2 Enter the IP Address, then press ENTER key.
3 Press SETUP key to exit the menu.
Subnet Mask
To input Subnet Mask
1 Select Subnet Mask on the IP menu then press
the ENTER key.
2 Enter the Subnet Mask, then press ENTER key.
3 Press SETUP key to exit the menu.
MAC Address
You can not change the MAC Address.
Set the IP address for this unit so that it does
not coincide with the IP address of any PC.
Example:
PC : 192.168.1.2
This unit : 192.168.1.1
Note
Note
If the setting contents have been changed, switch
the power off and on again.
Page 21

DVF-N7080 (EN/E,X)
Set Up functions
21
Preparations
Hierarchical structure of VCD menus (P.B.C. function)
When an item is selected on the menu screen during playback of a P.B.C.-compatible VCD, another menu with more
detailed items may be displayed. When a number of menus are connected in multiple layers in this way, it is said that
the menus have a hierarchical structure. In this structure, the desired scene can be reached by repeating item selections on the menu screens.
Example for a hierarchical structure
First level (menu)
Second level (submenu)
Third level (scenes)
Advancing
Each time the RETURN key is pressed, return is
made to the next higher menu.
When an item is selected on the menu screen
with the ENTER (Select) key or the numeric keys,
advance is made to the next lower menu level.
When the advance destination is the "scene" to
be played, the contents will be played.
Returning
Language Code
Abkhazian 6566
Afar 6565
Afrikaans 6570
Albanian 8381
Ameharic 6577
Arabic 6582
Armenian 7289
Assamese 6583
Aymara 6588
Azerbaijani 6590
Bashkir 6665
Basque 6985
Bengali; Bangla 6678
Bhutani 6890
Bihari 6672
Breton 6682
Bulgarian 6671
Burmese 7789
Byelorussian 6669
Cambodian 7577
Catalan 6765
Chinese 9072
Corsican 6779
Croatian 7282
Czech 6783
Danish 6865
Dutch 7876
English 6978
Esperanto 6979
Estonian 6984
Faroese 7079
DVD language code list
Fiji 7074
Finnish 7073
French 7082
Frisian 7089
Galician 7176
Georgian 7565
German 6869
Greek 6976
Greenlandic 7576
Guarani 7178
Gujarati 7185
Hausa 7265
Hebrew 7387
Hindi 7273
Hungarian 7285
Icelandic 7383
Indonesian 7378
Interlingua 7365
Irish 7165
Italian 7384
Japanese 7465
Javanese 7487
Kannada 7578
Kashmiri 7583
Kazakh 7575
Kirghiz 7589
Korean 7579
Kurdish 7585
Laothian 7679
Latin 7665
Latvian, Lettish 7686
Lingala 7678
Lithuanian 7684
Macedonian 7775
Malagasy 7771
Malay 7783
Malayalam 7776
Maltese 7784
Maori 7773
Marathi 7782
Moldavian 7779
Mongolian 7778
Nauru 7865
Nepali 7869
Norwegian 7879
Oriya 7982
Panjabi 8065
Pashto, Pushto 8083
Persian 7065
Polish 8076
Portuguese 8084
Quechua 8185
Rhaeto-Romance 8277
Rumanian 8279
Russian 8285
Samoan 8377
Sanskrit 8365
Scots Gaelic 7168
Serbian 8382
Serbo-Croatian 8372
Shona 8378
Sindhi 8368
Language Code Language Code
Singhalese 8373
Slovak 8375
Slovenian 8376
Somali 8379
Spanish 6983
Sudanese 8385
Swahili 8387
Swedish 8386
Tagalog 8476
Tajik 8471
Tamil 8465
Tatar 8484
Telugu 8469
Thai 8472
Tibetan 6679
Tigrinya 8473
Tonga 8479
Turkish 8482
Turkmen 8475
Twi 8487
Ukrainian 8575
Urdu 8582
Uzbek 8590
Vietnamese 8673
Volapük 8679
Welsh 6789
Wolof 8779
Xhosa 8872
Yiddish 7473
Yoruba 8979
Zulu 9085
Language Code
÷ When several menus (scenes) can be selected
in each level, screen switching is possible with
the keys ¢ (NEXT) and 4 (PREV.).
Page 22

22
DVF-N7080 (EN/E,X)
Various playback functions
DVD/CD/VCD operation
123
456
7890
POWER
RETURN
6(Play/Pause)
6(Play/Pause)
0 (Open/Close)
DVD/MEMORY CARD
DVD/
MEMORY CARD
Cursor/ENTER
ON/STANDBY
READING
DVD/MEMORY CARD
MAIN UNIT REMOTE
DVD
NETWORK SERVER
MEMORY CARD
Please choose selector.
RETURN
Basic play
Preparation
Load a disc.
1
MAIN UNIT
1 Open the tray.
Label side
Turn on the POWER.
2 Place a disc.
3 Close the tray.
When the Input selector is set to DVD, "READING" is displayed, and the HOME screen is displayed when the data
disc information has been recognized.
When the Input selector is not set to DVD,
press the DVD/MEMORY CARD key.
2
Instead of pressing the DVD/MEMORY CARD key,
switching also can be done in the following way.
1 Press the RETURN key on the remote to display
the SELECT INPUT menu.
2 Press the Cursor up/down (5/∞) keys on the re-
mote to select DVD, then press the ENTER key.
After pressing the POWER (ON/STANDBY) key, it
takes time for a while that operation becomes
posible.
Playback of DVD-Video, CD-DA or VCD disc
Page 23

23
DVF-N7080 (EN/E,X)
Various playback functions
DVD/CD/VCD operation
MAIN UNIT REMOTE
MAIN UNIT REMOTE
MAIN UNIT
REMOTE
REMOTE
Start playback.
3
CHAPTER No. (DVD)
TRACK No. (CD/VCD)
Time display
To stop playback
When a Disc Menu appears on the screen
In case of interactive DVDs, a Disc Menu appears on the
screen. Then press ENTER to select specific menu you
want to play by using Cursor keys.
÷ Each press pauses and plays the disc alternately.
÷ When the 6 key is pressed while the tray is open, the
tray closes automatically, and then playback begins.
÷ Playback does not start when the Input selector is not set
to DVD.
When a menu screen is recorded on the DVD disc,
the menu screen will be displayed when the TOP
MENU key or MENU key is pressed. At the menu
screen, the menu can be selected by pressing the
Cursor keys.
Note
Note
To pause playback
MAIN UNIT
REMOTE
Skipping chapters or tracks
÷ The chapter (or track) in the direction of the key pressed is
skipped, and the selected chapter (or track) will be played
from the beginning.
÷ When the 4 key is pressed once during playback, the chap-
ter (or track) being played will be played from the beginning.
÷ When the 4 key is pressed repeatedly, playback starts
from the start of the preceding chapter (or track).
Searching
÷ Press the 6 key at any time to resume normal playback.
1
FWD 8 X (¡ key) or REV 8 X (1 key)
2
FWD 16 X (¡ key) or REV 16 X (1 key) (only DVD and VCD)
3
FWD 32 X (¡ key) or REV 32 X (1key) (only DVD and VCD)
4
FWD 48 X (¡ key) or REV 48 X (1key) (only DVD and VCD)
4 : To skip backward
¢ : To skip forward
1 : To search backward (REV)
¡ : To search forward (FWD)
During playback, press 1 or ¡ key
÷ Each press switches the searching speed.
÷ You won't hear the sound (audio) on the DVD and VCD when you're using the Search, Step or Slow motion features.
÷ Playback features are not available during the opening credits of a movie.
Notes
Notes
Playback of DVD-Video, CD-DA or VCD disc
TITLE No. (DVD)
Page 24

24
DVF-N7080 (EN/E,X)
Various playback functions
DVD/CD/VCD operation
STEP
SLOW
123
456
7890
ABC
GHI
PQRS TUV WXYZ
JKL MNO
DEF
ENTER
SEARCH
ENTER
ENTER
123
456
7890
ABC
GHI
PQRS TUV WXYZ
JKL MNO
DEF
DVD Search
Time
Title/Chapter
: 00:00:00
: 01/01
Slow motion playback
÷ During playback, press the SLOW( ) keys.
÷ Each press switches the motion speed.
÷ Press the 6 key to resume normal playback.
1 Slow 1/2 (
key)
2 Slow 1/4 (
key)
3 Slow 1/8 ( key)
REMOTE
Playback of a desired track, chapter or title
STEP (freeze frame and frame advance)
÷ During playback, press the STEP keys.
÷ Each time you press the keys, the picture advances one
frame.
÷ Press the 6 key to resume normal playback.
REMOTE
REMOTE
1 Press the numeric keys, then press the ENTER
key.
Playback of discPlayback of DVD-Video, CD-DA or VCD disc
123
456
7890
STEP
SLOW
SEARCH
Numeric keys
Cursor keys,
ENTER
(Example)
To select track No. 23 : 23
ENTER
Playback of a requested title, chapter, track or time.
To start playing at any chosen title, chapter, track or time on the disc.
1 During playback, press the SEARCH key on the
remote.
3 Press the numeric keys to enter the time or
number, then press the ENTER key.
2 Press Cursor up/down (5/∞) keys on the remote
to select the search item. (Time or Title/Chapter,
etc.)
÷ If you enter the wrong numbers, press CLEAR to remove
the numbers you entered. Then input the correct numbers.
Note
Note
The disc being played back is paused.
÷ Playback starts from the selected time.
The SEARCH function does not work during disc stop and
during RANDOM playback.
Example of DVD video
At the time of DVD-Video
÷ Title is selected with operation during stop.
÷ Chapter is selected with operation during playback.
At the time of CD, VCD (with P.B.C. OFF)
÷ Track is selected.
REMOTE
REMOTE
REMOTE
Page 25

25
DVF-N7080 (EN/E,X)
Various playback functions
DVD/CD/VCD operation
AUDIO
AUDIO
SUBTITLE
TOP MENU
P.B.C.
Select Audio Language
If the disc was created with different language tracks,
you can use the AUDIO key on the remote to temporarily
change the DVD player’s Audio setting.
You can change the Subtitle language while you’re
watching a disc (but only if the disc was created
with subtitles).
Select Subtitle Language
The language feature only works if the disc was created with multiple audio tracks.
÷ The display is switched off when no operation is per-
formed for about 3 seconds.
During playback, press the AUDIO key on the remote.
During playback, press the SUBTITLE key on the
remote.
Notes
Notes
1. The subtitle feature only works if the disc was created with multiple subtitle tracks.
2. The subtitle menu of the disc appears in some discs.
Notes
Notes
Various playback functions
÷ The display is switched off when no operation is per-
formed for about 3 seconds.
Select Audio channel
During VCD playback, press the AUDIO key on
the remote.
Each time the key is pressed, the mode switches.
1 "AUDIO L" : Left channel
2 "AUDIO R" : Right channel
3 "AUDIO L+R" : Left and right channel
4 "STEREO" : Stereo
You can choose to play back only the right or the left
channel of audio recorded on the disc, or you can select
stereo playback.
The language is switched each time the AUDIO
key is pressed.
The language is switched each time the SUBTITLE key is pressed.
123
456
7890
ANGLE
ZOOM
RANDOM
SEARCH
Numeric keys
SUBTITLE
AUDIO
REPEAT
A-B
Use P.B.C.(Playback Control)
function
During VCD playback, press the P.B.C./TOP
MENU key on the remote.
Each time the key is pressed, the mode switches.
1 "PBC ON"
2 "PBC OFF"
Temporary on/off switching is possible by pressing the
P.B.C. switch of the remote control unit. (()
Changes with the P.B.C. key of the remote control unit
temporarily changes the setting at the Setup menu.
(()
Note
Note
Page 26

26
DVF-N7080 (EN/E,X)
Various playback functions
DVD/CD/VCD operation
REPEAT
A–B
A–B
RANDOM
RANDOM
Repeat play
Desired title, chapter, track or disc can be played back
repeatedly.
At the time of DVD playback.
÷ "REPEAT CHAPTER":Repeat the chapter that is playing.
÷ "REPEAT TITLE" : Repeat the title that is playing.
At the time of CD/VCD playback.
÷ "REPEAT TRACK": Repeat the track that is playing.
÷ "REPEAT DISC":Repeat the disc that is playing.
The A-B repeat function lets you mark a segment to repeat between the beginning "A" and the end "B" of the
segment you want to replay.
During playback, press the REPEAT key on the remote.
Each time the key is pressed, the mode switches.
At the time of DVD playback. (On screen display)
1 "REPEAT CHAPTER"
2 "REPEAT TITLE"
3 "REPEAT CLEAR" (Repeat off)
1 Press the A-B key on the remote when you want
to choose a scene as the beginning point.
2 Press the A-B key again to choose a scene as the
end point.
÷ To cancel repeat playback, press the REPEAT key and
select "REPEAT CLEAR" or goes off "REPEAT" indicator.
The Repeat play function does not work for the P.B.C.
mode of the VCD and for some DVDs. (
A-B Repeat play
At the time of VCD playback. (On screen display)
1 "REPEAT TRACK"
2 "REPEAT DISC"
3 "REPEAT CLEAR" (Repeat off)
÷ "A POINT SET" display appears.
÷ "B POINT SET" display appears and the repeat sequence
begins.
÷ To cancel A-B Repeat playback, press the A-B key.
If you press SKIP (¢) once during Repeat Chapter
or Track playback, the repeat playback cancels.
Note
Note
Note
Note
Note
Note
A-B REPEAT functions only in one title.
Random play
The tracks of the disc are played in random order.
÷ After all tracks of a disc have been played in random
order, playback will stop.
During playback, press the RANDOM key on the
remote.
To repeat random play
During random playback, press the REPEAT
key on the remote.
Each time you press REPEAT key on the remote, repeat
play would be on and off.
To cancel random play
Press the RANDOM key to cancel random playback.
÷ RANDOM indicator lights up.
÷ Each time you press RANDOM key on the remote,
random play would be on and off.
÷ By pressing ¢ key during random playback, the unit
selects another track and resumes random playback.
÷ RANDOM indicator goes off.
REPEAT
Note
Note
At the time of CD playback. (Display of unit)
1 "REPEAT" and "1" indicator light up
: REPEAT TRACK
2 "REPEAT" and "ALL" indicator light up
: REPEAT DISC
3 Goes off : (Repeat off)
Page 27

27
DVF-N7080 (EN/E,X)
Various playback functions
DVD/CD/VCD operation
ANGLE
ANGLE
ZOOM
On screen display
The on screen display contains many playback information. To see the on screen display, press ON SCREEN key
on the remote while a content is playing.
Playing DVD Playing VCD
Playing CD
Title : Current title number
Chapter : Current chapter number
Total Time: Elapsed time of current title
Audio : Current audio stream number / total audio stream
number, audio language and audio output mode
Subtitle : Current subtitle number / total subtitle number and
Subtitle language
Angle : Angle number / total angle number
Select Camera angle
Some disc contains multiple angles particular scene or
sequence. If the disc only has one angle, this feature
won’t work.
1 During playback, press the ANGLE key on the
remote.
2 Select the Camera angle by pressing the ANGLE
key.
÷ The "ANGLE" display is switched off when no operation is
performed for about 3 seconds.
Zoom function
Use zoom to enlarge the video image.
1 During playback, press the ZOOM key on the
remote.
Each time the key is pressed, the mode switches.
1 "ZOOM 01"
2 "ZOOM 02"
3 "ZOOM 03"
4 "ZOOM OFF"
Note
Note
Zoom may not work on some DVDs.
ANGLE : 1
ANGLE : 2
Track : Current track number/total track number
Track Time : Elapsed time of current track
Total Time : Total time of current disc
Track : Current track number/total track number (dis-
played at the time of P.B.C. off mode)
Track Time : Elapsed time of current track (displayed at the
time of P.B.C. off mode)
Audio : Current audio output mode (Stereo, L, R or L+R)
PBC : Displayed ON or OFF
Page 28

28
DVF-N7080 (EN/E,X)
Various playback functions (Data disc)
DVD/CD/VCD operation
123
456
7890
POWER
RETURN
6(Play/Pause)
6(Play/Pause)
0 (Open/Close)
DVD/MEMORY CARD
DVD/
MEMORY CARD
Cursor/ENTER
ON/STANDBY
READING
DVD/MEMORY CARD
MAIN UNIT REMOTE
DVD
NETWORK SERVER
MEMORY CARD
Please choose selector.
RETURN
Basic play
Preparation
Load a disc.
1
MAIN UNIT
1 Open the tray.
Label side
Playback of Data disc
Turn on the POWER.
2 Place a disc.
3 Close the tray.
When the Input selector is set to DVD, "READING" is displayed, and the HOME screen is displayed when the data
disc information has been recognized.
When the Input selector is not set to DVD,
press the DVD/MEMORY CARD key.
2
Instead of pressing the DVD/MEMORY CARD key,
switching also can be done in the following way.
1 Press the RETURN key on the remote to display
the SELECT INPUT menu.
2 Press the Cursor up/down (5/∞) keys on the re-
mote to select DVD, then press the ENTER key.
After pressing the POWER (ON/STANDBY) key, it
takes time for a while that operation becomes
posible.
When saving files onto media
Ensure that the session is closed or finalized when data has been written on media. There are cases where media on which the
session has not be closed or finalized will not be played back correctly with this equipment.
÷ There are cases where the folder names and file names will not be displayed correctly depending on the software used
to save them.
÷ Do not write folder or file types which cannot be played back with this equipment onto the media.
÷ It is recommended that ten or less sessions are stored when recording files onto a media.
÷ In case of a multisession disc, some time may be required until playback begins.
÷ There are cases where playback is not possible when MP3/WMA/JPEG files (CD-ROM) and music CD infomation (CD-DA)
are saved on the same media.
Page 29

29
DVF-N7080 (EN/E,X)
Various playback functions (Data disc)
DVD/CD/VCD operation
DVD
MOVIE
MUSIC
PHOTO
SETUP
ENTER
ENTER
DVD
NETWORK SERVER
MEMORY CARD
Please choose selector.
ENTER
DVD
MOVIE
HOME
PATH
BACK
1.TOKYO.mpg
2.PARIS.mpg
3.EGYPT.mpg
4.NEW YORK.mpg
5.LONDON.mpg
6.ROME.mpg
7.MUNICH.mpg
PATH:/TRAVEL/JUST PUSH PLAY
Select the files type
3
Press Cursor up/down (5/∞) keys on the remote to
select the files type (MOVIE, MUSIC or PHOTO), then
press ENTER key.
Select a file
4
Press Cursor up/down (5/∞) keys on the remote to
select a file to play.
Start playback
5
Playback of Data disc
÷ The display changes to the SETUP screen when the
SETUP part on the screen is selected.
÷ Return to the preceding screen is made when the RE-
TURN key is pressed.
The path to the current
folder is displayed.
Return icon
RETURN icon : Return is made to the HOME screen or to
the folder screen for the next-higher
level.
HOME icon : Return is made to the HOME screen of
the data disc.
BACK icon : When the RETURN key has been used
during file playback to return to the library
screen, the playback is paused. At this
time, playback will be continued when
the "BACK" icon is selected.
PATH icon : The screen showing the full path to the
presently displayed folder is displayed.
To display the next page of the presently displayed
part : Press the
PAGE
key.
To display the preceding page of the presently displayed part : Press the
PAGE
key.
When a folder has been selected and the ENTER
key is pressed, the next level in the folder is displayed.
Selecting by pressing the MOVIE key, MUSIC key
or PHOTO key of the remote also is possible.
DVD display
HOME screen of Data disc
Library screen example
Page 30

30
DVF-N7080 (EN/E,X)
Various playback functions (Data disc)
DVD/CD/VCD operation
MAIN UNIT REMOTE
MAIN UNIT
REMOTE
REMOTE
To stop playback To pause playback
MAIN UNIT
REMOTE
Skipping files
MOVIE MUSIC
PHOTO
÷ The file in the direction of the key pressed is skipped, and the
selected file will be played from the beginning.
4 : To skip backward
¢ : To skip forward
÷ When the 4 key is pressed once during playback,
the file being played will be played from the beginning.
Note
Note
Searching
MOVIE MUSIC
÷ Press the 6 key at any time to resume normal playback.
1 : To search backward (REV)
¡ : To search forward (FWD)
During playback, press 1 or ¡ key
FWD ¡
Playback of Data disc
During playback, press 4 or ¢ key
Page 31

31
DVF-N7080 (EN/E,X)
Various playback functions (Data disc)
DVD/CD/VCD operation
REPEAT
ANGLE
ZOOM
Various playback functions (Data disc)
Repeat play
MOVIE MUSIC
Desired file or folder can be played back repeatedly.
÷ "REPEAT FILE":Repeat the file that is playing.
÷ "REPEAT FOLDER": Repeat the folder that is playing.
During playback, press the REPEAT key on the remote.
Each time the key is pressed, the mode switches.
MOVIE
(On screen display)
÷ To cancel repeat playback, press the REPEAT key and
select "REPEAT CLEAR" or goes off "REPEAT" indicator.
1 "REPEAT FILE"
2 "REPEAT FOLDER"
3 "REPEAT CLEAR"
Select Picture angle
PHOTO
(only for JPEG files)
1 During playback, press the ANGLE key on the
remote.
÷ The "ANGLE" display is switched off when no operation is
performed for about 3 seconds.
It is possible to rotate a picture.
ANGLE 1 : normal direction.
ANGLE 2 : 90° rotation in clockwise direction.
ANGLE 3 : 180° rotation in clockwise direction.
ANGLE 4 : 270° rotation in clockwise direction.
1
2
3
4
Zoom function
PHOTO
(only for JPEG files)
Use zoom to enlarge the photo image.
1 During playback, press the ZOOM key on the
remote.
Each time the key is pressed, the mode switches.
Each time the key is pressed, the mode switches.
MUSIC
(Icon)
1
: REPEAT FILE
2 : REPEAT FOLDER
3 Goes off : (Repeat off)
Page 32

32
DVF-N7080 (EN/E,X)
Various playback functions (Data disc)
DVD/CD/VCD operation
SEARCH
ENTER
123
456
7890
ABC
GHI
PQRS TUV WXYZ
JKL MNO
DEF
FileSearch
Time:
Playback of a requested time.
MOVIE MUSIC
To start playing at any chosen time on the disc.
1 During playback, press the SEARCH key on the
remote.
2 Press the numeric keys to enter the time, then
press the ENTER key.
÷ If you enter the wrong numbers, press CLEAR to remove
the numbers you entered. Then input the correct numbers.
÷ Playback starts from the selected time.
On screen display
The on screen display contains many playback information. To see the on screen display, press ON SCREEN key
on the remote while a content is playing.
Playing MOVIE file Playing MUSIC file
Playing PHOTO
Note
Note
The disc being played back is paused.
÷ The SEARCH function does not work during disc stop.
File Name : Current file name with path name
File Time : Elapsed time of current file
File Size : Current file size (total time of current file, file size)
Audio Quality : Display audio Codec
Video Quality : Display video Codec
("–– –" is displayed when identification is not
possible.)
File Name : Current file name with path name
File Size : Current file size
Resolution : Resolution of current file
Rotate Angle : Rotate angle of current file
File Name : Current file name with path name
File Time : Elapsed time of current file
File Size : Current file size (total time of current file, file size)
Audio Quality : Display audio Codec
Page 33

33
DVF-N7080 (EN/E,X)
NETWORK SERVER operation
Double-click on shortcut icon on the desktop to launch the
KENWOOD PC SERVER.
Do not attempt to launch KENWOOD PC SERVER more than once.
Names and functions of window components
1 Folder window:
Displays the contents of the PC’s hard disk drive in the directory tree
format.
2 Menu bar:
3 [
] button:
Click on this button to move to the level directly above the level
displayed in the list window.
[SELECT ALL] button:
Click on this button to select all the files and folders displayed in the
list window.
[VIEW] button:
Click on this button to switch the display format the list window.
[EXPLORER] button:
Click on this button to open the Windows Explorer window showing
the list of folders that can be displayed in the list window.
The display format of the Explorer window depends on the setup
made for the OS.
4 List window:
Displays the contents of the folder selected in the folder window.
÷ The list window is used to display the contents (folders and
files that can be imported using this software).
5 [MOVIE] tag:
Selects the [MOVIE LIBRARY].
[MUSIC] tag:
Selects the [MUSIC LIBRARY].
[PHOTO] tag:
Selects the [PHOTO LIBRARY].
6 Library box:
Displays the genre boxes and album boxes in the selected library in
the directory tree format.
7 Library list window:
Displays the contents already imported in the selected library.
8 [IMPORT] button:
Click on this button to import the contents selected in the list window
into the library.
[DELETE] button:
Click on this button to delete the files selected in the library list
window.
[DELETE ALL] button:
Click on this button to clear all of the contents displayed in the library
list window.
[5] [∞] buttons:
Click on either button to move a file to change the order of
playback of files. (Used only when the [MUSIC LIBRARY] or
[PHOTO LIBRARY] is selected.)
Operating KENWOOD PC SERVER
[BGM] button:
Click on this button to link music with playback of a photo image.
(Used only when the [PHOTO LIBRARY] is selected.)
[SAVE] button:
Click on this button to save the library list window data and let this
unit recognize the contents of the corresponding library.
IMPORTANT: Before closing the KENWOOD PC SERVER software, be sure to save the changes you made otherwise they
will be lost.
Operations using the menu bar
When one of the menu names is selected, a pull-down menu is displayed
as described below.
When [File] is selected:
1 [Name Setting]
The default server name is [PC Server 1]. The server name can be
changed as desired.
2 [Movie Folder Setting]
[Music Folder Setting]
[Photo Folder Setting]
Specify the pathnames of the desired folders (up to three folders can
be set per library). The files stored in the specified folders will be
imported as “Temporary” files.
If you specify the folder for saving the recorded TV programs or that
used usually as a library, its contents can be imported automatically
into the server.
[Browse...]: Click on the [Browse] button to select the desired folder
by following the directory.
After completing the folder setting, click on the [OK] button.
When MOVIE files are imported as “Temporary”:
Only the contents in the highest layer below the specified folders are
imported as “Temporary”. (The files located immediately after the
imported folders can be played back.)
MOVIE
132
4
56 7 8
Folder
Contents: MOVIE File
Playback possible.
Playback impossible.
A folder specified in [Movie Folder
Setting]
Continued to next page
Page 34

34
DVF-N7080 (EN/E,X)
NETWORK SERVER operation
When MUSIC files or PHOTO files are imported as “Temporary”:
Only the files stored in the folders in the highest layer below
the specified folders are imported. (The files located in folders
below the folders in the highest layer cannot be played back.)
PHOTOMUSIC
÷ When importing PHOTO files, open the menu bar, select
[File] \ [Save] and select [OK]. (The same operation is also
possible by clicking on the [SAVE] button.)
3 [Save]
Saves the edited contents.
4 [Exit]
Exits from the software.
When [View] is selected:
1 [Large Icons]
2 [Small Icons]
3 [List]
4 [Details]
5 [Renewal tree]
When [Convert] is selected:
It is required to set the file copy operation for importing still image
contents in the [PHOTO LIBRARY].
1 [High Quality]:
Setting for viewing high-resolution image.
2 [Normal]:
Standard setting.
3 [Fast]:
Setting for converting image into low-resolution image. This setting
shortens the time required for import.
Contents:
MUSIC File or
PHOTO File
Playback
possible.
Playback impossible.
Folder
or
[MOVIE]
tag
Genre box
[IMPORT]
button
[SAVE]
button
Operating KENWOOD PC SERVER
Continued to next page
Import of contents
The contents of the PC can be imported in each library. To select a library,
click on the [MOVIE], [MUSIC] or [PHOTO] tag.
For the data types that can be imported, see “Playable files with
this unit”. 5
Importing contents in the [MOVIE LIBRARY]
1
Select the genre box for the contents to be imported.
The library box displays the genre boxes for the [MOVIE LIBRARY],
such as the [Action], [Drama], [Favorite] and [Sports] boxes.
÷ Contents cannot be imported unless a genre box is selected.
2
Select the movie contents to be imported in the folder window
so that they are displayed in the list window.
3
Drag & drop each content from the list window into the
library list window.
÷ The same operation is also possible selecting a content and
then clicking on the [IMPORT] button.
÷ When a genre box is selected in step 1 to display the folders storing
the contents to be imported in the list window and then the required
folder is dragged & dropped into the library list window, only the
contents in the hierarchical directly below the folder will be imported.
A folder specified in
[Music Folder Setting] or
[Photo Folder Setting]
Page 35

35
DVF-N7080 (EN/E,X)
NETWORK SERVER operation
÷ It is also possible to select multiple contents and drag & drop
them together.
4
In the menu bar, select [File] \[Save] and then click on [OK].
÷ The same operation is also possible by clicking on the
[SAVE] button.
Editing the [MOVIE LIBRARY] box
How to add a genre box:
Select the [MOVIE LIBRARY] and click the mouse right button or
select [ADD BOX].
÷ Input the genre box name and click on the [OK] button to add
the specified genre box.
How to delete a genre box:
Select the genre box to be deleted and click the mouse right button.
When a pull-down menu is displayed, select [Delete Genre].
÷ A genre box can also be deleted by selecting the genre box
name and then select [DEL BOX].
How to rename a genre box:
Select the genre box to be renamed and click the mouse right button.
When a pull-down menu is displayed, select [Modify Genre name ].
Editing the library list
How to delete a content:
Select the content to be deleted and click the mouse right button. When
a pull-down menu is displayed, select [Delete Movie].
÷ A content can also be deleted by selecting the content name
and then select [DELETE].
How to sort contents:
Click on an additional information tag in the library list window to sort the
contents for the selected kind of information.
÷ This operation does not affect the list display on this unit.
How to add additional information:
The additional information for each content displayed in the library list
window (“TITLE”, “STARS” and “YEAR”) can be edited.
÷ Some characters may be unable to be displayed in the library
list on this unit.
Importing contents in the [MUSIC LIBRARY]
Click on the [MUSIC] tag to select the [MUSIC LIBRARY].
1
Select the genre box or album box for the contents to be imported.
The library box displays the genre boxes for the [MUSIC LIBRARY], such
as [Classic], [Jazz], [Pop] and [Rock] boxes. Each genre box can have
album boxes in the lower level.
÷ Contents cannot be imported unless a genre box or album
box is selected.
2
Select the music contents to be imported in the folder window so that they are displayed in the list window.
3
Drag & drop each content from the list window into the
library list window.
÷ The same operation is also possible selecting a content and
then clicking on the [IMPORT] button.
[MUSIC]
tag
[IMPORT]
button
[SAVE]
button
Continued to next page
Operating KENWOOD PC SERVER
Genre box
Page 36

36
DVF-N7080 (EN/E,X)
NETWORK SERVER operation
Operation of import by selecting a folder:
When a genre box is selected in the library box (field on the bottom
left), a new album box is created and the contents in the folder
selected in the library list window (field on the top right) are imported
in the album box. (At this time, the album box is given the same name
as the folder.)
When an album box is selected in the library box (field on the bottom
left), the contents in the folder selected in the library list window (field
on the top right) are imported in the album box.
Operation of import by selecting files:
When a genre box is selected in the library box (field on the bottom
left), a new album box is created and the content(s) selected in the
library list window (field on the top right) are imported in the album
box. (At this time, the album box is given the same name as the
folder.)
When an album box is selected in the library box (field on the
bottom left), the content(s) selected in the library list window (field
on the top right) are imported in the album box. (One or multiple
contents can be selected and imported.)
4
In the menu bar, select [File] \[Save] and then click on [OK].
÷ The same operation is also possible by clicking on the
[SAVE] button.
Editing the [MUSIC LIBRARY] box
How to add a genre box:
Select the [MUSIC LIBRARY] and click the mouse right button or
select [ADD BOX].
÷ Input the genre box name and click on the [OK] button to add
the specified genre box.
How to delete a genre box:
Select the genre box to be deleted and click the mouse right button.
When a pull-down menu is displayed, select [Delete Genre].
÷ A genre box can also be deleted by selecting the genre box
name and then select [DEL BOX].
How to rename a genre box:
Select the genre box to be renamed and click the mouse right button.
When a pull-down menu is displayed, select [Modify Genre name].
How to add an album box:
Select the genre box to which you want to add an album box and
click the mouse right button. When a pull-down menu is dis-
played, select [Add Album].
÷ Input the album box name and click on the [OK] button to add
the specified album box.
How to rename an album box:
Select the album box to be renamed and click the mouse right button.
When a pull-down menu is displayed, select [Modify Album name].
How to delete an album box:
Select the album box to be deleted and click the mouse right button.
When a pull-down menu is displayed, select [Delete Album].
÷ An album box can also be deleted by selecting the album box
name and then select [DEL BOX].
Editing the library list
How to delete a content:
Select the content to be deleted and click the mouse right button. When
a pull-down menu is displayed, select [Delete Music].
÷ A content can also be deleted by selecting the content name
and then select [DELETE].
How to sort contents:
Click on an additional information tag in the library list window to sort the
contents for the selected kind of information.
÷ This operation does not affect the list displayed on this unit.
How to change the order of playback:
Select a content in the library list window and click on the [5] or [∞]
button to move its position up or down.
How to add additional information:
The additional information for each album displayed in the library list
window (“ALBUM”, “ARTIST”, “LABEL”, “YEAR” and “TITLE”) can
be edited.
÷ Some characters may be unable to be displayed in the library
list on this unit.
Deleting a music content linked as “BGM” causes the back-
ground music link setting to be canceled.
Operating KENWOOD PC SERVER
Page 37

37
DVF-N7080 (EN/E,X)
NETWORK SERVER operation
Importing contents in the [PHOTO LIBRARY]
Click on the [PHOTO] tag to select the [PHOTO LIBRARY].
1
Select the genre box or album box for the contents to be imported.
The library box displays the genre boxes for the [PHOTO LIBRARY],
such as [
2004
], [
Family
] and [
MyPicture
] boxes. Each genre box can have
album boxes in the lower level.
÷ Contents cannot be imported unless a genre box or album
box is selected.
2
Select the photo contents to be imported in the folder window so that they are displayed in the list window.
3
Drag & drop each content from the list window into the
library list window.
÷ The same operation is also possible selecting a content and
then clicking on the [IMPORT] button.
Operation of import by selecting a folder:
When a genre box is selected in the library box (field on the bottom
left), a new album box is created and the contents in the folder
selected in the library list window (field on the top right) are imported
in the album box. (At this time, the album box is given the same name
as the folder.)
When an album box is selected in the library box (field on the bottom
left), the contents in the folder selected in the library list window (field
on the top right) are imported in the album box.
Operation of import by selecting files:
When a genre box is selected in the library box (field on the bottom
left), a new album box is created and the content(s) selected in the
library list window (field on the top right) are imported in the album
box. (At this time, the album box is given the same name as the
folder.)
When an album box is selected in the library box (field on the
bottom left), the content(s) selected in the library list window (field
on the top right) are imported in the album box. (One or multiple
contents can be selected and imported.)
÷ When still-image data is imported as a content, a new file is created
automatically by converting the size of the original file.
The user is therefore recommended to take care about the remaining
capacity in the hard disk drive. It should also be noted that the
processing may take time depending on the PC performance.
÷ When photographic image data in a format other than JPEG is
imported, its copy file is converted into the JPEG format and resized.
4
In the menu bar, select [File] \[Save] and then click on [OK].
÷ The same operation is also possible by clicking on the
[SAVE] button.
Editing the [PHOTO LIBRARY] box
How to add a genre box:
Select the [PHOT
O
LIBRARY] and click the mouse right button or
select [ADD BOX].
÷ Input the genre box name and click on the [OK] button to add
the specified genre box.
How to delete a genre box:
Select the genre box to be deleted and click the mouse right button.
When a pull-down menu is displayed, select [Delete Genre].
÷ A genre box can also be deleted by selecting the genre box
name and then select [DEL BOX].
How to rename a genre box:
Select the genre box to be renamed and click the mouse right button.
When a pull-down menu is displayed, select [Modify Genre name ].
Genre box
[PHOTO]
tag
[IMPORT]
button
[SAVE]
button
Continued to next page
Operating KENWOOD PC SERVER
Page 38

38
DVF-N7080 (EN/E,X)
NETWORK SERVER operation
Linking BGM (BackGround Music) for SLIDE SHOW
Contents in the [MUSIC LIBRARY] can be linked to the contents in the
[PHOTO LIBRARY].
When the photo images are played in slide show on this unit, the linked
music files are played with the photo images as their background music.
÷ The photo image files and music files to be linked should be imported
in their libraries in advance. The background music links a music
content to an album box in the [PHOTO LIBRARY].
1 Click on the [PHOTO] tag to select the [PHOTO LIBRARY].
2 In the library list window, select the album to be linked as
the background music source.
Album
÷ No background music can be linked when no album is
selected in the [PHOTO LIBRARY].
3 Click on the [BGM] button.
The [Background Music setting] dialog is displayed.
÷ Displays the contents imported in the [MUSIC LIBRARY].
4 Select the music contents to be linked as the background
music for the album.
÷ The music contents linked as background music are played
repeatedly until the end of the slide show.
5 In the menu bar, select [File] \ [Save] and then click on
[OK].
÷ The same operation is also possible by clicking on the
[SAVE] button.
How to add an album box:
Select the genre box to which you want to add an album box click
the mouse right button. When a pull-down menu is displayed,
select [Add Album].
÷ Input the album box name and click on the [OK] button to add
the specified album box.
How to rename a album box:
Select the album box to be renamed and click the mouse right button.
When a pull-down menu is displayed, select [Modify Album name].
How to delete an album box:
Select the album box to be deleted and click the mouse right button.
When a pull-down menu is displayed, select [Delete Album].
÷ An album box can also be deleted by selecting the album box
name and then select [DEL BOX].
Editing the library list
How to delete a content:
Select the content to be deleted and click the mouse right button. When
a pull-down menu is displayed, select [Delete Photo].
÷ A content can also be deleted by selecting the content name
and then select [DELETE].
How to sort contents:
Click on an additional information tag in the library list window to sort the
contents for the selected kind of information.
÷ This operation does not affect the list display on this unit.
How to change the order of playback:
Select a content in the library list window and click on the [5] or [∞]
button to move its position up or down.
How to add additional information:
The additional information for each content displayed in the library list
window (“ALBUM”, “DATE”, “BGM” and “TITLE"”) can be edited.
÷ Some characters may be unable to be displayed in the library
list on this unit.
Operating KENWOOD PC SERVER
Page 39

39
DVF-N7080 (EN/E,X)
NETWORK SERVER operation
MOVIE
MUSIC
PHOTO
SETUP
ENTER
ENTER
PC Server 1
PC Server 2
Please choose a server
ENTER
ENTER
DVD
NETWORK SERVER
MEMORY CARD
Please choose selector.
NETWORK SERVER
NETWORK SERVER
MAIN UNIT
REMOTE
RETURN
Playback of NETWORK SERVER
Select the files type
3
Press Cursor up/down (5/∞) keys on the remote to
select the files type (MOVIE, MUSIC or PHOTO), then
press ENTER key.
Perform editing or deleting of contents with a KENWOOD PC SERVER before connecting to a NETWORK SERVER.
÷ The display changes to the SETUP screen when the
SETUP part on the screen is selected.
÷ Return to the preceding screen is made when the RE-
TURN key is pressed.
Selecting by pressing the MOVIE key, MUSIC key
or PHOTO key of the remote is also possible.
Home screen of NETWORK SERVER.
Select a server
2
Press Cursor up/down (5/∞) keys on the remote to
select a desired server, then press ENTER key.
NET LINK display
÷ Connection to the NETWORK SERVER may take
some time.
÷ Up to 16 PC servers can be logged in.
When the Input selector is not set to NETWORK
SERVER, press the NETWORK SERVER key.
1
Instead of pressing the NETWORK SERVER key,
switching also can be done in the following way.
1 Press the RETURN key on the remote to display
the SELECT INPUT menu.
2 Press the Cursor up/down (5/∞) keys on the re-
mote to select NETWORK SERVER, then press
the ENTER key.
The following is displayed when the server cannot be detected.
SETUP
Switches to the SETUP
screen.
CLOSE
The server detection is
cancelled.
RETRY
Server detection is performed again.
Page 40

40
DVF-N7080 (EN/E,X)
NETWORK SERVER operation
ENTER
MUSIC
HOME
SEARCH
BACK
/Classical1
/Classical2
Classics1
Year: Label:
Genre: Classical Location:
Temporary
ALL
Classical
Jazz
Pop
AV Room1
MAIN UNIT REMOTE
REMOTE
MAIN UNIT REMOTE
REMOTE
MAIN UNIT
ENTER
REMOTE
Select a file
4
Press Cursor up/down (5/∞) keys on the remote to
select a file name.
Start playback
5
To stop playback
Skipping files
MOVIE MUSIC PHOTO
÷ The file in the direction of the key pressed is skipped, and the
selected file will be played from the beginning.
4 : To skip backward
¢ : To skip forward
Searching
MOVIE MUSIC
÷ Press the 6 key at any time to resume normal playback.
1 : To search backward (REV)
¡ : To search forward (FWD)
During playback, press 4 or ¢ key
FWD ¡
Playback of NETWORK SERVER
When a folder has been selected and the ENTER
key is pressed, the next level in the folder is displayed.
Library screen example
HOME icon : Return is made to the HOME screen of
the NETWORK SERVER.
BACK icon : When the RETURN key has been used
during file playback to return to the library
screen, the playback is paused. At this
time, playback will be continued when
the "BACK" icon is selected.
SEARCH icon : Select this icon to search a file.
To display the next page of the presently displayed
part : Press the
PAGE
key.
To display the preceding page of the presently displayed part : Press the
PAGE
key.
÷ Each press pauses and plays the file alternately.
Text information
During playback, press 1 or ¡ key
MOVIEMUSIC
Page 41

41
DVF-N7080 (EN/E,X)
NETWORK SERVER operation
REPEAT
ZOOM
Note
Note
ANGLE
Repeat play
MOVIE MUSIC
Desired file, folder or genre can be played back repeatedly.
÷ "REPEAT TITLE" : Repeat a title that is playing.
(only for MOVIE)
÷ "REPEAT TRACK" : Repeat a track that is playing.
(only for MUSIC)
÷ "REPEAT ALBUM" : Repeat an album box that is playing.
(only for MUSIC)
÷ "REPEAT GENRE" : Repeat a GENRE box that is playing.
During playback, press the REPEAT key on the remote.
Each time the key is pressed, the mode switches.
÷ To cancel repeat playback, press the REPEAT key and
select "REPEAT CLEAR" or goes off "REPEAT" indicator.
1 "REPEAT TITLE"
2 "REPEAT GENRE"
3 "REPEAT CLEAR"
(Repeat off)
If you press SKIP (¢) once during "REPEAT FILE"
playback, the repeat playback cancels.
Playback of NETWORK SERVER
Zoom function
PHOTO
Use zoom to enlarge the photo image.
1 During playback, press the ZOOM key on the
remote.
Each time the key is pressed, the mode switches.
Note
Note
Zoom may not work on some files.
Select picture angle
PHOTO
1 During playback, press the ANGLE key on the
remote.
÷ The "ANGLE" display is switched off when no operation is
performed for about 3 seconds.
It is possible to rotating a picture.
ANGLE 1 : normal direction.
ANGLE 2 : 90° rotation in clockwise direction.
ANGLE 3 :180° rotation in clockwise direction.
ANGLE 4 :270° rotation in clockwise direction.
1
2
3
4
Each time the key is pressed, the mode switches.
Slide show
PHOTO
1 Select the SLIDE SHOW icon, then press the
ENTER key.
The Slide show function can be used to switch photo
images automatically from one file to the next.
2 Select an ALBUM to start slide show, then press
the ENTER key.
SLIDE SHOW icon
Text Information
MOVIEMUSIC
PHOTO
MJQ
Album:MJQbest
Year:1964Label:
Genre:JAZZLocation:
Travel1
BGM:
Date:2004.08.16
Genre:Location:
Rome1
Stars:Audrey
Year:2004Time:
Genre:DramaLocation:
1
2
3
4
1
2
3
4
5
6
5
1
2
3
4
5
6
1 Title
2 Stars
3 Year 5
Not used with this unit.
4 Genre 6
Not used with this unit.
1 Artist
2 Album
3 Year 5 Label
4 Genre 6
Not used with this unit.
1 Album
2 BGM
3 Date
4 Genre 5
Not used with this unit.
1 : REPEAT TRACK
2
: REPEAT ALBUM
3
: REPEAT GENRE
4 Goes off : (Repeat off)
MOVIE
(On screen display)
MUSIC
(Icon)
Page 42

42
DVF-N7080 (EN/E,X)
NETWORK SERVER operation
SEARCH
123
456
7890
ABC
GHI
PQRS TUV WXYZ
JKL MNO
DEF
SEARCH CANCEL
ENTER
ENTER
Playback of a requested file.
To start playing at any chosen file.
1 Press the SEARCH key on the remote during dis-
play of the library screen.
3 Press Cursor up/down (5/∞) keys on the remote
to select the SEARCH icon, then press the ENTER
key.
2 Use the numeric keys (character input keys) on
the remote to enter the first 3 characters of the file
(MOVIE; TITLE, MUSIC; TRACK, PHOTO; ALBUM)
to be searched for.
÷ If you enter the wrong character, press CLEAR key to remove
a character you entered. Then input the correct character.
Playback of NETWORK SERVER
The search screen is displayed on the library screen.
Numbers and upper- and lower-case letters of the alphabet can be entered.
Example:Switching as shown below is done when the
key "2" is pressed:
To enter "Ken":
Press the 5 key 2 times.
Press the 3 key 5 times.
Press the 6 key 5 times.
A→B→C→a→b→c→2
The corresponding file names in the library are displayed
in the column at the very top.
If there are no corresponding characters, the files with
the names closest in alphabetic order are displayed in the
column at the very top.
The possible input characters are shown in the following table.
Page 43

43
DVF-N7080 (EN/E,X)
Memory Card operation
MEMORYCARD
PHOTO
SETUP
MEMORY CARD display
ENTER
OFF
DVD/MEMORY CARD
MAIN UNIT
REMOTE
RETURN
DVD
NETWORK SERVER
MEMORY CARD
Please choose selector.
Playback of MEMORY CARD
Select the files type
3
Select PHOTO, then press ENTER key.
Insert a Memory card
1
1 Turn off the POWER
2 Insert a Memory card
3 Turn on the POWER
÷ Always set the power to OFF (STANDBY) before insert-
ing or ejecting a card.
÷ To eject a card, press the EJECT button and remove
the card.
÷ The display changes to the SETUP screen when the
SETUP part on the screen is selected.
÷ Return to the preceding screen is made when the RE-
TURN key is pressed.
PC card adapter
Memory card
÷ Please refer to page 46 for the memory cards and the PC card adapters which can be used with this unit.
÷ Only JPEG files can be played back.
Selecting by pressing the PHOTO key of the remote also is possible.
Home screen of MEMORY CARD.
When the Input selector is not set to MEMORY
CARD, press the DVD/MEMORY CARD key.
2
Instead of pressing the DVD/MEMORY CARD key,
switching also can be done in the following way.
1 Press the RETURN key on the remote to display
the SELECT INPUT menu.
2 Press the Cursor up/down (5/∞) keys on the re-
mote to select MEMORY CARD, then press the
ENTER key.
Note
Note
When no memory card or PC card adapter is inserted, or when the insertion is not sufficient, the
unit will not switch to the HOME screen. In such a
case, change to power off (STANDBY) state and
insert the memory card or the PC card adapter
again.
Page 44

44
DVF-N7080 (EN/E,X)
Memory Card operation
ENTER
ENTER
MEMORYCARD
PATH
PATH:/dcim
1. cimg0224.jpg
2. cimg0225.jpg
3. cimg0226.jpg
4. cimg0227.jpg
5. cimg0228.jpg
6. cimg0229.jpg
7. cimg0230.jpg
HOME
ENTER
MEMORYCARD
PATH
PATH:/
dcim1
dcim2
dcim3
HOME
Select a folder
4
Press Cursor up/down (5/∞) keys on the remote to
select a folder to play.
Press the ENTER key
5
Start playback
6
Press Cursor up/down (5/∞) keys on the remote to
select a file to play.
Playback of MEMORY CARD
When a folder has been selected and the ENTER
key is pressed, the next level in the folder is displayed.
The path to the current
folder is displayed.
Return icon
Folder icon
RETURN icon : Return is made to the HOME screen or to
the folder screen for the next-higher
level.
HOME icon : Return is made to the HOME screen of
the MEMORY CARD.
PATH icon : The screen showing the full path to the
presently displayed folder is displayed.
To display the next page of the presently displayed
part : Press the
PAGE
key.
To display the preceding page of the presently displayed part : Press the
PAGE
key.
HOME icon
PATH icon
File icon
To stop playback
Note
Note
The system may stop operation when cards other than the above or unrelated cards are inserted. In such case,
switch off the power, remove the card, and then switch on the power again.
Notes
Notes
÷ Depending on the image file size, some time
may be required until the image is displayed.
÷ If playback does not start, try to switch the
power off and on again.
Please refer to page 46 for the memory cards and the memory card adapters which can be used with this unit.
Page 45

45
DVF-N7080 (EN/E,X)
Memory Card operation
ZOOM
ANGLE
MAIN UNIT REMOTE
Skipping files
4 : To skip backward
¢ : To skip forward
On screen display
The on screen display contains many playback information. To see the on screen display, press ON SCREEN key
on the remote while a content is playing.
Playback of MEMORY CARD
Zoom function
Use zoom to enlarge the photo image.
During playback, press the ZOOM key on the
remote.
Each time the key is pressed, the mode switches.
Select picture angle
It is possible to rotate a picture.
During playback, press the ANGLE key on the
remote.
÷ The "ANGLE" display is switched off when no operation is per-
formed for about 3 seconds.
ANGLE 1 : normal direction.
ANGLE 2 : 90° rotation in clockwise direction.
ANGLE 3 : 180° rotation in clockwise direction.
ANGLE 4 : 270° rotation in clockwise direction.
1
2
3
4
Each time the key is pressed, the mode switches.
File Name : Current file name with path name
File Size : Current file size
Resolution : Resolution of current file
Rotate Angle : Rotate angle of current file
During playback, press 4 or ¢ key
MEMORY
CARD
Folder
File
Layers which can be played back
Files in folders within the second layer can be played back.
Playback is
not possible.
Page 46

46
DVF-N7080 (EN/E,X)
Memory Card operation
Notes
Notes
Memory Type Vender Model No Comment
Compact Flash SanDisk SDCFB-32-801 32MB
TDK TC064WA 64MB
I-O DATA CFS-64MX 64MB
SanDisk SDCFB-128-801 128MB
I-O DATA CFS-256MX 256MB
Memory Stick SONY MSA-64A 64MB
I-O DATA MSR-64M/U 64MB
SanDisk SDMS-64 64MB
SONY MSA-128A 128MB
SanDisk SDMS-128-824 128MB
SD Panasonic RP-SD064BL1A 64MB
LEXAR SD-128-231 128MB
HAGIWARA SYS-COM HPC-SD128MY 128MB
TDK TS128VS 128MB
SanDisk SDSDB-256-801 256MB
Smart Media SanDisk SDSM-128-801 128MB
Multi Media Card SanDisk SDMB-64-801 64MB
Memory Cards
Memory Type Vender Model No
Compact Flash Adaptor SanDisk SDCF-03A
I-O DATA PCCF-ADP
4 in 1 Adaptor Sitecom PC-200
SanDisk SDDR-65
PC Card adaptor (PCMCIA PC card type II)
Playback of MEMORY CARD
Memory cards and PC card adaptors for which operation with this unit
has been confirmed
÷ Playback is not assured with memory cards and PC card adaptors other than the above.
÷ Even with the above memory cards and PC card adaptors, playback may not be possible according to the recording
condition.
÷ Depending on the contents, some time may be required until playback occurs.
÷ Depending on the contents, the screen display may not be clear.
÷ Please format the memory card with the digital camera you are using. Playback of memory cards formatted with a PC is
not possible.
Page 47

47
DVF-N7080 (EN/E,X)
Memory Card operation
ENTER
ENTER
ENTER
ENTER
POWER
NETWORK SERVER
ENTER
ENTER
SETUP
PC Server 1
PC Server 2
Please choose a server
Firmware-Update
UPDATE
CANCEL
Current Virsion V00.00
Firmware Update
For a firmware update, first connect to the PC server (on
which the updated file has been downloaded) and this
unit via LAN. Exit from all software that is currentry
running.
Do not perform any other operations while performing the operations of steps 1 to 6, but perform the
steps one after the other.
5 Select "Firmware Update" in the MAIN Setup
menu, then press the ENTER key.
6 Select "UPDATE" on the TV screen, then press
the ENTER key.
7 After the indication "UPDATE OK" appears, re-
start this unit to make the update effective.
÷ The update starts.
÷ During update, don't turn off this unit, PC and router,
nor extract the ethernet cable.
÷ When the update has been completed, "UPDATE OK" is
displayed.
÷ If the update failed, "ERROR" is displayed on the
screen.
÷ The update may fail and stop operating due to possible
PC, network environment or power failure during the
update process. In that case please remove the power
cord from the wall socket immediately and consult your
dealer.
2 Press the NETWORK SERVER key to enter the
NETWORK SERVER mode.
4 Press the SETUP key.
To cancel the update operation, select "CANCEL".
3 Select the PC server where the Firmware Update
program has been downloaded.
÷ It takes approx. 10 seconds until the power is switched
off.
IMPORTANT: Be sure to update the KENWOOD PC
SERVER software to the latest version before updating
the Firmware. ^
The latest information and procedure to update your
DVF-N7080 Firmware can be found in the "Technical
Support" / "Service" section on the website of your resident country (if necessary you can find a link to your
local website on www.kenwood.com <http://
www.kenwood.com>).
Other
1 Turn on the power.
Page 48

48
DVF-N7080 (EN/E,X)
Knowledge
Playback does not start when the 3 key is
pressed.
Playback starts but no image/sound is seen
heard.
The picture is disrupted when the image is
fast forwarded or fast reversed.
No sound is heard.
No picture is displayed.
The picture does not look good or the picture/sound quality is poor.
It takes a while for the disc to start playing.
The tray opens automatically.
The top and bottom of the screen cannot be
seen, or the screen becomes black-andwhite.
÷ Load a disc and press the 3 key.
÷ Turn the disc over and properly place it on
the disc tray.
÷ Switch the selector to DVD.
™
÷ Turn on the TV.
÷ Properly reconnect the connection cords.
0!
÷ Select the video format put out to the
VIDEO OUT terminal. 8*
÷ This is not a malfunction.
÷ Properly connect the audio cords.
0!
÷ Set the sound volume to an appropriate
level.
÷ Press the 6 (play/pause) key to resume
normal playback mode.
÷ Switch the "Digital Audio" setting of "Main"
on the Setup menu screen to "PCM" or connect to the DIGITAL AUDIO terminal.
÷ Select the video format put out to the
VIDEO OUT terminal.
8*
÷ Separate this unit as far as possible from
the device you think is generating the
noise.
÷ Refer to the "Disc handling precautions"
section and wipe dirt from the disc.
9
÷ Use a new disc.
÷
Refer to the "Caution on condensation" section and evaporate the condensation.
9
÷ Approximately 10 to 20 seconds are re-
quired for a disc to start playing, although
the time differs depending on the disc.
÷ Properly place the disc on the tray.
÷ Refer to the "Video formats" section ,and
use a disc with the appropriate video format for your TV or a TV with the appropriate
video format for the disc. 8
In case of difficulty
Resetting
What appears to be a malfunction may not always be serious. If your unit should not perform as expected, consult the
table below to see if the problem can be corrected before seeking help from your dealer or service representative.
÷ There is no disc in the player.
÷ There are no signals recorded on the side of
the disc being played.
÷ The selector is not set to DVD.
÷ The TV is not turned on.
÷ The connection cords are not properly con-
nected.
÷ The video format is not matched to the TV
type.
÷ The picture is slightly disrupted during fast
forward and fast reverse operations.
÷ The audio output cords are not properly con-
nected.
÷ The volume control of the TV or amplifier is
not adjusted properly.
÷ The player is in a special playback mode.
÷ The Digital Audio output is "Bitstream" and
there is no Analog Audio output.
÷ The video format is not matched to the TV
type.
÷ A nearby device is generating noise.
÷ The disc is dirty.
÷ The disc is damaged.
÷ There is condensation on the optical lens.
÷ Time is required for the unit to detect the
disc type and size and for the rotation of the
motor to stabilize. This is not a malfunction.
÷ The disc is not placed horizontally.
÷ The video format of the disc being played
does not match that of the connected TV
monitor.
SolutionCause
DVD player part
Symptom
Erroneous operation (operation impossible, wrong display indication, etc.) may occur when a connection cable
is connected or disconnected while the power is on or because of an external influence. In such a case, try the
following procedure.
Soft reset
Press the ON/STANDBY key to switch to standby status. Wait for approx. 10 seconds and then press the ON/
STANDBY key again to switch on the power.
÷ When a memory card has been inserted, press the ON/STANDBY key, remove the card after standby status
has been reached, and then press the ON/STANDBY key again to switch on the power.
÷ The contents of the settings registered by you remain as they are.
Return to the factory shipping status
Bring the unit to STANDBY status and press the ON/STANDBY key while keeping the 7 (STOP) key pressed.
÷ Please note that the contents of the settings registered by you will be deleted.
Page 49

49
DVF-N7080 (EN/E,X)
Knowledge
÷ The DVD disc being played does not contain
the recording of subtitles.
÷ The subtitle mode is set to off.
÷ The DVD disc being played does not contain
the recording of more than one audio (or subtitle) language.
÷ The DVD disc being played does not contain
the recording of more than one angle.
÷ You are attempting to switch the angle in a
DVD section where more than one angle is
not recorded.
÷ A viewing restriction (PARENTAL) has been
set for the disc.
÷ You have forgotten the password.
÷ The DVD disc being played does not contain
the recording of the selected voice or subtitle
language.
÷ The initial playback language is specified by
the DVD disc.
÷ The DVD specifications provide for selection
at the menu screen.
÷ The menu language function (MENU) is not
set to desired language.
÷ The VCD disc being played is not compatible
with P.B.C.
÷ The operation is inhibited. Please try an-
other operation.
The invalid icon is displayed and
remote control is not possible.
÷ Playback is restricted intentionally by the
software producer.
DVD player part
÷ The subtitle cannot be displayed when the
DVD disc being played does not contain
the recording of subtitles.
÷ Press the SUBTITLE key to switch on the
subtitle mode.
∞
÷ The voice (or subtitle) language cannot be
changed when the DVD disc being played
does not contain the recording of more
than one voice (or subtitle) language.
÷ The viewing angle cannot be changed
when the DVD disc being played does not
contain the recording of more than one
angle.
÷ More than one viewing angle may be re-
corded only in limited sections in a disc.
÷ Check the viewing restriction level (PA-
RENTAL) setting.
÷ Set the initial setup to the factory setup
with the following procedure.
Bring the unit to STANDBY status and
press the ON/STANDBY key while
keeping the 7 (STOP) key pressed.
÷ Use a DVD disc containing the recording of
the selected voice or subtitle language.
÷ Press SUBTITLE or the AUDIO key on the
remote and select the language.
÷ Select at the menu screen of the disc.
÷ Select disc menu language. (
÷ Menu playback is available only with VCD
discs recorded with P.B.C.
The subtitle is not displayed.
The voice (or subtitle) language cannot be
changed.
The viewing angle cannot be changed.
Playback will not start even after a title is selected.
The parental level cannot be changed.
The voice or subtitle language selected in the
initial setting is not played.
Menu screen messages are not shown in the
desired language.
A VCD cannot be played using menus.
Remote control unit
Remote control operation is not possible. ÷ Batteries are exhausted.
÷ The remote control is too far away from the
system, the controlling angle is deviated or
there is an obstacle in between.
÷ Replace with new batteries.
÷ Operate the unit inside the remote control-
lable range.
Invalid icon
SolutionCauseSymptom
SolutionCauseSymptom
SolutionCauseSymptom
In case of difficulty
∞
Page 50

50
DVF-N7080 (EN/E,X)
Knowledge
÷ The OS of the PC is not compatible with the
application.
÷ The PC server does not see DVF-N7080.
÷ Use inside a firewall may not be possible.
÷ The network is busy.
÷ In case of a wireless connection it is possible
that the transfer rate drops because of interference from other equipment.
÷ The settings for the "KENWOOD PC
SERVER" application are not correct.
÷ The files have not been saved after import to
"KENWOOD PC SERVER".
÷ A not compatible audio format is used.
÷ The display resolution setting is low.
Network part
÷ Install an OS compatible with the applica-
tion.
÷ This is not a malfunction.
÷ Switch off the firewall.
÷ Check by stopping the other equipment
connected to the network.
÷ Switch off microwave ovens and other
equipment generating electromagnetic
waves and check again.
÷ Confirm the settings of the "KENWOOD PC
SERVER" application.
÷ Press SAVE of the "KENWOOD PC SERVER"
application and read-in the settings again.
÷ Use movie files with a compatible audio
format.
÷ Increase the display resolution.
The "KENWOOD PC SERVER" application
cannot be installed on the PC or it does not
run.
DVF-N7080 is not detected by the own PC.
Use inside a firewall is not possible.
There are no problems with the network connection, but playback is interrupted or stops.
The files of MOVIE, MUSIC, PHOTO are not
shown.
No sound with playback of movie files.
Some buttons are not displayed by the
KENWOOD PC SERVER application.
SolutionCauseSymptom
‹
‹
5
In case of difficulty
÷ The max. resolution has been exceeded.
÷ The max. file size has been exceeded.
÷ The file extension is not ".JPG" or ".JPEG".
÷ The file name contains characters or symbols
other than alphanumerics.
Photo part
÷ Lower the resolution to the max. resolution
or lower.
÷ Lower the file size to the max. file size or
lower.
÷ Resave as a JPEG file (extension: ".JPG" or
".JPEG").
÷ Use only alphanumerics "A - Z", "0 - 9" and
"_" (under score) for the file name.
Photo files are not shown.
JPEG files on memory cards or discs are not
shown.
SolutionCauseSymptom
Frequently Asked Questions (FAQ):
If you still have questions concerning the product after reading this manual, please consult the FAQ section on the Kenwood
website of your resident country (if necessary you can find a link
to your local website on www.kenwood.com <http://
www.kenwood.com>).
Software and Firmware update:
A possible update for the PC Server software and Firmware information for your product can be found in the "Technical
Support" / "Service" section on the website of your resident country (if necessary you can find a link to your local website on
www.kenwood.com <http://www.kenwood.com>).
5
5
Page 51

51
DVF-N7080 (EN/E,X)
Knowledge
Specifications
[Type]
System ................................................... DVD video player
Signal read system ......................... Semiconductor laser
[Laser section]
Laser wave length ..................... For DVD; 635 to 665 nm
For CD; 770 to 810 nm
Laser power class .......................................... Class 2 (IEC)
[Audio section]
Frequency response
Sampling frequency ; 44.1 kHz ............ 4 Hz ~ 20 kHz
Sampling frequency ; 48 kHz ............... 4 Hz ~ 22 kHz
Signal to noise ratio .............................. More than 96 dB
Dynamic range ....................................... More than 94 dB
Total harmonic distortion ...... Less than 0.005 % (1 kHz)
Channel separation ................... More than 90 dB (1 kHz)
Wow and flutter ........................ Below measurable limit
Analog output level/impedance ................... 2 V / 1.1 kΩ
Digital output level/impedance
COAXIAL .............................................. 0.5 Vp-p / 75 Ω
OPTICAL ..... -21 dBm ~ -15 dBm (Wave length 660 nm)
[Video Section]
Video output format ......................................... NTSC/PAL
Composite video output level .................... 1 Vp-p (75 Ω)
S-video output level
(Y-signal) ................................................. 1 Vp-p (75 Ω)
(C-signal)
NTSC ........................................... 0.286 Vp-p (75 Ω)
PAL .............................................. 0.300 Vp-p (75 Ω)
Component Video output level
(Y-signal) ................................................. 1 Vp-p (75 Ω)
(Cb-signal) ............................................ 0.7 Vp-p (75 Ω)
(Cr-signal) ............................................. 0.7 Vp-p (75 Ω)
RGB output level (SCART) .......................... 0.7 Vp-p (75 Ω)
Horizontal resolution ........................ More than 500 lines
Video signal to noise ratio .................... More than 67 dB
[General]
Power consumption .................................................. 25 W
Standby power consumption ................. Less than 0.3 W
Dimensions .................................. W : 440 mm (17-5/16”)
....................................................... H: 55 mm (2-3/16”)
....................................................... D: 345 mm (13-9/16”)
Weight (net) ............................................... 5.0 kg (11.0 lb)
KENWOOD follows a policy of continuous advancements in development. For this reason specifications may
be changed without notice.
÷ Sufficient performance may not be exhibited at extremely cold locations (Where water freezes).
Notes
Notes
This product incorporates copyright protection technology that is protected by U.S. patents and other intellectual property rights. Use of this copyright protection technology must be authorized by Macrovision, and is intended for home and other limited viewing uses only
unless otherwise authorized by Macrovision. Reverse engineering or disassembly is prohibited.
Trademark Information
÷ Manufactured under license from Dolby Laboratories.
“Dolby”, “Pro Logic” and the double-D symbol are trademarks of Dolby Laboratories.
÷ "DTS" and "DTS Digital Out" are regis-
tered trademarks of Digital Theater
Systems, Inc.
÷ Microsoft and Windows are registered
trademarks or trademarks in the USA and other countries of
Microsoft Corporation.
÷ IBM and PC/AT are registered trademarks of International
Business Machines Corporation.
÷ Pentium is a trademark or registered trademark of Intel
Corporation.
÷ Java and all trademarks and logo marks related to Java are
registered trademarks or trademarks in the USA and other
countries of Sun Microsystems Inc.
÷ Memory Stick is a trademark of Sony Corporation.
÷ DivX, DivX Certified, and associated logos are trade-
marks of DivXNetworks, Inc. and are used under
license.
Other system names and product names are also trademarks
or registered trademarks of their respective developers. Note
that the “™” and “®” markings are omitted in the text of this
manual.
Page 52

For your records
Record the serial number, found on the back of the unit, in the spaces
designated on the warranty card, and in the space provided below. Refer
to the model and serial numbers whenever you call upon your dealer for
information or service on this product.
Model Serial Number
Page 53

documentation manual, user maintenance, brochure, user reference, pdf manual
This file has been downloaded from:
User Manual and User Guide for many equipments like mobile phones, photo cameras, monther board, monitors, software, tv, dvd, and othes..
Manual users, user manuals, user guide manual, owners manual, instruction manual, manual owner, manual owner's, manual guide,
manual operation, operating manual, user's manual, operating instructions, manual operators, manual operator, manual product,
 Loading...