

Page 1

DVD / VCD / CD PLAYER
DVF-9010
INSTRUCTION MANUAL
KENWOOD CORPORATION
This player has been designed to play back the DVD software which has been encoded for specific
region areas. It cannot play back the DVD software encoded for other region areas than the region
areas for which it has been designed.
COMPACTCOMPACT
DIGITAL VIDEO
B60-3928-00 03 J (M2,T,E) MC 98 / 7
COMPACTCOMPACT
DIGITAL AUDIODIGITAL AUDIO
TEXT
Page 2
Introduction
DVF-9010 (En/E)
Before applying power
2
Units are designed for operation as follows.
This unit is intended for
Preparations
................................
AC 110-240 V
Caution : Read this section carefully to ensure safe operation.
For the United Kingdom
Factory fitted moulded mains plug
1. The mains plug contains a fuse. For replacement, use only a 13-Amp ASTA-approved (BS1362) fuse.
2. The fuse cover must be refitted when replacing the fuse in the moulded plug.
3. Do not cut off the mains plug from this equipment. If the plug fitted is not suitable for the power points in your home or the cable is too short
to reach a power point, then obtain an appropriate safety approved extension lead or adapter, or consult your dealer.
Operations
If nonetheless the mains plug is cut off, remove the fuse and dispose of the plug immediately, to avoid a possible shock hazard by inadvertent
connection to the mains supply.
IMPORTANT :
The wires in the mains lead are colouRed in accordance with the following code :
Blue : Neutral
Brown : Live
Do not connect those leads to the earth terminal of a three - pin plug.
Safety precautions
Caution : Read this section carefully to ensure safe operation.
WARNING : TO PREVENT FIRE OR ELECTRIC SHOCK, DO NOT EXPOSE THIS
APPLIANCE TO RAIN OR MOISTURE.
CAUTION
RISK OF ELECTRIC SHOCK
DO NOT OPEN
Other
THE LIGHTNING FLASH WITH ARROWHEAD SYMBOL, WITHIN AN EQUILATERAL TRIANGLE, IS INTENDED TO ALERT THE
USER TO THE PRESENCE OF UNINSULATED “DANGEROUS VOLTAGE” WITHIN THE PRODUCT’S ENCLOSURE THAT MAY
BE OF SUFFICIENT MAGNITUDE TO CONSTITUTE A RISK OF ELECTRIC SHOCK TO PERSONS.
THE EXCLAMATION POINT WITHIN AN EQUILATERAL TRIANGLE IS INTENDED TO ALERT THE USER TO THE PRESENCE OF
IMPORTANT OPERATING AND MAINTENANCE (SERVICING) INSTRUCTIONS IN THE LITERATURE ACCOMPANYING THE
APPLIANCE.
The marking of products using lasers
(Except for some areas)
CLASS 1
LASER PRODUCT
The marking is located on the rear panel and says that the component
uses laser beams that have been classified as Class 1. It means that
the unit is utilizing laser beams that are of a weaker class. There is no
danger of hazardous radiation outside the unit.
CAUTION: TO REDUCE THE RISK OF ELECTRIC SHOCK, DO NOT REMOVE COVER (OR
BACK). NO USER-SERVICEABLE PARTS INSIDE, REFER SERVICING TO QUALIFIED SERVICE PERSONNEL.
REQUIREMENT BY NEDERLAND GAZETTE
Batteries are supplied with this product. When
they empty, you should not throw away. Instead,
hand them in as small chemical waste.
Page 3

Introduction
DVF-9010 (En/E)
Unpacking
Unpack the unit carefully and make sure that all accessories are put aside so they will not be lost.
Examine the unit for any possibility of shipping damage. If your unit is damaged or fails to operate, notify your dealer
immediately. If your unit was shipped to you directly, notify the shipping company without delay. Only the consignee (the
person or company receiving the unit) can file a claim against the carrier for shipping damage.
We recommend that you retain the original carton and packing materials for use should you transport or ship the unit in the
future.
Keep this manual handy for future reference.
Accessories
Audio cord (Red, White) ...... (3)
Remote control unit............. (1)
S-VIDEO cord ....................... (1) Video cord (Yellow) .............. (1)
Batteries (R6/AA) ................. (2)
Optical fiber cable............. (1)
3
Preparations
Operations
Other
Page 4
IMPORTANT SAFEGUARDS
Caution : Read this page carefully to ensure safe operation.
4
Please read all of the safety and operating instructions before
operating this appliance. Adhere to all warnings on the appliance
and in the instruction manual. Follow all the safety and operating
instructions. These safety and operating instructions should be
retained for future reference.
1. Power sources – The appliance should be connected to a
power supply only of the type described in the instruction
Preparations
manual or as marked on the appliance. If you are not sure of
the type of power supply to your home, consult your appliance dealer or local power company. For appliances intended
to operate from battery power, or other sources, refer to the
instruction manual.
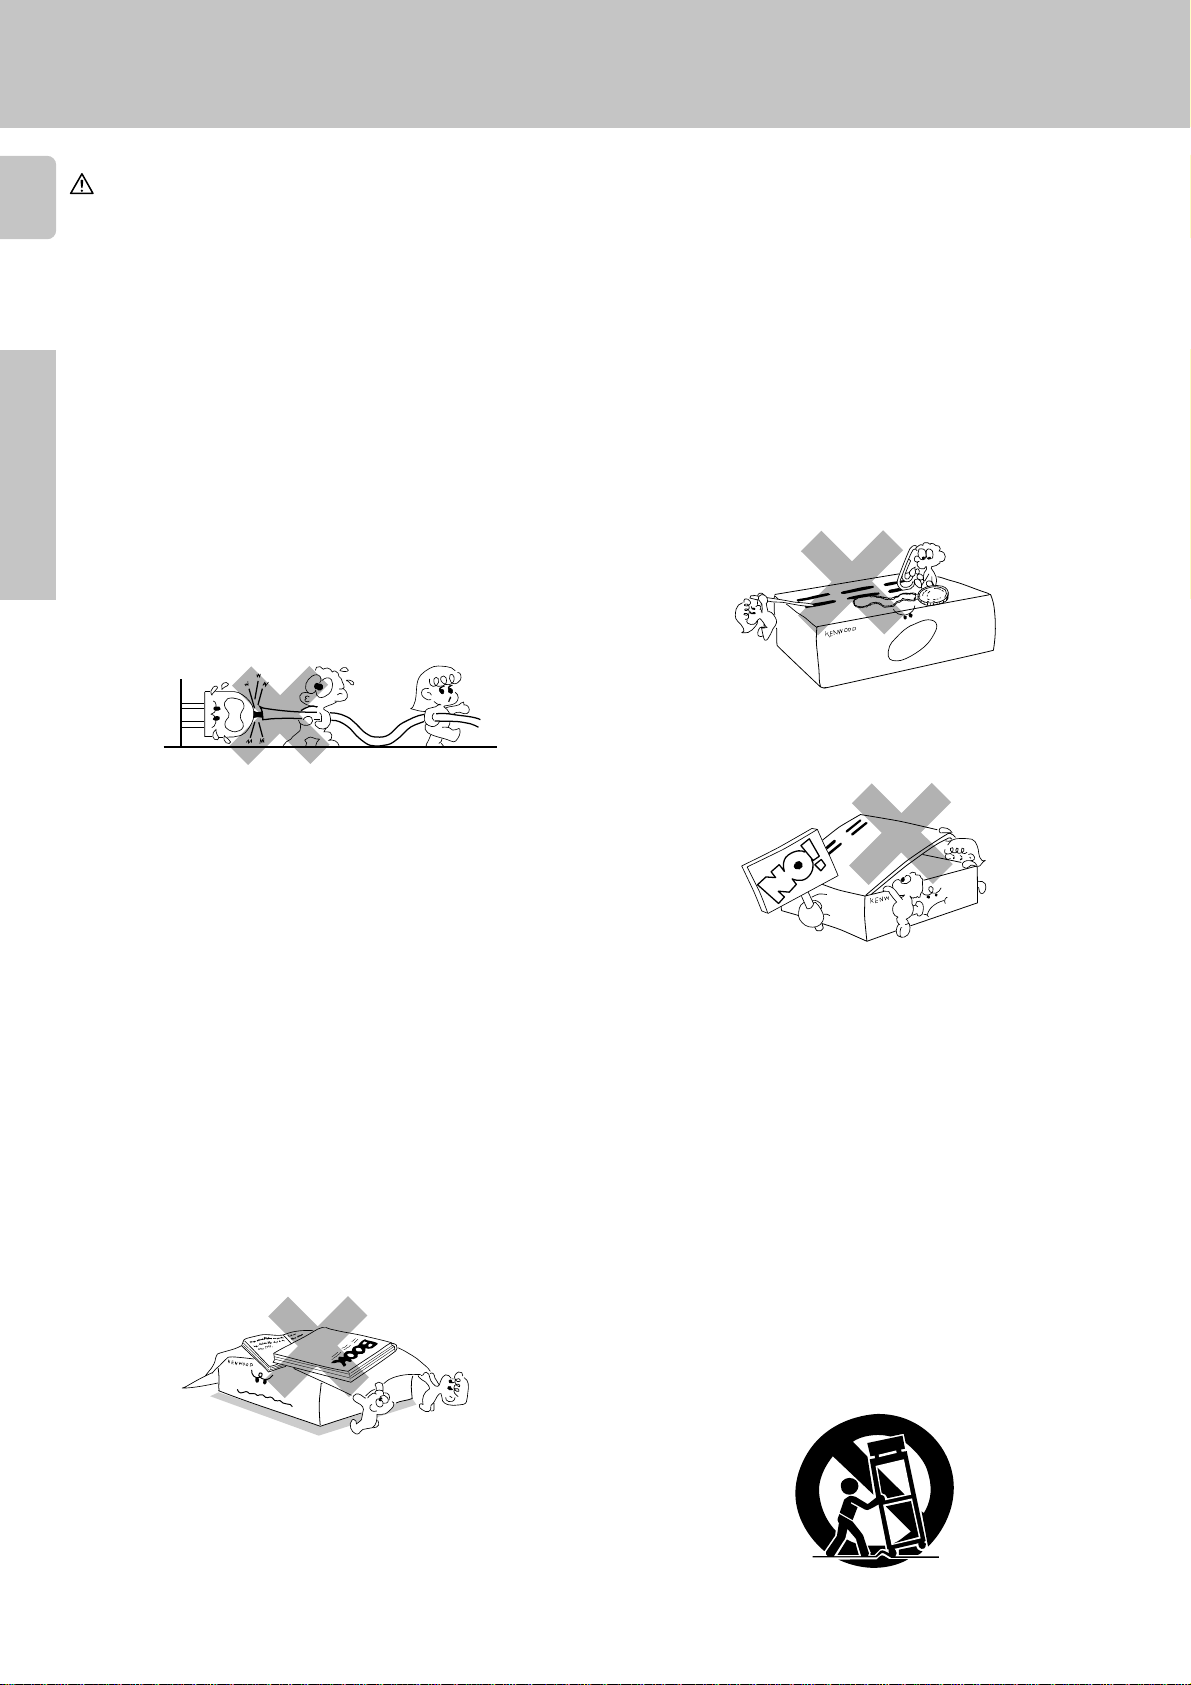
2. Power-cord protection – Power-supply cords should be
routed so that they are not likely to be walked on or pinched
by items placed upon or against them, pay particular attention
to cords at plugs, convenience receptacles, and the point
where they exit from the appliance.
Never pull or
stretch the cord.
DVF-9010 (En/E)
6. Temperature – The appliance may not function properly if
used at extremely low, or freezing temperatures. The ideal
ambient temperature is above +5°C (41°F).
7. Heat – The appliance should be situated away from heat
sources such as radiators, heat registers, stoves, or other
appliances (including amplifiers) that produce heat.
8. Electric shock – Care should be taken so that objects do not
fall and liquid is not spilled into the enclosure through openings. If a metal objects, such as a hair pin or a needle, comes
into contact with the inside of this appliance, a dangerous
electric shock may result. For families with children, never
permit children to put anything, especially metal, inside this
appliance.
CAUTION – Polarization – This appliance may be
3.
Operations
Other
equipped with a polarized alternating-current line plug (a plug
having one blade wider than the other). This plug will fit into
the power outlet only one way. This is a safety feature. If you
are unable to insert the plug fully into the outlet, try reversing
the plug. If the plug should still fail to fit, contact your
electrician to replace your obsolete outlet. Do not defeat the
safety purpose of the polarized plug.
4. Ventilation – Slots and openings in the cabinet are provided
for ventilation and to ensure reliable operation of the appliance and to protect it from overheating, and these openings
must not be blocked or covered. The appliance should be
situated so that its location or position does not interfere with
its proper ventilation.
To maintain good ventilation, do not put records or a tablecloth on the appliance. Place the appliance at least 10 cm
away from the walls.
Do not use the appliance on a bed, sofa, rug or similar surface
that may block the ventilation openings. This appliance should
not be placed in a built-in installation such as a bookcase or
rack unless proper ventilation is provided or the manufacturer’s
instructions have been adhered to.
9. Enclosure removal – Never remove the enclosure. If the
internal parts are touched accidentally, a serious electric
shock might occur.
10. Magnetic fields – Keep the appliance away from sources of
magnetic fields such as TV sets, speaker systems, radios,
motorized toys or magnetized objects.
11. Cleaning – Unplug this appliance from the wall outlet before
cleaning. Do not use volatile solvents such as alcohol, paint
thinner, gasoline, or benzine, etc. to clean the cabinet. Use
a clean dry cloth.
12. Accessories – Do not place this appliance on an unstable cart,
stand, tripod, bracket, or table. The appliance may fall, causing serious injury to a child or adult, and serious damage to the
appliance. Use only with a cart, stand, tripod, bracket, or table
recommended by the manufacturer, or sold with the appliance. Any mounting of the appliance should follow the
manufacturer’s instructions, and should use a mounting
accessory recommended by the manufacturer. An appliance
and cart combination should be moved with care. Quick
stops, excessive force, and uneven surfaces may cause the
appliance and cart combination to overturn.
5. Water and moisture – The appliance should not be used near
water - for example, near a bathtub, washbowl, kitchen sink,
laundry tub, in a wet basement, or near a swimming pool, etc.
Page 5

13. Lightning – For added protection for this appliance during a
lightning storm, or when it is left unattended and unused for
long periods of time, unplug it from the wall outlet and
disconnect the antenna or cable system. This will prevent
damage to the appliance due to lightning and power-line
surges.
IMPORTANT SAFEGUARDS
DVF-9010 (En/E)
18. Power lines – An outside antenna system should not be
located in the vicinity of overhead power lines or other electric
light or power circuits, or where it can fall into such power
lines or circuits. When installing an outside antenna system,
extreme care should be taken to keep from touching such
power lines or circuits as contact with them might be fatal.
5
14. Abnormal smell – If an abnormal smell or smoke is detected,
immediately turn the power OFF and unplug the appliance
from the wall outlet. Contact your dealer or nearest service
center.
POWER OFF!
15. Damage requiring service – The appliance should be ser-
viced by qualified service personnel when:
A. The power-supply cord or the plug has been damaged.
B. Objects have fallen, or liquid has been spilled into the
appliance.
C. The appliance has been exposed to rain or water.
D. The appliance does not appear to operate normally by
following the instruction manual. Adjust only those controls
that are covered by the instruction manual as an improper
adjustment of other controls may result in damage and will
often require extensive work by a qualified technician to
restore the appliance to its normal operation.
E. The appliance has been dropped, or the enclosure damaged.
F. The appliance exhibits a marked change in performance.
16. Servicing – The user should not attempt to service the
appliance beyond that described in the instruction manual. All
other servicing should be referred to qualified service personnel.
19. AC outlets – Do not connect other audio equipment with a
power consumption larger than that specified to the AC outlet
on the rear panel. Never connect other electrical appliances,
such as an iron or toaster, to it to prevent fire or electric shock.
20. Overloading – Do not overload wall outlets, extension cords,
or integral convenience receptacles as this can result in a risk
of fire or electric shock.
21. Attachment – Do not use attachments not recommended by
the appliance manufacturer as they may cause hazards.
22. Replacement parts – When replacement parts are required,
be sure the service technician has used replacement parts
specified by the manufacturer or have the same characteristics as the original parts. Unauthorized substitutions may
result in fire, electric shock, or other hazards.
23. Safety check – Upon completion of any service or repairs to
this appliance, ask the service technician to perform safety
checks to determine that the appliance is in proper operating
condition.
Preparations
Operations
17. Outdoor antenna grounding – If an outside antenna is
connected to the appliance, be sure the antenna system is
grounded so as to provide some protection against voltage
surges and built up static charges. Article 810 of the National
Electrical Code ANSI/NFPA 70, provides information with
respect to proper grounding of the mast and supporting
structure, grounding of the lead-in wire to an antenna discharge unit, size of grounding conductors, location of antenna
discharge unit, connection to grounding electrodes, and
requirements for the grounding electrode. See Figure.
EXAMPLE OF ANTENNA GROUNDING AS PER
NATIONAL ELECTRICAL CODE
ANTENNA
LEAD IN WIRE
GROUND
CLAMPS
ANTENNA
DISCHARGE UNIT
ELECTRIC
SERVICE
EQUIPMENT
NEC – NATIONAL ELECTRICAL CODE
(NEC SECTION 810-20)
GROUNDING CONDUCTORS
(NEC SECTION 810-21)
GROUND CLAMP
POWER SERVICE GROUNDING
ELECTRODE SYSTEM
(NEC ART 250, PART H)
Notes
Notes
1. Item 3 is not required except for grounded or polarized equipment.
2. Item 17 and 18 are not required except for units provided with antenna
terminals.
3. Item 17 complies with UL in the U.S.A.
Other
Page 6

Contents
DVF-9010 (En/E)
6
Preparations
Preparations
Operations
Caution : Read the pages marked carefully to ensure safe operation.
Introduction
Before applying power
Safety precautions
Accessories
IMPORTANT SAFEGUARDS
Contents
Special features
Region codes
Region codes of this player
Region codes of the DVD discs that can be played with this player
Region codes in the world
Restrictions due to difference between discs
Playable Discs
Recording systems and types of playable discs
Unplayable discs
Icons on the DVD discs
Video formats
Video formats of DVD discs that can be played on this unit
Video formats of VCD discs that can be played on this unit
Examples of TV screen display of each video format·
Important items
Maintenance
Reference
System Connections
Connection with TV with S-VIDEO jacks and general stereo system
Connection with an AV receiver
Controls and indicators
Display / Main unit
Listening through headphones
Remote control unit
Operation of remote control unit
Loading batteries
Operation
Remote control mode switch
Joystick operation
...........................................................................................................................................
....................................................................................................................................................
...........................................................................................................................................................
......................................................................................................................................................................
...............................................................................................................
.................................................................................................................................................
...................................................................................................................................
........................................................................................................................................
...........................................................................................................................................
...........................................................................................................................................
........................................................................................................
....................................................................................................................................
.....................................................................................................
...........................................................................................................................................................
.................................................................................................................................................
......................................................................................................................................
..........................................................................................
...................................................................................................................................
...................................................................................................................................................................
........................................................................................................................................................................
..........................................................................................................................
................................................................................................................................
....................................................................................................................
........................................................................................................................................................
...................................................................................................................................
.......................................................................................................................................................
.....................................................................................................
...........................................................................................................................................................
.........................................................................................................................................................................
......................................................................................................................................
.........................................................................................................................................................
...................................................................
................................................................................
................................................................................
................................................................
2
2
2
3
4
6
8
9
9
9
10
10
11
11
11
11
12
12
13
13
14
14
14
15
15
16
19
19
20
20
21
21
21
21
21
Other
Operations
Playback
Operations using the GUI screen
..............................................................................................................................................
Playing a disc from the beginning
Forward search and reverse search (Manual search)
Skipping tracks or chapters
Frame-by-frame playback
Slow playback
Playing tracks in a random order (Random playback)
Letting playback pause
Stopping playback
DISPLAY key
................................................................................................................................................................
................................................................................................................................................
.........................................................................................................................................................
...................................................................................................................................................................
.............................................................................................................................
........................................................................................................................................
............................................................................................................................................
....................................................................................................
Basic operations on the GUI screen
Icons on the TV screen
.................................................................................................................................................
..........................................................................................................................
Storing scenes in memory (Memory function)
Storing a scene in memory
Recalling/clearing a scene in memory
Programming
Programming tracks in the desired order
Adding tracks (chapters) in the program
Clearing tracks (chapters) from the program
Returning to normal playback
.......................................................................................................................................
..........................................................................................................................................
.....................................................................................................................
................................................................................................................
.................................................................................................................
..........................................................................................................
.....................................................................................................................................
..........................................................................................
..........................................................................................
.............................................................................
22
22
24
24
24
24
25
25
25
25
26
26
27
29
29
29
30
30
31
31
31
Page 7

Contents
DVF-9010 (En/E)
7
Operations
Repeating tracks, chapters or titles (Repeat playback, A-B repeat)
Repeating a single track (chapter or title) (Repeat playback)
Repeating entire disc (Repeat playback)
Repeating a desired section (A-B repeat)
Repeating program playback (Program repeat)
Versatile DVD play features
Switching the voice language (Multi-audio function)
Displaying/switching the subtitle language (Multi-subtitle function)
To switch the viewing angle (Angle function)
Menu playback
Hierarchical structure of VCD menus
Playback without using the menu playback function
Menu playback (DVD)
Title selection using the title menu (Title function)
Enjoying Virtual Surround sound (VIRTUAL SURR.)
...................................................................................................................................
Changing the initial setup
Basic operation for changing the initial setup
Changing initial setup [1 Disc Languages]
Changing initial setup [2 Ratings]
Changing initial setup [3 Menu Language]
Changing initial setup [4 On-Screen Messages]
Changing initial setup [5 FL Display]
Changing initial setup [6 TV Aspect]
Changing initial setup [7 Digital Audio Output]
Changing initial setup [8 Speaker Setting]
Changing initial setup [9 Other Settings]
DVD menu language code list
CD-TEXT operation
Searching for tracks by title (TITLE SEARCH)
Selecting the text information display (TEXT DISP.)
Displaying all the text information (ALL INFO.)
.............................................................................................................................
.............................................................................................................
...................................................................................................................................................
................................................................................................................
.....................................................................................................................................
Graphical remote control unit (GRC unit)
Basic operation of the DVD player
.................................................................................................................
................................................................................................................
......................................................................................................
........................................................................................................
.......................................................................................................................
..............................................................................................
...............................................................................................
.......................................................................................................
.............................................................................................................
.............................................................................................................................
.............................................................................................................
...................................................................................................
........................................................................................................................
........................................................................................................................
.....................................................................................................
.............................................................................................................
................................................................................................................
.........................................................................................................
.............................................................................................
......................................................................................................
......................................................................................
............................................................................................................................
............................................................................
..........................................................................................
..............................................................
...........................................................................................
.......................................
32
32
32
33
33
34
34
35
36
37
37
37
38
39
40
41
41
42
43
45
45
46
47
48
50
52
53
54
54
55
55
56
56
Preparations
Operations
Other
Glossary
...............................................................................................................................................
In case of difficulty
Specifications
.....................................................................................................................................
............................................................................................................................
57
58
60
Other
Page 8
Special features
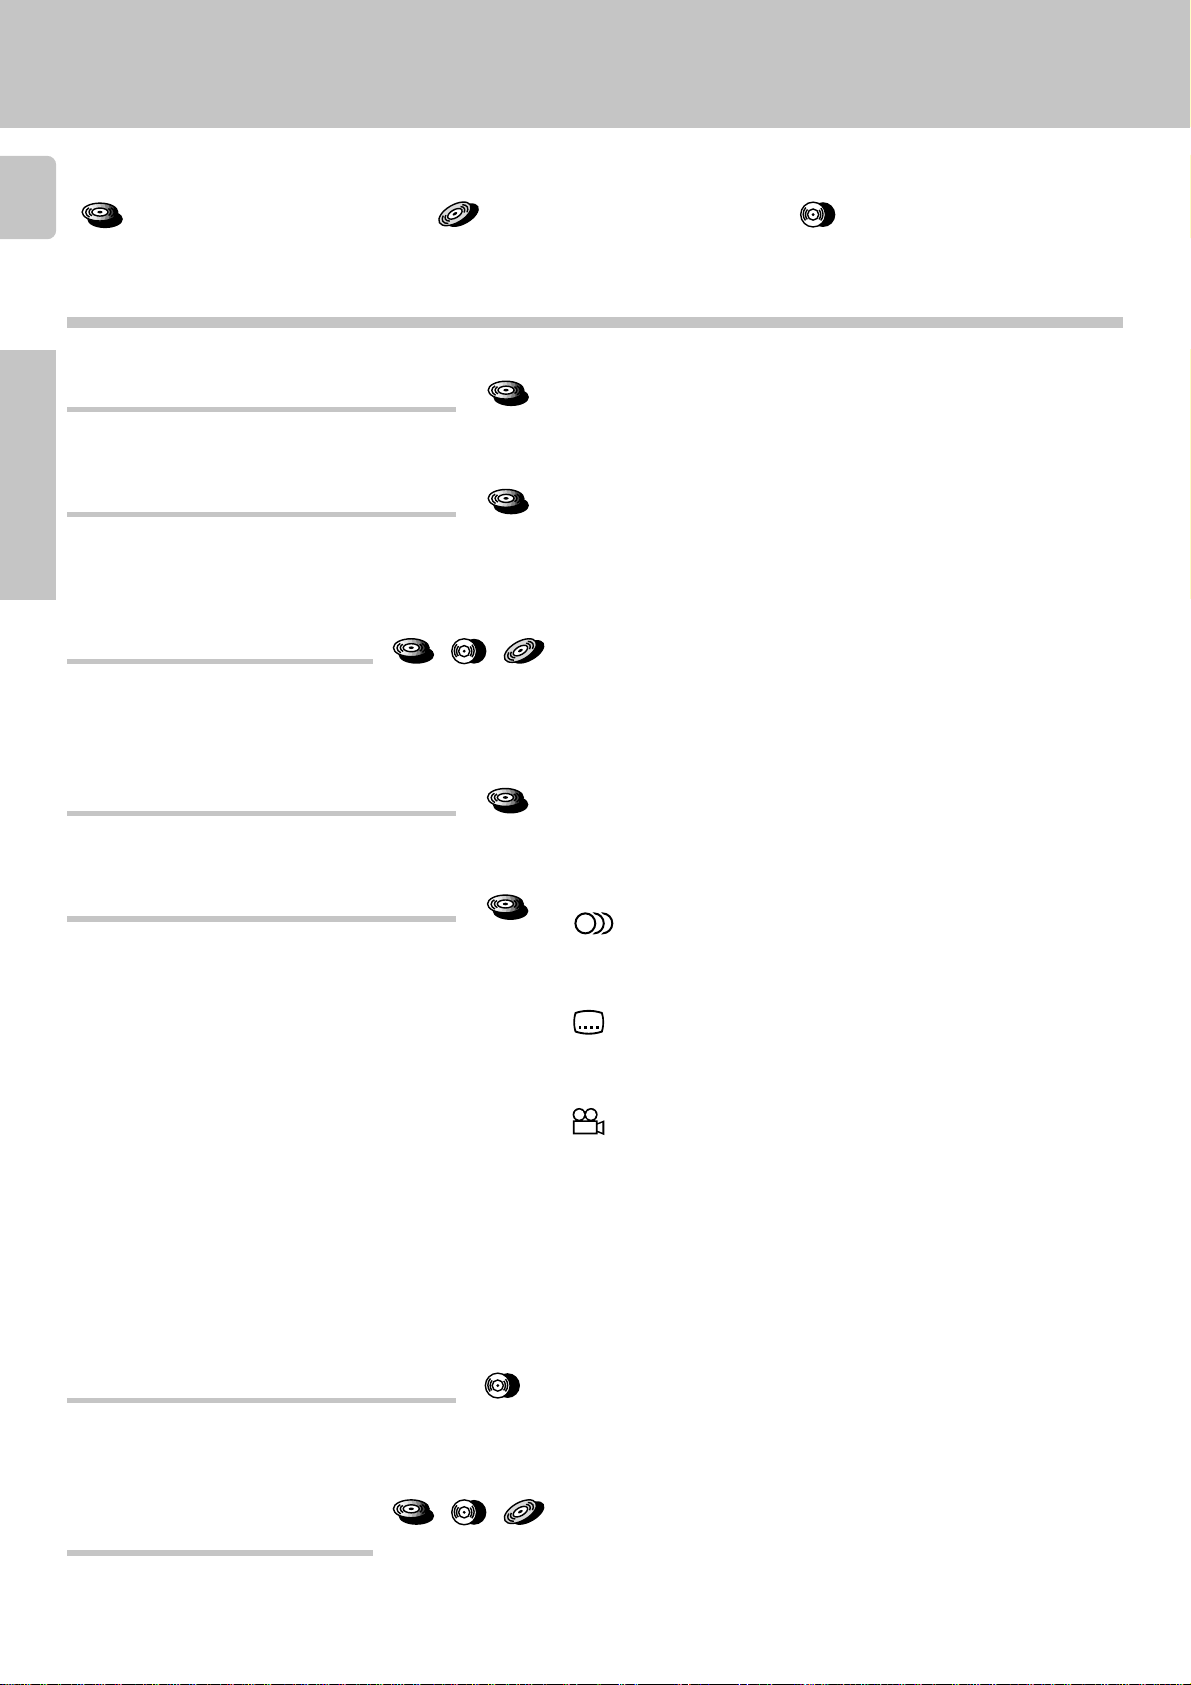
This document classifies the applications of each feature using the following icons.
8
DVD
Description of a feature that can be
used with DVD.
Higher video quality than S-VHS video
and LaserDisc
Preparations
Higher audio quality than music CD
Graphical user interface (GUI)
compatibility
6-Channel independent outputs using
built-in Dolby Digital (AC-3)/MPEG
multi-channel surround decoders
Operations
VCD
Description of a feature that can be
used with VIDEO CD.
The horizontal resolution of 500 lines or more is far above that of
the S-VHS video (400 lines) and LaserDisc (430 lines). The picture
quality is more noticeable when the screen size is larger.
The ultrahigh audio quality design can play discs with higher
quality than CDs, such as a recording with 48 kHz sampling frequency and 16-bit quantization up to 96 kHz sampling frequency
and 24-bit quantization. A recording with the 96 kHz sampling
frequency can reproduce as high frequencies as above 40 kHz!
The information related to the player and disc can be displayed on
the TV screen by pressing the ON SCREEN key of the remote
control unit. The remote control unit also has a joystick for simple
operations and settings of the player.
A Dolby Digital (AC-3) surround decoder and MPEG multi-channel
surround decoder as well as 6 output channels are built in to bring
movie theater-class powerfulness and presence to home theaters.
DVD
DVD
DVD
CD VCD
DVD
DVF-9010 (En/E)
CD
Description of a feature that can be
used with CD.
Versatile DVD playback features
Other
CD-TEXT compatibility
24-bit D.R.I.V.E. II, an advanced
technology in pursuit of quality
and safety
DVD
DVD
CD
CD VCD
Multi-audio function:
8
Icons on a DVD disc means that the spoken voice language
can be selected from up to 8 languages. (The number of
available voice languages is variable depending on discs.)
Multi-subtitle function:
32
Icons on a DVD disc means that the subtitle language can be
selected from up to 32 languages. (The number of available
subtitle languages is variable depending on discs.)
Angle function:
Icons on a DVD disc means that some objects can be viewed
9
from up to 9 different camera angles, as if switching the
video shot with multiple cameras. (The number of available
angles is variable depending on discs.)
Ratings function:
When a DVD disc contains scenes that should be protected
from viewing of children, playback of such scenes can be
prohibited based on the assigned restriction levels. (This
feature is available only with discs containing the recording
of viewing restriction levels.)
Text information recorded in CD (disc title, track titles, musician
names, verse writer names, composer names, etc.) can be recalled
and displayed in alphanumeric characters. (Certain character types
may not be able to be displayed.)
The 24-bit D.R.I.V.E. II is an advancement of the KENWOOD-original
D.R.I.V.E. (Dynamic Resolution Intensive Vector Enhancement)
technology.
›
fi
fl
e
Page 9
Region codes
DVF-9010 (En/E)
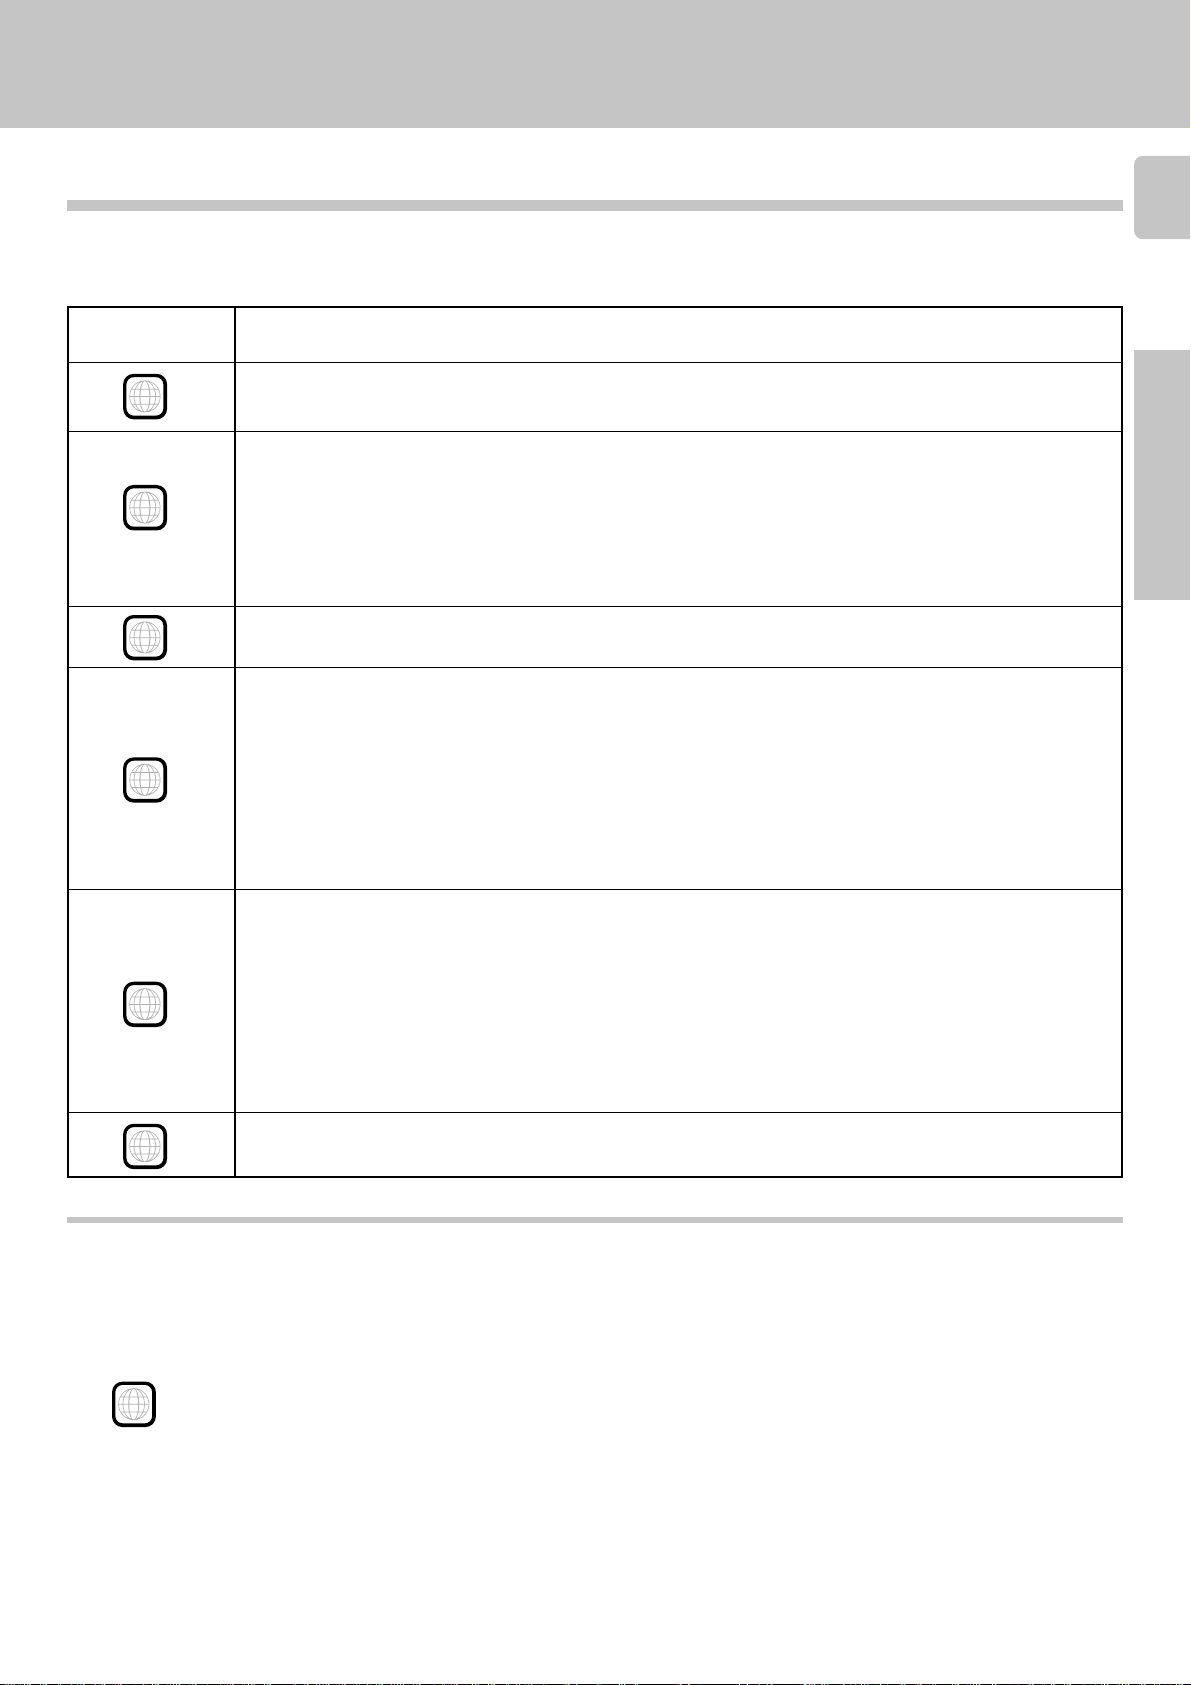
Region codes of this player
Every player of this model has a certain region code assigned to it based on the country where the player is used. When the
player is used to play back DVD discs, it can only play the DVD discs carrying the region codes matching the region code of the
player. See the following table for details. (The table shows the data as of October 1997.)
Region Code of
Player
1
2
3
4
Canada, United States, American Samoa, Bermuda, Johnston Island, Midway Islands, Puerto Rico, St.
Pierre and Miquelon, United States Virgin, Wake Island
Albania, Andorra, Austria, Bahrain, Belgium, Bosnia and Herzegovina, Bulgaria, Croatia, Cyprus, Czech,
Denmark, Egypt, Finland, France, Germany, Greece, Hungary, Iceland, Iran, Iraq, Ireland, Israel, Italy,
Japan, Jordan, Kuwait, Lebanon, Lesotho, Liechtenstein, Luxembourg, Macedonia, Malta, Monaco,
Netherlands, Norway, Oman, Poland, Portugal, Qatar, Romania, San Marino, Saudi Arabia, Slovakia,
Slovenia, South Africa, Spain, Swaziland, Sweden, Switzerland, Syrian Arab Republic, Turkey, United
Arab Emirates, United Kingdom, Vatican City State, Yemen, Yugoslavia, Channel Islands, Faeroe Islands,
Gibraltar, Greenland, Isle of Man, Svalbard and Jan Mayen Islands
Brunei Darussalam, Cambodia, Indonesia, Korea, Laos, Malaysia, Myanmar, Philippines, Singapore,
Thailand, Viet Nam, East Timor, Hong Kong, Macau, Taiwan
Antigua and Barbuda, Argentina, Australia, Bahamas, Barbados, Belize, Bolivia, Brazil, Chile, Colombia,
Costa Rica, Cuba, Dominica, Dominican Republic, Ecuador, El Salvador, Fiji, Grenada, Guatemala,
Guyana, Haiti, Honduras, Jamaica, Kiribati, Marshall Islands, Mexico, Micronesia, Nauru, New Zealand,
Nicaragua, Palau, Panama, Papua New Guinea, Paraguay, Peru, Saint Christopher and Nevis, Saint Lucia,
Saint Vincent and the Grenadines, Samoa, Solomon Islands, Suriname, Tonga, Trinidad and Tobago,
Tuvalu, Uruguay, Vanuatu, Venezuela, Anguilla, British Virgin Islands, Cayman Islands, Christmas Island,
Cocos Islands, Cook Islands, Falkland Islands, French Guiana, French Polynesia, Guadeloupe, Guam,
Martinique, Montserrat, Netherlands Antilles, New Caledonia, Niue, Norfolk Island, Northern Mariana
Islands, Pitcairn, Tokelau, Turks and Caicos Islands, Wallis and Futuna Islands
Usable Country or Area
9
Preparations
Operations
Afghanistan, Algeria, Angola, Armenia, Azerbaijan, Bangladesh, Belarus, Benin, Bhutan, Botswana,
Burkina Faso, Burundi, Cameroon, CapeVerde, Central Africa, Chad, Comoros, Congo, Cote d'Ivoire,
Djibouti, Equatorial Guinea, Eritrea, Estonia, Ethiopia, Gabon, Gambia, Georgia, Ghana, Guinea, GuineaBissau, India, Kazakhstan, Kenya, Kyrgyz Republic, Latvia, Liberia, Libya, Lithuania, Madagascar, Malawi,
5
6
Maldives, Mali, Mauritania, Mauritius, Moldova, Mongolia, Morocco, Mozambique, Namibia, Nepal,
Niger, Nigeria, North Korea, Pakistan, Russia, Rwanda, Sao Tome and Principe, Senegal, Seychelles,
Sierra Leone, Somalia, Sri Lanka, Sudan, Tadzhikistan, Tanzania, Togo, Tunisia, Turkmenistan, Uganda,
Ukraine, Uzbekistan, Zaire, Zambia, Zimbabwe, British Indian Territory, Jammu and Kashmir, Mayotte,
Reunion, St. Helena ex. dep., Western Sahara
China
Region codes of the DVD discs that can be played with this player
This player can play back a DVD disc which carries the corresponding code to the region code of the player shown in the table
above, a marking containing the region code of the player or the “ALL” marking shown below. Even when a DVD disc does not
carry any indication of the region code, it may sometimes unable to be played on this player due to certain restrictions.
ALL
Other
Page 10

,
Region codes
Region codes in the world
10
The DVD players are given a region code according to the country or area it is marketed, as shown in the following map.
DVF-9010 (En/E)
Preparations
Operations
1
5
2
1
6
2
3
4
1
5
2
4
Restrictions due to difference between discs
Some DVD and VCD discs can be played only in certain playback modes according to the intentions of the software producers.
As this player plays discs according to their intentions, some functions may not work as intended by you. Please be sure to read
the instructions provided with each disc. When an inhibition icon is displayed on the TV screen connected to the player, it
indicates that the disc being played is under the restriction as described above.
Other
Inhibition icon
Page 11
Playable Discs
DIGITAL AUDIODIGITAL AUDIO
COMPACTCOMPACT
DVF-9010 (En/E)
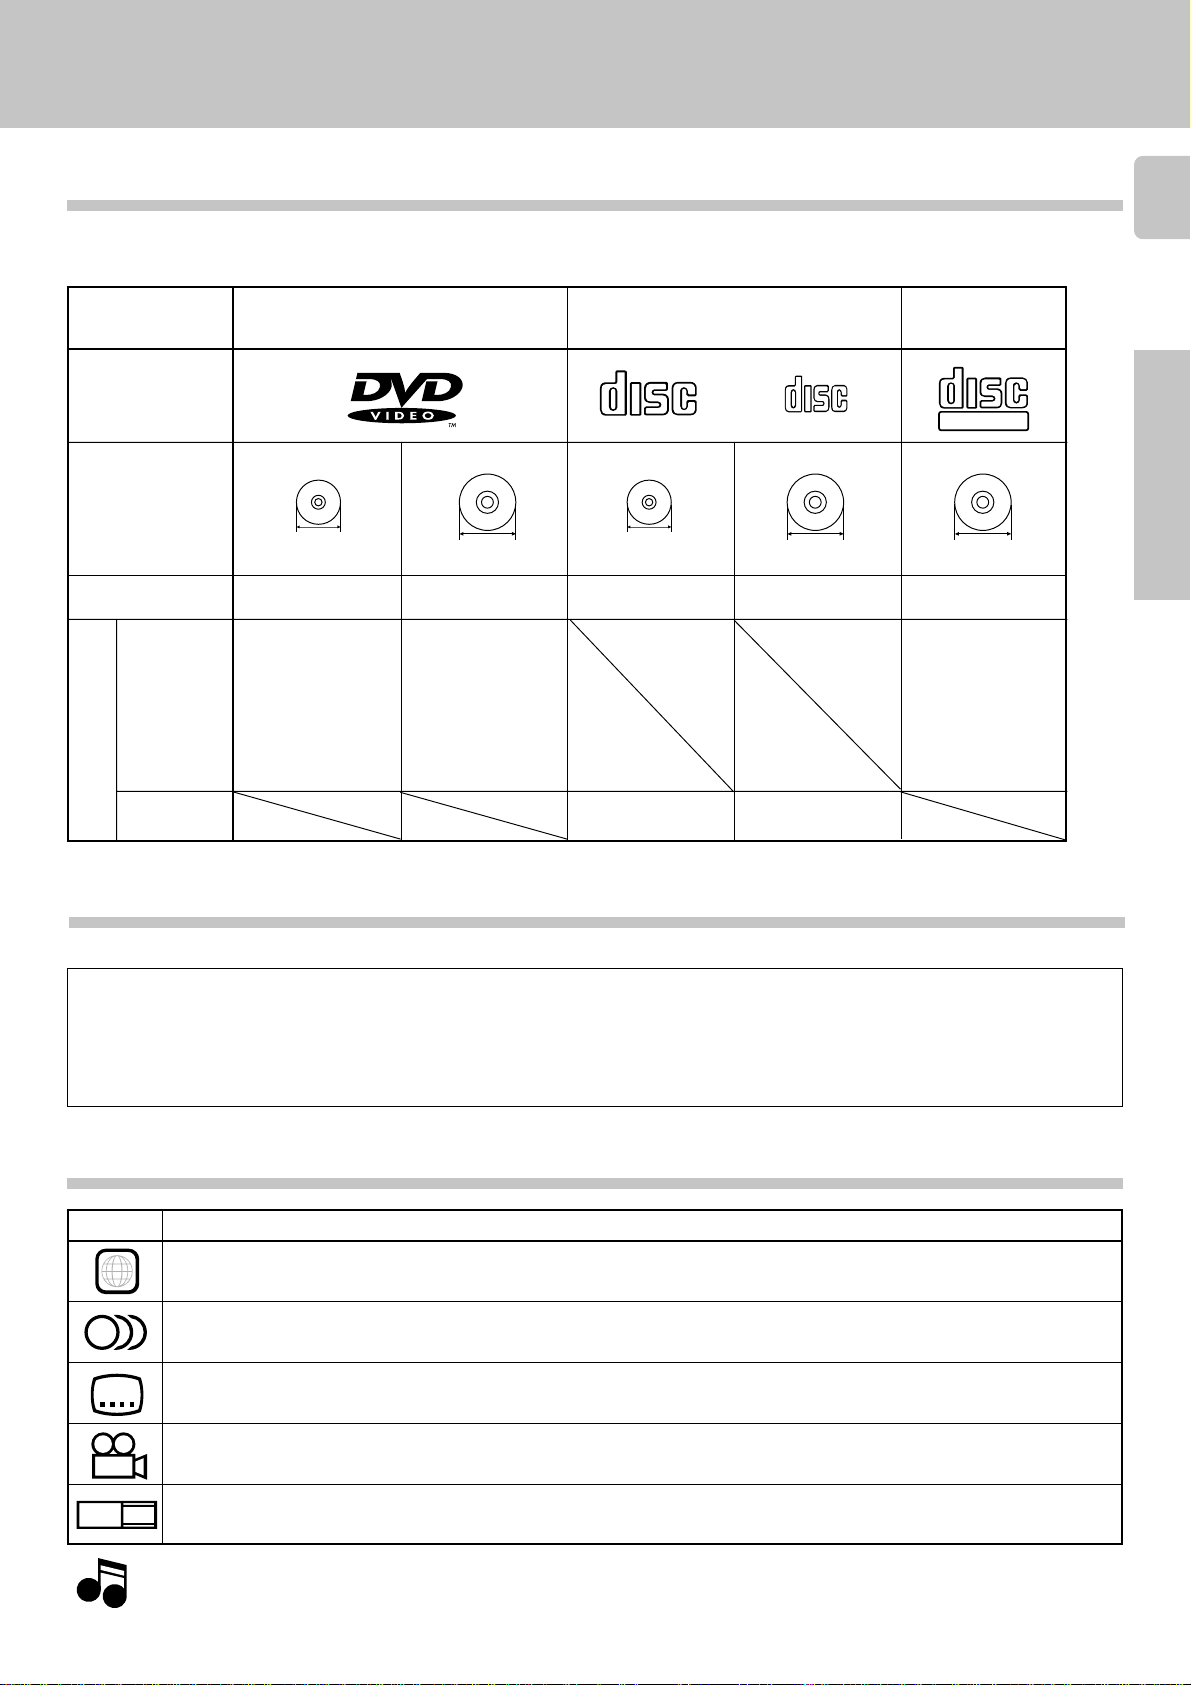
Recording systems and types of playable discs
The system using this unit does not only play music from CD but can also play the discs listed below to offer you high-quality
entertainment of video of movies and live concerts.
Playable Disc
Logo mark on disc
Disc size
Played sides
Contents
Video + Audio
8cm
One or both One or both
Approx. 41 min.
(1 side, 1 layer)
Approx. 75 min.
(1 side, 2 layers)
Approx. 82 min.
(2 sides, 1 layer)
Approx. 150 min.
(2 sides, 2 layers)
DVD CD VCD
COMPACTCOMPACT
DIGITAL VIDEO
12cm12cm
One side only
Max. 74 min.
12cm
Approx. 133 min.
(1 side, 1 layer)
Approx. 242 min.
(1 side, 2 layers)
Approx. 266 min.
(2 sides, 1 layer)
Approx. 484 min.
(2 sides, 2 layers)
COMPACTCOMPACT
DIGITAL AUDIODIGITAL AUDIO
8cm
One side only One side only
11
Preparations
Audio
Max. 20 min., digital Max. 74 min., digital
Unplayable discs
This player cannot play back any of the following discs.
÷ DVD-ROM discs
÷ DVD-R/DVD-RAM discs
÷ CD-ROM discs
÷ VSD discs
Icons on the DVD discs
Icon Description
ALL
8
32
Indicates the region code where the disc can be played.
Number of voice languages recorded with the audio function. The number in the icon indicates the number of voice languages. (Max.
8 languages)
Number of subtitle languages recorded with the subtitle function. The number in the icon indicates the number of subtitle languages.
(Max. 32 languages)
Operations
÷ CDV discs (Only the audio part can be reproduced.)
÷ CD-G/CD-EG/CD-EXTRA discs (Only the audio can be
reproduced.)
÷ CD-R/CD-RW discs (Never attempt to play them.)
÷ Photo CD discs (Never attempt to play them.)
Other
9
16:9 LB
Note
NoteNote
Number of angles provided by the angle function. The number in the icon indicates the number of angles. (Max. 9 angles)
Aspect ratios that can be selected. “LB” stands for Letter Box and “PS” for Pan/Scan. In the example on the left, the 16:9 video can
be converted into letter box video.
See “Glossary” for detailed description on the terms such as aspect ratio, letter box and pan/scan. U
Page 12
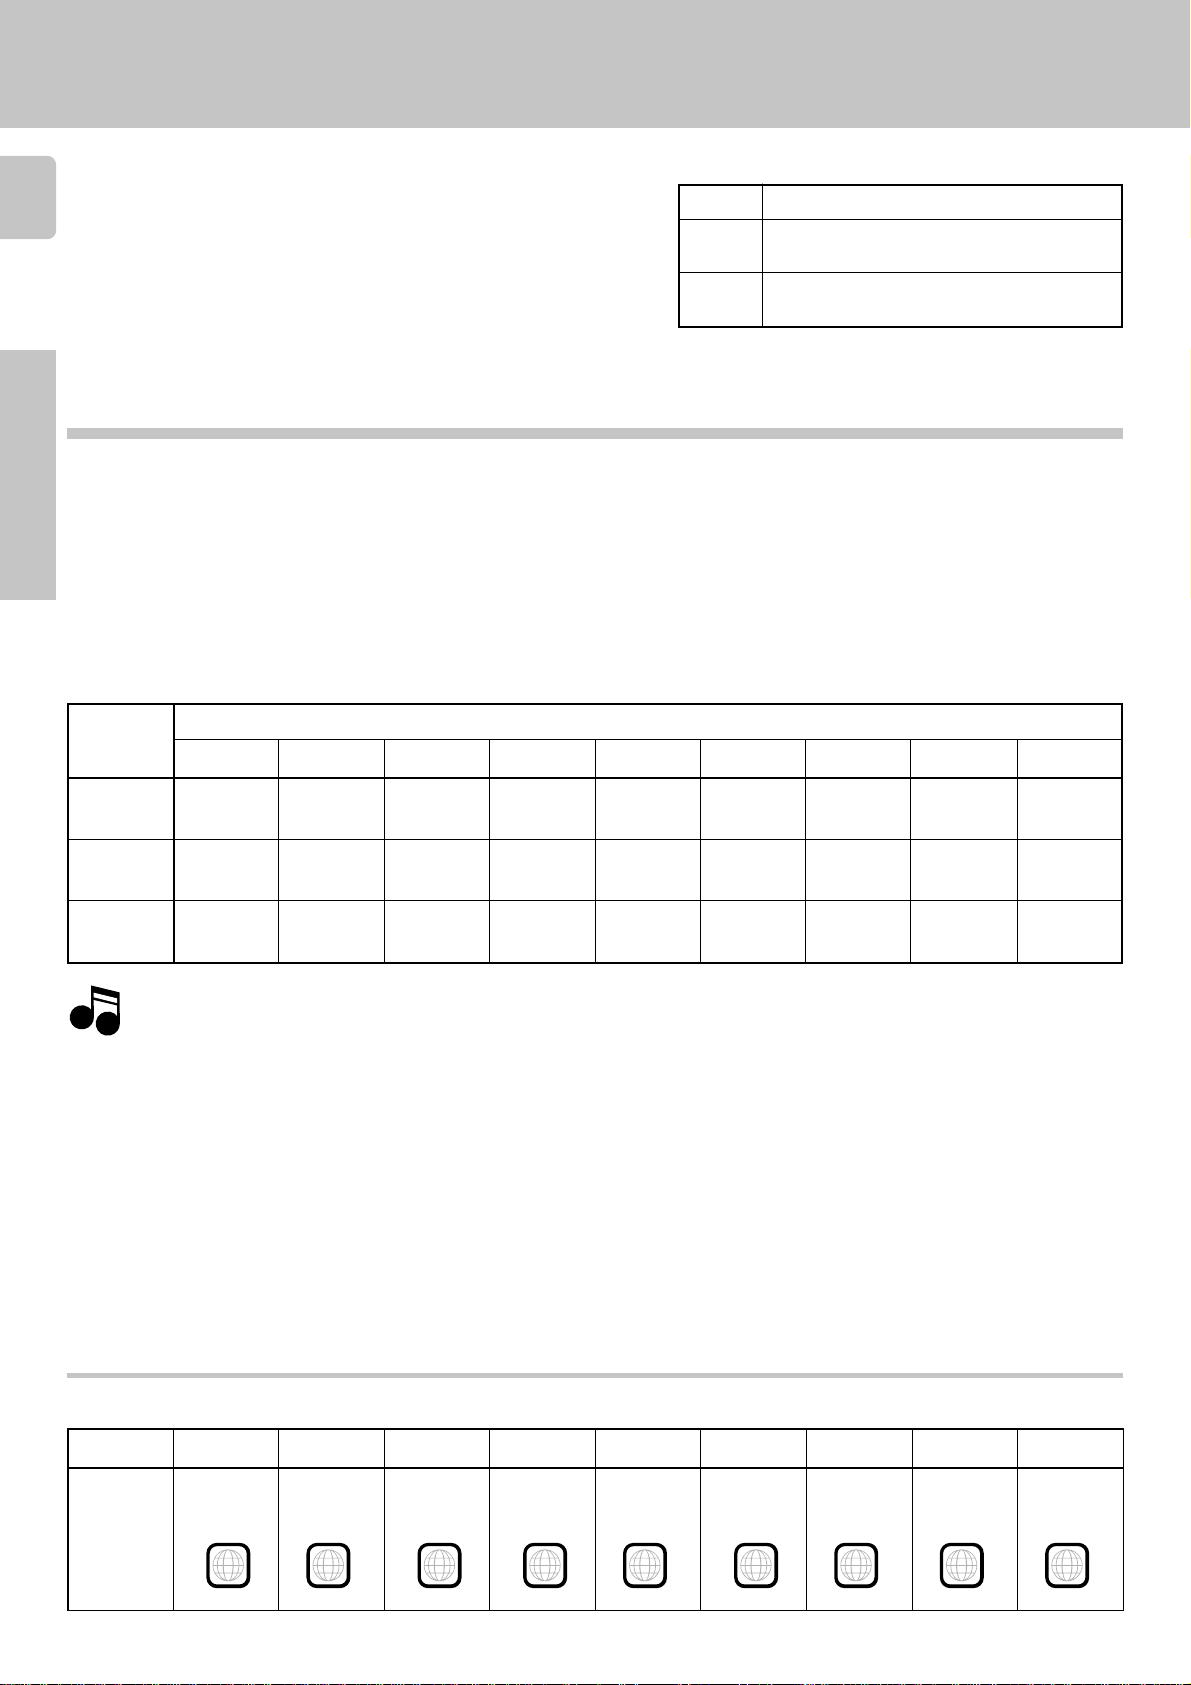
Video formats
The video signals used to display TV pictures and video disc
pictures are mainly based on two types of signal formats
12
(PAL and NTSC), which are assigned to each country or area
as shown on the right. As a result, it is required to select discs
according to the video format used with your TV monitor (in
your country or area).
Preparations
Video formats of DVD discs that can be played on this unit
Set the video formats of the DVD discs to be played on this unit as described below.
Check the video format(s) used by your TV monitor.
1
÷Refer to the operating instructions of your TV monitor for details.
Select DVD discs recorded with the playable video format by referring to the following
2
TV formats of major countries
TV Format
NTSC
PAL
Japan, Taiwan, Korea, U.S.A., Canada, Mexico,
Philippines, Chile, etc.
China, North Korea, U.K., Germany, Australia,
New Zealand, Kuwait, Singapore, etc.
Major Countries & Areas
DVF-9010 (En/E)
table.
÷See the region code table on the bottom of this page for details on districts 1 to 6.
Your TV
format
District 1
District 2-1
District 2-2
District 2-3
Playable Disc Formats
District 3
District 4-1
District 4-2
District 5
District 6
NTSC only
Operations
PAL only
NTSC/PAL
switchable
Note
NoteNote
3
Other
4
NTSC
NTSC*
NTSC
Normal video may not be reproduced when a disc recorded with the video format marked * in the above table is played. See “Examples of TV
screen display of each video format” for details.
NTSC*
PAL*
NTSC
PAL
NTSC
PAL
NTSC
NTSC*
NTSC
NTSC
PAL*
NTSC*
PAL
NTSC
PAL
NTSC
PAL*
NTSC*
PAL
NTSC
PAL
NTSC*
PAL*
NTSC
PAL
NTSC
PAL
NTSC
NTSC*
NTSC
NTSC*
PAL*
NTSC
PAL
NTSC
PAL
NTSC
PAL*
NTSC*
PAL
NTSC
PAL
When your TV is switchable between NTSC and PAL,
÷Districts 1, 2-2 and 4-2: Set the TV to NTSC.
÷Districts 2-1, 4-1 and 5: Set the TV to PAL.
÷Districts 2-3, 3 and 6: Set the TV according to each disc to be played.
Now play the disc.
#
Region code table
Area or
Country
Name,
Region
Code
District 1
North
America
District 2-1
Europe
District 2-2
Japan
District 2-3
Middle East
District 3
Southeast
Asia
District 4-1
Oceania
District 4-2
South
America
District 5
Russia
District 6
China
654432221
Page 13

Video formats
DVF-9010 (En/E)
Video formats of VCD discs that can be played on this unit
Set the video formats of the VCD discs to be played on this unit as described below.
1
Check the video format(s) used by your TV monitor.
÷Refer to the operating instructions of your TV monitor for details.
2
Select VCD discs recorded with the playable video format by referring to the following
table.
÷See the region code table on the bottom of the previous page for details on districts 1 to 6.
Your TV
format
NTSC only
PAL only
NTSC/PAL
switchable
Normal video may not be reproduced when a disc recorded with the video format marked * in the above table is played. See “Examples of
TV screen display of each video format” for details.
Note
NoteNote
District 1
NTSC
PAL
NTSC*
PAL*
NTSC
PAL
District 2-1
NTSC*
PAL*
NTSC
PAL
NTSC
PAL
District 2-2
NTSC
PAL
NTSC*
PAL*
NTSC
PAL
District 2-3
Playable Disc Formats
District 3
NTSC
PAL*
NTSC*
PAL
NTSC
PAL
NTSC
PAL*
NTSC*
PAL
NTSC
PAL
District 4-1
NTSC*
PAL*
NTSC
PAL
NTSC
PAL
District 4-2
NTSC
PAL
NTSC*
PAL*
NTSC
PAL
District 5
NTSC*
PAL*
NTSC
PAL
NTSC
PAL
District 6
NTSC
PAL*
NTSC*
PAL
NTSC
PAL
13
Preparations
When your TV is switchable between NTSC and PAL,
3
÷Districts 1, 2-2 and 4-2: Set the TV to NTSC.
÷Districts 2-1, 4-1 and 5: Set the TV to PAL.
÷Districts 2-3, 3 and 6: Set the TV according to each disc to be played.
Now play the disc.
4
Examples of TV screen display of each video format
When your TV is switchable between PAL/
NTSC
Try play a disc. If the picture is black and white or as shown on the right,
stop playback and switch the screen display formats of this unit and the
TV to another format. This will improve the played picture quality.
When your TV is compatible only with the
PAL format
When your TV is compatible only with the
NTSC format
Operations
Other
With certain discs, the playback picture may have black spaces above
and below it (as shown on the right).
This is because the disc has been
recorded in the NTSC format. The
screen may be somewhat hard to
see but this is not malfunction.
With certain discs, the playback picture may be cut above and below it
(as shown on the right). This is because the disc has been recorded in
the PAL format. The screen may be
somewhat hard to see but this is not
malfunction.
Page 14
Important items
Maintenance
14
DVF-9010 (En/E)
Cleaning
Unplug this appliance from the wall outlet before cleaning. Do not use
volatile solvents such as alcohol, paint thinner, gasoline, or benzine,
etc. to clean the cabinet. Use a clean dry cloth.
Preparations
Reference
Discs which can be played with this unit
DVD (12 cm, 8 cm), CD (12 cm, 8 cm), VCD, and the audio part of CDV,
CD-G, CD-EG and CD-EXTRA.
÷Use discs that comply with the IEC standard, for example a disc
carrying the
Never play a cracked or warped disc
During playback, the disc rotates at high speed in the player.
Therefore, to avoid danger, never use a cracked or deformed disc or a
disc repaired with tape or adhesive agent.
Please do not use discs which are not round because they may cause
a malfunction.
Operations
Disc accessories
The disc accessories (stabilizer, protection sheet, protection ring, etc.)
which are marketed for improving the sound quality or protecting discs
as well as the disc cleaner should not be used with this system because
they may cause malfunction.
COMPACTCOMPACT
marking on the label surface.
DIGITAL AUDIODIGITAL AUDIO
Caution against contact revitalizer
Do not use contact cleaners because it could cause a malfunction. Be
specially careful against contact cleaners containing oil, for they may
deform the plastic component.
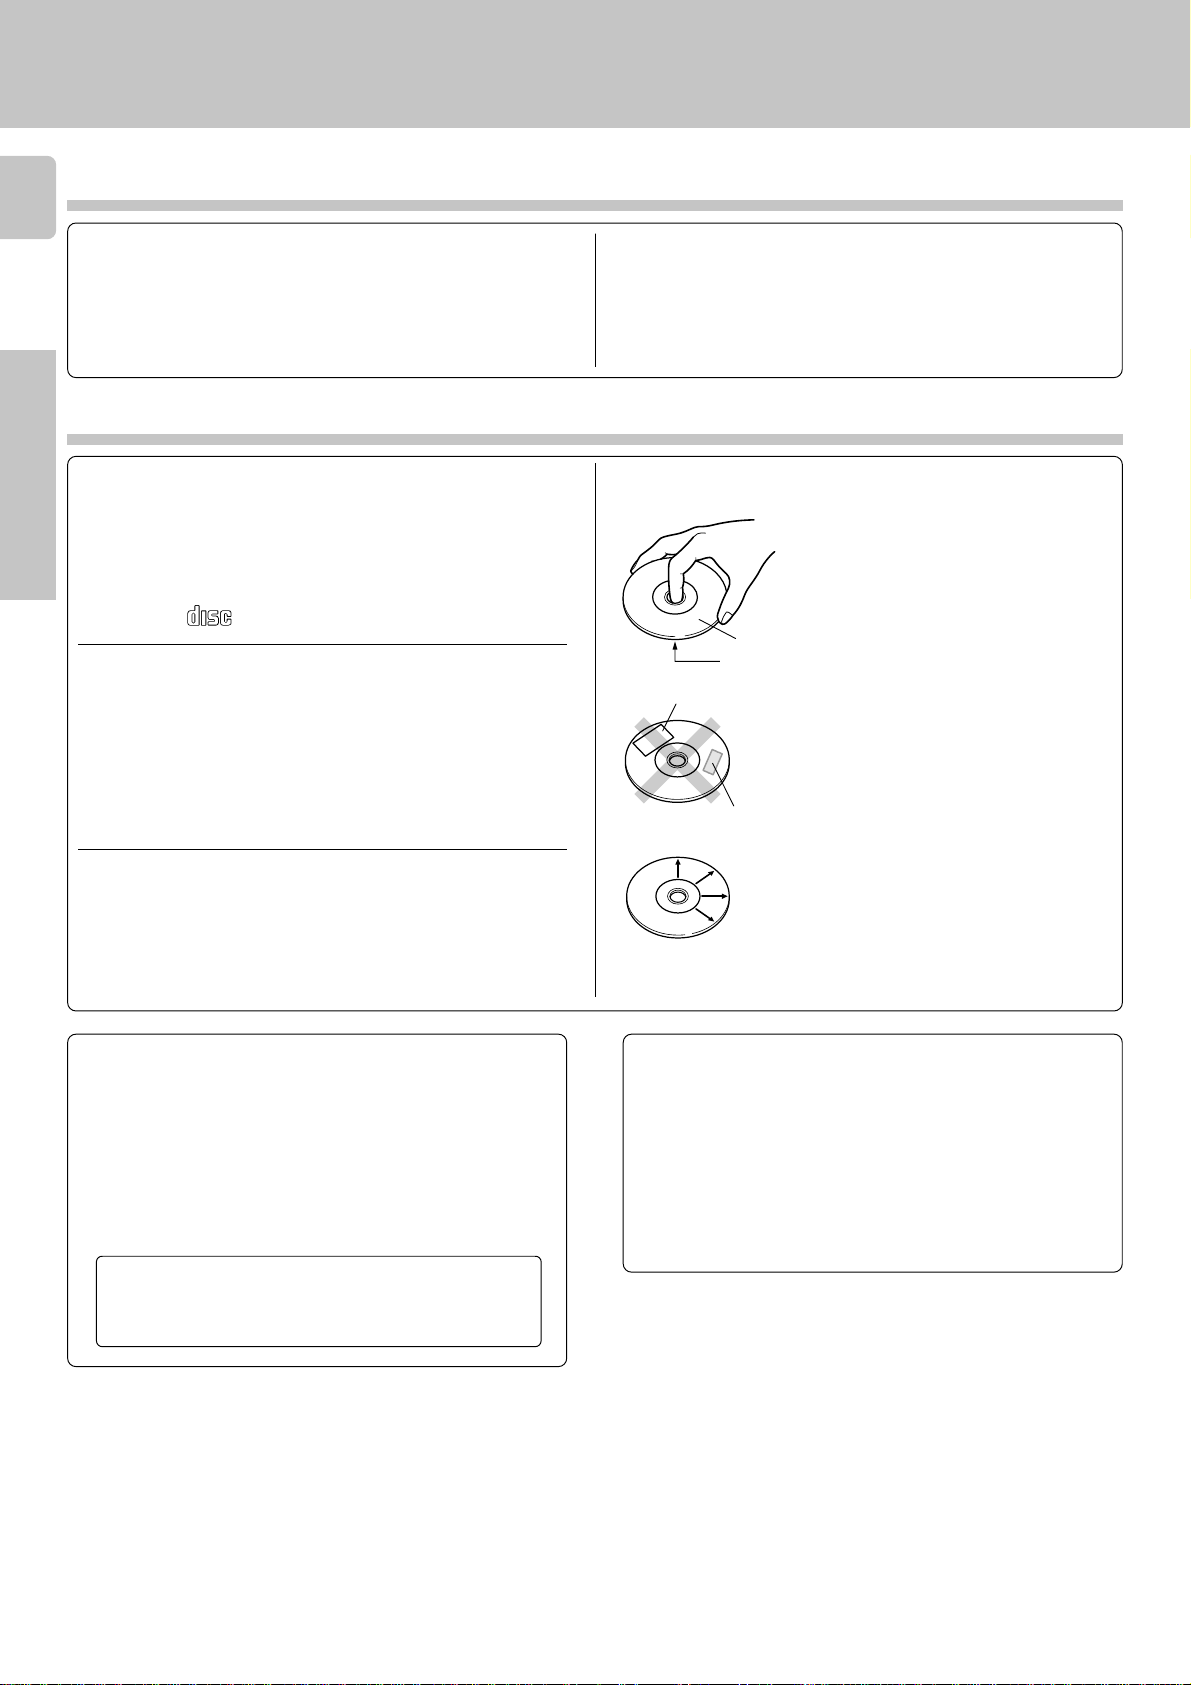
Disc handing precautions
Handling
Hold the discs so that you do not touch the
Label side␣
Playing side
Sticker
Sticky paste
playing surface.
Do not attach paper or tape to either the
playing side or the label side of the discs.
Cleaning
If fingerprints or foreign matter become
attached to the disc, lightly wipe the disc
with a soft cotton cloth (or similar) from the
center of the disc outwards in a radial
manner.
Storage
When a disc is not to be played for a long
period of time, remove it from the player
and store it in its case.
Note related to transportation and movement
Before transporting or moving this unit, carry out the following
operations.
1. Set the POWER key to ON without loading a disc.
2. Wait a few seconds and verify that the display shown appears.
Other
3. Set the POWER key to OFF.
DVD VCD CD
P.B.C. DOLBY DIGITAL RANDOM PROG.
TITLE CHAPTER TRACK CD TEXT
ANGLE REPEAT ALL
A B
NO DISC
STEREO
LR
KARAOKE
Beware of condensation
When the difference between the internal temperature of the unit and
external atmosphere is large, dew (mist) may be produced on the
internal parts of the unit. In such a case, turn the unit ON and leave
it for a few hours until the condensation has dried up.
Be especially careful in the following conditions:
When the unit is brought into a place where there is a large difference
in temperature between the previous location, when the humidity of
the listening room is high, etc.
Page 15
System Connections
Make connection as shown below. When connecting the
DVF-9010 (En/E)
related system components, refer also to the instruction
manuals of the related components.
Caution: Do not plug in the power lead until all connec-
tions are completed.
Malfunction of microprocessor
If operation is not possible or erroneous display appears even
though all connections have been made properly, reset the
microprocessor referring to “In case of difficulty”.
15
I
Caution regarding placement (Except for U.S.A., Canada)
To maintain proper ventilation, be sure to leave a space around the unit (from the largest outer dimensions including projections) equal to, or greater
than, shown below.
Left and right panels: 10 cm, rear panel: 10 cm
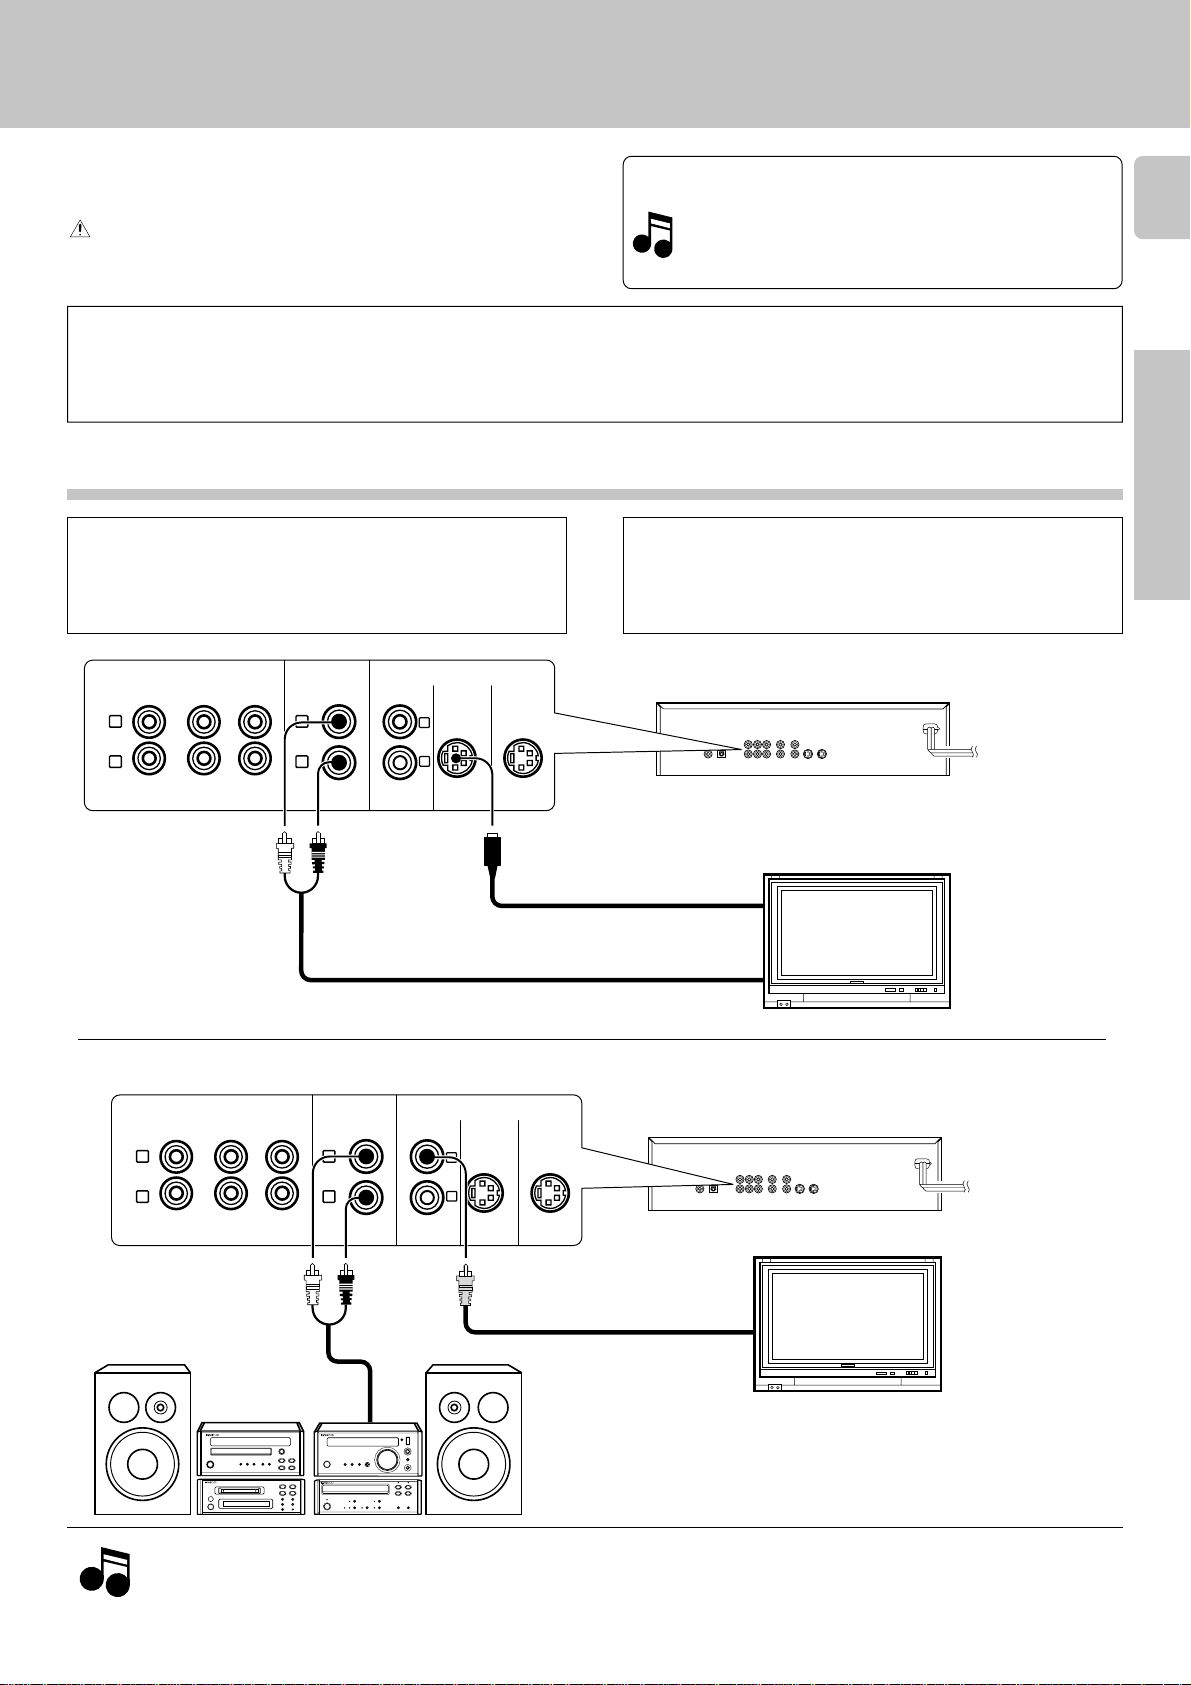
Connection with TV with S-VIDEO jacks and general stereo system
Connection with VCR
The VIDEO OUTPUT jacks should be connected directly to the TV. Do
not connect them to the TV via a VCR. Otherwise the played video
may be disturbed due to the copy protection function.
L
R
MIX LINE
OUTPUT
VIDEO OUTPUT
1
S-VIDEO 1 S-VIDEO 2
2
6CH. OUTPUT
CENTER
L
R
FRONT SURROUND SUBWOOFER
Initial setup
Set initial setup [6. TV Aspect] according to the aspect ratio (4:3 or
16:9) of your TV.
DVF-9010
To wall AC
outlet
u
Preparations
Audio cord (provided)
Connection with general stereo system
L
R
AUX IN
MIX LINE
OUTPUT
6CH. OUTPUT
CENTER
L
R
FRONT SURROUND SUBWOOFER
Audio cord (provided)
S-VIDEO cord (provided)
VIDEO OUTPUT
1
S-VIDEO 1 S-VIDEO 2
2
Video cord (75Ωcoaxial) (provided)
S-VIDEO IN
AUDIO IN
DVF-9010
VIDEO IN
Monitor TV
(commercially available)
Monitor TV
(commercially available)
To wall AC
outlet
Operations
Other
Notes
Notes
Stereo system (commercially available)
* The connected components shown here are typical examples.
1. Connect all cords firmly. If connections are loose, there could be loss of sound or noise produced.
2. When plugging and unplugging connection cords, be sure to first remove the power cord from the AC outlet. Plugging/unplugging
connection cords without removal of the power cord can cause malfunctions or damage to the unit.
Page 16

System Connections
DVF-9010 (En/E)
Connection with an AV receiver
16
This unit incorporates a Dolby Digital (AC-3) decoder and MPEG multi-channel decoder. As a result, it can play DVD discs
encoded with Dolby Digital (AC-3) or MPEG multi-channel without the need of purchasing a commercially available Dolby
Digital (AC-3) decoder.
A DTS-encoded CD or DVD disc cannot be played. Noise may be produced if such a disc is played.
The output audio is variable depending on the played discs and setups. By referring to the following table, perform initial setup
and other settings according to your system. (“Changing the initial setup”
Preparations
Played Disc
Audio Recording
System
Analog Output Digital Output
q)
Output Audio
Operations
Dolby Digital (AC-3)
DVD
VCD
CD
(*1) When the [7 Digital Audio Output] of the initial setup is set to “1 Off”, a DVD with a sampling frequency of 48 kHz (20 bit/
24 bit) or 96 kHz cannot be played back. (Changing initial setup [7 Digital Audio Output]
Linear PCM
MPEG Multi
MPEG 1
Linear PCM
6ch
2ch
6ch (max.)
2ch
2ch
•Bitstream
•PCM (48kHz/16bit) 2ch
(*1)
PCM (48kHz/16bit) 2ch
•Bitstream
•PCM (48kHz/16bit) 2ch
PCM (44.1kHz)
PCM (44.1kHz)
i)
Other
About the linear PCM audio
This is the signal recording format used with music CD discs. While music CDs use 44.1 kHz/16-bit recording format, DVDs use from 48 kHz/16-bit
to 96 kHz/24-bit formats so they can reproduce audio with a higher quality than music CDs.
Page 17
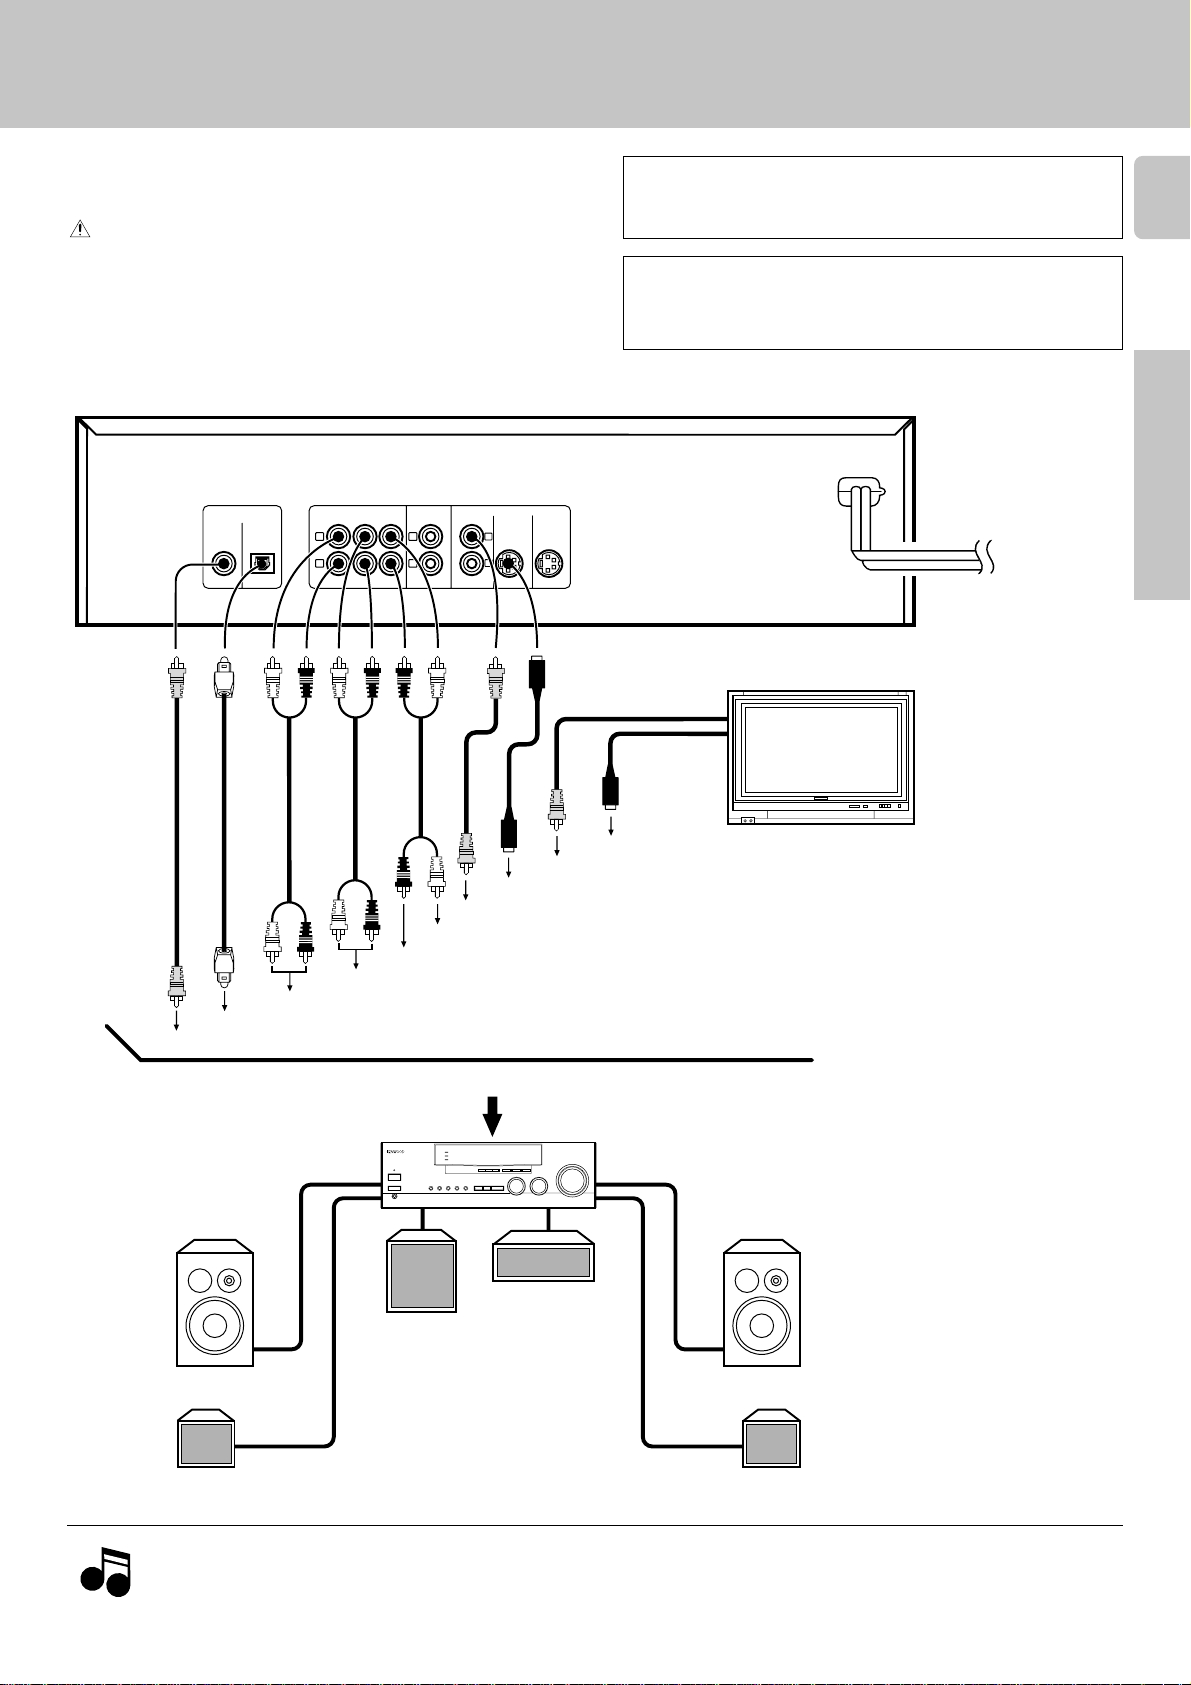
Make connection as shown below. When connecting the
related system components, refer also to the instruction
manuals of the related components.
Caution: Do not plug in the power lead until all connec-
tions are completed.
DVF-9010
System Connections
DVF-9010 (En/E)
The VIDEO OUTPUT jacks should be connected directly to the TV. Do
not connect them to the TV via a VCR. Otherwise the played video
may be disturbed due to the copy protection function.
Initial setup
Set initial setup [6. TV Aspect] according to the aspect ratio (4:3 or
16:9) of your TV.
u
17
DIGITAL OUTPUT
(PCM/BIT STREAM)
COAXIAL OPTICAL
6CH. OUTPUT
L
R
FRONT SURROUND SUBWOOFER
CENTER
MIX LINE
OUTPUT
L
R
VIDEO OUTPUT
1
S-VIDEO 1
2
S-VIDEO 2
Monitor TV
(commercially available)
VIDEO IN
S-VIDEO IN
S-VIDEO OUT/S-VIDEO cord (commercially available)
VIDEO OUT/Video cord (75Ωcoaxial) (commercially available)
S-VIDEO IN/S-VIDEO cord (provided)
VIDEO IN/Video cord (75Ωcoaxial) (provided)
CENTER IN/Audio cord (provided)
SUBWOOFER IN/Audio cord (provided)
SURROUND L/R IN/Audio cord (provided)
FRONT L/R IN/Audio cord (provided)
OPTICAL IN/Optical fiber cable (provided)
COAXIAL IN/Digital cord (75Ωcoaxial) (commercially available)
Connect the cords and cables according to the jacks available on the connected AV receiver.
To wall AC outlet
*If you want to use the macro
function of a KENWOOD
AUDIO VIDEO SURROUND
RECEIVER (optional), connect
this player to a wall AC outlet.
Be sure to set the POWER
switch on the front panel of
this unit to OFF when you are
going to leave the unit
unattended for going out of
the house, etc.
Preparations
Operations
Front speaker (R)
Surround
speaker (R)
Notes
Notes
AV receiver with 6-channel input (commercially available)
Center speaker
Active subwoofer
Front speaker (L)
Surround
speaker (L)
Stereo system (commercially available)
* The connected components shown here are typical examples.
1. Connect all cords firmly. If connections are loose, there could be loss of sound or noise produced.
2. When plugging and unplugging connection cords, be sure to first remove the power cord from the AC outlet. Plugging/unplugging
connection cords without removal of the power cord can cause malfunctions or damage to the unit.
Other
Page 18
System Connections
DVF-9010 (En/E)
To connect with an AV receiver with 6-chan-
18
nel input jacks
Connect the 6ch OUTPUT jacks of this unit with the 6ch INPUT jacks
of the AV receiver using audio cords.
In this case, make initial setup [8 Speaker Setting] according to the
speakers as shown below.
When the center speaker is not used:
CENTER \ No speaker displayed.
Preparations
When the surround speakers are not used:
SURROUND \ No speaker displayed.
When the subwoofer is not used:
SUBWOOFER \ No speaker displayed.
To connect with an AV receiver with built-in
Dolby Digital (AC-3) decoder and digital input
Connect the DIGITAL OUTPUT jack of this unit with the DIGITAL
INPUT jack of the AV receiver using an optical fiber cable or digital
cord.
NOTE: Some DVD and CD discs contain DTS data in the PCM
area. When such a disc is played, the MIX LINE OUTPUT
jack does not output correct audio.
p
To connect with an ordinary amplifier with 2
input channels
Set initial setup [8 Speaker Setting] as shown below. p
CENTER \ No speaker displayed.
SURROUND \ No speaker displayed.
SUBWOOFER \ No speaker displayed.
Connection of S-VIDEO jacks
The S-VIDEO connection offers clear video because it transmits the
video signal by separating it into the color (C) component and
luminance (Y) component. It is recommended to use an S-VIDEO cord
when the connected TV has an S-VIDEO input.
For details, refer to the instruction manual of your TV.
Digital output jacks (OPTICAL)
Remove the protective cap before using a
digital output jack.
OPTICAL
Remove cap.
Operations
Note on connection of optical-fiber cable
÷Insert the optical-fiber cable straight into the connector until it clicks.
÷Be sure to attach the protection cap when the connector is not used.
÷Never bend or bundle the optical-fiber cable.
÷All of the commercially-available optical fiber cables cannot be used with these units.
If there is an optical fiber cable which cannot be connected to your component, please consult
your dealer or nearest KENWOOD agent.
Other
Copyright and copy protection notes
Manufactured under license from Dolby Laboratories.
“Dolby” and the double-D symbol are trademarks of Dolby Laboratories .
Confidential Unpublished Works. c1992-1997 Dolby Laboratories.
All rights reserved.
It is prohibited by laws to duplicate, broadcast, perform in public or
rent a disc without the permission of the copyright owners.
Optical-fiber cable
This product incorporates copyright protection technology that is
protected by method claims of certain U.S. patents and other intellectual property rights owned by Macrovision Corporation and other
rights owners. Use of this copyright protection technology must be
authorized by Macrovision Corporation, and is intended for home and
other limited viewing uses only unless otherwise authorized by
Macrovision Corporation. Revers engineering or disassembly is prohibited.
This product is compatible with the MacroVision type copy protection. Some discs contain the recording of copy inhibit signals, and the
video may be disturbed when the video of such discs is recorded onto
a VCR and played back.
Page 19

Controls and indicators
DVF-9010 (En/E)
Display / Main unit
VCD and CD related indicators
DVD, VCD, CD indicators
DVD VCD CD
Operation indicators
3 :Play
8 : Pause
TITLE CHAPTER TRACK CD TEXT
• • • • • • • • • • • • • • •
1
POWER
ON OFF
PHONES LEVEL
MAXMIN
PHONES
Special playback related indicators
DVD related indicators
P.B.C. DOLBY DIGITAL RANDOM PROG.
PCM
ANGLE
REPEAT ALL
A B
Display
3
ENTER
1¡
VIRTUAL
SURROUND
654
96 kfs
MPEG
L, STEREO, R indicators
STEREO
LR
Character information display
7
PANEL UP / DOWN
ON SCREEN
OPEN/CLOSE
RETURN
82
DVD MENU
9
19
Preparations
0
3
7
4¢
!
@
# $%
1 POWER key ™
2 DVD indicator
Lights up when a DVD disc is loaded.
3 Remote control sensor ¡
4 MPEG indicator
Lights during playback of a DVD MPEG disc.
5 96 kfs indicator
Lights during playback of a DVD LPCM disc with 96 kfs sampling
frequency.
6 VIRTUAL SURROUND indicator ‚
Lights during playback of an AC-3 5.1-channel disc by setting virtual
surround.
7 OPEN/CLOSE (0) key ™
8 PANEL UP/DOWN key ™
¡
* (^ &
)
9 Stop (7) key ∞
0 Play (3) key ™
! PHONES LEVEL control
@ PHONES jack
# Tray panel
$ Manual search (1, ¡) keys
¢
% Cursor (%, fi, @, #) keys §
^ ENTER key £§
& ON SCREEN key §
* RETURN key ‡w
( DVD MENU key °
) Pause (8) key ¢∞
¡ Skip down (4) / up (¢) keys ¢
Operations
Other
Standby mode of the unit
While the POWER key is set to ON, this unit can be put to the standby mode using the graphical remote control unit provided
with a KENWOOD AUDIO VIDEO SURROUND RECEIVER. When the STANDBY indicator of this unit is lit, a small amount of
current flows in it to back up the internal memory. This status is referred to as the standby mode.
Page 20

Controls and indicators
DVF-9010 (En/E)
Listening through headphones
20
Plug the stereo headphones (with standard-plug) available in audio stores into
the PHONES jack and adjust the listening volume with the PHONES LEVEL
control on the front panel.
Note on DTS (Headphones listening)
When a DTS-encoded disc (CD or DVD) is played, noise may interfere with the
headphone output. To enjoy DTS digital surround playback through headphones, connect an external 5.1-channel DTS digital surround decoder system to the digital output of the DVD player and use the headphones jack of
Preparations
your amplifier or receiver.
PHONES LEVEL
MAXMIN
Remote control unit
The remote control unit incorporates the basic operation keys as well as a variety of applied operation keys so that it can be
used in a wide range of purposes.
Use care to store the remote control unit in a safe place so as not to lose it.
*The proper positioning of the mode switch (DVD, CD, DVD SET UP) is variable depending on the control and play modes.
Set the mode switch according to the desired control and play modes.
Information inside ( ) below indicates the mode switch setting position to implement the function in question.
Operations
1
Other
8
1
DVD
CD
DVD
SET UP
¢
SKIP UP
4
SKIP DOWN
SCREEN
ENTER
ON
RETURN
REPEAT
C
REPEAT
1
4
ANGLE SUB TITLE
7
23
VIRTUAL SURR.MEMORY TITLE
5
AUDIO
89
ALL INFO.TEXT DISP. TITLE SEARCH
0
OPEN
/ CLOSE
MENU
P.MODE
3
PLAY
7
STOP
A-B REPEAT
SET UP
6
0
¡
DISPLAY
2
3
4
5
6
1 Remote control mode switch
DVD
™
CD £
DVD SET UP q
2 Joystick/ENTER/Pause/forward search/reverse search
keys
(DVD, CD, DVD SET UP)
Joystick (%, fi, @, #) keys
£§
ENTER key £§
Pause (8) key ¢∞
Forward and reverse search (1, ¡) keys ¢
3 CD, VCD and DVD related control keys
SKIP DOWN (4) and SKIP UP (¢) keys
(DVD, CD, DVD SET UP)
¢
ON SCREEN key (DVD, CD, DVD SET UP) §
PLAY (3) key (DVD, CD, DVD SET UP) ™
STOP (7) key (DVD, CD, DVD SET UP) ∞
MENU key (DVD, DVD SET UP)/P.MODE key (CD)
∞°
RETURN key (DVD, CD, DVD SET UP) ‡w
4 DISPLAY key (DVD, CD, DVD SET UP) ∞
5 TV monitor related control keys
Numeric (0 to 9) keys (CD)
C (Clear) key (DVD, CD, DVD SET UP) ª
REPEAT key (DVD, CD, DVD SET UP) ¤
A-B REPEAT key (CD) ‹
SET UP key (DVD SET UP) q
MEMORY key (DVD) ª
VIRTUAL SURR. key (DVD) ‚
TITLE key (DVD) ·
ANGLE key (DVD) fl
AUDIO key (DVD) ›
SUB TITLE key (DVD) fi
OPEN/CLOSE (0) key (DVD) ™
6 CD-TEXT related control keys
TEXT DISP. key (DVD)
ALL INFO. key (DVD) T
TITLE SEARCH key (DVD) R
£e
T
Model: RC-D0705
Infrared ray system
Page 21

Operation of remote control unit
DVF-9010 (En/E)
Loading batteries
1Remove the cover. 2Insert batteries. 3Close the cover.
÷Insert two R6 (“AA”-size) batteries follow-
ing the polarity indications.
Operation
Insert the power plug into a power outlet, press the POWER
key of the main unit to ON, then press the desired remote
control key.
÷When pressing more than one remote control keys successively, press
the keys securely by leaving an interval of 1 second or more between
pressing of keys.
Remote sensor
21
2
1
Preparations
Notes
Notes
1.The provided batteries are intended for use in operation checking, and
their service life may be short.
2.When the remote controllable distance becomes short, replace both
of the batteries with new ones.
3.If direct sunlight or the light of a high- frequency fluorescent lamp
(inverter type, etc.) is incident to the remote sensor, malfunction may
occur. In such a case, change the installation position to avoid
malfunction.
Remote control mode switch
Before starting remote control operation, be sure to set the
mode switch according to the play modes and keys to be
controlled.
Switch
DVD
CD
DVD
SET UP
6m
30° 30°
Reference operating range
@
Joystick operation
The joystick allows you to select or enter an icon or item
displayed on the TV screen.
Basic operation
1Tilt the joystick to the direction of one of the arrows
(%, fi, @, #) to select an icon displayed on the TV
screen.
2 Press the ENTER key to enter the selection.
8
Operations
Other
1
ENTER
¡
Page 22

Playback
The following procedure shows how to play a disc, such as a CD, VCD or DVD, from the beginning.
When playing a VCD with P.B.C. (Play-Back Control) capability, please read “Menu playback”.
22
Preparation
1 Turn on the TV and set the input source of the TV to
“Video”.
2 If the player is connected to a stereo system, etc., turn
on the associated components and set its input source
to “DVD”.
Preparations
Playing a disc from the beginning
Turn power ON.
1
Main unit
POWER
ON OFF
DVF-9010 (En/E)
‡
Insert (Remove) the disc.
2
Operations
Main unit RC
1 Set the mode switch to DVD.
DVD
CD
DVD
SET UP
2 Open the tray.
OPEN/CLOSE
0
OPEN
/ CLOSE
0
3 Insert (Remove) the disc.
4 Close the tray.
0
OPEN/CLOSE
OPEN
/ CLOSE
0
Other
With certain discs, playback starts now.
If a menu screen appears on the TV screen, select the
desired items as described in steps 4 and 5 before
playing the disc.
For CD single (8 cm) or
Label side up
Disc tray
÷Place the disc to be played properly by aligning it with the groove on the
tray. (If the disc is not placed horizontally, malfunction will result.)
÷Do not touch the played side.
÷Load only one disc.
÷This unit cannot use a commercially available CD single (8 cm) disc
adapter.
÷The PANEL UP/DOWN key of the main unit allows to open or close
only the panel.
DVD single (8 cm)
Other disc (12 cm)
Start playback.
3
Main unit RC
3
PLAY
Display during disc play
CD playback DVD playback
P.B.C. DOLBYDIGITAL
DVD VCD
CD
3
TITLE CHAPTER
TRACK
01
VCD playback
DVD
P.B.C.
VCD
TITLE CHAPTERCDTRACK
DOLBYDIGITAL
P.B.C.
CD
TITLE CHAPTER
DOLBYDIGITAL
TRACK
VCD
DVD
01 01
Page 23

Playback
DVF-9010 (En/E)
Select the desired items from the menu screen.
4
Menu screen: When an interactive DVD (DVD software containing multiple viewing angles or stories, for example) or a P.B.C.-
compatible VIDEO CD is played, a menu screen is displayed in the beginning.
Example: Menu screen of a DVD
with menu recording
TITLE MENU
Dogs
Lovers
Castles
Birds
÷The display, operation method and usable keys of the menu screen are
variable depending on software. For details, read the instructions
provided with the played software.
RC
Selection using joystick (%, fi, @, #) keys
(DVD only)
8
1
ENTER
RC
¡
÷When the menu has a hierarchical structure, the menu at the lower
level appears.
÷ If there are more than one menu (scene) that can be selected, the
menus (scenes) can be switched using the ¢ (NEXT) and 4 (PREV.)
keys.
TITLE MENU
Dogs
Lovers
Castles
Birds
\
Birds
of the world
1 When a DVD is played, press the MENU key.
23
Preparations
MENU
P.MODE
2 Select an item with the numeric keys.
1
23
VIRTUAL SURR.
DVD
CD
DVD
SET UP
Press the ENTER key to start playback.
5
MEMORY TITLE
4
5
AUDIO
ANGLE SUB TITLE
89
7
ALL INFO.TEXT DISP. TITLE SEARCH
0
OPEN
/ CLOSE
6
0
Main unit RC
8
ENTER
1¡
1
ENTER
RC
Operations
Press numeric keys in the following order...
(Set the remote control mode switch to “CD”.)
To select “5” : 5 ENTER
To select “17” : 17 ENTER
¡
Other
Page 24

Forward search and reverse search (Manual search)
24
Main unit RC
¡ : Forward search
1 : Reverse search
8
1¡
Preparations
ENTER
1
ENTER
¡
÷Press once to start and continue forward or reverse search at a low
speed. The search speed can be adjusted in 5 steps.
÷ Audio is not output during forward or reverse search. (DVD, VCD)
÷ The video may be disturbed during forward or reverse search.
When the 1 or ¡ key is pressed during menu playback of a VCD,
the screen may sometimes return to the menu screen.
Skipping tracks or chapters
Playback
DVF-9010 (En/E)
Main unit
Operations
4¢
RC
¢
SKIP UP
4
SKIP DOWN
Frame-by-frame playback
Software with which this function is available:
Other
Press the 8 key during pause.
DVD
VCD
¢: Skip up
4: Skip down
÷Tracks are skipped in the direction corresponding to the pressed key,
and playback resumes from the beginning of the track (chapter)
reached after skipping.
÷ Pressing the 4 key once during playback returns to the beginning of
the current track (chapter).
When the 4 or ¢ key is pressed during menu playback of a VCD,
the screen may sometimes return to the menu screen.
Slow playback
Software with which this function is available:
DVD
Slow playback is possible in 5 speed steps.
VCD
RCMain unit
1
÷Each press advances to the next frame.
÷ Press the 3 key to resume normal playback.
8
ENTER
Press the ¡ key or 1 key during pause.
Main unit RC
8
ENTER
¡
1¡
÷ Press the 3 key to resume normal playback.
Reverse slow playback (1) of a DVD consists of playing frame
by frame backward and discontinuously.
Reverse slow playback is not available with a VCD.
1
ENTER
¡
Page 25

Playback
DVF-9010 (En/E)
Playing tracks in a random order (Random playback)
Tracks in a CD or VCD can be played in a random order.
Enter stop mode.
1
Select the random play mode.
2
RC
DVD
CD
DVD
SET UP
Start playback.
3
RC
MENU
P.MODE
PLAY
3
÷Before performing random playback of a P.B.C.-compatible VCD,
cancel the P.B.C. function by pressing the 7 key.
Each press switches the play mode as follows.
1 Track mode : PROG./RANDOM goes off
2 Program mode : PROG. lights up
3 Random play mode : RANDOM lights up
To return to normal playback
1Press the 7 key.
2Press the P.MODE key so that the RANDOM indicator
goes out.
25
Preparations
The following operation may not be available with certain DVD discs.
Letting playback pause
Main unit RC Main unit RC
8
1
ENTER
÷This operation may be invalid with certain software or scenes.
÷ Press the 3 key to resume normal playback.
¡
Stopping playback
7
÷Press the 7 key twice to cancel playback.
÷Pressing the 7 key once during playback stops it and the position
where it is stopped is stored in memory. When you press the 3 key
the next time, playback restarts from the position where it was
stopped.
÷Pressing the 7 key during P.B.C. playback of a VCD switches it off
and stops playback.
DISPLAY key
Each press of the DISPLAY key switches the main unit display on and
off alternately. However, even when the display is off, the 3 or 8
indicator lights up during playback or pause.
STOP
Operations
7
Other
‡
RC
DISPLAY key
Each press switches the mode as follows.
1 Main unit display : lights up
2 Main unit display : goes off
Page 26

35 1:07:48 3
LPCM
FRA
196k 24
b
2
ENG
ON
2
Operations using the GUI screen
DVF-9010 (En/E)
Basic operations on the GUI screen
26
The icons displayed on the TV screen can be selected easily by using the ON SCREEN key and joystick (%, fi, @, #) of the provided
remote control unit.
Press the ON SCREEN key.
1
RC
During playback or stop
Preparations
ON
SCREEN
Each press switches the TV screen display as follows.
Example: With a DVD
1 Normal playback screen
2 Disc information screen
The GUI screen appears.
Operations
Select the item to be changed.
2
RC
Select an item with the joystick (@, #).
3 Player information screen
T
AB
4 Shuttle information screen
÷The displayed items are variable depending on discs.
8
1
ENTER
¡
1 2 3 4 5
OFF
F
Change the content of the selected item.
3
Other
RC
Select the desired option with the joystick (%, fi).
8
1
ENTER
¡
÷Some of the changes are executed immediately while some are
executed after the ENTER or 3 key is pressed. Certain functions
cannot be operated from the GUI screen displayed in stop mode.
÷The item consisting of a number, such as a title, can be changed using
numeric keys. When an item has been changed using numeric keys,
press the ENTER key to execute the change.
Page 27

Operations using the GUI screen
-
12
dB
AB
T PRG
1 2 3 4 5
F
2
7:48
L R
OFF
PBC
DVF-9010 (En/E)
Information related to the disc (title, chapter, time, voice language, subtitle language, angle, etc.) or the player (repeat mode,
video quality, etc.) can be displayed and changed as required. The icons displayed on the TV screen are as shown below.
Software with which this function is available:
27
DVD
CD VCD
Icons on the TV screen
The % and fi markings in the icon frames indicate that the icon can be changed with the cursor keys on the main unit or the
joystick on the remote control unit.
During DVD playback
Disc information screen
1 2 3 4 5
Memory
LPCM
FRA
Picture mode
35 1:07:48 3
2
Elapsed time Angle No.
Chapter No.
Title No.
Voice (No., language, attribute)
Player information screen
T
AB
Repeat
A-B repeat
ON
b
2
Subtitle (No., language, ON/OFF)
OFF
F
Virtual Surround
ENG
196k 24
dB
-
12
During VCD playback
Disc information screen
Elapsed time
Track No.
Player information screen
Play mode
Repeat
A-B repeat
Voice mode
Memory
Playback control
Picture mode
Preparations
Operations
Shuttle information screen
Reverse slow playback
Reverse search
Voice language icons of DVD
Icon Language Icon Language
ENG English POR Portuguese
FRA French RUS Russian
DEU German JPN Japanese
ITA Italian CHI Chinese
ESP Spanish KOR Korean
NLD Dutch MAL Malay
SVE Swedish VIE Vietnamese
NOR Norwegian THA Thai
DAN Danish ÷ Others
Picture mode (DVD and VCD only)
N Normal quality
S Soft quality
F Fine quality
Still/pause
Play
Forward slow playback
Forward search
Shuttle information screen
Forward slow playbackStill/pause
Reverse search Play Forward search
Audio mode (VCD only)
LR Audio L + Audio R
L Audio L
R Audio R
Other
Page 28

28
During CD playback
Disc information screen
Operations using the GUI screen
DVF-9010 (En/E)
2
Elapsed time
Preparations
Track No.
Player information screen
AB
A-B repeat
T PRG
Repeat
Shuttle information screen
Operations
Reverse search
7:48
Play mode
1 2 3 4 5
Memory
Pause
Play
dB
-
12
Forward search
Other
Page 29

Storing scenes in memory (Memory function)
By storing scenes that you want to check later, subsequent playback can be started from any of the stored scenes any time.
Up to 5 scenes can be stored (using the remote control unit only).
This operation may not be available with certain DVD discs.
DVF-9010 (En/E)
Software with which this function is available:
DVD
CD VCD
Storing a scene in memory
Press the MEMORY key during playback.
1
RC
DVD
CD
DVD
SET UP
Press the ENTER key at the scene you want to store in memory.
2
RC
1
1
MEMORY
8
ENTER
÷“ ” is displayed in positions where no scene is stored in memory.
¡
1
29
Preparations
To store other scenes in memory, repeat following steps
1 and 2 for each.
1 Select a scene with the joystick (@, #).
2 Press the ENTER key.
Recalling/clearing a scene in memory
Press the MEMORY key during playback.
1
RC
1
MEMORY
Select the memory number to be recalled or canceled.
2
RC
To recall and play
1 Select a scene with the joystick (@, #).
2 Press the % key.
8
1
ENTER
¡
÷The scene corresponding to the selected memory number is searched
and playback starts from it.
132 4
1234
1234
Operations
Other
To clear
Press the C key.
134
C
÷The scene in the selected memory number is cleared.
Page 30

Programming
Desired tracks or chapters can be programmed and played back in a desired order. Up to 18 tracks (chapters) can be programmed
DVF-9010 (En/E)
but the attempt to program a 19th track (chapter) is rejected.
30
Software with which this function is available:
CD VCD
With a VCD, there is no relationship between the divisions in recording
and the track numbers, except of certain software such as karaoke
discs. As a result, the programming operation may not be usable
depending on software.
Programming tracks in the desired order
Preparations
Enter stop mode.
1
Select the program mode.
2
Operations
RC
DVD
CD
DVD
SET UP
MENU
P.MODE
÷To perform program playback of a P.B.C.-compatible VCD, first press
the 3 key then the 7 key to cancel the P.B.C. function.
Each press of the P.MODE key switches the play mode as
follows.
1 Track mode : PROG./RANDOM goes off
2 Program mode : PROG. lights up
3 Random play mode : RANDOM lights up
Choose a track, then press ENTER.
11319
7
21420
8
315
9
41610
51711
61218
21
Clear last
Clear all
Press PLAY to start
Select the desired tracks (chapters) in the order you want to play them later.
3
RC
1 Select a track (chapter) number with the joystick (%, fi,
@, #).
2 Press the ENTER key.
8
1
ENTER
Other
3 Program other tracks (chapters) by repeating steps 1
and 2 for each of them.
Play the program.
4
RC
3
PLAY
Select Entry
Choose a track, then press ENTER.
11319 2
7
14 20
8
2
21
315
9
41610
51711
61218
Clear last
Clear all
Press PLAY to start
¡
Choose a track, then press ENTER.
11319 2
7
2
14 20
88
21
3315
\
9
41610
5
61218
Clear last
Clear all
Press PLAY to start
5
181711
Tracks (chapters) can also be selected with numeric keys.
(Set the remote control mode switch to “CD”.)
To select track (chapter) No. 8 : 8 ENTER
To select track (chapter) No. 18 : 18 ENTER
÷Select “Clear last” with the joystick and press the ENTER key to clear
the currently last track (chapter) in the program one by one.
÷The entire program can also be cleared by selecting “Clear all” with the
joystick then pressing the ENTER key.
÷If you made a mistake, press the C (clear) key and select the correct
track (chapter).
÷Tracks (chapters) will be played in the order you programmed them (i.e.
in order of program numbers).
÷Pressing the 4 or ¢ key during program playback skips to the
previous or next track (chapter) in the program.
Page 31

Adding tracks (chapters) in the program
RC
1 Select a track (chapter) number with the joystick (%, fi,
@, #).
2 Press the ENTER key.
8
1
ENTER
¡
3 If you want to add more tracks (chapters), repeat steps
1 and 2 for each of them.
Choose a track, then press ENTER.
11319 2
2
3315
41610
5
61218
Tracks (chapters) can also be selected with numeric keys.
(Set the remote control mode switch to “CD”.)
To select track (chapter) No. 7 : 7 ENTER
To select track (chapter) No. 10 : 1) ENTER
÷The track is added to the last of the program.
Select Entry
7
14 20
88
21
9
181711
Clear last
Clear all
Press PLAY to start
Programming
DVF-9010 (En/E)
Remote control unit only
31
Choose a track, then press ENTER.
7
11319 2
14 20
88
2
21
3315
5
\
9
41610
5
1711
61218
Clear last
Clear all
Press PLAY to start
10
5
18
7
Preparations
Clearing tracks (chapters) from the program
RC
To clear the last track in the program
÷Each press of the C (clear) key clears the last track (chapter) in the
C
current program.
÷The entire program can also be cleared by selecting “Clear all” with the
joystick then pressing the ENTER key.
Returning to normal playback
RC
Press in stop mode.
Press so that the PROG./RANDOM indicator turns off.
MENU
P.MODE
Operations
Other
Page 32

Repeating tracks, chapters or titles (Repeat playback, A-B repeat)
Desired scenes or audio can be played repeatedly.
32
Software with which this function is available:
DVD
CD VCD
Repeating a single track (chapter or title)
Before performing repeat playback of a P.B.C.-compatible VCD, cancel the P.B.C. function by pressing the 7 key.
Preparations
RC
1 Select the track mode.
DVD
CD
DVD
SET UP
2 Start playback.
MENU
P.MODE
PLAY
3
With a VCD, there is no relationship between the divisions in recording
and the track numbers, except of certain software such as karaoke
discs. As a result, the programming operation may not be usable
depending on software.
The programming operation may also be unavailable with certain DVD
discs.
(Repeat playback)
Each press of the P.MODE key switches the play mode as
follows.
1 Track mode : PROG./RANDOM goes off
2 Program mode : PROG. lights up
3 Random play mode : RANDOM lights up
Each press of the REPEAT key switches the play mode as
follows.
With a DVD:
1 CHAPTER REPEAT : Repeats a chapter.
2 TITLE REPEAT : Repeats a title.
3 NORMAL PLAY : Repeat off.
DVF-9010 (En/E)
C T OFF
3 Press the REPEAT key to select CHAPTER REPEAT,
Operations
TITLE REPEAT or TRACK REPEAT.
REPEAT
REPEAT
With a CD or VCD:
1 TRACK REPEAT : Repeats a track.
2 ALL REPEAT : Repeat the entire disc.
3 NORMAL PLAY : Repeat off.
T A OFF
To stop repeat playback
Press the REPEAT key repeatedly until “OFF” is displayed.
Repeating entire disc
Before performing repeat playback of a P.B.C.-compatible VCD, cancel the P.B.C. function by pressing the 7 key.
RC
1 Select the track mode.
Other
2 Start playback.
3 Press the REPEAT key to select ALL REPEAT.
DVD
CD
DVD
SET UP
MENU
P.MODE
PLAY
REPEAT
REPEAT
3
(Repeat playback)
Each press of the P.MODE key switches the play mode as
follows.
1 Track mode : PROG./RANDOM goes off
2 Program mode : PROG. lights up
3 Random play mode : RANDOM lights up
Each press of the REPEAT key switches the play mode as
follows.
With a DVD:
1 CHAPTER REPEAT : Repeats a chapter.
2 TITLE REPEAT : Repeats a title.
3 NORMAL PLAY : Repeat off.
With a CD or VCD:
1 TRACK REPEAT : Repeats a track.
2 ALL REPEAT : Repeat the entire disc.
3 NORMAL PLAY : Repeat off.
To stop repeat playback
Press the REPEAT key repeatedly until “OFF” is displayed.
Page 33

REPEAT
STEREO
ANGLE
TOTAL
MPEG
CD TEXT
PCM
VCD
P.B.C. DOLBY DIGITAL
KARAOKE
B
ALL
INDEX
LR
RANDOM
A
01 01 1:23:45
CD
TRACK
DVD
TITLE CHAPTER
STEREO
ANGLE
TOTAL
MPEG
CD TEXT
PCM
VCD
P.B.C. DOLBY DIGITAL
KARAOKE
ALL
INDEX
LR
RANDOM
01 01 1:23:45
CD
TRACK
DVD
TITLE CHAPTER
BA
Repeating tracks, chapters or titles (Repeat playback, A-B repeat)
DVF-9010 (En/E)
Repeating a desired section
(A-B repeat)
A section specified during playback can be played repeatedly. With a CD or VCD disc, the A-B repeat playback is possible only
inside a single track.
RC
1 Select the track mode.
DVD
CD
DVD
SET UP
MENU
P.MODE
Each press of the P.MODE key switches the play mode as
follows.
1 Track mode : PROG./RANDOM goes off
2 Program mode : PROG. lights up
3 Random play mode : RANDOM lights up
2 Start playback.
3
PLAY
A
3 Press the key at the point you want to start repeating.
Point A
A-B REPEAT
SET UP
4 Press the key again at the point you want to end
repeating.
÷Start point A is specified.
A B
P.B.C. DOLBY DIGITAL
VCD
CD
DVD
TITLE CHAPTER
TRACK
MPEG
CD TEXT
PCM
ANGLE
TOTAL
RANDOM
REPEAT
ALL
BA
INDEX
STEREO
LR
KARAOKE
33
Preparations
Point B
A-B REPEAT
01 01 1:23:45
÷End point B is specified and repeated playback of the section between
A and B starts.
SET UP
To stop repeat playback
Press the A-B REPEAT key again.
Repeating program playback
Programmed tracks can be played repeatedly by pressing the REPEAT key during program playback.
Perform steps 1 to 4 of the procedure in “Programming tracks in the desired order”.
1
Select the all-program repeat mode.
2
RC
REPEAT
REPEAT
(Program repeat) (CD, VCD only)
Each press switches the repeat mode as follows.
1 Normal play screen
2 Track repeat screen
PRG
T
3 All-program repeat screen
PRG
A
4 Repeat off screen
º
Operations
Other
PRG
OFF
÷The display contents are variable depending on discs.
Page 34

Versatile DVD play features
The following operations may not be available with certain DVD discs.
34
Software with which this function is available:
DVD
Remote control unit only
Switching the voice language
When a DVD disc contains recording of voices in multiple languages, the languages can be switched during playback.
Preparations
Press the AUDIO key during playback.
1
RC
5
AUDIO
The language selected in the initial setup is used immediately
after turning power on or replacing disc. If the initially set
language does not exist in the disc, the priority language defined
for each disc is used.
(Multi-audio function)
LPCM
1
ENG
96k 24
b
÷The voice language display becomes “ ” when no voice is recorded
in the disc.
DVF-9010 (En/E)
Select the voice language with the joystick (%, fi).
2
Operations
RC
Press the AUDIO key or ENTER key to switch the display
off.
8
1
ENTER
¡
÷If the desired language cannot be displayed by operating the joystick
repeatedly, the desired language may not be recorded in the current
disc.
Switching the vocal of karaoke software on and off
Press the AUDIO key during playback.
1
RC
5
Other
Select the voice language with the joystick (%, fi).
2
RC
AUDIO
DVD karaoke (1-vocal disc)
8
1
ENTER
¡
ON - - - (OFF)
DVD karaoke (2-vocal disc)
1+2 V1 V2 ---(OFF)
LPCM
3
FRA
96k 24
b
Vocal
1
ON
Vocal
1
- - -
Press the AUDIO key or ENTER key to switch the display
off.
÷Select an option with the joystick (@, #).
VCD karaoke (2-vocal disc)
LRLR
L R
÷Select an option with the joystick (%, fi).
Page 35

1
FRA
ON
The following operation may not be available with certain DVD discs.
Versatile DVD play features
DVF-9010 (En/E)
Software with which this function is available:
DVD
Remote control unit only
Displaying/switching the subtitle language
When a DVD disc contains recording of subtitles in multiple languages, the languages can be switched during playback.
Press the SUB TITLE key during playback.
1
RC
6
SUB TITLE
The language selected in the initial setup is used immediately
after turning power on or replacing disc. If the initially set
language does not exist in the disc, the priority language defined
for each disc is used.
Select the subtitle language with the joystick (%, fi).
2
(Multi-subtitle function)
ON
2
ENG
35
Preparations
RC
Press the SUB TITLE key or ENTER key to switch the
display off.
8
1
ENTER
¡
÷If the desired language cannot be displayed by operating the joystick
repeatedly, the desired language may not be recorded in the current
disc.
Switching the subtitle on and off
The subtitle display can be switched on and off with the joystick (@, #).
Operations
Other
Page 36

PROG.
STEREO
KARAOKE
REPEATBALL
INDEX
LR
TOTAL
RANDOM
A
MPEG
CD TEXT
PCM
VCD CD
P.B.C.
TRACK
01 01 1:23:45
DVD
DOLBY DIGITAL
TITLE CHAPTER
ANGLE
The following operation may not be available with certain DVD discs.
36
Software with which this function is available:
DVD
Versatile DVD play features
DVF-9010 (En/E)
To switch the viewing angle
Preparations
When the DVD disc being played contains the scenes recorded from multiple viewing angles, the angle can be switched while
(Angle function)
the ANGLE indicator is lit.
Remote control unit only
Press the ANGLE key while the ANGLE indicator is lit during playback.
1
RC
Press ANGLE key while this is lit.
4
ANGLE
1
Operations
Select the viewing angle with the joystick (%, fi).
2
RC
8
Other
1
ENTER
¡
3
Page 37

Menu playback
DVF-9010 (En/E)
Software with which this function is available:
VCD
Hierarchical structure of VCD menus
When an item is selected on the menu screen during playback of a P.B.C.-compatible VCD, another menu with more details items
may be displayed. When a number of menus are connected in multiple layers in this way, it is said that the menus have a
hierarchical structure. In this structure, the desired scene can be reached by repeating item selections on the menu screens.
Example for a hierarchical structure
37
PLAY
RETURN
SELECT
Advancing
When an item is selected on the menu screen with the 3
key or the numeric keys, advance is made to the next lower
menu level. When the advance destination is the “scene”
to be played, the contents will be played.
÷When several menus (scenes) can be selected in each level, screen
switching is possible with the keys ¢ (NEXT) and 4 (PREV.).
NEXT NEXT NEXT
PREV.
First level (menu)
Second level (submenu)
Third level (scenes)
PREV. PREV.
Returning
Each time the RETURN key is pressed, return is made to the
next higher menu.
Preparations
Operations
Examples of operation keys and indications used during VCD playback
Soft jacket indication
KENWOOD operation key Play RETURN
÷Depending on the software, the jacket indication may differ from the above.
3
4
SKIP
DOWN
¢
SKIP
UP
Playback without using the menu playback function
(In case of a P.B.C.-compatible VCD)
RC
1 Press the 7 key while a menu is displayed.
2 Set the mode switch to CD.
3 Enter the desired track number using the numeric keys
or the 4 and ¢ keys.
4 Press the 3 key to start playback.
÷For the track numbers, refer to the disc jacket or other material.
÷Press numeric key “1” if you want to play the disc from the beginning.
To return to menu playback
Press the 7 key twice then the 3 key.
Other
Page 38

Menu playback
When a DVD disc containing the menu recording is played, the menu screen is displayed. You can select the playback contents
in an interactive manner.
DVF-9010 (En/E)
38
Software with which this function is available:
DVD
Menu playback (DVD)
Preparations
Press the MENU key.
1
RC
DVD
CD
DVD
SET UP
The DVD menu appears.
Select the desired item from the menu screen.
2
Operations
RC
1 Select an item with the joystick (%, fi, @, #).
2 Press the ENTER key to start playback.
MENU
P.MODE
8
1
ENTER
Remote control unit only
DVD MENU
1. SUB TITLE
2. AUDIO
3. ANGLE
÷Pressing the MENU key again returns to the screen from which you
recalled the DVD menu and starts playback from there.
DVD MENU
1. SUB TITLE
2. AUDIO
3. ANGLE
¡
Menu items can also be selected with numeric keys.
(Set the remote control mode switch to “CD”.)
To select “2” : 2 ENTER
To display other menus, perform steps 1 and 2 above.
Other
÷When the menu has a hierarchical structure, the menu at the lower
level appears.
The display, operation method and usable keys of the menu
screen are variable depending on software. For details, read the
instructions provided with the played software.
Page 39

Software with which this function is available:
DVD
Menu playback
DVF-9010 (En/E)
39
Remote control unit only
Title selection using the title menu
When a disc contains multiple titles, the desired title can be selected and played from the title menu.
Press the TITLE key during playback.
1
RC
3
TITLE
Select the desired title.
2
RC
1 Select a title with the joystick (%, fi, @, #).
2 Press the ENTER key to start playback.
8
1
ENTER
¡
(Title function)
TITLE MENU
Dogs
Lovers
TITLE MENU
Dogs
Lovers
Castles
Birds
Castles
Birds
\
Birds
of the world
Preparations
Operations
Menu items can also be selected with numeric keys.
(Set the remote control mode switch to “CD”.)
To display other menus, perform steps 1 and 2 above.
To select “4” : 4 ENTER
To return to the menu screen To stop playback
RC RC
3
TITLE
STOP
Other
7
Page 40

PROG.PROG.
CD
TRACK CD TEXT
STEREO
ANGLE
TOTAL
MPEG PCM
VCD
P.B.C. DOLBY DIGITAL
TITLE CHAPTER
KARAOKE
REPEATBALL
INDEX
LR
RANDOM
A
VIRTUAL SURR. 2
DVD
CD
PROG.
STEREO
ANGLE
TOTAL
MPEG PCM
VCD
P.B.C. DOLBY DIGITAL
TITLE CHAPTER
KARAOKE
REPEATBALL
INDEX
LR
RANDOM
A
VIRTUAL SURR. 1
DVD
CD
STEREO
ANGLE
TOTAL
MPEG
CD TEXT
PCM
VCD
P.B.C. DOLBY DIGITAL
TITLE CHAPTER
KARAOKE
REPEATBALL
INDEX
LR
RANDOM
A
OFF
DVD
Menu playback
Even when your system uses only two speakers, a DVD recorded with Dolby Digital 5.1-channel surround audio can be played
as if there were rear speakers on your sides, by simply switching the VIRTUAL SURR. key on.
DVF-9010 (En/E)
40
Software with which this function is available:
DVD
Enjoying Virtual Surround sound
Preparations
Start playback.
1
RC
3
PLAY
Press the VIRTUAL SURR. key.
2
RC
Operations
2
VIRTUAL SURR.
(VIRTUAL SURR.)
Main unit display
Lights only when a DVD AC-3 5.1-channel disc is played.
VIRTUAL
SURROUND
96 kfs
MPEG
Each press switches the Virtual Surround as follows.
1 Off
Other
2 Standard
3 Enhanced
÷This function is available only with DVD software encoded with Dolby
Digital 5.1-channel surround audio.
÷Switch this function off when the played disc uses other surround
function.
Page 41

Changing the initial setup
The initial setup of the player, which has been made at the factory, can be changed to the desired setup.
[1 Disc Languages]
This sets the language to be used when playing a disc. (If a disc
does not contain the recording the selected language, it is played
in the priority language set for each disc.)
[2 Ratings]
This can restrict playback of adult-oriented DVD discs that you do
not want to be seen by children.
However, even when a DVD disc is marked “Adult-oriented” or so
on the label, its viewing cannot be restricted unless the restriction
level is recorded in the disc itself.
[3 Menu Language]
This sets the initial setup of language as well as the language used
in on-screen messages such as “PLAY”.
[4 On-Screen Messages]
This sets whether the on-screen messages such as “PLAY” are to
be displayed on the TV screen or not.
[5 FL Display]
This sets the brightness of the main unit display.
[6 TV Aspect]
This sets the screen size (4:3 or 16:9 aspect ratio) according to the
connected TV.
[7 Digital Audio Output]
This sets the type of audio output from the digital audio output
jack.
[8 Speaker Setting]
This sets the type of the speaker system used in surround playback.
[9 Other Settings]
This sets special settings such as the audio dynamic range compression.
[0 Exit]
This exits the initial setup screen.
These operations may not be available depending on DVD discs.
DVF-9010 (En/E)
41
Preparations
Basic operation for changing the initial setup
Set the mode switch to DVD SET UP.
1
RC
DVD
Press the SET UP key in stop mode.
2
RC
Select the item to be set.
3
A-B REPEAT
SET UP
RC
1 Select an item with the joystick (%, fi).
2 Press the ENTER key.
8
1
ENTER
CD
DVD
SET UP
¡
Fixed icons
Disc icons
Unit icons
Connector icons
Each press of the joystick (%, fi) switches the item as
follows.
1 1 Disc Languages : To change setup, see w
2 2 Ratings : To change setup, see e
3 3 Menu Language : To change setup, see t
4 4 On-Screen Messages : To change setup, see t
5 5 FL Display : To change setup, see y
6 6 TV Aspect : To change setup, see u
7 7 Digital Audio Output : To change setup, see i
8 8 Speaker Setting : To change setup, see p
9 9 Other Settings : To change setup, see W
0 0 Exit : Exits the setup screen.
Initial setup screen
1 Disc Languages
2 Ratings
3 Menu Language
4 On-Screen Messages
5 FL Display
6 TV Aspect
7 Digital Audio Output
8 Speaker Setting
9 Other Settings
0 Exit
Level 8
English
On
Bright
4:3
Operations
Menu items
Other
See subsequent pages for the actual setup change
procedures.
Page 42

Changing initial setup [1 Disc Languages]
42
Perform steps 1 to 3 of the procedure in “Basic operation for changing the initial
1
setup”.
Select the item to be set.
2
Changing the initial setup
DVF-9010 (En/E)
q
RC
Preparations
1 Select an item with the joystick (%, fi).
2 Press the ENTER key.
Operations
Select the desired option.
3
RC
1 Select an item with the joystick (%, fi).
2 Press the ENTER key.
Disc Languages
1 AUDIO Original
2 Subtitle Automatic
3 Menus English
8
1
ENTER
¡
Each press of the joystick (%, fi) switches the items as
follows.
1 1 AUDIO
: Sets the voice language output from the speakers.
2 2 Subtitle
: Sets the subtitle language displayed on the TV screen.
3 3 Menus
: Sets the language used in on-screen messages including
title menus (menus recorded in each disc).
4 0 Exit
: Exits the current screen.
0 Exit
Setting options
When [1 AUDIO] is selected
1~5 English/French/German/Italian/Spanish
Select the desired voice language.
6 Original (Factory setup)
Select this option when you want to play discs in their priority
8
1
ENTER
¡
languages.
7 Other
Select this option when you want other language than the
above.
÷Enter the 4-digit language code with numeric keys.
See “DVD menu language code list”.
E
The setup completes and the initial setup screen appears
Other
again.
If you commit a mistake in the language
number input
Each press of the C key clears the currently last digit. Be sure to input the
correct digit(s) after clearing.
To return to the previous menu screen
Press the RETURN key.
To exit initial setup
Select “0 Exit” in the initial setup screen.
When [2 Subtitle] is selected
1 Automatic (Factory setup)
The subtitle language is set automatically according to the voice
language.
÷ No subtitle is displayed if the voice is played in the language set with
“1 AUDIO”.
÷ If the voice is not played in the language set with “1 AUDIO”, the
subtitle is displayed in that language.
2~6 English/French/German/Italian/Spanish
Select the desired subtitle language.
7 Other
Select this option when you want other language than the
above.
÷Enter the 4-digit language code with numeric keys.
See “DVD menu language code list”.
When [3 Menus] is selected
1~5 English/French/German/Italian/Spanish
Select the desired menu language.
6 Other
Select this option when you want other language than the
above.
÷Enter the 4-digit language code with numeric keys.
See “DVD menu language code list”.
E
E
Page 43

Changing the initial setup
DVF-9010 (En/E)
Changing initial setup [2 Ratings]
When the restriction level of the disc is [Level 8], i.e. without any restriction
Perform steps 1 to 3 of the procedure in “Basic operation for changing the initial
1
setup”.
Select the item to be set.
2
RC
1 Select an item with the joystick (%, fi).
2 Press the ENTER key.
1
8
ENTER
Please set a rating limit
8 No Limit
7
6
5
4
3
2
1
¡
0 Lock All
Press RETURN to cancel
Each press of the joystick (%, fi) switches the items as
follows.
1 8 No Limit (Factory setup)
: Plays any software (including adult-, general- and children-
oriented).
2 Levels 7 to 2
: Plays general- and children-oriented DVD software.
÷Restricts playback of adult-oriented DVD software.
3 Level 1
: Plays children-oriented software.
÷Restricts playback of adult and general-oriented DVD
software.
4 0 Lock All
: Inhibits playback of any DVD software. Select this item
when you want to restrict playback of adult-oriented DVD
software without viewing restriction level recording.
q
43
Preparations
Operations
Enter the password.
3
The password should be set if you selected level 7 or less.
RC
1 Input the 4-digit password with numeric keys.
1
23
VIRTUAL SURR.
MEMORY TITLE
4
ANGLE SUB TITLE
7
6
5
AUDIO
89
ALL INFO.TEXT DISP. TITLE SEARCH
0
OPEN
0
/ CLOSE
2 Press the ENTER key.
8
1
ENTER
¡
Password input Entry
Ratings
Enter a 4-digit password,
then press ENTER
\
Press RETURN to cancel
÷Write down the 4-digit password and retain the memo carefully.
÷ If you locked the setup, it can no longer be changed except by inputting
the correct password.
Ratings
The player is locked.
Remember the password.
0412
Press ENTER to continue
Other
Page 44

Changing the initial setup
DVF-9010 (En/E)
44
When the restriction level of the disc is [Level 0 to 7], i.e. with certain restriction
Perform steps 1 to 3 of the procedure in “Basic operation for changing the initial
1
setup”.
Input the correct password.
2
Preparations
RC
1 Input the 4-digit password with numeric keys.
1
23
VIRTUAL SURR.
MEMORY TITLE
4
ANGLE SUB TITLE
7
6
5
AUDIO
89
ALL INFO.TEXT DISP. TITLE SEARCH
0
OPEN
0
/ CLOSE
Password input Entry
Ratings
Enter your 4-digit password.
then press ENTER.
0412
Press RETURN to cancel
\
Ratinge
1 Unlock Player
2 Change Password
3 Change Level
4 Temporary Unlock
0 Exit
q
2 Press the ENTER key.
Operations
Other
Setting details
8
1
ENTER
¡
To release viewing restriction
Press numeric key “1” then the ENTER key.
To change the password
1 Press numeric key “2”.
2 Input a password with numeric keys and press the ENTER key.
3 Press the ENTER key.
To change the viewing restriction level
1 Press numeric key “3”.
2 Select a level with the joystick (%, fi) and press the ENTER
key.
To release the viewing restriction level temporarily
1 Press numeric key “4”.
2 Press the ENTER key.
To exit without changing the restriction level
Press numeric key “0”.
To return to the previous menu screen
Press the RETURN key.
To exit initial setup
Select “0 Exit” in the initial setup screen.
Page 45

Changing the initial setup
DVF-9010 (En/E)
Changing initial setup [3 Menu Language]
Perform steps 1 to 3 of the procedure in “Basic operation for changing the initial
1
setup”.
Select the item to be set.
2
RC
1 Select an item with the joystick (%, fi).
2 Press the ENTER key.
8
1
ENTER
The setup completes and the initial setup screen appears
again.
¡
Each press of the joystick (%, fi) switches the items as
follows.
1 1 English
2 2 Français
3 3 Deutsch
4 4 Italiano
5 5 Español
Select the language
for these Menus.
1 English
2 Français
3 Deutsch
4 Italiano
5 Español
Press RETURN to cancel
45
q
Preparations
To return to the previous menu screen
Press the RETURN key.
To exit initial setup
Select “0 Exit” in the initial setup screen.
Changing initial setup [4 On-Screen Messages]
Perform steps 1 to 3 of the procedure in “Basic operation for changing the initial
1
setup”.
Select the item to be set.
2
RC
On-Screen Messages
1 Select an item with the joystick (%, fi).
2 Press the ENTER key.
8
1
ENTER
¡
1 On
2 Off
Press RETURN to cancel
Operations
q
Other
The setup completes and the initial setup screen appears
again.
To return to the previous menu screen
Press the RETURN key.
Each press of the joystick (%, fi) switches the items as
follows.
1 1 On
2 2 Off
To exit initial setup
Select “0 Exit” in the initial setup screen.
Page 46

Changing initial setup [5 FL Display]
46
Perform steps 1 to 3 of the procedure in “Basic operation for changing the initial
1
setup”.
Select the brightness item.
2
Changing the initial setup
DVF-9010 (En/E)
q
Preparations
Operations
RC
1 Select an item with the joystick (%, fi).
2 Press the ENTER key.
8
1
ENTER
The setup completes and the initial setup screen appears
again.
¡
FL Display
1 Bright
2 Dim
3
Dim During DVD/VCD Play(Auto)
Press RETURN to cancel
Each press of the joystick (%, fi) switches the items as
follows.
1 1 Bright
: Sets the FL display always bright.
2 2 Dim
: Sets the FL display always dim.
3 3 Dim During DVD/VCD Play (Auto)
: Sets the FL display dim only during playback of a DVD or
VCD.
÷The FL display becomes temporarily bright during slow playback,
forward search and reverse search.
Other
To return to the previous menu screen
Press the RETURN key.
To exit initial setup
Select “0 Exit” in the initial setup screen.
Page 47

Changing the initial setup
DVF-9010 (En/E)
Changing initial setup [6 TV Aspect]
Perform steps 1 to 3 of the procedure in “Basic operation for changing the initial
1
setup”.
Select the aspect ratio of your TV.
2
RC
1 Select an item with the joystick (%, fi).
2 Press the ENTER key.
8
1
ENTER
¡
Each press of the joystick (%, fi) switches the items as
follows.
1 1 4:3
2 2 16:9
Setting details
Select your TV aspect
1 4:3
2 16:9
Press RETURN to cancel
47
q
Preparations
[1 4:3] (Factory setup)
Select this item when the player is connected to a TV with
standard aspect ratio.
÷Wide-screen software with pan & scan specification is played in a
panned & scanned screen (with the left and right sides cut off).
÷Wide-screen software with pan & scan specification is played in a
letterbox screen (with black stripes on the top and bottom).
[2 16:9]
Select this item when the player is connected to a widescreen TV. Wide-screen software is played in a full widescreen.
÷Set the picture mode of the wide-screen TV to “FULL”.
Operations
Other
To return to the previous menu screen
Press the RETURN key.
To exit initial setup
Select “0 Exit” in the initial setup screen.
Page 48

Changing initial setup [7 Digital Audio Output]
48
Perform steps 1 to 3 of the procedure in “Basic operation for changing the initial
1
setup”.
Select the item to be set.
2
Changing the initial setup
DVF-9010 (En/E)
q
Preparations
RC
1 Select an item with the joystick (%, fi).
2 Press the ENTER key.
Operations
Select the desired option.
3
Digital Audio Output
1 LPCM(DVD) Off
2 Dolby Digital Bitstream
3 MPEG Bitstream
8
1
ENTER
¡
Each press of the joystick (%, fi) switches the items as
follows.
1 1 LPCM (DVD)
: When playing a DVD with linear PCM recording, whether
the playback signal is to be converted into a 48 kHz/16-bit
signal and output at the digital audio output (optical/
coaxial) or not can be selected.
2 2 Dolby Digital
: When playing a DVD with Dolby Digital (AC-3) recording,
the format of the signal output from the digital audio
output (optical/coaxial) can be selected (from bitstream
and PCM).
3 3 MPEG
: When playing a DVD with MPEG recording, the format of
the signal output from the digital audio output (optical/
coaxial) can be selected (from bitstream and PCM).
4 0 Exit
: Exits the current screen.
0 Exit
RC
1 Select an item with the joystick (%, fi).
2 Press the ENTER key.
8
1
ENTER
Other
The setup completes and the initial setup screen appears
again.
¡
To return to the previous menu screen
Press the RETURN key.
To exit initial setup
Select “0 Exit” in the initial setup screen.
Setting details
When [1 LPCM (DVD)] is selected:
1 Off (Factory setup)
Only the linear PCM audio digital signal with 48 kHz/16-bit
recording is output.
No digital signal is output during playback of a DVD with 48 kHz/
20-bit or 24-bit or 96 kHz linear PCM recording.
2 PCM
When a DVD with 48 kHz/20-bit or 24-bit or 96 kHz linear PCM
recording is played, the signal is converted into a 48 kHz/16-bit
signal and output at the digital outputs.
÷The digital output of the PCM audio becomes a 48 kHz/16-bit or lower
signal because of the consideration for the copyright.
When [2 Dolby Digital] is selected:
1 Bitstream (Factory setup)
When a DVD with Dolby Digital (AC-3) recording is played, the
Dolby Digital (AC-3) bitstream (2- to 6-channel) audio is output.
Select this option when a Dolby Digital (AC-3) decoder is connected to the player.
2 PCM
When a DVD with Dolby Digital (AC-3) recording is played, the
signal is converted into a 48 kHz/16-bit signal and output at the
digital outputs.
When [3 MPEG] is selected:
1 PCM
The PCM (2-channel) signal is output.
2 Bitstream (Factory setup)
The bitstream is output.
Page 49

Changing the initial setup
DVF-9010 (En/E)
Recommended setup for [7 Digital Audio Output]
The recommended setup for [7 Digital Audio Output] is variable depending on the equipment connected to the digital audio
output. Set up this item by referring to the following table.
Digital Audio Output Connection
1 LPCM (DVD) 2 Dolby Digital
When no equipment is connected
When an amplifier having a digital input but not incorporating
a Dolby Digital (AC-3) decoder is connected
When a Dolby Digital (AC-3) decoder is connected
When a MPEG multi-channel decoder is connected PCM (*1) PCM Bitstream (*4)
(*1) The signal from the audio output of the player is converted into a 48 kHz/16-bit signal just like the signal output from the digital audio output. Therefore,
if you want to play high audio quality software with 48 kHz/20-bit or 24-bit or 96 kHz recording, do not connect the equipment such as an amplifier or
decoder to the digital audio output (i.e. set [1 LPCM (DVD)] to “1 Off”) and connect the equipment directly to the audio output jacks.
Off (Factory setup)
PCM (*1)
PCM (*1)
[7 Digital Audio Output] Setup
Bitstream (Factory setup)
PCM (*2)(*3)
Bitstream
3 MPEG
PCM
PCM
PCM
49
Preparations
(*2) Set to “PCM” when connecting the equipment other than a Dolby Digital (AC-3) decoder. If this item is set to “Bitstream”, loud noise may be produced
and speakers may be damaged.
(*3) When this item is set to “PCM”, any other speaker than the front speakers is set to other option than “Off” in [8 Speaker Setting] and a DVD with
Dolby Digital 6-channel surround recording is played, the digital audio output outputs only the front 2-channel components.
If this occurs, set other speakers than the front speakers to “Off” in [8 Speaker Setting].
(*4) Noise may interfere with the speaker output if the player is connected to a piece of equipment which does not incorporate an MPEG multi-channel
decoder. Never connect the player to equipment without a built-in MPEG multi-channel decoder.
Operations
Other
Page 50

Changing initial setup [8 Speaker Setting]
50
The speaker setting made in the following is applicable only for Dolby Digital (AC-3) playback.
Perform steps 1 to 3 of the procedure in “Basic operation for changing the initial
1
setup”.
Select the item to be set.
2
Preparations
RC
Setting details
Changing the initial setup
DVF-9010 (En/E)
q
1 Select an item with the joystick (%, fi, @, #).
2 Press the ENTER key.
1
Operations
8
ENTER
[Speaker mode setting]
This item allows you to set up whether each speaker type is used or
not in your system as well as the size of each speaker type.
The factory setup is as shown below.
÷ Front speakers (L/R) : Speakers displayed (Normal)
÷ Center speaker : Speaker displayed (Normal)
¡
÷ Subwoofer : Speaker displayed
÷ Surround speakers (L/R) : Speakers displayed (Normal)
[Delay time setting]
This item allows you to provide the audio from the center and
surround speakers with delay effects to set their positions virtually
to the ideal positions. The factory setup is “0 ms” for both types of
speakers.
[Test]
This item allows you to output the built-in test signal from the
speakers. Use the test signal for setting the balance between
channels.
[Channel balance setting]
This item allows you to adjust the output level of each type of
speaker using the built-in test signal.
The output level must be adjusted from the listening position.
The factory setup is “0 dB” for all types of speakers.
Center speaker
Delay time (Center speaker)
Front speaker (L)
Channel balance (Center speaker)
Other
Speaker Setting
3.9
ms
L
Exit
Test
+2
SL SR
dB
Press RETURN to cancel
Surround speaker (L)
Channel balance (Surround L) Channel balance (Surround R)
Delay time L/R
(Surround speakers)
-3
C
dB
R
+1
SW
dB
+2
5.3
dB
ms
Surround speaker (R)
Front speaker (R)
Subwoofer
Channel balance
(Subwoofer)
Page 51

Changing the initial setup
DVF-9010 (En/E)
3
Select the desired option.
RC
1 Select an item with the joystick (%, fi).
2 Press the ENTER key.
8
1
ENTER
¡
The setup completes and the initial setup screen appears
again.
When [Delay time setting] is selected
The ideal listening position for 6-channel surround playback is the
point at equal distance from all speakers.
By setting the delay time for the center and surround speakers, this
item realizes the ideal listening position virtually.
(The center and surround speakers can be set as if they are laid out
on the dotted line circle shown below.)
Ideal center speaker position
(A)
L
Dc
C
Df
R
Setting details
When [Speaker mode setting] is selected
1 Select “Used (Large)” when a speaker with the capability of
reproducing lower frequencies than 100 Hz is connected.
2 Select “Used (Normal)” when a speaker without the capability of
reproducing lower frequencies than 100 Hz is connected.
3 Select “Not used” when the corresponding speaker is not con-
nected.
Example: With Surround speaker (L)
Used (Large) Used (Normal) Not used
SL
[Center speaker setting]
(A) = Df - Dc
÷When Df = Dc or Df< Dc in the figure under “Delay time setting”, set
this value to 0 ms.
[Surround speaker setting]
(B) = Df - Ds
Distance A Setting
Approx. 50 cm 1.3 ms
Approx. 100 cm 2.6 ms
Approx. 150 cm 3.9 ms
Approx. 200 cm 5.3 ms
Distance B Setting
Approx. 200 cm 5.3 ms
Approx. 400 cm 10.6 ms
Approx. 600 cm 15.9 ms
SL
51
Preparations
Operations
SW
(B)
Ideal surround speaker position
SL
Ds
SR
To return to the previous menu screen
Press the RETURN key.
÷When Df = Ds in the figure under “Delay time setting”, set this value
to 0 ms.
When [Test] is selected
The built-in test signal of the player is output in the clockwise
direction starting with the front speaker (L). Adjust the channel
balance so that the volumes of the test signal from all speakers
sound identical.
The test signal output continues until the ENTER key is pressed.
Other
To exit initial setup
Select “0 Exit” in the initial setup screen.
Page 52

Changing initial setup [9 Other Settings]
52
Changing the initial setup
DVF-9010 (En/E)
Perform steps
1
1
setup”.
Select the item to be set.
2
RC
Preparations
Other Settings
1
Still Mode Automatic
2
Audio during Search On
3
TV Mode(4:3) Pan&Scan
4
D.Range Control On
0 Exit
1 Select an item with the joystick (%, fi).
2 Press the ENTER key.
Operations
to 3 of the procedure in “Basic operation for changing the initial
q
Each press of the joystick (%, fi) switches the items as
follows.
1 1 Still Mode
: Reduces image blur which tends to be observed on still
images.
2 2 Audio During search
: Switches the audio during forward search at the 1st speed
on or off.
3 3 TV Mode (4:3)
: Sets the TV screen mode when wide-screen software is
played through a standard-screen TV.
4 4 D. Range Control
: Sets the range of the audio output when a disc is played.
5 0 Exit
: Exits the current screen.
8
1
ENTER
¡
Setting details
Select the desired option.
3
RC
1 Select an item with the joystick (%, fi).
2 Press the ENTER key.
1
Other
To return to the previous menu screen
Press the RETURN key.
To exit initial setup
8
ENTER
When [1 Still Mode] is selected
1 Automatic (Factory setup)
Usually select this option, with which frame still image or field
still image are switched automatically.
2 Field
Select this option when image blur is observed when this item
is set to “Automatic”.
When [2 Audio During Search] is selected
1 On (Factory setup)
Select this option if you want to output audio during forward
search at the 1st speed.
÷ Select “Off” if noise during search disturbs you.
2 Off
Select this option if you want to mute audio during forward
¡
search at the 1st speed.
When [3 TV Mode (4:3)] is selected
1 Pan & Scan (Factory setup)
Select this option if you need a panned & scanned screen (which
is cut on the left and right sides) when playing wide-screen
software. However, even when this option is selected, software
without pan & scan specification is played in a letterbox screen.
2 Letterbox
Select this option if you need a letterbox screen (which has black
stripes on the top and bottom) when playing wide-screen software.
When [4 D. Range Control] is selected
1 Off
Returns to the standard setup.
2 On (Factory setup)
This option reproduces a DVD with Dolby Digital recording in a
powerful sound even when the volume is low.
÷This effect may not be available depending on the combination of
speakers.
Select “0 Exit” in the initial setup screen.
Page 53

DVD menu language code list
Changing the initial setup
DVF-9010 (En/E)
Cord No. Language
6565
6566
6570
6577
6582
6583
6588
6590
6665
6669
6671
6672
6678
6679
6682
6765
6779
6783
6789
6865
6869
6890
6976
6978
6979
6983
6984
6985
7065
7073
7074
7079
7082
7089
7165
7168
7176
7178
7185
7265
7273
7282
7285
7289
7365
7378
7383
7384
7387
7465
Afar
Abkhazian
Afrikaans
Amharic
Arabic
Assamese
Aymara
Azerbaijani
Bashkir
Byelorussian
Bulgarian
Bihari
Bengali; Bangla
Tibetan
Breton
Catalan
Corsican
Czech
Welsh
Danish
German
Bhutani
Greek
English
Esperanto
Spanish
Estonian
Basque
Persian
Finnish
Fiji
Faroese
French
Frisian
Irish
Scots Gaelic
Galician
Guarani
Gujarati
Hausa
Hindi
Croatian
Hungarian
Armenian
Interlingua
Indonesian
Icelandic
Italian
Hebrew
Japanese
Cord No. Language
7473
7487
7565
7575
7576
7577
7578
7579
7583
7585
7589
7665
7678
7679
7684
7686
7771
7773
7775
7776
7778
7779
7782
7783
7784
7789
7865
7869
7876
7879
7982
8065
8076
8083
8084
8185
8277
8279
8285
8365
8368
8372
8373
8375
8376
8377
8378
8379
8381
8382
Yiddish
Javanese
Geogian
Kazakh
Greenlandic
Cambodian
Kannada
Korean
Kashmiri
Kurdish
Kirghiz
Latin
Lingala
Laothian
Lithuanian
Latvian; Lettish
Malagasy
Maori
Macedonian
Malayalam
Mongolian
Moldavian
Marathi
Malay
Maltese
Burmese
Nauru
Nepali
Dutch
Nowegian
Oriya
Punjabi
Polish
Pashto; Pushto
Portuguese
Quechua
Rhaeto-Romance
Romanian
Russian
Sanskrit
Sindhi
Serbo-Croatian
Singhalese
Slovak
Slovenian
Samoan
Shona
Somali
Albanian
Serbian
Cord No.
8385
8386
8387
8465
8469
8471
8472
8473
8475
8476
8479
8482
8484
8487
8575
8582
8590
8673
8679
8779
8872
8979
9072
9085
Language
Sundanese
Swedish
Swahili
Tamil
Telugu
Tajik
Thai
Tigrinya
Turkmen
Tagalog
Tonga
Turkish
Tatar
Twi
Ukrainian
Urdu
Uzbek
Vietnamese
Volapük
Wolof
Xhosa
Yoruda
Chinese
Zulu
53
Preparations
Operations
Other
Page 54

TRACK
DVD VCD
P.B.C. DOLBY DIGITAL MPEG PCM RANDOM PROG.
STEREO
ANGLE REPEAT ALL
INDEX
KARAOKE
LR
TITLE CHAPTER
TOTAL
A B
02 I Did Not kn
CD
CD TEXT
TRACK
DVD VCD
P.B.C. DOLBY DIGITAL MPEG PCM RANDOM PROG.
STEREO
ANGLE REPEAT ALL
INDEX
KARAOKE
LR
TITLE CHAPTER
TOTAL
A B
01 Good Morning
CD
CD TEXT
CD-TEXT operation
When playing a CD-TEXT disc, the text information recorded in the disc (disc title, verse writer names, music composer names,
DVF-9010 (En/E)
etc.) can easily be recalled and displayed in alphanumeric characters.
54
Preparation
1 Load a disc (with CD-TEXT compatibility) in the player.
2 Start normal playback (track mode).
Preparations
Searching for tracks by title
Any track in a CD-TEXT disc can be search based on the title.
Press the TITLE SEARCH key in stop mode.
1
RC
DVD
CD
DVD
SET UP
9
TITLE SEARCH
Software with which this function is available:
CD
(TITLE SEARCH)
Blinks
Track title
To abort operation, press the TITLE SEARCH key again.
Operations
Select the desired track title.
2
RC
¢
SKIP UP
Start playback.
3
To decrease
track No.
4
SKIP DOWN
RC
Other
PLAY
3
To increase
track No.
÷If the current disc is not a CD-TEXT disc, “NO CD TEXT” is displayed
for about 3 seconds.
DVD VCD
P.B.C. DOLBY DIGITAL MPEG PCM RANDOM PROG.
CD
TITLE CHAPTER
TRACK
CD TEXT
ANGLE REPEAT ALL
TOTAL
A B
STEREO
LR
KARAOKE
INDEX
02 I Did Not kn
When no key has been pressed for a second, the
track title starts to scroll in the display.
| Characters scroll toward the left.
Scrolled display
When an item of character information such as a track title is too long
to be accommodated in the display, the characters flow from the left
to the right to show the characters which have been invisible in the
beginning. This movement is referred to as the scrolled display.
Example
01 A
BCDEFGHIJKLMNOPQ...
| Scrolled display
M N O P Q ...
Page 55

Selecting the text information display
(TEXT DISP.)
In the case of a CD-TEXT disc, the displays shown below can be selected.
RC
1 Set the mode switch to DVD.
DVD
CD
DVD
2 Press the TEXT DISP. key.
DVD VCD
P.B.C. DOLBY DIGITAL MPEG PCM RANDOM PROG.
CD
TITLE CHAPTER
TRACK
CD TEXT
7
TEXT DISP.
ANGLE REPEAT ALL
A B
TOTAL
SET UP
STEREO
LR
KARAOKE
INDEX
In the stop mode
When the TEXT DISP. key is pressed once, the 1 “Disc Title” is
scrolled on the display; when it is pressed repeatedly, the display is
changed.
1 Disc Title : Disc title
2 Disc Artist : Singer (or performer)
3 TIME : Track No., time display
÷If the key is released while 2 ”Disc Artist“ is displayed, 1 ”Disc Title“
returns to the display.
CD-TEXT operation
DVF-9010 (En/E)
Remote control unit only
55
Preparations
Track01 Title :
|Scroll display
DVD VCD
P.B.C. DOLBY DIGITAL MPEG PCM RANDOM PROG.
CD
TITLE CHAPTER
TRACK
CD TEXT
ANGLE REPEAT ALL
TOTAL
A B
STEREO
LR
KARAOKE
INDEX
: Here's That R
In the play mode
When the TEXT DISP. key is pressed once, the 1 “Track Title” is
scrolled on the display; when it is pressed repeatedly, the display is
changed.
1 Track Title : Track title
2 Track Artist : Singer (or performer)
3 Disc Title : Disc title
4 Disc Artist : Singer (or performer)
÷In the case of a non-CD-TEXT disc, the ”NO CD TEXT“ display will
appear for approx. 3 seconds.
5 TIME : Track No., time display
÷If the key is released at any point while 2 ”Track Artist“ to 4 ”Disc
Artist“ is displayed, 1 ”Track Title“ returns to the display.
Displaying all the text information
(ALL INFO.)
Remote control unit only
In the case of a CD-TEXT disc, the text information shown below is displayed automatically. (This does not operate during
program setup.)
RC
1 Set the mode switch to DVD.
DVD
CD
DVD
SET UP
2 Press the ALL INFO. key.
Each item is displayed in turn each time the ALL INFO. key is
pressed. When the key is repeatedly pressed while an item
8
ALL INFO.
DVD VCD
P.B.C. DOLBY DIGITAL MPEG PCM RANDOM PROG.
CD
TITLE CHAPTER
TRACK
CD TEXT
ANGLE REPEAT ALL
TOTAL
A B
STEREO
LR
KARAOKE
INDEX
Arranger : Mich
|Scroll display
To skip to the next track while the items are being
is being displayed, the display is forcibly moved to the next
item.
1 Disc/Track Title : Disc and track titles
2 Disc/Track Artist : Singer (or performer)
3 Disc/Track Songwriter : Songwriter
4 Disc/Track Composer : Composer
5 Disc/Track Arranger : Arranger
6 Disc/Track Message : Message from sponsor or artist
7 ID INFO. : Record company, release date, etc.
8 Genre INFO. : Genre information
9 ALL INFO. END : (Release)
displayed:
Press the ¢ key.
÷The display can be returned to a previous item by pressing the 4
key.
÷ALL INFO. is released when any other key is pressed while items
are being displayed.
÷Items from 1 to 6 are displayed in the sequence of disc and track.
÷In the case of a non-CD-TEXT disc, the ”NO CD TEXT“ display will
appear for approx. 3 seconds.
Operations
Other
Page 56

Graphical remote control unit (GRC unit)
The GRC unit provided with KENWOOD AUDIO VIDEO SURROUND RECEIVER (optionally available) can also remote control the
DVF-9010 (En/E)
DVD player. For details, please also refer to the instruction manual of your AUDIO VIDEO SURROUND RECEIVER (optional).
56
1 Segment screen␣
45
ENTER
MUTE
ON/STANDBY
1
2
Preparations
3
Main
Menu
Phono
TV2
TV1
Video2:DVD(Scan)
Mode
Pwr
CD1
Video1
Tuner
CD2
Video2
Video3 Video4
Ski
F1 F2
F3 F4
CD2/
AV AUX
Input
Input
Tape2
Analog
Digital
Remote
Macro
Mode
Clr
Ret.
y
10ke
Pad
MD/
Tape1
p
3
Model: RC-R0907
*Remote control unit is variable depending on the area
where it is marketed.
RC-R0807
Operations
Cautions on using the Graphical Remote Control (GRC)
When setting the standby mode from the GRC, always operate with
the disc tray closed. If the standby mode is set with disc tray opened,
it will no longer be possible to turn on the power from the GRC. If this
happens, use the POWER key on the main unit to turn OFF the power.
Then, press the POWER key again to turn ON the power.
VOLUME
CONFIRM
6
Shows the icons which are mainly used to select the controlled
components.
2 Menu screen␣
Shows the icons used to select the operation modes.
Play (3) icon
Starts playback.
Pause (8) icon
Lets playback pause temporarily.
Search (1, ¡) icons
Fast forwards or fast reverses a track. With a DVD, also used for
frame-by-frame playback.
Clr (Clear) icon
Clears a track, screen, etc.
Stop (7) icon
Skip icons
Skips tracks, etc. when locating the beginning of a track, etc.
Ret. (Return) icon
Returns to the previous menu (or hierarchy level).
Mode icon
Selects the play mode.
Pwr (Power) icon
When the POWER switch of the player is set to ON, puts it in standby
mode.
F1 to F4 icons
Any of these icons switches the screen to one of the menu screens
represented by F1 to F4.
10-keypad icon
Switches the screen to the numeric icon menu screen.
3 Icons
Icons are displayed according to the controlled component and
operation mode.
4 Joystick
Used to select the icons. (Can be tilted in 4 directions by pushing the
peripheral circle section of the ENTER key.)
5 ENTER key
Press to set or enter the selected icon (operation mode, etc.).
(ON / STANDBY) key
6
Switches the AUDIO VIDEO SURROUND RECEIVER (option) to the
ON mode or STANDBY mode.
Basic operation of the DVD player
It is first necessary to assign the DVD player to the GRC unit. The DVD player control screen cannot be displayed unless it has
been assigned to the GRC unit.
1 Assign the connected component (DVD player in this case) to the input selector. (Refer to the instruction manual of the
AUDIO VIDEO SURROUND RECEIVER.)
2 In the segment screen, select the icon of the component to be controlled.
Other
Example: If the DVD player has been assigned to “Video 2”, select the “Video 2” icon.
CD2/
Main
Menu
TV1
Phono
MD/
Tape1
Tuner
CD1
CD2
Video2
Video1
TV2
Video3 Video4
AV AUX
Tape2
Input
Digital
Macro
Input
Analog
Remote
Mode
The point of the cursor
3 In the menu screen, select the icon of the desired operation.
Scan menu screen Skip menu screen Slow menu screen
Video2:DVD(Scan)
Skip
Mode
Pwr
F1 F2
F3 F4
Clr
Ret.
10ke
Pad
Video2:DVD(Skip
)
Video2:DVD(Slow
Clr
Slow
y
Mode
Pwr
F1 F2
F3 F4
Ret.
10ke
Pad
y
Mode
Pwr
F1 F2
F3 F4
Scan
)
Clr
Ret.
10ke
Pad
When the Skip, Slow or Scan icon is selected, the menu screen switches over to the control menu screen for the selected
operation.
y
Page 57

Glossary
DVD: Digital Versatile Disc
A type of disc which contains recording of audio/video packaged
media with high video and audio quality, such as a movie,
featuring large recording capacity and digital signal processing
capability.
VIDEO CD (VCD)
A type of CD which contains the recording of moving images. It
compresses image information by about 1/120 and audio information by about 1/6 and accommodates up to 74 minutes of
recording in a disc with the same diameter as ordinary music CD
of 12 cm.
Some VCDs do not have the P.B.C. compatibility and are capable
of playback only, while some are P.B.C.-compatible and are
capable of various special playback control operations. This
player can play both of these VCDs.
MPEG: Moving Picture Expert Group (DVD, VCD)
This is an international standard for digital video and audio
compression and decompression in media.
Dolby Digital (AC-3)
This is a digital audio compression technology developed by
Dolby Laboratories. It is compatible with 5.1-channel surround
audio as well as normal stereo (2-channel) audio and can accommodate a large amount of audio data efficiently in a disc.
DTS
Name of a digital surround system developed by Digital Theater
Systems, Inc.
GUI: Graphical User Interface
An operation method with which the user can interface the
machine in an interactive manner with the help of displayed
graphics.
Title menu/DVD menu (DVD)
Some DVDs display more than one title in a screen. This screen
is referred to as the title menu.
The DVD menu is the item display (menu screen) for use in
setting operations. The DVD menu can be recalled any time
during playback to perform settings according to the current
software, including the audio switching between Dolby Digital
and PCM, switching of language used in the subtitles and spoken
voice.
Track/track number (CD, VCD)
DVF-9010 (En/E)
A track is also a section of video and audio recorded in a disc. The
numbers assigned to individual tracks are referred to as the track
numbers.
With most of music CDs, a track is assigned to a piece of music.
However, with a VCD, the sections of the contents do not always
correspond to the assigned tracks.
As (special) playback functions such as skipping and programming of ordinary CDs are based on track number data, such
playback functions are sometimes impossible with some VCDs.
TOC: Table Of Contents (CD, VCD)
The TOC consists of information on the number of tracks and
playing time and corresponds to the table of contents of a book.
In addition to audio (and video) data, all discs contain the
recording of TOC data in the beginning of disc.
P.B.C.: Play-Back Control (VCD)
When a VIDEO CD carries “Play Back Control capable” or similar
message on the disc or jacket, desired scenes and information
can be played back in an interactive manner using a hierarchical
structure while viewing the menu screens displayed on the TV
screen.
Aspect ratio
This is the ratio between the horizontal and vertical sizes of the
picture displayed on the TV screen. The aspect ratio of a standard-screen TV is 4:3 and that of a wide-screen or HDTV is 16:9.
Pan & scan (DVD)
A method of displaying a wide-screen picture, recorded with an
aspect ratio of 16:9, on a standard, 4:3 TV screen by trimming
parts of the picture. In general, the trimmed parts of a panned &
scanned screen is determined according to the player component. However, the DVD discs can also record the specification
by the software producer related to the trimmed positions.
57
Preparations
Operations
Title/title number (DVD)
The title is the largest unit of video and audio recorded in a DVD.
It usually corresponds to a single movie of video software or an
album (sometimes a piece of music) of music software. The
numbers assigned to individual titles are referred to as the title
numbers.
Chapter/chapter number (DVD)
The chapter is a section of video and audio recorded in a DVD. A
title is composed of several chapters. The numbers assigned to
individual chapters are referred to as the chapter numbers.
Subtitles (DVD)
Some DVD discs contains the recording of more than one subtitle language. This player allow you to select one of the recorded
subtitle languages during playback. If the subtitle language is set
to “Automatic” in the initial setup, subtitles are displayed only
when the spoken voice is in other language than the initial set
language.
Letterbox (DVD)
This method of displaying a wide-screen 16:9 picture on a
standard 4:3 TV screen displays a horizontally long image on the
screen center and black stripes on the top and bottom of it.
Other
Bitstream (DVD)
This is the generic name representing flow of data in accordance
with various standards, other than the standardized audio data.
Page 58

In case of difficulty
What appears to be a malfunction may not always be serious. If your unit should not perform as expected, consult the table
DVF-9010 (En/E)
below to see if the problem can be corrected before seeking help from your dealer or service representative.
58
Operation to reset
The microprocessor may fall into malfunction (impossibility to operate
erroneous display, etc.) when the power cord is unplugged while power
is ON or due to an external factor. In this case, execute the following
procedure to reset the microprocessor and return it to normal condition.
Preparations
DVD player unit
Symptom
Playback does not start when the play (3)
key is pressed.
Playback starts but no image/sound is seen/
heard.
The picture is disrupted when the image is
fast forwarded or fast reversed.
No sound is heard.
Operations
÷There is no disc in the player.
÷There are no signals recorded on the side of the
disc being played.
÷The TV is not turned on.
÷The connection cords are not properly con-
nected.
÷The picture is slightly disrupted during fast
forward and fast reverse operations.
÷The audio output cords are not properly con-
nected.
÷The volume control of the TV or amplifier is not
adjusted properly.
÷The player is in a special playback mode.
While holding the 7 key, press and hold the 8 key until “INITIAL OK!”
appears.
÷Please note that resetting the microprocessor clears the contents
stored in, it returns the microprocessor to the condition when it left
the factory.
RemedyCause
÷Load a disc and press the play (3) key.
÷Turn the disc over and properly place it on the
disc tray.
÷Turn on the TV.
÷Properly reconnect the connection cords.
÷This is not a malfunction.
÷Properly connect the audio cords.
÷Set the sound volume to an appropriate level.
÷Press the play (3) key to resume normal
playback mode.
The picture does not look good or the picture/sound quality is poor.
It takes a while for the disc to start playing.
The tray opens automatically.
The top and bottom of the screen cannot be
seen.
A VCD cannot be played using menus.
Other
The subtitle is not displayed.
The voice (or subtitle) language cannot be
changed.
÷A nearby device is generating noise.
÷The disc is dirty.
÷The disc is damaged.
÷There is condensation on the optical lens.
÷Time is required for the unit to detect the disc
type and size and for the rotation of the motor to
stabilize. This is not a malfunction.
÷The disc is not placed horizontally.
÷The video format of the disc being played does
not match that of the connected TV monitor.
÷The VCD disc being played is not compatible
with P.B.C.
÷The DVD disc being played does not contain the
recording of subtitles.
÷The subtitle mode is set to off.
÷The DVD disc being played does not contain the
recording of more than one audio (or subtitle)
language.
÷Separate this unit as far as possible from the
device you think is generating the noise.
÷Refer to the “Disc handling precautions” sec-
tion and wipe dirt from the disc.
÷Use a new disc.
÷Refer to the “Beware of condensation” sec-
tion and evaporate the condensation.
÷Approximately 10 to 20 seconds are required
for a disc to start playing, although the time
differs depending on the disc.
÷Properly place the disc on the tray.
÷Refer to the “Video formats” section ,and use
a disc with the appropriate video format for
your TV or a TV with the appropriate video
format for the disc.
÷Menu playback is available only with VCD
discs recorded with P.B.C.
÷The subtitle cannot be displayed when the
DVD disc being played does not contain the
recording of subtitles.
÷Press the SUB TITLE key to switch on the
subtitle mode.
÷The voice (or subtitle) language cannot be
changed when the DVD disc being played
does not contain the recording of more than
one voice (or subtitle) language.
The viewing angle cannot be changed.
÷The DVD disc being played does not contain the
recording of more than one angle.
÷You are attempting to switch the angle in a DVD
section where more than one angle is not recorded.
÷The viewing angle cannot be changed when
the DVD disc being played does not contain
the recording of more than one angle.
÷More than one viewing angle may be re-
corded only in limited sections in a disc.
Page 59

In case of difficulty
DVF-9010 (En/E)
DVD player unit
Playback will not start even after a title is
selected.
The viewing restriction level (RATING) cannot be changed.
The voice or subtitle language selected in
the initial setting is not played.
No message appears on the TV screen after
a key is pressed.
Menu screen messages are not shown in the
desired language.
Audio is not reproduced in surround sound.
÷A viewing restriction (RATING) has been set for
the disc.
÷You have forgotten the viewing restriction (RAT-
ING) password.
÷The DVD disc being played does not contain the
recording of the selected voice or subtitle language.
÷The function for displaying message on the TV
screen (On-Screen Messages) is set to off.
÷The menu language function (MENU) is not set.
÷The surround speakers are set to “Not used” in
the speaker mode [8 Speaker Setting].
Remote control unit
Symptom Cause Remedy
Remote control operation is not possible. ÷ Batteries are exhausted.
÷The remote control is too far away from the
system, the controlling angle is deviated or
there is an obstacle in between.
59
RemedyCauseSymptom
÷Check the viewing restriction level (RATING)
setting.
÷Set the initial setup to the factory setup with
the following procedure.
While holding the 7 key, press and hold the 8
key until “INITIAL OK!” appears.
÷Use a DVD disc containing the recording of
the selected voice or subtitle language.
÷Set On-Screen Messages to on.
Preparations
÷Set the disc menu language function (MENU)
as required.
÷Set the surround speakers to “Used” in the
speaker mode setting of initial setup [8
Speaker Setting].
÷Replace with new batteries.
÷Operate the unit inside the remote control-
lable range.
Operations
Inhibition icon
Symptom Cause Remedy
The inhibition icon is displayed
and remote control is not possible.
÷Playback is restricted intentionally by the soft-
ware producer.
÷The operation is inhibited. Please try another
operation.
Other
Page 60

Specifications
60
[Type]
System................................................. DVD video player system
Signal read system ..................................... Semiconductor laser
[D/A Conversion Section]
D/A conversion ..................................................................... 24 Bit
Oversampling .............. 8 fs (Sampling frequency; 44.1, 48 kHz)
[Audio section]
Preparations
Operations
Frequency response
Sampling frequency; 44.1 kHz (CD only) ....... 2 Hz ~ 20 kHz
Sampling frequency; 48 kHz ............................ 2 Hz ~ 22 kHz
Sampling frequency; 96 kHz ............................ 2 Hz ~ 44 kHz
Signal to noise ratio (CD only) ....................... More than 115 dB
Dynamic range (CD only) ................................ More than 100 dB
Total harmonic distortion (CD only)
........................................................Less than 0.002 % (1 kHz)
Channel separation (CD only)
....................... More than 95 dB (1 kHz, MIX LINE OUTPUT)
Wow and flutter (CD only)
...................... Below measurable limit (±0.001 % W. PEAK)
Analog output level/impedance
2ch ..................................................................... 2 V
5.1ch ................ 2 V
Digital output level/impedance
COAXIAL ......................................................... 0.5 Vp-p / 75 Ω
OPTICAL ............ -21 dBm ~ -15 dBm (Wave length 660 nm)
Headphone output ...... 20 mW / 32 Ω load (Phones level MAX)
4 fs (Sampling frequency; 96 kHz)
rms / 510 Ω
rms / 510 Ω (compression off:max 5.6 V)
DVF-9010 (En/E)
[Video Section]
Video output format ................................................................ PAL
Video compression
VCD ............................................................................... MPEG-1
DVD .............................................................................. MPEG-2
Composite video output level
......................................... 1 Vp-p (75 Ω load, sync. negative)
S-video output level
(Y-signal) ......................... 1 Vp-p (75 Ω load, sync. negative)
(C-signal)
PAL ......................................................... 0.300 Vp-p (75 Ω)
Horizontal resolution ................................... More than 500 lines
Video signal to noise ratio ................................ More than 65 dB
[General]
Power consumption.............................................................. 35 W
Dimensions ................................................. W:440 mm (17-5/16”)
H: 128 mm (5-1/16”)
D: 384 mm (15-1/8”)
Weight (net) ........................................................... 6.1 kg (13.4 lb)
Other
Notes
Notes
KENWOOD follows a policy of continuous advancements in development. For this reason specifications may be
changed without notice.
÷Sufficient performance may not be exhibited at extremely cold locations (Where water freezes).
For your records
Record the serial number, found on the back of the unit, in the spaces
designated on the warranty card, and in the space provided below. Refer
to the model and serial numbers whenever you call upon your dealer for
information or service on this product.
Model Serial Number
 Loading...