

Page 1

CD PLAYER
CD/DPF-R SERIES
CD-206
CD-204
CD-203
DPF-R6010
DPF-R4010
DPF-R3010
INSTRUCTION MANUAL
KENWOOD CORPORATION
This instruction manual is used for six models. Model availability and features
(functions) may differ depending on the country and sales area.
DTS disclaimer clause
When Playing DTS-encoded CDs, excessive noise will be exhibited from the analog
stereo outputs. The consumer should take proper precautions when the analog stereo
outputs of the CD player is connected to an amplification system. To enjoy DTS
Digital Surround playback, an external 5.1 channel DTS Digital Surround decoder
system must be connected to the digital output (S/ PDIF, ASE/EBU , or TosLink) of the
CD player.
B60-3684-00 CH ( K,P,Y, M ,X ,T )
99/12 11 10 9 8 7 6 5 4 3 2 1 98/12 11 10 9 8 7 6 5 4 3 2 1
I D
Page 2
Introduction
Before applying pow er
2
Units are designed for operation as follows.
U.S.A. and Canada .........................................................AC 120 V only
Australia.......................................................................... AC 240 V only
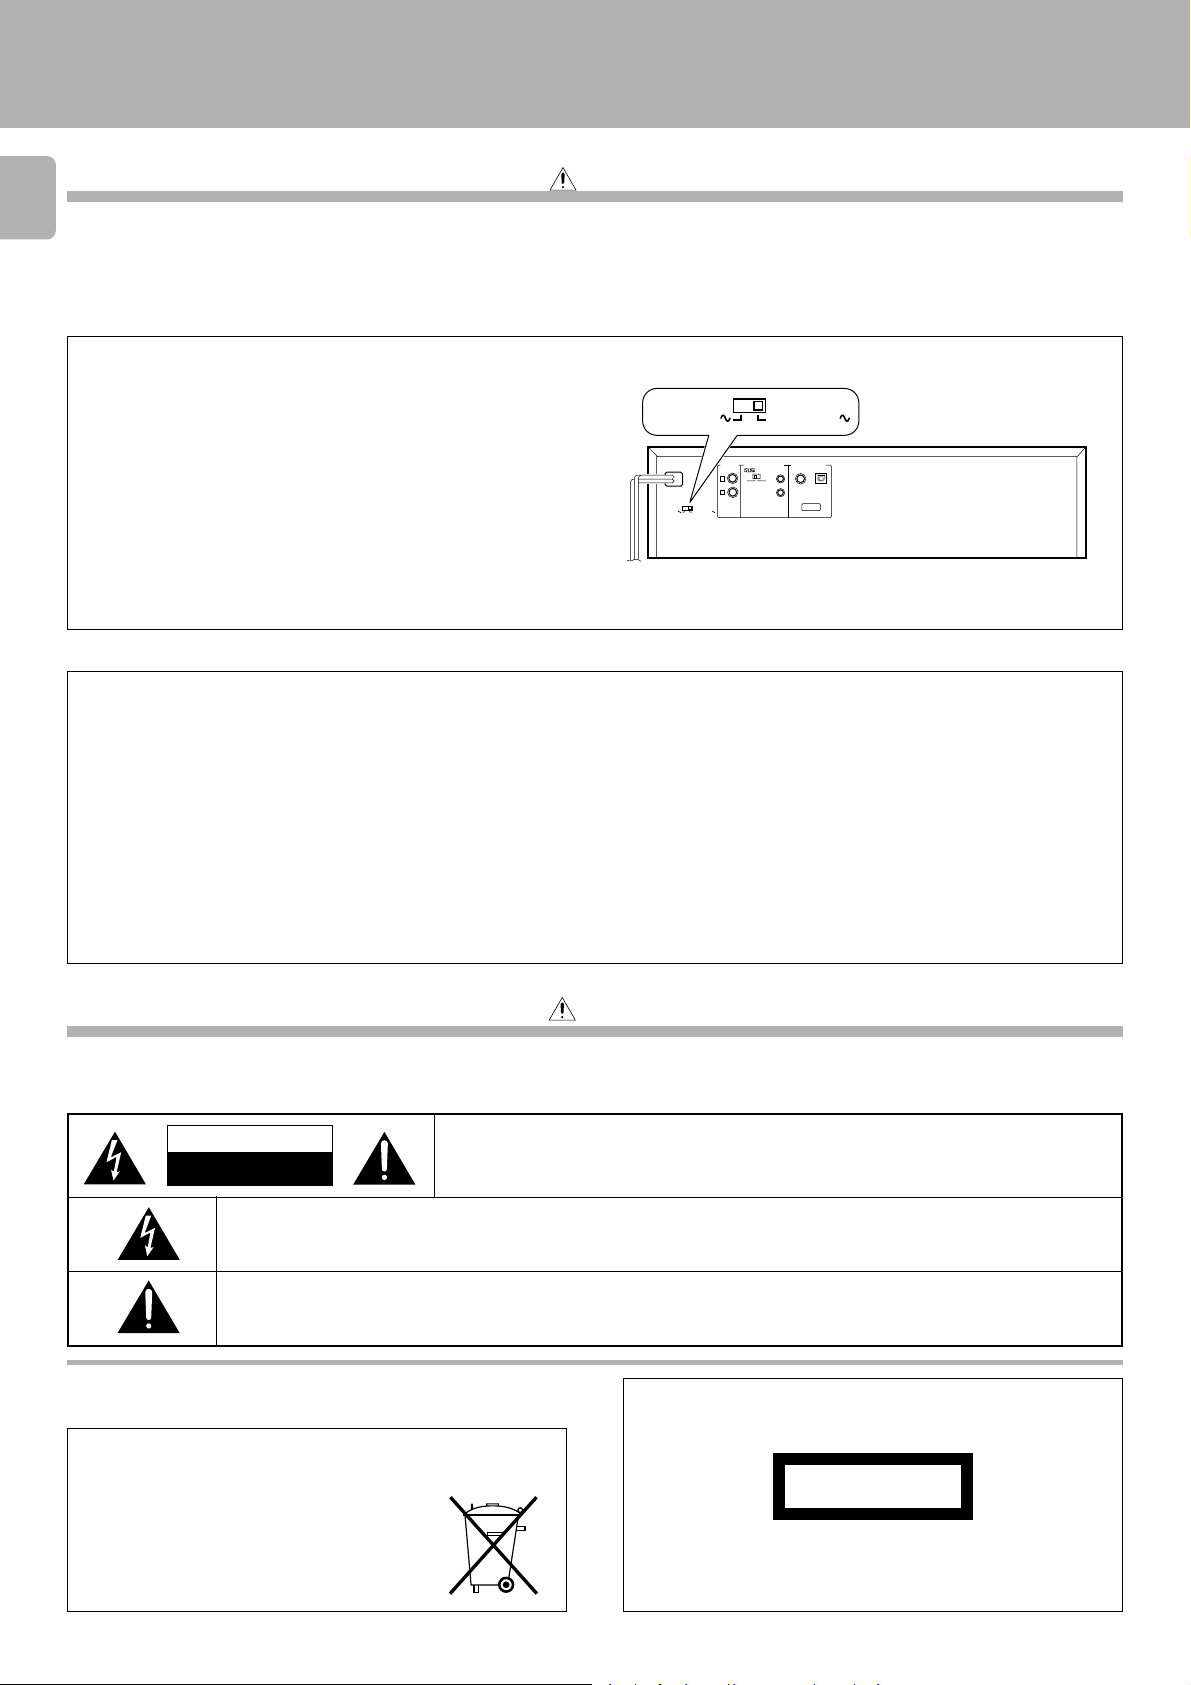
* AC voltage selection
The AC voltage selector switch on the rear panel is set to the voltage
that prevails in the area to which the unit is shipped. Before connecting
the power cord to your AC outlet, make sure that the setting position
of this switch matches your line volta ge. If not, it must be set to your
voltage in accordance with the following direction.
Note:
Our warranty does not cover damage caused by excessive line voltage
due to improper setting of the AC voltage selector switch.
For the United Kingdom
Factory fitted moulded mains plug
CD-206 / 204 / 2 03/ DPF-R601 0 / R4010/ R3 0 10 (En
Caution : Read this section carefully to ensure safe operation.
U.K. and Europe .............................................................AC 230 V only
China ...............................................................................AC 220 V only
*Other countries .........................AC 110-120 / 220-240 V switchable
AC voltage selector switch
The illustration shows
the CD-206/DPF-R6010.
LINE OUTPUT
VARIABLE
L
R
AC220-240V
SYSTEM CONTROL
ƒ
SL16 XS 8
DIGITAL OUTPUT
COAXIAL
TEXT
OPTICAL
AC110-220V
AC220-2 40V
AC110-2 20V
M ov e swit ch le ver t o match your lin e volt age
with a small screwdriver or other pointed tool.
)
1. The mains plug contains a fuse. For replacement, use only a 13-Amp ASTA-approved (BS1362) fuse.
2. The fuse cover must be refitted when replacing the fuse in the moulded plug.
3. Do not cut off the mains plug from this equipment. If the plug fitted is not suitable for the power points in your home or the cable is too short to
reach a power point, then obtain an appropriate safety approved extension lead or adapter, or consult your dealer.
If nonetheless the mains plug is cut off, remove the fuse and dispose of the plug immediately, to avoid a possible shock hazard by inadvertent
connection to the mains supply.
IMPORTANT
The wires in the mains lead are coloured in accordance with the following code:
Blue : Neutral
Brown : Live
Do not connect those leads to the earth terminal of a three-pin plug.
Safety precautions
Caution : Read this section carefully to ensure safe operation.
WARNING : TO PREVENT FIRE OR ELECTRIC SHOCK, DO NOT EXPOSE THIS
APPLIANCE TO RAINOR MO ISTURE.
CAUTION
RISK OF ELECTRIC SHOCK
DO NOT OPEN
THE LIGHTNING FLASH WITH ARROWHEAD SYMBOL, WITHIN AN EQUILATERAL TRIANGLE, IS INTENDED TO ALERT
THE USER TO THE PRESENCE OF UNINSULATED “ DANGEROUS VOLTAGE” WITHIN THE PRODUCT’S ENCLOSURE
THAT MAY BE OF SUFFICIENT MAGNITUDE TO CONSTITUTE A RISK OF ELECTRIC SHOCK TO PERSONS.
THE EX CLAMATION POINT WITHIN AN EQUILATER AL TR IANGLE IS INTE NDED T O ALER T T HE USE R T O THE PR E SE NCE
OF IMPOR TANT OPE RAT ING AND MAINTE NANCE (S ER VIC ING) INST RUC TIONS IN THE LITE RAT URE ACC OMPANYING
THE APPLIANCE.
CAUTION: TO REDUCE THE RISK OF ELECTRIC SHOCK, DO NOT REMOVE COVER (OR
BACK). NO USER-SERVICEABLE PARTS INSIDE. REFER SERVICING TO QUALIFIED
SERVICE PERSONNEL.
REQUIREM ENT BY NEDERLAND GAZETTE
Batteries are supplied with this product. When
they empty, you should not throw away. Instead,
hand them in as small chemical waste.
The marking of products using lasers
(Except for some areas)
CLASS 1
LASER PRODUCT
The marking is located on the rear panel and says that the component uses laser beams that have been classified as Cla ss 1. It means
that the unit is utilizing laser beams that are of a weaker class. T here
is no danger of hazardous radiation outside the unit.
Page 3
Introduction
CD-206 / 204 / 2 03/ DPF-R601 0 / R4010/ R3 0 10 (En
Unpacking
Unpack the unit carefully and make sure that all accessories are put aside so they will not be lost.
Exa mine the unit for any possibility of shipping damage. If your unit is damaged or fails to operate, notify your dealer immediately. If your unit was shipped
to you directly, notify the shipping company without delay. Only the consignee (the person or company receiving the unit) can file a claim against the carrier
for shipping damage.
We recommend that you retain the original carton and packing materials for use should you transport or ship the unit in the future.
Keep this manual handy for future reference.
Special features
CD-TEXT support (CD-206/DPF-R6010 only)
Advanced technologies incorporated in pursuit of improved sound quality and stability (CD-206/DPF-R 6010
only)
Convenient features for dubbing CD onto tape
¶ The text information (disc title, track titles, names of the artists, songwriters, composers,
etc.) recorded o n the CDs can be easily called and displayed in alphanumeric s. (Some
words and text may not be displayed.)
¶ D.R.I.V.E. (Dynamic Resolution Intensive Vector Enhancem e nt) IC is built in for drastic
reduct io n o f dist o rtion at small signal level.
¶ Normal EDIT: E dit function for rearra nging tracks according to the tape length so that no
music i s in terrupted in the middle.
¶ M ULTI EDIT: Several CDs can be edited and recorded on 1 tape. (Except f or CD-206/
DPF-R6010) ¡
¶ Auto space function. ^
@#
)
)
3
Easy operation functions
¶ Ea sy operation functions allow systematic operation with other KENWOOD components
connected through the system control connection. 5
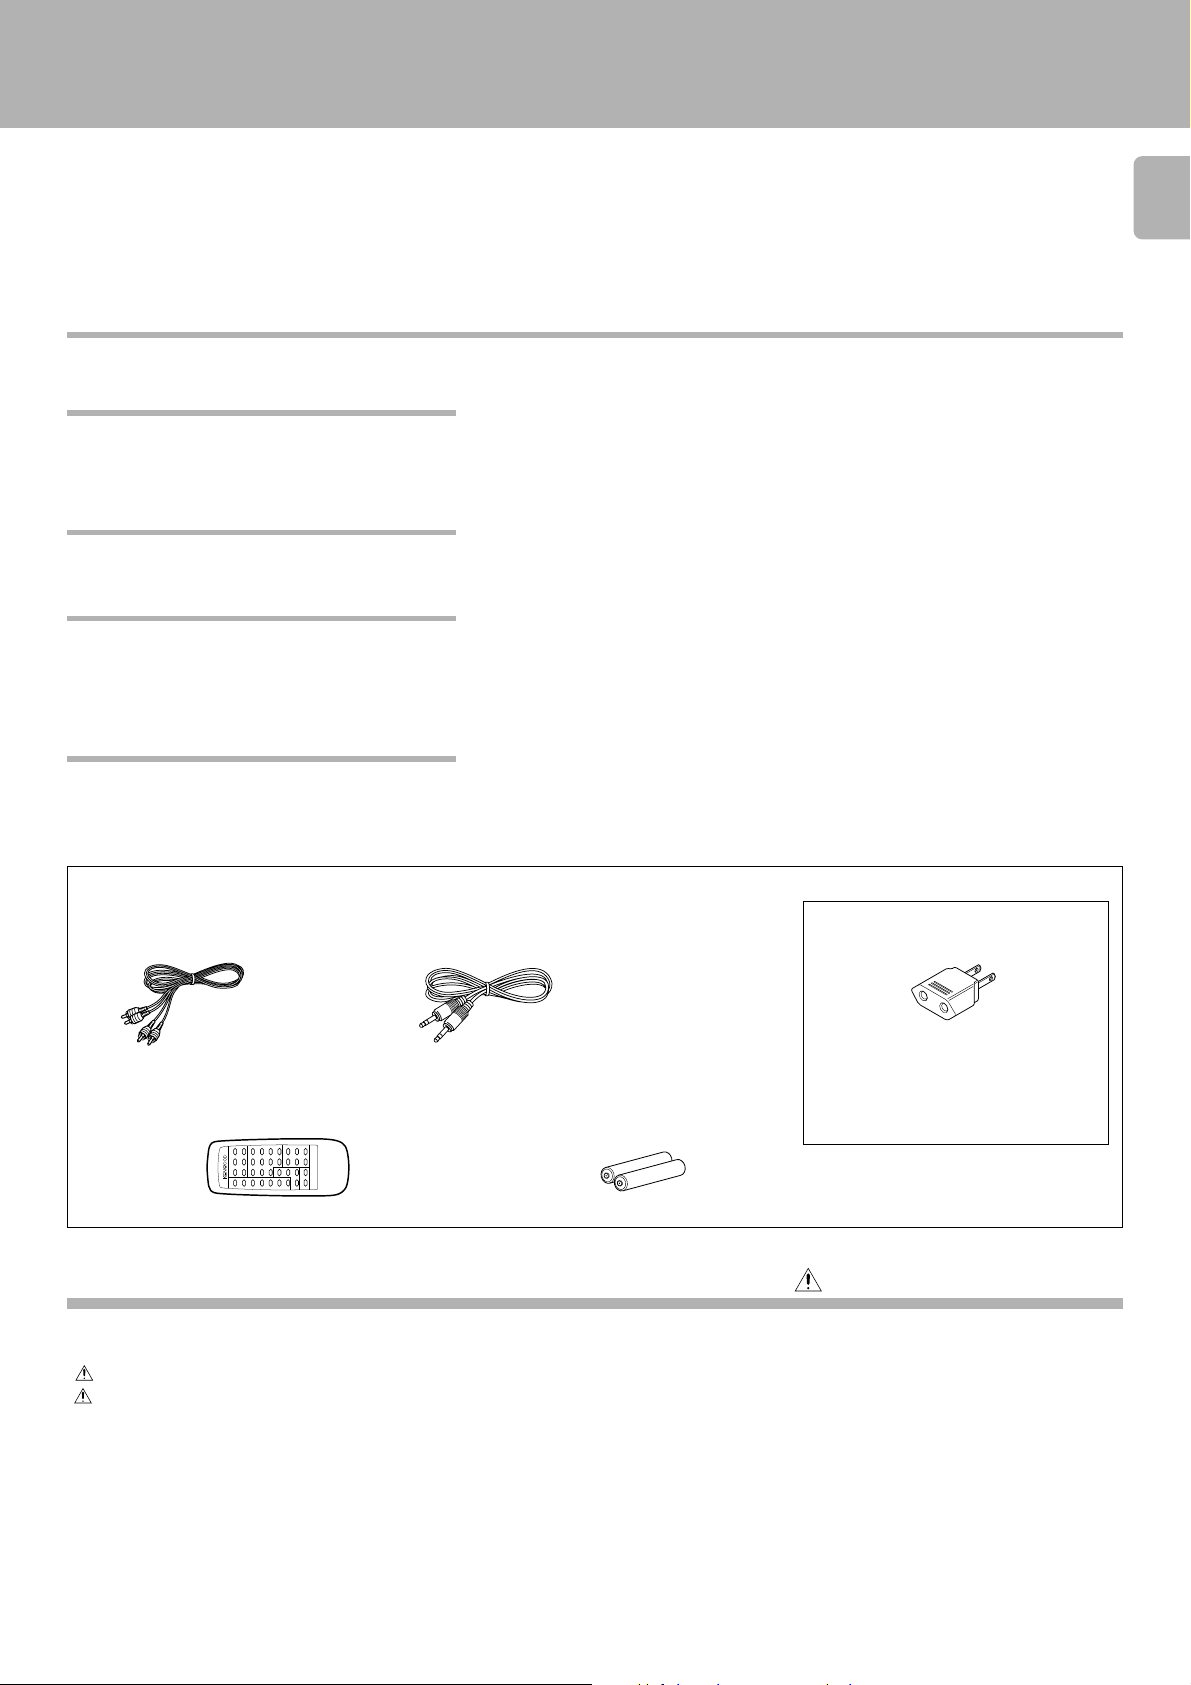
Accessories
Audio cord ............... (1) System control cord ...........(1)
Remote control unit ..............(1) Batteries (R6/AA)................. (2)
(Except for CD-203/DPF-R3010) (Except for CD-203/DPF-R3010)
RC-P0601
REMOTE CONTROL UNIT
Contents
Caution: Read the pages marked carefully to ensure safe operat ion.
AC plug adaptor .............. (1)
Use to adapt the plug on the power cord
to the shape of the wall outlet.
(Accessory only for regions where use is
necessary.)
Introduction..................................................................... 2
Before applying power................................................... 2
Safety precautions ......................................................... 2
Special features........................................................... 3
System connections....................................................... 4
Controls and indicators.................................................. 6
Operation of remote control unit ................................. 8
Preparing to play tracks................................................. 9
Normal play (TRACK mode) ........................................ 10
Searching for tracks by title (TITLE SEARCH)........... 12
Downloaded from:
Displays...........................................................................13
Programmed play (PGM mode) ................................... 14
Playback in random order (Random playback) ..........1 7
Repeated playback ........................................................ 18
Editing............................................................................. 20
Normal EDIT................................................................20
MULTI EDIT .................................................................21
Timer operations ........................................................... 23
Maintenance...................................................................24
In case of difficulty ........................................................ 25
Specifications................................................................. 26
Page 4
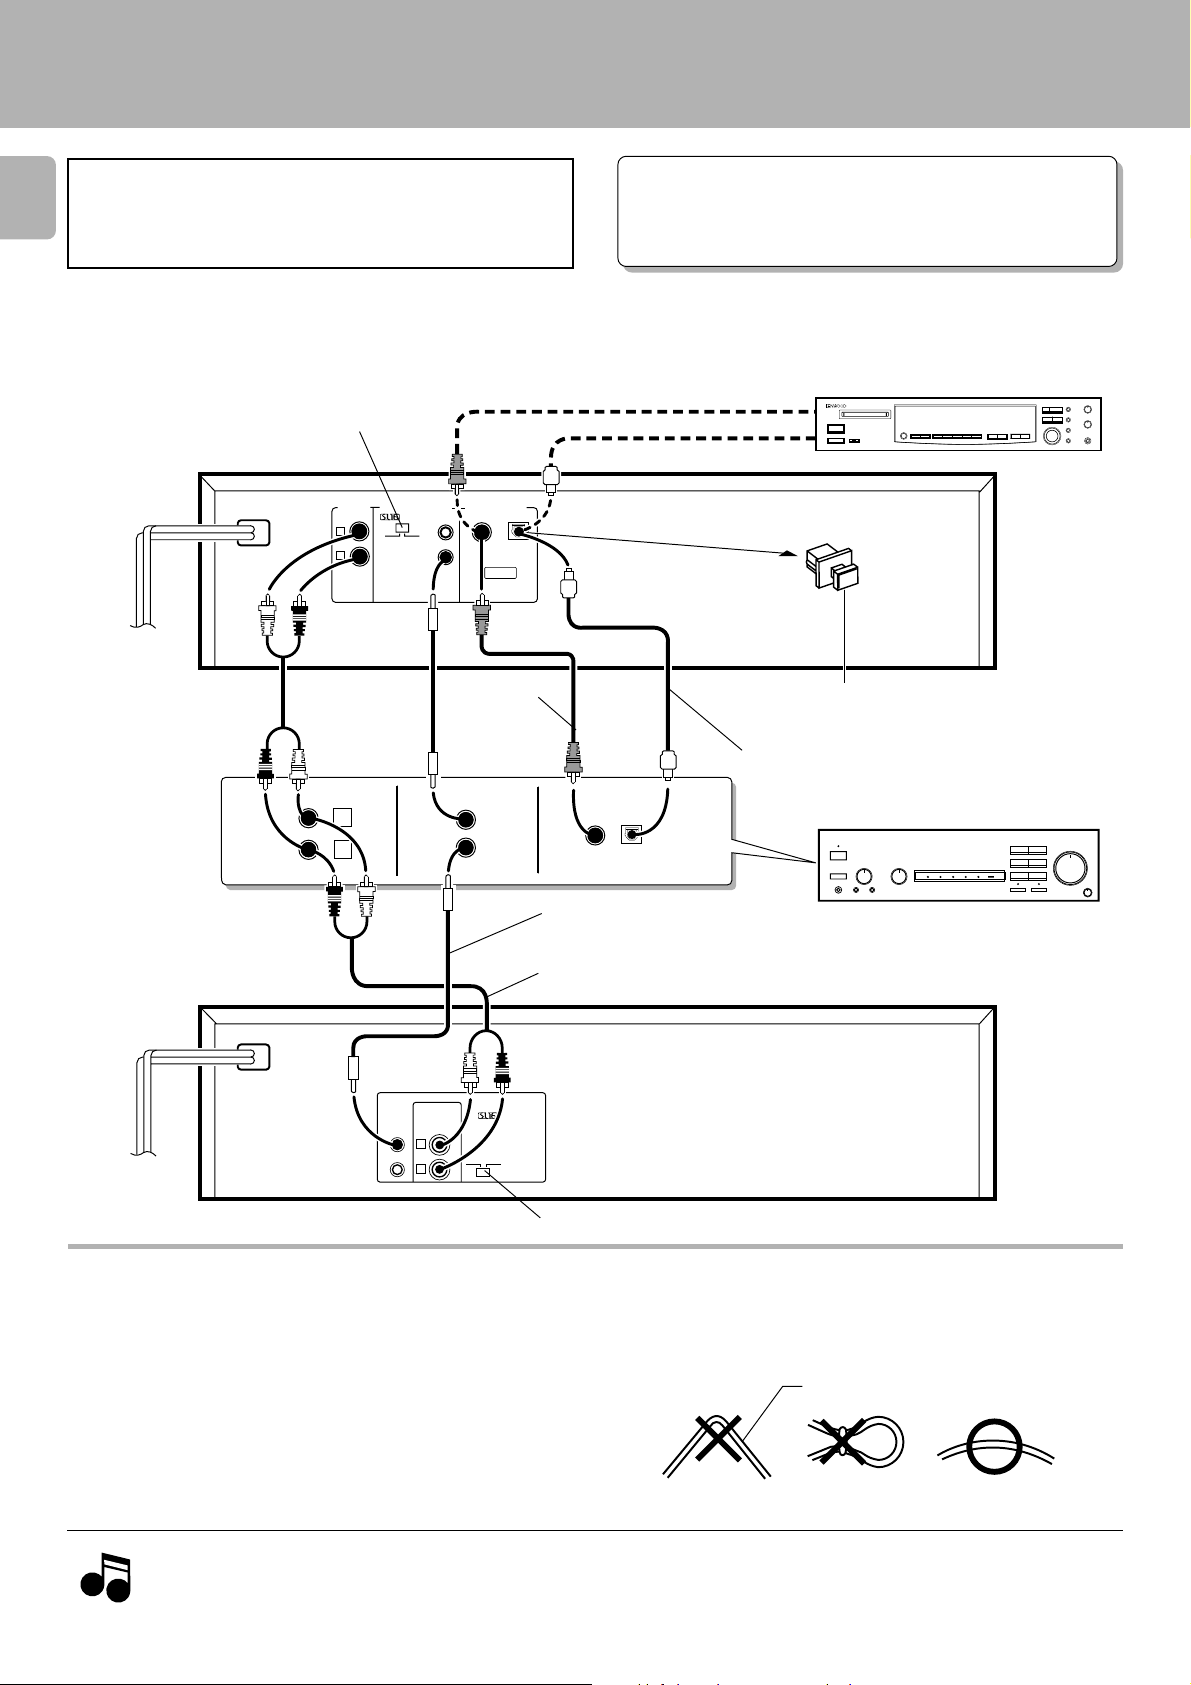
System connections
Caution:
4
Do not plug in t he pow er lead until all connections are
completed.
Make connections as shown below.
When connecting the related sys tem components, refer also
to the instruction manuals of the related components.
SL 16/XS8 switch 5
CD-206/DPF-R6010 :
LINE OUTPUT
@
To wall AC outlet
AC11 0-22 0V AC220 -24 0V
CD
VARI ABLE
L
R
L
R
SYSTEM CONTROL
ƒ
SL16 X S 8
DIGITAL OUTPUT
COAXIAL
TEXT
75Ω coaxial cable
with RCA PIN.
(Commerciallyavailable)
SYSTEM
CONTROL
OPTICAL
CD-206 / 204 / 2 03/ DPF-R601 0 / R4010/ R3 0 10 (En
M alfunction of microcomputer
If operation is not possible or erroneous display a ppears even though
all connections have been m ade properly, reset them icroco m put e r
referring to “ In case of difficulty” .
(COAXIAL)
DIGITAL INPUT
(OPTICAL)
Remove the protection cap when using the
DIGITAL OUTPUT (OPTICAL) jack
Commercially-available
optical fiber cable
DIGITAL
INPUT
COAXIAL
OPTICAL
∞
Digital component (MD, DAT, etc.)
Digital amplifier
(or ordinary amplifier, receiver, etc.)
)
System control cord
CD-204/203/
DPF-R4010/R3010 :
To wall AC outlet
AC 11 0-120 V 2 3 AC 2 20-24 0V
SYSTEM
CONTROL
LINE OUTPUT
L
R
SL16 XS 8
Audio cord
ƒ
SL 16/XS8 switch
5
Connection to digital amplifier or M D (CD-206/DPF-R6010 only)
Connec t the DIGITAL OUTPUT (OPTICAL or COAXIAL) jac k to the digital input jack of the amplifier, DAT recorder, MD recorder,
etc., using an optical fiber cable or coaxial cable which are commercially available in audio stores.
÷ When using an optical fiber cable to connect this unit to a digital
amplif ier, insert the pl ug straight into t he jack unt il a snap sound is
heard.
÷ Be careful not to b en d , co il, o r bu n d le the optical fiber cable.
÷ Optical fiber cables ava ila ble on the market may not always be able to
be used wit h t his player. If your cord cannot be us ed w it h t his u nit,
consult the store from which you pu r c h ased the cord or your n earest
dealer.
Optical fiber cable
Notes
Notes
Downloaded from:
1. Connect all cords firmly. If connections are loose there could be loss of sound or noise produced.
2. When plugging and unplugging connection cords, be sure to first remove the power cord from the AC outlet. Plugging/unplugging connection
cords without removal of the power cord can cause malfunctions or damage to the unit.
Page 5
OTUUPT 1-d2B
System connections
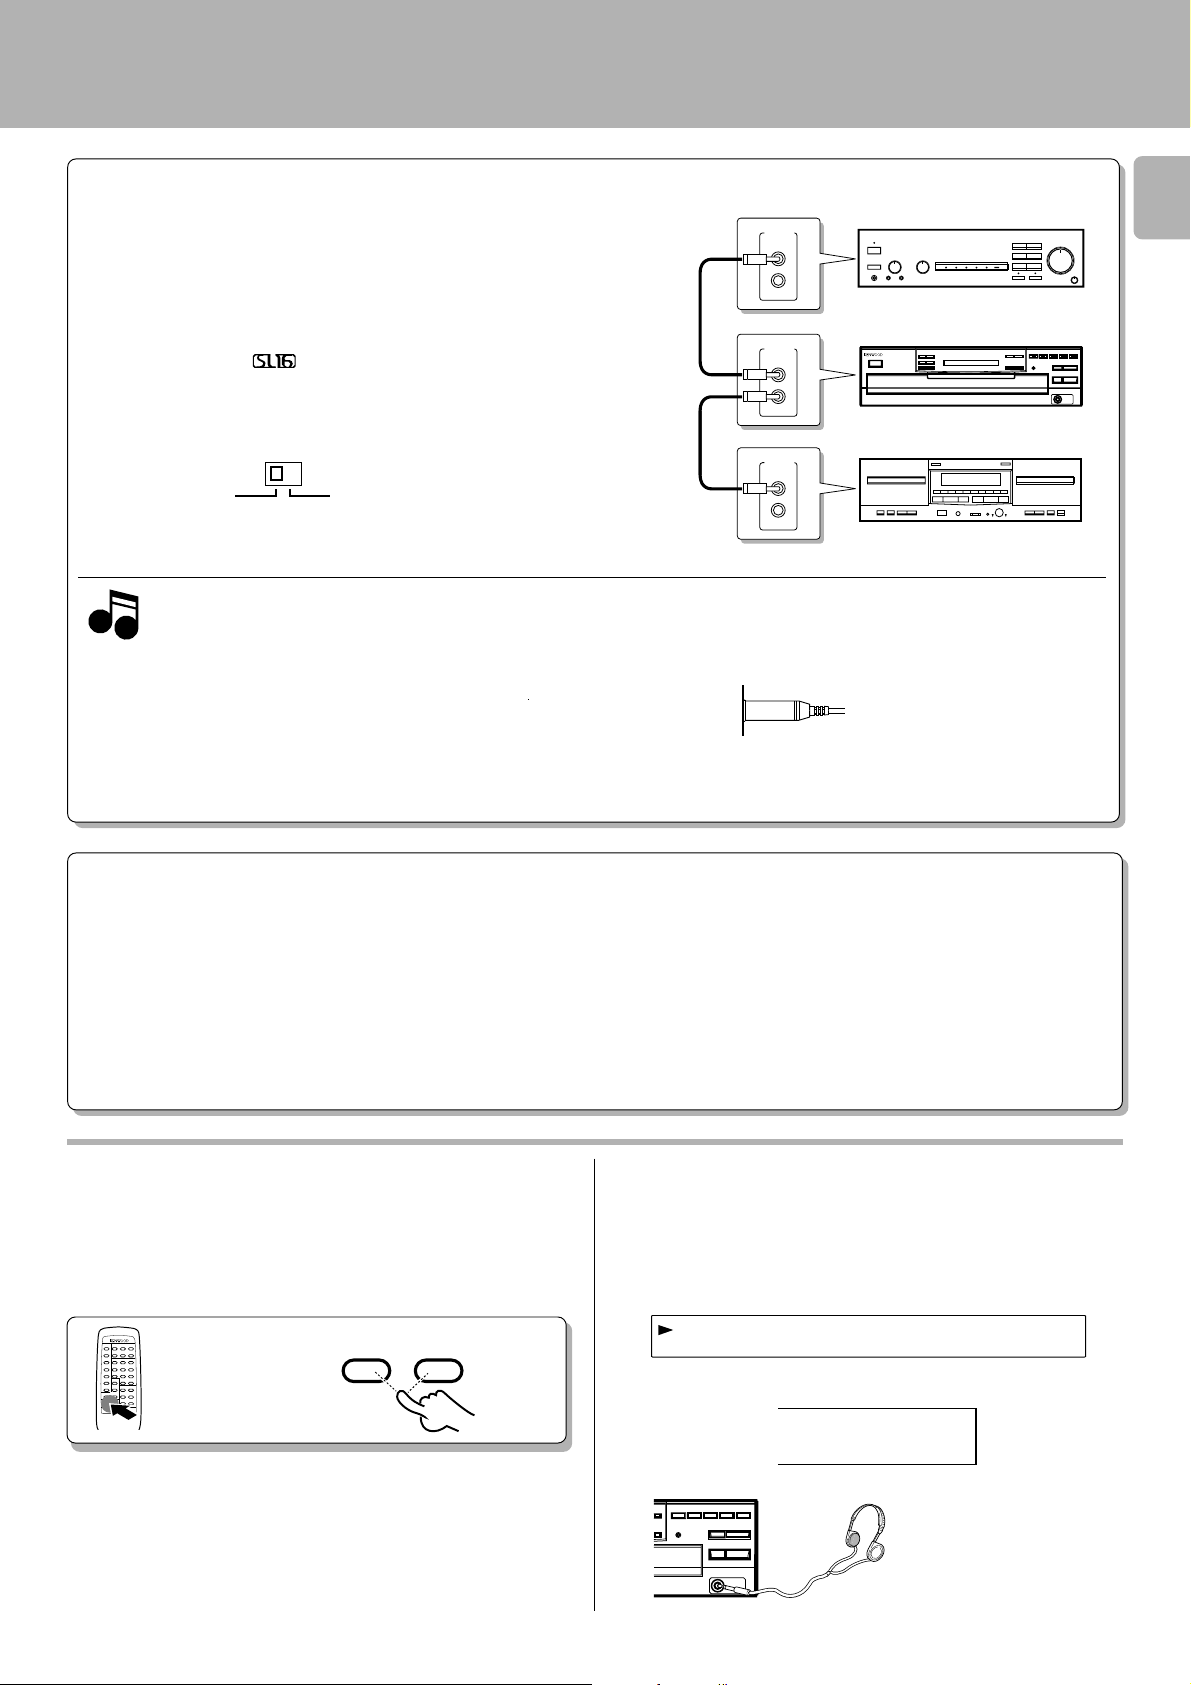
SYSTEM CONTROL CONNECTIONS
Connec ting sys tem control cords after connec ting a KE NWOOD
audio component system lets you take advantage of convenient
system control operations.
There are two KENWOOD system control modes. Make connections acc ording to the groups of terminal symbols shown below.
[XS 8] Mode : lets you combine F , f , and ƒ terminals
[SL16] Mode : for
This unit is compatible with both [XS8] and [SL16] modes.
Select the mode acc ording to the connec ted components. 4
SL16 XS 8
÷ Do this operation after completing all connections.
(Ensure that the unit is set to STANDBY mode.)
Notes
Notes
1. If yo u r am p li fier or receive r d o es n o t have a system control term in al, do not
connect any system control cords to the system control terminals on the other
components.
2. Do not con nect syst em c ont rol cords t o any com ponent s ot he r t han those
specified by KENWOOD. It may cause a malfunction and damage your
equipment.
3. Be sure the syst em c ont rol pl ugs are insert ed all t he way in t o t he sy st em
control terminals.
terminals only
j
CD-206 / 204 / 2 03/ DPF-R601 0 / R4010/ R3 0 10 (En
SYSTEM
CONTROL
SYSTEM
CONTROL
SYSTEM
CONTROL
Amplifier or receiver
Cassette deck
)
5
This unit
SYSTEM CONTROL OPERATIONS
Remote Control
Lets you operate this unit with the system remote control unit supplied with the amplifier or receiver.
Automatic Operation (Except [XR] equipment)
Automatically switches the input selector on the amplifier or receiver when you start playback from this unit.
Synchronized Recording (Except [XR] equipment)
Lets you synchronize recording with the start of playback when recording from a CD. Also, the simple CCRS operation enables great recordings from
CDs.
See the operating instructions supplied with your cassette deck for details.
Adjusting the output levels of the output jacks
and he adphone output (Exc ept for CD-203/DPFR3010)
The OUTPUT level (U P/DOWN) keys of the remote control
unit can adjust the out put levels from t he LINE/ OUT and
PHONES jacks of the unit.
OUTPUT
DOWN UP
REMOTE CONTROL UNIT
RC-P0601
÷ It is not favora ble for the sound quality to decrease the output level from
this u nit t oo muc h. Use th ese keys f or coordination w it h ot her line
levels.
÷ Adjust ing the headphone output level also changes t he LINE/OUT
level. Do not adjust the out put level f rom th is unit particularly during
recording.
÷ Please note th at the sound output is at the maximum le v el whe n the
power is turned on.
To use the headphone (Except for CD-203/DPFR3010)
Connect a stereo headphone to the PHONES jack of the CD
player. Adjust the sound volume using the rem ote control
unit.
CD-206/DPF-R6010
CD-204/DPF-R4010
12_db
Output level
Output level
54321
109876
Page 6
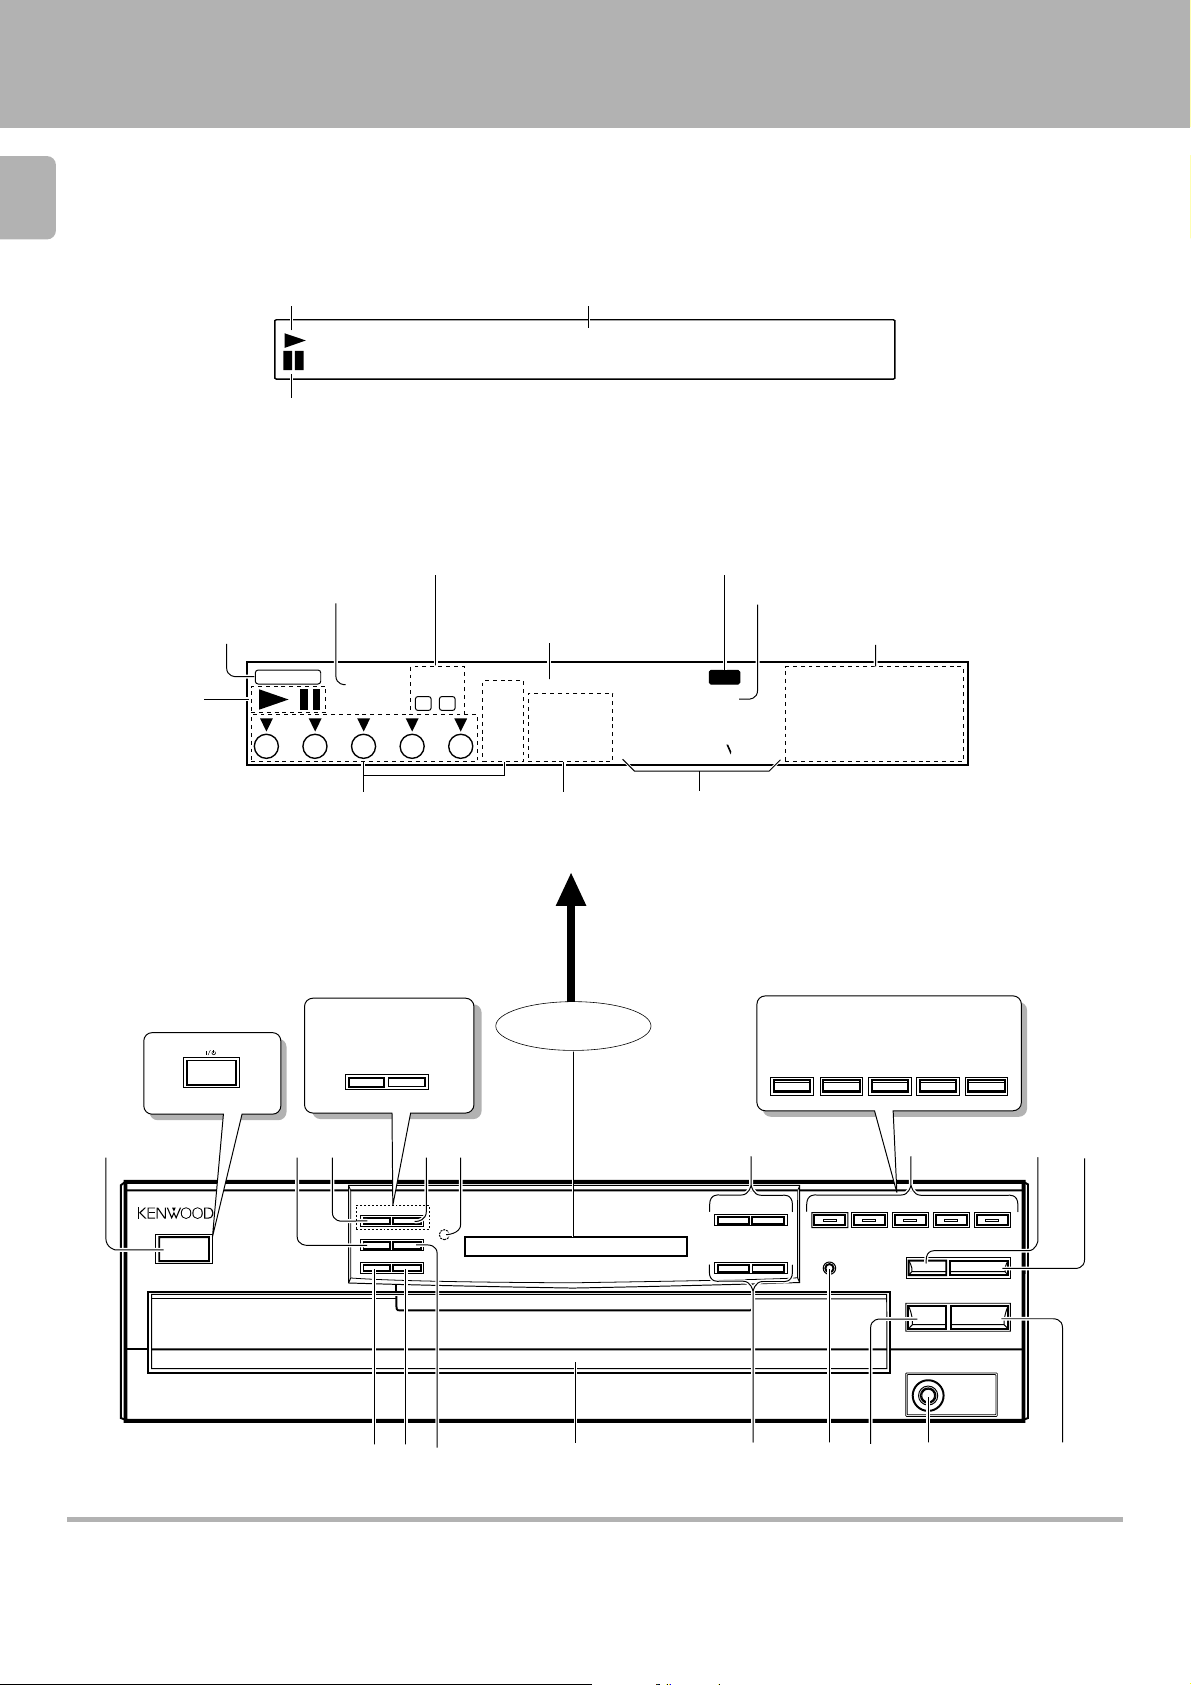
Controls and indicators
6
CD-206/DPF-R6010
CD-206 / 204 / 2 03/ DPF-R601 0 / R4010/ R301 0 (En)
Play indicator
•• •• •• •• •• •• •• •
Pause indicator
CD-204/203/DPF-R4010/R3010
EDIT indicator
RANDOM indicator
Program mode indicator
Play indicator
Pause indicator
PGM
Disc No. indicators
FILE
RANDOM
NORM AL
MULTI
EDIT
REPEAT indicator
DISC
NO.
BA
54321
8
Text information display
REPEAT
TRACK NO.
(The displays given in this manual are approximations only. They
may differ from what actually appears on the display.)
P.C. indicator
SINGLE
TOTAL
88 88 88_:
TRACK NO. indicator
Time counter, Program No.
(S INGLE, TOTAL)
ALL indicator
P.C.
ALL
Music calendar (1 ~ 20)
543210
109876
1514131211
2019181716
The illustration of the common parts
is of CD-206/DPF-R6010.
Except for USA
and Canada
CD-204/203
DPF-R4010/R3010
CHECK
-ON –STANDBY
1
POWER
-ON –STANDBY
COMPACT
DIGITAL AUDIO
MU LTIPLE CD
TEXT
D.R.I.V.E.
PLAYER DPF-R60 10
32
TEXT DISP.
P.MODE
0
CLEAR
ALL INFO.
TIME DISP.
REPEATRANDOM
!
4
@
5
DISPLAY
CD-204/203
DPF-R4010/R3010
DISC 1 DISC 2 DISC 3 DISC 4 DISC 5
6
4¢
1¡
DISC 1 DISC 2 DISC 3 DISC 4 DISC 5
EDIT
$
7
DISC SKIP
0
6
7
PHONES
&%#^ *
89
About the STANDBY mode
When the power cord of this unit is plugged into an AC outlet, a small amount of current is being supplied to the unit even when the ON/ST ANDBY switch
is not d ep r es s ed (–). This is called the STANDBY mode.
Downloaded from:
Page 7

The keys with the same name as those on the remote control
unit operate the same way as the remote control unit.
Controls and indicators
CD-206 / 204 / 2 03/ DPF-R601 0 / R4010/ R301 0 (En)
7
1 ON/STANDBY (POWER /
Turns the unit ON/STANDBY.
) switch 9
2 P.MODE key $
3 TEXT DISP. key (CD-206/DPF-R6010 only) #
Used to select the CD-TEXT information display.
CHECK key (CD-204/203/DPF-R4010/R3010 only) %
Used to check or change program contents.
4 ALL INFO. key
Used to display all text information on the CD.
CLEAR key
Used to clear the program.
5
Remote control light sensor (CD-206/204/DPF-R6010/
(CD-206/DPF-R6010 only)
(CD-204/203/DPF-R4010/R3010 only)
#
^
R4010 only) 8
6 Skip keys (4,¢) !
Press to skip to the beginning of another track.
7 Disc selector keys (DISC1 – DISC5) / Indicator (CD-206/
DPF-R6010
Press to select the disc to be played.
only)
0
8 DISC SKIP key 9
Press to rotate the disc tray or to select the disc.
9 Open/Close key (0) 9
Opens and closes the disc tray.
0 RANDOM key &
Press to play the tracks in a random order.
! REPEAT key *
Press to play the tracks repeatedly.
@ TIME DISP. key ^
Press to switch the time indication mode.
# Disc tray 9
Load the disc to be played back.
$ Search keys (1,¡) !
Fast forwards or fast reverses the track.
% EDIT mode key )
Press to select the edit mode.
^ STOP key (7) 0
& PHONES jack (CD-206/204/ DPF-R6010/R4010 only)5
Use to connect (optional) headphones.
* PLAY/PAUSE key (6) 0
Each time the key is pressed, playback and pause switch
each other.
Downloaded from:
Page 8
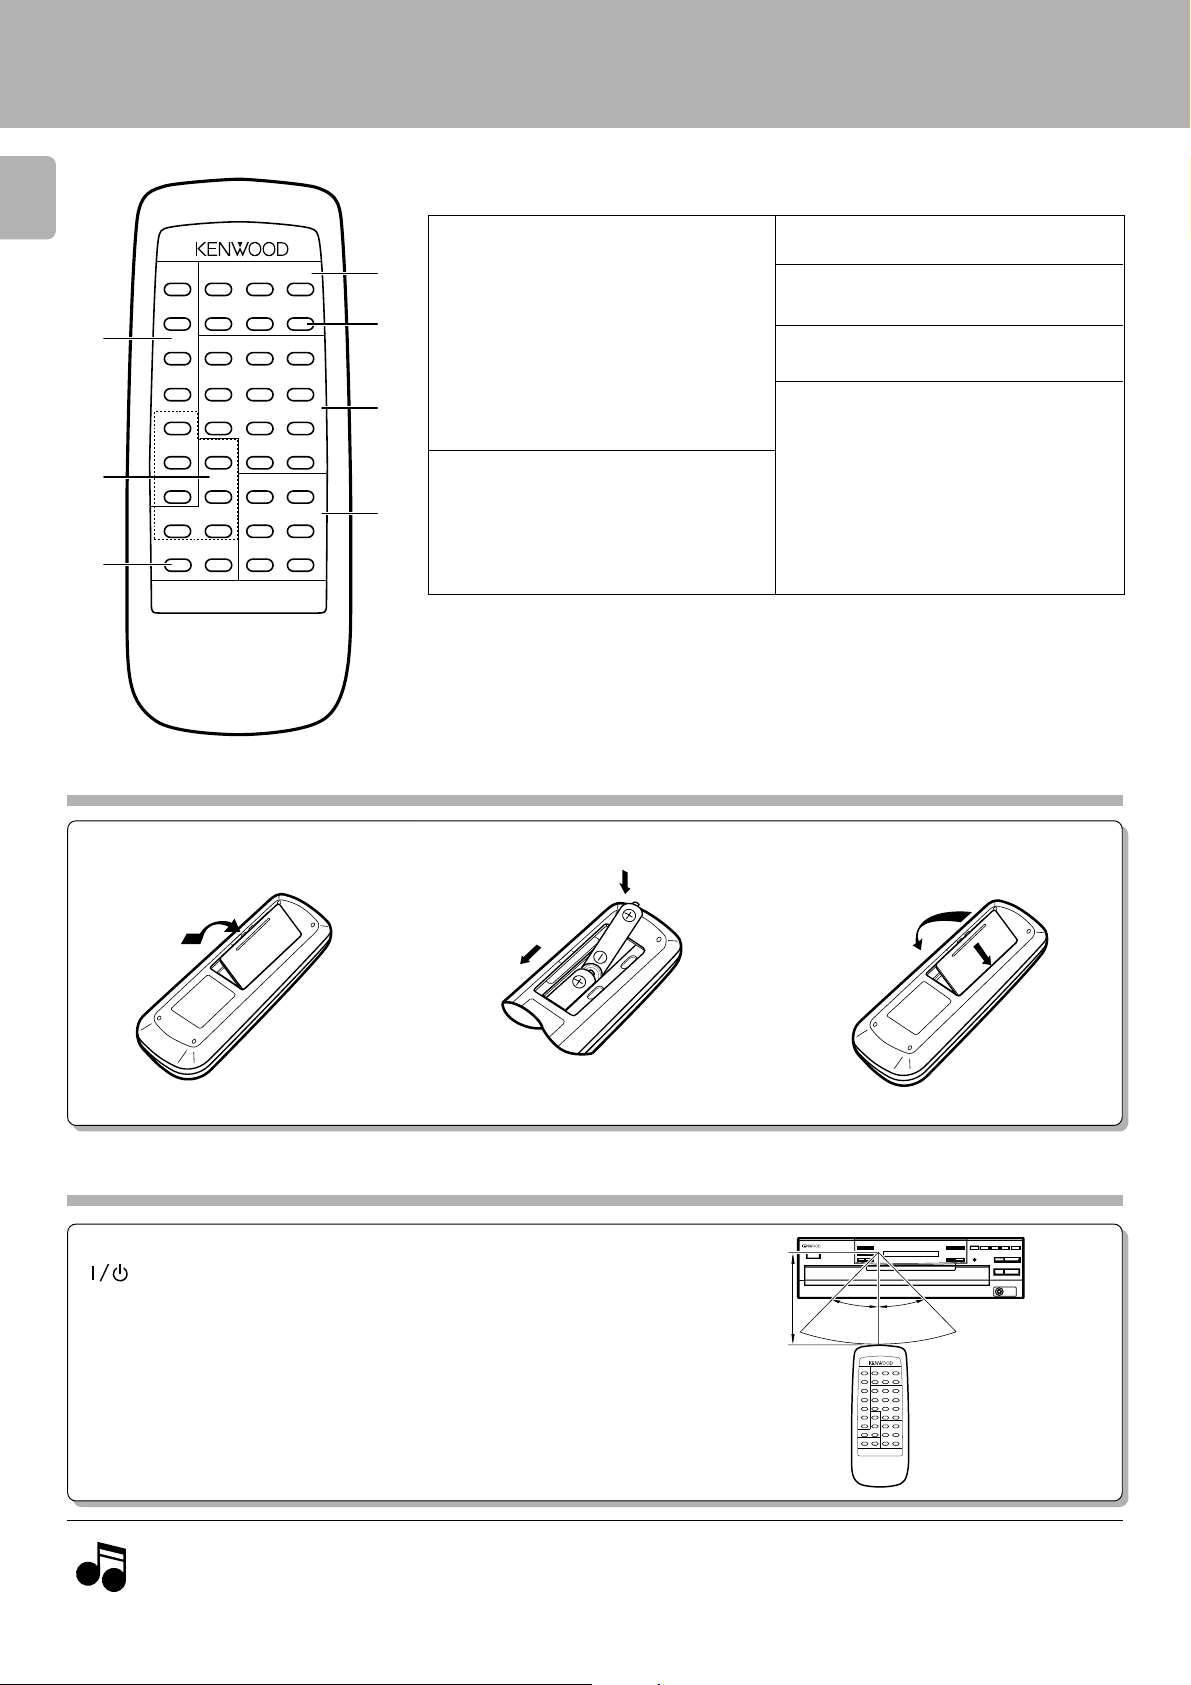
Operation of remote control unit
The illustration shows the RC-P0601.
8
The keys with the same name as those on the main unit operate the same way a s on the main unit.
The keys marked * are provided only on the remote control unit.
(Except for CD-203/DPF-R3010)
CD-206 / 204 / 2 03/ DPF-R601 0 / R4010/ R301 0 (En)
DISC SELECTOR
12
4
5
12
45
TEXT
DISPLAY
0 +10
7
TITLE
SEARCH
4
OUTPUT
REMOTE CONTROL UNIT
1
RC-P06 01
3
DISC SKIP
3
6
9
6
¢
¡
1
2
3
RANDOM
REPEAT
P.M ODE
TIME
DISPLAY
EDIT 7 8
CHECK
CLEAR ALL INFO.
ALL TEXT
SEARCH
DOWN UP
Loading batteries
1 Program-related and other keys
RANDOM key &
4
REPEAT key *
P.MODE key $
5
TIME DISPLAY key ^
EDIT key )
* CHECK key (CD-206/DPF-R6010
only) %™
6
* CLEAR key (CD-206/DPF-R6010
only) ^™
2 Selector keys relating to text infor-
mation
7
* ALL TEXT SEARCH key 9
TEXT DISPLAY key #
ALL INFO. key #
* TITLE SEARCH key @
CD-206/DPF-R6010 :
M odel:RC-P0601
Infrared ray system
(
CD-206/DPF-R6010 only)
CD-204/DPF-R4010 :
M odel:RC-P0504
Infrared ray system
* 3 OUTPUT (DOWN, UP) key 5
4 DISC SELECTOR keys 0
11
1 ~
11
90
))
00
),
0)
))
00
5 DISC SKIP key
*6 Numeric keys (
!
7 Basic function keys
Stop key (7) 0
Play/Pause key (6) 0
Skip (4,¢) keys !
Search keys (1,¡) !
1 Remove t he cover. 2 Insert batteries. 3 Close the cover.
2
1
÷ Insert two AA-size (R6) batteries as
indicated by the polarity marking.
2
Operation
After plugging in the power cord, press the ON/ST ANDBY ( P OWER/
) switch of the main unit to turn the unit ON. When the unit is
turned ON, press the key of the function to be operated.
÷ When pressing more than one remote control key successively, press
the keys securely by leaving an interva l of 1 second or more between
keys.
Remot e co n trol
light s e n s or
30°6m30°
REMOTE CONTROL UNIT
RC-P0601
Operating range
(Approx.)
1
1. The supplied batteries are intended for use in operation checks. Therefore, their lives may be shorter than ordinary batteries.
2. When the remote-controllable distance gets shorter than before, replace both batteries with new ones.
Notes
Notes
3. Malfunction may occur if direct sunlight or the light of a high-frequency lighting fluorescent lamp enters the remote control light sensor. In
such a case, change the system installation position to prevent the malfunction.
Page 9
IDCSRAEIDGN
1D:CDETTX
«
Preparing to Play Tracks
109876
54321
54321
TRACK NO.
01 0 00:1
SINGLE
TOTAL
DISC
NO.
CD-206 / 204 / 2 03/ DPF-R601 0 / R4010/ R301 0 (En)
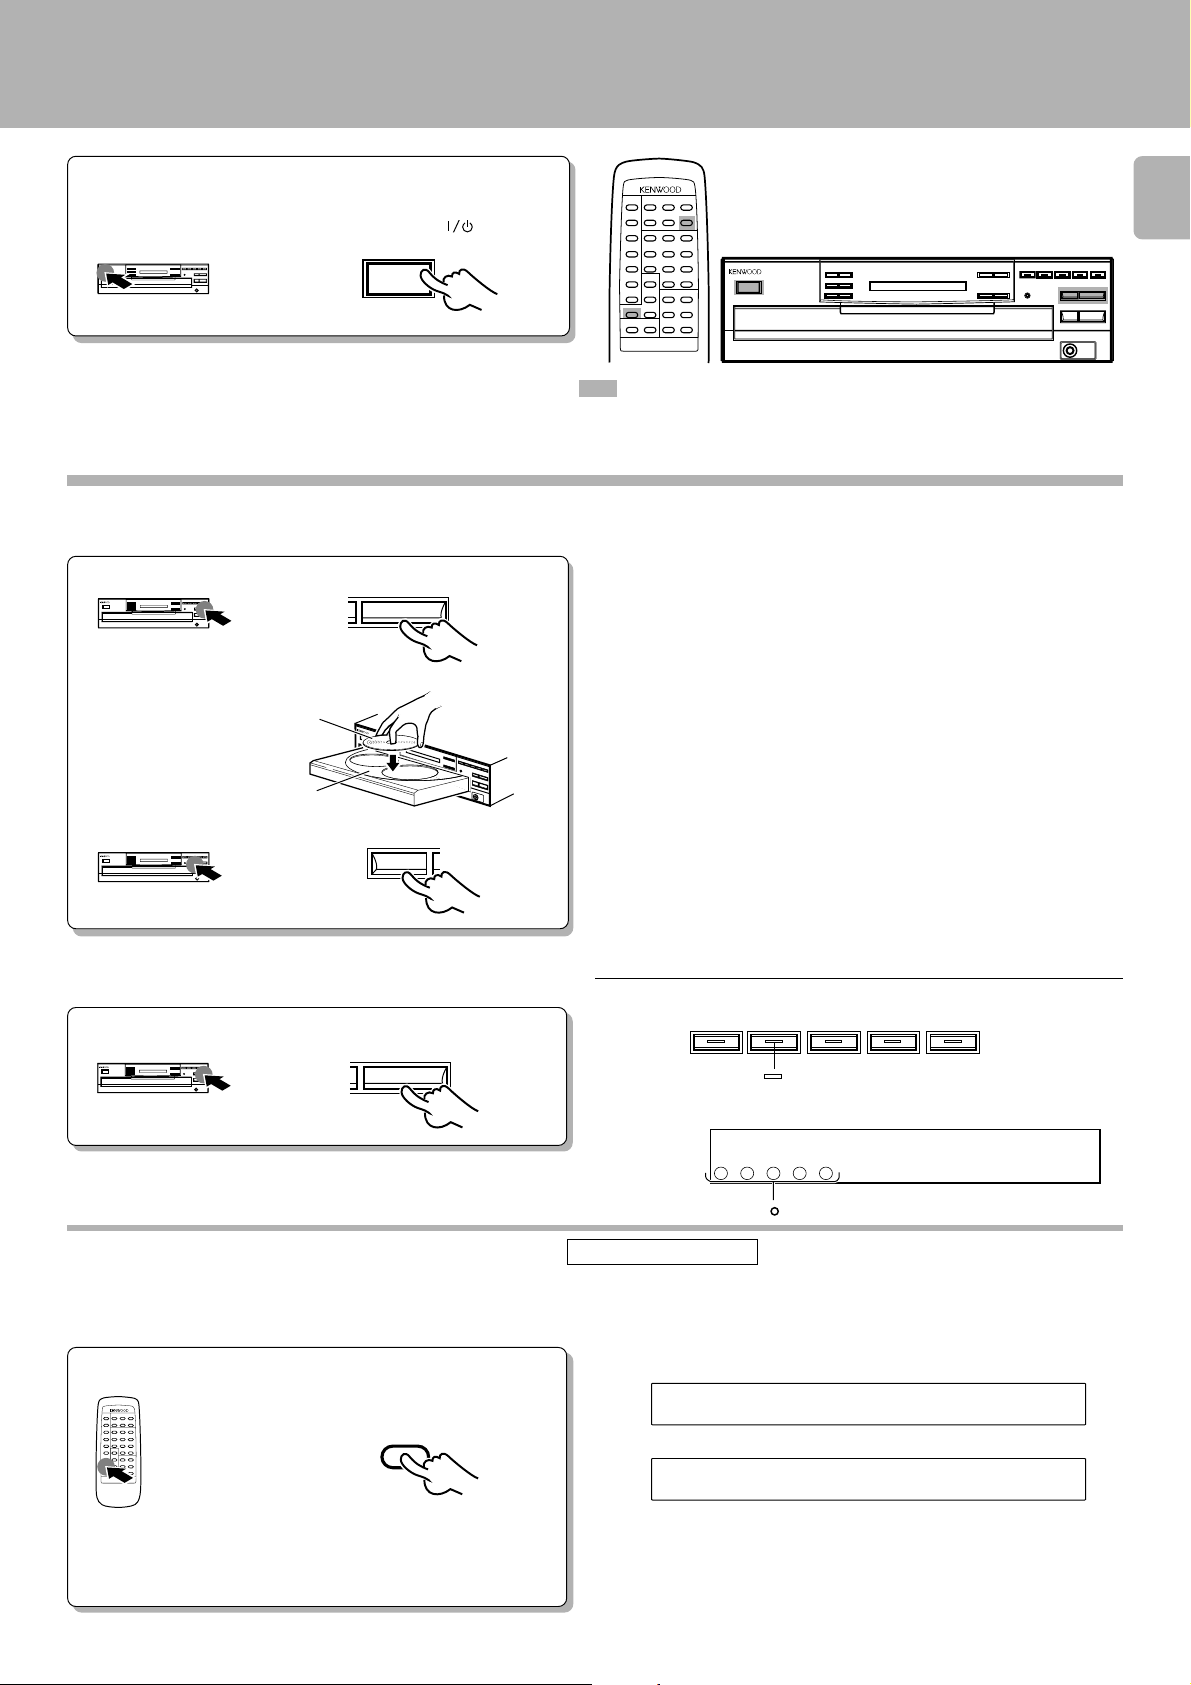
Preparation
Press the ON/ STANDBY (POWER / )key.
• Turn the unit ON.
POWER
-ON –STANDBY
Loading/unloading discs
Load/unload a disc.
1
Open the tray.
1
0
Place/remove a disc.
2
Label side
Disc tray
When loading or unloading other discs
3
Hereafter t he illustrat ion of t he comm on part s
on the front panel is of CD-206/DPF-R6010.
REMOTE CONTROL UNIT
RC-P060 1
: Keys and controls used in the operation s d es c rib e d o n this page.
÷ Do not touch the played side of disc.
÷ Loading two disc s toget h er will cause malfunct io n in g.
÷ Place the disc properly a long the groove on the tray. (If the disc is not
placed horizontally, malfu n ction will result.)
÷ A single CD (8 cm disc ) can also be played.
÷ Ordinary CD single (8 cm) disc adapters sold in audio stores cannot be
used wit h this unit.
9
Close the tray.
2
DISC SKIP
0
÷ Whe n loading/unloading a disc w hile t he tray rot ates, a malf unction
might occur. Load/unload th e d isc wh en the t ray does no t rotat e .
CD-206/DPF-R6010
DISC 1 DISC 2 DISC 3 DISC 4 DISC 5
All DISC indicators "
" light regardless of how many discs are present.
CD-204/203/DPF-R4010/R3010
ALL TEXT SEARCH (CD-206/DPF-R6010 only)
All DISC indicators "
Remote control unit only
" light regardless of how many discs are present.
For most CD-TEXT discs, it is convenient to read the complete disc information into the CD player before playing the disc.
This allows text information such as TITLE SEARCH, TEXT DISPLAY, ALL INFO., and other messages to be displayed faster.
Search in progress or reading information
After loading all the discs, operate in stop mode.
ALL TEXT
SEARCH
Blinks.
REMOTE CONTROL UNIT
RC-P0601
÷ The information read into the CD player is cleared when
the t ray is opened. Therefore, p erf orm th is operation
again if the tray was opened.
When the disc is CD-TEXT
÷ Repeat the above pro ce du re s o that t h e co mplete disc info rmation is
read into the CD player.
÷ In the case of a non-C D-T EX T disc, the ”D1 : NO CD TEXT“ display will
appear for approx. 3 seconds.
Page 10

10:132
Normal play (TRACK mode)
Use the following procedure to play a CD in the original order
of tracks from track No. 1.
10
REMOTE CONTROL UNIT
RC-P060 1
: Keys and controls used in the operation s de s cr ib e d on this page.
Playing tracks in order from track No. 1
Check that the unit is in the normal play TRACK
1
mode. !
Start playback.
2
Select the disc.
DISC 1 DISC 2 DISC 3 DISC 4 DISC 5
CD-206/DPF-R6010
If t here is no disc in t he selected disc t ray, the corresponding
indicator "
DISC 1 DISC 2 DISC 3 DISC 4 DISC 5
CD-206 / 204 / 2 03/ DPF-R601 0 / R4010/ R301 0 (En)
Hereafter t he illustrat ion of t he comm on part s
on the front panel is of CD-206/DPF-R6010.
" goes off .
or
DISC SKIP
Blinks during playback.
CD-204/203/DPF-R4010/R3010
If t here is no d isc in th e select ed disc t ray, the correspon ding
indicator "
÷ Playback starts from the d is c se le c ted in order of the DI SC No.
÷ When the 3/ 8 key is pressed without selecting a disc, playback starts
from the in d ic ate d D ISC No.
" goes off .
REPEAT
DISC
TRACK NO.
NO.
54321
1
SINGLE
TOTAL
01 2 18:
54321
109876
CD-206/DPF -R6010
Lights u p.
Track NO. being
played
÷ In the case of a CD- T E XT disc, the disc’s title is scrolled on the display.
What is then displa yed is in accordance with the TEXT DISPLAY mode.
Elapsed time of track being played
#
CD-204/203/DPF-R 4010/R3010
54321
109876
Disc indicator
during Playback (∞)
REPEAT
DISC
TRACK NO.
NO.
54321
01 2 18:
1
Track NO. being
played
SINGLE
TOTAL
Elapsed time of track being played
CD-206/DPF-R6010
6
Lights u p.
8
CD-204/203/DPF-R4010/R3010
÷ Each press p auses and plays the CD alternat e ly .
To stop playbackTo pause playback
10
7
54321
Page 11

Playback from desired track
FILE
RANDOM
GP0M1 DETI NRMD
PGM
PGM
54321
MULTI
EDIT
54321
54321
Select the disc.
1
DISC 1 DISC 2 DISC 3 DISC 4 DISC 5
Select the desired track No.
2
Main unit Remote c o n trol unit
4¢
12
45
78
0 +10
3
6
9
Normal play (TRACK mode)
CD-206 / 204 / 2 03/ DPF-R601 0 / R4010/ R301 0 (En)
11
Press the numeric keys as shown below....
To enter track No. 23 : 003
To enter track No. 40 : 0000)
÷ Playback st arts f rom t he selected t rack and continue s on t he subse-
quent tracks.
Skipping tracks
To skip
backward
4¢
To skip
forward
÷ The track in the direction of the pressed key is skipped, and the selected
track will be played from the beginning.
÷ Whe n t he 4 key is pr essed o nce durin g playback, the track being
played will be played from the b eg in n in g.
Searching
Backward
search
1¡
Forward
search
÷ Playback starts from the p o si tion where the key is released.
What is the “normal play TRACK mode”?
The normal play TRACK mode refers to the state in which the PGM, EDIT and RANDOM mode displays are off.
To set the unit to the TRACK mode:
Press the P.MODE key when the ”PGM“ or ”EDIT“ display is lighted.
Press the RANDOM key when the ”RNDM“ display is lighted.
CD-206/DPF-R6010
Goes off.
Goes off.
Goes off.
P.M ODE
Downloaded from:
RANDOM
CD-204/203/DPF-R4010/R3010
Goes off. Goes off.Goes off.
Page 12

TTIELXZY
20:132
1D01ITLTE BAC
Searching for tracks by title (TITLE SEARCH)
1D02ITLTE YXZ
In the case of a CD-TEXT disc, the tracks to be heard can be
searched by title.
12
Preparation
1
÷ Load a disc (CD-TEXT support ) in the CD
player.
÷ Check that the unit is in the norm al play
TRACK mode.
÷ Press the ALL TEXT SEARCH key. 9
Press the TITLE SEARCH key.
REMOTE CONTROL UNIT
RC-P0601
To stop the search, pres s the
TITLE SEARCH key again.
TITLE
SEARCH
!
REMOTE CONTROL UNIT
RC-P060 1
: Keys and controls used in the operation s d es c rib e d o n this page.
÷ W hen n o CD-TEXT discs are loaded, t he ”NO CD TEXT“ d isplay will
appear for approx. 3 seconds.
Hereafter t he illustrat ion of t he comm on part s
on the front panel is of CD-206/DPF-R6010.
Blinks.
(CD-206/DPF-R6010 only)
CD-206 / 204 / 2 03/ DPF-R6010 / R4 010 / R3 0 10 (En)
Track title
Select the name of the track (title) to be heard.
2
REMOTE CONTROL UNIT
RC-P0601
Start playback.
3
REMOTE CONTROL UNIT
RC-P0601
The track number skips
backward.
4
¢
The track number
skips fo rward.
6
Display scrolling
If no keys are operated for more than a second, the track title is scrolled
on the display.
|
The letters move toward the left.
Track NO. being played
÷What is displayed w ill dif f er depend ing on t he it em w hich has been
select e d by TEXT DISPLAY. #
Elapsed time of track being played
Some t rack titles contain so much text information that the full
titles will not fit on the dis play. In cas es like this, the letters on the
display move from right to left so that the non-visible part of the
tit le is revealed. This type of display movement is known as
“scrolling display.”
Display example
01CA
BCDEFGHIJKL
01LM N O P Q ...
MNOPQ...
|
Scroll display
Page 13

Displays
(CD-206/DPF-R6010 only)
CD-206 / 204 / 2 03/ DPF-R6010 / R4 010 / R3 0 10 (En)
REMOTE CONTROL UNIT
: Keys and controls used in the operation s d es c rib e d o n this page.
Selecting the text information display (TEXT DISPLAY)
In the case of a CD-TEXT disc, the displays shown below can
be selected.
TEXT
DISPLAY
REMOTE CONTROL UNIT
RC-P0601
In the stop mode
÷ If the key is relea sed while 2 ”Disc Artist“ is displayed, 1 ”Dis c Title“
return s to th e d is pl ay.
Hereafter t he illustrat ion of t he comm on part s
on the front panel is of CD-206/DPF-R6010.
RC-P060 1
When t he key is pressed once, the 1 “Disc
Title” is scrolled on the display; w hen it is
pressed repeatedly, the display is changed.
(This operation cannot be performed in t he
PGM mode.)
1 Disc Tit le : Disc title
2 Disc Artist : Singer (or perf o rmer)
3 TIME : Disc No., track No., time display
13
iDcsTtiel:AB
Scroll display
|
:ACBED.F..
÷ When there is no text information to be displayed “– – – – –” is scrolled
on the display.
÷ In the case of a non-CD-TEXT disc, the ”NO CD TEXT“ display will
appear for approx. 3 seconds.
In the play mode
1 Track Title :Track title
2 Track Artist :Singer (or performer)
3 Disc Title :Disc title
4 Disc Artist :Singer (or perform e r )
5 TIME :Track No., time disp lay
÷ If the key is released at any point while 2 ”Trac k Artist“ to 4 ”Disc
Artist“ is displayed, 1 ”Track Title“ returns to th e di sp lay.
When the key is pressed once, the 1 “Track
Title” is scrolled on the display; w hen it is
pressed repeatedly, the display is changed.
Displaying all the text information (ALL INFO.)
In the case of a C D-TE XT disc , the text information shown below is dis played automatically during normal play (TRAC K mode).
Each item is displayed in turn each time the key is pressed.
When t he key is repeatedly pressed w hile an item is being dis-
ALL INFO.
REMOTE CONTROL UNIT
RC-P0601
Scroll display
|
rAargnre:ACBD
To skip to the next track w hile the items are being displayed:
Press the ¢ key.
played, the display is forcibly moved to the next item.
1 Disc/Track Title : Disc and track titl es
2 Disc/ Track Artist : Singer (or perf o r mer)
3 Disc/ Track Songwriter : Songwriter
4 Disc/Track Composer : Composer
5 Disc/ Track Arranger : Arranger
6 Disc/Track Message : Message fro m sponsor or art i st
7 ID INFO. : Record com p any, release date, etc.
8 Genre IN FO. : Genre information
9 ALL INFO. END : (Release)
÷ The display can be returned to a previous ite m by pressin g the 4
key.
Downloaded from:
÷ Ite ms f ro m 1 t o 6 are displayed in the sequence of disc and track.
÷ When there is no text information to be displayed “– – – – –” is scrolled
on the d is p lay.
÷ In th e case of a non-CD-TEXT disc, the ” N O CD TEXT“ display w ill
appear for approx. 3 seconds.
Page 14

Programmed play (PGM mode)
GP0M1 IDCS?
GP0M1 1DTON?.?
Use the following procedure to program desired tracks in a
desired order. (up to 32 tracks)
14
Preparation
÷ Load a disc in the CD player.
CD-206 / 204 / 2 03/ DPF-R6010 / R4 010 / R3 0 10 (En)
Hereafter t he illustrat ion of t he comm on part s
on the front panel is of CD-206/DPF-R6010.
REMOTE CONTROL UNIT
RC-P060 1
: Keys and controls used in the operation s d es c rib e d o n this page.
Press so that the “PGM” indicator lights.
1
Do this operation in the stop mode.
P.M ODE
Program desired tracks.
2
Select the disc.
1
DISC 1 DISC 2 DISC 3 DISC 4 DISC 5
Go to step 2 within 8 seconds.
Select the desired track No.
2
Main unit Remote c o n trol unit
4¢
12
45
78
0 +10
3
6
9
CD-206/DPF-R6010
Blinks.
CD-204/203/DPF-R4010/R3010
Light up.
PGM
54321
In the case of a C D- TEXT disc, the disc title is scrolled on the display. (C D-206/
DPF-R6010 only)
Press the numeric keys as shown below....
To enter track No. 25 : 005
CD-206/DPF-R6010
GP0M1 1DTON2.5
«
GP0M1 BADCFEHG
In the case of a CD-TEXT disc, the track's title is scrolled on the display.
GP0M1 1DTON2.5
Go to step 3 within 8 seconds.
Set the entry.
3
P.M ODE
Repeat steps 1, 2 and 3 above.
4
Start playback.
3
6
CD-204/203/DPF-R4010/R3010
PGM
÷ Tracks can also be selected by pressing the 4 or ¢ key.
÷ Up t o 3 2 tracks can be programm ed . When “FULL” is disp layed, no
more tracks can be programm e d .
÷ If you make a mistake, press the CLEAR key and enter the track No.
from the b eg in n in g.
÷ When the 4 or ¢ key is pressed during pla yback, the track will be
skipped in the direction of the pressed button .
÷ When the 4 key is pressed once during playback, the play position
return s to th e b eg in n in g o f the c ur re n t track being p layed.
DISC
NO.
54321
1
REPEAT
TRACK NO.
25 P_ 01
Track number
5
Page 15

Programmed play (PGM mode)
CD-206 / 204 / 2 03/ DPF-R6010 / R4 010 / R3 0 10 (En)
To stop playback
7
To check or change the programmed tracks
Press the CHECK key.
1
CD-206/DPF-R6010
CHECK
REMOTE CONTROL UNIT
RC-P0601
CD-204/203/DPF-R4010/R3010
CHECK
Select the disc.
2
DISC 1 DISC 2 DISC 3 DISC 4 DISC 5
Press until the track
No. to be changed is
displayed.
Press until the track
No. to be changed is
displayed.
÷ The programm e d c o ntent s re main in memory.
CD-206/DPF-R6010
Blinks.
DGP0M1 5TON2.5
CD-204/203/DPF-R4010/R3010
REPEAT
DISC
TRACK NO.
NO.
25 P_ 01
5
÷ Perform only st e p 1 to simply check t h e p ro gr am .
÷ In the case of a CD- TE XT disc, the track's title is scrolled on the display.
(CD-206/DPF-R6010 only)
÷ Ea ch time the key is pressed, the program No. and the track No. on CD
are displayed.
Light up
P.C.
7
15
Select the new track No.
3
Main unit Remote c o n trol unit
4¢
Set the entry.
4
To add a track to the program
Select the disc.
1
2
DISC 1 DISC 2 DISC 3 DISC 4 DISC 5
Select the desired track No.
Main unit Remote con trol unit
4¢
12
45
78
P.M ODE
12
45
78
0 +10
3
6
9
3
6
9
Example
≠
÷ Press it while the “PGM 01” indicator blinks.(CD- 206/DPF- R6010 only)
÷
Press the key while the “P.C .” indicator is lit. (C D-204/203/DPF -R 4010/
R3010 only)
÷ The track being played cannot be c hanged.
÷ When a track No. is selected, the track will be added to the end of the
existin g p r og r am.
0 +10
Press the P.MODE key.
3
Page 16

To clear tracks from the program
16
CD-206/DPF-R6010
REMOTE CONTROL UNIT
RC-P0601
CD-204/203/DPF-R4010/R3010
To program all tracks on a disc (CD-204/203/DPF-R4010/R3010 only)
Press to clear tracks from the end.
CLEAR
CLEAR
To clear all tracks
P.M ODE
Pres s s o that the "PGM" indicator lights.
1
P.M ODE
÷ Ea ch time the key is pressed, the la st track in the program is clea red.
÷ The tracks which are programmed earlier than th e track being played
cannot be cleared.
÷ Selected tracks can be also completely cleared just by operating the 0
key.
÷ The entire pr og r am is c le ared.
Programmed play (PGM mode)
CD-206 / 204 / 2 03/ DPF-R6010 / R4 010 / R3 0 10 (En)
Select the desired disc.
2
DISC 1 DISC 2 DISC 3 DISC 4 DISC 5
Press the P. MODE key again.
3
P.M ODE
Auto space function
During programm ing of tracks, a non-recorded space of a few
sec onds will be automatically created between tracks . By rec ording tracks with these spaces on tape, the search and repeat play
operations of tape using the DPSS function (w hich w orks by
searching the non-recorded spaces) can be performed reliably.
Time display on CD player (TIM E DISP.)
Each press of the TIME DISP. (TIME DISPLAY) key changes
the displayed contents.
Do this operation in the play mode.
TIME DISP.
ALL indicator lights up.
ALL
54321
109876
P_ 01
÷ Even w h en the perf or mances of t wo tracks are continuous (which
occurs w it h classical or live r ecording mu sic), the spaces w ill be
created if they have different track Nos.
CD-206/DPF-R6010
1 1:23 : Elapsed time o f track being p layed
2 -2:23 : Remaining time of track being played
3 23:45T : Elapsed tim e o f ent ir e d isc (T lights up.)
4 -36:25T : Remaining time on entire disc (T lights up. )
CD-204/203/DPF-R4010/R3010
1 1:23 : Elapsed time of track being played ( SINGLE lights up.)
2 -2:23 : Remaining time of track being played (SINGLE lights
up.)
3 23:45 : Elapsed time of ent i re d is c (TOTAL lights up.)
4 -36:25 : Remaining t ime on entire disc (TOTAL lights up.)
÷ Only the display 1 and 2 will be displayed in PGM, RANDOM and EDIT
modes.
Page 17

<<><E<21>><>>
NRMD005
«
Playback in a random order (Random playback)
CD-206 / 204 / 2 03/ DPF-R6010 / R4 010 / R3 0 10 (En)
As tracks are s elec ted at random, you can enjoy listening to
for a long time.
Preparation
™
Check that the unit is in the normal play TRACK
1
÷ Load a disc in the CD player.
mode. !
Press the RANDOM key.
2
REMOTE CONTROL UNIT
RC-P060 1
: Keys and controls used in the operation s de s cr ib e d on this page.
CD-206/DPF-R6010
During t rack selection: ” >“ and ”<“ move f ro m the o utside t o the
inside.
Hereafter t he illustrat ion of t he comm on part s
on the front panel is of CD-206/DPF-R6010.
17
RANDOM
To select another track in the middle of play-
ing one
The number here changes.
In case track No. 5 is selected
CD-204/203/DPF-R4010/R3010
During random track selection
To select another track during random play
FILE
RANDOM
FILE
RANDOM
REPEAT
DISC
TRACK NO.
NO.
54321
4
REPEAT
DISC
TRACK NO.
NO.
54321
4
SINGLE
TOTAL
SINGLE
TOTAL
05 0 12:
÷ Each time a track ends, the same operation as above is repeated, and
the track selected n ex t is played.
÷ Random play stops after all of the tune s h ave been pl ayed once.
÷ The random playback can also be repeat ed by pr essing the REPEAT
key.
Blinks
54321
109876
151 413121 1
201 918171 6
5
To cancel random playback
4¢
÷ Pressing the 4 key once returns to the beginning of the track being
played.
RANDOM
÷ Press the RANDOM key to start n or mal playback.
Page 18

Repeated playback
GP0M1 IDCS?
EREPTAON
REPEAT
TRACK NO.
DISC
NO.
PGM
54321
01
3
CD-206 / 204 / 2 03/ DPF-R601 0 / R4010/ R301 0 (En)
Preparation
÷ Load a disc in the CD player.
18
™
To repeat only the programmed tracks
Press so that the “PGM” indicator
1
lights.
Select the disc.
2
DISC 1 DISC 2 DISC 3 DISC 4 DISC 5
Go to step 3 within 8 seconds.
P.M ODE
Hereafter t he illustrat ion of t he comm on part s
on the front panel is of CD-206/DPF-R6010.
REMOTE CONTROL UNIT
RC-P060 1
: Keys and controls used in the operation s de s cr ib e d on this page.
CD-206/DPF-R6010
CD-204/203/DPF-R4010/R3010
PGM indicator light up.
PGM
54321
Select the desired track number.
3
Main unit Remote con trol unit
4¢
12
45
78
3
6
9
0 +10
Go to step 4 within 8 seconds.
Set the entry.
4
P.M ODE
Repeat steps 2 – 4 above.
5
Press the REPEAT key.
6
REPEAT
For the CD-206/DPF-R6010
The current status is displayed when the key
is pressed once.
When it is pressed w hile t he status is dis played, the repeat ON status can be set to OFF
(or vice versa).
Start playback.
7
÷ All of the progr ammed tracks w ill b e re p eat e d .
÷ In case only one track is programmed, only that track will be repeated.
÷ Up t o 32 t r acks can be programm ed . W he n “ FULL” is displayed, no
more tracks can be programm e d .
CD-206/DPF-R6010
CD-204/203/DPF-R4010/R3010
REPEAT indicator light up.
6
Page 19

Repeated playback
REPEAT
TRACK NO.
DISC
NO.
PGM
54321
01
3
EREPTAON
REPEAT
TRACK NO.
DISC
NO.
PGM
54321
01
3
EREPTAOFF
REPEAT
TRACK NO.
DISC
NO.
PGM
54321
01
3
CD-206 / 204 / 2 03/ DPF-R6010 / R4 010 / R3 0 10 (En)
To repeat one of the discs (CD-204/203/DPF-R4010/R3010 only)
Press so that the “PGM” indicator
1
lights.
Select the disc.
2
3
4
5
DISC 1 DISC 2 DISC 3 DISC 4 DISC 5
Press the P.MODE key.
Press the REPEAT key.
Start playback.
P.M ODE
P.M ODE
REPEAT
6
19
PGM indicator light up.
PGM
54321
REPEAT indicator light up.
To repeat the entire disc
This allows repeated playback of all the t racks on the disc
loaded in the disc tray.
Press so that the “PGM” indicator
1
goes off.
P.M ODE
Press the REPEAT key.
2
REPEAT
For the CD-206/DPF-R6010
The current status is displayed when the key
is pressed once.
When it is pressed w hile t he status is displayed, the repe at ON stat us can be set t o
OFF (or vice versa).
Start playback.
3
6
CD-206/DPF-R6010
GP0M1
\
CD-204/203/DPF-R4010/R3010
PGM indicator goes off.
PGM
CD-206/DPF-R6010
CD-204/203/DPF-R4010/R3010
10
54321
REPEAT indicator light up.
To cancel repeated playback
Press the REPEAT key.
REPEAT
For the CD206/DPF-R6010
Press the REPEAT key once again.
(REPEAT ON \ OFF)
CD-206/DPF-R6010
CD-204/203/DPF-R4010/R3010
REPEAT indicator goes off.
Page 20

DETIDSI?C
Editing
DETIDSI3CC4-6
109876
54321
C_ 46
"46=54 =60=90 = - - "
=
The follow ing procedure allow s to record a CD w it hin t he
specified tape length so that no music is interrupted in the
middle at the ends of sides A and B.
20
Normal EDIT: Edit from one disc.
MULTI EDIT: Edit and record from several discs.
Preparation
÷ Load a disc in the CD player.
÷ Check that the unit is in the norm al play
TRACK mode. !
Normal EDIT
Light the “EDIT” indicator.
1
Do this operation in the stop mode.
EDIT
Go to step 2 within 8 seconds.
If more than 8 seconds have elapsed,
press the key again.
Select the disc.
2
CD-206 / 204 / 2 03/ DPF-R601 0 / R4010/ R301 0 (En)
Hereafter t he illustrat ion of t he comm on part s
on the front panel is of CD-206/DPF-R6010.
REMOTE CONTROL UNIT
RC-P060 1
: Keys and controls used in the operations described on this page.
CD-206/DPF-R6010
Blinks.
CD-204/203/DPF-R4010/R3010
Light up.
PGM
MULTI
EDIT
54321
DISC 1 DISC 2 DISC 3 DISC 4 DISC 5
Go to step 3 within 8 seconds.
Enter the recording time of the tape.
3
When using the numeric keys:
Main unit Remote c o n trol unit
4¢
«
EDIT
When using the TIME DISPLAY key:
Select the time.
1
TIME DISP.
12
45
78
0 +10
Set the entry.
2
EDIT
\
3
6
9
Press the numeric keys as shown below.
30-minute tape : 000)
46-minute tape : 00006
CD-206/DPF-R6010
CD-204/203/DPF-R4010/R3010
Blinks.
÷ The interval length can be adjusted with the skip keys 4 and ¢ in
units of one minute (to a maximum o f 99 minutes).
÷ If yo u comm it a m istake in t ime ent ry, press t he P.MODE key and
restart the procedur e from the beginning .
CD-206/DPF-R6010
÷ By pressing the TIME DISPLAY key the s et time-length i ntervals will
change in this o rd e r:
"46=54 =60=74 =90=??"
=
CD-204/203/DPF-R4010/R3010
÷ By pressing the TIME DISPLAY key the set time-length intervals will
change in this o rd e r:
÷ Aut o matic editing is executed for s id e A and side B,
Page 21

Several CDs can be edited and recorded on 1 tape.
Choose songs from each disc, and edit/ record w hile con-
firming the remaining time on files A and B, respectively.
Editing
CD-206 / 204 / 2 03/ DPF-R601 0 / R4010/ R301 0 (En)
Hereafter t he illustrat ion of t he comm on part s
on the front panel is of CD-206/DPF-R6010.
REMOTE CONTROL UNIT
RC-P060 1
: Keys and controls used in the operations described on this page.
21
M ULTI EDIT
Press so that the "MULTI EDIT " indicator light.
1
Enter the recording time of the tape.)
2
Select the desired track.
3
1
(Except for CD-206/DPF-R6010)
Do this operation in the stop mode.
EDIT
Press twice
Select the disc (one disc only).
DISC 1 DISC 2 DISC 3 DISC 4 DISC 5
Select the tracks to be recorded.
2
Main unit Remote c o n trol unit
4¢
«
P.M ODE
12
45
78
0 +10
3
6
9
Light up.
PGM
÷ If y ou made a mistake, press the CLEAR key and select t he co rre ct
track.
÷ The time remaining on sid e A o r si de B is in d ic ate d o n the display.
÷ When the time left on side A is less than the play time of the selected
song, t h at s o ng will b e p ro g rammed on si de B .
÷ If “FULL” is d is p layed, no furth e r p r og ramming can be accept ed .
MULTI
DISC
EDIT
NO.
54321
Start recording.
4
When recording with a cassette deck equipped with CCRS
function:
Press the CCRS key (Cassette deck).
When recording with a normal cassette deck:
Adjust the recording levels.
1
2 Press the record key.
Play the CD.
3
Repeat step 3,4 above.
5
÷ With th e CCRS fu n c tion, t h e re c o rd in g starts after about 1 minute.
÷ If yo u have a cassette de ck capable of Double -speed recording, us e
Norm al-speed recording.
÷ Change discs and, if the “b-01” indication is given when you first select
a song, turn the tape to the start of si de B.
Page 22

To check the edited contents
22
CD-206/DPF-R6010
Editing
CD-206 / 204 / 2 03/ DPF-R601 0 / R4010/ R301 0 (En)
CD-206/DPF-R6010
CHECK
REMOTE CONTROL UNIT
RC-P0601
CD-204/203/DPF-R4010/R3010
CHECK
Playing or recording the edited contents
6
DETIA01
÷ When the CHEC K key is pressed, track numbers and remaining time in
the file A are displayed first, th en those in the file B .
CD-204/203/DPF-R4010/R3010
P.C. indicator light up.
DISC
NO.
TRACK NO.
AFILE
4
P.C.
During normal EDIT:
÷ When the CHEC K key is pressed, the tra ck Nos. of edited songs will
autom at ic ally be disp layed in the order they are edited.
During MULTI EDIT:
÷ Every time the C HE C K key is pressed, the track Nos. are displayed in
the ed ited order.
When recording the edited content onto a tape, it is rec ommended
to use the synchro recording or CCRS recording function of
KENWOOD cassette decks.
÷ Do not adjust the output level from this unit particularly during record-
ing.
÷ For details, see the instruc tion manual of the cassette deck.
5
To clear the edited contents
During Normal EDIT:
Press any one of these keys.
Main unit Remote control un i t
CLEAR
Do this operation in the stop mode.
During MULTI EDIT:
P.M ODE
(C D-206/DPF- R6010 only)
CLEAR
0
P.M ODE
Press the 6 key to start playback according to t he edite d
Note
Note
content. The playback pauses at t he beginning of the track
edited for tape side B . Press t he 6 key again to cont inue
playback.
÷ The edit e d d at a is cleared entirely.
1. While you can edit with a different time setting to that of the tape you are using, part of the tape may be left with nothing recorded on it, or the
Notes
Notes
last track on side A or side B may be cut short.
2. The EDIT function may not operate properly for discs having only one track or having tracks of long duration such as classical music.
Page 23

Timer operations
Timer playback of CD can be started at any t im e using an
audio timer which is available in audio stores.
CD-206 / 204 / 2 03/ DPF-R601 0 / R4010/ R301 0 (En)
This unit
23
Preparation
÷ Connect the power cords of the associated
components so that their power can be
turned ON through the audio timer.
(Also, be sure t o read carefully the inst ruction manual of the timer.)
Turn the pow ers of the associated components
1
ON.
Preparation
2
Load a disc in the CD player. 9
Label side
Set the amplifier volume.
3
System control cord Audio cord
Amplifier
12:00
Audio timer
÷ If t he am plif ier is not connect ed t o t he CD player throu gh a system
contro l co r d, s el ec t the "CD" input with the input s e le ctor.
To wall AC outlet
Play the disc.
1
Adjust the amplifier volume.
2
(Use the remote control unit (Exc ept CD203/DPF-R 3010) of this unit to adjust the
volume to the maximum level.)
Stop the disc.
3
Set the timer ON time.
4
Set the timer so that it supplies
power at the specified time.
Turn OFF the pow er output from the audio
5
timer.
6
Adjusting the volume:
Set t he volume t he maxim um (0 dB) using the OUTPUT
Note
Note
(UP) key on the rem ote control unit (Except CD-203/ DPFR3010) , and adjust the volume to the desired level on the
amplifier side.
(S ince the sound output is at the maximum level when the power
is turned on, lowering the level with the remote control unit will
change the volume.)
7
÷ With some audio timer models, the power is automatically turned OFF
when the timer ON time is set. With such a model, skip step 5 below.
÷ Do not touch the ON/ STANDBY (POWER/
amplif ie r and CD player.
÷ W he n the set time come s, the disc playback starts automatically.
) switches of the
1. Some amplifiers cannot be used with a timer. Before using a amplifier, check it.
Notes
Notes
2. When operating the unit other than CD player using an audio timer, be sure to remove the disc from the CD player.
Page 24

M aintenance
NO IDCS
24
Disc handling precautions
Handling
Hold com pact discs s o t hat you do
not touch the playing surface.
CD-206 / 204 / 2 03/ DPF-R601 0 / R4010/ R301 0 (En)
Discs w hich can be played w ith this unit
CD (12 cm, 8 cm) (CD-TEXT support), CDV (only the audio part)
÷ With CD-G (CD Graphics) discs, this unit can play only the audio part.
Label side
Playing side
Sticker
Sticky paste
÷ Do not attach pa per or tape to either
the pl aying side or the label side of
compact discs.
÷ The paste lef t on t he label surface
after a sticker has been peeled off is
a factor which may cause malfunction. I f t he su rface is st icky du e to
remaining paste, be sure to clean it
with alcohol before use.
Cleaning
If f i ngerpri nt s o r f ore ign matte r become attached to the disc, lightly
wipe the disc with a soft cotton cloth
(or similar) from the cent er of t he
disc outwards, in a radial manner.
Storage
When a disc is not to be played for a
long period of time, remove it from
the CD player and store it in its case.
Cleaning
Do not use volatile solvents such as alcohol, paint thinner, gasoline, or
benzine, etc. to clean the cabinet. Use a clean dry cloth.
Do not use contact cleaners because it could cause a malfunction. Be
specially careful against contact cleaners containing oil, for t hey may
deform the plastic components.
Never play a cracked or w arped disc.
During playback, the disc rotates at high speed in the player.
Therefore, to avoid danger, never use a cracked or deformed disc or a disc
repaired with tape or adhesive agent.
Please do no t use discs which are not round because t hey may cause a
malfu nction.
CD accessories
The CD accessories (stabilizer, prot ection sheet, protect ion ring, etc.)
which are marketed for improving the sound quality or protecting discs as
well as the disc cleaner should not be used with this system because they
may cause malfunction.
Note related to transportation and movement
Before transporting or moving this unit, carry out the following
operations.
1. Turn the unit ON but do not load a disc.
2. Wait a few seconds and verify that the display s hown appears.
Caution on condensation
Condensation (of dew) may occur inside the unit when there is a great
difference in temper atu r e be tween t h is u n it and the outside.
This unit m ay not f unct ion properly if con densation occur s. In th is
case, leave the unit for a few hours with the power left ON, and restart
the op e rat io n af ter t h e co n d en s at io n has dried up .
Be s pec ially cautious agains t condens ation in a following
circ umstance:
When this unit is carried f rom a place to another across a large
difference in tempera ture, when the humidity in the room where this
unit is i ns talled increases, etc.
CD-206/DPF-R6010
CD-204/203/DPF-R4010/R3010
54321
109876
54321
no dI SC
3. Press the 0 OP EN/ CLOSE key to open the disc tray completely.
4. Press the 0 OPEN/CLOSE key again to close the tray.
5. Wait a few seconds and set the unit to STANDBY mode.
151 4131 211
201 9181 716
Downloaded from:
Page 25

In case of difficulty
CD-206 / 204 / 2 03/ DPF-R601 0 / R4010/ R301 0 (En)
What appears to be a malfunction may not always be serious . If your unit should not perform as expected, cons ult the table
below to see if the problem can be corrected before seeking help from your dealer or service representative.
Operation to reset
25
The microcomputer may malfunction (impos s ibility to operate,
erroneous display, etc.) when the connection cords are unplugged while the unit is ON or due to an external fac tor. In this
cas e, exec ute the following method to reset the microc omputer
and return it to normal condition.
CD player unit
Symptom Cause Remedy
The unit is not turned ON with the ON/
STANDBY (POWER/
There is no s ound even when a dis c is loaded.
) switch ON.
÷ Power plug is loosely connected.
÷ With the power plug connected to the switched
AC outlet of an amplifier, t he power of the
amplifier is turned off.
÷ Disc is loaded upside down.
÷ Disc is loose.
÷ Disc is dirty.
÷ Disc is cracked.
÷ Condensation has occurred on the optical lens
unit.
÷ Play mode is not entered.
÷ The connection cords are inserted loosely.
÷ Output level is attenuated too low.
Unplug t he pow er cord from the pow er socket and plug the
power cord into the socket again.
÷ Please be aware th at reset ting t he CD player w ill erase all stored
information and return it to the factory settings.
÷ Insert the power plug firmly to the AC outlet.
÷ Turn the amplifier’s power ON.
÷ Load the disc again with its label side up.
÷ Insert disc properly.
÷ W ipe of f t he dust on the surface of the di sc
referring to “ Disc handling precautions” .
÷ Replace the disc with a new one.
÷ Remove any condensation from the unit by
referr ing to t he sect ion ent itled, “ Caution on
condensation” . ¢
÷ Press the 6 key.
÷ Connect all connection cords firmly.
÷ Adjust t h e out put level wit h OU TPUT key on
the remote control unit. 5
¢
Music is interrupted. (Sound is skipped.)
Play begins as soon as the unit is turned ON.
÷ Disc is too dirty.
÷ Disc is cracked.
÷ Oscillation is applied to this unit.
÷ This unit is d e sig n ed s o that play begins auto-
matica lly when the unit is turned ON if a disc is
already loaded.
Remote control unit
Symptom Cause Remedy
Remote control operation is not possible.
÷ Batteries are exhausted.
÷ The remote control unit is too far a way from the
main system, con trolling angle is t oo large, or
there is an obstacle in between.
For the U.S.A.
CAUTION:
Use of controls or adjustment or performance of procedures other than
those specified herein may result in hazardous radiation exposure.
In compliance with Federal Regula tions, following are reproductions of
labels on, or inside the product relating to laser product safety.
÷ Wipe off the dust on the disc surface referring
to “ Disc handling precautions” .
÷ Replace the disc with a new one.
÷ Try selecting a pla ce where no strong vibrations
occur by changing the installation place, etc.
÷ If automatic p lay is not required rem ove th e
disc f rom th e p layer before set ting th e u nit to
STANDBY mode.
÷ Replace with new batteries. 8
÷ Operate the remote control unit within the
controllable range.
KENWOOD CORPORATION
2967-3, ISHIKAWA-CHO, HACHIOJI-SHI,
TOKYO, JAPAN
KENWOOD CORP. CERTIFIES THIS EQUIPMENT
CONFORMS TO DHHS REGULATIONS NO. 21
CFR 1040.10, CHAPTER
I
, SUBCHAPTER J.
¢
8
Location: Back Panel
Page 26

Specifications
CD-206 / 204 / 2 03/ DPF-R601 0 / R4010/ R301 0 (En)
CD-206/DPF-R6010
26
[ Format ]
System .......................... Compact disc digit al audio system
Laser...................................................... Semiconductor laser
[ D/A Convertors ]
D/A Conversion ........................................... 1 Bit (D.R.I.V.E.)
Oversampling.................................................8 fs (352.8 kHz)
[ Audio ]
Frequency response .......................... 4 Hz – 20 kHz, ±0.5 dB
Signal to noise ratio ................................. More than 100 dB
Dynamic range ............................................ More than 95 dB
Total harmonic distortion + noise
.............................................. Less than 0.005% (at 1 kHz)
Wow & flutter .......................................Unmeasurable Limit
Output level/impedance
Variable ...............................................(Max.) 2 V/0.3 kΩ
Digital output
Coaxial....................................................0.5 V p-p / 75 Ω
Optical ........................................... –15 dBm – –21 dBm
(Wave length 660 nm)
Headphone output (Max.) .............................. 20 mW (32 Ω)
[ General ]
Power consumption ....................................................... 14 W
Dimensions ......................................... W: 440 mm (17-5/ 16")
H : 125 mm (4-15/16")
D : 397 mm (15-5/ 8")
Weight (Net)....................................................5.0 kg (11.0 lb)
CD-204/203/DPF-R4010/3010
[ Format ]
System .......................... Compact disc digital audio system
Laser...................................................... Semiconductor laser
[ D/A Convertors ]
D/A Conversion ............................................................... 1 Bit
Oversampling.................................................8 fs (352.8 kHz)
[ Audio ]
Frequency response .......................... 4 Hz – 20 kHz, ±0.5 dB
Signal to noise ratio ................................... More than 95 dB
Dynamic range ............................................ More than 95 dB
Total harmonic distortion + noise
............................................. Less than 0.008% (at 1 kHz)
Wow & flutter .......................................Unmeasurable Limit
Output level/impedance
Fixed (CD-203/DPF-R3010) ............................. 2 V/0.8 k Ω
Variable (CD-204/DPF-R4010) .............(Max.) 2 V/0.3 kΩ
Headphone output (Max.)
(CD-204/DPF-R4010 only)...........................20 mW (32 Ω)
[ General ]
Power consumption ....................................................... 13 W
Dimensions ......................................... W: 440 mm (17-5/ 16")
H : 125 mm (4-15/ 16")
D : 397 mm (15-5/8")
Weight (Net).................................................... 5.0 kg (11.0 lb)
1. KENWOOD follows a policy of continuous advancements in development. For this reason specifications may be cha nged without notice.
Notes
Notes
2. The full performance may not be exhibited in an extremely cold location (under a water-freezing temperature).
For the U.S.A.
FCC WARNING:
This equipment may genera te or use radio frequency energy. Changes or modifications to this equipment may ca use harmful interference unless the
modifications are expressly a pproved in the instruction manua l. T he user could lose the authority to operate this equipment if an unauthorized change
or modification is made.
NOTE:
This equipment has been tested and found to comply with the limits for a Cla ss B digital device, pursuant to Part 15 of the FCC R ules. These limits are
designed to provide reasonable protection against harmful interference in a residential installation. This equipment may cause ha rmful interference to
radio communications, if it is not installed a nd used in accordance with the instructions. However, there is no guarantee that interference will not occur
in a particular installation. If this equipment does cause harmful interference to radio or television reception, which can be determined by turning the
equipment off and on, the user is encouraged to try to correct the interference by one or more of the following measures:
– Reorient or relocate the receiving antenna.
– Increase the separation between the equipment and receiver.
– Connect the equipment into an outlet on a circuit different from that to which the receiver in connected.
– Consult the dealer or an experienced radio/TV technician for help.
Page 27

CD-206 / 204 / 2 03/ DPF-R601 0 / R4010/ R301 0 (En)
,
,
,
,
,
,
27
,,
,,
,,,
,,,
,,
,,
Page 28

28
CD-206 / 204 / 2 03/ DPF-R601 0 / R4010/ R301 0 (En)
For your records
Record the seri al number, foun d o n the back of the unit , in the spaces
designated on the warranty card, and in the space provided below. Refer
to the model and serial numbers whenever you call upon your dealer for
information or ser vic e o n this product.
Model Serial Number
Page 29

documentation manual, user maintenance, brochure, user reference, pdf manual
This file has been downloaded from:
User Manual and User Guide for many equipments like mobile phones, photo cameras, monther board, monitors, software, tv, dvd, and othes..
Manual users, user manuals, user guide manual, owners manual, instruction manual, manual owner, manual owner's, manual guide,
manual operation, operating manual, user's manual, operating instructions, manual operators, manual operator, manual product,
 Loading...