

Page 1

MULTIPLE COMPACT DISC PLAYER
DPF-J9030
CD-4900M
INSTRUCTION MANUAL
KENWOOD CORPORATION
This unit is designed for home use only. If the unit is
used in a location other than at home, such as in a
shop (for commercial use), in a car or in a ship, etc.,
and is damaged, a service fee may be charged even
during the warranty period.
This instruction manual is used to describe multiple
models listed above.
Model availability and features (functions) may differ
depending on the country and sales area.
B60-4465-08 00 (K, T)
AP
9909
Page 2
Before applying power
2
Units are designed for operation as follows.
U.S.A. and Canada ...................................................................AC 120 V only
Europe and U.K......................................................................... AC 230 V only
For the United Kingdom
Factory fitted moulded mains plug
Chapter 1Chapter 2Chapter 3Chapter 4Chapter 5Chapter 6Chapter 7
1.The mains plug contains a fuse. For replacement, use only a 13Amp ASTA-approved (BS1362) fuse.
2.The fuse cover must be refitted when replacing the fuse in the
moulded plug.
3.Do not cut off the mains plug from this equipment. If the plug
fitted is not suitable for the power points in your home or the cable
is too short to reach a power point, then obtain an appropriate
safety approved extension lead or adapter, or consult your dealer.
If nonetheless the mains plug is cut off, remove the fuse and dispose of the plug immediately, to avoid a possible shock hazard by
inadvertent connection to the mains supply.
Caution : Read this page carefully to ensure safe operation.
Your New Kenwood 200-Disc Mega-Changer
IMPORTANT: The wires in the mains lead are coloured in accord-
Do not connect those leads to the earth terminal of a three-pin plug.
ance with the following code:
Blue : Neutral
Brown : Live
Safety precautions
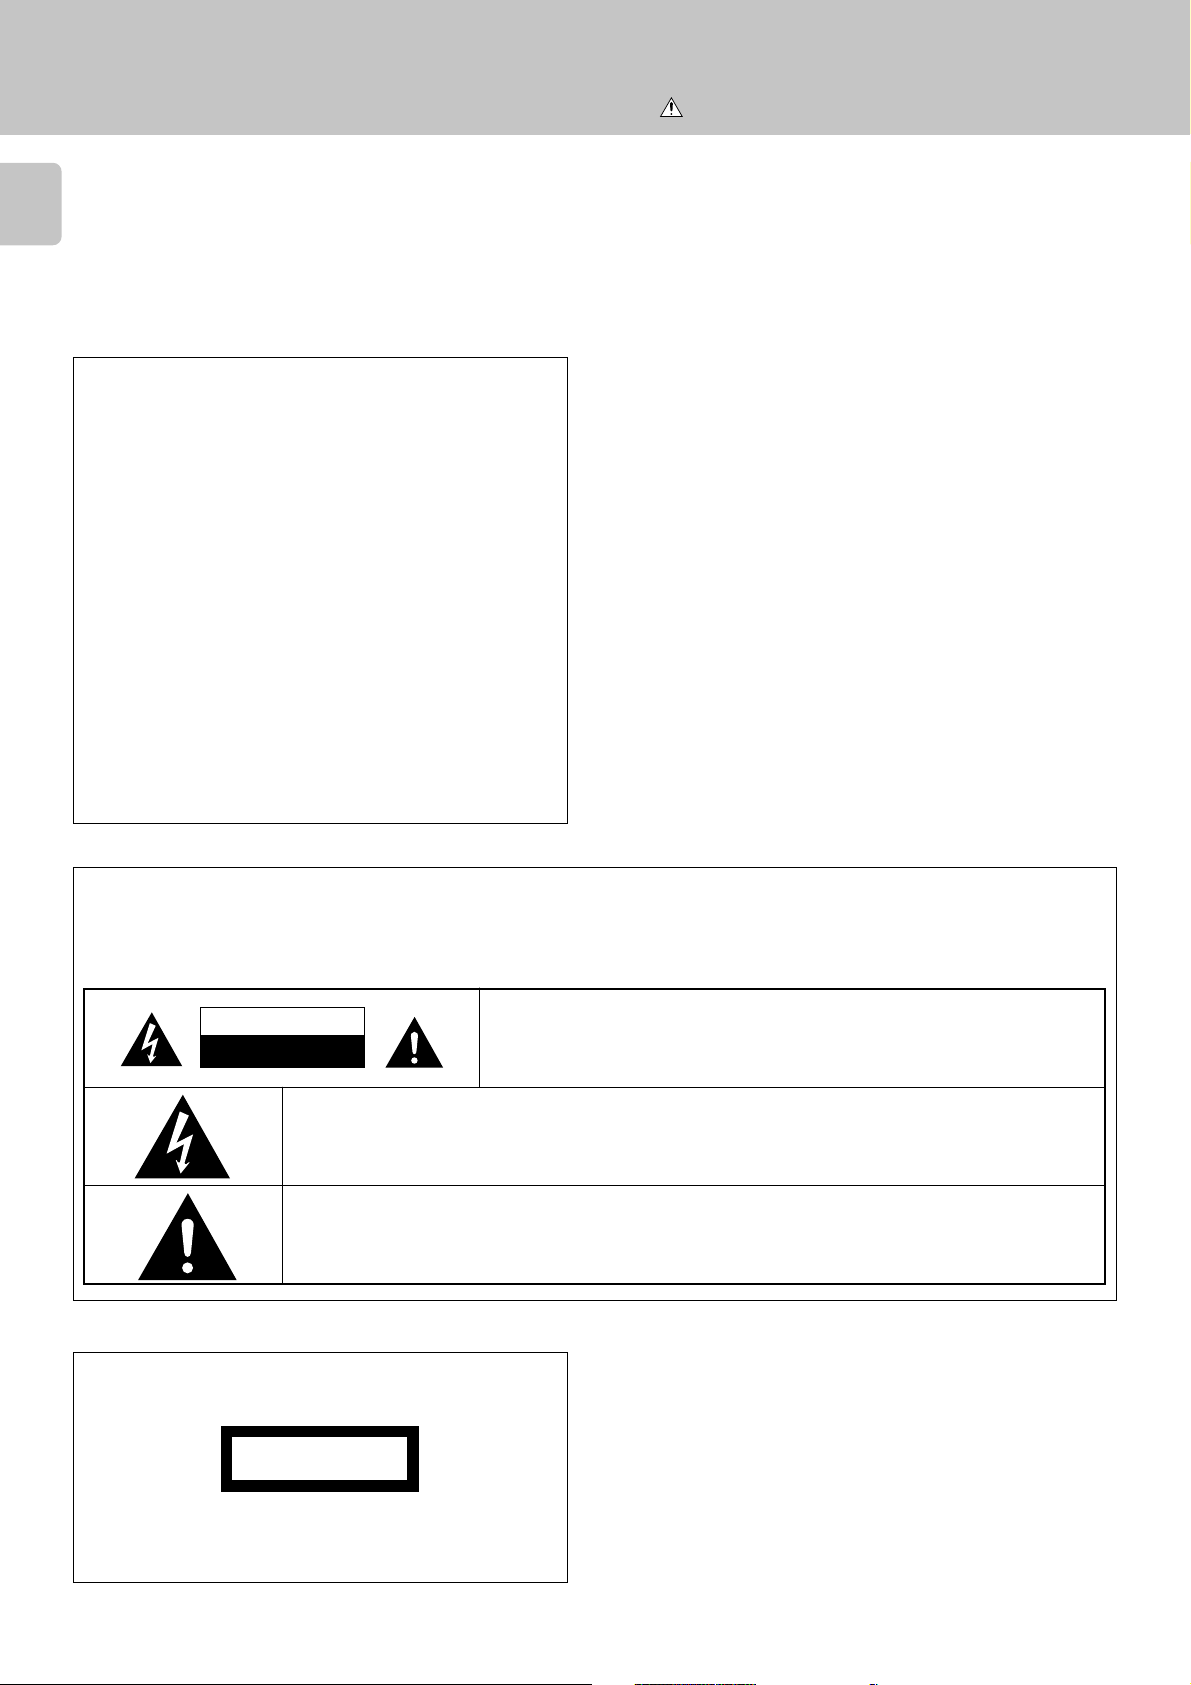
WARNING : TO PREVENT FIRE OR ELECTRIC SHOCK, DO NOT EXPOSE THIS APPLIANCE TO
RAIN OR MOISTURE.
CAUTION
RISK OF ELECTRIC SHOCK
DO NOT OPEN
THE LIGHTNING FLASH WITH ARROWHEAD SYMBOL, WITHIN AN EQUILATERAL TRIANGLE, IS INTENDED TO
ALERT THE USER TO THE PRESENCE OF UNINSULATED “DANGEROUS VOLTAGE” WITHIN THE PRODUCT’S
ENCLOSURE THAT MAY BE OF SUFFICIENT MAGNITUDE TO CONSTITUTE A RISK OF ELECTRIC SHOCK TO
PERSONS.
THE EXCLAMATION POINT WITHIN AN EQUILATERAL TRIANGLE IS INTENDED TO ALERT THE USER TO THE
PRESENCE OF IMPORTANT OPERATING AND MAINTENANCE (SERVICING) INSTRUCTIONS IN THE LITERATURE
ACCOMPANYING THE APPLIANCE.
CAUTION: TO REDUCE THE RISK OF ELECTRIC SHOCK, DO NOT REMOVE COVER
(OR BACK). NO USER-SERVICEABLE PARTS INSIDE. REFER SERVICING TO QUALIFIED SERVICE PERSONNEL.
The marking of products using lasers
(Except for some areas)
CLASS 1
LASER PRODUCT
The marking is located on the rear panel and says that the component uses laser beams that have been classified as Class 1. It means
that the unit is utilizing laser beams that are of a weaker class. There
is no danger of hazardous radiation outside the unit.
Page 3
Your New Kenwood 200-Disc CD Changer
Your New Kenwood 200-Disc Mega-Changer
Welcome to your new Kenwood 200-Disc CD Changer.
CD-4900M is sold in USA. DPF-J9030 is sold in other countries.
This CD changer offers the following exciting features :
÷ 200-disc capacity
÷ 10-key remote and infrared remote keyboard
÷ Digital audio output
÷ CD Text, which displays text from encoded CDs on the unit’s display.
÷ Disc and Track Naming, which allows you to program your own names for discs and tracks.
÷ Music Type File, which lets you organize your discs into specific musical types (such as Classical, Jazz,
Rock), and then play them by type.
÷ Dual disc transport mechanisms (2 CD players)
÷ Continuous Single-Zone Playback, which uses both the changer’s players to play all discs or tracks
continually, without interruption.
÷ Simultaneous Dual-Zone Playback, which plays 2 different CDs in 2 rooms at once when used with a
Kenwood Dual-Zone/Dual-Source receiver.
Your new changer can play the following disc types :
÷ Standard 12 cm CDs
÷ CDV (Video) and CDG (Graphics), although it will not display the video portion
You may not play 8 cm CD “singles.”
3
Chapter 1 Chapter 2 Chapter 3 Chapter 4 Chapter 5 Chapter 6 Chapter 7
Unpacking
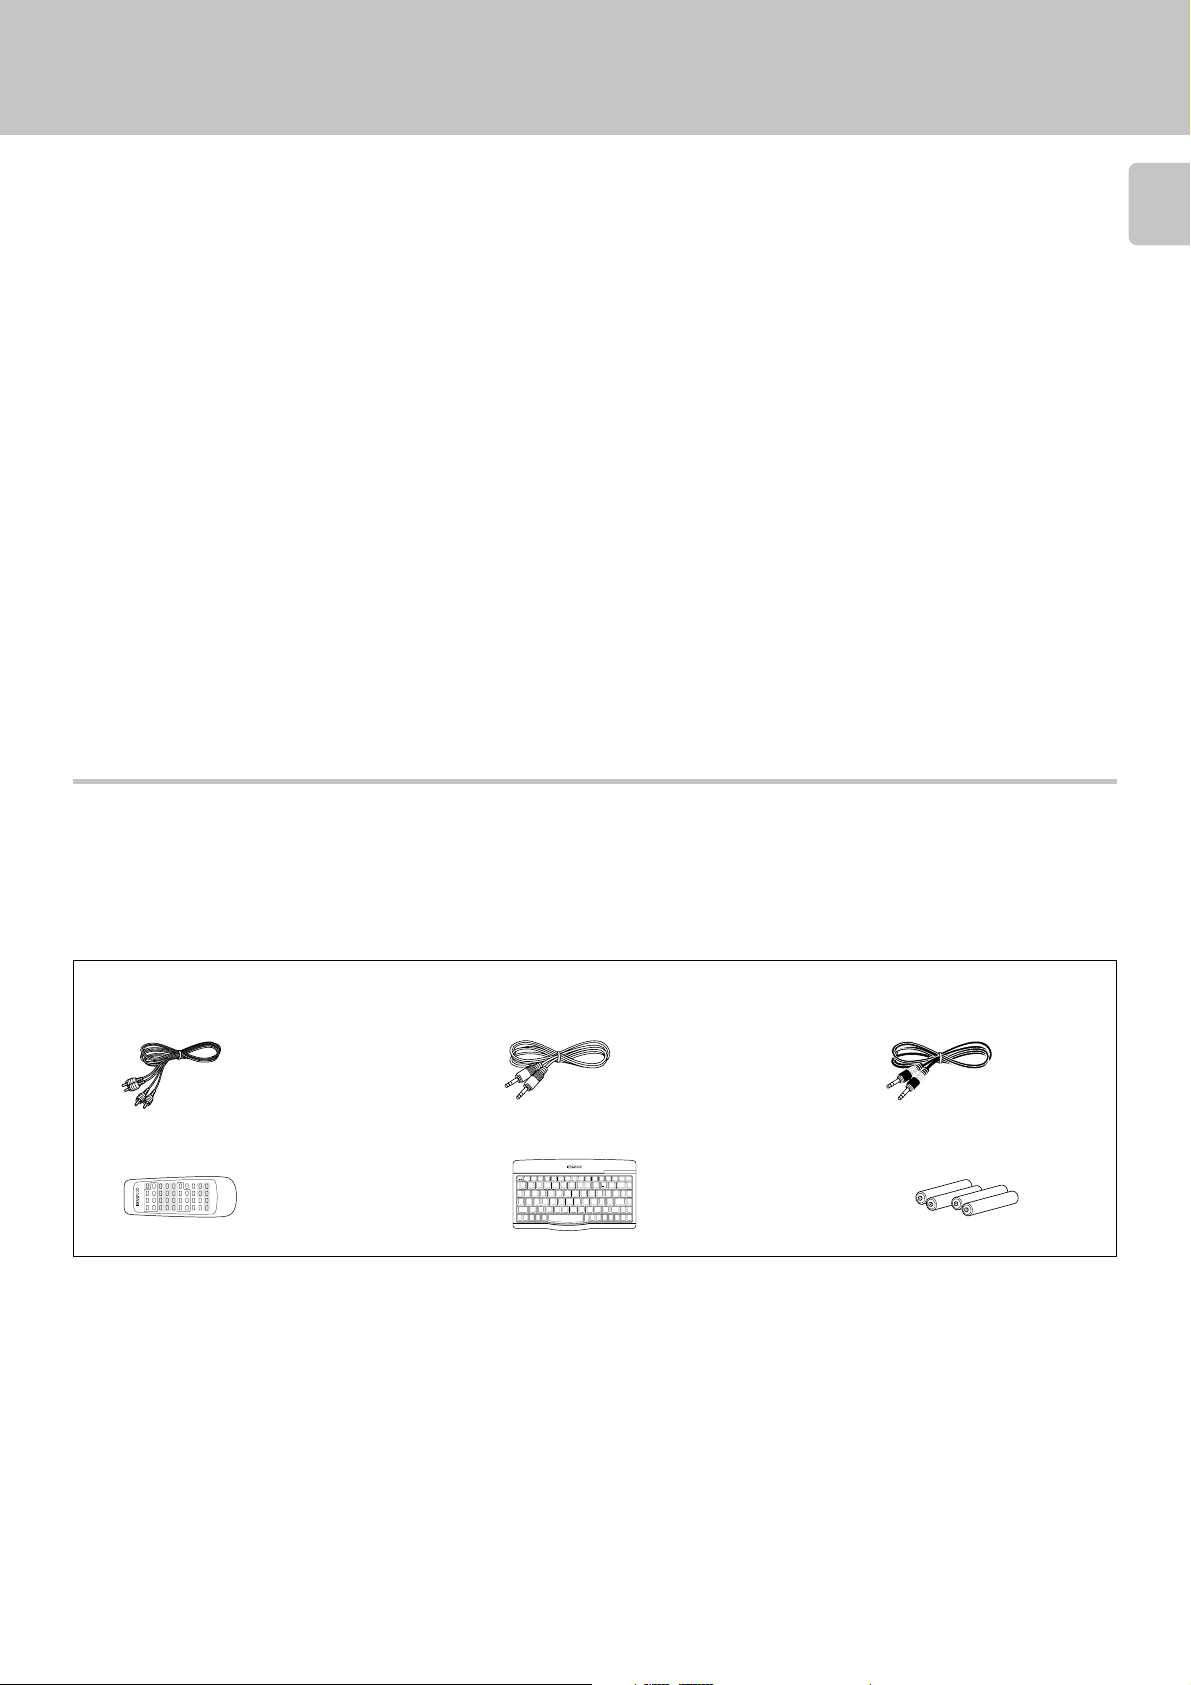
Unpack your new CD changer carefully and make sure that all the accessories are present:
If any accessories are missing, or if the changer is damaged or fails to operate, notify your dealer immediately. If your
changer was shipped to you directly, notify your shipper immediately. Kenwood recommends that you retain the
original carton and packing materials in case you need to move or ship the changer in the future.
Keep this manual handy for future reference.
Accessories
Audio cables .................... (2)
10-key Remote ................ (1)
System control cable ...... (1)
Infrared Remote Keyboard ......(1)
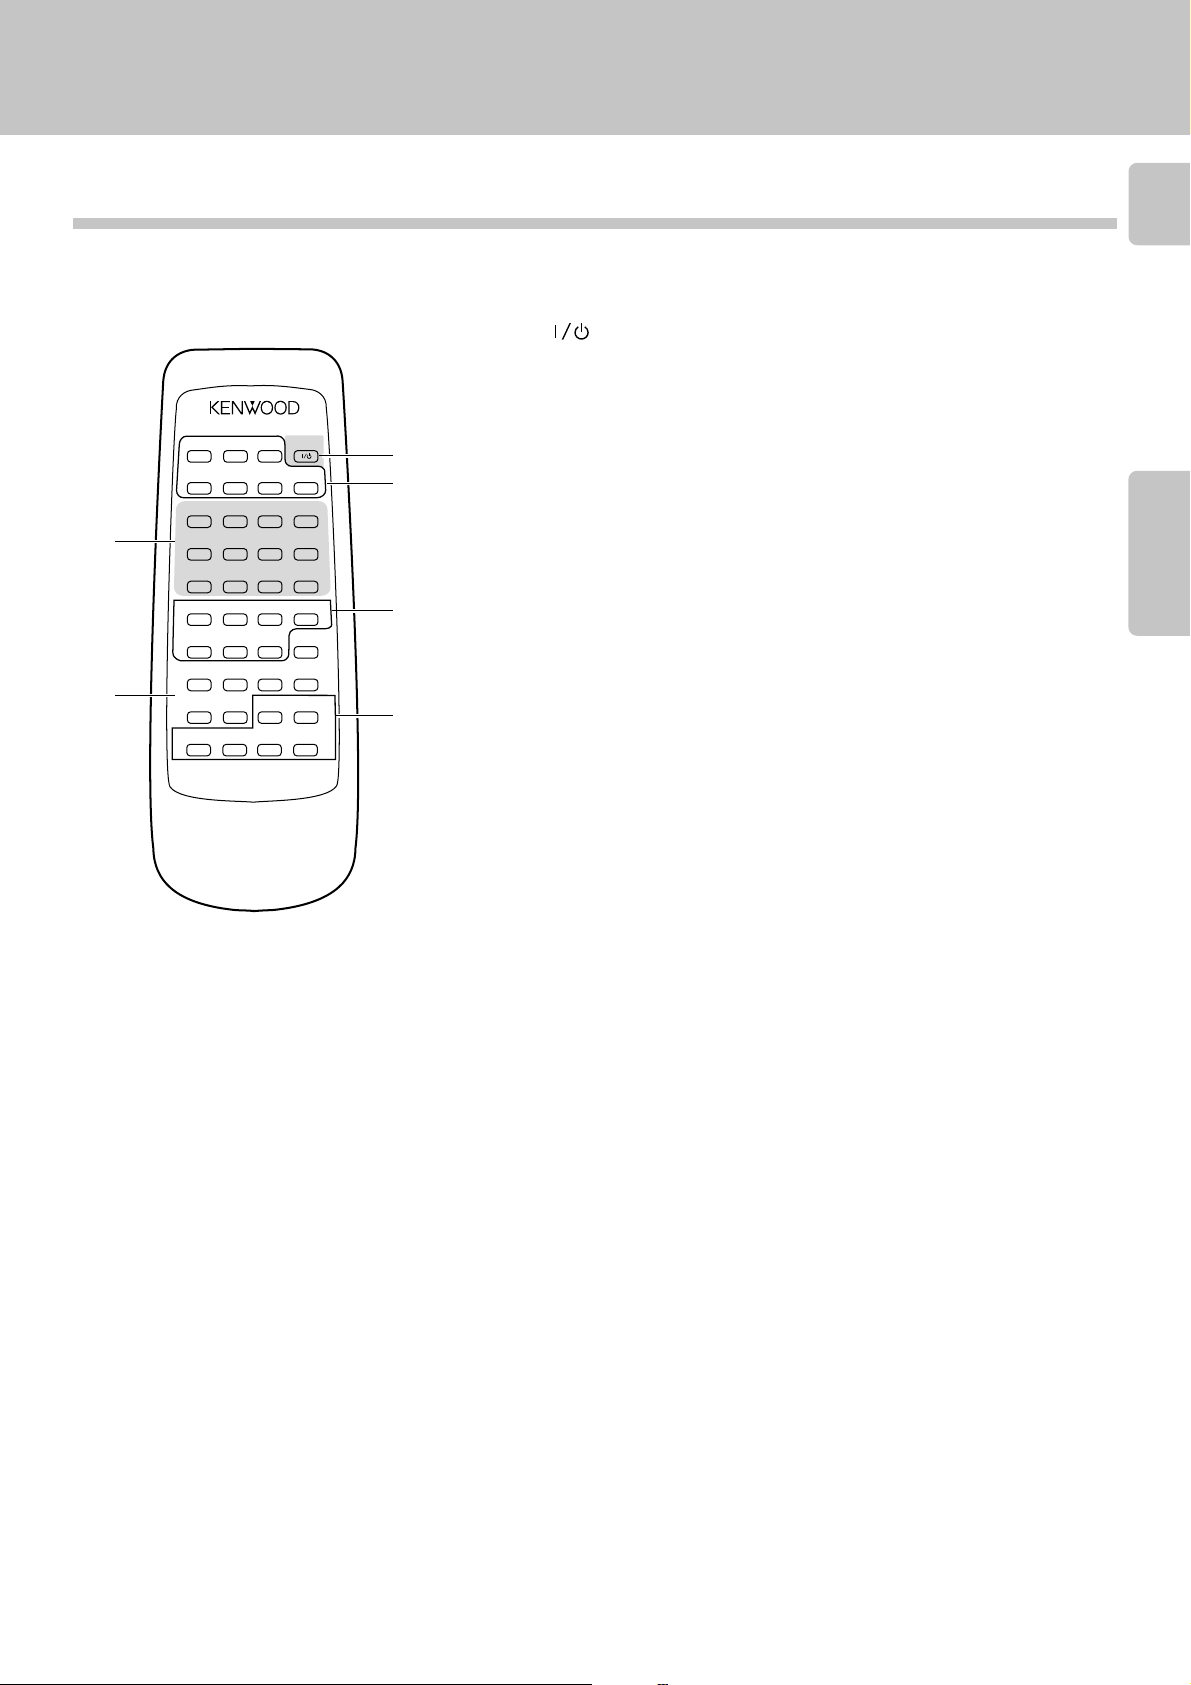
REMOTE CONTROL UNIT RC-KB2
POWER CONFIRM BEST
TITLE
USER
REPEAT RANDOM DISPLAY
+10 +100
SEL.
INPUT
FILE
764¢1¡
NAME
DELETE
()
@
!
#
$
%
^
&
✱
-
2
1
3
4
DISC
QWERTYUI OP
SEL
ASDFGHJKL
SHIFT
ZXCVBNM
ROOM
CONT
SUB
PLAY
OUT
B
MONIT.
+
5
6
7
8 9
0
=
CHECK CLEAR
P.MODE
,
,,
ENTER SET
:
,
;
MODE
SHIFT
<
>
?
,
/
.
ROOM
CURSORRCURSOR
DISC
DISC
CHARAC.
CHARAC.
SPACE
SRCH
SRCH
SKIP
SKIP
B
L
UP
DOWN
UP
DOWN
Communication cable ..... (1)
Batteries (R6/AA) ............ (4)
Page 4

Table of Contents
4
Before applying power ............................................... 2
Safety precautions .....................................................2
Your New Kenwood 200-Disc CD Changer ................ 3
Caution : Read the pages marked carefully to ensure safe operation.
Your New Kenwood 200-Disc Mega-Changer
Chapter 1 : Setting Up Your New CD Changer ........... 5
Connecting to a Receiver or Amplifier................................ 6
Chapter 1Chapter 2Chapter 3Chapter 4Chapter 5Chapter 6Chapter 7
System Control Chaining ........................................................ 8
Setting Up the 10-Key Remote and Keyboard .................... 9
10-Key Remote ..........................................................9
Keyboard ....................................................................9
Chapter 2 : Getting to know Your New CD Changer ...... 10
Front Panel .............................................................................. 11
Front Panel Displays ...............................................12
10-Key Remote and Keyboard ............................................. 13
10-Key Remote ........................................................13
Keyboard ..................................................................14
Chapter 3 : Loading and Playing Discs..................... 16
Preparation ............................................................................. 17
Loading discs in the carousel ................................17
Normal play (TRACK mode) ................................................. 19
Playing tracks in order from track No.1 ...............19
Playback from desired track ..................................21
Repeated playback (REPEAT mode)................................... 22
Playback in a random order (RANDOM mode) ............... 23
Programming tracks in desired order
(PGM mode) (Player A only) ...................................................24
Continuous playback ............................................................ 26
Timer operation (Player A only).......................................... 27
Registration of DTS discs..................................................... 28
Chapter 4 : Specifying and Using Disc or Track Data .. 29
Registration of Title............................................................... 30
Assigning Title (TITLE INPUT mode) .................... 30
To change or delete a title .....................................32
Listening to music by genre (MUSIC TYPE mode) .............. 33
Registration of music type (MUSIC TYPE SET mode)
...................................................................................33
Registration of user's disc file (USER FILE SET mode)
...................................................................................34
Playing the music type or user file
(MUSIC TYPE PLAY mode) (Player A only) .......... 35
Disc search (DISC SEARCH mode)
Searching a disc by the disc title
(CHARAC. SEARCH mode) .....................................36
Searching the music type or user file
(M.TYPE SEARCH mode) ........................................ 37
Listening to your favorite titles
(BEST SELECTION mode) (Player A only)
Registration of best selection file .........................38
Playing the best selection file ...............................38
(Player A only) ..................
....................................... 38
36
Chapter 5 : Dual-Zone Capabilities........................ 40
Chapter 6 : In case of difficulty............................... 41
In case of difficulty................................................................ 41
Important items ...................................................................... 42
Chapter 7 : Warnings and Specifications............. 43
Warnings ................................................................................. 43
Specifications ........................................................................ 43
Page 5
Chapter 1 : Setting Up Your New CD Changer
Connecting to a Receiver or Amplifier
Welcome to the Kenwood CD-4900M/DPF-J9030 Instruction manual.
The Instruction manual contains all the information you need to know to set up and operate your new CD changer safely and enjoyably.
This chapter guides you through the connection and setup of your new CD changer and its remote.
Refer to the following pages for details on these issues :
÷ Connecting to a Receiver or Amplifier 6
÷ System Control Chaining 8
÷ Setting Up the 10-Key Remote and Keyboard 9
Your CD changer includes a standard remote and a remote keyboard (for easier text entry). You can use
either device to control the changer. For the sake of simplicity, this manual provides standard remote
instructions for all functions except text entry.
Before You Begin
Be sure to read the notes on this page before you begin setting up the changer.
Notes
Notes
1. All cables (except the digital optical cable) should have been supplied with your new CD changer.
see “Unpacking”
If you need to purchase additional or replacement cables, visit any home electronics store or the Kenwood USA Web site at
www.kenwoodusa.com. You can also call 1-800-KENWOOD. (For USA and Canada only)
3
5
Chapter 1 Chapter 2 Chapter 3 Chapter 4 Chapter 5 Chapter 6 Chapter 7
2. Do not plug in the CD changer’s power cord until you have finished making connections to your receiver or amplifier.
3. If you exposed your changer to a great difference in temperature (for example, if you purchased it in winter from a store with
an unheated warehouse) or if the humidity in the room changes, condensation may form inside the unit. If this occurs, connect
the unit, turn it on, and leave it on but unused for a few hours. This will evaporate the condensation and return your changer to
working order. Restart the changer before using it again.
4. Clean your CD changer with a soft, dry cloth. Avoid solvents of any kind, as they may damage the cabinet components.
5. Do not use CD accessories such as protection sheets or disc cleaners with your new CD changer.
6. Kenwood recommends having your CD changer’s precision optical pickup inspected periodically. Depending on the operation
environment (humidity, dust, smoke, etc.), this pickup should operate approximately 1,000 hours before requiring inspection. To
schedule inspection, consult the store where you purchased the changer or visit the Kenwood USA Web site’s Support area.
7. Only player A supports DTS playback.
8. Be sure to locate your changer on a level and stationary surface, or it will not be able to play discs properly.
9. Your CD changer continues to store the following information for at least 3 weeks after you unplug its power cord:
÷ Power status (on or off)
÷ Disc and track names
÷ Music Type assignments
÷ User File assignments
÷ Best Selection assignments
÷ DTS assignments
After that you must reset this information according to the instructions in this manual.
10. Once you have set up the changer and loaded discs, you should not move it without doing the following:
(1) Remove all the discs from the unit and close the disc door.
(2) Look at the display(s). “NO DISC” should appear steadily (i.e., it should not be flashing).
(3) Turn off the CD changer.
(4) A few seconds after the display appears, disconnect the CD changer from the receiver and unplug the CD changer from the
wall outlet or power strip.
q
Page 6
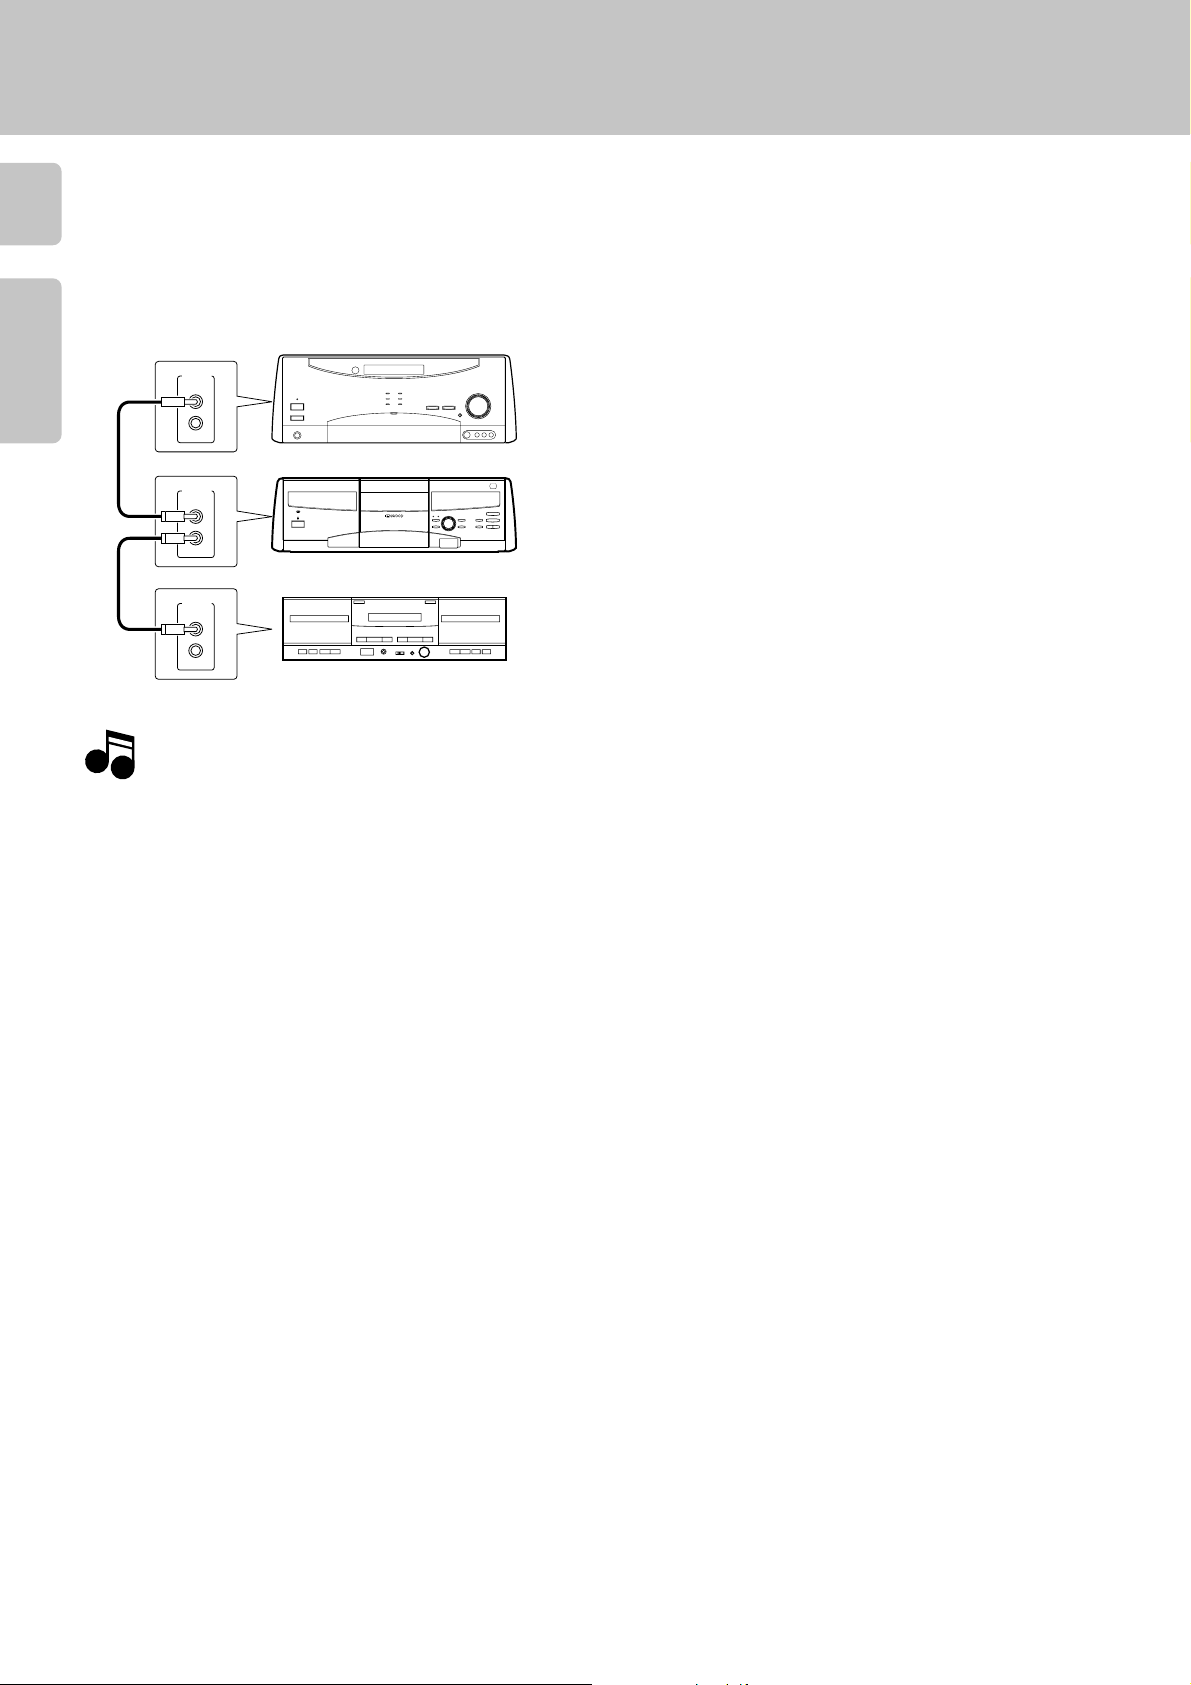
Connecting to a Receiver or Amplifier
Connecting to a Receiver or Amplifier
Make connections as shown below.
When connecting the related system components, refer
6
also to the instruction manuals of the related components.
Do not plug in the power lead until all connections are completed.
Chapter 1Chapter 2Chapter 3Chapter 4Chapter 5Chapter 6Chapter 7
Digital component (MD,DAT, etc.)
DIGITAL INPUT (OPTICAL)
Optical digital cable
(Commercially-available)
*1
L
R
OUTPUT
A
B
SYSTEM
CONTROL
DIGITAL OUT jack (OPTICAL)
Remove the protective cap before using the DIGITAL
OUT jack.
DIGITAL
OUT
OPTICAL
TEXT
Remove the cap
SL16
TEXT
OPTICAL
TEXT
DIGITAL
OUT
*2
System
control
cable
Communication cable
Optical digital cable
(Commercially-available)
To wall AC
outlet
Audio
cable
Audio
cable
CD1
SYSTEM
CONTROL
CD2
* 1
OUTPUT A:
Analog output from Player A.
OUTPUT B:
Analog output from Player B.
* 2
Note on the SL-16 TEXT jack
When using a KENWOOD Receiver equipped with the SL-16 TEXT
jack, connect it to the Receiver using the communication cable
provided with this unit. This makes it possible to display the
disc and track titles on the LCD remote control unit (provided
with the Receiver).
Note
Note
If your receiver has the SL16/XS8 mode select switch,
set the connected receiver to the [SL16] mode.
TEXT
Receiver or Amplifier, etc.
DTS Disclaimer clause
When playing DTS-encoded CDs, excessive noise will be exhibited from the analog stereo outputs. To avoid possible
damage to the audio system, the consumer should take proper
precautions when the analog stereo outputs of the CD player
is connected to an amplification system. To enjoy DTS Digital
Surround™ playback, an external 5.1 channel DTS Digital Surround™ decoder system must be connected to the digital output (S/P DIF, AES/EBU, or TosLink) of the CD player.
OPTICAL
NotesNotes
Notes
1. Connect all cables firmly. If connections are loose, there could be loss of sound or noise produced.
2. When plugging and unplugging connection cables, be sure to first remove the power cable from the AC outlet. Plugging/unplugging
connection cables without removal of the power cable can cause malfunctions or damage to the unit.
Page 7

Connecting to a Receiver or Amplifier
To Connect the Changer to a Kenwood Receiver
1.Unplug the receiver from the wall outlet or power strip.
2.Connect the audio cable from output A on the CD changer to the receiver as shown to the left. If you are connecting
the CD changer to a receiver that supports Dual-Zone/Dual-Source listening (such as the VR-4900/KRF-V9993D
shown in the illustration), connect audio cables for both outputs A and B to the appropriate jacks on the receiver.
3.Connect an optional optical digital cable from the changer to the receiver as shown to the left. If your receiver does
not support digital output, skip this step.
If you do not connect a digital cable or if your receiver does not support digital output and DTS decoding, DTS discs
do not play on your changer.
4.Connect the system control cable from the changer to the receiver jack as shown to the left. If your receiver has the
SL16/XS8 mode select switch, set the connected receiver to the [SL16] mode. If you are connecting more than one
Kenwood device with a system control cable, see “What if I Have Several Kenwood Devices ?” for more information.
5.Connect the SL16 text cable (Communication cable) from the changer to the receiver’s jack as shown to the left.
6.Plug the changer’s power cable into a wall outlet or power strip.
7
Chapter 1 Chapter 2 Chapter 3 Chapter 4 Chapter 5 Chapter 6 Chapter 7
8
7.Plug the receiver’s power cord back into a wall outlet or power strip.
To Connect the Changer to a Non-Kenwood Receiver or Preamplifier
1. Unplug the receiver or preamplifier from the wall outlet or power strip.
2. Connect the audio cable(s) from output A on the CD changer to the receiver or preamplifier as shown to the left.
3. Connect an optional optical digital cable from the changer to the receiver or preamplifier as shown to the left. If your
receiver does not support digital output and DTS decoding, skip this step. If you do not connect a digital cable or if your
receiver does not support digital output, DTS discs do not play on your changer.
4. Plug the changer’s power cable into a wall outlet or power strip.
5. Plug the receiver’s power cable back into a wall outlet or power strip.
To Connect the Digital Output Directly to a Digital Recorder (MD, DAT, etc.)
If your receiver does not support digital output, but you want to record discs to a digital format, you can connect the CD changer
directly to a digital recording device, such as an MD or DAT recorder.
1. Unplug the digital recorder from the wall outlet or power strip.
2. Connect the digital cable from the changer to the recorder.
3. Plug the changer’s power cable into a wall outlet or power strip.
4. Plug the recorder’s power cable back into a wall outlet or power strip.
Malfunction of microcomputer
If operation is not possible or erroneous display appears even though all connections have been made properly, reset the microcomputer
referring to “In case of difficulty”.
q
Page 8
System Control Chaining
What if I Have Several Kenwood Devices ?
8
System control allows you to :
÷ control connected devices via the receiver’s remote control
÷ switch the receiver’s input automatically to a connected device when you start playback from that device
÷ synchronize recording a CD or MD automatically when you start playback from those connected devices
Receiver or Amplifier
SYSTEM
Chapter 1Chapter 2Chapter 3Chapter 4Chapter 5Chapter 6Chapter 7
CONTROL
SYSTEM
CONTROL
SYSTEM
CONTROL
This unit
Cassette deck or MD
Connecting to a Receiver or Amplifier
This unit is compatible only with the [SL16] mode. The system
control operation is not available if the unit is connected in the
[XS-8] connection mode.
÷You can connect the system control cord to either system control
jack of the unit.
÷If your component has the mode select switch, set the connected
components to the [SL16] mode.
(Ensure that the power plug is not connected.)
Notes
Notes
1. If your amplifier or receiver does not support system control, do not connect the system control cable to any device.
2. Some CD players and cassette decks do not support the SL16 system control mode. Do not include these devices in a set of SL16 chained
connections.
3. Do not connect system control cables to any device not specified by Kenwood. Using system control functions with a device that does not
support them can damage the device.
4. Make sure system control plugs are firmly seated in the appropriate jacks.
Page 9
Setting Up the 10-key Remote and Keyboard
Connecting to a Receiver or Amplifier
10-key Remote
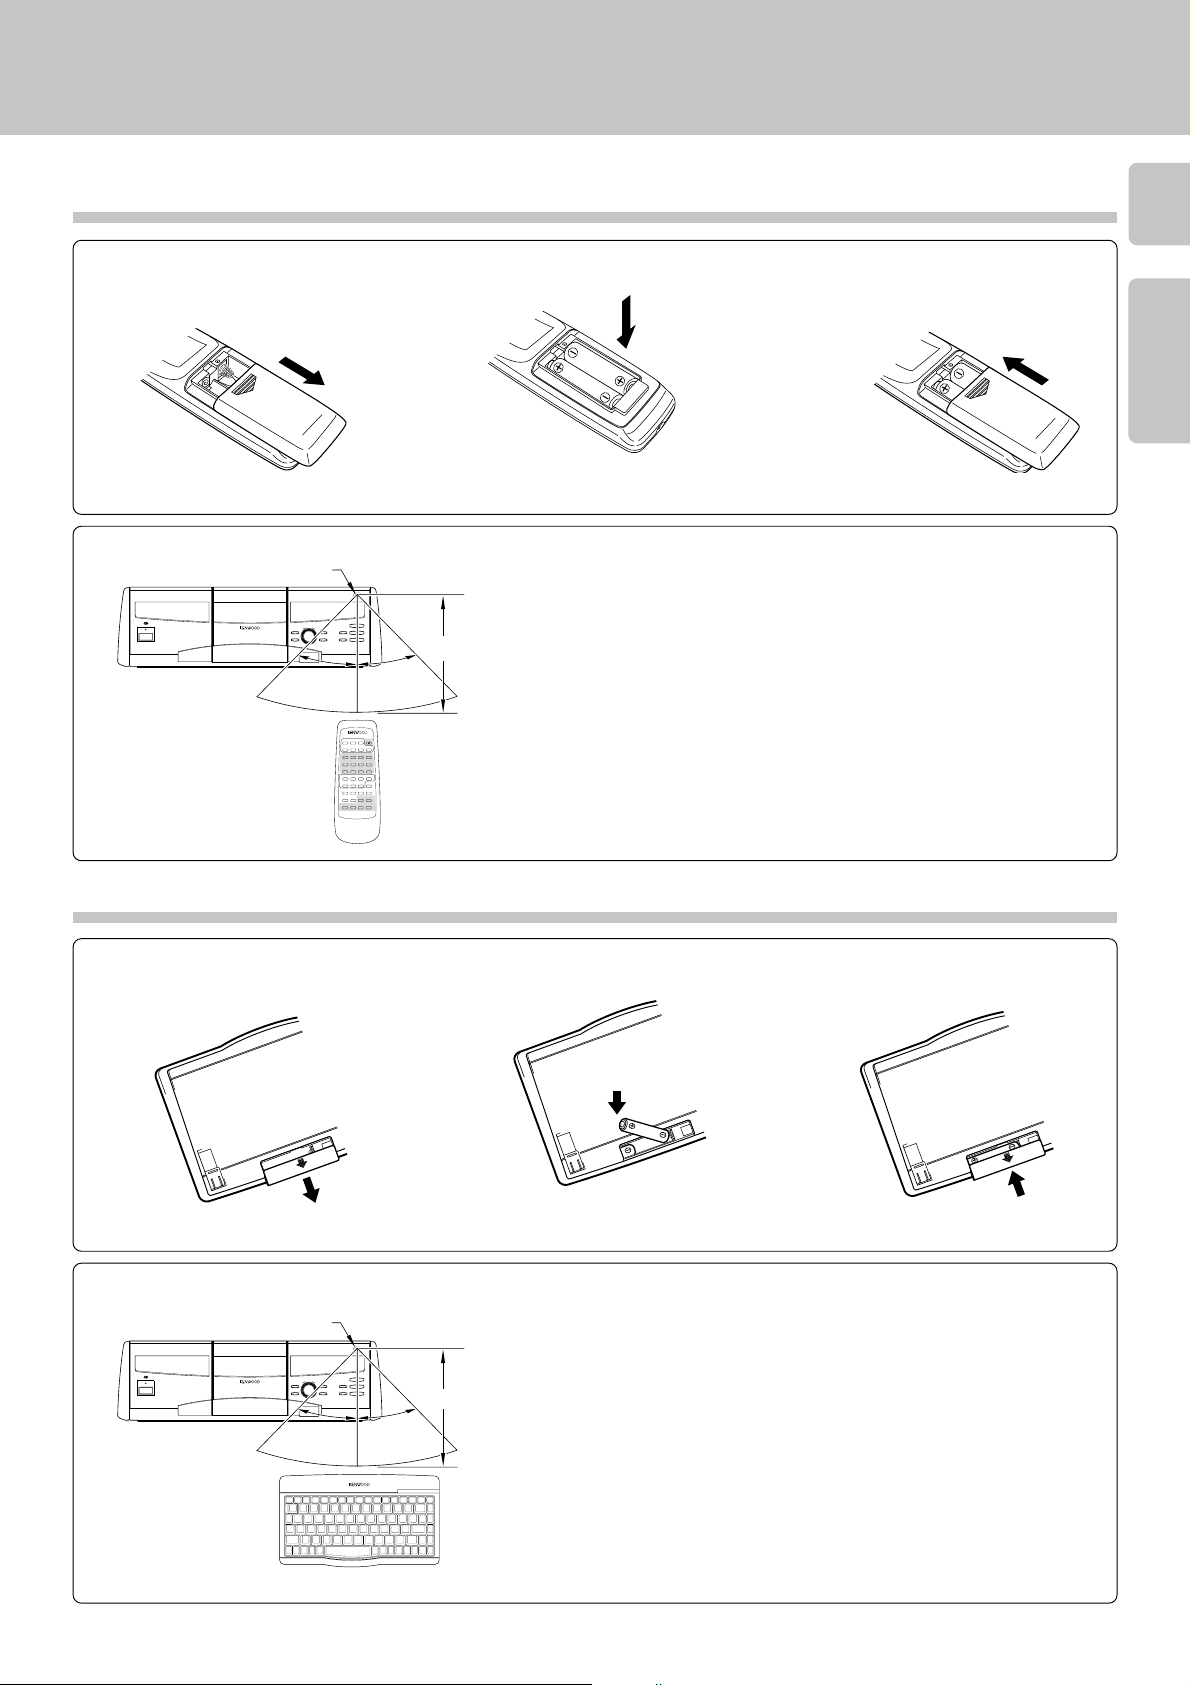
To load Batteries
1 Remove the cover. 2 Insert two AA batteries.
÷Insert two AA-size (R6) batteries as
indicated by the polarity marking.
The 10-key remote operates in the following range:
Infrared Remote Sensor
oPUSH OPEN
)
TIMER PLAY
OFF ON
STANDBY
POWER
ON/STANDBY
DISPLAY
RANDOM
Infrared Remote
transmitter
^
DISC SKIP
CONFIRM
CONTINUOUS PLAY
&
REPEAT
DISPLAY
$ ›
30° 30°
CONTINUOUS
SUB OUT
PLAY
MONITOR
CONFIRM
POWER
A
B
C
BEST
RANDOM DISPLAY
REPEAT
SELECTION.
DEF
G
324
1
HJK
I
5
768
LMN
O
+100 +100
9
PQR
S
.
/
–
'
T
U
V
W
DISC
(
)
SELECTOR.
MODE
XYZ
SPACE CHARAC.DELETE
SET
/CLEAR /CHECK /P.MODE
DISC SKIP
DOWN UP
ENTER
6
7
CURSOR
CHARACTER
LEFT
DOWN
RIGHT
UP
1
4¢
¡
REMOTE CONTROL UNIT
RC-P0713
6 m (20 ft.)
9
3 Close the cover.
Chapter 1 Chapter 2 Chapter 3 Chapter 4 Chapter 5 Chapter 6 Chapter 7
Remote Operating Range
If you use the remote outside of this range, the remote will not
operate correctly. As you use the remote, be aware of the following:
÷The batteries that came with your new CD changer are intended to
be used for operation checks and setup. Therefore, they may not
last as long as ordinary batteries. Consider replacing them as soon
as you have verified that the remote operates correctly.
÷When the remote’s operating range gets shorter, replace both
batteries.
÷Do not install the CD changer where direct sunlight or high-fre-
quency fluorescent lighting can shine directly into the remote
sensor. This can decrease the operating range of your remote.
÷When pressing more than one remote control key successively,
press the keys securely by leaving an interval of 1 second or more
between keys.
Keyboard
To load Batteries
1 Remove the cover. 2Insert two AA batteries. 3 Close the cover.
÷Insert two AA-size (R6) batteries as
indicated by the polarity marking.
The keyboard operates in the following range:
Infrared Remote Sensor
oPUSH OPEN
)
TIMER PLAY
OFF ON
STANDBY
POWER
ON/STANDBY
DISPLAY
RANDOM
^
DISC SKIP
CONFIRM
CONTINUOUS PLAY
&
REPEAT
DISPLAY
$ ›
3 m (10 ft.)
30° 30°
Infrared Remote
REMOTE CONTROL UNIT RC-KB2
keyboard
Keyboard Operating Range
If you use the remote outside of this range, the remote will not
operate correctly.
As you use the remote, be aware of the following:
÷The batteries that came with your new CD changer are intended to
be used for operation checks and setup. Therefore, they may not
last as long as ordinary batteries. Consider replacing them as soon
as you have verified that the keyboard operates correctly.
÷When the remote’s operating range gets shorter, replace both
batteries.
÷Do not install the CD changer where direct sunlight or high-fre-
quency fluorescent lighting can shine directly into the remote
sensor. This can decrease the operating range of your keyboard.
÷When pressing more than one remote control key successively,
press the keys securely by leaving an interval of 1 second or more
between keys.
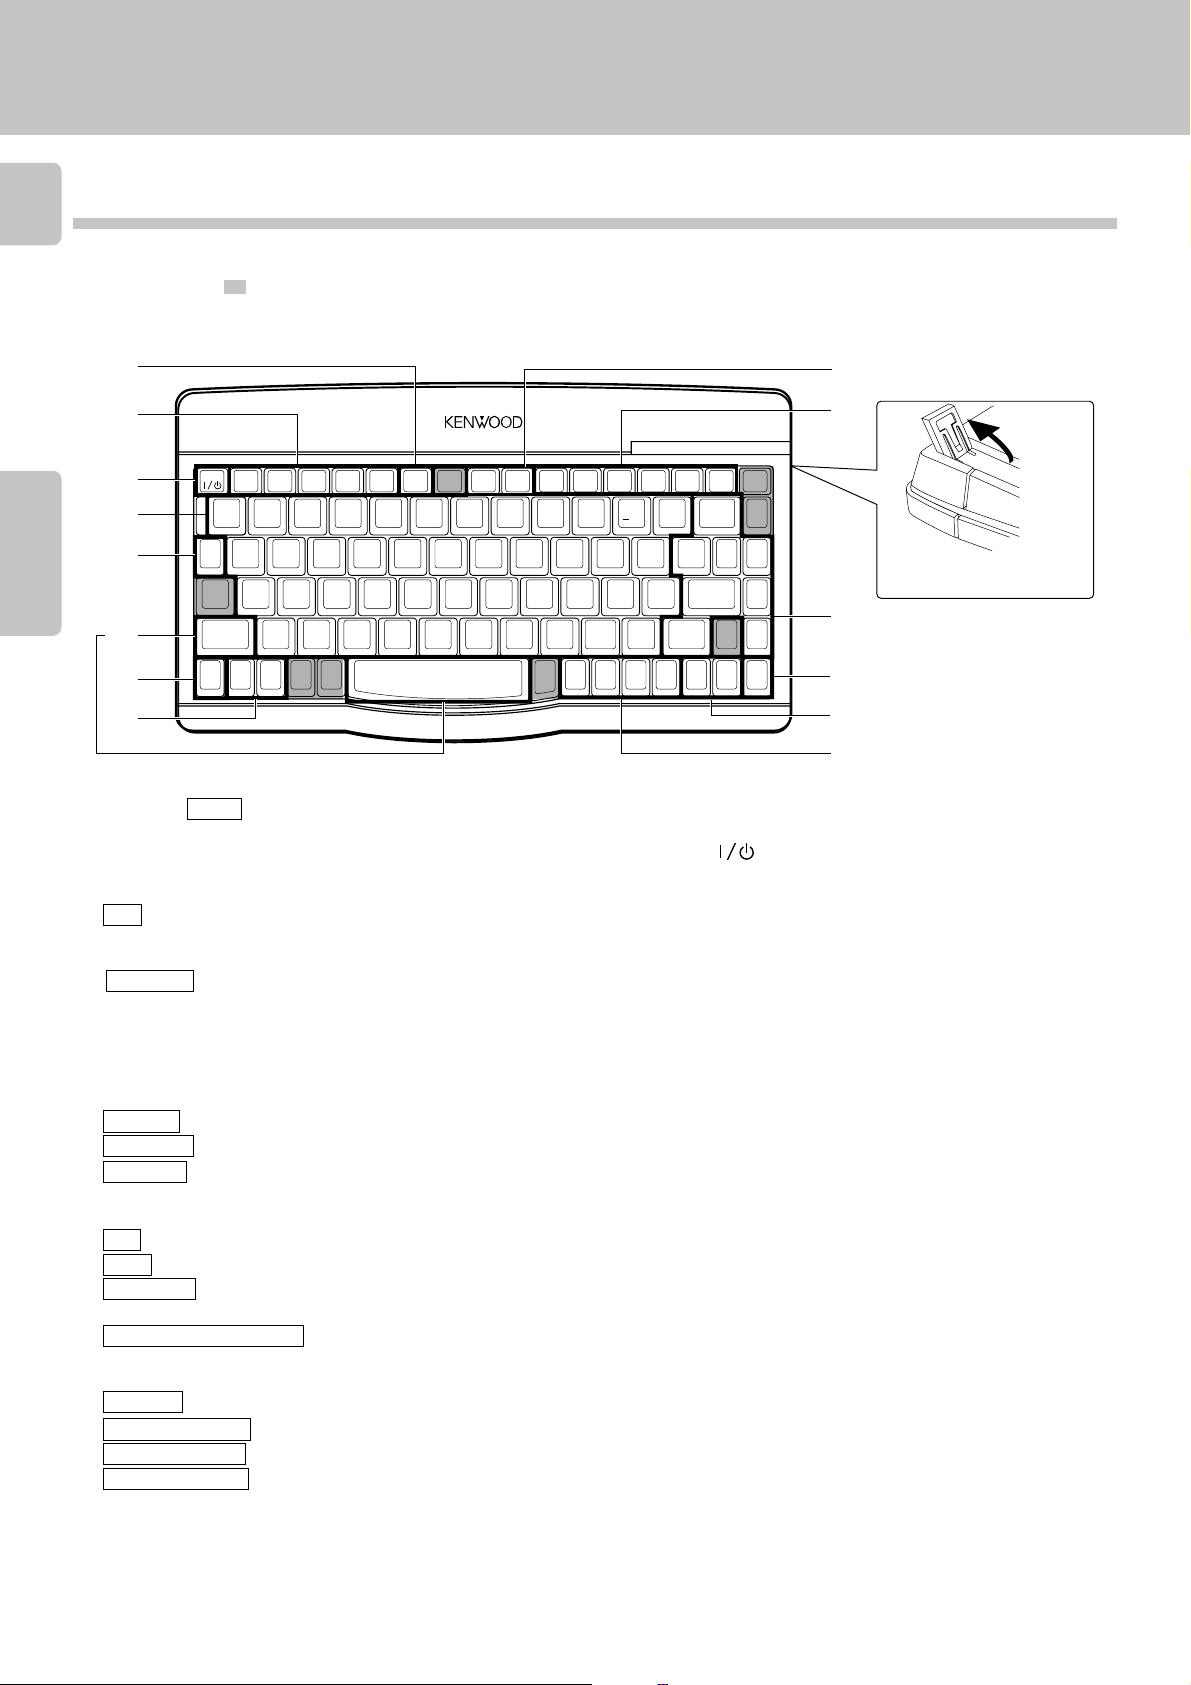
Page 10

Chapter 2 : Getting to know Your New CD Changer
Your new CD changer contains the following sophisticated features :
10
÷ An easy-to-use front panel, remote and keyboard
See “Front Panel” !
See “10-key Remote” #
See “Keyboard” $
÷ Multiple front panel display format that allow you to view detailed information about the disc currently
Chapter 1Chapter 2Chapter 3Chapter 4Chapter 5Chapter 6Chapter 7
playing
See “Front Panel Displays” @
Your CD changer includes a standard remote and a remote keyboard (for easier text entry).
You can use either device to control the changer. For the sake of simplicity, this manual provides standard remote instructions for all functions except text entry.
Operation of remote control unit
Page 11
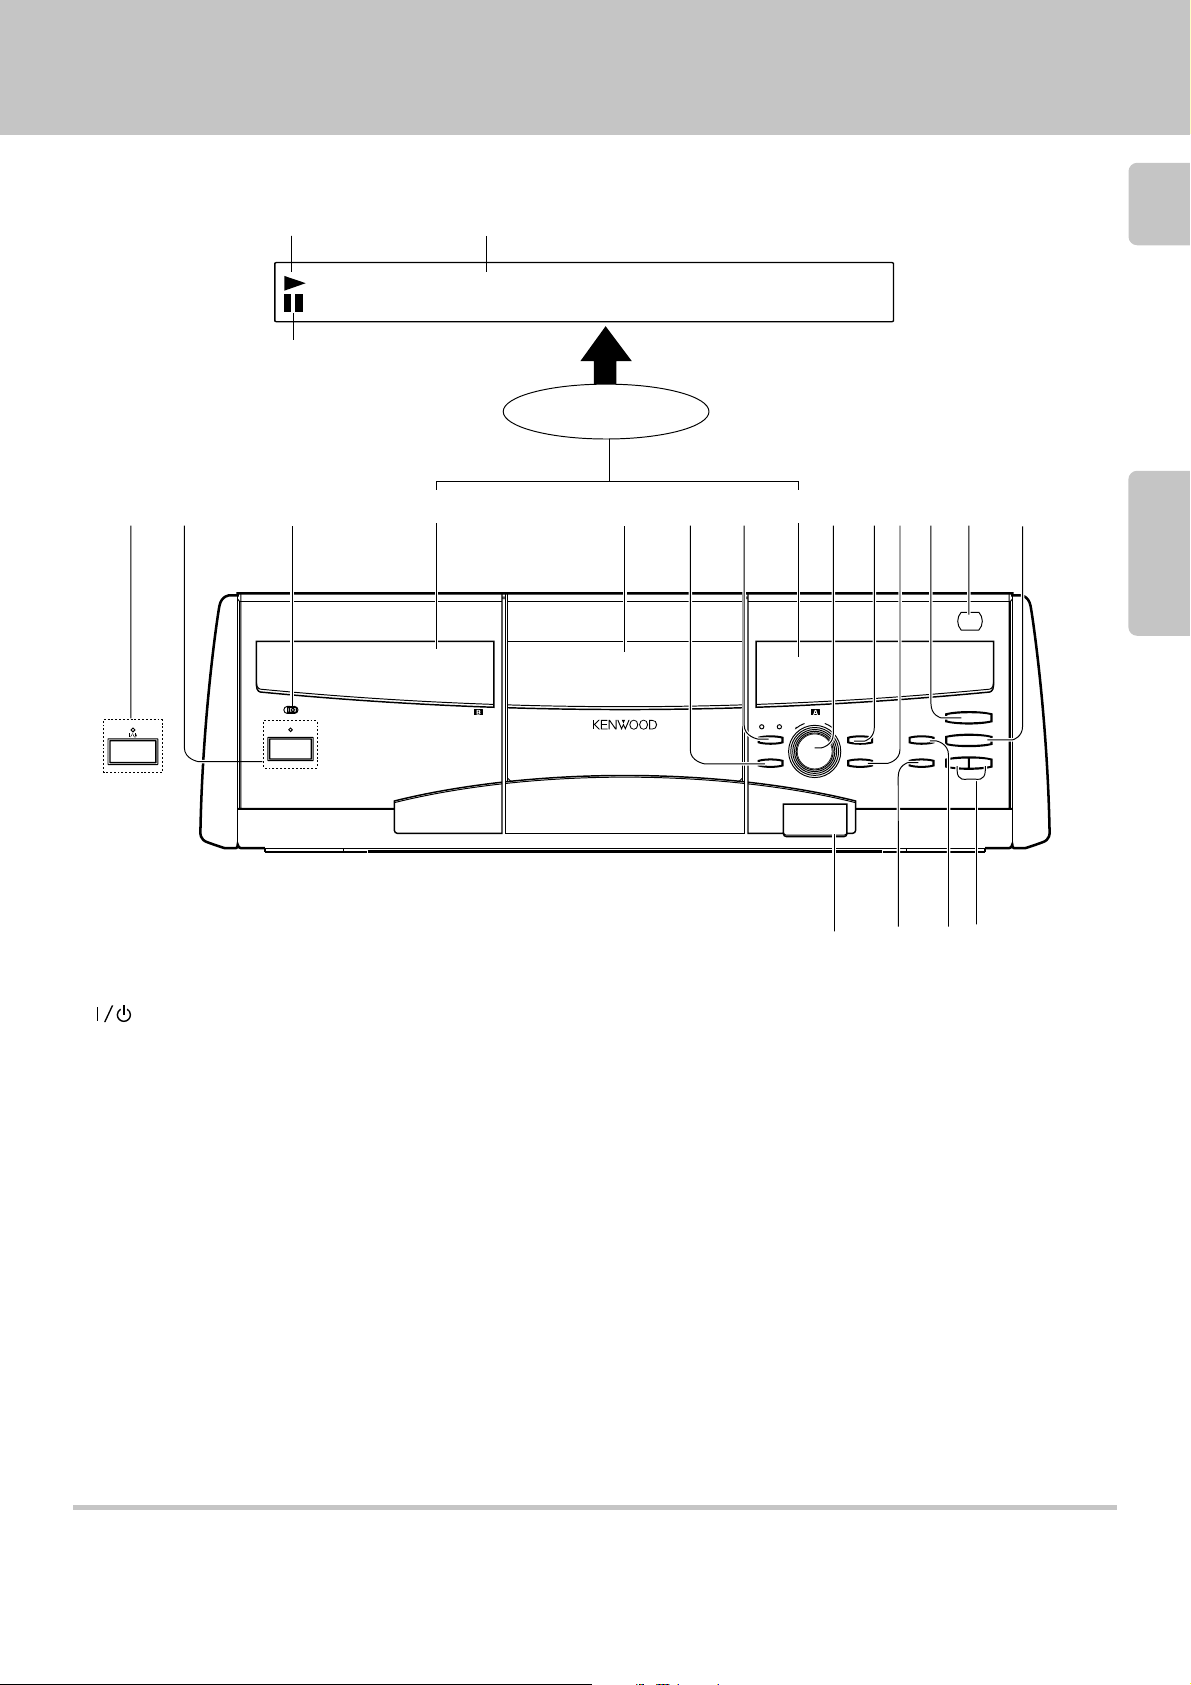
Front Panel
Operation of remote control unit
Play indicator
Text information display
(The displays given in this manual are approximations only. They may differ
from what actually appears on the display.)
•• •• •• •• •• •• •• •
Pause indicator
DISPLAY
11 2 4 567890!@#
TIMER PLAY
STANDBY
ON/STANDBY
OFF ON
STANDBY
POWER
ON/STANDBY
3
DISPLAY
o PUSH OPEN
)
|
DISPLAY
B A
OPERATION
RANDOM
|
DISC SKIP
CONFIRM
REPEAT
CONTINUOUS PLAY
DISPLAY
^
&
$ ›
11
Chapter 1 Chapter 2 Chapter 3 Chapter 4 Chapter 5 Chapter 6 Chapter 7
1 POWER button/STANDBY indicator (For U.S.A.)
button/STANDBY indicator (For other countries)
2 TIMER PLAY switch
3 Player B display
4 Disc door
5 RANDOM button
6 OPERATION A-B button
7 Player A display
8 DISC SKIP knob
Used for disc selection. Characters are selected at the time of
character input.
9 CONFIRM button
$%^&
0 REPEAT button
! Play/Pause (6) button
@ Remote sensor
# Stop (7) button
$ LCD remote transmitter
The disc and track title data are output to the LCD remote control
unit (provided with a KENWOOD Receiver or optional) through this
window.
% DISPLAY button
^ CONTINUOUS PLAY button
& Track skip button (4, ¢)
Press to skip to the beginning of another track.
Characters are selected at the time of title registration.
Standby mode
While the standby indicator of the unit is lit, a small amount of current is flowing into the unit’s internal circuitry to back up the memory. This condition is
referred to as the standby mode of the unit. While the unit is in the standby mode, it can be turned ON from the remote control unit.
Page 12
Operation of remote control unit
12
Front Panel Displays
Your CD changer’s front panel has one display for each player it contains. These displays show information about the disc or
track currently being played. Since some of the text information may be longer than can be displayed on one line, the text
information scrolls, if necessary.
Basic Info/Time Info
This display shows basic information like disc and track numbers as well as disc and track-specific time information (elapsed and remaining).
To change the display :
Chapter 1Chapter 2Chapter 3Chapter 4Chapter 5Chapter 6Chapter 7
1. Choose a player A or B.
2. Press the DISPLAY button on the front panel, remote, or the keyboard until the information you want appears.
The panel display shows the following:
1 Track title display (if the CD contains encoded title data or if you have entered title data)
*
OCCENTR NOISN CD T
2 Disc number/Track number display (the default if there is no title information)
IDC1S32TRCA0K1
3 Disc title display (if the CD contains encoded title data or if you have entered title data)
OLEEVOLEV I OLEV T
4 Elapsed time of current track
Disc # Track # Time
1D3E201 N0I2N 3:7
5 Remaining time of current track
Disc # Track # Time
1D3E201 N0I1-2:3
6 Elapsed time of current disc
Disc # Track # Time
During Stop
÷In the TRACK mode, MUSIC TYPE
mode, information is displayed in
order of 3, 2 then 4.
÷In the PGM mode, information is
displayed in order of 1, 2, 3 then
4.
÷In the TRACK mode, information is
displayed in order of 1, 2, 3, 4,
5, 6 then 7.
÷In the PGM mode, RANDOM
mode, MUSIC TYPE mode and
BEST SELECTION mode, information is displayed in order of 1,
2, 3, 4 then 5.
During Play
Front Panel
1D3E201 -0 3:652T
7 Remaining time of current disc
Disc # Track # Time
1D3E201-0 2:354T
Complete CD-Text Info (Player A only)
In the case of a CD-TEXT disc, the text information shown below is displayed automatically during normal play (TRACK mode).
To view complete text information :
1. Press MODE button on the remote or keyboard.
2. Use DISC SKIP (DOWN/UP) button on the remote or keyboard to select “ALL INFORMATION”.
3. Press SET button on the remote or keyboard. The display cycles through the following:
1 Disc/Track Title
2 Disc/Track Artist
3 Disc/Track Songwriter
4 Disc/Track Composer
5 Disc/Track Arranger
6 Disc/Track Message (such as a message from a sponsor or artist)
7 ID INFO. (such as record company, release date, etc.)
8 Genre INFO.
÷Items from 1 to 6 are displayed in the sequence of disc and track.
÷If there is no information for any given area, the panel displays “-----”. If the disc does not have factory-encoded CD Text disc or track information,
“NO CD TEXT” appears for 3 seconds.
To view the next or previous information item, use DISC SKIP (DOWN/UP) button on the remote or keyboard.
To skip tracks, use Skip (4,¢)(DOWN/UP) button on the remote or keyboard.
To stop viewing text information, press MODE button on the remote or keyboard.
With a CD-TEXT disc, disc and track titles can be displayed without the limit on the number of characters when “ALL INFORMATION” is set.
Note
NoteNote
The disc and track titles are also displayed without the limit on the number of characters during playback or loading of a CD-TEXT disc.
Page 13
10-key Remote and Keyboard
All operations can be controlled from both the 10-Key Remote and Keyboard remote control units.
Operation of remote control unit
10-key Remote
The buttons with the same name as those on the main unit operate the same way as on the main unit.
The buttons marked
B indicator on the main unit is lit or not.
5
6
Model : RC-P0713
(Player A only)
Infrared ray system
* are provided only on the remote control unit. The remote control unit controls Player A regardless of whether the OPERATION A-
1 POWER ( )
2 Buttons for modes, display control and letters
÷ CONFIRM
CONTINUOUS
PLAY
CONFIRM
A
B
BEST
SELECTION
REPEAT
D
E
1
H
I
5
L
M
9
P
Q
.
–
T
U
DISC
(
SELECTOR
X
Y
DELETE
SPACE
/CLEAR
/CHECK
DISC SKIP
DOWN
UP
CURSOR
LEFT
RIGHT
1
¡
REMOTE CONTROL UNIT
RC-P0713
SUB OUT
MONITOR
POWER
C
RANDOM DISPLAY
F
G
324
J
K
768
O
N
+100 +100
R
S
/
'
V
W
)
MODE
Z
CHARAC.
SET
P.MODE
ENTER
6
7
CHARACTER
DOWN
UP
4¢
1
2
3
4
÷ CONTINUOUS PLAY
÷ SUB OUT MONITOR *
Used to monitor the audio played on Player B.
÷ BEST SELECTION *
Used for best selection registration and playback.
÷ REPEAT
÷ RANDOM
÷ DISPLAY
3 Buttons for selecting discs and entering special characters
÷ DISC SELECTOR *
Press to select a disc number.
÷ Letter/special character buttons *
Used for selection of disc numbers, as well as for character input.
4 Buttons for basic operation
÷ Stop (7)
÷ ENTER/Play/Pause (6)
÷ Search (1, ¡), CURSOR (LEFT/RIGHT) *
Press to move the played position of disc at high speed. Used as cursor buttons at the time
of character input.
÷ Skip (4,¢), CHARACTER (DOWN/UP)
5 Buttons for entering numbers and letters *
Used for selection of disc numbers and track numbers, as well as for character input.
13
Chapter 1 Chapter 2 Chapter 3 Chapter 4 Chapter 5 Chapter 6 Chapter 7
6 Buttons for programming and data entry
÷ MODE *
Press to switch the mode.
÷ DELETE/CLEAR *
Used to delete the entered contents. At the time of character input, characters are deleted.
÷ SPACE/CHECK *
Used to confirm the entered contents. Inserts a space at the time of character input.
÷ CHARAC./P. MODE *
Used for playback mode switching. At the time of character input, this button switches
between capital letters/small letters/numbers and special characters.
÷ SET *
Used for confirmation of mode settings. At the time of character input, one character is
confirmed and the cursor goes to the next digit.
÷ DISC SKIP (DOWN/UP)
Page 14
14
Keyboard
The buttons with the same name as those on the main unit operate the same way as on the main unit.
The buttons marked
Buttons masked with
* are provided only on the remote control unit.
are not used with this unit.
You can use the keyboard to control both players. To control Player A, press the keyboard buttons as normal.
To control Player B, hold down while ROOM B button pressing the keyboard buttons you need.
73
Chapter 1Chapter 2Chapter 3Chapter 4Chapter 5Chapter 6Chapter 7
2
REMOTE CONTROL UNIT RC-KB2
Operation of remote control unit
10-key Remote and Keyboard
4
5
1
3
6
8
POWER CONFIRM BEST
!
1
DISC
QWERT YUI OP
SEL.
SHIFT
ROOM
CONT
B
PLAY
REPEAT RANDOM DISPLAY
SEL.
@
#
2
ASDFGHJKL
ZXCVBNM
SUB
OUT
MONIT.
$
3
4
SPACE
TITLE
USER
INPUT
%
5
+10 +100
FILE
NAME
^
&
6
7
2
Buttons inside
1 Input buttons for numbers and letters *
Used for selection of disc numbers and track numbers, as well as
for character input.
÷ 0~9 *
2 Buttons related to playback mode and display
÷ CONFIRM
÷ CONT PLAY
÷ SUB OUT MONIT. *
Used to monitor the audio played on player B.
÷ BEST SEL. *
Used for best selection registration and playback.
÷ REPEAT
÷ RANDOM
÷ DISPLAY
3 Disc selection buttons
÷ +10 *
÷ +100 *
÷ DISC SEL. *
Press to select a disc number.
÷ DISC SKIP (DOWN/UP)
4 Buttons for basic operation and character input
÷ Stop (7)
÷ Play/Pause (6)
÷ Skip (4, ¢)
÷ Search (1, ¡) *
Press to move the played position of disc at high speed.
÷ CHARAC. SRCH UP/DOWN *
Characters are selected at the time of character input.
÷ CURSOR (L/R) *
Used as cursor buttons at the time of character input.
are those for use with ROOM B.
764¢1¡
()
✱
8 9
<
,
CURSOR
L
-
0
:
;
>
?
/
.
CURSOR
CHARAC.
R
SRCH
DOWN
5 POWER (
6 Buttons related to program and file registration
7 Shortcut button to the TITLE INPUT mode
8 ROOM B *
DELETE
+
=
CHECK CLEAR
P.MODE
,
,,
ENTER SET
,
6
8
CHARAC.
SRCH
UP
SHIFT
DISC
SKIP
DOWN
MODE
ROOM
DISC
B
SKIP
UP
3
4
Adjust the keyboard
height as required.
Model : RC-KB2
Infrared ray system
)
÷ MODE *
Press to switch the mode.
÷ SET *
Used for confirmation of mode settings. At the time of character
input, one character is confirmed and the cursor goes to the next
digit.
÷ ENTER *
Used for title confirmation.
÷ SHIFT *
(This button is provided only on the Keyboard.)
At the time of character input, this button switches between
capital letters/small letters/numbers and special characters.
÷ P.MODE *
Used for playback mode switching.
÷ CHECK *
Used to confirm the entered contents.
÷ SPACE *
Inserts a space at the time of character input.
÷ DELETE *
At the time of character input, characters are deleted.
÷ CLEAR *
Used to delete the entered contents.
(This button is provided only on the Keyboard.)
÷ TITLE INPUT *
(This button is provided only on the Keyboard.)
Press when controlling Player B.
Page 15

Operation of remote control unit
15
Chapter 1 Chapter 2 Chapter 3 Chapter 4 Chapter 5 Chapter 6 Chapter 7
Page 16

Chapter 3 : Loading and Playing Discs
Your new CD changer contains a disc carousel that can store and play up to 200 discs using any
16
Preparation
of the following methods :
÷ Normal Play, where you play each disc in the order loaded
Normal play (TRACK mode), where the CD changer acts like a regular CD player, playing the next disc in the queue from start
to finish, then stopping.
See “Normal play (TRACK mode)”
÷ Repeat Play, which plays the tracks or discs over and over
Chapter 1Chapter 2Chapter 3Chapter 4Chapter 5Chapter 6Chapter 7
Repeat mode where the CD changer plays a particular disc or set of tracks over and over.
See “Repeated playback (REPEAT mode)”
÷ Random Play, which plays the tracks on the loaded CDs in random order
Random mode where the CD changer plays all tracks on all discs loaded in the carousel in random order, without repeating any
tracks.
See “Playback in a random order (RANDOM mode)”
÷ Programmed play order
See “Programming tracks in desired order (PGM mode)” ¢
÷ Continuous Play, which lets your CD changer function as your own personal jukebox, providing continuous
music — a CD plays on one player while the next CD is queuing up on the other
Continuous mode where the CD changer uses both players to provide seamless continuous audio—while a disc plays on one
player, another is queued on the second player.
See “Continuous playback”
÷ Timed Play, where you use an optional audio timer to automatically begin playing all CDs or only specified
CDs
See “Timer operation” ¶
÷ Internal processing that recognizes and stores disc data such as DTS registration
See “Registration of DTS discs” •
(
™
£
§
Your CD changer includes a standard remote and a remote keyboard (for easier text entry).
You can use either device to control the changer. For the sake of simplicity, this manual provides standard remote instructions for all functions except text entry.
The keyboard enables you to operate either player. To operate player A, press the keyboard buttons as
normal. To operate player B, hold down ROOM B button while pressing the appropriate keyboard buttons.
Page 17

Preparation
NoteNote
Note
Up to 200 CDs can be loaded in the carousel. Disc exchange
also is possible during playback.
Never let your hand or any object enter inside the unit.
Preparation
17
Loading discs in the carousel
Switch power ON.
1
Press the POWER ( ) button.
Open the disc door toward the front.
2
Load discs.
3
1 Turn the DISC SKIP knob and bring the slot with
the disc to be placed to the front.
STANDBY
POWER
ON/STANDBY
Press PUSH OPEN at the right top of
the disc door.
Main unit
Chapter 1 Chapter 2 Chapter 3 Chapter 4 Chapter 5 Chapter 6 Chapter 7
÷ Do not place any object on the open disc door.
DISPLAY-A (or DISPLAY-B)
IDCS001 E:132•
Carousel
2 Insert the disc vertically.
Insert CDs with the label side
facing toward your right.
3 Repeat 1 and 2 to insert discs.
Close the disc door.
4
Disc slot
Insert one CD per slot all the way.
The slot No. is displayed when the DISC SKIP knob is turned.
DISPLAY-B (or DISPLAY-A)
OCOC PONE OSUCET
Insert discs with the label on the right side. Playback is not
possible when a disc is inserted the other way round.
÷Do not insert more than one disc in a slot.
÷When a disc not corresponding to CD-TEXT is inserted, searching for
this disc will be facilitated when the title is registered at the time of disc
insertion.
“Registration of Title”
÷When a title has been registered and the disc door is closed, reading
operation is performed automatically.
º
DISPLAY-A : The display flashes.
IDCSDC TECEIT 3O
N N
Page 18

18
Disc replacement
Discs can be replaced with the same procedure as “Loading discs
in the carousel”. In stopped condition, all discs can be exchanged.
However, when the disc door is opened while “DISC DETECTION” is being displayed, it may not be possible to remove the
disc which had been played. Accordingly, wait for the “DISC
DETECTION” indication to go out before opening the disc door.
When the disc information has been read in at the time of registration of disc information like title, music type, etc., the disc
Chapter 1Chapter 2Chapter 3Chapter 4Chapter 5Chapter 6Chapter 7
information can be recalled even when the disc insertion place
is changed.
Selecting Player A or B
The audio played on Player A is output from OUTPUT-A and that
played on Player B is output from OUTPUT-B. This makes it possible to enjoy different music in different rooms.
Preparation
⁄
B A
OPERATION
In regard to ALL DATA READ mode
The disc information for all discs will be read. It is convenient to
execute this mode before playback after discs have been exchanged.
Close the disc door before operation.
Main unit
(Player A only)
1 Press the MODE button.
MODE
2 Select “ALL DATA READ”.
DISC SKIP
DOWN
UP
÷ Each press of the button switches Players A and B alternately and lights
the indicators accordingly.
÷ After selecting the Player, operate the player.
÷ The OPERATION A-B button is set to A during continuous play mode.
It is not possible to switch the Player during it.
÷If a registered DTS disc is selected when the Player B is selected,
blinking “DTS DISC!“ is displayed and the DTS disc selection is
cancelled.
To display the title on a LCD remote control unit (provided
with a KENWOOD Receiver or optional), perform the all data
read operation first, and operate the LCD remote control unit
with the door left closed. For the operation of the LCD
remote control unit, refer to the instruction manual provided
with your receiver or LCD remote control unit.
•
Each press switches the modes as follows:
1 MUSIC TYPE
2 DISC SEARCH
3 TITLE INPUT
4 ALL DATA READ
5 ALL INFORMATION
6 DTS DISC SKIP
DISPLAY-A
LAL ADATRAE 3D
Search in progress or
reading information The display flashes.
DD SI CCERDANI 3G
3 Set the input.
SET
When the disc is CD-TEXT
0D10:: DCTA XE 3T
÷ Repeat the above procedure so that the complete disc information is
read into the CD player.
÷ In the case of a non-CD-TEXT disc, the “D001:NO CD TEXT” display
will appear for approx. 3 seconds.
÷ This operation is not available during the continuous play mode.
To quit ALL DATA READ mode
Press the 7 button.
1. Please remove all CDs from the carousel before moving the unit.
Notes
Notes
2. If blinking “PLEASE WAIT“ is displayed when the disc door is opened, do not attempt to change the disc.
Page 19

Normal play
(TRACK mode)
Normal play (TRACK mode)
Preparation
÷Select the Player A or Player B. *
The 10-key remote is not capable of controlling Player B. It should
be controlled from the keyboard. Be sure to hold the ROOM B
button when controlling Player B.
Playing tracks in order from track No.1
Use the following procedure to play a CD in the original order of tracks from track No.1.
Select the disc.
1
÷Each press of a button increases (or decreases) the disc number.
Holding the button depressed varies the disc numbers successively.
÷When the disc corresponds to CD-TEXT, or when the disc title has been
registered, the disc title will be displayed with scrolling. Discs can be
selected by the disc title.
“Registration of Title” º
Display when disc No. 123 is selected
Previous disc
DISC SKIP
DOWN UP
Next disc
Go to step 2 within 8 sec.
19
Chapter 1 Chapter 2 Chapter 3 Chapter 4 Chapter 5 Chapter 6 Chapter 7
Start playback.
2
ENTER
6
To pause playback
ENTER
6
÷Each press pauses and plays the CD alternately.
1D32 :132
÷When the disc corresponds to CD-TEXT, or when the track titles have
been registered, the track title is displayed.
÷If the selected disc is being played on the other player, blinking
“DISCXXX BUSY!” is displayed and the disc will not be played.
For continuous playback
Press the CONTINUOUS PLAY button.
To stop playback
7
In regard to SUB OUT MONITOR
SUB OUT
MONITOR
C
Press the SUB OUT MONITOR button to output the audio played
on Player B from OUTPUT-A. Each press of the button switches
this feature on and off alternately.
DISPLAY-A
US OBUO NTOMINOTR
÷This operation is not available during the continuous play mode.
Page 20

Direct disc selection
20
1 Press the DISC SELECTOR button.
Within 8 seconds!
DISC
SELECTOR
X
Normal play (TRACK mode)
Press the numeric buttons in the following order...
Disc No. 63 : 6, 3
Disc No. 100 : 1, 0, 0
÷If the selected disc is being played on Player B, blinking “DISCXXX
BUSY!” is displayed and the disc will not be played.
Chapter 1Chapter 2Chapter 3Chapter 4Chapter 5Chapter 6Chapter 7
2 Input the disc number.
1
HIJK
5
LMN
9
PQRS
Within 8 seconds!
324
768
O
+100 +100
3 Start playback.
ENTER
6
What is the “normal play TRACK mode”?
Playback is made from the first track. The normal playback mode
is called TRACK mode. Press the CONFIRM button to confirm the
present mode.
CONFIRM
A
How to input numeric values
The input method for this product is of two different types. One
can either use the traditional KENWOOD +10 button approach,
or direct numeric input.
Special input method for CD player with 200-disc changer
To input 42 : 4, 2
To input 115 : 1, 1, 5
To input 200 : 2, 0, 0
Same input method as other KENWOOD products
To input 42 : +10, +10, +10, +10, 2
To input 115 : +100, +10, 5
To input 200 : +100, +100
To set the unit to the TRACK mode:
At the time of PGM mode:
Press the P.MODE button.
CHARAC.
/P.MODE
TRACK mode
RTCA 0KD1 21 :00T2
PGM mode
GP0M 01D1 31 :10T2
BEST SELECTION mode
EBTS10D1 01 :40T3
MUSIC TYPE mode
.MYTEP D1 hRtymh 2
RANDOM mode
NO 0EIDCSR1 NAODM
REPEAT mode
GP EREPTAO1:N 0T2
At the time of BEST SELECTION mode:
Press the 7 button during playback.
7
At the time of MUSIC TYPE mode:
Press the MODE button.
MODE
At the time of RANDOM mode:
Select “RANDOM OFF”.
RANDOM
F
At the time of REPEAT mode:
Select “REPEAT OFF”.
REPEAT
E
Page 21

Normal play (TRACK mode)
1D3208 :132
Preparation
÷Select the Player A or Player B. *
Playback from desired track
Select the disc.
1
1 Select the disc number.
Previous disc
Within 8 seconds!
2 Set the input.
DISC SKIP
DOWN UP
Next disc
SET
Go to step 2 within 8 sec.
The 10-key remote is not capable of controlling Player B. It should
be controlled from the keyboard. Be sure to hold the ROOM B
button when controlling Player B.
Display when disc No. 123 is selected
1D32 :132
÷The disc number can be selected directly by using the DISC SELECTOR
and numeric buttons in place of the DISC SKIP (DOWN/UP) buttons.
÷When the disc corresponds to CD-TEXT, or when the disc title has been
registered, the disc title will be displayed with scrolling. Discs can be
selected by the disc title.
“Registration of Title” º
÷Repeat step 1 when it is required to change the disc number.
21
Chapter 1 Chapter 2 Chapter 3 Chapter 4 Chapter 5 Chapter 6 Chapter 7
Select the track number.
2
1 Input the track number.
Within 8 seconds!
2 Set the input.
Skipping tracks
1
HIJK
5
LMN
9
PQRS
CHARACTER
DOWN
4¢
324
768
O
+100 +100
SET
UP
To skip forwardTo skip backward
Press the numeric buttons in the following order...
Track No.8 : 8
Track No.14 : 1, 4
Track No.20 : 2, 0
Display when track No. 8 is selected
÷When the disc corresponds to CD-TEXT, or when the track titles have
been registered, the track title is displayed. Tracks can be selected by
the track title.
“Registration of Title”
÷Playback starts.
÷If the selected disc is being played on the other player, blinking
“DISCXXX BUSY!” is displayed and the disc will not be played.
÷Repeat step 2 when it is required to change the track number.
º
Searching
CURSOR
LEFT RIGHT
1¡
Backward search Forward search
÷When the 4 button is pressed once during playback, the track being
played will be played from the beginning.
÷Playback starts from the position where the button is released.
Page 22

Repeated playback
(REPEAT mode)
22
Preparation
÷Select the Player A or Player B. *
Chapter 1Chapter 2Chapter 3Chapter 4Chapter 5Chapter 6Chapter 7
To repeat only the desired tracks (Player A only)
Programming tracks in desired order (PGM mode) (Player A only)
The 10-key remote is not capable of controlling Player B. It should
be controlled from the keyboard. Be sure to hold the ROOM B
button when controlling Player B.
1 Program the desired tracks by performing steps 1
to 3 of “Programming tracks in desired order”.
2 Switch REPEAT ON.
REPEAT
E
3 Start playback.
ENTER
6
To repeat one selected disc
1 Check that the Player is in the normal play TRACK
mode.
2 Select the disc number.
Previous disc Next disc
DISC SKIP
DOWN UP
÷Up to 32 tracks can be programmed by repeating steps 1.
¢
GP EREPTAO2DN 0T3
÷The current status is displayed when the button is pressed once. When
it is pressed while the status is displayed, the repeat ON status can be
set to OFF (or vice versa).
÷All of the programmed tracks will be repeated.
÷If a track to be played is located in the disc played on Player B, that track
will be skipped.
÷In case only one track is programmed, only that track will be repeated.
To cancel repeated playback
Press the REPEAT button twice. (REPEAT ON → OFF)
)
÷The disc number can be selected directly by using the DISC SELECTOR
and numeric buttons in place of the DISC SKIP (DOWN/UP) buttons.
Within 8 seconds!
3 Start playback.
ENTER
6
4 Switch REPEAT ON.
REPEAT
E
For random repetition
For music type or user file repetition
For best selection repetition
÷If the selected disc is being played on the other Player, blinking
“DISCXXX BUSY!” is displayed and the disc will not be played.
GP EREPTAO2DN 0T3
÷The current status is displayed when the button is pressed once. When
it is pressed while the status is displayed, the repeat ON status can be
set to OFF (or vice versa).
÷The operation is not available during the continuous play mode.
To cancel repeated playback
Press the REPEAT button twice. (REPEAT ON → OFF)
£
fi
°
Page 23

Playback in a random order
Use the following procedure to activate random playback
which selects a track at random after every track. This feature may allow you to play CDs for long hours without
getting tired of.
(RANDOM mode)
Programming tracks in desired order (PGM mode) (Player A only)
23
Preparation
Check that the Player is in the normal play
1
÷Select the Player A or Player B. *
TRACK mode.
Select discs.
2
To select one disc
1 Select the disc number.
Previous disc
Within 8 seconds!
2 Start playback.
3 Select “ONE DISC RANDOM”.
DISC SKIP
DOWN UP
ENTER
6
RANDOM
F
Next disc
)
The 10-key remote is not capable of controlling Player B. It should
be controlled from the keyboard. Be sure to hold the ROOM B
button when controlling Player B.
÷The disc number can be selected directly by using the DISC SELECTOR
and numeric buttons in place of the DISC SKIP (DOWN/UP) buttons.
÷If the selected disc is being played on the other Player, blinking
“DISCXXX BUSY!“ is displayed and the disc will not be played.
÷“ONE DISC RANDOM“ cannot be selected during the continuous play
mode.
Each press switches the modes as follows:
1 ONE DISC RANDOM
2 ALL DISC RANDOM
3 RANDOM OFF
RANDOM
F
><<>< E<10>2><>
The number here changes.
÷Each time a track ends, the same operation as above is repeated,
and the track selected next is played.
÷Random play stops after all of the tunes have been played once.
Chapter 1 Chapter 2 Chapter 3 Chapter 4 Chapter 5 Chapter 6 Chapter 7
÷If a track to be played is located in the disc played on the other Player,
that track will be skipped. (This track will not be selected later unless
the REPEAT mode is set.)
To select all discs
Select “ALL DISC RANDOM”.
RANDOM
F
For repeated playback
Press the REPEAT button to select “REPEAT ON”.
For continuous playback (ALL DISC RANDOM only)
Press the CONTINUOUS PLAY button.
To select another track in the middle of playing one To cancel random playback
CHARACTER
DOWN UP
4¢
÷Pressing the 4 button once returns to the beginning of the track being
played.
For random music type or random user file
fi
7
÷Press the 7 button to stop playback.
÷Normal playback will be performed when RANDOM OFF is selected.
Select “RANDOM OFF”.
or
RANDOM
F
Page 24

GP0M E12D00T1 -- C
Programming tracks in desired order
Use the following procedure to select desired tracks (up to
32 tracks) from different discs and program them in the
24
desired order.
Programming tracks in desired order (PGM mode) (Player A only)
(PGM mode)(Player A only)
Preparation
Chapter 1Chapter 2Chapter 3Chapter 4Chapter 5Chapter 6Chapter 7
Press so that the “PGM” indicator lights.
1
Select the disc.
2
1 Select the disc number.
÷Set the Player A to stop mode.
CHARAC.
/P.MODE
DISC SKIP
DOWN UP
Previous disc Next disc
Within 8 seconds!
DISPLAY-A
GP 3MESELTCD1 SIC
GP0M E12D00 D1SIC
2 Set the input.
Select the track number.
3
1 Input the track number.
1
HIJK
5
LMN
9
PQRS
Within 8 seconds!
2 Set the input.
Start playback.
4
SET
Go to step 3 within 8 sec.
324
768
O
+100 +100
SET
ENTER
6
÷The disc number can be selected directly by using the DISC SELECTOR
and numeric buttons in place of the DISC SKIP (DOWN/UP) buttons.
÷When the disc corresponds to CD-TEXT, or when the disc title has been
registered, the disc title will be displayed with scrolling. Discs can be
selected by the disc title.
“Registration of Title” º
÷If you make a mistake, press the CLEAR button and enter the disc No.
from the beginning.
Press the numeric buttons in the following order...
Track No.8 : 8
Track No.14 : 1, 4
Track No.20 : 2, 0
÷To program the entire disc, press the SET button without inputting the
track number. “ALL” will be displayed.
÷When the disc corresponds to CD-TEXT, or when the track titles have
been registered, the track title is displayed. Tracks can be selected by
the track title.
“Registration of Title”
÷Program other tracks in the desired order by repeating steps 2 and 3.
÷Up to 32 tracks can be programmed. “FULL” is displayed when no
more tracks can be programmed.
÷If you make a mistake, press the CLEAR button and restart from step
2.
÷Tracks will be played in the order they are programmed.
÷If a track to be played is located in the disc played on Player B, that track
will be skipped.
÷When the 4 or ¢ button is pressed during playback, the track will
be skipped in the direction of the pressed button.
º
For continuous playback
Press the CONTINUOUS PLAY button.
Page 25

Programming tracks in desired order (PGM mode) (Player A only)
25
Chapter 1 Chapter 2 Chapter 3 Chapter 4 Chapter 5 Chapter 6 Chapter 7
To check the programmed tracks
SPACE
/CHECK
To add a track to the program
1 Set the Player A to stop mode.
2 Perform steps 2 and 3 of “Programming tracks in
desired order”.
To change a track in the program
1 Set the Player A to stop mode.
2 Press the CHECK button.
SPACE
/CHECK
DISPLAY-A
GP0M E1DD02 D00T3
÷Each time the button is pressed, the program No. and the disc No. are
displayed.
÷The previous display resumes in a few seconds.
÷When a track No. is entered, the track will be added to the end of the
existing program.
¢
÷Press the CHECK button repeatedly until the program No, to be
changed is displayed.
DISPLAY-A
GP0M E1DD02 D00T3
3 Perform steps 2 and 3 of “Programming tracks in
desired order”.
To clear tracks from the program
To clear tracks from the end To clear all tracks
DELETE
/CLEAR
÷Each time the button is pressed, the last track in the program is cleared.
÷The tracks which are programmed earlier than the track being played
cannot be cleared.
¢
÷Press it while the “PGM01” indicator blinks.
÷The track being played cannot be changed.
÷When the P.MODE button is pressed during playback, playback in order
of tracks starts from the track being played.
Example
≠
CHARAC.
/P.MODE
Page 26

Continuous playback
With this feature, the time required for disc change can be
minimized so even different discs can be played naturally
26
and almost continuously. The same audio signal is output
at both OUTPUT-A and OUTPUT-B.
Preparation
Chapter 1Chapter 2Chapter 3Chapter 4Chapter 5Chapter 6Chapter 7
÷Close the disc door. &
÷Set the Player B to stop mode.
Initiate the continuous play mode.
CONTINUOUS
PLAY
B
DISPLAY-B
OCTNNIOUSUPU ALY
÷The OPERATION A-B button is set to A during continuous play mode.
÷When the disc door is opened, the continuous play mode is released
and playback also stops.
÷It is not possible to select a DTS disc during continuous play mode.
To quit continuous play mode
Press the CONTINUOUS PLAY button.
For continuous playback in normal play mode
For continuous playback in PGM mode
(
¢
For continuous playback in ALL DISC RANDOM mode
£
For continuous playback in MUSIC TYPE PLAY mode
fi
For continuous playback in BEST SELECTION mode
°
Page 27

Timer operation
(Player A only)
As this unit incorporate the timer standby function, playback can be started at desired moment if a commercially
available audio timer is combined with this unit.
Preparation
Set the power switches of the system compo-
1
nents to the ON positions.
Select the disc to be played.
2
1 Select the disc number.
Previous disc
÷Select the Player A. *
÷Connect the system components so that
their power can be switched on by the timer.
÷Read the instruction manual of the timer
carefully.
DISC SKIP
DOWN UP
Next disc
Audio timer
12:00
Receiver or Amplifier
This unit
÷The disc number can be selected directly by using the DISC SELECTOR
and numeric keys in place of the DISC SKIP (DOWN/UP) buttons.
Audio cable
To AC outlet
27
Chapter 1 Chapter 2 Chapter 3 Chapter 4 Chapter 5 Chapter 6 Chapter 7
Within 8 seconds!
2 Play the disc.
ENTER
6
Set the listening volume.
3
1 Adjust the volume on the amplifier or receiver.
2 Stop playback.
Set the timer for the desired ON time.
4
Set the TIMER PLAY switch to ON.
5
÷If the selected disc is being played on Player B, blinking "DISCXXX
BUSY!" is displayed. In this case, either stop Player B and select the
same disc again, or select another disc.
÷Read the instruction manual of the timer carefully.
TIMER PLAY
OFF ON
Main unit
÷When the set time comes, playback will start automatically.
÷The playback mode will be TRACK mode.
Page 28

Registration of DTS discs
When playing DTS-encoded discs, excessive noise will be exhibited from the analog stereo outputs. If DTS discs are registered beforehand, the audio signal from the Player B (analog OUTPUT-B) is skipped. Use the following procedure before
28
playing the DTS disc.
Preparation
Chapter 1Chapter 2Chapter 3Chapter 4Chapter 5Chapter 6Chapter 7
Activate the dts disc skip mode.
1
1 Press the MODE button.
2 Select “DTS DISC SKIP”.
Select “SET DTS DISC“.
2
DOWN
DOWN
÷Load DTS discs into the carousel. &
÷Check that the Player A is in the normal play
TRACK mode.
MODE
DISC SKIP
UP
SET
\
DISC SKIP
UP
SET
\
)
÷When the MODE button is pressed during DTS DISC SKIP mode, the
DTS DISC SKIP mode is cancelled.
Each press switches the modes as follows:
1 MUSIC TYPE
2 DISC SEARCH
3 TITLE INPUT
4 ALL DATA READ
5 ALL INFORMATION
6 DTS DISC SKIP
Each press switches the modes as follows:
1 SET DTS DISC
2 CANCEL DTS DISC
Select the DTS disc.
3
Select the disc number.
DISC SKIP
DOWN UP
Previous disc Next disc
SET
\
÷The disc number can be selected directly by using the numeric keys in
place of the DISC SKIP (DOWN/UP) buttons.
÷To register another DTS disc, repeat the procedure from step 3.
DISPLAY-A
0D10DI STSU TE A? Y
To quit DTS DISC SKIP mode
Press the MODE button.
To delete the DTS registration
Use the following procedure before moving or changing a DTS disc, and register the disc again.
1 Perform steps 1 of “Registration of DTS discs“.
2 Select “CANCEL DTS DISC“.
DISC SKIP
DOWN
UP
\
3 Select the DTS disc to be deleted.
DISC SKIP
DOWN UP
Previous disc Next disc
\
SET
SET
Each press switches the modes as follows:
1 SET DTS DISC
2 CANCEL DTS DISC
DISPLAY-A
0D10DI STCU NA.C?
To quit DTS DISC SKIP mode
Press the MODE button.
Note
Note
When a DTS disc is played, the audio signal is not output at the analog OUTPUT A jacks.
Page 29

Chapter 4 : Specifying and Using Disc or Track Data
Registration of Title
Thanks to sophisticated design and onboard memory storage, your CD changer can read and store additional
information about the discs you load, enabling you to choose discs by title information rather than just disc
position.
This memory feature means you don’t have to remember what disc is stored in which slot or spend time creating
a list of what you’ve loaded.
Here’s how it works: every CD has an unique ID code embedded in it. The changer reads this code and associates
with it any other information that it reads or that you enter for the disc. It stores the information internally so
that when you load or play the disc, the changer still contains the disc and track titles (among other things).
NotesNotes
Notes
1. Your CD changer will recall information read in at the time of registration even when the disc insertion place is changed.
2. Your changer stores this information for up to 210 discs, which allows you to rotate discs between the changer and
another CD player (for example, in your car) without losing any information read.
The CD changer can :
÷ read data from discs containing encoded CD Text information
÷ store disc and title information you enter using the 10-key remote, keyboard and LCD remote*.
÷ allow you to use the read or entered data to select discs
÷ allow you to program disc play for custom listening order
* VR-4900, KRF-V9993D and VR-4700 (Model available may differ depending on the country and sales area.)
The remote control unit of these receiver models can also be used to input titles or display information such as the titles.
29
Chapter 1 Chapter 2 Chapter 3 Chapter 4 Chapter 5 Chapter 6 Chapter 7
The changer reads any data you specify when you play the disc or when you instruct the changer to read all
data.
Your CD changer includes a standard remote and a remote keyboard. You can use either device to control
the changer. For the sake of simplicity, this manual provides standard remote instructions for all functions
except text entry
The keyboard enables you to operate either player. To operate player A, press the keyboard buttons as
normal. To operate player B, hold down ROOM B button while pressing the appropriate keyboard buttons.
You can use this internal processing to control various features, such as :
÷ Playing discs of a predefined or user-specified Music Type that you can assign to each CD
See “Listening to music by genre (MUSIC TYPE mode)” ‹
÷ Playing discs by selecting disc titles, either read from CD Text encoding on the CD or entered using the remote
or keyboard
See “Disc search (DISC SEARCH mode)” fl
÷ Assigning Best Selection status to your favorite tracks, then playing them at any time.
See “Listening to your favorite titles (BEST SELECTION mode)” °
Page 30

Registration of Title
For discs not corresponding to CD-TEXT, a title can be given
to the disc (max. 25 characters). Up to 20 tracks titles can
30
be registered per disc. Operation is possible also when the
disc door is open. We recommend to register titles while
discs are being inserted.
Registration of Title
Preparation
÷Set the Player A to stop mode.
÷Check that the Player A is in the normal play
TRACK mode.
Chapter 1Chapter 2Chapter 3Chapter 4Chapter 5Chapter 6Chapter 7
Assigning Title
Switch to title input mode.
1
10-key Remote Keyboard
1 Select “TITLE INPUT”.
DISC SKIP
MODE
DOWN
UP
(TITLE INPUT mode)
Press the TITLE INPUT
button.
\
2 Set the input.
Enter the title.
2
SET
TITLE
INPUT
)
Although all operations can be controlled from both the
10-key Remote and Keyboard remote control units, do not
change the remote control unit in the middle of operation
such as character input. Otherwise, characters may not be
input correctly.
10-Key Remote
÷When the MODE button is pressed during TITLE INPUT mode, the title
input mode is cancelled.
Keyboard
÷When the TITLE INPUT button is pressed during TITLE INPUT mode,
the title input mode is cancelled.
DISPLAY-A : The display flashes.
ITLT IENIUP NT ODM
-D--TC --SLECET
÷To enter track titles without assigning the disc title, go to “To enter the
track title“.
⁄
To enter the disc title
10-key Remote Keyboard
1 Select the disc number.
DISC SKIP
DOWN UP
Previous disc
2 Set the input.
SET
3 Enter the disc title.
CONTINUOUS
SUB OUT
PLAY
MONITOR
CONFIRM
A
B
D
1
H
5
L
9
P
–
T
DISC
X
C
RANDOM DISPLAY
REPEAT
E
F
324
I
J
768
M
N
+100 +100
Q
R
.
/
U
V
()
Y
Z
G
K
O
S
'
W
BEST
SELECTION
SELECTOR
4 Store the disc title.
ENTER
6
Next disc
Previous disc
@
!
#
$
1
QWERTY UI OP
ASDFGHJ KL
%
2
3
4
5
ZXCV BNM
÷The disc number can be selected directly by using the numeric buttons
DISC
SKIP
DOWN
DISC
SKIP
UP
Next disc
in place of the DISC SKIP(DOWN/UP) buttons.
÷During playback, the disc only being played can be selected.
10-key Remote Main unit
SET
÷If a desired character is not provided on the remote control buttons,
input the character as follows. Press the CHARACTER (DOWN/UP)
buttons or rotating the DISC SKIP knob on the main unit (provided that
the OPERATION-A indicator is lit) until the desired character is displayed in the flashing cursor position. Then, press the SET button.
=
&
7
()
✱
8 9
<
,
-
+
0
=
,
,,
:
,
;
>
?
/
.
÷One character is set and the cursor goes to the next digit.
÷Repeat this to enter the disc title.
^
6
>
Flashing cursor
CAZB
1. For discs corresponding to CD-TEXT, a new title can not be
Notes
Notes
registered.
2. As the entered title and the CD-TEXT title information are
memorized, the information may be displayed even when a
disc has been removed.
ENTER
ITLT IETSRO!E O! M
÷To register the disc title of another disc, repeat the entire procedure of
“To enter the disc title“.
Page 31

Registration of Title
In regard to disc information reading
The entered title is read in to the disc with the following
timing.
÷When the disc door is closed.
÷With closed disc door, when title input mode is finished.
DISPLAY-A : The display flashes.
DD SI CCERDANI 3G
When there are discs for which the disc information already has been
read in, there may be no display.
Do not move or exchange discs until the disc information
has been read in.
To enter the track title
10-key Remote Keyboard
1 Select the track number.
CHARACTER
DOWN
Previous
track
2 Press the SET button.
UP
4¢
Next
track
SET
Previous
track
4¢
Next track
SET
31
Chapter 1 Chapter 2 Chapter 3 Chapter 4 Chapter 5 Chapter 6 Chapter 7
DISPLAY-A
0D10TC 70
3 Enter the track title.
CONTINUOUS
SUB OUT
PLAY
MONITOR
CONFIRM
A
B
C
BEST
RANDOM DISPLAY
REPEAT
SELECTION
DISC
SELECTOR
D
1
H
5
L
9
P
–
T
X
E
F
324
I
J
768
M
N
+100 +100
Q
R
.
/
U
V
()
Y
Z
G
K
O
S
'
W
@
!
#
$
2
1
3
4
QWERTY UI OP
ASDFGHJ KL
ZXCV BNM
4 Store the track title.
ENTER
6
To change the character type
10-key Remote Keyboard
CHARAC.
/P.MODE
Holding this button down,
press a character or
numeric button.
%
5
ENTER
SHIFT
10-key Remote
Main unit
÷If a desired character is not provided on the remote control buttons,
input the character as follows. Press the CHARACTER (DOWN/UP)
&
7
()
✱
8 9
<
,
-
+
0
=
,
,,
:
,
;
>
?
/
.
^
6
buttons or rotating the DISC SKIP knob on the main unit (provided that
the OPERATION-A indicator is lit) until the desired character is displayed in the flashing cursor position. Then, press the SET button.
=
>
Flashing cursor
CAZB
÷One character is set and the cursor goes to the next digit.
÷Repeat this to enter the track title.
ITLT IETSRO!E O! M
÷To register another track titles in the same disc, repeat the entire
procedure of “To enter the track title“.
÷Up to 20 track titles can be registered per disc by repeating steps from
1 to 4 for each.
To quit TITLE INPUT mode
Press the MODE button.
10-key Remote
÷The type of characters which can be entered is switched each time the
CHARAC. button is pressed.
=
>
2
3
=
>
=
>
Keyboard
÷To input a small (lowercase) letter or a symbol, press and hold SHIFT
while press the desired character or numeric/symbol button.
Capital letters : ABC.....XYZ.....1
CAZB
Small letters : abc.....xyz.....
cazb
Numbers/symbols : 0 1 2 3.....7 8 9
201
space ! " # $ % & ' () * + , - . / : ; < = >
? @ ^ _ ` 0.....
Page 32

32
SPACE
/CHECK
Preparation
Chapter 1Chapter 2Chapter 3Chapter 4Chapter 5Chapter 6Chapter 7
÷Close the disc door. &
To change or delete a title
Registration of Title
Perform steps 1 and 2-1,2 of “Assigning Title”.
1
Change or delete characters one by one.
2
Change
10-key Remote Keyboard
1 Move the cursor to the desired character (to be
changed).
CURSOR
LEFT RIGHT
1¡
2 Select a character.
CONFIRM
BEST
SELECTION
DISC
SELECTOR
A
D
1
H
5
L
9
P
–
T
X
CONTINUOUS
PLAY
B
REPEAT
E
I
M
Q
.
U
()
Y
SUB OUT
MONITOR
C
RANDOM DISPLAY
G
F
324
J
K
768
N
O
+100 +100
R
S
/
'
V
W
Z
@
!
#
2
1
3
QWERTY UI OP
ASDFGHJ KL
ZXCV BNM
3 Delete the unnecessary character.
(See “Deletion”.)
$
4
CURSOR
L
CURSOR
R
%
5
()
^
&
✱
6
7
8 9
<
,
0
>
.
º
-
,
:
;
?
/
÷Call the disc or track to be changed.
÷Deletion mode is cancelled when the MODE button is pressed.
DISPLAY-A
OSENOBYDTC
>
=
CAZB
+ Move with the CURSOR button =
÷If the title to be changed is too long to be displayed on the display
section, press the CURSOR button to scroll the display so that the
characters hidden until then appear.
÷No character can be changed if 25 characters have already been input.
In this case, delete unnecessary characters then enter the desired
correction characters.
+
=
,,
,
DISPLAY-A
OSENOBYDTC
10-key Remote Main unit
=
>
Flashing cursor
OMLN
÷If a desired character is not provided on the remote control buttons,
input the character as follows. Press the CHARACTER (DOWN/UP)
button or rotating the DISC SKIP knob on the main unit (provided that
the OPERATION-A indicator is lit) until the desired character is displayed in the flashing cursor position. Then, press the SET button.
Deletion
10-key Remote Keyboard
1 Move the cursor to the desired character (to be
deleted).
CURSOR
LEFT RIGHT
1¡
2 Press the DELETE button.
DELETE
/CLEAR
Execute title change or deletion.
3
10-key Remote Keyboard
ENTER
6
CURSOR
L
DELETE
ENTER
CURSOR
R
To enter a space
10-key Remote Keyboard
SPACE
÷When a title is to be deleted, delete all characters one by one.
To quit TITLE INPUT mode
Press the MODE button.
Page 33

Listening to music by genre
Discs can be registered separately by 26 types of music
genres.
Preparation
÷Close the disc door. &
÷Check that the Player A is in the normal play
TRACK mode.
)
(MUSIC TYPE mode)
Listening to music by genre (MUSIC TYPE mode)
33
Chapter 1 Chapter 2 Chapter 3 Chapter 4 Chapter 5 Chapter 6 Chapter 7
Registration of music type
Activate the music type set mode.
1
1 Press the MODE button.
2 Select “MUSIC TYPE”.
DOWN
3 Select “MUSIC TYPE SET”.
DOWN
Select the music type.
2
DISC SKIP
DOWN UP
Previous type Next type
DISC SKIP
DISC SKIP
MODE
UP
UP
SET
SET
SET
(MUSIC TYPE SET mode)
÷When the MODE button is pressed during MUSIC TYPE SET mode, the
MUSIC TYPE SET mode is cancelled.
Each press switches the modes as follows:
1 MUSIC TYPE
2 DISC SEARCH
3 TITLE INPUT
4 ALL DATA READ
5 ALL INFORMATION
6 DTS DISC SKIP
DISPLAY-A : The display flashes.
UMIS ICYTEP NTODM
DISPLAY-A : The display flashes.
UMIS ICYTEPST TE M
Each press switches the modes as follows:
Adult Contemporary → Alternative Rock → Children’s Music →
Classical → Contemporary Christian → Country → Dance →
Easy Listening → Folk → Gospel → Hip Hop → Jazz → Latin →
Musical → New Age → Opera → Operetta → Pop Music → RAP
→ Reggae → Rock Music → Rhythm & Blues → Sound Effects
→ Sound Track → Spoken Word → World Music→Adult Con-
temporary → .....
DISPLAY-A : When “Rock Music” is selected
Select the desired disc.
3
DISC SKIP
DOWN UP
Previous disc
Next disc
SET
oRkcMC suci NTODM
÷When the selected disc corresponds to CD-TEXT and contains a genre
code, that genre code is registered as the music type.
To confirm the genre code ...
“Complete CD-Text Info”
÷The disc number can be selected directly by using the numeric buttons
in place of the DISC SKIP(DOWN/UP) buttons.
÷Repeat step 3 if it is required to register another disc in the music type
selected above.
÷To register another music type, exit the MUSIC TYPE SET mode once
and restart from the beginning.
To quit MUSIC TYPE SET mode
Press the MODE button.
@
Page 34

Listening to music by genre (MUSIC TYPE mode)
Registration of user's disc file
34
Eight user files are available for registering desired discs. This makes the user possible to create files registering the discs of
a favorite artist(s) or the user's favorite discs.
Activate the user file set mode.
1
1 Press the MODE button.
Chapter 1Chapter 2Chapter 3Chapter 4Chapter 5Chapter 6Chapter 7
2 Select “MUSIC TYPE”.
DOWN
3 Select “USER FILE SET”.
DOWN
DISC SKIP
DISC SKIP
MODE
UP
UP
SET
SET
(USER FILE SET mode)
÷When the MODE button is pressed during USER FILE SET mode, the
USER FILE SET mode is cancelled.
Each press switches the modes as follows:
1 MUSIC TYPE
2 DISC SEARCH
3 TITLE INPUT
4 ALL DATA READ
5 ALL INFORMATION
6 DTS DISC SKIP
DISPLAY-A : The display flashes.
UMIS ICYTEP NTODM
DISPLAY-A : The display flashes.
SUREFA LI EEES HT M
Select the desired user file.
2
Each press switches the modes as follows:
DISC SKIP
DOWN UP
Previous file
Select the desired disc.
3
DISC SKIP
DOWN UP
Previous disc Next disc
Next file
SET
SET
USER FILE 1 → USER FILE 2→ USER FILE 3 → USER FILE 4 →
USER FILE 5 → USER FILE 6 → USER FILE 7 → USER FILE 8
→USER FILE 1 →.....
÷The disc number can be selected directly by using the numeric buttons
in place of the DISC SKIP (DOWN/UP) buttons.
÷Repeat step 3 if it is required to register another disc in the user file
selected above.
÷To register another user file, exit the USER FILE SET mode once and
restart from the beginning.
÷The same disc can be registered in more than one user files.
÷If the CHECK button is pressed while the disc number is blinking, the
music type of the disc is displayed provided that its music type has been
registered.
To quit USER FILE SET mode
Press the MODE button.
To clear the music type or user file registered for a disc
1 Play the music type or user file.
2 Press the CLEAR button during playback of the disc
to be deleted.
DELETE
/CLEAR
fi
DISPLAY-A :
1D22TPYE LCAER
Page 35

When music types or user files have been registered for
the discs, it is possible to enjoy playback of discs of the
selected music type or user file. Random playback for a
selected music type or user file is also possible.
Listening to music by genre (MUSIC TYPE mode)
35
Preparation
÷Close the disc door. &
÷Register music type or user file.
‹›
÷Check that the Player A is in the normal play
TRACK mode.
Playing the music type or user file
Activate the music type play mode.
1
1 Press the MODE button.
2 Select “MUSIC TYPE”.
DOWN
3 Select “MUSIC TYPE PLAY”.
DOWN
DISC SKIP
DISC SKIP
MODE
UP
UP
SET
SET
)
(MUSIC TYPE PLAY mode) (Player A only)
÷When the MODE button is pressed during MUSIC TYPE PLAY mode,
the MUSIC TYPE PLAY mode is cancelled.
Each press switches the modes as follows:
Chapter 1 Chapter 2 Chapter 3 Chapter 4 Chapter 5 Chapter 6 Chapter 7
1 MUSIC TYPE
2 DISC SEARCH
3 TITLE INPUT
4 ALL DATA READ
5 ALL INFORMATION
6 DTS DISC SKIP
DISPLAY-A : The display flashes.
UMIS ICYTEP NTODM
DISPLAY-A : The display flashes.
Select the music type or user file.
2
DISC SKIP
Start playback.
3
DOWN
ENTER
6
UP
UMIS ECTPY RELPYA
DISPLAY-A : When “USER FILE 1” is selected
SUREFC IEL1ELPYA
÷Playback is performed in increasing order of the disc numbers they
were registered for the respective music type or user file. Skipping to
the next disc is done when the ¢ button is pressed.
÷If the disc to be played is being played in Player B, the disc will be
skipped.
÷Each time the CHECK button is pressed, the registered disc numbers
are displayed in increasing order of the disc numbers.
For repeated playback
Press the REPEAT button to select “REPEAT ON”.
For random playback
Press the RANDOM button.
÷Select “RANDOM OFF” or press 7 button to quit random playback.
For continuous playback
Press the CONTINUOUS PLAY button.
To quit MUSIC TYPE PLAY mode
Press the MODE button.
DISPLAY-A
.MYTEPMT DO SEFOF
Page 36

Disc search
(DISC SEARCH mode) (Player A only)
Disc search (MUSIC TYPE mode) (Player-A only)
Preparation
36
÷Close the disc door. &
÷Input the title. º
÷Check that the Player A is in the normal play
TRACK mode.
)
Although all operations can be controlled from both the 10key Remote and Keyboard remote control units, do not
change the remote control unit in the middle of operation
such as character input. Otherwise, characters may not be
input correctly.
Searching a disc by the disc title
(CHARAC. SEARCH mode)
By inputting the initial letter of the desired disc title, discs which have the disc titles beginning with that character can be
searched in sequence.
Chapter 1Chapter 2Chapter 3Chapter 4Chapter 5Chapter 6Chapter 7
Activate the character search mode.
1
10-key Remote
1 Press the MODE button.
MODE
2 Select “DISC SEARCH”.
DISC SKIP
DOWN
UP
SET
3 Select “CHARAC. SEARCH”.
DISC SKIP
DOWN
UP
SET
Keyboard
DISC
SKIP
DOWN
DISC
SKIP
DOWN
DISC
SKIP
DISC
SKIP
MODE
÷When the MODE button is pressed during CHARAC. SEARCH mode,
the CHARAC. SEARCH mode is cancelled.
Each press switches the modes as follows:
1 MUSIC TYPE
2 DISC SEARCH
UP
SET
3 TITLE INPUT
4 ALL DATA READ
5 ALL INFORMATION
6 DTS DISC SKIP
DISPLAY-A : The display flashes.
UP
SET
IDCSSC AECR NH ODM
DISPLAY-A : The display flashes.
HCRACA A.ESRAHC M
Input the initial letter of the disc title to be
2
searched.
DISPLAY-A : When initial letter “A” is selected.
A< RA E>ESRAHC?CM
10-key Remote
1 Input the initial letter of the disc title
to be searched.
CONTINUOUS
SUB OUT
PLAY
MONITOR
CONFIRM
A
B
D
1
H
5
L
9
P
–
T
X
RANDOM DISPLAY
REPEAT
E
I
M
Q
.
U
()
Y
+100 +100
C
G
F
324
J
K
768
N
O
R
S
/
'
V
W
Z
@
!
2
1
QWERTY UI OP
ASDFGHJ KL
ZXCV BNM
BEST
SELECTION
DISC
SELECTOR
2 Set the input.
SET
To search the next disc To play the searched disc
10-key Remote
DISC SKIP
DOWN
UP
#
3
Keyboard
$
%
4
5
Keyboard
DISC
SKIP
DOWN
÷The initial letters of disc titles are searched insensitively to the upper-
case and lowercase.
÷Lowercase characters cannot be input in the CHARAC. SEARCH mode.
Keyboard
&
7
()
✱
8 9
<
,
-
+
0
=
,
,,
:
,
;
>
?
/
.
^
6
÷To input a symbol, press and hold SHIFT while press the desired
numeric/symbol button.
10-key Remote
Main unit
÷If a desired character is not provided on the remote control buttons,
input the character as follows. Press the CHARACTER (DOWN/UP)
buttons or rotating the DISC SKIP knob on the main unit (provided that
the OPERATION-A indicator is lit) until the desired character is displayed in the flashing cursor position. Then, press the SET button.
÷The type of characters (capital letters or numbers/symbols) is switched
each time the CHARAC. button is pressed.
÷The disc titles beginning the specified character will be scrolled in the
SET
display.
÷If there is no disc title beginning with the specified character, “NO
ENTRY” will be displayed.
To quit CHARAC. SEARCH mode
Press the MODE button.
10-key Remote
DISC
SKIP
UP
SET
Keyboard
SET
If the selected disc is being played on Player-B, blinking “DISCXXX BUSY!” is displayed and the disc will not be played.
Note
Note
Page 37

Preparation
÷Close the disc door. &
÷Register music type or user file.
÷Check that the Player A is in the normal play
TRACK mode.
‹›
)
Disc search (DISC SEARCH mode) (Player-A only)
37
Chapter 1 Chapter 2 Chapter 3 Chapter 4 Chapter 5 Chapter 6 Chapter 7
Searching the music type or user file
The discs registered in the specified music type or specified user file can be searched in sequence.
Activate the M.TYPE SEARCH mode.
1
1 Press the MODE button.
MODE
2 Select “DISC SEARCH”.
DISC SKIP
DOWN
3 Select “M.TYPE SEARCH”.
DOWN
DISC SKIP
UP
UP
SET
SET
÷When the MODE button is pressed during M.TYPE SEARCH mode, the
M.TYPE SEARCH mode is cancelled.
Each press switches the modes as follows:
1 MUSIC TYPE
2 DISC SEARCH
3 TITLE INPUT
4 ALL DATA READ
5 ALL INFORMATION
6 DTS DISC SKIP
DISPLAY-A : The display flashes.
DISPLAY-A : The display flashes.
(M.TYPE SEARCH mode)
IDCSSC AECR NH ODM
.MYTEP . ESRAHC M
Select the music type or user file to be
2
searched.
DISC SKIP
DOWN
UP
SET
Each press switches the modes as follows:
USER FILE 1 → USER FILE 2→ USER FILE 3 → USER FILE 4 →
USER FILE 5 → USER FILE 6 → USER FILE 7 → USER FILE 8 →
Adult Contemporary → Alternative Rock → Children’s Music →
Classical → Contemporary Christian → Country → Dance →
Easy Listening → Folk → Gospel → Hip Hop → Jazz → Latin →
Musical → New Age → Opera → Operetta → Pop Music → RAP
→ Reggae → Rock Music → Rhythm & Blues → Sound Effects
→ Sound Track → Spoken Word → World Music →
USER FILE 1 → .....
÷If there is no disc registered in the specified music type or user file, “NO
ENTRY” will be displayed.
To quit M.TYPE SEARCH mode
Press the MODE button.
To search the next disc To play the searched disc
DISC SKIP
DOWN
If the selected disc is being played on Player-B, blinking “DISCXXX BUSY!” is displayed and the disc will not be played.
Note
Note
UP
SET
Page 38

Listening to your favorite titles
You can select only your favorite titles and register them
as the best selection. Use the following procedure to reg-
38
ister favorite tracks in the best selection file while playing
a CD.
Registration of best selection file
Play the track to be registered.
1
Chapter 1Chapter 2Chapter 3Chapter 4Chapter 5Chapter 6Chapter 7
(BEST SELECTION mode) (Player A only)
Disc search (MUSIC TYPE mode) (Player-A only)
ENTER
6
Register it in the best selection file.
2
BEST
SELECTION
D
Register other favorite tracks by performing
3
steps
1
and 2 for each of them.
Playing the best selection file
Preparation
Press the BEST SELECTION button.
÷Set the CD player to stop mode
÷Check that the unit is in the normal play track
mode
BEST
SELECTION
D
)
÷Only the track being played can be registered.
DISPLAY-A
EBTS10DY 01 L40T3
÷Up to 32 tracks can be registered. “FULL” is displayed when no more
disc is acceptable.
DISPLAY-A
EBTSS0 LECEITNO 3
÷The tracks are played in the order they are registered.
÷If a track to be played is located in the disc played on Player-B, that track
will be skipped.
÷Each time the CHECK button is pressed, the disc numbers and track
numbers are displayed in the order they are registered.
For repeated playback
Press the REPEAT button to select “REPEAT ON”.
For continuous playback
Press the CONTINUOUS PLAY button.
To quit BEST SELECTION mode
Press the 7 button during playback.
÷The recorded contents remain stored even when best selection mode
is quit.
To delete the registered best selection file
1 Play the track to be cleared.
2 Press the CLEAR button.
DELETE
/CLEAR
÷This is done during best selection mode.
DISPLAY-A
EBTS20CL ELRA 0N3
Page 39

39
Chapter 1 Chapter 2 Chapter 3 Chapter 4 Chapter 5 Chapter 6 Chapter 7
Page 40

Chapter 5 : Dual-Zone Capabilities
The CD-4900M/DPF-J9030 offers dual-zone output and control, which enables you to use the changer (along
40
with a Kenwood Dual-Zone/Dual-Source compatible receiver) to play 2 discs simultaneously in 2 rooms (or zones).
The changer can do this because it includes 2 complete CD players that can each access the full carousel of
loaded discs. Each player has its own analog output jacks and cables, and the primary player (output “A”) also
has a digital output connection.
Not all playback features can be used by both players or zones. The following chart shows which playback
features are available for each player and/or zone.
÷ Multi-room playback when used with a Kenwood receiver that has Dual-Zone/Dual-Source capability.
Chapter 1Chapter 2Chapter 3Chapter 4Chapter 5Chapter 6Chapter 7
Zone A/ Zone B/
Feature Player A Player B
DTS playback ‡
Normal Play/Track mode ‡‡
Random mode ‡‡
Repeat mode ‡‡
Program mode ‡
Continuous Play mode ‡
Music Type mode ‡
Best Selection mode ‡
Timed Play ‡
Remote control ‡
Infrared remote keyboard ‡‡*
*To operate the remote keyboard in Zone B, hold down ROOM B button while pressing
the appropriate keyboard buttons for the task.
Page 41

Chapter 6 : In case of difficulty
In case of difficulty
Operation to reset
The microcomputer may malfunction (impossibility to operate,
erroneous display, etc.) when the connection cords are unplugged while power is ON or due to an external factor. In this
case, execute the following method to reset the microcomputer
and return it to normal condition.
Unplug the power cord from the power socket and plug the
power cord into the socket again.
Remote control unit
Symptom Cause Remedy
Remote control operation is not possible. ÷Replace with new batteries. 9
÷Batteries are exhausted.
÷The remote control unit is too far away from
the main system, controlling angle is too large,
or there is an obstacle in between.
CD Player
Symptom Cause Remedy
No power is applied with the POWER( )
key ON.
÷Power plug is loosely connected.
÷With the power plug connected to the
switched AC outlet of an amplifier, the power
of the amplifier is turned off.
To reset the registered contents
The registered contents for title, music type, user file, best selection and DTS disc can be reset by the following procedure.
Unplug the power cord from the power socket, and while
holding the 7 button depressed, plug the power cord into
the socket again.
÷Operate the remote control unit within the
controllable range.
÷Insert the power plug firmly to the AC outlet.
÷Insert the power plug to the wall AC outlet.
9
41
Chapter 1 Chapter 2 Chapter 3 Chapter 4 Chapter 5 Chapter 6 Chapter 7
Sound is not heard with the 6 key on.
Music is interrupted. (Sound is skipped.)
Disc selection is not possible.
Disc begins to play when power is switched
ON.
÷Disc is loose.
÷Condensation occured on the optical lens
unit.
÷Disc is too dirty.
÷Disc is cracked.
÷The connection cords are inserted loosely.
÷Disc is too dirty.
÷Disc is cracked.
÷Oscillation is applied to this unit.
÷RANDOM or BEST SELECTION mode is se-
lected.
÷MUSIC TYPE PLAY mode is selected.
÷The TIMER PLAY switch is set to ON.
÷Insert disc properly. &
÷Leave the player for about 1 hour so that the
condensation is removed.
÷Wipe off the dust on the disc surface referring
to “Disc handling precautions”.
÷Replace the disc with a new one.
÷Connect all connection cords firmly.
÷Wipe off the dust on the disc surface referring
to “Disc handing precautions”.
÷Replace the disc with a new one.
÷Try selecting a place where no strong vibra-
tions occur by changing the installation place,
etc.
÷Press the 7 key to quit RANDOM,BEST SE-
LECTION mode.
÷Press the MODE button to quit MUSIC TYPE
PLAY mode.
÷Set the TIMER PLAY switch to OFF unless
timer playback is required.
w
w
6
w
£°
fi
¶
When “REMOVE DISC XXX” is displayed:
A CD is inserted in the slot with the same disc number as the CD being loaded.
It is not permitted to insert another disc in a slot from which the CD has been loaded. Remove the inserted disc and insert it in an idle slot.
Page 42

Important items
42
Disc handling precautions
Handling
Hold the discs so that you do not touch the
playing surface.
Discs which can be played with this unit
CD (12 cm), and the audio part of CDV, CD-G, CD-EG and CD-EXTRA.
Use discs that comply with the IEC standard, for example a disc carrying
COMPACTCOMPACT
the
÷An 8 cm CD cannot be played back.
marking on the label surface.
DIGITAL AUDIODIGITAL AUDIO
Chapter 1Chapter 2Chapter 3Chapter 4Chapter 5Chapter 6Chapter 7
Sticker
Label side
Playing side
Do not attach paper or tape to either the playing side or the label side of the discs.
Sticky paste
Cleaning
If fingerprints or foreign matter become attached to the disc, lightly wipe the disc with
a soft cotton cloth (or similar) from the center of the disc outwards in a radial manner.
Storage
When a disc is not to be played for a long
period of time, remove it from the player and
store it in its case.
Maintenance of the unit
When the front panel or case becomes dirty, wipe with a soft, dry
cloth. Do not use thinner, benzine, alcohol, etc. for these agents may
cause discoloration.
Never play a cracked or warped disc
During playback, the disc rotates at high speed in the player.
Therefore, to avoid danger, never use a cracked or deformed disc or a
disc repaired with tape or adhesive agent.
Please do not use discs which are not round because they may cause a
malfunction.
Disc accessories
The disc accessories (stabilizer, protection sheet, protection ring, etc.)
which are marketed for improving the sound quality or protecting discs
as well as the disc cleaner should not be used with this system because
they may cause malfunction.
In regard to contact cleaner
Do not use contact cleaners because it could cause a malfunction.
Be specially careful not to use contact cleaners containing oil, for
they may deform the plastic component.
Caution on condensation
Condensation (of dew) may occur inside the unit when there is a great
difference in temperature between this unit and the outside.
This unit may not function properly if condensation occurs. In this case,
leave the unit for a few hours with the power left ON, and restart the
operation after the condensation has dride up.
Be specially cautious against condensatin in a following circumsatance:
When this unit is carried from a place to another across a large
difference in temperature, when the humidity in the room where
this unit is installed increases, etc.
Memory backup function
Stored contents for at least
3 weeks after power plug is
unplugged from the AC outlet.
Power status (ON or OFF),
Title registration contents
Music type registration contents
User file registration contents
Best selection registration contents
DTS registration contents
Note related to transportation and movement
Before transporting or moving this unit, carry out the following operation:
1. Remove all discs from the carousel and close the disc door.
2. Confirm that the flashing “NO DISC” display has changed to steady
lighting, and then switch off the power.
DISPLAY-A and DISPLAY-B
NO IDCS
3. Wait a few seconds, then disconnect the power plug.
Page 43

Chapter 7 : Warnings and Specifications
Warnings
For the U.S.A.
FCC WARNING
This equipment may generate or use radio frequency energy. Changes or modifications to this equipment may cause harmful interference unless
the modifications are expressly approved in the instruction manual. The user could lose the authority to operate this equipment if an unauthorized
change or modification is made.
NOTE :
This equipment has been tested and found to comply with the limits for a Class B digital device, pursuant to Part 15 of the FCC Rules. These limits
are designed to provide reasonable protection against harmful interference in a residential installation. This equipment may cause harmful interference to radio communications, if it is not installed and used in accordance with the instructions. However, there is no guarantee that interference
will not occur in a particular installation. If this equipment does cause harmful interference to radio or television reception, which can be determined
by turning the equipment off and on, the user is encouraged to try to correct the interference by one or more of the following measures:
– – Reorient or relocate the receiving antenna.
– – Increase the separation between the equipment and receiver.
– – Connect the equipment into an outlet on a circuit different from that to which the receiver is connected.
– – Consult the dealer or an experienced radio / TV technician for help.
For the U.S.A.
CAUTION :
Use of controls or adjustments or performance of procedures other than
those specified herein may result in hazardous radiation exposure.
In compliance with Federal Regulations, following are reproductions
of labels on, or inside the product relating to laser product safety.
KENWOOD CORPORATION
2967-3, ISHIKAWA-CHO,HACHIOJI-SHI,
TOKYO, JAPAN
KENWOOD CORP. CERTIFIES THIS EQUIPMENT CON-
FORMS TO DHHS REGULATIONS NO. 21 CFR 1040.10,
CHAPTER 1, SUBCHAPTER J.
43
Chapter 1 Chapter 2 Chapter 3 Chapter 4 Chapter 5 Chapter 6 Chapter 7
Specifications
[Format]
System ......................................... Compact disc digital audio system
Laser .................................................................... Semiconductor laser
[D/A Convertors]
D/A Conversion .............................................................................. 1 Bit
Oversampling ............................................................... 8 fs (352.8 kHz)
[Audio]
Frequency response ........................................ 4 Hz ~ 20 kHz, ± 0.5 dB
Signal to noise ratio...................................................More than 97 dB
Dynamic range ........................................................... More than 94 dB
Total harmonic distortion + noise
............................................................ Less than 0.005% (at 1 kHz)
Channel separation .................................. More than 92 dB (at 1 kHz)
Wow & flutter ...................................................... Unmeasurable Limit
Output level/impedance
Fixed ............................................................................. 2.0 V/0.9 kΩ
Digital output
Optical ......................–15 dBm ~ –21 dBm (Wave length 660 nm)
1. KENWOOD follows a policy of continuous advancements in development. For this reason specifications may be changed without notice.
Notes
Notes
2. The full performance may not be exhibited in an extremely cold location (under a water-freezing temperature).
Location: Back Panel
[Laser]
Wave length ..................................................................... 760 ~ 800 nm
Laser power class ............................................................. Class 1 (IEC)
[General]
Power consumption ..................................................................... 14 W
Dimensions W : 481 mm (18-15/16")
H : 163 mm (6-7/16")
D : 484 mm (19-1/16")
Weight (Net) ................................................................... 11 kg (24.3 lb)
Page 44

44
Chapter 1Chapter 2Chapter 3Chapter 4Chapter 5Chapter 6Chapter 7
For your records
Record the serial number, found on the back of the unit, in the spaces
designated on the warranty card, and in the space provided below. Refer
to the model and serial numbers whenever you call upon your dealer for
information or service on this product.
Model Serial Number
 Loading...