

Kenwood AT972A, AT973A, AT970A, AT971A, AT974A Instructions Manual

English 2 - 4
Français 5 - 7
Español 8 - 10
HEAD OFFICE: Kenwood Limited, 1-3 Kenwood Business Park, New Lane, Havant, Hampshire PO9 2NH
Canada/USA
116143/1
2
3
4
5
1
instructions
instrucciones
AT970A, AT971A, AT972A,
AT973A, AT974A
116143 Iss 1 LV AT970A_AT974A 6 pg Eng_Fre_Sp:Blender multi 6 page template 26/4/12 09:45 Page 1
IMPORTANT SAFEGUARDS
When using electrical appliances, basic safety
precautions should always be followed to reduce
the risk of fire, electrical shock and/or personal
injury including the following:
•
READ ALL INSTRUCTIONS.
•
Close supervision is necessary when any appliance is
used by or near children.
•
Unplug from outlet when not in use and before
putting on or taking off parts and before cleaning.
•
Avoid contacting moving parts.
•
The use of attachments, including canning jars, not
recommended by the manufacturer may cause a risk
of injury to persons.
•
Do not use more than one attachment at a time.
•
Do not use attachment for other than intended use.
•
Never leave your Food Preparation Machine
unattended while it is operating.
•
Keep your fingers away from moving parts and the
openings on the attachment.
•
Always ensure loose articles and clothing are secured
before using this attachment to avoid entanglement.
•
Refer to your main Kitchen Machine instruction book
for additional safety warnings.
SAVE THESE INSTRUCTIONS
For Household use only
English
2
2
3
4
5
1
2
3
4
5
1
m
i
n
1
2
3
4
5
6
P
m
i
n
1
2
3
4
5
6
P
m
i
n
1
2
3
4
5
6
P
m
i
n
1
2
3
4
5
6
P
2
3
4
5
1
햲
햴
햳
햶 햵
116143 Iss 1 LV AT970A_AT974A 6 pg Eng_Fre_Sp:Blender multi 6 page template 26/4/12 09:45 Page 2

b
efore using your Kenwood
attachment
●
R
ead these instructions carefully and
r
etain for future reference.
●
Remove all packaging and any
l
abels.
b
efore using for the first time
●
W
ipe clean with a damp cloth. Do
not immerse in water.
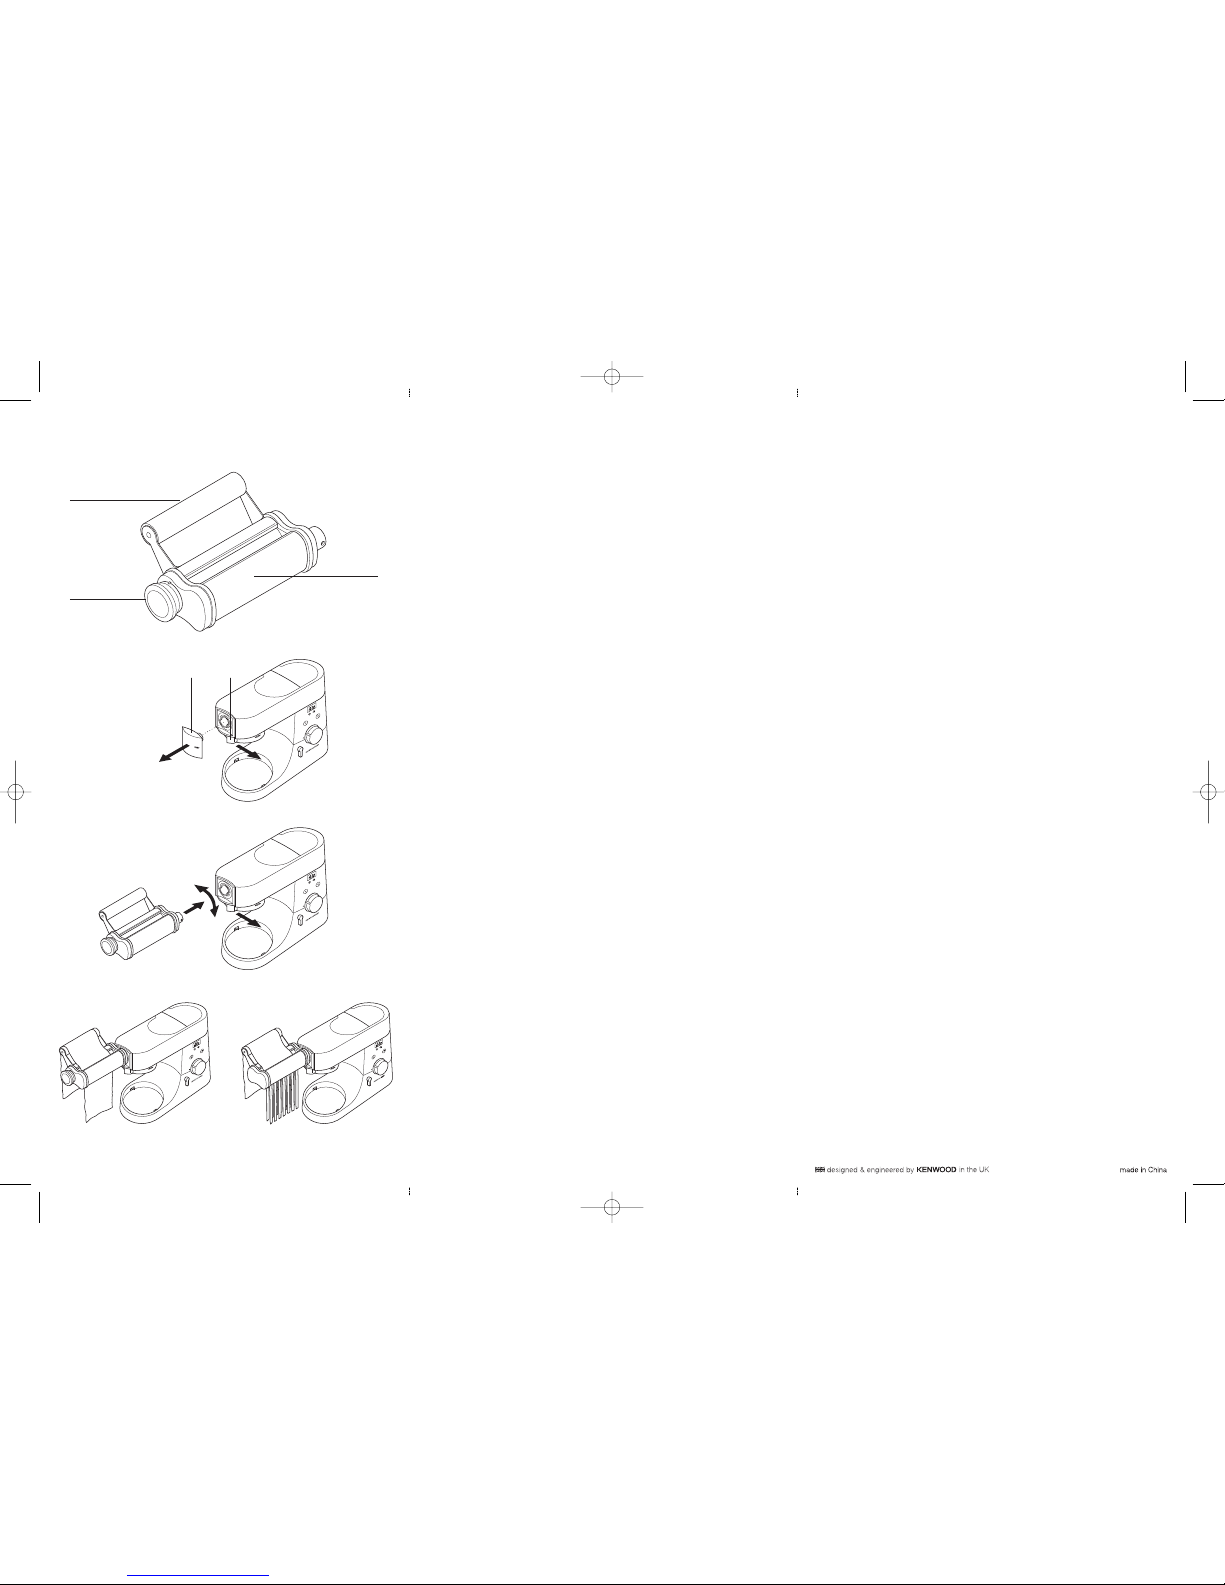
key
햲 adjustable knob
햳 pasta feed roller
햴 flat pasta attachment
햵 oultet catch
햶 slow speed outlet cover
to assemble
1 To remove the slow speed outlet
cover, slide the catch then pull off.
2 Hold the catch back and insert the
attachment into the outlet drive and
turn until the drive clicks into place you may have to turn it both ways.
When the drive is engaged, rotate
the attachment so that the pin is in a
vertical position, then engage the pin
into the slot.
3 Release the catch.
to use your pasta maker
1 Make your pasta dough. Follow one
of the dough recipes supplied.
2 Set the adjustable knob on the side
of the pasta attachment to number 1
by pulling the knob out and turning.
3 Flatten a piece of dough and sprinkle
some flour between the rollers.
4 Turn the kitchen machine to speed
1 (you will see the rollers turning).
5 Pass the piece of dough through the
rollers repeating until you get a
smooth surface. (Folding the dough
in half across its width or length
between rollings will help to achieve
this).
6 Adjust the knob progressively from 1
to 9, each time re-feeding the dough
through the attachment to achieve
the desired thickness . Pasta
thickness using settings 5 to 7 is
recommended.
7
Cut the rolled pasta into
desired/manageable pieces.
U
se as required.
using an additional
attachment
tagliatelle (
AT971A)
,
tagliolini
(AT972A),
trenette (
AT973A)
and spaghetti (AT974A)
1 To use these attachments you must
have rolled out pasta using the flat
pasta attachment (AT970A) first.
2 To fit any of the additional
attachments available, follow the “to
assemble” instructions.
3 Feed the rolled out pasta through
the pasta attachment and the
different cutters will slice the pasta to
create different pasta variations .
4 Pasta can be left for up to 4 hours
before cooking.
to cook pasta
1 Bring a pan three quarters full of
water to the boil. Add salt to taste.
2 It is optional to add a small amount
of olive oil to the water, this may help
prevent the pasta from sticking.
3 Add the pasta and gently boil for
approximately 2 to 4 minutes to
taste.
cleaning
Don’t wash any part in the
dishwasher.
1 Slide the slow speed outlet catch
and at the same time remove the
attachment from the mixer.
2 Wipe clean with a damp cloth. Do
not immerse in water.
●
Any other servicing should be
performed by an authorized service
representative.
3
116143 Iss 1 LV AT970A_AT974A Eng_Fre_Sp:Blender template multi Iss 5 26/4/12 09:45 Page 3
 Loading...