

Kenwood AP-300-B, AP-300-H Instruction Manual

.
COMPACT Hi-Fi COMPONENT SYSTEM
AP-300-B/AP-300-H
INSTRUCTION MANUAL
.
ENGLISHITALIANO
.
LVT2504-002B
[E]

Page 18
Play back MP3/WMA files on
a music CD or USB device
Page 23
Play back files on your BLUETOOTH
device by operating the System
Page 16
Play back files on your iPod or
iPhone by operating the System
Enjoy listening to music by adjusting the
sound mode or the bass sound! ( page 32)
Play back an external device that
does not support USB connection
Page 29
Listening to FM/AM radio
Page 25
What you can do using the System
.
2
Declaration of Conformity with regard to the
EMC Directive 2004/108/EC
Declaration of Conformity with regard to the
R&TTE Directive 1999/5/EC
Manufacturer:
JVC KENWOOD Corporation
3-12, Moriya-cho, Kanagawa-ku, Yokohama-shi,
Kanagawa 221-0022, Japan
EU Representative's:
Kenwood Electronics Europe BV
Amsterdamseweg 37, 1422 AC UITHOORN, The
Netherlands
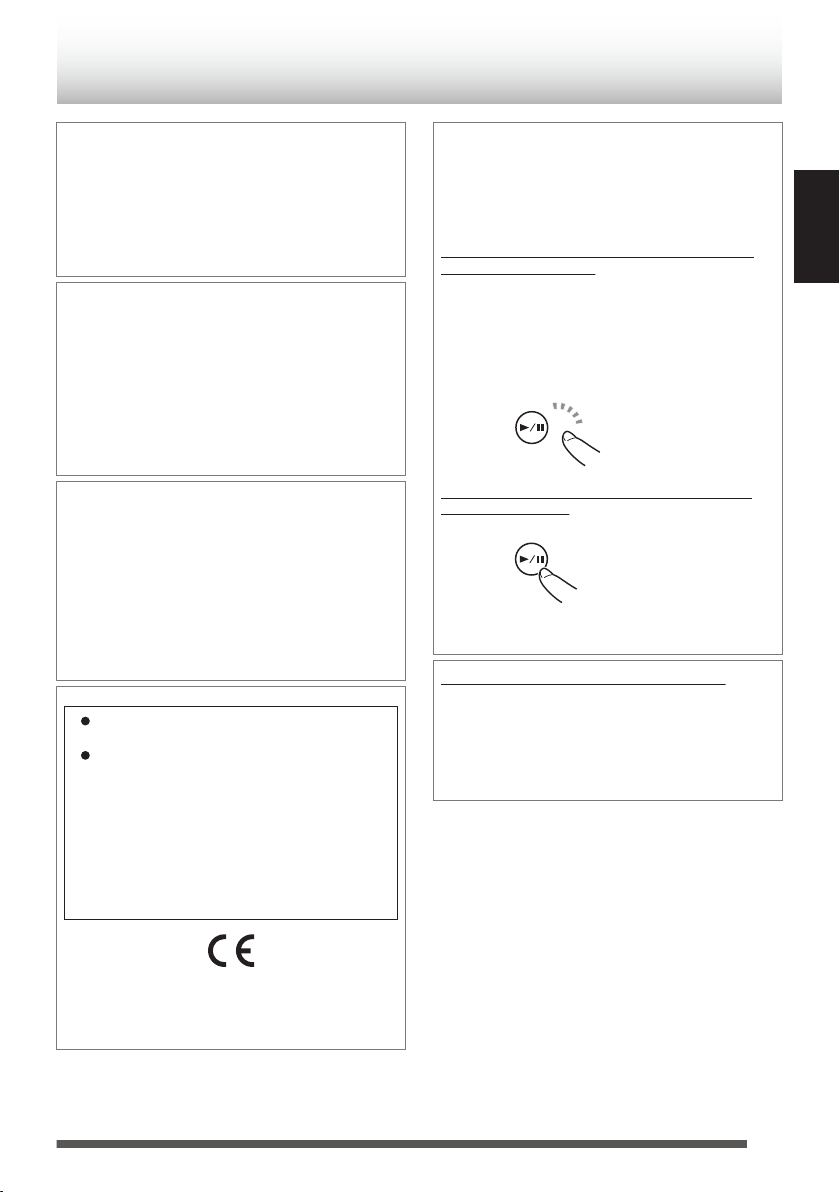
Release quickly
Press and hold down
Introduction
Auto Power Save function (APS)
0
The System comes with an “Auto
Power Save (APS)” function, which
turns off the power automatically
when no sound is output for 15
minutes. This function is enabled in
the default setting. (page 15)
In this manual...
0
The remote control buttons are used for
explaining the operations unless mentioned
otherwise. Button unless mentioned otherwise
indicates the remote control buttons.
However, if the System has buttons with the
same or similar names, they can also be used
for the operations.
0
The display shown in this manual may differ
from the actual display in some cases.
In this manual...
0
In this manual, “iPod” includes iPod, iPod
touch and iPhone devices. When referring
specifically to iPod touch or iPhone, “iPod
touch” or “iPhone” is used respectively.
0
In this manual, the term “Android device” is
referred to as a smartphone and a tablet
device, that are equipped with the Android OS.
0
In this manual, “file” and “track”, “folder” and
“group” are used interchangeably.
Ways to press the buttons
There are two ways of pressing the buttons on
the System. “Short press” refers to the action of
pressing a button and releasing it immediately,
while “long press” refers to pressing and holding
down a button.
Short press: Applicable to cases where “long
press” is not indicated
Press a button lightly and release it instantly. The
System may not respond if excessive force is
applied to a button or if the button is not released
instantly. If it does not respond as intended, retry
by adjusting how long a button is pressed or the
amount of force applied.
.
Long press: Applicable to cases where “long
press” is indicated
.
Press and hold down a button, followed by
releasing the finger.
IMPORTANT FOR LASER PRODUCTS
1. CLASS 1 LASER PRODUCT
2. CAUTION: Do not open the top cover or
cabinet. There are no user serviceable parts
inside the unit; leave all servicing to qualified
service personnel.
ENGLISH
.
.
Hereby, Kenwood declares that this unit
AP-300-B/AP-300-H is in compliance with the
essential requirements and other relevant
provisions of Directive 1999/5/EC.
The product label of this product or the other
information are located at the bottom of the
System.
3
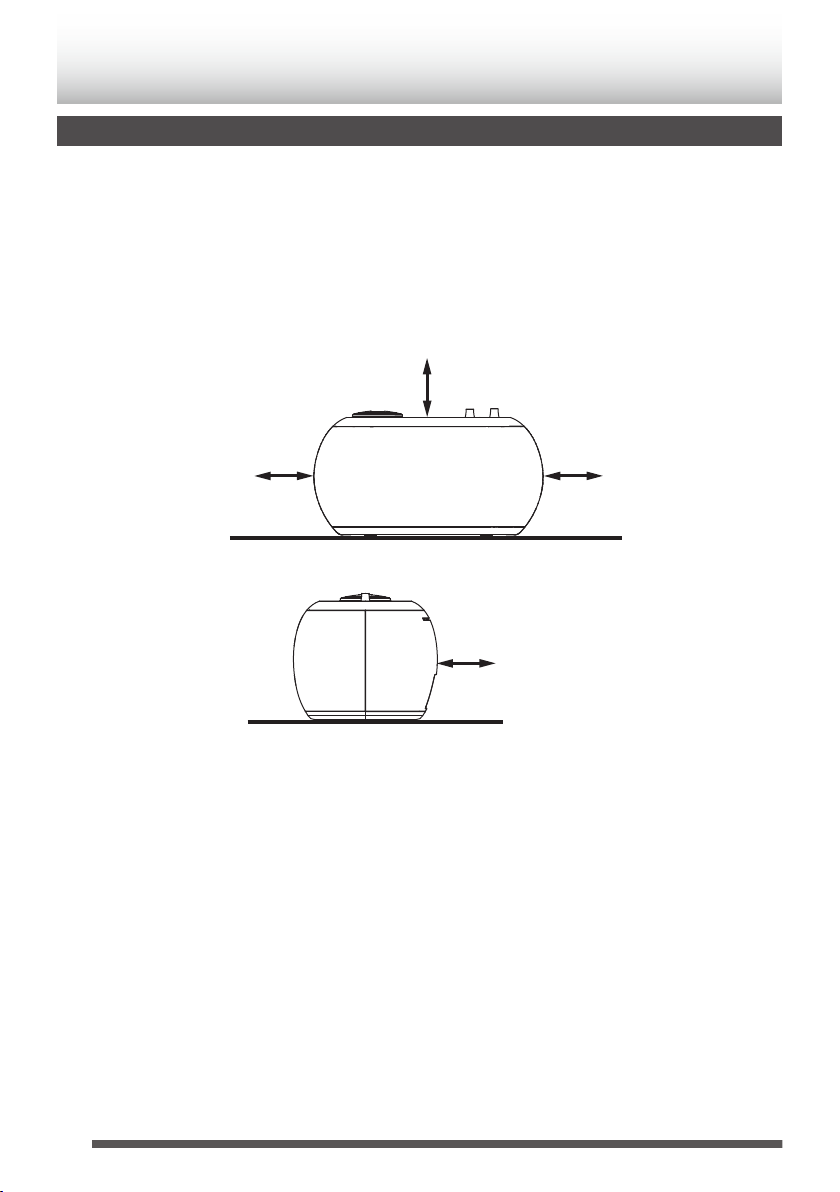
Installation
15 cm
15 cm
15 cm
15 cm
Rear of the System
Caution: Proper Ventilation
To avoid the risk of electric shock and fire, and to prevent damage, locate the apparatus as follows:
1
Front: No obstructions and open spacing.
2 Sides/ Top/ Back: No obstructions should be placed in the areas indicated by the dimensions in the
illustration.
3 Bottom: Place on a level surface.
Front view
.
Side view
.
Notes on installation
Select a place which is level, dry and neither too hot nor too cold — between 5 ˚C and 35 ˚C.
4

Contents
What you can do using the System
... 2
Introduction ..................................... 3
Installation ........................................................... 4
Preparation ...................................... 6
Accessories ........................................................ 6
Preparing the remote control ............................... 6
Part names ....................................... 7
Remote control .................................................... 7
Top of the main unit ............................................. 8
Rear .................................................................... 9
Display .............................................................. 10
Connections .................................. 11
Connecting antennas ........................................ 11
Connecting an AC adapter ................................ 12
Connecting headphones ................................... 13
Basic operations ........................... 14
Turning on/off the System ................................. 14
Setting the clock ................................................ 14
Getting started .................................................. 14
Activating/deactivating the Auto Power Save (A.P.S.)
... 15
Listening to iPod ........................... 16
Connecting iPod ................................................ 16
Playing back ...................................................... 16
Listening to a USB device/CD ...... 18
Preparing a USB device/CD .............................. 18
Playing back ...................................................... 19
Program playback ............................................. 20
Random playback ............................................. 21
Repeat playback ............................................... 22
Listening to a BLUETOOTH device
Connecting a BLUETOOTH device
Playing back
Canceling the connection
........................................................ 24
........................ 23
...................................... 24
... 23
Listening to the radio ................... 25
Searching for stations ....................................... 25
Presetting stations ............................................ 26
Using Radio Data System ................................. 27
Listening to an external device ... 29
Connecting an external device .......................... 29
Listening to an external device .......................... 29
Using the timer .............................. 30
Setting the sleep timer ...................................... 30
Setting the daily timer ........................................ 30
Other functions ............................. 32
Adjusting the sound quality ............................... 32
Adjusting the display/illumination ...................... 33
Changing the display information ...................... 34
References ..................................... 35
Compatible iPod ................................................ 35
Playable BLUETOOTH devices ........................ 35
Playable discs/files ............................................ 35
Important for USB mass storage class devices
Precautions on CD-R/CD-RW ........................... 36
Precautions on MP3/WMA files ......................... 36
Maintenance ..................................................... 37
Trademarks ....................................................... 37
.... 36
Troubleshooting ............................ 38
Resetting the System ........................................ 40
Specifications ................................ 41
ENGLISH
5
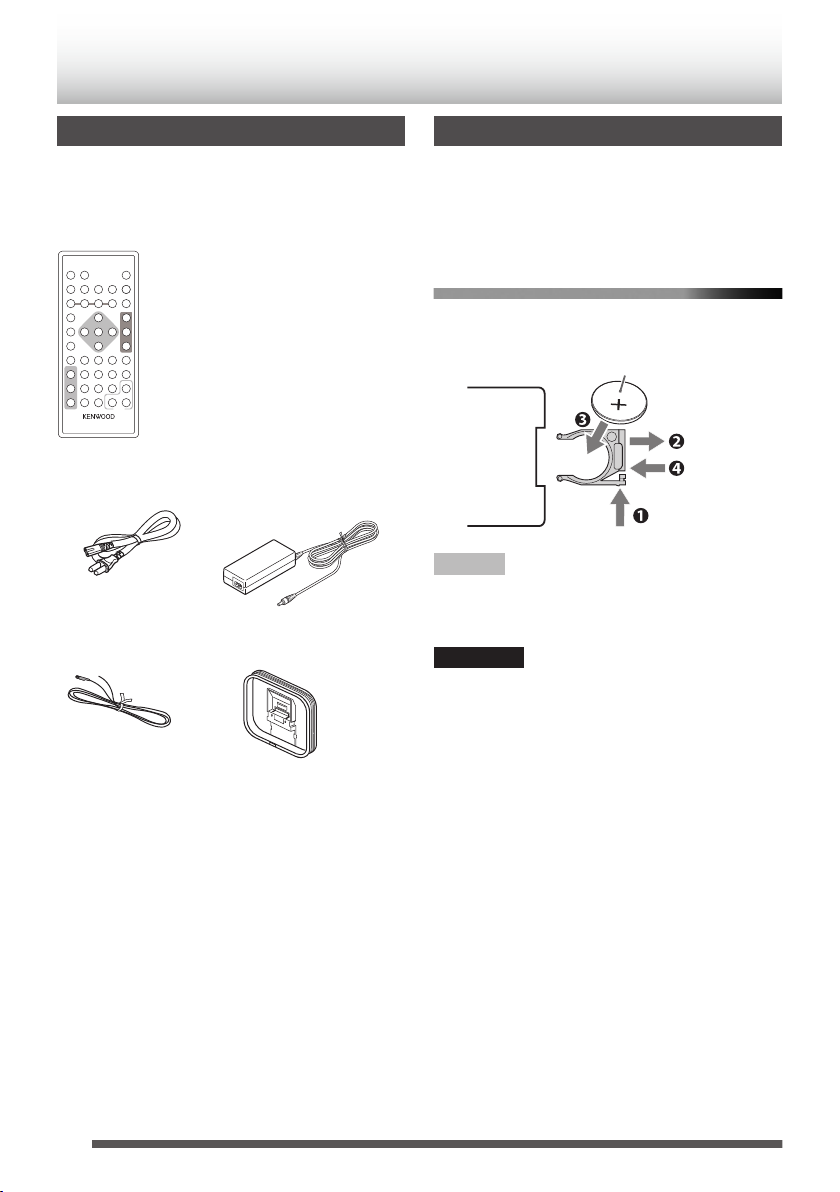
AM loop antenna x 1FM antenna x 1
AC adapter AA-R1809 (1)Power cord (1)
RC-F0328 (1)
Remote control
Lithium coin battery (CR2025)
Preparation
Accessories
Check that you have all the following items,
which are supplied for the System.
.
Preparing the remote control
When you use the remote control for the first time,
pull out the insulation sheet.
If the range or effectiveness of the remote control
decreases, replace the battery.
To replace the battery in the remote control
Match the polarities (+ and –) of the batteries with
those indicated on the remote control.
.
NOTE
0
The batteries supplied are intended for checking
system operation. Replace them with new ones
as soon as possible.
CAUTION
0
Danger of explosion if the battery is incorrectly
replaced.
0
Replace only with the same or equivalent type.
0
Store the battery in a place where children
cannot reach. If a child accidentally swallows the
battery, consult a doctor immediately.
0
To prevent the battery from overheating,
cracking, or starting a fire:
- Do not recharge, short, disassemble or heat
the battery, or dispose of it in a fire.
- Do not leave the battery with other metallic
materials.
- Wrap the battery with tape and insulate when
throwing away or storing it.
- Do not poke the battery with tweezers or similar
tools.
0
Dispose the battery in the proper manner,
according to federal, state, and local regulations.
6
(
)
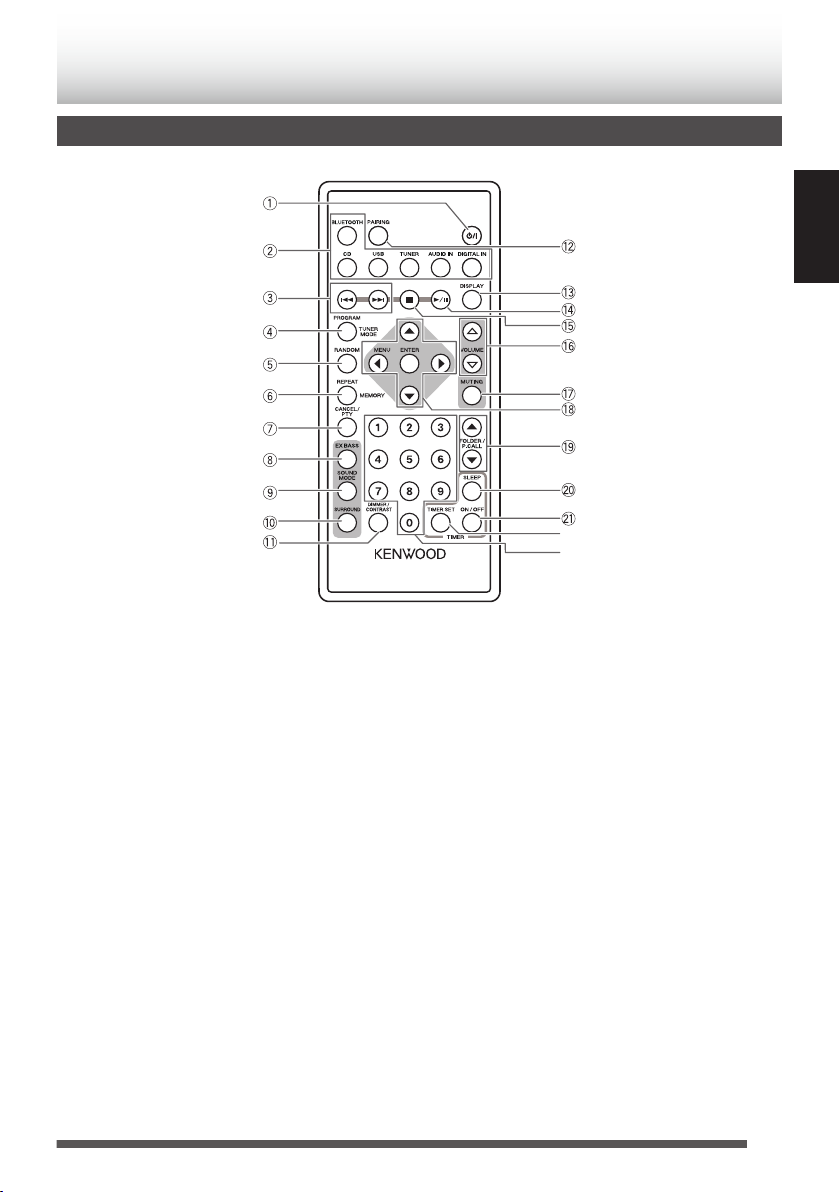
Part names
Remote control
0
The reference pages are mainly pages containing descriptions of the respective parts.
.
A
A (Power)
(page 14)
B
BLUETOOTH, CD, USB, TUNER, AUDIO IN,
DIGITAL IN
(pages 16, 19, 23, 25, 29)
C
S / T
(pages 16, 19, 24, 25)
D
PROGRAM / TUNER MODE
(pages 20, 25)
E
RANDOM
(pages 17, 21)
F
REPEAT / MEMORY
(pages 17, 22, 26)
G
CANCEL/PTY
(pages 26, 28)
H
EX BASS
(page 32)
I
SOUND MODE
(page 32)
J
SURROUND
(page 32)
K
DIMMER / CONTRAST
(page 33)
L
PAIRING
(page 23)
M
DISPLAY
(pages 27, 34)
N
I / W
(pages 16, 19, 24)
O
o
(page 19)
P
VOLUME F/G
(page 14)
Q
MUTING
(page 15)
R
J / K / H / I / SET
(pages 14, 26, 29, 30, 33)
S
FOLDER/P.CALL J/K
(pages 19, 26)
T
SLEEP
(page 30)
U
ON/OFF
(page 31)
V
TIMER SET
(pages 14, 30)
W
Number buttons
(pages 19, 26)
ENGLISH
7
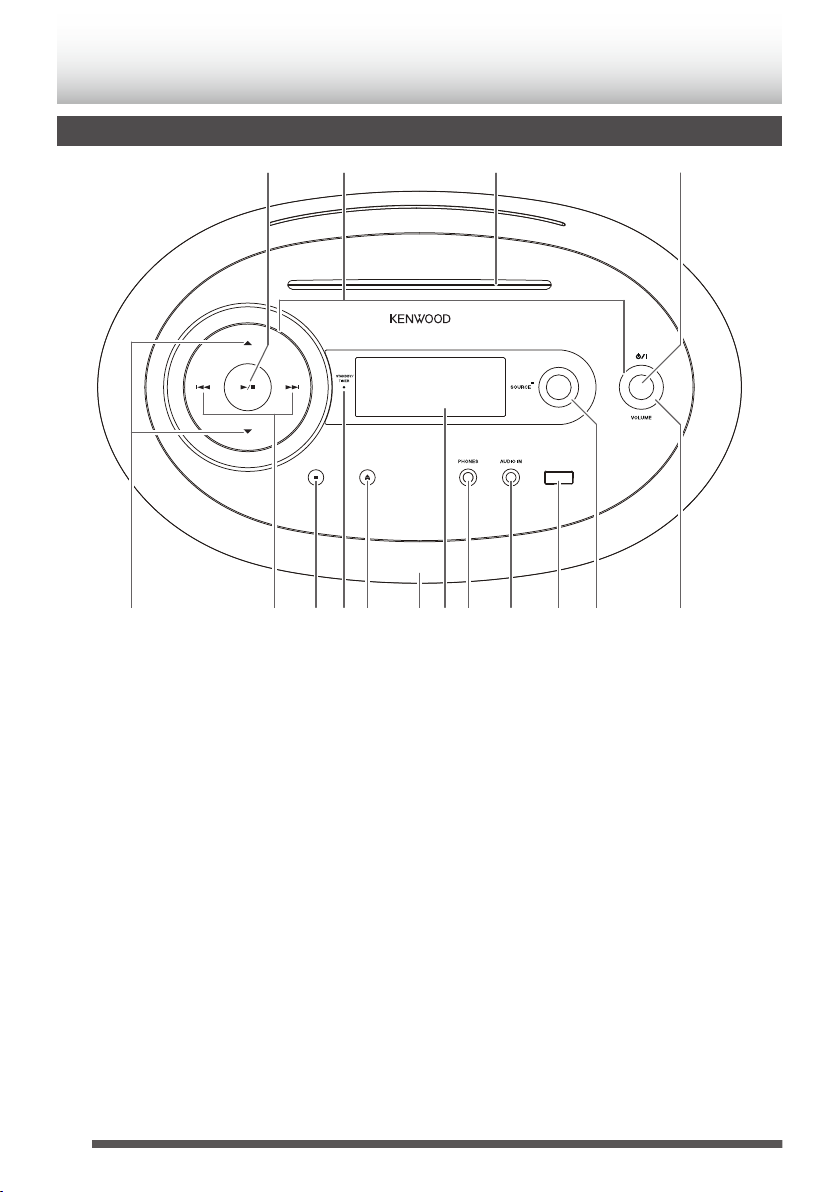
Top of the main unit
#
@
!~=
-098765
4321
.
A
(PAIRING) I/W button
(pages 16, 19, 23)
B
Illumination
Lights up in white when the power is on.
C
CD slot
(page 18)
D
A (Power) button
(page 14)
E
J / K button
(pages 19, 26, 40)
F
S / T button
(pages 16, 19, 24, 25)
G
o button
(page 19)
H
Standby indicator
Lights up in red when the power of the System
is off. The light goes off when the power is on.
Lights up in orange when the timer is set.
8
I
M (Ejecting CD) button
(page 18)
J
Remote control sensor
K
Display
L
PHONES jack
Connect headphones.
(page 13)
M
AUDIO IN jack
Connect an external device.
(page 29)
N
USB terminal
Connect iPod/iPhone or a USB device.
(pages 16, 18)
O
SOURCE
(pages 16, 19, 23, 25, 29)
P
VOLUME
(page 14)

Rear
43
2
3.35A
18V
1
.
A
DC IN jack
(page 12)
B
DIGITAL IN (OPTICAL) terminal
(page 29)
C
AM LOOP antenna terminal
(page 11)
D
FM 75Ω COAXIAL antenna terminal
(11 page)
ENGLISH
9
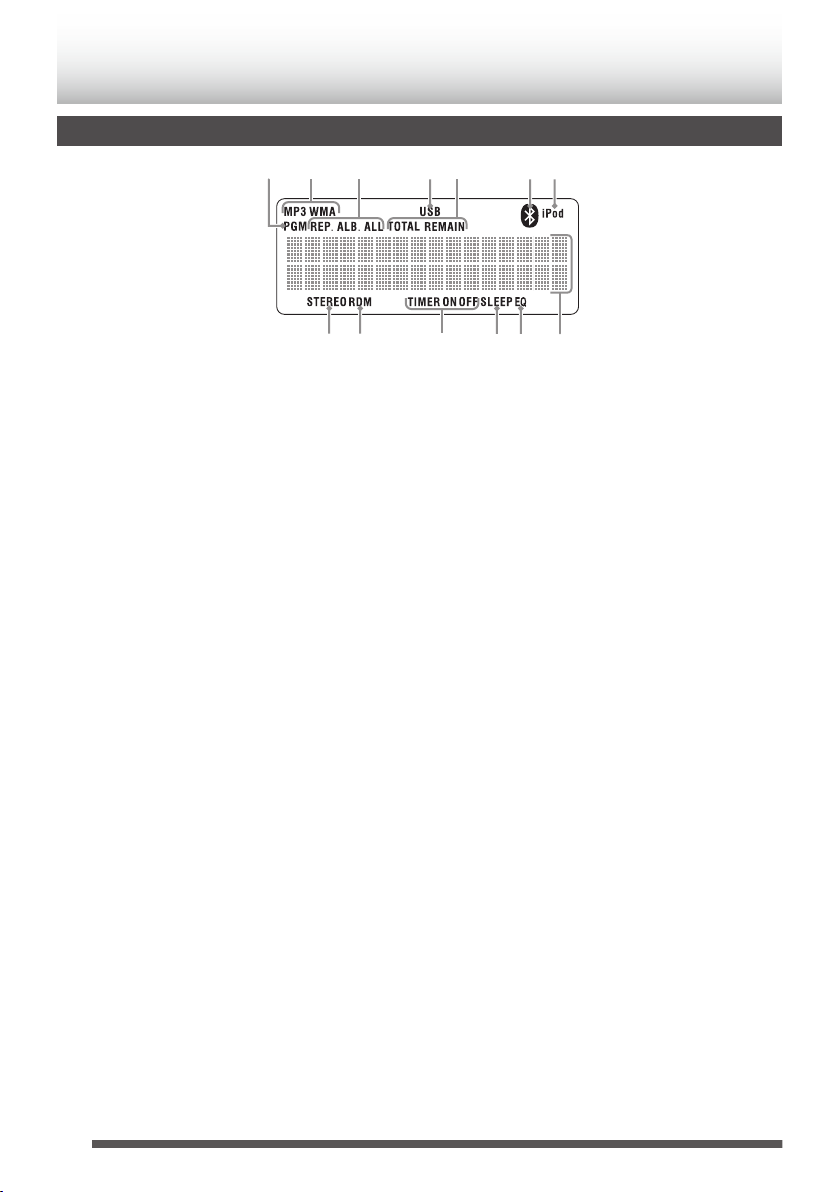
Display
1
23 4
657
89 0 -
=
~
A
PGM (program) indicator
(page 20)
Lights up during program playback. (“CD”,
“USB”)
B
File indicator
Lights up when an audio files are played back.
C
Repeat mode icon
(page 22)
REP. : Lights up when one track is
REP.ALB* : Lights up when the current folder
REP. ALL : Lights up when all tracks are
* MP3/WMA only
D
USB icon
(page 18)
Lights up when the USB device is connected to
the System.
E
Display switching icon
TOTAL : Lights up when the playback time
REMAIN : Lights up when the remaining
F
BLUETOOTH icon
(page 23)
Lights up when BLUETOOTH device is
connected to the System.
.
repeated.
(“CD”, “USB”)
is repeated.
(“CD”, “USB”)
repeated.
(“CD”, “USB”)
of whole disc is displayed while
the disc is played back.
playback time of a track is
displayed while the disc is played
back.
G
iPod icon
(page 16)
Lights up when iPod is connected to the System.
H
STEREO icon
(page 25)
Lights up when receiving an stereo broadcast.
I
RDM icon
(page 21)
Lights up during random playback. (“CD”,
“USB”)
J
Timer icon
(pages 30, 31)
TIMER : Lights up when the timer has
been set. Flashes while the
timer is functioning.
TIMER ON : Flashes when setting the
starting time of daily timer.
TIMER OFF : Flashes when setting the
ending time of daily timer.
K
SLEEP icon
(page 30)
Lights up when setting the sleep timer.
L
EQ icon
(page 32)
Lights up when the sound mode or EX.BASS is
set.
M
Main display
Shows the text information of each source.
10
3.35A
18V
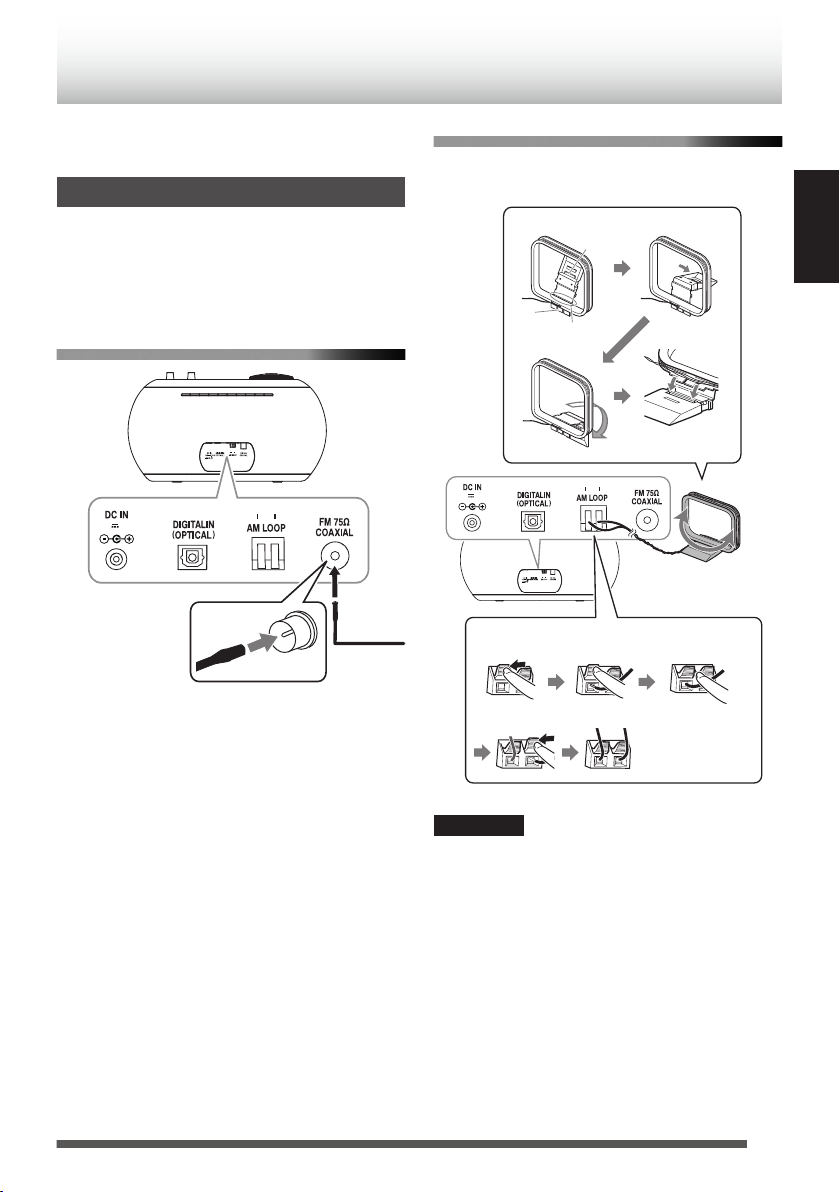
Insert the wire into the
center of the terminal.
3.35A
18V
Follow the same steps to insert the other wire
Insert the
wire core
Press hard
Inserting the antenna wire
Adjust the connected AM loop
antenna to the left or right to
position it in the direction with
the best reception.
Fit the tab into the groove
until it clicks into place
Foldable part at
the far end
Ta b
Groove
Assembling the antenna
Release
①
②
③
④
Connections
Connect the AC power cord to the wall outlet
after all other connections have been made.
Connecting antennas
Make sure to connect the antenna before
listening to radio broadcast.
Generally, installing the antenna near a window
helps to improve reception.
Included FM antenna
.
After you untied the bundled string, extend the FM
aerial when connecting so that you can obtain the
best reception.
Included AM loop antenna
0
Place the AM loop antenna as near as possible
to the window to obtain the best reception.
ENGLISH
.
CAUTION
0
Use the AM loop antenna with the antenna wire
wound around the frame. Removing the wire
from the frame deteriorates the sensitivity of the
antenna.
0
Make sure that the antenna conductor is not in
contact with other terminals or cables. Position
the antenna away from other cables. Reception
may be interfered if they are placed too close to
the antenna.
11
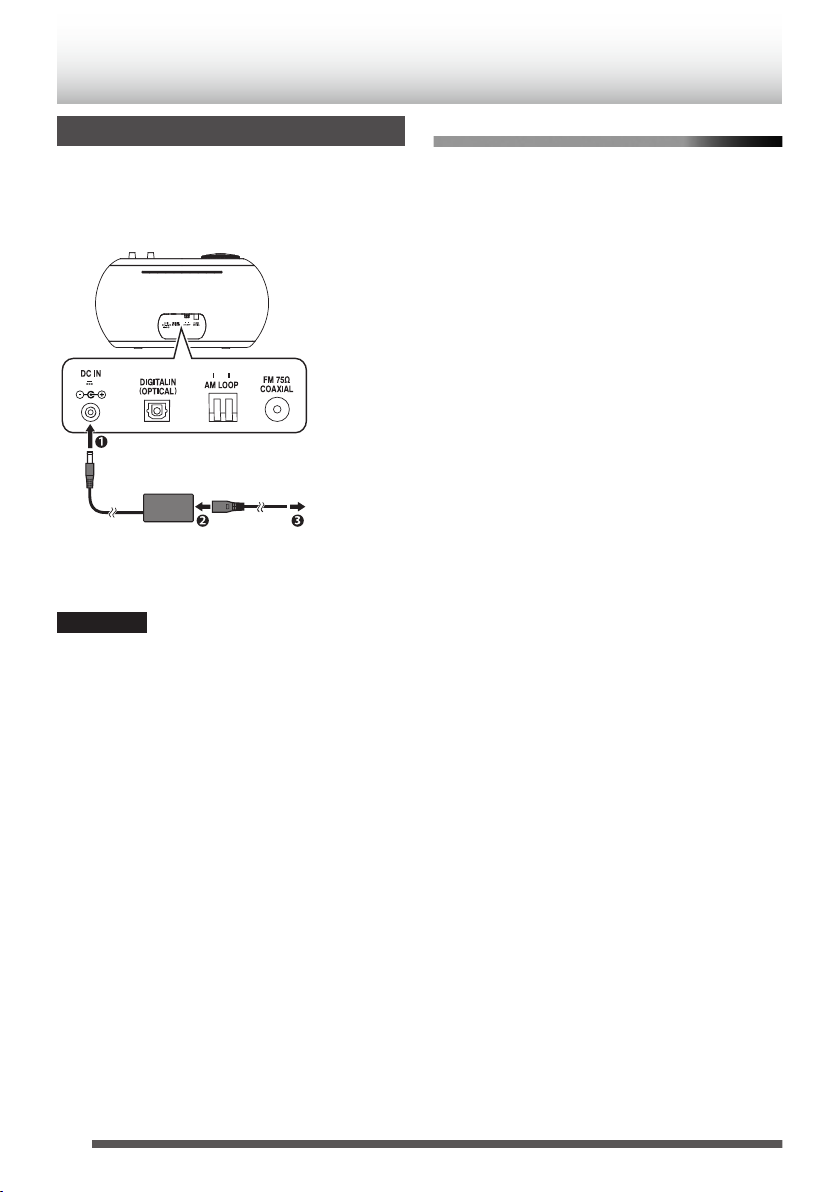
Connecting an AC adapter
3.35A
18V
To the AC outlet
Power cord
(supplied)
AC adapter
(supplied)
Connect the supplied AC adapter to DC IN jack of
the System. After connecting the supplied AC
power cord to the AC adapter, plug the AC power
cord into the wall outlet.
.
0
Unplug the AC adapter from the wall outlet if the
System will not be in use for a prolonged period
of time.
CAUTION
0
To avoid the risk of electric shock and fire
- Do not use any other adapters except the
supplied AC adapter.
- Do not use the supplied AC adapter with any
other products other than this System.
- Do not use any power cords except the
supplied power cord.
- Do not use the supplied power cord with any
other products other than this System.
About memory backup setting
Backup function can protect the various settings
even if the AC power cord is disconnected. The
protected settings are as follows.
0
Switching the source
0
Setting the volume
0
Setting the sound quality
0
The contents of timer setting
0
Setting the tuner
12
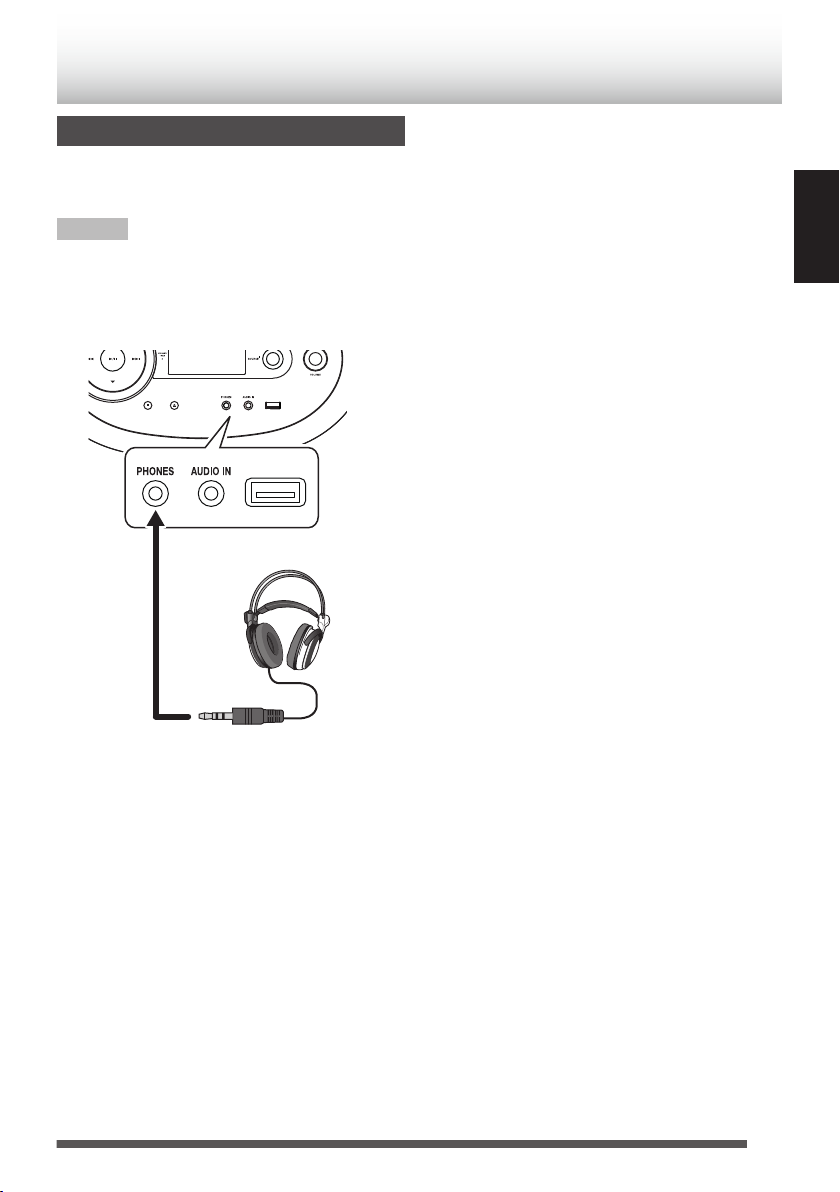
Connecting headphones
Stereo mini plug
Headphones(not supplied)
Be sure to turn down the volume before connecting
or putting on the headphones.
NOTE
0
Connecting the headphones deactivates the
speakers.
0
Use commercially available headphones with a
standard 3-pin stereo mini plug.
ENGLISH
.
13
Main unitRemote control
Press
/
(Press repeatedly)
/
(Press repeatedly)
/ / / / /
Remote control
Main unit
(Turn)
(Press repeatedly)
Remote control
Main unit
(Turn)
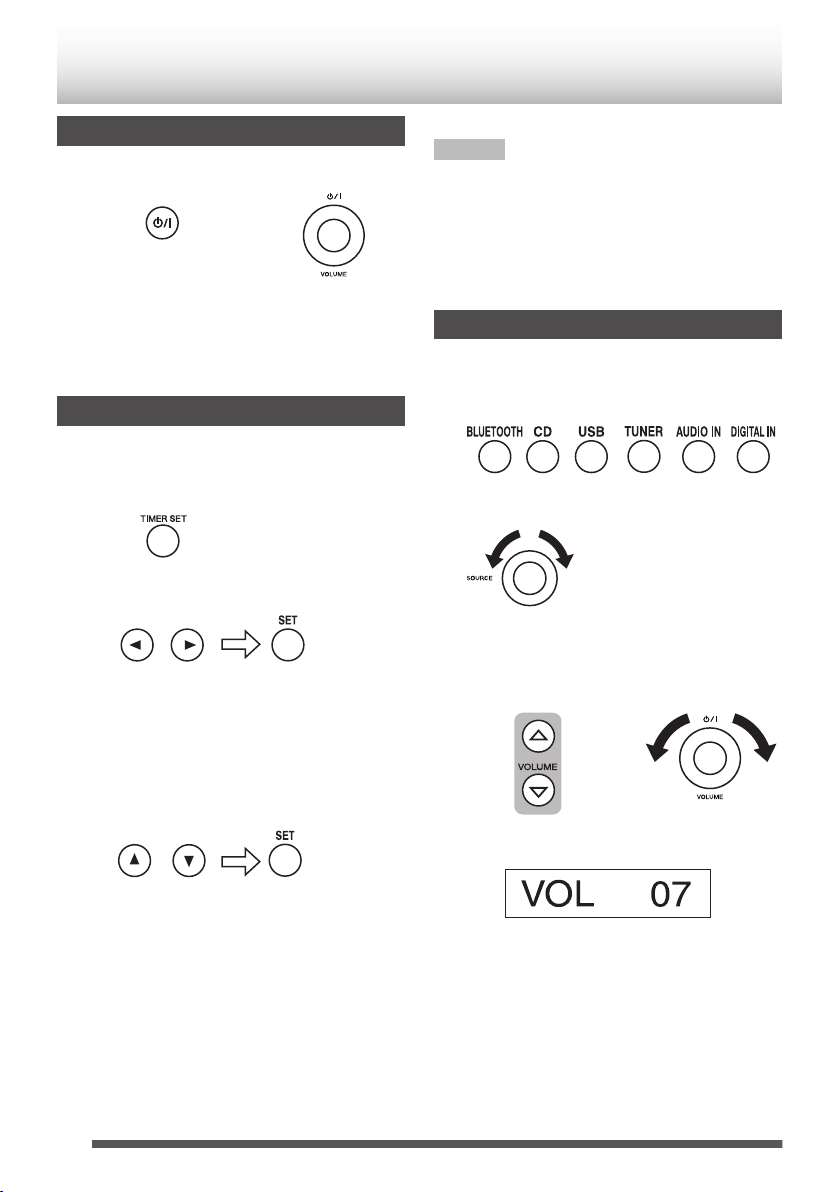
Basic operations
Turning on/off the System
.
0
You can also turn on the System by pressing the
source buttons such as [CD] on the remote
control.
Setting the clock
Set the clock to use the timer setting, etc.
1
Display the “TIMER SET” indicator.
.
2
Select and confirm “CLOCK”.
.
0
If you have already set the clock, after
pressing [TIMER SET], press [H]/[I]
repeatedly to select “CLOCK”, then press
[SET].
3
Adjust the hour.
NOTE
0
The clock may gain or lose 1 to 2 minutes per
month. You may need to readjust the clock
periodically.
0
Set the clock again if the AC power cord is
unplugged or the System is turned off due to the
power failure.
Getting started
1
Select a source.
.
.
2
Adjust the volume.
.
4
Repeat Step 3 to adjust the minute.
After adjusting the minute, “COMPLETE” is
displayed and the setting is completed.
14
.
.
0
Adjustable range: MIN (0) to MAX (40)
 Loading...