

Page 1

.
CD Tuner Amplifier
A-K805
INSTRUCTION MANUAL
.
.
LVT2492-002A
[E]
Page 2

Introduction
Introduction
Enjoying audio from different devices
Preparations before listening to audio
Connect the speakers (p. 8)
.
Connect the antenna too if you are listening to the radio
Connecting an DAB/FM antenna (p. 10)
.
NOTE
0
DAB/FM antenna is supplied with the System.
Listening to the audio of different devices
iPod/iPhone (p. 16) USB memory (p. 18) TV (p. 40)
.
.
.
Digital audio player (p. 40) Disc (p. 24) Radio (p. 30)
.
.
.
2
Page 3

Contents
Introduction
Introduction ..................................... 2
Enjoying audio from different devices ............. 2
Precautions during installation ........................ 5
Preparation ...................................... 6
Accessories .................................................... 6
Preparing the remote control .......................... 6
Connections ..................................... 8
Connecting speakers ..................................... 8
Connecting DAB/FM antenna ....................... 10
Connecting other commercially-available
devices ......................................................... 11
Part names ..................................... 12
Front ............................................................. 12
Display ......................................................... 13
Remote control ............................................. 14
Basic operations ........................... 15
Turning on/off the power ............................... 15
Selecting an audio source for listening ......... 15
Muting the volume temporarily ..................... 15
Listening to iPod/ iPhone ............. 16
Connecting iPod/ iPhone .............................. 16
Playing back ................................................. 16
Navigating the iPod/ iPhone menus .............. 17
Listening to a USB device ............ 18
Connecting a USB device ............................ 18
Playing back ................................................. 19
Using the charge mode ................................ 22
Listening to CDs ............................ 24
Inserting a disc ............................................. 24
Playing back ................................................. 25
Program playback ........................................ 28
Listening to FM radio .................... 30
Searching for stations ................................... 30
Presetting stations ........................................ 31
Tuning in to a preset station ......................... 34
Deleting a preset station ............................... 35
Listening to the radio data system ................ 35
Listening to DAB ........................... 36
Listening to DAB/DAB+ stations ................... 36
Setting for DAB ............................................. 38
Listening to an external device .... 40
Connecting an external device ..................... 40
Playing back ................................................. 41
Setting the sound quality ............. 42
Setting to your preferred sound quality ......... 42
Increasing the deep bass (EX.BASS) ........... 42
Resetting the sound quality .......................... 42
Enhancing the playback sound quality (K2
feature) ......................................................... 43
Adjusting the left/right sound balance of the
speakers ...................................................... 43
Using the timer .............................. 44
Setting the sleep timer .................................. 44
Other settings ................................ 45
Changing the display information ................. 45
Changing the brightness of the display window
...................................................................... 45
Activating/deactivating the Auto Power Save
(A.P.S.) feature ............................................. 46
References ..................................... 48
Compatible iPod ........................................... 48
Playable discs/files ....................................... 48
Precautions on CD-R/CD-RW ...................... 49
Important for USB mass storage class devices
...................................................................... 49
Precautions on audio files ............................ 50
Trademarks .................................................. 51
Troubleshooting ............................ 52
Specifications ................................ 54
3
Page 4

Release quickly
Press and hold down
Introduction
Auto Power Save function (APS)
0
The System comes with an “Auto Power Save (APS)” function, which turns off the
power automatically when no sound is output for 15 minutes. This function is
enabled in the default setting. (p. 46)
In this manual...
0
The remote control buttons are used for explaining the operations unless mentioned otherwise.
However, if the System has buttons with the same or similar names, they can also be used for the
operations.
0
The display shown in this manual may differ from the actual display in some cases.
In this manual...
0
In this manual, “iPod” includes iPod, iPod touch and iPhone devices. When referring specifically to
iPod touch or iPhone, “iPod touch” or “iPhone” is used respectively.
0
In this manual, for explanation of audio files (MP3/WMA/AAC), “file” and “track” are used
interchangeably.
Ways to press the buttons
There are two ways of pressing the buttons on the System. “Short press” refers to the action of pressing
a button and releasing it immediately, while “long press” refers to pressing and holding down a button.
Short press: Applicable to cases where “long press” is not indicated
Press a button lightly and release it instantly. The System may not respond if excessive force is applied
to a button or if the button is not released instantly. If it does not respond as intended, retry by adjusting
how long a button is pressed or the amount of force applied.
.
Long press: Applicable to cases where “long press” is indicated
.
Press and hold down a button, followed by releasing the finger.
4
Page 5

Speaker
(sold separately)
Speaker
(sold separately)
Main unit
1 cm 1 cm
15 cm 15 cm
15 cm
15 cm
15 cm
Rear of the System
Introduction
Precautions during installation
Caution: Proper Ventilation
To avoid the risk of electric shock and fire, and to prevent damage, locate the apparatus as follows:
1 Front:
No obstructions and open spacing.
2 Sides/Top/Back:
No obstructions should be placed in the areas indicated by the dimensions in the illustration below.
3 Bottom: Place on a level surface.
Front view
.
Side view
.
Notes on installation
Select a place which is level, dry and neither too hot nor too cold — between 5 ˚C and 35 ˚C.
5
Page 6
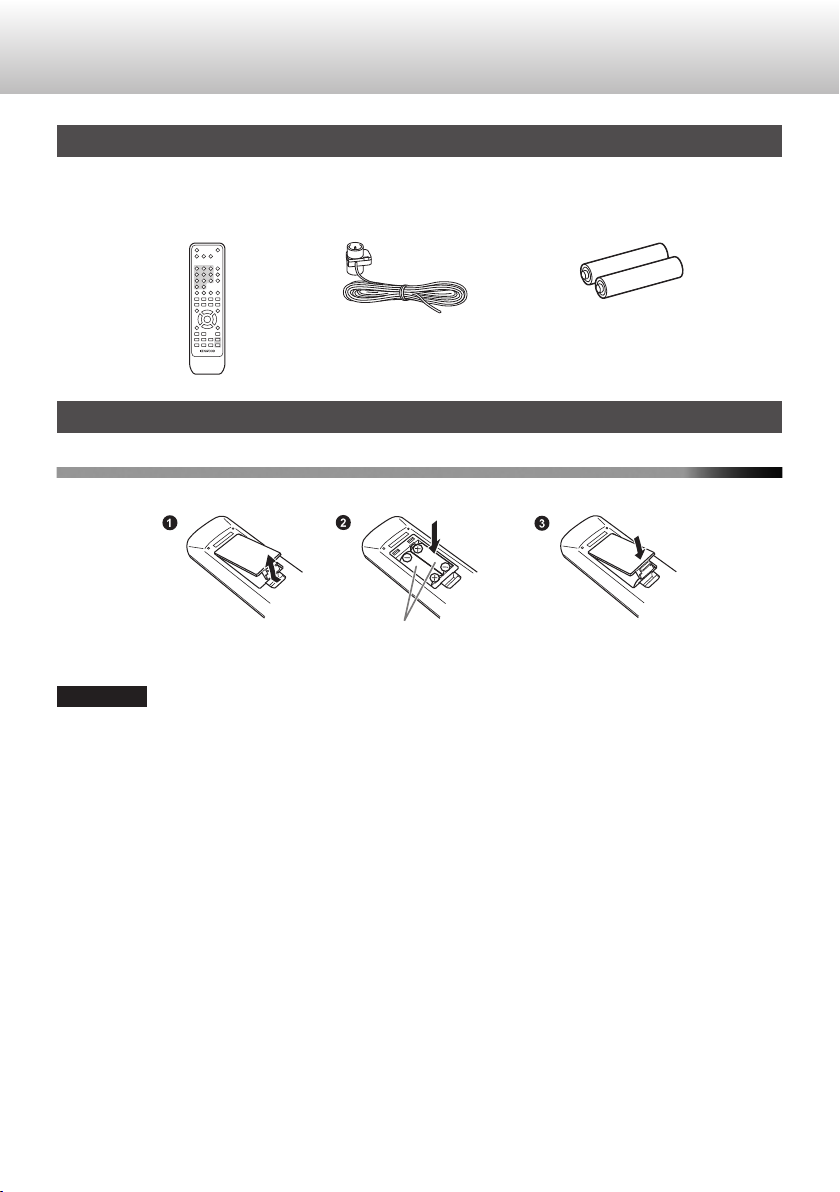
Dry-cell batteries for remote
control (AAA x 2)
RC-A0801
Remote control x 1
DAB/FM antenna x 1
AAA batteries (supplied)
Preparation
Preparation
Accessories
Check that you have all the following items, which are supplied for the System.
.
Preparing the remote control
Loading the batteries
Match the polarities (+ and –) of the batteries with those indicated on the remote control.
.
CAUTION
0
The batteries supplied are intended for checking system operation. Replace them with new ones as
soon as possible.
0
Read through the attached “Safety Precautions” to ensure proper handling of the batteries.
0
For used batteries, insulate them such as by attaching an insulating tape, and dispose of them
according to the guidelines set forth by the local government of the area of use.
0
Do not subject the remote control to strong impacts, such as dropping it or hitting it against other objects.
6
Page 7

Approx. 30°Approx. 30°
Approx. 6 m
Remote control sensor
Preparation
Operating the remote control
.
0
Exposing the sensor on the unit to strong light may interfere with operations. Change the direction of
the unit if this occurs.
7
Page 8

BCA
AB C
Tighten
the screw
Turn the screw
to open the
terminal
Connecting the speaker cord to the System
Rear view of System
Without line
With line
Speaker cords
(sold separately)
Tighten the
screw
Insert the core wire
without bending
Turn the screw to
open the terminal
Connecting the speaker cord to the speaker
The bare wires at the tip of the cord may cause
short circuit when they come into contact with the
metal parts of the System, causing it to break down.
Remove the
cable coating
Handling the tip of speaker
cord
Insert the core wire
without bending
from the top
The speaker cords can also be connected to the speakers by using
banana plugs which are commercially available. After tightening the
speaker terminals on the System, insert the banana plugs to which the
speaker cords are connected, into the hole of the speaker terminals.
Left Speaker
(sold separately)
Rear view
Right Speaker
(sold separately)
Rear view
When you connect the speaker
cords, connect them to match
the polarity (plus to plus and
minus to minus) between the
speakers and the System.
Connections
Connections
CAUTION
0
After checking all the connections have been made correctly, plug the AC power cord of this
unit into the outlet.
0
When unplugging a connected cord or cable, make sure to turn off the power of the System in advance,
and remove the AC power cord from the outlet.
Connecting speakers
0
The illustrations are examples for connection. The speaker can also be connected with speaker
terminals and speaker cords other than the illustration.
.
NOTE
0
You can also make use of general speakers besides the recommended product (LS-K901). Use one
with a speaker impedance of 4 Ω to 16 Ω.
8
Page 9

Connections
Precautions during speaker connection
0
Do not connect more than 2 speakers into 1 terminal.
0
Avoid applying excessive force when inserting the speaker cord to prevent the vinyl coating from
entering the terminal.
0
Incorrect connection of the speaker cords may cause the System to malfunction. Connect properly
according to the diagram.
9
Page 10

Rear view of System
Extend the wire of the antenna
at a position and in the direction
with the best reception, and
tape it securely.
DAB/FM indoor antenna (supplied)
Connections
Connecting DAB/FM antenna
DAB/FM antenna connection
.
0
For more details on connecting an antenna other than the one supplied, please refer to the instruction
manual of the antenna and antenna connector.
0
Listen to the actual broadcast to determine the location for installing the antenna.
10
Page 11

To power outlet
Audio cable
(not supplied)
To subwoofer
pre-out
Analog audio input
Built-in Subwoofer of
Amplifier
To LINE input
Audio cable
(not supplied)
Analog audio output
To LINE output
Audio cable
(not supplied)
Analog audio input
Cassette deck, etc.
Optical digital cable
(not supplied)
Coaxial cable
(not supplied)
Optical digital
output (PCM signal)
TV, BD/DVD recorder, etc.
Rear of the
System
Stereo
mini plug
Headphones(not supplied)
Coaxial digital
output (PCM signal)
TV, digital audio player, etc.
To coaxial digital input
To optical digital input
Front
Connections
Connecting other commercially-available devices
Insert the connection wire fully. Otherwise, audio sound may not be output, or noise may be generated.
.
NOTE
0
Refer also to the instruction manual for the external device.
0
When the digital input terminal is connected, set the digital audio output setting for the connected device
(TV, BD recorder, etc.) to “PCM”.
Precautions on the AC power cord
0
Be sure to unplug the AC power cord from the outlet before going out or when the System is not in
use for an extended period of time.
11
Page 12

MODE ENTER
RETURN
VOLUME
INPUT BASS TREBLE
PHONES
STANDBY
K2
B
F
E
G
H
D
A
I
J
C
N
O
P
K
L
M
Part names
Part names
Front
0
The reference pages are mainly pages containing descriptions of the respective parts.
.
A
Remote control sensor
(p. 7)
I
BASS
(p. 42)
B
STANDBY indicator
Lights up in red when the power of the System
is off. The light goes off when the power is on.
C
A (Power)
(p. 15)
D
K2 indicator
(p. 43)
E
CD tray
(p. 24)
F
USB terminal
(p. 16, 18)
G
PHONES jack
For connecting headphones.
0
Connecting the headphones deactivates the
speakers.
H
INPUT
(p. 15, 16, 19, 25, 30, 36, 41)
NOTE
0
A small amount of power is always consumed even while the power of the System is off (in the standby
J
TREBLE
(p. 42)
K
MODE/ENTER
S/T
(p. 17, 19, 21, 27, 28, 31, 35, 38,
46)
L
RETURN
(p. 17)
M
M (Open/Close CD tray)
(p. 24)
N
VOLUME
(p. 15)
O
o (Stop)
P
I/W (Playback/Pause)
mode).
12
Page 13

Display
FM
STEREO DAB
DIGITAL
RANDOM
SLEEP
USB FOLDER FILE MUTING DISC REMAIN
A
GHIJ K LMN
BC D F
E
A
SLEEP icon
(p. 44)
Part names
.
G
USB icon
Lights up when USB connection is established.
B
Playback status icon
I (Play) icon
W (Pause) icon
C
Radio broadcast reception display
AUTO icon
Lights up during automatic selection of radio
station. Light goes off during manual selection
of radio station.
TUNED icon
H
Lights up when an audio file folder is displayed.
I
Lights up when an audio file is displayed.
J
Lights up when a track is displayed.
K
(p. 15)
Lights up when signal is received from the
station.
FM icon
Lights up during FM broadcast.
STEREO icon
Lights up when FM stereo broadcast signal is
received.
DAB icon
Lights up during DAB broadcast.
D
DIGITAL icon
Lights up when the audio source is “D-IN”, and
the digital signal is input. Blinks when no digital
signal is input.
E
Repeat mode icon
(p. 21, 27)
1FOLDER icon
Displayed during repeat playback of a folder.
F
RANDOM icon
(p. 20, 26)
L
DISC icon
Lights up when the elapsed time of whole disc
is displayed while disc playback is paused.
TOTAL icon
Lights up when the elapsed time of whole disc
is displayed while disc playback is paused.
Lights up when the remaining time of whole
disc is displayed while the disc is played back.
REMAIN icon
Lights up when the remaining time of the track
is displayed while the disc is played back.
When the remaining time of whole disc is
displayed, both the TOTAL icon and REMAIN
icon light up.
M
Lights up when the preset number of the FM
radio station is displayed.
N
Shows the text information of each source.
FOLDER icon
FILE icon
TRACK icon
MUTING icon
Switching the display information icon
CH icon
Text display
13
Page 14

A
B
C
D
E
F
G
H
I
J
K
L
M
N
O
P
Q
R
S
T
Y
U
V
W
Z
X
Part names
Remote control
A
M (Open/Close CD tray)
(p. 24)
B
SLEEP
(p. 44)
C
DIMMER
(p. 45)
D
Number buttons
(p. 25, 28, 34)
E
External input selection
(p. 41)
F
Audio source selection,
I/W
(p. 15, 16, 19, 25,
30, 36)
G
S/T P.CALL
(p. 17, 19, 21, 27,
28, 34)
H
MODE
(p. 22, 31, 35, 37,
46)
I
ENTER
(p. 17, 22, 28, 31,
35, 37, 46)
J
H I J K
(p. 17, 22, 31, 35,
37, 46)
K
RETURN
(p. 17)
L
BALANCEH I
(p. 43)
M
Bass JK/Treble JK
(p. 42)
N
A (Power)
(p. 15)
O
DISPLAY
(p. 37, 45)
P
REPEAT
(p. 17, 21, 27)
Q
RANDOM
(p. 17, 20, 26)
R
CLEAR
(p. 29)
S
o AUTO/MONO
(p. 19, 25, 27, 30)
T
O/N TUNING
(p. 17, 19, 25, 29,
30, 32, 36)
U
P.MODE
(p. 28)
V
K2
(p. 43)
W
MUTE
(p. 15)
X
EX.BASS
(p. 42)
Y
VOLUME J K
(p. 15)
Z
FLAT
(p. 42)
14
Page 15

(Turn)
Main unitRemote control
VOLUME
(Turn)(Press repeatedly)
Main unitRemote control
MUTING
Basic operations
Turning on/off the power
0
You can also turn on the System by pressing the source buttons,
like as [CD I/W] on the remote control.
Selecting an audio source for listening
1
.
2
Basic operations
.
Select a source.
Adjust the volume.
.
0
Adjustable range: 0 to 50(Max)
0
When you press and hold the button, the hour digit
changes continuously.
Muting the volume temporarily
.
.
0
To cancel mute, press the button again or adjust the volume.
15
Page 16

USB cable for iPod
(cable supplied with iPod or commercially available)
(Turn)
Main unitRemote control
Listening to iPod/ iPhone
Listening to iPod/ iPhone
Connecting iPod/ iPhone
To play back files on the iPod by operating the System, connect the
iPod to the USB terminal of the System.
.
CAUTION
0
Stop playback before disconnecting the iPod. Disconnecting
during playback may cause damage to the files or file system of
the iPod.
0
Audio recordings cannot be imported from the System to the
iPod.
NOTE
0
iPod is charged in the following conditions.
- The charge mode of the System (p. 22) is set to on, and the
power of the System is off (standby state). When it is connected
to the USB terminal, the charging starts.
- It is charged with all sources while the power of the System is
on. When it is connected to the USB terminal, the charging
starts.
0
If the rechargeable battery or battery of the iPod/iPhone is
exhausted completely, the charge function might not work. In
that case, turn off the power of the System and turn it back on
again.
Playing back
To start playback
.
0
Playback of iPod starts.
16
.
Page 17

To pause
/
ST
(Turn)(Press repeatedly)
Main unitRemote control
/
(Hold)
/
(Press repeatedly)
.
0
To cancel pause, press the button again.
To select a track
.
0
Press [T] once to skip to the beginning of the
next track.
0
Press [S] to skip to the beginning of the track
being played. Press [S] twice to skip to the
beginning of the previous track.
Fast forward/reverse
During playback...
.
0
To fast reverse, press and hold [O] .
0
To fast forward, press and hold [N] .
Shuffle playback
.
0
Pressing the button each time switches the
shuffle playback mode of the iPod.
Repeat playback
Listening to iPod/ iPhone
Navigating the iPod/ iPhone
menus
Display the menu.
1
.
Select a menu item.
2
.
To return to the previous menu
0
Press [RETURN].
NOTE
0
Operation may differ depending on the type of
iPod device you are using.
0
Sound distortion may occur when the equalizer
of iPod is used for playing back audio sources
with high recording levels. If distortion occurs,
it is recommended that you turn off the
equalizer.
0
For some types of iPod devices, the menu can
only be operated on the screen of the iPod.
0
Operate the iPhone or iPod touch itself in the
following cases:
- When operating the home button
- When selecting application icons on the home
screen
- When dragging the slider
0
For details on operating the iPod, refer to the
instruction manual for iPod.
Listening to iPod/ iPhone
.
0
Pressing the button each time switches the
repeat playback mode of the iPod.
17
Page 18
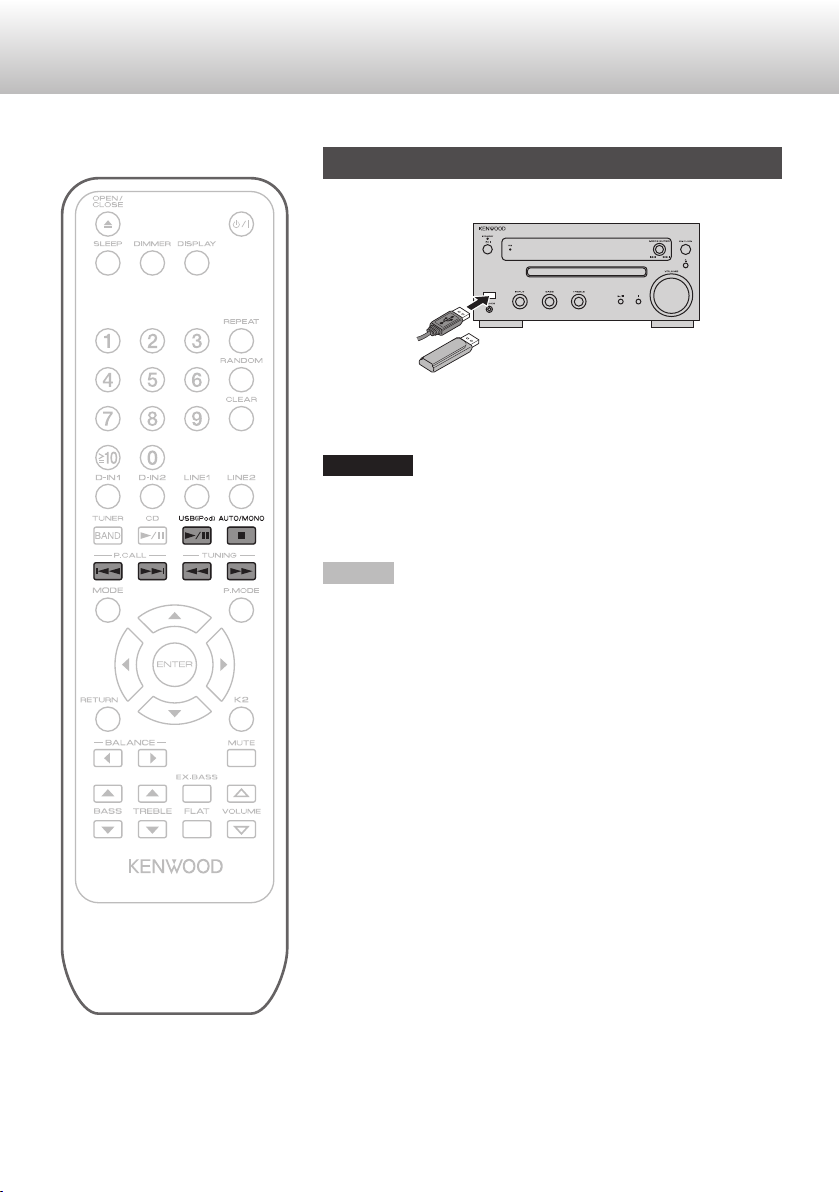
USB cable
(commercial product)
USB memory (commercial product), digital
audio player that supports the USB mass
storage class (commercial product), etc.
Listening to a USB device
Listening to a USB device
Connecting a USB device
CAUTION
0
Stop playback before disconnecting the USB device.
Disconnecting the USB device during playback may cause
damage to the files and file system of the USB device.
NOTE
0
USB device is charged in the following conditions.
- The charge mode of the System (p. 22) is set to on, and the
power of the System is off (standby state). When it is connected
to the USB terminal, the charging starts.
- It is charged with all sources while the power of the System is
on. When it is connected to the USB terminal, the charging
starts.
.
18
.
Page 19

Playing back
(Turn)
Main unit
Remote control
/
ST
(Turn)(Press repeatedly)
Main unitRemote control
/
(Hold)
Listening to a USB device
To select a track
To start playback
.
NOTE
0
For USB device connections, the program
playback feature is not available.
0
You cannot send any data from the System to
the USB device.
To stop
.
0
In the case of audio files, resuming playback
after stopping a file starts playback from the
beginning of the track (resume function).
Pressing [o] again when playback is stopped
cancels the resume function.
To pause
.
0
Press [T] once to skip to the beginning of the
next track.
0
Press [S] to skip to the beginning of the track
being played. Press [S] twice to skip to the
beginning of the previous track.
To fast forward/reverse
During playback or pause
.
Listening to a USB device
.
0
To cancel pause, press the button again.
19
Page 20
Listening to a USB device
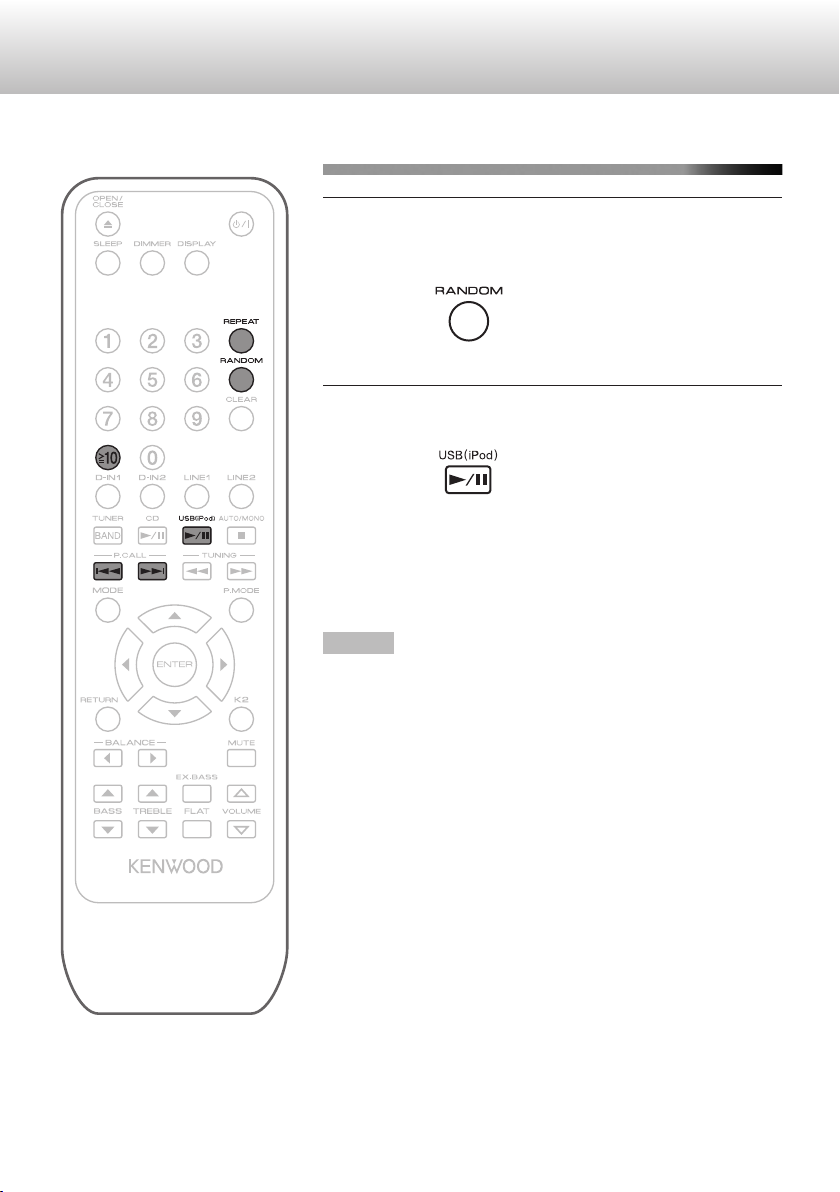
Random playback
1
2
0
Enable the random setting.
While in the stop mode
.
0
The “RANDOM” icon lights.
Start playback.
.
0
During random playback, pressing [S] does not bring
you back to the previous track.
0
While in the stop mode if you press [RANDOM] again,
random playback is canceled. And the “RANDOM” icon
also disappears.
NOTE
Random playback is canceled in the following cases:
- When the power is turned off
- When the USB device is removed
20
.
Page 21

/
ST
(Turn)(Press repeatedly)
Main unitRemote control
Listening to a USB device
Repeat playback
Select the type of repeat mode.
1
While in the play or stop mode
.
0
Each time you press the button, the
setting changes as follows:
- “ ” icon:
Repeats all the tracks.
- “ 1” icon:
Repeats the current track.
- “ 1FOLDER” icon:
Repeats the tracks in the current folder.
Start playback.
2
.
When playing back from a different
folder
Display the name of the current folder.
1
.
0
The folder name appears blinking.
Select a folder.
2
.
Start playback.
3
.
0
Playback starts from the first track in the
folder.
0
Some USB devices may not support the
selection of folders.
Listening to a USB device
21
Page 22

MODE / ENTER
(Hold)
Main unitRemote control
/
(Press repeatedly)
/
(Press repeatedly)
Listening to a USB device
Using the charge mode
You can specify the setting whether the power is charged or not to
the iPod or USB device during the System is turned off (standby
state).
1
2
3
Display the setting menu.
.
Select “Charge Mode”.
.
Select “On” or “Off”.
22
.
.
0
“On” (initial setting):
When iPod or USB device is connected to the System,
charging will start.
0
“Off”:
When iPod or USB device is connected to the System, it
is not charged.
Page 23

Turn off the power of the System (set
4
the System to standby state)
Connect the iPod or USB device.
5
“Charging” is shown on the display window,
and the charging is started.
0
When the charge mode is set to on, the power
consumption slightly increases while the
power of the System is off (standby state).
0
If the USB device is disconnected while
“ReadyCharging” appears, the System does
not enter the standby state. To enter the
standby state again, press the power button.
Listening to a USB device
Listening to a USB device
23
Page 24

Labeled Side
Listening to CDs
Listening to CDs
Inserting a disc
0
To close the CD tray, press [M].
NOTE
0
While the power is off (standby state), pressing [M] turns on the
power and opens the CD tray.
.
24
.
Page 25

Playing back
(Turn)
Main unitRemote control
/
ST
(Turn)(Press repeatedly)
Main unitRemote control
/
(Hold)
To start playback
Listening to CDs
To select a track
.
To stop
.
To pause
.
0
To cancel pause, press the button again.
.
0
Press [T] once to skip to the beginning of the
next track.
0
Press [S] to skip to the beginning of the track
being played. Press [S] twice to skip to the
beginning of the previous track.
To select a track with the track number
Select a track by keying in the number using the
numeric keys on the remote control.
Examples:
0
To select track no. 3: 3
0
To select track no. 17: Q10 1 7
0
To select track no. 20: Q10 2 `
0
To select track no. 123: Q10 1 2 3
(MP3/WMA files only)
To fast forward/reverse
During playback or pause
.
Listening to CDs
25
Page 26

Listening to CDs
Random playback
Enable the random setting.
1
While in the stop mode
.
0
The “RANDOM” icon lights.
Start playback.
2
.
0
During random playback, pressing [S] does not bring
you back to the previous track.
0
While in the stop mode if you press [RANDOM] again,
random playback is canceled. And the “RANDOM” icon
also disappears.
NOTE
0
Random playback is canceled in the following cases:
- When the power is turned off
- When the CD tray is opened
26
.
Page 27

/
ST
(Turn)(Press repeatedly)
Main unitRemote control
Listening to CDs
Repeat playback
Select the type of repeat mode.
1
While in the play or stop mode
.
0
Each time you press the button, the
setting changes as follows:
- “ ” icon:
Repeats all the tracks.
- “ 1” icon:
Repeats the current track.
- Icon not displayed:
Repeat playback is turned off.
Start playback.
2
.
NOTE
0
During program playback, selecting “ ”
(repeating all tracks) repeats all the
programmed tracks.
0
During random playback, selecting “ ”
(repeating all tracks) repeats all tracks in
random order.
0
Repeat playback is canceled in the following
cases:
- When the power is turned off
- When the audio source is changed
- When the CD tray is opened
Playing back from a different folder
(MP3/WMA only)
Display the selecting mode of the
1
folder and file.
While in the stop mode
.
0
Pressing the button again exits the folder
name display.
Select the folder or file.
2
.
0
You can also select a folder or file by
pressing [J] [K].
0
Pressing [RETURN] returns to the
previous layer.
0
Pressing [ENTER] advances to the next
layer.
Start playback.
3
.
0
Some types of discs may not support the
selection of folders.
Listening to CDs
27
Page 28
/
ST
(Turn)(Press repeatedly)
Main unitRemote control
MODE / ENTER
Main unitRemote control
Listening to CDs
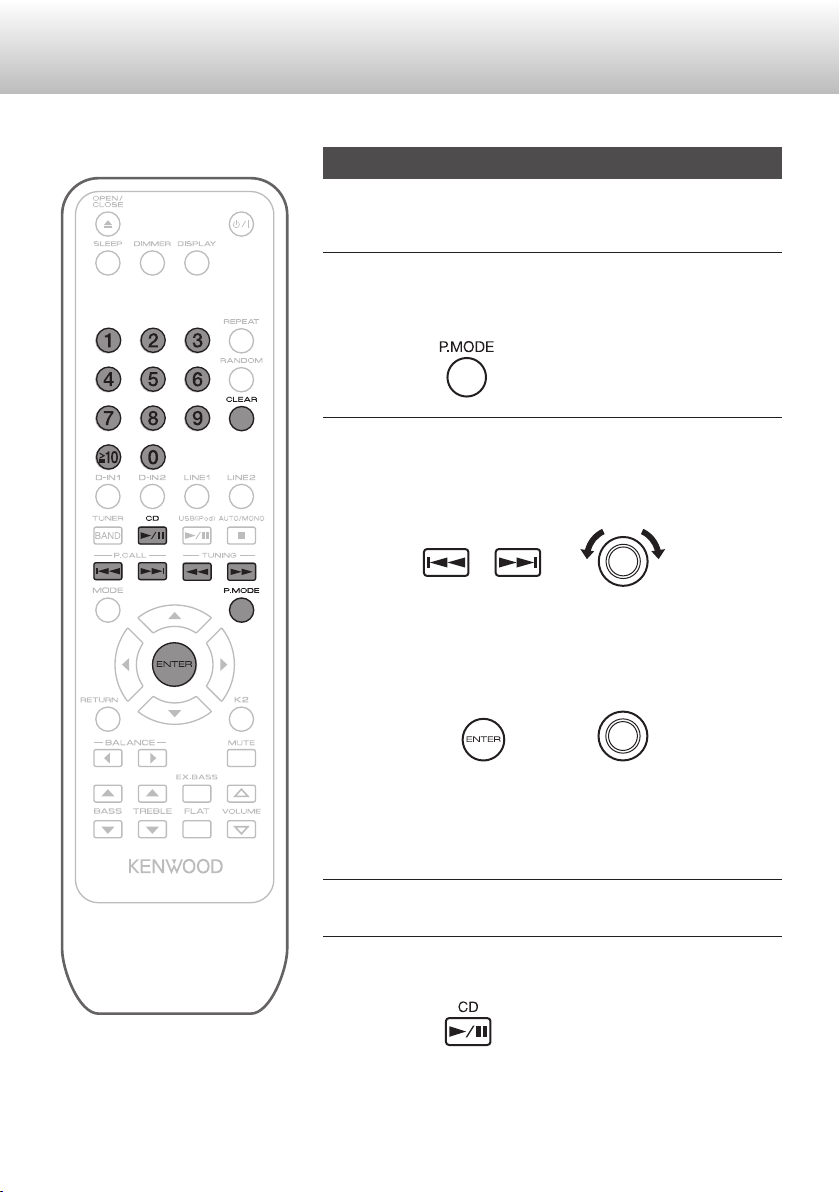
Program playback
You can program up to 32 tracks from a CD in any desired order for
playback.
Display the program mode.
1
While in the stop mode
.
Select a track to add to the program.
2
A
Select a track, folder, or file.
.
B
Press [ENTER].
28
.
.
0
For MP3/WMA files, you can also select a file or folder
using the numeric keys.
-
To select a file: press Q10 once
-
To select a folder: press Q10 twice
Repeat step 2 to add other tracks to the program.
3
Start playback.
4
.
Page 29

/
/
ST
(Turn)(Press repeatedly)
Main unitRemote control
MODE / ENTER
Main unitRemote control
Listening to CDs
Confirming the programmed tracks
While program playback is stopped
.
0
The tracks in the program will successively
appears on the display in the programmed
order.
Adding tracks to a program
While program playback is stopped
A
Select a track or file to add.
.
B
Press [ENTER].
.
0
The track is added to the end of the program
list.
Deleting tracks from the program
While program playback is stopped
.
0
Each time you press the button, the last track
in the program is erased.
Canceling program playback
While program playback is stopped
.
0
Program playback is also canceled in the
following cases:
- When the power is turned off
- When the CD tray is opened
Listening to CDs
29
Page 30

(Turn)
(Press repeatedly)
Main unitRemote control
/
Listening to FM radio
Listening to FM radio
Searching for stations
NOTE
0
Connect the antenna before listening to radio broadcast.
(p. 10)
Select “FM”.
1
.
Select a method for choosing the station (auto or
2
manual selection).
.
0
Select auto selection if the reception is good.
(“AUTO” icon lights up)
0
Select manual selection if the reception is poor.
(“AUTO” icon is not lit)
30
.
Select a station.
3
.
0
Auto selection:
Pressing the button each time start automatic reception of
signals from the next station.
0
Manual selection:
Continue pressing to select the frequency you want to
receive.
Press and hold the button for the frequency to run
continuously.
NOTE
0
Pressing the button repeatedly changes the reception
frequency in steps of 50 kHz.
0
Stereo reception is enabled during auto selection of a station,
and monaural reception during manual selection.
0
Monaural reception improves the reception but the stereo effect
is lost.
Page 31

(Turn)
(Press repeatedly)
Main unitRemote control
MODE / ENTER
(Hold)
Main unitRemote control
/
(Press repeatedly)
MODE / ENTER
Main unitRemote control
Listening to FM radio
Presetting stations
A total of 40 FM/DAB stations can be stored in the
memory.
Storing stations automatically
(auto preset; FM only)
Select “FM”.
1
.
Display the setting menu.
2
.
Store the station.
4
.
0
You can store up to 40 preset stations
maximum in the order of their frequency.
CAUTION
0
If the preset number is already assigned with a
station, storing a new station to it overwrites the
existing setting.
Listening to FM radio
Select “Tuner Setup” B “Auto Preset”
3
in sequence.
.
0
A confirmation message appears.
0
To cancel presetting, press [MODE].
31
Page 32

/
MODE / ENTER
(Hold)
Main unitRemote control
/
(Press repeatedly)
80.00 MHz 1 CH
/
MODE / ENTER
ST
(Turn)(Press repeatedly)
Main unitRemote control
80.00 MHz 3 CH
Selected preset number
Listening to FM radio
Storing stations manually (manual preset)
Tune in to a station you want to preset.
1
.
Display the setting menu.
2
.
Select “Tuner Setup” B “Memory” in sequence.
3
.
0
The preset number appears blinking.
32
.
.
0
To cancel presetting, press [MODE].
0
Perform the following steps while the indication flashes.
Select a preset number to store information.
4
.
.
Page 33

Store the station.
MODE / ENTER
Main unitRemote control
MODE / ENTER
(Hold)
Main unitRemote control
/
(Press repeatedly)
/
(Press repeatedly)
5
.
0
If the preset number is already assigned
with a station, a confirmation message
appears.
- To replace the existing station with the
new station, press [ENTER].
- If you do not want to replace the existing
station with the new station, press
[MODE].
0
Even when a station is preset, reception
will fail if the signals are weak.
Listening to FM radio
Search level setting
If the weak radio station is frequently received
during the auto preset or manual preset, set the
“Search Level” setting to “Strong” to receive the
strong radio station only.
0
The initial setting is “Normal”.
Display the setting menu.
1
.
Select “Tuner Setup” B “Search
2
Level” in sequence.
.
Listening to FM radio
Select “Normal” or “Strong”.
3
.
33
Page 34

/
ST
(Turn)(Press repeatedly)
Main unitRemote control
Listening to FM radio
Tuning in to a preset station
.
0
Press and hold the button to switch continuously from one preset
station to another.
0
You can also select a preset number using the numeric keys.
-
To select track no. 3: 3
-
To select track no. 17: Q10 1 7
34
.
Page 35

/
ST
(Turn)(Press repeatedly)
Main unitRemote control
MODE / ENTER
(Hold)
Main unitRemote control
/
(Press repeatedly)
MODE / ENTER
Main unitRemote control
(Press repeatedly)
Listening to FM radio
Deleting a preset station
Select the preset number
1
corresponding to the station you want
to erase.
.
Display the setting menu.
2
.
Select “Tuner Setup” B “PresetClear”
3
in sequence.
Listening to the radio data
system
.
Each time you press the button, the setting
changes as follows:
0
Frequency and the preset number
0
Program Service Name
0
Radio text (if available)
NOTE
0
If the signal from a station of Radio Data
System is weak, the data of Radio Data System
may be displayed intermittently or not at all.
0
“Waiting…” may appear while the RT data is
being received.
Listening to FM radio
.
0
A confirmation message appears.
0
To stop erasing, press [MODE].
Erase the preset information.
4
.
35
Page 36

(Turn)
(Press repeatedly)
Main unitRemote control
/
Listening to DAB
Listening to DAB
Listening to DAB/DAB+ stations
1
2
Select “DAB”.
.
Selecting DAB for the first time
0
Auto scan function automatically scans the DAB Band III
(5A-13F) for the multiplexes (i.e. , stations) available in your
area. Once the scanning process is complete, the first station
that was detected is selected.
Select a station.
.
36
.
Page 37

MODE / ENTER
(Hold)
Main unitRemote control
/
(Press repeatedly)
(Press repeatedly)
Listening to DAB
Using the auto scan function manually
If a new DAB station is introduced, or you move to
a new area, you can work the auto scan function
again.
Display the setting menu.
1
.
Select “Tuner Setup” B “Auto Scan ”
2
in sequence.
.
0
Auto scan starts.
0
The number of found stations and the
scanning progress are shown on the
display.
Displaying DAB radio information
Display more information about the selected DAB
station.
.
Each time you press the button, the setting
changes as follows:
0
DLS (Dynamic Label Segment)
When tuned in to a station which is
broadcasting DLS text data, the text will scroll
across the display.
0
Program type
0
Bit rate and audio mode
0
Signal quality
- 0-59: Poor reception
- 60-79: Good reception
- 80-100: Excellent reception
0
Multiplex name
0
Multiplex number and frequency
Listening to DAB
37
Page 38

MODE / ENTER
(Hold)
Main unitRemote control
/
(Press repeatedly)
/
(Press repeatedly)
/
(Press repeatedly)
Listening to DAB
Setting for DAB
Use the following functions and settings to set up DAB digital radio.
Display the setting menu.
1
.
Select “Tuner Setup”.
2
.
Select the preference you want to change.
3
38
.
.
Select the preferences options.
4
.
Page 39

DAB DRC
With using the DRC (Dynamic Range Control)
setting, you can reduce the dynamic range of DAB
digital radio, so that you can still hear quiet parts
even when listening at low volume levels. Ideal for
listening to the radio late at night when you do not
want to disturb anyone.
Off
Low
High
DAB Mode
You can sort the available stations alphabetically,
by active stations, or multiplex.
Alphabet
Active ST
Multiplex
: The initial setting
: Small reduction in dynamic range
: Large reduction in dynamic range
: Sort stations alphabetically. (The
initial setting)
: Sort by active stations.
Receivable stations appear at the
top of the list. Stations that cannot
be received properly appear at
the bottom of the list.
: Sort stations by multiplex.
Listening to DAB
Listening to DAB
39
Page 40

To LINE input
Audio cable
(not supplied)
To analog audio
output
Optical digital cable
(not supplied)
Coaxial cable
(not supplied)
Digital audio player
To coaxial digital input
To optical digital input
To optical digital output terminal
* Set the digital audio output of the
TV to “PCM”.
To coaxial digital
output terminal
TV, etc
BD/DVD recorder, etc.
Listening to an external device
Listening to an external device
Connecting an external device
.
40
.
0
Refer also to the instruction manual for the external device.
Page 41

Playing back
/
(Turn)
Main unitRemote control
/
(Turn)
Main unitRemote control
Select the input connected with the
1
external device.
Playing back the device connected to
the LINE input terminal
Listening to an external device
.
Playing back the device connected to
the digital input terminal
.
0
When using the “D-IN” terminal, set the
digital audio output setting of the external
device to “PCM”.
Audio sound will not be output if a setting
other than “PCM” is selected.
Start playback of the external device.
2
NOTE
0
Digital signals must be in the PCM
(32 kHz to 192 kHz) format to enable playback
on the System.
Listening to an external device
41
Page 42

/
BASS TREBLE
/
(Turn)(Press repeatedly)
Main unitRemote control
Setting the sound quality
Setting the sound quality
Setting to your preferred sound quality
.
0
You can adjust the bass and treble within the following range.
- BASS: Bass -8 to Bass +8
- TREBLE: Treble -8 to Treble +8
0
The value changes in increments of 2.
Increasing the deep bass (EX.BASS)
.
0
Each time you press the button, the K2 feature turns on/off.
42
.
Resetting the sound quality
.
0
Switches the BASS and TREBLE settings to 0 automatically,
and the EX.BASS setting to Off.
NOTE
0
The sound mode setting is also applied to the audio output from
the headphones.
Page 43

(Press repeatedly)
L
T R
Setting the sound quality
Enhancing the playback sound
quality (K2 feature)
The K2 function restores the lost signals during
recording and enables more natural audio
playback.
The lost signals are restored through high-bit
quantization (24-bit) and high sampling (128 kHz,
176.4 kHz or 192 kHz) of the digital audio.
When the audio source is “CD”, “USB(iPod)”,
or digital input (“D-IN1”, “D-IN2”)
.
0
Each time you press the button, the K2 feature
turns on/off.
0
While the K2 feature turns on, the K2 indicator
lights up.
NOTE
0
“Analog In” is displayed when the audio source
is radio or LINE input (“LINE1”, “LINE2”).
Adjustments cannot be made in this case.
Adjusting the left/right sound
balance of the speakers
.
.
0
Balance can be adjusted to a level between L7
and R7.
Setting the sound quality
43
Page 44

(Press repeatedly)
Using the timer
Using the timer
The power of the System automatically turns off after the shut-off
time you set has elapsed.
0
0
0
0
Setting the sleep timer
.
Each time you press the button, the shut-off time (in minutes)
changes as follows:
Off B 10 B 20 B 30 B 60 B 90 B 120 B (loops back to the
beginning)
When the sleep timer is on, the “SLEEP” icon is illuminated.
To check the remaining time before the System powers off,
press [SLEEP] once.
To cancel the sleep timer, turn off the power or select “Off”.
44
.
Page 45

(Press repeatedly)
USB FOLDER FILE
1 3 0:21
Playback time
Current track number
Folder no. currently playing
USB FOLDER FILE
8 32 USB
Total number of tracks
Total no. of folders
(Press repeatedly)
Other settings
Other settings
Changing the display information
.
0
Each time you press the button, the display information changes
from the time to other information.
0
The information shown on the display differs depending on the
source.
0
Tag information is shown on the display window while audio files
are played back.
0
In your iPod, the track name, artist name and album name can
be switched.
Example: When USB device is playing
.
Example: When playback of USB device is stopped
Other settings
.
.
Changing the brightness of the display window
Adjust according to your preferences or the surrounding conditions.
.
0
Each time you press the button, the brightness of the display
window changes as follows.
Standard brightnessÆ Lower brightness Æ More lower
brightness Æ (loops back to the beginning)
0
Turning off the power does not erase the settings.
45
Page 46

MODE / ENTER
(Hold)
Main unitRemote control
/
(Press repeatedly)
Other settings
Activating/deactivating the Auto Power
Save (A.P.S.) feature
This function turns off the System automatically if no operation is
performed for 15 minutes.
Display the setting menu.
1
.
Select “A.P.S. Set”.
2
.
46
.
Page 47

Select “On” or “Off”.
/
(Press repeatedly)
3
.
On : If no operation is performed for 15 minutes
in the following situations, the System turns
off automatically.
- When the volume level is set to 0 or when
the sound is muted
- When the audio source is “USB”, and no
device is connected
- When the audio source is “CD” or “USB”,
and playback is stopped
- When the audio source is “D-IN1”, “D-IN2”
or “LINE1”, “LINE2”, and there is no sound
input.
Off : When APS is set to Off.
0
Approximately 30 seconds before the power is
turned off, “A.P.S.” starts to blink.
0
The 15-minute countdown restarts when you
operate any buttons.
0
This APS function operates even while the
sleep timer is on.
Other settings
Other settings
CAUTION
0
When recording sounds on the external
device, set Auto Power Save to off, or set the
volume to more than 1 for recording.
47
Page 48

References
References
Compatible iPod
Made for *
iPod nano (7th generation) 1.0.1
iPod nano (6th generation) 1.2
iPod nano (5th generation) 1.0.2
iPod nano (4th generation) 1.0.4
iPod nano (3rd generation) 1.1.3
iPod nano (2nd generation) 1.1.3
iPod touch (5th generation) 6.1.3
iPod touch (4th generation) 6.1.3
iPod touch (3rd generation) 5.1.1
iPod touch (2nd generation) 4.2.1
iPod touch 3.1.3
iPod classic 2.0.4
iPhone 5 6.1.4
iPhone 4S 6.1.3
iPhone 4 6.1.3
iPhone 3GS 6.1.3
iPhone 3G 4.2.1
* Software version at the time of the operation
check.
0
If iPod does not play back correctly, update by
downloading and installing the latest iPod
software.
For details about updating iPod, please visit the
Apple website. <http://www.apple.com/>
Playable discs/files
0
We do not guarantee the operation and sound
quality of CDs that are not compliant with the
CD-DA standard
Before playing a CD, look for a “CD logo mark”,
and read through the precautions on the
package to check whether it complies with the
CD standard.
0
Playback of a CD on the System may fail due
to the CD’s characteristics, recording
condition, scratches or dirt on it, or when there
is dirt or condensation on the lens of the player.
0
Read through the precautions on the use of the
CD carefully.
0
The System does not support the display of CD
texts.
Discs CDs with any of the following marks
Files
are playable.
.
0
CD-R or CD-RW in the audio CD
format
0
MP3/WMA files of CD-R/CDRW
48
Page 49

References
Precautions on CD-R/CD-RW
For CD-Rs/CD-RWs edited by the user, only
finalized CDs can be played back on the
System.
0
To create a CD-R/CD-RW disc, set the format
to “ISO 9660 Level 1”. Do not use discs that are
packet-written (UDF format).
0
For CD-Rs/CD-RWs that contain MP3/WMA
files, it may take a longer time to read the disc
compared to normal audio discs. (The amount
of reading time needed varies with the
configuration of the folders and files.)
Important for USB mass
storage class devices
0
Playable files for USB device is
MP3/WMA/AAC file.
0
Do not connect devices other than a USB flash
memory device and a digital audio player that
supports the USB mass storage class to the
USB terminal.
0
It is recommended that you use a USB device
with a capacity of 16 GB or smaller.
0
The more files there are in a USB device, the
longer it takes for the System to load them.
0
Deactivate the security function of the USB
device before connecting.
0
You cannot connect a computer to the USB
terminal of the System.
0
Depending on the connected devices,
malfunction may occur. If this happens, turn off
the power of the System, and turn it back on
again.
0
Do not use a USB hub.
0
When connecting with a USB cable, use a USB
2.0 cable less than 1 m in length.
0
Some USB devices may not be recognized or
may not operate properly.
0
If the USB device is divided into multiple
partitions, the System recognizes only the first
partition.
0
It may take a longer time for the System to
recognize some USB devices.
0
Some USB devices may not be recognizable
by the System.
0
Playback does not start if there are no playable
files in the USB device.
0
You cannot send any data from the unit to the
USB device.
0
The System does not allow files and folders to
be deleted.
0
Before connecting, read through the
instruction manual of the USB device.
49
Page 50

References
Precautions on audio files
0
Playable audio files are files with the extension
of <.mp3>, <.wma> or <.m4a> (USB device
only).
0
The System can play back audio files recorded
with the following sampling frequency and
bitrate.
- The files are recorded on a disc
Sampling frequency: 32/44.1/48 kHz
Bitrate: MP3: 32 kbps to 320 kbps
WMA: 32 kbps to 192 kbps
- The files are recorded in a USB device
Sampling frequency: 32/44.1/48 kHz
Bitrate: MP3: 8 kbps to 320 kbps
WMA: 5 kbps to 384 kbps
AAC: 8 kbps to 320 kbps
0
For audio files, you are recommended to
create a disc with a sampling frequency of 44.1
kHz and bitrate of 128 kbps.
0
The number of folders and files which can be
recognized on the System is as follows.
On each 1 CD:
Maximum number of folders: 99
Maximum number of files in one folder: 499
No. of folder layers: up to 8
On each 1 USB device:
FAT 16: on root folder Maximum 512
on subfolder Maximum 65534
FAT 32: on root folder Maximum 65536
on subfolder Maximum 65534
(The number is the total number of folder and
file)
No. of folder layers: up to 8
0
DRM (Digital Rights Management) files cannot
be played back.
0
The System cannot play back files larger than
2 GB.
0
Some audio files may not be playable due to
the condition or method of recording. The
System will skip the playback of these files.
0
Playback order of the audio files
(Folders without audio files are ignored.)
- Tracks are played back in the order the
folders were created. Within a folder, tracks
are played back in the order they were
recorded.
- The order of playback may differ depending
on the recording method.
- Playback order may change if the folder
name or file name is altered.
0
You can specify the playback order manually
by appending numbers from “01” to “99” to the
beginning of a folder or file name when saving
folders or files to the media.
0
The file name cannot be displayed correctly if
characters other than single-byte
alphanumeric characters are used.
0
The System can display ID3 TAG
VERSION1,2 (song title, artist and album
name), file name and folder name
(alphanumeric characters only).
0
The maximum number of displayable
characters is as follows.
CD : File name / folder name and tag
display (track title / album title / artist
name): 31 characters
USB : File name / folder name and tag
display (track title / album title / artist
name): 32 characters
50
Page 51

References
Trademarks
0
Microsoft and Windows Media are either registered trademarks or trademarks of Microsoft Corporation
in the United States and/or other countries.
0
“Made for iPod” and “Made for iPhone” mean that an electronic accessory has been designed to
connect specifically to iPod or iPhone, respectively, and has been certified by the developer to meet
Apple performance standards. Apple is not responsible for the operation of this device or its compliance
with safety and regulatory standards. Please note that the use of this accessory with iPod or iPhone
may affect wireless performance.
0
iPhone, iPod, iPod classic, iPod nano and iPod touch are trademarks of Apple Inc., registered in the
U.S. and other countries.
IMPORTANT FOR LASER PRODUCTS
1. CLASS 1 LASER PRODUCT
2. CAUTION: Do not open the top cover or cabinet. There are no user serviceable parts inside the unit;
leave all servicing to qualified service personnel.
51
Page 52

Troubleshooting
Troubleshooting
If you are having a problem with your System, check this list for a possible solution before calling for service.
General
Symptom Action
Power does not turn on
Malfunction of the
microcomputer (unable to
operate, erroneous display,
etc.)
0
Insert the plug correctly.
0
Connect correctly by checking to ensure that there is no short circuit
in the speaker cord (contact between the + and - ends of the core
wire), and the thin bare wires are not in contact with the metallic parts
of the System.
0
The microcomputer may malfunction due to external factors, or when
the connection cable is inserted or removed while the power of the
System is on.
Follow the steps below to reset the microcomputer.
After resetting, the settings will be restored to the factory default.
A
With the power turned on, press and hold [o] on the System,
followed by pressing [A] (power button) on the System.
B
After reset is complete, the System switches to the standby
mode.
No audio output from the
speaker unit
No audio output from one side
of the speaker unit
No audio output from the
digital input terminal (D-IN1,
D-IN2)
Unable to operate using the
remote control
0
Connect the speaker unit and the devices correctly.
0
Increase the volume.
0
Cancel muting.
0
Disconnect the headphones.
0
Connect the speaker unit correctly.
0
Check the left/right sound balance.
0
Connect the devices correctly.
0
Check to ensure that the digital audio output setting of the connected
device is set to “PCM”.
0
Replace the batteries with new ones.
0
Use the remote control within the operating range.
iPod
Symptom Action
No audio output from iPod or
unable to perform charging
Unable to recognize or play
from iPod
52
0
Connect the iPod correctly.
Disconnect the iPod and cable from the System, and connect them
again.
0
Reset your iPod after disconnecting it from the System, unplug the
power cord of the System, and plug it in again. (For details on resetting
your iPod, please visit Apple’s official website.)
Page 53

USB device
Symptom Action
No audio output even when a
USB flash memory or USB
audio player is connected
CD
Symptom Action
Unable to play back a disc or
no audio output from it
Some audio files are not
playable
A long time is needed before
playback starts
Tag information is not
displayed correctly
Troubleshooting
0
Insert the USB flash memory correctly.
0
Connect the USB cable correctly.
0
Turn on the power of the USB audio player.
0
Format the USB flash memory into the FAT32 format on a computer.
(Take note that formatting the USB flash memory erases all data
stored inside it.)
0
Try using a different USB flash memory device.
0
Place the disc correctly with the label side facing up.
0
Wipe off any dirt on the disc surface.
0
Playback is not possible if an audio file is corrupted.
0
Check whether the audio file format is supported by the System.
0
Packet-written discs or discs recorded in the Universal Disc Format
(UDF) are not playable.
0
When there is a large number of folders, it may take a while before
playback starts.
0
Check whether the tag information can be displayed on the System.
Radio
Symptom Action
No reception from the radio
station
Noise is generated
Unable to perform preset call
0
Connect the antenna correctly.
0
Adjust the frequency to the station you want to listen to.
0
Install the external antenna away from the road.
0
Install the System at a distance away from the TV.
0
Store the station to a preset number again automatically.
0
Make use of manual preset to store a station with receivable
frequency.
53
Page 54

Specifications
Specifications
Amplifier
Maximum useful output 50 W +50 W
Frequency response (LINE input) 10 Hz to 100 kHz ( +1 dB, ‒3 dB)
Distortion factor 0.007% (1 kHz, 1 W, 4 Ω, LPF 20 kHz)
Tone control characteristics BASS ±8 dB (at 100 Hz)
TREBLE ±8 dB (at 10 kHz)
EX.BASS (On) +4 dB (55 Hz)
Input terminals
(sensitivity/impedance)
Output terminals
(level/impedance)
Speaker impedance 4 Ω ‒ 16 Ω
Digital
LINE input 900 mV / 47 kΩ
Subwoofer pre-out 2 V / 370 Ω
LINE output 900 mV / 330 Ω
Supported sampling frequencies 32 kHz, 44.1 kHz, 48 kHz, 88.2 kHz, 96 kHz,
Input terminals (sensitivity /
wavelength / Impedance)
USB
Supported USB devices USB mass storage class devices
Interface Compatible with USB2.0 (Full speed), USB1.1
Supported file systems FAT 16 / FAT 32
Output
Optical ‒15 dBm to ‒24 dBm, 660 nm ± 30 nm
Coaxial 0.5 Vp-p / 75 Ω
176.4 kHz, 192 kHz
DC 5 V P 1 A
54
Page 55

Specifications
Tuner
FM tuner Reception frequency range 87.50 MHz - 108.00 MHz, Radio Data System
Antenna impedance 75 Ω (unbalanced)
DAB Reception frequency range DAB Band lll (5A - 13F)
CD player
Signal readout
Power supply/others
Power supply
Power consumption 45 W (during operation)
Maximum external dimensions (W x H x D) 247 mm x 115 mm x 288 mm
Weight 3.3 kg
Specifications and appearance of this unit are subject to change without prior notice for improvement.
Non-contact optical readout (semiconductor laser)
AC 230 V, 50 Hz
0.5 W and below (during standby)
55
Page 56

For your records
Record the serial number, found on the back of the
unit, in the spaces designated on the warranty card,
and in the space provided below. Refer to the model
and serial numbers whenever you call upon your
dealer for information or service on this product.
Model
Serial Number
Page 57

.
CD-Tunerverstärker
A-K805
BEDIENUNGSANLEITUNG
.
.
LVT2492-002A
[E]
Page 58

Einleitung
Einleitung
Hörgenuss von verschiedenen Geräten
Vorbereitungen vor der Audio-Wiedergabe
Anschließen der Lautsprecher (S. 8)
.
Schließen Sie auch die Antenne an, wenn Sie Radio hören
Anschließen einer DAB/UKW-Antenne (S. 10)
.
HINWEIS
0
Die DAB/UKW-Antenne wird mit dem System mitgeliefert.
Audio-Wiedergabe von verschiedenen Geräten
iPod/iPhone (S. 16) USB-Speicher (S. 18) TV (S. 40)
.
.
Digitaler Audio-Player
.
Disc (S. 24) Radio (S. 30)
(S. 40)
.
.
2
.
Page 59

Inhalt
Einleitung
Einleitung ......................................... 2
Hörgenuss von verschiedenen Geräten ......... 2
Vorsichtsmaßnahmen bei der Installation ....... 5
Vorbereitung .................................... 6
Zubehör .......................................................... 6
Vorbereiten der Fernbedienung ..................... 6
Verbindungen .................................. 8
Anschließen der Lautsprecher ....................... 8
Anschließen der DAB/UKW-Antenne ........... 10
Anschließen anderer im Handel erhältlicher
Geräte .......................................................... 11
Teilebezeichnungen ...................... 12
Vorderseite ................................................... 12
Anzeige ........................................................ 13
Fernbedienung ............................................. 14
Grundlegende Bedienungsverfahren
.......................................................... 15
Ein-/Ausschalten der Stromversorgung ........ 15
Auswahl einer Audioquelle für die Wiedergabe
...................................................................... 15
Vorübergehendes Stummschalten der
Lautstärke .................................................... 15
Anhören von iPod/ iPhone ........... 16
Anschließen von iPod/ iPhone ...................... 16
Wiedergabe .................................................. 16
Navigieren durch die iPod/ iPhone-Menüs ... 17
Wiedergabe von einem USB-Gerät
.......................................................... 18
Anschließen eines USB-Geräts .................... 18
Wiedergabe .................................................. 19
Verwenden des Lademodus ........................ 22
Hören von CDs ............................... 24
Einsetzen einer CD ....................................... 24
Wiedergabe .................................................. 25
Programmwiedergabe .................................. 28
Hören von UKW-Radio .................. 30
Sendersuchlauf ............................................ 30
Sender voreinstellen ..................................... 31
Einstellen eines voreingestellten Senders .... 34
Einen voreingestellten Sender löschen ........ 35
Hören des Radio-Daten-Systems ................. 35
Hören von DAB .............................. 36
Hören von DAB/DAB+-Sendern ................... 36
Einstellung für DAB ...................................... 38
Hören von einem externen Gerät 40
Anschließen eines externen Geräts ............. 40
Wiedergabe .................................................. 41
Einstellung der Klangqualität ...... 42
Einstellen Ihrer bevorzugten Tonqualität ...... 42
Erhöhen der tiefen Bässe (EX.BASS) .......... 42
Zurücksetzen der Klangqualität .................... 42
Verbessern der Wiedergabe der Tonqualität
(K2-Funktion) ............................................... 43
Einstellung der links/rechts Ton-Balance der
Lautsprecher ................................................ 43
Verwendung des Timers ............... 44
Einstellung des Sleep-Timers ....................... 44
Andere Einstellungen ................... 45
Ändern der Display-Information .................... 45
Ändern der Helligkeit des Anzeigefensters ... 45
Aktivieren/Deaktivieren von automatischem
Energiesparen (A.P.S.) Funktion .................. 46
Referenz ......................................... 48
Kompatibel iPod ........................................... 48
Abspielbare Discs/Dateien ........................... 48
Vorsichtsmaßnahmen bei CD-R/CD-RW ..... 49
Wichtig für USB-Massenspeichergeräte ...... 49
Vorsichtsmaßnahmen bei Audiodateien ....... 50
Warenzeichen .............................................. 51
Fehlersuche ................................... 52
Technische Daten .......................... 54
3
Page 60

Lassen Sie schnell los
Nach unten gedrückt halten
Einleitung
Automatisches Energiesparen (APS)
0
Das ist System ist mit der Funktion „Automatisches Energiesparen (APS)
“ ausgestattet, das das Gerät automatisch ausschaltet, wenn 15 Minuten lang
keine Wiedergabe erfolgt. Diese Funktion ist in der Standardeinstellung aktiviert.
(S. 46)
In dieser Bedienungsanleitung...
0
Beziehen sich Erklärungen, wenn nicht ausdrücklich anders angegeben, auf die
Fernbedienungstasten. Wenn sich an der Anlage jedoch Tasten mit gleichen oder ähnlichen Namen
befinden, können diese ebenfalls für die Bedienung verwendet werden.
0
Die Anzeige, die in dieser Bedienungsanleitung angezeigt wird, kann in manchen Fällen von der
tatsächlichen Anzeige abweichen.
In dieser Bedienungsanleitung...
0
In dieser Bedienungsanleitung beinhaltet „iPod“ die Geräte iPod, iPod touch und iPhone. Wenn
ausdrücklich auf iPod touch oder iPhone hingewiesen wird, wird entsprechend „iPod touch“ oder
„iPhone“ verwendet.
0
In dieser Bedienungsanleitung werden bei Erklärungen von Audiodateien (MP3/WMA/AAC)
„Datei“ und „Titel“ synonym verwendet.
Möglichkeiten, die Tasten zu drücken
Es gibt zwei Möglichkeiten, die Tasten des Systems zu drücken. „Kurzes Drücken“ bezieht sich auf das
kurze Drücken und sofortige Loslassen einer Taste, während sich „Langes Drücken“ auf das gedrückt
halten einer Taste bezieht.
Kurzes Drücken: Für Fälle, bei denen „Langes Drücken“ nicht angezeigt wird
Drücken Sie eine Taste leicht und lassen Sie sie sofort wieder los. Das System reagiert möglicherweise
nicht, wenn übermäßige Kraft auf einer Taste angewendet oder wenn die Taste nicht sofort losgelassen
wird. Wenn das Gerät nicht wie gewünscht reagiert, versuchen Sie es erneut mit veränderter Länge
oder Kraft, mit der die Taste gedrückt wird.
.
Langes Drücken: Für alle Fälle, bei denen „Langes Drücken“ angezeigt wird
.
Halten Sie eine Taste nach unten gedrückt, und heben Sie dann den Finger.
4
Page 61

Lautsprecher
(separat erhältlich)
Lautsprecher
(separat erhältlich)
Hauptgerät
1 cm 1 cm
15 cm 15 cm
15 cm
15 cm
15 cm
Rückseite des Geräts
Einleitung
Vorsichtsmaßnahmen bei der Installation
Achtung: Angemessene Ventilation
Stellen Sie das Gerät zur Verhütung von elektrischem Schlag und Feuer und zur Vermeidung von
Beschädigung wie folgt auf:
1 Vorderseite:
Offener Platz ohne Hindernisse.
2 Seiten/Oben/Hinten:
Innerhalb der in der Abbildung unten dargestellten Bereiche dürfen sich keine Hindernisse befinden.
3 Unterseite: Auf eine ebene Oberfläche stellen.
Vorderansicht
.
Seitenansicht
.
Hinweise zur Aufstellung
Wählen Sie einen Ort, der eben, trocken und nicht zu heiß oder zu kalt ist—zwischen 5˚C und 35˚C.
5
Page 62

Trockenzellenbatterien für die
Fernbedienung (AAA x 2)
RC-A0801
Fernbedienung x 1
DAB/UKW-Antenne x 1
AAA-Batterien
(im Lieferumfang enthalten)
Vorbereitung
Vorbereitung
Zubehör
Überprüfen Sie, ob folgende mit dem System mitgelieferte Artikel vorhanden sind.
.
Vorbereiten der Fernbedienung
Einlegen der Batterien
Passen Sie die Polarität (+und –) der Batterie mit den auf der Fernbedienung angezeigten an.
.
VORSICHT
0
Die im Lieferumfang enthalten Batterien dienen zur Überprüfung des Systembetriebs. Tauschen Sie
sie sobald wie möglich gegen neue aus.
0
Lesen Sie die beigelegten „Sicherheitshinweise“ gut durch, um eine sichere Verwendung der Batterien
zu gewährleisten.
0
Isolieren Sie benutzte Batterien beispielsweise mit Isolationsband und entsorgen Sie sie entsprechend
der lokalen Gesetzgebung in der Region, in der sie benutzt werden.
0
Setzen Sie die Fernbedienung keinen starken Stößen aus, wie beim Herunterfallen oder beim Stoßen
gegen andere Gegenstände.
6
Page 63

Ca. 30°Ca. 30°
Ca. 6 m
Fernbedienungssensor
Vorbereitung
Bedienung der Fernbedienung
.
0
Wenn der Sensor am Gerät starkem Licht ausgesetzt wird, kann der Betrieb beeinträchtigt werden.
Verändern Sie die Ausrichtung des Gerätes, wenn dieser Fall eintritt.
7
Page 64

BCA
AB C
Ziehen Sie die
Schraube fest
Drehen Sie die
Schraube, um den
Anschluss zu öffnen
Anschluss des Lautsprecherkabels an das System
Rückansicht des Systems
Ohne Linie
Mit Linie
Lautsprecherkabel
(separat erhältlich)
Ziehen Sie die
Schraube fest
Führen Sie das Hauptkabel
ein, ohne es zu biegen
Drehen Sie die Schraube,
um den Anschluss zu öffnen
Anschluss des Lautsprecherkabels an den Lautsprecher
Die blanken Drähte an der Spitze des
Kabels können einen Kurzschluss und einen
folgenden Zusammenbruch des Systems
verursachen, wenn sie mit den Metallteilen
des Systems in Berührung kommen.
Entfernen Sie die
Kabelverkleidung
Verwendung der Spitze des
Lautsprecherkabels
Führen Sie das
Hauptkabel von oben ein,
ohne es zu biegen
Die Lautsprecherkabel können auch mit Hilfe von Bananensteckern,
die im Handel erhältlich sind, an die Lautsprecher angeschlossen
werden. Setzen Sie die Bananenstecker, an welche die Lautsprecher
angeschlossen sind, in die Öffnung des Lautsprecheranschlüsse ein,
nachdem die Lautsprecheranschlüsse am System festgezogen sind.
Linker Lautsprecher
(separat erhältlich)
Rückansicht
Rechter Lautsprecher
(separat erhältlich)
Rückansicht
Schließen Sie die Lautsprecherkabel beim Anschließen entsprechend der Polarität (Plus zu Plus und
Minus zu Minus) zwischen den
Lautsprechern und dem System an.
Verbindungen
Verbindungen
VORSICHT
0
Stecken Sie nach der Überprüfung, dass alle Anschlüsse richtig verbunden wurden, das
Netzkabel des Geräts in die Steckdose.
0
Achten Sie beim Ausstecken einer verbundenen Leitung oder eines Kabels darauf, dass die
Stromzufuhr des Systems vorher ausgeschaltet wurde und entfernen Sie das Netzkabel aus der
Steckdose.
Anschließen der Lautsprecher
0
Die Abbildungen zeigen Beispiele für Verbindungen. Die Lautsprecher können auch mit anderen als
in der Abbildung gezeigten Lautsprecheranschlüssen und Lautsprecherkabeln angeschlossen
werden.
.
HINWEIS
0
Neben dem empfohlenen Produkt (LS-K901) können Sie auch andere Lautsprecher verwenden.
Verwenden Sie Einen mit einer Lautsprecherimpedanz von 4 Ω bis 16 Ω.
8
Page 65

Verbindungen
Vorsichtsmaßnahmen beim Lautsprecheranschluss
0
Schließen Sie nicht mehr als 2 Lautsprecher an einem Anschluss an.
0
Vermeiden Sie die Anwendung übermäßiger Kraft beim Einsetzen der Lautsprecherkabel, um zu
verhindern, dass die Vinyl-Beschichtung in den Anschluss gelangt.
0
Der falsche Anschluss der Lautsprecherkabel kann dazu führen, dass das System nicht richtig
funktioniert. Schließen Sie entsprechend der Grafik richtig an.
9
Page 66

Rückansicht des Systems
Ziehen Sie den Draht von der Antenne
an einer Position und in die Richtung
mit dem besten Empfang auseinander
und befestigen Sie ihn sicher.
DAB/UKW-Innenantenne (im Lieferumfang enthalten)
Verbindungen
Anschließen der DAB/UKW-Antenne
DAB/UKW-Antennenverbindung
.
0
Für weitere Informationen zum Anschließen einer anderen Antenne als der Mitgelieferten, beziehen
Sie sich bitte auf die Bedienungsanleitung der Antenne und des Antennensteckverbinders.
0
Hören Sie die aktuelle Sendung, um den Ort für die Montage der Antenne zu ermitteln.
10
Page 67

Zur Netzsteckdose
Audiokabel
(nicht im Lieferumfang
enthalten)
Zur
SubwooferVorstufe
Analoger Audioeingang
Integrierter Subwoofer
des Verstärkers
Zum LINE-Eingang
Audiokabel
(nicht im Lieferumfang
enthalten)
Analoger Audioausgang
Zum LINE Ausgang
Audiokabel
(nicht im Lieferumfang
enthalten)
Analoger Audioeingang
Kassettendeck, usw.
Optisches Digitalkabel
(nicht im Lieferumfang
enthalten)
Koaxialkabel
(nicht im Lieferumfang
enthalten)
Optischer Digitalaus-
gang (PCM-Signal)
TV, BD/DVD-Rekorder, usw.
Rückseite
des Geräts
StereoMinistecker
Kopfhörer(nicht im Lieferumfang enthalten)
Koaxialer Digitalaus-
gang (PCM-Signal)
TV, digitaler Audioplayer, usw.
Zum koaxialen Digitaleingang
Zu dem optischen Digitaleingang
Vorderseite
Verbindungen
Anschließen anderer im Handel erhältlicher Geräte
Setzen Sie das Verbindungskabel vollständig ein. Andernfalls ist möglich, dass der Ton nicht
ausgegeben werden kann oder Störgeräusche erzeugt werden.
.
HINWEIS
0
Siehe auch die Bedienungsanleitung des externen Geräts.
0
Wenn der digitale Eingangsanschluss angeschlossen ist, stellen Sie die Einstellung der digitalen
Audioausgabe für das angeschlossene Gerät (TV, BD-Rekorder, usw.) auf „PCM“.
Vorsichtsmaßnahmen für das Netzkabel
0
Vergewissern Sie sich, dass Sie das Netzkabel aus der Steckdose entfernt haben, bevor Sie das
Haus verlassen oder wenn das System für längere Zeit nicht benutzt wird.
11
Page 68

MODE ENTER
RETURN
VOLUME
INPUT BASS TREBLE
PHONES
STANDBY
K2
B
F
E
G
H
D
A
I
J
C
N
O
P
K
L
M
Teilebezeichnungen
Teilebezeichnungen
Vorderseite
0
Die Referenzseiten sind hauptsächlich die Seiten mit den Beschreibungen der jeweiligen Teile.
.
A
Fernbedienungssensor
(S. 7)
I
BASS
(S. 42)
B
STANDBY-Anzeige
Leuchtet rot, wenn die Stromversorgung des
Systems ausgeschaltet ist. Die Leuchte
erlischt, wenn der Strom eingeschaltet ist.
C
A (Strom)
(S. 15)
D
K2-Anzeige
(S. 43)
E
CD-Fach
J
TREBLE
(S. 42)
K
MODE/ENTERS/T
(S. 17, 19, 21, 27, 28, 31, 35,
38, 46)
L
RETURN
(S. 17)
M
M (Öffnen/Schließen des CD-Fachs)
(S. 24)
(S. 24)
N
F
USB-Anschluss
VOLUME
(S. 15)
(S. 16, 18)
O
G
PHONES-Buchse
Um Kopfhörer anzuschließen.
0
Durch Anschließen der Kopfhörer werden die
Lautsprecher deaktiviert.
H
INPUT
(S. 15, 16, 19, 25, 30, 36, 41)
HINWEIS
0
Eine geringe Menge Strom wird immer verbraucht, auch wenn der Strom des Systems ausgeschaltet
o (Stopp)
P
I/W (Wiedergabe/Pause)
ist (im Standby-Modus).
12
Page 69

Anzeige
FM
STEREO DAB
DIGITAL
RANDOM
SLEEP
USB FOLDER FILE MUTING DISC REMAIN
A
GHIJ K LMN
BC D F
E
.
A
SLEEP-Symbol
(S. 44)
B
Wiedergabe-Statussymbol
I
(Wiedergabe) Symbol
W
(Pause) Symbol
C
Empfangsanzeige für Radiosendungen
AUTO-Symbol
Leuchtet während der automatischen Auswahl
eines Radiosenders auf. Die Lampe erlischt
während der manuellen Auswahl eines
Radiosenders.
TUNED-Symbol
Leuchtet auf, wenn ein Signal vom Sender
empfangen wird.
FM-Symbol
Leuchtet während UKW-Sendungen.
STEREO-Symbol
Leuchtet auf, wenn ein UKW-Sendungssignal
empfangen wird.
DAB-Symbol
Leuchtet während DAB-Sendungen.
D
DIGITAL-Symbol
Leuchtet auf, wenn die Audioquelle „D-IN“ ist und
das digitale Signal eingegeben wird. Blinkt, wenn
kein Digitalsignal eingegeben wird.
E
Wiederholungsbetrieb-Symbol
(S. 21, 27)
1FOLDER-Symbol
Angezeigt während der
Wiedergabewiederholung eines Ordners.
F
RANDOM-Symbol
(S. 20, 26)
G
USB-Symbol
Leuchtet auf, wenn eine USB-Verbindung
besteht.
H
Leuchtet auf, wenn ein Audiodateiordner
angezeigt wird.
I
Leuchtet auf, wenn eine Audiodatei angezeigt
wird.
J
Leuchtet auf, wenn ein Titel angezeigt wird.
K
(S. 15)
L
DISC-Symbol
Leuchtet auf, wenn die verstrichene Zeit der
gesamten CD angezeigt wird, während die
Wiedergabe der CD angehalten ist.
TOTAL-Symbol
Leuchtet auf, wenn die verstrichene Zeit der
gesamten CD angezeigt wird, während die
Wiedergabe der CD angehalten ist.
Leuchtet auf, wenn die verbleibende Zeit der
gesamten CD angezeigt wird, während die CD
wiedergegeben wird.
REMAIN-Symbol
Leuchtet auf, wenn die verbleibende Zeit des
Titels angezeigt wird, während die CD
wiedergegeben wird. Wenn die verbleibende
Wiedergabezeit der gesamten CD angezeigt
wird, leuchten sowohl das TOTAL-Symbol als
auch das REMAIN-Symbol auf.
M
Leuchtet auf, wenn die gespeicherte Nummer
des UKW-Radiosenders angezeigt wird.
N
Zeigt die Textinformationen jeder Quelle an.
Teilebezeichnungen
FOLDER-Symbol
FILE-Symbol
TRACK-Symbol
MUTING-Symbol
Wechseln des Anzeigeinformationssymbols
CH-Symbol
Textanzeige
13
Page 70

A
B
C
D
E
F
G
H
I
J
K
L
M
N
O
P
Q
R
S
T
Y
U
V
W
Z
X
Teilebezeichnungen
Fernbedienung
A
M (Öffnen/Schließen des
CD-Fachs)
(S. 24)
B
SLEEP
(S. 44)
C
DIMMER
(S. 45)
D
Zifferntasten
(S. 25, 28, 34)
E
Externe Eingangsauswahl
(S. 41)
F
Audioquellenauswahl,
I/W
(S. 15, 16, 19, 25,
30, 36)
G
S/T P.CALL
(S. 17, 19, 21, 27,
28, 34)
H
MODE
(S. 22, 31, 35, 37,
46)
I
ENTER
(S. 17, 22, 28, 31,
35, 37, 46)
J
H I J K
(S. 17, 22, 31, 35,
37, 46)
K
RETURN
(S. 17)
L
BALANCEH I
(S. 43)
M
Bass JK/Höhen JK
(S. 42)
N
A (Strom)
(S. 15)
O
DISPLAY
(S. 37, 45)
P
REPEAT
(S. 17, 21, 27)
Q
RANDOM
(S. 17, 20, 26)
R
CLEAR
(S. 29)
S
o AUTO/MONO
(S. 19, 25, 27, 30)
T
O/N TUNING
(S. 17, 19, 25, 29,
30, 32, 36)
U
P.MODE
(S. 28)
V
K2
(S. 43)
W
MUTE
(S. 15)
X
EX.BASS
(S. 42)
Y
VOLUME J K
(S. 15)
Z
FLAT
(S. 42)
14
Page 71

(Drehen)
HauptgerätFernbedienung
VOLUME
(Drehen)
(Drücken Sie wiederholt)
HauptgerätFernbedienung
MUTING
Grundlegende Bedienungsverfahren
Grundlegende Bedienungsverfahren
Ein-/Ausschalten der Stromversorgung
.
0
Sie können das System auch durch Drücken der Quellentasten,
wie [CD I/W] auf der Fernbedienung, einschalten.
Auswahl einer Audioquelle für die
Wiedergabe
Wählen Sie eine Quelle.
1
.
Einstellen der Lautstärke.
2
.
.
0
Einstellbereich: 0 bis 50(Max)
0
Wenn Sie die Taste gedrückt halten, schaltet die
Stundenstelle kontinuierlich weiter.
Vorübergehendes Stummschalten der Lautstärke
.
0
Um den stummen Modus zu beenden, drücken Sie die Taste
erneut oder stellen Sie die Lautstärke ein.
15
Page 72

USB-Kabel für iPod (im Lieferumfang von
iPod enthalten oder im Handel erhältlich)
(Drehen)
HauptgerätFernbedienung
Anhören von iPod/ iPhone
Anhören von iPod/ iPhone
Anschließen von iPod/ iPhone
Um Dateien des iPod durch Bedienung des Systems abzuspielen,
schließen Sie iPod an den USB-Anschluss des Systems an.
.
VORSICHT
0
Stoppen Sie die Wiedergabe vor dem Trennen von iPod. Das
Trennen während der Wiedergabe kann die Datei oder das
Dateisystem des iPod beschädigen.
0
Audioaufzeichnungen können nicht vom System auf iPod
importiert werden.
HINWEIS
0
Ein iPod wird unter den folgenden Bedingungen aufgeladen.
- Der Lademodus des Systems (S. 22) wird auf ein gestellt, und
die Stromversorgung des System ist ausgeschaltet (StandbyModus). Wenn er mit dem USB-Anschluss verbunden ist,
beginnt der Ladevorgang.
- Er wird mit allen Quellen geladen während die Stromversorgung
des Systems eingeschaltet ist. Wenn er mit dem USBAnschluss verbunden ist, beginnt der Ladevorgang.
0
Falls der Akku des iPod/iPhone vollständig leer ist, ist es
möglich, dass der Ladevorgang nicht ausgeführt werden kann.
Schalten Sie in diesem Fall die Stromversorgung des Systems
aus und dann wieder ein.
16
.
Wiedergabe
Zum Starten der Wiedergabe
.
0
Die Wiedergabe von iPod beginnt.
Page 73

Zum Pausieren
/
ST
(Drehen)
(Drücken Sie wiederholt)
HauptgerätFernbedienung
/
(Gedrückt halten)
/
(Drücken Sie wiederholt)
.
0
Zum Aufheben der Pause, drücken Sie die
Taste erneut.
Zum Wählen eines Titels
.
0
Drücken Sie [T] einmal, um zum Anfang des
nächsten Titels zu springen.
0
Drücken Sie [S], um zum Anfang des
wiedergegebenen Titels zu springen. Drücken
Sie [S] zweimal, um zum Anfang des
vorherigen Titels zu springen.
Schneller Vorlauf/Rücklauf
Während der Wiedergabe...
.
0
Zum schnellen Rücklauf gedrückt halten [O] .
0
Zum schnellen Vorlauf gedrückt halten [N] .
Abspielen in willkürlicher Reihenfolge
(Shuffle)-Wiedergabe
.
0
Das Drücken der Taste wechselt jedes Mal die
Wiedergabereihenfolge des Shuffle-Modus von iPod.
Wiedergabewiederholung
.
0
Das Drücken der Taste wechselt jedes Mal den
Wiedergabewiederholungsmodus von iPod.
Anhören von iPod/ iPhone
Navigieren durch die iPod/
iPhone-Menüs
Rufen Sie das Menü ab.
1
.
Wählen Sie eine Menüoption.
2
.
Um zum vorherigen Menü
zurückzukehren
0
Drücken Sie [RETURN].
HINWEIS
0
Die Bedienung kann je nach dem Typ des
verwendeten iPod-Geräts variieren.
0
Klangverzerrungen können auftreten, wenn
der Equalizer von iPod für die Wiedergabe von
Audioquellen mit hohen Aufnahmepegeln
verwendet wird. Falls eine solche
Klangverzerrung auftritt, empfiehlt es sich, den
Equalizer auszuschalten.
0
Bei bestimmten Arten von iPod-Geräten, kann
das Menü nur auf dem Bildschirm des iPod
bedient werden.
0
Bedienen Sie in den folgenden Fällen iPhone
oder iPod touch selbst:
- Wenn die Home-Taste bedient wird
- Wenn Anwendungssymbole auf der Startseite
gewählt werden
- Wenn der Schieberegler gezogen wird
0
Für Einzelheiten zur Bedienung von iPod,
beziehen Sie sich auf die Bedienungsanleitung
für iPod.
17
Anhören von iPod/ iPhone
Page 74

USB-Kabel
(nicht im Lieferumfang
enthalten)
USB-Speicher (nicht im Lieferumfang
enthalten), digitale Audioplayer, die die
USB-Massenspeicher unterstützen (nicht im
Lieferumfang enthalten), usw.
Wiedergabe von einem USB-Gerät
Wiedergabe von einem USB-Gerät
Anschließen eines USB-Geräts
.
VORSICHT
0
Stoppen Sie die Wiedergabe vor dem Trennen des USBGeräts. Das Trennen des USB-Geräts während der
Wiedergabe kann die Datei und das Dateisystem des USBGeräts beschädigen.
HINWEIS
0
Ein USB-Gerät wird unter den folgenden Bedingungen
aufgeladen.
- Der Lademodus des Systems (S. 22) wird auf ein gestellt, und
die Stromversorgung des System ist ausgeschaltet (StandbyModus). Wenn er mit dem USB-Anschluss verbunden ist,
beginnt der Ladevorgang.
- Er wird mit allen Quellen geladen während die Stromversorgung
des Systems eingeschaltet ist. Wenn er mit dem USBAnschluss verbunden ist, beginnt der Ladevorgang.
18
.
Page 75

Wiedergabe
(Drehen)
Hauptgerät
Fernbedienung
/
ST
(Drehen)
(Drücken Sie wiederholt)
HauptgerätFernbedienung
/
(Gedrückt halten)
Wiedergabe von einem USB-Gerät
Zum Wählen eines Titels
Zum Starten der Wiedergabe
.
HINWEIS
0
Für USB-Gerätverbindungen ist die
Wiedergabe-Programmfunktion nicht
verfügbar.
0
Das Versenden von Daten von dem System an
das USB-Gerät ist nicht möglich.
Zum Beenden der Wiedergabe
.
0
Im Falle von Audiodateien führt die
Wiedergabefortsetzung nach dem Stoppen
einer Datei zur Wiedergabe vom Beginn des
Titels (Fortsetzungsfunktion).
Das nochmalige Drücken [o], wenn die
Wiedergabe angehalten ist, bricht die
Fortsetzungsfunktion ab.
.
0
Drücken Sie [T] einmal, um zum Anfang des
nächsten Titels zu springen.
0
Drücken Sie [S], um zum Anfang des
wiedergegebenen Titels zu springen. Drücken
Sie [S] zweimal, um zum Anfang des
vorherigen Titels zu springen.
Zum schnellen Vorlauf/Rücklauf
Während der Wiedergabe oder Pause
.
Wiedergabe von einem USB-Gerät
Zum Pausieren
.
0
Zum Aufheben der Pause, drücken Sie die
Taste erneut.
19
Page 76

Wiedergabe von einem USB-Gerät
Zufallswiedergabe
Aktivieren der Zufallseinstellung.
1
Während dem Stopp-Modus
.
0
Das „RANDOM“-Symbol leuchtet.
Starten Sie die Wiedergabe.
2
.
0
Während der Zufallswiedergabe bringt Sie das Drücken
von [S] nicht zum vorherigen Titel zurück.
0
Während des Stopp-Modus wird die Zufallswiedergabe
abgebrochen, falls Sie [RANDOM] erneut drücken. Und
das „RANDOM“-Symbol verschwindet auch.
HINWEIS
0
Die Zufallswiedergabe wird in den folgenden Fällen
abgebrochen:
- Wenn die Stromversorgung ausgeschaltet ist
- Wenn das USB-Gerät entfernt wird
20
.
Page 77

/
ST
(Drehen)
(Drücken Sie wiederholt)
HauptgerätFernbedienung
Wiedergabe von einem USB-Gerät
Wiedergabewiederholung
Auswählen der Art des
1
Wiederholungsbetriebs.
Während des Wiedergabe- oder StoppModus
.
0
Bei jedem Drücken der Taste ändert sich
die Einstellung wie folgt:
- „ “-Symbol:
Wiederholt sämtliche Titel.
- „ 1“ Symbol:
Wiederholt den aktuellen Titel.
- „ 1FOLDER“-Symbol:
Wiederholt die Titel des aktuellen
Ordners.
Starten Sie die Wiedergabe.
2
.
Bei der Wiedergabe von einem anderen
Ordner
Anzeigen des Namens des aktuellen
1
Ordners.
.
0
Der Ordnername erscheint blinkend.
Wählen Sie einen Ordner.
2
.
Starten Sie die Wiedergabe.
3
.
0
Die Wiedergabe beginnt mit dem ersten
Titel im Ordner.
0
Manche USB-Geräte unterstützen
möglicherweise die Auswahl der Ordner
nicht.
Wiedergabe von einem USB-Gerät
21
Page 78

MODE / ENTER
(Gedrückt halten)
HauptgerätFernbedienung
/
(Drücken Sie wiederholt)
/
(Drücken Sie wiederholt)
Wiedergabe von einem USB-Gerät
Verwenden des Lademodus
Sie können die Einstellung festlegen, ob iPod oder das USB-Gerät,
während das System ausgeschaltet ist (Standby-Modus),
aufgeladen wird.
Anzeigen des Einstellungsmenüs.
1
.
Wählen Sie „Charge Mode“ aus.
2
.
Auswählen von „On“ oder „Off“.
3
22
.
.
0
„On“ (Werkseinstellung):
Wenn ein iPod oder ein USB-Gerät an das System
angeschlossen ist, wird der Ladevorgang gestartet.
0
„Off“:
Wenn ein iPod oder ein USB-Gerät an das System
angeschlossen ist, wird es nicht aufgeladen.
Page 79

Schalten Sie die Stromversorgung
4
des Systems ab (stellen Sie das
System auf Standby)
Schließen Sie einen iPod oder ein
5
USB-Gerät an.
Im Anzeigefenster erscheint „Charging“ und
der Ladevorgang beginnt.
0
Wenn der Lademodus auf ein gestellt ist,
erhöht sich der Stromverbrauch geringfügig,
während das System ausgeschaltet ist
(Standby-Modus).
0
Wenn das USB-Gerät abgezogen wird,
während „ReadyCharging“ erscheint, geht das
System nicht in den Standby-Modus über. Um
in den Standby-Modus zurückzukehren,
drücken Sie die Einschalt-Taste.
Wiedergabe von einem USB-Gerät
Wiedergabe von einem USB-Gerät
23
Page 80

Etikettierte Seite
Hören von CDs
Hören von CDs
Einsetzen einer CD
.
0
Um das CD-Fach zu schließen, drücken Sie [M].
HINWEIS
0
Während das Gerät ausgeschaltet ist (Standby-Modus),
schaltet das Drücken von [M] die Stromversorgung ein und
öffnet das CD-Fach.
24
.
Page 81

Wiedergabe
(Drehen)
HauptgerätFernbedienung
/
ST
(Drehen)
(Drücken Sie wiederholt)
HauptgerätFernbedienung
/
(Gedrückt halten)
Zum Starten der Wiedergabe
Hören von CDs
Zum Wählen eines Titels
.
Zum Beenden der Wiedergabe
.
Zum Pausieren
.
0
Zum Aufheben der Pause, drücken Sie die
Taste erneut.
.
0
Drücken Sie [T] einmal, um zum Anfang des
nächsten Titels zu springen.
0
Drücken Sie [S], um zum Anfang des
wiedergegebenen Titels zu springen. Drücken
Sie [S] zweimal, um zum Anfang des
vorherigen Titels zu springen.
Zum Auswählen eines Titels mit der
Titelnummer
Wählen Sie einen Titel durch das Eingeben der
Nummer über die Zifferntasten auf der
Fernbedienung.
Beispiele:
0
Zum Auswählen von Titel Nr. 3: 3
0
Zum Auswählen von Titel Nr. 17: Q10 1 7
0
Zum Auswählen von Titel Nr. 20: Q10 2 `
0
Zum Auswählen von Titel Nr. 123:
Q10 1 2 3
(nur MP3/WMA-Dateien)
Zum schnellen Vorlauf/Rücklauf
Während der Wiedergabe oder Pause
Hören von CDs
.
25
Page 82

Hören von CDs
Zufallswiedergabe
Aktivieren der Zufallseinstellung.
1
Während dem Stopp-Modus
.
0
Das „RANDOM“-Symbol leuchtet.
Starten Sie die Wiedergabe.
2
.
0
Während der Zufallswiedergabe bringt Sie das Drücken
von [S] nicht zum vorherigen Titel zurück.
0
Während des Stopp-Modus wird die Zufallswiedergabe
abgebrochen, falls Sie [RANDOM] erneut drücken. Und
das „RANDOM“-Symbol verschwindet auch.
HINWEIS
0
Die Zufallswiedergabe wird in den folgenden Fällen
abgebrochen:
- Wenn die Stromversorgung ausgeschaltet ist
- Wenn das CD-Fach geöffnet ist
26
.
Page 83

/
ST
(Drehen)
(Drücken Sie wiederholt)
HauptgerätFernbedienung
Hören von CDs
Wiedergabewiederholung
Auswählen der Art des
1
Wiederholungsbetriebs.
Während des Wiedergabe- oder StoppModus
.
0
Bei jedem Drücken der Taste ändert sich
die Einstellung wie folgt:
- „ “-Symbol:
Wiederholt sämtliche Titel.
- „ 1“ Symbol:
Wiederholt den aktuellen Titel.
- Symbol nicht angezeigt:
Die Wiedergabewiederholung ist
ausgeschaltet.
Starten Sie die Wiedergabe.
2
.
HINWEIS
0
Während der Programmwiedergabe, werden
durch die Auswahl von „ “ (alle Titel
wiederholen) alle programmierten Titel
wiederholt.
0
Während der Zufallswiedergabe, werden
durch die Auswahl von „ “ (alle Titel
wiederholen) alle Titel in zufälliger Reihenfolge
wiederholt.
0
Die Wiedergabewiederholung wird in den
folgenden Fällen abgebrochen:
- Wenn die Stromversorgung ausgeschaltet
ist
- Wenn die Audioquelle geändert wird
- Wenn das CD-Fach geöffnet ist
Wiedergabe von einem anderen Ordner
(nur MP3/WMA)
Anzeigen des Auswahlmodus der
1
Ordner und Dateien.
Während dem Stopp-Modus
.
0
Durch erneutes Drücken der Taste wird
die Ordnernamenanzeige verlassen.
Wählen Sie den Ordner oder die
2
Datei.
.
0
Sie können einen Ordner oder eine Datei
auch durch Drücken von [J] [K]
auswählen.
0
Durch Drücken von [RETURN] wird zur
vorherigen Ebene zurückgekehrt.
0
Durch Drücken von [ENTER] wird zur
nächsten Ebene vorangeschritten.
Starten Sie die Wiedergabe.
3
.
0
Manche Arten von CDs unterstützen
möglicherweise die Auswahl der Ordner
nicht.
Hören von CDs
27
Page 84

/
ST
(Drehen)
(Drücken Sie wiederholt)
HauptgerätFernbedienung
MODE / ENTER
HauptgerätFernbedienung
Hören von CDs
Programmwiedergabe
Sie können bis zu 32 Titel einer CD in jeden beliebigen Ordner zur
Wiedergabe einprogrammieren.
Anzeigen des Programmmodus.
1
Während dem Stopp-Modus
.
Wählen Sie einen Titel, um ihn zum Programm
2
hinzuzufügen.
A
Wählen Sie einen Titel, Ordner oder eine Datei aus.
.
B
Drücken Sie [ENTER].
28
.
.
0
Bei MP3/WMA-Dateien können Sie eine Datei oder einen
Ordner auch mit Hilfe der Zifferntasten auswählen.
-
Zum Auswählen einer Datei: Drücken Sie einmal Q10
-
Zum Auswählen eines Ordners: Drücken Sie Q10 zweimal
Wiederholen Sie Schritt 2, um weitere Titel zum
3
Programm hinzuzufügen.
Starten Sie die Wiedergabe.
4
.
Page 85

/
/
ST
(Drehen)
(Drücken Sie wiederholt)
HauptgerätFernbedienung
MODE / ENTER
HauptgerätFernbedienung
Hören von CDs
Bestätigen der programmierten Titel
Während die Programmwiedergabe gestoppt
ist
.
0
Die Tracks im Programm erscheinen im
Display nacheinander in der programmierten
Reihenfolge.
Hinzufügen von Titeln zu einem
Programm
Während die Programmwiedergabe gestoppt
ist
A
Wählen Sie einen Titel oder eine Datei
zum Hinzufügen.
.
B
Drücken Sie [ENTER].
Löschen von Titeln aus einem
Programm
Während die Programmwiedergabe gestoppt
ist
.
0
Bei jedem Drücken der Taste wird der jeweils
letzte Track im Programm gelöscht.
Abbrechen der Programmwiedergabe
Während die Programmwiedergabe gestoppt
ist
.
0
Die Programmwiedergabe wird auch in den
folgenden Fällen abgebrochen:
- Wenn die Stromversorgung ausgeschaltet
ist
- Wenn das CD-Fach geöffnet ist
Hören von CDs
.
0
Der Titel wird ans Ende der Programmliste
hinzugefügt.
29
Page 86

(Drehen)
(Drücken Sie wiederholt)
HauptgerätFernbedienung
/
Hören von UKW-Radio
Hören von UKW-Radio
Sendersuchlauf
HINWEIS
0
Schließen Sie die Antenne vor dem Hören von Radiosendungen
an. (S. 10)
Wählen Sie „FM“ aus.
1
.
Wählen Sie eine Methode für die Senderauswahl aus
2
(automatische oder manuelle Auswahl).
.
0
Wählen Sie automatische Auswahl, wenn der Empfang
gut ist.
(„AUTO“-Symbol leuchtet auf)
0
Wählen Sie manuelle Auswahl, wenn der Empfang
schlecht ist.
(„AUTO“-Symbol leuchtet nicht auf)
30
.
Wählen Sie einen Sender.
3
.
0
Automatische Auswahl:
Jedes Drücken der Taste startet den automatischen
Empfang von Signalen der nächsten Station.
0
Manuelle Auswahl:
Drücken Sie fortlaufend, um die gewünschte Frequenz
auszuwählen.
Halten Sie die Taste gedrückt, um die Frequenz
kontinuierlich durchlaufen zu lassen.
HINWEIS
0
Wiederholtes Drücken der Taste ändert die Empfangsfrequenz
in Schritten von 50 kHz.
0
Während der automatischen Senderauswahl wird
Stereoempfang aktiviert, während der manuellen Auswahl
Mono-Empfang.
0
Mono-Empfang verbessert den Empfang, aber der StereoEffekt geht verloren.
Page 87

(Drehen)
(Drücken Sie wiederholt)
HauptgerätFernbedienung
MODE / ENTER
(Gedrückt halten)
HauptgerätFernbedienung
/
(Drücken Sie wiederholt)
MODE / ENTER
HauptgerätFernbedienung
Hören von UKW-Radio
Sender voreinstellen
Insgesamt können 40 UKW/DAB-Sender im
Speicher abgelegt werden.
Automatisches Speichern von Sendern
(automatisches Voreinstellen; nur UKW)
Wählen Sie „FM“ aus.
1
.
Anzeigen des Einstellungsmenüs.
2
.
Speichern Sie den Sender.
4
.
0
Sie können bis zu maximal 40
voreingestellte Sender in der
Reihenfolge ihrer Frequenz speichern.
VORSICHT
0
Wenn die gespeicherte Nummer bereits einem
Sender zugewiesen ist, überschreibt das
Speichern eines neuen Senders die
vorhandene Einstellung.
Hören von UKW-Radio
Wählen Sie „Tuner Setup“ B „Auto
3
Preset“ in der Sequenz.
.
0
Eine Bestätigungsmitteilung erscheint.
0
Um das Voreinstellen abzubrechen,
drücken Sie [MODE].
31
Page 88

/
MODE / ENTER
(Gedrückt halten)
HauptgerätFernbedienung
/
(Drücken Sie wiederholt)
80.00 MHz 1 CH
/
MODE / ENTER
ST
(Drehen)
(Drücken Sie wiederholt)
HauptgerätFernbedienung
80.00 MHz 3 CH
Ausgewählte gespeicherte Nummer
Hören von UKW-Radio
Sender manuell speichern (manuell voreinstellen)
Stellen Sie einen Sender ein, den Sie voreinstellen
1
möchten.
.
Anzeigen des Einstellungsmenüs.
2
.
Wählen Sie „Tuner Setup“ B „Memory“ in der
3
Sequenz.
32
.
.
0
Der gespeicherte Nummer erscheint blinkend.
.
0
Um das Voreinstellen abzubrechen, drücken Sie [MODE].
0
Führen Sie die folgenden Schritte aus, während die
Anzeige blinkt.
Wählen Sie eine gespeicherte Nummer, um
4
Informationen zu speichern.
.
.
Page 89

Speichern Sie den Sender.
MODE / ENTER
HauptgerätFernbedienung
MODE / ENTER
(Gedrückt halten)
HauptgerätFernbedienung
/
(Drücken Sie wiederholt)
/
(Drücken Sie wiederholt)
5
.
0
Wenn die gespeicherte Nummer bereits
einem Sender zugewiesen ist, erscheint
eine Bestätigungsmeldung.
- Um den vorhandenen Sender mit dem
neuen Sender auszutauschen, drücken
Sie [ENTER].
- Falls Sie den vorhandenen Sender nicht
mit dem neuen Sender austauschen
wollen, drücken Sie [MODE].
0
Selbst wenn ein Sender voreingestellt ist,
wird der Empfang abbrechen, wenn die
Signale schwach sind.
Hören von UKW-Radio
Suchlaufpegeleinstellung
Wenn der schwache Radiosender während der
automatischen Voreinstellung oder der manuellen
Voreinstellung häufig empfangen wird, stellen Sie
die „Search Level“-Einstellung auf „Strong“, um
ausschließlich starke Radiosender zu
empfangen.
0
Die Werkseinstellung ist „Normal“.
Anzeigen des Einstellungsmenüs.
1
.
Wählen Sie „Tuner Setup“ B „Search
2
Level“ in der Sequenz.
Hören von UKW-Radio
.
Auswählen von „Normal“ oder
3
„Strong“.
.
33
Page 90

/
ST
(Drehen)
(Drücken Sie wiederholt)
HauptgerätFernbedienung
Hören von UKW-Radio
Einstellen eines voreingestellten Senders
.
0
Halten Sie die Taste gedrückt, um fortlaufend von einem zum
anderen voreingestellten Sender zu wechseln.
0
Sie können eine gespeicherte Nummer auch über die
Zifferntasten wählen.
-
Zum Auswählen von Titel Nr. 3: 3
-
Zum Auswählen von Titel Nr. 17: Q10 1 7
34
.
Page 91

/
ST
(Drehen)
(Drücken Sie wiederholt)
HauptgerätFernbedienung
MODE / ENTER
(Gedrückt halten)
HauptgerätFernbedienung
/
(Drücken Sie wiederholt)
MODE / ENTER
HauptgerätFernbedienung
(Drücken Sie wiederholt)
Hören von UKW-Radio
Einen voreingestellten Sender
löschen
Wählen Sie die gespeicherte Nummer
1
aus, die dem Sender, den Sie löschen
wollen, entspricht.
.
Anzeigen des Einstellungsmenüs.
2
.
Wählen Sie „Tuner Setup“ B
3
„PresetClear“ in der Sequenz.
Hören des Radio-DatenSystems
.
Bei jedem Drücken der Taste ändert sich die
Einstellung wie folgt:
0
Frequenz und die gespeicherte Nummer
0
Programmservicename
0
Radiotext (falls verfügbar)
HINWEIS
0
Wenn das Signal von einem Sender mit RadioDaten-System schwach ist, werden die Daten
des Radio-Daten-System möglicherweise mit
Unterbrechungen oder überhaupt nicht
angezeigt.
0
„Waiting…“ kann erscheinen, während die RTDaten empfangen werden.
Hören von UKW-Radio
.
0
Eine Bestätigungsmitteilung erscheint.
0
Um den Löschvorgang zu beenden,
drücken Sie [MODE].
Löschen der voreingestellten
4
Informationen.
.
35
Page 92

(Drehen)
(Drücken Sie wiederholt)
HauptgerätFernbedienung
/
Hören von DAB
Hören von DAB
Hören von DAB/DAB+-Sendern
1
2
Wählen Sie „DAB“ aus.
.
Erstmaliges Auswählen von DAB
0
Die automatische Scanfunktion scannt automatisch das
DAB-Band III (5A-13F) nach Multiplexen (d.h. Stationen), die
in Ihrem Gebiet empfangbar sind. Sobald der Scanvorgang
abgeschlossen ist, wird der erste Sender, der erkannt wurde,
ausgewählt.
Wählen Sie einen Sender.
.
36
.
Page 93

MODE / ENTER
(Gedrückt halten)
HauptgerätFernbedienung
/
(Drücken Sie wiederholt)
(Drücken Sie wiederholt)
Hören von DAB
Manuelle Nutzung der automatischen
Scanfunktion
Wenn ein neuer DAB-Sender eingeführt wird oder
Sie in eine neue Region ziehen, können Sie die
automatische Scanfunktion erneut betätigen.
Anzeigen des Einstellungsmenüs.
1
.
Wählen Sie „Tuner Setup“ B „Auto
2
Scan “ in der Sequenz.
.
0
Der automatische Scan startet.
0
Die Anzahl der gefundenen Sender und
der Scanfortschritt werden auf der
Anzeige gezeigt.
DAB-Radioinformationen anzeigen
Anzeige weiterer Informationen über den
ausgewählten DAB-Sender.
.
Bei jedem Drücken der Taste ändert sich die
Einstellung wie folgt:
0
DLS (Dynamisches Label-Segment)
Wenn ein Sender eingestellt ist, der DLSTextdaten sendet, wird der Text über die
Anzeige rollen.
0
Programmtyp
0
Bitrate und Audiomodus
0
Signalqualität
- 0-59: Schlechter Empfang
- 60-79: Guter Empfang
- 80-100: Exzellenter Empfang
0
Multiplex Name
0
Multiplexnummer und -frequenz
Hören von DAB
37
Page 94

MODE / ENTER
(Gedrückt halten)
HauptgerätFernbedienung
/
(Drücken Sie wiederholt)
/
(Drücken Sie wiederholt)
/
(Drücken Sie wiederholt)
Hören von DAB
Einstellung für DAB
Verwenden Sie die folgenden Funktionen und Einstellungen, um
DAB digitales Radio einzustellen.
Anzeigen des Einstellungsmenüs.
1
.
Wählen Sie „Tuner Setup“ aus.
2
.
Wählen Sie die Einstellung aus, die Sie ändern
3
möchten.
38
.
.
Wählen Sie die Einstellungsoptionen.
4
.
Page 95

DAB DRC
Bei Verwendung der DRC (Dynamische
Bereichskontrolle)-Einstellung können Sie den
dynamischen Bereich von DAB digitalem Radio
eingrenzen, sodass Sie leise Teile auch bei
niedrigem Lautstärkepegel hören können. Ideal,
wenn Sie spätabends Radio hören wollen, ohne
jemanden zu stören.
Off
Low
High
DAB Mode
Sie können die verfügbaren Sender in
alphabetischer Reihenfolge, nach aktiven
Sendern oder Multiplex sortieren.
Alphabet
Active ST
Multiplex
: Die Werkseinstellung
: Geringe Reduktion im
dynamischen Bereich
: Große Reduktion im
dynamischen Bereich
: Sender alphabetisch sortieren.
(Die Werkseinstellung)
: Nach aktiven Sendern sortieren.
Empfangbare Sender erscheinen
oben in der Liste. Sender, die
nicht gut empfangen werden
können, erscheinen am Ende der
Liste.
: Sortieren der Sender nach
Multiplex.
Hören von DAB
Hören von DAB
39
Page 96

Zum LINE-Eingang
Audiokabel
(nicht im Lieferumfang
enthalten)
Zum analogen
Audioausgang
Optisches Digitalkabel
(nicht im Lieferumfang enthalten)
Koaxialkabel
(nicht im Lieferumfang
enthalten)
Digitaler Audio-Player
Zum koaxialen
Digitaleingang
Zu dem optischen Digitaleingang
Zum optischen digitalen Ausgangsanschluss
* Stellen Sie die digitale Audioausgabe des TV auf „PCM“.
Zum koaxialen digitalen
Ausgangsanschluss
TV, usw.
BD/DVD-Rekorder, usw.
Hören von einem externen Gerät
Hören von einem externen Gerät
Anschließen eines externen Geräts
.
40
.
0
Siehe auch die Bedienungsanleitung des externen Geräts.
Page 97

Wiedergabe
/
(Drehen)
HauptgerätFernbedienung
/
(Drehen)
HauptgerätFernbedienung
Wählen des Eingangs, der mit dem
1
externen Gerät verbunden ist.
Wiedergabe des Geräts, welches mit
dem LINE-Eingangsanschluss
verbunden ist
.
Wiedergabe des Geräts, welches mit
dem digitalen Eingangsanschluss
verbunden ist
Hören von einem externen Gerät
Hören von einem externen Gerät
.
0
Stellen Sie bei Verwendung des „DIN“ Anschlusses die digitalen
Audioausgangs-Einstellungen des
externen Geräts auf „PCM“.
Der Ton wird nicht ausgegeben, wenn
eine andere Einstellung als
„PCM“ ausgewählt ist.
Starten Sie die Wiedergabe des
2
externen Geräts.
HINWEIS
0
Digitale Signal müssen im PCM
(32 kHz bis 192 kHz)-Format sein, um die
Wiedergabe auf dem System zu ermöglichen.
41
Page 98

/
BASS TREBLE
/
(Drehen)
(Drücken Sie wiederholt)
HauptgerätFernbedienung
Einstellung der Klangqualität
Einstellung der Klangqualität
Einstellen Ihrer bevorzugten Tonqualität
.
0
Sie können die Bässe und Höhen innerhalb der folgenden
Bereiche einstellen.
- BASS: Bass -8 bis Bass +8
- TREBLE: Treble -8 bis Treble +8
0
Der Wert ändert sich in 2er-Schritten.
Erhöhen der tiefen Bässe (EX.BASS)
.
0
Jedes mal, wenn Sie die Taste drücken, wird die K2-Funktion
an-/ausgeschaltet.
42
.
Zurücksetzen der Klangqualität
.
0
Schaltet die BASS und TREBLE Einstellungen automatisch auf
0, und die EX.BASS Einstellung auf Aus.
HINWEIS
0
Die Sound-Modus-Einstellungen werden auch für den
Audioausgang für Kopfhörer angewendet.
Page 99

(Drücken Sie wiederholt)
L
T R
Einstellung der Klangqualität
Verbessern der Wiedergabe
der Tonqualität (K2-Funktion)
Die K2-Funktion stellt die verlorenen Signale
während der Aufnahme wieder her und ermöglicht
eine natürlichere Audio-Wiedergabe.
Die Signale werden durch high-bit-Quantisierung
(24 Bit) und hohes Sampling (128 kHz, 176,4 kHz
oder 192 kHz) der digitalen Audiosignale
wiederhergestellt.
Wenn die Tonquelle „CD“, „USB(iPod)“ oder
der digitale Eingang („D-IN1“, „D-IN2“) ist
.
0
Jedes mal, wenn Sie die Taste drücken, wird
die K2-Funktion an-/ausgeschaltet.
0
Während die K2-Funktion eingschaltet ist,
leuchtet die K2-Anzeige auf.
HINWEIS
0
„Analog In“ ist angezeigt, wenn die Tonquelle
Radio oder der LINE-Eingang („LINE1“,
„LINE2“) ist. Einstellungen können in diesem
Fall nicht vorgenommen werden.
Einstellung der links/rechts
Ton-Balance der Lautsprecher
.
.
0
Die Balance kann auf einen Wert zwischen L7
und R7 eingestellt werden.
Einstellung der Klangqualität
43
Page 100

(Drücken Sie wiederholt)
Verwendung des Timers
Verwendung des Timers
Einstellung des Sleep-Timers
Das System schaltet automatisch aus, nachdem die von Ihnen
eingestellte Ausschaltzeit abgelaufen ist.
.
0
Bei jedem Drücken der Taste wird die Ausschaltzeit (in Minuten)
wie folgt geändert:
Off B 10 B 20 B 30 B 60 B 90 B 120 B (Schleife zurück zum
Anfang)
0
Wenn der Sleep-Timer eingeschaltet ist, leuchtet das
„SLEEP“ Symbol.
0
Um die Restzeit bis zum Ausschalten des Systems zu prüfen,
drücken Sie [SLEEP] einmal.
0
Schalten Sie das Gerät zum Abbrechen des Sleep-Timers aus
oder wählen Sie „Off“.
44
.
 Loading...