

KENWOOD
STEREO CASSETTE TAPE DECK 101CT INSTRUCTION MANUAL
KENWOOD CORPORATION
B60-3182-08 C (K, P, Y) MC
Your choice of this product indicates that you are a devotee to excellence in sound reproduction.
We appreciate your patronage and take pride in the long tradition of quality components that our company represents.
So that you can get the most out of your unit, we suggest that you take the time to read through this manual before you hook up and operate your system. This will acquaint you with operating features and system-connection considerations so that your listening pleasure will be enhanced right from the start. You will notice that in all aspects of planning, engineering, styling, operating convenience and adaptability we have sought to anticipate your needs and desires.
Keep this manual handy for future reference.
For your records
Record the serial number, found on the back of the unit, in the spaces designated on the warranty card, and in the space provided below. Refer to the model and serial numbers whenever you call upon your dealer for information or service on this product.
Model ______ Serial Number _____
Unpacking
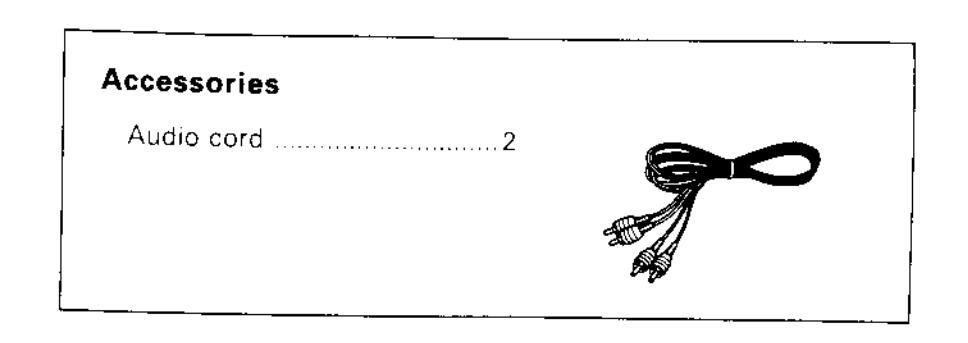
Unpack the unit carefully and make sure that all accessories are put aside so they will not be lost. Examine the unit for any possibility of shipping damage. If your
Examine the unit for any possibility of shipping damage. If your unit is damaged or fails to operate, notify your dealer immediately. If your unit was shipped to you directly, notify the shipping company without delay. Only the consignee (the person or company receiving the unit) can file a claim against the carrier for shipping damage.
We recommend that you retain the original carton and packing materials for use should you transport or ship the unit in the future
Contents
Caution : Read the pages marked 1 carefully to ensure safe operation.
| Introduction 2 Special features 3 ▲ Before applying power 3 ▲ Safety precautions 3 ▲ IMPORTANT SAFEGUARDS 4 Before operation 6 Maintenance 7 | System connection |
|---|
Special features
- Double cassette decks: Deck A can be used for playback only and deck B can be used for both playback and recording.
- Dolby Noise Reduction: The Dolby B NR system minimizes the tape hiss noise felt by human ears by processing signals during playback and recording.
- Dubbing facility: This convenient function allows to copy the prerecorded tape in deck A onto a tape in deck B.
Before applying power
A Caution: Read this section carefully to ensure safe operation.
Units are designed for operation as follows.
U.S.A. and Canada ...... AC 120 V only * Other countries ...... AC 110-120 / 220-240 V switchable
*AC voltage selection
The AC voltage selector switch on the rear panel is set to the voltage that prevails in the area to which the unit is shipped Before connecting the power cord to your AC outlet, make sure that the setting position of this switch matches your line voltage. If not, it must be set to your voltage in accordance with the following direction.
AC voltage selector switch
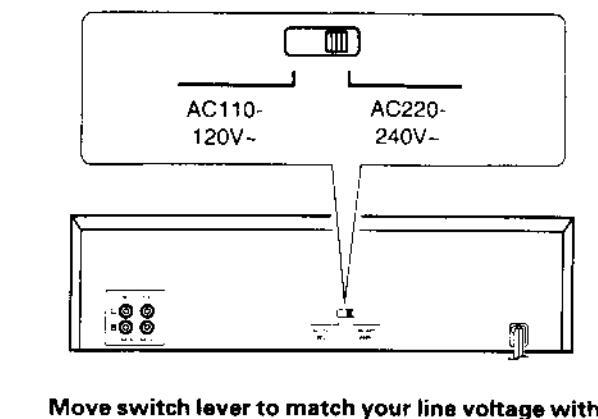
a small screwdriver or other pointed tool.
Note
Our warranty does not cover damage caused by excessive line voltage due to improper setting of the AC voltage selector switch.
Safety precautions
L Caution: Read this section carefully to ensure safe operation.
WARNING: TO PREVENT FIRE OR ELECTRIC SHOCK, DO NOT EXPOSE THIS APPLIANCE TO RAIN OR MOISTURE.
|
CAUTIC
RISK OF ELECTRI DO NOT OP |
CAUTION: TO REDUCE THE RISK OF ELECTRIC SHOCK, DO NOT RE-
MOVE COVER (OR BACK). NO USER-SERVICEABLE PARTS INSIDE, RE- FER SERVICING TO QUALIFIED SERVICE PERSONNEL. |
|---|---|
| A |
THE LIGHTNING FLASH WITH ARROWHEAD SYMBOL, WITHIN AN EQUILATERAL TRI-
ANGLE. IS INTENDED TO ALERT THE USER TO THE PRESENCE OF UNINSULATED "DAN- GEROUS VOL-TAGE" WITHIN THE PRODUCT'S ENCLOSURE THAT MAY BE OF SUFFICIENT MAGNITUDE TO CONSTITUTE A RISK OF ELECTRIC SHOCK TO PERSONS. |
|
THE EXCLAMATION POINT WITHIN AN EQUILATERAL TRIANGLE IS INTENDED TO ALERT
THE USER TO THE PRESENCE OF IMPORTANT OPERATING AND MAINTENANCE (SERVIC- ING) INSTRUCTIONS IN THE LITERATURE ACCOMPANYING THE APPLIANCE. |
Please read all of the safety and operating instructions before operating this appliance. Adhere to all warnings on the appliance and in the instruction manual. Follow all the safety and operating instructions. These safety and operating instructions should be retained for future reference.
- 1. Power sources The appliance should be connected to a power supply only of the type described in the instruction manual or as marked on the appliance. If you are not sure of the type of power supply to your home, consult your appliance dealer or local power company. For appliances intended to operate from battery power, or other sources, refer to the instruction manual.
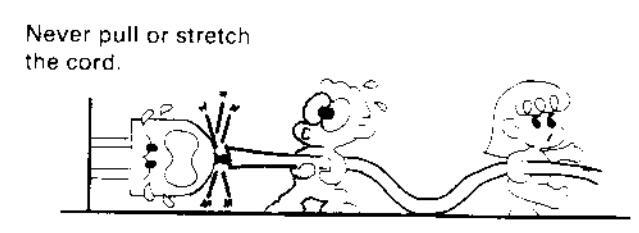
- 2. Power-cord protection Power-supply cords should be routed so that they are not likely to be walked on or pinched by items placed upon or against them, pay particular attention to cords at plugs, convenience receptacles, and the point where they exit from the appliance.
- 3. CAUTION Polarization This appliance may be equipped with a polarized alternating-current line plug (a plug having one blade wider than the other). This plug will fit into the power outlet only one way. This is a safety feature. If you are unable to insert the plug fully into the outlet, try reversing the plug. If the plug should still fail to fit, contact your electrician to replace your obsolete outlet. Do not defeat the safety purpose of the polarized plug.
- 4. Ventilation Slots and openings in the cabinet are provided for ventilation and to ensure reliable operation of the appliance and to protect it from overheating, and these openings must not be blocked or covered. The appliance should be situated so that its location or position does not interfere with its proper ventilation.
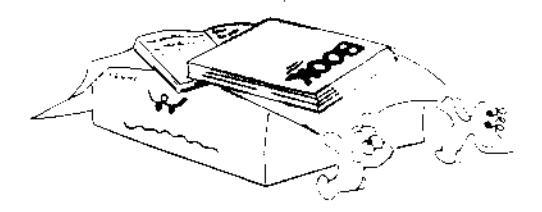
To maintain good ventilation, do not put records or a tablecloth on the appliance. Place the appliance at least 10 cm away from the walls.
Do not use the appliance on a bed, sofa, rug or similar surface that may block the ventilation openings. This appliance should not be placed in a built-in installation such as a bookcase or rack unless proper ventilation is provided or the manufacturer's instructions have been adhered to.
5. Water and moisture - The appliance should not be used near water - for example, near a bathtub, washbowl, kitchen sink, laundry tub, in a wet basement, or near a swimming pool, etc.
- 6. Temperature The appliance may not function properly if used at extremely low, or freezing temperatures. The ideal ambient temperature is above +5°C (41°F).
- Heat The appliance should be situated away from heat sources such as radiators, heat registers, stoves, or other appliances (including amplifiers) that produce heat.
- 8. Electric shock Care should be taken so that objects do not fall and liquid is not spilled into the enclosure through openings. If a metal objects, such as a hair pin or a needle, comes into contact with the inside of this appliance, a dangerous electric shock may result. For families with children, never permit children to put anything, especially metal, inside this appliance.
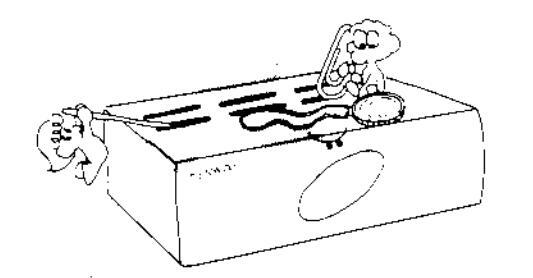
9. Enclosure removal – Never remove the enclosure. If the internal parts are touched accidentally, a serious electric shock might occur.
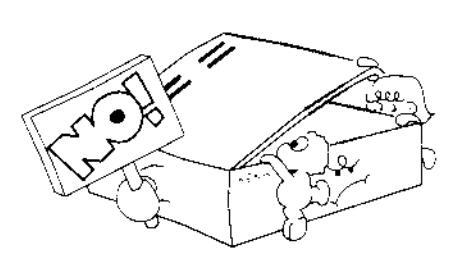
- 10.Magnetic fields Keep the appliance away from sources of magnetic fields such as TV sets, speaker systems, radios, motorized toys or magnetized objects.
- 11.Cleaning Unplug this appliance from the wall outlet before cleaning. Do not use volatile solvents such as alcohol, paint thinner, gasoline, or benzine, etc. to clean the cabinet. Use a clean dry cloth.
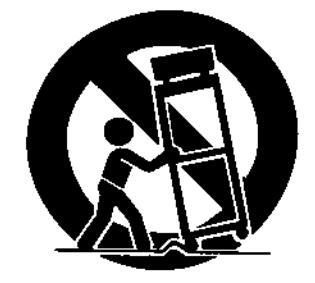
- 12. Accessories Do not place this appliance on an unstable cart, stand, tripod, bracket, or table. The appliance may fall, causing serious injury to a child or adult, and serious damage to the appliance. Use only with a cart, stand, tripod, bracket, or table recommended by the manufacturer, or sold with the appliance. Any mounting of the appliance should follow the manufacturer's instructions, and should use a mounting accessory recommended by the manufacturer. An appliance and cart combination should be moved with care. Quick stops, excessive force, and uneven surfaces may cause the appliance and cart combination to overturn.
- 13. Lightning For added protection for this appliance during a lightning storm or when it is left unattended and unused for long periods of time, unplug it from the wall outlet and disconnect the antenna or cable system. This will prevent damage to the appliance due to jightning and power-line surnes
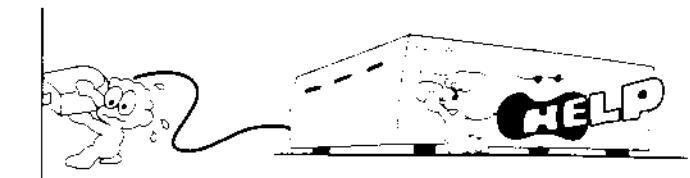
- 14. Abnormal smell If an abnormal smell or smoke is detected, immediately turn the power OFF and uppure the appliance from the wall outlet. Contact your dealer or nearest service center.
POWER OFFI
-
15.Damage requiring service The apprance should be serviced by qualified service personnel when.
- A . The power-supply cord or the plug has been damaged
- R Objects have fallen or liquid has been spilled into the appliance.
- C. The appliance has been exposed to rain or water
n The appliance does not appear to operate normally by following the instruction manual Adjust only those controls that are covered by the instruction manual damage and will often require extensive work by a gualified
- E. The appliance has been dropped or the enclosure damagen
- F. The appliance exhibits a marked change in performance
- 16.Servicing The user should not attempt to service the appliance beyond that described in the instruction manual. All other servicing should be referred to qualified service personne
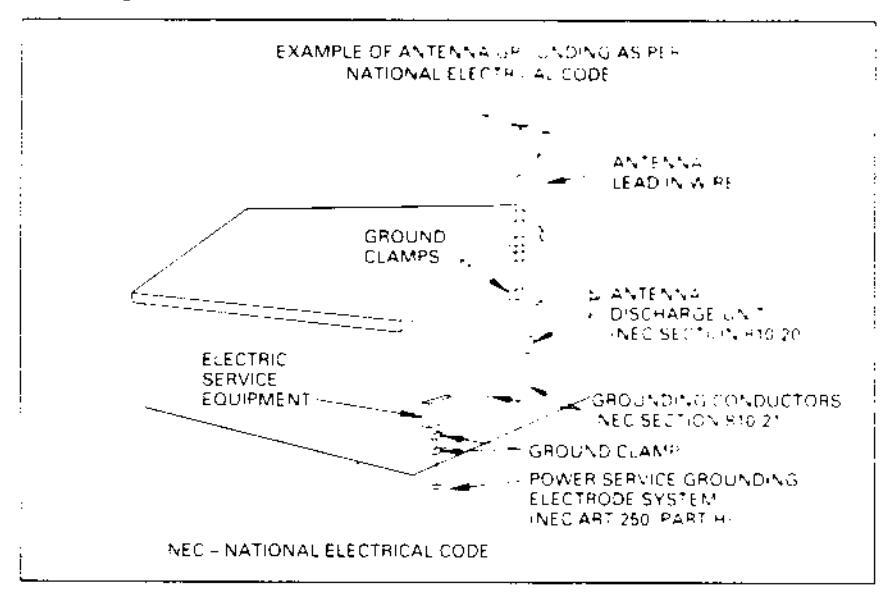
- 17. Outdoor antenna grounding If an outside antenna system is arounded so as to provide some protection. against voltage surges and built up static charges. Article 810 of the National Electrical Code - ANSI/ NEPA 70, provides information with respect to proper grounding of the mast and supporting structure grounding of the lead-in wirk to an antennis of charge un t. size of grounding conduit insi location stantenna. discharge unit, connection to around have estroges, and requirements for the griduation electrope. See
- 18. Power lines An outside antenna system should not be located in the vicinity of overhead power lines or other electric light or power circuits, or where it can fall into such nower lines or circuits. When installing an outside antenna system extreme care should be taken to keep from touching such power lines or circuits as contact with them might be fatal
- 19. AC outlets Do not connect other audio equipment with a power consumption larger than that specified to the AC outlet on the rear panel. Never connect other electrical appliances, such as an iron or toaster. to it to prevent fire or electric shock
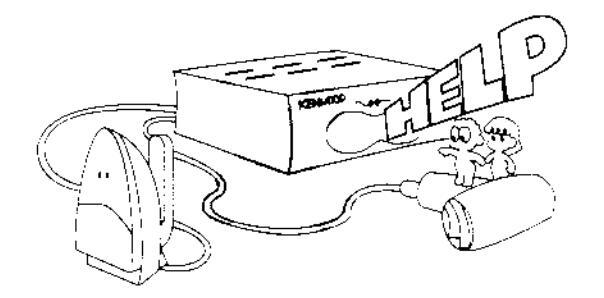
- 20. Overloading Do not overload wall outlets, extension cords or integral convenience recentacles as this can result in a risk of fire or electric shock.
- 21 Attachment Do not use attachments not recommended by the appliance manufacturer as they may cause hazards
- 22. Replacement parts When replacement parts are required be sure the service technician has used replacement parts specified by the manufacturer or have the same characteristics as the original parts. Unauthorized substitutions may result in fire electric shock or other
- 23. Safety check Upon completion of any service or repairs to this appliance, ask the service technician to perform safety checks to determine that the appliance is in proper operating condition.
- 2. Item 17 and 18 are not required except for units provided with
- 3. Item 17 complies with UL in the U.S.A.
Item 3 is not required except for grounded or polarized equipment.
Notes on cassette tape
Safety tab (accidental erasure prevention tab) After an important recording has been finished, break the safety tab, to prevent the recorded contents from being erased or recorded on accidentally.
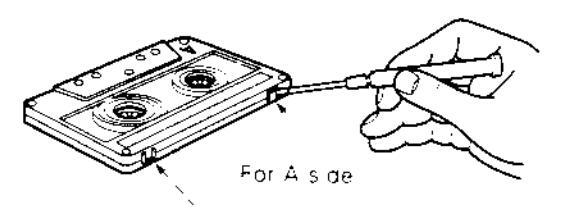
For B side
1. Longer tape than 110 minutes cassette tape
Since longer tape than 110 minutes cassette tape is
very thin, the tape could adhere to the pinch roller or be easily cut. It is recommended that these tapes not be used with this unit to prevent possible damage.
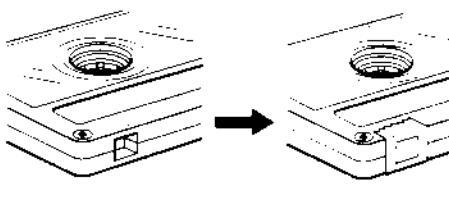
To re-record
Apply tape only to the position where the tap has been removed
To store cassette tapes
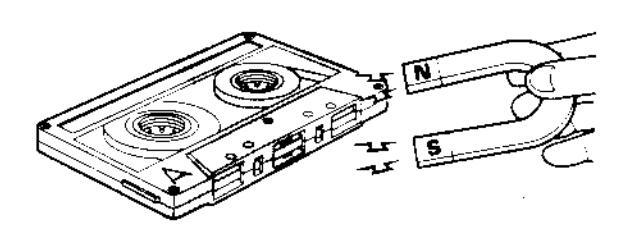
Do not store the tapes in a place which is subject to direct sunlight, or near equipment that generates heat. Keep the cassette tapes away from any magnetic field.
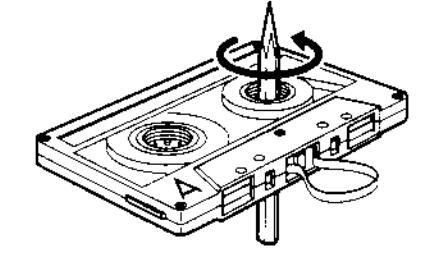
When there is slack in the tape
In such a case, insert a pencil into the reel hole and wind the reel hub to remove the slack
2. Endless tapes
Do not use an endless tape, as this could damage the mechanism of the unit.
Beware of condensation
When water vapor comes into contact with the surface of cold material, water drops are produced
If condensation occurs, correct operation may not be possible, or the unit may not function correctly.
This is not a malfunction, however, and the unit should be dried. (To do this, turn the POWER switch ON and leave the unit as it is for several hours i
Be especially careful in the following conditions:
- When the unit is brought from a cold place to a warm place, and there is a large temperature difference.
- When a heater starts operating
- When the unit is brought from an air-conditioned place to a place of high temperature with high humidity.
- When there is a large difference between the internal temperature of the unit and the ambient temperature, or in conditions where condensation occurs easily.
Dolby no se reduction manufactured under license from Dolby Laboratories Licensing Corporation
"DOLBY" and the double-D symbol are trademarks of Dolby Laboratories Licensing Corporation
WARNING NOTICE:
IN MOST CASES IT IS AN INFRINGMENT OF COPY-RIGHT TO MAKE COPIES OF TAPES OR DISCS WITH-OUT THE PERMISSION OF THE COPYRIGHT OWNERS. ANYONE WISHING TO COPY COMMERCIALLY AVAIL-ABLE TAPES OR DISCS SHOULD CONTACT THE ME-CHANICAL COPYRIGHT PROTECTION SOCIETY LIMITED OR THE PERFORMING RIGHTS SOCIETY LIM-ITED.
Cleaning the head section
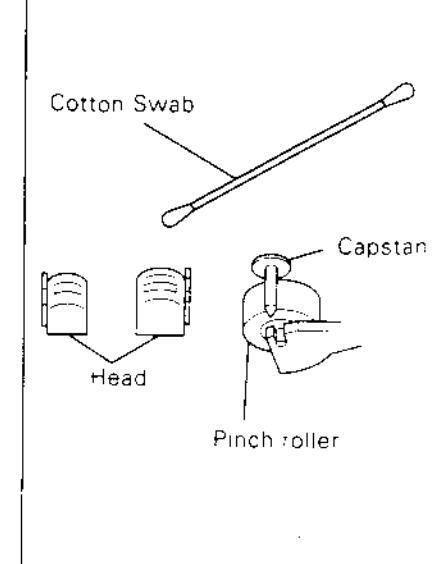
Cleaning the heads and peripheral components
For maintaining the best condition of the deck and for longer service life, always keep the head (recording/playback/erase), capstan and pinch roller clean. To clean them, perform the following.
1 Press the STOP/EJECT key to open the cassette holder.
Using a cotton swab dipped in alcohol, clean the nead (recording/playback/ erase), capstan and pinch roller carefully.
Demagnetizing the head
When the recording / playback head is magnetized, the sound quality will be deteriorated. In such a case, demagnetize the head using a commercially available demagnetizer (head eraser)

There are precisely aligned parts around the heads, including the tape guides. When cleaning, pay special attention so as not to apply shock to them.
Cleaning
Unplug this appliance from the wall outlet before cleaning. Do not use volatile solvents such as a cohol, paint thinner, gasoline, or benzine, etc. to clean the cabinet. Use a clean dry cloth
Do not use contact cleaners because it could cause a malfunction. Be specially careful against contact cleaners containing oil, for they may deform the plastic components.
Make connection as shown below. When connecting the related system components, refer also to the instruction manuals of the related components
Caution : Do not plug in the power lead until all connections are completed.
Except for U.S.A., Canada )
Caution regarding placement
Be sure to leave a space around the unit (from the largest outer dimensions including projections) equal to, or greater than, the left and right panels: 10 cm, rear panel: 10 cm
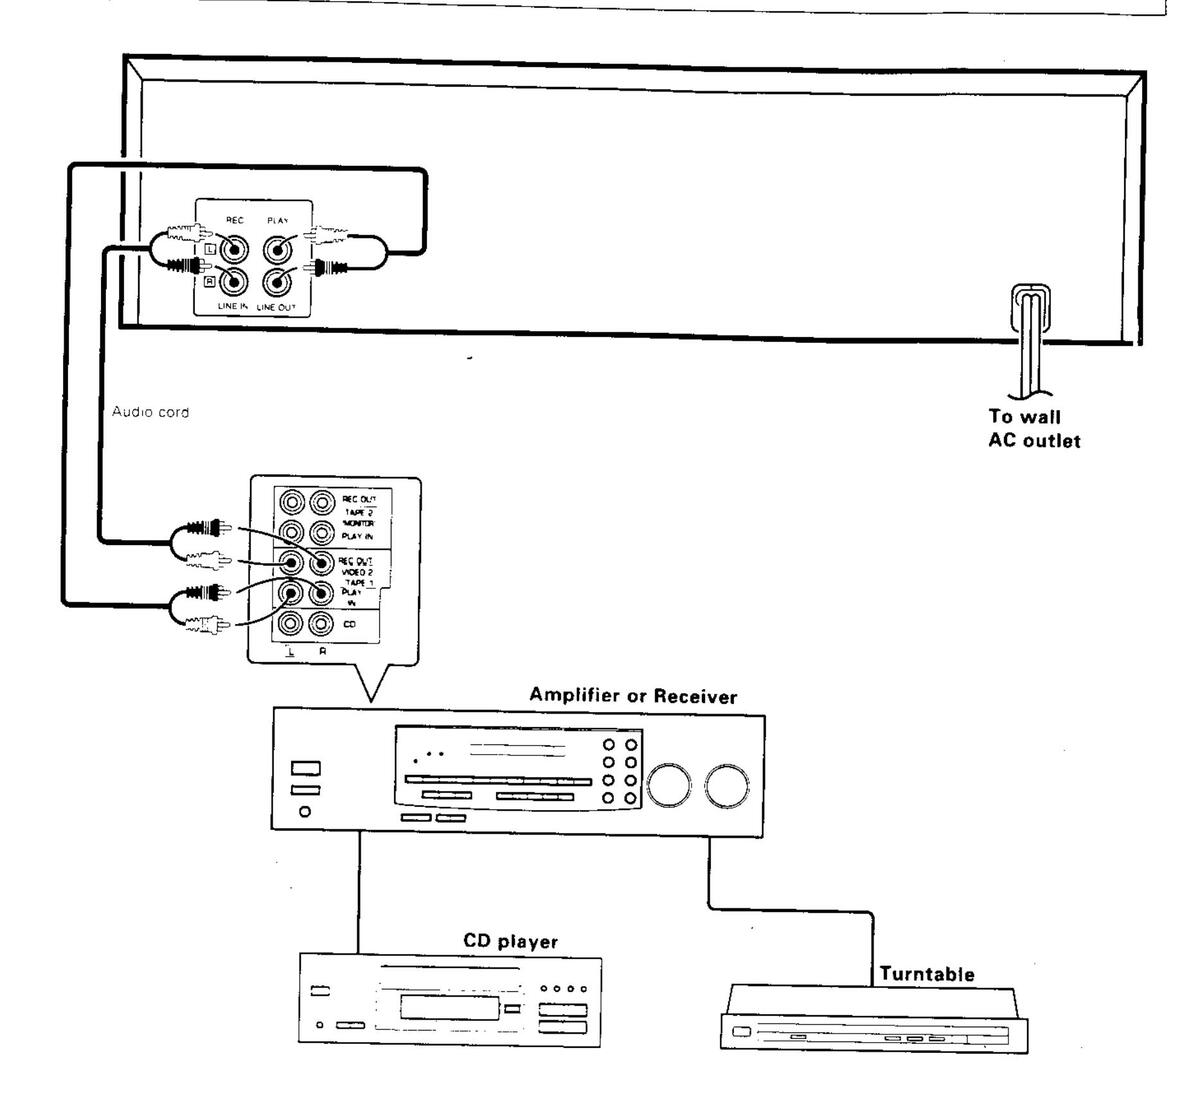

1 Connect all cords firmly. If connections are loose, there could be loss of sound or noise produced.
When plugging and unplugging connection cords, be sure to first remove the power cord from the AC outlet. Plugging/
unplugging connection cords without removal of the power cord can cause malfunctions or damage to the unit. 3. Do not connect up a power source which is larger than that indicated on the socket at rear of the unit.
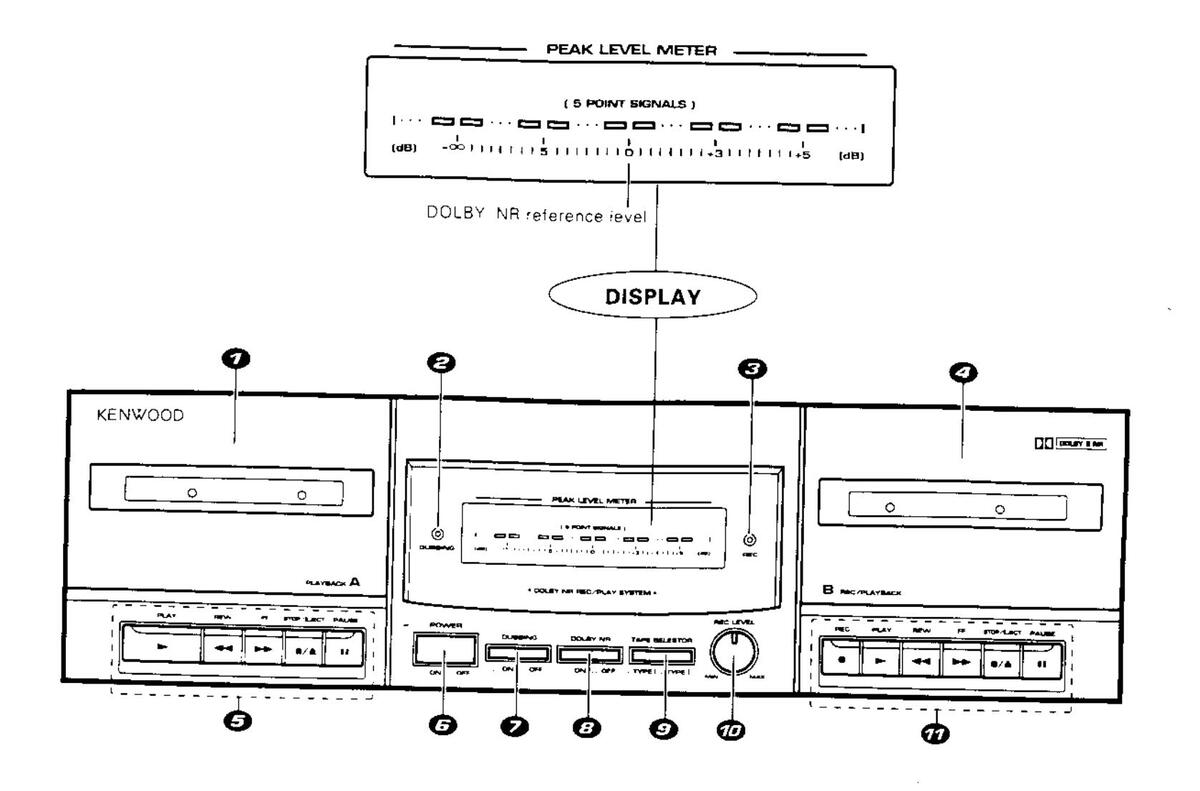
O Deck A
Playback-only tape deck DUBBING indicator:
Lights up when the DUBRING switch is
pressed in to n ON. The indicator turns off when the switch is set to E OFF
RFC indicator
Liants up when the REC key is pressed Turns off when recording is stopped
Ø Deck B
Tape deck which is capable of both
playback and recording A Deck A operation keys
PLAY key (>)
Press to start playback
REW (Rewind) key ( Press to rewind tape
FF (Fast Forward) key (>>):
Press to fast forward tape STOP/EJECT key (■/▲):
Press the STOP key to stor tape
Press the EJECT key in stop mode to open the cassette holder and load or
take out the cassette no PAUSE key (II):
Press to stop the tape playback
POWER switch:
Press to turn power rac ON and C OFF. DUBBING switch:
Press to - ON when it is required to copy the tape in deck A onto the tape in deck
B. Set the switch to D OFF while dubbing
DOLBY NR switch:
Press to select the Dolby Noise Reduction
- ON activates the Dolby B NR mode.
OFF deactivates the Dolby mode.
O TAPE SELECTOR switch:
- Press to select the type of tape in use
- TYPE I is the Normal tape position TYPE I is the High tape position.
@ REC LEVEL control:
Adjusts the recording level
n Deck B operation keys REC key (•):
Press to start recording.
PLAY key (►):
Press to start playback. REW (Rewind) key (
Press to rewind tane
FF (Fast Forward) key (>>): Press to fast forward tape
STOP/EJECT key (■/▲):
Press the STOP key to stop tape nlavback. Press the EJECT key in stop mode to
open the cassette holder and load or take out the cassette
PAUSE key (III):
Press to stop the tabe playback temporarily.
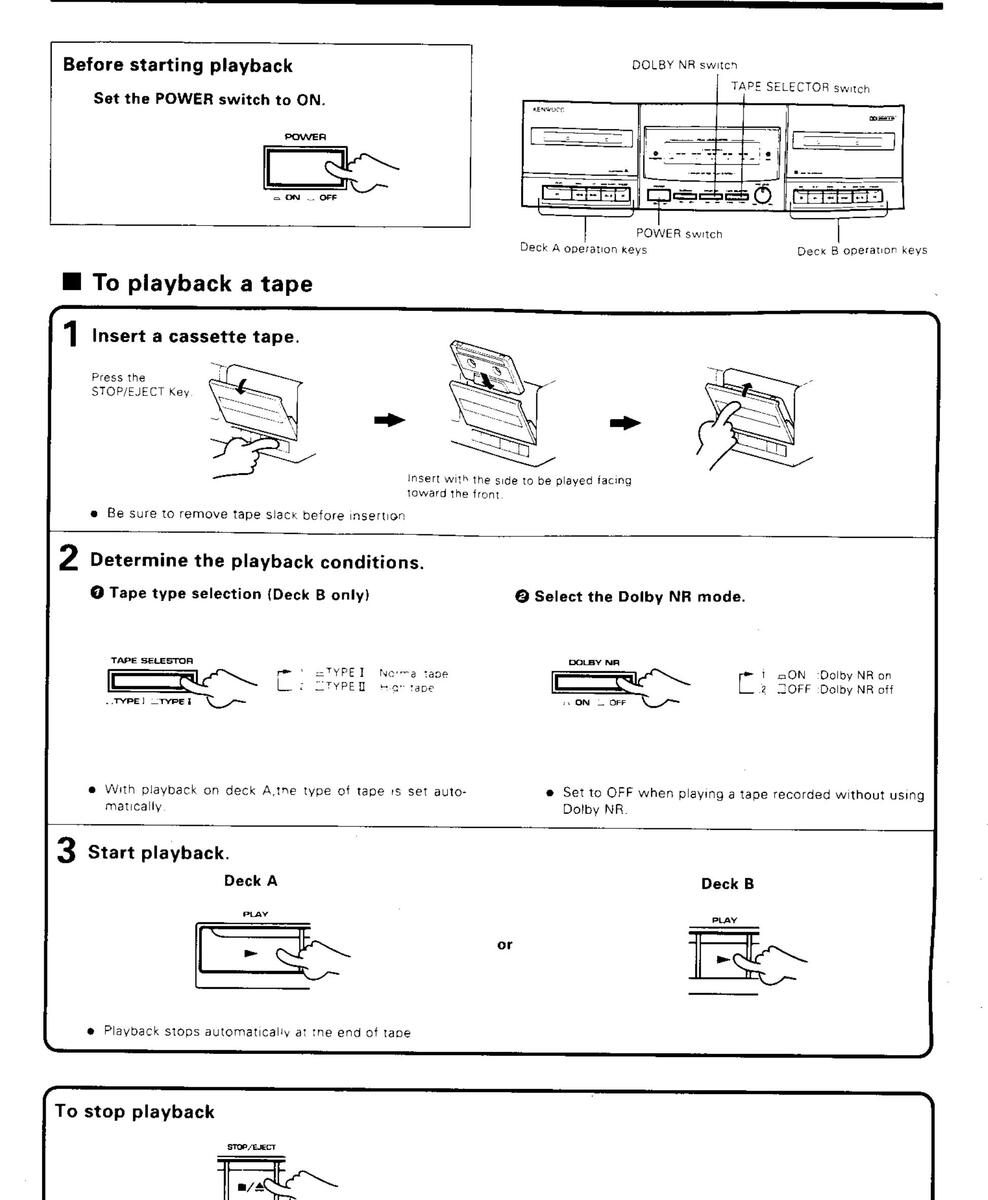
• When taking out the tape, press the STOP/EJECT key after the tape transport has stopped completely.
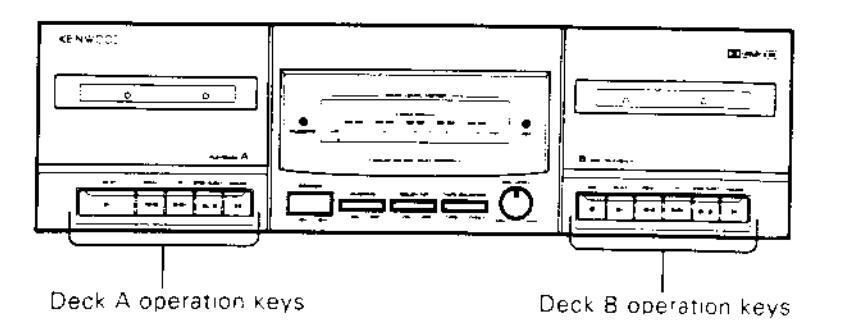
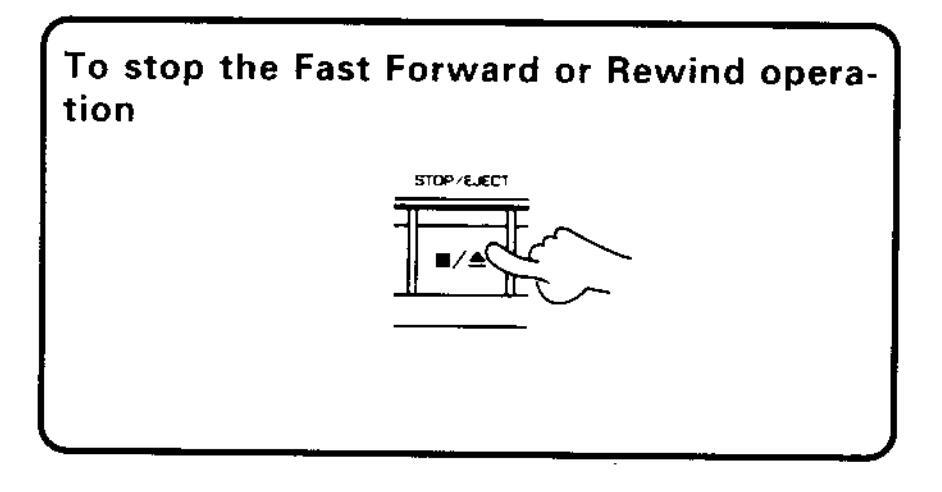
Fast Forward and Rewind 1 Stop playback. 2 Press the ≪ key or >> key. 4. Rewind in the + direction Fast forward in the + direction
Ordinary recording
Since this unit is not designed for use with metal tapes, recording on metal tapes cannot be carried out.
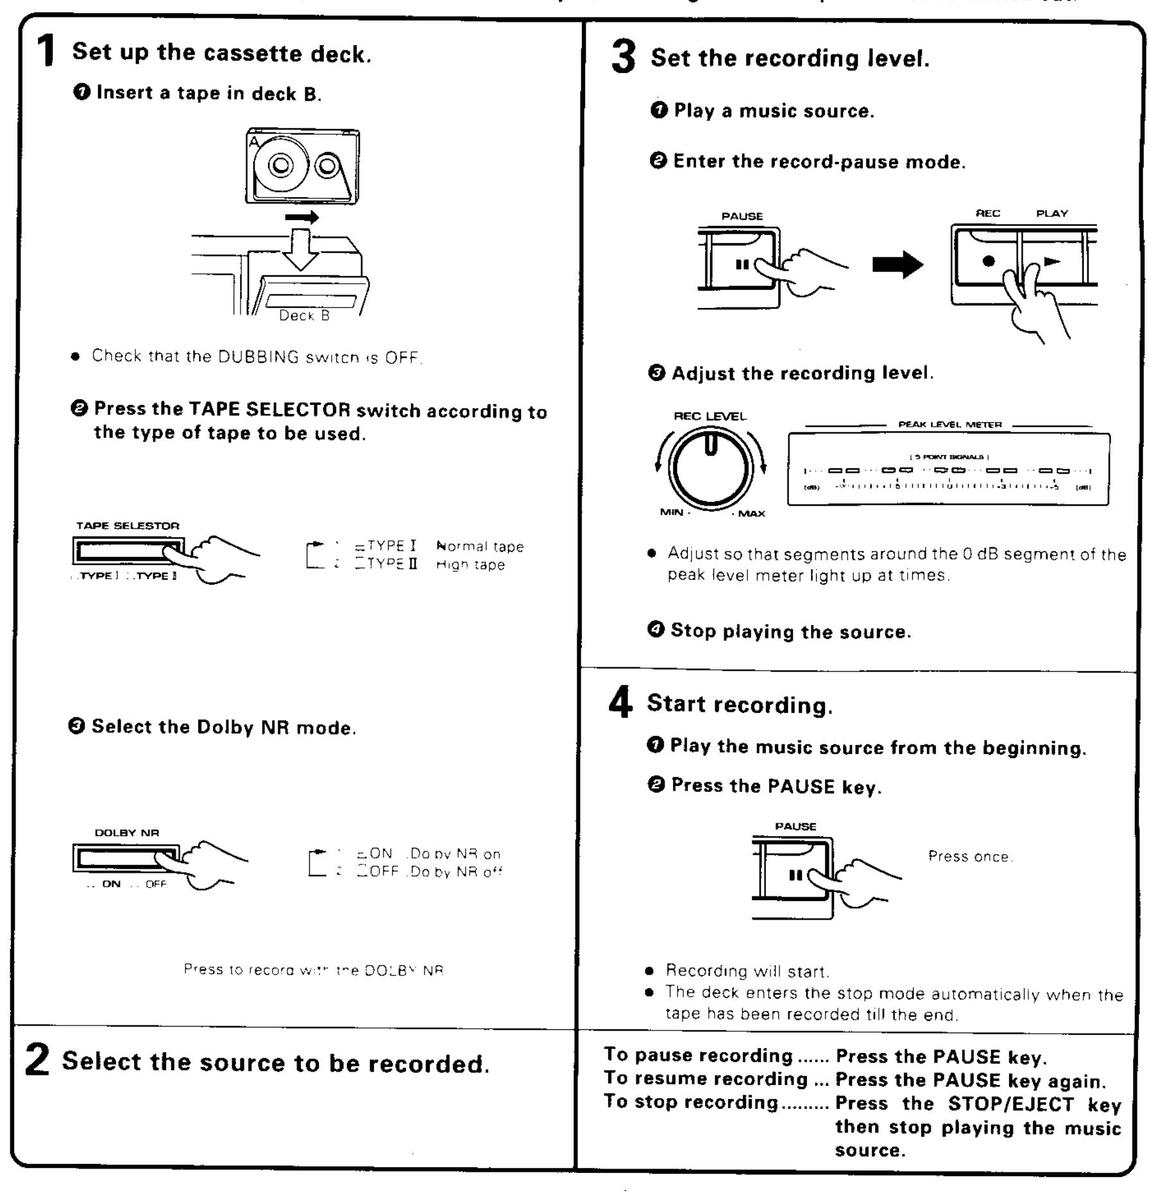
Dolby noise reduction system
The Dorby noise reduction system was developed to reduce the tape hiss noise generated during playback. The optimum effect of the Dolby NR system is obtained when the same type NR system is used for both recording and playback. If a different type NR system is used, playback is not performed correctly. Make sure that the same type noise reduction system is used for both recording and playback.
Dolby B NR
The most popular noise reduction system used in nome audio components. Usually, Dolby NR system corresponds to B NR.
Tape dubbing operation
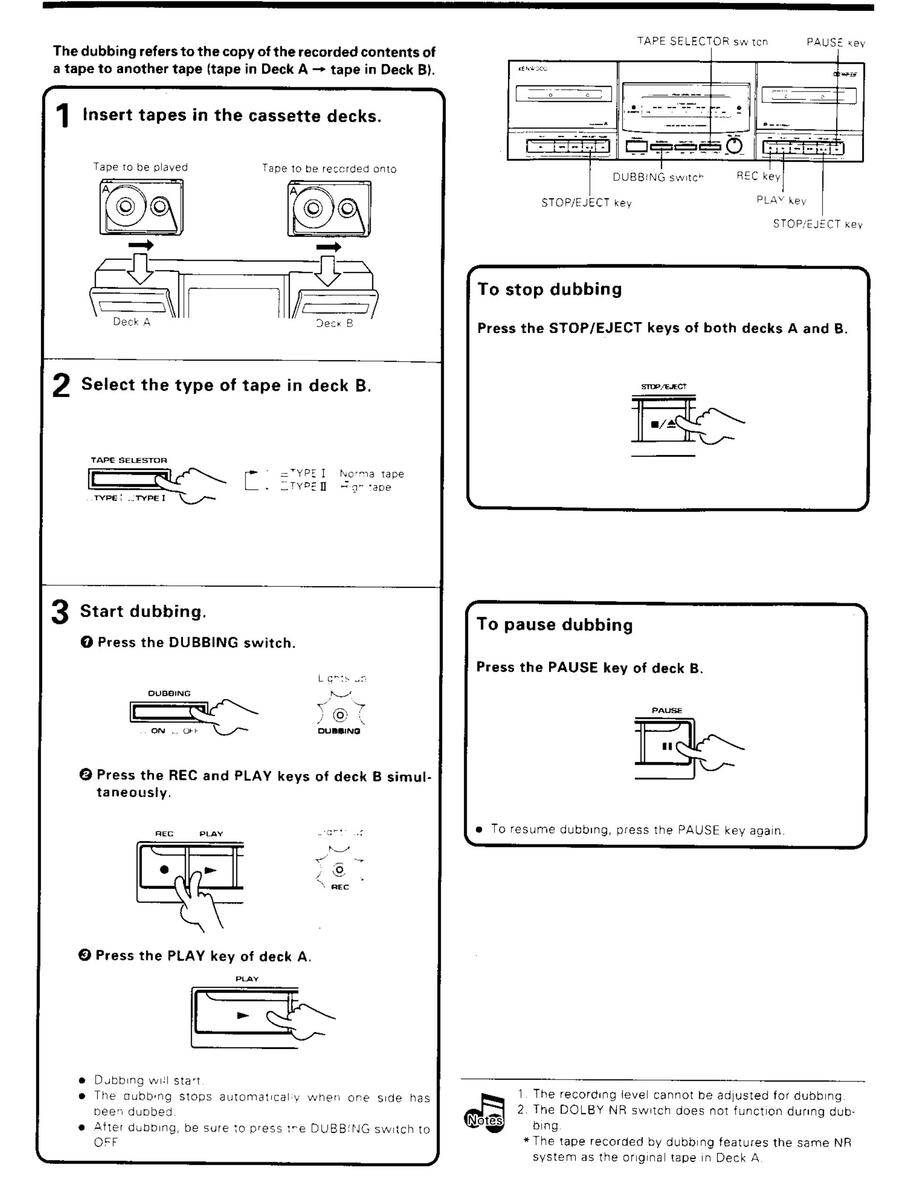
What appears to be a malfunction may not always be serious. If your unit should not perform as expected, consult the table below to see if the problem can be corrected before seeking help from your dealer or service representative
| Symptom | Cause | Remedy |
|---|---|---|
| Sounds is not produced when the Play key is pressed. |
|
|
|
|
|
|
The deck does not work when an op-
eration key is pressed. |
|
|
| Tape has been rewound to a reel. |
|
|
| The dubbing on Deck A and Deck B ends at different timing. |
|
|
| The cassette holder does not open when the STOP/EJECT key is pressed. |
|
|
| Sound is hoarse, or high frequencies are not audible. |
|
|
| Recording is not initiated when the REC key is pressed. |
|
|
| Sound is distorted. |
|
|
| Noise level is high. |
|
|
| Sound is vibrating. |
|
|

1. With some tapes, a squeaky noise is produced when the tape is stopped automatically. This is due to the tape protection function, and not a malfunction. not a malfunction. 2. Do not use longer tape than 110 minutes tapes, for the tape is too thin and gets easily tangled.
[ MODEL : 101CT ]
| Track System 4 track, 2 channel stereo |
|---|
| Recording System AC bias (Frequency: 105 kHz) |
| Heads A DECK |
| Playback heads |
| B DECK |
| Playback / recording heads 1 |
| Erasing head |
| Motors A DECK |
| B DECK |
| Wow and Flutter |
| Fast Winding Time Approx. 110 seconds (C-60 tane) |
| Frequency Response |
| TYPE I Tape 30 Hz to 13.000 Hz. ± 3 dB |
| TYPE II Tape |
| Signal to Noise Ratio |
| Dolby NR OFF |
| Dolby B NR ON |
| (3rd, H.D., 3 %, TYPE [] Tape) |
| Input sensitivity / Impedance |
| LINE IN 122.8 mV / 47 kΩ |
| Output Level / Impedance |
| LINE OUT |
| [General] |
| Rever Concurrention |
| Dimensions |
| H :133 mm (5-1/4") |
| D : 280 mm (11") |
| Weight (Net) 4.0 kg (8.8 lb) |

KENWOOD follows a policy of continuous advancements in development. For this reason specification may be changed without notice
For the U.S.A. FCC WARNING
This equipment may generate or use radio frequency energy. Changes or modifications to this equipment may cause harmful interference unless the modifications are expressly approved in the instruction manual. The user could lose the authority to operate this equipment if an unauthorized change or modification is made.
NOTE:
This equipment has been tested and found to comply with the limits for a Class B digital device, pursuant to Part 15 of the FCC Rules. These limits are designed to provide reasonable protection against harmful interference in a residential installation. This equipment may cause harmful interference to radio communications, if it is not installed and used in accordance with the instructions. However, there is no guarantee that interference will not occur in a particular installation. If this equipment does cause harmful interference to radio or television reception, which can be determined by turning the equipment off and on, the user is encouraged to try to correct the interference by one or more of the following measures.
-- Reorient or relocate the receiving antenna
- Increase the separation between the equipment and receiver.
- --- Connect the equipment into an outlet on a circuit different from that to which the receiver is connected.
- -- Consult the dealer or an experienced radio / TV technician for help.
 Loading...