

Kenmore Elite 79631462410, 79631463410, 79631462411 Owner’s Manual

Use & Care Guide
Manual de Uso y Cuidado
ie u _:÷d,
English / Es_fio|
Model/Modelo: 796.31_*
i_ i!']= L {i' "s!i!' -ii )U), )_5
ore Elite,
@
@
®uto @tic®
' _ co,oF numbeB _@wero de ce/oy
MFL39760255
Scots 8ranis Management Corporation
Hoffman Estates, IL 60179 U.S_A
www_kenmo_e,com
www.$ea_s_om
d@
carga
@
s_peFIoF
®
Using the Kenmore ConnectTM System ...........................26
TROUBLESHOOTING GUIDE
Normal Sounds You May Hear .........................................27
Before Calling for Service ............................................27_32
Error Codes ................................................................. 31-32
WARRANTY ............................................................................33
SERVICE ................................................................. Back Cover
In the space below, record the dote of purchase, model,
and serial number of your product. "Youwillfind the
mode_ end serial number printed on an identification
plate located inside the washer tid. Have these items of
information available whenever you contact Sears
concerning your product.
Model No.
Date of Purchase
Serial No.
Save these instructions and your sates receipt for
future reference.
Master Protection Agreements
Congratulations on making, a smart purchase, Your new
Kenmore_ product is designed and manufactured for years
of dependable operation, But _ike aH products, it may require
preventive maintenance or repair from time to time, That's
when having a Master Protection
Agreement can save you money and aggravation°
The Master Protection Agreement' also he_psextend the _ife M
your new product. Here's whm the
Agreement _ includes:
• Parts and labor needed to heip keep products operating
properllt under _rmo[ use, not _ustdefects, Our coverage g_
well beyond the productwarranty, No deducible, no fun_iona_
foffure excluded from coverage - real protection.
• l_xpert servke by a force of more than 10,000 authc_-ized
S_rs _rvice _chnkians, whichmeans someone you can trust
wil! be working on yourproduct.
• Unlimited service calls and nationwide service, as often as
you want us,whenever you want us.
• "No-lemon" guarantee - replacement of your covered
prode_ ff four or more productfaitures occur within twelve
months,
• Product replacement if ,your covered product can not
be fixed.
• Annual Preventive Maintenance Check at your request - no
extra charge,
• Fast help by phone - we coff it Rapid Resolution. Phone
supportfrom a Sears representative on aft products.Think:of us
aSa "talking owner's manual,"
• Powersurgeprotectionagainst e_ectricdamage dueto
powerfluctuations,
• $_0 food lossprotectionannually for any food spo}Joge that
istheresu#of mechanicalfailure of any coveredrefrigerator
or freezer.
Rental reimbursement if repair of your covered product takes
longer than promi_d.
• 25% d&count off the regular price of any non-covered re_ir
service and related installed parts,
Once you purchase the Agreement, a simple phone ca_l is aH
that it takes for you to schedule service, "Youcan coil at any
time day or night or schedule a service appointment on_ine.
The Master Protection Agreement is a risk-free purchase_
If you cancel for any' reason during the product warranty
period, we wiJlprovide a full refund, or a prorated refund any
time after the product warranty period expires, Purchase your
Master Protection Agreement today!
Some limitations and exclusions apply.
For prices and additional information in the U,S,A,
call i-800-827-6655.
_Coveragein Canadavarleson someitems,
Forfull detailscallSe_rsCanada ati-800-361-6665.
SearsInstallation Service
For Sears professiona_installation of home appliances,
There are many important safety messages in thls manual and on:your appllance. Always read and obey
oil safety messages.
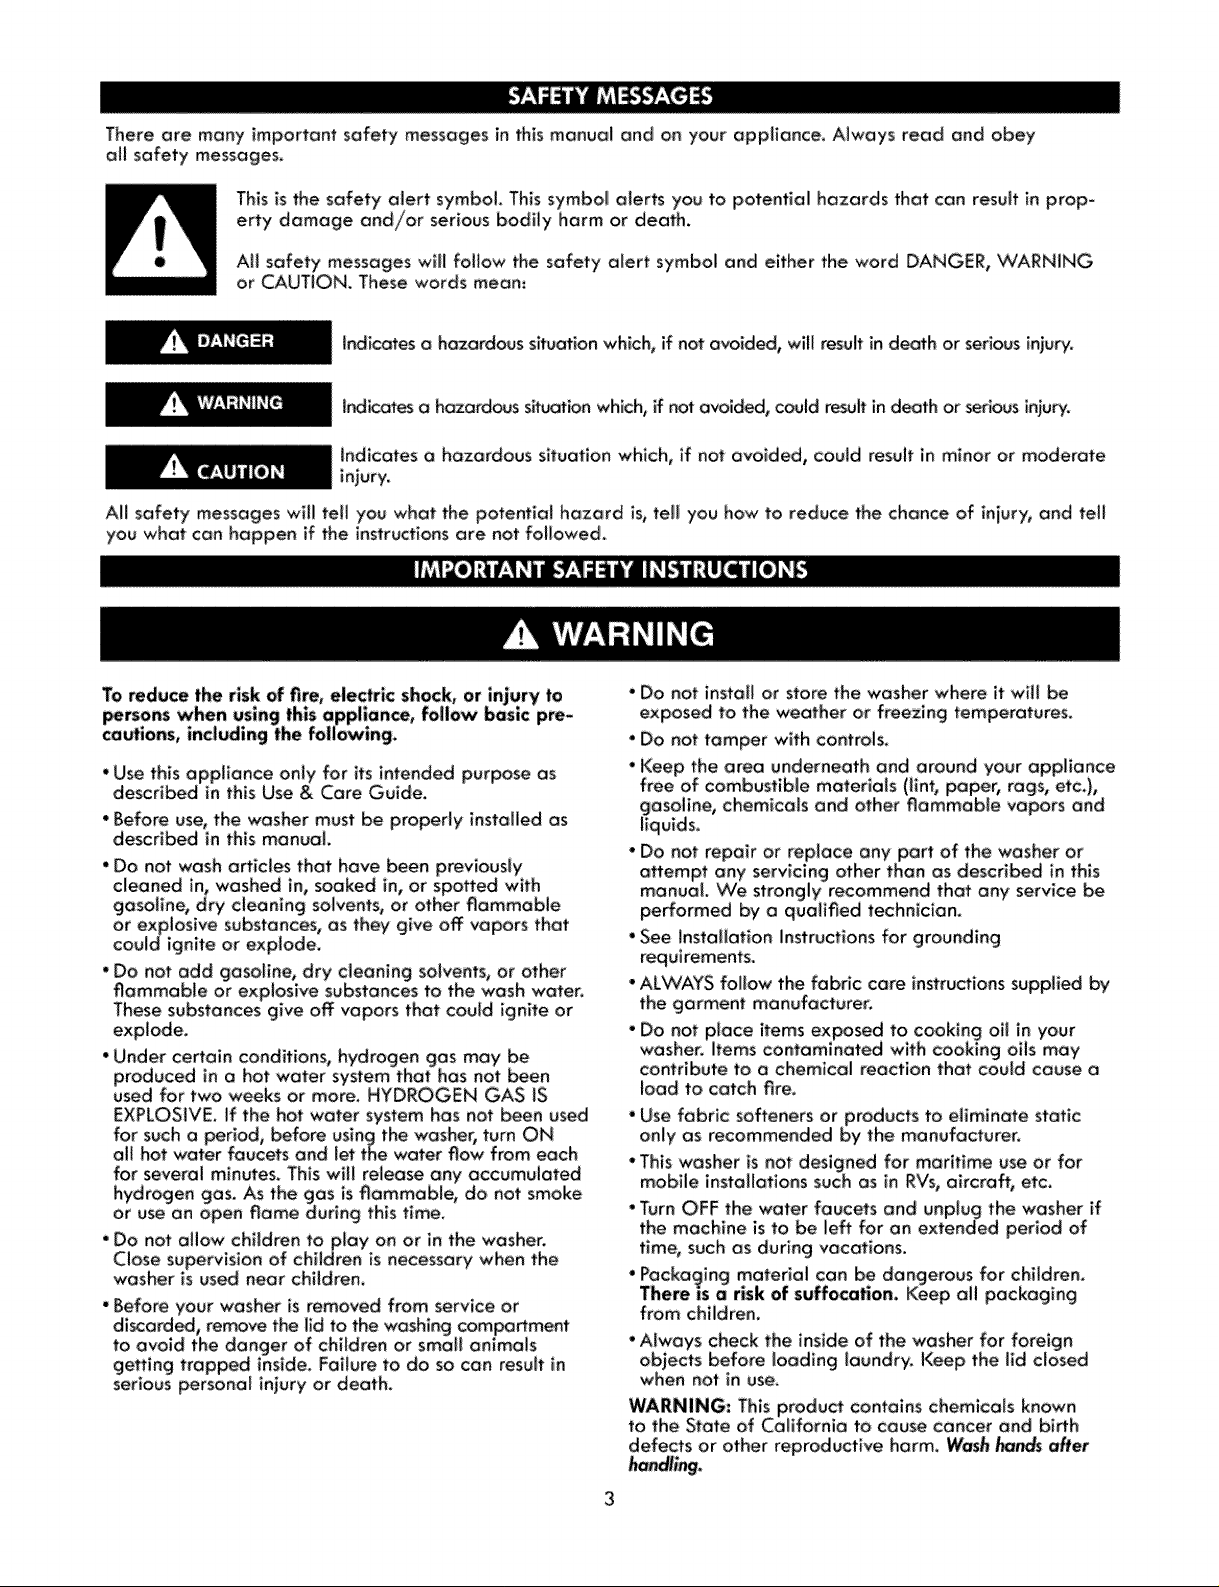
This _sthe safety alert symbol. This symbol alerts you to potentlai hazards that can result in prop_
erty damage and/or serious bodily harm or death.
All safety messages will follow the safety alert symbol and either the word DANGER, VCARNING
or CAUTION_ These words mean:
Indicates a hazardous situation which, if not avoided, will result in death or _rious injury.
Indicates a hazardous situation which, if not avoided, could _sult in death or _ric,Js ir_ury.
Indicates a hazardous situation which, if not avoided, could result in minor or moderate
injury.
All safety messages will tell you what the potential hazard is, tell you how to reduce me chance of injury, and tell
you what can happen if the instructions are not followed.
• Do not install or store the washer where it will be
exposed to the weather or freezing temperatures.
"Do not tamper with controls.
•Use this appliance only for _tsintended purpose as
described tn this Use & Care Guide.
Before use, the washer must be properly installed as
described in thls manual.
• Do not wash articles that have been previously
cleaned in:, washed in, soaked in, or spoffed w_th
gasoline, dry cleaning solvents, or other flammable
or expiosive substances, as they g_ve off vapors that
could ignite or explode.
These substances glve off vapors that could ignite or
explode.
• Under certain conditions, hydrogen gas may be
produced in a hot water system that has not _en
used for two weeks or more. HYDROGEN GAS IS
EXPLOSIVE. if the hot water system has not been used
for such a period, before using the ,washer, turn ON
all hot water faucets and let the water flow from each
for several minutes, This will release any accumulated
hydrogen gas. As the gas is flammable, do not smoke
or use an open flame during this tlme.
on or in the washer.
is necessary when the
washer is used near children.
• Before your washer is removed from service or
serious personal injury or death.
asoline, chemicals and other flammable vapors and
iqulds.
• Do not repair or replace any part of the washer or
attempt any servicing other than as descried in this
manual. We strongly recommend that any service be
performed by a qualified technician.
• See Installation Instructions for grounding
requirements.
• ALWAYS follow the fabric: core instructions supplied by
the garment manufacturer.
• Do not place items exposed to cooking oH in:your
washer; Items contamlnated with cook}ng oils may
contribute to a chemical reaction that could cause o
load to catch fire.
• Use fabrlc: softeners or products to eliminate statlc
only as recommended by the manufacturer.
• This washer is not designed for maritime use or for
mobile installations such as in RVs, aircraft, etc.
time_ such as during vacations.
• Packaging material can be dangerous for children.
There is a risk of suffocation. Keep all packaging
from children.
• Always check the inside of the washer for foreign
objects before loading laundry_ Keep the lid dosed
when not in use.
defects or other reproductive harm. Washhar_ a_er
handling.

the following,
• Unplug the wasber before cl_ning to ovo_d the risk of
electricshock,
• Never usaharshchemicals,abrasivecleaners,orsolventsto
cleanthewasher.Theywfftdamagethe finish
• Do not p_ oily or greasy ragsor clothingontopof the
washer.Thesesubstancesgiveoff vaporsthatcould ignite
the materials.
• Do not washitemsthataresoiled-withvegetable or cooki_
oil. Theseitemsmaycontain someoff after _aunderingand
may catch fire,
• Disconnectthisappliancefrom thepowersupply before
aflemptingany usor maintenance. Turningthecontrolsto
theOFFposffiondoesnotdisconnectthis appffancefromtbe
pcrwersupply.Faffureto followthiswarningcan causeserious
injury,fire, electricshock,ordeath,
• Do nat combine detergents,fabric softeners,and/orother
laundry productsfromdiffe_nt manufacturersforuseina
load,unbss_clfied ontbe _abeL
• Do not mix chbr_ne bleachwith ammoniaor acids such
asvinegar.Foffcrwpackagedlr_ions when usinglau_ry
products,Incorrectusagecan produce poisonousgas,resulting
in seriousinjuryordeath.
reaching aside. Failure to folbw th_swarning con cause serious
_niury, fire, electric shock or death.
• Refer to _NSTALLATION INSTRUCTIONS for detaiied
groundingprocedure,InstaHmioninstructionsore packedin
the washer for t;heinstaller's reference. If the washer ismoved to
a new J_otlon,haveitchecked and reinstalledby a qualified
_rvice technlc_an. Foiture to follow th_swarning can cause
serious _njur_;fire, electric sh_k, or death.
• Do not, under any circumstances, cut or remove the third
(ground)prig fromthepower cord.FailuretofoH_ this
warningcancause_riousin_ur_fire,eI_ricshock,ordeath.
• For personal safety_ this appliance must be pro_rly
ground_, Failuretofollowthiswarningcan causeserious
iniury,fir_electricshock_ordeath,
• The power card of this appliance is equipp_ with a
_p_g (grounding) pl_ which m_es with a standa_ _prong
(grouPie) wall outer to minimize the _sslbHi_t of e_ectric
sh_k hazard from thisappliance.
• This washer must be plugged into a 12OVAC, _Hz
grounded outlet.Failuretofollowthiswarningcan cause
serious iniury, fire, electric shock, or death_
• Have the wall outlet and circuit choked by a qualified
el_tHcian to make _e the outlet is pro_dy grounded.
Failuretofollowthiswarningcan causeseriousiniury,fire,
electricshock, or death.
• Where a standard 2-prong waft outlet is encounterS, it
Failuretofollowthiswarningcan causeseriousinjury,fire,
electric shock, or death.
• Do notinstall on carpet.Installthe washeron a solid floor.
Foffureto follow thiswarningconcauseseriousleakdamage.
• Do not removegrounding prong. Do notusean adapteror
extensioncord.Plugintoagrounded 3-prongoutEet.Failure
to foffow thesewarningscan cau_ seriousinjury,fir_ electric
shock,or death.
• Do not,under any circumstances,cut or removethethird
(ground)prongfromthe_er cord.Failureto followthis
warningcancauseserious_ury, fire,ele_ric shock,or death.
• Thewashershouldalways be pluggedInto itsown
individualelectrical outletwhichhas a voltagerating
that matchestheratingplate.Thisprovidesthe best
wires.
• Never unplug your washe_by pullingon the powercord.
injury,fire, eight shock,or death.
• Immediatelyirepairorreplaceall powercordsthat hove
becomefrayedorothe_ise damaged. Do notusea co_
that shows cracksorabrasion damagealong its length or
at effherend.Consultwffha qualified servicetechnician.
Failureto follow thiswarningcancauseseriousinjury,fire,
electricshock,or death.
• When_nstaff[ngor movingthe washer,becarefulnotto
pinch,crush,ordamage the power cord.Failureto follow
thiswarningcancauseseriousinjury,fire, ei_rlc shock,or
death°
codesto preventshockhazardand assurestabilityduring
resuit indamage to propertyor se6ousbodily injury.
• Storeand installthe washerwhere itwiff not beexpos_
causeseriousleak damage.
• Toreducethe Hskof electricshock, do notinstallthe
washerin humid s_ces. Failureto foffowthiswarningcan
causeserious injury,fire, electricsh_k, or death.
sleev_ gloves and safetyglasses Failureto foflow all of
the safetywarningsin this manual could resultin proper_
damage,personalinjuryordeath.
broken_rts, indudlnga damag_ cordat plug.
maintenance or cleaning_
• To reduce the riskof eledric shock, do not touch the power
plug with wet hands.
•Donotallowchildrentoplayonorinthewasher.
Closesupervisionofchildrenisnecessarywhenthe
washerisusednear cNldren. As children grow, teach
them the prope_ safe u_ of all appliances.Failure
to comply with these warnings could result in serious
personal injury.
• Destroy the carton, plastic bag, and other packing
materials after the washer is unpacked, Children
might use them for piay. Cartons covered with rugs,
bedspreads, or p_ostic sheets con become airtight
chambers, Failure to comply with these warnings could
resultinseriouspersonal injury.
•Keep laundry products out of children'sreach, To
prevent personal iniury,observe allwarnings on
product labels, Failure to comply with these warnings
could resultin seriouspersonal injury.
* Before your washer is removed from service or
discarded, remove the lid to the washing com_rtment to
avoid the danger of children or small animals getting
trapped inside.Failureto do so can resultin serious
personai injury or death,
IMPORTANT: Please read carefully.
TO CONNECT ELECTRICITY
Improper connection of the equipment-groundlng
conductor can resultinriskof electricshock,Check
with a qualified electrician or service technician
if you ore in doubt as to whether the appliance
is properly grounded, Do not modify the plug
provided with the applionceo Ifitdoes not fit the
outlet, have a proper outlet installed by a qualified
eIectrlcian,Failureto followthese wamings con
cause seriousinjury,fire,electricshock, or death.
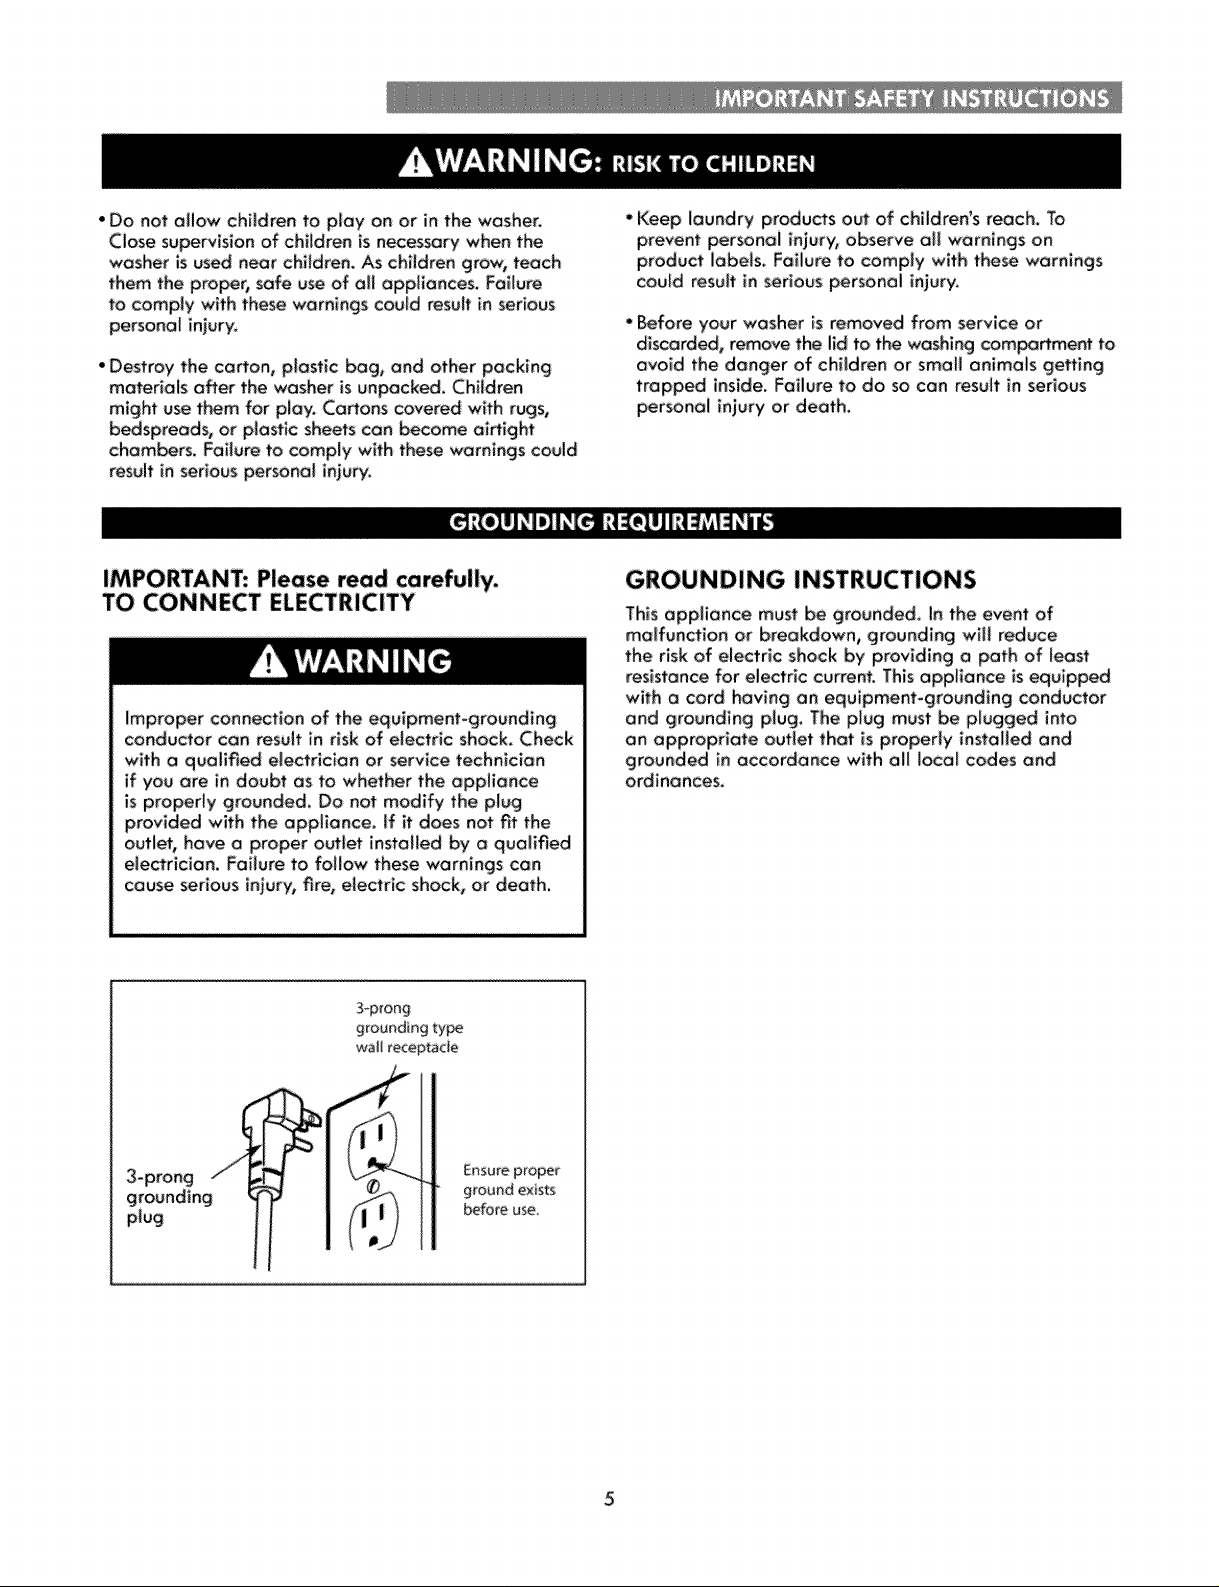
3-prong
grounding type
wall receptacle
GROUNDING INSTRUCTIONS
This appliance must be grounded. In the event of
malfunction or breakdown,, grounding wiH reduce
the risk of electric shock by providing a path of least
resistance for eIectric current. This appliance is equipped
with a cord having an equipment-grounding cond_tor
and grounding plug,The p(ug must be plugged into
an appropriate outlet that is properly installed and
grounded in accordance with all local codes and
ordinances.
plug
grounding_
Ensure proper
g_ound exists
befo_ use_
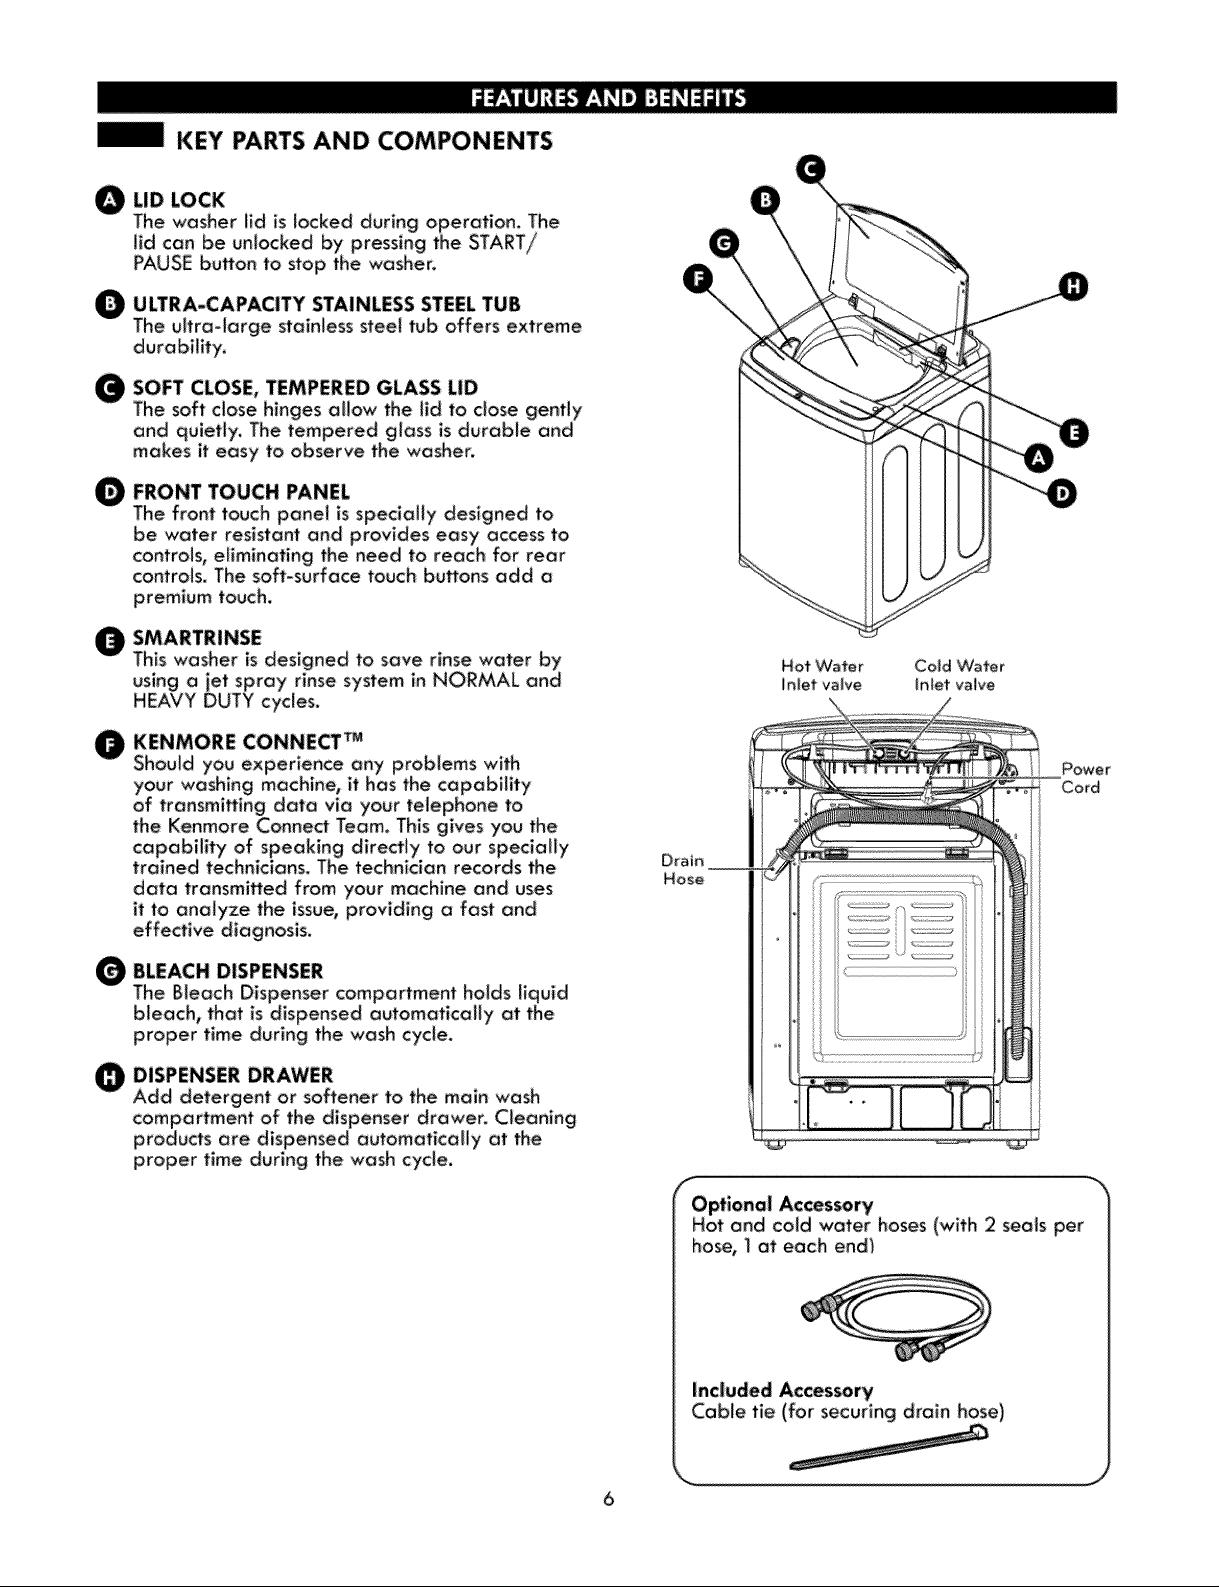
KEY PARTS AND COMPONENTS
g LID LOCK
The washer lid is locked during operation. The
lid can be unlocked by pressing the START/
PAUSEbutton to stop the was:her.
ULTRA-CAPACITY STAINLESS STEELTUB
The ultra-large stainless steel tub offers extreme
durability.
SOFT CLOSE, TEMPERED GLASS LID
The soft close hinges allow the lid to close gently
and quietly. The tempered gloss is durable and
makes it easy to observe the washer.
FRONT TOUCH PANEL
The front touch panel is specially designed to
be water resistant and provides easy access to
controls, eliminating the need to reach for rear
controls, The soft-surface touch buffons add a
premium touch.
SMARTRINSE
This washer is designed to save rinse water by
using a jet spray rinse system in NORMAL and
HEAVY DUTY cycles.
Hot Water Cold Water
inlet valve InJet valve
O KENMORE CONNECT TM
Should you experience any problems with
your washing machine_ it has the capability
of transmi_ing data via your telephone to
the Kenmore Connect Team. This gives you the
data transmitted from your machine and uses
it to analyze the issue, providing a fast and
effective diagnosis.
BLEACH DISPENSER
The Bleach Dispenser compartment holds liquid
bleach, that is dispensed automatically at the
proper time during the wash cycle,
DISPENSER DRAWER
Add detergent or softener to the main wash
compartment of the dispenser drawer. Cleaning
produ_s are dispensed automatically at the
proper time during the wash cycle.
Drain
Hose
Optional Accessory
Hot and cold water hoses (with 2 seals per
hose, 1at each end_
Included Accessory
Cable tie (for securing drain hose}
KEY DIMENSIONS AND SPECIFICATIONS
Top_Loading VVasher
120VAC, 60Hz
Dimensions 27"(VV} X 28 3/8"(D) X 40 3/8"(H), 55 3/8"(H with lid open)
68.6 cm (W) X 72.i cm (D) X 102.6 cm (14),140.6 cm (H {_'ith iid
Net Weight 138.2 Ibs. (62.7kg)
CHOOSE THE PROPER LOCATION
WARN ING
°Washerisheavy. Twoor mare peopleare requiredwhen
moving and unpackingthe washer. Faitureto do somay
resultindamage to property or seriousbodily harm.
°Storeand installthe washerwhere it wiff notbe exposed
totemperatures below freezingor exposedto ou_oor
weather conditions,Failureto fol}ow this warnlngcon cause
_rious injury, fire,electric shock,or death.
• Properlyground washerto conformwith aft electric
governingcodesand ordinances.Failureto foffow this
warning con causeseriousinjury, fire, ele_ric shock,or
death,
• Toreducethe Hskofeiectrk shock,do not install the
washer inhumid spaces.Failureto follow thiswarning can
causeseriousinjury,fire, electric shock,or death.
• Toensure proper air flow,do not blockthe large opening
onthe harlem of the washer with carpetingor other
materials.
• 0o notremovegroundprong. Donotuse an adopteror
extension_. Plugintoa grounded 3-prongoutlet,Failure
to follow this warning can causeseriousi_ury, fire, eie_ric
shock,or death.
NOTE::tnstailingthewasherin a humidspace,or installingor
storingthe washerwhere itwHIbe exposedto the weather or
freezhg ternperatures,may resultinrustor other damage that
isnot coveredby the produd warranty.
PowerOut|at
• The poweroutletmustbewithin 60 in. (1.5m)of either side
ofthe washer,
•The applianceand outletmust be positionedso thatthepbg
is easilyaccessible,
• Do not over_oad the outlet with more than
one opplionce.
• The ouHet must be grounded in accordance with current
wiring e_e_ric codes and regulations,
• Time-delay fuse or circuit breaker is recommended.
NOTE: Itisthepersonalresponsibifftyand oMigeti_ ofthe
productowner tohove a properouHetin_aHed by a qualified
service technician,
€ FLOORING
• To minimizenoiseandvibration,thewasherMUST be
instoUedono solidlyconstructedfioonSeetheNOTEtoyour
right.
' AItowebJeslopeunderthe entire washerisa maximum:1in.
difference fromsideto side or from front to back.
"_nstaliing on carpeting and soft tile surfaces is
not recommended.
• Never install the washer on a platform or weakly
supported structure,
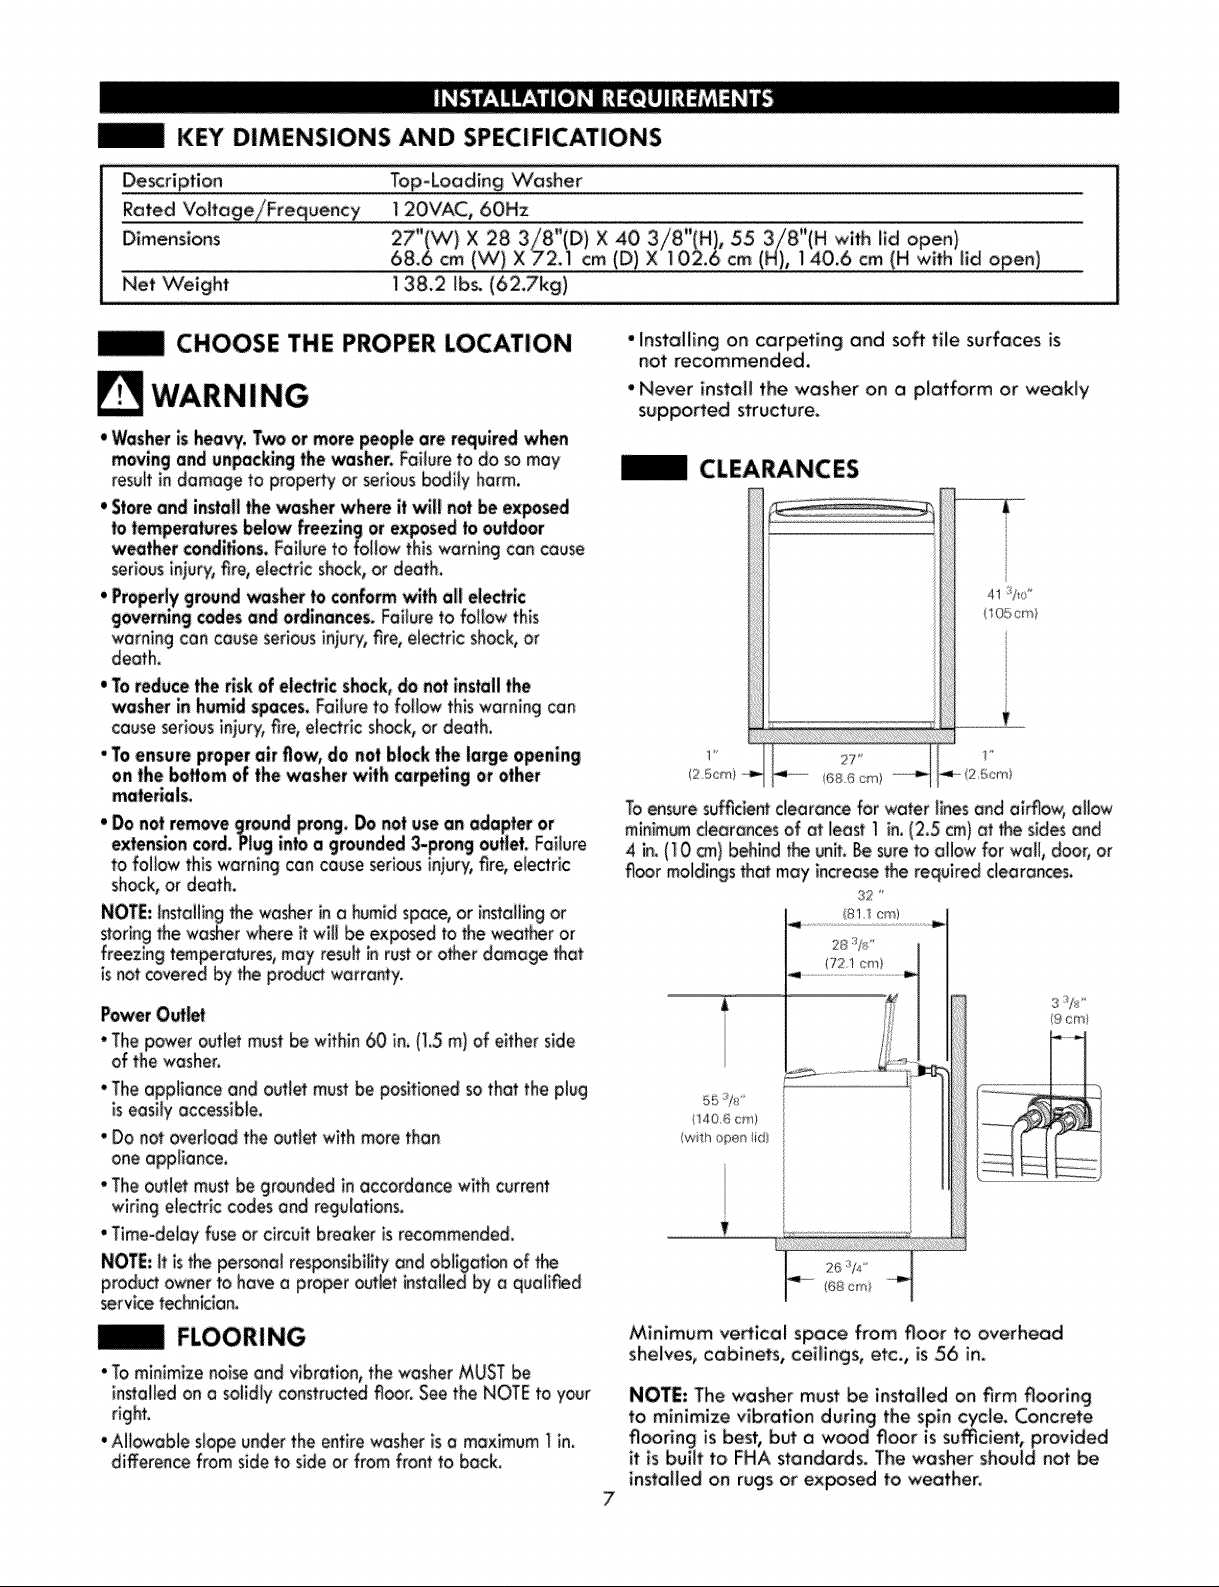
CLEARANCES
105cm}
1'_ 2'7' 1_
_250m (686 cm} 2 5,cm}
Toensuresufficientclearancefor ",voterlinesand airflow, allow
minimumclearancesof at least I in. (2_5cm)at _ sidesand
4 in. (10 _) behind theunit. Besureto allow for wall, doeGor
floor moldlngsthat may increa_ the required clearances.
3 _/_
(9 _m
I40,6 cm}
iwith <p÷n lid
Minimum vertical space from floor to overhead
shelves, cabinets, ceilings, etc., is 56 in.
NOTE: The washer must be installed on firm flooring
to minimize vibration during the spin cycle, Concrete
flooring is best, but a wood floor is sumcient, provided
it is built to FHA #andards. The "washershould not be
installed on rugs or exposed to weather.
7

| UNPACKING AND REMOVING SHIPPING MATERIAL
When removing the washer from the carton base_be
sure the plastic tub support comes off wi_ the base.
If you must lay the washer down to remove the base
packaging materials, always prote_ the side of the
washer and lay it carefully on its side. DO NOT _ay
the washer _ its front or back.
f "x
Pad --
J
x, j
3. Caref:uliy remove the two foam pads which cover
the top sides of the tub guide, making sure not to
leave behind any pieces of the foam_
Tub support
Carton Base
I. After removing the carton and shipping materiai,
lift the washer off the foam base. Make sure the
plastic tub support comes off with the base and
is not stuck to the bottom of the washer.
2. Save the foam b_ock for future use. If the washer
must be moved in the future, this will help prevent
damage to the washer during transportation.
NOTE: To prevent damage, do not remove Re foam
btock until the washer is at the final location.
4. Unfasten the power cord from the back of the
washer.
fTOOLS YOU WILL NEED _-"
• Adjustable Pliers
, Carpenter's Level
j
CONNECTING THE WATER LINES
• IMPORTANT: Use new hoses when installing the
-washer. Do NOT reuse old hoses.
• IMPORTANT: Use ONLY the inlet hoses provided by
Kenmore. Aflermarket hosesare not guaranteed to tit or
functbn correctly. Other ho_ may not tighten correctly
and couM cau_ looks. Subseq_nt damage to product
or proem/will not _ covered under the terms of the
product warranty.
• "vVater supply pressure must be between 14.5 psi and
116psi (100_800 kPa).if t_ water supply pressu_ is
re,orethan 116psi, a pressurereducing vaive must
installed.
• PerlodicaHy check the hose for crocks, leaks, and
wear_ and replace the hoseif necessary.
• Make sure that the water Jines are not stretched,
pinched, crushed, or kinked,
• The washer should never be MstaHed or stored in a
Iocafion _bject to freeing tem_ratures_ Damage to the
water fines and internal m_hanlsms of the washer can
result, if the washer was exposed to freezing temperatu_
prior to installation, allow it to stand at room temperature
for severa_ hours before u_ and check for leaks prior to
operation.
i
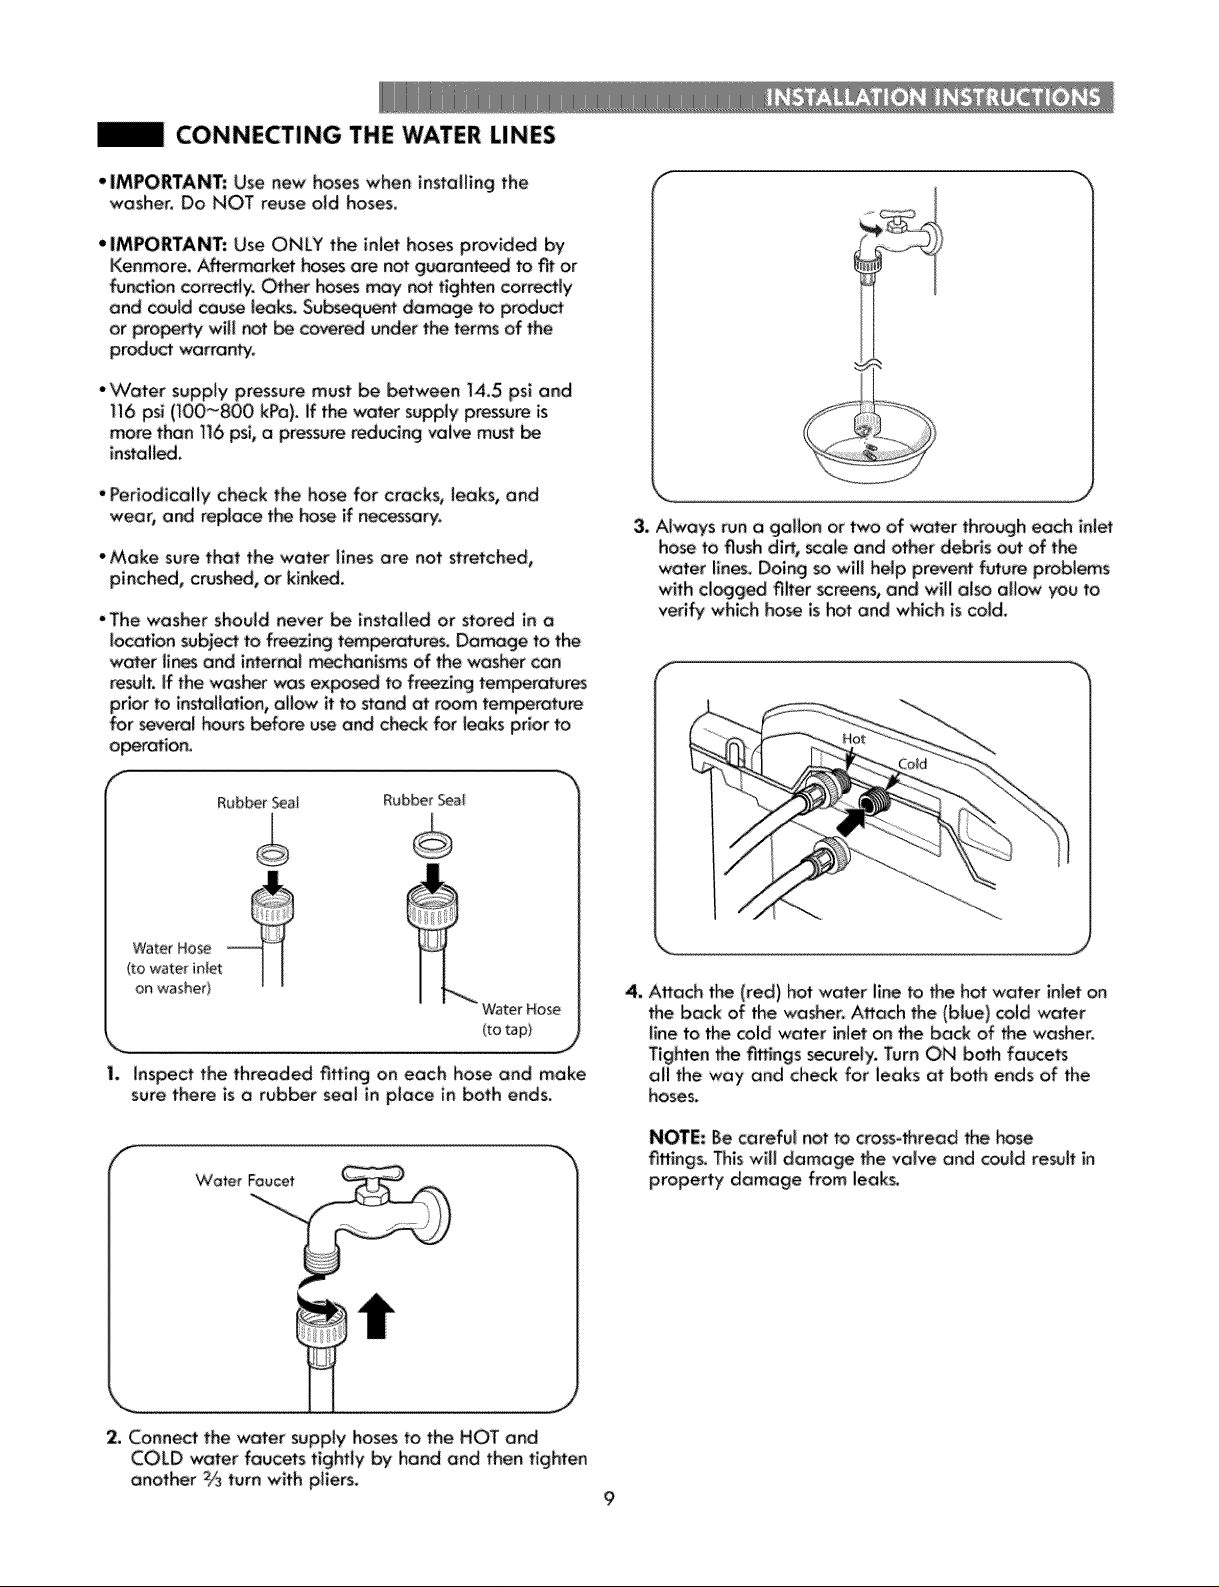
Rubber Sea| Rubbe_ Seal
3. Always run a gallon or two of water thrash each inlet
hose to flush dirt, scale and other debris out of the
water lines, Doing so will help prevent future problems
with cl_ged filter screens, and wiff also allow you to
verify which hose is hot and which is cold.
Wate_Hose
(towate_inlet
on washeO
WaterHose
(to tap)
1. Inspect the threaded tiffing on each hose and make
sure there is a tuber seal in place in both ends.
f
2, Connect the water supply hoses to the HOT and
COLD w_ter faucets tightly by hand and then tighten
another 2/3 turn with pliers,
4, Attach the (red) hot water line to _e hot water inlet on
the back of the washer. Attach the (blue) cold "water
line to the cold water inlet on the back of _e washer.
Tighten the _¢tings securely. Turn ON both faucets
all the way and check for leaks at bath ends of the
hoses.
NOTE: Be careful not to cross-thread fine hose
fifflngs, This will damage _e valve and could result in
property damage from leaks.
9
CONNECTING THE DRAIN HOSE
• The drain hose should always be properly secured.
Failure to properly s_ure the drain hose can resuff in
flooding and property damage,
•The drain must be installed in accordance with any
applicable toca_codes and regulations.
• Make sure that the drain hose is not stretched,
pinched, crushed, or kinked.
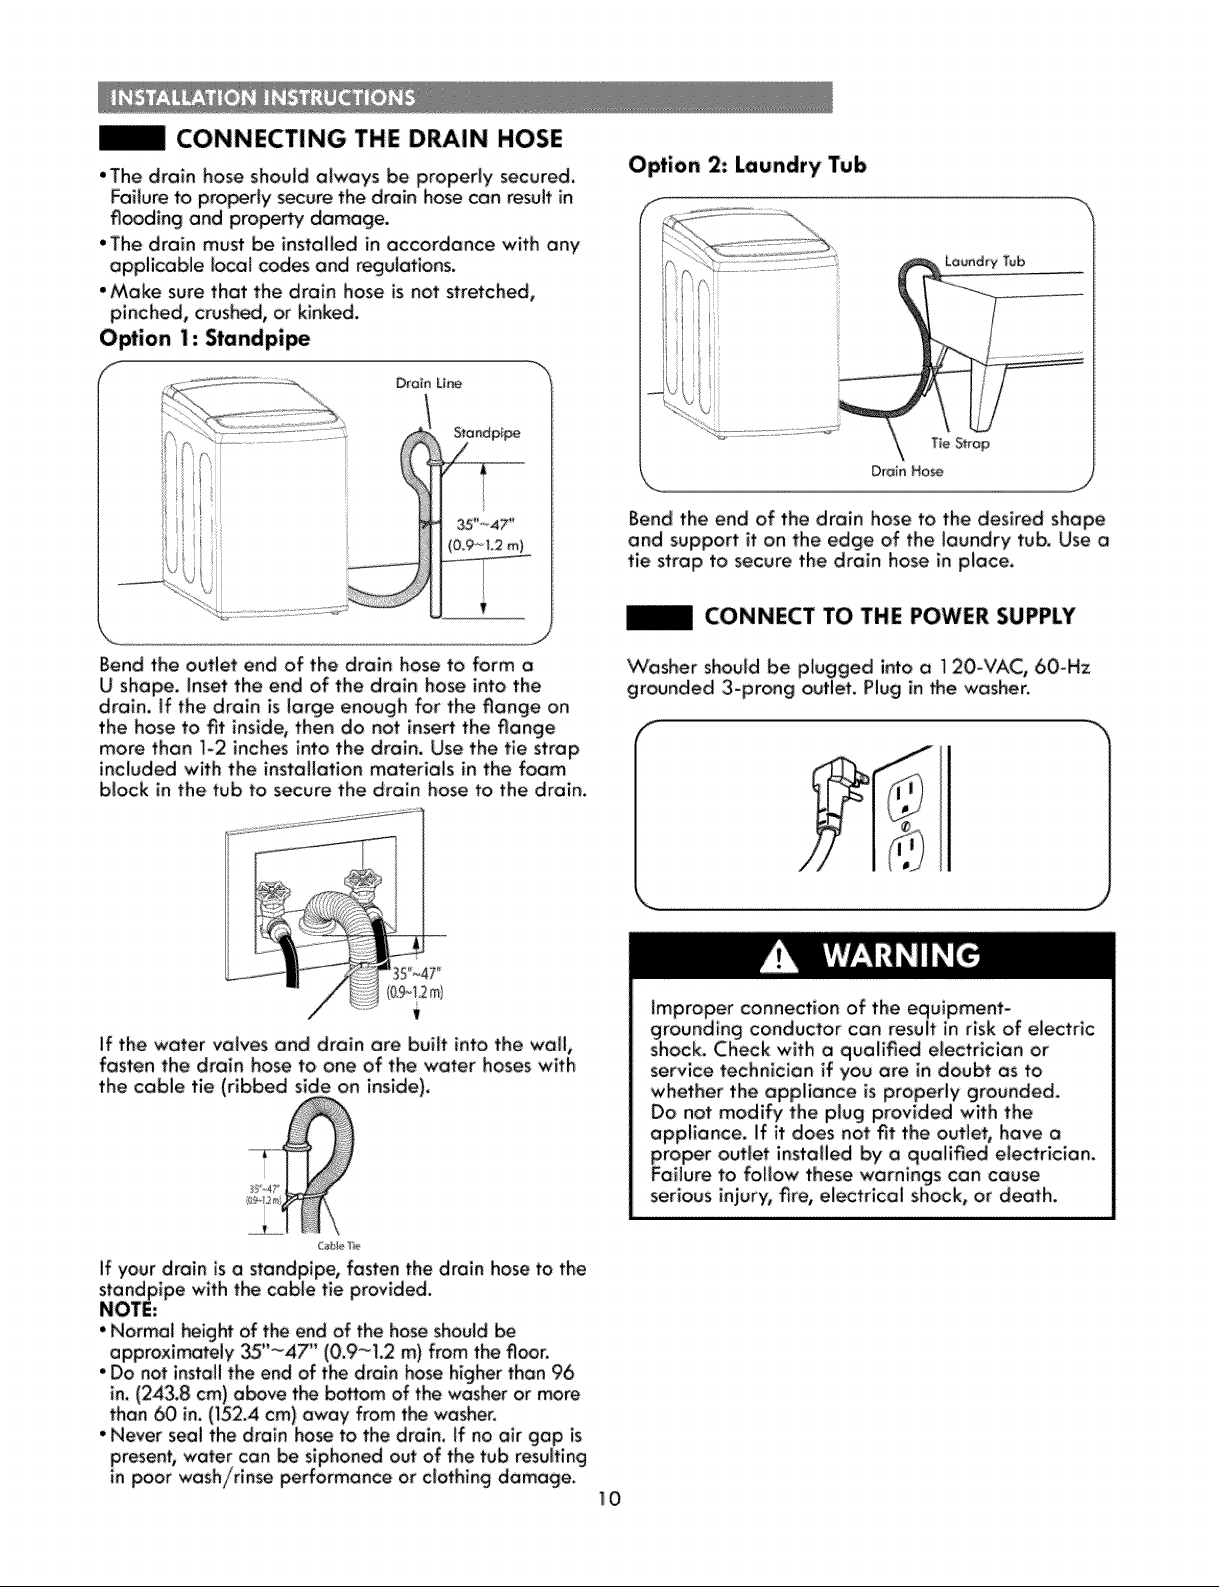
Option 1: Standpipe
f Drain Line
Option 2: Laundry Tub
Bend the end of the drain hose to the desired shape
and support it on the edge of the _aundry tub. Use a
tie strap to secure the drain hose in place.
CONNECT TO THE POWER SUPPLY
Bend the outlet end of the drain hose to form a
U shape, inset the end of the drain hose into the
drain, if the drain is large enough for the flange on
the hose to fit inside, then do not inse_ the flange
more than ]-2 inches into the drain. Use the tie strap
included with the installation materials in the foam,
block in the tub to secure the drain hose to the drain.
T
if the water valves and drain are buiff into the wall,
fasten the drain hose to one of the water hoses with,
the cable tie (ribbed side on inside).
Washer should be plugged into a 120-VAC, 60-Hz
grounded 3-prong outlet. Plug in the washer.
shock. Check with a qualified electrician or
service technician if you are in doubt as to
appliance, if it does not fit the outleh have a
roper outlet instalied by o qualified e_ectrician.
ailure to follow these warnings can cause
serious injury, fire, electrical shock, or death.
If ,your drain is o standpipe, fasten the drain hose to the
standpipe with the cable tie provided.
NOTE:
• Normal height of the end of the hose should be
approximately _'_47" (0.9~I.2 m) from the floor.
• Do not install the end of the drain hose higher than 96
in. (243.8 cm) above the bottom of the washer or more
than 60 in. (_52.4 cm) away from the washer.
in poor wash/rinse pedormance or c_othing damage.
10
LEVELING THE WASHER
The tub of your new washer spins at very high
speeds. To minimize vibration, noise, and unwanted
movement, the floor must be o _evel, solid surface.
NOTE: Adjust the _eveHng feet only as far as
necessary to _evel the washer.
Extending the feveling feet more
than necessary can cause the
-washer to vibrate.
NOTE: Before installing the
washer, make sure that the floor
is clean, dry and free of dust, dirt,
water and oil so the washer feet
cannot slide easily. Leveling feet
that move or s_ide on the floor can contribute to
excess vibration and noise due to poor contact with
the floor,
All four leveling feet must rest solidly on the floor.
Attempt to rock the washer from corner to corner
to make sgr.ethat^all four leveling feet are in firm
contact wtth the tloor,
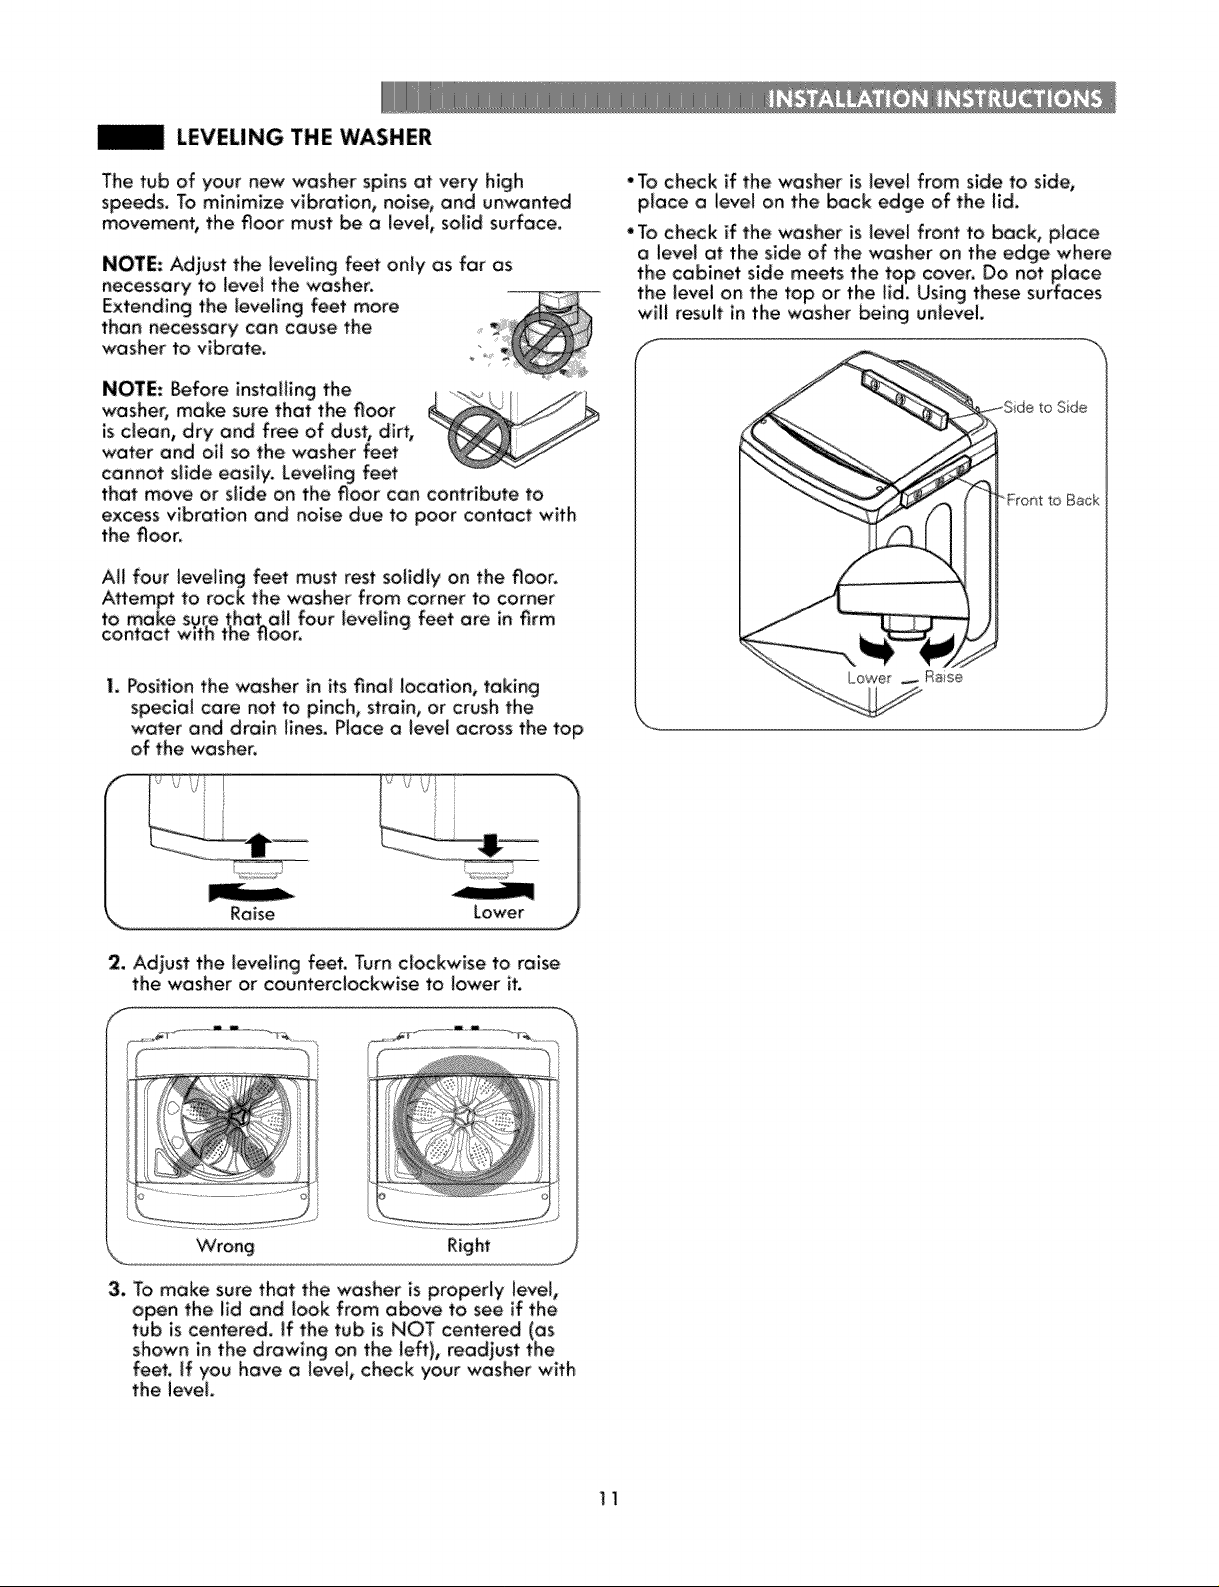
I. Position the washer in itsfinal location, taking
special care not to pinch, strain, or crush the
water and drain lines. Place a level across the top
of the washer,
•To check if the washer is level from side to side,
place a level on the back edge of the lid.
f
Sde
J
2. Adjust the leveling feet, Turn clockwise to raise
the washer or counterclockwise to lower it.
f
Wrong Righf
3. To make sure that the was:her is properly level,
open: the lid and look from above to see if the
the level.
11
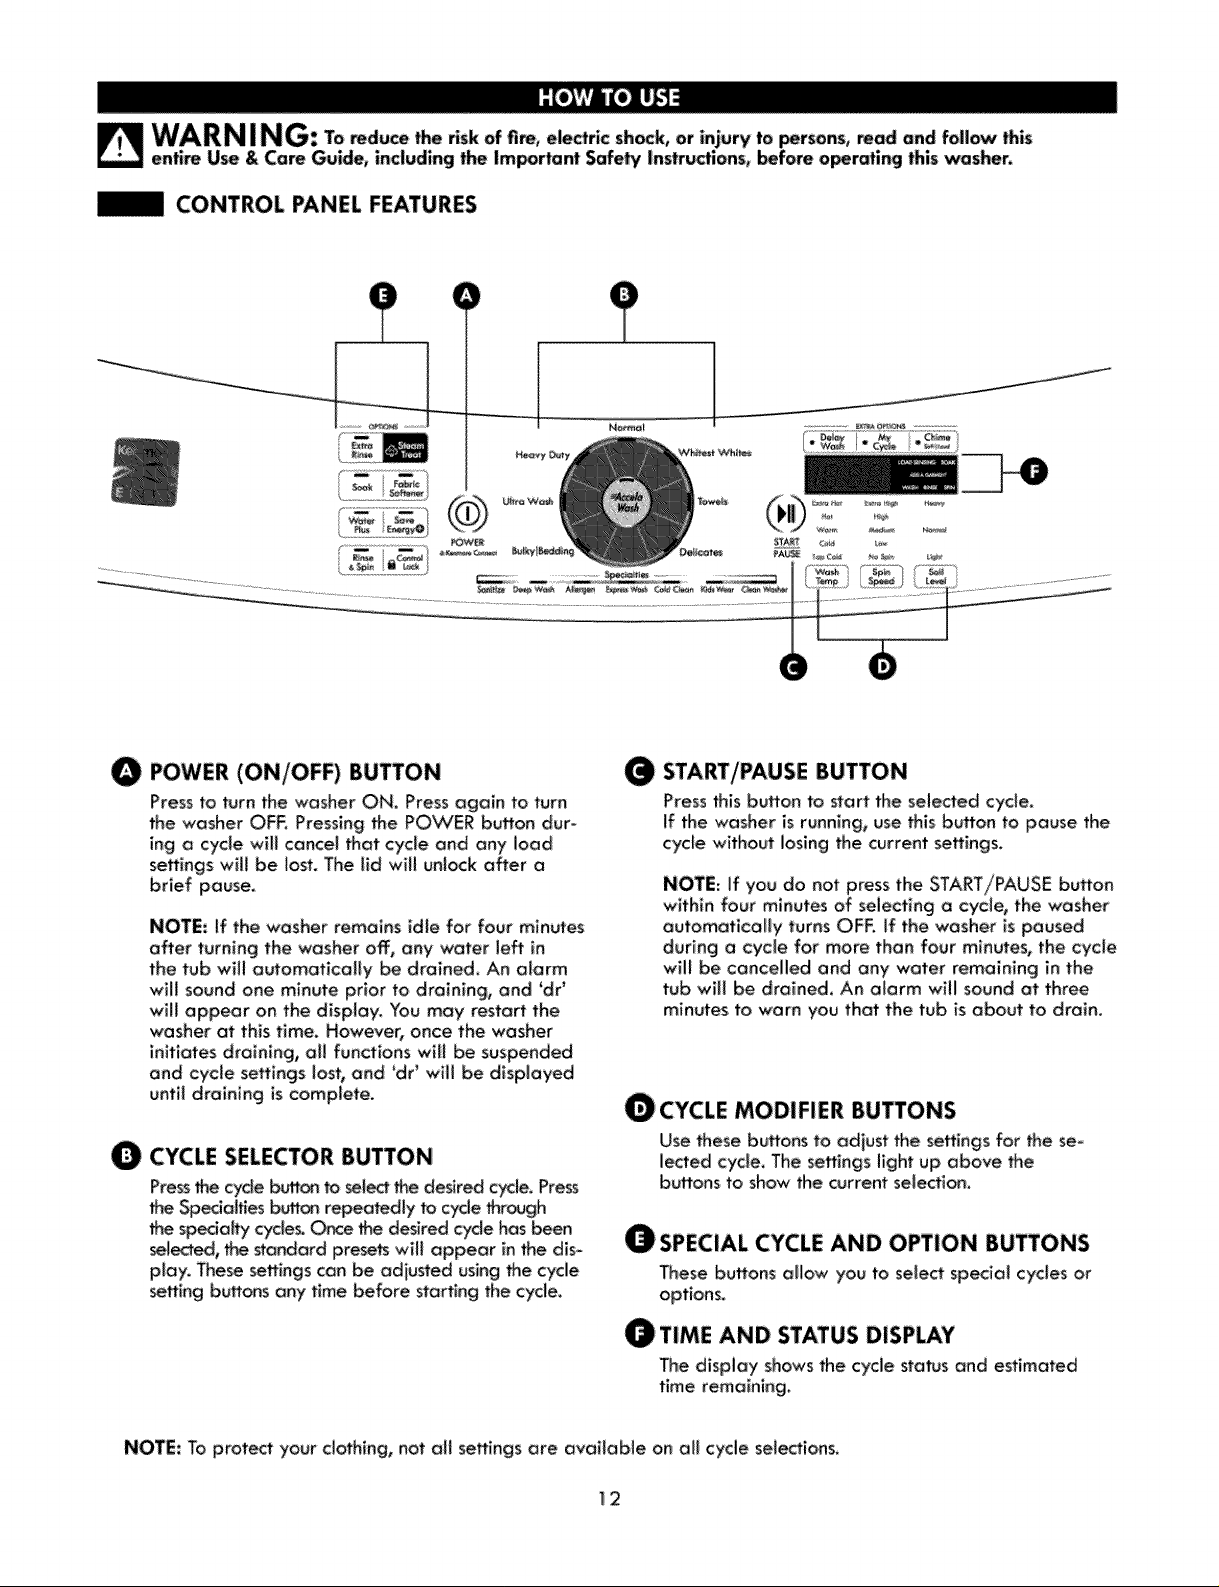
CONTROL PANEL FEATURES
O
POWER (ON/OFF) BUTTON
Press to turn the washer ON. Press again to turn
the washer OFF. Pressing _e POWER bu_on dur-
ing a cycle wtl cancel that cycle and any load
settings wll be lost. The ld wil unlock after a
brief pause,
NOTE: ff the washer remains idle for four minutes
offer turning the washer off, any water left in
the tub will automatlcaly _ drained. An alarm
wll sound one minute prior to draining, and 'dr _
wlJ appear on the display. You may restart the
washer at this time. However, once the washer
initiates draining, al functions wll be suspended
and cycle settings lost, and 'dr' will be displayed
until draining is complete.
O
CYCLE SELECTOR BUTTON
Press_e cycle button to _J_ the desired cyde. Press
• e Specialties b_ repeatedly to cyde thigh
the specialty c_le_ Or_:e tk_ desired cycle has been
selected, the standard prese_ will appear in the dis-
play. These settings can be adjusted using the cycle
setting buttons any time before starting the cycle.
START/PAUSE BUTTON
Press this button to start the selected cycle
If the washer is running, use this button to pause the
cycle without losing the current settings.
NOTE: If you do not press the START/PAUSE button
within four minutes of seiecting a cycle, the washer
automatlcaly turns OFE if the washer is paused
during a cycle for more than four minutes, the cycle
will be cancelled and any water remaining in the
tub will be drained, An alarm will sound at three
minutes to warn you that the tub is about to drain.
_'CYCLE MODIFIER BUTTONS
Use these buffons to adjust the settings for _e se-
lected cycle, The settings light up above the
buttons to show the current selection.
A
SPECIAL CYCLE AND OPTION BUTTONS
These buttons allow you to select specla_ cycles or
options.
TIME AND STATUS DISPLAY
The display shows the cycle sta_s and estimated
time remaining.
NOTE: To prot_ your clothing, not all settings are available on all! cycle selections,
1_2
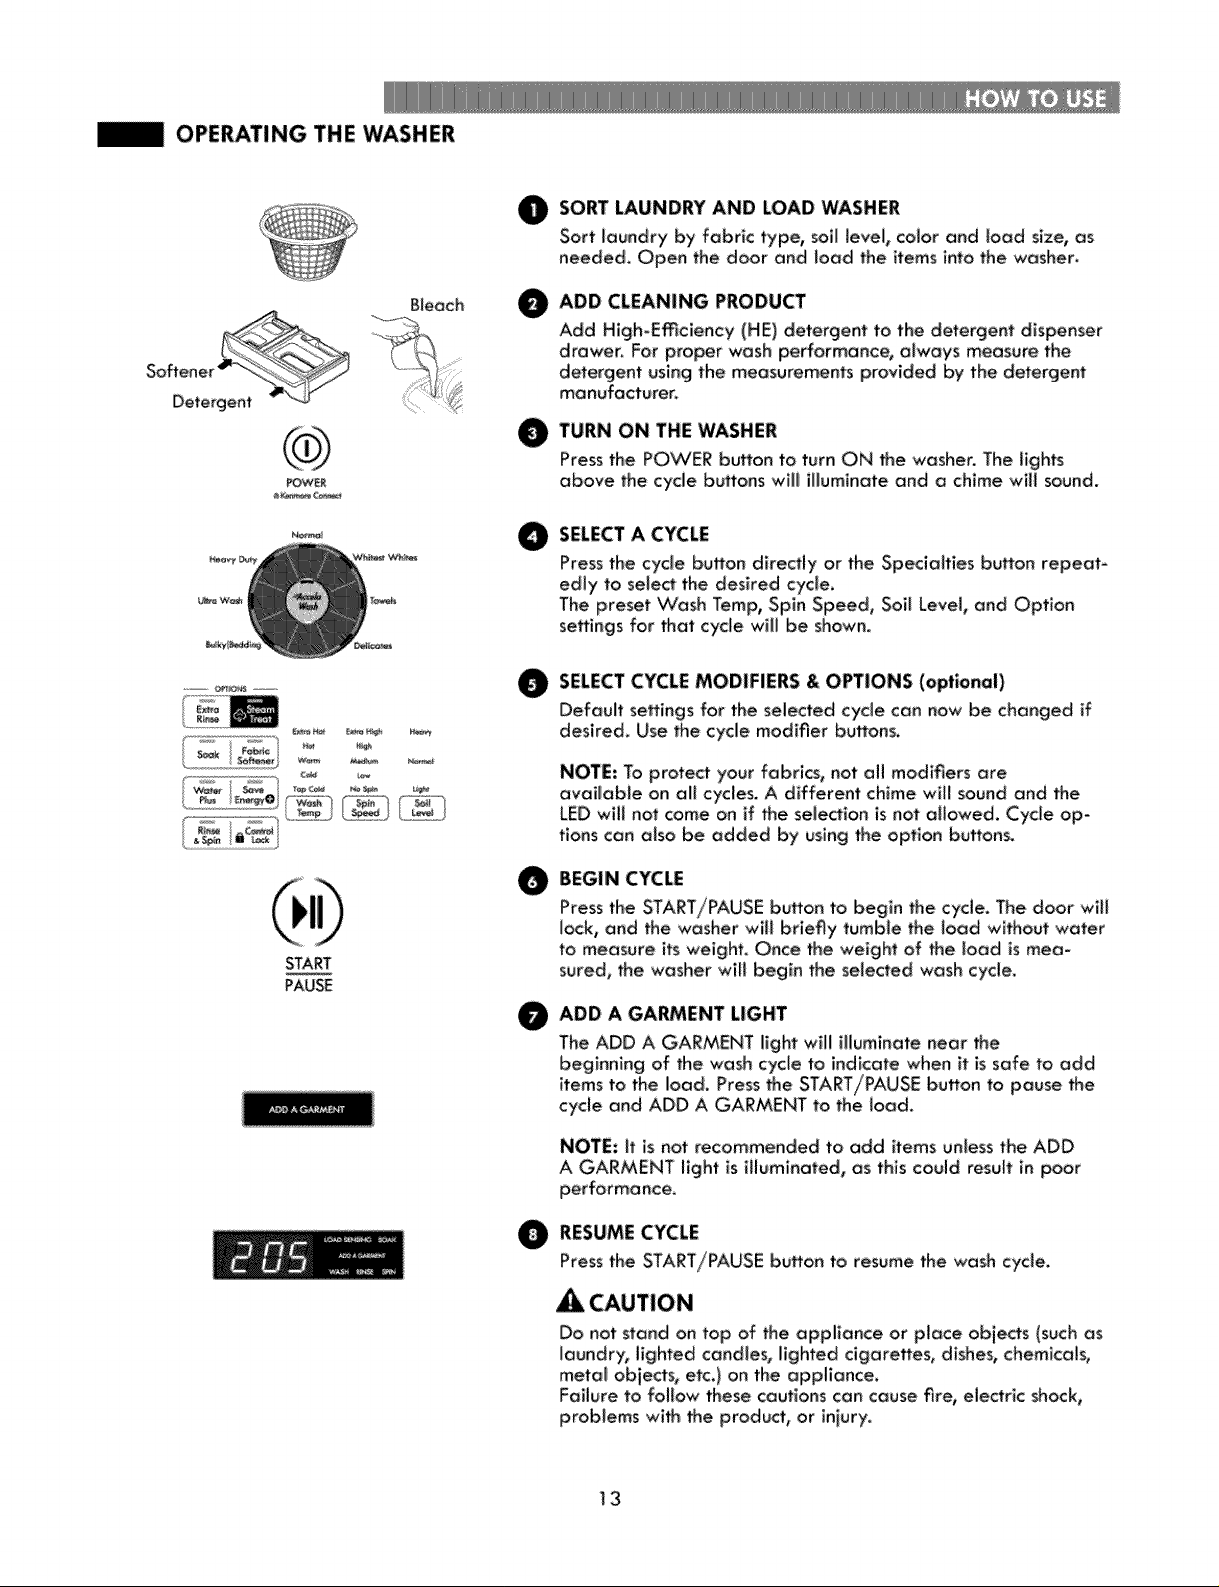
OPERATING THE WASHER
SORT LAUNDRY AND LOAD WASHER
@
Sort laundry by fabric type, soil level, color and _oad size, as
needed. Open the door and toad the items into the washer.
So_ener
Do,o goot......
START
PAUSE
POWER
Bleach
............
ADD CLEANING PRODUCT
@
Add High-Emciency (HE) detergent to the detergent dispenser
drawer. For proper wash periformance, always measure the
detergent using the measurements provided by the detergent
manufacturer,
TURN ON THE WASHER
0
Pressthe POVCERbu_on to turn ON the washer. The lights
above the cycle buttons will ffluminate and a chime will sound.
SELECTA CYCLE
0
Pressthe cycle button directly or the Specialties button repeat-
edly to select the desired cycie.
The preset Wash Temp, Spin Speed, Soil Level, and Option
settings for _at cycle wiff be shown.
SELECT CYCLE MODIFIERS & OPTIONS (optional)
Defauff settings for the selected cycle can now be changed if
desbed, Use the cycle modifier buttons.
NOTE: To protect your fabrics, not all modifiers are
available on all c:ycles, A different chime will sound and the
LED will not come on if the seJection is not affowed. Cycle op-
tions can also be added by using the option buttons.
BEGIN CYCLE
0
Pressthe START/PAUSEbuffon to begin _e cycle. The d_r will
lack, and the washer will briefly tumble the load without water
to measure its weight. Once the weight of the load is mea-
sured, • e washer will begin the selected wash cycle.
ADD A GARMENT LIGHT
@
The ADD A GARMENT fight wiff iffumlnate near the
beg_nnlng of the wash cycle to indicate when ff is safe to add
items to the load. Press the START/PAUSE button to pause the
cycle and ADD A GARMENT to the load.
NOTE: It is not recommended to add items unless the ADD
A GARMENT I_ght is illuminated, as this could result _n poor
O RESUMECYCLE
Pressthe START/PAUSEbutton to resume the wash cycle.
Do not stand on top of the appliance or place obiects (such as
laundry, lighted candies, lighted cigarettes, dishes, chemicals,
metal objects, etc,} on the appliance.
Failure to follow these cautions can cause fire, electric shock,
problems with the product, or iniury.
13
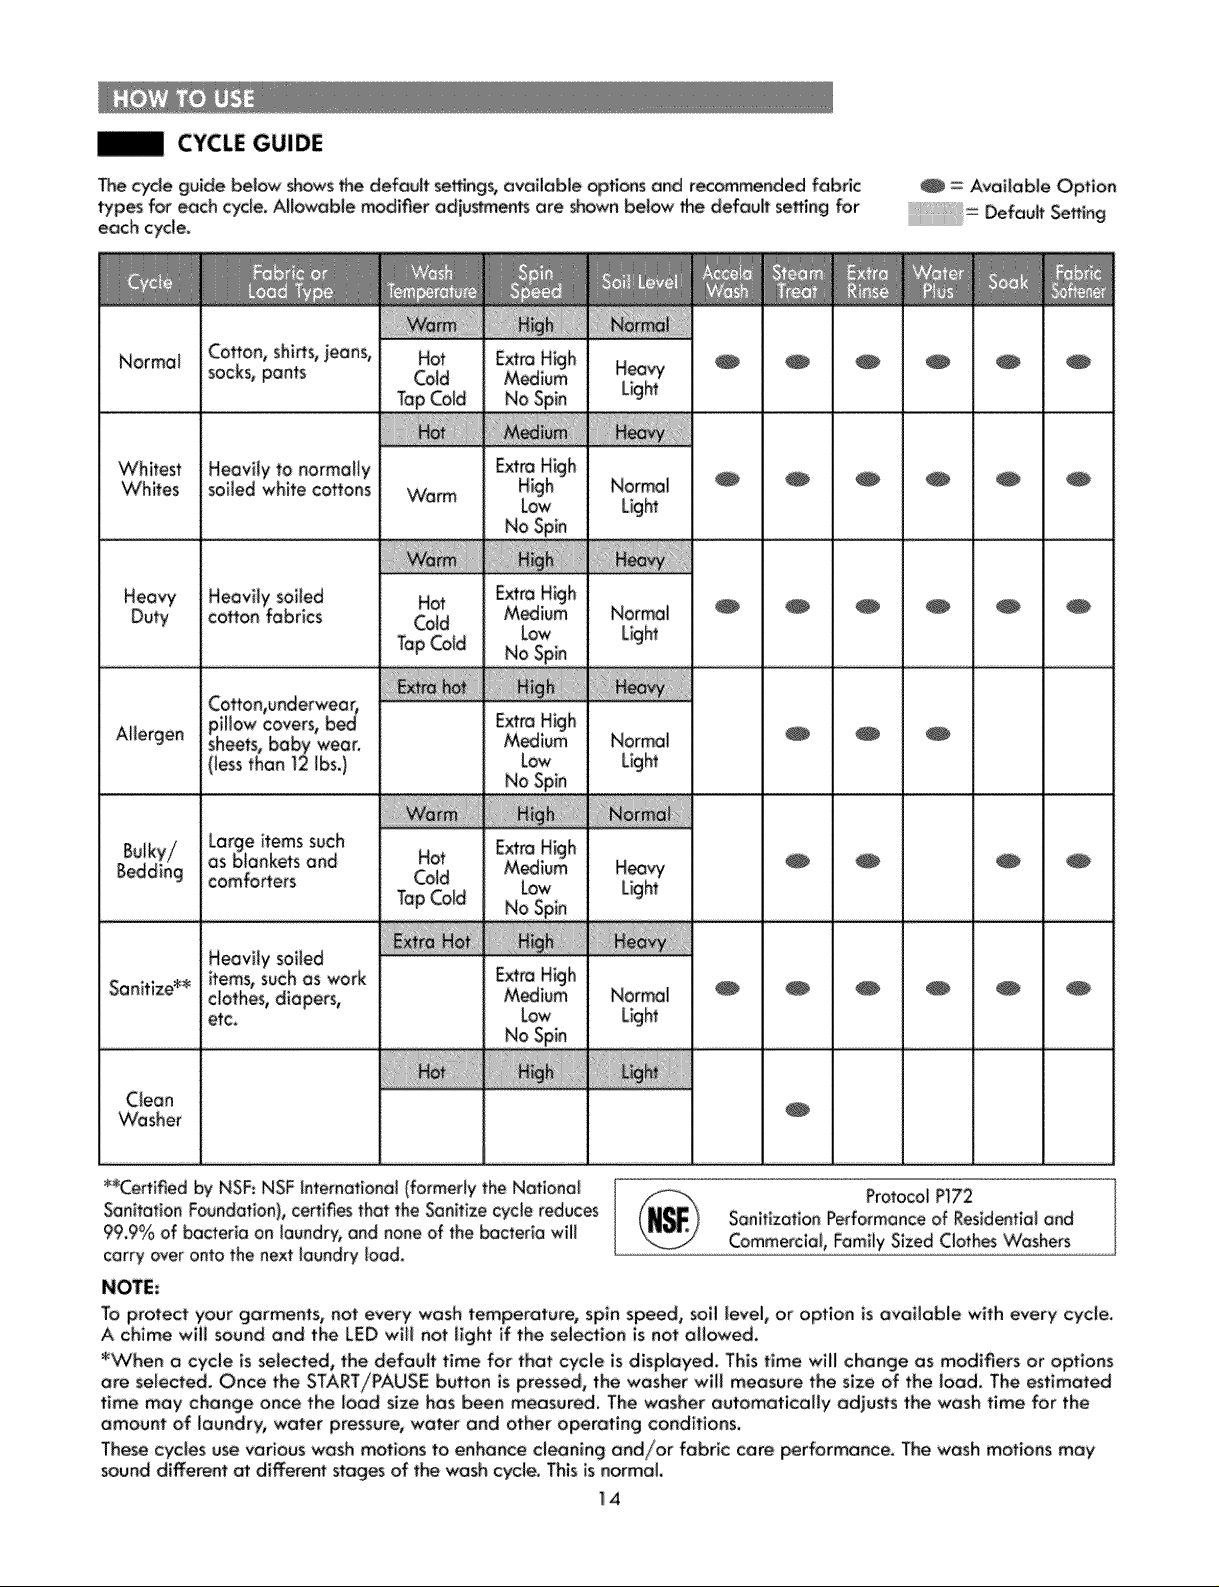
CYCLE GUIDE
The cycle guide beiow shows the defavff settings, avaiioble options and recommended fabric
types for each cycle. Allowable modifier adiustmen_ are shown below the defauff seff_ng for
each cycle.
IIIIIIIIHl_
i
i
Normat
Cotton, shins, jeans,
socks,pants
H_vy
Light
! .......................
Whitest
Whites
Heavy
Duty
Allergen
Heavily soiled
cotton fabrics
Warm
O_ii_Jiiiiiiii_ili!
H_
Cold
TapCold
Extra Hk
Mman
LOW
NoSp!n
Low
NoSp!o
Low
No Spin
Normal
Light
Normal
Light
Normal
Light
O
!.
[
@ : Available Option
i: Defauff Se#ing
@
@
@
@
@
@
@
@
@
@
Large items such
as blankets and
caretakers
H_
Cold
Tap Cold
E_tra Hk Ih
Low
_O _DII
H_vy
Light
@
@
i
Heavily soiled
Sanitize*:_
Clean
Washer
_*Cen;fied by NSF: NSF International (formerly the Nafiona_
Sanitation Foundation}, certifies that the Sanitize cycle reduces
99.9% of _eria on laundry, and none of the bacteria will
carry over onto the next laundry toad.
NOTE:
To protect your garments, not every wash temperature, spin speed_ soil level, or option is available with every cycle.
A chime will sound and the LED will not fight if the selection is not allowed.
*W'hen a cycle is selected, the default time for that cycle is displayed. This time will change as modifiers or options
ore selected. Once the START/PAUSE bufon is pressed, the washer wil! measure the size of the load. The e#_mated
time may change once the load size has been measured. The washer automatically adjusts the wash time for the
amount of laundry, water pressure, water and other operating conditions,
These cycles use various "wash motions to enhance cleaning and/or fabric care performance. The wash motions may
sound different m different stages of the wash cycle. This is normal
items,such as work
clothest diapers,
etc.
E_tra Hk ih
Low
No Spin
Normal
Light
14
@
@
@
@
@
@
Protocol P]72
Sanifization Performance of: Res_dentia_and
Commercla_, Famffy Sized Clothes Washers
@
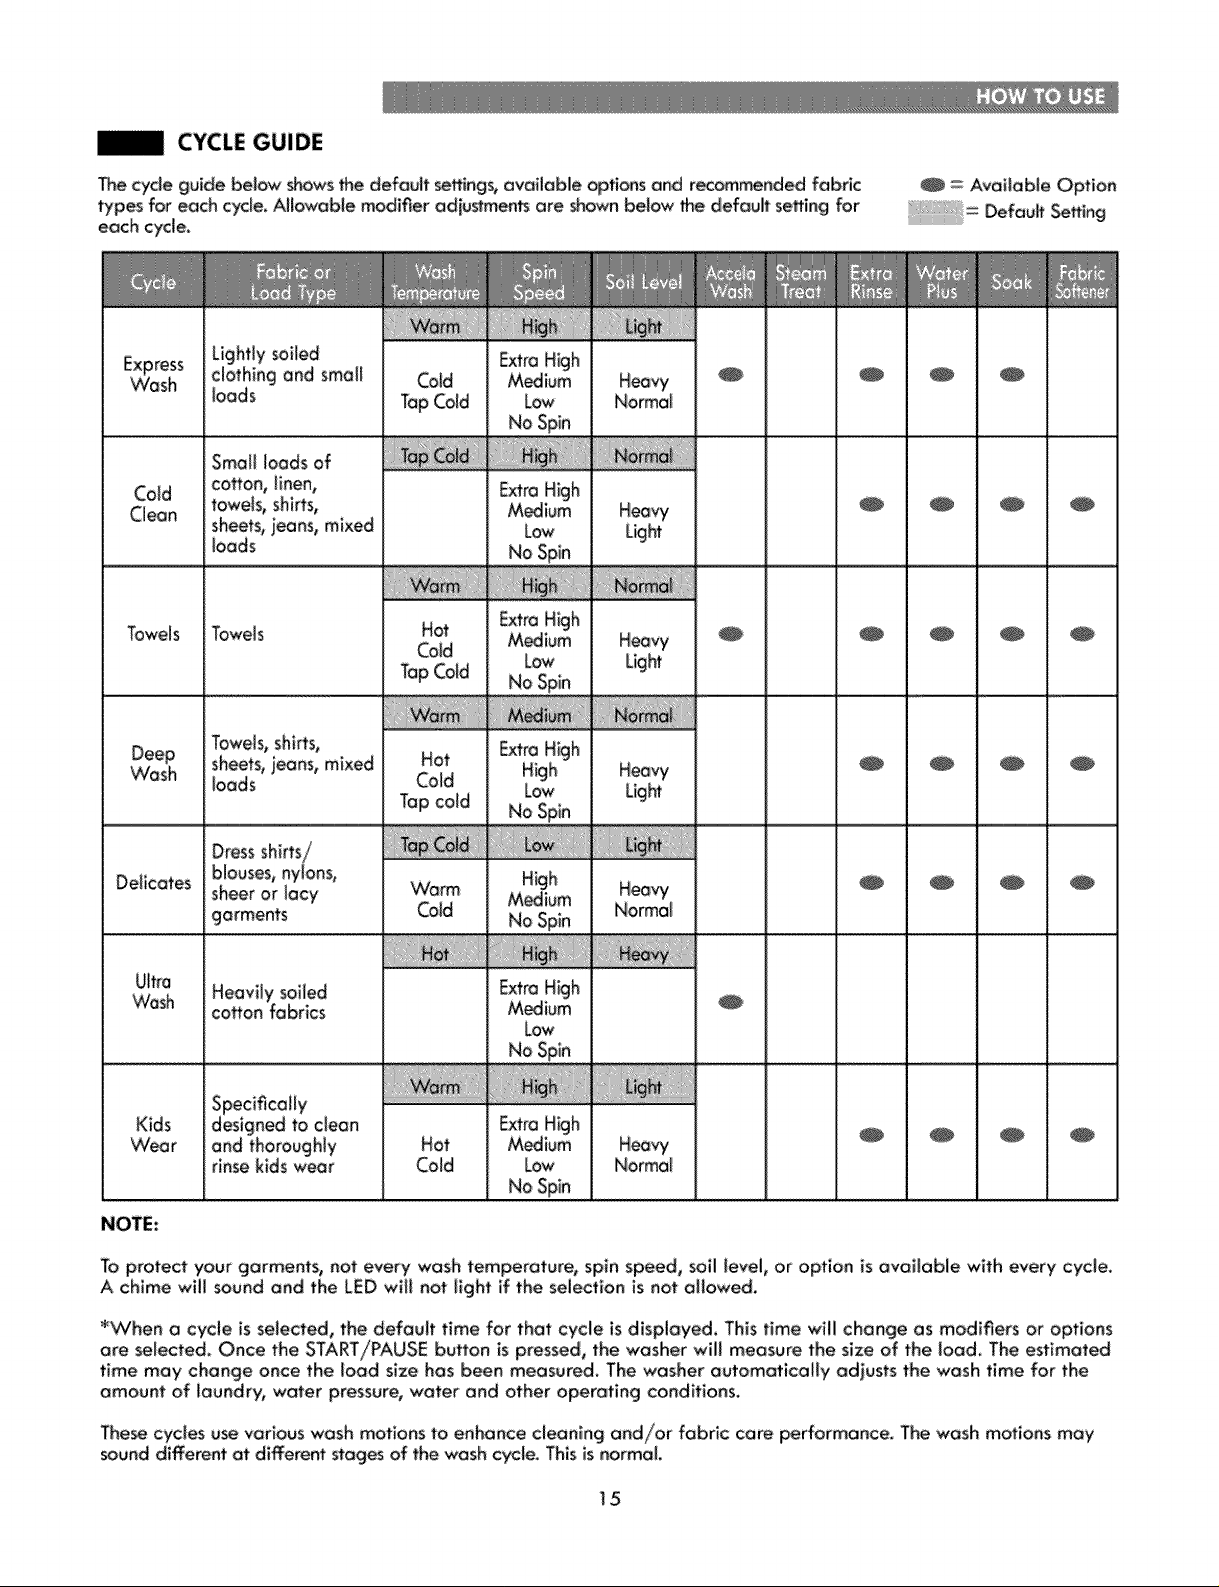
CYCLE GUIDE
Thecycle guide below showsthe default settings,available options and recommended fabric
types for each cycle, AHowable modifier adiustmen_ are shown below the default setting for
each cycle.
Express
Wash
Lightly soiled
clothing and small
loads
Extra H_h
M_ium
Low
Extra High
Medium
Low
No Spin
Towels
Deep
Wash
DeHcates
Dressshirts/
blouses, nytons0
sheer or lacy
garments
H_
Cold
TapCold
Hot
Cold
TaD cold
Worm:
Cold
Extra High
Medium
Low
NoSP!n
Extra High
High
Low
No Spin
LOW]I]
High
M_ium
NoSp!n
= Available Option
Default Se_ing
0
Ultra
Wash
Kids
VVeor
Heavily soiled
cotton fabrics
and thoroughly
rinsekids wear
Hot
Cold
E_o Hklh
Low
No Spin
E_°a Hklh
_iun_
Low
No Spin
NOTE:
To protect your garments, not every wash temperature, spin speed, soll level, or option is available with every cycle.
A chime will _und and the LED will not _ight if the selection is not allowed.
_When a cycle is selected, the default time for that cycle is displayed. This time will change as modifiers or options
are selecte.d. Once the START/PAUSE button is pressed, the washer will measure the size of the load. The estimated
time may change once the load size has been measured. The washer automatically adjusts the wash time for the
amount of _aundry, water pressure, water and other operating conditions,
The_ cycles use various wash motions to enhance cleaning and/or fabric care performance, The wash motions may
sound different at different stages of the wash cycle. This is normal.
15
SORTING WASH LOADS
CAUTION
• Do not load items higher than the top edge of the tub,
Faiiureto followthiscaution can resuJtin (eakage or
damage to fabrics.
• Use the BULKY/BEDDING cycle for buoyant or
nonabsorbent items such as piUows or comforters.
Faffure to foiiow thls caution can resu(t in )eakage.
• If possible, do not wash any water-resistant items.
If you must_ please se(ect the Bulky/Bedding cycle.
- Examples of water-proof or water-resistant items
inc(ude ce_a(n mattress pads, mattress covers, rain
gea5 camping gear, skiing appare(, outdoor gear and
s(mi(ar items.
Grouping _lm mr items
For me best washing results, and to red_e the posslbliity
of damage to clothing, core shou)d be taken to sort the
in poor wash performance, color transfer or discoloration,
fabric damage or linting. Fabrics should be sorted into
groups as de_ribed below.
Colors
Soft a_icIes by color. 'Wash dark clothes together in
aseparate bad from (ight colors or whites. Mixing dark
clothes with light clothes can result in dye transfer or
discoloration of the tighter cbthes.
Soil Level
,Washheavily soiled clothing together. VVasNng lightly
soiled clothing in the same load with heavi(y soiled
ciothlng could result in poor wash performance for the
Ughfly soiled cbthing.
Fabric Type
Deilcatea_iciesshould not be mixed with heavier or
sturdier fabric types. _,/asNng deilcates in a bad
wffh heavy fabrics can resu(t in damage to the more
deiicate fabrics. VCashlng heavier fabrics _n a deilcate
load can resuff in poor wash performance for the
heavier fabrics and possible damage to the delicates.
,_. i•
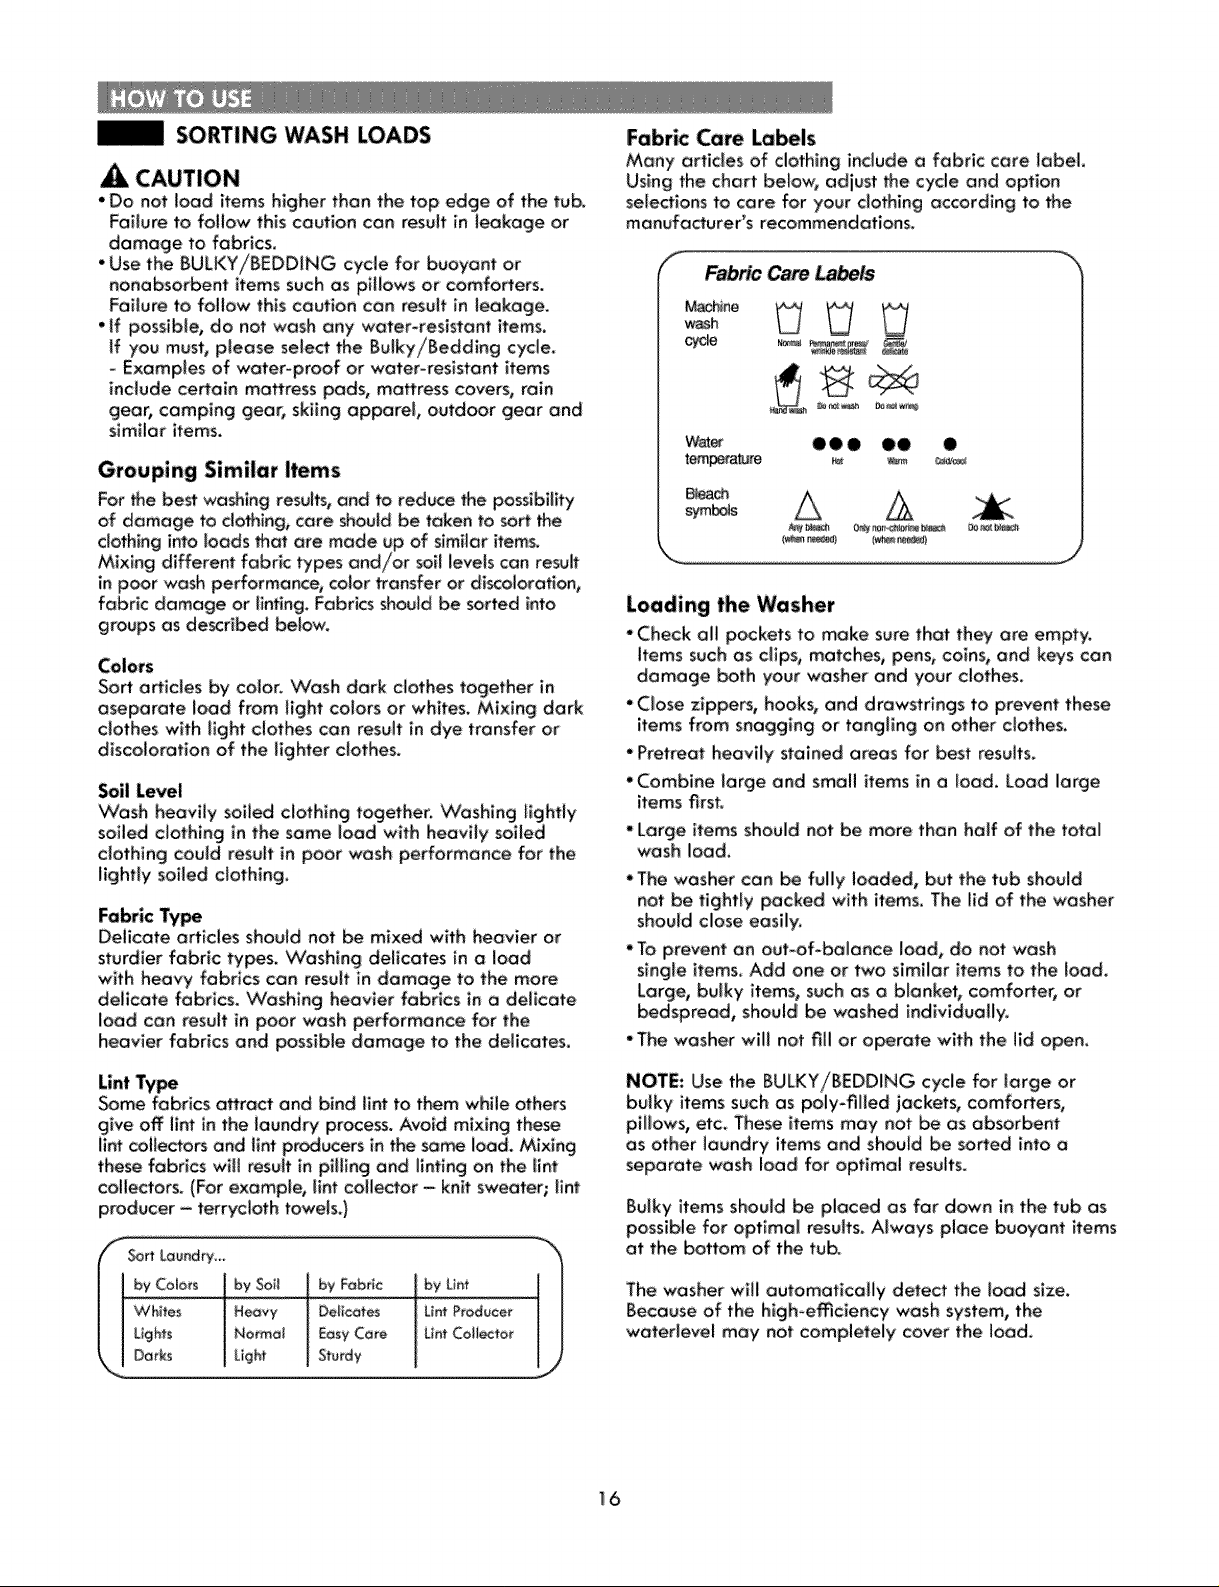
Fabric Care Labels
Many arfic(es of clothing include o fabric core label
Using the chart below, adjust the cycle and option
selections to care for your clothing according to the
manufacturer's recommendations.
FabricCam La_s
Machine
Waer O0 • O0 •
Ble_
symbols A
Loading the Washer
"Check allpockets to make sure that they are empty.
items such as dips, matches, pens, coins, and keys can
damage both your washer and your clothes.
•Close zippers, hooks, and drawstrings to prevent these
items from snagging or tangling on other c(othes.
•Pretreat heavi)y stained areas for best resu(ts.
•Combine large and smaU items in a bad, Load large
items first.
• Large items should not be more then half of the total
wash load.
• The washer can be fuUy loaded, but the tub should
not be tightly packed with items. The ffd of the washer
should cbse easliy.
• To prevent an out-of-be(once bad, do not wash
single items. Add one or two sim(Iar ffems to the bad.
Large, bulky items, such as a blanket, comfo#e5 or
bedspread, should be washed individuaUy.
"The washer wiil not fii( or operate wlth the lid open.
Lint Type
Some fabrics affect and bind tint to them while others
give off lint in the laundry process. Avoid mixing these
ilnt coiiectors and lint producers in the same ioo& Mixing
thesefabricswillresultin pillingand tintingon the lint
collectors. (For examp)_ lint collector - knit sweater; lint
producer - terrycbth towels.)
( ( by Colors ( by SoU ( by Fabric by Lint
( De)Ico_es llm Prodvce_
[/f Sort Laundry _ jl
( I LIgh:t$ Easy Care L(nlCoffectot
_X,,J DaAs ( Light ) Sturdy
NOTE: Use the BULKY/BEDDING cycle for (orge or
bulky items such as poly-fiUed jackets, comforters,
pli)ows, etc_ These ffems may not be as absorbent
as other laundry items and should be so#ed into a
separate wash load for optimal results.
Bulky items should be placed as far down in the tub as
possible for optimal results. Always place buoyant items
at the bottom of the tub.
The washer will automatically detect the load size.
Because of: the Ngh-e_ciency wash system, the
waterlevel may not completely cover the load.
I_6
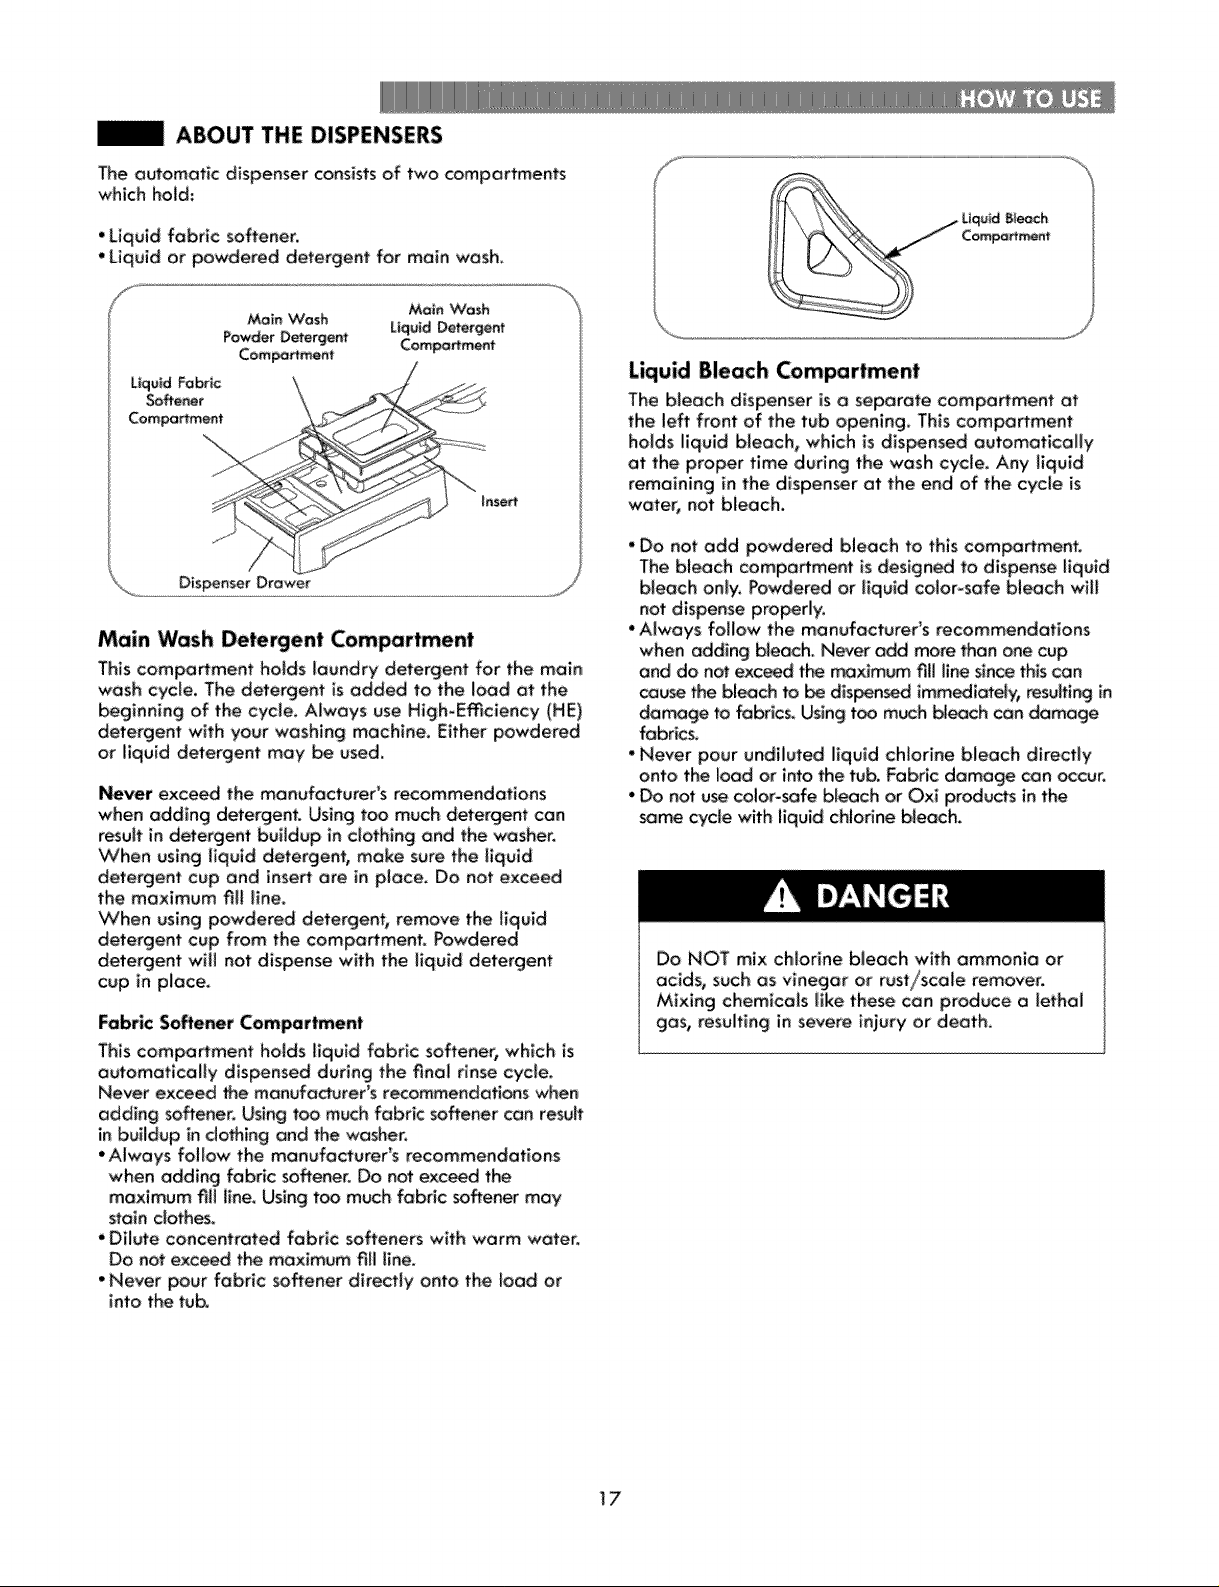
| ABOUT THE DISPENSERS
The automatic dispenser consists of two compartments
which hold:
•Liquid fabric softener,
•Liquid or powdered detergent for main wash,
Main Wash Detergent Compartment
This compartment holds laundry detergent for the main
wash cycle, The detergent is added to the load at the
_ginning of the cycle, Always use High-E_clency (HE)
dmergent with your washing machine. Either powdered
or liquid dmergent may be used.
Never exceed the manufacturer's recommendations
when adding detergent. Using too much detergent can
resuff in detergent buffdup in clothing and the washer.
When using liquid detergent, make sure the liquid
detergent cup and insert are in place. Do not exceed
the maximum fill line.
VChen using powdered detergent, remove the liquid
detergent cup from the compa_ment. Powdered
dmergent will not dispense with the liquid detergent
cup in place.
Fabric Softener Compartment
This compa_ment holds liquid fabric softener, which is
automatically dispensed during the final rinse cycle,
Never exceed _e manufa_urer's recommendations when
adding softener. Using too much fabric softener can result
in buildup in clothing and the washer.
• Always follow the manufacturer's recommendations
when adding fabric softener. Do not exceed the
maximum fill llne, Using too much fabdc softener may
stain clothes.
• Dilute concentrated fabric softeners with warm water.
Do not exc_d the maximum fill line.
• Never pour fabric softener directly onto the load or
into the tub.
Liquid Bleach Compartment
The bleach dispenser is a separate compartment at
the left front of the tub opening. This comportment
holds liquid bleach, which is dispensed automotlcolly
at the proper time during the wash cycle. Any liquid
remaining in the dispenser at the end of the cycle is
water, not bleach.
• Do not add powdered bleach to this coml=_flment.
The bleach compaflment is designed to dispense liquid
bleach only. Powdered or liquid color-safe bleach will
not dispense properly.
• Always follow the manufacturer's recommendations
when adding bleach. Never add more than one cup
and do not exceed the moxlmum fill line since this can
_use the bleach to _ disused immediately, resultin_ in
damage to fabrics, Using too m_h bleach can damage
fabrics.
• Never pour undiluted liquid chlorine bleach directly
onto the load or into the tub. Fabric damage can _cur.
- Do not use color-safe bleach or Oxl produ_s in the
same cycle with liquid chlodne bleach.
Do NOT mix chlorine bleach with ammonia or
acids, such as vinegar or rust/scale remover.
Mixing chemicals like these can produce a lethal
gas, resulting in severe injury or death.
17
| DETERGENT AND DISPENSER USE
A Word About Detergents
High-Efficiency (HE} detergents produce fewer suds,
dissolve more emciently to improve washing and
rinsing performance, and help to keep the interior of
your washer clean. Using dete_ent that _snot HE may
cause oversudslng and unsatisfactory performance
which could result in error codes, cycle failure, and
machine damage,
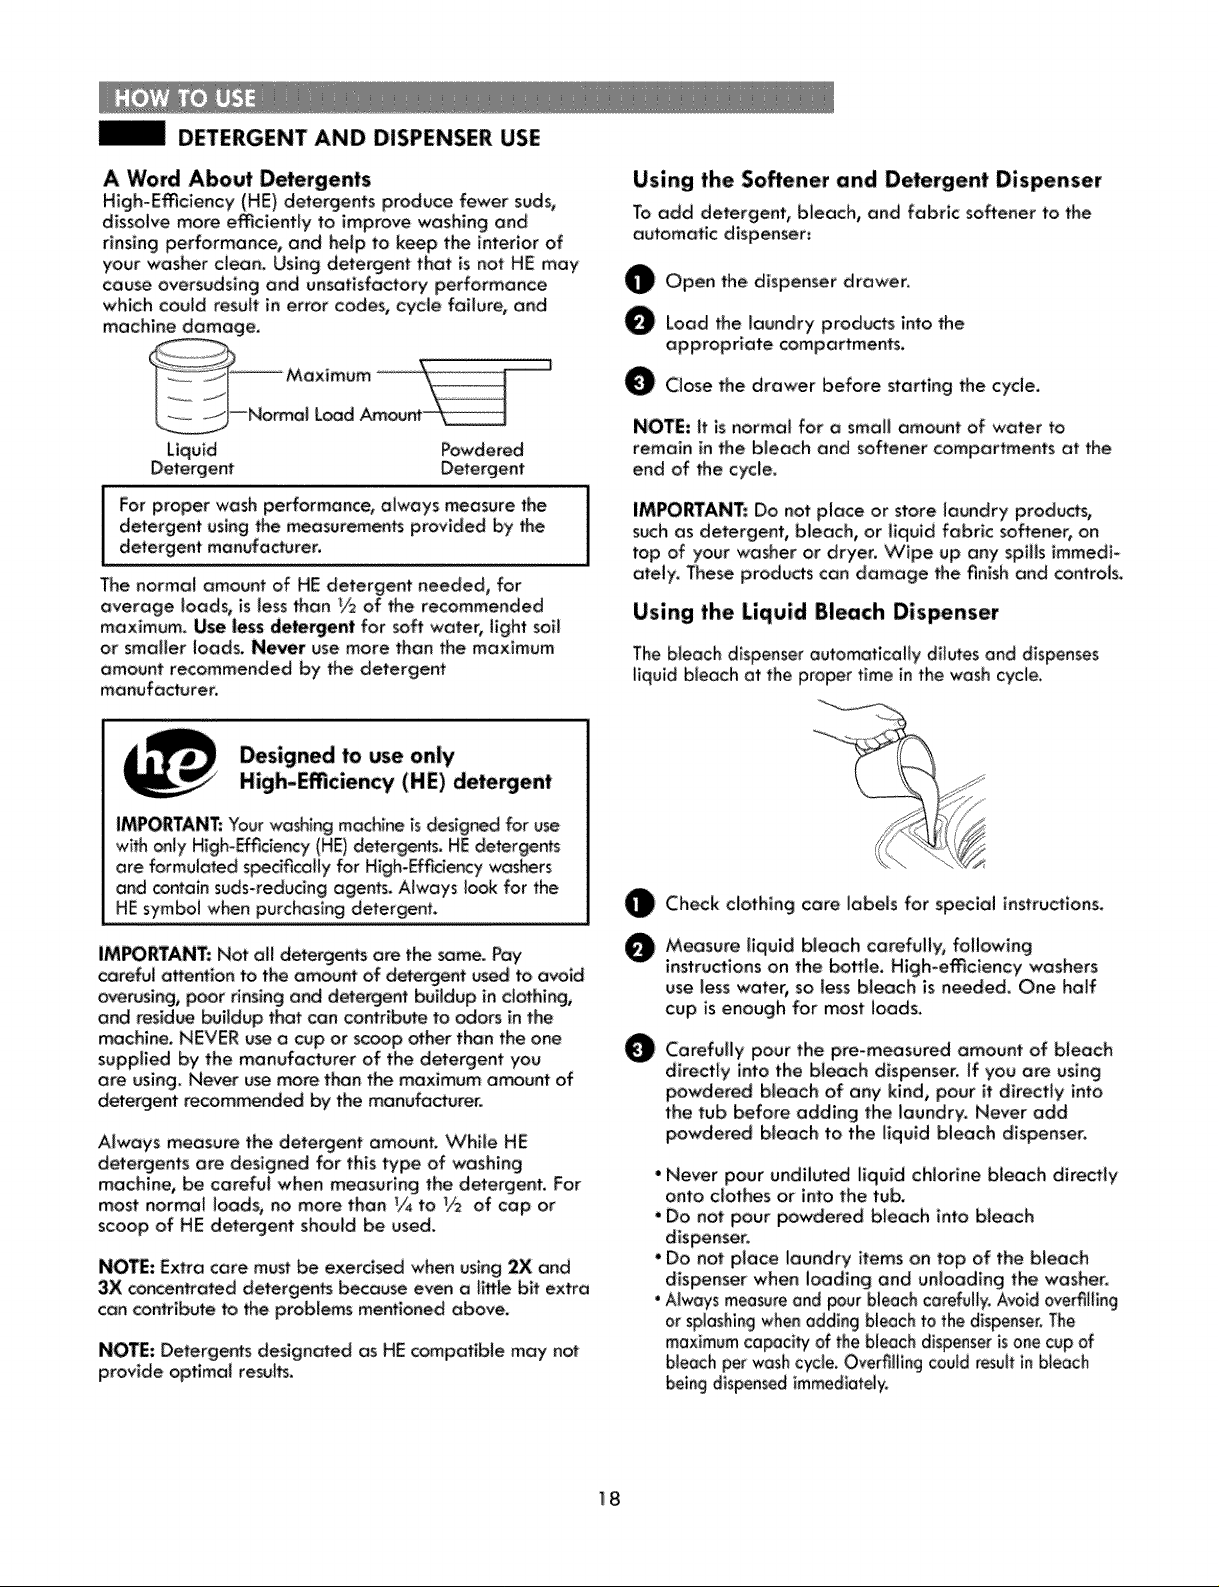
Liquid Powdered
Detergent
detergent using me measurements provided by me
i,o.o, o,o oooowo, oo0o,oi
detergent manufacturer,
The normal amount of HE detergent needed, for
average loads, is less than _/2of the recommended
maximum. Use less detergent for soft water, light soil
or smaller loads. Never use more than the maximum
amount recommended by the detergent
manufacturer.
Designed to use only
High-Emciency (HE) detergent
Using the Softener and Detergent Dispenser
To add detergent, bleach, and fabric softener to the
automatic dispenser:
Open the dispenser drawer,
Load the laundry products into the
appropriate compartments.
Close the drawer before starting the cycle.
NOTE: it is normal for a small amount of water to
remain in the bleach and softener compartments at the
end of the cycle.
IMPORTANT: Do not place or store laundry products,
such as detergent, bleach, or liquid fabric softener, on
top of your washer or dryer. Wipe up any spills immedi-
ately, These produ_s can damage the finish and controls.
Using the Liquid Bleach Dispenser
The bleach: dispenser automatically dilutes and dispenses
liquid bleach at the proper time in the wash cycle.
IMPORTANT:Yourwashing macNneisdesigned for use
wlth only High-Efficiency(HE}detergents, HEdetergents
are formulated specifically for High- y washers
and contain suds-reducing agents. Ahvays look for the
HEsymboi when purchasing detergent.
IMPORTANT: Not all detergents are the same. Pay
careful attention to the amount of detergent used to avoid
overusing, poor rinsing and detergent buildup in clothing,
and residue buildup that can contribute to odors in the
machine. NEVER use a cup or scoop other than the one
supplied by the manufacturer of the detergent "you
are using, Never use more than the maximum amount of
de'rergent recommended by the manufacturer.
Always measure the detergent amount. While HE
detergents are designed for this type of washing
machine, be careful when measuring the detergent. For
most normal loads, no more than _/_to 1/2 of cap or
scoop of HE detergent should be used.
NOTE: Extra care must be exercised when using 2X and
3X concentrated detergents because even a little bit extra
can contribute to the problems mentioned above.
NOTE: Detergents designated as HE compatible may not
provide optimal results.
Check clothing core labels for special instructions.
Measure liquid bleach carefully, following
instructions on the bo_[e. HighLemciency washers
use less water, so less bleach is needed. One half
cup is enough for most loads.
_
Carefully pour the pre-measured amount of bleach
directly into the bleach dispenser, if you are using
powdered bleach of any kind, pour it dlrect_y into
the tub before adding the laundry. Never add
powdered bleach to the liquid bleach dispenser.
• Never pour undiluted liquid chlorine bleach directly
onto clothes or into the tub.
• Do not pour powdered bleach into bleach
• Do not place laundry items on top of the bleach
dispenser when loading and unloading the washer.
' Always measure and pour bleach carefully./kxoid overfilling
or splashingwhen,addingb_eoch to the dispenser.The
maximum capacity, of the bteach dispenser is one cup of
bleach per wash cycle, Ove_lHng could result in b_eoch
being dispensed immedlate_y.
1_8

TIME AND STATUS DISPLAY
The time and status dlsplay shows the estimated time remaining and cycle progress.
CYCLE STATUS INDICATOR
These LEDs wffl iffumlnate when a cycle is selected
to indicate which stages wiff run. When a cycle is
running, the LED will blink for the active stage. Once
a stage is complete, the LED wiH turn off. If a cycle
is paused, the a_ive LED wffl stop bllnklng_
ESTIMATED TIME REMAINING
O
When a cycle is selected, the default time for
that cycle is displayed. This time will change as
modifiers or options ore sele_ed, Once the START/
PAUSE button is pressed, the washer will measure
the size of the load. The estimated time may
change once the load size has been measured.
NOTE: The time shown is only an estimate. This time
is based on normal operating conditions. Several
external factors (load size, room temperature,
incoming water temperature, etc.} can affect the
actual time.
19
| CYCLE MODIFIER BUTTONS
Each cycle has default settings that are selected
automatically. You may also customize these settings
using the cycle modifier buttons. Press the button for
the desired modifier untll the indicator light for the
desired setting is [it. The washer automatlco[[y adjusts
the water level for the type and size of wash load for
best resuits and maximum emclency. Due to the high-
nature of this product, water levels may be much lower
than expected. This is normal and cleaningirlnsing
performance wffl not be compromised,
Extra Hot
Extra High
Hot
Warm
Cold
Tap Cold
High
Medium
Low
No Spin
NOTE: To protect your garments, not every wosh/rlnse
temperature, spin speed, soll level, or option is avail-
able with every cycle. A chime wil| sound and the LED
will not light if a selection is not allowed.
Heavy
Normal
Light
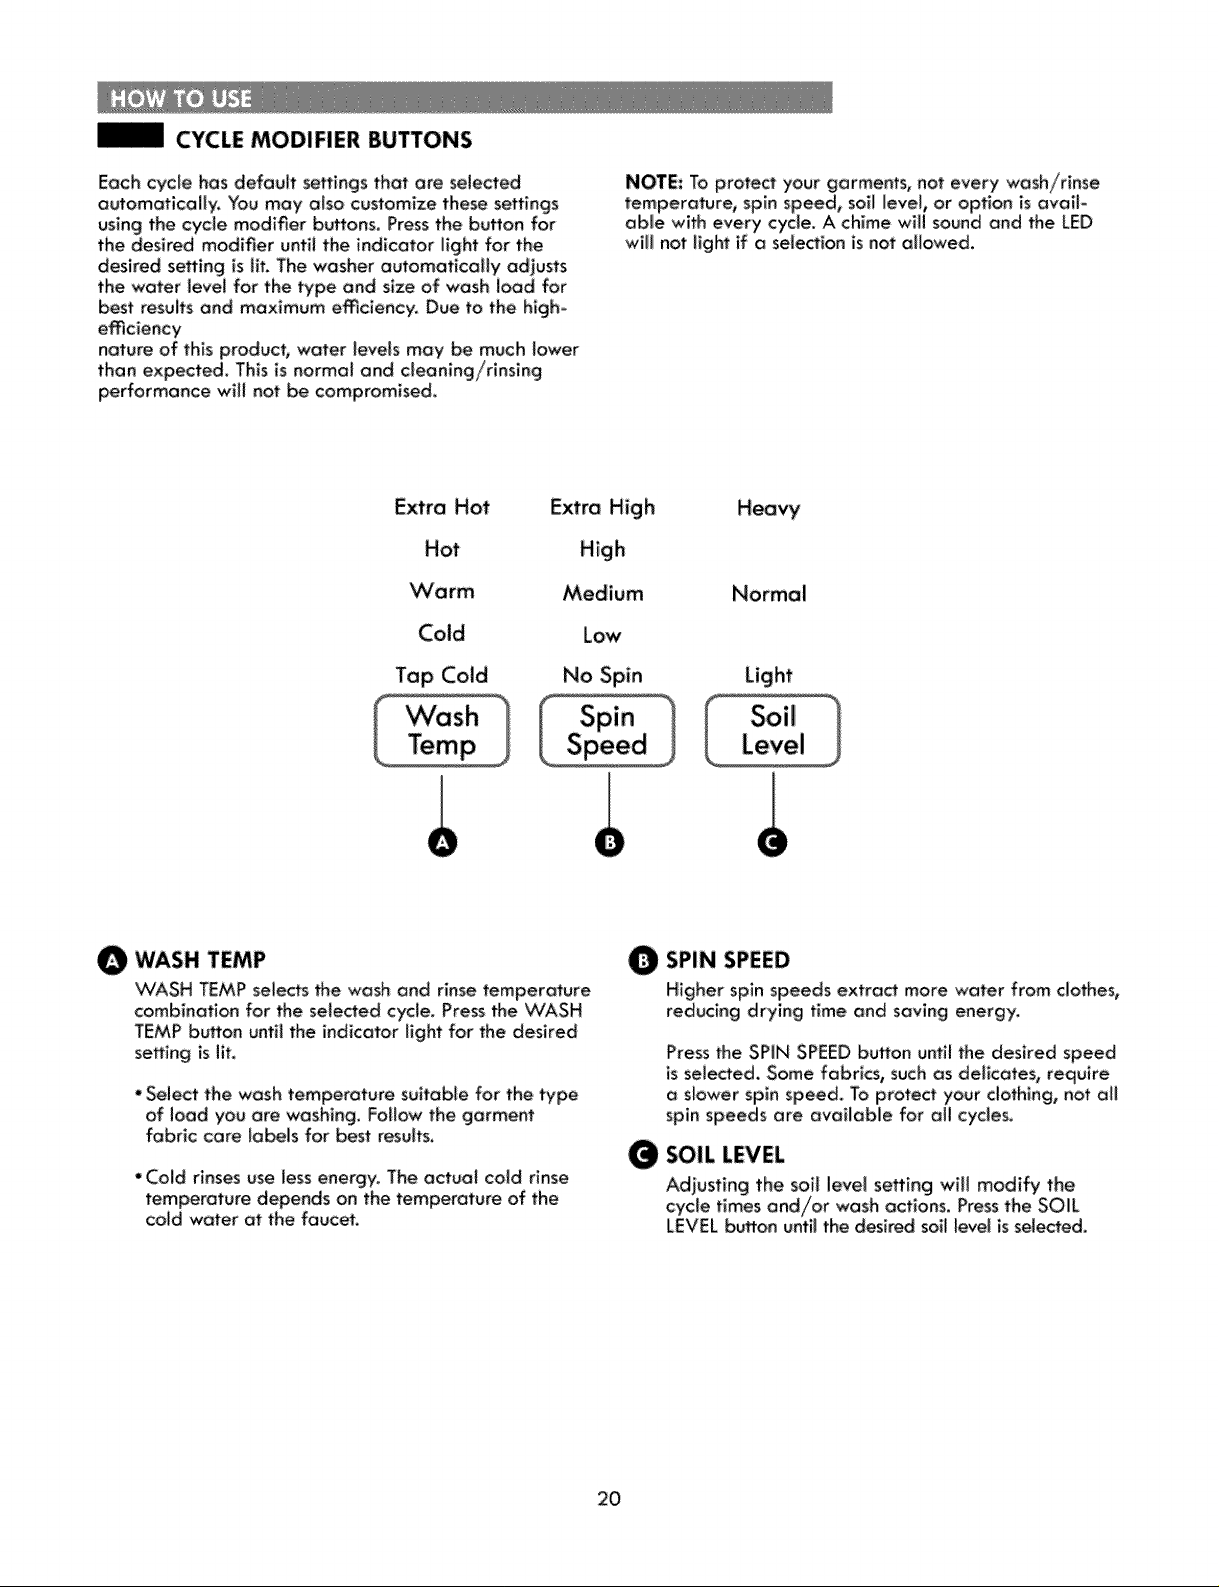
WASH TEMP
WASH TEMP selects me wash and rinse temperature
combination for the selected cycle, Press the WASH
TEMP button until the indicator light for the desired
setting is lit.
*Select the wash temperature suitable for the type
load "youare washing. Foffow the garment
fabric care Iabels for best results,
• Cold rinses use less energy. The actuat cold rinse
temperature depends on the temperature of the
cold water at the faucet.
2O
SPIN SPEED
O
Higher spin speeds e×tract more water from clothes,
reducing drying t_me and saving energy.
Press the SPIN SPEED button until the desired speed
_sseiected. Some fabrics, such as deticates, require
o slower spin speed. To protect your dothlng, not ail
spin speeds are available for oH cycles.
SOiL LEVEL
O
Adjusting the soil level setting wi[[ modify the
cycle times and/or wash actions. Press the SOiL
LEVEL button until the desired soft [eve[ is selected.
| OPTION BUTTONS
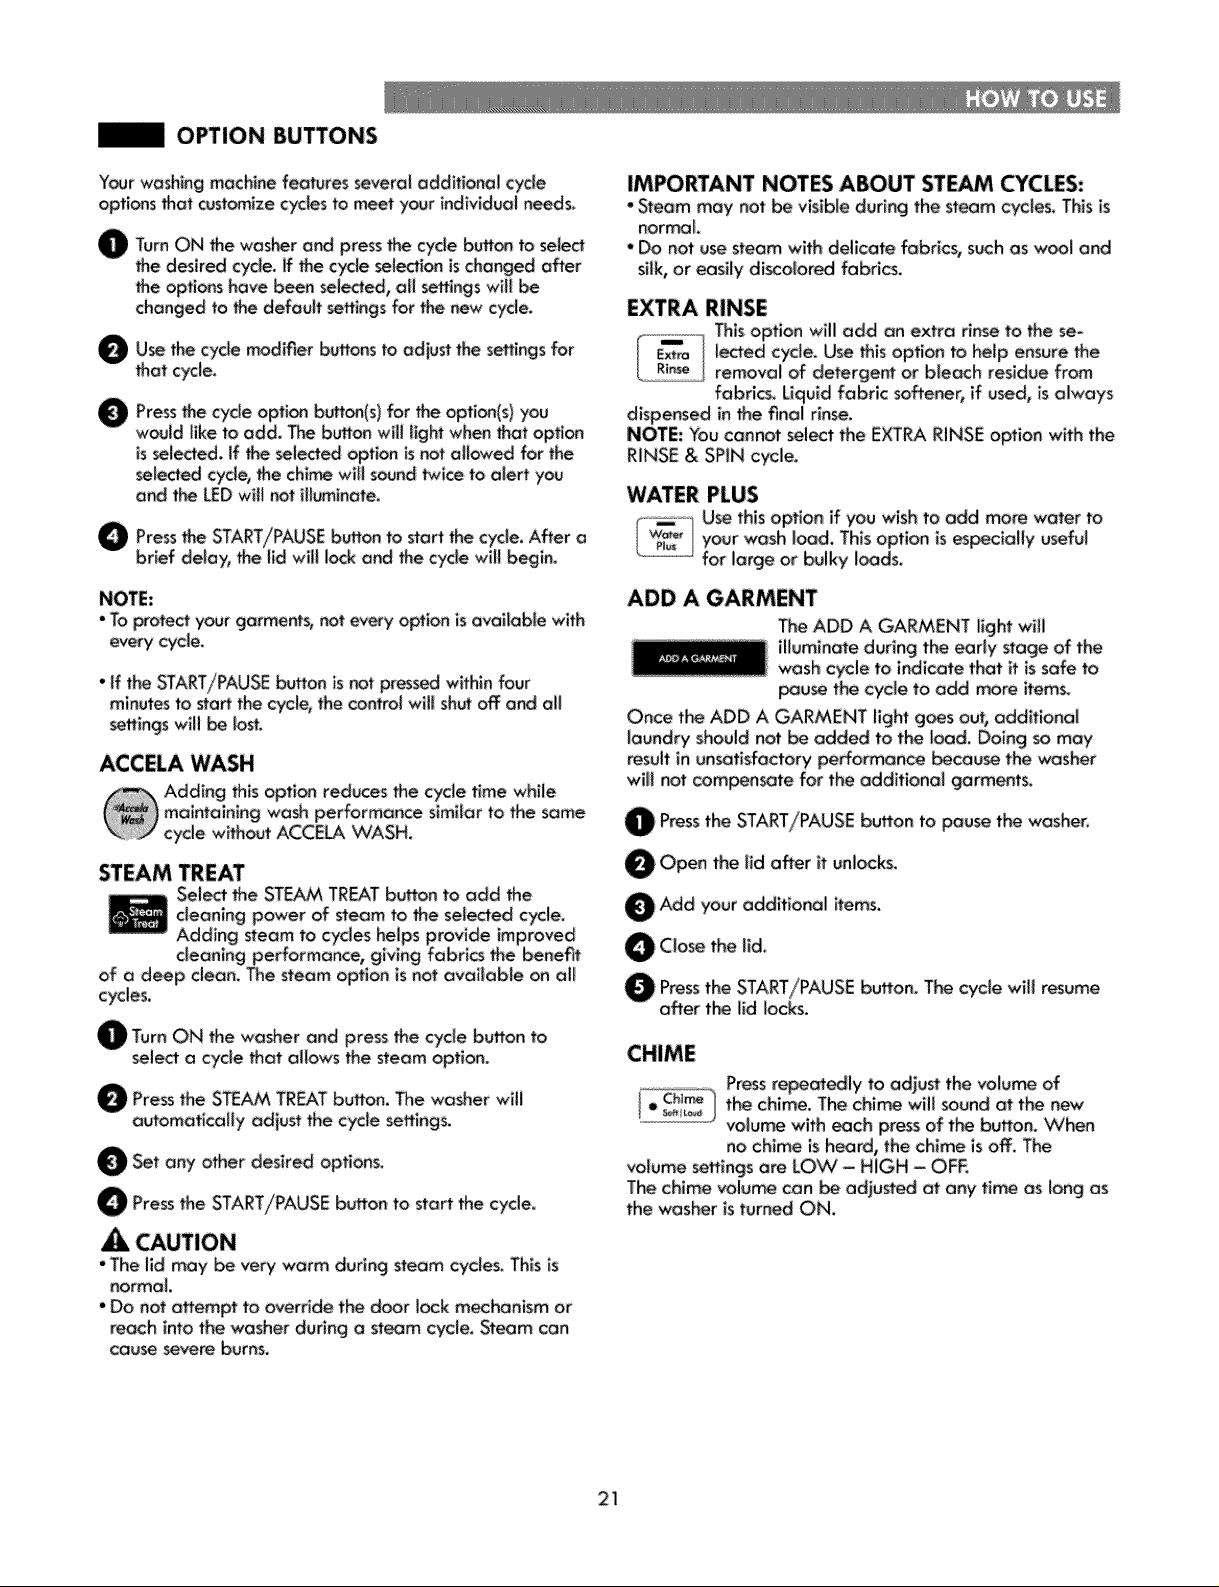
Your washingmachinefeatures several additional cycle
options that customizecyclesto meet yc_jr individual needs.
O TurnON He washer and pressthe cyclebuffon to select
the desired cycle,if the cycle _lectian is changed after
the optics have been _lected, allsettings willbe
changed to He defauit settingsfor the new cycle.
O Use the modifier buttons the for
thatcycle.
cycle
to
adjust
settings
O Press_ cycle optionbutton(s)for the option(s)you
w_ld like to add. The button will light when that option
isseiected. If the sele_:l option is notallowed for the
_le_ed cycle, the chimewffl soundtwice to alert you
end the LEDwillnotiIIuminate.
O Pressthe START!PAUSEbuttonto startthe cycle. After o
brief delay, the lid will I_k and the cycle will begin.
NOTE:
• To protect your garments, not every optlon isavailable with
e_ry cycle.
• If the START/PAUSE button is not pressed within four
minutes to staff the cycle, the control will sh_ off: and all
settingswill be lost.
ACCELA WASH
IMPORTANT NOTES ABOUT STEAM CYCLES:
• Steam may not _ vlslble during the steam cycles. This is
normal
• Do not use steam with delicate fabrics, such as wool and
silk, or easily discolored fabrics.
EXTRA RINSE
This option Wil_ add an extra rinse to _e se-
lected cycle.Use thisoptionto helpensurethe
removal of detergent or bleach residue from
fabrics. Liquid fabric softener, if used, is always
dispensed inHe final rinse.
NOTE: You cannm sel_t the EXTRA RINSE option with the
RINSE & SPIN cycle.
WATER PLUS
I-w_iI Use this option if you wish to add more water to
L_..[!_.__your wash I_d. This option is es_cially useful
Once the ADD A GARMENT light g_s out, additional
laundry should not be added to the load. Doing so may
result in un_tisfactory performance becau_ the washer
•,viii not compen_te for the additional garments.
for large or bulky loads.
The ADD A GARMENT light will
illuminate during the _rly stage of the
wash cycle to indicate that it is safe to
pause the cycle to add more items°
Seled He STE,_A_,TREATbutton to add He
cleaning power of steam to He selected cycle.
Adding steam to cycles helps provide improved
cleaning performance, giving fabrics the benefit
of a deep dean. The steam option is not available on all
cycles.
O TurnON He washer and press He cycle button to
sele_ a cycle that allows He steam option.
O Press the STEAM TREAT button. The wa_er will
automatlcelly adjust the cycle settings,
O Set any options.
O Press the START/PAUSE button to start the cycle.
other desired
CAUTION
• The lid may _ _ry warm during steam cycles, Thisis
normal.
"Do not attempt to override tee door lock mechanism or
reach into the washer during a steam cycle. Steam can
cau_ severeburns.
O Pressthe START/PAUSE button to pause the washer.
O Open the lid after it unlocks.
,Add 'four additional items.
O Closethe lid.
O Pressthe START/PAUSE button. The cycle will resume
after the lid locks.
Press repeatedly to adjust the volume of
1• -_I,_,ChlmeI the chime. The chime will sound at the new
volume with each press of the button. When
no chime is heard, the chime is off. The
volume settings are LOW - HIGH - OFE
The chime volume can be odiusted at any time as iong as
the washer isturned ON,
21
 Loading...