


Model/Modelo: 796.4168*
MFL68005528

TABLE OF CONTENTS |
|
SAFETY MESSAGES......................................................................... |
3 |
IMPORTANT SAFETY INSTRUCTIONS.................................... |
3-5 |
GROUNDING REQUIREMENTS................................................... |
5 |
FEATURES AND BENEFITS |
|
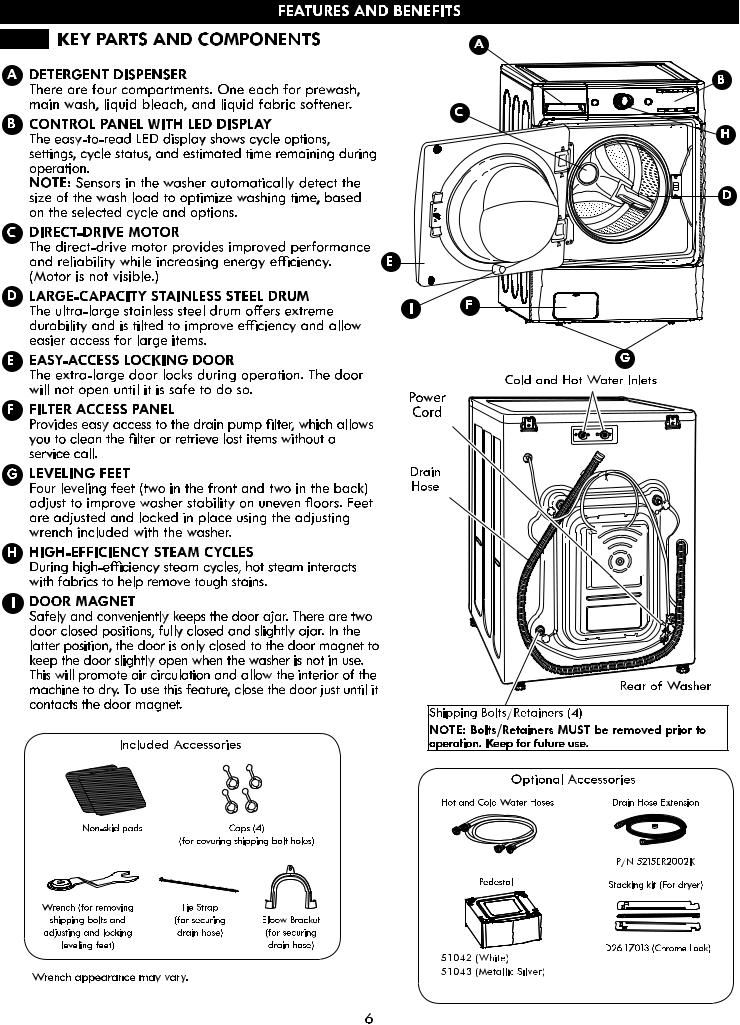
Key Parts and Components........................................................ |
6 |
Included Accessories.................................................................. |
6 |
Optional Accessories................................................................. |
6 |
INSTALLATION REQUIREMENTS |
|
Key Dimensions and Specifications.......................................... |
7 |
Choose the Proper Location...................................................... |
7 |
Flooring........................................................................................ |
7 |
Clearances................................................................................... |
7 |
INSTALLATION INSTRUCTIONS |
|
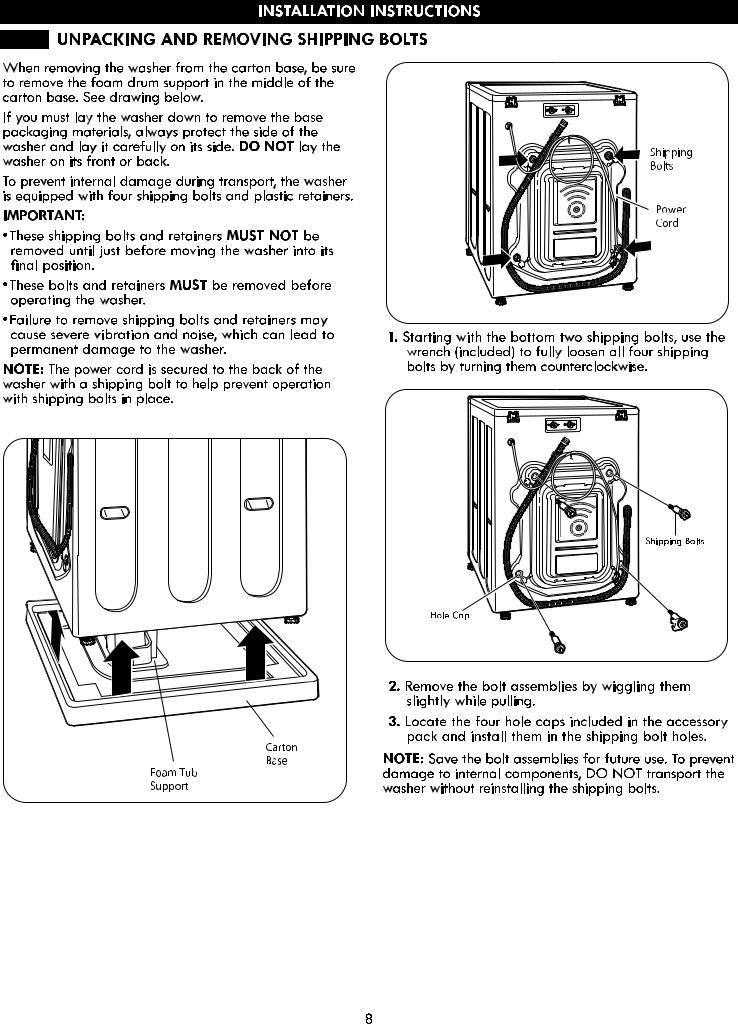
Unpacking and Removing Shipping Bolts................................ |
8 |
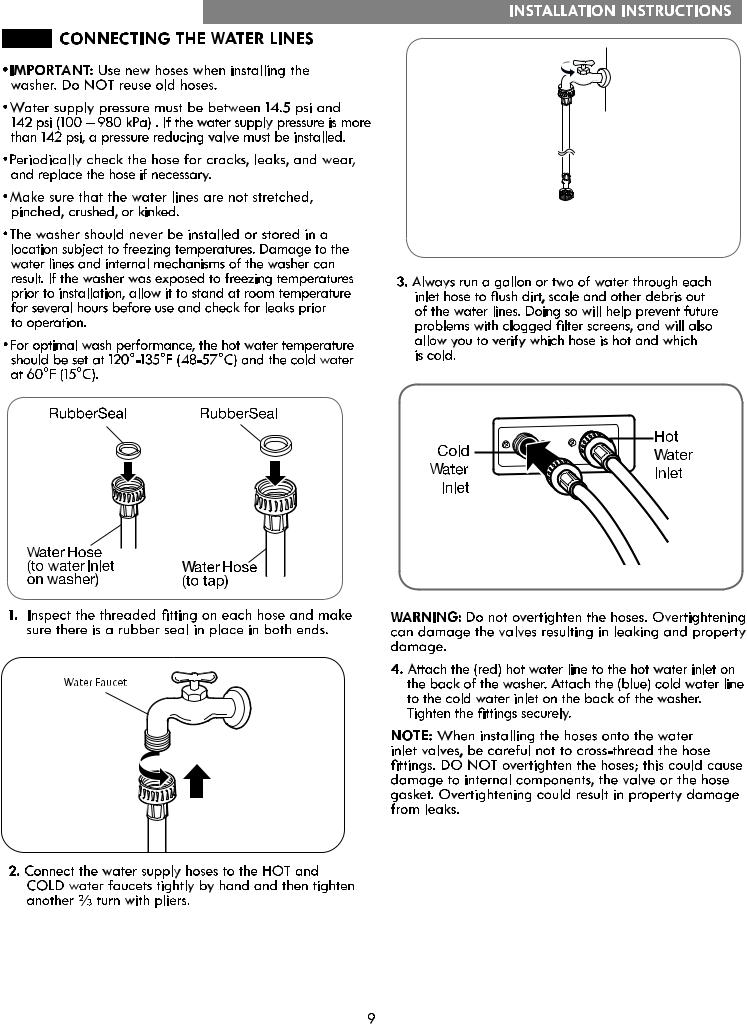
Connecting the Water Lines...................................................... |
9 |
Connecting the Drain Hose....................................................... |
10 |
Connecting to the Power Supply.............................................. |
10 |
Leveling the Washer.................................................................. |
11 |
Installation of Non-Skid Pads (optional).................................. |
11 |
HOW TO USE |
|
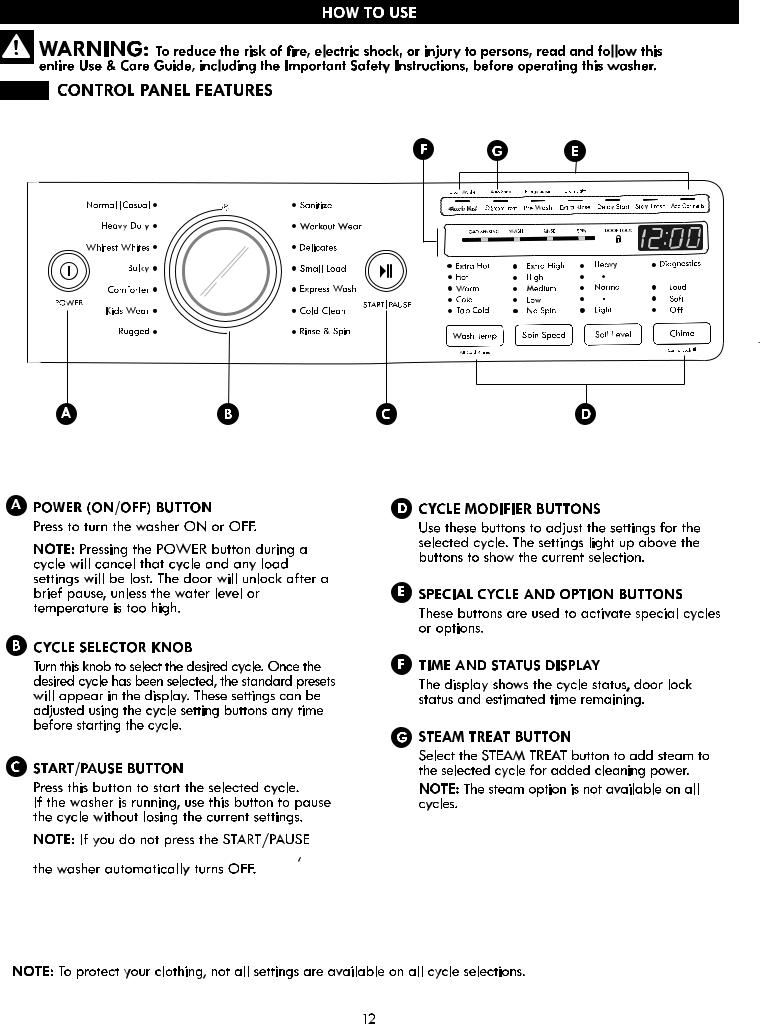
Control Panel Features............................................................... |
12 |
Operating the Washer............................................................... |
13 |
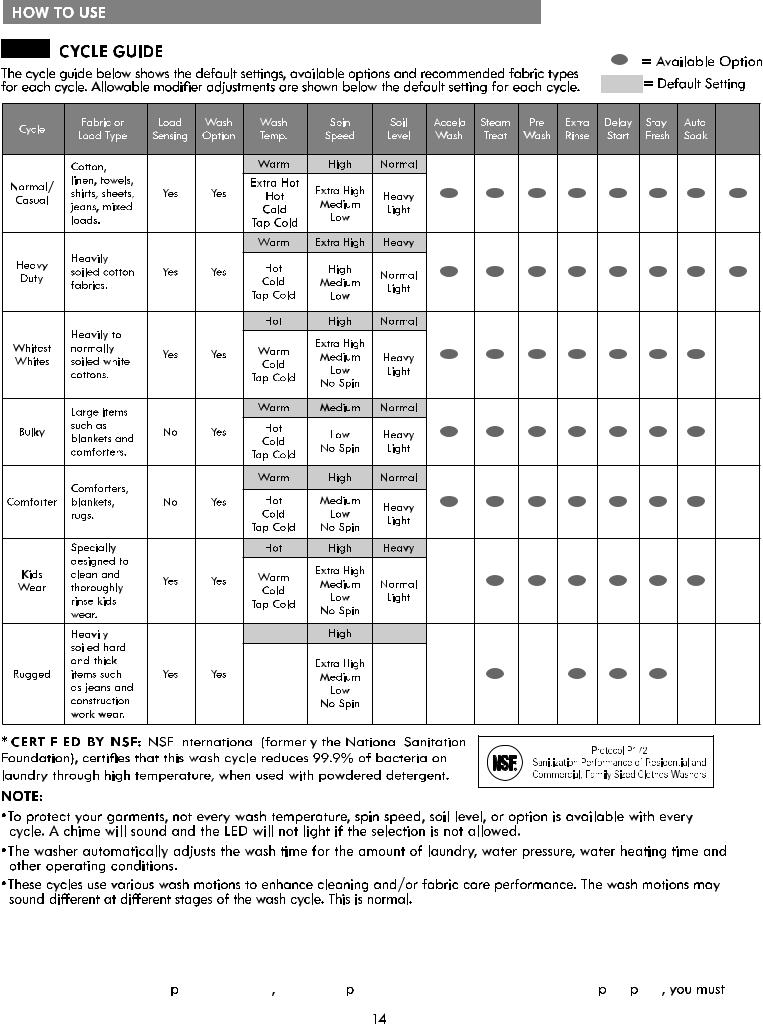
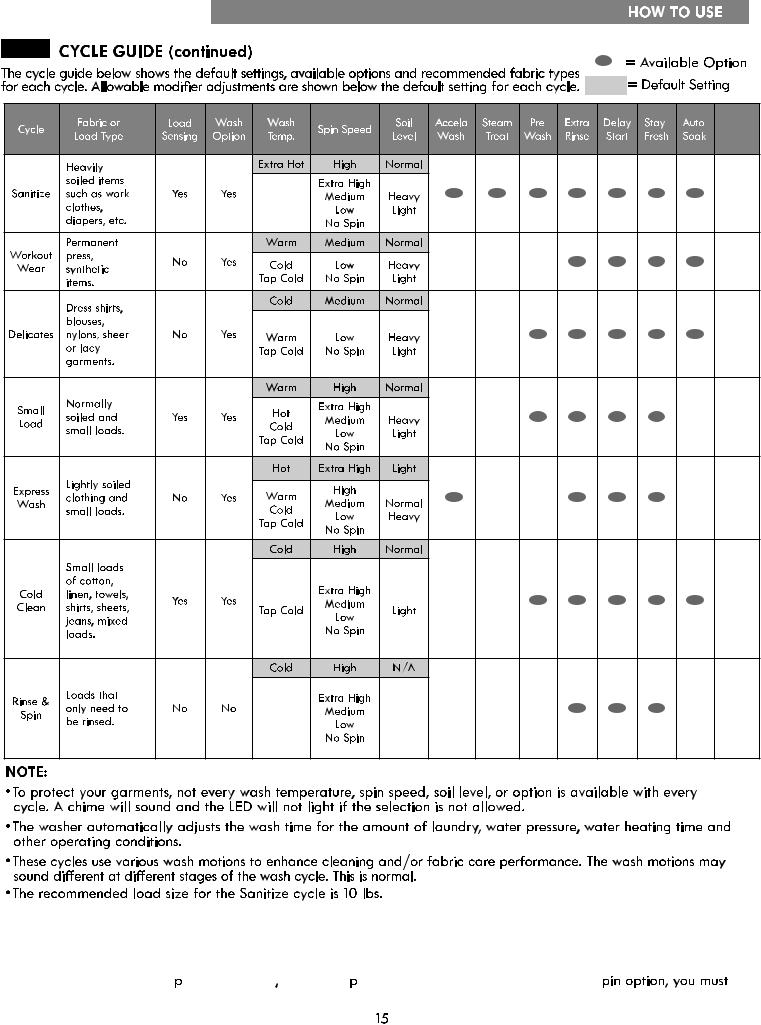
Cycle Guide........................................................................... |
14-15 |
Sorting Wash Loads.................................................................. |
16 |
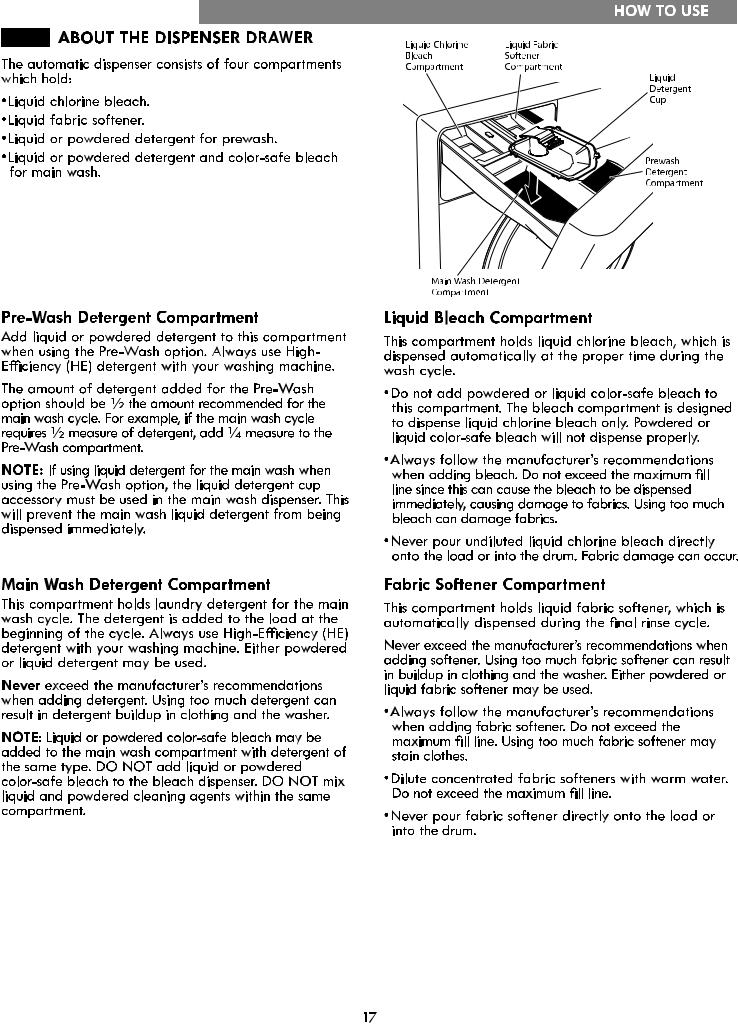
About the Dispenser Drawer.................................................... |
17 |
Detergent and Dispenser Use................................................... |
18 |
Time and Status Display........................................................... |
19 |
Cycle Modifier Buttons............................................................. |
20 |
Steam Cycles and Options....................................................... |
21 |
Special Functions...................................................................... |
22 |
CARE AND CLEANING |
|
Regular Cleaning................................................................. |
23-24 |
Maintenance........................................................................ |
25-26 |
Cleaning the Water Inlet Filters.......................................... |
25 |
Cleaning the Drain Pump Filter........................................... |
26 |
DIAGNOSTICS |
|
Using Diagnostics...................................................................... |
27 |
TROUBLESHOOTING GUIDE |
|
Normal Sounds You May Hear............................................... |
28 |
Before Calling for Service.................................................. |
28-30 |
WARRANTY.................................................................................... |
31 |
PRODUCT RECORD
In the space below, record the date of purchase, model, and serial number of your product. You will find the model and serial number printed on an identification plate located inside the washer door. Have these items of information available whenever you contact Sears concerning your product.
Model No.
Date of Purchase Serial No.
Save these instructions and your sales receipt for future reference.
PROTECTION AGREEMENTS
Master Protection Agreements
Congratulations on making a smart purchase. Your new Kenmore® product is designed and manufactured for years of dependable operation. But like all products, it may require
preventive maintenance or repair from time to time. That’s when having a Master Protection Agreement can save you money and aggravation.
The Master Protection Agreement also helps extend the life of your new product. Here’s what the Agreement includes:
•Parts and labor not just for repairing defects, but to help keep products operating properly under normal use. Our coverage goes well beyond the product warranty. No deductible, no functional failure excluded from coverage – real protection.
•Expert service by experienced service technicians trusted in millions of homes every year.
•Unlimited service calls and nationwide service, as often as you want us, whenever you want us.
•“No-lemon” guarantee – replacement of your covered product after three separate product failures occur within twelve months and a fourth repair is required. Includes free delivery and installation, if necessary, of replacement product.
•Product replacement if your covered product can not be fixed.
•Annual Preventive Maintenance Check at your request – no extra charge.
•Fast help by phone – phone support from a service agent on all products to help troubleshoot problems. Think of us as a “talking owner’s manual.”
•Power surge protection against electric damage due to power fluctuations.
•$300 Food Loss Protection for any food spoilage that is the result of mechanical failure of any covered refrigerator or freezer.
•Service Promise: $50 if first attempt repair of your covered product can’t be accomplished and product is not usable while awaiting further repair service.
•25% discount off the regular price of any non-covered repair service and related installed parts.
Once you purchase the Agreement, a simple phone call is all that it takes for you to schedule service. You can call anytime day or night.
The Master Protection Agreement is a risk-free purchase. If you cancel for any reason during the product warranty period, we will provide a full refund, or a prorated refund any time after the product warranty period expires. Purchase your Master Protection Agreement today!
Some limitations and exclusions apply.
For prices and additional information in the U.S.A. call 1-800-827-6655.
*Coverage in Canada varies on some items.
For full details call Sears Canada at 1-800-361-6665. Sears Installation Service
For Sears professional installation of home appliances, garage door openers, water heaters, and other major home items, in the U.S.A. call 1-844-553-6667, and in Canada call 1-800-469- 4663.
2


|
|
|
INSTALLATION REQUIREMENTS |
|
|
|
KEY DIMENSIONS AND SPECIFICATIONS |
||
|
|
|||
|
|
|
|
|
|
Description |
Front-Loading Washer |
|
|
|
Electrical Requirements |
120 VAC, 60 Hz |
|
|
|
Max. Water Pressure |
14.5 - 142 psi (100 - 980 kPa) |
||
|
Dimensions |
27" (W) X 29 3/4" (D) X 38 11/16" (H), 52" (D with door open) |
|
|
|
|
|
68.6 cm (W) X 75.6 cm (D) X 98.3 cm (H), 132.2 cm (D with door open) |
|
|
|
|
|
|
|
Net Weight |
205 lbs (93 kg) |
|
|
|
Max. Spin Speed |
1,300 RPM |
||
CHOOSE THE PROPER LOCATION
 WARNING
•This washer is heavy. Two or more people are required when moving and unpacking the washer. Failure to do so may result in damage to property or serious bodily harm.
•Store and install the washer where it will not be exposed to temperatures below freezing or exposed to outdoor weather conditions. Failure to follow this warning can cause serious injury, fire, electric shock, or death.
•Properly ground washer to conform with all electric governing codes and ordinances. Failure to follow this warning can cause serious injury, fire, electric shock, or death.
•To reduce the risk of electric shock, do not install the washer in humid spaces. Failure to follow this warning can cause serious injury, fire, electric shock, or death.
•To ensure proper air flow, do not block the large opening on the bottom of the washer with carpeting or other materials.
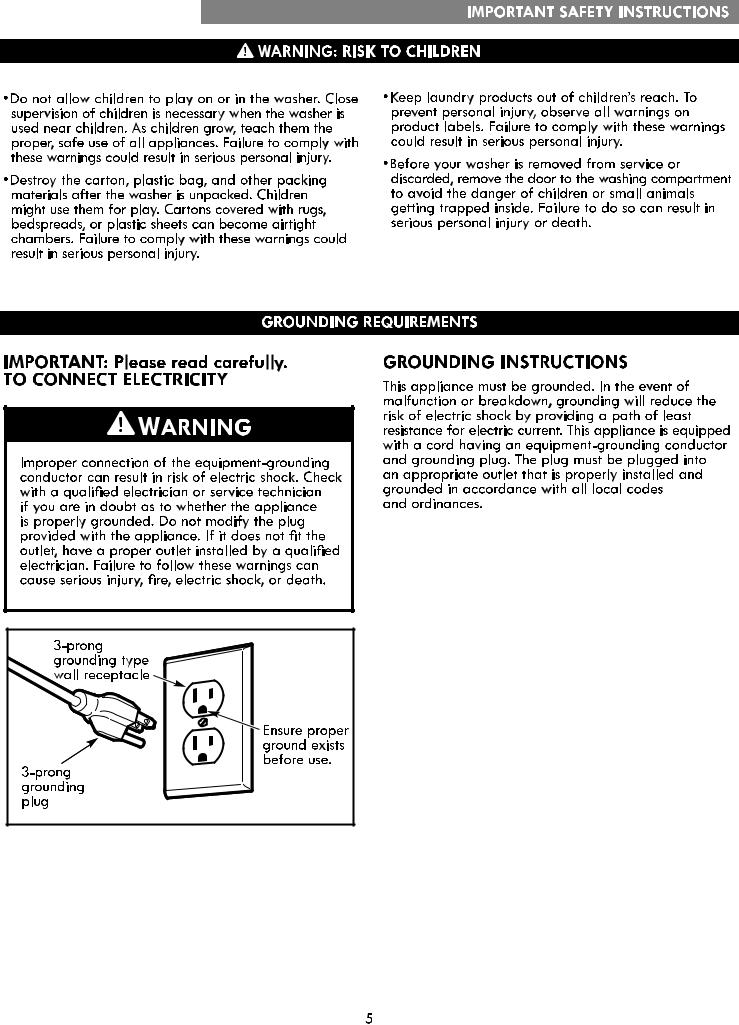
•Do not remove ground prong. Do not use an adapter or extension cord. Plug into a grounded 3-prong outlet.
Failure to follow this warning can cause serious injury, fire, electric shock, or death.
NOTE: Installing the washer in a humid space, or installing or storing the washer where it will be exposed to the weather or freezing temperatures, may result in rust or other damage that is not covered by the product warranty.
Power Outlet
•The power outlet must be within 60 in. (1.5 m) of either side of the washer.
•The appliance and outlet must be positioned so that the plug is easily accessible.
•Do not overload the outlet with more than, one appliance.
•The outlet must be grounded in accordance with current wiring electric codes and regulations.
•Time-delay fuse or circuit breaker is recommended.
NOTE: It is the personal responsibility and obligation of the product owner to have a proper outlet installed by a qualified service technician.
FLOORING
• To minimize noise and vibration, the washer MUST be installed on a solidly constructed floor. See the NOTE at right.
• Allowable slope under the entire washer is a maximum
1 in. difference from side to side or from front to back.
• Installing on carpeting and soft tile surfaces is not recommended.
• Never install the washer on a platform or weakly
supported structure.
7
CLEARANCES |
|
|
|
|
|||
22 |
1 |
4 |
" |
|
|
|
|
/ |
|
|
|
|
|||
(56.6 cm) |
|
|
|
|
|||
|
|
|
29 |
3 |
4 |
" |
4" |
|
|
|
/ |
(10 cm) |
|||
|
|
|
(75.6 cm) |
||||
|
|
|
|
||||
|
|
|
52" |
|
|
|
|
|
|
|
(132.2 cm) |
|
|||
To ensure sufficient clearance for water lines and airflow, allow minimum clearances of at least 1 in. (2.5 cm) at the sides and 4 in. (10 cm) behind the unit. Be sure to allow for wall, door, or floor moldings that may increase the required clearances.
1" |
27" |
1" |
(2.5 cm) |
(68.6 cm) |
(2.5 cm) |
Allow at least 22 1/4 in. (56.6 cm) in front of the washer to open the door.
NOTE: The floor must be strong and rigid enough to support the weight of the washer, when fully loaded, without flexing or bouncing. If your floor has too much flex, reinforce it to make it more rigid.
A floor that is adequate for a top-loading washer may not be rigid enough for a front loading washer, due to the difference in the spin speed and direction. If the floor is not solid, your washer may vibrate and you may hear and feel the vibration throughout your house.
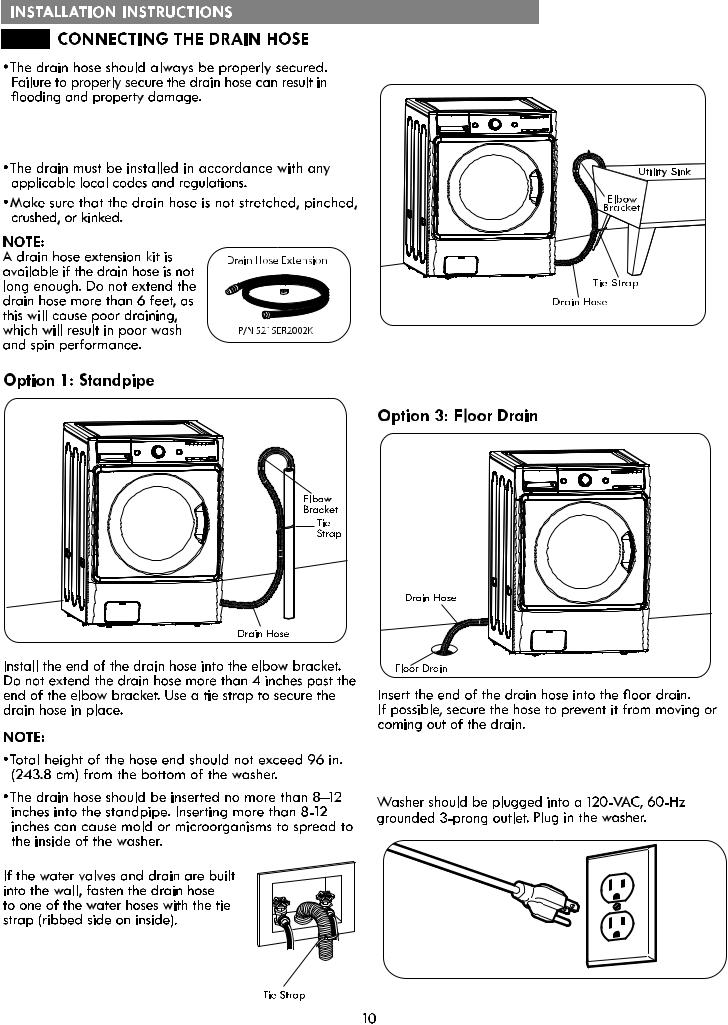
 Do not install the end of the drain hose lower than 29 in. (73.7 cm) or higher than 96 in. (243.8 cm) above the bottom of the washer.


 Tub
Tub
Install the elbow bracket near the end of the drain hose. Hang the end of the drain hose over the side of the utility sink. Use a tie strap to secure the drain hose in place.
 CONNECTING TO THE POWER SUPPLY
NOTE: Non-skid pads are included in the installation packet


 one hour


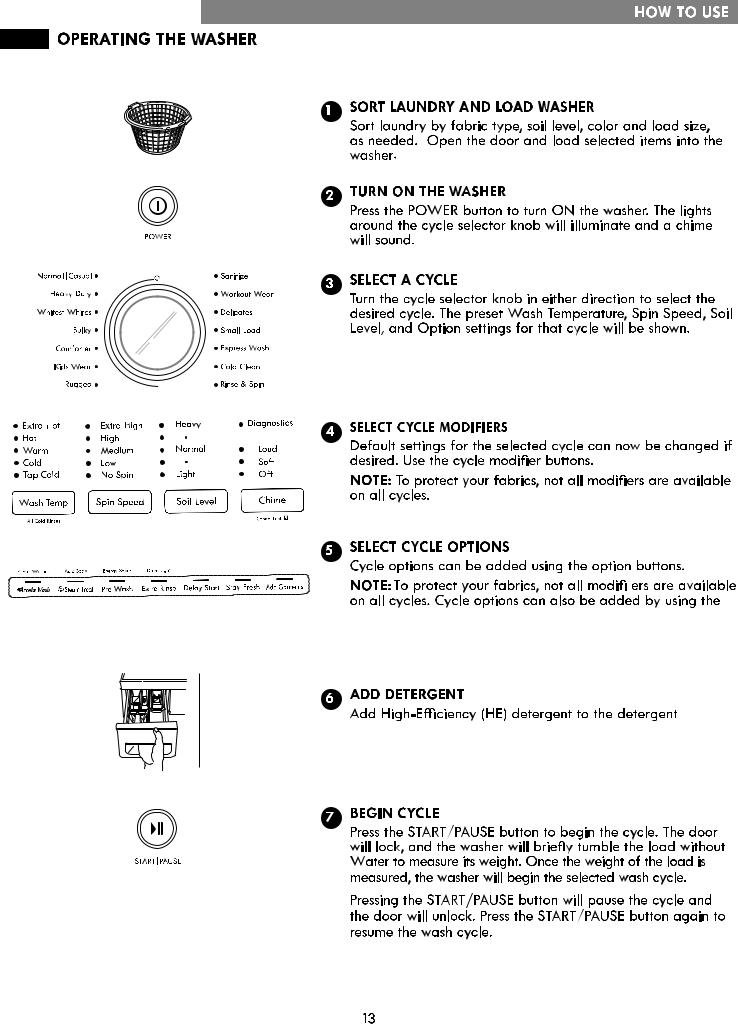
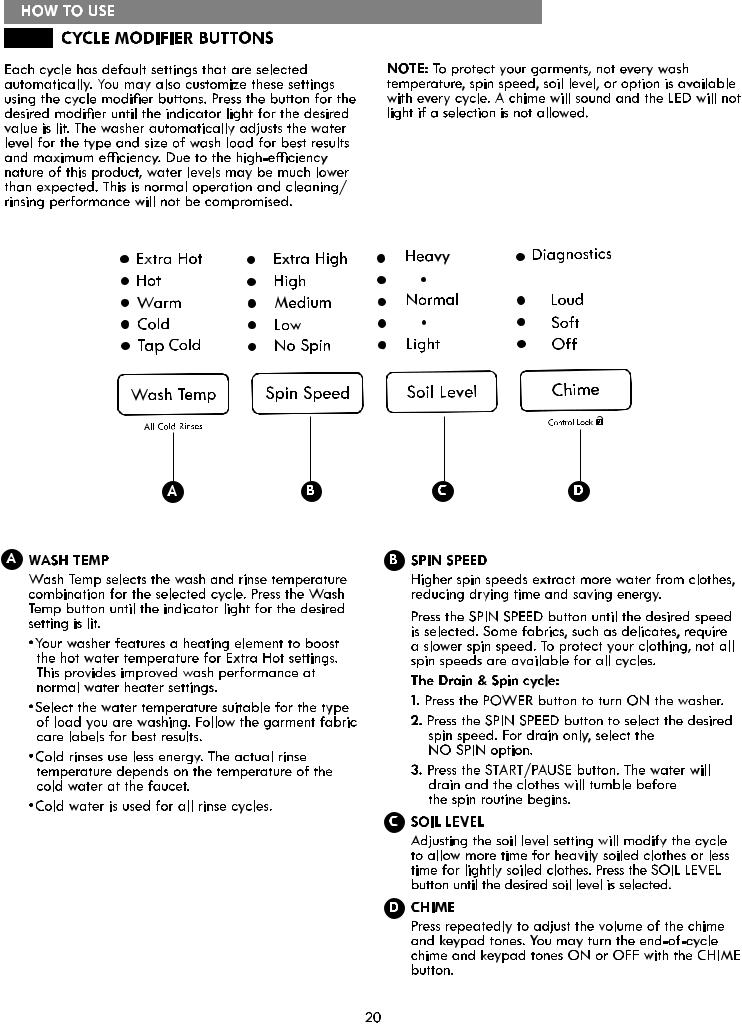
option buttons. Not all options are available on all cycles. A di erent chime will sound and the LED will not come on if the selection is not allowed.
dispenser drawer. For proper wash performance, always measure the detergent using the measuring device provided by the detergent manufacturer.
Energy
Saver
|
|
|
|
|
N/A |
N/A |
|
|
|
|
|
|
|||
|
|
|
|
|
|
|
|
|
|
|
|
|
|
|
|
|
|
|
|
|
|
|
|
|
|
|
|
|
|
|
|
•Do not load more than 22 lb. (10 kg) in the washer. (1 thick, dry bath towel = 1 lb.) Do not use the Sanitize cycle with more than 10 lb. (4.5 kg) of laundry.
•Do not overload the Bulky cycle. If the washer does not function properly, manually redistribute the load or wash one item at a time.


 Accela Wash


 Accela Wash


Energy
Saver
•Do not load more than 22 lb. (10 kg) in the washer. (1 thick, dry bath towel = 1 lb.) Do not use the Sanitize cycle with more than 10 lb. (4.5 kg) of laundry.
•Do not overload the Bulky cycle. If the washer does not function properly, manually redistribute the load or wash one item at a time.


 Accela Wash


 Accela Wash


 For best performance, load clothes as shown.
4
3 
2
1 
-Load clothes loosely, and do not overfill the drum. Clothes need room to circulate in order to get clean.
-Do not press down on items while stacking them in the drum.
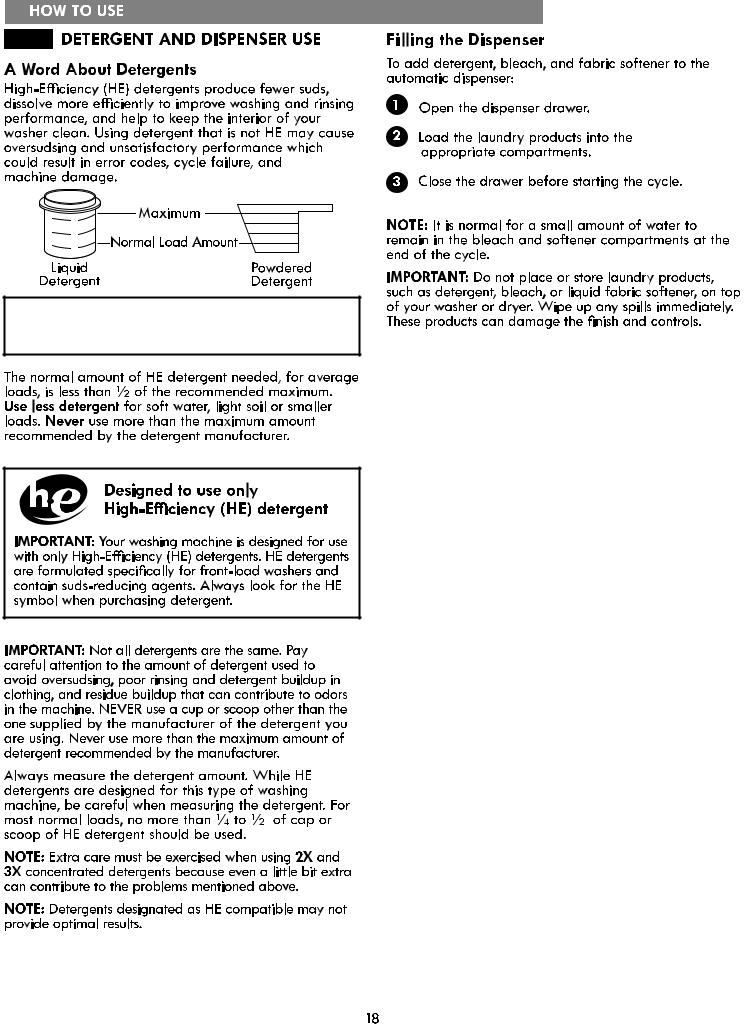
For proper wash performance, always measure the detergent using the measuring device provided by the detergent manufacturer.
 Loading...