

Kenmore 204101 - Elite 56 oz. Stand Blender, Elite 100.06901, Elite 100.06911 Use And Care Manual

Use & Care Guide
Manual de Uso y Cuidado
English/ Espa_ol
i
Kenmore Elite°
lender
Mezc[ador
ModeLsiModetos:
100,06£0I - Brushe_,dAi|Jminum
100,069!t - Black
P!N 134779000B (0807)
. Sears Brands Manclg_lent Corporation
Hoffmczn Estates, IL 60179 U.S.A,
wv/w.kenmore.com
w_.seors.com
KENMORE ELI TE FULLWARRANTY
if this product fails due to a defect in material or workmanship within five years _rom the
date of purchase, return it to any Sears store or other Kenmore outlet in the United States
for free replacement,
If the motor et this product fails due to a defect in material or workmanship within I0 years
from the date of purchase, return this product to any Sears store or other Kenmore outlet
in the United States for free repfacement,
This warranty does not cove r the gasket and blade ossembI% which a re expendable parts
that can wear ou! from norrnat use withi_ the warranty period.
This w0rranty is void if thTs product is ever used for other lhan private household
purposes,
This warranty gives you specific legal rights, and you may also have other rights which
vary from state to state.
Sears BrandsMonogement Corporation, Hoffmon Estates, IL60179
When using electrical appliances, basic safety precautions should always be
foI!owed,_ncluding the following:
i. READ oJI instructions.
2. To protect against risk of electrical shock do not put b_ender in water Or other liquid.
3, Close supervision is necessary when any appliance is used by or near children,
4. UNPLUG from outlet when not in use, before putting on or faking off parts, and
before cleaning.
S AVOID contact with moving parts.
6. DO NOT operate any appliance with a damaged cord or plug, or after the appliance
malfunctions or has been dropped or damaged in any manner. Return appliance to
the nearest authorized service facility for examination, repair or adjustment.
7. The use of accessory attachments, including canning iars, not recommended by the
appliance manufacturer may cause o risk of personal iniur,!
8. DO NOT use outdoors.
9, DO NOT let the cord hang over the edge of table or counter.
10. Keep hands and utensils out of container while blending to reduce the risk of severe
injury to persons or damage to the blender. A scraper may be used, but must be
used ONLY when the blender is not running,
11. Blades are sharp, Hc_ndte carefully,
12.Toreducetheriskofinjury, never place cutter-assembly blades on base without jar
properjyattached.
13. ALWAYS operate blender with cover in place.
14.When blending hot liquids remove measuring cup from the two-piece lid. Do not fill
jar beyond 3-cup level.
15. To protect against electrical shock this appliance is equipped with a cord having a
3-prong grounding-type plug for insertion in_o a proper grounding-type receptacle
DO NOT alter the Plug for use in a 2-prong receptacle. If the plug will not fit into
a receptacle, have the proper receptacle insla]Ied by a qualified electrician.
16.A short powersupply cord (or detachable powersupp[y cord] is to be provided to
reduce risks resulting from becoming entangled in or tripping over a ranger cord
_7.Thisappliance is for household use only.
18.SAVE THESE INSTRUCTIONS!
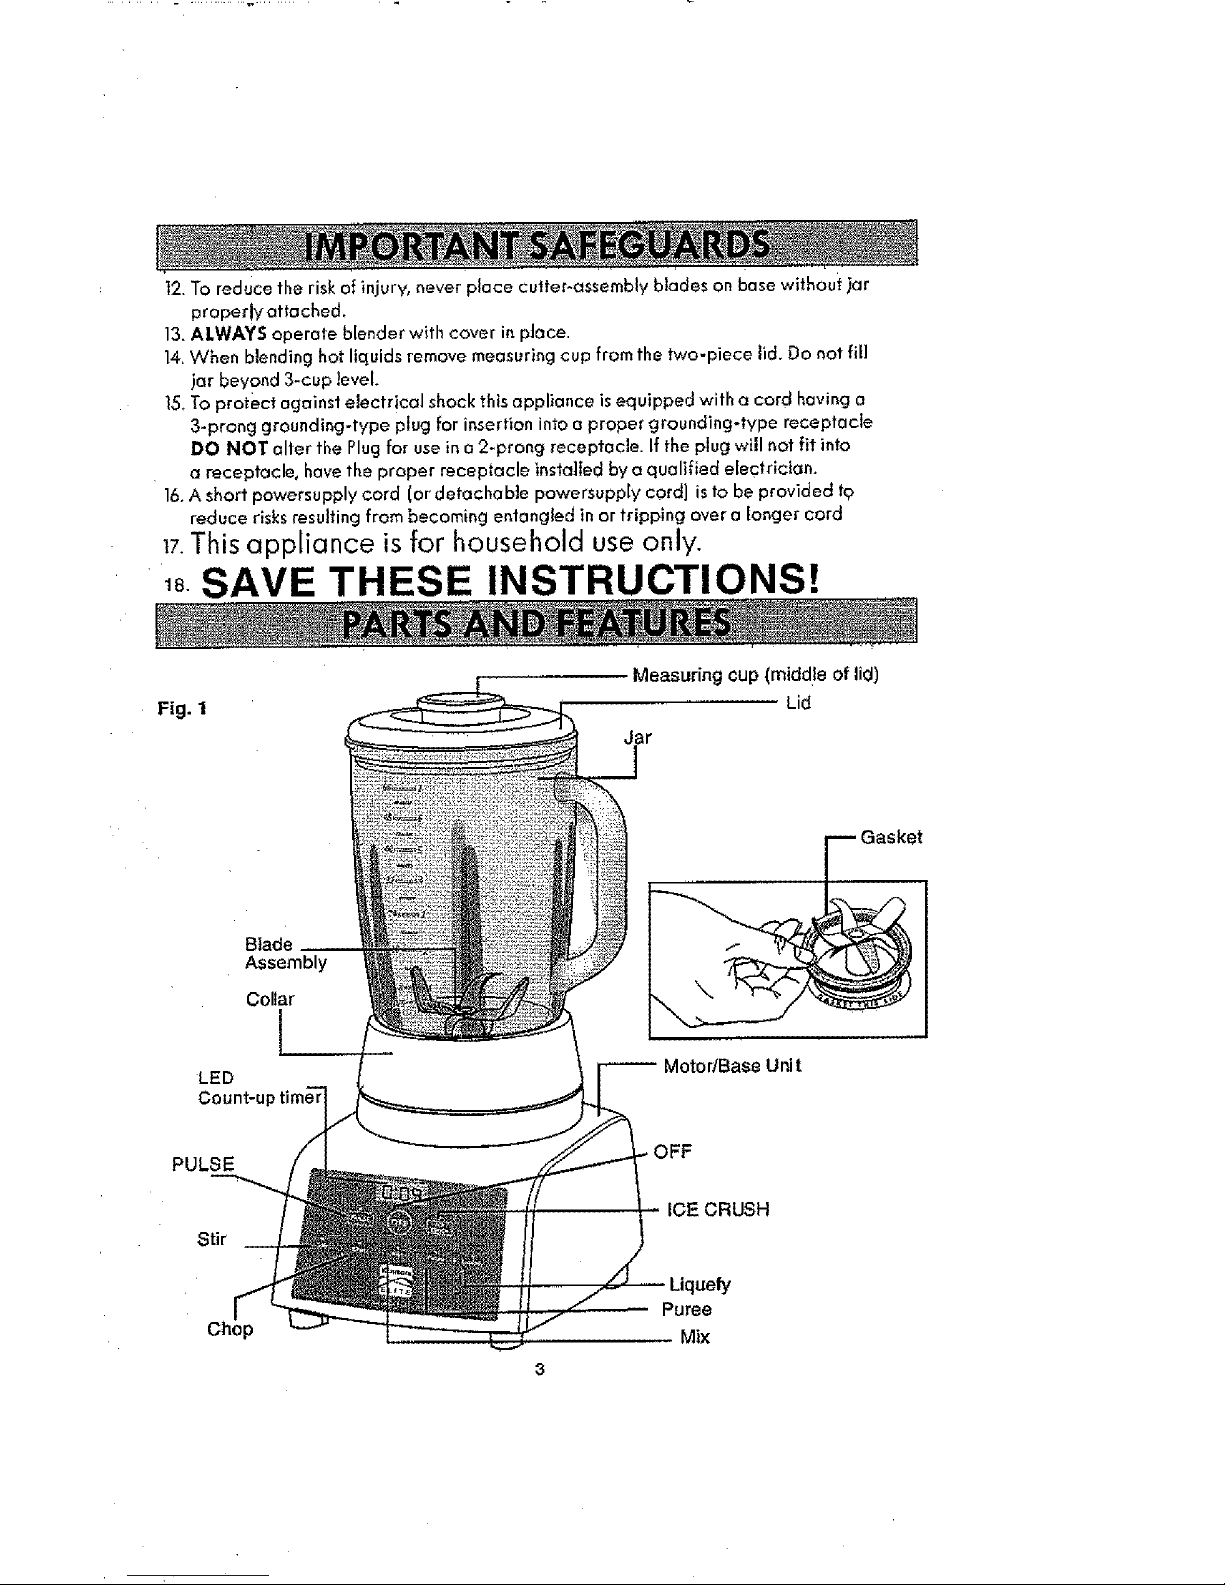
Fig. 1
Measuring cup (middle of lid)
Jar
Lid
Blade
Assembly
Collar
I
LED
Count-u
PULSE
Stir
_e,.., t1
Motor/Base Unit
OFF
ICE CRUSH
Puree
Mix
3
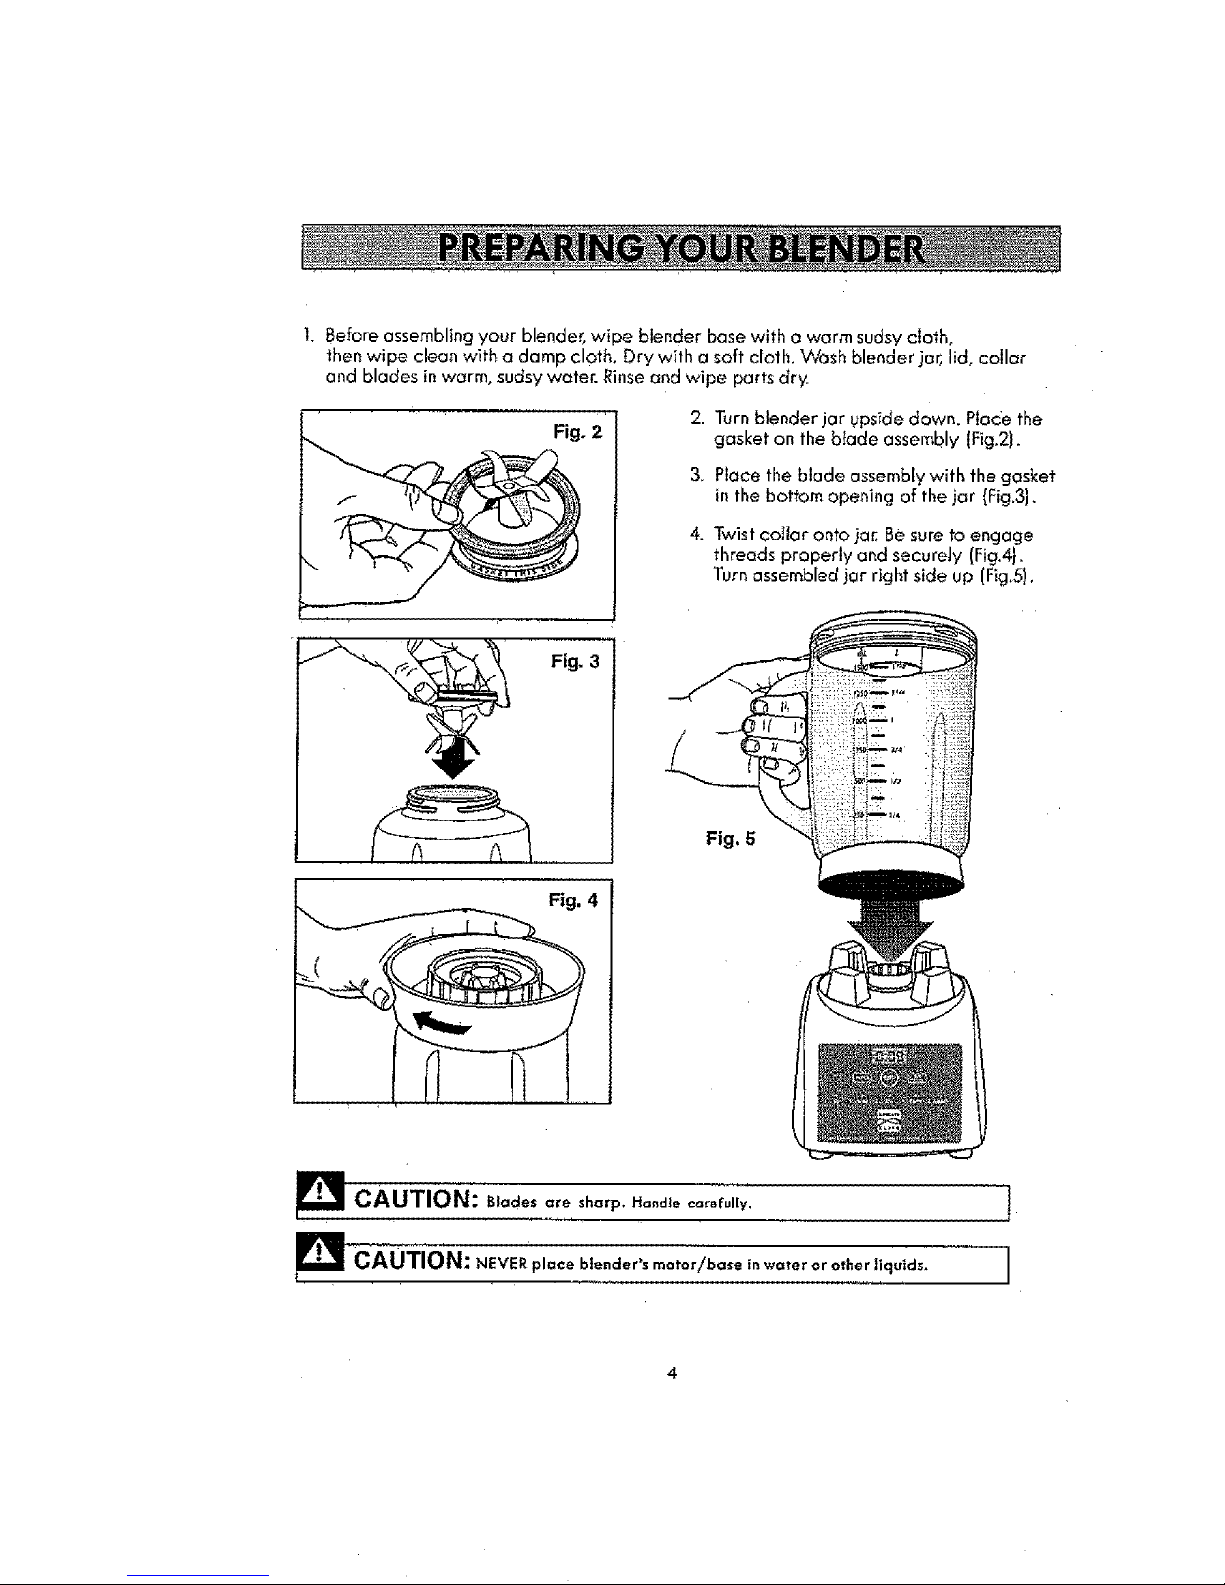
1. Before assembling your blender, wipe blender base with a warm sudsy cloth,
then wipe clean with a damp cloth, Dry with a soft cloth. Wash blender jar, lid, collar
and blades in warm, sudsy water. Rinse and wipe parts dry
2. Turn blender jar .upside down. Ploc_e the
gasket on the b_ade assembly (Fig.2).
3. Place the blade assemblywith the gasket
in the bottom opening of the jar {Fig,3].
4. Twist coJlar onto jar. Be sure to engage
threads properly and securely (Fig.4},
Turn assembled jar right side up (F_g.5).
Fig. 3
"_ CAUTION: Blade,, ,:,_o sharp, Handle .... fully.
m: CAUT'ON: NEVE_ _,_ce b,ender', motor/bo., in _€_,er or o,_er ,,quid,. I

Your blender has been designed to work ina
variety of ways to suit your blending needs.
Once you plug the blender in, The LED light
display is illuminated. Operate the blender in
either continuous or pulse made by pressing
the speed buttons. The soft start Function begins
blending action slowly, and then picks up to
maximum setting speed.
1. Make surethe power cord isunplugged.
2, Place Bbnder motor/base on a dry, level,
stable surface,
3. Set jar assembly into place on motor/base,
making sure motor/base and jar are
securely tightened into place.
4. Place the _ood solids and liquids to be
blended into the jar and put the lid on
the jar before blending. Be sure _he
measuring cup is _nplace in the middle
of the lid.
5. Plug power cord into a standard
120-V, 60 Hz AC-onty, 3-prong
electrical outlet. The blue LCD will display
0:00 for the timer, and the blue OFF
indicalor will illuminate (Fig, 7).
Fig. 6
Fig, 7
 Loading...