

Page 1

Undercounter Dishwasher
Installation Instructions
What do I need to have to
install the dishwasher?
• Tools, parts & materials 1-2
• Requirements 3-6
• Dishwasher dimensions Back cover
• Customize dishwasher Back cover
What do I need to do before
i install the dishwasher?
• Prepare cabinet 7-12
• Prepare dishwasher 13-16
How do I install the
dishwasher?
• Connect dishwasher 17-20
• Secure dishwasher 21
• Check operation 22
Important:
Read and save these instructions.
Doing so will:
• make installation easier.
• help you in the future if you have questions.
• help if you have an electrical inspection.
Call your Sears store or service center when you
have questions or need service. When you call, you
will need the dishwasher model and serial numbers.
Part No. 9744231
Page 2
Your safety and the safety of
others is very important.
We have provided many important
safety messages in this manual and
on your appliance. Always read and
obey ali safety messages.
O
3
■3
O
-^Éii
This is the safety alert
symbol. This symbol alerts
you to hazards that can kill
or hurt you and others. All safety
messages will be preceded by the
safety alert symbol and the word
“DANGER” or “WARNING". These
words mean:
You can be killed or seriously
injured if you don’t follow
instructions.
All safety messages will identify the
hazard, tell you how to reduce the
chance of injury, and tell you what
can happen if the instructions are
not followed.
You need to:
carefully open dishwasher door
while someone grasps the rear of
the dishwasher. Remove shipping
materials, drain hose and lower rack.
Close dishwasher door. Latch the
dishwasher door shut,
observe all governing codes and
ordinances.
instaii this dishwasher as specified in
these instructions.
have everything you need to properly
install dishwasher,
contact a qualified instaiier to insure
that dishwasher is instaiied to meet
ail electrical and plumbing national
and local codes and ordinances.
Page 3
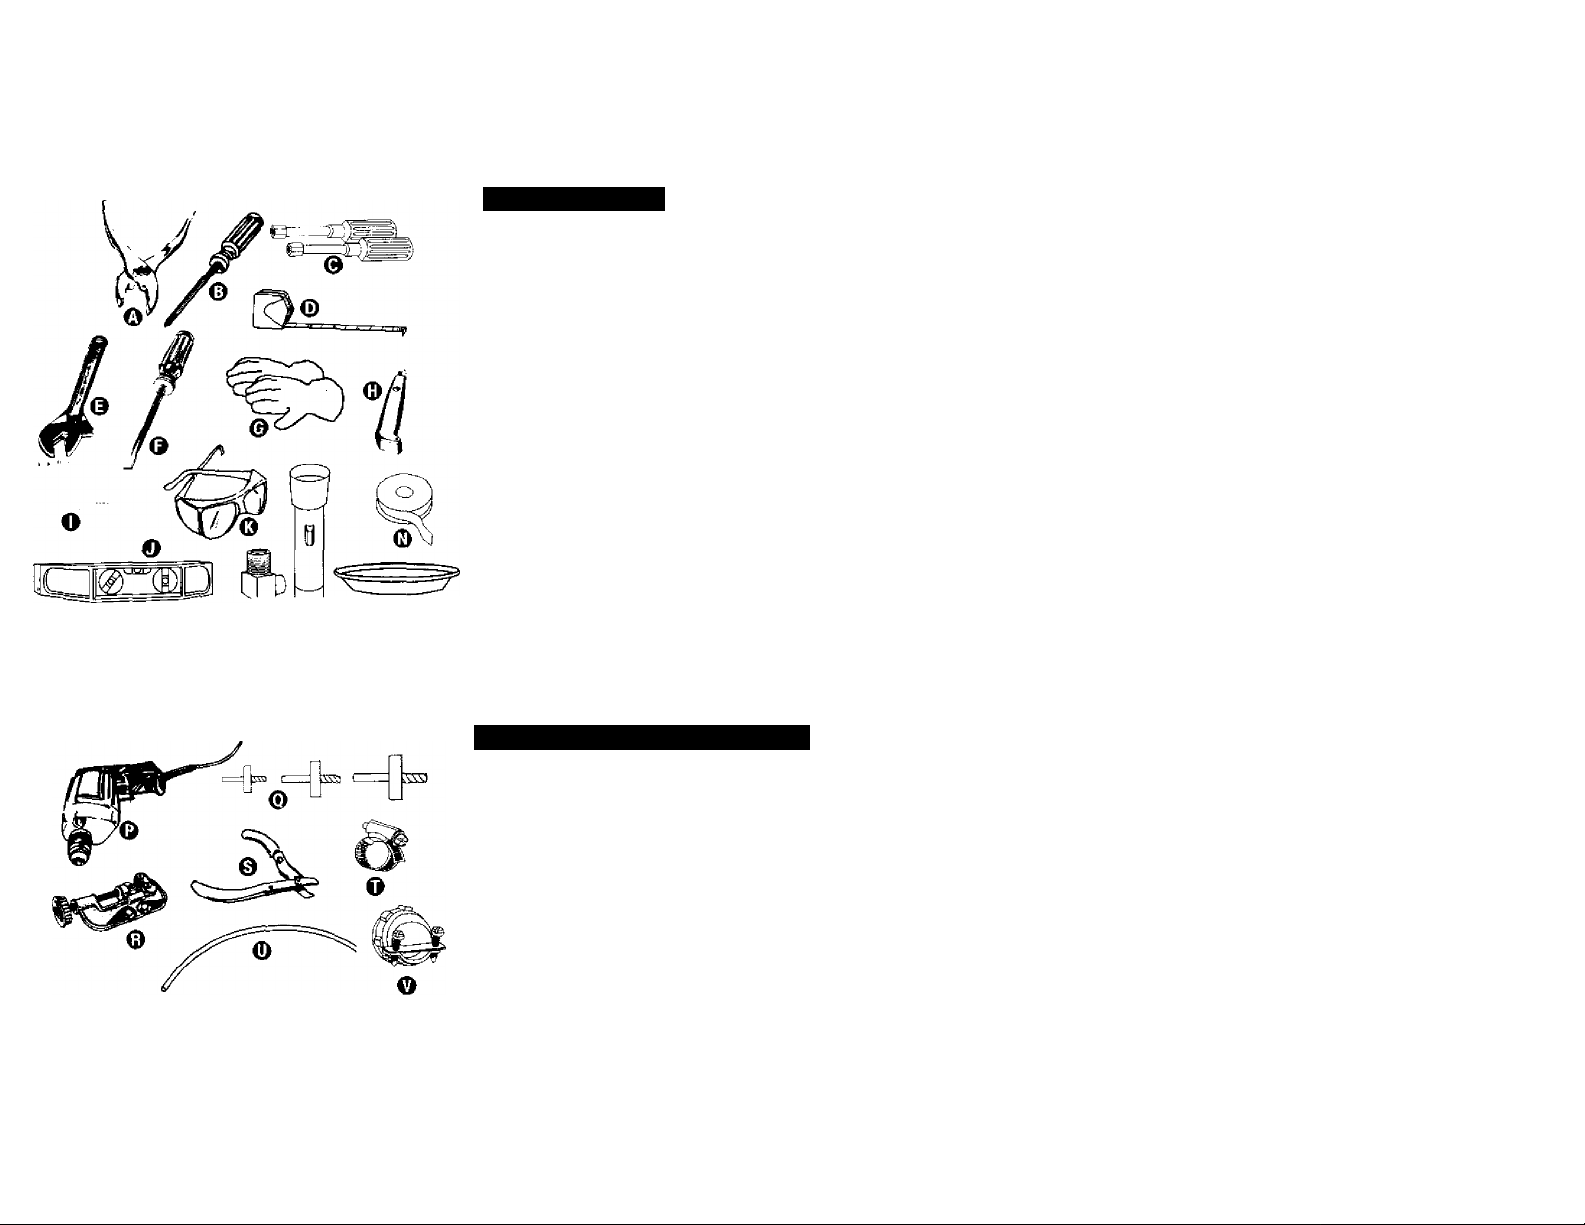
Tools and
materials needed
All installations
O ® ®
A. pliers
B. Phillips screwdriver
C. 5/16" and 1/4" nut
drivers or hex
sockets
D. measuring tape or
ruler
E. 10" adjustable
wrench that opens to
M/r (23cm)
F. flat-blade
screwdriver
G. gloves
H. utility knife
I. 2 twist-on wire
connectors which
are the proper size
to connect your
household wiring to
16-gauge wiring in
dishwasher
J. small level
K. safety glasses
L. 90" elbow with 3/8"
N.P.T. external
threads on one
end. (The other end
must tit your water
supply line.)
M. flashlight
N. Teflon™ tape or
pipe joint
compound
O. shallow pan
In addition for new installations
P. electric drill with
Q. 1/r. 3/4" and
1'1/?‘ hole saw bits
R. small tubing cutter
S. wire stripper
T. 1-1ff"-2"screw-^pe
clamp if connecting
to waste-tee
U. copper tubing (3/8"
recomnoended)
V. clamp connector or
conduit connector to
fit a 7/8“ (2.2cm)
diameter hole
Parts supplied
A. 2 drain hose clamps
o
©
Make sure all these parts are included.
—p-. See parts list for accessories available tor your
aJ dishwasher.
0
B. 2 No. 10x1/2"
Phillips-head screws
C. drain hose
Page 4

(0
Cabinet opening
0)
E
o
CD
tsc
^WARNING
V
Electrical Shock Hazard
Enclose dishwasher completely
on the top, sides, and rear.
Failure to do so can result in
death or electrical shock.
Do not run water or drain lines or
electrical wiring where they can cross
in front of or contact dishwasher motor
or legs.
The location must provide 1/4“ (.64cm)
minimum clearance between motor and
flooring to prevent motor overheating.
Do not install dishwasher over carpeted
flooring.
Protect dishwasher and water lines
leading to dishwasher against freezing.
Damage from freezing is not covered by
the warranty.
A side panel kit is available from your
Sears store or service center for
installing your dishwasher at end of
cabinet.
Check location where dishwasher
will he installed. The location must
provide:
✓ easy access to water, electricity and
drain.
✓ convenient loading. Corner iocations
require a 2" (5.1cm) minimum
clearance between the side of the
dishwasher door and wali or cabinet.
✓ square opening for proper operation
and appearance.
Page 5
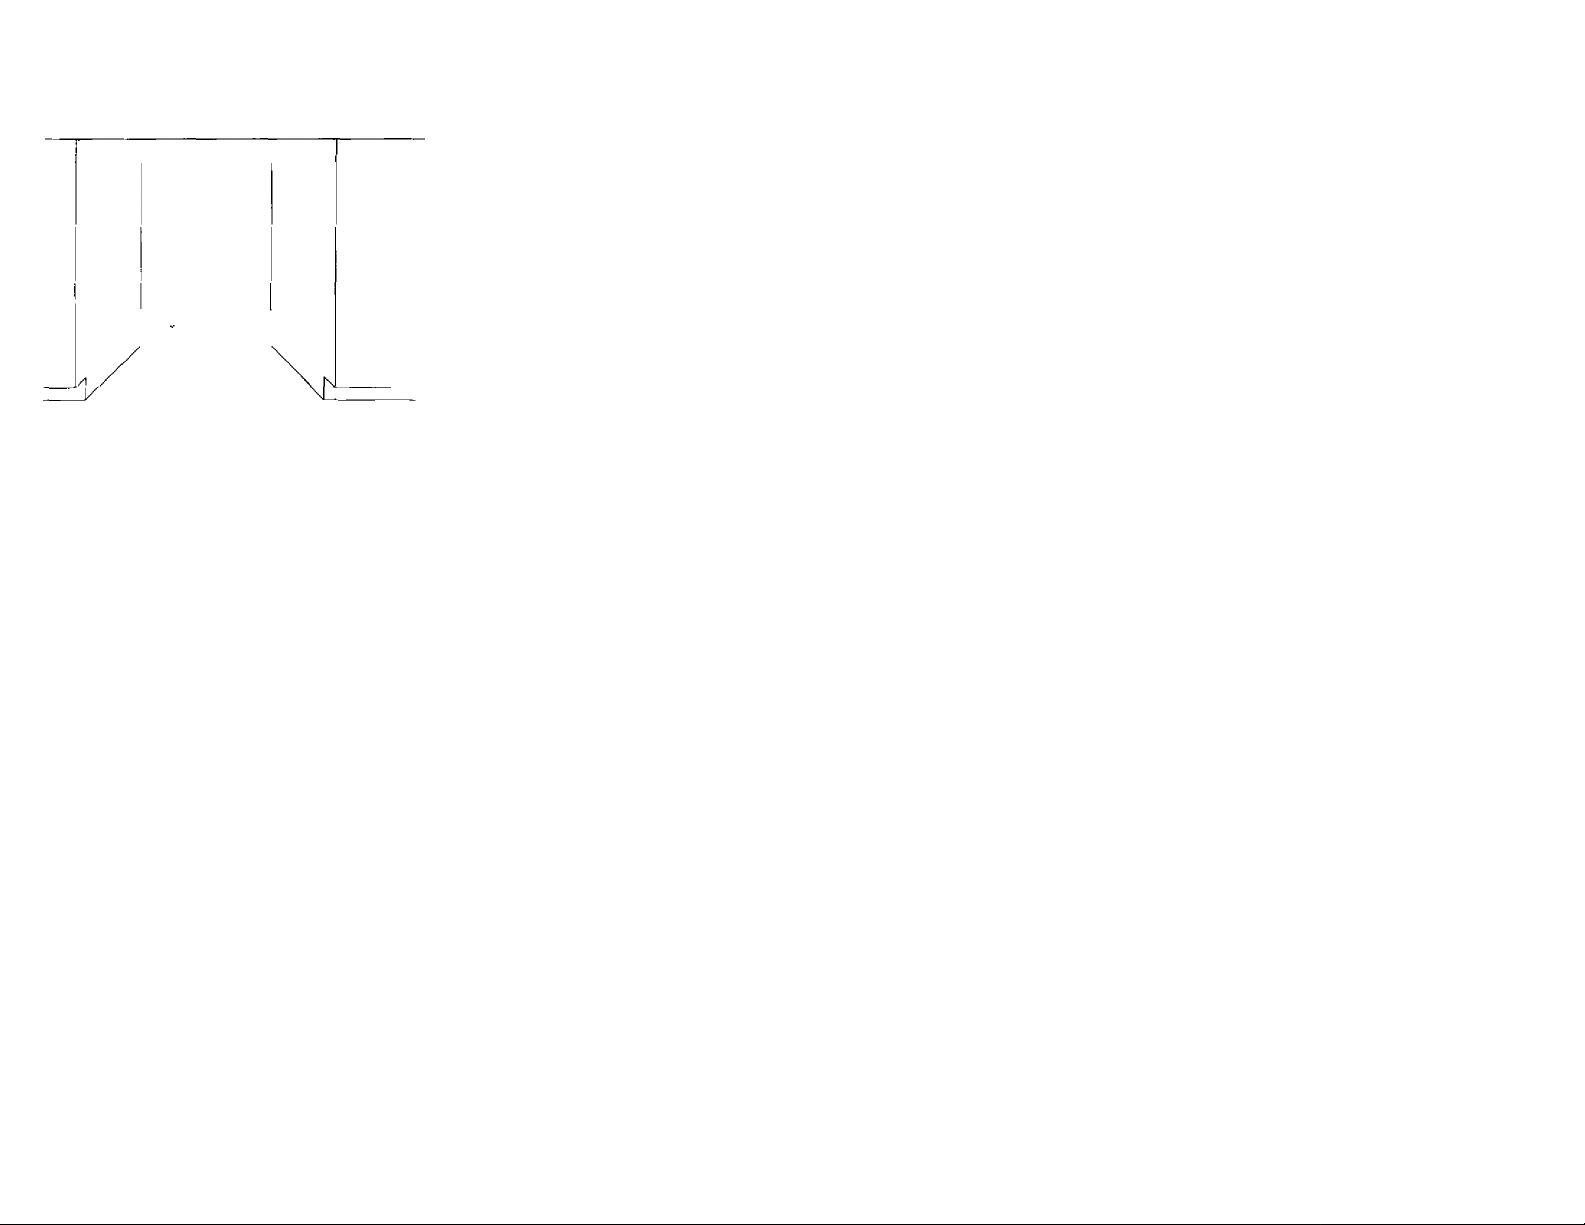
✓ cabinet front perpendicular to floor.
✓ level floor. (If floor at front of opening
is not level with floor at rear of
opening, shims may be needed to
level dishwasher.)
If dishwasher will be left unused for a
period of time or in a location where it
may be subject to freezing, follow
“Winterizing” instructions in Use and
Care Guide.
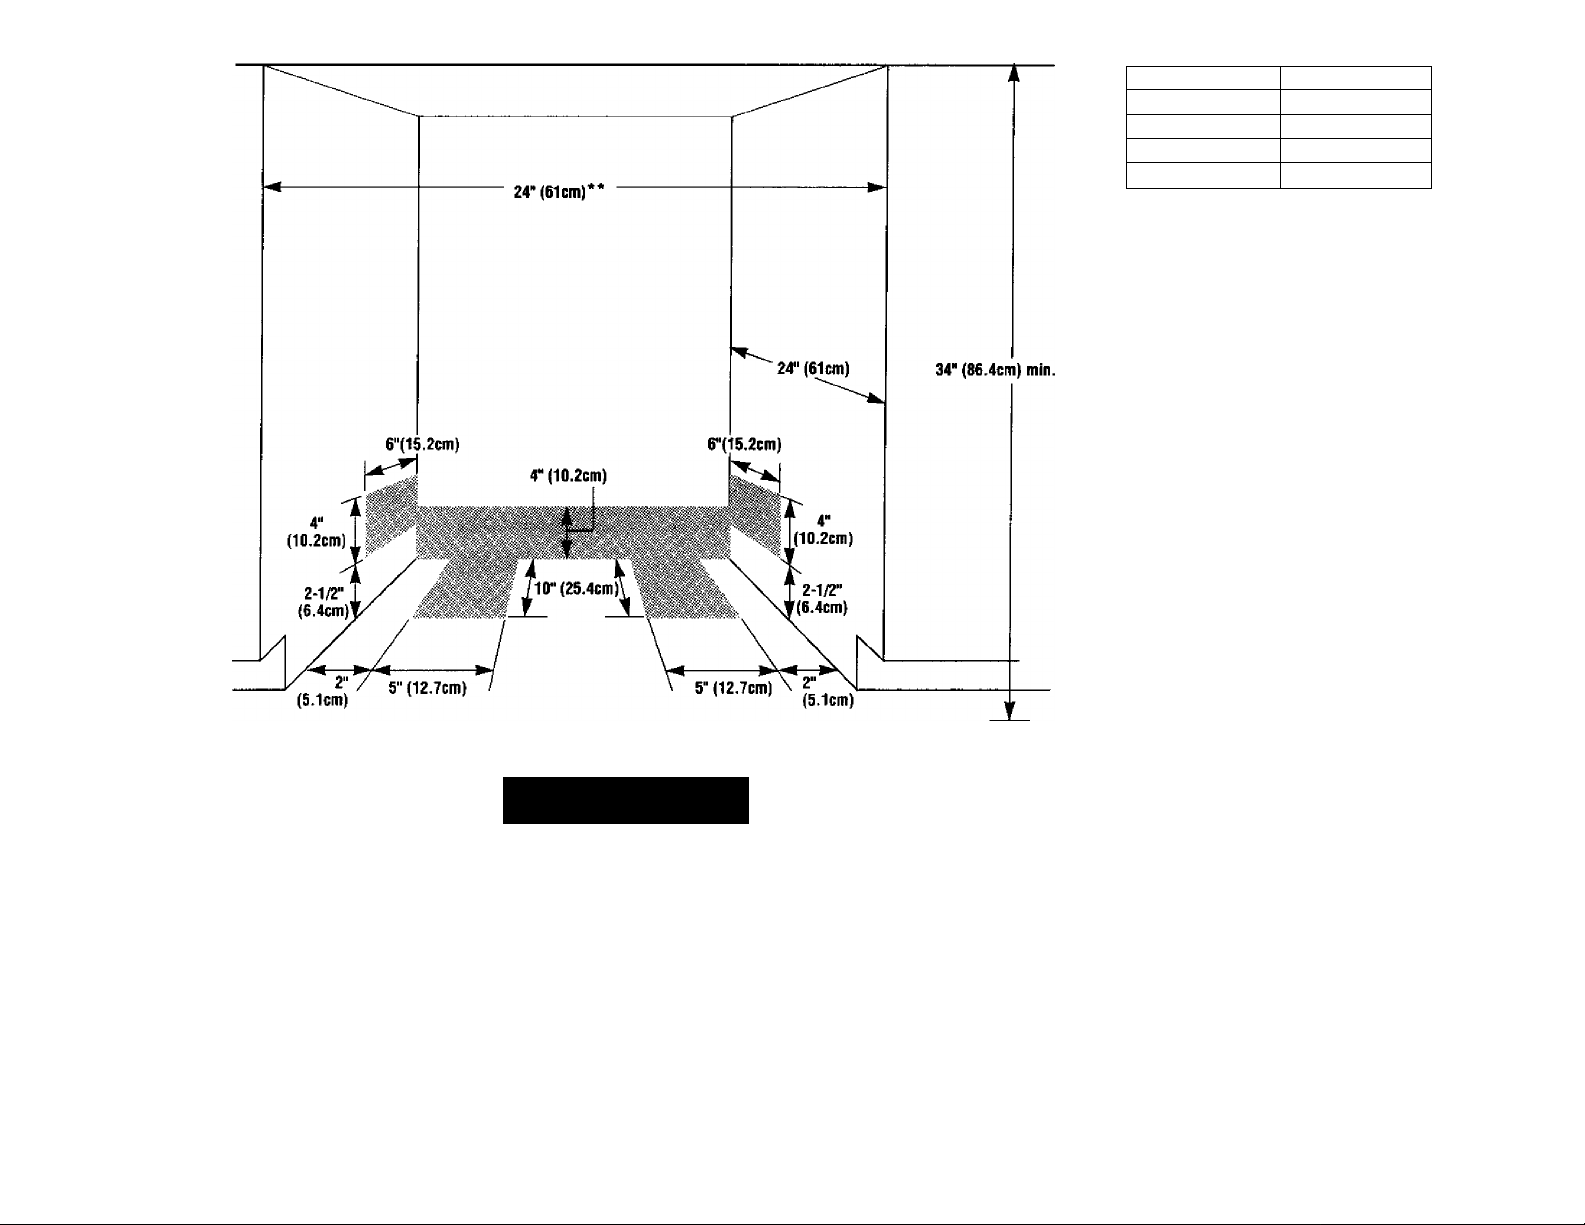
Make sure pipes, wires and dram hose
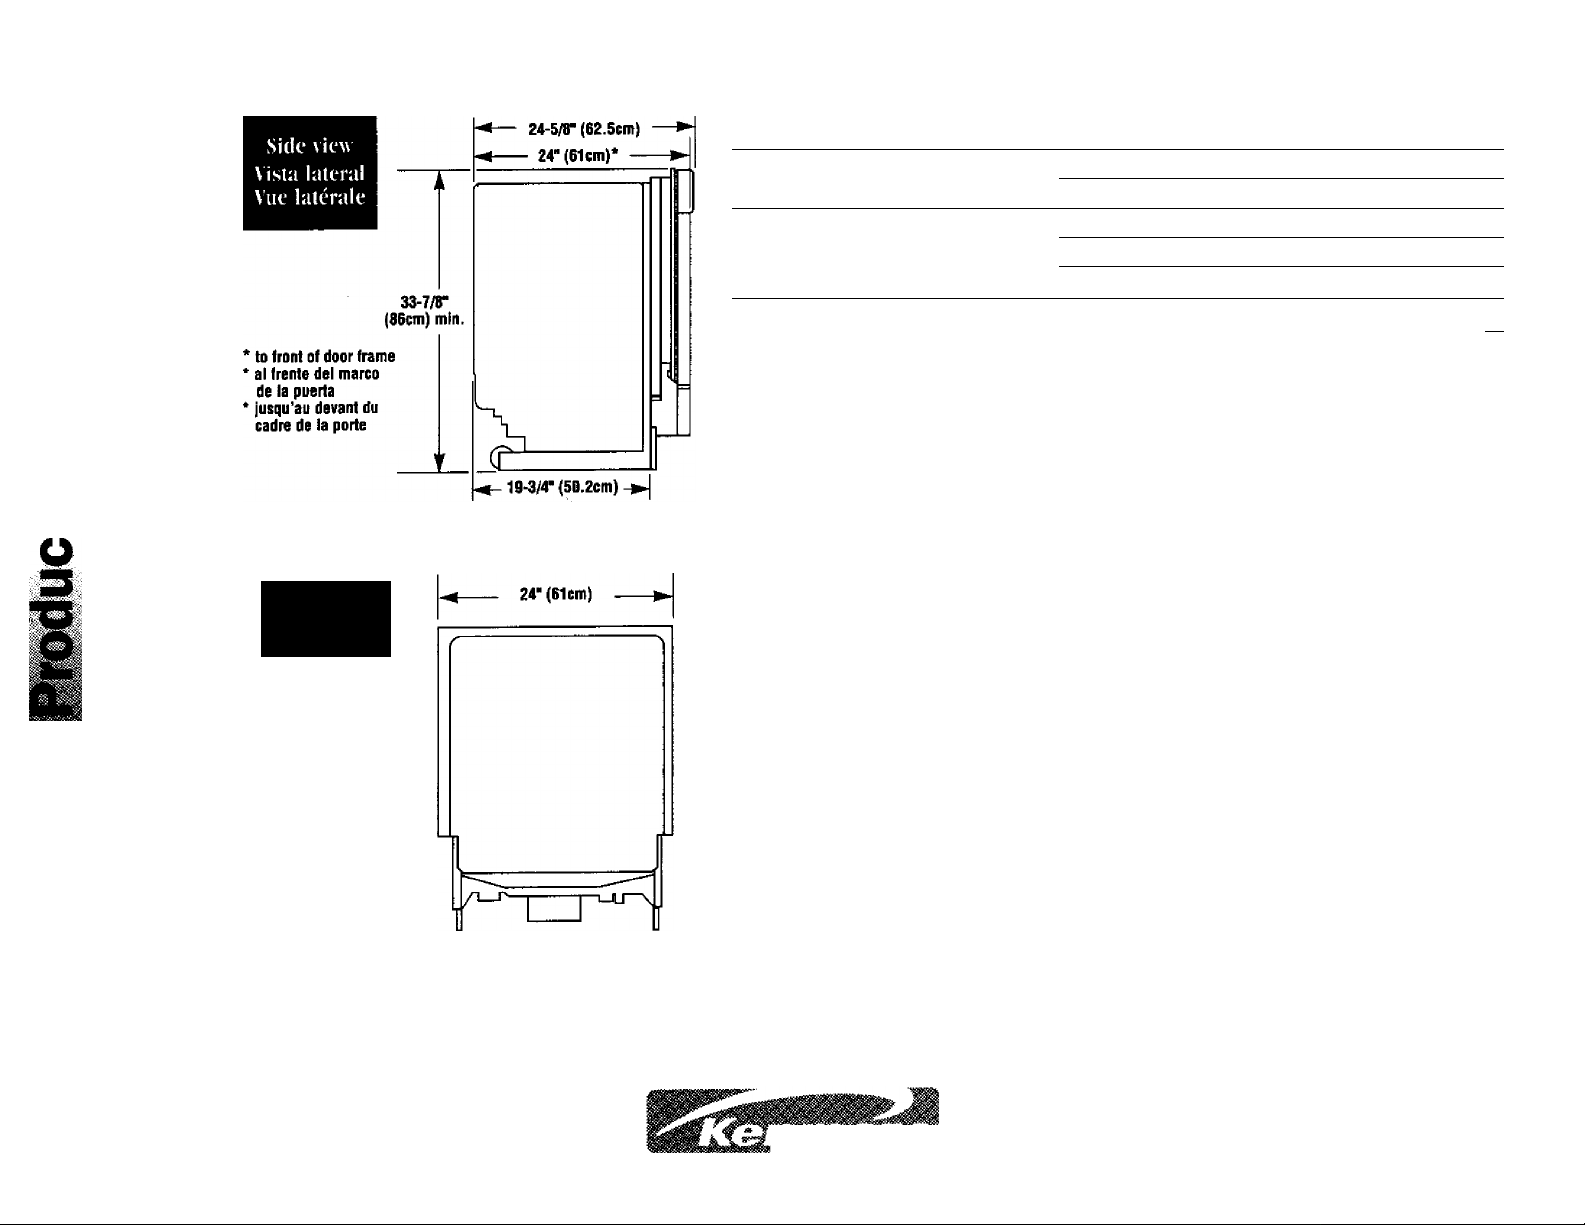
are within the shaded area. See Page 7
for dimensions.
HELPFUL TIP:
If the noor tn the itlstiwasher
opening te iBieven (example:
tile floovbig oitfy part wmy Into
opening you wftt need to take
special care In meaeuring
cNittenskifte and In feveflttg
dishwasher.
continued on page 5
Page 6
continued from page 4
Electrical
If is the customer’s responsibility:
To contact a qualified electrician.
To assure that the electrical
installation is adequate and in
conformance with all national and
local codes and ordinances.
You must have:
✓ 120-volt, 60-Hz, AC-only, 15- or
20-amp., fused electrical supply.
✓ COPPER WIRE ONLY.
We recommend:
✓ a time-delay fuse or circuit breaker.
✓ a separate circuit.
If direct wiring dishwasher:
✓ use flexible, armored or non-metallic
sheathed, copper wire with
grounding wire that meets the wiring
requirements for your home and
local codes and ordinances.
✓ use strain relief method provided
with house wiring junction box or
install a U.L.-listed/CSA-certified
clamp connector to the house wiring
junction box. If using conduit, use a
U.L-listed/CSA-certified conduit
connector.
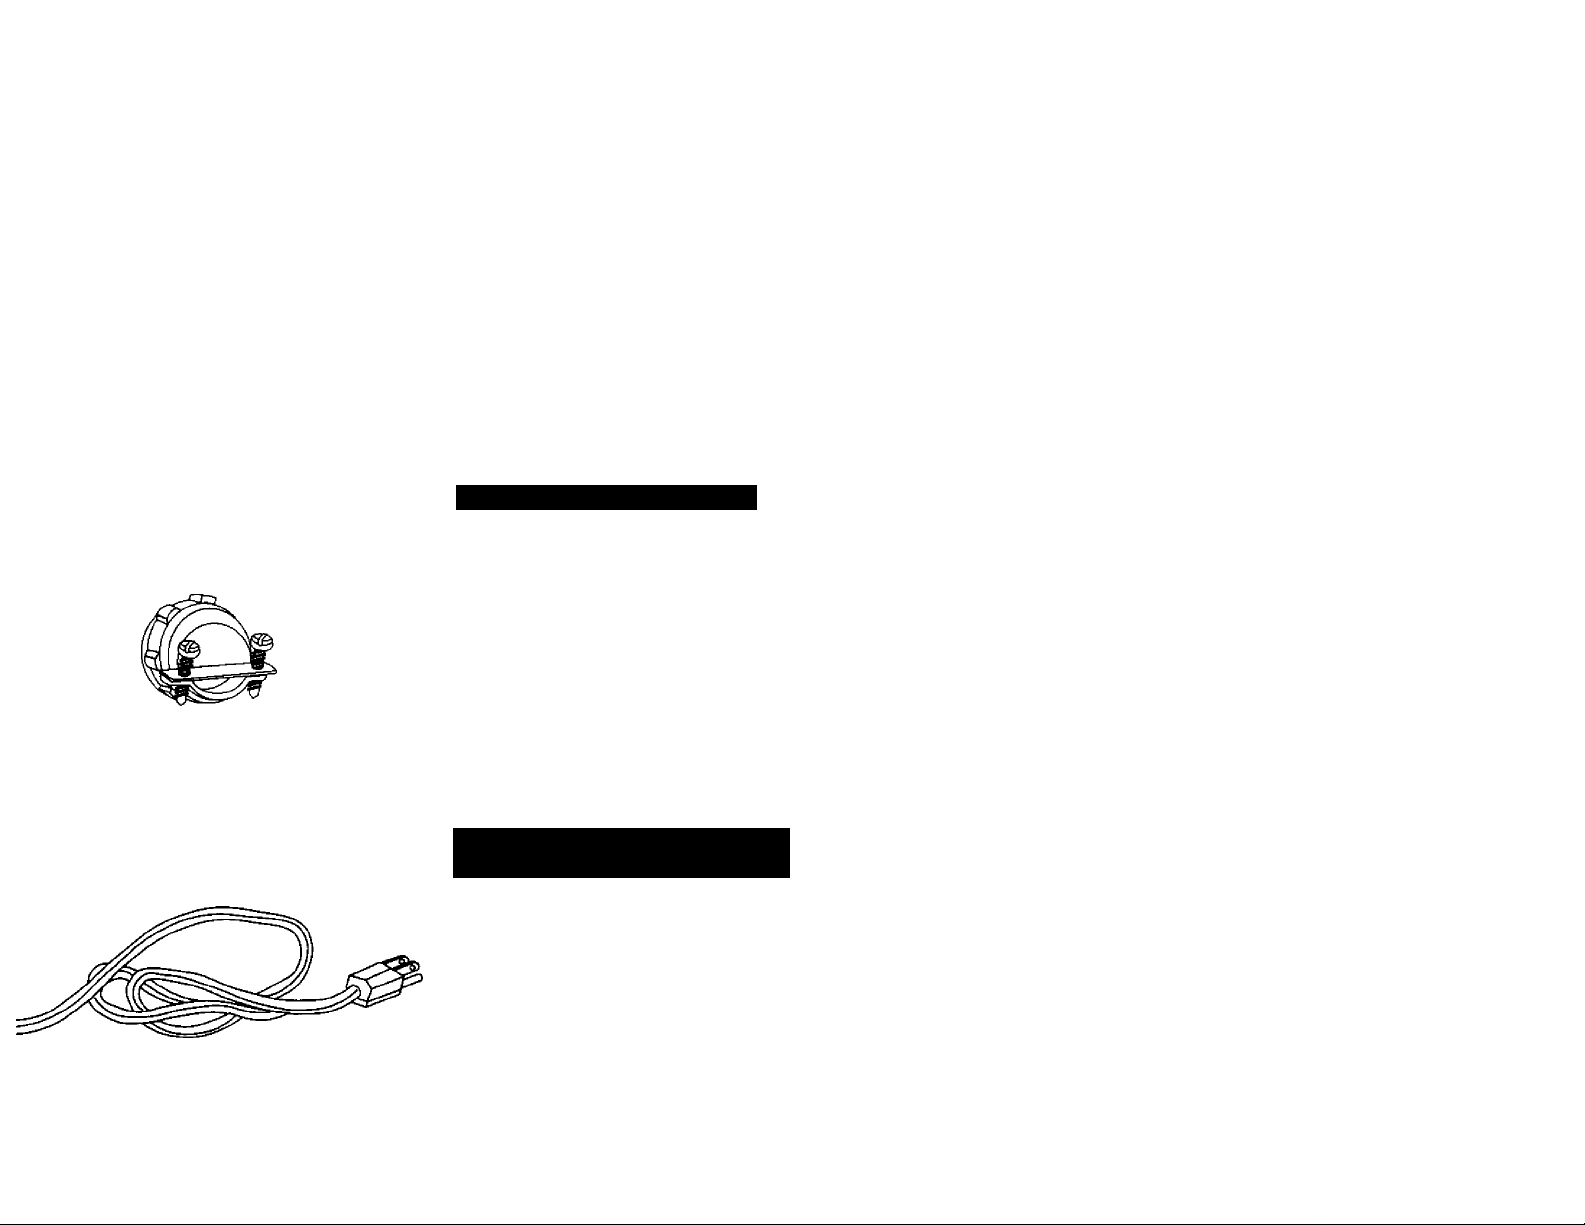
If connecting dishwasher with
a power supply cord:
✓ use Power Supply Cord Kit (Part No.
4317824) available from your Sears
store or service center. Follow the kit
instructions for installing the power
supply cord.
If kit is unavailable, use a U.L.-listed,
16-gauge, three-conductor power
supply cord that meets all local
codes and ordinances. Maximum
length of the power supply cord is
6 feet (1.8m).
✓ a clamp connector to fit a 7/8"
(2.2cm) diameter hole is required to
Page 7
secure power supply coru lu
dishwasher terminal box.
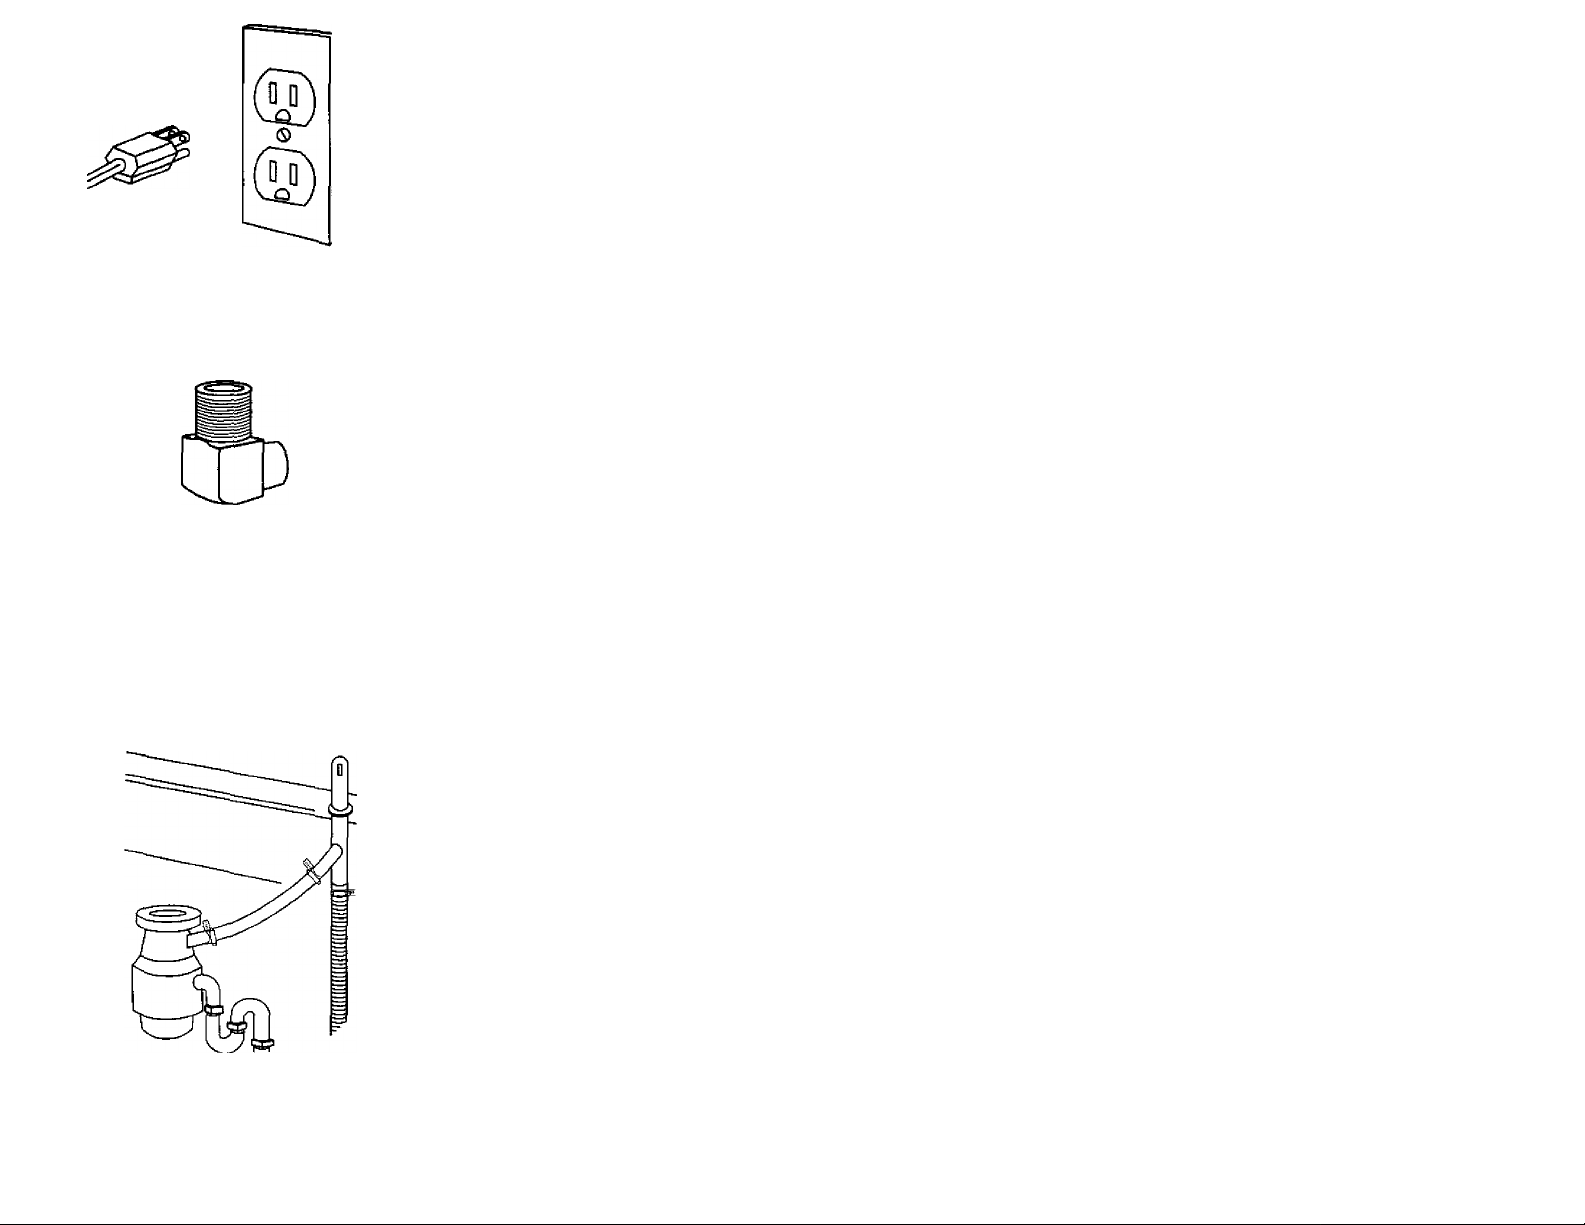
✓ power supply cord must plug into a
mating three-prong, grounded outlet,
located in the cabinet next to the
dishwasher opening. Outlet must
meet all local codes and ordinances.
Water
You must have:
✓ a hot water line with 20-125 psi
(138-862 kPa) water pressure.
✓ 120®F {49°0 water at dishwasher.
✓ 3/8" O.D. copper tubing with
compression fitting (1/2" minimum
plastic tubing is optional but not
recommended).
✓ a 90° elbow with 3/8" N.P.T. external
pipe threads on one end.
Do not solder within 6" (15.2cm) from
water inlet valve.
Drain
You must:
✓ use a new 12 feet (3.7m) maximum
drain hose that meets all current
AHAM/IAPMO test standards and is
resistant to heat and detergent.
✓ have a high drain loop 20 inches
(50.8cm) above the subfloor or floor.
✓ connect drain hose to waste tee or
disposer inlet above drain trap in
house plumbing and 20 inches
(50.8cm) minimum above the floor.
✓ use an air gap if the drain hose is
connected to house plumbing lower
than 20 inches (50.8cm) above
subfloor or floor.
✓ use 1/2" minimum I.D. drain line
fittings.
6
Page 8
C
o
to
m
Cut openings In shaded area of caoinet walls
or floor as specified in chart:
OPENING FOR: DIAMETER:
water line
drain line
direct wire 3/4" (1.9 cm)
power supply cord 1-1/2" (3.8 cm)
1/2" (1.3 cm)
1-1/2" (3.8 cm)
* Measured from the lowest point on the underside of countertop.
Minimum, measured from narrowest point of opening.
AWARNING
'll!
W
Electrical Shock Hazard
Disconnect electrical power at
the fuse box or circuit breaker
box before installing dishwasher.
Failure to do so can result in
death or electrical shock.
Page 9
A.
1.
2.
Disconnect the power supply. Turn
water off.
Put on gloves and safety glasses
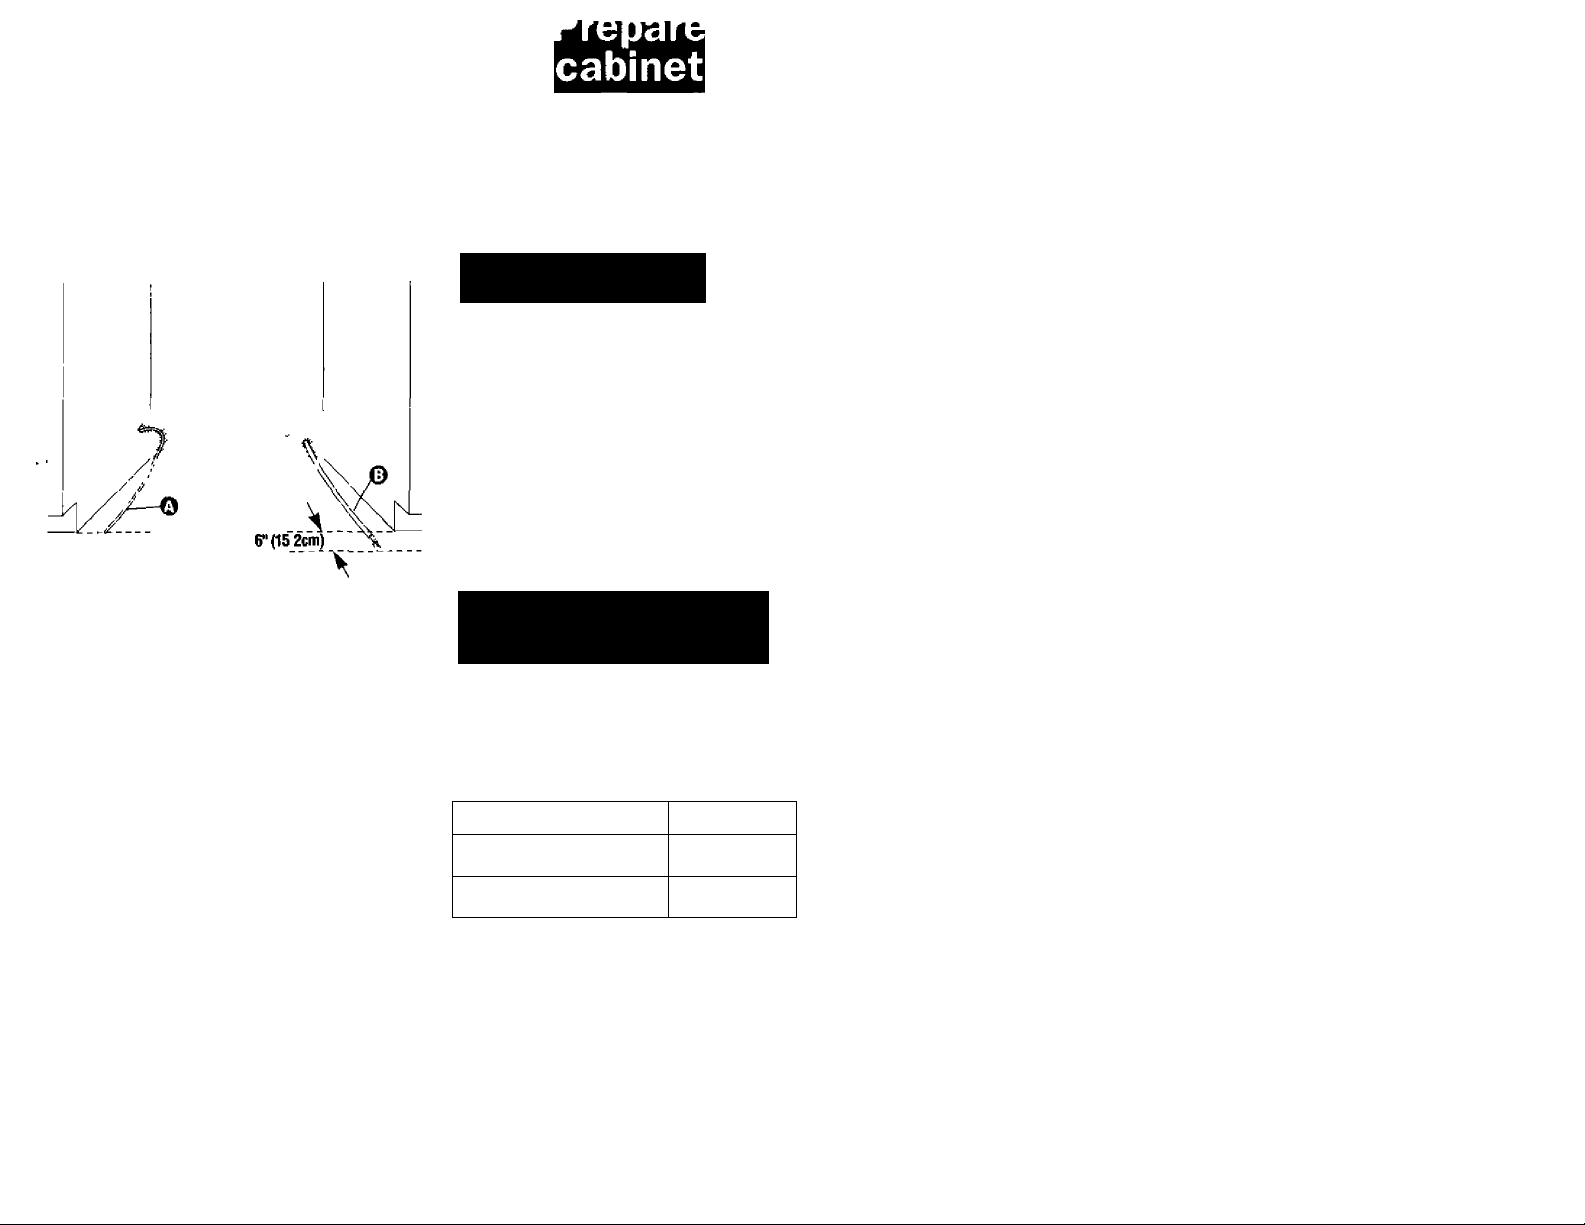
If you are replacing a
dishwasher;
✓ check that the water line Q reaches
to the front left of opening where the
water connection will be made
✓ check that the direct wire © reaches
to the front right of opening where
the electrical connection will be
made
If the water line and the direct wire
reach into the opening far enough, go to
step 10, page 11.
If you are installing a new
dishwasher, complete all of
the following steps:
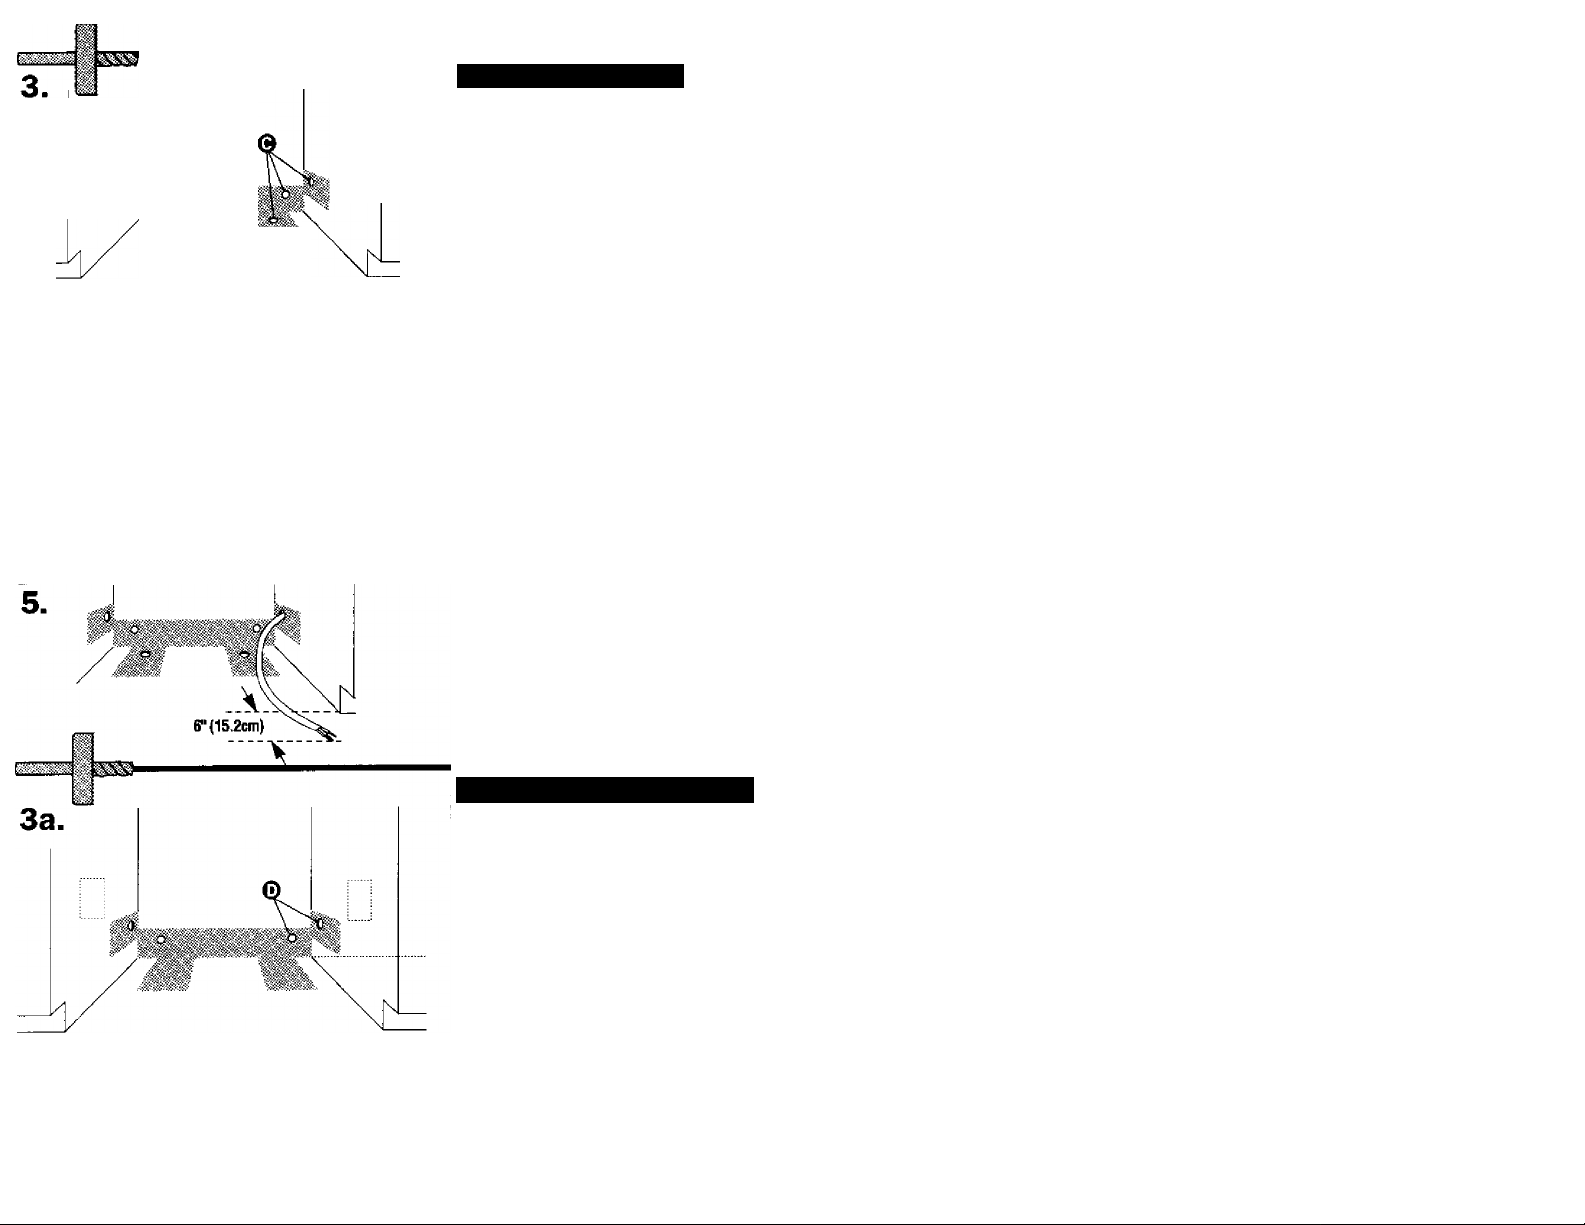
Electrical
Follow all national and local codes and
ordinances for completing electrical
supply to cabinet.
If you are:
direct wiring 3,4 and 5
using a power supply cord
use steps:
3a and 4a
HELPFUL TIP:
Wiring the dishwasher will be
easier if yott route wire into the
cabinet opening from the ri^t
side.
continued on page 9
8
Page 10
4,
continued from page 8
Direct wire method:
Cut a 3/4’ (1.9cm) hole © in right-hand
cabinet side, rear or floor. Optional
locations are shown.
Wood cabinet: Sand hole until smooth.
Metal cabinet: Cover hole with
Grommet (Part No. 302797) available
from your Sears store or service center.
Run wire into house wiring junction
box. Use strain relief method provided
with junction box. If no strain relief is
provided, install a U.L.-listed/CSAcertified clamp connector for flexibletype wire. If installing conduit, attach a
U.L.-listed/CSA-certlfied conduit
connector to junction box.
Run other end of wire through cabinet
hole. Cable must extend to the right
front of cabinet opening. Go to step 6.
4a.
Power supply cord method:
Cut a 1-1/2" (3.8cm) hole © in righthand cabinet rear or side. Optional
locations are shown.
Wood cabinet: Sand hole until smooth.
Metal cabinet: Cover hole with
Grommet (Part No. 302797) available
from your Sears store or service center.
Install a mating, three-prong,
grounding-type wall receptacle © in the
cabinet next to the dishwasher opening.
Go to step 6.
Page 11
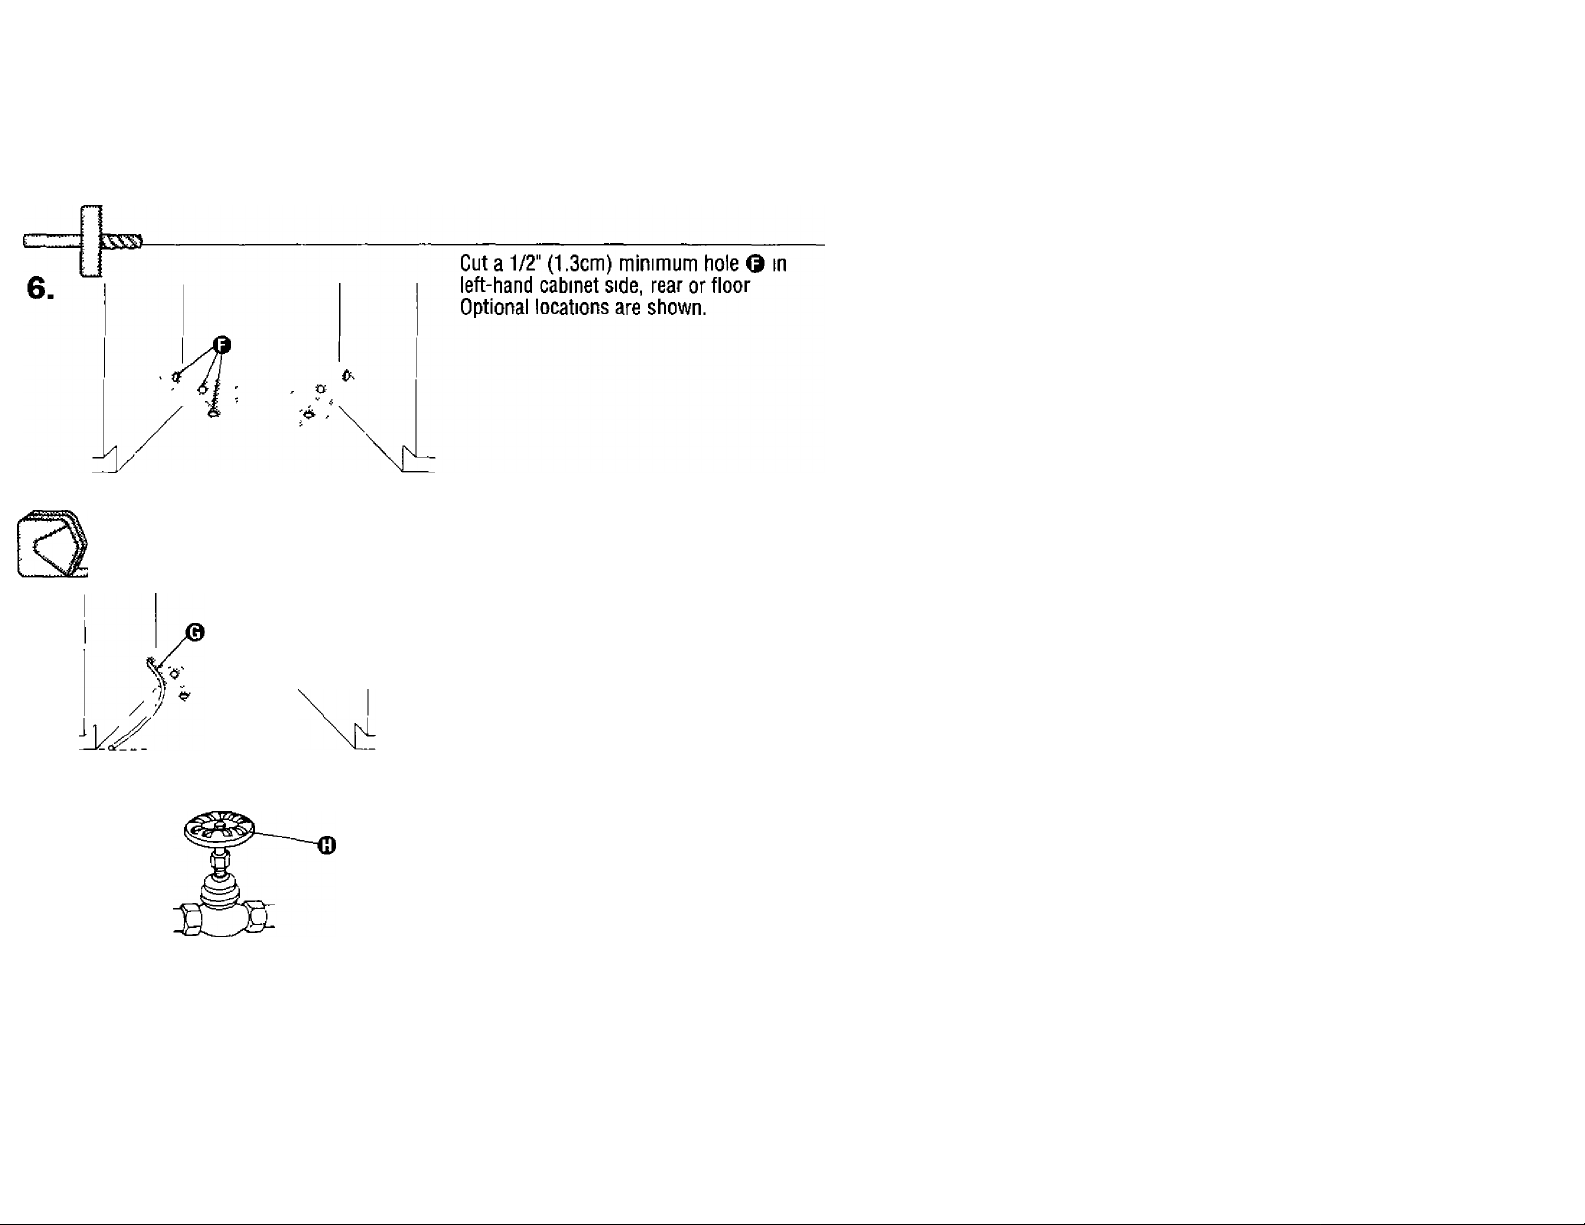
Water line
HELPFUL TIP:
Routlr^ the water ttne through
the left stde of cabinet opening
edit make water connection
easier.
7.
8.
9.
Ù’'
Measure overall length of copper tubing
© required. Attach copper tubing to
water line with manual shutoff valve
Carefully feed copper tubing through
hole in cabinet (copper tubing will bend
and kink easily) until it is far enough
into the cabinet opening to connect it to
dishwasher inlet on the front left of
dishwasher.
Turn shutoff valve © to “ON" position.
Flush water into a bucket to get rid of
particles that may clog the inlet valve
Turn shutoff valve to “OFF" position.
continued on page 11
10
Page 12
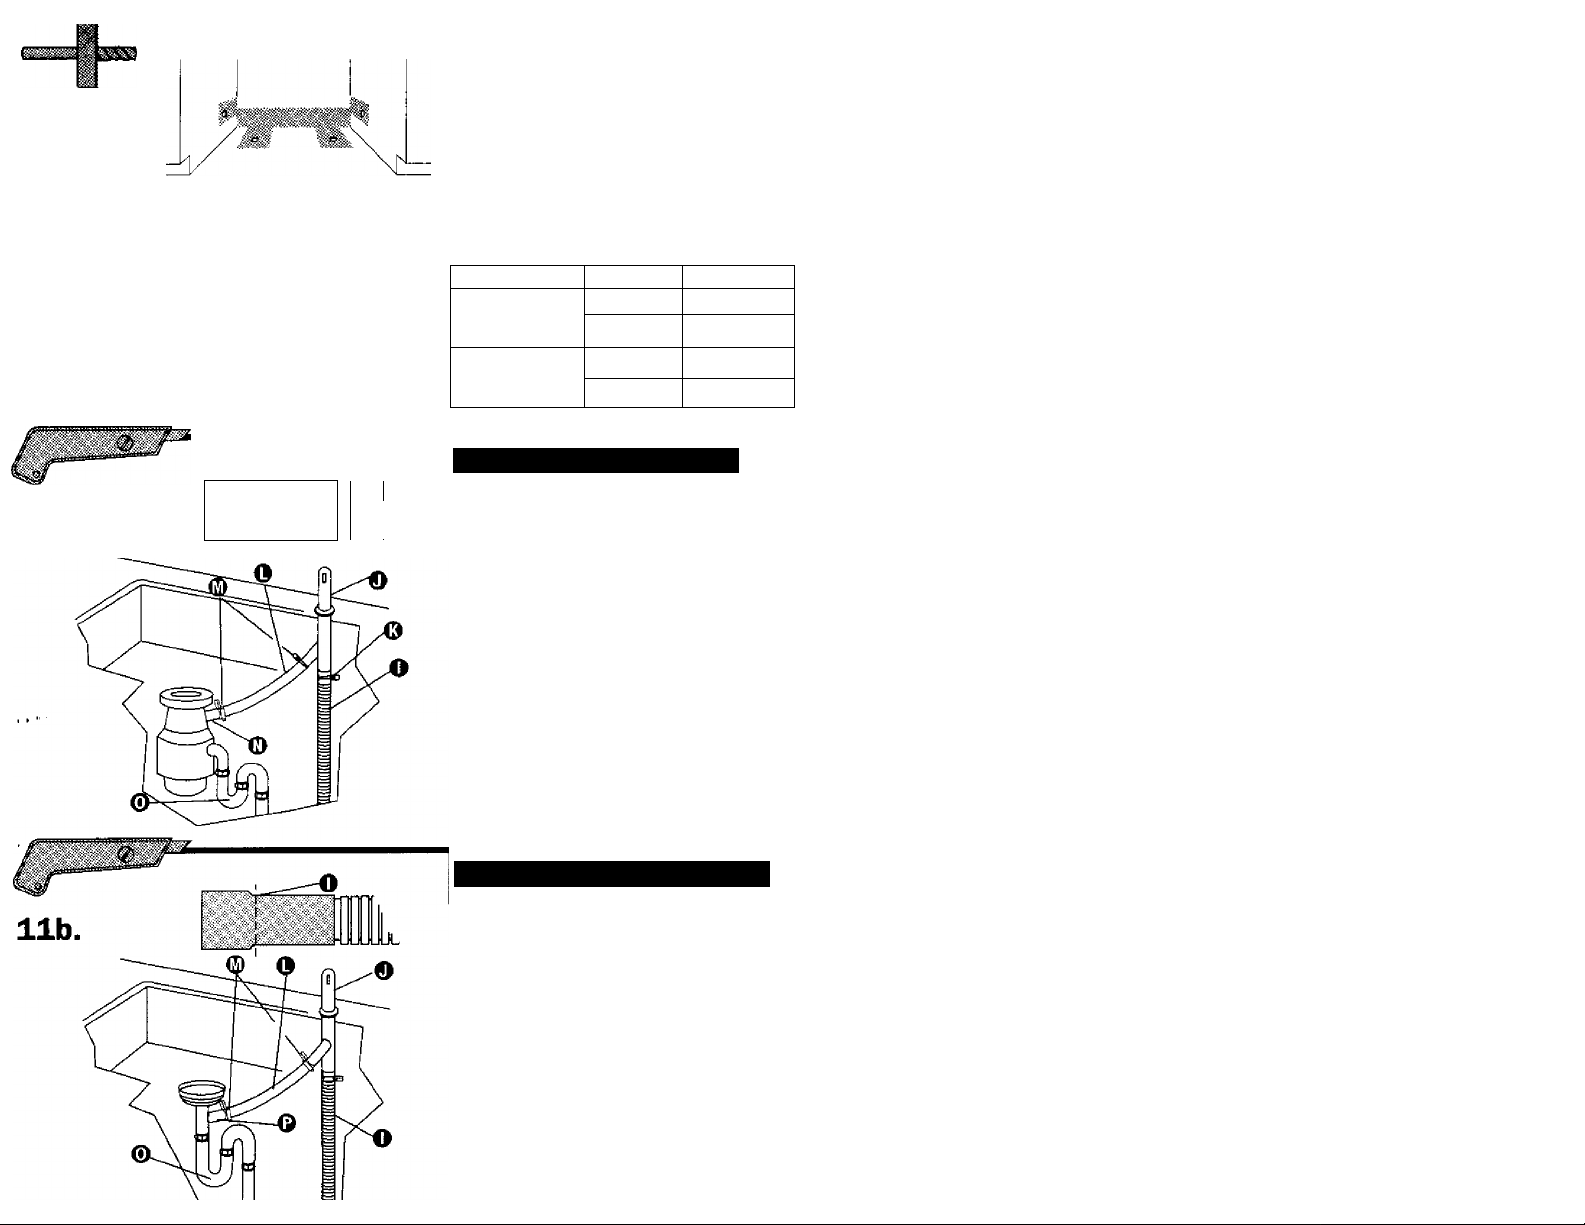
10.
continued from page 10
Drain hose
Cut a 1-1/2" (3.8cm) diameter hole in
cabinet wali or floor on the side of the
opening ciosest to the sink.
Connect drain hose to waste tee or
waste disposer following one method.
11.
11a.
If you have:
a waste disposer
no waste disposer
*an air gap is recommended
Waste disposer + air gap
1
i
HU.Ll
1. Remove the disposer knockout plug.
Cut end of drain hose O if needed
(do not cut ribbed section).
2. Attach drain hose to air gap O with
spring-type clamp O.
3. Use a rubber hose connector* O
with spring or screw-type clamps*
© to connect air gap to disposer
inlet O.
This connection © MUST be before
drain trap © and at least 20” (50.8cm)
above the floor where dishwasher will
be installed. Goto step 12.
and:
an air gap 11a.
no air gap* 11c.
an air gap 11b.
no air gap* 11d.
no to step:
No waste disposer + air gap
1. Cut end of drain hose O if needed
(do not cut ribbed section).
2. Attach drain hose to air gap © with
1-1/2"-2" (3.8-5cm) screw clamp.
3. Use a rubber hose connector* O
with spring or screw-type clamps*
© to connect air gap to waste tee Q.
This connection O MUST be before
drain trap ® and at least 20” (50.8cm)
above the floor where dishwasher will
be installed. Goto step 12.
11
Page 13
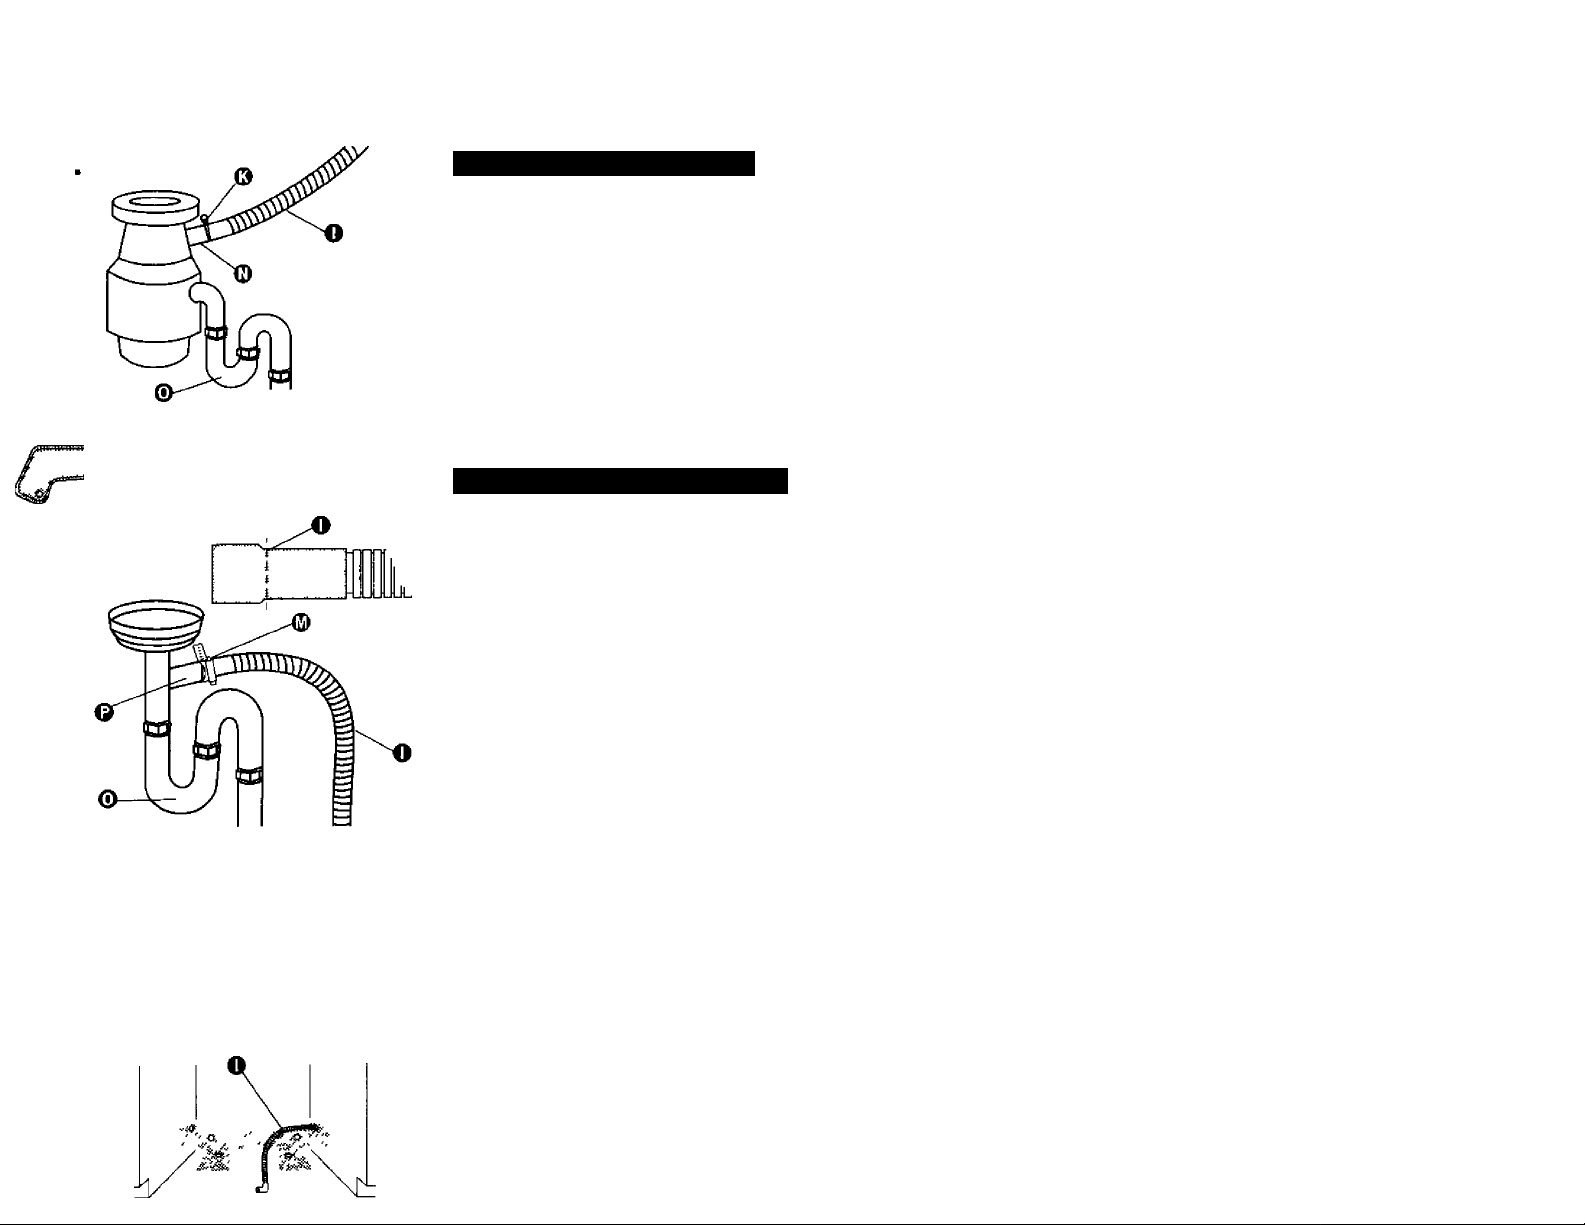
11c
Waste disposer, no air gap
1. Remove the disposer knockout piug.
Do not cut end of dram hose
2. Attach drain hose O to disposer inlet
© with spring-type clamp ©.
This connection O MUST be before
drain trap © and at least 20" (50 8cm)
above the floor where dishwasher will
be installed. Go to step 12
No waste disposer, no air gap
lid.
12.
1 Cut end of dram hose O (do not cut
ribbed section)
2 Attach dram hose to waste tee O
with 1-1/2-2" (3.8-5cm) screw
clamp* ©.
This connection O MUST be before
dram trap © and at least 20" (50 8cm)
above the floor where dishwasher will
be installed Go to step 12.
Parts available from local plumbing
supply stores.
HELPFUL TIP:
To reduce the vibration of the
hose, Insert a cloth, putty or
caulking compound In hole
around drain hose.
Insert drain hose O mto hole cut in
cabinet to the front center of opening
where dram connection will be made.
12
Page 14
B.
Prepare
dishwasher
^WARNING
Tip Over Hazard
Do not use dishwasher until
completely installed.
Do not push down on open door.
Doing so can result In serious
injury or cuts.
^WARNING
Excessive Weight Hazard
Use two people to move and
install dishwasher.
Faiiure to do so may result in
back or other injury.
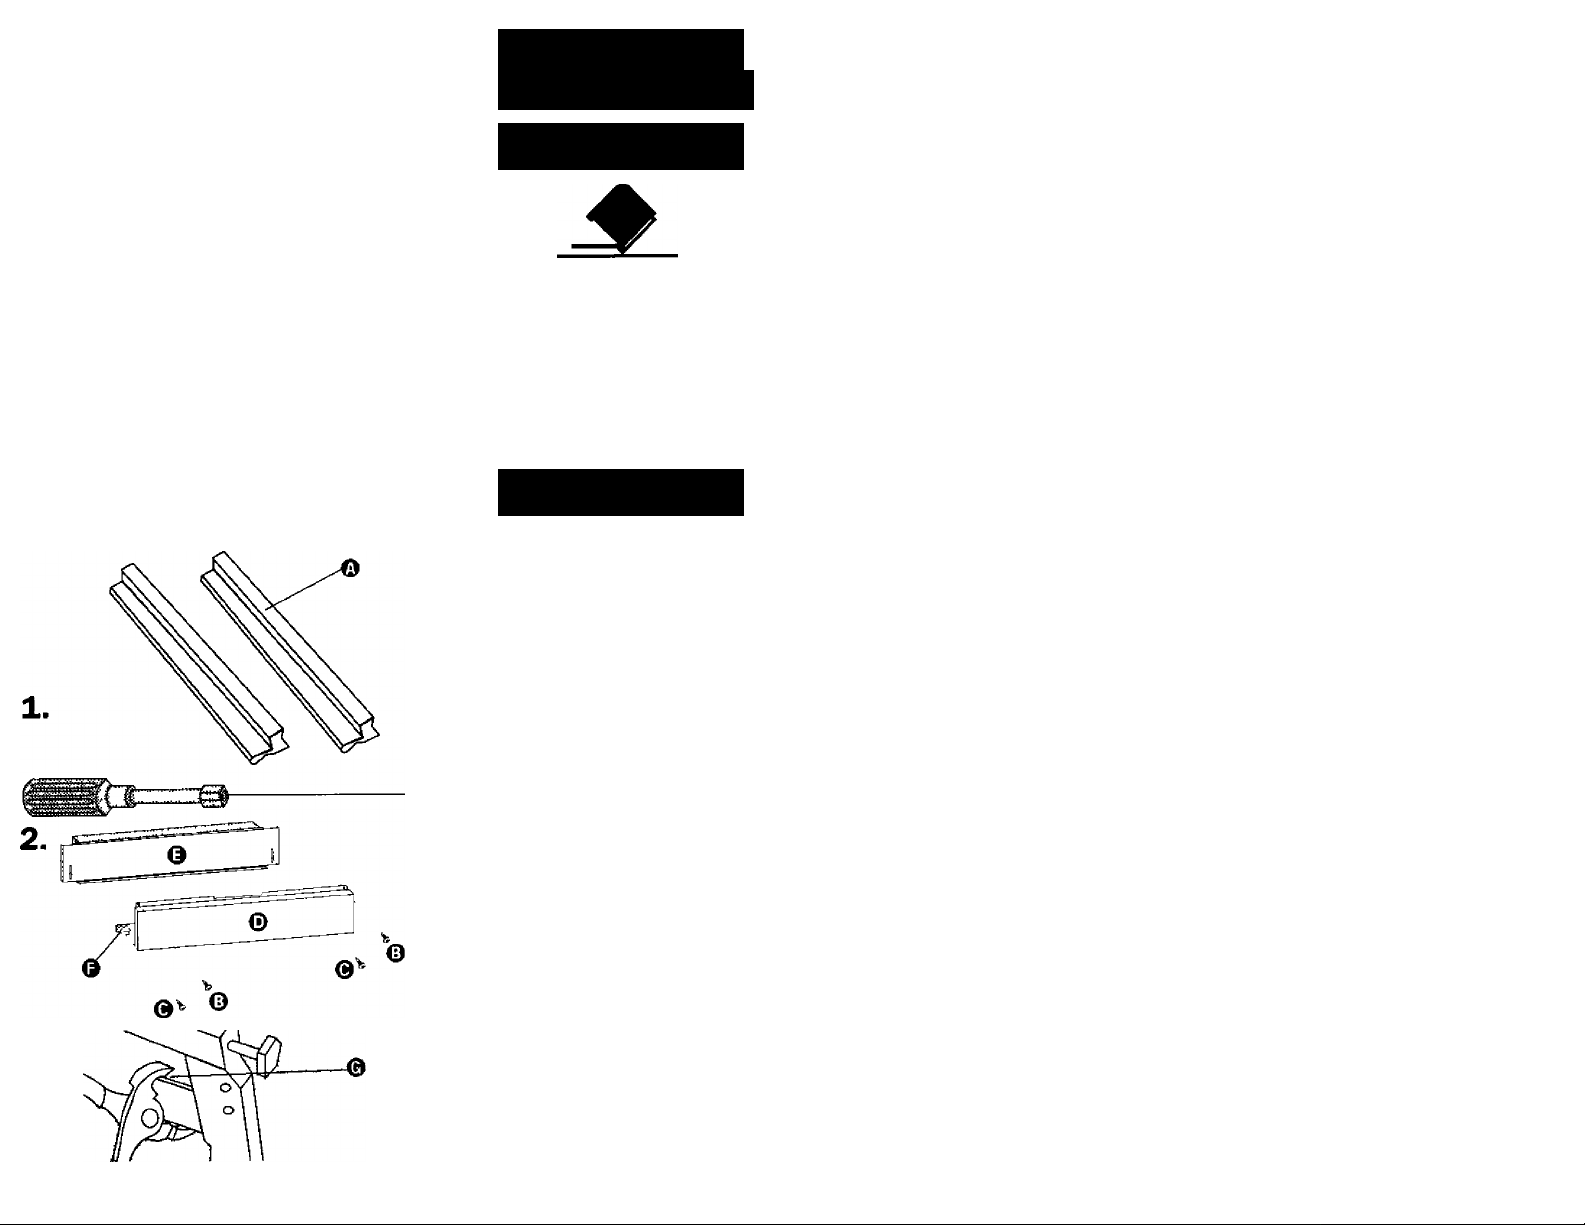
Put dishwasher corner posts O behind
dishwasher. Grasp sides of dishwasher
door frame and put dishwasher on its
back.
Remove two top screws © and two
bottom screws 0 attaching access
panel © and lower panel © to
dishwasher using a 1/4" hex socket, nut
driver or Phillips screwdriver Remove
panels and set panels aside on a
protective surface. Check that
grounding clip © stays attached to
access panel
HELPFUL TIP:
Hotd water valve mowitbig
bracket 0 with pliers while
attaching elbow to water inlet
valve.
13
Page 15
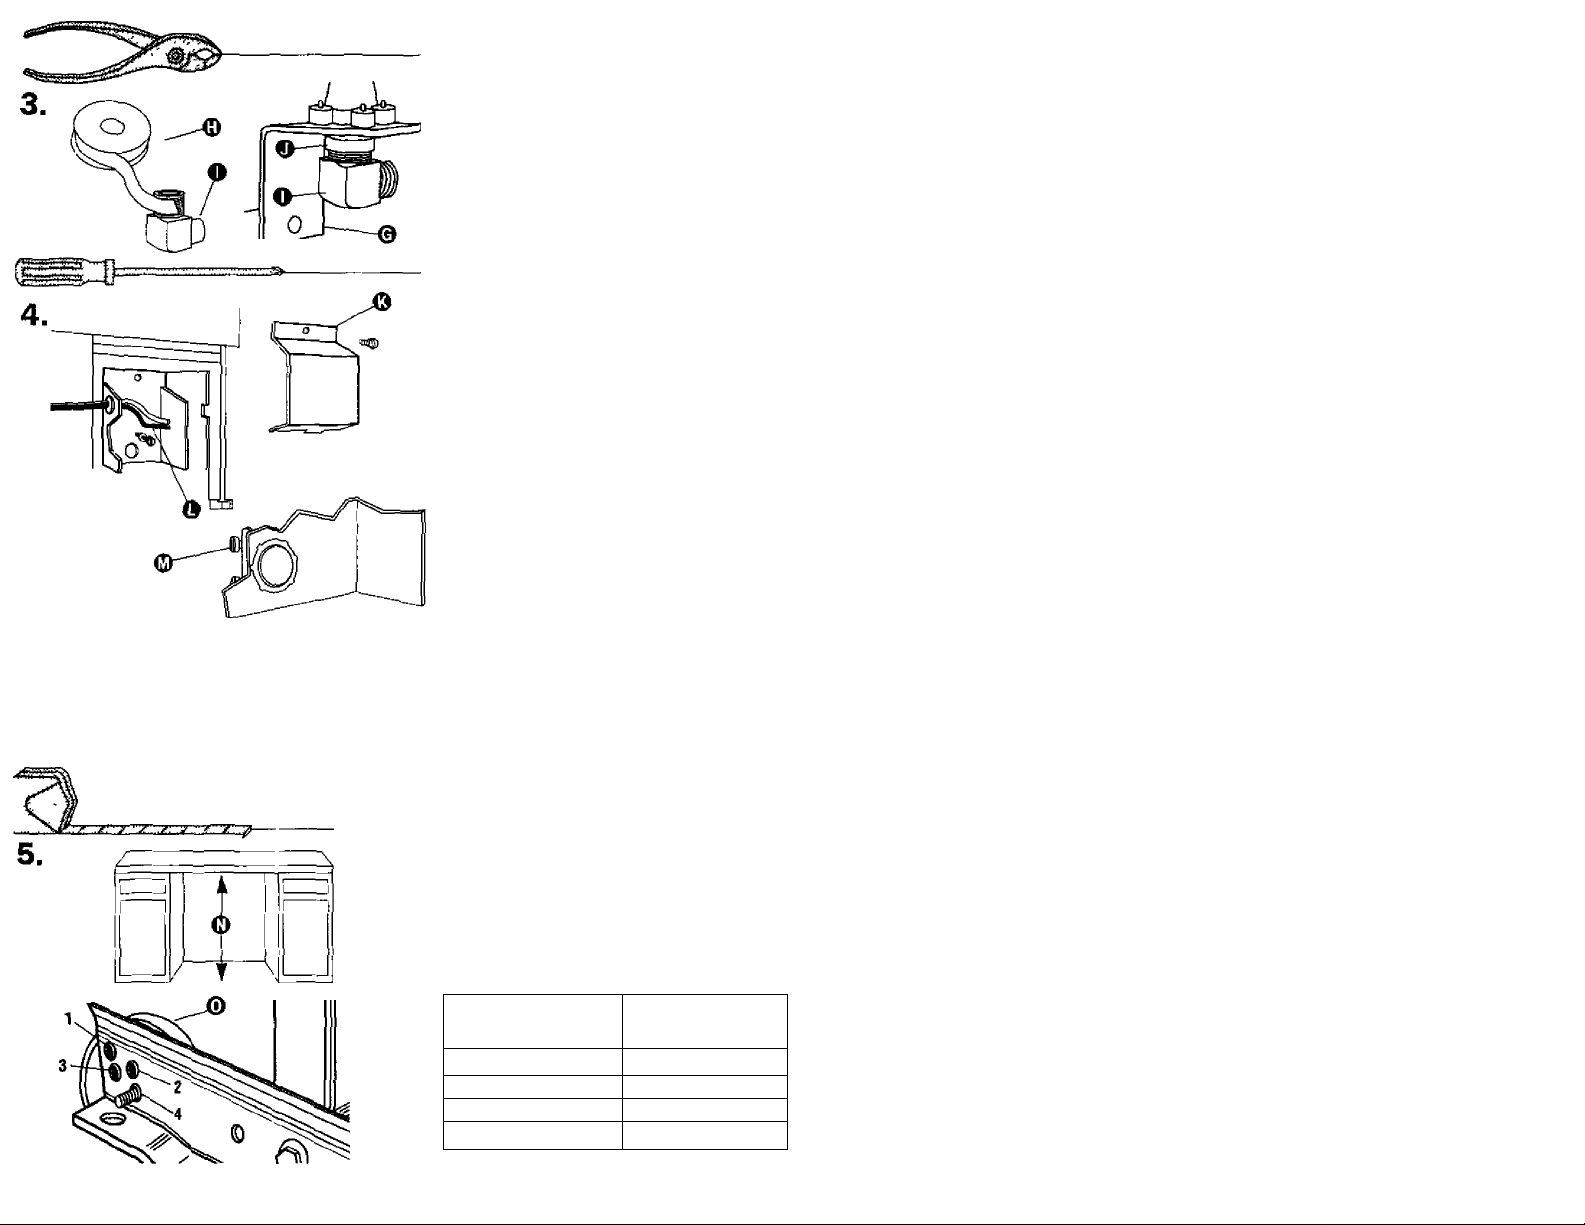
Apply Teflon tape or pipe joint
compound © to 90“ elbow fitting O
and connect fitting to water inlet valve
O. Hold bracket ® with pliers Tighten
elbow until snug, and be sure that it
faces to the rear.
Remove terminal box cover © Pull
appliance wires O through hole in
terminal box
If you are direct wiring: install a U L.'
listed/CSA-certified clamp connector ©
to the terminal box If using conduit,
use a U L -listed/CSA-certified conduit
connector.
If you are installing a power supply
cord kit, do so now and follow kit
instructions.
HELPFUL TIP:
Put cardboant under cHehwasher
unttt ft fs Inefaffed fn c^net
opening, lite cardboard will help
protect floor covering during
tnstaltatfon.
Measure height of cabinet opening from
underside of countertop to floor where
dishwasher will be installed D (you
need the lowest point) Check chart for
that height opening Put wheels <s) in
the required position.
Min.
cutout height
34’ {86.4cm)
34-1/8" (86.7cm)
34-5/16’ (87 2cm)
34-1/r (87.6cm)
continued on page IS
Wheel position
(see illustration)
1
2
3
4
14
Page 16
continued from page 14
6.
7.
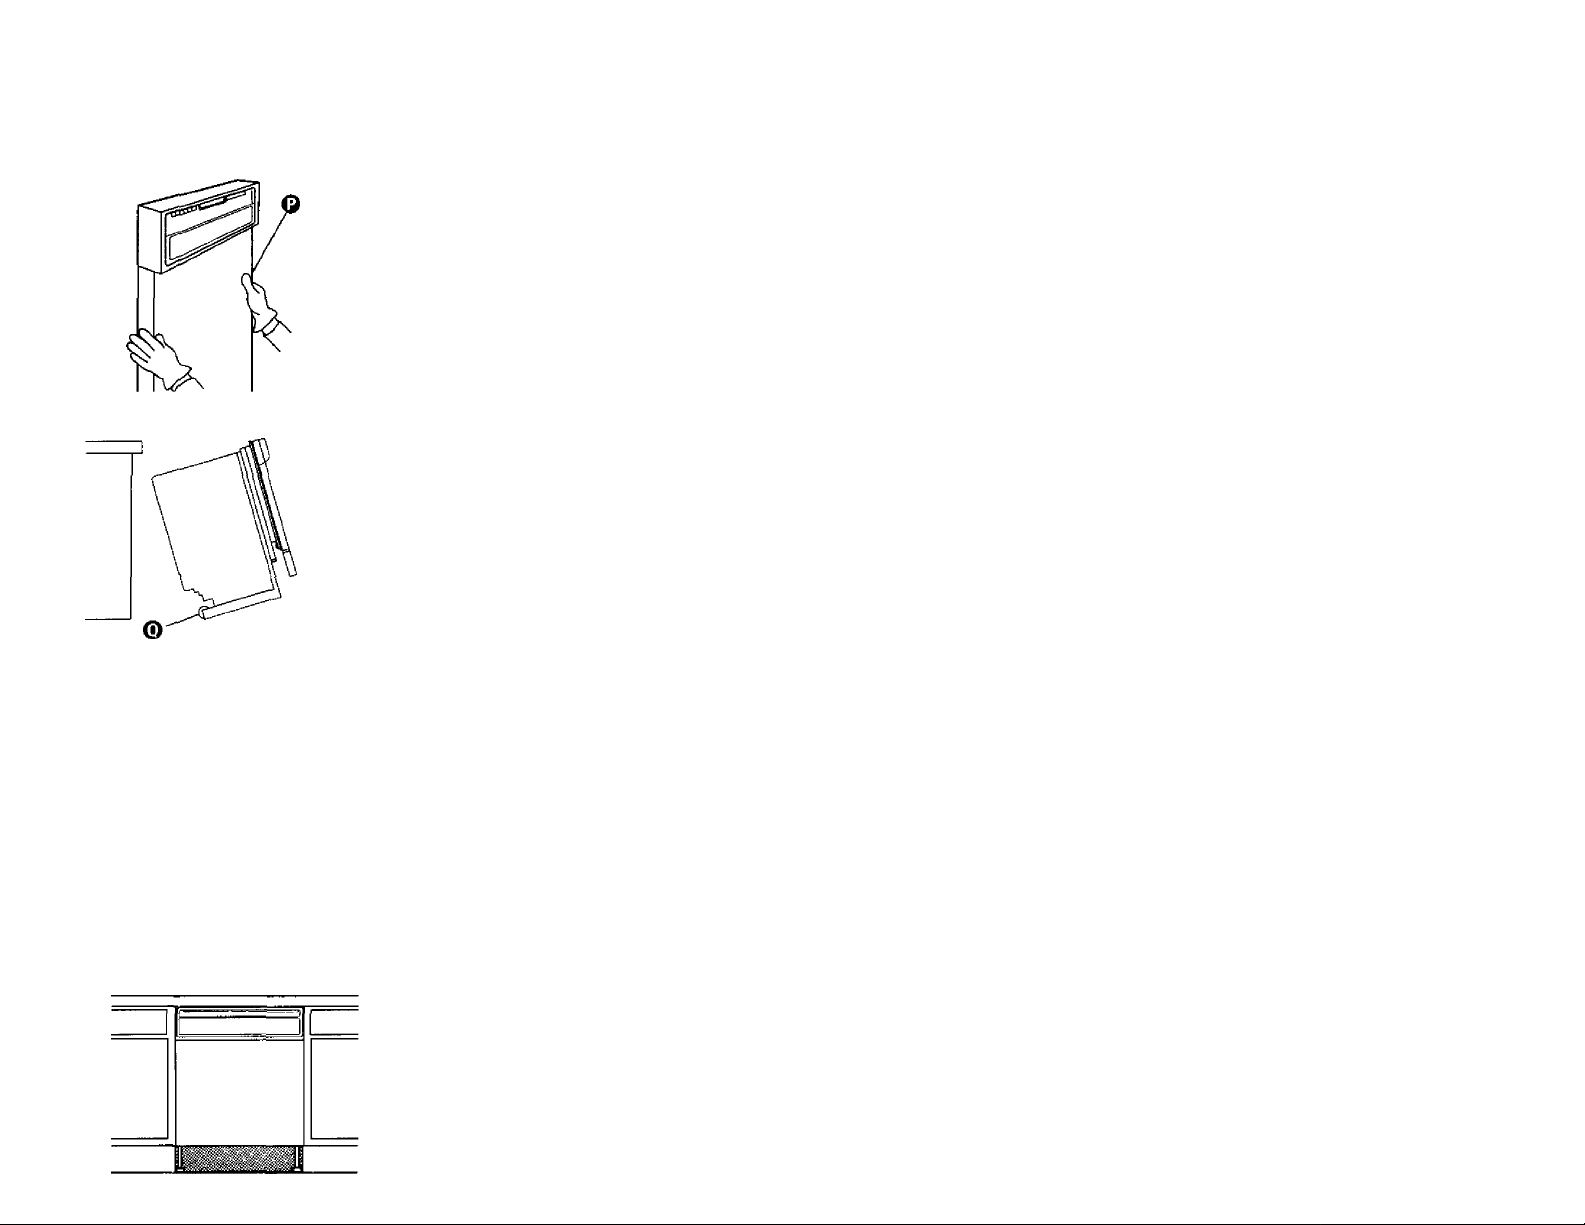
Stand dishwasher upright.
Grasp the dishwasher door frame O.
Tiit dishwasher backwards on wheeis
©. Move dishwasher ciose to cabinet
opening. Do not push on dishwasher
panels or consoie—they may dent.
8.
9.
10.
if dishwasher has a power supply cord,
insert power suppiy cord into hole cut
into cabinet.
Check that water iine is on the left side
of opening and drain hose is near the
center of opening, if using direct wire,
check that it is on the right side of
opening.
Carefully move dishwasher completely
into cabinet opening. Do not kink or
pinch copper tubing, drain hose,
power supply cord or direct wire
between dishwasher and cabinet.
Center dishwasher in opening.
15
Page 17
11.
Remove cardboard from under
dishwasher
HELPFUL TIP:
It Is okay if dlshwastier fits
ti^itiy lirto cabinet opening. Do
not remove insutation blanket—
it acts ^ a sound barrier:
12.
13.
side view
vue latérale
vista lateral
œ-*
1—©
t
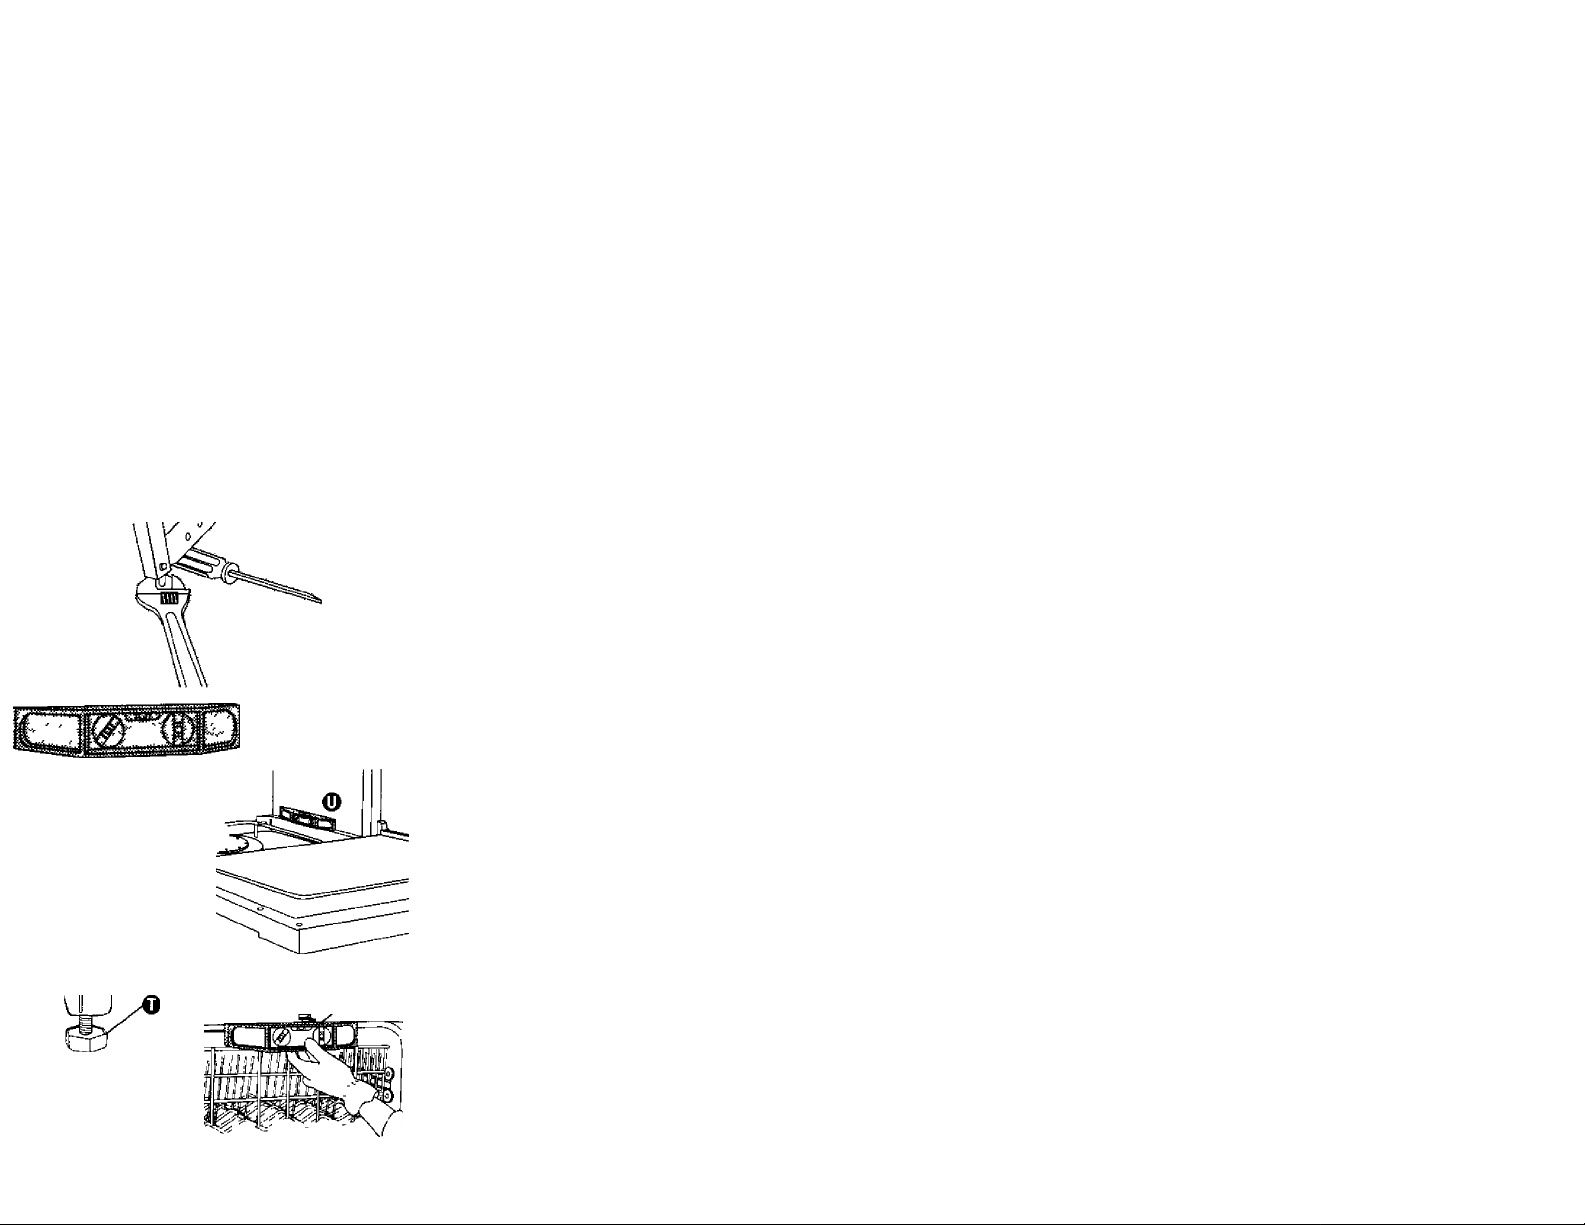
Align front of dishwasher console O
with countertop edge ©. You may need
to adjust alignment to look good with
your cabinets.
HELPFUL TIP:
Prop up one side of firame to
hold dtehwi^ier up off fioor
when ac^tisttng front legs.
Check that leveling legs O are firmly
against the floor. Place level on the rack
guide O on one side of the dishwasher
tub. Check that dishwasher is level from
front to back. Adjust leveling leg or add
shims under rear wheel until
dishwasher is level. Repeat for other
side of dishwasher.
Place level against top front opening of
tub O- Check that dishwasher is level
from side to side If dishwasher is not
level, adjust front legs up or down until
dishwasher is level.
16
Page 18
décharge
iHtJiIlLSiHi
Dishwash
Electrical
Connection
Check electrical requirements
(see pages 4-6). You need to,
✓ have the correct electricai supply and
recommended grounding method
✓ check that power supply is
disconnected
tt you are
direct wiring 1-4
using a power supply cord 1
use steps
1.
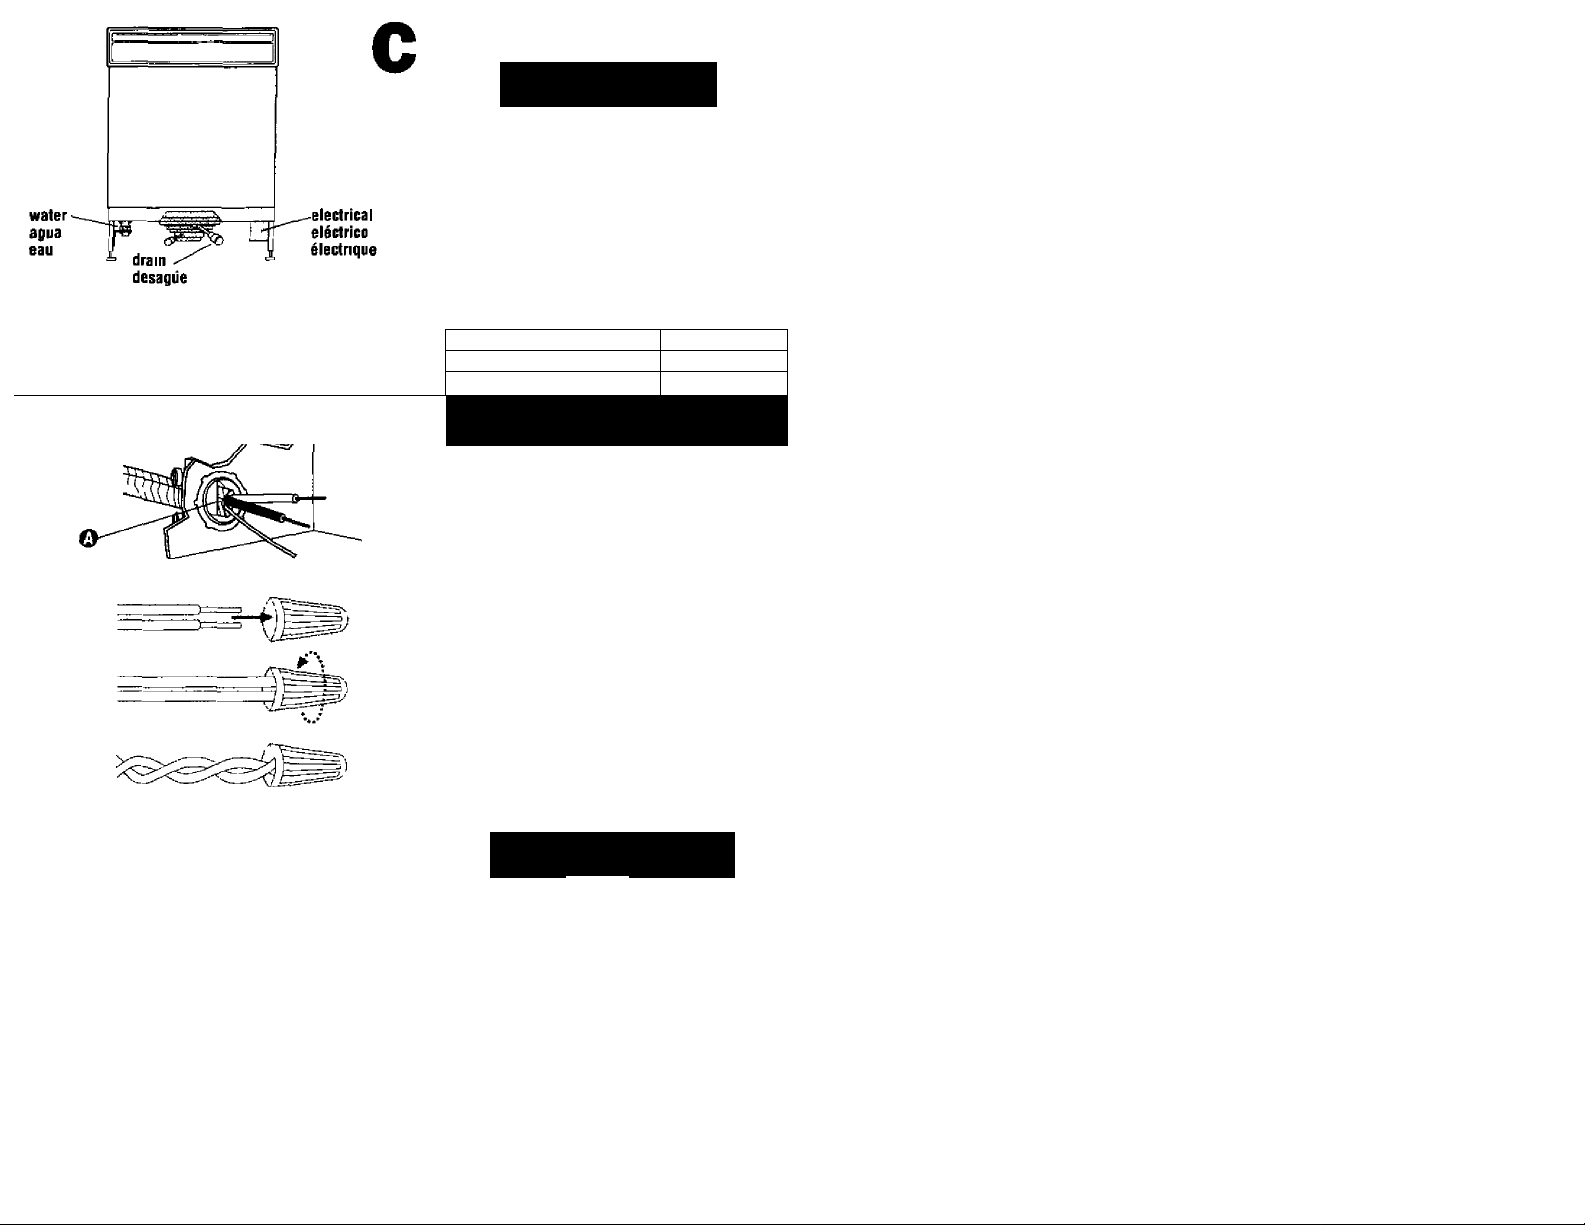
Direct wire methot :
Route direct wire so that it does not
touch dishwasher motor or lower part
of dishwasher tub Pull direct wire O
through hole in terminal box
HELPFUL TIP:
• Select the proper stee toist-on
cormectors to connect your
household wlrli^ to l&gauge
dishwasher wiring.
• Insert wire ends Into twiston
connector. Do not pre-twist
bare wire.
• Twist connector.
• Gently tug on wires to be sure
both are secured.
^WARNING
>4
Electrical Shock Hazard
Electrically ground dishwasher.
Connect ground wire to green
ground connector in terminal box.
Do not use an extension cord.
Failure to do so can result in
death, fire, or electrical shock.
Page 19
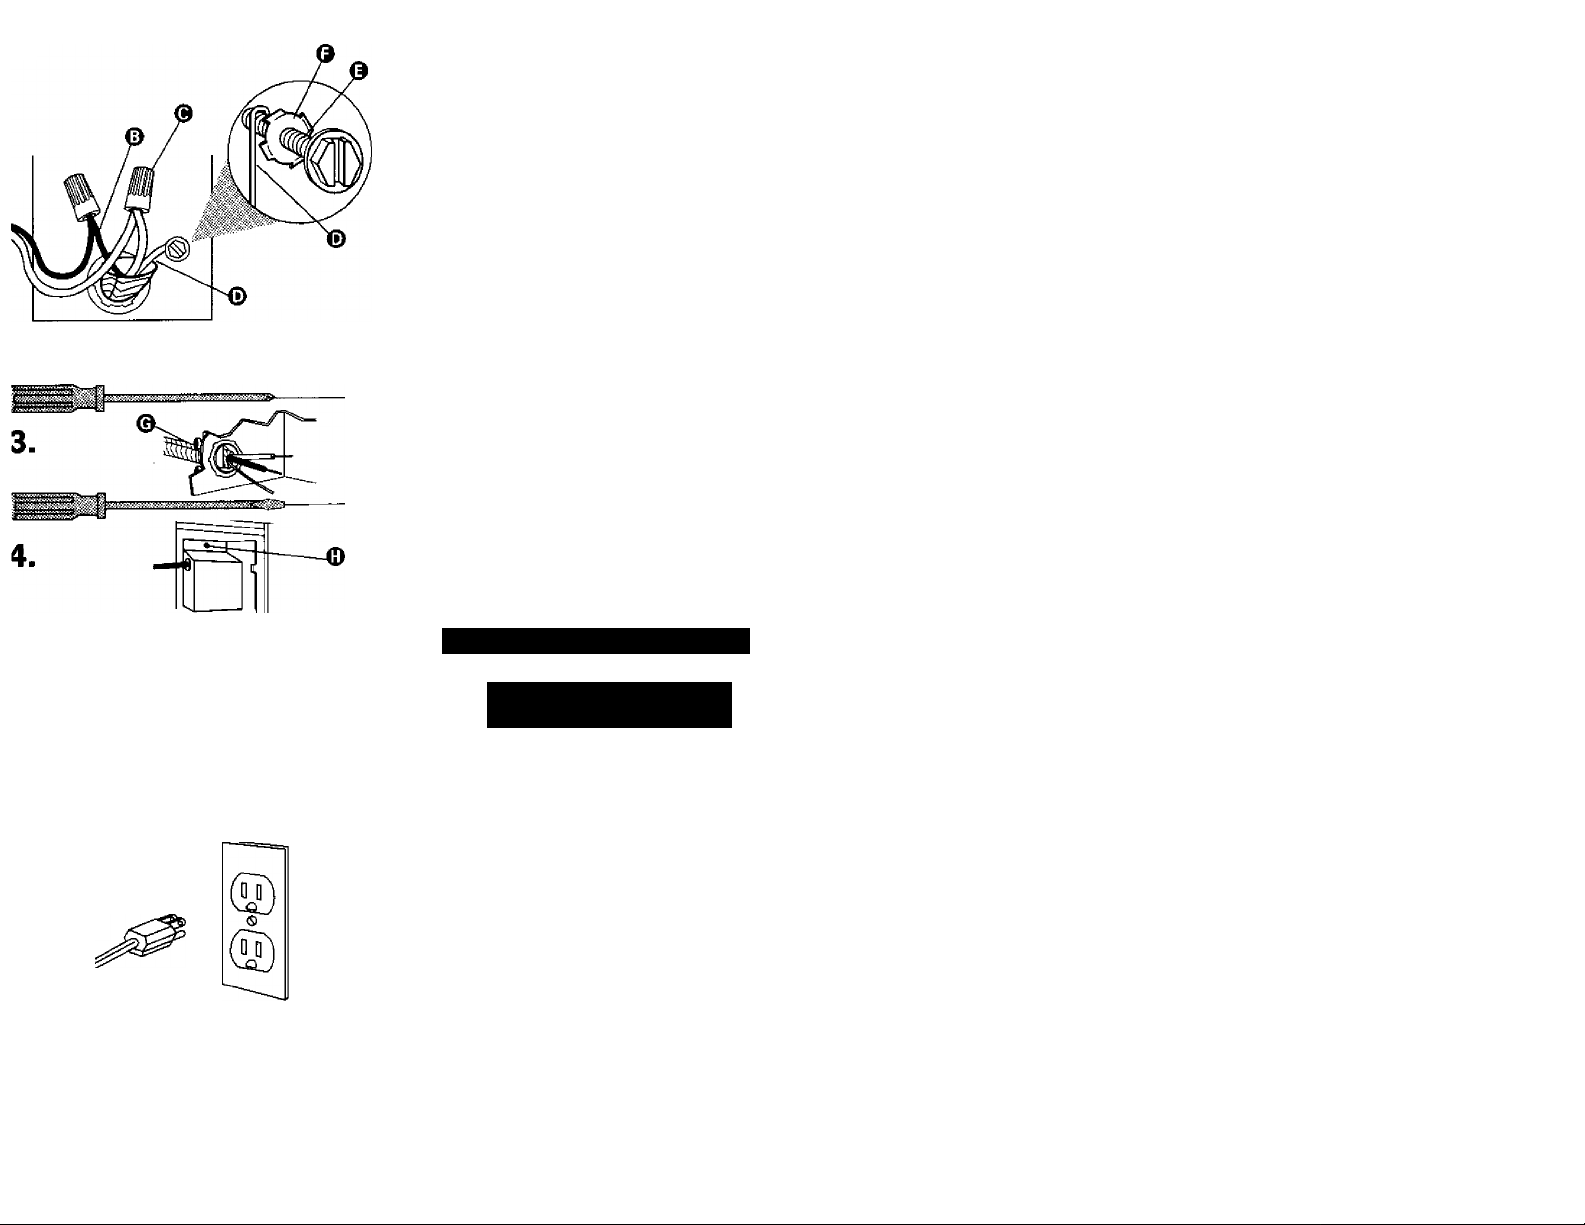
2.
Connect the wires © as follows using
twist-on connectors © sized to connect
direct wire to 16-gauge dishwasher
wire:
Form bare, ground wire © into a
U-shaped hook. Wrap ground wire hook
clockwise around ground connector ©
and under the washer ©. Securely
tighten ground connector ©,
1.
Power supply wire:
white-
black
grounding wire
Terminal box wire:
white
black
ground connector
Tighten clamp connector or conduit
connector screws ©.
Reinstall terminal box cover © with
wires inside terminal box. Go to step 5.
Power supply cord method:
^WARNING
V
Electrical Shock Hazard
Plug into a grounded 3 prong
outlet.
Do not remove ground prong.
Do not use an adapter.
Do not use an extension cord.
Failure to follow these
instructions can result in death,
fire, or eiectricai shock.
Check that power supply cord does not
touch dishwasher motor or lower part
of dishwasher tub. Go to step 5.
continued on page 19
18
Page 20
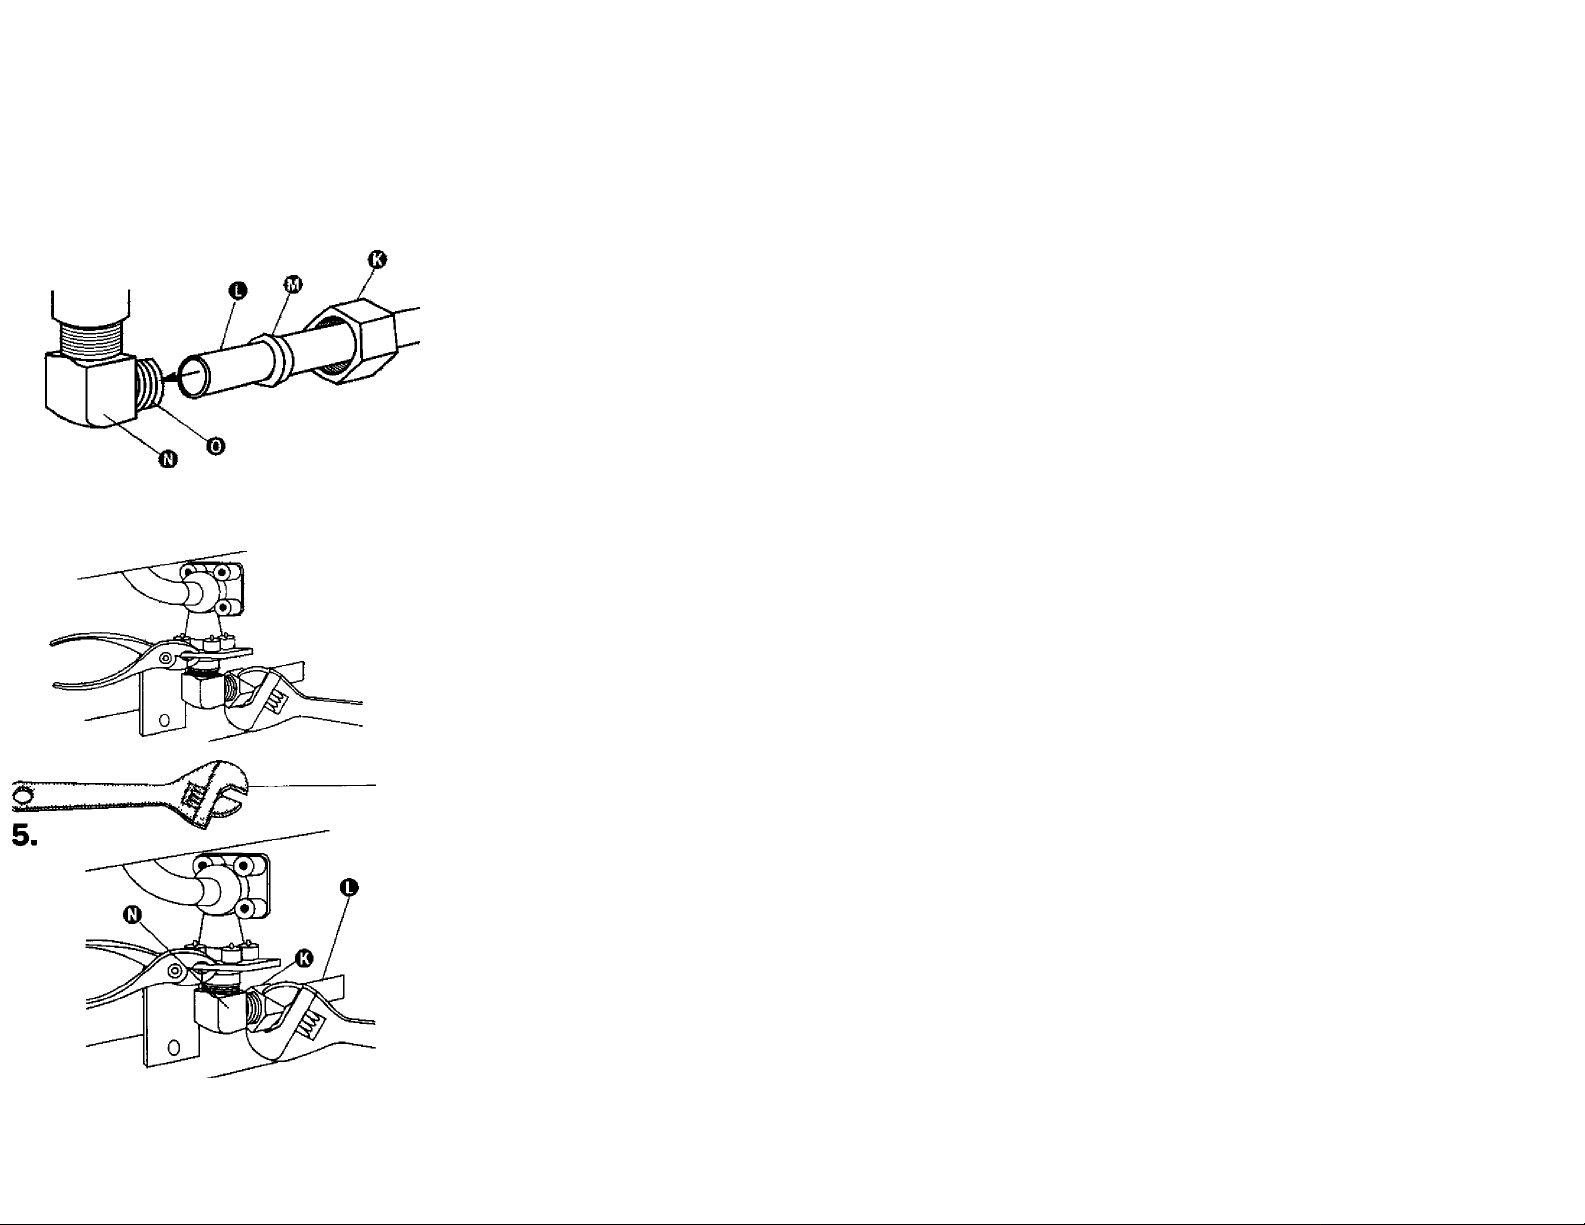
continued from page 18
Water Connection
HBPRJL TIP:
Compiesshm Atthigs:
. Slide nut Oonta copper tubmg
O about 1 inch (2.5cnt).
, Slide femde # onto the hibing>
Do not position ferrule on the
end of the tutdng.
. Rft tile tubing into the ^bow 0
as far as it wUt go>
. SOde the nut and ferrule forward
and start the not onto the ^bow
threads 0. Be careful when
handling and positioning the
copper tutdng. It bends and
kiriks easily.
HEtPFUL TIP:
Hold water vidve mounting
bracket with pliers white
attaching copper tubing.
To prevent vibration during operation,
route the water supply line so that it
does not touch the dishwasher base,
frame or motor
With copper tubmg O pushed into
compression fitting as far as it will go,
use an adjustable wrench and tighten
compression fitting nut O to elbow ©
on water inlet valve
19
Page 21
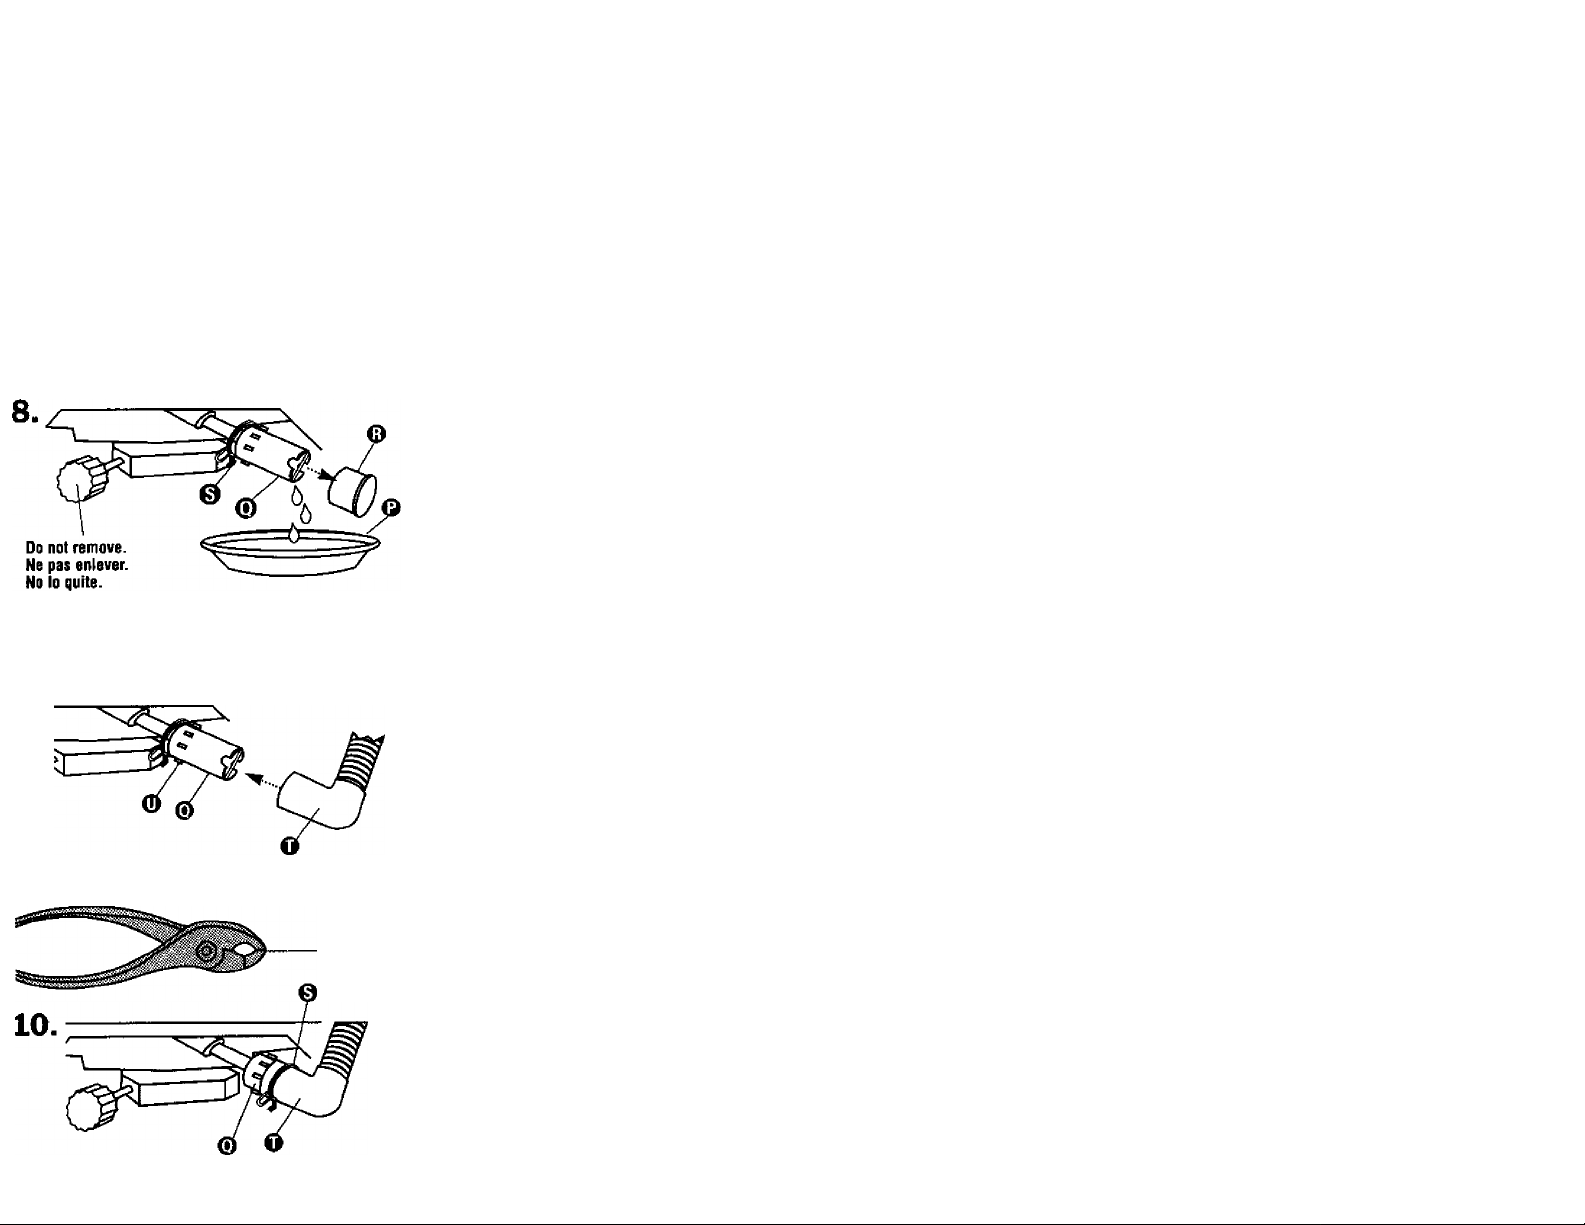
6.
Place paper towel under elbow. Turn on
water supply and check for leaks.
Drain Connection
7.
9.
Route drain hose to avoid contact with
motor, door springs, water line, cabinet
or flooring. Insert a cloth, putty or
caulking compound in hole around drain
hose where hose passes through
cabinet to help minimize vibration noise.
Place a shallow pan O (pie or cake
pan) under drain connector ©. Remove
drain hose connector cap ©. Put the
drain hose clamp @ onto the
connector.
Push drain hose O onto connector ©
up to the stops © on connector.
Use pliers to open clamp © and
slide clamp over drain hose O and
connector ©. Release clamp and check
that the drain hose is held securely on
connector.
20
Page 22
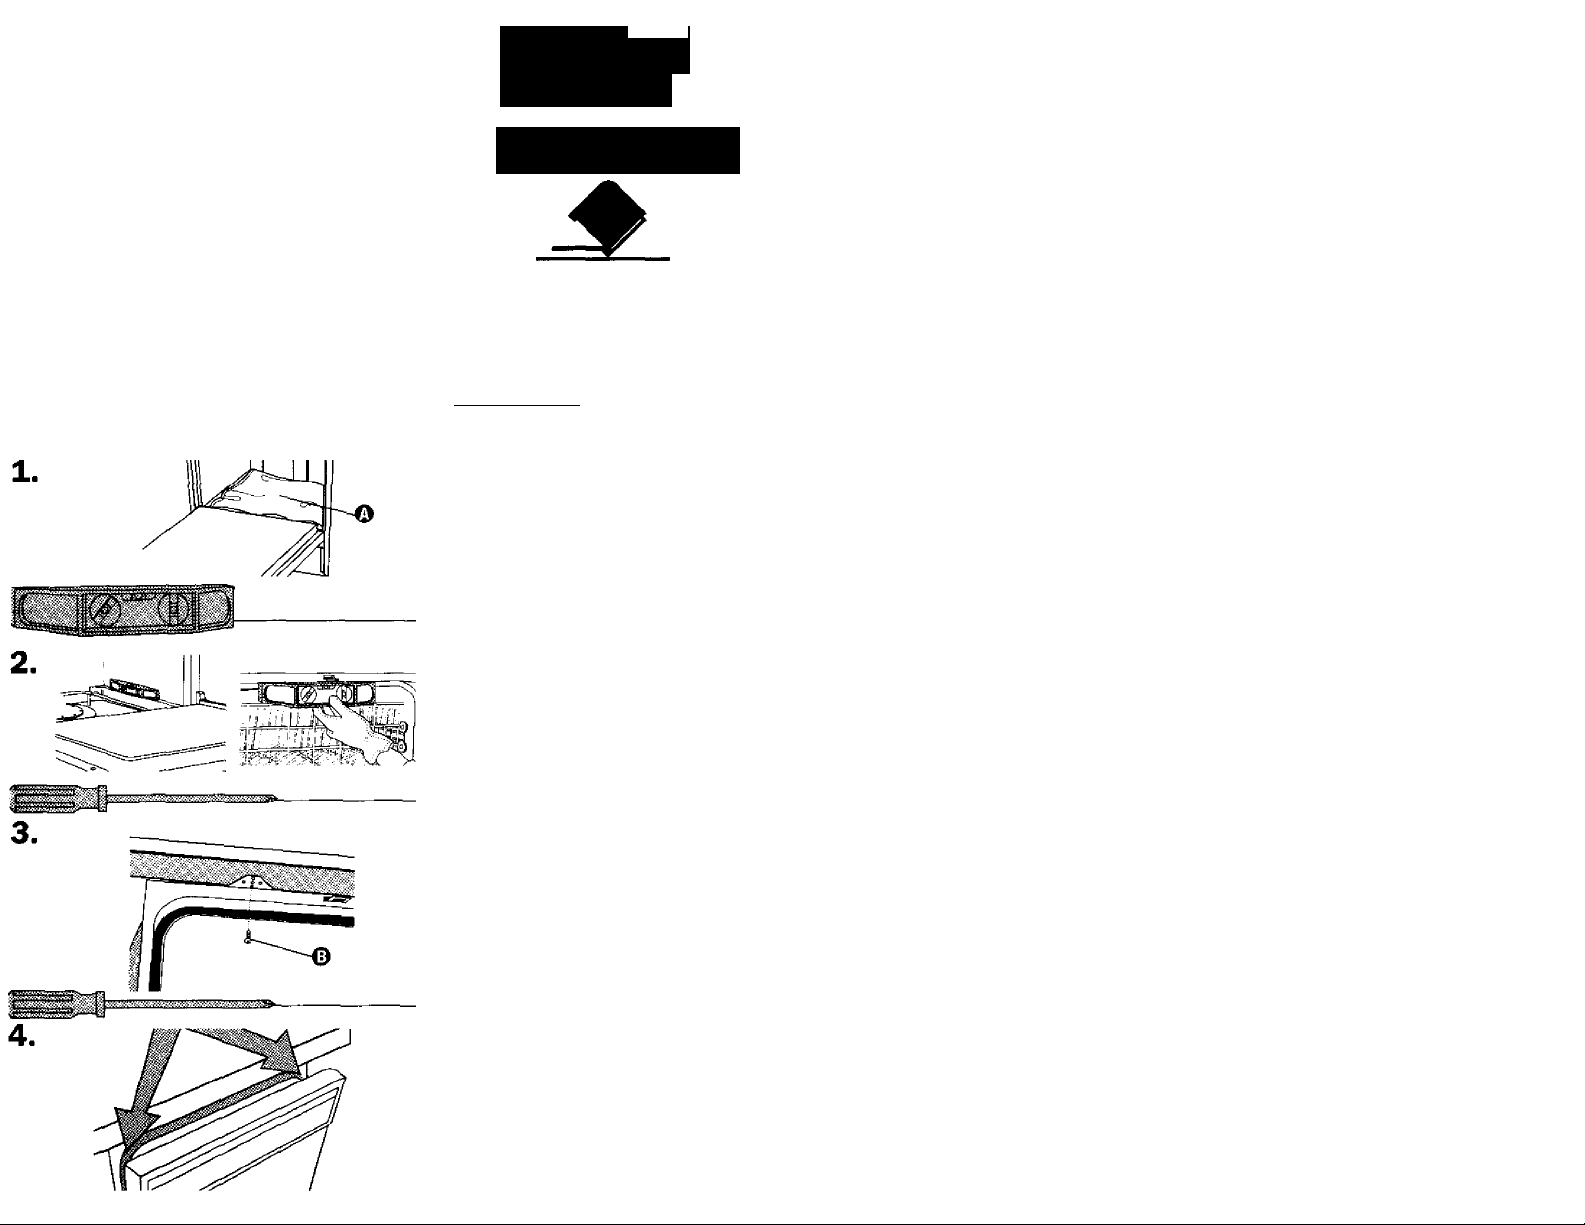
D.
Sec
Dishwas
m
^WARNING
Tip Over Hazard
Do not use dishwasher untii
completely instalied.
Do not push down on open door.
Doing so can resuit in serious
injury or cuts.
Open ciishwasher door and place towel
€> over pump assembly and spray arm
of dishwasher. This will prevent screws
from falling into pump area when
securing dishwasher to countertop.
_________________
Check that dishwasher is still level.
Secure dishwasher to countertop with
two, No. 10 X1/2" Phillips-head screws
©. The dishwasher MUST be secured
to keep it from tipping when door is
opened. Do Not drop screws into
bottom of dishwasher.
Open door about 3 inches (7.6cm) and
check that space between inner door
and tub is equal on both sides. If
spacing is not equal, loosen bracket
screws and shift tub. Tighten bracket
screws. Remove paper or towel from
dishwasher.
21
Page 23
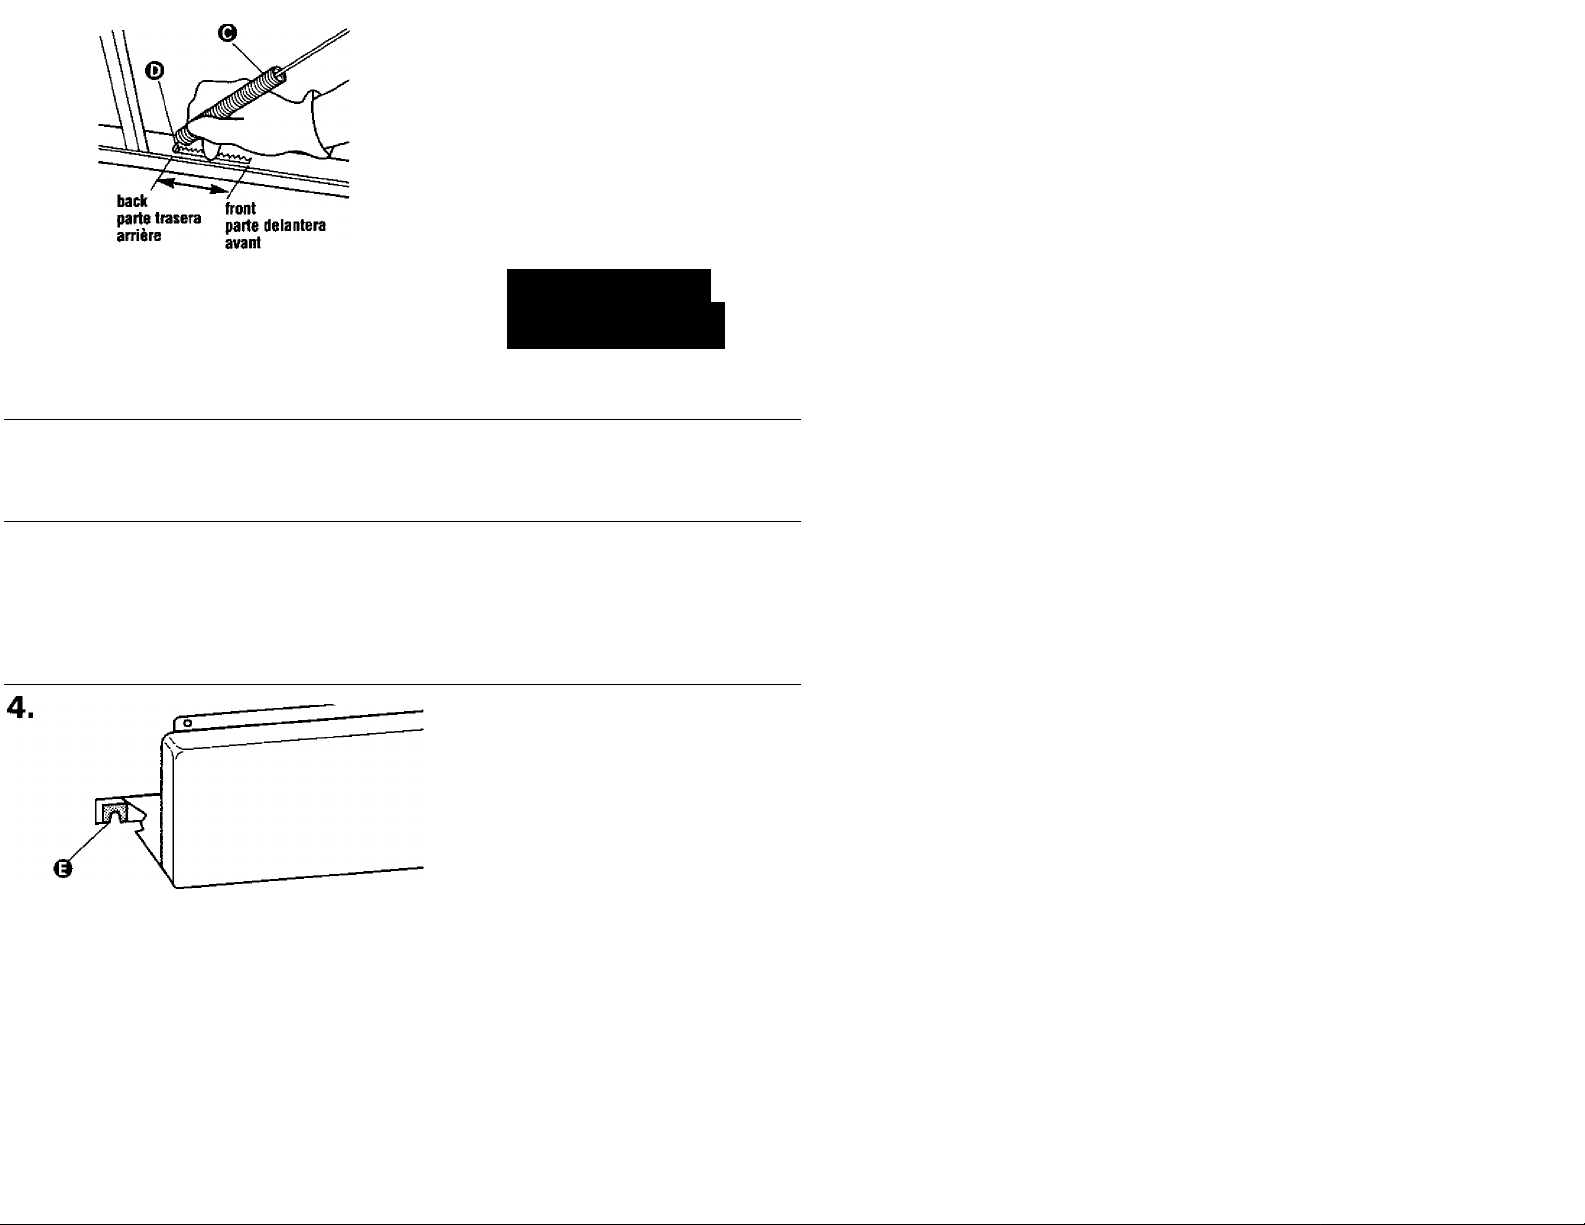
upen ana cióse rne aoor several iimes.
The door should open and close easily.
If the door closes too quickly, decrease
the spring © tension by moving the
spring end © toward the front of the
dishwasher. If the door falls open,
increase the spring tension by moving
the spring end toward the back of the
dishwasher. Springs should be in the
same notches on left and right sides.
2.
3.
E.I
____________________
Check
Operation
Read the Owner's Manual that came
with your dishwasher.
Check that all parts have been installed
and no steps were skipped. Check that
you have all the tools you used.
At fuse box or circuit breaker, turn on
electrical power supply to dishwasher.
Start dishwasher and allow it to
complete the “Water Miser” cycle.
Check that dishwasher is working
properly and that there are no water
ifiaks
---------------------------------------------------
Check that grounding clip © is attached
to the access panel. Put lower panel in
place and start screws through lower pane
holes and into dishwasher frame. Do not
tighten. Slide access panel over and down
onto screws. Reinstall screws through
holes in top of access panel. Check that
bottom edge of lower panel contacts the
floor. Tighten lower access panel screws.
If dishwasher
does not operate:
✓ Has the circuit breaker tripped or the
house fuse blown?
✓ Is the door closed tightly and
latched?
✓ Has the cycle been set correctly to
start the dishwasher?
✓ Is the water turned on?
22
Page 24
(0
c
o
"Jo
c
0)
E
m^m
■o
Back \ic\v
Vista trasera
Vue arrière
To customize your dishwasher:
If you want to:
Change door and access pane! color
Install custom wood panels, you
need a trim accessory that matches
the dishwasher color
If you have installation questions:
*ln Canada, call toll-free 1-800-665-4455 to order accessories or ask Installation questions.
Order the color accessory
you need.
White - 675773
Almond - 675774
Black - 9743678
White - 9743679
Almond - 9743680
Call (U.S. only*)
1-800-665-9978
1-800-665-9978
1-800-366-7278
1-800-366-7278
1-800-366-7278
1-800-473-7247
Part No. 9744231
Pieza No. 9744231
№ de pièce 9744231
ilü.
Sears, Roebuck and Co,, 3333 Beverly Rd. Hoffman Estates, IL 60179
Printed in U.S.A,
Impreso en los EE.ULt.
imprimé aux É.-U.
 Loading...