

Kenmore 91195575891, 91195576891, 91195579891 Owner’s Manual
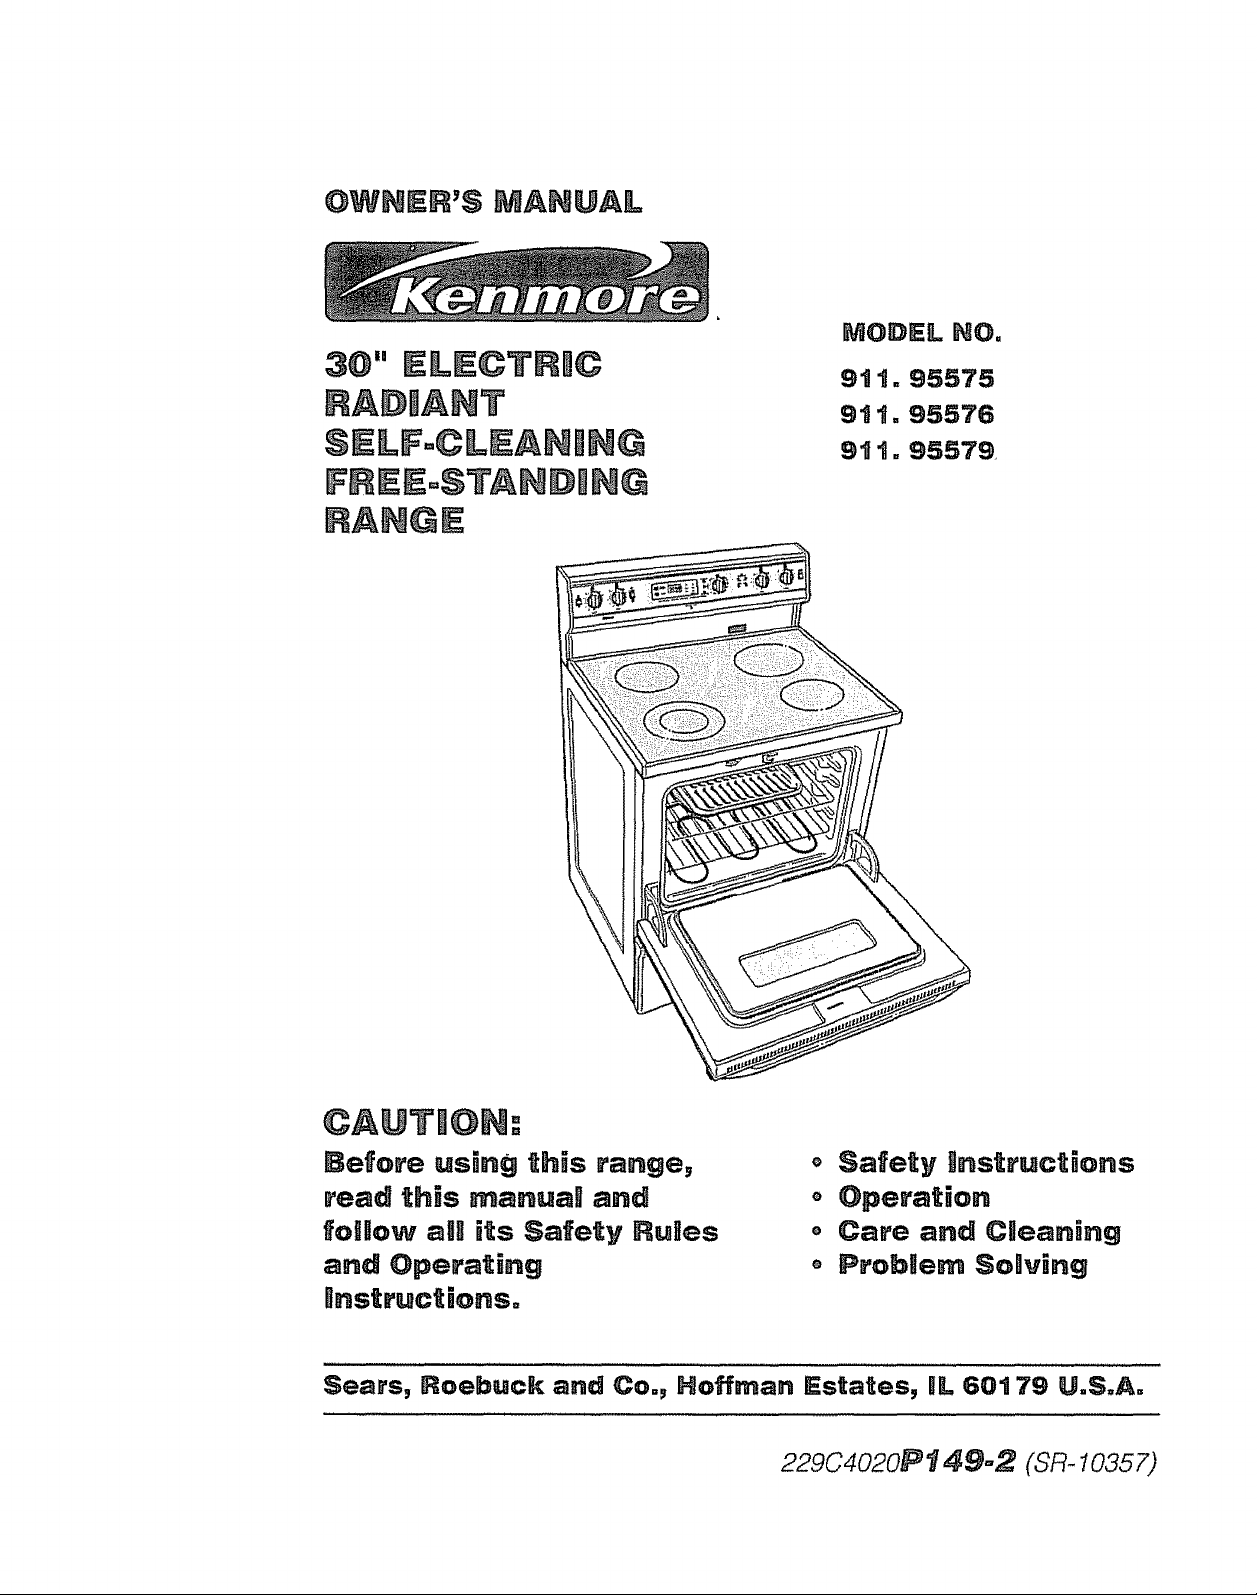
OWNER'S MANUAL
SELF°@LEANmN@
FREEoSTANDmN@
RANGE
MODEL HO°
9tt,95575
911.95576
9tto9557g
@A@THOH:
Before using this range,
read this _anuaR and
fogllow aH its Safe_y Ru_es
and Operating
BnstructionSo
Sears, Roebuck and Co., Hoffman R=sta_es, UL 60179 U,S.Ao
o Safety gnstruct_ons
o Operation
Care and Caeaning
o Probgern SoUring
229C4020Pt 49,,2 (SR- 10357)
7"ableof Contents
Range Safety ......................... 3-6
Stability Device ......................... 3
Protecting the Cooktop ............. 7
Removal of Packaging Tape .... 7
Features of Your Range ........... 8
Cooking Zones ......................... 9
Cooking Utensils ...................... 9
Checking Your Cookware ......... 9
Cookware Performance ............ 9
Radiant Coils .......................... 10
Radiant Unit Cycle .................. 10
Control Settings ...................... 10
Dual Cooking Zone ................. 10
Simmer ................................... 11
Home Canning Tips ................ ! 1
Hour/Minute Arrow Pad .......... 12
Display .................................... t2
To Black Out The Display ....... 12
F-Codes .................................. 12
Power On ................................ 12
Automatic Oven Shut-Off ........ 12
Oven Control .......................... 13
Indicator Lights ....................... 13
Disable 12 hour shut-off ......... 13
Oven Light .............................. !3
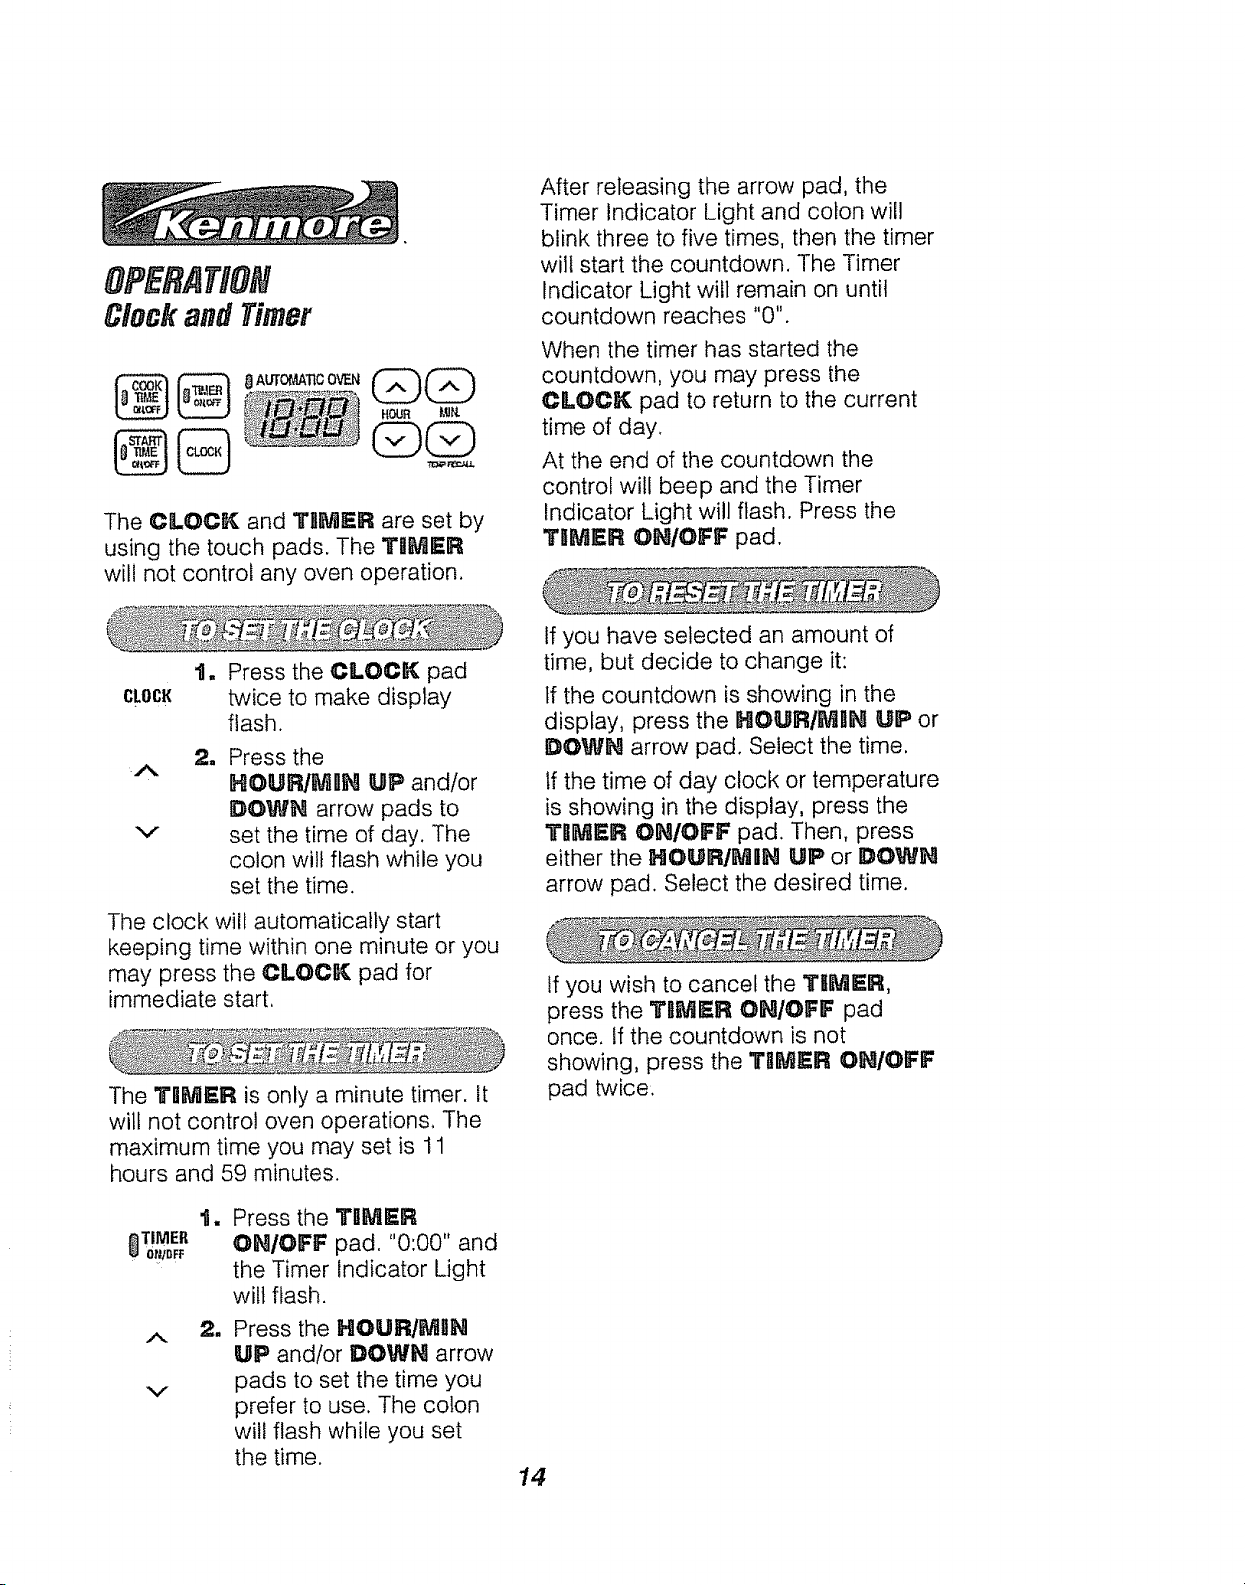
Clock and Timer ..................... 14
SELF-CLEANING
flADIANT#:flEESTANDINGflANGE
To Set The Clock .................... 14
To Set The Timer .................... 14
To Reset The Timer ................ 14
To Cancel The Timer .............. 14
Oven Cooking Tips ........... 15 -16
Baking With Margarine ........... 15
Baking .................................... 17
Broiling ................................... 18
Self-Cleaning Cycle ........... 19-20
Glass-Ceramic Cooktop
Cleaning ............................ 21-22
General Information ................ 22
Precautions ............................. 22
Control Panel .......................... 22
Broiler Pan and Grid ............... 22
Control Knobs ......................... 23
Oven Light Bulb ...................... 23
Oven Racks ............................ 24
Oven Door .............................. 24
Storage Drawer ...................... 25
Before Calling for
Service ............................... 26-28
Temperature Adjustment ........ 29
Warranty ................................. 31
Consumer Service Numbers ... 32
For your convenience and future reference, pgease write down
your model and seriaJ numbers in the space provided. They are
located on the front frame behind the storage dirawer.
MODE"- HUMBER:
SER_A!!. NUMBER:
2
SAVE THESE IIHSTRUCTUOHS
Read aH instructions before using th_s appliance, When using
gas or electr_caU appniances, basic safety precautions shougd
be foHJowed, including the following:
Outside Edge Of
Bracket To Be
Flush With Left Or
Right Side Of Range
o All Ranges Can Tip ':::
o Injury To Persons :..
Could Result
• Install Anti-tip
Device Packed With
Range
• See Installation :::
Instructions :
TooBs you wHD need:
o Phillips head screwdriver
o 1318"open end or adjustable wrench
1, Remove the bracket from the
prepack located inside the oven.
2, Decide whether the bracket will be
installed on the right or left side of
range location.
3, tfthe bracket side of the range is
adjacent to a cabinet, place the
bracket against back wall and
cabinet as shown in Fig. !.
If there is no adjacent cabinet,
determine where the location of
the range side (painted outside
panel) will be. Place the bracket
with its outside edge at this
location and against back wall.
See Fig. 2.
4, Determine whether you wil! anchor
the bracket to the floor or wall.
Make sure this location is clear of
electrical wiring or plumbing.
:
Fig. 1
5_
Fasten the bracket securely with
the screws provided. Screws are
self-drilling in wood, plywood,
particle and chip board, and most
metal framing, if attaching to
masonry, you can buy suitable
screws and anchors at hardware
stores. Use a masonry drill bit to
drill the required holes.
Bracket 11 Wall
Screw Must Enter \ II Plate
WoodOrMetal _)_
Attachment To Wall
Fig, 2
=
Using the wrench, back out the
four leg levelers at least two turns,
See your installation guide for
more leveling information before
positioning range.
m
Slide the range into place. Be sure
rear leg leveler fully engages the
slot in the bracket. If range cannot
be moved back far enough for
rear teg leveler to enter bracket,
move bracket forward as required
and attach to floor in new location.
3
_, _. x ¸ ::_: : :....
_ ARNIING! To
prevent accidenta_
tipping of the range
from abnorrnait usage,
incguding excessive Boading
of the oven door, attach the
range to the wal0 or floor by
instagRing the Anti.Tip
device suppaied. If the range
is moved for cleaning,
servicing or any reason, be
sure the Anti-Tip device is
re-engaged properly when
the range is sgid back in the
opening. Failure to do so
couUd resuRt in the range
tipping or personaB injury. To
inspect the anti-tip device,
remove the storage drawer
and nook to see if the rear
geg leveger _uHy engages the
s,ot in the bracket,
Iirnportant: To insure safety for
yourself, family and home, please read
your Owner's Manual carefully. Keep it
handy for reference. Pay close attention
to Safety Sections. BE SURE your
appliance is installed and grounded by a
qualified technician.
o if}O HOT leave children alone or
unattended near an appliance in use.
° TEACH CHILDREN not to play with
controls or any part of the appliance,
and not to sit, climb or stand on the
door, or any other part of the appliance.
CAUTgON: NEVER STORE items of
interest to children on the backguard or
in cabinets above the appliance,
Children climbing on the appliance
could be seriously injured.
o
KEEP THIS book for later use,
°
NEVER USE your appliance for
warming or heating the room.
o NEVER TRY to repair or replace
any part of the appliance unless
instructions are given in this manual.
All other work should be done by a
qualified technician.
• ALWAYS KEEP combustible wall
coverings, curtains, dish cloths, towels,
potholders, and other linens a safe
distance from the appliance.
o NEVER HEAT unopened food
containers. Pressure buildup can cause
the container to burst and cause injury.
,, NEVER LEAVE jars or cans of fat or
drippings in your oven.
° ALWAYS KEEP the oven and surface
unit areas free from things that will
burn. Food, wooden utensils, and
grease buildup could catch fire. Plastic
utensils could melt and canned foods
could explode. Your appliance should
never be used as a storage area.
° ALWAYS KEEP your appliance clear
of things that will burn (gasoline and
other flammable vapors or liquids).
° NEVER TRY to clean a hot surface,
Some cleaners produce noxious fumes,
and wet cloths or sponges could cause
steam burns.
NEVER WEAR loose fitting clothing
when using your appliance.
NEVER USE a towel or other bulky
cloth as a pothotder, and make sure the
potholder is dry. Moist potholders and
wet cloths or sponges could cause
steam burns. DO NOT let potholders
touch hot heating elements.
4
o DO NOT touch cooktop zones,
surfaces near them, or interior oven
surfaces. These may be hot enough to
cause burns even though they are
dark in color. During and after use, do
not touch or let clothing or flammable
material contact the elements or hot
surfaces until they have had time to
cool. Other surfaces near the oven
vent openings, oven door and
window, and cooktop surfaces may
also be hot enough to cause burns.
o ONLY SOME kinds of glass or
ceramic cookware can be used for
cooktop cooking. Make sure the
cookware you choose to use is
designed for cooktop cooking without
breaking due to the sudden
temperature change.
• ALWAYS USE care when touching
cooktop zones. They wilt retain heat
after the range has been turned off.
• HEVER BLOCK the oven air vent
behind the right rear element.
• COOKWARE USED for cooktop
cooking should be flat on the bottom
and large enough to cover the heating
area being used. Undersized utensils
expose the heating element and may
result in direct contact or ignition of
clothing.
o HEVER LEAVE surface units
unattended at high settings. Boilovers
result in smoking or greasy spills
which could catch fire.
HEVER cook on a broken cooktop;
cleaning solutions and spillage could
penetrate it and create the risk of
electrical shock or fire,
o ALWAYS TURN utensil handles
inward and away from other surface
units to reduce the risk of burns,
ignition, unintended contact, and
spillage.
° WHEN PREPARING flaming foods
under the vent hood, turn the fan on.
o PLACE OVEH RACKS in the
desired position while the oven is
cool. If racks must be moved while
oven is hot, do not let potholder
contact the hot oven element.
• AFTER BROBUHG, always take
the broiler pan and grid out of the
oven and clean them, Leftover
grease in the broiler pan could catch
fire the next time you use your oven.
• ALWAYS USE care when opening
the oven door. Let hot air and steam
escape before moving foods,
• NEVER USE aluminum foi! to line the
oven bottom, improper use of foil could
start a fire, or electrical shock could
result.
5
iMPORTANT: The health of some
birds is extremely sensitive to
the fumes given off during the
self-cleaning cycle of any range.
Move birds tlo another well.
ventilated room.
READ AHD UHDERSTAHD
THRS RHFORMATBOH NOW w.
,, CLEAH OHLY the parts listed in this
manual. Follow all cleaning
instructions. Be sure to remove broiler
pan and grid before the self-clean
cycle.
o NEVER RUB, move or damage the
door gasket on self-cleaning ranges.
o NEVER TRY to clean utensils,
cookware, removable parts, or broiler
pan and grid in the self*clean cycle.
o DO NOT USE oven cleaners - No
commercial oven cleaner, or protective
coating of any kind, should be used in
or around any part of the oven.
o NEVER force the latch handle open
while oven is hot.
nMPORTANT SAFETY
NOTICE. w
The California Safe Drinking
Water and Toxic Enforcement
Act requires the governor of
Cagifornia to publish a 0ist of
substances known to the state
to cause birth defects or other
reproductive harm and re.
quires businesses to warn
their customers of potentiag
exposure to such substances.
The fiberglass insugation in a
seBf.cleaning oven will give off
a very smaU amount of carbon
monoxide during the cleaning
cycle, Exposure can be mini-
mized by venting with an open
door or window oR'using a
ventigation fan or hood.
Be sure everyone in you,' home
knows what to do in case of fire.
Never use water on a grease
fire; it will only spread the
flames,
COOKTOP GRI_a, SE FIRE:
Never pick up a flaming pan,..
1, Turn off the surface elements,
11
Smother the flame with a tightly
fitting lid. Use baking soda or a dry
chemical, foam, or haton type
extinguisher.
OVEN FI1RE:
Do not try to move the pan.w
1. Close the oven door and turn
controls off.
tl
If fire continues, carefully open the
door, throw baking soda on the fire,
or use a dry chemical, foam, or
haton type extinguisher,
6
Protectingthe Cooktop
o Do not slide cookware across your
cooktop.
o Do not use a dish towel or sponge
to clean or wipe your cooktop.
o Do not use scouring powders or
plastic, nylon or metal cleaning
pads on your cooktop.
o Do not apply your cooktop cleaning
creme to the cooktop surface if the
surface is hot.
• Read the instruction label on the
cooktop cleaning creme bottle
before attempting to clean the
surface of your cooktop.
o After cleaning the cooktop surface,
be sure to wipe off any residue with
a dry paper towel that may be left
from the cleaning creme.
,, For major spills, turn the surface
control knob to OFF. Use a dry
paper towel to wipe up spill, then
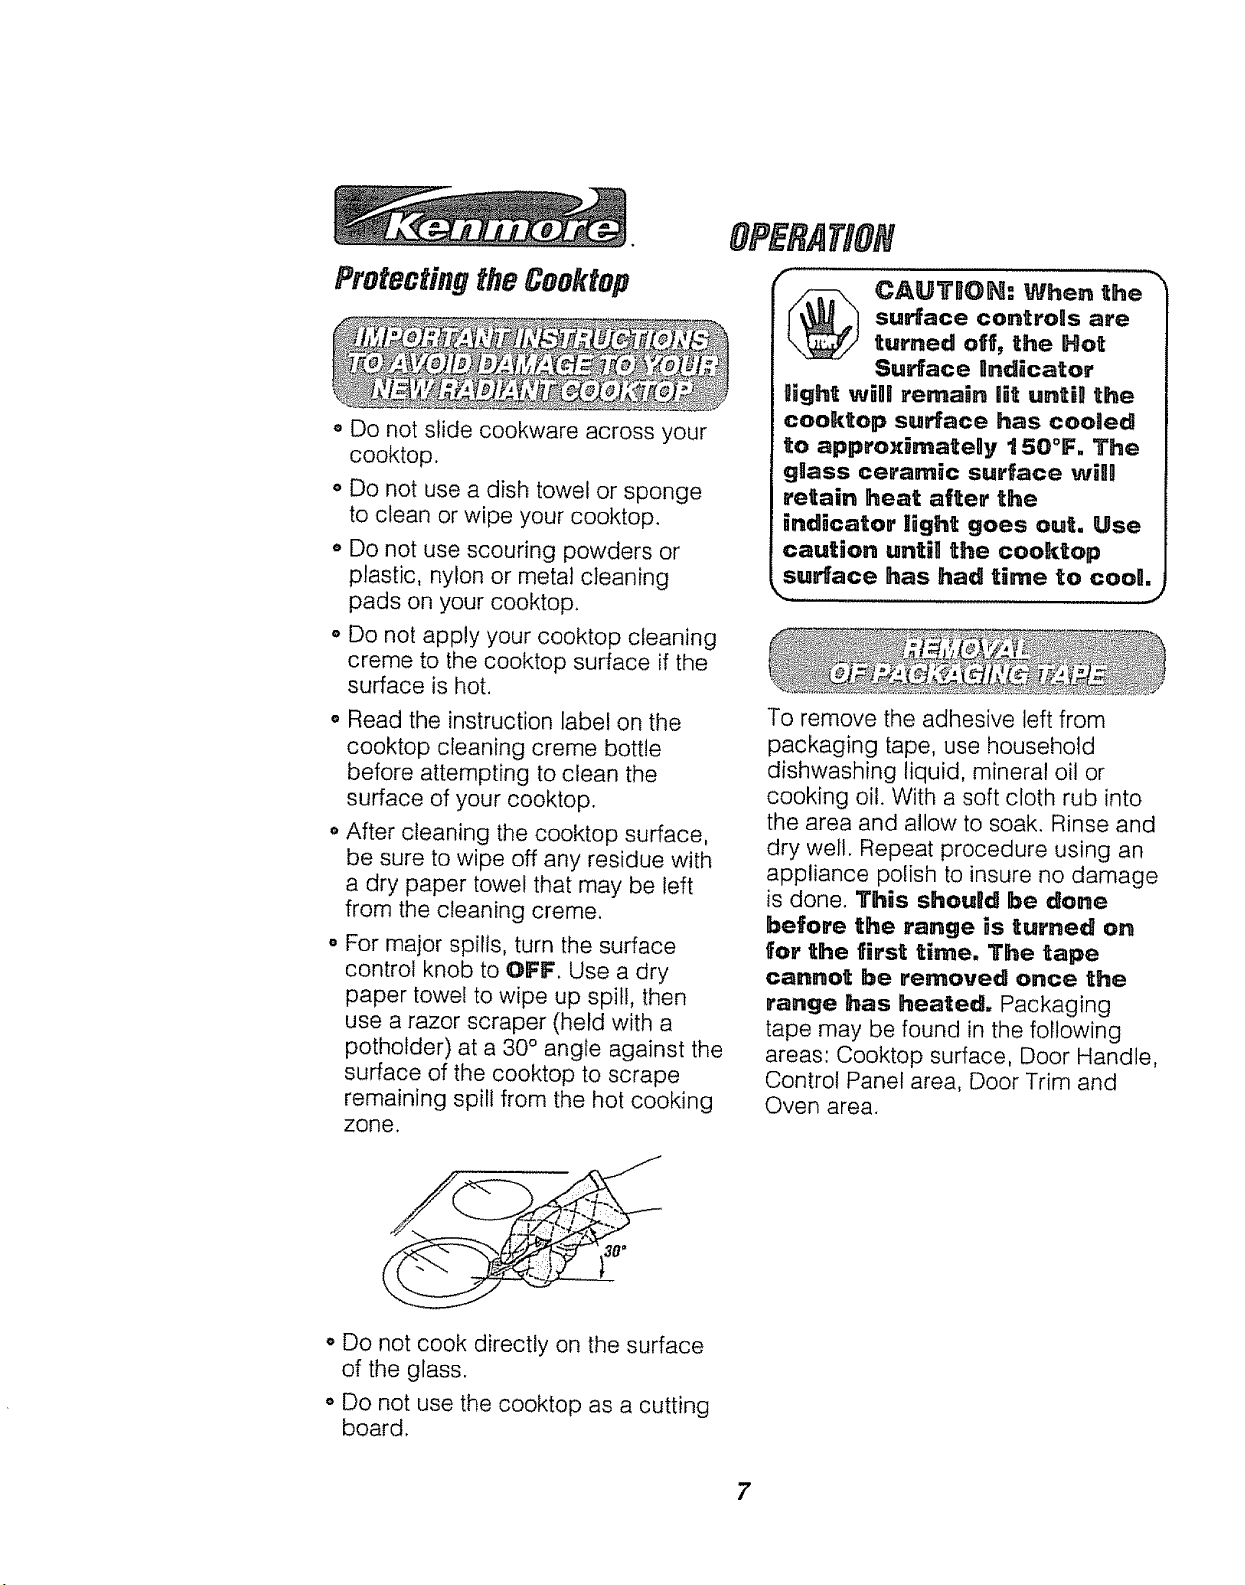
use a razor scraper (held with a
potholder) at a 30° angle against the
surface of the cooktop to scrape
remaining spill from the hot cooking
zone.
OPERAtiON
_ AUTBOH: When the
gight wigi remain lit unt[B the
cooktop surface has cooledl
to approxirnatelly 150°F, The
glass ceramic surface will
retain heat after the
_ndicator llight goes out. Use
caution until] the cooktop
surface has had time to cool,
To remove the adhesive left from
packaging tape, use household
dishwashing liquid, mineral oil or
cooking oil. With a soft cloth rub into
the area and allow to soak. Rinse and
dry well. Repeat procedure using an
appliance polish to insure no damage
is done, This should be done
before the range is turned on
for the first time. The tape
cannot be removed once the
range has heated,, Packaging
tape may be found in the following
areas: Cooktop surface, Door Handle,
Control Panel area, Door Trim and
Oven area.
surface controlls are
turned off, the Hot
Surface Bndlicator
o Do not cook directly on the surface
of the glass.
o Do not use the cooktop as a cutting
board.
OPERATION
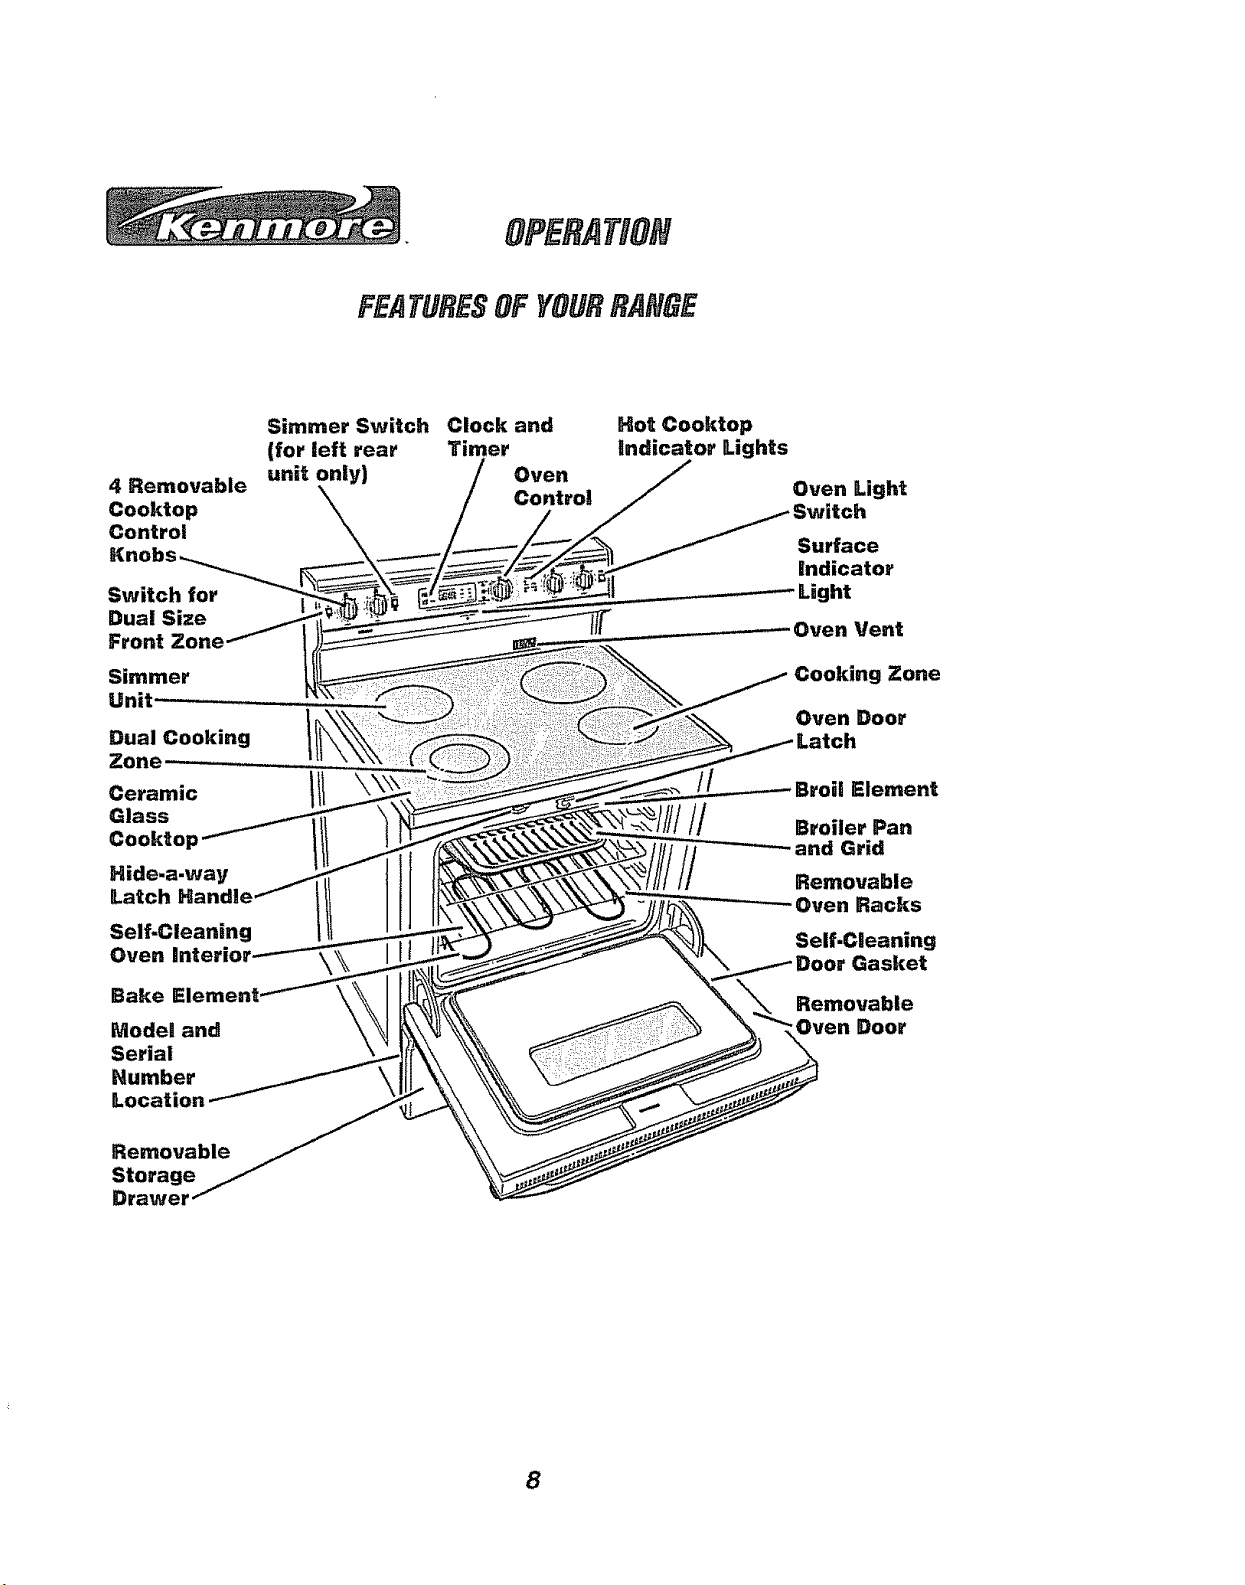
FEATURESOFYOURRANSE
4 Removable
Cooktop
Control
Switch for
Dual Size
Front Zone,
Simmer
Unit- , ,
Dual Cooking
Zone
Ceramic
Glass
Cooktop
Hide.a.way
Latch
Self-Cleaning
Oven I
Bake
Model and
Serial
Number
Location
Simmer Switch
(for left rear
unit only)
Clock and
Timer
Oven
Control
Hot Cooktop
indicator Lights
!/ffl
Oven Light
Surface
indicator
Light
Oven Vent
Cooking Zone
Oven Door
Broil Element
Broiler Pan
and Grid
Removable
Oven Racks
Self-Cleaning
Door Gasket
Removable
Oven Door
Removable
Storage
Drawer
8

OPERATION
RadiantCooktopCooking
Before using your new radiant
cooktop, clean it with the Cooktop
Cleaning Creme ®. This will leave a
protective coating.
The cooking zones are shown by the
outline on the glass. The sign below
each control knob shows you which
radiant zone is turned on by that knob.
If you don't ( j
cookware is
know if your _ }
flat on the
bottom, try this test, Turn your pan
upside down on the countertop and
place the edge of a ruler flat against
the surface of the pan. Rotate the
ruler a full circle, checking as you turn
for any space between the two
surfaces. The bottom of the pan and
the edge of the ruler should fit flush
against each other all the way across.
O@
Rear
O0 O@
@ 0 Right
Left Front
Front
Use pans and woks that are flat on
the bottom. The size of the pan
should be the same size as the zone
used when cooking.
Sta_nlless SteeH: Highly
recommended for use with your new
cooktop. Especially good with a
sandwich clad bottom.
Aguminum: Heavyweight aluminum
cookware recommended,
Cast llron: Cast iron cookware that
is completely covered with porcelain
enamel is recommended, Cast iron
that is not covered with porcelain
enamel may scratch the glass
ceramic surface of the cooktop,
Copper Bottom: Has good
performance, but it can leave a
residue on the cooktop surface.
Gllass=Ceramic or Stoneware:
Usable. Check for rough edges or
burrs, which may scratch the cooktop
surface.
Size of
cooking
zone
Pans should be flat on bottom.
9
OPERATION
Radiant CooktopCooking
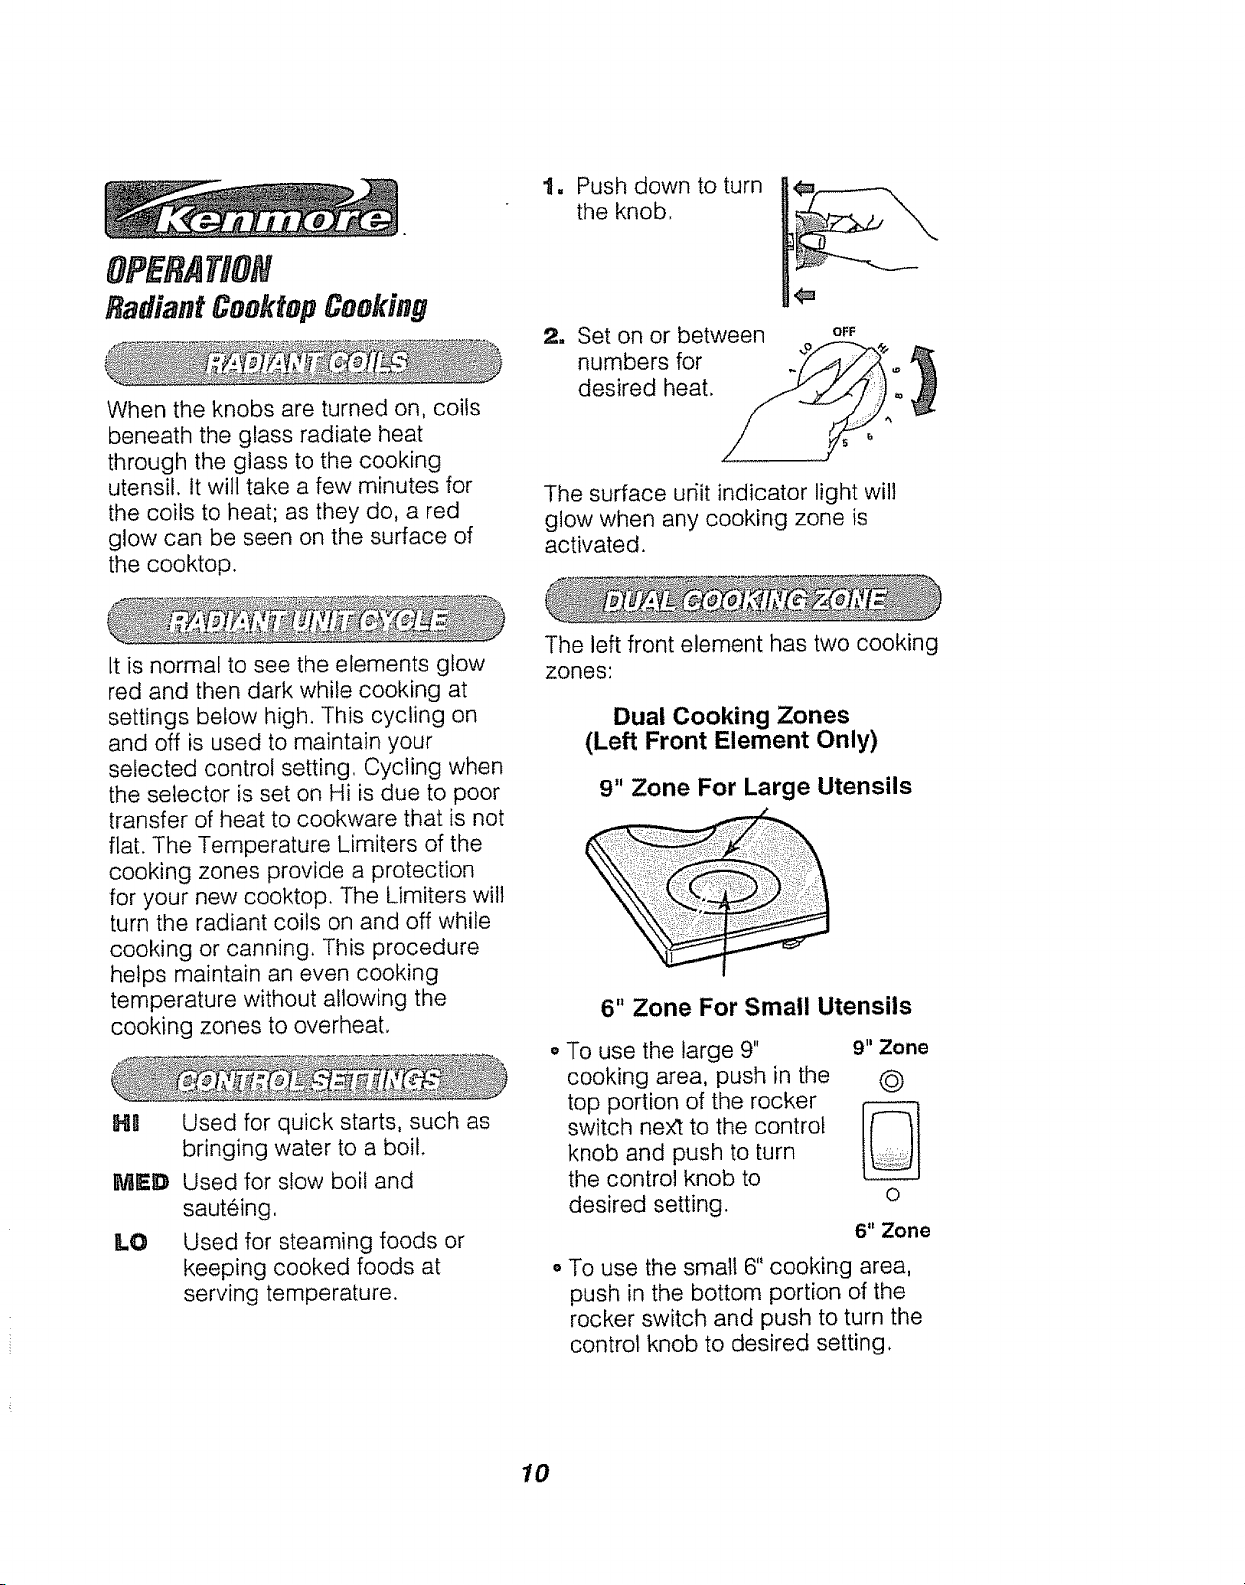
1. Push down to turn
the knob,
u
Set on or between o
numbers for .__'_o/_
When the knobs are turned on, coils
beneath the glass radiate heat
through the glass to the cooking
utensil, it will take a few minutes for
the coils to heat; as they do, a red
glow can be seen on the surface of
the cooktop.
It is normal to see the elements glow
red and then dark while cooking at
settings below high. This cycling on
and off is used to maintain your
selected control setting, Cycling when
the selector is set on Hi is due to poor
transfer of heat to cookware that is not
flat. The Temperature Limiters of the
cooking zones provide a protection
for your new cooktop. The Limiters will
turn the radiant coils on and off while
cooking or canning. This procedure
helps maintain an even cooking
temperature without allowing the
cooking zones to overheat.
Hg
MED
LO
Used for quick starts, such as
bringing water to a boil.
Used for slow boil and
sauteing,
Used for steaming foods or
keeping cooked foods at
serving temperature.
desired heat. /___
The surface udit indicator light will
glow when any cooking zone is
activated.
The left front element has two cooking
zones:
Dual Cooking Zones
(Left Front Element Only)
9" Zone For Large Utensils
6" Zone For Small Utensils
To use the large 9" 9" Zone
cooking area, push in the Q
top portion of the rocker
switch next to the control
knob and push to turn
the control knob to
desired setting, o
6" Zone
To use the small 6" cooking area,
push in the bottom portion of the
rocker switch and push to turn the
control knob to desired setting,
10
OPEflATION
RadiantCoolrtopCooking
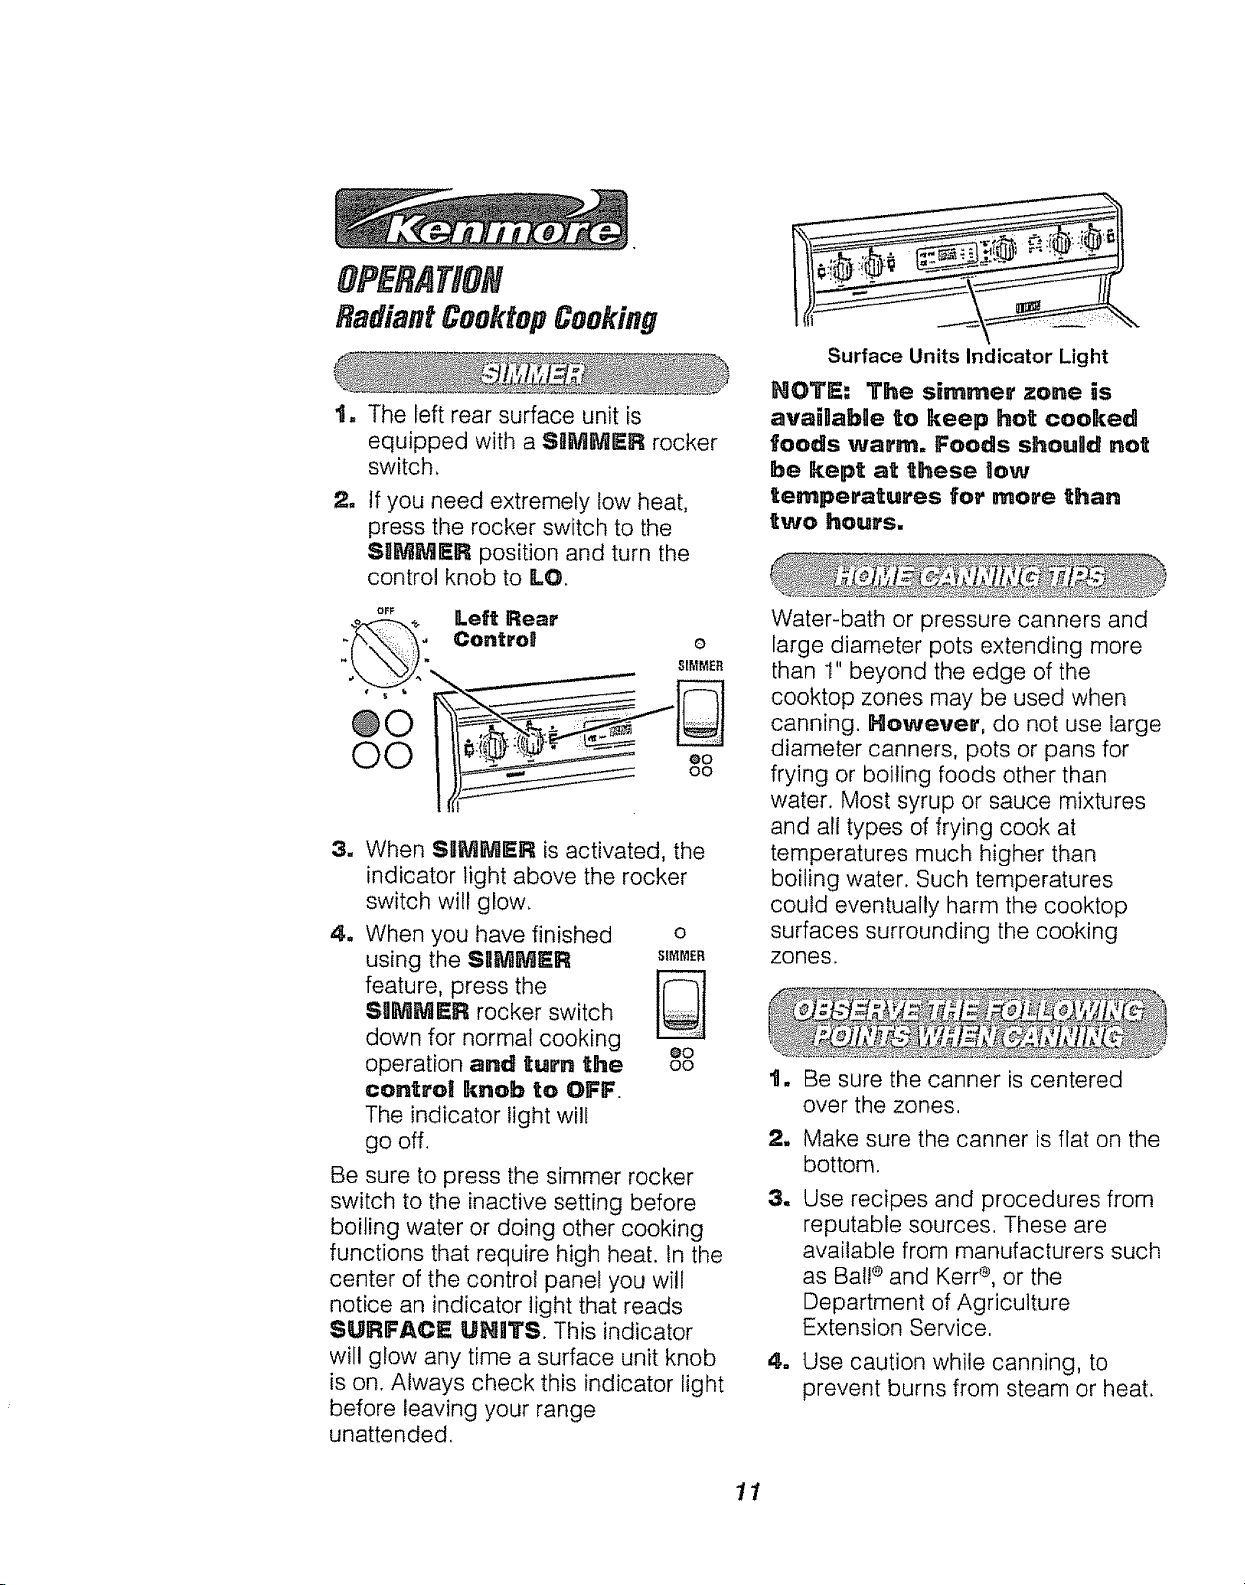
11.The left rear surface unit is
equipped with a SLIMMER rocker
switch,
1t
If you need extremely low heat,
press the rocker switch to the
SIIMM_:R position and turn the
control knob to LO.
opl_
N _
NO
©©
u
When SLIMMER is activated, the
indicator light above the rocker
switch will glow.
a
When you have finished o
using the S_MMER s_ER
feature, press the
SLIMMER rocker switch
0
81MMER
Surface Units Indicator Light
NOTE: The simmer zone is
ava_ablle to keep hot cooked
foods warm. Foods shoulld not
be kept at these low
temperatures for more _han
two hours.
Water-bath or pressure canners and
large diameter pots extending more
than 1" beyond the edge of the
cooktop zones may be used when
canning. However, do not use large
diameter canners, pots or pans for
frying or boiling foods other than
water. Most syrup or sauce mixtures
and all types of frying cook at
temperatures much higher than
boiling water. Such temperatures
could eventually harm the cooktop
surfaces surrounding the cooking
zones.
down for normal cooking eo
operation and turn the oo
control knob to OFF.
The indicator light will
go off.
Be sure to press the simmer rocker
switch to the inactive setting before
boiling water or doing other cooking
functions that require high heat. In the
center of the control panel you will
notice an indicator light that reads
SURFACE UNFITS. This indicator
will glow any time a surface unit knob
is on. Always check this indicator light
before leaving your range
unattended.
11
tit
Be sure the canner is centered
over the zones,
1t
Make sure the canner is flat on the
bottom.
1I
Use recipes and procedures from
reputable sources, These are
available from manufacturers such
as Bal!®and Kerr ®, or the
Department of Agriculture
Extension Service.
=
Use caution while canning, to
prevent burns from steam or heat.
OFERAT#ON
OvenControl,Clock, and Timer
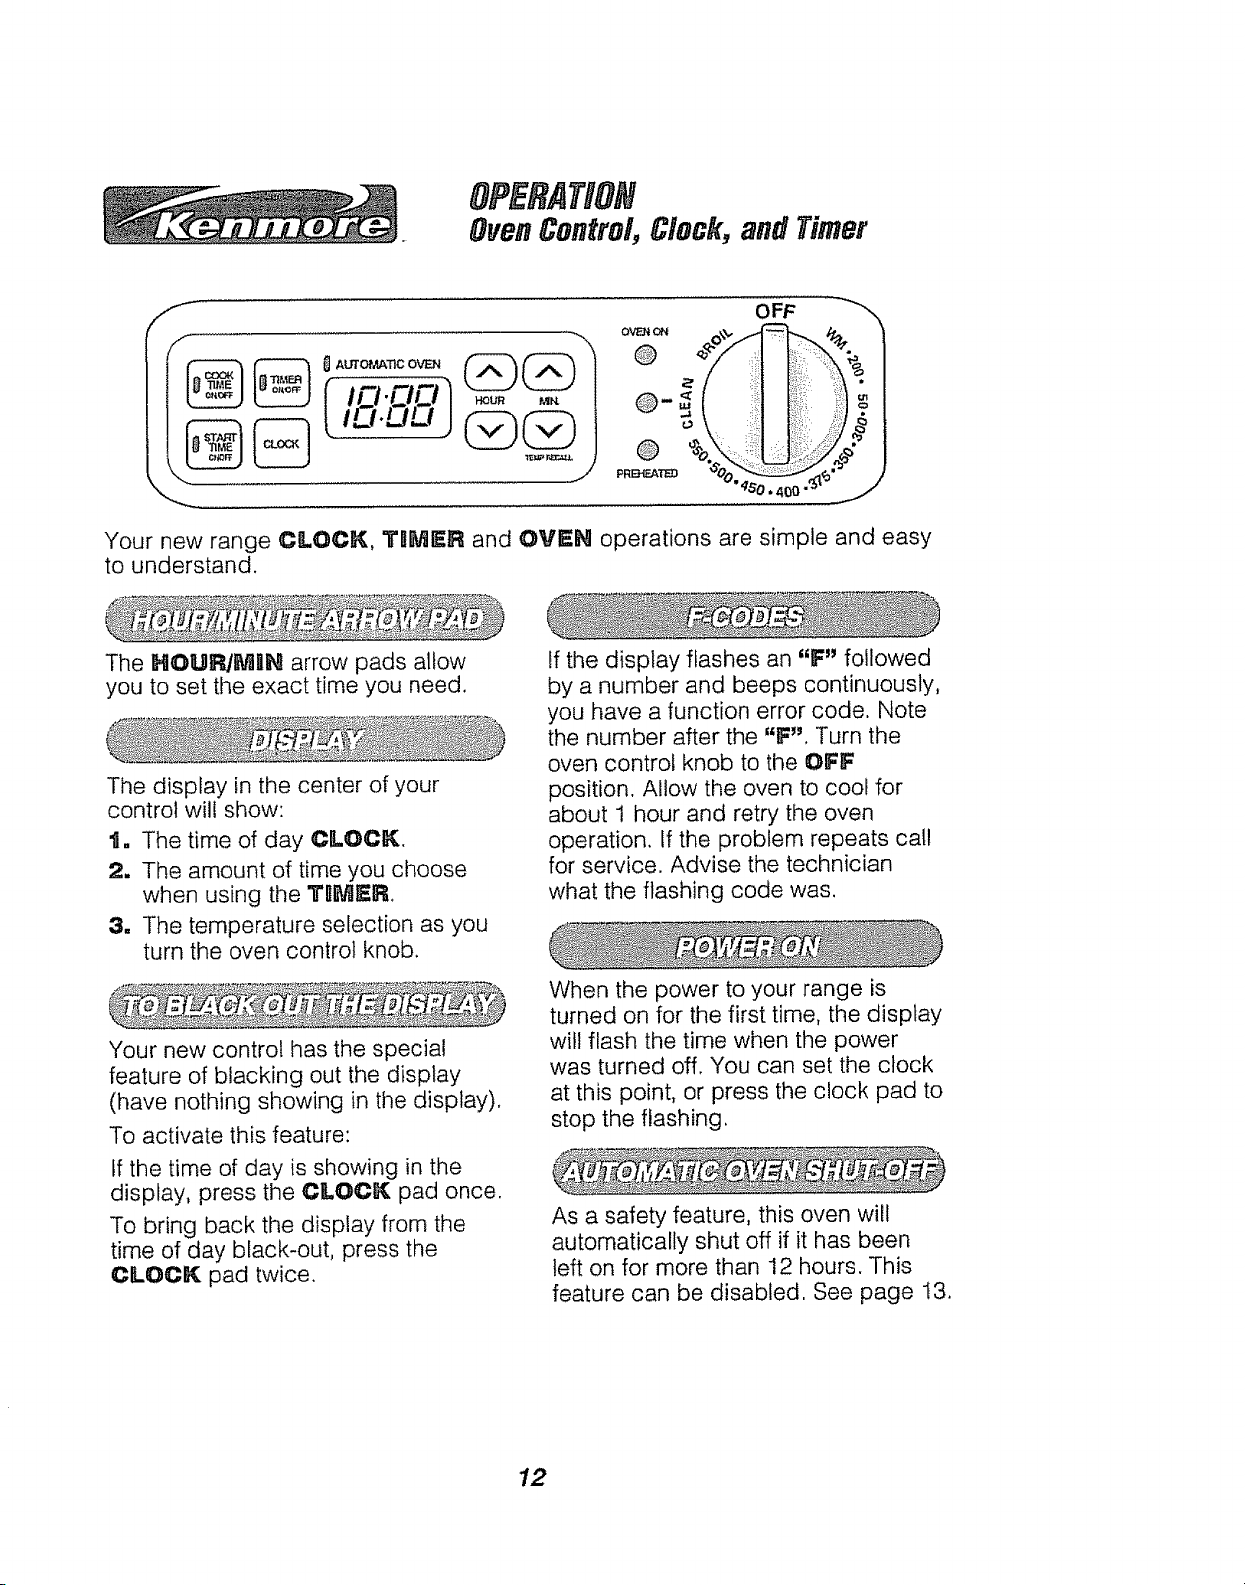
f
OFF
%%I
@
..... FR_'I'B:J "_'00_
Your new range CLOCK, TRMER and OVEN operations are simple and easy
to understand.
The HOUR/MIH arrow pads allow
you to set the exact time you need.
The display in the center of your
control will show:
t. The time of day CLOCK.
2. The amount of time you choose
when using the TIIMI_R
3. The temperature selection as you
turn the oven control knob.
If the display flashes an "F" followed
by a number and beeps continuously,
you have a function error code. Note
the number after the "F'. Turn the
oven control knob to the OFF
position. Allow the oven to cool for
about 1 hour and retry the oven
operation. If the problem repeats call
for service. Advise the technician
what the flashing code was.
0 *4OO''"
Your new control has the special
feature of blacking out the display
(have nothing showing in the display).
To activate this feature:
If the time of day is showing in the
display, press the CLOCK pad once.
To bring back the display from the
time of day black-out, press the
CLOCK pad twice.
When the power to your range is
turned on for the first time, the display
will flash the time when the power
was turned off, You can set the clock
at this point, or press the clock pad to
stop the flashing.
As a safety feature, this oven wilt
automatically shut off if it has been
left on for more than 12 hours. This
feature can be disabled. See page 13.
12
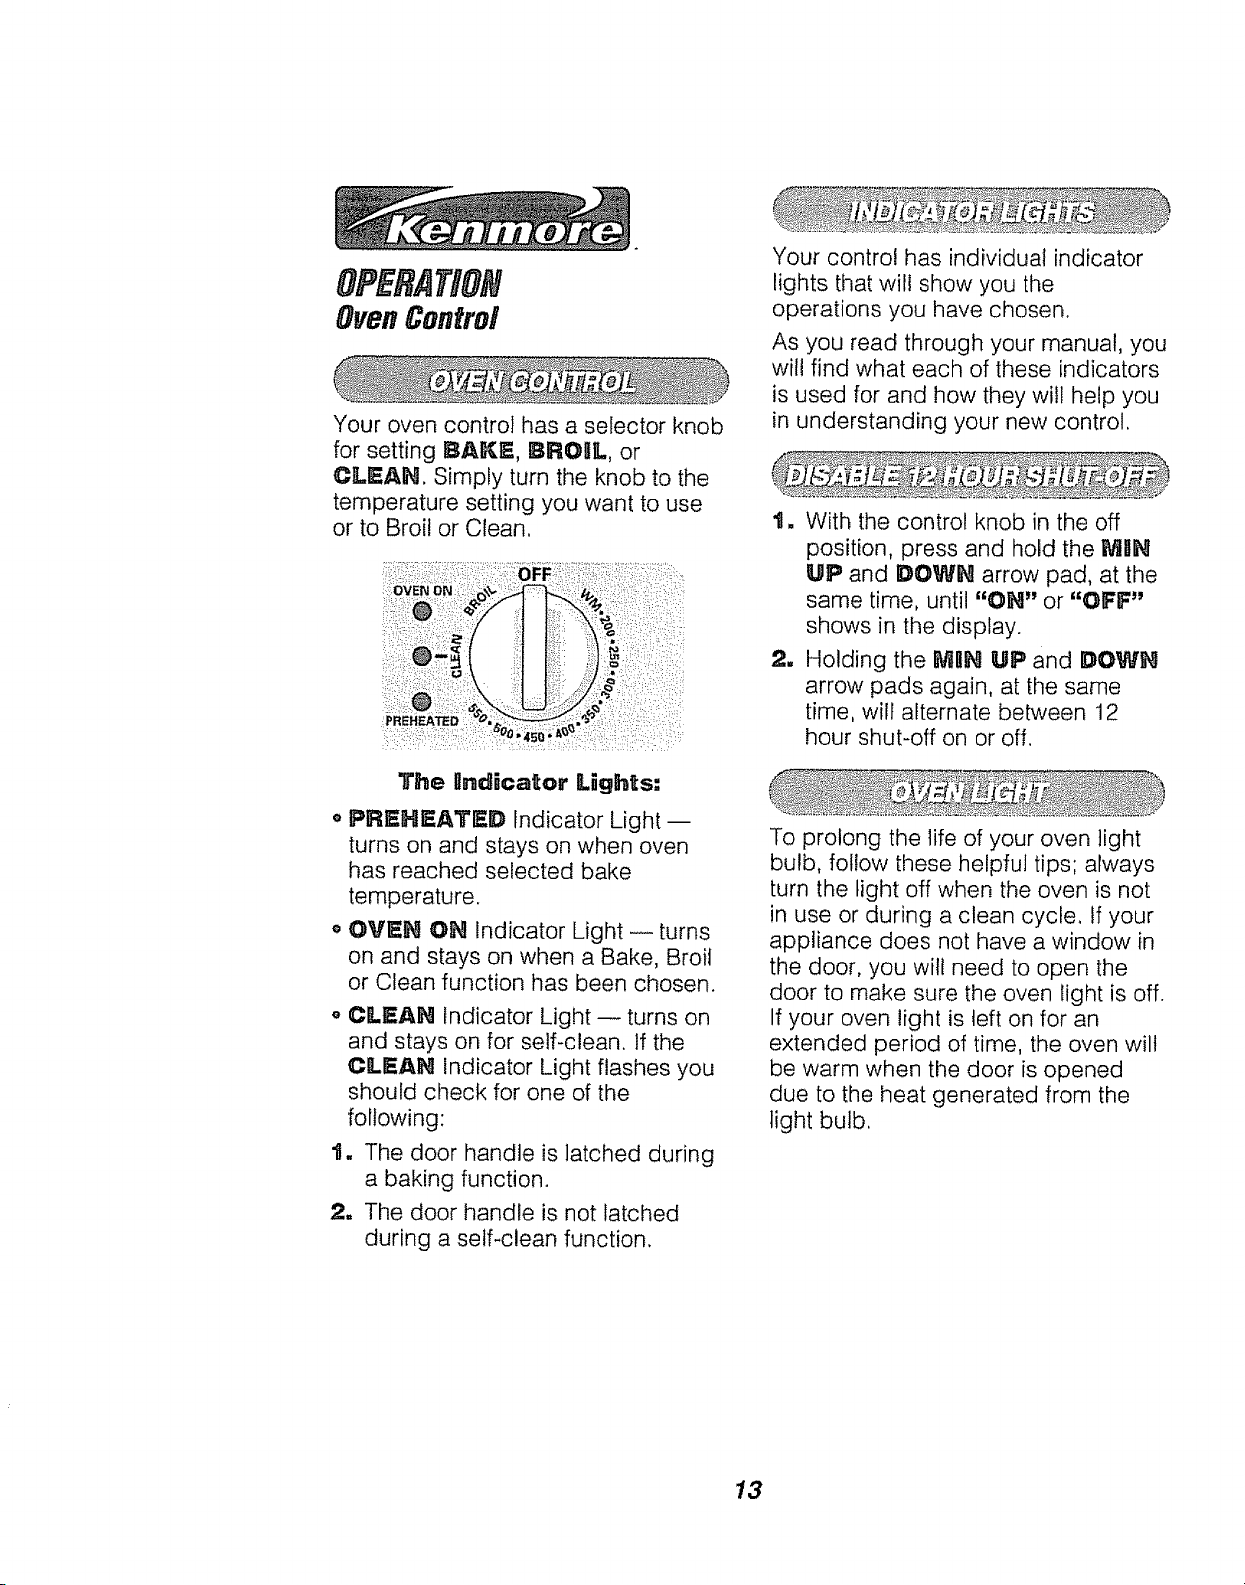
Your oven control has a selector knob
for setting BAKE, BROIIL, or
CLEAH. Simply turn the knob to the
temperature setting you want to use
or to Broil or Clean,
Your control has individual indicator
lights that will show you the
operations you have chosen,
As you read through your manual, you
will find what each of these indicators
is used for and how they wil! help you
in understanding your new control.
t. With the control knob in the off
position, press and hold the I_BN
UP and DOWH arrow pad, at the
same time, until "OH" or "OFF"
shows in the display.
2. Holding the MIIH UP and DOWH
arrow pads again, at the same
time, will alternate between 12
hour shut-off on or off,
The PndDcator " "
L,ghts,
• PREHEATED Indicator Light-
turns on and stays on when oven
has reached selected bake
temperature.
o OVEN OH Indicator Light -- turns
on and stays on when a Bake, Broil
or Clean function has been chosen.
o CLEAN Indicator Light -- turns on
and stays on for self-clean. If the
CLEAN indicator Light flashes you
should check for one of the
following:
1. The door handle is latched during
a baking function.
2. The door handle is not latched
during a self-clean function.
To prolong the life of your oven light
bulb, follow these helpful tips; always
turn the light off when the oven is not
in use or during a clean cycle. Ifyour
appliance does not have a window in
the door, you will need to open the
door to make sure the oven light is off.
If your oven light is teft on for an
extended period of time, the oven wilt
be warm when the door is opened
due to the heat generated from the
light bulb,
13
OPERATION
Clockand Timer
The CLOCK and TIIMER are set by
using the touch pads. The TgMER
w[ti not controt any oven operation.
1. Press the CLOCK pad
CLOCK twice to make display
flash.
a Press the
HOUR/MgN UP and/or
DOWH arrow pads to
%/
set the time of day. The
colon wilt flash while you
set the time.
After releasing the arrow pad, the
Timer Indicator Light and colon will
blink three to five times, then the timer
will start the countdown. The Timer
Indicator Light will remain on until
countdown reaches "0".
When the timer has started the
countdown, you may press the
CLOCK pad to return to the current
time of day.
At the end of the countdown the
control will beep and the Timer
Indicator Light will flash. Press the
T_MER OH/OFF pad,
If you have selected an amount of
time, but decide to change it:
tf the countdown is showing in the
display, press the HOUR/MUlN! UP or
DOWN arrow pad. Select the time,
If the time of day clock or temperature
is showing in the display, press the
TIIMER ON/OFF pad. Then, press
either the HOURIMBN UP or DOWN
arrow pad. Select the desired time.
The clock will automatically start
keeping time within one minute or you
may press the CLOCK pad for
immediate start,
The "IrlIMER is only a minute timer. It
wilt not control oven operations. The
maximum time you may set is 11
hours and 59 minutes.
It
Press the TtIMER
ON/OFF pad. "0:00" and
the Timer Indicator Light
will flash.
2_
A
Press the HOUR/_IIIN
UP andlor DOWN arrow
V
pads to set the time you
prefer to use. The colon
will flash while you set
the time.
tf you wish to cancel the TIMER,
press the TRMER ON/OFF pad
once. tf the countdown is not
showing, press the "filMER ON/OFF
pad twice.
14
OPERAT#ON
OvenCookingTips
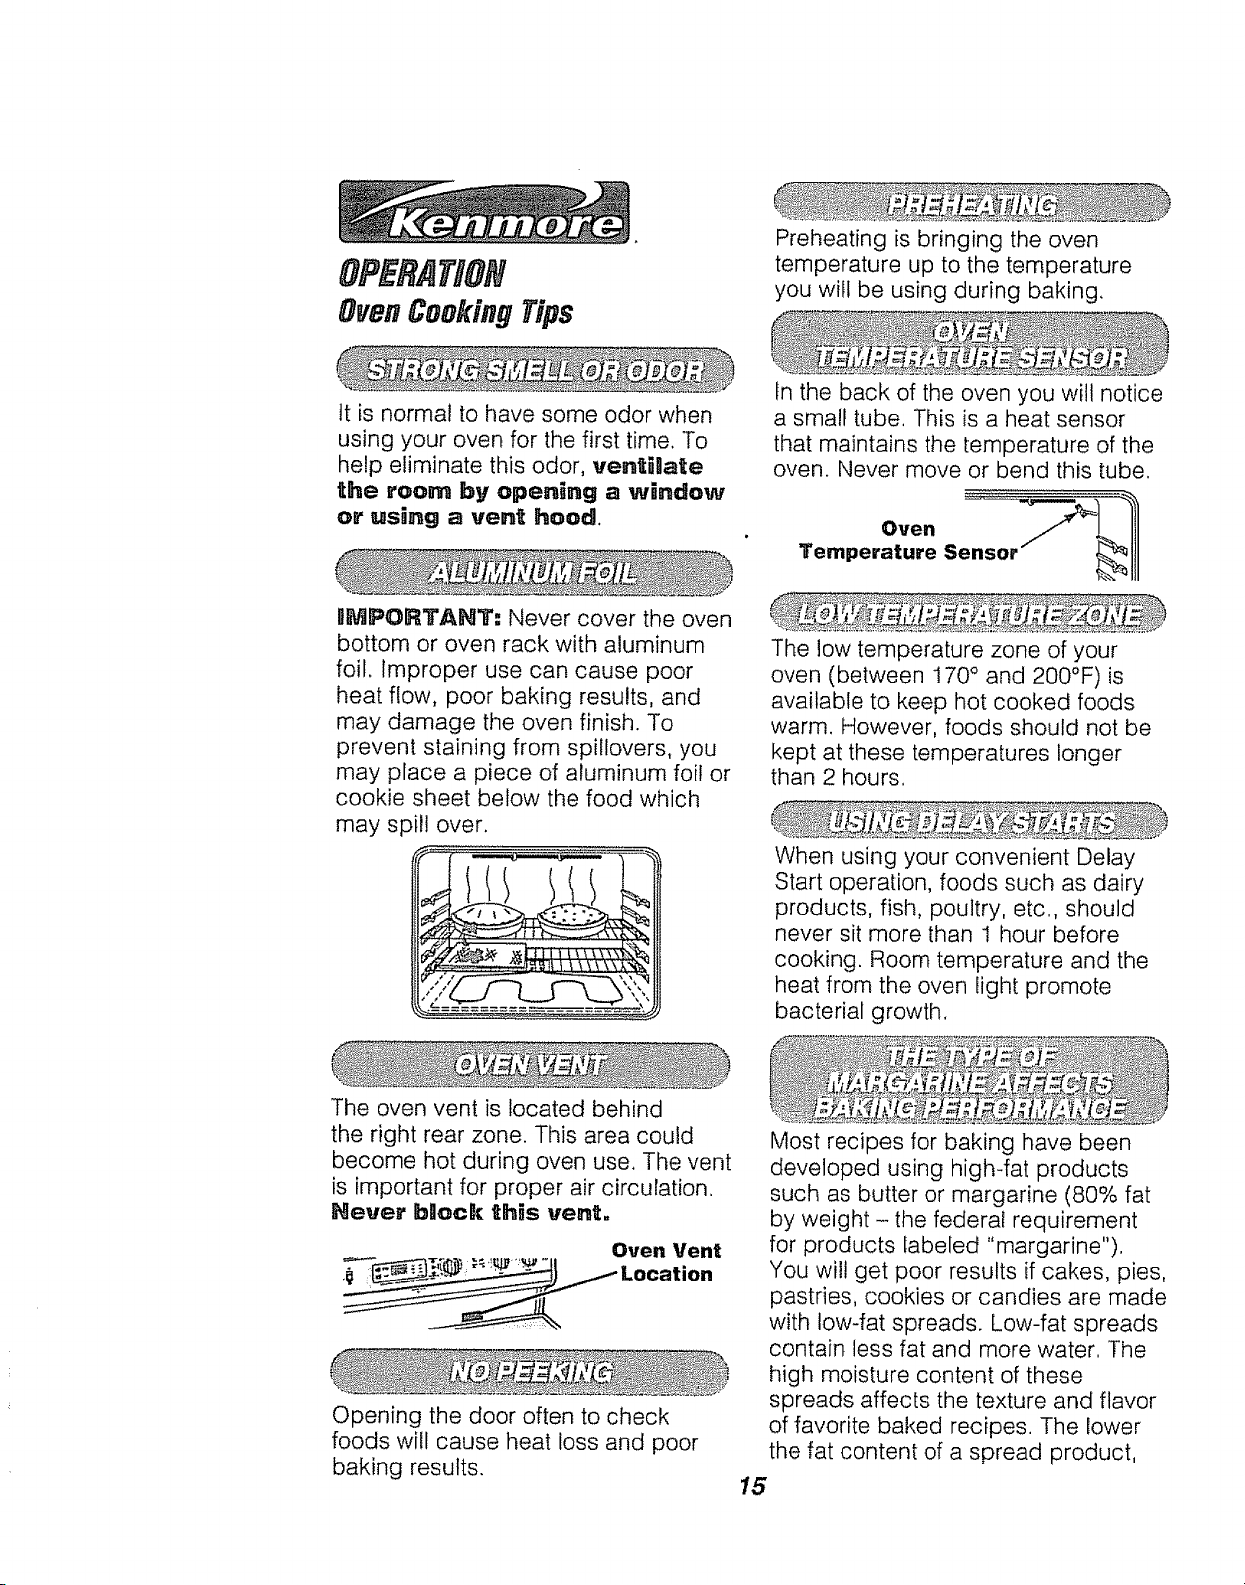
it is normal to have some odor when
using your oven for the first time. To
help eliminate this odor, ventilate
the room by open_ng a window
or using a vent hood.
PMPORTANT: Never cover the oven
bottom or oven rack with aluminum
foil. Improper use can cause poor
heat flow, poor baking results, and
may damage the oven finish. To
prevent staining from spillovers, you
may place a piece of aluminum foil or
cookie sheet below the food which
may spill over.
Preheating is bringing the oven
temperature up to the temperature
you will be using during baking.
In the back of the oven you wilt notice
a small tube, This is a heat sensor
that maintains the temperature of the
oven. Never move or bend this tube.
Temperature S
The low temperature zone of your
oven (between 170° and 200°F)is
available to keep hot cooked foods
warm. However, foods should not be
kept at these temperatures longer
than 2 hours.
When using your convenient Delay
Start operation, foods such as dairy
products, fish, poultry, etc., should
never sit more than 1 hour before
cooking. Room temperature and the
heat from the oven light promote
bacterial growth.
The oven vent is located behind
the right rear zone. This area could
become hot during oven use. The vent
is important for proper air circulation,
Never b_ock this vent.
Oven Vent
Opening the door often to check
foods will cause heat loss and poor
baking results.
Most recipes for baking have been
developed using high-fat products
such as butter or margarine (80% fat
by weight - the federal requirement
for products labeled "margarine"),
You will get poor results if cakes, pies,
pastries, cookies or candies are made
with low-fat spreads. Low-fat spreads
contain less fat and more water. The
high moisture content of these
spreads affects the texture and flavor
of favorite baked recipes. The lower
the fat content of a spread product,
15
OFERAfi#f
OvenCookingTips
the more noticeable these differences
become. To ensure best results, use
margarine, butter or stick spreads
containing at least 70% vegetable oil.
The Oven Temperature Sensor at the
back of the oven continuously senses
and controls the temperature inside the
oven. To keep a constant set
temperature, the elements will cycle or
turn on and off during cooking.
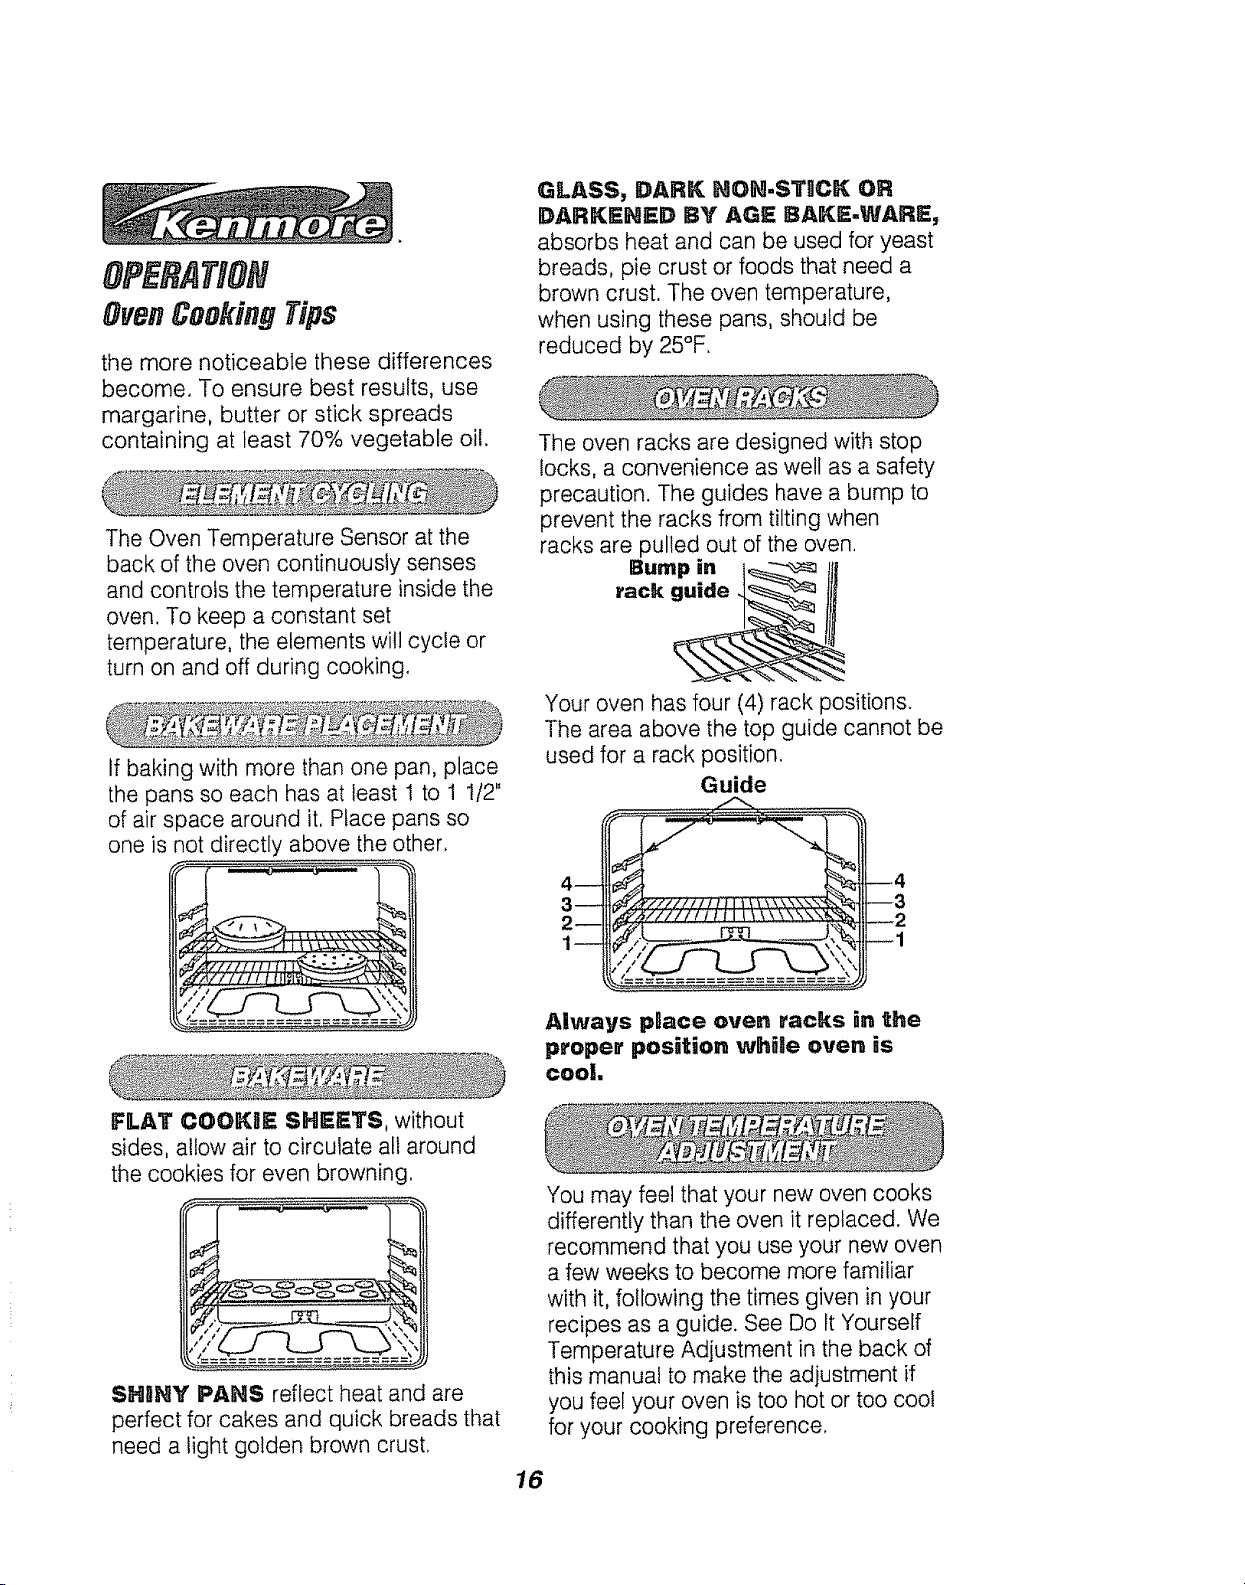
If baking with more than one pan, place
the pans so each has at least t to 1 1/2"
of air space around it. Place pans so
one is not directly above the other.
GLASS, DARK NON-STgCK OR
DARKENED BY AGE BAKE-WARE,
absorbs heat and can be used for yeast
breads, pie crust or foods that need a
brown crust. The oven temperature,
when using these pans, should be
reduced by 25°F.
The oven racks are designed with stop
locks, a convenience as well as a safety
precaution. The guides have a bump to
prevent the racks from tilting when
racks are pulled out of the oven.
Your oven has four (4) rack positions.
The area above the top guide cannot be
used for a rack position.
Guide
FLAT CO(_KSE SHEETS, without
sides, allow air to circulate all around
the cookies for even browning.
oo
1114, ,,',
SHnNY PANS reflect heat and are
perfect for cakes and quick breads that
need a light golden brown crust.
Always place oven racks in the
proper position while oven is
cool,
You may feel that your new oven cooks
differently than the oven it replaced. We
recommend that you use your new oven
a few weeks to become more familiar
with it, following the times given in your
recipes as a guide. See Do It Yourself
Temperature Adjustment in the back of
this manual to make the adjustment if
you feel your oven is too hot or too coo!
for your cooking preference.
16
1. Turn the OVSN CONTROL KNOB
to selected temperature from WM to
550°F. As the knob turns, the control
display will show the changing
temperatures. When the display
shows your selected temperature,
release the coritrol knob. The
temperature will remain in the display
for 5 seconds then return to the time
of day. To recall the temperature
display, press the MIIN DOWN
arrow pad.
2. The "OVEN ON" indicator light
will glow.
3, When the oven has reached the
selected temperature, a series of
short tones will sound, and the
"PREHEATED" and "OVEN ON"
indicator lights will glow.
4, The "PREHEATED" and "OVEN
ON" indicator lights will remain on
until baking is complete and the
control knob is turned to the OFF
position.
1. Make sure the correct time of day is
showing in the display.
2, Press the COOK TIME
ONtOFF pad.
3. Press the HOUR/MnN UP and/or
DOWN arrow pads, to set how tong
you want foods to cook.
4. Turnthe Oven Control Knob to the
baking temperature you want to use.
The Oven On and Automatic Oven
indicator lights will glow. When the
temperature reaches the temperature
you have selected, the preheated
indicator light will glow.
5. When the set amount of cooktime has
reached zero, a tone will sound and
the "COOK TRME" and "OVEN
OH" indicator lights will blink until
the oven control knob is turned to the
OFF position.
1. Make sure the correct time of day is
showing in the display,
2. Press the COOK. T_ME
OH/OFF pad.
3. Press the HOUR/MgH UP and/or
DOWN arrow pads, to set how long
you want foods to cook.
4, Press the START Tg_E
ONtOFF pad.
5. Press the HOURIMIIN UP and/or
DOWN arrow pads to set the time of
day you want the oven to turn on.
6. Turn the OVEN CONTROL _N08
to the baking temperature you want
to use. The "OVEN ON" indicator
light will blink when the
A_TO_AT_C OVEN times are set,
but a temperature is not selected.
7. The "START TOME" and
"AUTO_ATIC OVEN" indicator
lights will glow.
8. When the start time is reached, the
oven will automatically turn on and
start cooking,
9. When the temperature inside the
oven reaches the selected
temperature, the "PREHEATED"
indicator light wil! glow.
10, When baking is finished the
"CO0_TI_E" and "OVEN ON" in-
dicator lights will blink until the control
knob is turned off.
DOTE: After pressing the Cook Time or
Start Time pads, if you hesitate before
pressing the Hour/Min pads, the display
witl blink 5 times and return to the time of
day, if this happens just press again the
Time pad you were setting to continue.
Cook Time, Clock, Timer, and Start
Time can be recalled by pressing the
desired pad once, Press the HOUR/_g_
UP and/or DOWN arrow pads if atime
change is desired.
17
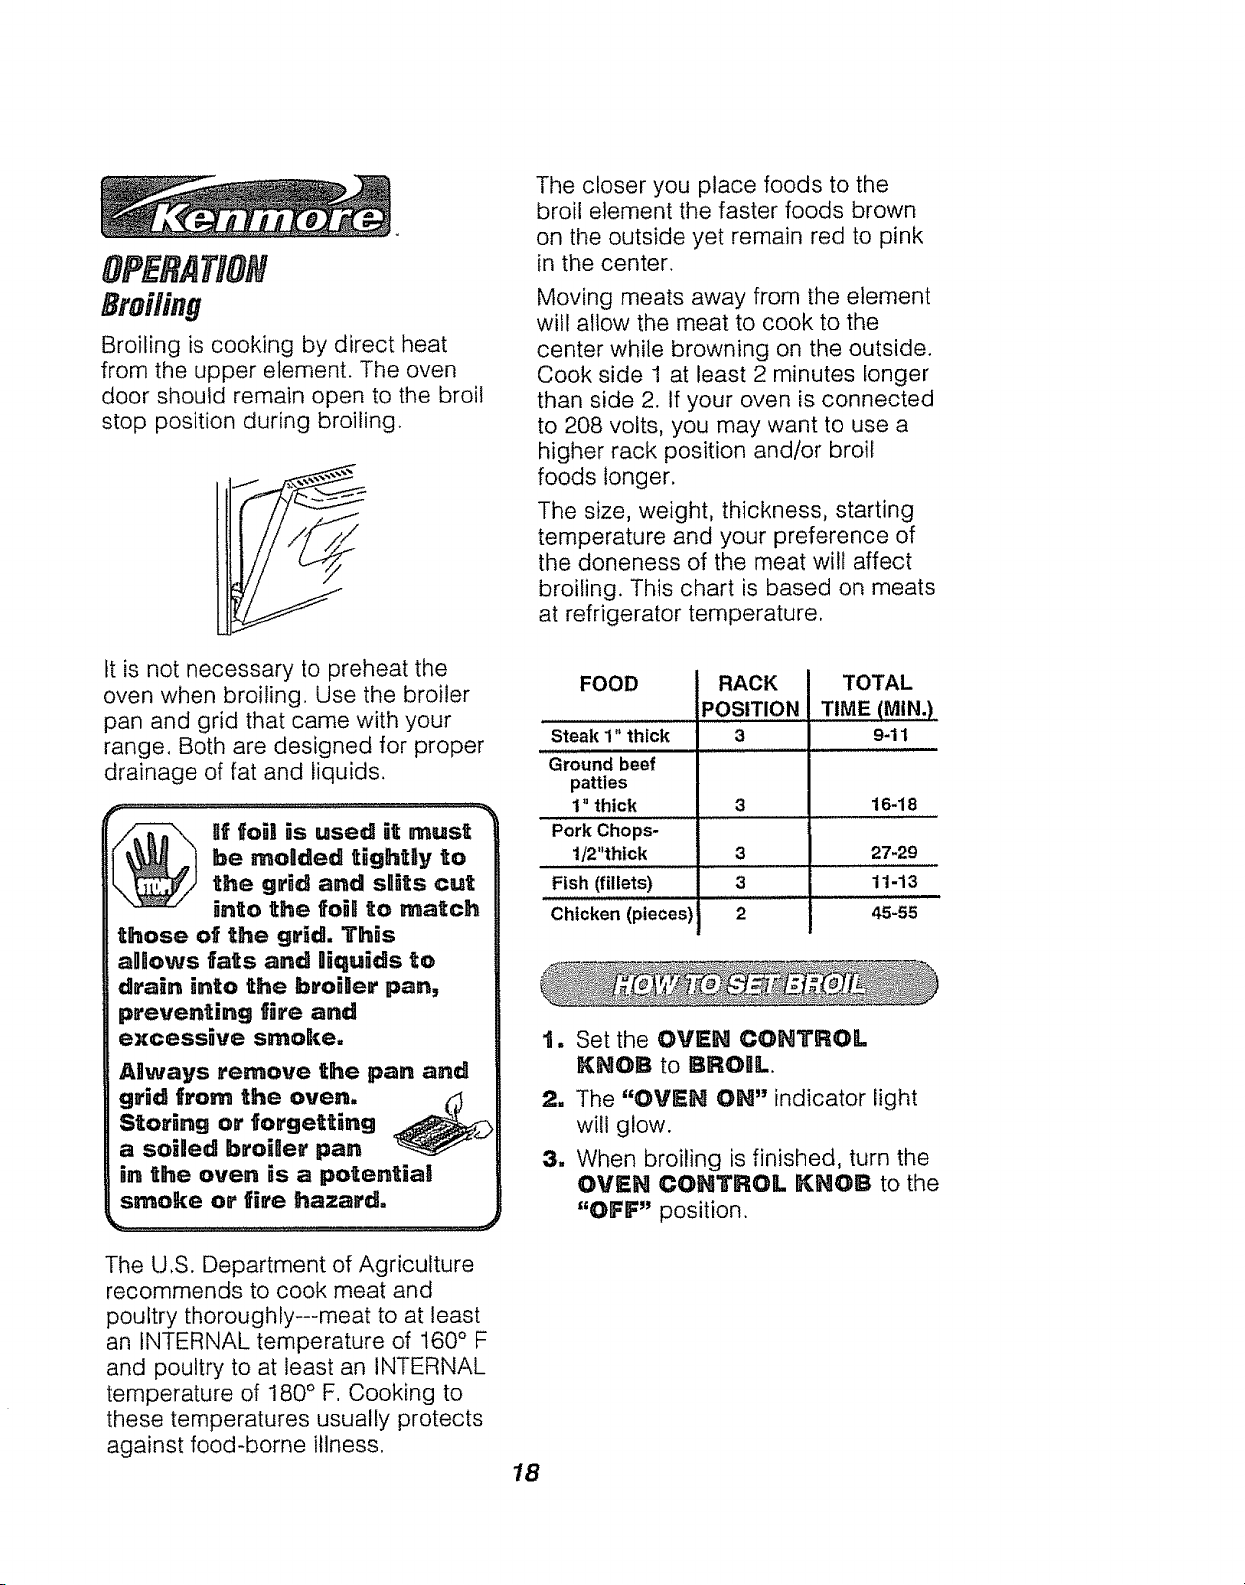
Broiling is cooking by direct heat
from the upper element. The oven
door should remain open to the broil
stop position during broiling.
The closer you place foods to the
broi! element the faster foods brown
on the outside yet remain red to pink
in the center.
Moving meats away from the element
will allow the meat to cook to the
center while browning on the outside.
Cook side 1 at least 2 minutes longer
than side 2. If your oven is connected
to 208 volts, you may want to use a
higher rack position and/or broil
foods longer.
The size, weight, thickness, starting
temperature and your preference of
the doneness of the meat will affect
broiling. This chart is based on meats
at refrigerator temperature,
tt is not necessary to preheat the
oven when broiling. Use the broiler
pan and grid that came with your
range. Both are designed for proper
drainage of fat and liquids.
be mollded t_ghUy to
af foil _s used _t must
the gr_d and sgits cu_
into _he fo_ll _o match
those of the grid. ThRs
allllows fats and Oiqu_ds to
drain into the broiUer pan,
preventing fire and
excessive smoke=
A_ways remove the pan and
gr_d from the oven.
Storing or forgetting
a soiged broi_er pan
in the oven is a potential
smoke or fire hazard=
........................................... J
FOOD RACK
POSITION
Steak 1" thick
Ground beef
patties
1" thick 3 16-18
Pork Chops-
1/2"thick 3 27-29
Fish (fillets) 3 11-13
Chicken (pieces) 2 45-55
3
TOTAL
TIME (MIN.)
9-11
I. Set the OVEH COHTROL
KHOB to BROIIL
2. The "OVEH ON" indicator light
will glow.
3. When broiling is finished, turn the
OVe:N CONTROL KNOB to the
"OFF" position,
The U,S. Department of Agriculture
recommends to cook meat and
poultry thoroughly---meat to at least
an INTERNAL temperature of 160° F
and poultry to at least an INTERNAL
temperature of 180 ° F. Cooking to
these temperatures usually protects
against food-borne illness.
18
Serf-CleaningCycle
1. Remove the broiler pan and grid,
oven racks, utensils and any foil
that may be in the oven.
2. Soil on the front frame, 1" inside
the oven and outside the door
gasket, will need to be cleaned
by hand.
Front Frame
P Door Gasket ___
/
--'-- Door Liner
\
CLEANING
The door gasket is designed to have
a 5-6" gap at the bottom of the door.
This allows for proper air circulation.
Door Panel
Door Liner
it is normal for your oven door to give
the appearance of not having a good
seal against the range. This is due to
the gasket, The location of the gasket
on the oven door maintains a good
seal and prevents any heat loss.
Gasket
Clean these areas with hot water,
soap-filled steel wool pads or
cleansers such as Soft Scrub ®to
remove any soil. Rinse well with clean
water and dry.
3, Wipe up any heavy spillovers on
the oven bottom.
4. Do not clean the door gasket. The
fiberglass material of the oven
door gasket cannot withstand
abrasion. It is essential for the
gasket to remain intact. If you
notice it becoming worn, frayed or
displaced on the door, it should be
replaced.
_ tensills should never
The oven racks may be
cgeaned during the self.
cBean cycle, but wHB Bose
their Buster and become hard
to slide. If you choose to
Deave them in during the
cycge, wiping them down
with vegetabge oiB after the
cycle wHII heBp them sBide
easier.
For the first cnean cycDe,
vent the room w_th an
opened window or hood
vent. Th_s wiU reduce the
odor produced when heating
new parts,
be aeft _n the oven
during a seRf-cBean
cycBeo
19
CAREAft# NIN6
Self-Cleaning Cycle
1, For best results, follow the steps in
PR_=PARUHG YOUR OVEN.
2. Slide the handle to the right. Do not
force the handle.
3, Turn the oven control knob to
"CLEAN". The "CLEAN",
"AUTOMA'IraC OVEN", "COOK
TIIME", and "OVEN OH"
indicator lights will glow.
4, The handle will lock when high
temperatures are reached inside
the oven.
5, The clean cycle lasts 4 hours and
20 minutes. This includes a cool
down time. You may change this
clean time from 3 hours up to 5
hours and 59 minutes by pressing
the HOUR/_ilItN UP and/or
DOWN arrow pads, while the
colon is flashing.
When the clean cycle has started, you
may press the CLOCK pad to return
the display to the time of day. By
pressing the COOK TIME pad you
can return to the remaining clean time.
6, When the cycle is finished, the
"OVEN OH" and "CLEAN"
indicator lights will flash until the
oven control knob is turned to the
off position.
7, When the temperature has cooled,
the door handle will easily slide to
the left.
tm
For best results, follow the steps
in PRI_PARIIHG YOUR OVEN.
,1
Slide the handle to the right. Do
not force the handle.
3, Turn the oven control knob to
"CLEAN". The '_CLEAI_" and
"OVEH ON" indicator lights
will glow.
4, To delay the start of the clean
cycle press the START T_MI_
ON/OFF pad.
5, Press the HOUR/M_H UP and/or
DO_'NH arrow pads to set the time
of day you want the oven to start
cleaning automatically. The
"OVEH OH" indicator light is off
until the start time is reached.
a
When the cycle is finished the
"OVe:H OH" and "CLe=AH"
indicator lights will flash. Turn the
oven control knob to the off
position and unlock the door.
Turn the oven control knob to the off
position. Wait (approx. 1 hour) before
attempting to open the door. The indi-
cator light will not blink if the cycle is
interrupted.
If any white spots remain, wipe with a
damp cloth or sponge, or scrub them
with a soap-filled steel wool pad and
rinse thoroughly.
2O
 Loading...