

Kenmore 911.9281 Series, 911.9222 Series, 911.9309 Series, 911.9322 Series, 911.9332 Series Use And Care Manual
...
_t,;_ii:! I I ] I
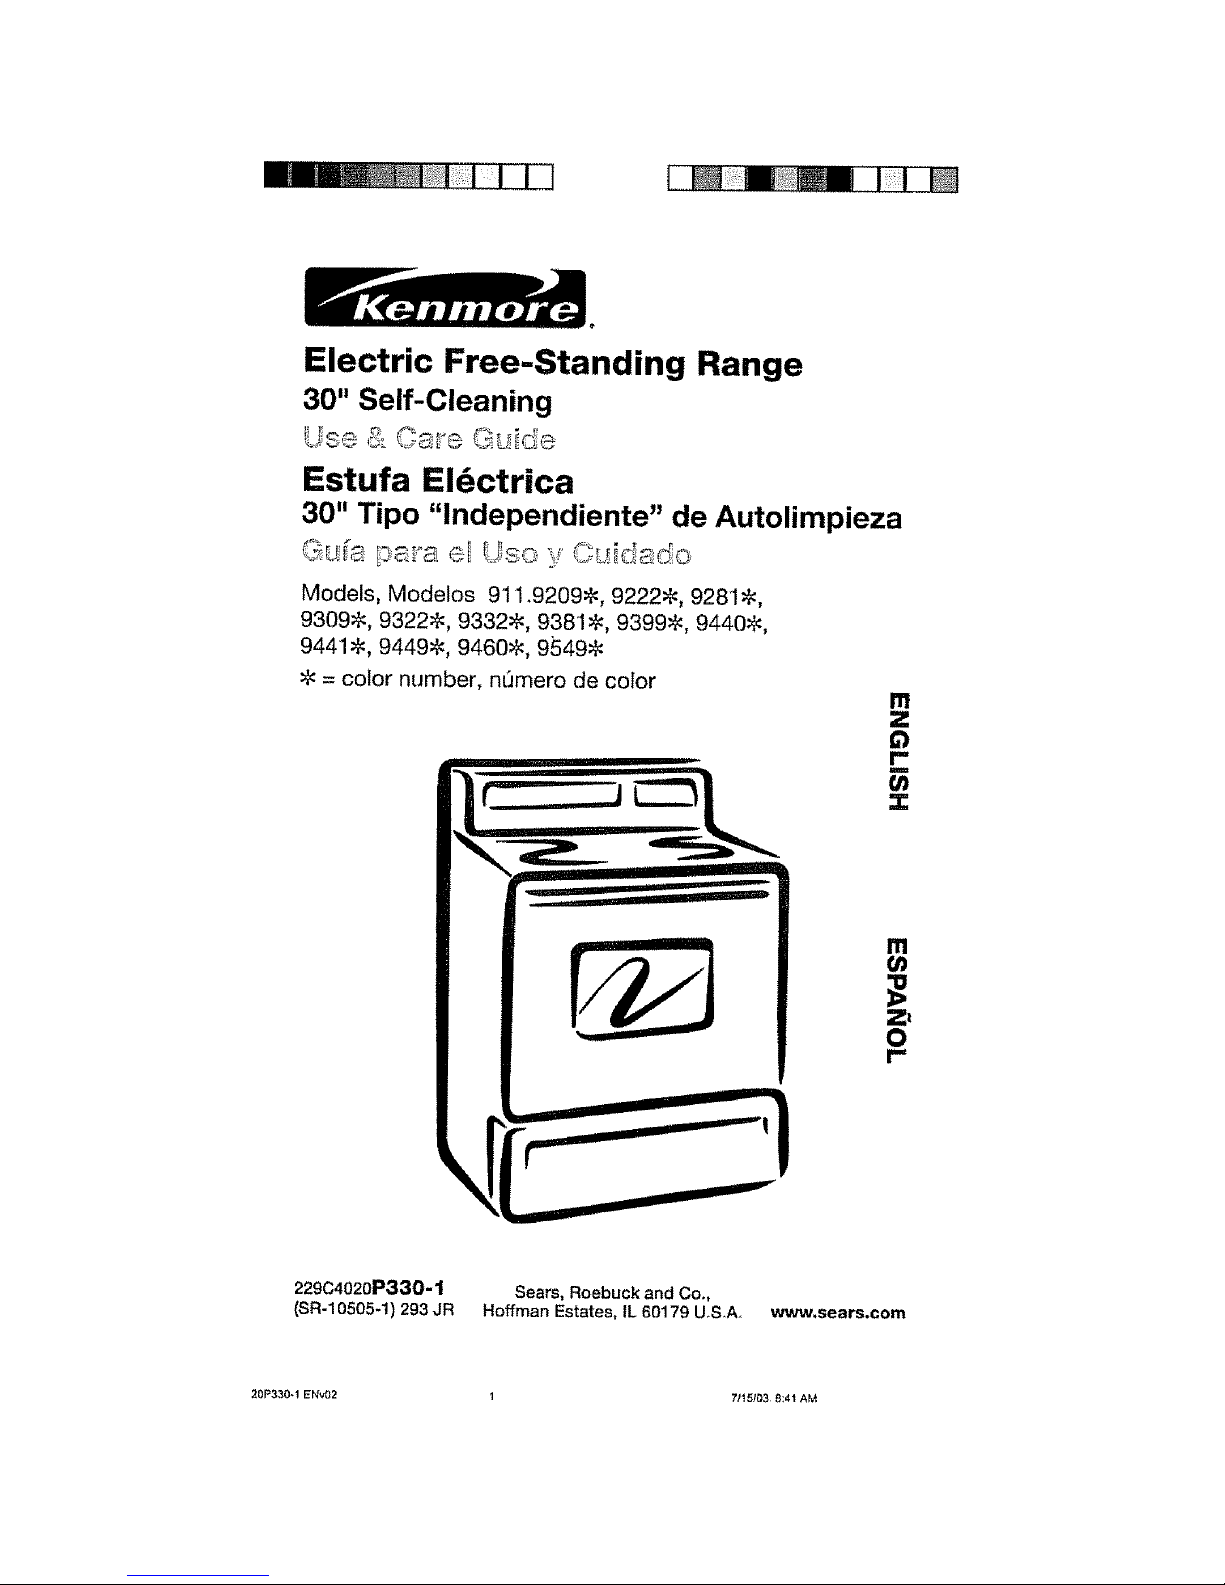
Electric Free-Standing Range
30" Self-Cleaning
Use & O_'e GL_id÷
Estufa El6ctrica
30" Tipo "lndependiente" de Autolimpieza
G_.!;_:,ps4_ae_Use y' Ouid_do
Models, Modelos 911.92098, 92228, 92818,
93098, 93228, 93328, 9381#, 93998, 9440@,
94418, 9449_, 9460>_, 9549@
8 = color number, nt'Jmero de color
r-
m
Zt
O
I-
229C4020P330-1 Sears, Roebuck and Co.,
(SR-10505-1) 293 JR Hoffman Estates, IL 60179 U.S.A. www, sears,com
20P330-1 ENVO2 1 71151_3 8:41 AM
SELF-CLEANING
FREE-STANDINGRANGE
Table of Contents
Range Safety 3-7
Anti-Tip Bracket 3, 4
Features of Your Range 8
Removal of Packaging Tape 8
Cooking Elements 9
Control Settings, 9
Home Canning Tips ., 9
Oven Control , 10-11
To Set the Clock : 12
To Set the Timer 12
To Reset the Timer 12
To Cancel the Timer 12
Baking , 13
Oven Cooking Tips 14-16
Strong Smell or Odor t4
Aluminum Foil t4
Oven Vent 14
Peeking I4
Preheating 14
Oven Light., 14
Baking With Margarine 14
Bakeware Placement 15
Bakeware 15
Element Cyciing 15
Oven Racks ,, t5
Broiling . 17-t8
Timed Baking
and Roasting 19-20
Special Features .... 21
Sabbath Feature 22-23
Self-Cleaning Cycle 24-25
Preparing Your Oven 24
Oven Door Gasket , 24
To Set A Clean Cycle 25
To Stop A Cycle 25
After The Cycle 25
Delay Start . 26
Control Panel 27
Broiler Panand Grid 27
Walls Of The Oven. 27
Cooktop and Area under
Cooktop . _ 27
Drawer and Sides of Range 27
Oven Door Glass 27
Door Vent Trim ..... 27
Removable Parts 28-33
Lift-Up Cooktop 28
Control Knobs 29
Oven Light Bulb 29
Cooktop Unit 30
Oven Racks 31
Oven Door _31-32
Storage Drawer 33
Before Caliing for
Service. 34-36
Temperature /_cljus_nent 16, 37
Warranty ..... 38
Consumer Service Numbers 76
For your convenience and future reference, please write down your model
and serial numbers in the space provlded_ They are located on the front
frame behind the storage drawer,
MODEL NUMBER: SERIAL NUMBER:
© Seats Roebuck and Co
IMPORTANTSAFETY
INSTRUCTIONS
SAVE THESE INSTRUCTIONS
Read all instructions before using this appliance. When using gas
or electrical sppliances, basic safety precautions should be followed,
including the following:
• AI_Ranges Can Tip
tnjury to Persons
Coutd Result
install Anti-Tip
Device Packed
With Range
• See nsta at on
instructions
,,i,.,,, ,,=,
r
WARN|NG!
To prevent accidental
tipping of the range
from abnormal use, including
excessive loading of the oven
door_ attach the range to the
wall or floor by installing the
Anti-Tip device supplied._ If the
range is moved for cleaning,
servicing or any reason, be
sure the Anti-Tip device is
re-engaged properly when
the range is slid back in the
opening. Failure to do so could
result in the range tipping and
may cause personal injury.
To inspect the Anti-Tip device,
remove the storage drawer and
look to see if the rear leg leveler
fully engages the slot in the
bracket.
If the Anti-Tip device supplied with
the range does not fit this application,
use the universal Anti-Tip device
WB2X7g09 Call 1-800-4-MY-HOME ®
These ANTI-TIP bracket installation
instructions are for wood or concrete
floors and walls Any other type of
construction may require special
installation techniques to provide
adequate fastening of the ANTI-TIP
bracket to the floor and wall
The use of this bracket does not
prevent tipping of the range when
bracket is net properly installed
NOTE: The installation of the
ANTI-TIP bracket must meet all local
codes for securing appliance
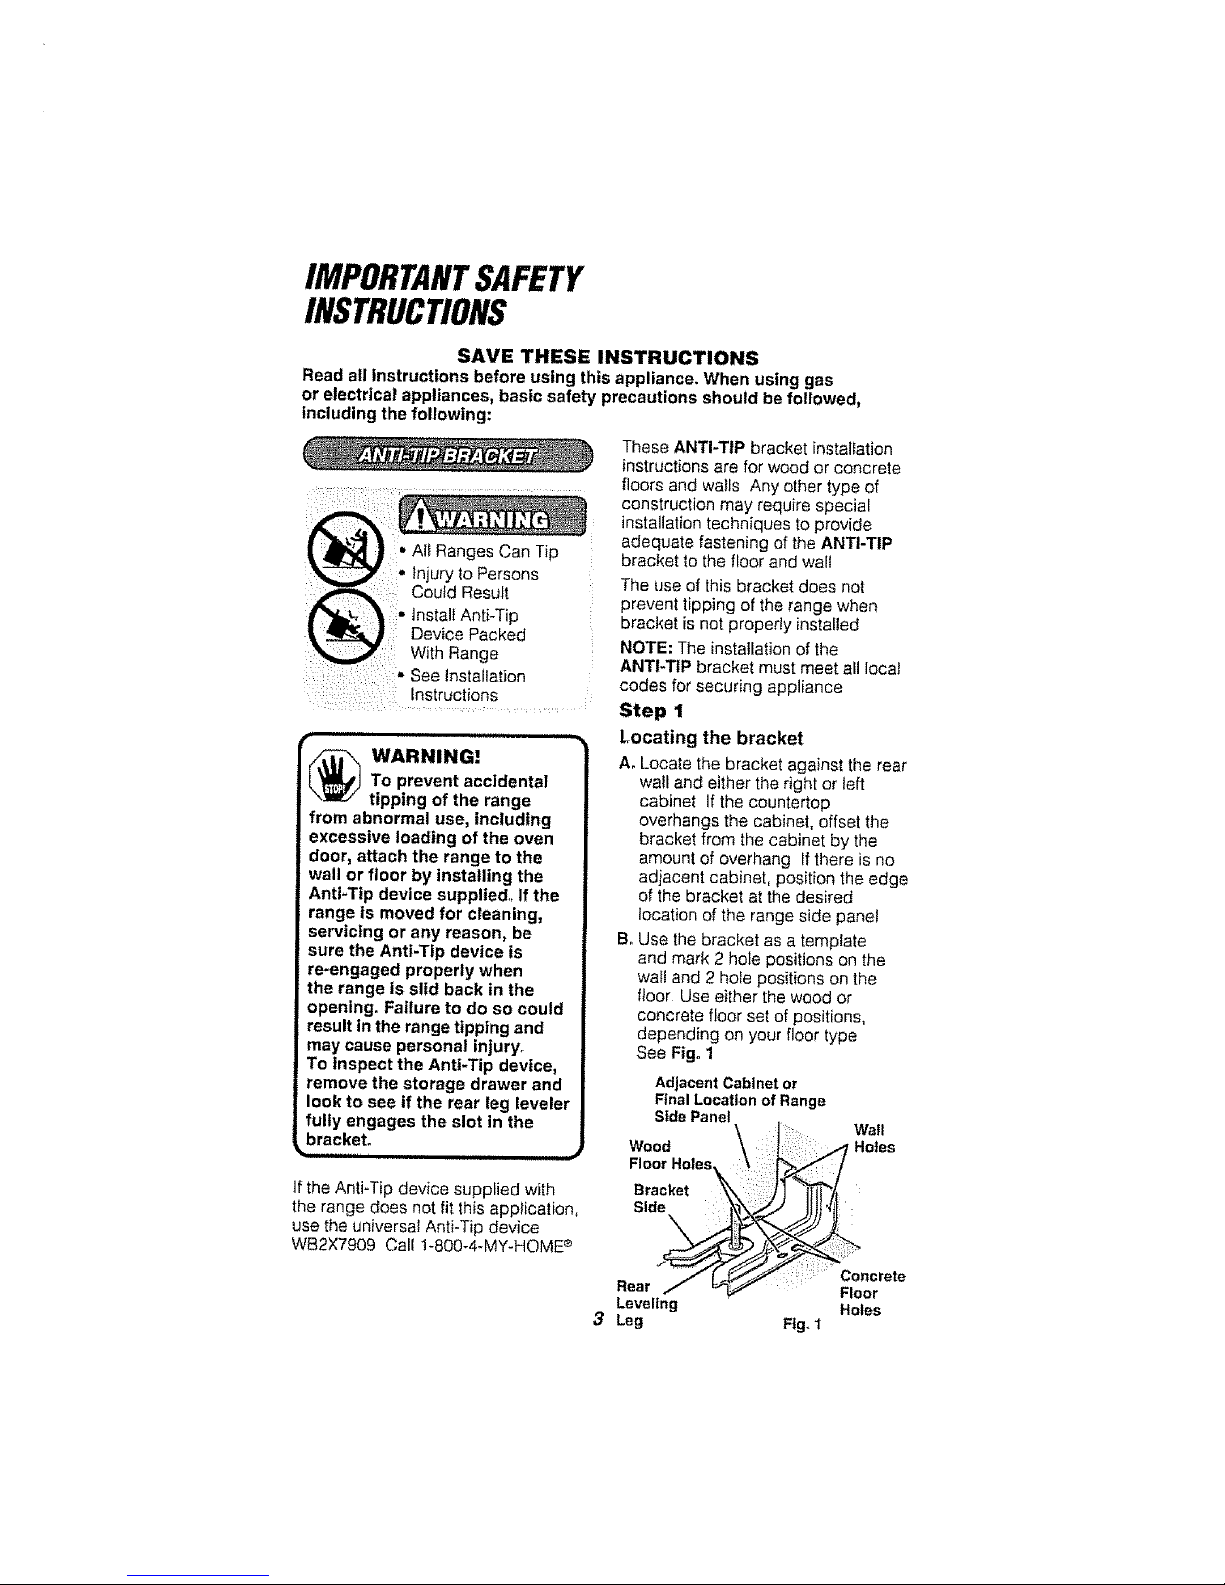
Step 1
Locating the bracket
A_Locate the bracket against the rear
wall and either the right or left
cabinet If the countertop
overhangs the cabinet, offset the
bracket from the cabinet by the
amount of overhang Ifthere is no
adjacent cabinet, position the edge
of the bracket at the desired
location of the range side panel
BoUse the bracket as a template
and mark 2 hole positions on the
wall and 2 hole positions on the
floor Use either the wood or
concrete floor set of positions,
depending on your floor type
See Fig. 1
AdjacentCabinetor
FinalLocationof Range
Side Panel
Wood :_ Holes
rete
Rear
Leveling Holes
3 Leg Fig. 1
IMPORTANTSAFETY
INSTRUCTIONS
Anti-Tip Bracket(contdo)
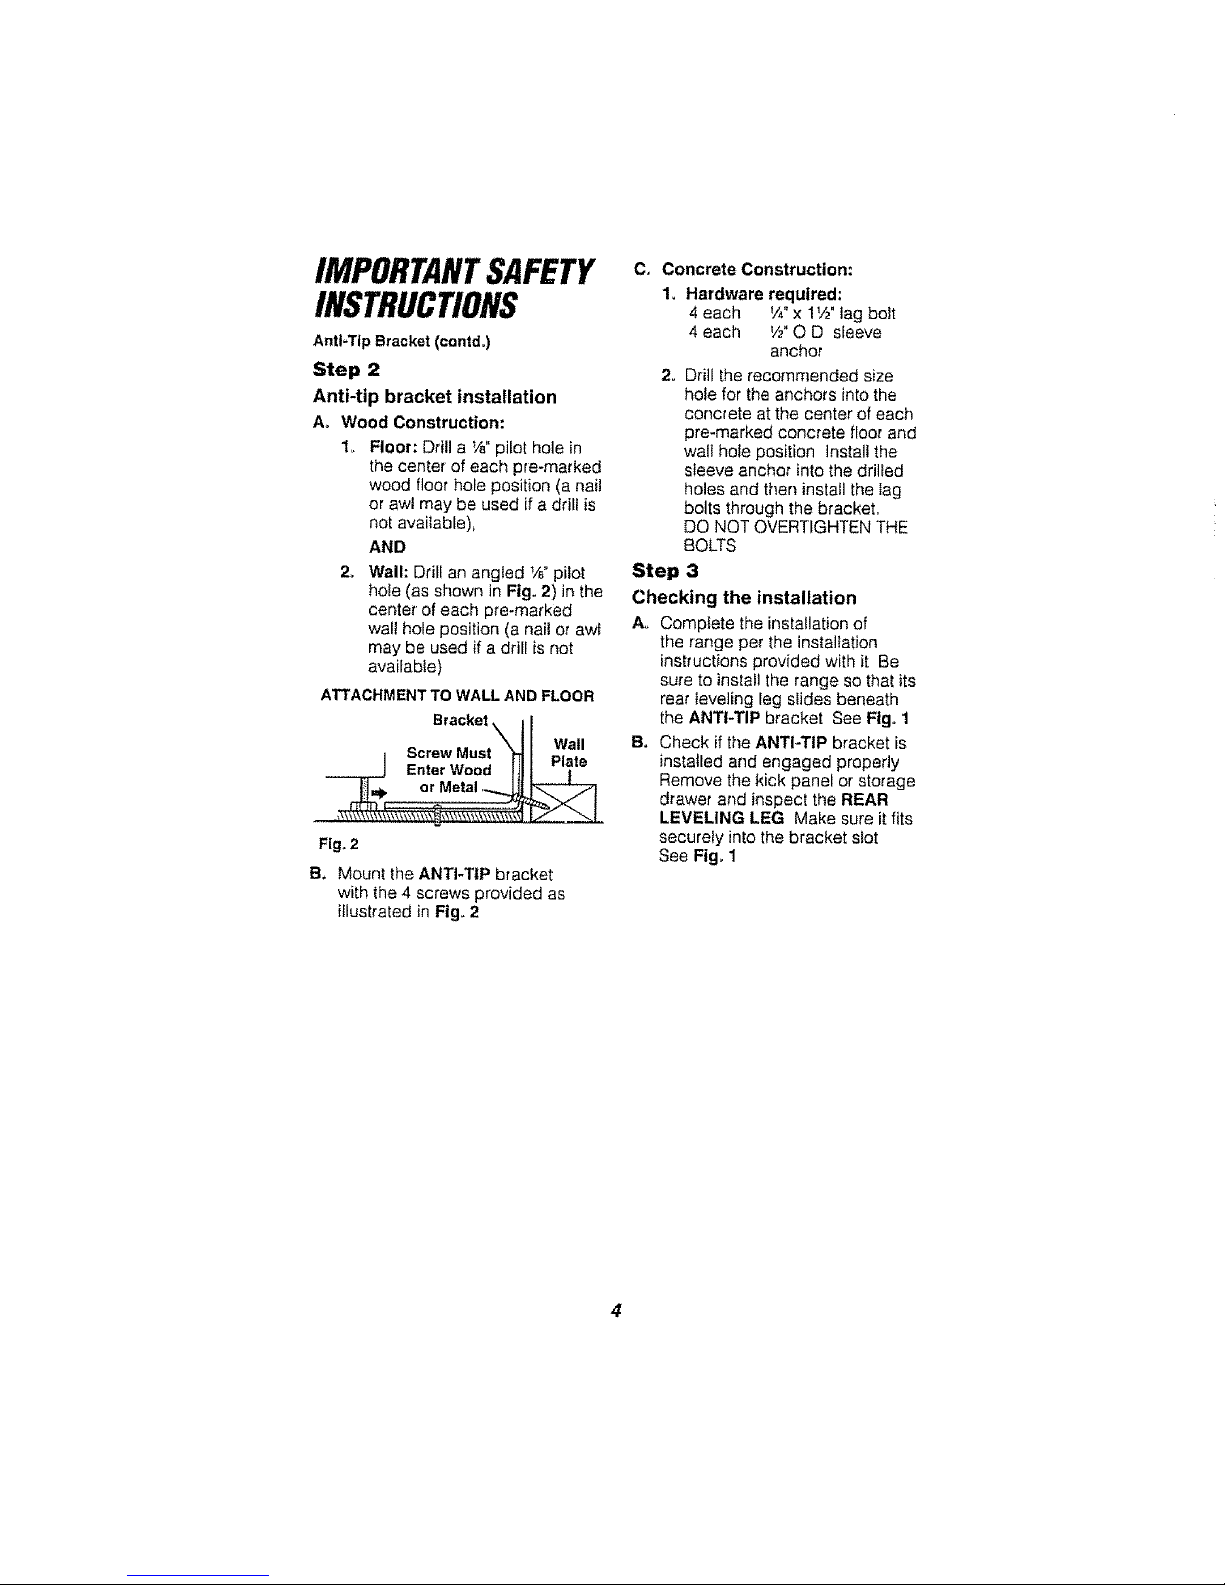
Step 2
Anti-tip bracket installation
Ao Wood Construction:
1_ Floor: Drill a Ve"pilot hole in
the center of each pre-marked
wood floor hole position (a nai!
or awl may be used if a ddlt is
not available),
AND
2o Wall: Drill an angled 1/_.plier
hole (as shown in Fig. 2) in the
center of each pre-marked
wal! hole position (a nail or awl
may be used if a drill is not
available)
ATTACHMENTTOWALL AND FLOOR
BracketXt Wall
I ScrewMust "Fr_
EnterWood tt_ Plate
&........o,?e,a,..4
Fig, 2
B. Mount the ANTI-TIP bracket
with the 4 screws provided as
illustrated in Flg_ 2
C, Concrete Construction:
1. Hardware required:
4 each _,4"x 1112'lag bolt
4 each W O D sleeve
anchor
2o Drill the recommended size
hole for the anchors into the
concrete at the center of each
pre-marked concrete floor and
wall hole position install the
sleeve anchor into the drilled
holes and then install the Iag
bolts through the bracket.
DO NOT OVERTIGHTEN THE
BOLTS
Step 3
Checking the installation
A. Cemptete the installation of
the range per the installation
instructions provided with it Be
sure to install the range so thai its
rear leveling leg slides beneath
the ANTI-TIP bracket See Fig° 1
B. Check if the ANTI-TIP bracket is
installed and engaged properly
Remove the kick panel or storage
drawer and inspect the REAR
LEVELING LEG Make sure it fits
securely into the bracket slot
See Ftg_1
IMPORTANTSAFETY
INSTRUCTIONS
Important: To ensure safety for
yourself, family, and home, please
read your Owner's Manual carefully
Keep it handy for reference Pay
close attention to Safety Sections
BE SURE your appliance is installed
and grounded by a qualified
technician
IMPORTANT SAFETY
NOTICE!
The California Safe Drinking
Water and Toxic Enforcement Act
requires the governor of California
to publish a list of substances
known to the state to cause birth
defects or other reproductive harm
and requires businesses to warn
their customers of potential
exposure to such substances.
The fiberglass insulation in a
self-cleaning oven will give off a
very small amount of carbon
monoxide during the cleaning
cycle° Exposure can be minimized
by venting with an open door or
window or using a ventilation fan
or hood,
IMPORTANT: The health of
some birds is extremely sensitive
to the fumes given off during
the self-cleaning cycle of any
range, Move birds to another
welFventilated room.
• DO NOT leave children alone
or unattended near an appliance
in use
" TEACH CHILDREN not to play with
controls or any part of the appliance
and not to sit, climb, or stand on the
door or any other parts of the
appliance
o CAUTION: NEVER STORE
items of interest to children on the
backguard or in cabinets above the
appliance Children climbing on the
appliance could be seriously
injured
• KEEP THIS book for later use
• NEVER TRY to repair or replace
any part of the appliance unless
instructions are given in this
manual All other work should be
done by a qualified technician
IMPORTANTSAFETY
INSTRUCTIONS
• NEVER USEyour appliance for
warming or heating the room
, ALWAYS KEEP combustible wall
coverings, curtains dishcloths, towels
pothoiders and otherlinens a safe
d{stance from the appliance
* DO NOT LEAVE closed containers on
the cooktop The pressure in closed
containers may fncrease which may
cause themto burst
• NEVER LEAVE containers of fat or
drippings inyour oven
• ALWAYS KEEP theappliance
area free from things thatwill burn
Food.wooden utensils and grease
buildup could catch fire Plastic
u_ensilscould mettand canned foods
could explode Your appliance should
never be used as a storage area
• ALWAYS KEEPyour appliance ctear
of things thatwilt bum (gasoline and
other flammable vapors or liquids)
• NEVERTRY to clean hot surfaces
Some cleaners producenoxious fumes
• NEVER WEAR toosefitting clothing
when using your appliance
• NEVER USEa towel or other bulky cloth
asa potholder Make sure the potholder
isdry Moist potholders andwet cloths
or sponges could cause steam burns
DO NOT letpotholders touchhot
heating elements
• DO NOTtouch heating eiements
surfaces near them or interioroven
surfaces These may be hot enough to
causeburns even though they aredark
incolor Duringand after use, do not
touchor let clothing or flammable
materialcontact the elementsor hot
surfaces unlil they have hadtime to
cool Othersurfaces near theoven vent
openings oven door andwindow, and
cooktop surfaces may also be hot
enough to cause burns
• ONLY CERT'A|Nkinds ofglass or
ceramic cookware can be usedfor
cooktop cooking Makesurethe
cookware you chooseto use is
designed forcooktop cooking
withoutbreaking dueto the sudden
temperaturechanges
• ALWAYS USE care when touching
cooktop elements They will retainheat
aftertherange has been turnedoff
• NEVERBLOCK theoven airvent under
the right rear element
• COOKWARE USED forcooktop
cooking should be flat on the bottom
and large enoughto cover the heating
area being used Undersized utens{ls
expose the heating e_ementand may
resultin direct contact or ignitionof
clothing Theproper size utensil willalso
improveelficiency
• ALWAYSUSE drip bowls to prevent
wiring and component damage DO
NOTuse aluminumliners orfoil in drip
bowls Improper use mayresult in risk of
electric shock or fire
• NEVER LEAVE surface units
unattendedat high settings Boilevers
result insmoking orgreasy spilSswhich
could catch fire
• ALWAYS TURN utensii bandies inward
and awayfrom other surface unitsto
reduce theriskofburns, ignition
unintended contact, and spillage
• NEVERput heating elements in water
',,WHEN PREPARING flaming
foods under the vent hood, turn
the fan on
• DO NOT _eaveplastic or flammable
itemson the cooktop--they may melt
ot ignite if left too close to thevent

IMPORTANTSAFETY
INSTRUCTIONS
° PLACE OVEN RACKS in the
desired position while the oven is
cool tf racks must be moved while
oven is hot, do not let potholder
contact the hot oven element
• AFTER BROILING, always take the
broiler pan and grid out of the oven
and clean them Leftover grease in
the broiler pan could catch fire the
next time you use your oven
• ALWAYS USE care when opening
the oven door Let hot air and steam
escape before moving foods
• NEVER USE aluminum foil to line the
oven bottom Improper use of foil
could start afire, or electrical shock
could result
• CLEAN ONLY the parts listed
in this manual Follow all cleaning
instructions Be sure to remove
the broiler pan and grid before
self-cleaning
,, NEVER RUB, move, clean, or
damage the door gasket on
self-cleaning ranges It is
essential for a good seal
• NEVER TRY to clean utensils,
cookware, removable parts, or
broiler pan and grid in the
self-clean cycle
• DO NOT USE oven cleaners-
No commercial oven cleaner or
protective coating of any kind
should be used in or around any
part of the oven
• IF THE SELF-CLEANING mode
malfunctions, turn the oven off and
disconnect the power supply Have
itserviced by a qualified technician
pllUlU H[
r_-_ CAUTION:
Never line the drip bowls
with aluminum foil, Foil
can block the normal heat flow
and damage the range° Always
use cookware and woks that
are fiat on the bottom and
the same size as the cooking
element being used° Cookware
should not extend more than 1"
beyond the edge of the cooking
element.
READ AND UNDERSTAND
THIS INFORMATION NOW!
Besureeveryonein your home
knowswhattodo in case of fire.
Neverusewateron a greasefire;
it wiltonly spreadtheflames=
COOKTOP GREASE FIRE:
Never pick up a flaming pan..,
1. Turn off the surface elements
2,, Smother the flame with a tightly
fitting lid, use baking soda, or
use a dry chemical, foam, or
halonotype extinguisher
OVEN FIRE:
Do not try to move the panl
1. Close the oven door and turn
controls off
2. If fire continues, carefully open
the door, throw baking soda on
the fire, or use a dry chemical,
foam, or halon-type extinguisher
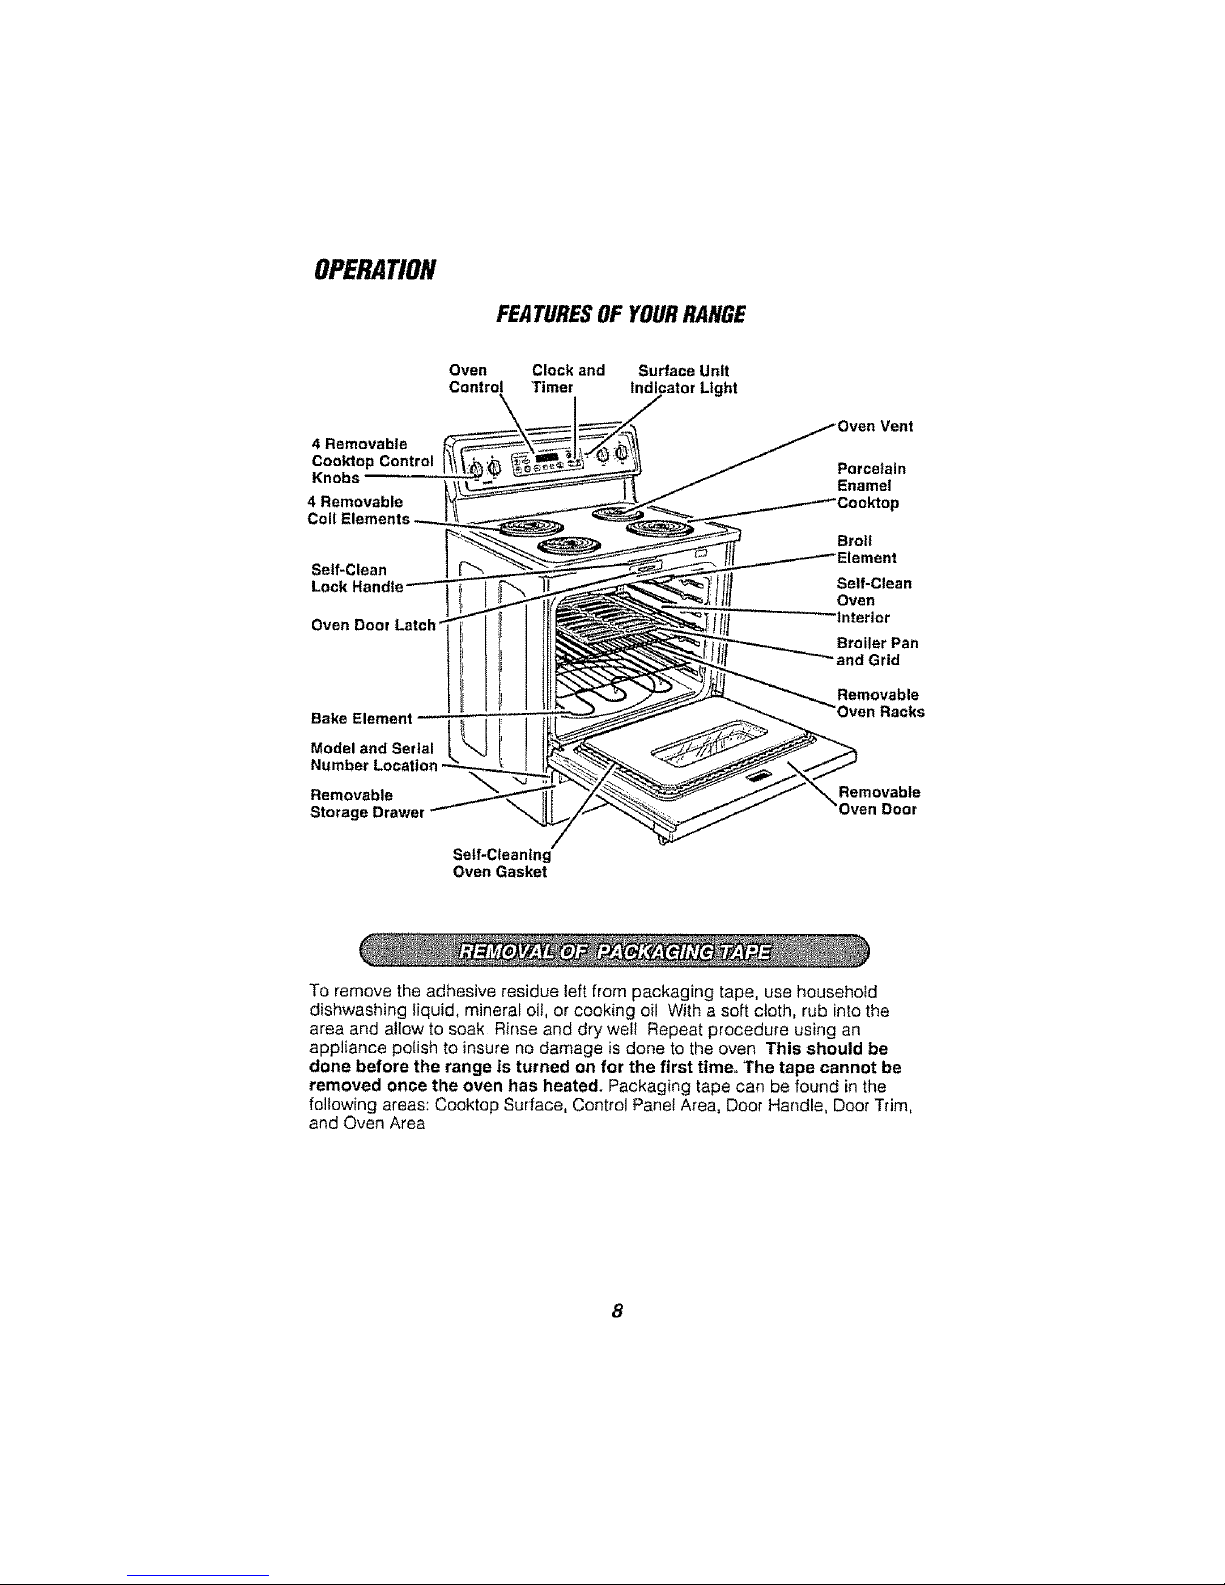
OPERATION
FEATURESOFYOURRANGE
Oven Clock and Surface Unit
Control Timer Indicator Light
Vent
4 Removable
Cook'top Control Porcelain
Knobs Enamel
4 Removable
Self-Clean
Oven Door Latch"
Bake Element | I
[
Model and Serial
Number Location
Self-Clean
Oven
Broiler Pan
and Grid
Removable
Racks
Removable Removable
Storage Drawer Door
Self-Cleaning
Oven Gasket
To remove the adhesive residue left from packaging tape, use household
dishwashing liquid, mineral oil, or cooking oil With a soft cloth, rub into the
area and allow to soak Rinse and dry welt Repeat procedure using an
appliance polish to insure no damage is done to the oven This should be
done before the range is turned on for the first time= The tape cannot be
removed once the oven has heated. Packaging tape can be found in the
following areas: Cooktop Surface, Control Panel Area, Door Handle, Door Trim,
and Oven Area
OPERATION
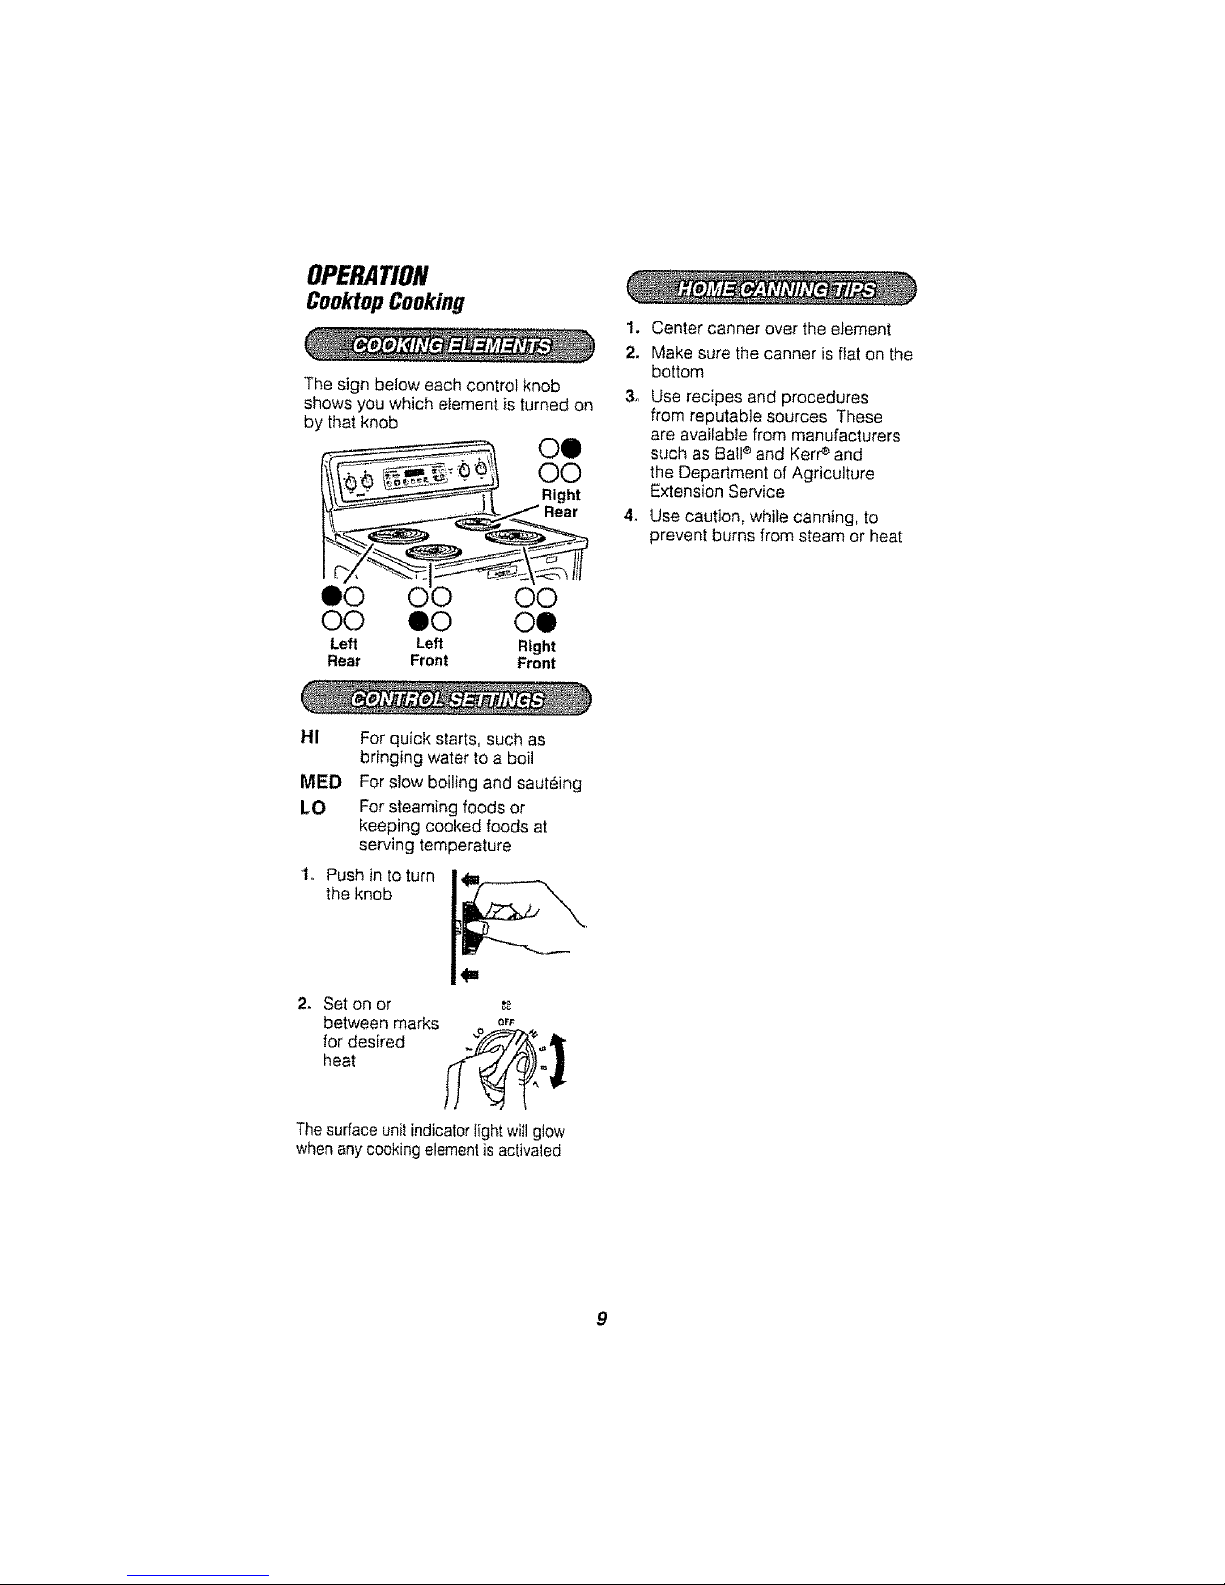
CooktopCooking
The sign below each control knob
shows you which element is turned on
by that knob
1. Center canner over the element
2. Make sure the canner is flat on the
bottom
3. Use recipes and procedures
from reputable sources These
are available from manufacturers
such as Ball®and Kerr_and
the Department of Agriculture
Extension Service
4_ Use caution, while canning, to
prevent burns from steam or heat
O0 QO 00
Left Left Right
Rear Front Front
HI For quick starts, such as
bringing water to a boil
MED For s!ow boiling and sauteing
LO For steaming foods or
keeping cooked foods at
serving temperature
1., Push in to turn
the knob
2. Set on or _
between marks o_F
for desired _,1_
heat Ij,P_ ?,:_.
Thesurface unit indicator light will glow
when any cookingelement is activaled

OPERATION
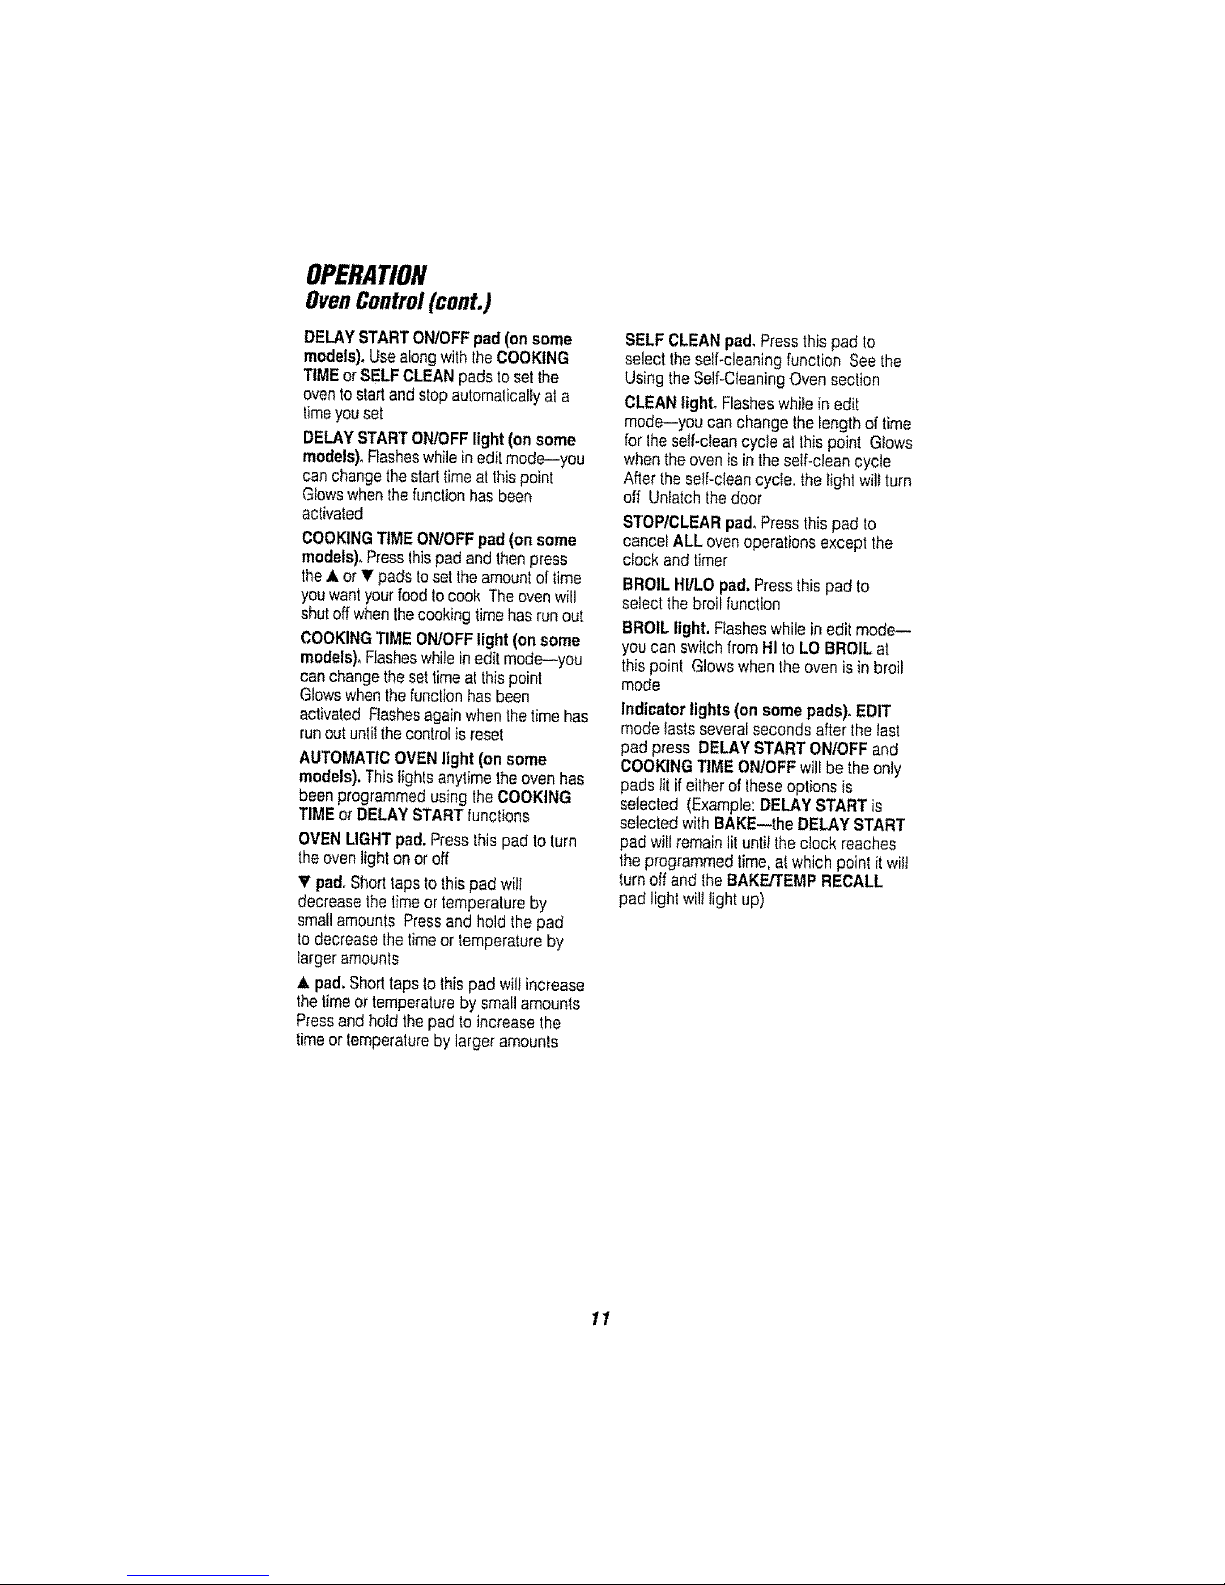
OvenControl
Bake/Temp Start
RecallPad Pad
O_IENCONTRI1LS
Broil HI/LO Stop/Clear
Pad Pad
SelfCtean
Pad
Display
I
Kitchen
Timer On/Off Crock
Pad Pad
TitVII.:CONTRO¢
KITCHEN
TIME
AU:
Automatic
Oven Light
Oven
Pad
Delay Start
On/Off Pad
.ight
Cec !tng
TimeOn/Off
Pad
BAKE/TEMPRECALLpad. Pressthispad
toselect thebake function
BAKElight,Rasheswhileinedit mode---
you can change theoven temperatureat
thispoint Glows when theovenis inbake
mode
STARTpad, Must be pressed tostartany
cookingor cleaning function
DISPLAY, Showsthetime ofday, oven
temperature,whether theovenis in lhe
bake.broil or self-cleaningmode and the
timesset lor thetimer or automatic oven
operations Thedisptay will showPRE
whileprehealing When theovenreaches
the selectedtemperature,theoven control
will beepand thedisplay will showthe
oventemperature
If"F- anda number or letter" flash in the
display and theovencontrotsignals,this
indicatesa functionerror code
Ifyourovenwas set for a timed oven
operationand a poweroutage occurred,
theclock arid allprogrammed functions
mustbe reset
Thetime elday wil! flashinthe display
when therehas beena poweroutage
Resettheclock
If"Err" appears in thedisplay, you have
triedtoset a Iimeor temperatureoutsideof
thecontrol's limits Pressthe STOP/
CLEAR padand entera newsetting
IftheIunctionerrorcode appearsduring
theself-cleaningcycte, check theoven
door latch Thelatch handtemay have
been moved, evenifonly slightly,fromthe
latched position Makesure the latchis
moved to theright as far as it willgo
Pressthe STOP/CLEARpad,Allow the
oventocoolfor one hour Puttheoven
back intooperation II thefunctionerror
code repeats,disconnect the powerto the
range andcall Searsforservice
KITCHENTIMERON/OFF pad. Pressthis
pad tosetect thetimerfeature Then press
the • and • pads to adiust the timer
TIMERlight, Flasheswhile inedit mode--
youcan change theset timeat thispoint
Glowswhen the timer hasbeen activated
Flashesagainwhen thetime hasrunout
untilthecontrolis reset
CLOCKpad. To setthe clock, press this
pad lwice andthen press theA and •
pads Thetimeof daywill flastlin the
disp+aywhen the oven is firstturned on
10
OPERATION
OvenControl(cont.)
DELAYSTARTON/OFFpad (on some
models).Use alongwith the COOKING
TIMEor SELFCLEAN padstosetthe
ovento start and stopautomaticallyal a
timeyouset
DELAY STARTON!OFFlight (on some
models),Flasheswhile inedil mode--you
canchange the start,time atthispoint
Glowswhenthe functionhas been
activated
COOKINGTtMEON/OFF pad (on some
models),Pressins pad and thenpress
the ,_,orT pads to set lheamount of time
you wantyourfoodto cook Theovenwill
shutoff whenthecookingtime has run out
COOKINGTIMEON/OFFlight (on some
models), Flasheswhilein edit mode--you
canchange the settimeat thispoint
Glowswhenthe functionhasbeen
activated Fiashesagain whenthe time has
runout unlitthe controlisreset
AUTOMATICOVENlight (on some
models).This lightsanytime the ovenhas
beenprogrammed using the COOKING
TIME or DELAYSTARTfunctions
OVENLIGHTpad.Pressthispad toturn
theoven light onoroff
_r pad, Shorttapstothis padwilI
decreasethe time or temperatureby
small amounts Pressand hold thepad
to decrease thetimeor temperatureby
largeramounts
,tkpad.Shed taps lo thispad wil!increase
the time or temperatureby small amounts
Pressand hold the pad to increase the
time or temperatureby larger amounls
SELFCLEANpad, Pressthispad to
select the self-cleaningfunction See the
Using theSelf-CleaningOven seclion
CLEAN light, Flasheswhile in edil
mode--you can change the length of time
for thesell-clean cycle atthis point Glows
whenthe oven is inthe self-cleancycle
Afterthe se!{-cieancycle, the light wiltturn
off Unlatch the door
STOP/CLEARpad. Press this pad to
cancel ALL over,operationsexcept the
clock and timer
BROIL HI/LOpad, Pressthis pad to
select thebroil function
BROIL light. Flasheswhile in edit mode--
youcan switchfrom HI to LO BROIL at
thispoint Glowswhen theoven is inbroil
mode
Indicatorlights (on some pads). EDIT
mode lastsseveralseconds after thelast
pad press DELAY START ON/OFF and
COOKINGTIME ON/OFFwill be theonly
pads tit ifeither of theseoptions is
selected (Example:DELAYSTART is
selectedwith BAKE--the DELAY START
pad will remainlit until the dock reaches
theprogrammed time, at which point it wilt
turnoffand theBAKE/TEMP RECALL
pad light wiltlightup)
11
OPERATION
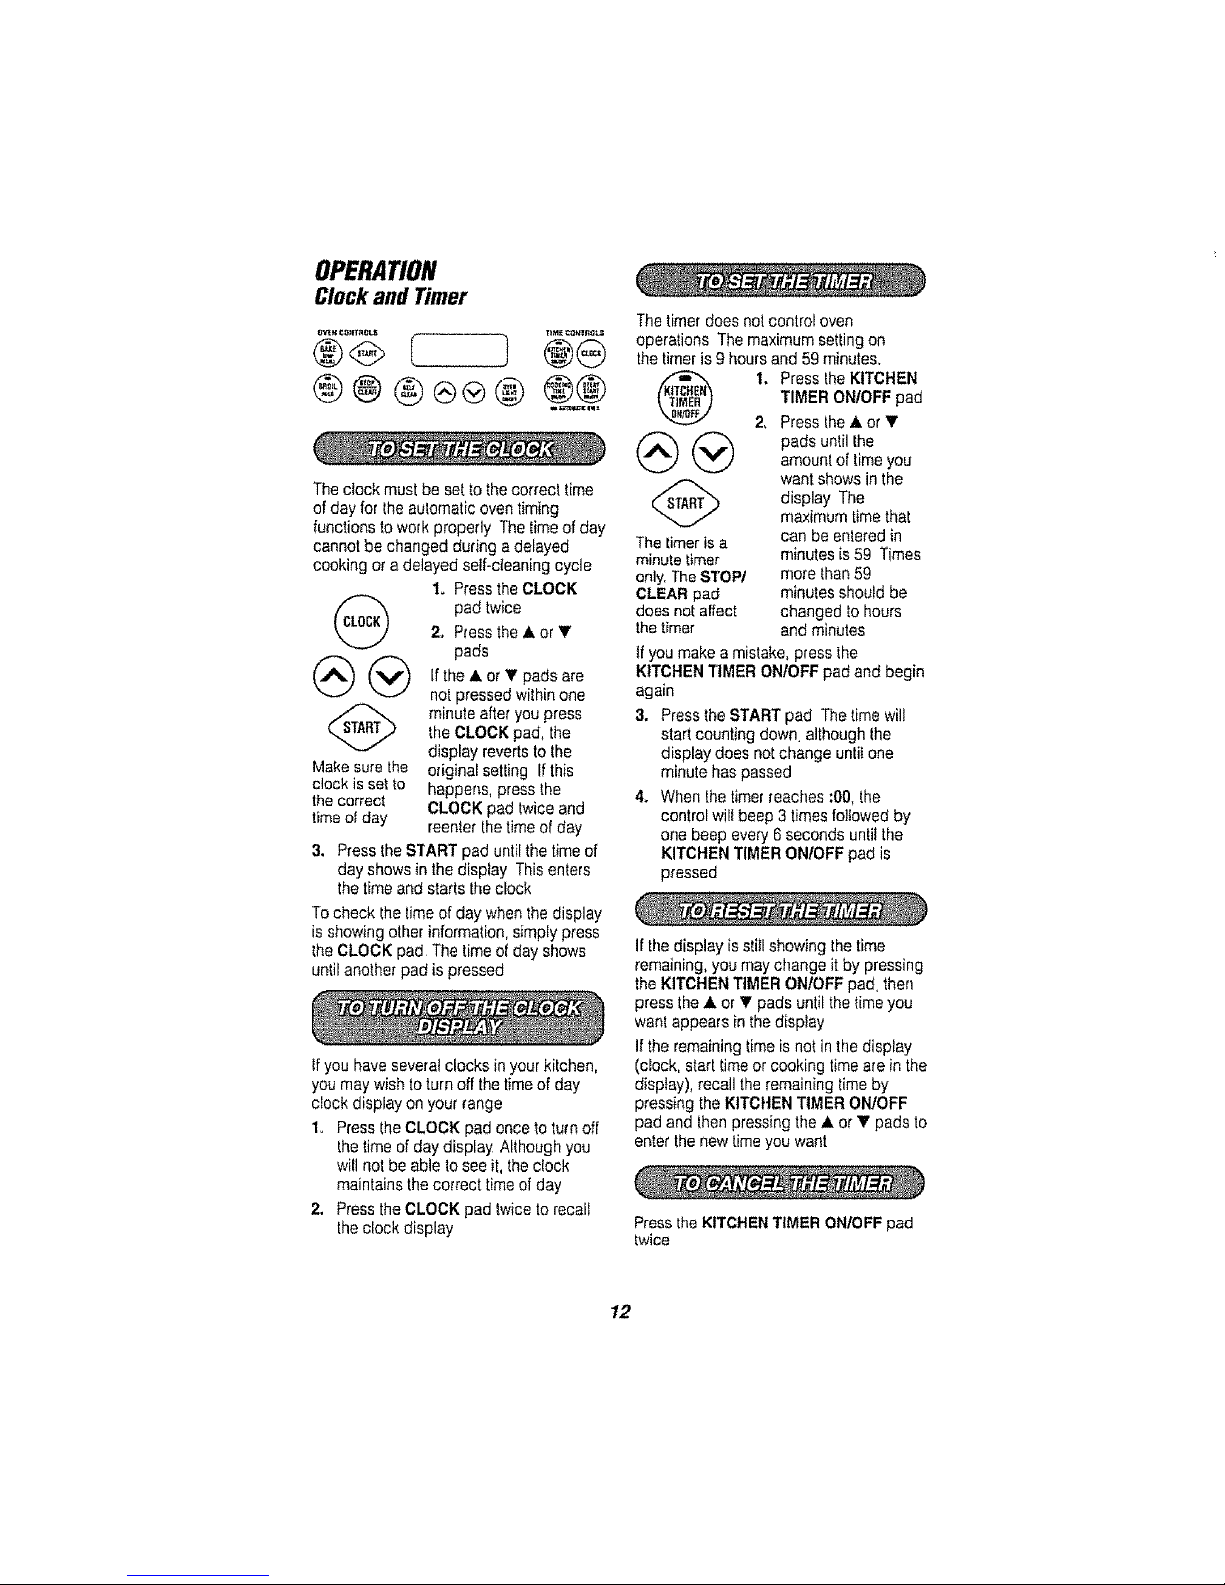
Clock and Timer
®@ ®®®@ @@
The clock must be setto thecorrect time
of day for the automaticoven timing
functions to work properly The timeof day
cannot be changed during a delayed
cooking or a delayed self-cleaning cycle
1o Press the CLOCK
pad twice2. Press the A or T
pads
(_ (_ lfthe•or"!'padsare
no_pressed within one
(_ minuteafter you press
theCLOCK pad, the
display reverts to lhe
Make surethe odginalsetting Ifthis
clock is setto happens, press the
the correct CLOCK pad twiceand
time of day reenterthe time of day
3. Press the START pad untilthe timeof
day shows in the display Thisenters
thetimeand startstheclock
Tocheck the timeof day when the display
is showing otherinformation,simply press
_heCLOCK pad The timeof day shows
untilanother pad is pressed
Ifyou have severWclocks in yourkitchen,
you may wishtoturn off thetimeofday
clock display on your range
1o PresstheCLOCK pad once to turnoff
the time of day display Althoughyou
will not be able to seeit, the dock
maintains the correct timeof day
2. Pressthe CLOCK pad twice to recall
the clock display
Thetimer does not control oven
operations The maximumsetting on
thetimer is9 hoursand 59 minutes,
I. Press theKITCHEN
TIMER ON/OFF pad
2. Press the& or T
(_(_) pads untilIhe
amount of timeyou
want shows in the
display The
maximum timethat
Thetimeris a can be entered in
minutetimer minutes is 59 Times
only.TheSTOP/ more than 59
CLEAR pad minutes shoutd be
doesnotaffect changed to hours
the timer and minutes
tfyou make a mistake,press the
KITCHENTIMER ON/OFF pad and begin
again
3. Pressthe START pad Thetime will
startcounting down although the
display does notchange until one
minute haspassed
& When the timerreaches :00,the
control will beep 3 times followedby
one beep every 6 seconds until the
KITCHENTIMER ON/OFF pad is
pressed
Ifthe display isstill showing lhe time
remaining,you may change it by pressing
the KITCHENTIMER ON/OFF pad.then
press the • or T padsuntil the time you
want appears in thedisplay
Ifthe remaining time is not inthe display
(clock, start timeor cooking timeare in the
display), recall theremaining timeby
pressing the KITCHENTIMER ON!OFF
pad and lhen pressing the• or "_'pads to
enter the new timeyou want
Press the KITCHEN TIMER ON/OFF pad
b,vice
12
OPERATION
ClockandTimer(cont.)
Clear the tones by pressing the padof the
function youare using
OPERATION
Baking
®
or
®
If aflashing time isin thedisplay,you
haveexperienced a powerfailure Rese!
the clock
Toreset the c_ock,press the CLOCK pad
Enterthe correct time of day bypressir_g
the _. or _' pads Pressthe STARTpad
1. Press the BAKE pad
2. Press the ,tk or Y pads unti_the
desired temperature is displayed
3. Press the START pad
The oven will start automatically
The display will show PRE while
preheating When the even reaches
the selected temperature, the even
control wiUbeep severa_ times and
the display wil! show the oven
temperature
To change the oven temperature
during BAKE cycle, press the BAKE
pad and then the A or V pads to get
the new temperature
4. Check food for doneness at
minimum time on recipe Cook
_onger if necessary
& Press the STOP/CLEAR pad when
baking is finished and then remove
the food from the oven
BAKING RACK POSITION CHART
TYPE OF FOOD RACK POSITION
Frozen pies 4
(on cookie sheet)
Angel lood cake. 3 or 4
bund[ or pound
cakes
Biscuits. muffins. 3 or 4
brewniee, cookies.
cupcakes, tayer
cakes, pies
Casserotes 3 or 4
Turkey or Roast 1
13
OPERATION
OvenCooking Tips
It is normal to have some odor when
using your oven for the first time To
hetp eliminate this odor, ventilate the
room by opening a window or using
a vent hood
Opening thedoor often to check foods wiiI
cause heat less and poor baking results
Preheating is bringing the oven
temperatureup tothe temperature you will
be using during baking Let theoven
preheat when recipes call forpreheating
Never cover the oven bottom with
aluminum foil.
You can use aluminum foil to line the
broiler pan and broiler grid, However,
you must mold the foil tightly to the
grid and cut slits in it }ust like the
grid
Aluminum foil may also be used to
catch a spillover To do so, place a
small sheet of foil on a lower rack
several inches below the food
Never entirely covet a rack with
aluminum foi! This will disturb the
heat circulation and result in poor
baking
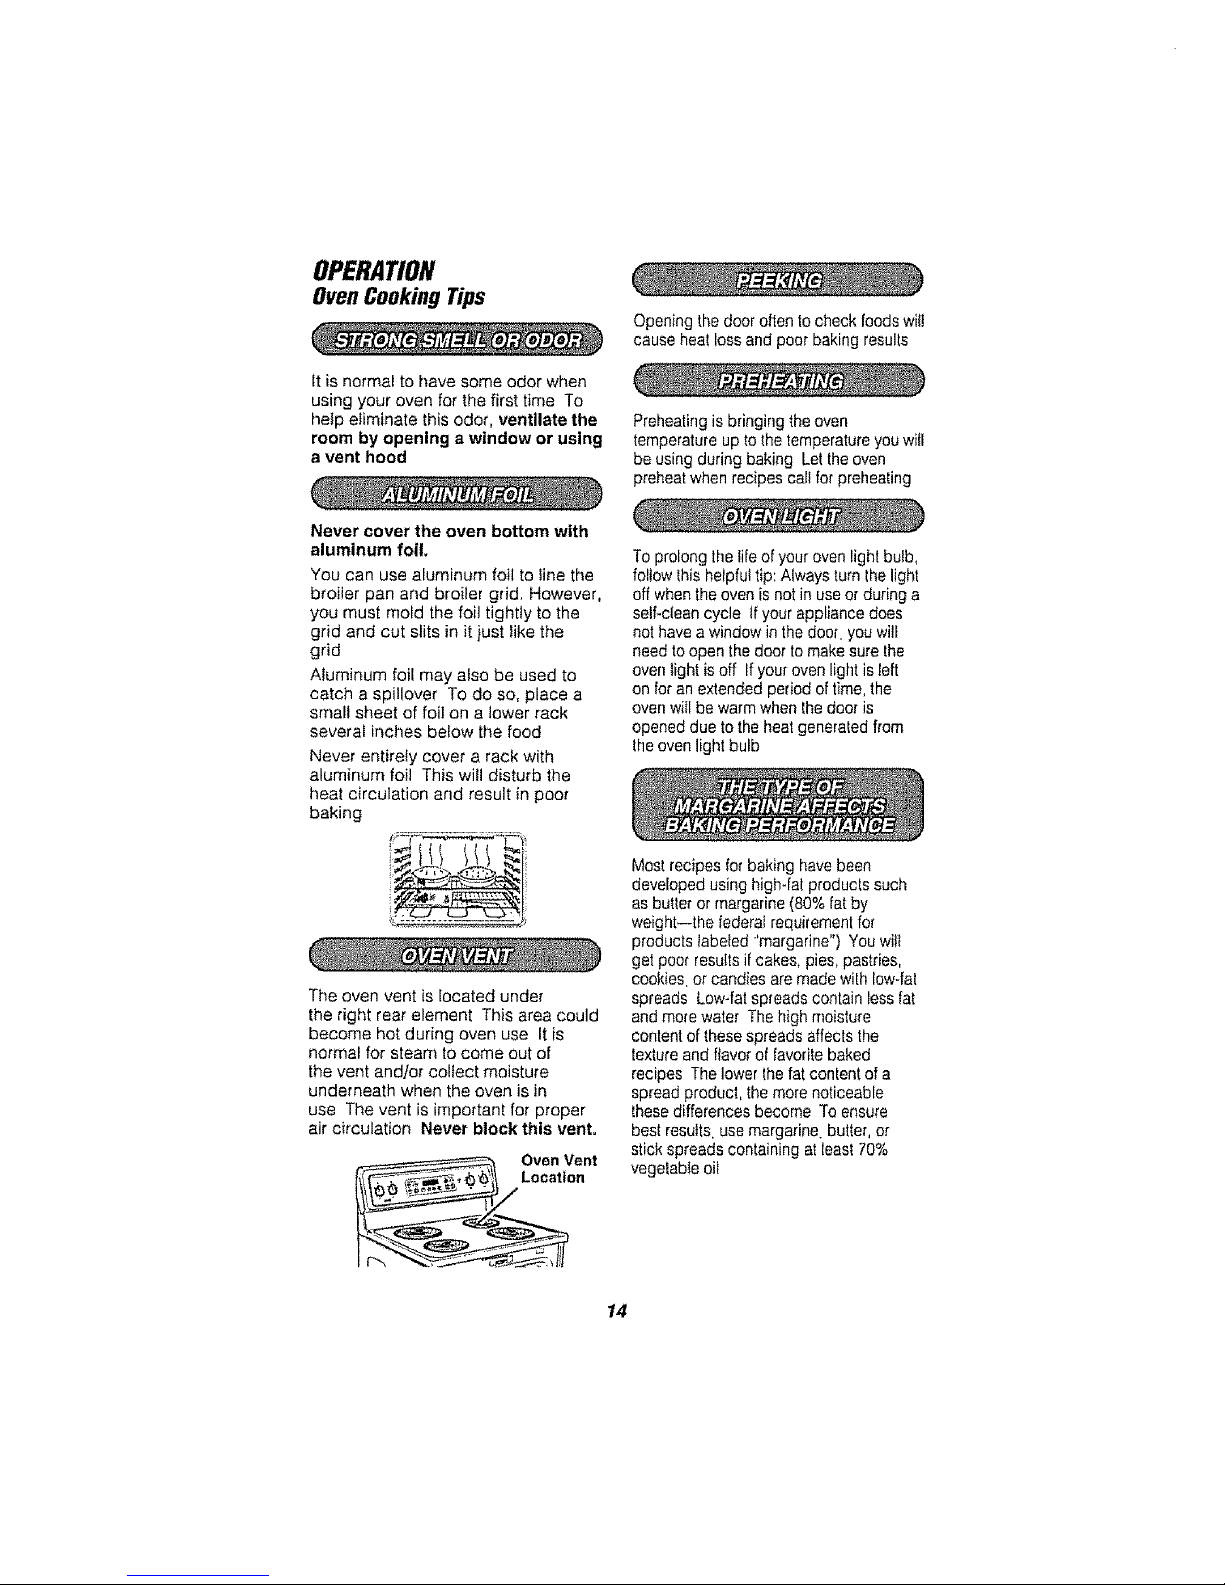
The oven vent is located under
the right rear element This area could
become hot during oven use It is
normal for steam to come out of
the vent and/or collect moisture
underneath when the oven is in
use The vent is important for proper
air circulation Never block this vent.
Oven Vent
Location
Toprolong thelife of your ovenlight bulb,
follow thisheipfuitip:Always turnthe light
off when theoven is not in useor during a
seGclean cycle If your appliance does
not have a window in the door. you will
need to open the door tomake sure the
ovenlight is off If your oven light is left
on for an extended period of time,the
ovenwill be warm when the door is
opened due tothe heatgenerated from
theoven light bulb
Mostrecipes for baking havebeen
developed using high-fatproducts such
asbutter or margarine (80% fat by
weight--the federal requirementfor
products tabeled 'margarine") Youwilt
get poor resultsifcakes, pies_pastries,
cookies or candies aremade with low-fat
spreads Low-fatspreads contain less fat
andmore water The high moisture
content ofthese spreads affects the
textureandflavorof Iavoritebaked
recipes Thelower the fat contentof a
spreadproduct, the morenoticeable
thesedifferences become To ensure
best results,use margarine butter, er
stick spreads containing at [easi70%
vegetable oil
14
OPERATION
OvenCookingTips(cont.)
Baking results will be better if baking
pans are centered in the oven as
much as possible tf baking with
more than one pan, place the pans so
each has at least t to 1W of air space
around it If baking four cake layers at
the same time, place two layers on
rack 2 and two layers on rack 4
Stagger pans on the rack so one
is not directly above the other
i:
FLAT COOKIE SHEETS, without
sides, allow air to circulate att around
the cookies for even browning
!,i i ,i
SHINY PANS reflect heat, and are
perfect for cakes and quick breads
that need a light brown crust
GLASS, DARK NON-STICK,
OR DAFIKENED-BY_AGE
BAKEWARE absorbs heat, and can
be used for yeast breads, pie crust, or
foods that need a brown crust The
oven temperature should be reduced
by 25°F
The OvenTemperatureSensor
continuouslysensesand controls the
temperatureinside the oven To keep a
conslant set temperature, theelements
will cycle (turn on and off during cooking}
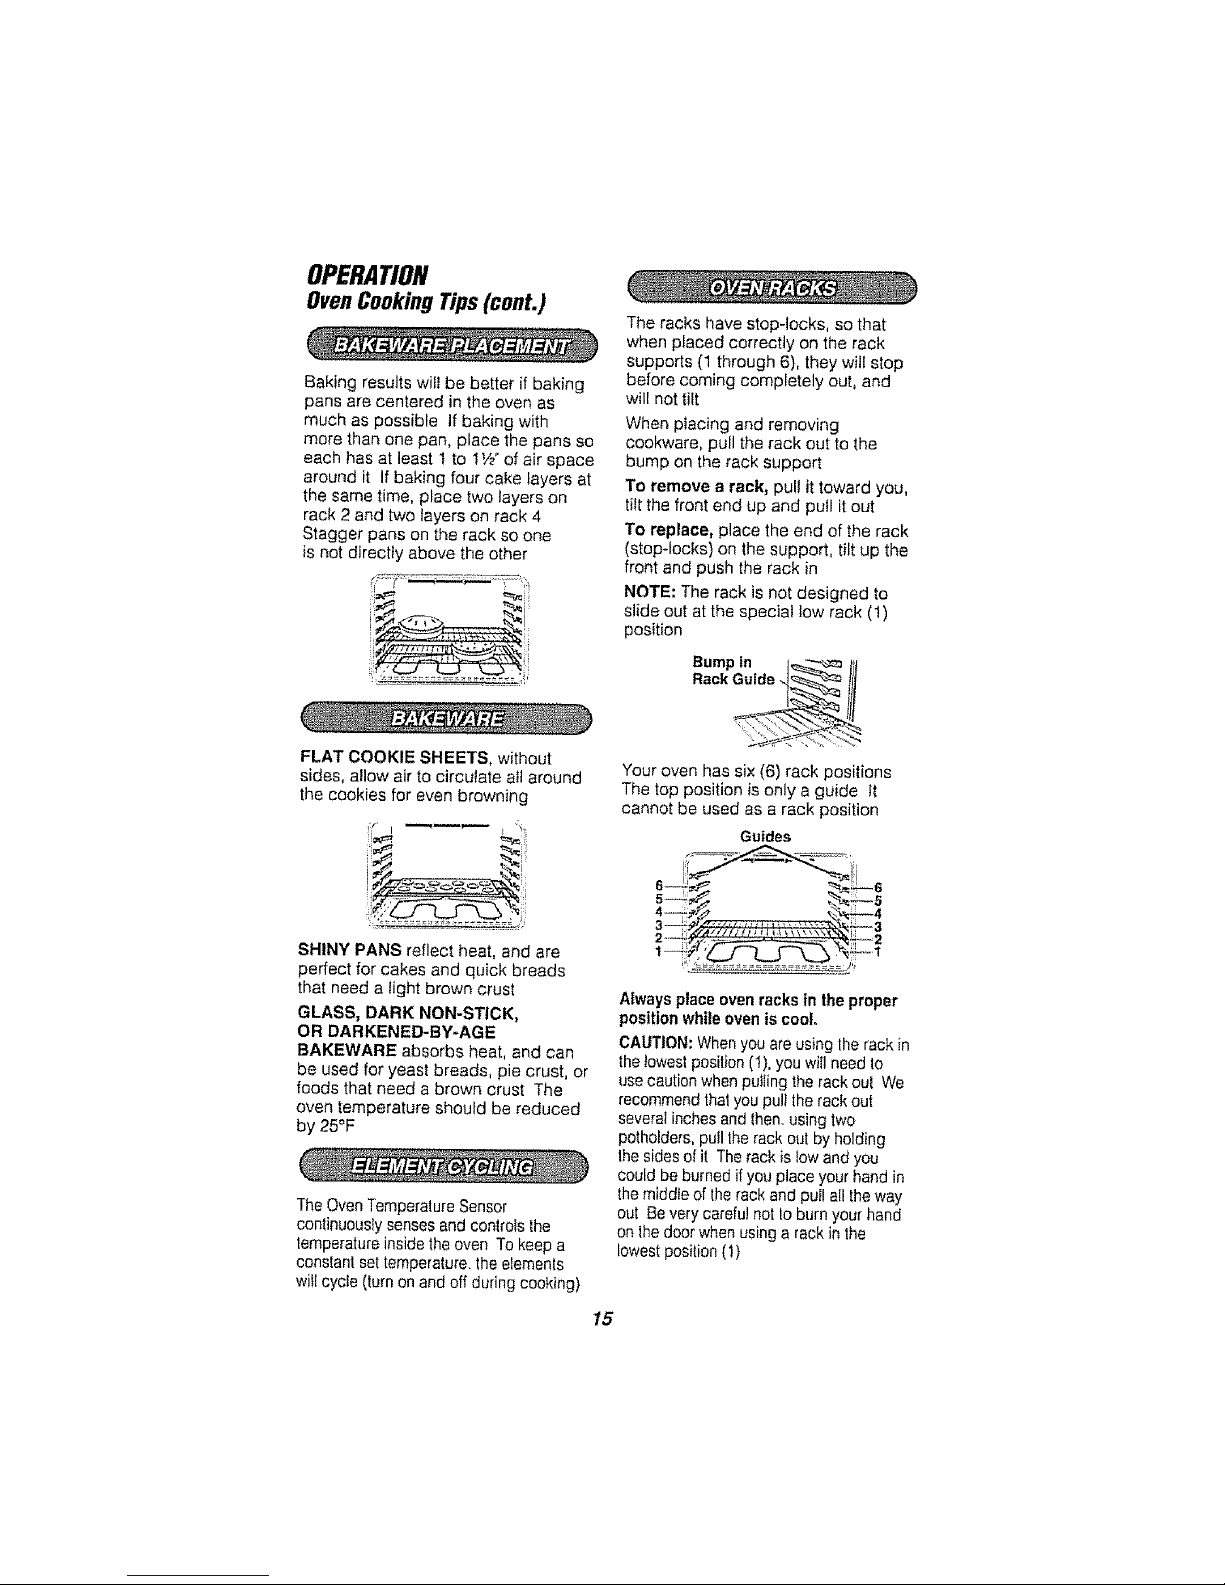
The racks have stop-locks, so that
when placed correctly on the rack
supports (1 through 6), they will stop
before coming completely out, and
will not tilt
When placing and removing
cookware, pull the rack out to the
bump on the rack support
To remove a rack, pult it toward you,
titt the front end up and pu_lit out
To replace, place the end of the rack
(stop-lacks} on the support, tilt up the
front and push the rack in
NOTE; The rack is not designed to
slide out at the special low rack (1)
position
Bumpin J_ tit
Rack Guide q_'_"_-"-'-'-'-'-'-'-'-'_III
Your oven has six (6) rack positions
The top position is only a guide tt
cannot be used as a rack position
Guides
i! ii
s
Alwaysplace oven racks in the proper
positionwhile oven is cool,
CAUTION:Whenyou areusing the rack in
the towestposilion (I), you will need to
use caution when pulling the rackout We
recommend thaiyou pul!the rack out
several inchesand then_using two
potholders, pullthe rack out by holding
Ihe sides of it The rack is lowand you
could be burned if you place your hand in
the middle of therack and pull all theway
out Be very careful not 1oburnyour hand
on the door when using arack in the
lowestposition (1)
15

OPERATION
OvenCookingTips(cont.)
You may feel that your new oven
cooks differently than the oven it
replaced We recommend that you
use your new oven a few weeks
to become more familiar with it,
following the times given in your
recipes as a guide If you feel
your oven is too hot or too cooi
for your cooking preference, see
Do-It-Yourself Temperature
Adjustment in the back of this
manua! to make the adjustment
16
OPERATION
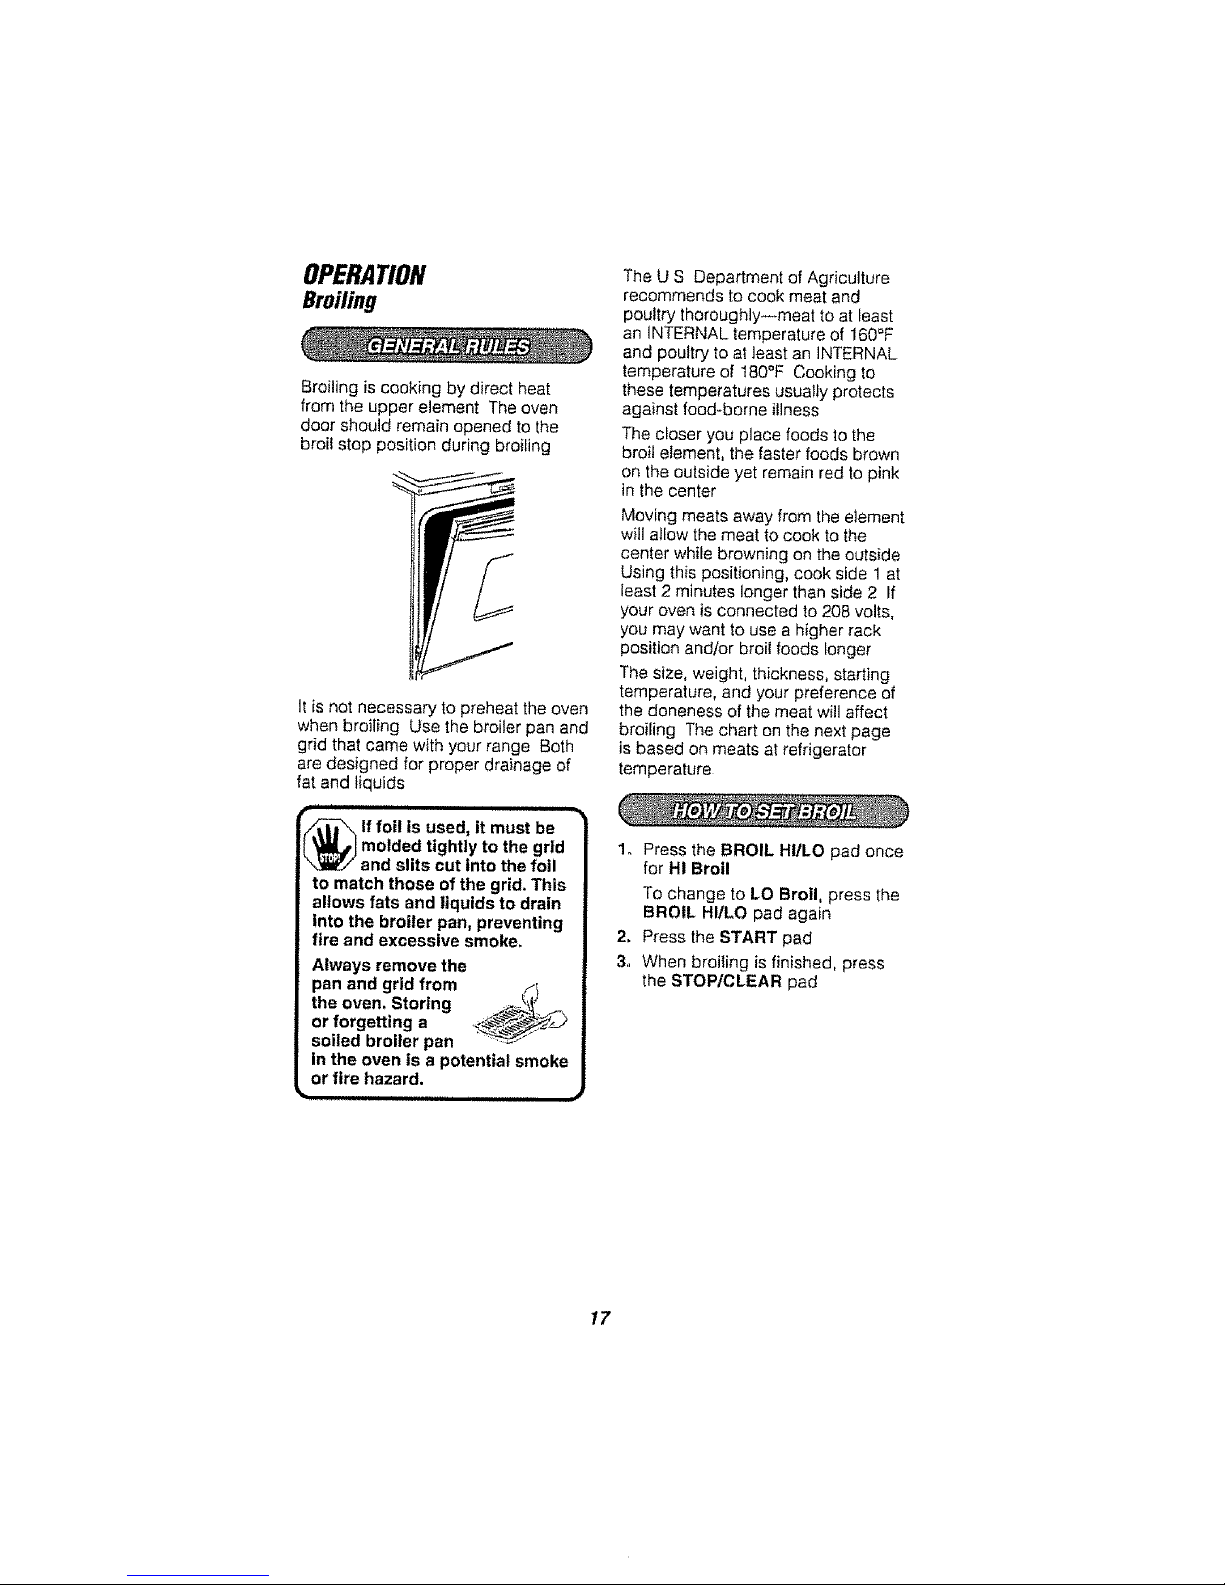
Broiling
Broiling is cooking by direct heat
from the upper element The oven
door should remain opened to the
broit stop position during broiling
it is not necessary to preheat the oven
when broiling Use the broiler pan and
grid that came with your range Both
are designed for proper drainage of
fat and liquids
n = n,,,,,,,,,,,,,,,,, H i1
r
lf foi! is used, it must be
molded tightly to the grid
and slits cut into the foil
to match those of the grid. This
allows fats and liquids to drain
into the broiler pan, preventing
fire and excessive smoke.
Always remove the
pan and grid from . _
the oven. Storingor forgetting a .
soiled broiler pan ....... "
In the oven is a potential smoke
or fire hazard.
The U S Department of Agriculture
recommends to cook meat and
poultry thoroughly--meat to at least
an _NTERNAL temperature of 160_F
and poultry to at least an INTERNAL
temperature of t80°F Cooking to
these temperatures usually protects
against food-borne illness
The closer you place foods to the
broil element, the faster foods brown
on the outside yet remain red to pink
in the center
Moving meats away from the element
will allow the meat to cook to the
center while browning on the outside
Using this positioning, cook side 1 at
least 2 minutes longer than side 2 If
your oven is connected to 208 volts,
you may want to use a higher rack
positien andtor broil foods longer
The size, weight, thickness, starting
temperature, and your preference of
the aloneness of the meat will affect
broiling The chart on the next page
is based on meats at refrigerator
temperature
1. Press the BROIL HI/LO pad once
for HI Broil
To change to LO Broil, press the
BROIL HIILO pad again
2. Press the START pad
3,, When broiling is finished, press
the STOP/CLEAR pad
17
OPERATION
Broiling(cont.)
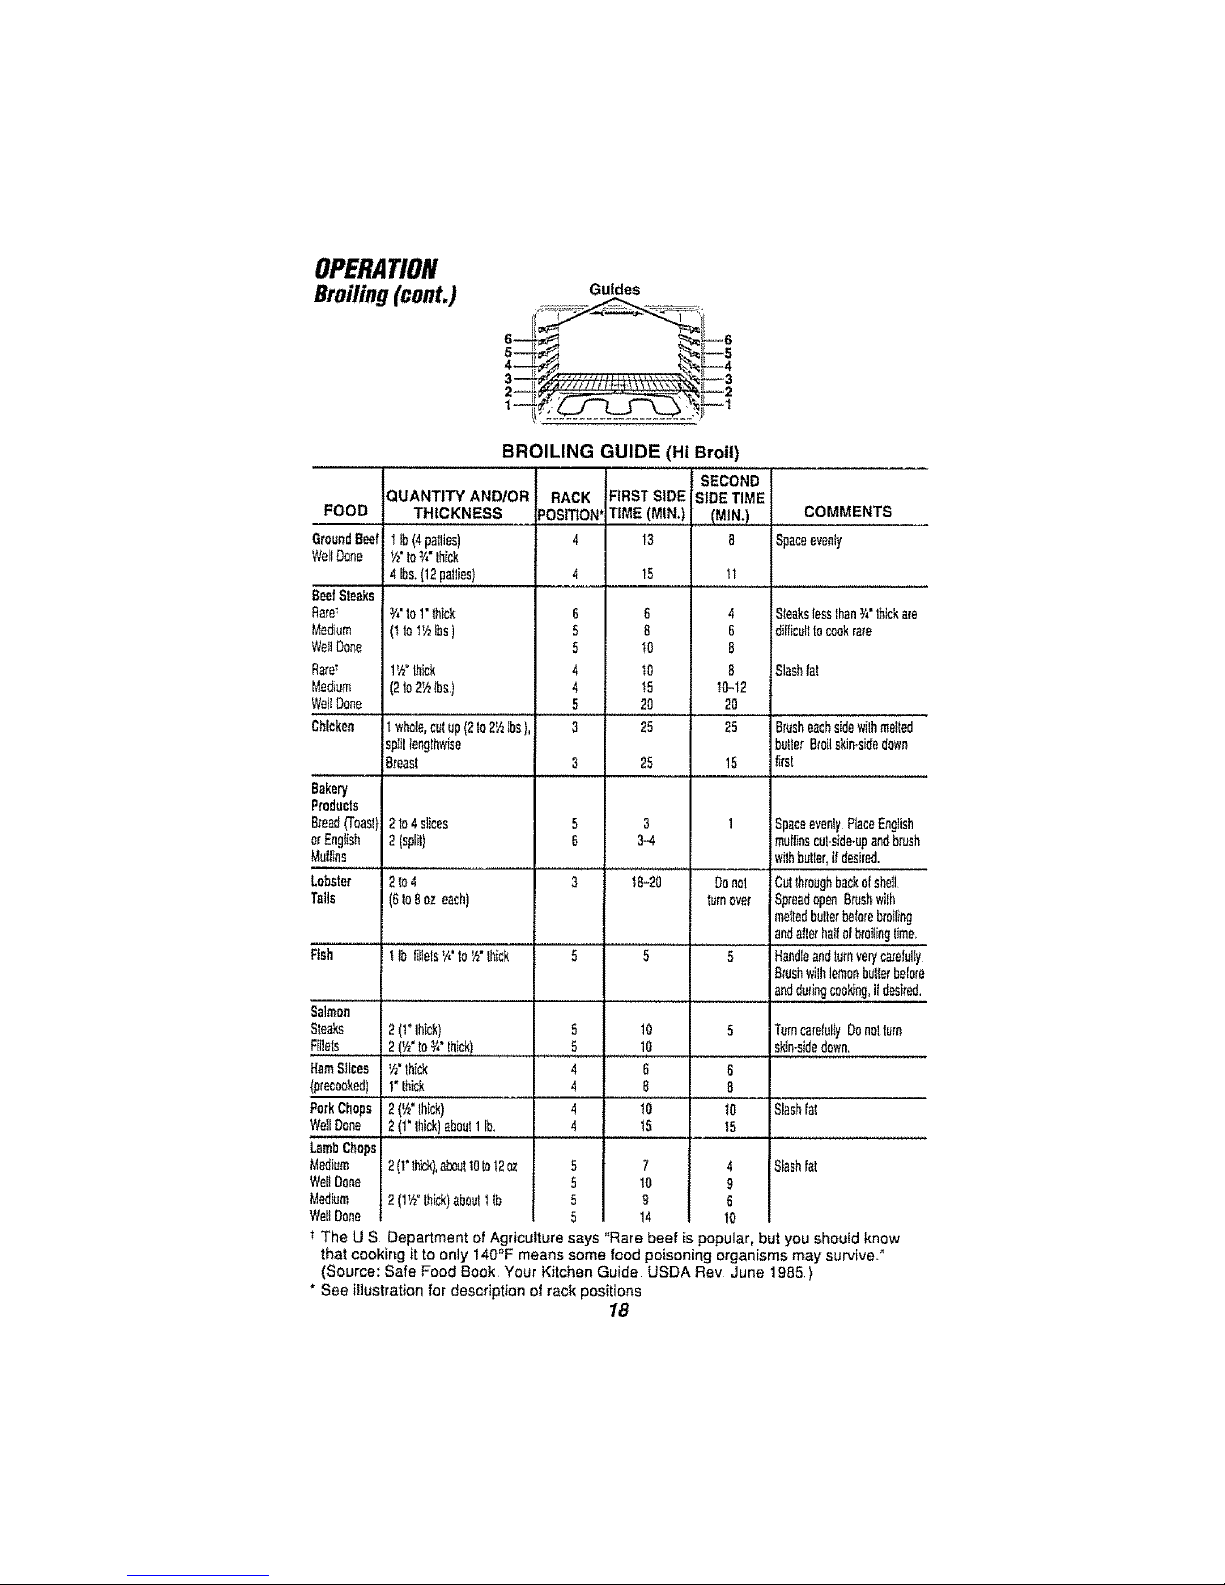
Guides
5--
3--7 iV_
FOOD
GroundBeef 1Ib(4pwliss)
WellDone V2"to Y,"thick
BROILING GUIDE (Hi Broil)
SECOND
QUANTITY AND/OR RACK FIRST SiDE SIDETIME
THICKNESS _OSITION*TIME (MIN+) (MIN.),,,,,i
4 13 8
4Ibs,(12pewee) 4 15
BeefSteaks
Rare_ Y4"to1"thick 6 6
Medium (t tol_hIbs) 5 8
,,Vel_Do_e 5 10
Rare7 l'h° thick 4 10
Medium (2to2½ths) 4 !5
_VellDone 5 20
4
6
B
B
t0-12
20
COMMENTS
Spaceevenly
SteakstessthanY+"lhlokare
diMcutitocookrare
Slashfat
"{am8Iisee
precooked)
:_orkChops
NellDone
LambChops
Medium
WeltDone
Medium
WellDone
Chicken Iwhole,cutup(2to2_Ibs),
spiltlengthwise
Breast
Bakery
P,rodtJcts
Breed_0asi)i 21o4slices
:+rEnglish 2 {split)
_,tulf+ns
Lobster 2 In4
rails (_to8eeeach)
:tah t Ibfillets'_'to_"thick
+simon
_tesks 2 (++Ihick)
:[ilets 2(½'to+i"thick)
'h"thick
1+thick
2('k"thick)
2(1"lhick)ab0uiIIb+
2(l'th!d,(),aboultOto|2oz
2(I_._°thick)abouiIib
3
3
5
5
4
4
4
4
25
25
3
3-4
181+20
10
10
@
B
'+0
15
7
10
S'
14
25 Brusheachsidewithmelted
butlerBroilskin+sidedown
15 _rst
1 jSpaceeventyRaceEnglish
muffinscutside+upandbrush
wi!hbutEer,i_desired.
Cutthroughbackelshell
SpreadopenBrashwiIh
me,tedbultorbeforeb,'silintj
andaIle_hz{ilotbrWiingtime,
5 HandleandturnveryearefWly
Brushwithlemonbutlerbolero
andduringcooing,ildesired.
5 TurncarefullyDonotlure
sldn-sidudown.
B
B
I0 Slash{al
15
Slashfat
Donot
turneve{
t The U S Department of Agriculture says '+Rarebeef is popular, but you should know
that cooking it to only 140"F means some food poisoning organisms may survive,"
(Source: Safe Food Book Your Kitchen Guide USDA Rev June 1985)
* See illustration for description at rack positions
18
OPERATION
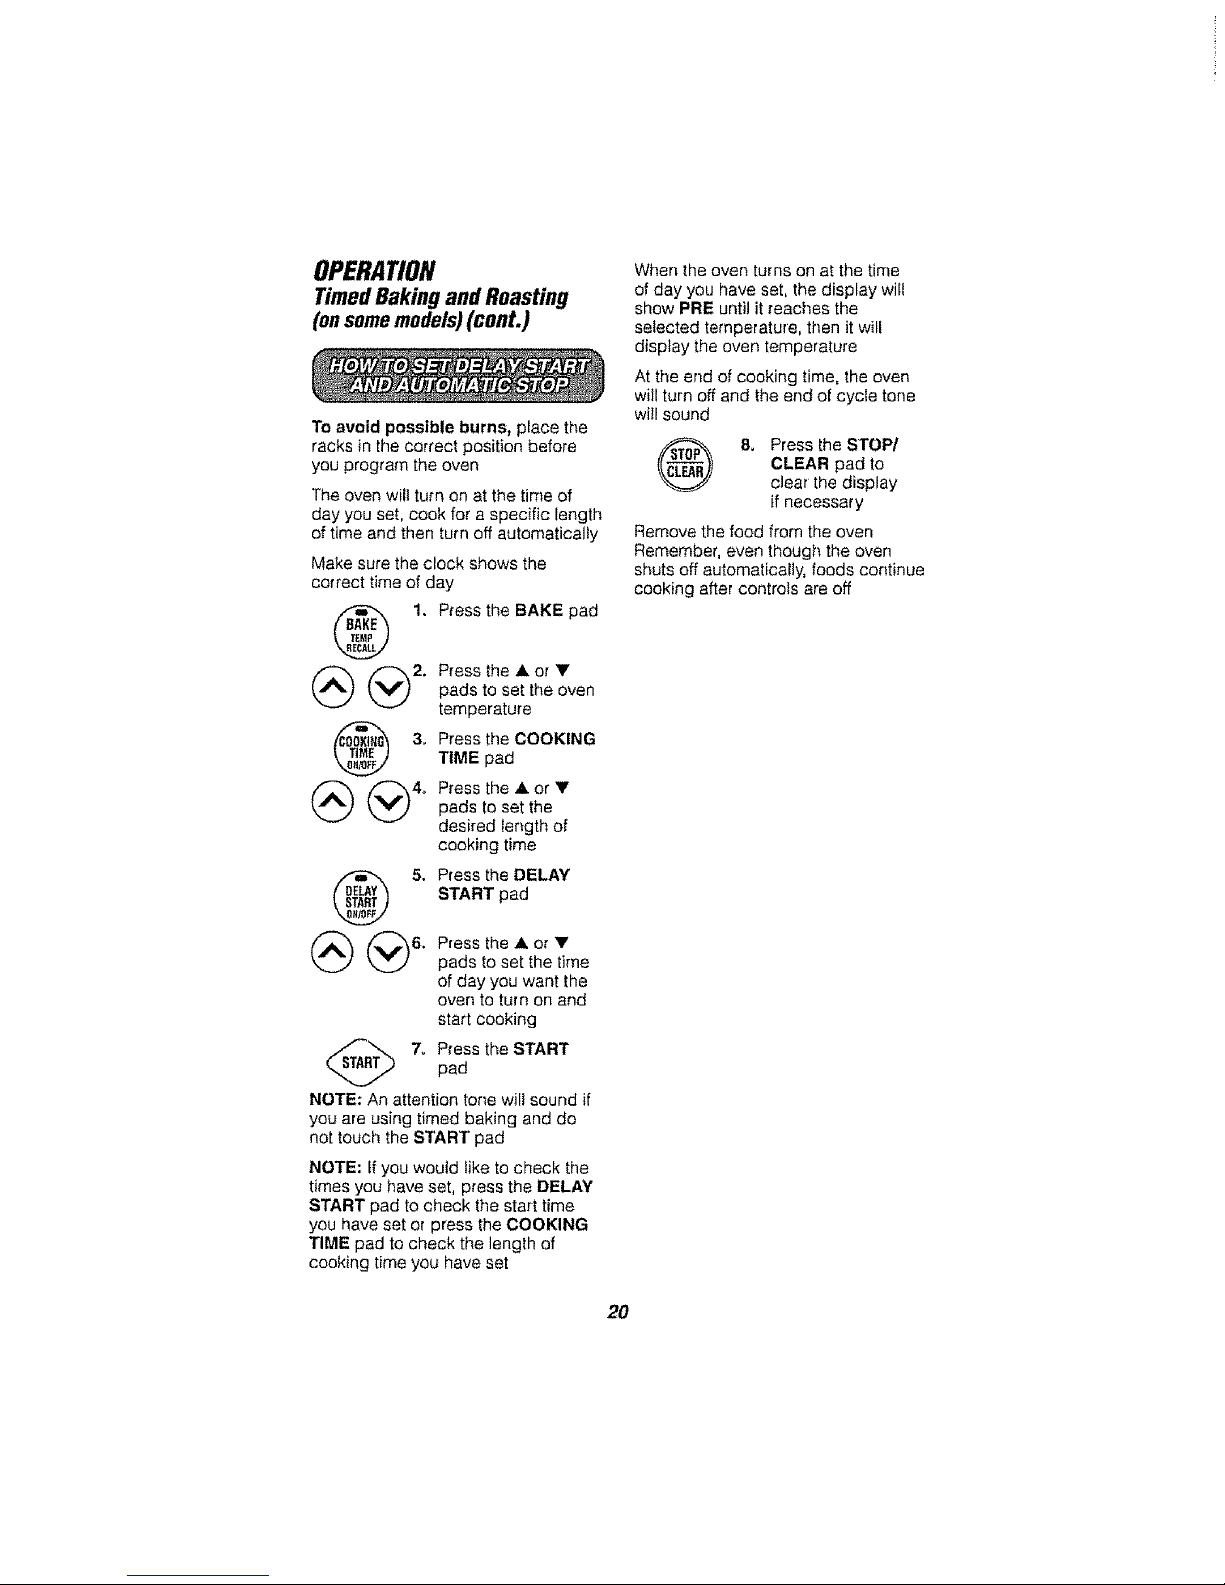
TimedBaking and Roasting
(onsome models)
Do not lock the oven door with the
latch during timed baking. The latch
is used for self-cleaning only,,
The oven control allows you to turn
the oven on or off automatically at
specilic times that you set Examples
of Immediate Start (even turns on now
and you set it to turn off automatically)
and Delay Start and Stop (setting the
oven to turn on automatically at a later
time, cook for a preset amount of time
and then turn off automatically} will be
described
NOTE: Before beginning, make sure
the oven clock shows the correct time
of day See the Using the Clock and
Timer section
To avoid possible burns, place the
racks in the correct position before
you turn the oven on
The oven will turn on immediate+y and
cook for a selected length of time At
the end of the cooking time, the oven
will turn off automatically
1. Press the BAKE
pad
2, Press the Aor Y
(_) (_ padstosetthe
oven temperature
3. Press the
COOKING TIME
pad
NOTE: If your recipe requires
preheating, you may need to add
additional time to the length of the
cooking time
(_ (_ 4+ Press the ,i,. or 'V'
pads to set the
baking time
The cooking time that you entered will
be displayed. (If you select Cooking
Time first and then adjust the Bake
Temperature, the oven temperature
will be displayed instead)
(_ 5o Press the START
pad
The display shows either the oven
temperature that you set or the
cooking time countdown (The display
starts with PRE if showing the oven
temperature )
The oven will continue to cook for the
programmed amount of time, then
turn off automatically
6. Press the STOP/
CLEAR pad to
clear the display
if necessary
Remove the food from the oven
Remember, even though the oven
shuts off automatically, foods continue
lg cooking after controls are off
OPERATION
TimedBaking and Roasting
(on some models) (cont.)
To avoid possible burns_ place the
racks in the correct position before
you program the oven
The oven wilt turn on at the time of
day you set, cook for a specific length
of time and then turn off automatically
Make sure the clock shows the
correct time of day
1. Press the BAKE pad
(_ (_2. Press the .& or •
pads to set the oven
temperature
3. Press the COOKINGTIME pad
_ (V_ 4o Pressthe'or"pads to set the
desired Iength of
cooking time
5. Press the DELAY
START pad
(_ (_6. P,essthe.or•
pads to set the time
of day you want the
oven to turn on and
start cooking
7o Press the START
pad
NOTE: An attention tone will sound if
you are using timed baking and do
not touch the START pad
NOTE: tf you would like to check the
times you have set, press the DELAY
START pad to check the start time
you have set or press the COOKING
TIME pad to check the length of
cooking time you have set
When the oven turns on at the time
of day you have set, the display wilt
show PRE until it reaches the
selected temperature, then it will
display the oven temperature
At the end of cooking time, the oven
will turn off and the end of cycle tone
will sound
& Press the STOP/
CLEAR pad to
clear the display
if necessary
Remove the food from the oven
Remember, even though the oven
shuts off automatically, foods continue
cooking after controls are off
20
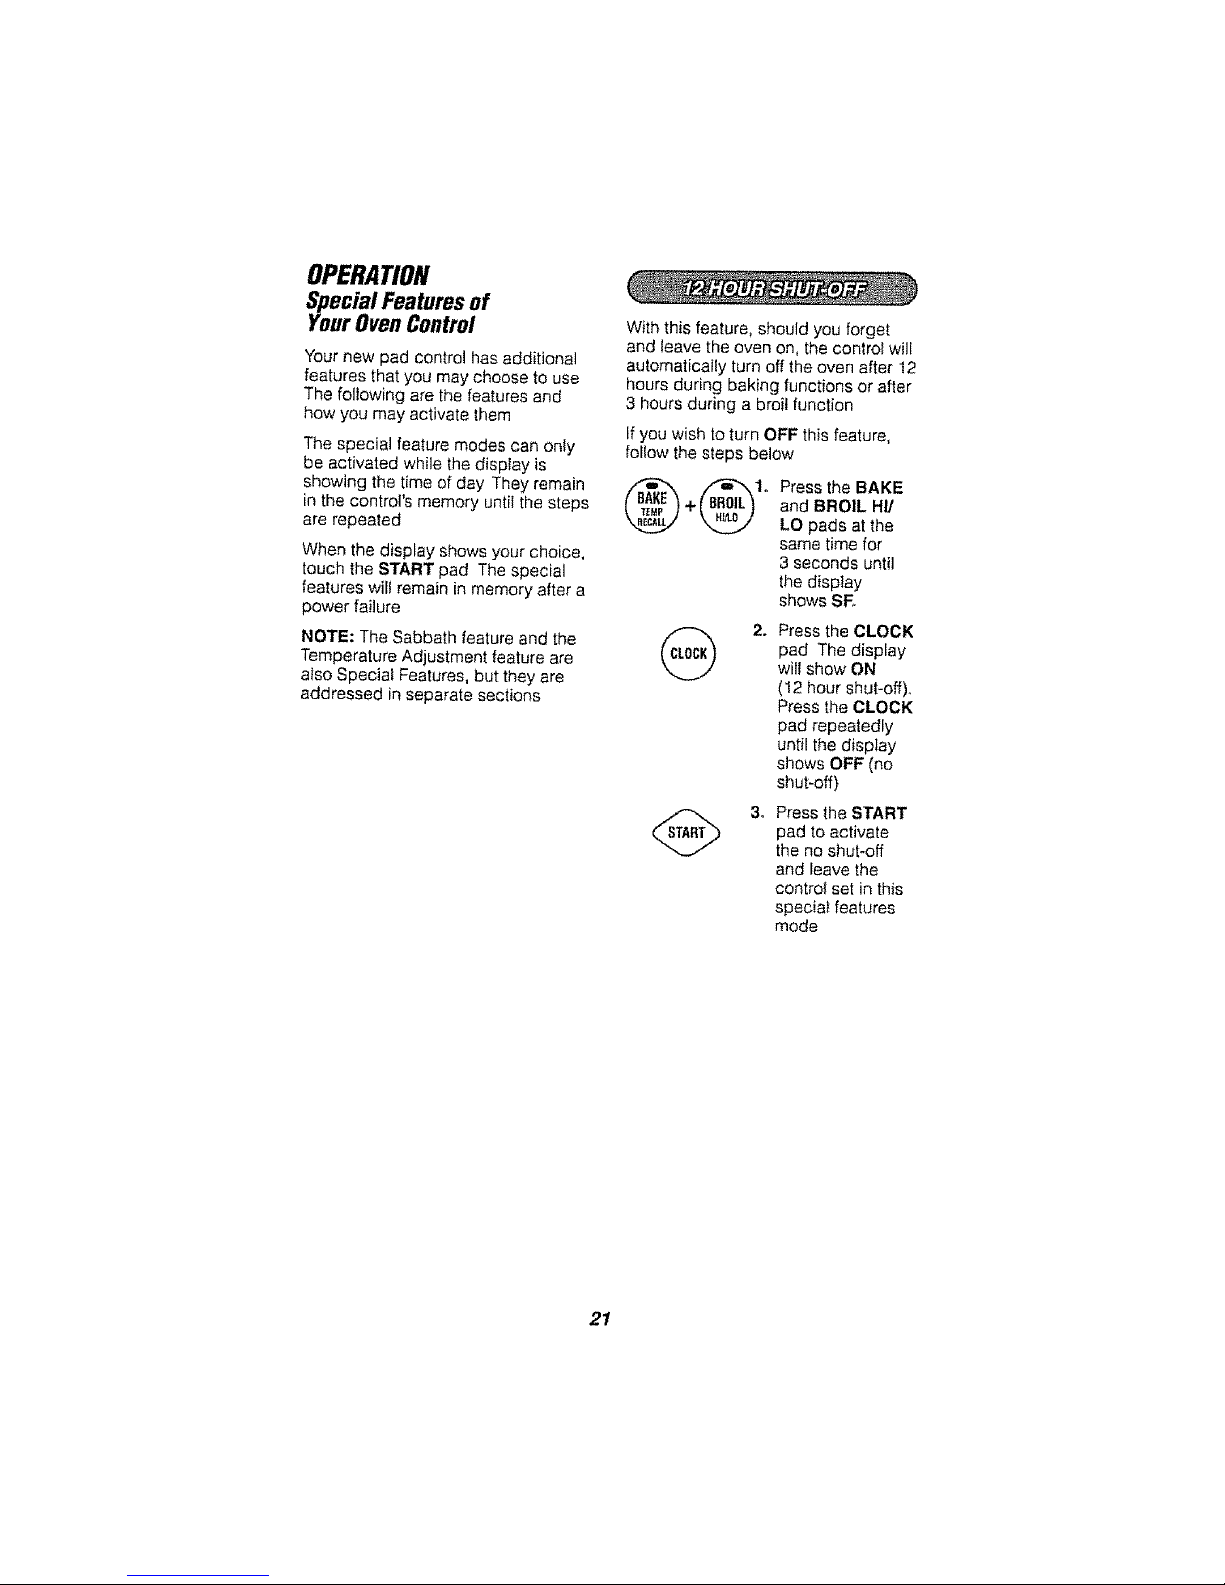
OPERATION
Special Features of
YourOven Control
Your new pad control has additional
features that you may choose to use
The following are the features and
how you may activate them
The special feature modes can only
be activated while the display is
showing the time of day They remain
in the control's memory until the steps
are repeated
When the display shows your choice,
touch the START pad The special
features will remain in memory after a
power failure
NOTE: The Sabbath feature and the
Temperature Adjustment feature are
also Special Features, but they are
addressed in separate sections
With this feature, should you forget
and leave the oven on, the control will
automatically turn off the oven after 12
hours during baking functions or after
3 hours during a broil function
Ifyou wish to turn OFF this feature,
follow the steps below
Press the BAKE
and BROIL HI/
LO pads at the
same time for
3 seconds until
the display
shows SF,,
2_
Press the CLOCK
pad The display
will show ON
(12 hour shut-off),
Press the CLOCK
pad repeatedly
until the display
shows OFF (no
shut-off)
3. Press the START
pad to activate
the no shut-off
and leave the
control set in this
special features
mode
21
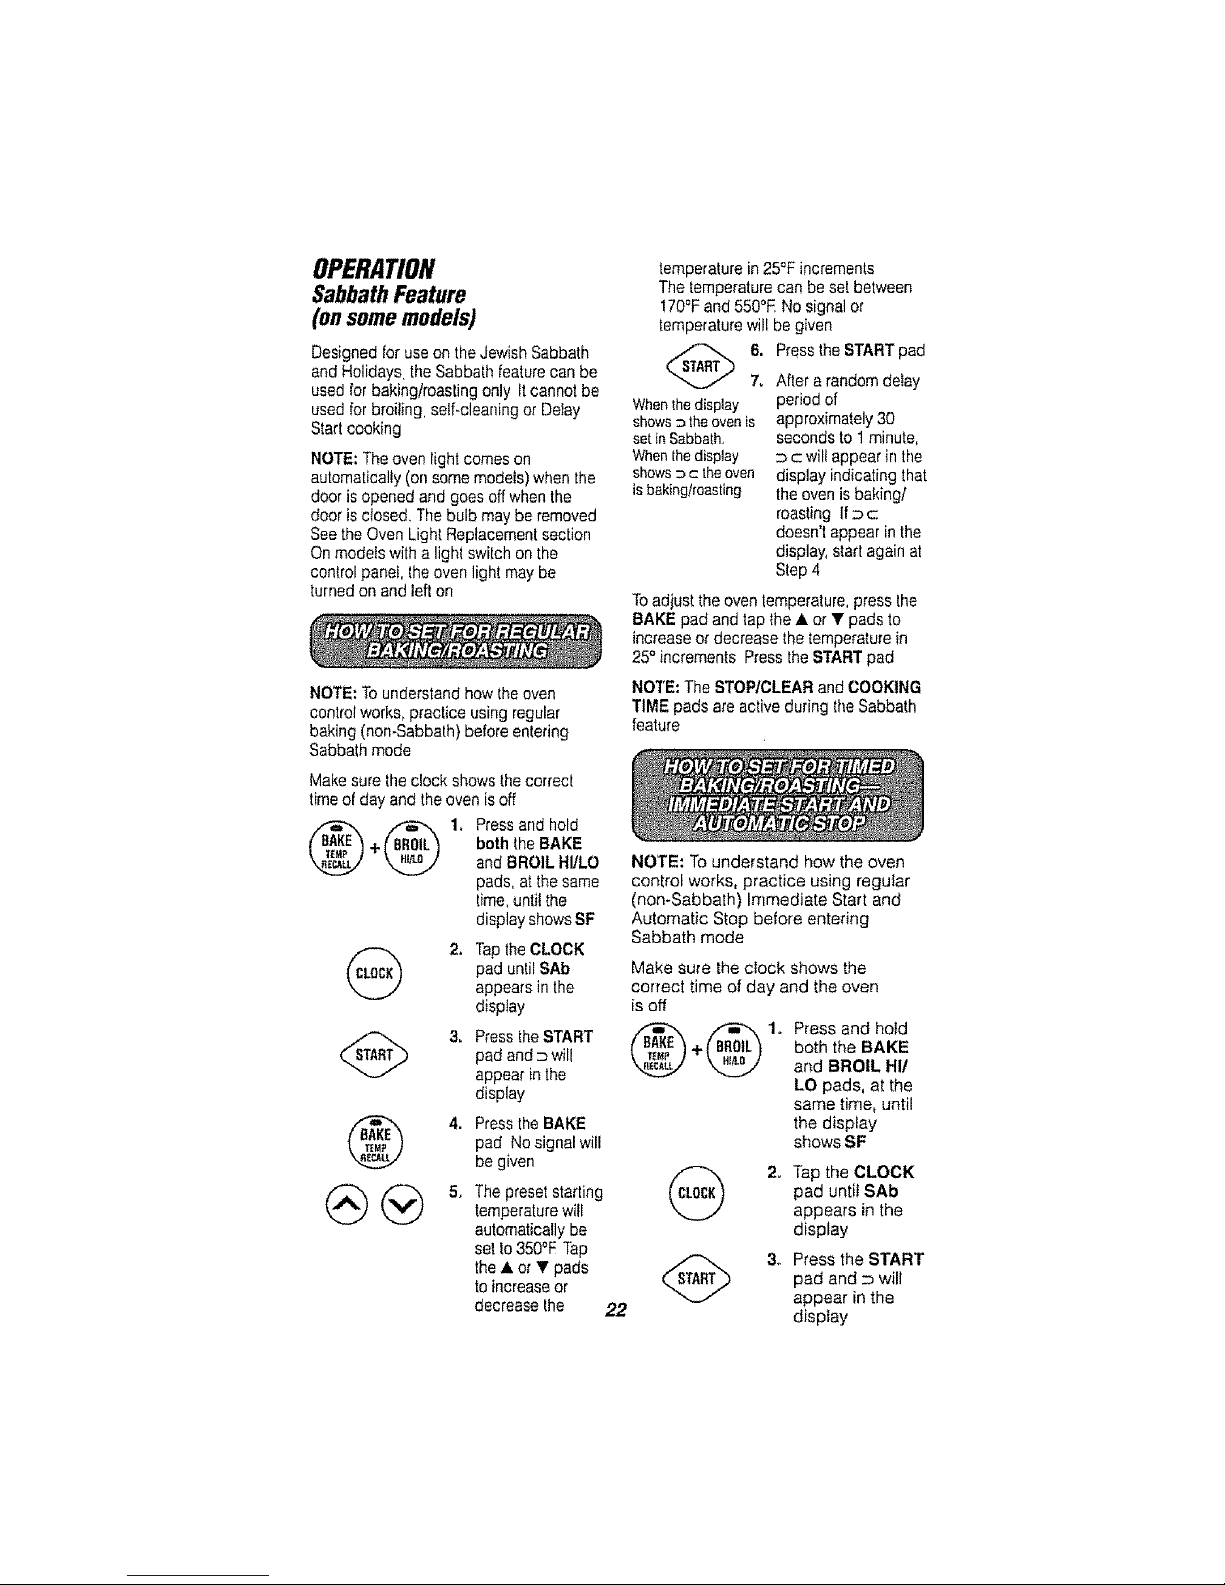
OPERATION
SabbathFeature
(onsomemodels)
Designed lot use onthe Jewish Sabbath
andHolidays the Sabbath featurecan be
usedfor baking/roasting only tt cannot be
usedfor broiling, seGclean[ngor De_ay
Startcooking
NOTE: Theoven light comes on
automaticai}y(on some models) when the
door isopened and goes offwhen the
door isclosed. Thebulb may be removed
See the Oven LightReplacement section
On modeiswith a ligh_switch onthe
control panel, the oven light may be
turned on and left on
NOTE: To understand how the even
control works, practice using regular
baking (non*Sabbath)before entering
Sabbathmode
Makesure theclock shows thecorrect
timeof day and the oven isoff
G 1_ Pressand hold
+ both the BAKE
andBROILHI/LO
pads, atthe same
time,unlit the
displayshowsSF
2. Tap theCLOCK
pad untilSAb
appears in the
disptay
(_ 3. PresstheSTART
pad and_ will
appear in the
display
4. Pressthe BAKE
pad No signal will
be given
(_ _ 5, Thepresetstarting
temperaturewill
automaticallybe
set to350°F Tap
the • orT pads
toincrease or
decrease the 22
temperature in25QFincrements
The temperaturecan be set between
170°Fand 550°E No signal or
temperature will be given
_._ 6. Press the STARTpad
7. After arandom delay
When the display
shows 3 theoven is
set inSabbath,
When the display
shows _ c the oven
is baking/roasting
period of
approximately30
seconds to 1minute,
c wil_appear in the
display indicating that
the oven is baking/
roasting if _ c
doesn't appear in the
display, start again at
Step4
Toadjust the oven temperature,press the
BAKE pad andtap the • or T pads to
increase or decrease thetemperature in
25° increments PresstheSTARTpad
NOTE:The STOP/CLEAR and COOKING
TIME pads are active during the Sabbath
feature
NOTE: To understand how the oven
control works, practice using regular
(non-Sabbath) Immediate Start and
Automatic Stop before entering
Sabbath mode
Make sure the cIock shows the
correct time of day and the oven
is off
_1_ Press and hold
+ both the BAKE
and BROIL HI/
LO pads, at the
same time, until
the disptay
shows SF
(_ 2o Tap the CLOCK
pad until SAb
appears in the
display
(_ 3,, Press the START
pad and _ will
appear in the
disptay
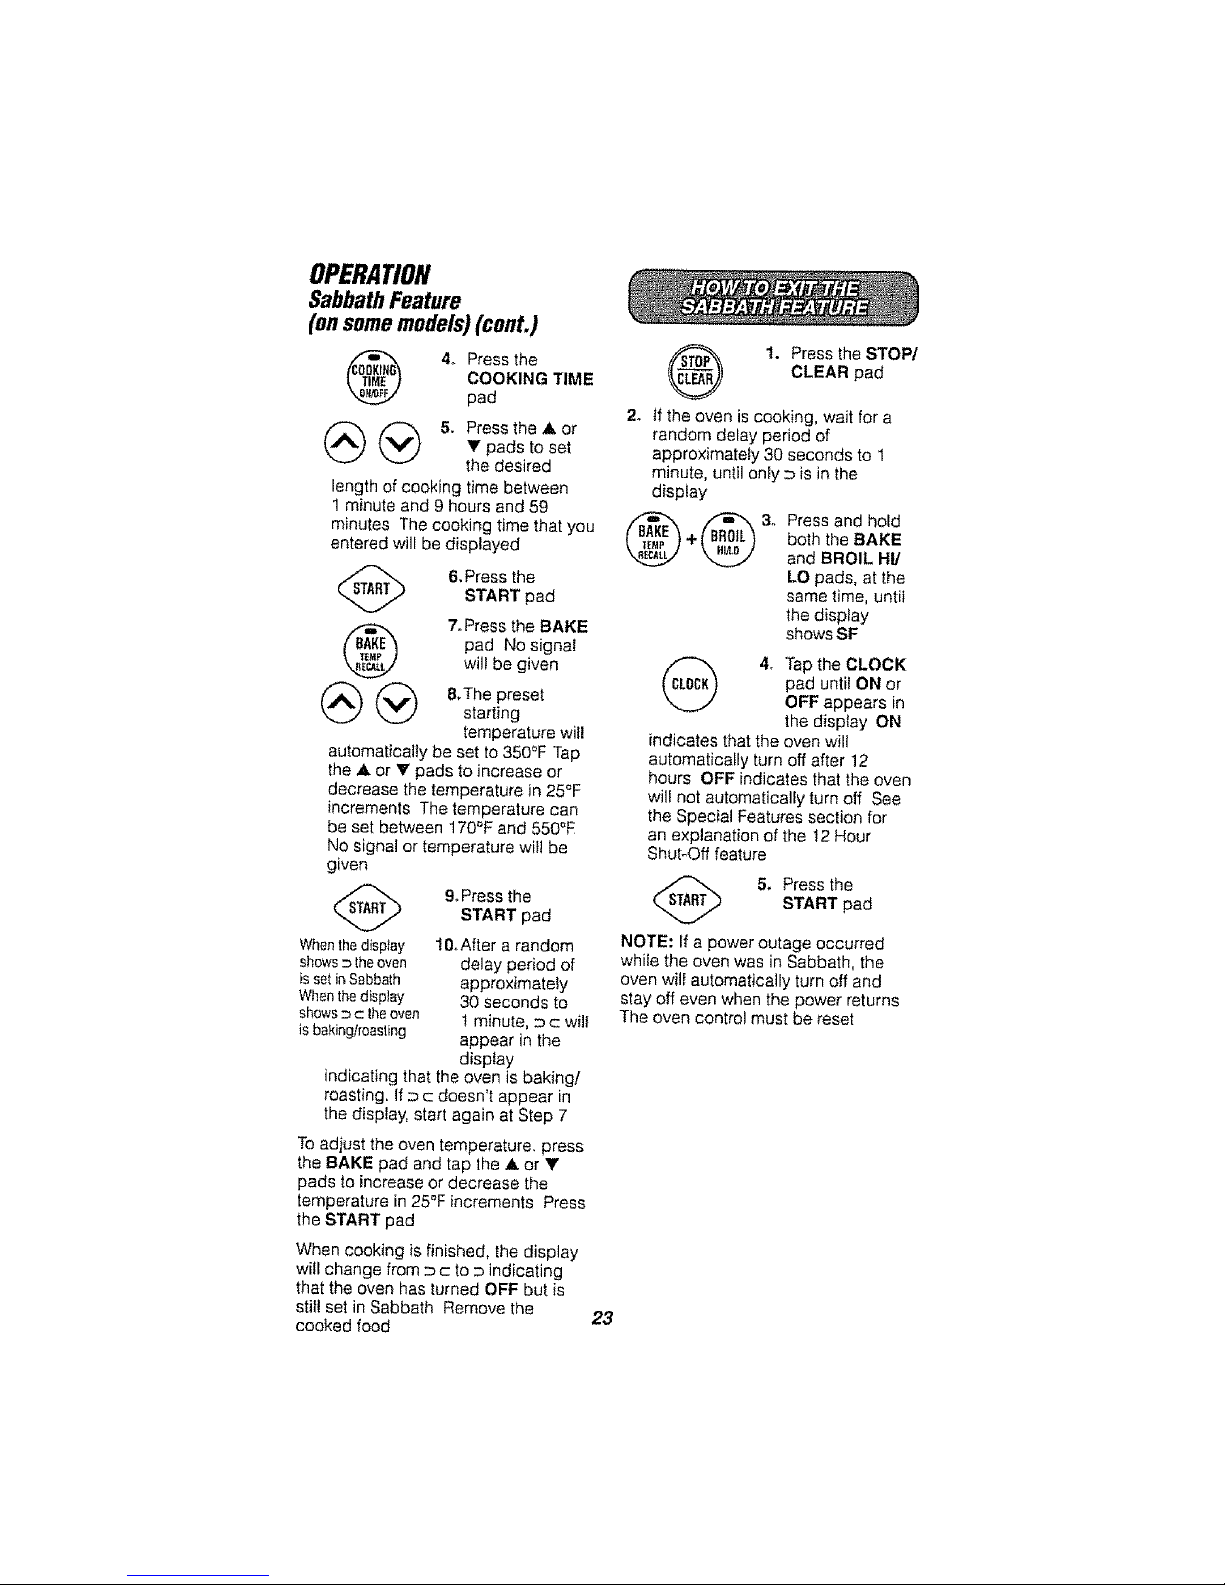
OPERATION
SabbathFeature
(onsomemodels)(coot.)
4o Press the
COOKING TIME
pad
(_ (_ 5. Press the A or
Y pads to set
the desired
length of cooking time between
1 minute and 9 hours end 59
minutes The cooking time that you
entered will be displayed
@
@@
6, Pressthe
START pad
7. Press the BAKE
pad No signal
will be given
8,The preset
starting
temperature will
automatically be set to 350°F Tap
the A or V pads to inorease or
decrease the temperature in 25°F
increments The temperature can
be set between 170'_Fand 550°E
No signal or temperature wilt be
given
9. Press theSTART pad
When the display 10, After a random
shows= theoven delay period of
is set in Sabbath approximately
When thedisplay 30 seconds to
shows_c theoven ! minute, _ c will
is baking/roasting appear in the
display
indicating that the oven is baking/
roasting. If _ c doesn't appear in
the display, start again at Step 7
To adiust the oven temperature, press
the BAKE pad and tap lhe ,,Lor •
pads to increase or decrease the
temperature in 25°F increments Press
the START pad
When cooking is finished, the display
will change from _c to _ indicating
that the oven has turned OFF but is
still set in Sabbath Remove the
cooked food
23
I. Press the STOP/
CLEAR pad
2o tf the oven is cooking, wait for a
random delay period of
approximately 30 seconds to 1
minute, until only = is in the
display
Press and hold
both the BAKE
and BROIL HI/
LO pads, at the
same time, until
the display
shows SF
(_ 4. Tap the CLOCK
pad until ON or
OFF appears in
the display ON
indicates that the oven will
automatically turn off after 12
hours OFF indicates that the oven
will not automatically turn off See
the Special Features section for
an explanation of the 12 Hour
Shut-Off feature
5, Press the
START pad
NOTE: If a power outage occurred
while the oven was in Sabbath, the
oven will automatically turn off and
stay off even when the power returns
The oven control must be reset

CAREANDCLEANING
Self-Cleaning Cycle
1. Remove the broiler pan and grid,
oven racks, utensils, and any foil
that may be in the oven
2. Soii on the front frame and outside
the gasket on the door liner wiil
need to be cleaned by hand
Front Frame
j,f.4 ._'_i
/4 _}oor Door
"'Gasket Liner _
Clean these areas with hot water,
soap-filled scouring pads, or
cleansers such as Soft Scrub eto
remove any soil Rinse we!l with
cIean water and dry,
3. Wipe up any heavy spillovers on
the oven bottom
4. Do not clean the gasket The
fibetgiass material of the oven
door gasket cannot withstand
abrasion It is essential for the
gasket to remain intact If you
notice it becoming worn or frayed,
it should be replaced
The gasket is designed to have a
5°-6" gap at the bottom of the doo_
This allows for proper air circulation
DoorPanel Gasket
t
Door Liner
It is normal for your oven door to give
the appearance of not having a good
seal against the range This is due to
the gasket The location of the gasket
on the door maintains a good sea!
and prevents any heat loss
t/_l_X Utensils should never be
I _ I left in the oven during a
self-clean cycle.
NOTE: Take the racks out of
the oven before you begin the
self clean cycle or they will
discolor. If you choose to leave
them in during the cycle, wiping
them down with vegetable oil
after the cycle wfll help them
slide easier.
For the first clean cycle, vent the
room with an opened window or
hood vent. This will reduce the
odor produced when heating
new parts.
24

CAREANDCLEANING
Self.CleaningCycle(cent.)
1o For best results, follow the steps
in PREPARING YOUR OVEN
2. Slide the self-clean lock handle to
the right as far as it will go Do not
force the handle
Press the STOP/CLEAR pad
Wait until the oven has cooled below
the locking temperature to unlatch
the door You will not be able to
open the door right away unless
the oven has cooled below the
locking temperature
3. Press the SELF
CLEAN pad
(_ _4. Pressthe,&or,pads until the
desired Clean Time
is displayed
The Clean Time is normally 4 hours
and 20 minutes You can change the
Clean Time to any time between 3
and 5 hours, depending on the
amount of soil in your oven
(_ 5. Press the START
pad
The self-clean cycle will automatically
begin after CLEAN is displayed and
the time countdown appears in the
display
While the oven is self-cleaning, you
can press the CLOCK pad to display
the time of day TO return to the clean
countdown, press the SELF CLEAN
pad
The oven shuts off automatically when
the self-clean cycle is complete, and
0:0O wilt flash in the display
6. Slide the latch handle to the left as
far as it will go and open the door
After the cycle, you may notice some
white ash in the oven Just wipe it up
with a damp cloth or sponge
Ifwhite spots remain, scrub them
with a soap-filled scouring pad Be
sure to rinse thoroughly These are
usually deposits of salt that cannot be
removed during the cycle
If for any reason you are not
satisfied with the cleaning
results, just repeat the cycle,,
25

CAREAND CLEANING
Self-CleaningCycle(cont.)
The oven shuts off automatically when
the clean cycle is complete, and O:O0
will flash in the display
6. Slide the latch handle to the left as
far as it will go and open the door
You can set the oven control to
delay-start the oven, clean for a
specific length of time and then
turn off automatically
Make sure the clock shows the
correct time of day
Follow the directions in the Before a
Clean Cycle section
1, Latch the door
NOTE: Never force the latch If the
oven is too hot, you witl not be able to
slide the latch Allow the oven to coot
2. Press the SELF
CLEAN pad
3. Press the A or V
(_ (_ padstosetthe
Clean Time
The Clean Time is preset for 4 hours
and 20 minutes You can change the
Clean Time to any time between 3
and 5 hours, depending on the
amount of soil in your oven, if a
different Clean Time is desired, touch
the ,A,or Y pads until the desired
Clean Time is displayed
4. Press the DELAY
START pad
Change the Start Time by pressing
the ,& or Y pads The start time will
appear in the display
(_ 5. Press the START
pad
The self-clean cycle will automatically
begin at the time set
While the oven is self-cleaning, you
can press the CLOCK pad to display
the time of day To return to the clean
countdown, press the SELF CLEAN
pad
26

CAREAND CLEANING
Cleaning
CLEANING MATERIALS
=Dishwashing detergent
=Warm water
aSoft cloth
Do not use abrasive cleaners,
industrial cleaners, or bleach.
CLEANING MATERIALS
• Dishwashing detergent
• Warm water
• Soap-rifled scouring pad
•Commercial oven c_eaner
TO CLEAN
Allow the pan to soak Sprinkle the
grid with dishwashing detergent and
cover with a damp cloth or paper
towe_and let stand Scour as needed
Wash, rinse, and dry well You may
also place both the pan and grid in
the dishwasher
Clean only as touch-up between
clean cycles Use dishwashing
liquid, warm water, or soap-filled
scouring pad Rinse well after
cleaning and dry
NEVER USE OVEN CLEANERS IN
OR AROUND ANY PART OF THE
OVEN.
When cleaning, be sure not to bend
or displace the temperature sensor,
located on the back wall of the oven
CLEANINGMATERIALS
• Dishwashingdetergant
• Warm water
• Papertowel
• Ammonia
• Abrasive cleaner
• Scouring pad
TO CLEAN
Clean aftereach use Ifacidic foods
(hot fruil filling, tomatoes, sauerkraut,or
sauceswithvinegaror_emonjuice) spilt,
use a dry paper toweltowipe up as much
as possible Whensurfacehas cooled.
therougNy clean cooktop
CLEANING MATERIALS
• Dishwashing detergent
'=Warm water
• Paper towels
TO CLEAN
Do not use oven cleaners,cleansing
powder or harsh abrasives if
marinades,tomato sauce, basling
materials,etc should spill,wipe up
asmuch aspossible.Whensurfaces have
cooted, Iheroughlyclean painted areas
TO CLEAN
For everyday cleaning, use glass
cleaner and a paper towel For
stubborn soil, use paste of baking
soda and water Rinse thoroughly
CLEANING MATERIALS
• Soft abrasive cleaner
• Sponge scrubber
Do not use hardy abrasive cleaners,
Industrial cleaners, or bleach°
27

CAREANDCLEANING
RemovableParts
Some models have a cooktop that
can be lifted up foreasier cleaning
The entire cooktop may be lifted up
and supported in the up position
The surface units do not need to be
removed; however, you may remove
one to make raising the cooktop
easier There are two side supports
that lock into position when the
cooktop is lifted up
I
Be sure all surfaceunits areturned off
before raisingthecook'tep_
After cleaning under the cooktop with
hot, mild soapy water and a clean
cloth, lower the cooktop Be careful
not to pinch your fingers
To lower the cooktop, push the rods
back and gently lower the cooktop
until it rests in place
n
_ CAUTION: When working
_ in this area, be careful not to_
lbump into the support rod(s)= The i
J porcelain enamel surface of the |
Lcooktop can chip if dropped. J
28

CAREANDCLEANING
RemovableParts (cont.)
CLEANING MATERIALS
• Dishwashing detergent
=Warm water
• Soft cloth
Clear
Groovein
Spring CIlp
TO REMOVE
1. Be sure the control knob is in the
OFF position
2. The control knobs may be
removed for easier cteaning To
remove a knob, pu_lit straight off
the stem If knob is difficult to
remove, place a towel or dishcloth
between the knob end control
panel and put! gently
De not bend knobs by putling
them up or down or by hanging a
towe! or other such loads on them
This can damage the shaft
TO CLEAN
Wash the knobs in soap and water or
a vinegar and hot water solution
TO REPLACE
1o Check the back of the knob
2. The molded rib of the knob is
designed to fit perfectly onto the
knob stem
3. Align the molded rib to the clear
groove in the knob stem. Push the
knob back as far as it will go
Disconnect electrical
power to the oven at
the main circuit breaker
or fuse box before attempting
to replace the oven light bulb,,
Do not touch a hot light bulb
with wet hands or a wet cloth.
Wait until the bulb has cooled
and use a dry cloth,
................... ,a
Live
Bail _ . Col,ar
Wire ,_.
o°,°,..;0
TO REPLACE
1o Hold your hand under the bulb
cover and firmly push back the
bail wire_ until it clears and
releases the bulb cover
2,. Unscrew the light butb
3. Replace the bulb with a 3%'
40-watt appliance bulb
4, Place the bulb cover into the
grooves of the socket and pull the
bail wire forward until it rests in the
indentation on top of the bulb
cover
29

CAREAND CLEANING
RemovableParts(cont.)
TO REMOVE
To remove the drip bowls for
cleaning, the elements must be
removed first
1. Push the element back toward the
receptacle to free the locking tab
from the cooktop
Bowl
2o Lift the element about t inch
above the drip bowl and pull it out
CAUTIO.:Donot.. "1
_._ the element more than 1". /
If you do, it may not lie flat I
on the drip bowl when you plug |
it back in. ,)
NOTE: Repeated lifting of the
element more than 1inch above the
drip bowl can permanently damage
the receptacle
TO CLEAN THE DRIP BOWL
For brown food stains - Use
dishwashing detergent, warm water,
plastic scouring pads, mild abrasive
cleaners, soap4illed scouring pads,
or ammonia. Clean drip bowls after
each use Rinse and dry well Foods
that are net removed can cause
permanent stains that cannot be
removed For heavily so!ted bowls,
place them in a covered container (or
a plastic bag) with _Acup of ammonia
to loosen the soil, then gently scrub
the bowl with a plastic scouring pad
CAUTION: Do not
operate the cooktop
elements without the drip
bowl in place. Scorching of
the cook'top, burning of wiring
insulation and loss of energy
will occur.
TO REPLACE THE UNIT
1. Replace the drip bowl into the
recess in the cooktop Make sure
the opening in the bowl Einesup
with the receptacle
2. Insert the terminals of the element
through the opening in the drip
bowl and into the receptacle
Tab
"*",Locking Tab
When properly seated, the locking tab shouid
lock onto the cooktop rim through the notch
In the drip howl
3o Push the element in and down to
lock the tab in place so it rests
evenly in the cooktop
r,-
_ AUTION:
Do not immerse the
elements in liquids of any kind°
Do not clean the elements in a
dishwasher°
Do not bend the element plug
terminals.
Do not attempt to clean, adjust
or in any way repair the plug-in
receptacle°
30

CAREAND CLEANING
RemovableParts(coot.)
CLEANING MATERIALS
• Dishwashing detergent
• Warm water
. Scouring pad
Bump in
Rack Guide _.
Raised Back
of the R_
TO REMOVE
1. Pull the racks out to the stop lock
position
2o Pull up the front of the rack and
slide under the bump of the rack
guide
TO CLEAN
Clean with warm water and detergent
For hard4o_remove stains, gently
scrub w_th a soap-filled scouring pad
Rinse well
TO REPLACE
1. Place the raised back of the rack
onto the rack guides
2o Lift the front of the rack until the
raised back slides under the bump
of the rack guides
3. Slide the rack all the way back
TO REMOVE
1. Fully open the
door
2_ Push the hinge
locks down
toward the door
frame, to the
unlocked
position Slot
You may need
to push down
the locks with
the tip of a
flat-blade
screwdriver
Hinge Lock
(Unlocked
Position)
Hinge Arm
3. Firmly grasp both
sides of the door
at the top
4, Close door to the
door removal
position
5. Lift door up until
the hinge arm is
clear of the slot t
Removal Position
TO REPLACE
Bottom
1. Firmly grasp both Edgeof Hinge
sides of the door Blot Arm
/
at the top \.,_
2, With the door at _
the same angle
as the removal
position, seat the
indentation of the
hinge arm into
the bottom edge of
the hinge slot
Indentation
J
31

CAREAND CLEANING
RemovableParts (cont.)
RemovableOven Door(cont.)
3, Fully open the
door
4. Push the hinge
locks up against
the front frame of
the oven cavity, to
the locked
position
5o Close the oven
door
Locked
Position
Sealed Hinge
Arm
TO CLEAN OUTSIDE OF DOOR
• Use soap and water to thoroughly
clean the top, sides, and front of the
oven door Rinse well You may also
use a glass cleaner to clean the
glass on the outside of the door
Do not let water drip into the vent
openings
,, Spillage of marinades, fruit iuices,
tomato sauces, and basting
materials containing acids may
cause discolorati, on and shoutd be
wiped up immediately When
surface is cooi, clean and rinse
• Do nat use oven cleaners, cleaning
powders, or harsh abrasives on the
outside of the door
• if any stair_on the door vent trim is
persistent, use a soft abrasive
cleaner and a sponge scrubber for
best resutts
TO CLEAN INSIDE OF DOOR
• Because the area inside the gasket
is cleaned during the self-clean
cycte, you do not need to clean this
by hand
• The area outside the gasket and the
door liner can be cleaned with a
soap-filled scouring pad, hot water,
and detergent Rinse well with a
vinegar and water solution
• DO NOT clean the gasket er you will
damage it
32

CAREANDCLEANING
RemovableParts (cont.)
CLEANING MATERIALS
• Dishwashing detergent
,' Damp cloth
• Warm water
TO REMOVE
1. Pull the drawer out until it stops
2. Lift the front of the drawer until the
stops clear the guides
Rail
Stop
Sto
Guide
3, Remove the drawer
TO CLEAN
Wipe the inside and outside with
warm soapy water and a damp
cloth or sponge Do not use harsh
abrasives or scouring pads on the
drawer
TO REPLACE
1. Place the drawer rail on the
guides
2. Push the drawer back unlil it
stops
3o Lift the front of the drawer and
push back until the stops clear the
guides
4. Lower the front of the drawer and
push back until it closes
IF DRAWER WON'T CLOSE
Powercord may I Drawer
be obstructing _ I_ does not
drawer in this area t n close
H1
Reardrawer Drawer
supportis resting _ t_.front panel
ontop of guide ra I rl [ippea.
I _., , Ili awaylrorn
............,...... bodyside
IF DRAWER IS CROOKED
Reardrawersupport
is ontop of guide
rail on the highside
Drawerfront
panel tipped
toIone side
In each of the above cases, remove
the drawer, clear the obstruction if
necessary, then correctly replace it
'_ AUTION: The drawergives you space for
keeping cookware
and bakeware. Plastics and
flammable materials should not
be kept in this drawer. Do not
overload the storage drawer. If
the drawer Is too heavy, it may
slip off the base rail when
opened+
CLEANING MATERIALS
. Dishwashing detergent
• Damp cloth
, Warm water
TO REMOVE
1_ Remove the drawer
2. Lift the liner out of the drawer
TO REPLACE
1. Place the liner back into the drawer
2. Place the drawer back into the
33 range

BEFORECALLINGFORSERVICE
To save you time and money, before making a service call, check the tist
below for any problem you may think you have with the performance of your
range If the problem is something you cannot repair, use the Consumer Service
Numbers located on the back cover of this manual When making any calls,
have the Model No,, Serial No., Repair Parts Ltst_ Use and Care Manual, and
the Date of Purchase available,
PROBLEM
Range wellnot
work; totally
inoperative°
POSSIBLE CAUSE POSSIBLE SOLUTION
No power to range a. Check the household circuit
breaker or fuse box
ho Check to make sure the range is
plugged in
Cooktop will
not works
oven is ok.
Elements
unplugged
Check the elements, make sure
they are properly plugged into the
receptacle
Oven will
not work,
cooktop
okay.
Foods do not ao
bake properly.
b_
Controlset
improperly
Oven is not
preheated
Improper rack or
pan placement
c_ Oven vent
blocked or
covered with foil
d. Improper use
of foil
e. Improper
temperature
setting for
utensil used
f. Oven
temperature
needs
adjustment
g, Range and oven
rack not level
h, Oven controls
improperly set
Check the control and check
baking and broiling sections
a, Be sure to preheat until the tone
sounds
b, Maintain uniform air space
around pans and utensils See
over] cooking tips section
c. Keep vent clear
d. Racks should not be covered
during baking
e, Reduce temperature 25 degrees
for glass or dull/darkened pans
f. Check the temperature
adjustment following this
section
g, Check the installation
instructions for leveling
h. See the baking section
34

BEFORECALLINGFORSERVICE
PROI3LEM ' POSSIBLE CAUSE
Oven Oven control
temperature calibration
seems
inaccurate.
Oven will Clean cycle is not
not unlock_ finished
POSS!,B.L,,ESOLUl",!oN , ,,
See temperature adjustment
section
Oven"tempe';ai_.'_remust drop below ............
the look temperature before the door
will unlock
,,,,,,,,,,,,,, ,,, H=H = =l,,,,,,,,,,,,,,,, IN,,=
Oven light a° Light switch isin off a. Check switch setting
does not position
work,, b, Bulb needs b, Check or replace light bulb
replacing or is loose
'F; d's................................
do a. Improper rack aoCheck broil pan placement; see
not broil position broiling section
properly, b. Oven preheated bo Do not preheat when broiling
c. Improper use of foi_ co Check broiling section
d. Oven door closed doOpen door to broil stop position
during broiling
e° Low voltage e,, Use higher rack position and/or
(208 volte} longer cooking time
f, improper f° Check broiling chart in broiling
broiling time section
g. Oven controls g. See the broiling section
improperly set
H,=== ,,,,,,m=, , = u,iHi= ,,,,,,,,,,,ira i
Oven a. Dirty oven a_ Check for heavy spillover
smokes, b. Broiler pan b. Clean pan and grid after
containing grease each use
left in the oven
35

BEFORECALLINGFORSERVICE
PROBLEM POSSIBLE CAUSE POSSIBLE SOLUTION
Oven emits a. Oven insulation may ao Put oven through self-clean cycle
odor_ emit odor during the to speed up process of odor
first few usages "wearing off"
b. Failure to wipe out b, Wipe excess soil off before
excess soil using oven
=H,H== =
Oven door
accidentally
locked while
baking°
==lHH=HHnrmnrm
Cleaning
results were
poor.
"F--and a
number or
letter" flash
in the display
imn,,uu,Hl=, = nil== =HH= =H= == =H
Do not force the lock
handle. Temperatures
above the locking
temperature will
prevent the lock handle
from sliding to the
unlock position
Turn the control knob to the off
position Allow the oven to cool until
the temperature inside drops below
the lock temperature and the handle
slides easily
mHimmHl= i,n,= =HH= H, HHHn H==
a, Oven was heavily ao Heavy spillovers should be
soiled cleaned before the cycle is set
b, Clean cycle bo Allow the oven to clean its full
interrupted cycle
,,,,,, ,,,,,,,,,, ,,,,,,,,,,,,,,,,,, ,,,,,,,, ,,, ,,,,,,,,,,, ,,,, ,, , ,
You have a function If the time display flashes -F--and a
error code number", you have a function error
code Ifa function error code
appears during the self-cleaning
cycle, check the oven door tatch
The latch may have been moved,
even if only slightly, from the latched
position Make sure the latch is
moved to the right as far as it will go
Press the STOPICLEAR pad Allow
the oven to cool forone hour Put the
oven back into operation
Disconnect all power to the range for
5 minutes and then reconnect power
Ifthe failure code repeats, then call
for Sears service
Display
flashes
"bAd" then
"linE" with
a loud tone,
The installed
connection from the
house to the unit is
rniswired
Contact intatler or electrician to
correct miswire
36

"DO-IT-YOURSELF"
TEMPERATURE
ADJUSTMENT
You may feel that your new oven
cooks differently than the oven it
replaced We recommend that you
use your new oven a few weeks to
become more familiar with it, following
the times given in your recipes as a
guide
Ifyou think your new oven is too hot
(burning foods) or not hot enough
(foods are undercooked) you can
adjust the temperature yourself. The
appearance and texture of foods is a
better indicator of oven accuracy than
an oven thermometer These
thermometers can vary by 20--40
degrees from the true temperature of
the oven In addition, the oven door
must be opened to read these
thermometers Opening the door will
change the temperature of the oven
To decide how much to change
the temperature, set the oven
temperature 25 degrees higher
(if foods are undercooked) or
25 degrees lower (if foods are
burning) than the temperature in your
recipe, then bake The results of this
"test" should give you an idea of how
much the temperature should be
changed
_ 1. Touch the BAKE
+ and BROIL HI/
LO pads at the
same time for
2 seconds until
the display
shows SF.
2. Touch the BAKE
pad A two digit
number shows in
the display
(_) (_ 3o Theoven
temperature can
be adjusted up
to (+) 35°F hotter
or (-) 35°F cooler Touch the A
pad to increase the temperature
in 1 degree increments
Touch the V pad to decrease
the temperature in 1 degree
increments
(_ 4. When you have
made the
adjustment,
touch the START pad to go back
to the time of day display Use
your oven as you would normally
This adjustment will remain in memory
until these steps are repeated and a
new temperature is selected It wilt
remain in memory even after a power
failure
This adjustment will not affect the Broil
or Clean temperatures
37

FREE-STANDINGRANGEWARRANTY
FULL ONE YEAR WARRANTY ON ALL PARTS
If, within one year from the date of installation, any part fails tofunction
properly due to a defect in material or workmanship, Sears will repair or
replace it, at our option, free of charge
If this product is subjected to other than private family use, the above
warranty is effective for only 90 days
WARRANTY SERVICE IS AVAILABLE BY CALLING SEARS SERVICE AT
1-800-4-MY-HOME ®.
This warranty gives you specific legal rights, and you may also have other
rights which vary from state to state
Sears Roebuck and Co Dept 8t7 WA Hoffman Estates, IL 60179
MasterProtectionAgreements
Congratulationson making a smart
purchase Yournew Kenmorez product is
designed and manufactured for yearsof
dependable operation But likeall
products il may require preventive
maintenanceor repairfrom time totime
That'swhen havinga MasterProtection
Agreement can save you moneyand
aggravation
Purchasea Master Protection
Agreement nowand protect yeursefffrom
unexpected hassle and expense
TheMaster ProtectionAgreement
also helpsextend the life of your new
product Here'swhat's included
in theAgreement:
Expert service by our 12000
professionalrepair specialists
V Unlimitedserviceand nocharge for
parts and labor on all covered repairs
it' "No-lemon" guarantee - replacement
of yourcovered product iffouror more
product failuresoccur within twelve
months
v' Product replacement ifyour covered
product can't be fixed
v' Annual Preventive Maintenance
Check at yourrequest- noextra
charge
V' Fast help by phone- phone supporl
from a Searstechnician on products
requiring in-homerepair plus
convenientrepair scheduling
v' Power surge protectionagainst
electrical damage due to power
fluctuations
v' Rental reimbursement if repairof your
covered product takeslonger than
promised
Once youpurchase the Agreement a
simple phonecarl is all thatit takes foryou
to schedule service Youcan call anytime
day or nighl, or schedule a service
appointment on-line
Sears hasover 12.000professionalrepair
speciatists who have access toover 4 5
millionquality parts and accessories
That'sthekindof professionalismyou can
count on tohelp prolong the life of your
new purchasefor years to come
PurchaseyourMasterProtection
Agreement today!
Some limitations and exclusions apply
For prices and additional information,
call t-800-827-6655.
Sears Installation Service
ForSearsprofessiona! installationof home
appliances, garage deer openers, water
heaters and other majorhome items in
theU SA call 1-800-4-MY-HOME®
38

ESTUFAELECTRICATIPO
'INDEPENDIENTE"
Indice
Seguridad en el uso
de la estufa 40-44
Contra volcaduras 40. 41
Caracteristicas de su estufa 45
C6mo sacar la cinta de empaque 45
Elementos para cocinar, 46
Posici6n de los controles ..... 46
Conse os para hacer conservas ,. 46
Conlrol de homo . 47-.48
C6mo poner el relo ......... 49
Comoprogremar e cron6metro 49
C6mo reprogramar
et cron6metro ............. 49
Para cancelar el oron6metro 49
Para cocinar en el homo 50
Consejos para cocinar
en el homo ..... 5t-53
Clot u clot fuerte 51
Papel de aluminio 51
Ventitaci6n del homo 51
No mire ...... 51
Precalentamiento 51
Luz del homo., 51
Homeado con margarina 51
Como co,coat los utensi_ios 52
Utensilios .......... 52
Ciclo de los elemenlos 52
Parrillas del homo ....... 52
C6mo asar a Is parrilla 54-55
Medir el tiempo para
homear o asar ..... 56-57
Funciones especiales .... 58
Funci6n Sabbath 59q_0
El oiclo de au_olimpieza 61-63
C6mo preparar el homo .. 6!
Sello de la puerla del homo .. 6t
Para poner el ciclo de limpieza 62
Para interrumpir et cicle
de limpieza .... 62
Despu_s del ciclo _ . 62
Funci6n retrasar inicio 63
Panel de control ......... 64
Cacerolay parril_a para asar 64
Paredes del homo ..... 64
Cubierta para cooinar y area
debajo de la cubierta . .. 64
Caj6n y iados de la estufa . 64
Vidrio de la puerta del homo 64
Moldura de le ventilaci6n
de la puerta .......... 64
Partes removibles. 65-70
Cubieda levantable 65
Peril]as de control .... 66
Foco de la tuz del homo .... 66
Unidad removible de la cubierta 67
Parfitlas removible del homo .... 68
Puerta remevible del homo 68-69
Caj6n de almaceoamienlo
removible 70
Antes de Ilamar para
un servicio ............ 71-73
Ajustes a la temperatura 53. 74
Garantla .............. 75
N_Jmerospara servicios de]
consumidor 76
m
t
r-
Para su conveniencfa y referencia futura_ pot favor escrtba el ndmero de modelo y
de serle en el espacio que se proveeo Estdn ubicados en el marco frontal detrds del
caj6no
NUMERO DE MODELO: NUMERO DE SER1E:
© Sears, Roebuck and Co
39

INSTRUCCIONESDE
SEGURIDADIMPORTANTES
GUARDE ESTAS |NSTRUCCIONES
Lea todas las Instrucciones antes de usar esta estufa. Cuando use un aparato a
gas o el_ctrice, se debe segulr Instrucctenes de segurldad b_slcas, lncluyendo
Io sigulente:
Vea las instrucciones
: :: de instalaci6n
/t/_\ ADVERTENC|A: Pare
._ prevenlt que la estufa se
vuelque accidentalmente
debtdo a un use anormal,
ineluyendo una carga exceslva
sabre la puerta, eng_nche ta estufa
a la pared oal suelo Instalando el
dtspasltivo contra velcaduras que
se provee. St la estufa se mueve
pare Ilmplarla, pare hacerle servlcto
o cuatqufer raz6n, asegdrese que el
dtsposttlve centre volcaduras sea
enganchade nuevamente cuando la
estufa so coloque de vuelta en la
abertura, No hacerla podrfa resultar
en que la estufa se vuelque y podrfa
causer herfdas personales. Para
Inspeectonar et disposltivo contra
velcaduras, saque el cajdn y mire
pare ester seguro que el nlvelador
de la pate trasera estd bien
enganchado en la ranura de la
abrazader&
Si e! disposifivo centre votcaduras que
se suministra con la estufa no se ajusta e
esta aplicaci6n, use el dispositivo contra
volcadura universal WB2X7909
Llame a_ 1-888-SU-HOGAR _
Estas instrucciones pare la instalaci6n de
la abtazadera CONTRA VOLCADURAS
son pare madera o pisos y paredes de
concrete Cuafquier otto ripe de
construcci6n pod_fa requarir t_cnicas de
inslalac_6n especiales pare proveer un
ancIado adecuado de la abrazadera
CONTRA VOLCADURAS ai piso o ata
pared
El use de esta abrazadera no evita que ta
es[ufa se dO vuetta cuando no est_ bien
instatada
NOTA: La inslaleciOn de la abrazadera
OONTRA VOLCADURAS debe cumplir
con todas las ordenanzas locales para
asegurar la estufa
Paso 1
Ublcaci6n de la abrazadera
A,, Coloque la abrazadera centre le pared
trasera ala derecha o izqule_da del
gabinete SI la supetficie del gabine[e
sale mAs afuera que el gabinete, corra
ta abrazadera pare compensar _a
canIidad de la distancia S_no existe
un gabinete adyacente ponga eI
horde de Iaabrazadera en la posici6n
deeeada sobre el panel tatetal de la
estufa
B, Use la abrazadera come un molde
y marque lee poslciones de 2 hoyos
sobre la pared y _as posiciones de 2
hoyos sobre el piso Use los juegos de
posicianes para madera o concrete
dependieedo del ripe de piso
Vea la Fig. 1
Hayes
pare
piso de
madera \
Lade _\
deTa X\
abrazadera
40 Pate ntveladera
trasera
Gabinete adyacente o
ubteacldn final del panel
lateral de la estufa
,: ,%%n
!_ _!iiii:_i;_!_:i_,,
'zra
Cotlcreto
Fig, 1

INSTRUCCIONES
DESEGURIDAD
IMPORTANTES
Dtspositivo de establltdad (cant.)
Paso 2
InstalacI6n de la abrazadera centre
volcaduras
Am Construecl6n de madera:
1, Plso: Haga un hoyo piloto de _.,£"
en e! centre de cada posici6n de
hoyo premarceda sobre et piso de
madara (un clave o una Iezna se
puede usar si no tiene un taladro),
Y
2o Pared: Haga on hoyo piloto de t4"
en _ngulo (come se muestra en la
Fig, 2) en el centre de cada
posic[Sn de hoyo premarcada en
le pared (un clave o una tezna se
puede user si no tiene un taledro)
INSTALACION SOBRE LA PARED Y PISO
Abrazadera.
Eltornlffo _J
[ debe penetrar la_
Place
de la
pared
Fig. 2
Be instate ]a abrazadera CONTRA
VOLCADURAS con lOS4 tomillos
que se proveen come se itustraen
la Fig,,2
C,, Concrete Construcci6n:
1_ Mater]ales requeridos:
4 de cada Perno "lag" de
uno _A*x lye"
4 de cada Mange para
uno anclar O D de '/2°
2o Haga el hoyo del tamar3o
recomendedo para las anclas
sobTe el cut, crete en el ceRtro de
cada hoyo premarcado sobre el
piso de concrete y sobre la pared
lnstale le mange de_ancia dentro
del hoyo y ]uege instale )us pemos
a traves de la abrazadera NO
APRIETE LOS PERNOS
DEMASEADO
Paso 3
Revise la Instalact6n
A, Complete la instalaciSn de la estufa
de acuetdo a ]as [nstrucciones de
instalaci6n qua se proveen con e!la
CerciSrese de instala_"la estufa de
forma ta_qua las pates nivetadoras
en su parte poslerior se desHcen per
debajo de la abrazadera CONTRA
VOLCADURAS Vea la Ftg_ 1
B_ Revise pare asegu_'arse qua ta
abrazadera CONTRA VOLCADURAS
est_ instalada y enganchada
cerrectamente Saque el panel de
abejo o el cajSn e inspeccione ta
PATA NIVELADORA TRASERA
AsegL_rese qua est_ firmemente bien
colocada dentro de la ran_Jrade ta
abrazadere Vea ta Fig. 1
41

INSTRUCCIONES
DESEGURIDAD
IMPORTANTES
Importante: Pare garantizar su segutidad,
la de su familia y la de su hagar par favor
lea su Manual del Consumidor
cuidadosamenta Mant_ngalo ala mane
pate refetencias Ponga touche atenciSn a
ias seceiones de seguridad ASEGURESE
qua su estufa sea instalada par un t_cnJco
especializado y qua haga tierra
adecuadamen{e
;ADVERTENCIA DE
SEGURIDAD IMPORTANTE!
California Safe Drinking Water and Toxic
Enforcement Act requiere que el
gobm'nador de California publ|que u_.a
lista de substancias que ei estado sepe
que producen defectos de naetmlento u
otros da_os reproductivos y requlere
que los hombres de negoclos advlertan
a sus cltentes del contacto potential a
tales substancias. El als|ante de fibre de
vtdrlo en el homo con autollmpleza
emltir_ una muy pequeSa cantldad de
mondxido de carbono durante el clclo de
autolimpleza. E! contacto se puede
minimizer ventllan#o con una puerta o
ventana abterta o usando unventtlador o
una campana de venttlacldn_
IMPORTANTE: La salud de algunos
p_jaros as extremadamente sens_tiva a
Ins vapores producldos per el clc!o de
autoltmpleza de cualquler homo, Penga
Ins pdjaros en otra habltacidn que estd
blen ventllada,
• NO DEJE a los niSos sin vigitancia cerca
de una estufa qua se eSt6usando
• ENSEI_IE A LOS NIr_OS a no jugar con
los controles o cualquier parte de }a
estufa o no sentarse, subitse o pararse
sabre la puerta o cua_quier o[ra parle de
[a estufa
• PRECAUCION: NUNCAGUARDE
cases de interes pare los nitros sabre el
tespaldo de la estufa en el panel trasero
o en los gabinetes que quedan par
sabre el estufe Los nifiosque se suban
sabre la astute poddan _'esultar
gravemente heddos
• GUARDE ESTE libra para un usa future
• NUNCA TRATE de reparar o reemplazar
una parte de la estufa a manes que las
inst_'ucciones se dan en este manual
Toda otto trabajo debeda set hecho par
un tecnico especializado
,, NUNCA USE su estufa para entibiar o
ca_entar una habitacion
42

INSTRUCCIONES
DESEGURIDAD
IMPORTANTES
• SIEMPRE MANTENGA los revestJmien_os
combustibles de las parades, coffin,s y
ot_os par3osa una distancJe prudente de
la eslufa
• NO DEJE contenedores cerrados en la
eslufa, ya qua la presidn podda aumentar y
causal que exploten
,, NUNOA DEJE contenedores de grase o
goteaduras sabre o ca[ca de _aeslufa
, SIEMPRE MANTENGA ei _rea de le estufa
despejada de cosas qua se poddan
quemar La aeumulaci6n de comida y
grasa y los utensiUosde madera se
podrtan incendiar Los utensUiosde
pt6stico se poddan derre_iry las comidas
en conservas podrlan explorer Su homo
nunca se debeda usar pare almacenar
COSa,_
• SIEMPRE MANTENGA iaestufa
despeieda de cases qua se podden
quemar (gaseUna y eves vapores y
IIquidos inllamables)
• NUNOA TRATE de la limpiar las
superficies cal[entea Algunos limpiadores
producen vapores nocivous
• NUNCA USE rope sue_tacuando use
}aestufa
• NUNCA USE una toa_la u otro paso
abuilado come agerrade_a Asegt_[ese
que la agarredera es}_ eeca Las
8,gerraderas ht_medas podr[an causer
quemaduras pet vapor Mantenga tee
toaUasy los pados pare plates,
agarraderas y otros pa,5os a una dlstancia
prudente de la estufa NO permita que las
agarraderas toquen los etementos para
ealenlar
• NO toque los elemen;os para ca_en'_ar,las
superficies cerea de eIIos, o {assuperficies
_nterioresdel homo, Poddan estar
suficientemente ealientes aunque sevean
de co}or oscuro Durante y despuas det
use, no toque o permita qua la rope o
mateneles inftamables hagan contacto con
los elementos olas superficies calientes
hasta que hayan tenido tiempo de
en(darse Las or[as superticies eerca de
las abertura$ de la ventilaci6n del homo,
la pueda y la ventena de_homo y _as
superficies de la cubierta tambien podrian
estar Io suficientemente calienles Data
causar quemaduras
• SOLO CIERTAS clesea de utens[tios de
viddo o cer_mica se pueden user para
coclnar en le cubier_,aAsegt_rese qua los
utensilbs qua eUjapara user est_n
dlsefiados pare coeinar en tacubierta sin
quebrarse debido a _oss0bitos cambios de
temperature
• SIEMPRE TENGA cuidado cuando toque
teaelementos de la cubierla Relendr_n
cater despu_s de que ]a estufa se haya
apagado
• NUNCA OBSTRUYA la ventitacion de_homo
bajo et elamento derecho de atr_s
• LAS OLLAS QUE SE USEN papaeoc{r_arer_
(acubierta debedan set de rondo piano y ]o
eu_icientemente grandes para cubrir el area
de celor qua se est& usando Los utensilies
qua son demasiado peque6os exponen el
elemen{o eatentador y podria causer un
contacto directo o el incendio de la rope El
tamale correcto de los utensi)ios tambien
mejorar_,la eficiencie
,, SIEMPRE USE _os_ecipien_espapa
dertames para evitar dafios a los
alambrados y a los componentes NO use
fortes de alumlnio e de papel de atuminio
sabre los reeipientes El use inadeCuadode
estoe pedda resultar en un desgo de goipe
de cordente o ineendio
• NUNCA DEJE ias ut_idades de supegicie
sin vigilancia a lemperaturas altas Los
de_rames podflan resu_tarer_humo o en
derrames de grasa qua se podrian
incendiar
• SfEMPRE COLOQUE las agarfaderas
(manitIas) de las alias hacia adentro y leios
de Ias o}ras unidades de (a eupedicie para
reducir el riesgo de quemaduras, encendido,
y un con_acto y derrame accidental
• NUNCA co_oque los elementos calen_adores
en agua
• CUANDO PREPARE comidas a (a }lama
debeie de la campana de ve_tilaei6n,
encienda el ventHador
• NO deie pl&s_icoso art}culos |nflamebles en
la superficie de la estuta ya qua se poddan
detretir e prender sise dejan muy cerea al
ventilador
43

INSTRUCCIONES
DESEGURIDAD
IMPORTANTES
. COLOQUE LAS PARRILLAS DEL
HORNO en laposici6ndeseada
mienlras et homo est6 fifo Si Ias parrillas
se deben mover mientras el homo est,4
caliente no permita que la agarradera
haga contacto con el quemador ealiente
delhomo,
• DESPUES DE ASAR A LA PARR1LLA,
siempre saquela cacerola y la parrilla
para asar del homo y tlmpieEas Los
sobrados de grasa en _acacerola para
asat podr[an incendiarse la pr6×ima vez
que usted use el homo.
" SIEMPRE TENGA CUIDADO cuando
abra la puerta del homo Deje que e! aire
caliente y el vapor escapen antes de
mover tos al#nentos
• NUNCA USE papel de aluminio para
cubtit e_rondo del homo Eluse
incorrecto de+ pape+ de aluminio podda
empezar un incendio o podrfa resu_tar
en un golpe de cordente
• LIMPIE SOLAMENTE las partes que
se I;stan en este manual Siga todas
+asins,'tucciones pate Ia limpleza
AsegOrese de sacar la cacerola y ta
patriifa para asar antes del clcto de
auto++mpieza.
* NUNCA FRIEGUE, mueva, l_mpie, o
daSe el sello de _apuetta en las estufas
con auto[impieza Es esencial pare un
buen sellado
,, NUNCA TRATE de limpiar los utensilios
oIlas, pastes removibles ofa caceroia y
Ia parfifla para asar en el ciclo de
autollmpieza
. NO USE limpiadores para homes -
NingOn limpiador comereial se debeda
usar o cremes protectoras dentro o
alrededor de ninguna parte del homo
• SI LA FUNCION DE AUTOLIMPIEZA faUa,
apague el homo y desconecte la
e_eetricidad. H_gale un servicio pot un
t_cnico calificado
f-
pReCAUC,O.:
j Nunca forre los
rec pientes para derrames
con papel de aluminlo+ El pape!
de aluminio puede obstruir el
paso normal del calor y dafiar ta
estufao Siempre utilice elias y
woks de rondo plane y del
mtsmo tamafio de! elemento que
se est_ usando,, Las utenslltos
no se deberian extender m_s all,_
de 1" del borde del elemento
para cocinar.
;LEA Y COMPRENDA ESTA
INFORMACION AHORA!
Aseg_rese que redes en su hogar
sepan qu_ hater en case de Incendioo
Nunca use ague sobre un incendlo de
grasa, esto solamente extenderd las
llamas°
INCENDIO DE GRASA EN LA
CUBIERTA:
Nunca levante una ella en llamas...
1. Apague los efementos de la superficie
2. Sofoque tas llamas con una tape
aptetada+ soda para hornear o un
extintor
FUEGO EN EL HORNO=
|No trate de mover la eacerola!
1. Cierte la puerta del homo y apague fos
centroles
2.r Si el incendio continOa,
cuidadosamenle elate Ia puerta, arroje
soda pare cocinar sobre el [uego o
use un extintor de qufrnice seeo
espuma o 'halon"
44

OPERACION
CARACTERISTICASDESUESTUFA
Control del
homo
Reloj y Indlcador de
cron6metro luz de la unidad
4 Perillas
removibles del
control de
la cubierta
4 Elementos ripe
espiral removibles _
Manilta para
cerrar
Seguro de la
poerta del homo
Elemento
pare hornear
Ubicacidn
de ndmero de
modelo y serie
Caj6n de
almacenal
Ventilaci6n del
Cubterta de
porcelana
Elemenlo para
parrilla
Interior del homo
con autolimpleza
Cacerota y parrllla
pare asar ala
Parrtllas del homo
Seflo de la puerta Puerta removible
del homo del homo
Pare sacar el residue del adhesive de la cinta de empaque, use un detergente lfquido
normal pare plates, aceite minera! opara cecinar Con un paso suave frote et area y
permita que se remoje Enjuague y seque bien Repita ei procedimiento usando un
pulidor pare estufas pare asegurarse queet homo no se daSe Esto deber[a hacerse
antes que la estufa se enclenda per prlmera vezo La ctnta no se puede sacar una vez
que el homo ha side calentado_ La cinta de empaque se puede encontrar en las
slguientes _reas: Super_icie de la cubierta. Mani]la de la puerta. Area del panel de
control. Mo_dura de la puerta y Area de_ home
45

OPERACION
CGmococinarenla cubierta
La marca cerca de cada peritla de contro}
le muestra cu_l e[emento se enciende con
esa perilla
O0 QO O0
_zqulerda izquierda Derecha
trasera detantera defantera
t. AsegOrese qua la olta est_ centrada
sobre e_quemade_
2, AsegOrese que la ofla sea de rondo
plane
3, Use recetas y procedimientos de
buenas fuentes. Estas se encuentran
disponibles de fabricantes tales
como Ball e y Kerr _ y Servicio de
ExtensiSn del Departamento de
Agriculture
4. Tenga cuidado, cuando haga
conserves, pate prevenir quemaduras
a cause de vapor o calor
HI Se usa pare comienzos r&pidos tal
como pare hervir ague
MED Se usa para hervir y fre[r
LO Se usa para comidas al vapor o
pare manteeer los alimentos a
_emperaturas pare set servidos
1, Empuje pare hacer
girar la perilla
2o Cotoque entre _as _'_
marcas pare et e_
calor deseado _,_
La Iuz indicadota de la unidad de
superficie se encender,_ cada vez que un
e]emento pare cocinar es activada
46

OPERACION
Controldel homo
Bot6n de
memoria de Bot6n
horneadol de
temperature tnlclo Pantalta
Bot6n de
encendldo/
apagado Bot6n
cron6metro de}
coclna reIoJ
Ti'_[" CONTR_!_
w ".._J
Bot6n Bot6n pararl Bot6rlde auto _k Bot6n Y Bot6n
asador aftol borrar llmpfeza
be]o Bot6nde
luzdel
homo
Botan BAKEiTEMP RECALL Presioneeste
bol6n pare seleccionar lafunclbn de homeado
Luz BAKE (homear).Aparece intermi[ente
mientras est_ enmodo de edict6n En esle
momenta puede cambiar latemperaturedel
homo Se enciende cuando elhomo est_ en
el modo de t_ornear
Bot6nSTART (irilcio). Se debe presionar pare
iniciar cuWquierfunci6nde cocci6n o limpieza
PANTALLA.Muestra lahora del die,
temperaturadel homo. ya sea que el homo
est_ en elmodo de homeaq asar ala parri_iao
auto timpiezey los tiempos es[ablecidos pare
el cron6metrou ope_aciones aUtomaticasde_
homo LapaalaltamuestraPRE cuandose
est_ precWantando Cuando el homo alcanza
tatemperaturadesea0a e!control del homo
pita y la pantatlamuastra la tempara_uradet
homo
Si aparece "F- yun n_mero o aria letra" de
farinaintermitente enTapantalla y el control de_
homo muestre unaserial, significa que hay un
error de funeiSn
Si el homo se configur6 para una operaci6n de
homo programada y hubo una interrupci6n en
el suministroel_ctrico, sedeben rapregramar
et reb}y todas }asfur_cionesprogramadas
La hare del die aparecer_ inlermitente en _a
pantaIla cuando haya habido una interrupci6n
en el sumir_istreel6etrtco Vuetvaa programar
et reloj
AU
Luz Bot6n
automdttca encendidol
del homo apagado
retrasarIn]clo
47
Bot6nencendtde/
apagado tiempo
de cocclGn
Si "Err" aparece ente pantatla,se ha intentado
configurar una horao temperatureparfuera de
los limites dal control Presione e_bot6n STOP/
CLEAR eingrese un nuevo valor
Si el c6digo de errorde la funcbn aparece
duranta el cielo de autolimpieza,reviseel
pasador dela puarta de_homo Esposible qua
la manija de_pasador ee'nayamovido, inc_uso
tansac ligeramente, deede ta posicbn de
bloqueo Cerci6resede qua el pas_dor se
muevaala derecha al m_fmo posiMe
Preslone el bot6n STOP/CLEAR, Permita que
el homo se enffla par una hora. Coloque el
homo de nuevo enoperaci6n SI et c6digo de
error de funci6n se repite, deaconecte la
cordente de laestufa y ffameSears a solicitar
servicio
Batbn KITCHEN TIMERON/OFF, Presbne
este bot6n pare seleceionar _afunci6n del
cron6melro Luegopresbne los botches A y T
pare a)ustar etsincronizador
LuzTtMER, Aparece intermilenta miantras esl_
enmado de edieidn; en estememento puede
cambiar el tiempo programatic Se i}umina
cuando se ha activado el cronometro Se
vuelve intermitente nuevamen_ecuando e!
tiempe se haya age?adohaste qua el control
se reestablezca
Bot6n CLOCK, Pareconfigurar el retoi.
presioneewe bol6n dos races y luego los
botones _ky T La hera del d_aapareee
intermitenteen la pantafla cuando el homo
se enciende pot primeravez

OPERACION
Control del homn (cont.)
Botdn DELAY START ON/OFF (en
algunos modelos)_ Use junto con ros
botches COOKING TIME o SELF CLEAN
para configurar el homo para iniciar y
parar autom_ticamente a la hora que
establezca
Luz DELAY START ON/OFF (on atgunos
modelos). Aparece intermitente mientras
est,_ en el modo de edici6n; en este punic
se puede cambia_" la hora de inicio. Se
i_umina cuando _afunci6n se ha activado
Bot6n COOKING TIME ON/OFF (an
algunos modelos). Presione este bot6n y
tuego presione los botches A y V para
establecer ta cantidad de Iiempo qua
desea cocinar el atimento EI homo se
apagart_ cuando el tiempo se haya
agotado
Luz COOKING TIME ON/OFF (on
algunos modelos), Aparece inte_mitente
mientras est_ en el modo de edici6n; en
este punic se puede cambiar el tiempo de
programaciSn Se iFumina cuando ia
funci6n se ha activado, Aparece
intermitente nuevamente cuando e! tiempo
se haya agotado o basra qua el control se
reirficialice
Luz AUTOMATIC OVEN (on algunos
modelos), Esta fuz se enciende en
cua_quier momenta que el homo se haya
programado usando las funciones
COOKING TIME o DELAY START
Bot6n OVEN LIGHT. Presione este bot6n
para encender o apagar la luz del homo
Bot6n Y Goipecitos cortos en este botbn
dlsminuyen el tiempo o ta temperatuta en
pequeSas cantidades Presione y
sostenga el bot6n para disminuir el tiempo
o la temperatura en can[idades mayo_es
Bot6n A Golpecitos cortos an este bot6n
aumentan el tiempo o _atemperatura en
pequeSas cantidades Presione y
sostenga el bot6n para aumentar el tiempo
o la temperatura en cantidades mayores
Botdn SELF CLEAN° P_esione este bot6n
para seleccionar la Iunci6n de auto
limpieza ConsMte la secci6n C6mo usat
el homo de auto _impieza
Luz CLEAN_ Aparece intetmitente
mienttas est_ en el maria de edici6n; en
este punto se puede cambiar et tiempo de
la auto timpieza Se ilumina cuando el
homo est_ en el ciclo de auto fimpieza
Despu_s del ciclo de auto Iimpieza. la tuz
se apaga Quite et bloqueo de la puerta
Bot6n STOP/CLEAR. Presione este bot6n
pata cancelar TODAS las operaciones del
homo, excepto el retoj y el cron6metro
Botdn BROIL HI/LO_ Presione este bot6n
para seleccionar la funci6n de asador
Luz BROIL Aparece intermitente mienttas
est_ en el modo de edici6n; en este punic
se puede cambiar la temperatura del
asador de alto (HI) a bajo (LO) Se ilumina
cuando el homo est& en e_modo de
asador
Luces indlcadoras (en algunos
botones),_El modo EDIT {modificar) dura
vafios segundos despu_s de ptesionar el
_ltimo botdn. DELAY START ON/OFF y
COOKING TIME ON/OFF ser&n los 8nicas
botches encendidos si se selecciona
cualquiera de estas opciones
(Ejemplo: DELAY START se selecciona
con BAKE - el bot6n DELAY START
permaaecet;& encendido hasta qua el reloj
flegue a la hora progtamada, cuando se
apagar_ y la tuz del bot6n BAKE/TEMP
RECALL se er_cende_)
48

OPERACION
Relojy cronGmetro
El reloi se debe configurat ala hera
corrects det dia para que ]as funciones
aulom_ticas de tiempo del homo
funcionen correctamente La hera del dis
no se puede cambiaT durante un ciclo de
cocci6n retrasado o de auto limpleza
retrasado
(_ 1, Presione et botdn
CLOCK dos veces
2o Presione los botches
AoV
(V') Si los botches A Y
o
no
se p_'esionan dentro de
un minute despu_s de
presionar el boron
CLOCK, Ispantalla
CerciSrese de regress a ts
que el feloi se configuraci6n original Si
configure en la esto ocu_re, presione el
hera corrects bot6n CLOCK dos veces
y vuelva a ing_esar la
del dis hera del dfe
3. Presione et bot6n START haste que
la hera de] dia aparezca en la pantalta
De esta manors se ingress la hera y se
inicia el reloj
Para tevisar la hera de[ dis cuando
Is pantalla muestre olra intormaci6n.
simplemente presione el bot6n CLOCK
La hera del dta aparece haste que se
presione otto botSn
Si tiene varies relojes en su cocina, quiz_s
desee apagar la pantalla con la hera del
dis en su eatufa
1. Presione el bot6n CLOCK una vez
pars apagar la pantalla de la hera dot
dis Aunque quizas no Io pueda vet, et
reloj manliene la hera corrects del df'a
2, Presione el bot6n CLOCK dos veces
pars tIamar la psntalfa del reloi
El cron6metro no controla los operaciones
del homo La configurac;Sn mf_xima en et
cron6metro es 9 heros y 59 minutes
1. Presione el bot_n
KITCHEN TIMER
ON/OFF
(_) _ 2, Presione los botches
A o Y hasta que la
cantidad de tiempo
(_ que desee aparezca
en la pan'_alla El
tiempo m_ximo que
El cren6melro se puede ingresar es
es pars minotos 59 minutes Los
0nicamente. El tiempes supedores a
botc_nSTOP,/ 59 minutes se deben
CLEAR no elects cambisr a heros y
el cronSmetro minutes
Si comete un error, pros[one el bo16n
KITCHEN TIMER ON/OFF y empiece
nuevsmente
3_ Presione el bot_n START. La hera
empieza la cuenta regreaiva, aunque
la pantalls no cambie hasta tonic no
transcurra un minute
4o Cusndo el cron6metto lfegue a -*0D,el
con[rot pitar_ 3 veces, seguido par un
sonido cads 6 segundos hasta que el
bot6n KITCHEN TIMER ON/OFF se
presione
Sila panlalta [odavla muestra el tiempo
restante, puede cambiarfo a/presionar el
bot6n KITCHEN TIMER ON/OFF tuego
lOSbotches A o V haste que le hera que
desee aparezca en la pantalla
Siel tiempo restante no est,. en la pantatla
(el reloj, hera de inicio o tiempe de
cocci6n apareeen en ta pantalla), traiga
de ta memoda el tiempo restante al
presionar e! bot6n KITCHEN TIMER ON/
OFF y tuego los botches i e Y pars
ingtesar la nueva hera que doses
Presione et bot6n KITCHEN TIMER ON/
OFF dos veces
49

OPERACION
Relojycron6metro(cont.)
OPERACiON
ParaCocinarEnElHomo
Botre los tones presionando el bot6n de la
funci6n que est6 utilizando
@
Si le hera aparece intermitente en le
pantalla, significa que ha hebido una
interrupci6n en el suministro el6ctfico
Reinicialice el reloj
Pa_'areinicializat el re_oj presione e_bot6n
CLOCK tngrese _ahera correcta del dia
presionando los botones Ako Y Presione
el bot6n START
1_Presione el bot6n BAKE
2, Presione los botones • o Y haste que
aparezce ]a temperetura deseada
3, Presione et bot6n START,
E[ homo iniciar_ autom_ticamente La
pantalla mestrer_ PRE mientras se
precalienta Cuendo el homo alcance ta
temperature seIeccionada, eI control de!
homo sonat_ varies veces y la pantalle
mostrar_ la temperatura det homo
Pate cambier la temperatura de] homo
durente el cicIo BAKE. presior_e el bot6n
BAKE y luego los boi:ones • o V pare
obtener la nueva temperature
4. Rev;se el nivel de cocci6n de le comide
cuando t_'anscurrael tiempo mfnlmo de
le recete, cocine pot mas tiempo de set
necesario
5. Preslone el botSrl STOP/CLEAR cuando
termine de hornear y tuego retire el
aIimenLo del homo
TABLA PARA LA POSICION DE LOS
ESTANTES PARA HORNEAR
TiPODECOMIDA POS]CEONDEESTANTES
PasleIescor_gelad0s 4
(sabrebandejaspate
galietas)
Oueque_angelto0d" o 3 o 4
clueot,_ss
Pancitea panesdulces 3 o 4
"muffins""brownies*
galletas quequios
lodes,paste]as
Caceralas 3 o 4
Paveo Asado 1
50

OPERAClGN
ConsejosPara Cocinar
EnElHomo
Si abre la puerta pare mirar _osalimentos
causar,_ una perdida de calory males
resul_ados cuando hornee
Es normal sentir un poco de olor cuendo
use su homo per primera vez Para ayudar
a elimtnar este olor, venttle la habffacten
abrlendo una ventana o usando una
campana de ventnaclen.,
El precalentamiento es subir la temperature
del homo a _atemperatura que va a usar
cuando homee Permita que e) homo se
preealiente euando lasrecetas requieren
precalentamiento
Nunca cubra e| fondo det homo con
papel de aiumfnlo.
Puede user paper de aluminio pare _orrar
la cacero_a del asador y la parrilla de}
asador Sin embargo, debe aiustar e!
aluminio firmemente ata rejilla y cortar las
ranuras ai igual que las tiene la rejiiia
Tambi_n se puede usar atuminle para
atrapar los derramamientos Pare hacer!o,
coloque una hoia pequefia de papel
atuminio en un estante varies pulgadas
debajo del alimento
Nunca eubra per complete un estente
con papel de aluminio, ya que obstruye
ia circulaeien del valor y resulta en un
homeado deficiente
La ventilacien del homo esta ubicada
debaio del etemento posterior dereeho
Esta _rea se podrla calenlar mucho
durante el use del homo Es normal que
salga vapor de la ventilaciSn yto que se
acumule humedad debajo cuando el
homo eat& en use La vent_lacien es
importante pare la circulacien adecuada
del aire Nunca ebstruya la ventltacien,,
Para prolongar la vida del foco de la luz
det homo. siga estos eonsejos: Siemp_e
apague la luz cuando el homo no este en
use o durante un ciclo de !}mpieza Sita
luz del homo se deja encendida per un
targo periodo de tiempo, el homo ester&
tibio cuando abra la puerta debido al calor
generado per el foco de ta luz del homo
La mayoda de las reeetas pare hornear
hen side desarrolladas utilizando
productos con un a_tocontenido de
manteca tales come mantequilla y
margarina (80% de manteea per peso--et
requerimiento federal para los productos
marcades "margarine") Usted obtend_6
males resultados si los quaques, pasteles.
tortas, galletas, o dulces son hechos con
mantequilia con bajo contenido de
manteca Las mantequillas y margarinas
con bajo contenido de aeei[e contienen
menos manteca y m_s ague Et alto
contenido de agua de la mantequi_la o
margarina a_'ectala texture y el saber de
sus recetas pare hornear favorites
Mientras m_s baje sea el contenido de
manteca de la mantequilla o margadna,
m_ts se notar_n estas diferencias Pare
asegurar los mejores resultades, use
margarina, mantequilla u otras barras de
estes preductos que centengan po_
menos 70% de aceite vegetal
51

OPERACION
ConsejosPara Cocinar
EnE! Homo(cont.)
Los resultados del homeado aer_ major si
los cacerolas para homear estEn centtadas
an ef homo $0mas posibie Si est_
horneando con m_s de un utensilio,
coI6quetos de mane_a que cada uno
tenga pot Io menos de 1" a 1V2"de
espacio de aire a su alrededor, Coloque
los utensillos de mane[a qua n_nguno
quede ditectamente encima de otro
Los estantes tienen frenos de manera que
cuando se celoquon correctamente en los
soportes de los estantes (1-6), frenat_n
antes de salitse per complete y no se
inclinen
AIcolocar y retirar recipientes de cocina,
hale el estante hasta e+tope en et soporte
del estante
Para retirar un estante, hale en direcciOn
suya, +nclina el frente hacia arriba y hale
hac[a fuera
Para reemplazar, coloque et extreme del
estante (francs) en el soporte, incline
e_frente y empuje el estante hacia
et interior
NOTA: E! estante no est6 diseSada para
deslizarse hacia fuera en la posicion del
estonia especial baia (1)
Tope en las ]_ fll
g_[aspara %_ _l
BANDEJAS BAJAS PARA GALLETAS,
sin lades permiton qua el aire circule
alredodo[ de +asgalletas para que se
do[on en farina pareja
LOS UTENSILIOS BRfLLANTES refiejan
el calory son perfectos para quequea y
#anecit_os r&pidos qua deben quedar
+evemente do[odes
LOS UTENSILIOS DE VIDRIO,
CONTRAPEGADURAS O OSCURECIDOS
POR LA EDAD, absoi'ben calory pueden
set usados para panes con levadura,
cortezas para pasteles e atimentos qua
necesitan tenet una corteza de color car&
La temperatura de+ homo cuande use estos
utensilios deberia set reducida en 25°F
El Sensor de Temperatura del Homo
mida y conVola continuamente ia
temperatuta dentro del homo, Para
mantener una temperatura programada
constante, los elementos harsh un ciclo
Su homo tiene six (6) posiciones La
posici6n de m_s arriba es solamente una
gufa No puode ser usada come posici6n
para una parril_a
Gufas
4_pr,# -_,_L+-4
2-- T _2
+--P:_/.C+,"-q_++r-L_,'_ +
_:+'................................. J?
Slempre coloque las parrlllas del homo
en la posleldn cerrecta cuando el homo
est6 fr[o+
PRECAUCION: Cuando usted est_
usanda la parr++laen ta posici_n m,_s baja
(t), necesitar_ tenor cuidado cuando
saque _apar[ilia Recomendamos que tire
la parriHa varias pulgadas hacia atuara y
entonces, usando dos agarraderas tire la
parril+a hacia aIuera sujet_ndola de los
lades La parrilla est_ baja y usted se
podrfa quemar si coloca ta mane on el
media de la parrilla y la saca
cempletamente hacia aluera Tenga
cuidado de no quemarse la mane en +a
puerto cuando use une parrifla en la
pesici_n m_a baja (1)
de encendido (so prenden y se apagan 52
durante la coccid)n)

OPERACION
ConsejosPara Cocinar
EnEl Homo(coot.)
Usted podfla pensar qua su homo nuevo
cocina diferentemente a] homo qua
reempIaz6 Le recomendamos qua use su
homo nuevo por varias semanas para qua
se famifiarice m_s cen _I, siguiendo los
tiempos qua se dan er_la _-ecetacomo una
gufa, Si cree que su homo est,,
funcionando demasiado caliente o frlo
para su preferencia, yea Ajustes de
Temperatura-H_galos Usted Mismo en la
parte de aires de este manual para hacer
tos ajustes
53

OPERACION
CGmoAsar A La Parrilla
Asar es cocinar al ca!or directo del
eIemento superior La puerta del homo
debeda permanecer ableda en la posici6n
de tope para asar cuando ase a la parfilIa
No es necesario precalentaT el heine
cuando ase a la parrilta Use facacerola y
ta pardtla pata asar que viene con su
estufa Ambas est_n diser_adas para
drenar adecuadamente la grasa y los
lfquidos
f_ SI usa papel de aluminlo, •
debe set moldeado
flrmemente a la parrllla y
dehe hater cortes en el
papel que eat_n allneados
con tas ranuras de ta parrllla. Esto
permite que la grasa y los II'qutdos
catgan a ta cacerola, evltando que se
produzca un tncendto y humo
exceslvo_
Slempre saque la _}
cacerola y ta parrtlla _>__._)
del horno_ Guardar y t_
olvldar una caeerola
para asar sucla en el homo es un
pellgro para produclr un Incendto
o humo.
b, _a
El Departamento de Agficultura de los
Estados Unidos recomienda coclnar la
came y tas ayes completamente--la came
a un calor INTERNe de per Io menos
160_'F y las ayes a un cater INTERNe de
per 1omenos 180_'F El cocinar a estas
temperaturas generalmente protege
contra enie[medades causadas per los
alimentos
Mientras m_s cerca coloque los alimentos
del elemen(o para asar. m_s r_pido se
dorar_n per aluera pete quedando rojo o
rosado en el centre
Colocando las cames lejos del eiemento
permitir,_ que las tames se cocinen en el
centre mientras se do, an per afueta
Usando estas posiciones cocine el lade 1
per Io menos 2 minutes m&s que e! Iado 2
Si su homo est_ coneclado a 208 voltios
usted podr/a usar una posici6n de parrilla
m_s alia yio cocinar los alimonies per m_s
tiempo
El tamale peso groso_, tempetatura
initial y su preferencia personal aleotar,_ e!
asado a la parrilla Esla tabla est_ basada
en caress a ta lemperatura del
reffigerador
1o Ptesione el bot6n BROIL H!/LO una
vez para HI Broil (asar a la parrilla en
nivel alto)
Pars cambiar a LO Broil (asar a la
parrilla en nivel bajo), presione el
bot_n BROIL HI/LO nuevamente
2,. Presione el bo[6n START
3_ Cuando [ermine de asar a la parritia
presione el bot{bn STOPICLEAR
54

OPERACION
CGmoAsar ALa
Parrilla (cont.)
SalmOn
Bistecs
FJletet
Tejadasde
lam6n
_,m_c_nadas)
Chulelaade
cerdo
Bien_c_as
Chelatesde
cordero
Madianas
Bien_ctdat
Medianas
Biencocidas
CANT|DAD we
AIJMENTO GROSOR
CamemotIda1 Ib(4tortes)
Bieoe_ad_ _,5"e_',"deg_ue_o
4lbs.(t2tortes)
Blslecs
Crudot_ Y_'a t*gtueto
Medianos (1a15!Ibt)
Biencoeidoa
C;udot_ 'iV_gr,aetr:,
Medianot (2a2½Ibs)
Biencocidoa
PoIlo f cetera,codedo(2a2½
Ibt),carlaatofarg_
PecflugB
P'0ducta_di
_anaderfa
Pen(totlada}2 a 4lajada$
openciller 2(cudadot)
inglaset
Colasde 2 a4
langos_s !(6_guzcodaone)
Pestle 11Ib R!eleeV,_"a_" g_'ueto
!2(1°grease)
2($_"a_A"gruese)
'/_"grueta
I"gmeto
2(_" grueto)
2(I"g_ue_o)aprox_Ib
Gu(as
c, 9;
GUIA PARA
PRIMER SEGUNDO
POStCION LADO LADO
DE TiEMPO TfEMPO
-:5"I'A.NT_ (MIN.) (MIN,)
4 13
COMENTARIOS
8 Sep_e]osparejamenle
I5
6
5
5
4
5
3
6 4
B 6
10 B
10 B
15 II)-'i2
20 20
25 25
ILotblsleosdom_notde=J'son
dilicite_decocinarcruder
eerielagrass
3 25 15
Peo_am_nl_itilttdew,elide'ancads
ladeco_unablocha._e conlapiel
haciaabslapdme_a,
5
3 I fSepaTepaieiarnen!e.PangsI0_
3-4 ip_nciflesing_esealadeex[eriunada
annay_!_qaemanl_qu_laconuna
br_cha,sidesea.
!8-20 Nolasd_ Co_eal_av_delapar_ettaseradal_
vuella co_I_ AbtaPongam_nlNt_irla
defrel_aConnnat_f_a anlesde
a_aty amediaa_aL
,,,,, ,
5 ,5 T6meioty d_los_eilaconCuidado
Po{igamael_lliilladelim_nsolesy
: duraeleelcoc_nado,aidates,
5
5
4
4
I0
I0
B
B
5
6
I1
06vuellacuidadatamenleNo
....po,ngalapiolh,acia,abajo,,.......
10
15
2(I"gru_._),apr{}x10a'_2oz. Codelaglass
(1½"grass(})aFox'IIb
ElDeparlamenlodeAgdculiuradeEsladosUni_lasdiceRue'is camedaratuudaespopular,_ro usleddnberfasaber
quacoeinarlaas6to140=Fsignilicaquaulgunoeo_ganitmosquacautanenvonenamie_loperlit commaspoddan
soblev_r*(Fuenle:SafeFoodBopkYourKilchenGuide,UBDARayJ_neI_B51
• Vetilatlraci_nptraladascri_i6n_telasposicfonetdala_eslanles
55

OPERACION
Horneadoy asado
programados
(en aigunos modelos)
No use el pasador de la puerta del
homo durante el horneado, El pasador
se usa para la auto llmpieza
dnieamente,,
El control del homo le petmite encender o
apagar el homo automt_ticamen[e a horas
especificas qua se establezcan Se
describen !os ejempios de Immediate Start
(inicio inmediato) (e! home se enciende
ahora y se conflgu_a para que se apague
autom_!licamente) y Delay Start (retrasat
inicio) (con%urar el homo para que se
encianda autom&ticamente a una hera
posterior cocine per un tiempo
predeterminado y luego se apague
autom_ticamente)
NOTA: Antes de empezar, cerei6rese de
qua el reloj del homo muestre la hera
correcta del dfa Consulte la secciOn Use
del role i y cron6melro
Para evltar poslbtes quemaduras,
coloque los estantes en la posici6n
correcta antes de encendet el homo
El homo se encenderD, de inmediato y
cocinarA per el tiempo seleccionado AI
final del tiempo de cocci6n, el homo se
apagar,_ au!om_ticamente
1. Presione el bot6n
BAKE
2. Presione los botches .&
(_ (_ o • para configurar latemperatura del horno
3. Presione et bot6n
COOKING TiME
NOTA, Si su receta requiere precalentado
de; homo. quiztts necesife agregar tiempo
adiclonal at tiempo de coeei6n
(_ (_& Preslonelosbotones
,i, o V para establecer
ef tiempo de horneado
Aparece en la pantalla el tiempe de
cocci6n que ingres6 (Si seleceiona
Cooking Time primero y Iuego ajusta la
temperafura de homeado, aparece mas
bien la temperatura de! homo)
(_ 5_ Presiene el boron
START
La pantafla muestra ya sea la temperatura
del homo que configur6 o la cuenta
regresiva de_tiempo de cocci6n (La
pantalla empieza con PRE si muestra la
temperatura del homo )
El homo continuar& cocinando duranle
el tiempo programado, luego se apaga
autom&ticamente
6 Presiene et bot{_n
STOP/CLEAR para
borra la pantalta, si es
neceserio
Retire el alimento del homo Recuerde.
aunque e! homo se apague
autom_ticamente la comida se sigue
cocinando despu_s de que los controfes
est_n apagados
56

OPERACI#N
Horneadoy asado
prograrnados
(en algunos modelos) (cont.)
Para evitar posibles quemaduras,
cotoque los estan[es en ta posicion
correcta antes de programar el homo
El homo so encendera autom_ticamente a
la hera de! dia que estabiezca, cocinar_
per et tiempo especificado y {uego se
apagar_ autom,tticamente
Cerci6rese de que e! reloj muestre la hera
correcta del die
P_esione el bot6n
BAKE
Presione los botones h,
o T pare conligurar la
temperature det homo
Presione el bot6n
COOKING TIME
Presione los botones A
o V para cenfigurar el
liempo deseado de
coccion
Presione el botbn
DELAY START
Presione los botones ,_.
o _ pare configurar la
hera del die que desee
que el homo empiece a
cocinar
7. Presiene el botch
START
NOTA: Escuchar,t un tone de atenci6n si
est_ usande horneado programado y no
presiona el bat6n START
NOTA: Si desea reviser los Iiempos
configurados, presione el bot6n DELAY
START pare revisar la hera de inicio
seleccienada o presione el bolon
COOKING TIME para revlsar el
tiempo de eocci6n seleccionado
57
Cuando el homo se encienda ala hera
del die que se ha cenligurada, la pantatla
muest_'a PRE haste que aleance Ia
temperature seleccionada, luego
muestra ta temperature del homo
At linal del tiempo de cocci6n, e! homo se
apaga y se escuche un sonido de! linal del
ciclo
8 PresioneelbotOn
STOPICLEAR para
borrar la pantalla, si es
necesario
Reti_'eel alimen[o del homo Recuerde
que aunque el homo se apague
autom&Iicamente, los alimentos se
contin0an cocinando despu_s de que
se apaguen _oscontroles

OPERACION
Funciones especiales
del control del homo
El nuevo control de botones tiene
Iueciones adicionales que puede utilizat
Las siguientes son las funciones y c6mo
se pueden activar
Los modes de funciones especiates s61o
se pueden activar mientras la pantalla
muestra la hera del dla Petmanecen en la
memoria del control hasta que los poses
se repitan
Cuando la pantalta muestre su selecci6n,
presione et bot6n START Las funciones
especiafes pet manecet_n en la mernoria
despu_s de una lalla en el suministro
el_cldco
NOTA: La lunci6n Sabbafh (s6bado judfo)
y la funci6n Temperature Adjustment
(ajuste de la tempetatura) son tambi_n
funciones especiales pero se explican en
secciones separadas
Con esta funci6n, sl se oMdara y dejara
et homo encendido, el control apagar,_
aulom,_ticamente el homo despu6s de 12
horas durante los funciones de homeado o
despu_s de 3 horas durante la funci6n de
asado a la parfilla
Si desea APAGAR esLa
pasos a centinuaci6n
@+%,.
funci6n, siga los
Presione los
bofones BAKE y
BROIL HI/LO al
mismo Iiempo per
3 segundos hasta
que la pantalla
muestre SF
2o Presione el botbn
CLOCK La
pantalta muestra
ON (apagado en
12 horas), Ptesione
el bot6n CLOCK
una y otra vez
hasta la pantafla
muesfra OFF (sin
apagado)
3 Presiene el botdn
START para
desactivar el
apagado y deje el
control establecido
en este mode de
funciSn especial
58

OPERACION
FunciSnSabbath
(en algunos modelos)
Diaefiada pata useen el Sabbath y tosdies de
fiestajud[os, IafunciSn Sabbath se puede usar
pare homeado! asado Onicamente Nose
puede usarpara asad0 a ta parfi)}a,auto
limpieza o cocci6n de retrasa[ inido (Delay
Start)
NOTA: El homo se enciende autom_ticamente
(an afgunos modetos)cuando la puerta seab_a
y se apaga cuando la puerta se cieTra El(ace
se puedereemplazar Consulteta secciOn
Reemp_azode _atuz de_homo Enalgunos
modelos con un inlerruptorde luz en el pane_
del control, e{homo se puede encender y dejar
qua pe_manezcaencendido
NOTA: Pareantender edmo lun¢iona e_control
det homo, praelique a user el homeado normal
(diferenta al Sabbath) antesde entrar almode
Sabbath
Cerci6rese de qua el relojmuestre la hera del
die correcta y e_homo esle apagado
_ 1 Presbneysostenga
+ los botches BAKE y
BROILH#LO al
mismotiempo, haste
quala pantalIa
muestreSF
2. Toqueel bot6n
CLOCKhaste qua
SAb aparezca an la
panta!la
@
@@
3 Presioneet bot6n
START y el signo
aparece en _a
pantaUa
4 Presioneelbo'_6n
BAKE NOhay sehal
incrementos de 25°F La temperaturese
puede configurar entre 170"Fy 550"F No
aparece unaseSal de la temperature
6, Presionee!bot6n
START
Cuando la pantatla 7. Despu_s de un
muestra _, el homo periodode
esta con(igurado en retrasoal azarde
Sabbath Cuando fa aproximadamente
pantalta muestra _ c 30segundos a
et homo est_en el I minute, aparece
mode de homeadoi _ cen tapanta0a
asado indicando que e]
homo es(_horneadoi
asando S( D c
noapatece enta
pantaUa,tniciede
nuevoen e)paso 4
Pareajusta_-la temperatura del homo, presione
el boronBAKE y presione (os bolones • o _'
pare aumentar o disminuir la temperatura en
incremeetos de 25°F Presionael helen START
NOTA: Los botchesSTOP/CLEARy
COOKING TIME est_n activos durante Ia
lunci6n Sabbath
NOTA: Paraentender cSmofunclona el control
del homo, practique eluse de Immediate Stall
normal (diferenle aSabbath) y Automatic Stop
antes de ingresar al tootle Sabbath
CereiSresede quael reIoimuestre]a hera
correcta det d(a y e)homo eal_ apagado
+ los botches BAKEy
BROIL Bt/LO,al
mismotiempo,hasla
que (apantWla
muestre£F
5 Lalempe[atura de
inicio preestablecida
se conligurara @
autom_ticamenteen
350°F Presiona los
botches • o _' para
aumentaro disminuir ./_,,,'_._
)atemperaturaen
59
(_) 2 Toque e]boise
CLOCK hastequa
SAb aparezca enla
pantaUa
3. Presione etbot6n
STARTy _ aparece
en Ia pantaI_a
4 Presione e(bot6n
COOK|NG TIME

OPERACION
FunciGnSabbath
(on algunosmodelos)(cont.)
@ 5,P_esionelosbolones
A o T pata
estableeer el tiempo
de cocci6n deseade entre 1 minute y 9
hares y 59minutes, En lapantar_aaparece
a!liempo de cocci6n ingresado
6. P_esioneel bot6n
START
7. Presiene el bot6n
BAKE No aparace
ninguna selma1
@ 8, Latemperatura
preealablecida inicia{
se f;iat_en &50"F
Presione/as bo'_oneaA o Y pare aumenta_
o disminuir la temperature en incremenIes
de 25°F La temperature se puede
eslabfecer entre 170°F y 550°F En la
pantalla noaparece ninguna sehal o
tempera'Lure
9. Presione el beI_n
START
10. Oeepu_s de un
Cuando la pantalla periodo de retraso
mueslra =, el homo af azar de
est_ configuredo en api'o×imadamente
Sabbath Cuandola 30 segundos a 1
pantaIla muastra = c minute, aparace = c
el homo esl,_enel en Iapanta!la
mode de horneado/ indicando que el
asado homo eat&
homeando/asando
Si _ c no aparece
anlapantaIIa,
ampiece
nuevamenteen el
paso 7
Pareajustar latemperaturadel homo,
prewona el bot6n BAKE y los botones A o Y
pare aumenta_o disminut_la temperature an
incramentesde 25°F Presioneel betdnSTART
Cuando la coecidn conotuya, la pantalia
cambiar_ de = c a = indicando que el harno
se haAPAGADO pete qua todaviaesta an
el mode Sabbath Retire el alimento eocinado
1_ Presioneel bot6n
STOP/CLEAR
2. Si el home est_ cocinando, espere per un
periodo de relraso alazar de
apro×imadamente30 segundos a 1minulo.
hasta que _Snicamente_ apatezca en la
pantaIta
_ 3. Presione y soStenga
+ lento el botdn BAKE
come BROIL HI/LO
afmismo liempo,
hasta que aparezca
SF an la pantaIla
4_ Toqueel bot6n
CLOCK haste que
ON e OFF aparezca
en ta pantaIla ON
indicaque e{homo seapaga_,
aulomaficamantedespu_sde 12horas
OFF indicaque e_homo no seapagara
aulom&ticamenleConsu{telasecci0nde
funcionesespeeiates pa(a una explicacidn
de IaIunci6nde apagadede 12 hob'as
(_ 5, Presioneelbet6n
START
NOt"A=Si hay una interrupci6n en eI
suministroelectsicemientras el homo est_ an
Sabbath, el homo se apaga'r& autom'_ticamente
y permanacert_apagadocuando se
reestablezca eIsumlnistro, E!controI
del homo se debe reinicial_zar
60

CUIDADOYLIMPIEZA
El CicloDe Autolimpieza
1 Saque la cacerola y ta pardlla para
asar, la parrilla del homo, utensilios,
y cualquier papel de aluminia que
podrla quedar an e! homo
2. La suciedad sobre el marco frontal y
afuera del sello del revestimiento de
la puerta necesitar_ ser limpiada a
mane
/
Marco frontal
I
RevestJmlento
de la puerta
Limpie eslas _reas con agua caliente.
lanes pare fregar can iab6n e timpiadores
come Soft Scrub _ para saear cuatquier
suc}edad Enjuague bien can agua timpia
y seque
3. Limpie cualquier derrame pesado del
rondo dei homo
4- No limpie el selto El materia! de libra
de vidrio de Ia puerta del homo no
soporta ta abrasi6n Es esenciat qua el
sello permanezca intacto Si usted
nota que se est_ gastando o trizande,
debeffa set reempiazado
E!sello de la puerta est_ dise_ado para
que tenga un espacio de 5"6" an el fondo
de! homo Esto permite la circulaci6n
adecuada del aire
Panel de la puerta Sello
Revestimlento de la puerta
Es normal que su homo d_ Is apariencia de
no tener un buen sello sobre el homo Esto
se debe at setlo La ubicaci6n del sello
sobre [a puerta manliene ta puerta sellada y
previene cualquler perdida de calor
Los utensilios nunca se
debeflan dejar dentro del
homo durante un cicto de
autotlmplezao
NOTA: Saque los enstantes del homo
antes de empezar el ciclo de auto
limpleza, o de Io contrario se
decolorar_n,. SI decidedejarlas dentro
durante el cicto de Ilmpieza, p,_sefes
aceite vegetal para que se deslicen
rods fdctlmente.
Durante et primer clclo de llmpleza,
ventile la habitacl6n con una ventana
ablerta o una eampana de ventllacfSn.
' Esto evltar,_ el olor faerie producido
por el calentamtento de las partes
nuevaso
61

CUIDADOYLIMPIEZA
El Ciclo De Autolimpieza
(cont.)
1o Para major resultado, siga los pasos
papa PREPARAR SU HORNO
2, Si la maniita no se ve, levante la
cubierta supedor y tire la mani[la Lo
m&s afuera posibie
: '"__J" I
I
& Presione el bot_n SELF
CLEAN
(_ _4o PresioneJosbotones
A o • hasta que
aparezca el tiempo
de limpieza deseado
(Clean Time)
El tiempo de limpieza es notrnalmente de
4 hot'as y 20 minutes Puede cambiar eJ
tlempo de _impieza a cualquier tiempo
entre 3 y 5 horas dependiendo de }a
suciedad del homo
-_. Presiane el bot6n
START
El ciclo de auto limpieza iniciar_
autom_ticamente despu_s de que CLEAN
aparezca en la par_talla y empiece Ja
cuenta t,egresiva
Mien[ras el homo este en auto !impieza,
puede pt,esionar el boLOnCLOCK para
visualizer la hera de} dfa Pare velvet a ta
cuente regtesiva, presione el bot_n SELF
CLEAN
El hQmo se apaga au[om_ticamente
euando et ciclo de limpieza se complete.
y 8:00 apafezca en la panta_ta de manera
in[ermitente
6. Destice la manija del pasador hacia la
izqulerda aI m_ximo posible y abra Ea
puerta
Presione et bot6n STOP/CLEAR
Espere hasta que el homo se haya
enfriado per debajo de la temperatura
de btoqueo para que ta puerta se
pueda abdr No podr_, abrit, la puerta
de inmediato a menos que el homo
se haya enfriado per debajo de ta
temperatuta de bloqueo
Daspu_s del cic!o usted podrfa notar un
poco de cenizas blancas en e! homo
Simplemsnte Ifmpie_ascon un parka o
esponia hOmeda
Si algunas manchas blancas persisten,
fd_guelas con una tana para fregar con
jab6n Aseg_rese de enjuagat bien Estas
son generalmente depSsitos de sal que no
se pueden sacar dutante el ciclo
SI por alguna razSn usted no queda
satlsfecho con los resultados de la
limpleza, slmplemente reptta el cicloo
62

CUIDADOYLIMPIEZA
El Ciclo DeAutolimpieza
(cont.)
El homo seapaga automatieamente
cuando e_ciclo de limpieza esti&complete
y O:£',Daparece intermiter, teen _apantal_a
6. Deslice la manija del pesador al
m&ximo hacia la izqulerda y abra _a
puerto
Puede configurar el control def home pare
retrasar el inloio el home, limpiar per un
tiempo espec{tico y Iuego apagarse
autom_,l}camente
Cerci6rese de que et relojmues_re ta hera
correcta del die
Siga los instrucc]ones en la seeci6n Antes
de un ciclo de limpieza
1. Bloqueela puerto
NOTA: Nunca _uerce el pasader St e!
homo est,, muy caliente, no podr_ des_izar
el gasador Deje que el homo se enfrfe
2. Presione el botSn
SELF CLEAN
(_ (_ 3, Presiane _osbotanes •
o Y para eon%urar et
tiempo de limpieza
El tiempo de limpieza se preestablece
pare 4 horasy 20 minutes. Se puede
cambiar eI tiempo de limpieza a cualquier
tiempo entre 3 y 5 heros, dependiendo de
_asuc{edad de_ homo Si se desea un
tiempo de limpieza diferente, toque los
botches h, o Y hasta que aparezca e!
tiempo de limpieza deseado
4. Preslone el hot6n
DELAY START
Cambie el tiempo de inicio presionando
los botches • o V El tiempo de inieio
apareee en la pantalla
5. Presione el bot6n
START
El cielo de auto llmpieza iniciarb.
autom_ticamente a la hera establecida
Mientraa e{ homo estA en auto limpieza.
puede presionar el bot6n CLOCK para
visualizer la hera del dta Para regresar
ala cuenta regresiva de la limpieza.
presione el bot{_n SELF CLEAN
63

CUIDADOYLIMPIEZA
Limpieza
MATERIALES DE LtMPIEZA
• Detergente I[quido para plates
• Ague tibia
• Pane Suave
No use timpladeres abrasives,
limpladores |ndustrlales, o
blanquadores (clom),
MATERIALES DE LtMPIEZA
• Detergente Ifquido para plates
• Ague tibia
• Lena pate fregat con jabSn
" Limpiador comerdat pare hornos
COMO LIMPIAR
Permita qua la cacerota se remoie Ponga
detergenLe para plates sabre la parrirla y
eubra con un pa_o o una toalla hOmeda
per un rate. Friegue a medida qua sea
necesario Lave, eniuague, y seque bien
Usted tambi_n podr_a porter ia caceroIa y
ta parritia en ta lavadora de pla_os
Limpie soiamente pare retocarlas entre
cic{os de Iimpieza Use detergentes
Ifquidos para plates, ague tibia o lane
para fregar con jab6n Enjuague bien
despu6s de iimpiar y seque
NUNCA USE LIMPIADORES PARA
HORNOS DENTRO 0 ALREDEDOR DE
CUALQUIER PARTE DEL HORNO.
Cuando limpie, asegOrese de no deblar
o mover el sensor de la temperature
ub{cado en la pared trase_'adel homo
MATERIALES DEUMPIEZA
• Detergente pate ptatos
• Ague tibia
• Toalla de papel
• Amonia
• Limpiadores abrawvos
• Lenitiespara fregar
COMO LIMPIAR
Limpie despues de cada use Si alimentes
_cidos (tales come reIlenosde Irate tomates,
chucrut o satsas con vinagre o jugo de limon)
se derraman sabre lacubierta, use una
toalla de papal seca pare limpiatlos
inmediatamente. Cuando Ia superficie se
enide, lave y enjuague
MATERIALES DE LIMPIEZA
• Detergente Ifquido pare pfatos
• Ague tibia
• Teailas de papal
COMO LIMPIAR
No use limpiadores para hernos,po_vospara
limp[ar, o abrasives luen.es Si sWsas pare
sasonar, salsa de tomates,materiales pare
betides, eta, se derraman, limp[ales to m_s
posible Cuando tas superficiesse en#Ien
limpie bien las superficies pintadas
PARA LtMPIAR
Pare limpieza diaria, use tin _impiadar pate
vidrios y una loalia de papal Pate suciedad
pesada use una pasta de soda pare homear
y ague Eajuague blen
MATERIALES DE LIMPrEZA
• Limpiado_ abrasive suave
• Esponia.fregador
No use l_mpfaderes abrasives faertes,
ltmpladores tndustrlales, o eloro,
64

CUIDADOYLIMPIEZA
Partes Removibles
Algunos modelos tienen una cubierta que
se puede _evan'_arpara facilita_"la limpieza
La cubieda completa se puede Sevantar y
mantener en esa posici6n alta
Las unidades de la superficie no necesitan
ser sacadas; sin embargo, usted podrfa
sacar una para levantar la cubierta con
mayor facilidad Hay dos soportes
Jaterales que se mantienen en posioi6n
cuando se levanta la cubierta
Asegt_rese que todas 1as unidades de la
superfic{e est_n apagadas antes de
tevantar la eublerta.
Despu_s de limpiar debajo de la cubier_a
con agua caliente, jab6n suave, y un paso
limpio, baje la cubierta Tonga cuidado de
no agarrarse los dodos
Para bajar la cubierta, empuie las vadllas
hacia atr_s y baje suavemente la cubierta
haste que quede biee en su lugar
=,l,,,in,m ====
f/'G;_ PRECAUCION: Cuando _1
trabaje an esta _irea, tenga /
| cutdado de no pasar a llevar |
| las varlllas de soporte., La superficie|
| de esmaite poree|antzado de la |
| cublerta se puede da_ar si se deja |
, )
65

CUIDADOY LIMPIEZA
PartesRemovibles(cont.)
MATERIALES DE LIMPIEZA
• Detergente para plates
• Ague tibia
• Pa_o suave
Canal Ranura plana
moldeado en
Gancho del resorte
COMe SACAR
1,. Aseg0rese que la perilla est_ en
pos}ci6n de APAGADO
2, Las pedrlas de control se pueden
retirar pare una lirnpieza m_s Moil
Pare retirar una perilla, hale
directamente desde el v,'_stago Si Ia
per|lie es diffcil de retirar, coloque una
toatla o un par_oentre la per|lie y el
panelde controly halecon suavidad
No doble las perillas tirando hacia
ardba o hacia abajo o colgando una
toalla u otra carga similar de las
mismas Esto puede daSar el eje
PARA LIMPIAR
Lave [as perillas en agua yjab6n o en una
soluciSn de vinag_e y ague caliente
PARA COLOCARLA NUEVAMENTE
1, Mire la parte ttasera de la pedlla
2. El canal moideado de la periila esl_
dise_ado para quedar pedectamente
ajustado en el tallo de la perilia
3. Coloque el canal moldeado en lfnea
con la ranura p_ana en el taIlo de ta
pedlla. Empuje la peritia haste Iom_s
atr,_s posible
PRECAUCION:
Desconecte el poder
eldctrico hacla el homo en
la caja del circuits prlnclpa!
o an la eaja de los fuslbles antes de
tratar de reemplazar el foce de la luz
del homo° No toque un foco de la luz
caliente can las manes mojadas o
con un paso hdmedo_ Espere a que
el foco se enfrfe y use un paso seco,,
Collar con
Sujetador _,_ electrtcldad
.o,v,..o
PARA REEMPLAZAR
1_ Coloque ta mane baio ta cubierta
y empuje el alambre sujetador
firrnemente hacia art,s, haste que
pase per encima y sueIte ta cubierta
del foco
2. Desatornille el foco de la luz
3. Reemplaee el Ioco con un feco papa
homes de 40 watts de 3V_"
4, Tire el atambre suietador hacia
adelante hasta que caiga en la
indencidn sobre la cubierta de_foco
66

CUIDADOYLIMPIEZA
PartesRemovibles(cont.)
PARA SACAR
Para retirar los tezones de gores pare
timpieza, se deben retirar primers _as
resistenctas
t. Empuje la resistencia hacia el
recept_culo pare liberar la tengueta de
bisques de fa superficie de la estufa
ulln=
p. cAuc,o.:.s.ag.
i _J funclonar los elementos de la/
| eubterta sin el reciplente en su I
| lugar. Si Io hace causar,_ que se |
| quame la cubierta, el alslante de los |
_ alambres y productrd p_rdida de |
_energfa, )
PARA REEMPLAZARLO
1. Reemplace el taz6n de gores en et
oriticio de ta supedicie de la estula
AsegOrese de que ]a abertura det
tez6n est_ atineada con el
recept&cuto
2, Inserte Ios terminates de ta resistencia
a tray,s de la abeflura del !azdn de
gores y dentro del recept_cuto
gores
2, Levante ta resis!eneia
aproximadamente una pulgada per
encima del tazon de go[eo y ret[reto
1" ..Ec.uc,o.,.o,sva.,o)
| _'_ la reslstencia m_s de I |
| pulgada, st Io hace, es |
| peslble que no encaJe en e! taz6n de I
| goteo euando Io coloque de nuevo |
_en su lugar. )
NOTA: Levantar ia resistencia
repetidamente m,_s de 1 pulgada per
eneima del taz6n de gores puede daSar
de forma permanente el recept_eulo
COMe LIMPtAR LOS RECIPIENTES
PARA DERRAMES
Pare manchas de alimentos oscures -
use detergents pare plates, ague tibia,
lanillas pare fregar de pl_s!ico,
limpiadores abrasives suaves, laniflas
lfenas con jab6n o amonia Limpie los
recipientes despu_s de cada use
Enjuague y seque bien Los atimentos que
no se limpien pueden causar manchas
permanentes que no se pueden sacar
Para recipien!es muy sucios, cot6que!es
en un conLeneder eubierto (oen una bolsa
de pl_s[ico) con '/_de taza de amonia
para soltar la suciedad, tuego friegue el
recipien!e suavemente con una lana de
pl_stico
Resisteneia
de
bisques
de gores
Are de la
de !a estufa
Leng_Jet_
de bisques
Cuandoest_cot_'ectamentecubterta,!a
leegSetadebisques se debeaJustara!are de
la superficledela estufaa travdsdeIagujero
que seeneuentraen e!taz6n de goteo_
3 Empuje Ia resistencia hacia dentro y
hacia abajo para ajustar la leng'Jeta en
su lagar de forma que descanse de
forma nivelada en la superficie de ta
estula
,,,,,,,,,,,,,
"[_ PRECAUCION:
No sumerja las reststencias
en lfquldos de ntnguna class.
No lave las reststermtas en el
lavaplatos.
No doble los terminales de conexldn
de ins reslstenctas.
No inteete limptar, ajustar o
de ninguna manera reparar el
recept&culo de enchufe.
67

CUIDADO YLIMPIEZA
PartesRemovibles(cont.)
MATERtALES DE LIMPIEZA
• Detergente para plates
• Agua tibia
• Lana pare fregar
Tope en
lagufe
levantada de la J_,,"'_.._
parrilla_
COMO SACAR
!. Tire [as parrillas haste la posici_n
de tope
2. Levaete el frente de ta parr|lie y
desl_ceta bajo el tope de la gufa para
los pardltas
PARA LIMPIAR
Limpie con agua tibia y de[ergente. Para
sacar manchas duras, fHegue levemente
con lane pare fregar con jab6n Enjuague
bien
PARA COLOCAR NUEVAMENTE
1. Coioque la porte Ievantada de atr,ts
de la parfilla sabre las gules
2. Levante el frente de la parrilla hasta
qua la parts levaetada de arras se
deslice pot debaio del tope de tas
guias
3. Deslice ta parr|lie hasta arras
COMO SACAR
1. Abra la puerto
comptetamente
2. Empuje los topes
de tas bisagras
hacia abajo hacia
el marco de la
puerto, a la
posiciSn de So|go
abietto Es posible
que usted necesite
empujar hacia
abajolas
cerraduras con la
punta de una
navaja o un
destomillader
3. Tome firmemente
los _ados de la
puerta de arriba
4, Cierre la puerta a ta
pesici6nde saque
5o Levantelapuer_a
hastaque elbrazo
de la bisagra satga
de fa ranura
Cerradura de
bisagra
(Posic|6n
abierta)
Brazo de la
Bisagra
2_
Posleldn
de saque
COMO PONERLA
NUEVAMENTE
1, Toms tirmemente Ranura
los dos lades de la del Braze
puerta de arfiba Borde de la
del Blsagra
Can la puerto en Fondo
el mismo _ngulo de _ /
saque coloque la
indencid_n del braze
de la bisagra deetre
del borde del rondo
de la ranura de la
bisagra
Indencl6n
68

CUIDADOYLIMPIEZA
PartesRemovibles(cont.)
Puerta removible de_homo (cent,)
3- Abra complelamente Poslcl6n de
]a puerta Clerre
&, Empuje los topes de
las bisagras hacia
arfiba contra el
marco frontal de la
cavidad del homo, a
la posici6n de cierre
5o Cierre la puerta det
homo Braze de
Bisagra Sellada
COMe LIMPIAR AFUERA DE
LA PUERTA
• Use jab6n y ague pare fimpiar bien la
suparficie, tados, y frente de la puerta
de! homo Enjuague bien Usted tambi_n
podda usar un limpiador de vidfio pare
limpiar el vidrio exterior de la puerta No
permita que el agua gotee dentro de las
aberturas de ta ventilaci6n
• Los derrames de salsas para alitSar.
iugos de fruta, salsas de temate, y
materiales para sasonar qua contengan
_cidos poddan causar una
descoloraci6n y se deberlan limpiar
inmediatamente Cuando la superficie
se enfr[e, timpie y eniuague
° No use timpladores pare hornos, pelves
para limpiar, o abrasivos duros en la
parte exterior de ta puerta
•' Si cuaIquier mancha sobre la moidura
de Faventilacidn de la puerta persisLe,
use un iimpiador abrasive suave y un
fregador de esponja pare mejores
resultados
COMe LIMPIAR ADENTRO DE
LA PUERTA
,, Debido a qua el area dentro del se_lose
limpia durante el ciclo de auto_impieza.
usted no necesita limpiar esto a mane
• Ef _rea afuera del selb y el revestimiento
de la puerta se pueden limpiar con lane
pare fregar con jab6n, ague caliente y
detergente Enjuague bien con uea
soluci6n de vinagre y ague
• NO LIMPIE la junLao la dat_ar_
69

CUIDADO YLIMPIEZA
PartesRemovibles(cont.)
MATERIALES DE LIMPIEZA
• Detergente para plates
•Agua tibia
° Parle h0medo
COMe SACAR
1. Tire el caj6n haste que se detenga
2. Levante eI frente del caj0n hasta que
los topes selgen de las gules
Tope
To
3. Saque elcajQn
PARA LIMPtAR
Riel
_e Gufa
Limpie per dentro y fuera del caj6n con
agua tibia con iab6n y Un pa_o o esponja
hOmeda No use abrasives fuertes o lanes
pera fregar sobre el cajun
COMe COLOCARLO NUEVAMENTE
t_ Ponga el riel dsl cajSn sob_e tas gufas
2, Empuje el cajQn hacia atr_s haste que
se detenga
3. Levante el trente del cajSn y empuie
haole a[r#,s haste que Ios topes pasen
per sobre las gules
4, Baje el ftente del caion y empuje hacia
arras hasta que cierre
Sl EL CAJON NO ClERRA
Etcord6ndela
dectrlcldadpodda
c0mpietamente
Elsoportettaserodel
caJ6nest&puesto Elpaneldd
eobree_r d dela _ t_ frontsdotcaj6n
-u_'a I n estatueraae
Y. _ . II_ lineaconellado
_::::::',:::;:'i:::',:!.l de'cUerp°
========================
SI EL CAJON ESTA TORC|DO
Elseportedeta
parletraseradel
caj6nest,_sebree! Elpanelfmntaldel
flelde1_gutaenel eaj6nest_t0_c[de
ledoatlo hacieellado
En cada uno de los cases enteriores,
remueva la gave[a limpie la obstrucci6n si
es necesaria y reemp_ace correctamBnte
_ RECAUCION: El caj6n
?eofrece espacto para
guardar utenslllos para
coclnar y hernear_ Los
materiales de pt_st_co no so
deberl'an guardar en este caj6n, No
sobrecargue el cajun. SI el caJSn est_
demastado pesade, se podrfe salir
_del rlel de la base ouando Io abra_
MATERIALES DE L1MPIEZA
•Detergente para plates
o Patio hOmedo
- Ague tibia
PARA RETIRAR
1_ Retire la gevete
2_ Levante el Iorro de la gaveta
PARA REEMPLAZAR
1o Coioque el forte de nuevo en la gaveta
2, Coloque la gaveta do nuevo an la estufa
70

ANTESDELLAMARPARA
UNSERVICIO
Para ahorrar liempo y dine_'o, antes de llamar para un servic}o revise ta lista de m_s abajo
pare cualquier problema que usted piense que t}ene con et funcionamiento de su estula
Si el problema es algo que usted no puede reparar, use los Numeros de Servicio para el
Consumidor que Ioealizados en la cubierta posterior de este manual Cuando haga un
Ilamado, tenga dlsponible el n_mero de modelo, n_mero de serle, lisle de partes
pare teparaciones, manual de uso y cuidado y la fecha de eompra,
_ PROBLEMA POSIBLE CAUSA POS1BLE SOLUCION
El horno no No pasa electricidad a
funclona; la estufa
totalmente
Inoperante,,
a Revise la caia del circuito de la casa
o los fusibles
bo Revise y asegOrese que la estula este
enchufada
,H ,,,,,,,,,,,,,, ...............
La cublerta no Los elementos es[_n Revise los elementos, asegurese que
funclona, desenchufados est_n enchufados correctamente en los
homo OK, recep[_culos
H,,,n =,=m =,l,,,,,,,,=,=== ======,,,,,==
Horno no Control puesto Revise el control y la secciSn de c6mo
funclona, incorrectamente cocinar en ei homo
cublerta OKo
,,m,H ======== ,,,,nn=
Los allmentos ao E! homo no se a. Aseg0rese de precalentar haste que
no se cocinan precalent6 suene el tono
adecuadamente,, b,, Posicion incorrecta b, Mantenga un espaeio de aire unilorme
de la parrifla o ta alrededor de las oIlas y utensilios Vea
caoerola ta secci6n consejos pare cocinar en
el homo
c, La ventilaciSn del c, Mantenga la ventifaci6n despejada
homo est._obstruida
o cubierla con papel
de aluminio
d, Uso incorrecto del d. No cubra Ins parrillas cuando hornee
pape[ de alumlnio
e,, Temperature e, Reduzca la temperatura en 25 grados
incorrecta pare e_ pare utensilios de vidrio, oscuros u
utensilio usado opacos
f, La temperatura del f,, Revise la secci6n de ajustes ala
homo necesita un temperature que sigue esta seccion
ajuste
g. La estufa o {a g. Vea [as instrucciones de instalaciSn
parfilla del homo no pare la nivelaci6n
est_n nlvetadas
ho Controls dei homo h, Vea la secci6n pare homear
mal puestos
71

ANTESDELLAMARPARA
UNSERVICIO
PROBLEMA
La temperatma
del homo no
pareee estar
exacta,
POSIBLE CAUSA
Calibracidn del control
delhomo
El homo no EPciclo de limpieza no
se abre,, ha terminado
POSIBLE SOLUCION
Vea las instrucciones para ajustar la
temperature que siguen esta secci6E
La temperatura debe caet m_s abajo que
la temperatuta de cierre antes que la
puerta se abra
a. Revise la posiciSn del interruplor
,i
La luz del homo a. El interruptor de la
no funciona_ !uz estA apagado
b. E! foco necesita
set reernplazado o
esf_ sueltQ
b, Revise o reempIace e! foco de }a luz
Los alfmentos a_
no se asan
adecuadamente b,
ala parrilta,,
C.
Posici6n incorrecta de
_aparrilla
El homo se
precalent6
Mal uso de papel de
aluminio
La puerta del homo
se cerr6 durante el
asado ala parrilla
e. Voftaje bajo (208
Vet[los)
f, Cantidad de tiempo
incorrecta papa asar
g Contreles delhomo
real puestos
El homo a_ Homo sucio
humea, b. Se dej6 la cacerota
pare asat con grasa
dentro del homo
a. REvise la posicidn de las cacerolas;
yea ta secci6n para asar ala parfllla
b, No precaliente cuando ase ala parrilla
c,. Lea Ia secciSn para asar a Ia partitla
d, Abta la puerta a fa pesici6n de tope
para asar
e,, Use posici6n de parrilla m_s alta y/o
ase pot m_s tiempo
f, Vea la tabia pare asar en ia secci6n de
cdmo asar ala parrilla
g, Vea ta secciSn pare asar
=,===,===n= n,=,Hum=,ram, HnuHmHmm= mu ====
a Vea que no hayan derrames grandes
b,, Limpie Ia cacerola y la pardlla despu6s
de cada use
72

ANTESDELLAMARPARA
UNSERVICIO
....P,ROBLEMA,,,,,, pOSIBLE CAUSA
E! homo emlte a, El aislante del homo
un oloro puede emitir un olor
durante Ios primeros
USOS
b. Fallo de limpiar
exceso de suciedad
Puerta No [uerce {a maniila del
del borne cerrojo
se clerra
accldentalmerrte
COn cerrojo
mientras se
hornea_
POS1BLE SOLUCION
,,,,,,,,,, ,,,,H, , ..............
a, Ponga e_homo en un ciclo de
autolimpieza para acelerar e} proceso
de "gastar el o}or"
b,, Limpie el exceso de suciedad antes de
usar e] homo
I,,II,,H i HHHHIn I
Las temperaturas m_.sattas qua las
temperaturas de cerrado evitar_n que la
manilla de] cerrojo se desliee a ta posici6n
de abierto
Mates a, Homo demasiado
resultados de sucio
Ifmplezao
i
"F--y un
ndmero o
tetra"
pestafiea r_
en el dia!,
La pantalta
muestra "bAd"
entonces "DINE"
COntin tono
alto,,
b. Cicte de limpieza
inter.rumpido
a. Los derrames pesados se deberfan
limpiar antes de programar un ciclo
de limpieza
b, Permita qua e! homo se limpie per un
cielo complete
lu ,i Hn
Usted tiene un c6digo de Si la pantaJla muestra de manera
error de tuncion intermitente "F - yun nOmero", se trala
de un c6digo de error de funci6n Si un
c6digo de error de l'uneiSn aparece
durante el cicto de auto limpieza, revise
el pasador de ta puerta det homo Es
posible que el pasador se haya movido.
incluso s61oligeramente, desde la
posici6n de bloqueo CerciSrese de qua
et pasador se mueva a la derecha al
m_ximo posible Presione el bo_6n STOP/
CLEAR Deie que el homo se enide per
una hera Reestablezca et homo a la
operaci6n normal
Desconecte el suministro de corfiente
hacia la eslufa per 5 minutes y Iuego
vuelva a conectar la corriente Si el
c6digo de lalla se repite, llama a Sears
solicitar servicio
El cableado de la cone×i6n P6ngase en conlacto con el instalador o
instalada de la casa a la con un eled[ficista paJa conectar los cables
unidad no es correcto con'eetamente
73

AJUSTESDE
TEMPERATURA-
"HAGALOSLISTEDMISMO"
Usted podHa pensa_"que su nuevo homo
eocina dlferentemente al homo que
reernplazd Recomendamos que use su
homo nuevo unas pocas semanas para
que se fam_liarlce con el, siguiendo los
tiempos qua se dan en Ias recetas corno
una gala
Si cree qua su nuevo homo estb,
funcionando demasiado caliente (quema
Ia comida) o no calienta Io suficiente
(ta comida no queda bien cocida) usted
mismo puede ajustar la temperatura La
apadencia y la textura de los atimentos
son mejores indicadores de la exactitud
de un homo que un term0metro barato,
Estos tetm6metros pueden varlet en 20-40
grados de la verdadera temperatura dei
homo Adam,s, la puerta se tiene que
abdr para leer estos term6metros Abdr la
puerta cambiar_i la temperatura de_homo
Papadecidir en cu_.nta cambiar la
temperatura suba la temperatura det
homo en 25 grados (si los alimentos no
quedan bien cocidos) o baje la
temperatura en 25 grados (si la comida se
quema) de la temperatura de ia [eceta
luego homee Los resultados de esta
'prueba*' ie deberlan dar una idea de
eu&nto se deberfa cambiar la tempetatura
_ 1- Toque los botones
+ BAKE y BROIL Hit
LO a_mismo
tiempo par 2
segundos hasta
que la pantalla
muestre SF
2_ Toque el bot0n
BAKE Aparece
en la pantalla un
n0mero de dos
dlgitos
(_ (_ 3,. La [ernperatui'a
del homo se
puede ajustar
hasta (+) 35"F
m,_s caliente o
(-) 35_F m_s ftto
Toque el bot6n ,k para aumentar
la temperatura en incrernentos de
1 grado
Toque el bot6n Y para disminuir
la temperatura en inctementos de
1 grade
(_ 4, Cuando haya hecho
el aiuste, toque el
bot6n BTART para
regresar a la hora
del d[a Use ei
homo notmalmente
Este ajuste permanecer_ en la memoria
hasta que estos pasos sean tepetidos y
una nueva temperatuta sea seleccionada
Permanecer6 en la memoria ineluso
despues de un carte de corriente
Eslos a}ustes no afectar,tn las
temperaturas pat a Aear y Limpiar
74

GARANTIADELAESTUFATIPO
INDEPENDIENTE
f
UN A_IO COMPLETe DE GARANTIA PARA TODAS LAS PARTES
Si, dentro de un afio de la fecha de instalacidn, cuatquier parte deja de
funcionar adecuadamente debido a un defecto en el materia! o la obra de
mane, Sears la repararA o reemplazar& a nuestra opciOn, sin costo
Si este producto es sometido a un use que no sea el familiar privado, la
garantfa de arriba es elective per solamente 90 dfas
EL SERVICIO DE GARANT[A EST._. DISPONIBLE AL LLAMAR A SEARS
SERVICE AL 1-888-SU-HOGAR®o
Esta garantfa le brinda derechos tegates especfficos, y usted tambi_n
podrla tenet otros derechos que varfan de estado a estado
Sears Roebuck and Co Dept 817 WA Hoffman Estates, IL 60179
'--,,-,---- j
Contrato de protecciOnmaestra
Felicitacionesper sucompra intefigente
Su nuevo produclo Kenmore_ est_
diseOadoy fabricado pare touches aries
de operaciOnconfiable Sinembargo, al
igual que todos los productos, puede
requerirde mantenimientoo reparaciOn
preventivesencualquier memento Es ahi
cuando el eontrato de proleeeiOnmaestra
le puede ahorrardinero y molest!as
Adquiera unContrato deproteccidn
maestra ahoramismo y prot_jase centre
inconvenTentesy gastos inesperados
El Contralo de protecciOnmaestra
tambienle ayuda aampliar la vide de su
nuevoproducto Losiguiente es !oque se
inctuyeen el contrato:
v' Servicio experlo per parle de nuestros
12,000especialistas profesionalesde
reparaciOn
V' Servicioillmitadosin costo per patios
y manede obra en redestas
reparaeionescubiertas
Garantiatotal- reposiciOnde su
producto cubierto siocurren cuatro o
m_s de cuatrofallas del producto
dentro de doce meses
_"ReposiciOn del producto si el
producto cubierto nosepuede reparar
V RevisiOnanual de mantenimiento
preventive a susolicitud - sin cargo
adicional
v' AyudatelefOnicar_ipida- asistencia
telefOnicade parte de un t_cnicode
Seats sobrelos productos que
requierenreparaciOnencasa, edemas
de una convenienteprogramacion de
reparaciones
ti ProtecciOncontra descargas
eldctricaspara defies debido a
flucluaciones el_ctricas
v"Reembolso per alquiler si la
reparaciOndel producto cubierto toma
m_s liempo del prometide
Unavez adquiera etcontraio, sOlo
necesita una llamadatelefOnicapare
programarel servicio
Puede!tamara cualquier hera deldia o
de ta nocheo programar una cila de
servicio per fnternel
Searscuenta con m_s de 12.000
espeeialistas profesionalesde repareeiOn,
quienes tienenacceso a m_s de4 5
mitlonesde parles y aceesorios de
calidad Estees el lipo de profesionalismo
enel que puede centerpare ayudar a
prolonger lavide de su nuevaeompra
para los aOosyen!dares iAdquiera el
Contralo de prolecciOnmaestrahey
mlsmo!
Aplican ciertas limitacionesy
exclusiones,
Pera precios einformaci_n adicional,
ilameel 1-800,-827-6655,
Serviciode instalaciOnde Sears
Parela instalaeiOnprofesionalde Sears
de electrodomeslicos, dispositivospara
abrir puerlas de garaje, calenladores
de ague y otros aparatos importantes
para et hogar,entos EEUU Ilameal
1-888.SU-HOGAR®
75
 Loading...