

Kenmore 911.93729, 911.93725 Use, Care, Safety Manual
USE AND CARE
BEFORE CALLING FOR SERVICE
WARRANTY
MODEL _1i 93725
93729
:::::::::::::::::::::
Kenm
MNM2
T
TY
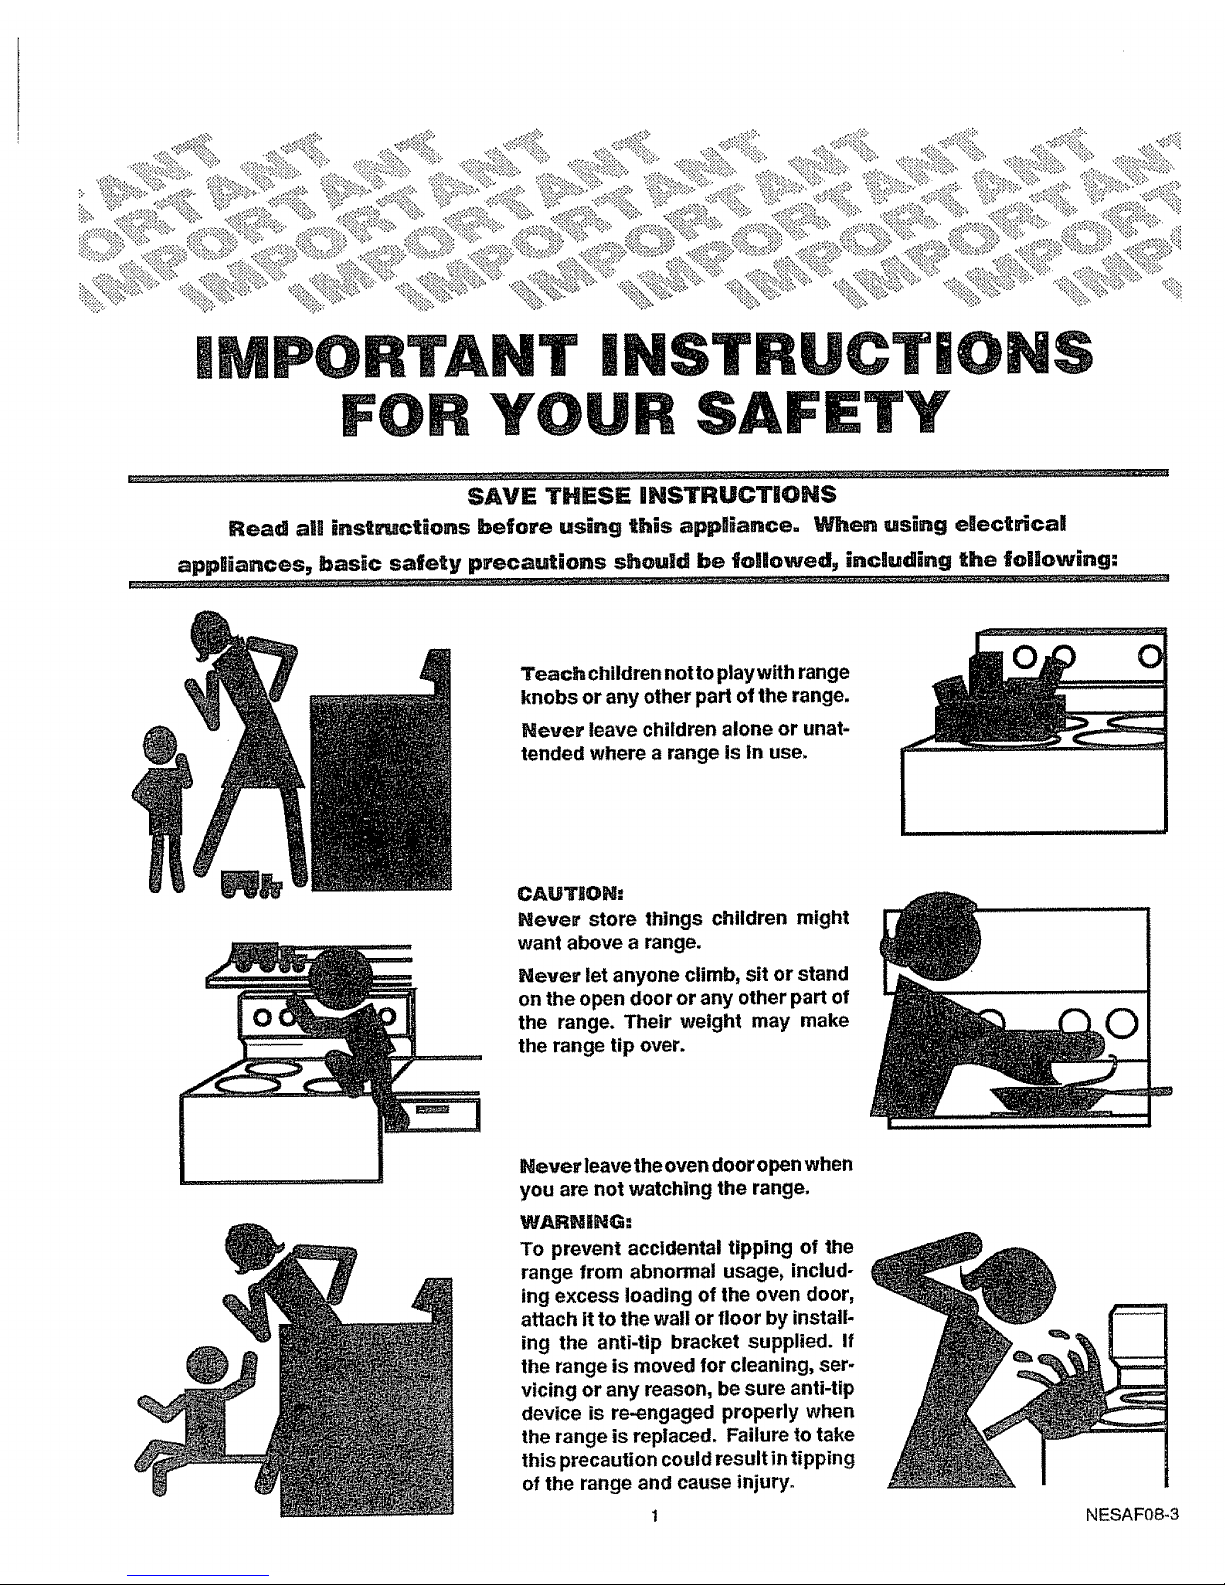
SAVE THESE INSTRUCTIONS
Read all instrJctions before using this appliance. When using enectNca!
appliances, basic safety precautions should be foUowed_ including _he following:
Teach children not to play with range
knobs or any other part of the range.
Never leave children alone or unat-
tended where a range is in use.
CAUTItON:
Never store things children might
want above a range.
Never let anyone climb, sit or stand
on the open door or any other part of
the range. Their weight may make
the range tip over.
Never leave theoven door open when
you are not watching the range.
WARNING:
To prevent accidental tipping of the
range from abnormal usage, includ-
ing excess loading of the oven door,
attach it to the wall or floor by install-
ing the anti-tip bracket supplied. If
the range is moved for cleaning, ser-
vicing or any reason, be sure anti-tip
device is re-engaged properly when
the range is replaced. Failure to take
this precaution could result in tipping
of the range and cause injury.
1 NESAF08_3

Altways keep the range area clear
and free from things that will burn.
CAUTIION:
Hever store things in an oven
or near cooktop elements/
burners. These things may catch
fire and plastic items could melt.
Never use your range for warming
or heating a room. You could be
burned or seriously Injured. Such
misuse could also cause damage to
the range.
Never wear loose clothing when
using your range. Such clothing
could catch fire.
Never use a towel or other bulky cloth
as a potholder. Such cloths could
catch fire on a hot element/burner.
Never let pot handles stick out
over the front of the range. Turn
handles in so that they cannot be
bumped into. Keep the handles
away from other hot surface ele*
merits/burners,
Never leave cooktop elements/
burners unwatched at high heat
settings. Bollovers cause smok-
ing and greasy spillovers could
catch fire.
2 NESAF09-2
Keep this book for later use.
Be sure your range is installed and grounded properly
by a qualified technician.
Aaways use care when touching surface elements,
oven heating elements or inside the oven. Heating
elements could be hot enough to burn you even if they
are dark in color. The oven vent duct and oven door may
also become hot during oven use.
A_er hroiming, always take the broiler pan out of the
oven and clean it. Leftover grease in the broiler pan can
catch on fire next time you use the pan.
Allways use dry potholders when removing pans from
the oven. Moist or damp potholders can cause steam
burns.
A_ways use care when opening oven door. Let hot air
and steam out before moving food.
AIIways follow cleaning instructions in this book_
Agways keep the range clean. Food and grease are
easy to ignite. Clean the oven regularly.
Always keep combustible wall coverlngs, curtains or
drapes a safe distance away from your range. Never
store such items in or on your range.
AHways keep wooden, plastic utensils, or canned food
a safe distance away from your range.
Always keep the appliance area clear and free from
things that will burn, gasoline and other flammable
vapors and liquids.
Always remove the broiler pan and other utensils from
the oven before a self-clean cycle.
C_ear= Or=ltypans llisted in the Mar=uaW.
Amuvays keep dish towels, dish cloths, potholders, and
linens a safe distance away from your range. Never
store such items in or near your range.
Neverheatunopenedfood containers. Pressure buildup
may make container burst and cause injury.
Never leave jars or cans of fat or drippings on or near
the range. Never let grease build up on your range. You
can keep grease fires from starting if you clean up
grease and spills after each range use.
Be sure eye.one in your hon:e knows what to do
it= case of a f_re,
Read ar=d understar=d this infon_at_on NOW!
ShouUd you ever need it, you wiB!not have t_me for
reading.
NeveruSe aluminum foil tel!he oven bottoms. Improper
use of foil could start a fire.
Never block free airflow through the oven vent.
Never try to move a pan of hot fat, especially a deep fat
fryer. Wait until the fat has cooled.
Place oven racks in desired position while oven is cool.
If racks must be handled when hot, do not let potholder
contact hot heating element in oven.
Choose pots and pans with flat bottoms, large enough
to cover the entire cooktop element. This will cut down
the risk of setting potholders or clothing on fire with an
uncovered element and waste less energy,
Only some kinds of glass or ceramic pans can be used
for cooktop cooking. Be sure that the pan you use will
not break when heated on the cooktop elements.
Never try to clean utensils, cookware or removable
parts of your range In the oven during a self-clean cycle.
Never rub, move, or damage the door gasket on self-
cleaning oven. The gasket is essential for a good seal.
Only clean the gasket by soaking it with hydrogen
peroxide, as described in the self-clean section of this
manual.
Illthe self.cllean_r=g mode maifunctier=s, turn off and
disconnect the power supply. Have serviced by a
qualified technician.
Never try to repair or replace any part of the range
unless instructions are given in this book. All other
work should be done by a skilled technician.
Do Not Use Over= C0ear=ers -- No commercial oven
cleaner or oven liner protective coating of any kind
should be used in or around any part of the oven.
Never put removable heating elements in water. Do not
put them in a dishwasher. Do not put them in the self.
clean cycle of your oven.
Never clean cooktop surface when it is hot. Some
cleaners produce noxious fumes and wet cloths could
cause steam bums if used on a hot surface.
OVEN FIIRE
Do not try to move the pan.
1. Close oven door and turn controls off.
2. If fire continues, throw baking soda on the fire.
Never use water on a grease f_re _ ll_ w_H er_lly
spread the flames.
, ,,, ,,,
I]MPORTANT SAFB=P# ' NOTliCB
The California Safe Drinking Water and Toxic Enforce-
ment Act requires the Governor of California to publish
a list of substances known to the state to cause birth
defects or other reproductive harm, and requires busi-
nesses to warn customers of potential exposure to
such substances.
3
The fiberglass insulation in self-clean ovens gives off a
very small amount of carbon monoxide during the
cleaning cycle. Exposure can be minimized by venting
with an open window or using a ventilation fan or hood,
NESAF47

iMPORTANT:
Cooktop Control
(See page
YO
The model and serial number of your range can be found on a tag, behind the
storage drawer panel, on the left side of the range front frame.
Oven Light Switch
(Push to turn oven
light on and off)
Range Control
5-7)
Cooktop Indicator
Light (glows when any
cooking element Is on)
Solid Disk Cooktop
Element
(See page 8-10)
Oven Door
Lock/Unlock for
Self-Clean Cycle
(See pages 13 & 14)
Model and Serial
Nt
Removable Storage
Drawer (See
Removable Oven Door
with Window (See page
/
'Oven Vent
(Area may get hot during
oven use. DO NOT
block vent.)
.Glass Cooktop
(See page 16)
Oven Door Latch
(Locks door during
Self-clean cycle)
Removable
Oven Racks
(See page 17)
Self.Cleaning Oven
Door Gasket (See
pages 3 & 13)
Oven Bake Element
Broiler pan and grid
(See page 12)
4 NEFSF16

..... i,ii
PROGRAM CLOCK /
STATUS TIMER TEMPERATURE FUNCTION UP ARROW PAD
DISPLAY DISPLAY DISPLAY DISPLAY (INCREASES TIME
OR TEMPERATURE)
PRESS TO TURN
TIMER ON AND OFF
1
SET AUTOMATIC
OVEN OPERATIONS
Your range control Is touch controlled. To set BAKE,
BROIL, TIMER or CLEAN, touch the destred function pad
and select the temperature or time bytouching the arrow
pad.
TO SET THE CLOCK:
1, Press CLOCK, The word "TIME" will flash in the
display.
2. Press the UP or DOWN arrow padto select the correct
time of day. Hold your finger on the arrow pad to
change display numbers quickly. Touch and release
the arrow pad to change the time slowly. See Fig. 1.
DOWN ARROW PAD
(DECREASES TIME
OR TEMPERATURE)
The TIMER display will Increase as follows:
:10 TEN SECONDS See Fig. 2
1:00 ONE MINUTE See Fig. 3
1HR:00 ONE HOUR See Fig. 4
When the display reaches one hour, the display will
change. "HR" will appear In the display.
DISPLAYS TEN SECONDS
INCREASE OR
(_) DECREASE TIME
Fig. 2
DISPLAYS ONE MINUTE ZERO SECONDS
Fig° 1
(T) INCREASE OR
DECREASE TIME
TO SET THE TIMER:
NOTE: The TIMER does not control oven operatlonso
The maximum time setting is 9 hours and 55
minutes.
1. Press TIMER. "TIMER" will flash in the display.
2. Press the UP or DOWN arrow pad to select the
amount of time. Hold your finger on the arrow pad to
changethetimequickly. Touch and releasethearrow
pad to change the time slowly. The TIMER will
automatically begin counting down after a few
seconds.
3_ When the time is up, the end-of-cycle tone will beep.
Press CLOCK to return the time of day to the display.
INCREASE OR
(D DECREASETIME
Fig. 3
DISPLAYS ONE HOUR: ZERO MINUTES
HOLD INCREASE OR
(_ TO CANCEL TIMER DECREASETIME
Fig. 4 NCERC08
TO RESET THE T|MER:
"TIMER" will stop flashing and the TIMER will start
counting down a few seconds after you stop touching
the UP or DOWN arrow. If you pause while selecting the
time and the tlmer activates, press TIMER again and
continue to set the time.
TO CANCEL THE TIMER:
After TIMER begins to count down, press TIMER and
hold TIMER In at least four seconds until "TIMER" quits
flashing and time of day returns to display.
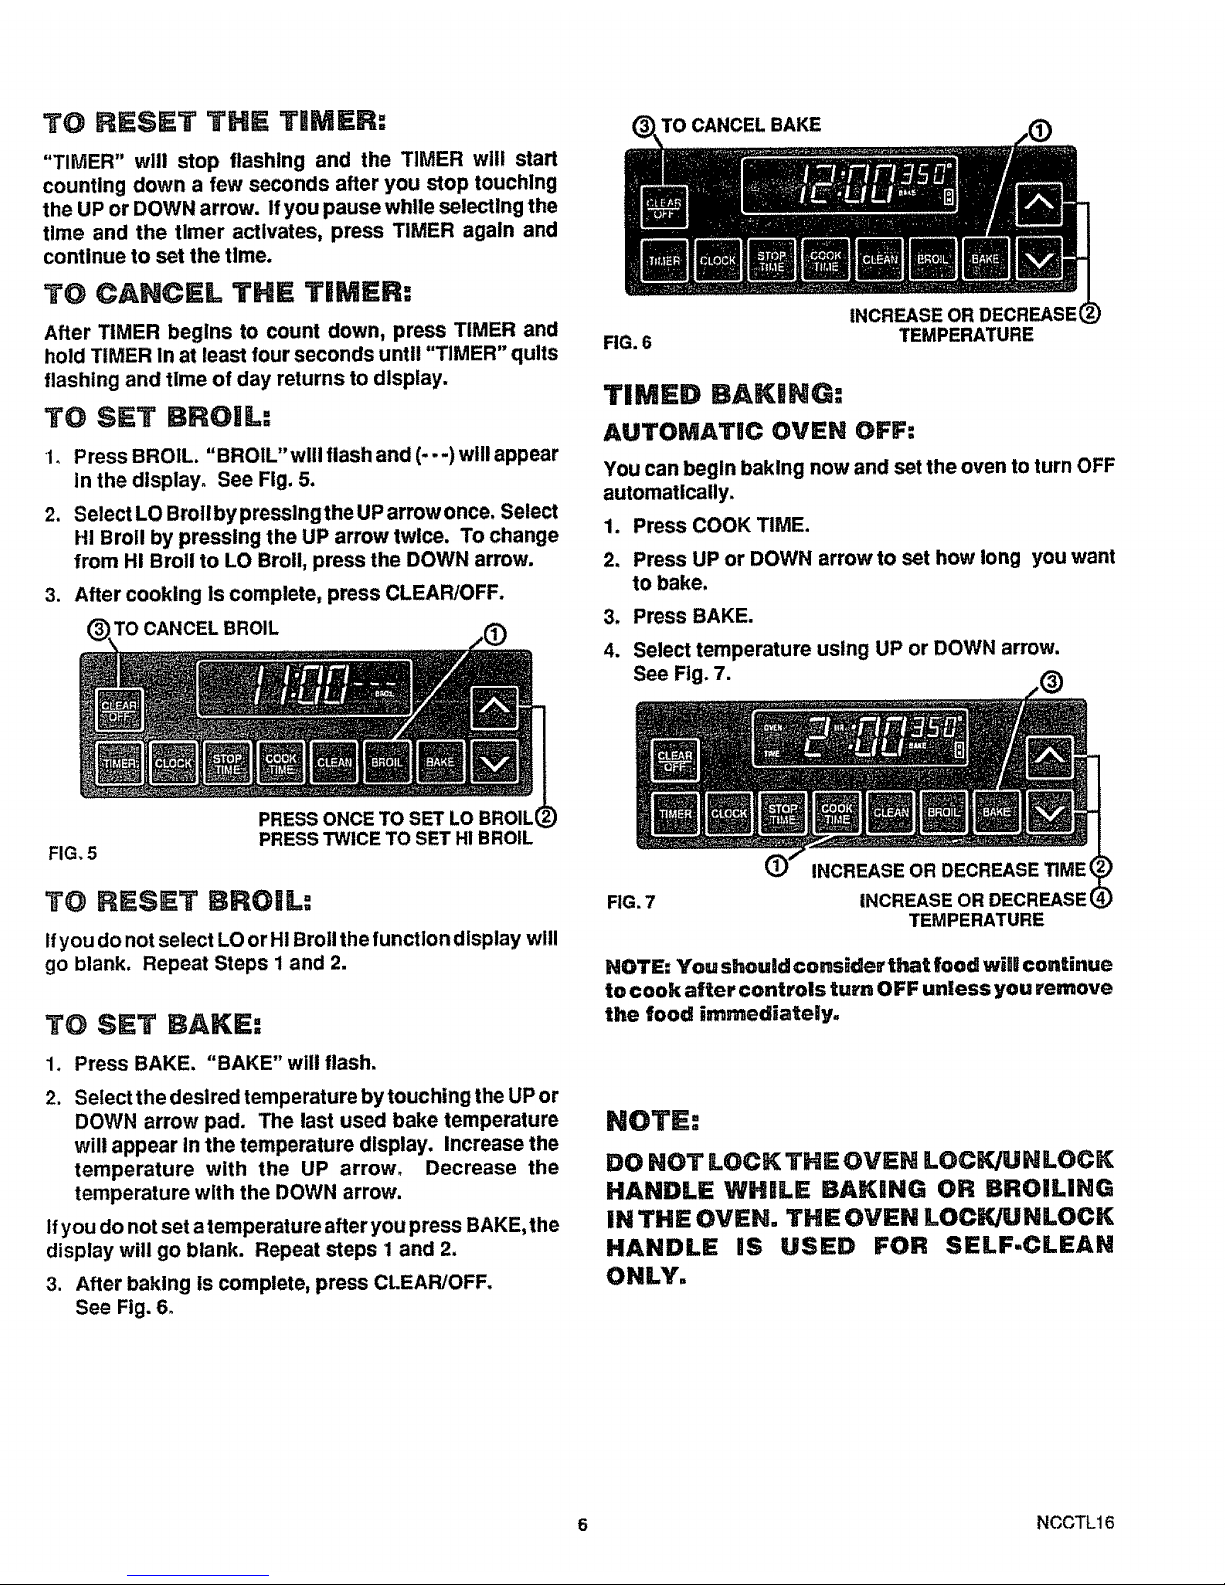
TO SET BROIL:
I,.Press BROIL. "BROIL" will flash and (- --) will appear
In the display° See Fig. 5,
Select LO Broil by presslngthe UP arrow once. Select
H! Broll by pressing the UP arrow twice. To change
from HI Broil to LO Broil, press the DOWN arrow.
3. After cooking is complete, press CLEAR/OFF.
(_, TO CANCEL BROIL
bTOCANCEL BAKE
FIG. 6
INCREASE OR DECREASE4
TEMPERATURE
TIMED BAKING:
AUTOMATIC OVEN OFF:
You can begin baking now and set the oven to turn OFF
automatically.
1. Press COOK TIME.
2. Press UP or DOWN arrow to set how long you want
to bake.
3. Press BAKE.
4. Select temperature using UP or DOWN arrow,
See Fig. 7.
FIG, 5
PRESS ONCE TO SET LO BROILq
PRESS TWICE TO SET HI BROIL
TO RESET BROIL:
Ifyou do not select LO or Hi Broil the function display will
go blank. Repeat Steps 1 and 2.
TO SET BAKE:
.
2.
Press BAKE. "BAKE" will flash.
Select the desired temperature by touching the UP or
DOWN arrow pad. The last used bake temperature
will appear In the temperature display. Increase the
temperature with the UP arrow. Decrease the
temperature with the DOWN arrow.
Ifyou do not set atemperature after you press BAKE, the
display will go blank. Repeat steps 1 and 2.
3. After baking Is complete, press CLEAR!OFF,
See Fig. 6o
FIG.7
INCREASE OR DECREASE_ME(
INCREASE OR DECREASE(
TEMPERATURE
NOTE: You should consider that food will continue
to cook after controls turn OFF unless you remove
the food immediately.
NOTE:
DO HOT LOCK THE OVEN LOCK/UNLOCK
HANDLE WHILE BAKING OR BROILING
IN THE OVEN. THE OVEN LOCK/UNLOCK
HANDLE iS USED FOR SELF-CLEAN
ONLY.
6 NCCTL16
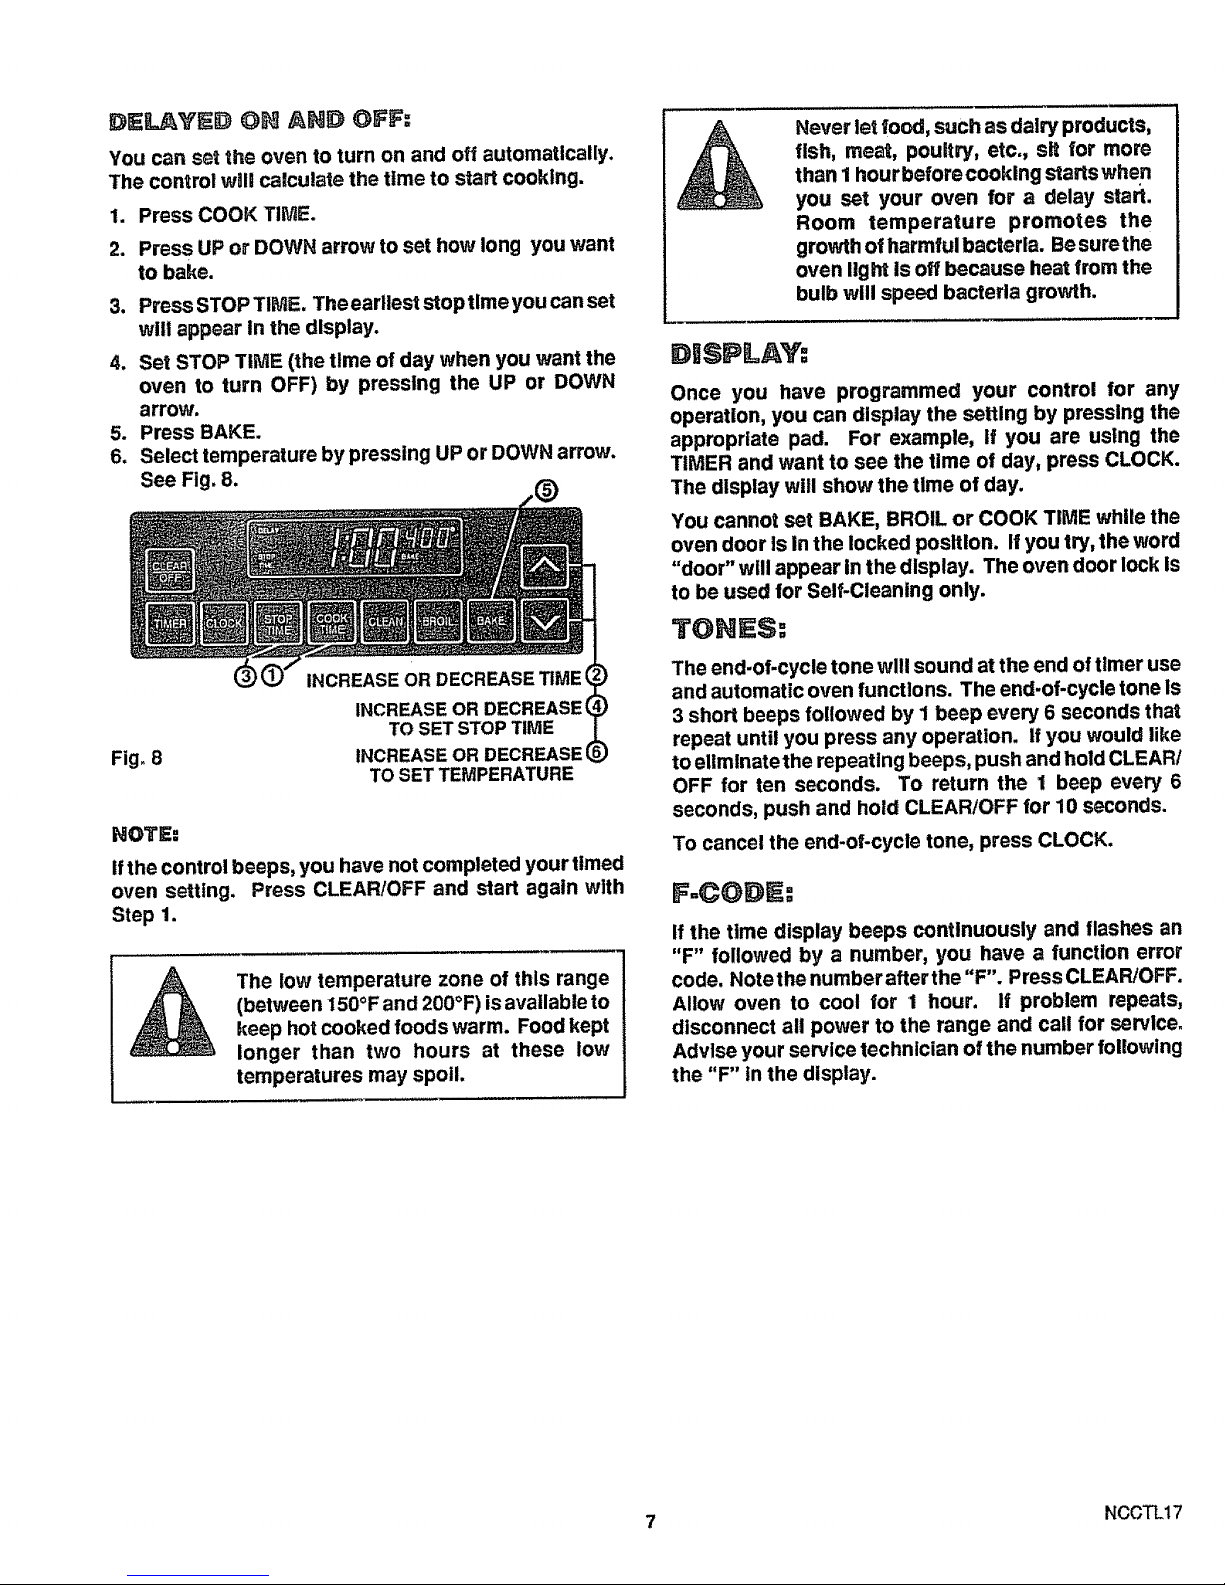
DELf_Y_ 0_ AND OFF:
You can set the oven to turn on and off automatically.
The control wall calculate the time to start cooking.
1. Press COOK TIME.
2. Press UP or DOWN arrow to set how long you want
to bake.
3. Press STOP TIME. Theearllest stop time you can set
will appear In the display.
4. Set STOP TIME (the time of day when you want the
oven to turn OFF) by pressing the UP or DOWN
arrow.
5. Press BAKE.
6. Select temperature by pressing UP or DOWN arrow.
See Fig. 8.
Fig° 8
INCREASE OR DECREASEI
TO SET STOP TIME
INCREASE OR DECREASEq
TOSET TEMPERATURE
NOTE:
ifthe control beeps, you have not completed your timed
oven setting. Press CLEAR/OFF and start again with
Step 1.
The low temperature zone of this range
(between 150°F and 200°F) isavailable to
keep hot cooked foods warm. Food kept
longer than two hours at these low
temperatures may spoil.
Never let 4oo4, such as dairy products,
fish, meat, poultry, etc., sit for more
than I hour before cooking starts when
you set your oven for a delay start.
Room temperature promotes the
growth of harmful bacteria. Besure the
oven light Is off because heat from the
bulb will speed bacteria growth.
DWSPLAY:
Once you have programmed your control for any
operation, you can display the setting by pressing the
appropriate pad. For example, if you are using the
TIMER and want to see the time of day, press CLOCK.
The dlsplay will show the time of day.
You cannot set BAKE, BROIL or COOK TIME while the
oven door Is in the locked position. If you try, the word
"door" will appear In the display. The oven door lock Is
to be used for Self-Cleaning only.
TOH S:
The end-of-cycle tone will sound at the end of timer use
and automatic oven functions. The end-of-cycle tone Is
3 short beeps followed by I beep every 6 seconds that
repeat until you press any operation. If you would like
to eliminate the repeating beeps, push and hold CLEAR/
OFF for ten seconds. To return the 1 beep every 6
seconds, push and hold CLEAR/OFF for 10 seconds.
To cancel the end-of-cycle tone, press CLOCK.
F=CODE:
If the time display beeps continuously and flashes an
"F" followed by a number, you have a function error
code. Note the number after the "F". Press CLEAR/OFF.
Allow oven to cool for t hour. If problem repeats,
disconnect all power to the range and call for servlce_
Advlse your service technician of the number following
the "F" in the display.
7 NCCTL17
 Loading...