

Kenmore 911.93582, 911.93508, 911.93588, 911.93601, 911.93602 Use And Care Manual
...
t
30" Self-Cleaning
Electric Free-Standing Range
Use & Care Guide
Estufa EI6ctrica
30" Tipo "lndependiente"
con Autolimpieza
Guia para el Uso y Cuidado
Models, Modelos 911.93501, 93508, 93581, 93582, 93587,
93588, 93601,93602, 93607, 93608
÷
÷
229c4o2oP183-6
(SR-10452)
Sears, Roebuck and Co,
Hoffman Estates, IL 60179 U.SJ_. www.sears.eom
I ÷
SELF-CLEANiNG
FREE-STANDiNGRANGE
Tableof Dontents
RangeSafety ........................3-7
Anti-Tip Bracket....................3-4
Oven Racks............................ 17
Oven Control.......................... 17
Broiling............................. 18-19
÷
Featuresof YourRange ...........8
Removalof Packaging Tape.... 8
Cooking Elements ....................9
Control Settings........................9
Home Canning Tips .................. 9
Hour/Minute ArrowPad ..........10
Temp Recall ...........................10
Display.................................... 10
Oven Light Switch ..................10
Indicator Lights .......................10
Black OutThe Display ............10
F-Codes.................................. 11
PFCode .................................. 11
Automatic Oven Shutoff .........11
ToSet The Clock .................... 12
ToSet TheTimer .................... 12
To ResetTheTimer ................ 12
To Cancel The Timer ..............12
Baking .............................. 13-14
Oven Cooking Tips ........... 15-17
Strong Smell or Odor.............. 15
Aluminum Foil......................... 15
Oven Vent ............................... 15
Peeking................................... 15
Preheating .............................. 15
Oven Light ..............................15
Baking With Margarine ...........15
Bakeware Placement..............16
Bakeware ................................16
Element Cycling .....................16
Self-Cleaning Cycle .......... 20-21
Preparing YourOven..............20
Oven DoorGasket..................20
ToSet AClean Cycle .............21
To SetA Delayed Cycle .........21
ToStopA Cycle......................21
AfterThe Cycle.......................21
ControlPanel..........................22
BroilerPanand Grid...............22
WallsOf The Oven..................22
Cooktopand Area Under
Cooktop..................................22
Drawerand SidesofRange .. 22
Oven DoorGlass....................22
DoorVentTrim........................22
RemovableParts.............. 23-28
Lift-UpCooktop......................23
ControlKnobs.........................24
OvenLightBulb......................24
CooktopUnits.........................25
OvenRacks ............................26
OvenDoor ........................26-27
StorageDrawer ......................28
BeforeCalling for
Service.............................. 29_31
TemperatureAdjusb]_3nt.... 17,32
Warranty.................................34
ConsumerServiceNumbers.,.68
For your convenience and future reference, please write down your model
and serial numbers In the apace provided. They are located on the front
frame behind the storage drawer.
MODEL NUMBER:
SERIAL NUMBER:
© Sears, Roebuck and Co.
,2
÷
I 2_'t8_EN'_01 .pro6 2 ÷ _24J00, _34 AM
f [
PI iiii!i m
÷
IMPORTANTSAFETY
INSTRUCTIONS
SAVE THESE INSTRUCTIONS
Read all Instructions before using this appliance. When using gea
or electrical appliances, basic safety precautions should be followed,
Including the following:
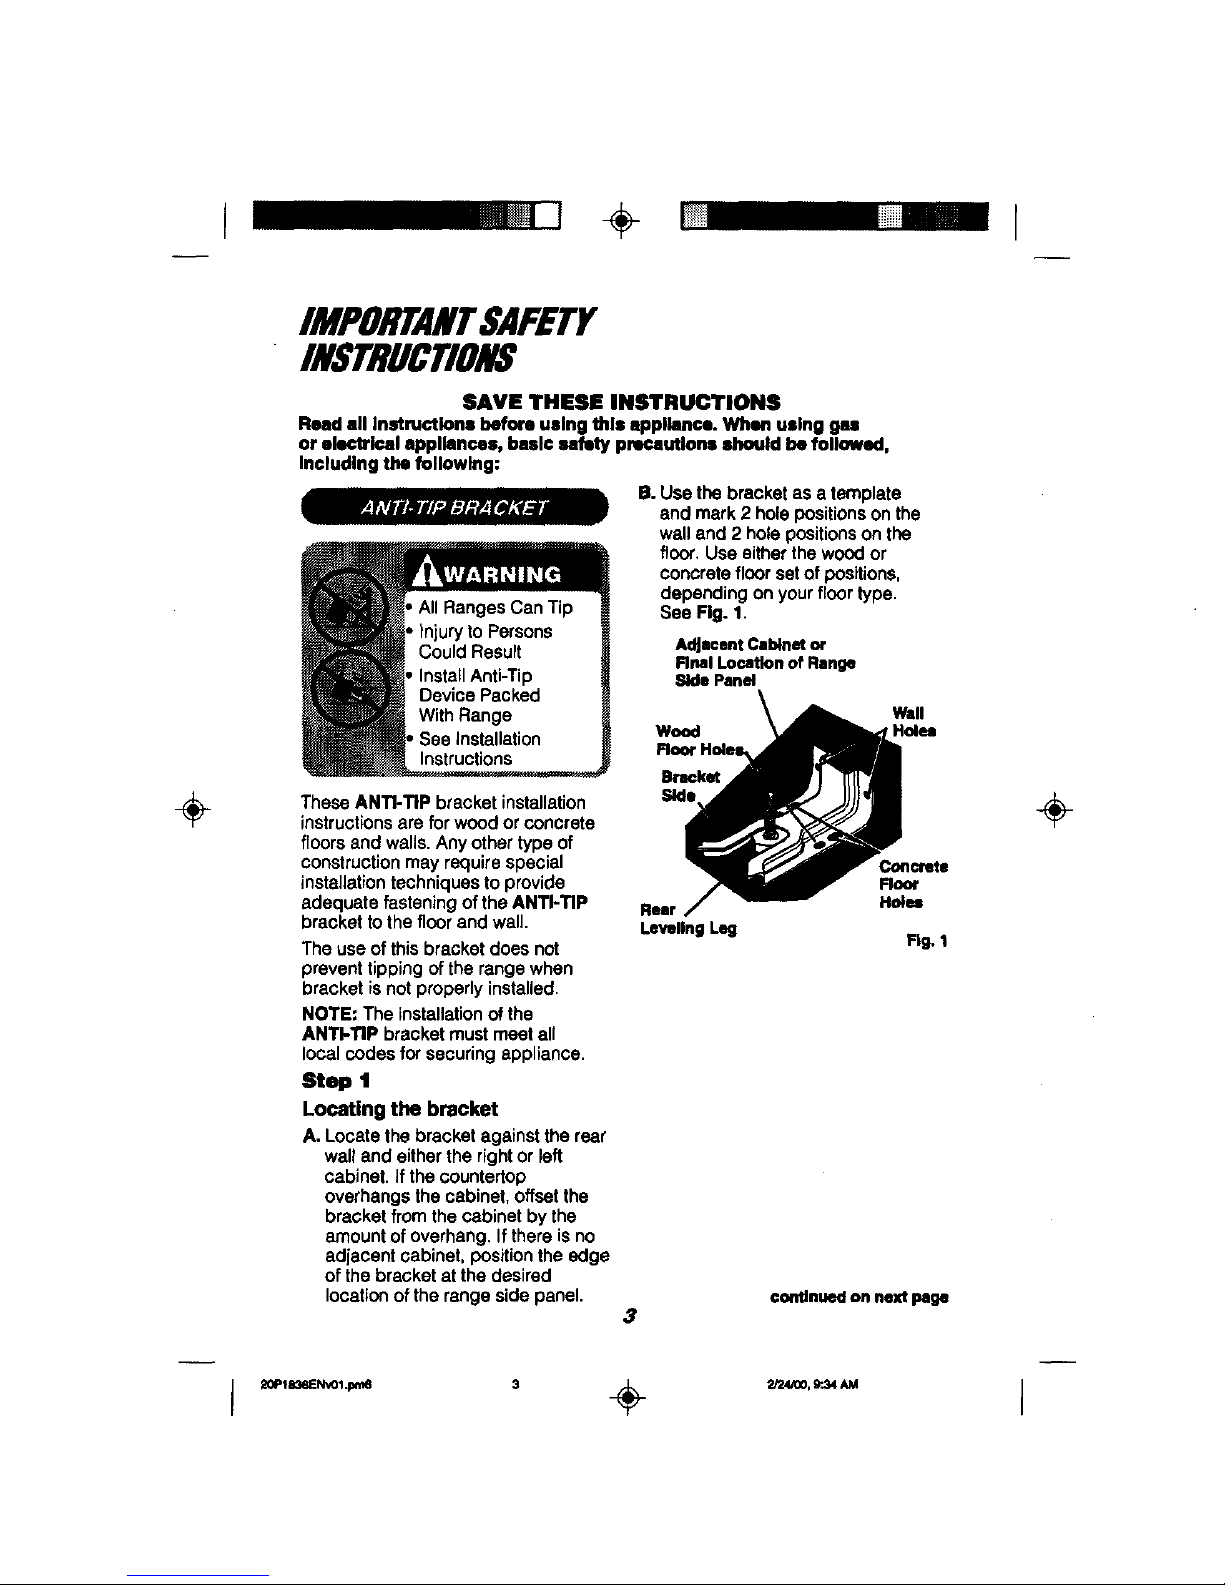
B. Usethe bracketas atemplate
and mark2 holepositionsonthe
wall and 2 holepositionsonthe
floor,Use either the woodor
concretefloor setof positions,
dependingonyourfloortype.
See Fig. 1.
Adjacent Cabinet or
Final Location of Range
Side Panel
TheseANTI-TIP bracket installation
instructionsare for wood orconcrete
floors andwalls.Any othertypeof
constructionmayrequirespecial
installation techniquesto provide
adequatefastening oftheANTI-TIP
bracket tothe floorand wall.
The useof thisbracketdoes not
preventtippingof the rangewhen
bracket isnotproperlyinstalled.
NOTE: The installation of the
ANTI-TIP bracketmustmeatall
localcodes forsecuringappliance.
Step 1
Locating the bracket
A. Locatethe bracketagainstthe rear
walland eitherthe rightorleft
cabinet, if the countertop
overhangsthe cabinet,offsetthe
bracketfrom thecabinet bythe
amountof overhang.Ifthereis no
adjacentcabinet, position the edge
ofthe bracket atthe desired
locationoftherangeside panel.
Wood
Floor Holes
Bracket
Side
Rear
Leveling Leg
3
Wall
Holes
Fig. 1
€ondnued on next page
÷
I
÷
IMPORTANTSAFETY
INSTRUCTIONS
Ard_l-TIp Bracket (contd.)
Step 2
Anti-tip bracket installation
A. Wood Construction:
1. Roor. Drilla _' pilothoaein
the centerof each pre-.marked
woodfloorhole position(a nail
or awlmay be usedif a drillis
notavailable),
AND
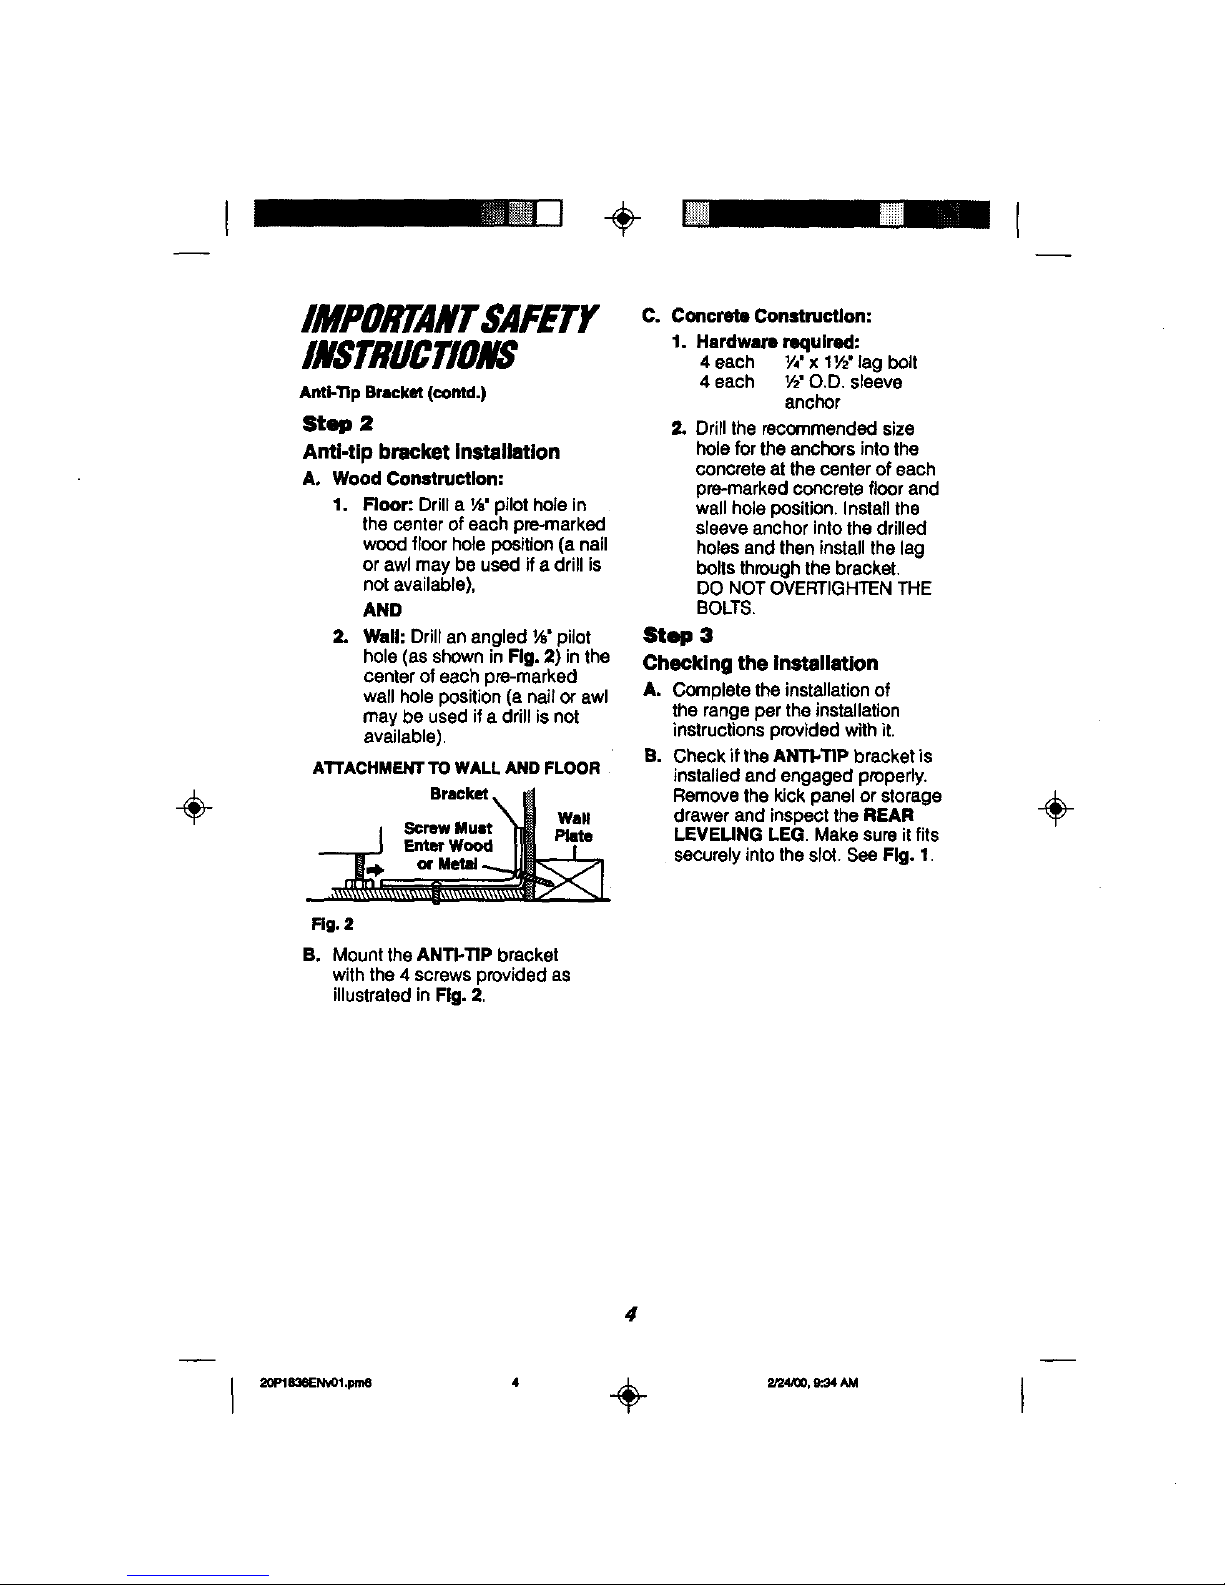
2. Wall: Drillan angled _" pilot
hole (as showninFig. 2) inthe
centerofeach pre-marked
wall holeposition(a nailor awl
may be usedif a drillis not
available).
A'rrACHMENTTOWALLANDFLOOR
Bracket
I ScrewMunt "_ Plate
__..._j F.==w_ Im T
Rg. 2
B. Mount theANTI-TIP bracket
withthe4screwsprovided as
illustratedin Fig. 2,
C. Concrete Construction:
1. Hardware required:
4 each V,'x 11/2'lag bolt
4 each V£O.D. sleeve
anchor
2. Drillthe recommendedsize
hole forthe anchors intothe
concreteatthe centerof each
pre-markedconcretefloorand
wallholeposition.Installthe
sleeveanchorintothedrilled
holesandtheninstallthelag
boltsthroughthebracket.
DO NOTOVERTIGHTENTHE
BOLTS.
Step 3
Checking the installation
A. Complete theinstallationof
the rangeper theinstallation
instructionsprovidedwithit.
B. CheckiftheANTI.TIP bracketis
installedand engaged properly.
Removethekick panelor storage
drawerand inspeottheREAR
LEVEUNG LEG. Makesureit fits
securelyintotheslot.See Fig. 1.
÷
4
I
÷
÷
IMPORTANTSAFETY
INSTRUCTIONS
from abnormal use, Including
exceealvs loading of the oven
door, attach the range to the
wall orfloor by installing the
Anti-Tip device supplied, if the
range is moved for cleaning,
servicing or any reason, be
sure the Anti-Tip device is
re-engaged properly when
the range Is slid back n the
opening. Failure to do so could
resultIn the rangetippingend
may causepersonal Injury. To
Inspect the AnU-TIp device,
remove the storage drawer end
look to see If the rear leg leveler
fully engages the slot In the
bracket.
t #
Important: To ensure safetyfor
yourself, family,and home,please
read yourOwner'sManualcarefully.
Keep ithandyfor reference.Pay
closeattentionto SafetySections.
BE SURE your appliance is installed
and groundedby a qualified
technician.
IMPORTANT SAFETY
NOTICE:
The California Safe Drinking
Water andToxic Enforcement Act
requires the governorof California
to publish • list of substances
known to the stets to cause birth
defects or other reproductive harm
and requires businesses to warn
their customers of potential
exposure to such substances.
The fiberglass insulation ina
saIl-cleaning oven will give off a
very small amount of carbon
monoxide during the cleaning
cycle. Exposurecan be minimized
byventing with an open dooror
window or usinga ventilationfan
or hood.
IMPORTANT: The health of
some birds is extremely sensitive
to the fumes given off during
the self-cleaning cycle of any
range. Move birds to another
well-ventilated room.
• DO NOT leavechildren alone
or unattendednear an appliance
in use.
• TEACH CHILDREN notto play with
controlsorany part ofthe appliance
and nottosit,ctimb,or standon the
dooror any otherpartsof the
appliance.
• CAUTION: NEVER STORE
itemsof interestto childrenonthe
backguard orincabinetsabove the
appliance,Childrenclimbing on the
appliance couldbe seriouslyinjured,
• KEEP THIS bookfor lateruse.
• NEVER TRY to repair or replace
any part of the appliance unless
instructions are given in this manual.
Atl other work should be done by a
qualified technician.
• NEVER USE your appliance for
warming or heating the room.
÷
5
j , ÷ ,-,=.,,'-, f
f
[
W
÷
IMPORTANTSAFETY
INSTRUCTIONS
• ALWAYS KEEP combustible wall
coverings, curtains, dishcloths,
towels,potholdersand otherlinens
a safedistancefrom the appliance.
• NEVER HEAT unopenedfood
containers.Pressurebuildupcan
cause the containerto burst and
causeinjury.
• NEVER LEAVE containersof fat or
drippingsinyouroven.
• ALWAYS KEEP theoven and
surfaceunitareas free from things
thatwill burn.Food, wooden
utensils,and grease buildup could
catchfire. Plasticutensilscould
meltand cannedfoods could
explode.Your appliance should
neverbe used as a storagearea.
• ALWAYS KEEP yourappliance
clear of thingsthatwillburn
(gasolineand other flammable
vaporsor liquids).
• NEVER TRY to cleanhot
surfaces.Some cleanersproduce
noxiousfumes, and wet clothsor
spongescould cause steamburns.
• NEVER WEAR loose-fittingclothing
when usingyourappliance.
• NEVER USEa towelorother bulky
clothas apotholder.Make surethe
potholderisdry. Moistpotholders
and wet clothsor spongesoouJd
causesteam burns. DO NOT let
potholderstouchhotheating
elements.
• DO NOTtouch heating elements,
surfacesnearthem,or interioroven
surfaces.Thesemay be hotenough
tocause burnseventhoughthey
are darkin color.Duringand after
use,do nottouchor let clothingor
flammablematerialcontactthe
elementsor hotsurfacesuntil they
havehadtimetocool.Other
surfacesnear the ovenvent
openings, oven doorandwindow
and cooktopsurfacesmayalsobe
hotenoughto cause burns.
• ONLY CERTAINkindsof glassor
ceramiccookwarecanbe usedfor
cooktopcooking.Makesurethe
cookwareyouchooseto useis
designedfor ccoktopcooking
withoutbreakingdue to thesudden
temperaturechanges,
• ALWAYSUSE carewhentouching
cod(topelements.Theywiltretain
heataftertherangehasbeen
turnedoff.
• NEVERBLOCKtheovenairvent
underthe dghtrearelement.
• COOKWAREUSEDforcook,top
cookingshouldbeflat onthebottom
andlargeenoughto covertheheating
areabeingused.Undersizedutensils
exposethe heatingelementandmay
resultindirectcontactor ignitionof
clothing.Thepropersizeutensilwill
alsoimproveefficiency.
• ALWAYSUSE dripbowlstoprevent
widngandcomponentdamage.DO
NOT usealuminumlinersorfoil indrip
bowls.Improperusemay resultin risk
ofelectricshookorfire.
• NEVERLEAVEsurfaceunits
unattendedat highset_ngs.Boilovers
resultinsmokingorgreasyspills
whichcouldcatchfire.
• ALWAYSTURN utensilhandles
inwardand awayfromothersurface
unitstoreducetheriskofburns,
ignition,unintendedcontact,and
spillage.
• NEVERputheatingelementsin water.
• WHEN PREPARINGflaming foods
underthe venthood,turn thefanon.
6
÷
I
÷
IMPORTANTSAFETY
INSTRUCTIONS
• PLACE OVEN RACKS in the
desired positionwhilethe oven is
cool If racksmustbe movedwhile
ovenis hot,do notlet potholder
contactthehotovenelement.
• AFTER BROILING, alwaystake the
broilerpan and gridoutof theoven
and cleanthem.Leftovergrease in
the broiler pan couldcatch firethe
nexttimeyou useyouroveR.
• ALWAYS USE care whenopening
theoven door.Lethotair and steam
escape before movingfoods.
• NEVER USE aluminumfoil to line
the ovenbottom,Improperuseof
foil couldstarta fire, orelectrical
shookcouldresult.
• CLEAN ONLY the parts listed
in thismanuel. Follow all cleaning
instructions, Be sure to remove
the broiler pan end grid before the
self-clean cycle.
• NEVER RUB, move, clean, or
damage the door gasket on self-
cleaning ranges, It is essential for a
good seal.
• NEVER TRY to clean utensils,
cookware, removable parts, or
broiler pan and grid in the self-
clean cycle.
• DO NOT USE oven cleaners -
No commercial oven cleaner or
protective coating of any kind
should be used in or around any
part of the oven.
• IF THE SELF-CLEANING mode
malfunctions,turnthe ovenoffand
disconnectthepowersupply.Have
itservicedbya qualified technician.
_ CAUTION:
Nevar lins the drip bowls
with aluminum foil. Foil
can block the normal heat flow
and damage the range.
Always use cookware and woke
that are fiat on the bottom and
the same size asthe cooking
element being used.
Cookware should not extend
more than 1"beyond the edge
ofthe conking element.
READ AND UNDERSTAND
THIS INFORMATION NOW!
Be sure everyone In your home
knows whet to do In case of fire.
Never use water on a grease fire;
It will only spread the flames.
COOKTOP GREASE RRE:
Never pick up • flaming pen...
1. Turn off the surface elements.
2. Smothertheflame witha tightly
fitting lid, usebaking soda,oruse
a drychemical,foamor halon-type
extinguisher.
Do not try to =wovethe panl
1. Close the oven door and turn
controls off.
2. If firecontinues,carefullyopen
the door, throw baking sodaon
the fire, or use edrychemical,
foam, or helen-typeextinguisher.
÷
7
I I ÷
OPERATION
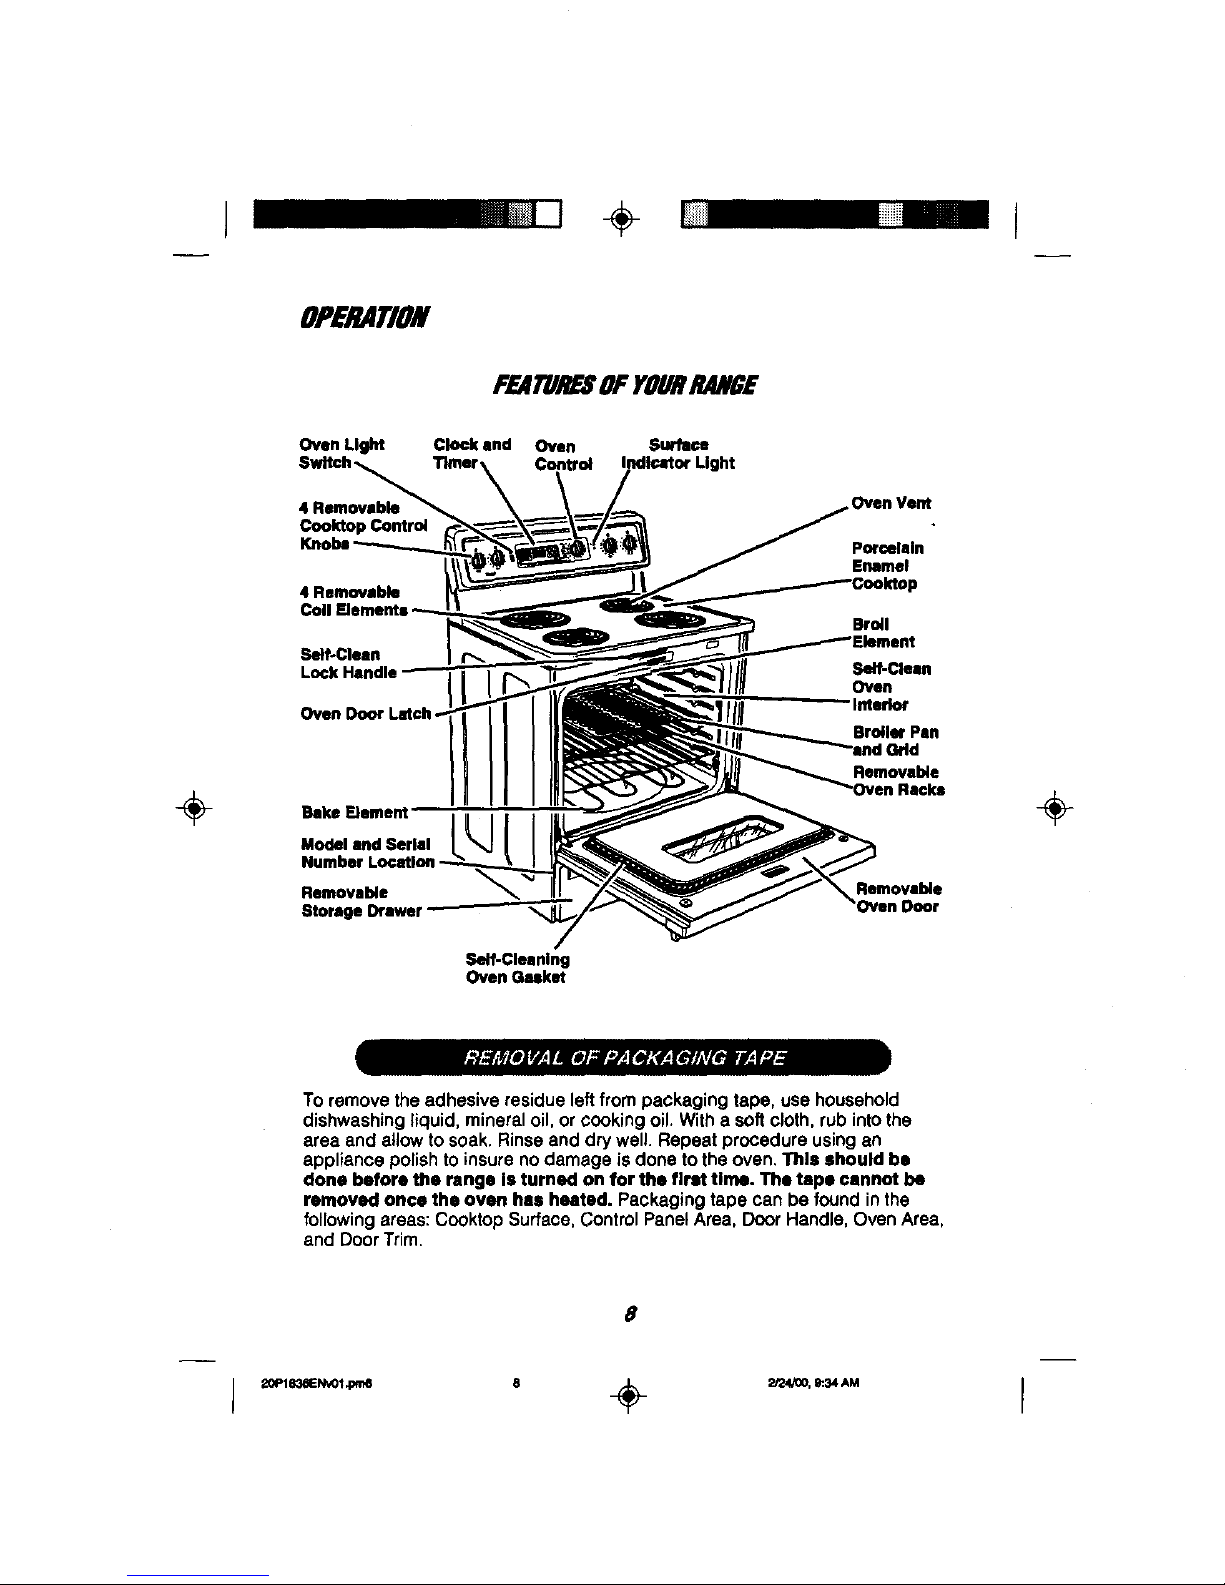
FEATURESOFYOURRANGE
÷
Oven Light Clock and Oven Surhlna
Timer Control Indicator Light
4 Removable
Cooktop Control
4 Removable
Self-Clean
Lock
Oven Door
Bake memem
Model end Serial
Number Location -
Removalde
Storage Drawer
Self-Cleaning
Oven Geaket
Oven Vent
Porcelain
Enamel
Broil
Serf-Cleen
Oven
nterle_'
Broiler Pan
and Grid
Removeble
Rllcke
Remove_e
)ocr
÷
To removetheadhesive residueleft frompackaging tape, use household
dishwashingliquid, mineraloil,or cookingoil, Witha softcloth,rub intothe
area and allowto soak.Rinse and drywell. Repeat procedureusingan
appliance polishtoinsurenodamage is done to theoven,This should be
done before the range Is tumed on for the flrattime. The tape cannot be
removed once the oven has heated. Packagingtape can be found inthe
following areas: Cooktop Surface, Control PanelArea, Door Handle,Oven Area,
and DoorTrim.
8
I
r
OPERATION
Cooktop Cooking
J
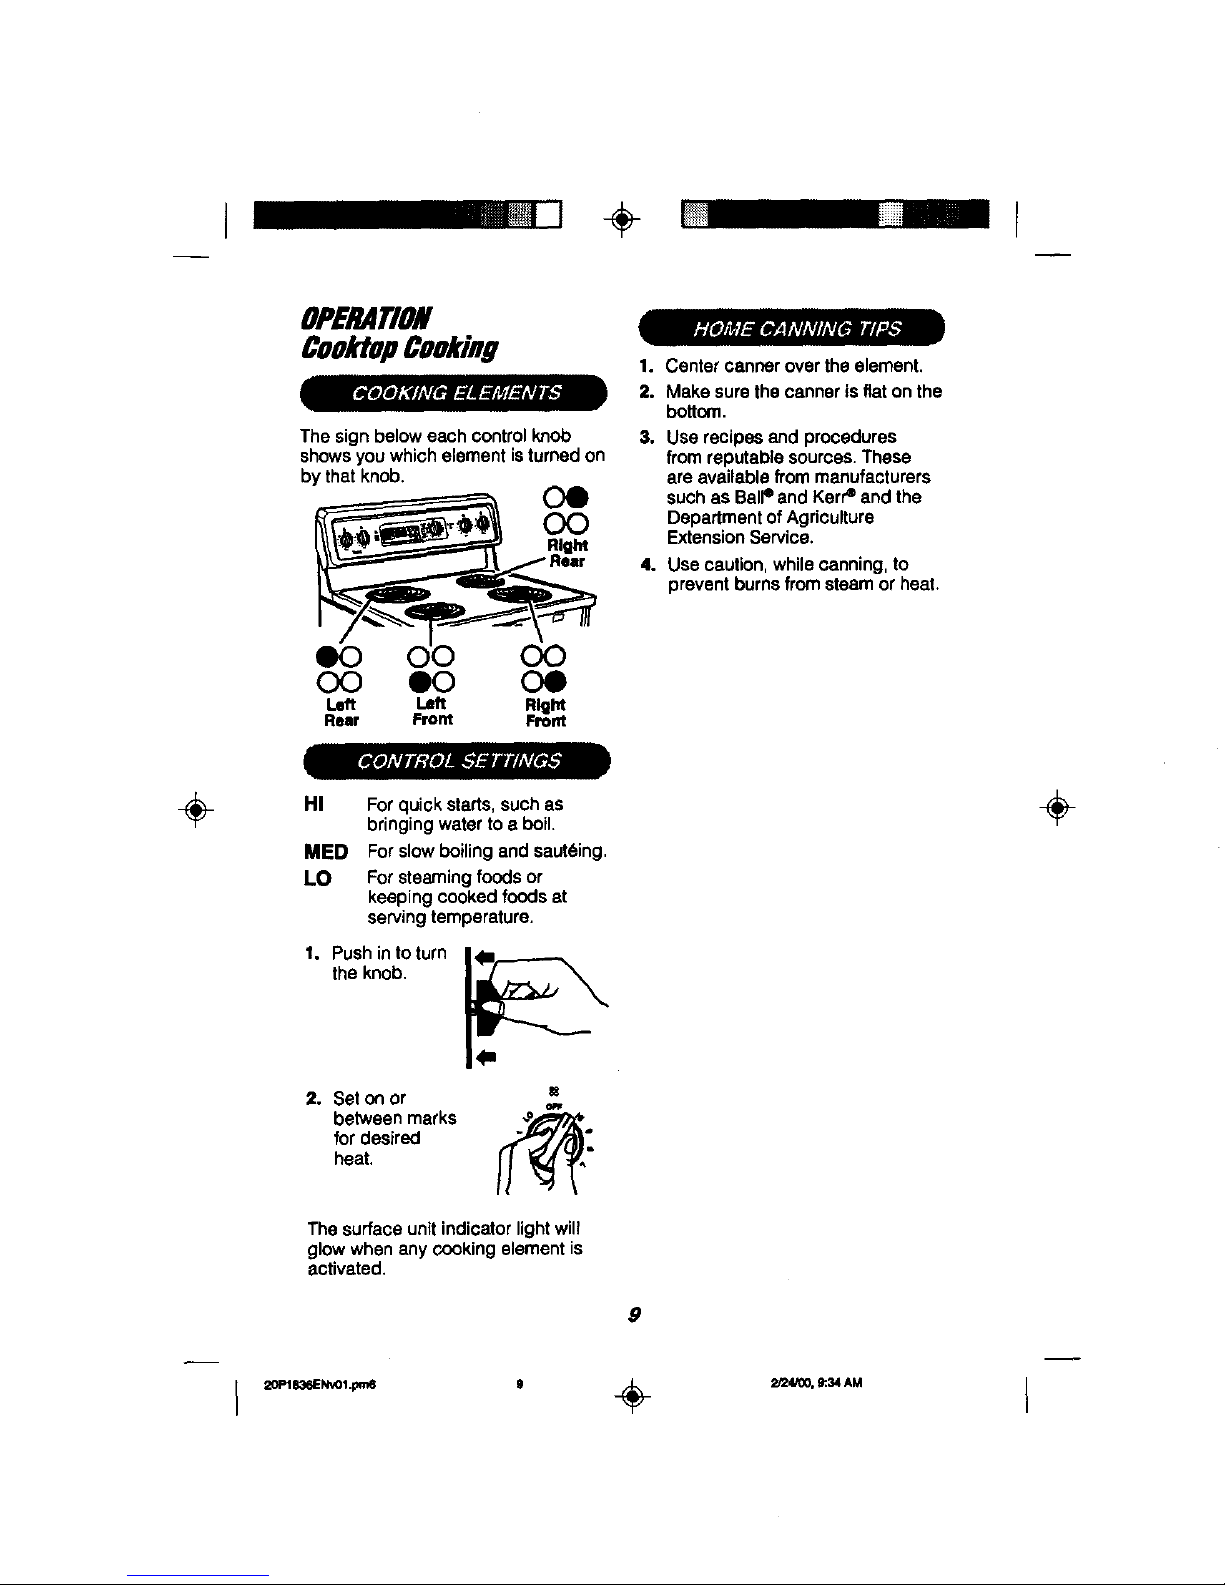
The signbelow each controlknob
showsyouwhichelementisturnedon
bythat knob.
OO
O0
O0
O0 O0 O0
Left Left Rlgflt
Rear Front Front
1.
2.
3,
4.
Centercannerover theelement.
Make surethe canneris fiaton the
bottom.
Use recipesand procedures
from reputablesources.These
are availablefrom manufacturers
suchas BalPand Kerre andthe
Departmentof Agriculture
ExtensionService.
Use caution, while canning, to
prevent burns from steam or heat.
÷
HI Forquick starts,suchas
bringing waterto a boil.
MED Forslowboilingand saut6ing,
LO Forsteamingfoods or
keepingcookedfoods at
servingtemperature.
1. Push in to turn
the knob,
2. Seton or =
between marks /_
for desired
heat,
The surfaceunitindicator light will
glowwhenany cooking elementis
activated.
9
÷
i
I ÷
r
OPERATION
OvenControl, Clock,andtimer
O'_,NCd..EJUIg4G G_OC_U, AI_4TO_ O'_O_aa_TO'_
OFF _1
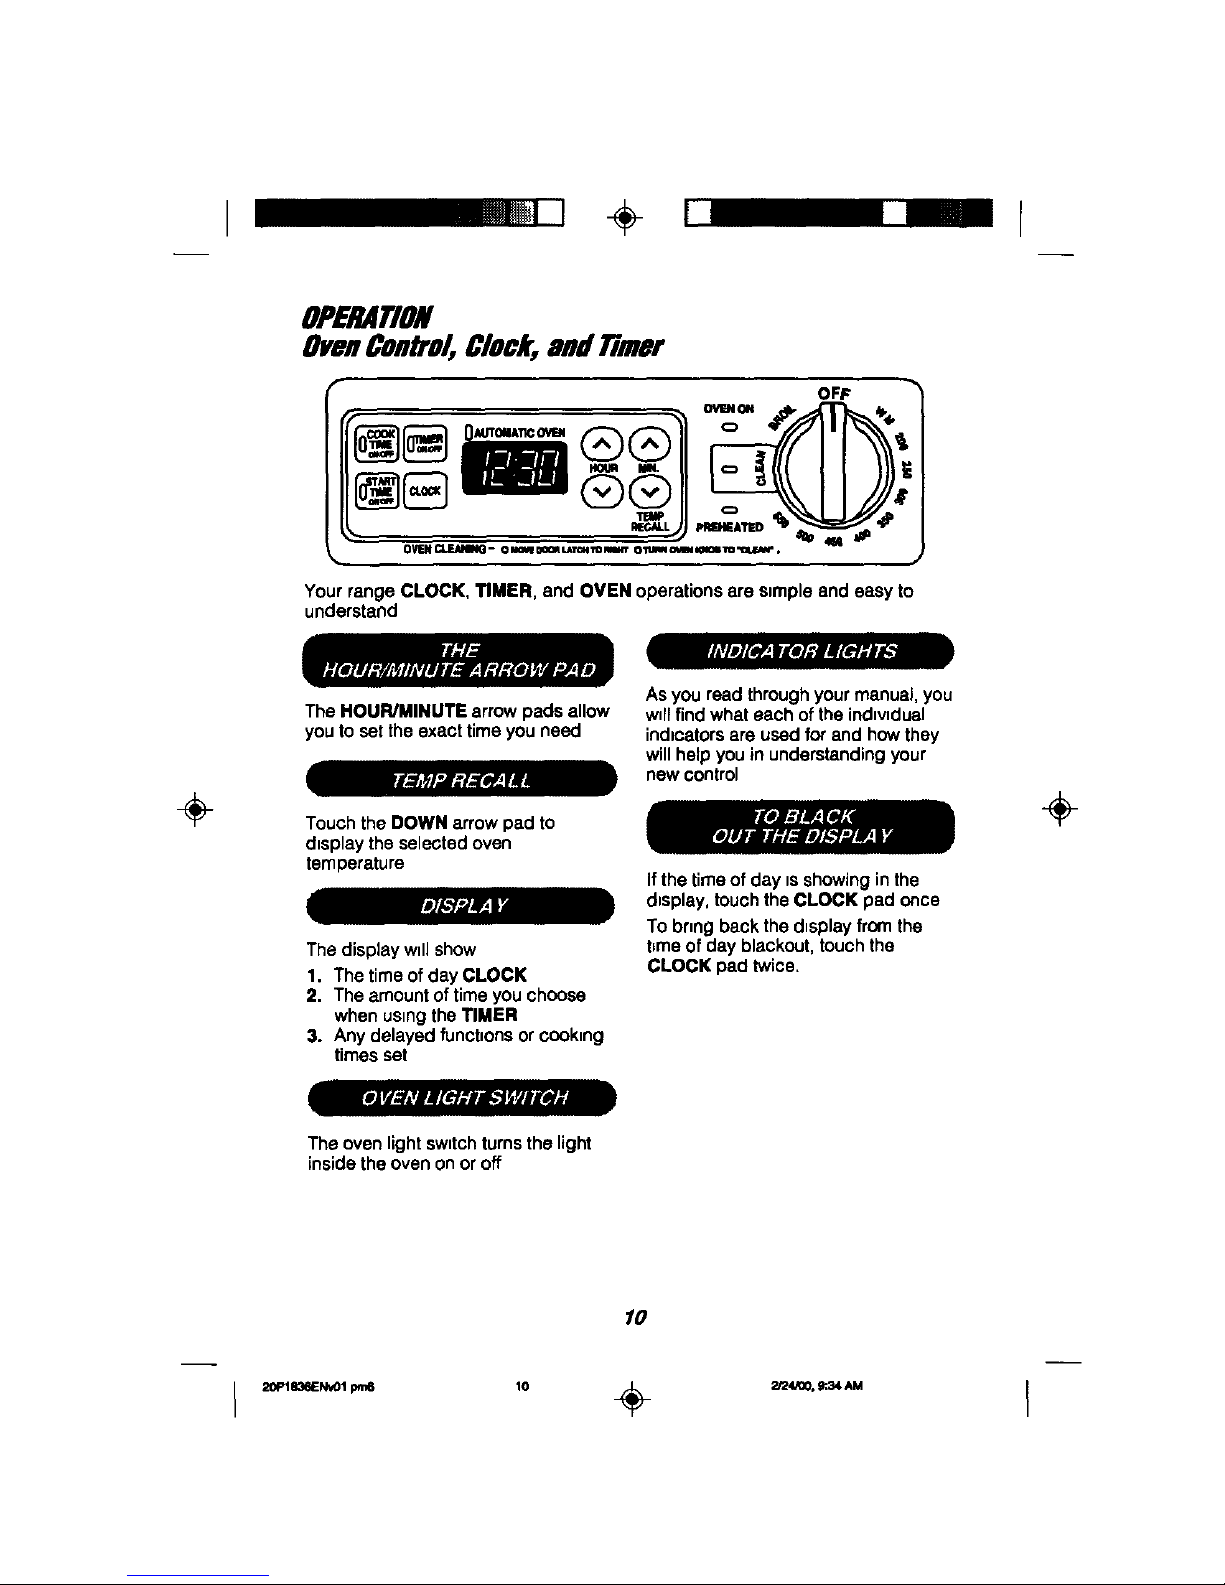
Yourrange CLOCK, TIMER, and OVEN operationsares=mpleand easy to
understand
Jm
÷
The HOUR/MINUTEarrow padsallow
youto setthe exact timeyou need
Touch the DOWN arrow pad to
d=splay the selected oven
temperature
The displaywdlshow
1. The timeof dayCLOCK
2. The amountoftimeyou choose
when us=ngthe TIMER
3. Anydelayedfunct=onsor cooking
timesset
Asyou read throughyourmanual,you
w=llfind what eachof theind_wdual
indtoatorsare usedforand howthey
willhelpyou inunderstandingyour
newcontrol
If the time of day is showing in the
dtsplay, touch the CLOCK pad once
To bring back the d_splayfrom the
bme of day blackout, touch the
CLOCK pad twice,
÷
The ovenlightsw_tchturnsthe light
inside the oven onor off
/o
I ÷
J
OPBMTiON
OvenCon ol, Clock,and Timer(cont.)
÷
If thedisplay flashes an "F" followed
by a number and beeps continuously,
you have afunction errorcode.
Note the number afterthe "F." Turn
the oven controlknob to the OFF
position. Disconnect all power to the
range for at least30 seconds and
retry the oven operation. If the "F"
displays during aself-clean cycle,
check the ovendoor latch. Make sure
the latch is moved to the right as
far as it will go. Turn the OVEN
CONTROL KNOBto the OFF
position. Allow theovento cool 1 hour
and retrythe oven operation. If the
problem repeats, call for service,
Advise the technician what the
flashing code was.
When the power to your range is
turned on for thefirsttime, or if you
experience a powerfailure, the
display will flash "PF." By touching
the CLOCK pad, the display will flash
"12:00."Touch the CLOCK pad again
and follow the instructionsto setthe
clock.Any operation set beforea
power failure will needto be reset.
The oven will automatically shut off
if it has been left on for more than
12 hours.
To deactivateor reactivatethe
automaticshutoff,touchand hold the
MIN UPand DOWN arrowpadsfor
about4 seconds,
÷
11
 Loading...