

Ken or
OWNER'S
MANUAL
MODEL NO.
91t. 9336t
911.93368
9tl. 9345t
9tt, 93458
Read and Follow All Safety
Rules and Operating
Instructions Before First
Use of This Product
911,93361
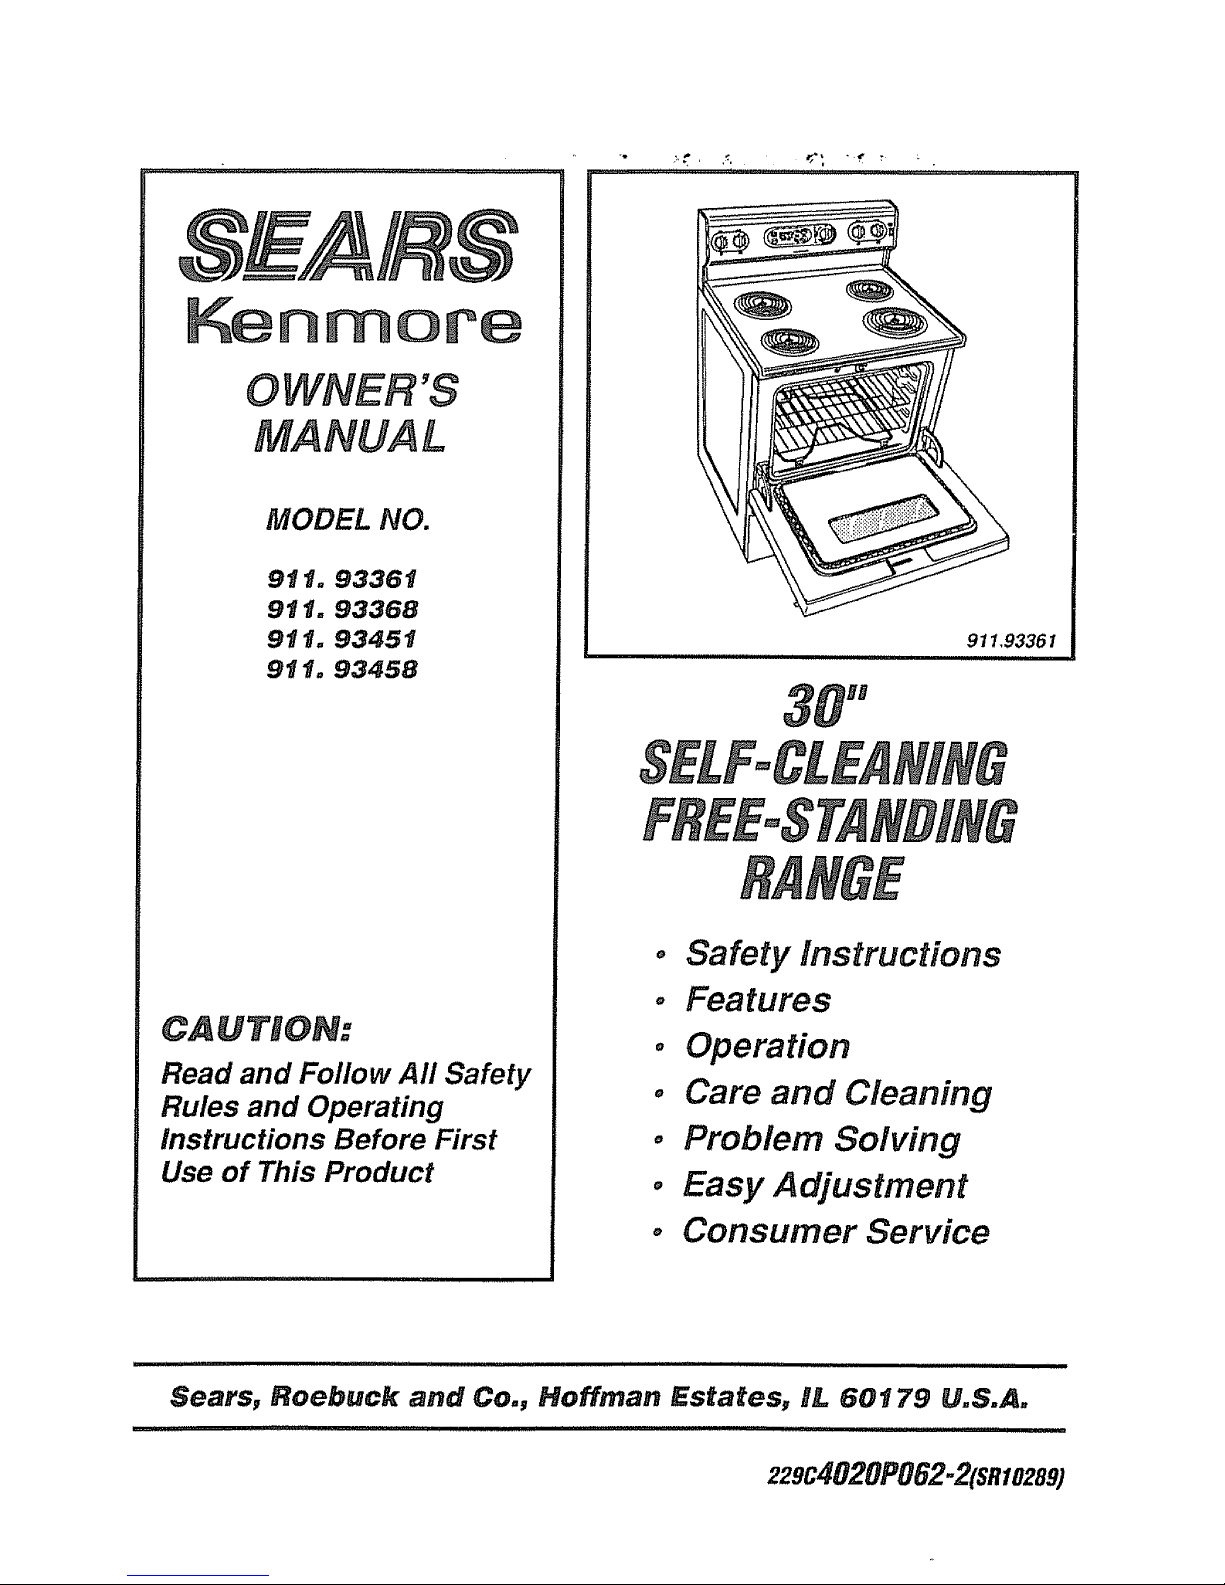
30"
SELFoCLEANgNG
o Safety Instructions
° Features
o Operation
° Care and Cleaning
° Problem Solving
o Easy Adjustment
o Consumer Service
ii i _ii ii.................................... i i i i , i ,, i i i ...................
Sears, Roebuck and Co., Hoffman Estates, tR_60t 79 U.S.A.
i _1 ilt'tL"t'tl'I ititt .............ttl ] liliM'Ni' " 't
229C4020PO62-2(SR10289)

SELF-CLEANINGFREE-STANDINGRANGE
TABLEOFCONTENTS
Range Safety .................................................3-5
Stability Device ....................................................3
Removal of Packaging Tape ........................6
Features of Your Range ...................................6
Control Settings ...................................... 7
Broiling .................................. 13
General Rules, Preparing Meats for
Broiling, How to Set Broil .............................13
Self.Cleaning ..................... I4-15
Preparing Your Oven .................................14
Oven Door Gasket ........................................t4
Door Lock Device .................................... 14
Walls of the Oven ................................. 14
How to Set A Clean Cycle ..................... 15
To Stop A Cycle ........................................ 15
After The Cycle ........................... ......... 15
Home Canning ........................................ 7
Arrow Pads ................................. .............. 8
Display .................................................. 8
Indicator Lights .............................................8
F.Codes .............................................................8
PF.Codes ..................................... 8
Black-Out Display ............................. 8
Automatic Shut-Off ............................... 8
To Set the Clock .................................. 9
To Set the Timer, ....................................... 9
Control Panel ........................................... 16
Broiler Pan and Grid ............................... 16
Cooktop .......................................... 16
Burner Box Bottom ........................ !6
Painted Surfaces ............................. 16
Glass ......................................... 16
Surface Control Knobs ..........................
17
Oven Light Bulb ................................ 17
Storage Drawer ................................. 18
Lift-Up Cooktop ........................ 18
CookTop Units .............................. 19
Oven Racks .......................... 20
Oven Door ................................ 20
Oven Cooking Tips .......................... I0-t2
How to Set Bake ...................................... t2
Before Calling for Service .............. 2I, 22
Temperature Adjustment .................. 23
Consumer Service Numbers ................. 25
Warranty
For your convenience and future reference, please write down
your model and serial numbers in the space provided. They are
located on the front frame behind the storage drawer.
MODEL NUMBER:
SERIAL NUMBER:
IMFORTA
oAll Ranges Can Tip
Result
o install Anti-tip Device ii_ii_i
Packed With Range ',_ii::ii_:i:_
o See Installation Instructions i!i!ii!
Tools you win need:
Phillips head screwdriver
1 3/8" open end or adjustable wrench
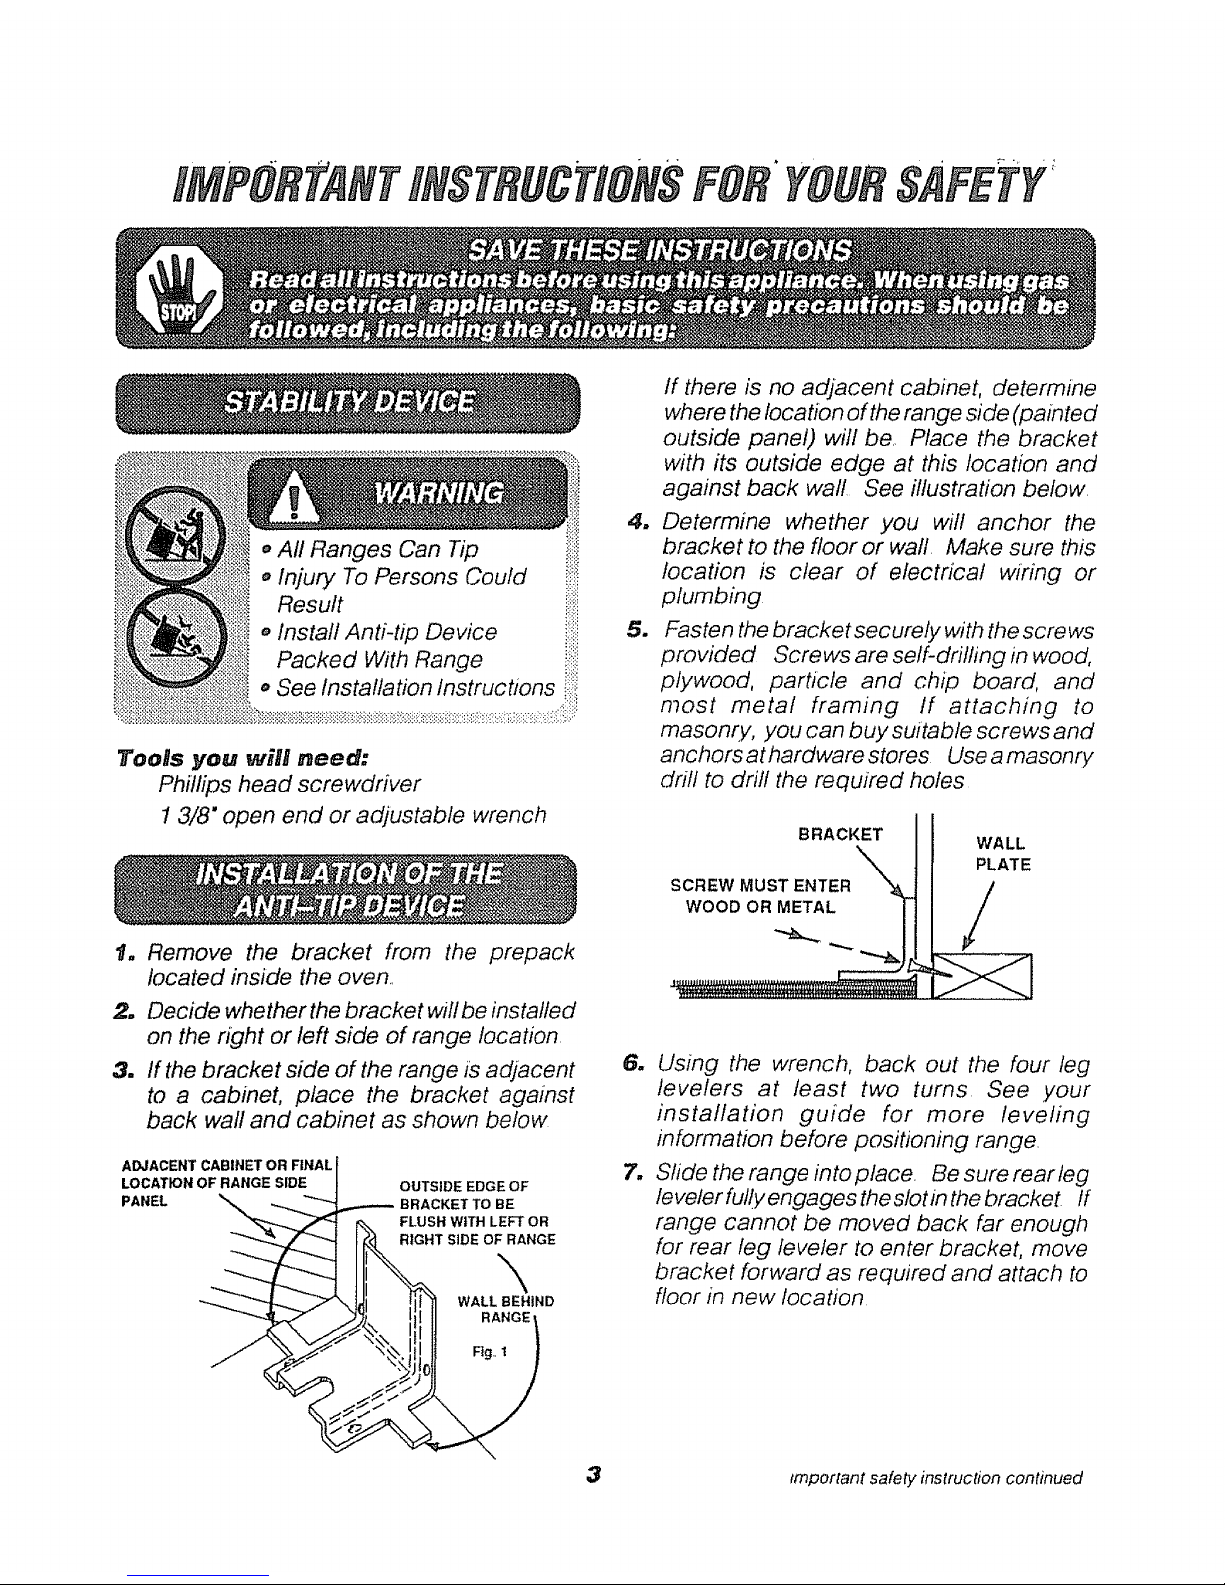
t. Remove the bracket from the prepack
located inside the oven,,
2.mDecide whether the bracket w/llbe installed
on the right or left side of range location,
If the bracket side of the range iS adjacent
to a cabinet, place the bracket against
back wall and cabinet as shown below
ADJACENT CABINET OR FINAL
LOCATION OF RANGE SIDE
PANEL
OUTSIDE EDGE OF
,..-.--.- BRACKET TO BE
,,. [_FLUSH WiTH LEFT OR
1GHT SiDE OF_NGE
WALL BEHIND
J'}i RANGE
3
=
5.
if there is no adjacent cabinet, determine
where the location of the range side (painted
outside panel) will be,. Place the bracket
with its outside edge at this location and
against back wall See illustration below,
Determine whether you will anchor the
bracket to the floor or wall Make sure this
location is clear of electrical wiring or
plumbing
Fasten the bracket securely with the screws
provided Screws are self-drilling in wood,
plywood, particle and chip board, and
most metal framing If attaching to
masonry, you can buy suitabte screws and
anchors at hardware stores Use a masonry
drill to drill the required holes
BRACKET
X
SCREW MUST ENTER _'_,
WOOD OR METAL |
/
WALL
PLATE
/
6. Using the wrench, back out the four leg
levelers at least two turns See your
installation guide for more leveling
information before positioning range,
7. Slide the range into pface Be sure rear leg
levelerfully engages the sfotin the bracket If
range cannot be moved back far enough
for rear leg leveler to enter bracket, move
bracket forward as required and attach to
floor in new location
trnporlant safety instruction continued
IMPORTANTINSTRUCTIONSFORYOURSAFETY o, i,,,,
To insure safety for yourself, family and home,
please read your Owner's Manual carefully
Keep it handy for reference. Pay close
attention to Safety Sections.
BE SURE your appliance is installed and
grounded by a qualified technician_
IMPORTANT SAFETY NOTICEI
The California Safe Drinking Water
and Toxic Enforcement Act requires
the governor of California to publish
a list of substances known to the
state to cause birth defects or other
reproductive harm and requires
businesses to warn their
customers of potential exposure to
such substances.
The fiberglass insulation in
self.cleaning oven will give off a
very small amount of carbon
monoxide during the cleaning cycle.
Exposure can be minimized by
venting with an open door or
window or using a ventilation fan or
hood.
WARNING!
_ To prevent accidental tipping
of the range from abnormal
usage, including excessive
loading of the oven door,
attach it to the wall or floor by
installing the Anti-Tip device supplied.
If the range is moved for cleaning,
servicing or any reason, be sure the
Anti-Tip device is re.engaged properly
when the range is slid back in the
opening. Failure to do so could result in
the range tipping or personal injury.
L i ii,lllj U I'1'1 II I IIII i i i iii i iii iiiii
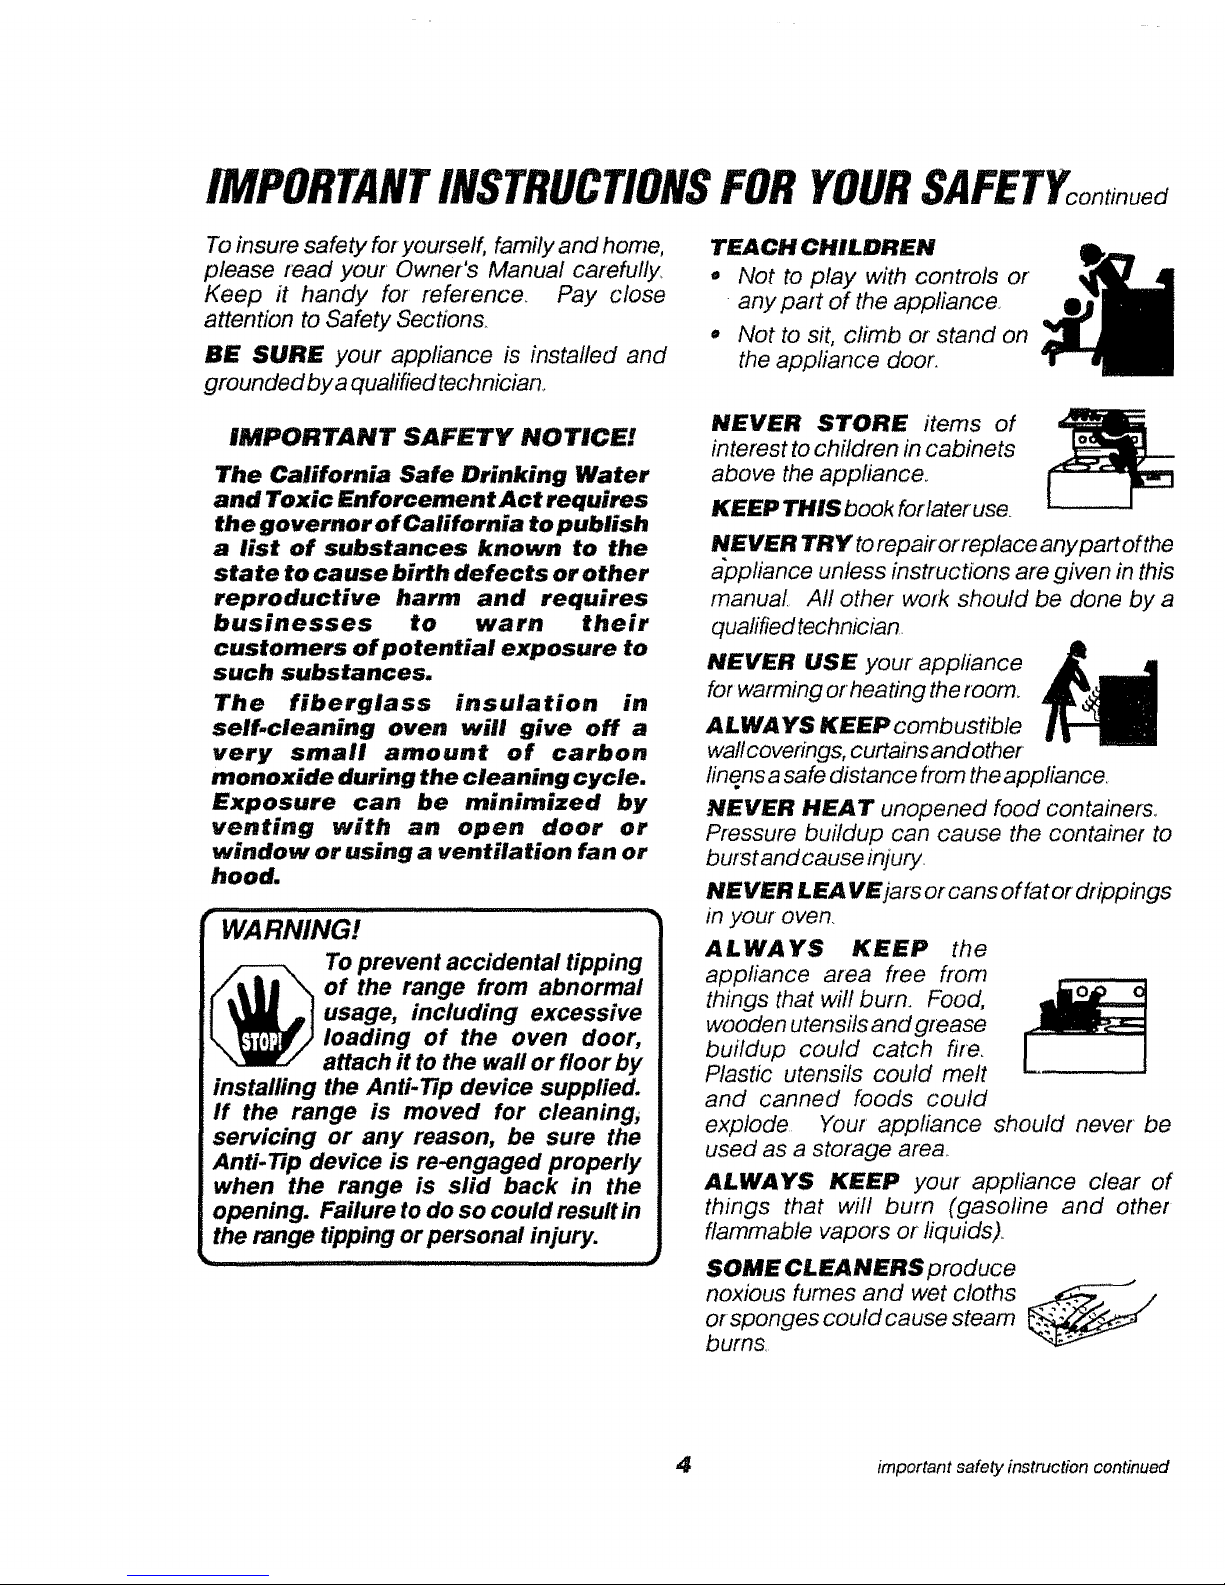
TEACH CHILDREN
,, Not to play with controls or
•any part of the appliance.
• Not to sit, climb or stand on
the appliance door.
NEVER STORE items of
interest to children in cabinets
above the appliance.
KEEP THIS book forlater use.
NEVER TRY to repa#or replace anypart ofthe
appliance unless instructions are given in this
manual, All other work should be done by a
qualified technician.
NEVER USE your appliance ,_ _
for warming or heating the room_
ALWAYS KEEP combustible
wafl coverings, curtains and other
linens asafe distance from the appliance
NEVER HEAT unopened food containers,
Pressure buildup can cause the container to
burst and cause injury.
NEVER LEA VEjars or cans offat or drippings
in your oven.
ALWAYS KEEP the
appliance area free from
things that will bum. Food,
wooden utensils and grease
buildup could catch fire.
Plastic utensils could melt
and canned foods could
explode Your appliance should never be
used as a storage area..
ALWAYS KEEP your appliance clear of
things that will burn (gasoline and other
flammable vapors or liquids).
SOME CLEANERS produce
noxious fumes and wet cloths _---_. /
or sponges could cause steam
burns
4 important safety instruction continued
NEVER WEAR loose fitting clothing when
using your appliance,
NEVER USE a towel or
other bulky cloth as a
potholder and make sure the
potholder is dry, Moist
potholders could cause
steam burns. Keep dish
towels, dish cloths,
potholders and other linens a safe distance
away from your appliance_
ONLY SOME kinds of glass or ceramic
cookware can be used for cooktop cooking,
Make sure the cookware.you choose to use is
designed for cooktop cooking
ALWAYS USE care when touching cooktop
elements. They will retain heat after the range
has been turned off
NEVER BLOCK the oven air vent under the
right rear element..
COOKWARE USED for cooktop cooking
should be flat on the bottom
and large enough to cover
the heating area being used.
SA onZ,nuo
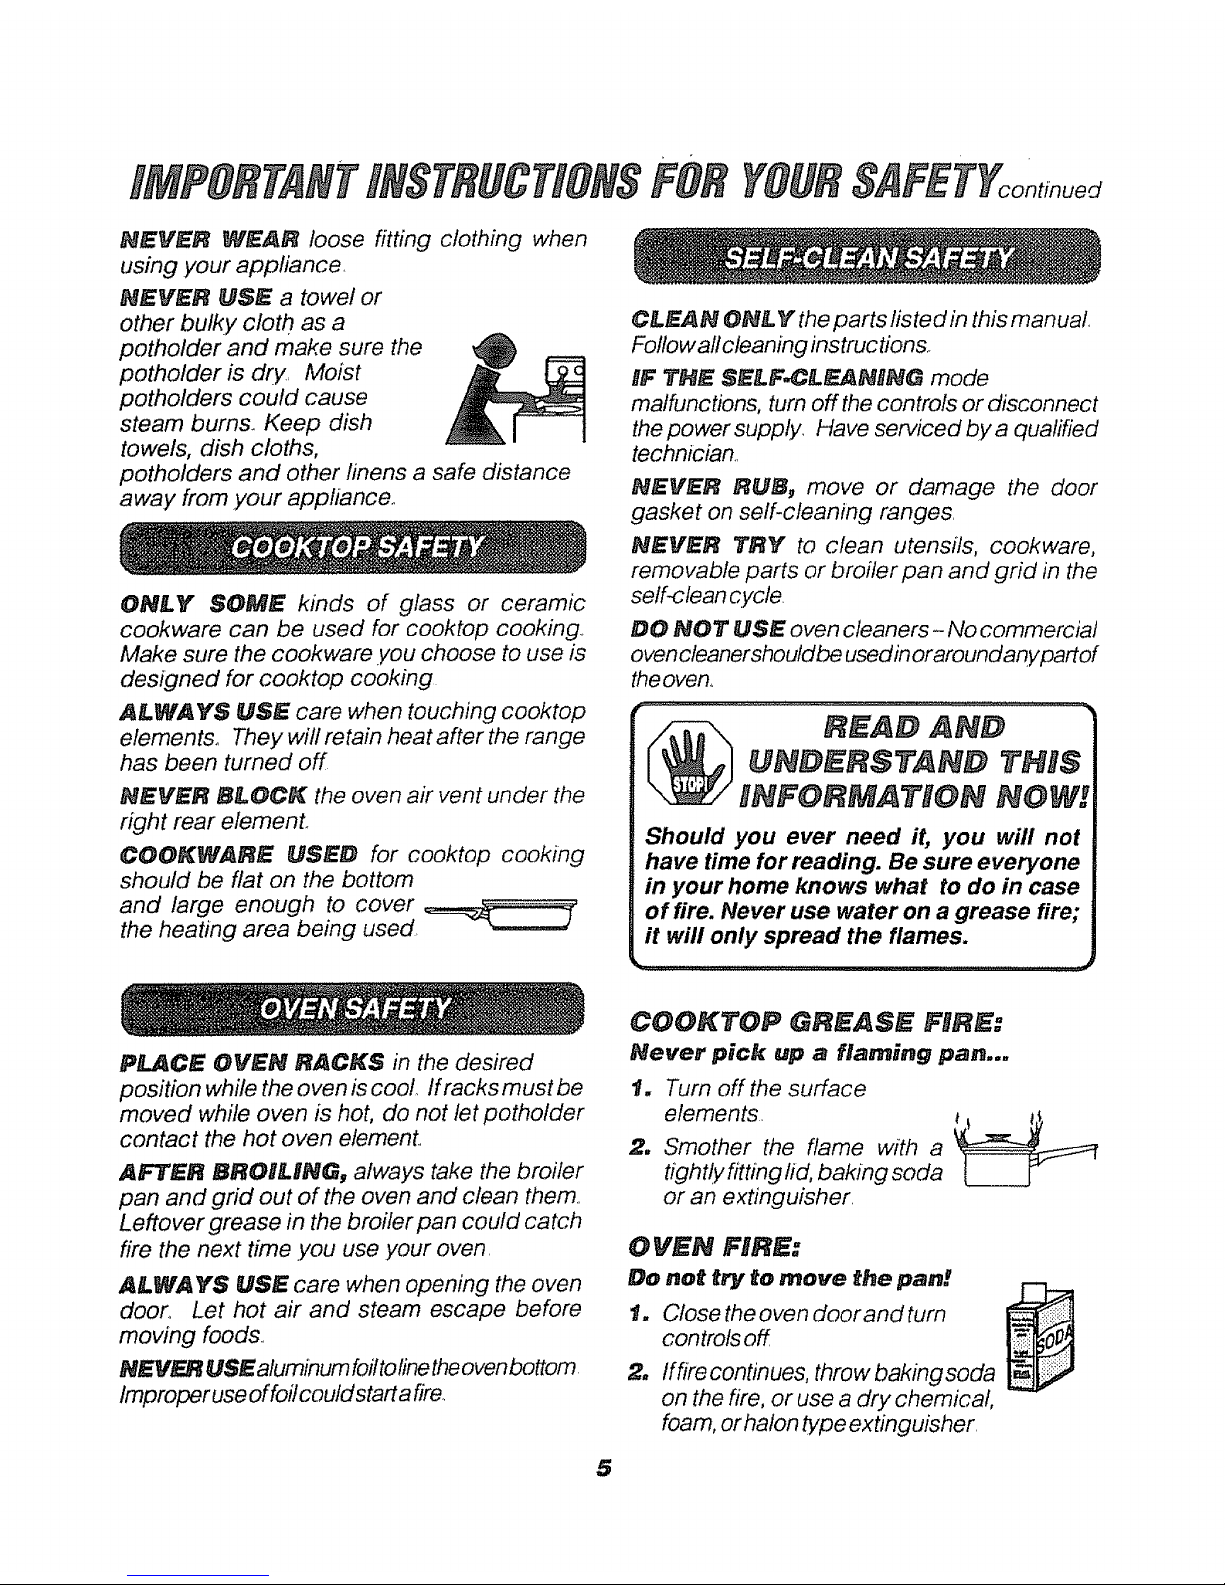
CLEAN ONLY the parts listed in this manual
Follow all cleaning instructions,,
BF THE SELF4_,rLF.J&NBNG mode
malfunctions, turn off the controls or disconnect
the power supply, Have serviced by a qualified
technician.,
NEVER RUB_ move or damage the door
gasket on self-cleaning ranges,
NEVER TRY to clean utensils, cookware,
removable parts or broiler pan and grid in the
self-c lean cycle
DO NOT USE oven cleaners- No commercial
oven cleaner shoufd be used inor around anypart of
theoven,,
READ AND
UN#ERSTAN# THBS
INFORMATflON NOW
Should you ever need it, you will not
have time for reading. Be sure everyone
in your home knows what to do in case
of fire. Never use water on a grease fire;
it will only spread the flames.
L ...................................
PLACE OVEN RACKS in the desired
position while the oven iScoo!. If racks must be
moved while oven is hot, do not let potholder
contact the hot oven element,
AFTER BROILING_ always take the broiler
pan and grid out of the oven and clean them.,
Leftover grease in the broiler pan could catch
fire the next time ,you use your oven,
ALWAYS USE care when opening the oven
door., Let hot air and steam escape before
moving foods.,
NEVER USE aluminum foiltolinetheoven bottom.
Improper useof foilcould start a fire.
COOK'tOP GREASE FHRE:
Never pick up a flaming pan,..
I. Turn off the surface
elements,
2. Smother the flame with a
tightly fitting lid, baking soda
or an extinguisher,
OVEN FIRE:
Do not try to move t_e pan!
1. Close the oven door and turn
controls off
2. Iffirecontinues, throw bakingsoda
on the fire, or use a dry chemical,
foam, or halon type extinguisher,
5
FEATURESOF,YOURNEW
FREE-STANDINGRANGE
\
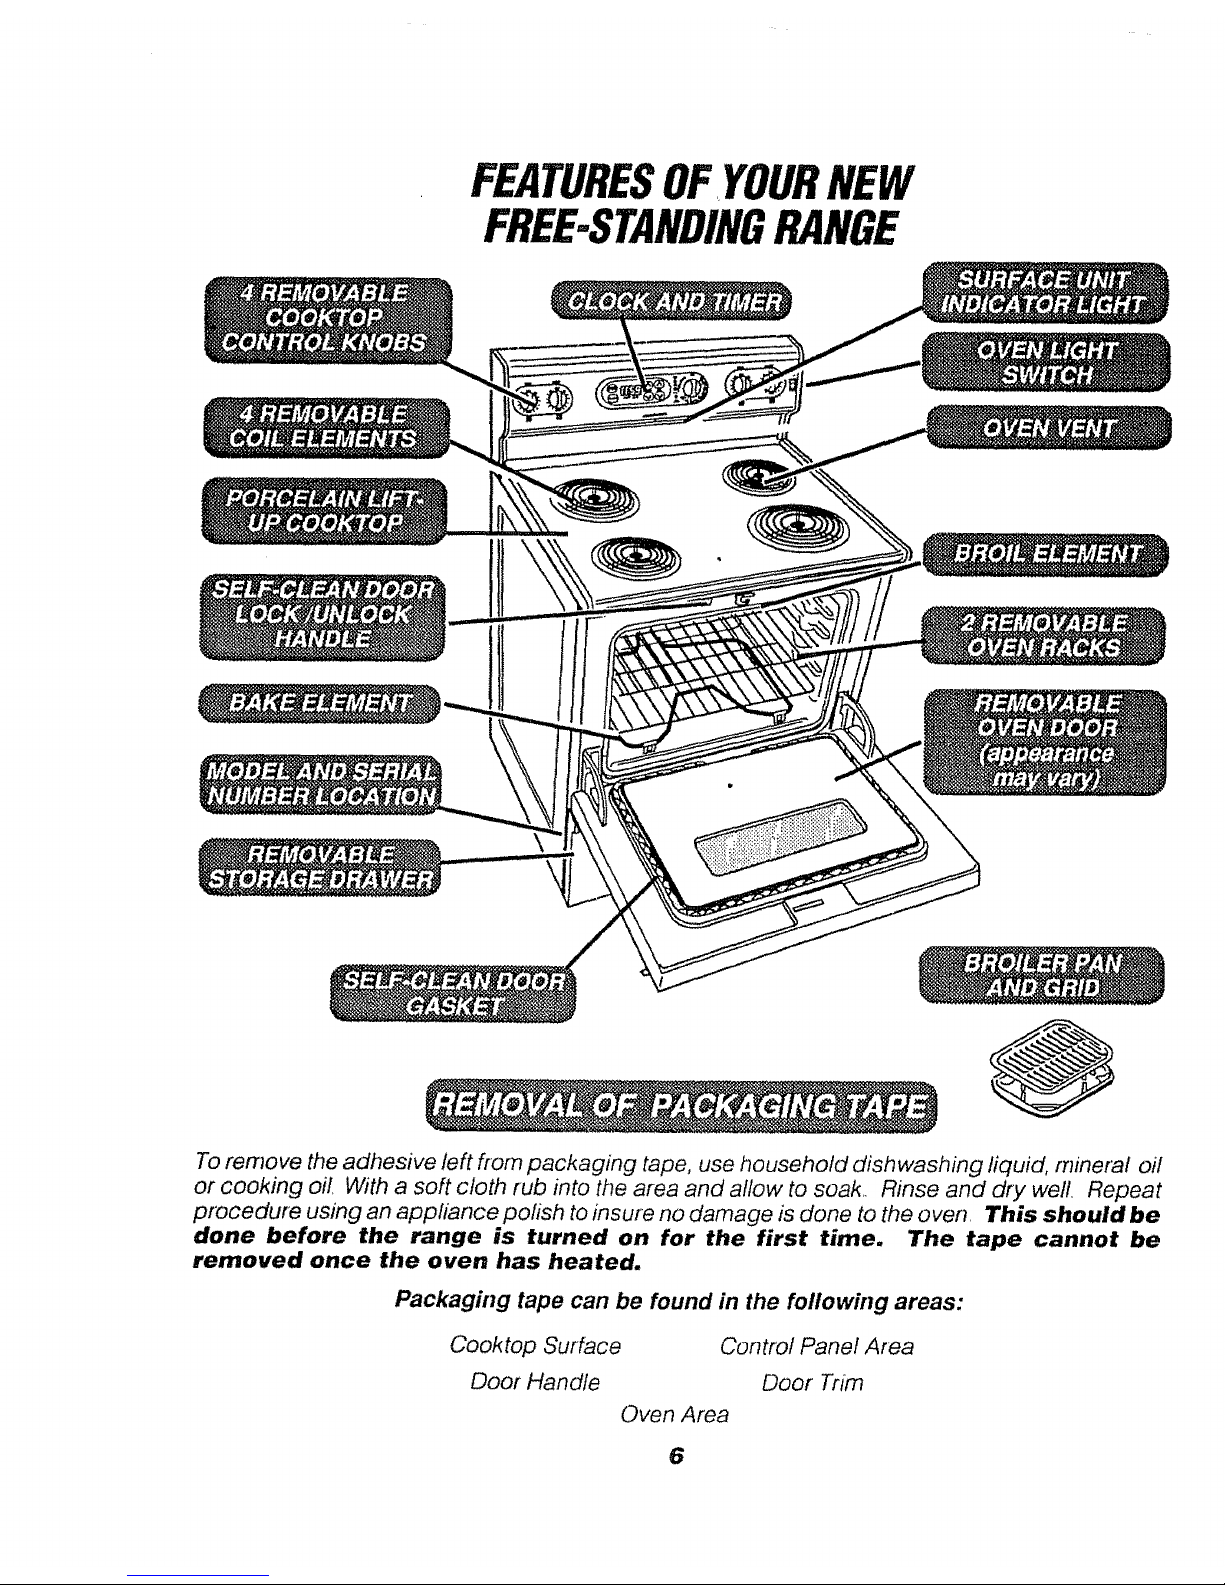
To remove the adhesive left fiom packaging tape, use household dishwashing fiquid, mineral oil
or cooking oil. With a soft cloth rub into the area and allow to soak.. Rinse and dry well. Repeat
procedure using an appliance polish to insure no damage is done to the oven. This should be
done before the range is turned on for the first time. The tape cannot be
removed once the oven has heated.
Packaging tape can be found in the following areas:
Cooktop Surface
Door Handle
Control Panel Area
Door Tnm
Oven Area
6
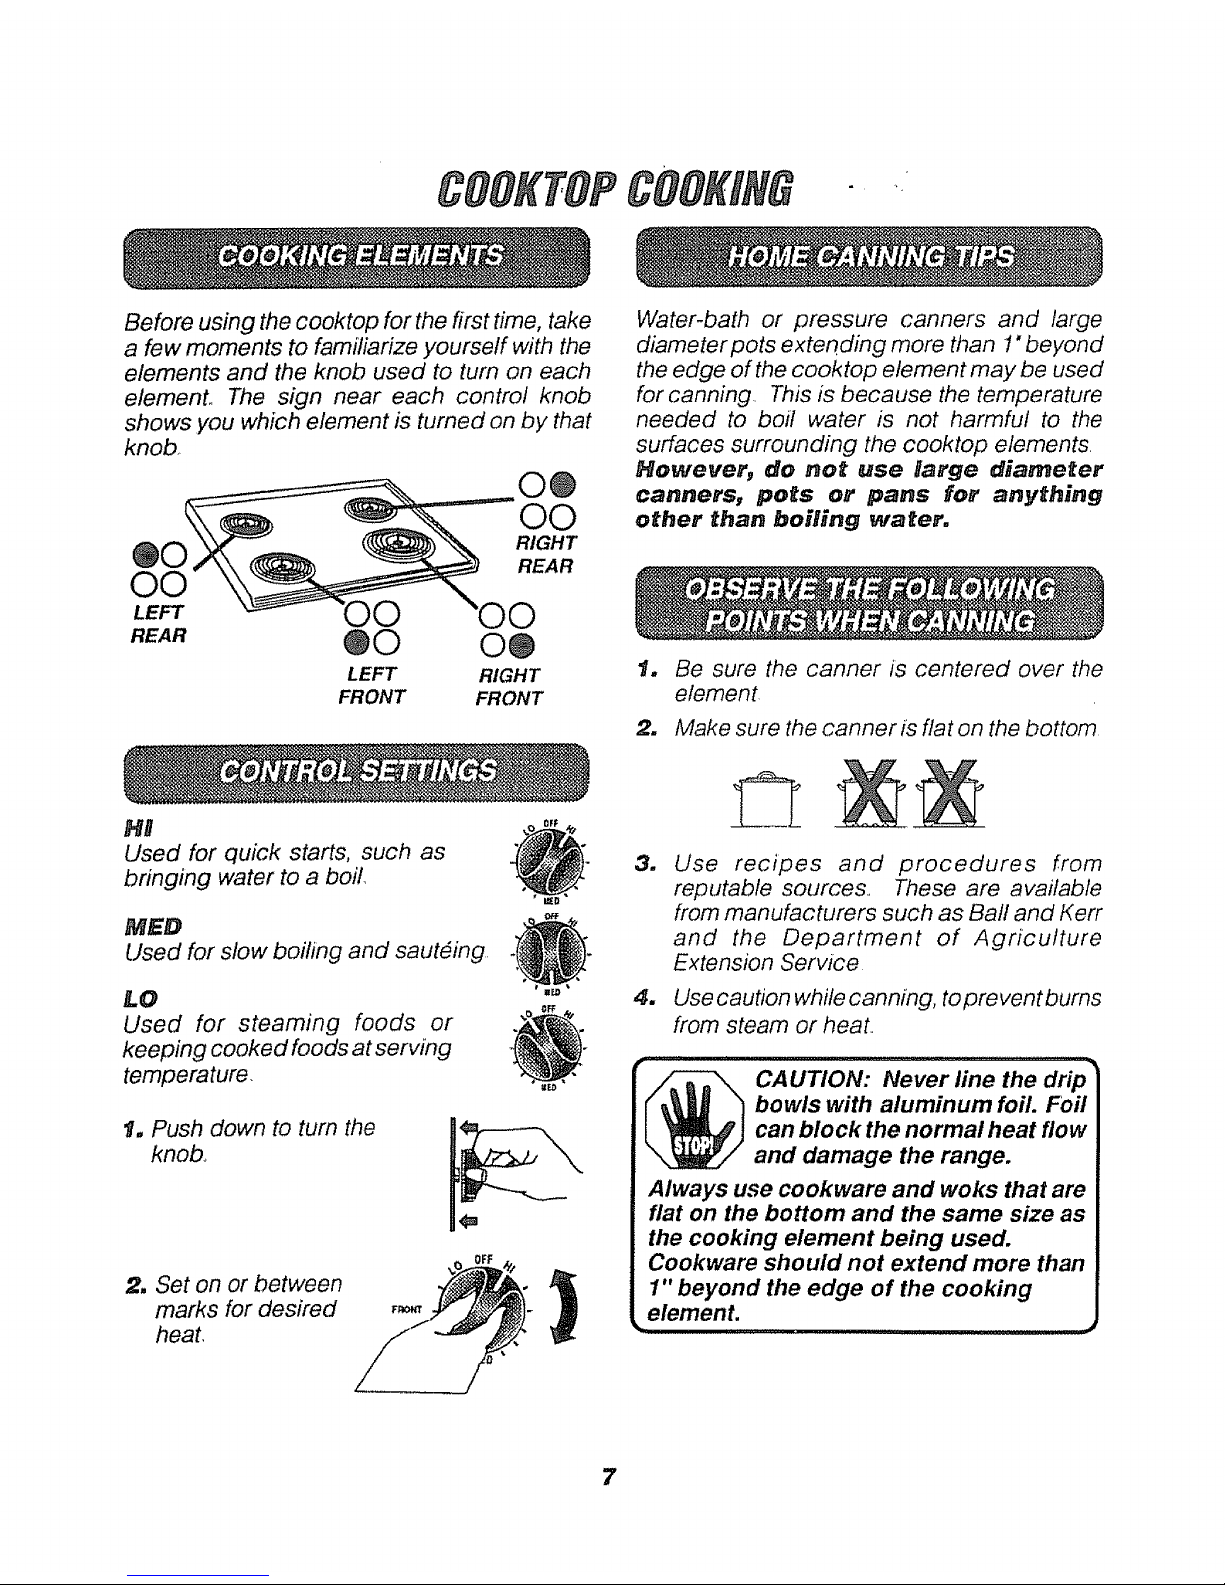
Before using the cooktop for the first time, take
a few moments to familiarize yourself with the
elements and the knob used to turn on each
element.. The sign near each control knob
shows you which element is turned on by that
knob
@0
O0
LEFT
REAR
@0
LEFT
FRONT
O@
O0
RIGHT
REAR
o®
RIGHT
FRONT
HH
Used for quick starts, such as
bringing water to a boil
MED
Used for slow boiling and sauteing,
LO
Used for steaming foods or
keeping cooked foods at serving
temperature.
t. Push down to turn the
knob.,
2, Set on or between
marks for desired
heat.
Water-bath or pressure canners and large
diameter pots extending more than 1" beyond
the edge of the cooktop element may be used
for canning, This is because the temperature
needed to boil water is not harmful to the
surfaces surrounding the cooktop elements,
However_ do not use Rarge diameter
cannersg pots or pans for anything
other than boiling water,
1. Be sure the canner is centered over the
element
2. Make sure the canner is flat on the bottom
3_
a
Use recipes and procedures from
reputable sources,, These are available
from manufacturers such as Ball and Kerr
and the Department of Agriculture
Extension Service
Use caution while canning, toprevent bums
from steam or heat..
_ CAUTION: Never line the drip
bowls with aluminum foil. Foil
can block the normal heat flow
and damage the range.
Always use cookware and woks that are
flat on the bottom and the same size as
the cooking element being used.
Cookware should not extend more than
1" beyond the edge of the cooking
element.
7
cLocx,
& OVENCONTROL
HOUR MIN.
HOUR MIN.
OVEN
ON
©
LOCK
©
IX_R
©
PRE-
HEATED
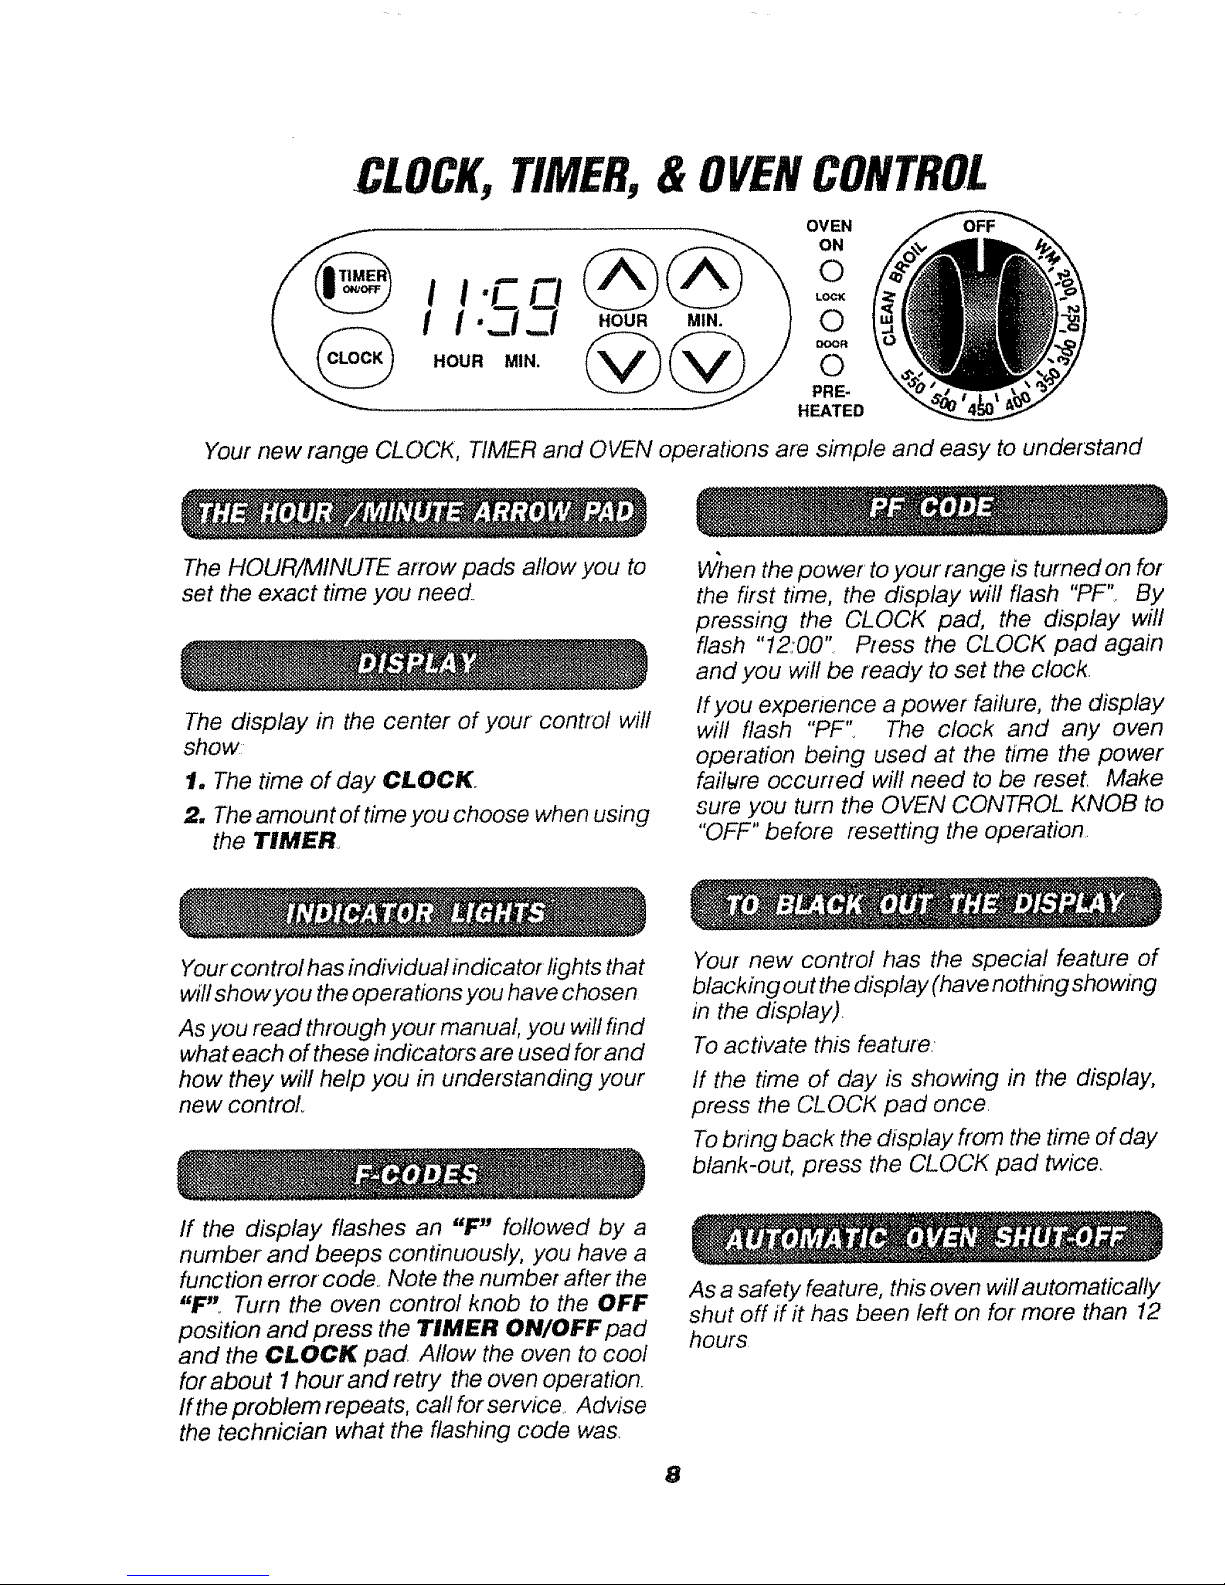
Your new range CLOCK, TIMER and OVEN operations are simple and easy to understand
The HOUR/MINUTE arrow pads allow you to
set the exact time you need.
The display in the center of your control will
show:
1. The time of day CLOCK,.
2. The amount of time you choose when using
the TIMER,
_4/hen the power to your range is turned on for
the first time, the display will flash "PF't. By
pressing the CLOCK pad, the display will
flash "12:00"_ Press the CLOCK pad again
and you will be ready to set the clock.
If you experience a power failure, the display
will flash "PF", The clock and any oven
operation being used at the t/me the power
fait_re occurred will need to be reset, Make
sure you turn the OVEN CONTROL KNOB to
"OFF" before resetting the operation,
Your control has individual indicator lights that
will show you the operations you ha ve chosen
As you read through your manual, you will find
what each of these indicators are used for and
how they will help you in understanding your
new control,
Your new control has the special feature of
blacking out the display (have nothing showing
in the display).
To activate this feature:
If the time of day is showing in the display,
press the CLOCK pad once.
To bring back the display from the time of day
blank-out, press the CLOCK pad twice,
If the display flashes an "IF" followed by a
number and beeps continuously, you have a
function error code,. Note the number after the
"F",. Turn the oven control knob to the OFF
position and press the TIMER ON/OFF pad
and the CLOCK pad, Allow the oven to cool
for about I hour and retry the oven operation.
If the problem repeats, call for service. Advise
the technician what the flashing code was,
As a safety feature, this oven will automatically
shut off if it has been left on for more than 12
hours
8
II:5
HOUR P,ilN
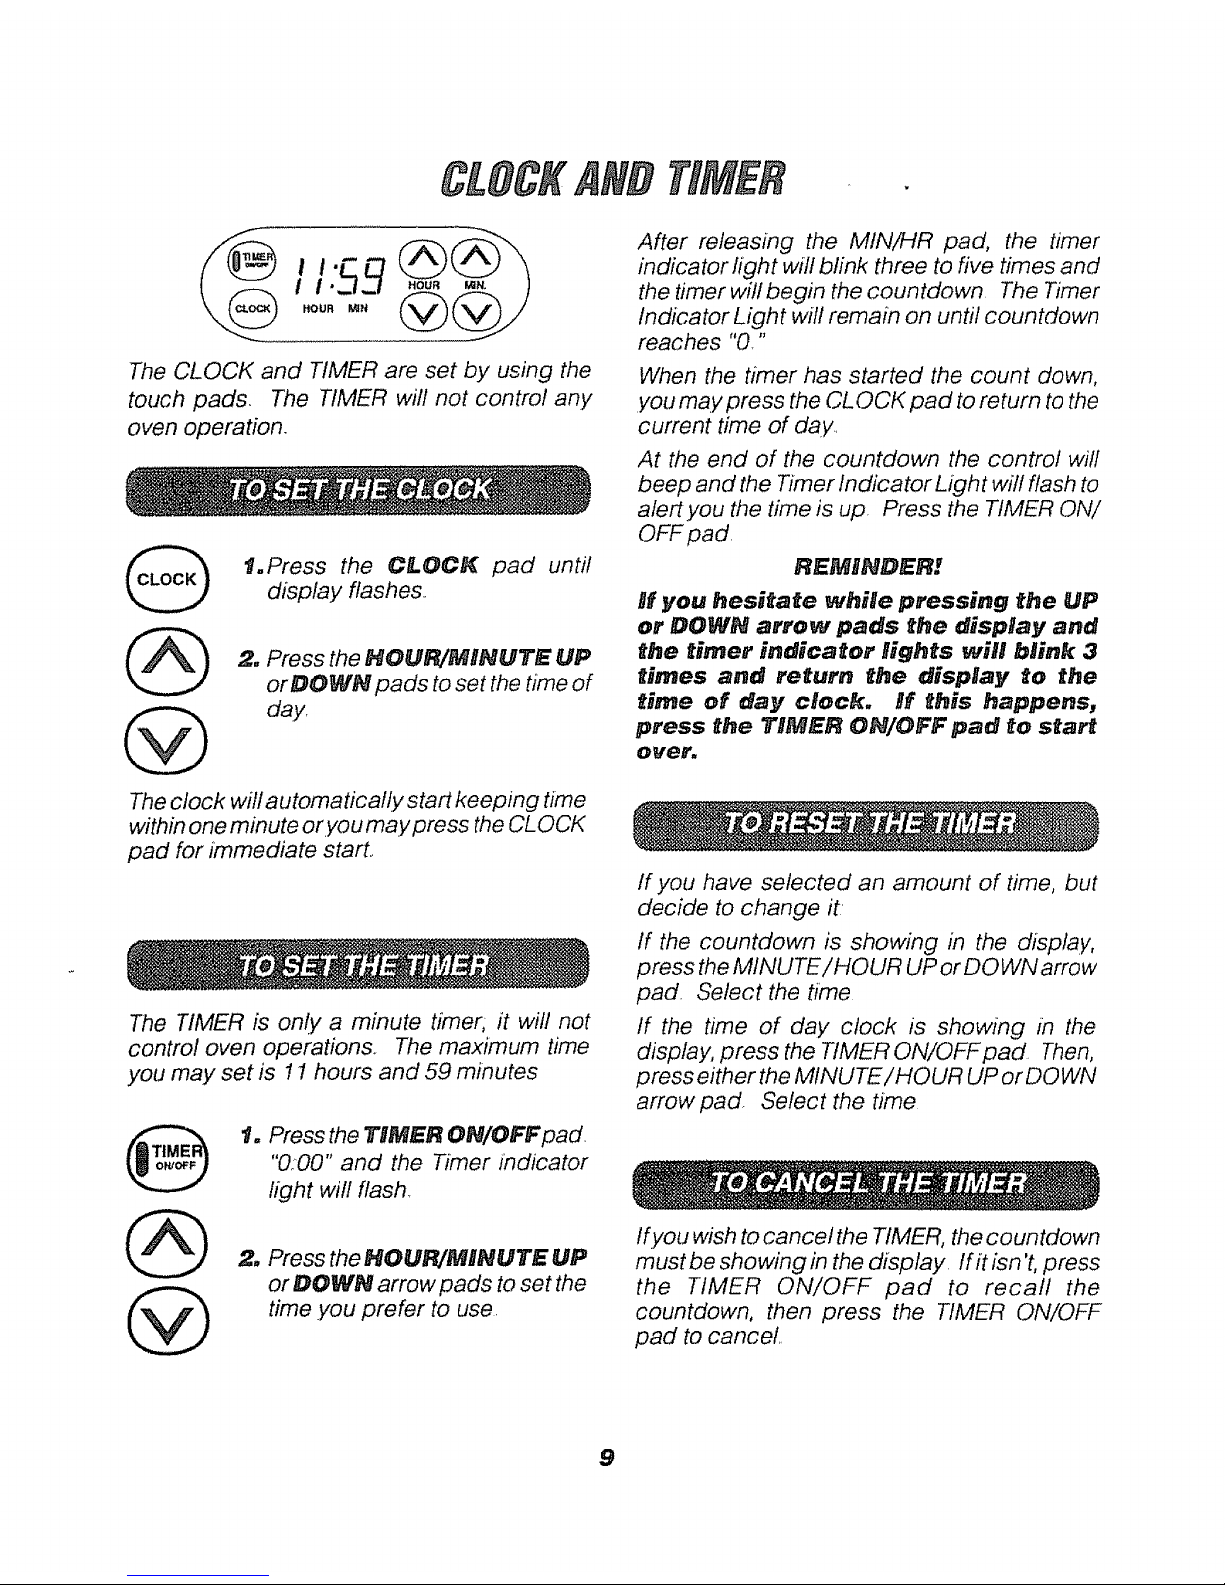
The CLOCK and TIMER are set by using the
touch pads. The TIMER will not control any
oven operation.
1.Press the CLOCK pad until
display flashesr
2, Press the HOUR/MINUTE UP
orDOWN pads to set the time of
day,
The clock will automatical!y start keeping time
within one minute or you ma.ypress the CLOCK
pad for immediate start..
The TIMER is only a minute timer; it will not
control oven operations.. The maximum time
you may set is 11 hours and 59 minutes
t. Press the TIMER ON/OFF pad
"0:00" and the Timer indicator
light will flash
2, Press the HOUR/MINUTE UP
or DOWN arrow pads to set the
time .you prefer to use.
After releasing the MIN/HR pad, the timer
indicator light will blink three to five times and
the timer will begin the countdown. The Timer
Indicator Light will remain on until countdown
reaches "0."
When the timer has started the count down,
you may press the CL OCK pad to return to the
current time of day.
At the end of the countdown the control will
beep and the Timer Indicator Light will flash to
alert you the time is up Press the TIMER ON/
OFF pad,
REMBNDER!
nf you hesitate while pressing the UP
or DOWN arrow pads the dispNay and
t#_e timer indicator Nights will blink 3
times and return the display to the
time of day chock. If t_is #_appens,
press the _'IMER ON/OFF pad to start
over,
If you have selected an amount of time, but
decide to change it
If the countdown is showing in the display,
press the MINUTE/HOUR UP or DOWN arrow
pad. Select the time
If the time of day clock is showing in the
display, press the TIMER ON/OFFpad Then,
press either the MINUTE/HOUR UP or DO WN
arrow pad Select the time
Ifyou wish to cancel the TIMER, the countdown
must be showing in the display. If it isn't, press
the TIMER ON/OFF pad to recall the
countdown, then press the TIMER ON/OFF
pad to cancel.
9

OVENCOOKINGTIPS
It is normal to have some odor when using
your, oven for the first time. This is caused by
the heating of new parts and insulation,,
To help eliminate this odor; ventilate the
room by opening a window or using a
vent hood,
IMPORTANT:
Never cover the oven
bottom or oven rack
with aluminum foil
Improper use can
cause poof heat flow,
poor baking results,
and may damage the
oven finish,
4,;' i i i_,
fllN:ii,;'::i t!l
in the back of the oven you will notice a small
tube, This is a heat sensor that maintains the
temperature of the oven.. Never move or bend
this tube.
II Ir
OVEN TEMPERATURE
SENSOR
The oven vent is located under the right rear
elemenL This area could become hot during
oven use_ The vent is important for proper air
circulation. Never block this vent.
OVEN VENT
Let the oven preheat thoroughly when recipes
carl for preheating. Preheating is bringing the
temperature up to the temperature you will be
using during baking When the oven has
reached the preheat temperature, a tone will
sound Have foods nearby ready to place in
the oven°
t0
Opening the door often to check foods will
cause heat loss and poor baking results,
During any oven operation you may hear a fan
noise This is the internal cooling fan that
keeps all electrical parts from overheating it
is not uncommon for this fan to keep running
even after the oven is turned off_
FLAT COOKIE SHEETS
(without sides)
Flat cookie sheets allow
air to circulate atl around
the cookies for even
btowninq.
SHINY-PANS
(reflect heat)
Shiny pans are perfect for cakes and quick
breads that have a golden brown crust.
GLASS, DARK NON.STICK, OR
DARKENED BY AGE BAKEWARE
(absorb heat)
Pedect for yeast breads, pie crust or foods that
have a brown crust, The oven temperature
should be reduced by 25°F
oven cooking tips continued
condnued
As the oven heats, the change in temperature
inside the oven causes water droplets to form
on the oven door glass,, To prevent this, open
the door momentarily toallow the moist air out,
If baking with more than one pan, place the
pans so each has at least 1 to 1 1/2" of air
space around it. Place pans so one is not
directly above the other,
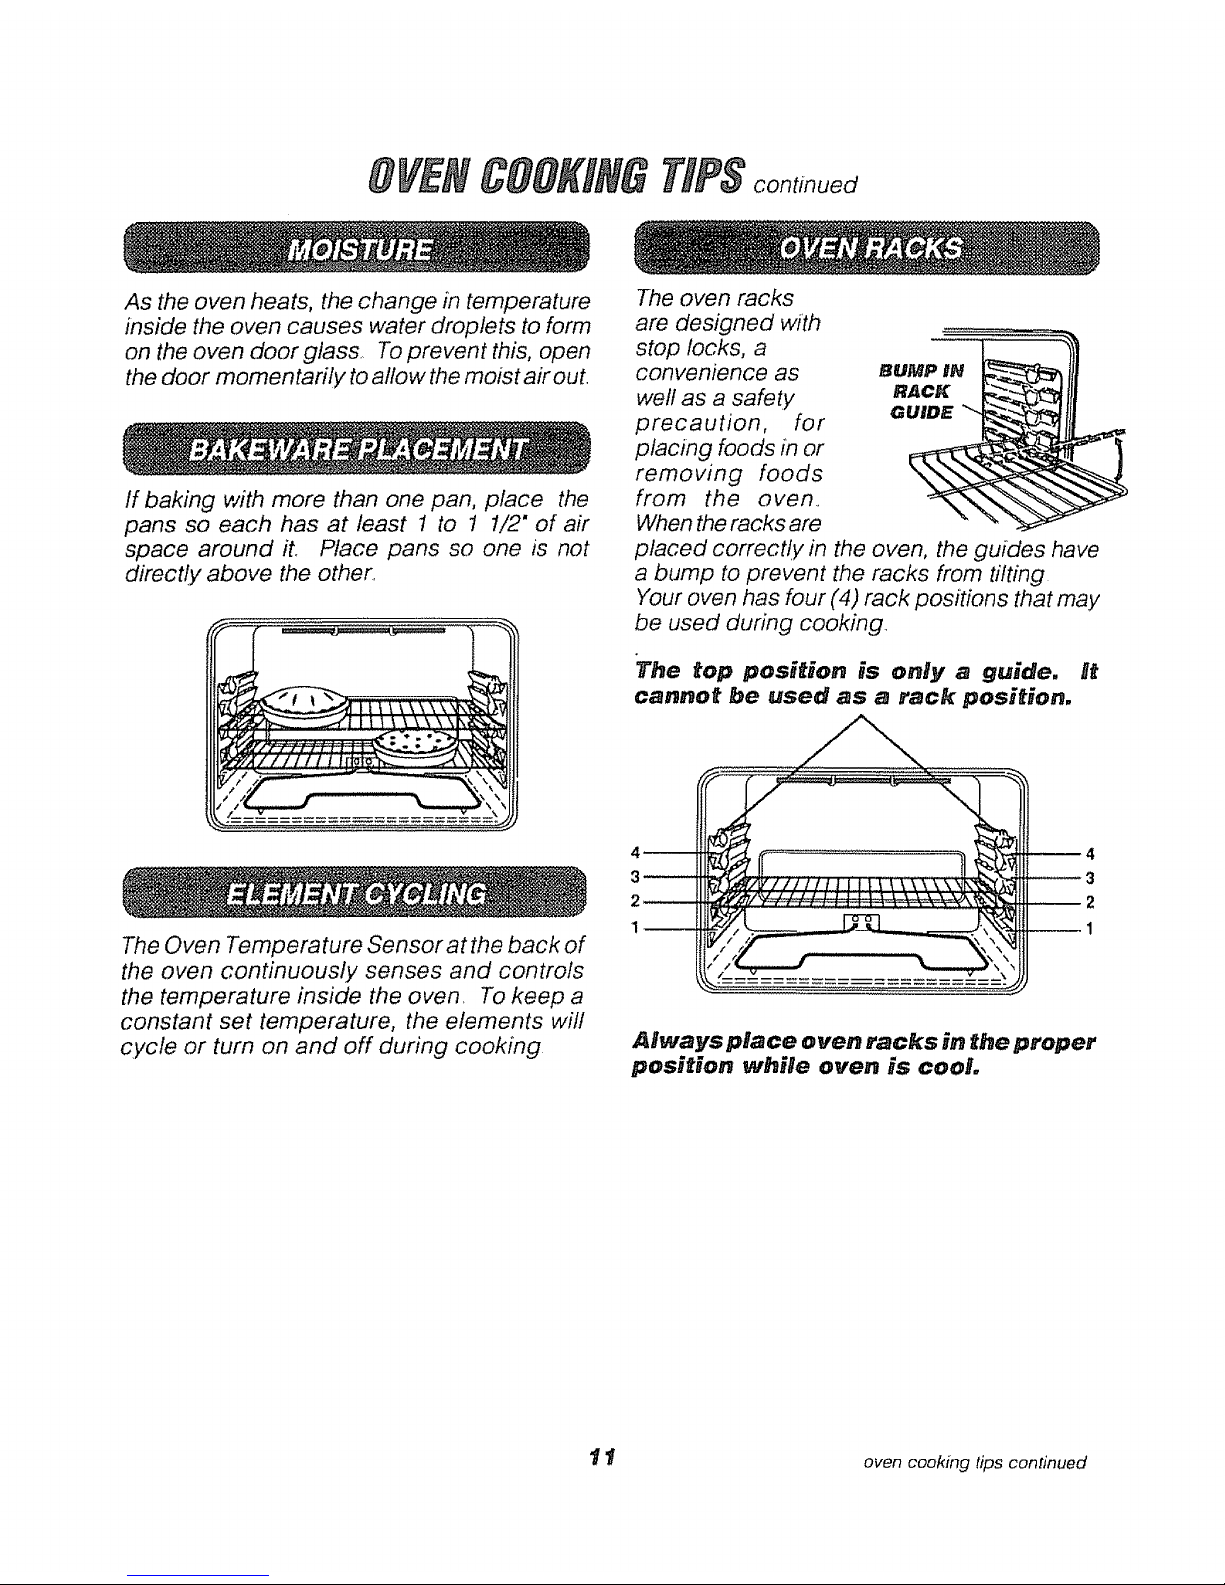
The oven racks
are designed with
stop locks, a
convenience as hUMP mH
well as a safety R4CK
precaution, for CUnDE "
placing foods in or
removing foods
from the oven,,
When the racks are
placed correctly in the oven, the guides have
a bump to prevent the racks from tilting
Your oven has four (4) rack positions that may
be used during cooking,
The top position Js only a guide. Ht
cannot be used as a rack position,
The Oven Tempera ture Sensor at the back of
the oven continuously senses and controls
the temperature inside the oven, To keep a
constant set temperature, the elements will
cycle or turn on and off during cooking
Aiways place oven racks in the proper
position _vhiRe oven is cool
"_t oven cooking tips continued
OVENCOOKINGTIPS
You may feel that your new oven cooks
OVEN CONTROL
differently than the oven it replaced We
recommend that you use your new oven a
few weeks to become more familiar with it,
following the times given in your recipes as
a guide. See Do It YourseffAdjustment in the
back of this manual to make the adjustment if
you feel your oven is too hot or too cool for your
cooking preference,
Your new range is equipped with a
hideaway handle (used for self-clean only)
that can be hidden under the maintop when
it is in the unlocked position
1. Be sure the handle is in the unlocked
position and raise the cooktop
2. Push the handle into the latch cover until
it stops,
3. Lower the cooktop
Never lock during baking or broiling.
t2
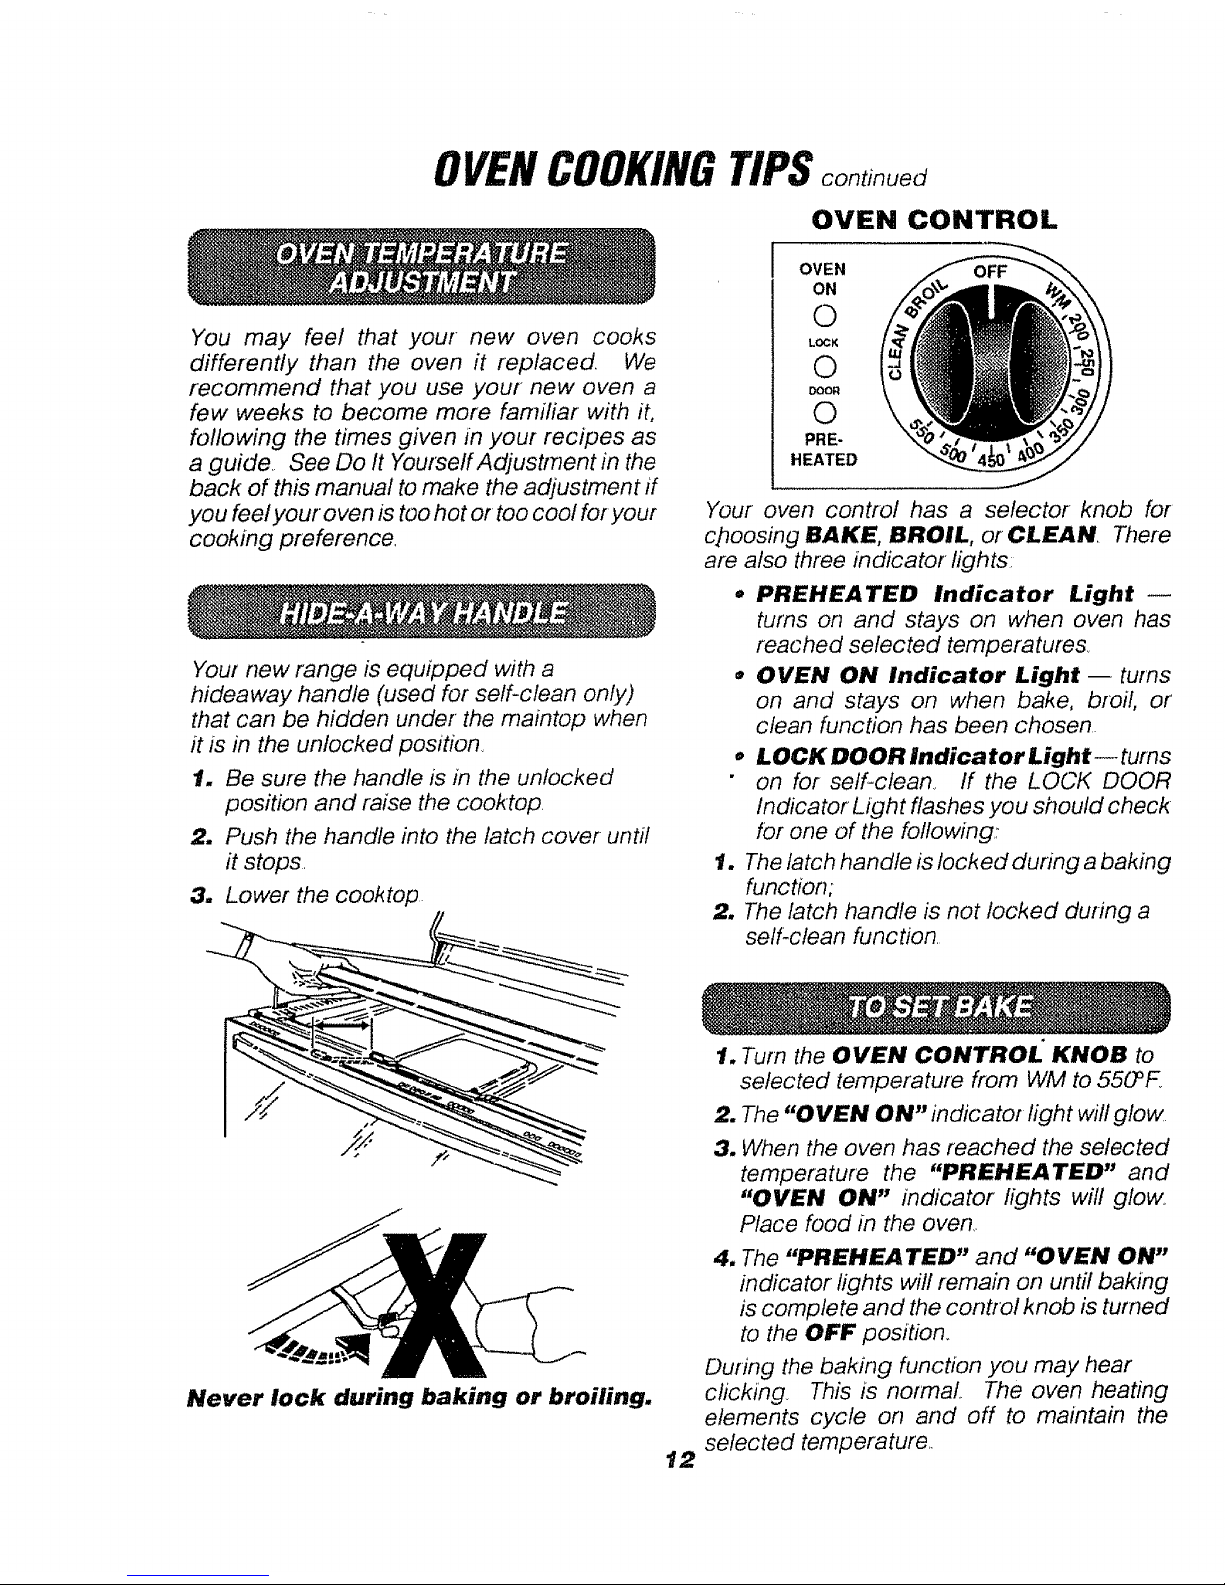
OVEN
ON
©
LOCK
©
DOOR
©
PRE-
HEATED
Your oven control has a selector knob for
choosh_g BAKE, BROIL, or CLEAN There
are also three indicator lights:
• PREHEATED Indicator Light
turns on and stays on when oven has
reached selected temperatures,
• OVEN ON Indicator Light -- turns
on and stays on when bake, broil, of
clean function has been chosen.
• LOCK DOOR Indicator Light _ turns
" on for self-cleano ff the LOCK DOOR
Indicator Light flashes you should check
for one of the foflowing:
11.The latch handle is focked during a baking
function;
2, The latch handle is not locked during a
self:clean function,
1. Turn the OVEN CONTROL KNOB to
selected temperature from WM to 550_F_
2. The "OVEN ON" indicator light will glow
3. When the oven has reached the selected
temperature the "PREHEATED" and
"OVEN ON" indicator lights will glow.
Place food in the oven,,
4. The "PREHEATED" and "OVEN ON"
indicator lights will remain on until baking
is complete and the control knob is turned
to the OFF position.
During the baking function you may hear
clicking This is normal. The oven heating
elements cycle on and off to maintain the
selected temperature.
Broiling is cooking by direct
heat from the upper element,
Theoven door should remain
opened to the broil stop
position during broiling,,
It is not necessary to preheat
theoven whenbroiling Use the broiler pan
and grid thatcame withyour range Both are
designed for proper drainage of fat and
liquids,
Foil must be molded tightly
to the grid and silts cut into
the foil to match those of the
grid. This allows fats and
liquids to drain into the broiler
pan, preventing fire and
excessive smoke.
Always remove the pan
and grid from the oven.
Storing or forgetting a
soiled broiler pan in the
oven is a potential
smoke or fire hazard.
The U,S, Department of Agriculture notes that
meat cooked rare is popular, but meat cooked
to only 140°F (rare) means that some
poisoning organisms may survive,
The cfoser you place foods to the broil element,
the faster foods brown on the outside yet
remain red to pink in the center
Moving meats away from the efemen t will allow
the meat to cook to the center while browning
on the outside Using this positioning, cook
side ! at least 2 minutes longer than side 2 If
your oven is connected to 208 volts, .you may
want to use a higher rack position and/or broil
foods longer
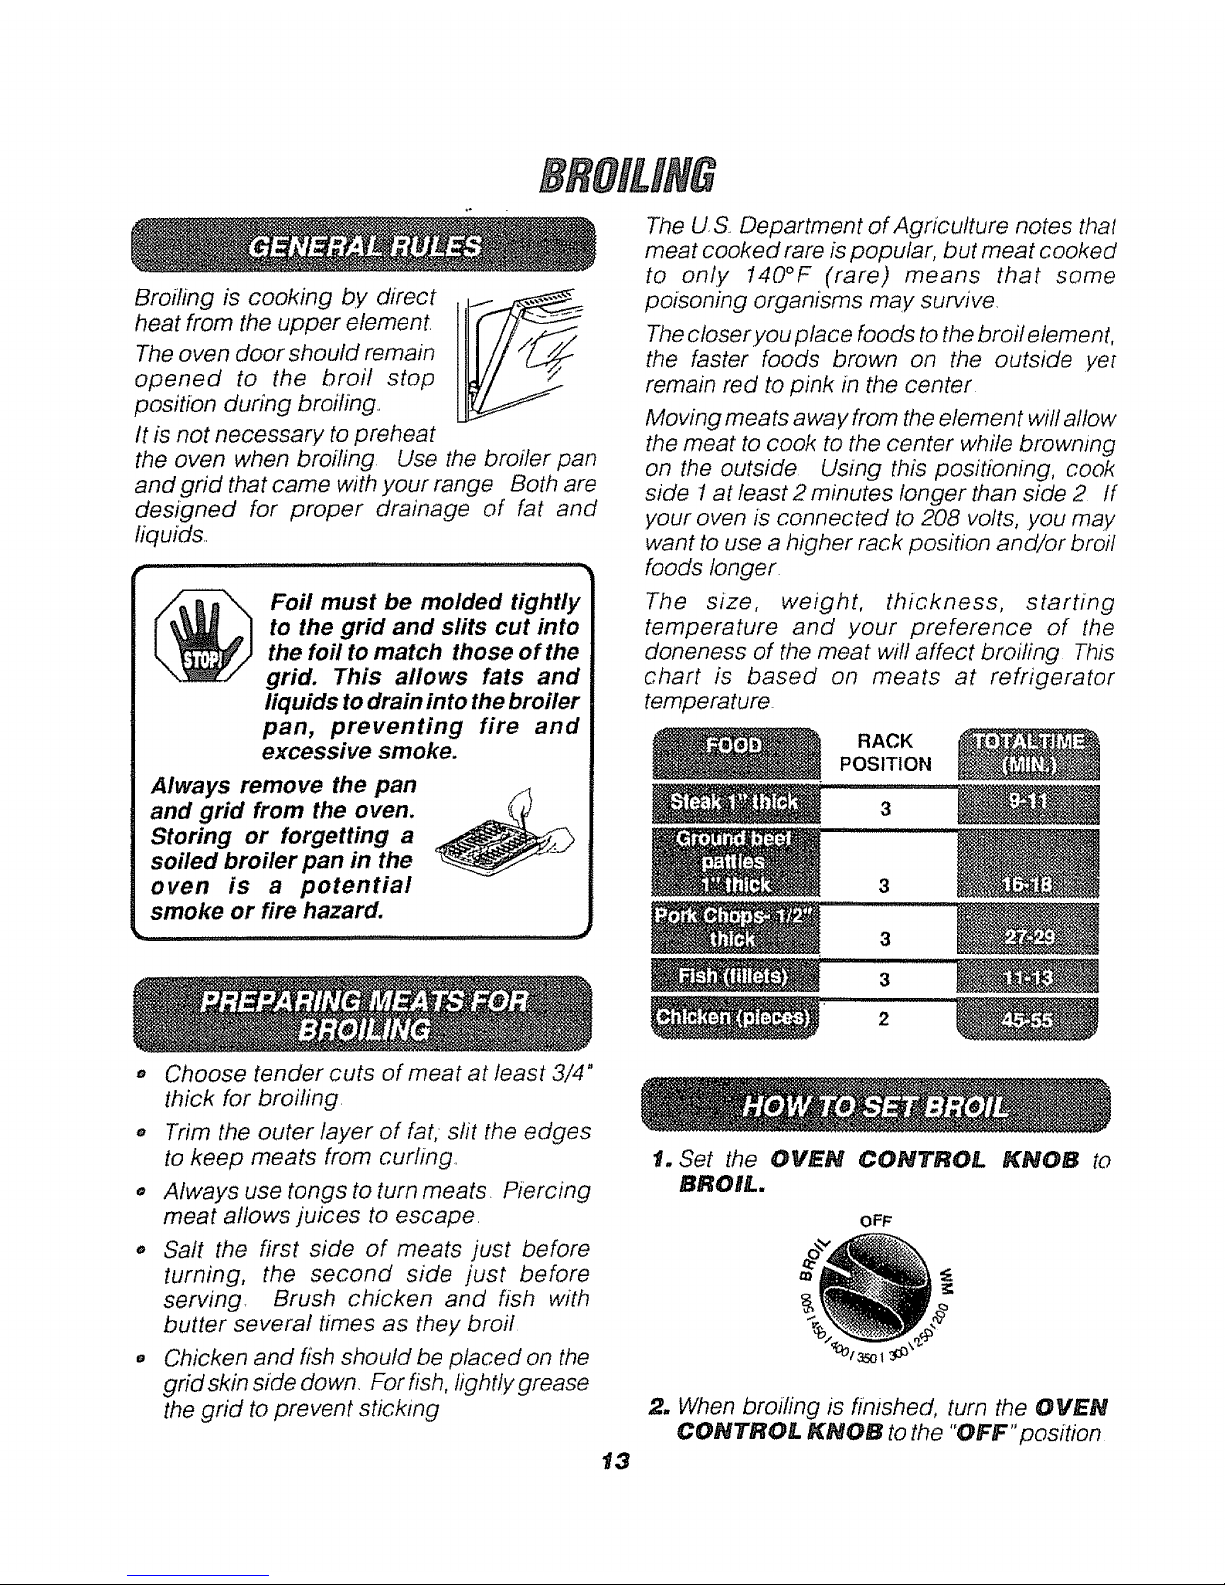
The weight, thickness, starting
temperature and your preference of the
doneness of the meat wff! affect broiling This
chart is based on meats at refrigerator
temperature
RACKPOSITION
3
Choose tender cuts of meat at least 3/4"
thick for broiling,
Trim the outer layer of fat; slit the edges
to keep meats from curling,
Always use tongs to turn meats. Piercing
meat allows juices to escape,
o Salt the first side of meats just before
turning, the second side just before
serving, Brush chicken and fish with
butter several times as they broil
,, Chicken and fish should be placed on the
grid skin side down, For fish, lightly grease
the grid to prevent sticking
13
3
1. Set the OVEN CONTROL KNOB to
BROIL.
OFF
2, When broifing is finished, turn the OVEN
CONTROL KNOB to the "OFF"position
SELF-CLEANINGCYCLE
t. Remove the broiler pan and grid, oven racks,
utensilsand any foil that may be in the oven
2. Soft on the front ,,_,,,_,=
frame, 1"inside the L__
oven, andoutside _
the door gasket
will need to be
cleaned by hand.
Clean these areas with hot water, soap filled
steel wool pads or cleansers such as Soft
Scrub® to remove any soi!. Rinse well with
clean water and dry
3. Wipe up any heavy spillovers on the oven
bottom
4. Do not clean the door gasket The
fiberglass material of the oven door gasket
cannot withstand abtasion. It is essential
for the gasket to remain intact Ifyou notice
it becoming worn, frayed, or displaced on
the door; # should be replaced
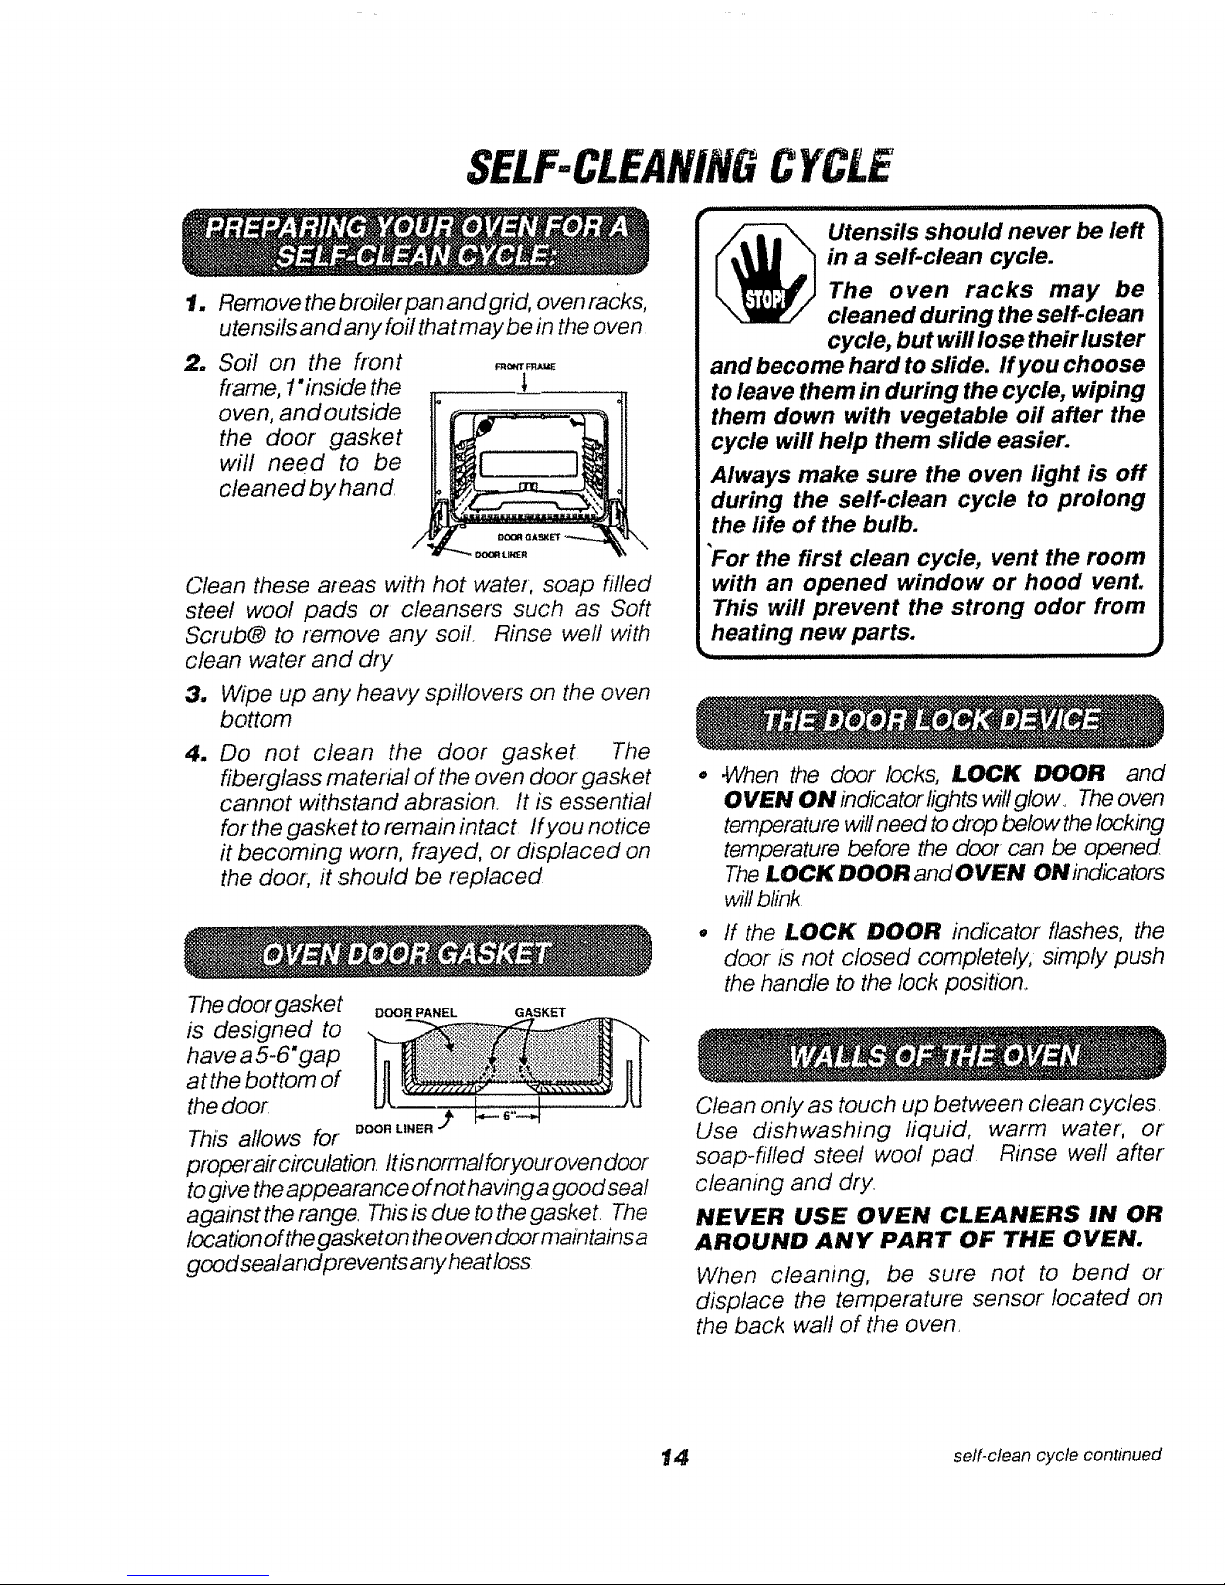
The door gasket
is designed to
have a 5-6" gap
atthe bottom of
the door
DOOR PANEL GASKET
This allows for
pfoper air circulation. Itisnormal foryour oven door
togive the appearance of not having a good seal
against the range, This is due to the gasket. The
!ocation ofthe gasket on the oven door main tains a
good seal and prevents any heat loss
Utensils should never be left
in a self-clean cycle.
The oven racks may be
cleaned during the self.clean
cycle, but will lose their luster
and become hard to slide. If you choose
to leave them in during the cycle, wiping
them down with vegetable oil after the
cycle will help them slide easier.
Always make sure the oven light is off
during the self-clean cycle to prolong
the life of the bulb.
For the first clean cycle, vent the room
with an opened window or hood venL
This will prevent the strong odor from
heating new parts.
• ,When the door locks, LOCK DOOR and
OVEN ON indicator lights will glow. The oven
temperature willneed to drop below the locking
temperature before the door can be opened
The LOCK DOOR and OVEN ON indicators
wiltblink
o if the LOCK DOOR indicator flashes, the
door is not closed completely, simply push
the handle to the lock position.
Clean only as touch up between clean cycles,
Use dishwashing fiquid, warm water, or
soap-filled steel wool pad Rinse well after
cleaning and dry.
NEVER USE OVEN CLEANERS IN OR
AROUND ANY PART OF THE OVEN.
When cleaning, be sure not to bend or
displace the temperature sensor located on
the back wall of the oven
14 self-clean cycle continued
SEL NIN6 CY ,LF,con ,ue
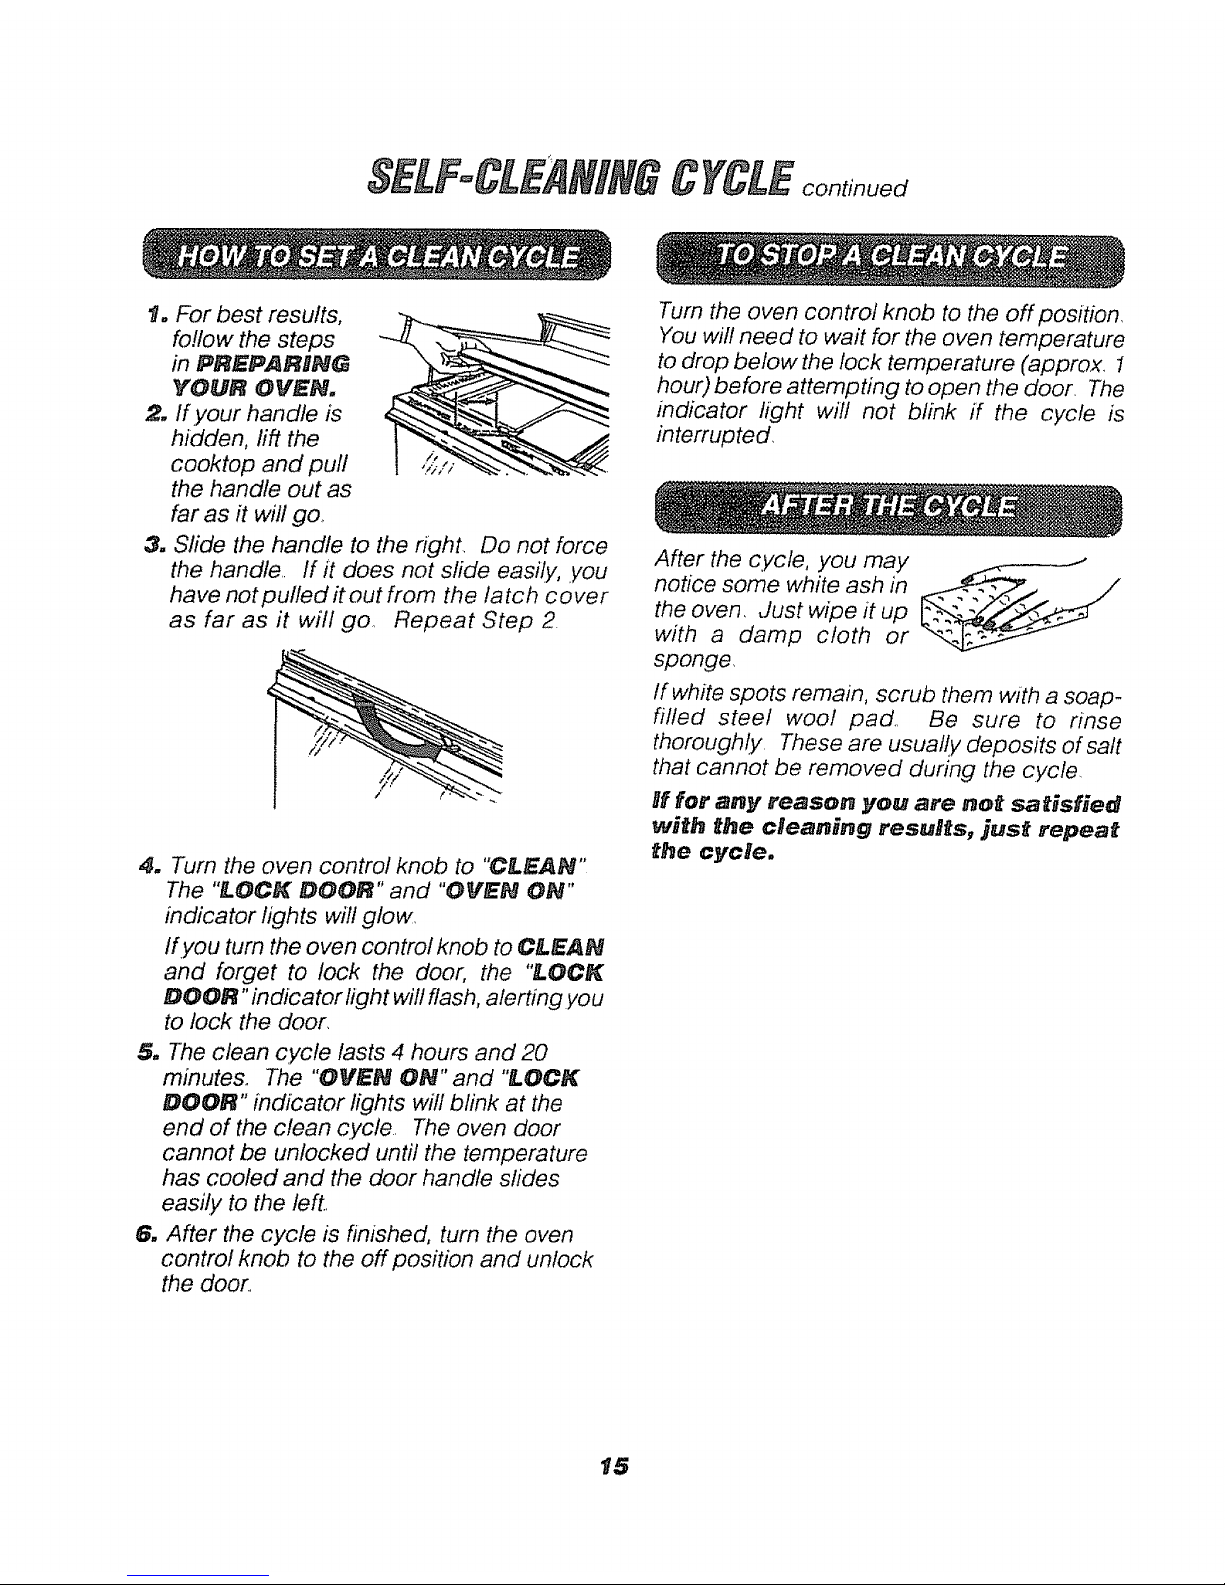
1. For best results,
foflow the steps
in PREPARING
YOUR OVt_No
2. If your handle is
hidden, lift the
cooktop and pull
the handle out as
far as it will go..
3. Slide the handle to the right. Do not force
the handle,. If it does not slide easily, ,you
have not pulled it out from the latch cover
as far as it will go, Repeat Step 2.
4. Turn the oven control knob to "CLEAN"
The "LOCK DOOR" and "OVEN ON"
indicator lights will glow,
If you turn the oven control knob to C&_AN
and forget to lock the door, the "LOCK
DOOR" indicator light will flash, alerting you
to lock the door,
5. The clean cycle lasts 4 hours and 20
minutes. The "OVEN ON" and "LOCK
DOOR" indicator lights will blink at the
end of the clean cycle, The oven door
cannot be unlocked until the temperature
has cooled and the door handle slides
easily to the left.,
6. After the cycle is finished, turn the oven
control knob to the off position and unlock
the door,
Turn the oven control knob to the off position_
You wifl need to wait for the oven temperature
to drop below the lock temperature (approx, 1
hour) before attempting to open the door, The
indicator light wifl not blink if the cycle is
interrupted,
After the cycle, you may _."
notice some white ash in _. ._.,, /
the oven, Just wipe it up __ _
with a damp cloth or
sponge,
If white spots remain, scrub them with a soap-
filled steel wool pad, Be sure to rinse
thoroughly, These are usually deposits of salt
that cannot be removed during the cycle.
ff for any reason you are not satisfied
with the clean_ng resuRts9 jus_ repeat
#_e cycle.
15
CLEANING
CLEANING MATERIALS TO USE:
• Dishwashing detergent
• Warm water
• Soft cloth
Do not use abrasive cleaners,
industrial cleaners, or bleach.
CLEANING MATERIALS TO USE:
. Dishwashing detergent
. Warm water _
o Soap-riiled steel wool pad
o Commercial oven cleaner
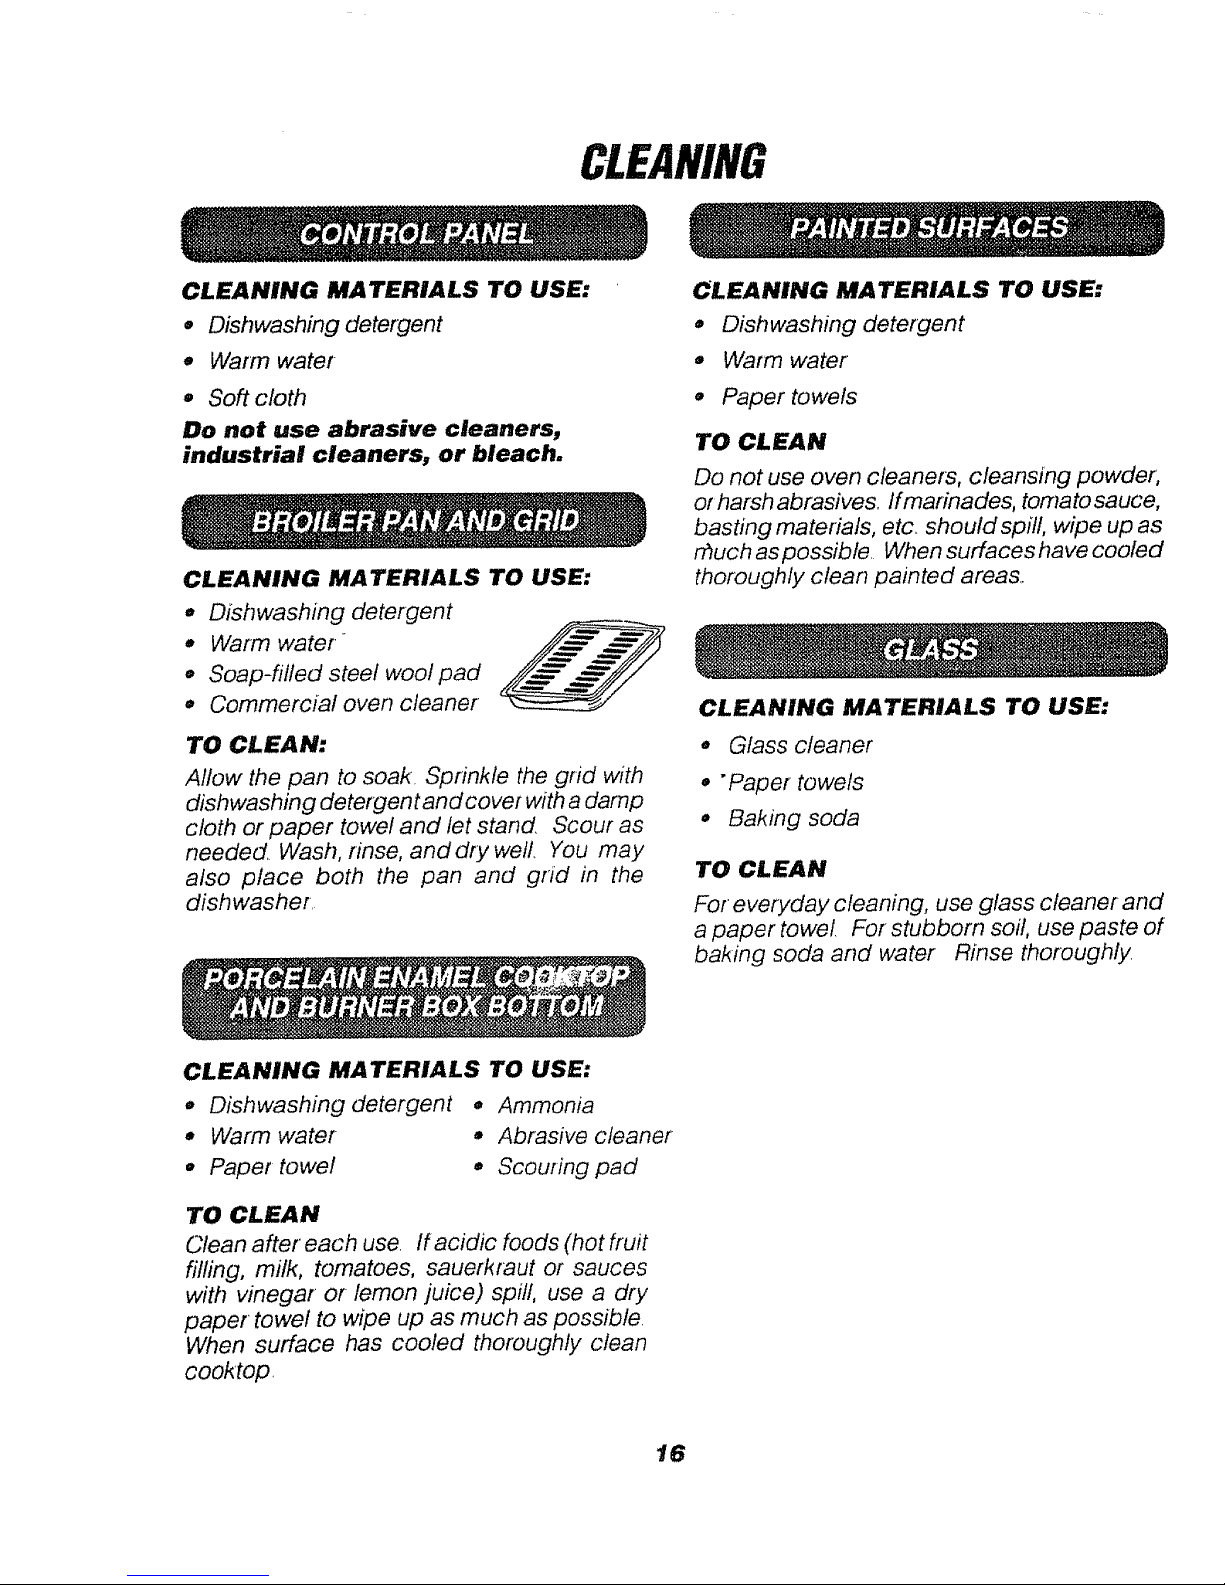
TO CLEAN:
Allow the pan to soak. Sprinkle the grid with
dishwashing detergent and cover with a damp
cloth or paper towel and let stand. Scour as
needed. Wash, rinse, and dry well You may
also place both the pan and grid in the
dishwasher
CLEANING MATERIALS TO USE:
CLEANING MATERIALS TO USE:
* Dishwashing detergent
° Warm water
° Paper towels
TO CLEAN
Do not use oven cleaners, cleansing powder,
or harsh abrasives., if marinades, tomato sauce,
basting materials, etc should spi!l, wipe up as
rhuch as possible. When surfaces have cooled
thoroughly clean painted areas..
CLEANING MATERIALS TO USE:
• Glass cleaner
° "Paper towels
• Baking soda
TO CLEAN
For everyday cleaning, use glass cleaner and
a paper towel For stubborn soil, use paste of
baking soda and water Rinse thoroughly.
,, Dishwashing detergent ° Ammonia
• Warm water ° Abrasive cleaner
• Paper towel • Scouring pad
TO CLEAN
Clean after each use. If acidic foods (hot fruit
filling, milk, tomatoes, sauerkraut or sauces
with vinegar or lemon juice) spill, use a dry
paper towel to wipe up as much as possible.
When surface has cooled thoroughly clean
cooktop.
16

CLEANING MATERIALS TO USE:
o Dishwashing detergent
o Warm water
,, Soft cloth
MOLDED
RIB
_ CAUTION:
Be sure the oven light switch is
in the offposition. Do not touch
a hot light bulb with wet hands
or a wet cloth. Wait until the
bulb has cooled and use a dry cloth.
Never touch the five collar of the bulb. if
you are replacing a broken light bulb,
make sure the power supply is off.
SPRING
CLIP
"tO REMOVE
1. Be sure the control knob is in the off
position,
2, Pull straight off the stem, Using a piece of
string can make removing the knob easier..
Slip the string under and around the knob,
pulling straight out.
TO CLEAN
Wash the knob thoroughly with soapy water
Dry completely with a soft cloth. DO NO T let
the knob soak.
TO REPLACE
t. Check the back of the knob. The molded
rib of the knob is designed to fit perfectly
onto the knob stem.
2. Align the molded rib to the clear groove in
the knob stem,.
3. Push the knob back as far as it will go..
_,._ GLASS
RETAINER
LIVE COLLAR
GLASS_
COVER
TO REPLACE
1. Unscrew glass cover and remove..
2. Unscrew the light blub,
3o Replace the bulb with a 3 1/2 ° 40 watt
appliance bulb.
4, Replace the cover.
17 removable parts continued

REMOVABLEPARTS
CLEANING MATERIALS
• Dishwashing detergent
o Damp cloth
• Warm water
TO REMOVE:
1. Pull the drawer out until it
stops°
2. Lift the front of the drawer
until the stop guide of the
drawer clears the stop
guide on the base rail
3. Lift the drawer up and
over the drawer stop,
STOP GUIDE
TO CLEAN
Wipe the inside and outside with warm soapy
water and a damp cloth or sponge. Do not use
harsh abrasives or scouting pads on the
drawer,
TO REPLACE
1= Liftthe frontofthe drawer
stop and lower the stop
of the drawer through the
opening of the base rail.
2. Lower the front of the
drawer and push back
the drawer until it stops
STOP GUIDE
3. Lift up on the front of the drawer until the
stop guide of the drawer clears the stop
guide of the base fail,. Sfide the drawer into
place.
r
CAUTION: The drawer gives"
you space for keeping
cookware and bakeware.
Plastics and flammable
materials should not be kept
in this drawer. Do not overload the
storage drawer. If the drawer is too
heavy, it may slip off the base rail when
opened.
SUPPORTRODS
1. Grasp the edge of the cooktop and lift up.
2, Holding the cooktop with one hand, lift the
support rod(s) up and rest the edge of the
cooktop on it.
3. When cleaning is finished, lower the
support rod(s) and the cooktop
t 8 removable parts continued

RF$ cont,nued
ELEMENTS
REFLECTOR BOWLS
RECEPTACLE
"tO REMOVE:
1. Be sure the controls are in the off position
and the elements are cool before attempt-
ing to remove them,
2. Grasp the element and lift slight!y, just
enough to clear the drip bowl and pull it
straight out°
,,m,,,,, i,,m 4k
CAUTION: Do not lift the
element more than 1". Lifting
the element more than 1" can
damage the receptacle,
causing the element not to lie
flat when if is plugged back in.
3. Lift out the drip bowl.
TO CLEAN THE DRHP BOWL:
For brown food stains-- use dishwashing
detergent, warm water, plastic scouring pads,
mild abrasive cleaners, soap-filled scouring
pads or ammonia.
Clean drip bowls after each use. Rinse and
dry well Foods that are not removed can
cause permanent stains that cannot be
removed, For heavily soiled bowls, place an
ammonia-soaked paper towel over the bowl
to loosen the soil, then gently scrub the bow!
with a plastic scouring pad.
For bBue.gold heat stains-- use a metal
polish
These stains are caused by overheating, and
are usually permanent, To help minimize this
effect, avoid excessive use of high heat set-
tings and use flat bottom pans that do not
extend more than 1" from the edge of the
cooking element
CAUTION: Do not operate the
cooktop elements without the
drip bowl in place. Scorching
of the cooktop, burning of
wiring insulation and loss of
energy will occur.
,n ............ a
TO REPLACE THE; UNIT:
1. Place the drip bowl into the opening and
make sure the receptacle is visible,
2, Slide the element firmly back into the
receptacle and lower it onto the drip bowl
_9 removable parts continued

REMOVABLEPARTScontinued
CLEANING MATERIALS
• Dishwashing detergent
• Warm water
• Scouring pad or soap-filled steel woo!
pad
BUMP
RAISED BACK GUIDE
OF THE RACK
TO REMOVE:
1, Puff the racks out to the stop lock position
2, Pull up the fiont of the rack and slide under
the bump of the rack guide.
TO CLEAN:
Clean with warm water and detergent For
hard to remove stains, gently scrub with a
scouring pad or a soap-filled steel wool pad
Rinse well.
TO REPLACE:
1. Place the raised back of the rack onto the
rack guides,
2. Liftthe front of the rack until the taised back
slides under the bump of the rack guides.
3. Slide the rack all the way back,
BROIL STOP POSITON
TO REMOVE:
1. Open the door to the broil stop position.
2. Grasp the door at each side and lift up
and off the hinges, DO NOT LIFT
DOOR 3Y THE HANDLE.
iii,u ............. _lnulnlillnIIinlllnl I
_. ,. CAUTION: When the door is"
_|| "_ removed and the hinge arms
I _1 are at the broil stop position,
\_ as a precaution, cover the
hinge arms with toweling or an
empty paper towel roll. Do not bump or
try to move the hinge arms while working
in the oven area. They could snap back
causing injury to the hands or damage
the porcelain finish of the front frame.
. .=.d
TO REPLACE:
1. Make sure the hinge arms are in the broil
stop position..
2, Lift the door by the sides.
3, Line up the slots at the bottom edge of the
door with the hinge arms
4, Slide the door down onto the hinge arms as
far as it will go.
5, Close the door
20

To save .you time and money, before making a service calf, check the fist below for any
problem .you may feel you have with the performance of your range., if the problem is
something you cannot repair, use the Consumer Service Numbers located at the back of this
manual. When making any caBis_ have the mode8 number_ repair parts gist, use
and care rnanua8 and the date of purchase available.
PROBLEM POSSIBLE CAUSE
POSSIBLE SOL UTION
Range will not
work;
totally inoperative,
Foods do not
bake properly.
No power to range,,
,, ,,,,i u,
Oven temperature
seems inaccurate°
• ,i ,,H i,, ,i,: , i ,
Oven fight does
not work.
a. Oven is not
preheated
bo Improper rack or pan
placement..
c. Oven vent blocked or
covered.,
d, Improper use of foil
ea
Improper
temperature setting for
utensil used.
f, Recipe not followed.
g, Improper oven control
calibration
h, Range and oven rack
not level.
a. Check the household circuit
breaker or fuse box,,
b, Check to make sure the range is
plugged in,,
a, Be sure to preheat until the tone
sounds
b, Maintain uniform air space around
pans and utensils., See oven
cooking section
¢o Keep vent clear
d, Racks should not be covered
during baking..
e. Reduce temperature 25 degrees
for glass or dull!darkened pans..
f, Check recipe and measurement.,
g, Check the temperature adjustment
following this section.
t_, Check the installation instructions
for leveling
Oven control calibration., See oven cooking section
a. Light switch is in
off position,
b, Bulb needs
replacing
ill...........
ao Check switch setting.
b, Check or replace light bulb,
21 before catting for service continued

CALLINGFORSERVICE
PROBLEM
Foods do not
broil properly.
iii1,1,111,1
Oven smokes.
Cooktop will not
work, oven is ok.
POSSIBLE CAUSE
POSSIBLE SOLUTION
a. Improper rack •
position,.
b. Oven preheated
c. Improper use of foil,
do Oven door closed
during broiling,
a. Check broil pan placement; see
broiling section
b. Do not preheat when broiling,.
c. Check broiling section.
d. Open door to broil stop position,,
e. Low voltage (208
volts)_
f. Improper broifing
time,
e. Use higher rack position and/of
longer cooking time,
f. Check broiling chart in broiling
section.
a. D#ty oven.
b. Improper use
of aluminum foi!
a. Check for heavy spillover,
b. Use of foil not recommended
c. Broiler pan containing
grease left in the oven,
c. Cleon pan and grid after each
use,
,,lU,
a. Elements unplugged.
b. Control set improperly
ILIII_III UIIL
. a. Check the elements, making sure
they are properly plugged into
the receptacle.
b. Push knob in while turning to
temperature setting,,
................ i itl it
Oven will not a. Control set improperly,
work, Cooktop ok. b. Control knob turned
wu ii inl u] II llll ill ,J
Oven door
accidentally
locked while
baking.
i ,ll ii , i,
Cleaning results
were poor.
too far past 500 °.
a. Check the control and check oven
cooking section,,
b. The indicator mark on the knob
should align exactly with 500°.
........... ................... i tl
a, Do not force the lock
handle.
Temperatures above the
locking temperature will
prevent the lock handle
from sliding to the
unlock position.
a. Clean cycle interrupted
b. Oven was heavily
soiled
a. Turn the control knob to the off
position,. Allow the oven to cool
until the temperature inside drops
below the lock temperature and the
handle slides easily,.
a. Allow the oven to clean its full
cycle,
b. Heavy spillovers should be
cleaned before the cycle is set,
22

"#0 IT
You may feel that your new oven cooks
differently than the oven it replaced. We
recommend that you use your new oven a few
weeks to become more familiar with it,
following the times given in .your recipes as a
guide.,
If ,you think .your new oven is too hot (burning
foods) or not hot enough (foods are
undercooked).you can adjust the tempera ture
.yourself The appearance and texture of foods
is a better indicator of oven accuracy than an
inexpensive thermometer, such as those found
in grocery stores, to check the temperature
setting of your new oven_, These thermometers
can vat:y by 20-40 degrees In addition, the
oven door must be opened to read these
thermometers, Opening the door will change
the temperature of the oven,,
To decide how much to change the
temperature, set the oven temperature 25
degrees higher (if foods are undercooked) or
25 degrees lower (if foods are burning) than
the temperature in your recipe, then bake, The
results of this "test" should give .you an idea of
how much the temperature should be changed.
1. Turn to OFFand remove the knob by pulling
straight off,
2. Look at the back of the knob, The arrow
pointing to the center of the bottom screw
indicates the original factory setting
3. Use a screwdriver to loosen the two screws
about 2 turns each.
=
Hold the knob handle (A on illustration)
while turning the disk (B on illustration) in
the desired direction to increase or
decrease the temperature (See illustration
below for "Standard Thermostat. ") Asyou
turn, you should be able to hear clicks and
feel notches or teeth, Each click or notch
is 15°F You can turn up to 2 clicks or
notches in either direction
5. When you reach the desired adjustment,
retighten both screws, Return the knob to
the range
(See illustration beHewmuse the
arrows in the gray area to make your
temperature adjustment.)
"A" "B"
KNOB DISK
TO MAKE OVEN
COOLER
TURN DISK
TO MAKE OVEN
HOTTER
TURN DISK
ARROW
23

NOTES
24

Fortherepairor replacementpartsyouneed
delivered directlytoyourhome
Call7 am- 7 pro,7daysaweek
1°8@@°366°
(1-800=366-7278)
©
For in-homemajorbrandrepairservice
Call24 hours a day,7 daysa week
t ,,8@@o4oREPAI
(1-800-473o7247)
,i
Forthe locationof a
Searsparts andRepairCenterinyourarea
Call24 hours a day,7 daysa week
t °8@@°488° t 222
BB
Forinformationonpurchasinga Sears
MaintenanceAgreementorto inquire
aboutanexistingAgreement
Call9 am - 5 pro,Monday-Saturday
1°8@@°827°5555
America's Repair Specialists
25

KENMORE ELECTRIC RANGE WARRANTY
r_
r
Dear Customer:
Our constant efforts are
directed toward making
sure your new Kenmore
Range will arrive at your
home in perfect condi-
tion and will give you
properperformance. As
part of these efforts, we
feel it is our responsibil-
ity to provide you with
this warranty for your
range.
RecydodPape_
..J
FULL ONE YEAR WARRANTY ON THE FUNCTIONING OF ALL
PARTS EXCEPT GLASS PARTS
within one year from the date of installation, any part, other than a glass
_art, fails to function properly due to a defect in material or workmanship,
Sears will repair or replace it, free of charge.
FULL 30.DAY WARRANTY ON GLASS PARTS AND FINISH OF PORCE-
LAIN ENAMEL, PAINTED OR BRIGHT METAL FINISHED PARTS
If, within 30 days from the date of |nstallation, any glass part or the finish
on any porcelain enamel, painted or bright metal part is defective in
material or workmanship, Sears will replace the part, free of charge.
FULL 90-DAY WARRANTY ON MECHANICAL ADJUSTMENTS
For 90 days from the date of installation, Sears will provide, free of charge,
any mechanical adjustments necessary for proper operation of the range,
except for normal maintenance.
If the range is subjected to other than private family use, the above
warranty coverage is effective for only 90 days_
WARRANTY SERVICE IS AVAILABLE BY CONTACTING THE
NEAREST SEARS SERVICE CENTEP4DEPARTMENT IN THE
UNITED STATES
This warranty applies only while this product is in use in the United States°
This warranty gives you specific legal rights, and you may also have other
rights which vary from state to state. SEARS, ROEBUCK and CO.
Dept. 817 WA
Hoffman Estates, IL 60179
WE SERVICE WHAT WE SELL
"We Service What We Sell" is our assurance to you that you can depend on Seats for service because Sears service is
nationwide°
Your Kenmore Range has added value when you consider that Sears has a service unit near you staffed by Sears trained
technicians., _professional technicians specifically trained on Sears appliances, having the parts, tools and equipment
to ensure that we meet our pledge to you -- "We Service What We Sell["
TO FURTHER ADD TO THE VALUE OF YOUR RANGE, BUY A SEARS MAINTENANCE AGREEMENT.
Y¢l_'l Of Owt_atshtp Covm_',lg0 l_lt Y01M' 2rid YelJ" 3td YIR
Kenmoro Ranges are designed, manufactured and tested
for years of dependable operation. Yet, any modern
appliance may require service from time to time. The
Sears Warranty plus the Sears Maintenance Agreement
provides protection from unexpected repair bills and
assures you of enjoying maximum range efficiency.
Here's a comparative warranty and Maintenance Agree-
ment chart showing you the benefits of a Sears Range
Maintenance Agreement.
Rep_ ...... tatD_ia©l|ve W MA MA
1 pL_ts o_ thBn Porr;el_ri
or G_==.
90 DAYS
2 M,o,=°,=_A_J.,_.0., W MA MA
_0 DAYS
3 P°'°°""'_"_'""="" W MA MA
Armu_,l Preventlv= M=dnten-
4 ..o._.°_k.,yo.,,°,=°., MA MA MA
..,, ........
W,- Wmrn_ty MA ,,MIdi_ _.J A,M*,,_ww_l
CONTACT YOUR SEARS SALESPERSON OR LOCAL SEARS SERVICE
CENTER TODAY AND PURCHASE A SEARS MAINTENANCE AGREEMENT.
....................... ,,,, ,,, ,H,,,, '1!111 'i1'1 I="11'" " III1'
Kenmore 0
Sold by SEARS, ROEBUCK AND CO., Hoffman Estates, IL 60179
• ,,,111= i iI , _, i,,lll __. ___ ?._ .... , ,, i --
Printed in LaFayette, Georgia

MANUAL DEL
MODELO NO.
91#,9336t,
9##,93368
9##.9345#
B#l. B3458
PRECAUCHON:
Lea y Mga todas las
reglas y las instrucciones
para el funcionam#ento
antes de usar este
producto por prirnera vez.
911. 93361
• InstruccJones de Seguridad
. CaracteristHcas
Func#onamiento
Cuidado y Lirnpieza
o C6rno Besolver ProMernas
,, Aiuste Facil
o Servicio para el ConsumNdor
i r, i _, ,P,i ..... i
Sears, Roebuck and Co._ Hoffrnan Estates, IL 60179 U.S.A.
229C4020PO62-2(SR10289)

ESTUFAELECTRICATIPO'INDEPENDIENTE"
INDICE
Seguridad de ta estufa ...........................3-5
Dispositivo contra volcadufas ..............3
Cdmo sacar la cinta de empaque ......6
Caracter/sticas de su estufa ............. 6
Cdmo programar los controles ......... 7
Cdmo hater conservas en casa ....... 7
C6mo asar a la parriUa ........... I3
Reglas generales, cdmo preparar las carnes
para asar, cdmo programar para asat a la
parfifla ............................................................13
Botones con flechas .......................... 8
Dial ....................................................... 8
Luces tndicadoras ............................. 8
Cddigo F.......................................................8
Cddigo PF .......................................... 8
Como Poner El Dial En Blanco ......... 8
Apagado autom_tico ........................ 8
Cdmo poner el re!oj ............................ 9
C6mo progtamar el cton6metro ...... 9
Consejos para cocinar en el horno 10-12
Cdmo ptogramar para Homear. ..... 12
Autolimpieza ........................ 14-15
COmo pteparar el horno ......................I4
Sello de la puerta del homo ...............14
Dispositivo para certar la puerta .... I4
Paredes del homo ...............................14
Cdmo prepatar un ciclo de
autolim. _ie,_za..............................................15
Cdmo_tener un ciclo .................... 15
Despu#s def ciclo ............................. 15
Panel de_bf_ttol J:...,..:_.:_:. ÷.i,-......_...-r..I/6
Cacerola y parrilla p_ra _asar ......:;...:. 56
Cubierta de esmalte porcelanizado 16
Fondo de la caja del quemador ....... 16
Superficies pintadas .......................... 16
Vidrio ................................................... !6
Perillas de control de la supefficie 17
Foco de la luz de/homo ......................I7
Cajdn de afmacenamiento .............. 18
Cubierta levantabfe ....................................I8
Unidades de fa cubierta ........................19
Parritfas de homo .....................................20
Puerta del homo ...........................................20
Antes de Ilamar para un setvicio ..........
................................................................21,22
Ajustes a la temperatuta .....................23
Ndmeros para servicios del
consumidor ........................................... 25
Gafantfa
Para su conveniencia y referencia futura. Por favor escriba el nbmero de modeloy de
serie en el espacio que se provee. Estan ubicados en el marco frontal detras de la puerta.
NUMERO DE MODELO:
NUMERO DE SERIAL:
...... ........................I_HH_1j

* Todas las estufas se pueden !iiilii
vo!car _:_:_
" Personas podrian resultar i!iiii"
heridas !:_i!::i
Instale el dispositivo contra i!i!:
volcaduras empacado con la iii_:ii_
*Vealasinstrucci°nesdeiii!instalacidn
Herran_ientas que necesitar,_:
Destomillador de cabeza Phillips
Llave ajustable o abierta de t 3/8"
t. Saque la abrazadera del preempacado
ubicado dentro def homo
2. Decida si la abrazadera serb instalada en el
lado derecho o izquierdo de la ubicacidn de la
estufa,
Si el lado de fa abrazadera de la estufa es
adyacente at gabinete, coloque fa abrazadera
contra la pared de arras y el gabinete como se
n
muestra mbs abajo,
GABINETE ADYACENTE O
UBICACION FINAL DEL PANEL
LATERAL DE LA ESTUFA
ORILLA EXTERIOR DE LA
ABRAZADERA DEBE ESTAR
EN UNEA CON EL LADO
IZQUIERDO O DERECHO DE LA
ESTUFA X
PARED DETRAS
DE LA PARED"
4_
5_
6_
1t.
Si no hay un gabinete adyacente, determine
cu#l ser,_ ta ubicacidn det panel de fa estufa
pintado, Cofoque fa abrazadera con su orilfa
exterior en este fugar y contra la pared de
atr#s Vea ta ilustracidn de abajo
Determine siva a ancfar la abrazadera al piso
o a la pared Asegdrese que esta ubicaci6n
est# libre de atambres ef#ctricos o ptomeda
Pegue la abrazadera firmemente con los
tornillos que se proveen, Los tomillos son para
madera, madera terciada, tabfas de partfculas
y fragmentos, y la mayorfa de marcos de metal
Siva a ancfar a cemento, usted puede comprar
tomillos y anclas adec uadas en fas ferreterfas
Use barrenos para cemento para hacer los
hoyos requeridos,
ABRAZADERA
TORNILLO '_
OMETA' "-./
t--
BASE DE LA
PARED
/
ANCLADO A LA PARED
Usando una ftave inglesa, saque fas cuatro
patas niveladoras por Io menos dos vueltas
Vea su gufa de instataci6n para m_s informaci6n
para la nivelaci6n antes de poner fa estufa en
posici6n,
Deslice y cofoque la estufa en posicir_n
Asegdrese que et nivelador de la pata trasera
agarra completamente ta ranura en la
abrazadera Si fa estufa no se puede mover
suficientemente hacia atras para que el
nivetador de la pata entre en fa abrazadera,
mueva la abrazadera hacia adelante como se
requiera y _nclela at piso en un tugar diferente
3 instrucciones de seguridad importantes continOan

INSTRUCCIONESIMPORTANTESPARASUSEGURIDAD conti,uaci ,
Para gafantizar su seguridad, la de su familia y la
de su hoga[, por favor lea su Manual del
Consumidor cuidadosamente.. Mant_ngalo a la
mano para refetencias Ponga mucha atenci6n a
las secciones de seguridad
ASEGURESE que su estufa sea instalada por un
t_cnico especializado y que haga tierra
adecuadamente.
sADVERTENCIA DE SEGURIDAD
IMPORTANTE!
California Safe Drinking Water and Toxic
Enforcement Act requiere que el
gobernador de California publique una lista
de substancias que el estado sepa que
producen defectos de nacimiento u otros
da_os reproductivos y requiere que los
hombres de negocios adviertan a sus
clientes del contacto potencial a tales
substancias.
El aislante de fibra de vidrio en el homo con
autolimpieza emitir;J una muy peque_a
cantidad de mon6xido de carbono durante
el ciclo de autolimpieza. E1 contacto se
puede minimizar ventilando con una puerta
o ventana abierta o usando un ventilador o
una campana de ventilaci6n.
_,__ ADVERTENCIA
Para prevenir que la
estufa se vuelque
accidentalmente
debido a un uso
anormal, incluyendo
una carga excesiva sobre la puerta,
eng;inchela a la pared o al suelo
instalando el dispositivo contra
volcaduras que se provee. Si la
estufa se mueve para limpiarla,
para hacerle servicio o cualquier
razdn, asegdrese que el dispositivo
contra volcaduras sea enganchado
nuevamente cuando la estufa se
coloque de vuelta en la abertura.
No hacerlo podria resultar en que
ia estufa se vuelque o en heridas
personales.
ENSENE A LOS NINOS A:
, No jugar con los controles o
cualquier parte de la estufa
,, No sentarse, subirse o pararse
sobre la puerta del homo,
NUNCA GUARDE cosas de
interns para los nitros en los
gabinetes sobre el estufa
GUARDE ESTE libropara un uso
fututo
NUNCA TIRA TE de reparar o reemplazar una
parte de la estufa a menos que las instrucciones
se den en este manual Todo otto trabajo deberfa
set hecho pot un t_cnico especializado
NUNCA USE su estufa para entibiar o calentar
una habitacidn
SIEMPRE MANTENGA los
revestimientos combustibles de
fas paredes, cortinas y otros
patios a una distancia prudente
de la estufa
NUNCA CALIENTE contenedores de alirnentos
cerrados. El aumento de la presidn podrfa causar
que el contenedor explore y cause heridas..
SIEMPRE MANTENGA el _rea de la estufa
despejada de cosas que se podffan quemat: La
acumulacidn de comida y grasa
y los utensilios de madera se
podrlan incendiat: Los utensifios
de pl_stico se podr/an dertetir y
fas comidas en conservas
podrian exptotar. Su homo
nunca se deberfa usar pafa
afmacenaf cosas
NUNCA deje fiascos o latas de
grasa o goteaduras sobte o cerca de la estufa
SIEMPRE MANTENGA la estufa despejada de
cosas que se podrlan quemar (gasolina y otros
vapores y lfquidos inflamables).
ALGUNOS LIMPIADORES
producen vapores nocivos y
los pa_os y las esponjas
mojadas podrlan causar
quemadutas pot vapor.
4
instrucciones importantes de seguridad continQan

NUNCA USE ropa suelta cuando use fa estufa
NUNCA USE una toalfa u
otro par_o abultado come
agarradera y asegurese
que la agarradera est6
seca_ Las agarraderas
humedas podrfan causar
quemaduras per vapor.
Mantenga las toallas
y los pa_os para plates, agarraderas y otros
pados a una distancia prudente de la estufa
SOLO CIERTAS clases de utensilios de vidrio o
cer_mica se pueden usar para coeinar en fa
cubierta Asegdrese que los utensilios que elija
para usar estbn dise_ados para cocinar en la
cubierta
SIEWtPRE T'ENG,_ cuidado cuando toque los
elementos de la cubierta, Retendr_n calor despu_s
de que la estufa se haya apagado
NUNCA OBSTRUY'A la ventilacidn det homo
bajo el elemente derecho de atras
LAS OLLAS QUE SE USEN
para cocinar en la cubierta
deberfan ser de fondo plane y
Io suficientemente grandes
para cubrir el brea de cafor que se est_ usando
tLNMPIE SO&_MENTE las partes que se listan
en este manual. Siga todas las instrucciones para
fa fimpieza.
Si EL MODULO PARA LA AUTOLIMPIEZA
funciona mal, apague los controles o desconecte
fa electricidad Pida un servicio per un t_cnico
especializado
NUNCA FRIEGUE, mueva, o dahe el sello de fa
puerta en fas estufas con autolimpieza,
NUNCA 11"RATE de timpiar los utensilios, oltas,
partes removibfes o fa cacerola y fa parrifla para
asar en et ciclo de autotimpieza,
NO USE limpiadores para hornos- Ningun fimpiador
comercial se debeffa usar dentro o alrededor de
ninguna parte det homo.,
CO&OQUE LAS PAnRILLAS DEL HORNO
en la posicidn deseada mientras el homo est# frio
Si las parrillas se deben mover mientras et homo
est_ caliente, no permita que la agarradera haga
contacto con el quemador caliente del homo
DESPUES DE ASAR A I-A PARRILLA,
siempre saque la cacerola y la parrifla para asar
del homo y Ifmpielas, Los sobrados de grasa en
la cacerola para asar podrfan incendiarse la
prdxima vez que usted use el homo,,
SIEMPRE TENGA CUIDADO cuando abra la
puerta del homo, Deje que el aire caliente'y et
vapor escapen antes de mover los alimentos
NUNCA USE papel de aluminio para forrar et
rondo del horno. El use inadecuado del papef de
aluminio podrfa empezar un incendio
5
INCENDIO DE GRASA EN LA
CUBIERTA:
Nunca levante una ella
en llamas...
I. Apague los efementos de
la superficie
2. Sofoque las llamas con una
tapa apretada, soda para
hornear o un extintor
FUEGO EN EL HORNO:
;No tra_e de mover _acacero_a!
tm
2.
Cierre fa puerta def homo y
apague los controles.
Si elincendio continua, arro/e soda
para cocinar sobre el fuego, o use
un e>rtintor de qufmico seco,
espuma o "hafon"

CARACTERISTICASDESUNUEVAESTUFATIPO
INDEPENDIENTE
Para sacar el adhesivo que queda de la cinta de empaque, use un deter gnete I/quido normal para platos,
aceite mineral o para cocinar: Con un paso suave frote el _rea y permita que se remoje.. Enjuaque y seque
bien. Repita el procedimiento usando un pulidor para estufas para asegurarse que el homo no se dafie.
Esto deberia hacerse antes que la estufa se encienda por primera vez. La cinta no se
puede sacar una vez que el homo ha sido calentado.
La cinta de empaque se puede encontrar en las siguientes areas:
Superficie de la cubierta
Area del panel de control
Area del homo
6
Manilla de la puerta
Moldura de la puerta

Antes de usar la cubierta por primera vez, tome
unos pocos momentos para famifiarizarse con los
elementos y con la perilfa que enciende cada
elemento, La mama cerca de cada perilla de
control le muestra cu_l elemento se enciende con
esa perilla
O@
O0
DERECHA
TRASERA
@0
O0
IZQUIERDA
TRASERA
O0
@0
IZQUIERDA
DELANTER4
O0
O0
DERECHA
DELA.tCTE'RA
HI
Se usa para comienzos r#pidos, taf
como para hervir agua
MED
Se usa para hervir y frefr
LO
Se usa para comidas al vapor o para
mantener los alimentos a temperaturas
para ser servido&
1. Empuje para hacer girar la
perilla.
2. Coloque entre lasmamas
para el calor deseado
Se pueden hacer conservas a bar_o mafia o con
ollas a presidn, ocon ollas de di_metro grande que
se extiendan m#s de 1"de fa ori!la del quemador..
Esto se puede hacer porque la temperatura que se
necesita para hervir el agua no da4a las superficies
que rodean a los quemadores Si embargo, no
use utensilios o freidoras de di#metro
grande para o_ro prop6sito que no sea
hervHr agua.
2,
m
P
Asegdrese que ta olla est# centrada sobre el
quemador
AsegLkese que ta ofla sea de fondo piano
Use recetas y procedimientos de buenas
fuentes, Estas se encuentran disponibtes
de fabricantes tales como Ball and Kerr® y
Servicio de Extensi6n def Departamento de
Agricuttura,
Tenga cuidado cuando haga conservas, para
prevenir quemaduras a causa de vapor o
cator
PRECAUCION: Nunca forre los
recipientes con papel de
aluminio. E1 papei de aluminio
puede obstruir el paso normal
del calor y datiar la estufa.
Siempre use utensilios y woks que tengan
fondo piano y que tengan el mismo tamafio
que el elemento que se est# usando. Las
ollas no se deberian extender m#s de 1" de
la orilla del elemento.
7

RELOJ,CRONOMETROYNUEVOCONTROL
I ! LC!
I I "_Id
HOUR MIN,,
HOUR
@
OVEN
ON
©
LOCK
MIN. (:_
O00R
©
PRE-
HEATED
Su nuevo control es simple, f,tci! de entendet y le permite programar las siguientes operaciones
El botdn con las flechas para SUBIR o BAJAR Las
HORAS le permite seleccionar la hora exacta que
necesita.
El dial en e! centro de su control mostrar_:
1, El reloj para la hota def dia
2. La cantidad de tiempo que ha seleccionado
cuando use el crondmetro.
Cuando la corriente se prende por primera vez en
su estufa, et dial har_ pestar_ear "PF". Apretando
el Botdn de Reloj el dial camb iar_ a "12:00", el cual
pesta4ear_ Empuje ef Botdn del Reloj nuevamente
y usted estar_ fista para poner el Reloj,
El Cddigo "PF" tambi#n ocurrir,_ cuando haya un
corte de corriente Cuando la electricidad vuelva,
el Relojy efCrondmetro, si usted los ha programado
antes del corte de corriente, tendr_n que ser
programados nuevamente..
Su control tiene luces indicadoras individuales
que le mostrar_n que usted ha seleccionado
A medida que usted tea su manual, encontfarb el
propdsito de cada uno de estos indicadores y
cdmo le ayudar_n a entender su nuevo control
Si el control hace pestafiear una "F'seguida
de un ndmero y un tono continuo, existe un
Si usted prefiere no vet ta hora del dfa en el dial
su nuevo controf le ofrece ta caracterfstica especial
de poner el dial en btanco, o de no mostrar nada
en el dial
Para activar esta funci6n:
Si la hora def dia se muestta en el dial empuje el
botdn del reloj dos veces,
Para activar nuevamente el dial del Reloj, empuje
el botdn del reloj dos veces
error en el cddigo de la funcidn. Tome nota del
ndmero despu#s de la "F"_ Ponga la perilla
del control del homo en la posicidn de apagado
OFF y empuje el botdn TIMER ON/OFF y el
bot6n del CLOCK. Petmita que el homo se
enfrie por 1 hora y trate nuevamente la
operacidn del homo° Si el problema se repite
Ilame para un servicio. Diagale al t#cnico que
codigo estaba pesta_eando.
Como medida de precaucidn este horno se
apagara autom_ticamente si se deja prendido por
m_s de 12 horas.
8

2"
El RELOJ y el
.°...,.@@./
CRONOMETRO se programan
usando los botones. El CRONOMETRO no
controlar_ ninguna operacidn del homo.
t.Empuje el botdn para RELOJ
(CLOCK) hasta que empiece a
pestat_ear
2. Empuje el bot6n para SUBfR o
BAJAR LA HORA..
El reloj empezar,:1 a dar la hora dentro de un minuto
ousted puede empujar el botdn del RELOJ para
un comienzo inmediato
Despu_s de soltar los botones de MIN or HR, la fuz
indicadora del crondmetro pesta_ear_ de tres a
cinco veces y el crondmetro empezar_ la cuenta.
La luz indicadora del crondmetro permanecer_
encendida hasta que la cuenta Ifegue a cero.
Duando el crondmetro empiece su cuenta, usted
podrfa apretar el botdn del RELOJ para vofver a la
hora presente del dfa.
AI final de la cuenta el control empezar_ a sonar y
la fuz indicadora del crondmetro empezar_ a
pestar_ear avis,_ndole que el tiempo ha terminado.
Empuje el botdn TIMER ON/OFF (BOTON DEL
CRONOMETRO)
;R_CUERD_I
Si ernpuja y sujeta los botones con las
flechas _acia arriba o hacia abajo, la
hora cambiara r,_pidamente. Si usted
vacila mfentras empuja los botones con
las flechas hac_a arriba o hacia abajo, el
dHal y las suces Jndicadoras dell
cron6metro pesta_earan tres veces y
retornara'n el dial al reloj con la hora deR
dia. Si esto sucedep empuja el bot6n
THMER ON/OFF para volver a ernpexar.
El Crondmetro es sdlo un crondmetro en minutos y
no controlarb las operaciones del homo. La
cantidad de tiempo m_xima que puede programar
es 11 horas y 59 minutos
@
ta
Empuje el bot5n TIMER ON/OFF
(CRONOMETRO), Mostrar8 "0.00"
y la luz indicadora del cromdmetro
empezar_ a pesta#ear
Empuje los botones con la ffechas
para SUBIR o BAJAR LOS
MINUTOS para programar los
minutos exactos que necisitar usar
Si usted ha seteccionado una cantidad de tiempo,
pero decide cambiarlo,
Si la cuenta se muestra en et dial empuje et botdn
de los MINUTOS o de fa HORA con tas flechas
hacia ARRIBA ohacia ABAJO. Sefeccione ef tiempo
que necesita
Si el reloj de la hora def dfa aparece en el dial,
empuje el botdn TIMER Old/OFF Entonces empuje
uno de los botones de la HORA o MINUTOS con
las flechas hacia arriba o hacia abajo, Seteccione
el tiempo que usted prefiere
Si usted desea cancelar el CRONOMETRO, la
cuenta debe aparecer en el dial. Si no, empuje el
bot6n TIMER ON/OFFpara que aparezca la cuenta,
entonces empuje el botdn TIMER ON/OFF para
cancefar
9

CONSEJOSPARACOCINARENELHORNO
Es normal sentir un poco de olor cuando use su
homo pot primera vez Esto es causado pot el
calentamiento de las partes nuevas y del aislante.
Pata ayudar a efiminar este olor, veatile la
habitaci6n abriendo una ventana o
usando una campana de ventilaci6n.
IMPORTANTE: Nunca
cubra el rondo del homo o
la parrilla def horno con
papel de alumirfio El uso
inadecuado puede causar
una mala circulacidn del
calof , pobres resultados al
hornear, y podria da_ar el
acabadodelhorno
usted notarb un peque_o
tubo Esto es un sensor de
ca!or que mantiene la
temperatura del homo,
Nunca mueva o dobfe este
tubo
]1
SENSOR DE
TEMPERATURA DEL
HORNO
Si abre fa puerta para mirar los afimentos causara
una p_rdida de catot: La p_rdida de calor causar_
mafos resuttados cuando hornee Use la luz def
homo para revisar los alimentos mienttas se
homean
La ventilacidn del horno est_ ubicada
inmediatamente sobre la puerta, Esta _tea se
podrfa calentar mucho durante el uso del homo
La ventilacidn es importante para la corfecta
circulacidn del aire.
ventilaci6n.
Nunca obstruya la
UBICACION
DE LA
VBVTIL4_
DEL HORNO
Permita que el homo se precatiente bien cuando las
recetas tequieren precalentamiento,. El
precalentamiento es subir la tempetatufa a la
temperatura que va a usar cuando homee.. Cuando
el homo llegue ala temperatura de precalentamiento,
sonarb un tono Tenga los alimentos a la mano y
listos para ponedos en el homo.
Durante cuatquier operacidn del horno usted podrfa
oir un ruido de ventifador Esto es el ventilador
interno para enfriar y prevenir que todas las partes
el_ctricas se recalienten No es poco comdn que
el ventiladot siga corriendo incluso despu_s que
el homo se haya apagado,
BANDEJAS BAJAS
PARA GALLETAS
(sin fados)
Las bandejas bajas para galfe-
tas permiten que el aire circule
atrededor de las gafletas para
que se doten en forma pareja
UTENSlLIOS BRILLANTES (que reftejen cator)
Los utensitios brillantes son perfectos para que los
queques y panes rapidos tengan una corteza caf#
dorada
UTENSlLIOS DE VIDRIO, OSCUROS
CONTRA PEGADURAS, U OPACOS POR LA
EDAD (absorven el calot)
Son perfectos para panes con levadura, cortezas para
pasteles o alimentos que tengan una corteza caf#. La
temperatura dot homo se deberla reducir en 25°F,
10 consejos para cocinar en et homo continDan

con#nuacidn
A medida que el homo se cafienta, e! cambio de
temperatura dentro del homo causa que gotas de
agua se formen sobre el vidrio de fa puerta del
homo.. Para prevenir esto, abra la puerta por unos
momentos para permitir que salga el aire hdmedo.
Si est_ horneando con m,_s de un utensifio,
coldquelos de manera que cada uno tenga por Io
menos de 1" a 1 1/2" de espacio de aire a su
alrededor Coloque los utensilios de manera que
ninguno quede directamente encima de otro
El Sensor de Temperatura def Homo en ta parte
trasera del homo mide y controta continuamente
la temperatura dentro det homo Para mantener
una temperatura programada constante, los
elementos harbn un ciclo de encendido y
apagado mientras el homo cocina
Las parrillas def
homo est_n
dise_adas con
topes, una TOPE E_.
conveniencia y u_s _uIAs
PARA LAS.
tambi_n una PARmLUAS
precaucidn de
seguridad para
colocar o sacar la
comida del homo
Cuando las
parrittas est_n puestas correctamente en el
homo, las gufas tienen una indencJdn para
prevenir que las parriltas se den vuelta Su
homo tiene cuatro (4) posiciones para parrilfas
que se pueden usar cuando hornee.
R-aposici6n de m_s arriba es solarnente
una guia. No puede set usada como
posici6n para una parrilla.
2
1
Siernpre coloque las parrillas det homo
en la posici6n correcta cuando el homo
est_ frio.
1 1 consejos para cocinar en el homo contindlan

CONSEJOSPARACOCINARENELHORNOco,,,u,ci ,
Usted podrfa pensar que su homo nuevo cocina
NUEVO CONTROL
diferentemente al homo que reemplazd Le
recomendamos que use su homo nuevo por varias
semanas para que se familiarice m_s con _I,
siguiendo los tiempos que se dan en la receta
como una gufa. Vea Ajustes-Hagalos Usted Mismo
en la parte de atr,ts de este manual pata hacer los
ajustes si cree que su homo est,_ funcionando
demasiado caliente o fdo pafa su prefetencia
Su nueva estufa viene equipada con una manilfa
que puede ocultarse debajo de la cubiefta
cuando no se encuentra en posicidn de ceffar.
1. Asegdrese de que la manilfa no est# en
posici6n de cerrar y levante fa cubierta de la
estufa
2. Empuje la manilla dentro del seguro hasta
donde tope
3. Baje la cubierta
ov_
PR_
HEATED
El contfo! de su homo tiene una perilla para
seleccionar Homear, Asar o Limpiat: Hay tambi#n
tres luces indicadoras:
Luz indicadora de
Precalentamiento-- se prende y
permanece encendida cuando el homo
haya afcanzado fa temperatura
seleccionada.
• La luz que indica que el Homo est;J
encendido (Oven On)-- se prende y
permanece encendida cuando la funcidn de
homeat; asar, o limpiar ha sido seleccionada.
, La luz del cerrojo de la puerta (Lock
Door)-- se prende pata la autolimpieza Si
ta luz det CERROJO DE LA PUERTA
pesta_ea, revise uno de Io siguiente:
1. La manifta delcerrojo est_ cerfada durante la
funci6n de hornear;
2. La manilla del cerrojo no est_ cerrada durante
fa function de autolimpieza.
Manilla para cerrar/abrir el seguro
de la puerta del homo.
1. D# vuelta la peritla OVEN CONTROL a la
tempefatura deseada de tibio WM hasta 550_F.
2. La luz indicadora HORNO ENCENDIDO
(OVEN ON) se encender_
3. Cuando el horno haya alcanzado la temperatufa
seleccionada las luces "PR£HEAT£D" y
"0 VEN ON" se encender_n Ponga la comida
en el homo.
4. Las luces indicadoras de "PREHEATED" y
"OVEN ON" permanecer_n encendidas hasta
que el horneado haya tefTninado y ta petilla de
control se haya puesto en la posicidn de
apagado (OFF).
Es posible que dutante la funcidn de hornear
escuche un sonido de click. Esto es normal. Los
elementos calentadores del homo se prenden y
se apagan para manterer ta termperatura deseada
12

Asar es cocinar at calor directo , ,j _
del elemento superior.
La puerta del homo deberfa
permanecer abierta en fa
posicidn de tope para asar
cuando ase a la parrilla.
No es necesario precalentar el homo cuando ase
a la parrilla Use la cacerola y la parrilla para asar
que viene con su estufa Ambas est_n dise#adas
para drenar adecuadamente la grasa y los tfquidos..
: ............................: ......... _,L,q
f f E1 papel de aluminio debe ser
J /_ \,, moldeado firmemente a la
| 1 __, _j parrilla y debe hacer cortes en
| L.._ vj el papel que est_n alineados
J "_ _ con las ranuras de la parrilla.
| Esto permite que la grasa y los
| gquldos caigan a ia cacerola,
| evitando que se produzca un
incendio y humo excesivo.
| Siempre saque la cacerola y la parrilla del
| homo. Guardar y olvidar fl
| unacacerolaparaasarsucia _,_1/
| en el homo es un peligro
J para producir un incendio o _.._
hum°,..............................................."......
E! Departamento de Agricultura de los Estados
Unidos nota que las cames cocinadas crudas son
populares, pero que ta came que se cocina hasta
sdlo 140°F, (cruda) significa que atgunos
organismos venenosos podr/an sobrevivir..
Mientras m_s cerca coloque los atimentos del
etemento para asar, m_s rbpido se dorar_n por
afuera, pero quedando rojo o rosado en el centro
Cofocando las cames tejos def elemento permitir8
que las cames se cocinen en el centro mientras se
doran por afuera Usando estas posiciones, cocine
el fado 1por fo menos 2 minutos mSs que el lado
2 Si su homo est_ conectado a 208 vottios, usted
podrfa usar una posici6n de parrilla m_s atta y/o
cocinar los afimentos por mbs tiempo
Et tama#o, peso, grosor, temperatura iniciaf y su
preferencia personal afectarb efasado a faparrifla
Esta tabla estb basada en cames a la temperatura
del refrigerador
POSICION
DE
PARRILLA
3
Seleccione cortes de carnes blandas que
tengan por lo menos 3/4" de grueso para asar
a la parrilla.
Corte el exceso de grasa de las orillas, traga
cortes en las orilfas para evitar que la came se
enrosque.
Siempre use tenazas para dar vuefta fa came
Si hace hoyos en fa came, permitir_ que el jugo
se escape.
Ponga sal sobre el primer lado de ta came
inmediatamente antes de darla vuefta, y sobre
el segundo lado inmediatamente antes de
servirla. Aplique mantequilla sobre el polto y el
pescado con una brocha varias veces mientras
se asan,
El pollo y el pescado deberian ser puestos
sobre la parritla con la piel hacia abajo Para el
pescado, aplique un poco de grasa sobre la
parrilla para evitar que se pegue
t, Ponga la PERILLA DE
CONTROL DEL HORNO
en BROIL
2, Cuando termJne de asar,
ponga la PERHLLA
CONTROL #EL HORNO
en la posicidn de apagado
(OFF)
OFF
13

ELCICLODEAUTOLIMPIEZA
lm
Saque la cacerola y la parrilla para asar, la
parrilla del homo, utensilios, y cualquier papel
de aluminio que podrta quedar en el horno
2. La suciedad en ,..._o..o.._
el frente del _-
marco, 1" dentro
del horno, y
alrededor del
sello de la puerta
del homo tendr_
que set limpiada
a mano. ._,,,,,,,,,,..,o,_
LA pigE R'i*A
Limpie estas breas con agua cafiente, fanilfas con
jabdn o limpiadores como Soft Scrub para sacar
cualquier suciedad Enjuague bien con agua
limpia y seque.
3, Limpie cualquier derrame pesado de! rondo
del homo
m
No limpie el sello de la puerta del homo El
material de fibra de vidrio de la puerta def
homo no soporta la abtasidn Es esencial que
el sel!o permanezca intacto Si nota que se
est_ gastando, trizando, o saliendo de la puerta,
deberia ser reemplazado
El sello de la puerta
estb dise#ado para que
tenga un espacio de 5-
6"en el fon do del horno
PANELDELAPUERTA SELLO
Esto permite la
c#culaci6n adecuada
del aite Es normal que
su homo d # la REVF.STtM1E.TODELAPUERTA
apariencia de no tenet
un buen sello sobte e! homo Esto se debe al sel!o
La ubicacidn del sello sobte la puerta del homo
mantiene la puerta sellada y pfeviene cualquier
p_fdida de calor.
_ os utensillos nunca
deberian dejar dentro del homo
durante un ciclo de autolimpieza.
Las parrillas del horno se
podr[an limpiar durante el clclo
de autolimpieza, pero perderdn su briilo y se
pondrdn dificiles de deslizar. Si decide
dejarlas dentro durante el ciclo de limpieza,
pdseles aceite vegetal para que se deslicen
rods fdcilmente.
Siempre asegdrese que la luz del homo est6
apagada durante el ciclo de autolimpieza
para alargar la vida del foco,
Durante el primer ciclo de limpfeza, ventile
la habitacidn con una ventana abierta o una
campana de ventilaciOn. Esto evitard el olor
fuerte producido por el calentamlento de las
partes nuevaso
• Cuando fa puerta se cietra c_ cerrojo, fas tuces
indicadoras LOCK DOOR (PUERTA CON
CERROJO) YOVEN ON (HORNO ENCENDIDO)
se encender,_n La temperatura del homo tendr,_
que bajar arnenos de la temperatura de cierre antes
que la puerta se pueda abfir, Los indicadores de
LOCK DOOR, y OVEN ON pesta_ear,_n _
• Si LOCK DOORpestaYtea eneldiat, lapuettano
est_ enganchada completamente, simptemente
empuje ta manilla de la cerrojo posicidn.
Limpie solamente para tetocarlas entre ciclos de
timpieza Use detetgentes Ifquidos pafa pfatos,
agua tibia, o lanillas de aceto con jabdn. Enjuague
bien despu#s de limpiar y seque.
NUNCA USE LIMPIADORES PARA
HORNOS DENTRO 0 ALREDEDOR DE
CUALQUIER PARTE DEL HORNO.
Cuando limpie, asegdfese de no doblar o mover el
sensor de la temperatufa ubicado en ta pared
tfaseta del homo
14 ciclo de auto/impieza continOa en la p#oina ,,,ioL,'ente

continuaci_n
t. Para mejor
resultado, siga los
pasos para
PREPARAR SU
HORNO.
2. Si su manilla no se
ve, levante la
cubierta superior y
tire la manilla Io mbs
afuera posible,
3. Corra la manilla hacia la derecha. No fuerce la
mani!la. Si no corre f_cilmente, usted no la ha
tirado Io m,ts afuera posible desde fa cubierta
Repita el paso 2.
4. D_ vuelta la perilla de control a "CLEAlkl _
(LIMPIEZA)_ Las luces indicadoras def
CERROJO DE LA PUERTA (LOCK DOOR).y
de HORNO ENCENDIDO (OVEN ON) se
encenderbn.
Si usted da vuelta la perilla de control del homo
a CLEANyse olvida de asegurarlapuerta, la luz
indicadora de "LOCK DOOR" se encender,t,
alert_ndolo que cierre la puerta con el cerrojo
5. El ciclo de limpieza dura 4 horas y 20 .
minutos. Las luces indicadoras de "OVEN
ON" y de "LOCK DOOR" empezar_n a
pesta_ar al final del ciclo de limpieza. La
puerta del homo no se puede abrir hasta que
la temperatura haya bajado y la manija de la
puerta corra fScilmente hacia la izquierda
6. Cuando el ciclo haya terminado, ponga la
perilla de control del homo en posicidn de
apagado (OFF) y sbquele el cerrojo a la
puerta.
D6 vuelta la perilla de CONTROL DEL HORNO
a la posicidn de apagado (OFF), No podrb
sacarle el cerrojo a la puerta hasta que la
temperatura dentro del homo se haya enfriado,
Las luces indicadoras no pestafiarbn si el
ciclo de limpieza es interrumpido,
Despu_s de un ciclo de
limpieza, es posibfe que ..._j_ i/
yea un poco de cenizas
blancas en el homo
Si manchas blancas
persisten, fri#guelas con lanillas de acero con
jabdn. Asegdrese de enjuagar bien_ Estas
son generalmente depdsitos de sal que no se
pueden sacar durante el ciclo de limpieza.
Si por alguna raz6n usted no quee_
satHsfecho con Ros resultados de na
8irnpJeza_ simplemen_e repUta el cicNoo
t5

LIMPIEZA
QUE MA TERIALES DE LIMPIEZA USAR:
, Detetgente Ifquido para platos.
: Agua tibia,.
o Par-lo suave
No use limpadores abrasivos, limpiadores
industriales, o blanquedores (cioro).
COMO LIMPIAR:
Limpie despu#s de cada derrame, Si alimentos
_cidos (tales como nellenos de fruta, leche,
tomates, chucrut o salsas con vinagre o jugo de
limdn) se derraman sobre la cubierta, use una
toalla de papel seca o un patio pata limpiarlos
inmediatamente Cuando la superficie se enfrfe,
lave y enjuague, Para otros derrames, como
salpicaduras de grasa, lave con jabdn y agua
cuando se enfrfen y luego enjuague Saque brillo
con un pa4o seco
QUE MA TERIALES DE
LIMPIEZA USAR:
o Detergente liquido para
platos.
° Agua tibia,
° Lanillas de acefo con jab6n
• Limpiador cometcial pafa
hornos.
COMO LIMPIAR:
Permita que la cacerola se remoje Ponga
detergente para platos sobre la parrilla y cubra
con un patio o una toalla hdmeda por un tato..
Friegue a medida que sea necesario Lave,
enjuague, y seque bien Usted tambi_n podria
poner la cacerola y la parrilla en la lavadora de
platos
QUE MA TEFtlALES DE LIMPIEZA
USAR:
• Detergente fiquido pata piatos
• Agua tibia
,, Pa4o suave
COMO LIMPlAR:
No use limpiadores para homos, polvos para
limpiar, o abtasJvos fuertes Si salsas pata
sasonm, salsa de tomates, materiales para
batidos, etc , se derraman, lfmpielos Io robs
posible Cuando las superficies se enffien
fimpie bien fas superficies pintadas
QUE MA TERIALES DE LIMPIEZA USAR:
• Detetgente para platos
° Agua tibia
• Toalla de papel
° PaSo seco
• Amonia o limpiadores abrasivos y lanillas pafa
ffegar
QUE MA TERIALES DE LIMPIEZA USAR:
° Limpiador para vidrio
° Toallas de papel
• Soda para hornear
PARA LIMPIAR:
Para limpieza diar ia, use un limpiador para vidr ios
y una toalta depapeL Pata suciedadpesada, use
una pasta de soda pata hornear y agua. Enjuague
bien..
116

GUE M._ THRBALES DE LUMPHET.J_ USaR:
o Detergente para plates
o Agua tibia
o Par_o suave
CANAL
MOLDEADO
GANCHO
DEL RESORTE
come SACAR
t, AsegEirese que la perilla est_ en posici6n de
apagado.,
2. Tire derecho hacia afuera del tallo.
Usando un pedazo de cuerda podrfa facilitar el
sacado de la perilla. Ponga la cuerda debajo y
alrededor de la perilla, y tire derecho hacia afuera
PAIRA LIMPl_R
Lave bien la perilla con agua con jab6n. Seque
completamente con un par_o suave. No permita
que la perilla se remoje.
PARA COLOCARL_ NUEVAMENTE
Mire la parte trasera de la perilla Et canal
moldeado de la perilla estb dise#ado para
quedar perfectamente ajustado en e! tatlD de
la perilla,
2. Coloque el canal moldeade en linea con la
ranura plana en el tallo de la perilla,
3, Empuje la perilla hasta Io m#s atr#s posible..
PRECAUCION: Asegdrese
que el interrupter de la luz del
homo est_ en posici6n de
apagado. No toque un foco
caliente con las manes o con
un parle mojado, espere hasta que el foco
est6 frio y use un patio seco. Nunca toque
el collar de un foco que tenga electricidad.
S! estd reemplazando un foco quemado,
aseg_rese que la electrlcldad est;J
desconectadao
SUJETADOR
DEL VIDRIO
/_/ COLLAR CON
o_-._ ELECTRICIDAD
FOCO "'_'J"'-
CUBIERTA "'_
DE VIDRIO
PARA REF.MPLAZAR
1, Desatornilfe el vidrio y saque fa cubierta de
vtdrio,
2. Desatorni!fe el foco
3. Reemptace ef foco con un foco para homes de
40 watts de 3 1/2" de Iongitud
4. Coloque nuevamente la cubierta.,
1 7' pares removibles continua

PARTESREMOVIBLES
MA TERIALES DE LIMPIEZA
• Detergente pata platos
,, Agua tibia
• Par_o hdmedo
COMO SACAR:
1. Tire el cajdn hacia afuera
hasta que se detenga,
2.
Levante el frente def caj6n
hasta que el tope de la guia
del cajdn pase por encima
del tope de la gufa sobre el
riet de la base
TOPE DE LA GUtA
3. Levante el caj6n pot sobre los topes.
m
Levante el frente del cajdn hasta que el tope
de la gu/a del caj6n pase por encima de la gu[a
en el riel de la base,. Deslice el cajdn hacia su
lugar
PRECAUCION: El caj6n le
ofrece espacio para guardar
utensilios para cocinar y
hornear.
Los materiales de plastico
no se deberian guardar en este caj6n.
No sobrecargue el cajon. Si el cajon
esta demasiado pesado, se podria salir
del riel de la base cuando Io abra.
.................. IL I II]1111 II / IIIII II I [111
PARA LIMPIAR
Limpie por dentro y fuera de! caj6n con agua tibia
con jab6n y un pado o esponja hdmeda No use
abrasivos fuertes o lanas para fregar sobre et
cajdn
COMO COLOCAR NUEVAMENTE
1. Levante el frente del tope del
cajdn y bajelo a ttav#s de la
base de/rie/
2. Baje e! frente del cajdn y
empuje el cajdn hacia atr_s
hasta que se detenga
STOP GUIDE
VARILLAS DE
SOPORTE
1. Tome ta oritla de la cubierta y levbntela
2. Sujetando fa cubierta con una mano,
fevante la varilfa de soporte y ponga la
orilla de la cubierta sobre ella
m
Cuando termine de h'mpiar; baje ta varilla
de soporte y la cubierta.
[ _-\ PRECAUCION: El esmalte de
I _J _1 porcelana se puede da_ar si I
_) se deja caer. Trate las |
cubiertas de esmalte con |
cuidado. |
L , , J,, ............. J
18 pares removibfes continEta

continuacidn
ELEMENTOS
RECIPIENTES
REFLECTORES
RECEPTACULO
PARA SACAR:
t. Asegdrese que los controles estan en
posicidn de apagado y que los elementos
est_n frios antes de tratar de sacarfos
2. Tome el elemento y levbntelo levemente,
sdlo Io suficiente para que pase por encima
de! recipiente, sbquelo derecho hacia
afuera.
:: ..... , ,,, ,i,,=,=l=111_ ,i ,ll,,,i
PRECAUCION: No levante el
elemento mas 1": Levantar el
elemento mas de 1" podria
da_ar el recept_Jculo, causando
que el elemento no quede
nivelado cuando io enchufe
nuevamente.
,4
3. Levante y saque el recipiente
COMO LBMPIAR EL RECIPNENTE:
Para mancha$ de cornida caf_ _Jse
detergente para platos, agua tibia, lanas para
fregar de plbstico, limpiadores abrasivos
suaves, lanillas con jabdn o amonia
Limpie los recipientes despu_s de cada uso
Enjuague y seque bien.. Los alimentos que no
se limpien pueden causar manchas
permanentes que no se pueden sacar. Para
recipientes muy sucios, coloque una toalla
empapada con amonia sobre e! recipiente
para soltar la suciendad, luego friegue el
recipiente suavemente con una lana" de
plbsticoo
Para manchas azuSes.doradas_ use
un pulidor para metal
En un perfodo de tiempo, estas manchas son
causadas por el calor excesivo, y
generalmente son permanentes. Para ayudar
a minimizar este efecto, evite usar las
posiciones de calor altas y use ollas de fondo
piano que no se extJendan m_s de 1" de la
orilla del elemento
k= 'HI'I'I' "1
PRECAUCION: No haga
funcionar los elementos de la
cubierta sin el recipiente en su
lugar. Si Io hace causara que
se querne la cubierta, el aislante
de los alambres y producira
perdida de energia.
i ill .... Hi "_
PARA REEMPLAZARLO:
1. Reempface el recipiente para derrames,
Aseg_rese que el receptacufo se vea en la
abertura def recipiente.
2. Desfice el elemento con firmeza
encaj_ndolo en el receptbculo y baje el
etemento hasta acomodarfo en su lugar,.
, 1_ partes removibles continua

REMOVIBLES
QUE MA TERIALES DE LBMPIEZA USAR:
. Detergente para platos
,J Agua tibia
• Lanas pafa fregar o lanilla de acero con jab6n
TOPE
PARTE
TRASERA
LEVANTADA
DE LA
PARRILLA
COMO SACAR
1. Tire las pemllas hasta la posici6n de tope
2. Levante el frente de la parrilla y deslfcela bajo
el tope de la guia para las parrillas,
PARA LIMPIAR
Limpie con agua tibia y detergente Para sacar
manchas dufas, friegue levemente con fana para
ffegar o con una lanilla de acero con jabdn
Enjuague bien.
PARA COLOCAR NUEVAMENTE
1. Coloque la parte levantada de atras de la
parrilla sobre las guias
2, Levante el frente de la parrilla hasta que la
parte levantada de atrbs se desfice por
debajo del tope de las guias,
3. Deslice la patfitla hasta atlas,
POSICION DE TOPE PARA
ASAR A LA PARRILLA
U BISAGRA
I1
J_
PARA SACAR
1. Abta la puefta hasta la posicidn pafa asar a
fa pardfta
2. Tome la puerta de cada lado, lewlntela y
saquela de fas bisagras NO LEVANTE
LA PUERTA DE LA MANILLA.
PARA COLOCARLA NUEVAMENTE
1. Asegdrese que los brazos de las bisagras
est_n en la posicidn de tope para asar a la
parfilla.
2. Levante la puet-ta de ambos lados.
3. Coloque en Ilnea las ranuras en la orilla del
fondo delhomo con los brazos de las bisagtas.
4. Deslice la puerta hacia abajo sobre los brazos
de las bisagras Io rn_s posible,
5. Cierte la puerta
20 partes removibfes.continOa

Para ahorrar tiempo y dinero, antes de Ilamar para un servicio, revise ta fista de m_s abajo para cualquier
problema que usted crea que tiene con el funcionamiento de su estufa Si elproblema es algo que usted
no puede reparar, use los NE_meros de Servicio para el Consumidor que se encuentran al final de este
manual° Cuar_lo _aga un Hamadop tenga disponible el n_rnero de modele, Bista de partes
para reparac_ones_ manual de uso y cuJdado y la recta de cernpra.
PROBLEMA
I ,i, i,,,llll,,lll,i
POSIBLE CAUSA POSIBLE SOLUCION
El homo no
funciona; totalmente
inoperante.
No pasa electricidad a
la estufa
a. Rewse fa caja def circuito de la casa o los
fusibfes
b. Revise y asegurese que la estufa est_
enchufada
Los aHrnen_os no se
cocinan
adecuadamente.
a. El homo no se
precalentd
b. Posicidn incorrecta
de la parriffa o la
cacerola
¢. La ventitaci6n del
homo estb ob struida
o cubierta
d. Uso incorrecto del
pape! de afuminio
e. Temperatura
incorrecta, para el
utensilio usado:
f. No se siguid la
receta
g. Mafacalibracidn def
control del homo
h. La estufa o laparritla
de! homo no est_n
nieveladas
a. Asegurese de precalentar hasta que
suene el tono
b. Mantenga un espacio de aire uniforme
alrededor de tas ollas y utensilios Vea la
seccidn para Cocinar en e! Homo
c. Mantenga la ventilacidn despejada
df
e.
f.
No cubra las parriflas cuando homee
Reduzca fa temperatura en 25 grados
para utensitios de vidrio, oscuros u
opacos
Revise la receta y tas medidas
g. Revise fa seccidn de ajustes a la
temperatura que sigue esta seccidn
_. Vea las instrucciones de instalacidn para
la nivelacidn
La temperatura del Calibracidn del _ontrot del Vea la secci6n de cdmo cocinar en el
horno no parece homo homo,
estar exacta.
La llu:e dell _(rno no
funciona
a. El inlerruptor de la luz
est_ apagado,
b. El foco necesita ser
reemplazado
a. Revise ta posickln def interruptor
b. Revise o reemplace el foco
de la tuz
_1 Antes de ltamar para un servicio continua

ANTESDELLAMARPARAUNSERVICIO
PROBLEMA POSIBLE CA USA POSIBLE SOL UCION
III ]1 /I IIIIII iiiii
Los alimentos no
se asan
adecuadamente a
la parrilla.
a. Posicidn incorrecta de la a.
parrilla
b. El homo se precalentd, b.
c. Mal uso de papel de c.
aluminio,
d. La puerta del horno se d.
certd durante el asado a
la pardlla
e. Bajo voltage (208
Revise la posici6n de las cacetolas; yea
la seccidn pata asar a la parrilla,
No precaliente cuando ase a la paffilla
Lea la secciOn pata asar a la pard!lao
Abta la puerta a la posicidn de tope para
asar:
e. Use posici6n de parnlla mas alta y/o ase
El homo humea.
La cubierta no
funciona, homo
OK.
Voltios),
#. Cantidad de tiempo
incorrecta para asar:,
a. Homo suck]
b. Ma! uso de papet de
aluminio
c. Se dej6 fa cacelda para
asat con gfasa dentro def
homo
a. Los elementos est_n
desenchufados
b. Control en posicidn
incorrecta
pot m_ts tiempo_
f. Vea la tabla pata asar en la seccidn de
c6mo asar a la parrilla
a. Vea que no hayan detrames grandes
b. No se recomienda el uso def paper de
aluminio,
c. Limpie la caacerota y ta pattflla despu#s
de cada uso
ul i,lll
a. Revise los elementos, asegdtese que
est#n enchufados cor_ectamente en
los receptaculos.
b. Empuje la perilla mienttas la hace
girar pata seleccionar la temperatuta..
ii..... -
Homo no funciona,
Cubierta OK
.... i
Puerta del homo
se cierra
accidentalmente
con cerrojo
mientras se
a. Control puesto
incortectamente
am
b, Peri!la de control mucho b.
m_s al!b de 500 _
......................nr_r,fn_ .........
a, No force la manilla det
cerrojo
aa
Revise el conttof y la seccidn de cdmo
cocinar en el homo,
La marca de la perilla debe estar
alineada exactamente con 500 ° gtados,
Las temperatutas mas altas que las
temperaturas de certado evitar_n que
la manilla del cerrojo se deslice a la
posicidn de abierto ....
hornea.
Maios resultados
de limpieza.
a. Ciclo de limpieza
interrumpido,
b, Homo demasiado sucio
a. Petmka que el homo se Iimpie por un
ciclo cornpleto,
b. Los derrames pesados se deberlan
limpiar antes de progtamar un ciclo de
limpieza,
22

Usted podrfa pensar que su nuevo homo cocina
diferentemente al horno que reemplazd
Recomendamos que use su homo nuevo una.s
pocas semanas para que se familiarice con _I,
siguiendo los tiempos que se dan en las recetas
como una gufa
Si cree que su nuevo homo estb funcionando
demasiado caliente (quema la comida) o no
calienta !o suficiente (ta comida no queda bien
cocida) usted mismo puede ajustar la temperatura
La apariencia y la textura de los alimentos son
mejores indicadores de la exactitud de un homo
que un termdmetro barato, como los que se venden
en las tiendas, para controlar la posicidn de fa
temperatura de su nuevohorno Estos term6metros
pueden variar entre 20-40 grados Adembs, ta
puerta se tiene que abrir para leer estos
termdmetros. Abrir la puerta cambiar_ fa
temperatura del homo.
Para decidir en cu_nto cambiar la temperatura,
suba la temperatura del horno en 25 grados (se los
alimentos no quedan bien cocidos) o baje ta
temperatura en 25 grados (si la comida se quema)
de la temperatura de la receta, luego hornee Los
resultados de esta "prueba" le deberfan dar una
idea de cu_nto se deberfa cambiar la temperatura.
2,
Apague la estufa.y saque la perilla tirando
derecho hacia afuera.
Mire la parte trasera de la perilla La flecha
que sefiala hacia el centro del tomillo del
fondo indica la posicidn original que viene
de fbbrica.
m
Use un destomillador para soltar los dos
tomi!los unas dos vueltas cada uno.
4, Sujete fa penlla de la manilla (A en la
ilustracidn) mientras hace girar el disco (B
en la ilustracidn) en la direccidn deseada
para aumentar o disminuir la temperatura
(Vea la itustracidn de abajo para un
"Termostato Normal').. Mientras haga girar
deberfa oir clicks o sentir los dientes. Cada
click o diente es 15°F Usted puede hacer
girar dos clicks o dien tes en cada direccidn
5,Cuando Ifegue af ajuste deseado, apriete
los dos tomitlos Coloque nuevamente la
perifla en la estufa.
(Yea Ra a'lustraci6n mas abajo.use las
fNechas en eN area gris para hacer 8os
ajustes de ternperateera)°
PERILLA DISCO
CHA
PARAHACER EL
HORNO MAS FRIO
GIRE EL DISCO
),
PARAHACER EL
HORNO MAS
CALIENTE GIRE EL
DISCO
23

NOTAS
24

Parapartesdereparacionesode
reempiazoque necesita
Llamede7 am - 7 pm,7 diasa lasemana
1o8@@o366o
(1=800-366-7278)
©
Parareparacionesyserviciodernarcas
mayoresensucasa
Liame24 horasal dia,7 diasalasemana
1-8@@-4°REPAmIR
(1-800°473-7247)
ParaubicarunCenkodeServiciode
Reparacionesensu_rea
Llame24 horasal dia,7 diasa lasemana
1=8@@ 88°1 222 BBBBBB
ParainformacionesacercadeConlratosde
rvlantencionSearso para preguntasacerca
de unContratoexistente,
Llamede 9 am - 5 pro,Lunes-S_bado
t -,8@@,-827=6655
Los especialistasdereparacionesde America
25

GARANTIA
r
Estimado cliente:
Nuestros esfuerzos
constantes est_n
dirigidos a asegurar
que su nueva Estufa
Kenmore Ilegue a su
hogar en perfectas
condlciones y le dd el
servlcio adecuado.
Como parte de estos
esfuerzos, sentimos
que es
responsabflidad
nuestra
_roporcionarle esta
garantia para su
estufao
Q Jk
Papel ,ad¢_do
DE LA ESTUFA ELECTRICA KENMORE
f
TODO UN A_IU DE GARANTIA COMPLETA PARA LAS FUNCIONES DE
TODAS LAS PARTES EXCEPTO LAS DE VIDR|O
St, dentro det lapso de un a_o a parttr de la fecha de instalacl6n, cualquter parts
que no sea de vidrto, functona mal debldo a un defecto en et material o en la mano
de obra, Sears la reparard o la reemplazard, sin costo algunoo
GARANT|A TOTAL DE 30 DIAS PARA LAS PARTES DE VIDRIO Y EL
ACABADO DE ESMALTE PORCELAN|ZADO, PARTES DE METAL
PINTADO 0 BRILLANTE
SI, dentro de los treinta dlas posteriores a la Instalactbn, cuatquier parte de vidrio
o el acabado de cualquter esmalte porcelantzado o parts de metal pintado o
brlllante tlene defectos en el material o rnano de obra, Sears reemplazarb la parts,
sin costo alguno.
GARANTIA TOTAL DE 90 DIAS EN AJUSTES MECAN|COS
Durante 90 dias a partir de la fecha de instalaclbn, Sears proporctonar_, sln costo
alguno, cuatquier ajuste mecdnico necesarto para la correcta operacibn de la
estufa, exceptuando el mantentmiento normal.
Si la estufa est;_ sujeta a otro uso que no sea el prlvado familiar, la cobertura de
la garantia mencionada arrlba ser_ efecttva sblo durante 90 dlas,
EL SERVICIO DE GARANTIA ESTA DISPONIBLE CON SOLO
PONERSE EN CONTACTO CON EL CENTRO 0 DEPARTAMENTO DE
SERVIC|O SEARS MAS CERCANO EN LOS ESTADOS UNIDOS.
Esta garantla se apltca sblo cuando este producto se use en los Estados Untdoso
Esta garantla le brlnda derechos legales especlflcos, y tambidn puede tenet otros
derechos que varlan de un estado a otro..
_. i IIIIIIIIIIIIIIIII111 Jl lJ L IL I II , i llJl IIIIIIIIIIII IIII LI IIIII1 IIIII J II IIIII II ....
LE DAMOS SERVICNO A
LO QUE VENDEMOS
"Le damos servicio a Io que vendemos" es la manera de asegurarle quepuede depender de Sears parael servicio
porque el servlclo Sears se ofrece en todo el pats.
Su Estufa Kenmore tiene un valor agregado cuando usted considera que Sears posse una unidad de servicio cerca
de usted, que cuenta con un equlpo Sears de tdcnicos capacitados. _.t_cnicos profesionales especiflcamente
entrenados para manejar los aparatos Sears, yque tienen acceso a taspartee,herramientas y equipo pare asegurar
que cumplamos nuestro compromiso con usted: "ALedemos servicio a Io que vendemos_"
PARA AMPLIAR EL VALOR DE SU ESTUFA, COMPRE UN CONTRATO DE MANTENIMIENTO SEARS.
Las estufas Kenmore est&n dise_adas, fabricadas
y probadas para brindarle a_os de operaci6n
confiable. Sin embargo, cualquier aparato
moderno pued8 requerir de a|gt_n servicio de vez
en cuands. La garantia Sears, adem&s del
contrato de Mantenimiento Sears |e brindan
protecci6n contra cuentas de reparaciones
inesperadas y |8 aseguran que disfrute de |a
m&xima eficiencia en estu|as.
He aqui una garantia comparativa y una tabla del
contrato de Mantenimiento que le muestra los
beneficios de un contrat8 Mantenimiento Sears
para Estufas.
1 ..,_,1,_°_o.=,,_.,,_..... G AM AM
qU_ nO e0_lnde por_o|anl o v_d_'lo
90 DAYS
2 AJultamm:_nloo G AM AM
30 DAYS
3 PsM. deperc_*_rteyvldrk= G AM AM
A Revlwt_n °nua] do mea_t_nlento
G. _3_Lm Nhl .. Cm_t i ° €_I t,_/Vt_.Iml_'_o
PONGASE EN CONTACTO CON SU VENDEDOR DE SEARS 0 CON EL CENTRO DE SERVICIO SEARS DE
LA LOCALIDAD HOY MISMO Y COMPRE UN CONTRATO DE MANTENIMIENTO SEARS.
Ken more ® La marca de aparatos electrodom_sticos de mayor venta en America
Vendida por SEARS, ROEBUCK AND CO., Hoffman Estates, IL 60179
.... ' i]],,].... !.......................................................... [' ]]'11 ...........................
-- Impreso en Los Estados Unidos --
 Loading...