

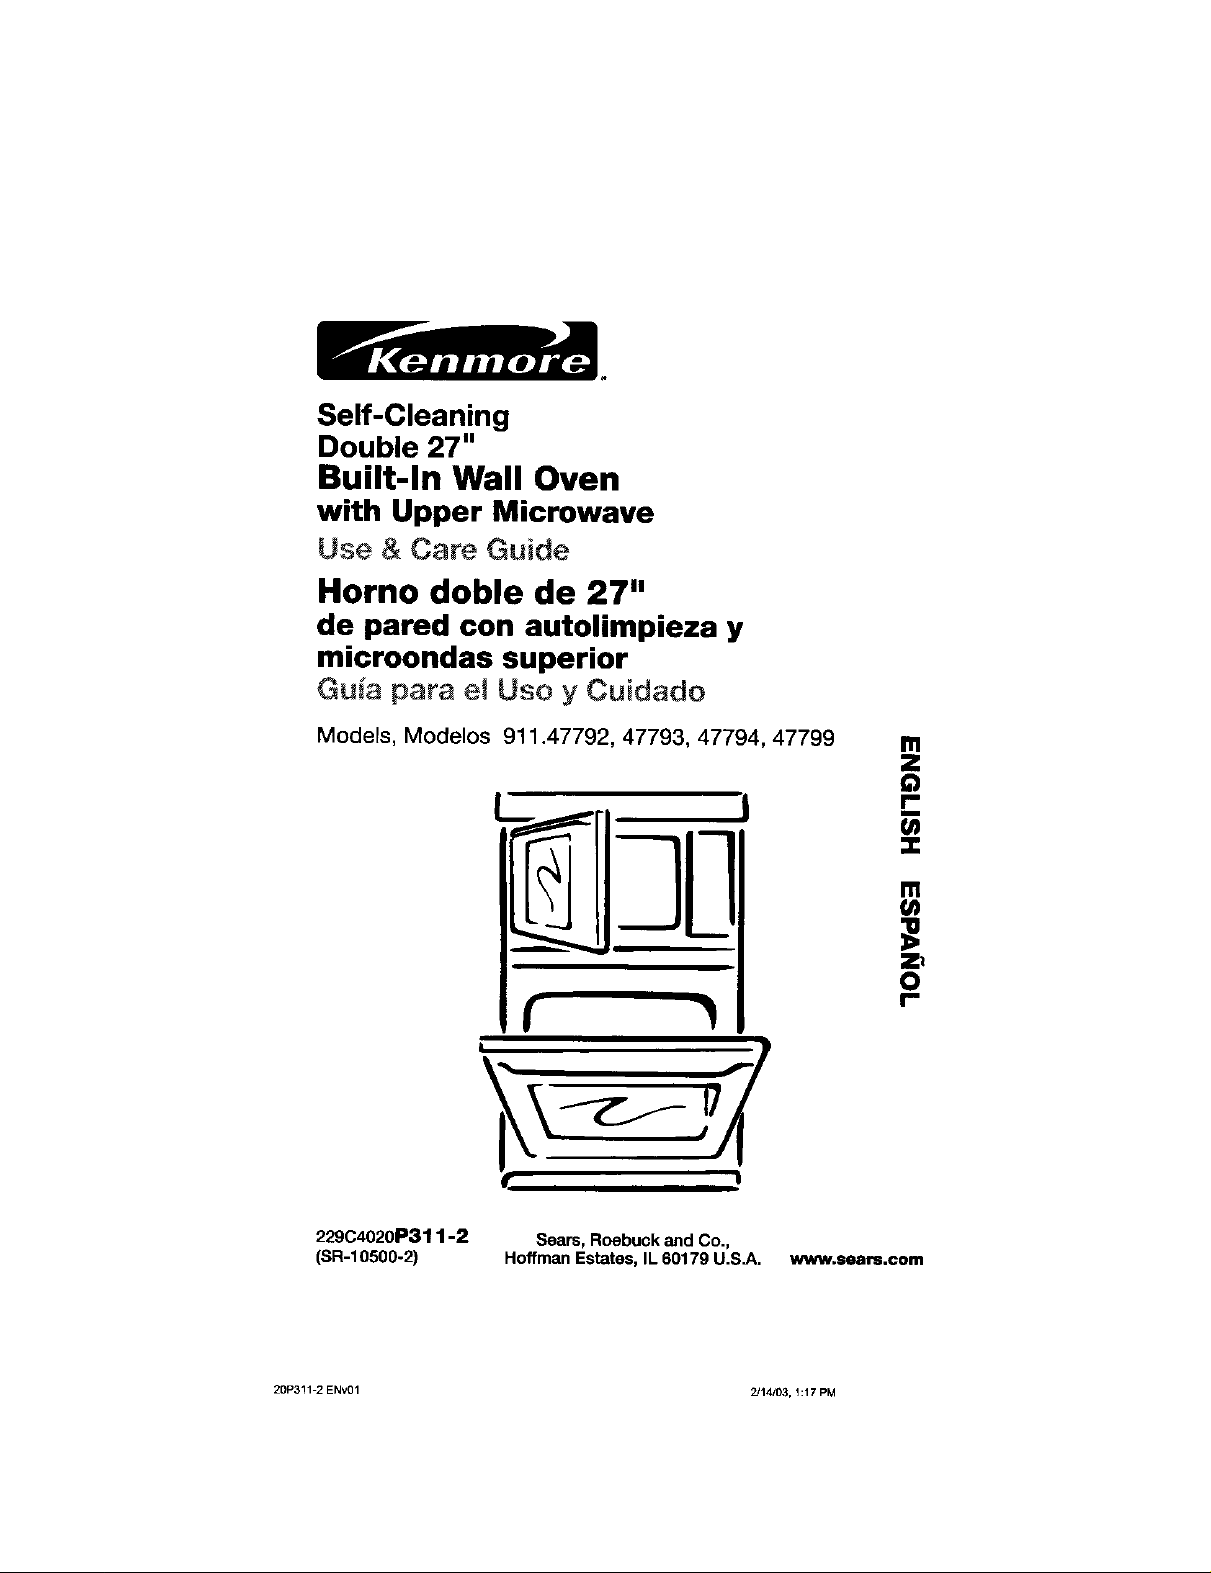
Self-Cleaning
Double 27"
Built-In Wall Oven
with Upper Microwave
Use & Care Guide
Horno doble de 27"
de pared con autolimpieza y
microondas superior
Gu_a para eJ Uso y Cuidado
Models, Modelos 911.47792, 47793, 47794, 47799
w
t
I"
229C4020P311-2 Sears, Roebuck and Co.,
(SR-10500-2) Hoffman Estates, IL60179 U.S.A. w,..nv.sears.com
20P3!1-2 ENv01 2214103, 1:17 PM
SELF-CLEARIRGBUILT-IN
WALLOVERWITHMICROWAVE
TABLEOFCONTENTS
Oven Safety ................................ 3_;
Removal of Packaging Tape ........... 6
Features of Your Oven .................... 7
Microwave Oven Control ................ 8
Power Level ................................ _9
Timed Cook I................................... B
Timed Cook Guide .......................... 9
Timed Cook II ................................ 10
Timed Defrost ............................... 10
Add 30 Seconds ........................... 10
Express Cook ................................ 10
Auto Feature ................................. 10
Timed Defrosting Guide ................ 11
Humidity Sensor ............................ 12
Popcorn ........................................ 12
Reheat ........................................... 12
Potato ....................................... 12-13
Beverage ...................................... 13
Snacks .......................................... 13
Snacks Guide ............................... 13
Cook .............................................. 13
Cook Guide ................................... 13
Upper Oven Clock ........................ 14
Display On/Off .............................. 14
Reminder ...................................... 14
Delay Start .................................... 14
Sound On/Off ................................ 14
Lower Oven Control ...................... 15
Lower Oven Display ...................... 16
Lower Oven Clock ........................ 17
Lower Oven Kitctlen Timer ........... 17
Lower Oven Tones ........................ 18
Lower Oven F Codes .................... 18
Lower Oven Cooking Tips ....... 19-21
Baking with Margarine .................. 20
Baking ........................................... 22
Broifing .......................................... 23
Setting Special Features .......... 24-25
Self-Cleaning CycLe ................ 26-27
Microwave interior ........................ 28
Microwave Oven Floor .................. 28
Microwave Door Window .............. 28
Outside Oven Surfaces ................. 28
Microwave Control Paner .............. 28
Lower Oven Control Panel ............ 29
Broiler Pan and Grid ..................... 29
Oven Racks .................................. 29
Walls of the Oven .......................... 29
Glass ............................................. 29
Oven Light Bulb ............................ 30
Removable Oven Racks ............... 30
Removable Oven Door ................. 31
Before Calling for
Service .................................... 32 34
Temperature Adjustment .............. 35
Warranty ........................................ 36
Service Numbers .......................... 72
For your convenience and future reference, please write down your model
and serial numbers inthe space provided. They are located on the vertical
side trim, when the microwave oven door is opened.
MODELNUMBER: SERIAL NUMBER:
© Sears, Roebuck and Co.
20P311-2 ENV01 2/14/03, 1:18 PM
2

IMPORTANTSAFETYINSTRUCTIONS
SAVETHESEINSTRUCTIONS
Readallinstructionsbeforeusingthis appliance.Whenusing gas or electrical
appliances,basiceaf_,typrecautionsshouldbefollowed,includingthefollowing:
• ALWAYS KEEP your appliance
clear of things that will burn
(gasoline and other flammable
vapors or Fiquids).
• ALWAYS KEEP the oven area
IMPORTANT: To ensure safety for
yourself, family and home, please
read your Use and Care Guide
carefully. Keep it handy for reference.
Pay close attention to Safety Sections.
BE SURE your appliance is installed
and grounded by a qualified
technician.
• DO NOT leave children alone
or unattended near an appliance
in use.
• TEACH CHILDREN not to play with
controls or any part of the appliance
and not to sit, climb or stand on the
door or any part of the appliance.
• CAUTION: NEVER STORE items
of interest to children in cabinets
above the appliance. Children
climbing on the appliance could
be seriously injured.
• KEEP THIS book for later use.
• NEVER TRY to repair or replace
any part of the appliance unless
instructions are given inthis guide.
All other work should be done by a
qualified technician.
• NEVER USE your appliance for
warming or heating the room.
• ALWAYS KEEP combustible wall
coverings, cudains, dishcloths,
towels, pot holders and other linens
a safe distance from the appliance.
• NEVER USE a towel or other
bulky cloth as a pot holder. Make
sure the pot holder is dry. Moist pot
holders could cause steam burns.
DO NOT let pot holders touch
hot surfaces.
free from things that will burn. Food,
wooden utensils and grease buildup
could catch fire, Plastic utensils
could melt and canned foods could
explode. Your appriance should
never be used as a storage area.
• NEVER HEAT unopened food
containers. Pressure buildup can
cause the container to burst and
cause injury.
• NEVER LEAVE containers of fat or
drippings in your oven.
• NEVER TRY to clean a hot surface.
Some cleaners produce noxious
fumes and wet cloths or sponges
could cause steam burns.
• NEVER WEAR loose-fitting clothing
when using your appriance.
• BE SURE the oven is securely
installed in a cabinet that is firmly
attached to the house structure.
• LARGE SCRATCHES OR
IMPACTS to glass doors can lead
to broken or shattered glass.
• DO NOT touch heating elements,
surfaces near them or interior oven
surfaces. These may be hot enough
to cause burns even though they
are dark incolor. During and after
use, do not touch or let clothing or
flammable material contact the
elements or hot surfaces until they
have had time to cool. Other
surfaces near the oven vent
openings, oven door and window
surfaces may also be hot enough
to cause burns.
20P311-2 ENv01 2/14/03, 1:18 PM
IMPORTANTSAFETY
INSTRUCTIONS
• PLACEOVENRACKSinthe desired
positionwhile the oveniscool. Ifracks
mustbe movedwhile ovenis hot, do not
letpot holdercontact thehotoven
element.
• AFTERBROILING,alwaystake the
broiler pan and grid outof the oven
and cleanthem. Leftovergreaseinthe
broiler pan could catchfire the nexttime
you useyouroven
• ALWAYSUSEcarewhenopeningthe
ovendoor. Let hotair and steamescape
beforemovingfoods.
• NEVERUSE aluminumfoilto linethe
ovenbottom Improperuseoffoil could
starta fire,or electricalshockcould
result.
• NEVERBLOCKtheovenventopening.
• CLEANONLYthe partslisted inthis
manual.Followal[ cleaninginstructions.
Be suretoremove the broilerpanand
grid before self-cleaning
• NEVERRUB,move,cleanor damage
the doorgasket onself-cleaningovens.
Itis essentialfora good seat.
• NEVERTRYto clean utensils,
cookware,removableparts,orbroiler
panand grid inthe self-cleancycle.
• DO NOTUSEoven cleaners- No
commercialovencleaner or protective
coating ofany kindshouldbe used inor
aroundany partof theoven
• IFTHE SELF-CLEANINGmode
ma[functions,turnthe ovenoff and
disconnectthe powersupply. Haveit
servicedby a qualifiedtechnician
IMPORTANT SAFETY NOTICE!
The CagforniaSafeDrinkingWaterand
ToxicEnforcementAct requlreathe
governorof Californiato publisha list
ofsubstancesknownto thestateto
causebirthdefectsor other
reproductiveharmand requires
buslneeseato warntheircustomersof
potentialexposuretosuchsubstences.
The flbergleasInsulationina self-
cleaningoven willgive off avery small
amountofcarbonmonoxideduringthe
cleaningcycle.Exposurecan be
minimized byventingwithanopen
doororwindowor usinga ventilation
fan or hood,
IMPORTANT: Thehealthof some
birdsis extremelysensitivetothe
fumesgivenoff duringtheseif-ctesning
cycleof any oven.Movebirds to
anotherwell-ventilatedroom.
READ AND UNDERSTAND
THIS INFORMATION NOW!
Be sure everyoneinyour home knows
what to doin caseoffirs. Neveruse
wateron agreasefire;it will only
spreadthe flames.
OVENRRE:
Donot try to movethe pan!
1. Close theoven door and turn
controlsoff
2. If firecontinues,carefullyopenthe
door,throwbakingsoda onthe fire,
or useadry chemical,foamor
haJon-typeextinguisher
4
2OP311-2 ENvO1 2J14/03, 1:_8 PM
IMPORTANTSAFETY
INSTRUCTIONS
r_ll _ Whenusingelectrical
L_ appliances,basicsafety
_/ precautionsshouldbe
tottow_l,inc|udtngthefollowing:
WARNING: Toreducethedskof
burns,electricshock,fire,injuryto
personsorexposuretoexcessive
microwaveenergy:
• Readall instructionsbeforeusing
thisappliance.
• Readand followthe specific
microwave safetyinstrections.
• THIS APPUANCEmustbe grounded,
Connectonlyto properlygrounded
junctionbox Seethe Grounding
Instructionsin the Installation
Instructions
• USEthis applianceonly for its intended
useasdescribed in thismanual Do not
use corrosivechemicalsorvapors in
thisappliance. Thismicrowaveovents
specifically designedto heator cook
food, andis not intendedfor laboratory
or industrialuse,
• INSTALL or locatethisappliance
onlyin accordancewiththe provided
InstallationInstructions
• DO NO"[coveror btockany openings
onthe appliance.
• THIS MICROWAVEovenis not
approvedortested for marineuse.
• DONOToperate thisappliance ifit is
notworkingproperly or if it hasbeen
damagedor dropped.
• AS WITHANYAPPLIANCE,close
supervisionis necessarywhen used
bychildren.
• DONOT heatfood in closed containers,
suchas glassjars,which may explode.
• DONOT poppopcorn in your
microwaveunlessyouusepopcorn
labeledfor useinmicrowaveovens,
• DONOTovercookpotatoes.They courd
dehydrateand catchfire,causing
damagetoyouroven.
• DONOToperatethemicrowaveovenif
it isempty
• DO NOTuseyourmicrowaveovenas a
1
storagespace
• DONOTovercookfood. Carefully
attend appliance ifpaper, plasticor
othercombustiblematerialsare placed
insidethe ovento facilitatecooking,
• REMOVEwiretwist-tiesfrom paper or
plasticbags before placinginthe oven
• DONOTuseyour microwaveovento
dry newspapers
• DO NOTuserecycled paperproducts
Recycledpapertowels, napkinsand
waxed papercan containmetalflecks
whichmaycause arcing or ignite, Paper
productscontaining nylonor nylon
filaments_ould be avoided
• IF MATERIALINSIDEthe ovenshould
ignite,closethe door,turnthe ovenoff
anddisconnect the powerto the
appliance.
• OVERSIZEDfoodor oversized
metalcookwereshouldnot be used
in a microwaveoven,Erectricalshock
or firecould occur,
• DO NOTcreanwithmetal scounng
pads Piecescan breakoffthe pad,
causingelectrical shock.
• DONOTdefrostfrozenbeveragesthat
havenarrow-neckedbottles,Pressure
could build up, causing the bottleto
burst.
• USE POT HOLDERSwhenremoving
sookwarefromthe oven Coekware
could become hotduringcooking due
to the transferredheatfromthefood.
• BECAREFULtouchingthewallsor the
ovenbottomduringor after cooking.
Thewailsand floor could become hot
• DO NOTboileggs ina microwaveoven.
Pressurewillbuild up insidethe egg
5 yolkand willcause theegg to burst.
20P311-2ENv01 Z/14103,1:18PM
I
IMPORTANTSAFETY
INSTRUCTIONS
• USEPL&STICcontainersthatare
approvedbythemanufacturerfor
microwaveuse,Do notallowchildren
touseplasticcontainersunless
supervised.Donotsubjectempty
containerstomicrowaving,
• FOODSWITHUNBROKENOUTERSKIN,
suchaspotatoes,sausages,tomatoes,
apples,eggyolks,chickenliverandother
giblets,shouldbepiercedtoallowsteam
to escapeduringcooking.
• MAKESUREPLASTICWRAPSused
duringmicrowavecookingareapproved
formicrowaveuse.
• SUPERHEATEDWATER:Microwaved
waterandotherliquidsdonotalways
bubblewhentheyreachthe boilingpoint.
Theycanactuallygetsuperheatedand
notbubbleatall
Superheatedliquidwill bubbleup
outofthecup whenit ismovedorwhen
somethinglikeaspoonortea bagis put
intoit.
Topreventthisfromhappeningand
causinginiury,donotheatanyliquidfor
morethan2 minutespercup.
Afterheating,letthe cupstandinthe
microwavefor30secondsbeforemoving
it orputtinganythingintoit.
Spontaneousbelling:Undercertain
specialcircumstances,liquidsmaystartto
boilduringorshortlyafterremovalfromthe
microwaveoven.Topreventburnsfrom
splashingliquid,we recommendthe
followingbeforeremovingthecontainer
fromtheoven:
Allowthe containerto standinthe
ovenfor30to40secondsafterthe
ovenhas shutoff.
- Donotboil liquidsinnarrow-necked
containerssuchassoftdrinkbottles,
wineflasksandespeciallynarrow-
neckedcoffeecups,Evenifthe
containerisopened,excessive
steamcanbuildupandcauseitto
burstor overflow
SAVE THESE INSTRUCTIONS
• DONOTheatbabyfoodinglassjarsin
themicrowave.
• BOILABLECOOKINGPOUCHESand
tightlyclosedplasticbagsshouldbeslit,
piercedorventedas directedby package.
Iftheyare notventedinsomeway,
pressurewillcausethemto burst.
• DONOTattempttooperatethisovenwith
thedooropensinceopen-dooroperation
can resultin harmfulexposureto
microwaveenergy.Itis important notto
defeatortamperwiththeasfety
Intedonks.
• DONOTplaceanyobjectbetweenthe
ovenfrontfaceandthedoororallowsoil
orcleanerresiduetoaccumulateon
sealingsurfaces.
• THEOVENshouldnotbeadjustedor
repairedbyanyoneexceptproperly
qualifiedservicepersonnel,
• DONOToperatetheovenifit isdamaged.
Itisparticurarlyimportantthattheoven
doorcloseproperlyandthatthereisno
damagetothe:
1.door(bent)
2.hingesandlatches(brokenor
loosened)
3.doorsealsandsealingsurfaces,
Toremovethe adhesiveresidueleftfrom
packagingtape,usehouseholddishwashing
liquid,mineraloilor cookingoil.Witha soft
sloth,rubintotheareaandallowtosoak.
Rinseand drywell.Repeatprocedureusing
anappliancepolishto insurenodamageis
done.Thisshouldbedonebeforethe
ovenisturnedonforthefirsttime.The
tapecannotheremovedoncetheoven
hasheated.Packagingtapemaybefound
inthefollowingareas:DoorHandle,Control
PanelArea,DoorTrimandOvenArea
6
20p311-2 ENVOI 2/14/03,1:18 PM
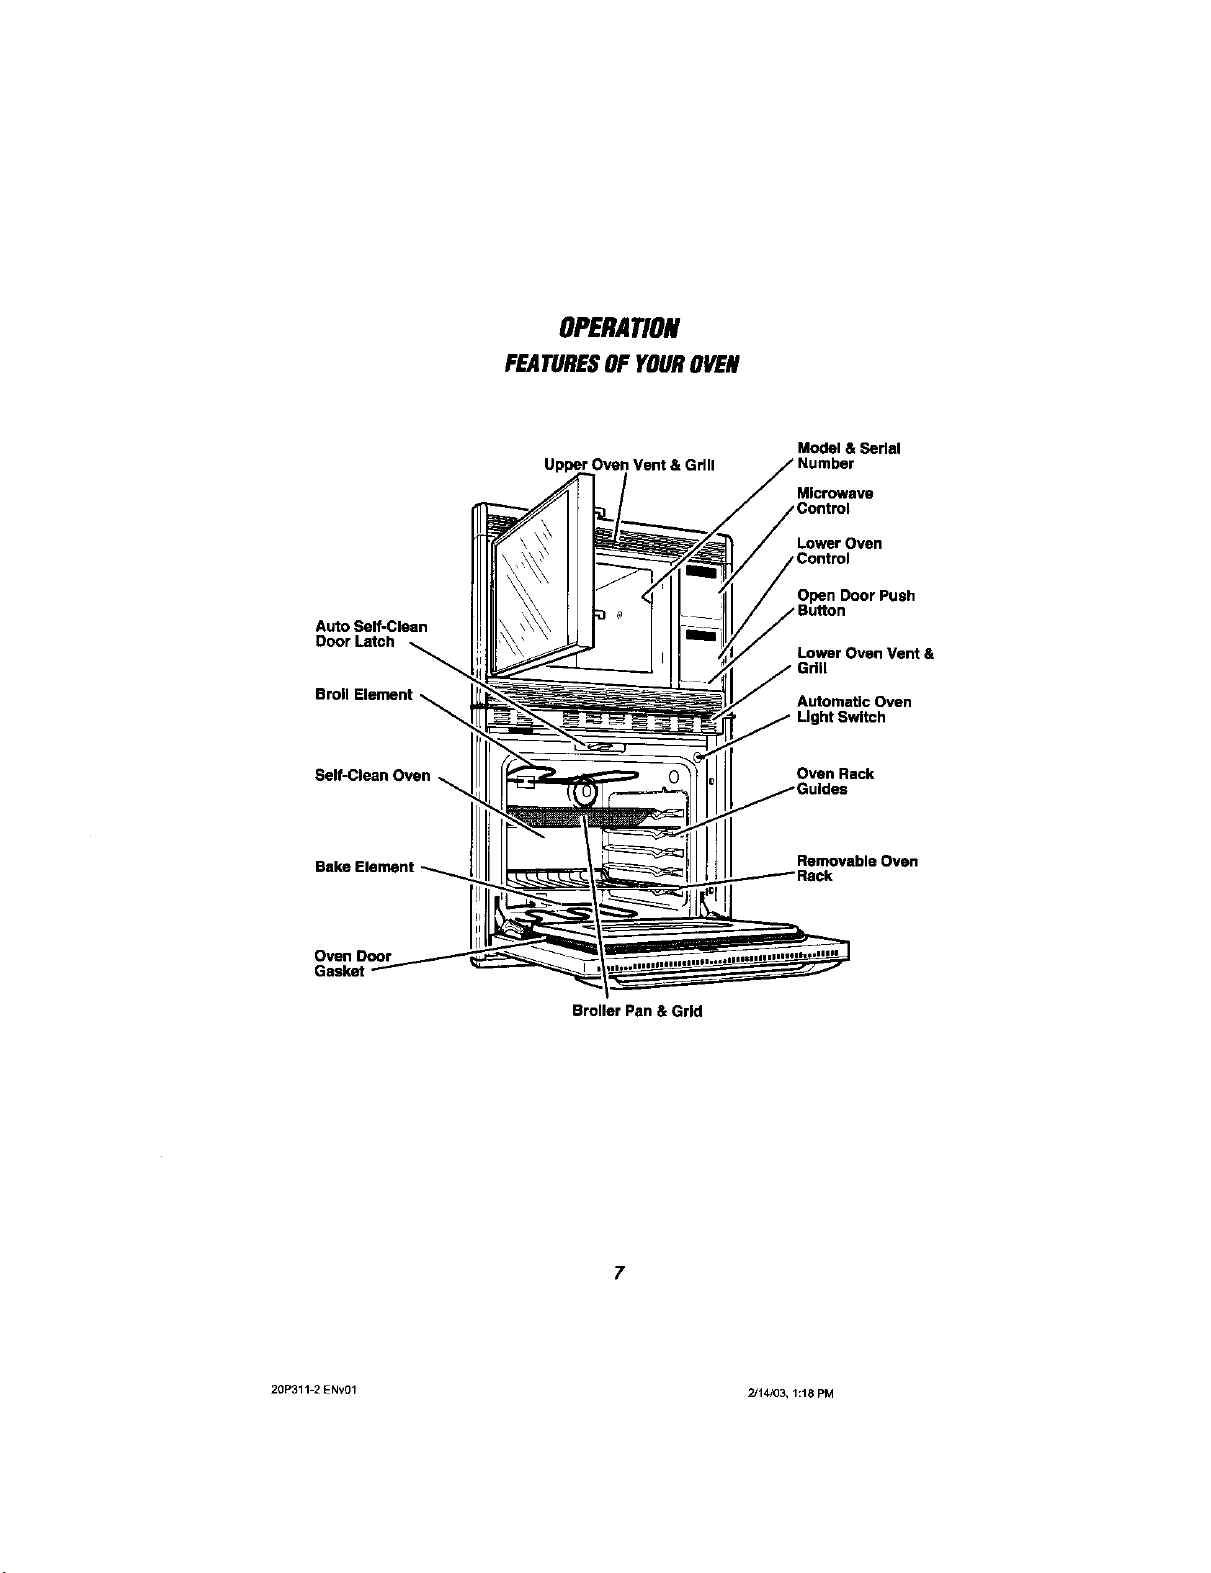
OPERATION
FEATURESOFYOUROVEN
Auto Self-Clean
Door Latch
Broil Element
Self-Clean Oven
Bake Element
Oven Door
Upper Oven Vent & Grill
Model & Sedal
Microwave
Lower Oven
Open Door Push
Lower Oven Vent &
Automatic Oven
Light Switch
Oven Rack
Removable Oven
Broiler Pan & Grid
7
20P311-2 ENv01 2/14/03, 1:18 PM
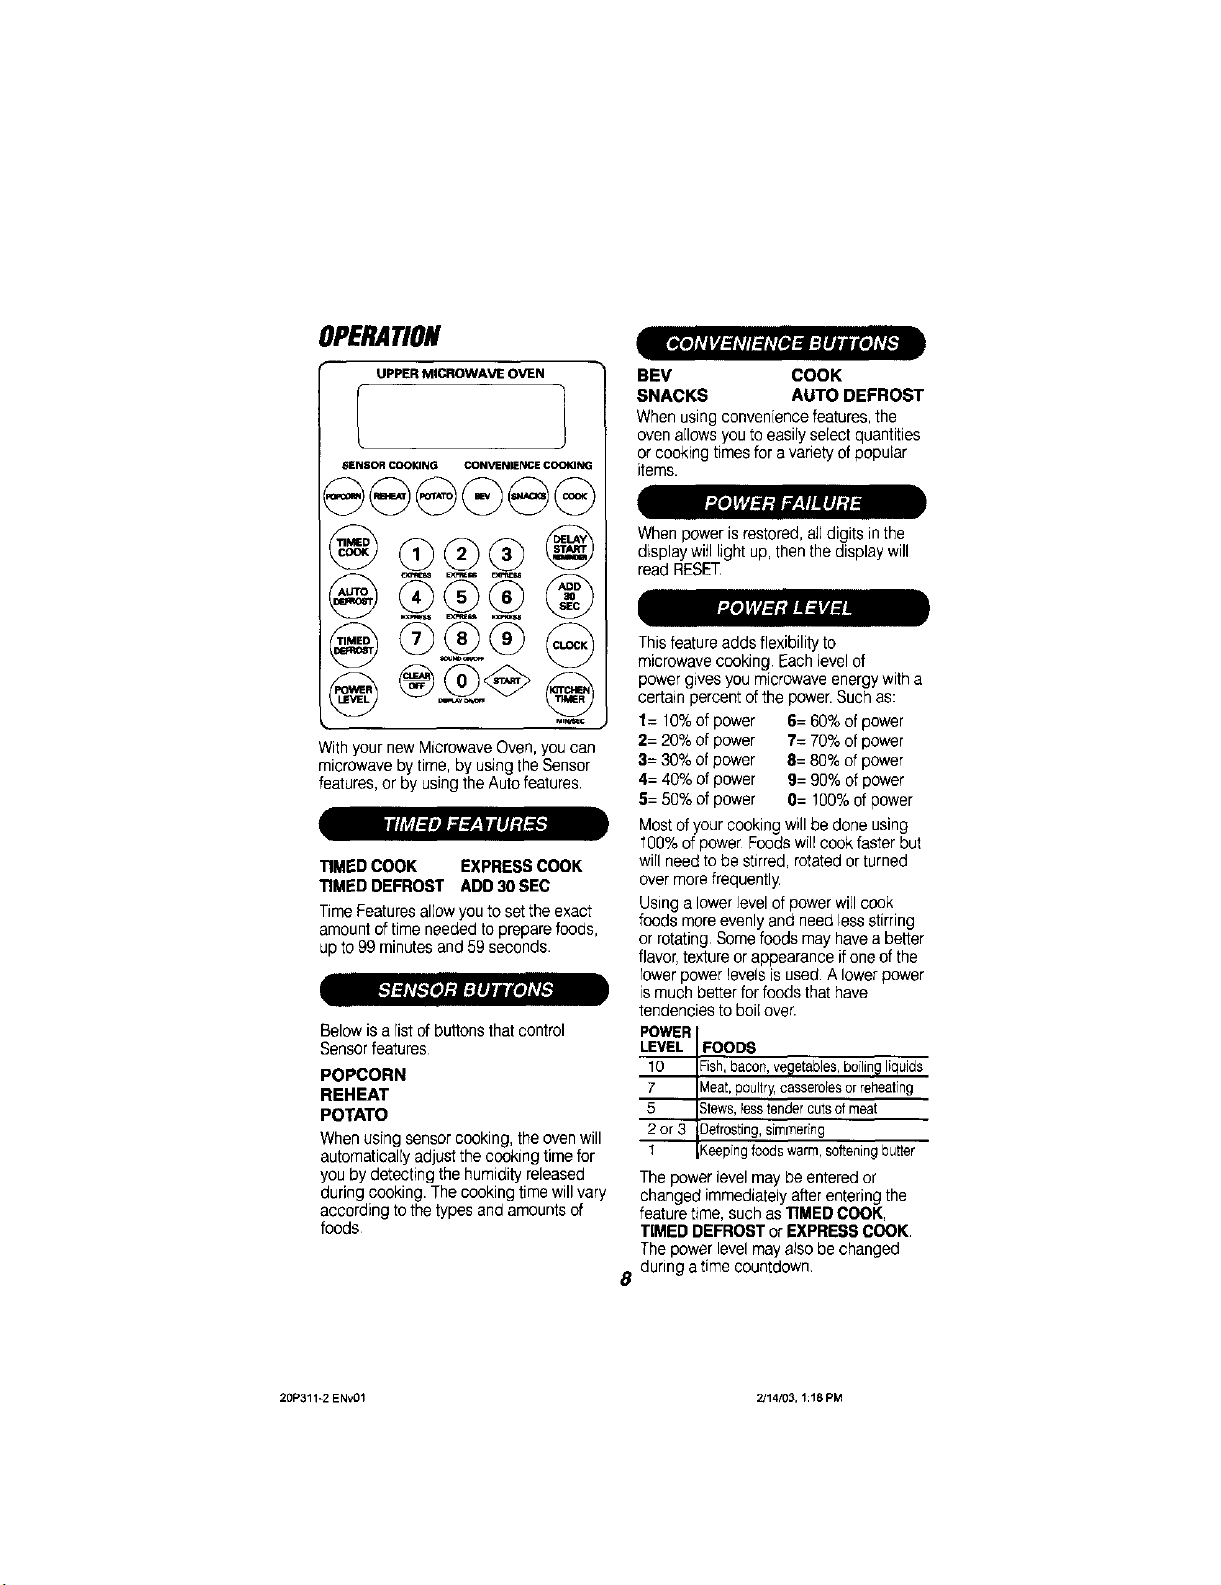
OPERATION
UPPER MICROWAVE OVEN
SENSOR COOKING CONVENIENCE COOIONG
WithyournewMicrowaveOven,you can
microwavebytime,by usingtheSensor
features,orby usingtheAuto features
TIMEDCOOK EXPRESSCOOK
TIMED DEFROST ADD30SEC
TimeFeaturesallowyouto setthe exact
amountoftime neededto preparefoods,
upto 99 minutesand 59seconds.
Belowisa fistof buttonsthatcontrol
Sensorfeatures
POPCORN
REHEAT
POTATO
Whenusing sensorcooking,theovenwill
automaticallyadjust thecookingtimefor
youby detecting thehumidityreleased
during cooking. Thecookingtime willvary
accordingto thetypes andamountsof
foods
BEV COOK
SNACKS AUTO DEFROST
Whenusing conven[encefeatures,the
ovenallows youtoeasily select quantities
or cooking timesforavariety ofpopular
items.
Whenpowerisrestored,all digits in the
displaywitllight up, thenthedisplay will
read RESET
Thisfeatureaddsflexibilityto
microwavecooking Eachlevelof
powergivesyou microwaveenergywith a
certain percentof the power.Suchas:
1= 10%of power 6= 60%of power
2= 20%of power 7= 70%of power
3= 30%of power 8= 80%of power
4= 40%of power 9= 90% ofpower
5= 50%of power O=100%of power
Mostof yourcookingwill be done using
100%of power Foodswill cookfaster but
will needtobe stirred,rotatedor turned
overmore frequently.
Usinga lowerlevel ofpowerwill cook
foods moreevenlyandneed lessstirring
or rotating Somefoodsmayhavea better
flavor,textureorappearance if oneof the
lowerpowerlevelsis used.A lowerpower
ismuch betterforfoodsthat have
tenden
iesto boilover.
POWER
LEVEL
FOODS
lO
:ish,bacon,vegetables,boilingliquids
7
_leat,poultry,casserolesorreheating
5
;tews,bss tendercutsofmeat
20r3
3etrosting,simmering
1
<.eepingfoodswarm,softeningbutter
Thepowerlevelmay beenteredor
changed immediatelyafterenteringthe
featuretime, such as TIMEDCOOK,
TIMEDDEFROSTorEXPRESSCOOK.
Thepowerlevelmaya_sobe changed
during a time countdown
8
20P311-2 ENv01 2/14/03, 1:18 PM
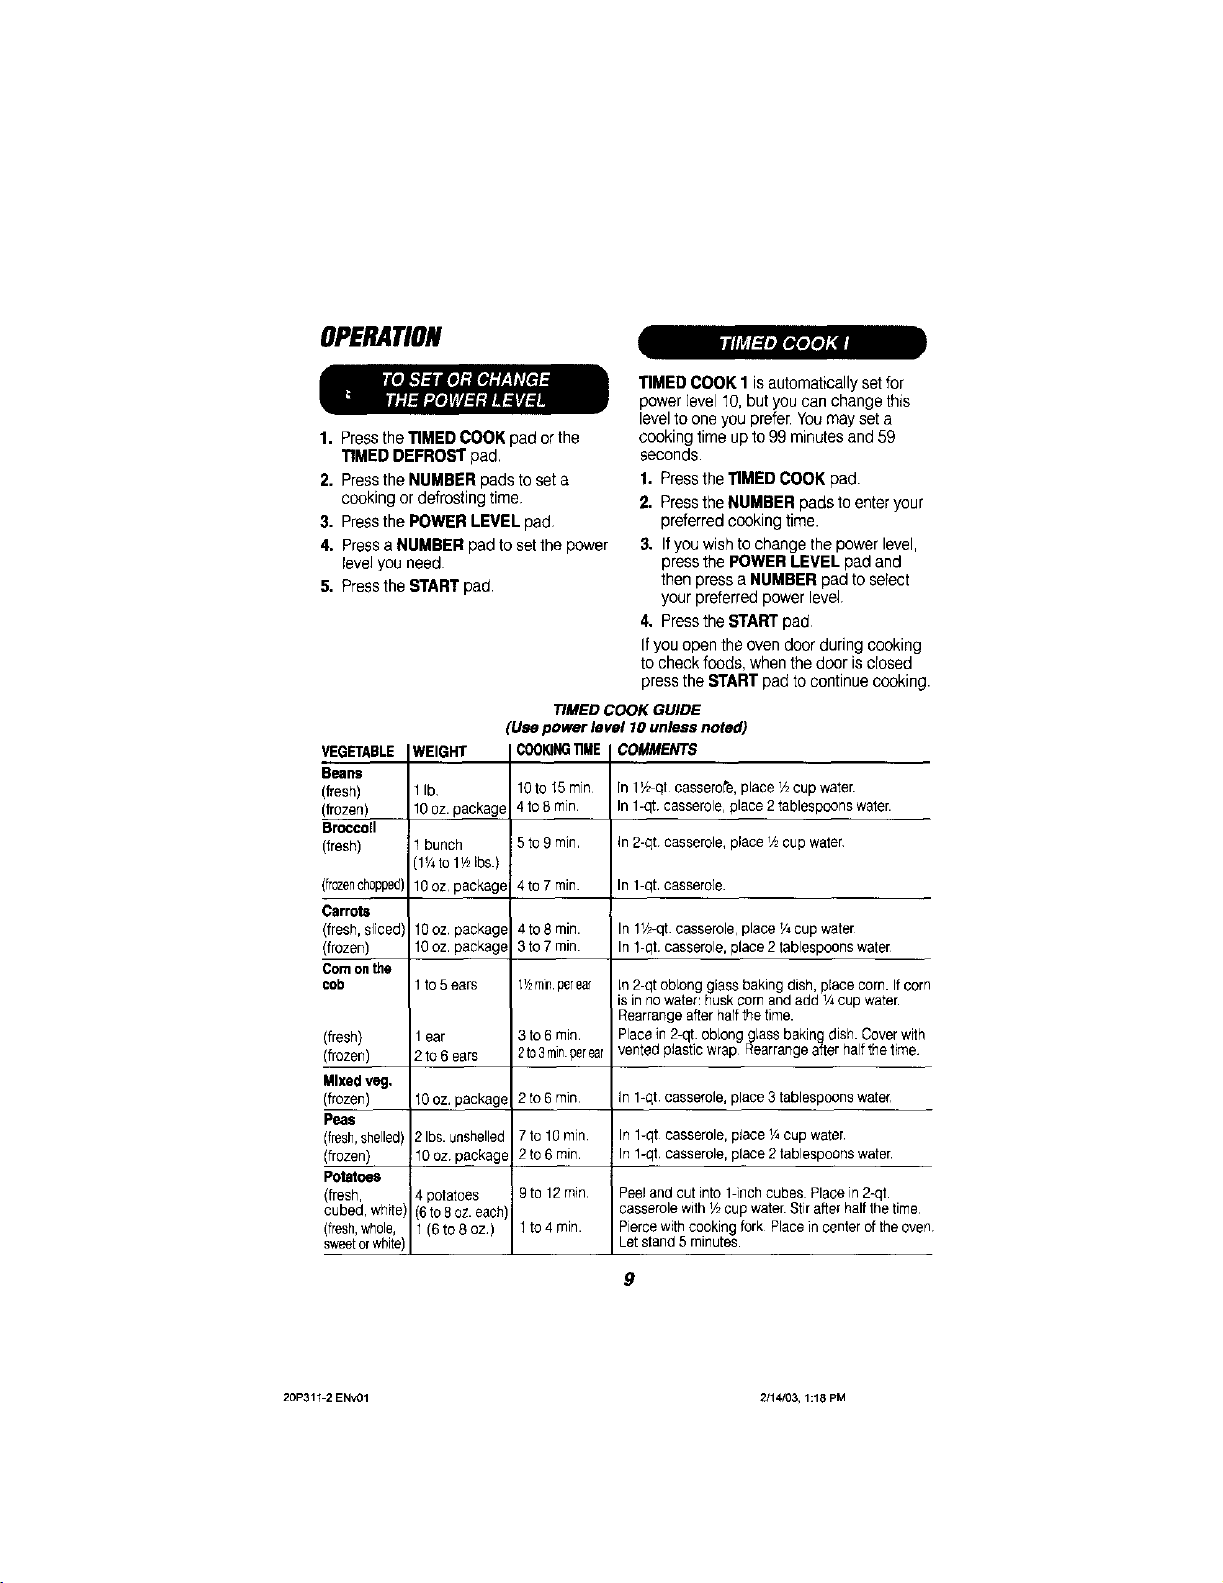
OPERATION
1, PresstheTIMED COOKpad or the
TIMEDDEFROSTpad.
2, Pressthe NUMBERpads toset a
cookingor defrostingtime
3. PressthePOWERLEVELpad
4. Pressa NUMBERpadto set thepower
levelyou need
5, Pressthe STARTpad
TIMED COOK GUIDE
(Use power level 10unless noted)
VEGETABLE
Beans
[fresh)
(frozen)
Broccoli
(fresh)
[frozenchopped)
Carrots
fresh,slicedl
(frozen)
Cornonthe
cob
(fresh)
(frozen)
Mixedveg.
(frozen)
Peas
(fresh,shelled)
(frozen)
Potatoes
fresh,
cubed, white)
fresh,whole,
sweetorwhite)
WEIGHT
lib,
10oz. package
1 bunch
(1¼ to 1½ Ibs.)
10oz package
10oz, package
10oz, package
1to5 ears
1ear
2tO 6 ears
tO oz, package
2Ibs. unshelled
10oz package
4 potatoes
8to 8oz.eact
(6 to 8 oz,)
COOKING"tiME
10to t5 min
4to 8min
5to 9min
4to 7min
4 toamin.
3to7min.
1½rnin.perea_
3t06 min.
2to3rain.perear
2to6 min
7to 10mLn
2to 6 rain,
9to 12rnin
lto4 min.
TIMEDCOOK1is automaticallysetfor
power level10,but youcan changethis
levelto one you prefer.Youmayset a
cookingtime upto 99 minutesand59
seconds.
1. PresstheTIMEDCOOKpad.
2. PresstheNUMBER padsto enteryour
preferredcooking time.
3. Ifyou wishto changethepower level,
pressthe POWERLEVELpadand
thenpress a NUMBERpadto serect
yourpreferred powerlevel,
4. PresstheSTARTpad
Ifyouopen the ovendoorduring cooking
to checkfoods,whenthe door is ctosed
pressthe STARTpad to continuecooking.
COMMENTS
In 1Y_ql casserote,place 1/2cup water.
In 1-qt,casserole,place 2tablespoons water.
In 2-qt casserole, place 1/2cup water
In 1-qt casserole.
In 1Vz-qt.casserole,place Y4cupwater
In1-qt, casserole, place 2 tablespoons water
Ln2-qt oblong glassbaking dish, place corn. Ifcorr
is innowater: huskcorn andadd 1/_cup water.
Rearrangeafterhalfthe time.
Placein 2-qt.oblong glass baking dish.Cover wrlh
vented plastic wrap Rearrangeafter halfthetime
in 1-qt casserole,place3 tablespoonswater
In 1-qt casserole,place ¼cup water,
In 1-gt,casserole,place 2tablespoonswater
Peeland cut into 1-]nchcubes PlaCein2_qt.
casserolewithV2cupwater.Stir after halfthe time
Piercewith cooking fork Placein center of the aver
Letstand 5 minutes
9
20P311 2ENv01 2/14/03, 1:18 pM
OPERATION
TimedCooking
,J
_jL_wI_oJ_gl|
TIMEDCOOKII allowsyouto change
powerlevelsautomatically duringcooking
1, Pressthe TIMED COOK pad
2, Pressthe NUMBERpads to enter
yourfirst cooking time.
3. If youwishto changethe powerlevel,
pressthe POWERLEVELpad and
thenpress the NUMBERpad to select
yourpreferred powerlevel
4. PresstheTIMEDCOOKpad again
5. PresstheNUMBERpads againtoenter
yoursecond preferredcookingtime.
6, If youwishto changethe powerlevel,
pressthe POWERLEVEL padand
then pressthe NUMBERpad to select
yourpreferredpowerlevel.
7. PresstheSTARTpad.
Atthe endof thefirst cookingtime
countdown,the secondcookingtime will
startitscountdown
Allowsyouto defrostfor a selectedlength
oftime. ThePowerLevelis automatically
setfor level3,but can be changed When
using higherpowerlevels,foodswill need
to bechecked morefrequently.
TO SETTIMEDDEFROST:
1. PresstheTIMEDDEFROSTpad,
2. PresstheNUMBERpads to enterthe
defrostingtime
3. PresstheSTARTpad.
Jml I • •
Youcan use thisfeaturetwoways:
• [t willadd 30 secondstothe time
counting down eachtimethe pad is
pressed
• It can be used asa quick wayto set 30
secondsof cooking time
Thisis aquick wayto setcookingtime
from t to 6 minutes
Pressone of theExpressCookpads
(from1to 6)for 1to 6 minutesof cooking
at powerlevel 10
Thepowercan bechangedwhile thetime
iscounting down,PressthePOWERLEVEL
padand entera numberfrom 1to 10,
AutoDefrostautomaticallysetsthe
defrostingtimesand powerlevelsto give even
defrosting resultsfor meats,poultryand fish,
UseTimeDefrostformostother frozenfoods.
TO SETAUTODEFROST:
1. PresstheAUTO DEFROSTpa_.
2. Usingthe ConversionGuide,enter the
foodweight.
3. PresstheSTARTpad.
Lookfor tile handyguidelocated onthe
insidefront ofthe microwaveoven.
• Removemeatfrom packageand place
on amicrowave-safedish
• Twiceduring defrost,theoven signals
"TURn," Ateach "TURn" signal,turn
the foodover.Removedefrosted meator
shieldwarmareaswithsmallpiecesof foil
• Afterdefrosting,mostmeatsneedto
stand5 minutesto complete defrosting.
Largeroastsshouldstandforabout
30minutes,
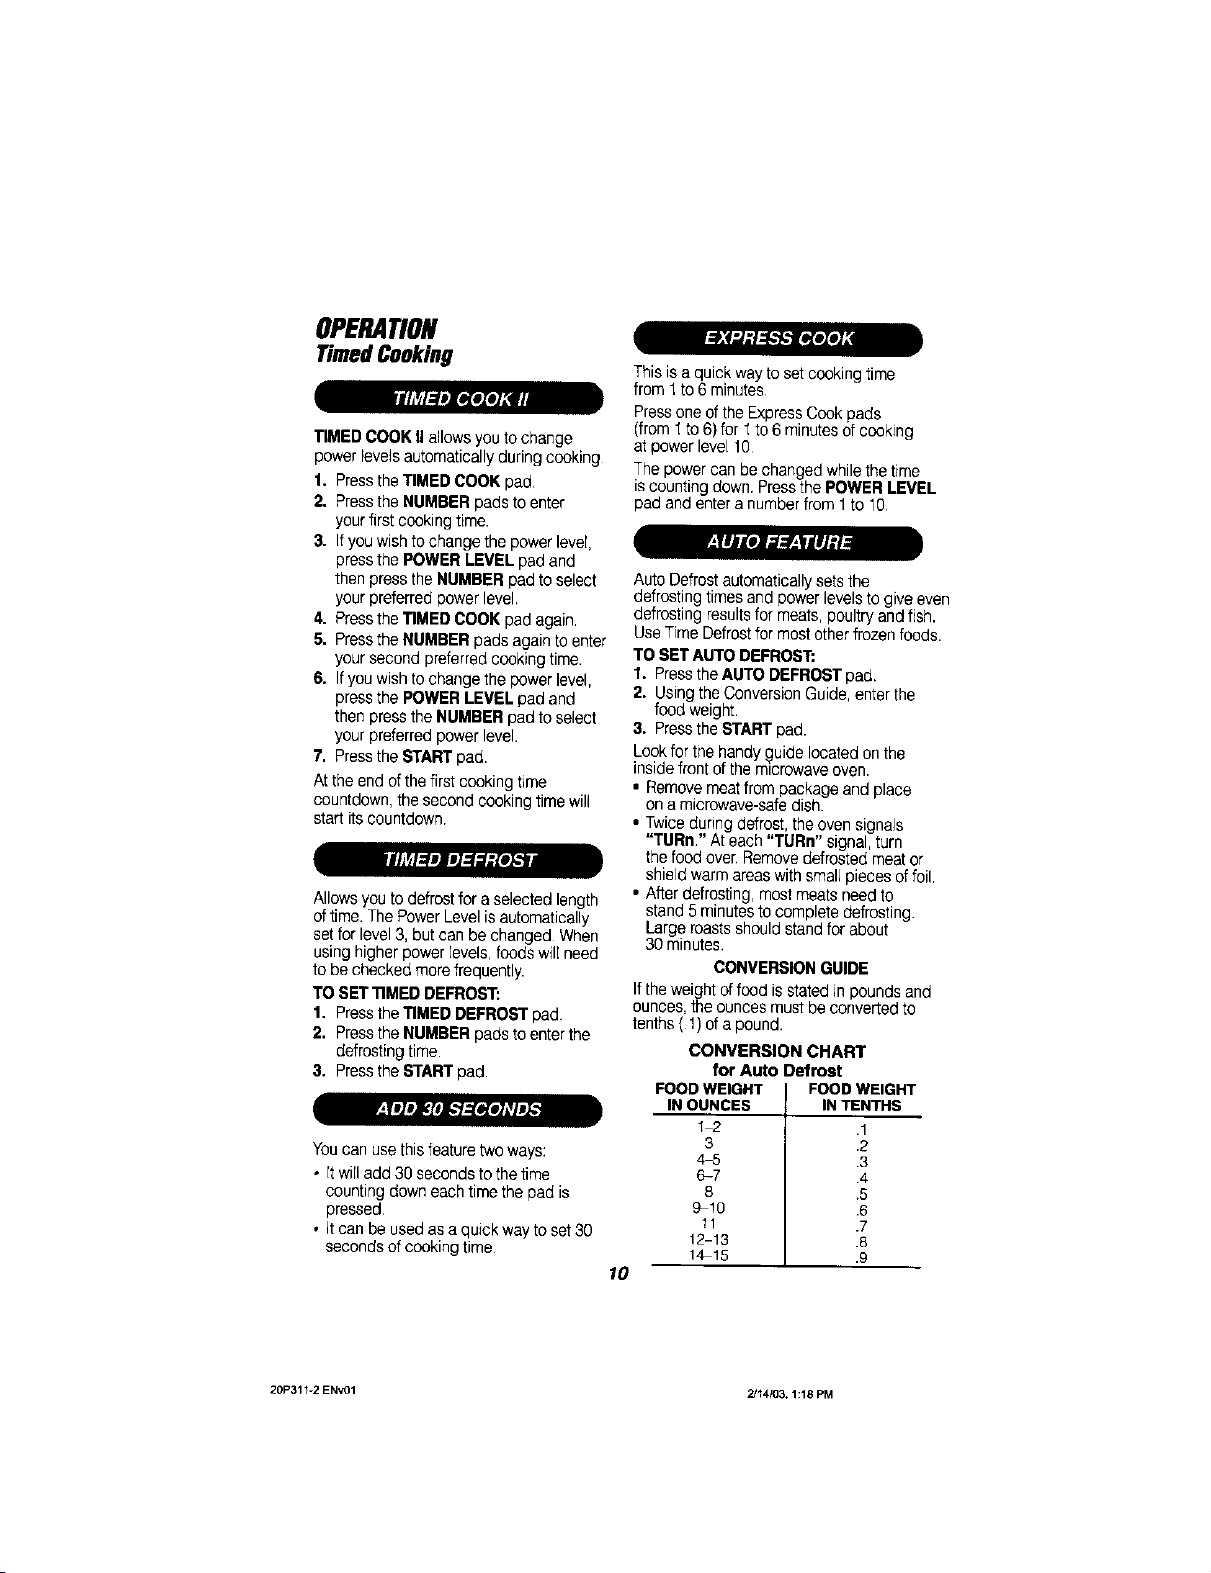
CONVERSIONGUIDE
Ifthe weightoffood is statedin poundsand
ounces, theounces mustbe convertedto
tenths(1) ofa pound.
CONVERSION CHART
for Auto Defrost
FOOD WEIGHT
IN OUNCES
3
4-5
6-7
8
_10
11
12-13
14-15
FOOD WEIGHT
IN TENTHS
.1
.2
.3
.4
.5
.6
.7
.8
.9
10
20P311-2 ENvO1 2/14/03, 1:18 PM
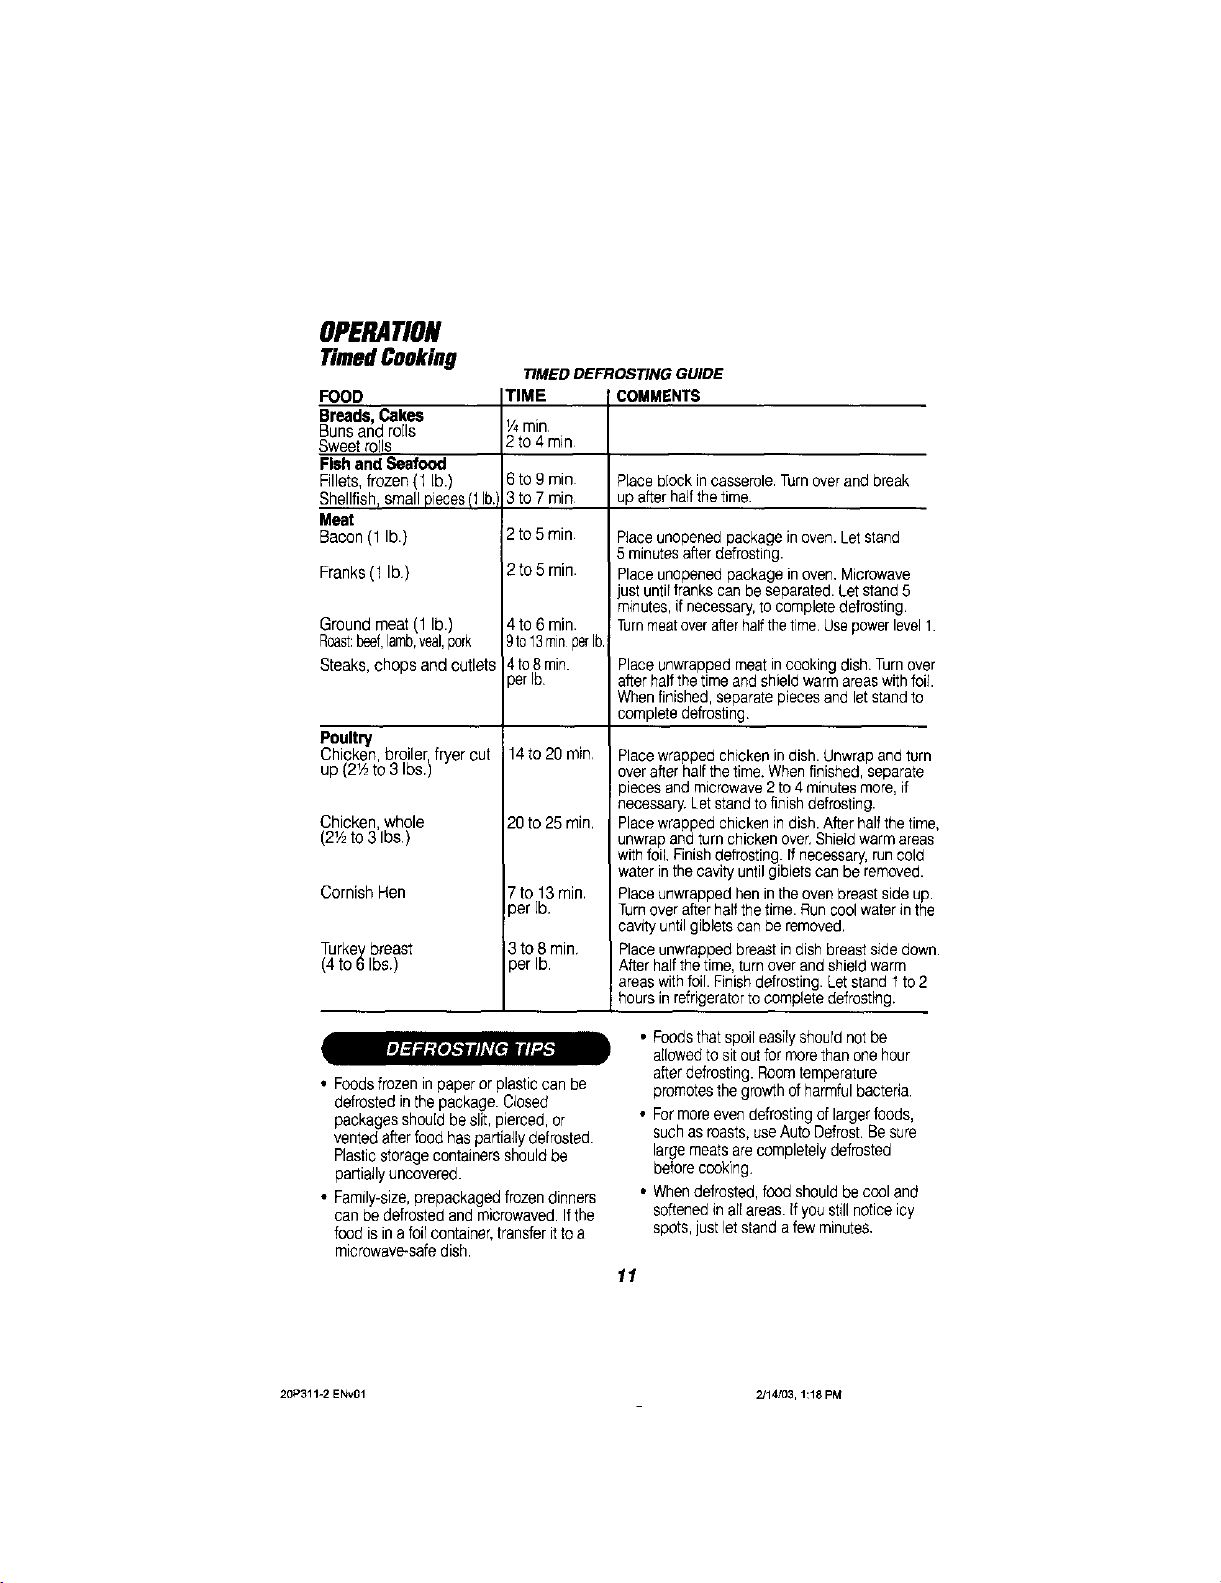
OPERATION
TimedCooking
FOOD
Breads, Cakes
Bunsand roils
Sweetroils
Fishand Seafood
Fillets,frozen(t Lb.)
Shellfish,small pieces(1lb.)
Meat
Bacon(1 lb.)
Franks(1 Ib)
Groundmeat (1 lb.)
Roast:beef,lamb,veal,pork
Steaks,chops andcutlets
Poultry
Chicken broiler fryer cut
up 2_Ato 3 bs.)
Chicken whole
2_ to3 Ibs,
CornishHen
Turkeybreast
(4 to 6Ibs.)
TIMED DEFROSTING GUIDE
TIME
V4min
2to4min
6 to 9 min
3 to 7 min
2to5min
2to5min.
4to 6rain.
9to13rainperIb
4to8min.
)erlb.
14to20 min
20 to25 min.
7to 13min.
perlb.
3to8 min,
)erIb
COMMENTS
Place b[ook in casserole. Turn over and break
up after half the time.
Place unopened package in oven. Let stand
5 minutes after defrosting.
Place unopened package in oven, Microwave
ust until franks can be separated. Let stand 5
minutes, necessary, to complete defrosting.
Turn meatover afterhalfthe time. Use power level 1.
Place unwrapped meat in cooking dish. Turnover
after half the time and shield warm areas withfoil.
When finished, separate pieces and let stand to
complete defrosting.
Place wrapped chicken in dish. Unwrap and turn
over after half the time. When finished, separate
pieces and microwave 2 to 4 minutes more, if
necessary. Let stand to finish defrosting.
Place wrapped chicken in dish. After half the time,
unwrap and turn chicken over. Shield warm areas
with foil, Finish defrosting. Ifnecessary, run cold
water inthe cavity until giblets can be removed.
Place unwrapped hen inthe oven breast side up.
Turn over after half the time. Run cool water in the
cavity until giblets can be removed.
Place unwrapped breast in dish breast side down.
After half the time, turn over and shield warm
areas with foil. Finish defrosting. Letstand 1to 2
hours in refrigerator to complete defrosting.
• Foodsthatspoileasilyshourdnotbe
allowedtositoutformorethanone hour
• Foodsfrozeninpaperor plasticcanbe
defrostedinthepackage.Closed
packagesshouldbeslit,pierced,or
ventedafterfoodhaspartiallydefrosted.
Plasticstoragecontainersshouldbe
partiallyuncovered.
• Family-size,prepackagedfrozendinners
canbedefrostedandmicrowaved.If the
foodis inafoilcontainer,transferittoa
afterdefrosting.Roomtemperature
promotesthegrowthofharmfulbacteria.
• Formoreevendefrostingoflargerfoods,
suchasroasts,useAutoDefrost.Besure
largemeatsarecompletelydefrosted
beforecooking.
• Whendefrosted,food shouldbecooland
softenedin allareas.If youstillnoticeicy
spots,justletstandafew minutes,
microwave-safedish.
11
20P311-2 ENv01 2J14,'03, 1:18 PM
OPERATION
SensorCooking
TheSensorFeaturedetectsthe increasing
humidityreleasedduringcooking.The
ovenautomaticallyadjuststhe cooking
timeto varioustypes andamountsof food.
• The propercontainersandcovers are
essentialfor best sensorcooking.
• Always use microwave-safecontainers
and coverthemwith lidsor vented
plastic wrap.Neverusetight-sealing
plastic containers,whichcan prevent
steamfromescaping andcause foodto
overcook.
• Be surethe outsideofthe cooking
containersandthe insideof the
m_crowaveoven aredry beforepracing
food inthe oven Beadsof moisture
turninginto steamcan mislead the
senson
Useonlywithprepackaged microwave
popcorn weighing 1.75to 3.5ounces.
TO USETHEPOPCORNFEATURE=
Followpackageinstructionsusing
TIMEDCOOK ifthepackage is lessthan
1.75ouncesor larger than 3.5ounces.
1. Race the package of popcorn inthe
center of themicrowave.
2. PressthePOPCORNpad.
Ifyouopenthe door while"POP" is in
display,"ERROR" willappear
3. Closethe doorand pressthe
STARTpad
HOWTOADJUSTTHEPOPCORN
PROGRAMTO PROVIDEASHORTEROR
LONGERCOOKTIME:
Ifyou findthat the brandof popcornyou
useunderpopsor overcooksconsistently,
you canadd or subtract20 to30 seconds
to/fromtheautomaticpopping time.
TOADDTIME:
After pressingthe POPCORNpad,press
9 immediatelyafterthe ovenstartsforan
extra20 seconds Press9 againto add
another 10seconds(iota;30 seconds
additional time).
TO SUBTRACTTIME:
After pressingthe POPCORNpad, press
1immediatelyafterthe ovenstartsfor
20 seconds lesscooking time.Press1
againto reduce cookingtime another
10seconds (total30 secondslesstime).
The ReheatFeaturereheatssingle
servingsof previouslycookedfoods or a
plateof leftovers
1. Placecoveredfood intheoven
2. PresstheREHEATpad.The ovenwill
startimmediately.
3. Theoven signalswhensteam is
sensedand thetime remainingbegins
counting down.
Do notopenthe oven door untiltimeis
finishedcounting down,If thedooris
opened, closeit andpress the START
padimmediately,
After removingfoodfromthe oven,stir1
if possible,to evenout thetemperature.
Ifthefood isnot hot enough,usethe
TIMEDCOOKpadto reheatformore
time.Reheatedfoods mayhavewide
variationIn temperature.Someareas
may beextremelyhot.
FOODSNOTRECOMMENDEDFOR
REHEATING:
• BreadProducts
• Foodsthatmustbe reheateduncovered
• Foodsthatneedto be stirred
• Foodsthatcall for adry lookor crisp
surfaceafterreheating.
The PotatoFeaturecooks V2to 2]bs.of
potatoes.
1. Pierceskinwith fork and place potatoeson
the turntable, rfcooking threeor more
potatoes,arrange _na star pattern
2, Pressthe POTATOpad. Theoven starts
immediately Theoven signals whensteam
is sensedand thetime remaining begins
12 counting down.
_P311-2 ENv01 2/14/03, 1:18 PM
OPERATION
SensorCooking(cont.)/
ConvenienceFeatures
Donotopentheovendooruntiltimeisfinished
countingdown Ifthedoorisopened,closeit
endpresstheSTARTpadimmediately.If food
isnotdoneenough,usetheTIMEDCOOK
padto cookformoretime.
dl
Touse the BeverageFeature:
PresstheBEV pad once for
a4 oz.beverage,twice foran 8 oz.
beverageor threetimes fora 12oz.
beverage.
Drlnksheatedwith the Beverage
Featuremay he veryhot.Removethe
containerwithcare.
TheSnacksFeatureautomaticallysetsthe
m_crowavingtimesand power levelsto
warma varietyof snackfoods
1, PresstheSNACKSpad.
2. Selectsnack type1 to6. (Seechart
below.)
3, Enterthe numberof itemsorthe food
weight inounces
4, PresstheSTARTpad.
Youcan pressandhold the SNACKSpad
during cookingto display the remaining
microwavingtime
FOOD TYPE
1Bread,rolls,muffins
2Sandwiches
3 Pizza(leftovers)
4 Desserttoppings
5 Soup
6 Cheesedip
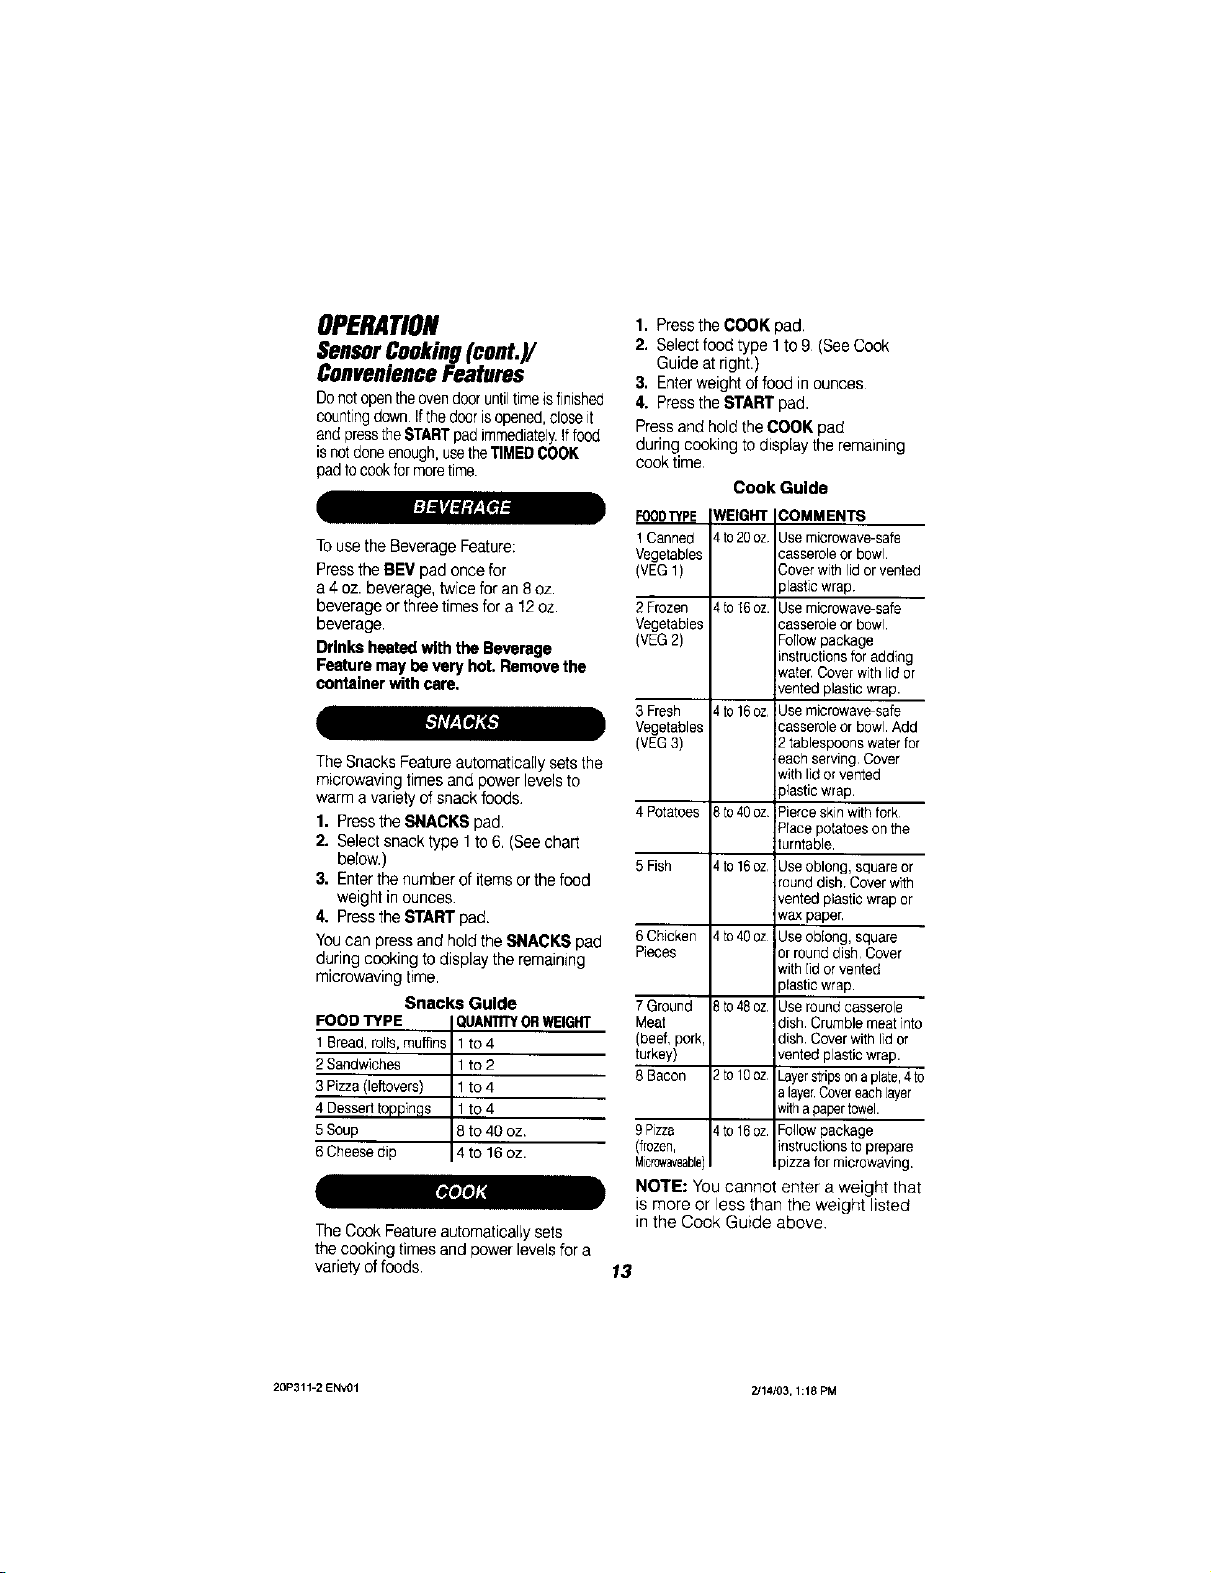
TheCookFeatureautomaticallysets
the cookingtimesand powerlevelsfora
varietyoffoods
:r_L,lrj _;_tr_
Snacks Guide
QUANTITYORWEIGHT
1 to4
1 to2
1 to4
1 to4
8 to 40 oz.
4to 16oz.
1. Pressthe COOK pad.
2. Selectfoodtype 1to 9 (SeeCook
Guideat right.)
3. Enterweightoffood in ounces
4. PresstheSTART pad.
Pressand holdthe COOKpad
during cookingto display the remaining
cook time
Cook Guide
FOODTYPE WEIGHT COMMENTS
1Canned 4,to20oz Usemicrowave-safe
Vegetables casseroleor bowl.
(VEG1) Cover with lidorvented
2 Frozen 4to;6oz. Usemicrowave-safe
Vegetables casseroleor bowl.
(VEG2) Forlowpackage
3 Fresh 4to 16oz Usemicrowave safe
Vegetables casseroleor bowl.Add
(VEG3) 2 tablespoonswaterfor
4Potatoes 3to4Ooz Pierceskinwithfork
5 Fish 4to16oz Useoblong, square or
6 Chicken 4to400z Useoblong, square
Pieces or round dish Cover
7 Ground _to48oz. Useroundcasserole
Meat dish Crumble meat into
(beef, pork, dish Cover with lid or
turkey) vented plastic wrap.
8 Bacon 2to10oz Layerstripsonaplate,4to
9Pizza 4to16oz. Follow package
(frozen, instructionstoprepare
Micr0waveable) _izzafor microwaving.
NOTE: YOU cannot enter a weight that
is more or less than the weight listed
in the Cook Guide above
plasticwrap
instructionsfor adding
water,Coverwith lid or
vented plastic wrap.
each serving Cover
with lid or vented
plastic wrap
Pracepotatoesonthe
turntable
round dish.Coverwith
vented plastic wrap or
wax paper,
with []d or vented
plastic wrap
alayer.Covereachlayer
witha papertowel.
13
20P311-2 ENVO1 2J14103, 1:18 PM
OPERATION
OtherFeatures
PresstheCLOCK padto enterthetimeof
dayor to checkthetime ofday while
microwaving.
TO SETTHE CLOCK:
1. PresstheCLOCKpad.
2. Enterthetimeof day.
3. PresstheSTARTorCLOCKpad
Pressthe KITCHENTIMERMINISECpad
to setthe timerup to 99minutesand99
seconds Pressthe numberpads to set
the time Pressthe KITCHEN"RMERMINI
SECpad againto start.Pressthe
KITCHENTIMERMINiSECpad
twice to clearthe display.
Usingthe KitchenTimerdoes notturnon
the microwaveenergy.
jm
Thereminderfeaturecan be used likean
aEarmclock
1. PresstheREMINDERpad.
2. Enterthetime ofday youwantthe
ovento remindyou. (Besurethe
microwaveclockshowsthe correct
time of day)
3. PresstheSTART pad.
Whenthe ReminderSignaloccurs,press
the CLEAWOFFpad toturn it off The
Remindertime maybedisplayed by
pressingtheREMINDERpad
NOTE:TheREMindicatorwillremainlit to
showthat theReminderFeatureis set To
clearthe Reminderbefore itoccurs,press
the CLEAR/OFFpad TheREM indicator
lightwill go off
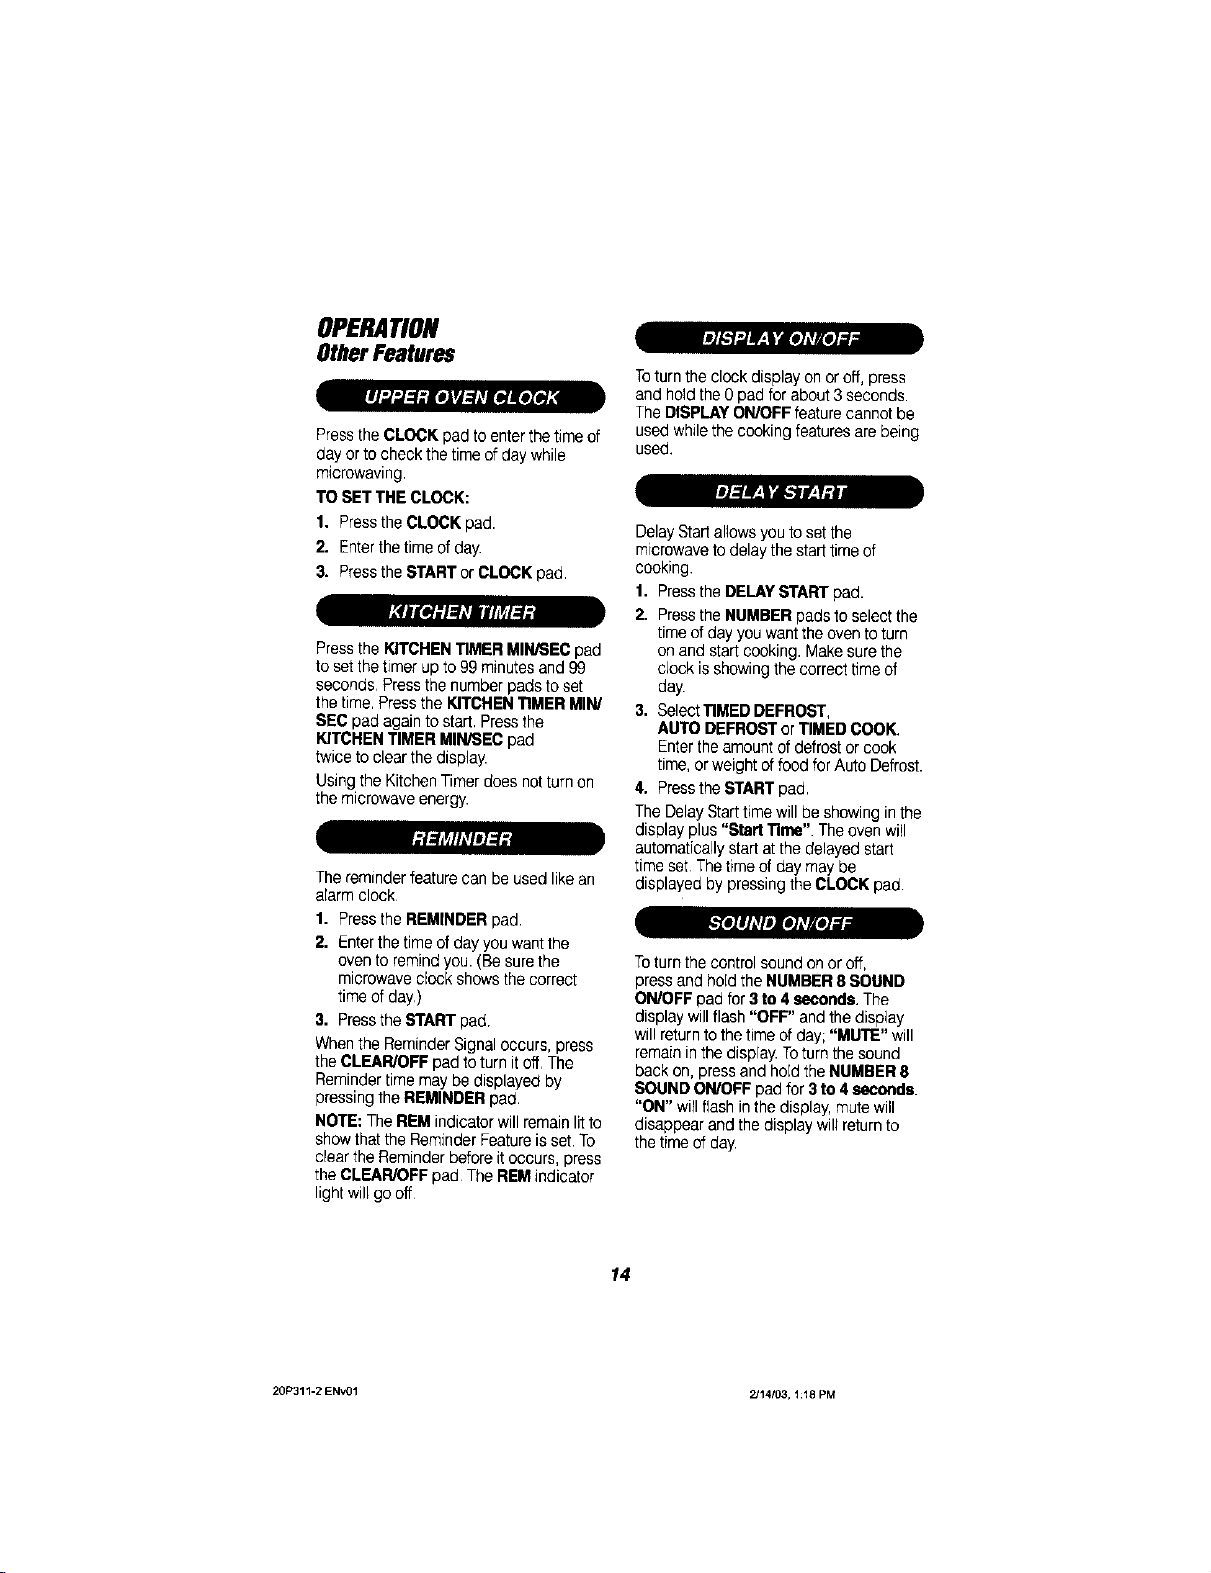
lJ2f.*]'.,lJr._yie]i_o2_dl
Toturn theclock display onoroff, press
and holdthe Opad for about3 seconds.
TheDISPLAYONIOFFfeaturecannot be
usedwhilethe cockingfeaturesare being
used,
DelayStartallowsyou toset the
microwavetodelay thestart timeof
cooking
1. PresstheDELAYSTAR'rpad.
2. PresstheNUMBERpadsto selectthe
time ofday youwanttheoven toturn
on andstart cooking.Makesurethe
clock is showingthe correcttime of
day
3. SelectTIMEDDEFROST,
AUTODEFROSTor TIMEDCOOK.
Enterthe amountof defrostor cook
time,orweight offood forAuto Defrost.
4, PresstheSTARTpad
TheDelayStart timewill beshowing inthe
display plus"Start Time".The oven will
automaticallystart at thedelayed start
time set Thetime of daymay be
displayed bypressingthe CLOCKpad
Toturn thecontrol soundonor off,
pressand holdthe NUMBER8 SOUND
ONIOFFpadfor 3 te 4 seconds.The
displaywill flash"OFF" andthe display
will returnto thetimeof day;"MUTE" will
remainin the display.Toturn thesound
back on, pressand holdthe NUMBER8
SOUNDONIOFFpadfor 3 to4 seconds.
"ON" wiFIflashinthedisplay,mute will
disappearand thedisplay will returnto
thetime ofday
14
20P311-2 ENV01 2J14103, 1:18 PM

OPERATION
LowerOvenControl
LOWER OVEN
CLEAN Cleansthe oven for4hours,but
you can changethis lengthoftimeto
between3and5 hours.
NOTE:Theovendoorwillautomatically
latch andwillonly unlatchonce the oven
has eooreddown
OVEN "rIMER
@®®®
@ ®®÷@
Your new touch pad control will allow
you to set various functions with ease.
Below are the features of your oven
control and a description of each.
BAKING Cookfoods in thetraditional
thermaloven witha temperaturerangeof
170°Fto550°F.
BROILING- Cookmeatat550°F HIor
450°FLQWfromthe direct heatof the
upper elementinsidetheoven.
|ll_l_lnJ[e]rJ_lAvl_lhV[ell[e]_vt¢
TheNUMBERpadsset theoven
temperature,timeof day, delaystarttime,
cookingtime,cleantime and thekitchen
timer.
TheSTARTpad mustbe pressedto
activateanyovenfunction.
TheOVENCOOKINGTIMEpad is used
whensettingthe lengthof bakingtime.
TheDELAYSTARTTIME pad isused to
setthetime of day youprefertheoven to
turn on andstart bakingor cleaning.
WhenDELAYSTAR3"TIMEis usedwith
OVENCOOKINGTIME,theoven willalso
turnoff automaticallyat theendof the
cookingtiros
TheCLEAR/OFFpad is usedto cancel
anyovenfunctionand the.end-of-cycle
tone.It willnot canceltheclockor
KitchenTimer.
TheKITCHENTIMERON/OFFpad is
usedto turnthe kitchentimeron or off. It
will notcontrolanyotherfunctions.
TIME BAKING- Choosebakeandthe
temperatureyou preferto use.Thenset
howlong you wantfoodsto cook.
DELAYEDBAKINGor
CLEANING- Choosebake or cleanand
the temperatureyou preferto use, setthe
time of dayyou prefertheovento turnon,
or set howlong youpreferfoodsto cook.
15
20P311-2 ENv01 2/14/03, 1:18 PM
OPERATION
LowerOvenControl
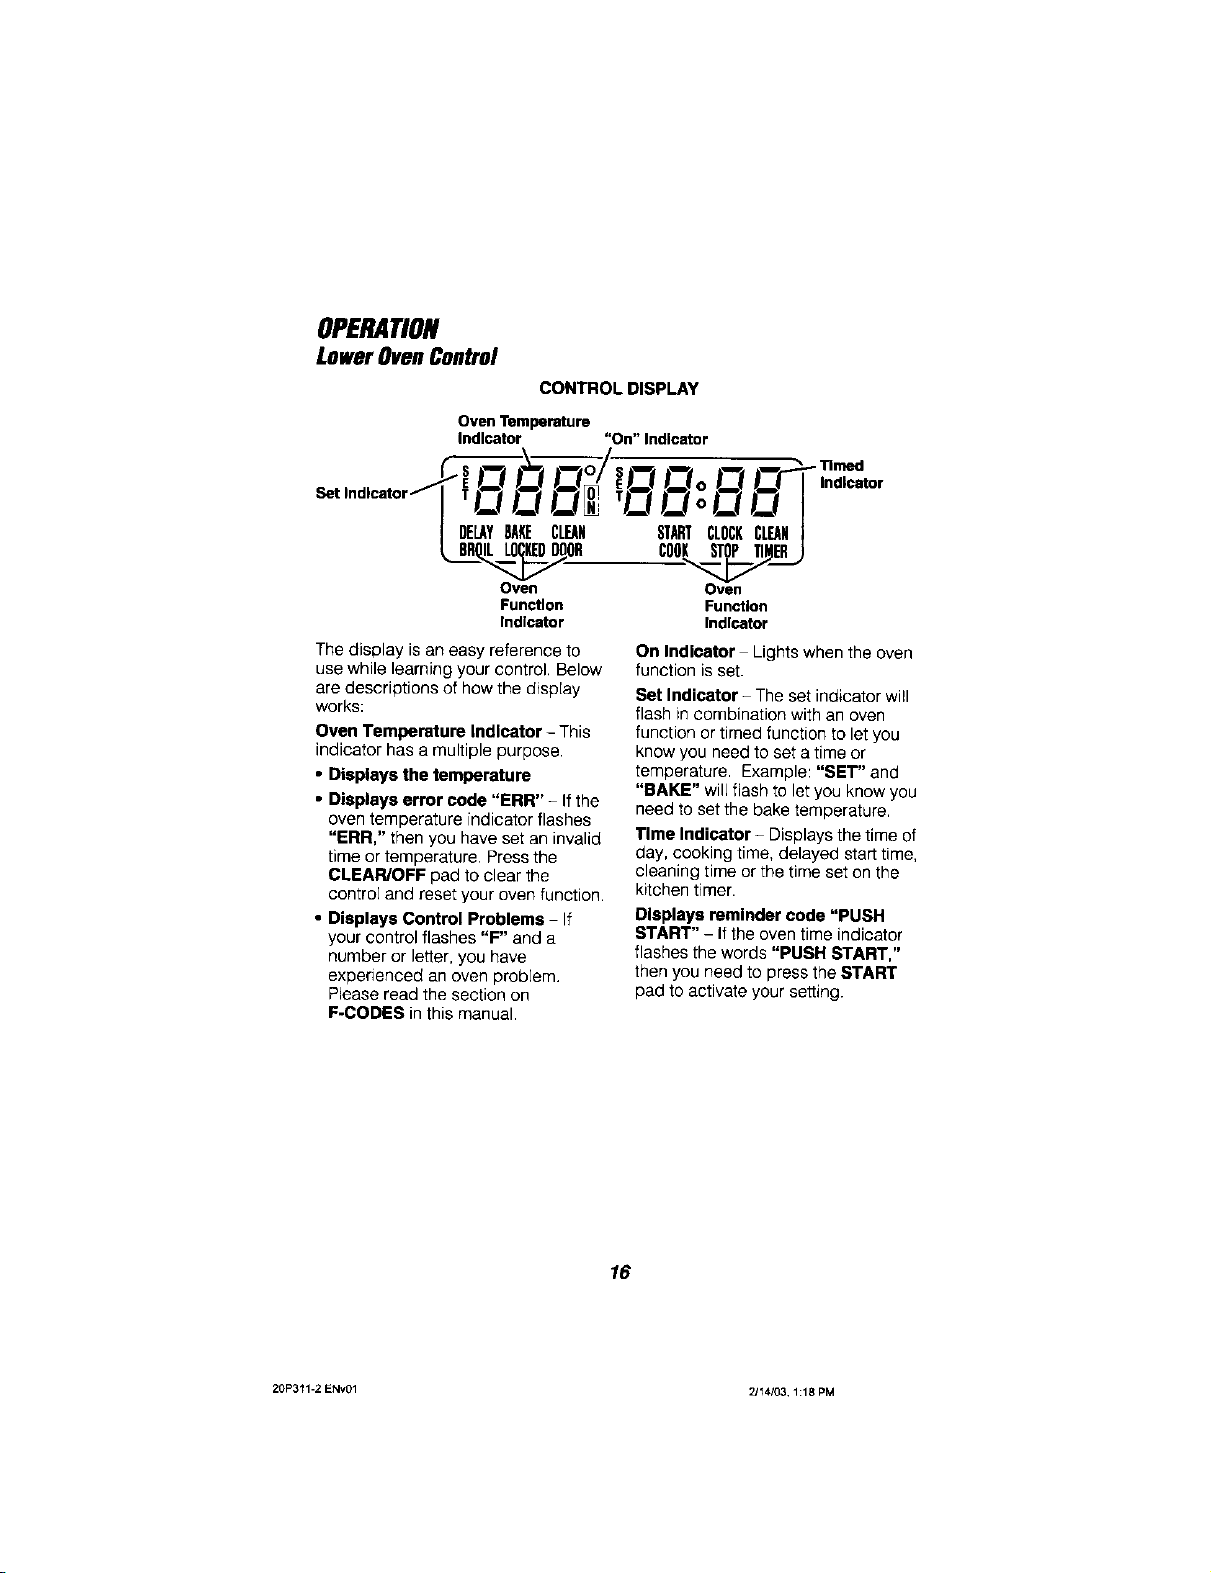
CONTROL DISPLAY
Oven Temperature
Indicator "On" Indicator
SetIndlcat r-'/_1__/S#'_ _._0 _ _" _dln_d_tor
o i T/ !/ZID 'EIC!o/ l/ [
i ## S,o,o CL.,,..I
Function Function
Indicator Indicator
The display is an easy reference to
use while learning your control, Below
are descriptions of how the display
works:
Oven Temperature indicator- This
indicator has a multiple purpose,
• Displays the temperature
• Displays error code "ERR" - Ifthe
oven temperature indicatorflashes
"ERR," then you have set an invalid
time or temperature, Press the
CLEAR/OFF pad to clear the
control and reset your oven function.
• Displays Control Problems - If
your control flashes "F" and a
number or letter, you have
experienced an oven problem,
Please read the section on
F-CODES in this manual.
On Indicator Lights when the oven
function is set.
Set Indicator - The set indicator will
flash incombination with an oven
function ortimed function to let you
know you need to set a time or
temperature. Example: "SET" and
"BAKE" wilLflash to letyou know you
need to set the bake temperature.
Time Indicator - Displays the time of
day, cooking time, delayed start time,
cleaning time or the time set on the
kitchen timer.
Displays reminder code "PUSH
START" - Ifthe oven time indicator
flashes the words "PUSH START,"
then you need to press the START
pad to activate your setting.
16
20P311-2 ENvOl 2/14/03,1:18 PM
OPERATION
LowerOvenClockandTimer
Theclock mustbe setfor thecorrect time
of day beforea delayed ovenfunction can
work properly.Thetimeof day cannotbe
changed during a delayedovenfunction,
butcan be changed duringa bakeor
broilfunction
H WTOSETTHE L K
1. PresstheCLOCKpad.
2, PresstheNUMBERpads tosetthe
time.
3. PresstheSTART pad.
RECALLTHE CLOCK
Whileusing your ovenfor timedcooking,
pressthe CLOCKpad ifyouwishto
check thetimeof day.Thecurrenttime
ofday will showin the display.
POWERFAILURE
Ifyou havehad a powerfaiEure,the time
flashingin the displaymay be incorrect.
Resetthe Clock.
Anyoven functionthat wasin processwill
needto be reset.
TheKitchenTimeris usedto timecooking
processesor other householdactivities,It
doesnot controlthe oven.Itcan be setfor
up to9 hoursand 59 minutes,It willcount
down inminutesuntilthe last60 seconds
is reached,thenthe controlwillbeep
once Whenthecountdownreaches zero,
the controlwill beep 3 timesfollowed by
onebeep every6 secondsuntilthe
KITCHENTIMERON/OFFpadis
pressed.This6-secondtonecan be
cancePedSeeTonesonthefollowing
page
ETT
1. Pressthe KFrCHENTIMER
ON/OFF pad.
2. PressNUMBERpadsto set time
3. Pressthe START pad.
4. Whenthe countdownhasreached
zero, pressthe KITCHENTIMER
ON/OFFpad.
Tocancel the timerduring thecountdown,
pressthe KITCHENTIMERON/OFFpad
twice.
17
20P311-2 ENV01 2J14/03, 1:18 PM
OPERATION
ClockandTimer
Yournewcontrol hasaseriesof tonesthat
will soundat differenttimes.Thesetones
maysoundwhileyouset the controlfor an
ovenfunction,or atthe end ofthe oven
function Itwill alsoalertyouthat there
may13ea orobtemwiththe functJoos.
Belowarethetypes of tonesand a brief
descriptionofeach.
TONESWHILE SE'rrlNG THE
CONTROL- Whenyou pressatouch pad
youwill heara beep Thisbeep willlet you
knowyou haveplaced enoughpressure
on the pad to activateit.
ENDOFTIMEDCYCLETONE At the
endof atimed cookingfunction,youwill
hear3shortbeeps followedby 1 beep
every6 seconds This6-second beep wile
continueto sounduntilthe CLEAR/OFF
pad ispressed, oryou mayselectthe
special featureto cancel this6-second
beepfromsoundingat theend of future
cycles
TO CANCELTHE6-SECONOSEEP:
1. Pressand holdtheBAKE andBROIL
HI/I.O pads,at the slimetime, for 3
seconds, untilthe displayshows"SF"
2. PresstheKITCHENTIMERON/OFF
pad The display willshow"CON
SEEP"(continuousbeep)
3. PresstheKITCHENTIMERON/OFF
padagain. The display will show
"BEEP" (beep canceled).
4. Pressthe START pad.
Ifyouwould liketo returnthe6-second
beep, repeatsteps aboveuntilthe display
showsyourchoice and press the
STARTpad
A'n'ENTIONTONE- Thistonewill sound
if youmakean erroror an oversightis
made whilesetting an ovenfunction.
Exampleswouldbe:
a. Settinga clean cycle andthe oven
door is notproperly closed.
b. Settingfunctionand notpressingthe
STARTpad
c. Pressingan additionalfunction pad
withoutfirstsetting atemperatureor
time,
d. "ERR" wilrflash ifyou setan invalid
temperature.PresstheCLEAR/OFF
pad to clear thecontroland resetyour
ovenfunction.
Anyofthesecan be quickly identifiedby
watchingthe display
PREHEATTONE- Whenyou
select acooking mode, setanoven
temperatureandpressthe STARTpad,
the ovenstarts to heat Whenthe
temperatureinsidetheoven reachesthe
temperatureyou haveset, a tonewill
soundto let you knowtheoven is ready
for baking
d
Ifyousetan ovenfunction andthe control
beepswhilethedisplay isflashing "F"
and a number"F,-4"or letter "FI," there
may be a problem withthe control SimpLy
presstheCLr_R/OFF pad andwait
aboutan hour Try settingthefunction
again If thecode repeats,write down
the codeand callfor service.Tellthe
technicianwhat codewasflashing
IPJZ-_e.7_J_"]l
18
70P311-2 ENV01 2J14103,1:18 PM
OPERATION
OvenCookingTips
It isnormaltohavesomeodorwhen
usingyourovenforthefirsttime.Tohelp
eliminatethisodor,vent,ate the room by
openingawindowor usinga venthood.
IMPORTANT:Nevercovertheovenbottom
or ovenrackwithaluminumfoil. Improper
usecan causepoorheat flow,poorbaking
results,andmaydamagethe ovenfinish.To
preventstainingfromspillovers,you may
placea pieceofaluminumfoil ora cookie
sheetbelowfoodswhichmayspillover.
Theoven ventis located underthe control
panel.Thisareacould become hotduring
ovenuse.It is normalfor steam to come
out ofthe ventand/or collect moisture
underneathwhenthe ovenis in use The
vent isimportantfor proper aircirculation
Neverblockthisvent.
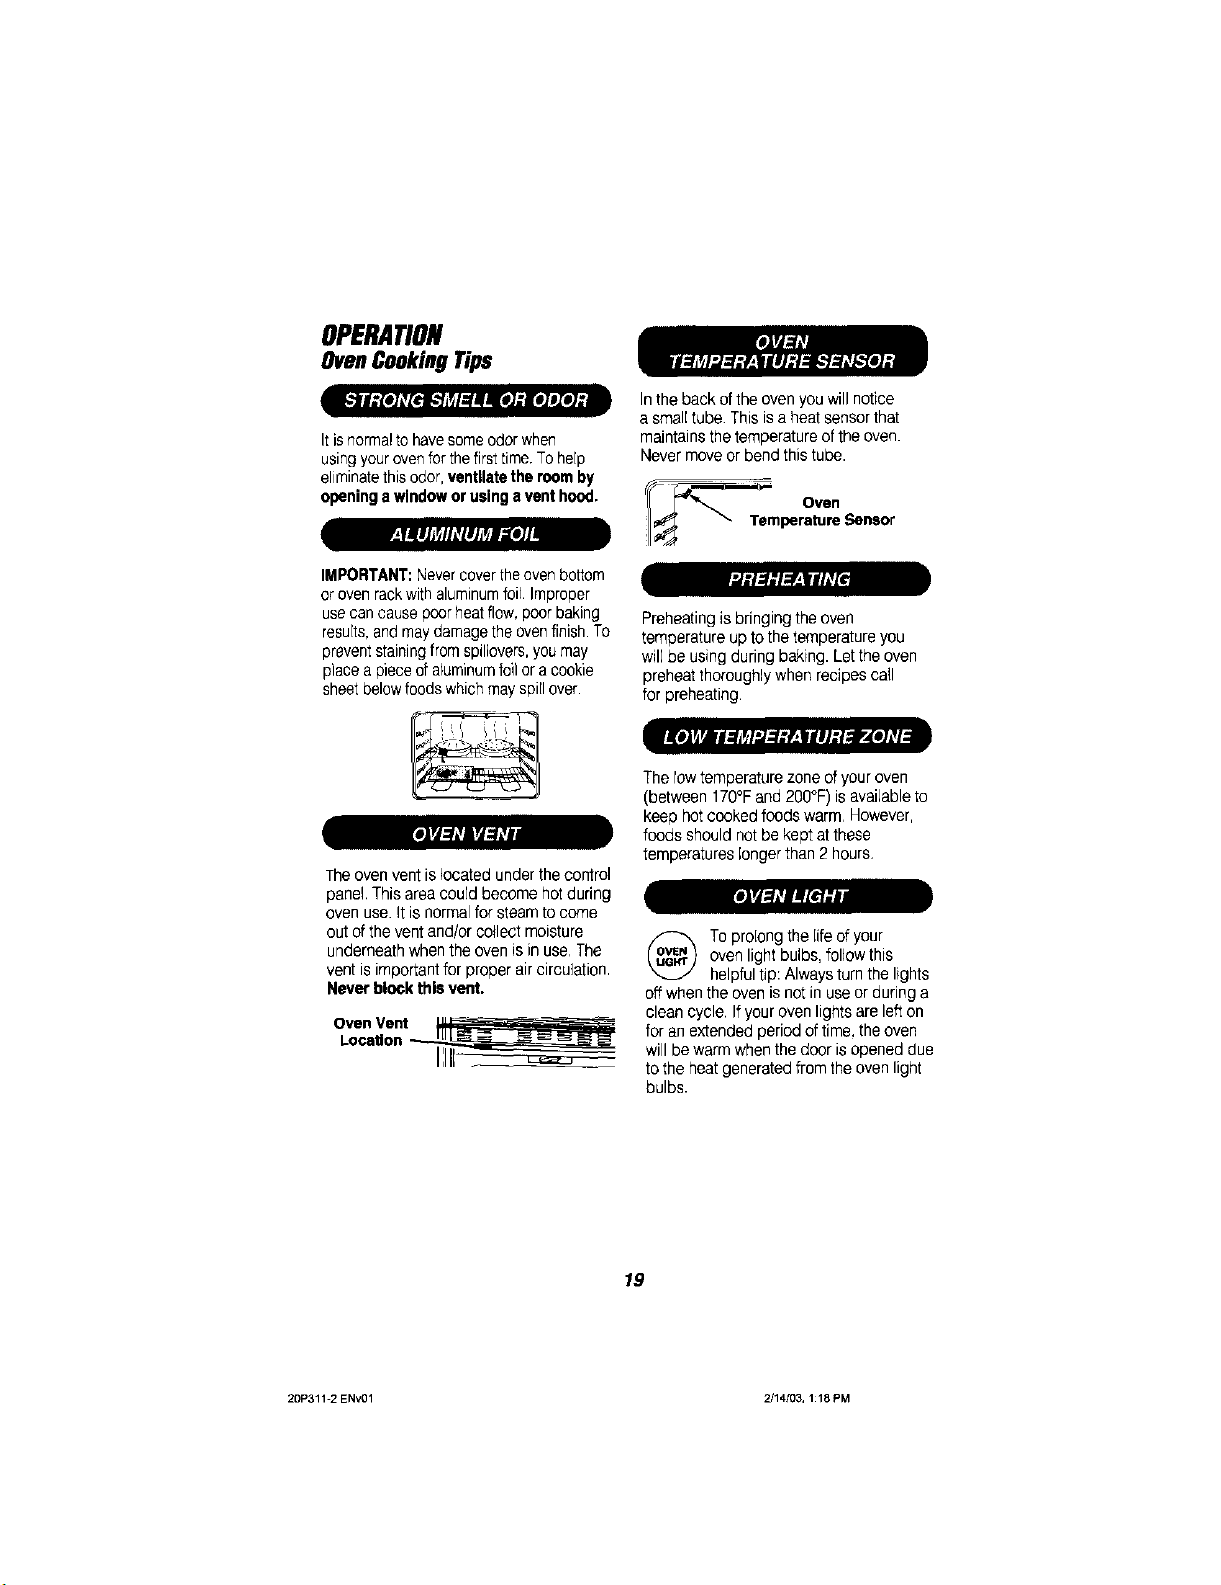
Inthe back ofthe ovenyou willnotice
asmalltube Thisis aheatsensorthat
maintainsthetemperatureofthe oven.
Nevermoveorbend this tube.
__ Oven
_- Temperature,Sensor
Preheatingisbringing theoven
temperatureupto thetemperatureyou
will be usingduring baking. Lettheoven
preheatthoroughlywhen recipescall
for preheating
The rowtemperaturezone ofyouroven
(between170°Fand 2O0°F)is availableto
keephotcookedfoods warm However,
foods shouldnot be keptatthese
temperatureslongerthan 2 hours.
ovenlight bulbs,followthis
Topro[ongthe lifeofyour
off whentheoven isnot in useor duringa
clean cycle,Ifyour ovenlightsare left on
for anextended periodof time,theoven
will bewarmwhenthedoor isopeneddue
to the heatgeneratedfromtheoven light
bulbs.
helpfultip: Alwaysturnthe lights
19
20P311-2 ENv01 2/14/03, 1:18 PM
OPERATION
OvenCookingTips
Mostrecipes for bakinghave been
developed using high-fat productssuch
as butter ormargarine(80%tat by
weight the federal requirement for
products labeled "margarine"). You
will get poor results if cakes, pies,
pastries, cookies or candies are made
with low-fat spreads. Low-fat spreads
contain less fat and more water, The
high moisture content of these
spreads affects the texture and flavor
of favorite baked recipes. The lower
the fat content of a spread product,
the more noticeable these differences
become. To ensure best results, use
margarine, butter or stick spreads
containing at least 70% vegetable oil.
TheOven TemperatureSensoratthe
beckof the ovencontinuouslysenses
and controlsthetemperatureinsidethe
oven To keep aconstant settemperature,
the elementswill cycle (turnon and off
during cooking).
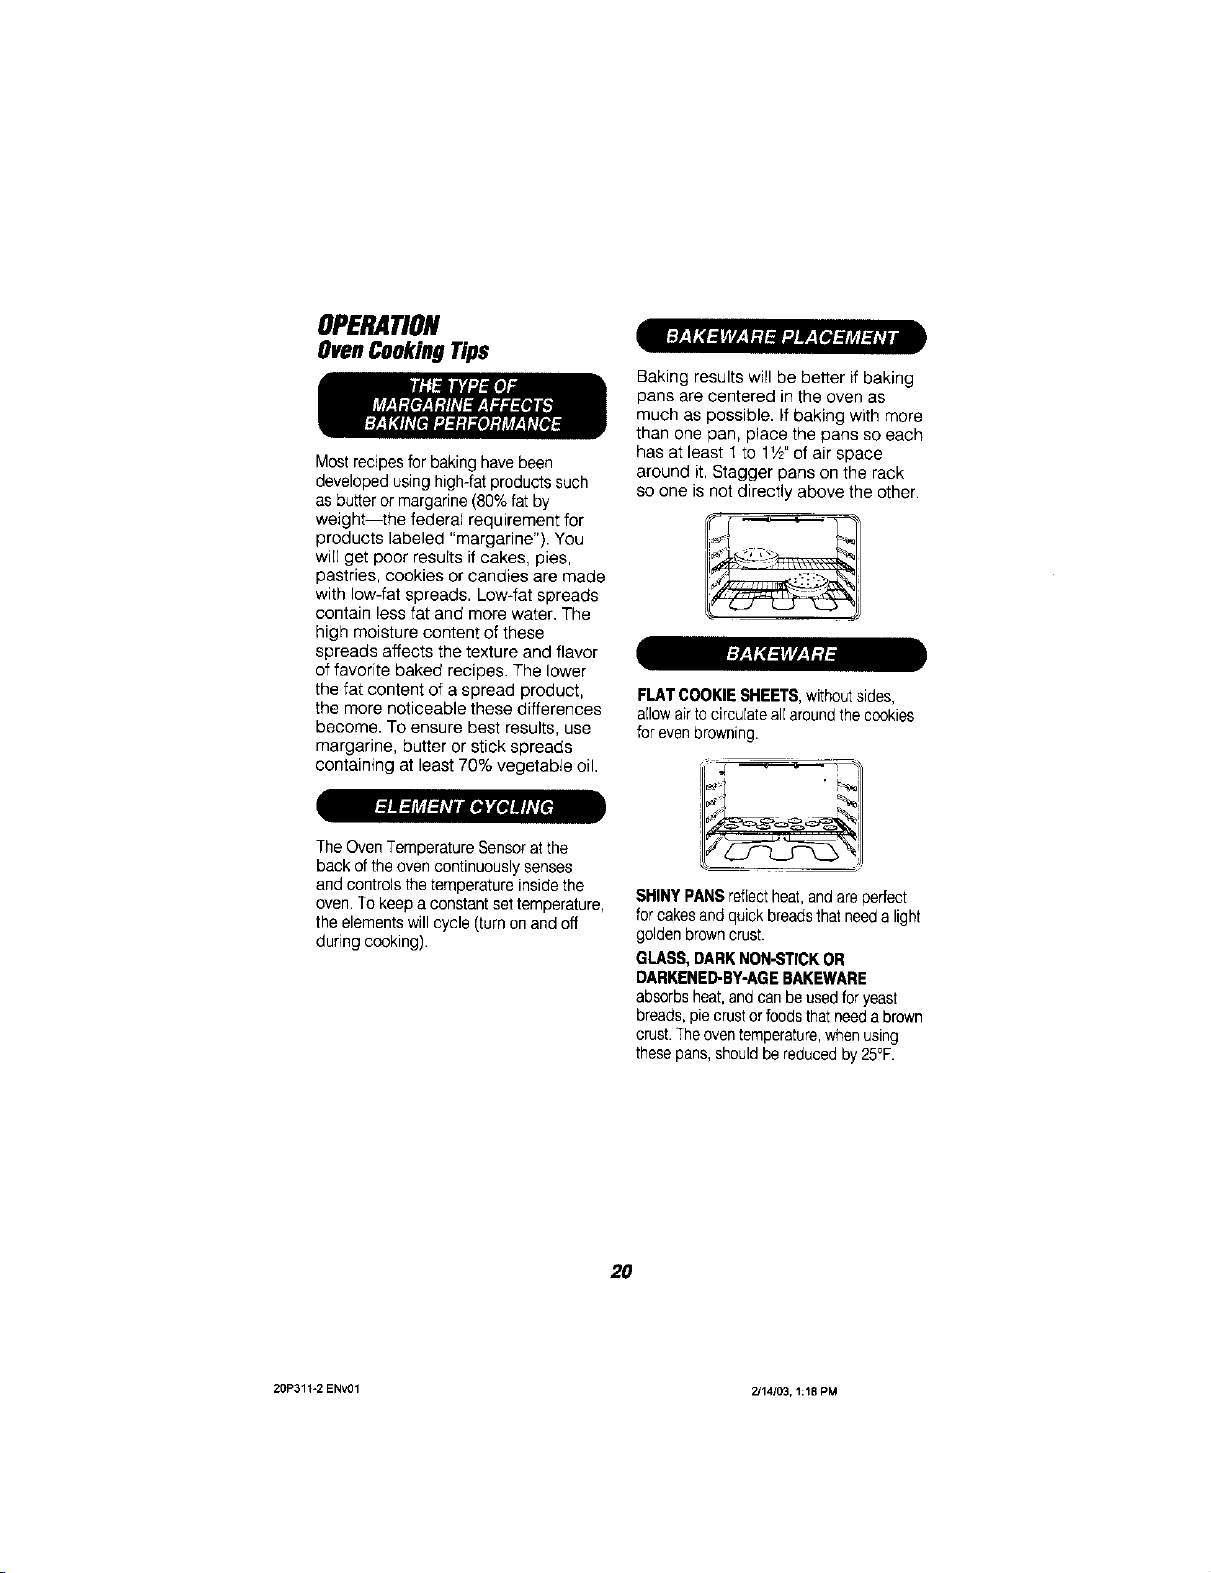
Baking results will be better if baking
pans are centered in the oven as
much as possible. Itbaking w_thmore
than one pan, place the pans so each
has at least t to 1W of air space
around it. Stagger pans on the rack
so one is not directly above the other
FLATCOOKIESHEETS,withoutsides,
allowairtocirculateallaroundthecookies
forevenbrowning.
SHINYPANSreflectheat,andareperfect
forcakesand quickbreadsthatneeda light
goldenbrowncrust.
GLASS,DARKNON-STICKOR
DARKENED-BY-AGEBAKEWARE
absorbsheat,andcanbeusedforyeast
breads,piecrustor foodsthatneedabrown
crust.Theoventemperature,whenusing
thesepans,shouldbe reducedby25°F.
20
20P311-2 ENv01 2J14/03, 1:18 PM
OPERATION
OvenCookingTips
A
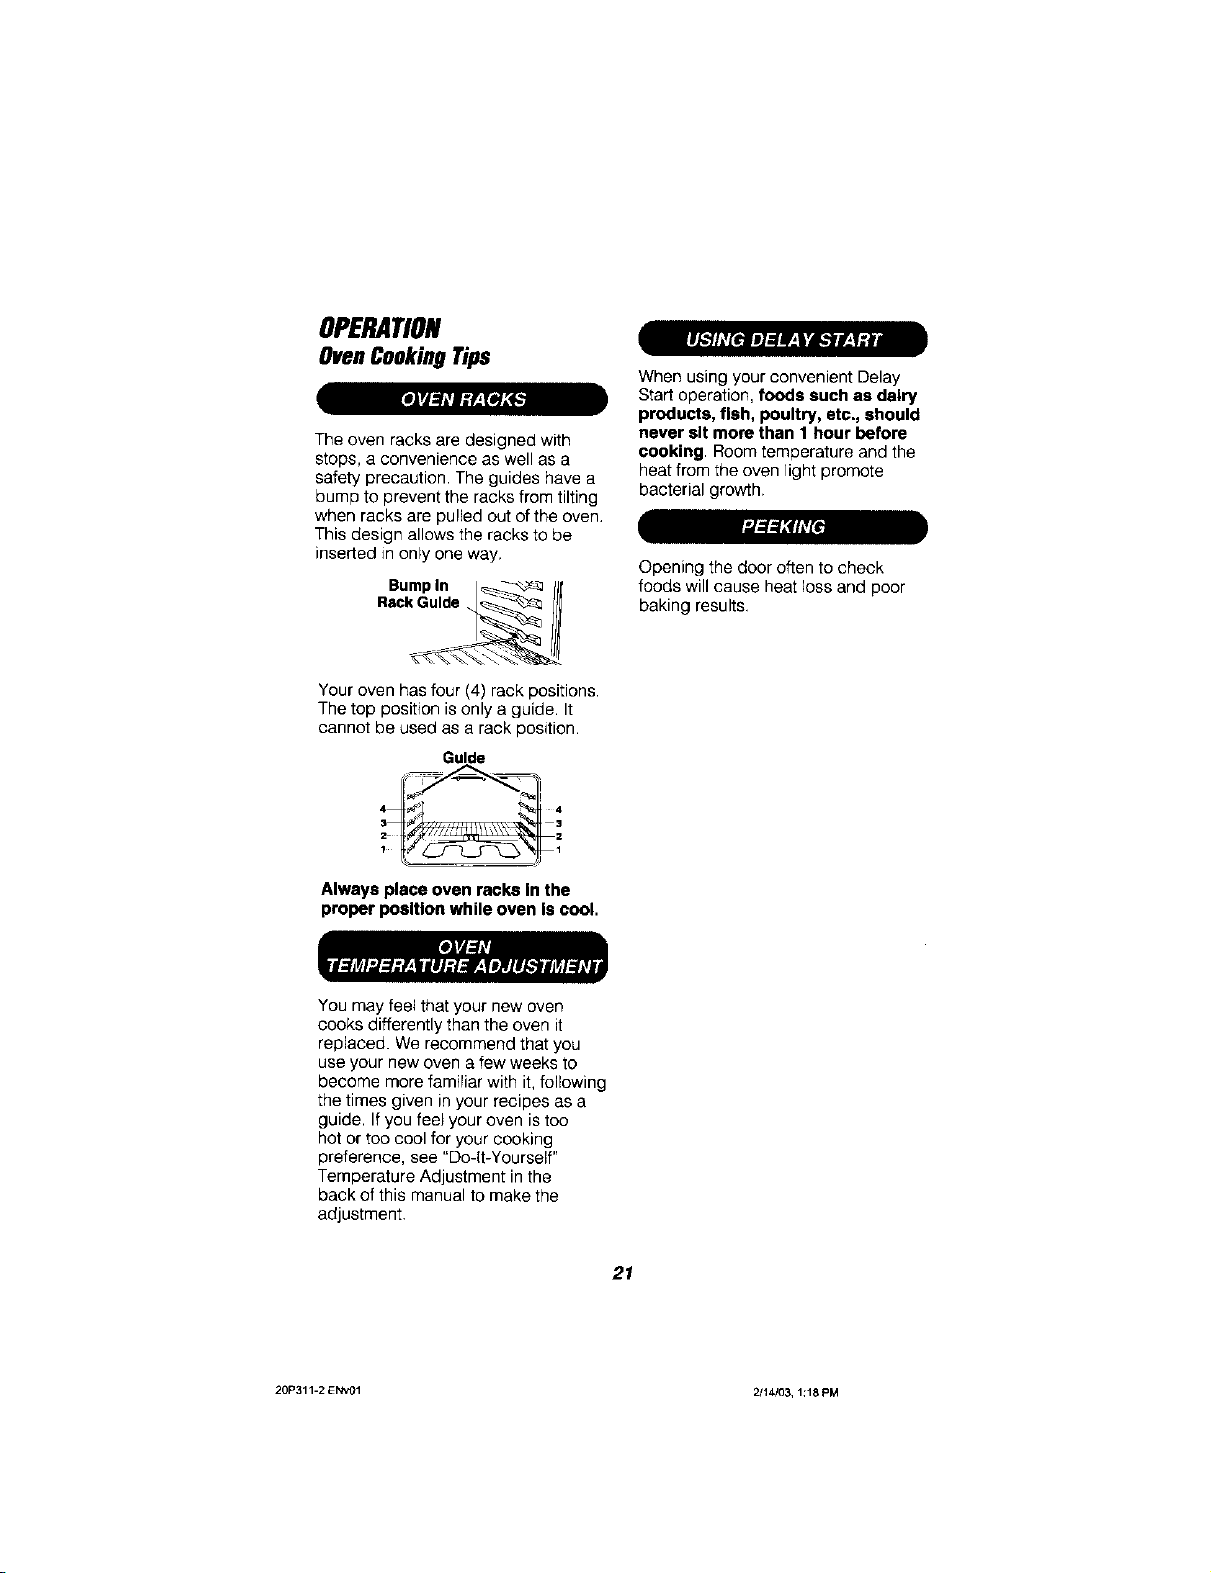
The oven racks are designed with
stops, a convenience as well as a
safety precaution. The guides have a
bump to prevent the racks from tilting
when racks are pulled out of the oven,
This design allows the racks to be
inserted in only one way.
RackGuld
.ump,n j
Your oven has four (4) rack positions.
The top position is only a guide, It
cannot be used as a rack position.
Guide
Always place oven racks In the
proper position while oven is cool.
When using your convenient Delay
Start operation, foods such as dairy
products, fish, poultry, etc., should
never sit more than 1 hour before
cooking. Room temperature and the
heat from the oven light promote
bacterial growth.
Opening the door often to check
foods will cause heat loss and poor
baking results.
You may feel that your new oven
cooks differently than the oven it
replaced. We recommend that you
use your new oven a few weeks to
become more familiar with it, following
the times given in your recipes as a
guide. If you fee_your oven is too
hot or too cool for your cooking
preference, see "Do-it-Yourself"
Temperature Adjustment in the
back of this manual to make the
adjustment.
21
20P311-2 ENv01 2/14/03, 1;18 PM
OPERATION
Baking&Roasting
(_ 1. Press theBAKE pad.
Toset the oven to turn on at a later time
of day, cook fora specific amount of
time, and turn off automatically:
(_ 2, Pressthe NUMBER
<_ 3. Pressthe START pad.
TOsetthe oven to cook for a specific
time and turn off automatically.
(_) 1. Pressthe BAKE pad.
(_) 2, Press the NUMBER
(_) 4. Press theNUMBER
<_ 5. Press the START pad.
pads to set the oven
temperature you prefer
to use.
pads to set the oven
temperature you prefer
to use.
COOKING TIME pad.
3. Pressthe OVEN
pads to set the amount
of time you prefer your
foods to cook.
(_) 1. Press theBAKE pad.
(_ 2. Pressthe NUMBER
(_ 4. Pressthe NUMBER
(_) 6. Press the NUMBER pads
<_7. Pressthe START pad.
The oven will turn off at the
end of the cooking time unless
the COOK AND HOLD feature has
been act|vated. (Sea the Setting
Specla[ Features eacUon for more
information on the COOK AND
HOLD feature.)
pads to set the oven
temperature you prefer
to use.
COOKING TIME pad
3. Press the OVEN
padsto setthe amount of
time you prefer your foods
to cook.
TIME pad.
5. ressthe BELAY START
to set the time of day you
prefer the oven to turn on.
22
20P311-2 ENv01 2J14103, 1:18 PM

OPERATION
Broiling
d
Broiling is cooking by direct heat
from the upper element. The oven
door should remain opened to the
broil stop position during broiling.
It is not necessary to preheat the oven
when broiling. Use the broiler pan and
grid that came with your oven. Both
are designed for proper drainage of
fat and liquids.
molded tightly to the grid
lffoil isused, it must be
end slits cut Intothe foil t(
Thisallows fats and liquidstodrain
intothe broilerpan,preventingfire
and excessive smoke.
Always remove the panand
grid from the oven. Storing
or forgetting a soiled ...._'
broilerpan in the oven _.-_
isa potential smokeor
fire hazard.
The U.S. Department of Agriculture
recommends to cook meat and
poultry thoroughly--meat to at least
an INTERNAL temperature of 160°F
and poultry to at least an INTERNAL
temperature of 180°F. Cooking to
these temperatures usually protects
against food-borne illness.
matchthose of the grid.
The closer you place foods to the
broil element, the faster foods brown
on the outside yet remain red to pink
in the center.
Moving meats away from the element
will allow the meat to cook to the
center while browning on the outside.
Cook side 1 at least 2 minutes longer
than side 2. If your oven is connected
to 208 volts, you may want to use a
higher rack position and/or broil
foods longer.
The size, weight, thickness, starting
temperature and your preference of
the doneness of the meat will affect
broiling. This chart is based on meats
at refrigerator temperature.
FOOD RACK TOTAL
POSITION TIME (MIN.)
Steak 1" thick 3 9--11
Ground beef 3 1618
patties -
1• thick
Pork Chops -
_/2"thick 3 27-29
Fish (fillets) 3 11-13
Chicken (pieces) 2 45-55
la. Press the BROIL HI/LO pad.
(This will automatically set HI
Broil.)
lb. While the set indicator is flashing
in the display, press the BROIL
HI/LO pad again if you prefer to
use LOBroil. Use Lo Broil to cook
foods such as poultry or thick
cuts of meat thoroughly without
over-browning them.
2. Press the START pad.
3. When broiling is finished, press
the CLEAR/OFF pad.
23
20P311-2 ENv01 2J14/03, 1:18 PM

OPERATION
SettingSpecialFeatures
Yournewtouch pad control hasadditional
featuresthatyou may chooseto use. After
makingaselection,if youwantto change
that setting,followthe steps untilthe
displayshowsyourchoice
Thecontrol isautomaticallysetto turn off
theovenafter 12hoursbakingor 3 hours
broilingshouldyouforget and leavethe
ovenon. [fyouwant to removethis
feature:
1, Pressandhold, atthesame time,the
BAKEand BROIL HI/LOpadsfor 3
seconds, untilthe display shows"$F."
2. PresstheDELAYSTARTTIMEpad
Thedisplay shows"12Shdn"
(12hour shutoff).PresstheBELAY
STARTTIME pad again.The display
will show"no Shdn" (no shutoff).
3, PresstheSTART pad
Thecontrol issetto usethe 12hourcieck.
Ifyou preferto usethe 24-hourMilitary
Timeclock orblack out the display:
1. Pressandhold, at thesameUme,the
BAKEand BROILHI/LO padsfor 3
seconds,unti_the displayshows"SF."
2. (a) Pressthe CLOCK pad.Thedisplay
shows"12hr" if this is yourchoice,
pressthe STARTpad,
(b) PresstheCLOCKpadagain.The
displaywill show"24hr." Example:
5:00on the 12-hourclock will show
17:00hoursonthemilitaryclock. Ifthis
isyourchoice, presstheSTARTpad,
(¢) PresstheCLOCK padagain.The
displaywill show"Off." if thisisyour
choice,press theSTARTpad The
displaywill notshowtime.(TheDelay
StartTimefeaturewill notoperate)
Theoven control isset for the Fahrenheit
temperatureselections.Mostrecipes are
given usingthe Fahrenheitscale.Youcan
change this to usethe Celsiusselection
1. Pressand hold, at the sametime, the
BAKEand BROILHI/LOpads for 3
seconds, untilthe disp[ayshows"SF"
2, (a) PresstheBROIL HI/LO pad. The
control display willshow the degrees
sign and "F."
(b) Pressthe BROILBI/LO
pad again Thiswill change "F"
(Fahrenheit)to "C" (Celsius)
3, Pressthe STARTpad.
24
20P311-2 ENv01 2J14103,1:18 PM

OPERATION
SettingSpecialFeatures
[*Te_-i;_e]lilEo_(e]lji
Thecontrolwill arlowyou tolockthe touch
padsso they cannot be activatedwhen
pressed. Ifyou're worriedabout leaving
the ovenunsupervised,activatethis
feature
1. Pressandhold, atthesame time,the
BAKEand BROIL HIILOpads for3
seconds,untilthe display shows"SF."
2. (a) PresstheCLEAN pad. Thedisplay
shows%O0 OFF" (lockoutoff).
(b) Pressthe CLEANpad again
Thedisplay will show"LOCON"
(lockouton)
3. PresstheSTARTpad.
Thisfseturecanonlybe set whenthe
ovenisnot inuse.Whenthis feature is
on, thedisplay will show"LOC," ifatouch
pad ispressed. (Thisfeaturewillnotaffect
the Clock,Timer orOvenLight pads)
Your newcontrolhasa cookand hold
featurefortimed cookingonlythatwill
keephotcooked foodswarm upto
3hours,after thetimedcooking is
finished To activatethisfeature:
1. Pressand hold, atthe same time,the
BAKEand BROIL HI/LO padsfor 3
seconds,untilthedisplay shows"SF."
2. (e) PresstheOVENCOOKINGTIME
pad The display will show"HLd OFF."
(b) Pressthe OVENCOOKINGTIME
padagain toactivatethe feature.The
displaywill show"HLdON."
3. Pressthe START pad.
25
20P311-2 ENV01 2/14/03, 1;18 PM
I

CAREANDCLEANING
Self-CleaningCycle
1. Removethe broiler panand grid,
utensilsand anyfoil that may be in
the oven
2. The gray porcelain-coated oven
racks maystay in the oven during
the self-clean cycle.
3. Soil onthe front frame and outside
the gasket of the door linerwill need
to be cleaned by hand
FrontFrame
/
Cleantheseareaswith hotwater,
soap-filledpads or cleanserssuch asSoft
Scrub®to removeanysoil. Rinsewellwith
clean wateranddry.
De notuse ovencleaners nocommercial
ovencleaner or protectivecoatingof any
kind shouldbe used inor aroundanypart
ofthe oven.
4, Wipe up anyheavyspil[overson the
ovenbottom.
5, Do notcleanthe doorgasket,
Thefiberglass materialof the
ovendoor gasket cannotwithstand
abrasion.Itis essentialforthe gasket
to remainintact. Ifyou noticeit
becomingworn orfrayed, it
should_e replaced.
The door gasket is designed to have
a 5'-6' gap atthe bottom of the door.
This allowsfor proper air circulation.
DoorPanel Gasket
It is normal for your oven door to give
the appearance of not having a good
sea[ against the oven. This is due to
the gasket. The location of the gasket
on the door maintains a good seal and
prevents any heat loss.
be left inthe oven
_ ltensile should never
oven racks may safely be
cleaned in the oven during a
self-clean cycle. It will be
necessary to grease the edges
of the oven rack with alight
coating of vegetable oll after a
clean cycle. This will help
maintain the ease of sliding the
racks In and out of the oven.
For the first clean cycle, vent the
room with an opened window or
hood vent. Thle will reduce the
odor produced when heating
_r_w perle.
during e clean cycle,
Gray porcelain-coated
26
20P311-2 ENv01 2/14/03, 1:18 PM

CAREAND CLEANING
Self-CleaningCycle
The Clean Cycle, including cooldown
time, is automatically set for 4 hours,
but you may change this from 3 hours
if oven is lightly soiled, up to 5 hours if
oven is heavily soiled.
4 hours will show in
1. Press the CLEAN pad.
the display.
After the cycle, you may notice some
white ash in the oven. Just wipe it up
with a damp cloth or sponge.
If white spots remain, scrub them
with a soap-filled steel-wool pad. Be
sure to rinse thoroughly. These are
usually deposits of salt that cannot
be removed during the cycle.
If for any reason yeu are net
satisfied with the cleaning results,
just repeat the cycle,
(_ 2. If you want to change
<_> 3. Press the START pad.
Simply press the CLEAR/OFF pad.
You wiJl need to wait for the oven
temperature to drop below the lock
temperature (approx. 1 hour) before
attempting to open the door. "Locked
doer" will go out in the display.
the length of clean time,
press the NUMBER
pads.
1. Press the CLEAN pad.
2. If you want to change
the length of clean time,
press the NUMBER
pads.
START TIME pad.
3. Pressthe DELAY
(_ 4. Press the NUMBER
,_ 5. Press the START pad.
pads to set the time you
prefer the clean cycle to
start.
27
20P311-2 ENv01 2/14/03, 1;18 PM

CAREANDCLEANING
CleaningMicrowaveOven
CLEANING MATERIAL
• Plasticscouring pad
• Damp cloth
• Dishwashing detergent
• Warm water
Clean with mild dishwashing detergent
and water, then rinse well with damp
cloth, if desired, a container of water
can be boiled in the even using
microwave energy. This w[[I help loosen
soil. Forhard-to-clean soil, clean gently
with a plastic scouring pad. Do not
use abrasive cleaners, which could
scratchor damage the surface. Do
not clean with metal scouring pads;
pieces can break off, causing
electrical shock.
TO CLEAN
Wash with warm sudsy water. For
harder to remove soil, gently rub
with a nylon mesh scouring pad
and nonabrasive cleanser. Rinse
thoroughly
REPLACE THE GLASS
TURNTABLE
Replace the glass turntable. Make
sure the glass turntable is aligned
properly with the turntable support.
CLEANING MATERIALS
• Soft cloth
• Warm water
• Dishwashing detergent
Wipe off spills orspatters while they
are still warm. Use mild dishwashing
detergent and warm water, then rinse
with clean water, and dry with soft
cloth.
CLEANING MATERIALS
• Nonabrasive nylon mesh
scouring pad
• Nonabrasive cleanser
• Warm water
• Dishwashing detergent
TO REMOVE THE GLASS
TURNTABLE
Grasp the glass turntable on both
sides and lift straight up.
Glass
Tumtable
Turntable /- "-"='_ _,_-_. ---_
Support _ i
CLEANING MATERIALS
• Warm water
• Soft c_oth
• Dishwashing detergent
Clean with mild dishwashing
detergent and warm water. Rinse
with clean water and dry with soft
cloth.
CLEANING MATERIALS
• Soft cloth
Open the oven door to prevent the
oven from turning on while cleaning.
Wipe the control panel with a damp
cloth. Dry immediately with a dry
cloth to prevent spotting.
28
20P311-2 ENv01 2J14103, 1:18 PM

CAREANDCLEANING
CleaningLowerOven
CLEANING MATERIALS
• Dishwashing detergent
• Warm water
• Soft cloth
Do not use abrasive cleaners,
industrial cleaners or bleach.
TO CLEAN
Wipe with warm soapy water. Rinse
and dry wee
,4g
Clean only as touch-up between
cLeancycles. Use dishwashing liquid,
warm water or soap-filled pad. Rinse
well after cleaning and dry.
NEVER USE OVEN CLEANERS IN
OR AROUND ANY PARTOF THE
OVEN,
When cleaning, be sure not to bend
or displace the temperature sensor
located on the back wall of the oven.
Ov.n
II1_ TemperatureSensor
CLEANING MATERIALS
• Dishwashing detergent
• Warm water
• Soap-filled scouring pad
• Commercial oven cleaner
TO CLEAN
Allow the pan to soak. Sprin_,le the
grid with dishwashing detergent and
cover with a damp cloth or paper
towel. Scour as needed. Rinee and
dry well. You may also place both the
pan and grid in the dishwasher.
CLEANING MATERIALS
• Glass cleaner
• Paper towels
• Baking soda
TO CLEAN
For everyday cleaning, use glass
cleaner and a paper towel For
stubborn soil, use paste of baking
soda and water. Rinse thoroughly.
29
20P311-2 ENv01 2114/03, 1:18 PM

CAREANDCLEANING
RemovableParts
3. Placethetabs of theglass coverinto
the groovesofthe socket
4. Turntheglass cover clockwise
'/4turn.
5. Reconnectelectricalpowertothe
ovenat the maincircuit breakeror
fuse box.
(_ CAUTION: YOUmust
rusebox beforeattemptingto
replaceovenlightbulbs.Do not
touchthe lightbulbswith bare
hands.The bulbsget very hotvery
quickly.Wrapfoamrubberfrombulb
packagearoundbulbwhen
installing.Whenremovingthe bulb,
waituntilthe bulbhas cooledand
usea dry cloth.
Togive youthe best lightingavailable,
youroven hastwohalogenbulbs. Both
lightsare on the ceilingof the ovencavity.
disconnectelectdcal
powerto theoven at the
maincircuitbreakeror
Receptacle Socket
Bu,
TO REMOVE Cover
1. Youmustdisconnecterectricalpower
tothe ovenat the maincircuit breaker
or fusebox.
2. Turntheglass cover
counterclockwiseV4turn untilthetabs
ofthe glasscover clearthegrooves of
thesocket.
3. Pullstraightoutto removethe bulb
TO REPLACE
1, Wrapbulb withcottonclothor bulb
packagingmaterial Don'ttouch bulb
withyourfingers
2, Pushbulb straightintoreceptacle all
theway.Use onlya 120wolt,35-watt
halogenbulb.
l;l=i_llJrl:Y:ll|cJrJ=Avl:Fi|l_i_-!
CLEANINGMATERIALS
• Dishwashing detergent
• Warmwater
• Scouringpad or soap-filled pad
Bump
In Rack
e.ok- j- Ill
ofthe Rack_
TO REMOVE
1. Pullther_cks outto the stoplock
position
2. Pull upthefrontof the rackand slide
underthe bump offthei_ackguide.
TO CLEAN
Cleanwith warm waterand detergent,
Forhard to removestains, gently scrub
with a scouring pad or a soap-filled pad.
Rinsewell.
Grayporcelain-coatedoven racksmay
alsobe cleaned inthe oven duringthe
self-cleancycte. [t isnecessaryto wipe
the edges of grayporcelain-coatedoven
rackswitha lightcoatingofvegetab4eoil
aftercleaning.Thiswill help maintainthe
easeof slidingthe racksin andout
ofthe oven.
TO REPLACE
1. Placethe raisedback ofthe rackonto
therack guides.
2. Liftthefrontof the rack untiltheraised
backslides underthebump ofthe
rackguides.
3. Slidethe rack allthe way back
30
20P311-2 ENv01 2J14103, 1:18 PM

CAREANDCLEANING
RemovableParts
_;l:l_Y,[ejyl,_lo]l!:leJvJ_lDZele_;n
The door Isve_/heaw. Becarefulwhen
removingand liftingthe door.Do not lift
thedoor bythe handle.
TO REMOVE
1. Fullyopenthe door,
2. Pullthehinge locks
downtoward the door
frame,to the unlocked
position.Thismay
requireaflat-blade
screwdriver.
3. Fitly gtasp both
sides ofthe doorat
the top.
4. Closedoorto the
door removal
position,whichis
halfwaybetween
the broilstop and
fully closed,
5, Liftdoor up
andout untilthe hinge
armis clear of theslot.
TO REPLACE
1. Firmlygrasp both
sidesofthe door
atthe top.
2. Withthe door at
the sameang;e
asthe removal
position,seatthe
indentationofthe
hingearminto
the bottomedge of
the hingeslot.Thenotch
in the hinge arm mustbe
fully seatedintothe
bottomof theslot.
• I
! s,o,
HingeLock
PULLhinge rocks
down to unlock
Removat position
Indentation
",,'r#"
Removable Oven Door (cont.)
3. Fullyopenthe
door. If the doorwill
notfullyopen. the
indentationisnot
seatedcorrectlyin
the bottomedge of
the slot
4. Push the hinge
looks up against Hinge lock
the front frame of Push hinge locks
the oven cavity, to up to lock
the locked position.
5. Close the oven
door.
TO CLEANOUTSIDEOFDOOR
• Use soapand watertothoroughly clean
the top,sidesand front of theoven door.
Rinsewerl Youmay alsousea glass
cleaner to cleanthe glassonthe outside
ofthe door Donotletwaterdrip intothe
ventopenings.
• Spillageof marinades,fruit
juices,tomato saucesand basting
materialscontaining acids maycause
discolorationand should be wiped up
immediately.Whensurfaceiscool,
clean andrinse.
• Do notuseevencleaners,cleaning
powdersorharshabrasivesonthe
outsideofthe door
• If any stain onthe doorvent trim is
persistent,useasoftabrasive cleaner
anda sponge scrubberfor beetresults.
TO CLEANINSIDEOF DOOR
• Becausethe area inside the gasketis
cleanedduringthe self-cleancycle,you
do not need tocleanthis by hand.
,, Theareaoutsidethe gasketand
the doorlinercan be cleanedwith
a soap-ffliedpad, hotwater and
detergent Rinsewell witha vinegar
andwater solution.
31
20P311-2 ENv01 2214103, ! :lB PM

BEFORECALLINGFORSERVICE
To save you time and money, before making a service call check the list below
for any problem you may feel you have with the performance of your oven. If
the problem is something you cannot fix, use the Consumer Service Numbers
located at the back of this guide. When making any calls, have the Model No.,
Serial No., Repair Parts List, Use and Care Guide and the Date of Purchase
available.
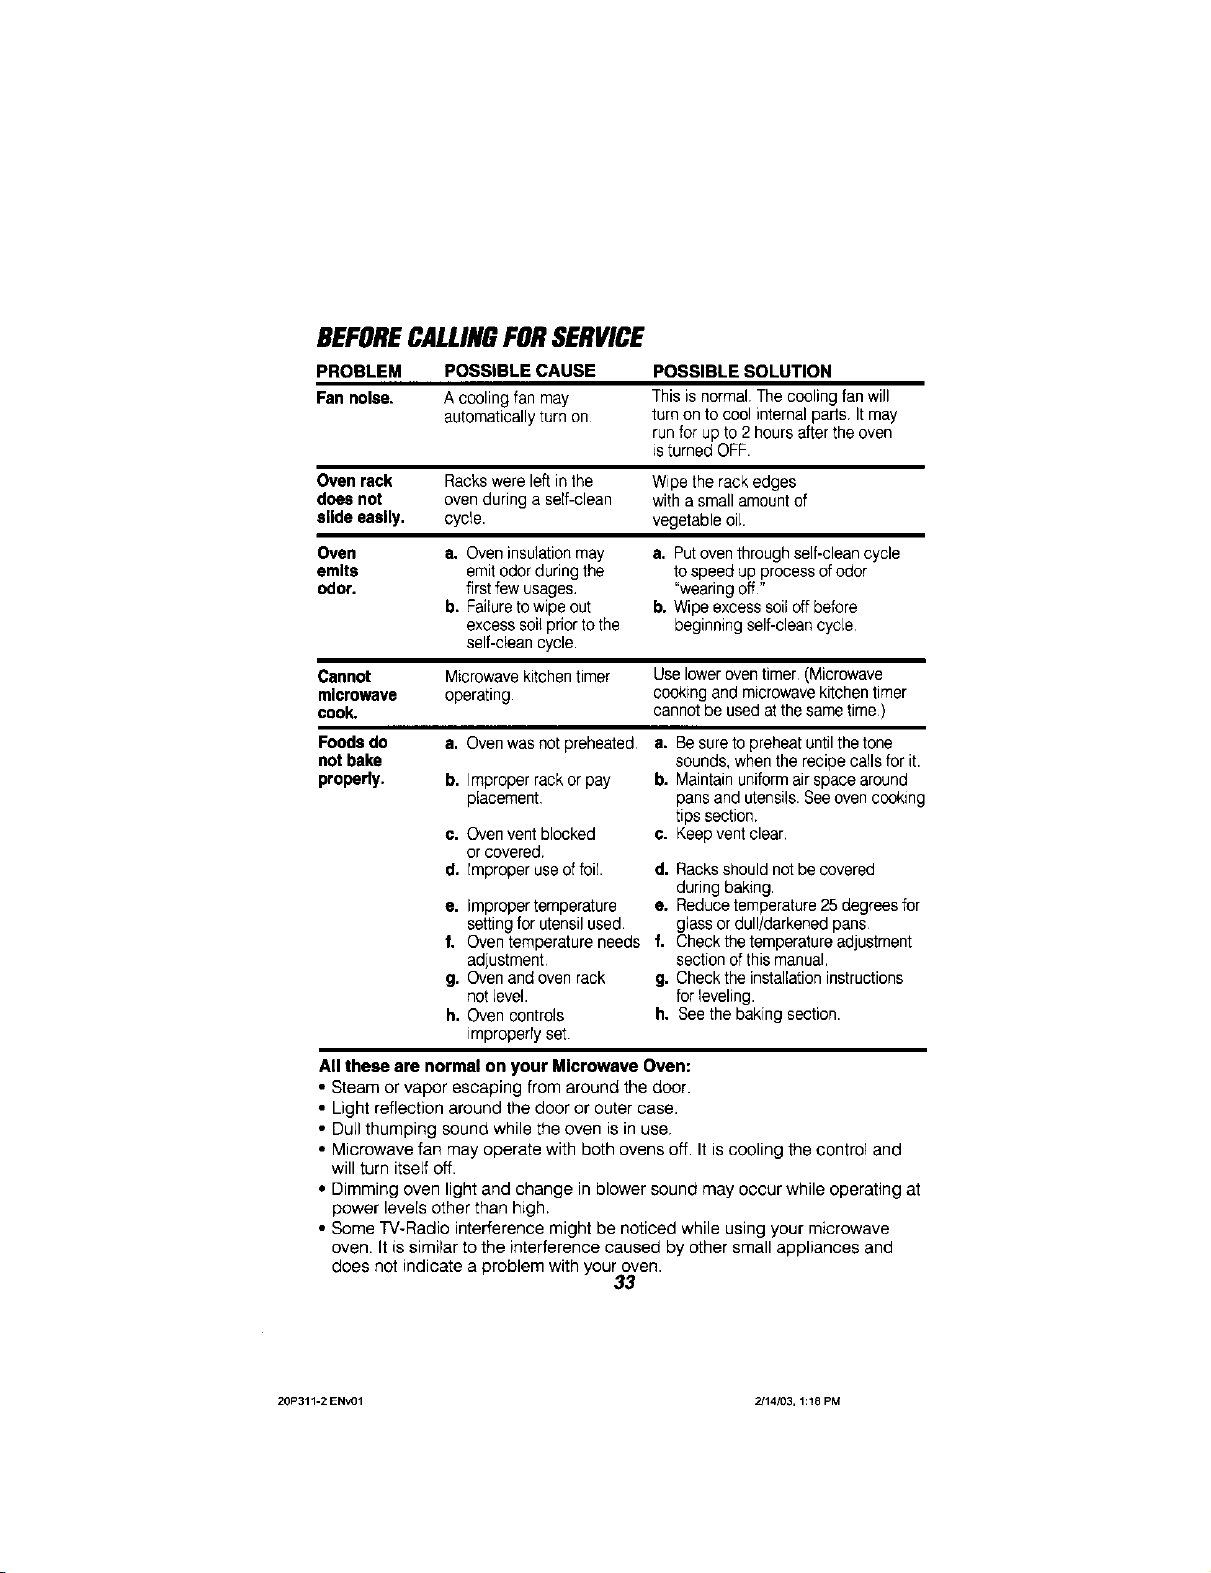
PROBLEM POSSIBLE CAUSE POSSIBLE SOLUTION
The display of your Oven malfunction. Press the CLEAR/OFF pad.
control Is flashing Let the oven cool for 1 hour
"F" followed by a and enter an oven or cleaning
number or letter, operation. If code repeats, call
Oven and oven a. No power to oven. a. Check the circuit breaker or
control will not fuse. Make sure the power
work. cord is plugged in.
b. The clock is in the b. Seethe setting special features
black-out mode. sectionofthis manual
Oven temperature Oven control See the temperature adiustment
seems inaccurate, calibration, instructions following this
Oven will not Clean cycle is not Oven temperature must drop
unlock, finished. Oven is too below the lock temperature
hot. before the door will unlock.
Oven light will a. Light switch in off a, Check oven light switch on
not work. position, the control pane}.
b. Oven light bulb b. Check the oven light bulb.
looseor burned out.
Oven will not accept Degrees-Celsius See the setting speciaLfeatures
bake Setpeint. option selected, section of this manual.
Ovendidnot a. Controlswerenot set a. Checktheself-cleaning
clean or results properly sectionof thismanual
were poor. b. Ovenwas soiled b. Heavyspilioversshouldbe
heavily, removedbeforethe cycle is set.
c. Cleancycle was c. The normalcleancycle should
interrupted last4 hoursforheavilysoiled
Oven smokes, a. Dirty oven. a. Checkfor heavyspil[over.
b. Improper use of b. Use offoil notrecommended.
aluminum foil.
c. Broilerpan containing c.
greaseleft in the oven.
32
for service.
section.
You can arsorepeatthe cycle.
oven,
Cleanpanand grid after
eachuse.
20P31%2 ENv01 2J14,'03, 1:18 PM
BEFORECALLINGFORSERVICE
PROBLEM POSSIBLE CAUSE POSSIBLE SOLUTION
Fan noise. A cooling fan may This is normal.Thecoolingfan will
Oven rack Rackswere left inthe Wipethe rack edges
doesnot ovenduring a self-clean witha small amountof
elide easily, cycle, vegetableoil.
Oven a. Oveninsulatioomay a. Putoven throughself-cleancycle
emits emitodor during the to speed up processofodor
odor. first fewusages. "wearingoff"
Cannot Microwavekitchentimer Use loweroventimer (Microwave
microwave operating, cookingand microwavekitchentimer
cook. cannot be usedat thesametime)
Foodsdo a. Ovenwasnot preheated a. Besureto preheatuntilthetone
notbake sounds, whenthe recipecalls for it.
properly, b. Improperrackor pay b. Maintainuniformairspace around
All these are normal on your Microwave Oven:
• Steam or vapor escaping from around the door.
• Light reflectionaround the door or outer case.
• DuLlthumping sound while the oven is in use.
• Microwave fan may operate with both ovens off. It iscooling the control and
will turn itself off.
• Dimming oven light and change in blower sound may occur while operating at
power leve[e other than high.
• Some TV-Radio interference might be noticed while using your microwave
oven. It is similar to the interference caused by other small appliances and
does not indicate a problem with your oven.
automaticallyturn on turn on to cool internalparis It may
b. Failureto wipe out b, Wipe excesssoil offbefore
excesssoil priorto the beginningself-cleancycle
self-cleancycle
placement pansand utensils.Seeovencooking
c. Ovenvent blocked
or covered.
d. Improperuseof foil d, Racksshouldnotbe covered
e, impropertemperature e, Reducetemperature25degreesfor
settingfor utensilused. glass or dull/darkenedpans
f, Oven temperatureneeds f, Checkthe temperatureadjustment
adjustment sectionof this manual
g. Ovenandoven rack g, Checkthe installationinstructions
not Level. for leveling.
h, Oven controls h, Seethe baking section.
improperryset.
runfor upto 2 hoursafter the oven
isturned OFF.
tips section.
c. Keepvent clear.
during baking.
33
20P311-2 ENV'31 2/14/03, 1:18 PM

BEFORECALLINGFORSERVICE
PROBLEM
Foodsdo not
broil properly.
POSSIBLE CAUSE POSSIBLE SOLUTION
a. Improperrack position, e. Checkbroil panplacement;see
b. Ovenpreheated b. Donotpreheatwhenbroiling.
c. Improperuseof foil, ¢. Check broiling section
d. Oven doorclosed during d. Open doorto broilstop.
broiling,
e. Lowvoltage(208Volts). e. Usehigher rackposition and/or
f. Improperbroilingtime. f. Checkbroilingchart in broiling
g. Ovencontrols g. Seethe broiling section.
improperlyset.
broiling section.
longer cooking time
section.
Foods
overcooked
or
undercooked
In the
microwave.
a. Not enough timeset a. Varying densityand amountof
when usingTime Cook foods will sometimesrequire
function becausestarting morecooking
temperaturesoffoods
variedwidely.
b. Incorrect power b. Is recipetestedand reliable?
levelentered.
e. Dishnot rotated,turned e. Followrecipeinstructions.
or stirredas called for
in recipe.
d. Too manydishes in d. Do notovercrowdthe oven.
ovenat thesametime.
e. Food notthoroughly e. Checkthetimed defrosting
defrosted, sectionofthis manual
f. Improper useofcoverings, f. Fodowinstructionsinthis manual
andrecipe
34
20P311-2 ENvOi 2J14/03, 1:18 PM

"DO-IT-YOURSELF"
TEMPERATURE
ADJUSTMENT
You may feel that your new oven
cooks differently than the oven it
replaced. We recommend that you
use your new oven a few weeks to
become more familiar with it,
following the times given in your
recipes as a guide.
Ifyou think your new oven is too hot
(burning foods) or not hot enough
(foods are undercooked), you can
adjust the temperature yourself. The
appearance and texture of foods is a
better indicator of oven accuracy than
an over] thermometer. These
thermometers can vary by
20-40 degrees (from the true
temperature of the oven), in addition,
the oven door must be opened to
read these thermometers. Opening
the door will change the temperature
of the oven.
To decide how much to change
the temperature, set the oven
temperature 25 degrees higher
(if foods are undercooked) or
25 degrees lower (if foods are
burning) than the temperature in your
recipe, then bake. The results of this
"test" should give you an idea of how
much the temperature should be
changed.
(_ 1. Whilethe oven is not in
4- and BROIL NI/LOpad
(_ 2. Pressthe BAKE pad.
(_ 3a. Pressthe NUMBER
(_ temperature as much
,_ 4. Pressthe STARTpad.
This increased or decreased
temperature setting will remain in
memory unti/the above steps are
repeated. A power failure will not
affect this setting.
The broil and self-clean temperatures
wilt not be affected.
use, press and hold
down both the BAKE
display shows "SF"
for3 seconds, until the
A factory-set2-digit
number will show in the
display, usually "0O."
If you think the oven is
nothot enough,
pad to increase (+) the
temperatureas much
as+35°F,
If you think the oven is
toohot,
again and the NUMBER
3b. Pressthe BAKE pad
pads to decrease (-) the
as-35°F.
35
20P311-2 ENv01 Z/14/03, 1:18 PM

BUILT-IN
WALLOVEN/MICROWAVE
WARRANTY
f
FULL ONE-YEAR WARRANTY ON ALL PARTS
If, within one year from the date of installation, any part fails to function
properly due to a defect in material or workmanship, Sears will repair or
replace it, at our option, free of charge.
If this product is subjected to other than private family use, the above
warranty is effective for only 90 days.
WARRANTY SERVICE IS AVAILABLE BY CALLING SEARS SERVICE AT
1-800-4-MY-HOME e.
Thiswarranty gives you specific legal rights, and you may also have other
rights which vary from state to state.
Sears Roebuck and Co. Dept. 817 WA Hoffman Estates, IL 60179
Master Protection Agreements
Congratulationsonmakingasmart
purchase.YournewKenmore®appliance
is designedand manufacturedforyearsof
dependable operation Butlikeall
products, it mayrequirepreventive
maintenanceor repairfromtime totime.
That'swhen havinga MasterProtection
Agreementcan saveyoumoneyand
aggravation,
Purchasea Master Protection
Agreementnow andprotect yoursefffrom
unexpectedhassleand expense.
TheMasterProtectionAgreement
also helpsextendthe lifeofyour new
appliance, Here'swhat'sincluded
intheAgreement:
_/Expert servlseby our 12,000
professionalrepairspecialists
v' Unlimitedserviceand nochargefor
partsand labor onall coveredrepairs
_/"No-lemon" guarantee replacement
ofyourcovered product if morethan
threeproduct failuresoccur within
twelvemonths
Productreplacementifyourcovered
productcan't be fixed
v' AnnualPreventiveMaintenance
Checkatyourrequest noextra
charge
v' Fasthelpby phone- non-technical
and instructionalassistanceon
productsrepairedinyour home,plus
convenientrepairscheduling
v"PowersTJrgeprotectionagainst
electricaldamage due topower
fluctuations
Rentalreimbursementifrepairofyour
coveredproduct takeslongerthan
prom[sed
Onceyou purchasetheAgreement,a
simplephonecall isall thatit takesforyou
toschedule service.Youcan callanytime
dayor night, orschedulea service
appointmenton-line
Searshasover12,000professionalrepair
specia[ists,who haveaccess toover4.5
millionqualitypartsand accessories
That'sthekind ofprofessionalismyoucan
countonto help protongthelifeof your
newpurchasefor yearsto come.
PurchaseyourMasterProtection
Agreementtoday!
Somelimitationsandexclusionsapply.
Forpricesand additionalinformation,
call 1-800-827-6655.
Sears Installation Service
ForSearsguaranteedprofessional
installationofhomeappliances anditems
36
likegarage door openersand water
heaters,call 1-800-4-MY-HOMEe.
20P311-2 ENv01 Z/14/03, 1:18 PM

HORNODEPAREDCON
AUTOUMPIF.ZAYMICROONDAS
INDICE
Cron0metro del homo inferior ....... 52
Tonos del homo inferior ................ 53
C6digos F del homo inferior ......... 53
Consejos para cocinar en el
Seguridad en el usa
del horno ................................. 38_41
C0mo sacar la cinta
de empaque ................................. 41
Caractedsticas de su homo .......... 42
Nivel de poder ............................. 43
Cantidad de tiempo para
cocinar I ....................................... 44
Guia para la cantidad de tiempo
para coc_nar................................. 44
Cantidad de tiempo para
cocinar II ...................................... 45
Tiempo para descongelar ............ 45
Agregue 30 segundos .................. 45
Cocinado expreso ....................... 45
Funci0n automatica ..................... 45
Gula para el tiempo
de descongelaci0n ...................... 46
Sensor de humedad .................... 47
Popcorn ........................................ 47
C0mo recalentar ........................... 47
Papas ........................................... 47
Bebidas ........................................ 48
Bocadillos .................................... 48
Guia para bocadillos ................... 48
Para cocinar ................................. 48
Gu_apara cocinar ........................ 48
Reloj superior ............................... 49
Encendido/Apagado del dial ....... 49
Funci6n para recordar ................. 49
Comienzo demorado ................... 49
Encendido/Apagado del sonido .. 49
Control del homo inferior .............. 50
Dial deLhorrid inferior .................... 5!
Reloj del homo inferior .................. 52
Para eu convenlencla y referencla futura, por favor escrlba los n0meroe de modelo
y serle en el eapaclo que se provee. Eatos estan Iocallzados enel panel lateral
vertical, cuando la puerta del mlcroondas es ablerta.
NUMERO DE MODELO: NUMERO DE SERIE:
homo inferior ........................... 54-56
C6mo hornear ............................... 57
CSmo asar a [a parrilla .................. 58
Funciones especiales ................... 59
Ciclo de autolimpieza ............. 60_1
rnterior del homo ........................... 62
Interior del microondas ................. 62
Fondo dei microondas .................. 62
Ventana de Lapuerta del
microondas ................................... 62
Superficies exteriores del horno ...62
Panel de control microondas ........ 62
Panel de control homo
inferior ........................................... 63
Cacerola y parrilla para asar ........ 63
Parrillas del homo ......................... 63
Paredes del homo ........................ 63
Vidrio ............................................. 63
Foco de ra luz de] horrid ............... 64
Parrillas removibIes del homo ....- 64
Puerta de[ homo ........................... 65
Antes de [lamar para
un servicio ............................... 66_8
Ajustes a la temperatura ............... 69
Garantia ........................................ 71
Numeros de servicio ..................... 72
© Sears, RoebuCk and Co.
37
20P311-2 SPy02 2J14/03, 1:21 PM

INSTRUCCIONESDESEGURIDADIMPORTANTES
GUARDE ESTAS INSTRUCClONES
Lea todas las Instrucclones antes de usar este aparato. Cuando use aparatos a gas
o el_ctdcos, se deber|an eegulr precauclones de segurldad, Incluyendo Io slgulente:
• SIEMPRE MANTENGA la homo
despeiada de cosas que se podrlan
quemar (gasolina y otros vapores y
liquidos inflamables).
• SIEMPRE MANTENGA el _rea de la
IMPORTANTE: Para garantizar su
seguridad, [a de su fami[ia y fa de slu
hogar, por favor lea su Guia para el Us{) y
Cuidado euidadosamente. Mant_ngalo a
la mano para referencias. Ponga mucha
atenci6.n alas secciones de seguridad.
ASEGURESE que su estufa sea insta_ada
por un tecnico especializado y que haga
tierra adecuadamente.
• NO DEJE a los nirflos solos o sin
supervision cerca de una estufa en
funcionamJento.
• ENSEI_E A LOS NII_IOSA: No jugar con
ros controles ocualquier parte de ra
estufa, no sentarse, subirse o pararse
sobre la puerta del homo o cualquier
parte de la estufa.
• PRECAUCION: NUNCA GUARDE
articuros que sean de interns para los
ni_os en los gabinetes sobre el estufa.
LOSniflos que se suban sobre la estufa
poddan resultar gravemente heridos.
• GUARDE ESTE libro para un uso futuro.
• NUNCA TRATE de reparar o reemplazar
una parte de la estufa a menos que las
instrucciones se den en este gufa. Todo
otro trabajo debeda ser hecho por un
t_cnico especializado.
• NUNCA USE su estufa para entibiar o
ca[entar una habitaci6n.
• SIEMPRE MANTENGA los
revestimientos combustibles de las
paredes, cortinas y otros paSos a una
distancia prudente de la estufa.
• NUNCA USE una toalla u otro paso
abultado como agrraderas. Asegurese
que la agarradera este seca. Las
agarraders hSmedas podrian causar
quemaduras por vapor. NO PERMITA
que las agarraderas toquen las
superficies calientes.
homo despejada de cosas que se
prodrian quemar. La acumulaci6n de
comida y grasa y los utensilios de
madera se prodrian incendiar. Los
utensilios de pl_stico se prodrian derretir
y las comidas en conservas poddan
explotar. Su homo numca se deberia
usar para almacenar cosas.
• NUNCA CAMENTE contenedores de
alimentos eerrados. El aumento de la
presi0n puede causar que el eontenedor
explore y cause heridas.
• NUNCA DEJE contenedores con
grasa o goteaduras dentro o cerca de
la estufa.
• NUNCA TRATE de limpiar una cubierta
ea[iente. Una esponja o un patio ca[iente
puede causar quemaduras por vapor.
Algunos limpiadores pueden producir
vapores tC)xicossobre una superficJe
caliente.
• NUNCA USE ropa suelta cuando use e[
estufa.
• ASEGORESE que el homo este
instalado firmemente en un gabinete
que este bien pegado a la pared.
• RASGU_IOS GRANDES O IMPACTOS
sobre las superficies de vidrio de las
puertas poddan romper o agrietar el
vidri
• NO TOQUE las superficies para
calentar, las superficies cerca de elias o
las superficies interiores. Estas podrian
estar suficientemente calientes para
quemar aunque sevean de color
oscuro. Durante y despues de] uso, no
toque o permita que la ropa o materiales
inflamables hagan contacto con las
superficies calientes basra que hayan
tenido tiempo de enfriarrse. Las otras
suprficies cerca de las ventani[las de
ventilaciOn del homo, puertas, ventanas
y las superficies para cocinar tambien
poddan estar suficientemente calientes
para causar quemaduras.
38
20P311-2 SPvO2 2/t4/33, 1;21 PM

INSTRUCClONES
DESEGURIDAD
IMPORTANTES
• COLOQUELASPARRILLASDtELHORNO
en la posici6n deseadamientraseLhomoest6
frio.Si lasparrillassedeben movermientras
e[ homoest&ca[iente,nopermltaque la
agarradera haga contactocon elquemador
caliente delhomo.
• DESPUESDEASARA LAPARRILLA,
s_empresaque [acacerolay la parri[lapara
asardel homoy [impielas Lossobrados de
grasa en la cacerorapareasar poddan
]ncendiarselapr6ximavezque ustoduse el
homo.
• SIEMPRETENGACUIDADOcuando abrala
puerta del home Dejeque el airecarientey el
vapor escapen antesde moverlosalimentos,
• NUNCA USE papelde aluminiopare forrar el
fondo del homo,El usoinadecuado del papel
de aruminiopodria resultarenungorpede
corrienteo en un incendio.
• NUNCAOB$'rRUYA laaberturade la
ventilaci6ndelhomo.
• LIMPIESOLAMEN'I1Elas partesque
se listan eneste manual. Siga todas las
instruccienespara lalimpieza.
• NUNCA FRIEGUE, mueva, limpie o darle
el sello de lapuerta en los hornos con
autolimpieza. Esesencial para un buen
serlado
• NUNCATRATE de Ilmpiar los utensllios,
ollas, partes removibleso lacacerola y la
parrilla paraasaren elciclo de autolimpieza
• NUNCA USE ;impiadoresparahornos
Ning_n limpiadorcomercialse deberla user
dentroo alrededorde ningunaparte del
home
• Sl LA FUNCION DEAUTOLIMPIEZA
fa[[alapague el homo y desconecte la
electrieidad. Hgtgaleun servicio per un
t_cnico oalificado
IADVEITTENCIADE SEGURIDAD
IMPORTANTE!
CaliforniaSafeDrinkingWaterandToxic
EnforcementActmqulerequeelgobernador
deCallfomlepubllqueunaIletade eubstenclas
queelestedeespaqueproducendefectoede
naclmlentountres Patiosreproductlvosy
requiemqueloshombresde nngocloe
advlertana suecllentesdelcontestopntenclal
• talessubstanclas.Elalslantedefibrede
vldrioenel homoconautollmplezaemltlmuna
muypequeSacantidaddemon6xidede
carbonoduranteeLclclodeautollmpleza.El
contectoes pesdeminimizarventllendocon
uneposrteoventenaeblertao usandoun
ventiladoro uneeempanadeventllael6n.
IMPORTANTE: La saludde algunos
piiJarosos extremadamenfeseosltlvaa
losvaporesproducldosporel clclode
autollmpleza de cualquier homo. Ponga
losp6Jarosen otra habltacl6nque est_
blenventllade.
iLEA Y COMPIRENDA ES'rA
INFORMACION AHORA!
Asegfireosqostodosen su hogarsepanque
haceren casode Incendlo. Nunca useague
sobre unIncendlode grase,osto solamente
extendenilas llamas.
FUEGO EN EL HORNO:
iNotrntede mover la cacerola!
1. Cierrela puerte del homoy apegue los
controles.
2. Siel incendio contint_a,cuidodosamente
abra lapuerta,arrojesoda para cociner
sobre el fuego,o use un extintor de qulmico
seco,espumao "halon"
39
20P311-2 SPY02 2/14/03, 1:21 PM

INSTRUCCIONES
DESEGURIDAD
IMPORTANTES
debensegulrprecauclonesb_slcas
_ Cuandouse aparatoeell_cldcos,se
de seguridad,Inctwendo tas
slgulentes:
ADVER'rENCIA: Para reducirel rlesgo
de _, 9otpesde c_rdsnte,
incendlo,herldaspersonaleso exposlci6n
exceslvaa energia de rnlcroondas:
IJmtodas[sst_stn_r._nes antes de
usareste aparato.
Leayslgalas Instruccionesde
seguddadespec(_s delmtcroondas.
• ESTEAPARATO debe hacer tierra. Conecte
solamentea una caia de conexionesdue
hagatierra,Vea las instrucciones pare hacer
tierra enlas instruccionespare la instalaciSn.
• USE esleapatate solamente pata su use
apropiado come se describeeneste manual
No usequimicos o vaporescorrosivesen
esteaparato. Estehomo a micreondas est0.
espelficamentediser_adoparecalentaro
cocinar alimentos,y no tieneun prop6sito in-
dustrialo de laboratorio.
• INS'tALE o ubique este aparatosolamente
de acuerdo con lasinstruceionespare
]nstalaciOnquese proveen.
• NO CUBI_ u obstruya ninguna aberturade
este aparato.
• ES31EHORNOMICROONDASno est_
aprobadoo probado paria use maritrmo
• NO HAGAfuncionareste aparatosi no est_
funcionando bienosi haside dahado o se
ha dejado caer.
• C_MO CUALQUIERO3RO APARATO
ELECTR[CO,se necesita una vigi[anciamuy
de cetca o_Jar_dose usa per losni_o$,
• NO SOBRECOCINElacomida Vigile el
homo cuidadosamente sipapeLpl&sticou
otro£materialescombustibles se hen
colocado dentro delhomo para facilitar [a
cocci0n
• SAQUE La8amarrasde aLambrede
Lasbolsas depapel o pl&stbo antesde
ponerlasen el homo
• HOUSE su homomicroondas papasecal
periOdicos.
• NO USE productos de papel reciclado. Las
toallasy las selvilletas depapel reciOado'_
el papel decerapueden contenerparticulas
de metalque podrian producir arcos o
incendiarse,Los produetos de papel due
contienennil6n o filamentosde nil0n
debedanevitarse.
• NO CALIENTEal]mentosen contenedores
cerrados, talescome fiascos de vidrio, los
cuales poddan explotaE
• NO PREPARE"popcorn" ensu homo
microondas a menos que use un"popcorn"
que sea marcadopara use en loshornos
microondas
• I,IO COCtNE_EMASlADO las papas.
Sepodrlan deshidratareincendiarse,
causandodaSo asu homo
• 140HAGAFUNC_ONARel _omo microondas
si estAvacio.
• NO USEsu homo microondaspara
_mS_;eq_r COSe,S,
• Sl EL MAllERIAL DENTROdel homo se
ineendia, cierre lapuerta,apague el homoy
desconecte la e[ectricidad a[ aparato.
• ALIMENTOSDETAMANO GRANDEy
utensiliosdemetal demasiadogrande no
deberian usarse en un homo microondas Se
podrla producir ungolpe de corfienteo un
incendio.
• NO LIMPIEcon lanillaspara fregardo metal.
Sepodrian quebrar tragmentos de rafanilra,
causando un golpe decorriente.
• NOOESOONGELEbebidas congeladasque
tenen botelias decuello angosto, Podda
subir [apres]6ny causerque rabotella
explote.
• USE AGARRADER_,Scvandosaque
los utensi[iosdel horno.LosutensiNosse
podr(ancalentarcuando co¢ine debido a [a
traneferenci_del ealer desde [aeomida
• TENGA CUIDADOsi tocalas paredeso el
fondo de[ homo duranteydespues que
cocine. La$paredes y e[fonde podrlen estar
ce[ientes
• NO HIERVAhuevos enun homo
microondas.La sul3]dade presi6ndentrode
[ayema delhuevopodria causar queel
huevoexplore
• USE CONTENEDORESde pl_sticoquesean
aprobado$ perel fabricante para usecon
microondas.Nopermitaque losniSosusen
centenedores de pL&sticoa menosqueesten
siendo'_igi_adosNo expo_gaco_tenede_es
vaciosalas microondas.
40
_0P311-2 Sl=v02 2/t 4/03, 1:21 PM

INSTRUCCIONES
DESEGURIDAD
IMPORTANTES
• ALIMENTOSCON PIEL O CASCARA
ENTERA,talescomapapas, salchichas,
tomates,manzanas,hlgadode polio, yemas
de huevoyarraspartes del polio, debeflan
tenethoyos para permitirque elvapor
escapedurante Lacoccien.
• ASEGURESEQUE LOSENVOLTORIOSDE
PLASTICOque usecuando cocine a
microondassean aprobados para usacon
microondas,
• AGUA SUPERCALENTADA:El agua
sometida a calentamiento demicroondas y
arrasllquidos nosiemprehacen burbujas
cuarldo alcanzansupunto de ebullicien. De
hecho, podfian supercalentarsey nohervir
erl Ioabsaluto.
Los [iquidossupercalentados hacen burbujas
que saler1delenvaseeuandoson movidoso
cuando alga coma unacucharao unabo[sita
de td le sonintroducidas
Para evitar que esto suceda y qua cause
alguna lesien, no caliente ning[3n Ilquido
par m&s de 2 minutos par taza, Despues
de calentado, deie rataza par unos
30 segundos en el interior del
microondas antes de moverlo o
de introducir alga en su interior.
Ebulllclenespont_nea: Bajociertas
c]rcunstanciasespeciales,los liquidos
podrian comenzar a hervir duranteo poco
despuds de removerlosde1microondas.
Paraevitar quemadurasdebidasa derrames
de liquidos calientes,recomendamos Io
siguiente despodsderemover el envase
del homo:
- Permitaqueel envase permanezcaenel
interior derhomo par 305 40segundos
despuds de que el homo hayadetenido
el calentamiento.
- No hierva[Iquidosen envasescon cuellos
estrechos comabote[las de bebidas, de
vinos,o tazas de care con cuellos
especialmenteestrechos.Aiin s1el
envasees abierto,vapor excesivopodria
causar unrebosooun derrame.
• NO CALIENTEcomidapara los babes en
fiascos devidrio con microondas
• ALAS BOI_/_ para cocinar hervibles y
balsasde pl_stico hermeticamentecerradas
seles debeflan hacer hoyos,tajaduraso
deberlan set ventiladas comese instruyeen
el paquete. Sino sonventiladas de alguna
manera,Lapresiencausar&que se revierlten.
• NO"IRATEde operar este homocon la
puerfaabiertaya que el funcionamientocon
la puerta abierta puederesultaren urla
exposicienda_irlaa la energia de
microondas,EsImportarrtenodesconectar
o Interferlr con los slstemasde segurldad.
• NOCOLOQUEning_n objetoentreeltrente
del homoy la puerta o permita la
acumulacidnde suciedad o residuo de
limpiadoresenlassuperficies de cierre.
• EL NORNO nodeberia ser ajustadoo
reparadopar nadie excepto par un servic_o
depersonalespecializado
• NO HAGAFUNCIONAREL HORNOsi esttL
da_ado. Es,particularmenteimporfanteque
el homo cierrecorrectamentey que no haya
daSoa:
I puerta(doblada)
2 bisagras y cerrojos(quebrados osueltos)
3 sello de la puertaysellosde las
superficies
Parasacar elresiduodel adhesivo de la cinta
de empaque, useun detergente liquido para
[avarplatos, aceite mineralo paracocinar. Con
un paso suavefrote e[&reay permita poese
remoje. Enjuagueyseque bien. Repitael
procedimiento usandounpulidor para barrios
para asegurarsequael homo nohasido
danado, Esto sedeberiahacer antesque el
homo seenclenda porprlmeravez. Laclnta
no se puedesacaruna vez queel homo ha
eldo calentado. Lacintade empaquese
poede encontraren las_reas siguientes:
maniLlade lapoerta,area delpanel decontrol,
moldura de la puertayarea del homo.
GUARDE ESTAS INSTRUCCIONES
41
20P311-2 SPY02 2J14/03, 1:21 PM

CerroJode la puerta
OPERACION
CARACTERISTICA$gE$UIIOR#O
Relllla y ventllaclbn del homo NOmerode
y sede
Control delhorno
mlcroondas
Elemento para
asar a la parrllla
\
Homo COn
Cacerola y
Elemento
Control del homo
Inferior
Bot6n de empuJepara
homo Inferior
Interruptor autom_ltlco
de luz del homo
Guia para parrlllas del
homo
Parrllla removlble del
homo
Sello de la puerta
del homo
y relllla del
42
20P311-2 SPv02 2/14/03.1:21 PM

OPERACION
U_cR _A_ C_T=N
Consu nuevoHomo Microondas,usted puede
horneara cierta cantidad de tiempo,usando
lasfuncionessensoras,ousando lasfunciones
autom_ticas
TIMED COOK(TIEMPOPARACOCINAR)
TIMED DEFROST(TIEMPO DE
DESDONGELACION)
EXPRESSCOOK (COCtNADOEXPRESO)
ADD30SEC(AGREGUE30 SEGUNDOS)
Lasfunciones de liempo te permiten
seleccionar la canlidad exacta detiempo que
se necesitapara preparar [os a[imentos,basra
99minutosy 59segundos.
M_sabajo hay una[istade botonesque
controlar[asfunciones de[Sensor.
POPCORN POTATO
REHEAT (PAPAS)
(RECALENTAMIENT)
Cuando cocine con ersistemadel sensor,el
horns ajustaraautem_ticamente[a cantidad
detiempo para cocinarcuando detecte la
humedad emitidamientrascocina La cantidad
detiempo variar&deacuerdoa lostipos ya tas
cantidades dealimentos.
BEV.(BESIDAS) AUTODEFROST
SNACKS(BOCADILLOS)(DESCONGELAMIENTO
COOK(COCINAR) AUTOMATICO)
43
Cuando se encuentreusando las
caractefisticas de conveniencia, el hornole
permite seleccionar f_cilmentecantidadeso
tiempos para cocinado pararatios articulos
populates.
Cuando la electricidadIleguenuevamente,
todos los dlgitos del dial se encender_n,luego
eLdial mostrar_RESET
Estafunci6nagrega flexibilidad cuandococine
en el micrcondas. Cada niveLde poder le da
energIade microondascon un cierto
porcentagede poder Talcomo:
1= 10% de poder 6- 60%de pealer
2= 20% de poder 1= 70%de poder
3= 30% de poder 8= 80%de poder
4- 40% de poder 9= 90%de poder
5= 50% de poder O=100%de poder
Lamayoriade Ioqueusted cocine
ser&hecho usando el poder a 100% Los
alimentosse cocinar&nmtts r_pidopero
necesitanserrevueltos,rotados,o dados
vuella m&sfrecuentemente.
Usandoun nivelm_sbaio cocinar_ lacomida
en formam_s parelay necesitar_darlavuella y
rotarlamenos.Algunos alimentos podrian
quedar con mejor sabor,textura, oapariencia
sise usaun nivelde poder m_sba3o.Unpoder
m_sbajoes mucho meierpara los alimentos
que tienen latendencia a subirse
N_EL_
_D_
Elnivelde poder puede ser seleccionado
o cambiado inmediatamentedespues de
seLeccionarla funci6n de tiempo,tal como
TIMEDCOOK(TIEMPO PARACOCINAR),
TIMEDDEFROST'(TIEMPODE
DESCONGELACION)O EXPRESSCOOK
(COCINADOEXPRESO) El nivelde poder
tambi_npuede ser cambiado durantera
cuenta deltiempo haciaarras
ALIMENTOS
lO
Pescado,ve_etales,herv[r]iquidos
7
Oarne,ayes,caserolas,o recalentar
5
Estofados,cortesdecarnesm_sduros
2o3
Descongelar,cocinarafuegolento
1
Mantenerlosalimentostib[os,ablandar
mantequil!a
20P311-2 SFV02 2/14!03, 1:21 PM
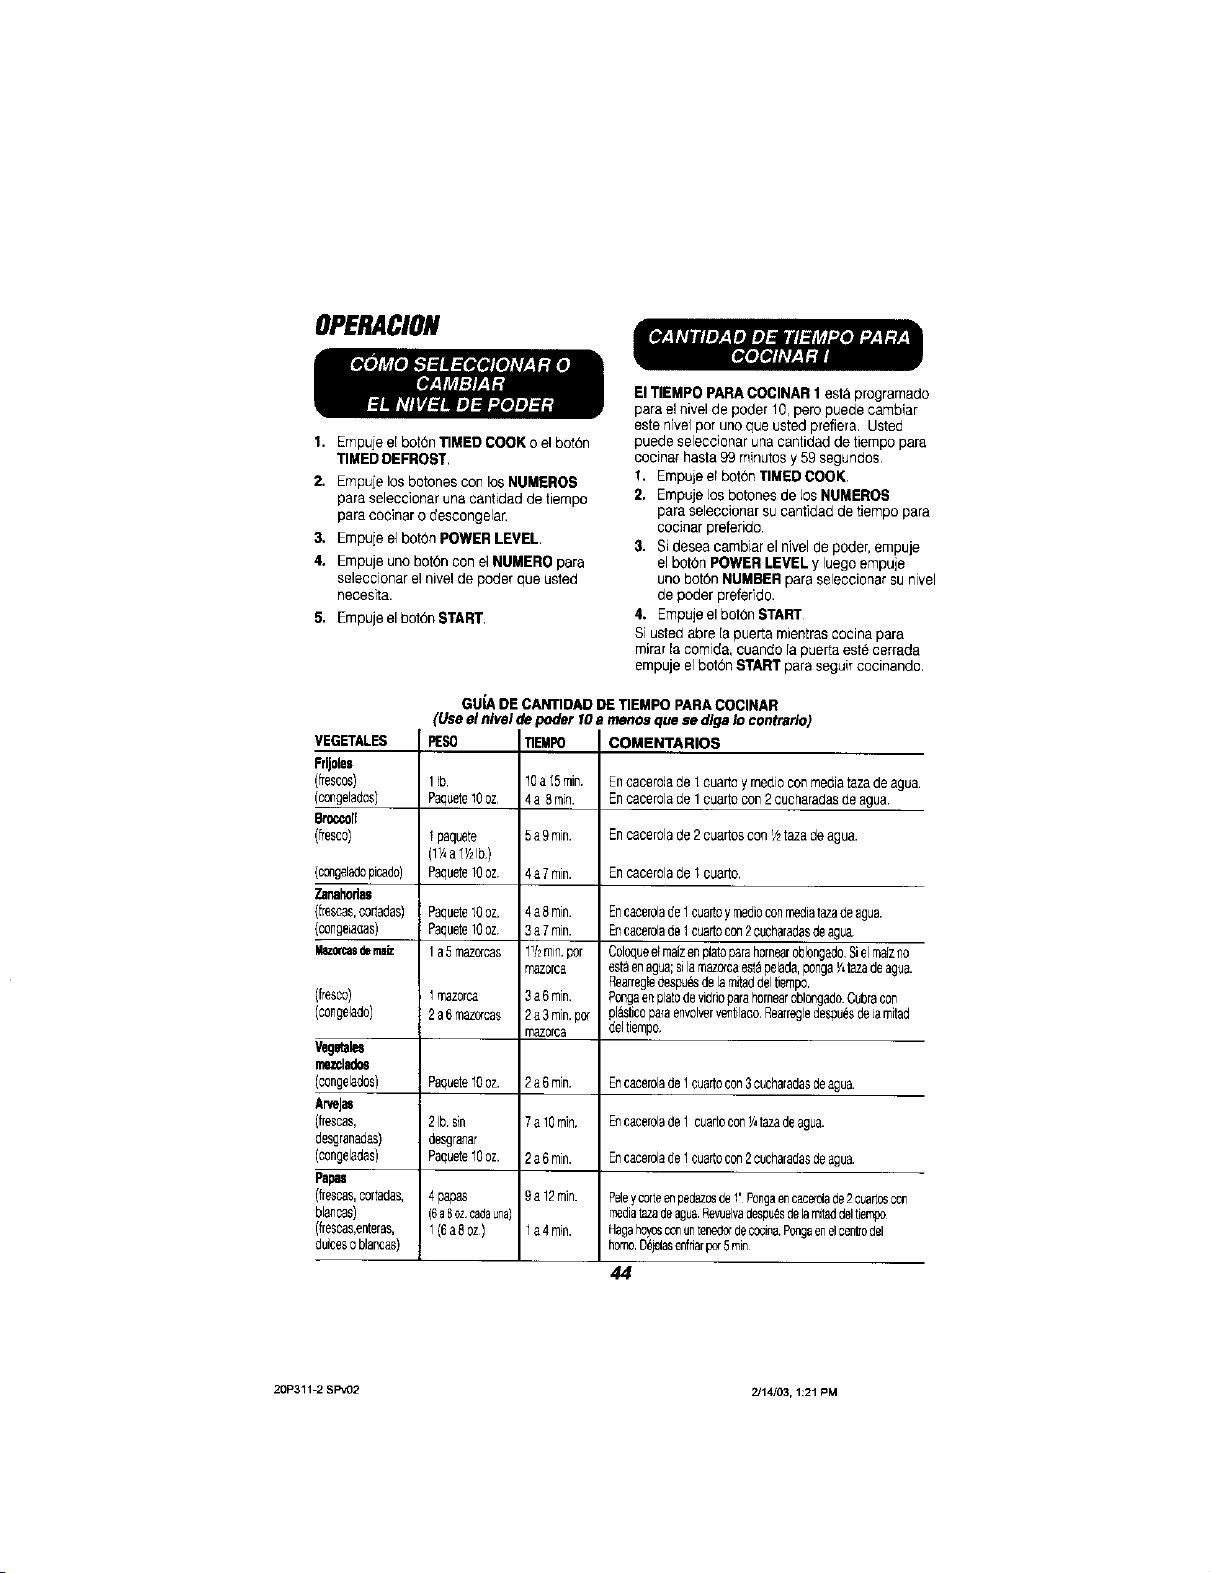
OPERACION
1. Empujee[botdnTIMED COOKo elbot6n
TIMEDDEFROST.
2. Empuielos botonesCOnlosNUMEROS
para seleooionaruna cantidad detiempo
para coc]naro descongelar.
3. Empuiee]bot0n POWER LEVEL
4. Empujeuno bot0n conel NUMEROpara
seleccionar el nive!de poder due usted
necesita.
5. Empujeel botdn START,
GUiA DE CANTIDAD DETIEMPOPARACOCINAR
VEGETALES
-'riJoles
frescos)
congelados)
3roccoll
ifresco)
congeladopicado)
5_nahorlas
ifrescas,cortadas)
icongeiaaas)
_lzo_asdema_
ifresoo)
iconge]ado)
_getales
rnezclado_
icongelados)
J,neJas
rescas,
3esgranadas)
icongeladas)
_apu
ifrescas,cortadas,
3lances)
rescas,enteras,
Juiceso blancas)
(Useel nlvelde poder 10e menosque se dlga Io contrario)
PESO COMENTARIOS
1Ib 10a15rnin. Encacerolade1euartoymedioconmediatazadeagua.
Paquete10oz 4a 8 rain. Encacerolade1cuartocon2 cucharadasde agua.
1paquete 5a 9rnin. Encacero]ade2cuartoscon72tazadeagua.
(lY,a_'/2Ib)
Paquete10oz. 4a 7rain. EncaceroladeI cuarto.
Paquete10oz.
Paquete10oz,
1a 5 rnazofoas
4a8rain. Encacerolade1cuadoymedioconmediatazadeagua.
3a7rain. Encacerolade1cuadocon2cucharadasdeagua.
11/2rain.por Coloqueelmalzenplatoparehomearoblongado.SielmaIzno
mazorca est_enagua;silamaz(xcaest_pelada,pongaV,tazadeague.
1mazorca 3a 6rain.
2a 6 mazorcas 2a 3rain.p(x
I_azorc8
Paquetel0 oz. 2a6min. Encacerolade1cuariocon3cucharadasdeague.
2lb.sin 7a10rain, Encacerolade1 cuartoconY4azadeagua.
desgranar
Paquete10oz. 2a 6rain. Encacerolade1cuartocon2cucharadasdeagua.
4p_
9a 12m]n. Peteycorteeapedazosde1' Pongaencace_olade2cuarLoscon
(6aS_cadauna)
1(6a8_)
1a 4rlin. Hagahoyosconunterrsd_decocin&PongaenelcentTodel
ElTIEMPO PARACOCINAR1 est_programado
paraelnive!de poder 10, pero puede cambiar
estehive1pot unoque usted prefiera. Usted
puede seleccionar unacantidad de tiempo para
cocinarhasta 99minutosy 59 segundos
I. Empuje el bot(_nTIMEDCOOK.
2. EmpujeLosbotones de LosNUMEROS
para seleccionarsu cant]dadde frempopara
coc]nar preferido.
3. Si deseacambiar el nivel de poder,empuje
el botdn POWERLEVELy luegoempuje
uno bot6n NUMBERpare seleccionarsunivel
de poder prefer]do.
4. Empujeel bot6nSTART
Si usted abre [apuerta mientrascocina para
mirarla comida, cuando rapuerta est_cerrada
empuje elbot6n STARTpareseguir cocinando.
Rearregledespu&sdelamireddeltiempo.
Pongaenplalodevidrioparahomearoblo_gado.Cubracon
pl_ticopareenvolverventilate.Rearregledespuesdeiamitad
deltiempo.
mediatazadeague.Revuelvadespu_sdelamitaddeltiempo
homoDdptasenfriarper5rain
44
20P311-2 SPY02 2J14/03, 1:21 PM
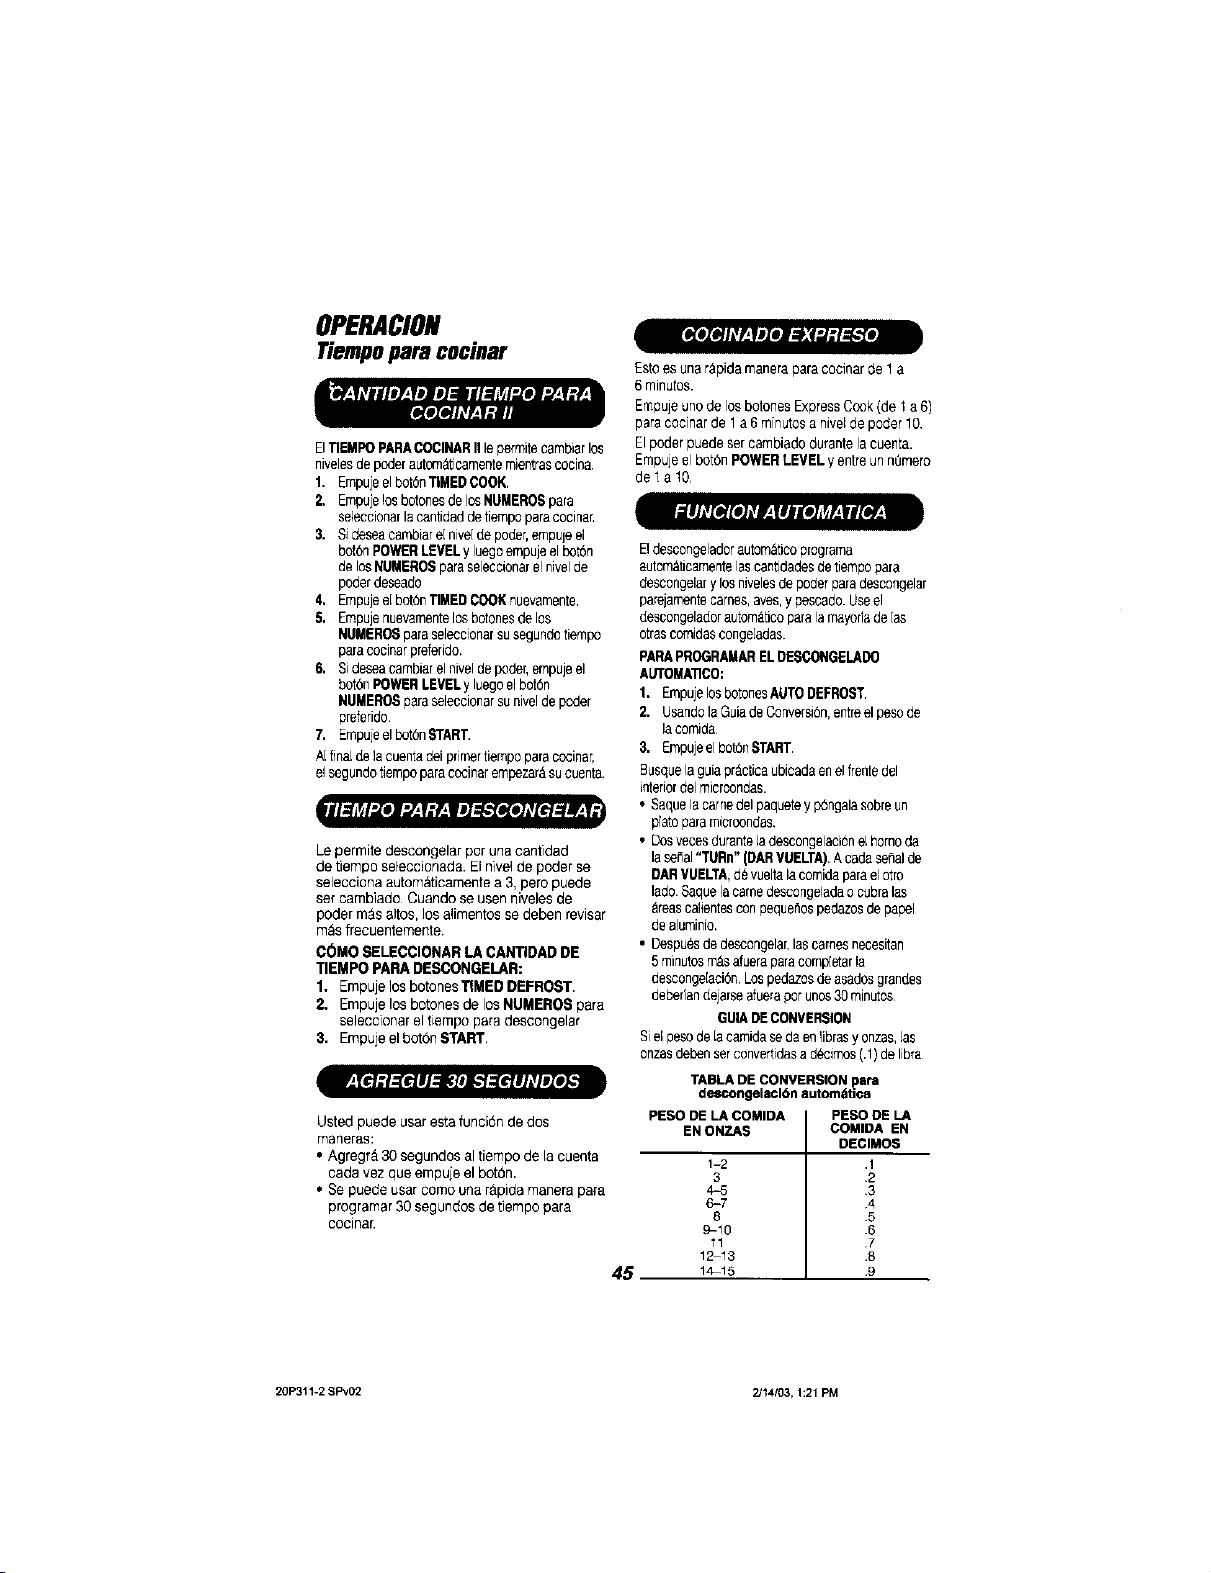
OPERACION
Tiempoparecocinar
ElTIEMPOPARACOCINARII le permitecambiarlos
nivelesdepoderautem_ticarnentemientraseoelna
1. Ernpujeelbot6n"riMEDCOOK.
2, Empuie!osbotonesdelosNUMEROSpara
se]eccionarlacantidaddetiempoparaaocina_
3. Sideseaeambiare[nive[depoder,empuleel
bot6nPOWERLEVELyluegoempujeelbot6n
delosNUMEROSparaseleccionarelnivelde
poderdeseado
4. Empuiee[ bot0n"rIMEDCOOKnuevamente.
5. Empujenuevarnentelosbotonesdelos
NUMERO$paraseleccionarsusegundetiempo
paracoclnarpreferido.
6, Sideseacambiarelniveldepoder,empuieel
bot6nPOWERLEVELy luegoelbot6n
NUMEROSpareseleccionarsuniveldepoder
preferido
7. Ernpu[eelbot6nSTART
A[finaLdelacuentadelprimertiempoparacocinar,
elsegundotiempoparacocinafempezar_sucuenta.
Lepermite descongelar per unacant]dad
detiempo seleccionada. Einivel de poder se
selecciona autom&ticamentea 3,pero puede
set camb]ado Cuandoseusenniveleede
poder mas altos, los alimentos se deben revisar
m_sfrecuentemente
C(_MOSELECCIONARLA CANTIDADDE
TIEMPOPARA DESCONGELAR:
1. Empujelosbotones"riMEDDEFROST
2. Ernpu[elos botones de losNUMEROSpara
seleccionarel tiempo para descongelar
3. Empujeel bot6nSTART.
Usted puede usarestafunai0n de dos
oqane[R£:
• Agregr_ 30 segundos altiempo de la cuenta
cada vezque empuieelbot6n.
• Se puedeusarcome unar_pida manera para
prog[amar30 segundosde tempo para
co¢inar.
Estoes unar_pidamaneraparacocinar de1a
6 minutes.
Empuieunode losbotenesExpressCOOk(de 1a6)
paracoc[narde1a 6minutesanivelde poder 10
Elpoderpuedesercambiadodurantelacuenta.
Empujeel bot6nROWERLEVELyentreun nOmero
de1 alO,
E!descongeladorautem_ticoprograma
autom&ticamentelaseantidadesdetiempopara
descongelary losnivelesde poderparadescongelar
parejamentecarries,eves,y pescado.Useel
descongeladorautormtticoparalamayoriade[as
otrascomidasconge[adas.
PARAPROGRAMARELDESCONGELADO
#.UT0UJk'(ICO:
I, EmpujelosbotonesAUTODEFROST
2. UsandolaGuiadeConversbn,entreelpesode
lacomida
3. Empujeel_otbnSTART
Busquelaguiapracticeubicadaanel frentedel
interiordelmicroondas.
• Saquelacamedelpaquetey pSngalasobreun
pratoparamicroondas,
• DosvecesduranteLadescongelaci6nelhomoda
laserial"TURn"(DARVUELTA)A cadasehalde
OARVUELTA,devue[talacomidaparael Otto
lad&Saquelacamedescongeladaocubralas
_reasca_ientesconpequerbspedazosdepape]
dealuminio.
• _sp_s de d_sco_e_a£Las_r_s _eces_tan
5minutesmt_safueraparaeomp[etarla
desconge[aci6n.Lospedazosdeasadosgrandes
deberfandejarseafueraperunos30minutes
GUIADECONVERSION
SielpeSOde[acamidasedaenlibrasyonzas,Las
onzasdebenserconvertidasa d_cimos(.1)de libra
TABLA Of. CONVERSION ps_t
descongelaclbn automdtica
PESO DE LA COMIDA PESO DE LA
45
EN ONZAS COMIDA EN
1-2 .!
3 2
4-5 3
6-7 4
8 .5
9-10 .6
11 7
1_13 .8
14-15 .9
DEClMOS
20P311-2 SPV02 2/t4/03, 1:21 PM

OPERACION
Tiempopara cocinar
GU|A PARA LA CANTIDA_ DE TEMPO PARA DI:SCONGELAR
ALIMENTO COMENTARIOS
Panes, queques
Panecillesy bolillos
Bolillos dulces
Pescadosy madecos
Piletescongeqades(lib) Ponga el bloque en la cacerola De vueltay quiebre
Mabscos, pedeeS_s pedaz_s(l_b/ desp_s de tami_addeLt_emp_
Came
Bacon(lib)
ceofizos (fib)
Came molide(lib.)
Asado:res, cordero, temera, cerdo
B_tecs,chutetas,_edazos
Ayes
p_o, a_d_, tlito e_pe_azos(2_ea3 rb/
Polio,entero(2Y2a 3 Ib)
Gallina
Pechuga de pave (4 a 6 Ib)
• Las comidas congeladasen papel o pl&et]co
pueden ser desconge[adasen el paquete.
Alos paquetes cerradosseres debe hacer
cortes, hoyos,oser ventiladosdespues que
hayan side parcialmentedescongelados, Los
contenedores de pl&sticospara guardar
comida debedan abri{separcialmente
• Lascomidas empaquetadasde tamale
de familia pueden serdesconge]adas y
cocinadas en ei microondas.S lacomide
est&en uncontenedor de aluminio,c_mb]elo
aun plato para microondas.
TIEMPO
'/4rain
2a4min
6a9min
3a7 rain
2a5 rain.
2a5 rain.
4a6 min
9a13min porlb
4 a8 rain _oHb
14a20m_
20 a 25 min.
7a 13min, porlb.
3 a 8min. porb
Pongael paquetesin abrir en el homo Dejeloafuera
per5 minutesdespues dedescongelarlo
Pongael paquetesin abrir en el homo. Enciende
eLm_c(oo_deshast_q_e loscheeses se pL_ader_
separar DSje!osafuera per 5 minutes,si es necesarbo,
are quese terminen de descongelan
De vuelta la came despues de la mitaddel tiempo
Use el nivel de poder 1
Ponga la came s}nenvoltorio en un plato para cocinar.
Devue_tadespues de la mitaddeltiempo y cubra 1as
_reas tibiascon "foil" Cuando terrains,separe los
pedaZOSy permita que descansen basra que se
des_ongelen compietamente
'ongael polio envuelto enunplato Desenvuelva
'de vueltadespues de lamitad del tiempo Cuande
ermine,separe la$ presasy ponga ene[microondas
)or2a 4 minutes mas,si es necesario Dejelo
descansar paraque se terminede descongelar.
Pongael polioenvuelto en un plato Oespues de la
milad del t_m£o dese_vue_va$,de v_lta _1eollo.
Cubra las _reas tibias con "foil_ Terminede
des¢ongelar, si es necesariohaga correr ague fPaen
la cavidad basra que las presasinteriores se puedan
$ac_
Penga [a gal[ina deaenvue[ta en e[ homo con [a
pecf_uga hacia alriba Devt_etta _espues delam_a_
deltiempo Haga correr ague ffia enla cavidad haste
que laspresasinterloresse puedan sacar
PongaLapechuga desenvuelta enun plato con
la pechuga hacia abaie Despuesde la mitad del
tiempo, dela vuelta y cubra las &reastibiascon "foil"
Terminede r]escongelar Deela descansar de 1a 2
horasen el refrigerader parecompletar a
descongelacbn
• Losalimentosque se echana perder
f_cilmente nodeberian dejarse expuestos
per m_sde une heradespues de ser
descongelados Latemperaturaamb]ente
promueveelcreoimientode bacterias
darlinas.
• Para una descongelaciOnm_spareja de
lascomidasgrendes,tales come los asados,
useelAuto Defrost.AsegQreseque lae
carnes grandeeestencompLetamente
descongeIadas antes desercocinadas.
• Cuando sean descongeladas, la comida
deberia estarfria per{)blandasentodas
partes. Siusted notalugarescongelados,
46 d_jelosdescarlsar unos pocosminutes.
20P311 2 SPY02 2J14,'03, 1:21 PM

OPERACION
CGmococinarconelsensor
[.'];l_"Ie" m],l_j_lF&l.f_y:fm]
Lasfuncbnes delsensordetactanelaumentode
la humedademitidadurantelaooccbn. Elhomo
ajustaautom_ticamentala cantidaddetiempo
paracocinarparavariostiposycantidadesde
comida.
• Loscontenedoresy lastapasadecuadasson
esencialesparaobtanerlosmejoresresultados,
• Siempreusecontenedoresparamicroondas
y ct)braloscon tapaso papelde pl&stico
ventilados.Nuncausecontenedoresdepl_stico
selladosqueevitanque elvaporescapey
causenquelacomidasecocinedemasiado
• Aseg0resequelaporteexteriorde los
contenedoresparacocinar y queel interior
de[m[oroondasest¢nsecosantesdeponer la
comidaen eLhomo.Las gotasde humedadque
setransformanenvaporpuedenhacerque el
sensorseequivoque
UsesOlamentepopcornpreempaquetadopara
microondasquepeseentre175 a35 onzas.
PARAUSARLAFUNCIONPARAPOPCORN:
SigaLasinstruccionesdelpaqueteusandoTIMED
COOKsielpaquetepesemenosde1.75onzaso m_s
de3.5onzas.
1. Pongaelpaquetaenel centrodelmicroondas.
2. Empujeel bot6nPCI_',ORN
Siabrelapuertamientrassemuestra"POP"aparecer_
"ERROR".
3. CierreLapuertayempo}eelbot6nSTART.
COMOAJUSTARELPROGRAMADEPOPCORN
PARAPROVEERUNTIEMPOPARACOCINAR
MENOR0 MAYOR:
Siustedencuentraquelamarcadepopcornque usa
secoctnapesoo demasiadoconsistentemente,usted
puedeagregarosustraerde20a30segundosde/al
tiempoautom&tico.
PARAAGREGARTIEMPO:
Despu_sdeempojarPOPCORN,empuje9
inmediatamentedespuesqueelhomoempiecepara
20segundosextras.Empuje9nuevamentepara
agregarotros10segundos(totalde30segundos
detiempoadicional).
PARASUSTRAERTIEMPO:
DespuesdeempoiarPOPCORN,empuieI
inmediatamentedespuesqueelhomoempiecepara
20segundosmenosdetiempo.Empuje1
nuevamenteparareducireltiempootros10
segundos(totalde30segundosmenos).
Lafunci6nparafecalentarrecalientaporc_ones
individualesqseyabansidococinadaso unplatode
sobrados
1. Coloquela comidacubiertaenel homo.
2. EmpujeelbotOnREHEAT.Elhornoempezar&
inmediatamenta.
3. Elhomodaunase6alcuandodetectavapory
comienzalacuentadeltiempoquequeda.
Noabrala puertadel horsehastaquelacuentahaya
terminado.Silapuertaseabre,cierrelay empujeel
bot6nSTARTinrnediatamente.
Despu_sde sacarlacomidadelhomo,revuelvasies
posibleparaemparejarlatamperaturaSilacomida
noes_ Iosuficientamentecalienta,useTIMED
COOKpararecalentarporm&stiempo.Los
allmentosrecalentadospuedentenetunagran
vadacl6nentemperatura.Algunas_reaspodrian
estarexlz'ernadamentecalle_tes,
ALIMENTOSNORECOMENDADOSPARASER
RECALENTADOS:
• Productosde pan
• Comidasquetienenqueserrecalentadassinestar
tapadas
, Comidasquetienenqueserrevue[tas
• Comidasqsedebenquedarcontexturasecao
unacoriezaduradespuesde serrecalentadas.
Lafunci6n para cocinar papas cocina de 1/2a 2
Ibs de papas.
1. Haga hoyitosenlac_scara con untenedor
y ponga las papasen la bandejag]ratoria.
Si cocina 3o m&spapas, col6quelasen
forma deestrella.
2. Empujeel bot6n POTATO.E[homo
empieza inmediatamente.E[ homoda una
serialcuando detectavapory empieza la
cuenta deltiempo quequeda.
Noabra lapuerta del homo hasta que
la cuentahaya terminado Si la puerta se
abre,ci_rrelay empujeel bot6n START
inmediatamente.Si lacomidanoesttt bien
cocida, useTIMEDCOOKparacocinar por
mastiempo
47
20P311-2 SPY32 2/14103, 1:21 PM

OPERACION
Funcionesparasuconvenlencia
,dE
Para usar la tunciOn para las bebidas:
empuje BEV, una vez para una bebida de
4 oz., dos veces para una bebida de 8 oz.,
o tres veces para una bebida de 12 oz.
Las bebldas qua se callenten con la
funcl6n para las bebldas podrfan estar
muy callentes. Saque el contenedor con
cuIdado.
La funci6n para bocadillos programa
automAticamente los programas de tiempo
y nivel de poder para calentar una
variedad de bocadillos.
1. Empuje el botdn SNACKS.
2, Seleccione el tipo de bocadillo de 1 a
6. (Vea iatabla de mAs abajo.)
3, Entre el n0mero de items o el peso de
la comida en onzas.
4. Empuje el bot6n START.
Usted puede empujar y sujetar el botdn
SNACKS mientras cocina para mostar ei
tiempo que queda para cocinar.
11PODECOMIDA CANTIDADO PESO
1Pan,bolillo,pandulce11 a 4
2Sandwiches 11 a 2
3 Pizza (sobrados} 11 a 4
4 Cremas de postre 11 a
5 Sopa 8 a 40 onzas
6 SaLsade queso 4 a 16 onzas
La funci6n para cocinar autom_.ticamente
programa el tiempo y los niveles de poder
para coclnar una variedad de comidas,
1. Empuje er bot6n COOK.
2. Seleccione el tipo de comida de 1 a 9.
(Vea la Guia para cocinar a la
derecha.)
[:]:l:fleT_T.'J
Gufa para bocadlllos
3, Entre e! peso de la comida en onzas,
4. Empuje el bot(bnSTART.
Empuje y sujete el bot6n COOK mientras
coctna para mostrar el tiempo que queda
para cocinar.
Gu|a para coclnar
TIPODE COMIDA
1Vegetates
en lata
(VEG1)
2
Vegetales
congelados
(VEG2)
3
Vegetales
frescos
(VEG3)
4 Papas
5 Pescado
6 Presas
de polio
7Came
too[ida
(res, cerdo,
pave)
8 Tocino
(bacon)
9 Pizza
(congelada,
para
m_roo_da_
NOTA: Usted no puede entrar un peso
que sea mayor o menor que e} peso que
se lista en la Gula para Cocinar de arriba.
PESO
4a20oz.
4a16oz.
4a16oz
8a 40oz.
4a16oz.
4a40oz.
8a48 oz.
2al0oz.
4a t6oz.
COMENTARIOS
Usecacerolaobolopara
microondas.Cubracontapao
papeldepl_sticoventilado
Usecacerolaobolopara
microondasSiga
instruccionesdelpaquetepara
agregaragua.Cubracontapa
opapaldepl_sticoventilado.
Usecacerolaobolopara
microondas.Agreguedos
cucharadasdeaguapotcada
servido.Cubracontapaode
lastcoventilado,
Hagahoyitosena c_scara
conuntenedor.Ponga[as
papassobreiabandeja
iratofia.
Useplatooblongado,redondo
ocuadrado.Cubraconpapel
depl_sticoodecera
ventirado
Useplatooblongado,redondo
ocuadrado.Cubracontapao
papeldeplAsticoventilado,
Usecacerdaredonda,
Deshagaa camesobrela
cacerola.Cubracontapao
papaldepl_sticorantlad&
PongaIonjasencapassobre
unplato,4porcap&Cubra
cadacapaconunatoarlade
paper.
Sigainstruccionesdelpaquete
paraprepararpizzaenel
microondas.
48
20P311-2 SI::'V02 2/14/03, 1:21 PM

OPERACION
OtrasFuncione$
Empuje ei bot6n CLOCK para entrar la
hora del dia over la hora mientras est&
cocinando.
PARA PONER EL RELOJ:
1. Empuje eLbotdn CLOCK.
2. Ponga la hora del dla.
3. Empuje el bot0n START o CLOCK.
Presione para ajustar el sincronizador de
tiempo hasta 99 minutos y 99 segundos.
Presione el nQmero de teclas para ajustar
el tiempo. Presione el bot0n de KITCHEN
TIMER MINiSEC para iniciar. Presione el
botdn KITCHEN TIMER MINtSEC dos
veces para borrar la pantarla.
Usarel crondmetro no iniciar la energla de
microondas.
Lafuncidn para recordar se puede usar
coreD un reloj de alarm&
1. Empuje el botOn REMINDER,
2. Entre la hora del dla en la cual desea
que el homo le recuerde. (Aseg_rese
que el reidi de4microondas muestre la
correcta hora det dla).
3, Empuje el bot6n START.
Cuando se prenda [aseSal de recuerdo,
empuje el botdn CLEAR/OFF para
apagarla, La hora para recordar se puede
mostrar empujando el bot0n REMINDER.
NOTA: ELindieador REM permanecer_
encendido para mostrar que [a FunciOn
para Recordar est& en efecto. Para
eliminar el recordador antes de que
ocurra, empuje el botOn CLEAR/OFF
La luz de1indicador REM se apagar&
Para encender o apagar el dial de_reloj.
empuje y sujete el bot6n 0 por unos 3
segundos. La funci6n DISPLAY ON/OFF
(ENCENDICO/APAGADO DEL DIAL) no
puede ser usada mientras 4asfunciones
para cooinar se ester usando.
El comienzo demorado le permite
programar para que el microondas
comience a cocinar en forma demorada.
1,
Empuje el bot0n DELAY START.
2.
Empuje los botones de losNUMEROS
para seleccionar la hora del dia en
que desea queet homo se encienda
y comience a coeinar. AsegQrese que
el reloj este mostrando la correcta hora
del alia.
3. Seleccione TIMED DEFROST,
AUTO DEFROST, or TIMED COOK.
Entre la cantidad de tiempo para
descongelar o el tiempo para
cocinar o el peso de la eomida
para descongelaci0n automatic&
4, Empuje el bot0n START.
La hora de Comienzo Demorado se vera
en el dial adem_s de "Start Time'. El
homo comenzar_ automAticamente en la
hora demorada seleccionada. La hora de!
dia se puedever empujando el botdnCLOCK.
Para encender o apagar el controt
del sonido, empuje y sujete et botOn
NUMEROS 8 SOUND ON/OFF por 3 o 4
segundos, Eldial pesta_ear_ "OFF" y el
dia_volver_a la hora del dia. "MUTE"
permanecer_ en el dial. Para encender
nuevamente el sonido, empuie y sujete el
bot(3nNUMEROS 8 SOUND ON/OFF por
3 o 4 segundos. "ON" pestaSear_ en el
dial, mute desaparecer& y el dial volver_
a la hora del dia.
49
20P31%2 SPY02 2/!4/03,1:21 PM

OPERAClON
Controldelhomoinferior
LOWEROVEN
OVEN TIMER
HORNEADOY LIMPIEZADEMORADA
Seleccionehornearo limpiar y latemperatura
queprefiereusarlprograme laheradel dia
enque deseaque el homo seencienda, o
programelacantidad de tiempo que desea
para cocinarla comida.
AUTOLIMPIEZA- Limpiael homoper 4 horas,
pero usted puedecambiar esta cantidad de
tiempoa entre3 y 5 betas.
NOTA: La puerta derhomo se cerrar&con
cerrojo autom&ticamentey e[ cerrojo seabrir_
s61ocuando el homose haya enfriado.
@G®®
@®®®
@®®®@
@®®÷@
x k_O_WlVE FAN MAy O_p._TE W_U O_EN mcus_mm
Su nuevo contror a botones le permitir&
seleccionar [as varias funciones con
facilidad. Abajo est_n las funciones deL
control del homo y la deseripeiOn de
cada una.
HORNEAR - Cocina la comida en
un homo termal tradicional con una
temperatura de 170°F a 550°E
ASAR A LA PARRILLA- Cocina la
came a 550°F Hi o 450°F Lo desde el
calor directo del elemento superior dentro
del borne.
HORNEADOAUTOMATICO- Seleccione
horneary la temperatura que prefiereusar.
Luego pregramela cantidad detiempo que
desea usarpara cocinar lacomida.
Los botones para los NUMEROS
programan la temperatura del homo,
hera del dla, tiempo demorado, tiempo
para cocci6n, tiempo para limpieza y
cron6metro de la cocina,
El bot6r_ START debe ser empuiado para
activar cuarquier funci6n.
El bot6n OVEN COOKtNG TIME (TEMPO
PARA COClNAR EN EL HORNO) se usa
para porgramar la cantidad de tiempo
para hornea£
E[botSn DELAY START TIME (HERA DE
COMIENZO DEMORAOO) se usa para
programar la hera deL aliaen que desea
que el homo se encienda y empiece a
homear o limpiar. Cuando se use la HeRA
DE COMIENZO DEMORADO con el
TIEMPO PARA COCINAR EN EL
HORNO, el homo tambien se apagarA
autom&ticarnente alfinal de la cantidad
de tiempo para coctnar.
ELbot6n CLEAR/OFF se usa para
cancelar cualquier funci6n del homo y del
tono de fin de ciclo. NO cancelar_ el reloj
o el Cronometro de la Coclna.
El bot6n KITCHEN TIMER ON/OFF
es usado para encender y apagar el
sincronizador de tiempo de la cocina.
NO controlar& ninguna otra funci6n.
50
20P311-2 SPy02 2/14/03, 1:21 PM

OPERACIOli
Controldelhomoinferior
DIAL DEL CONTROL
Indicadordetempemtura
del homo Indicadordeencendido
Indicadorde I T _ _ _ T m _ 0 _ _1 hora
'r°grama C_ Ct C_ _C_OC_ Ct
I
I DELAYBAKE CLEAN STMT CLOCKCLEANI
L BROil.L_.__I_D.DOOR COOKSI"OP..TI#ERJ
funci6ndelhomo funci6n delhomo
Erpane! es una referencia f&cil de usar
mientras usa _oscontroles. Abajo est_ la
descripci6n de c0mo funciona.
Indlcador de la Temperatura del Horno -
Este indicador tiene un prop6sito mLiltiple.
• Muestm la temperatura
• Muestra el c6dlgo de error "ERR"
Si el indicador de temperatura del horno
pestaNea "ERR", entonces usted ha
programado un tiempo o una
temperatura incorrecta. Empuje el botOn
CLEAR/OFF para despejar et control y
reprogamar la funci6n del homo.
• Muestm problemas del control - Si el
control hate pesta_ear "F" y un n_mero
o letra, ha experimentado un problema
con ef homo. Pot favor lea la secci6n
F-CODES en su manual.
Indlcador de Encendldo (ON) -
Se encender_ cuando se programa una
funci0n del homo,
Indlcador de Programa - E[ indicador de
programa pestaSeara en combinacidn con
una funcidn der homo o una funci6n
automAtica para avisarle que necesita
programar un tiempo o una temperatura.
Eiemplo: "SET" y "SAKE" pesta_ear_n
para avisarle que tiene que programar la
temperatura para hornear,
Indlcador d_la Hora Muestra la hora
del dia, tiempo de cocci6n, hora de
comienzo demorado, hora de limpieza o la
hora programada en el cron6metro de la
COCll3a,
Muestra el c6dlgo para recordar "PUSH
START" Si el indicador de la
temperatura del horno pestat_ea las
palabras "PUSH" y "START", entonces
usted tiene que empujar el botSn START
para activar su programa.
51
20P311 2 SPv02 2/14103, 1:21 PM

OPERACION
RelojyCronGmntroInferior
El reloj debe ponerse a la correcta hora
del dla antes que una funci0n demorada
del homo funcione correctamente. La hora
del dla no se puede cambiar durante una
funci0n demorada del homo.
1. Empuje el bot6n CLOCK.
2. Empuje los botones con los NUMEROS
para poner la hora.
3. Empuje el bot0n START.
PARA VOLVER AL RELOJ
Mientras est_ usando el homo para
cocinar en forrna automatica, empuje el
bot0n CLOCK, si desea ver la hora del
dia. La hora presente der dia se ver_ en
el dial.
CORTE ELECTRICO
Si ocurre un corte de corriente, la hora que
se muestra en el dial estar& incorrecta.
Ponga nuevamente el reloj a la hora.
Cualquier funciOn para cocinar del homo
que estaba en proceso tendr_ que ser
reprogramada
EtcronOmetro de la cocina se usa para
medir el tiempo de los procesos para
cocinar u otras actividades del hogar. No
controla er homo. Se puede programar
hasta 9 horas y 59 minutos. Contar_ hacia
atr_.s en minutos hasta que Eleguea los
L_ltimos60 segundos. Cuando la cuenta
Ilegue a cero, eLcontrol sonar_ 3 veces
seguido de un sonido cada 6 segundos
hasta que se empuje el bot0n KITCHEN
TIMER ON/OFF. Elsonido de cada 6
segundos se puede eliminar. Vea tonos en
la p&gina siguiente.
COMO PROGRAMAR EL CRONOMETRO
1. Empuje e! bot6n KITCHEN TIMER
ON/OFF
2. Empuie los botones con los NUMEROS
para programar la cantidad de tiempo.
3. Empuie el bot6n START.
4. Cuando la cuenta liegue a cero,
empuje el bot6n KITCHEN TIMER
ON/OFF.
Para cancelar el cron0metro durante
la cuenta, empuje el bot6n KITCHEN
TIMER ON/OFF dos veces.
52
20P311 2 SPY02 ?/14103, 1:21 PM

OPERACION
RelojyCrondmetroInferior
El nuevo control tiene una serie de tonos
que sonar_n a tiempos diferentes. Estos
tonos pueden sonar mientras usted
programa una funciOn del homo, o al final
de una funciOn del homo. Tambi_n re
avisar_, si existe un problema con una de
[as funeiones. M_s abajo estan los tipos
de tonos y una breve deseripcidn de cada
uno.
TONOS MIENTRAS PROGRAMA EL
CONTROL - Cuando empuje un botdn
usted escuchar& un tono. Este tono le har_t
saber que aplicO sufieiente presidn sobre
el botdn para activarlo.
TONO AL FINAL DE UN CICLO
AUTOMATiCO - Despu_s de una funci0n
para cooinar automatic& usted escuchar&
tres tonos cor_os seguidos por un tono
cada 6 segundos. El tono de cada 6
segundos seguir_ sonando hasta que
empuje el botdn CLEAR/OFF o usted
decida seleceionar el programa especial
para cancelar y evitar que el tend de
6 segundos suene al final de an ciclo
futuro.
COMO CANCELAR EL TONO DE
6 SEGUNDOS:
1. Empuje y sujete los botones BAKE
y BROIL HI/LO, a la mlsma vez, por
3 segundos, hasta que el dial
muestre "SF."
2. Empuje el botdn KITCHEN TIMER
ON/OFF. El dial mostrarA "CON
BEEP" (tono continuo).
3. Empuje el bot0n KITCHEN TIMER
ON/OFF nuevamente. El dial mostrar&
"BEEP" (tono canceLado).
4. Empuje er botdn START, para cancelar
el tono y salir de este modulo especial.
Si desea volver a los tonos de cada
6 segundos, repita los pasos de arriba
hasta queer dial muestre su selecciOn y
empuje START (comienzo).
TONO DE ATENCION Este tono sonar_
si hace un error u omite algo mientras
programa una funcidn de! homo.
Unos ejemplos sedan:
a. Programar an ciero de limpieza y la
puerta del homo no esta bien cerrada.
b. Programar una funcidn y no empujar el
botdn START.
c. Empujar un botdn para una funci0n
adicional sin programar primero la
temperatura o el tiempo.
d. "ERR" pestafiear& siusted programa
una temperatura inv&lida, Empuje el
botdn CLEAR/OFF para porter el dial
en blanco y reprogramar la funeidn del
horno.
Cualquiera de estos se puede identificar
rt_pidamente con mirar el dial.
TONO DE PRECALENTAMIENTO
Cuando usted seleccione un modo de
cocinado, ajuste la temperatura del homo,
y presione el bot0n para el comienzo
(START) para que eLhomo comience a
calentar. Cuando latemperatura dentro del
homo Ilega a la temperatura due usted
programd, sonar& un tono para avisarle
que el homo est_ listo para hornear.
Si usted programa una funciOn del homo
y el control suena mientras el dial hace
pestatlear una "F" y un n0mero o letra tal
como "F-4" o "FI," es posible que exista
un problema con el control o con el homo,
Simplemente empuje el botdn CLEAR/
OFF yespere una hora. Trate de
programar esa funcidn nuevamente. Si el
c0digo se repite, escriba el cddigo que
pestadea y Llamepara un servicio. DIgale
al tecnico que cddigo estaba
pestadeando.
53
20P311-2 SPY02 2/14/03, 1:21 PM

OPERACION
ConsejosParaCocinar
EnElHomoInferior
Esnormalsentirun poco de olor cuando use
su homo por primera vez. Para ayudara
eliminar este olor,"_ntlle la habltacl6n
abrlendo una ventanao usando una
campana deventllacl6n.
r_T=/-'flHr_.-jlr_,y4r_r_o]
Enla partetraseradel homo ustednotar&un
pequefio tube,Estoes un sensor de calor que
mantienelatemberatura delhomo. Nunca
muevao doble estetubo.
I .or °.
_/_ temperatura del homo
IMPORTANTE:Nuncacubra el fondodel
homo o la parrilla del homo con papel de
aluminio.Eluso inadecuado puedecausar una
maJacirculaciSndelca[or, pobres resultadosal
hornear,ypodria dar_arel acabado de1homo.
Paraprevenir manchasdebido a derrames,
usted podriacolocar un pedazo de papel de
aluminioo unabandeJapara gafletassobre la
parfilla debajo de la comida que sepodria
derramar,
La ventilaci6n del homo est& ubicada
debajo del panel de control. Esta &rea se
podria calentar mucho durante el uso del
homo. Es normal que salga vapor de la
ventilaci6n y/o que se produzca humedad
debajo cuando el homo no este en uso. La
ventilaci6n es importante para [a correcta
ciroulaci6n deLaire. Nunca obstruya la
ventllaclbn.
Ventllacl8n
del homo
I
E[preea[entamiento es subir La
temperatura a Latemperatura que va a
usar cuando homee. Permita que el homo
se precaliente bien cuando las recetas
requieren precalentamiento.
La zona de temperatura baja de su homo
(entre 170°F y 2go°F) esttt disponible para
mantener tibios los alimentos que se hau
coclnado calientes. Sin embargo, los
alimentos no se deberlan mantener a estas
balas temperaturas por m_s de 2 horas
Paraprolongar la vidadel foco delas
luces del homo, siga estos consejos:
Siempreapaguelas [ucescuando el
homo no est6en uso5 durante un ciclo de
limpieza.Si LaLuzdeLhomo sedejaencendida
por unlargoperiodo de tiempo, el homo estar_
t]bio cuando abra la puerta debido al calor
generadopor el foco de laslucesdel horno.
54
20P311-2 SPY02 2J14103, 1:21 PM

OPERACION
ConsejosPareCocinar
EnE1HomoInferior
La mayofia de las recetas para hornear
hart sido desarrolladas utilizando
productos con un alto contenido de
manteca tales como manteqJla y
margarina (80% de manteca por pes_l
requerimiento federa[ para rosproductos
marcados "margarina"), Usted obtendr_.
ma[os resultados si [os queques, pasteLes,
tortas, galietas, o dulces son hechos con
mantequilla con bajo contenido de
manteca, Las mantequi!las y margarinas
con bajo eontenido de aceite contienen
menos manteca y m_s agua. El alto
contenido de agua de la mantequilla o
margarJna afecta la textura y el sabor de
sus recetas para hornear favoritas.
Mientras m_s bajo sea el contenido de
manteca de la mantequilla o marganna,
m_s se notar_n estas diferencias. Para
asegurar los mejores resultados, use
margarina, mantequi]la u otras barras de
estos productos que contengan por Io
menos 70% de aceite vegetal.
|_}[olKeJf_]..IR_.1,.'n.,-lll_h_l_l_Vllfo_1
Los resultados del horneado ser_
mejor si las cacerolas para hornear est_n
centradas en el homo Io m&s posible. Si
est_ horneando con m&s de un utensilio,
col6quelos de manera que cada uno
tenga por Io menos de 1" a 1_/2' de
espacio de aire a su alrededor. Coloque
los utensilios de manera que ninguno
quede directamente encima de otro.
LAS BANDEJAS BAJAS para galtetas
permiten que el aire circule alrededor de
las galletas para que se doren en forma
pareja.
El Sensor de Temperatura del Homo en
la parte trasera del homo mide y controla
continuamente la temperatura dentro del
homo. Para mantener ureatemperatura
programada constante, los elementos
har_.nun ciclo de encendido y apagado
mientras el homo cocma.
LOS UTENSILIOS BRILLANTES son
perfectos para que los queques y panes
r&pidos tengan una corteza cafe dorada.
UTENSILIOS DE VIDRIO, OSCUROS
CONTRA PEGADURAS, U OPACOS
POR LA EDAD, absorben el calor, son
perfectos para panes con levadura,
cortezas para pasteies o alimerqtos que
tengan una corfeza caf& Cuando use
estos utensiLios, Latemperatura del homo
se deberia reducir en 25°F
55
20P311-2 SPY02 2/14/03, 1:21 PM

OPERACIO#
ConsejosParaCocinar
EeElHomoInferior
Las parril]as det homo est_n diseSadas
con topes, una conveniencla y tambi@n
una precauci6n de seguridad. Cuando las
parrirlas est&n colocadas correctamente
en el homo, las gulas tienen un tope para
prevenir que las parri[las se den vueita
ct_ando se sacan de_homo, F__tedise_o
permite que hasparrillas puedan ser
insertadas de sS]o una manera.
Tope on
Su homo tiene cuatro (4) posiciones. La
posiciOn de rn_s arriba es solamente una
gula_ No puede ser usada como posiciOn
para una parrilla.
Guias
3 1 3
Usted podrla pensar que su horno nuevo
cocina diferentemente aqhomo que
reempiaz5, Le recomendamos que use su
homo nuevo por vafias semanas para que
se familiarice mas con 61,siguiendo los
tiempos que se dan en la receta como una
gula. Si cree que su homo est_
foncionando demasiado caliente o frio
para su preferencia, vea Ajustes -
H&galos Usted Mismo en la parte de arras
de este manual pata hace_ los ajustes.
Cuando use su conveniente operaciSn de
Comienzo Demorado, los allmentos tales
como productos I+cteos, pescado, ayes,
etc., nunca se deber{an deJarexpuestos
;)or mas de una hora ante_ de set
coclnAdos. La temperatu_a ambier_te y el
cator de la Iuz del homo promueven el
crecimiento_de bacterias.
Si abre la puerta frecuentemente para
mirar los alimentos, causar_ una pOrdida
de calory malos resultados cuanOo
hornee,
S(empre coloque tas parrllles del homo
en la poslcl6n correcta cuando el homo
estd frfo.
56
20P311-2 SPy02 2/14/03, 1:2_ PM

OPERAClON
CGmoHornearYAsar
(_ I. Empuje e[ bot6n BAKE.
(_ 2, Empuje los botones
<_ 3, Empuje el bot6n START.
con los NUMEROS para
seleccionar [atemperatura
deLhomo que prefiere usar.
Para programar que el homo empiece en
forma demorada, cocine por un tiempo
especifico y se apague autom&ticamente
(_ I. Empuje el bot0n BAKE.
(_ 2. Empuie los botones
con los NUMEROS para
seleocionar [atemperatura
del homo que prefiere usar
COOKING TIME
3, Empuje el bot6n OVEN
Para programar que el homo cocine
por un tiempo especlfico y se apague
automaticamente.
(_ 1. Empuje el bot6n BAKE.
(_ 2. Empuie los botones
{_ 4. Empuje los botones
<_ 5. Empuie el botOn START,
con los NUMEROS para
seleccionar la temperatura
del homo que prefiere usar.
COOKING TIME.
3. Empuje el bot6n OVEN
con los NUMEROS para
programar la cantidad
de tiempo que prefiere
para coclnar los alimentos
(_ 4. Empuie los botones
(_ 6. Empuje los botones
<_ 7. Empuje el bot6n START.
El homo se apagard al t_irmlno del
tlempo para coclnar a menos que el
programa para MANTENCI(_R DE
TEMPERATURA se haya actlvado.
(Vea la secclbn de "C6mo Programmar
Funclones Especlales.")
con ros NUMEROS para
programar la cantidad de
tiempo que prefiere para
cocinar LOSalimentos.
START TIME.
5, Empuje el bot0n DELAY
conrosNUMEROS para
programar la hora del dia
en la cual prefiere que el
homo se encienda,
57
20P311-2 SPY02 2J14103, 1:21 PM

OPERACIO#
CGmoAsarALaParrilla
Asar es cocinar al ca[or directo de[ etemento
superior. La puerta del homo debeda
permanecer abierta en laposici6n de tope
para asarcuando ase a la parrilla.
No esnecesarioprecalentar el homocuando
ase a la parrilla Use lacacerola y la parrilla
para asat que viene con su estufa. Ambas
est_n diser_adaspara drenar adecuadamente
lagrasa ylos llquidos.
Cuandousepapalde alumlnlo,
el papal dealuminlodebeestar
moldeadofl_e a laparrllla
colncldlrconloscortesdelaparrltLa.Esto
permitsquelagresay los liquldoscalgan
a iacacerola,evltandoqueseproduzcaun
Incendloy humoexceslvo.
Slempresaquela l
delhomo.Guardary
olvldarunacacerola
cacerolay la parrllla __
paraesar suela enel
homoesunpallgro
paraproduclrunInesndloo humo.
t I
El Departamento de Agrieultura de los
Estados Unidos recomienda coeinar la
came y las ayes completamente_la
came a un calor FNTERNOde por Io
menos 160°F y las ayes a un calor
INTERNO de por Io menos 180°F.
El cocinar a estas temperaturas
generalmente protege contra
enfermedades eausadas pot los
aiimentos.
y los cortesen el papal deben
Mientras m_s eerea eoloque los alimentos
del elemento para asar, m&s r_pido se
dorartm por afuera, pero quedando roio o
rosado en el eentro.
Colocando las carnes leios del elemento
permitir_, que ]as carnes se cooinen en el
centro mientras se doran por afuera.
Usando estas posiciones, eocine el lado 1
pot Iomenos 2 minutos m&sque et lado 2.
Si su homo est& conectado a 208 voltios,
usted podda usar una posici6n de parri[la
m&s alia y]o cocinar los atimentos por m+s
tiempo.
El tamaMo, peso, grosor, temperatura
inicial y su preferencia personal afectar_ el
asado a la parrida. Esta tabla est_ basada
en carnes a la temperatura def
refrigerador.
POSI_ON I TIEMPO
DF I TOTAL
AMMENTO PARRILLAI
Slmc1"degrueso 9-11
Tortasdecarrie 16-18
mo[ide-1•degrueso
Chuletasdecerdo- 27-29
(mlnutos)
i
i
I
1/2'degrueso
PeP.ado(flletes) 11-13
Polio(presas) 45-55
I
la. Empuje el bot6n BROIL HVLO (Esto
automdtlcamente programa ASADO
en HI-ALTO.)
lb. Mientras el indicador de programa
pestanea en el dial, empuje
nuevamente el bot6n BROIL HI/LO
si prefiere asar en Bajo (Lo). Ase
en Lo (Bajo) para cocinar bien
alimentos tales como ayes o cortes
de came gruesos s_nque se doren
demasiado
2. Empuje el botSn START.
3. Cuando termine de asar, empuje el
bot6n CLEAR/OFF,
58
20P311-2 SPY02 2J14/03, 1:21 PM

OPERACION
Cdmo$eleccionorProgramas
EspecialesDolControl
Elnuevocontrolabotonest[eneprogramas
adicionalesqueustedpuedeseleccionar,Despu0s
dedecorsuseLecck_,_ deseacambiade,sigalos
pasoshastaqueeldialmuestresunuevaselecciBn
Elcentre[seprogramaautom_ticamentepare
apagarsedespu_sdehomearper12boreso
gespu0sdeasara laparrilleper3 horasencaseque
selealvideydejeelhomoencendido,Sidesea
eliminaresteprograma:
1. Empujey sulete,almllmo_pe, per
3segundos,losbotonesBAKEyBROILI.R&O,
hastaqueeldial muestre"SF,"
2, EmpujeelbotBnDELAYSTARTTIME.Eldial
muestra"12Shdn"(apagadoen_2horas),
EmpuieelbotBnOELAYSTART
nuevamente.Eldialmestrar&"no Slain"
(noapagado)
3. Empuieel botdnSTART,
Elcontrold_ I_e[_ est_pfog(ar_d_palela
seleccidndetemperaturesenFahrenheit.Lamayoda
delasrecetassedanusandolaescalaFahrenhe_
UstedpuedecambiarestoparausarIaselecciBnen
Centigrades.
1. Empuiey suiete,al _Imo tlempo,losIootones
BAKEy BROILHI/LOper3segundos,basra
queel dialmuestre"SF"
2. (a) Empujeel botdnBROILHI/LO.Eldialdel
co_t_olmost[a_&els_ pa[agradey"F."
(b)Empuieel botBnBROILHI/LOnuevamente.
Estocambia_"F" (Fahrenheit)a"C"
(Cent'grado).
3, Empujeel botBnS'i'ART.
S_co_trolest,,p_og[am_do9arausa[elIebie__2
horas.Siustedprefiereu_arHeraMilitarde 24betas
oponereldialen blanco:
1. Empuieysujete,al mbmoSerape,per
3 segundos,losbotchesBAKEy BROILHI/LO
hastaqueeldialmueetre"SF."
2. (a) Empujeel bot0nCLOCK.Eldialmostrar_
"12hr,"Si0staessuseleccidn,empujeelbotdn
START.
_b)Em_e a_bot(mCLOCK_evamer_t_E_
dialmostrar_"24hr." Ejemplo:5:00enel relol
de12horasleer_17:00enel relojde 24 bores.
Siesta essuseleccidn,empuleel boron
START,
(c) Empujeel botdnCLOCKnuevamente,
Eldialahorarnostrar&"OFF."(Leherano
semostrar_enel dial,)Si_staessu selecciBn,
empujeSTART,Laheranosernostrar&enel
dial(taI_c_Bnpalep[ogramaedemoredosno
funei0na.)
Elcentre[lepermitirOoerrarlosbotchesdemanera
quenosepuedanactivarcuandoIo8empuje.Sise
preocupadedeiarerhomosinsupervision,active
esteprograma
1, Empujeysujete,almlsmo_mpo, per3
segundos,rosbotonesBAKEy BROILHI/LO
hastaqueeldialmuestre"SF."
2. (a)Empujee[bOtChCLEAN.Eldialmuestra
%06 OFF"(cte(_einactive)
(b)EmpujeelbetdnCLEANnuevamente,ELdial
mostrar&"LOCON"(cierreactivado).
3. EmpuieelbotBnSTART.
Em programasepuedeselecclonaraolamente
cuandoel homonoesbtenuse.Cuandoeste
prograrnaestOactivado,elcontrolsonar_y eLdial
mostrara"Loc." s[seempujaunbotdn.(Los
botonesClock,TimeroOvenLightnoson
ef_ctados./
E[nuevecontroltieneunprogramade mantencidn
detemperaturaparecocinarautomaticamente
solamentequemantendr_[acomidaque haside
cocinadatibiahast,a3 horasdespuesqueel
cocinadoautom&ticotermina.Pareactivareste
prograrna:
1. Empujey sujete,almls|netJernpo,per
3segundos[osbotonesBAKEyBROILRI/I.O
dastaquee_dial_uestre"SF."
2. (a)EmpujeelbotdnOVENCOOKINGTIME.El
dialmostrar&"H_ OFF"
(b)Empuieel botdnOVENCOOKINGTIME
nuevamentepareactivaresteprogram&Eldial
mostrar_"HLdON."
3. Empujee[botBn5TART.
59
20P31t-2 SPY02 2/14'03. 1:21 PM

CUIDADOYLIMPIEZA
E1CicloDeAutolimpieza
1, Saque la caceroLay laparrilla para asar,
utensilios,ycuaLquierpapeLdealuminio
que podria quedar en el home.
2. Las parrillascubiertas de porcelanagris
mismasdeben serremovidasdurante el
ciclo de Limpiezaautomat]ca.
3. La suciedad sobre el marco frontal
y afuera dei se[Io del revestLmientede ia
puerta necesitara ser limpiada a mane.
Marco frontal
L
Limpieestas areas conagua caliente, lanillas
con iab6no limpiadores comoSoftScrub para
sacarcualquier suciedad. Enjuague bien con
agualimpia yseque.
Nouse limpiadores de hernos--ningt3n
Iimpiadorde hornospara usos comercialeso
revestimientode protecci6n debe serusado en
el interioro arrededordel homo.
4. Limpie cualquierderrame pesado del
fondo del homo
5. No limpie elsello de la puertadel
homo. El materialdefbra de vidrio
de la puerta del homono soporta la
abrasi6n.Es esencialque el sello
permanezca intacto Si nota que se
est_ gastando o trizando, deberla ser
reemplazado.
El sello de la puerta est& diseflado para
que tenga un espacio de 5"-6" en el fondo
del horno,
Panelde la puerla Sello
Revestimentode la puerta
Esto permite la circulaci6n adecuada
del aire, Es normal que su homo de la
apariencfa de no tener url buen sel[o sobre
e[ homo. Esto se debe al se[Io, La
ubicaci6n de[ sello sobre la puerta
mantiene la puerta sellada y previene
cualquier perdida de calor.
r
deberfan deJar dentro del
homo duranle un clclo de
Los utenelllos nunca se
Ilmpleza.
[.as parrlllas cublertas de porcelana
grls pueden ser Ilmpladas con
segurldad en el Interior del homo
durante el clclo de Ilmpleza
automdtlca. SI usted le peaa un trapo
parclelmente empapado con acelta
vegetal despuds del clclo ayudar_ a
que la Ilmpleza sea m_s eflclente.
Duranta et primer clclo de
Ilmpleza, ventlle la habltacl6n con
una ventana ablerta o una campana
de ventllacl6n. Esto evltar_ el olor
fuerte producldo por el
calentamlento de las partes nuevas.
6O
20P31%2 Sl:>v02 2J14/03, 1:21 PM

CUIDADOYLIMPIEZA
Ciclo De Autolimpleza
El Ciclo de Umpieza est_ programado
para 4 horas, pero usted podia cambiar
esto desde 3 horas si el homo esta
Levementesucio a 5 horas si el homo est&
muy sucio.
MostrarA 4 horas en el dial.
1. Empuje el bot6n CLEAN.
Despues der ciclo usted podria notar un
pooo de cenizas b[ancas en el homo.
Simpiemente [impielas con un paso o
esporTja ht3meda.
Si algunas manchas blancas persisten,
frieguelas con una lanilla de acero con
jabOn.Asegurese de enjuagar bien. Estas
son generalmente depOsitos de sal que no
se pueden sacar durante el cicio.
SI por alguna raz6n ust_-_lno queda
satlsfecho con los resultados de la
nmpleza, slmplemente replta el clclo.
(_ 2. Si desea cambiar la
_3. Empuje el bot_n START.
Simplemente empuie el bot6n CLEAR/
OFF. Usted necesitar& esperar a que la
temperatura det homo baie m&s que la
temperatura de enganehe (aprox. 1 hora)
antes de tratar de abrir la puerta. "Locked
Door" desaparecer& del dial.
cantidad de tiempo para
limpiar, empuje los botches
de los NUMEROS.
1. Empuie el bot0n CLEAN.
2. Si desea cambiar la
cantidad de tiempo para
limpiar, empuje los botones
*, de los NUMEROS.
START TIME,
3. Empuje el bot6n DELAY
4. Empuje los botones con los
NUMEROS para programar
la hora de comienzo del
ciclo.
<_ 5. Empuje el bot0n START,
61
20P311-2 SPY02 2J14/03, 1:22 PM

CUIDADOYLIMPIEZA
LimpiezaMicroondas
MATERIALES DE LIMPIEZA
• Pano hQmedo
• Lanilla para fregar de pl&stico
• Detergente liquido para platos
• Agua tibia
Limpie con un detergente para platos
suave y agua, entonces enjuague bien
con un paso hOmedo, Si desea, puede
hacer hervir un contenedor con agua en
el homo usando energla de microondas,
Esto ayudar_ a soltar la suciedad. Para
suciedad dificil de limpiar, limpie
cuidadosamente con una lanilta para
fregar de pl&stico. No use Ilmpladores
abrasivos que puedan rayar on dafiar
la superflcle. NO utlllce esponJa$ de
metal para Ilmplar; algunos trozos de
material pueden desprenderse y causar
choques el_ctrlcos.
COMO UMPIAR
Lave con jaboncillo tibio. Para suciedad
m&s dificil de limpiar, friegue suavemente
con una lanilla de nilOn y un limpiador que
no sea abrasivo. Enjuague bien
COMO COLOCAR LA BANDEJA
GIRATORIA DE VIDRIO
Coloque la bandeja giratoria de vidrio,
aseg_rese que la bandeia giratoria de
vidrio este bien alineada con el soporte
de la bandeja giratoria,
MATERIALES DE MMPIEZA
• PaNo suave
• Agua tibia
• Detergente para platos
Limpie las salpicaduras o derrames
mientras est&n tibios. Use un detergente
para platos suave y agua tibia, ;uego
enjuague con agua limpia, seque con un
patio suave.
MATERIALES DE UMPIEZA
• Lanilla para fregar de nilOnno abrasiva
• Limpiadores no abrasivos
• Agua tibia
• Detergente para platos
COMO SACAR LA BANDEJA
GIRATORIA
Tome la bandeja giratoria de ambos lados
y lev_ntela derecho hacia arriba,
Soporte de / _'_%\
\
/_................................... I,
20P311-2 SI:>v02 2/14/03, 1:22 PM
MATERIALES DE LIMPIEZA
• Agua tibia
• PaSo suave
• Detergente para platos
Limpie con un detergente para platos
suave y agua tibia. Eniuague con agua
limpia y seque con un paso suave.
MATERIALES DE MMPIEZA
• PaSo suave
Abra la puerta del homo para prevenir
que el homo se encienda mientras Io esta
limpiando. Limpie el panel de control con
un paso h8medo. Seque inmediatamente
con un patio seco para prevenir
manchas.
82

CUIDADOYLIMPIEZ4
LimpiezaHomoInferior
QUE MATERIALES DE LIMPIEZA USAR
• Detergente llquido para pLatos
• Agua tibia
• Patqo suave
No use llmpadores abraslvos,
llmpladores Industdales, o
blanquedores (cloro).
COMO LIMPIAR
Limpie con agua tibia con jabOn,
Enjuague y seque bien.
Limpie solamente para retocarlas entre
ciclos de rimpieza. Use detergentes
liquidos para platos, agua tibia, o lanillas
con jab6n. Enjuague bien despu_s de
[impiar y seque.
NUNCA USE LIMPIADORES PARA
HORNOS DENTRO OALREDEDOR DE
CUALQUIER PARTE DEL HORNO.
Cuando limpie, aseg_rese de no doblar
o mover er sensor de [atemperatura
ubicado en la pared trasera derhomo.
:__ _ Sensor de
_._ temperatura de homo
QUE MATERIALES DE LIMPIEZA USAR
• Detergente fiquido para platos
• Agua tibia
• LaniI[as de acero con jabOn
• Umpiador comerciar para hornos
C(_MO LIMPIAR
Permita que la cacerola se remoje. Ponga
detergente para platos sobre la parrilta y
cubra con un parle o ur]a toalla humeda
por un rato. Friegue a medida que sea
necesar_o, Lave, eniuague, y seque bien,
Usted tambien podfla poner la cacerola y
raparrirla en la lavadora de pratos.
QUE MATERIALES DE LIMPIEZA USAI
• Limpiador para vidrio
• Toa[las de pape[
• Soda para homear
C(_MO UMPIAR
Para limpieza diaria, use un limpiador
para vidrios y una toalla de papel. Para
suciedad pesada, use una pasta de so{
para hornear y agua. Enjuague bien,
83
20P311-2 SPY02 2214/03, 1:22 PM

CUIDADOY LIMPIEZA
PartesRemovlbles
PRECAUCION: UMed
dede desconectarel poder
eidctrlcohaelael homo en•
Interrupterprincipal del
clrcultooan lacaJade losfuslblesames
detratar de reemplazarlos focos de laluz
del homo. Notoque el foco de la luz con
iss manospalades. Elfoco secahanta
mucho rdpldemente.Envustvala gores
de sspumadei paquMe del fo¢o
atrededordelfoco pars la InMalacl6n.
Cuandoseqtmst foco, espaTehastequa
el focose haysenfrladoyuse onpare
8eco,
Pars dade lame]orluz posible, su homo tiene
dos luces defocos de halOgeno.Losfocos
est_n eneltecho de lacavidad del homo
Receptt_ulo Soquete
Cublerta
COMOSACAR de vlddo
1. Usteddebe desconectar elpoder el_otfico
haciael homo en elinterruptorprincipal del
circuito o en la caiade losfusibles.
2. Haga girar _acubierta de vidrio en
direcciOncontra elrelo] 1/4 de vuelta
hastaqua 1asaletillas de lacubierta de
vidriosalgan de [astenuresdsl soquete.
3. Tire derecho haciaafuerapara sacar
el foco.
COMOCOLOCAR
1. Envuelvael foco con unpatio seco o
con el materialde empaquedel foco.
Notoqueel foco con losdedos.
2, Empu]ecomplatamenteelfoco derecho
dentro gel recept_culo. Use s61ofocosde
hal6genode 120voltios,35 warts
3. Coloquelas aretirlasde la cubiertade
vidrioen lasranurasdei soquete
4. Haga girar [acubierta devidrio en
_rtecci6n del _eloiV4 de vueLta.
5. Reconectelaelectricidad hacia elhornoen
el interruptor del oircuitoprincipal o lacaia
de losfusibles,
MA'I_RIALESDELIMPIEZA
• Detergente paraplatos
• Agua tibia
• Lanes para fregaro lanillaconjabOn
Perte trasere la gula _
COMO,_CAR
1. Tire_as_rriLLast_astalaposiei6n
do tope.
2. Levanteelfrentede la parfilla y deslicela
baio el topede laguia pars las parri!las
PARALIMPIAR
Limplecon aguetibia ydetergente. Parasacar
manchasduras, friegue levementecon lana
parsfregar o conuna lanillacon jab5n.
Eniuaguebien.
Las parrillas cubiertasde porcelana gris
pueden ser limpiadas con seguridad en
el interiordelhomo durante elciclo delimpieza
automatic& Serenecesariopara engrasar los
extremosde la parrilladel homocon unacaps
ligerade aceitevegetaldespues de un ciclo de
limpieza.Estoayudar_ a quesehaga f&¢il
deslizarlos estanteso rejillasenel homo,
PARACOLOCARNUEVAMEN'rE
1. Coloque laparte levantadade arrasde [a
parriLlasobre[asgu(as
2. Levanteelfrentede la parri[lahasta quela
partelevantada de atr&sse deslice per
debajo deltope de [as guias
3. Deslicela parlilla hastaat_&s.
64
Tope en 1_ /IJ
20P311-2 SPY02 2/14/03, 1:22 PM

CUIDADOYLIMPIEZA
PartesRemovibles
La puertaes mw pededa.Tengaculdado
cuandoremuevay levantelapuertl. No
levanteIa puertapor lamanlJa.
C(_MOSACAR '_ _ Salga
1, Abra [apuarta ,1_--'_..... C
completamente.
2. Tire_ostopesde Las
bisagras hacia abajo
haciael marco de la
puerte,a la posiciSn C_um de
de abierto. Esto blsagra
podria requerirun "rim de loscierres
destomirlader de de labisagrahacla
cabezaplana, abajo pareabrir
3, Tomefirmemente
los ladesde la
puerta dearriba.
4, Cierre la puerta a la
posici6nde saque
[acualseencuentra
entrelapos]ei0n
intefmedia
tetalmentecerrada
5. Levante la pueday
hagaun movimiento
de extracciOnhaste
que el braze de la
bisagra saiga
de la ranura.
COMOPONERLANUEVAMENTE
1. Tomef_rmeme_te
losdos lades de
la puertade arriba,
2. Con la puerta enel
mismo&ngulode
extracciOn,coloque la
hendidura del brazede
la bisagra dentrodel
bordedel fondo de la
ranurade labisagra. Inden616n
Lamuesca en el braze
de la bisagra debe ester
totalmenteasentada en
el londe dela ianura.
I
PoSict6n
de saque
del bo_le
Puerta removlble del homo (cont.)
3. Abracompletamentela Brazodelabisagm
puerta.Silapuerta no i_ _
abrecompletemente,[a '_,
hendid_rano est{_ If'l
asentada
correctamenteenel
extreme inferiorde la
ranura
4, Empuje Lostopes delas
blsagras hacia arr]ba Cerradurade
contra el marcofrontal blsagra
de la cav]dad del EmpuJede los
homo, a la poslci_)nde ciermsde la
cierre, bisagrahacla
5. Cierre la puerta cerrar
del homo.
C_)MOLIMPIARAFUERA
DELA PUERTA
• Use jabCny aguepare limpierbien _e
euperficie,ladesyfrentede la puerta do[
homo, Enjuaguebien.Ustedtambi_n podria
usarun [impiaderde vidrio pare limpiar e[
vidrio exteriorde la puerta.No permita que el
aguagotee dentro de Lasaberturasdo la
ventilaci0n
• Losderramesdesalsas para alir_ar,jugos
defruta, salsasde tomatey materialespare
sasonarque contengan_cidos podrian
causar unadescoloraci0n y se deberlan
limpiarinmediatemente.Cuando la
superficie seenfrle, limpiey eniuague.
• No uselimpiadorespara homo& pelvespare
limpiaroabrasives duros en la parte exterior
de la pueria.
• Si cualquier mancha sobre lamoldura de
la ventilaai0nde lapuerta persiste,use un
limpiador abrasive suavey un fregader de
esponja pare mejoresresultedos.
C_MO U MPL,I_RADFN'tRO
DIELA PUIERTA
• Debido a quael _rea dentro del sellose
limpia durante e!ciclo de autolimpieza,usted
no neeesitalimpiar este amane
• El_reaafueradel selloyel revestimientode
la puerta se puedenlimpiar con unalanilla
Ilenacon jab6n, ague caliente y detergente.
Enjuaguebien con una soluci6nde _nag_e
y agua.
arribapare
20P311-2 SPY02 2J'14/03, 1:22 PM

ANTESDELLAMARPAPAUNSERVICIO
Para ahorrar tiempo y diners, antes de Ilamar para un serviclo, revise la lista de m&s abajo
para cualquier problema que ustecl crea que tiene con el funcionamiento de su estufa. Si
el problema es algo que usted no puede reparar, use los NQmeros de Servicio para el
Consumidor que se encuentran al final de este gula. Cuando haga un Ilamado, t_nga
dlsponlble el n,',mero de modelo, n_mero de serle, Ilsta de partes para reparaclones,
gu|a para el uso y culdado y la fecha de compra.
PROBLEMA POSIBLE CAUSA POSIBLE SOLUCION
Eldial delcontrol Malfuncionamientode el Empujeel bot6n CLEAR/OFF.Permita
I_Ma_a aria "F" homo, que la estufase enfrlepor unahoray
_ulda per un n_mem ponga nuevamenteelhomo en
o letra, funcionamiento.$1el problema se
Elhomo y loscontroles a. Nopasa electricidad ael a. Revisela caia del circuitso los
del homo no funclonan, homo. fusibles.AsegL_resequeel cord6n
b, Elre!oiest&enlafunci6n b. Vealasecci6nde"C6mo
enblanco ProgrammarFuncionesEspeciales"
La temperaturade[ Calibraci6ndel Vealas instruccionespara ajustarla
home paraceestar controLdeLhomo. temperaturaque siguen estasecci6n.
Ir_xacta,
La puertadel horns no Elciclo de limpiezanoha Latemperaturadel homo debe bajar a
8edesengancha, terminado,Elhomo est_ menosde la temperaturade enganche
Laluzdelhornono a. InterruptordeLaluzen a. Reviselaposici6ndelinterruptorde
funclona, posici6nde apagado, la LuzdeLhomo
Elhorns no Seseleccion6la opci6n Vea la secci6n defunciones
aceptaprograma en grados Centigrados. especiales.
parahomear.
Elhornonosellrnpl6o a, Loscontrolesnose a, Lealaseccibndeautolimpiezade
los resultadosfueron pusieronbien. estemanual,
rnalos, b. El homo estaba b. Losderrames grandes se deberian
La parrllladel Lasparrillasfuerondeiadas Paseuntraps mojadocon un
homo nose enelinterior del homo poco de aceite vegetal a los
desllzacon duranteel process de extremos de la parrilla.
facllldad, Iimpiezaautom_tica.
Ruldodelventllador. Unventilador de Estoes normal.Elventilador de
demasiadocaliente, antes quela pueria pueda abrirse.
b, Foco de laluzest&suelto b. Reviseel foco de la luz del horns,
o quemado,
demasiado sucio. Iimpiarantesde programarunciclo.
¢, El ciclo de limpiezafue ¢, Elciclo de limpiezanormal deberia
interrumpido, serde 4 horas,
refrigeraci6nse podrfa refrigeraciSnse encender
encender autom_ticamente, refrigerar las partes intemas.El
66
repite, LLamepara unservicio
de la corfiente est6enchufado
en estemanual
Ustedtambibn podrfa repetir el
cicio.
ventilador podrla funcionarpor 2 horas
despues de qua el homo se haya
apagado (OFF).
20P311-2 SPY02 2J14103,1:22 PM

ANTESDELLAMARPARAUNSERVICIO
PROBLEMA POSIBLE CAUSA
El homo humea, a. Homosucio.
b. Maluse de papel de
aluminio
c. Se dej6 racacerorapara
asarcon grasadentro del
homo.
El homo
emlto un olor.
a. El aislanfe del homo
podrla emitir unolor
durante los primeros
uses,
b. No limpiar el exceso de
suciedad antesdel ciclo
de autolimpleza
a. Veaque no hayan derrames grandes.
b. Nose recomienda el usedel papel de
aluminio.
c, Limpie la cacerola y la parrilla despu_s
de carla use
a. Ponga erhomo en un ciclo de
autorimpiezapara acererar e[ proceso
de el]minarel olor.
b. L]mpie el exceso de suciedad antes de
comenzar unciclo de autol]mpieza.
POSIBLE SOLUCION
No se puede
coclnar en el
mlcroondas.
Los allmentos
no se hornean
adecuadamente.
Elcron6metrode racocina
est_ en operaciOn.
a.
El homo nose precalent6.
b.
Posici6n incorrecta de la
parrillao lacacerola
Use el cron6metro del homo inferior.
(No se puede cocinar en el microondas
y usar el cron6metrode la Cocinaa la
n31sm8 vez),
a. Aseg_rese de precalentar hasta que
sueneeltone, cuando la receta
Iorequlera.
b. Manten'gaunespacio de aire uniforme
alrededorde laselias y utensilios.Veala
secci6npara cocinar enel Homo
¢.
Lavent]laci6n del homo
est_ obstruida ocubierta.
d.
Use incorrecto de! papel
de aluminio
e,
Temperafuraincorrecta
para elutensilio usado
f.
Latemperaturadel homo
necesita ajuste.
g.
El homo o laparrilladel
homo no est_n niveladas.
h.
Controlesde1homo real
c. Mantengalavenfilaci6rLdespejada
d. Nocubra lasparrillascuando hornee.
e. Reduzcala temperatura en 25 grades
para utensiliosde vidrio, oscuros
uopacos
f. Reviselasecci6n de aiustes a la
temperaturaquesigue estasecci6n.
g. Vealasinstruccionesde instalaci6n
para lanivelaci6n
h. Veala secci6n para hornear
puesfos,
Todo eato as normal an su Homo Mlcroondas:
• Escape de vapor alrededor de la puerta.
• Reflecci6n de luz alrededor del marco exterior de la puerta.
• Ruido apagado mientras erhomo est_ en use.
• El ventilador de[ microondas podrla operar con ambos berries apagados. Est_ enfriando
el control y se apagar_ solo.
• gisminuci6n de la luz del borne y cambio en el sonido del ventilador podrlan ocurrir si
Beopera a un nivel de pealer que no sea alto.
• Algo de interferenciacon la TVy radio se podrla notar cuando use el homo mioroondas.
Es similar a la interferencia causada per otros aparatoB el_efricos peque_os y no indica
un problema con su homo.
67
20P311-2 SF'v02 Z/14/03. 1:22 PM

ANTESDELLAMARPARAUNSERVlCIO
PROBLEMA POSIBLE CAUSA POSIBLE SOLUCION
Los alimentos
no se asan
adecuadameflte.
a. Posici6n incorrecta de la a, Revise la posioidn de las cacerolas;
parrdla, yea la secci6n para asar a la
parrifla.
b. Elhomo se precarent0.
b. No precaliente cuando ase a la
parril[a,
c. Mal uso de papel de
aluminio,
d. La puerta del homo se
cerr0 durante el asado a
la parrilla.
e. Bajo voltage
(208 Voltios).
f. Cantidad de tiempo
incorrecta para asar.
g. Controles del homo mal
¢. Lea la secci6n para asar a la
parrilla.
d. Abra la puerta a la posici0n de tope
para asar.
e. Use una posici6n de parrilla m_s
alta y/o ase pot m_.stiempo.
f. Vea la tabla para asar en la secci0n
de c6mo asar a la parrilla.
g. Vea la secci6n para asar.
puestos.
Las comidas
8e cocinan
demasiado o
muy poco.
a. Insuficiente cantidad
de tiempo cuando se
oocina con la funciOn
de tiempo porque las
temperaturas iniciales
de los a}imentos varian
macho.
b. Se program0 un nivel
de poder incorrecto.
¢. El plato no se hizo
girar, no se revolvi6
como 1orequiere la
reoeta,
d Demasiados platos en
el homo a la misma
vez.
e. Los alimentos no se
descongelaron bien.
f. Mal uso de las
cubiertas.
a. La variaci0n de la densidad de la
comida algunas veces requiere m_s
tiempo de cocciOn.
b. &Es la receta probada y confiable?
c. Siga las instruccionesde la receta.
d. No Ilene demasiado el homo.
e. Yea la secci6n de la
descongelacion del manual,
f. Siga las instrucciones en este
manual yen la receta,
68
20P31%2 SPy02 2/14/03,1:22 PM

AJU$TE$DE TEMPERATURA-
"tlAGALOSlISTEDMI$MO"
Usted podrla pensar que 8u nuevo homo /" .'_
cocina diferentemente al homo que
reemplaz0. Recomendamos que use su
homo nuevo unas pocas semanas para
que se familiarice con _1,siguiendo los
tiempos que se dan en las recetas come
una guia.
Si cree que su nuevo homo estA
funcionando demasiado caliente (quema
la comida) o no calienta Io suficiente (la
comida no queda biencocidB)usted
mismo puede ajustar la temperatura. La
apariencia y la textura de los alimentos
son mejores indicadores de la exactitud
de un homo que un termdmetro. Estos
term0metros pueden variar entre 20-40
grades de laverdarer temperatura deL 3_
homo. Adem&s, Lapuerta se tiene que
abrir para leer estos termOmetros. Abrir la
puerta eambiar_ latemperatura del homo.
Para decidir en cu_nto cambiar la
temperatura, suba la temperatura del
homo en 25 grades (si los alimentos no
quedan bien cocidos) o baje la
temperatura en 25 grades (si la comida
so quema) de la temperatura de la receta,
luego hornee. Los resultados do esta
"prueba" le deberian dar una idea de
cu&nto se debeda cambiar latemperalura. _,
kCY
I. Mie_ITaBelborneno
est_ en use, empuie y
sujete los botones BAKE
y BROIL HI/LO, per 3
segundos, hasta que
e[ dial muestre "SF."
2. Emuje el botOn BAKE. Un
n0mero puesto en f&brica
de dos dfgitos aparecer&
en eLdial, generalmente
SI plensa que el horne
no estd suflclentemente
ca|lel_O,
3a. Empuie el bot_)ncon la
flecha NUMEROS para
aumentat (+) la
temperature hasta un
m_ximo de +35°E.
SI plensa que el borne
esta demas|ado ca|iente,
3b. Empuie el botOn con la
fiecha BAKE y NUMEROS
para balat 0 la
temperatura hasta un
m_ximo de -35°F
4. Empuje e{bot_)nSTART.
Este aumento o disminuici6n en la posici0n
de la temperatura permanecer& er_18.
memoria hasta que los pasos de arriba
sean repetidos. Ufl corte de corriente no
afectar& esta posici6n.
Las temperaturas para asar a la parrilia no
ser&n afectadas.
89
23P3_1-2 SFv02 2/14/03.1:22 PM

GARANTIADELHOR#ODE
PAREDEMPOTRADO
f UN AI_O COMPLETO DE GARANTIA PARA TODAS LAS PARTES
Si, dentro de un a_o de la fecha de instalaci6n, cualquier parte deja de
funcionar adecuadamente debido a un defecto en el materiat o la obra de
mano, Sears la reparar_, o reemplazar&, a nuestra opci6n, sin costo.
Si este producto es sometido a un uso que no sea el familiar privado, la
garantia de arriba es efectiva por solamente 90 dias.
EL SERVIClO DE GARANTJA ESTA DISPONIBLE AL LLAMAR A SEARS
SERVICE AL 1-800-4-MY-HOME ®.
Esta garantia [e brinda derechos legales especificos, y usted tambien
podria tenet otros dereohos que varian de estado a estado.
Sears Roebuck and Co. Dept. 817 WA Hoffman Estates, IL60179
7O
20P311-2 SPy02 2/14/03, 1:22 PM

Contrato de protecci6n
maestra
Felicitaciones por su compra
inteligente. Su nuevo aparato
Kenmore®est& diser3ado y fabricado
para muchos argosde operaci6n
confiable. Sin embargo, al igua! que
todos los productos, puede requerir
de mantenimiento o reparaci6n
preventivas on cualquier momento. Es
ahf cuando el contrato de protecci6n
maestra le puede ahorrar dinero y
molest]as.
Adquiera un Contrato de protecciOn
maestra ahora mismo y prot_jase
contra inconvenientes y gastos
inesperados.
El Contrato de protecoi6n maestra
tambi_n [e ayuda a ampliar la vida de
su electrodomestico. Lo siguiente es
Io que se incluye en el contrato:
Servicio experto por parte de
nuestros 12,000 especialistas
profesionales de reparaci0n
V'Servlclo IIImltado sin costo por
partes y mane de obra er_todas las
reparaciones cubiertas
Garantia total - reposiciOn de su
producto cubierto si ocurren m&s
de tres fallas del producto dentro
de doce meses
v' Reposici6n del producto si ef
producto cubierto no se puede
reparar
v"Revisibn anual de mantenlmlento
preventlvoa su solicitud sin
cargo adicional
V'Ayuda telef6nlca rdplda
asistencia no t_cnica y de
instrucciones sabre los productos
reparados en su casa, adem&s
de una conveniente programaci6n
de reparaciones
_/Protecci6n contra descargas
el6ctrlcas para darlos debido a
fluctuaciones electricas
Reembolso por alquller si ]a
reparaci6n del producto cubierto
toma m&s tiempo de1prometido
Una vez adquiera el contrato, solo
necesita una Ilamada telef6nica para
programar el servieio. Puede Ilamar a
cua]quier hora del dia o de la noche o
programar lacitadel servicio per
Internet.
Sears cuenta con m_s de 12,000
especialistas profesionales de
reparaci6n, quienes tienen acceso a
m&s de 4,5 millones de partes y
accesorios de calidad. Este es el tipo
de profesionalismo en el que puede
contra para ayudar a prolongar la
vida de su nueva compra para los
arlos venicteros, iAdquiera el Contrato
de protecci6n maestra hoy mismo!
Aplican clertas Umltac!ones y
exclusiones,
Para precios e informacibn
adicional, Ilame al 1-800-827-6655.
Servicio de instalaci6n de Sears
Para la instalaciOn profesiona!
garantizada de Sears de
electrodomesticos y articulos para el
hogar como dispositivos para abrir
puertas de garaje y calentadores de
agua, en los EE.UU. ]lame al
1-800-4-MY-HOME ®,
71
20P311-2 SPY02 2/14/03, 1:22 PM
Your Home
For repair-in your home-of all majorbrandappliances,
lawnand gardenequipment, orheatingandcoolingsystems,
no matterwho made it, no matter who sold it!
For the replacement parts, accessories and
owner's manuals that you need to do-it-yourself.
For Sears professional installationof home appliances
and items like garage door openers and water heaters.
1-800..4-MY-HOME ® (l-soo-4sg-4_3)
Call anytime, day or night (U.S.A. and Canada)
w_rw.sears,com www,sesrs.ca
Our Home
Forrepair of carry-in items like vacuums, lawnequipment,
and electronics, call or go on-line for the location of your nearest
Sears Parts & Repair Center.
1-800-488-1222
Calt anytime, day or night (U,S,A, only)
W'kW .seaP_2,.com
or maintenanceagreement (Canada) ona productservicedbySears:
To purchasea protectionagreement (U.S.A.)
1-800-827-8655 (U.S.A.) 1-800-361-8665 (Canada)
Para pedir servicio de reparacibn Au Canada pour service en frane.,ais:
adomicilio,yparaordenarpiezas: 1-800-LE-FOYER"_
1-888-SU-HOGAR_" (1-800533-6937)
(1-888-784-6427) _w.sears.ca
I:_gl_et ed Tr_de_T]ark/ IM Tr_m_rk / _ _ Mark of Seats, I:_ and CO
_ Matc_ Regl_r ada / Tu Marca de Ft_ca / s_Marca de Setv;ciode Seam, _ andCo.
MCMar_ de comn_rce / _' Mamue d_pos_lede Seam, POeI_ and Co,
© S_am. P,oeo.J_ a_l Co
72
20P311-2 SP_02 2/14/03, 1:22 PM
 Loading...