

Drop-In
30" Electric Range
Estufa I_ctrica de 30"
Tipo "Drop-In"
Models, Modelos 911.45241,45248
229C4020P246
(SR-10449)
Z_
0
/=,
Sears, Roebuck and Co.,
Hoffman Estates, IL 60179 U.S.A. www.sears.com
30"ELECTRICDROP-INRANGE
Tableof Contents
Range Safety ......................... 3-4
Features of Your Range ........... 5
Removal of Packaging Tape ....5
Cooking Elements ................... 6
Control Settings ..................... 6
Home Canning Tips ................. 6
To Set the Clock ...................... 7
To Set the Timer ...................... 7
To Reset the Timer ................... 7
To Cancel the Timer .................. 7
End-Of-Cycle Tone ................... 7
Oven Cooking Tips ............ 8-10
Baking With Margarine ......... 8
Element Cycling ..................... 9
Bakeware Placement ................ 9
Bakeware ................................... 9
Oven Racks ......................... 9
To Set Bake ........................... 10
Broiling ............................ t 1
Control Panel ......................... 12
Broiler Pan and Grid ............... 12
Oven Interior ......................... 12
Sides of Range ....................... 12
Oven Door Glass ..................... !2
Door Vent Trim ........................ 12
Control Knobs ......................... 13
Oven Light Bulb ..................... 13
Lift-Up Cooktop .................... 14
Cooktop Units ......................... 14
Oven Racks ............................. 15
Oven Door .............................. 15
Before Calling for
Service ............................ 16-17
Temperature Adjustment, • 10, 18
Warranty ................................... 20
Consumer Service Numbers ,,, 40
For your convenience and future reference, please write down your model
and serial numbers in the space provided. They are located under the
cooktop.
MODEL NUMBER: SERIAL NUMBER:
© Sears, Roebuck and Co
2
IMPORTANTSAFETY
INSTRUCT!ONS
Important: To insure safety for yourself,
family and home, please read your
Owner's Manual carefully, Keep it
handy for reference Pay close attention
to Safety Sections, BE SURE your
appliance is installed and grounded by
a qualified technician.
• DO NOT leave children alone or
unattended near an appliance in use_
• TEACH CHILDREN not to play with
controls or any part of the appliance,
and not to sit, climb or stand on the
door, or any other part of the
appliance.
• CAUTION: NEVER STORE items of
interest to children in cabinets above
the appliance. Children climbing on
the appliance could be seriously
injured,
• KEEP THIS book for later use,
. NEVER USE your appliance for
warming or heating the room
• NEVER TRY to repair or replace
any part of the appliance unless
instructions are given in this manual.
All other work should be done by a
qualified technician,
• ALWAYS KEEP combustible wal!
coverings, curtains, dishcloths,
towels, potholders, and other linens a
safe distance from the appliance
• NEVER HEAT unopened food
containers, Pressure buildup can
cause the container to burst and
cause injury
• NEVER LEAVE containers of fat or
drippings in your oven.
• ALWAYS KEEP the oven and
surface unit areas free from things
that will burn, Food, wooden utensils,
and grease buildup could catch fire_
Plastic utensils could melt and
canned foods could explode. Your
appliance should never be used as
a storage area.
• ALWAYS KEEP your appliance clear
of things that will burn (gasoline and
other flammable vapors or liquids).
• NEVER TRY to clean a hot surface.
Some cleaners produce noxious
fumes, and wet cloths or sponges
could cause steam burns.
• NEVER WEAR loose-fitting clothing
when using your appliance.
• NEVER USE a towel or other bulky
cloth as a potholder, and make sure
the potholder is dry, Moist potholders
and wet cloths or sponges could
cause steam burns. DO NOT let
potholders touch hot heating
elements.
° DO NOT touch heating elements,
surfaces near them, or interior oven
surfaces. These may be hot enough to
cause burns even though they are
dark in color. During and after use, do
not touch or let clothing or flammable
material contact the elements or hot
surfaces until they have had time to
cool. Other surfaces near the oven
vent openings, oven door, window,
and cooktop surfaces may also be hot
enough to cause burns.
• ONLY certain kinds of glass or
ceramic cookware can be used for
cooktop cooking Make sure the
cookware you choose to use is
designed for cooktop cooking
without breaking due to the sudden
temperature change.
• ALWAYS USE care when touching
cooktop elements. They will retain
heat after the range has been
turned off.
3
IMPORTANTSAFETY
INSTRUCTIONS
• NEVER BLOCK the oven vent
under the right rear element
• COOKWARE USED for cooktop
cooking should be flat on the
bottom and large enough to cover
the heating area being used.
Undersized utensils expose the
heating element and may resu!t in
direct contact or ignition of clothing.
The proper size utensil will also
improve efficiency
• ALWAYS USE drip bowls to prevent
wiring and component damage, DO
NOT use aluminum liners or foil in
drip bowls. Improper use may result
in risk of electrical shock or fire.
, NEVER LEAVE surface units
unattended at high settings.
Boilovers result in smoking or
greasy spills which could catch fire.
• ALWAYS TURN utensil handles
inward and away from other surface
units to reduce the risk of burns,
ignition, unintended contact, and
spillage.
oNEVER put heating elements in
water.
• WHEN PREPARING flaming foods
under the vent hood, turn the fan on,
• PLACE OVEN RACKS in the
desired position while the oven is
cool. If racks must be moved while
oven is hot, do not let potholder
contact the hot oven element
. NEVER USE aluminum foil to line
the oven bottom. Improper use of
foi! could start a fire, or electrical
shock could resulL
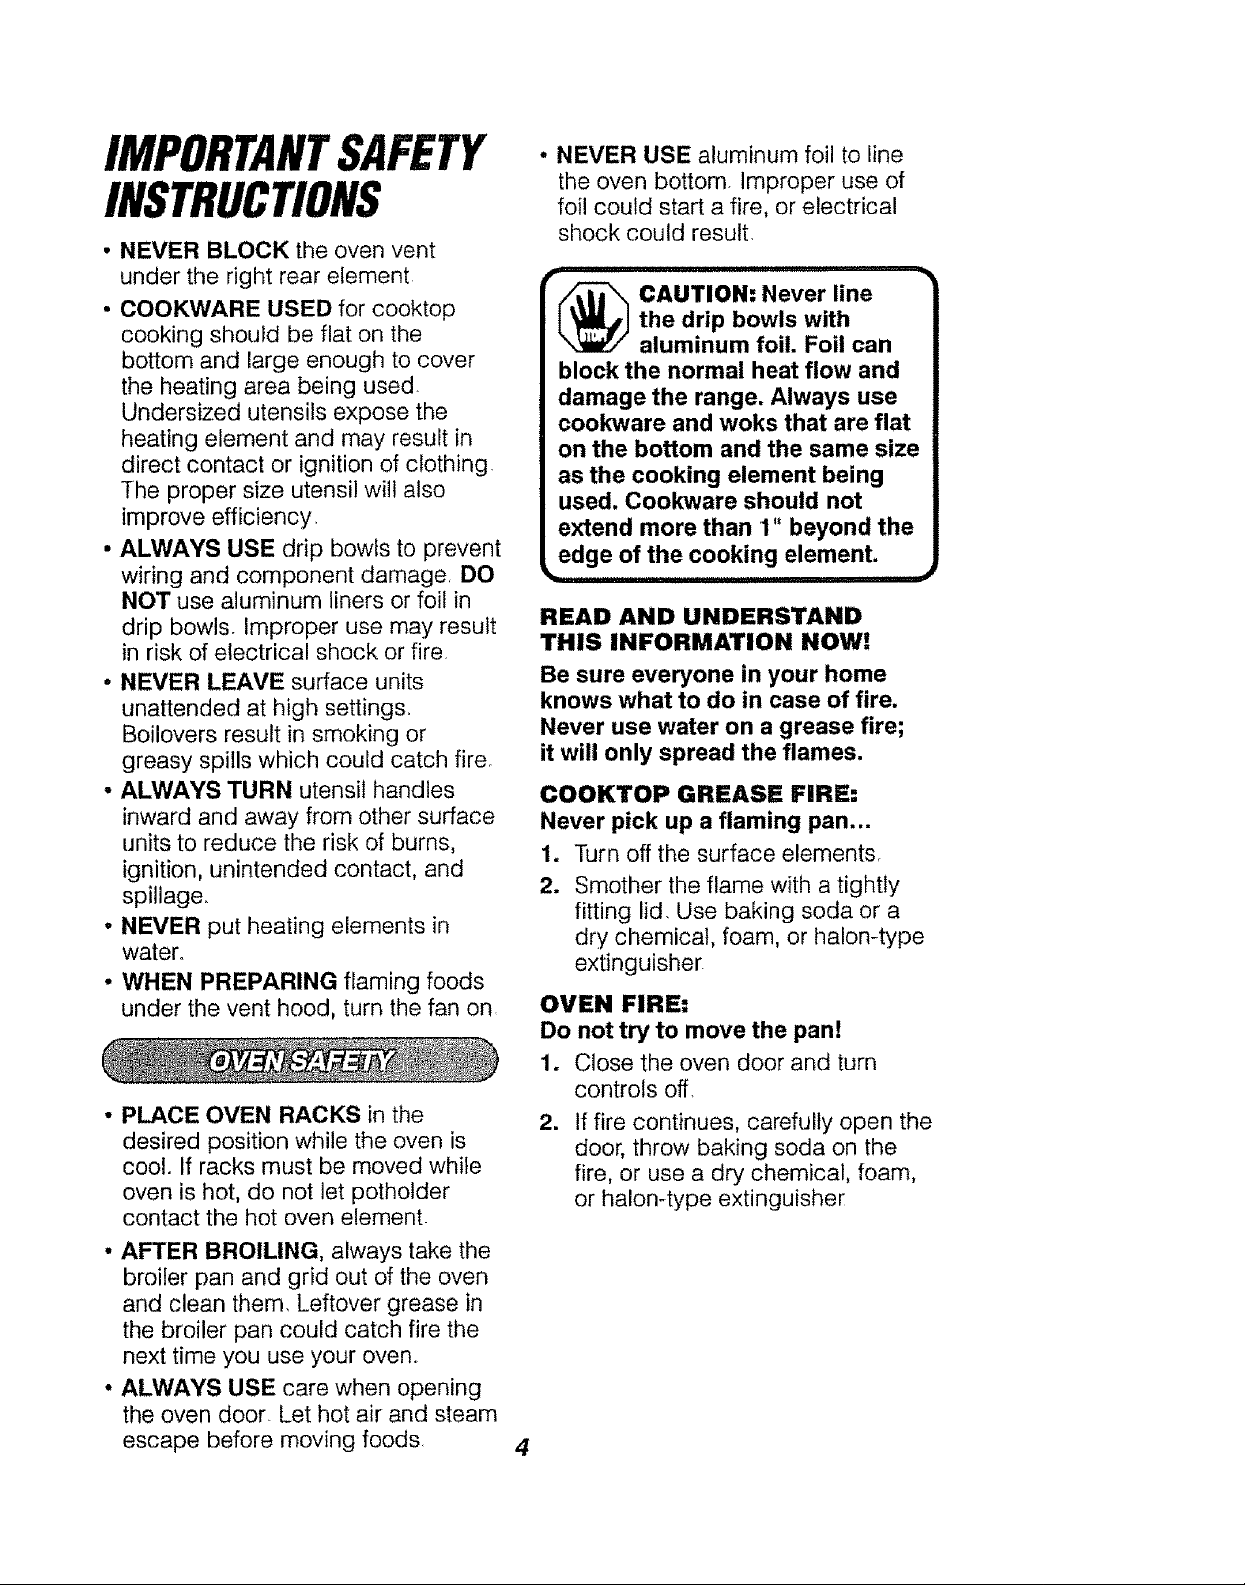
r •
(_ CAUTION: Never line
block the normal heat flow and
damage the range. Always use
cookware and woks that are flat
on the bottom and the same size
as the cooking element being
used. Cookware should not
extend more than 1" beyond the
edge of the cooking element.
READ AND UNDERSTAND
THIS INFORMATION NOW!
Be sure everyone in your home
knows what to do in case of fire.
Never use water on a grease fire;
it will only spread the flames.
COOKTOP GREASE FIRE:
Never pick up a flaming pan...
1. Turn off the surface elements.
2. Smother the flame with a tightly
fitting lid. Use baking soda or a
dry chemical, foam, or halon-type
extinguisher.
OVEN FIRE:
Do not try to move the pan!
1. Close the oven door and turn
controls off,
=
If fire continues, carefully open the
door, throw baking soda on the
fire, or use a dry chemical, foam,
or halon-type extinguisher
the drip bowls with
aluminum foil. Foil can
• AFTER BROILING, always take the
broiler pan and grid out of the oven
and clean them. Leftover grease in
the broiler pan could catch fire the
next time you use your oven..
• ALWAYS USE care when opening
the oven door. Let hot air and steam
escape before moving foods
4
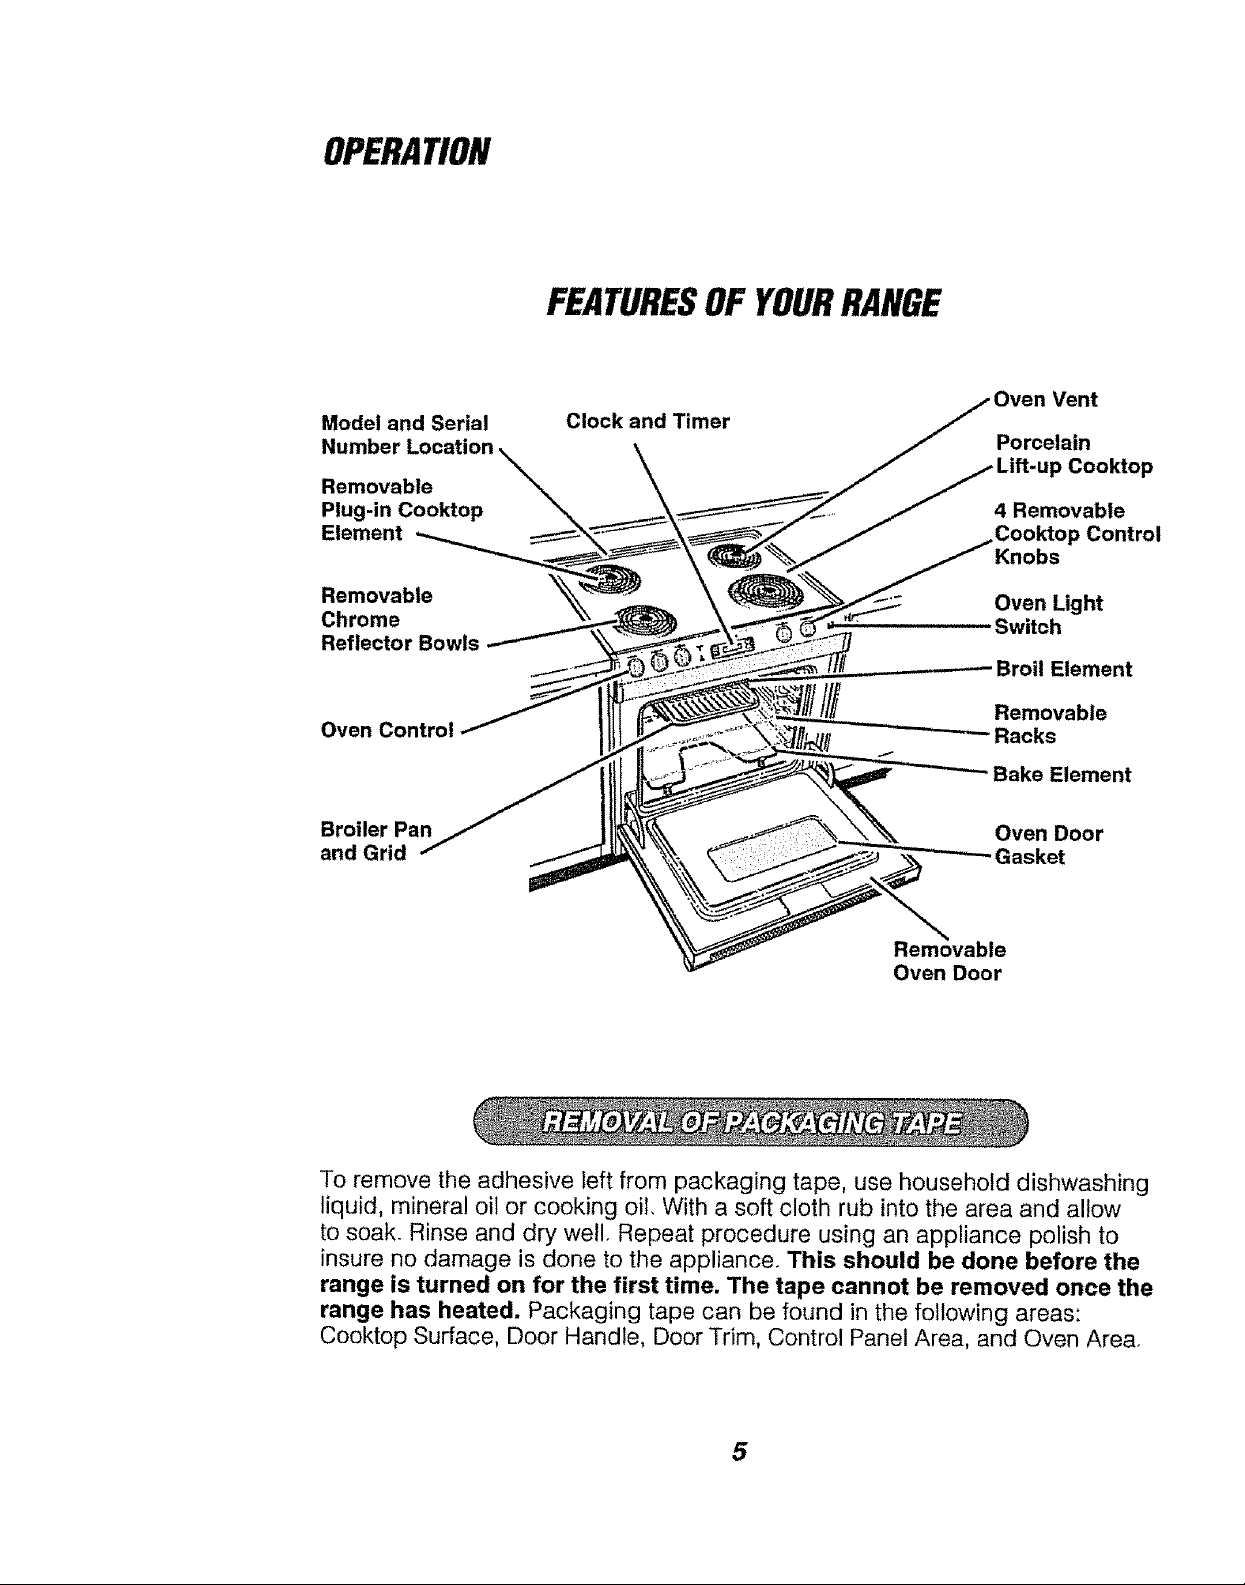
OPERATION
Model and Serial
Number Location
Removable
Plug-in Cooktop
Element
FEATURESOFYOURRANGE
Vent
Clock and Timer
Porcelain
Cooktop
4 Removable
) Control
Knobs
Removable
Chrome
Reflector Bowls
Oven Control
Broiler Pan
and Grid
Oven Light
Switch
Broil Element
Removable
Racks
Oven Door
Gasket
le
Oven Door
To remove the adhesive left from packaging tape, use household dishwashing
liquid, mineral oil or cooking oil, With a soft cloth rub into the area and allow
to soak Rinse and dry well Repeat procedure using an appliance polish to
insure no damage is done to the appliance. This should be done before the
range is turned on for the first time. The tape cannot be removed once the
range has heated. Packaging tape can be found in the following areas:
Cooktop Surface, Door Handle, Door Trim, Control Panel Area, and Oven Area.
5
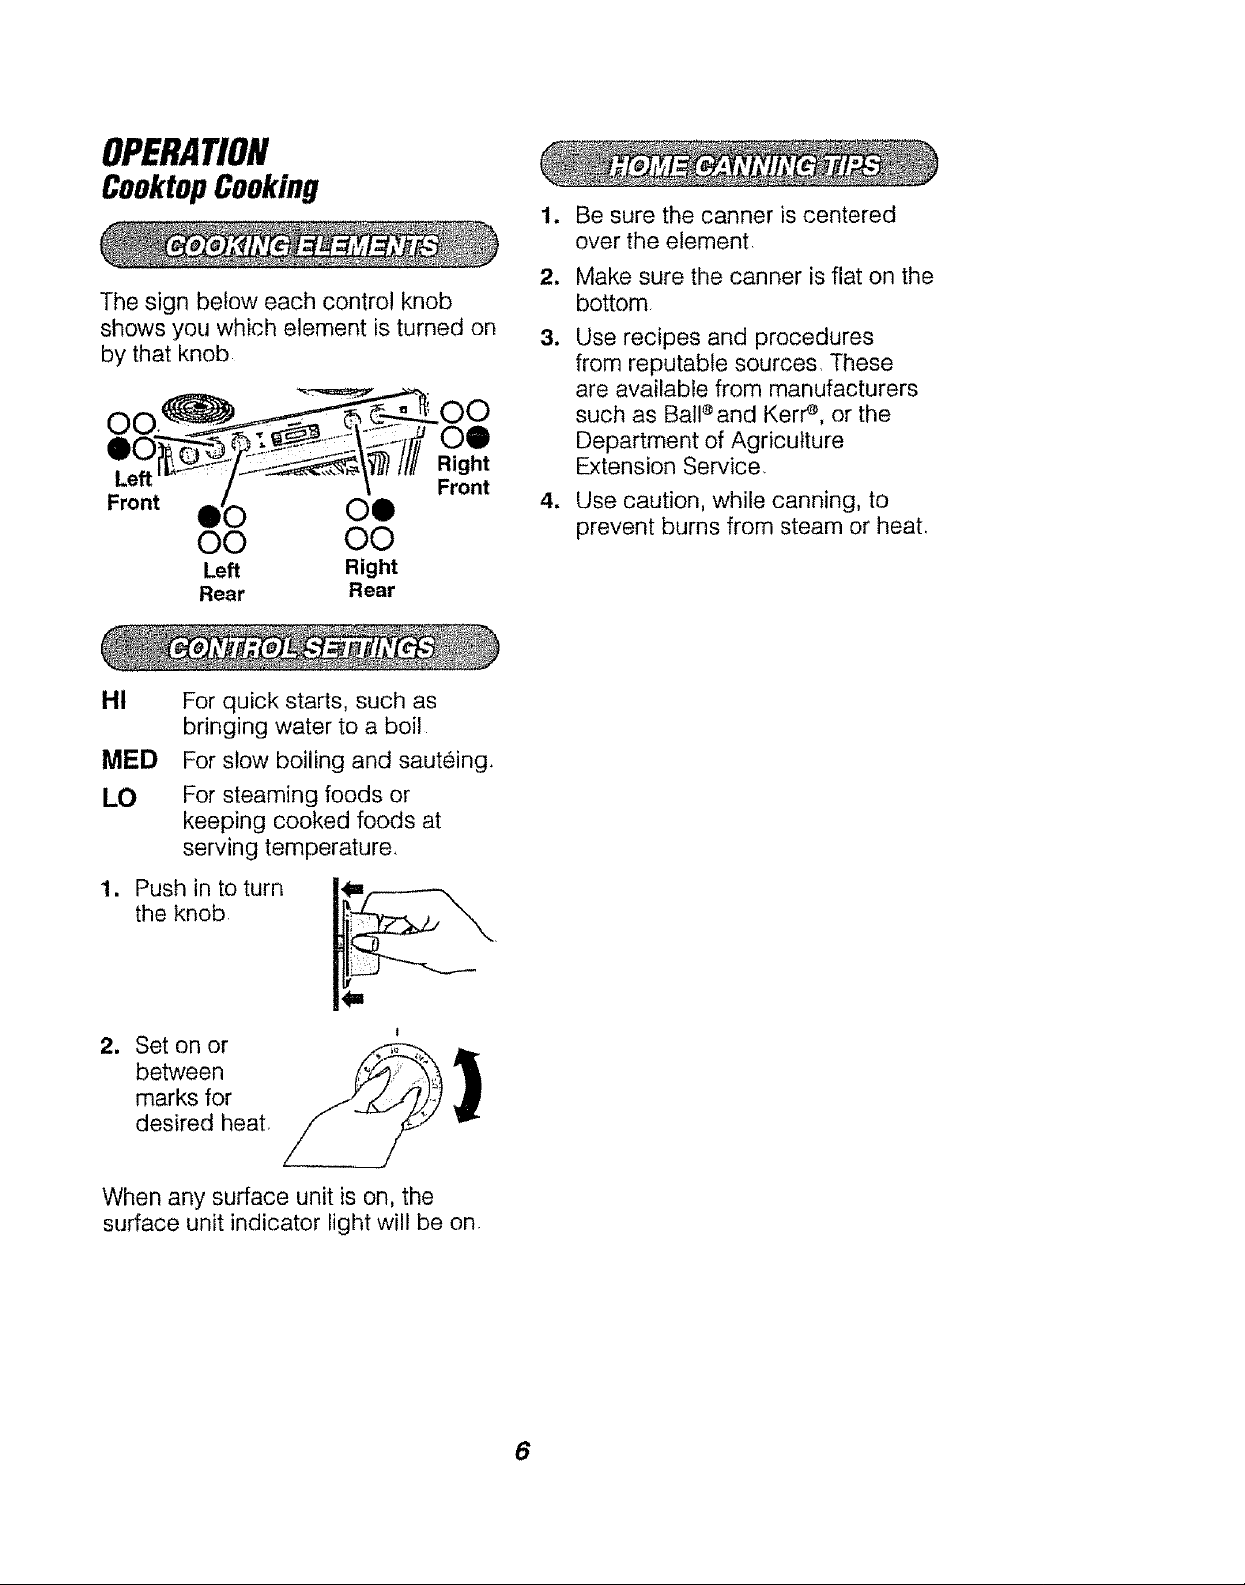
OPERATION
CooktopCooking
The sign below each control knob
shows you which element is turned on
by that knob
O0
00
Left
Front
OQ
O0 O0
Left Right
Rear Rear
Right
Front
Be sure the canner is centered
over the element,
Make sure the canner is flat on the
2,
bottom
3.
Use recipes and procedures
from reputable sources, These
are available from manufacturers
such as Ball®and Kerr e, or the
Department of Agriculture
Extension Service,
s
Use caution, while canning, to
prevent burns from steam or heat.
HI
MED
LO
1. Push in to turn
w Set on or
When any surface unit is on, the
surface unit indicator light will be on.
For quick starts, such as
bringing water to a boil
For slow boiling and sauteing
For steaming foods or
keeping cooked foods at
serving temperature,
the knob.
between
marks for
desired heat,
6
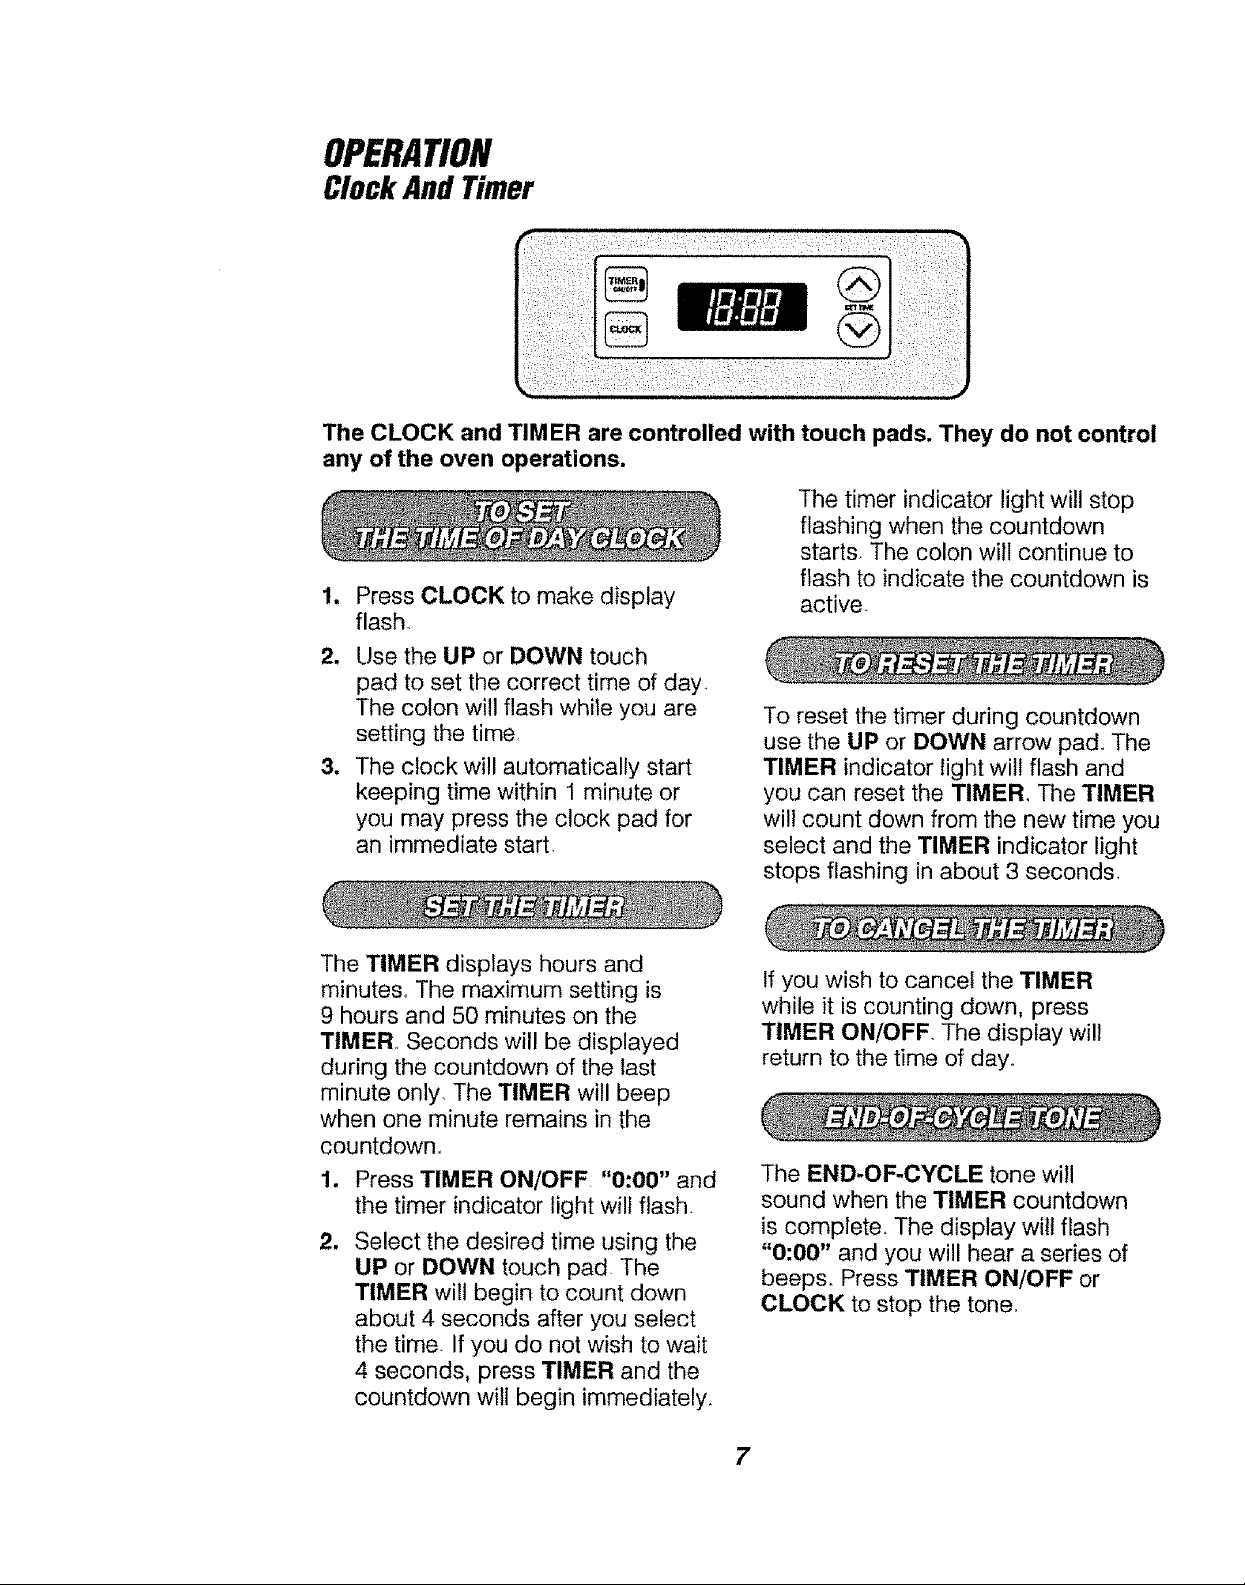
OPERATION
ClockAnd Timer
The CLOCK and TIMER are controlled with touch pads. They do not control
any of the oven operations.
The timer indicator light will stop
flashing when the countdown
starts The colon will continue to
flash to indicate the countdown is
Press CLOCK to make display
flash
2, Use the UP or DOWN touch
pad to set the correct time of day
The colon will flash while you are
setting the time
3, The clock will automatically start
keeping time within 1 minute or
you may press the clock pad for
an immediate start
active
To reset the timer during countdown
use the UP or DOWN arrow pad° The
TIMER indicator light will flash and
you can reset the TIMER. The TIMER
will count down from the new time you
select and the TIMER indicator light
stops flashing in about 3 seconds.
The TIMER displays hours and
minutes. The maximum setting is
9 hours and 50 minutes on the
TIMER° Seconds will be displayed
during the countdown of the last
minute only The TIMER will beep
when one minute remains in the
countdown.
.
Press TIMER ON/OFF "0:00" and
the timer indicator light will flash
2.
Select the desired time using the
UP or DOWN touch pad The
TIMER will begin to count clown
about 4 seconds after you select
the time. If you do not wish to wait
4 seconds, press TIMER and the
countdown will begin immediately.
If you wish to cancel the TIMER
while it is counting down, press
TIMER ON/OFF The display will
return to the time of day..
The END-OF-CYCLE tone will
sound when the TIMER countdown
is complete. The display wilt flash
"O:00" and you will hear a series of
beeps. Press TIMER ON/OFF or
CLOCK to stop the tone,
7
OPERATION
OvenCookingTips
It is normal to have some odor when
using your oven for the first time. To
help eliminate this odor, ventilate the
room by opening a window or
using a vent hood,
IMPORTANT: Never cover the oven
bottom or oven rack with aluminum
foil, Improper use can cause poor
heat flow, poor baking resutts, and
may damage the oven finish, To
prevent staining from spillovers, you
may place a piece of aluminum foil or
a cookie sheet on the rack below the
food which may spill over
Preheating is bringing the
temperature up to the temperature
you will be using during baking. Let
the oven preheat thoroughly when
recipes call for preheating.
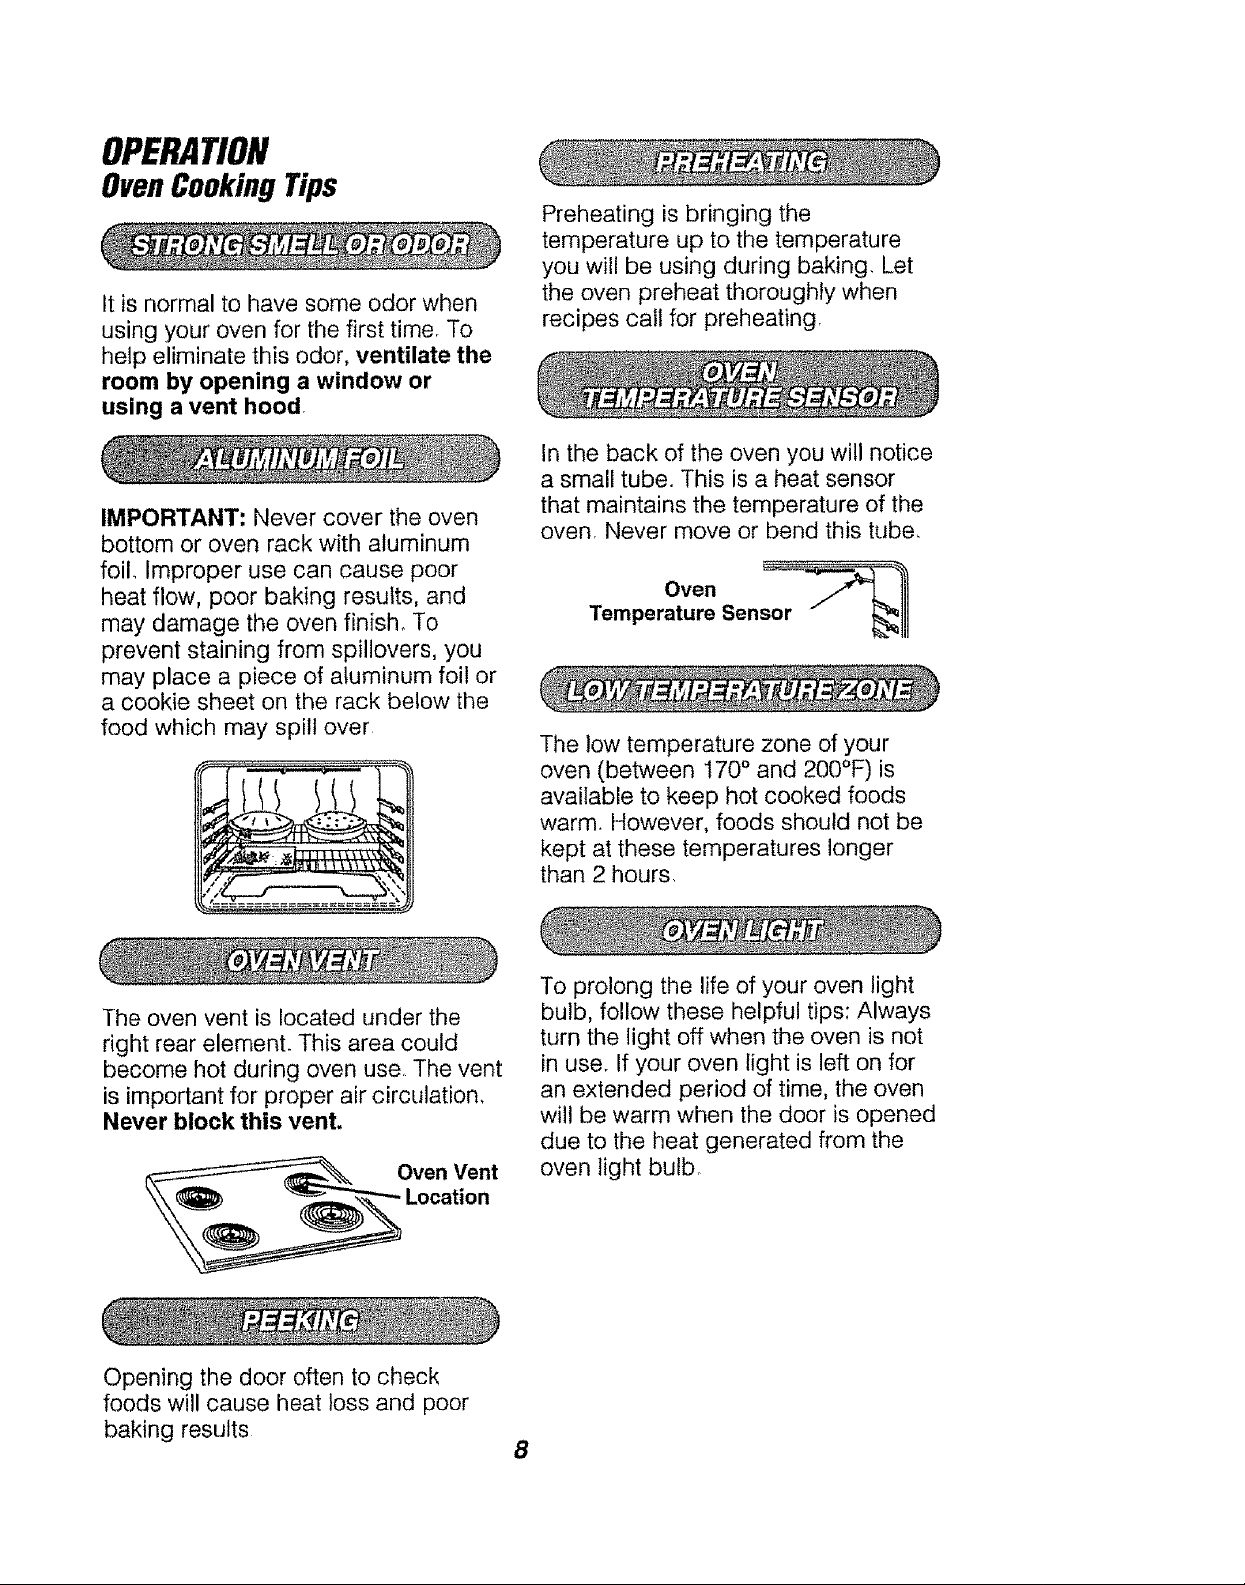
In the back of the oven you will notice
a small tube. This is a heat sensor
that maintains the temperature of the
oven. Never move or bend this tube,
Oven _ _-_
Temperature Sensor _ _!!1
The low temperature zone of your
oven (between 170 ° and 200°F) is
available to keep hot cooked foods
warm. However, foods should not be
kept at these temperatures longer
than 2 hours.
The oven vent is located under the
right rear element. This area could
become hot during oven use. The vent
is important for proper air circulation,
Never block this vent.
Opening the door often to check
foods will cause heat loss and poor
baking results
To prolong the life of your oven light
bulb, follow these helpful tips: Always
turn the light off when the oven is not
in use. If your oven light is left on for
an extended period of time, the oven
will be warm when the door is opened
due to the heat generated from the
oven light bulbr
8
OPERATION
OvenCookingTips(cont.)
Most recipes for baking have been
developed using high-fat products
such as butter or margarine (80% fat
by weight--the federal requirement
for products labeled "margarine").
You will get poor results if cakes, pies,
pastries, cookies or candies are made
with low-fat spreads, Low-fat spreads
contain less fat and more water.
The high moisture content of these
spreads affects the texture and flavor
of favorite baked recipes. The lower
the fat content of a spread product,
the more noticeable these differences
become. To ensure best results, use
margarine, butter or stick spreads
containing at least 70% vegetable oil.
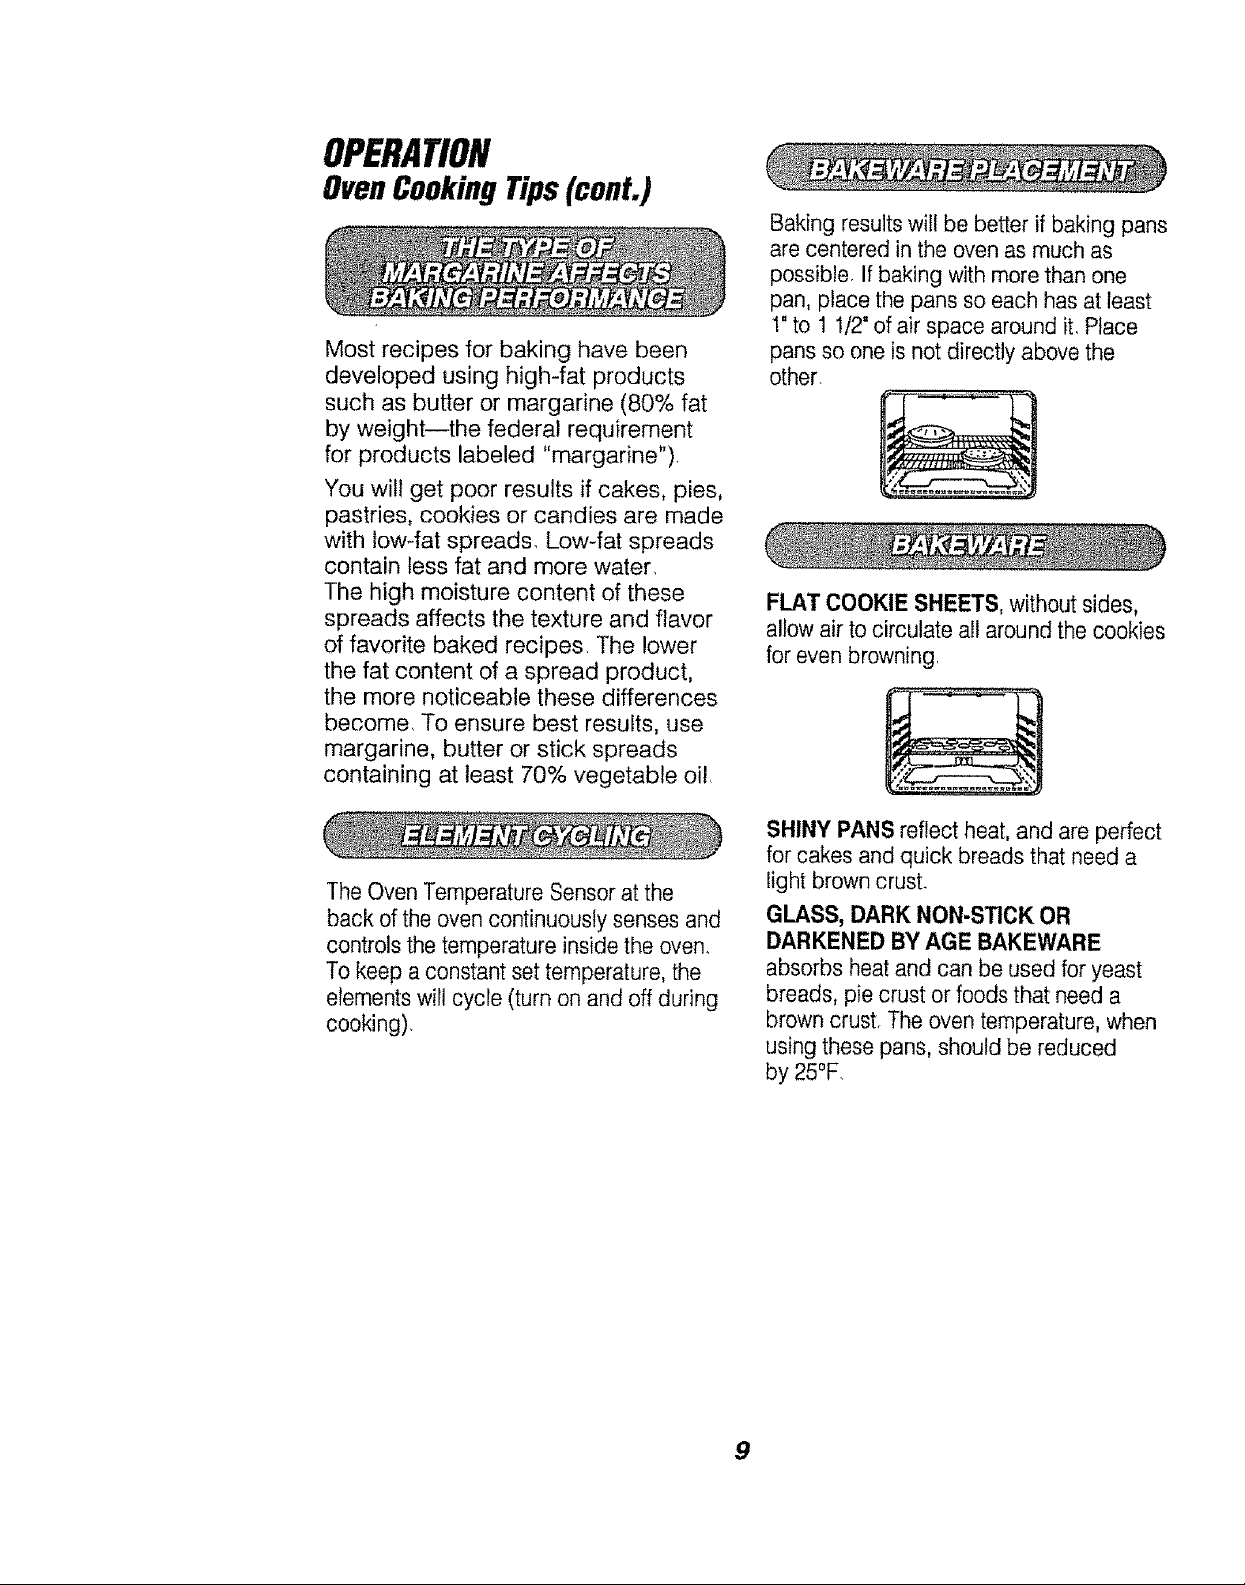
Baking results will be better if baking pans
are centered in the oven as much as
possible. If baking with more than one
pan, place the pans so each has at least
1"to 1 1/2' of air space around it. Place
pans so one is not directly above the
other.
FLAT COOKIE SHEETS, without sides,
allow air to circulate all around the cookies
for even browning.
The Oven Temperature Sensor at the
back of the oven continuously senses and
controls the temperature inside the oven.
To keep a constant set temperature, the
elements will cycle (turn on and off during
cooking).
SHINY PANS reflect heat, and are perfect
for cakes and quick breads that need a
light brown crust.
GLASS, DARK NON-STICK OR
DARKENED BY AGE BAKEWARE
absorbs heat and can be used for yeast
breads, pie crust or foods that need a
brown crust. The oven temperature, when
using these pans, should be reduced
by 25°F.
9
OPERATION
OvenCookingTips(cont.)
The oven racks are designed with stop
locks, a convenience as well as a safety
precaution° The guides have a bump to
prevent the racks from tilting when racks
are pulled out of the oven. This design
allows the racks to be inserted in only
one way.
Bump in
Rack Guide
You may feel that your new oven
cooks differently than the oven it
replaced. We recommend that you
use your new oven a few weeks to
become more familiar with it, following
the times given in your recipes as a
guide, if you fee! your oven is too
hot or too cool for your cooking
preference, see Do-It-Yourself
Adjustment in the back of this manual
to make the adjustment.
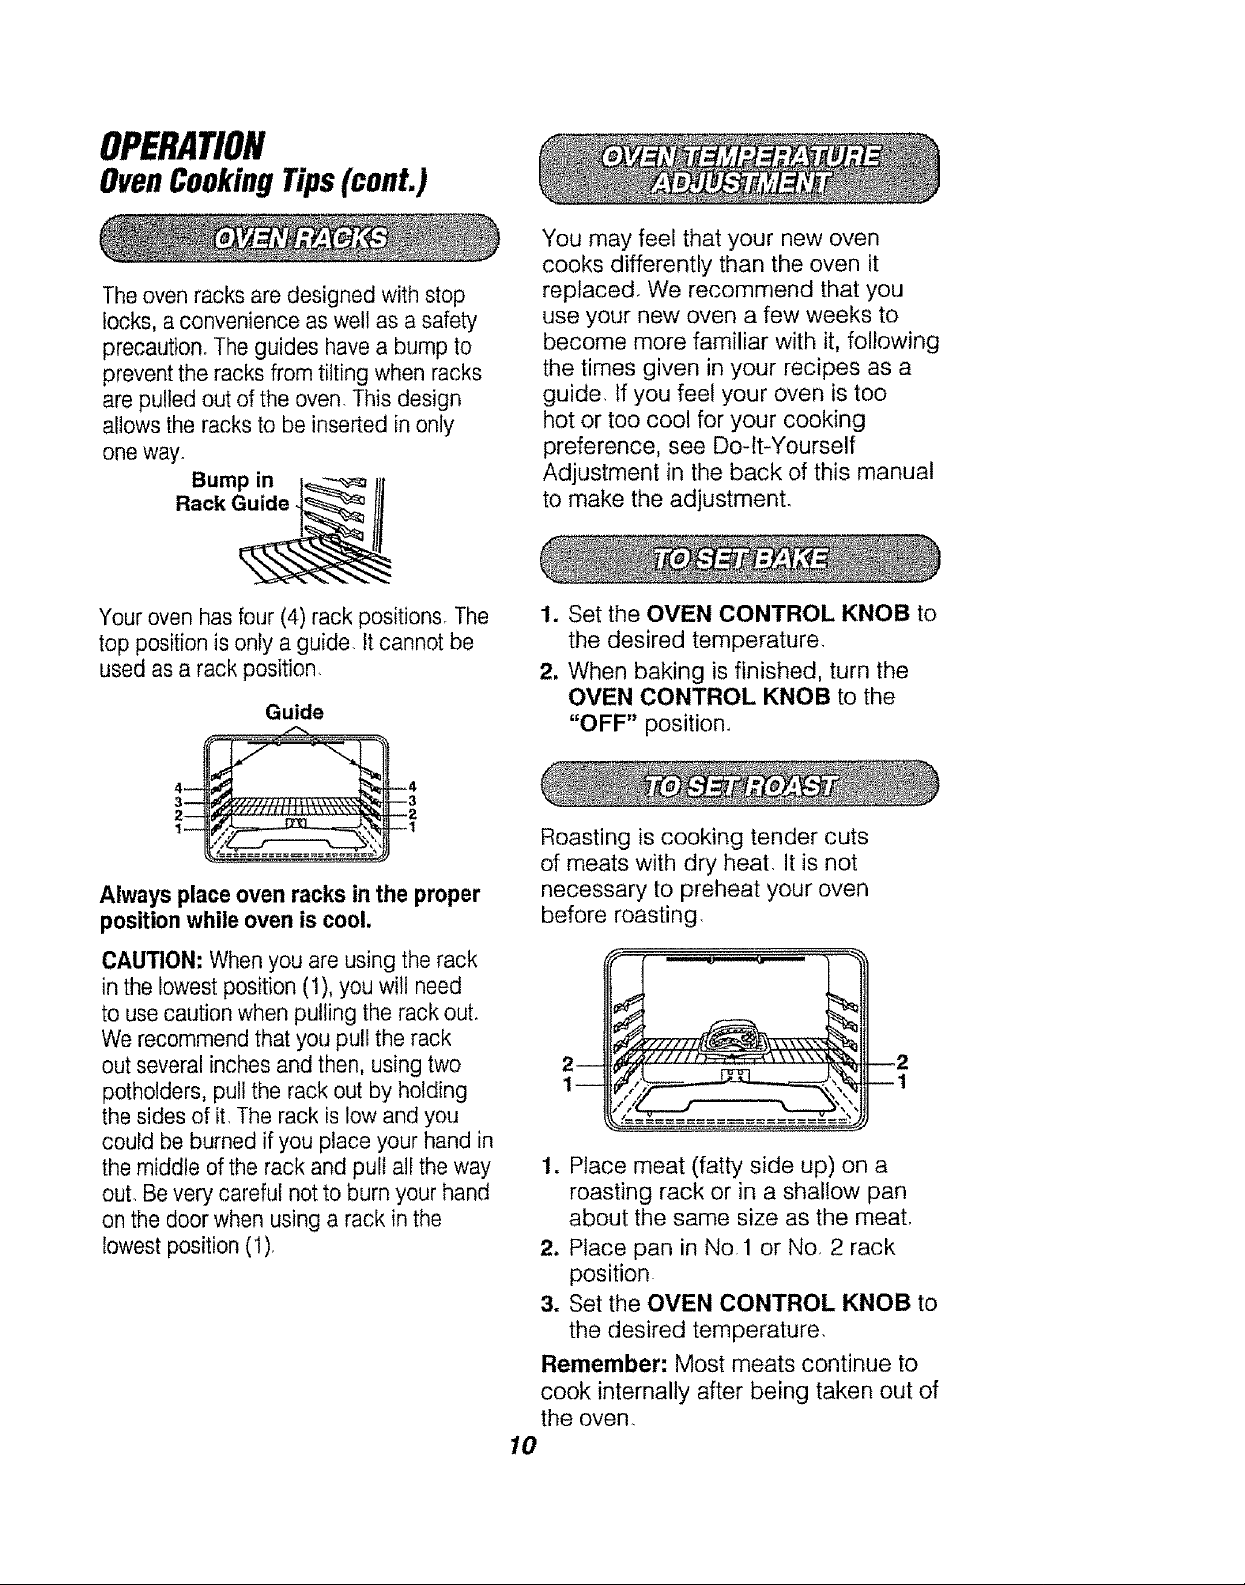
Your oven has four (4) rack positions The
top position is only a guide. It cannot be
used as a rack position.
Guide
Always place oven racks in the proper
position while oven is cool.
CAUTION: When you are using the rack
in the lowest position (1), you will need
to use caution when pulling the rack out.
We recommend that you pull the rack
out several inches and then, using two
potholders, pull the rack out by holding
the sides of it, The rack is low and you
could be burned if you place your hand in
the middle of the rack and pull all the way
out. Be very careful not to burn your hand
on the door when using a rack in the
lowest position (1).
1. Set the OVEN CONTROL KNOB to
the desired temperature
2. When baking is finished, turn the
OVEN CONTROL KNOB to the
"OFF" position.
Roasting is cooking tender cuts
of meats with dry heat, It is not
necessary to preheat your oven
before roasting,
1. Place meat (fatty side up) on a
roasting rack or in a shallow pan
about the same size as the meat,
2. Place pan in No. 1 or No, 2 rack
position
3. Set the OVEN CONTROL KNOB to
the desired temperature
Remember: Most meats continue to
cook internally after being taken out of
the oven.
10
OPERATION
Broiling
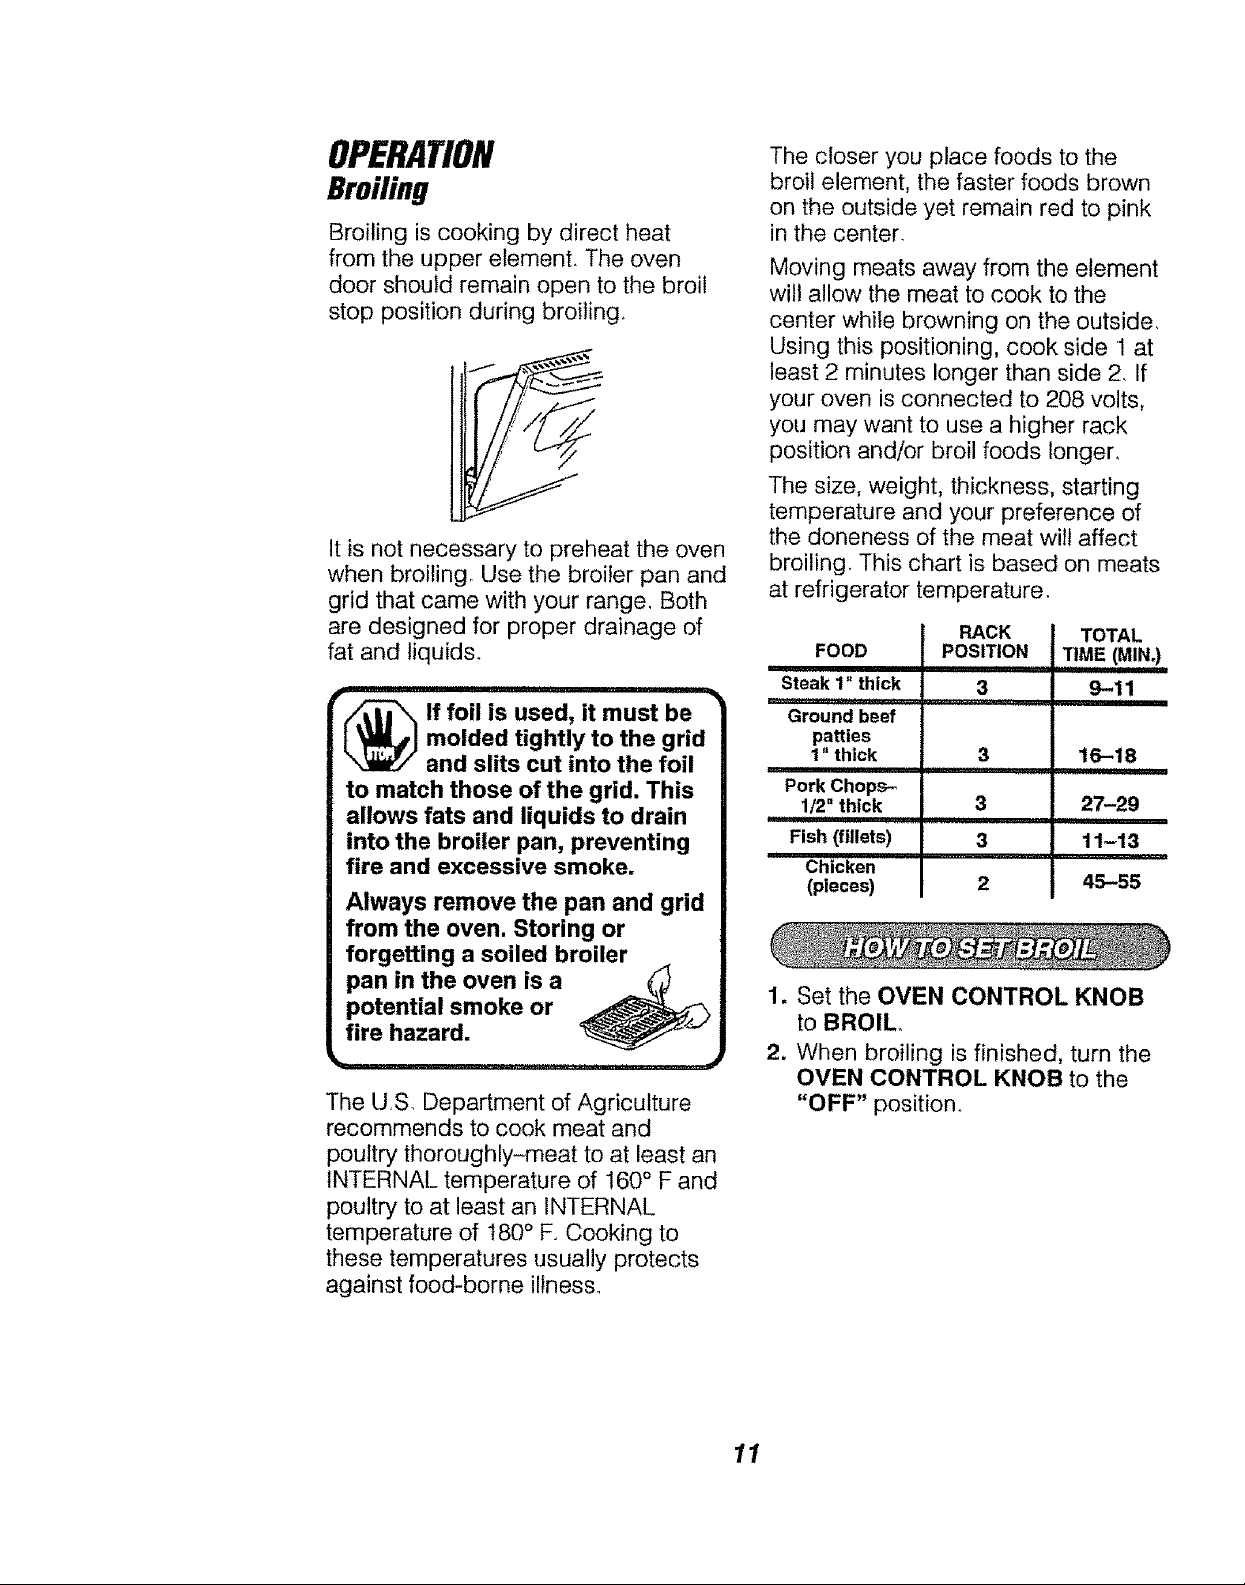
Broiling is cooking by direct heat
from the upper element. The oven
door should remain open to the broil
stop position during broiling
It is not necessary to preheat the oven
when broiling Use the broiler pan and
grid that came with your range, Both
are designed for proper drainage of
fat and liquids.
(_ If foil is used, it must be
t _W_/J molded tightly to the grid
i. ,,,,!,,!,,•
to match those of the grid. This
allows fats and liquids to drain
into the broiler pan, preventing
fire and excessive smoke.
Always remove the pan and grid
from the oven. Storing or
forgetting a soiled broiler
pan in the oven is a
potential smoke or
fire hazard.
i, ,..... r llll iI ii i I
The U,S. Department of Agriculture
recommends to cook meat and
poultry thoroughly-meat to at least an
INTERNAL temperature of t60 ° F and
poultry to at least an INTERNAL
temperature of 180 ° F. Cooking to
these temperatures usually protects
against food-borne illness°
and slits cut into the foil
The closer you place foods to the
broil element, the faster foods brown
on the outside yet remain red to pink
in the center.
Moving meats away from the element
will allow the meat to cook to the
center while browning on the outside.
Using this positioning, cook side 1 at
least 2 minutes longer than side 2, If
your oven is connected to 208 volts,
you may want to use a higher rack
position and/or broil foods longer,
The size, weight, thickness, starting
temperature and your preference of
the doneness of the meat will affect
broiling. This chart is based on meats
at refrigerator temperature.
FOOD
Steak 1" thick
Ground beef
patties
1" thick
Pork Chops-
1/2" thick
Fish (fillets)
I
Chicken
(pieces)
RACK
POSITION
3
,i,'1'"1,11'ii ......
3
3
U,llJl i, i,
3
TOTAL
TIME (MIN.)
IIIII I
9-11
16-18
27-29
11-13
45-55
1. Set the OVEN CONTROL KNOB
to BROIL.
2. When broiling is finished, turn the
OVEN CONTROL KNOB to the
"OFF" position.
11

CAREANDCLEANING
Cleaning
CLEANING MATERIALS
= Dishwashing detergent
• Warm water
• Soft cloth
Do not use abrasive cleaners,
industrial cleaners, or bleach.
CLEANING MATERIALS
• Dishwashing detergent
• Warm water
• Soap-filled steel-wool pad
• Commercial oven cleaner
TO CLEAN
Allow the pan to soak. Sprinkle the
grid with dishwashing detergent and
cover with a damp cloth or paper
towel and let stand. Scour as needed.
Wash, rinse, and dry well. You may
also place both the pan and grid in
the dishwasher.
CLEANING MATERIALS
• Oven cleaner
• Soap-fitted steel-wool pad
CLEANING MATERIALS
• Dishwashing detergent
• Warm water
_,Paper towels
TO CLEAN
Do not use oven cleaners, cleansing
powder, or harsh abrasives. If
marinades, tomato sauce, basting
materials, etc., should spill, wipe up
as much as possible. When surfaces
have cooled thoroughly, clean
painted areas.
TO CLEAN
For everyday cleaning, use glass
cleaner and a paper towel. For
stubborn soil, use paste of baking
soda and water. Rinse thoroughly.
CLEANING MATERIALS
o Soft abrasive cleaner
= Sponge scrubber
Do not use hard, abrasive cleaners,
industrial cleaners, or bleach.
TO CLEAN
Clean up after each oven use. Rinse
thoroughly. Do not coat bake or broil
element with oven cleaner. When
using oven cleaner read directions on
container carefully.
12

CAREANDCLEANING
RemovableParts
tl't II ._
CLEANING MATERIALS
* Dishwashing detergent
* Warm water
* Soft cloth
Molded Rib
Clear
Stem
Spring Clip
TO REMOVE
1. Be sure the control knob is in the
off position.
2. Pull straight off the stem.
Using a piece of string can make
removing the knob easier, Slip the
string under and around the knob,
then pull straight out.
TO CLEAN
Wash the knob thoroughly with soapy
water, Dry completely with a soft
cloth DO NOT let the knob soak.
_ AUTION =Disconnect
breaker or fuse box before
attempting to replace the oven
light bulb, Do not touch a hot
light bulb with wet hands or a
wet cloth. Wait until the bulb has
cooled and use a dry cloth.
L_ ,I
TO REPLACE
1. Unscrew and remove the glass
2. Unscrew the light bulb,
3. Replace the bulb with a 3 1/2"
40 watt appliance bulb.
4. Replace the cover.
electrical power to the
oven at the main circuit
/__iGlass Retainer
"_ Live Collar
Bulb __ "
Glass Cover
cover.
.
TO REPLACE
1. Check the back of the knobThe
molded rib of the knob is designed
to fit perfectly onto the knob stem°
2. Align the molded rib to the clear
groove in the knob stem.
3. Push the knob back as far as it
will go,
13

CAREANDCLEANING
RemovableParts (cont.)
1. Grasp the edge of the cooktop and
lift up.
2. Holding the cooktop with one
hand, lift the support rod up and
rest the edge of the cooktop on it.
3. When cleaning is finished, lower
the support rod and the cooktop.
_ CAUTION: When
the support rod. The porcelain
enamel surface of the cooktop
can chip if dropped.
k,_ ............ -,_
working in this area, be
careful not to bump into
_ AUTION: Do not lift
the element more than I".
Lifting the element
more than 1" can damage the
receptacle, causing the element
not to lie flat when it is plugged
back in.
TO CLEAN THE DRIP BOWL
For brown food stains - use
dishwashing detergent, warm water,
plastic scouring pads, mild abrasive
cleaners, soap-filled scouring pads or
ammonia. Clean drip bowls after each
use Rinse and dry well. Foods that
are not removed can cause
permanent stains that cannot be
removed, For heavily soiled bowls,
place an ammonia-soaked paper
towel over the bowl to loosen the soil,
then gently scrub the bow! with a
plastic scouring pad.
For blue-gold heat stains - use a
metal polish, These stains are caused
by overheating, and are usually
permanent. To help minimize this
effect, avoid excessive use of high
heat settings and use flat bottom
pans that do not extend more than 1"
from the edge of the cooking element.
Element __
Drip Bowls Receptacle
TO REMOVE
1. Be sure the controls are in the off
position and the elements are cool
before attempting to remove them.
2. Grasp the element and lift slightly,
just enough to clear the drip bowl
and pull it straight out.
3. Lift out the drip bowl
p._ .................... •
_ AUTION: Do not
operate the cooktop
elements without the drip
bowl in place. Scorching of the
cooktop, burning of wiring
insulation and loss of energy
will occur.
TO REPLACE THE UNIT
1. Place the drip bowl into the
opening and make sure the
receptacle is visible.
2. Slide the element firmly back into
the receptacle and lower it onto the
drip bowl
14

CAREANDCLEANING
Removable Parts (cont.)
Broil Stop Position
CLEANING MATERIALS
* Dishwashing detergent
• Warm water
• Scouring pad or soap-filled
steel-wool pad
Bump in _--_---_
Rack Guide _._ Ill
TO REMOVE
1. Pull the racks out to the stop lock
position
2. Pull up the front of the rack and
slide under the bump of the rack
guide,
TO CLEAN
Clean with warm water and detergent
For hard to remove stains, gently
scrub with a scouring pad or a
soap-filled stee!-wool pad° Rinse well
TO REPLACE
1. Place the raised back of the rack
onto the rack guides.
2. Lift the front of the rack until the
raised back slides under the bump
of the rack guides,
3. Slide the rack all the way back,
Yf
TO REMOVE
1. Open the door to the broil stop
position,
2. Grasp the door at each side and lift
up and off the hinges DO NOT
LIFT DOOR BY THE HANDLE.
r " _q
_ AUTION: When the
broil stop position, as a
precaution, cover the hinge
arms with toweling or an empty
paper towel roll. Do not bump or
try to move the hinge arms while
working in the oven area. They
could snap back, causing injury
to the hands or damage to the
porcelain finish of the front
frame.
• ............. . =4
TO REPLACE
1. Make sure the hinge arms are in
the broil stop position.
2. Lift the door by the sides_
3. Line up the slots at the bottom
edge of the door with the hinge
arms
4. Slide the door down onto the hinge
arms as far as it will go,
5, Close the door,
door is removed and the
hinge arms are at the
15

BEFORECALLINGFORSERVICE
To save you time and money, before making a service call, check the list below
for any problem you may feel you have with the performance of your range.
If the problem is something you cannot repair, use the Consumer Service
Numbers located at the back of this manual, When making any calls, have the
Model No., Serial No., Repair Parts List, Use and Care Manual and the Date
of Purchase available.
PROBLEM POSSIBLE CAUSE POSSIBLE SOLUTION
Range will not No power to range a. Check the household circuit
work; totally breaker or fuse box,
inoperative, b. Check to make sure the range is
plugged in,
Foods do not
bake properly.
a. Oven was not
preheated long
enough
b. Improper rack or
pan placement
Oven vent
Cl
blocked or
covered.
d. Improper use
of foil
em
Improper
temperature
setting for
utensil used
f. Oven
temperature
needs
adjustment,
g. Range and oven
rack not level.
h. Oven controls
improperly set
a. Be sure to preheat, when
recipe caIls for it
b. Maintain uniform air space
around pans and utensils. See
oven cooking tips section.
c. Keep vent clear
d. Use of foil not recommended
on racks or oven bottom.
ew
Reduce temperature 25
degrees for glass or dull/
darkened pans
f. Checkoven temperature
adjustment section
g. Check the installation
instructions for leveling,
h. See the Baking section,
16

BEFORECALLINGFORSERVICE
PROBLEM POSSIBLE CAUSE POSSIBLE SOLUTION
1,
Oven Oven control See the temperature adjustment
temperature calibration, instructions following this section,
seems
inaccurate.
.... :: : : ............................................ L JL I I lln ,n , I L, JUJL',' _±,L_
Oven light a. Light switch is inoff a. Check switch setting°
does not work, position,
b. Oven light bulb loose b. Check or replace light bulb,
or burned out°
Foods do a. Improper rack a, Check broil pan placement; see
not broil position broiling section,
properly, b, Oven preheated b. Do not preheat when broiling°
c. Improper use of foil c, Check broiling section.
d, Oven door closed d, Open door to broil stop position.
during broiling,
e, Low voltage e,
(208 volts).
f, Improper broiling f.
time.
Use higher rack position and/or
longer cooking time,
Check broiling chart in broiling
section,
g. Oven controls
g. See the Broiling section.
improperly set
Oven a, Dirty oven. a, Check for heavy spillover.
smokes, b. Improper use b. Use of foil not recommended
of aluminum foil
c, Broiler pan
containing grease
c, Clean pan and grid after
each use.
left in the oven.
Cook-top a. Elements
will not work; unplugged,
oven is ok.
b, Control set
improperly.
Oven will
Control set improperly,
not work;
a. Check the elements; make sure
they are properly plugged into the
receptacle
b, Push knob in while turning to
temperature setting
Check the control and check baking
or broiling section.
cooktop ok.
12"

"DOIT YOURSELF"
TEMPERATURE
ADJUSTMENT
You may feel that your new oven
cooks differently than the oven it
replaced. We recommend that you
use your new oven a few weeks to
become more familiar with it,
following the times given in your
recipes as a guide.
If you think your new oven is too hot
(burning foods) or not hot enough
(foods are undercooked), you can
adjust the temperature yourself The
appearance and texture of foods is a
better indicator of oven accuracy than
an oven thermometer These
thermometers can vary by
20-40 degrees from the true
temperature of the oven. In addition,
the oven door must be opened to
read these thermometers. Opening
the door will change the temperature
of the oven,,
To decide how much to change
the temperature, set the oven
temperature 25 degrees higher
(if foods are undercooked) or
25 degrees lower (if foods are
burning) than the temperature in your
recipe, then bake, The results of this
"test" should give you an idea of how
much the temperature should be
changed,
1. Make sure the oven control knob
is in the off position. Remove the
knob by pulling it straight off_
2. Look at the back of the knob.
3. Use a screwdriver to carefully
loosen both screws.
4. To make your oven temperature
HOTTER, hold the knob by the
handle and turn the knob skirt so
the top screw moves toward the
word hotter. As you turn the skirt
you wilt hear clicks and feel
notches or teeth Each click or
notch will adjust the temperature
15°F hotter
5. To make your oven temperature
COOLER, hold the knob by the
handle and turn the knob skirt so
that the bottom screw moves
toward the word cooler. As you
turn the skirt you wit! hear clicks
and feel notches or teeth, Each
click or notch will adjust the
temperature 15°F cooler,
6. When you have made the desired
temperature adjustment, re-tighten
both screws and return the oven
control knob to your range
18

NOTES
19

DROP-INRANGEWARRANTY
FFULL ONE-YEAR WARRANTY ON ALL PARTS
If, within one year from the date of installation, any part fails to function
properly due to a defect in material or workmanship, Sears will repair or
replace it, at our option, free of charge
If this product is subjected to other than private family use, the above
warranty is effective for only 90 days
WARRANTY SERVICE IS AVAILABLE BY CONTACTING THE NEAREST
SEARS SERVICE CENTER IN THE UNITED STATES,
This warranty gives you specific legal rights, and you may also have other
rights which vary from state to state,
Sears Roebuck and Co Dept 817 WA Hoffman Estates, IL 60179
To further add to the value of your Range,
Buy a Sears Maintenance Agreement.
Years of Ownership Coverage 1st Year 2nd Year 3rd Year
1. Replacement of Defective Parts W MA M.4
2. Annual Preventive Maintenance MA M.4 MA
_. Check at your request
W - Warranty MA - Maintenance Agreement
Kenmore Appliances are designed, manufactured and tested for years of
dependable operation. Yet, any appliance may require service from time to
time. The Sears Maintenance Agreement offers you an outstanding service
program for your product,
The table above shows the additional benefits a Sears Maintenance
Agreement offers compared to a Sears Warranty.
Contact your Sears Sales Associate or local Sears Service Center to
purchase a Sears Maintenance Agreement.
2O

ESTUFAELECTRICADE30"
TIPO"DROP-IN"
Indite
Seguridad en el uso de la
estufa ...................................... 22-23
Caracteristicas de su estufa ......... 24
C6mo sacar la cinta de empaque 24
Elementos para cocinar ................. 25
C6mo programar los controles .... 25
C6mo hacer conservas en casa ... 25
C6mo poner el reloj ......................... 26
C6mo programar el cron6metro . .26
C6mo reprogramar
el cron6metro ................................. 26
Para cancelar el cron6metro ........ 26
Tono ................................................ 26
Consejos para cocinar en
el homo ......................................... 27
Horneado con margarina .............. 27
Cicto de los elementos .................. 28
C6mo colocar los utensilios .......... 28
Utensilios ................................. 28
Parrillas det homo .................. 28, 29
C6mo hornear ................................... 29
Para asar ....................................30
Panel de control .............................. 31
Cacerola y parri!ta para asar ........ 31
Interior del homo ............................ 31
Cajon y lados de la estufa ........... 31
Vidrio de ta puerta del homo ......... 31
Moldura de la ventilaci6n
de la puerta ................................ 31
Perillas de control ......................... 32
Foco de la tuz del homo .............. 32
Cubierta levantable ......................... 33
Unidades de la superficie ...............33
Parrillas del homo ........................... 34
Puerta del homo .............................. 34
Antes de llamar para
un servicio ............................... 35-36
Ajuste a ta temperatura .......... 29, 37
Garantia ................................... 39
Nameros para servicios del
consumidor ............................... 40
Para su conveniencia y referencia futura, por favor escriba et ndmero de modelo y
serie en el espacio que se provee. Para ubicar levante la cubierta principal.
NUMERO DE MODELO:
IJl_lllJV
© Sears, Roebuck and Co
NUMERO DE SERIE:
21

INSTRUCCIONES
DESEGURIDAD
IMPORTANTES
IMPORTANTE: Para garantizar su seguridad,
la de su familia y la de su hogar, pot favor lea
su Manual del Consumidor cuidadosamente
Mant_ngalo a la mano para referencias
Ponga mucha atenci6n a tas secciones de
seguridad ASEGURESE que su estufa sea
instalada por un t6cnico especiatizado y que
haga tierra adecuadamente.
,, NO DEJE a los nir_ossin vigitancia cerca de
una estufa que se est6 usando..
• ENSE_E A LOS NtI_IOSa no jugar con los
controles o cualquier parte de la estufa y no
sentarse, subirse o pararse sobre la puerta
de este aparato o de cualquier otra parte
de la estufa.
- PRECAUOION' NUNCA GUARDE articulos
que sean de inter6s para los ni_os erl el
panG!lrasero o en los gabinetes sobre la
estufa. Los niSos que se suban sobre la
estufa podrlan resultar gravemente heridos_
,, GUARDE ESTE libro para un uso futuro.
• NUNCA USE su estufa para entibiar o
calentar una habitaci6n.
• NUNCA TRATE de reparar o reemplazar
una parte de la estufa a menos que las
instrucciones se den en este manual, Todo
otro trabajo deberla set hecho por un
t6cnico especializado.
• SIEMPRE MANTENGA los revestimientos
combustibles de las paredes, cortinas y
otros pai_os a uffa distancia prudente de
la estufa.
• NUNCA CAUENTE contenedores de
alimentos cerrados El aumento de la
presi6n podrla causar que el contenedor
explote y cause heridas.
, NUNCA DEJE contenedores de grasa o
goteaduras dentro det homo
• SIEMPRE MANTENGA el _.reade la estufa
despejada de cosas que se podrian quemar.
La acumulaci6n de comida y grasa y los
utensilios de madera se podflan incendiar
Los utensilios de pl&stico se podrian derretir
y las comidas en conservas podrfan explotar
Su homo nunca se deberla usar para
almacenar cosas.
• SIEMPRE MANTENGA la estufa despejada
de cosas que se podrian quemar (gasolina y
otros vapores o llquidos inflamables)
• NUNCA TRATE de limpiar las superficies
calientes<Algunos limp!adores producen
vapores nocivos y los paSos o las esponjas
mojadas podrian causar quemaduras por
vapor,
• NUNOA USE ropa suelta cuando use la
estufa
• NUNOA USE una toalla u otro patio
abullado come agarradera y asegurese qua
la agarradera est6 seca Las agarraderas
ht)medas y los paSos y las esponjas mojadas
podrian causar quemaduras por vapor NO
PERMITA que las agarraderas toquen las
zonas para cocinar calientes
,, NO TOQUE tas superficies para cafentar, las
superficies cerca de e!las o las superficies
interiores Estas podrfan estar
suficientemente calientes para quemar
aunque se vean de color oscuro Durante y
despues del uso, notoque o permita que la
ropa o materiales inflamables hagan
contacto con las superficies cafientes hasta
que hayan tenido tiempo de enfriarse. Las
otras superficies cerca de las ventanillas de
ventilaci6n del homo, puerlas, ventanas y las
superficies para cocinar tambien podrian
estar suficientemente calientes para causar
quemaduras
• SOLO ClERTAS clases de utensilios de
vidrio o cer_mica se pueden usar para
cocinar en la cubierta. Asegurese que los
utensilios que seleccione est_n diseSados
para cocinar sobre la cubierta sin quebrarse
debido a los s0bitos cambios de
temperatura.
,, SIEMPRE TENGA cuidado cuando toque los
elernentos de la cubierta Retendr_n calor
despu6s de que la estufa se haya apagado.
• NUNCA OBSTRUYA laventilaci6n del
homo bajo el etemento derecho de atr_s..
22

INSTRUCCiONES
DESEGURIDAD
• NUNCA USE papet de atuminio para cubrir el
rondo deI homo El uso incorrecto del papel
de aluminio podria empezar un incendio, o
podrTaresultar en un golpe de corriente,
IMPORTANTES
• LAS OLLAS QUE SE USEN para cocinar
en la cubierta deberlan ser de rondo piano
y Iosuficientemente grandes para cubrir el
&tea que se est_ utilizando, Los utensilios
que son demasiado pequeSos exponen el
elemento calentador y podr[a causar un
contacto directo o elincendiode la ropa.
El tamaSo correcto de los utensitios tarnbien
rnejorar#,la eficiencia
• StEMPRE USE los recipientes para derrames
para evitar da5os a losalambrados y a los
componentes, No use forros de aluminio o de
pape! de aluminio sobre los recipientes El
uso inadecuado de estos podria resultar en
un riesgo de golpe de corriente o incendio.
• NUNCA DEJE las zonas para calentar de ]a
superficie sin vigi[ancia a temperaturas altas
Los derrames podrlan resultar en humo o en
derrames de grasa que se podrian incendiar
• SIEMPRE COLOQUE las agarraderas
(manillas) de las ollas hacia adentro y lejos
de lasotras zonas para calentar de [a
superficie para reducir elriesgo de
quemaduras, encendido, un contacto y
derrame accidental
• NUNCA PONGA los elementos para calentar
en agua
• CUANDO PREPARE comidas a lallama
debajo de la campana de ventilaci6n,
encienda el ventilador
• COLOQUE LAS PARRILLAS DEL HORNO
en la posiciSn deseada mientras et homo
est6 frto. Si las parrillas se deben mover
mientras er homo est_ caliente, no permita
que faagarradera haga contacto con el
quemador caliente del homo
• DESPUES DE ASAR A LA PARRILLA,
siempre saque ta cacerola y laparrillapara
asar del homo y limpielas. Lossobrados de
grasa en ]acacerola para asar podrfan
incendiarsela prSximavez que usted use
el homo.
• SIEMPRE TENGA cuidado cuando abra la
puerta deFhomo Deje que et aire ca]iente y
el vapor escapen antes de mover los
alimentos,
iii, •
_ RECAUCION: Nunca
alumlnio. El papel de aluminio puede
obstruir el paso normal del calor y
da_ar la estufa. Siempre utilice oilas
y woks de fondo piano y del mismo
tamaSo del elemento que se est_
usando, l.as utensilios no se deberlan
extender m_s all_ de 1" del borde del
elemento para cocinar.
;LEA Y COMPRENDA
ESTA IINFORMACION AHORA!
Asegt_rese que todos en su hogar
sepan qu6 hacer en caso de incendio.
Nunca use agua sobre un incendio de
grasa; esto solamente extender& las
llamas.
INCENDIO DE GRASA EN LA
CUBIERTA:
Nunca levante una olla en llamas...
1. Apague los elementos de la superficie
2. Soloque lallama con una tapa apretada,
FUEGO EN EL HORNO:
iNo trate de mover la cacerolal
1. Cierre la puerta del homo y apague los
2. Si el incendio continua, cuidadosamente
forre los recipientes para
derrames con papel de
soda para cocinar o con un extintor
qulmico, a espuma o "baton".
controles
abra la puerta, arroje soda para cocinar
sobre el fuego, o use un extintor de
quimico seco, espuma o "halon"
23

OPERACION
CARACTERISTICASDESUESTUFA
Ubicaci6n de
nt_mero de modelo
y serie
Elementos
enchufables
removibles
Recipientes
reflectores de
cromo
removibles
Control del
homo
Cacerola y
parrilla para
asar a la parrilla
Ventilaci6n del
Reloj y Cron6metro
Cubierta de
porcelana
4 Perillas
removibles
del control
la cubierta
interruptor de ia
iuz del homo
Elemento para
asar a la parrilla
Parrillas del homo
removibles
Elemento para
"hornear
Puerta removible
del homo
/
Sello de la puerta
del horno
Para sacar el residuo del adhesivo de la cinta de empaque, use un detergente llquido
normal para plalos, aceite mineral o para cocinar, Con un pano suave frote el Area y
permita que se remoje, Enjuague y seque bien, Repita el procedimiento usando un
pulidor para estufas para asegurarse que Ia estufa no se dane, Esto deberia hacerse
antes que la estufa se eneienda per primera vez. La cinta no se puede sacar una vez
que el estufa ha side calentado, La cinta de empaque se puede encontrar en las
siguientes _reas: Superficie de la cubierta, Manilla de la puerta, Area del panel de
control, Moldura de la puerta y Area del homo,
24

OPERACiON
CGmoCocinarenla Cubierta
La marca cerca de cada perilta de control
le muestra cu_l elemento se enciende con
esa perilla.
O0
Derecha
delantera
O0 QO OQ
00 O0 O0
Izquierda
delantera Izquierda Derecha
trasera trasera
1. Aseg_Jrese que la olla est6 centrada
sobre el quemador
2. Asegorese que la otla sea de fondo
piano.
3. Use recetas y procedimientos de
buenas fuentes, Estas se encuentran
disponibles de fabrieantes tales como
Ball" y Kerr _'y el Servicio de ExtensiOn
del Departamento de Agricultura
4. Tenga cuidado, cuando haga
conservas, para prevenir quemaduras
a oausa de vapor o calor
HI Para comienzos r&pidos, tal como
para hervir agua
MED Para hervir lentamente y freir
LO Para comidas al vapor o para
mantener los alimentos a
temperaturas para set servidos,
1. Empuje para hacer
girar la periIla.
2. Coloque entrelas
marcas para el _/'_ .41,_t
calor deseado,/,,_..y_AJ }
Cuando cualquier unidad de la superficie
este encendida, la luz indicadora de la
unidad de superficie se prender,€
25

OPERACION
Relojy CronGmetro
El RELOJ y el CRONOMETRO son controtados con botones° EIIos no controlan
ntnguna de las operaciones del horno.
La luz indicadora de! cron6metro dejar_ de
pestaSear cuando ta cuenta comience, Los
dos puntos continuar&n pestafieando para
indicar que la cuenta est_ activa.
1. Empuje CLOCK para que el dial
pesta,%e,
2. Use el bot6n para SUBIR o BAJAR para
poner la hora del dfa correcta Los dos
puntos pestaSear_n mientras usted est6
poniendo la hora.
3. El re!oj comenzar_ a dar la hora
automAticamente dentro de 1 minuto,
ousted puede empujar el bot6n "clock"
para un comienzo inmediato.
Para reprogramar el cron6metro durante la
cuenta, use los botches con las flechas para
SUBIR o BAJAR La luz indicadora del
CRONOMETRO pesta_ear_ y usted puede
reprogramar el CRONOMETRQ El
CRONOMETRO contar_ hacia atrb.s desde
la nueva cantidad de tiempo que usted
program6 y la tuz indicadora del
CRONOMETRO dejarA de pestaSear en
unos 3 segundos.
El CRONOMETRO muestra las horas y los
minutos. La cantidad de tiempo m_xima del
CRONOMETRO es 9 horas y 50 minutos,
Los segundos aparecer_n durante la cuenta
solamente en et ultimo minuto. El
CRONOMETRO dar_ tonos cuando fatte un
minut'o en la cuenta,
lm
Empuje TIMER ON/OFF. "0:00" y el
indicador de la hora pestarhear_n
2.
Seleccione la hora deseada usando los
botches para SUBIR y BAJAR El
CRONOMETRO empezar,_ la cuenta
hacia atr&s unos 4 segundos despues
q[Je usted seleccione la cantidad de
tiempo. Si no quiere esperar 4
segundos, empuje TIMER y la cuenta
empezar_ inmediatamente..
Si desea cancelar el CRONOMETRO
durante la cuenta, empuje TIMER ON/OFF,
El dial volverb, a la hora del dla
El tono de RN DE ClCLO sonar_ cuando la
cuenta del CRONOMETRO haya sido
completada. El dial pestanear_ "0:00" y
usted oir_ una serie de tonos< Empuje
TIMER ON/OFF o CLOCK para apagar los
tonos.
26

OPERACION
ConsejosPara Cocinar
EnE1Homo
Es normal sentir un poco de o!or cuando
use su homo por primera vez, Para ayudar
a eliminar este olor, ventile la habitaci6n
abriendo una ventana o usando una
campana de ventilacibn
IMPORTANTE: Nunca cubra el fondo del
homo o ta parrilla det horno con papel de
aluminio. Et uso inadecuado puede causar
una mala circulaciOn del calor, pobres
resultados al homear, y podria daSar et
acabado del homo. Para prevenir manchas
a causa de derrames, usted podria porter
un pedazo de papef aluminio o una
bandeja para galletas debajo de la comida
que se podria subir.
El precalentamiento es subir la temperatura
a la temperatura que va a usar cuando
hornee Permita que el homo se precaliente
bien cuando las recetas requieren
precalentamiento,
En ta parte trasera del homo usted notar_ un
pequer_o tubo. Esto es un sensor de calor
que mantiene la temperatura del homo
Nunca mueva o doble este tubo.
del homo
La zona de temperatura baja de su homo
(entre 170° y 200°F) est,. disponible para
mantener los alimentos tibios Sin embargo,
los alimentos no se deberfan mantener a
estas bajas temperaturas pot m_s de 2 horas
La ventilacbn del homo est& ubicada debajo
del elemento trasero derecho Esta _rea se
podrfa calentar mucho durante el uso del
homo. La ventilaciOn es importante para la
correcta circulaci6n det aire. Nunea
obstruya la ventilaci6n.,
la ventilacibn
del horno
Si abre ta puerta frecuentemente para mirar
Dosatimentos, causar& una p6rdida de calor
y malos resultados cuando homee.
Para prolongar la vida del foco de la luz del
homo, siga estos consejos: Siempre apague
la luz cuando el homo no est6 en uso Si la
luz del homo se deja encendida pot un largo
perfodo de tiempo, el homo estar& tibio
cuando abra la puerta debido al calor
generado pot el foco de la luz del homo.
27

OPERACION
ConsejosPara Cocinar
EnE1Homo(cont.)
La mayorla de las recetas para hornear han
sido desarrolladas utilizando productos con
un alto contenido de manteca tales como
mantequi!la y margarina (80% de manteca
por peso-iel requerimiento federal para los
productos marcados "margarina").
Usted obtendr_ malos resultados si los
queques, pasteles, tortas, galletas, o dulces
son hechos con mantequilla con bajo
contenido de manteca.. Las mantequiltas y
margarinas con bajo contenido de aceite
contienen menos manteca y m_s agua.
Etalto contenido de agua de la mantequilla
o margarina afecta la textura y el sabor de
sus recetas para hornear favoritas Mientras
m_s bajo sea el contenido de manteca de
la mantequilta o margarina, m_s se notar_n
estas diferencias. Para asegurar los mejores
resultados, use margarina, mantequilla u
otras barras de estos productos que
contengan por Io menos 70% de aceite
vegetal.
Los resultados del horneado ser_ mejor si
las caceroEas para hornear est,_n centradas
en el homo Io m_s posible,, Siest_
homeando con mAs de un utensilio,
col6quetos de manera que cada uno tenga
por Io menos de 1" a 1 1/2" de espacio de
aire a su alrededorr Coloque los utensilios de
manera que ninguno quede directamente
encima de otro.
Las bandejas bajas, sin Iados, para galletas
permiten que el aire circule alrededor de tas
gaftetas para que se doren en forma pareja
El Sensor de Temperatura del Homo en ta
parle trasera det horno mide y controla
continuamente la temperatura dentro del
homo. Para mantener una temperatura
programada constante, los elementos har_n
un ciclo (se prenden y se apagan durante
la cocci6n).
UTENSILIOS BRILLANTES reflejen el calor,
y son pedectas para queques y panes
r_pidos queden con una corteza levemente
dorada,
LOS UTENSILIOS DE VIDRIO,
CONTRAPEGADURAS O OSOUREOIDOS
POR LA EDAD, absorben calory pueden
ser usados para panes con levadura,
cortezas para pasteles o alimentos que
necesitan tener una corteza de color cafe,
La temperatura del homo cuando use estos
utensilios deberla ser reducida en 25° F,
28

OPERACiON
ConsejosPara Cocinar
EnE1Homo (cont.)
Las parrillas del homo est_n diseC_adascon
topes, una conveniencia y tambien una
precauci6n de seguridad Las gulas tienen
topes para prevenir que las parrillas se den
vuelta cuando se satan del homo Este
diseho permite que las parrillas puedan
ser insertadas de s61o una manera
Tope en las
gulas para las
parrillas
Su homo tiene cuatro (4) posiciones para la
parrilla. La gula de m&s arriba no puede set
usada como una posici6n para parrilla.
Usted podria pensar que su homo nuevo
cocina diferentemente al homo que
reemplaz6. Le recomendamos que use su
homo nuevo pot varias semanas para que
se familiarice m&s con 61,siguiendo los
tiempos que se dan en la receta como una
gufa Vea Ajustes-H_galos Usted Mismo en
ta parte de atrAs de este manual para hacer
los ajustes si cree que su homo est,,
funcionando demasiado caliente o frio para
su preferencia.
1. Coloque la PERILLA DE CONTROL DEL
HORNO a la temperatura deseada.,
2. Cuando termine de hornear, haga girar fa
PERtLLA DE CONTROL DEL HORN(_ a
ta posici6n de APAGADO ("OFF").
Gu_s
3 3
2 2
4 4
1 1
Siempre coloque las parrillas del homo
en la posici6n correcta cuando el homo
est_ frio.
PRECAUCION: Cuando usted este
usando la parrilla en la posici6n m_s
baja (1), necesitar_ tener cuidado cuando
saque la parrilla. Recomendamos que tire
la parrilla varies pulgadas hacia afuera y
entonces, usando dos agarraderas, tire
ta parrilla hacia afuera sujet&ndola de
los lades, La parrilla est_ baja y usted
se podrfa quemar si cotoca la mano en
el medic de la parrilla y la saca
completamente hacia afuera. Tenga
cuidado de no quemarse la mano en
la puerta cuando use una parritla en ta
posici6n m_.s baja (1)
Asar es cocinar cortes blandos de came con
calor seco, No es necesario precalentar su
homo antes de asar
i
"@--2
X'_ --1
_,..,
=_
INSTRUCCIONES GENERALES PARA
ASAR
1. Coloque la came (grasa hacia arriba)
sobre una parrilla para asar o en una
cacerola baja de m,Cso menos el mismo
tama¢_ode la came,
2, Ponga ta cacerola en la posici6n de
parrilla No. 1 o No, 2.
3. Coloque la PERILLA DE CONTROL DEL
HORNO a la temperatura deseada.
Recuerde:
La mayorta de las carnes contin0an
cocin_ndose internamente despu_s que
se hayan sacado del homo
29

OPERACION
CGmoAsarALa Parrilla
Asar es cocinar al calor directo del elemento
superior. La puerta del homo deberia
permanecer abierta en la posicbn de tope para
asar cuando ase a ta parrilla
No es necesario precalentar el homo cuando
ase a la parrilla. Use la cacerola y la parrilla
para asar que viene con su estufa Ambas
est_n diseriadas para drenar adecuadamente
la grasa y los Ilquidos.
debe ser moldeado
Si usa papet de aluminio,
firmemente a la parriila y debe
hacer cortes en el papel que
est6n alineados con las ranuras de la
parrilla, Esto permite que la grasa y los
llquidos caigan a la cacerola, evitando
que se produzca un incendio y humo
excesivo.
Siempre saque la cacerola y la parrilla
del horno. Guardar y olvidar una
cacerola para asar ,-1
sucia en el horno es un
peligro para producir
un incendio o humo.
El Departamento de Agricuttura de los
Estados Unidos recomienda cocinar la
came y las aves completamente-qa came
a un calor INTERNO de por Io menos
160°F y las ayes a un calor INTERNO de
pot Io menos 180°F El cocinar a estas
temperaturas generalmente protege
contra enfermedades oausadas por los
alimentos.
Mientras m_s cerca co!oque los alimentos
del elemento para asar, m_s rApido se
dorar_n por afuera, pero quedando rojo o
rosado en el centro.
Colocando las carnes lejos del elemento
permitirA que las carnes se cocinen en el
centro mientras se doran por afuera
Usando estas posiciones, cocine el lado 1
pot Io menos 2 minutos m_s que el lado 2,
Si su homo est_ conectado a 208 voltios,
usted podrla usar una posici6n de parrilla
m_s alta y/o cocinar los alimentos por m_s
tiempo,
El tamaSo, peso, grosor, temperatura
iniciat y su preferencia personal afectar_ el
asado a la pardlfa Esta tabla estA basada
en carnes a la temperatura det
refrigerador,
AUMENTO
Blstec 1" de grueso
Tortas de came
,molida 1= de grueso
Chuletas de cerdo
1/2 =de grueso
Pescado (flletes)
Porto (presas)
lw
Ponga la PERILLA DE CONTROL
POSICION DE
,PARRILLA
3 .
3
3
3
2
TIEMPO TOTAL
(minutos)
9-11
16-18
27-29
11-13
45-55
DEL HORNO en BROIL
2.
Cuando termine de asar, ponga la
PERILLA DE CONTROL DEL
HORNO en la posici6n de apagado
(OFF),,
3O

CUIDADOYLIMPIEZA
Limpieza
MATERIALES DE LIMPIEZA
° Detergente Ifquido para platos
• Agua tibia
° PaSo suave
No use limpiadores abrasivos,
limpiadores industriales, o
blanquedores (cioro).
MATERIALES DE L1MPIEZA
° Detergente lfquido para platos
• Agua tibia
• Lanillas de acero con jabOn
• Limpiador comercial para hornos
COMO LIMPIAR
Permita que la cacerola se remoje Ponga
detergente para platos sobre la parritla y
cubra con un paRo o una toalla humeda
pot un rato. Friegue a medida que sea
necesario. Lave, enjuague, y seque bien.
Usted tambien podrfa poner la cacerola y
la parriila en ta lavadora de platos.
MATERIALES DE LIMPIEZA
° Limpiador para hornos
• Lanillas de acero con jab6n
COMO LIMPIAR
Umpie despu6s de cada uso del homo,
Enjuague bien, No ponga limpiador para
hornos sobre el elemento para homear o
asar, Cuando use un limpiador para
homes lea bien las direcciones en el
contenedor,
MATERIALES DE LIMPIEZA
• Detergente liquido para platos
• Agua tibia
• Toallas de papel
COMO LIMPIAR
No use limpiadores para hornos, polvos
para limpiar, o abrasivos fuertes, Si salsas
para sasonar, salsa de tomates, materiales
para batidos, etc,, se derraman, Ifrnpielos
Io m_s posible, Cuando las superficies se
enfrfen limpie bien las superficies
pintadas
PARA LIMPIAR
Para iimpieza diaria, use un limpiador
para vidrios y una toalia de papel, Para
suciedad pesada, use una pasta de soda
para hornear y agua, Enjuague bien,
MATERIALES DE LIMPIEZA
• Limpiador abrasivo suave
• Esponja-fregador
No use limpiadores abrasivos fuertes,
limpiadores industriales, o cloro.
31

CUIDADOYLIMPIEZA
PartesRemovibles
MATERtALES DE LIMPIEZA
= Detergente para piatos
• Agua tibia
• PaSo suave
Canal
moldeado
Ranura plana
en el tailo
Gancho
del resorte
"i/_X PRECAUCION: Desconecte -_
I _l_Ltt el poder el_ctrico hacia el
horno en la caja del circuito
principal o en la caja de
los fusibles antes de tratar de
reemplazar el foco de la luz del
homo. No toque un foco de la luz
caliente con las manos mojadas o
con un paso h_medo. Espere a que
el foco se enfrle y use un paso seco.
i,= ,_
Sujetador
del vidrio
Collar con
-,. _F electricldad
Foco/_""
COMO SACAR
1. AsegQrese que la perilta este en
posiciOn de apagado,
2, Tire derecho hacia afuera del talIo,
Usando un pedazo de cuerda podda
[acilitar el sacado de ta perilta Ponga la
buerda debajo y alrededor de la perilla, y
tire derecho hacia afuera,
PARA LIMPIAR
Lave bien la perilla con agua con jabdn,
Seque comptetamente con un pa#,o suave,
No permita que la perilla se remoje.
PARA COLOCARLA NUEVAMENTE
1. Mire la parte trasera de la perilla Et
canal moldeado de la perilla est,.
disenado para quedar perfectamente
ajustado en ef tal!o de la perilla
2. Coloque el canal mofdeado en linea
con la ranura plana en el tallo de la
perilla,
3. Empuje la peritla hasta Io m_s atr_s
posible
Cubierta
de vidrio
PARA REEMPLAZAR
1. Desatornille el vidrio y saque la
cubierta de vidrio
2. Desatomille el foco,
3. Reemplace el foco con un foco para
hornos de 40 watts de 3 1/2' de
Iongitud,
4, Coloque nuevamente la cubierta
32

CUIDADOYLIMPIEZA
Partes Removibles
PARA SACAR
1. Tome la oriila de la cubierta y lev_ntelaL
2. Sujetando ta cubierta con un mane,
levante ta varilia de soporte y haga
descansar la oriHa de la cubierta
sobre ella
3. Cuando termine de limpiar, baje la
varilla de soporte, y la cubiert&
_ PRECAUCRON: Cuando
superficie de esmalte porcelanizado
de la cubierta se puede dafiar si se
deja caer.
trabaje en esta _rea, tenga
cuidado de no pasar a Ilevar
las varillas de soporte. La
PRECAUCION: No levante •
_ I el elemento m&s de 1% Si !o
levanta mds de 1" podria
dal_ar el recept_cu!o,
causando que el elemento no quede
piano cuando se enchufe nuevamente.
COMO UMPIAR LOS RECIPIENTES
PARA DERRAMES :
Para manchas de alim_ntos oscuras- use
detergente para plates; agua tibia, lanillas
para fregar de pl_stico_ limpiadores
abrasives suaves, lanillas Ifenas con jabOn o
amonia Umpie los recipientes despues de
cada use. Enjuague y seque bien. Los
alimentos que no se limpien pueden causar
manchas permanentes que no se pueden
sacar, Para recipientes muy sucios, coloque
una toalla empapada con amonia sobre el
recipiente para soltar fa suciedad, luego
friegue el recipiente suavemente con una
tana de pl_stico.L
Para manchas azules-doradas - use un
pulidor para metal En un periodo de tiempo,
estas manchas son causadas per el calor
excesivo, y generatmente son permanentes
Para ayudar a minimizar este efecto, evite
usar las posiciones de calor altas y use ollas
de rondo plane que no se extiendan m_s de
1°de la orilla del elementoo
...................................... i ,i,, q
reflectores Receptbculo
PARA SACAR
1. AsegL/rese que ios controles est_.n
en posici6n de apagado y que los
elementos est6n frfos antes de tratar
de sacarlos.
2. Tome el elemento y levAnteto
levemente, s6to Io suficiente para
que pase per encima del recipiente,
y s_.quelo derecho hacia afuer&
3. Levante y saque ef recipiente
_ RECAUCION: No haga
que se queme ia cubierta, el aislante
de los alambres y producir_ p6rdida
de energla.
PARA REEMPLAZARLO
1. Reemplace el recipiente para
derrames, AsegL_rese que el
del recipiente
2. Deslice el elemento con firmeza
encaj_ndolo en e! recept&culo y baje
el elemento hasta acomodarlo sobre
funcionar los elementos de la
cubierta sin el recipiente en
su lugar. Si Io hace causar_
recept,_culo se yea en la abertura
el recipiente
33

CUIDADOYLIMPIEZA
PartesRemovibles
MATERIALES DE LIMPIEZA
• Detergente para platos
• Agua tibia
• Lanas para fregar o tanilla de acero con
jab6n
Tope en
la guias
Parte trasera
levantada
de la parrilla
COMO SACAR
1, Tire las perrillas hasta la posici6n
de tope.
2, Levante el frente de la parrilla y
deslicela bajo el tope de la gufa para
tas parri_las.
PARA LIMPIAR
Limpie con agua tibia y detergente. Para
sacar manchas duras, friegue levemente
con lana para fregar o con una Eanilta de
acero con jab6n.. Enjuague bien.
PARA COLOOAR NUEVAMENTE
1, Coloque la parte tevantada de atr_s de
la parrilla sobre las gulas.
2, Levante el frente de la parrilla hasta
que la parte levantada de atr&s se
destice pot debajo del tope de las
gulas
3, Deslice la parrilla hasta atr_s
Posicibn de tope para asar a la parrilla
IL_ Bisagra
PARA SACAR
1, Abra la puerta hasta la posici6n para
asar a la parrilia.
2, Tome la puerta de cada lado, levAntela
y s_quela de ]as bisagras. NO
LEVANTE LA PUERTA DE LA
MANILLA,
ii, i iiiiiiiiiiiiil,ll_lJ,lUil_Ul_lJl i •
_ PRECAUCION: Cuando la
la parritla, como precauci6n cubra los
brazos de las bisagras con toallas o
con un folio de toallas vaclo. No pase
a llevar o trate de mover los brazos de
las bisagras mientras est_ trabajando
en el _rea del homo. Se podrian
devolver violentamente y causarle
heridas en las manos o da_ar
el acabado de porcelana en el frente
del marco.
PARA COLOCARLA NUEVAMENTE
1. Asegt3rese que los brazes de las
bisagras est_n en la posici6n de tope
para asar a la parrilla.
2. Levante la puerta de ambos lados
3. Cotoque en I[nea las ranuras en la
oritla del fondo del homo con los
brazos de las bisagraso
4. Deslice la puerta hacia abajo sobre los
brazos de fas bisagras lo m&s posible
5. Cierre la puerta.
puerta se saca y los brazos
de las bisagras est_n en la
posici6n de tope para asar a
34

ANTESDELLAMARPARA
UNSERVICIO
Para ahorrar tiempo y dinero, antes de tlamar para un servicio, revise la lista de m_s abajo
para cualquier problema que usted crea que tiene con el funcionamiento de su estufa, Si
el problema es algo que usted no puede reparar, use los NL_meros de Servicio para el
Consumidor que se encuentran al final de este manual, Cuando haga un Ilamado, tenga
disponible el nt_mero de modelo, nt_mero de serie, lista de partes para reparaciones,
manual de uso y cuidado y la fecha de compra.
PROBLEMA POSIBLE CAUSA
i,, iiiiiiiiii ,111111I ! !1 [I '11111' I1'11
La estufa no funciona;
totalmente inoperante.
/!!/!!IU IIIII1"111
Los alimentos
no se homean
adecuadamente.
No pasa electricidad
a la estufa
a. El homo no se
precatent6 Io
suficiente
b, Posici6n
incorrecta de la
parritla o la
cacerola
c. La ventilaci6n
del homo est,_
obstruida o
cubierta,
d, Uso incorrecto
del papel de
aluminio
e. Temperatura
incorrecta para el
utensilio usado
f. La temperatura
del homo
necesita ajuste
g. La estufa o la
parrilta del homo
no est_,n
niveladas
h. Controtes del
horno real
puestos
POSIBLE SOLUCION
a. Revise la caja del circuito de la
casa o los fusibles
b. Revise y asegL)rese que la estufa
este enchufada
a.
AsegOrese de precalentar cuando la
receta 1orequiera
b. Mantenga un espacio de aire
uniforme alrededor de las ollas y
utensilios Vea la secci6n para
Cocinar en et Homo
c, Mantenga la ventilaci6n despejada
d=
No cubra las parrillas cuando
hornee
e, Reduzca ta temperatura en 25
grados para utensilios de vidrio,
OSCUrOS U opacos,
f. Revise la secci6n de ajustes a la
temperatura que sigue esta
secci6n,
g. Vea las instrucciones de instalaci6n
para la nivelaci6n_
h. Vea la secci6n para hornear
35

ANTESDELLAMARPARA
UNSERVICIO
PROBLEMA POSIBLE CAUSA POSIBLE SOLUCION
La temperatura Calibraci6n del control Vea las instrucciones para ajustar la
del homo no parece del homo, temperatura que siguen esta secci6n.
estar exacta.
II1' !ii ,i,i
La luz del horno
no funciona.
a, El interruptor de ia
luz est_ apagado.
b. El foco de la luz del
homo est_ suelto o
quemado,
a. Revise la posiciOn del
interruptor.
b. Revise o reemplace el feco de ia
tuz.
Los alimentos nd'se
asan adecuadamente
a la parrilla,
E! homo humea.
La cubierta no
funciona, homo OK.
i
Homo no funciona,
cubierta OK.
ao PosiciOn incorrecta
de la parrilla.
b. El homo se
precalent6.
e, Mat uso de papel de
aluminio.
d, La puerta del homo
se cerr6 durante el
asado a la parrilla.
e. Voltaje bajo (208
Voltios).
f, Cantidad de tiempo
incorrecta para asar
g. Controles det homo
real puestos
a. Horno sucio.
b, Mal uso de papel
de aluminio.
c, Se dej6 la cacerota
para asar con grasa
dentro del homo.
a, Los elementos a, Revise los etementos, asegurese que
est_n est6n enchufados correctamente en
desenchufados, los recept_culos.
b. Control en posici6n b. Empuje la perilla mientras la hace
incorrecta, girar para seleccionar la temperatura.
'1 I II IJ I1 IIIJ Jl '11 I' ..... ! ......................................... ' ! I '1
Control puesto
incorrectamente
a, Revise ta posici6n de fas cacerolas;
yea ta secci6n para asar a la parrilla.
b, No precaliente cuando ase a la
parrilla.
¢, Lea la secci6n para asar a la parrilla,
d, Abra la puerta a la posici6n de tope
para asar.
e, Use pesici6n de parrilla m_s alta yio
ase pot m_s tiempo.
f. Vea la tabla para asar en la secci6n
de c6mo asar a la parrilla
g. Vea la secci6n para asar.
a. Yea que no hayan derrames grandes.
b. No se recomienda el uso del pape! de
aluminio
e. Limpie la cacerola y la parrilla
despues de cada uso.
Revise el control y la secci6n de c6rno
cocinar en el homo.
36

AJUSTESDETEMPERATURA-
"HAGALOSUSTEDMISMO"
Usted podda pensar que su nuevo homo
cocina diferentemente al homo que
reemplaz6 Recomendamos que use su
homo nuevo unas pocas semanas para
que se famiiiadce con 61, siguiendo los
tiempos que se dan en las recetas como
una gu/a
Si cree que su nuevo homo est_
funcionando demasiado caliente (quema
la comida) o no calienta Io suficiente (la
comida no queda bien cocida) usted
mismo puede ajustar la temperatura La
apariencia y ta textura de los alimentos
son mejores indicadores de la exactitud
de un homo que un term6metro Estos
term6metros pueden varlet en 20-40
grados de la verdadera temperatura del
homo Adem,_s, la puerta se tiene que
abrir para Seerestos term6metros Abrir ta
puerta cambiar_ la temperatura del homo
Para decidir en cu_nto cambiar la
temperatura, suba la temperatura del
homo en 25 grados (si los afimentos no
quedan bien cocidos) o baje ta
temperatura en 25 grados (si fa comida se
quema) de la temperatura de la receta,
luego homee Los resultados de esta
"prueba" le deberfan dar una idea de
cu&nto se deberla cambiar la temperatura,
AsegQrese que la perilia de control
del horno est& en la posici6n de
apagado (OFF), Saque la perilla
tir&ndola derecho hacia afuera
2.
Mire fa parte trasera de la peritla,
3.
Use un destornillador para soltar los
dos tornillos unas dos vueltas cada
unoo
4. Para subir ia temperatura del homo
(HOTTER), sujete ta perilia de la
manilla y de vuelta la falda de la
perilla para que el tornilio superior se
mueva hacia la palabra hotter_
Cuando de vuelta la falda escuchar_,
clicks y sentir& ranuras o dientes,
Cada click o diente ajustar_ fa
temperatura 15°F m_s caliente
5. Para bajar la temperatura del homo
(COOLER), sujete la perilta de la
manilla y d6 vuelta la falda de la
perilla para que et tornitlo superior se
mueva hacia ta palabra cooler
Cuando d6 vuelta la falda escuchar_
clicks y sentir& ranuras o dientes.
Cadas ctick o diente ajustar_, la
temperatura 15°F m_s fria,
37
6_
Cuando haya hecho el ajuste de
temperatura deseado, optima
nuevamente los terniflos y devuelva la
perilla de control del homo a su estufa

#OTAS
38

GARANTIADELAESTUFATIPO
"DROP-IN"
f
fUN A_OCOMPLETODE GARANTIAPARATODASLASPARTES "%
Si,dentrodeunafiodelafechadeinstalaci6n,cuatquierparledejadefuncionaradecuadamente
debidoa undefectoenel materialo la obrade mano,Searsfareparardo reemplazar_,anuestra
opci6n,sincosto.
Siesteproductoessometidoa un usoqueno seaetfamiliarprivado,lagarantfadearribaes
efectivaporsolamente90diaso
ELSERVICIODEGARANTIAESTADISPONtBLEPONIENDOSEENCONTACTOCONELCENTRO
DESERVlCIOSEARSMAS CERCANOENLOSESTADOSUNIDOS
Estagarantialebrindaderechoslegatesespecificos,y ustedtambidnpodriatenerotrosderechos
quevariandeestadoa estado.
SearsRoebuckandCo.Dept.817WAHoffmanEstates,IL60179
Para ampliar el valor de su estufa,
compre un contrato de mantenimiento Sears.
Argos de cobertura de propiedad ler argo 2do afio 3er afio
1. Reemplazo de las partes defectuosas G CM CM
2. Revisi6n de mantenimiento preventivo
anual a solicitud de usted
Losaparatoselectrodom6sticosKenmoreest_indiseMados,fabricadosy probadosporamosde
operaci6nconfiable+Sinembargo,cualquieraparatoelectrodomdsticopodriarequerirun serviciocada
ciertotiempo.ElContratodeMantenimientoSearsleofreceun excelenteprogramadeservicioparasu
producto.
Latabladearribamuestralos beneficiosadicionalesqueun Contratode MantenimientoSearsofrece
comparadoa unaGarantiaSears.
P6ngaseencontactoconsuServiciodeVentasdeSearso con unCentrode ServicioSearspara
comprarunContratodeMantenimientoSears.
CM CM CM
G - Garantla CM - Contrato de Manten|mtento
39

Get it fixed, at your home or ours!
For repair of major brand appliances in your own home...
no matter who made it, no matter who sold it!
1-800-4-MY-HeM EsMAnytime, day or night
(1-800-469-4663)
www, sears.com
To bring in products such as vacuums,
lawn equipment and electronics for repair, call for
the location of your nearest Sears Parts & Repair Center.
1-800-488-1222 Anytime, day or night
www.sears.com
For the replacement parts, accessories and owner's manuals
that you need to do-it-yourself, call Sears PartsDirect sM!
1-800-366-PART 6am- 11pmCST,
(1"800-366-7278) 7 days a week
www.sears.com/partsdirect
To purchase or inquire about a Sears Service Agreement:
1-800-827-6655
7 a,m, - 5 pm. CST Men. - Sat
Para pedirservicio de reparaci6n a domicilio,
y para ordenar piezas con entrega a domicilio:
1"888"SU'HOGAR sM
(1-888-784_6427
, H0meCentrar J
Part No 229C4020P246
© Sears, Roebuck and Co
® Registered Trademark / TMTrademark of Sears, Roebuck and Co.
® Marca Registrada / TM Marca de F&brica de Sears, Roebuck and Co
Au Canada pour service en fran_ais:
1-877-LE-FOYER sM
(1 -B77-533-6937)
4O
 Loading...