

Kenmore 91141369690 Owner’s Manual

n o
MANUAL
MODEL NO.
9ti. 41369
Read and Follow All Safety
Rules and Operating
Instructions Before First
Use of This Product
, ,, :,: ..........................
911.41369
• Safety Instructions
Features
o Operation
o Care and Cleaning
o Problem Solving
o Easy Adjustment
o Consumer Service
229C4820PO70(SR_0295)

TABLEOFCONTENTS
Range Safety ........................................ 3-4
Fea_:ures .......... =....................... 5
Oven @,on_trM CBock & Tie_er
a_aaaaa_one_a_mmRa=_u_m_ua_n_nan_aai_m =u 6_9
Traditional Oven Function ....................... 6
Timed Oven Function .............................. 6
Touch Pads ............................................. 6
Control Display ........................................ 7
Clock, Kitchen Timer ............................... 8
Tones ....................................................... 9
F-Codes ................................................... 9
Ove_ Cook_r_ 'Tips ............ 10-12
Strong Smell or Odor ............................. 10
No Peeking ............................................ 10
Aluminum Foil ........................................ 10
Preheating ............................................. 10
Oven Light ............................................. 10
Temperature Sensor .............................. 10
Oven Vent .............................................. 10
Fan ........................................................ 11
Moisture ................................................. 1t
Low Temperature Zone ......................... 11
Using Delay Start ................................... 11
Bakeware .............................................. 1t
Element Cycling .................................... 11
Bakware Placement ............................... 11
Oven Racks ........................................... 12
Temperature Adjustment ................. 12, 23
Se_ting The @on_r@U ............... 13
To Set Bake ........................................... 13
To Set Time Bake .................................. 13
To Set Delay Bake ................................. 13
Br@_#_ng .................................. 14
General Rules ........................................ 14
Preparing Meats .................................... 14
Oven Rack Position ............................... 14
To Set Broil ............................................ 14
SeHf-@He_n_g ..................... 15, 16
Preparing Your Oven ............................ 15
Oven Door Gasket ................................. 15
Door Lock Device .................................. 15
Walls of the Oven .................................. 15
How to Set A Clean Cycle .................... 16
To Stop A Cycle .................................... 16
After The Cycle ...................................... 16
To Set A Delayed Cycle ....................... 16
$pec#al Feafture$ ............... 17-18
12 Hour Shut-Off .................................... 17
Centigrade Selection ............................. 17
12 Hour Clock ....................................... 17
Control Lockout ..................................... 18
Cook and Hold ...................................... 18
Arrow speed .......................................... 18
Control Panel ......................................... 19
Broiler Pan and Grid .............................. 19
Oven Racks ........................................... 19
Glass ..................................................... 19
Oven Door ............................................. 20
Replacing the Light Bulb ....................... 20
Before Calling for Service ................ 21, 22
Consumer Service Numbers ................. 24
Warranty
For your convenience _nd future referencej please _ri_e down your mode_ and
ser_a_ _umbers _ _e space prov_de_, T_ey are _oca_ed on _t_e _ren_ _rame,
SEF_L _MBER:
...... ,,, ...........................................
2

TY
To insure safety for yourself, family and home,
please read your Owner's Manual carefully.
Keep it handy for reference.
Pay close attention to the Safety sections.
BE, SURE, your appliance is installed and
grounded by a qualified technician.
TEACH CH#LDE_E,#*#
,, Not to play with controls or
any part of the appliance.
o Not tosit, climborstandon
the oven door.
NE,VEE_ _E,_R loose fitting clothing when
using your appliance.
_E,VER USE, a towel or other bulky cloth as
a pot holder and make sure the pot holder is
dry. Moist pot holders could cause steam
burns. Keep dish towels, dish cloths, pot
holders and other linens a safe distance away
from your appliance.
USE, your
appliance for warming or
heating the room.
BE SUrE _he appHiance is secureSy
inst_Hed 5n a cabine_ _ha_ Hs firmly
a_tached _o _'he house s_ruc_ure_
_EVE,R STORE, items of
interest to children in cabinets
above the appliance.
_EE,P THS,_ book for later use.
_EVER "ERY to repair or replace any part of
the appliance unless instructions are given in
this manual. All other work should be done by
a qualified technician.
ALYJ,_YS _,EEP the appliance area free
from things that will bum. Food, wooden
utensils and grease build up could catch fire.
Plastic utensils could melt and canned foods
could explode. Your appliance should never
be used as a storage area.
AL_VAYS _EE,P your appliance clear of
things that will bum (gasoline and other
flammable vapors or liquids).
ALWA Y_ KEEEP combustible wall
coverings, curtains and other linens a safe
distance from the appliance.
_E,VE,R HEAT unopened food containers.
Pressure build up can cause the container to
burst and cause injury.
NEVER LEA VE jars or cans of fat or
drippings in or near your appliance.
SOME, @,LE,_E,_S produce
noxious fumes and wet cloths _. /
or sponges could cause steam
burns.
3 important safety precautions continued
FETY
PL,_@E @VE_ RA@KS in the desired
position while the oven is cool. If racks must be
moved while oven is hot, do not let potholder
contact the hot oven element.
AF27E_ E_OI1LII_G_ always take the broiler
pan and grid out of the oven and clean them.
Leftover grease in the broiler pan could catch
fire the next time you use your oven.
ALWAYS USE care when opening the oven
door. Let steam escape before moving foods.
_EVE_ USE aluminum foil to line the oven
bottom. Improper use of foil could start a fire.
CLEf&H @HL Y the parts listed in this manual.
Follow all cleaning instructions.
nF THE SELFo@LE_HUHG mode
malfunctions, turn off the controls or disconnect
the power supply. Have sen,iced by a qualified
technician.
HEVE_ _UB_ move or damage the door
gasket on self-cleaning ovens.
HEVEF_ clean utensils, cookware, removable
parts or broiler pan and grid in the self-clean
cycle.
D@ H@T USE oven cleaners _ No
commercial oven cleaner should be used in or
around any part of the oven.
CONTINUED
#MP@_TANT $AFETY _@T#CE E
ve_,i_ vJ_,_ an epe_ _eer _r w_n_ow
READ AND
UNDERSTAND THIS
NFORMA T ON
NOW .
Should you ever need it, you will not ha ve
time ior reading. Be sure everyone in
your home knows wha_ to de in case of
fire. Never use water on a grease fire; it
_Jill only spread the flames.
@VE_ F_F_E:
Do no_ try to move the pan!
_. Close the oven door and turn
controls off.
2.
If fire continues, throw baking soda on the
fire, or use a dry chemical, foam, or halon
type extinguisher.
4

IIIii11111111
To remove the adhesive left from packaging tape, use household dishwashing liquid, mineral oil
or cooking oil With a soft cloth, rub into the area and allow to soak. Rinse and dry well. Repeat
procedure using an appliance polish to insure no damage is done to the range. This shouRd
be done before _he oven Us _urned on for_he firs__ime= The _ape canno_ be
rer_oved once _he @verahas hea_ed.
Where can you look forpackaging tape ?
Door handle Contro! panel area
Door trim Oven area
5
m "o_ .........., "
[",BBB BB:BB1
I _LAT _ _ IT_ CLD_ _Ji
TIMED OVEN
ERCFiEN
TIMER
@ @@
TEMP FLOUR MIH
0
@ @@
,J
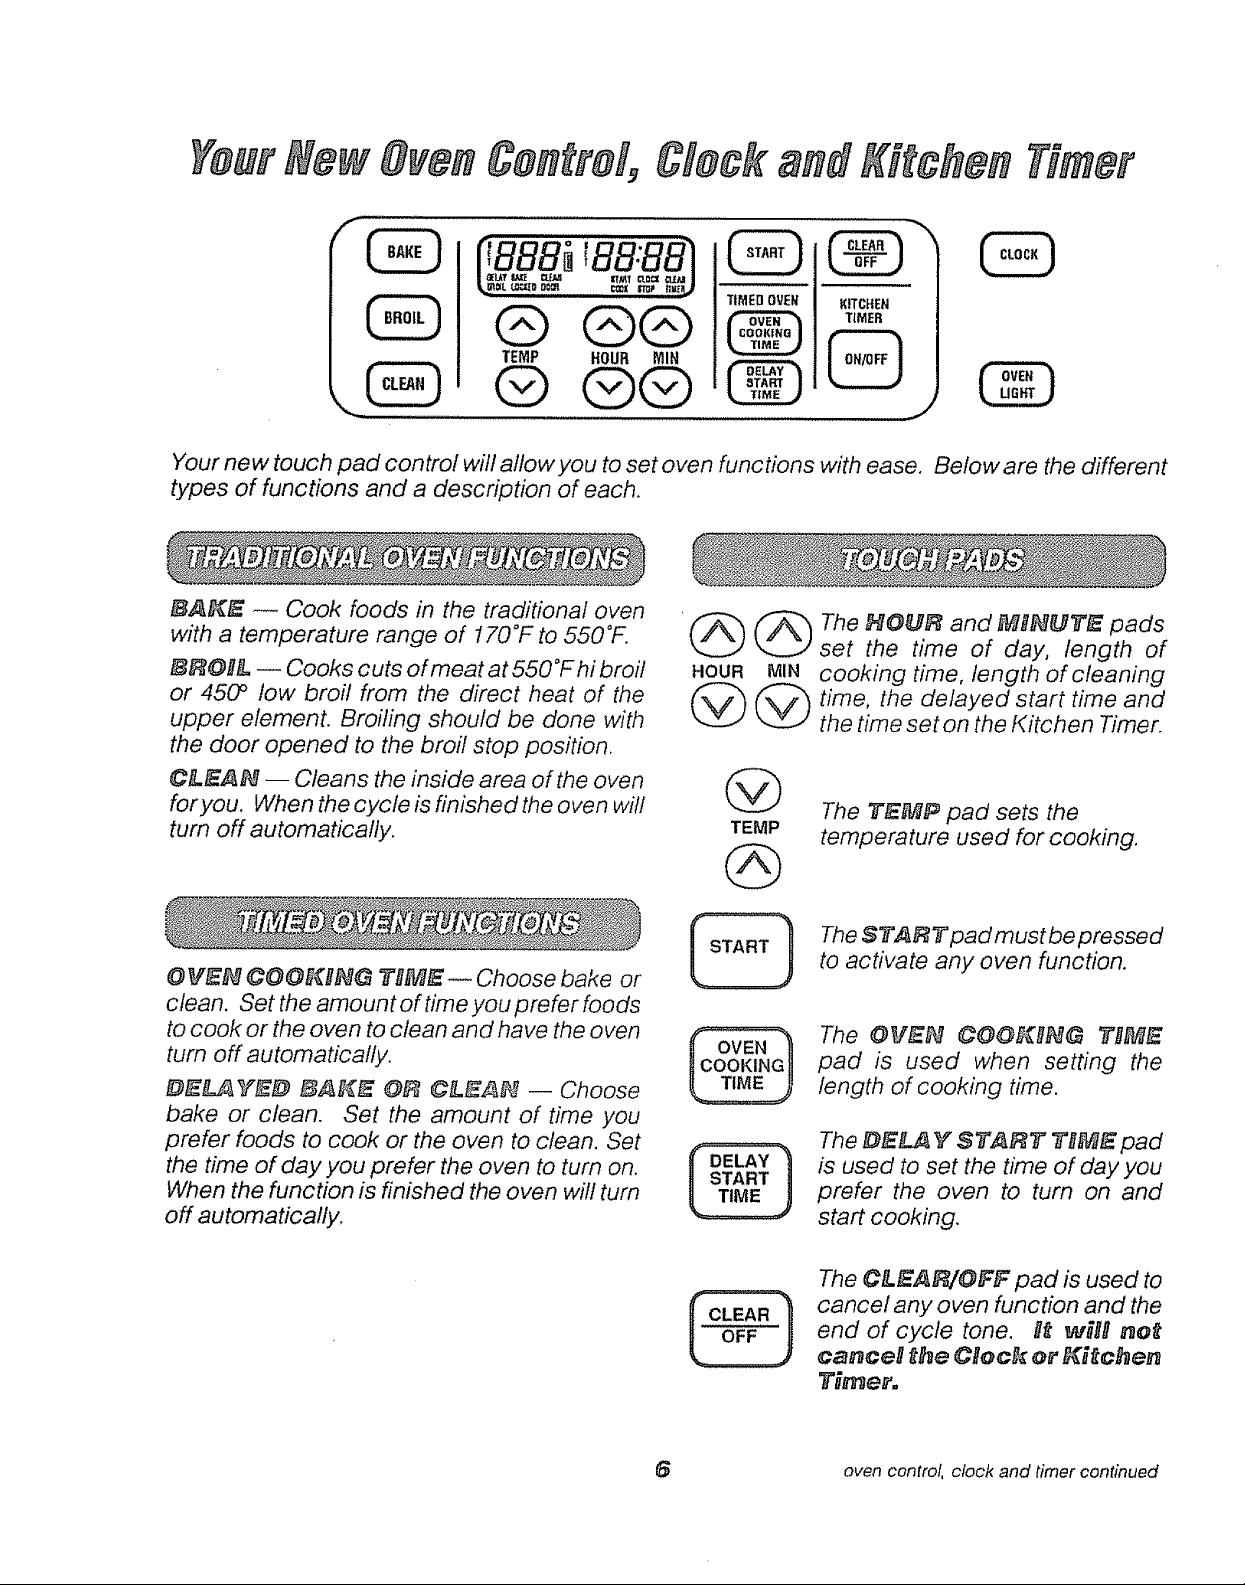
Your new touch pad control will al!ow you to set oven functions with ease. Below are the different
types of functions and a description of each.
BA_E _ Cook foods in the traditional oven
with a temperature range of 170°F to 550°F.
BROIl& _ Cooks cuts of meat at 550°F hi broil
or 450 ° low broil from the direct heat of the
upper element. Broiling should be done with
the door opened to the broil stop position.
CLfEA_ -- Cleans the inside area of the oven
foryou. When the cycle is finished the oven will
tum off automatically.
_@@ TheHOUE#andMtlE_#UTEP ads
HOUR MIa cooking time, length of cleaning
_..zJ
_ time, the delayed start time and
". _..ZJ
set the time of day, length of
the time set on the Kitchen Timer.
@
TEMP
The TEMP pad sets the
temperature used for cooking.
OVE_ CO0_!!_G TOME-- Choose bake or
clean. Set the amount of time you prefer foods
to cook or the oven to clean and have the oven
turn off automatically.
E#EL_ _E_ B_E @_ CLEAN -- Choose
bake or clean. Set the amount of time you
prefer foods to cook or the oven to clean. Set
the time of day you prefer the oven to turn on.
When the function is finished the oven will turn
off automatically,
The START pad must be pressed
to activate any oven function.
The OVE_ COO_8_G THME
pad is used when setting the
length of cooking time.
The DELA _ STAF_T T_ME pad
is used to set the time of day you
prefer the oven to turn on and
start cooking.
The CLEAR/OFF pad is used to
cancel any oven function and the
end of cycle tone. _ w_HUnot
car_ceH _e CUoc_: or _c_en
Timer.
oven control, clock and timer continued

VE# andVUT H
CONTROL DISPLAY
OVENTEMPERATURE INDICATORTOLETYOUKNOW
INDICATOR THEOVENHASTURNEDON
continued
FLASHINGINDICATOR _. E £_u £_e: y_e _ E _ ",._ _,,. ,'_. ..4- CLOCK,KITCHENTIMER,DELAY
TOALERTYOUTOSETATIME''iT _'Q _ _ _ T _._ _ °_0 _-_ gj STARTTIME,cLEANINGTIMEOVENCOOKING,OR
TEMPERATUREORA
_S h'==_ h'_ h'_ O / S _'=_ O_ oO_ _"_ LOCATIONFORTHETIMEOFDAY
! DELAYSAKECLEAN STARTC -OCKCLEA,I
_'_IL_BROIL\LOCKEDDODR ,€O0_
0VENFUNCtiON 0 VENFUNCTION
INDICATOR INDICATOR
The display is an easy reference to use while using your control, Below are descriptions of how
the display works.
@VE_ TEMPEF_A TUF_E H_DnCA TG_
This indicator has a multiple purpose.
o #Esplla_fs _e f.e_e_'af, ure
#_sp_a_'s are erc#_" oo¢_e _ "ERR" - tf
the oven temperature indicator flashes
"_'; then you ha ve set an in valid time or
temperature. Press the OLEAF_/OFF pad
to clear the control and reset your oven
function.
_, t_sp_a_t's Overe ProbEe_s- If your
control flashes '_'_" and a number or letter,
you have experienced an oven problem.
Please read the section on _oCO#ES in
your manual.
O_ _D_CA TOR -- Will light when an oven
function is seL
SET EHD#CA TO_S _ The set indicator will
flash in combination with an oven function or
timed function to let you know you need to set
a time or temperature. Example: _ET" and
"BAKE" will flash to fet you know you need to
set the bake temperature.
T_ME E_DIIOA'EOR _ Displays the time of
day, cooking time, delayed start time, cleaning
time or the time set on the kitchen timer.
D_s_EaVs a #'emEndee' oode -- "PUSH
and START" - If the time indicator flashes the
words "PUSH S1f'ART '_, then you need to
press the START pad to activate your setting.
OVE_ FU_CT_Ot_ E_D#CATORS
Displays which oven function has been set,
when the oven door locks, and if the function
is delayed.
7 oven control, clock and timer continued

continued
The clock must be set for the correct time of
day before a delayed oven function can work
properly. The time of day cannot be changed
during a timed oven function, but can be
changed during a bake or broil function.
HOW TO SET THE CLOCE_
HOUR MIN
@@
I. Press the CLOCK pad.
2, Press the HOUR and MnH pads to set the
time.
3o Press the START pad.
RECALL THE CLOCK
While using your oven for cooking, if you wish
to check the time of day press the CLOC_
pad. The current time of day will show in the
display.
POWER FA#LURE
if you have experienced a power failure, the
time flashing in the display will be incorrect.
Reset your Clock.
Any oven function that was in process will
need to be reset.
The Kitchen Timer is used to time cooking
does not control the oven. It can be set for up
to 9 hours and 59 minutes. It will count down
in minutes until the fast 60 seconds is reached
then the control will beep once. When the
countdown reaches zero, the control will beep
3 times followed by one beep every 6 seconds
until the _tlTCHEH TBMER OH/OFF pad is
pressed. The 6 second tone can be canceled.
See Tones on the following page.
HOW TO SET THE T#ME_
TIMER '_ HOUR MIN
=,.c..=
t. Press the _tlTCHEH TBMER OH/OFF
pad.
2, Press HOUR and/or MItH arrow pads to
set time.
3, Press the START pad.
4. When the countdown has reached zero,
press the _HTCHEH TRMER G_/OFF
pad.
To cancel the timer during the countdown
press the TUMER OH/OFF pad twice,
Itprocesses or other household activities.
8 Oven control, clock and timer continued
Your new control has a series of tones that will
sound at different times. These tones may
sound while you set the control for an oven
function, or at the end of the oven function. It
will also alert you there maybe a problem with
the functions. Below are the types of tones
and a brief description of each.
TO_ES WH#LE SETT#_G THE
CO_TROL
When you press a touch pad you will hear a
beep. This beep will let you know you have
placed enough pressure on the pad to
activate it. (The arrow pads do not beep.)
E_3D OF T#MED CVCLE TGE#E
At the end of a timed cooking function, you will
hear 3 short beeps followed by I beep every
6 seconds. This 6 second beep will continue
to sound until the C_.EA_OFF pad ispressed
or you may select the special feature to cancel
this 6 second beep from sounding at the end
of future cycles.
TO CA_3CEL THE 6 SECO_D BEEP
t, Press and hold the BA#_[E and B_OHL
pads, a* _the same ftHme for 3 seconds,
until the display shows "SF".
2. Press the _HTCHE_ TIIMER Oh#/OFF
pad. The display will show "COb,_ BEEP"
(continous beep).
Press the KBTCHE_ TIIMER O_/OFF
pad again. The display will show _'BEEP"
(beep canceled).
4. Press the START pad.
continued
A TTE_T#O_ T@_E
This tone will sound if you make an error or an
oversight is made while ,setting an oven
function.
Examples would be:
ao Setting a clean cycle and the oven door is
not properly closed.
bn
Setting a function and not pressing the
START pad.
Cu
Pressing an additional function pad
witf_out first setting a temperature or time.
Any of these can be quickly identified by
watching the display.
PECEHEA T TOPEE
When you set an oven temperature, the oven
automatically starts to heat. When the
temperature inside the oven reaches the
temperature you have set, a tone will sound to
let you know the oven is ready for baking.
If you set an oven function and the control
beeps while the display is flashing _'F" and a
number _F.4" or letter _F_" there may be a
problem with the control or oven. Simply
press the CLEA_JOFF pad and wait about
an hour. Try setting the function again. If tl_e
code repeats, write down the flashing code
and call for service. Tell the technician
what the code was flashing.
if you would like to retum the 6 second beep
repeat steps above until the display shows
your choice and press start.
9
It is normal to have some odor when using your
oven for the first time. This is caused by the
heating of new parts and insulation.
To help eliminate this odor, ven_iBa_e _#e
room by ope_Hn_ a _Bndo_ er us_ a
ven_ hood_
Let the oven preheat thoroughly when recipes
call for preheating. Preheating is bringing the
temperature up to the temperature you will be
using during baking. When the oven has
reached the preheat temperature, a tone will
sound. Have foods nearby, ready to place in
the oven.
Never cover the oven
bottom or oven rack
with aluminum foil.
Improper use can
cause poor heat flow,
poor baking results,
and may damage the
oven finish.
The oven vent is located just above the door.
This area could become hot during oven use.
The vent is important for proper air circulation.
_ever bBoc_ _hHs ven_.
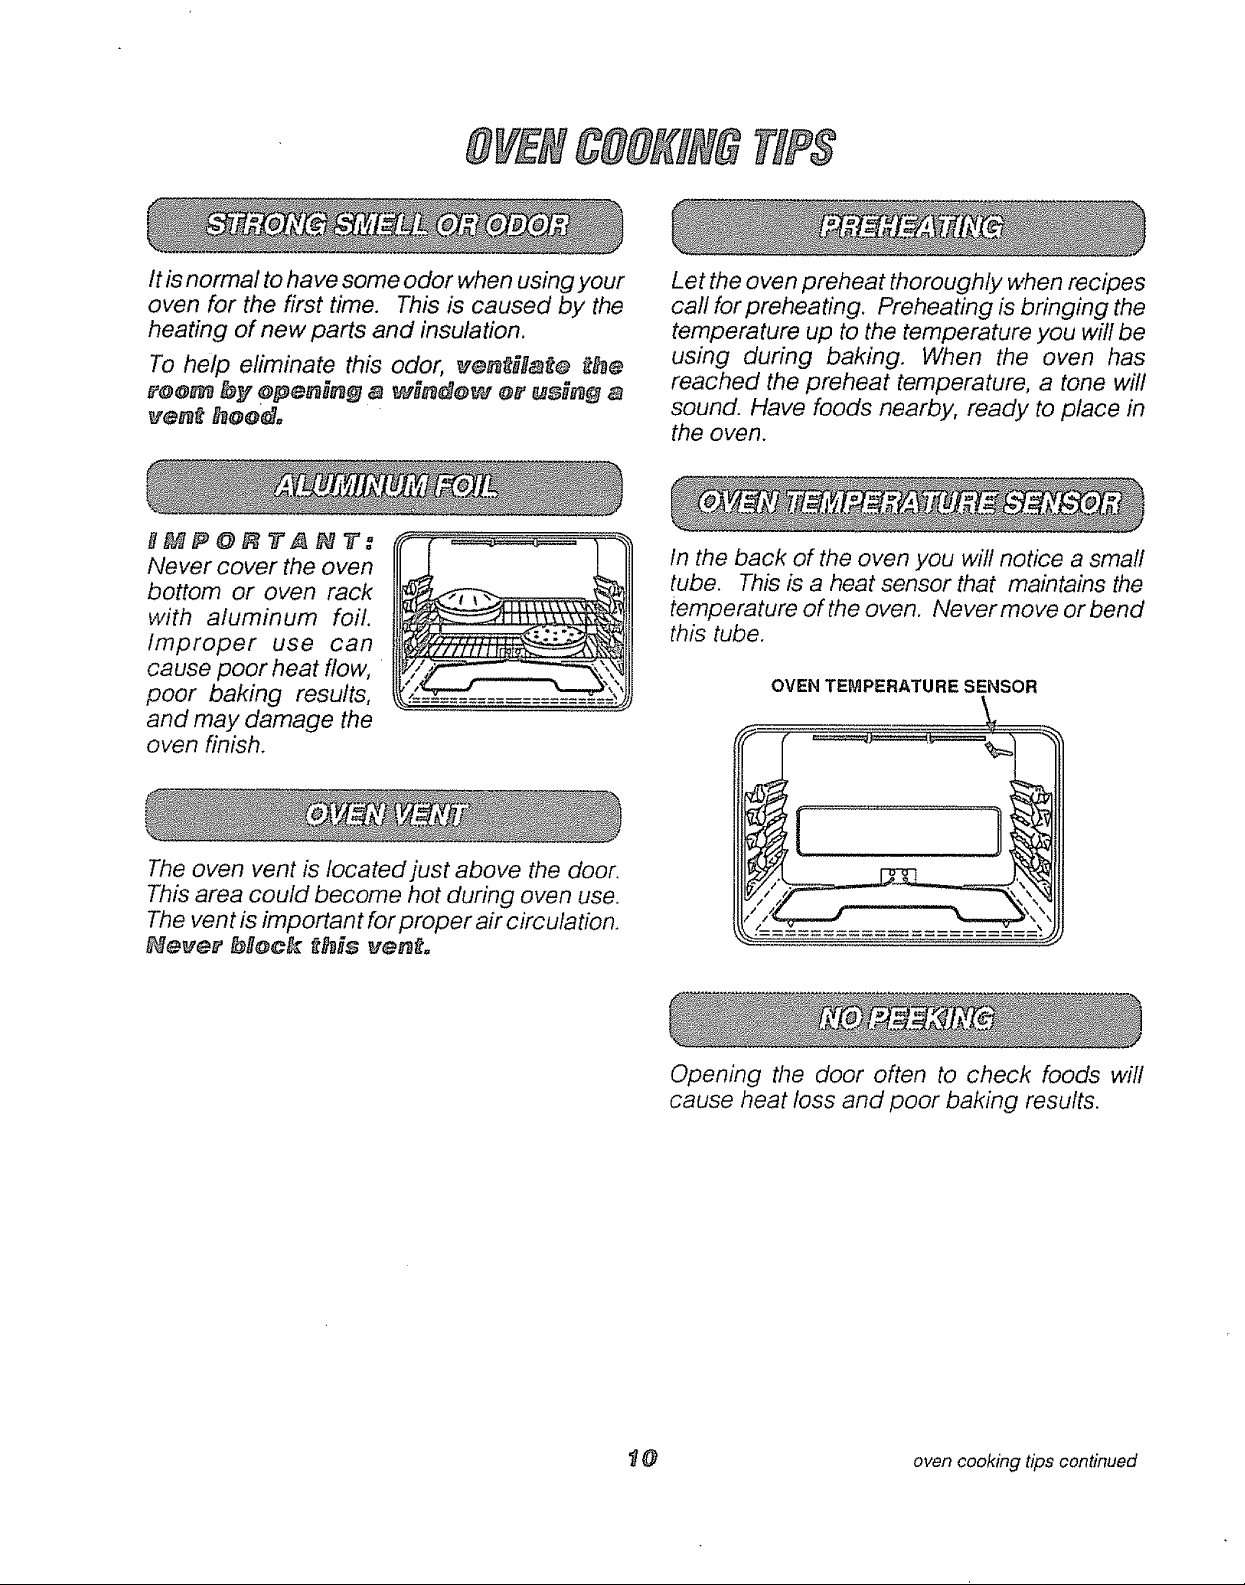
In the back of the oven you will notice a small
tube. This is a heat sensor that maintains the
temperature of the oven. Never move or bend
this tube.
OVEN TEMPERATURE SENSOR
Opening the door often to check foods will
cause heat loss and poor baking results.
1]@ oven cooking tips continued
TEP8con nue ,
During any oven operation you may hear a fan
noise. This is the internal cooling fan that
keeps all electrical parts from overheating, it
is not uncommon for this fan to keep running
even after the oven is turned off.
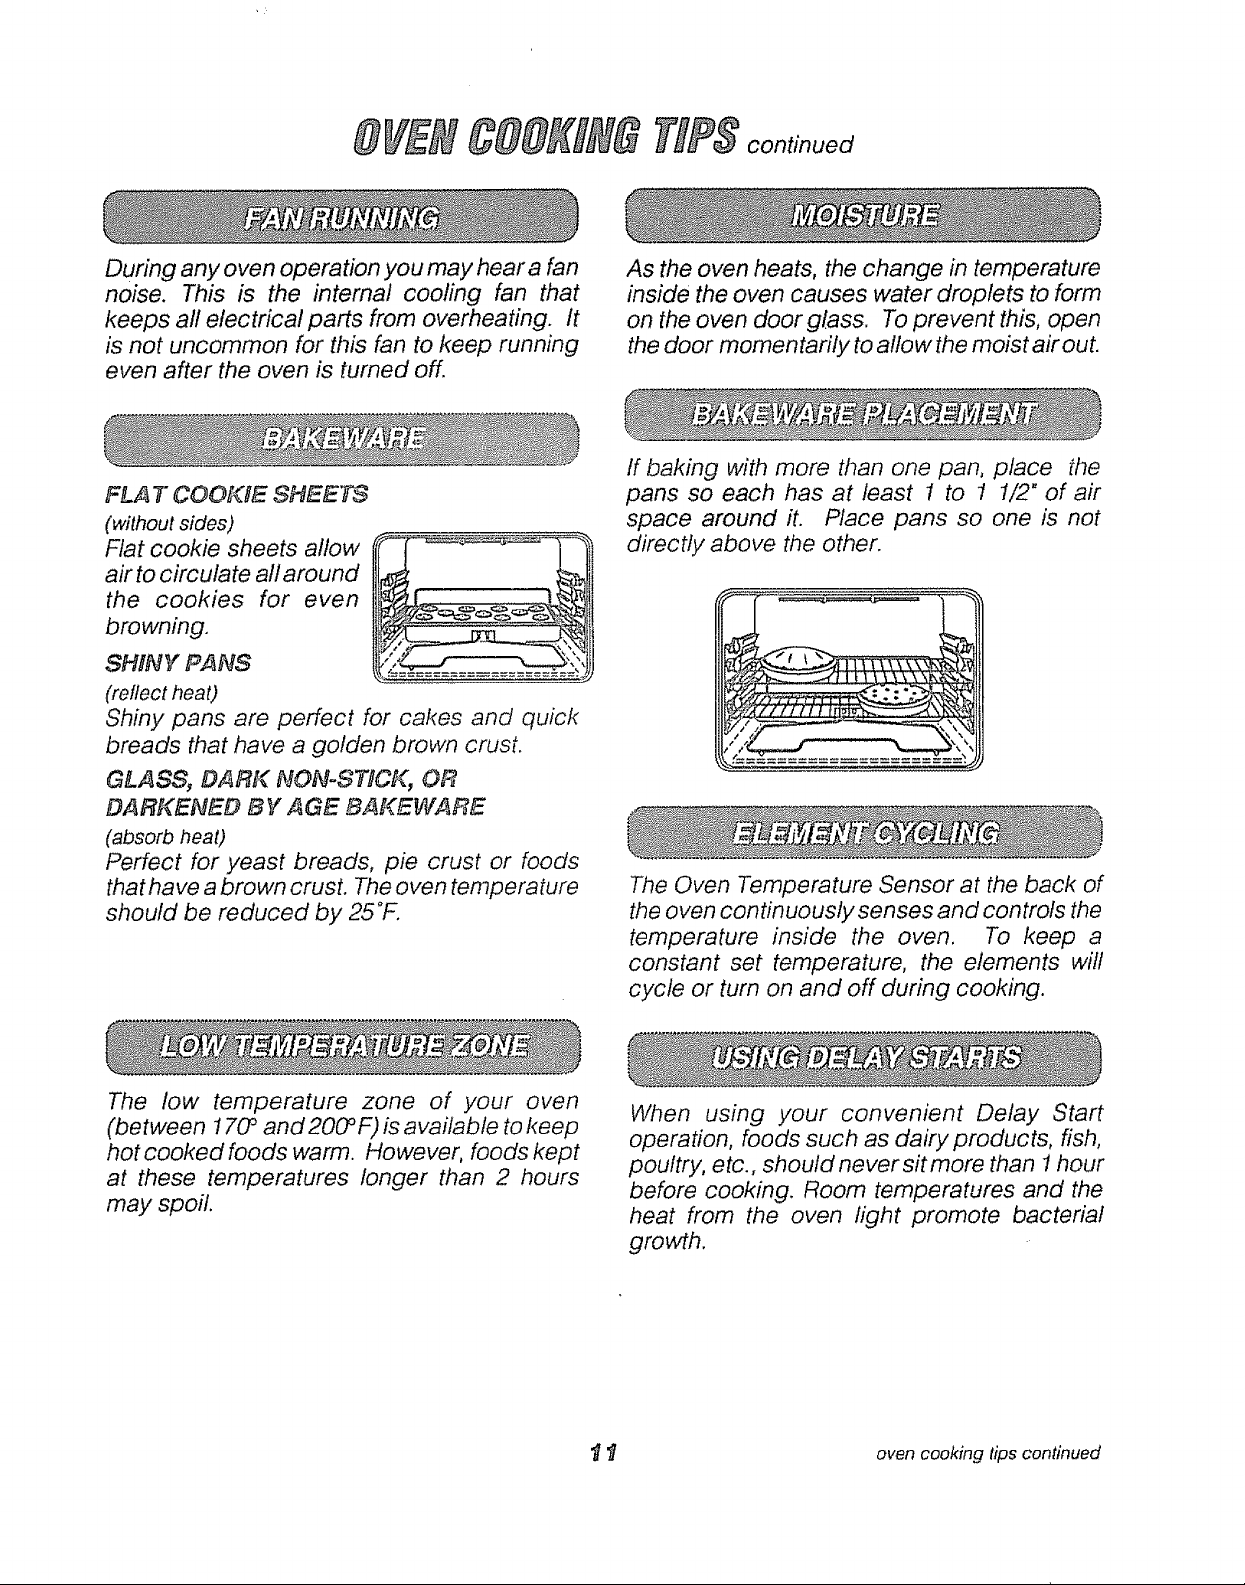
FLA T COOKIE SHEETS
(without sides)
Flat cookie sheets allow
airto circulate all around
the cookies for even
browning.
SHINY PANS
(reflect heat)
Shiny pans are perfect for cakes and quick
breads that have a golden brown crust.
GLASS, DARK NONoSTICK, OR
DARKENED BY AGE BAKEWARE
(absorb heat)
Perfect for yeast breads, pie crust or foods
that have a brown crust. The oven temperature
should be reduced by 25°F.
As the oven heats, the change in temperature
inside the oven causes water droplets to form
on the oven door glass. To prevent this, open
the door momentarily to allowthe moist air out.
If baking with more than one pan, place the
pans so each has at least 1 to 1 1/2" of air
space around it. Place pans so one is not
directly above the other.
The Oven Temperature Sensor at the back of
the oven continuously senses and controls the
temperature inside the oven. To keep a
constant set temperature, the elements will
cycle or turn on and off during cooking.
The low temperature zone of your oven
(between 170 _and 2OO°F) is available to keep
hot cooked foods warm. However, foods kept
at these temperatures longer than 2 hours
may spoil.
When using your convenient Delay Start
operation, foods such as dairy products, fish,
poultry, etc., should never sit more than 1 hour
before cooking. Room temperatures and the
heat from the oven light promote bacterial
growth.
t 1] oven cooking tips continued
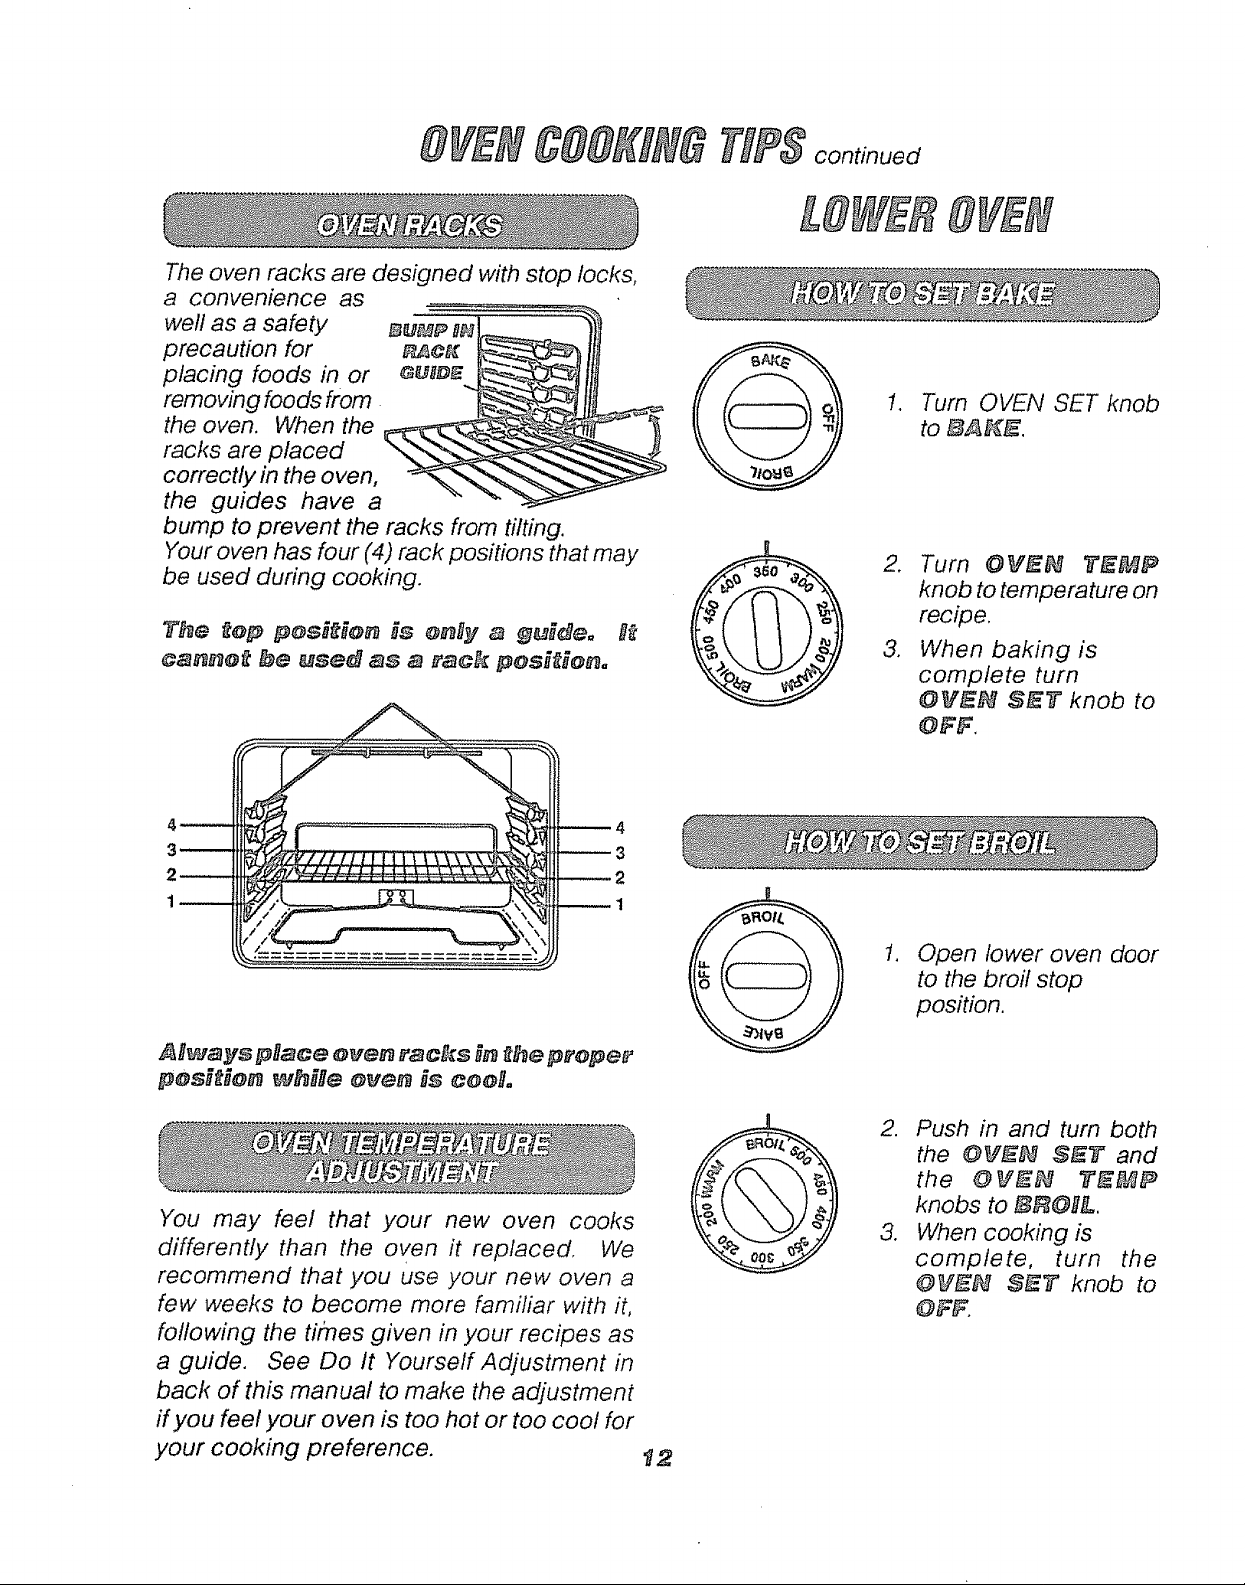
The oven racks are designed with stop locks,
a convenience as
well as a safety _ump n_
precaution for _c_
placing foods in or _,uu#e
removing foods from
the oven. When the
racks are placed
correctly in the oven,
the guides have a
bump to prevent the racks from tilting.
Your oven has four (4) rack positions that may
be used during cooking.
T_e £op posi_Ho_isonBya Ssideo fl_
can_o_be ssed _s a rac£ posH_Bon_
_P8 continued
1. Turn OVEN SET knob
to ZI&_E.
Turn OV£@J _'£MF
knob to temperature on
recipe.
o
When baking is
complete turn
O_I£M SE_" knob to
OFF,
4
3
_2
AnywayspBace@yenrac£sgn_heproper
posi_io_whSBeores iscooB°
You may feel that your new oven cooks
differently than the oven it replaced. We
recommend that you use your new oven a
few weeks to become more familiar with it,
following the times given in your recipes as
a guide. See Do It Yourself Adjustment in
back of this manual to make the adjustment
ff you feel your oven is too hot or too cool for
your cooking preference.
1,2
1. Open lower oven door
to the broil stop
position.
Push in and tum both
the @_t_M $£T and
the @%¢_M _'_
knobs to ZBO_&.
°
When cooking is
complete, turn the
@%¢_ S_2" knob to
OFF.
TEMP
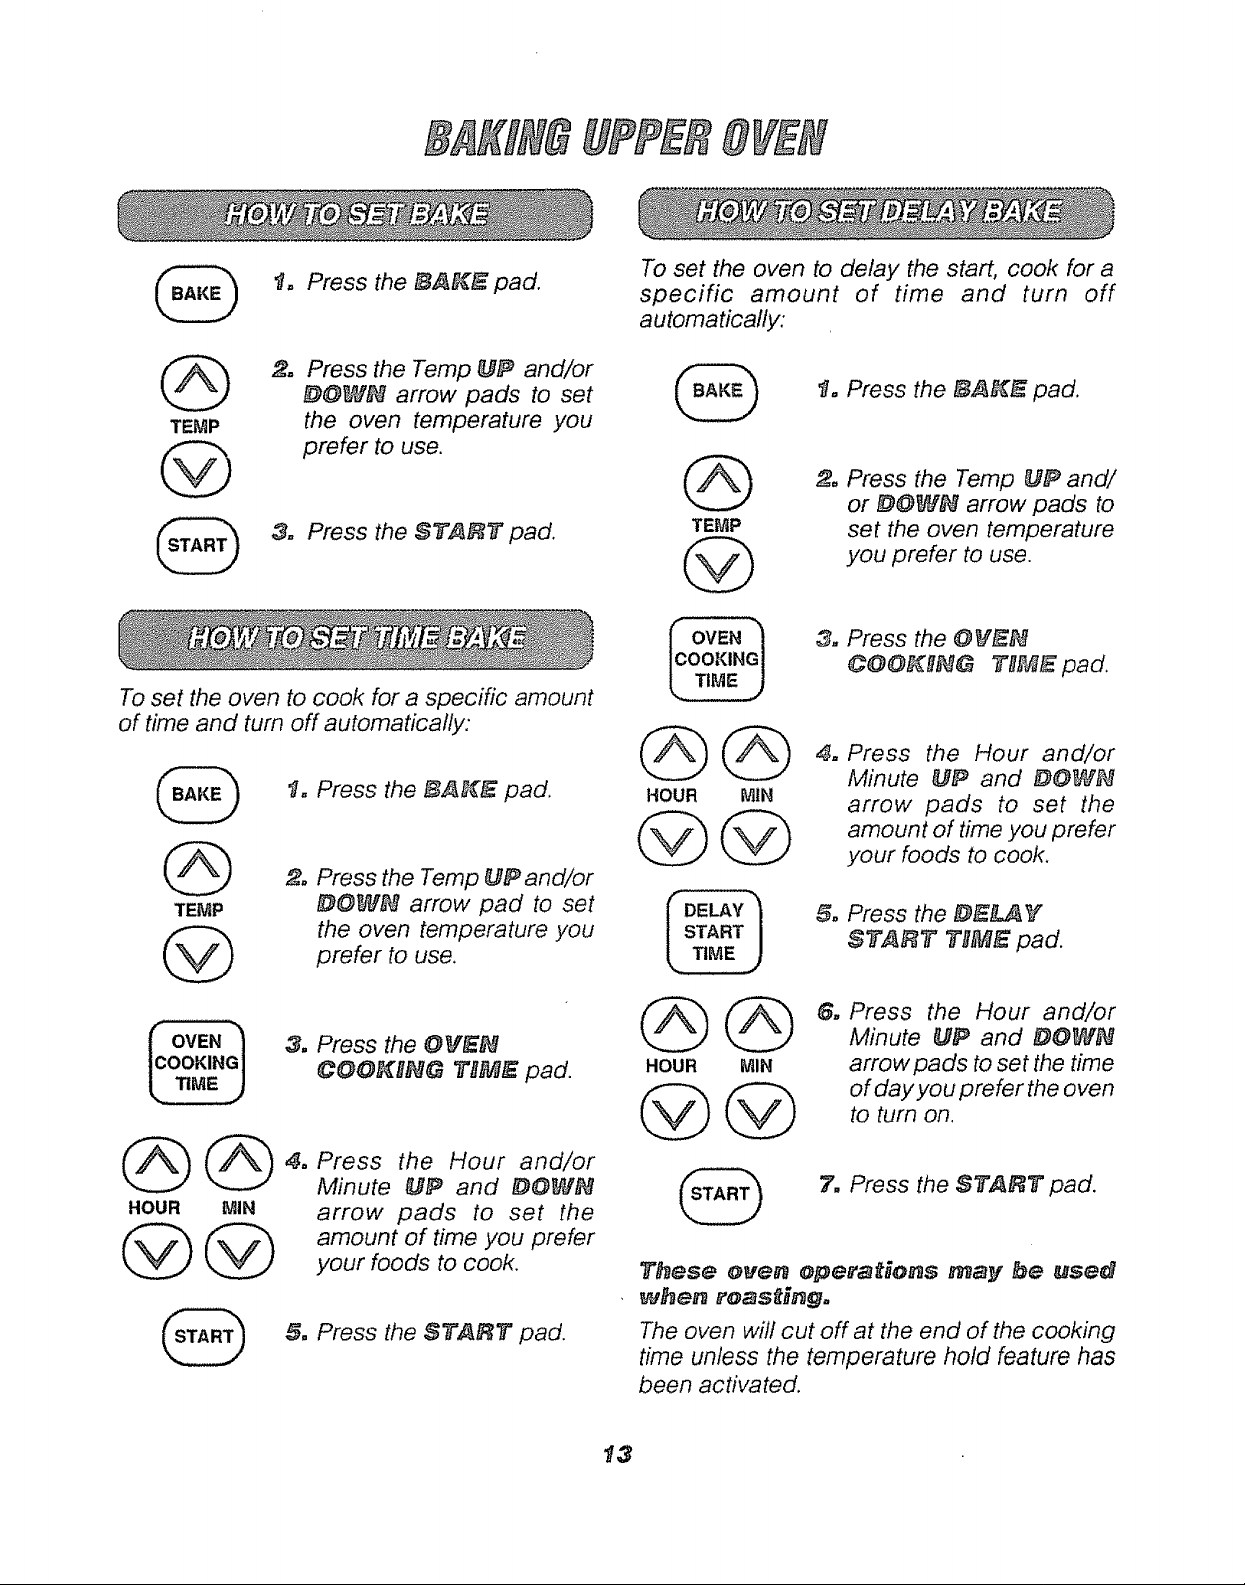
1= Press the t_/_E pad.
2o Press the Temp UP and/or
@OY_ arrow pads to set
the oven temperature you
prefer to use.
3.= Press the $T,_fl_" pad,
To set the oven to delay the start, cook for a
specific amount of time and turn off
automatically:
1= Press the _,_ pad.
2, Press the Temp UP and/
TEMP
or DO_fb,_ arrow pads to
set the oven temperature
you prefer to use.
To set the oven to cook for a specific amount
of time and tum off automatically:
t, Press the [_A_E pad.
2o Press the Temp UP and/or
TEMP
@
_OVEN
lCOOK,'_GI
G@
HOUR MIN
@@
DOW¢_ arrow pad to set
the oven temperature you
prefer to use.
3, Press the OVEN
COOKIt_G _'BME pad.
4o Press the Hour and/or
Minute UP and DO_f_€_
arrow pads to set the
amount of time you prefer
your foods to cook.
5= Press the START" pad.
OVEN
COOKING
TIME
GG
HOUR _tilN
@@
HOUR MIN
These _ver_ opera_io_s may be used
w_er_ feasting.
The oven will cut off at the end of the cooking
time unless the temperature hold feature has
been activated.
3, Press the O V_P_
e,OOK_tt_G _'HME pad.
Press the Hour and/or
Minute UP and DO_b,_
arrow pads to set the
amount of time you prefer
your foods to cook.
5, Press the #Efl, J&Y
_TART _'H[_REpad.
6o Press the Hour and/or
Minute UP and DOW_
arrow pads to set the time
of day you prefer the oven
to turn on.
7. Press the $7"_" pad.
13

Broiling is cooking by direct
heat from the upper element.
The oven door should remain
opened to the broil stop lock
position during broiling.
It is not necessary to preheat the oven when
broiling. Use the broiler pan and grid that
came with your range. Both are designed for
proper drainage of fat and liquids.
The U.S. Department of Agriculture notes
that meat cooked rare is popular, but meat
cooked to only 140 °F (rare) means that some
poisoning organisms may survive.
Moving meats away from the element will allow
the meat to cook to the center while browning
on the outside. Using this positioning, cook
side 1 at least 2 minutes longer than side 2. if
your oven is connected to 208 volts, you may
want to use a higher rack position and!or broil
foods longer.
The size, weight, thickness, starting temperature
and your preference of the doneness of the meat
wil! affect broiling. This chart is based on
meats at refrigerator temperature.
RACK
POSITION
3
o Choose tender cuts of meat at least 3/4"
thick for broiling.
o Trim the outer layer of fat silt the edges to
keep meats from curling.
Always use tongs to turn meats. Piercing
meat allows juices to escape.
,_ Salt the first side of meats just before
turning, the second side just before
serving. Brush chicken and fish with butter
several times as they broil
o Chicken and fish should be placed on the
grid skin side down. For fish, lightly grease
the grid to prevent sticking.
The closer you place foods to the broil
element, the faster foods brown on the outside
yet remain red to pink in the center.
3
3
2
tao Press the BB08tL pad.
_Tbu's _,_HR8a#_e_at#c, aBSy
se_ _H Bce_O_
_]b. While the indicator is flashing in
the display, press the $_@8&
pad again if you prefer to use
LO Broil.
2, Press the _$TzSRTYpad.
3o When broiling is finished, press
the @_,EAB/OFF pad.

t= Remove the broiler pan and grid, oven
racks, utensils .o_.._o
and any foil that __
may be in the I[
oven.
2, Soil on the front
frame, i" inside ;
the oven, and
outside the door
gasket will need to be cleaned by hand.
Clean these areas with hot water, soap-fitted
steel wool pads or cleansers such as Soft
Scrub® to remove any soil. Rinse well with
clean water and dry.
3, Wipe up any heavy spillovers on the oven
bottom.
4, Do not clean the door gasket. The
fiberglass material of the oven door gasket
cannot withstand abrasion. It is essential
for the gasket to remain intact. Ifyou notice
it becoming worn, frayed, or displaced on
the door, it should be replaced.
The door gasket _oRPANEL GASKET
is designed to
have a 5-6" gap
at the bottom of
the door. _
This allows for Doe,u,_
proper air circulation. It is normal for your oven
door to give the appearance of not having a
good seal against the range. This is due to the
gasket. The location of the gasket on the oven
door maintains a good seal and prevents any
heat loss.
Utensils should never be le#
in a self-clean cycle.
The oven racks may be
cleaned during the selbclean
cycle, but will lose their luster
and becem_ hard to slide, if you choose
to leave them in during the cycle, wiping
them down with vegetable oil after the
cycle will help them slide easier.
Al_vays make sure the oven light is off
during _he self-clean cycle _o prolong
the life of the bulb.
For the first clean cycle, vent the room
with an opened window or hood vent,
This will prevent the strong odor from
heating new parts.
o When the door locks, _-GC_ #GGB will
show in the display. The oven temperature wilt
need to drop below the locking temperature
before the door can be opened. The word
LGCK_ DGGB will go out in the display,
o If LOCK DGGR flashes in the display, the
door is not closed completely, simply press
on the door.
Clean only as touch-up between clean cycles.
Use dishwashing liquid, warm water, or
soap-filled steel wool pad. Rinse well after
cleaning and dry.
_EVE_ USE OVE_J CLEA_Ef_S _ O_
A_tOU_D AE#Y PART GF THE OVE_o
When cleaning, be sure not to bend or
displace the temperature sensor located on
the back wall of the oven.
t5 self-clean cycle continued
 Loading...