

CONTENTS
SAFETY
USE AND CARE
Removal o! Packaging Tape ......................................... 4
Your Oven and Its Features ...................................................5
Oven Controls ..................................................................6, 7
Clock ........................................................................................7
Timer ................................................................................................7
Oven Cooking .......................................................... 8-10
Broiling .......................................................................... 11
Self-Clean Cycle ..................................................... 12, 13
Cleaning Tips ................................................................... 14
Removable Parts ............ ........................................... 1 5, ! 6
SERVICE
Before Catling For Service ................................. 17, 18
Thermostat Adjustments ............................................. 19
Conumer Service Numbers ..............................................21
WARRANTY
Ken{Tloi_e
MODELS 911. 30425
R_._,dedPaper
911. 30429
° E, TY
Al.
229C4020P038=3 31.10216
SAVE THESE INSTRUCT|ONS
Read all instructions before using this appliance. When using electrical
appliances, basic safety precautions should.be followed, including the following:
WARNING: If the Information in this manual is
not followed exactly, aftre or explosion may result
causing property damage, personal injury or death
Do not store or use gasoline or other
flammable vapors and liquids in the vicinity
of this or any other appliance.
WHAT TO DO IF YOU SMELL GAS
• Do not try to light any appliance!
• DO not touch any electrical switch; Do not
use any phone in your building!
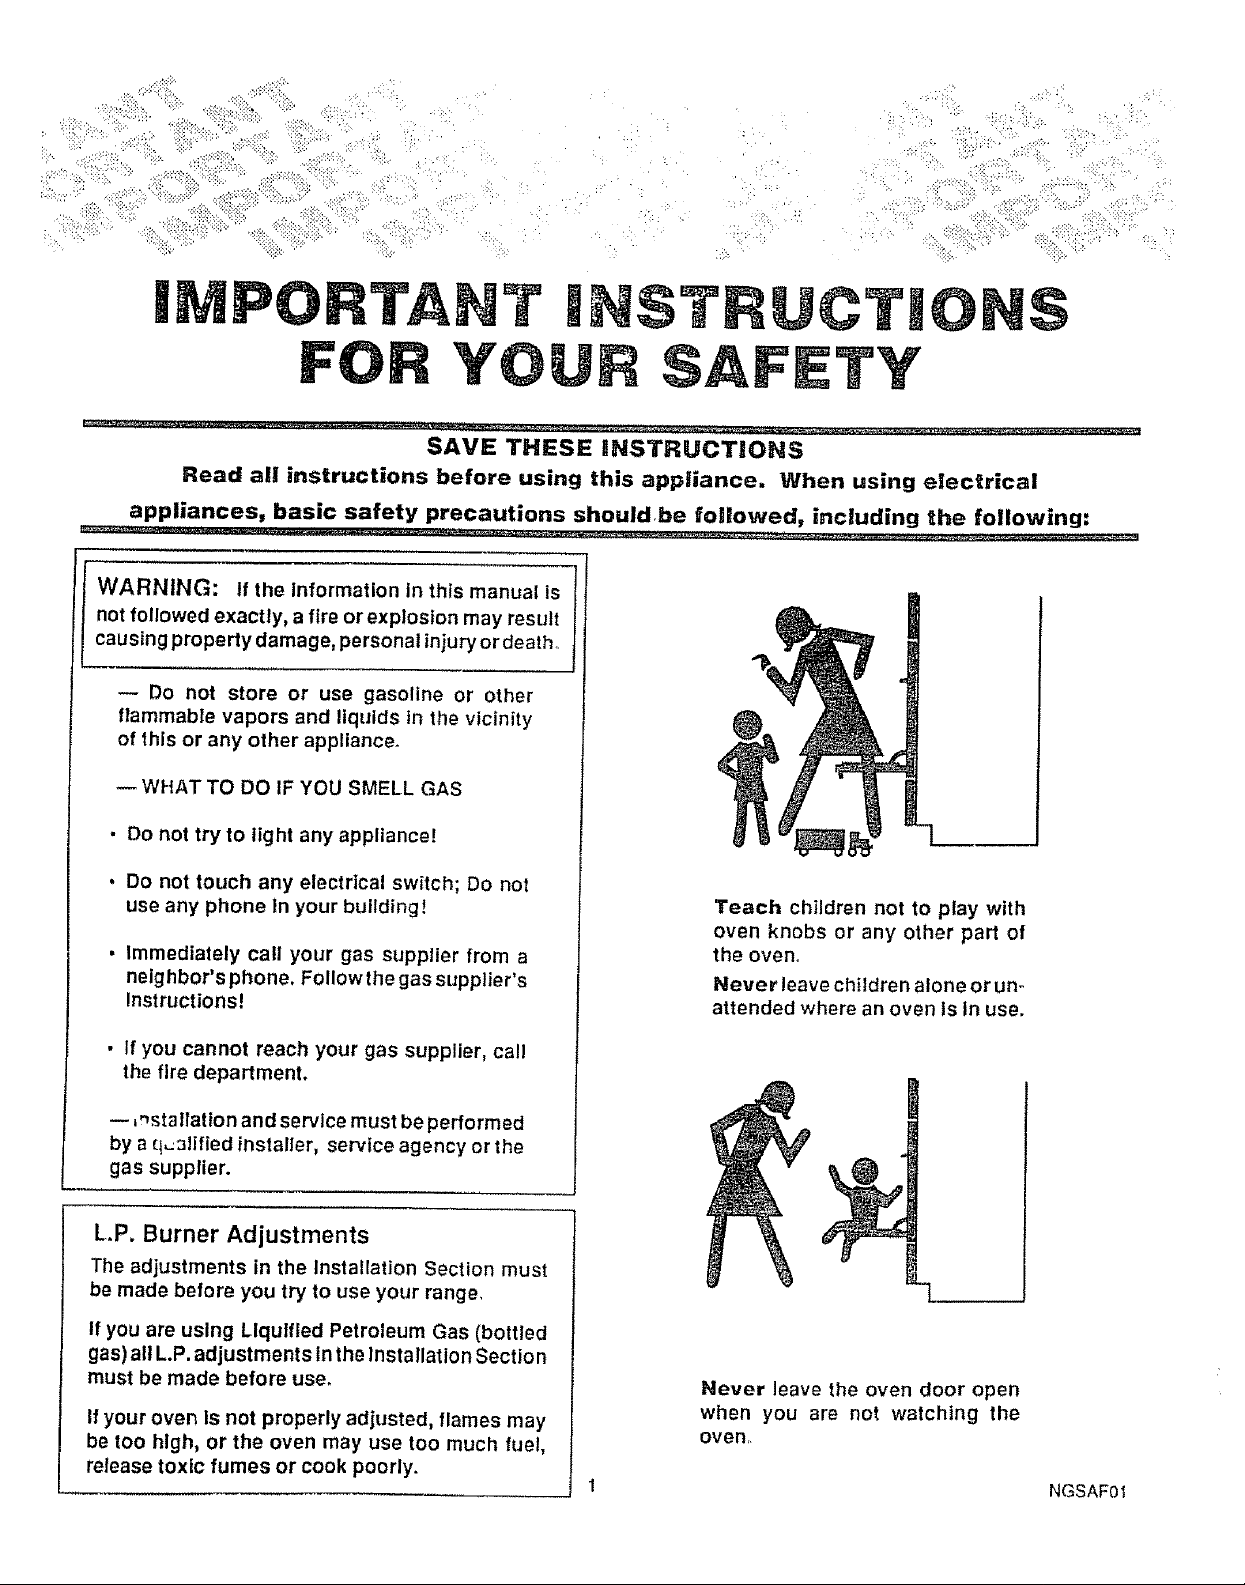
Teach children not to play with
oven knobs or any other part of
• Immediately call your gas supplier from a
neighbor's phone. Follow the gas supplier's
Instructions!
the oven
Never leave children alone or un-
attended where an oven is In use.
• If you cannot reach your gas supplier, call
the fire department.
-- ¢_statlatlon and service must be performed
by a q_31flied installer, service agency or the
gas supplier.
L.P. Burner Adjustments
The adjustments in the Installation Section must
be made before you try to use your range
If you are using Llqulfled Petroleum Gas (bottled
gas)all L.P. adjustments In the Installation Section
must be made before use.
If your oven Is not properly adjusted, flames may
be too hlgh, or the oven may use too much fuel,
release toxic fumes or cook poorly.
Never leave the oven door open
when you are not watching the
oven,
NGSAF01
To insure safety for yourself and your home, please read your Owner's Manual
carefully. Keep it handy for quick easy reference. Pay close attention to the
safety sections of your manual. You can recognize the safety sections by
looking for the _ symbol or the word "Safety".
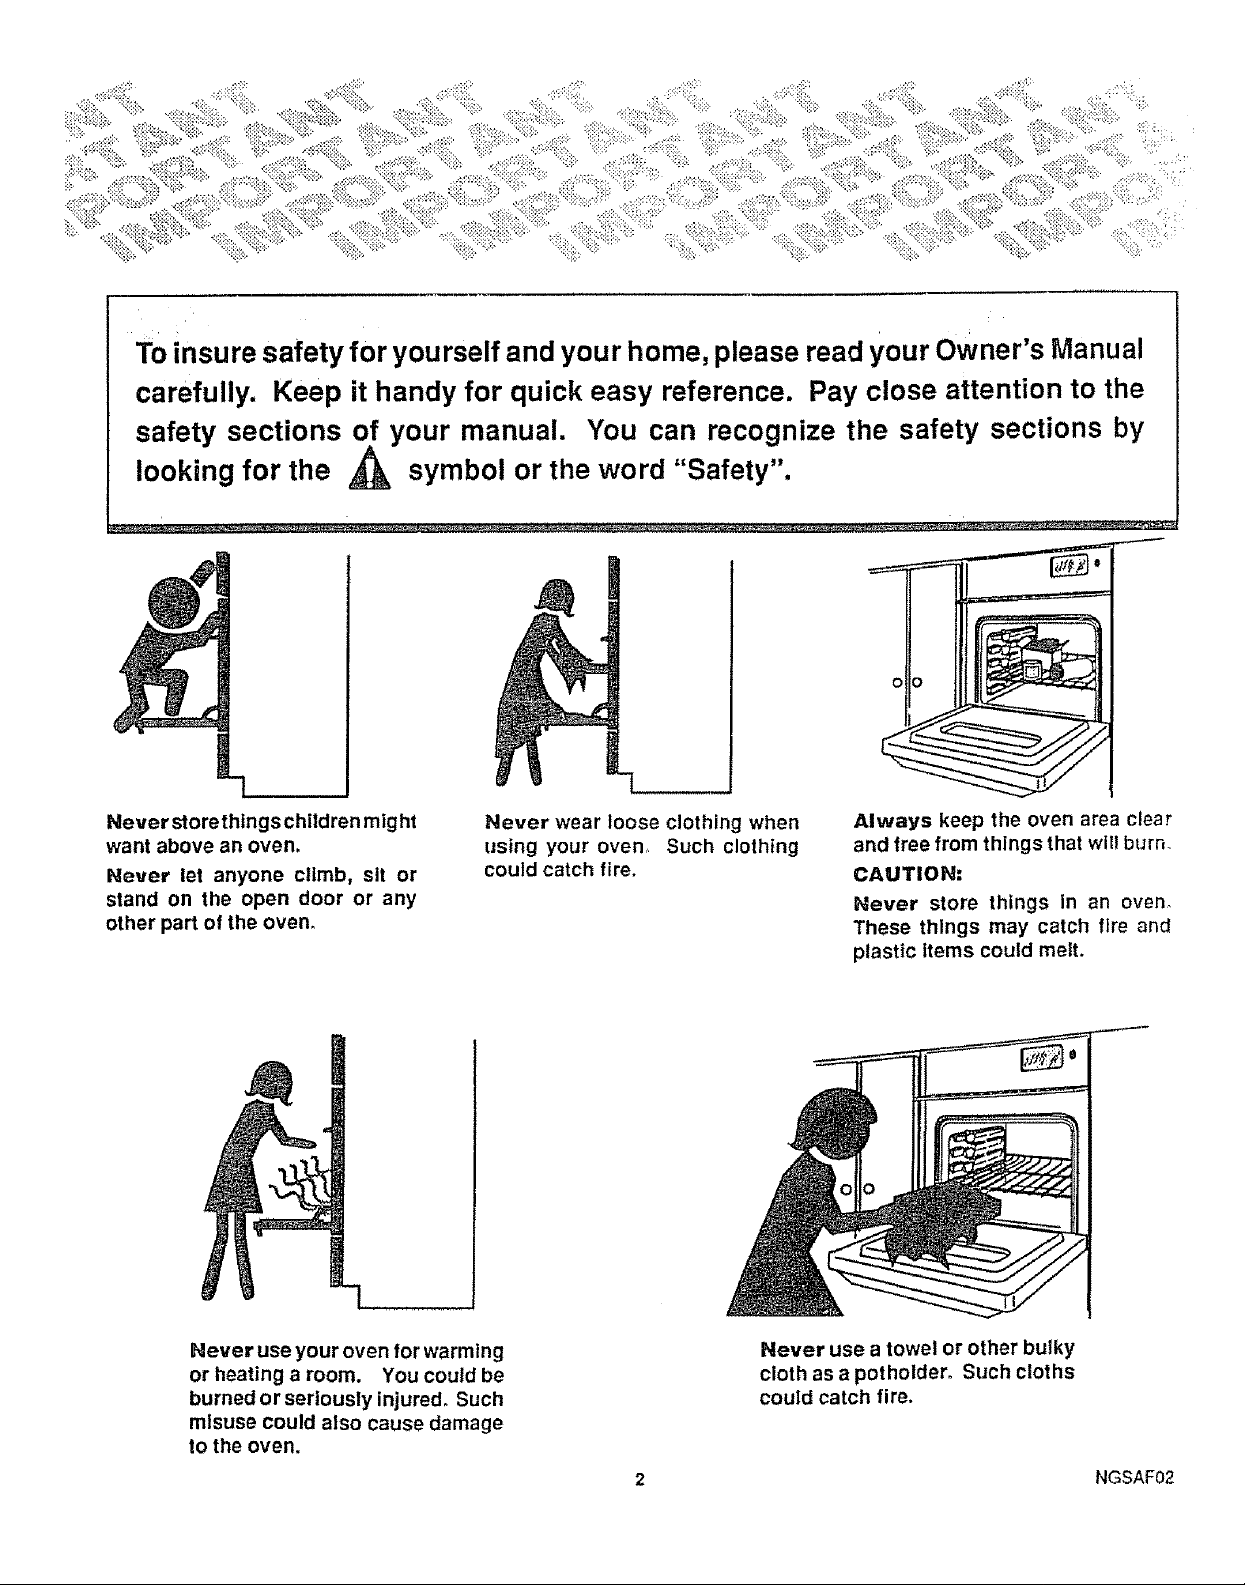
Never store things children mtght
want above an oven.
Never let anyone climb, sit or
stand on the open door or any
other part of the oven.
Never use your oven for warming
or heating a room. You could be
burned or seriously injured. Such
misuse could also cause damage
to the oven.
Never wear loose clothing when
using your oven< Such clothing
could catch fire.
Never use a towel or other bulky
cloth as a potholdero Such cloths
could catch fire.
2 NGSAF02
Always keep the oven area clear
and free from things that wll) burn.
CAUTION:
Never store things In an oven°
These things may catch fire and
plastic items could melt.
SAFETY
INSTRUCTnO
BASIC SAFETY PRECAUTIONS
Keep this book for later use,
Be sure your oven Is installed and grounded properly
by a qualified technician.
Always use dry potholders when removing pans from
the oven or cooktop, Moist or damp pothoiders can
cause steam burns.
Always follow cleaning instructions in this book,
Always keep the oven clean. Food and grease are easy
to ignite, Clean the oven and vents regularly.
Clean Only Parts Listed In Manual.
CAUTION." Do not store items of interest to
children in cabinets above an oven, Children
climbing on an oven to reach items could be
seriously injured.
Always keep combustible wall coverings, curtains, or
drapes a safe distance away from your range and oven
Always keep dish towels, dish cloths, potholders and
other linens asafe distance away from your oven_ Never
store such items on your oven.
Always keep the appliance area clear and free from
things that will burn (gasoline and other flammable
vapors and liquids).
Never fry to repatr or replace any part of the oven
unless Instructions are given in this book. All other
work should be done by a skilled technician,
Never heat unopened food containers. Pressure
buildup may make container burst and cause injury,
Never leave jars or cans of fat or drippings near the
oven. Never let grease build up in your oven, You can
keep grease fires from starting If you clean up grease
and spills after each oven use.
OVEN SAFETY
Place oven racks in desired position while oven is cool.
If rack must be moved whtle oven Is hot, do not let
potholder contact hot heating element tn oven.
After broiling, always take the broiler pan out of the
oven and clean it, Leftover grease in the broiler pan can
catch on fire the next time you use the pan,
Always use care when opening oven door. Let hot air
and steam escape before moving food.
Never use aluminum foil to line oven bottoms, improper
use of foil could start a fire.
Be sure the oven is securely installed to a cabi-
net that is firmly attached to the house struc.
ture. Weight on the oven door could potentially
cause the oven to tip and result in injury. Never
allow anyone to climb, sit, stand, or hang on the
oven door.
SELF-CLEAN SAFETY
If the self.cleaning mode malfunctions, turn off
and disconnect the power supply_ Have serviced by a
qualified technician.
Always remove broiler pan and other utensils from the
oven before a self-clean cycle°
Never rub, move, or damage the door gasket on self-
cleaning ranges. The gasket isessential for a good sealo
Never try to clean utensils, cookware or removable
parts of your oven during a self-clean cycte_
Do Net Use Overt C_eaners -- No commercial oven
cleaner or oven liner protective coating of any kind
should be used in or around any part of the oven°
Never try to move a pan of hot fat, especially adeep fat
fryer. Walt until the fat has cooled.
Never touch burners or interior surfaces of the oven.
They may be hot even though they appear dark in color°
Always keep wooden utensils, plastic utensils orcanned
food a safe distance away from your oven_
Some cleaners produce noxious fumes and wet cloths
or sponges could cause steam
burns if used on a hot surfacer
3 NGSAF39
SAFETY MHSTRUCTiOHS (continued)
READ AND UNDEFISTAND
THIS IHFORMAT|ON NOW!
Should you ever need it, you wiiI
not have time for reading.
Be sure everyone in your home
knows what to do in case of fire.
Never use water on a grease fire.
it will only spread the flames.
OVEN FIRE--
DO HOT TRY TO MOVE THE PAN. w
1. Close oven door and turn controls
off.
2. If fire continues,throwbaking soda
on the fire, or use a dry chemical,
foam, or halon type extinguisher.
iMPORTANT SAFETY
NOTICE
The California Safe Drinking Water and Toxic Enforce-
ment Act requires the governor of California to publish
a list of substances known to the state to cause birth
defects or other reproductive harm and requires busi-
nesses towarn customers of potential exposure to such
substances.
The fiberglass insulation In self-clean ovens gives olf a
very small amount ofcarbon monoxide during the clean-
ing cycle. Exposure can be minimized by venting with
an open window or using a ventilation fan or hood°
REMOVAL OF PACKAGING TAPE:
To remove adhesive left from packing tape and
ensure you do not damage the finish of your new
appliance, use an application of household liquid
dish washing detergent, mineral oil, or cooking
oil. Apply with soft cloth and allow to soak. Wipe
with soft cloth. DO NOT use plastic pad or
equivalent. Wipe dry and then apply an appli.
ance polish to thoroughly clean and protect the
surface. This procedure is also safe for the face
of microwave doors and other plastic parts.
NOTE: The plastic tape must be removed from
chrome trim on oven parts. It CANNOT be
removed if baked on.
WHERE CAN YOU LOOK FOR
PACKAGING TAPE?
Control panel: top, sides, and bottom
Door trim: top, sides, and bottom
Bake burner
Door handles
4 NGSAF40
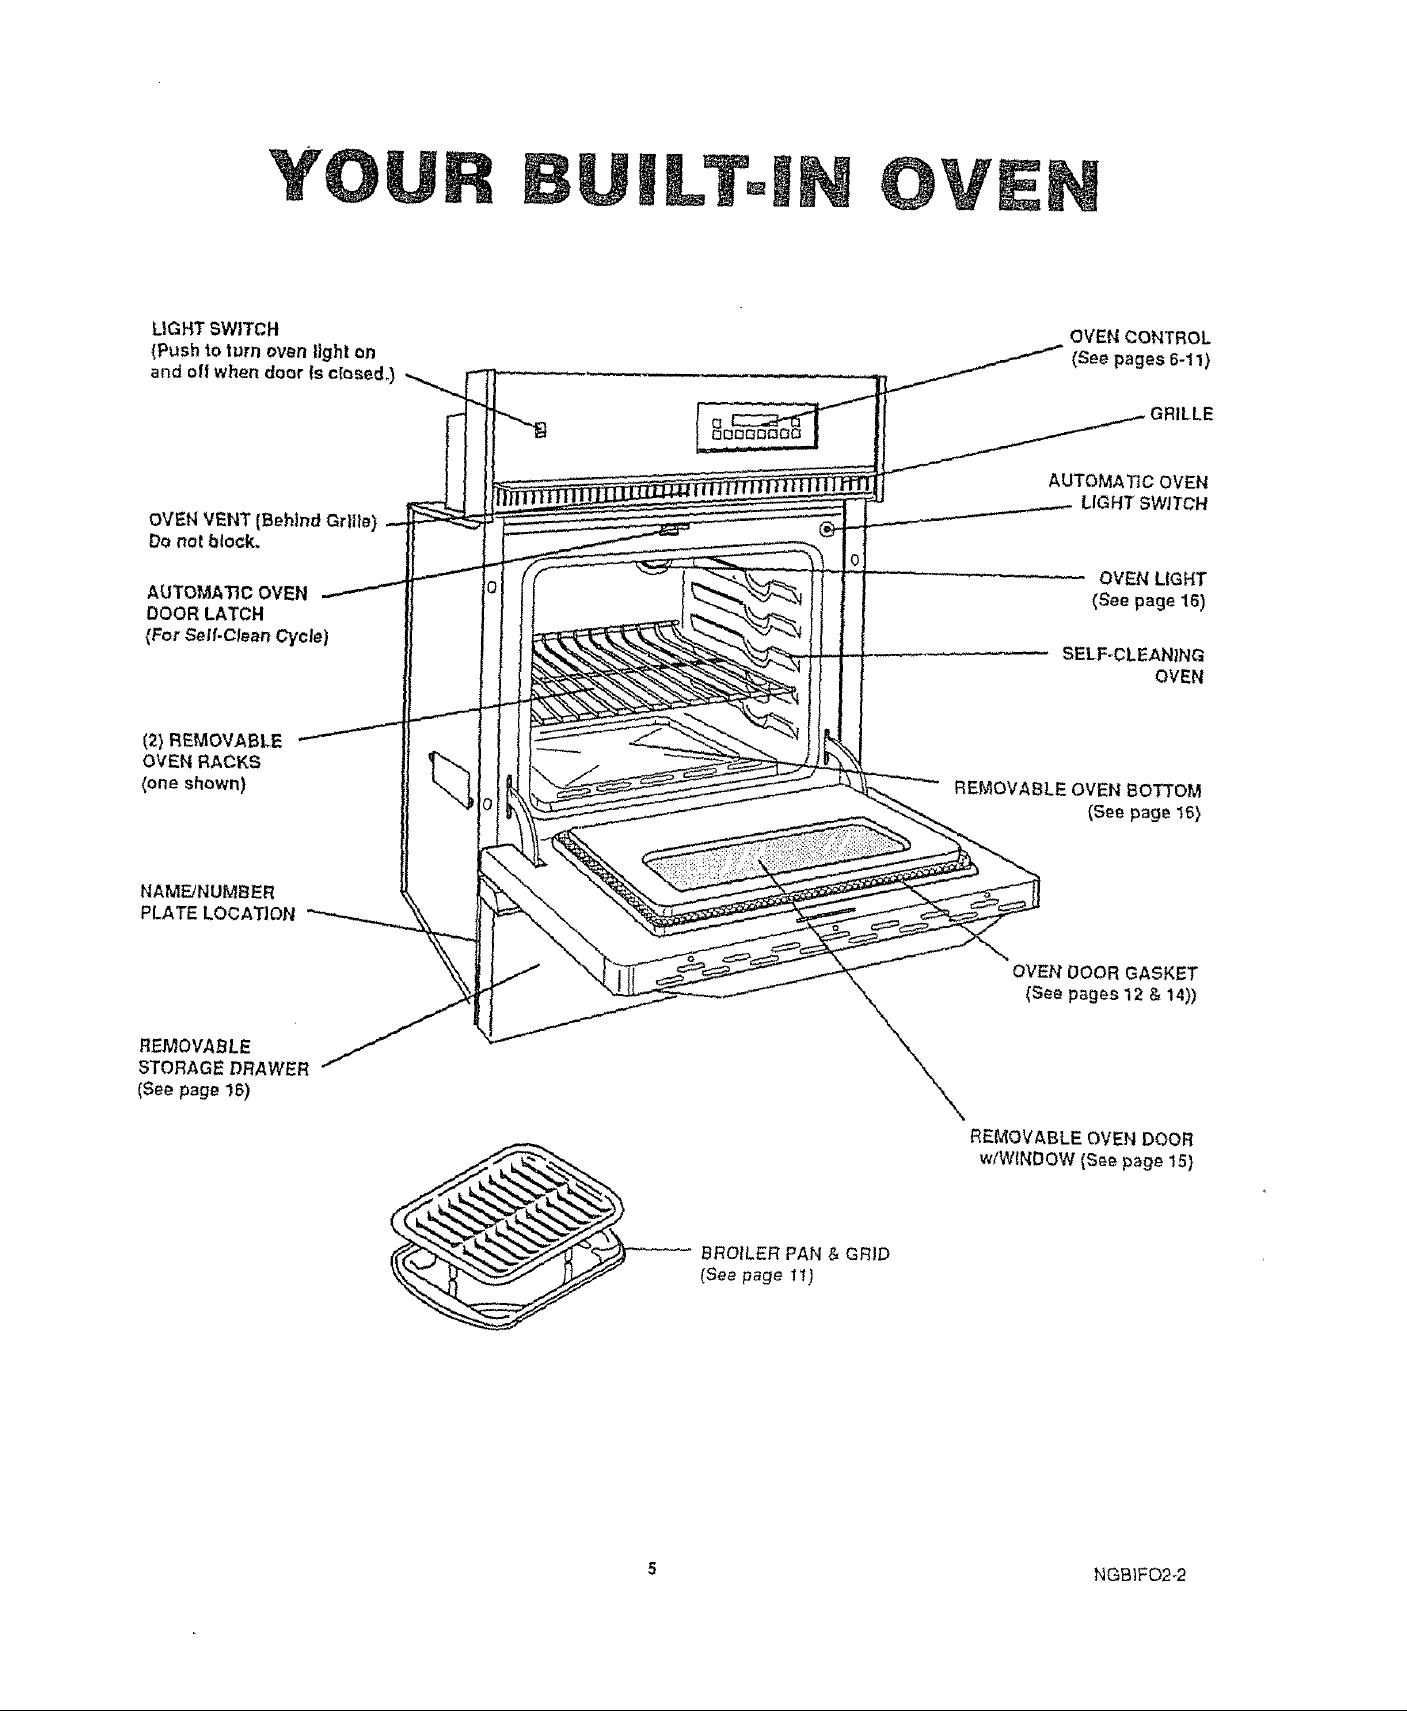
YO
AUTOMATIC OVEN
DOOR LATCH
{For Self-Clean Cycle)
(2) REMOVABLE
OVEN RACKS
(one shown)
LTo
OVEN CONTROL
(See pages 6-11)
LLE
AUTOMATIC OVEN
LIGHT SWITCH
OVEN L|GHT
(See page 16)
SELF-CLEAN}NG
OVEN
REMOVABLE OVEN BOTTOM
(See page t5)
NAMF_JNUMBER
PLATE LOCATION
OVEN DOOR GASKET
(See pages 12 & 14))
REMOVABLE OVEN DOOR
w#W{NDOW(Seepage!S)
BROtLER PAN & GRID
(See page 11)
5 NGBIFO2-2
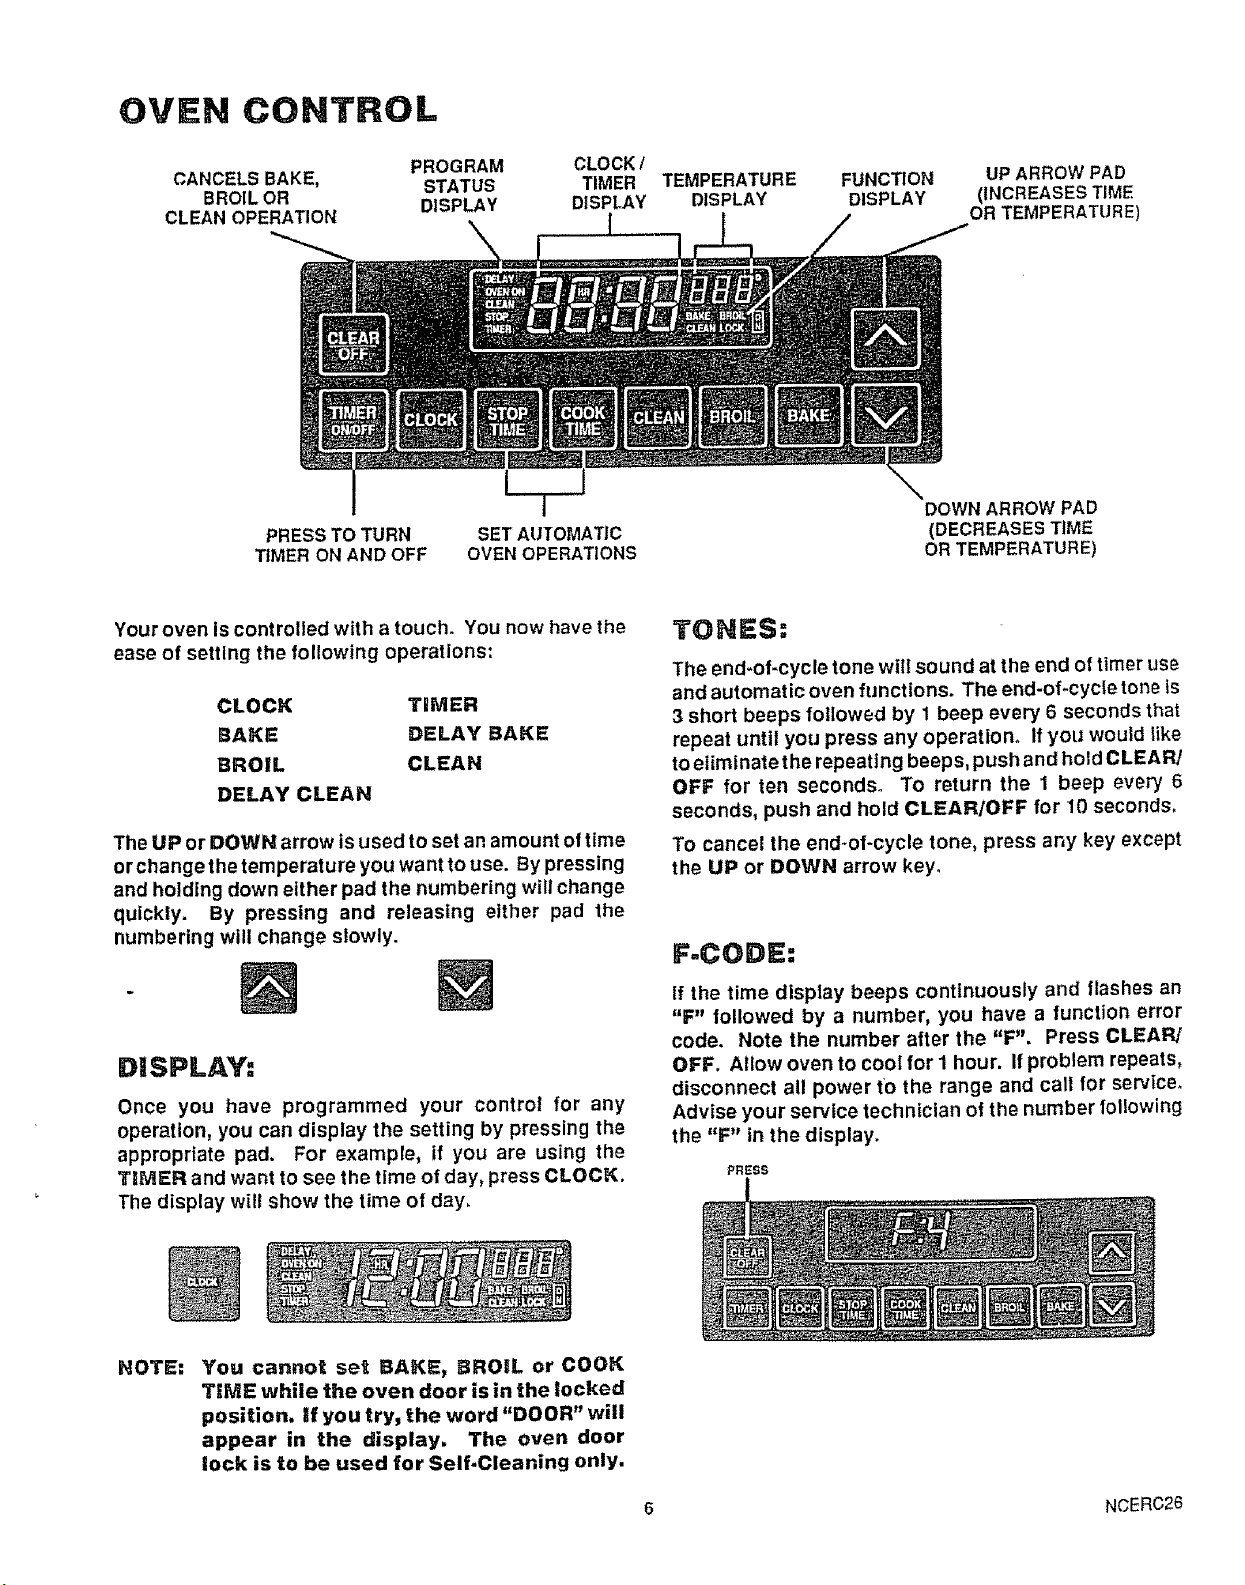
OVEN CONTROL
CANCELS BAKE,
BROIL OR
CLEAN OPERATION
PROGRAM
STATUS
DISPLAY
Lm
CLOCK/
TIMER
DISPLAY
T
PRESS TO TURN
TIMER ON AND OFF
Your oven is controlled with a touch. You now have the
ease of setting the following operations:
CLOCK TIMER
BAKE DELAY BAKE
BROIL CLEAN
DELAY CLEAN
The UP or DOWN arrow is used to set an amount of time
or change the temperature you want to use. By pressing
and holding down either pad the numbering will change
quickly. By pressing and releasing either pad the
numbering will change slowly.
SETAUTOMATIC
OVENOPERATIONS
I
TEMPERATURE
DISPLAY
FUNCTION
DISPLAY
UP ARROW PAD
(INCREASES TiME
OR TEMPERATURE)
DOWN ARROW PAD
(DECREASES TiME
OR TEMPERATURE)
TONES:
The end-of-cycle tone will sound at the end of timer use
and automatic oven functions° The end-of-cycle tone is
3 short beeps followed by 1 beep every 6 seconds that
repeat until you press any operation. If you would like
to eliminate the repeating beeps, push and hold CLEAR/
OFF for ten seconds. To return the 1 beep every 6
seconds, push and hold CLEAR/OFF for 10 seconds.
To cancel the end-of-cycle tone, press any key except
the UP or DOWN arrow key.
F.CODE:
DISPLAY:
Once you have programmed your control for any
operation, you can display the setting by pressing the
appropriate pad. For example, if you are using the
TIMER and want to see the time of day, press CLOCK.
The display will show the time of day.
NOTE:
You cannot set BAKE, BROIL or COOK
TIME while the oven door is in the locked
position, if you try, the word"DOOR" will
appear in the display. The oven door
lock is to be used for Self.Cleaning only,
If the time display beeps continuously and flashes an
"F" followed by a number, you have a function error
code. Note the number after the "F". Press CLEAR/
OFF. Allow oven to cool for I hour. If problem repeats,
disconnect all power tO the range and call for service_
Advise your service technician of the number following
the "F" in the display.
PRESS
6 NCERC26
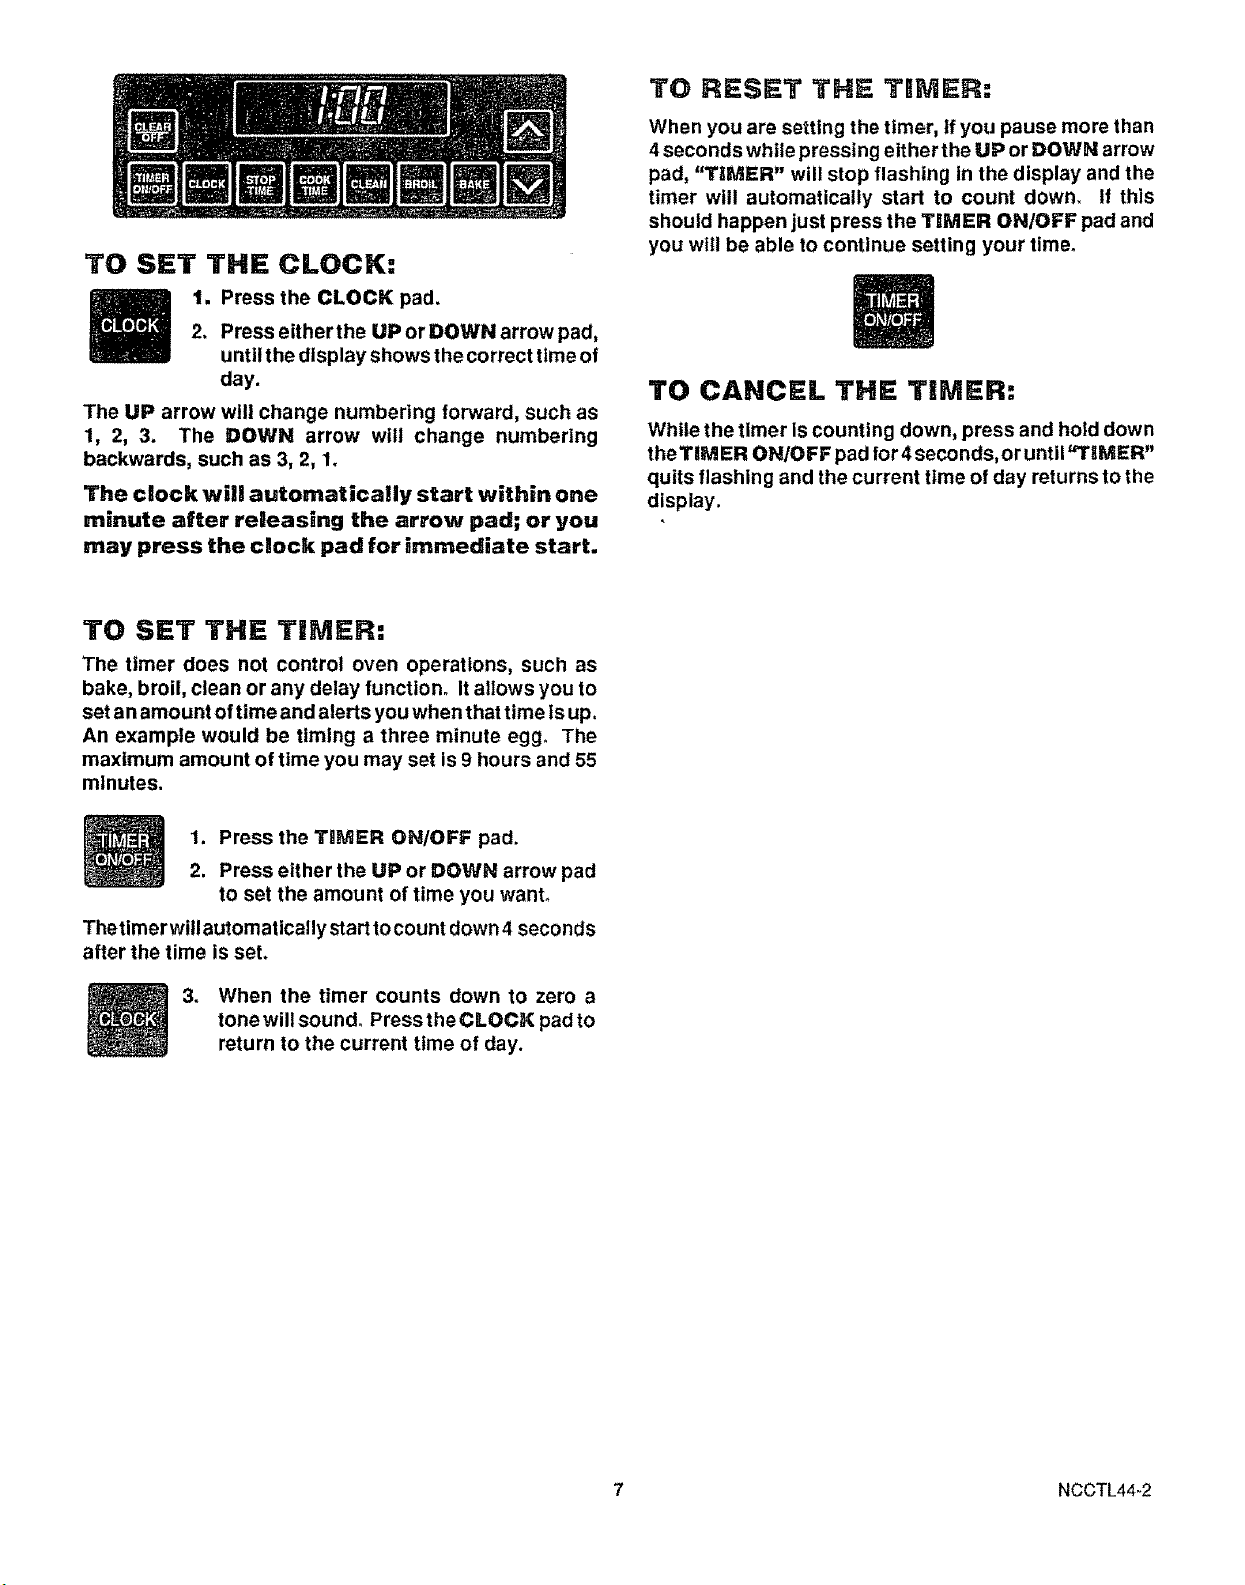
TO SET THE CLOCK:
1, Press the CLOCK pad.
2. Press eitherthe UP or DOWN arrow pad,
until the display shows the correct time of
day.
The UP arrow will change numbering forward, such as
1, 2, 3. The DOWN arrow w|ll change numbering
backwards, such as 3, 2, 1.
The clock will automatically start within one
minute after releasing the arrow pad; or you
may press the cJock pad for immediate start.
TO SET THE TIMER:
The timer does not control oven operations, such as
bake, broil, clean or any delay function. It allows you to
set an amount of time and alerts you when that time is up.
An example would be timing a three minute egg_ The
maximum amount of time you may set is 9 hours and 55
minutes.
TO RESET THE TIMER:
When you are setting the timer, if you pause more than
4 seconds while pressing either the UP or DOWN arrow
pad, "TIMER" will stop flashing in the display and the
timer will automatically start to count down. It this
should happen just press the TIMER ON/OFF pad and
you wig be able to continue setting your time.
TO CANCEL THE TIMER:
While the timer is counting down, press and hold down
theTIMER ON/OFF pad for 4seconds, oruntil"TIMER"
quits flashing and the current time of day returns to the
display.
1. Press the TIMER ON/OFF pad.
2. Press either the UP or DOWN arrow pad
to set the amount of time you want°
Thetlmer will automatically start tocount down 4 seconds
after the time is set.
3. When the timer counts down to zero a
tonewillsound° PresstheCLOCK padto
return to the current time of day.
7 NCCTL44-2
OVEN COOKING
GENERAL RULES
• When cooking a food for the first time in your new
oven, use time given on recipes as a guide.
Your new oven has been set correctly at the factoryand
Is apt to be more accurate than the oven ttmplacedo
After you have used your oven for awhile, If you feel
your oven should be hotter orcooler, you can adjust
ityourself. See TEMPERATURE ADJUSTMENTS
In this manual.
• NO PEEKING-- Opening the door too often to check
food during baking will allow heat loss and may
cause poor baking results.
• Theremay be some odorwhen theoven ISfirstused. This
is caused by the heating of new parts and Insulation.
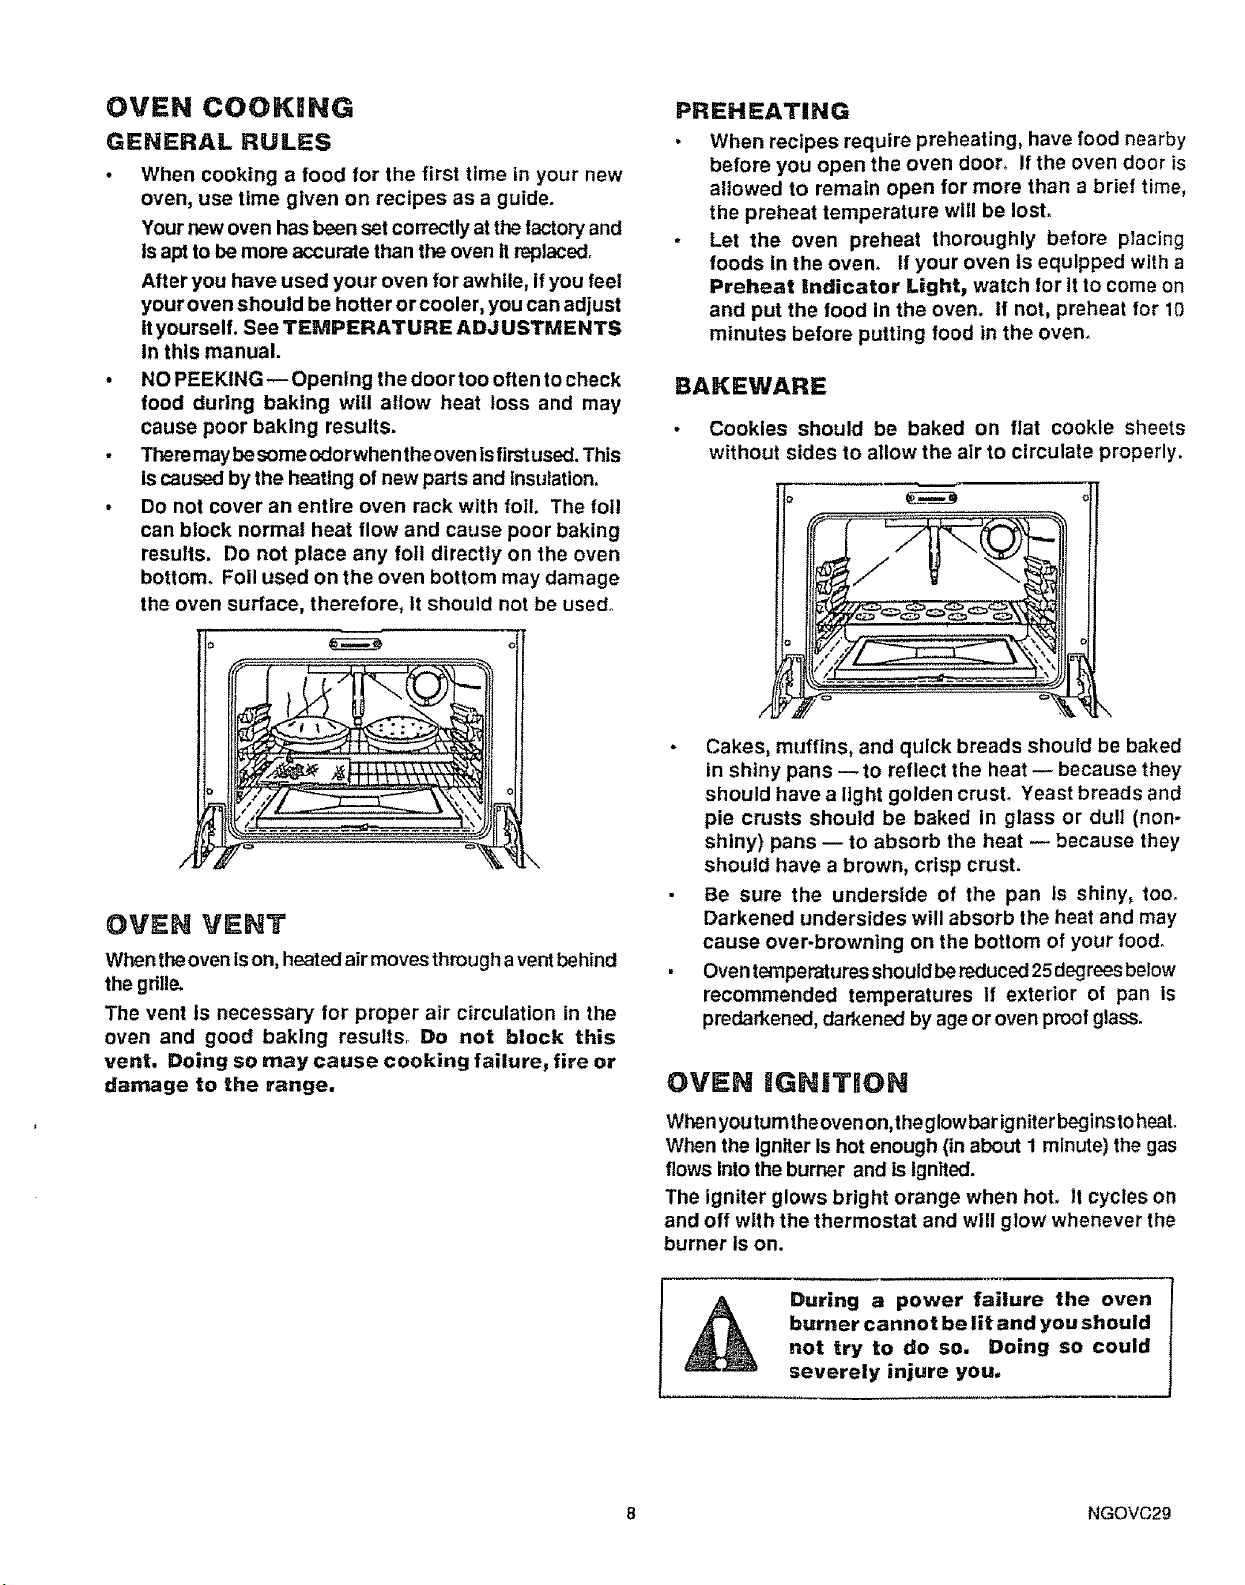
• Do not cover an entire oven rack with foil. The foil
can block normal heat flow and cause poor baking
results. Do not place any foil directly on the oven
bottom. Foil used on the oven bottom may damage
the oven surface, therefore, It should not be used.
PREHEATING
When recipes require preheating, have food nearby
before you open the oven door° if the oven door is
allowed to remain open for more than a brief time,
the preheat temperature will be lost.
. Let the oven preheat thoroughly before placing
foods In the oven. If your oven Is equipped with a
Preheat Indicator Light, watch for It to come on
and put the food in the oven. if not, preheat for 10
minutes before putting food in the oven°
BAKEWARE
• Cookies should be baked on flat cookle sheets
without sides to allow the air to circulate properly.
OVEN VENT
When theoven is on, heated air moves through a vent behind
the grille.
The vent Is necessary for proper air circulation in the
oven and good baking results. Do not block this
vent, Doing so may cause cooking failure, fire or
damage to the range,
Cakes, muffins, and qulck breads should be baked
in shiny pans m to reflect the heat -- because they
should have a light golden crust. Yeast breads and
pie crusts should be baked In glass or dull (non-
shiny) pans -- to absorb the heat -- because they
should have a brown, crisp crust.
Be sure the underside of the pan Is shiny, too.
Darkened undersides will absorb the heat and may
cause over-browning on the bottom of your food_
Oven t_nperaturesshould bereduced 25 degrees below
recommended temperatures If exterior of pan Is
predarkened, darkened by age or oven proof glass.
OVEN IGN|TJON
When youtumtheoven on,the glowbarigniterbeginstoheat.
When the igniter Is hot enough (in about I minute) the gas
flows into the burner and ts Ignited.
The igniter glows bright orange when hot. It cycles on
and off wlth the thermostat and will glow whenever the
burner is on.
During a power failure the oven
burner cannot be lit and you should
not try to do so, Doing so could
severely injure you.
8 NGOVC29
BAKING:
• Always follow recipe carefuily_
• Measure Ingredients properly_
• Use proper pan and rack placement to obtain the
best cooking results_
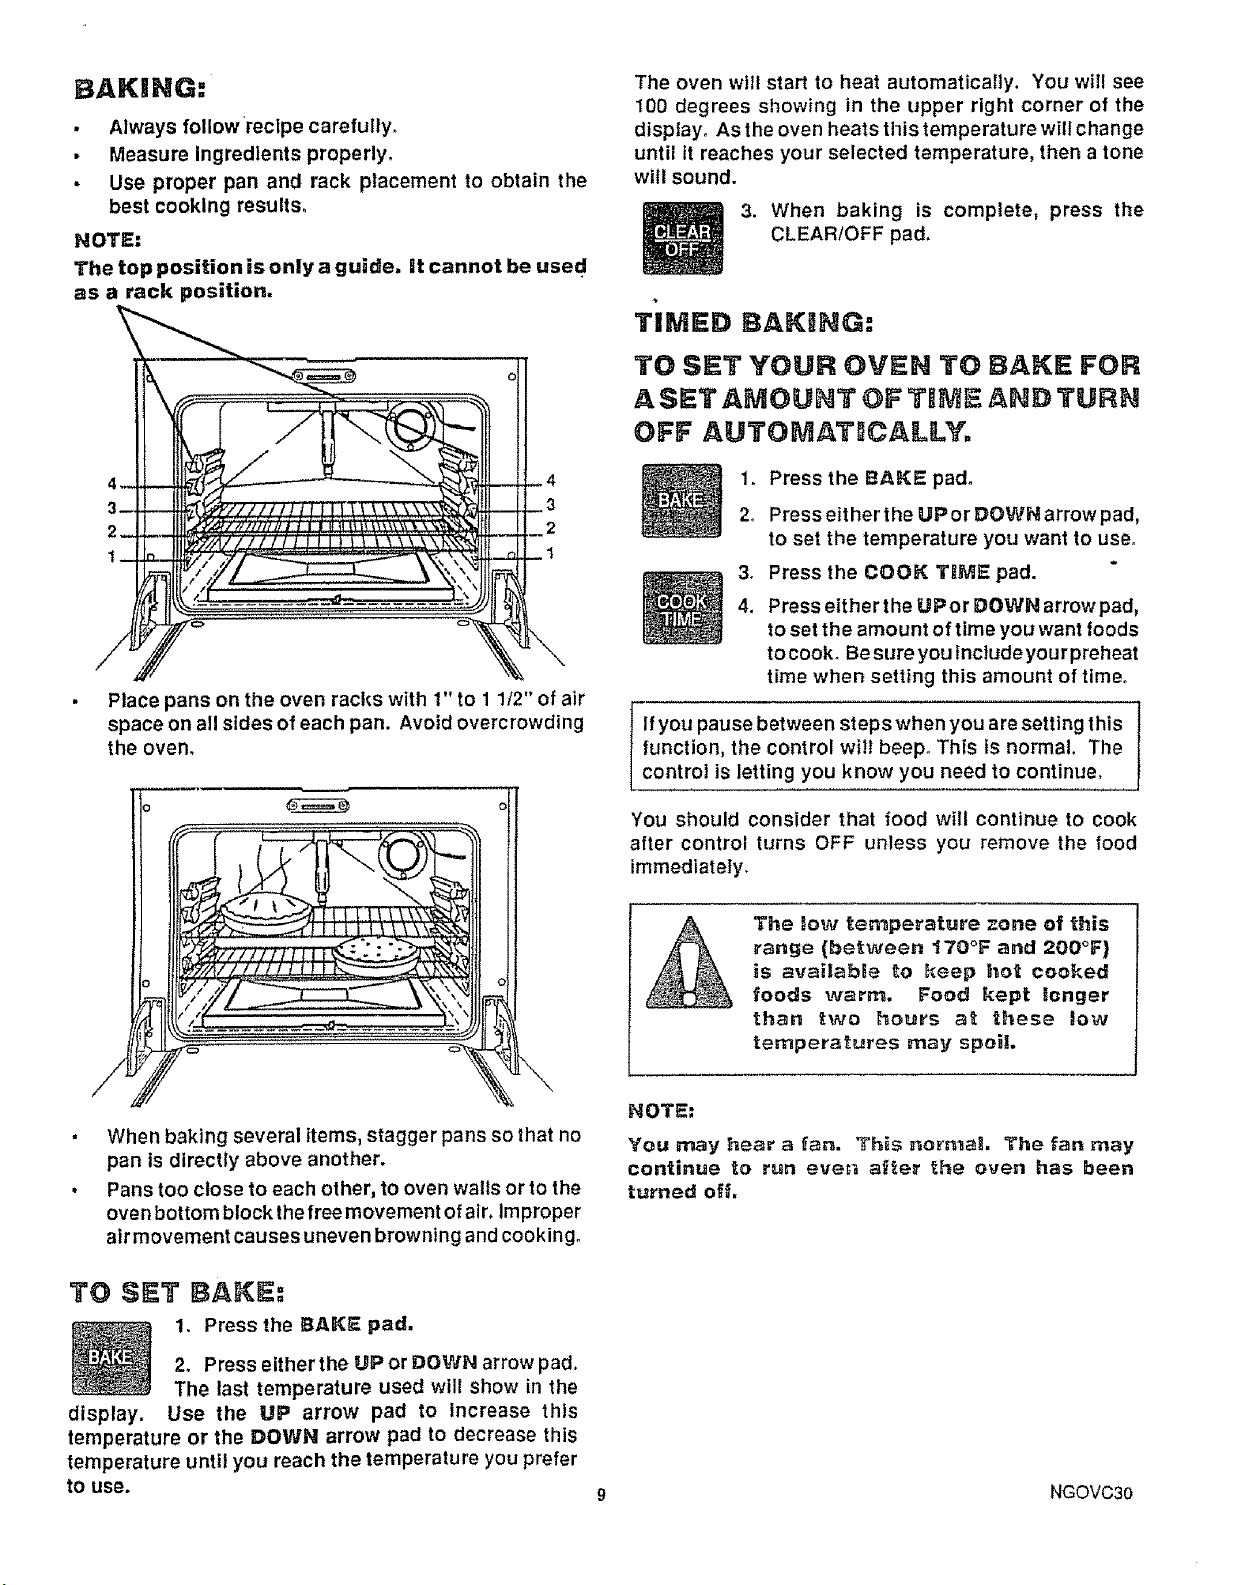
NOTE:
The top position is only a guide, it cannot be used
as a rack position.
• Place pans on the oven racks with 1" to 1 1/2" of air
space on all sides of each pan. Avoid overcrowding
the oven.
The oven will start to heat automatically. You wil! see
100 degrees showing in the upper right corner of the
display. As the oven heats this temperature will change
until it reaches your selected temperature, then a tone
will sound.
3. When baking is complete, press the
CLEAR/OFF pad.
TIMED BAKING:
TO SET YOUR OVEN TO BAKE FOR
A SET AMOUNT OF TIME AND TURN
OFF AUTOMA=F_CALLY.
1. Press the BAKE pad.
2o Press either the UP or DOWN arrow pad,
to set the temperature you want to use°
3. Press the COOK TIME pad.
4. Press eitherthe UPor DOWNarrowpad,
to set the amount of time you want foods
tocook. Besureyou includeyourpreheat
time when setting this amount of time.
function, the control wi!l beep. This fs normal. The
I If you pause between steps when you are setting this ]
control ls letting you know you need to continue.
}
When baking several items, stagger pans so that no
pan is directly above another.
Pans too close to each other, to oven walls otto the
oven bottom block the free movement of air. Improper
air movement causes uneven browning and cooking.
TO SET BAKE,=
1. Press the BAKE pad.
2. Press either the UP or DOWN arrow pad.
The last temperature used will show in the
display. Use the UP arrow pad to increase this
temperature or the DOWN arrow pad to decrease this
temperature until you reach the temperature you prefer
to use.
You should consider that food will continue to cook
after control turns OFF unless you remove the food
immediately.
The low temperature zone of this
range (between "i70OF and 200°F)
is available to keep hot cooked
foods warr_. Food kept longer
than two hours at these low
temperatures may spoil.
NOTE:
You may hear a fan. Th_s normal. The fan may
continue to run eve_ a_ter the even has been
turned of_,
NGOVC30
TO SET YOUR OVEN FOR A DELAYED
START AND AUTOMATIC STOP
While setting this operation you will not need to
calculate when the oven will turn on; the control will
do this for you. You will need to set the following:
1, Temperature 2. Cooking Time 3, Stop Time
1. Press the BAKE pad.
2. Press the UP or DOWN arrow pad to
select the temperature you want.
3. Press the COOK TIME pad.
4_ Press the UP arrow to select how long
you want food to cook. Be sure to
include your preheat time.
5. Press the STOP TiME pad_
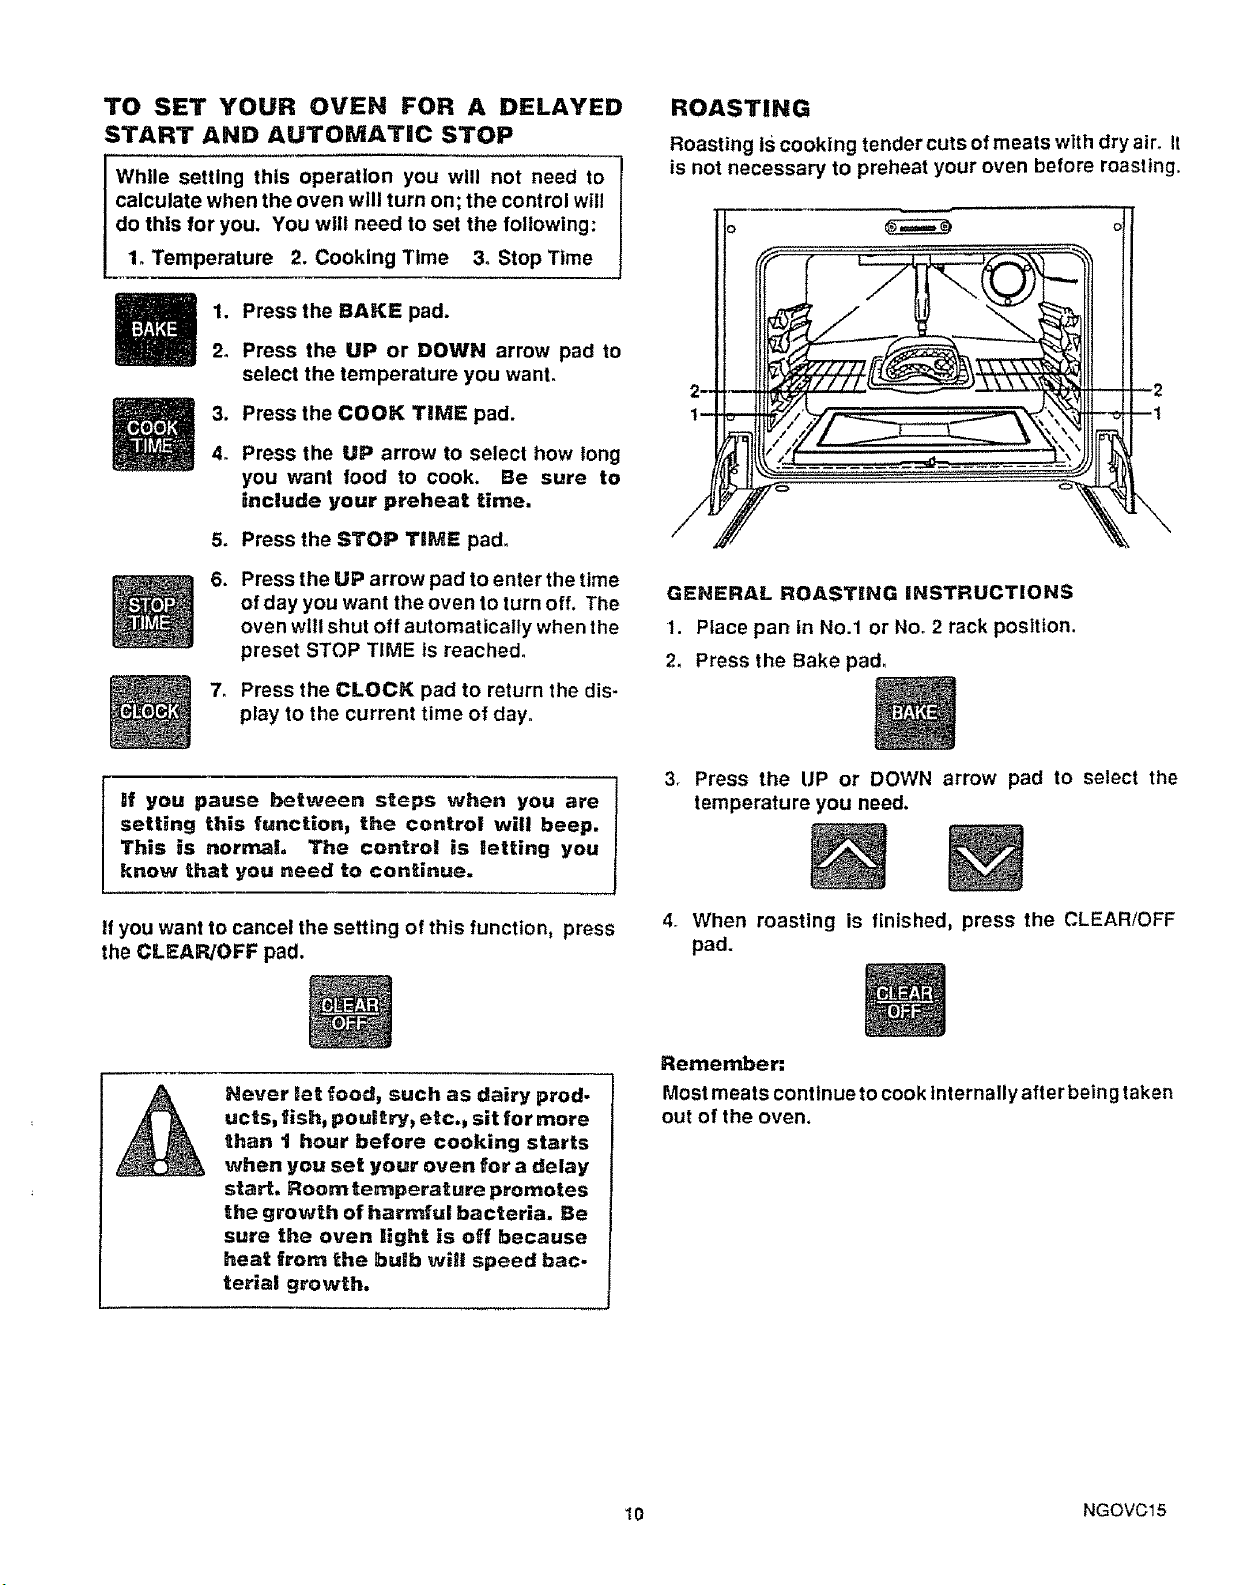
ROASTING
Roasting Is cooking tender cuts of meats with dry air_ It
is not necessary to preheat your oven before roasting.
6. Press the UP arrow pad to enter the time
of day you want the oven to turn off. The
oven will shut off automatically when the
preset STOP TIME is reached.
7. Press the CLOCK pad to return the dis-
play to the current time of day.
]
if you pause between steps when you are|
This is normal, The control is letting you
setting this function_ the control will beep.___
know that you need to continue.
If you want to cancel the setting of this function, press
the CLEAR/OFF pad.
Never _et food, such as dairy prod-
ucts, fish_ pouitry_ etc., sit for more
than t hour before cooking starts
when you set your oven for a delay
start. Roomternperature promotes
the growth of harmful bacteria. Be
sure the oven light is off because
heat from the bulb wiil speed bac-
terial growth.
GENERAL ROASTING iNSTRUCTIONS
1. Place pan in No.1 or Noo2 rack position.
2. Press the Bake pad.
3, Press the UP or DOWN arrow pad to select the
temperature you need.
4. When roasting is finished, press the CLEAR/OFF
pad.
Remember:
Most meats continue to cook internally after being taken
out of the oven.
10 NGOVC15
BROILING
BROILING TliPS:
Please note:
Your oven door should
be closed while broiling,
Use only the brotler pan and grid that came with your
range for broiling. They are designed for proper
drainage of fat and Ilqutds and help prevent spatter,
smoke or fire.
e
Do not preheat when broiling, Foreven broiling
on both sides, start the food on a cold pan.
o
Trim the outer layer of fat from steaks and chops. Slit
the fatty edges to keep the meat from curfing.
For maximum juiciness, salt the first side just before
turning the meat. Salt the second side just before
serving°
Brush chicken and fish with butter several times as
they broil, When broiling fish, grease the grid to
prevent sticking. Broil chicken with skin side down.
It is not necessary to turn fish_
Never leave a soiled broiler pan in the range.
Grease in the pan may smoke or burn the next time
the oven Is used°
Be sure you know the correct procedure for putting
out a grease fire. See the section on safety.
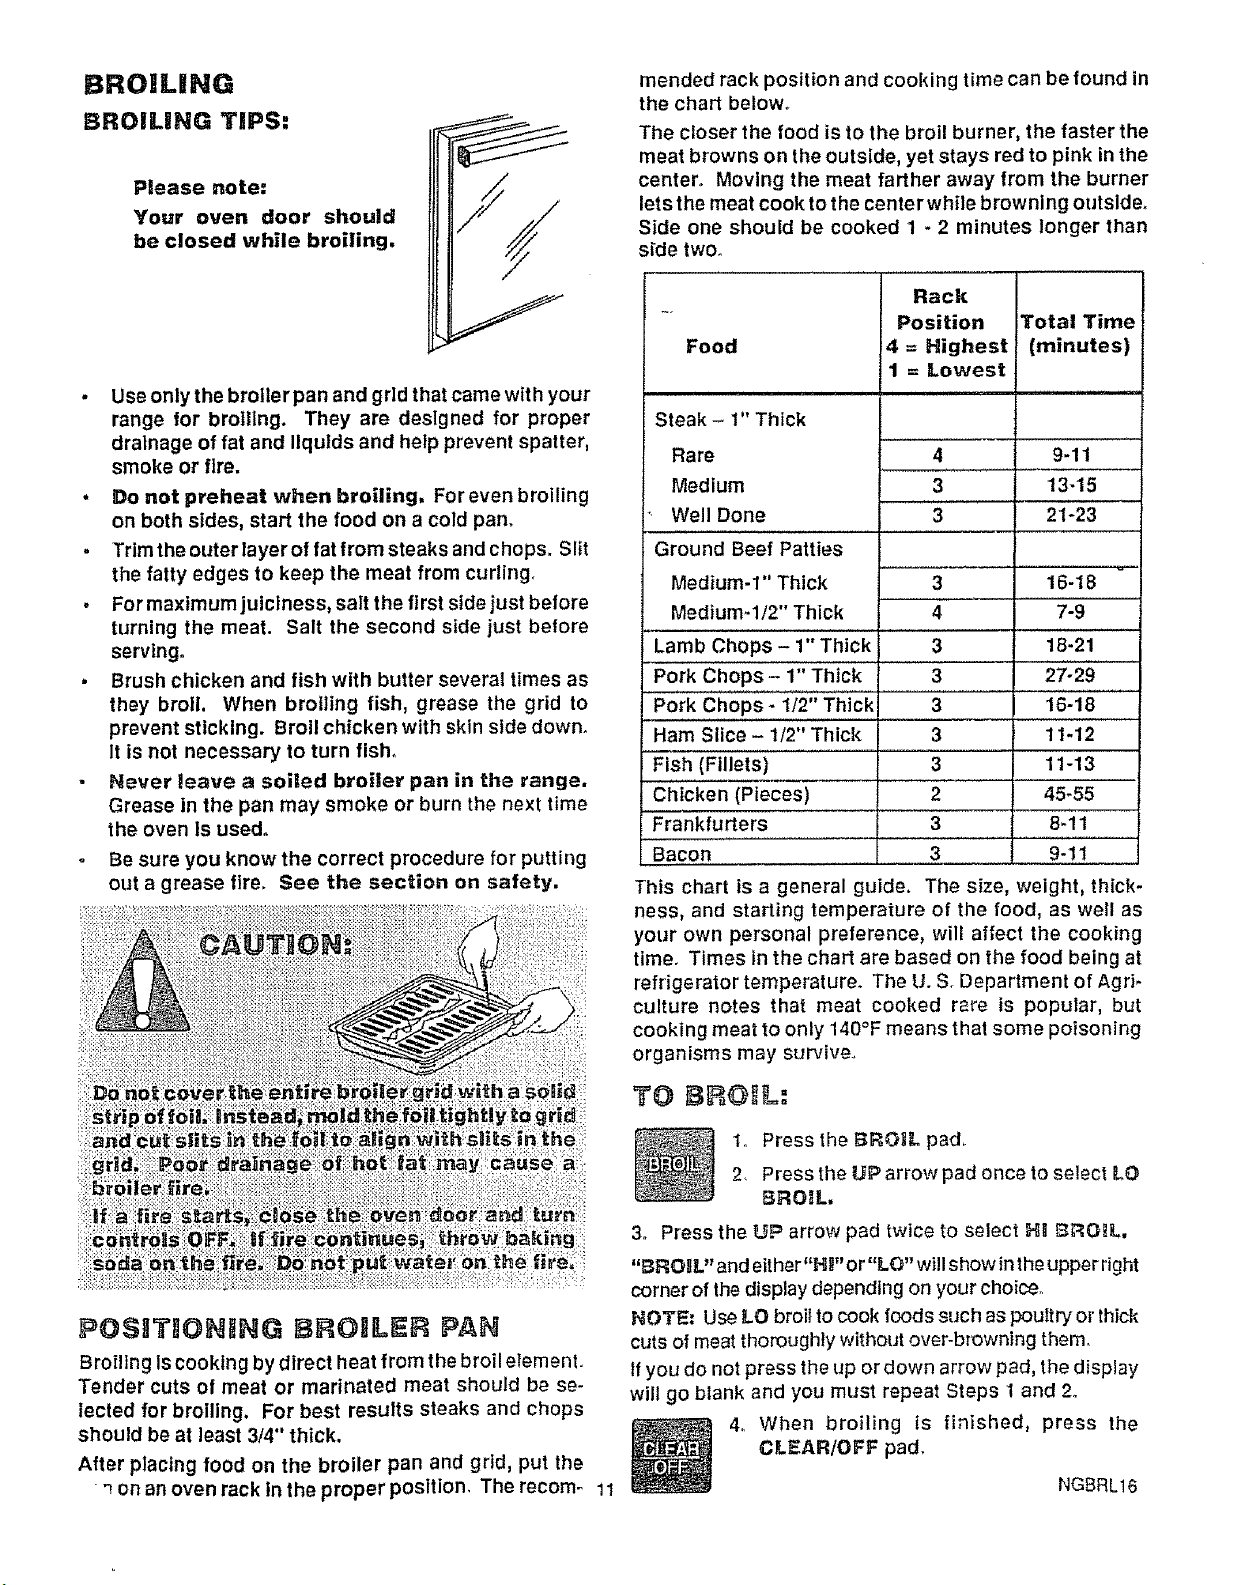
mended rack position and cooking time can be found in
the chart below°
The closer the food is to the broil burner, the faster the
meat browns on the outside, yet stays red to pink in the
center. Moving the meat farther away from the burner
lets the meat cook to the center while browning otJtslde.
Side one should be cooked 1 - 2 minutes longer than
side two.
Rack
Total Time
(minutes)
Food
Position
4 = Highest
1 = Lowest
Steak - 1" Thick
Rare
Medium
Well Done
4 9-11
3 13-15
3 21-23
Ground Beef Patties
Medium-1" Thick
Medium4/2" Thick
Lamb Chops - 1" Thick 3
Pork Chops- 1" Thick
Pork Chops - 1/2" Thick
Ham Slice - 1/2" Thick
Fish (Fillets)
Chicken (Pieces)
"-Frankfurters
Bacon
3
4
3 27-29
3 16-18
3 11-12
3 11-13
2 45-55
3 8-11
3 9-11
16-18
7-9
18-21
This chart is a general guide. The size, weight, thick-
ness, and starting temperature of the food, as well as
your own personal preference, will affect the cooking
time. Times in the chart are based on the food being at
refrigerator temperature. The U. S. Department of Agri-
culture notes that meat cooked rm'e is popular, but
cooking meat to only 140°F means that some poisoning
organisms may survive_
FOSNTItOHNHG BROILER PAN
Broiling Iscooking by direct heat from the broil element.
Tender cuts of meat or marinated meat should be se-
lected for broiling. For best results steaks and chops
should be at least 3/4" thick,
After placing food on the broiler pan and grid, put the
•_on an oven rack in the proper position. The recom- 11
TO
1. Press the BROIL pad_
2. Press the UP arrow pad once to select LO
BROIL.
3o Press the UP arrow pad twice to select H! _RORL,
,,BRO!IL" and either"H V'o r"LO" will show in theupper right
corner of the display depending on your choice°
NOTE: Use LO broil to cook foods such as poultry or thick
cuts of meat thoroughly without over-browning therno
If you do not press the up or down arrow pad, the display
will go blank and you must repeat Steps 1 and 2.
4. When broiling is finished, press the
CLI_AR/OFF pad.
NGBRL16
THE SELF.CLEAN CYCLE (3 MOURS. NORMAL CLSANT,MS)
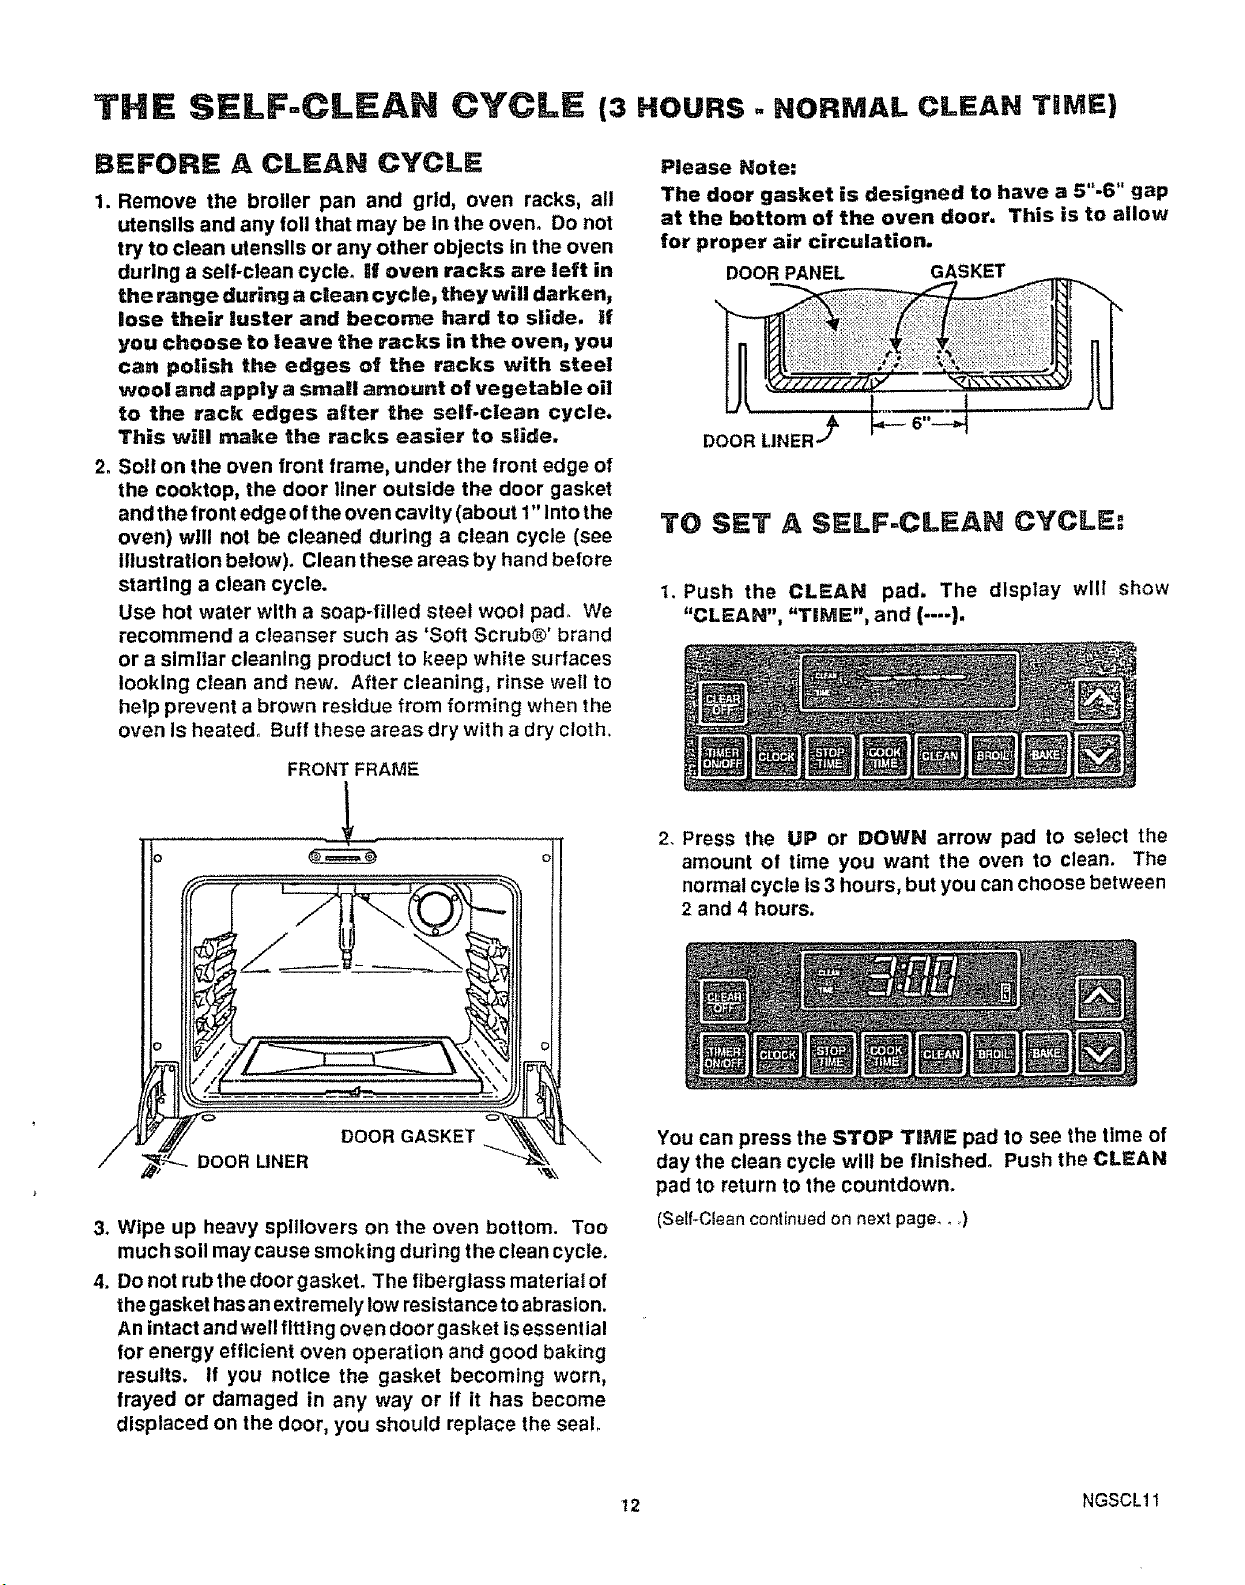
BEFORE A CLEAN CYCLe:
1. Remove the broiler pan and grid, oven racks, al!
utensils and any foil that may be In the oven° Do not
try to clean utensils or any other objects in the oven
during a self-clean cycle° If oven racks are left in
the range during a clean cycle, they will darken_
lose their luster and become hard to slide, if
you choose to leave _he racks in the oven, you
can polish the edges of the racks with steel
wool and apply a small amount of vegetable oil
to the rack edges after the self-clean cycle.
This will make the racks easier to slide.
2. Soil on the oven front frame, under the front edge of
the cooktop, the door liner outside the door gasket
and the front edge of the oven cavity (about 1" Into the
oven) will not be cleaned during a clean cycle (see
illustration below). Clean these areas by hand before
starting a clean cycle.
Use hot water with a soap-filled steel wool pad° We
recommend a cleanser such as 'Soft Scrub®' brand
or a similar cleaning product to keep white surfaces
looking clean and new. After cleaning, rinse well to
help prevent a brown residue from forming when the
oven Is heated° Buff these areas dry with a dry cloth.
Please Note:
The door gasket is designed to have a 5"-6" gap
at the bottom of the oven door. This is to allow
for proper air circulation.
DOOR PANEL GASKET
DOOR',JNER- S
TO SET A SELF=CLEAN CYCLE:
1. Push the CLEAN pad. The display will show
"CLEAN", "TIME", and (----).
FRONT FRAME
L
DOOR GASKET
DOOR LINER
3.
Wipe up heavy splllovers on the oven bottom. Too
much soil may cause smoking during the clean cycle.
4.
Do not rub the door gasket. The fiberglass material of
the gasket has an extremely low resistance to abrasion.
An intact and well fitting oven door gasket is essential
for energy efficient oven operation and good baking
results. If you notice the gasket becoming worn,
frayed or damaged in any way or if it has become
displaced on the door, you should replace the seal.
2. Press the UP or DOWN arrow pad to select the
amount of time you want the oven to clean. The
normal cycle Is 3 hours, but you can choose between
2 and 4 hours.
You can press the STOP TiME pad to see the time of
day the clean cycle will be flnlshed. Push the CLEAN
pad to return to the countdown.
(Serf-Clean continued on next page_ o)
12 NGSCL11
(Self-Clean continued.. )
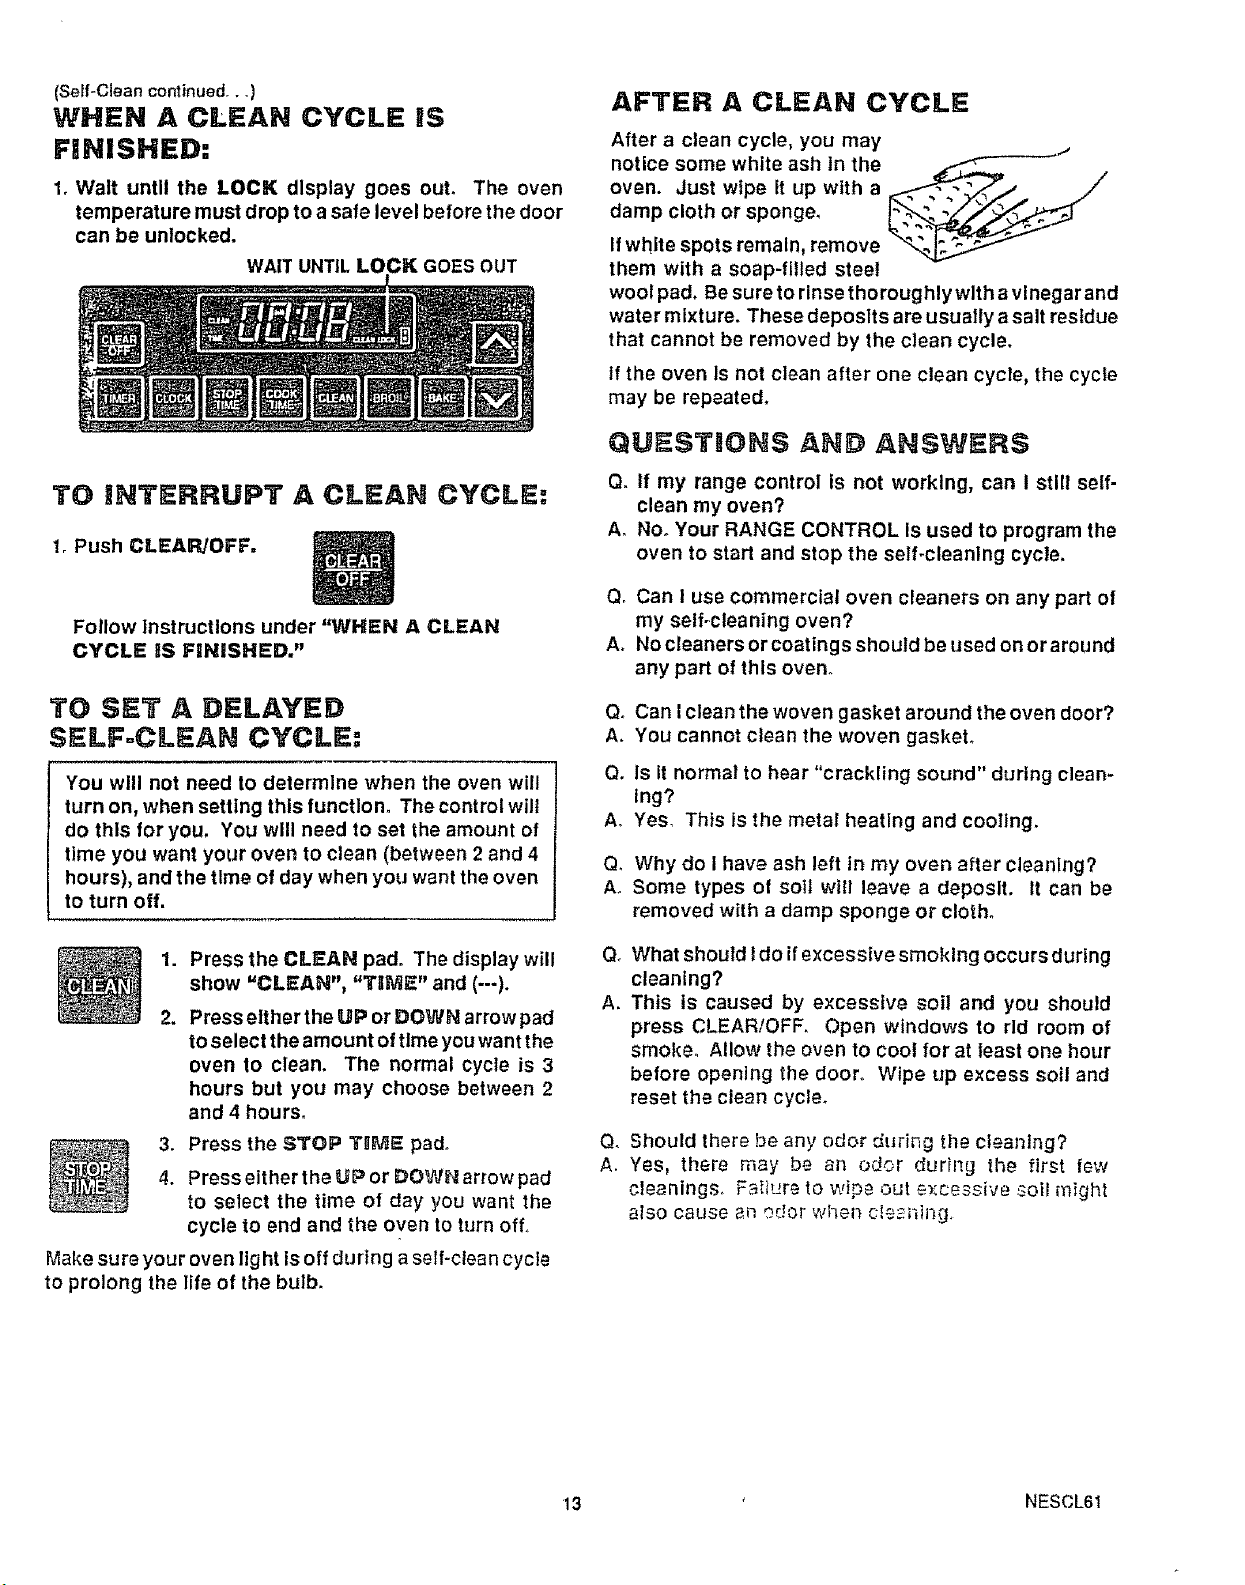
WHEN A CLEAN CYCLE IS
FINISHED:
1, Walt until the LOCK display goes out. The oven
temperature must drop to a safe level before the door
can be unlocked.
WAIT UNTIL LOCK GOES OUT
AFTER A CLEAN CYCLE
After a clean cycle, you may
notice some white ash in the
oven. Just wipe it up with a
damp cloth or sponge_
If white spots remain, remove
them with a soap-filled steel
wool pad. Be sure to rinse thoroughly with a vinegar and
water mixture. These deposlts are usually a salt residue
that cannot be removed by the clean cycle.
tf the oven Is not clean after one clean cycle, the cycle
may be repeated.
QUESTIONS AND ANSWERS
3"0 iNTERRUPT A CLEAN CYCLE:
l r Push CLEAR/OFF.
Follow Instructions under "WHEN A CLEAN
CYCLE BS FINISHED."
3=0 SET A DELAYED
SELFoCLEAN CYCLE:
You will not need to determine when the oven will
turn on, when setting this function. The control wilt
do this for you, You will need to set the amount of
time you want your oven to clean (between 2 and 4
hours), and the time of day when you want the oven
to turn oil.
1. Press the CLEAN pad° The display will
show =CLEAN", "TIIME" and (---).
2. Press either the UP or DOWN arrow pad
to select the amount of time you want the
oven to clean, The normal cycle is 3
hours but you may choose between 2
and 4 hours.
3. Press the STOP TgME pad°
4. Press either the UP or DOWN arrow pad
to select the time o1 day you want the
cycle to end and the oven to turn off,
Make sure your oven Iight ts off during a self-clean cycle
to prolong the life of the bulb.
Q. If my range control is not working, can I still self-
clean my oven?
A. No. Your RANGE CONTROL Is used to program the
oven to start and stop the self-cleanlng cycle,
Q. Can I use commercial oven cleaners on any part of
my self-cleaning oven?
A. No cleaners or coatings should be used on or around
any part of this oven.
Qo Can Iclean the woven gasket around the oven door?
A. You cannot clean the woven gasket.
Q. Is it normal to hear "crackling sound" during clean-
Ing?
A. Yes, This is the metal heating and cooling.
Q, Why do I have ash left in my oven after cleaning?
A_ Some types of soil will leave a deposit. It can be
removed with a damp sponge or cloth.
Q,
What should Ido ifexcessive smoking occurs during
cleaning?
A.
This is caused by excessive soil and you should
press CLEAR/OFF. Open windows to rid room of
smoke. Allow the oven to cool forat least one hour
before opening the door. Wipe up excess soil and
reset the clean cycle_
e_
Should there be any odor during the cleaning?
A_
Yes, there may be an odor duri_,g the first few
cleaningso F_tture to wipe out _n:cessive _.oil might
atso cause _ odor when Ci.£_i"iii'_,_j,
13 NESCL61

CLEANING TIPS
On the following pages, all removable parts on your oven are shown. Refer to those pages when cleaning your oven.
Warm water, a mild detergent and a soft cloth are safe to use on all cleanabte parts of your range. Do not use metal
scouring pads, except where recommended°
,ll =
PART
111pii,,,,,,,,lr,q =
CONTROL PANEL
GLASS OVEN DOOR/
WKNDOW
"H'H',=,I ==ll
CLEANING MATERIALS
=l ==,rliHll
Lightly dampened cloth
Glass cleaner and paper towels. If you
need additional cleaning for spotting,
wash with equal parts white vinegar
and water, rinse well and dry.
Doorshould be completely open when
cleaning top edge.
Note= Afterusing the oven fora periodof
time, you may notice some discoloration
of the inner glass,. This is normal.
=, ,,,, i/ =,='HH,,,,,I
REMARKS
,, ,,, ,,,,,,,, ,,,,,, ,,,= Hi,,,iN H,'=
Do not use abrasive cleaners, steel or
plastic pads, Knobs pull off for easier
cleaning.
Do not allow water to run down inside
openings In door while cleaning, R_
move stubborn soil with paste of baking
soda and water. Do not use abrasive
cleaners. RInse thoroughly. Doorcan be
removed; see removable parts section.
OVEN DOOR GASKET
DO NOT CLEAN
Do not clean door gasket w the fiber.
glass material of the gasket has an ex.
tremely low resistance to abrasion. _n
intact and well fitting oven door gasket is
essential for energy efficient oven op.
eratIon and good baking results. If you
nottcethe gasket becoming worn,frayed
or damaged In any way or if It has be.
come displaced on the door you should
have it replaced.
OVEN RACKS Detergent, warm water and scouring Removefmmoventoclean. Drythoroughty.
pad, or soap-filled steel wool pad
BROHLER PAN AND
GRBD
Detergent, water, soap-filled scour-
Ing pad
Remove soiled pan from oven to cool.
Drain fat or drippings. Fill pan with warm
water. Sprinkle grid with detergent and
cover with damp cloth or paper towels.
Let pan and grid soak for a few minutes,
Rlnseorscouras needed. DrywelL Grid
and pan may be washed in a dishwasher,
PAINTED SURFACES
front of oven door,
sides of range
Soap and water, damp cloth, paper
towel, glass cleaner on door glass
DO NOT USE oven cleaners, cleansing
powders or harsh abrasives_ These might
scratch the surface. Ifacids (marinades,
tomato sauces, basting materials .... )
should spill on the range while it Is hot,
usea dry paper towel or cloth to wipe up
rig ht away. When the surface has cooled,
washand rinse. Forotherspills, such as
fat spattering, etc., wash with soap and
water when cooled and then rlnse° Pol-
ish with a dry cloth.
Glass cleaner can be used on glass door
fronts,
14 NGCCH35

REMOVABLE OVEN DOOR REMOVABLE OVEN RACKS
BUMP
IN RACK
GUIDE \
HINGE
STOP POSITION
NOTE= Do not allow water to run down inside the door.
Opendoorcomp]etely when cleaningthetop edger
To remove:
1. Open the door to the stop position (see illustration).
2. Grasp the door at each side and tlft up and off the
hinges. To prevent possible damage to the
door_ DO NOT lift the door by the handle.
NOTE: When the door is removed and hinge arms are
at stop position, do not bump or try to move the hinge
arms. The hinges could snap back causing an injury to
the hands or damage to the porcelain on the front of the
range. Cover the hinges with toweling or empty towel
roils while working in the oven area.
To replace t
1, Hold the door over the hinges with the slots at the
bottom edge of the door lined up with'the hinges,
The hinge arms must still be in the stop position.
2. Slide the door down onto the hinges as far as it wifl
go and close the door.
)
Be careful not to scratch the oven finish when installing
or removing oven racks.
To install=
1. Set the raised back edge of the rack on a pair of rack
guides.
2_ Push the rack in until you reach the bump in the rack
guide, then lift the front of the rack a bit and push the
rack all the way in.
To remove:
1 Pull the oven rack out, then up, in one motion. See
the cleaning chart.
NOTE:
A. The racks _re designed L_i_h Sl_ep HOCKS. When
the racks are placed correc_,ly on _he rack
support and extencled from _he ove_% the s_op
lock prevents the racP-_s from t_ing when you
are removing food from the _'acks or placing
food on then't.
B_
Fer best per_e_'_ance _'el_ove ove_t racks dur-
ing a clean cycle. _ oven rac_s _re _eft in the
oven during a selfoc_ean_g c_-c_e_ _hey w_il
darkenj lose their Duster arid become hard to
slide. Ill you choose _o Beave '_he yacks in the
even_ you can po_ish the e_es of _he racks
with steel wo_i and appty a sn_ll amount of
vegetLable oli _;o_he rac_ edges after the self-
clean cycle.
15 NGMNT53

REMOVABLE OVEN BOTTOM
LOCK
The oven bottom may be removed for cleaning heavy
splllovers or to reach the oven burner.
Be careful not to scratch the oven finish when removing
or replacing the oven bottom.
To remove:
1. Slide the tab at the center front of the oven bottom to
the left.
2. Lift the oven bottom up and out.
To replace:
1. Slip the oven bottom Into the oven so the tabs in the
rear of the oven bottom fit Into the slots in the oven
back,
2, Lower the front of the oven bottom into place° Slide
the tab at the front of the oven bottom into place,
REMOVABLE STORAGE DRAWER
ROLLER GUIDE STORAGE
STOP COMPARTMENT
;OCKET
BULB COVER BAIL WiRE
touch bulb with wet hands, Never
Do not touch hot oven bulb. Do not
wipe oven light area with we t cloth.
metal collar on the bulb when re.
_ Never touch the electrically live j
placing,
To remove:
1. Disconnect electric power to the oven at the main
fuse or circuit breaker.
2o Hold your hand undercover and firmly push back the
bail wire until it clears the cover, The cover wil! fail
Into your hand. DO NOT REMOVE ANY SCREWS
TO REMOVE THE COVER.
3, Replace bulb with 40-watt home appliance bulb.
To replace cover;
1. Place cover into groove of lamp receptacle, Pull wire
bail forward until it snaps into place. Be certain wire
bail is in center of cover. Wire wil! hold cover firmly
when in correct position.
2. Connect powerto oven_
FRONT FRAME
This drawer provldes space for keeping cookware and
bakeware, Plastlcsandflammable material should
not be kept in this drawer.
Do not overload the storage drawer, tf the contents of
the drawer are too heavy, the drawer may slip off the
track when opened° To open the drawer, grasp the
center of the handle and pull straight out.
To remove:
Pull drawer straight out and llft over the guide stops.
To replace:
Lift over the guide stops and slide drawer into place.
16 NGMHT34-I

BEFORS CALLING FOR SERVICE
Save tlme and money -- Check this list before you call for service°
To eliminate unnecessary service caIts, first, read all the instructions in this manual carefully. Then, If you have a
problem, always check this list of common problems and possible solutions before you call for service.
If you do have a problem you cannot fix yourself, call your nearest Sears Store or Service Center for help. When
calling, have this manual and your repair parts list h;andy with the model number, serial number and purchase date.
DON'T CALL FOR SERVICE
PROBLEM
POSSIBLE CAUSE
UNTIL YOU CHECK
• RANGE DISPLAY
IS FLASHING =F"
AND A NUMBER
• OVEN DOES NOT
CLEAN; OR POOR
CLEANING
RESULTS
. Function error
• Controls not set properly
Clean cycle interrupted too
soon
• Oven too dirty
• Let oven cool down for 1 hour. Place oven
back into operation. If problem repeats, call
for service.
Check self clean instructions.
Heavily soiled ovens requlre a 3 1/2 hour clean
cycle.
Heavy spillovers should be removed before
setting self-clean cycle.
• OVEN DOOR WILL • Clean cycle not complete • Oven must cool below lock temperature.
NOT UNLOCK
• TONE DOES NOT • Tone has been altered • Push and hold CLEAR/OFF for 10 seconds.
SOUND
• FOODS DO NOT • Improper rack position .
BROIL PROPERLY
, Oven preheated
• Improper utensil used
• Improper broiling time
• Oven door open
Check broiler pan placement In brolling
section,
Do not preheat when broiling.
Use broiler pan and grid supplied wtth range.
o
Check broiling chart in broiling section,
t
Close oven door,
OVEN SMOKES
Dirty oven
Broiler pan full of grease left
in oven
17 NGSER39
• Check for heavy spillover.
• Clean pan and grid after each use,
• Be sure that the sump (grease well) Is to the
front of the range when broiling.

BEFORE CALLING FOR SERVICE (co..r, ued)
........... == r,,= =H I ,====,,,,HH,,,= = == ,,,,,H_ ,,,,_ ,===,,=,,,,, ==,== , =','=',L
DON'T CALL FOR SERVICE
PROBLEM POSSIBLE CAUSE UNTIL YOU CHECK
=' OVEN LIGHT
HI, ................................. HiH,,H,=,,= 111 ,1,,,,, ,,,,,,,,,,,,,u,l,,,,,,,,J J
• Light switch in off position
• Light bulb
. Check switch setting.
• Check or replace light bulb; see use and care
Instructions,
" OVEN BURNERS
DO NOT WORK
• FOODS DO NOT
BAK[ PROPERLY
• Gas supply not connected
or not turned on. If using
LP. gas, tank may be empty°
• Appliance not properly
grounded or polarizedo This
can affect spark ignition (on
models so equipped).
• Control not programmed
properly
Burners not adjusted
properly
• Oven not preheated long
enough
• Improper rack or pan
placement
, Oven vent blocked or
covered
o Improper use of foil
• Improper temperature
setting for utensil used
• Recipe not followed
• Improper thermostat
calibration
• Using improper cookware
Check the reducer shut-off valve and the gas
supply shut*off valve to be sure they are open
(see Installation section).
If using L.P_ gas, Is there any gas in the L.P.
tank?
Check installation section,
• Check Range Control Instructions In this
manual.
• See the installation section,
- Be sure to preheat until notification tone
Sounds.
- Maintain uniform air space around pans and
utensils; see oven cooking section.
• Be sure oven vent is not blocked.
. Refer to broiling instructions.
* Reduce temperature 25° for glass or dull/
darkened pans,
• Is recipe tested and reliable?
. Check oven temperature adjustment
procedures (next page).
• See oven cooking section.
18 NGSER40

;DO-IT-YOURSELF OVEN TEMPERATURE ADJUSTMENT
You may feel that your new oven cooks differently than
the oven It replaced. We recommend that you use your
new oven a few weeks to become more familiar with it,
following the times given In your recipes as a guide.
Your oven has been preset to maximize cooking
efficiency. If you think your new oven is too hot
(burning foods), or not hot enough (foods are under:.
cooked) you can adjust the temperature yourself. The
appearance and texture of foods is a better Indlcator of
oven accuracy than an Inexpensive oven thermometer.
We do not recommend the use of inexpensive
thermometers, such as those found in the grocery
store, to readjust the temperature setting of your
new oven. These thermometers can vary by 20°-40°F.
Also, you must open the oven door to read the
thermometer and this changes the temperature of the
oven.
To decide how much to change the temperature, set the
oven temperature 25°F higher (if foods are under-
cooked) or 25°F lower (If foods are burning) than the
temperature In your recipe, then bake. The results of
this "test" should give you an idea of how much the
temperature should be changed°
To adjust temperature follow these instructions:
1. Press the BAKE pad.
o
Press the UP arrow to Increase your
oven's temperature up to+35 °FtOTTER.
Pressthe DOWNarrow padto decrease
your oven's temperature down to -35°
COOLER.
4, When your selection Is complete press
the CLOCK pad to return to the time of
day_
Your oven's thermostat will retain this temperature
adjustment untll each of the four steps above are
repeated. This adjustment will remain in memory even
after a power failure.
You will not need to do anylhlng elseo Bake as you
n_rmally would. This adjustment will not affect broil or
clean temperature.
2_
Press the UP arrow pad to set 5500 and
UMiVlEDIATELY press and HOLD the
BAKE pad for 10 seconds until the
clock disappears and thedlsplay shows
a two digit figure.
(This two digit number may vary
according to the original factory
settlng.)
19 NESER116

NOTES
,,,
20

OVEH WARRAHTY
I H I
Dear Customer: FULL 30-DAY WARRANTY ON GLASS PARTS AHD FiNiSH OF PORCE.
Our constant eftorts are dl- LAiN ENAMEL, PAliNTED OR BRIGHT METAL FiNiSHED PARTS
rectedtoward making sure if, within 30 days from the date of installation, any glass part or the finish on
your new Kenmore Oven any porcelain enamel, painted or bright metal part is defective in material or
will arrive at your home in workmanship, Sears will replace the part, free of charge.
perfect condition and will FULL 90-DAY WARRANTY" ON _ECHANgCAL ADJUSTMENTS
give you proper perform- For 90 clays from the date of installation, Sears will provide, free of charge, any
ance. As part of these el- normal maintenance.
forts, we feel It Is our re-
sponsibliity to provide you is effective for only 90 days.
with this warranty for your WARRANTY S_=RVICE ]S AVAILABLE BY CONTACTING THE
oven. NEAREST SEARS SERVnCE CENTER/DEPARTmENT ItN THE
_,-,_. warranty gives you specific legal rigP,'._,:.,._ ;_-_ "__; :.:_.. ;..... :....... ;,_.,,-
.................... u ' , ............................. i uu uHHlUml
FULL ONE YEAR WARRANTY OH THE FUNCTIONING OF ALL
PARTS EXCEPT GLASS PARTS
If,within one year from the date of installation, any part, other than a glass part,
fails to function properly due to adefect in material or workmanship, Sears will
repair or replace It, free of charge.
mechanical adjustments necessary for proper operation of the range, except for
Iftherange Issubjected to other thanprivatefamily use, the above warranty coverage
UNITED STATES
This warranty applies onlywhilethis product is in use inthe United States. This
_ which vary from state to state. SEARS, ROEBUCH and CO.
Dept.S17 WA
_ocy_oe_,_ Noffman Estates, ]tL 60179
J _ im , H lUHi ,
$ERV1]©E G LL
"We Service What We Sell" is our assurance to you that you can depend on Sears for service because Sears
service Is nationwide.
Your Kenmore Oven has added value when you consider that Sears has a service unit near you staffed by
Sears trained technicians=. ° professional technicians specifically trained on Sears appliances, having the
parts, tools and equipment to ensure that we meet our pledge to you _ "We Service What We Sell["
TO FURTHER ADD TO THE VALUE OF YOUR RAHGE, BUY A SEARS _AIIHTEH_t_C5 AGREEMENT.
Kenmore Ovens are designed, manufactured and
tested foryears of dependable operation. Yet, any
modern appliance may require service from time
to time.. The Sears Warranty plus the Sears Main-
tenance Agreement provides protection from un-
expected repair bills and assures you of enjoying
maximum range efficiency.
Here's a comparative warranty and Maintenance
Agreement chart showing you the benefits of a
Sears Range Maintenance AgreemenL
Years of Own_rsh|p Cowrage
Replacement of Detective
.a
| Parts other than Porcelain
or Glass
2 MBchan_cal Ad}ualmant
Porcelain and Glass Parts
Annual Preventive Main_en-
JJl
_, ante Ch_ck at your r_quest
3st Year
W
90 DAYS
W
30 DAYS
W
MA
2rid Year= 3rd Yvar
MA
MA
W -Warrrmty
MA + M_nt_n_nce Al_reorn_nl
CONTACT YOUR SEARS $_,_SPERSO_ OR LOCAL $_AR$ SERVnCF.
CEHTER TOD_Y AND PURCHASE A SF._ARSMA_NTE;NANCE AGREE;_EHT.
® America's Bes Selling Appliance Brand
Sold by SEARS, ROEBUCK AND CO,,, Chicago, IL 60684
-- Printed in LaFayette, Georgia --

INDIICE
SEGURIDAD
USO Y CUmDADO
C6mo sacar la cinta de empaque ........................................4
Su homo y sus caracterisflcas .........................................5
Controles del homo ............................................................6, 7
ReioJ .........................................................................................7
Cronometro ......................................................................... 7
C6mo coclnar a| homo ............................................. 8-10
Cbmo asar .......................... ........................................ 11
Clclo de aulo limpleza ........................................... 12, 13
ConseJos para la I|mp|eza ..............................................14
Psrtes removibles ................................................... 15, 16
ANTES DiE LLAMAR PARA UN
SERVlCllO
Qu_ hacer antes de Ilamar para un servicio .....17, 18
Ajustes de temperatu ra ................................................ t 9
Nt_meros para servtclos del consumidor ..................21
GARANTtA
MODELOS 911. 30425
911. 30429
USO e CUIDADO o SEGURIDAD
MANUAL
229C4020P038=3 31-10216

U©C
GUARDF_ ;:STAS INSTRUCCIONES
Lea todas las instrucciones antes do usar esle apar_to. Cuando se usa un aparato
eldctrico, se deben seguir p_ec_uciones bdsicas, incluyendo Io siguiente:
ADVERTENCIA: Si _a inferm_c_n
MPORTAHTE$
en este rnanua_ no se s_gue
exactarnen_e, podHa resul_ar un
incendio o un_ explosion
causando da_o a ia propied_d,
heHdas personales o muerteo
-- No almacene o use gasollna uotros vapores
y I_quidos inflamables cerca de este o
cualquier otto aparato electrodom_stico_
-- QUE HACER SI USTED HUELE GAS
. iNo trate de encender ningun otro aparato!
• iNo toque ningt_n interruptor el_ctrico; No
use ning0n teldfono en el edificio!
• Inmediatamente Ilame a su proveedor de
gas usando el tel_fono de un vecinoo iSiga
tas instrucciones de su proveedor de gas!
• Si no puede comunicarse con su proveedor
de gas, llame a la compa_iia de bomberos°
La instalaci_n y el servicio debe hacerse
por un instalador competente, agencia de
servtcio o proveedor de gas_
Ense_e a los nifios a nojugar con las perillas de los
controles o cualquier otra parte de la horno.
Nunca deje a los nitros solos o sin supervlslSn
cuando se est_ usando la horno.
ADVERTENCIA:
Los ajustes en las instrucciones de i_stalacion
deben hacerse antes de que trate de usar su
estufa. St va a usar Gas Ltcuado de Petrbleo (gas
embotellado) todos los ajustes para L,P, en ]as
instrucciones de instalaci6n deben hacerse antes
del usoo Si su estufa no se ajusta adecuadamente,
las llamas podrian ser demasiado altas, o la estufa
podria usar demasiado combustible, emitir gases
t6xicos o cocinar real
Nurtca deje abierta la puerta del horno cuando no la
este vigtlando.
NGSAF01

Para garantizar su seguridad y ia de su hogar, por favor lea con todo cuidado
su Manual del Consurnidor. T_ngalo a la rnano para hacer consultas r_pidas.
Por favor ponga rnucha atencion alas secciones de seguridad de su manual.
Puede reconocer las secciones de seguridad buscando el sirnbolo _ o la
palabra "Seguridad".
Nunca guarde cosas que los
nif_os deseen sobre la estufa.
Nunca use su homo para entlblar o
calentar una habitacl6n_ Podda resultar
con heridas o quemaduras graves. El
uso inadecuado tambl_n puede causar
dafio al homo.
Nunca use ropa suelta cuando
use su homo° Ese tipo de ropa
podria incendtarse.
Nunca use una toaIla o patios
abultados on lugar deagarraderas.
Esas telas poddan incendiarse.
Siempre mantenga el drea del
horno despejada y fibre de objetos
que podrian quemarseo
PRE;CAUClON-"
Nunca almacene cosas en un
homo, Estas cosas se pueden
quemar y las cosas de pt_stico se
pueden derretir,
NGSAF02

PRECAUCIOHES DE SEGURIDAD
BAS|CA$
Conserve este Ilbro para un use future.
Cercidrese de que su estufa haya side Instalada y que
haga tlerra correctamente per un tdcnlco competente.
Slempre use agarraderas secas cuando quite oltas del
homo o de la cubtertao Las agarraderas humedas o
mojadas pueden causar quemaduras per vapor_
Siempre slga las Instrucclones de limpleza que vlenen
en este libro.
Siempre mantenga Itmplos la estufa y el homo. La
comida y lag _sa se pueden lncendiar f_ctlmente. Limpie
la estufa, el hornoy la ventilacl6n regularmente_
Limpie sblo las partes que se enumeran en este manual.
PRECAUCIOH: He guarde cosas de interns para
los n_=_osen gabinetes sobre la es_ufa o en ta
consola de ia estufa. Los ni_os que se suben a
una estufa para aicanzar tales objetos podrJan
resultar gtavemente heridos,
Siempre mantenga los revesttmientos inflamables de
las paredes, cortinas, colgaduras a una distancia
prudente de la estufa y del horno.
Siempre mantenga las toallas de plates, paflos de
ptatos, agarraderas y otros paSos a una distancta
prudente de su estufa. Nunca guarde tales articulos en
su estufao
IDAD
Siempre mantenga los utenslllos de madera y de
pl_st ico o allmentos envasados a un adlstanc|a prudente
de su estufa.
Algunos productos para Ilmplar
producen vapores t0xlcos y
patios o esponjas h13medas
pueden causar quemaduras de
vapor Sl se usan en una
superficie callente.
SEGUR DAD EN EL USO DEL
HORN{)
Penga tasparrillasen la posiclbn deseada cuando el homo
est_frio. Sttienequecambiar laposicibn dela parrillacuando
elhomo est_ caliente, no perrnita que las agarraderas hagan
contacto con los quemadores del homo.
Despu_s de asar, siempre saque la fuente de asar del
homo y limpieta. Los residues de grasa en ia fuente de
asar se pueden incendiar la pr6×ima vez que la use.
Siempre tenga cuidado cuando abra la puerta del
homo. Permita que el aire caliente y el vapor salgan
antes de sacar los alimentos.
Hunca usepapet de aluminio para forrarel rondo delhomo, El
use income del papel dealumlnio podr_ac_usar unlncendio.
Cerci6rese que el aparato est_ instalado firmemente
en un gabinete que est_ fuertemente pegado a la
estructura de la casa. Peso sobre la puerta del homo
podria causar potenclalmente que la estufa se vuelque
y resultar en heridas.
Siempre mantenga el _rea alrededor de la estufa lejos
y fibre de cosas que se podrian tnflamar (gasolina y
otros vapores y liquidos tnflamables).
Nunca trate de reparar o reemplazar una parte de la
estufa a menos que las Instrucciones se den en este
libro. Todo otro trabajo debiera set hecho per un
t_cnico especiatizado.
Nunca caliente utensilios con comida cuando est_n
cerradoso El aumento de la presi(_n podria causar que el
contenedor explote y cause heridaso
Nunca deje frascos o latas con grasa o goteaduras de
grasa cerca de la estufa. Nunca permita que la grasa se
acumule en su estufa. Usted puede prevenir incendios
de grasa si limpia las goteaduras o derrames de grassa
despu_s de usar la estufa.
Nunca trate de remover un utensilio con grasa caliente,
espectalmente una freidora, Espere hasta que la grasa
se haya enfriado_
Nunca toque la superficie de los quemadores, los
quemadores del homo, o las superficies interiores det
horno. Podrian estar calientes aunque nohayan Itamas
presentes.
SEGURIIDAD EH LA AUTOUMPIEZA
Si no funciona bien el mode de auto|impieza, ap_guelo
ydesconecte el suministro de energia elect ricaoSolicite
que un t_cnico calificado revise y le d_ servtcio a su
homo.
Siempre retire la fuente para asar y otros utensllios del
homo antes de un ctclo de autolimpieza.
Nunca friegue, mueva o daSe el sello de la puerta en las
estufas que tienen mode de autolimpleza. El sello es
esencial para un buen cierre.
Nunca trate de limpiar utensllios, trastes o partes
removibles de su estufa durante un ciclo de auto-
limpleza.
No utilice limpiadores para homo - no debeia utilizar
ningtJn limpiador comercial para homo o revestimiento
prolector de nlngL_n tlpo en el horno o alrededor de
cualquiera de sus parteso
NGSAF39

mNSTRUCC ONES DE $EGURIDAD
(continuaci6n)
LEA Y CO PRENDA ESTA
NFORMACION AHORA
$i alguna vez la necesita, no tendrd
t_empe para leerla,
CercJ6rese de que redes en su
hegar sepan qu_ hacer en case de
incendioo
Hunca utiHce agua en un incendio
causado per grasa ya que es|o s61e
ayudard a extender las Hamaso
FU_:GO EH EL HORNO
;NO HNTtENTE MOVER LA FUEHTE!
1. Cierre la puerta del horno y
apague los controles.
2. Si el fuego continua, eche
soda para hornear sobre el
fuego, o use una espuma
quimicasecaoun extinguidor
de tipo hal6n.
COMe $ACAR LA CINTA DE
EMPAQU_:
Para sacar el residuo del adhesivo que qued6 dela cinta
de empaque y cerctorarse de no datiar el termlnado de
su nueva estufa, use una aplicaci6n de detergente
domdstlco liquido, aceite mineral, o aceite para cocinar.
Aplfquelo con un patio suave y ddjelo remojaro Limpleto
con un patio suave. No use fibra de pldstlco o cosa
similar° Seque y apltque una capa de pulldor para
estufas para ltmplar blen y proteger el acabado. Este
procedImtento tambl_n es seguro para las puertas de
los hornos microondas y otras partes de pl_stico°
NOTA: La cinta de pldstico debe sacarse de
_DONDIE PUEDE BUSCAR CllNTA
ADH_'SIVA DE EMPAQUE?
Panel de control: cubterta, lades, tondo
Mantllas de la puerta
Quemadores marco de la puerta
Parte superior, costados y parte inferior
redes los berries cromados de las partes
de ia estufa. No se podrd sacar si se
hornea con ella puesta=
NOTIFICACJON DE
SEGURIDAD IMPORTANTE
ElActa de Aplicacl6n de Agua Potable y Tbxicos requtere
que el gobernador de Californla publique una lista de
sustanclas conocldas por elestado que causen c_ncer,
defectos de naclmiento, u otros dat_os reproductivos y
requiere que los hombres de negocios adviertan a los
cltentes de la exposicibn potencial a dichas sustancias.
Los aparatos a gas pueden causar una exposlciSn leve
a cuatro de estas sustancias, tales como benceno,
mon6xldo de carbono, formaltna y hollin, causados
prlncipalmente pot la combustibn Incompleta del gas
natural o combustibles L.P. Las estufas ajustadas
adecuadamente, tndlcado pot una llama azulada en vez
de una llama amarilla, minimizard la combusttbn
tncompleta. La exposlcibn aestas sustancias se puede
minimlzar aun m_s con la ventilacic_n a traY,s de una
ventana abierta o usando un ventilador o una campana
de ventilacibno
4 NGSAF40

$
lnterruptor de luz de horno
(Presione para prender o
apagar la luz del homo)
Ventllecl6n del homo
(delrds de la parrilla)
No Obstruya!
Seguro autom_tico d_-la
puerta del horno
(Para c_ctode autoltmpleza)
(2) Parriltas removlbles
del homo
UbtcaciSn de los numeros de
modelo y de serte
_ Controles del homo
(Vea pdglnas 6-I 1)
Parrilla
Interruptor automdtlco de
luz del homo automattcamente
Luzdel homo
(Vea pdgina16)
Superflcle det homo
de autolfmpleza
Fondoremovibledel homo
(Vea pdgina16)
Caj6n removible
de almacenamiento
(Yea pdgina 16)
Sello de la puerta delhotno
(Vea pdginas12 & !4))
Puerta removible del homo
(Yea pdgina 15)
- Fuente y parrilla
para asar
(Vea p_gina 11)
5 NGBIFO2-2

CONTROL DEL HORNO
DIAL PARA
MOSTRAR ESTADO
DEL PROGRAMA
CANCELA LA
OPERACIO_!
DE HORNEAR,
ASAR,
O LIStIPIEZ_
PARA PONER OPERAClONES
DEL HORNO EN AUTOMATICO
DIAL DEL RELOJ/ DtAL DE
CRONOMETRO TEMPERATURA
L
APRETE PARA ENCENDER O
APAGAR EL CRONOMETRO
Su estufa se controla con un toque. Used puede poner
ahora las sigutentes operactones t_cttmente:
RELOJ CRONOMETRO
HORNEAR HORNEADO D1EMORADO
ASAR LIMPmEZA
LIMPIEZA DEMORADA
Las flechas UP o DOWN se usan para poner el tiempo
o cambiar la temperatura que desea usar, Apretando y
manteniendo presionadas cualquiera de las dos, los
m)meros cambiar_n r_pidamente, Apretando y soltando
las flechas los numeros cambiar_n lentamente.
DIAL DE
FUNCION
BOTON CON FLECHA
HAClA ARRtBA (SUBE
EL TIEMPO Y LA
TEMPERATURA)
BOTON CON FLECHA HACIA ABAJO
(BAJA EL TIEMPO Y LA TEMPERATURA)
TONOS:
El tono de fin de ciclo sonar;_ cuando termine de usar el
cronbmetro y las funciones autom_ticas del homo. E1
tono de fin de cicto son 3 son!dos cortos seguldos por
un sonido eada 6 segundos que se repiten hasta que
usted seleccione otra operacibn. Slusted desea eliminar
los son!dos que se repiten, aprete y mantenga CLEAR/
OFF pot diez segundos. Para volver a 1son!do cada 6
segundos, aprete y mantenga CLEAR/OFF por 10
segundoso
Para cancelar el tono de fin de ciclo, aprete cualquier
clave excepto las claves de las flechas UP o DOWN_
DDAL:
Una vez que haya programado su control para cualquier
operacibn, usted puede mostrarlo apretando el boron
apropiado. Pot ejemplo, si est_ usando el cronometro
y desea ver la hora del dia, aprete CLOCK. El dial
mostrar_ Ia hora del alia.
HOTA:
Usted no puede porter HORNEAR, ASAR
oTIEMPO DE COClNAR mientras ia puerta
del homo estd cerrada con cerrojo. Si io
trata de hacer, la palabra "DOOR"
aparecerd en el dial. El cerrojo de la
puerta del homo se debe usar solamente
para autolimpieza.
CODIGO=F:
Si el diat de la hora suena continuamente y una "F"
seguida por un n0mero pestahea, usted tiene un c6digo
de error de funciOno Note el n0mero despu_s de la "F"o
Aprete CLEARIOFF. Permita que el horno se enfrie por
t hora. Si el problema se repite, desconecte toda la
electric!dad a la estufa y llame para un serviclo. Dlgale
a su t_cn !co el n0mero que aparece despu_s de la "F" en
el dia!.
PRESS
NCERC26

COMO P@NER EL RELOJ:
t. Empuje el botbn CLOCK.
2. Empuje cualqulera de los botones con
las flechas UP o DOWN hasta que el dial
muestre la hora correcta del dia.
La flecha UP camblard los ndmeros hacla adelante, tai
como 1, 2, 3. La flecha DOWN cambtard los nt_meros
hacla atrbs, tal como 3, 2, 1.
I_lirelloj empezar_ au_om_ticamente dentro
de un m_nuto; ousted puede apre_ar ell bot6n
de! reloj (clock) para que empiece
inmed_a_amen_e.
COMO POHER EL CROHOMETRO:
COMO PONER HUEVAiVIEHTE
CRONOMETRO:
Cuando estd poniendo el cronbmet ro, sl usted hace una
pausa de m_s de4 segundos mientras empuja cualqulera
de los botones con las flechas UP o DOWN, "TIMER"
dejard de pestatlear en el dial y el cronbmetro empezard
a contar hacia atrds automdticamente. Si esto ocurre
empuja solamente el bot6n TIMER ON/OFF y usted
podrd continuar seleccionando su tiempo.
COMO CAHCELAR EL
CRONOMETRO:
Mlentras el cronbmetro estd contando hacla atrds,
empuje y mantenga el botbn TIMER ON/OFF por 4
segundos, o hasta que "TIMER" deje de pestafiear y la
hora correcta del dfa vuelva al dial.
El cronbmetro no controla las operaclones del horno,
tales como hornear, asar, lirnpleza 0 cualquler funcibn
demorada. Le permite poner una canttdad de tiempo y
le avisa cuando el tiempo ha terminado. Un ejemplo
serta porter un huevo a tres mlnutos. La canttdad de
tiempo mdxima que puede poner es9 horasy55 minutos,
1. Empuje el botbn TIMER ONIOFF.
2. Empuje cualqulera de los botones con
las flechas UP o DOWN para seleccionar
la cantidad de tiempo que necesita.
El crondmetro empezard a contar hacia atrds
automdticamente dentro de 4 segundos.
.
Cuando el cronbmetro Ilegue a cero
sonard un tono_ Empuje el bot6n del reloj
(clock) para volver a la hora correcta del
dia.
7 NCCTL44-3

CO O COCnNAR EN EL HORNO
REGLA$ GEHERALE$
" Cuando coclne una comlda pot prtmera vez en su
nuevo homo, use como gufa el tlempo que se le da
en la receta. Su nuevo homo ha sldo programado
correctamente en ta f_brica y es m_s exacto que el
homo que reemplaza_
Despu_s que haya usado el homo por un tlempo, s!
usted cree que debeda funclonar m_s callente o
m_s fr|o, Io puede ajustar usted mlsmo. Vea COMO
SE AJUSTA LA TE[vlPERATURA en este manual.
. NO MIRE _ SI abre frecuentemente la puerta para
mlrar la comida cuando se est_ horneando, perder_
calory puede produclr malos resultados al hornear.
• ES poslble que exlsta un poco de plot cuando el
homo se usa por prlmera vez_ Esto es causado per
el calentamlento de las partes nuevas y del alslanteo
• No cubra laparrllla del horno completa con papel de
alumlnio. El papel de alumlnlo puede obstru/r el
tlujo normal del calory produclr malos resultados al
hornear. No ponga papel de alumlnlo dlrectamente
sobre el fondo del horno. El papel de aluminio que
se use en el fondo del homo debajo de! elemento
puede dafiar la superficle; por Io tanto, no debe
usarse.
i
/,
VENTAHHLLA DE VENTIILACION DEL
HORNO
Cuando el homo est;_ encendido, el aire caliente circula
a traY,s de una ventanllla de ventllaci6n detr_s de la
cubierta.
. La ventanilla de ventilaclbn es necesaria para la
correcta clrculaclbn del aire en el homo y obtener
buenos resultados al hornear. No obstruya esta
ventanilla de ventltacibn_ Si lo hace podrta causar
un tncendto o dattar la estufa.
PRECALENTAMIENTO
• Cuando las recetas requieren precalentamiento,
tenga la comida a la mano antes de abrir la puerta del
horno. Stdeja la puerta del homo abierta por m_s de s
un breve momento, se perderd la temperatura de
precalentamtento.
Permlta que el homo se precallente bten antes de
hornear. Sl estb equlpado, espere que la luz
Indicadora de precalentamlento o escuche el tono
de precalentamlento antes de poner lacomlda en el
horno. SI no, precallente por 10 mlnutos antes de
poner la comida en el homo°
UTENSIUOS PARA HORNEAR
Las galletas se deben hornear en bandejas planas
sin lados para galletas para permltlr que el aire
circule adecuadamente.
Los queques, panes dulces, y panecillos deberian
ser horneados en moldes brillantes -que reflejen el
calor-para obtener una corteza de tono dorado
claro. Los panes con levadura y los moldes de
masa para pasteles debleran hornearse en moldes
de vlddo u opacos (que no brlllen) -que absorban el
calor-para obtener una corteza caf_ y quebradiza.
Cerci6rese de que el rondo del molde tambldn sea
brlllante. Los rondos oscuros absorber_n el calory
pueden causar que lacomlda se dore demaslado en
la parte de abajo.
Las temperaturas del homo se deberian reducir en
25 grados m_s abajo de las temperaturas
recomendadas st el exterior del utensllllo el
preoscurecido, oscurecldo por la vejez o es de
vidrio a pueba de horno.
COMO ENCENDER EL QUEMADOR -
BARRA IINCANDESCENTE
Cuando enciende el control del homo, la barra
tncandescente empieza a calentarse. Cuando el en-
cendedor est_ suficientemente callente, en como 1
mlnuto, el gas entra al quemador y se enctende.
El encendedor se ve de color naranjo brillante cuando
est_ caliente. Hace un ciclo de encendtdo y apagado
con el termostato y estar_ incandescente cuando el
quemador est_ encendido.
Durante un corte de corriente el quemador del homo no
se puede encender y no debe tratar de hacerlo_ Sl Io
hace le podria causar graves heridas_
NGOVC29

CO_O HORNEAR:
• Slempre siga la receta culdadosamente.
• Mlda blen los ingredtentes,
• Use utensllios adecuados y ponga blen la parrllla
para obtener los mejores resultados.
HOTA:
Lapostci6n de m_s arriba es solarnente una guia_ No se
puede usar para poner una parr!fla.
come PROGRAMAR EL HORHO PARA
HORHEAR:
1, Aprete el botbn BAKE (HORNEAR).
2. Ap fete el botbn con laflecha UP o DOWN.
La ultlma temperatura que se usb
aparecer_ en el dial Use la flecha UP
para subir esta temperatura o la tlecha
DOWN para bajar esta temperatura hasta
que ilegue a la temperatura que preflere
usaro
Elhomo ernpezard acalentarse autom_tIcamente_ Usted
ver_ que 100 grades aparecen en el lade derecho de
arriba del dial. A medida que el horno se caltente, esta
temperatura camblard hasta que Ilegue a la
temperatura que usted haya selecclonado,
entonces sonar_ un tonoo
3, Cuando termine de hornear aprete et
botbn CLEAR/OFF.
COI'_O HORNEAR PeR UH TBEMPO
DETERMIINADO:
Coloque los utenslllos sobre la parrtlla dejando un
espacto de 1" a 1 1/2" por todos los lados entre ellos.
No coloque demasiados utenslltos en el homo°
Cuando hornee varlas cosas, acomode los moldes
de manera que nlnguno quede direetamente encima
de otto.
come PROGRAMAR SU HORHO PAPA QUE
HORH_EE PeR UN TfEMPO D_-TERMgNADO
Y SE APAGUE AUTOMATICAMEHTEo
lr
Aprete el botbn BAKE (HORNEAR).
2o
Aprete la flecha UP o DOWN para
seleccionar la temperatura que desea
usar.
3o Aprete el botbn COOK T1ME (TIEMPO DE
COCINAR).
4. Aprete la flecha UP o DOWN para
selecclonar el tlempo que desee para
cocinar la comlda. Cerclbrese de incluir
el tiempo de precalentam|ento cuando
selecclone esta canttdad de tlempo.
Si hace una pausa entre pasos cuando estd
programando esta funci6n, el tone del con-
fro! sonatA, Esto es normal, Ei centre! le
est_ avisando que debe continuar,
Usted debe constderar que los alimentos se slguen
cocinando despu_s de que los controles se hayan
apagado a menos que los retire Inmedlatamente.
Si los moldes quedan demasiado cerca uno del otro,
las paredes o el rondo del horno pueden obstruir el
libre movlmtento del alre. Elmovimlento tnadecuado
del aire causa un dorado y una eocci6n Irregular.
La zona de baja temperatura de
esta estufa (entre t 70°F y 200°F)
estA disponilbie para mantener
la comida tibia. Los alimentos
que se man|engan per n_s de
dos betas a estas bajas
temperaturas se podrian eehar
a perder.
9 NGOVC30

COMO PROG P_MAR SU HORHO PAPA QUE
EMPJECE Y TERM_HS EN FORMA
AUTOMATBCA:
Cuando seieccione esta operaci6n, usted no
necesJta_'d cagcuga_ cuando el homo se
encer_er_; el contro! Io hard pot ust_o Ust_
r_cesi_ar_ seSeccio_r lo siguiente:
1. Te_sratura 2, Pot cu_nto tlempo 3. Hot8
de apaga¢_o
1. Aprete el botbn BAKE (HORNEAR).
2. Aprete laflecha UPoDOWN paras_leccionar
la temperatura que desea usar.
3. Aprste el botdn COOK TIME (TIEMPO DE
COClNAR).
4. Aprete iaflecha UPoDOWN parasel_cclonar
por cu_nto tim po desea coclnarsucomida.
Cerclbrese de Inclufr el ttempo de
precalentarniento.
5. Aprete el bot6n STOP TiME (HORA DE
APAGADO).
6. Apretelaflecha UPpara programarla horadel
d/a en que usted desea que el homo se
apague. Elhomoseapagar;t autom_lcamerrte
¢uando llegue a la HORA DE APAGADO
preseleccionada.
7. Aprete el botbn CLOCK (RELOJ) para que et
dial vuelva a la hora corriente del dia.
COMO ASAR:
Asarescoclnar cortes tlernos de came con calor seco. No
es necesarloprecalentar su homo para asar.
INSTRUCCIONES GENERALES PAPA ASAR
1, Coloque la ft_nte en la posict6n de pan'ilia No.1 o
No,2.
2. Aprete el botbn BAKE(HORNEAR).
3. Aprete la flecha UP o DOWN 10am selecclonar la
temperatura que necesita.
SI hace una pausa cuando _st_ seleccionando esta funcibn,
el control har_ un sonido. Esto es normal, El control le est_
haciendo saber que debe conttnuar.
Sldesea cancelar la selecciOn deesta functSn, apreteel bot6n
CLEAR/OFF,
Hunca permita que alirtmntos
_ies con_ los productos idcteos,
pescado, aves, e_c., permanezcan
al aire por rnds de uP.ahora antes
de cocinarlos cuando usted haya
seleccionado un programa
autorndtico. La temperatura
amblente ayuda el crecirrdento
de bacterias da_inas. Cerci(_rese
que la luz del homo estd apagada
porque el calordel foco acelerar;_
el desarroliO de las bacterias.
4. Cuando terrnine de asar, aprete el botbn CLEARiOFF
(APAGADO).
Recuerde:
La mayor_a de las carnes continuan coclndndose
lnternamentedespu_s de que se sacan del homo.
10 NGOVC15

° Use solamente la fuente y ta parrilla para asar que
viene con su estufa. Est_n disefiadas para drenar
grasa y llquldos adecuadamente y prevenir
salpicaduras, humo o fuego.
• He precaiien_e cuando asa a ia parrilRa. Para
asar en forma unlforrne en ambos lados, empiece en
una fuente frfa.
• Corteet e×ceso de grasa de la came y las chuletaso
Haga cortes en la carne para prevenir que se
enrosqueo
, Para que la carne quede bien jugosa, p6ngale sal al
primer lado a[ momento de darla vuetta. P6ngale sal
al segundo lado ai momento de servirla.
• Aplique mantequ_lla al polio y al pescado vartas
veces con una brocha mientras se asa. Cuando ase
pescado, engrase la parrilla para prevenir que se
pegue y _selo con ia piel hacia abajo, No es
necasario dar vuelta el pescado.
• Nunca deje una fuen_e para asar sucia en la
estufa, La grasa en la fuente podrla causar humo o
quemarse la prbxima vez que el horno se use.
• Cerci(_rese de que sepa el procedimiento correcto
para apagar un Incendlo de grasa. Vea ga seccidn
de seguridad.
pardllas y el tlempo de coclnar se encuentran en la tabla
de m_s abajo.
Mlentras mds cerca estd la comida del quemador para
asar, m_s r_pido se dorar_ la carne por afuera,
permaneciendo roja o rosada en el centro. Atejando la
came del atemento permite que la came se coclne en et
centro mientras se dora por afuera. E1primer lado se
_ebe coctnarde 1a 2 minuto rods que el segundo lado.
Posici6n de
ga pari'il|a =t'Jempo
Alirnento
Btstec - 1"
de grueso
Casi crudo
A medio asar
Bien asado
Tortas de came moltda
Tdrmino medio - t"
de grosor
T_rmino medto - t/2"
de grosor
Chuletas de c0rd'ero - 1"
de grosor
Chuletas de cerdo - 1"
de grosor
Chuletas de cerdo - 1/2"
de grosor
Rebanada de jambn - 1/2"
de grosor
Pescado (filetes)
Potlo (presas)
Salchichas
Tocino
4 = M_s ai_a Iota!
= M_s baja (m_mnuLos
4 9-11
3 13-15
3 21-23
3 16-18
4 7-9
3 18-21
3 27-29
3 16-18
3 11-12
3 11-13
2 45-55
3 8_11
3 9-11
_
Esta tabla es una guia general., El tamat'io, peso, grosor
y la temperatura intctal de comida, asi como su su
preferencia personal, afectar_n el tiempo en cocclbn.
Lostiempos en ta tabla est_n basados en latemperatura
de la comida en el refrigerador.
COMO SELECCIOHAR PARA ASAR A LA
PARRNLILA:
POSICION DE LA FUENTE PAPA ASAR
Asar a la parrilla es asar a fuego directo del elemento
para asar. Los cortes tternos de came o carne marinada
deben set selecctonadas para ser asadas. Para mejores
resultados, los blstecs y las chuletas deben tenet
menos de 3/4" de grosor,
Despu_s de poner la comida sobre la fuente y la parrilla,
cotoque la fuente en la parrilla del horno en la posicion
recomendada. La poslci6n recomendada para las 11
1. Aprete el bot(_n BROIL (ASAR)°
2. Aprete la flecha UP una vez para
ceteccionar LO broil (temperatura baja),
3. Aprete la flecha UP dos veces para selecclonar HI
BROIL (temperatura alta).
La palabra "BROIL" y "HIGH" o "LOVe' aparecer_ en la
parte derecha de ardba en el dial de acuerdo a su selecck_n.
NOTA: Use LO (BAJA) para cocinar altimentos talles
como ave y cortes de earnes gruesos
cornpletamente sin que se doren demasiado.
SI no apreta ninguna de las fiechas, el dial semostrard en
blanco y deber_ repetir los Pasos 1 y 2_
4. Cuando termine de asar, aprete el bot6n
CLEAR/OFF.
NGBRLt6

EL CHCL@
AUTOL!iMPIEZA (3 HORAS.TIEMPO NORMAL De:
AHTE$ DEL C CLO D[ LaMPIiE£A
1. Saque la fuente y la parrilla para asar, las parrillas,
todos los utenstllos y papel de aluminlo del horno. No
trate de llmpiar los utensilios uotros objetos en el
homo durante el clclo de limpleza. Sl las pardtlas se
dejan en el homo durante el clclo de limpieza, se
oscurecer_ln, perder_n su brlllo y ser_ dlftcll
desllzarlas. SI decide dejar las parrilias en el homo,
las puede pullr con lanllla de acero y apticarles una
pequefta cantldad de acelte vegetal en las orltlas
despu_s det ctclo de llmpleza. Esto los permitlr_
desllzarse con facllldad.
2° La sucledad en e! frente del marco del borne, bajo la
orilla de la cubierta, el revestimiento de la puerta
afuera del sello de la puerta y la orilla del frente de la
cavldad del horno (come 1" hacla dentro del homo)
no se Ilmpiardn durante e! ciclo de limpieza (yea la
]lustracibn de abajo). Llmpie estas _reas a mane
antes de empezar el ciclo de autolimpieza.
Use agua caltente y lanilla de acero Ilena con jab6n.
Recomendamos limpladores tales come" Soft Scrub"
o productos de limpleza simiiares para mantener las
superficies blancas limplas y come nuevas. Despu_s
de limpiar, enjuague bien para preventr que se forme
un restduo card cuando el homo se caliente. Pula y
seque estas dreas con un paso seco.
LUZ DEL HORHO
Para prolongar la vida de! foco, cerci6rese que la
muz de! borne est_ apagade durante el ciclo de
au_oUimp_eza.
MARCO FRONTAL
LIiMPIIEZA )
buenos resultados al cocinar. Si nora que el sello se
est_ gastando, desajustando o datlando en cualquier
forma o si se ha salido de ta puerta, deberia
reemplazarlo.
Per favor note:
El sello de la puerta est& dlsetiado para tenor un
espaclo de 5" - 6" en el rondo de la puerta del borne.
Esto es para permltlr la circulaclbn adecuada del aire.
REVEST1MtENTO
PANELDELA PUERTA DE LA PUERTA
come PROGRAMAR UH CICLO DE
AUTOLtiVIPJEZA :
1. Aprete el botbn CLEAN. El dial mostrar_ "CLEAN",
"TIME", y (----).
2
REVESTIMIENTO
DE LA PUERTA
3. Llmple los derrames grandes en el rondo del homo.
Demaslada sueiedad uede causar humo durante el
ciclo de autollmpieza.
4. No limple el sello de la puerta. El material de fibra de
vldrlo del sello tiene una resistencia extremadamente
baja a la abrastSno Un sello intacto y blen ajustado es
esencial para aprovechar energia y para obtener
2. Aprete la flecha UP o DOWN para selecctonar la
canttdad de tlempo que desea para limpiar el borne.
Elciclo normal es de 3 horaS, pete puede seleccionar
entre 2 y 4 horas.
Usted puede apretar el bot6n STOP TIME para ver a
qu_ hera del dla termlnard el elclo de autollmpieza.
Aprete el botbn CLEAN para volver a la cuenta.
(Autoiimpieza continua en Ia pr6xirna p&gina.. )
12
NGSCL11

(continuac}Snde Autolimpiezao,)
CUANDO TERMIHA UN CHCLO DE
AUTOLIMPIEZA:
1. Espere que la palabra LOCK desaparezca_ La
temperatura del homo debe bajar a un nlve! prudente
antes de sacarle el cerrojo a la puertao
ESPEREQUELOCK DESAPAREZCA
COMO SE NTEF RUMPE ClICLO
DE L MPliEZA:
1. Aprete CLEAR/OFF.
Siga las instrucciones bajo "CUANDO
TERMRNA UN CBCLO DE AUTOL{MPIEZA."
COMO PP OGRAMAR UN C CLO DE
AUTOLI MPIEZA AUTOMAT CO:
Usted no necesttard determinar cuando el horno se
encender,t cuando selecclone esta funcibn. El
control Io har_ por usted. Usted necesltar_
seleccionar la cantldad de tlempo que desea para
limpiar el horno (entre 2 y 4 horas), y la hora del dia
en que usted desee que el horno se apague.
1, Apreteelbot6nCLEAN. Eldialmostrar_
"CLEAN". "TIME" y (---),
2. Aprete una de las flechas UP o DOWN
para selecclonar la hora del dia en que
usted desee que el homo se llmpieo El
ciclo normal es de 3 hornas, pero usted
puede seleccionar entre 2 y 4 horas.
3. Aprete el botbn STOP TIMEo
4. Aprete una de las flechas UP o DOWN
para seleccionar la hora del dia en que
desee que el horno se apague.
Cerei6rese de que la iuz del homo est_ apagada durante
et cic!o de limpieza para prolongar la vida del foco,
DESPUE$ DE UN CICLO DE
gMPt EZA
DespuOs de un clclo de __
!Irnpieza, ustedpuedenotarun , -, L_
poco de cenlzas blancas en el _ ,
homo° Ltmplelas con un paf_o _,_' ___
o una esponja rnojada.
Si las manch_s blancas persisten, s&quelas con un_
lanHla de acero rellena con jab(_n° Cercl(_ rese de enjuag_r
blen con una mezcia de vlna grey ag ua, Estos dep0sltos
son generalmente un residuo de sal que no se puede
Iimpiar con el ciclo de limpleza.
St el homo noqueda Iimpio despu_s de un clclo, el ctclo
se puede repetir.
PF EGUI T S Y RESPUESTA$
P, Si los controles el_ctricos no funclonan, _.puedo a_n
poner el homo en un ciclo de autollrnpleza?
R, No, El CONTROl_ DEESTU FA se usa para laprog ramar
el homo para que empiece y termlne el clclo de
autollmpieza.
Po _,Puedo usar Iimpiadores cornerclales en cualquier
parte de mi homo de tIpo autolirnpleza?
Ro NingrJn limpiador o capa protectora deberia usarse
alrededor o dentro de cualquier parte de este homo,
P.
&Puede limpiar et selto alrededor de la puerta del
homo?
R,
No debe ltmplar el sello de la puerta,
P.
i.,Es normal sentir un ruido durante la Ilmpleza?
R.
SL Esto es el metal que se calienta y se enfria_
P, (T,Por qu(_ quedan cenizas en el homo despu_s de
Ilrnpiarlo?
R. Clertos tipos de suciedad dejar_n un depbsito. Se
pueden sacar con un pa,fio o una esponja mojada.
P,
&Qu_ deberia hacer si se produce demasiado humo
durante la limpieza?
R,
Esto es causado pot exceso de suciedad y debe
apretar elbot(_n CLEAR/OFF, Abra lasventanas para
sacar e! humo. Permita que el homo se enfr{e pot Io
menos una hora antes de abrir la puerta. Llmpie el
exceso de suciedad y empiece nuevamente el ciclo
de limpiezao
P_
z,Deberia salir un olor durante la Iimpieza?
R_
Sf, pod ria salir un olor durante las primeras lim piezas.
Si no limpia el exceso de suciedad tambi_n podria
causar un olor cuando se limpia_
13 NESCL61

PARTE
L MPIEZA
T_l-i_i .........
MATERtALES DE LIMPiEZA
COMEHTARIOS
PAHSL DE
CONTROL
PARR_LLA DEL Detergente, agua tibla, lanilla de acero con
HORNO
FUENTE Y
PARR_LLA P_RA
ASAR
SUPERFHCIES
PIHTADAS
{Frente de la
pue_a de! horno_
lados de la
estufa)
Detergente, agua tibia, patio suave
jabOn o limpiador de homos
Detergente, agua tibia, lanillas con jab6n,
limpiadores de homos comerclales
Jabbn y agua, pafio htJmedo, toalla de
papel, llmpiador de vidrio sobre vidrio de
la puerta
No use limpiadores abrasivos, ianillas de
acero o pl_stico. Seque blen despu_s de
ilmpiar.
Saque del homo para limplar. Enjuague bien.
Se pueden tavar en m_qutna lavaplatos.
Saque Jafuente sucia del homo para enfriarla..
Bote la grasa. Llene la luente con agua t_lao
Ponga detergente sobre la parrilta y c£tbrala
con un patto humedo o una toalla de papel.
Dejecluelafuente y la pardlla seremojen por
unos pocosminutoso Enjuagueofdegue sise
necesita. Fuente y parritla pueden lavarse en
mdquina lavaplatos.
NO USE limpladores de hornos, polvospara
limpiar o abmslvos fuerteso Podrfanrayar la
superficle. SI _cldos (marinadas, salsas de
tomate,aderezos)caenenlasuperficiecuando
estd caliente,useunatoallade papelseca oun
patloparaltmpiar inmediatamente. Cuandela
superficie se enfde, lave y enjuague. Para
otros derrarnes, tales como grasa, etc., lave
conjab6nyagua cuandoseenfrie yenjuague.
Saque brillo con un pafio seco.
Ltmptadordeviddopuede usarseenlosvidrios
del frente.
SELLO DE LA
PUERTA DEL
HORHO
PUERTA DE
HORHO CON
VENTAHA
No los llmpie
Ltmptador de vidrios y t,_alias de papel. Si
necesita una llmpieza adic!onal para sacar
manchas, lavecon una so;ucibn departes
iguales de vtnagre con agua tibia.
Enjuague y seque bien. L_ puerta deblera
estar completamente abierta cuando
limple taorilla de arrtba. Despu_s de usar
el homo pot un tiempo, p:._edenotar una
descoloracibn en el vidr!o interior de la
puerta. Esto es normal
NO permita que el agua corra pot la abertura
de la puerta cuando la limpie. Elimine la
suciedad pegada con una pasta de soda para
homearyagua. Nouse limpladores abras|vos.
Enjuague bien, ta puerta del homo se puede
sacar; vea la secci6n departes removibles°
14 NGCCH35

PUI RTA REMOVIBLE DEL HORNO
BISAGRA-
POSlCION DE PARe
_ARA ASAR AL
LA PARRILLA)
PARRILLA$ DEL HORNO
REMOVIBL $
GUIAS CON
INDENCIONES PARA
LAS PARRILLAS
Para qultarla:
1o Abra la puerta del horno hasta la postciSn de pare
(yea la tlustraci6n),
2, Tome la puerta de cada lade y lev_ntela sac_ndoia de
las bisagraso NO levante la puerta tom_ndola de ia
manilla.
HOTA: Cuando se quita aa puerta y los brazes de
tas bisagras es_dn en posici_n de pare, nc_goipee
ni trate de mover lies brazes de tas bisagras, Las
blsagras pedr_an za_a_se caus_nde|e lesiones ee_
las manes o da=Sando |a porcelana dei fren_e de
=a estufa. Cubra Ilas b_sagras con teaHas o con
rollos vacios de teat]ias mientras trabaja en e!
&tea del homo,
Para reernp!azarla t
1. Sostenga lapuertasobrelas bisagrascon lasranuras
de la orilla inferior de la puerta alineadas con las
bisagraso
Los brazes de las bisagras deben seguir en posici6n
de pare.
2o Deslice ta puerta hacta abajo sobre las btsagras
tanto come sea posible y cierre la puerta.
Tenga cuidade de no rayar e_ acabado de! horno
cuando instaie o quite !as parri]ilas deg homo.
Para instalar|a:
1. Coloque la orilla posterior levantada de la parrilla en
un par de guias°
2, Empuje la parrilla hasta que Ilegue a la indenci6n en
la guia para las parrillas, despu_s tevante un poco el
frente de la parrllla y emp=Jjela hasta atr_s
Fara quitarla:
1. Tire de la parHIla y luego lev,_ntela_
HOTA:
Las parriilas han side dise_adas cen topes de
seguridad. Cuando se hart coiocado de manera
correcta sebre los sope_es para las parri!!as y
se sacan ciel homo, el tope de seguridad evita
que !as parrilias se vuelquen cuando usted estd
retirando alirnentos de las parrillas o
colecdndo!os sobre elias,
15 NGMNT53

FARTE$ DEL HOR O REMOVRBLES
ABIERTO CERRADO
Elfondo del homo se puede sacar para Itmpiar derrames
grandes o para alcanzar el quemador del horno_
Tenga culdado de no rayar e! acabado del homo
cuando saque y ponga nuevamente el fondo.
C6mo se saca:
1. Corra la manilla del centro del fondo del horno hacia
ia Izquierda.
2, Levante y saque el fondo dei homo.
Cdmo se co!oca nuevamente:
1. Deslice el rondo de manera que las puntas de atr_s
del fondo entren alas ranuras en la parte trasera del
horno_
2. Baje el frente del fondo del homo en su lugar y corra
la manllla hacfa la derecha para enganchar el rondo
en su lugar.
CAJON DE ALMACEHAMIEHTO
REMOVABLE
TOPE DE GUIAPARA COMPARTIMIENTO
ELRODILLO ALMACENAR
COMO REEMPLAZAR LA LUZ DIEL
_=_OF_N(_t SOQUETE
FOCO
CUBIERTA ALAMBRE
DEL FOCO SUJETADOR
A No toque el foco caliente de! horno.
A Nunca toque el collar de metal con
C6mo se saca:
1. Desconecte la electricldad al homo en el fusible
principal o en la caja de! ctrcuito.
2. Ponga su mano debajo de la cublerta y empuje el
alambre sujetador flrmemente hacta arras hasta que
pase por enclma de la cublerta. La cublerta caer_ en
su mano. NO SAQUE NINGUNO DE LOS TOR.
NILLOS PARA SACAR LA CUBIERTA,
3o Reemplace el foco con un foco de 40 watts para
hornos de casao
No toque el foco con las manes
mojadas, Nunca limpie el ;_rea dei
foco del homo con un paso mojado.
electricidad de! |oco cuando le
reemplace.
MARCO FRONTAL
Este caj6n provee espaclo para guardar utensilios para
coclnar y hornear. Mater!ales inflamables y de
pldstico no deberlan guardarse en este caj6n.
No recargue el cajbn de almacenamientoo Si los
contenidos del caj0n son demaslado pesados, et cajbn
se podrla salir de las gufas cuando se abra° Para abrir
elcaj6n, tome el cent rode lamanilla y tire derecho hacia
afuera.
Para sacarlo:
Tire el cajOn derecho hacia afuera y lev_ntelo por sobre
los topes de las guias.
C6me se coloca nuevamente:
Levante el caj6n por sobre los topes de las guias y
deslicelo hacia su lugar.
C6mo poner nuevamente ia cubierta:
1. Coloque la cubierta en la ranura de! recept_culo de la
I_mpara. Tire el alambre sujetador hacta adelante
basra que caiga en su lugar_ Est_ seguro que el
alambre est_ en el centro de la cubierta. El alambre
sujetar_ firmemente la cublerta si est_ en la postcibn
correcta.
2. Conecte la efectricidad al homo.
16
NGMNT34-!

ANTES DE $OLICITAR UN SERVICitO
Ahorre tiernpo y d_nero - Revise esta lista antes de solicitar un servicio,
Para eiimlnar solicitudes de servlcio Innecesarias prlmero lea con gran culdado todas las lnstrucclones de este
manual. Luego, sl tlene un problema, verifique slempre la lista de problemas comunes y posibles soluctones antes
de sollcltar el servlclo.
SI tlene un problema que no puede soluclonar, Ilame a su tlenda Sears o a su Centro de Serviclo rods cercano para
sotlcitar ayuda. Cuando hable, tenga a la mano este manual, la lista de Partes de Repuesto, su nOmero de modelo,
su n0mero de serle y la fecha de compra.
IPROBLEMA
=l =
- DIAL ESTU :A
PESTANEA CON UHA
POSJBLE CAUSA
o Posible malfunclonamlento
de la estufa
"F" Y UH NUMERO;
HORNO DEJA DiE
FUNCIONAR,
CUB_ERTA FUHCRONA
• EL HORNO NO SE
LIMPnA EN EL CaCLO
DE AUTOLIMPaEZA O
LOS RESULTADOS
SON BASTANTE
• Los contmles es_n malpuestos
. El ctclo de limpieza se
, Elhorno est_ demasiado suclo
POBRES
• LA PUERTA DEL
HORNO NO SE PUEDE
ABRIR
completo
w
accidental mientrashomeaba o
asaba
• EL TONO HO SUENA
" LOS ALZMEHTOS NO
SE ASAH A LA
PARRILLA DE
MANERA ADECUADA
El tonoha sido alterado
Puertadel homo est_ ablerta
• La posictbn de laparrillaes
Incorre_a
. [] homo rueprecalentado
• _ _ unutensilio inadecuado
• "P,empo de _ tnadecuado
EL HORNO DESPDDE
UN OLOR
• La instalaci6n del homo puede
despedir un olor durante las
primeras veces que la use
No limplb bien el exceso de
sucledad antes de cada clclo de
autolimpieza
LA LUZ DEL HORNO
NO FUNCIONA
• [] lnterruptor est_ en posick_n de
APAGADO (OFF)
• Elfoco esf3 furElido
,, .,,.,
Interrumpi6 demaslado pronto
[] ciclo de limpieza noest_
Lapuertase cerr6 de marera
H,
|
NO SOLICgTE UN SERVaCIO SSN ANTES
REVISAR LO SOGUHENTE
Aprete CLEAR/OFF. Permlta que laestufa se
enfrie por una hora. Ponga la estufa en el
clclo de cocinar o de llmpleza nuevamente_
SIel problema persiste, llama para un servtcloo
• Consulte las Instrucclones de autollmpleza
• Los hornos mt, y suclos requleren unclclo de
autolimpieza de 3 horas y media.
• Los derramesdeimportancladebenlimplarse
antes de realizar el clclo de llmpieza, Reptta
el clcltode limpleza.
El homo debe enfriarse por debajo de la
temperatura a la que el seguro no se abre.
• Pongaelcontrolen APAGADO(OFF). Espere
a que el homo se enfrie y la puerta se podr_
abrir. No fuerce el seguro de la puerta.
Aprete y sujete CLEAR/OFF (APAGADO) por
10 segundos.
Abra la puerta del homo.
• Revise la colocaclbn de la fuente para asar;
consulte la secctbn Asar a la parr||la.
• No precaliente cuando ase a la parr|fla.
• Utilico lafuenteylapa_llaquevienenconla estufa.
• Verifique la labia de asado.
• Ponga el homo en un clclo de autolimpieza 10am
acelerar el proceso de "desgaste" de! olor.
• Limpie el exceso de suciedad antes de empezar
el ciclo de autolimpiez&
• Verifiquelaposiclbndelinterruptor;consults
gas instrucciones de operac[bn,
• Revise o camble et foco; consulte la secclbn
de partes removibles de este manual°
17 NGSER43

AHTE$ DE $OUCtTAR UN SERVICIO (=onU.uaci6n|
NO SOLICITE UN SERVICIO SIN ANTES
PROBLEMA
POSIBLE CAUSA
RiEVISAR LO SlGUIENTE
• LOS
QUEMADORES
DEL HORNO HO
FUNCIONAN
o LOS ALIMEHTOS
HO SE HORHEAH
DE MANERA
ADECUADA
La linea del gas no estd
conectada o no estb
encendlda. St estb usando
gas LP., el tanque podr|a
estar vacio.
El aparato no est._ haciendo
tlerra o no estb polarizado
adecuadamente. Esto
puede aiectar el encendido
a chlspa (en los modelos
que estdn equlpados asi)
El controlnom._-l_ptogramado
corr"_'tamente
Los quemadores no est_n
ajustados adecuadamente
• El homo no se precalent6
durante suficiente tiempo
• La parrilla o ta fuente est_n
real colocadas
- La rejilla de ventilaci6n del
homo est,_tapada o cubierta
, Se us6 papel de alurninio de
manera lncorrecta
• Latemperatura seestableci6
de manera incorrecta para el
utenstlio que se utilizb
No stgui6 la receta
. La estufa y las parrtllas del
horno est_n desniveladas.
- Usa utensilios para c'octnar
que no son adecuados.
, Revise la vdlvula de apagado y la vdlvula de
apagado de la i|nea de abasteclmlento de gas
para estar seguro de que estdn ablertas (vea la
secclbn de Instalaclbn). S! est_i usando gas
L.P°, &hay gas L.P. en el tanque?
• Revise la secci6n de Instalact6m
• Revise las tnstrucciones para Control de la
Estufa en este manual,
• Vea la secci6n de instalaci6n.
AsegrJrese deprecalentar el homo hasta que
se apague la luz tndicadora de latemperatura
del homo.
Mantenga un espacto de aire untforme
alrededor de las cacerolas y utensillos.
Consulte la Seccl6n de Consejos.
RecipIente de derrames del elemento poste-
rior derecho debe tenet un agujero en el
centro, sobre fa venttlaclbn del homo°
No se recomienda el uso depapel dealuminio.
Reduzca la temperatura 25 grados F si usa
vidrio o moldes opacos u oscurecidos,
- /.Ha sido ta receta probada yes confiable?
• Verifique las instrucciones de Instalacl6n de
tas patas niveladoras.
• Consulte los consejos para cocinar.
18 NGSER44

Es poslble que slenta que su nuevo horno cocina
dlferente horno al que reemplazb, Recomendamos que
deje pasar unas semanas para fanllllarlzarse con dl,
slgulendo como gu_a los tlempos que se dan en las
recetas.
SI plensa que su nuevo horno est_ demaslado caliente
(quema la comlda) o no Io suficlentemente caliente (la
comlda no se coclna blen), usted puede ajustar la
temperatura. La aparlencla y textura de los alimentos
son mejores Indicadores de la preclstbn de un homo
que un tem6metro barato para homo. No recomendamos
el uso de termbmetros baratos para homo, corno los
que se venden en las tiendas de abarrotes, para reajustar
la temperatura de su homo nuevo. Estos term6metros
pueden variar e 20°-40°F, Tambt_n, usted tlene que abrir
la puerta del homo para leer el termbmetro y esto
cambla la temperatura del horno.
Para determtnar en cu_nto Cambtar la temperatura,
ponga la temperatura 25°F m._s alta (si los alimentos no
se coclnan bien) o 25°F rods baja (st las comidas se
queman), que las temperaturas de su receta; luego
hornee. Los resultados deesta"prueba" dar_n una idea
de cu_nto tendr& que ajustar la temperatura.
3_ Aprete ia flecha UP para subir la
temperatura de su homo +35 ° rods
CALIENTE.
Aprete la flecha DOWN para bajar la
temperatura de su horno -35 ° mds
FRIIO.
4. Cuando complete su selecclbn aprete
el bot6n CLOCK para volver a la hora
del dia.
El termostato de su homo retendr_ este ajuste de
temperatura hasta que carla uno de los cuatro pasos de
arrlba sean repetldos. Este ajuste se retendrd en la
memoria Incluso despuds de una falla de corrlente.
Usted no necesltar& hacer nada mds. Hornee como de
costumbre_ Este ajuste no afectar_ la temperatura de
asar o de limpieza.
Para ajustar la ten'bperatura slga estas
instrucciones:
1. Aprete el botbn BAKE (HORNEAR),
2. Aprete la flecha UP hasta que muestre
550 ° e INMEDIATAMENTE aprete y
SUJETE el botOn BAKE por 10
segundos hasta que el reloj
desaparezca y eldiat muest reuna figura
de dos digltos.
(Estos dos digitos pueden varlar
de acuerdo a Io que fue
seleccionado en f,'_brica.)
19 NESER116-2

r" "
Es_lmado c|tente:
Nu_"tros es_,u_.os
cons|antes es_n d|dgldes a
a,s_jurar qua su nueva
Homo Kenmore I_gt_ a su
I_gar en p_ffectas
cond_clonssy le d_ el
pa_e de estos e_fue_s,
s_ntlmos qua es
ra.spon..o.o.o.o.o.o.o.o._bI!lde d nuestra
propo_clonarie esta garantla
para su homo.
Papalredc_ado
,,,,,,J
f
TO_© UH _0 DE _R_TI_ P.O_PL_TA PAR_ LAS F_NCIOH_S DE
TODAS LA._ PART_S _CEPTO LAS DE V_DRtO
SI, den|to del lapso de un a_o a par|t| d_la f_chade ]nstalaci6n,cualquierparts qua
no _a devtdr_o,funclona me! debldo a un def_cto en el material o en la mano de
obra, Sears la reparard o la reemplazard, sin costo algunoo
G_A_TilA TOT_._ DE 3(} _i_$ PA_ LA_ PARTE$ DE V_DRIO Y EL
ACA_ADO D_ _$_ALTE PORCELANIZADO, PARTES D_ METAL
PI_T,_O 0 BRILLANTE
SI, dentrode los tre}ntadies posterloree a fa Instalac_bn, cualquler parle d_ vidrlo
o el acabado de cualquler esma|te procelanlzado o parle de metal pin|ado o
brlllante tlenedefactos en e!materla| o mano deobra, Sears reemplazar_ laparts,
sin costo alguno.
GAR_NTIA TOTAL DE 90 DIAS EN A_USTES MECANICOS
Duranle 90 d|as aparlorde lafacha de |nsta|aclbn, Searsproportionate, sin costo
alguno, cualqulsr aJuste mecdnico necesar|o para la correcta operaclbn de ia
estufa, e_ceptuando el mantenlmlento normal.
SI la estufa est_ suJetaa otro uso qua no seael prlvado familiar, lacobertura de la
garantta menclonada arrlba sar_ efectlva sblo durante 90 d|as.
EL SERVIC_O DE GARANT_A ESTA DiSPONI_LE CON SOLO PONERSE E_
COHTACTO CON EL CENTRO 0 DEPARTAMEHTO DE SERVIC_O SEARS
_AS CERCANO EN LOS ESTADOS UNIDOS,
Esta garantla se aplca sblo cuando esta producto seuse en los Estados Unidos.
Esta garantla le brlndaderechos legaies especlficos, y tambl6n puadetenerotros
derechos qua varlan de un estado o otro. SEARS, ROEBUCK and CO.
Dept. 817 WA
Hoffman Estates, IL 60179
ii ,,,i,iiii i _J
"Le demos servlclo a io qua vendemos" es la manera de asegurar|e qua puede depender de Sears para el
servlclo porque el servicio Sears se ofrece en todo el pals.
Su Homo Kenmore |lena un valor agregado cuando usted constdera qua Sears poses una unldad de servlcio
cerca de usted, qua cuenta con un equipo Sears de t_cnicos capacltados, o .t_cnlcos profesionales
especlflcamente entrenados para manejar los aparatos Sears, y qua tienen acceso alas partes, herramientas
y equlpo pare asegurar que cumplamos nuestro compromiso con usted: "iLe damos servicio a Io que
vendemos!"
PARA AMPUAR EL VALOR DE SU ESTUFA, COMPRE UN COHTRATO DE MANTENIMIENTO SEARS=
LasHomo Kenmore estdn dise_adas, fabricadas
y probadas para brindarle aSos de operaclbn
conflable. Sin embargo, cualquiar aparato
modarno pueda requerlrdealgdn servlctodevez
en cuando. Lagarant|aSears,ademdsdelcontrato
de Mantenimlento Sears le brindan protecclbn
contracuentas dereparaclonas Inesperadas y le
aseguran qua dlsfrute dela m_xlma eflclenctaen
homes.
Ar=oodo cob_rlura do I= pmpied=d
1 R_ompl_Zo do por_a defocluosa_
quo no seen do pomelan: o vidtio
2 ApJstO moc_.-o
,,,,,,,,,
3 po.o, de pot¢ol_'=;= y vldrlo
1or =rio
,,_ ,
30 DAYS
2" n_ 3or aho
"9
G
AM AM
DAYS
G AM AM
G AM AM
Heaqul una garantla comparatlva y una tabla del
contrato de Mantenlmlento qua le muestra los
beneflclos de un contrato Mantenlmlento Sears
4 ._.,.,_. anuat de m_nfenlmbnto
provonlivo = solicitud do u_10d
AM AM AM
pare Hornos.
G - Gar_n_ AM ,,Cotll_= de M=n_nlrni_t t_
PONGASE EN CONTACTO CON SU VENDEDOR DE SEARS 0 CON EL CENTRO DE SERVICIO SEARS DE LA
LOCALIDAD HOY MISMO Y COMPRE UN CONTRATO DE MANTENIMIENTO SEARS.
_#'_"_ .'_ .'_t_ *"_ _'_"_® La marca de aparatos electrodomdsticos de
mayor venta en America
Vend|de pot SEARS, ROEBUCK AND CO, Chicago, IL 60684
--Impreso en LaFayette, Georgia

Forin@omemajor brandrepairservice:
Call24 hours a day,7 daysaweek
t =800-4-MY"HOME _
(1-88D-469-4663)
Parapedirservicio de reparaciSna domicilio-
t-800=676-58t t
In Canada for all your service and parts needs call -
Au Canada pour tout le service ou les pi_ces -
t °800=665=4455
Forth8repairorreplacementpartsyou need:
Call6am-11 pm CST,7 daysa week
PartsDirect °°
t .800-366-PART
(1-818-368-7278)
Para erdenarpiezascenentmga a domidiio =
1.800-659.7084
Ferthelocatio# of a
SearsFarts andRepair Center
inyourarea:
Call24 hours a day,7 daysa week
1o800o4,88=t 222
Forinformationonp_rcbasingaSears
MaintenanceAgreementor toinquire
aboutanexistingAgreement:
Call9am-5 pro,Monday-Saturday
HomeCentraF
 Loading...