

Page 1

BlEAm
USE & CARE
MANUAL
STOCK NO.
88329
KNOW YOUR UNIT
Read this booklet so
you will be able to
enjoy ail the features
in your Kenmore
Microwave Oven.
Under Cabinet
Wall Mount
Record in space
provided below the
Model No. found on
the label on the
cavity front and the
Serial No. found on
the label on the
inner left side of the
control panel.
Model No.
Serial No.
Retain this information
for future reference.
400223
Sears Kenmore mounting kits, Stock No. 22-84196 for under cabinet
rnounting and Stock No. 22-84297 for wall mounting are sold separately.
^3 n m r* ^3
MICROWAVE OVEN
Use and Care
Sears, Roebuck and Co., Chicago, IL. 60684, U.S.A.
Page 2

YOUR SAFETY FIRST
The Sears Kenmore Microwave Oven, though simple to use, is not a toy. Respect it as an electric cooking
appliance. Become familiar with microwave enecgy. ks uses and limitations.
PRECAUTIONS TO AVOID POSSIBLE EXPOSURE
TO EXCESSIVE MICROWAVE ENERGY
(a) DO NOT ATTEMPT to operate this oven with the door open since open-door operation can result in
harmful exposure to microwave energy. It is important not to defeat or tamper with the safety
interlocks. _
(b) DO NOT PLACE any object between the oven front face and the door or allow soil or cleaner residue
to accumulate on sealing surfaces.
(c) DO NOT OPERATE the oven if it is damaged. It is particularly important that the oven door close properly
and that there is no damage to the;
(1) DOOR (bent)
(2) HINGES AND LATCHES (broken or loosened)
(3) DOOR SEALS AND SEALING SURFACES
(d) THE OVEN SHOULD NOT BE ADJUSTED OR REPAIRED BY ANYONE EXCEPT PROPERLY
QUALIFIED SERVICE PERSONNEL.
IMPORTANT—FOR PROPER AND SAFE USE OF YOUR OVEN
• The oven must be level.
• The glass tray must be in the oven during cooking.
® Place the cookware gently on the glass tray and handle the tray carefully to avoid possible breakage.
® When a browning dish is used, the browning dish bottom must be at least 3,16 in. above cooking
tray. Carefully read and follow the instructions for the browning dish. Incorrect usage may cause the
glass tray to break.
» The oven should be thoroughly checked by a trained service technician, should it be dropped or
damaged, before it is operated again.
• The electrical power cord must be kept dry and must not be pinched or crushed in any way.
• The oven has several built-in safety switches to make sure the power remains off when the door is
opened. DO NOT try to defeat these switches.
DON’TS
• DO NOT INSTALL YOUR OVEN OVER A RANGE, COOKTOP OR OTHER HEAT PRODUCING
APPLIANCE, OR DAMAGE TO THE OVEN MAY RESULT.
• DO NOT attempt to operate this oven with the door open.
® DO NOT run the oven empty without food in it.
» DO NOT cook bacon directly on the glass tray to avoid excessive local heating of the glass tray.
• DO NOT leave the temperature probe unplugged in the cavity when operating the oven.
• DO NOT let the temperature probe touch the side walls, glass tray or door of the cavity when in use.
• DO NOT plug the pointed end of the temperature probe into the socket inside the cavity.
• DO NOT use the temperature probe in a regular oven. This probe is designed for microwave oven
only.
9 DO NOT store burnable material, such as food, in your microwave oven.
« DO NOT heat any types of baby bottles or baby food. Uneven heating may occur and possibly cause
personal injury.
« DO NOT heat small-necked containers, such as syrup bottles, in the microwave oven.
9 DO NOT use this microwave oven for commercial purposes. This Sears Kenmore Microwave Oven is
made for household use only.
-------------------------------------------SAFETY CERTIFICATION
The Sears Kenmore Microwave Ouen is designed and thoroughly tested to meet exacting safety standards. It
meets UL and FCC requirements and complies with safety performance standards of the U.S. Department of
Health and Human Services.
-----------------------------------------------
Page 3

IMPORTANT SAFETY INSTRUCTIONS
When using electrical appliances basic safety precautions should be followed, including the following;
WARNING —To reduce the risk of
burns, electric shock, fire, injury to persons or
exposure to excessive microwave energy:
1. Read all instructions before using the appliance.
2. Read and follow the specific “PRECAUTIONS
TO AVOID POSSIBLE EXPOSURE TO EX
CESSIVE MICROWAVE ENERGY” found on
Page 2.
3. As with most cooking appliances, close
supervision is necessary to reduce-the risk of a
fire in the oven cavity.
NOTE: If a fire should start:
*KEEP THE OVEN DOOR CLOSED
*TURN THE OVEN OFF
*AND DISCONNECT THE POWER CORD
OR SHUT OFF POWER AT THE FUSE OR
CIRCUIT BREAKER PANEL.
a. Do NOT grossly overcook foods. As many
grossly overcooked foods will cause fires in
the oven cavity, carefully attend the oven;
especially, if paper, plastic, or other
combustibles are placed inside the oven.
b. Do NOT store combustible items such as,
bread, cookies, etc. inside the oven because if
lightning strikes the power lines it may cause
the oven to turn ON.
Install or locate
accordance 'with
instructions.
6. Some products such as whole eggs, water with
oil or fat, sealed containers and closed glass jars
for example may explode and should not be
heated in this oven. .
7. Use this appliance only for its intended use as
described in this manual.
8. As with any appliance, close supervision is
necessary when used by children.
9. Do not operate this appliance if it has a damaged
cord or plug, if it is not working properly, or if it
has been damaged or dropped.
10. This appliance should be serviced only by
qualified service personnel. Contact nearest
authorized service facility for examination,
repair or adjustment.
11. Do not cover or block any openings on the
appliance.
12. Do not use outdoors.
13. Do not immerse cord or plug in water.
14. Keep cord away from heated surfaces.
this appliance only in
the provided installation
c. Do NOT use wire twist-ties in the oven. Be
sure to inspect purchased items for wire
twist-ties and remove them before the item is
placed in the oven.
This appliance must be grounded. Connect only
to properly grounded outlet. See “GROUND
ING INSTRUCTIONS" found on Page 6.
SAVE THESE INSTRUCTIONS
15. Do not let cord hang over edge of table or
counter.
16. When cleaning surfaces of door and oven that
come together on dosing the door, use only
mild, non-abrasive soaps or detergents applied
with a sponge or soft cloth. (See “Care and
Cleaning” instructions on Page 29.)
Page 4

TABLE OF CONTENTS
General Instructions
H Location of Model Number Label .................................................
■ IMPORTANT—Electrical Grounding Instructions
■ Installation
■ Setting "Time of Day”
H Names of Oven Parts .....................................................................
.......................
..................................................................
’............................................................
......................
5
6
7
7
M Oven Control Panel
User Instructions
■ Easy Use Chart
■ Recall and Change of Settings
■ Regular Timer ..........................
■ Child Lock-Out
■ Hold Warm
Detailed Directions
■ Quick-Start Cooking...............................................................................................................................
■ Cooking Guide for “Multi-Power” Settings/Wattage of Output Power
B “HI-Power”/‘‘Multi-Power” Cooking .............................................................................................................. 16
B “Temperature Controlled” Cooking .......................................................................................................
B Temperature Controlled “HI-Power”/“MuIti-Power” Cooking .............................................................
B Programmed Defrost ............................................................................................................................... 21—25
B Multi-Stage Cooking ................................................................................................................................ 25—27
B Delay Start Cooking ....................................................................................................................................... 27
...............................
.......................................................................
........................
.......................
.................................................
IS
17—19
.
20
10
11
12
12
12
Utensils ................................................................................................................................................................. 28
Care and Cleaning ................................................................................................................................................ 29
Questions and Answers ................................................................................................................................ 30—32
Before Calling for Service ................................................................................................................................. 33
Sears Service ........................................................................................................................................................ 34
Sears Warranty ...................................................................................................................................... Back Cover
Page 5
SEARS KENMORE MICROWAVE OVEN
“USE AND CARE MANUAL”-
MICROWAVE OVEN USE INSTRUCTIONS
Enjo\; a new cooking experience from Sears. Please read this booklet. It takes
onlj^ a few minutes —time well spent to learn how to use all of the features.
Advice on the use and care of Sears appliances is alwai^s available at pour nearest
Sears store. When seeking information, be sure you have the complete model
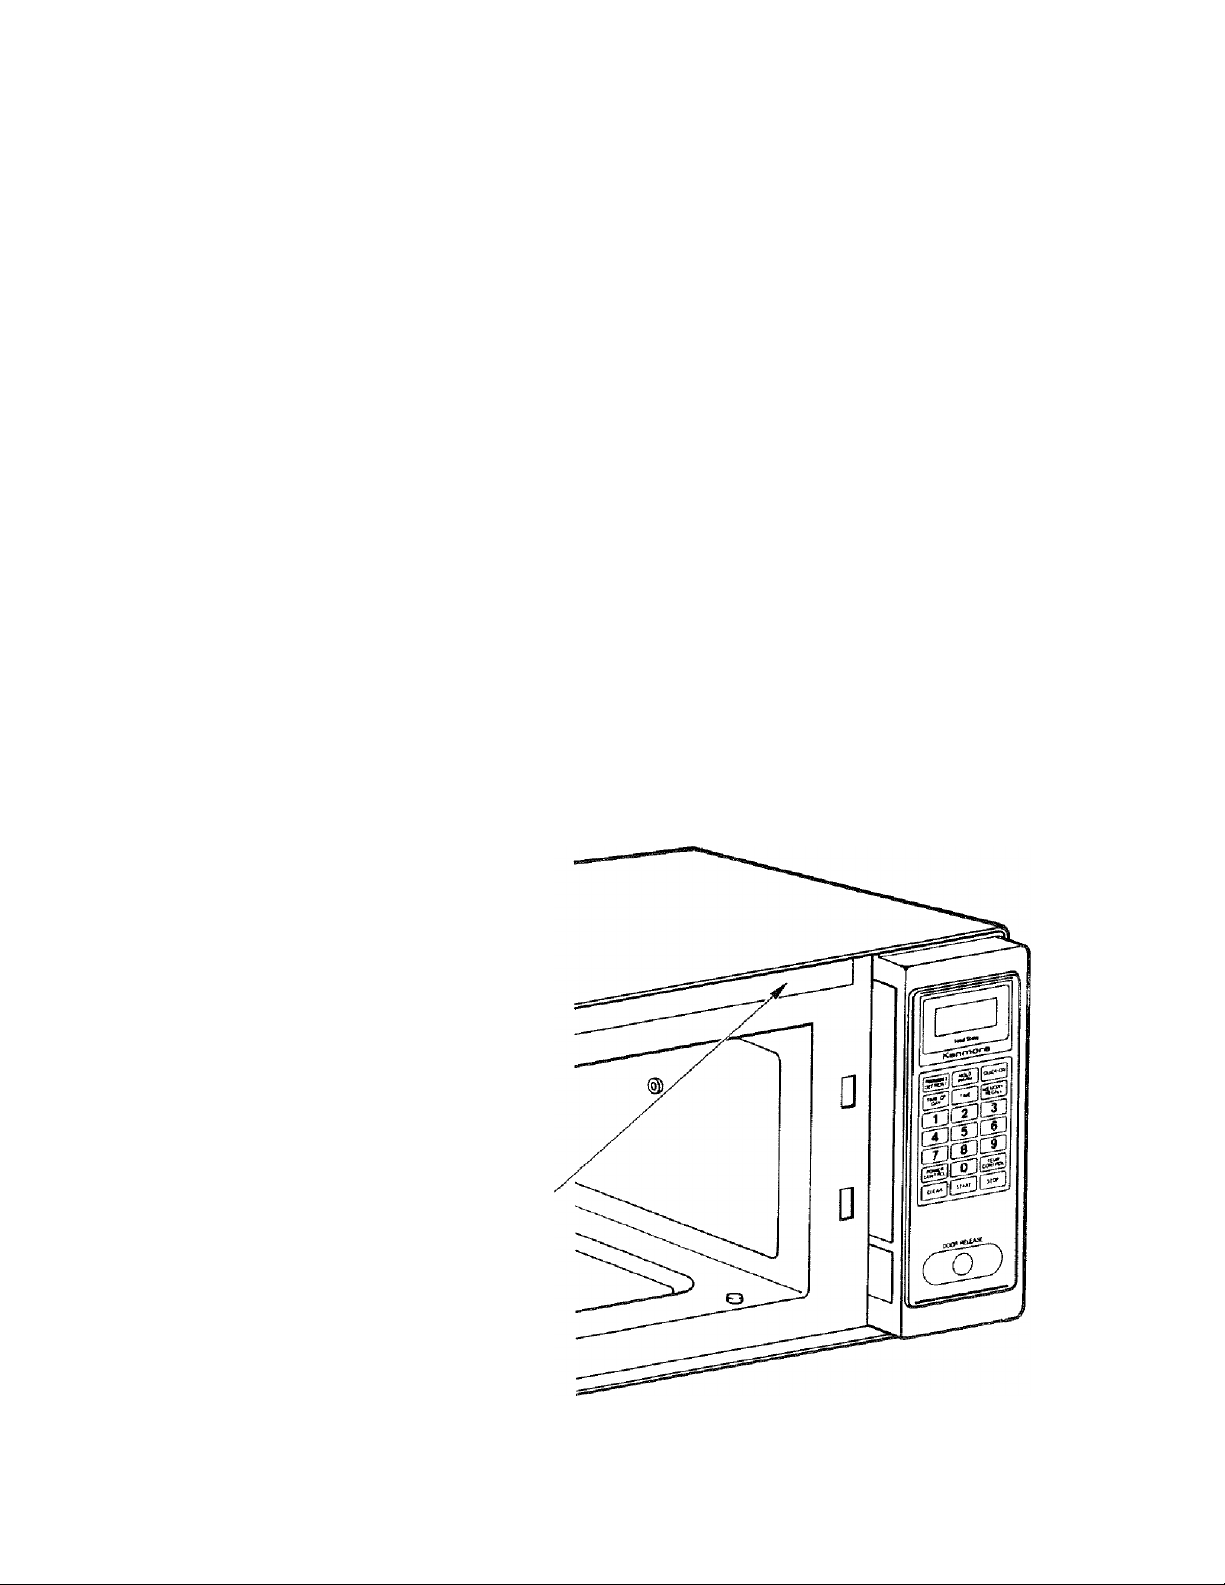
number which is located on the plastic label. See below for its location.
MODEL NUMBER
To make a request for service, information or replacement of parts, Sears will require the complete model
number of your microwave oven. The number is on the cavity front. (You must open the door to see the
number).
The number will look like this: 566,8000000
Model Number Label
Page 6

IMPORTANT-
ELECTRICAL GROUNDING INSTRUCTIONS
This appliance must be grounded. In the event of an electrical short circuit, grounding reduces the risk
of electric shock by providing an escape wire for the electric current, This appliance is equipped with a
cord having a grounding wire with a grounding plug. The plug must be plugged into an outlet that is
properly installed and grounded.
WARNING — Improper use of the grounding plug can result in a risk of electric shock.
Consult a qualified electrician or Sears Service Department if the grounding instructions are not
completely understood, or if doubt exists as to whether the appliance is properly grounded.
A short power-supply cord is provided to reduce the risks resulting from becoming entangled in or
tripping over a longer cord.
Longer cord sets or extension cords are available and may be used if care is exercised in thier use.
If a long cord or extension cord is used, (1) the marked electrical rating of the cord set or extension
cord should be at least as great as the electrical rating of the appliance*, (2) the extension cord must
be a grounding-type 3 wire cord, and (3) the longer cord should be arranged so that it will not drape
over the countertop or tabletop where it can be pulled on by children or tripped over accidentally.
The electrical power cord must be kept dry and must not be pinched or crushed in any way.
*NOTE: This oven draws a 12-ampere electrical current on 120 volts.
PROPERLY POLARIZED AND
GROUNDED OUTLET
Page 7

INSTALLATION
Your new microwave oven can be placed in several convenient locations. If you want your microwave oven
installed under the cabinet or mounted on wall,Sears Kenmore mounting kits, Stock Nos. 22-84196 (under
cabinet) and/or 22-84297 (wall mounting) are sold separately. Contact your Sears store or the catalog.
Install your oven by following these four simple steps for countertop use:
Step 1: Remove all packing material and accessories.
Step 2: Place the oven in the level location of your choice, but make sure that inlet and/or outlet openings
which are located at the rear and bottom of the oven are not blocked.
Blocking the inlet and/or outlet openings can damage the oven.
Step 3: Plug your oven into a Standard 120-volt/60 Hz household outlet. Be sure the electrical circuit
is at least 15 amperes and that your microwave oven is the only appliance on the circuit.
Step 4: When your microwave oven is plugged in for the first time or when power resumes after a power
interruption, the numbers in the display window will show “0:00” plus the hours and minutes that have
elapsed since the oven was plugged in or the power was restored. This means that the TIME OF DAY
clock must be set. Refer to “Setting Time of Day” below.
NOTE: If your oven does not operate properly, unplug the oven from the 120-volt/60Hz household outlet and
SETTING TIME OF DAY
then plug it back in.
This unit is not designed for 50 Hz or any circuit other than a 120-volt/60 Hz AC circuit.
• Touch CLEAR.
• Touch TIME OF DAY.
• Touch numbers indicating the correct time.
• Touch TIME OF DAY.
(This is also explained in the “Easy Use Chart” Time of Day Section on Page 10.)
NOTE: DO NOT INSTALL YOUR OVEN OVER A
RANGE. COOKTOP OR OTHER HEAT
PRODUCING APPLIANCE, OR DAMAGE
TO THE OVEN MAY RESULT.
Under Cabinet
Countertop
When one side is installed flush
to the wall, the opposite side i
or top must be open.
DIMENSIONS:
Height:
Width:
Depth:
Weight: 39 lbs.
11-3/4"
21-5/8"
13-1/8"
I
.Wall Mount
Page 8

NAMES OF OVEN PARTS
Easy-Clean
Remove your Sears Kenmore Microwave Oven and all material from the shipping carton. Your oven will be
packed with the following materials:
Glass Tray .............................................................................................................. 1 Each
Temperature Probe ................................................................................................ 1 Each
Cookbook ............................................................................................................... 1 Each
“Use and Care Manual”........................................................................................... 1 Each
“Easy Use Chart” Card ........................................................................................... 1 Each
Do not use this Sears Kenmore Microwave Oven for commercial purposes. This microwave oven is made for
household use only.
Page 9

OVEN CONTROL PANEL
Hold Warm—Used in setting.
Hold Warm. Cooked food can be
kept warm.
.-Display Window—Used to show:
• Time of day
• Cooking time
• Cooking po\(Ver level
• Food temperature
• Hold, End
also functions as countdown
timer or temperature indicator
when cooking.
Programmed Defrost—Used in,
setting Programmed Defrost.
Time of Day—Used in setting-
time of day and Child Lock-Out.
Time—Used in setting cooking'
time.
Numbers—Used to enter the:
• Time of day.
• Cooking times.
• Cooking power levels.
• Food temperatures.
Power Control—Used to select
cooking power levels. j
Clear—Clears all entries except'
TIME OF DAY. Once cooking has
begun, however, CLEAR will
function only after STOP has
been touched.
- Quick-On—Used in setting
Quick-Start cooking.
■ Memory/Recall—For Multi-Stage
cooking, MEMORY/RECALL is
used in setting:
• Cooking time
• Power level
• Temperature
Also, it is used to recall each mem
ory stage in a multi-stage cooking
program.
Temp Control —Used in setting
the desired food temperature.
“Temperature Controlled” cook
ing can be done only when the
temperature probe is plugged into
the socket inside the oven.
Stop—Stops the oven.
Start—Starts the oven.
Door Release Button—Opens
door when pushed.
NOTE: A “beep tone” sounds when a “pad” on the
control panel is touched, to indicate a setting has
been entered.
Page 10

EASY USE CHART
Your new solid state control system allows you to use your microwave oven in many ways.
TIME OF DAY
To set:
1. Touch CLEAR,
2. Touch TIME OF DAY.
3. Touch numbers for correct time of
day.
4. Touch TIME OF DAY.*
* This “locks” in the fime and starts the
clock running.
QUICK-START COOKING
To set:
1. Touch CLEAR.
2. Touch QUlCK-ON.
3. Touch number (single digit, 1~9) for
desired cooking time.
(See Pages 13 and 14 tot more detailed
instructions.)
TIMER
To set:
1. Touch CLEAR.
2. Touch TIME.
3. Touch correct numbers for time.
4. Touch POWER CONTROL.
5. Touch “0” (power level 0).
6. Touch START.
(See Pages 12 for more instructions.)
“Hl-POWER”/“MULTI-POWER”
COOKING
To set:
1. Touch CLEAR.
2. Touch TIME.
3. Touch numbers for desired cooking
time.
4. Touch POWER CONTROL.
5. Touch numbers for desired cooking
power level.
6. Touch START. •
NOTE: It is not necessary to touch
POWER CONTROL when
cooking with the highest power
(“HI”). To set “HI-POWER”
Cooking, skip steps 4 and 5
above.
(See Page 16 for more detailed
instructions.)
CHILD LOCK-OUT
To set:
1. Touch CLEAR.
2. Touch TIME OF DAY.
3. Touch “9” four times.
4. Touch START.
To clear:
1. Touch CLEAR.
2. Touch TIME OF DAY.
3. Touch “7” four times.
4. Touch START,
(See Page 12 for more detailed
instructions.)
TEMPERATURE CONTROLLED
“HI-POWER”/“MULTI-POWER”
COOKING
To set:
1. Plug in Temperature Probe,
2. Touch CLEAR.
3. Touch TEMP CONTROL.
4. Touch numbers for desired food
temperature.
5. Touch POWER CONTROL,
6. Touch numbers for desired cooking
power level.
7. Touch START.
NOTE: It is not necessary to touch
POWER CONTROL when
cooking with the highest power
(“HI”). To set “HI-POWER”
Cooking, skip steps 5 and 6
above.
(See Page 20 for more detailed
instructions.)
MULTI-STAGE COOKING
To set;
1. Touch CLEAR.
2. Touch TIME or TEMP CONTROL.
3. Touch numbers for cooking time or
temperature.
4. Touch POWER CONTROL.
5. Touch numbers for cooking power
level.
6. Touch MEMORY/RECALL and
repeat steps 2-5 to set 2nd cooking
stage.
7. Touch START.
(See Pages 26 and 27 for more detailed
instructions.)
10
DELAY START COOKING
To Set:
1. Touch CLEAR.
2. Touch TIME.
3. Touch numbers for desired delay
time.
4. Touch POWER CONTROL.
5. Touch “0” (power level 0),
6. Touch MEMORY/RECALL.
7. Touch TIME or TEMP CONTROL.
8. Touch numbers for desired cooking
time or temperature.
9. Touch POWER CONTROL.
10. Touch numbers for cooking power
level.
11. Touch START.
NOTE: A preset delay time must be no
more than 99 minutes and 99
seconds.
(See Page 27 for more detailed
instructions.)
PROGRAMMED DEFROST
To set:
1. Touch CLEAR.
2. Touch PROGRAMMED DEFROST.
3. Touch numbers for desired defrost
time.
4. Touch START.
(See Pages 21 thru 25 for more detailed
instructions.)
HOLD WARM
To set;
1. Touch CLEAR.
2. Touch HOLD WARM.
3. Set for desired cooking cycle follow
ing suitable operating instructions.
4. Touch START.
(See Page 12 for more detailed
instructions.)
Page 11

RECALL AND CHANGE OF SETTINGS
To Recall a Setting
To recall (check) a setting before you start the oven, follow the directions below -
9 To check the setting for a given stage, touch MEMORY/ RECALL one or more times until the correct stage
light and indicator light turns on. The set TIME or TEMP CONTROL for that stage will show in the display
window.
• To check the cooking power level, touch POWER CONTROL.
To recall (check) a setting while the oven is operating, follow the directions below.
» To check settings while the oven is operating, touch the desired pad to recall the setting for the operating
stage.
• To recall a future stage, touch STOP, follow the directions above for recalling (checking) a setting before
starting the oven, and then touch START to continue cooking.
• To recall TIME OF DAY while the oven is running, touch TIME OF DAY. It will show momentarily in the
display window.
• To check the cooking power level during cooking, touch POWER CONTROL.
Power level will show momentarily in the display window.
To Change a Setting
Recall the setting to be changed by following the directions above and make the change as follows:
• Touch STOP ............................................... The oven will stop cooking.
• Touch TIME ............................................... Then touch "O" until only one "O" shows in the display
window. Set the cooking time.
• Touch TEMP CONTROL
« Touch POWER CONTROL
..........................
........................
Set food temperature.
Set cooking power level. To reset to “HI", set “99”,
maximum power.
11
Page 12

REGULAR TIMER
Your oven also has a timer that can be used for noncooking functions. When used as a regular timer, the
oven is not running. The time is simply counting down in the display window with no cooking or heating in
the oven. A tone will sound and the word “End” will show in the display window when the time is over.
For settings of this timer, see “Easy Use Chart” Timer Section on page 10.
CHILD LOCK-OUT
Your oven has a “Child Lx>ck-Out” feature to prevent a playful or accidental running of the oven by a child.
After this feature is set, the time is simply counting down to zero in the display window, and no cooking
can occur.
For setting this Child Lock-Out feature, see below.
To set:
1. Touch CLEAR.
2. Touch TIME OF DAY.
3. Touch “9” four times.
4. Touch START.
To clear:
1. Touch CLEAR.
2. Touch TIME OF DAY.
3. Touch “7” four times.
4. Touch START.
^^HOLD WARM”
Your oven has a “Hold Warm” feature that keeps food warm after the cooking is done.
To use the “Hold Warm” feature:
1. Touch CLEAR.
2. Touch HOLD WARM.
3. Set the desired cooking cycle following suitable operating instructions on pages 13 through 27 in this
manual.
4. Touch START. When the cooking cycle is over, the oven will switch into “Hold Warm” to keep the food
warm. “Hold” will show in the Display Window. The power control setting changes to Power Level 1.
The “Hold Warm” will continue for up to 100 minutes or until the door has been opened or STOP has
been touched.
If you want to keep your cooked food warm, the “Hold Warm” feature can be used independently without
setting the cooking cycle.
To use the “Hold Warm” feature independently:
1. Touch CLEAR.
2. Touch HOLD WARM.
3. Touch START.
The oven will begin to keep the food warm with power level 1 for up to 100 minutes or until the door has been
opened or STOP has been touched.
12
Page 13

QUICK-START COOKING (Hl-power only)
This feature was designed for simple, 2-step setting of the oven with convenience cooking and/or reheating in mind. To
set, simply touch the “QUICK-ON” pad, and touch a number pad from 1 to 9. The oven starts instantly.
1. Touch CLEAR, and beep tone will sound. The CLEAR
erases all previous settings.
2. Touch QUlCK-ON,
“0” will show in the display window.
3. Touch a number (single digit, 1~9) for desired cooking
time in minutes. The oven will begin to cook on HIpower and the display window will show the time
counting down in minutes and seconds.
4. A tone will sound and the word “End” will show in the
display window for two seconds when the cooking
time is completed. The oven will automatically shut
off.
NOTE: To stir or rearrange food during cooking, simply
open the door; stir or rearrange and close the door.
Touch “START”.
The oven will automatically continue to count down the
remaining amount of time left in the display window.
EXAMPLE: To reheat 1 cup of coffee, you would use
Hl-power for 1 minute.
To do this, follow these steps:
1. Touch CLEAR,
2. Touch QUICK ON.
3. Touch “1”.
The oven begins to cook and
the time will begin to count
down in the display window.
mmm
mmrs
cacscjj
DOOfl WLEASE
o
A tone will sound and the word
“End” will show in the display
window for two seconds when
the 1 minute is over. The oven
will automatically shut off.
mr^m
rnmrrn
QD
13
Page 14

QUICK-START REHEATING GUIDE
This guide shows the food items and some special notes for reheating with “Quick-Start” feature.
Touch CLEAR, touch QUICK-ON, touch numbers from 1 to 9 for minutes of heating.
Food
BEVERAGES
Water Based
Milk Based
Broth-based soups
Cream-based soups
Sandwich
Cooked pizza,
10 inches,
cut in 8 portions
Casseroles
MEAT
Sliced thin
Sliced thick
Barbecued beef, chili,
stews, hash, etc.
Hamburgers, Meat loaf
slices, Sausage patties
Amount
1 cup
2 cups
1 cup
2 cups
10% oz. can
10% oz. can
1-2
2 wedges
4 wedges
whole
1 qt. (4 cups)
3-5 oz.
%"-l'' thick
16 02. can
1 serving
2 serving
4 serving
Time
1-2 min
3-4 min
2 min
3 min
3-4 min
4-5 min
1 min
2 min
2-3 min
4-5 min
5-7 min
1 min
2 min
4-5 min
1 min
2-3 min
4-5 min
Special Notes
Heat uncovered. Use 6-8 ounce cup.
Use ll4-quart casserole. Cover.
Use ll4-quart casserole. Cover.
Place on paper plate or towels.
Place on paper towels or paper plate or
leave in uncovered cardboard box, points
toward center.
Cover. Stir once.
Heat on microproof plate, covered with
waxed paper.
Place in microproof dish. Cover. Stir half-
way through cooking time.
Place on microproof plate. Cover with
paper towel. Turn over once.
POULTRY
Chicken pieces
1
2
4
6
Creamed chicken
1014 oz. can
Chicken, turkey, sliced 3-5 oz.
SEAFOOD
Shrimp, crab, or scallops
6/4 oz.
in sauce, frozen
Seafood or fish
16 oz,
casseroles, frozen
SIDE DISHES
Rice, Pasta
% cup
1-2 cups
Vegetables, frozen in
10-12 02.
pouch
Mashed potatoes, instant
Canned vegetables
4 servings
[3% oz. packet)
8 oz.
15 oz.
17 oz.
Pudding and pie filling
3% oz.
mix
1 min
1-2 min
2-3 min
Heat on microproof plate. Cover with
waxed paper. If fried, cover with paper
towel.
4-6 min
3-4 min
1-2 min
Cover. Stir once.
Heat on microproof plate. Cover with
waxed paper.
4-6 min
Slit pouch and place on microproof plate.
Flex pouch to mix halfway through cooking
time.
5-7 min
Remove from package to 1-quart microproof
casserole. Cover, Stir once during cooking.
1 min
Heat in microproof casserole, covered
2 min tightly with plastic wrap.
5-8 min
Slit pouch. Place on microproof plate. Flex
half way through cooking time to mix.
5-7 min
Follow package directions. Reduce liquid
by 1 tablespoon.
1-2 min
2-3 min
Use 4-cup microproof casserole, covered.
Stir once.
3-4 min
6-7 min
Follow package directions. Stir once.
Use 4-cup glass measure.
14
Page 15

COOKING GUIDE FOR “MULTI-POWER” SETTINGS
The "Multi-Power" feature lets you cook at the best power level for the food being cooked. Cooking directions can
be found in the cookbook
POWER
LEVEL
10 WARM • Softening cream cheese.
20 LOW • Softening chocolate.
30
40 BRAISE • Cooking less tender cuts of meat in liquid or
50 SIMMER • Cooking stews and soups after bringing to a boil.
60 BAKE • Cooking scrambled eggs.
70 ROAST
80
90 SAUTÉ • Cooking onions, celery and green peppers quickly.
too
(HI)
* Approximate watts as measured by 2-liter method.
As you get to know your microwave oven. you may find that a particular setting is too low or too high for the results
you desire.
POWER
SETTINGS
DEFROST
MED LOW
MED HIGH
REHEAT • Reheating precooked or prepared food quickly,
MAX
POWER
HIGH
EXAMPLES
» Keeping casseroles and main dishes warm.
» Heating breads, rolls, pancakes, tacos, tortillas
and french toast.
® Clarifying butter.
• Taking the chill out of fruit.
• Heating small amounts of food.
• Thawing meat, poultry and seafood.
• Completing the cooking cycle of casseroles,
stews and some sauces.
• Cooking small quantities of most food.
slow cooking dishes.
• Completing the cooking cycle of less tender roasts.
• Cooking baked custards and pasta.
• Cooking cakes.
• Cooking rump roast, ham, veal and lamb.
• Cooking cheese dishes.
* Cooking eggs and milk.
* Cooking quick breads and cereal products.
® Heating sandwiches.
* Reheating meat slices quickly.
• Cooking tender cuts of meat.
• Cooking poultry, fish, vegetables and most
casseroles.
• Preheating the browning dish.
• Boiling water.
• Thickening some sauces.
MICROWAVE
OUTPUT POWER *
145
200
255
315
370
425
480
540
595
650
Multiple-power control gives you the means to obtain greater precision in setting power levels. For instance, if
you want a power level between ROAST and REHEAT, you would set the time as usual: touch POWER
CONTROL, and then touch “7” and “5’’. The display window will show “75”, indicating that your oven is set to
run at power level 75—halfway between ROAST and REHEAT,
FAST DEFROST
Your oven is equipped with a Programmed Defrost system which is the best defrost method for this oven.
FAST DEFROST is explained in order to show other defrosting possibilities.
To speed up the defrosting of dense food items over 1 lb., start on “HI”, then reduce to the 30 (DEFROST)
setting.
1. Microwave on “HI” for T2 minutes per pound of dense food items.
2. Then Microwave on 30 (DEFROST) for 3 minutes per pound or until food is thawed. Defrosting time will be
greatly reduced.
15
Page 16

“H1-POWER7 “MULTI-POWER” COOKING
“HI” gives the highest cooking power possible with your microwave oven. It is the recommended setting for cooking
foods with high moisture content or for cooking foods that need fast cooking to maintain their natural flavor and tex
ture. Many foods need slower cooking (at less than full power) in order to give you the best results. In addition to '“HI”
there are ninety-nine multi-power settings. The cookbook tells you which power setting is recommended for the food
being cooked.
To Cook
1. Touch CLEAR, and a beep tone will be heard. The
CLEAR erases all previous settings.
2. Touch TIME. “0” will show in the display window.
3. Touch the correct numbers on the control panel to set
the cooking time. The time set will show in the display
window at the top of the control panel. For example:
® To set 30 seconds, you would touch “3” and then
“0”.
® To set 3 minutes, touch “3”, “0” and “0”.
» To set 3-1/2 minutes, touch “3”, “3” and “0”.
Remember, the timer is a digital clock that is divided
into 60 seconds. Therefore, 1/2 minute is equal to 30
seconds. Touch 30 and not 50 (as with a calculator) to
indicate 1/2.
4. Touch POWER CONTROL. The word “HI” will
show in the display window until a lower setting is
entered. This is to tell you that the oven will be
operating on “HI” unless a different power setting is
chosen.
5. Touch numbers for desired cooking power level. For
example, if the recipe calls for cooking at the “80
(REHEAT)” setting, you would touch "8” and “0”. The
display window will show “80”. This means that in the
REHEAT setting, the oven is cooking at power level
80.
EXAMPLE: To warm 5 dough
nuts, you would use power level
“80 (REHEAT)” for 45 seconds.
To do this, follow these six steps:
1. Touch CLEAR.
2. Touch TIME.
3. Set 45 seconds by touching “4”
and then “5”. “45” will show in
the display window.
4. Touch POWER CONTROL.
The display window will show
“HI”.
5. Choose the “80 (REHEAT)”
setting by touching the num
bers “8” and “0”. The display
window will show “80”. This
means the oven is cooking at
power level 80.
Kenmore
mmcAj
CECJ3CA]
[tDCZ/CZJ
0
..
EXCEED EE-)
DOOR f5R.E4.5e
o
Kenmopie
□□LiDm
mciDCj]
DOORFCLEAS.
NOTE: It is not necessary to touch POWER CONTROL
when cooking with the highest power (“HI”). To set
“HI-POWER” Cooking, skip steps 4 and 5 above.
However, if POWER CONTROL is touched. The word
“HI” will show in the display window. This is to let you
know that the oven will be operating on “HI” power
unless a different power setting is chosen.
6. Touch START. The oven begins to cook and the
display window will show the time counting down in
minutes and seconds. A tone will sound and the word
“End” will show in the display window for two seconds
when the cooking time is completed. The oven will
automatically shut off.
16
6. Touch START. The oven
begins to cook and the time will
begin to count down in the
display window.
A tone will sound and the word
“End” will show in the display
window for 2 seconds when the
45 seconds are over. The oven
will automatically shut off.
NOTE: If you want to keep the
food warm after finishing the
cooking cycle, you can use “Hold
Warm” feature. For detailed in
structions on using “Hold Warm”
feature, see page 12.
mmren
DgO<RECE4Se
Page 17
“TEMPERATURE CONTROLLED” COOKING
The temperature probe is used to judge doneness when
cooking or reheating food. Set the desired food tem
perature with the TEMP CONTROL and the desired
power level with the POWER CONTROL. When “Hold
Warm” is set, after completing the cooking cycle the
oven will hold the food warm up to 100 minutes.
TEMPERATURE SETTING &
DISPLAY TEMPERATURE
Temperature from 115° F to 185° F can be chosen and set
in the oven. The temperature should be set in five-degree
increments. The display window will show the rise in food
temperature in five-degree increments.
For example, when a temperature of 125° F is set, the
display window will show the temperature as it rises from
115° F to 120° F and then to 125° F. The lowest tempera
ture number that can be displayed is 115°F. Therefore,
even though the food may be less than 115° F, the
display will remain at 115° F until the food is heated to
above 115° F.
MEATS
H Choose only fresh, completely thawed meat.
B Place meat fat side down on the microwave roasting
rack in a glass baking dish.
B Microwave cook on the first “multi-power” setting for
half of the total cooking time. (See “Temperature Con
trolled” Meat Cooking Guide on Page 18.)
B Turn meat to fat side up and:
1. Place the temperature probe sensor into the meat with
the first inch of the sensor in the center of the meat.
The sensor should not touch the bone or fat pocket.
The sensor should be put in from the side or from the
front—it should not be put in from the top of the meat.
2. Plug the temperature probe into the socket on the side
of the oven wall.
3. Choose the doneness temperature from the chart on
Page 18. Set the ternperature with the TEMP
CONTROL.
4. Microwave cook the meat on the second “multi
power” setting. The microwave oven will turn itself
off when the preset temperature is reached. Take the
food out of the oven as soon as the display window
shows “Hold”.
5. Remove the temperature sensor. Let the meat stand,
covered with foil for about 10 minutes before serving,
The temperature will rise about 15°F during standing
time.
NOTE: ft is normal for meats to become slightly over
cooked in a small circular area in the immediate vicinity of
the hole made by the meat probe.
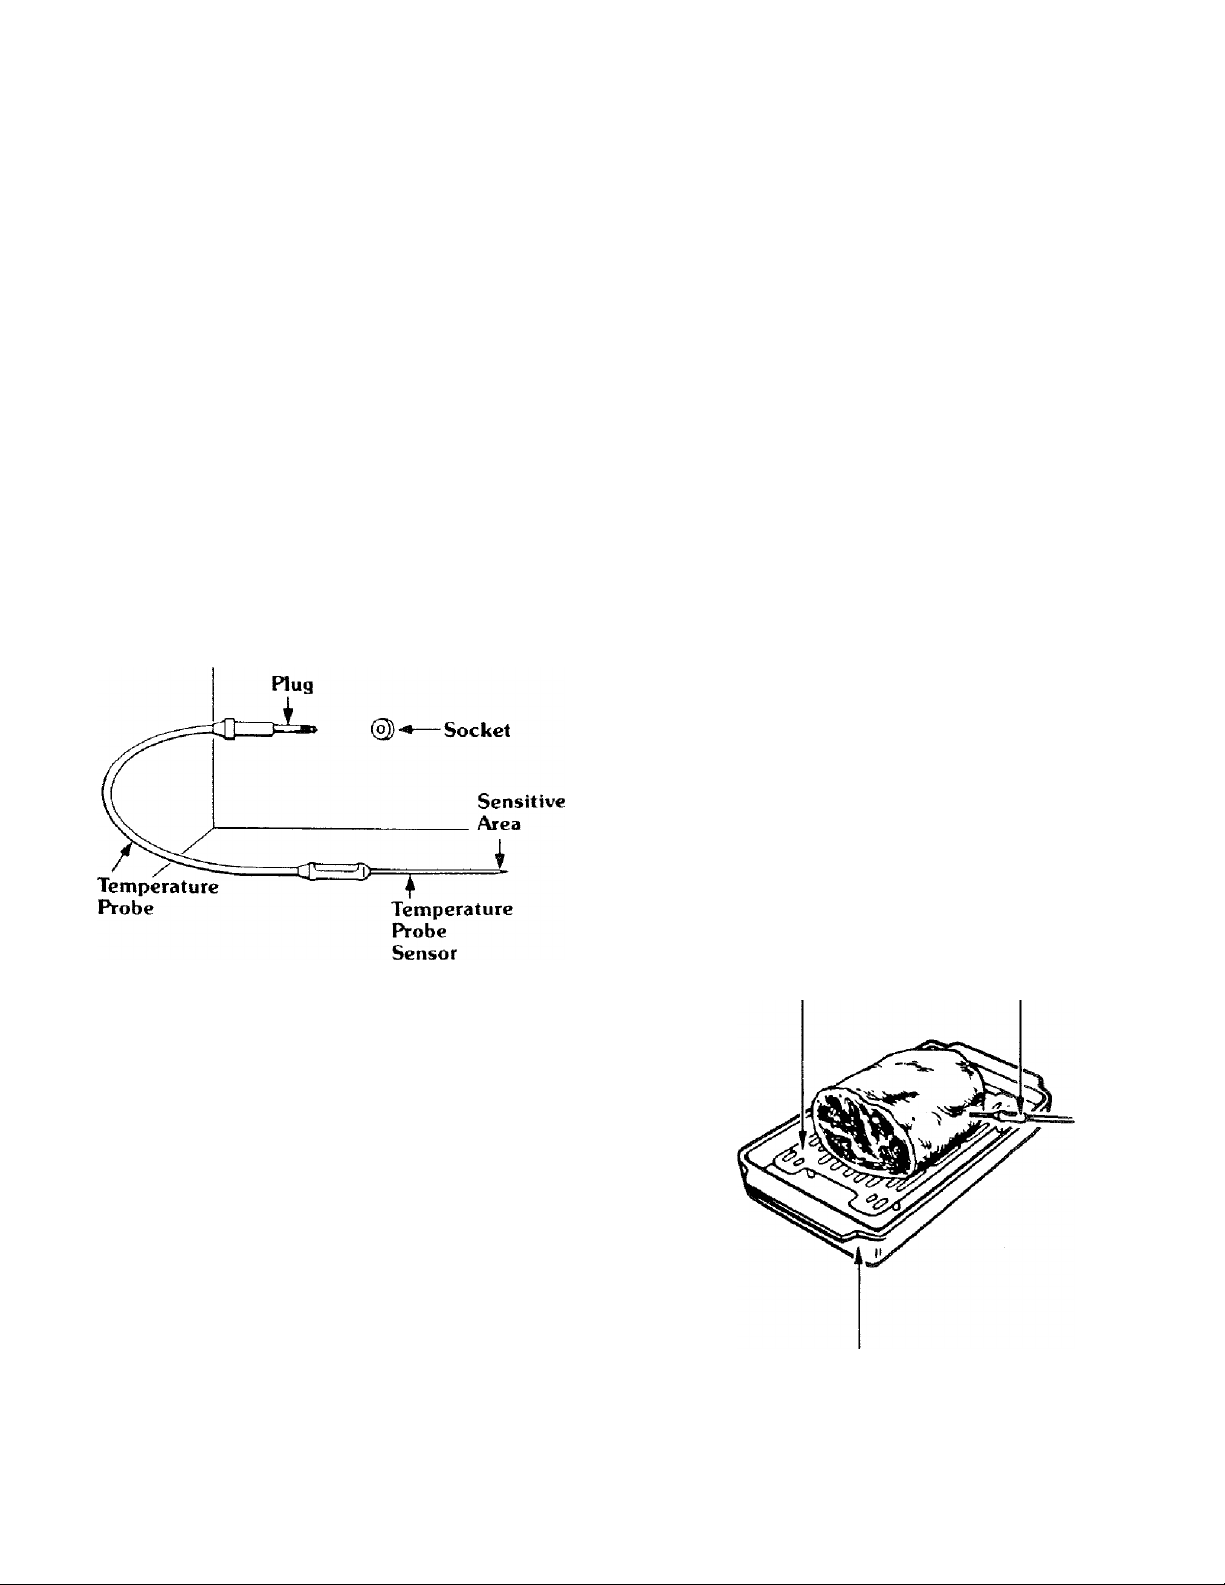
DEFINITIONS
TEMPERATURE PROBE SENSOR: The pointed metal
portion of the probe which is placed into the food.
SENSITIVE AREA OF SENSOR: The first inch, or tip,
of the temperature probe sensor.
PLUG: The end of the temperature probe that is plugged
into the oven socket.
SOCKET: The outlet on the side of the oven wall.
CAUTION: Do not plug the pointed end of the
temperature probe into the socket.
DISPLAY WINDOW: Show the cooking temperature
rising as the food is cooking. Chosen temperature may be
seen during cooking by touching TEMP CONTROL.
When “Hold Warm” is set, after completing the cooking
the display will show “Hold” for 100 minutes or until the
door is opened or STOP is touched.
Microwave Roasting Rack Temperature Probe
Glass Baking Dish
17
Page 18

TEMPERATURE CONTROL” POINTS TO REMEMBER
DO
• Place ilie temperature probe sensor into the thickest
part of the meat or in the center of the food to be
reheated. Avoid touching bone or fat.
• Check that the first inch of the sensor is in the densest
part of the food to be cooked.
9 Remove the temperature probe from the oven after
use.
• Be sure to turn meat between first and second settings.
9 Refer to cookbook for other information.
DO NOT
« Do not operate the oven empty with the temperature
probe plugged in.
9 Do not leave the temirerature probe unplugged in the
cavity when operating the oven,
9 Do not let the temperature probe touch the side
walls, glass tray or door of the cavity when in use.
9 Do not plug the pointed end of the temperature
probe into the socket inside the cavity.
9 Do not use the temperature probe in a regular oven.
This probe is designed (or imicrowave oven only.
“TEMPERATURE CONTROLLED” MEAT COOKING GUIDE
Refer to “Meats” section on Page 17.
SECOND SETTING
TIME O
MEAT
BEEF
Meat Loaf
2 lbs.
Rib Roast, boneless
Rib Roast, with bone
cmcT
1 ll&o 1 -^JL. 1 i ii
TIME
HI (Max. Power)
12—14 min.
HI (Max. Power)
Rare 4—5 min. per lb.
Medium 5—6 min. per lb.
Well done 6—7 min. per lb.
HI (Max. Power)
Rare 3—4 min. per lb.
Medium 4—5 min. per lb.
Well done 5 -6 min. per lb.
---------------------------------------r
70 (Roast)
Rare 3—4 min. per lb.
Medium 5—5 min. per lb.
Well done 6—7 min. per lb.
70 (Roast)
Rare 3—4 min. per lb.
Medium 3—5 min. per lb.
Well done 5—6 min. per lb.
, TEMPERATURE
PROBE
HI (Max. Power)
160" F
70 (Roast)
120" F
130" F
140“ F
70 (Roast)
120“ F
130“F
140“ F
STANDING
TIME
5—10 min.
10 min.
10 min.
10 min.
10 min.
10 min.
10 min.
POULTRY
Chicken, whole
3-1/2—5 lbs.
Chicken, pieces
2-1/2—3-1/2 lbs. 10 min.
Duckling
4—5 lbs.
Turkey breast
3—4 lbs. 7 min. per lb
PORK
Pork Loin Roast, boneless HI (Max. Power)
3—5 lbs.
Pork Loin, center cut HI (Max. Power)
4—5 lbs.
Ham, boneless, precooked 70 (Roast)
Center Cut Ham Slice
1—1-1/2 lbs.
Canned Ham
3 lbs.
HI (Max. Power)
3—4 min. per lb.
HI (Max. Power)
70 (Roast)
4 min. per lb.
HI {Max. Power)
5 min. per lb.
5—6 min. per lb.
5—7 min. per lb.
70 (Roast)
5 min. per lb.
70 (Roast)
5—6 min. per lb.
HI (Max. Power)
4—5 min. per lb.
HI (Max. Power)
8—12 min. per lb.
70 (Roast)
4 min. per lb.
70 (Roast)
5 min. per lb
70 (Roast)
5—6 min, per lb.
70 (Roast)
4—5 min. per lb.
70 (Roast)
5—7 min. per lb.
70 (Roast)
5—6 min. per lb.
70 (Roast)
5—6 min. per lb.
H! (Max. Power)
180" F
HI (Max. Power)
170" F
70 (Roast)
170" F
70 (Roast)
170“ F
70 (Roast)
165“ F
70 (Roast)
165“ F
70 (Roast)
130" F
70 (Roast)
130" F
70 (Roast)
130" F
5 min.
5 min.
8—10 min.
10 min.
10 min.
10 min.
5 min.
10 min.
18
Page 19
REHEATING FOODS
• Place the temperature probe sensor into the food to be
reheated with the first inch of the sensor in the center of
the food
« Plug the temperature probe into the socket on the side of
the oven wall.
* Select “multi-power” setting as shown below.
® The microwave oven will stop cooking when the set
temperature is reached and then it will “Hold Warm”
when “Hold Warm” is set.
« Remove the temperature probe from the oven after use.
• Cover the food if desired,
» Set the temperature of the desired doneness (See chart
below. )
“TEMPERATURE CONTROLLED” REHEATING GUIDE
FOOD
Beverages
Soups
Precooked
Casseroles
SETTING
HI (MAX POWER)
80 (REHEAT)
80 (REHEAT)
DONENESS
150“F
150T
150“F
INSTRUCTIONS
Place the temperature probe sensor in the center
of the beverage glass.
Place the temperature probe sensor into the center
of the soup Cover with casserole lid, waxed
paper, or plastic wrap.
Place temperature probe sensor into the center
of the food. Cover with a casserole lid. waxed
paper, or plastic wrap.
Canned
80 (REHEAT)
150T
Vegetables
Leftovers
Meat Sandwiches
80 (REHEAT)
80 (REHEAT)
150T
120°F
(Thick)
Baked Foods
Syrup
80 (REHEAT)
70 (ROAST)
120°F
150T
CAUTION: From time to time, the same kind of foods
may vary in shape, form and density, and, therefore will
not produce the same results each time. For this reason,
we do not recommend using the temperature controlled
settings for thin food items or for foods that require
Place the temperature probe sensor into the center
of the food to be reheated. The sensitive area
of the sensor should rest in the middle of the food.
Place the temperature probe sensor in the densest
or largest amount of food.
Place the temperature probe sensor into the thickest
part of the sandwich to be warmed The sensitive
area of the sensor should be located in the sandwich
filling.
Place the temperature probe sensor into the center of
the food to be reheated. The sensitive area of the
sensor should rest in the middle of the food.
Place the temperature probe sensor into the center of
the container ,
tenderizing by simmering. Also, in some cases the
microwave oven may shut off prematurely. This means
that either the temperature probe is not placed properly
or that it should not be used with this type of food.
19
Page 20
TEMPERATURE CONTROLLED
“HI-POWER7“MULTI-POWER” COOKING
The “Temperature Controlled Meat Cooking Guide” and “Reheating Guide” on Pages 18 and 19 will show you which
multi-power setting and temperature setting are recommended for the food you are cooking. When cooking with the
temperature control settings, the timer is not used.
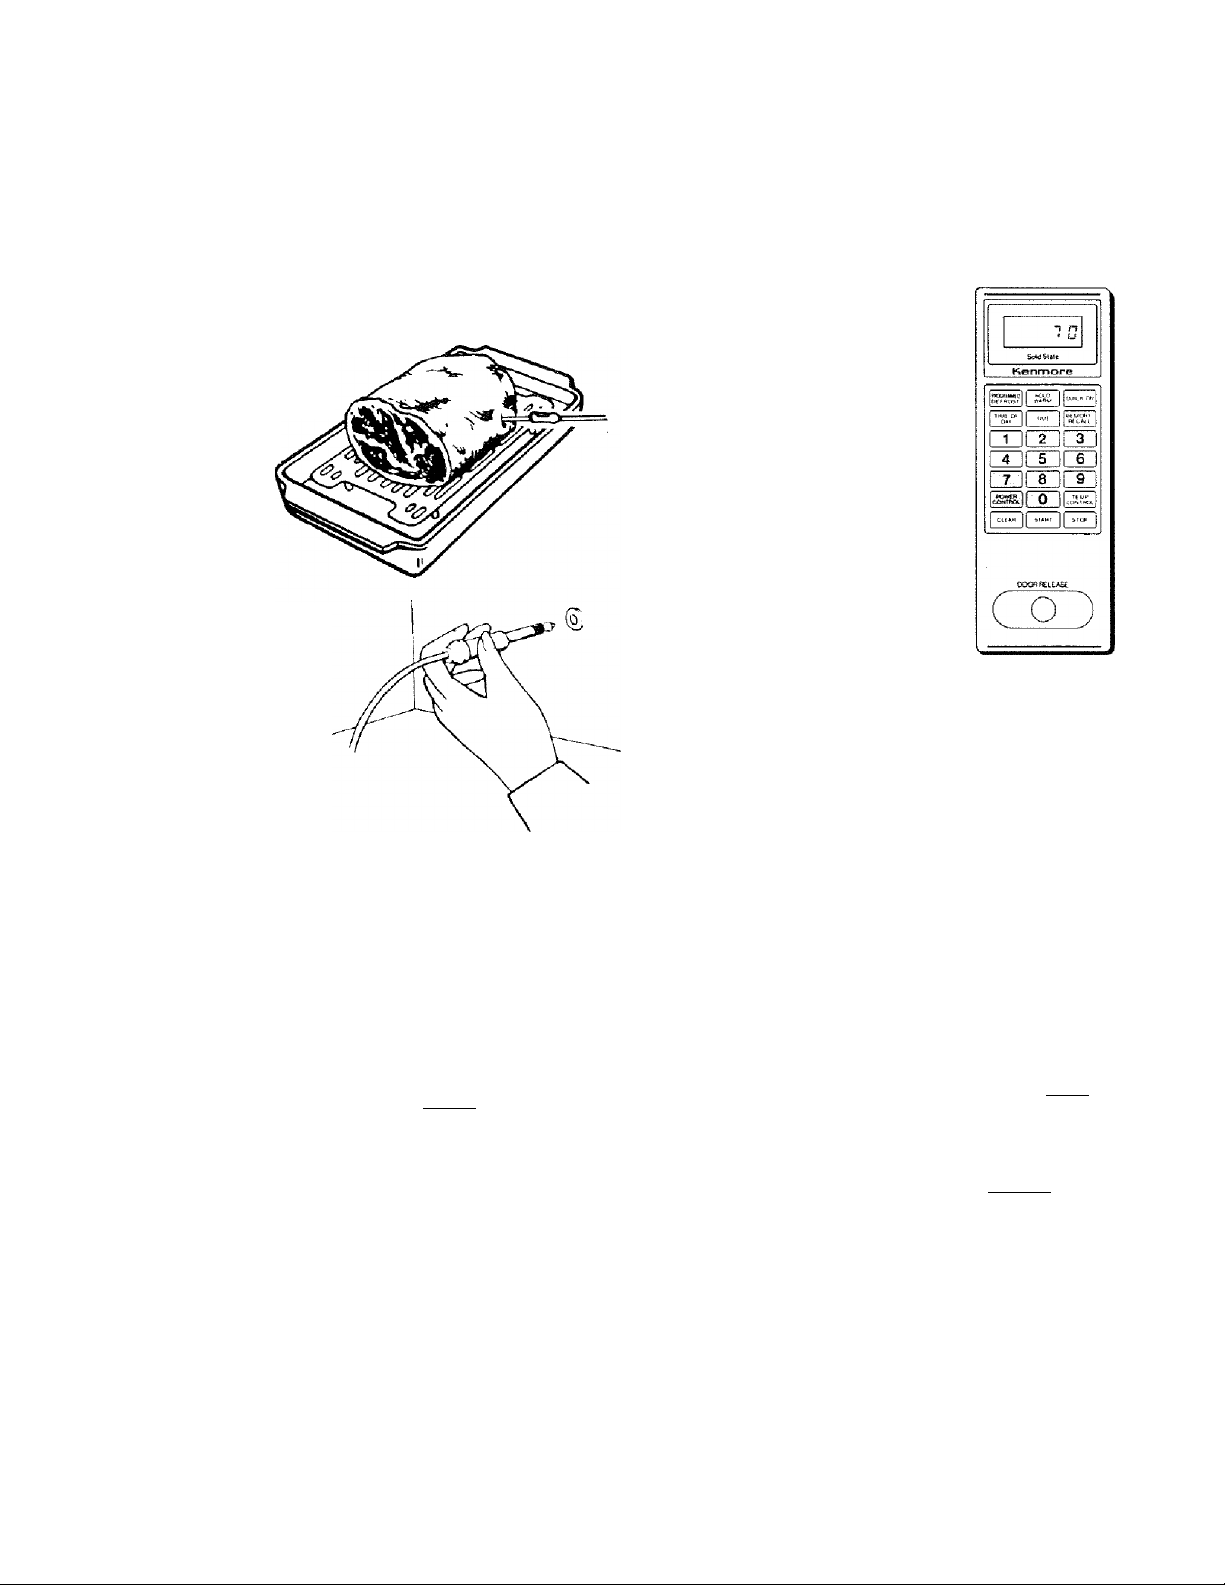
1, Place the temperature probe into the
food with the first inch of the
sensor in the center of the food.
The probe should be in a
level direction or on an
angle as shown. It should
NOT be put in from
the top.
2. Plug the temperature
probe into the socket on
the side of the oven.
CAUTION: Do not plug
the pointed end of the
temperature probe into
the socket.
3. Touch CLEAR.
4. Touch TEMP CONTROL. “F”
will show in the display window.
5. Choose the food temperature
and touch the corresponding
numbers. For example, if the
recipe calls for doneness at
165° F, you would touch num
bers “1”, “6” and “5”. When
you touch “165”, the display
window will show “165F”. If the
temperature probe is not
plugged into the socket, the
oven will not start.
Kenmore
I ”^ii II I
CX;X>I HELEASE
6. Touch POWER CONTROL.
Also, the word “FH” will show in
the display window until you
enter a lower power setting.
This is to remind you that the
oven will always operate at full
power unless you set a lower
power.
7. Choose the power control
setting you desire and touch
the corresponding numbers.
For example, if the recipe
should call for cooking at the
“70 (ROAST)” setting, you
would touch numbers “7” and
“0”. When you touch “7" and
“0”, the display window will
show “70”. This means that in
the “70 (ROAST)” setting the
oven is at power level 70.
NOTE: You do not need to touch
POWER CONTROL when you
are cooking with HI (max power).
To set “HTPOWER” Cooking,
skip steps 6 and 7 above.
However, if POWER CONTROL
is touched, the word “HI” will
show in the display window. This
is to tell you that the oven will
work at HI (highest microwave
power) unless a different power
setting is chosen.
8. Touch START. The oven will
begin to cook and you will be
able to see the temperature of
the food rising in the display
window.
9. A tone will sound and the word
“End” will show in the display
window for 2 seconds when the
desired temperature is reached.
Kenmore
Ijiggrl
rnrTjiin]
[TDCIjCS
mms
I j [i jsWiT j Pstp" ]
EXXWREIEASC
Cod
20
NOTE: If you want to keep the food warm after finishing
the cooking cycle, you can use “Hold Warm” feature. For
detailed instructions on using “Hold Warm” feature, see
page 12.
The highest temperature that can be set is 185° F.
The temperature is displayed in 5°F increments.
Page 21

PROGRAMMED DEFROST
The power levels for defrosting are predetermined and programmed into this oven. The oven will defrost at “HI” power
for the beginning of the chosen time and at power level 30 for the remaining period of time.
1. Touch CLEAR.
2. Touch PROGRAMMED DEFROST. “0” will show in
the display window.
3. Set the defrosting time by following the “Programmed
Defrosting Chart” on Pages 22 through 25.
4. Touch START. The oven will begin and the time will
begin counting down in the display window. A tone
will sound when the time is over and the oven will
automatically shut'off.
NOTE: If you plan to use additional cooking stages
immediately following Programmed Defrost cycles, you
must allow for standing time as recommended on the
Programmed Defrosting Charts on pages 22 through 25.
This can be accomplished as follows:
1. Touch PROGRAMMED DEFROST and enter the
defrosting time.
2. Touch MEMORY/RECALL.
3. Touch TIME.
4. Enter standing time per charts
(pages 22 thru 25).
5. Touch POWER CONTROL.
6. Enter “0”.
7. Touch MEMORY/RECALL.
8. Set the next cooking stage per cookbook or USE
AND CARE INSTRUCTIONS.
EXAMPLE: To defrost two pounds of ground beef, use
the PROGRAMMED DEFROST cycle for 9 minutes.
1. Touch CLEAR.
2. Touch PROGRAMMED
DEFROST. The display
window will show “0”.
I ga IHH
mmm
FTimm
ii I
DOOnnaEAEE
3. Set 9 minutes by touching “9”,
“0” and "0”. “900” will show in
the display window.
Ksnmore
mrrim
caciDm
mrenrFi
The cooking process can be set for up to 3 stages when
Programmed Defrost is one of the stages.
4. Touch START. The oven will
begin to operate and time will
begin to count down in the dis
play window,
A tone will sound and the word
“End” will show in the display
window for two seconds when
time is over and the oven will
automatically shut off.
OOOR ?!ElE*3£
o
mrTim
QDmm
mmm
aej.F.i5E
Cm)
21
Page 22
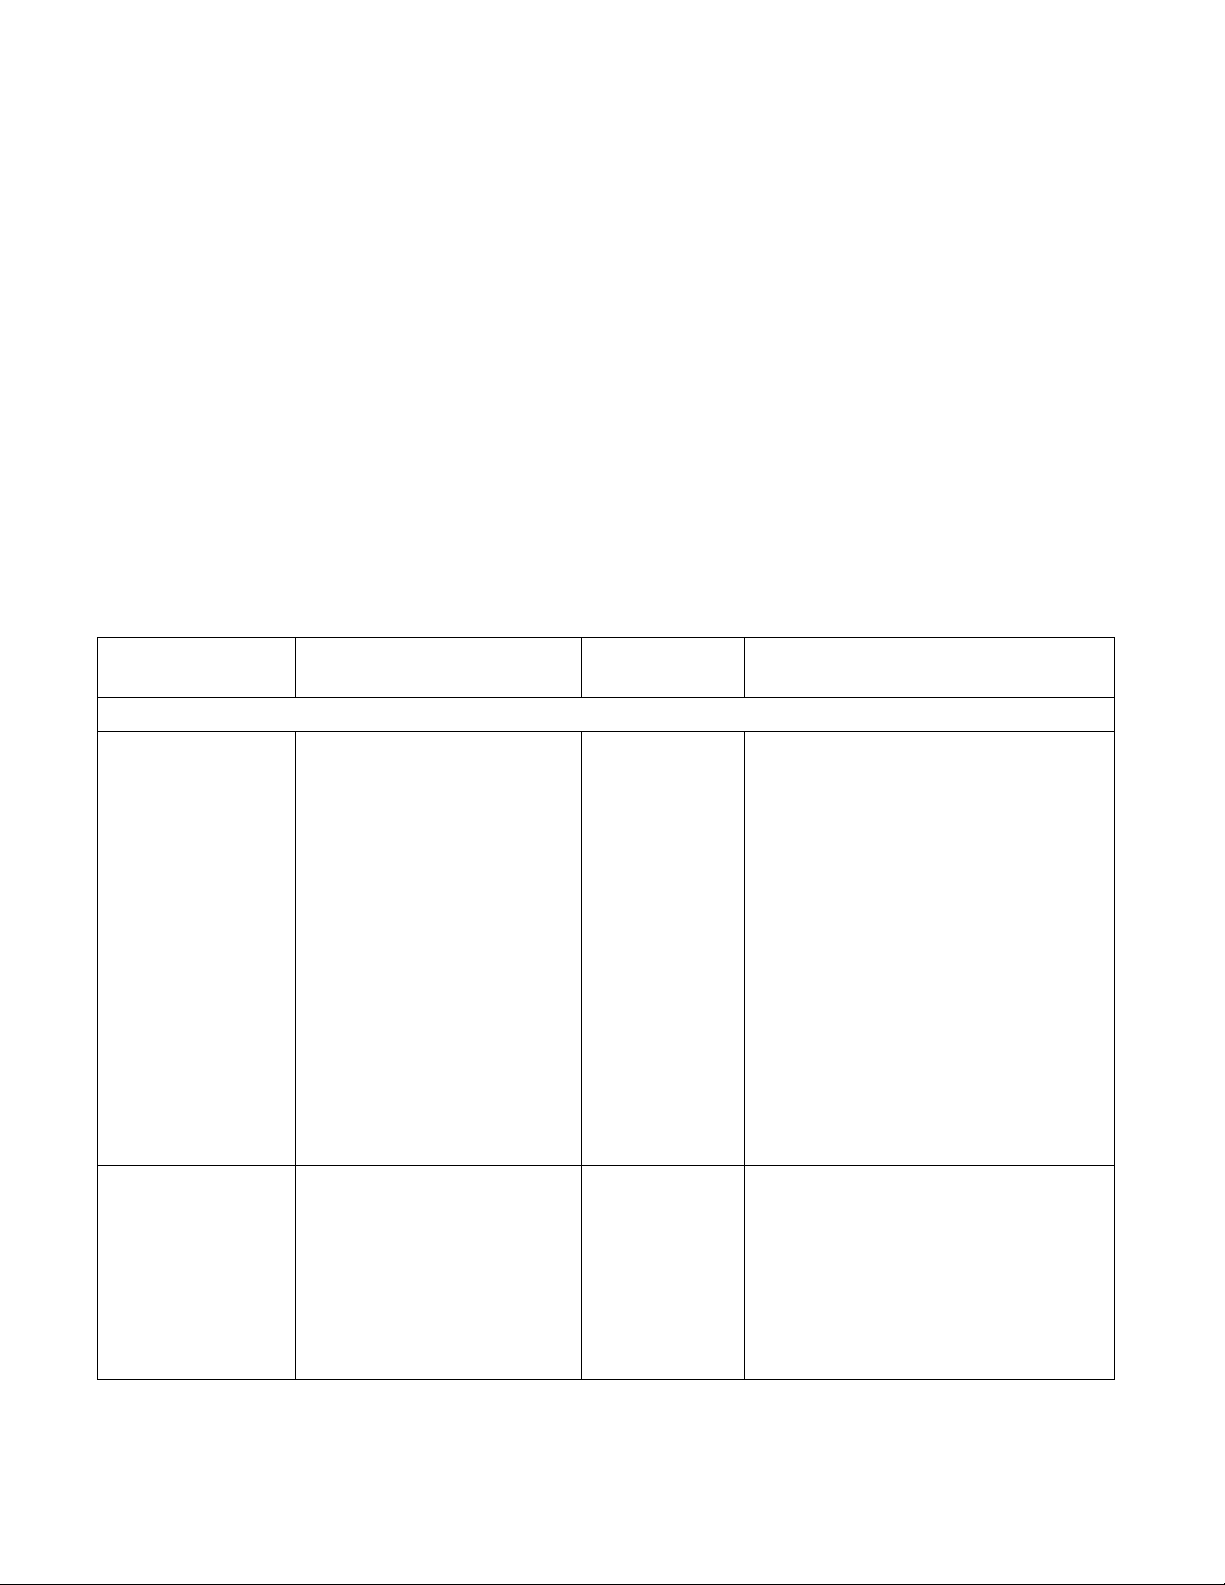
PROGRAMMED DEFROSTING CHART
The defrosting times in this chart have been made available specifically for use with the “Programmed Defrost feature.
PROGRAMMED DEFROSTING
INSTRUCTIONS:
• For best results, remove fish/seafood/meat/poultry
from its original paper or plastic closed package
(wrapper).
Otherwise, the wrap will hold steam and juice close to
the foods which can cause the outer surface of the
foods to cook.
9 When it is difficult to remove the wrap from the foods,
defrost the wrapped food for about a quarter of the
total defrost time, which is displayed at beginning of
the defrost cycle. Remove the wrap from foods.
• Metal clip and pop-up timers may be left in poultry.
Metal twisters must be removed from bags. They may
be replaced with rubber bands.
9 Place food in a flat glass baking dish to catch drippings.
9 Use the “Programmed Defrost” setting to thaw fish,
seafood, meat and poultry, according to the times in
the chart below. Thaw completely before cooking.
9 Food should still be somewhat icy in the center when
removed from the oven.
9 The chart gives you standing times and standing tech
niques needed to complete the thawing process.
IMPORTANT NOTE: The defrosting power setting
(power level 30) should not be confused with this “Pro
grammed Defrost.” The defrost cooking level is a lowenergy setting used to cook foods that need slow, gentle
cooking. Use the defrost cooking level to defrost small
ground beef patty, bacon and bread items.
CUT AND
WEIGHT
FISH AND SEAFOOD
FISH
Fish fillets
lib.
2 lbs.
Fish steaks
lib.
Whole Fish
8 to 10 oz.
1-1/2 lb. to 2 lbs.
Lobster tails
8 02. pkg.
DEFROSTING TIME
4 to 5 min.
5 to 6 min.
4 to 5 min.
3 to 5 min.
4 to 6 min.
4 to 6 min.
STANDING
TIME
5 min.
5 min.
5 min.
5 min.
5 min.
5 min.
DIRECTIONS
Defrost in package on dish.
Turn over once.*
After defrosting, carefully separate
fillets under cold water.
Defrost in package on dish.
After defrosting, carefully separate
steaks under cold running water.
Turn over once.*
Use a shallow dish; the shape of the fish
determines size. Cover the head with
aluminum foil.
Turn over once.*
The fish should be icy when removed
from the oven.
Finish thawing while standing at room
temperature.
Remove from package to baking dish.
22
Crab legs
8 to 10 oz.
Crabmeat
1 6 oz.
4 to 6 min.
3 to 4 min.
Use a glass baking dish.
5 min.
5 min.
*Turning or stirring should be done in the middle of the defrosting cycle.
Break the legs apart and turn over
once.*
Defrost in package on dish.
Break apart and turn over once.*
Page 23
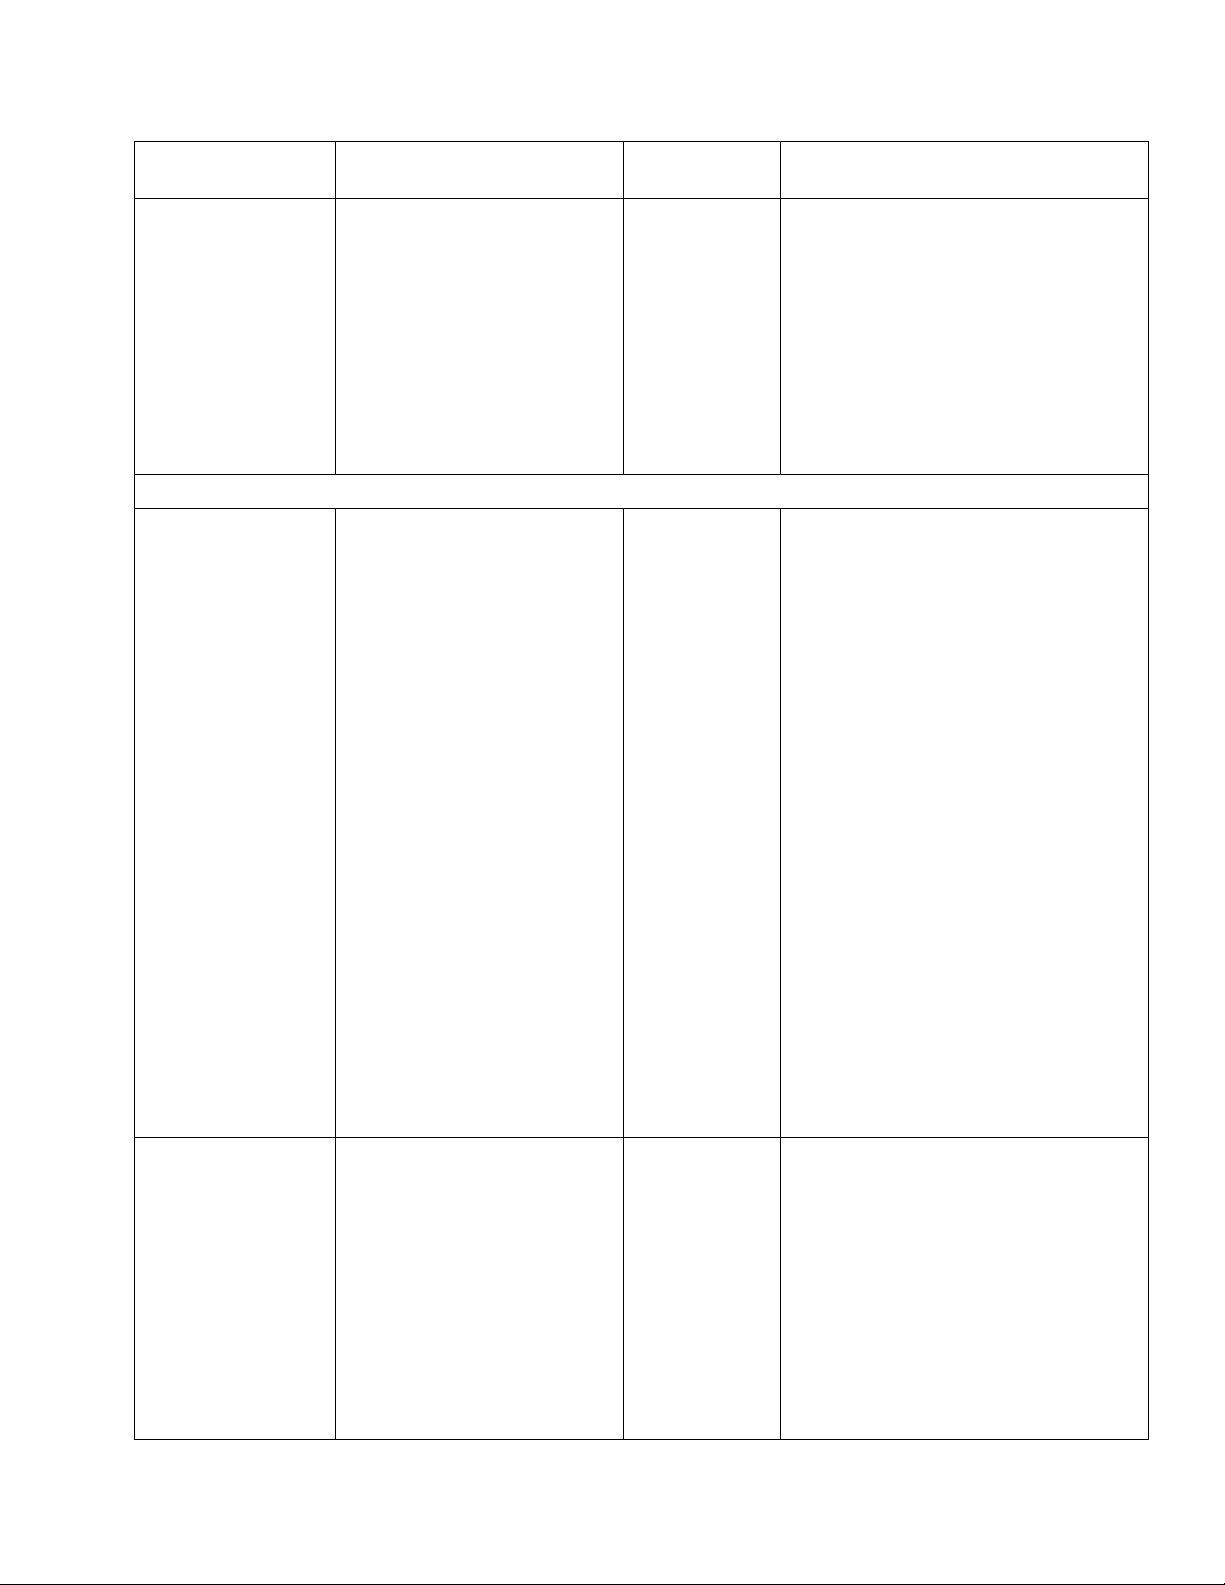
PROGRAMMED DEFROSTING CHART (Cont’d)
CUT AND
WEIGHT
Shrimp
1 lb.
Scallops
11b.
Oysters
12 oz. 2 to 3 min. 5 min.
DEFROSTING TIME
2 to 3 min.
4 to 6 min.
STANDING
TIME
5 min.
5 min.
DIRECTIONS
Remove from package to dish.
Spread loosely in baking dish and
rearrange during thawing as necessary.
Defrost in package, if in block; spread
out on baking dish if in pieces.
Turn over and rearrange during thawing
as necessary.
Remove from package to dish.
Turn over and rearrange during thawing
as necessary.
MEAT
BEEF
Ground beef
1 lb.
2 lbs.
Pot roast, chuck
Under 4 lbs. 3 to 4 rnin. per lb. 10 min. Turn over once.*
4 to 4T/2 min.
8 to 9 min.
5 min.
5 min.
Turn over once.*
Remove thawed portions with fork.
Return remainder into oven to defrost.
(The best way to freeze ground beef is
in a doughnut shape.}
Rib roast, rolled
3 to 4 lbs.
Rump roast
3 to 4 lbs.
Round steak
Flank steak
Sirloin steak
1/2 inch thick
Tenderloin steak
Stew beef
2 lbs.
LAMB
Cubed for stew
Ground lamb
Under 4 lbs.
Chops
1 inch thick
5 to 7 min. per lb. 30-45 min. Turn over once.*
3 to 5 min. per lb. 30 min. Turn over once.*
3 to 4 min. per lb. 5-10 min. Turn over once.*
3 to 4 min. per lb. S-10 min.
3 to 4 min. per lb.
4 to 5 min. per lb. 10 min.
3 to 4 min. per lb. 8-10 min.
6 to 7 min. per lb.
3 to 4 min. per lb. 5-10 min. Turn over once.*
4 to 6 min. per Ib.
5-10 min.
5 min.
15 min. Turn over twice.*
Turn over once.*
Turn over once.*
Turn over once.*
Turn over once.* Separate.
Turn over once.* Separate.
Remove thawed portions with fork.
Return remainder into oven to defrost.
Leg
5 to 8 lbs.
3 to 4 min. per 1b.
15-20 min. Turn over twice.*
*Turning or stirring should be done in the middle of the defrosting cycle.
23
Page 24
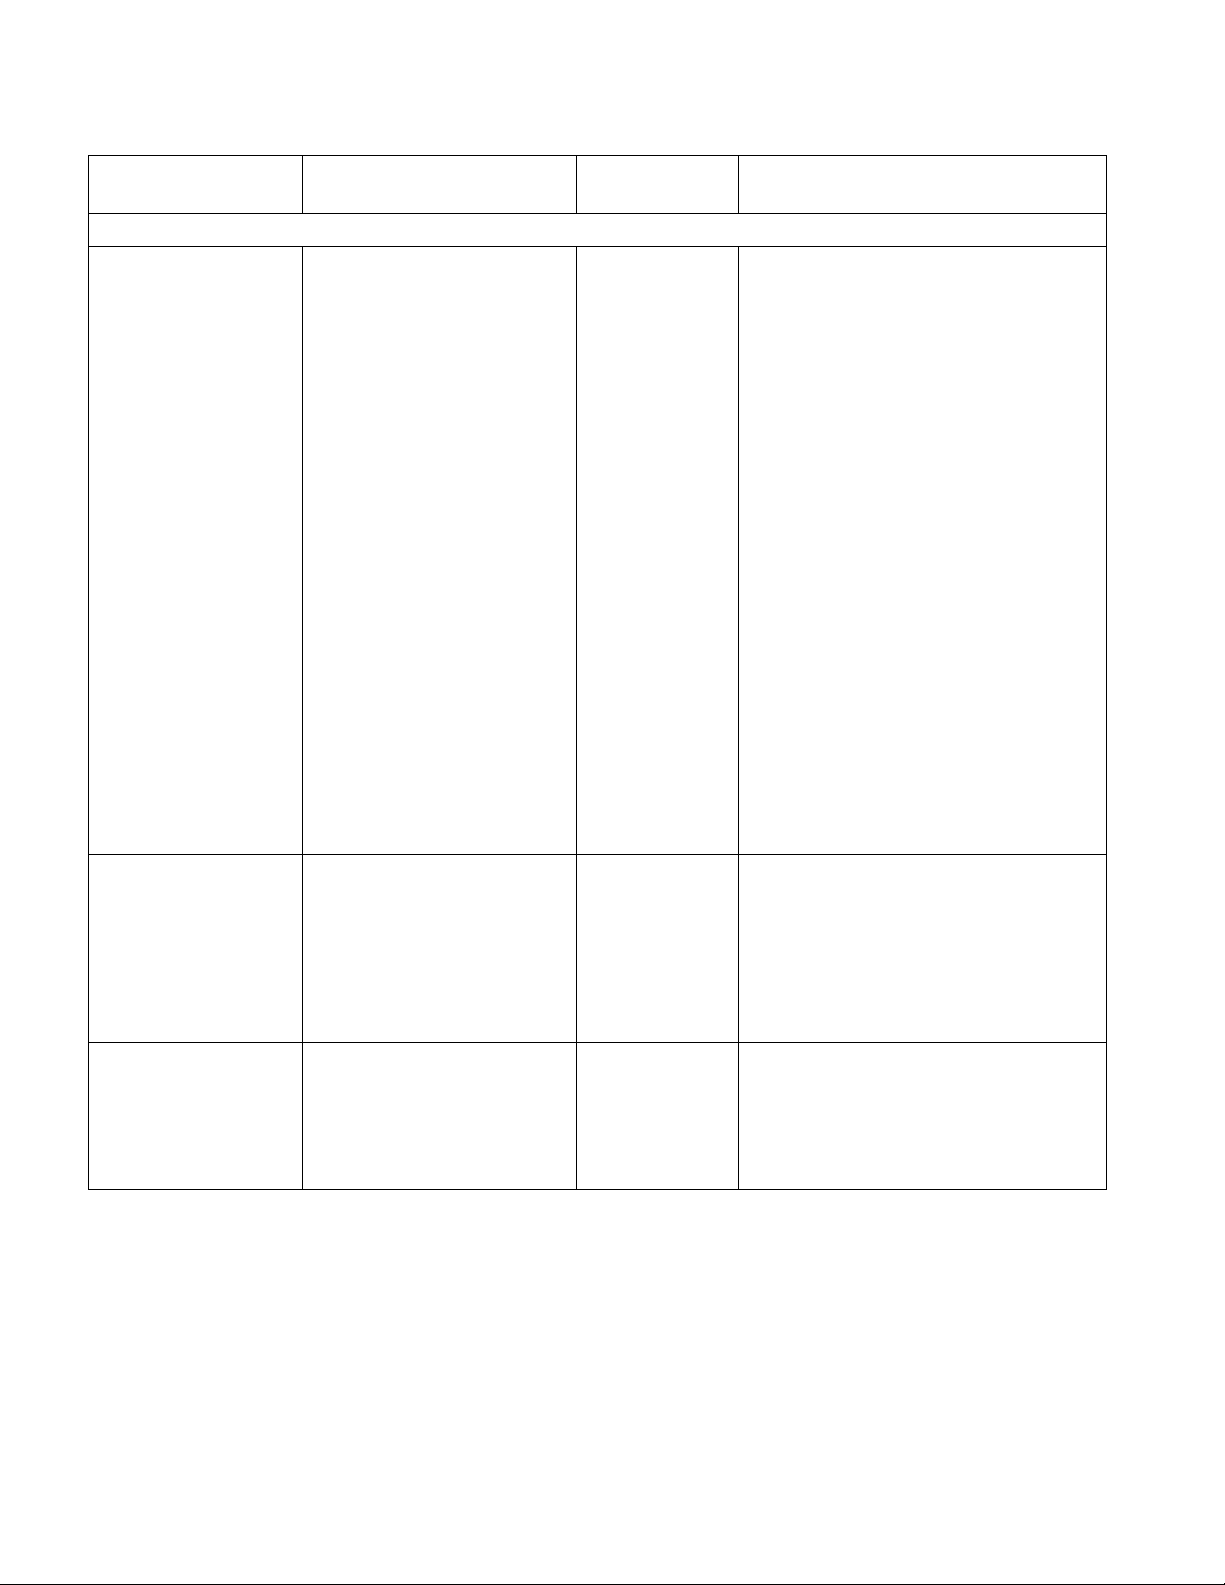
PROGRAMMED DEFROSTING CHART (Cont’d)
CUT AND
WEIGHT
MEAT
PORK
Chops
1/2 inch thick
1 inch thick
Spareribs,
Country-style
ribs
2 to 3 lbs.
Roast
Under 4 lbs.
Bacon
1 lb.
Sausage, bulk
11b.
Sausage, links
1 lb. 2 to 4 min.
DEFROSTING TIME
4 to 5 min. per lb.
5 to 6 min. per lb.
4 to 6 min. per lb.
3 to 4 min. per lb. 30-45 min.
1-1/2 to 2-1/2 min.
1-1/2 to 2-1/2 min.
STANDING
TIME
5-10 min.
10 min.
10 min.
3-5 min.
3-5 min.
4-6 min.
DIRECTIONS
Separate chops halfway through
defrosting time.
Turn over once.*
Turn over once.*
Defrost until strips separate.
Turn over once *
Remove thawed portions with fork.
Return remainder into oven to defrost.
Turn over once.*
Defrost until pieces can be separated.
Hot dogs
1 lb. 4 to 5 min.
VEAL
Roast
3 to 4 lbs.
Chops
1/2 inch thick 3 to 5 min. per lb.
VARIETY MEAT
Liver
lib. 4 to 5 min.
Tongue
11b.
4 to 6 min. per lb.
6 to 7 min.
5 min.
30 min.
20 min.
10 min.
10 min.
*Turning or stirring should be done in the middle of the defrosting cycle.
Turn over once.*
Turn over once.*
Separate chops and continue
defrosting.
Turn over once.*
Turn over once.*
24
Page 25

PROGRAMMED DEFROSTING CHART (Cont’d)
CUT AND
WEIGHT
POULTRY
Chicken
Whole
2 to 3 lbs.
Cut up
2 to 3 lbs.
TURKEY
Whole
Under 8 lbs.
Breast
Under 4 lbs.
DEFROSTING TIME
5 to 7 min. per lb. 25-30 min.
4 to 5 min. per lb.
3 to 4 min. per lb.
3 to 4 min. per !b.
STANDING
TIME
10-15 min.
60 min.
20 min.
DIRECTIONS
Turn over once* and shield warm
areas.
Immerse in cold water for standing
time.
Turn over once* and shield warm
areas.
Separate pieces when partially thawed.
Turn over once* and shield warm
areas.
Immerse in cold water for standing
time.
Turn over once* and shield warm
areas.
Drumsticks
1 to 1-1/2 lbs.
Roast, boneless
2 to 4 lbs.
CORNISH HENS
Whole (2)
1 to 1-1/2 lbs. ea.
4 to 5 min. per lb.
2-1/2 to 3 min. per lb.
6 to 8 min. per lb. 20 min.
*Turning or stirring should be done in the middle of the defrosting cycle.
15-20 min.
10 min.
Turn over once* and shield warm
areas.
Separate pieces when partially thawed.
Remove from foil pan.
Cover with waxed paper before
defrosting.
Turn over once* and shield warm
areas.
Immerse in cold water for standing
time.
25
Page 26
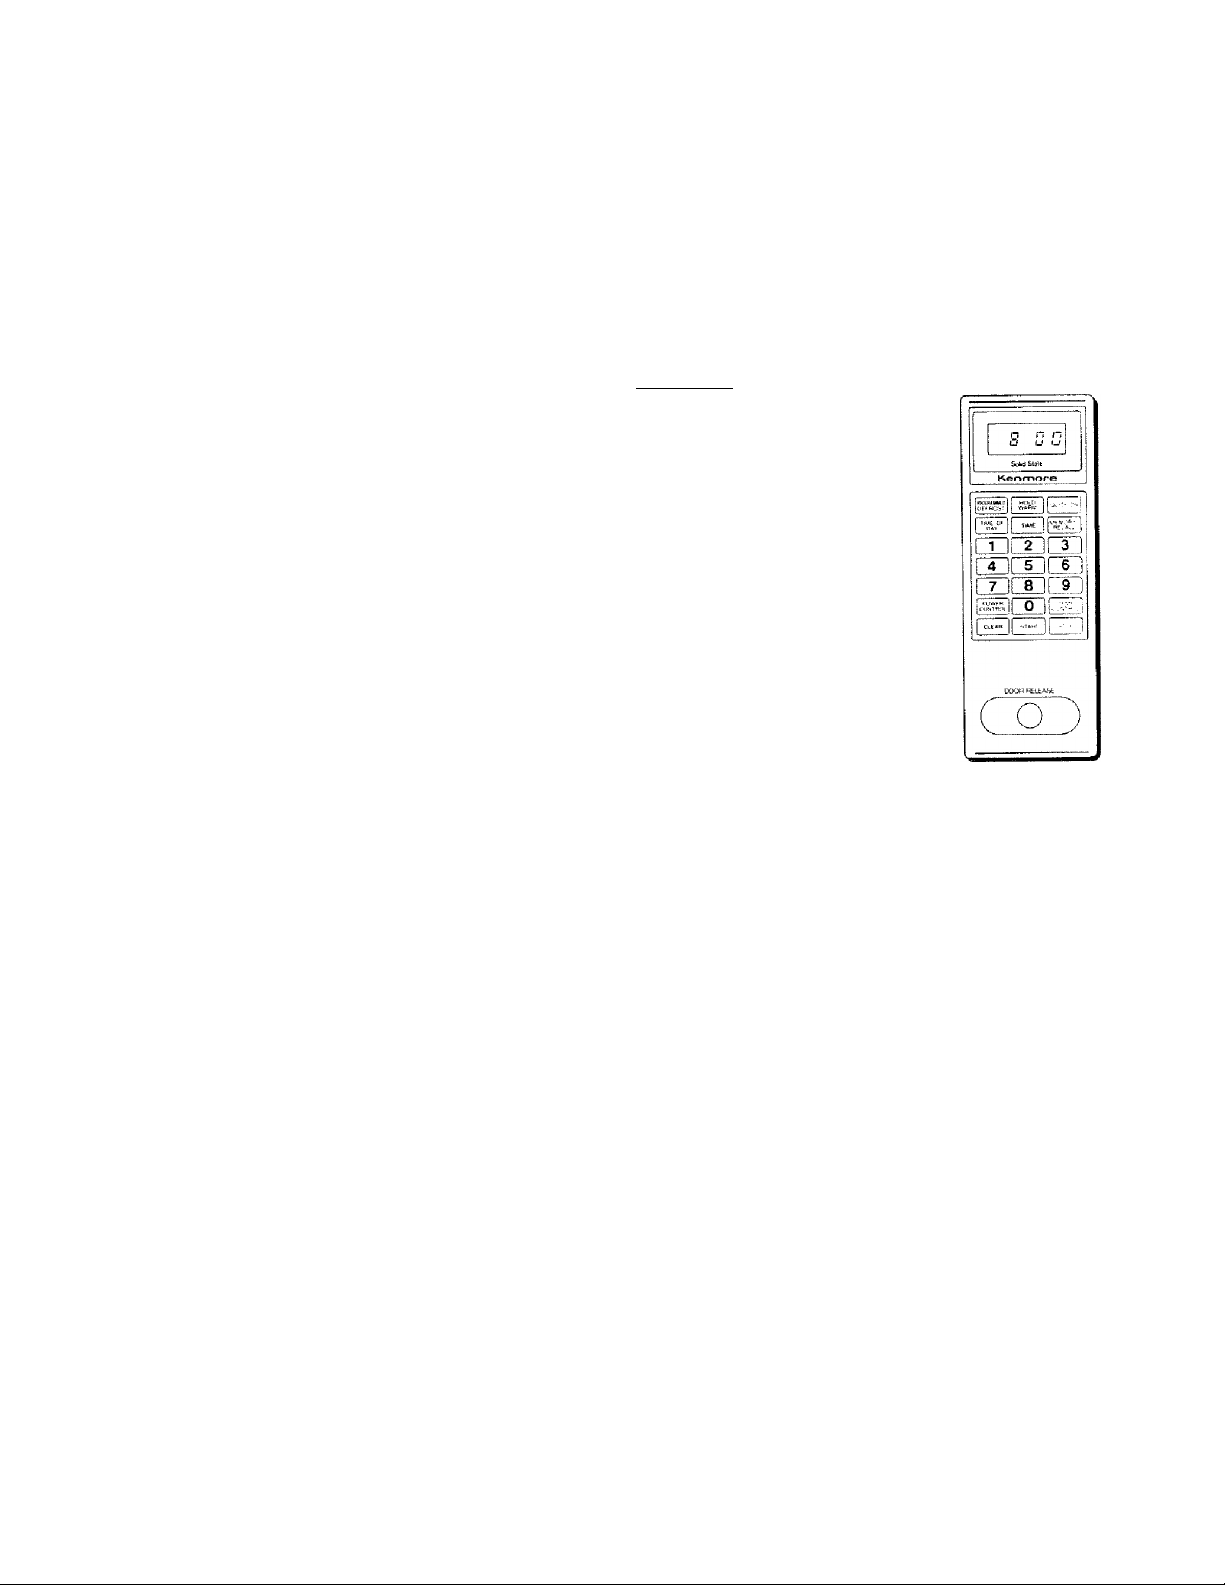
MULTI-STAGE COOKING
Two-Stage cooking allows you to set the oven to cook in one stage at a certain power level for a chosen time or
temperature and then in a second stage at a different power level for a chosen time or temperature, The cooking process
can be set for three memory stages when Programmed Defrost is included as the first stage. The stages are set before
cooking and will follow automatically when oven is started.
Touch CLEAR,
1.
Touch TIME or TEMP CONTROL. The display
2.
window will show “0” or “F”.
Touch the correct numbers for the time or tempera
3.
ture of the first cooking stage.
Touch POWER CONTROL. The display window
will show “HI”.
Touch the correct numbers for the cooking power
5.
level of the first cooking stage {if other than “HI”).
Touch MEMORY/RECALL. The display window
6.
will show “0”.
Touch TIME or TEMP CONTROL.
7.
Touch the correct numbers for the time or tempera
8.
ture of the second cooking stage.
Touch POWER CONTROL. The display window
will show “HI”.
Touch the correct numbers for the cooking power
10.
level of the second cooking stage (if other than “HI”).
Touch START.
11.
MULTI-STAGE COOKING WITH
PROGRAMMED DEFROST
If you want to cook after using the Programmed Defrost,
before setting the above multi-stage cooking, set the
Programmed Defrost and touch MEMORY/RECALL,
then touch the correct numbers for standing time.
Touch POWER CONTROL and enter “0” then follow
the above instructions numbered 6-11.
See pages 21 thru 25 for the detailed instructions of
Programmed Defrost. The cooking process can be set
up to three stages when Programmed Defrost is one of
the stages.
EXAMPLE: In preparing a cake mix, the cookbook calls
for a first stage of 8 minutes at the “50 (SIMMER)” power
level followed by a second stage of 2 minutes at “HI”. The
following steps explain how to set the oven.
First Stage
(8 minutes; Power level 50
SIMMER.)
1. Touch CLEAR.
2. Touch TIME.
3. Set 8 minutes by touching “8”,
“0”, and “0”. “800” will show in
the display window.
4. Touch POWER CONTROL.
“HI” will show in the display
window to remind you that the
oven will operate at highest
power unless you enter a lower
power setting.
5. Touch numbers “5” and “0”.
“50” will show in the display
window (indicating that you
have set the oven to operate at
power level 50).
The first stage has been set.
□□mm
mmm
mmm
DCOB sasase
26
(m)
Page 27

MULTI-STAGE COOKING
(Cont’d)
Second Stage
(2 minutes; Power level “HI”)
6. Touch MEMORY/RECALL.
The display window will show
“
0”.
Kenmore
IjjggJI
mmm
rrimnn
ryimm
DELAY START COOKING
Delayed cooking can be done by using the MULTI
STAGE COOKING feature. After counting down the
preset delay time, the oven will cook for the chosen
cooking time.
1. Touch CLEAR-.
2. Touch TIME.
3. Touch the correct numbers for the required delay
time,
4. Touch POWER CONTROL.
7. Touch TIME.
8. Set 2 minutes by touching “2”,
“0” and “0”. “200” will show in
the display window, (Power is
on “HI”.)
The second stage has been set.
9. Touch START. The first stage
will begin. “800” will show in the
display window. The oven will
begin to cook at 50 (SIMMER)
and the time will begin to
counting down in the display
window. When the 8 minutes
are over, a tone will sound and
the oven will proceed into the
second stage. The oven will
begin to cook at “HI” power.
When the 2 minutes are over,
a tone will sound and the word
“End” will show in the display
window and the oven will
automatically shut off.
The oven will have finished both
stages.
ncofl ne.ea.'se
o
mmi^
rumm
[X1C1DC3:]
j i'~^ I j
[^CEiE]E3
:ww BFLEt'f
o
KeniTiorw
LIZICEIICE
(
5. Touch “0” (power level 0).
6. Touch MEMORY/RECALL.
7. Touch TIME or TEMP CONTROL.
8. Touch the correct numbers for the required cooking
time or food temperature.
9. Touch POWER CONTROL.
10. Touch the correct numbers for desired cooking
power level.
11. Touch START,
NOTE: A preset delay time must be no more than 99
minutes and 99 seconds.
NOTE: If you want to keep the food warm after finishing
the cooking cycle, you can use “Hold Warm” feature. For
detailed instructions on using “Hold Warm” feature, see
page 12.
Page 28
UTENSILS
MATERIALS TO USE
IN YOUR MICROWAVE OVEN
OVENPROOF GLASS
Ovenware {treated for high-intensity heal), such as utility
dishes, bread dishes, pie plates, cake plates, liquid
measuring cups, casseroles and bowls without metallic
trimming.
CHINA
Bowls, cups, serving pieces, plates and platters without
metallic trimming.
POTTERY
Dishes, cups, mugs and serving pieces without metallic
trimming.
PLASTIC
Plastic wrap may be used as a cover. Lay the plastic wrap
loosely over the dish and press it to the sides. The dish
should be deep enough so that plastic wrap will not touch
the food. As the food heats, it may cause the wrap to melt
wherever it touches the food. Plastic dishes, cups,
semirigid freezer containers and plastic bags are usable for
short-time cooking. Use with care as some softening of the
plastic may occur with heat from the food.
PAPER
Paper towels, waxed paper, paper napkins and paper
plates are usable.
UTENSIL TEST: A simple way to find out if a utensil can
be used for microwave cooking is to place it empty on the
cooking tray. Close the door and set the time to 30
seconds (1/2 minute). Then touch START. If the utensil is
warm at the end of this time, it should not be used for
microwave cooking.
CAUTION: Always make sure that closed utensils are
opened and plastic pouches of vegetables (or other food
items) are pierced before cooking. Tightly closed utensils
could explode.
MATERIALS TO AVOID USING IN YOUR MICROWAVE OVEN
METAL UTENSILS
Metal utensils are not recommended because the metal
shields the food from microwave energy on the bottom
and on the sides, causing uneven cooking results.
utensils will also cause arcing and can damage the microwaue ouen.
METAL DECORATION
Metal-trimmed or metal-banded dinnerware, casserole
dishes, etc., should not be used. The metal trim interferes
with normal cooking and may damage the dish.
CENTURA® TABLEWARE
Corning Glass does not recommend the use of its Cen
tura® tableware or Corelle® closed handle cups for micro
wave cooking,
ALUMINUM FOIL
Large sheets or pieces of aluminum foil should be avoided
because they will hinder cooking and may cause harmful
arcing. However, smaller pieces may be used to cover
areas such as poultry legs and wings. Any aluminum foil
used should be at least 1 inch from the side walls of ouen.
WOOD
Wooden bowls and boards will dry out when used in the
microwave oven and may split or crack.
OTHER
Avoid using brown paper and cracked, flawed or chipped
utensils, including ovenproof glassware.
CAUTION: Do not use metal ties on any paper or plastic
bags; the ties become hot and could cause a fire.
Metal
28
Page 29
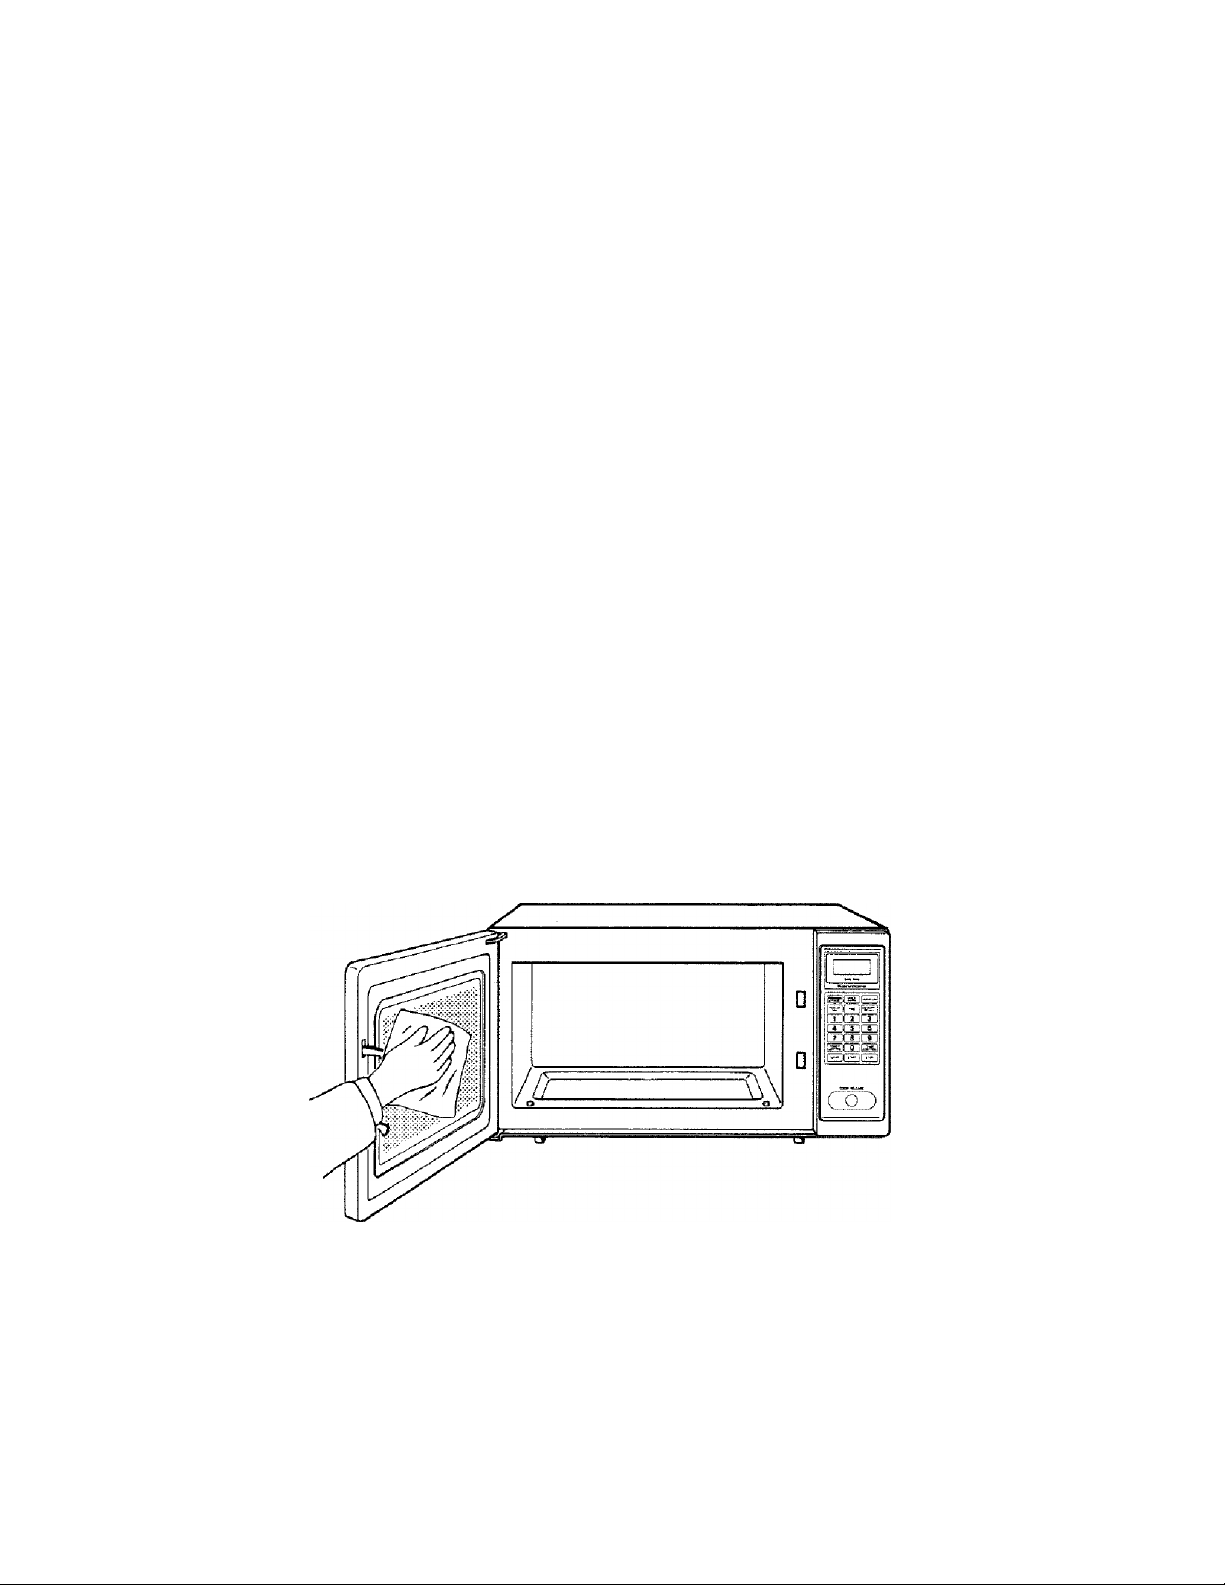
CARE AND CLEANING
Wipe the oven inside and outside with a soft cloth and a mild detergent solution. Then rinse and wipe dry.
This should be done on a weekly basis—more often if needed. Never use rough powders or pads.
The inside oven top (stirrer shield) can be gently wiped in place. Excessive oil spatters on the inside top
(stirrer shield) will be difficult to remove if left for many days.
Wipe spatters with a wet paper towel especially after cooking chicken or bacon.
REMOVABLE PARTS
The following parts may be removed as described. They should be washed in warm (not hot) water with a
mild detergent and a soft cloth. Once they are clean, rinse them well and dry with a soft cloth.
Never use rough cleaning powders, steel wool or rough cleaning pads.
* After each use of the temperature probe, it must be removed from the socket. Use pot holder, as the wire, plug
and sensor sections may be hot. Wipe food or liquid from the sensor with a soft damp cloth.
• The glass tray may be removed for cleaning at the sink. Wipe up spillovers with a paper towel or cloth before
removal of the tray. Be careful not to chip or scratch the edges of the tray as this may cause the tray to break
during use.
SPECIAL CARE
For best performance and safety, the inner door panel and the oven front frame should be free of food or grease
build-up. Wipe both often with a mild detergent. Then rinse and wipe dry. Never use rough powders or pads.
After cleaning the control panel, touch CLEAR. This will clear any entries that might have been entered
accidentally while cleaning the panel.
29
Page 30

QUESTIONS AND ANSWERS
OPERATION
Q.What is wrong when the oven light will not glow during cooking or when the oven door is open?
A, There mop be several reasons why the oven light will not glow. Perhaps:
• Door is not closed and locked. Push door firmly to be sure that door is locked property.
■ The light bulb has burned out.
Q.Why does steam come out of the air exhaust vent?
A. Steam is normally produced during cooking. The microwave oven has been designed to vent this steam
out the bottom vent.
Q.Will the microwave oven be damaged if it operates empty
A. Yes. Never operate the oven empty or without the glass tray.
Q.Does microwave energy pass through the viewing screen in the door?
A. No. The metal screen bounces bock the energy to the oven cavity. The holes (or ports) are made to
allow light to pass through. They do not let microwave energy pass through.
Q.Why does the “beep tone” sound when a "pad" on the control panel is touched?
A. The “beep tone” sounds to assure that the setting is being properly entered.
Q.Why does the display show “0:00”?
A. This indicates that there has been a temporary loss of electrical power to the oven, and the TIME OF
DAY must be reset. .
Q.Can my microwave oven be damaged if food is cooked for too long a period of time?
A. Like any other cooking appliance, it is possible to overcook food to the point of destruction which may
result in the food creating smoke and euen possible fire damage to the inside of the oven. It is always best
to attend the oven while it is in the cooking process. See “Important Safety Instructions" on Page 3.
Q. When the oven is plugged into a wall outlet for the first time, it might not work properly. What is wrong?
A. Only when the oven is plugged in for the first time or when power resumes after a power interruption,
the microcomputer used in the oven control assembly may temporarily become scrambled and fail to
function as programmed.
Unplug the oven from the 120-uoU household outlet and then plug it back in. The microcomputer will be
reset for proper function thereafter.
Q.Why do I see light reflection around the outer case?
A, This light is from the oven light which is located outside the oven cavity.
Q.Why does my oven show time counting down in the display window but no cooking is occuring?
A. The microcomputer in your oven has caused this. Simply unplug the oven and then plug it back in.
30
Page 31
QUESTIONS AND ANSWERS (Cont’d)
FOODS
Q. What is wrong when baked foods have a hard, dry, brown spot?
A, A hard, drij, brown spot shows ouercooking. Shorten the cooking or reheating time.
Q.Why do eggs sometimes pop?
A. When baking, frying or poaching eggs, the yolk may pop due to steam build-up inside the yolk
membrane. To prevent this, simply pierce the yolk with a toothpick before cooking it.
CAUTION: Never microwave eggs in the shell.
Q.Why are scrambled eggs sometimes a little dry after cooking?
A. Eggs dry out if they are overcooked. Though the same recipe is used each time, one may need to vary
the cooking time for one of these reasons:
• Eggs vary in size.
• Eggs are at room temperature one time and at refrigerator temperature another time.
• The shapes of utensils vary, thereby making it necessary to vary the cooking time.
• Eggs continue cooking during standing time.
Q.ls it possible to pop corn in a microwave oven?
A. Yes, if using one of the two methods described below.
(1) Microwove-popping devices designed specifically for this type of microwave cooking or
(2) Prepackaged commercial microwave popcorn that contains specific times and power outputs
needed for an acceptable final product.
FOLLOW EXACT DIRECTIONS GIVEN BY EACH MANUFACTURER FOR THEIR POPCORN
PRODUCT AND DO NOT LEAVE THE OVEN UNATTENDED WHILE THE CORN IS BEING
POPPED.
IF CORN FAILS TO POP AFTER THE SUGGESTED TIMES, DISCONTINUE COOKING.
OVERCOOKING COULD RESULT IN AN OVEN FIRE.
CAUTION: NEVER USE A BROWN PAPER BAG FOR POPPING CORN.
31
Page 32
QUESTIONS AND ANSWERS (Cont’d)
Q.What is wrong when three potatoes bake thoroughly and the fourth one is still not cooked?
A. The fourth potato may be shghtli; heavier than the others and should be cooked 30 to 60 seconds longer.
Remember to allow space around each potato when baking. Also, for more even cooking, put potatoes
in a circle.
Q.Why do baked apples sometimes burst during cooking?
A. The peeling has not been removed from thetophalfofeach apple to allow for expansion of the interior of
the apple during cooking. As in regular cooking methods, the interior of the apple expands during the
cooking process.
Q.How are boil-overs avoided?
A. When cooking foods that tend to boil over, use a larger utensil than usual for cooking, //you open the
oven door or touch STOP, the food will stop boiling. (Remember to touch START again after closing the
door to restart the cooking cgcle.)
Q.Why is a standing time recommended after microwave cooking is over?
A. Standing time allows foods to continue cooking euenig throughout for a few moments after the actual
microwave oven cooking cyc/e. The amount of standing time depends upon the density of the food.
Q.Why is an additional time required for cooking food stored in refrigerator?
A. As in conventional cooking, the initial temperature of food affects total cooking time. More time is
needed to cook food just taken out of a refrigerator versus food at a room temperature.
32
Page 33

BEFORE CALLING FOR SERVICE
You can often correct operating problems yourself. If your microwave oven fails to work properly, locate the
operating problem in the chart below and try the solutions marked for each problem.
If the microwave oven still does not work properly, contact the nearest Sears Service Center. Sears Service
Centers are fully equipped to handle your service requirements.
PROBLEM
Oven Will Not Start
Arcing or Sparking
Incorrect Time of Day
Unevenly Cooked Foods
Overcooked Foods
Undercooked Foods
Improper Defrosting
SOLUTION
Is power cord plugged in? —
Is door closed? ■
Cooking time not set.
Temperature not set or probe not plugged in.—
Use approved cookware only,—1
Properly position temperature probe. •
Do not operate with oven empty.-
Is temperature probe properly plugged in?—
Reset time of day.—
Supplied glass tray must be used.-
Turn or stir food. ■
Completely defrost food. —
Use correct time/cooking power level. —
Use correct temp control setting. ■
Check to see that oven ventilation ■
ports are not restricted.
33
Page 34

SEARS SERVICE
“WE SERVICE WHAT WE SELL”
“We Service What We Sell” is our assurance to you thaï you сап depend on Sears for service because Sears
Service is nationwide.
Your Sears Kenmore Microwave Oven has added value when you consider that Sears has a service unit near
you, staffed by Sears Trained Technicians—professional technicians specifically trained on Sears Kenmore
Microwave Ovens, having the parts, tools and equipment to insure that we meet our pledge to you—“We
Service What We Sell!”
TO FURTHER ADD TO THE VALUE OF YOUR MICROWAVE OVEN,
BUY A SEARS MAINTENANCE AGREEMENT.
Sears Kenmore Microwave Ovens are designed, manufac
tured, and tested for years of dependable operation. Yet, any
modern appliance may require service from time to time. A
Sears Maintenance Agreement is more than an extension of
the Warranty.
It provides complete protection from unexpected repair bills
and undue inconvenience. It assures you of maximum effi
ciency from your Microwave Oven.
Here’s a comparative Warranty and Maintenance Agreement
chart showing you the benefits of a Sears Microwave Oven
YEARS OF OWNERSHIP
COVERAGE
1. Replaci>nipnt ol
defective parts other
than magnetron
2. Replacement of
magnclron
3- Annual preventive
maintenance check
at your request
W WARRANTY
MA -MAINTENANCE AGREEMENT
1st Yr.
W
W
MA
2nd Yr,
thru
5th Yr.
MA
W
MA
Maintenance Agreement.
Contact your Scars salesperson or local Sears Service Center today and purchase a Sears Maintenance
Agreement.
34
Page 35

BEAIRS
USE & CARE
MANUAL
STOCK NO.
88329
MICROWAVE OVEN
WARRANTY
FULL ONE YEAR WARFiANTY ON MICROWAVE OVEN
FOR ONE YEAR FROM THE DATE OF PURCHASE, IF THIS
KENMORE MICROWAVE OVEN FAILS DUE TO A DEFECT IN
MATERIAL OR WORKMANSHIP, SEARS WILL REPAIR IT, FREE OF
CHARGE.
FULL FIVE YEAR WARRANTY OF THE MAGNETRON
FOR FIVE YEARS FROM THE DATE OF PURCHASE, IF THE
MAGNETRON IN THIS KENMORE MICROWAVE OVEN FAILS DUE
TO A DEFECT IN MATERIAL OR WORKMANSHIP, SEARS WILL
REPAIR IT, FREE OF CHARGE.
THE ABOVE WARRANTY COVERAGE APPLIES ONLY TO
MICROWAVE OVENS WHICH ARE USED FOR PRIVATE
HOUSEHOLD PURPOSES.
Part No. 400223 (U384398-1)
WARRANTY SERVICE IS AVAILABLE BY SIMPLY
CONTACTING THE NEAREST SEARS STORE OR
SERVICE CENTER IN THE UNITED SWES.
THIS WARRANTY APPLIES ONLY WHILE THIS PRODUCT IS IN
USE IN THE UNITED STATES.
THIE WARRANTY GIVES YOU SPECIFIC LEGAL RIGHTS, AND
YOU MAY ALSO HAVE OTHER RIGHTS WHICH VARY FROM STATE
TO STATE.
SEARS, ROEBUCK AND CO.,
DEPT. 698/731A, SEARS TOWER, CHICAGO, IL. 60684
Sears, Roebuck and Co., Chicago, IL. 60684, U.S.A.
7l’sr Printed in U.S.A.
 Loading...