

Kenmore 79575952400, 79575952402 Owner’s Manual

(D
TOP FREEZER REFRIGERATOR
Use & Care Guide
REFRIGERADOR CON MONTAJE SUPERIOR
Guia para el Uso y Cuidado
Ri_FRIGERATEUR SUPERPOSe:
Guide d'utirisation et d'entretien
Itl
Z
¢)
I"
mlB
:£
iti
o
Model(s):
795,73262303 795,73269303
795.73962303 795 73969303
795.75252401 795 75259401
795,75952401 79&75959401
_8_,_J_0o3c Sears, Roebuck and Co._ Hoffman Estates, IL 60179 U.S,A. wwwosears.com
Pria_d _n MeK_e
79573264303 795473266303 795.73263303
795.73964303 795.73966303 795,73963303
79575254401
79575954401

English Version 2
Versi6n en espaSo? 31
Version fran_aise 59
Warranty (U.S A,) 3
Master ProtecUonAgreements (USA..) 3
Safety instructions 4-5
Grounding Requirements 5
Parts and Features 6
Refrigerator Instaflation 7-10
Unpacking Your Refrigerator 7
Installation 7
Base Grille 7
Removing, Reversing and Replacing
Your Refrigerator Doors 8-9
Door Closing and Alignment 10
Using Your Refrigerator 11-18
Ensuring Proper Air Circulation 11
Frontchilt Door Cooling 11
Setting the Controls 11-12
Adjusting Control Settings 12
Food Storage Guide 13
Storing Frozen Food 13
Refrigerator Shelves 14
Meat TraylSnack Pan 15
SupraFrash Crisper with Tilt-Out Compartment 15
Crisper Humidity Control 15
Crisper Tilt-Out Feature 15
Crisper Cover whit lattice on inner surface 16
Door Racks 16
Modular Door Bins 16
Dairy Comer 17
Tilt-Out Door Baskets 17
Swing-Down Shelf 17
Pull-Over Shelf 17
Glide-Out Floor Tray 18
lee Tray 18
Care and Cieaning 19-20
Genera] Cleaning "Aps 19
Outside 19
Inside Walls 19
Door Liner and Gaskets 19
Plastic Parts 19
Condenser CoiIs 19
Light Bulb Replacement 19-20
Power interruptions 20
Vacation and Moving Care 20
About the Automatic lcemaker 21
Connecting the Water Une 22-24
Troubleshooting Guide 25-28
Customer Service Back Cover
tn the space below, record the date of purchase, model and serial number of your product..You will find the model and
serial number printed on an identificationlabel located on the fight-hand side of the refrigerator compartment. Have
these items of information avaitable whenever you contact Sears concerning your produu-"t,
Model No.. Date of Purchase
Sedal No.
Save these instructionsand your sales recelpt for future reference,.
®
Kenmore and Ken,more E,,!,i,te Refrigerator War,ra,ntY ..........................
r
ONE YEAR FULL WARRANTY ON REFRIGERATOR
For one year from the date of purchase, when this refrigerator is operated and maintained according to the instrUctions
supplied with it, Sears wilt repair this refrigerator, free of charge, if defective in material or workmanship This one year
time period does not include the refrigerator water filter cartridge (if equipped), which is an expendable part warranted for
only 30 days (see betow).
FIVE YEAR FULL WARRANTY ON SEALED REFRIGERATION SYSTEM
For five years from the date of purchase, when this refrigerator is operated and maintained according to the instructions
supplied with it, Sears wilt repair the sealed system (consisting of refrigerant, connecting tubing, and compressor), free of
charge, if defective in materiat or workmanship
30 DAY FULL WARRANTY ON WATER FILTER CARTRIDGE (if equipped)
For thirty days from the date of purchase, Sears wilt replace the refrigerator water fi_ter cartridge if it is defective in
material or workmanship
AIt above warranty coverage applies only to refrigerators which are used for storage of food for private househoid
purposes
Warranty service is available in the United States or Canada by contacting Sears at 1-800-4-MY-HOME® (I-800-469-4663)
This warranty applies only while this product is in use in the United States or Canada
This warranty gives you specific legal rights, and you may also have other rights which vary from state to slate or province
to province.
Sears, Roebuck and Co., Dept. 817WA, Hoffman Estates, IL 60179
Sears Canada, lnc., Toronto, Ontario, Canada M5B 2BB
TOP-MOUNT REFRIGERATOR
Master Protection Agreements
Congratulations on making a smart purchase Your new
Kenmore" appliance is designed and manufactured for
years of dependable operation. But like eli products, it may
require preventive maintenance or repair from time to t_,me
That's when having a Master Protection Agreement can
save you money and aggravation
Purchase a Master Protection Agreement now and protect
yourself from unexpected hassle and expense
The Master Protection Agreement also helps extend
the life of your new appliance. Here's what's included
in the Agreement:
,/Expert service by our 12.000 professional repair
specialists
_ Unlimited service and no charge for parts and Iabor
on all covered repairs
_," "NO4emon" guarante -repfacement of you covered
product if four or more product failures occur within
twelve months
/ Product replacement if your covered product can't
be fixed
,/Annual Preventive Maintenance Check at your
request--no extra charge
,/Fast help by phone-phone support from a Sears
technical on products requiring in-home repair,
plus convenient repair scheduling
.,," Power surge protection against electrical damage due
to power fluctuations
,," Rental reimbursement if repair of your covered product
takes longer than promised
Once you purchase the Agreement, a simple phone
call is eli that it takes for you to schedule service
You can caU anytime day or night, or schedule a
service appointment online.
Sears has over 12,000 professional repair specialists,
who have access to over 4 5 million quality parts and
accessories. That's the kind of professionalism you can
count on to help prolong the life of your new purchase
for years to come. Purchase your Master Protection
Agreement today!
Some limitations and exclusions apply
For prices and additional information, call
1-800-827_6655°
Sears Installation Service
For Sears professional installation of home
appfiances, garage door openers, water heaters,
and other major home items, in the USA call
1-800.4-MY-HOME?

This guide contains many important safety messages Always read and obey at! safety messages
This is the safety alert symbol It alerts you to safety messages that inform you
of hazards that can kill or hurt you or others, or cause damage to the product
All safety messages will be preceded by the safety alert symbol and the hazard
signal word DANGER, WARNING. CAUTION. These words mean:
You can be killed or seriously injured if you don't follow instructions
Indicates an imminently hazardous situation which, if not avoided,
may result in minor or moderate th}ury, or product damage only
All safety messages will identify the hazard, tell you how to reduce the chance of injury and tell you what can happen if
the instructionsare not followed
To reducethe riskof fire, electricshock,or injury
to personswhen using your product,basic safety
precautionsshould befollowed, including the following:
• NEVER unplugyour refrigeratorby pullingon thepowercord
Alwaysgnp the plugfirmly and pullit straightout fromthe
cutlet
"Repair or replaceimmediatelyall electricservice cards that
havebecomefrayedor otherwisedamaged,Do not usea cord
thatshowscracks orabrasion damagealong its length or at
eitherthe plugor connectorend
"When movingyour refrigeratoraway from thewall,
be carefulnot to roll overor damagethe powercord.
• DO NOTstore or use gasoline or otherflammablevapors and
liquidsin the vicinityof thisor any otherappliance
• DONOTaI/ow childrento climb,standor hang onthe
refrigeratordoors or shelvesin the refrigerator:Theycould
damagethe refrigeratorandseriouslyinjure themselves
• Keep fingersout of "pinchpoint"areas; clearancesbetween
the doorsand cabinet arenecessadlysmall.Be careful
when youopen the doorswhen childrenare inthe area.
"Unplug your refrigeratorbeforecleaningor makingany repairs.
NOTE:We strongly recommendthatany servicingbe
performedbya qualifiedindividual
• Beforereplacing a bumed_outlightbulb, unplug the
refrigeratoror turnoff powerat the circuitbreaker or fuse box
in orderto avoid contactwitha livewire filament (A burned.-
out light bulbmay breakwhenbeingreplaced) NOTE:Se_ng
either or both controlsto the OFF positiondoes not remove
powerto the Ilghtcircuit
• Do not store bottles inthefreezer compartment- theymay
break when frozen, causing damage.
• Forpersonal safety,this appliancemust beproperly grounded
Havethe wail outletand the circuit checkedby a qualified
etactddan to makesure the outiet is properlygrounded
"Read all instructionsbefore using thisappliance
Use thisapplianceonly for its intended purposeas described
in thisuse and caregulde
"After yourrefrigeratoris inoperation,do not touch the cold
surfacesinthe freezer compartmentwhen handsaredamp or
we_Skin may adhere tothe extramely cold surfaces.
• In refrigeratorswith automaticicemakers,avoidcontactwith
the movingparts of theejectormechanism,or withtheheating
element[hatreleasesthe cubes DO NOTplacefingersor
hands on theautomatictcemakingmechanismwhile the
refrigeratorispluggedin
• DO NOTrefreeze frozen foodswhich have thawedcompletely
The United StatesDepartmentofAgriculture in Homeand
GardenBulletin No 6gsays:
", You may safelyrefreezefrozen toads thathave thawed if
they still containice crystalsor if they arestill coldbelow
40"F (4"C)"
°..Thawed ground meats,poultry,orfish thathave any off-odor
or off-colorshould notbe refrozenand should not be eaten.
Thawedicecream shouldbe discarded. Ifthe odoror colorof
any feed is pooror questionable,get rid of it. Thefood may be
dangerousto eat"
_Evenportal thawingandrafreezingreduces theeating quality
of foods,pa_cularlyfruits, vegeiabtesand preparedfoods.
The eating quality of redmeats isaffected less thanthatof
manyotherfoods Userefrozenfoods as soon as possibleto
save as muchel theirquality as you can."
SAVE THESE INSTRUCTIONS
Child entrapment and suffocation are not problems of
the past Junked or abandoned refrigerators are stil+
dangerous ,,even if they will sit for "iust a few days" If
you are getting dd of youro_drefrigerator, please follow
the instructions at fight to help prevent accidents
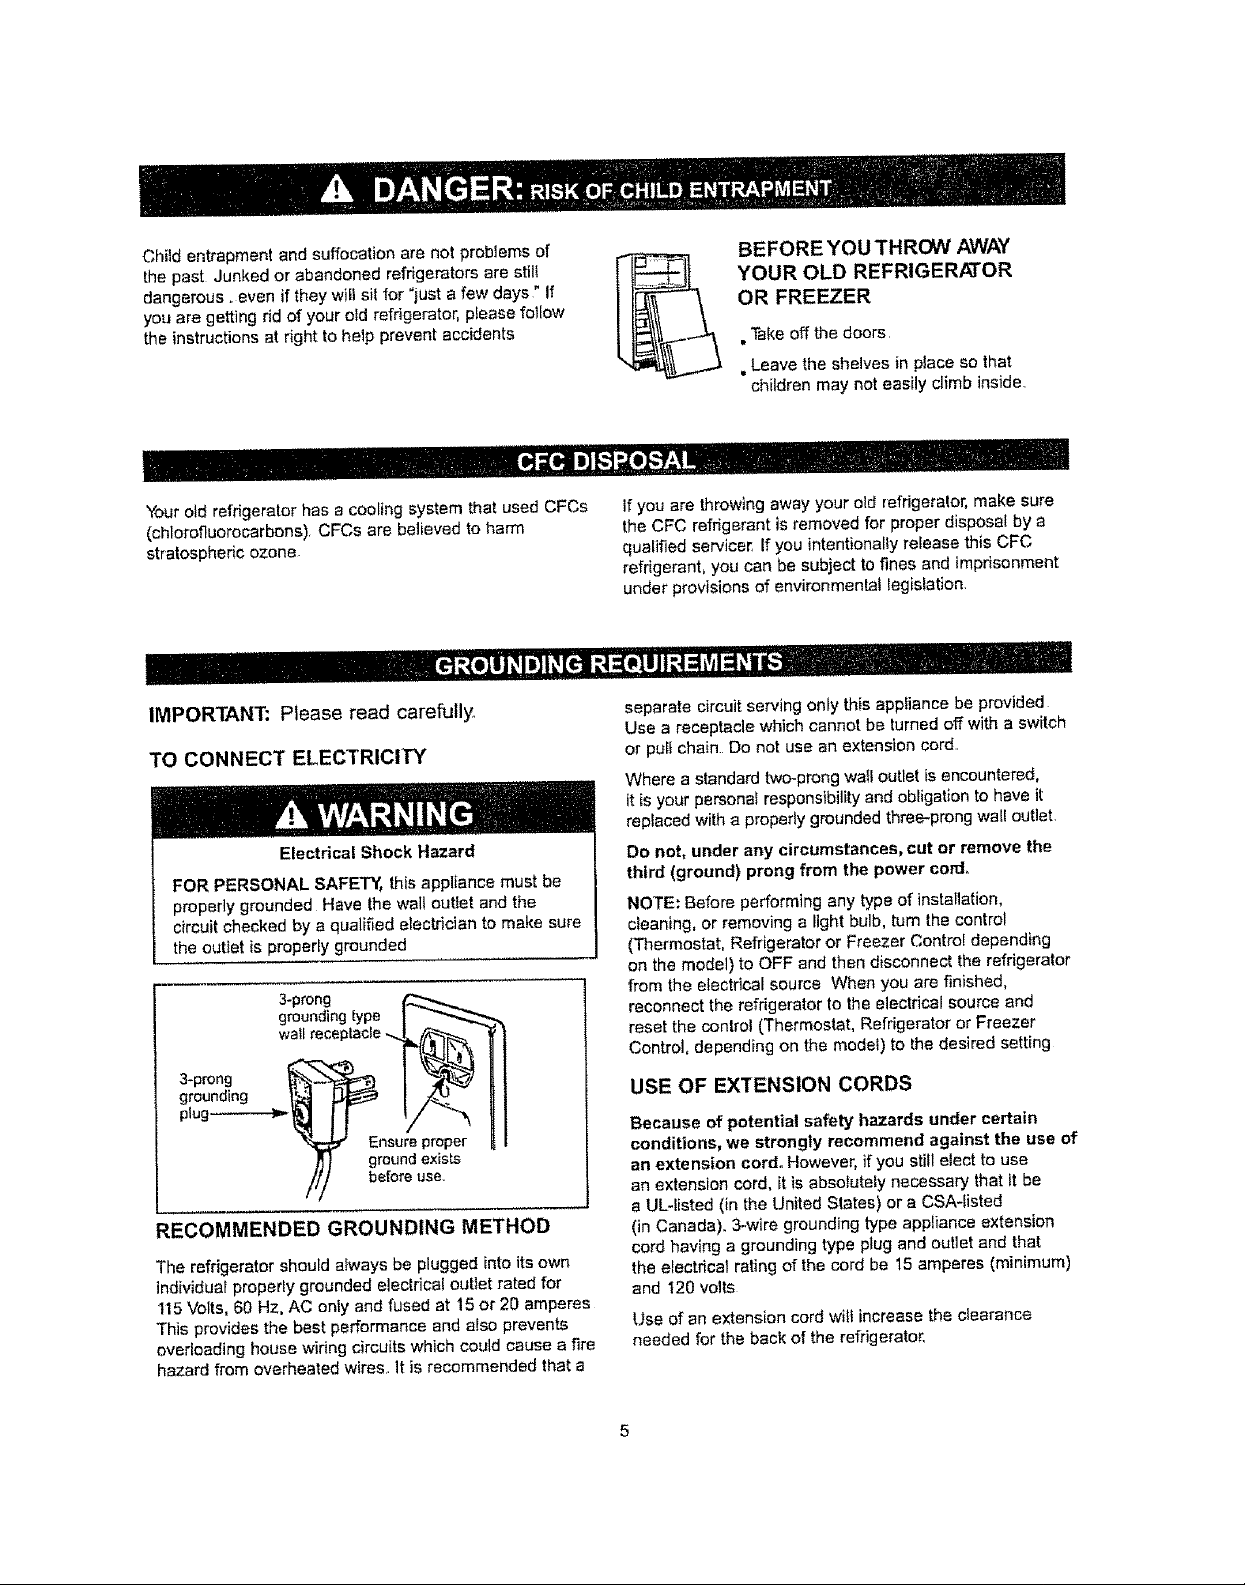
BEFORE YOU THROW AWAY
YOUR OLD REFRIGERATOR
OR FREEZER
• Take off the doors,
. Leave the shelves in place so that
children may not easily climb inside.
Your old refrigerator has a cooling system that used CFCs
(chlorofluorocarbons) CFCs are believed to harm
stratospheric ozone+
III
IMPORTANT: Please read carefully,+
TO CONNECT ELECTRICITY
Electrical Shock Hazard
FOR PERSONAL SAFETY, this appliance must be
properly grounded Have the wall outlet and the
circuit checked by a qualified electricianto make sure
the outiet is properly grounded
3-prong
grounding type
wa_lreceptacle ....
3-prong _ _'J__t"-_
grounding _',.q] _ _ +
t[
Ensure proper
j ground exists
/// before use.
RECOMMENDED GROUNDING METHOD
The refrigerator should a}ways be plugged into its own
individual properly grounded electrical outlet rated for
115Volts, 60 Hz, AC only and fused at 15 or 20 amperes
This provides the best performance and also prevents
overloading house wiring circuits which could cause a fire
hazard from overheated wires. It is recommended that a
if you are throwing away your old refrigerator, make sure
the CFC refrigerant is removed for proper disposal by a
qualified servicer, if you intentionally release this CFC
refrigerant, you cart be subject to fines and imprisonment
under provisions of environmental legisfation
I" ' 'l'l"l
separate circuit serving only this appliance be provided
Use a receptacle which cannot be turned off with a switch
or puEt chain Do not use an extension cord,,
Where a standard two-prong wail outlet is encountered,
it is your personal responsibility and obligation to have it
replaced with a properly grounded three-prong wait outlet,
Do not, under any circumstances, cut or remove the
third (ground) prong from the power cord.
NOTE: Before perfor`ming any type of installation,
cleaning, or removing a light bulb, turn the control
(Thermostat, ReNgerator or Freezer Contro! depending
on the model) to OFF and then disconnect the refrigerator
from the electrical source When you are finished,
reconnect the refrigerator Io the electrical source and
reset the control (Thermostat, Refrigerator or Freezer
Control, depending on the model) to the desired setting
USE OF EXTENSION CORDS
Because of potential safety hazards under certain
conditions, we strongly recommend against the use of
an extension cord,, However, if you still elect to use
an extension cord, it is abeo+uteiy necessary that it be
a UL-tisted (in the United States) or a CSA-fisted
(in Canada). 3-.wire grounding type appliance extension
cord having a grounding type plug and outlet and that
the etectdcat rating of the cord be _5 amperes (minimum)
and 120 volts.
Use of an extension cord witf increase the clearance
needed for the back of the refrigerator,

i , i , .................... i
I
Use this section to become more famitiar with the parts and features Page references are included for your
convenience.
NOTE:This guide covers several different models,The refrigerator you have purchased may have some
or all of the items listed below, The locations of the features shown below may not match your model,
OSw]ng-Down Shelf (p, 18)* (_)Leveling Feet (inside) (p,, 11)
OAdjusta Cube Ice Maker (p, 22)" (_)Refrigeralor Door Rack (p 17)
e PuTi-Over Shelf (p 18) O Egg Box*
eGlide-Out Floor Tray (p 19)" eModular Door Bins (p. 17)
OCoolSense ElectronicTemperatura Control System (p, t2) QFronlchil_ Door Cooling (p,1t)*
(Digilal Readout)"
(_ Refrigerator Light (p, 20)
(_Meat Tray" I Snack Pan (p15)
OAdjustable Shetves (p, 15)
O Can Dispenser'
(_Supra Fresh Cdsper (with Tilt-Out Compartment')(p, 16)
(_Base Grille (p 8)
e Door Cooling
QDairy Comer (p 18)
OTilt-Out Door Basket (2 basket) (p, 18) °
OFreezer Light (p 21)
• on some models
Excessive Weight Hazard
Use two or more people to move and install
refrigeratol:
Failure to do so can result in back or other injury.
UNPACKING YOUR REFRIGERATOR
Remove tape and any temporary labets from your
refrigerator before using Do not remove any warning-
type labels, the model and serial number label or the
TechSheet that is attached to back wall of the refrigerator.
To remove any remaining tape or glue, rub the area
briskly with your thumb Tape or glue residue can also be
easily removed by rubbing a small amount of liquid dish
soap over the adhesive with your fingers Wipe with warm
water and dry
Do not use sharp instruments, rubbing alcohol, flammable
fluids or abrasive cleaners to remove tape or glue These
products can damage the surface of your refrigerator For
more information, see the Important Safety Instructions
section.
Refrigerator shelves are installed in the shipping position
Please reinstall shelves according to your individual
storage needs.
When Moving Your Refrigerator:
Your refrigerator is heavy When moving the
refrigerator for cleaning or service, be sure to protect
the floor A_ways pul! the refrigerator straight out when
moving it Do not wiggle or walk the refrigerator when
trying to move it, as floor damage could occult
Explosion Hazard
Keep flammable materials and vapors, such as
gasoline, away from refrigerator
Failure to do so can result in death, explosion or fire.
INSTALLATION
I n Avoid placing the unitnear heat sources, direct sunlight
or moisture
2. To avoid vibration, the unit must be tevet If required,
adjust the leveling screws to compensate for
unevenness of the floor The front should be slightly
higher than the rear to aid in door closing Leveling
screws can be turned easily by tipping the cabinet
slightly Turn the leveling screws clockwise (dh_) to
raise the unit, counterclockwise (t,gIlt) to lower it
Install this appliance in an area where the temperature
is between 55°F (13°C) and 110°F (43"C) If the
temperature around the appliance is too low or high,
cooling ability may lessen
NEXT
1o Clean your refrigerator thoroughly and wipe off al_ dust
accumulated during shipping
2. lnstatl accessories such as ice cube bin, drawers,
shelves, etc, in their proper places They are packed
together to prevent possibie damage during shipment
3o Let your refrigerator run for 2 or 3 hours before putting
food in it Check the flow of cold air in the freezer
compartment to ensure proper cooling Your refrigerator
is now ready for use
CAUTION:
• Be careful when you work with hinge, base grille,
stopper etc You may be injured
" Do not put hands or metal sticks into air vents, base
grille or bottom of refrigerator You may be injured or
receive an electrical shock,
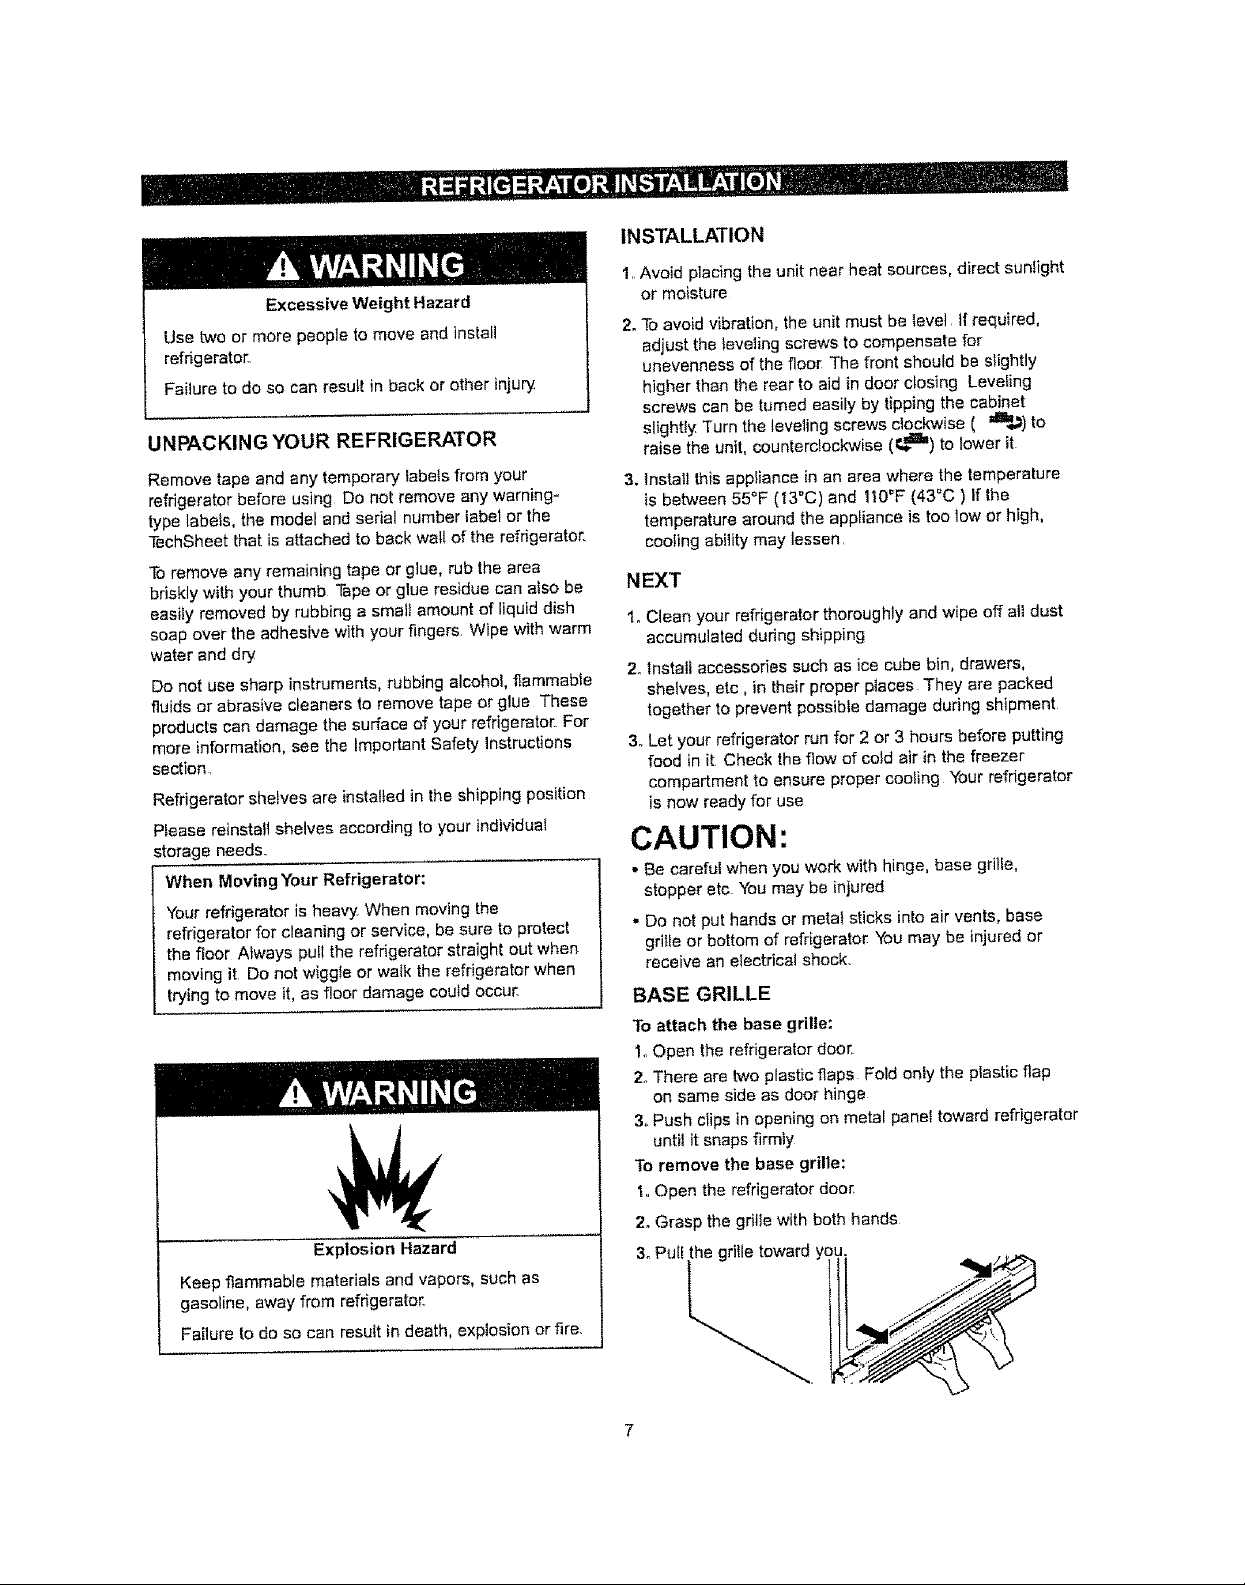
BASE GRILLE
To attach the base grille:
Io Open the refrigerator door,
2oThere are two plastic flaps Fold onfy the plastic flap
on same side as door hinge
3,,Push clips in opening on metal panel toward refrigerator
until it snaps firmly
To remove the base grille:
1. Open the refrigerator door
2o Grasp the grille with both hands
3. Pull the grille toward you.

REMOVING REVERSING (OPTIONAL) AND
REPLACING REFRIGERATOR DOORS
TOOLS NEEDED: 10mm hex-head socketwrench,
No. 2 Phillips screwdriver, flat-head screwdriver; ll4-inch
opemend wrench, flat 2,.inchputty knife
IMPORTANT: Before you begin, turn the refrigerator OFF
and unptug it Remove food and any adjustable door or
utility bins from doors.
HOWTO REVERSE DOOR OPENING DIRECTION
(when converting from the left-opening type to right.,
opening type)
1. Removing Freezer Door
• Remove the lop hinge cover (1)
• Remove the 3 bolts end lift off the top hinge (2)
• Lift the freezer door (3) slightIy and remove it
• Pry off the cover (4) using a flat-head screwdriver and
attach it on the right
• Remove the screw (5), remove (6), (7), (8). Reverse (6)
(7), (8) as i({ustrated exactIy and attach it to the left
of the door
2. Removing Refrigerator Door
• Remove the boils and Phillips screw (9) fift off the
middle hinge (10)
• Lift the door (11) slightly and remove it
• Take off the base griIie (12)
• Remove the pin (t5)from right side on hinge (20)
to left side on hinge (20).
• Remove screw (17) on lefi side of the base.
• Loosen 3 bolts (18) on right side of the base
Remove the bottom hinge (20) and replace it on the
left side of the base
• Attach screw (17) on right side of the base
• Loosen 4 screws (22) and reverse (I6) and (23) as
illustrated exactly and attach it to the left side
• Pry off the cover (24) using a flat-head screwddver and
attach it on the right,,
Before After
l---O I =--4@
__AIjeL_
Before
3, Moving Freezer Handle
• Remove cap (3) and cover I4)
• Loosen the screws (I) (_vo on the top
and two on the bottom), take off the handle (2), and
attach it on the right
• Attach the removed cover (4) on the left,
- Attach cap (3) on the top right side,
@
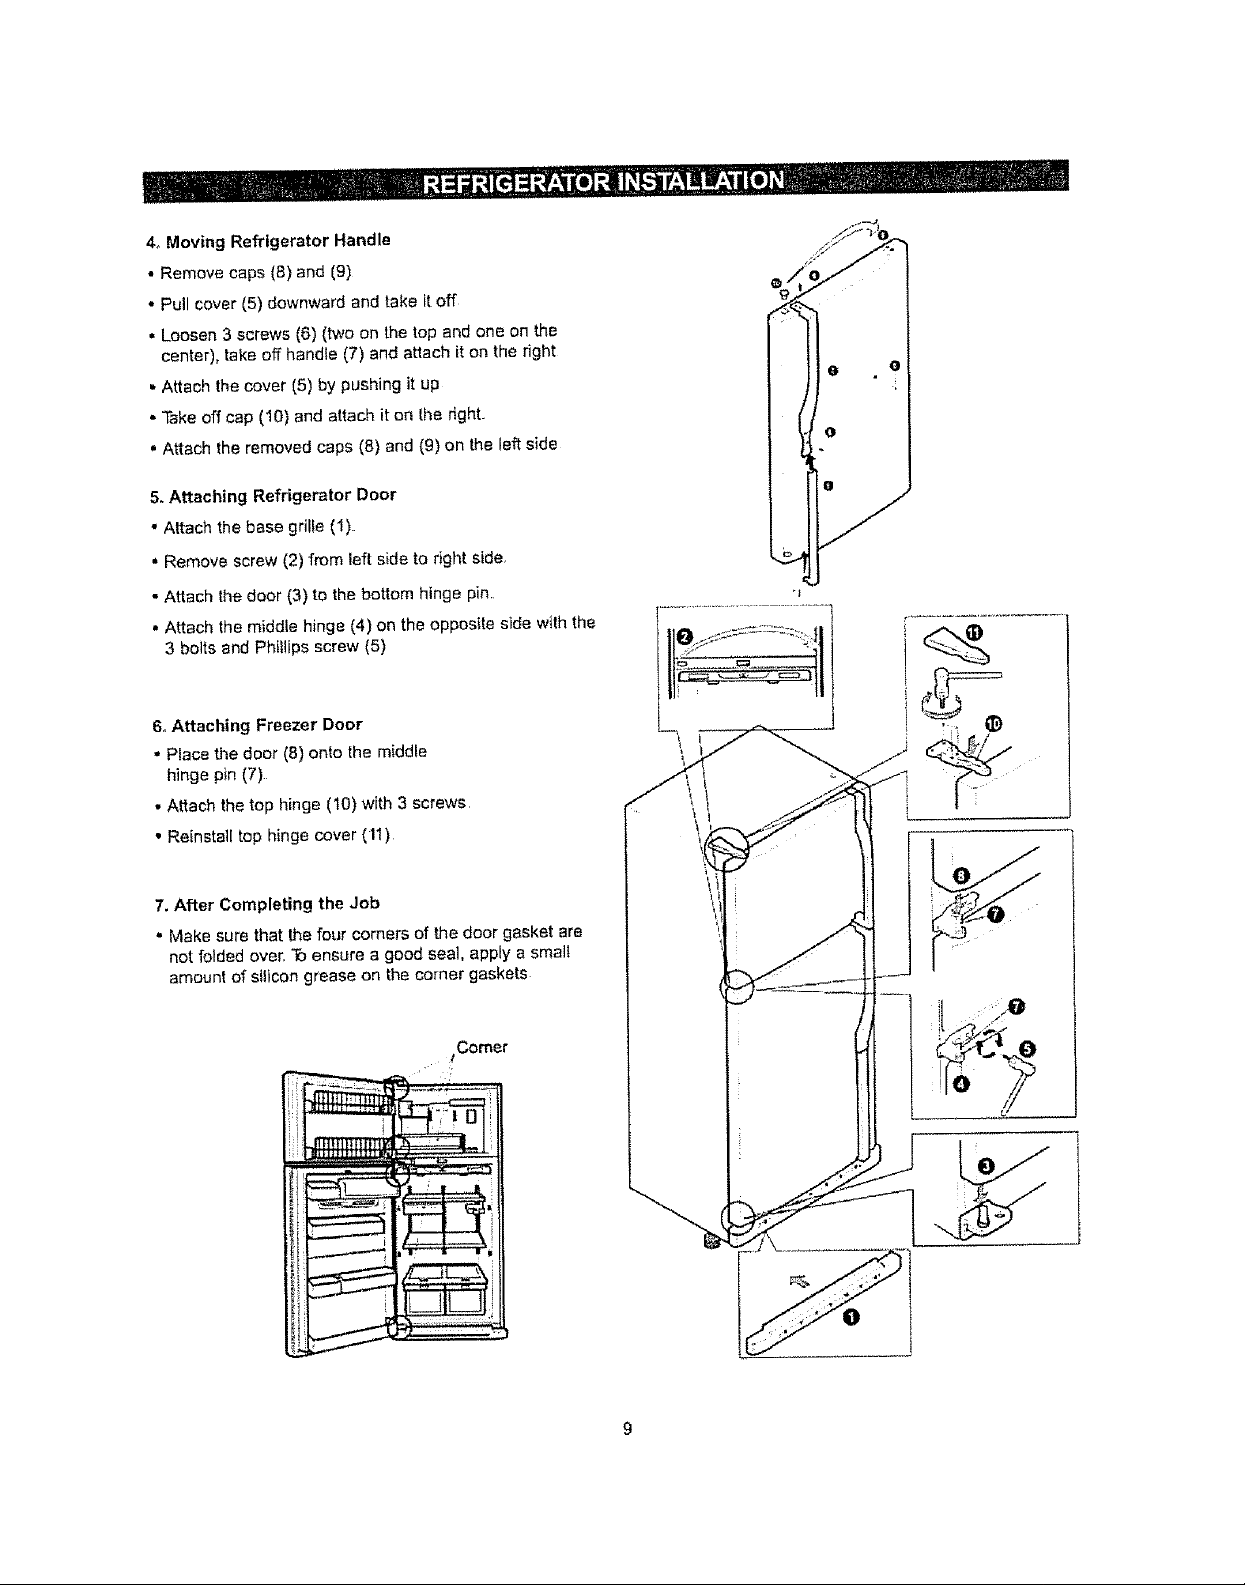
4,Moving Refrigerator Handle
• Remove caps (8) and (9)
• Pull cover (5) downward end take it off
• Loosen 3 screws (6) (two on the top and one on the
center), take off handle (7) and attach it on the right
• Attach the cover (5) by pushing it up
• Take off cap (10) and attach it on the fight
• Attach the removed caps (8) and (9) on the left side
5. Attaching Refrigerator Door
• Attach the base gritfe (f)
• Remove screw (2) from teft side to right side.
- Attach the door (3) to the bottom hinge pin.
• Attach the middle hinge (4) on the opposite side with the
3 bolts and Phillips screw (5)
6. Attaching Freezer Door
. Place the door (8) onto the middle
hinge pin (7)
• Attach the top hinge (t0) with 3 screws
• Reinstall top hinge cover (11)
7. After Completing the Job
= Make sure that thefour corners of the door gasket are
not folded over. Toensure a good seal, apply a small
amount of silicon grease on the corner gaskets
 Loading...