

Page 1
Electric Range
Use & Care Guide
Estufa eléctrica
Manual de uso y cuidado
Model/Modelo 790.99613
m
z
O
n
C/3
m
C/)
5
z<
o
Sears Roebuck and Co., Hoffman Estates, IL 60179 U.S.A.
www.sears.com
P/N 318200712 Rev. A (0801)
Page 2

Table of Contents
Range Warranty............................................................. 2
IMPORTANT SAFETY INSTRUCTIONS
...........................
3-5
Serial Plate Location............................................................5
Product Record....................................................................5
Surface Cooking................................................................6-7
Range Features....................................................................8
Setting Surface Controls
Before Setting Oven Controls
Setting Side Oven Control
...
....................................... 9-11
..........................................
..............................................
12
13
Control Pad Features.........................................................14
Minimum and Maximum Control Pad Settings.
Setting the Oven Controls
...........................................
..............
15-32
14
Please carefully read and save these instructions
This Use & Care Manual contains general operating instructions for your appliance and feature information for several
models. Your product may not have all the described features. The graphics shown are representative. The graphics on
your appliance may not look exactly like those shown. Common sense and caution must be practiced when installing,
operating and maintaining any appliance.
Kenmore Elite Warranty
When installed, operated and maintained according to all instructions supplied with the product, if this appliance fails due to a
defect in material and workmanship within one year from the date of purchase, call 1-800-4-MY-HOME® to arrange for free
repair.
For five years from the date of purchase, if the cooktop glass fails due to thermal shock or the cooktop elements are
defective, call 1-800-4-MY-HOME® to arrange for free part replacement. After the first year from purchase date, you must
pay the labor cost of part installation.
This warranty applies for only 90 days from the date of purchase if this appliance is ever used for other than private family
purposes.
This warranty covers only defects in material and workmanship. Sears will NOT pay for:
1. Cracks in a ceramic glass cooktop that are not a result of thermal shock.
2. Stains and scratches on a ceramic glass cooktop resulting from accident or improper operation or maintenance.
3. Expendable items that can wear out from normal use, including but not limited to filters, belts, light bulbs, and bags.
4. A service technician to instruct the user in correct product installation, operation or maintenance.
5. A service technician to clean or maintain this product.
6. Damage to or failure of this product if it is not installed, operated or maintained according to the all instructions
supplied with the product.
7. Damage to or failure of this product resulting from accident, abuse, misuse or use for other than its intended purpose.
8. Damage to or failure of this product caused by the use of detergents, cleaners, chemicals or utensils other than those
recommended in all instructions supplied with the product.
9. Damage to or failure of parts or systems resulting from unauthorized modifications made to this product.
Disclaimer of implied warranties; limitation of remedies
Customer’s sole and exclusive remedy under this limited warranty shall be product repair as provided herein. Implied
warranties, including warranties of merchantability or fitness for a particular purpose, are limited to one year or the
shortest period allowed by law. Sears shall not be liable for incidental or consequential damages. Some states and
provinces do not allow the exclusion or limitation of incidental or consequential damages, or limitation on the duration of
implied warranties of merchantability or fitness, so these exclusions or limitations may not apply to you.
This warranty applies only while this appliance is used in the United States or Canada.
This warranty gives you specific legal rights, and you may also have other rights which vary from state to state.
Sears, Roebuck and Co., Hoffman Estates, IL 60179
Sears Canada Inc., Toronto, Ontario, Canada MSB 2B8
Self-Cleaning.................................................................33-36
Adjusting the Oven Temperature
Porcelain Enamel Oven Cleaning
.....................................
....................................
36
37
Ceramic Glass Cooktop Cleaning
and Maintenance...........................................................38-39
Care and Cleaning of Stainless Steel
General Cleaning & Maintenance..............
Before you Call
Protection Agreements
.............................................................
.....................................................
..................
...............
............
40-41
42-43
39
44
Notes ........................................................................ 45
Sears Service
.........
....................................................... 46
Printed in United States
Page 3
Important Safety Instructions
Read all instructions before using this appliance.
Save these instructions for future reference.
This manual contains many important safety messages. Always read and obey all safety messages.
The safety symbol m calls your attention to safety messages that inform you of hazards that can kill or hurt you or
others, or cause damage to the product.
A WARNING
A CAUTION
product damage.
All safety messages will identify the hazard, tell you how to reduce the chance of injury, and tell you what can happen if the
instructions are not followed.
Indicates an imminently hazardous situation which, if not avoided may result in death or serious injury.
Indicates an imminently hazardous situation which, if not avoided may result in minor or moderate injury, or
A WARNING
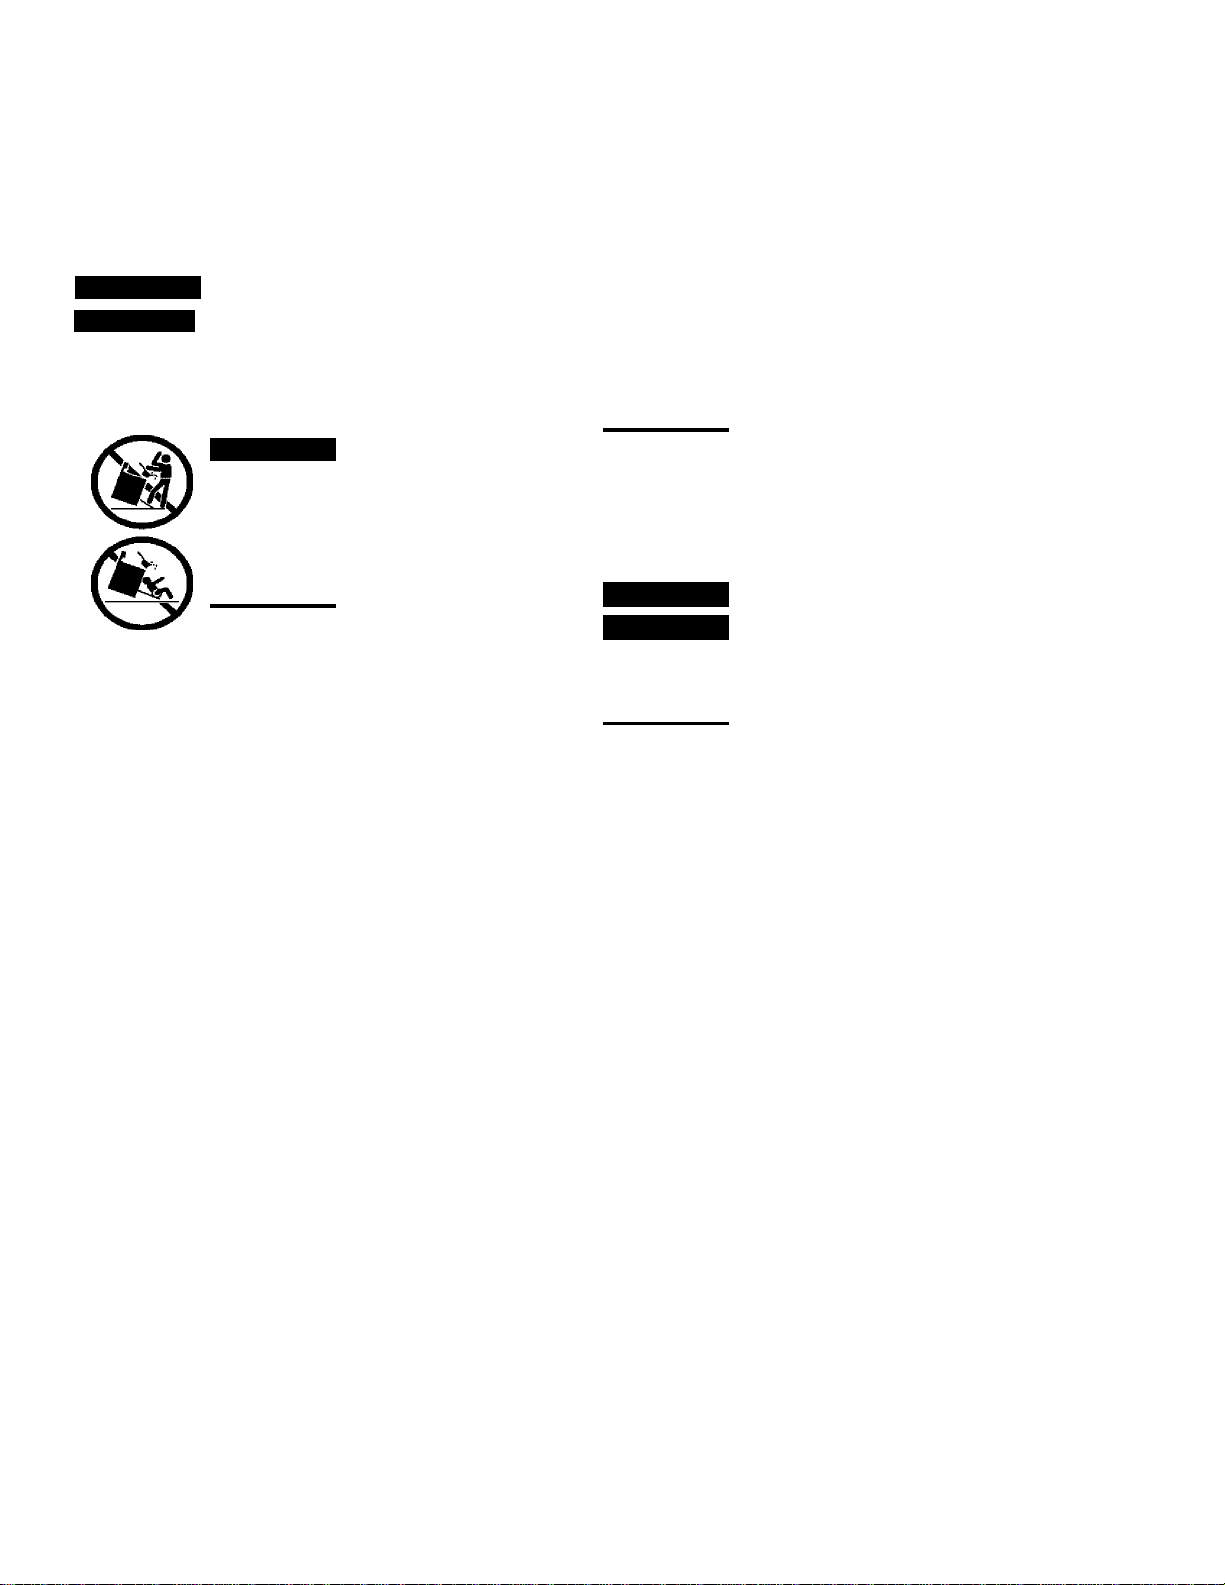
All ranges can tip.
Injury to persons could result.
Install anti-tip device packed
with range.
See Installation Instructions.
A WARNING
tipping, the range must be secured by properly
installed anti-tip bracket(s) provided with the
range. To check if the brackets are installed
properly, remove the storage drawer and verify
that the anti-tip brackets are engaged. Refer to
the Installation Instructions for proper anti-tip
bracket(s) installation.
Remove all tape and packaging before using the
range. Destroy the carton and plastic bags after
unpacking the range. Never allow children to play
with packaging material.
Proper Installation-Be sure your appliance is
properly installed and grounded by a qualified
technician in accordance with the Nationai
Eiectricai Code ANSI/NFPA No. 70—iatest edition,
and iocai code requirements. Install only per
installation instructions provided in the literature
package for this range.
Ask your dealer to recommend a qualified technician
and an authorized repair service. Know how to
disconnect the power to the range at the circuit
breaker or fuse box in case of an emergency.
User servicing—Do not repair or repiace any part
of the appiiance uniess specificaiiy
recommended in the manuais. All other servicing
shouid be done only by a qualified technician, this
may reduce the risk of personal injury and damage to
the range.
Never modify or aiter the construction of a range
by removing ieveiing iegs, paneis, wire covers,
anti-tip brackets/screws, or any other part of the
product.
To reduce the risk of
A WARNING
or drawer of this range can resuit in serious injuries
and aiso cause damage to the range. Do not allow
children to climb or play around the range. The weight of a
child on an open door may cause the range to tip, resuiting
in serious burns or other injury.
A WARNING
A CAUTION
in the cabinets above a range or on backguard of a
range. Children climbing on the range to reach items could
be seriously injured.
A WARNING
heating the room.
• Storage in or on Appiiance—Fiammabie materiais
shouid not be stored in an oven, near surface units.
This includes paper, plastic and cloth items, such as
cookbooks, piasticware and toweis, as well as
flammable liquids. Do not store expiosives, such as
aerosoi cans, on or near the appliance. Flammable
materials may explode and result in fire or property
damage.
• Do not leave children alone—Children should not be
left alone or unattended in the area where appliance
is in use. They should never be allowed to sit or stand
on any part of the appliance.
• DO NOT TOUCH SURFACE UNITS, AREAS NEAR
THESE UNITS, OVEN HEATING ELEMENTS OR
INTERIOR SURFACES OF THE OVEN. Both surface
and oven heating elements may be hot even though
they are dark in color. Areas near surface units may
become hot enough to cause burns. During and after
use, do not touch, or let clothing or other flammable
materials touch these areas until they have had
sufficient time to cool. Among these areas are the
cooktop, surfaces facing the cooktop, the oven vent
openings and surfaces near these openings, oven door
and window.
• Wear proper apparel—Loose-fitting or hanging
garments should never be worn while using the
appliance. Do not let clothing or other flammable
materials contact hot surfaces.
• Do not use water or flour on grease fires—Smother
the fire with a pan lid, or use baking soda, a dry
chemical or foam-type extinguisher.
I Stepping, ieaning or sitting on the doors
Do not use the oven for storage.
Do not store items of interest to chiidren
Never use your appliance to warming or
m
Q
n
Page 4

Important Safety Instructions
• When heating fat or grease, watch it cioseiy. Fat or
grease may catch fire if aiiowed to become too hot.
• Use oniy dry pothoiders—Moist or damp pothoiders
on hot surfaces may resuit in burns from steam. Do
not iet pothoiders touch hot heating eiements. Do not
use a towei or other buiky cioth instead of a potholder.
• Do not heat unopened food containers—Build-up of
pressure may cause container to burst and result in
injury.
• Remove the oven doors from any unused range if it
is to be stored or discarded.
IMPORTANT—Do not attempt to operate the oven
during a power failure. If the power fails, always turn
the ovens off. If the ovens are not turns off and the power
resumes, the oven may begin to operate again. Food left
unattended could catch fire or spoil.
ACAUTION
by cold temperatures. When you use your appliance
for the first time, or if it has not been used for a long
period of time, make sure that it has been exposed to a
temperature above 0°C/32°F for at least 3 hours before
connecting it to the power supply.
IMPORTANT INSTRUCTIONS FOR USING YOUR COOKTOP
• Know which knob controls each surface heating
unit.
• Use proper pan size. This appliance is equipped with
one or more surface units of different sizes. Select
utensils having flat bottoms large enough to cover the
surface unit. The use of undersized utensils will expose
a portion of the surface heating to direct contact and
may result in ignition of clothing. Proper relationship of
utensil to the surface unit will also improve efficiency.
• Utensil handles should be turned inward and not
extend over adjacent surface units—To reduce the
risk of burns, ignition of flammable materials, and
spillage due to unintentional contact with the utensil.
The handle of the utensil should be positioned so that it
is turned inward, and does not extend over adjacent
surface units.
■ Never leave surface units unattended at high heat
settings—Boilovers cause smoking and greasy
spillovers that may ignite, or a pan that has boiled dry
may melt.
• Protective liners—Do not use aluminum foil to line
oven bottom or any other part of the appliance. Only use
aluminum foil as recommended for baking if used as a
cover placed on the food. Any other use of protective
liners or aluminum foil may result in a risk of electric
shock or fire or short circuit.
Electronic controllers can be damaged
• Glazed cooking utensils—Only certain types of glass,
glass/ceramic, ceramic, earthenware, or other glazed
utensils are suitable for rangetop service without
breaking due to the sudden change in temperature.
Check the manufacturer’s recommendations for
rangetop use.
• Do not use decorative surface element covers. If an
element is accidentally turned on, the decorative cover
will become hot and possibly melt. Burns will occur if
the hot covers are touched. Damage may also be done
to the cooktop.
FOR GLASS COOKTOPS ONLY
• Do not clean or operate a broken cooktop—If
cooktop should break, cleaning solutions and spillovers
may penetrate the broken cooktop and create a risk of
electric shock. Contact a qualified technician
immediately.
• Clean cooktop glass with caution—If a wet sponge or
cloth is used to wipe spills on a hot cooking area, be
careful to avoid a steam burn. Some cleaners can
produce harmful fumes if applied to a hot surface.
• Avoid scratching the cooktop glass with sharp
objects.
IMPORTANT INSTRUCTIONS FOR USING YOUR OVEN
• Use care when opening oven door—Stand to the side
of the range when opening the door of a hot oven. Let
hot air or steam escape before you remove or replace
food in the oven.
• Keep ovens vents unobstructed. Each vent has its
own vent located on the top, near each side and towards
the back of the cooktop. Touching the surfaces in this
area when the oven is operating may cause severe
burns. Also, do not place plastic or heat-sensitive items
on or near an oven vent. These items could melt or
ignite.
• Placement of ovens racks. Always place oven racks in
desired location while ovens are cool. If rack must be
moved while oven is hot use extreme caution. Use
pothoiders and grasp the rack with both hands to
reposition. Do not let pothoiders contact the hot heating
elements in the ovens. Remove all utensils from the rack
before moving.
• Do not use the broiler pan without its grid. The
broiler pan and its grid allow dripping fat to drain and be
kept away from the high heat of the broiler.
• Do not cover the broiler grid with aluminum foil.
Exposed fat and grease could ignite.
• Do not touch a hot light bulb with a damp cloth.
Doing so could cause the bulb to break. Disconnect the
appliance or turn off the power to the appliance before
removing and replacing light bulb.
Page 5
Important Safety Instructions
IMPORTANT INSTRUCTIONS FOR CLEANING YOUR RANGE
• Clean the range regularly to keep all parts free of
grease that could catch fire. Exhaust fan ventilation
hoods and grease fiiters should be kept ciean. Do not
aliow grease to accumuiate on hood or fiiter. Greasy
deposits in the fan couid catch fire. When you are
fiaming food under the hood, turn the fan on. Refer to
the hood manufacturer’s instructions for cieaning.
■ Kitchen cleaners and aerosols—Always follow the
manufacturer’s recommended directions for use. Be
aware that excess residue from cleaners and aerosols
may ignite causing damage and injury.
SELF CLEANING OVENS
• In the self-Cleaning cycle only clean the parts listed
in this Use and Care Guide. Before self cleaning the
oven, remove the broiler pan and any utensils or foods
from the oven.
• Do not use oven cleaners—No commercial oven
cleaner or ovens liner protective coating of any kind
should be used in or around any part of the oven.
• Do not clean door gasket—^The door gasket is
essential for a good seal. Care should be taken not to
rub, damage or move the gasket.
• Remove oven racks. Oven racks color will change If
left in the oven during a self-cleaning cycle.
[!22â!lUSm health of some birds is extremely
sensitive to the fumes given off during the self-cleaning
cycle of any range. Move birds to another well ventilated
room.
IMPORTANT SAFETY NOTICE
The California Safe Drinking Water and Toxic
Enforcement Act requires the Governor of California to
publish a list of substances known to the state to cause
cancer, birth defects or other reproductive harm, and
requires businesses to warn customers of potential
exposure to such substances.
SAVE THESE INSTRUCTIONS 5
0)
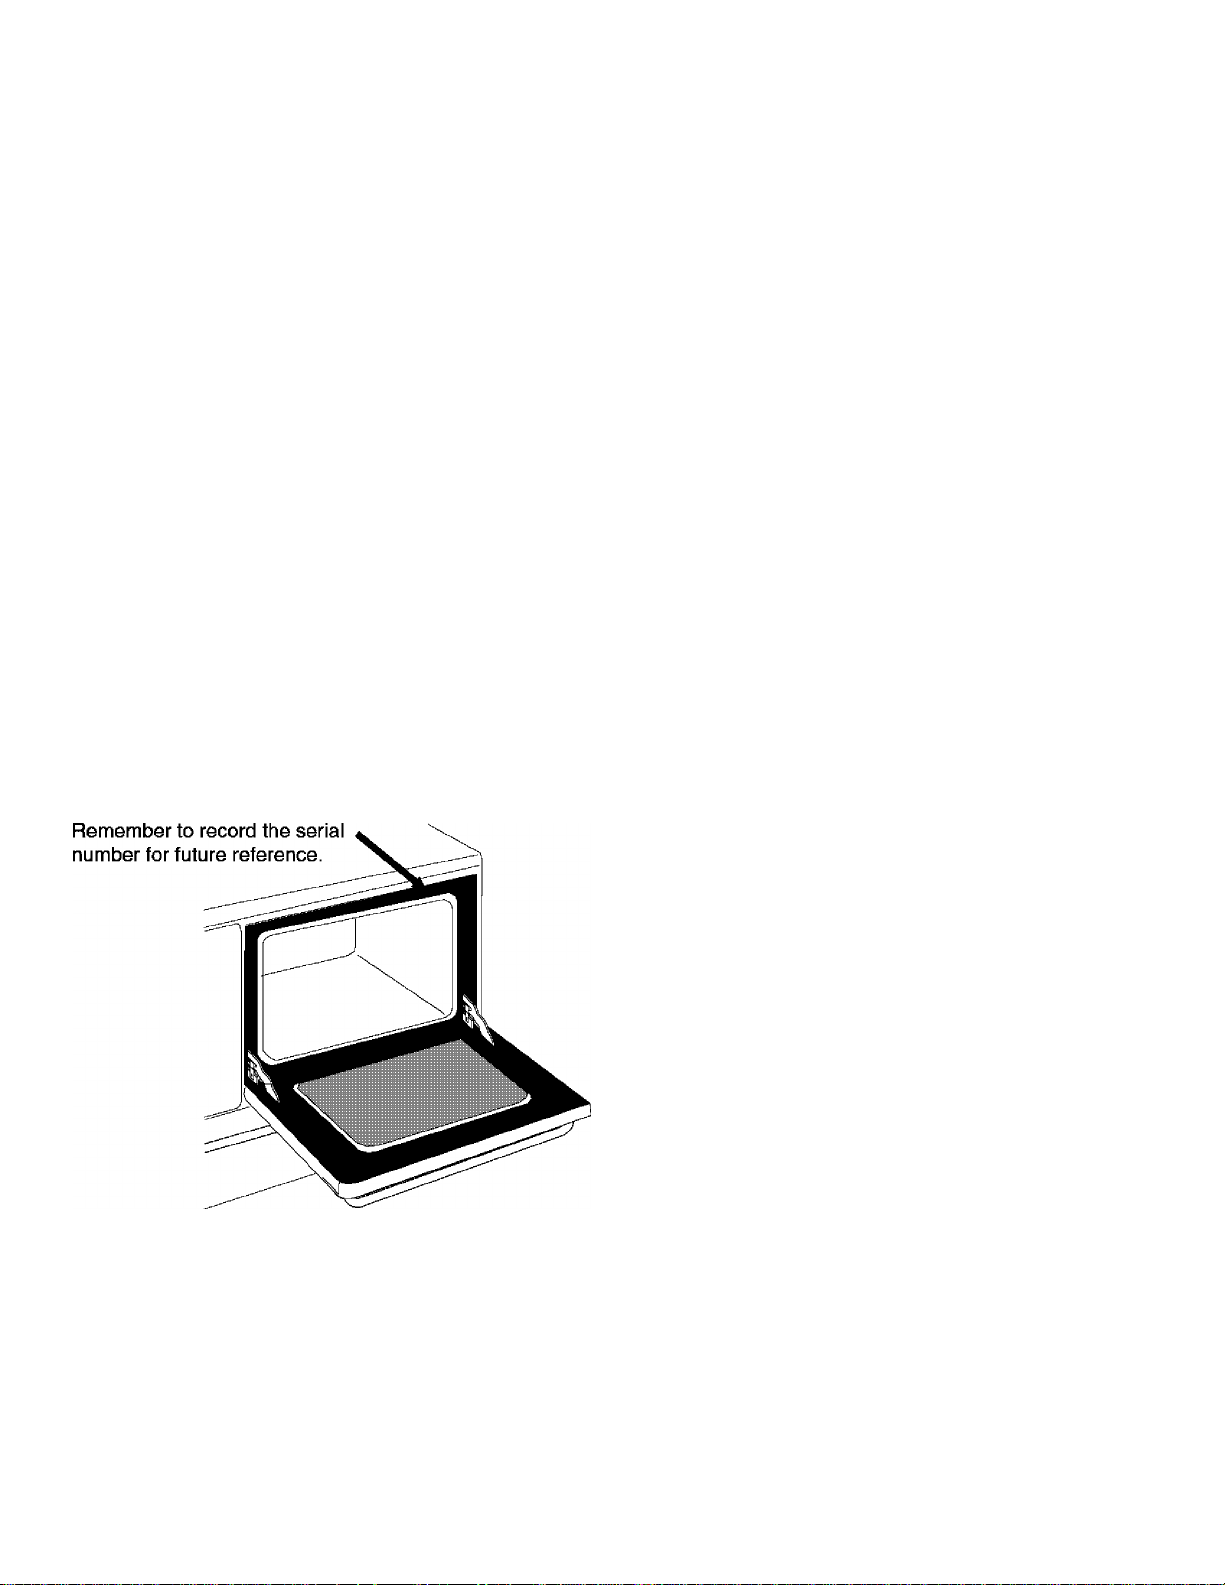
Serial Plate Location
You will find the model and serial
number printed on the serial plate.
Product Record
In this space below, record the date of purchase, model
and serial number of your product. You will find the model
and serial number printed on the serial plate.
Model No.
Serial No.
Date of purchase
Save these instructions and your sales receipt for future
reference.
Page 6
Surface Cooking
Use Proper Cookware
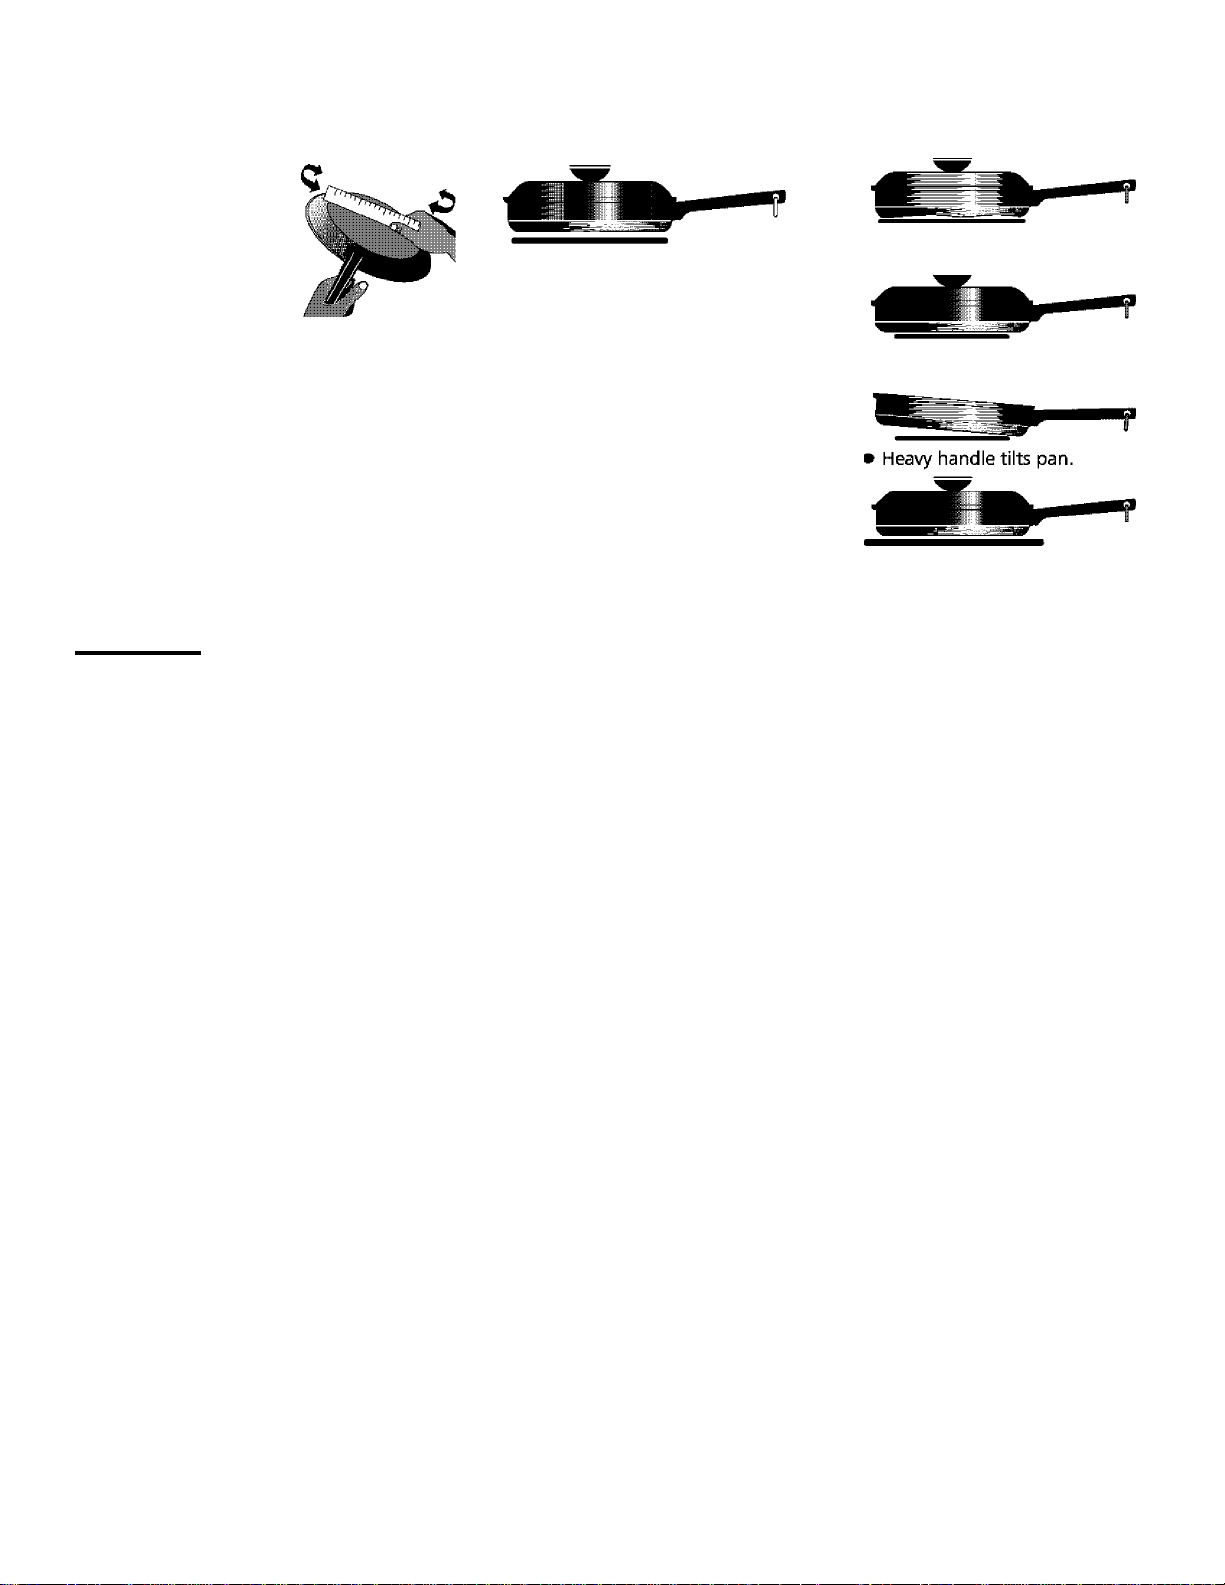
Cookware should
have flat bottoms that
make good contact
with the entire
surface heating
element. Check for
flatness by rotating a
ruler across the
bottom of the
cookware (See
Figure 1). Be sure to follow the
recommendations for using cookware as
shown in Figure 2.
Note: The size and type of cookware used
will influence the setting needed for best
cooking results.
Note: Always use an utensil for its intended
purpose. Follow manufacturer's instructions.
Some utensils were not made to be used in
the oven or on the cooktop.
^CAUTION
more than one burner because it could
damage your cooktop. It can also result in
exposure to carbon monoxide levels above
allowable current standards and be
hazardous to your health.
Do not use griddle over
Figure 1
CORRECT
Flat bottom and straight sides.
Tight fitting lids.
Weight of handle does not tilt
pan. Pan is well balanced.
Pan sizes match the amount of
food to be prepared and the
size of the surface element.
Made of a material that
conducts heat well.
Easy to clean.
Always match pot diameter to
element diameter.
Specialty pans such as lobster pots, griddles and pressure cookers may
be used but must conform to the above recommended cookware
requirements.
INCORRECT
Figure 2
Curved and warped pan
Pan overhangs unit by more
than one-half inch or 12mm.
Pan is smaller or larger than
element
Cookware Material types
The cookware material determines how evenly and quickly heat is transferred from the surface element to the pan
bottom. The most popular materials available are:
ALUMINUM - Excellent heat conductor. Some types of food will cause it to darken (Anodized aluminum cookware
resists staining & pitting). If aluminum pans slide across the ceramic glass cooktop, they may leave metal marks which
will resemble scratches. Remove these marks immediately.
COPPER - Excellent heat conductor but discolors easily. May leave metal marks on ceramic glass (see Aluminum
above).
STAINLESS STEEL - Slow heat conductor with uneven cooking results. Is durable, easy to clean and resists staining.
CAST IRON - A poor heat conductor however will retain heat very well. Cooks evenly once cooking temperature is
reached. Not recommended for use on ceramic cooktops.
PORCELAIN-ENAMEL on METAL - Heating characteristics will vary depending on base material. Porcelain-enamel
coating must be smooth to avoid scratching ceramic cooktops.
GLASS - Slow heat conductor. Not recommended for ceramic cooktop surfaces because it may scratch the glass.
Page 7
Surface Cooking
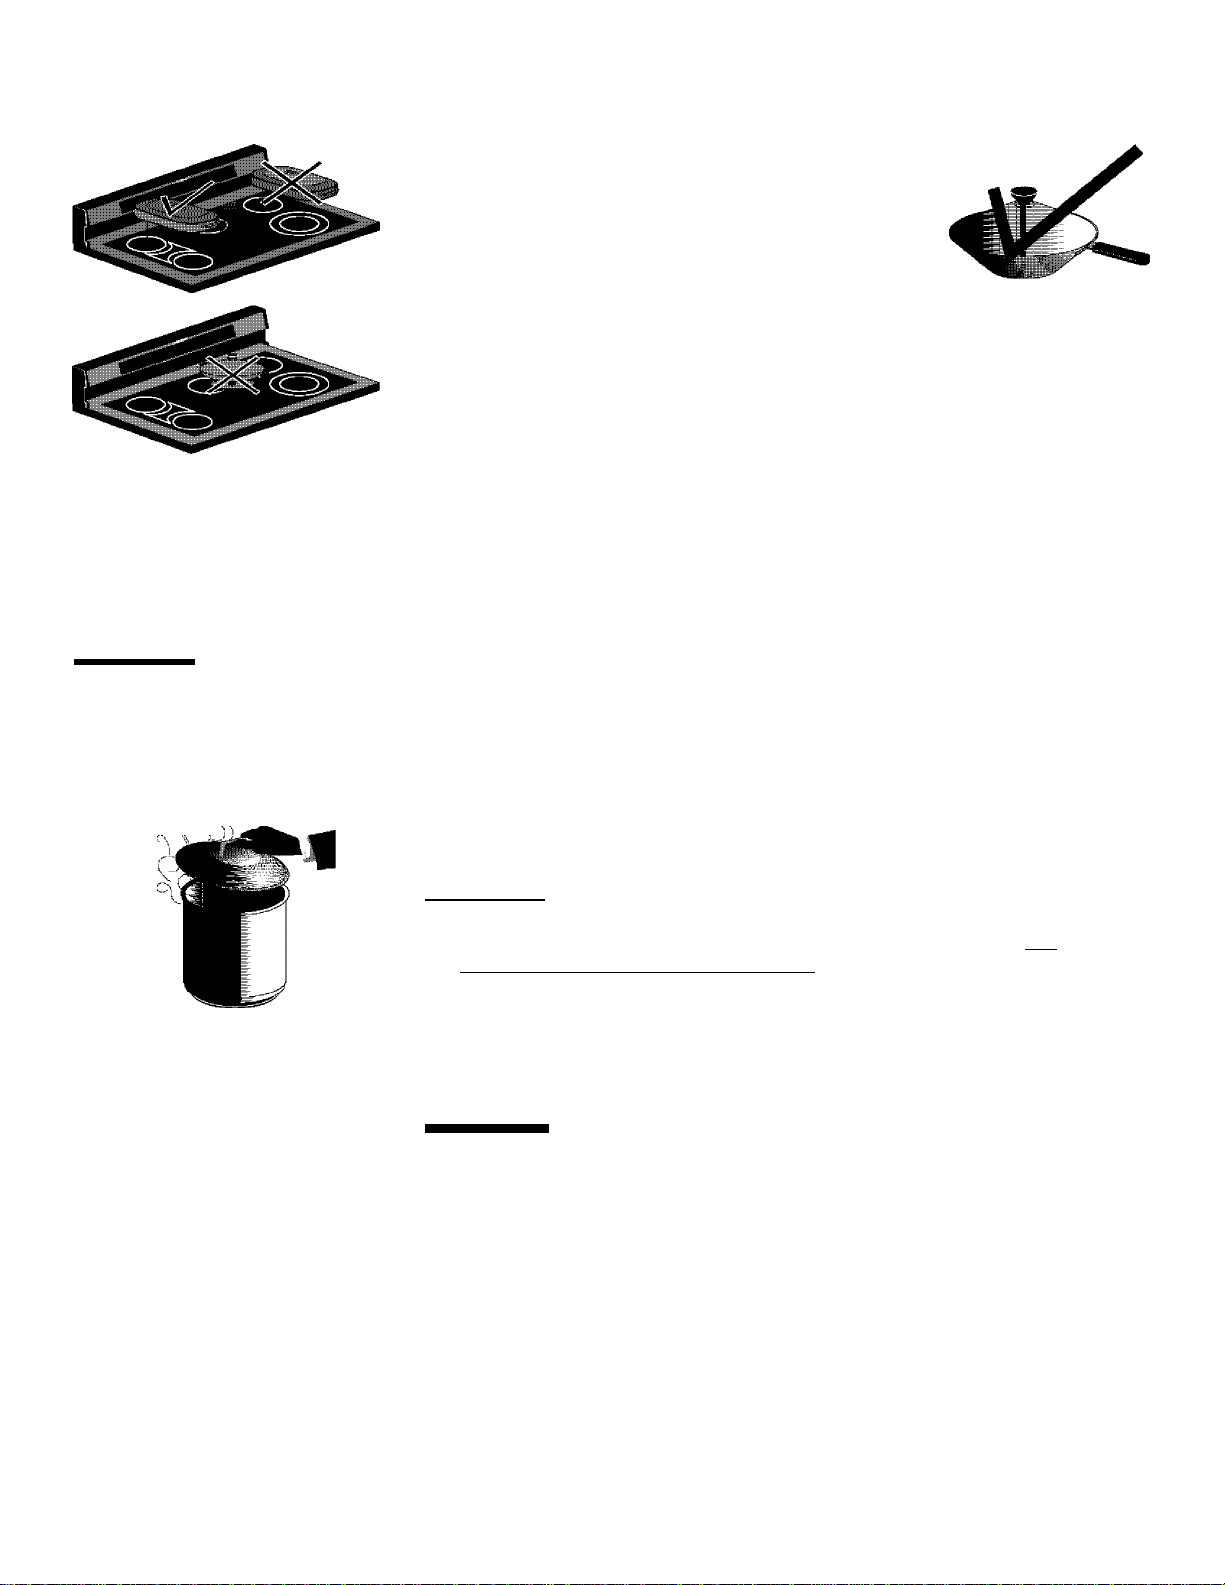
Specialty Pans & Trivets
DO NOT use a wok if it is
equipped with a metai ring.
Because this ring traps heat, the
cooktop surface couid be
damaged.
Woks with flat bottoms suitable for use on your
cooktop are available in most cookshop or hard
ware stores.
DO NOT use two elements (if the cooktop is not
equipped with bridge element) to heat one large
pan such as a roaster or griddle, or allow cooking
utensils to boil dry. The bottom surface of the pan in
either of these situations could cause discoloring or
cracking of the glass range surface.
Wire trivets: Do not use wire trivets. Cookware
bottoms must be in direct contact with the surface
elements.
* Specialty pans such as lobster pots, griddles and
pressure cookers may be used but must conform
to the above recommended cookware
requirements.
For glass smoothtop
models, only flat
bottomed woks (without
support rings) may be
used.
m
Canning Tips & information
A CAUTION I Canning can generate
large amounts of steam. Use ex
treme caution to prevent burns.
Always raise the lid to vent steam
away from^ou.
1. Use tested recipes and follow instructions carefully. Check with the
manufacturer of glass jars for the latest canning information.
2. Use flat-bottomed canners only. Heat is spread more evenly when the
bottom surface is flat.
3. Center canner on the burner grate.
4. Start with hot water and a high heat setting to reduce the time it takes to
bring the water to a boil; then reduce the heat setting as low as possible to
maintain a constant boil.
5. It is best to can small amounts and light loads.
A CAUTION
1. Do not use water bath or pressure canners that extend more than one
inch beyond the edge of the burner grate.
2. Do not leave water bath or pressure canners on high heat for an extended
amount of time.
3. Alternate surface units between each batch to allow the units and
surrounding surfaces to cool down. Try to avoid canning on the same
burner unit all day.
A CAUTION
destroyed and the jars are sealed completely. When canning in a water bath
canner, a gentle but steady boil must be maintained continuously for the
required time.
I
Prevent damage to cooktop:
I Safe canning requires that harmful micro-organisms are
Q
n
Page 8
Range features
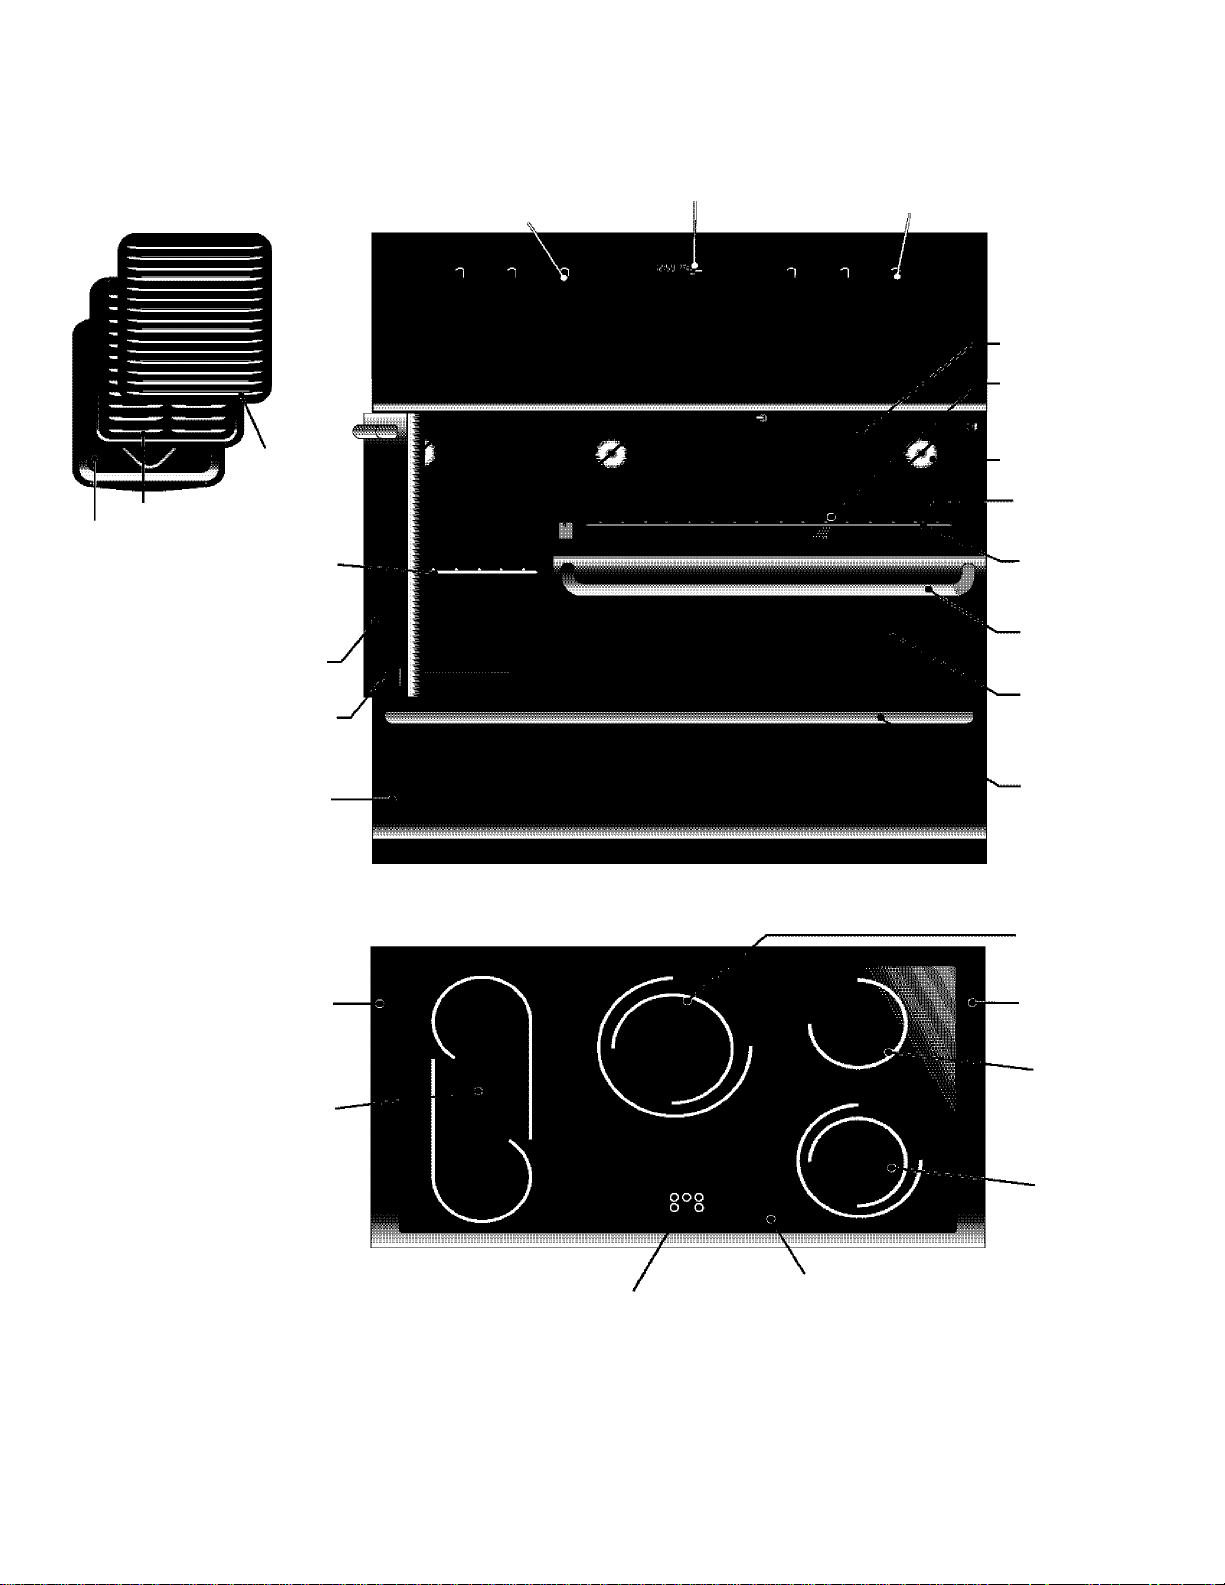
Grid
Broil Pan
Searing
Grill
Adjustable
Oven Rack (1)
Side
Oven Door
Name Piate
Side Oven Thermostat
Electronic Oven Controls
Surface
Control Knobs
Broil
— Element
— Convection
Element Cover
Oven Light
Self-Cleaning
Oven
Adjustable Oven
Racks (3)
Door
Handle
Glass Front
Oven Door
Drawer
Side
Oven Vent
Bridge
Element
Cooktop
Hot Surface
Indicator Lights
Drawer
Handle
Dual Element
Main
Oven Vent
Element
Dual
Element
Ceramic Glass
Cooktop
Page 9
Setting Surface Controls
Figure 1
NOTE: Please read detailed instructions for ceramic
glass cooktop cleaning in the General Care &
Cleaning section and Before You Call checklist
section of this Use and Care Guide.
NOTE: Radiant elements have a limiter that allows the
element to cycle on and off, even at the HI setting.
This helps to prevent damage to the ceramic smooth
top. Cycling at the HI setting is normal and can occur if
the cookware is too small for the radiant element or if
the cookware bottom is not flat (Refer to page 6 under
Use Proper Cookware).
NOTE: Due to the high intensity of heat generated by
the surface elements, the glass surface will turn green
when the element will be turned off. This phenomenon
is normal and the glass will come back to its original
white color after it has completely cooled down. (White
glass cooktops only).
Surface Cooking Settings
Use the chart (see Figure 2) to determine the correct
setting for the kind of food you are preparing. The
Simmer settings are used to simmer and keep larger
quantities of foods warm such as stews and soups.
The lower Simmer settings are ideal for delicate foods
and melting chocolate or butter.
Note: The size and type of cookware used will
influence the setting needed for best cooking results.
About the Ceramic Glass Cooktop
The ceramic cooktop has radiant surface elements located
below the surface of the glass. The design of the ceramic
cooktop outlines the area of the surface element underneath.
Make sure the diameter of the pan matches the diameter of
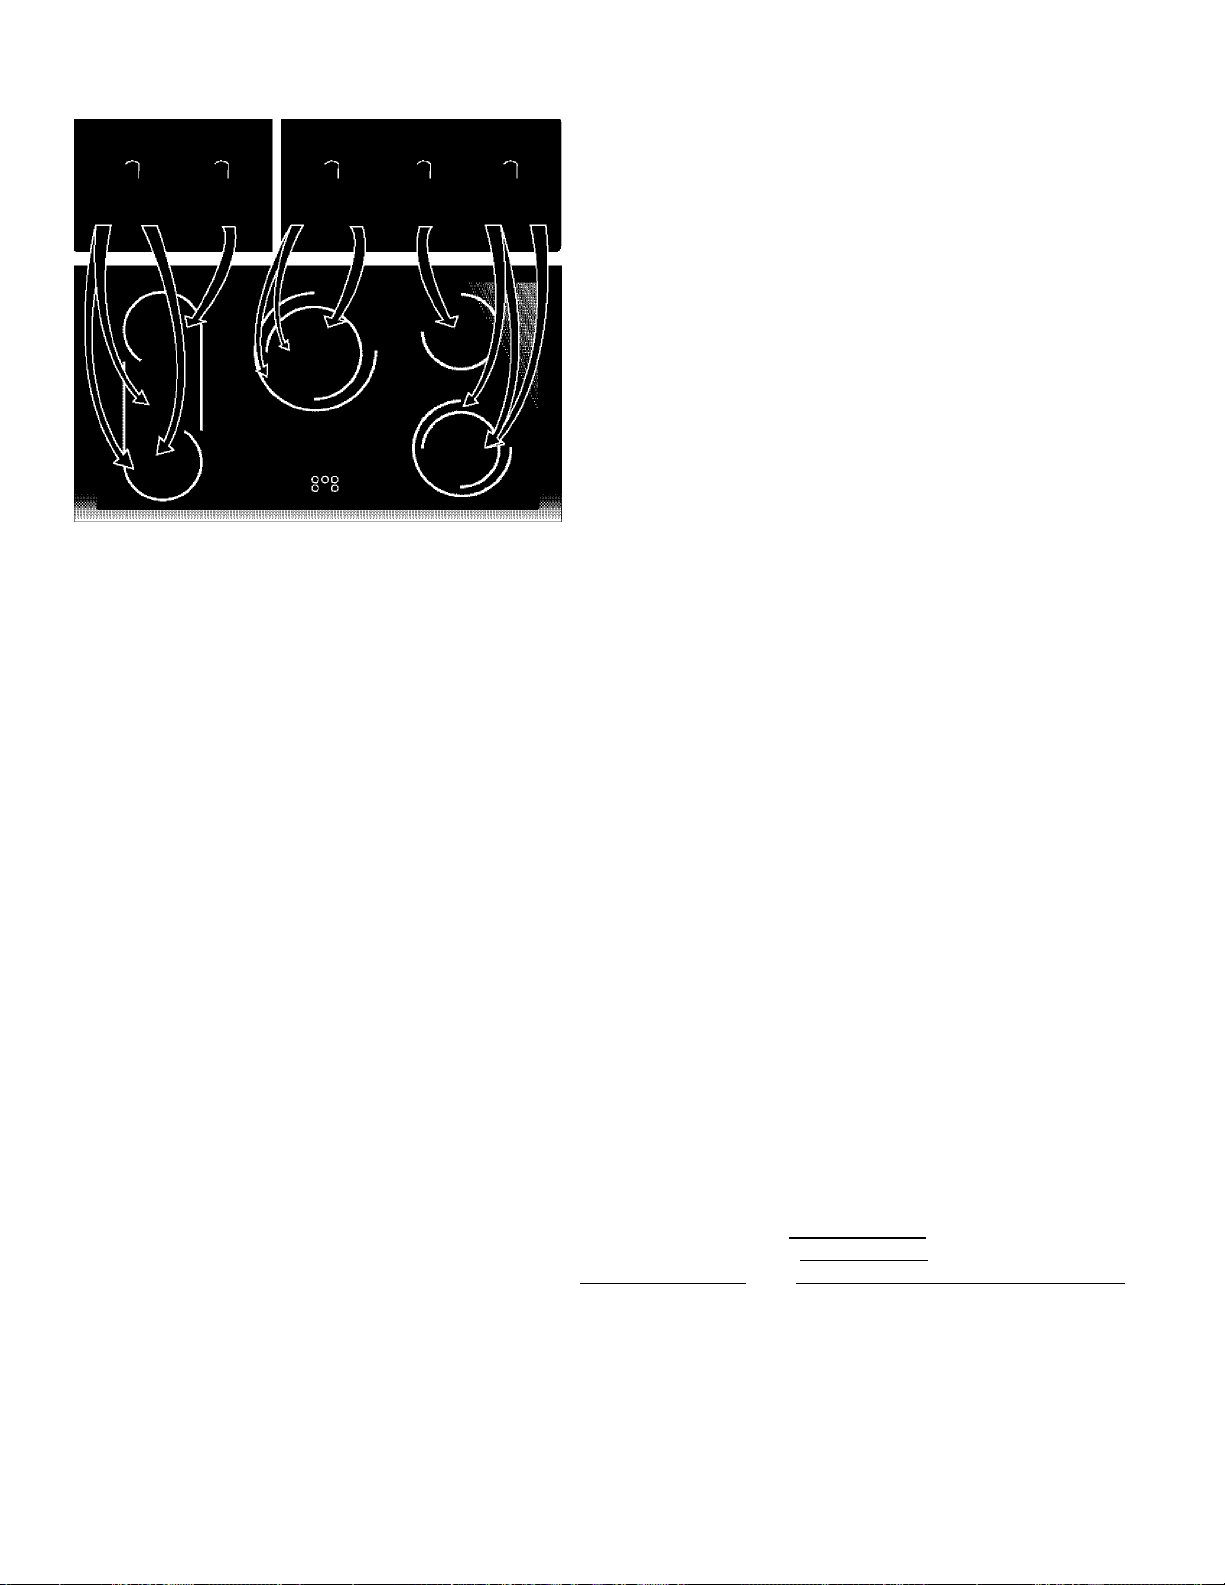
the element outline on the cooktop (See Figure 1).
Heat is transferred up through the surface of the cooktop to
the cookware. Only flat-bottom cookware should be used.
The type and size of cookware, the number of surface
elements in use and their settings, are all factors that will
affect the amount of heat that will spread to areas beyond the
surface elements. The areas surrounding the elements may
become hot enough to cause burns.
About the Radiant Surface Elements
The element temperature rises gradually and evenly. As the
temperature rises, the element will glow red. To maintain the
selected setting, the element will cycle on and off. The
heating element retains enough heat to provide a uniform and
consistent heat during the off cycle. For efficient cooking, turn
off the element several minutes before cooking is complete.
This will allow residual heat to complete the cooking process.
Locations of the Radiant Surface Elements and
Controls
Your range is equipped with radiant surface elements with
different wattage ratings. The ability to heat food quicker and
in larger volumes increases as the element wattage
increases.
The radiant surface elements are located on the cooktop as
follows:
- One 6 inch radiant element at the right rear position;
- A dual 6-or-9 inch radiant element at the right front
position;
- A dual 9-or-12 inch radiant element at the center rear
position;
- Two 7 inch radiant elements located at both the left front
and rear positions.
- Between left front and rear elements is a Bridge radiant
element. The BRIDGE radiant element is controlled using
the same knob that controls the left front radiant element
position.
lecommenc
Setting Type of Cooking
face Elements
^tarnriosnooSsn)^
joiT^af^roiIm^
MEDIUM HIGH (5-8)
MEDIUM LOW (2-4)
¡LOW (Lo - 2)
Continue a rapid boil, fry, deep fat fry
Maintain a slow boil, thicken saucE
Keep foods cooking, poach, stew
Keep warm. moll, sirnmorl
m
Q
n
0)
Figure 2
Page 10
Setting Surface Controls
Operating Single Radiant Surface Elements
The cooktop has single radiant surface elements at location as shown on figure 2.
To Operate the Single Surface Elements
1. Place correctly sized cookware on the radiant surface element.
2. Push in and turn the surface control knob in either direction to the desired setting
(Figure 1). Turn the knob to adjust the setting if desired. Sfart most cooking
operations on a higher setting and then turn to a lower setting to finish cooking.
Each surface element provides a constant amount of heat at each setting. A
glowing red surface heating area extending beyond the bottom edge of the
cookware indicates the cookware is too small for the surface heating area.
When cooking has completed, turn the surface control knob to OFF before
3.
removing the cookware. Note: The specific Hot Surface Indicator light for the
element will come on when the control knob is turned on. The light will continue to
glow until the glass cooktop is cooled enough to touch. The light may remain on
even though the controls are turned OFF. Note: See Figure 2 on page 7 for
recommended control settings.
Operating the Dual Surface Radiant Element
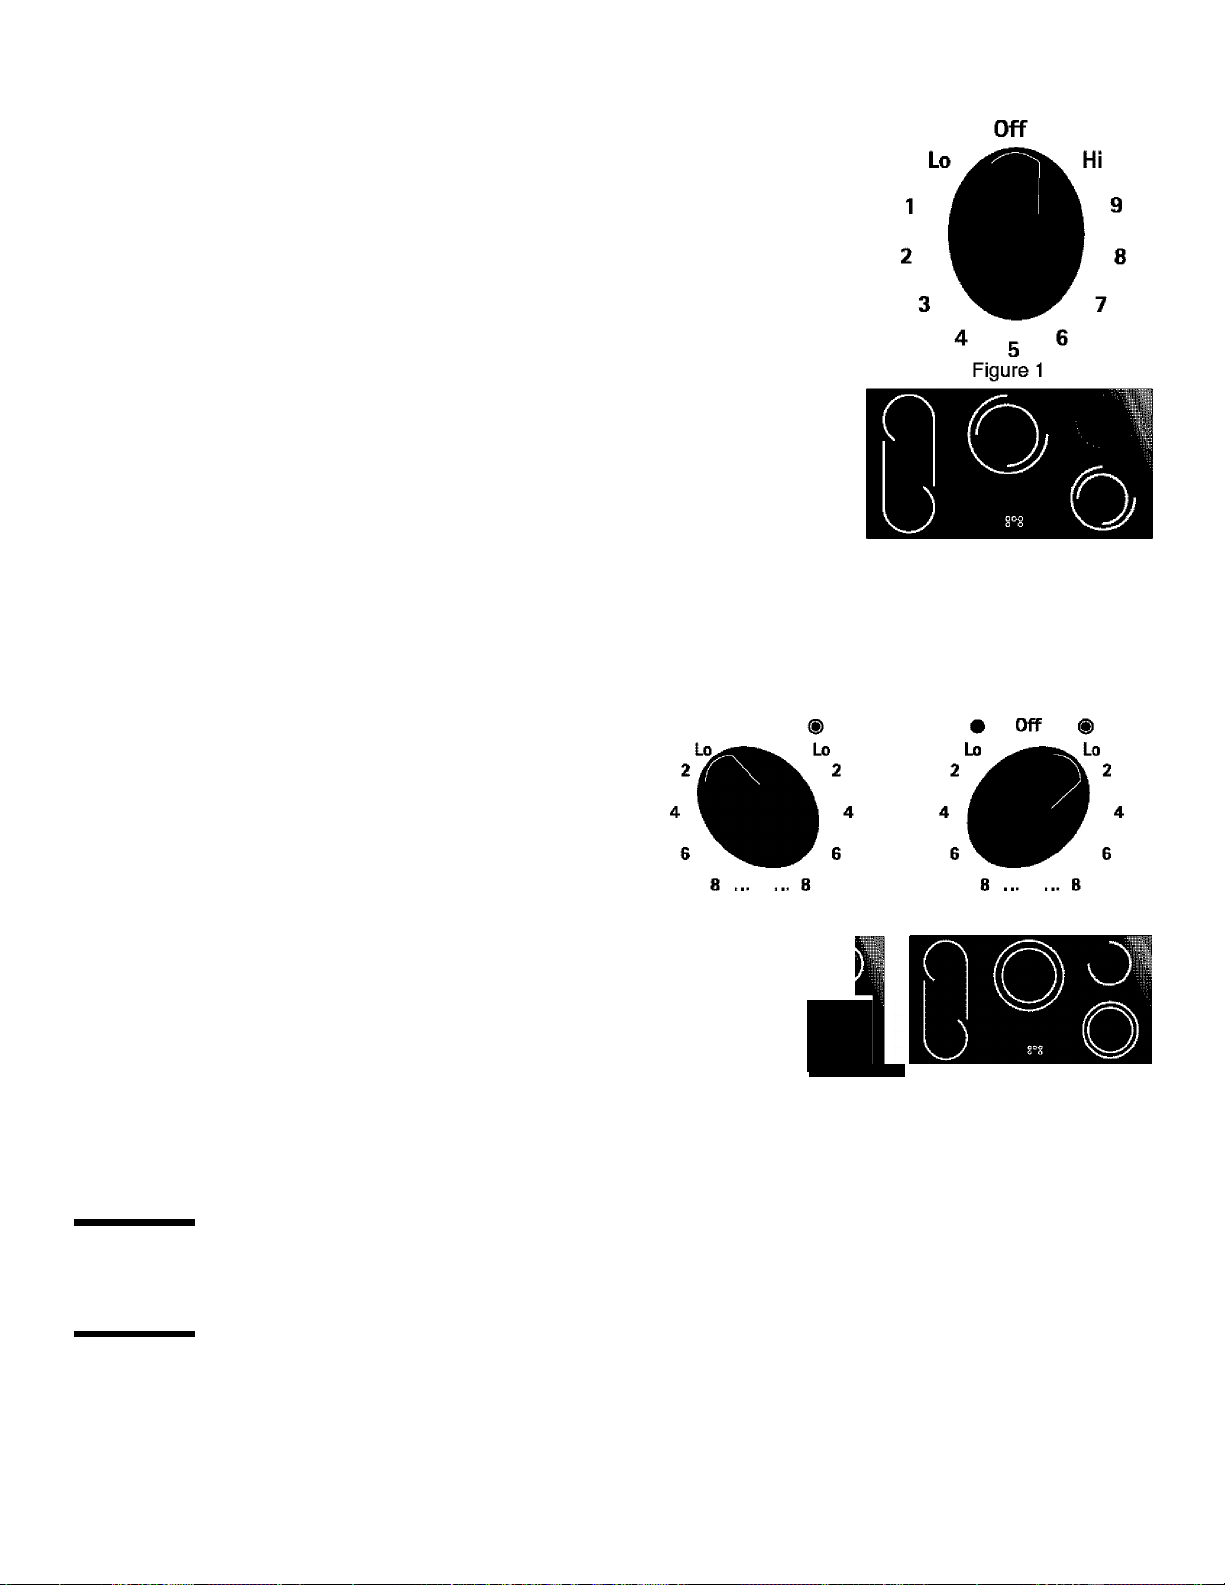
The range is equipped with a dual radiant surface elemenf
located at the right front (See Figure 3) position. Symbols on
the control panel are used to indicate which coil of the dual
radiant element will heat. The® symbol indicates that only
the inner coil will heat (Figures 3, 4 and 5). The® symbol
indicates that both inner and outer coils will heat (Figures 6, 7
and 8). You may switch from either coil setting at any time
during cooking.
Inner
+ Outer
Inner
Element
Figure 3
Off
Inner
Element
Inner
+ Outer
Figure 2
Inner
+ Outer
Figure 6
To Operate the Dual Surface Element
1. Place correctly sized cookware on the dual surface
element.
2. Push in and turn the control knob counterclockwise (See
Figure 2) for smaller cookware or clockwise (See Figure
7) for larger cookware.
3. Turn the knob to adjust the setting if needed. Start most
cooking operations on a higher setting and then turn to a
lower setting to finish cooking. Each surface element
provides a constant amount of heat at each setting. A
glowing red surface heating area extending beyond the
bottom edge of the cookware indicates the cookware is
too small for the surface heating area.
4. When cooking has completed, turn the surface confrol
knob to OFF before removing the cookware. Note: The specific Hot Surface Indicator light for the element will come
on when the control knob is turned on. The light will continue to glow until the glass cooktop is cool enough to touch.
The light may remain on even though the controls are turned OFF. Note: See page 7, Figure 2 for recommended
control settings.
Hi HI
Figure 4
Hi Hi
Figure 7
G
Figure 5 Figure 8
Inner
Element
A CAUTION
indicator light will come on and will continue to glow until the glass cooktop has cooled down to a moderate level. The
Radiant surface elements may appear to have cooled after they have been turned off. A hot surface
glass surface may still be hot and burns may occur if the glass surface is touched before the indicator light has turned
off.
A CAUTION
Do not place plastic items such as sait and pepper shakers, spoon hoiders or piastic wrappings on
top of the range when it is in use. These items could melt or ignite. Potholders, towels or wooden spoons could catch
fire if placed too close to the surface elements.
10
Page 11
Setting Surface Controls
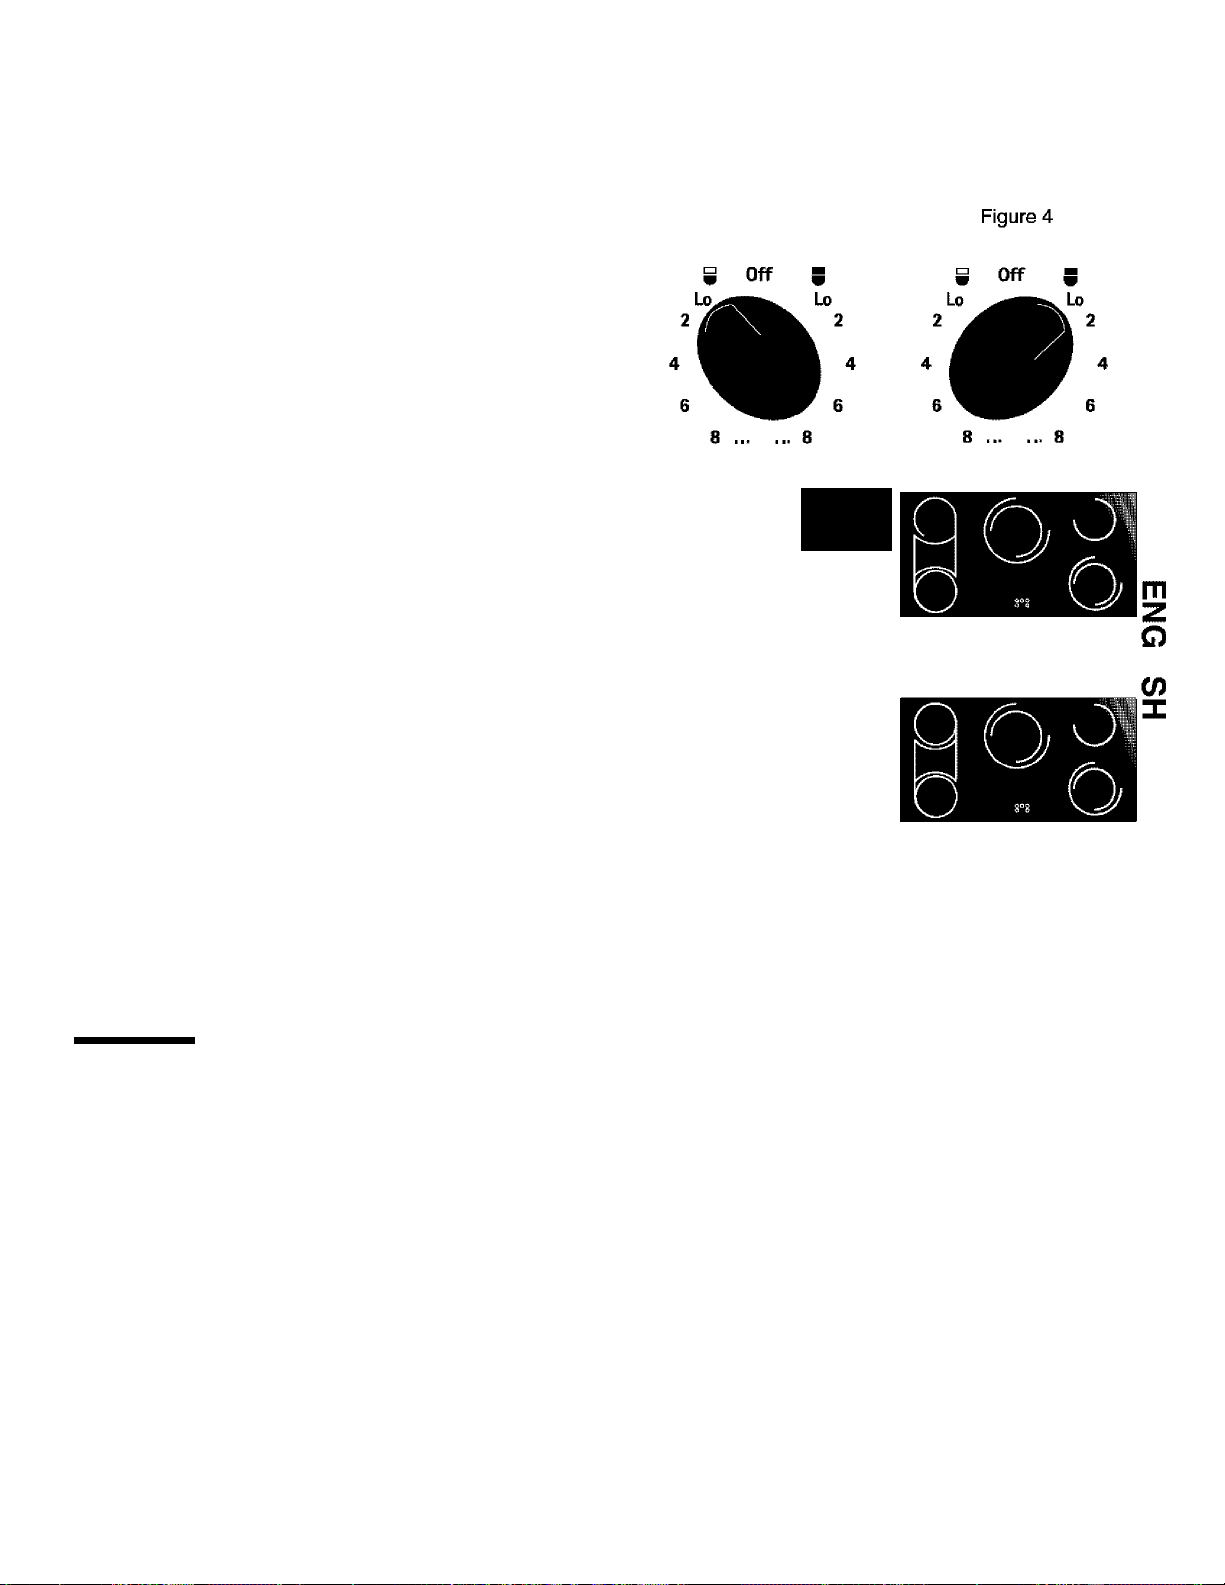
Operating the Bridge Surface Radiant Element
The range is equipped with a “BRiDGE” surface element iocated at the
left front and middle {See Figure 6) positions. The Bridge can be used
when cooking with rectanguiar (like a griddle) or oval shaped cookware.
The element will maintain an even temperature setting across both
portions of the Bridge. If needed for normal cookware, the
Bridge element can work like a single element without the
Bridge (See Figure 3).
Bridge element operation symbols are located on the control
panel on each side of the Bridge element control knob.
These symbols indicate the direction to turn the control knob
when operating the Bridge element. The symbol in Figure 1
indicates that only the single portion of the Bridge element
will heat (Figure 3). The symbol in Figure 4 indicates that
both the single and Bridge portions of the element will heat
together (Figure 6). You may switch from either of these
settings at any time during cooking with the Bridge element.
Element
Front
Front
Element
Figure 1
Hi Hi
Figure 2
Front + Bridge
Front
Element
+ Bridge
Hi Hi
Figure 5
o
To Operate the Bridge Surface Element
1. Place correctly sized cookware on the Bridge surface
element.
2.
Push in and turn the control knob counterclockwise (See
Figures 2 and 3) to heat the portion of the Bridge
element for normal shaped cookware or clockwise (See
Figures 5 and 6) for larger or rectangular shaped cookware.
3.
Turn the knob to adjust the setting if needed. Start most cooking operations on a
higher setting and then turn to a lower setting to finish cooking. Each surface element
provides a constant amount of heat at each setting. A glowing red surface heating
area extending beyond the bottom edge of the cookware indicates the cookware is
too small. Please note that not all cookware will fit the Bridge element correctly.
When cooking has completed, turn the surface control knob to OFF before removing
4.
the cookware. Note: The specific Hot Surface Indicator light for the element will come on when the control knob is
turned on. The light will continue to glow until the glass cooktop is cool enough to touch. The light may remain on
even though the controls are turned OFF.
Bridge element without
Figure 3
Bridge portion.
O
Figure 6
Bridge element with
Bridge portion.
Figure 7
Front
Front
+ Bridge
The BRIDGE element may also be used in combination with the left rear single element. Because these elements have
2 different controls, one element can be used to cook while the other element may be used to keep food warm (See
Figure 7). Note: See page 7, Figure 2 for recommended control settings.
A CAUTION
indicator light will come on and will continue to glow until the glass cooktop has cooled down to a moderate level. The
glass surface may still be hot and burns may occur if the glass surface is touched before the indicator light has turned
off.
Radiant surface elements may appear to have cooled after they have been turned off. A hot surface
Indicator Lights
Two different surface control lights will glow on your range: Surface Indicator Lights and Hot Surface Indicator Lights.
• The surface indicator lights, located on the control panel, glow when any surface unit is turned on. A quick glance at
the lights after cooking is an easy check to be sure all surface controls are turned off.
• The hot surface indicators lights, located under the glass cooktop, will come on as the surface cooking area heats
up and will continue to glow until the glass cooktop has cooled down to a moderate level. The lights may remain on even
though the controls are turned to OFF.
11
Page 12
Before Setting the Oven Controls
Oven Vent(s) and Racks
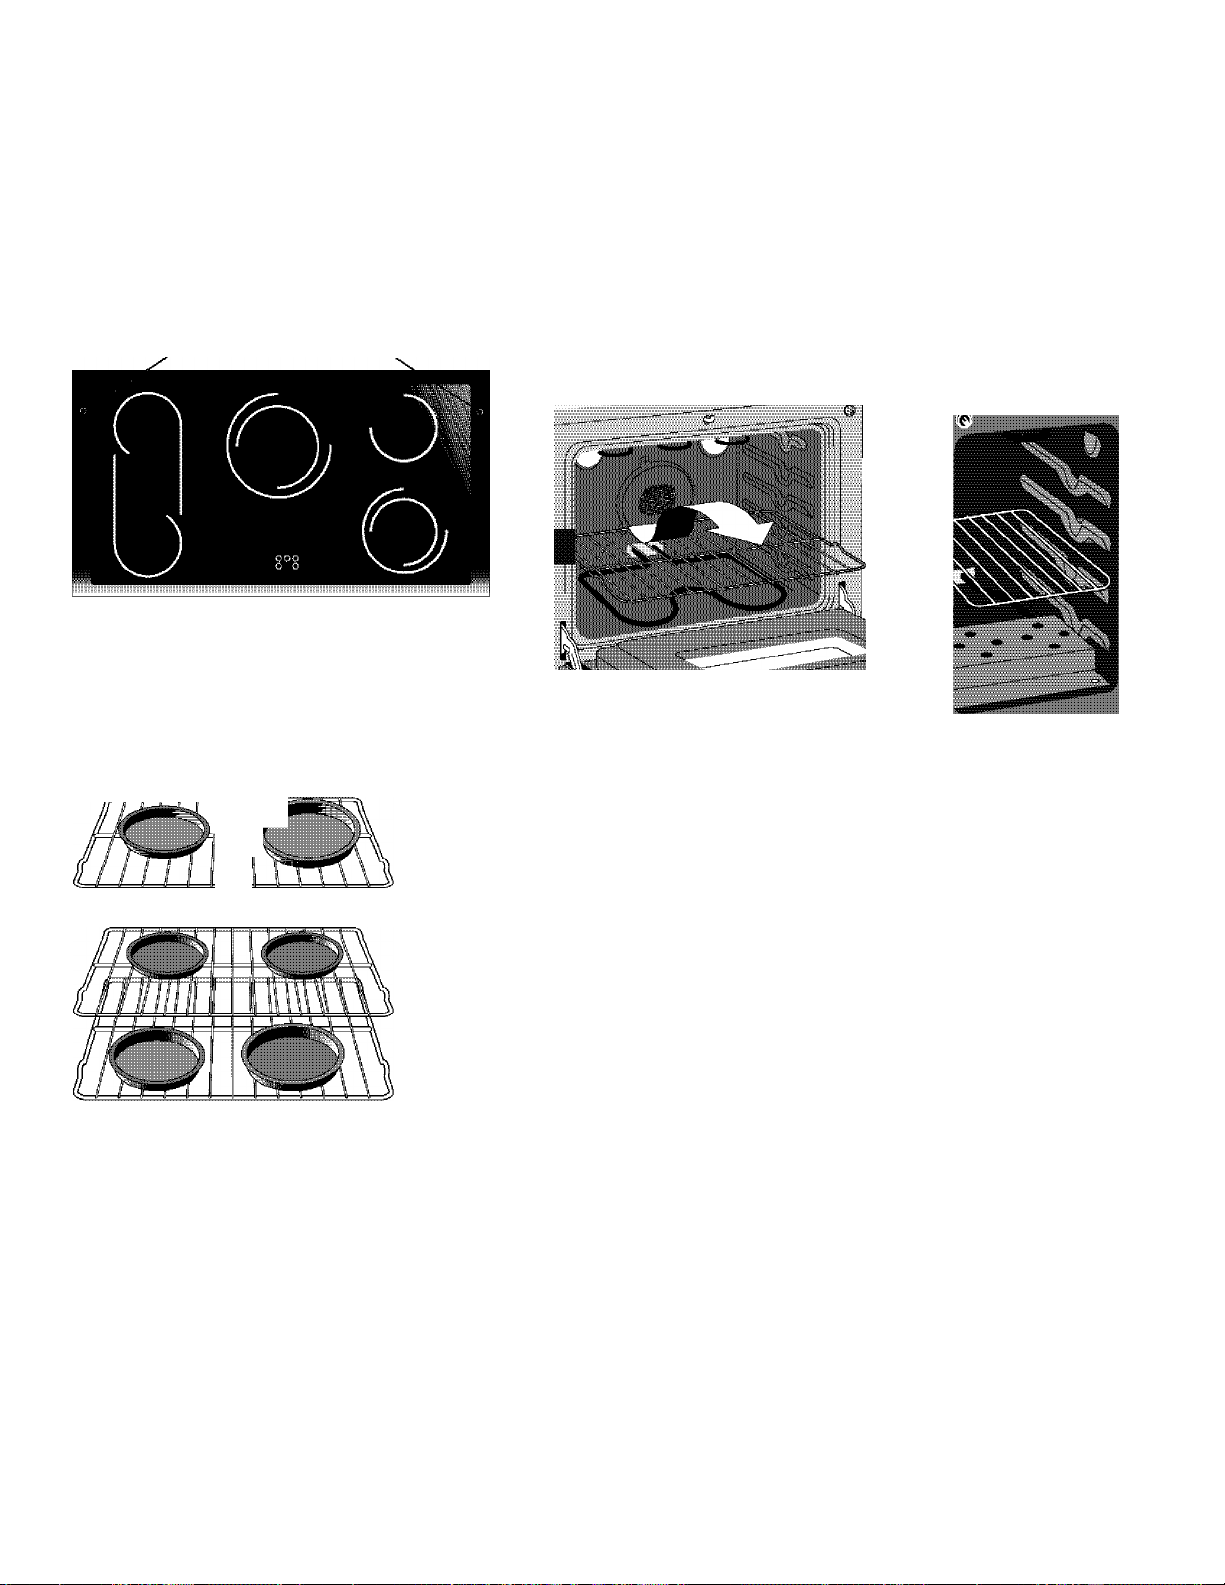
Oven Vent Locations
Each oven has its own vent located on the top,
near each side and towards the back of the
cooktop. When an oven is on, warm air is
released through the vent; this ventilation is
necessary for proper air circulation in the oven
and good baking results.
Oven Vent Locations
Arranging Oven Racks
The smaller oven has one oven rack and the larger oven has
three oven racks. ALWAYS ARRANGE OVEN RACKS WHEN THE
OVEN IS COOL (PRIOR TO OPERATING THE OVEN). Always
use oven mitts when using the oven.
To remove an oven rack, pull the rackfon/vard until it stops. Lift
up front of rack and slide ouf. To replace an oven rack, fit the
rack onto the guides on the oven walls. Tilt the front of the rack
upward and slide the rack back into place.
Main Oven
1 Oven Rack
Multiple Oven Racks
Side Oven
Air Circulation in the Oven
For best air circulation and baking results allow 2-4" (5-10 cm) around the
cookware for proper air circulation and be sure pans and cookware do not touch
each other, the oven door, sides or back of the oven cavity. The hot air must
circulate around the pans and cookware in the oven for even heat to reach
around the food.
12
Page 13
Setting Side Oven Control
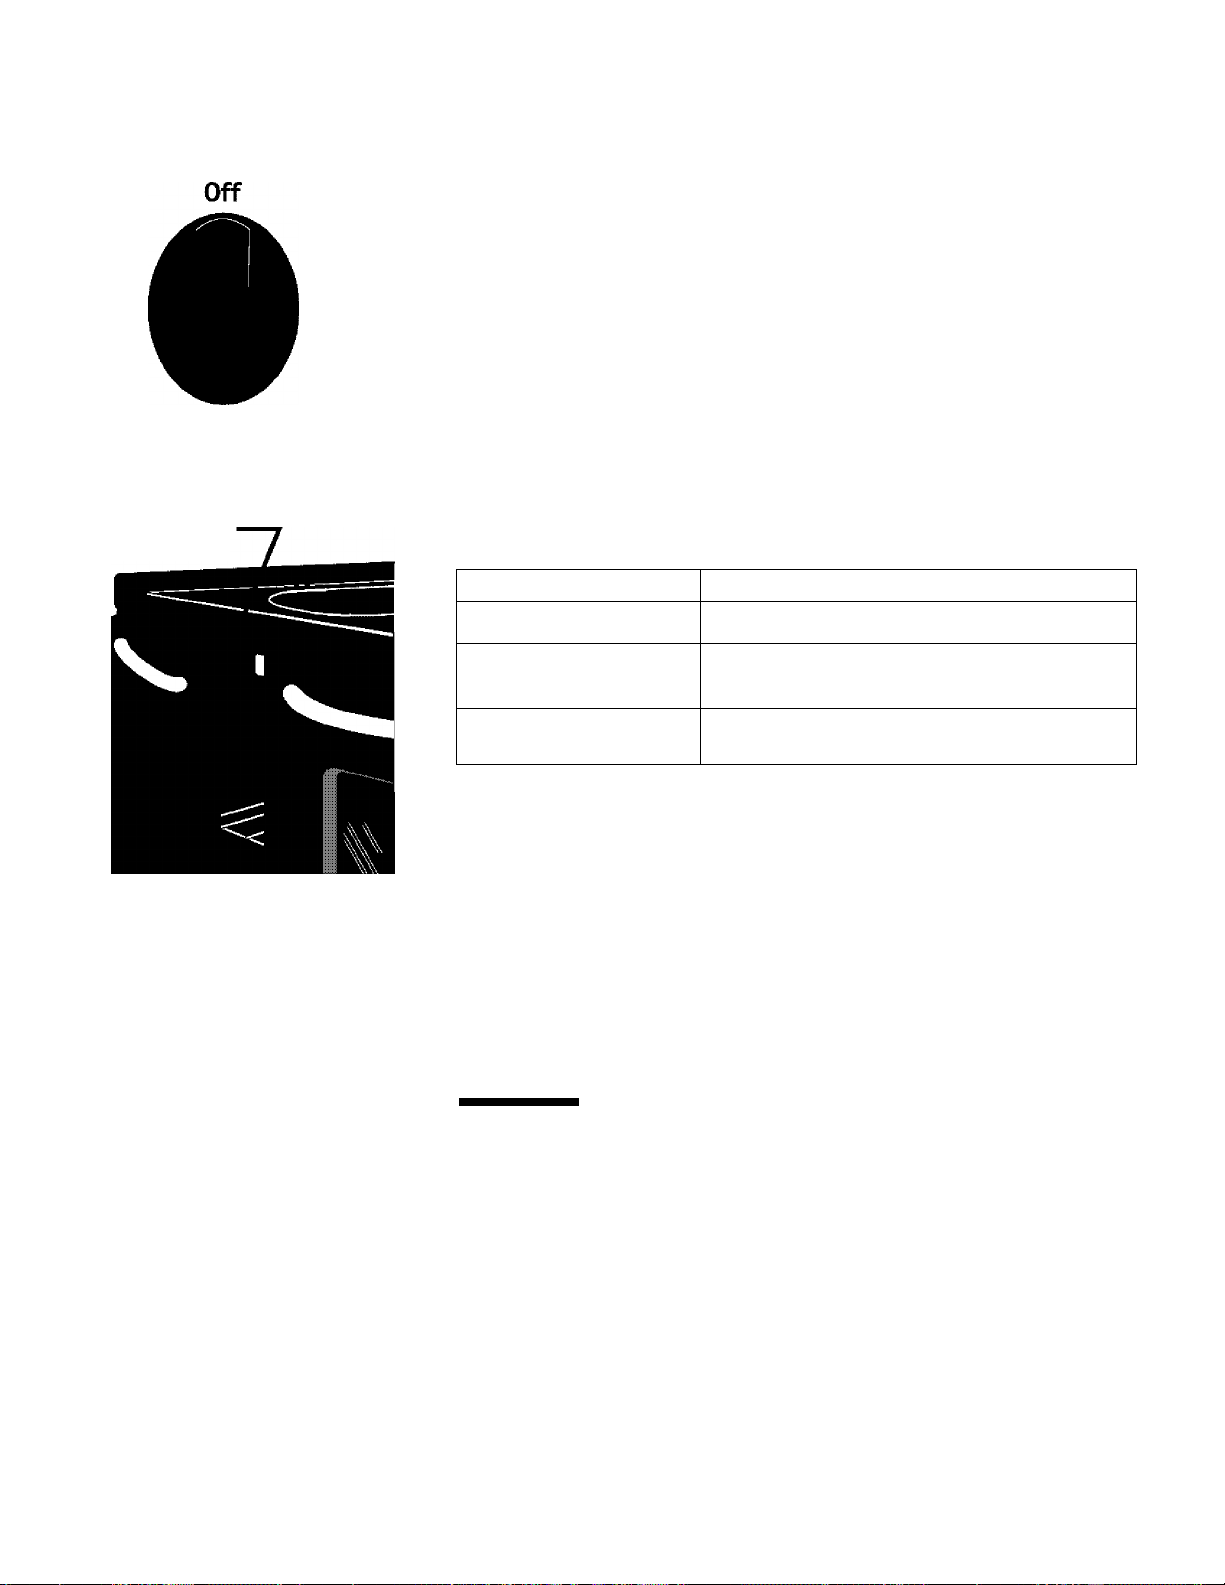
Left Oven
Temperature Control Knob
Broil
500
150
200
250
Broil Stop
Position
300
350
450
400
To Bake
1.
Arrange oven racks while the oven is still cool.
2.
Turn theTemperature Control Knob to thedesired oven temperature. When
the oven is first turned on, the oven indicator light above the Temperature
Control Knob will glow.
3.
Preheat the oven for 10 to 12 minutes before baking. Preheating is not
necessary when roasting, cooking casseroles or broiling most foods. When
the desired temperature is reached, the oven indicator light will go out. The
light will then go on and off as the element cycles on and off to maintain the
desired temperature.
4.
When cooking is finished, turn the Temperature Control Knob to OFF.
To Broil
1. Arrange oven rackwhileoven isstillcool. For rare meats, position broiler pan
closer to theelement (upper position). For well-done foods such as chicken,
lobster tails or thick cuts of meat, position the pan further from the element
(to a lower position).
Side Oven
Rack Position From Top Food
1 Rare steaks.
2 Ham slices, fish, hamburgers and medium
steaks and chops.
3 Well-done foods such as chicken and lobster.
2. Turn theTemperature Control Knob to BROIL. To sear rare steaks, allow the
elementto become red-hot—about2 minutes—before placing food in oven.
3. Obtain a properly sized side oven broiler pan and grid (not supplied with
purchase of this unit). Place the grid on broiler pan, and then place the meat
on the grid. DO NOT use broiler pan without the grid or cover the grid with
aluminum foil. The exposed fat could ignite.
4. Place the pan on the oven rack. Close the oven door to the Broil Stop
position while broiling (door opened about 2 inches).
5. Broil on one side until food is browned; turn and cook on the other side.
Season and serve. Note: Always pull the rack out to the stop position before
turning or removing food.
6. When broiling is finished, turn the Temperature Control Knob to OFF.
A CAUTION
oven. If the fire contin ues, throw baking soda on the fire or use a fi re extingu isher.
DO NOT put water or flour on the fire. Flour may be explosive.
Should an oven fire occur, close the oven door and turn off the
m
Q
n
0)
Note: See page 30 for table of suggested broiling times.
13
Page 14
Control Pad Features
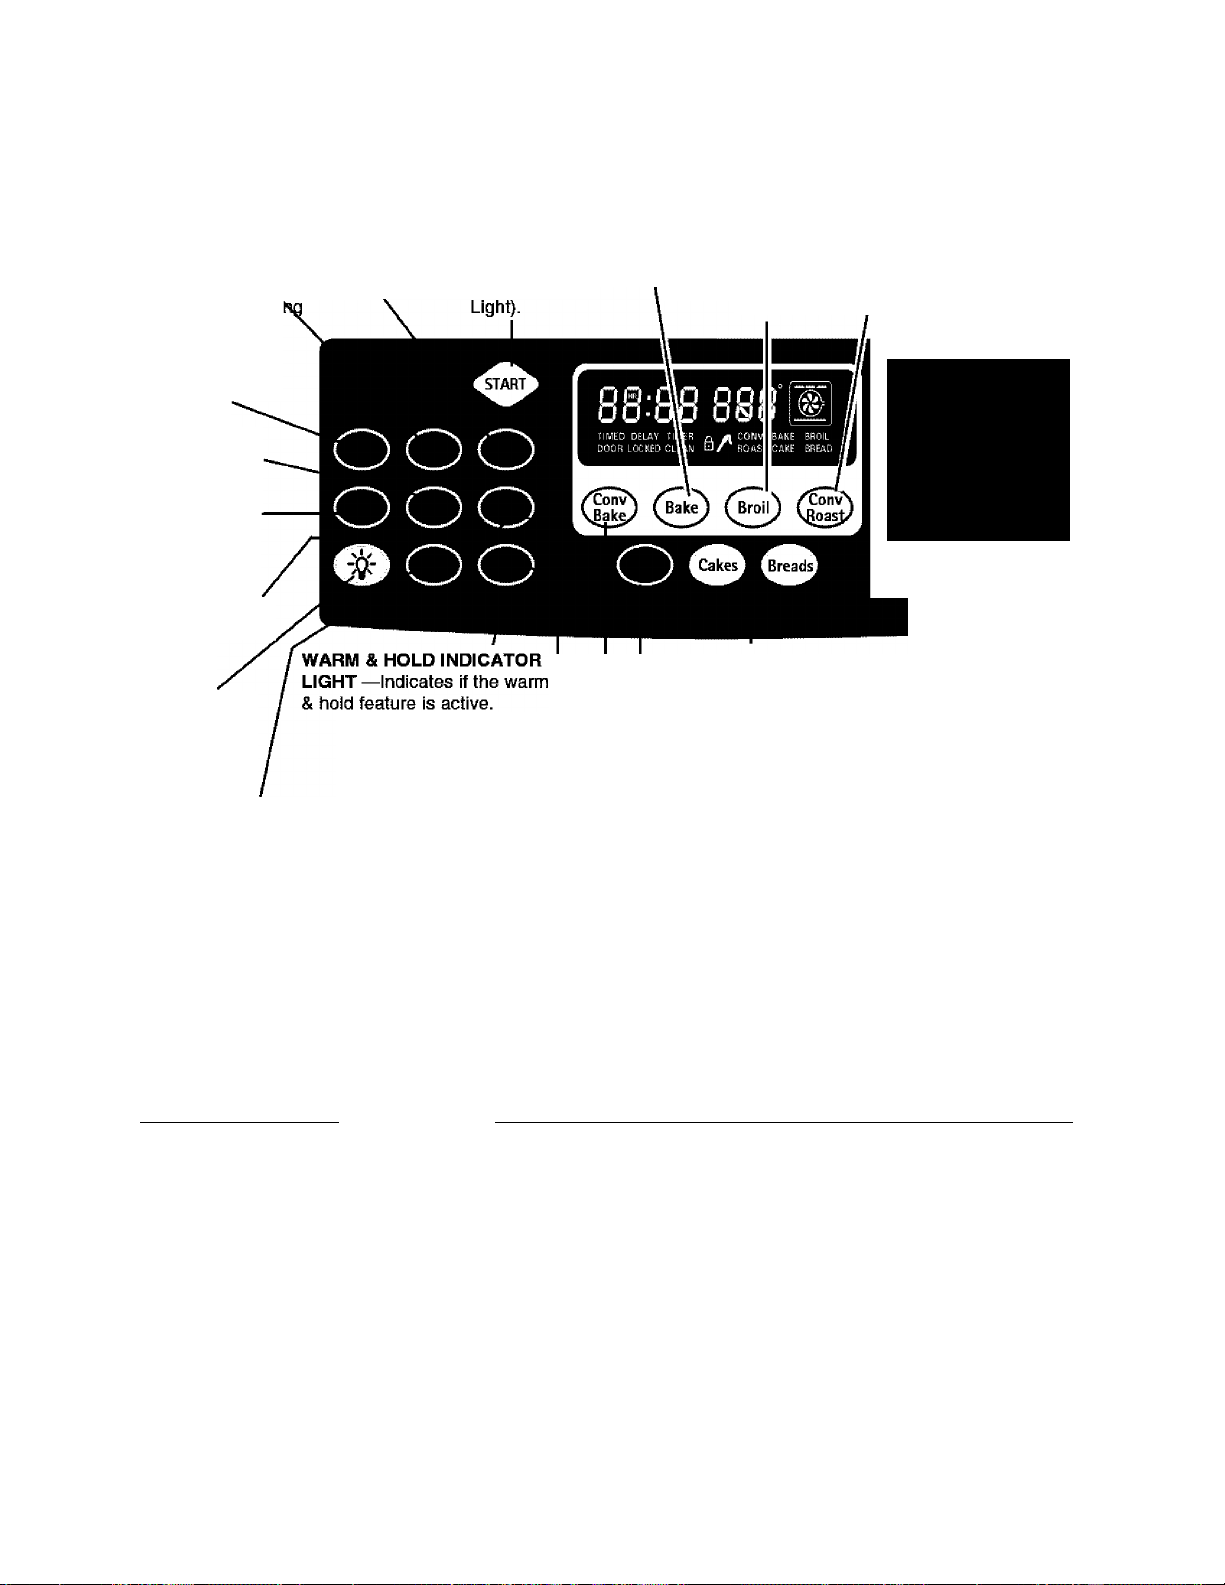
READ THE INSTRUCTIONS CAREFULLY BEFORE USING THE OVEN. For satisfactory use of your oven, become
familiar with the various features and functions of the oven as described beiow. Detailed instructions for each feature
and function follow later in this Use & Care Guide.
DELAY START— Use with
BAKE, CONVBAKE,
PREHEAT, SLOW COOK
COOK TIME and CLEAN to
program a Delayed Timed
Bake or Delay Self-Cleani
cycle start time.
OVEN COOK TIME—
Use to enter the length
of the baking time.
ADD 1 MINUTE—Use
to select Add 1 Minute
feature.
SLOW COOKUse to select the
Slow Cook feature.
CONV CONVERT—Use
to select the Convection
Convert feature.
OVEN LIGHT—Use to
turn the oven light ON
and OFF.
KITCHEN TIMER ON/OFF Use
cancel the Kitchen Timer. The Kitchen
Timer does not start or stop cooking.
FLEX CLEAN
PAD— Use to
select the Self
Cleaning
feature.
WARM & HOLD PAD—Use
to select the Warm & Hold
feature.
to set or CONVECTION BAKE—
START—Use
to start all
oven features
(not used
with Oven
Use to select the
Convection Bake feature.
BAKE PAD—
Use to enter
the normal
Bake feature.
PREHEAT— Use to raise oven
to cooking temperature.
BROIL
PAD— Use
to select
variable
broil
function.
CAKES & BREADS— Use
to seiect the Meats, Cakes
& Breads cooking features.
CLOCK SET—Use to set
the time of day; also
controls the Cooktop
Lockout feature.
CONVECTION 0 THRU 9
ROAST— Use to NUMBER PADS
select the
Convection
Roast feature.
— Use to enter
temperature and
times.
/
ooo
ooo
ooo
I
STOP—Use to cancel
any oven mode
previously entered
except the time of day
and minute timer. Press
STOP to stop cooking.
STOP also controls the
Oven Lockout feature.
Minimum and
Maximum
Control Pad
Settings
FEATURE MINIMUM TEMP. /TIME MAXIMUM TEMP. /TIME
PREHEAT TEMP. 170°F/77°C 550‘’F/288°C
BAKE. CAKES,BREADS TEMP. 170°F/77°C 550“F/288°C
BROIL TEMP. 400°F/205°C 550°F/288°C
KITCHEN TIMER 12 Hr. Mode 0:01 Min. 11:59 Hr./Min.
CLOCK TIME 12 Hr. “ 1:00Hr./Min. 12:59 Hr./Min.
COOK TIME 12 Hr. “ 0:01 Min. 11:59 Hr./Min.
DELAY START 12 Hr. “ 1:00 Hr./Min. 12:59 Hr./Min.
CLEAN TIME 2 hours 4 hours
CONVECTION BAKE 170'“F/77‘’C 550‘’F/288'“C
CONVECTION ROAST 170''F/77‘’C 550"F/288''C
All of the features listed below have minimum and maximum time or temperature settings
that may be entered into the control. An ENTRY acceptance beep will sound each time a
control pad is touched (the Oven Lockout pad is delayed 3 seconds).
An ENTRY ERROR tone (3 short beeps) will sound if the entry of the temperature or time is
below the minimum or above the maximum settings for the feature.
24 Hr. “ 0:01 Min. 11:59 Hr./Min.
24 Hr. “ 0:00 Hr./Min. 23:59 Hr./Min.
24 Hr. “ 0:01 Min. 11:59 Hr./Min.
24 Hr. “ 0:00 Hr./Min. 23:59 Hr./Min.
14
Page 15
Setting Oven Controls
Setting the Clock
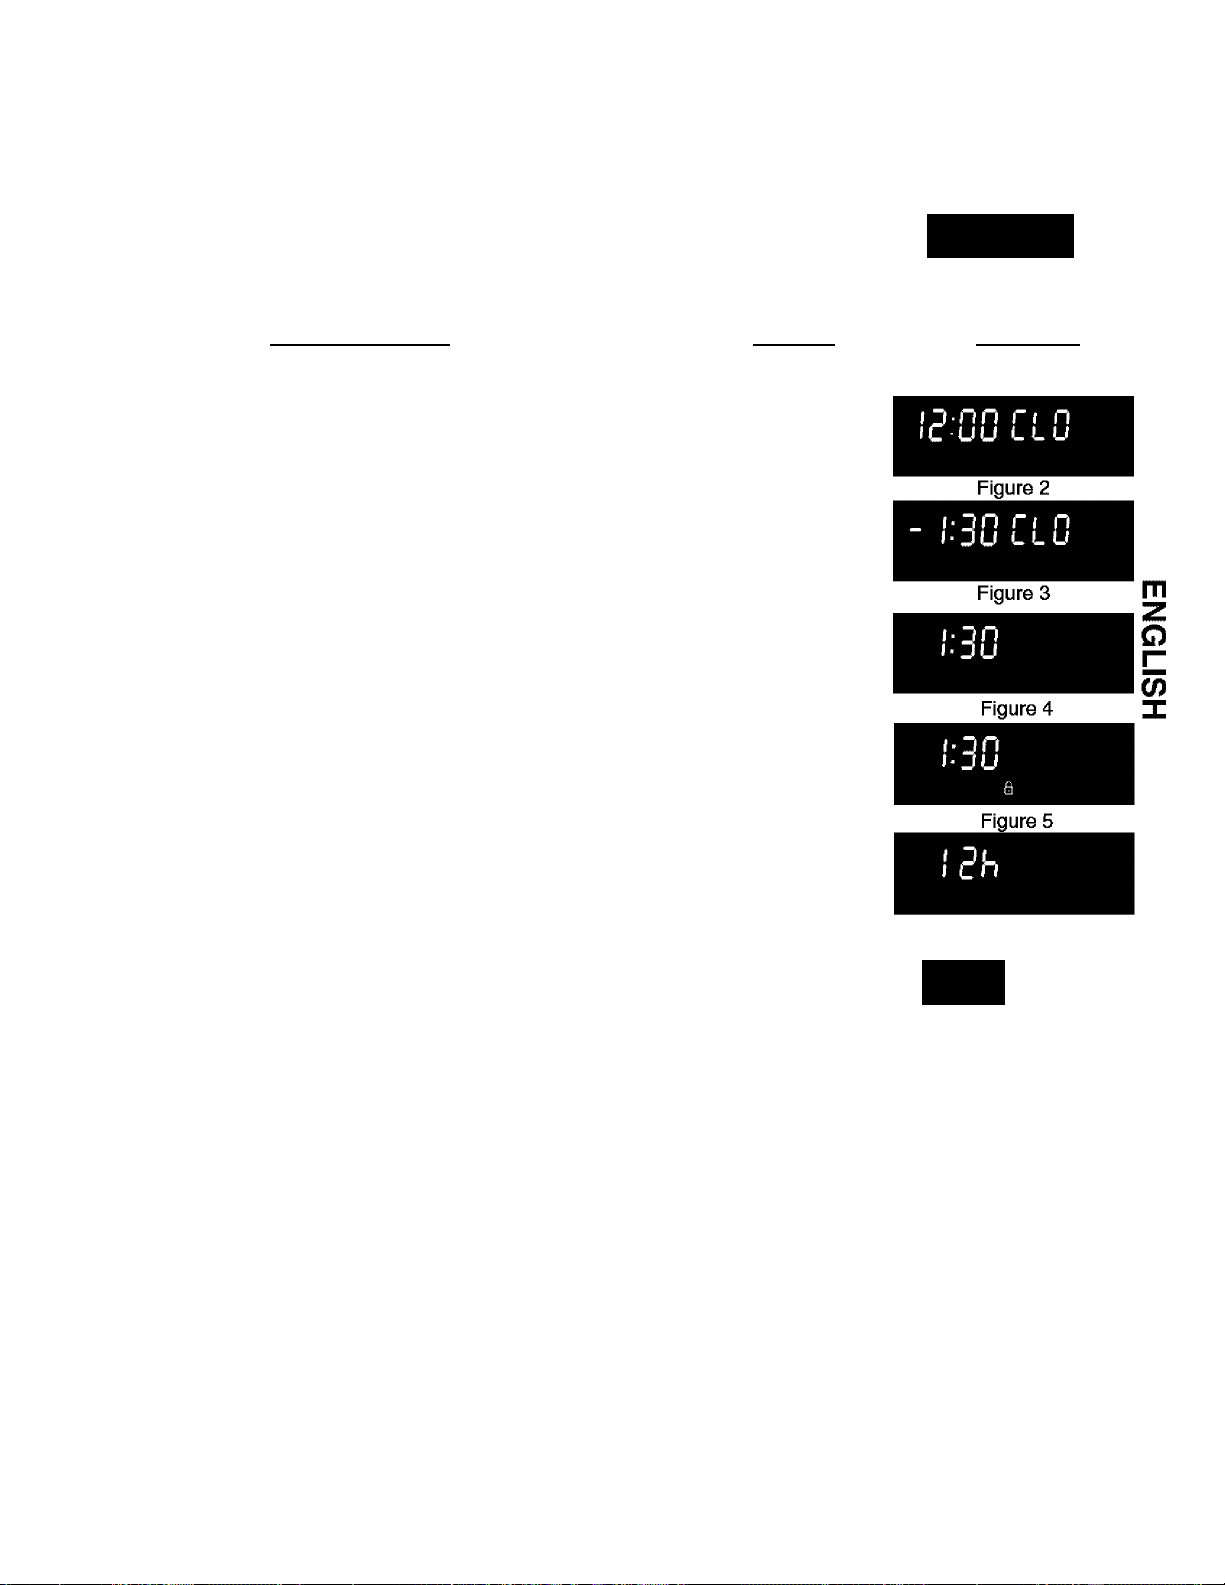
The (^) pad is used to set the clock. The clock may be set for 12 or 24 hour time of day
operation. The clock has been preset at the factory for the 12 hour operation. When the
range is first plugged In, or when the power supply to the range has been interrupted, the
timer in the display will flash with "PF" (power failure. See Figure 1).
3-nn OC
C-UU rr
When PF appears in the display, press PF will disappear.
INSTRUCTIONS
To set the clock (example below for 1:30)
1. Press (^). "CLO" will appear in the display (Figure 2).
2. Press CZ) ^
(Figure 3). "CLO" will stay in the display. Press "CLO"
will disappear and the clock will start (Figure 4).
Changing between 12 or 24 hour time of day dispiay
1. Press and hold (^) for 7 seconds. "CLO" will appear in the
display. After 3 seconds ^ will appear In the display indicating
that the cooktop lockout is active (Figure 5). CONTINUE
holding the pad until "12h" (Figure 6) or "24h" (Figure 7)
appears in the display and the control beeps once.
Pfsss to switch between the 12 and 24 hour time of day
2.
display. The display will show either "12h" (Figure 6) or "24h"
(Figure 7).
PRESS
©CD®
for 7 seconds
I
Figure 1
DISPLAY
Press to accept the change or press to reject the
3.
change. Q will disappear from the display.
Reset the correct time as described in To set the Clock
4.
above. Please note that if the 24 hour time of day mode was
chosen, the clock will now display time from 0:00 through
23:59 hours.
or
Figure 6
iMh
Figure 7
15
Page 16
Setting Oven Controls
Setting Continuous Bake or 12 Hour Energy Saving
The TIMER and FLEX CLEAN pads control the Continuous Bake or 12 Hour Energy Saving features. The oven
control has a factory preset built-in 12 Hour Energy Saving feature that will shut off the oven if the oven controi is left on for
more than 11 hours and 59 minutes. The oven can be programmed to override this feature for Continuous Baking.
INSTRUCTIONS
PRESS
DISPLAY
To set the control for Continuous Bake or 12 Hour Energy Saving features
1.
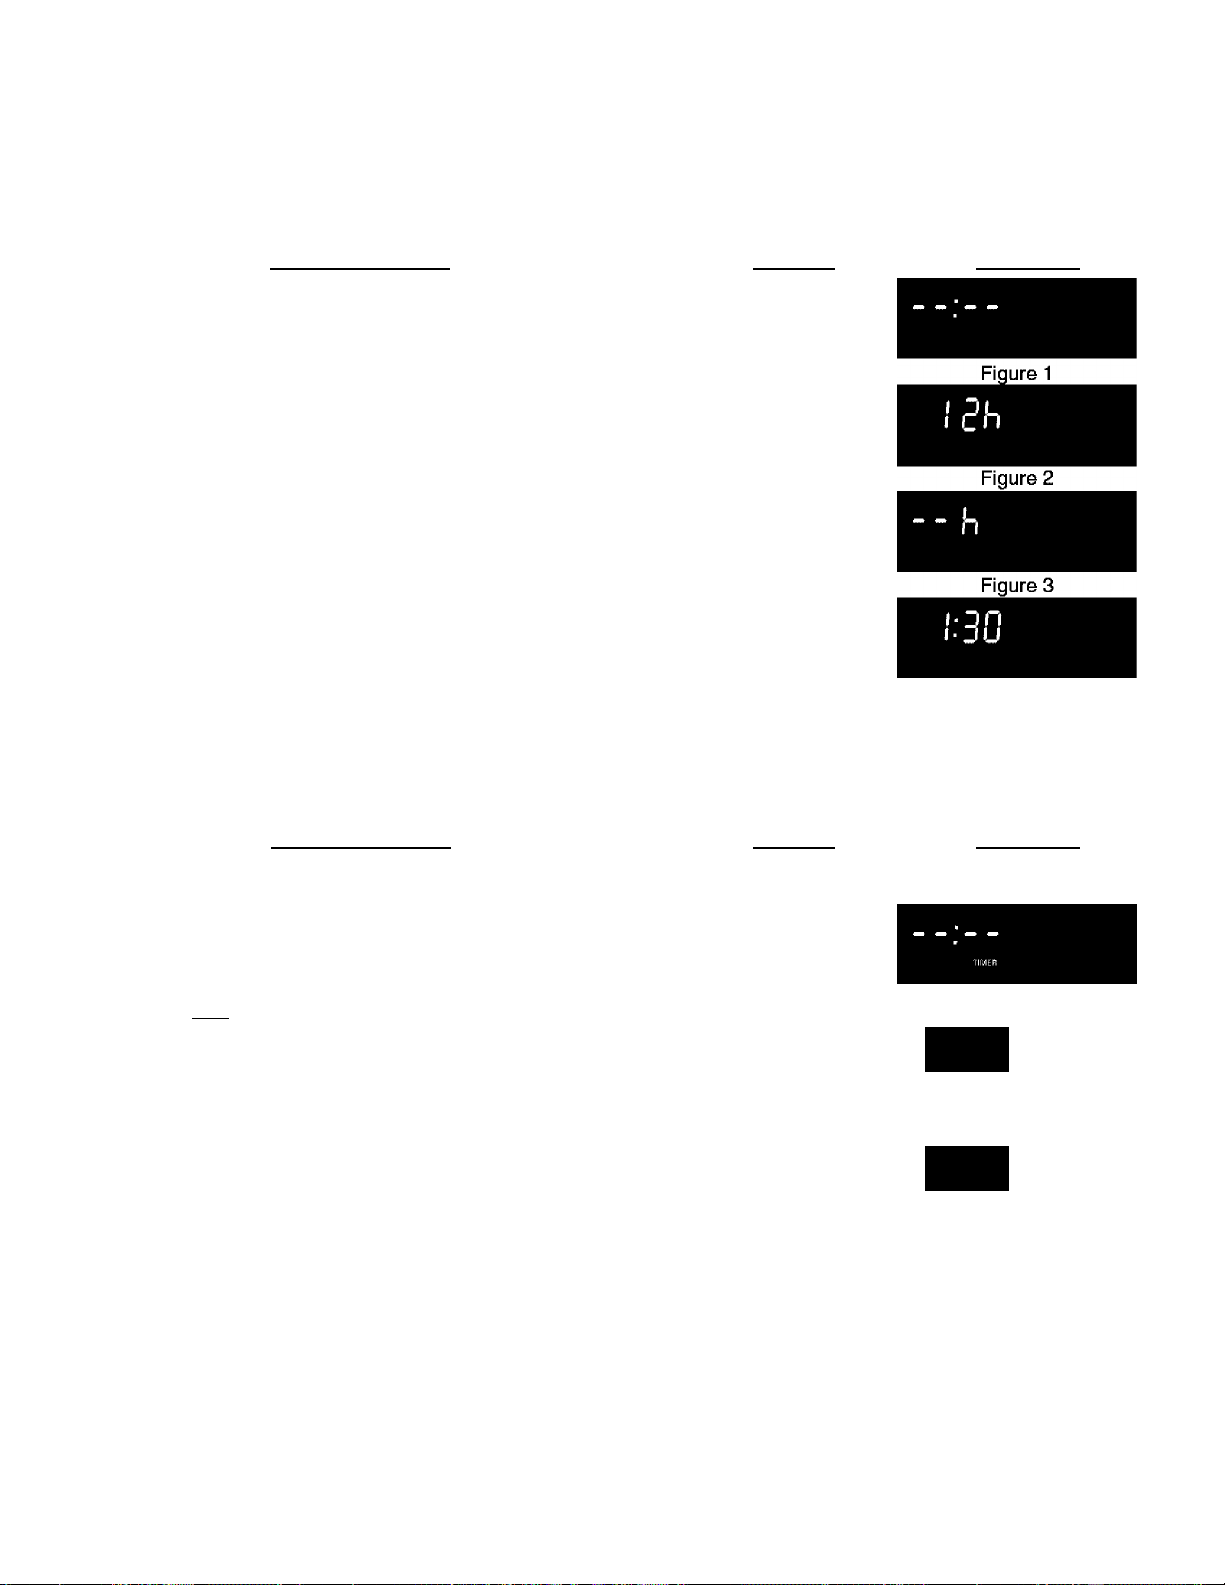
Press and hoid for 7 seconds (Figurel). After 7 seconds "12h" or
-h" wili appear in the display and the control will beep once.
2.
Press to switch between the 12 Hour Energy Saving and
continuous bake features. Note: "12h" (Figure 2) in the display
indicates the control is set for the 12 Hour Energy Saving mode and
-h" indicates the control is set for the Continuous Bake feature (Figure
p'imerA fnr 7
seconds
3).
3.
Press to accept the change (Figure 4; display will return to
or (STOP
time of day) or press (stopI to reject the change
Setting Kitchen Timer Figure 4
The TIMER pad controls the Kitchen Timer feature. The Kitchen Timer serves as an extra timer in the kitchen that
will beep when the set time has run out. It does not start or stop cooking. The Kitchen Timer feature can be used during
any of the other oven control functions. Refer to “Minimum and Maximum Control Pad Settings” for time amount settings.
INSTRUCTIONS
To set the Kitchen Timer (example for 5 minutes)
PRESS DISPLAY
1. Press will appear and "TIMER" will flash in the display
(Figure 5).
2. Press the number pads to set the desired time in the display
(example (^5^). Press The time will begin to count down
with "5:00" and "TIMER" will stay in the display (Figure 6). Note: If
is not pressed the timer will return to the time of day after 25
seconds.
3. When the set time has run out, "End" and "TIMER" will show in the
display (Figure 7). The clock will sound with 3 beeps every 5
seconds until is pressed.
Figure 5
c-nn
J-UU
Figure 6
£ nd
Figure 7
To cancel the Kitchen Timer before the set time has run out
Press The display will return to the time of day.
To Set Add 1 Minute Feature
The ADD 1 MINUTE pad is used to set the Add 1 Minute feature. When the pad is pressed, 1 minute is
added to the Kitchen Timer feature if fhis feature is already active. If the Kitchen Timer feature is not active and the
pad is pressed, the Kitchen Timer feature will become active and will begin counting down from 1 minute.
16
Page 17
Setting Oven Controls
Consumer Defined Control
Note: The Consumer Defined Control features are adjustments to the control that will not affect cooking results. These
Include the Oven Lockout, Temperature Display and Silent Control Operation features
Setting Oven Lockout Feature
The pad controls the Oven Lockout feature. The Oven Lockout feature automatically locks the oven door and
prevents the oven from being turned on. It does not disable the clock, Kitchen Timer or the interior oven lights.
INSTRUCTIONS
To activate the Oven Lockout feature
□ DCCC
DISPLAY
1. Press and hold for 3 seconds.
2. After 3 seconds "Loc" will appear, a beep will sound and
"DOOR LOCKED" will flash in the display. Once the oven door
Is locked the "DOOR LOCKED" Indicator will stop flashing and
remain on along with the "Loc" {Figure 1).
{si^for3
seconds
Figure 1
To reactivate normal oven operation
1. Press and hold for 3 seconds. A beep will sound. The
"DOOR LOCKED" will flash In the display until the oven door
has completely unlocked (Figure 2).
2. The wall oven is again fully operational.
{si^fbr 3
seconds
Figure 2
Setting Silent Control Operation
The DELAYTIME and FLEX CLEAN pads control the Silent Control operation feature. The Silent Control
operation feature allows the oven control to be operated without sounds or beeps whenever necessary. If desired the
control can be programmed for silent operation and later returned to operating with all the normal sounds and beeps.
INSTRUCTiONS PRESS DISPLAY
To change control from normal sound operation to silent control operation
(i)
1.
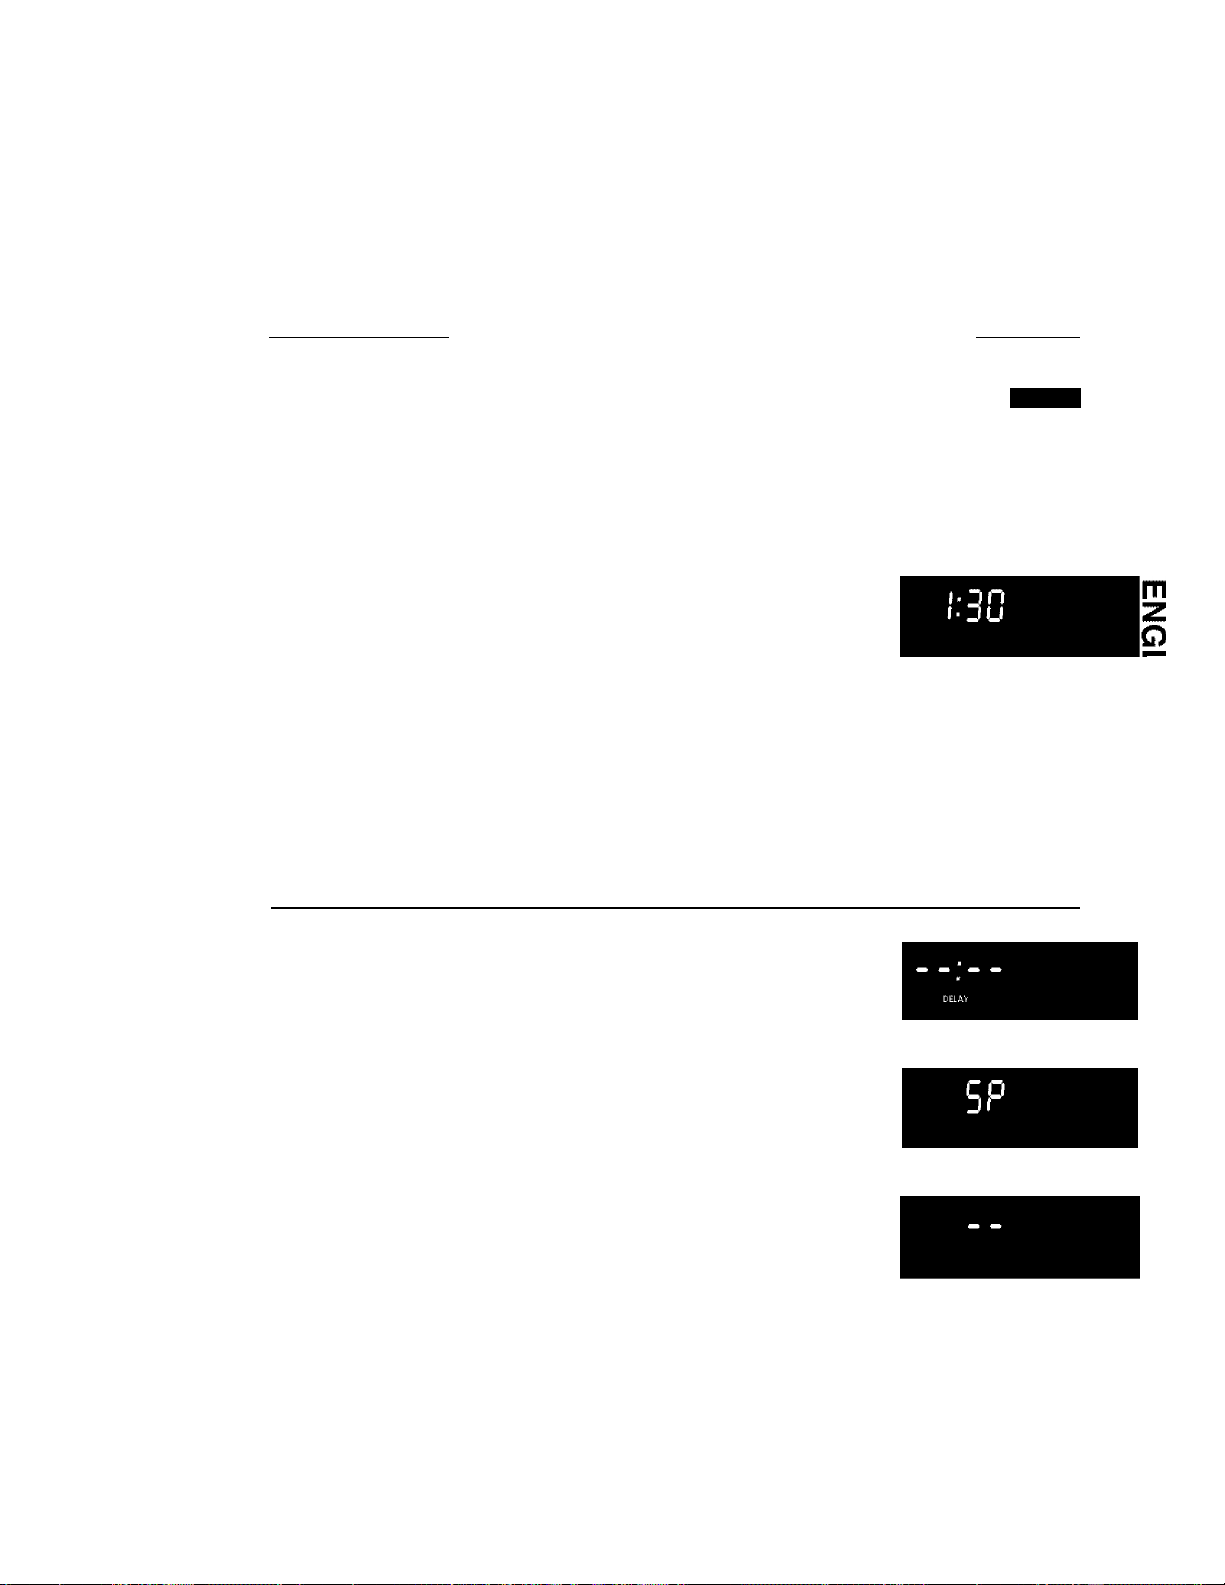
To tell if your range is set for normal or silent operation press
and hold will appear and "DELAY" will flash in the
display (Figure 3). After 7 seconds "SP" (Speaker) will appear
in the display (Figure 4).
2.
Press to switch between normal sound operation and
silent operation mode. The display will show either "SP"
(Figure 4) or(Figure 5).
If "SP" appears (Figure 4), the control will operate with normal
sounds and beeps. Ifappears (Figure 5), the control is in
the silent operation mode.
3.
Press to accept the change or press to reject the
change.
Note: The control will always beep at the end of a kitchen timer and will beep when a set temperature has been
reached, even if the control is set to silent operation.
17
Delay
for 7 seconds
or
Figure 3
Figure 4
Figure 5
Page 18
Setting Oven Controls
Consumer Defined Control Features
Setting Temperature Display — Fahrenheit or Celsius
The BROIL and FLEX CLEAN pads control the Fahrenheit or Celsius temperature display modes. The
oven control can be programmed to display temperatures in Fahrenheit or Celsius. The oven has been preset at the
factory to display in Fahrenheit.
INSTRUCTiONS
To change dispiay from Fahrenheit to Ceisius or Ceisius to Fahrenheit
1.
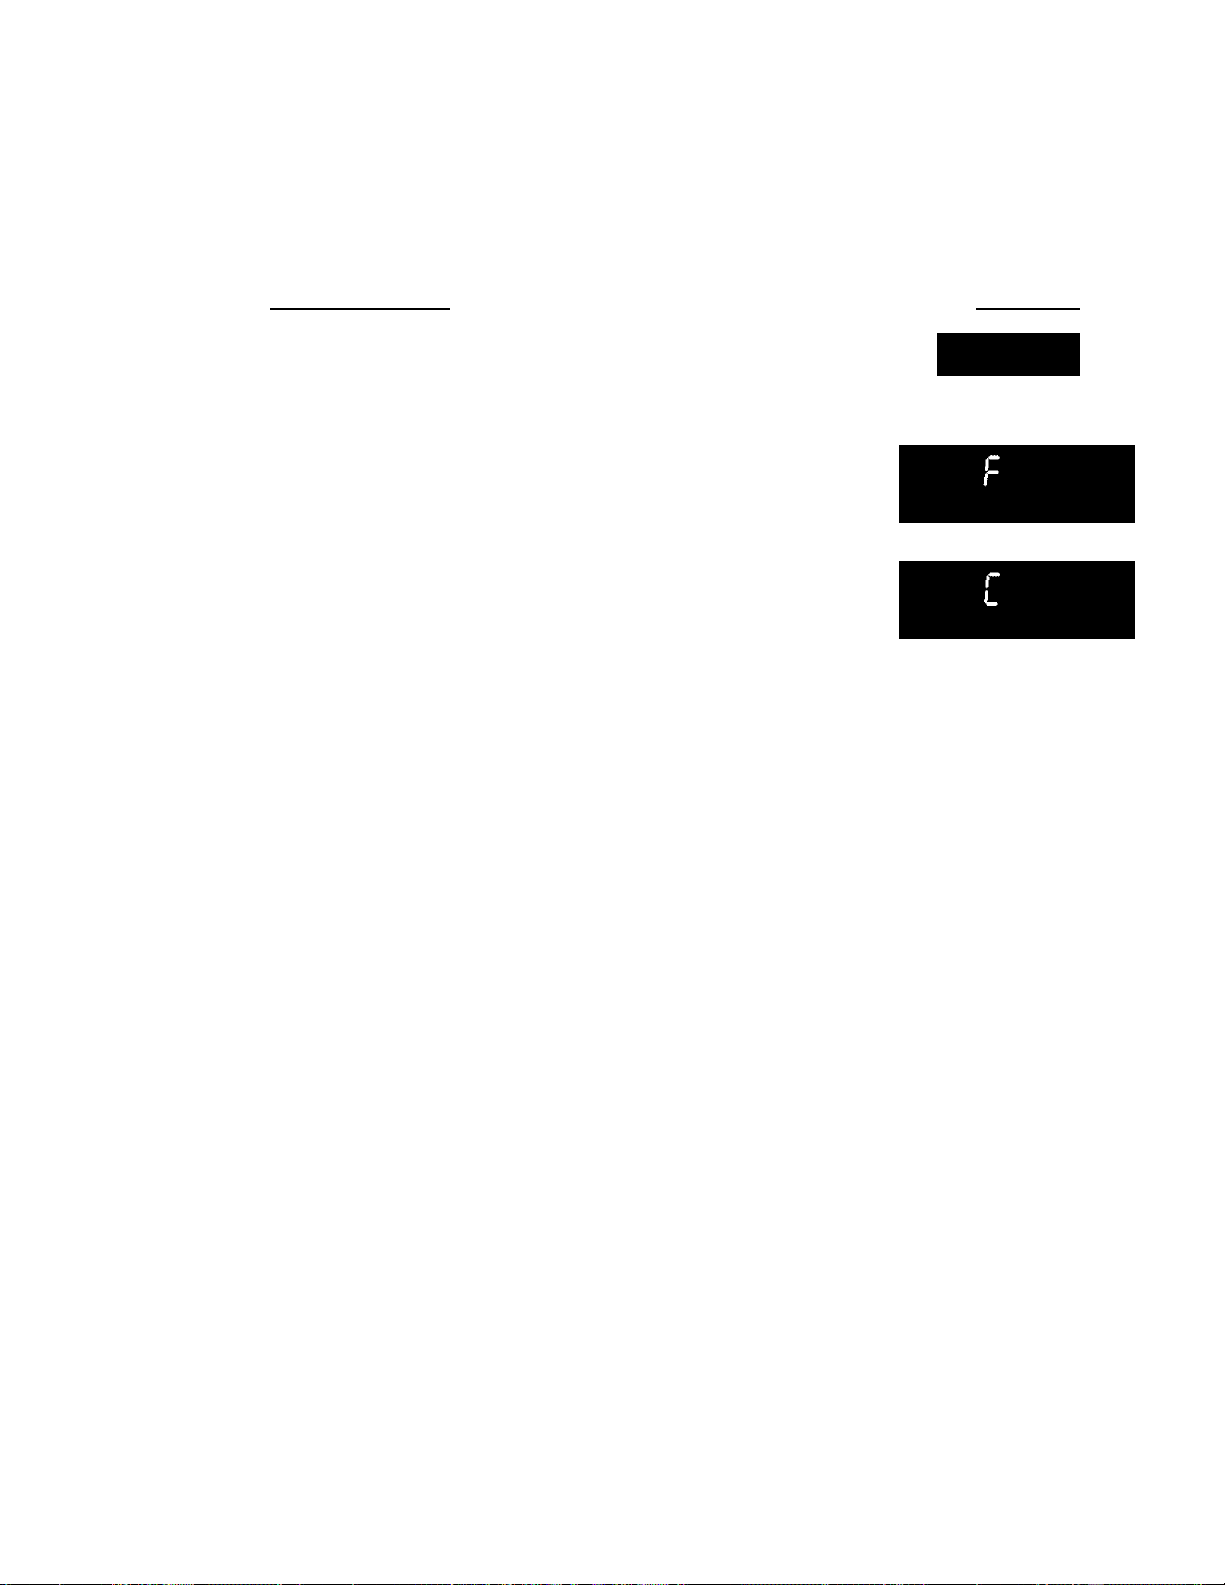
To tell if the display is set for Fahrenheit or Celsius press
(Figure 1) and hold for 7 seconds; "550°" will appear and
"BROIL" will flash in the display and a beep will sound. If "F"
appears, the display is set to show temperatures in Fahrenheit
(Figure 2). If "C" appears, the display is set to show
temperatures in Celsius (Figure 3).
2.
Pfsss to switch between Fahrenheit or Celsius display
modes. The display will show either "F" (Figure 2) or "C"
(Figure 3).
3.
Press to accept the change or press to reject the
change.
□ DCCC
»
for/seconds
or
DISPLAY
lOn ccn
I- JU □ Du
Figure 1
Figure 2
Figure 3
18
Page 19
Setting Oven Controls
Setting Preheat
The PREHEAT (g) pad controls the Preheat feature. The Preheat feature will bring the oven up to temperature and
then indicate when to place the food in the oven. Use this feature when recipes call for preheating. Preheating is not
necessary when roasting or cooking casseroies. The oven can be programmed to preheat at any temperature between
170°Fto550°F.
INSTRUCTIONS PRESS DISPLAY
To set the Preheat temperature for 375°F __________________
1. Arrange the interior oven racks.
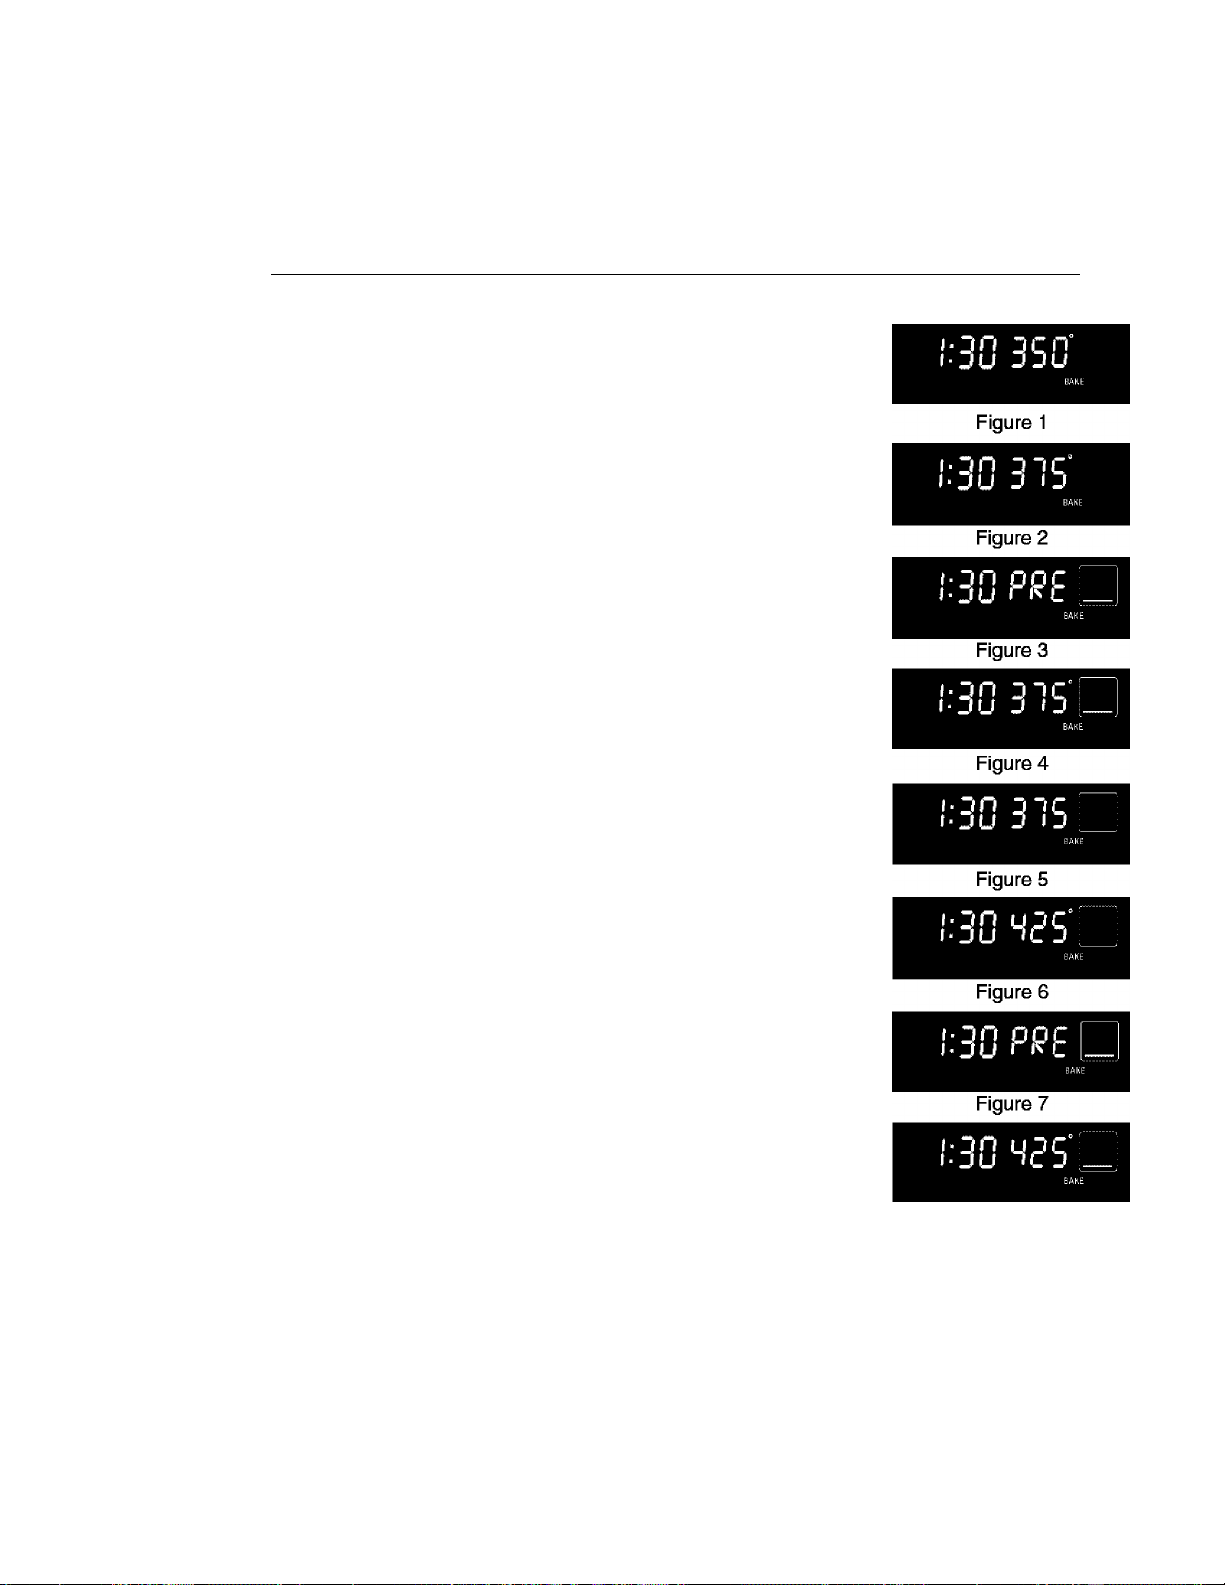
2. Press (^0. "350" and "BAKE" wiil appear in the display
(Figure 1). Note that if a preheat of 350°F is needed, press
3. Press ®CD® "375“ and "BAKE" wiii appear in the
dispiay (Figure 2).
4. Press "PRE" and "BAKE" will appear in the dispiay
the oven heats and reaches 375°F (Figure 3).
Note: After the oven has reached the desired temperature (this
example, 375°F) the control will beep and the "PRE" light will turn
off and oven temperature will be displayed (Figure 4). If you
missed hearing the beep, you can tell that the oven has reached
preheat temperature if you see the oven temperature showing in
the oven display. Once the oven has preheated, PLACE FOOD IN
THE OVEN. The "BAKE" light will stay on.
Press when baking is complete or to cancel the preheat
feature.
as
To change Preheat temperature while oven Is preheating (example: changing from 375°F to 425°F)
If it is necessary to change the preheat temperature while the oven
is preheating to the original temperature:
1. While preheating, press "375" and "BAKE" will appear
in the display (Figure 5).
®®®
m
Q
n
0)
2. Enter the new preheat temperature. Press (7) CX) CZ)-
"425°" and "BAKE" will appear in the display (Figure 6).
3. Press "PRE" and "BAKE" will appear in the display as
the oven heats to 425°F (Figure 7). A beep will sound once the
oven temperature reaches 425°F and the display will show
"425°" and "BAKE" (Figure 8).
4. When baking is complete press (sropl.
19
®®®
<0>
Figure 8
Page 20

Setting Oven Controls
Setting Bake
The BAKE pad controls normal baking. If preheating is necessary, refer to the © Preheat Feature for
instructions. The oven can be programmed to bake at any temperature from 170° F to 550° F (the sample shown below
is for 350° F).
INSTRUCTIONS
_____________
PRESS
DISPLAY
To set the Bake Temperature to 375° F
1. Arrange interior oven racks and piace food in oven.
2. Press "350" wiii appear and "BAKE" will flash in the (вак^
display(Figure 1). If a bake of 350°F is needed, press
3. Press CZ^ CE^ (Figure 2). "BAKE" will continue to flash <D®CD
and "375°" will appear in the display.
4. Press A beep will sound once the oven temperature
reaches 375° F and the display will show "375°" and "BAKE"
(Figure 3).
Pressing l^sropi will cancel the Bake feature at any time.
To change the Bake Temperature (example: changing from 375°F to 425°F)
1. After the oven has already been set to bake at 375°F and the
oven temperature needs to be changed to 425°F, press (jak^
(Figure 4) and "375" will appear and "BAKE" will flash in the
display.
2. Press (4^ CD CD ^)- "BAKE" will continue to flash CD CD CD
and "425°" will appear in the display.
3. Press "BAKE" and "425°" will stay in the display (See
Figure 6).
I ■ _f О ^ П
lOU JJU
Figure 1
lOn 31C°
l-DU J
Figure 2
Ì.-30 315'
Figure 3
(ОП Э1С
l-JU J <J
Figure 4
(;30 435’L
Figure 5
ton U3C
lOu iC3
Figure 6
Note; During the first rise of temperature, both Bake and Broil
elements will cycle for a better heat distribution.
20
Page 21

Setting Oven Controls
Oven Baking
For best cooking results, pre-heat the oven before baking cookies, breads, cakes, pies or pastries, etc.
The cooking times and temperatures needed to bake a product may vary slightly from your previously owned appliance.
If you feel your oven is too hot or too cold, you can adjust its temperature. Refer to the “Adjusting oven temperature"
section.
Baking Probiems and Soiutions Chart
Baking
Problems
Cookies and bis
cuits burn on the
bottom.
jyt
Cakes too dark on
top or bottom.
Cakes not done in
the center.
. ..
Causes Corrections
• Cookies and biscuits put into
the oven before the preheat
ing time is completed.
• Oven rack overcrowded. • Choose pan sizes that will permit 2" to 4" (5.1 cm to
• Dark pan absorbs heat too
fast.
• Cakes put into the oven be
fore preheating time is com
pleted.
• Rack position too high or low. • Use proper rack position for baking needs.
• Oven too hot. • Set oven temperature 25°F/12°C lower than recom
• Oven too hot. • Set oven temperature 25°F/12°C lower than recom
• Incorrect pan size. • Use pan size suggested in recipe.
• Pan not centered in oven. • Use proper rack position and place pan so there is
• Allow oven to preheat to the selected temperature
before placing food in oven.
10.2 cm) of air space on all sides when placed in
the oven.
• Use a medium-weight aluminum baking sheet.
• Allow oven to preheat to the selected temperature
before placing food in the oven.
mended.
mended.
2" to 4" (5.1 cm to 10.2 cm) of space on all sides of
pan.
m
Q
n
0)
Cakes not level.
Foods not done
when cooking
time is up.
• Range not level. • Place a marked glass measuring cup filled with wa
ter on the center of the oven rack. If the water level
is uneven, refer to the installation instructions for
leveling the appliance.
• Pan too close to oven wall or
rack overcrowded.
• Pan warped. • Do not use pans that are dented or warped.
• Oven too cool. • Set oven temperature 25°F/12°C higher than sug
• Oven overcrowded. • Be sure to remove all pans from the oven except
• Oven door opened too fre
quently.
• Be sure to allow 2” to 4" (5.1 cm to 10.2 cm) of
clearance on all sides of each pan in the oven.
gested and bake for the recommended time.
the ones to be used for baking.
• Open oven door only after shortest recommended
baking time.
21
Page 22
Setting Oven Controls
Setting Convection Bake
The CONVECTION BAKE pad controls the Convection Bake feature.
Use the Convection Bake feature when cooking speed is desired. The oven can
be programmed for Convection baking at any temperature between 170° F {77°
C) to 550° F (288° C).
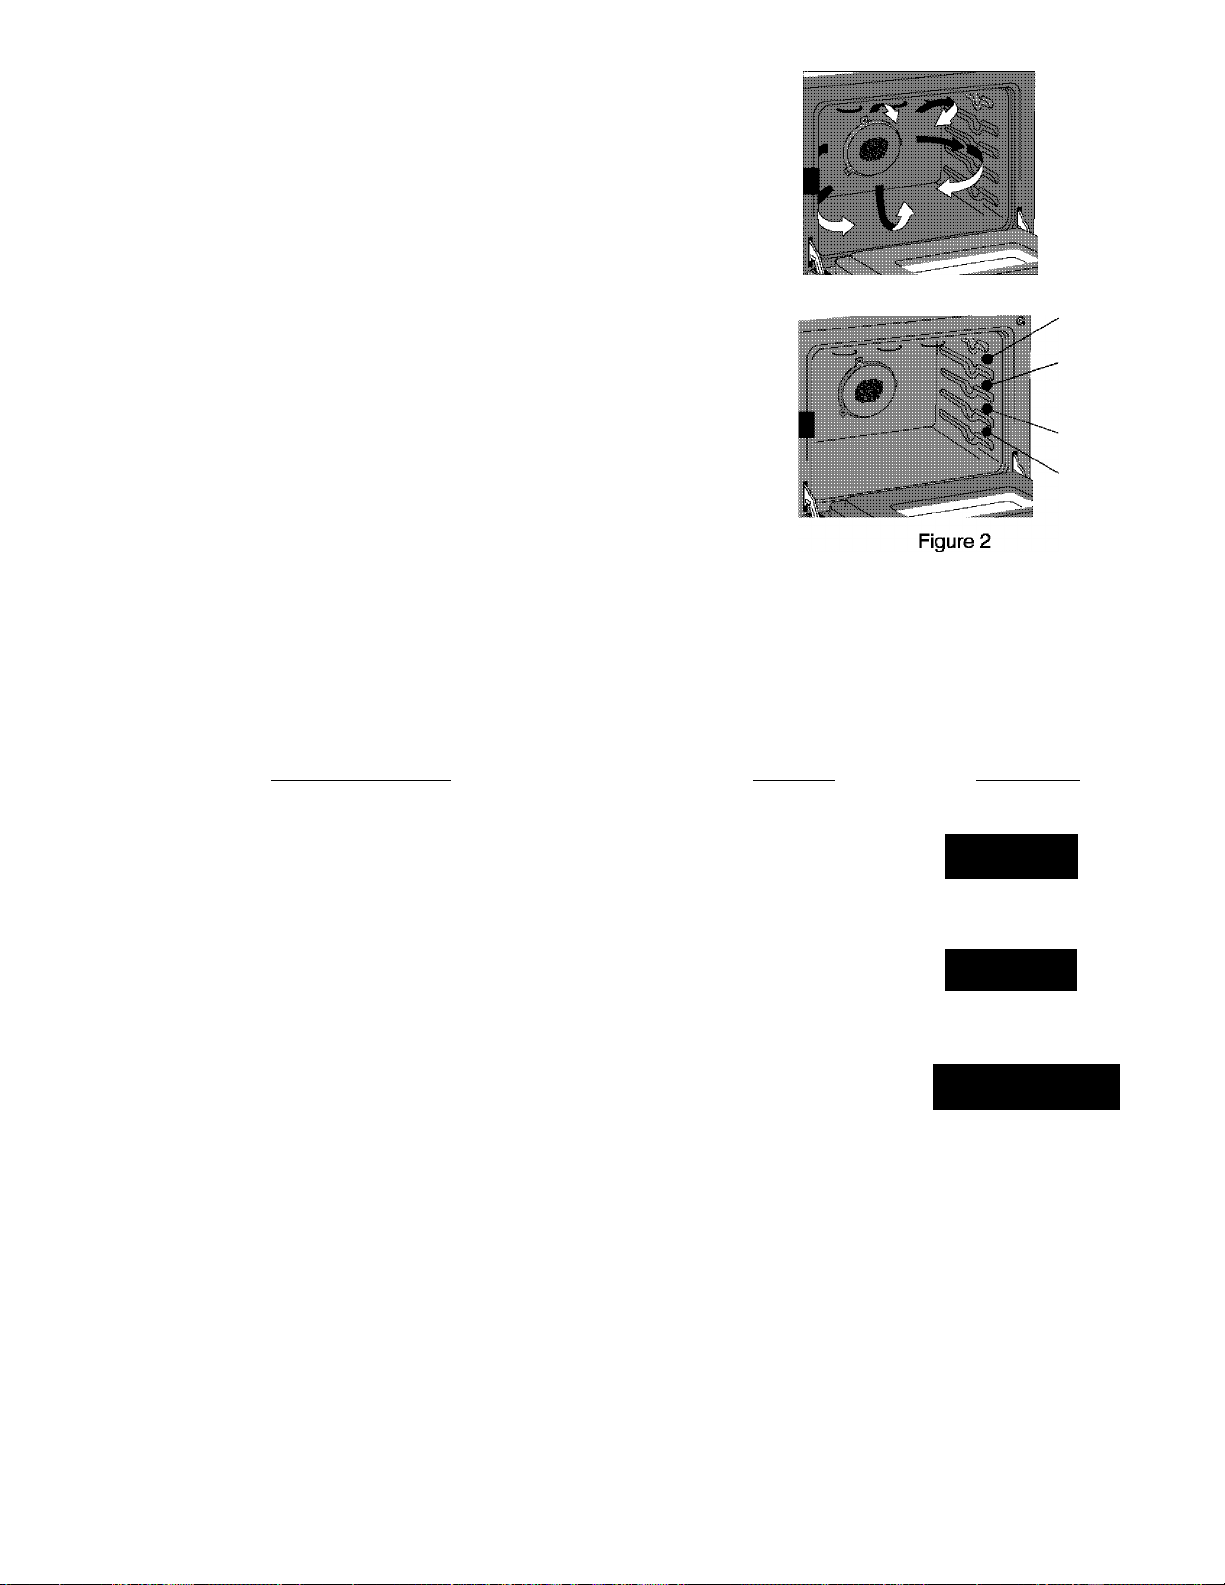
Convection baking uses a fan to circuiate the oven's heat evenly and continuously
within the oven (See Figure 1 ). This improved heat distribution allows for fast, even
cooking and browning results. It also gives better baking results when using 2 or 3
racks at the same time. Breads and pastries brown more evenly. Convection bake
cooks most foods faster, at lower temperature and more evenly than conventional
bake. This oven is equipped with multiple fan speeds for even cooking when
baking and better tasting meats when roasting. It will use a slower fan speed for
baking. The slow fan speed slowly and evenly moves the air through the cavity
and produce lighter flakier crusts for pies and evenly brown cookies.
General Convection Bake Instructions
Time reductions will vary depending on the amount and type of food to be
1.
cooked. Cookies and biscuits should be baked on pans with no sides or
very low sides to allow heated air to circulate around the food. Food baked
on pans with a dark finish will cook faster.
Preheating is not necessary when cooking casseroles with Convection
2.
Bake.
When using Convection Bake with a single rack, place oven rack in position
2 or 3. If cooking on multiple racks, place the oven racks in positions 2 and
4.
Air
circulation
during
Convection
Bake
Figure 1
4th Rack
position
3rd Raok
position
2nd Rack
position
1 St Rack
position
Benefits of Convection Bake:
—Multiple rack baking.
—Some foods cook up to 30%
faster, saving time and energy.
—No special pans or bakeware
needed.
INSTRUCTIONS PRESS
To set the oven for Convection Bake and temperature to 375°F
1. Arrange interior oven racks and place food in oven.
2. Press (J^. "CONV BAKE" will flash and "350" will appear in
the display (Figure 3). If a Conv Bake of 350°F is needed,
press
3. Press "CONV BAKE" will keep flashing and
"375°" will appear in the display (Figure 4).
4. Press ^™^."CONV BAKE" will stop flashing and the fan
icon will appear in the display (Figure 5).
Note: The convection fan will starf AS SOON AS the oven is set for
Convection Bake. The display will show an icon of rotating fan
wifhin a square. This rotating fan icon indicates when the
Convection Fan is operating. The Bake, Broil and Convection
elements will cycle for a better heat distribution.
Press to stop Convection Bake or cancel Convection Bake at
any time.
C0)
DISPLAY
n DCn
3
U jDu
Figure 3
lOn D"(C°
l-DU J IJ
Figure 4
lOn □ ir° ' ^
(■□U J IJ ^
Figure 5
22
Page 23

Setting Oven Controls
Setting Convection Roast
This method of cooking enables you to obtain the best results when roasting. The oven can be programmed to
convection roast at any temperature from 170°F to 550°F (77°C to 288°C). Remember to use tested recipes with times
adjusted for convection roasting when using the convection mode. Times may be reduced by as much as 30% when
using the convection feature. This oven is equipped with multiple fan speeds for even cooking when baking and better
tasting meats when roasting. It will use a faster fan speed for roasting which wiil quickiy strip the cold air away from the
meats repiacing it with warm air {making a crisp outside type of searing) sealing in juices for better tasting meats.
INSTRUCTIONS PRESS
To Set the oven to Convection Roast at 375°F
1. Arrange oven racks.
2. Press "350" wili be displayed; CONV ROAST will flash (Figure 1 ). (g)
DISPLAY
l-jn DC П’
lOU JJU
3. Enter the desired roasting temperature using the number pads ^3^ CZ)
(T) (J) (Figure 2). (7) (7)
4. Press CONV ROAST and the fan icon will be displayed
(Figure 3). The Bake, Broii and Convection elements will also cycle for
a better heat distribution.
To change the Convection Roast temperature
Figure 1
1:30 31S'
Figure 2
1:30 B'iS'
(example: changing from 375°F to 425°F)
1. Press (g); "375" will be displayed; CONV ROAST will flash (Figure 2).
2. Enter the desired roasting temperature using the number pads (^4^
® ® (Figure 4).
3. Push the current oven temperature, CONV ROAST and the
fan icon will be displayed (Figure 5).
After the oven has reached the desired temperature, the control will beep
and CONV ROAST light will stay on. Note: The Bake, Broil and
Convection elements will cycle for a better heat distribution. Figure 5
When convection roasting is complete press
Figure 3
1:30 435'
Figure 4
1:30 43S‘
Setting Convection Convert
ГП
Q
n
CO
The CONV CONVERT pad is used to automatically convert a standard baking recipe for convection baking. When
set properly, this feature is designed to display the actual converted (reduced) temperature in the display.
Convection Convert may ONLY be used with a Conv Bake, Timed Conv Bake or a Delay Start (Delayed Timed Conv
Bake) setting. When used with a Timed Bake or a Delay Start (Delayed Timed Bake) setting, the Convection Convert will
display a "CF" for check food when the bake time is 75% complete (See Fig. 8). At this time the oven control will sound 3
long beeps at regular intervals until baking had finished. When the bake time has completely finished the control will
display "End" and will sound 3 long beeps every 30 seconds until the pad is pressed.
To change from a normal bake recipe to a convection bake
recipe (example: changing a 400° (204°C) normal bake
recipe to a convection bake recipe)
When the conv bake mode is on at 400°F (204°C) (Figure 6), press
"CONV BAKE" and the oven temperature adjustment will
appear in the display (for this example it is 375°F). A beep will sound
once the adjusted oven temperature is reached. The display will show
"375°", "CONV BAKE" and the fan icon (Figure 7).
NOTE: When using a Cook Time, the convection convert will not
operate if you have a timed bake under 20 minutes.
23
<-ЭП unn
I- Du "uu
Figure 6
1:30 ЗЗЗ’Ц
Figure 7
lOU L
Figure 8
Page 24
Setting Oven Controls
Setting the Slow Cook Feature
The SLOW COOK pad is used to activate this feature. The Slow Cook feature may be used to cook foods more
slowly, at lower oven temperatures and provides cooking results much the same way as a Slow Cooker or Crock-Pot.
The Slow Cook feature Is Ideal for roasfing beef, pork & poultry. Slow Cooking meats may result in the exterior of meats
becoming dark but not burnt. This is normal.
There are 2 settings available, high (HI) or low (LO). The maximum cook time for the Slow Cook feature is 12 hours
unless the oven control has been changed to the Continuous Bake mode or the Sabbath mode has been activated.This
feature may be used with the additional settings of a Timed Bake Slow Cook (see Timed Bake beginning with step 5-7)
or a Delayed Start Bake Slow Cook (see Delayed Start Bake steps 6-10).
Below is a list of preparation and cooking tips you should review for best possible results using Slow Cook:
• Completely thaw all frozen foods before cooking with the Slow Cook feature.
• When using a single rack, place in position 2 or 3 (see figure 1 on page 15).
• Position multiple racks to accommodate size of cooking utensils when cooking multiple food items.
• Do not open the oven door often or leave the door open when checking foods. If the oven heat escapes often, the
Slow Cook time may need to be extended.
• Cover the foods to keep them moist or use a loose or vented type cover to allow foods to turn crisp or brown.
• Cook times will vary; depending on the weight, fat content, bone & the shape of the meat.
• Use a food thermometer to determine when the food is done to the recipe recommended temperature.
• Preheating the oven will not be necessary when using the Slow Cook feature.
• Add any cream or cheese sauces during the last hour of cooking.
INSTRUCTIONS
To Program the Oven to begin baking with the Siow Cook feature
1. Place the food in the oven.
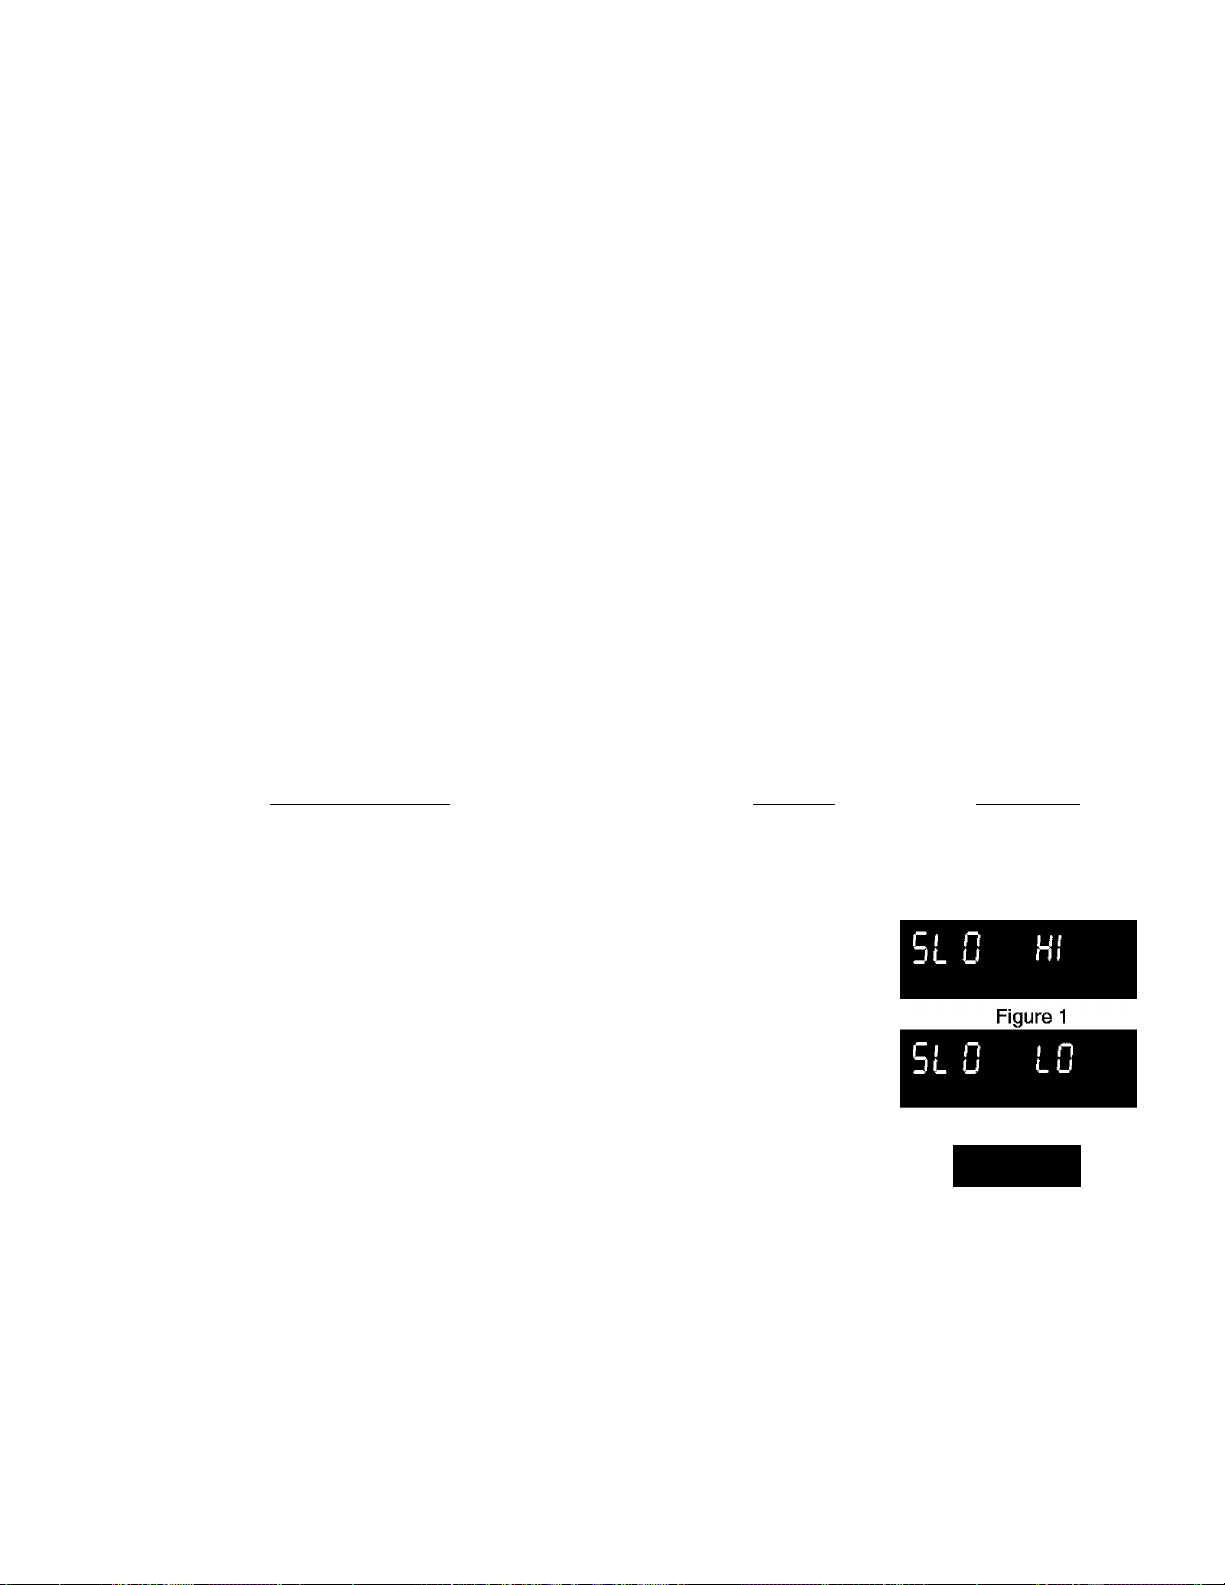
Press d^. "SLO" and "HI" will appear in the display. The
2.
Slow Cook feature will be set to the high setting. This setting is
best for cooking foods from a 4 to 5 hour time period (Figure 1).
Press again set the Slow Cook feature to the low
4.
setting (Lo will appear in the display). This setting is best for
cooking foods from a 8 to 9 hour time period (Figure 2).
Press (Figure 3).
If desired, add any Timed Bake or Delayed Start Bake
settings at this time.
To cancel the Slow Cook feature press at any time.
PRESS DISPLAY
Figure 2
on Cl n
■ □ LI J L U
■
Figure 3
24
Page 25

Setting Oven Controls
Setting Timed Bake, Timed Convection Bake orTimed Convection Roast
The BAKE (BakO or CONVECTION BAKE
control the Timed Bake feature. The automatic timer of the Timed Bake feature will turn the oven OFF after cooking for the
desired amount of time you selected.
iNSTRUCTiONS PRESS
or CONVECTION ROAST I and OVEN COOK TIME (g) pads
DISPLAY
To program the oven to begin baking immediately and to shut off automaticaliy (example: BAKE at 350°F for 30 minutes)
1. Be sure the clock is set for the correct time of day.
2. Arrange interior oven rack{s) and place the food in the oven.
3. Press (Bak^, "350" will appear and "BAKE" will flash in the
display (Figure 1).
4. Press "BAKE" and "350°" will appear in the display
(Figure 2).
limed Oven
5. Press (g). "TIMED" will flash; "BAKE", and "350°" will
appear in the display (Figure 3).
6. Enter the desired baking time by pressing (Figure 4).
Note: Baking time can be set for any amount of time between 1
minute to 11 hours and 59 minutes.
7. Press Both the "TIMED" and "BAKE" icons will remain on
CD®
on qcn°
Ou j ju
Figure 1
on ^
JU J JU
Figure 2
"" 350
Figure 3
___
________
m
Q
n
(/)
in the display (Figure 5). Once the Timed Bake feature has
started, the current time of day will appear in the display.
Note: After the Timed Bake feature has activated, press ^g^ to
display the bake time remaining in the Timed Bake mode. Once
Timed Bake has started baking, a beep will sound when the oven
temperature reaches the set temperature.
Press when baking has finished or at any time to cancel the
Timed Bake feature.
When the timed bake finishes
1. "End" and the time of day will show in display. The oven will shut
off automatically (Figure 6).
2. The control will beep 3 times. The control will continue to beep 3
times every 30 seconds until (stopI is pressed. C stop j
ACAUTION
cooking cured or frozen meats and most fruits and vegetables. Foods that can easily spoil such as milk, eggs, fish,
meat or poultry, should be chilled in the refrigerator first. Even when chilled, they should not stand in the oven for more
than 1 hour before cooking begins, and should be removed promptly when cooking is completed. Eating spoiled food
can result in sickness from food poisoning.
I Use caution with the DELAY START (Delayed Timed Bake) features. Use the automatic timer when
Timed Oven
Figure 4
»on DCn”
lOU JJU
Figure 5
3-nn C„J
c-uu end
Figure 6
25
Page 26

Setting Oven Controls
Setting Delayed Timed Bake or Delayed Timed Convection Bake
Timed Owen
The BAKE (g) or CONVECTION BAKE (^, OVEN COOK TIME (g) and DELAY START (g) pads control the
Delayed Time Bake feature. The automatic timer of the Delayed Time Bake will turn the oven on and off at the time you
select in advance. Note: If your clock is set for normal 12 hour display mode the Delayed Timed Bake or Delayed Timed
Convection Bake cycle can never be set to start more than 12 hours in advance. To set for Delayed Timed Bake or
Delayed Timed Convection Bake 12-24 hours in advance set the control for the 24 hour time of day display mode.
INSTRUCTIONS PRESS DISPLAY
To program the oven for a delayed BAKE start time and to shut off automatically (example: baking at 350°F, starting at 5:30 and baking for 30 minutes)
Be sure that the clock is set with the correct time of day.
Arrange interior oven rack{s) and place the food in the oven.
lon qcn
Ì JU JJU
Press "350" will appear and "BAKE" will flash in the display
(Figure 1).
Press "BAKE" and "350°" will stay in the display (Figure 2).4.
5. Press
"350°" will remain in the display (Figure 3).
6.
Enter the desired baking time using the number pads by pressing
in the display (Figure 4). Note: Baking time can be set for any amount
of time from 1 minute to 11 hours and 59 minutes.
7.
Press <^>. "TIMED". "BAKE" and "350°" will remain in the display
(Figure 5).
8.
Press d^). "DELAY" will flash in the display. Enter the desired start
time using the number pads ^5^ CX) (Figure 6).
Press When Delayed Time Bake starts, the set oven
9.
temperature will disappear, "DELAY", "BAKE" and the current time of
day will appear in the display (Figure 7).
10. When the desired start time is reached, "350°" appears in display and
“DELAY" disappears. Oven starts to bake at the previously selected
temperature (Figure 8).
Note: Once Delayed Time Bake has started, press to display the
"TIMED" will flash. will appear and "BAKE" and
"TIMED" will flash; "BAKE". "-:30" and "350°" will appear
Timed Oven
CD
CD
CD CD CD
Figure 1
:30 350’
Figure 2
Figure 3
___
-^n
Figure 4
!'3u
Figure 5
5:30 350'
Figure 6
3u 350
350’D
bake time remaining . Once the Delayed Timed Bake has started baking,
a beep will sound when the oven temperature reaches the set
temperature.
Press when baking has completed or at any time to cancel the
Delayed Time Bake feature.
When the set bake time runs out:
1. "End" will appear in the display and the oven will shut off
automatically (Figure 9).
2. The control will beep 3 times. The control will continue to beep 3
times every 30 seconds until (srapl ¡s pressed.
26
Figure 7
5:30 350"
Figure 8
Figure 9
Page 27

Setting Oven Controls
Setting the Food Categories Feature
The CAKES (CAi^ and BREADS ^REA^ pads in the Food Categories feature are used when cooking certain food
items. These pads have been designed to give optimum cook performance for the foods selected in each category.
The CAKES pad provides a preheat with a gentie cycling of heat giving cakes more volume and allowing delicate foods to
cook more evenly.
The BREADS pad adds a preheat feature to the bake cycle to thoroughly heat the oven from top to bottom to give more
evenly browned foods. Refer to (Figure 4) for foods to cook in each category.
INSTRUCTIONS
To set the Food Categories feature (example: for Cakes to cook at 375° F)
1. Arrange interior oven racks and place food in oven.
2.
Press "CAKE" will flash and "350°" will be displayed
(See Figure 1). Note that if a bake temperature of 350°F is
needed, simply press
Press CD®® "“KE " will flash and "375°" will
appear in the display (See Figure 2).
Press "CAKE" will stop flashing and "375°" will
4.
remain in the display (See Figure 3). The convection fan icon
will come on.
Press to stop cooking Cakes or Breads, or to cancel cooking
Cakes or Breads at any time.
Recommended
foods to be
cooked in each
category
Cakes
Cakes
Brownies
Pies (fresh & frozen)
Baked Custards
Cheesecake
Breads
Breads
Rolls
Biscuits
Muffins
Corn bread
PRESS
<
0
>
®®®
DISPLAY
rOn Drn°
|.JU 33U
Figure 1
J-Dn lie“
l-JU J IJ
Figure 2
l:9S 915 -
Figure 3
im
Q
n
(/)
Figure 4
27
Page 28

Setting Oven Controls
Setting the Warm & Hold™ Feature
The Warm & Hold pad turns ON the Warm & Hold feature and will maintain an oven temperature of 170°F (77°C).
The Warm & Hold feature will keep oven baked foods warm for serving up to 3 hours after cooking has finished. After 3
hours the Warm & Hold feature will shut the oven OFF. The Warm & Hold feature may be used without any other cooking
operations or can be used after cooking has finished using BAKE, CONVECTION BAKE, CONVECTION ROAST.
The Warm & Hold feature may be used with TIMED BAKE if you wish to have the Warm & Hold feature turn ON
automatically when cooking has finished. The Timed Bake features require you to set start time and the amount of
cooking time. With this information the control can calculate the time when cooking will complete and can then start the
Warm & Hold feature automatically.
INSTRUCTIONS
To set Warm & Hold
1. Arrange interior oven racks and place food in oven.
Press "HLd" will appear in the display (Figure 1).
2.
Note: If no pad is touched within 25 seconds the request to turn
ON Warm & Hold feature will be cancelled.
3. Press The oven icon will appear in the display (Figure 2).
To turn the Warm & Hold OFF at any time press
Note: The Warm & Hold feature will automatically turn OFF after
3 hours.
To set Warm & Hold to turn ON automatically
1. Arrange interior oven racks and place food in oven. Set the oven
properly for Timed Bake or Delayed Timed Bake.
2. Press (^). (Figure 3)
Note: If no pad is touched within 25 seconds the request to turn
ON Warm & Hold feature all functions previously programmed will
be cleared.
3. Press "HLd" will disappear and the temperature will be
□ DCCC
/WarinS
\gHoj4/
<0>
■
TIMED DELAY BAKt
DISPLAY
(■ in (jt J
i-du nLd
Figure 1
n Ut J
U ntd
3
Figure 2
<On ui J
i-du HLd
Figure 3
displayed (Figure 4). The Warm & Hold mode is set to turn ON
automatically after Timed Bake has finished (See Figure 2).
4. To turn the Warm & Hold feature OFF at any time press [stop!
Note: The Warm & Hold feature will automatically turn OFF after
3 hours.
Pressing i^sropt at any time will stop all oven baking operations.
28
IIMED DELAY SAKE
ion icn
lOu JJU
Figure 4
Page 29
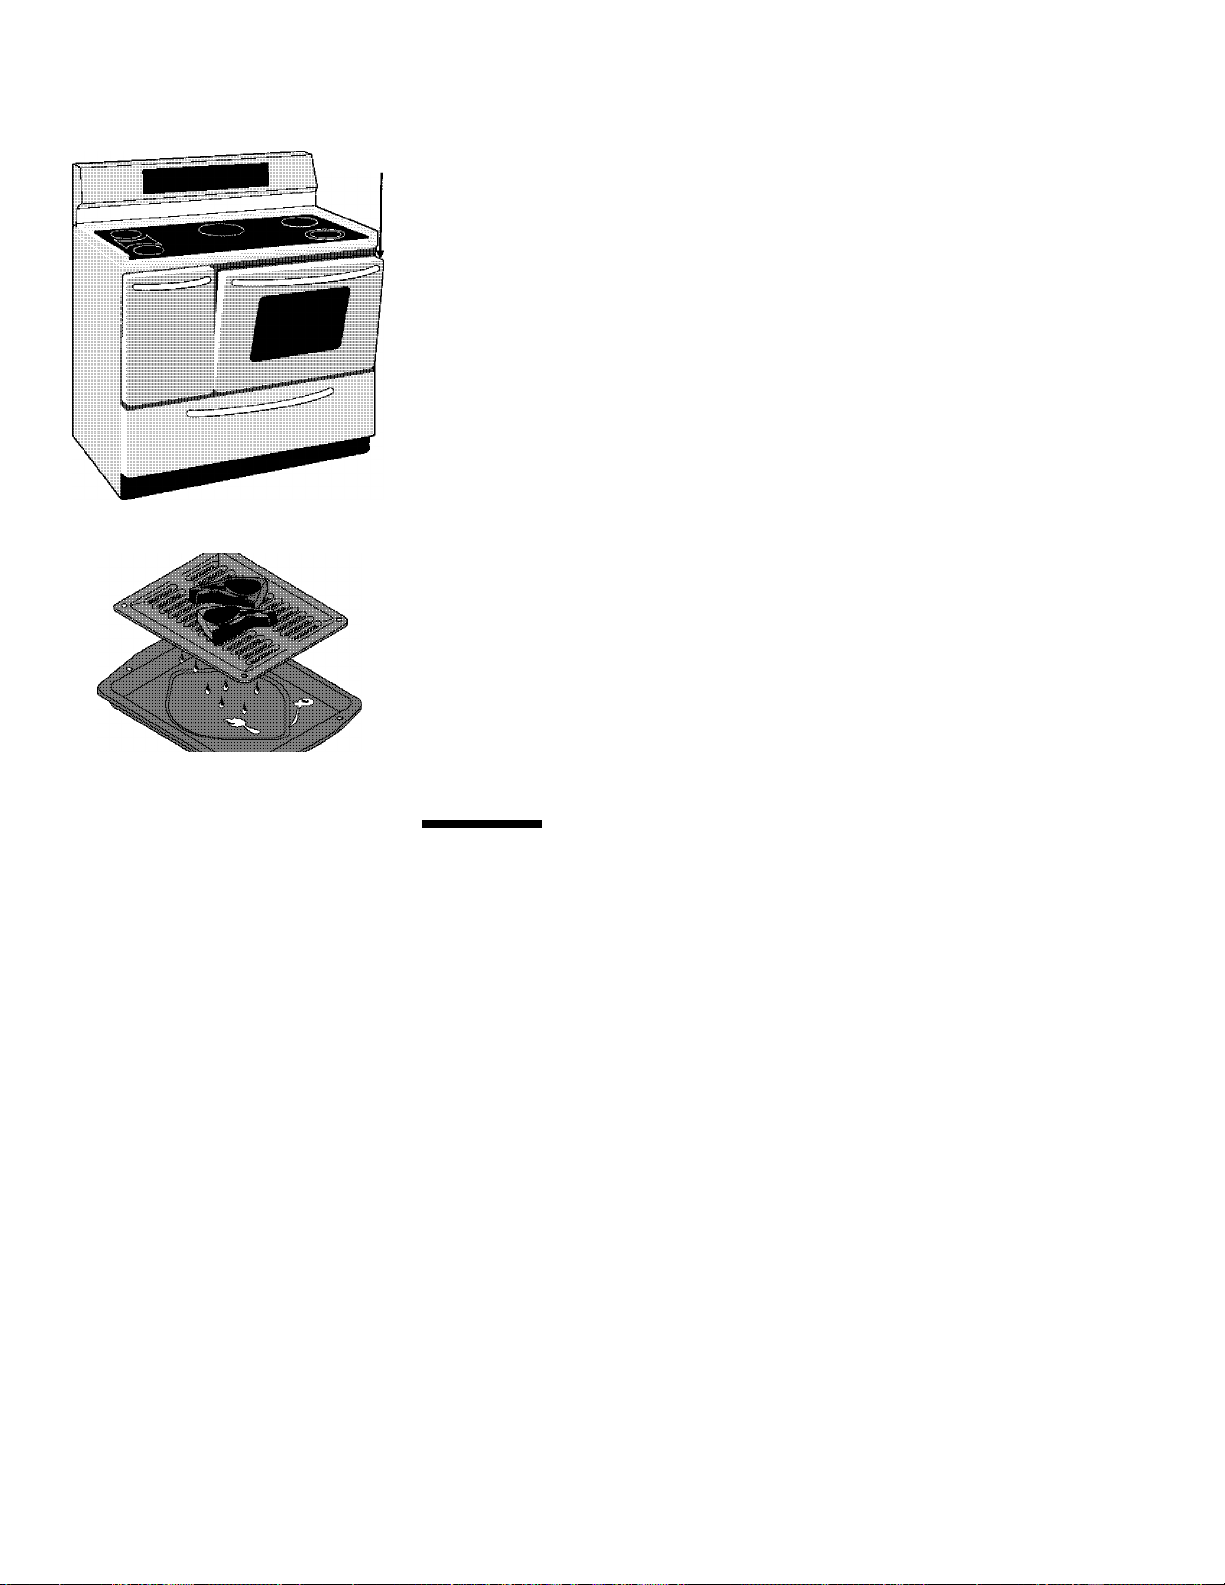
Setting Oven Controls
Broil Stop
Position
Main Oven
Broiling Information
Broiling is a method of cooking tender cuts of meat by direct heat from the broil
element of the oven. Meats are placed on the broiling rack and the rack is
placed under the broiling element.
See the broiling instructions for main oven in the Setting Oven Controls section.
See side oven step-by-step instructions in the Setting Side Oven Control
section.
Preheating
Preheating is suggested when broiling rare steaks (remove all utensils before
preheating). To preheat, set the oven control to BROIL. Wait for the element to
become red-hot, usually about 2 minutes. Preheating is not necessary when
broiling meats well-done.
To Broil
Broil on one side until the food is browned; turn and cook on the other side;
season and serve. Always pull rack out to the stop position before turning or
removing food.
Determining Broiling Times
Broiling times vary; watch the food closely. Time not only depends on the
distance from the element, but on the thickness and age of meat, fat content
and doneness preferred. The first side usually requires a few minutes longer
than the second. Frozen meats also require additional time.
Broiling Tips
Broiler pan and its grid allow dripping grease to drain and be kept away from the
high heat of the broiler.
m
Q
n
0)
DO NOT use a pan without its grid. DO NOT cover the grid with foil. The
exposed grease could ignite.
ACAUTiON
If the fire continues, throw baking soda on the fire or use a fire extinguisher. DO NOT
put water or flour on the fire. Flour may be explosive.
Always pull oven rack out to the stop position before turning or removing
food.
Broiier Ciean-Up Tips:
• To make cleaning easier, line bottom of the broiler pan with aluminum foil. DO
NOT cover the broiler grid with foil.
• To prevent grease from baking on, remove the broiler pan from the oven as soon
as cooking is completed. Use hot pads because the broiler pan is extremely hot.
Pour off grease. Soak the pan in HOT, soapy water.
• Clean the broiler pan as soon as possible after each use. If necessary, use soap-
filled steel wool pads. Heavy scouring may scratch the grid.
Should an oven fire occur, close the oven door and turn off the oven.
29
Page 30
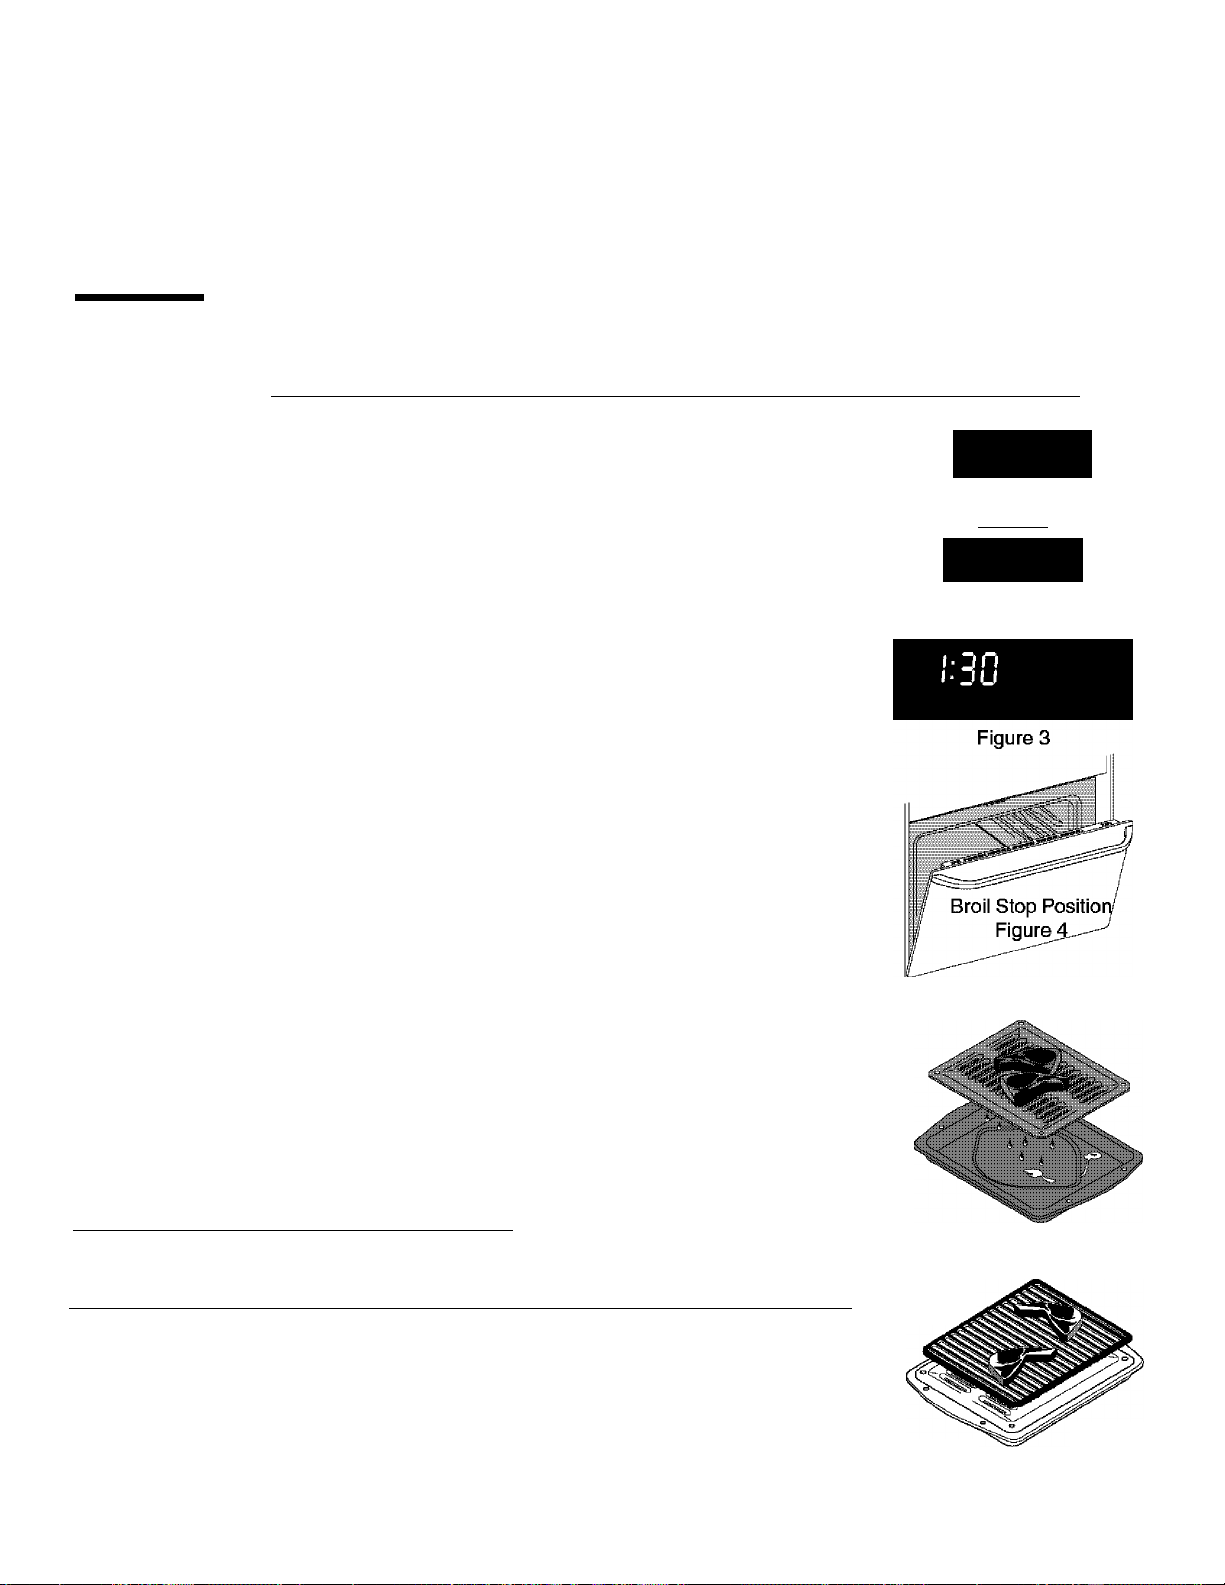
Setting Oven Controls
Setting Broil
The (bi^ pad controls the Broil feature. When broiling, heat radiates downward from the oven broiler for even coverage.
The Broil feature temperature may be set between 400°F and 550°F. This appliance includes a Searing Grill for searing
meats (Figure 6). The broil pan and broil pan insert used together allow dripping grease to drain and be kept away from
the high heat of the oven broiler. DO NOT use the broil pan without the insert (See Figure 5). DO NOT cover the broil
pan insert with foil. The exposed grease could catch fire.
À WARNING
baking soda on the fire or use a fire extinguisher. DO NOT put water or flour on the fire. Flour may be explosive and
water can cause a grease fire to spread and cause personal injury.
Should an oven fire occur, leave the oven door closed and turn off the oven. If the fire continues, throw
INSTRUCTIONS PRESS DISPLAY
To set the oven to broil at 500°F
1. Place the broiler pan insert on the broiler pan. Then place the food
on the broiler pan insert. DO NOT use the broiler pan without the
insert. DO NOT cover the broiler insert with foil. The exposed
grease could ignite.
Arrange the interior oven rack and place the broiler pan on the
2.
rack. Be sure to center the broiler pan directly under the broiler
element. Make sure the oven door is in the broil stop position
(See Figure 4).
Press (bi^. "BROIL" will flash and "550" will appear (Figure 1).
3.
4.
Press CD (o)®-
If a lower broil temperature is desired (minimum broil temperature
5.
setting is 400°F), press the desired temperature before continuing
to step 6.
6.
Press The oven will begin to broil. "BROIL" and "500°" will
appear in the display (Figure 2).
7.
Broil on one side until food is browned; turn and cook on the
second side. Season and serve. Note; Always pull the rack out to
the stop position before turning or removing food.
CD(D®
30 SSu
Figure 1
»on cnn“
l-JU Duu
Figure 2
8.
To cancel broiling press (Figure 3).
Broiling Times and Searing Grill
Use the following table for approximate broiling times. Increase or decrease broiling times,
or move the broiling pan to a different rack position to suit for doneness. If the food you are
broiling is not listed in the table, follow the instructions provided in your cookbook and
watch the item closely. Use the Searing Grill for meats and steaks if desired. Before placing
the meat, be sure to heat the Searing Grill using Broil for 10 minutes. Cook times should be
reduced 1 -2 minutes per side when cooking with the Searing Grill. Place Searing Grill on
top of Broiler Pan and insert for meats and steaks (See Figure 6).
Electric Range Broiling Table Recommendations
Food Rack Temp Cook Time
Item Position Setting 1st side 2nd side Doneness
Steak 1" thick 2nd 550° F 6:00 4:00 Rare
2nd 550° F 7:00 5:00 Medium
Pork Chops 3/4" thick 2nd 550° F 8:00 6:00 Well
Chicken - Bone In 3rd 450° F 20:00 10:00 Well
Chicken - Boneless 2nd 450° F 8:00 6:00 Well
Fish 2nd 500° F 13:00 n/a Well
Shrimp 3rd 550° F 5:00 n/a Well
Hamburger 1" thick 2nd 550° F 9:00 7:00 Medium
3rd 550° F 10:00 8:00 Well
30
Searing
Grill
Broil Pan
& insert
Figure 5
Figure 6
Page 31

Setting Oven Controls
To Set the Sabbath Feature (for use on the Jewish Sabbath & Holidays)
Timed Owen ____
The COOK TIME and DELAY START pads are used to set the Sabbath feature. The Sabbath feature may
only be used with the pad. The oven temperature may be set higher or iower after setting the Sabbath feature
(oven temperature adjustment shouid be used oniy during Jewish Holidays), however the display will not visibly show or
provide any audible tones indicating whether the change occurred correctly. Once the oven is properly set using Bake
with the Sabbath feature active, the oven will remain continuously ON until cancelled. This will override the factory preset
12-Hour Energy Saving feature.
If the oven light will be needed during the Sabbath, press before activating the Sabbath feature. Once the oven
light is turned ON and the Sabbath feature is active, the oven light will remain ON until the Sabbath feature is turned
OFF. If the oven light needs to be OFF, be sure to turn the oven light OFF before activating the Sabbath feature.
IMPORTANT NOTES: It is not advised to attempt to activate any other program feature other than BAKE while the
Sabbath feature is active. ONLY the following key pads will function after setting the Sabbath feature; to
&' ALL OTHER KEYPADS should not be used once the Sabbath feature is properly activated.
INSTRUCTIONS PRESS DISPLAY
To Program the Oven to Begin Baking Immediately &
on 3Cn°|
Ou JJU
_______
activate the Sabbath feature (example: baking at 350°F)
1. Be sure that the clock is set with the correct time of day.
2. Place the food in the oven.
3. Press {Bakej. "350°" appears in the display
Press (Figure 1).
4.
5.
If you desire to set the oven control for a Timed Bake or Delayed Start Bake do so at this time. If not, skip this step
and continue to step 7. Refer to the Timed Bake (complete steps 5-7) / Delayed Start Bake (complete steps 6-10)
section for complete instructions. Remember the oven will shut down after using Timed Bake or Delay Start Bake
and therefore may only be used once during the Sabbath/Jewish Holidays. The maximum Delayed Start Bake time
is 11 hours & 59 minutes.
6.
The oven will turn ON and begin heating.
iirncu umn
7. Press and hold both the and pads for at least 3
seconds. SAb will appear in the display (Figure 2). Once SAb
appears in the display the oven control will no longer beep or
display any further changes and the oven is properly set for the
Sabbath feature.
<0>
Note: You may change the oven temperature once baking has started by pressing (bÌ^, the numeric key pads for the
Figure 1
;^n
Figure 2
m
Q
n
temperature you want (example for 425°C press CX). press TWICE (for Jewish Holidays
only). Remember that the oven control will no longer beep or display any further changes once the oven is set for
the Sabbath feature.
8. The oven may be turned OFF at any time by first pressing
pad (this will turn the oven OFF only). To turn OFF the Sabbath
Timed Oven
feature press and hold both the and pads for at
least 3 seconds. SAb will disappear from the display (Figure 3).
31
Figure 3
Page 32

Setting Oven Controls
To Set the Sabbath Feature (for use on the Jewish Sabbath & Holidays) (continued)
Should you experience a power failure or interruption, the oven wili shut off. When power is returned the oven will not
turn back on automatically. You should remove the food when the power failure occurs, because you may only start the
oven once during the Sabbath/Jewish Holidays. After the Sabbath observance turn OFF the Sabbath feature and the
oven may be used with all normal functions.
After the Sabbath observance turn OFF the Sabbath feature. Press and hold both the and pads for at least 3
seconds. SAb will disappear from the display and the oven may be used with all normal functions. For further assistance,
guidelines for proper usage, and a complete list of models with the Sabbath feature, please visit the web at
http:Wwww.star-k.org.
To Set the Recipe Recall Feature
This feature will ONLY recall a Bake, Convection Bake, Convection roast, Slow Cook, Timed Bake or a Timed Bake
with a Warm & Hold added setting. This feature will not work with any other function including a Delayed Timed Bake, a
Clean Cycle or a Broil setting.
Tirned Own
INSTRUCTIONS PRESS
To Program the Oven to Begin Baking immediately and record a Recipe (example: for a Bake mode at 375“C)
1. Place the food in the oven.
2. Press "350" appears and "BAKE" will flash in the display
(Figure 1).
3. Enter the desired roasting temperature using the number pads
(T) (T) (J) (Figure 2).
4. Press and hold pad for at least 3 seconds or until a beep
sounds. The beep indicates that this recipe has been recorded
for future recall.
To Program the Oven to Begin Baking with a stored Recipe
1. Place the food in the oven.
2. Press (Bak^ " 375 " appears and "BAKE" will flash in the display
(Figure 2) and (Figure 3).
CD®®
<05
for 3 seconds.
DiSPLAY
l-3n 3Cn“
lou dju
Figure 1
I ■ 3 n 1 r°
l-3U J <3
Figure 2
j.^n ^ 1^'
Figure 3
To Quickiy Erase ali Stored Recipes:
1. Press and hold the ® key pad until the first single beep
sounds (6 seconds).
2. After the first beep press the key pad once. Any stored
recipes will be erased. Please note: Clearing the recipes will
also reset all other adjustments back to the factory settings.
These include 12 or 24 Hour Time of Day Display,
Continuous Bake or 12 Hour Energy Savings mode. Silent
Control Operation, Fahrenheit or Celsius Temperature
Display and any Oven Temperature adjustments that are set.
32
Page 33
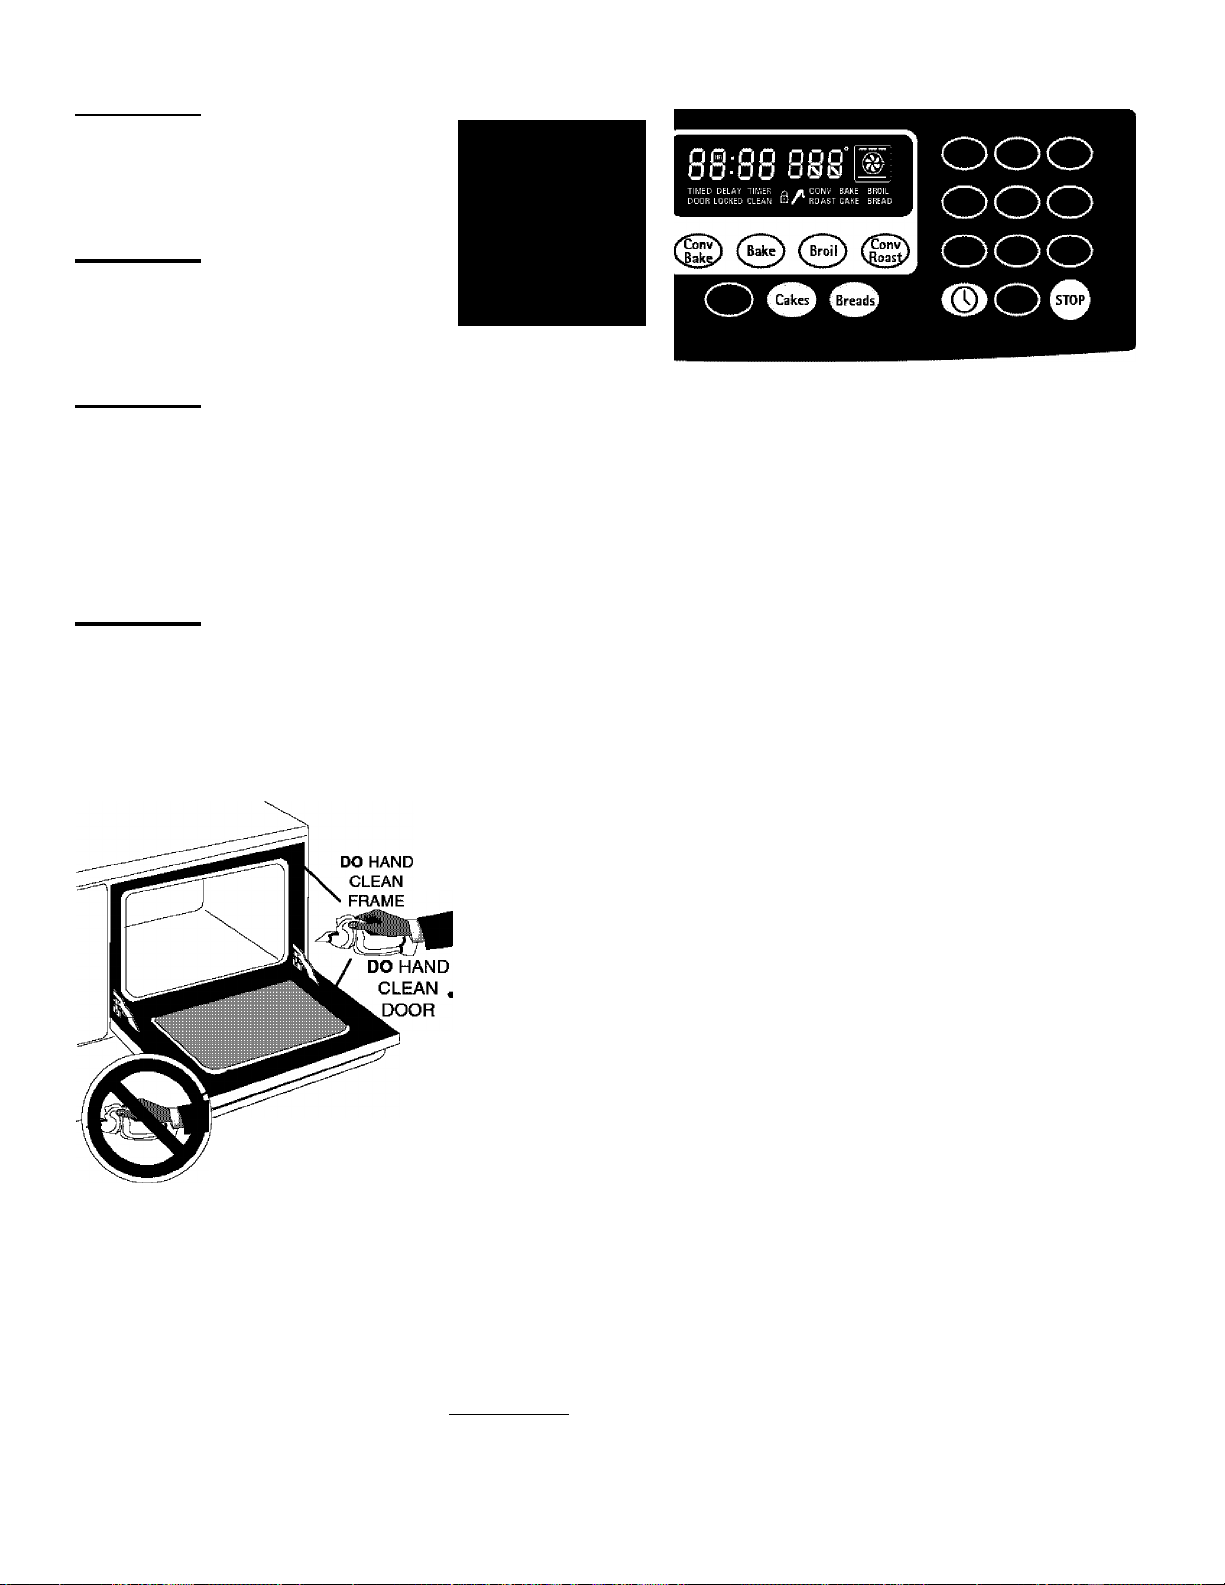
Self-Cleaning
Acaution
Cleaning cycle, the outside of the
range can become very hot to the
touch. DO NOT leave small children
unattended near the appliance.
Acaution
birds Is extremely sensitive to the
fumes given off during the Self
Cleaning cycle of any range. Move
birds to another well-ventilated room.
^CAUTION
walls, racks, bottom or any other part
of the range with aluminum foil. Doing
so will destroy heat distribution,
produce poor baking results and cause
permanent damage to the oven interior
(aluminum foil will melt to the interior
surface of the oven).
ikCAUTION
oven door open. This can damage the
automatic door locking system. Use
caution when opening the door after
the Self-Cleaning cycle is completed.
The oven may still be VERY HOT.
During the Self
The health of some
DO NOT line the oven
DO NOT force the
ooo
ooo
©oo
Self-Cleaning Oven
A Self-Cleaning oven cleans itself with high temperatures (well above
cooking temperatures) which eliminate soils completely or reduces them to a
fine powdered ash you can wipe away with a damp cloth.
Adhere to the following cleaning precautions:
• DO NOT use oven cleaners or oven protective coatings in or around any
part of the Self-Cleaning oven.
• DO NOT clean the oven door gasket. The woven material of the oven
door gasket is essential for a good seal. Care should be taken not to rub,
damage or remove the gasket.
• DO NOT use any cleaning materials on the oven door gasket. Doing so
could cause damage.
• Remove the broiler pan and insert, all utensils and any aluminum
foil. These items cannot withstand high cleaning temperatures.
• Porcelain oven racks do not have to be removed. After the cycle is
complete and the oven has cooled, rub the sides of the oven racks with
wax paper or a cloth containing a small amount of salad oil (this will
make the racks glide easier into the rack position).
• Remove any excessive spillovers In the oven cavity before starting
the Self-Cleaning cycle. To clean, use hot, soapy water and a cloth.
Large spillovers can cause heavy smoke or fire when subjected to high
temperatures. DO NOT allow food spills with a high sugar or acid content
(such as milk, tomatoes, sauerkraut, fruit juices or pie filling) to remain
on the surface as they may leave a dull spot even after cleaning.
Clean any soil from the oven frame, the door liner outside the oven door
gasket and the small area at the front center of the oven bottom. These
areas heat sufficiently to burn soil on. Clean with soap and water.
m
Q
n
0)
DO NOT HAND
CLEAN OVEN
DOOR GASKET
Note: See additional cleaning Informa
tion for the oven door in the General
Care & Cleaning section.
Note: If your range is equipped with a
warmer drawer, the warmer drawer
cannot be used during a self-clean
cycle. Warmer drawer must be turned
off before the clean cycle is started.
NOTE: Prior to setting the Self-Clean cycle, any spills remaining on the oven
bottom should be removed.
What to Expect during Cleaning
While the oven is in operation, the oven heats to temperatures much higher
than those used in normal cooking. Sounds of metal expansion and
contraction are normal. Odor is also normal as the food soil is being removed.
Smoke may appear through the oven vent.
If heavy spillovers are not wiped up before cleaning, they may flame and
cause more smoke and odor than usual. This is normal and safe and should
not cause alarm. If available, use an exhaust fan during the self-cleaning
cycle.
A CAUTION
after the Self-Cleaning cycle. Stand to the side of the oven when opening the
door to allow hot air or steam to escape.
I To avoid possible burns use care when opening the oven door
33
Page 34

Self-Cleaning
What to Expect during Cleaning
While the oven is in operation, the oven heats to temperatures much higher than those
used in normal cooking. Sounds of metal expansion and contraction are normal. Odor is
aiso normai as the food soii is being removed. Smoke may appear through the oven
vent. If heavy spillovers are not wiped up before cieaning, they may flame and cause
more smoke and odor than usuai. This is normal and safe and should not cause alarm.
If available, use an exhaust fan during the self-cleaning cycle.
The cooktop lockout Q feature will be activated during the self-clean and will unlock
after the oven has cooled down.
Self-Clean Cycle Time Length
The FLEX CLEAN pad controls the Self-Cleaning feature. If you are planning
to use the oven directly after a self-clean cycle remember to allow time for the oven
to cool down and the oven door to unlock. This normally takes about one hour. So
a 3 hour self-clean cycle will actually take about 4 hours to complete.
*lt is recommend to use a 2 hour self-clean cycle for light soils, a 3 hour cycle for
average soils, and a 4 hour cycle for heavy soils (to assure satisfactory results).
INSTRUCTIONS PRESS
To set the controls for a 3 hour Self-Cleaning cycle to start immediately and shut off automatically
1. Be sure the clock is set with the correct time of day and the oven
door is closed.
2. Press
display (Figure 1). The control will automatically clean for a 3
hour period (default self-cleaning cycle time). Note: If a 2 or 4
hour clean time is desired, press ^
"CLEAN" will flash and "3:00" HR will show In the
CD®®'
A CAUTION
burns use care when opening the
oven door after the Self-Cleaning
cycle. Stand to the side of the
oven when opening the door to
allow hot air or steam to escape.
CAUTION
oven door open. This can
damage the automatic door
locking system. Use caution and
avoid possible burns when
opening the door after the Self
Cleaning cycle has completed.
The oven may still be VERY
HOT.
To avoid possible
DO NOT force the
DISPLAY
3-nn n „
J-UU L L n
Figure 1
press ®(S)CS) for a 4 hour clean time. Set the cleaning
time based on the amount of soil: light, medium or heavy (* See
above).
3. Press The "DOOR LOCKED" icon will flash; "CLEAN",
Q icon and the letters "CLn" will remain on in the display
(Figure 2).
4. As soon as the control is set, the motor driven oven door lock will
begin to close automatically. Once the door has been locked the
"DOOR LOCKED" indicator light will stop flashing and remain on.
Also, the oven icon will appear in the display (Figure 3).
Note: Allow about 15 seconds for the oven door lock to close.
When the Self-Clean Cycle is Completed
1. “END” will appear in the display. The time of day, the "DOOR
LOCKED" and "CLEAN" icon will remain In the display (Figure 4).
2. Once the oven has cooled down for approximately 1 HOUR, and
the "DOOR LOCKED" and Q icon is are longer displayed, the
oven door can then be opened (Figure 5).
Stopping or Interrupting a Self-Cleaning Cycle
If it becomes necessary to stop or interrupt a self-cleaning cycle due
to excessive smoke or fire in the oven:
®®®
ton n „
l-JU llo
Figure 2
1:3s [in
Figure 3
4:30 End
Figure 4
5:30
Figure 5
1. Press (stop
2. The oven door can only be opened after the oven has cooled
down for approximately 1 HOUR and the "DOOR LOCKED" icon
is no longer displayed (Figure 5).
34
Page 35

Self-Cleaning
To Start the delayed Self-Clean Cycle
The FLEX CLEAN (g), DELAY START (g) pads and length of clean cycle, controls the Delayed Self-Clean
operation. The automatic timer wiii turn the oven on and off at the time you seiect in advance. Be sure to review TO
START THE SELF-CLEAN CYCLE for recommended dean times.
INSTRUCTIONS
To set the control for the Self-Cleaning Cycle to start at a delayed time and shut off automatically (example: 3 hour self-clean cycle to start at 4:30)
1. Be sure the clock is set with the correct time of day and the
oven door is ciosed.
2. Press (g). "CLEAN" will flash and "3:00" HR will show in
the dispiay {Figure 1). The controi wiil automaticaiiy dean for
a 3 hour period (default self-cleaning cycle time). Note: If a 2
or 4 hour clean time is desired, press (g) (2) ^
hour or press ©Co)® for a 4 hour dean time. Set the
cleaning time based on the amount of soil—light, medium or
heavy (*See previous page).
Press <^>. The "DOOR LOCKED" icon will flash;
3.
"CLEAN" icon and the ietters "CLn" wili remain on in the
display (Figure 2).
Press (g^^. Enter the desired start time using the number
4.
pads ®<D® (Figure 3).
5. Press "DELAY", "DOOR LOCKED" and " CLEAN"
PRESS
®®®
®®®
<0>
or
DISPLAY
3-nn rt „
J UU L L n
Figure 1
ton ri „
(Ou llh
Figure 2
S'-30 Li
ton n „
<-JU Lun
Ltn
Figure 3
m
¡2!!
Q
1^
icons wili remain on (Figure 4).
6. As soon as the control is set, the motor driven oven door lock
will begin to close automatically. Once the door has been
locked the "DOOR LOCKED" indicator light will quit flashing
and remain on.
7. The control will start the self-cleaning at the set start time, for
the period of time previously selected. At that time, the icon
""DELAY"" will go out; ""CLn"" and oven icon will appear in the
display (Figure 5).
When the Self-Clean Cycle is Completed
1. “END” will appear in the display .The time of day, the ""DOOR
LOCKED" and "CLEAN" icon will remain in the display
(Figure 6).
2. Once the oven has cooled down for approximately 1 HOUR,
and the ""DOOR LOCKED"" icon is no longer displayed, the
oven door can then be opened (Figure 7).
Figure 4
uon ri
LLH
LL
Figure 5
Figure 6
Figure 7
35
Page 36
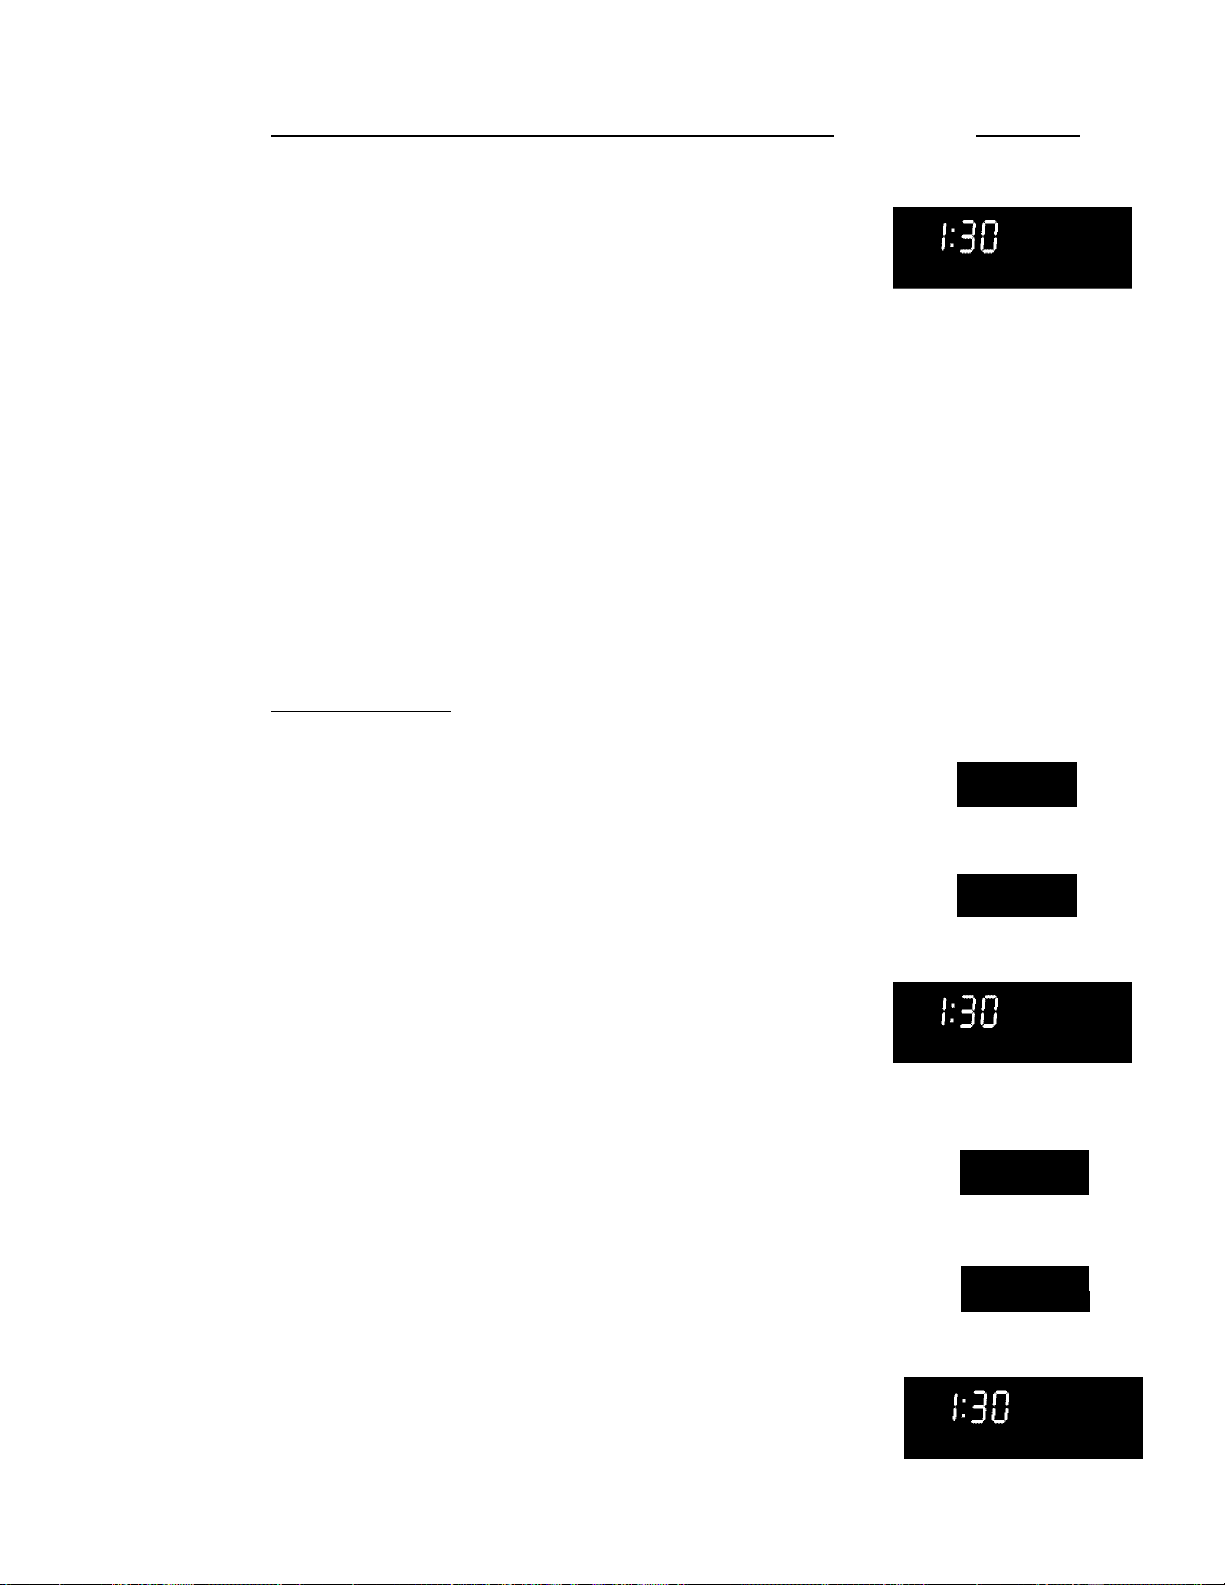
Self-Cleaning
INSTRUCTIONS PRESS
Stopping or Interrupting a Self-Cleaning Cycie
If it becomes necessary to stop or interrupt a self-cleaning cycle
due to excessive smoke or fire in the oven:
1. Press
2. Once the oven has cooled down for approximately 1 HOUR
and the "DOOR LOCKED" Icon is no longer displayed, the
oven door can then be opened (Figure 1).
Note: Self-Clean cycle can never be set to start more than 12 hours in advance.
Adjusting Oven Temperature
The temperature in the oven has been pre-set at the factory. When first using the
oven, be sure to follow recipe times and temperatures. If you think the oven is cooking
too hot or too cool for the temperature you select, you can adjust the actual oven
temperature to be more or less than what is displayed. Before adjusting, test a recipe
by using a temperature setting that is higher or lower than the recommended
temperature. The baking results should help you to decide how much of an adjustment
is needed.
INSTRUCTIONS
To adjust the oven temperature higher
PRESS
DISPLAY
Figure 1
Note: The oven
temperature adjustments
made with this feature will
not change the Self-Clean
cycle temperature.
DISPLAY
1.
Press (Bak^ for 6 seconds (Figure 2).
2.
To increase the temperature use the number pads to enter the
desired change. (Example 30°F) (Figure 3). The
temperature may be increased as much as 35°F (19°C).
3.
Press to accept the temperature change and the display
will return to the time of day (Figure 4). Press to reject the
change if necessary.
To adjust the oven temperature lower
1. Press for 6 seconds. 0° will appear in the display (Figure 5).
2. To decrease the temperature use the number pads to enter the
desired change. (Example -30°F) (^^3^ press
(Figure 6). The temperature may be decreased as much as 35°F
(19°C).
3. Press to accept the temperature change and the display
will return to the time of day (Figure 7). Press ^^stopJ to reject the
change if necessary.
CD®
or
CD®©
or
DH nn
JU uu
Figure 2
_n jp’
JU JU
■
Figure 3
Figure 4
on nn
■JU uu
■
Figure 5
■Dn _ jrr
■JU JU
I
Figure 6
36
Figure 7
Page 37

Porcelain Enamel Oven Cleaning (Side oven)
Adhere to the following cleaning
precautions:
• Allow the oven to cool before
cleaning.
• Wear rubber gloves when cleaning
the appilance manually.
Porcelain has a smooth finish and is a type of glass fused to metal. Oven
cleaners can be used on all interior oven surfaces.
General Cleaning
Remove soils using hot, soapy water. Do not allow food spills with a high sugar
or acid content {such as milk, tomatoes, saukerkraut, fruit juices or pie filling)
to remain on the surface as they may cause a dull spot even after cleaning.
Remove spillovers and heavy soils
as soon as possible. Regular
cleanings now will reduce the
extent and difficulty of major
cleaning later.
A CAUTION
rinsed off before operating the oven.
Provide adequate ventiiation.
Ammonia must be
To Remove Heavy Soil
1. Allow a dish of ammonia to sit in the oven overnight or for several hours with
the oven door closed. Clean softened spots using hot, soapy water. Rinse
well with water and a clean cloth.
2. If soil remains, use a soap-filled scouring pad or a nonabrasive cleaner. If
necessary, use an oven cleaner following manufacturer's instructions. DO
NOT mix ammonia with other cleaners.
Adhere to the following precautions when using oven cleaners
1. DO NOT spray on the electrical controls or switches because it could cause
a short circuit and result in sparking or fire.
2. DO NOT allow a film from the cleaner to build up on the temperature sens- fTI
ing bulb located at the top left rear corner of the oven; it could cause the ¡S!
oven to heat improperly. Carefully wipe the bulb clean after each oven clean- Q
ing, being careful not to move the bulb. A change in its position could affect ^
how the oven bakes. Avoid bending the bulb and capillary tube. (/)
3. DO NOT spray any cleaner on the oven door trim or gasket, handles or any I
exterior surfaces of the range, wood or painted surfaces. The cleaner can
damage these surfaces.
To Ciean the Oven Bottom
Clean using hot, soapy water, a mild abrasive cleanser, a soap-filled abrasive
pad or oven cleaner following oven cleaner manufacturer's instructions.
___________
A CAUTION
the appliance with aluminum foil. Doing so will destroy heat distribution, pro
duce poor baking results and cause permanent damage to the oven interior
(aluminum foil will melt to the interior surface of the oven).
^ DO NOT line the oven walls, bottom, racks or any other part of
37
Page 38
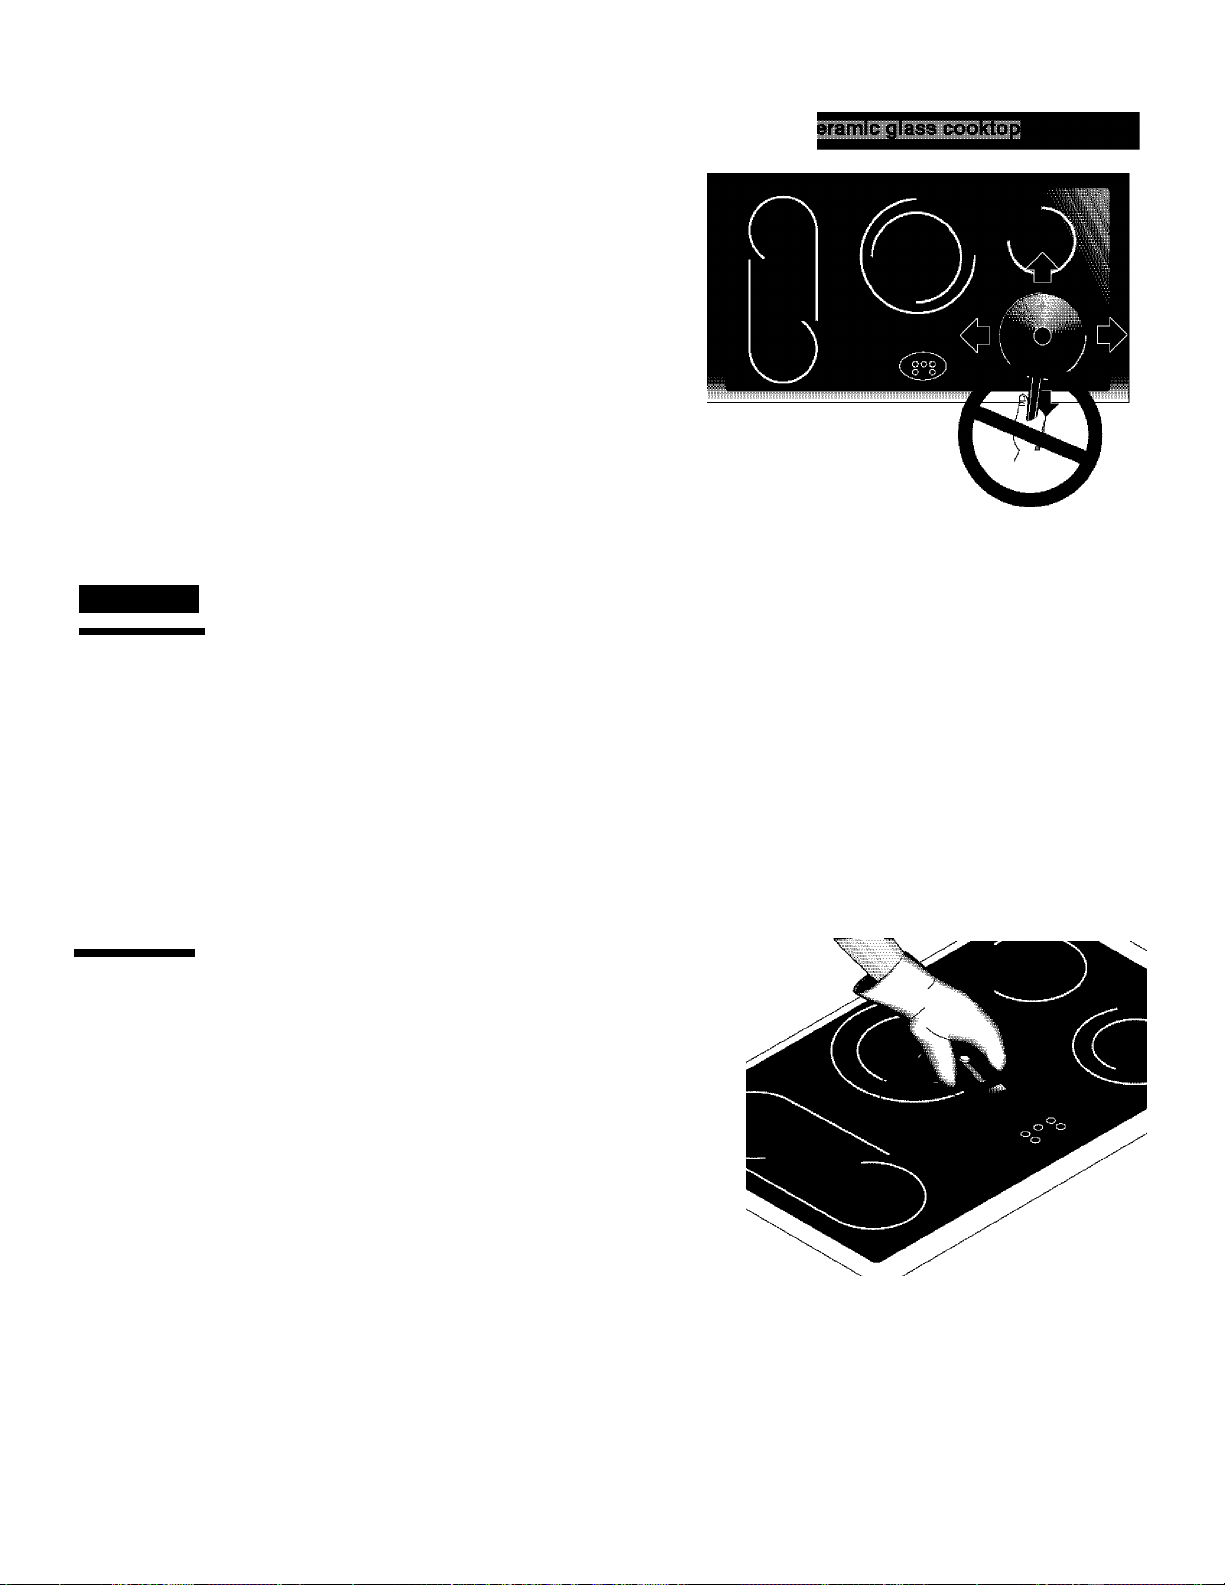
Ceramic Glass Cooktop Cleaning & Maintenance
Prior to using your cooktop for the first time, appiy the recommended
Cieaning Creme to the ceramic surface. Ciean and buff with a non
abrasive cloth or pad. This wiil make cleaning easier when soiied
from cooking. The special cooktop cleaning cream leaves a protec
tive finish on the glass to help prevent scratches and abrasions.
Siiding aiuminum or copper clad bottom pans on the cooktop can
cause metal markings on the cooktop surface. These marks should
be removed immediately after the cooktop has cooled using the
cooktop cleaning cream. Metal marks can become permanent if not
removed prior to future use.
Cookware {cast iron, metal, ceramic or glass) with rough bottoms can mark or scratch the cooktop
surface. Do not slide anything metal or glass across the cooktop. Do not use your cooktop as a
cutting board or work surface in the kitchen. Do not cook foods directly on the cooktop surface
without a pan. Do not drop heavy or hard objects on the glass cooktop, or they may crack it.
ik CAUTION
ik WARNING
chemically damage the ceramic glass surface.
Cleaning Recommendations for the Ceramic Glass Cooktop For light to moderate soil:
Apply a few drops of Cleaning Creme directly to the cooktop. Use a paper towel or a Multi-Purpose No Scratch Scrub
Sponge to clean the entire cooktop surface. Make sure the cooktop is cleaned thoroughly, leaving no residue. Do not use
the sponge you use to clean the cooktop for any other purpose.
For heavy, burned on soil:
First, clean the surface as described above. Then, if soils remain, carefully scrape soils with a metal razor blade scraper,
holding scraper at a 30 degree angle to the surface. Remove the loosened soils, and then apply the cooktop cleaning
creme and buff surface clean.
A CAUTION
use any scrub pad other than a Multi-Purpose No Scratch Scrub
Sponge.
Plastic or foods with a high sugar content:
These types of soils need be removed immediately if spilled or melted
onto the ceramic cooktop surface. Permanent damage (such as pitting of
the cooktop surface) may occur if not removed immediately. After
turning the surface elements OFF, use a razor blade scraper or a metal
spatula with a mitt and scrape the soil from the hot surface (as illus
trated). Allow the cooktop to cool, and use the same method for heavy or
burned on soils.
Before cleaning the cooktop, be sure the controls are turned to OFF and the cooktop is COOL.
DO NOT use a cooktop cleaner on a hot cooktop. The fumes can be hazardous to your health, and can
Damage to the ceramic glass cooktop may occur if you
38
Page 39
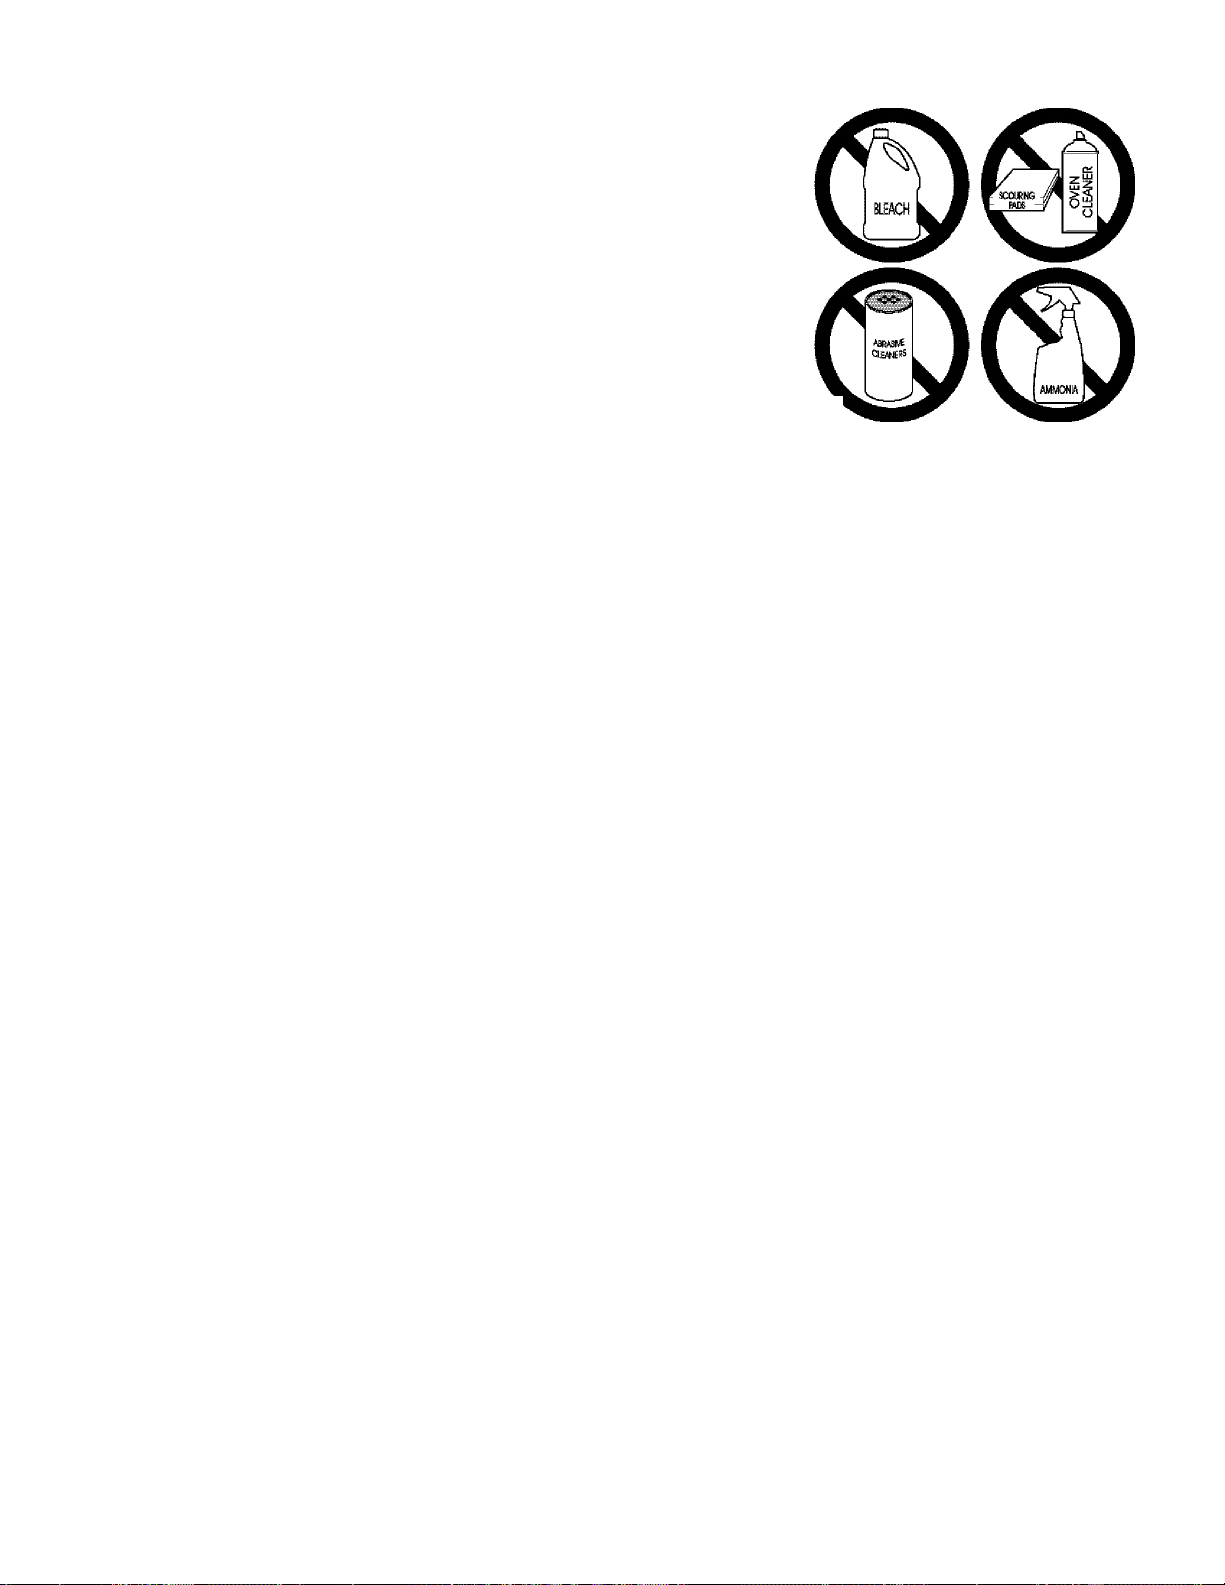
Ceramic Glass Cooktop Cleaning & Maintenance
Do not use the following on the ceramic glass cooktop:
• Do not use abrasive cleaners and scouring pads, such as metal and
some nylon pads. They may scratch the cooktop, making it more
difficult to clean.
• Do not use harsh cleaners, such as chlorine bleach, ammonia or oven
cleaners, as they may etch or discolor the cooktop.
■ Do not use dirty sponges, cloths or paper towels, as they can leave soil
or lint on the cooktop which can burn and cause discoloration.
Special Caution for Aluminum Foil and Aluminum Cooking Utensils
• Aluminum foil
Use of aluminum foil will damage the cooktop. Do not use under any circumstances.^
• Aluminum utensils
Since the melting point of aluminum is much lower than that of other metals, care must be taken when aluminum
pots or pans are used. Pans that boil dry may permanently damage cooktop by marking, breaking or fusing to it.
Care and Cleaning of Stainless Steel (Stainless Steel models only)
Some models are equipped with stainless steel exterior parts. Special care and cleaning are required for maintaining
the appearance of stainless parts. Please refer to the table provided at the beginning of the General Care & Cleaning pp|
section in this Use & Care Guide.
Q
(i)
39
Page 40
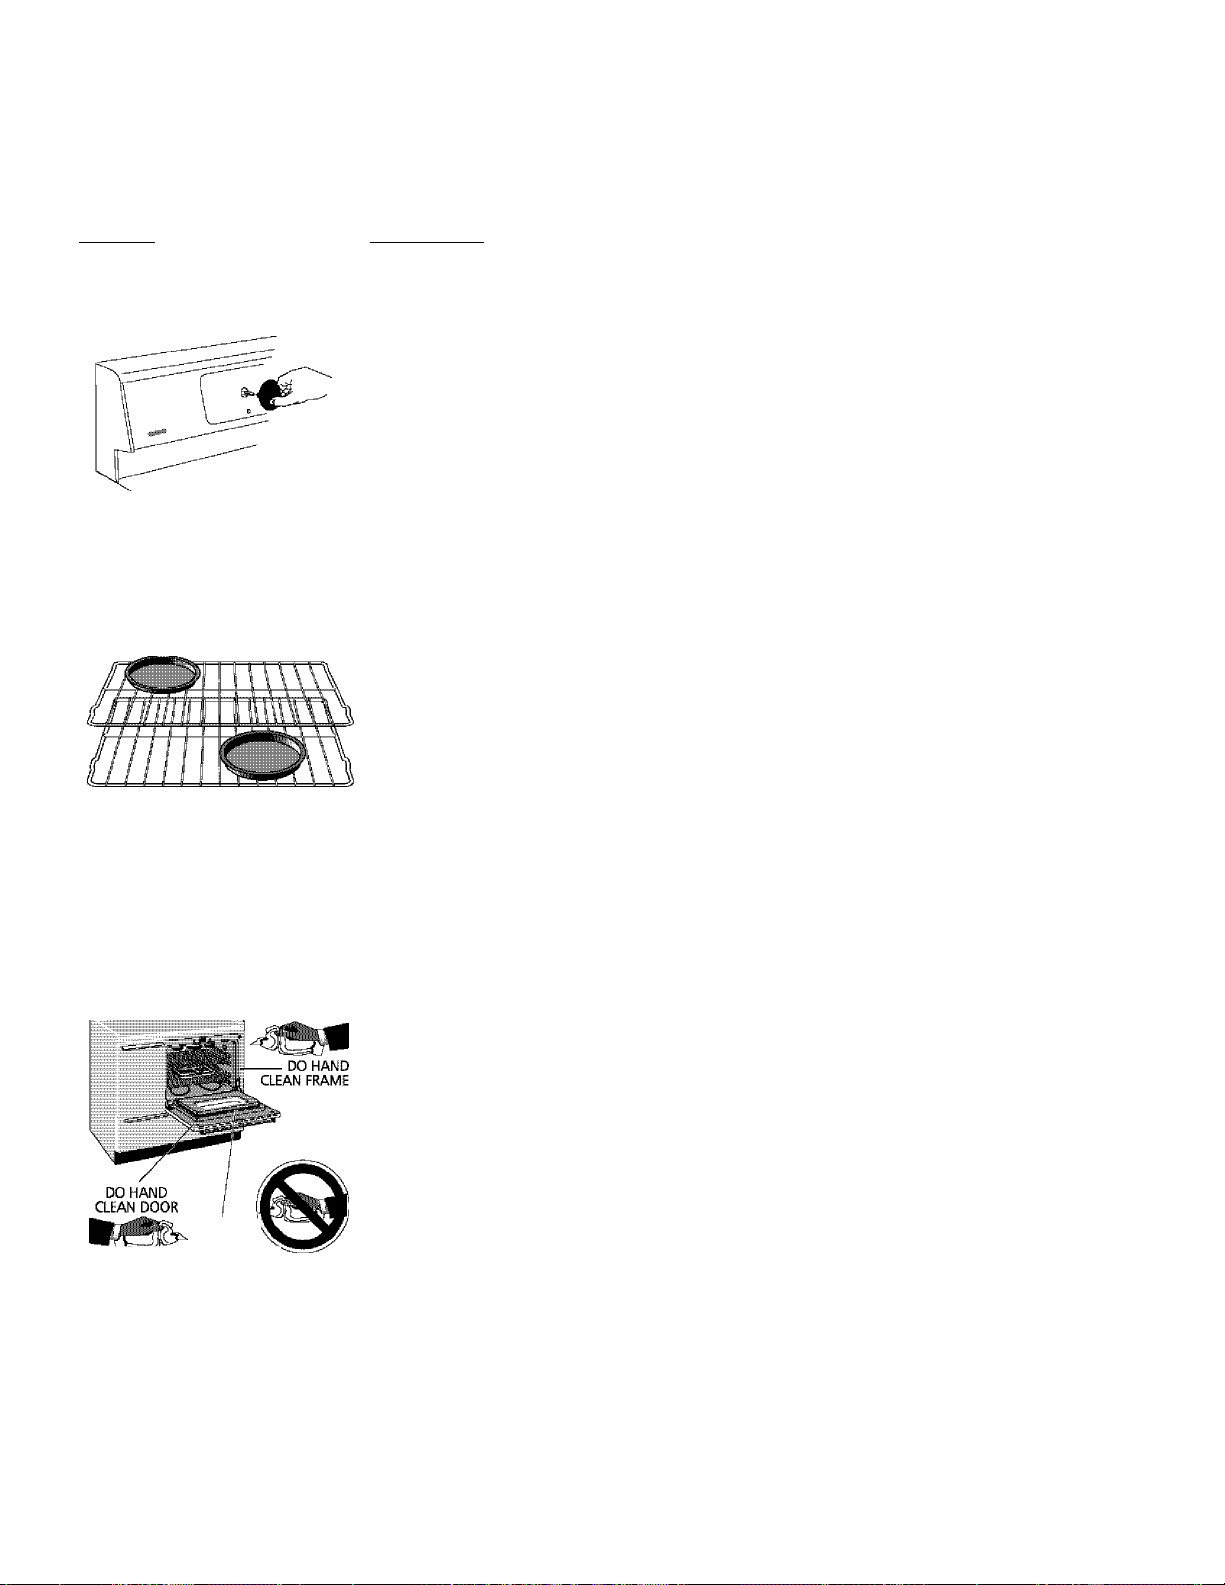
General Cleaning & Maintenance
Cleaning Various Parts of Your Range
Before cleaning any part of the range, be sure all controls are turned OFF and the range is COOL. REMOVE
SPILLOVERS AND HEAVY SOILING AS SOON AS POSSIBLE. REGULAR CLEANINGS NOW WILL REDUCE THE
EXTENT AND DIFFICULTY OF MAJOR CLEANING LATER.
Surfaces
Vinyl and
______________
How to Ciean______________________________________
Use hot, soapy water and a cioth. Dry with a clean cloth.
Aluminum (Trim Pieces)
Control Panel Before cleaning the control panel, turn all controls to OFF and remove the control
knobs. To remove, pull each knob straight off the shaft. Clean using hot, soapy water
and a dishcloth. Be sure to squeeze excess water from the cloth before wiping the
panei; especially when wiping around the controls. Excess water in or around the con
trols may cause damage to the appliance. To repiace knobs after cieaning, line up the
fiat sides of both the knob and the shaft; then push the knob into piace.
Stainless Steel
Control panel,
Oven door and
Drawer front panel
Cleaners made especially for stainless steel as Stainless Steel Magic, or other similar
cleaners are recommended. Always follow the manufacturer’s instructions. Be sure to
rinse the cleaners as bluish stains may occur during heating and cannot be removed.
Oven Racks Remove racks. See "To remove and to replace an Oven Rack" under Setting Oven
Controls. Use a mild, abrasive cleaner, following manufacturer's instructions. Rinse
with clean water and dry. After cleaning the racks, rub the sides of the racks with wax
paper or a cloth containing a small amount of baby oil or salad oil (this will make the
racks glide easier into the rack positions).
Cooktop, under Cooktop,
Broiler Pan and Insert
(some models), Door Liner,
Small Oven
Oven Door
DO NOT'
HAND
CLEAN GASKET '
Glass, Paint and Plastic
Control Knobs, Body Parts
and Decorative Trim
Gentle scouring with a soapy scouring pad will remove most spots. Rinse with a 1:1
solution of clear water and ammonia. If necessary, cover difficult spots with an ammo
nia-soaked paper towel for 30 to 40 minutes. Rinse with clean water and a damp cloth
and then scrub with a soap-filled scouring pad. Rinse and wipe dry with a clean cloth.
Remove all cleaners or the porcelain may become damaged during future heating. DO
NOT use spray oven cleaners on the cooktop.
To clean oven door, wash with hot, soapy water and a clean cloth. DO NOT immerse
the door in water.
DO NOT clean the oven door gasket. The oven door gasket is made of a woven mate
rial which is essential for a good seal. Care should be taken not to rub, damage or
remove the gasket.
For general cleaning, use hot, soapy water and a cloth. For more difficult soils and builtup grease, apply a liquid detergent directly onto the soil. Leave on soil for 30 to 60
minutes. Rinse with a damp cloth and dry. DO NOT use abrasive cleaners on any of
these materials; they can scratch. To remove control knobs, turn to the OFF position;
grasp firmly and pull straight off the shaft. To replace knobs after cleaning, line up the
flat sides of both the knob and the shaft; then push the knob into place.
40
Page 41
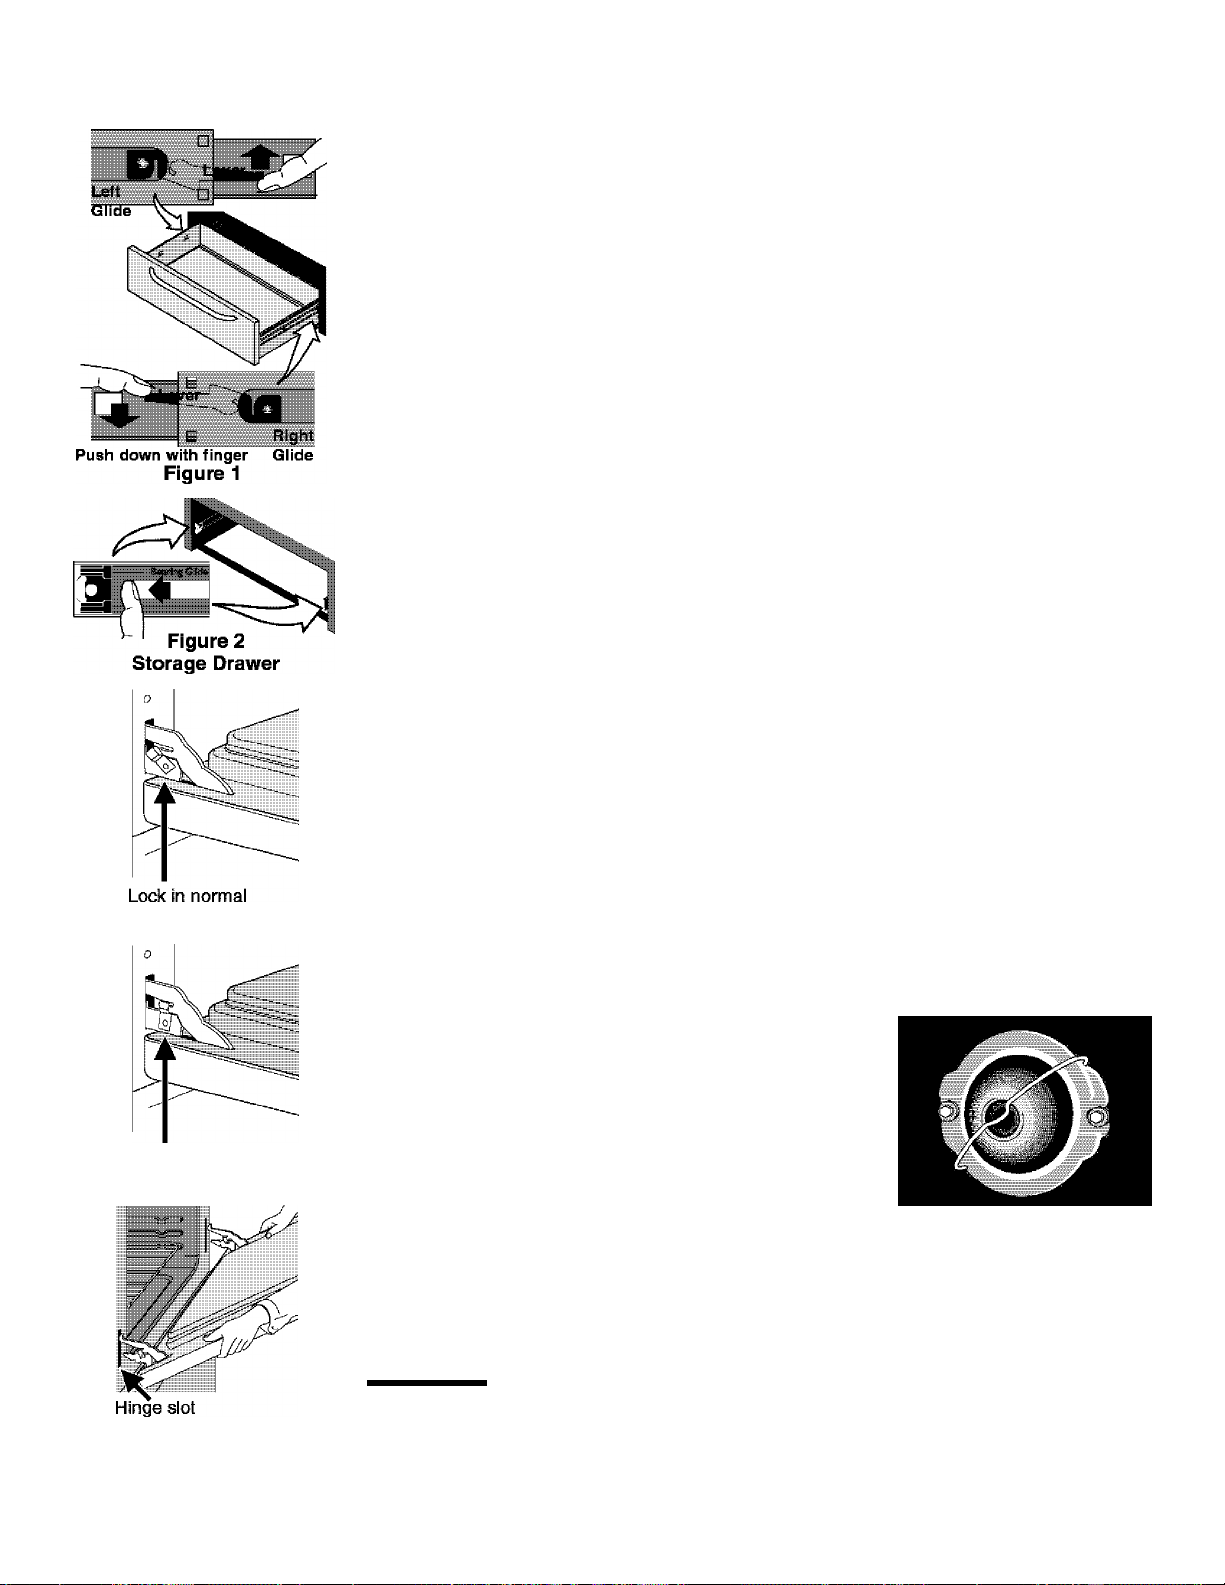
General Cleaning & Maintenance
Pull up with finger
Storage Drawer
Use the storage drawer for storing cooking utensiis. The drawer can be removed to
faciiitate cleaning under the range. Use care when handiing the drawer.
To Remove Storage Drawer:
1. Open the drawer to the fully opened position.
2. Locate the giide iever on each side of drawer; pull up on the left glide lever and push
down on the right glide lever (see figure 1).
3. Pull the drawer away from the range.
To Replace Storage Drawer:
1. Pull the bearing glides to the front of the range (see figure 2).
2. Align the drawer glides with the slots on the bearing glides.
3. Push the drawer into the range until the glides levers “click” (approx. 2 in.). Pull the
drawer open again to seat it into position.
4. If you do not hear the glide levers “click” or if the drawer does not feel seated,
remove it and repeat steps 1 through 3. Doing so will minimize damage to the
bearing glides. Do not try to force the drawer into place.
elements or in the storage drawer or compartment (if equipped). This includes paper,.
plastic and cloth items, such as cookbooks, plasticware and towels, as well as flammable!
liquids. Do not store explosives, such as aerosol cans, on or near the range. Flammable ^
materials may explode and result In fire or property damage. ^
Flammable materials should not be stored in an oven, near surface
z
position
Lock engaged
for door removal
To Remove and Replace Right Oven Door
1. Open the door to the fully opened position. '
2. Pull up the lock located on both hinge supports and engage it in the hinge levers. You
may have to apply a little downward pressure on the door to pull the locks fully over
the hooks.
Grab the door by the sides, pull the bottom of the door up and toward you to disen
3.
gage the hinge supports. Keep pulling the bottom of the door toward you while rotat
ing the top of the door toward the range to completely disengage the hinge levers
from the hinge slots.
To replace the door, reverse the door removal steps. Make sure the hinge supports
4.
are fully engaged before unlocking the hinge levers.
The door is heavy. After removing door, lay it flat on the floor with its inside
facing down.
To Change the Oven Light
The oven light automatically turns on when the door is opened
(some models). To turn the oven light on and off when the
door is closed, use the OVEN LIGHT switch located on the
control panel.
1. Turn electrical power off atthe main source or unplug the
oven.
2. Wear a leather-faced glove for protection against possible broken glass.
3. Press wire holder to one side to release the glass shield.
4. Replace bulb with a new 40 watt appliance bulb.
5. Replace glass shield in socket and snap wire holder Into place.
6. Turn power back on at the main source (or plug the appliance back in).
7. The clock will then need to be reset. To reset, see Setting the Clockand Minute Timer
in the ELECTRONIC OVEN CONTROL manual.
A CAUTION
oven light bulb. Donotturn the oven light on during a self-cleaning cycle. High temperature
will reduce lamp life.
I Be sure the oven Is unplugged and all parts are COOL before replacing the
0)
41
Page 42

Before You Call
Solutions To Common Problems
Before you call for service, review this list, it may save you time and expense. The iist inciudes common occurrences
that are not the result of defective workmanship or materials In this appiiance.
OCCURRENCE
Range is not level.
Cannot move appliance
easily. Appliance must
be accessible for service.
Entire range or oven
does not operate.
*Oven control beeps and
displays F10, F30 or F90.
Oven I ig hts does not work.
Surface unit does not
heat.
POSSIBLE CAUSE/SOLUTION
Poor installation. To level range, refer to Leveling Guide,In the Installation Instructions.
When range Is level, cooktop may appear out of alignment if countertop is not level.
Weak, unstable floor. Be sure floor is level and can adequately support range. Contact a
carpenter to correct sagging or sloping floor.
Kitchen cabinet misalignment may make range appear to be unlevel. Be sure cabinets are
square and have sufficient room for range clearance.
Cabinets not square or are built in too tight. Contact a cabinet maker to correct the problem.
Contact builder or installer to make appliance accessible.
Carpeting interferes with range. Provide sufficient space so range can be lifted over carpet.
Make sure cord/plug is tightly into outlet.
Service wiring is not complete. Contact your dealer, installing agent or authorized servicer.
Power outage. Check house lights to be sure. Call your local electric company for service.
Electronic control has detected a fault condition. Push CLEAR to clear the display and stop
beeping. Program oven again. If fault recurs, record fault number. Push CLEAR and contact
Sears or another qualified service dealer.
Replace or tighten bulb. See 'To Change the Oven Light” in this Guide for instructions.
No power to the appliance. Check steps under “Entire Range or Oven Does Not Operate" in
this Before you call Checklist.
Incorrect control setting. Make sure the correct control is on for the surface unit to be used.
Surface element too hot
or not hot enough.
Scratches or abrasion on
cooktop surface.
Metalmarks.
Brown streaks or specks.
Areas of discoloration
with metallic sheen.
Poor baking results.
Incorrect control setting. Make sure the correct control is on for the surface element to be
used.
Coarse particules such as salt and sand between cooktop and utensils can cause
scratches. Be sure cooktop surface and bottoms of utensils are clean before usage. Small
scratches do not affect cooking and will become less visible with time.
Cleaning materials not recommended for ceramic-glass cooktop have been used. See
“Ceramic Glass Cooktop Cleaning and Maintenance” section.
Cookware with rough bottom has been used. Use smooth, flat-bottomed cookware.
Sliding or scraping of metal utensils on cooktop surface. Do not slide metal utensils on
cooktop surface. Use a ceramic-glass cooktop cleaning cream to remove the marks. See
“Ceramic Glass Cooktop Cleaning and Maintenance” section.
Boilovers are cooked onto surface. Use razor scraper to remove soil. See “Ceramic Glass
Cooktop Cleaning and Maintenance” section.
Mineral deposits from water and food. Remove using a ceramic-glass cooktop cleaning
cream. Use cookware with clean, dry bottoms.
Many factors affect baking results. Make sure the proper rack position is used. Center food
in the oven and space pans to allow air to circulate. Allow the oven to preheat to the set
temperature before placing food in the oven. Try adjusting the recipe recommended
temperature or baking time. If you feel the oven is too hot or cool, see “Adjusting Oven
Temperature” section.
42
Page 43

Before You Call
Solutions To Common Problems
Flames inside oven or
smoking from vent.
Oven smokes excessively
during broiling.
Self-cleaning cycle does
not work.
Soil not completely
removed after self
cleaning cycle.
Excessive spillovers in oven. Set self-clean cycle for a longer cleaning time.
Excessive spillovers in oven. This is normal, especially for pie spillovers or large amounts
of grease on the oven bottom. Wipe up excessive spillovers before starting the self-clean
cycle. If flames or excessive smoke are present, stop the self-clean cycle and follow the
steps under "Stopping or Interrupting the Self-Cleaning Cycle" in the Self-Cleaning
section.
Control(s) not set properly. Follow instructions under “Setting Oven Controls” section.
Make sure oven door is opened to the Broil Stop Position.
Meat too close to the element. Reposition the rack to provide proper clearance between
the meat and the element. Preheat broil element. Preheat broil element for searing.
Grid on broiler pan wrong side up and grease not draining. Always place grid on broiler pan
with ribs up and slots down to allow grease to drip into pan.
Grease has built up on oven surfaces. Regular cleaning is necessary when broiling
frequently. Old grease or food spatters cause excessive smoking.
Control{s) not set properly. Follow instructions under “Self-Cleaning" section.
Self-cleaning cycle was interrupted. Stop time must be 3 to 4 hours past the start time.
Follow steps under "Stopping or Interrupting the Self-Cleaning Cycle" in the Self
Cleaning section.
Failure to clean bottom, front top or oven, frame or door area outside oven seal. These
areas are not in the self-cleaning area, but get hot enough to burn on residue. Clean these
areas before the self-cleaning cycle is started. Burned-on residue can be cleaned with a
stiff nylon brush and water or nylon scrubber. Be careful not to damage the oven seal.
43
Page 44

Protection Agreements
Master Protection Agreements
Congratulations on making a smart purchase. Your new
Kenmore® product is designed and manufactured for years of
dependable operation. But like all products, It may require
preventive maintenance or repair from time to time. That's when
having a Master Protection Agreement can save you money
and aggravation.
The Master Protection Agreement also helps extend the life of
your new product. Here’s what the Agreement* includes:
Ш Parts and labor needed to help keep products operating
properly under normal use, not just defects. Our coverage
goes well beyond the product warranty. No deductibles,
no functional failure excluded from coverage - real
protection.
Ш Expert service by a force of more than 10,000 authorized
Sears service technicians, which means someone you
can trust will be working on your product.
Ш Unlimited service calls and nationwide service, as
often as you want us, whenever you want us.
0 «No-lemon» guarantee - replacement of your covered
product it four or more product failures occur within twelve
months.
Ш Product replacement if your covered product can’t be
fixed.
Ш Annual Preventive Maintenance Check at your request -
no extra charge.
0 Fast help by phone - we call it Rapid Resolution -
phone support from a Sears representative on all products.
Think of us as a «talking owner’s manual».
Ш Power surge protection against electrical damage due to
power fluctuations.
Ш $250 Food Loss Protection annually for any food
spoilage that is the result of mechanical failure of any
covered refrigerator or freezer.
Ш Rental reimbursement If repair of your covered product
takes longer than promised.
0 10% discount off the regular price of any non-covered
repair service and related Installed parts.
Once you purchase the Agreement, a simple phone call is all
that it takes for you to schedule service. You can call anytime
day or night, or schedule a service appointment online.
The Master Protection Agreement is a risk free purchase. If you
cancel for any reason during the product warranty period, we
will provide a full refund. Or, a prorated refund anytime after the
product warranty period expires. Purchase ycur Master
Protection Agreement today!
Some limitations and exclusions apply. For prices and
additional information in the U.S.A. call 1-800-827-6655.
* Coverage in Canada varies on some items. For full details
call Sears Canada at 1-800-361-6665.
Sears Installation Service
For Sears professional installation ot home appliances, garage
door openers, water heaters, and other major home items, in
the U.S.A. or Canada call 1-800-4-MY-HOME®.
Acuerdos maestros de protección
Enhorabuena por haber hecho una compra inteligente. Su nuevo producto
Kenmore® está diseñado y fabricado para brindarle años de funcionamiento
fiable. Pero, como cualquier producto, puede necesitar mantenimiento
preventivo o reparaciones periódicas. Es por eso que tener un Acuerdo maestro
de protección podría ahorrarle dinero y molestias.
El Acuerdo maestro de protección también sirve para prolongar la durabilidad
de su nuevo producto. El acuerdo* incluye lo siguiente:
0 Piezas y mano de obra necesarias para contribuir a mantener el
funcionamiento adecuado de los productos utilizados en condiciones
normales de uso, no sólo en caso de defectos de los productos. Nuestra
cobertura va mucho más allá que la garantía del producto. No se
aplican deducidles ni exclusiones por fallas del funcionamiento: es decir,
verdadera protección.
0 Servicio técnico por expertos (más de 10000 técnicos autorizados de
Sears), ic cua! significa que quien repare o realice e! mantenimiento de su
producto será un profesional de confianza.
0 Servicio técnico a escala nacional y número ilimitado de llamadas de
solicitud de servicio técnico: se puede poner en contacto con nosotros
cuantas veces lo desee y cuando lo desee.
0 Garantía «sin sorpresas»: se reemplaza el producto cubierto por el
acuerdo si ocurren cuatro o más fallas del producto en un periodo de 12
meses.
0 Reemplazo dei producto: en caso de que no se pueda reparar el
producto cubierto por el acuerdo.
0 Revisión anual preventiva de mantenimiento de! producto: puede
solicitarla en cualquier momento, sin costo alguno.
0 Rápida asistencia telefónica, la cual denominamos Solución rápida: es
decir, asistencia telefónica a través de cualquiera de nuestros
representantes de Sears, sobre cualquiera de nuestros productos. Piense
en nosotros como en un «manual parlante dei usuario».
0 Protección contra fallas eléctricas, contra daños debidos a fluctuaciones
de la corriente eléctrica.
0 $250 al año para cubrir cualquier posible deterioro de alimentos que
haya tenido que desechar debido a una falla mecánica de cualquiera de
nuestros refrigeradores o congeladores cubiertos por este acuerdo.
0 Devolución de gastos de alquiler de electrodomésticos si la reparación
de su producto asegurado toma más que el tiempo prometido.
0 10% de descuento aplicEibie tanto a los costos del servicio de reparación,
como de las piezas instaladas relacionadas que no hay^ quedado
cubiertos por este acuerdo.
Una vez que haya realizado el pago de este acuerdo, bastará una simple
llamada telefónica para concertar una visita de servicio. Puede llamar a
cualquier hora del día o de la noche, o bien concertar una visita de servicio por
Internet.
La adquisición del Acuerdo maestro de protección es una inversión exenta de
riesgos. Si por cualquier motivo decide cancelar dicho acuerdo durante el
periodo de garantía del producto, le haremos un reintegro total dei valor. O bien
un importe proporcional sí cancela el acuerdo en cualquier otro momento
posterior ai vencimiento del periodo de garantía del producto. ¡Adquiera hoy
mismo su Acuerdo maestro de protección!
Algunas limitaciones y exclusiones podrían aplicarse. Para solicitar
precios e información adicional, llame al 1-800-827-6655 (en los EE.UU.).
* La cobertura en Canadá varía en ei caso de algunos artículos. Para
obtener detalles completos al respecto, llame al 1-800-361-6665 de Sears
de Canadá.
Servicio de instalación de Sears
Para solicitarla instalación por profesionales de Sears de electrodomésticos,
abridores de puertas de garaje, calentadores de agua y otros artículos de uso
prioritario en el hogar, llame al 1-800-4-MY-HOME en los EE.UU. o Canadá.
44
Page 45

Your Home
For expert troubleshooting and home solutions advice:
manage home
www.managemyhome.com
For repair - in your home - of all major brand appliances,
lawn and garden equipment, or heating and cooling systems,
no matter who made it, no matter who sold it!
For the replacement parts, accessories and
owner’s manuals that you need to do-it-yourself.
For Sears professional installation of home appliances
and items like garage door openers and water heaters.
1-800-4-MY-HOME®
Call anytime, day or night (U.S.A. and Canada)
www.sears.com www.sears.ca
(i-8oo-
469-4663
)
Our Home
For repair of carry-in items like vacuums, lawn equipment,
and electronics, call anytime for the location of your nearest
Sears Parts & Repair Service Center
1-800-488-1222 (U.S.A.) 1-800-469-4663 (Canada)
www.sears.com www.sears.ca
To purchase a protection agreement on a product serviced by Sears:
1-800-827-6655 (U.S.A.) 1-800-361-6665 (Canada)
Para pedir servicio de reparación
a domicilio, y para ordenar piezas:
1-888-SU-HOGAR®
(1-888-784-6427)
Au Canada pour service en français:
1-800-LE-FOYER^^
(1-800-533-6937)
www.sears.ca
© Registered Trademark / ™ Trademark / Service Mark of Sears Brands, LLC
© Marca Registrada / ™ Marca de Fábrica ! Marca de Servicio de Sears Brands, LLC
Marque de commerce / “° Marque déposée de Sears Brands, LLC
I Sears Brands, LLC
 Loading...