

Kenmore 790.7745 Series, 790.7748 Series, 790.7746 Series, 790.7747 Series, 790.7744 Series Use & Care Manual
Gas
Estufa a gas
®
Models, Modelos
790. 7744*, 7745*, 7746*, 7747*, 7748*
* = color number, nQmero de color
j, ......
ill'i_'i_
www.sears.com Sears Roebuck and Co., Hoffman Estates, IL 60179 U.S.A. pin 316544103 (0704)
q
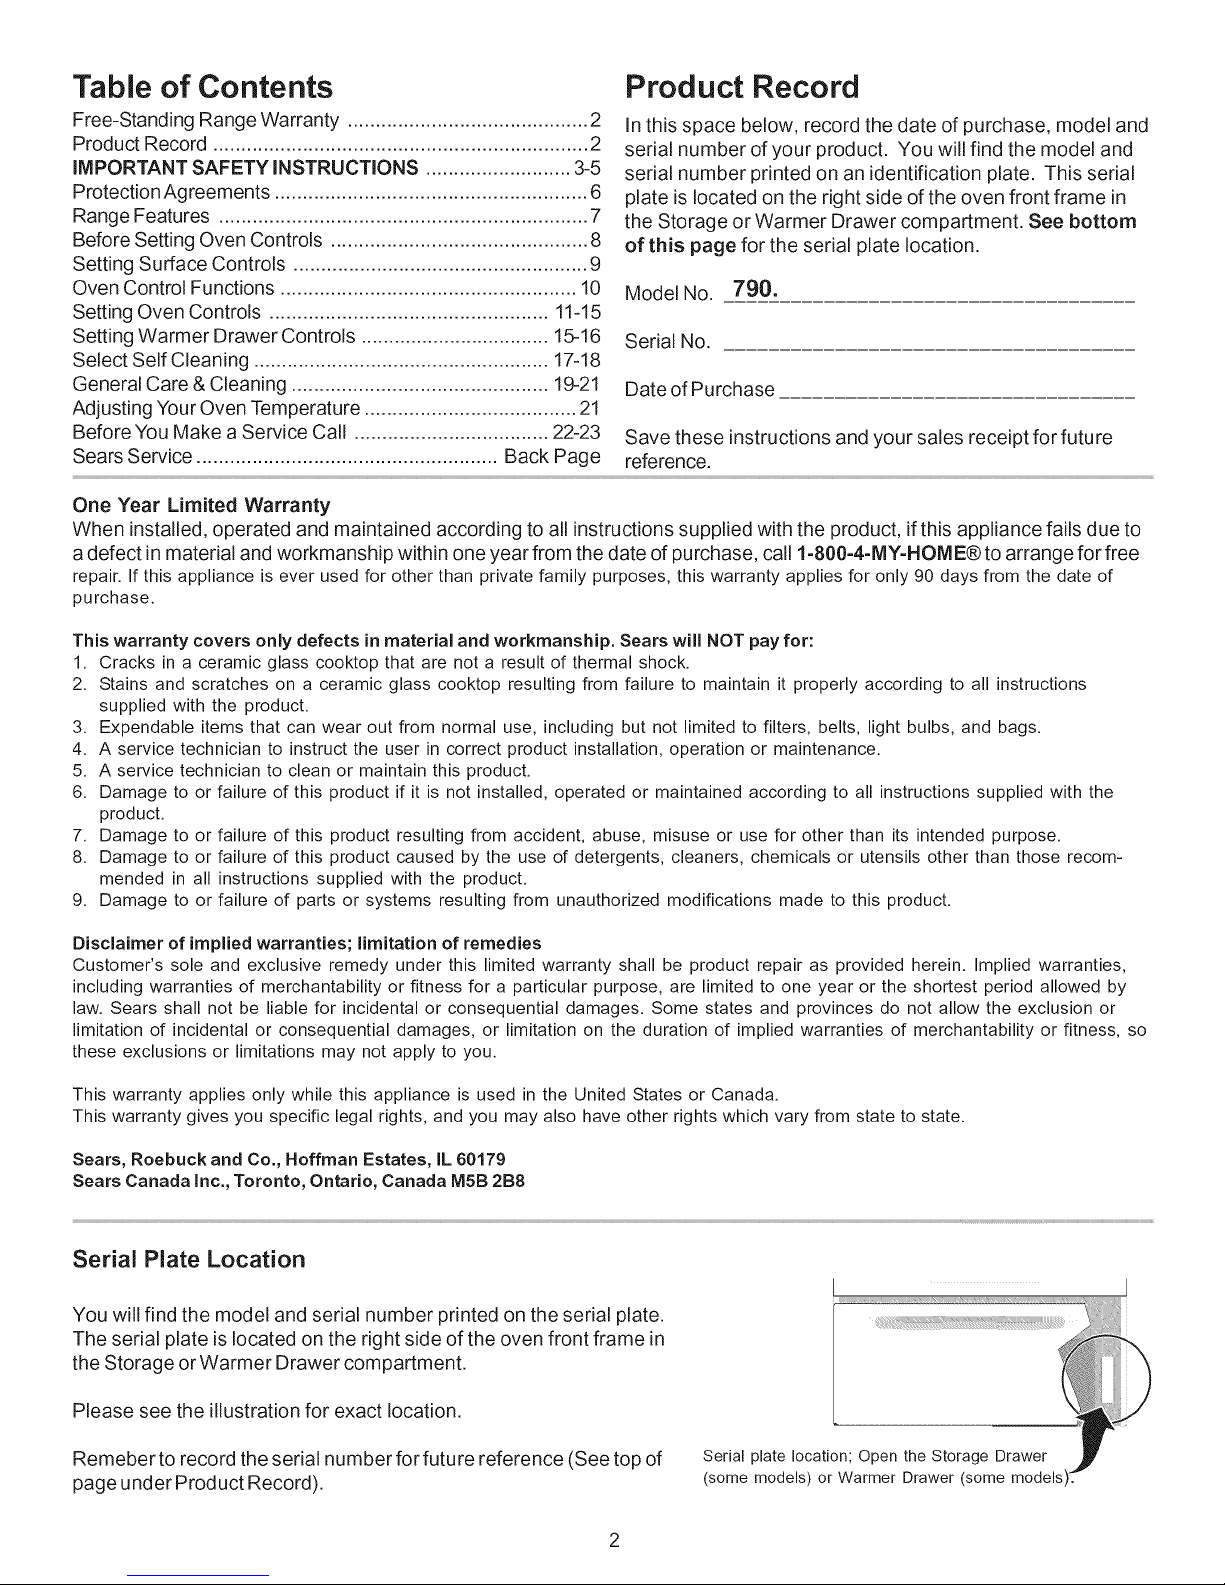
Table of Contents
Free-Standing Range Warranty ........................................... 2
Product Record ................................................................... 2
iMPORTANT SAFETY iNSTRUCTiONS .......................... 3-5
ProtectionAgreements ........................................................ 6
Range Features .................................................................. 7
Before Setting Oven Controls .............................................. 8
Product Record
In this space below, record the date of purchase, model and
serial number of your product. You will find the model and
serial number printed on an identification plate. This serial
plate is located on the right side of the oven front frame in
the Storage or Warmer Drawer compartment. See bottom
of this page for the serial plate location.
Setting Surface Controls ..................................................... 9
Oven Control Functions ..................................................... 10
Setting Oven Controls .................................................. 11-15
Setting Warmer Drawer Controls .................................. 15-16
Select Self Cleaning ..................................................... 17-18
General Care & Cleaning .............................................. 19-2!
Model No. 790.
Serial No.
Date of Purchase
Adjusting Your Oven Temperature ...................................... 21
Before You Make a Service Call ................................... 22-23
Sears Service ...................................................... Back Page
Save these instructions and your sales receipt for future
reference.
One Year Limited Warranty
When installed, operated and maintained according to all instructions supplied with the product, if this appliance fails due to
a defect in material and workmanship within one year from the date of purchase, call I=800=4=MY=HOME@to arrange for free
repair. If this appliance is ever used for other than private family purposes, this warranty applies for only 90 days from the date of
purchase.
This warranty covers only defects in material and workmanship. Sears will NOT pay for:
1. Cracks in a ceramic glass cooktop that are not a result of thermal shock.
2. Stains and scratches on a ceramic glass cooktop resulting from failure to maintain it properly according to all instructions
supplied with the product.
3. Expendable items that can wear out from normal use, including but not limited to filters, belts, light bulbs, and bags.
4. A service technician to instruct the user in correct product installation, operation or maintenance.
5. A service technician to clean or maintain this product.
6. Damage to or failure of this product if it is not installed, operated or maintained according to all instructions supplied with the
product.
7. Damage to or failure of this product resulting from accident, abuse, misuse or use for other than its intended purpose.
8. Damage to or failure of this product caused by the use of detergents, cleaners, chemicals or utensils other than those recom-
mended in all instructions supplied with the product.
9. Damage to or failure of parts or systems resulting from unauthorized modifications made to this product.
Disclaimer of implied warranties; limitation of remedies
Customer's sole and exclusive remedy under this limited warranty shall be product repair as provided herein. Implied warranties,
including warranties of merchantability or fitness for a particular purpose, are limited to one year or the shortest period allowed by
law. Sears shall not be liable for incidental or consequential damages. Some states and provinces do not allow the exclusion or
limitation of incidental or consequential damages, or limitation on the duration of implied warranties of merchantability or fitness, so
these exclusions or limitations may not apply to you.
This warranty applies only while this appliance is used in the United States or Canada.
This warranty gives you specific legal rights, and you may also have other rights which vary from state to state.
Sears, Roebuck and Co., Hoffman Estates, IL 60179
Sears Canada Inc., Toronto, Ontario, Canada M5B 2B8
Serial Plate Location
I
You will find the model and serial number printed on the serial plate.
The serial plate is located on the right side of the oven front frame in
the Storage or Warmer Drawer compartment.
Please see the illustration for exact location.
Remeber to record the serial number for future reference (See top of
page under Product Record).
Serial plate location; Open the Storage Drawer
(some models) or Warmer Drawer (some models
important Safety instructions
Read all instructions before using this appliance. Save these instructions for future reference.
This manual contains important safety symbols and instructions. Please pay attention to these symbols and follow all instructions given.
_ This sYmb01 Will help alert y0u t0 sitUati0ns that maY cause Sedous bodily harm: death or pr0perty damage:
This symbol will help alert youto situationS that may cause bodily injury or property damagel
If the information in this manual is not
followed exactly, a fire or explosion may result causing
property damage, personal injury or death.
FOR YOUR SAFETY:
-- Do not store or use gasoline or other flammable
vapors and liquids in the vicinity of this or any
otherappliance.
-- WHAT TO DO IF YOU SMELL GAS:
• Do not try to light any appliance.
• Do not touch any electrical switch; do not use any
phone in your building.
• Immediately callyour gassupplier from a neighbor's
phone. Follow the gas supplier's instructions.
• If you cannot reach your gas supplier, call the fire
department.
-- Installation and service must be performed by a
qualified installer, servicer or the gas supplier.
• Remove all tape and packaging before using the range. Destroy
the carton and plastic bags after unpacking the range. Never
allow children to play with packaging material.
• Proper Installation--Be sure your appliance is properly
installed and grounded by a qualified technician in accordance
with the National Fuel Gas Code ANSI Z223.= latest edition, or
in Canada CAN/CGA B149.1, and CAN/CGA B149.2, and the
the National Electrical Code ANSI/NFPA No.70=latest edition,
or in Canada CSA Standard C22.1, Canadian Electrical Code,
Part 1, and local code requirements. Install only per installation
instructions provided in the literature package for this range.
Ask your Sears dealer to recommend a qualified technician and
an authorized Sears repair service. Know how to disconnect the
power to the range at the circuit breaker or fuse box in case of an
emergency.
• User servicing--Do not repair or replace any part of the
appliance unless specifically recommended in the manuals.
All other servicing should be done only by a qualified technician,
This may reduce the risk of personal injury and damage to the
range.
• Never modify or alter the construction of a range by removing
leveling legs, panels, wire covers, anti=tip brackets/screws, or
any other part of the product.
• Air curtain or other overhead range hoods, which operate by
blowing a downward airflow on to a range, shall not be used
in conjunction with gas ranges other than when the hood and
range have been designed, tested and listed by an independent
test laboratory for use in combination with each other.
f
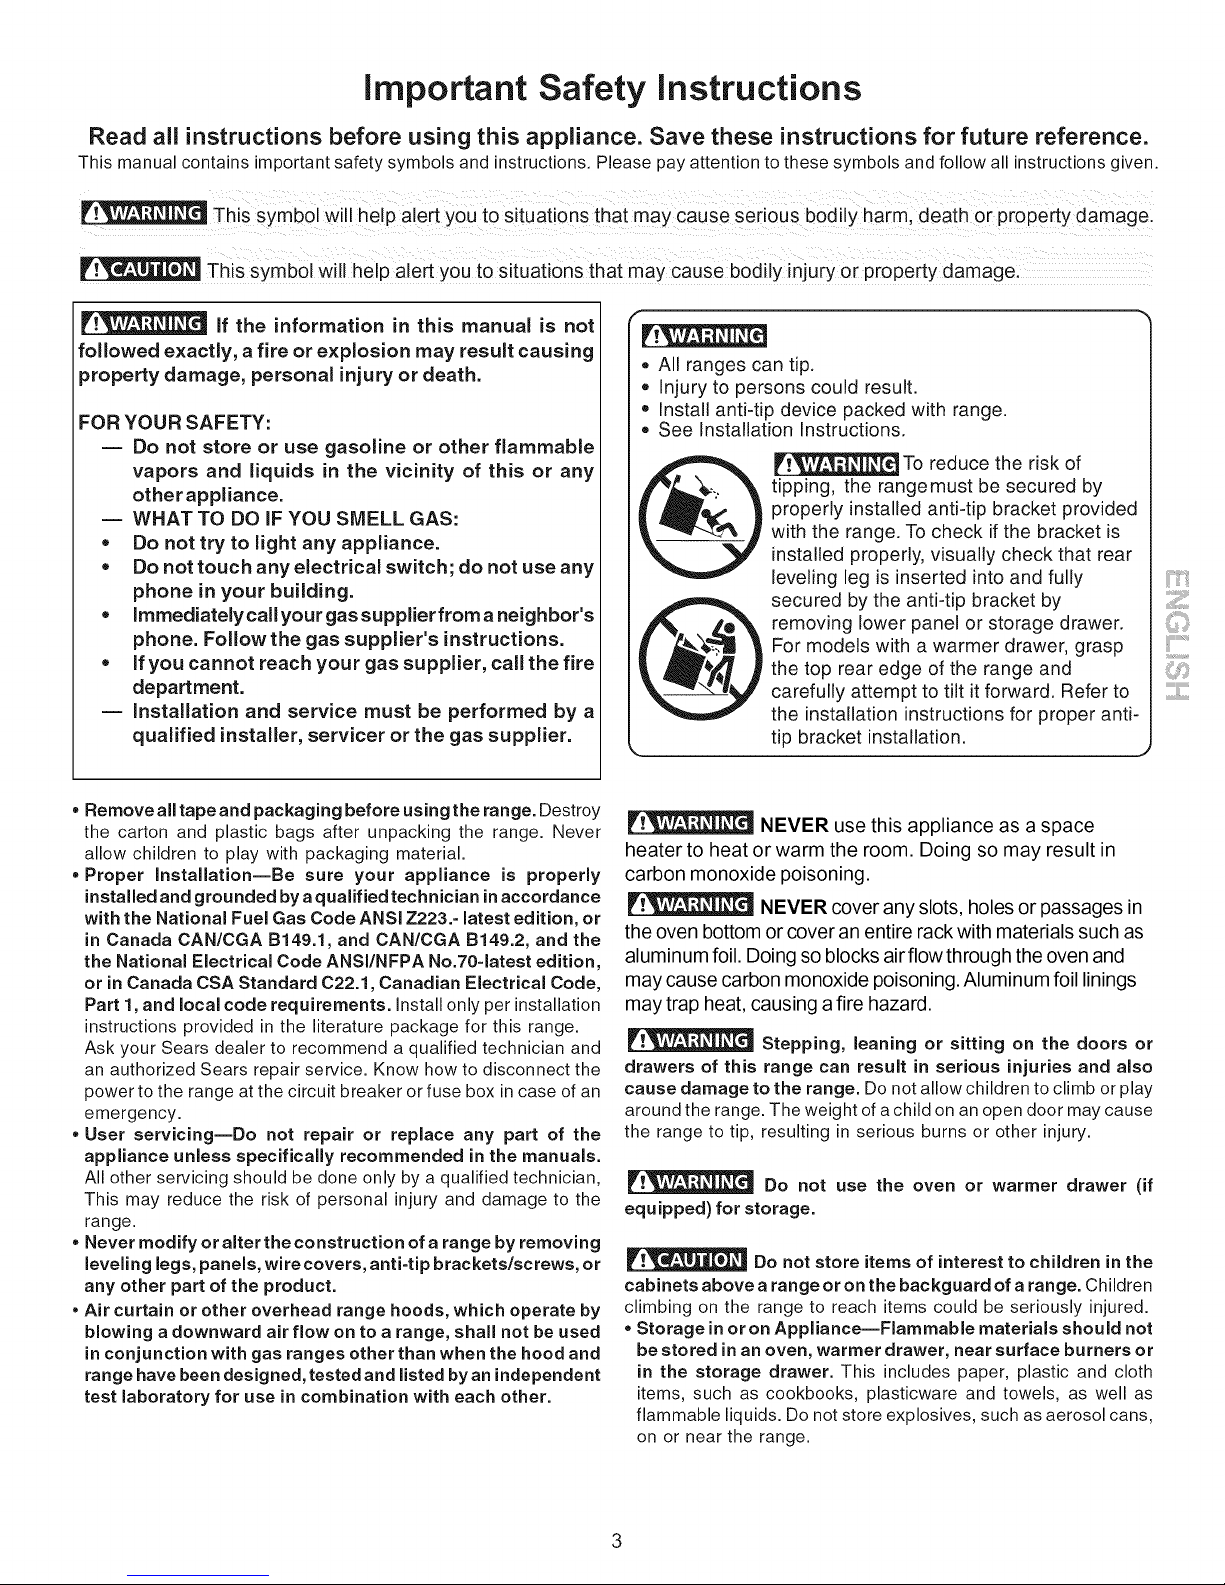
= All ranges can tip.
o Injury to persons could result.
Install anti-tip device packed with range.
See Installation Instructions.
I_j__ To reduce the risk of
tipping, the rangemust be secured by
properly installed anti-tip bracket provided
with the range. To check if the bracket is
installed properly, visually check that rear
leveling leg is inserted into and fully
secured by the anti-tip bracket by
removing lower panel or storage drawer.
For models with a warmer drawer, grasp
the top rear edge of the range and
carefully attempt to tilt it forward. Refer to
the installation instructions for proper anti-
tip bracket installation.
)
NEVER use this appliance as a space
heater to heat or warm the room. Doing so may result in
carbon monoxide poisoning.
NEVER cover any slots, holes or passages in
the oven bottom or cover an entire rack with materials such as
aluminum foil. Doing so blocks airflow through the oven and
may cause carbon monoxide poisoning. Aluminum foil linings
may trap heat, causing a fire hazard.
Stepping, leaning or sitting on the doors or
drawers of this range can result in serious injuries and also
cause damage to the range. Donot allowchildren to climb or play
around the range. The weight of a child on an open door may cause
the range to tip, resulting in serious burns or other injury.
Do not use the oven or warmer drawer (if
equipped) for storage.
Do not store items of interest to children in the
cabinets above a range or on the backguard of a range. Children
climbing on the range to reach items could be seriously injured.
• Storage in oron Appliance--Flammable materials should not
be stored in an oven, warmer drawer, near surface burners or
in the storage drawer. This includes paper, plastic and cloth
items, such as cookbooks, plasticware and towels, as well as
flammable liquids. Do not store explosives, such as aerosol cans,
on or near the range.
important Safety instructions
• Do Not Leave Children Alone--Children should not be left
alone or unattended inthe area where appliance isin use.They
should never be allowed to sit or stand on any part of the
appliance.
• DO NOT TOUCH SURFACE BURNERS, AREAS NEAR THESE
BURNERS, OVEN BURNERS OR INTERIOR SURFACES OF
THE OVEN. Both surface and oven burners may be hot even
though flames are not visible. Areas near surface burners may
become hot enough to cause burns. During and after use, do not
touch, or let clothing or other flammable materials touch these
areas until they have had sufficient time to cool. Among these
areas are the cook top, surfaces facing the cook top, the oven vent
openings and surfaces near these openings, oven door and
window.
• Wear Proper Apparel--Loose-fitting or hanging garments
should never be worn while using the appliance. Do not let
clothing or other flammable materials contact hot surfaces.
• Do Not Use Water or Flour on Grease Fires--Smother the fire
with a pan lid, or use baking soda, a dry chemical or foam=type
extinguisher.
• When heating fat or grease, watch it closely. Fat or grease may
catch fire if allowed to become too hot.
• Use Only Dry Potholders--Moist or damp potholders on hot
surfaces may result in burns from steam. Do not let potholders
touch hot heating burners. Do not use a towel or other bulky cloth
instead of a potholder.
• Do Not Heat Unopened Food Containers--Buildup of pressure
may cause container to burst and result in injury.
• Remove the oven door from any unused range if it is to be
stored or discarded.
IMPORTANT--ELECTRIC IGNITION MODELS ONLY: Do not
attempt to operate the oven during a power failure. If the power fails,
always turn off the oven. If the oven is not turned off and the power
resumes, the oven will begin to operate again. Once the power
resumes, reset the clock and oven function.
iMPORTANT iNSTRUCTiONS FOR USINGYOUR
COOKTOP
Use Proper Flame Size--Adjust flame size so it
does not extend beyond the edge of the utensil. The use of
undersized utensils will expose a portion of the burner flame to
direct contact and may result in ignition of clothing. Proper
relationship of utensil to flame will also improve efficiency.
• Knowwhich knob controls each surface burner. Place a pan of
food on the burner before turning it on, and turn the burner off
before removing the pan.
•Always turn knob to the full LITE position when igniting top
burners. Visually check that burner has lit. Then adjust the flame
so it does not extend beyond the edge of the utensil.
• Utensil Handles Should BeTurned Inward and Not Extend Over
Adjacent Surface Burners--To reduce the risk of burns, ignition
of flammable materials, and spillage due to unintentional contact
with the utensil, the handle of the utensil should be positioned so
that it isturned inward, and does not extend over adjacent su rface
burners.
• Never Leave Surface Burners Unattended at High Heat
Settings--Boilovers cause smoking and greasy spillovers that
may ignite, or a pan that has boiled dry may melt.
• Protective Liners--Do not use aluminum foil to line surface
burner pans, or oven bottom, except as suggested in this manual.
Improper installation of these liners may result in risk of electric
shock, or fire.
• Glazed Cooking Utensils--Only certain types of glass, glass/
ceramic, ceramic, earthenware, or other glazed utensils are
suitable for cooktop service without breaking due to sudden
change in temperatures. Check the manufacturer's
recommendations for cooktop use.
iMPORTANT iNSTRUCTiONS FOR USING YOUR OVEN
• Use Care When Opening Oven Door or Warmer Drawer--
Stand to the side ofthe range when opening the door of a hot oven.
Let hot air or steam escape before you remove or replace food in
the oven.
• Keep Oven Vent Ducts Unobstructed. The oven vent is located
below the backguard. Touching the surfaces in this area when the
oven is operating may cause severe burns. Also, do not place
plastic or heat-sensitive items on or near the oven vent. These
items could melt or ignite.
• Placement of Oven Racks. Always place oven racks in desired
location while oven is cool. If rack must be moved while oven is
hot use extreme caution. Use potholders and grasp the rack with
both hands to reposition. Do not let potholders contact the hot
heating elements in the oven. Remove all utensils from the rack
before moving.
• Do not usethe broiler pan without its insert. The broiler pan and
its insert allow dripping fat to drain and be kept away from the high
heat of the broiler.
• Do not cover the broiler insert with aluminum foil. Exposed fat
and grease could ignite.
• Cold temperatures can damage the electronic control. When
using the appliance for the first time, or when the appliance has
not been used for an extended period of time, be certain the unit
has been in temperatures above 32°F (0°C) for at least 3 hours
before turning on the power to the appliance.
iMPORTANT INSTRUCTIONS FOR CLEANING
YOUR RANGE
• Clean the range regularly to keep all parts free of grease that
could catch fire. Pay particular attention to the area underneath
each surface element. Do not allow grease to accumulate. Refer
to the range manufacturer's instructions for cleaning.
• Kitchen cleaners and aerosols--Always follow the
manufacturer's recommended directions for use. Be aware
that excess residue from cleaners and aerosols may ignite
causing damage and injury.
SELF CLEANING OVENS
• Clean in the self-cleaning cycleonlythe parts listed inthis Use
& Care Guide. Before self cleaning the oven, remove the broiler
pan and any utensils or foods from the oven.
• Do Not Use Oven Cleaners--No commercial oven cleaner or
oven liner protective coating of any kind should be used in or
around any part of the oven.
• Do Not Clean Door Gasket--The door gasket is essential for a
good seal. Care should be taken not to rub, damage or move the
gasket.
4
important Safety instructions
important Safety Notice
The California Safe Drinking Water and Toxic Enforcement Act requires the Governor of California to publish a list of
substances known to the state to cause cancer, birth defects or other reproductive harm, and requires businesses to warn
customers of potential exposure to such substances,
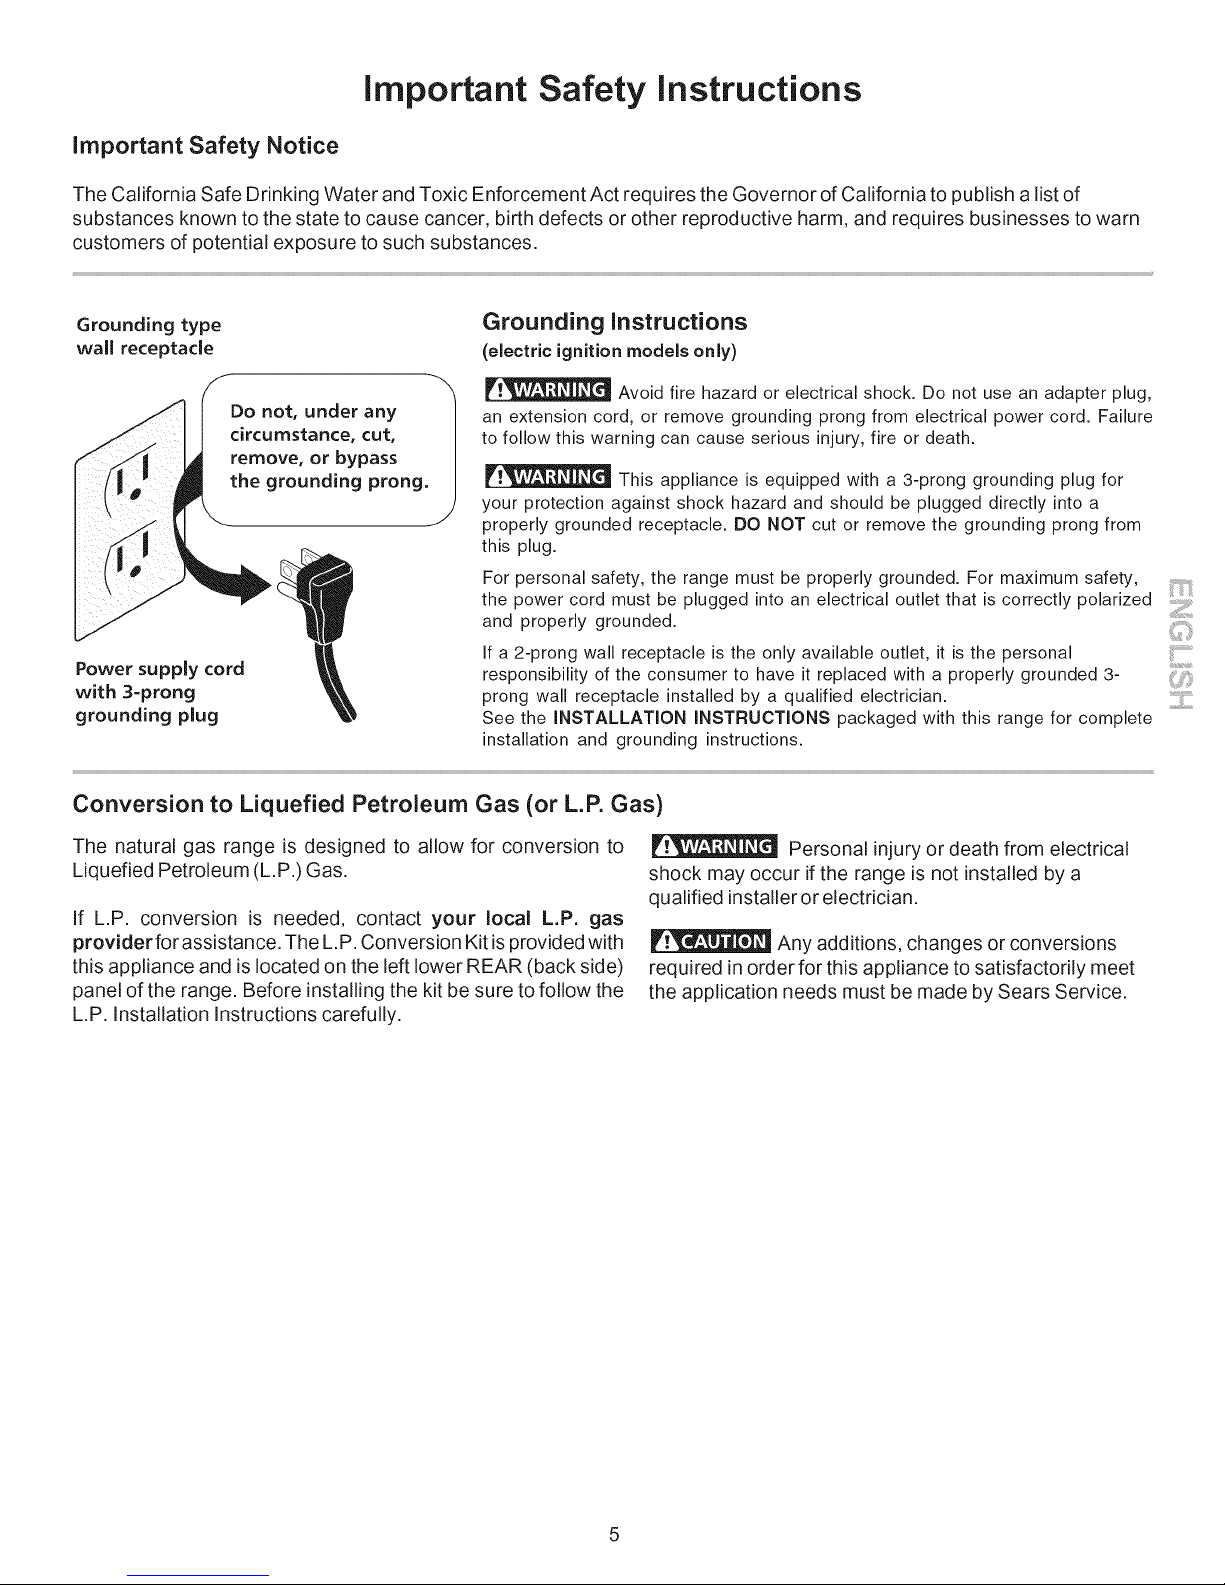
Grounding type
wall receptacle
Do not, under any
circumstance, cut,
remove, or bypass
the grounding prong.
Power supply cord
with 3=prong
grounding plug
Grounding instructions
(electric ignition models only)
Avoid fire hazard or electrical shock. Do not use an adapter plug,
an extension cord, or remove grounding prong from electrical power cord. Failure
to follow this warning can cause serious injury, fire or death.
This appliance is equipped with a 3-prong grounding plug for
your protection against shock hazard and should be plugged directly into a
properly grounded receptacle. DO NOT cut or remove the grounding prong from
this plug.
For personal safety, the range must be properly grounded. For maximum safety,
the power cord must be plugged into an electrical outlet that is correctly polarized
and properly grounded.
If a 2-prong wall receptacle is the only available outlet, it is the personal
responsibility of the consumer to have it replaced with a properly grounded 3-
prong wall receptacle installed by a qualified electrician.
See the INSTALLATION INSTRUCTIONS packaged with this range for complete
installation and grounding instructions.
Conversion to Liquefied Petroleum Gas (or L.R Gas)
The natural gas range is designed to allow for conversion to
Liquefied Petroleum (L.P.) Gas.
If L.P. conversion is needed, contact your local L.P. gas
provider for assistance. The L.P. Conversion Kit isprovided with
this appliance and is located on the left lower REAR (back side)
panel of the range. Before installing the kit be sure to follow the
L.P. Installation Instructions carefully.
iii...................
Personal injury or death from electrical
shock may occur if the range is not installed by a
qualified installer or electrician.
Any additions, changes or conversions
required in order for this appliance to satisfactorily meet
the application needs must be made by Sears Service.
Master Protection Agreements Acuerdos de protecci6n
Master Protection Agreements
Congratulations on making a smart purchase. Your new Kenmore ®
product is designed and manufactured for years of dependable operation.
But like all products, it may require preventive maintenance or repair from
time to time. That's when having a Master Protection Agreement can
save you money and aggravation.
The Master Protection Agreement also helps extend the life of your new
product. Here's what the Agreement* includes:
[] Parts and labor needed to help keep products operating properly
under normal use, not just defects. Our coverage goes well
beyond the product warranty. No deductibles, no functional failure
excluded from coverage - real protection.
[] Expert service by a force of more than 10,000 authorized Sears
service technicians, which means someone you can trust will be
working on your product.
[] Unlimited service calls and nationwide service, as often as you
want us, whenever you want us.
[] "No-lemon" guarantee - replacement of your covered product if
four or more product failures occur within twelve months.
[] Product replacement if your covered product can't be fixed.
[] Annual Preventive Maintenance Check at your request - no extra
charge.
[] Fast help by phone - we call it Rapid Resolution - phone support
from a Sears representative on all products. Think of us as a "talking
owner's manual".
[] Power surge protection against electrical damage due to power
fluctuations.
[] $250 Food Loss Protection annually for any food spoilage that is
the result of mechanical failure of any covered refrigerator or
freezer.
[] Rental reimbursement if repair of your covered product takes
longer than promised.
[] 10% discount off the regular price of any non-covered repair
service and related installed parts.
Once you purchase the Agreement, a simple phone call is all that it takes
for you to schedule service. You can call anytime day or night, or
schedule a service appointment online.
The Master Protection Agreement is a risk free purchase. If you cancel
for any reason during the product warranty period, we will provide a full
refund. Or, a prorated refund anytime after the product warranty period
expires. Purchase your Master Protection Agreement today!
Some limitations and exclusions apply. For prices and additional
information in the U.S.A. call 1-800-827-6655.
* Coverage in Canada varies on some items. For full details call
Sears Canada at 1-800-361-6665.
Sears Installation Service
For Sears professional installation of home appliances, garage door
openers, water heaters, and other major home items, in the U.S.A. or
Canada call 1-800-4-MY-HOME ®.
Acuerdos maestros de proteccion
Enhorabuena por haber hecho una compra inteligente, Su nuevo
producto Kenmore®esta disefiado y fabricado para brindarle afios de
funcionamiento fiable, Pero, como cualquier producto, puede necesitar
mantenimiento preventivo o reparaciones peri6dicas, Es por eso que
tener un Acuerdo maestro de protecci6n podria ahorrarle dinero y
molestias,
El Acuerdo maestro de protecci6n tambien sirve para prolongar la
durabilidad de su nuevo producto, El acuerdo* incluye Io siguiente:
[] Piezas y mano de obra necesarias para contribuir a mantener el
funcionamiento adecuado de los productos utilizados en
condiciones normales de uso, no s61oen caso de defectos de los
productos. Nuestra cobertura va mucho mas alia que la garantia
del producto. No se aplican deducibles ni exclusiones por fallas del
funcionamiento: es decir, verdadera proteccibn.
[] Servicio t_cnico por expertos (mas de 10000 t_cnicos
autorizados de Sears), Io cual significa que quien repare o realice
el mantenimiento de su producto sera un profesional de confianza.
[] Servicio t_cnico a escala nacional y numero ilimitado de
Ilamadas de solicitud de servicio t_cnico: se puede poner en
contacto con nosotros cuantas veces Io desee y cuando Io desee.
[] Garantia "sin sorpresas": se reemplaza el producto cubierto por el
acuerdo si ocurren cuatro o mas fallas del producto en un periodo
de 12 meses.
[] Reemplazo del producto: en caso de que no se pueda reparar el
producto cubierto por el acuerdo.
[] Revisibn anual preventiva de mantenimiento del producto:
puede solicitarla en cualquier momento, sin costo alguno.
[] Rapida asistencia telefbnica, la cual denominamos Soluci6n
rapida: es decir, asistencia telef6nica a traves de cualquiera de
nuestros representantes de Sears, sobre cualquiera de nuestros
productos. Piense en nosotros como en un "manual parlante del
usuario".
[] Proteccibn contra fallas el_ctricas, contra dafios debidos a
fluctuaciones de la corriente el6ctrica.
[] $250 al aho para cubrir cualquier posible deterioro de
alimentos que haya tenido que desechar debido a una falla
mecAnica de cualquiera de nuestros refrigeradores o congeladores
cubiertos por este acuerdo.
[] Devolucibn de gastos de alquiler de electrodom_sticos si la
reparaci6n de su producto asegurado toma mas que el tiempo
prometido.
[] 10% de descuento aplicable tanto a los costos del servicio de
reparaci6n, como de las piezas instaladas relacionadas que no
hayan quedado cubiertos por este acuerdo.
Una vez que haya realizado el pago de este acuerdo, bastara una simple
Ilamada telef6nica para concertar una visita de servicio. Puede Ilamar a
cualquier hora del dia o de la noche, o bien concertar una visita de
servicio por Internet.
La adquisici6n del Acuerdo maestro de protecci6n es una inversi6n
exenta de riesgos. Si por cualquier motivo decide cancelar dicho acuerdo
durante el periodo de garantia del producto, le haremos un reintegro total
del valor. O bien un importe proporcional si cancela el acuerdo en
cualquier otro momento posterior al vencimiento del periodo de garantia
del producto, iAdquiera hoy mismo su Acuerdo maestro de protecci6n!
Algunas limitaciones y exclusiones podrian aplicarse. Para solicitar
precios e informaci6n adicional, Ilame al 1-800-827-6655 (en los
EE.UU.).
* La cobertura en Canada varia en el caso de algunos articulos. Para
obtener detalles completos al respecto, Ilame al 1-800-361-6665 de
Sears de Canada.
Servicio de instalacion de Sears
Para soficitar la instalacidn por profesionales de Sears de
electrodomesticos, abridores de puertas de garaje, calentadores de agua
y otros articulos de uso prioritario en el hogar, Ilame al 1-800-4-MY-
HOME en los EE.UU. o Canada.
Range Features
©
Y
@
i
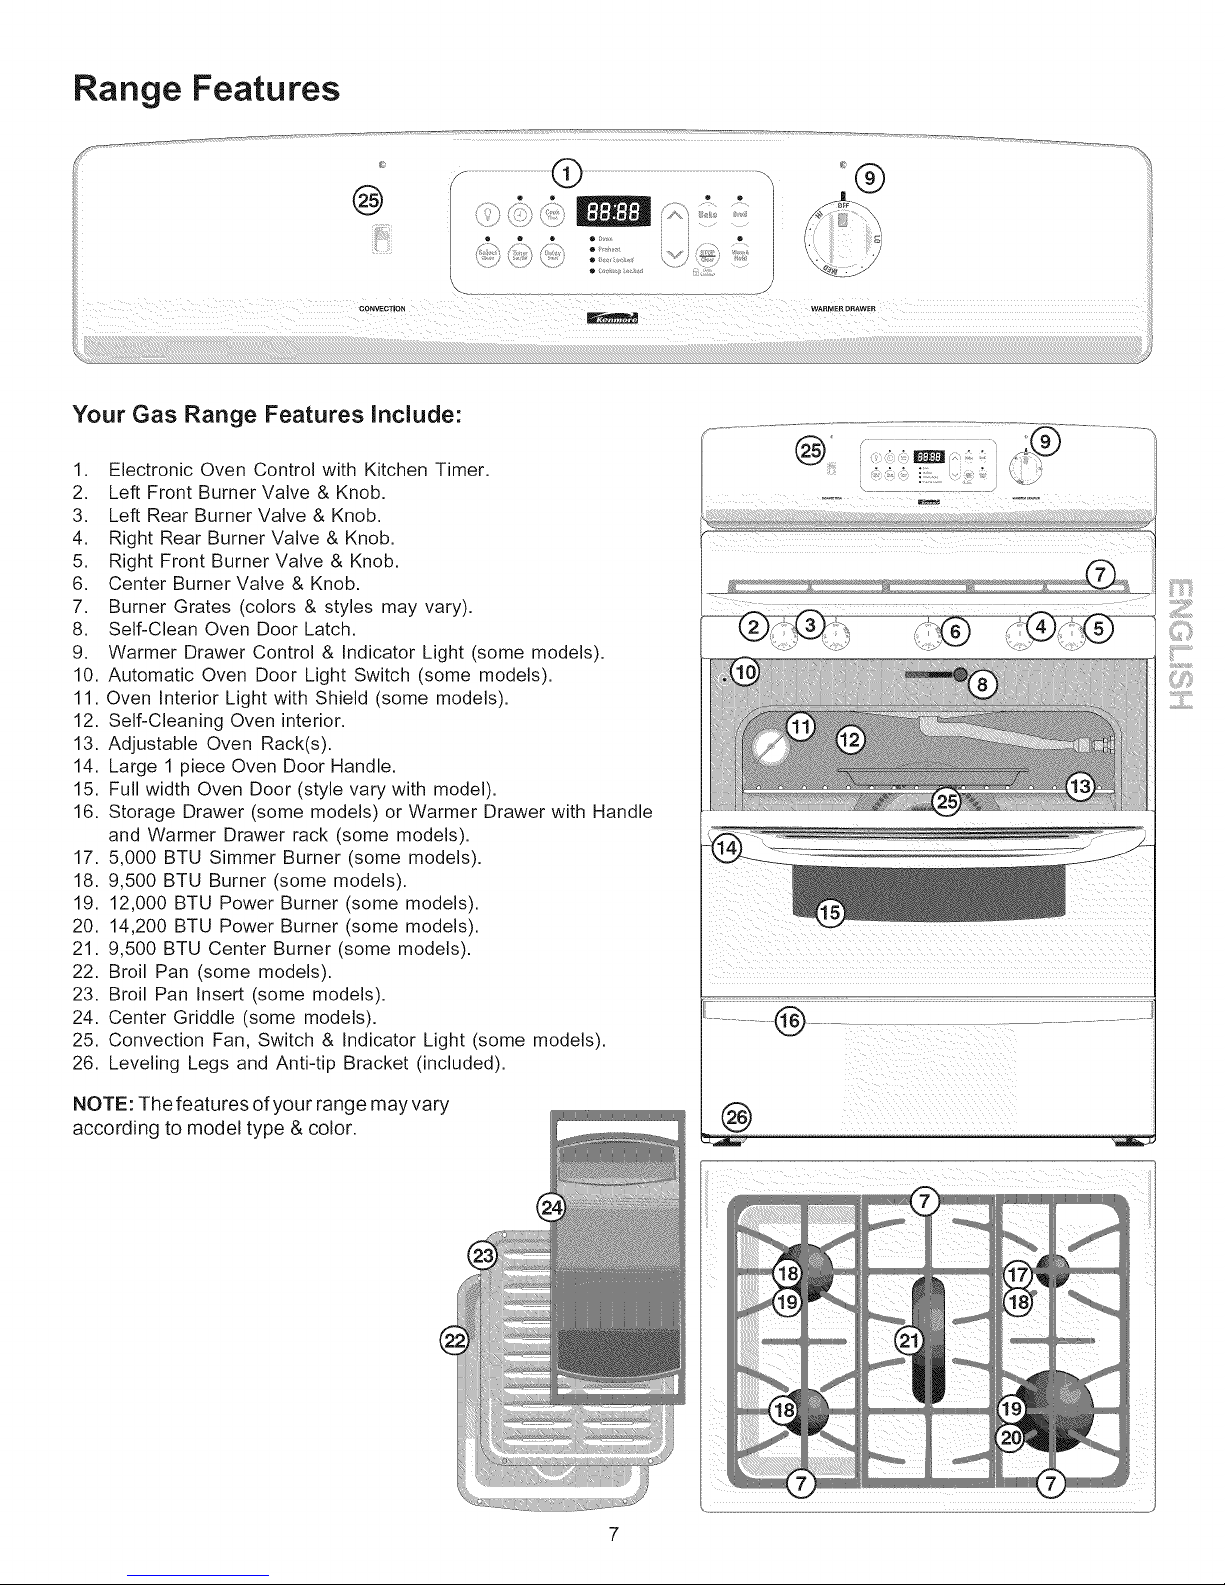
Your Gas Range Features include:
1. Electronic Oven Control with Kitchen Timer.
2. Left Front Burner Valve & Knob.
3. Left Rear Burner Valve & Knob.
4. Right Rear Burner Valve & Knob.
5. Right Front Burner Valve & Knob.
6. Center Burner Valve & Knob.
7. Burner Grates (colors & styles may vary).
8. Self-Clean Oven Door Latch.
9. Warmer Drawer Control & Indicator Light (some models).
10. Automatic Oven Door Light Switch (some models).
11. Oven Interior Light with Shield (some models).
12. Self-Cleaning Oven interior.
13. Adjustable Oven Rack(s).
14. Large 1 piece Oven Door Handle.
15. Full width Oven Door (style vary with model).
16. Storage Drawer (some models) or Warmer Drawer with Handle
and Warmer Drawer rack (some models).
17. 5,000 BTU Simmer Burner (some models).
18. 9,500 BTU Burner (some models).
19. 12,000 BTU Power Burner (some models).
20. 14,200 BTU Power Burner (some models).
21. 9,500 BTU Center Burner (some models).
22. Broil Pan (some models).
23. Broil Pan Insert (some models).
24. Center Griddle (some models).
25. Convection Fan, Switch & Indicator Light (some models).
26. Leveling Legs and Anti-tip Bracket (included).
o®
iiiiii!lliiiiiliii!!
_iiii!_!_ii_iYii!iii
NOTE: The features of your range may vary
according to model type & color.
@

Before Setting Oven
Controls
OVEN VENT
Fig. 1
Fig. 2
Oven Vent Location
The oven vent is located below the backguard (See Fig. 1). When the oven
is on, warm air is released through this vent. This venting is necessary for
proper air circulation in the oven and good baking results. DO NOT BLOCK
THE VENT.
Arranging Oven Racks
ALWAYS ARRANGE OVEN RACKS WHEN THE OVEN IS COOL (PRIOR TO
OPERATING THE OVEN). Always use oven mitts when using the oven.
Removing & Replacing Oven Racks
To remove, pull the rack forward until itstops. Lift up front of rack and
slide out. To replace, fit the rack onto the guides on the oven walls.
Tilt the front of the rack upward and slide the rack back into place.
Recommended Rack Positions for Broiling, Baking & Roasting:
Food Rack Position
Broilinq hamburgers & steaks
Broiling meats, chicken or fish
Cookies, cakes, pies, biscuits
& Muffins
Frozen pies, angel food cake, 1 or 2
yeast, bread, casseroles, small
cuts of meat or poultry
Turkey, roast or ham 1 or 2
See Broil section
See Broil section
3or4
Types of Oven Racks
Your range may be equipped
with one or more of the oven
rack types shown; Flat Rack,
Handle Rack or Stepdown
Rack.
The Flat and Handle Oven racks may be used in all the available rack postions. The Stepdown Oven Rack design provides
additional oven rack cooking positions located between the standard oven rack positions.
Flat Handle Stepdown
Oven Rack Oven Rack Oven Rack
Baking Layer Cakes with 1 or 2 Oven Racks
For best results when baking cakes using 2 oven racks, place cookware on oven rack positions 2 & 5 (Refer to Figs. 2 & 3).
When using a single oven rack, place cookware on oven rack position 3 or 4 (Refer to Fig.s 2 & 4).
Air Circulation in the Oven
For best air circulation and baking
results allow 2-4" (5-10 cm) around
the cookware for proper air circulation
and be sure pans and cookware do not
touch each other, the oven door, sides
or back of the oven cavity. The hot air
must be able to circulate around the
pans and cookware in the oven for
even heat to reach around the food.
Fig. 3 Fig. 4
 Loading...