

Kenmore 721.62299, 721.62292 Service Manual

MODEL 721.62292
DIVISION 20
BASIC FIELD MANUAL
721.62299
FOR
TOASTER AND MICROWAVE OVEN
MODEL 721.62292
721.62299
July, 2002

MODEL 721.62292
721.62299
CAUTION
WARNING TO SERVICE TECHNICIANS
PRECAUTIONS TO BE OBSERVED BEFORE
AND DURING SERVICING TO AVOID
POSSIBLE EXPOSURE TO EXCESSIVE
MICROWAVE ENERGY
a. Do not operate or allow the oven to be operated with the door open.
b. Make the following safety checks on all ovens to be serviced before activating the magnetron or other
microwave source, and make repairs as necessary; (1) Interlock operation, (2) proper door closing, (3)
seal and sealing surfaces (arcing, wear, and other damage), (4) damage to or loosening of hinges and
latches, (5) evidence of dropping or abuse.
c. Before turning on microwave for any service test or inspection within the microwave generating
compartments, check the magnetron, wave guide or transmission line, and cavity for proper alignment,
integrity, and connections.
d. Any defective or misadjusted components in the interlock, monitor, door seal, and microwave
generation and transmission systems shall be repaired adjusted by procedures described in this
manual before the oven is released to the owner.
e. A Microwave leakage check to verify compliance with the Federal performance standard should be
performed on each oven prior to release to the owner.
• Proper operation of the microwave ovens requires that the magnetron be assembled to the wave guide and
cavity. Never operate the magnetron unless it is properly installed.
• Be sure that the magnetron gasket is properly installed around the dome of the tube whenever installing the
magnetron.
• Routine service safety procedures should be exercised at all times.
• Untrained personnel should not attempt service without a thorough review of the test procedures and safety
information contained in this manual.
-1-

MODEL 721.62292
721.62299
FOREWORD
Read this Manual carefully. Failure to adhere to or observe the information in this Manual may result in exposing yourself to
the Microwave Energy normally contained within the oven cavity.
MODEL 721.62292
721.62299
MECHANICAL SERVICE INFORMATION
TABLE OF CONTENTS
1. Adjustment Procedures....................................................................................................................................... 3
2. Precautions on Installation .................................................................................................................................. 5
3. General Precautions in Use................................................................................................................................. 5
4. Trial Operation..................................................................................................................................................... 5
5. Features and Specifications................................................................................................................................ 6-7
6. Overall Circuit Diagram ....................................................................................................................................... 8-9
7. Operating Procedures ......................................................................................................................................... 10-11
8. Procedure for Measuring Microwave Energy Leakage........................................................................................ 12-13
9. Disassembly Instructions..................................................................................................................................... 14-17
10. Interlock Continuity Test.................................................................................................................................... 18
11. Test and Checkout Procedures, and Troubleshooting
A. Test Procedures............................................................................................................................................. 19-22
B. Checkout Procedures..................................................................................................................................... 23-25
C. Troubleshooting............................................................................................................................................. 26-31
-2-

MODEL 721.62292
721.62299
1. ADJUSTMENT PROCEDURES
To avoid possible exposure to microwave energy
leakage, adjust the door latches and interlock switches,
using the following procedure.
ONLY AUTHORIZED SERVICE PERSONNEL
SHOULD MAKE THIS ADJUSTMENT.
The Interlock Monitor and Primary Interlock Switch acts
as the final safety switch protecting the user from
microwave energy. The terminals between “COM” and
“NC” of the Interlock Monitor must close when the door
is opened. After adjusting the Interlock Monitor Switch,
make sure that it is correctly connected. See Figures 1-a
and 1-b throughout this procedure.
CHECK THE DOOR LATCH AND SWITCH
CLOSING.
NOTE: The outer cover of the microwave oven is
removed.
(1) Set the microwave oven on its side so that you can see
the latch board and the switches, as shown in
Figure 1-a.
ADJUST THE LATCH AND SWITCH CLOSING
(3) Loosen the two screws holding the plastic latch board as
shown.
(4) With the oven door closed tightly, move the latch board
upward toward the top of the oven and/or away from the
door latch until the gaps are less than 1/64” (0.5 mm).
Hold the latch board tightly in this position until you
check the sequence of the switches in steps 5 and 6.
TEST THE LATCH AND SWITCH SEQUENCE
(5) Open the oven door slowly. Watch the door latch, the
Primary Switch. Release Rod and Lever on the switches
to make sure they are zero to the body of the switches
in the following sequence:
- Primary Interlock Switch
- Secondary Interlock Switch
- Interlock Monitor Switch
Adjust the latch board until the switches operate in this
sequence. See Steps 3 and 4.
(2) Close the door tightly and check gaps A and B to be
sure they are no more than 1/64” (0.5 mm). See Figure
1-b for close-up view of gaps A and B (door latches).
If all gaps are less than 1/64” (0.5 mm), adjustment of
the latch board may not be necessary. Go to Steps 5
and 6 to check the sequence of the switches.
NOTE: To correct sequence of the Primary Interlock
Switch, Secondary Interlock Switch and the
Interlock Monitor Switch is very important.
If any gap is larger than 1/64” (0.5 mm), you will need to
adjust the latch board-U, L. Go to step 3 and follow all
steps in order.
(6) Close the oven door slowly and be sure it is tightly
closed. Watch the three switches to make sure they are
zero to the body of the switches in the following
sequence:
- Interlock Monitor Switch
- Primary Interlock Switch
- Secondary Interlock Switch
NOTE: The Interlock Monitor Switch is an added safety
check on the Primary and Secondary Interlock
Switches. If the Primary and Secondary Interlock
Switches allow the oven to operate with the door
open, the Monitor Switch will blow the fuse.
(7) When you achieve the proper sequence of switches in
Steps 5 and 6, tighten the latch board screws at that
point.
TEST THE MICROWAVE ENERGY LEAKAGE
(8) Using a survey meter, make sure the microwave energy
is below 5 mW/cm.sq.
-3-
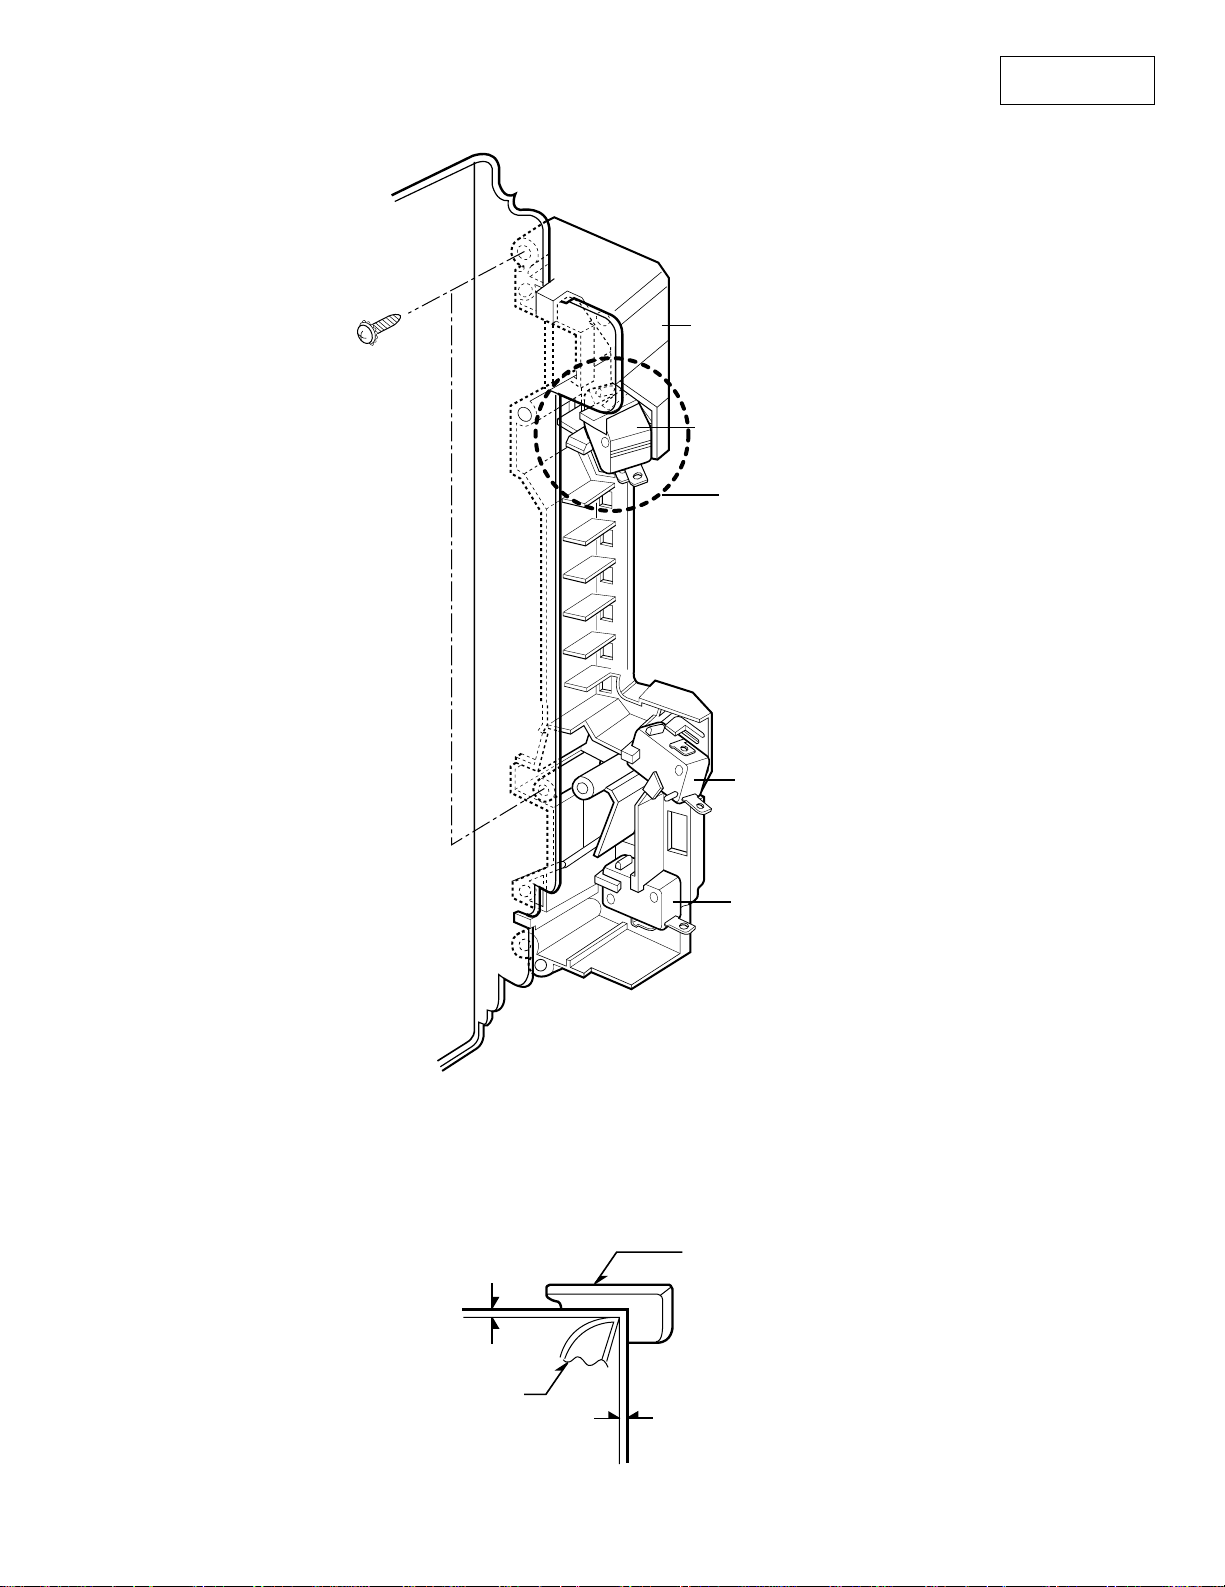
LATCH
LATCH BOARD
0-1/64"
0-1/64"
Latch Board
Secondary
Interlock Switch
A
Interlock
Monitor Switch
Primary
Interlock Switch
MODEL 721.62292
721.62299
Figure 1-a
Figure 1-b
-4-
MODEL 721.62292
721.62299
2. PRECAUTIONS ON INSTALLATION
(Figure 2)
A. Plug the power supply cord into a 120 V AC, 60 Hz,
single-phase power source with a capacity of at least 20
amperes.
B. Since the unit weights about 34 lbs, be sure to place it
on a sturdy and flat surface.
C. Avoid placing the unit in a location where there is direct
heat or splashing water.
D. Place the unit as far away as possible from TV, radio,
etc. to prevent interference. And do not place on or near
a hot gas or electric burner or in a heated oven.
CAUTION
This unit is equipped with a 3-prong plug for your safety.
If the wall outlet is a grounded 3-hole type, the unit will
be grounded automatically.
Properly Polarized and
Grounded
Outlet
Three-Pronged(Grounding)
Plug
3. GENERAL PRECAUTIONS IN USE
Microwave Oven
A. Never operate the unit when it is empty. Operating the
oven with no load may shorten the life of the magnetron.
Whenever cooking dry foods (dried fish, bread, etc.) or a
small amount of food, be sure to put a glass of water
into the cooking compartment. The turntable tray may
become hot after operating, be careful when touching it.
B. Aluminum foil should be avoided because it will disrupt
cooking and may cause arcing. However, small pieces
may be used to cover some parts of food to slow the
cooking. Any aluminum foil used should never be closer
than 2.5 cm to any side wall of the oven.
Toaster
A. Never operate the toaster when it is empty. Operating
the toaster with no load may overheat this appliance.
B. Oversized food, metal foil packages or utensils must not
be inserted in this toaster, as they may create a fire or
electrical hazards.
Figure 2
4. TRIAL OPERATION
After installation, the following sequences and results
should be checked carefully.
Microwave Oven
A. Put a container filled with water (about 1 liter) into the
oven, and close the door tightly.
B. Touch the STOP/CLEAR and the COOK TIME keys.
C. Set cooking time for 10 minutes by touching “1”
and then “0” three times. “1000” appears in the
display window.
D. Touch the START key.
Make sure the cavity light comes on. The unit will begin
cooking and the display window will show the time
counting down by seconds.
E. After about 5 minutes, make sure the primary interlock
switch, the secondary interlock switch and the interlock
monitor and oven lamp switch operate properly by
opening and closing the door several times. Touch the
START key each time the door is closed.
F. Continue operating the unit. Four long beep sound
signal is heard when the time is up. The unit will shut off
automatically.
G. Confirm the water is hot.
H. Finally, measure the output power according to
“POWER OUTPUT MEASUREMENT” on page 13.
Toaster
A. Make sure the crumb tray is pushed all the way in place
plugging in.
B. Remove all protective wrappings from food before
placing into toasting slots. Then place bread into slots
and close the door.
C. Select one mode(Toast/Bagel).
D. Press the Darkness Control to the desired setting.
E. Press the Start button. Make sure indicator light comes
on. The unit will begin cooking and the display will show
the browning level you selected.
F. After 1 minute, make sure the toaster door switch and
indicator light operate properly by opening and closing
the door several times (In normal state, indicator light
blinks when door is opened).
G. Continue operating the unit by pressing the Start button.
Beep sound signal is heard when the time is up. The
unit will shut off automatically and fan will blow for 1
minute to cool this toaster.
H. Confirm the bread is cooked.
NOTE : If you operate this toaster for the first time, you will
notice an odor, that is a characteristic of burning off
residues on the new heating elements. This is
normal.
-5-

5. FEATURES AND SPECIFICATIONS
Microwave Oven
A. The safety systems incorporated in this oven are:
(1) Primary interlock switch
(2) Secondary interlock switch
(3) Interlock monitor switch
(4) Choke system
(5) Oven cavity thermostat
(Note: This thermostat located on the oven cavity will
open and stop the unit from operation only if a high
temperature is reached, such as, a fire created by
overcooking food.)
B. Any one of 10 power output levels ranging 100W to
900W can be selected by the touch control and
electronic computer system.
C. Cooking time can be displayed on the digital readout.
And MWO mode and Toaster mode can be displayed to
avoid confusion.
D. Three different cooking stages can be set. The oven
remembers three cooking stages and changes from one
cooking stage to another. This is made possible with the
memory function of the microprocessor.
MODEL 721.62292
721.62299
Toaster
A. The safety systems incorporated in this toaster are:
(1) Toaster door switch
(2) Toaster thermostat
(Note : This thermostat located on the air tunnel will
open and stop the unit from operation only if
a high temperature is reached, such as, a fire
created by overcooking food.)
B. Cooking mode (Toast/Bagel) and browning level can be
displayed on the digital readout.
C. Thermister controls the toasting time by detecting the
internal temperature. This makes it possible to cook
bread evenly.
-6-

SPECIFICATIONS
Rated Power Consumption..........................................1350W
Output
Microwave oven ......................................................900W (
Adjustable 100W through 900W, 10 steps
Toaster.....................................................................800W
Frequency....................................................................2,450 MHz ± 50 MHz
Power Supply...............................................................120V ±12V AC, 60Hz
Rated Current...............................................................11.5 Amp.
Magnetron & Heater Cooling........................................Forced Air Cooling
Microwave Stirring........................................................Turntable
Rectification..................................................................Rectification Voltage Doubler Half-Wave
Door Sealing ................................................................Choke System
Safety Devices
Microwave oven ......................................................Thermostat : Open at 110°C ± 5°C, Close at 60°C ± 5°C
Fuse(15A)
Primary Interlock Switch
Secondary Interlock Switch
Interlock Monitor
Toaster.....................................................................Toaster Door Switch
Thermostat : Open at 145°C ± 5°C, Close at 60°C ± 5°C
Magnetron....................................................................2M214
High Voltage Capacitor................................................Capacitor: 0.95µF, 2.1KV Ac
High Voltage Diode......................................................350mA, 9.0KV
Cavity Lamp.................................................................125V, 20W
Timer............................................................................Digital, up to 99 mm. 99 sec. (in each cooking stage)
Tray..............................................................................Tempered Safety Glass
Thermistor, NTC...........................................................150°C ± 3%
Crumb Tray..................................................................Crumbs of bread lay on it
Overall Dimensions......................................................21
Oven Cavity Size..........................................................13
Effective Capacity of Oven Cavity................................0.9 Cu.ft.
Accessories..................................................................Use and Care Manual ,Turntable,
Rotating Ring Assembly.
*
IEC 60705 Rating standard)
5
/16”(W) x 123/16”(H) x 169/16”(D)
1
/2”(W) x 811/16”(H) x 143/16”(D)
MODEL 721.62292
721.62299
SWITCH TABLE
PRIMARY SECONDARY INTERLOCK TOASTER
SWITCH MODE
INTERLOCK INTERLOCK MONITOR DOOR
SWITCH SWITCH SWITCH SWITCH
CONDITIONS
DOOR OPEN
DOOR CLOSED
COM COM COM COM
NO NO NC NO
∞∞∞0
0
0
NOTE: Use the above switch table with circuit diagram on page 8.
-7-
∞
0
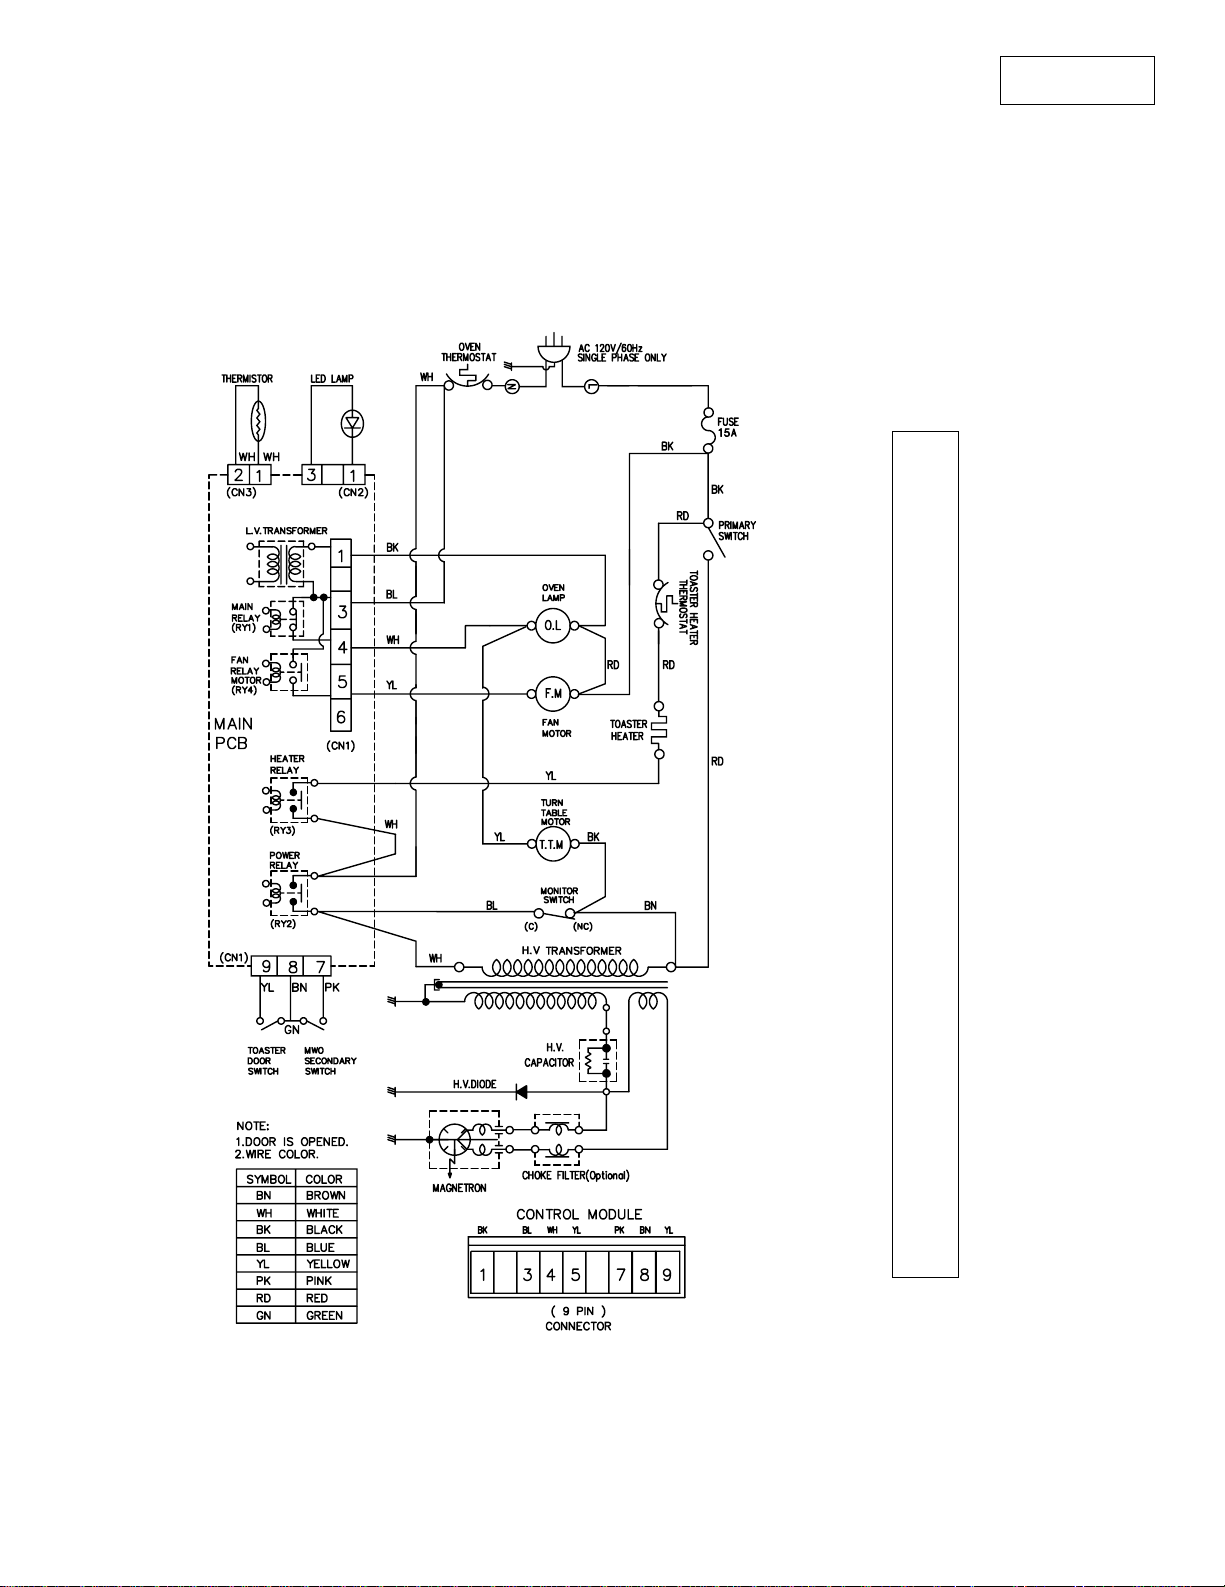
6. OVERALL CIRCUIT DIAGRAM
IMPORTANT SAFETY NOTE: THE SHADED AREAS ON THIS SCHEMATIC DIAGRAM INCORPORATE SPECIAL FEATURES
IMPORTANT FOR PROTECTION FROM MICROWAVE RADIATION, FIRE, ELECTRICAL SHOCK, AND
HAZARDS. WHEN SERVICING IT IS ESSENTIAL THAT ONLY MANUFACTURER’S SPECIFIED PARTS
BE USED FOR THE CRITICAL COMPONENTS IN THE SHADED AREAS OF THE SCHEMATIC DIAGRAM.
NOTICE: SINCE THIS IS BASIC SCHEMATIC DIAGRAM, THE VALUES OF COMPONENTS AND
SOME PARTIAL CONNECTIONS ARE SUBJECT TO CHANGE FOR IMPROVEMENT.
A. SCHEMATIC DIAGRAM
MODEL 721.62292
721.62299
Figure 3
-8-
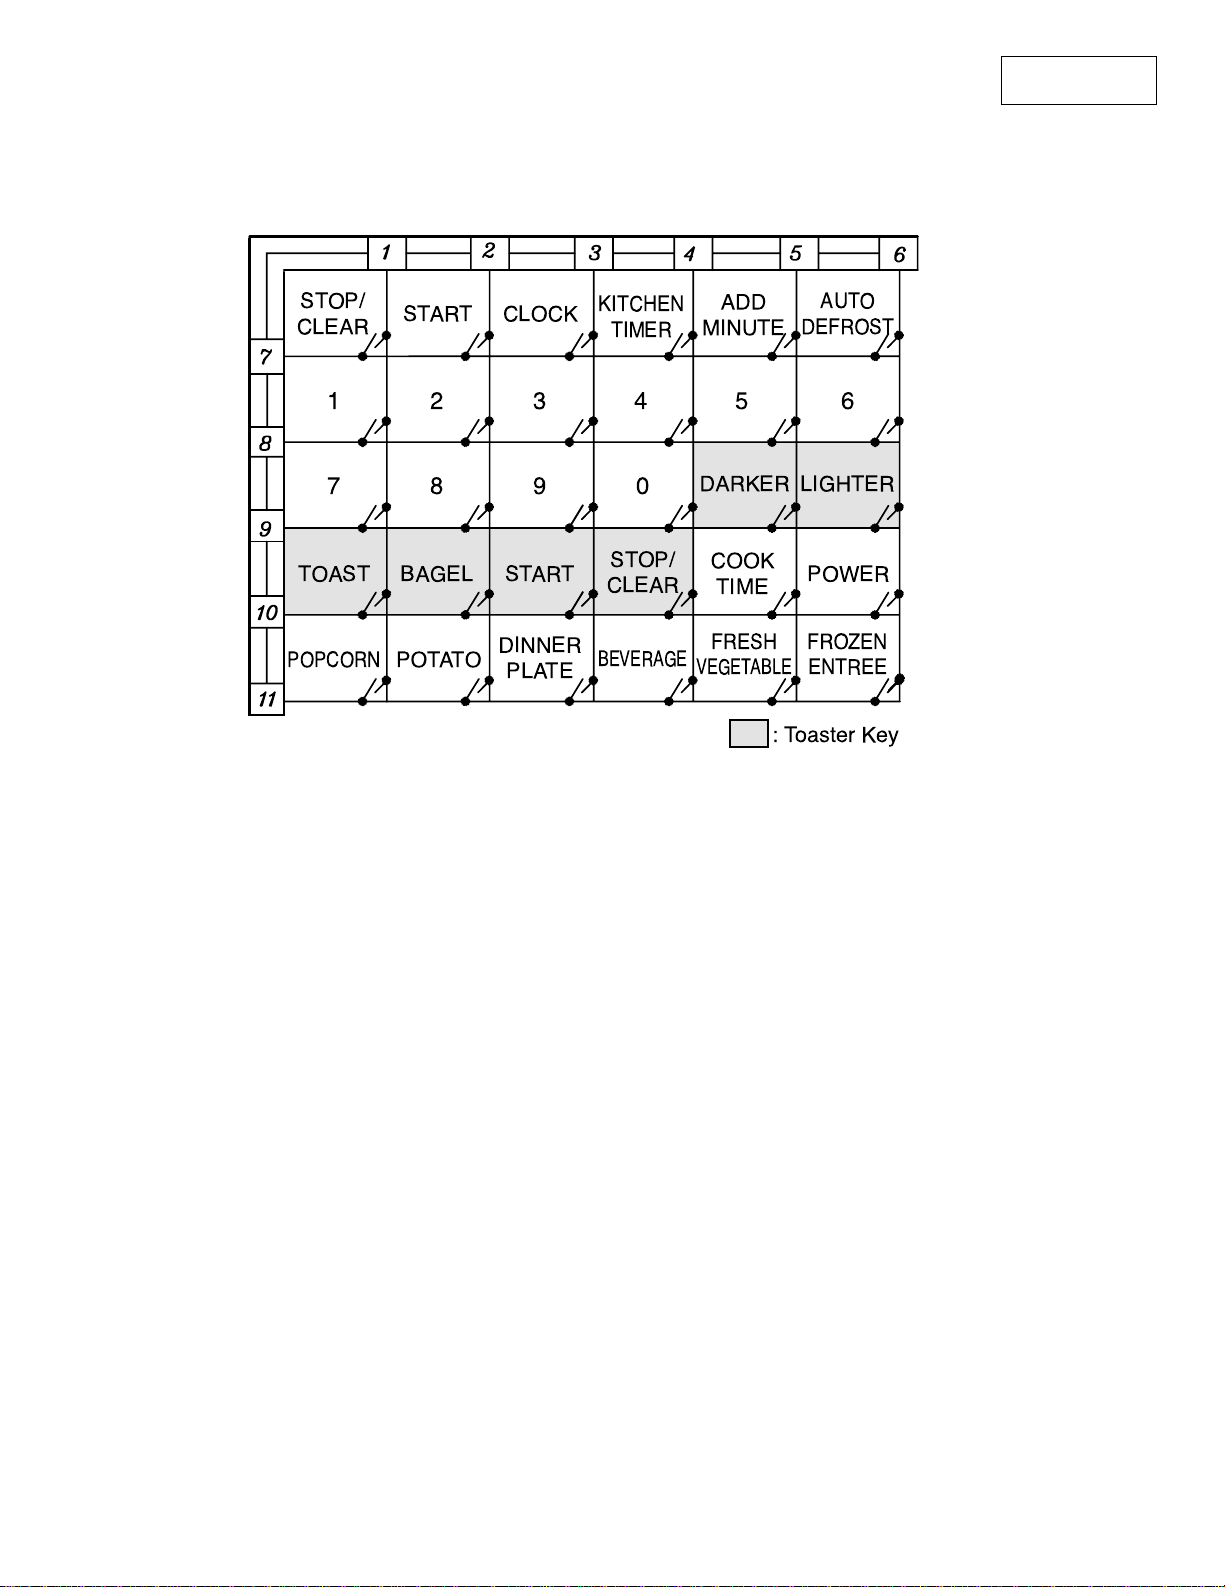
B. MATRIX CIRCUIT FOR TOUCH KEY BOARD
STOP/
CLEAR
START CLOCK
KITCHEN
TIMER
AUTO
DEFROST
ADD
MINUTE
DINNER
PLATE
POPCORN
POTATO
DARKER
LIGHTER
1
7
2345 6
890
STOP/
CLEAR
TOAST BAGEL START
COOK
TIME
POWER
: Toaster Key
BEVERAGE
FRESH
VEGETABLE
FROZEN
ENTREE
MODEL 721.62292
721.62299
Figure 4
-9-
7. OPERATING PROCEDURES
0
1 3
5
2 4 6
0
2 4
1
75 9
3
6 8
11
10
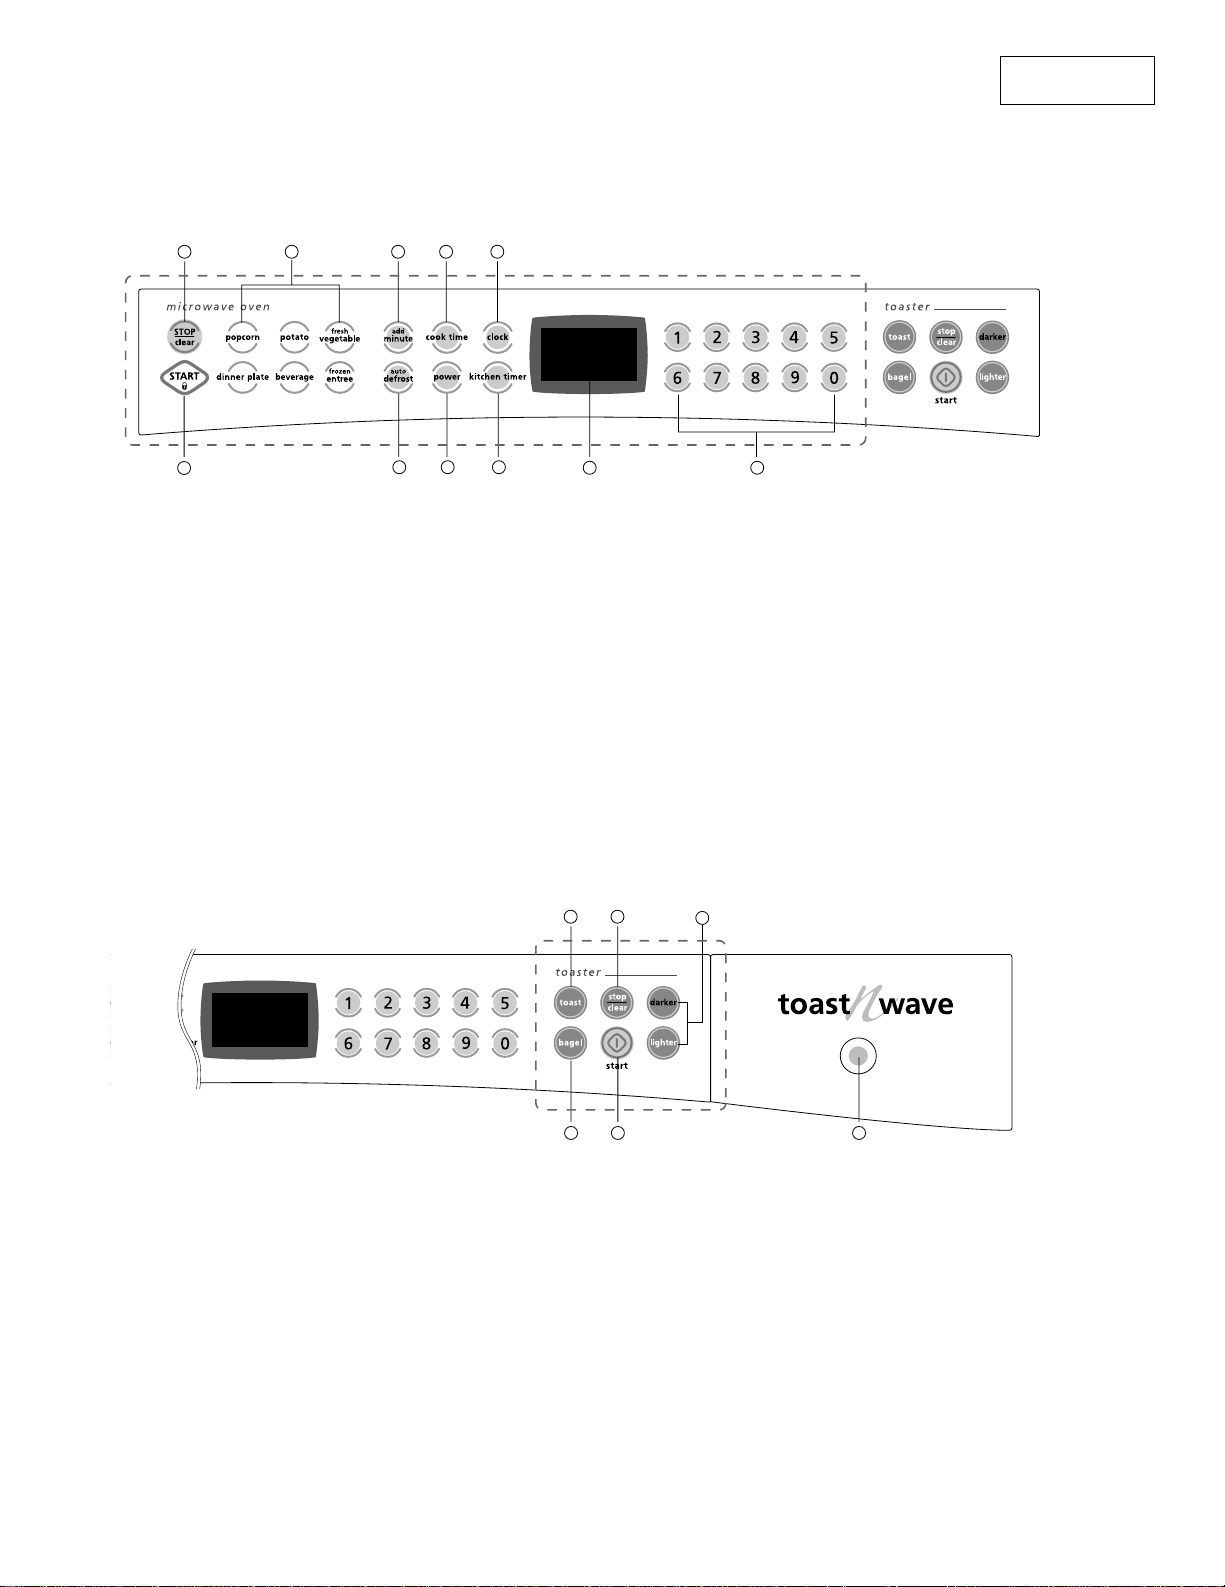
A. OVEN CONTROL PANEL
MICROWAVE CONTROL AREA
1. DISPLAY. The Display includes a clock and indicators that tell you time of day, cooking time settings, and cooking
functions selected.
2. STOP/CLEAR. Touch this pad to stop the oven or clear entries.
3. START. Touch this pad to start all entries (except the Auto Cook and Add Minute function which start
automatically) and to turn Child Lock on or off.
4. AUTO COOK. Touch this pad to select programming food items.
5. ADD MINUTE. Touch this pad to cook at 100% cook power for 1 minute to 99 minutes 59 seconds.
6. AUTO DEFROST. This pad is an accurate defrosting method for frozen meat, poultry and fish up to 6.0 lbs.
7. COOK TIME. Touch this pad to set a cooking time.
8. POWER. Touch this pad to set a cooking power.
9. CLOCK. Touch this pad to set the time of day.
10. KITCHEN TIMER. Touch this pad to use your microwave oven as a kitchen timer.
11. NUMBER PADS. Touch Number Pads to enter cooking time, power level, quantities, or weights.
MODEL 721.62292
721.62299
TOASTER CONTROL AREA
1. Toast. Toast bread
2. Bagel. Toasts Bagels
3. Stop/Clear. Touch this pad to stop the toaster or clear entries.
4. Start. Touch this pad to start the toasting process.
5. Darkness Control. Adjust darkness control to desired setting before cooking foods.
(Default : 5, "1" is the lightest and "9" is the darkest)
6. Indicator Light. When operating toaster with door closed, this will be illuminated. If you open the door during
toasting, this will blink.
NOTE: A “beep” sounds when you touch a “key” on the control panel, to indicate that you have entered
a setting.
-10-

B. EASY USE TABLE
MICROWAVE OVEN
(1) KITCHEN TIMER
1. Touch STOP/CLEAR.
2. Touch KITCHEN TIMER.
3. Touch correct number for time.
4. Touch START.
MODEL 721.62292
721.62299
TOASTER
(1) TOAST
1. Touch STOP/CLEAR.
2. Touch TOAST.
3. Touch Darkness Control (1~9 step)
4. Touch START.
(2) CHILD LOCK
To set:
1. Touch STOP/CLEAR.
2. Touch “START” more than 4 seconds.
To cancel:
1. Touch STOP/CLEAR.
2. Touch “START” more than 4 seconds.
(3) AUTO COOK
1. Touch STOP/CLEAR.
2. Touch AUTO COOK Category.
3. Touch START.
(Although you don’t touch start, it will start after
4 seconds automatically)
(4) ADD MINUTE
1. Touch STOP/CLEAR.
2. Touch ADD MINUTE.
(5) AUTO DEFROST
1. Touch STOP/CLEAR.
2. Touch AUTO DEFROST.
Three different defrosting levels are provided.
(Touch 1 : Meat
Touch 2 : Poultry
Touch 3 : Fish)
3. Enter the weight of your food in decimal
increments from 0.1 to 6.0 pounds.
4. Touch START
5. At beeping, turn food over by following the
instructions in the manual.
6. After turning food over, touch START to resume
defrosting.
(6) TIMED COOKING
1. Touch STOP/CLEAR.
2. Touch COOK TIME.
3. Touch number for cooking time.
4. Touch POWER.
5. Touch number for cooking power level.
6. Touch START.
(2) BAGEL
1. Touch STOP/CLEAR.
2. Touch BAGEL.
3. Touch Darkness Control (1~9 step)
4. Touch START.
(3) DARKNESS SETTINGS
Degree of darkness Select darkness level
Light 1~3
Medium 4~6
Dark 7~9
(7) MULTI-STAGE COOKING
1. Touch STOP/CLEAR.
2. Touch COOK TIME.
3. Touch number for cooking time.
4. Touch POWER.
5. Touch number for cooking power level.
6. Repeat steps 2-5 to set 2nd cooking stage.
7. Touch START.
-11-
 Loading...