

Page 1
®
MICROWAVE OVEN
Use and Care Guide
HORNO DE MICROONDAS
Manual de Uso y Cuidado
Models/Modelos 721.60102
60109
Sears, Roebuck and Co., Hoffman Estates, IL60179 U.S.A.
www.sears.com P/NO.: 3828W5A1517
Page 2
WARRANTY ......................................................... 2
SAFETY ............................................................. 3-4
Precautions ToAvoid Possible Exposure
To Excessive Microwave Energy ........................ 3
Grounding Instructions ........................................ 3
Important Safety Instructions .............................. 4
UNDERSTANDING YOUR
MICROWAVE OVEN ........................................ 5-8
Specifications ...................................................... 5
Installation .......................................................... 5
Parts And Accessories ........................................ 6
Control Panel ...................................................... 6
Cookware Guide ................................................ 7
Tips For Microwave Cooking .............................. 8
Cleaning .............................................................. 8
USING YOUR MICROWAVE OVEN .............. 9-15
Setting the Clock ................................................ 9
Kitchen Timer ...................................................... 9
Child Lock .......................................................... 9
Quick On .......................................................... 10
Timed Cooking .................................................. 10
Multi-Stage Cooking .......................................... 11
Microwave Power Levels .................................. 11
Quick Touch Cooking ........................................ 12
Quick Touch Cook Chart .................................. 12
Auto Defrost ...................................................... 13
Auto Defrost Chart ............................................ 13
Cooking Tips ................................................ 14-15
TROUBLESHOOTING .................................. 16-18
Questions And Answers ................................ 16-17
Before Calling For Service ................................ 18
.lI_i r&_FAWl
FULL ONE-YEAR WARRANTY ON
MICROWAVE OVEN
For one year from the date of purchase, if this
Kenmore microwave oven fails due to a defect
in material or workmanship, Sears will repair it
free of charge.
FULL FIVE-YEAR WARRANTY ON
THE MAGNETRON
For five years from the date of purchase, if the
magnetron in this Kenmore microwave oven
fails due to a defect in material or workmanship,
Sears will repair it free of charge.
WARRANTY SERVICE IS AVAILABLE
BY SIMPLY CONTACTING THE
NEAREST SEARS STORE OR
SERVICE CENTER IN THE UNITED
STATES.
This warranty applies only while this product is
in use in the United States.
This warranty gives you specific legal rights,
and you may also have other rights which vary
from state to state.
Sears, Roebuck and Co., D/817WA,
Hoffman Estates, IL. 60179 U.S.A.
Page 3
PRECAUTIONS TO AVOID POSSIBLE EXPOSURE
TO EXCESSIVE MICROWAVE ENERGY ...
• Do not attempt to operate this oven with the door open, since open-door operation can result
in harmful exposure to microwave energy. It is important not to defeat or tamper with the safety
interlock.
• Do not operate the oven if it is damaged. It is particularly important that the oven door close
properly and that there is no damage to the:
- door (bent)
- hinges and latches (broken or loosened)
- door seals and sealing surfaces.
• Do not place any object between the oven front face and the door, or allow soil or cleaner
residue to accumulate on sealing surfaces.
• The oven should not be adjusted or repaired by anyone except properly qualified service
personnel.
GROUNDING INSTRUCTIONS
Thisappliancemustbe grounded!If an electricalshortcircuitoccurs,groundingreducesthe risk ofelectdc
shockbyprovidingan escapewirefor the electriccurrent.This applianceisequippedwith a cord havinga
groundingwirewith a groundingplug.
Putthe plugintoan outletthatisproperlyinstalledand grounded.
,& WARNING ,A
if you use the grounding plug Improperly, you risk electric shock.
Aska qualifiedelectricianorthe Sears Service
Departmentifyou do notunderstandthe grounding
instructionsor if youwonderwhetherthe appliance is
properlygrounded.
Thisappliancehas a shortpower supplycord to
reducetheriskofanyone's trippingoveror becoming
entangledinthecord.Youmay use an extension
cordit youare careful.
if you use an extension cord, be sure that:
• the extensioncord hasthe same electricalrating
as the appliance.
• the marked rating oftheextensioncordshallbe
equaltoor greaterthanthe electricalratingof the
appliance.
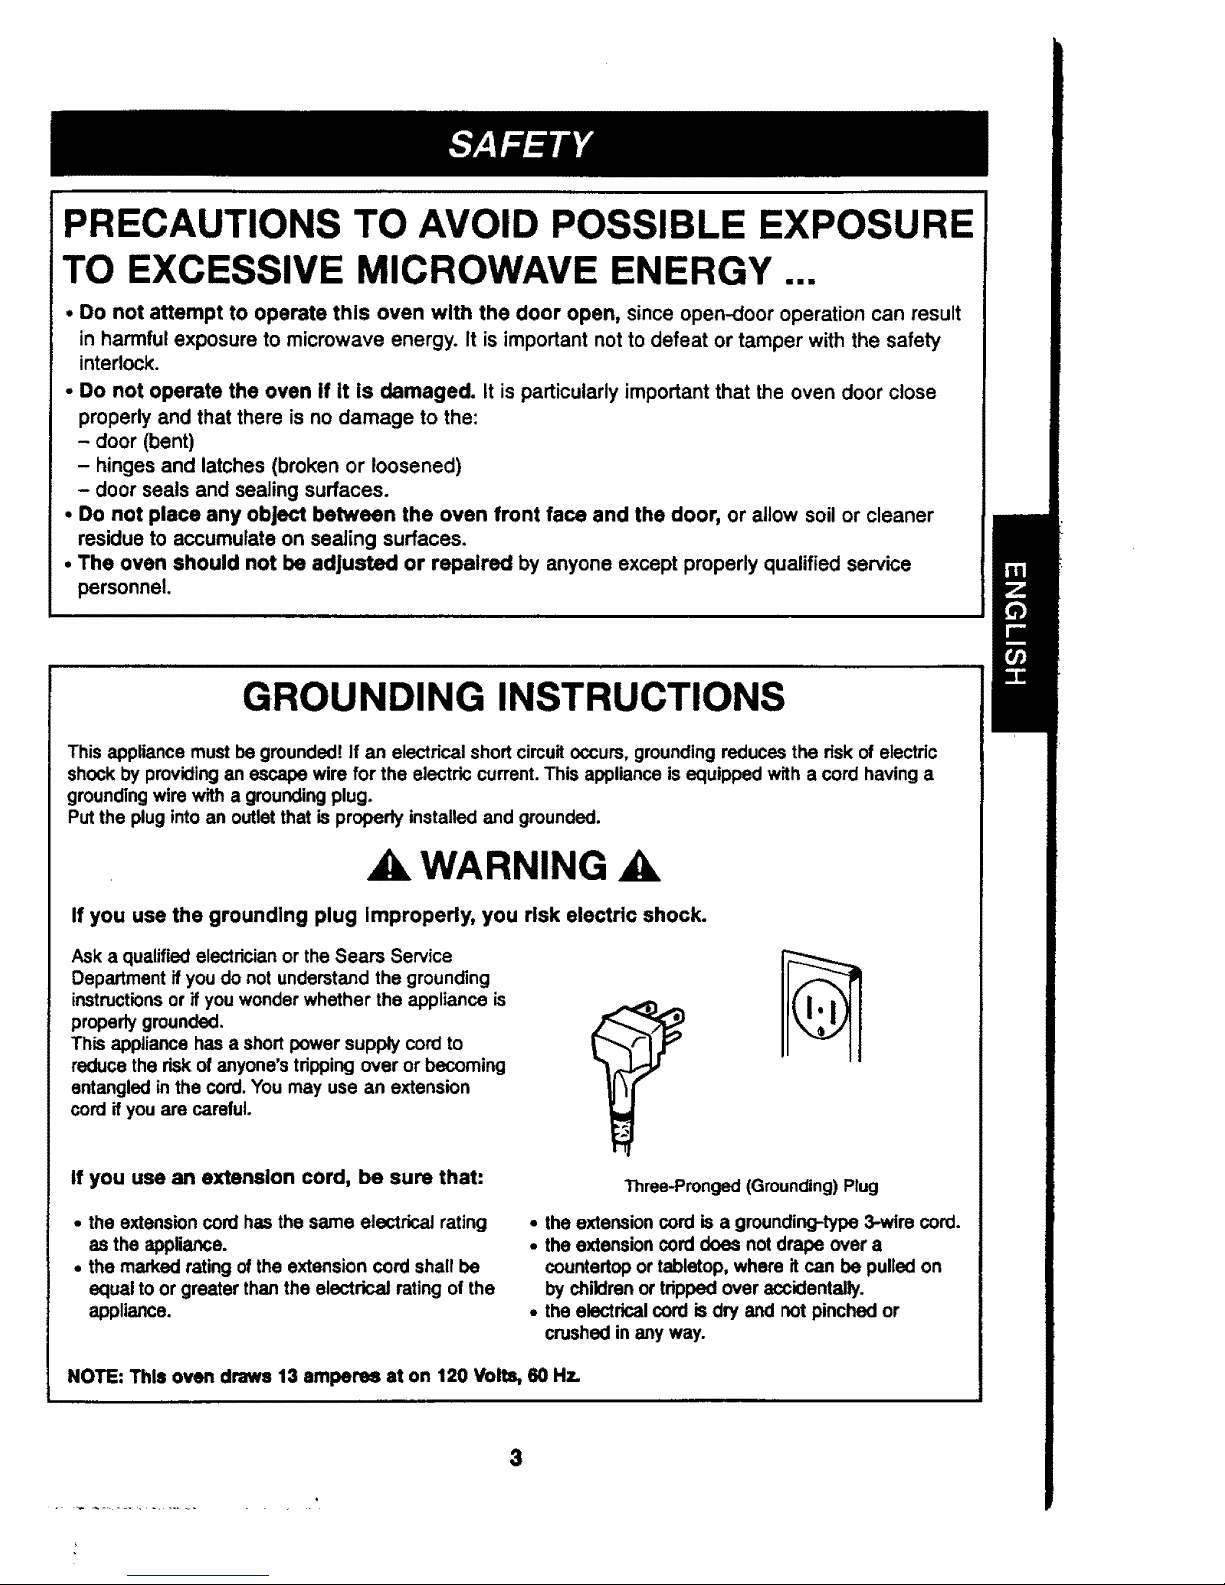
Three-Pronged (Grounding) Plug
• the extensioncord is a grounding-type3-wire cord.
• the extensioncorddoesnotdrape overa
countertoportabletop,where it can be pulledon
by childrenortdppedover accidentally.
• the electricalcord is dry and notpinchedor
crushedin any way.
NOTE: This oven draws 13 amperes at on 120 Volts, 60 Hz.
$
Page 4
IMPORTANT SAFETY INSTRUCTIONS
The safetyinstructionsbelow willtell youhowto use youroven to avoidharmto yourselfor damage
to youroven.
WARNING --Toreducethe riskof bums, electricshock,fire, injurytopersons,orexposureto
excessivemicrowaveenergy:
1. Read all the instructions before using your
oven.
2. Do not allow children to use this oven without
close supervlslon!
3. Read and followthe specificPRECAUTIONS TO
AVOID POSSIBLE EXPOSURE TO EXCESSIVE
MICROWAVE ENERGY foundon page3.
4. Do not tamper wlth the built- In safetyswltchas
on the oven door! The ovenhas severalbuilt-in
safetyswitchesto make surethe poweris off
when the door isopen.
5. When cleaning the door and the surfaces that
touch the door, use only mild, nonabrasive
soaps or detergents anda sponge or softoloth.
6. If your oven Is dropped or damaged, have it
thoroughlycheckedby a qualifiedservice
technicianbeforeusingitagain.
7. To avoid a fire hazard:
a) Do not severely overoook foods. It can
causea fire inthe oven.
b) Do not use recycled paper products In your
oven. They can containparticlesthatcan
causearcingor may ignite.
c) Do not overcook potatoes. Overcooking
couldcausea fire.
d) Do not store combustible Items (bread,
cookies,etc.) In the oven, becauseiflightning
strikesthe powerlines,it maycausethe oven
to turnON.
e) Do not use wire twlst.tlea in the oven. Be
sureto removethem beforeplacingtheitem in
the oven.
f) Do not use the cavity for storage purposes.
Do not leavepaperproducts,cookingutensils,
or food in thecavitywhen notin use.
8. If a fire should start:
a) Keep the oven door closed.
b)Turn the oven off.
€) Dlsoonnect the power cord or shut off the
power at the fuse or circuit breaker panel.
9. Do not usethisoven forcommercialpurposes.
This microwaveis made for householduseonly.
10. Installor locatethisapplianceinaccordancewith
theprovidedinstallationinstructions.
11.To avoid elsotdc shock:
a) This appliance must be grounded! Connect
it onlyto a properlygroundedoutlet.(See the
Grounding Instructions onpage 3.)
b) Do not operate this appliance if it has a
damaged cord or plug, ifitisnotworking
properly,orifit has beendamaged ordropped.
c) Do not Immerse the electdcal cord or plug
in water.
d) Keep the cord away from heated surfaces.
e) This applianceshouldbeservicedonlyby
qualifiedservicepersonnel.
12.To avoid Improperly cooking some foods:
a) Do not heat any types of baby bottles or
baby food. Unevenheatingmay occurand
possiblycausepersonalinjury.
b) Do not heat small-necked containers, such
as syrup bottles.
c) Do not deep-fat fry In your microwave oven.
d) Do not attempt home canning in your
microwave oven,
e) Do not heatwhole eggs inthe shell,water with
oil or fat, andsealed containersor closed
glassjars.These items mayexplode.
13. Keep the glasstray andtheturntablerollerrestin
the ovenwhen you are cooking.
14. Do notusethe oven outdoors.Do notstorethe
oven outdoors.Do not usethisproductnear
water.
15. Do notcoveror blockany openingsinthe oven.
16. Do notrunthe microwaveovenempty.
17. Do notletthe cordhang overthe edge ofa table
or counter.
18. Do notheat glassturntableexcessively.
- Do notcook bacondirectlyontheglass
turntable.
- Do notallowthe grey filmon specialmicrowave
cookingpackagesto touchtheglassturntable.
Putthe packageon a microwave-saledish.
- Keep a browningdishat least_ieinch above
the glassturntable.If youuse the browningdish
incorrectly,youcouldbreakthe glasstumtable.
19. Be carefulnotto chipor scratchthe edgesof the
tumtable. Chipsor scratchesmaycause the
turntabletObreak dudnguse.
SAVE THESE INSTRUCTIONS!
4
Page 5
SPECIFICATIONS
PowerSupply 120 V AC, 60 Hz
RatedPowerConsumption 1050 W
MicrowaveOutput "700W
RatedCurrent 9.3 A
OverallDimensions(WxHxD) 19"x 1l"x 12 Vs"
................................................................................. e.....................................................................................................................................
Oven CavityDimensions(WxHxD) 11V4"x7%" x 121/2"
................................................................................ -II..............................................................................................................................................
Capacityof Oven Cavity 0.7 Cu. ft.
" IEC 705 RATING STANDARD
Specifications subject to change without prior notice.
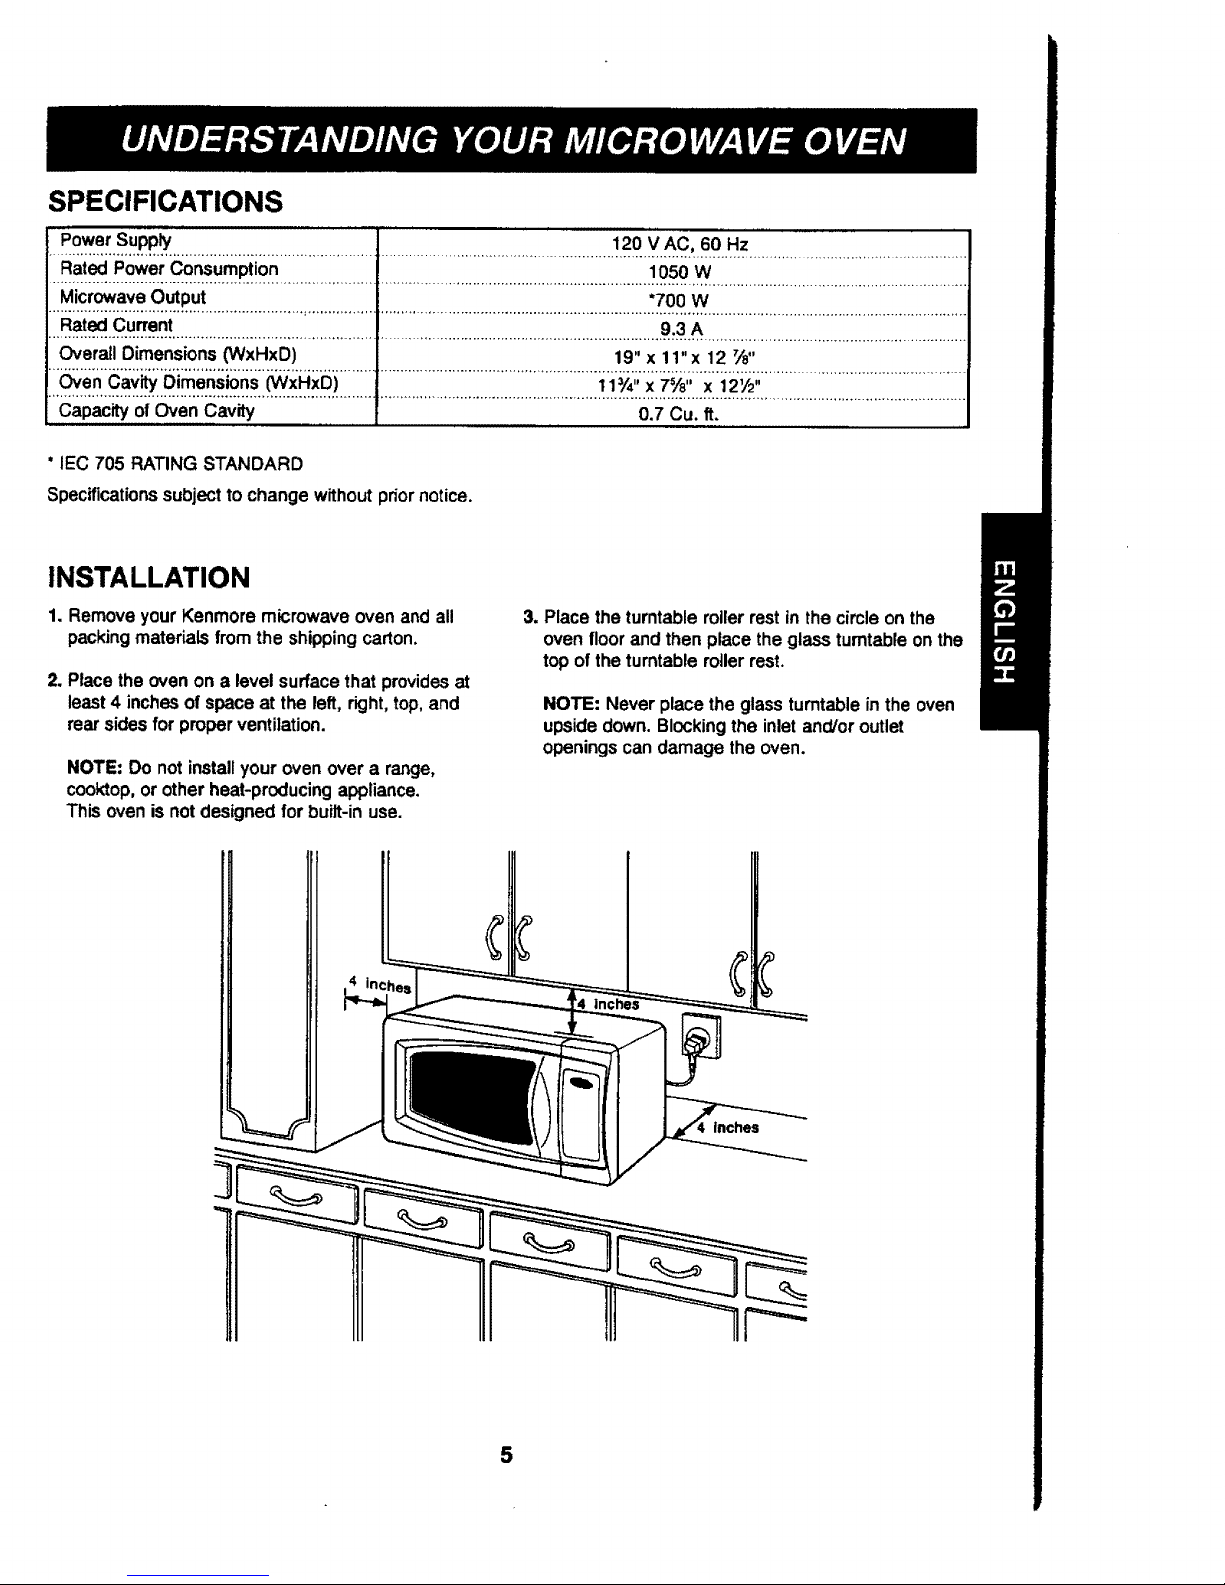
INSTALLATION
1. Remove your Kenmoremicrowaveovenand all
packing materials from the shippingcarton.
2, Placetheovenon a level surfacethat providesat
least 4 inches ofspace at the left, right,top, and
rear sidesfor properventilation.
NOTE: Do not installyourovenover a range,
cooktop,orotherheat-producingappliance.
Thisovenis not designedfor built-in use.
3. Place theturntable rollerrest in thecircleonthe
oven floorand then place theglassturntableonthe
top of the turntablerollerrest.
NOTE: Never place theglass turntable in theoven
upside down.Blockingthe inlet and/oroutlet
openingscandamage the oven.
inches
5
Page 6
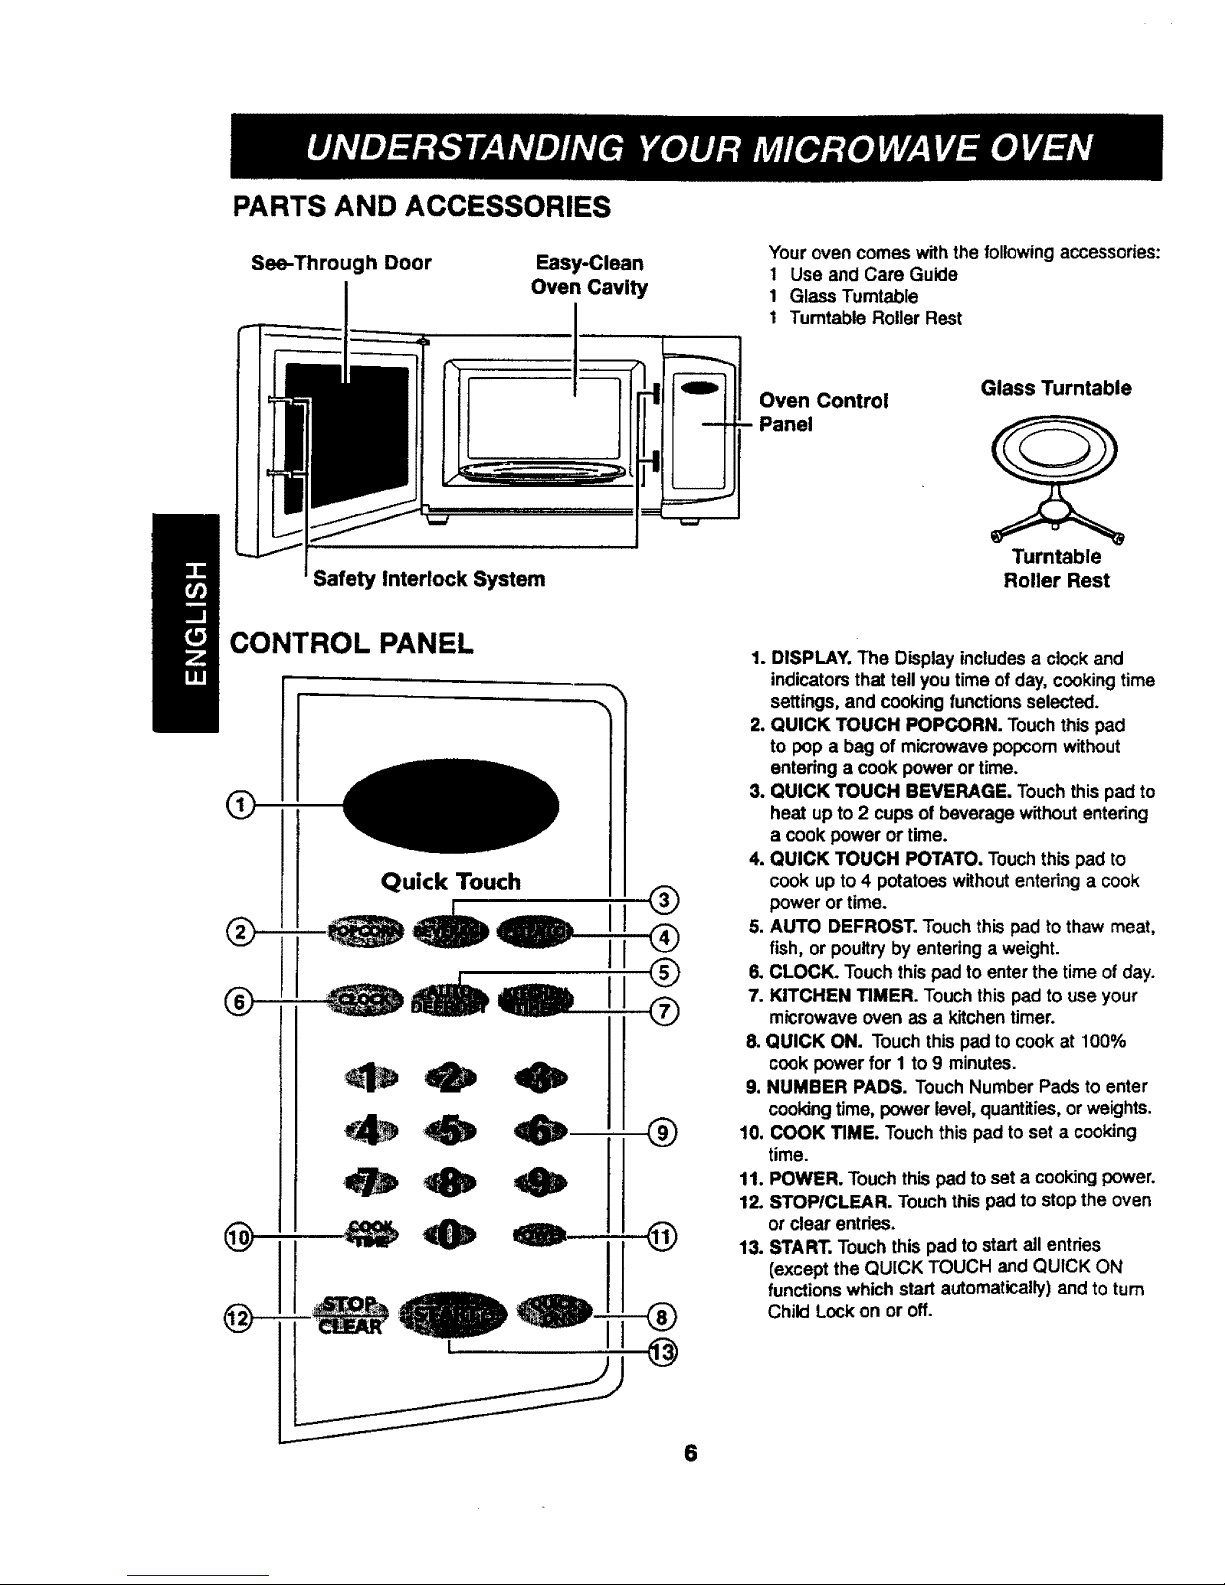
PARTS AND ACCESSORIES
See-Through Door
J
Safety Interlock System
Easy-Clean
Oven Cavity
O
Yourovencomeswiththe followingaccessories:
1 Use and Care Guide
1 Glass Tumtable
1 TurntableRoller Rest
Oven Control
- Panel
Glass Turntable
Turntable
Roller Rest
CONTROL PANEL
O
Quick Touch
i! ®
@
1. DISPLAY. The Display includes a clock and
indicators that tell you time of day, cooking time
settings, and cooking functions selected.
2. QUICK TOUCH POPCORN. Touch this pad
to pop a bag of microwave popcorn without
entedng a cook power or time.
3. QUICK TOUCH BEVERAGE. Touch this pad to
heat up to 2 cups of beverage without entering
a cook power or time.
4. QUICK TOUCH POTATO, Touch this pad to
cook up to 4 potatoes without entering a cook
power or time.
5. AUTO DEFROST. Touch this pad to thaw meat,
fish, or poultry by entering a weight.
6. CLOCK. Touch this pad to enter the time of day.
7. KITCHEN TIMER. Touch this pad to use your
microwave oven as a kitchen timer.
8. QUICK ON. Touch this pad to cook at 100%
cook power for 1 to 9 minutes.
9. NUMBER PADS. Touch Number Pads to enter
cooking time, power level,quantities, or weights.
10, COOK TIME. Touch this pad to set a cocking
time.
11, POWER. Touch this pad to set a cooking power.
12. STOPtCLEAR. Touch this pad to stop the oven
or clear entdes.
13. START. Touch this pad to start all entries
(except the QUICK TOUCH and QUICK ON
functions which start automatically) and to turn
Child Lock on or off.
6
Page 7
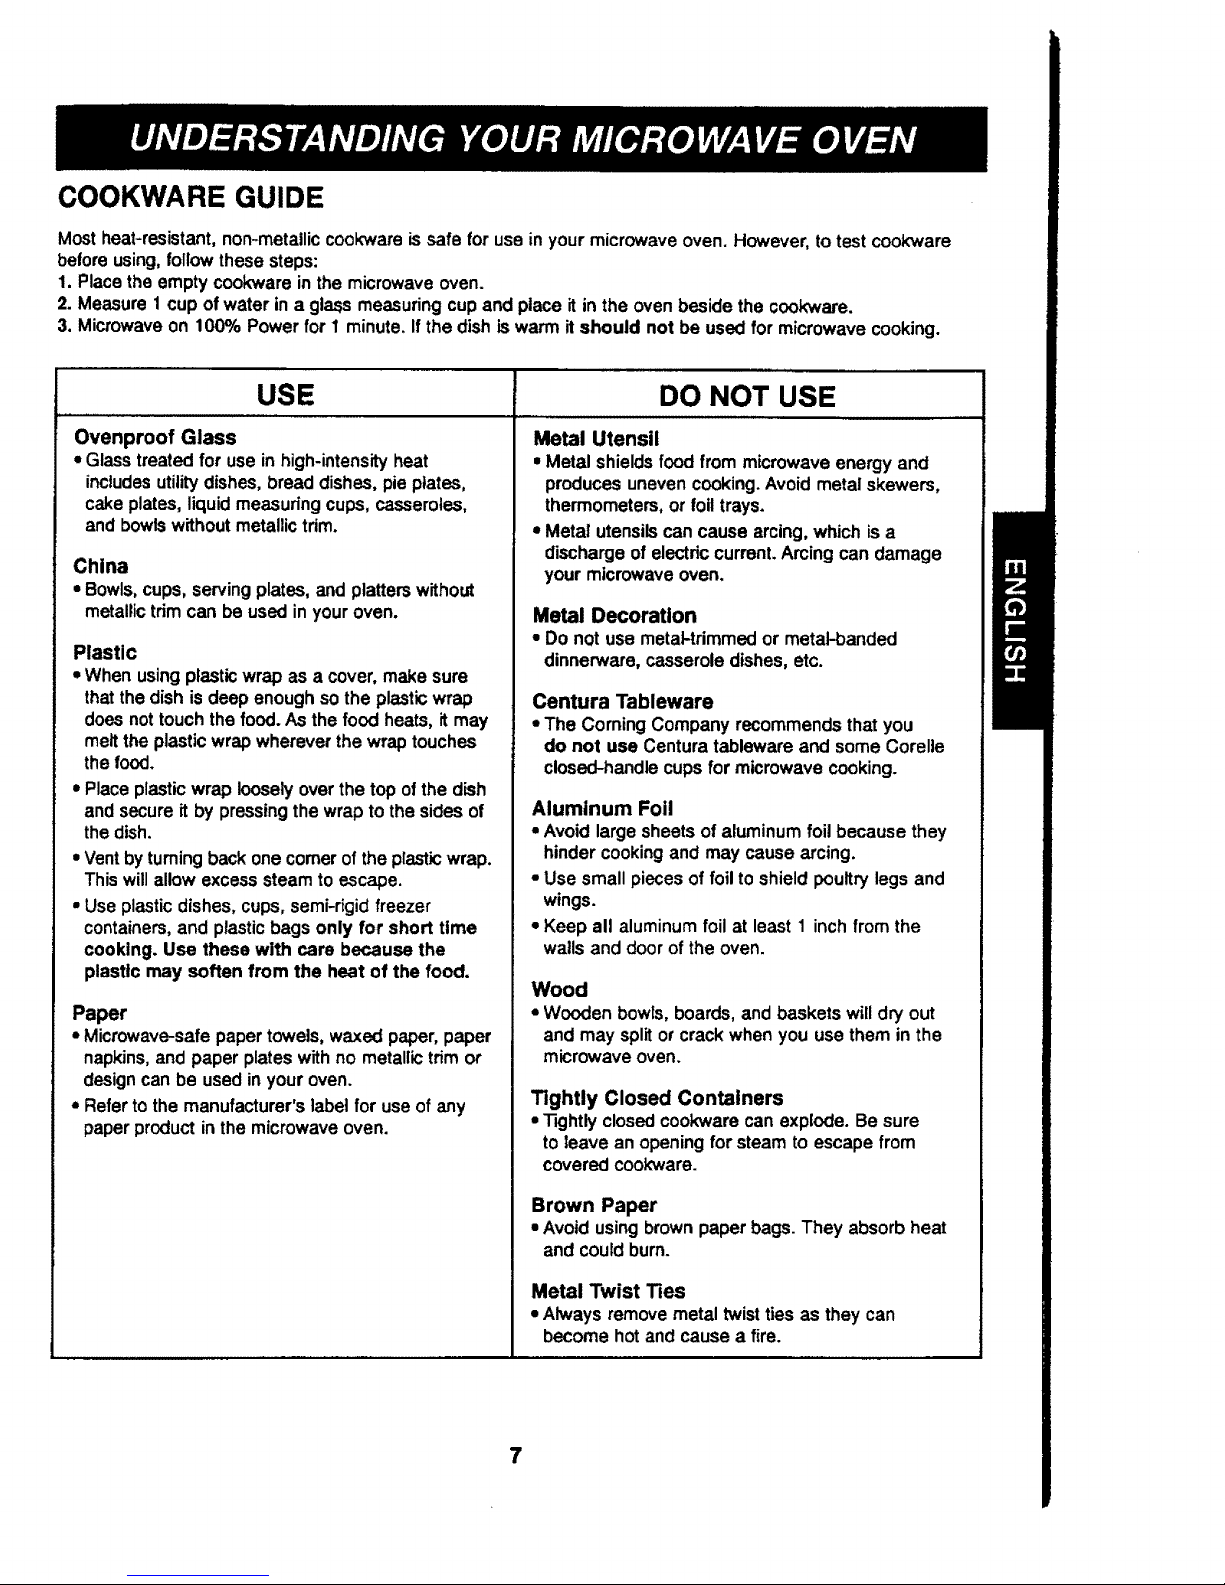
COOKWARE GUIDE
Most heat-resistant, non-metallic coekware is safe for use in your microwave oven. However, to test cook'ware
before using, follow these steps:
1. Place the empty cookware in the microwave oven.
2. Measure 1 cup of water in a glass measuring cup and place it in the oven beside the cook'ware.
3, Microwave on 100% Power for 1 minute, If the dish is warm it should not be used for microwave cooking.
USE DO NOT USE
Ovenproof Glass
• Glass treated for use in high-intensity heat
includes utility dishes, bread dishes, pie ptates,
cake plates, liquid measuring cups, casseroles,
and bowls without metallic tdm.
China
• Bowls, cups, serving plates, and platters without
metallic trim can be used in your oven,
Plastic
• When using plastic wrap as a cover, make sure
that the dish is deep enough so the plastic wrap
does not touch the food. As the food heats, it may
melt the plastic wrap wherever the wrap touches
the food.
• Place plastic wrap loosely over the top of the dish
and secure it by pressing the wrap to the sides of
the dish.
• Vent by turning back one comer of the plastk::wrap.
This will allow excess steam to escape.
• Use plastic dishes, cups, semi-rigid freezer
containers, and plastic bags only for short time
cooking. Use these with care because the
plastic may soften from the heat of the food.
Paper
• Microwave-safepapertowels,waxed paper,paper
napkins,and paper plateswithno metallictrim or
designcan be usedin youroven.
• Refertothemanufacturer's label for use of any
paperproduct in themicrowaveoven.
Metal Utensil
• Metal shields food from microwave energy and
produces uneven cooking. Avoid metal skewers,
thermometers, or foil trays.
• Metal utensils can cause arcing, which is a
discharge of electric current. Arcing can damage
your microwave oven.
Metal Decoration
• Do not use metal-trimmed or metal-banded
dinnerware,casseroledishes,etc.
Centura Tableware
• The Coming Company recommends that you
do not use Centura tableware and some Corelle
closed-handle cups for microwave cooking.
Aluminum Foil
• Avoid large sheets of aluminumfoil because they
hindercookingandmay cause arcing.
• Use small piecesof foil to shieldpoultrylegsand
wings.
• Keep all aluminumfoil at least1 inch from the
wailsand doorof theoven.
Wood
• Wooden bowls, boards, and baskets will dry out
and may split or crack when you use them in the
microwave oven.
Tightly Closed Containers
• _ghtly closed cookware can explode. Be sure
to leave an opening for steam to escape from
covered coolo,vare.
Brown Paper
• Avoidusingbrownpaperbags.They absorbheat
and couldburn.
Metal Twist Ties
• Always remove metal twist ties as they can
become hot and cause a fire.
7
Page 8
TIPS FOR MICROWAVE COOKING
BROWNING
Meat and pcultry withhighfat contentthatare cooked
for 10 or 15 minutesorlongerwillbrownlightly.Foods
cookeda shortertimecan be brushedwith a browning
agent,suchas Womestershiresauce, soy sauce, or
barbecuesauce.
COVERING
A covertrapsheat andsteam andcauses the food to
cookmorequickly.Usea lid ormicrowave-safeplastic
wrapwith onecomer foiled backtoventthe excess
steam. Lidson glasscasserolescan become hot
duringcooking.Handlecarefully'.Waxedpaper will
preventthe food from splattednginthe oven and help
retainheat. When warmingbread items,use waxed
paper, napkins,or papertowels.To absorbextra
moisture,wrapsandwichesand fattyfoodsin paper
towels.
SPACING
Arrangeindividualfoods,suchas bakedpotatoes,
cupcakes,and horsd'oeuvresin a circleand at least
1 inchapart.Thiswill helpthe food cookmore evenly.
STIRRING
Stirringblends flavorsand redistributesthe heat in
foods. Alwaysstirfrom the outsidetowardthe center
ofthe dish.Foodat the outsideofthe dishheatsfirst.
TURNING
Largefoods, suchas roastsand whole poultry,should
beturned sothat the topand bottomcookevenly.Also
turnover chickenpiecesand chops.
ARRANGEMENT
Do notstack food.Arrange ina singlelayerinthe dish
for moreeven cooking.Becausedensefoodscook
more slowly,placethickerportionsofmeat, poultry,
fish, andvegetables toward the outsideofthe dish.
TESTING FOR DONENESS
Becausefoodscookquicklyina microwaveoven,you
need to test frequently foraloneness.
STANDING TIME
Food often needs to stand from 2 to t5 minutes after
you remove it from the oven. Usually, you need to
cover food during standing time to retain heat. Remove
most foods when they are slightly undercooked and
they will finish cooking during standing time. The
internal temperature of food will rise about 10 °F
dudng standing time.
SHIELDING
To prevent some portions of rectangular or square
dishes from overcooking, you may need to shield
them with small strips of aluminum foil to block the
microwaves. You can also cover poultry legs and
wing tips with foil to keep them from ovemooking.
Always keep foil at least I inch from oven walls
to prevent arcing.
PIERCING
Pierce the shell,skin,or membraneoffoods before
cookingto prevent them from bursting.Foodsthat
requirepiercinginclude:yolksand whitesof eggs,hot
dogs,clams, oysters,and wholevegetables,suchas
potatoesand squash.
CLEANING
Wipe the oven inside and outside with a soft cloth and
a mild detergent solution. Then rinse and wipe dry.
This should be done weekly or more often, if needed.
Never use cleaning powders or rough pads.
Excessive oilsplatters on the inside top will be difficult
to remove if left for many days. Wipe splatters with a
wet paper towel, especially after cooking chicken or
bacon,
REMOVABLE PARTS
The turntableand turntablerollerrestare removable.
They shouldbe hand-washedinwarm (nothot)water
witha milddetergentand a softcloth.Once they are
clean,rinsewell and drywitha softcloth.Never use
cleaningpowders,steelwool,or roughpads.
• The turntablemay be cleanedat thesink. Be careful
notto chipor scratchthe edges as thismay cause
the turntableto break duringuse.
• The turntableroller rest shouldbe cleaned regularly.
SPECIAL CARE
Forbestperformanceand safety,the innerdoorpanel
andthe oven front frame shouldbe free of foodor
grease buildup.Wipe oftenwitha milddetergent;then
rinseand wipe dry.Never usecleaningpowdersor
roughpads.
Aftercleaningthe controlpanel,touchSTOPfCLEAR
to clear any entries thatmight have been entered
accidentallywhile cleaningthe panel.
8
Page 9
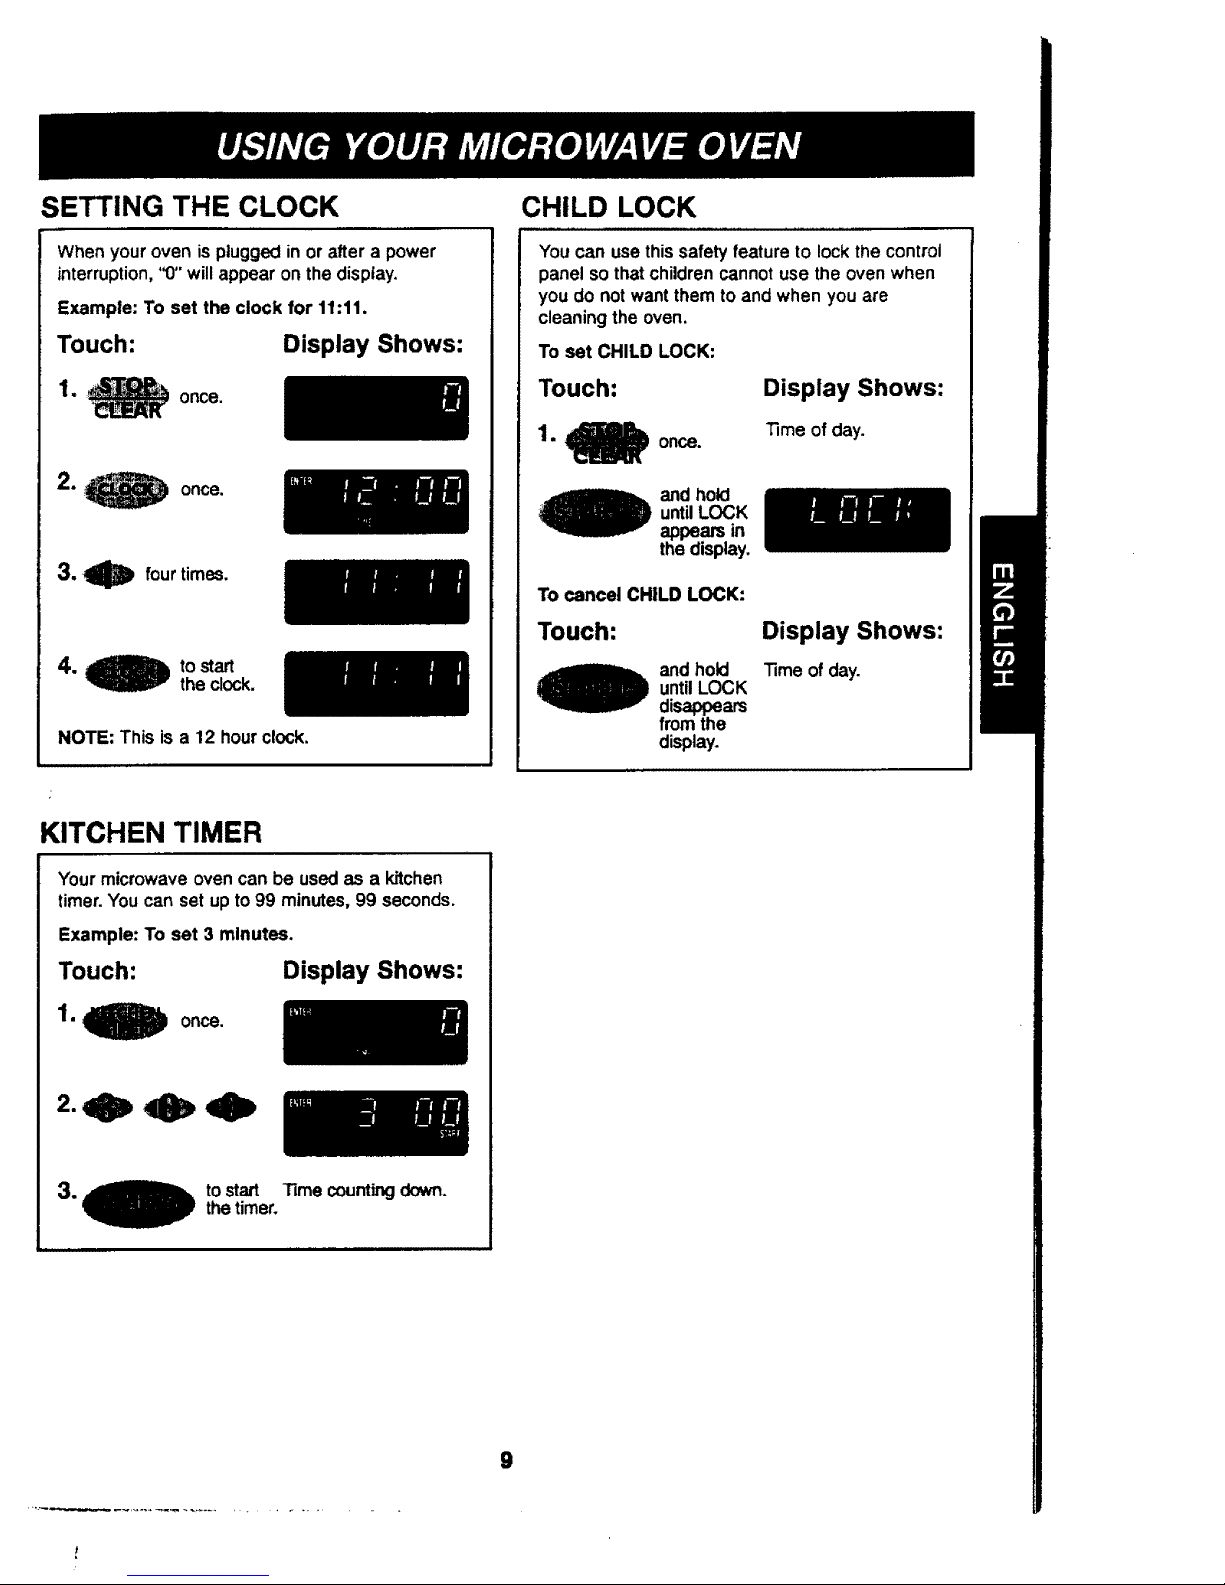
SETTING THE CLOCK
When your oven is plugged in or after a power
interruption, "0" will appear on the display.
Example: To set the clock for 11:11.
Touch: Display Shows:
1, once.
2. once.
3.10 four times.
4. _ tostart
the clock.
NOTE: This is a 12 hour clock.
CHILD LOCK
You can use this safety feature to lock the control
panel so that children cannot use the oven when
you do not want them to and when you are
cleaning the oven,
To set CHILD LOCK:
Touch:
Display Shows:
1.0 once. "Rme of day.
andhold
untilLOCK
appearsin
thedisplay.
To cancel CHILD LOCK:
Touch:
and hold
untilLOCK
disappears
fromthe
display.
Display Shows:
"13meof day.
KITCHEN TIMER
Your microwave oven can be used as a kitchen
timer. You can set up to 99 minutes, 99 seconds.
Example: To set 3 minutes,
Touch: Display Shows:
1, O once.
2.<1 ,ib 4b
g
tostart Timecountingdown.
thetimer.
9
Page 10
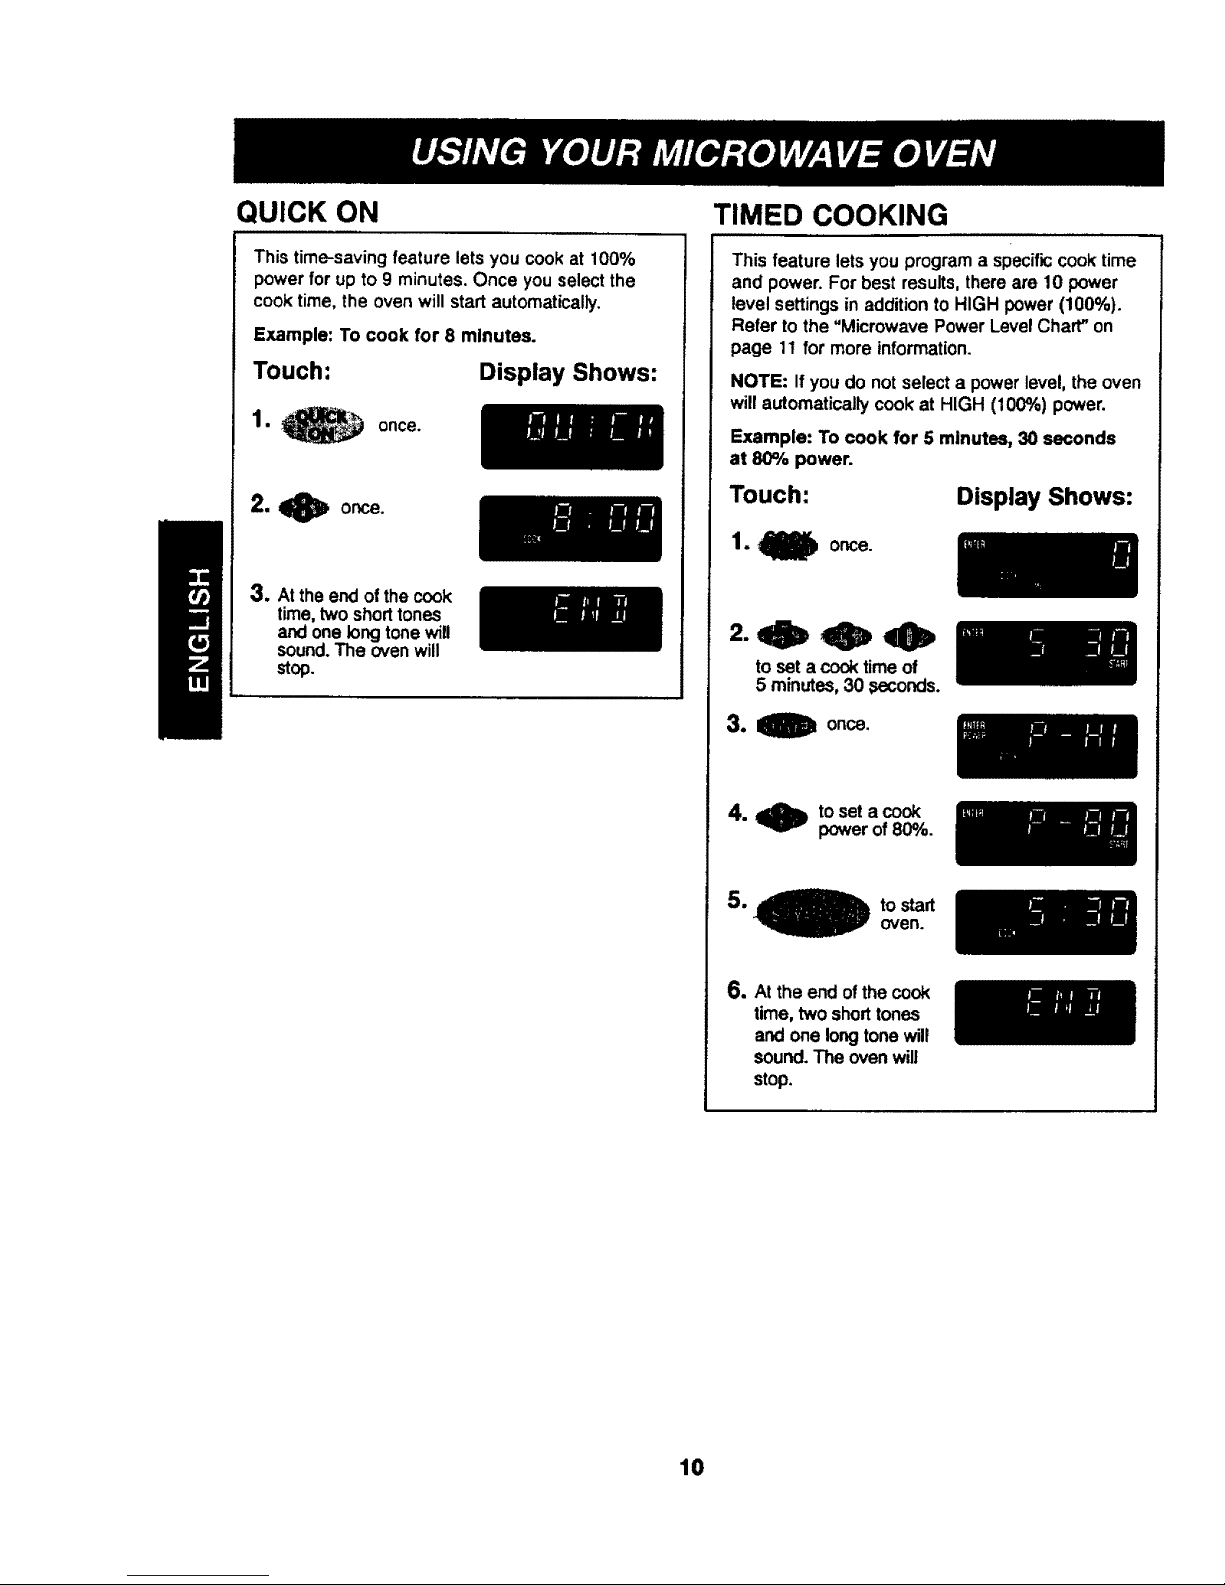
QUICK ON
Thistime-savingfeature letsyou cookat 100%
powerfor up to 9 minutes.Once youselectthe
cooktime, theovenwill startautomatically.
Example: To cook for 8 minutes.
Touch: Display Shows:
1. once.
2. _ or_ce.
3. Attheendof the cook
time,two shorttones
and onelongtonewill
sound.Theovenwill
stop.
TIMED COOKING
Thisfeature lets you programa specificcooktime
and power. Forbest results, thereare 10 power
level settingsin additionto HIGH power(100%).
Refer to the "MicrowavePowerLevelChart"on
page 11 for more information.
NOTE: If you donotselect a power level,the oven
willautomaticallycookat HIGH (100%) power.
Example: To cook for 5 minutes, 30 seconds
at 8_o power.
Touch:
Display Shows:
1 • Q once.
toset a cooktime of
5 minutes, 30 ,seconds.
3.
4. _ to set a cook
power of 80%.
5o O to start
oven.
6. At the end ofthe cook
time, two short tones
and one long tone will
sound. The oven will
stop.
10
Page 11
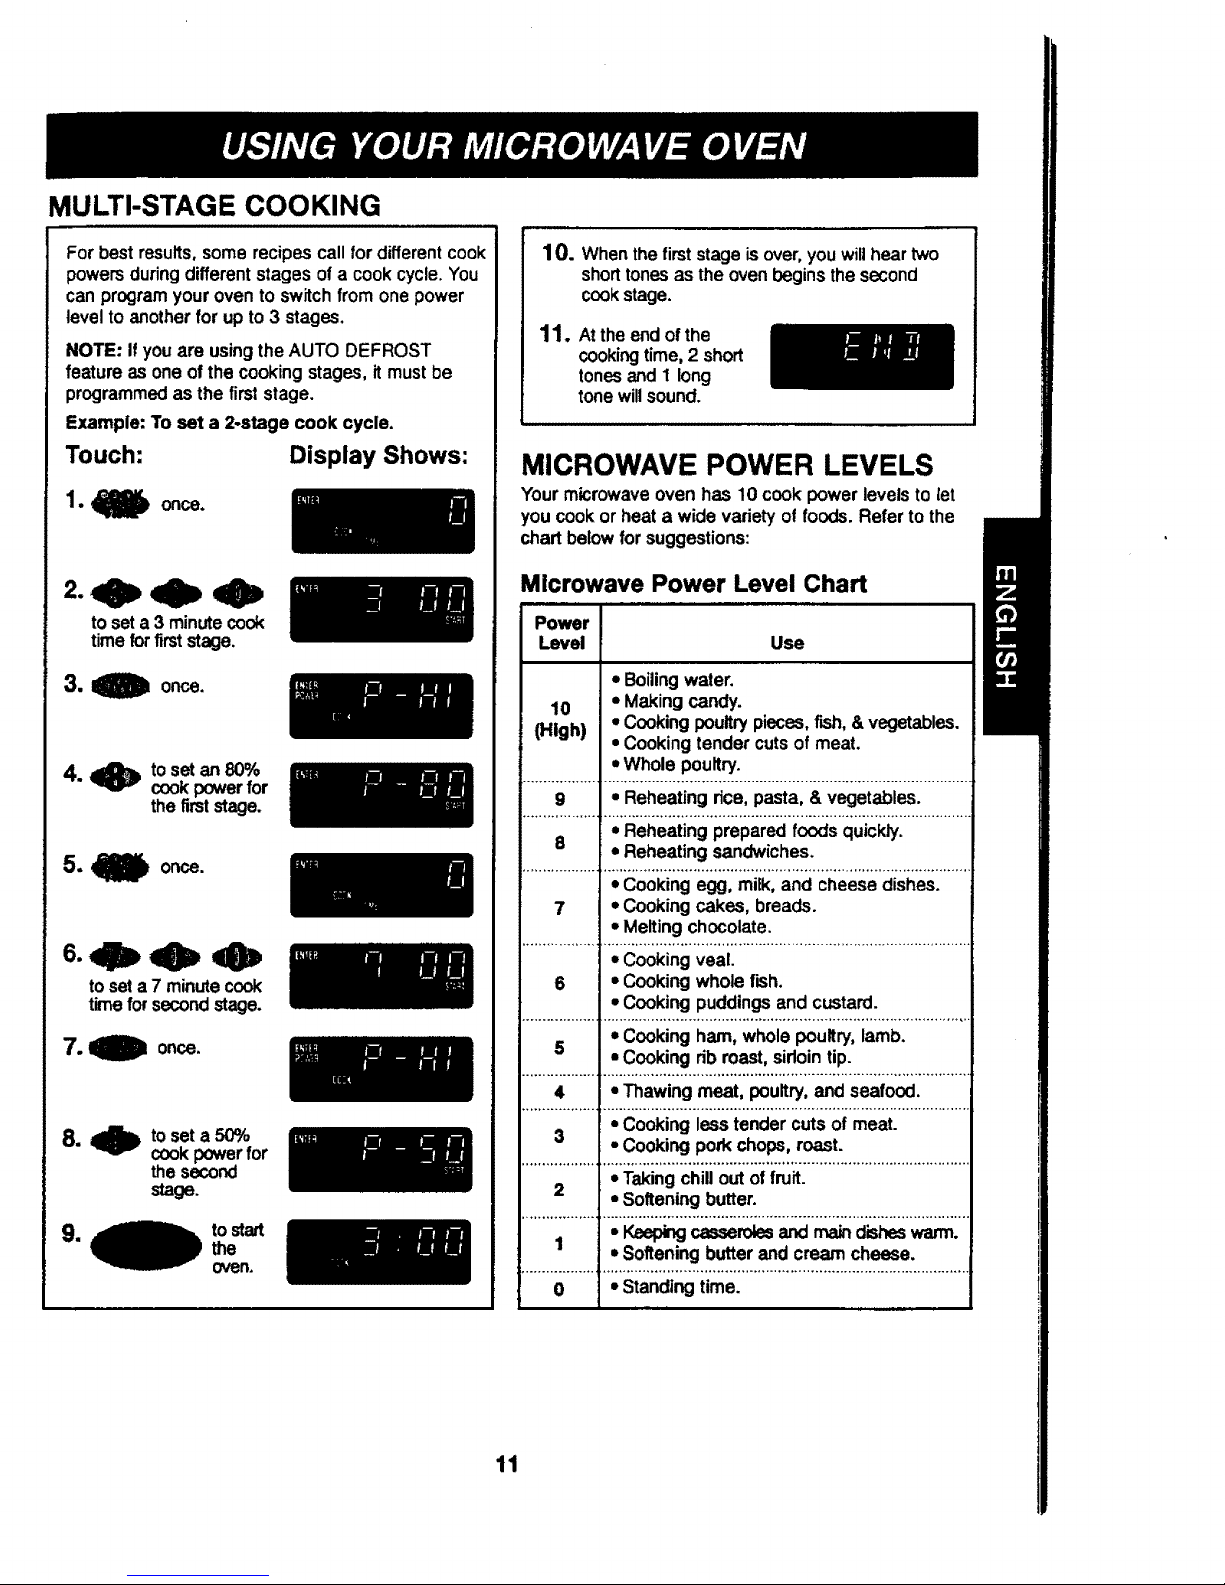
MULTI-STAGE COOKING
For best results, some recipes call for different cook
powers during different stages of a cook cycle. You
can program your oven to switch from one power
level to another for up to 3 stages.
NOTE: If you are using the AUTO DEFROST
feature as one of the cooking stages, it must be
programmed as the first stage.
Example: To set a 2.stage cook cycle.
Touch: Display Shows:
1, Q once.
2.<tD41DqD,
toseta 3 minute cook
time forfirststage.
3, O once.
4. _ toset an 80%
cook power for
the first stage.
5. O once.
toseta 7 minute cook
timefor secondstage.
7. O once,
8. _ to set a 50%
cook power for
thesecond
stage.
1
to start
the
Oven.
10. When the first stage is over, you will hear two
short tones as the oven begins the second
cook stage.
11. Atthe end of the
cooking time, 2 short
tones and 1 long
tone will sound.
MICROWAVE POWER LEVELS
Your microwave oven has 10 cook power levels to let
you cook or heat a wide variety of foods. Refer to the
chart below for suggestions:
Microwave Power Level Chart
Power
Level Use
• Boiling water.
10 • Making candy.
(High) • Cooking poultry pieces, f_sh, & vegetables.
• Cooking tender cuts of meat.
• Whole poultry.
9 • Reheating rice, pasta, & vegetables.
8 _,Reheating sandwiches.
7 • Cooking cakes, breads.
• Melting chocolate.
• Cooking veal.
6 = Cooking whole fish.
• Cooking puddings and custard.
5 = Cooking ham, whole poultry, lamb.
• Cooking rib roast, sirloin tip.
4 • Thawing meat, poultry, and seafood.
3 • Cooking less tender cuts of meat.
• Cooking pork chops, roast.
2 • Softening butter.
• Keeping casseroles and main dishes warm.
1 • Softening butter and cream cheese.
0 • Standing time.
11
Page 12
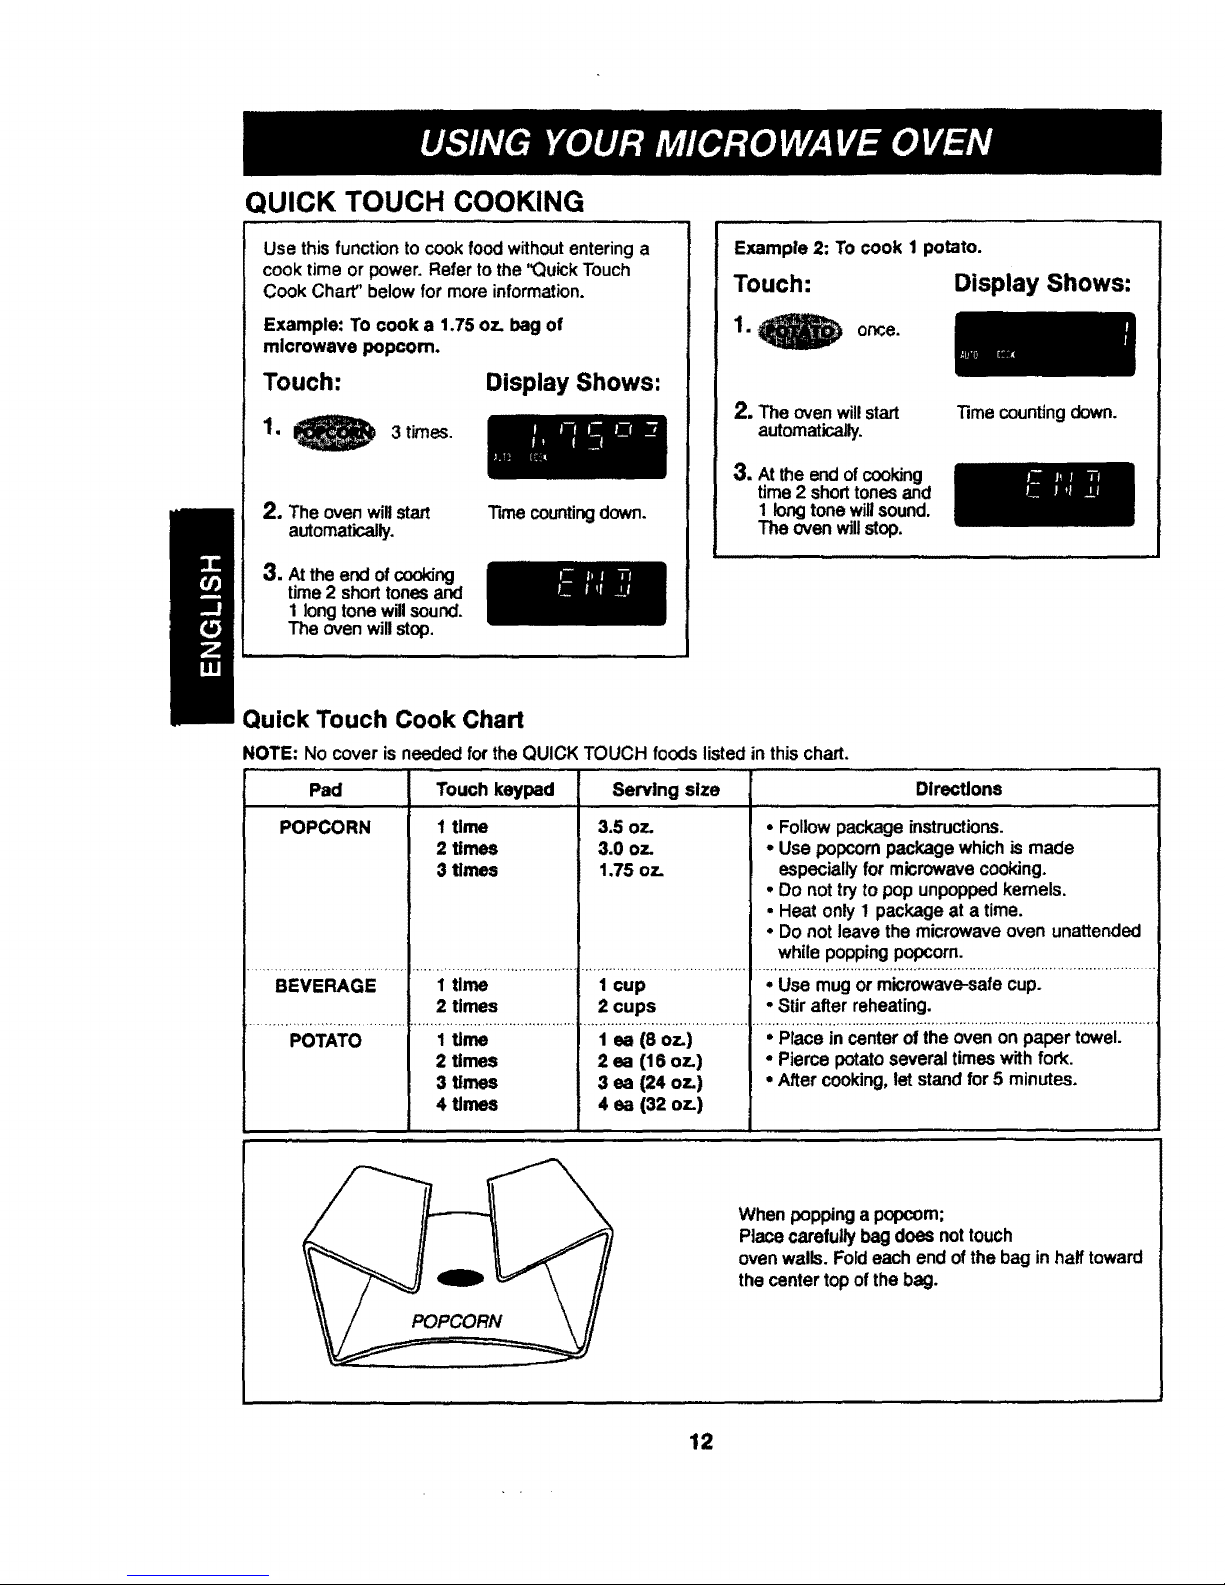
QUICK TOUCH COOKING
Use this function to cook food without entering a
cook time or power. Refer to the "Quick Touch
Cook Chart" below for more information.
Example: To cook a 1.75 oz. bag of
microwave popcom.
Touch:
Display Shows:
,=
3 times.
2. The ovenwillstart
automatically.
3. At the end of cooking
time 2 shorttonesand
1 longtonewillsound.
The ovenwillstop.
Timecountingdawn.
Example 2: To cook 1 potato.
Touch: Display Shows:
1. one.
2, The ovenwillstart
automatically.
3. Attheendof cooking
time 2 shorttones and
1 long tonewillsound.
The ovenwill stop.
13mecountingdown.
Quick Touch Cook Chart
NOTE: No cover isneeded for theQUICK TOUCH foods listed in thischart.
Pad Touch keypad Serving size DirecUons
POPCORN 1 time 3.5 oz. • Followpackageinstructions.
2 times 3.0 oz. • Use popcornpackagewhichis made
3 times 1.75 oz. especially for microwave cooking.
• Do nottryto popunpoppedkernels.
• Heat only 1 packageat a time.
• Donot leavethe microwave oven unattended
whilepoppingpopcorn.
BEVERAGE 1 time 1cup • Use mugor microwave-safecup.
2 times 2 cups - Stirafter reheating.
2 times 2 ea (16 oz.) • Pierce potatoseveraltimeswith fork.
3 times 3 ea (24 oz.) • Aftercooking,let standfor 5 minutes.
4 Umes 4 ea (32 oz.)
When poppinga popcom;
Placecarefullybagdoes nottouch
ovenwalls.Foldeach endof the bag in half toward
thecentertopof the bag.
12
Page 13

AUTO DEFROST
AUTO DEFROST thaws frozen food without entering
a cook time or cook power. Three defrost categories
are preset in your oven: Meat, Poultry, and Fish. See
the "Auto Defrost Chart" below.
NOTES:
• For added convenience, AUTO DEFROST has a
built-in reminder tone to tell you when to check, turn
over, separate, or rearrange food. The oven will sound a
tone twice during the defrost cycle. At each tone, open
the door and turn, separate, or rearrange food. Remove
any portions that have thawed. Return frozen portion to
the oven and touch START to resume the defrost cycle.
• You can defrost foods that weigh 0.1 to 6.0 Ibs.
For best results:
- Removefish, shellfish,meat, and poultry fromits
originalclosed paper or plasticpackage (wrapper).
Otherwise, the wrap willholdsteam andjuice close
tothefoods,whichcan causethe outersurfaceof
thefoods to cook.
• Shapegroundmeatintotheform of a doughnut before
freezing. When defrosting,removethawedmeat when
the remindertonesoundsand continuedefrosting°
• Place foodsin a shallowcontaineror on amicrowave
roastingrack to catch drippings.
• Foodshouldstillbe somewhaticy inthe centerwhen
removedfrom the oven.
Example: To defrost 1.2 Ibs. of ground beef.
Touch: Display Shows:
1. oncefor
meat.
toentertheweight.
3_
tostart
theoven.
4. Atthe endof the
defrosttime,twoshort
tonesand onelong
tonewillsound.
The ovenwillstop.
"13mecounting down.
Auto Defrost Chart
Category Touch AUTO DEFROST
MEAT
Food to be Defrosted
once Beef
Groundbeef, Roundsteak, Cubesfor stew,Tenderloinsteak,
Pot roast,Rib roast, Rumproast, Chuck roast, Hamburgerpatty
_mb
Chops(1 inchthick), Rolledroast
Pork
Chops(I,_inchthick),Hotdogs, Spareribs,Country-styleribs.
Rolledroast, Sausage
Veal
Cutlets(1 lb., 1,_inchthick)
POULTRY twice Poultry
Whole (under4 Ibs.),Cut-up,Breasts(boneless)
Cornish Hens
Whole
Turkey
Breast
.............................. | .......................................................... t .........................................................................................................................................
RSH 3 times Fish
Fillets,Whole steaks
Shellfish
Crabmeat, Lobstertails, Shrimp,
Scalk_ps
13
Page 14

WARNING: Do not use aluminum foil during cooking cycle.
COOKING TIPS
Meat
1. No specialtechniquesare required.Meatshouldbe
preparedas w_thconventionalcooking.Season if
desired.Alwaysthoroughlydefrostmeat before
cooking.
2. Placethemeat ona microwaveroastingrack or
microwave-proof plateand placeon the turntable.
3. Cook accordingtothe "Meat CookingChart"
(below),Use the longertimefor large meats and
theshortertimefor smallermeats.Forthicker
chops,use the longertime.
4. Turnthemeat oncehalfwaythroughthe cooking
time.
5. Let stand for5-10 minuteswrappedin foil after
cooking.The standingtimeisvery importantas it
completesthe cookingprocess.
6. Makesure meat, especiallypork,isthoroughly
cookedbeforeeating.
Meat Cooking Chart
Microwave Cooking Time
Cut Power Per Pound
......... j,
BEEF
Standing/RolledRib
- Rare 8 9to11minuteS
- Medium 8 10to!2 minutes
- Well-done 8 12to 14minutes
Ground Beef (to HIGH(100%) 7 to 9 minutes
brown forcasserole)
Hamburgers,
Fresh or defrosted
(4 oz. each)
- 2 patties HIGH(100%) 3 to5 minutes
- 4 patties HIGH(100%) 4 to 6 minutes
PORK
Loin,Leg 8 13to 16minutes
Bacon
- 4 slices HIGH(100%) 3to 4 minutes
- 6 slices HIGH(100%) 4 to 6 minutes
NOTE: The times listed above are only a guide. Allow
for difference in individual tastes and preferences. The
times may also vary due to the shape, cut, and
composition of the food.
Poultry
1. No specialtechniquesare required.Poultryshould
bepreparedas withconventionalcooking.Season
if desired.
2. Poultryshouldbe thoroughlydefrosted. Remove
gibletsand any metal clamps.
3, Prickthe skinand brushlightlywithvegetableoil
unlessthe poultry is self-basting.
4.AUpoultryshouldbe placedon a microwave
roastingrack ora microwave-proof plateand placed
on the turntable.
5. Cook accordingtothe instructionsinthe "Poultry
CookingChart"below.Turnover halfwaythrough
the cookingtime. Because of itsshape, poultryhas
a tendency to cookunevenly,especiallyin very
bonyparts.Turningduringroastinghelpstocook
these areas evenly.
6. Let stand for 5-10 minutes wrappedinfoil after
cookingbefore carving.The standingtimeisvery
important, as it completesthe cookingprocess.
7. Make sure poultry is thoroughlycookedbeforeeating.
Whole poultry iscompletelycookedwhenthejuices
runclear from the insidethighwhen itis pierced
witha sharp knife. Poultrypiecesshouldbe pierced
with a sharpknifethroughthe thickest partto
ensurethatthejuices are clearandthe flesh isfirm.
Poultry Cooking Chart
Microwave Cooking Time
Poultry Power Per Pound
,,j , ,
CHICKEN
Whole
Breast (boned)
Portions
8
8
8
12to 14minutes
10to 12 minutes
11to 13 minutes
TURKEY
Whole 8 13to 15minutes
NOTES:
- The timeslisted above are only aguide. Allowfor
differencein individual tastes and preferences.The
timesmay alsovarydue to the shape, cut,and
compositionofthefood.
• If whole poultryisstuffed,the weightof the stuffed
bird shouldbe usedwhen calculatingthecooking
time.
14
Page 15

COOKING TIPS (continued)
Fish
1.Arrangefishin a fargeshallownon-metallicdishor casserole.
2. Coverwithpiercedmicrowaveplasticwrapor casserolelid.
3. Placethe dish ontheturntable.
4. Cookaccordingto theinstructionsin the"FreshFish CookingChart" below.Flakesof buttercan beadded to
thefish if desired.
5. Letstandas directedin the CookingChartbeforeserving.
6.Afterstandingtime,checktosee thatthe fish isthoroughlycooked.The fish shouldbe opaqueand flake easily.
Fresh Fish Cooking Chart
Fish Power
...... L
FishFillets HIGH
Whole Mackerel, HIGH
Cleanedand Prepared
Cooking Time
Per Pound
5 to 7 minutes
5 to 7 minutes
Butter
Add 15 to 30 ml (1 to 2 tbsp.) lemon juice.
Standing
Time
2 to 3 minutes
3 to 4 minutes
................................................ = ............................................................................................................................................................
WholeTrout,Cleaned HIGH 6 to 9 minutes - 3 to 4 minutes
and Prepared
! ............................................... !................. I ............................. I- ............................................................................ I ..................................
Salmon Steaks HIGH 6to 8 minutes Add 15 to 30 mt(1 to 2 tbsp.) lemon juice. 3 to 4 minutes
15
Page 16

QUESTIONS AND ANSWERS
Operation
Question
Why is the oven light not on during
cooking?
Why does steamcome out of the air
exhaustvent?
Will the microwave oven be damaged if it
operatesempty?
Does microwaveenergypassthroughthe
viewingscreen inthedoor?,
Answer
There may be several reasonswhythe ovenlightis noton.
Haveyou:
oSeta cookingtime?
• TouchedSTART?
• Checked the lightbulb?
Steam is normallyproducedduring cooking.The microwaveoven
hasbeen designedto vent thissteam.
, [
Yes. Neveroperatethe ovenempty orwithouttheglassturntable.
No.The metal screen bouncesthe energybacktotheovencavity.
The holes (or ports)only allowlight to pass through.Theydo not
let microwaveenergypassthrough.
w,,
Why doesa tone soundwhen a padon The tonetells youthatthe settinghas beenentered.
thecontrolpanel istouched?
Can mymicrowave oven be damaged if
food iscooked for too long?
When the oven is plugged into wall outlet
for the first time, it might not work property+
What is wrong?
Why do t see lightreflection around the
outercase?
What are the varioussoundsI hear when
the microwaveovenisoperating?
Likeany othercookingappliance,it is possibletoovercookfood
to thepointthat thefoodcreatessmoke and evenpossiblyfire
damage to the insideofthe oven.It isalwaysbest to benear the
oven whileyou are cooking.
The microcomputercontrollingyour ovenmay temporarily
becomescrambledand fail to function as programmedwhenyou
plug infor the firsttime orwhen powerresumesaftera power
interruption.Unplugthe ovenfrom the 120 volthouseholdoutlet
and then plugit back into resetthe microcomputer.
i
Thislightis fromthe oven light whichislocatedbetween the
oven cavityand the outerwail ofthe oven.
The clickingsoundiscaused by a mechanical switchturningthe
microwaveoven'smagnetron ON and OFF.
The heavy humand clunk is from the changeinpowerthe
magnetrondraws as it is turnedON and OFF by a mechanical
switch.Thechangein blowerspeed is from the changeinline
voltagecaused bythe magnetron being turnedON andOFF.
16
Page 17

QUESTIONS AND ANSWERS (continued)
Food
Question
What is wrongwhen bakedfoods have
a hard,dry,brownspot?
Whydo eggs sometimespop?
Why are scrambledeggssometimesa
littledryaftercooking?
Isitpossibletopop popcornin a
microwave oven?
Why dobaked applessometimesburst
duringcooking?
Why do bakedpotatoessometimes
bum duringcooking?
Why is a standingtimerecommended
aftermicrowave cookingtime isover?.
Why is additionaltimerequiredfor
cookingfoodstoredinthe refrigerator?.
Answer
A hard, dry,brown spot indicatesovercooking.Shortenthe
cookingorreheatingtime.
When baking,frying,or poachingeggs, the yolkmay popdue to
steam build-upinsidethe yolkmembrane.To preventthis,simply
piercetheyolkwitha woodentoothpickbefore cooking.
CAUTION: Never microwave eggsin the shell.
Eggswilldryoutwhen theyare overcooked,even if the same
recipeisusedeach time. The cookingtime may need to be
variedfor oneof thesereasons:
• Eggsvaryin size.
• Eggsare at roomtemperatureone timeand at refrigerator
temperatureanothertime.
• Eggscontinuecookingduringstandingtime.
L
Yes, ifusingone of the twomethods described below:
(I) microwave-popping devicesidesigned specificallyfor
microwave cooking
(2) prepackagedcommercial microwavepopcornthat ismade
for specifictimesand poweroutputneeded
Follow exact directions given by each manufacturer for
Its popcorn popping productand do not leave the oven
unattended while the corn is being popped, if corn falls
to pop after the suggested time, discontinue cooking.
Overcooking could result in an oven fire.
CAUTION:
• Never use a brown paper bag for popping corn or attempt
to pop leftover kernels.
• Do not pop prepackaged commercial microwave popcorn
directly on the glass tumtableoTo avoid excessive heating
of the glass turntable, position the popcorn bag on a plate.
The peel has notbeen removedfrom the tophalf of eachapple
to allowfor expansionofthe interiorof the appleduringcooking.
As in conventionalcookingmethods,the interiorof the apple
expandsdudngthe cookingprocess.
Ifthecookingtime istoo long,fire couldresult.At the end ofthe
recommendedcookingtime,potatoes shouldbe slightlyfirm.
CAUTION: Do not overcook.
Standingtimeallows foodsto continuecookingevenly for a few
minutes afterthe actualmicrowaveovencookingcycle.The
amountof standingtimedependsuponthe densityofthefoods.
I
As in conventionalcooking,theinitialtemperature offood affects
totalcookingtime.Youneed moretime to cook foodtakenout of
a refrigeratorthan for food at roomtemperature.
17
Page 18

BEFORE CALLING FOR SERVICE
You can often correct operating problems yourself. If your microwave oven fails to work properly, locate the
operating problem in the list below and try the solutions listed for each problem.
If the microwave oven still does not work properly, contact the nearest Sears Service Center, Sears Service
Centers are fully equipped to handle your service requirements.
Problem Possible Causes
Oven does not start • Is the power cord plugged in?
• Is the door closed?
• Is the cooking time set?
Arcing or Sparking • Are you using approved cookware?
• Is the oven empty?
Incorrect Time of Day • Have you tried to reset the Time of Day?
Unevenly Cooked Foods • Are you usingapprovedcook'ware?
• is the glass turntable in the oven?
• Did you turnor stirthe food while it was cooking?
• Were the foodscompletelydefrosted?
• Was the time/cookingpowerlevelcorrect?
OvercookedFoods • Was thetime/cookingpowerlevelcorrect?
UndercookedFoods
• Are youusingapprovedcookware?
• Were the foodscompletelydefrosted?
• Was the time/cookingpower levelcorrect?
• Are theventilationportsclear?.
Improper Defrosting • Areyou usingapprovedcookware?
• Was the time/cookingpower levelcorrect?
• Did you turnorstirthe food duringthe defrostingcycle?
FEDERAL COMMUNICATIONS COMMISSION RADIO FREQUENCY INTERFERENCE
STATEMENT (U.S.A. ONLY)
WARNING:
This equipment generates and uses ISM frequency
energy and if not installed and used properly, that is
in strict accordance with the manufacturer's instruc-
tions, may cause interference to radio and television
reception. It has been type tested and found to
comply with limits for ISM Equipment pursuant to
part 18 of FCC Rules, which are designed to provide
reasonable protection against such interference in a
residential installation.
However, there is no guarantee that interference will
not occur in a particular installation, if this equipment
does cause interference to radio or television recep-
tion, which can be determined by turning the equip-
ment off and on, the user is encouraged to try to cor-
rect the interference by one or more of the following:
=Reorientthe receivingantenna of the radioor
television.
• Relocatethe MicrowaveOvenwith respecttothe
receiver.
• Movethe microwave oven away from the receiver.
• Plugthe microwave oven intoa differentoutletso
thatthe microwave oven and thereceiverare on
differentbranchcircuits.
The manufacturer is notresponsiblefor anyradio
or TV interferencecausedby unauthorized modifi-
cation tothis microwave oven.It istheresponsibility
ofthe user to correctsuchinterference.
18
Page 19

19
Page 20

GARANTIA ......................................................... 20
SEGURIDAD ................................................. 21-22
Precauciones para evitar la posibleexposici6n
a excesiva energfa de microondas .................. 21
tnstrucciones para conexi6n a tierra ................ 21
Instruccionesimportantes de seguridad............22
COMO ENTENDER SU HORNO DE
MICROONDAS ............................................. 23-27
Especificaciones .............................................. 23
Instalaci6n ........................................................ 23
Partes y accesorios .......................................... 24
Panel de controles ............................................ 24
Gu/a de cocci6n ................................................ 25
Consejos para cocci6n con microondas .......... 26
Llmpieza ............................................................ 27
COMO USAR SU HORNO DE
MICROONDAS .............................................. 28-35
C6mo poner el reloj en hora ............................ 28
Reloj autom,_ticopara cocina .......................... 28
Seguro para nifios ............................................ 28
Encendido automdtico ...................................... 29
Coccibn a tiempo programado.......................... 29
Cocci6n en etapas ............................................ 30
Niveles de intensidad de las microondas ........ 30
Cocci6n por contacto r_q:_ido............................ 31
Tabla para cocci6n pot contactordpido............ 31
Descongetacibn autom_tica .............................. 32
Tabla para descongelaci6n autom_.tica ............33
Consejos para coccibn ................................ 34-35
DIAGN(_STiCO Y SOLUCI(_N
DE PROBLEMAS .......................................... 36-39
Preguntas y respuestas................................ 36-37
Antes de Ilamar para servicio .......................... 38
GARANT|A TOTAL POR UN A_O
Por un afio desde la fecha de compra, si este
horno de microondas Kenmore falla debido a
defectos de material o mano de obra, Sears 1o
reparar_, sin cargo.
GARANTIA TOTAL POR CINCO
AltOS PARA EL GENERADOR DE
MICROONDAS (MAGNETRON)
Por cinco afios desde la fecha de compra, si
el magnetr6n de este horno de microondas
Kenmore falla debido a defectos de material o
mano de obra, Sears Io reparard sin cargo.
LA GARANTiA DEL SERVlClO ESTA
DISPONIBLE. PARA EL HORNO DE
MICROONDAS SIMPLEMENTE
CONTACTE SU TIENDA SEARS MAS
CERCANA O CENTRO DE SERVICIO
EN LOS ESTADOS UNIDOS.
Esta garantfa es aplicable s6lo mientras este
producto se use en Estados Unidos.
Esta garantfa le da derechos legales
especfficos y Ud. puede tambi6n tener otros
derechos que pueden variar de unestado
a otto.
Sears, Roebuck and Co., D/817WA
Hoffman Estates, IL., 60179, EEUU.
20
Page 21

PRECAUClONES PARA EVITAR LA POSIBLE
EXPOSICION A ENERGiA DE MICROONDAS
EXCESIVA...
• No intente operar este horno con la puerta abierta, ya que esto puede resultar en exposici6n
nociva a fa energia de microondas. Es importante no forzar la traba de segurJdad.
• No use el homo si ester dariado. Es particularrnente importante que Tapuerta del horno cierre
bien y que no haya dar_os en:
- ta puerta (torcida)
- bisagras y seguros (rotoso flojos)
- sellado de la puerta y superficies de sellado.
• No ponga ningdn obJeto entre la cara frontal del homo y la puerta y no permita que se
acumule polvo o residuos de limpiadores sobre las superficies de sellado.
• El horno no debe set ajustado o reparado pot nadie, excepto personal de ser¢icio calificado.
F
INSTRUCClONES PARA CONEXlON A TIERRA
Esteaparatoelectrodom6sticodebe ser conectadoa tierra.Si hay uncortocircuito,laconexibna tierra
reduce el riesgode electrocuci6nproveyendoun cable de escapepara la corrienteel6ctrica. Esteaparato
etectrodom_sticoest&equipadocon un cableque tieneun alambreparaconexibna tierra con un enchufe
deconexkSna tierra.
Pongaelenchufeen untomacordentequeest6 correctamenteinstaladoy conectadoa tierra.
PRECAUCION
Si Ud. usa el enchufe con conexi6n a tierra en forma indebida, corre el riesgo de
electrocutarse.
Consulteconun electdcistacalificadoo conel
Departamentode Serviciosde Sears si Ud. no
entienderasinstruccionesparahacer la conexibna
tierrao si quieresaber si el aparatoelectrodom_stico
est_correctamenteconectadoa tierra.
EsteelectrodomSsticotiene uncable cortopara
reducirefriesgode que alguiense tropieceo enrede
conel cable.Sea cuidadososi usa un cable de
extensidn.
Si Ud. usa un cable de extensi6n asegdrese
de !o slgulente:
• la extensiondebeset pare el mismovoltaje que el
electrodom6stico.
• el voltajeque ffgura en el cablede extensi6ndebe
seriguaJo mayorque el del electrodom6stico.
• el cablede extensi(_ndebetenet enchufedetres
clavijasparaconexi6na tierra.
Enchufe de tres clavijas (con conexibn a tierra)
• el cable deextensi6nno debecolgar de una
mesa o de la cubiertade un gabinetedonde un
ni_opuedatirardel mismoo se puedatropezar
con _1.
• el cable debeestarseco y no estar pellizcadoo
aplastadoen ning_nlugar.
NOTA: Este homo usa 13 amperlos a 120 Voltios, 60Hz
21
Page 22

INSTRUCCIONES IMPORTANTES
DE SEGURIDAD
Las siguientes instrucciones de seguridad le indicaran c6mo usar su homo para evitar daflos a Ud. y a
su homo.
UClC)N - Para reducir el desgo de quemaduras, electrocuci6n, incendio, heridas a personas
PRECA
o exposici6n a energia de microondas excesiva:
1. Lea todas las instrucciones antes de usar su
homo.
2. iNo permita que los nifios usen este homo sin
supervisibn!
3. Lea y siga las PRECAUCIONES PARA EVITAR
LA POSlBLE EXPOSlCI(_N A ENERGfA DE
MICROONDAS EXCESIVA especfficas que se
detallan en la pdgina 21.
4. iNo toque los Interruptores de seguridad
embutldos en la puerta de! homo! El homo tiene
varios interruptores de seguridad para asegurar
que 8ste se apague cuando se abre la puerta.
5. Cuando Ilmpla la puerta y las superficies que
tocan la puerta, use s61o jabones o detergentes
suaves, no abrasivos y una esponJa o patio
suave.
6. SI su homo se cae o dana, hdgato revisar por un
t_cnico calificado antes de volverlo a usar.
7. Para evitar peligro de incendio:
a) No recocine los alimentos en exceso. Se
puede iniciar fuego en el homo.
b) No useproductos de papel reciclado en el
homo. Estos pueden contener partfculas que
se incendian.
c) No recocine las papas. Esto puede causar
fuego.
d) No guarde artfculos combustibles (pan,
galletas, etc.) en el homo, porque si cae un
rayo en las line.as el_=ctricas,puede hacer que
el homo s¢ prende.
e) No use ataduras de alambre en el homo.
Asegt_rese de quitadas antes de poner el articulo
en el horno.
f) No use la cavidad para guardar cosas. No
deje productos de papel, utensilios de cocina
o comida en la cavidad cuando no estd en uso.
8. Si se prende fuego:
a) Mantenga la puerta del homo cerrada.
b) Apague el homo.
c) Desconecte el enchufe, corte la corrlente en
el tablero el_tdco de fuslbles o dlsyuntores.
9. No use este homo para fines comerciales. Este
homo de microondas es s61opara uso familiar.
10. Instale o ubique el electrodom_.stico de acuerdo
con las instrucciones para instalaci6n pmvistas.
I1. Para evitar electrocuci6n:
a) Este electrodom6stlco debe conectame a
tlerra. Con_'telo sblo a un tomacordente
debidamente conectadoa tierra (Vea las
instrucciones para conexi6n a tierra en
la pdgina21).
b) No use el electrodom6stico si el cable o el
enchufe est_n datiados, sino funciona bieno
si est_ dafiadoo se hacaido.
c) No sumerJael cable o el enchufe en agua.
d)Mantenga el cable aleJadode superficies
callentes.
e) Esteelectrodom_sticodebe setrevisados61o
poruntdcnicocalificado.
12. Para evitar la cocct6n indebida de allmentos:
a) No callente ningdn Upo de botella para
beb6s o allmento para beb_s. Puede haber
calentamientodesparejoy puede causardaflos
personales.
b) No callente reciplentes de boca pequetia,
como botellasdejarabe.
c) No haga frituras en su homo.
d)No trate de enlatar comida en su homo de
mlcroondas.
e) No calientehuevosenterosconcdscara,agua
con aceiteo grasay recipienteshermdticoso
frascos de vidriocerrados.E_stospueden
explotar.
13. Mantengala bandejade vidrioy eldescansodel
rodillode la bandeja giratoriaen elhomocuando
estd cocinando.
14. NOuse el homoal aire libre.No guardeel homo
a la intemperie.Nouse este productocerca del
agua.
15. No cubrao bloquee ningunaaberturadel homo.
16. No hagafuncionarel homocuandoest_ vacio.
17. No deje que el cablecuelguedel bordede la
mesa o de la cubiertadel gabinete.
18. No calientela bandeja giratoriaexcesivamente.
- No cocinetocinodirectamentesobrela bandeja
giratoriadeviddo.
- No permitaque la pel[culagdsespecialde las
bolsasparacocinartoquenla bandejagiratoda.
Pongael paquetesobre unplatopara
microondes.
- Si usa un platopara dorar alimentos mant_ngalo
3A6pulgadas sobrela bandeja. Si se usa
incorrectarnente la bandeja se puede romper.
19.Tengacuidadodeno rasguflaroastillarlosbordes
de la bandejagiratoda.Rasgufloso astitlaspueden
hacerquela bandejase rompaduranteeluso.
GUARDE ESTAS INSTRUCCIONES
22
Page 23

ESPECIFICACIONES
Suministro de electricidad 120 V CA., 60 Hz
iiiiiiiiii.............iiii.....iiiiiiiiiiiiiiii.,,iiilHii iiiiiiiiiiiiO iOi iiiiill......
Producci6nde microondas "700W
Corrienteestimada 9.3 A
Dimensionestotales(Ancho x alto x profundidad) 19" x 11" x 127/8''
Dimensionesde lacavidaddel homo (A x a x p) 11_/4''x 7%" x t21/2''
Capacidadde la cavidaddet homo 0.7 pie cf3bico
"Norma estdndarEC705
Lasespecificacionesestdnsujetasa cambiossin previo aviso.
INSTALACl6N
1. Saquesu homode microondasKenmorey todoel
materialde empaquede la caja de embalaje.
2. Pongael homo sobreunasuperficienivetadaque
deje por Iomenos 4 pulgadasde espacioa la
izquierda,a la derecha,porencimay poratrds
para unaventitaciOnapmpiada.
NOTA:No instale su homosobreuna estufau otro
electrodom6sticoque producecalor.Este homo no
est_ disettadoparaserinstatadoembutido.
3. Pongael descansodel rodillode la bandeja
giratoriaen el cfrculosobreel piso del homo y
luego coloquela bandeja giratoriade vidrioencima
det descansodel rodillode la bandeja.
NOTA: Nuncaponga la bandeja giratoriade vidrio
invertidadentroel homo. Sise bloqueanlosorificios
de entradaosalidase puede dattar el homo.
pulgadas
qq
23
Page 24

PARTES Y ACCESORIOS
Puerta con visor Cavldad del homo
de f=_cillimpieza
PANEL DE CONTROLES
Quick Touch
0
Su homo viene con los siguientesaccesodos:
1 Manual de uso y cuidado
1 Bandeja giratoria de vidrio
1 Descanso del rodillo de labandeja giratoria
I
Bandeja de vidrio
Panel de controles glratorla
- del homo
Descanso del
rodillo de la
bandeJa giratorla
1. MONITOR. La pantalla incluyeun re]oje
indicadoresque muestmnla horadel dt'a,tiempo
de cocci6ny funcionesde coccidnseleccionadas
2. QUICK TOUCH POPCORN. Toqueestebot6npara
hacer una bolsade palomitasde mafzcon
microondas sin necesidadde fijarla intensidado el
tiempode coccibn.
3. QUICK TOUCH BEVERAGE. Toqueeste bot6n
para calentar hasta2 tazas de bebidassin
necesidadde fijarla intensidadoel tiempode
cocci6n.
4. QUICK TOUCH POTATO, Toqueeste botbn para
cocinarhasta4 papas sin necesidadde fijarla
intensidado el tiempode cocci6n.
5. AUTO DEFROST, Toqueeste botbnpara
descongelarcame, pescadoo aves fijando
elpeso.
6, CLOCK. Toqueeste bot6npara fijar la hora.
7. KITCHEN TIMER. Toqueeste botbnpara usarsu
homode microondascomo relojautombtico de
cocina.
8. QUICK ON. Toque este bot6n para cocinaral
100% de intensldadpor 1 a9 minutos.
9. BOTONE$ CON NOMEROS. Toque los botones
con nt_merospara fijarel tiempo de ¢occi6n,la
intens_dad,cantidadeso pesos.
10. COOK TIME. Toque este botbn paraseleccionarel
tiempo de cocci5n.
11.POWER. Toqueeste bot6npara seleccionar]a
intensidaddecocdbn.
12.STOPICLEAR- Toqueeste botbnparapararel
homoo para anu|ar las entradas.
13, START,Toqueeste botdnpara comenzarlas
entradas(exceptolas funciones"QUICKTOUCH"y
"QUICKON"que empiezan autom_,ticamente)y
para activary desactivarla funci6n"ChildLock'.
24
Page 25

GUiA DE COCCI( N
La mayoria de los recipientes de cocina no met_licos resistentes at calor se pueden usar en su homo de
microondas. Sill embargo, para probar los recipientes antes de usados, siga las siguientes instrucciones:
1. Coloque el recipiente vacio en el homo de microondas.
2. Mida I taza de agua usando una taza de vidrio para medir y p6ngala en el homo al lado del recipiente.
3. Prenda el homo de microondas a1100% de su intensidad durante 1 minuto. Si el recipiente est_ tibio no debe
usarse para cocinar a microondas.
USAR
Vldrio a prueba de homo
• El viddotratadopara ser usadoen catorde gran
intensidadincluyeplatosde uso general, platos
para pan, pasteleso tortas,tazas para medir
Iiquidos,cacerolasy recipientessinmolduras
de metal.
Porcelana
• Tazones,tazas, platos y fuentessin molduras
met&licaspueden setusados en el homode
microondas.
Pl_mtico
• Cuandose usa pel[culade pldstico comotapa,
aseg0resede que el plato sea Io suficientemente
profundopara que el plbsticonotoque la comida.
Cuandolacomidase calienta,puedederretirel
ptdsticodonde Iotoca.
• Coloquela pelfculadepkLsticofloja sobmelplato
y aseg0rela apretandoel pt_sticocontraloslados
del plato.
• Ventiledoblando unaesquinadet pl_Lstico.Esto
permitir_queet excesode vapor escape.
• Use platospl_Lsticos,tazas, recipientespara
congeladorsemi-rfgidosy botsasde pbLsticos
s_lo para tlempos de coccl6n breves. Use con
culdado ya que el pl_stlco se puede ablandar
por el calor de la comlda.
Papel
• Toaltasde papel a pruebade microondas, papel
encerado,servilletasde papel y platosde papet
sin hordeso diset_osmetdlicos pueden usarseen
su homo.
• Ref'_rasea ta etiquetadel fabdcantepara usar
cualquierproductodepapei en el homo de
microondes.
NO USAR
Utensilios de metal
• El metal no permite que las microondas Ileguen al
alimentoy produceuna coccibndespareja.Evite
el usode brochetasmet_licas,term6metroso
bandejasde aluminio.
• Losutensiliosmetdlicospuedencausarchispas
porla descargade corrienteel_=ctrica.Estopuede
dettar el homode microondas.
Decoraclones de metal
• NOusevajillao platos conhordesmetdlicos o con
bandas met&licas, etc.
Vajilla Centura
• La compatifaComing recomiendaque no se use
vajillaCenturay algunastazas cerradasde
Corelleparacocinara microondas.
Papet de aluminio
• Evite el uso de hojas grandes de papel de
aluminio ya que pueden afectar ta cocci6n y
causar chispas.
• Use trozos pequet_os de papel de aluminio para
proteger las patas y alas de ayes.
• Mantenga el papel de aluminio por 1omenos a
1 pulgada de las paredes y la puerta del homo
de microondas.
Madera
• Los tazones de madera, tablasy canastosse
secan y puedenpartirseo quebrarsecuandoUd.
los usa en el homo de microondas.
Reciplentes cerrados herm_tlcamente
• La vajillaherm6ticapuede explotar.Asegdresede
dejar una aberturapara queelvaporsalgade la
vajillatapada.
Pal>el de estraza
• Evite el usode boisasde papelde estraza. Este
absorbecalory puede arder.
Ataduras de metal
=Siempm saquelas atadurasde metal ya que
puedencalentarsey causarincendio.
25
Page 26

CONSEJOS PARA COCCION CON MICROONDAS
DORADO
La came y las ayes con mucha grasa que se cocinan
por 10 a 15 minutos o m_,sse dorar_nligeramente.
Los alimentos cocinadospot menostiempose pueden
pintarcon una sustanciaparaque se doren, como
salsaWorcestershire,salsade soyao salsa para
barbacoa.
TAPAS
Las tapasatrapanel calory elvapor y los alimentos
se cocinanm_s n_pido.Use unatapao pelfcula
pldsticapara microondas conuna esquinadoblada
para dejar salirel excesodevapor.Las tapasde las
cacerolasde vidriose puedencalentardurantela
cocci6n,0selas con cuidado.El papelenceradoevita
que el alimentosalpiqueelhomo y ayudaa mantener
el calor.Cuandocalienteartfculosde panaderiause
papel encerado,serviltetasdepapel o toallasde
papel. Para absorberrobshumedadenvuelvalos
emparedadosy comidasgrasosascontoallasde
papel.
ESPACIAMIENTO
Pongalosalimentosindividualestalescomopapas,
tortitasyhorsd'oeuvresformado uncfrculoy por Io
menosa unadistancia de 1 pulgada entreellos. Esto
ayudar_a que la comidase cocineen formam_s
pareja.
AGITACION
La agitaci6nmezclalos saboresy redistribuyeelcalor
en losalimentos.Siemprerevuelvadesde el borde
hacia el centrodel plato.La partede afuera se
calientapdmero.
ROTACI_N
Los alimentos voluminosos, como asados o ayes
enteras deben darse vuelta para que la partes de
arriba y de abajo se cocinen en forma pareja. Tambidn
dar vuelta las piezas de po]lo y las chuletas.
DISTRIBUCION
No apile losalimentos.Distribuyaen unasolacapa en
el platoparaque se cocine en formapareja.Como los
alimentosm_Lsdensos se cocinanmdslentamente,
pongalasporcionesrodsgruesasde came, aves,
pescadoy verdurasen el bordedel plato.
C(_MO PROBAR LA COCClON
Como losalimentosse cocinanrdpidoen un homode
microondas,es necesariocontrolarconfrecuencia si
ya estdncocidos.
TIEMPO DE REPOSO
Los alimentosnecesitanmuchasveces reposarpot
unos2 a 15minutosdespua..sde sacadosdel homo.
En generales necesariotaparla comidaduranteel
periodode reposopara conservarelcalor.Qu_tela
mayor[ade lascomidascuandoestd.ncasi cocinadas
y 6stasse terminardnde cocinarduranteel reposo.La
temperaturaintemade la comidase elevardunos
10=Fduranteel perfodode reposo.
PROTECCI_)N
Paraprevenirquealgunasporcionesen platos
rectangularesocuadradosse recocinen,usteddebe
protegedoscon pequettastirasde papelde aluminio
para bfoquearlasmicmondas. Ustedtambi_npuede
cubrirlas parasde lasaves y tas puntasde las alas
con papefde aluminiopara evitarque se recocinen.
Slempre rnantenga el papei de aluminio pot Io
menos a 1 pulgada de las paredes del homo para
evitarchispas.
PERFORACION
Perforela cdscara,pielo membranadeIos alimentos
antesde cocinarlospata evitarque estallen.Los
alimentos que requierenperforaci6nson:yemasy
clarasde huevo,saJchichas,almejas,ostras y
verdurasenterascomopapas y calabacitas.
26
Page 27

LIMPIEZA
Limpie el horno por clentroy por fuera con un patio
suavey detergente di]uido. Luego enjuague y seque.
Estodebe hacerse una vez potsemana o ma,s a
menudo sies necesario. Nunca usepolvos
Umpiadoreso esponjasz_speras.
Lassalpicadurasexcesivasde aceite en el techo
interiorsondif(cilesde quitarsi se dejan por muchos
dias.Limpielassalpicadurasconuna toa|lade papel
mojada,especiaimentedespu_s de cocinarpolio
o tocino.
PARTESDESMONTABLES
Labandeja giratoriay etdescansode!rodillo de la
bandejasondesmontabtes.Estosdeben lavarse a
manoconagua tibia(no caliente)y detergentedilufdo
usandoun patiosuave. Nuncausepolvoslimpiadores,
lanade aceroo esponjas_tsperas.
• La bandeja giratoria se puede lavar en el fregadero.
Tengacuidadode no astiilaro rasgur3arlos hordes
ya que estopuedehacer que la bandeja se rompa
duranteel uso.
• E!descansodel rodiUode labandejagiratoriadebe
limpiarse con regularidad.
CUIDADO ESPECIAL
Para mejorfuncionamiento y seguridad,el panet
internode la puertay el marcofrontal del homodeben
estarlibresde acumulaci6nde alimentoso grasa.
I.jmpie a menudo condetergentediluido;luego
enjuaguey seque.Nuncausepolvos limpiadoreso
esponjas_lsperas.
Despu6sde limpiar el panelde controles,toque el
bot6n"STOP/CLEAR" paraborrar cualquierentrada
dedatos que se pudohaber hecho accidentalmente
durante la limpiezadel panel.
27
Page 28

COMO PONER EL RELOJ
EN HORA
Cuandosu homoest_ enchufadoduranteo
despu_sde un cortede etectdcidad,el '1)"
aparecerden la pantatla.
Ejemplo: Para poner el reloj alas 11:11.
Toque: La pantalla muestra:
1
unavez.
=
unavez.
3, 0 cuatro veces.
40
para queel reloj
comlenceafuncionar.
NOTA: Este es un reloj de 12 horas.
,, ,,
SEGURO PARA NIi_IOS
Ud. puede usareste elementode seguddadpara
trabarel panel de contmtesde manera quelos
nitrosnopuedan usarel homocuandoUd noIo
de,sea y tambi_ncuando Ud. est_limpiandoel
homo.
Para programar el seguro para nt_os:
Toque: La pantalla muestra:
1, unavez. Horadelalia.
mantenga
apretado
hastaque
la pantalla
muestre.
Para cancelar:
Toque: La pantalla muestra:
mantenga apretado hasta
que la paJabra"LOCK"
desaparezcade la pantalla.
Hora del dla.
RELOJ AUTOMATICO PARA
COCINA
Su homo de microondas puede usarse como reloj
automdtico para cocina. Ud. Io puede fijar hasta un
tiempo de 99 minutos y 99 segundos.
Ejemplo: Pare fijado en 3 minutos.
Toque: La pantalla muestra:
1._ una vez.
2.ql ,O,
m
Cuenta regresiv&
paraque el reloj
comiencealuncionar.
28
Page 29

ENCENDIDO AUTOMATICO
Este elemento le permiteahorrar tiempo para
cocinara1100% de la intensidadpot un tiempode
hasta 9 minutos.Unavez que Ud.seleccionae!
tiempode coccibnel homo comienzaa tuncionar
automdticamente.
Ejemplo: para cocinar durante 8 minutos.
Toque: La pantalla muestra:
lJ
una vez.
2. 4) unavez.
3. AIfinaJdel tiempode
cocci0n,habr&dos
sonkJoscortosy uno
largo.Elhomose
detendrd.
COCCION A TIEMPO
PROGRAMADO
Esteelementole permiteprogramarun tiempoy
una intensidadde coccibn.Para resuttados6ptimos
hay 10 nivalesde intensidadademds de intensidad
alta (HIGH) que es el 100%. Para mds informacibn
referirsea la "Cuadro de nivelesde intensidadde
microondas" en lapdgina12.
NOTA: Si Ud. noseleccionael nivelde intensidad,
el homococinardautom_ticamentea 100% de
intensidad(HIGH).
Ejemplo: Para cocinar por 5 mlnutos, 30
segundos a 8(P/ode intensldad.
Toque: La pantalla muestra:
1._ unavez.
paraprogramarel reloj
en5 minutosy 30
segundos.
3. _ unavez,
4. _ _ programar
laintensidad
al80°/o.
=
paraqueel homo
commncea funcionar.
6. AIfinaldelpedodode
coccibn,habrddos
sonidosoortosy uno
largo.B homose
detendr_.
29
Page 30

COCCl0N EN ETAPAS
Para resultados6ptimos, algunasrecetas necesitan
intensidadesde cocci0ndiferentesen las distintas
etapasdel ciclode cocci6n.Ud. puedeprogramarsu
homoparaque cambie de unaintensidada otra
hastaen3 etapas.
NOTA, Si Ud. estbusandola descongelacibn
automdtica(AUTO DEFROST) comouna de las
etapasdecoccibn,dsta debe serprogramadacomo
primeraetapa.
Ejemplo: Para programar un clclo de coccldn
de 2 etapas.
Toque: La pantalla muestra:
1._ unavez.
paraprogramar]a
primeraetapaen
3 minutos.
3. _ unavez.
4. _ paraprogramar
laintensidadat
80% en la
primeraetapa.
5. Q unavez.
s.411,,O,
paraprograrnarla
segundaetapaen
7 minutos.
7.4D, unavez.
50% an la
segundaet,_aa.
m
10. AJ final de la primera etapa, Ud escuchard
dos sonidos cortos cuando la segunda etapa
comienza.
11. AI final del pedodo de
cocci0n se escuchardn
dos sonidos cortos y
uno largo.
NIVELES DE INTENSIDAD DE
LAS MICROONDAS
Su homode micmondastiene 10nivelesde intensidad
de cocci_)npara permitirlecocinaro calentaruna
vadedadde alimentos. En el siguientecuadrose
muestran a_gunassugerencias:
Cuadro de nivel de intensidad de
microondas
Nlvel de
Intensldad
paraqueelhomocomkence
a funcx)nar.
Uso
• Herviragua.
=Hacer caramelo.
10 =Cocinartrozosde ave-s,pescado
(High) y verduras.
• Cocinartrozostiemosde came.
=Cocinaraves enteras.
9 • Recalentararroz,pastasy verduras.
=Recalentarcomidaspreparadas
8 r_q_idamente.
=Recalentaremparedados.
=Cocinarplatosa basede huevos,leche
7 yqueso.
• Cocinarpasteles,pan.
• Derretirchocolate.
,, Cocinartemera.
6 • Cocinarun pescadoenteto.
• Cocinarbudinesy natillas.
• CocinarjamOn,aves enteras,cordero.
5 • Cocinarasado deCostilta,puntas
de filete.
4 • Descongelarcame, ayes y martscos.
• Cocinarcodesde came menos tiema.
3
• Cocinarchuletasde cerdo,asado.
2 ,, Quitadeetfri'oalas frutas.
• Ablandar mantequilla.
1 tibios.
• Ablandarmanteca y quesocrema.
0 - T]empode reposo.
30
Page 31

COCCI()N POR CONTACTO RAPIDO
Useesta funcibn paracocinaralimentos sin
necesidad de fijar el tiempode coccibno la
intensidad.Para m&sinformacidnlea la "labta
de coccibnporcontactor&pido"que se muestra
a continuaci(_n.
Ejemplo: Para coclnar una bolsa de 1.75 oz. de
palomltas de mafz para microondas.
Toque: La pantalla muestra:
1- 0 3 veces.
2. El homo comenzant
a funcionar
automdticamente.
3. AI final dei pedodo de
coccidn habr_ dos
sonidoscortos y uno
largo.Elhomose
detend_.
Cuentaregresiva.
Ejemplo 2: Para cocinar 1 papa.
Toque: La pantaila muestra:
1. unavez.
2. Elhomocomenzard,
a funcionar
automdticamente.
3. AI final delper|odode
cocck_nhab_ dos
sonidoscortosy uno
largo,El homose
detendrJL
Cuentaregresiva.
Tabla para cocci6n por contacto rdpido
NOTA: Para cocinar los alimentos de la lista no se necesita tapar.
Bot6n
POPCORN
(Palomltas
de mafz)
Toque el bot6n Pomi6n Instmcciones
1 vez 3.5 oz. • Siga las instrucciones del paquete.
2 veces 3.0 oz. • Use palomitas especiales para microondas.
3 veces 1.75 oz. • NO trate de hacer reventar los granos de
mal'z que no hart reventado.
• Caliente un s01opaquete pot vez.
• No deje el homo descuidado mientras hace
palomitas de mafz.
BEVERAGE 1 vez 1 taza • Use una taza o vaso para microondas.
(Bebldas) 2 veces 2 tazas • Revuelva despuds de recalentar.
POTATO 1 vez 1 (8 oz.) • Colbquelas en el centro del homo sobre una
(Papas) 2 veces 2 (16 oz.) toalla de papel,
3 veces 3 (24 oz.) • Pique ta papa varias veces con un tenedor.
4 veces 4 (32 oz..) • Luego de cocinar, deje reposar por 5 minutos.
31
Page 32

DESCONGELACION AUTOMATICA
El bot6n "AUTO DEFROST" es para descongelar
aIimentoscongeladossin necesidadde programarel
tiempoo intansidadde cocci6n.Hay tres categoflasde
descongelaci6npre-programadasansu homo: Came,
Aves y Pescado.Vea la"Tabla paradescongelaci6n
autombtica"a continuacibn.
NOTAS:
• Para mayor conveniencia,lafuncibn de
descongelaci6nautombticatieneunaalarma
incorporadaque le avisarbcubndodebe controlar,
dar vuetta,separaro redistribuirlosalimentos.El
homohar,_un sonidodosvecesduranteel ciclode
descongelacibn. En cada tono,abra lapuertay d_
vuelta,separe o redistribuyalosalimentos.Saque
todaslas porcionesque se hayandescongelado.
Vuelvaa poner las pomionescongeladasen el
homoy toque"START" paracontinuarelciclode
descongelaci6n,
• Ud. puede descongetaralimentosque pesan
entre0.1 y 6.0 libras.
Para 6ptimos resultados:
• Saque el pescado, mariscos,camey aves de su
envolturaoriginalo paquetede pl_stico.De Io
contrario,laenvolturamantendr_,el vapory los
jugoscema del alimento,Iocual puedecausar
que la superficiese cocine.
• Antesde congelarla came rnolida,p6ngalaen forma
de unacorona.Cuando descongela,saquela came
descongeladacuandola alarmasuenay luego
contindedescongelando,
• Ponga losalimentosan recipientesque no son
profundoso en una bandejapara asara microondas
paraque junte Ioqua gotea.
• Losalimentosdebenestar todavfafrlos enel centro
cuandolos sacadel homo.
Ejemplo : Para descongelar 1.2 Ibs. de came
molida.
Toque: La pantalla muestra:
1. unavez
paracames.
para entrarel peso.
3a
paraque elhomo
commencea _jncionar.
4. AI final del perlodo de
cocci6n habrb dos
sonidos cortosy uno
largo. El homo se
detendrd.
Cuentaregresiva.
32
Page 33

Tabla para descongelaci6n automdtica
Categorfa Toque "AUTO DEFROST" Alimento a deS'congelar
MEAT un vez Res
(Came) Came motida, filetes, cubos para estofado, asado (distintos
cortes), asado de costilla, hamburguesa.
Cordero
Chuletas (1 pulgada de espesor), asado
Cerdo
Chuletas(1,_pulgada de espesor), hotdog, costillar, asado,
chorizos
Temera
Chuletas (1 Ib, _ pulgada de espesor)
POULTRY 2 veces Ayes
(Avee) Enteras (menos de 4 lbs.), cortes, pechugas (sin hueso)
FISH 3 veces
(PeeP,ado)
i ......
Galllnita de Comualles
Entera
Pavo
Pechuga
Pescado
Filetes, rebanadas
Madscos
Came de cangrejo0 colas de langosta, camarones, callo de
hacha (vieiras).
33
Page 34

PRECAUCION: No use papel de aluminio durante el ciclo de coccidn.
CONSEJOS PARA COCCION
Carne
1. No se requierent6cnicasespeciales.Lacame debe
preparaseen laforma convencionalpara cocinar.
AgreguecondimentossiIo desea.Siempre
descongelela came totalmenteantesde cocinar.
2. Pongalacame en una bandejapara asar a
microondaso unplato especialpara microondas y
ponga _ste sobrelabandejagiratoria,
3. Cocinede acuerdoa ]a "Tablapara cocinarcarnes"
(a continuacibn).Use el tiernpom4s largopara
carnesgrandesy lostiemposm4s cortospara
cames mds pequet_as.Para chuletasgruesasuse
el tiemporods largo.
4. D6 vuelta la came unavez en la mitad del tiempo
de coccibn.
5. Deje reposar por5-10 minutosenvuelta en papet
de aluminiodespu6sde cocinar.Eltiempode
reposoes muy importanteparaque se completeel
proceso de coccibn.
6, Aseg0resede que ta came, especiatmentede
cerdo,est_ completamentecocinadaantesde
comerla.
Tabla para cocinar carnes
Intensldad de Tlempo de
Corte mlcroondas coccl6n por libra
RES
Costillas
- Pocococida 8 9 a 11minutos
- Medio cocida 8 10 a 12 minutos
- Bien cocida 8 12 a 14 minutos
Came molida "HIGH"(100%) 7 a 9 minutos
(para guisados),
hamburguesas,
frescaso
descongetadas
(40Z C]U)
- 1 hamburguesa "HIGH"(100%) 3 a5 minutos
- 2 hamburguesas "HIGH"{t00%) 4 a 6 minutos
........................................ l .............................. i .....................................
CERDO
Lomo,pata, tocino 8 13a 16 minutos
- 4 lonjes "HIGH"(100%) 3 a 4minutos
- 6 Ionjas "HIGH"(100%) 4 a 6 minutos
NOTA: Lostiemposfistadosen la tabtason s61ouna
guia. Considere algunas diferenciasde acuerdoal
gustoy preferenciasindividuales.Lostiempos
tambidnpuedenvariarcon laforma, cortey
composicibnde losalimentos.
34
Aves
1. No se requierent_cnicasespeciales. Lasaves
debenpreparaseen la forma convencionalpara
cocinar.Agreguecondimentossi Io desea.
2. Lasaves debenestar completamente
descongeladas.Saque las menudencias y las
abrazaderes de metal.
3. Pique la piel y pese aceite vegetal con un pincela
menos que el ave est6 previamente madnada.
4. Todas las carnesde ave deben cocinarseen una
bandejapara asara microondas o en un plato
especialpara microondas y luegopuestosobrela
bandeja giratoria.
5. Cocinede acuerdoalas instruccionesde la "Tabla
paracocinaraves"que se muestra a continuacidn.
D6 vueltacuandoestd a medio cocinar.Debidoa
suforma,las avestiendena cocinarseen forma
despareja,especialmentelaspartes huesudas.Ai
darlasvueltadurantela cocci6nestas partesse
cocinanenformarobspareja.
6. DeJereposar por5-10 minutosenvueltaen papel
de aluminioantesde sacar la came. El tiempode
reposoes muy importante para completarla
coccibn.
7. Asegtiresede que les aves est_nbiencocidas
antesde comedas.Las aves enterasestdn
completamentecocidascuandolosjugossalen
clamsdesdeadentrodel musloal pincharloconun
cuchillo.Lostrozosde ave deben picarseconun
cuchilloen laparte rods gruesapara asegurarque
losjugos son clarosy la came es firme.
Tabla para cocinar aves
Ave
POLLO
Entero
Peshuga(conhueso)
Porciones
Intensldad de
mlcroondas
8
8
8
T1empo de
coccidn por
libra
12 a 14 minutos
10 a 12 minutos
!1 a 13 minutos
............................................. 4 .............................. | ................................
PAVO
Entero 8 13a 15minutos
NOTAS:
• Lostiempos listadosen la tabla sons61ounagula.
Considem algunasdiferenciasde acuerdoalgustoy
preferenciasindividuaJes.Lostierr_,,ostambidn
puedenvariarcon la forma, code y composicibnde
los alimentos.
° Si se rellenaunave entera,el peso del averellena
se debe considerarpara calcularel tiempode
cocc_n.
Page 35

CONSEJOS PARA COCCI( N (continuacibn)
Pescado
1.Pongael pescado en un platoo fuente grandeque no sea de metalni muyprofunda,
2. Cubraconpelicula de plbsticoperforadao conuna tapa.
3. Pongael plato sobre la bandejagiratoria.
4. Cocinede acuerdoalas instruccionesde la "Tablapara cocinarpescadofresco" que se muestra a
continuaci6n.Se pueden agregartrocitosde mantequilla si se desea.
5. Deje reposarcomose indicaenla =Tablaparacoccibn"antes de servir.
6.Antesdel tiempo de reposo,revisesi el pescadoest_ completamentecocido.Etpescado debe estaropaco y
separarseen escamasf_cilmente.
Tabla para cocinar pescado fresco
Pescado
Filetesde pescado
13empode Tiempo de
Intensidad €occldn por libra Mantequilla reposo
"HIGH" 5 a 7 minutos Agregar15 a 30 ml 2 a 3 minutos
(1 a 2 cucharadassoperas)
Macarelaentera, "HIGH" 5 a 7 minutos - 3 a 4 minutos
limpiay preparada
Truchaentera,limpia =HIGH" 6 a 9 minutos - 3 a 4 minutos
y preparada
Filetesde salmbn =HIGH" 6 a 8 minutos Agregar15 a 30 ml 3 a 4 minutos
(1 a 2 cucharadassoperas)
35
Page 36

PREGUNTAS Y RESPUESTAS
Funcionamiento
Pregunta
i_Por qu_ la luz de! homo no se prende
mientras esta cocinando?
Respuesta
Puede haber muchas razones para que la luz no se encienda
• &Programb el tiempode cocci6n?
,, sTocb el botbn "START"?
• &Revisb la bombillade luz?
&Por qud sale vaporpor la ventilaci6n? Es normal que se produzcavapor durantela cocci6n.El homo de
microondas hasidodiset_adopara que el vaporse libere.
&Sedattael homo si se usavacio? Si. Nunca use el homo cuandoest& vac|oosin labandeja
giratoda.
_,Laenergia a microondas pasa a trav_.s No. La mallade metalen la puerta hace que la energfarebotea
del visorde vidriode la puerta? tacavidaddel homo. Losorificiossdlodejanpasarla luz. Estos
nodejanque las microondaspasen.
z,Por qu6 hay unsonidocuandose toca El sonidole avisa cuando Ud.est&entrandodatos.
unbot6nen el panelde controles?
&Se puede da_ar el homosila comidase
cocinademasiado?
Cuandoel homo se enchufapor primera
vez puedeser que nofuncione
correctamente.
_,Porqu6?
Comocon cualquierelectrodom6sticoparacocinar,esposible
que la comidase recocineal puntode que se formehumoy hasta
fuegodentrodel homo. Lo mejores quedarsecercadethomo
mientras est,_cocinando.
La microcomputadoraque controlasu homo puede fallar
temporariamentepara funcionar como se programbcuandoUd. Io
enchufaporpdmeravez o cuandovuelve la luzluegode uncorte
de corriente.Desenchufeel homodel tomacorrientede 120voltios
y vu,_lvaloa enchufarpara volvera programarlacomputadora.
$Por qu6 se ve un reflejode luzen la Estaluz vienede la luz del homoque est&ubicadaentrela
cubiertaextema? cavidady la paredextema del homo.
/.Curies son los diferentes sonidos que se
escuchan mientras el homo esta
funcionando?
&Por qu6 a veces los alimentos
homeados tienen manchas marrones,
secas y duras?
&Por qu6 los huevos explotan a veces?
Elchasquidoes causado porun interruptor mecdnicoque
enciendey apagael magnetr6n del homode microondas.
Elzumbidoyet sonidometdlico vienen del cambiode intensidad
del magnetr6n cuandose prende o se apagacon etinterruptor
mecdnico.El cambioen la velocidaddel ventitadorsa produce
porelcambioen el voltaje causadopor el encendidoy apagado
del magnetrbn.
t.as manchas marrones, secas y duras indican que se recocin6.
Acorte el tiempo de cocci6n o calentamiento.
Cuandohomea, frfe o hierve huevos,la yema puedereventar
debidoa la acumulaci0nde vapor dentrode la membranade la
yema. Para evitaresto, simplementeperforela yemacon unpalillo
de madera antesde cocinar.
PRECAUClON: Nuncacocinehuevosconcdscaraen ethomode
microondas.
36
Page 37

PREGUNTAS Y RESPUESTAS (continuaci6n)
Alimentos
Pregunta
_.Porqu6 loshuevos revueltosa veces
estdnun pocosecosdespu_sde
cocinar?
_,Se pueden hacer palomitas de malz en
el homo de microondas?
i,Porqu6 aveces las manzanas asadas
revientan durante la cocci6n?
_,Porqu6 a veceslaspapas asadasse
queman durantelacoccibn?
_,Porqu6 se recomiendauntiempo de
reposodespu_sde cocinarcon
microondas?
i_Porqu6 se requiemtiempo adicional
_ara cocinaralimentosguardadosen el
refrigerador?
Respuesta
Los huevos se secan si estbn recocidos aunque use siempre
la misma receta. El tiempo de coccibn puede variar por las
siguientes razones:
• Los huevos vat|an de tamario.
• Los huevos estbn a temperatura ambiente algunas veces y
otras veces est;tn refrigerados.
• Los huevos se siguen cocinando durante el tiempo de reposo.
S|, si se usaunode lossiguientesm6todos:
(1) Dispositivospara hacerpalomitasespec|licospara
microondas.
(2) Bolsas de ma|z para palomitasespecialespara microondas
que,estbnpreparadasparatiemposde cocci6ne intensidad
especfficos.
Slga las Instrucciones exactas dadas pot carla fabdcante
para su producto y no deJeel homo desculdado mlentras el
mafz se es_ coclnando. SI el mafz no explota despud_ del
tlempo indicado, de|e de co¢lnar. SI se recocina se puede
prender fuepo.
PRECAUCION:
- Nunca use bolsas de Pal)el de estraza para hacer palomitas
de mafz o Intente hacer s,altar los granos de mafz que han
quedado sln reventar.
• No ponga el mafz 10ampalomltas pre_mpaquetado
dlrectamente sobre la bandejaglmtoda. Para evltar
sobrecalentamlento de la bandeja glmtorla, ponga la
bolsa sobre un plato.
La cdscara no se ha quitado de la parte superior de cada
manzana para permitir la expansi6n del interior de la fruta
mientras se cocina. Como en los m6todos convencionales de
coccidn, el interior de la manzana se expande durante el proceso
de cocciOn.
Si se cocinapormucho tiempose pueden incendiar.AI final del
tiempode cocci6nrecomendado,laspapas deberian estar
relativamentefirmes.
PRECAUCION: no cocinaran exceso.
El tiempo de reposo permiteque losalimentosse cocinenen
forma pareja por unosminutosdespu_ del ciclode cocci6ncon
microondas. Eltiempo de reposodepende de la densidadde los
alimentos.
Encocinaconvencional,la temperaturainicialde los alimentos
afectael tiempototalde coccibn.Ud. necesitarods tiempopara
cocinaralimentossacadosdel refdgeradorque para alimentos
que estbna temperaturaambiente.
37
Page 38

ANTES DE LLAMAR PARA SERVICIO
Hay muchos problemas de funcionamiento que Ud. puede corregir solo. Si su homo de microondas no tunciona
correctamente, Iocalice el problema en fa siguiente lista y pruebe las soluciones sugeridas para cada problema.
Si et homo de microondas aLin no funciona correctamente, contacte el centro de servicio Sears mds cercano. Los
centros de servicio Sears est&n totalmente equipados para darle el servicio requeddo.
Problerna Causas posibles
El homono arranca • i.,Estdenchufado?
• _,Lapuertaestd cerrada?
• _.Programbel tiempode cocci6n?
Hay chispas • &Estd usandovajillaaprobada?
•/.El homoest_ vacfo?
Hora incorrecta •/.Ha tratadoUd. de volvera poner el reioja la hora?
Comidascocidasen forma despareja
• _.Est_usandovajillaaprobada?
• _.Est_la bandeja giratodaen el homo?
• _,Diovuelta o revohti6lacomidamientras se cocinaba?
• i,Estaban losallmentoscompletamentedescongelados?
•/.El tiempoy la intensidadde cocci6nerancorrectos?
Alimentos recocidos •/.,El tiempo y la intensidadde cocci6nerancorrectos?
Alimentosnosuficientementecocidos
Descongelaci6nincorrecta
• i.Est_ usandovajillaaprobada?
• &Estaban los alimentoscompletamentedescongelados?
•/.El tiempoy la intensidadde cocci6neran correctos?
• _,Losorificiosde laventilaci6nest_mdestapados?
• _,Estd usando vajifla aprobada?
• t.EI tiempo y la intensidad de cocci6n eran correctos?
• &Dio vuelta o revolvid la comida mientras se descongelaba?
$8
Page 39

DECLARACION DE INTERFERENCIA DE RADIOFRECUENCIA DE LA COMISION
FEDERAL DE COMUNICAClONES ($61o para Estados Unidos)
AVISO:
Esteaparatogenera y usa energia de frecuencia
ISM y sino setnstalao usa debidamente,es decir
en estrictoacuerdoconlasinstruccionesdel
fabricante, puede causarinterferencia a la
recepci6nde radioytelevisibn.Se ha analizadoel
tipoy se ha encontradoque cumplecon losI_mites
de aparatosindustdates,cientificosy mddicos(]SM)
segr_nla parte 18 de lasreglasde la Comisibn,las
cualesest_mdiseftadasparaproveer una proteccibn
razonable€ontradichainterferenciaen la instalaci6n
residencial.
Sinembargo,no se garantizaque no habr_
interferenciaen una instalacibnespec_rP..a.Si este
aparatocausa tntederenciaa la recepcidn de la
radiootelevisi6n,io cualse puededeterminar
prendiendoy apagandoelaparato,se recomienda
que el usuariotratede corregirlainterferencia
medianteunoo mdsde lossiguientespasos:
,,Carnbiela orientaci6nde la antena de radioo
televisi6n.
,,Cambie laposici6ndel homo de microondascon
respectoal receptor.
,, Mueva elhomode micmondasa otro
tomacordenteparaque el homoy el receptor
est6n endistintoscircuitose!_ctricos.
* Enchufeel homode microondasen otro
tomacorrientepara que el hornoy el receptorest_n
en distintoscircuitos.
El fabrlcante no es responsablepor la interferencia
de radioo televisk_ncausadapot 18modificacldn
sin autodzacl6n de este homode rnicroondas.La
correcci6nde la interferenciaes responsabilidaddel
usuado.
39
Page 40

i ii iiiiiiiiiiii iii iiiiiiiiiiiiiIIIIIIIIIIIn I I,I,HI I I
For in-home repair of a major appliance,
no matter who made it, no matter who sold it!
Call 24 hours a day, 7 days a week
1-800-4-MY-H OME'"(_-800-469-4663)
Para pedir servicio o ordenar piezas:
1-888-SU-HOGAR sM(1-888-784-6427)
w •
Pour tout le service.
1-877-LE-FOYER _ (1-877-533-6937)
For repair of carry-in products like
vacuums, lawn mowers, stereos and VCRs,
call for the nearest Sears Service Center location.
Call 24 hours a day, 7 days a week
1-800-488-1222
For the replacement parts and owner's manuals that
you need to "do-it-yourself," call and ask for PartsDirect. s,
Call 6 a.rn. - 11 p.m. CT, 7 days a week
1-800-4-MY-HOME " (_-800-469-4663)
www.sears.com/partsdirect
For a Sears Service Agreement purchase or inquiry:
Call 7 a.m. - 5 p.m. CT, Monday - Saturday
1-800-827-6655
SEARS
I L JLLIIIIIIIIIIIIIIIIIII I
HomeCentral"
PaR No. 3828WSA1517 O ReglllM,'_ T_/TM T_ ot Seenl, _ ImndCo.
OSim. Roetx_k=',dCo. ® ICUm_Rqlstmcla/ TM M=_ _ Ft_I_ €leSeam_ andCo.
 Loading...