

Kenmore 72135821500, 72135820500 Owner’s Manual
Owner's Manual
Manual del Propietario
Vacuum Cleaner
Aspiradora
Model, Modelo 721.35820500
721.35821500
CAUTION: Read and follow all safety
and operating instructions before first
use of this product.
CUIDADO: Lea y sigue todas las
instrucciones de operaci6n y seguridad
antes del uso de este producto.
8ears, Roebuck and Co., Hoffman Estates, IL 60179 U.8.A
www.sears.com
PART No.: 3828Fi3858A
Directions for Use
Itis a violation of Federal law to use this
product in a manner inconsistent with its
labeling.
Direcciones de uso
Es una violaci6n a la ley Federal utilizar
este producto de una manera contraria
con su etiquetado.

BeforeUsingYour New Vacuum.......................2
KenmoreVacuumCleanerWarranty ................2
ImportantSafetyInstructions............................3
PartsandFeatures.............................................4
TelescopicHandleRelease................................5
CordRelease.......................................................5
SwitchOperation................................................6
Body Releaseand Positions..............................6
RecommendedPileHeightSettings.................6
AttachmentUseChart........................................7
VacuumingTips..................................................7
Vacuum Cleaner Care ....................................... 10
Vacuum Storage ............................................. 10
Dust bin assembly .......................................... 10
Dust bin cleaning ............................................ 11
Filters cleaning / changing .............................. 11
Replacing headlight bulb ................................ 12
Belt Changing and Agitator Cleaning .............. 13
Cleaning exterior ............................................. 15
Removing clogs .............................................. 15
Troubleshooting ............................................... 16
Master Protection Agreements ........................ 17
Service ................................................ Back Cover
Attachments........................................................7
PerformanceFeatures........................................9
Please read this guide. It will help you assemble and operate your new Kenmore vacuum in the safest
and most effective way.
For more information about the care and operation, call your nearest Sears store.
You will need the complete model and serial numbers when requesting information.
Your vacuum's model and serial numbers are located on the Model and Serial Number Plate.
Use the space below to record the model number and serial number of your new Kenmore vacuum.
Model No.
Serial No.
Date of Purchase
Keep this book and your sales check (receipt) in a safe place for future reference.
LIMITED ONE YEAR WARRANTY ON KENMORE VACUUM CLEANER
This warranty is for one year from the date of purchase, and includes only private household
vacuum cleaner use. During the warranty year, when this vacuum cleaner is operated and
maintained according to the owner's manual instructions, Sears will repair any defects in material
or workmanship free of charge.
This warranty excludes vacuum belts, light bulbs, and filters, which are expendable parts and
become worn during normal use.
For warranty service, return this vacuum cleaner to the nearest Sears Parts and Repair
Center in the United States.
This warranty applies only while this product is in use in the United States.
This warranty gives you specific legal rights, and you may also have other rights which vary from
state to state.
Sears, Roebuck and Co., D/817WA, Hoffman Estates, IL 60179
-2-
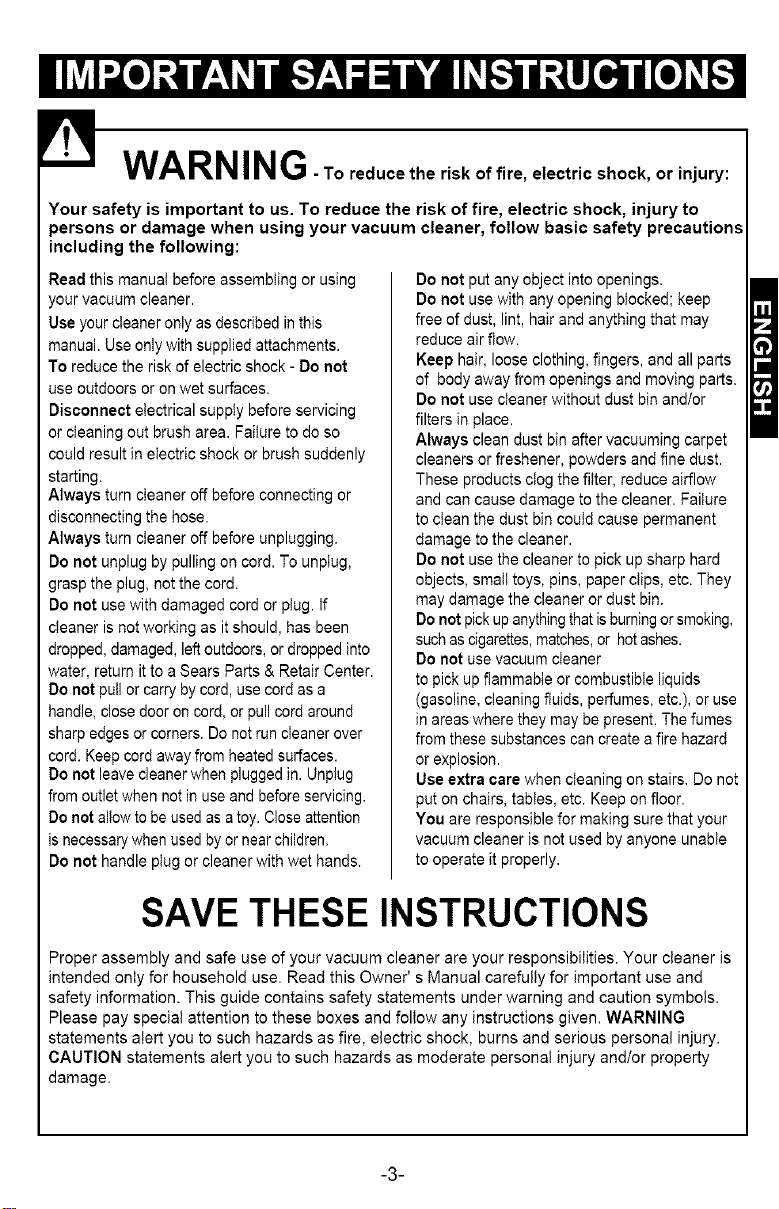
WARNING-Toreduce the risk of fire, electric shock, or injury:
Your safety is important to us. To reduce the risk of fire, electric shock, injury to
persons or damage when using your vacuum cleaner, follow basic safety precautions
including the following:
Read this manuat before assembling or using
your vacuum cleaner.
Use your cleaner only as described in this
manual. Use only with supplied attachments.
To reduce the risk of electric shock - Do not
use outdoors or on wet surfaces.
Disconnect electrical suppIy before servicing
or cIeaning out brush area. FaiIure to do so
could result in etectric shock or brush suddenly
starting.
Always turn cteaner off before connecting or
disconnecting the hose.
Always turn cIeaner off before unplugging.
Do not unplug by pulling on cord. To unpIug,
grasp the plug, not the cord.
Do not use with damaged cord or pIug. If
cleaner is not working as it should, has been
dropped, damaged, leftoutdoors, or dropped into
water, return it to a Sears Parts & Retair Center.
Do not pull or carry bycord, use cord as a
handle, close door on cord, or pull cord around
sharp edges or corners. Do not run cleaner over
cord. Keep cord away from heated surfaces.
Do not leave cleaner when plugged in. Unplug
from outlet when not in use and before servicing.
Do not allow to be used as a toy. Close attention
is necessary when used by or near children.
Do not handle ptug or cleaner with wet hands.
Do not put any object into openings.
Do not use with any opening bIocked; keep
free of dust, lint, hair and anything that may
reduce air flow.
Keep hair, loose clothing, fingers, and all parts
of body away from openings and moving parts.
Do not use cteaner without dust bin and/or
filters in place.
Always clean dust bin after vacuuming carpet
cleaners or freshener, powders and fine dust.
These products clog the fiIter, reduce airflow
and can cause damage to the cleaner. Faiture
to cIean the dust bin couId cause permanent
damage to the cleaner.
Do not use the cleaner to pick up sharp hard
objects, smatI toys, pins, paper cIips, etc. They
may damage the cleaner or dust bin.
Do not pick up anything that is burning or smoking,
suchas cigarettes, matches, or hotashes.
Do not use vacuum cleaner
to pick up flammable or combustible liquids
(gasoline, cleaning fluids, perfumes, etc.), or use
in areas where they may be present. The fumes
from these substances can create a fire hazard
or explosion.
Use extra care when cteaning on stairs. Do not
put on chairs, tabIes, etc. Keep on floor.
You are responsible for making sure that your
vacuum cleaner is not used by anyone unabte
to operate it properly.
SAVE THESE INSTRUCTIONS
Proper assembly and safe use of your vacuum cleaner are your responsibilities. Your cleaner is
intended onIy for household use. Read this Owner' s Manual carefully far important use and
safety information. This guide contains safety statements under warning and caution symbols.
Please pay special attention to these boxes and fallow any instructions given. WARNING
statements alert you to such hazards as fire, electric shock, burns and serious personal injury.
CAUTION statements atert you to such hazards as moderate personal injury and/or property
damage.
-3-
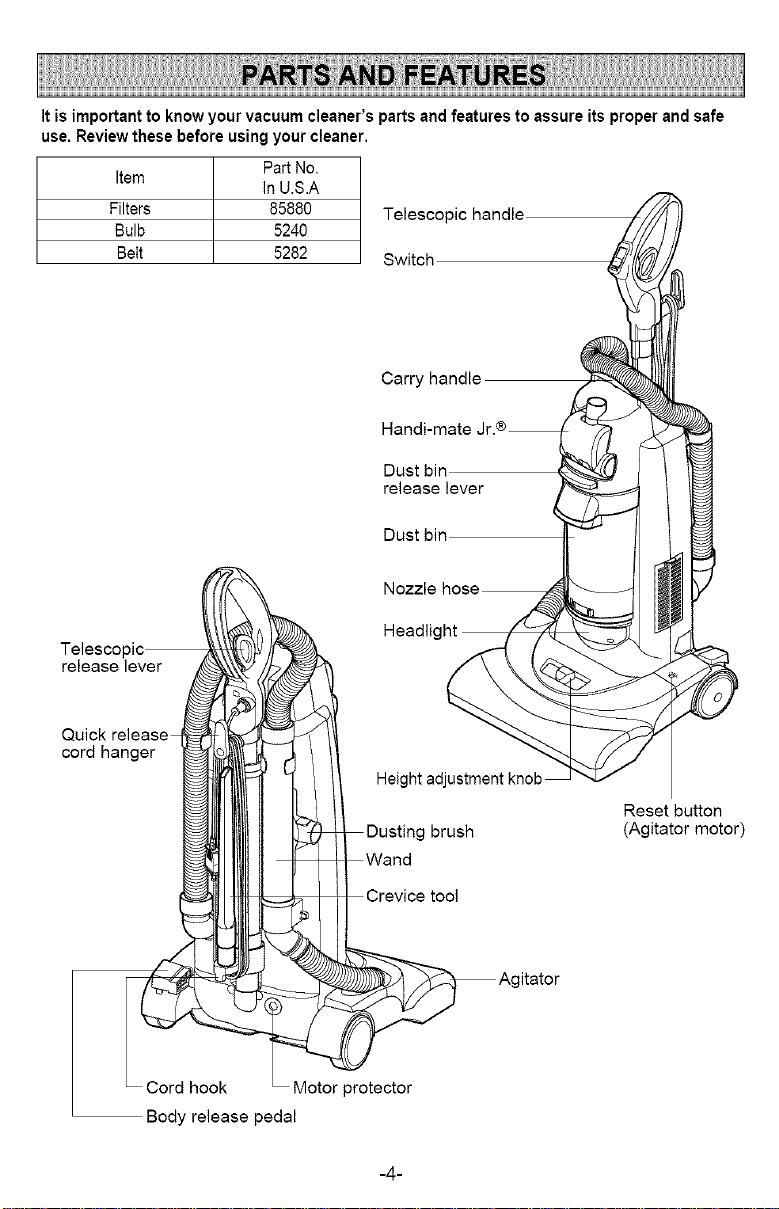
It is important toknowyour vacuum cleaner'sparts andfeaturesto assure its properandsafe
use. Reviewthesebefore usingyourcleaner.
Item
Filters 85880
Bulb 5240
Belt 5282
Telescopic
release lever
Part No,
In U.S.A
Telescopic handle
Switch
Carry handle
Dust bin
release lever
Dust bin
Nozzle
Headlk
l
Quick release
cord hanger
d.
Cord hook Motor protector
Body release pedal
-4-
brush
Reset button
(Agitator motor)
itator
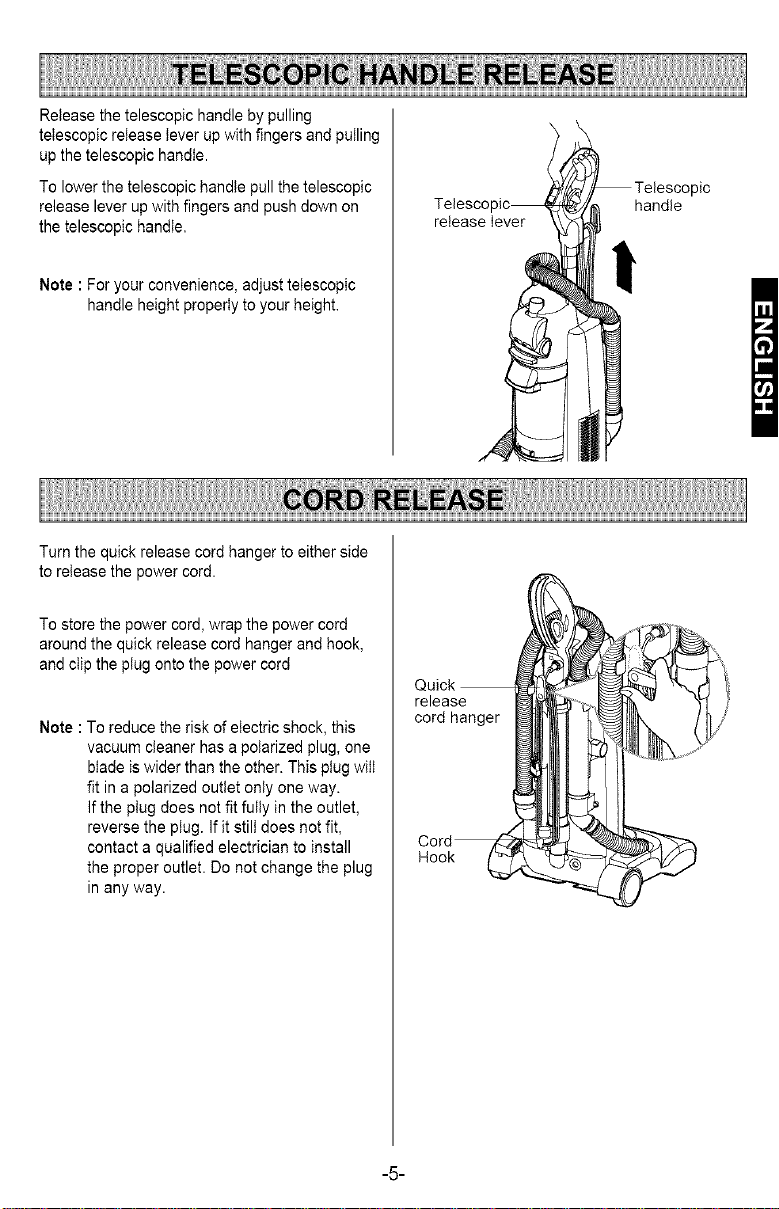
Release the telescopic handle by pulling
telescopic release lever up with fingers and pulling
up the telescopic handle.
To lower the telescopic handle pull the telescopic
release lever up with fingers and push down on
the telescopic handle.
Telesco "
release lever
pic
handle
Note : For your convenience,adjusttelescopic
handleheightproperlytoyour height,
Turn the quick release cord hanger to either side
to release the power cord.
To store the power cord, wrap the power cord
around the quick release cord hanger and hook,
and clip the plug onto the power cord
Note : To reduce the risk of electric shock, this
vacuum cleaner has a polarized plug, one
blade is wider than the other. This plug will
fit in a polarized outlet only one way.
if the plug does not fit fully in the outlet,
reverse the plug. If it still does not fit,
contact a qualified electrician to install
the proper outlet. Do not change the plug
in any way.
I
01
release
cord hanger
Hook
-5-
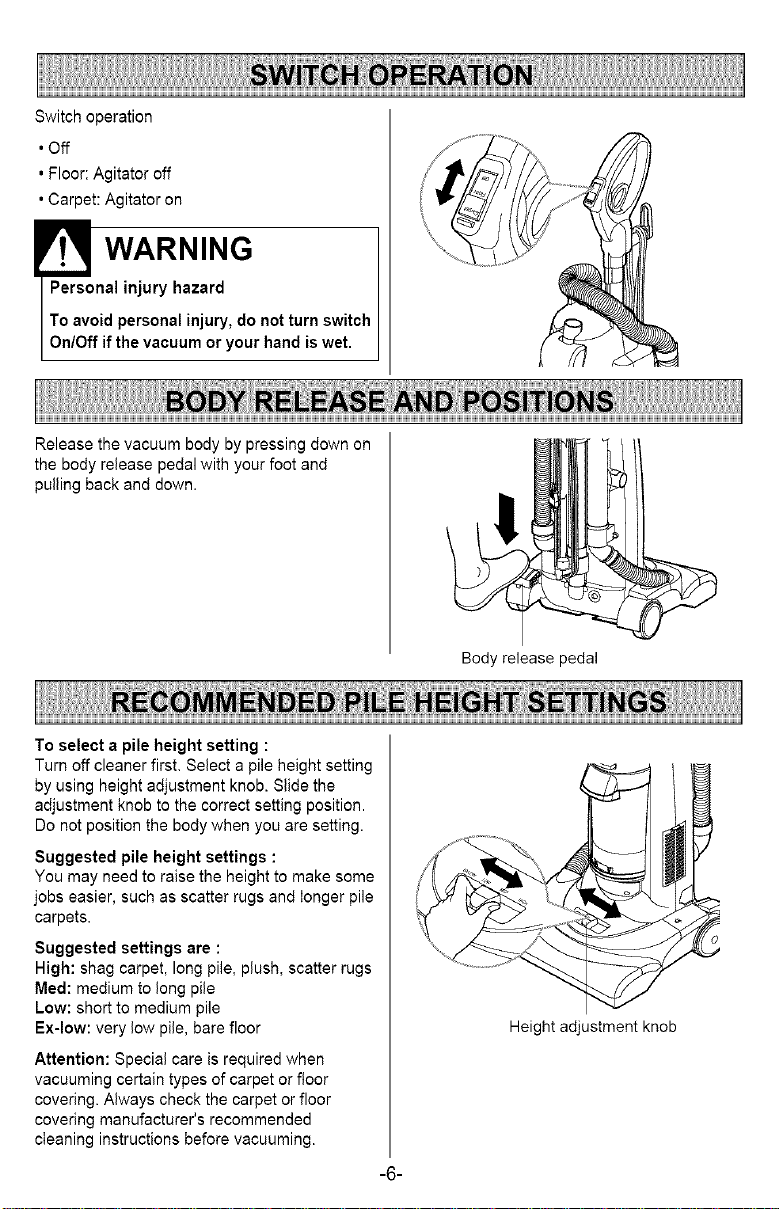
Switch operation
• Off
• Floor: Agitator off
• Carpet: Agitator on
WARNING
Personal injury hazard
To avoid personalinjury,do not turn switch
On/Offifthe vacuum oryour handis wet.
Release the vacuum body by pressing down on
the body release pedal with your foot and
pulling back and down.
Body release pedal
To select a pile height setting :
Turn off cleaner first. Select a pile height setting
by using height adjustment knob. Slide the
adjustment knob to the correct setting position.
Do not position the body when you are setting.
Suggested pile height settings :
You may need to raise the height to make some
jobs easier, such as scatter rugs and longer pile
carpets.
Suggested settings are :
High: shag carpet, long pile, plush, scatter rugs
Med: medium to long pile
Low: short to medium pile
Ex-low: very low pile, bare floor
Attention: Special care is required when
vacuuming certain types of carpet or floor
covering. Always check the carpet or floor
covering manufacturer's recommended
cleaning instructions before vacuuming.
Height adjustment knob
-6-
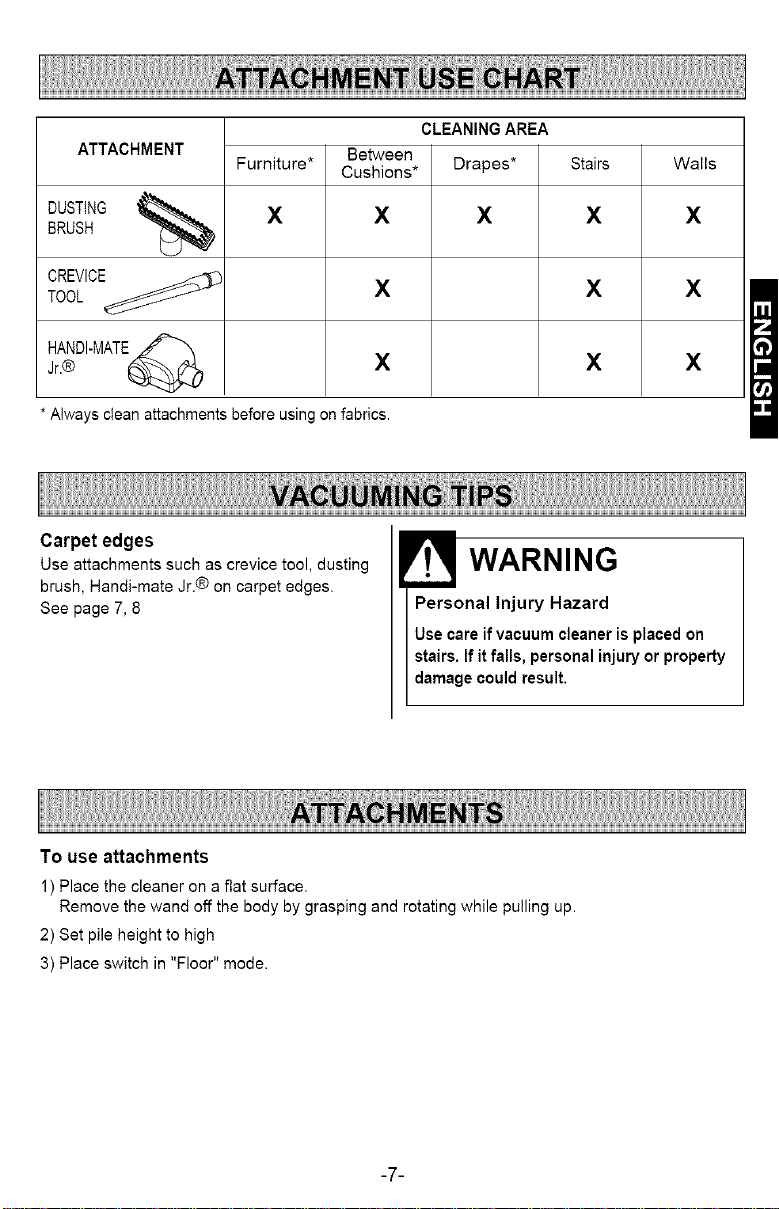
CLEANING AREA
ATTACHMENT Between
DUSTING _ X X X X X
BRUSH
TOOL X X X
CREVICE_
HANDI-MATE_
Jr.® _ X X X
* Always clean attachments before using on fabrics.
Furniture* Cushions* Drapes* Stairs Walls
Carpet edges
Use attachments such as crevice tool, dusting
brush, Handi-mate Jr.® on carpet edges.
See page 7, 8
WARNING
Personal Injury Hazard
Usecare ifvacuum cleaneris placed on
stairs. If itfalls, personalinjury or property
damagecould result.
To use attachments
1) Place the cleaner on a ftat surface,
Remove the wand off the body by grasping and rotating while pulling up.
2) Set pile height to high
3) Place switch in "Floor" mode.
-7-
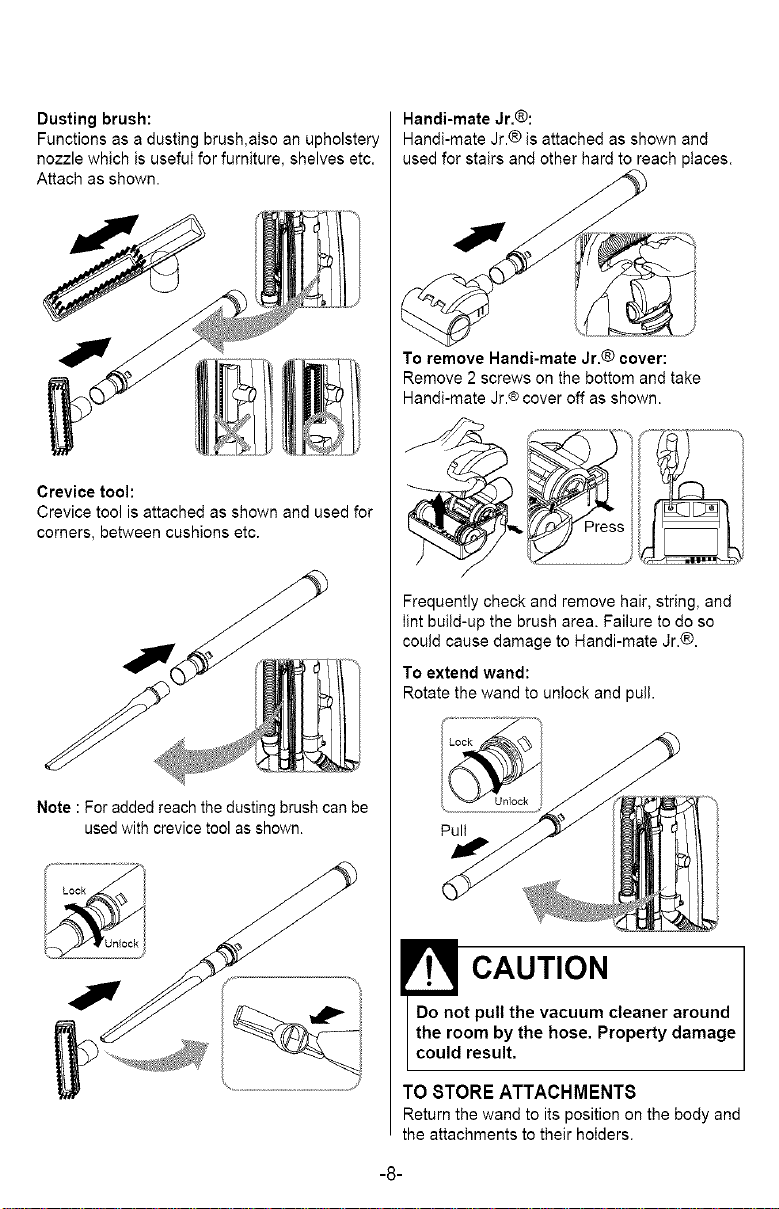
Dusting brush:
Functions as a dusting brush,also an upholstery
nozzle which is useful for furniture, shelves etc.
Attach as shown.
Crevice tool:
Crevice tool is attached as shown and used for
corners, between cushions etc.
Handi-mate Jr.®:
Handi-mate Jr.® is attached as shown and
used for stairs and other hard to reach places.
To remove Handi-mate Jr,® cover:
Remove 2 screws on the bottom and take
Handi-mate Jr.® cover off as shown.
Frequently check and remove hair, string, and
lint build-up the brush area. Failure to do so
could cause damage to Handi-mate Jr.®.
To extend wand:
Rotate the wand to unlock and pull.
Note : For added reach the dusting brush can be
used with crevice tool as shown.
Pull
CAUTION
Do not pull the vacuum cleaner around
the room by the hose, Property damage
could result.
TO 8TORE ATTACHMENT8
Return the wand to its position on the body and
the attachments to their holders.
-8-
Motor protector
This vacuum has a motor protector bypass
valve which automatically opens to provide
cooling air to the motor when a clog prevents
the normal flow of air to the motor. If the by-
pass valve opens to prevent motor overheating
and possible damage to the vacuum, you will
notice a change of sound as air rushes through
the valve opening.
NOTE: Do not block motor protector.
To correct problem: Check for and remove
clogs. See CLOG REMOVAL section.
NOTE: The motor protector may open when
using attachments or when cleaning new
carpet, due to reduced airflow caused by the
attachments themselves or by new carpet fuzz
filling the dust bin quickly.
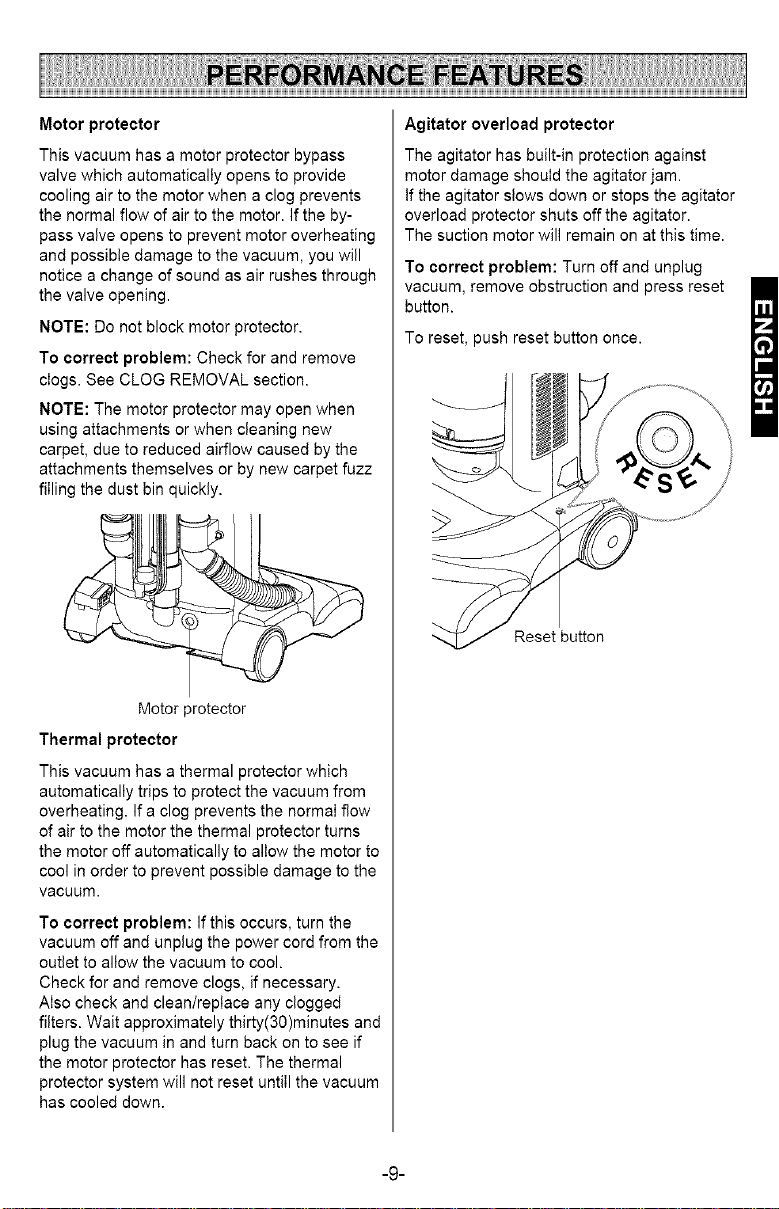
Agitator overload protector
The agitator has built-in protection against
motor damage should the agitator jam.
If the agitator slows down or stops the agitator
overload protector shuts off the agitator.
The suction motor will remain on at this time.
To correct problem: Turn off and unplug
vacuum, remove obstruction and press reset
button.
To reset, push reset button once.
Reset button
Motor protector
Thermal protector
This vacuum has a thermal protector which
automatically trips to protect the vacuum from
overheating. If a clog prevents the normaI flow
of air to the motor the thermal protector turns
the motor off automatically to allow the motor to
cool in order to prevent possible damage to the
vacuum.
To correct problem: If this occurs, turn the
vacuum off and unplug the power cord from the
outlet to allow the vacuum to cool.
Check for and remove clogs, if necessary.
Also check and clean/replace any clogged
filters. Wait approximately thirty(30)minutes and
plug the vacuum in and turn back on to see if
the motor protector has reset. The thermal
protector system will not reset untiII the vacuum
has cooled down.
-9-
VACUUM CLEANER CARE
Always follow all safety precautions when cleaning and servicing the vacuum cleaner.
WARNING
Electrical shock and personal injury hazard.
Disconnect electrical supply before servicing or cleaning the unit. Failure to do so
could result in electrical shock or personal injury from cleaner suddenly starting.
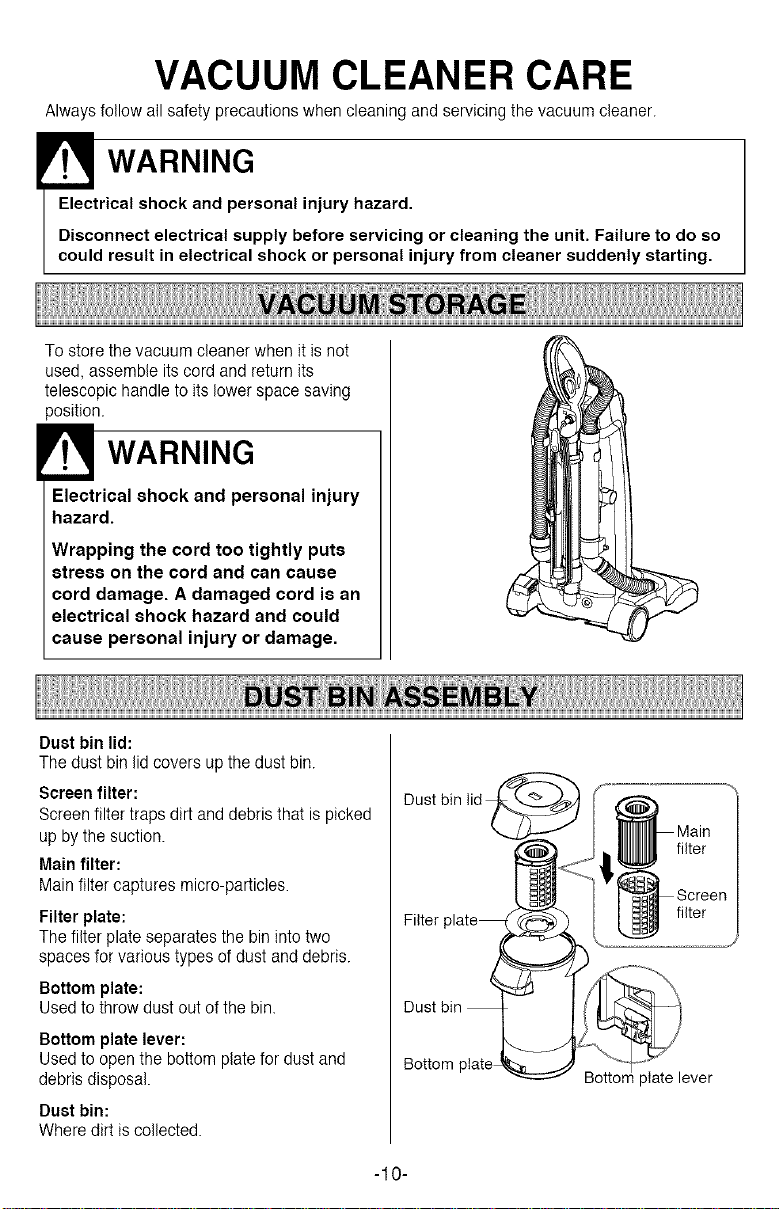
To store the vacuum cleaner when it is not
used, assemble its cord andreturn its
telescopic handle to its lower space saving
position.
WARNING
Electrical shock and personal injury
hazard.
Wrapping the cord too tightly puts
stress on the cord and can cause
cord damage. A damaged cord is an
electrical shock hazard and could
cause personal injury or damage.
Dust bin lid:
The dust bin lid covers up the dust bin.
Screen filter:
Screen filter traps dirt and debris that is picked
up by the suction.
Main filter:
Main filter captures micro-particles.
Filter plate:
The filter plate separates the bin into two
spaces for various types of dust and debris.
Bottom plate:
Used to throw dust out of the bin.
Bottom plate lever:
Used to open the bottom plate for dust and
debris disposal.
Dust bin:
Where dirt is collected.
Dust bin
Dust bin
plate lever
-10-
For best perfornance always empty the dust bin
when the dirt levei reaches the "MAX" line.
WARNING
Electrical shock and personal injury
hazard.
Always unplug power cord from
electrical outlet before performing
any service on vacuum.
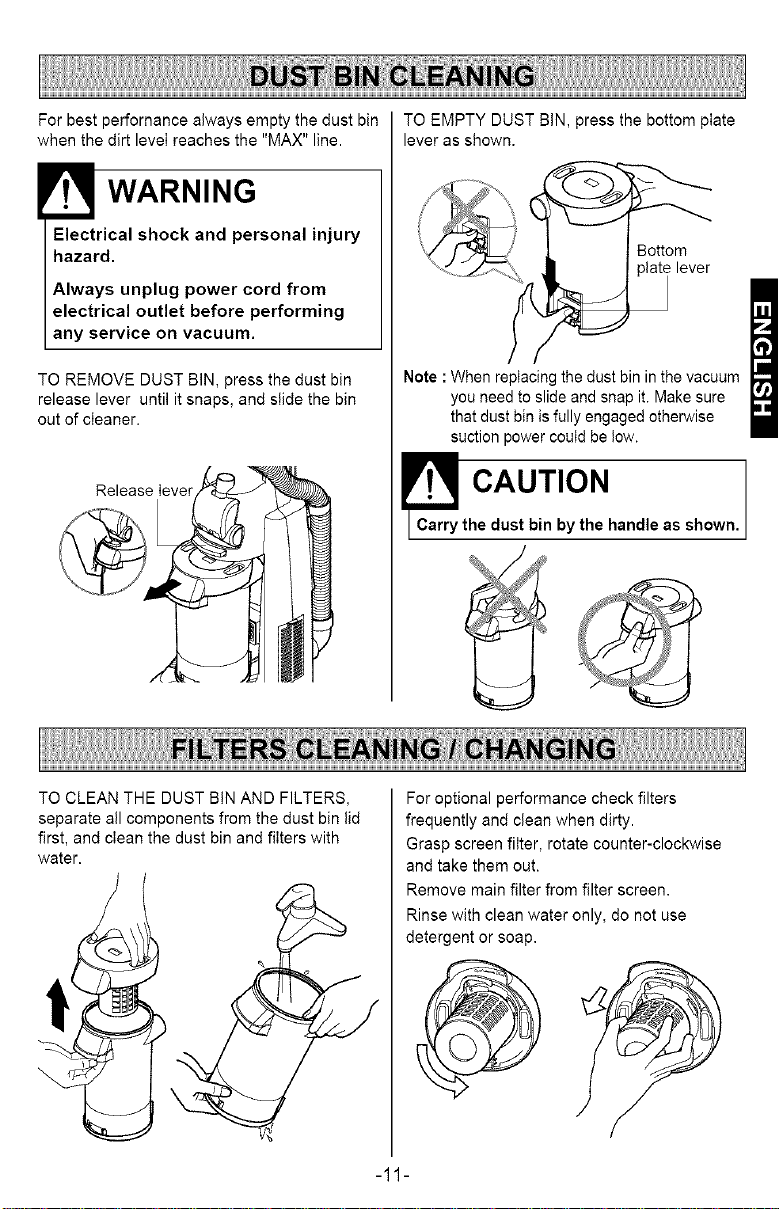
TO EMPTY DUST BIN, press the bottom plate
lever as shown.
Bottom
)late lever
TO REMOVE DUST BIN, press the dust bin
release lever until it snaps, and slide the bin
out of cleaner.
Release lever
9
TO CLEAN THE DUST BIN AND FILTERS,
separate all components from the dust bin lid
first, and clean the dust bin and filters with
water.
Note : When replacing the dust bin in the vacuum
you need to slide and snap it. Make sure
that dust bin is fully engaged otherwise
suction power could be tow.
C .rryCAUTION
the dust bin by the handle as shown,
For optional performance check filters
frequently and clean when dirty.
Grasp screen filter, rotate counter-clockwise
and take them out.
Remove main filter from filter screen.
Rinse with clean water only, do not use
detergent or soap.
-11-
 Loading...