

Page 1
Owner's Manual
Manual del Propietario
Ken more
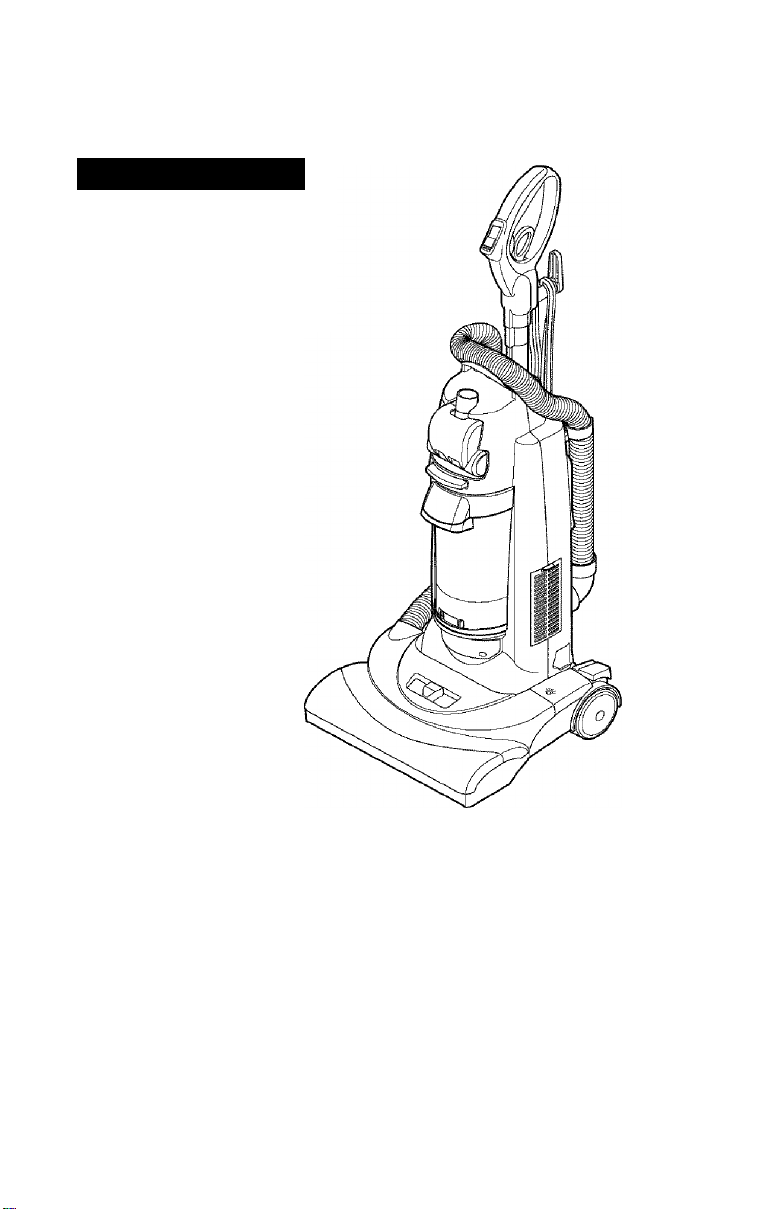
Vacuum Cieaner
Aspiradora
Model, Modelo 721.35820500
721.35821500
CAUTION: Read and follow all safety
and operating instructions before first
use of this product.
CUIDADO: Lea y sigue todas las
instrucciones de operación y seguridad
antes del uso de este producto.
Sears, Roebuck and Co., Hoffman Estates, IL 60179 U.S.A
www.sears.com
PART No.: 3828FÌ3858A
Directions for Use
It is a violation of Federal law to use this
product in a manner inconsistent with its
labeling.
Direcciones de uso
Es una violación a la ley Federal utilizar
este producto de una manera contraria
con su etiquetado.
Page 2

TABLE OF CONTENTS
Before Using Your New Vacuum
Kenmore Vacuum Cleaner W arranty
Important Safety Instructions
Parts and Features......................................................4
Telescopic Handle Release.......................................5
Cord Release................................................................5
Switch Operation..........................................................6
Body Release and Positions
Recommended Pile Height Settings
Attachment U se Chart
Vacuuming Tips
Attachments
Performance Features................................................9
..................................................................
................................................
...........................................................
.............................
......................
....................................
.....................................
.......................
2
Vacuum Cleaner Care.. .10
2
Vacuum Storage......................................................10
Dustbin assembly....................................................10
3
Dustbin cleaning
Filters cleaning / changing.....................................11
Replacing headlight bulb
Belt Changing and Agitator Cleaning....................13
Cleaning exterior
6
Removing clogs.......................................................15
6
Troubleshooting..........................................................16
7
Master Protection Agreements...............................17
7
Service..........................................................Back Cover
7
.....................................................
........................................
.....................................................
BEFORE USING YOUR NEW VACUUM
Please read this guide. It will help you assemble and operate your new Kenmore vacuum in the safest
and most effective way.
For more information about the care and operation, call your nearest Sears store.
You will need the complete model and serial numbers when requesting information.
Your vacuum’s model and serial numbers are located on the Model and Serial Number Plate.
Use the space below to record the model number and serial number of your new Kenmore vacuum.
Model No.
Serial No.
11
12
15
Date of Purchase
Keep this book and your sales check (receipt) in a safe place for future reference.
KENMORE VACUUM CLEANER WARRANTY
LIMITED ONE YEAR WARRANTY ON KENM ORE VACUUM CLEANER
This warranty is for one year from the date of purchase, and includes only private household
vacuum cleaner use. During the warranty year, when this vacuum cleaner is operated and
maintained according to the owner's manual instructions, Sears will repair any defects in material
or workmanship free of charge.
This warranty excludes vacuum belts, light bulbs, and filters, which are expendable parts and
become worn during normal use.
For warranty service, return this vacuum cleaner to the nearest Sears Parts and Repair
Center in the United States.
This warranty applies only while this product is in use in the United States.
This warranty gives you specific legal rights, and you may also have other rights which vary from
state to state.
Sears, Roebuck and Co., D/817WA, Hoffm an Estates, IL 60179
Page 3

IMPORTANT SAFETY INSTRUCTIONS
A
WARNING
Your safety is im portant to us. To reduce the risk of fire, electric shock, injury to
persons or damage when using your vacuum cleaner, follow basic safety precautions
including the following:
Read this manual before assembling or using
your vacuum cieaner.
Use your cleaner only as described in this
manual. Use only with supplied attachments.
To reduce the risk of electric shock - Do not
use outdoors or on wet surfaces.
Disconnect electrical supply before servicing
or cleaning out brush area. Failure to do so
could result in electric shock or brush suddenly
starting.
Always turn cleaner off before connecting or
disconnecting the hose.
Always turn cleaner off before unplugging.
Do not unplug by pulling on cord. To unplug,
grasp the plug, not the cord.
Do not use with damaged cord or plug. If
cleaner is not working as it should, has been
dropped, damaged, left outdoors, or dropped into
water, return it to a Sears Parts & Retair Center.
Do not pull or carry by cord, use cord as a
handle, close door on cord, or puli cord around
sharp edges or corners. Do not run cleaner over
cord. Keep cord away from heated surfaces.
Do not leave cleaner when plugged in. Unplug
from outlet when not in use and before servicing.
Do not allow to be used as a toy. Close attention
is necessary when used by or near chiidren.
Do not handle plug or cleaner with wet hands.
To reduce the risk of fire, electric shock, or injury:
Do not put any object into openings.
Do not use with any opening blocked; keep
free of dust, lint, hair and anything that may
reduce airflow.
Keep hair, loose clothing, fingers, and all parts
of body away from openings and moving parts.
Do not use cleaner without dust bin and/or
filters in place.
Always clean dust bin after vacuuming carpet
cleaners or freshener, powders and fine dust.
These products clog the filter, reduce airflow
and can cause damage to the cleaner. Failure
to clean the dust bin could cause permanent
damage to the cleaner.
Do not use the cleaner to pick up sharp hard
objects, small toys, pins, paperclips, etc. They
may damage the cleaner or dust bin.
Do not pick up anything that is burning or smoking,
such as cigarettes, matches, or hot ashes.
Do not use vacuum cleaner
to pick up flammable or combustible liquids
(gasoline, cleaning fluids, perfumes, etc.), or use
in areas where they may be present. The fumes
from these substances can create a fire hazard
or explosion.
Use extra care when cleaning on stairs. Do not
put on chairs, tables, etc. Keep on floor.
You are responsible for making sure that your
vacuum cleaner is not used by anyone unable
to operate it properly.
SAVE THESE INSTRUCTIONS
Proper assembly and safe use of your vacuum cleaner are your responsibilities. Your cleaner is
intended only for household use. Read this Owner's Manual carefully for important use and
safety information. This guide contains safety statements under warning and caution symbols.
Please pay special attention to these boxes and follow any instructions given. W ARNING
statements alert you to such hazards as fire, electric shock, burns and serious personal injury.
CAUTION statements alert you to such hazards as moderate personal injury and/or property
damage.
Page 4
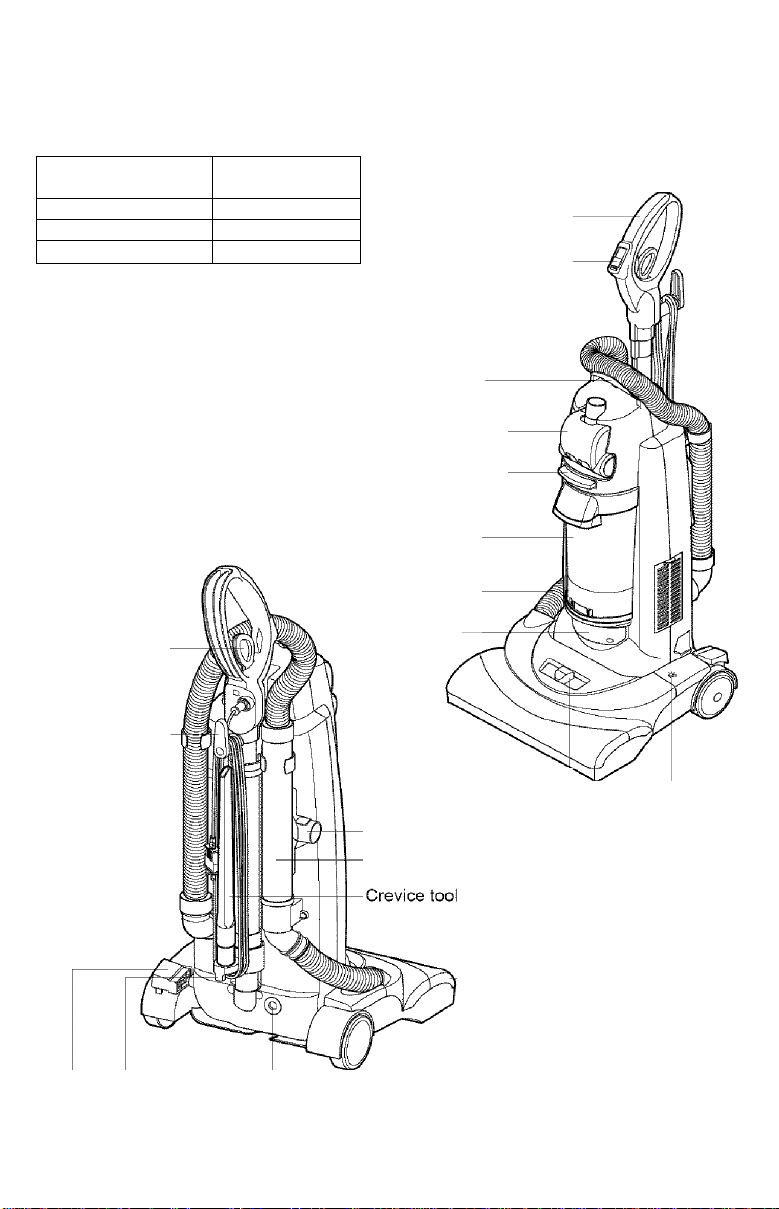
PARTS AND FEATURES
It is important to know your vacuum cleaner’s parts and features to assure its proper and safe
use. Review these before using your cleaner.
Item
Filters 85880
Bulb 5240
Belt 5282
Part No,
!nU.S.A
Telescopic handle
Sv\/!tch
Carry handle
Handi-mate Jr.®
Dust bin
----------------
release lever
Dust bin
Nozzle hose
Telescopic
release lever
Quick release
cord hanger
- Cord hook — Motor protector
Body release pedal
Headlight
Height adjustment knob —
Dusting brush
Wand
-Agitator
-4-
Reset button
(Agitator motor)
Page 5

TELESCOPIC HANDLE RELEASE
Release the telescopic handle by pulling
telescopic release lever up with fingers and pulling
up the telescopic handle.
To lower the telescopic handle pull the telescopic
release lever up with fingers and push down on
the telescopic handle.
Note : For your convenience, adjust telescopic
handle height properly to your height.
CORD RELEASE
Turn the quick release cord hanger to either side
to release the power cord.
To store the power cord, wrap the power cord
around the quick release cord hanger and hook,
and clip the plug onto the power cord
Note : To reduce the risk of electric shock, this
vacuum cleaner has a polarized plug, one
blade is wider than the other. This plug will
fit in a polarized outlet only one way.
If the plug does not fit fully in the outlet,
reverse the plug. If it still does not fit,
contact a qualified electrician to install
the proper outlet. Do not change the plug
in any way.
Telescopic----------handle
release lever
B
Quick
release
cord hanger
Cord
Hook
là
-------
T elescopic
-5-
Page 6
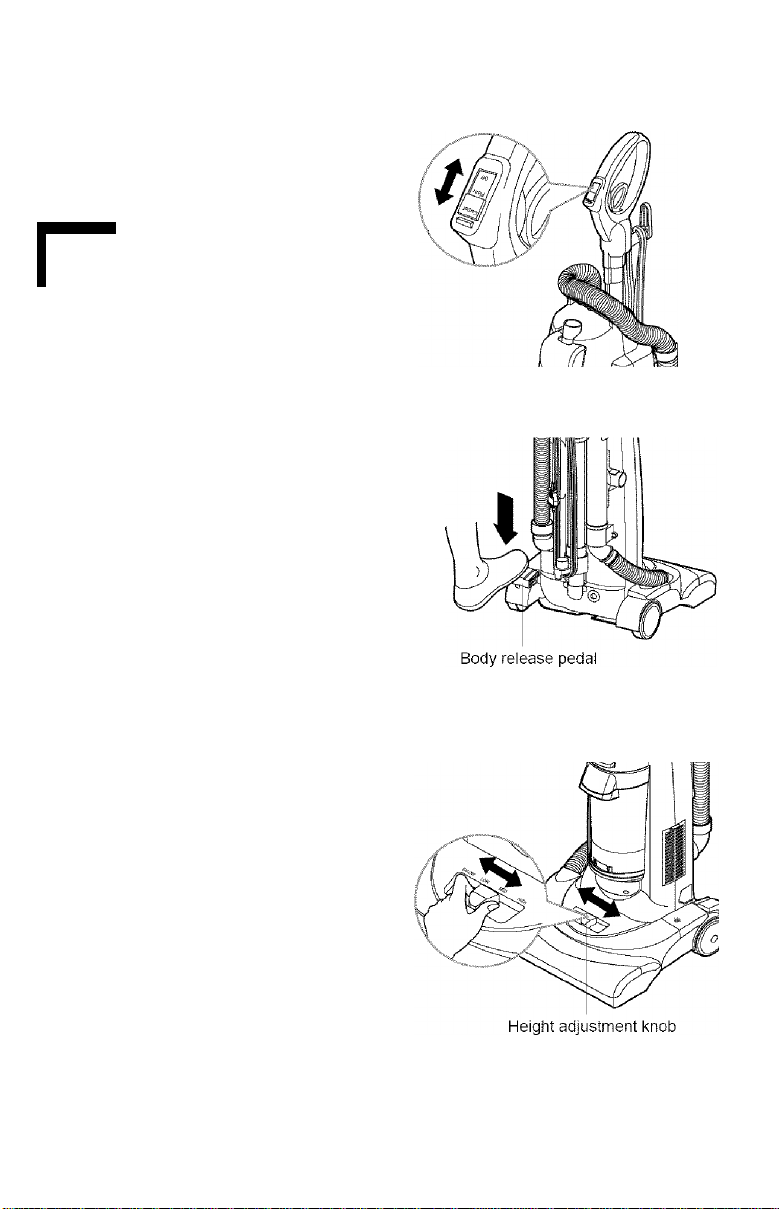
Switch operation
•Off
• Floor: Agitator off
• Carpet: Agitator on
SWITCH OPERATION
A
WARNING
Persona! injury hazard
To avoid personal injury, do not turn switch
On/Off if the vacuum or your hand is wet.
BODY RELEASE AND POSITIONS
Release the vacLium body by pressing down on
the body reiease pedal with your foot and
pulling back and down.
RECOMMENDED PILE HEIGHT SETTINGS
To select a pile height setting :
Turn off cleaner first. Select a pile height setting
by using height adjustment knob. Slide the
adjustment knob to the correct setting position.
Do not position the body when you are setting.
Suggested pile height settings :
You may need to raise the height to make some
jobs easier, such as scatter rugs and longer pile
carpets.
Suggested settings are:
High: shag carpet, long pile, plush, scatter rugs
Med: medium to long pile
Low: short to medium pile
Ex-low: very low pile, bare floor
Attention: Special care is required when
vacuuming certain types of carpet or floor
covering. Always check the carpet or floor
covering manufacturer's recommended
cleaning instructions before vacuuming.
-6-
Page 7

ATTACHM ENT
ATTACHMENT USE CHART
CLEANING AREA
Furniture*
Between
Cushions*
Drapes* Stairs Walls
DUSTING
BRUSH
CREVICE
TOOL
HANDI-MATE^^^^
' Always clean attachments before using on fabrics.
X X X X X
VACUUMING TIPS
Carpet edges
Use attachments such as crevice tool, dusting
brush, Handi-mate Jr.® on carpet edges.
See page 7, 8
X X X
X X X
A
WARNING
Personal Injury Hazard
Use care if vacuum cleaner is placed on
stairs. If it fails, personal injury or property
damage could result.
ATTACHMENTS
To use attachments
1) Place the cleaner on a flat surface.
Remove the wand off the body by grasping and rotating while pulling up.
2) Set pile height to high
3) Place switch in "Floor" mode.
Page 8
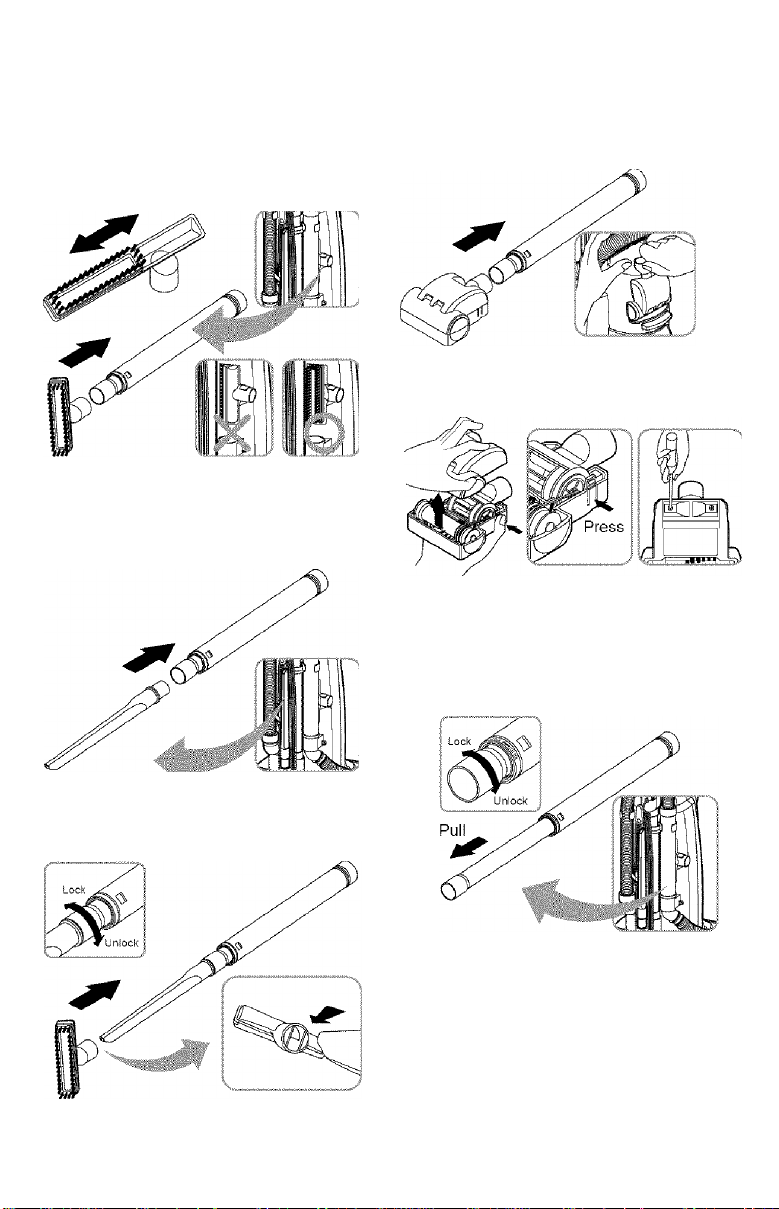
Dusting brush:
Functions as a dusting brush,also an upholstery
nozzle which is useful for furniture, shelves etc.
Attach as shown.
Crevice tool;
Crevice tool is attached as shown and used for
corners, between cushions etc.
Handi-mate Jr.®:
Handi-mate Jr.® is attached as shown and
used for stairs and other hard to reach places.
To remove Handi-m ate Jr.® cover;
Remove 2 screws on the bottom and take
Handi-mate Jr.® cover off as shown.
Frequently check and remove hair, string, and
lint build-up the brush area. Failure to do so
could oause damage to Handi-mate Jr.®.
To extend wand:
Rotate the wand to unlock and pull.
Note : For added reach the dusting brush can be
used with crevice tool as shown.
CAUTION
Do not pull the vacuum cleaner around
the room by the hose. Property dam age
could result.
TO STORE ATTACHMENTS
Return the wand to its position on the body and
the attachments to their holders.
-8-
Page 9
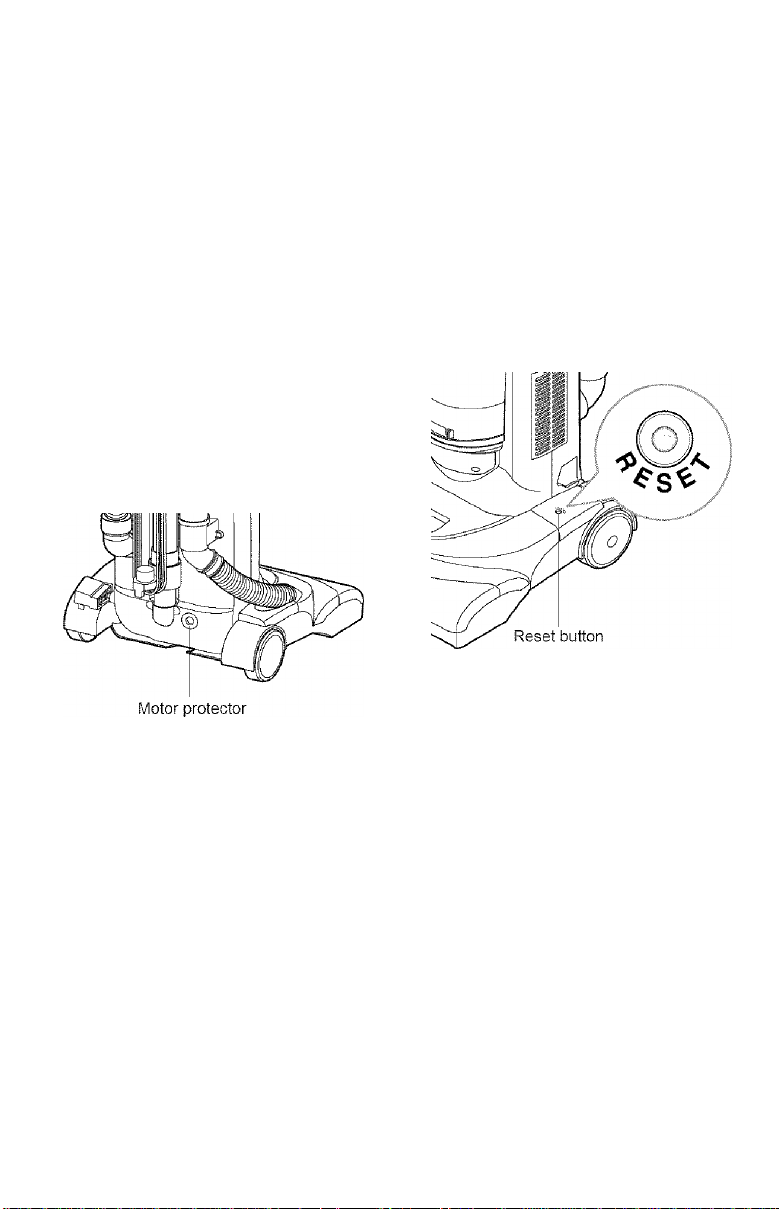
PERFORMANCE FEATURES
Motor protector
This vacuum has a motor protector bypass
valve which automatically opens to provide
cooling air to the motor when a clog prevents
the normal flow of air to the motor. If the by
pass valve opens to prevent motor overheating
and possible damage to the vacuum, you will
notice a change of sound as air rushes through
the valve opening.
NOTE: Do not block motor protector.
To correct problem; Check for and remove
clogs. See CLOG REMOVAL section.
NOTE: The motor protector may open when
using attachments or when cleaning new
carpet, due to reduced airflow caused by the
attachments themselves or by new carpet fuzz
filling the dust bin quickly.
Agitator overload protector
The agitator has built-in protection against
motor damage should the agitator Jam.
If the agitator slows down or stops the agitator
overload protector shuts off the agitator.
The suction motor will remain on at this time.
To correct problem: Turn off and unplug
vacuum, remove obstruction and press reset
button.
To reset, push reset button once.
Thermal protector
This vacuum has a thermal protector which
automatically trips to protect the vacuum from
overheating. If a clog prevents the normal flow
of air to the motor the thermal protector turns
the motor off automatically to allow the motor to
cool in order to prevent possible damage to the
vacuum.
To correct problem: If this occurs, turn the
vacuum off and unplug the power cord from the
outlet to allow the vacuum to cool.
Check for and remove clogs, if necessary.
Also check and clean/replace any clogged
filters. Wait approximately thirty(30)minutes and
plug the vacuum in and turn back on to see if
the motor protector has reset. The thermal
protector system will not reset untill the vacuum
has cooled down.
-9-
Page 10
VACUUM CLEANER CARE
Always follow all safety precautions when cleaning and servicing the vacuum cleaner.
A
WARNING
Electricaf shock and personal injury hazard.
Disconnect electrical supply before servicing or cleaning the unit. Failure to do so
could result in electrical shock or personal injury from cleaner suddenly starting.
VACUUM STORAGE
To store the vacuum cleaner when it is not
used, assemble Its cord and return its
telescopic handle to its lower space saving
position.
WARNING
Electrical shock and personal injury
hazard.
Wrapping the cord too tightly puts
stress on the cord and can cause
cord dam age. A damaged cord is an
electrical shock hazard and could
cause personal injury or dam age.
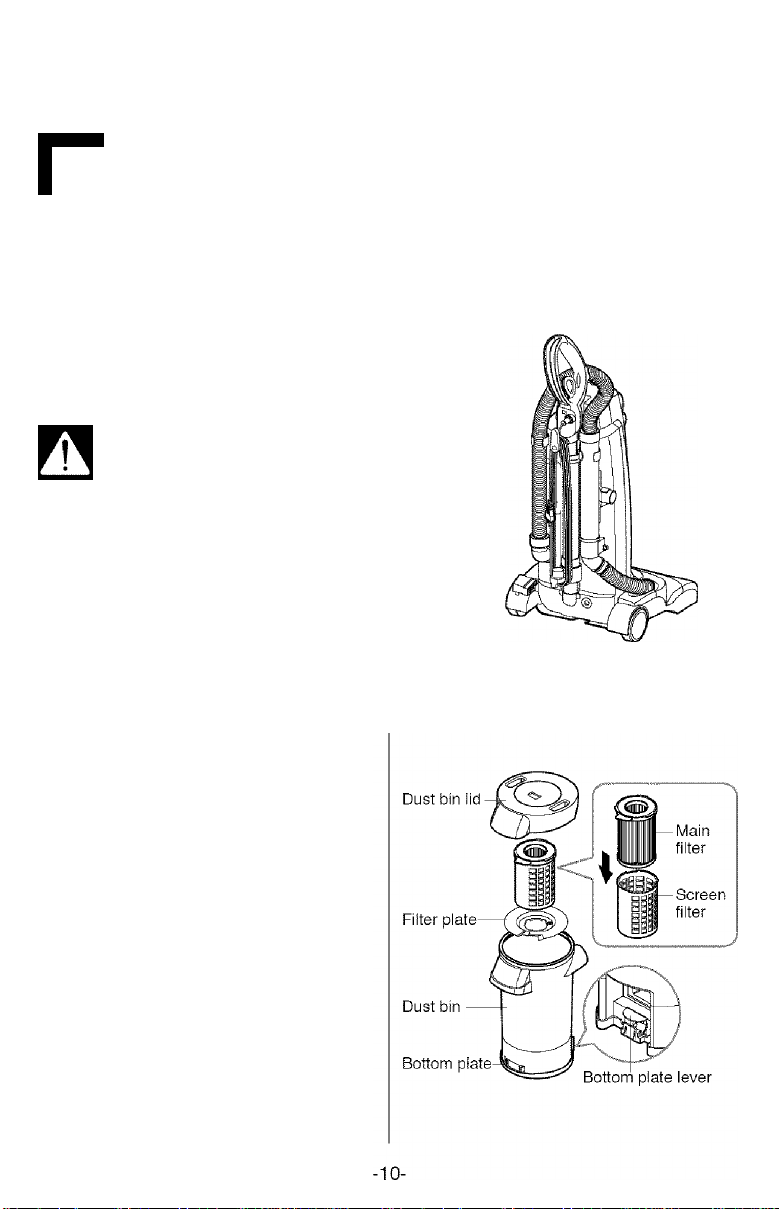
DUST BIN ASSEMBLY
Dust bin lid:
The dust bin lid covers up the dust bin.
Screen filter:
Screen filter traps dirt and debris that is picked
up by the suction.
Main filter:
Main filter captures micro-particles.
Filter plate:
The filter plate separates the bin into two
spaces for various types of dust and debris.
Bottom plate:
Used to throw dust out of the bin.
Bottom plate lever:
Used to open the bottom plate for dust and
debris disposal.
Dust bln:
Where dirt is collected.
Page 11
DUST BIN CLEANING
For best perfornance always empty the dust bin
when the dirt level reaches the "MAX" line.
A
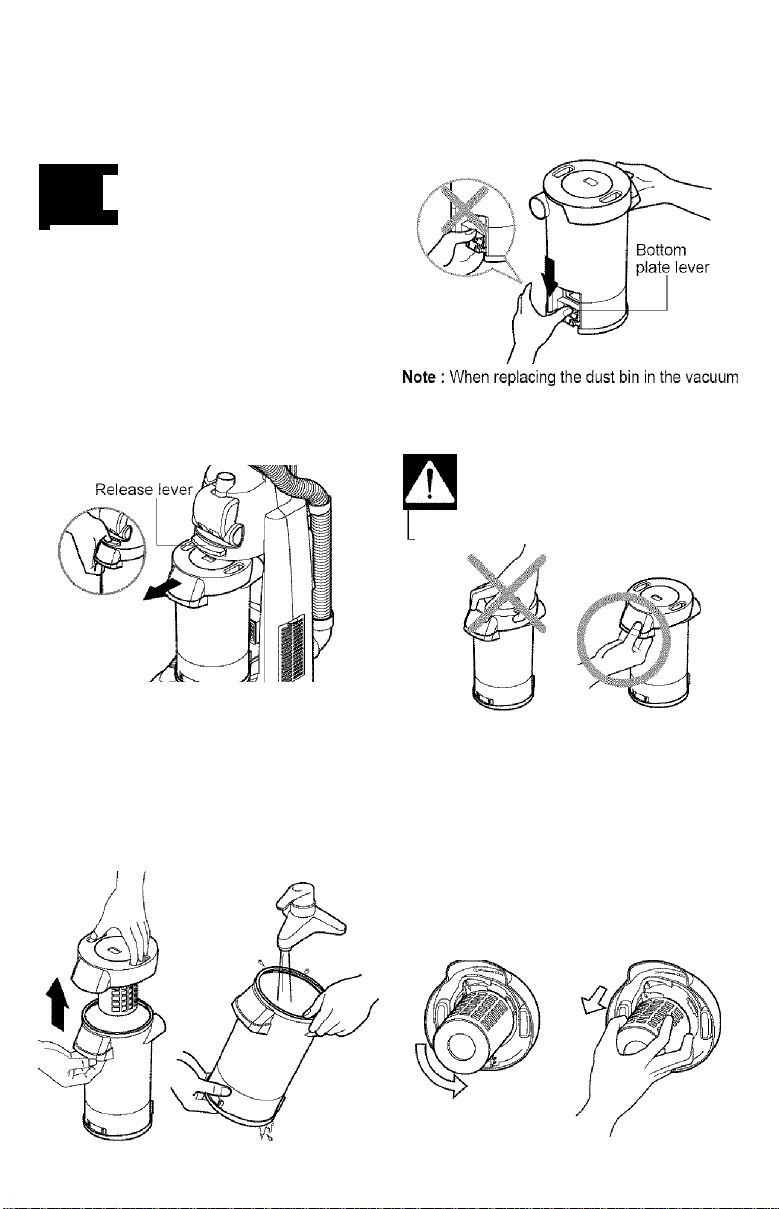
TO REMOVE DUST BIN, press the dust bin
release lever until It snaps, and slide the bin
out of cleaner.
WARNING
Electrical shock and personal injury
hazard.
Always unplug power cord from
electrical outlet before perform ing
any service on vacuum.
TO EMPTY DUST BIN, press the bottom plate
lever as shown.
you need to slide and snap It. Make sure
that dust bin is fully engaged otherwise
suction power could be low.
CAUTION
Carry the dust bin by the handle as shown.
FILTERS CLEANING / CHANGING
TO CLEAN THE DUST BIN AND FILTERS,
separate all components from the dust bin lid
first, and clean the dust bin and filters with
water.
For optional performance check filters
frequently and clean when dirty.
Grasp screen filter, rotate counter-clockwise
and take them out.
Remove main filter from filter screen.
Rinse with clean water only, do not use
detergent or soap.
-11-
Page 12

Allow main and screen filter to dry 24 hours
before putting them back. Make sure that the
filters dry completely.
When cleaning the main filter no longer restores
vacuum suction to full power, you need to
TO CHANGE THE EXHAUST FILTER, take it
out of cleaner and replace it with new one.
DO NOT CLEAN WITH WATER OR LIQUID.
This filter can not be cleaned and must be
replaced for proper performance.
REPLACING HEADLIGHT BULB
Make sure that the cleaner's switch is off and
disconnect the power cord.
Remove two screws and light cover.
Remove the bulb by twisting and pushing it in
slightly; Then pull out.
Replace the bulb by pushing the bulb in.
A
WARNING
Personal injury hazard
To avoid personal injury, switch off
and disconnect the power cord.
A
CAUTION
Wet filter can cause permanent
damage to cleaner.
Ensure that all filters dry completely.
-12-
Page 13

BELT CHANGING AND AGITATOR CLEANING
WARNING
Electrical shock and personal injury
hazard.
Disconnect electrical supply before
servicing or cleaning the unit. Failure
to do so could result in electrical
shock or personal injury from cleaner
suddenly starting.
Frequently check and remove hair, string, and
lint build-up in the agitator brush area. If build
up becomes excessive, follovi/ the steps below.
Should the belt become loose or should it
break, follow the belt removal instructions.
NOZZLE COVER REMOVAL / INSTALLATION
Disconnect electrical supply, press body
release pedal and rotate body down, so the
cleaner is laying flat on the floor.
To protect the floor surface place paper under
the nozzle and work area.
Remove 4 screws from the bottom as shown.
Turn cleaner upside down to take the cover off.
To replace the nozzle cover, hook the front of
the nozzle cover onto the nozzle base and turn
the cleaner upside down. Replace the 4 screws
on the bottom.
A
WARNING
Personal injury hazard
Always unplug the vacuum cleaner
before cleaning the brush area as
agitator may suddenly restart. Failure
to do so can result in personal injury.
TO REMOVE BELT/ CLEAN AGITATOR
Position hands on opposite ends of the agitator.
If the belt is still attached to the agitator, there will
be tension on it.
Carefully lift the right end of the agitator and
then lift the other end.
Remove the worn or broken belt from the motor
drive shaft and clean the agitator.
-13-
Page 14

Remove string or hair that may be wrapped
around the agitator.
Pull right end of agitator forward and seat it
into nozzie base.
A
WARNING
Be careful when removing the
agitator as the belt tension is high.
Failure to do so could result in
personal injury from the agitator
releasing quickly and snapping away.
TO REPLACE BELT
Seat the left end of agitator into nozzle base.
Loop the new belt on the motor shaft.
Loop the other end of beit onto the belt
pulley on the right end of agitator.
To seat agitator right end, put right end of
agitator into slot in nozzle base as shown.
Press firmiy, checking to see that each end
is completely inserted.
To replace the nozzle cover, foilow the
NOZZLE COVER REMOVAL /
INSTALLATION section.
-14-
Page 15

CLEANING EXTERIOR
Unplug power cord from wall outlet. Clean
exterior using a clean, soft cloth that has been
dipped in a solution of mild liquid detergent and
water and wrung dry.
REMOVING CLOGS
The hose located on the vacuum cleaner
carries the dirt from the nozzle up to the dust
bin. If the hose should become clogged :
Unplug vacuum. Remove the assembled v/and,
nozzle hose and check them.
DO NOT drip water in the cleaner.
DO NOT clean tools in dishwasher or clothes
washer. Wash tools in warm soapy water, rinse
and air dry.
DO NOT use tools if they are wet.
Check the base of the hose for clogging as
shown.
Check suction inlet and filters for clogs.
Check
suction inlet.
Note : Clogged filters can cause suction power to
be low. To clean the filter, refer to FILTERS
CLEANING / CHANGING section.
-15-
Page 16

TROUBLESHOOTING
Review this chart to find do-it-yourself solutions for a minor performance problems. Additional service
needed, other than those described in this owner's manual, should be performed at Sears Parts &
Repair Center.
WARNING
Electrical shock and personal injury hazard.
Disconnect electrical supply before servicing or cleaning the unit. Failure to
do so could result in electrical shock or personal injury.
PROBLEM
CLEANER WILL
NOT RUN
POOR JOB OF
DIRT PICKUP
DUST ESCAPES
THE DUST BIN
LIGHT WILL NOT
WORK
PO SSIBLE CAUSE
2. Switch in off position.
3. Thermal protector activated
1. Full or clogged dust bin. 1. Empty dust bin and clean the filters
2, Broken agitator belt. 2. Replace agitator belt.
3. Clogged hose or nozzle. 3. Clean hose or nozzle area.
4. Hose not inserted fully 4. Insert hose
5. Worn agitator. 5. Replace agitator.
6. Hole in hose 6. Replace hose.
7. Dust bin assembly improperly
installed.
8. Belt not installed on motor shaft. 8. Install belt on the motor shaft
9. Motor protection system
activated.
10. Agitator overload protector
activated
1. Dust bin assembly improperly
installed.
1. Burned out light bulb. 1. Replace light bulb.
1. Plug in firm'y, check circui: breaker, fuse.
2. Push switch to floor or carpet mode.
3. See "To correct problem", page 9.
7. Properly install dust bin assembly
9. Check for clogs
10. See "To correct problem", page 9.
1. Properly install dust bin
PO SSIBLE SOLUTION
-16-
Page 17

MASTER PROTECTION AGREEMENTS
Master Protection Agreements
Congratulations on making a smart purchase.
Your new Kenmore® product is designed and
manufactured for years of dependable operation.
But like all products, it may require preventive
maintenance or repair from time to time.
That’s when having a Master Protection Agreement
can save you money and aggravation.
Purchase a Master Protection Agreement now and
protect yourself from unexpected hassle and
expense.
The Master Protection Agreement also helps extend
the life of your new product. Here’s what's included in
the Agreement:
0
Expert service by our 12,000 professional repair
specialists
0 Unlimited service and no charge for parts and
labor on ail covered repairs
01 "No-lemon" guarantee - replacement of your
covered product if four or more product failures
occur within twelve months
0
Product replacement if your covered product
can’t be fixed
0 Annual Preventive Maintenance Check at your
request - no extra charge
0
Fast help by phone - phone support from a
Sears technician on products requiring in-home
repair, plus convenient repair scheduling
0
Power surge protection against electrica!
damage due to power fluctuations
0 Rental reimbursement if repair of your covered
product takes longer than promised
Once you purchase the Agreement, a simple phone
call is all that it takes for you to schedule service.
You can call anytime day or night, or schedule a
service appointment online.
Sears has over 12,000 professional repair specialists,
who have access to over 4.5 million quality parts and
accessories. That’s the kind of professionaiism you
can count on to help prolong the life of your new
purchase for years to come. Purchase your Master
Protection Agreement today!
Some limitations and exclusions apply.
For prices and additional information call
1-800-827-6655.
Sears Installation Service
For Sears professional installation of home
appliances, garage door openers, water heaters, and
other major home items, in the U.S.A. call
1-800-4-MY-HOME®
-17-
Page 18

Page 19

CONTENIDO
Antes de utilice su nueva aspiradora......................1
Garantía de la aspiradora Kenmore
Instrucciones importantes de seguridad
Piezas y características.............................................3
Soltar el m ango telescópico......................................4
Salida del cable
Funcionamiento del interruptor
Soltar el cuerpo principal y posiciones
Parámetros de altura recomendados
Gráfico de uso de los accesorios.............................6
Consejos de aspiración..............................................6
Accesorios.....................................................................6
Características de rendim iento
...........................................................
.......................
..................
................................
...................
.....................
................................
Cuidado de su aspiradora..........................................9
1
Almacenamiento de la aspiradora
Montaje del depósito de polvo
2
Limpieza del depósito de polvo
Limpieza/cambio de filtros......................................10
Sustituir la bombilla principal.................................11
4
Cambio de correa y limpieza del mezclador
5
Limpieza exterior.....................................................14
5
Eliminar obstrucciones
5
Solución de averías
Acuerdos de protección original
Servicio.
.............................................
8
...........................................
..................................................
...........................
.................................
.............................
.............................
cubierta posterior
.................
9
9
10
12
14
15
16
ANTES DE UTILICE SU NUEVA ASPIRADORA
Por favor, lea esta guía. Le ayudará a montar y a poner en. tune onamiento su nueva asp radora Kenmore
de la forma más segura y eficaz posible.
Para obtener más información sobre el cuidado y e! funcionamiento, llame a su tienda Sears más cercana.
Necesitará el modelo y los números de serie completos para solicitar información.
El modelo y loá números de serie de su aspiradora están situados en la placa de modelo y número de serie.
Utilice el espacio a continuación para registrar el número de modelo y el número de serie de su nueva aspiradora Kenmore.
№ de modelo.
№ de serie.
Fecha de compra
Guarde este libro y su ticket de compra (recibo) en un lugar seguro para referencias futuras.
GARANTIA DE LA ASPIRADORA KENMORE
GARANTIA LIMITADA DE UN ANO EN LA ASPIRADORA KENM ORE
Esta garantía será válida durante un año a partir de la fecha de compra, e incluye solamente el usof
doméstico de la aspiradora. Durante el año de garantía, siempre que esta aspiradora se haga
funcionar y se mantenga según las instrucciones en el manual del propietario, Sears reparará
gratuitamente cualquier defecto material o de mano de obra.
Esta garantía excluye las correas de la aspiradora, las bombillas, y los filtros, que son piezas
consumibles que se gastan debido al uso normal.
Para beneficiarse del servicio bajo la garantía, devuelva esta aspiradora al Centro de Piezas
y Reparaciones Sears más cercano de los Estados Unidos.
Esta garantía sólo se aplicará siempre que este producto se utilice en el interior de los Estados Unidos.
Esta garantía le da derechos legales específicos, y también puede tener otros derechos que
varían de estado a estado.
Sears, Roebuck and Co., D/817WA, Hoffm an Estafes, IL 60179
Page 20

INSTRUCCIONES IMPORTANTES DE SEGURIDAD
AVISO
Su seguridad es muy importante para nosotros. Para reducir el riesgo de fuego, descarga
eléctrica, lesiones a personas o daños durante el uso de su aspiradora, respete las
precauciones básicas de seguridad, incluyendo las siguientes:
Lea este manual antes de montar o utilice su
aspiradora.
Utilice su aspiradora sólo según lo descrito en este
manual. Utilice únicamente con los accesorios incluidos.
Para reducir el riesgo de descargas eléctricas - No
utilice al aire libre o sobre superficies mojadas.
Desconecte la alimentación antes de reparar o
limpiar el área. No hacerlo podría dar lugar a
descargas eléctricas o que el cepillo se active
repentinamente.
Siempre apague la aspiradora antes de conectar
o desconectar la manguera.
Siempre apague la aspiradora antes de desenchufarlo.
No lo desenchufe tirando del cable. Para
desenchufarlo, tire del enchufe, no del cable.
No lo utilice si el cable o el enchufe están dañados.
Si la aspiradora no funciona como debe, se ha caído,
dañado, sacado al exterior, o se ha caído en el agua,
devuélvala a un Centro de servicio de Sears,
No
tire del cable de la aspiradora, no lo utilice como asa, cierre una
puerta sobre ei cable, o ío haga pasar por bordes o esquinas afiíadas.
No desplace la aspiradora sobre el cabíe. Mantenga el cable de
alimentación iejos de superf des calientes.
No
se aleje de la aspiradora cuando esté enchufada. Desenchufe
de la toma cuando no vaya a utilizarla y antes de repararla.
No
permita que sea utilizada como un juguete. Preste
atención ai utilizar la aspiradora cerca de los niños.
No
toque el enchufe o la aspiradora con !as manos mojadas.
Para reducir el riesgo de fuego, descarga eléctrica o lesiones:
No
coloque ningún objeto sobre sus orificios de salida.
No
la utilice si sus orificios de salida están bloqueados:
manténgala limpia polvo, pelusa, pelo y cualquier
cosa que pueda reducir el flujo de aire.
Mantenga
oí pelo, !a ropa suelta, los dedos, y todas las partes
dei cuerpo lejos de los orificios de saüda y las piezas móviles.
No utilice la aspiradora sin el depósito de
polvo/filtros en su sitio.
Siempre
limpie el depósito de polvo después de limpiar
la alfombra con la aspiradora, tanto el polvo como el polvo
fino. Estos productos limpiadores obstruyen el filtro,
reducen la circulación de aire y pueden causar daños a la
aspiradora. De no limpiar el depósito de polvo, podría
causar daños permanentes a la aspiradora.
No
utilice !a aspiradora para eliminar objetos duros y afilados,
juguetes pequeños, chinchetas, clips de papel, etc. Estos
podrían dañar la aspiradora o el depósito de polvo. .
No aspire nada que se esté quemando o suelte humo,
por ejemplo cigarrillos, fósforos, o cenizas calientes.
No utilice !a aspiradora para eliminar üquidos
inflamables o combustibles (gasolina, quitamanchas,
perfumes, etc.), o lo utilice en áreas donde estos
puedan estar presentes. Los humos de estas
sustancias pueden representar crear un riesgo
de incendio o explosión.
Em plee un cuidado especial
al aspirar escaleras. No raloque
la aspiradora sobre una silla, mesa, etc. Manténgala sobre el suelo.
Usted
es responsable de asegurarse de que su
aspiradora no sea utilizada por alguien incapaz de
hacerla funcionar correctamente.
GUARDE ESTAS INSTRUCCIONES
El montaje y e! uso seguro de su aspiradora son sus responsabilidades. Su aspiradora está diseñada
únicamente para el uso doméstico. Lea cuidadosamente el manual de del propietario para obtener información
importante acerca de! uso y ia seguridad. Esta guía contiene comentarios de seguridad bajo símbolos de
advertencia y precaución. Por favor, preste especial atención a estos recuadros y siga las instrucciones
faciiitadas. Los comentarios de AVISO le alertan de peligros como fuego, descargas eléctricas, quemaduras
y daños corporales serios. Los comentarios de ADVERTENCIA le alertan de peligros como daños corporales
moderador y/o daños a la propiedad.
Page 21

PIEZAS Y CARACTERISTICAS
Es importante conocer las piezas y características de su aspiradora para asegurar un uso adecuado
y seguro. Revise estas antes de utilizar su aspiradora.
Artículo
Filtros 85880
Bombilla 5240
Correa 5282
№ de pieza en
EE.UU.
Mango telescópico
Interruptor
Asa de transporte
Handi-mate Jr.®
Palanca
telescópica de inicio
Soporte del
re bota i nado
Palanca para
--------liberarei depósito
de polvo
Depósito
de polvo
Manguera
con boquilla
Luz principa:
Botón del ajuste de altura
Cepillo para el polvo
Varilla
Herramienta para hendiduras
-Mezclado
Botón de reinicio
(motor del mezclador)!
- Gancho del cable — Protector del motor
- Pedal para soltar el cuerpo
-3-
Page 22

SOLTAR EL MANGO TELESCOPICO
Suelte el mango telescópico tirando hacia arriba
de la palanca telescópica para soltar y extraer el
mango telescópico.
Para bajar el mango telescópico, tirando hacia
arriba de la palanca telescópica y presione hacia
abajo el mango telescópico.
Nota : Para su comodidad, ajuste la altura del mango
telescópico para adaptarlo a su altura.
SALIDA DE CABLE
Gire el soporte de emisión rápida del cable hacia
cualquier lado para soltar el cable de alimentación.
Para almacenare! cable de alimentación, enrolle el cable
de alimentación alrededor del soporte de emisión rápida
del cable y el gancho, y sujete el enchufe sobre el cable
de alimentación.
Nota : Para reducir el riesgo de descargas eléctricas,
esta aspiradora cuenta con un enchufe
polarizado, lo que significa que una clavija es
más ancha que la otra. Este enchufe se
adaptará a un enchufe polarizado unidireccional.
Si el enchufe no se ajusta completamente al
enchufe, Invierta el enchufe. Si aún así no
logra adaptarlo correctamente, póngase en
contacto con un electricista cualificado para
instalar el enchufe adecuado. No modifique el
enchufe de ninguna forma o manera.
Soporte de
emisión rápida
del cable
Gancho
del cable
-4-
Page 23

FUNCIONAMIENTO DEL INTERRUPTOR
Funcionamiento del interruptor
• Apagado
• Suelo: Mezclador apagado
• Alfombra: Mezclador encendido
A
AVISO
Peligro de lesiones personales
Para evitar lesiones personales, no encienda/apague el
interruptor si la aspiradora o sus manos están mojadas.
SOLTAR EL CUERPO PRINCIPAL Y POSICIONES
Suelte el cuerpo de la aspiraoora presíonanoo hacia
abajo con su pis sobre el peda: de emisión del cuerpo
y tirando hacia atrás y abajo.
PARAMETROS DE ALTURA RECOMENDADOS
Seleccionar un parámetro de altura :
Primero apague la aspiradora. Seleccione un parámetro
de altura usando !a perilla de ajuste de altura. Deslice el
botón de ajuste a la posición correcta. No coioque ei
cuerpo cuando lo esté configurando.
Parámetros de altura recomendados :
Usted puede necesitar elevar la altura para hacer algunos
trabajos más fáciles, por ejemplo la aspiración de mantas
y alfombras de pelo más grueso.
Los parám etros recomendados son :
Alto:
alfombras desgastadas, pelo aito, feipa, aifombras pequeñas
Medio: pelo de medio a largo
Bajo: pelo de corto a medio
Extra bajo: pelo muy corto, suelo libre
Atención:
de alfombra o cubierta de sueio. Revise siempre ias instrucciones de
limpieza recomendadas por ei fabricante de la alfombra o cubierta de
sueio antes de utilizar !a aspiradora.
Es necesario un cuidado especial a! aspirar ciertos tipos
-5-
Page 24

ACCESORIO
GRAFICO DE USO DE LOS ACCESORIOS
ÁREA DE LIMPIEZA
Muebles *
Entre
cojines*
Cortinas* Escaleras Paredes
CEPILLO PARA^s^
EL POLVO
HERRAMIENTA PARA
HENDIDURAS^^^^^^
HANDi-MATE^^^^
X X X X X
X X X
X X X
' Limpie siempre los accesorios antes de utilizarlos sobre las telas.
CONSEJOS DE ASPIRACION
Bordes de alfombras
Utilice accesorios tales como la herramienta para hendiduras,
el cepillo para el polvo, Handi-mate Jr. ® en ios bordes
de la alfombra.
Consulte la página 7,8
A
Peligro de lesión personal
Tenga cuidado sí piensa aspirar en las escaleras. Si la
aspiradora se cayera, podría causar lesiones personales
o daños a la propiedad.
AVISO
ACCESORIOS
Uso de los accesorios
1 ) Coloque la aspiradora sobre una superficie plana.
Retire la varilla del cuerpo agarrando y rotándola mientras tira hacia arriba.
2) Fije la altura del pelo en Alta
3) Fije el interruptor en modo "Suelo".
Page 25

Cepillo para el polvo:
Funciona como un cepillo para el polvo, como una boquilla
para tapicerías útil para ios muebles, estantes etc.
Acóplela como se muestra a continuación.
Herramienta para hendiduras;
La herramienta para hendiduras se acopla según se
muestra y se utiliza en esquinas, entre ios cojines, etc.
Handi-mate Jr.®:
Handi-mate Jr.® se acopla según se muestra y se
utiliza en escaleras y otros lugares de difícil acceso.
Desmontar la cubierta del Handi-m ate Jr.®;
Retire los 2 tomillos de la parte inferior y desmonte ia
cubierta del Handi-mate Jr.® según se muestra.
Revise y retire frecuentemente los restos de pelo, hilos,
y peiusa acumulada en el área del cepillo. De no
hacerlo podría causar daños al Handi-mate Jr.®.
Para extender la varilla;
Gire la varilla para desbloquear y tirar.
Nota :
Para aumentare! alcance dei cepillo de polvo, éste puede utilizarse
con ia tieiramienta para hendiduras como se muesfra a continuación.
ADVERTENCIA
No desplace la aspiradora alrededor del
cuarto tirando de la manguera. Podría
causar daños a la propiedad.
ALMACENAR ACCESORIOS
Devuelva la varilla a su posición en el cuerpo
y los accesorios a sus soportes.
-7-
Page 26

CARACTERISTICAS DE RENDIMIENTO
Motor protector
Esta aspiradora tiene una váívula de derivación
protectora del motor que se abre automáticamente
para proporcionar aire frió al motor cuando una
obstrucción evita el flujo normal de aire al motor.
Si la una válvula de derivación se abre para evitar
el recalentamiento del motor y los posibles daños
a la aspiradora, notará un cambio del ruido, como
el aire corriera a través la abertura de la válvula.
NOTA: No bloquee el protector del motor.
Para corregir el problem a:
Revise y elimine las obstrucciones.
Protector de sobrecarga del m ezclador
El mezclador tiene incorporada una protección contra daños
en el motor si sufriera una obstrucción en ei mezclador.
Si el mezclador se ralentiza o para, el protector de sobrecarga
del mezclador apagará el mezclador. El motor de succión
permanecerá encendido durante ese tiempo.
Para corregir el problem a:
la aspiradora, retire la obstrucción y presione el botón de
reinicio.
Para reiniciar, presione una vez el botón de reínicio.
Consulte la sección ELIMINAR OBSTRUCCIÓN.
NOT A:
El protector del motor puede abrirse al utilizar accesorios
o al limpiar una nueva alfombra, debido al reducido flujo de aire
causado por los propios accesorios o por la pelusa de la nueva
alfombra que está llenado rápidamente el depósito de polvo.
Apague y desenchufe
Protector térmico
Esta aspiradora tiene un protector térmico que se activa
automáticamente para proteger la aspiradora contra el
recaientamiento. Si una obstrucción evita el flujo normal de
aire ai motor, el protector térmico apaga automáticamente
ei motor para permitir enfriarse al motor y evitar posibles
daños a ia aspiradora.
Para corregir el problem a:
Si esto ocurriera, apague
y desenchufe el cable de alimentación para permitir el
enfriamiento de la aspiradora. Revise y elimine las
obstrucciones, si fuera necesario. Además, revise y
limpie/cambie cualquier filtro obstruido. Espere
aproximadamente treinta (30) minutos y enchufe de nuevo
la aspiradora y vuelva a encenderla para comprobar que el
protector del motor se haya reiniciado. El sistema del
protector térmico no se reiniciará hasta que la aspiradora
se haya enfriado.
-8-
Page 27

CUIDADO DE SU ASPIRADORA
Siga siempre todas ias medidas de seguridad ai limpiar y reparar su aspiradora.
AVISO
Peligro de descarga eléctrica y lesiones personales.
Desconecte la alimentación antes de reparar o lim piar la unidad. De no hacerlo, podría causar
descargas eléctricas o lesiones personales a la aspiradora.
ALMACENAMIENTO DE LA ASPIRADORA
Para almacenar la aspiradora cuando no vaya a ser
utilizada, monte su cable y devuelva su mango
telescópico a su posición inferior de ahorro de
espacio.
AVISO
Peligro de descarga eléctrica y
lesiones personales.
Envolver el cable demasiado fuertemente
crea presión sobre el cable y puede causar
daños. Un cable dañado representa un
peligro de descargas eléctricas y puede
causa lesione personales o daños.
MONTAJE DEL DEPOSITO DE POLVO
Tapa del depósito de polvo;
La tapa del depósito de polvo cubre el depósito de polvo.
Rejilla del filtro:
El rejilla de! filtro atrapa la suciedad y basura
atraída mediante succión.
Filtro principal:
La filtro principal captura micropart ículas.
Placa del filtro;
La placa del filtro separa el depósito en dos
espacios para los varios tipos de polvo y basura.
Placa base:
Utilizada para extraer ei polvo del depósito.
Palanca de la placa base;
Utilizada para abrir la placa base para la
eliminación de polvo y basura.
Depósito de polvo:
Donde se recoge la suciedad.
-9-
Tapa del
depósito
de polvo
Placa de filtro
Depósito de —
polvo
Placa base
a placa base
Page 28

LIMPIEZA DEL DEPOSITO DE POLVO
Para lograr el mejor rendimiento, vacíe siempre el depósito
de poivo cuando ei nivel de suciedad alean» la línea"
A
PARA DESMONTAR EL DEPOSITO DE POLVO, presione
¡a palanca de ¡iberacíón del depósito de polvo hasta que
escuche un chasquido, y deslice el depósito fuera de la
aspiradora.
AVISO
Peligro de descarga eléctrica y
lesiones personales.
Desenchufe siempre el cable de
alimentación antes de realizar
cualquier reparación a su aspiradora.
PAIRA VACIAR EL DEPOSITO DE POLVO,
presione la placa base según se muestra.
necesitará deslizado y encajarlo a presión. Asegúrese
que ei depósito de polvo está completamente encajado,
de otra forma la potencia de succión podría ser baja.
ADVERTENCIA
Desplace el depósito de polvo por el asa, como se muestra.
LIMPIEZA / SUSTITUCIÓN DE LOS FILTROS
PARA LIMPIAR EL DEPOSITO Y LOS FILTROS DE POLVO,
primero separe todos los componentes de la tapa del depósito
de polvo, y limpie el depósito y los filtros de polvo con agua.
Para lograr el rendimiento más adecuado, revise los filtros
con frecuencia y limpíelos cuando estén sucios. Tome
la rejilla del filtro, gírela a la izquierda y extráigala.
Retire el filtro principal de la rejilla del filtro.
Aclárela únicamente con agua limpia, no utilice detergente
o jabón.
-10-
Page 29

Permita que el filtro principal y la rejilla se sequen durante
24 horas antes de volver a coiocarlas. Asegúrese de que
los filtros estén totalmente secos.
Cuando limpiar el filtro prinoipal ya no restablezca la potencia
de succión de la aspiradora a su máxima potencia, necesitará
PARA CAMBIAR EL FILTRO DE EXTRACCION,
extráigalo de la aspiradora y cámbielo por uno nuevo.
NO LO LIMPIE CON AGUA O LÍQUIDO.
Este filtro no se puede limpiar y debe cambiarse
para lograr el funcionamiento apropiado.
ADVERTENCIA
CAMBIAR LA BOMBILLA
Asegúrese de que el interruptor de la aspiradora esté
apagado y desconecte el cabie de alimentación.
Retire dos tornillos y la cubierta de la luz.
Retire la bombilla girándola y empujándola levemente:
después tire de ella.
Cambie la bombilla empujándola hacia adentro.
AVISO
Peligro de lesiones personales.
Para evitar lesiones personales, apague la aspiradora
y desconecte e! cable de alimentación.
-11-
Un filtro mojado puede causar daños
permanentes a la aspiradora.
Asegúrese que todos los filtros estén completamente secos,
Page 30

CAMBIO DE CORREAS Y LIMPIEZA DEL MEZCLADOR
AVISO
Peligro de lesiones personales y
descargas eléctricas.
Desconecte la alimentación antes de reparar
o lim piar la unidad. De no hacerlo podría ser
la causa de descargas eléctricas o lesiones
personales.
Revise y elimine con frecuencia ios restos de pelo, hilos, y
acumulación de pelusa en el área del cepillo del mezclador.
Si la acumulación llega a ser excesiva, sigua los pasos a
continuación. Si !a correa lega se aflojara o rompiera,
sigua las instrucciones de desmontaje de la correa.
DESMONTAJE / INSTALACIÓN DE
LA CUBIERTA DE BOQUILLAS
Desconecte la alimentación, presione el pedal de liberación
del cuerpo y gire el cuerpo hacia abajo, de tal forma que
aspiradora esté completamente sobre el suelo.
Para proteger la superficie del suelo, coloque papel
bajo el área de trabajo y de la boquilla.
Para sustituir la cubierta de la boquilla, enganche la
parte frontal de la cubierta de la boquilla sobre la base
y dé la vuelta a la aspiradora. Sustituya los 4 tornillos
de ia base.
A
Peligro de lesiones personales.
Desenchufe siempre la aspiradora antes de
limpiar el área del cepillo, porque el m ezclador
podría iniciarse. repentinamente. El no
hacerlo podría resultar en lesiones personales.
DESMONTAR LA CORREA
Retire los 4 tornillos de la base, como se muestra.
Dé la vuelta a la aspiradora para desmontar la cubierta.
/ LIMPIAR EL MEZCLADOR
Coloque sus manos en los extremos opuestos
del mezclador. Si la correa aún está acoplada al
mezclador, provocará tensión sobre ella.
Levante cuidadosamente el extremo derecho
del mezclador y después levante el otro extremo.
Retire la correa gastada o rota de la
transmisión del motor y limpie el mezclador.
AVISO
12-
Correa
Page 31

Retire los restos de hilos o pelo que puedan estar
enroilados alrededor del mezclador.
Tire del extremo derecho del mezclador y fíjelo
sobre la base de! inyector.
AVISO
Tenga cuidado al retirar el mezclador porque
la tensión de la correa es demasiado alta.
De no hacerlo podría sufrir lesiones
personales cuando el mezclador se suelte
rápidamente.
SUSTITUIR LA CORREA
Fije ei extremo izquierdo del mezclador sobre la base del
Enrolle la nueva correa sobre el eje del motor.
Enrolle el otro extremo de la correa sobre la polea
de correa en el extremo derecho del mezclador.
Para fijar el extremo derecho del mezclador, coloque el
extremo derecho de mezclador en la ranura de la base
Presione firmemente, revisando para comprobar
que cada extremo se inserte totalmente.
Para sustituir la cubierta del inyector, respete
la sección DESMONTAJE DE LA CUBIERTA
DEL INYECTOR / INSTALACIÓN.
-13-
Page 32

LIMPIEZA EXTERIOR
Desenchufe e! cable de alimentación de ia pared.
Limpie el exterior con un paño limpio, suave que haya
empapado en una solución de detergente líquido
suave y agua y eümine e! exceso de humedad.
NO derrame agua sobre la aspiradora.
NO limpie las herramientas en el lavaplatos o lavadora.
Lave las herramientas en agua jabonosa caliente,
aclárelas y séquelas ai aire.
NO utilice las herramientas si están mojadas.
ELIMINAR OBSTRUCCIONES
La manguera situada en la aspiradora transporta la Revise la base de la manguera para saber si existen
suciedad desde el inyector hasta el depósito de poivo.
Si la manguera sufriera una obstrucción:
Desenchufe !a aspiradora. Retire la varilla montada
y la manguera con boquilla y revíselas.
Revise la entrada de succión y los filtros en busca de
obstrucciones.
-14-
Revise ¡a
entrada de succión
Nota
; Los filtros obstruidos pueden causar que la potencia
de succión sea baja. Para limpiar el filtro, consulte la
sección LIMPIEZA/CAMBIO DE FILTROS.
Page 33

SOLUCION DE AVERIAS
Revise este gráfico para encontrar soluciones simples para los problemas menores de funcionamiento. Si necesitara un servicio
adicional, a excepción de los descritos en este manual de! propietario, deberá realizarse en un Centro de reparación y Piezas de Sears.
AVISO
Peligro de descarga eléctrica y lesiones personales.
Desconecte la alimentación antes de reparar o limpiar la unidad. De no hacerlo podría causar peligro de
descarga eléctrica o lesiones personales.
PROBLEMA CAUSA POSIBLE SOLUCIÓN POSIBLE
LA ASPIRADORA
NO FUNCIONA
WtAL
RENDIMIENTO DE
LA RECOGIDA DE
SUCIEDAD
EL POLVO SE ESCAPA DEL
DEPÓSITO DE POLVO
LA LUZ NO
FUNCIONA
2. Interruptor en posiciónapagado.
3. Protector térmico activado
1
. El depósito de polvo está lleno u obstruido.
2. Correa del mezclador rota.
3. Manguera o boquilla obstruida.
4.
Manguera no insertada completamente
5. Mezclador desgastado.
6. Agujero en la manguera
7. El depósito de polvo está
instalado incorrectamente
8. La correa no esta instalada en e! eje del motor.
9. El sistema de protección del
motor está activado.
10. El protector de sobrecarga del
mezclador está activado
1. El depósito de polvo está
Incorrectamente instalado.
1. Bombilla fundida. 1. Cambiar la bombilla.
2. Presione el interruptor al modo suelo o alfombra.
3. Consulte "para corregir el problema", en la página 9
1. Vade el depósito de polvo y limpie ios filtros
2. Cambie la correa del mezclador.
3. Limpie el área de la manguera o de ia boquilla.
4. Inserte la manguera
5. Cambie ei mezclador.
6. Cambie la manguera.
7. Instale correctamente el depósito de polvo
8.
Instale la correa en el eje del motor
9. Revise si hay obstrucciones
10. Consulte "para corregir el problema", en ¡a página 9.
1. Instale correctamente el depósito de polvo.
-15-
Page 34

ACUERDOS DE PROTECCION ORIGINAL
Una
Acuerdos de protección original
Felicidades por realizar una compra inteligente.
Su nuevo producto Kenmore® está diseñado y fabricado
para proporcionar años de funcionamiento fiable.
Pero, como todos los productos, puede requerir un mantenimiento
de prevención o ciertas reparaciones en alguna ocasión.
Aquí es donde tener un acuerdo de protección original puede
ahorrarle dinero y molestias.
Adquiera ahora un acuerdo de protección original y protéjase
contra inesperadas y costosas molestias.
El acuerdo de protección original también ayuda a extender la
vida de su nuevo producto. A continuación puede ver qué
se incluye dentro del acuerdo:
0
Experto servicio de nuestros 12.000 profesionales
y especialistas de reparación Especialistas
0 Servicio gratuito ilimitado de piezas y mano de
obra en todas las reparaciones cubiertas
0 Garantía "No-lemon" - sustitución de su producto
cubierto si experimenta cuatro o más averías en el producto
en un plazo de doce meses
0 Sustitución del producto sí su producto cubierto
no puede repararse
0 Revisión anual preventiva de mantenimiento
según ia solicite - sin ningún recargo
0
Ayuda telefónica rápida - asistencia telefónica de
los técnicos de Sears en aquellos productos que requieran
la reparación en e¡ hogar, mas un cómodo horario de reparación
0
Protección contra subidas de tensión contra los
daños eléctricos debidos a las fluctuaciones de energía
0 Reembolso del alquiler si reparación de su
producto cubierto tarda más del tiempo prometido
vez
será todo lo que
Usted puede llamar en cualquier momento del día o de la noche,
o programar una cita de servicio
Sears tiene más de 12.000 espedaiistas profesionales de ia
reparación, que tienen acceso a más de 4,5 míliones de piezas
y accesorios de calidad. Ésa es la dase de profesionalismo con
la que usted desea contar para ayudarle a prolongar la vida de
su nueva adquisición. lAdquiera su acuerdo de protección
original hoy mismo!
Se aplicarán ciertas limitaciones y exclusiones.
Para obtener información adicional acerca de nuestros
precios, llame al 1-800-827-6655.
Servicio de Instalación Sears
Para contratar el servicio de instalación profesionai de Sears en
electrodomésticos, cierres de
agua, y otros importantes artículos domésticos, en EE.UU, lame al
1-800-4-MY-HOME®
que adquiera el acuerdo,
necesite
hacer para concertar una cita con ei servicio.
puertas
una
simple Samada de teléfono
Online.
de garaje, calentadores
16-
Page 35

Page 36

Get it fixed, at your home or ours!
Your Home
For repair - in your home - of all major brand appliances,
lawn and garden equipment, or heating and cooling systems,
no matter who made it, no matter who sold it!
For the replacement parts, accessories and
owner's manuals that you need to do-it-yourself.
For Sears professional installation of home appliances
and items like garage door openers and water heaters.
1-800-4-MY-HOME®
{1-800-469-4663}
www.sears.com
Anytime, day or nigtit
(U.S.A. and Canada)
www.sears.ca
Our Home
For repair of carry-in products like vacuums, lawn equipment,
and electronics, call or go on-line for the nearest
Sears Parts and Repair Center.
1-800-488-1222 Anytime, day or night {U.S.A. only)
www.sears.com
To purchase a protection agreement (U.S.A.)
or maintenance agreement (Canada) on a product serviced by Sears:
1-800-827-6655 (U S A.) 1-800-361-6665 (Canada)
Para pedir servicio de reparación Au Canada pour service en français:
a domicilio, y para ordenar piezas: 1 -800-LE-FOYER“‘^
1-888-SU-HOGAR®“ (1-800-533-6937)
(1-888-784-6427)
www.sears.ca
© Sears, Rœbuck and Co.
© Registered Trademark / ™ Trademark / Service Mark of Sears, Roebuck and Co.
© Marca Registrada / Marca de Fábrica / ™ Marca de Servicio de Sears, Roebuck and Co.
Marque de commerce / Marque déposée de Sears, Roebuck and Co.
 Loading...