

Page 1
Owner's Manual
Manual del Propietario
Vacuum Cteaner
Aspiradora
iViodei, Modelo
721.33078
72! .33079
CAUTION: Read and follow a!l safety
and operating instructions before first
use of this product.
CUIDADO: Lea y sigue todas tas
instrucciones de operaci6n y seguridad
antes del uso de este producto.
Directions for Use
It is a violation of Federal law to use this
product in a manner inconsistent with its
labeling.
Direcciones de uso
Es una viotaci6n a ta fey Federal utitizar
este producto de una manera contraria
con su etiquetado.
Sears, Roebuck and Co., Hoffman Estates, IL 60179 U.S.A
www,sesrs.com
PART No. • 3828FI3841A Printed in China
Page 2
Before Using Your New Vacuum ........................2
Kenmore Vacuum Cfeanet Warranty ................ 2
impo_ant Safety fnstruct:ions ...............................3
Par_sand Features ...............................................4
Assembly instructions ........................................ 5,
Operatir_g lnst_Jctions ........................................ 6
Cord Re_ease..........................................................6
Autornatic Height Adjustment ........................... 7
Handie Release al_d Positions ...........................7
O_/Off Switch ..................................................... 7
Atlachmelts ....................................................... 7
At_.achme:n;tsUse Chart ...................................... 9
Vacuuming Tips ................................................ 9
Performance Features ..................................... !0
Vacuum Cleaner Care.............................................11
Vacuum Storage ................................................t t
Cleaning E×_eriorand Attachments ..................t t
Dust Bag Changing ............................................i2
Motor Safety Fil!_erC[eanhlg ...............................I3
Exhaust Filter C_eaning and Replacement .....13
Bell Changing and Agitator Qeaning ...............14
Agitate_ Servicing ............................................ ! 6
Agitato_'Assembly ...............................................16
Ciog Remora! ................................................... i7
Tro_b!eshooting ......................................................18
Master Protection_ Agreements. ....................... t 9
Service ..................................................Back Cover
Ptease read this guide. 11will help you assemble and operate your new Kenmore vacuum in the safesl
and most e_feclive way.
For more intermation about the care al_doperation, c_! your nearest Sears store.
You wi!l need _hecomplete model and seria_ numbers wher_ requesting information.
Your vacuum's model_and serial numbers are Iocated on the Model and Sofia! Number PIale.
Use the space below to record the model number and serial number el your new Ket_morevacuum.
Modet No,
Serial No,
Date d Purchase
Keep this book and your sales check (receipt) in a safe #ace for Mute re!erence,
UM|TED ONE Y_:R WARRANTY ON KENMORE VACUUM CLEANER
This warranty is for one yea_' firo:mthe date of purchase, and inciudes only private household
vacuum cleaner use, During the warra_y year, when this vacuum cleaner is o_rated and
m_ntained according to:the owner's manua_ instructbns, Sears will repair any defects in materiat
or workmanship free of charge.
Thiswarranty excludes vacuum bags, be_ts,t[gh_bulbs, and filters, which are expendable parts
and become worn during normat use_
For warranly service, return this vacuum cleaner to the neares! Sears Parts and Repair
Center in the Uni!ed Steres.
This warranty applies only white this product isin use in the United States.
This warranty gives you specific legaf rights, and you may atso have other rights which vary from
state to: state.
Sears, Reeb_k and Co., D!817WA, Hoffra8n Estate, |L 60179
Page 3
WA
G-To reduce the risk of fire, etectric shock, or injury:
Your safety is important te us. To reduce the risk of fire, electric shock, injury to
persons or damage when using your vacuum cleaner, foltow basic safety precautions
including the following:
Read this manual before assembling or using
your vacuum cleaner.
Use your cleaner only as described in this
manual. Use oniy with supplied attachments.
To reduce the risk of electric shock- Do not
use outdoors or on wet surfaces.
Disconnect electrical supply before servicing
or cleaning out brush area. Failure to do so
could result in electric shock or brush suddenly
starting.
Always turn cleaner off before connecting or
disconnecting the hose.
Always turn cleaner off before unplugging.
Do not unplug by pulling on cord. To unplug,
grasp the plug, not the cord.
Hold plug when rewinding onto cord reel.
Do not allow plug to whip when rewinding.
Do not use with damaged cord or plug. If
cleaner is not working as it should, has been
dropped, damaged, left outdoors, or dropped
into water, return it to a Sears Service Center.
De net pull or carry by cord, use cord as a
handle, close door on cord, or pull cord around
sharp edges or corners. Do not run cleaner over
cord. Keep cord away from heated surfaces.
De not leave cleaner when plugged in,Unplug
from outlet when not in use and before servicing.
Do not allow to be used as atoy. Closeattention
is necessarywhen used byor near children.
Do not handle plug or cleaner with wet hands.
Do not operate the cleaner with a punctured
hose. Replace if cut or worn. Avoid vacuuming
sharp objects.
Do not use with any opening blocked; keep
free of dust, lint, hair and anything that may
reduce air flow.
Keep hair, loose clothing, fingers, and all parts
of body away from openings and moving parts.
Do not use cleaner without dust bag andlor
filters in place.
Always change the dust bag after vacuuming
carpet cleaners or freshener, powders and fine
dust. These products clog the bag, reduce
airflow and can cause the bag to burst. Failure
to change bag could cause permanent damage
to the cleaner.
Do not use the cleaner to pick up sharp hard
objects, small toys, pins, paper, etc. They may
damage the cleaner or dust bag.
Do net pick upanything thatisburning orsmoking,
such ascigarettes,matches,or hot ashes.
Do not use vacuum cleaner
to pick up flammable or combustible liquids
(gasoline, cleaning fluids, perfumes, etc.), or use
in areas where they may be present. The fumes
from these substances can create a fire hazard
or explosion.
Use extra care when cleaning on stairs. Do not
put on chairs, tables, etc. Keep on floor.
You are responsible for making sure that your
vacuum cleaner is not used by anyone unable
to operate it properly.
SAVETHESE i STRUCT
Proper assembly and safe use of your vacuum cleaner are your responsibilities. Your cleaner is
intended only for household use. Read this Owner's Manual carefully for important use and
safety information. This guide contains safety statements under warning and caution symbols.
Please pay special attention to these boxes and follow any instructions given. WARNtNG
statements alert you to such hazards as fire, electric shock, burns and serious personal injury.
CAUTION statements alert you to such hazards as moderate personal injury andlor property
damage.
-3-
Page 4
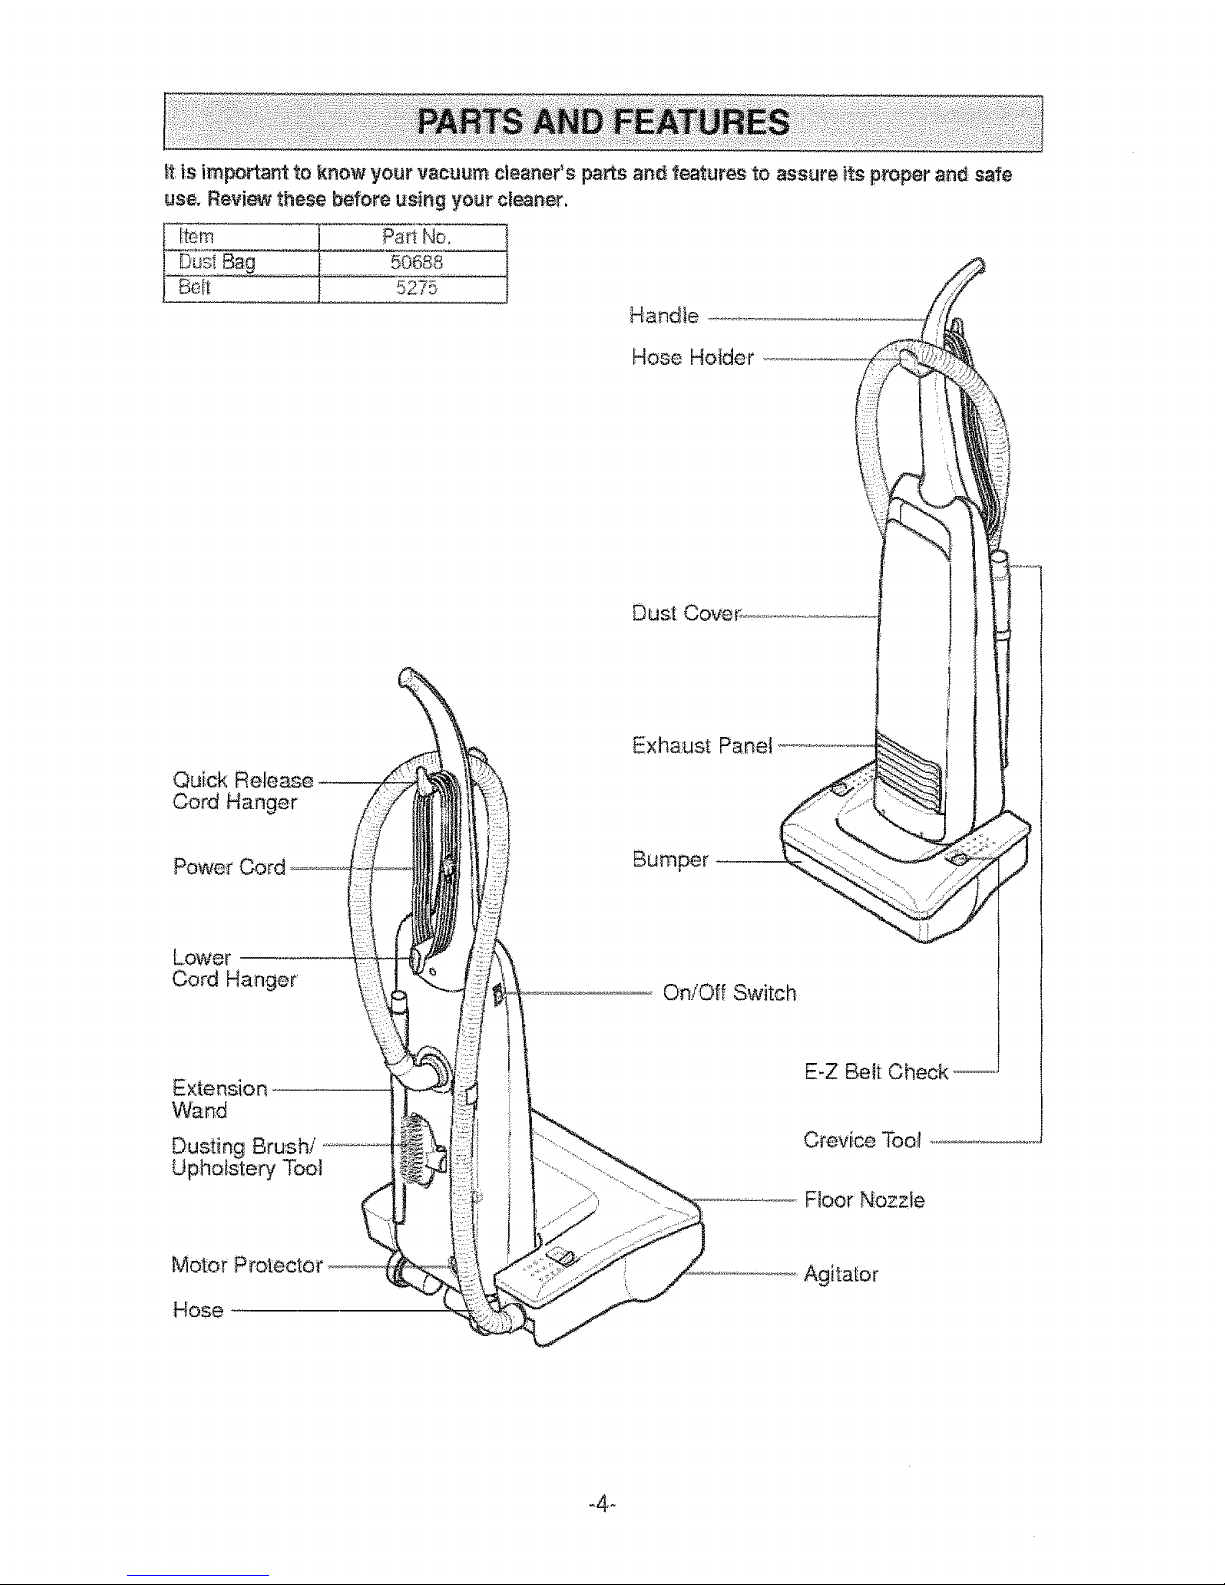
_t:is important to know your vacuum cleaneCs parts an_ features to assure its proper and: safe
use, Review these before, _sing your cleaner.
_tem Pa_SNo.
Dust Bag 5O688
Bait 5275
Handle
Hose Hotder
Quick Release
Cord Hanger
Power Cord
Exhaust Panel
Lower
Cord Hanger
On/Off Switch
Extension
Wand
Dusting Brush/
Upholstery Tool
E-Z Belt Check
Crevice Too_
Floor Nozzle
Motor
Hose
Agitator
_4_
Page 5
Before assembling your vacuum, check the
PACKING UST on the cover of the separate
Parts List. Use this {_stte verify that you have
received aJlthe components of your nmv
Kenmore v_uum.
WARNING
Electric Shock Hazard
Do not plug _nt_the electrical supply until
the assembly is complete.
Failure to do so could result ir_electric
shock or iniury.
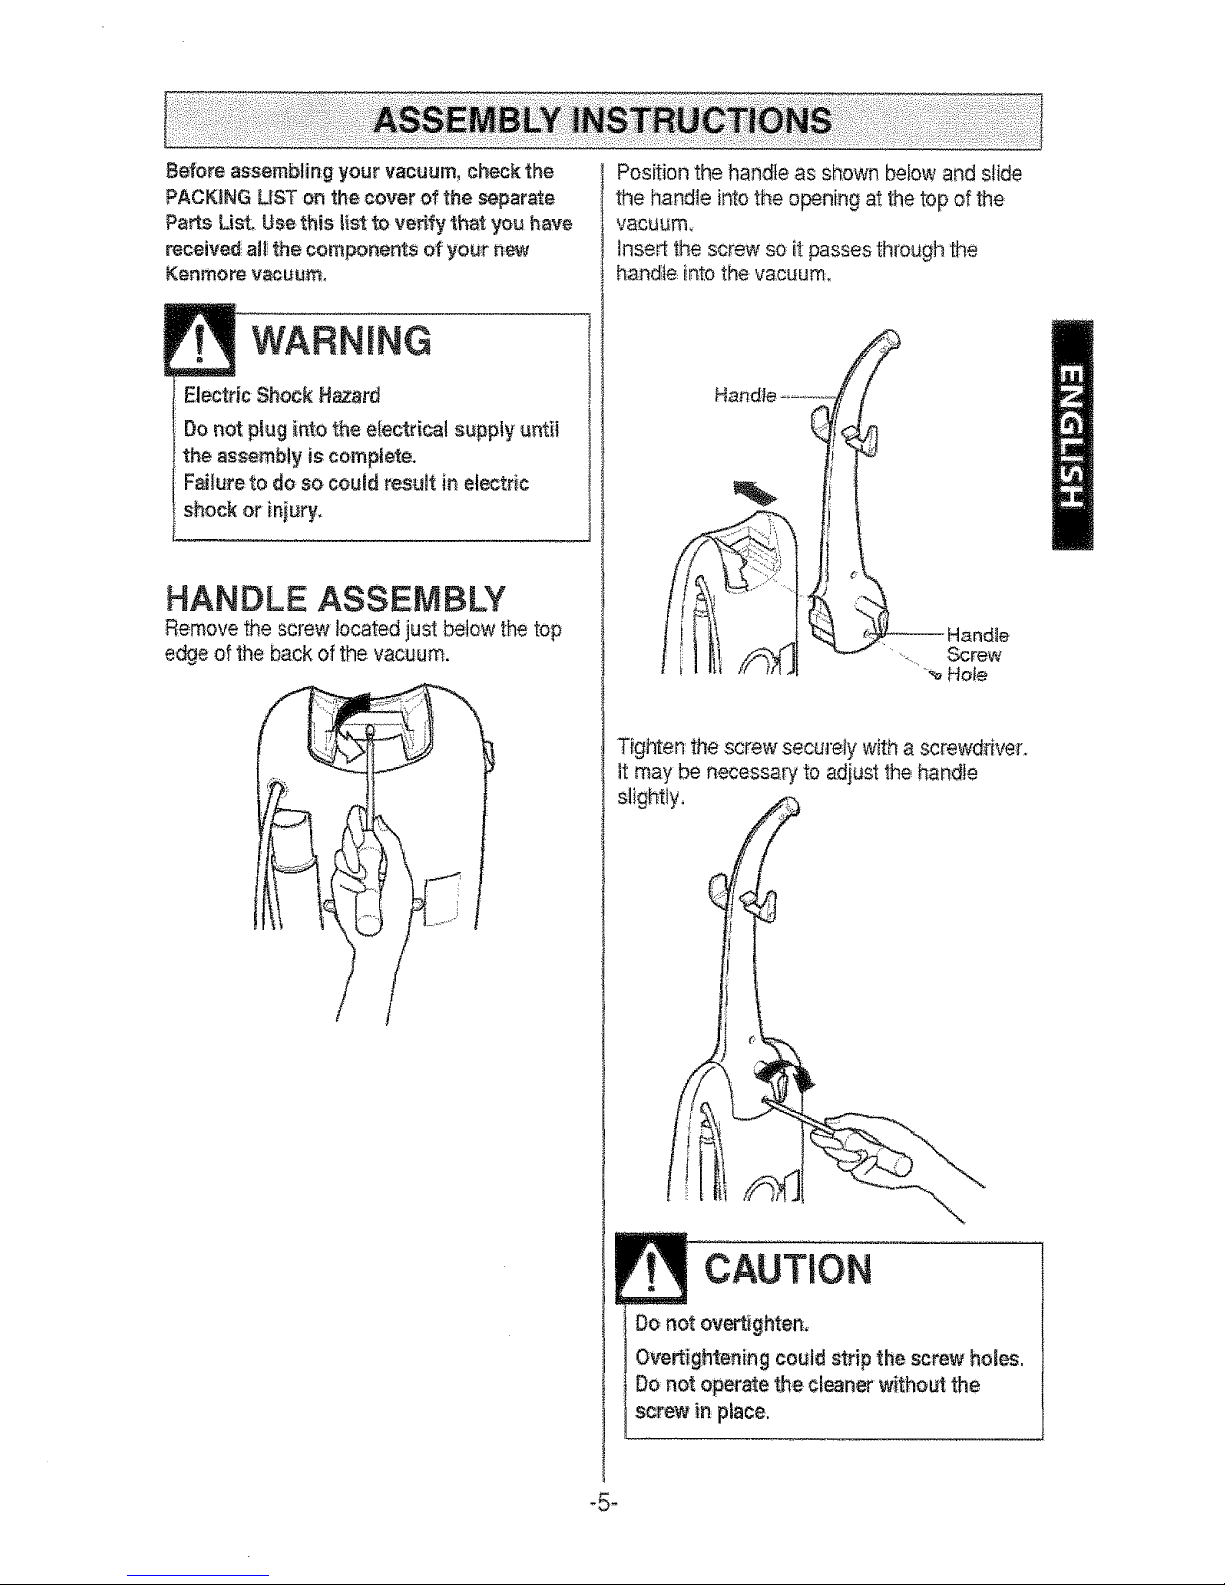
HANDLE ASSEMBLY
Remove the screw located just bel:ow the top
edge of the back of the vacuum.
Position the handle as shown befow and slide
the handle into the opening at the top of the,
vacuum,
inse_thescrew so itpasses1_hroughthe
handle intothevacuum,
Tighten: fl_e screw setupely witha screwdrive:l.
It may be necessary to adiust the handle
slightly,
CAUTION
Do,not overtighten:,
Overtightening coutd strip the screw holes.
Do not operate the c_eaner w_thout the
screw in place.
-5o
Page 6
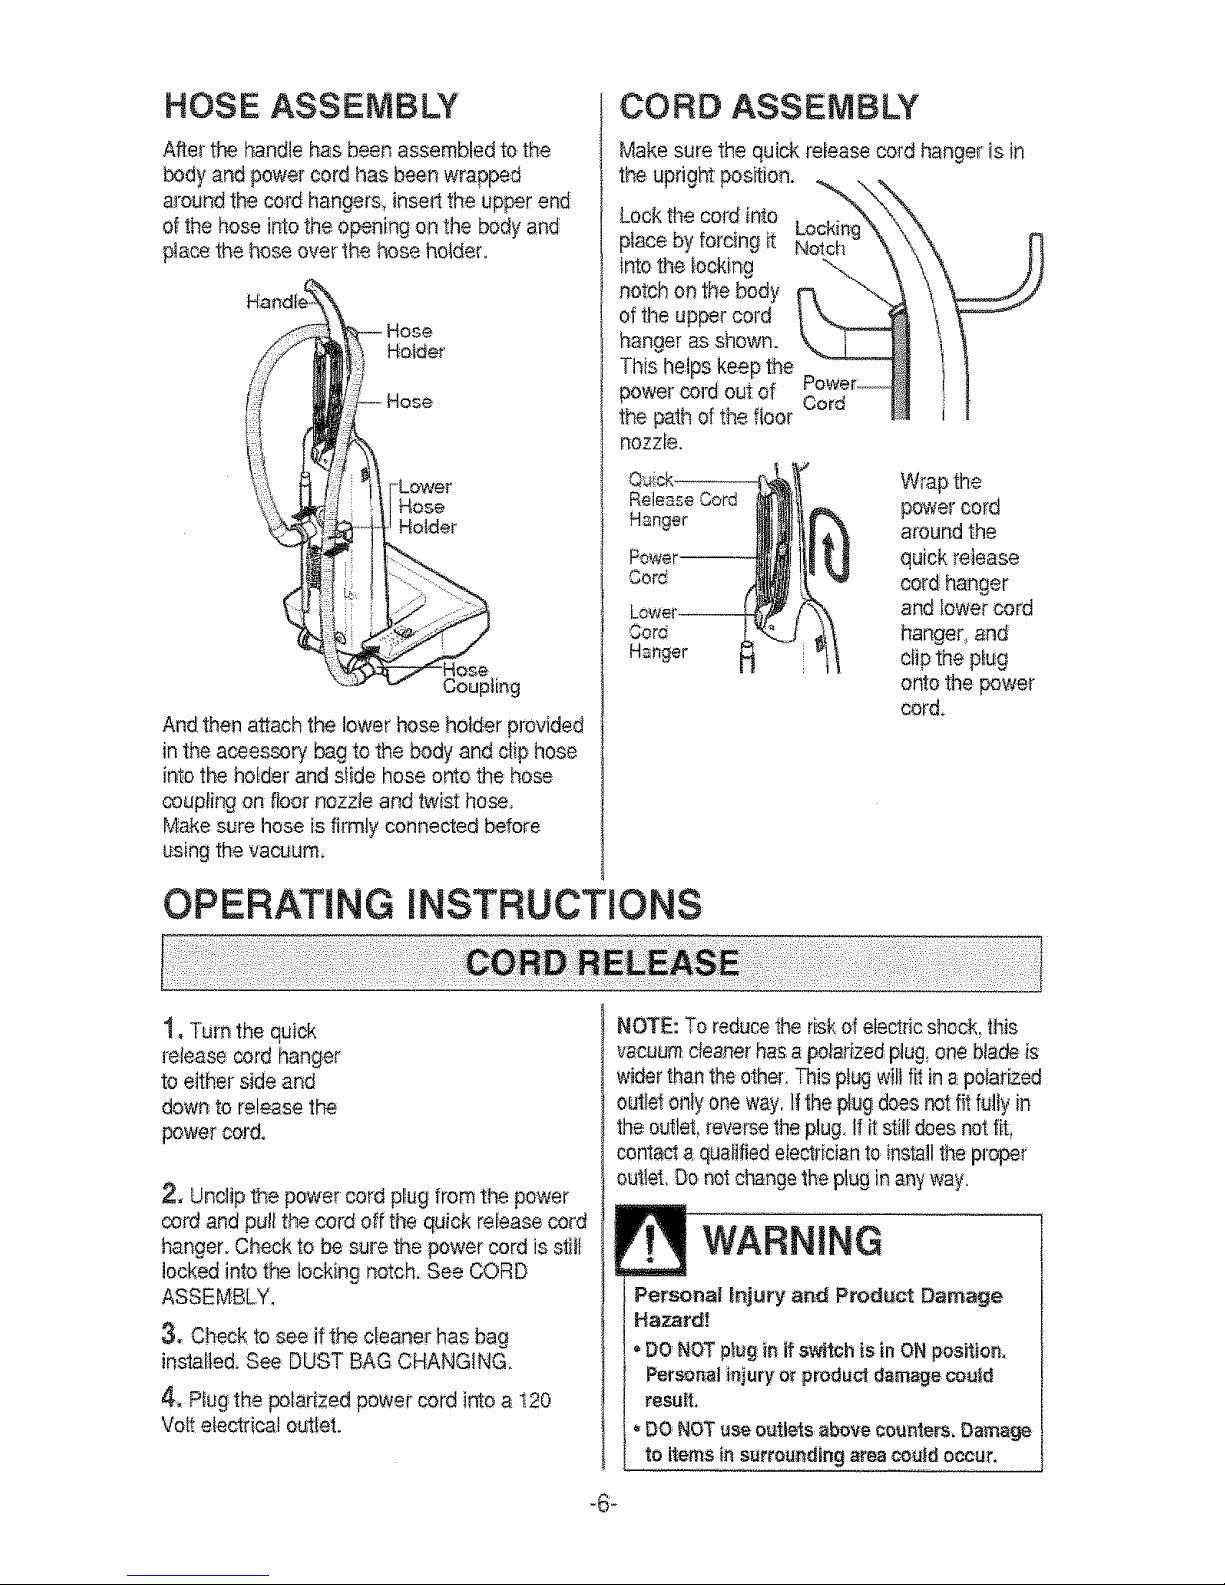
HOSE ASSEMBLY
After the handle has been assembled to.the
body and power cord has been wrapped
a'ound the cord hangers_ inser_ the upper end
of the hose i_o the opening on the body and
place the hose over the hose hoBer.
Hose
Holder
l-- Hose
_ r.Lower_
'__|Hose
'J Coupling
And then a_ach the lower hose holder Fovided
in the aceessory bag to the body and clip hose
into the holder and slide: hose onto the hose
coupling on floor nozzle and twist hose°
Make: sure hose is firmty connected before
_sing the vacuum.
CORD ASSEMBLY
Make sure the quick release cord hange_ is in
the upright pos_ion.
Lock the cord into
Locking
place by forcing _ Notch
into the _ocking
notch on the body
of the upper cord
hanger as shown.
This helps keep the
power coli out of
Cord
the path of the floor
r)ozzie.
Cord
Wrap the
power cord
around the
quick release
cord hanger
and Iower cord
hanger, and
clip the pt_g
onto the power
cord,
OPERATING INSTRUCTIONS
1, Turn the quick
release cord hanger
to either side and
down to release: the
power cord.
2, Unc_ipthe power cord plug from the power
cord and pult the cord off the quick release cord
hanger. Check to be sure the power cord is sill}
locked into the locking notch. See CORD
ASSEMBLY.
3, Check to see if the cleaner has bag
installed, See: DUST BAG CHANGING,
4, Plug the polarized pow,_rcord., into a t20
Vo_ elec_'ical out_et.
NOTE: To reduce the risk of electric shock, flis
vacuum cleaner has a polarized plug, one blade is
wider than the o_:hel.This ptug will fit in a_polarized
out,e1 onty one wa_y./flhe plug does not:f_tfully in
the outleL [everse the plug, If it still:does no¢fit,
conlact a qualified elect!'ician to [l_sta]lthe proper
outlet, 9o not change the p_ugin any way.
WARNING
Personal injury and Prodect Damage
Hazard!
DO NOT pteg.in if s_ftch is in ON pesi_iot_,
Personal inlury o_ producl damage could
reSUft,
, DO NOTuse outle_s,above touters, Damage
to items ia surto_#d_ng area co£td occur.
Page 7
This vacuum ciea_er is designedwith s_ Automatic
Height Ad!ustment which adjuststhe floor nozzleto
the proper height of a_qyca_et pile..
The height of floor nozzle is in_an_y and
automaticallyadi_,_stedwhen yo_ move from one
carpeted area to ano_ser.
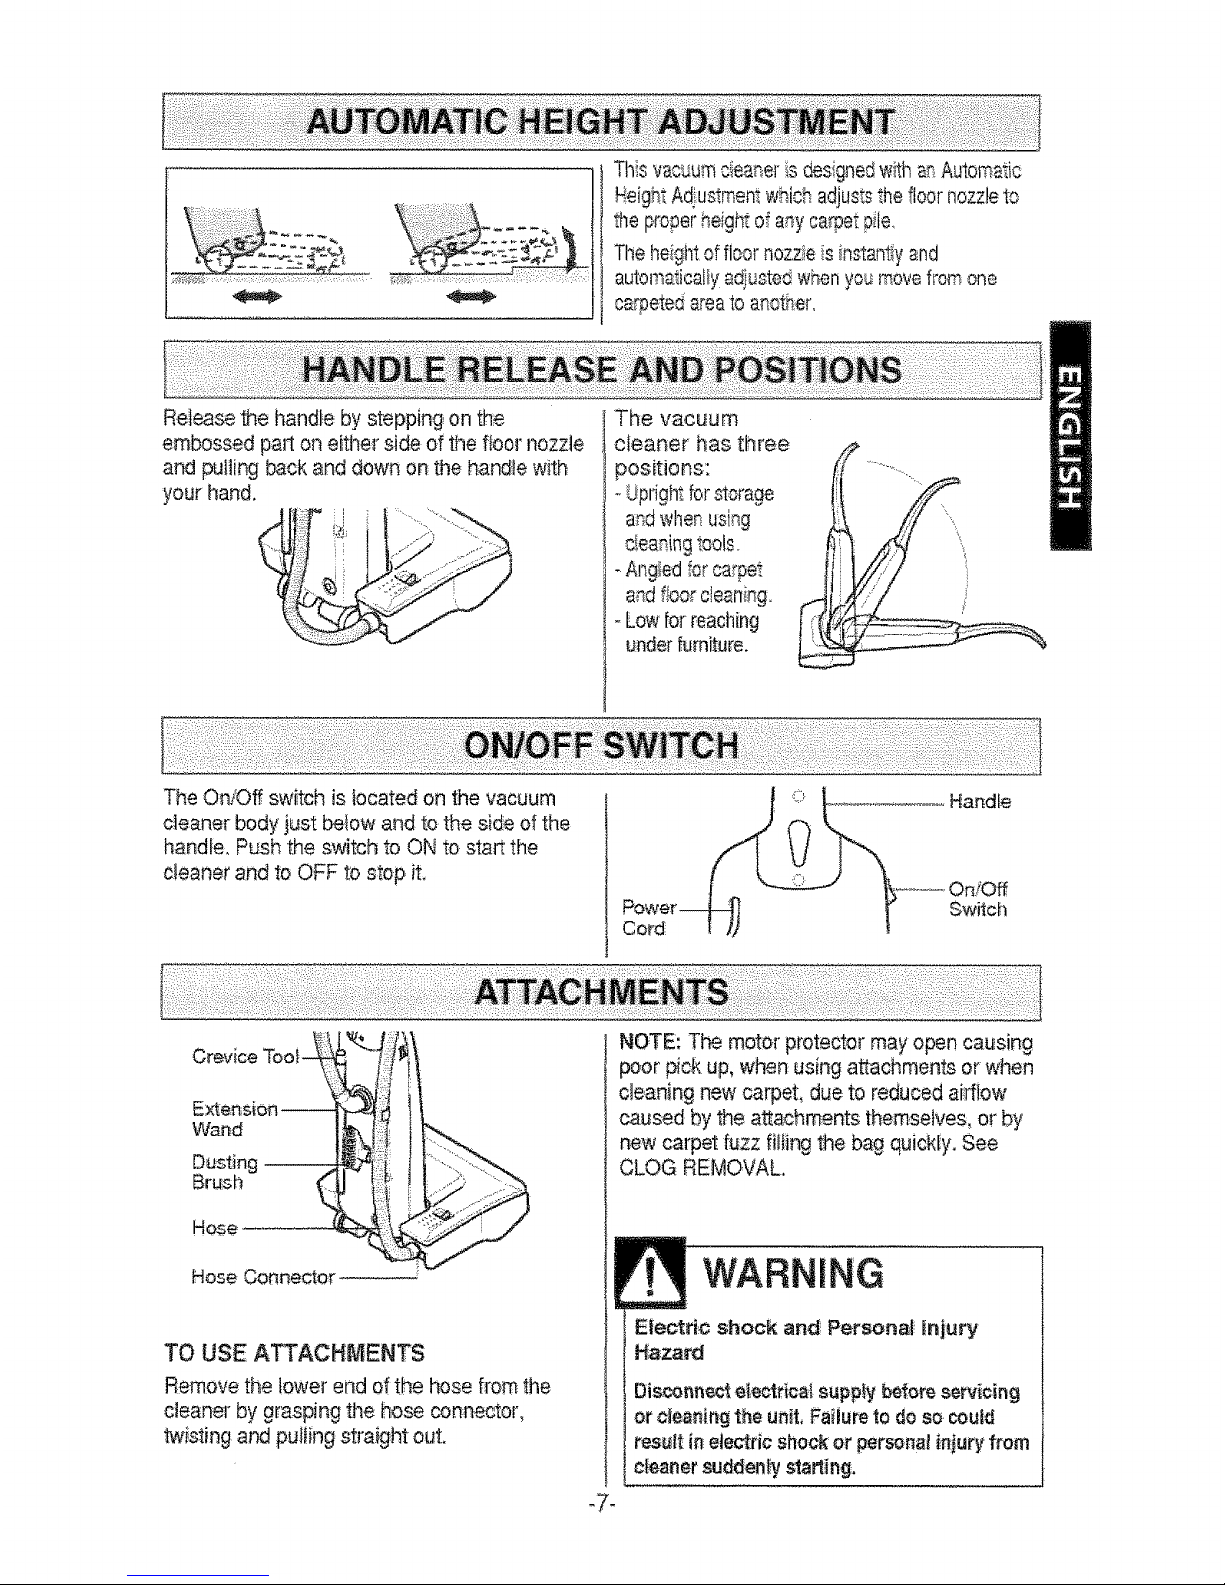
Release the handle by stepping, on the
embossed pal1 on either" side of the fbor nozzle
and pulling back and dow_ on the handle with
your hand.
The vacuum
cteaner has three
positions:
iJpright forstorage
and when using
_,_ea_tr_gtoolso
- Angled _orcarpet
and floor ctesni_g.
- Low for roaching
under rum[lure.
The On/Off switch is located on the vacuum
cleaner body just below and to the si_e of the
handle, Push the switch to ON to start the
cleaner and to OFF to stop it.
Cerd
Hat, die
On/Off
Swilch
Wa_d
Dusting --
Brush
Hose
Hose Connector
J
TO USE ATTACHMENTS
Remove the !ower end of the hose fi'orn the
cleaner by gras#ng the hose connector,
twisting and pulling straight out.
:::::::'::: : ::: :[: :: :
NOTE: The motor protector may open cau_sing
poor p_ck up, when using attachments or when
cleaning new carpet, due: to reduced ai#t:ow
caused by the a_,achments themselves, or by
new carpet i_uzzflIfing the: bag quickiy. See
CLOG REMOVAL
WARNING
Page 8
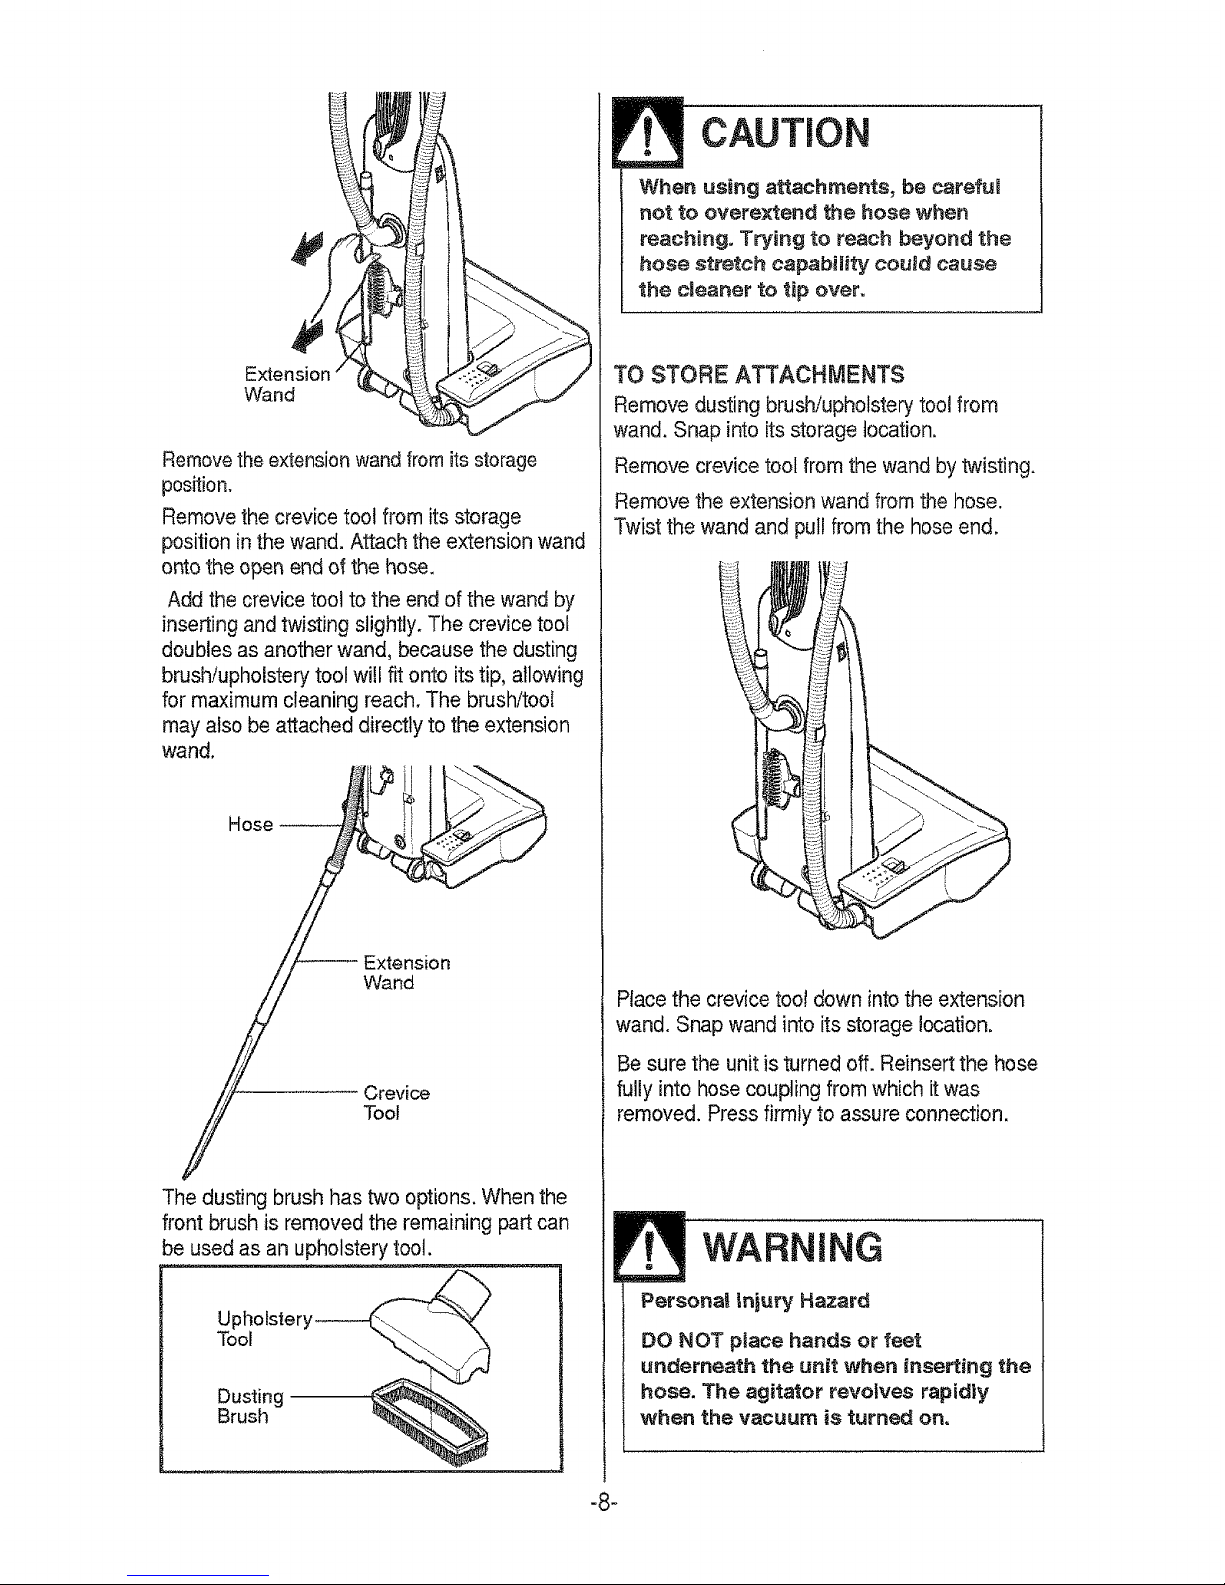
Wand
Remove the extension wand from its storage
position.
Remove the crevice tool from its storage
position in the wand. Attach the extension wand
onto the open end of the hose.
Add the crevice tool to the end of the wand by
inserting and twisting slightly. The crevice tool
doubles as another wand, because the dusting
brushtupholstery tool will fit onto its tip, allowing
for maximum cleaning reach. The brushttool
may also be attached directly to the extension
wand.
HOSe
//- Extension
Wand
i/f Crevice
Tool
The dusting brush has two options. When the
front brush is removed the remaining part can
be used as an upholstery tool.
Upholstery __
Tool "__:/f,_
Dusting
Brush
CAUTION
When using attachments, be carefu_
not to overextend the hose when
reaching. Trying to reach beyond the
hose stretch capability couRd cause
the cleaner to tip over.
TO STORE ATTACHMENTS
Remove dusting brush/upholstery tool from
wand. Snap into its storage location.
Remove crevice tool from the wand by twisting.
Remove the extension wand from the hose.
Twist the wand and pull from the hose end,
Place the crevice tool down into the extension
wand. Snap wand into its storage location.
Be sure the unit is turned off. Reinsert the hose
fully into hose coupling from which itwas
removed. Press firmly to assure connection.
WARNING
Personal Injury Hazard
DO NOT ptace hands or feet
underneath the unit when inserting the
hose. The agitator revolves rapidly
when the vacuum is turned on,
-8-
Page 9
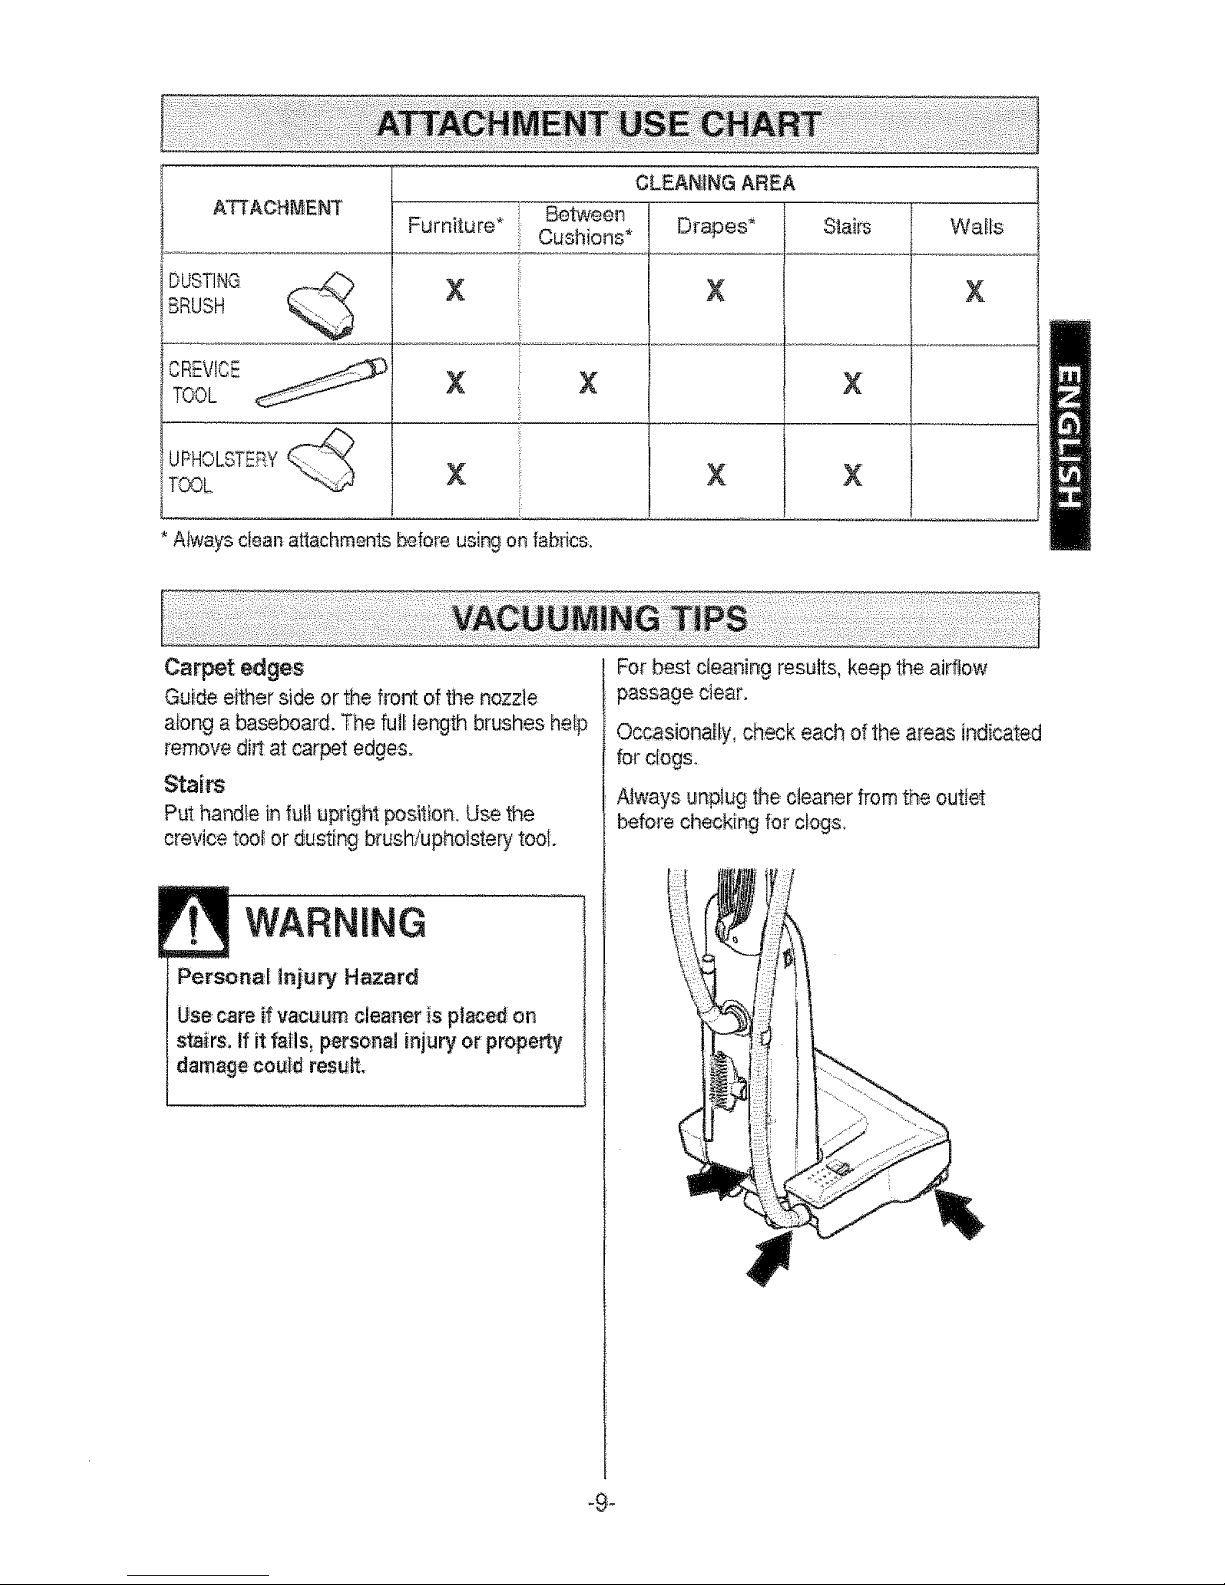
A]3"ACHMENT
DUSTING _,_
BRUSH
CREVICE
TOOL
t .. _: I*._ ¸
JPHOL_T_d
TOOL
Furniture*
X
X
CLEANING AREA
Betweel_
Gush ons* Drapes_
×
X
Smi_
X
X
X
X
Wails
X
A_wayscban attachments _bre using on fabdcs,
Carpet edges
Guide efther side or the front of the nozzle
abng a baseboard. The full length brushes he_p
remove dirt at carpet edges.
Stairs
Put handle in _uL!upright position. Use the
crevice too_or dusting bfushiuphoistery tool.
WARNING
Personal In_ury Hazard
Use care if vacuum cleaner is ptac_ on
stairs, if it falls_ personal injury or property
damage couW result,
For best cleaning results, keep the airfbw
passage clear.
Occasionally, check each of the areas indicated
for chgs.
Always _nplug _e cleaner from the outlet
before checking for clogs,
-9-
Page 10
WARNING
Electric Shock And, Persona! injury
Hazard
Disconnect efectricai supply before
,servicing or cleaning the ur_it.
Failure to do so could resu_ in
emectric shock or personal injury from
cleaner suddenly starting°
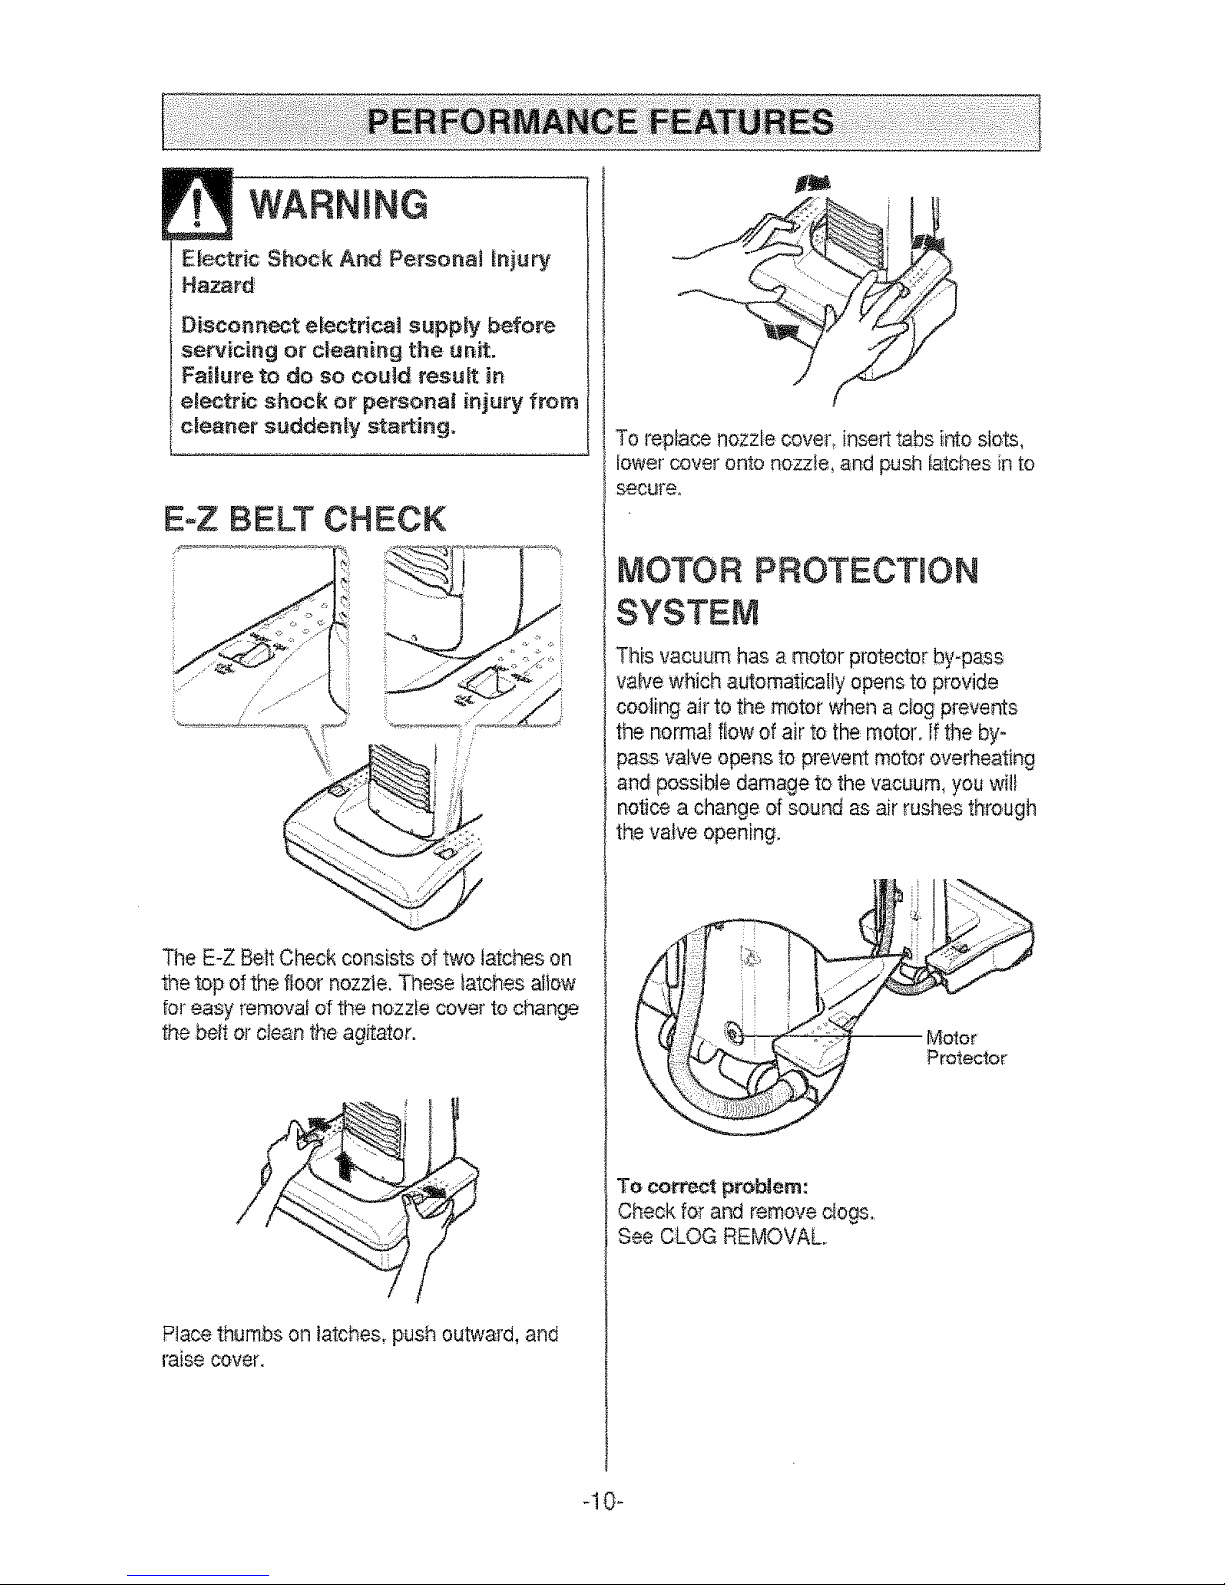
E-Z BELT CHECK
The E-Z Belt Check consists of two latches on
the top of the fioor nozzte. These latches aliow
br easy removal of tt_e nozzfe cove_' to change
the beit orcle_n the agitator.
Place thumbs on latches, push out_,,a]'d, and
raise cover.
To reptace nozzle covel._ insetl tabs into.slots,
Iower cover onto nozzle, 8nd push tatches in to
secure,
MOTOR PROTECTION
SYSTEM
This vacuum has a motor protector by-pass
valve which automaticatfy opens to provide
cooling air to the motor when a clog prevents
the: nomlal flow of air to: the motor. If the by-
pass. valve opens to prevent motor overheating
and possible damage to the vacuum, you will
notice a change of sourd as air rushes through
the vak_e opening.
Motor
Protector
To correct prebllem:
Check fo[ and remove clogs.
See CLOG REMOVAL.
-10-
Page 11
VACUUM CLEANER CARE
Always fotiow al_safety precautions when
o_eaning and servicing the vacuum cteaner.
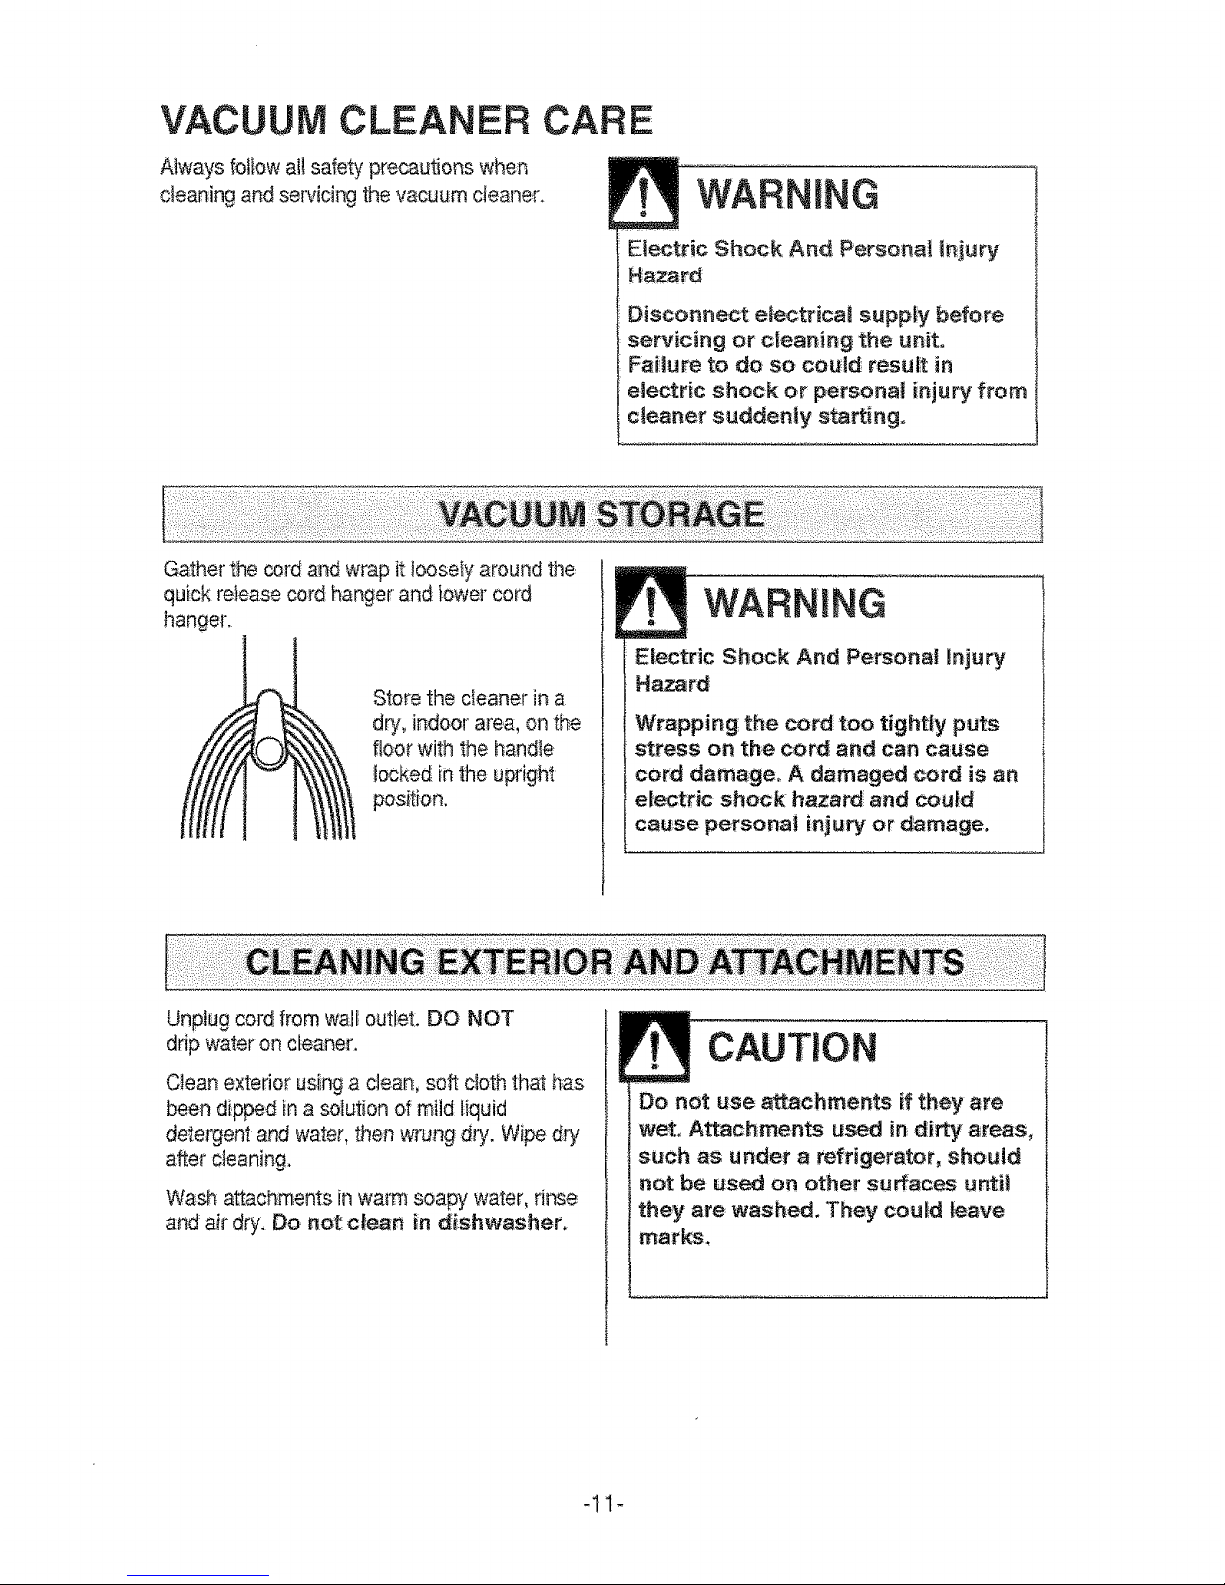
Gather the cord and wrap it loosely around the
WARNING
Etectric Shock And, Persona_ injury
Hazard
Disconnecl etectricai supply before
servicing or clieaning the unit.
Failure to do so could resullt in
electric shock or personal injury from
cleaner suddenly starting.
quick release cordhar_er and tower cord
hanger,
Stere the cl.eaner in a
dry, indoor area, on the
floor with the handie
_ocked in the upright
position.
WARNING
Eiectric Shock And Persona! injury
Hazard
Wrapping the eo_ too tightly puts
stress on the cord and can cause
cord damage.. A damaged cord is an
electric shock hazard and could
cause persona| injury or damage.
Unplug cord from wall outlet. DO NOT
drip water on clea_er.
Clean extedor using a clean, soft cloth thai has
been dipped in a sotution of mild liquid
detergent and water, then wrung dry. Wipe dry
after cleaning,
Wash; attachments in wa_'msoapy water rinse
and: ait-dry. Do not: ctesn in d_shwasher.
::: ::::::[:::::[:::: ::::::: ::::::::[
CAUTION
Do not use attachments if they are
wet, Attachments used in dirty areas,
such as under a refrigerant, should
not be used on other surfaces untit
they are washed, They could leave
marks.
Page 12
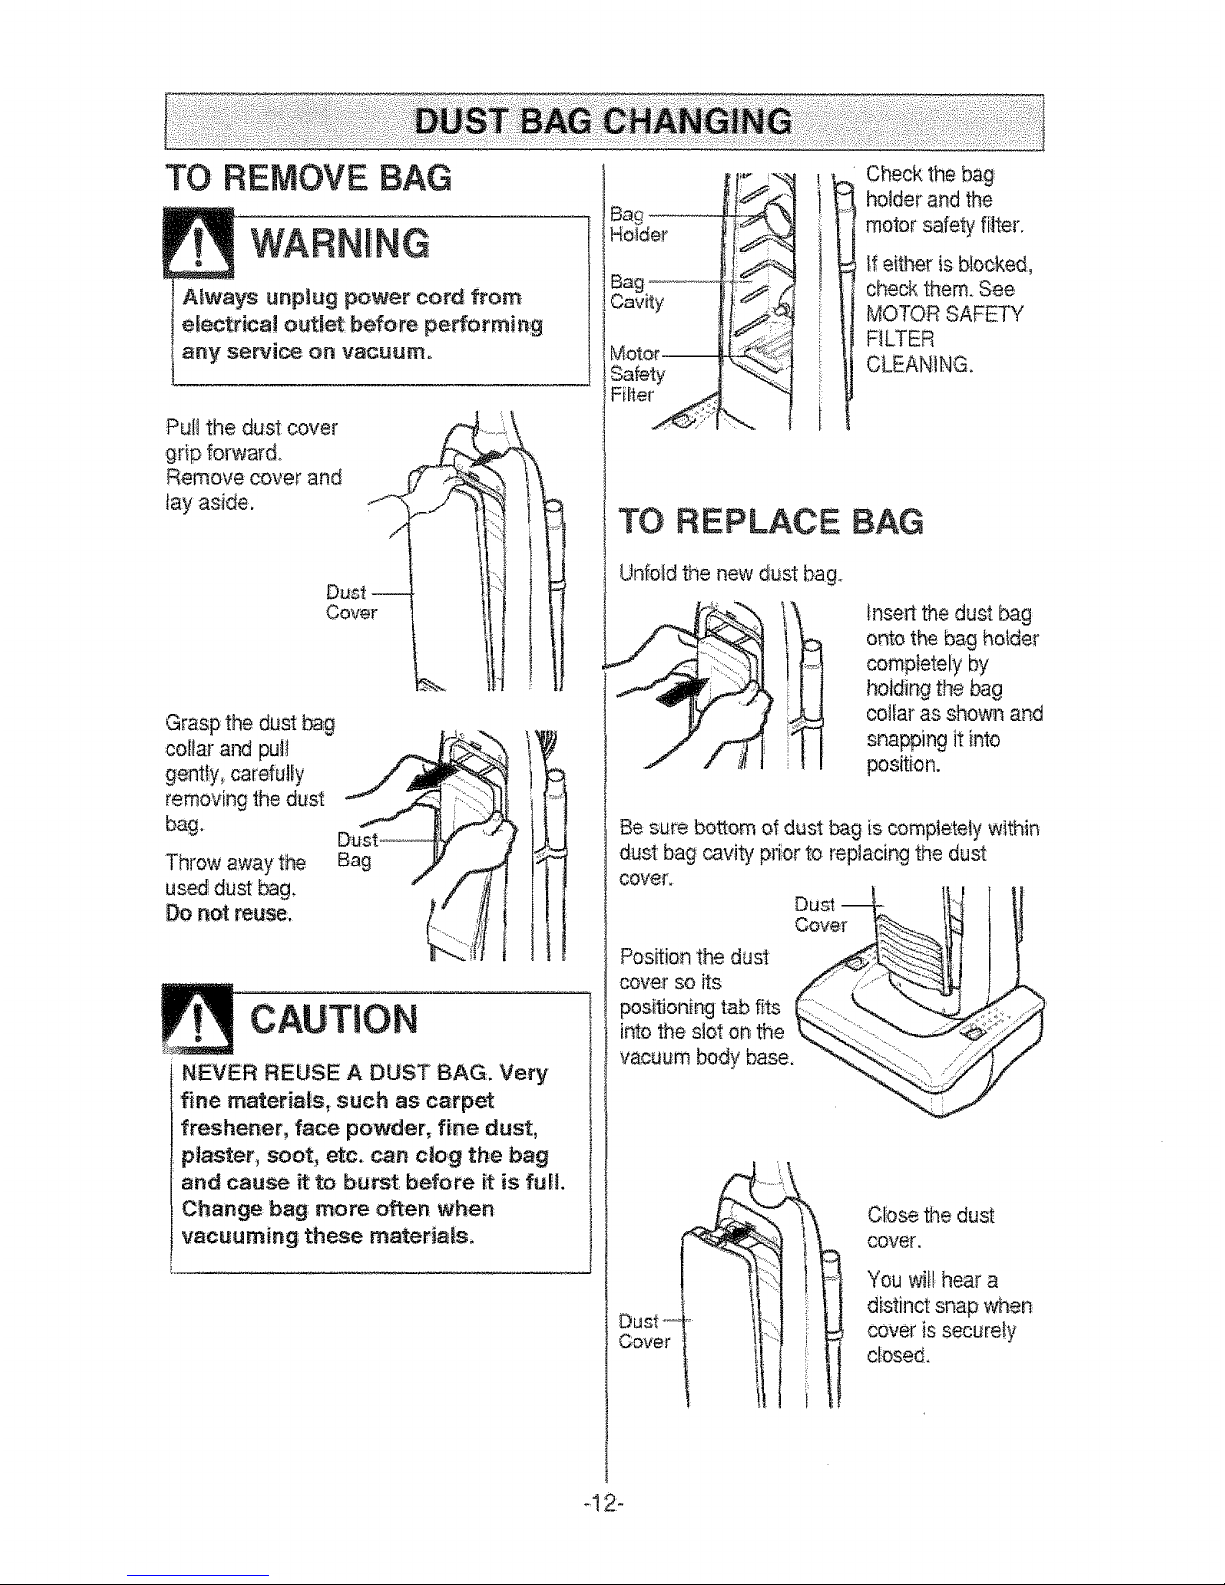
TO REMOVE BAG
WARNING
Pull the dust cover
gr{p forward.
Remove cover and
lay aside.
/
Dust --
Cover
Grasp the dust bag
collar and puit
gentty, carefulFy
removing the dust
bag.
Throw away the
used dust bag,
notreuse:.
Bag
CAUTION
NEVER REUSE A DUST BAG. Very
fine materials, such as carpet
freshener, face powder, fine dust,
piaster, soot, etc. can clog the bag
and cause _ to burst before it is fuN.
Change: bag: more omen when
vacuuming these materials.
BOO ....
Motor--
Safety :_t'l
Check the bag,
holder and the
motor safety filter.
If either is:bbcked,
check them. See,
MOTOR SAFETY
FILTER
CLEANING.
TO REPLACE
Un_oId the new dust bag,
BAG
ii lnsell the dust bag:
onto the bag hotde[
completely by
holding the bag
'" collar as sho_,m and
snapping it into
position.
Be sure bottom of dust, bag, is completely within
dust bag cavity prior to replacing the dust
oovefl
PosRion the dust
cover so its
positioning tab fits
into the slot on the
vacuum body base,
Dust _'_
Cover
,......
i
Close the dust
cover.
You wit!;hear a
distinct snap when
cover is securefy
closed,
Page 13
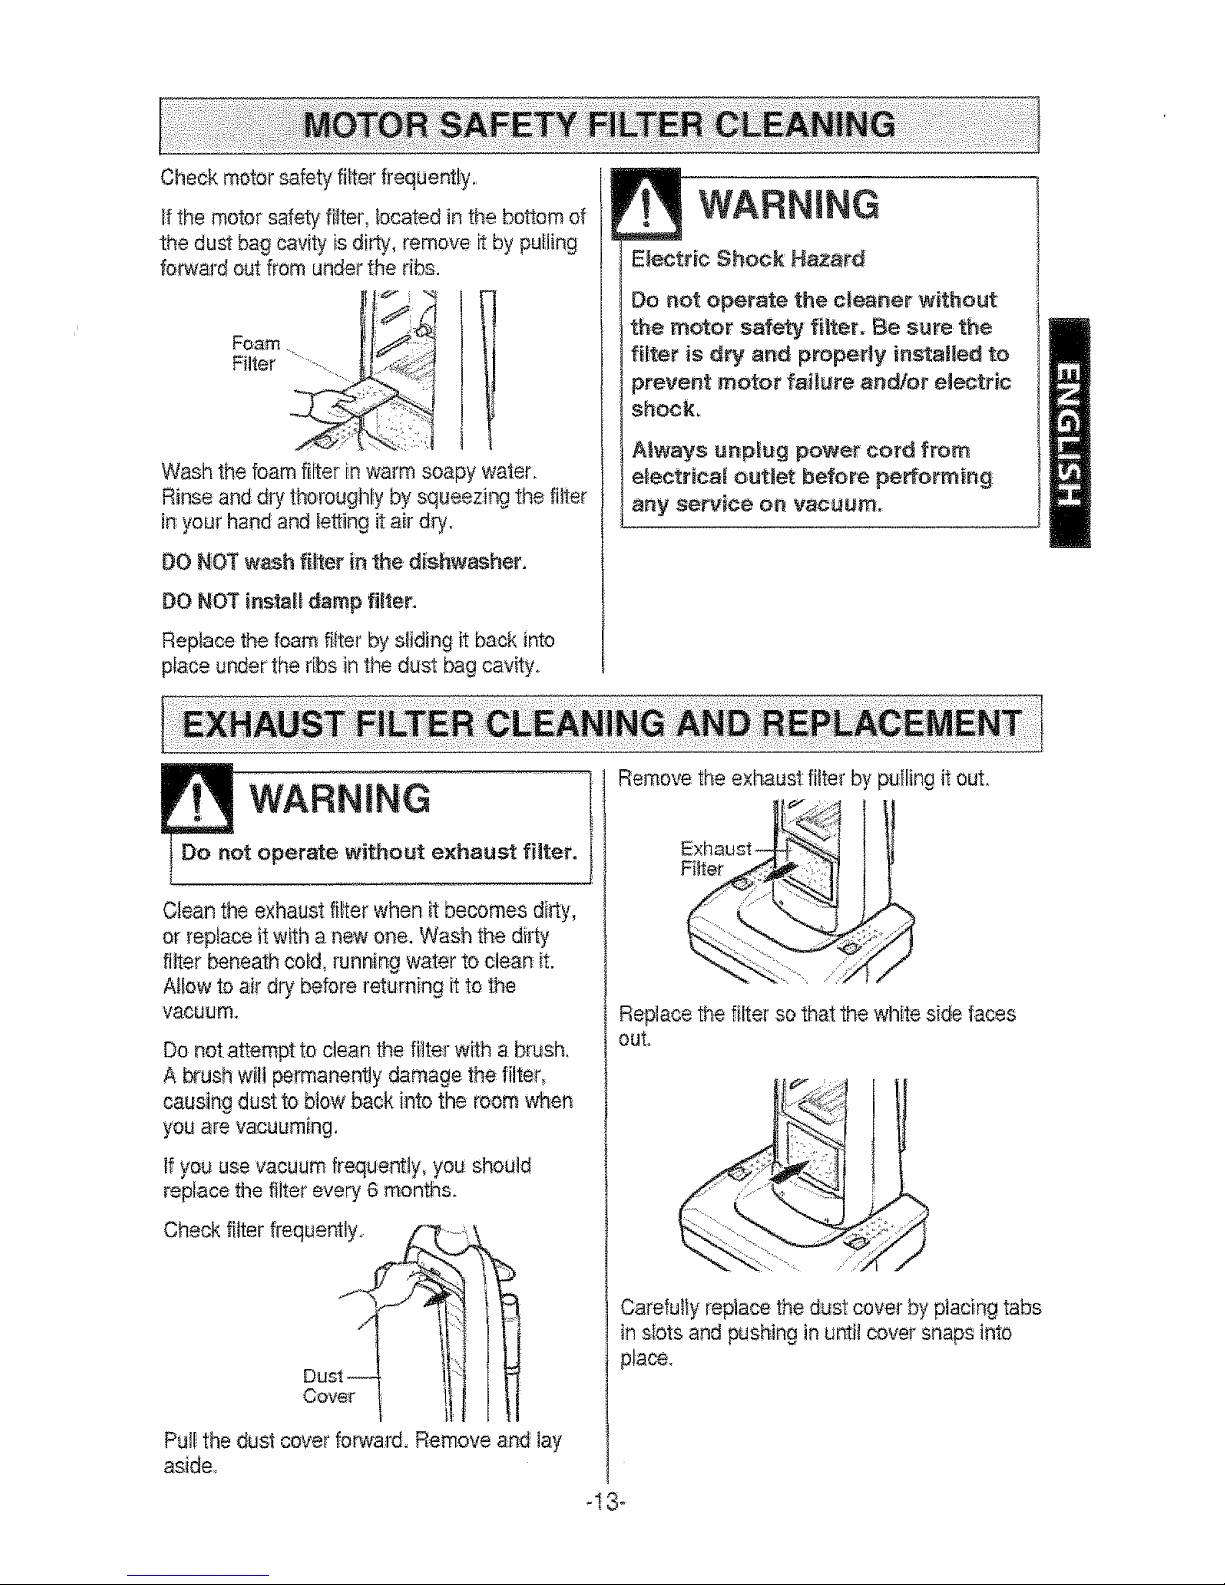
Checkmotorsafetyfi_erfrequently.,
ff the motor safety filter, local_ed in the bottom of
the dust bag cavity is dirty, remove it by pulling
forward out from under the ribs.
; j
FilterFoam...........
Wash the foam fitter in wal'm soapy waNr.
Rinse and dry thoroughly by squeezing the fifter
in your hand and Ietting it air dry,
DO NOT wash f_ller in the, dishwasher.
DO NOT install damp f_l'ter.
Replace the foam filter by sliding it back into
place under the ribs in the dust bag cav_y.
WARNING
Etectric Shock Hazard
Do no_: operate the cl_ner without:
the motor safety fi_tero Be sure the
filter is d:_ and properly installed to
prevent motor failure and/or electric
shock.
Always unplug power cord from
electrical outlet before performing
ar_y service on vac_J#m.
WARNING
Do not operate without exhaust filter.
Clean the exhaust filter when it becomes di_y,
or repiace it with a new one. Wash the dirty
filter beneath co_d, running water to clean it.
Atlow to ai_"dry before returning it to the
vacuum.
Do not attempt to clean the filter wRha brush,
A brush wi!! permanently damage the filter_
causing dustto bbw back into the _om wher_
you are vacuuming.
If you use vacuum freque_ity, yo_ should
replace the filter every 6 months.
Check filter frequently.
Dust
Cover
PUl! the dust cover foP_,ard, Remove and lay
aside_
Remove the exhaust: filter" by
Ex:hau
/>
)u_ling it out.
Replace the fi_er so that the _ite side faces
out.
Ca_'efu_}yreplace the dust cover by placing tabs
in slots and pushing in unti! cover snaps into
place_
-13-
Page 14
WARNING
Frequently check and remove hair, string and
Iint buitd-up in the brush area. _fbuitd-up
becomes excessive, fc41owthe steps below.
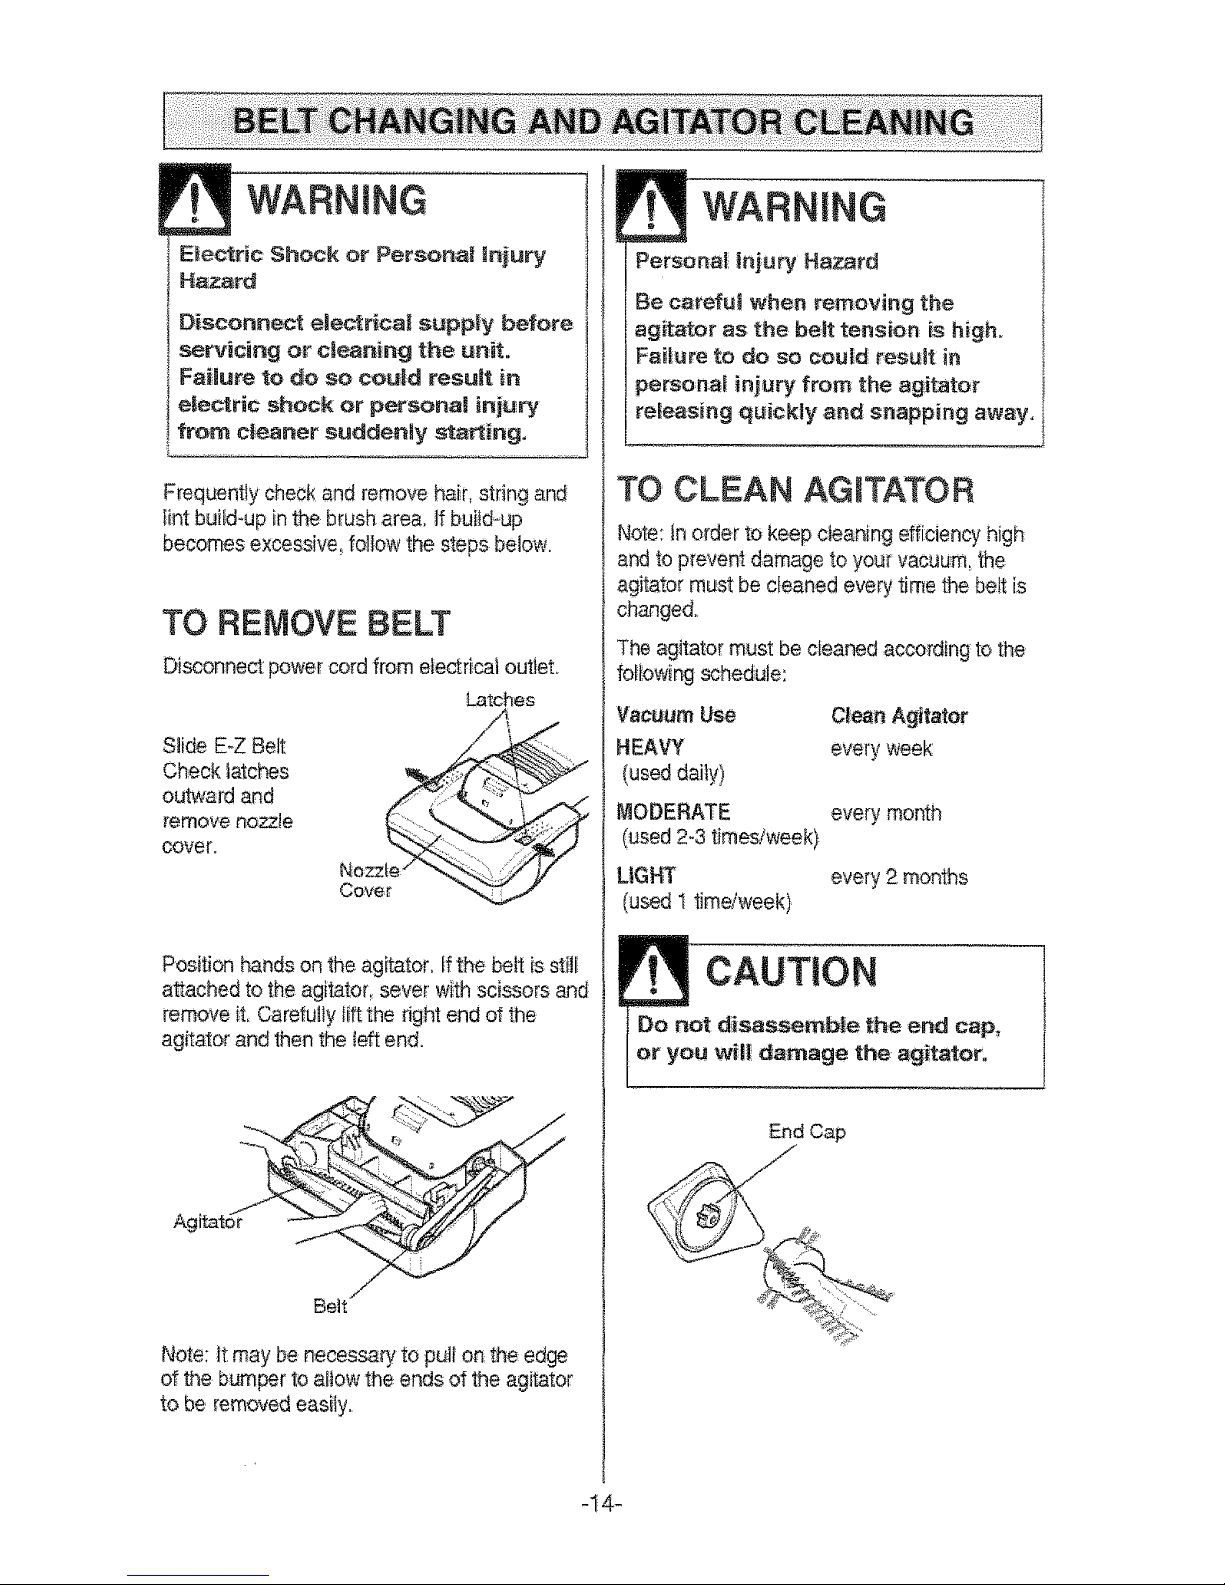
TO:REMOVE BELT
Disconnect power cord from e}ectricat outlet.
Slide E-Z Belt
Check taters
outward and
remove nozzle
cover.
D3tches
/!/
Position bands on the agitator, if the belt is s_iil
attached to the agitatoL sever with scissors and
remove it. CaretuHy fift the right end o1the
agkator and then the ldt end.
Belt
Note: :itmay be necessaq_, to pu_l on the: edge
of the bumper to allow the ends of the agitator
to be removed easily..
WARNING
Persona_ tn}ury Hazard
Be carefut when remo:ving the
ag_t_r as the belt tension is h_gh.
Failure to do so coul_d result in
personaf injury from: the agitator
releasing q_ick|y and snapping away,
TO CLEAN AGFATOR
Note: in order to keep ctea.ning efficiency high
and to prevent damage to your vacuu:m, the:
agitator m_st be cieaned every time the belt [s
changed.:
The agitator must be cteaned according to the
following schedule:
Vacuum Use
HEAVY
(used daily)
MODERATE
(used 2-3 times/week)
UG_
(used t tJmdweek)
C_ean Agitator
every week
every month
every 2 months
End Cap
-I4-
Page 15
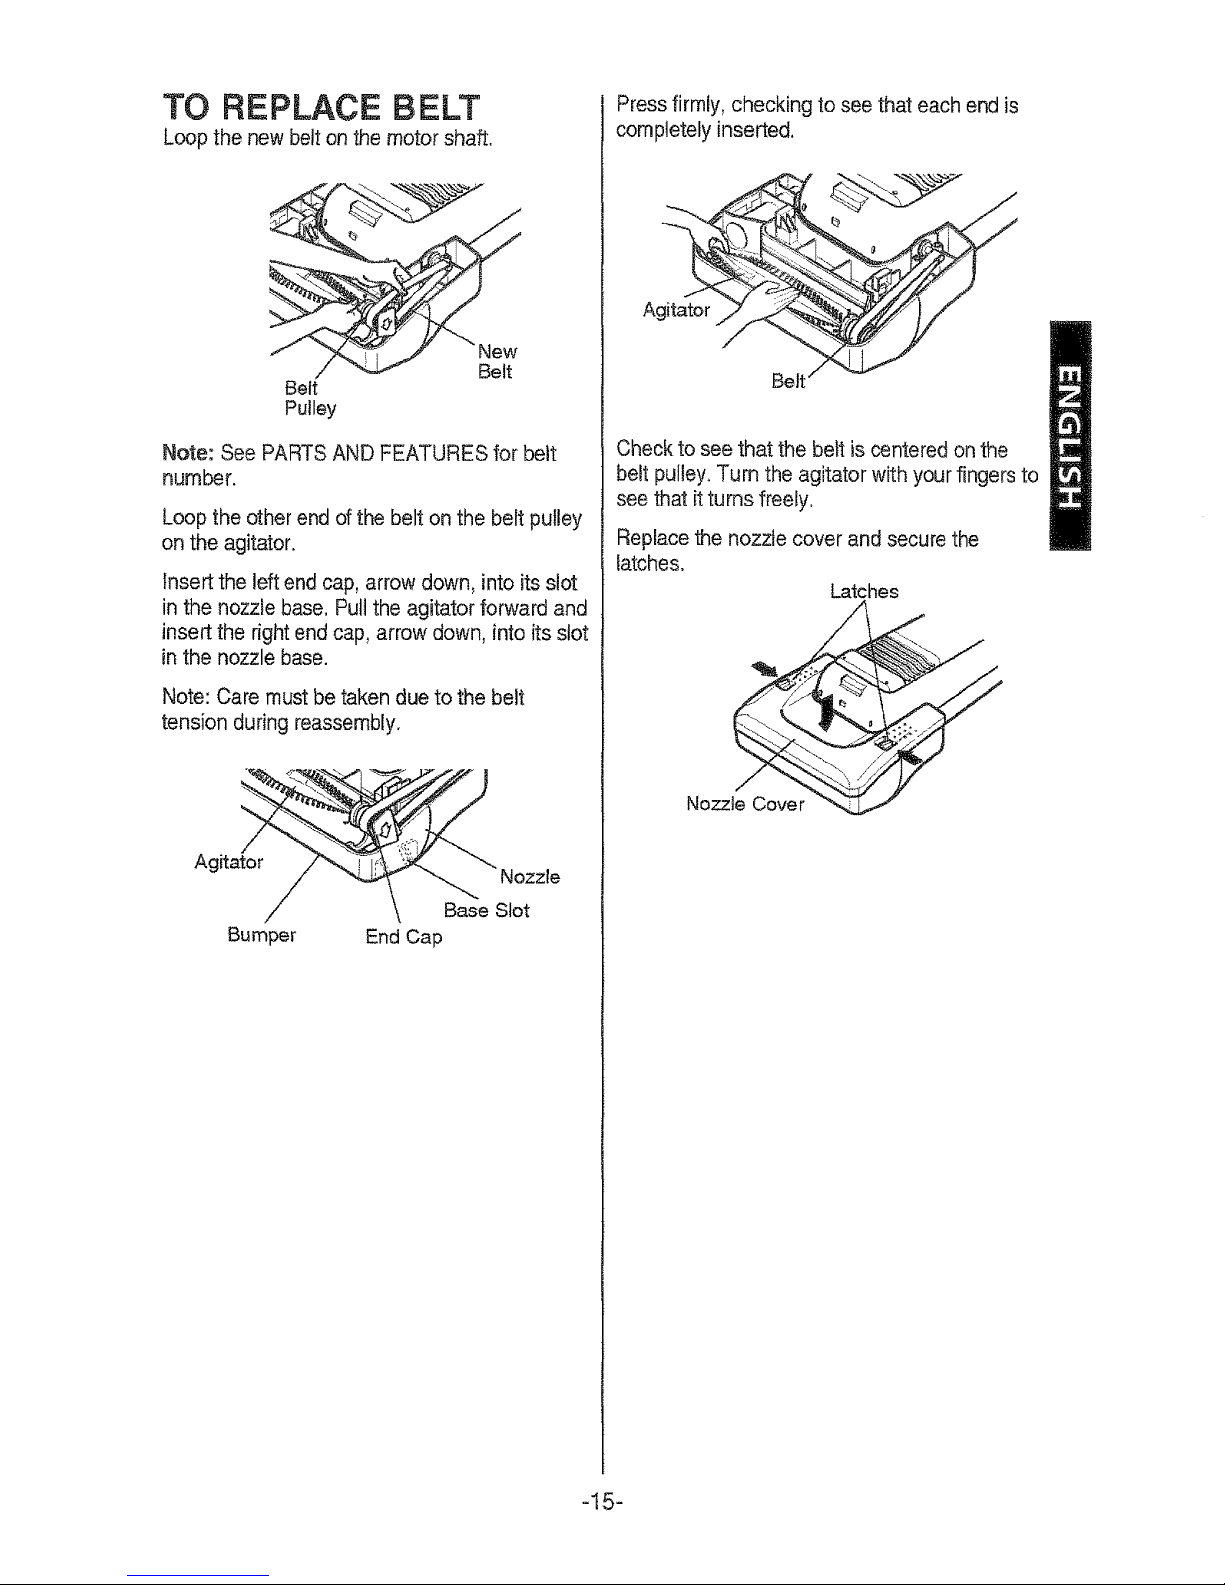
TO REPLACE BELT
Loop the new belt on the motor shaft.
Belt
Pulley
Belt
Note: See PARTS AND FEATURES for belt
number.
Loop the other end of the belt on the belt pulley
on the agitator.
Insert the left end cap, arrow down, into its slot
in the nozzle base. Pull the agitator forward and
insert the right end cap, arrow down, into its slot
in the nozzle base.
Note: Care must be taken due to the belt
tension during reassernbly.
Agit __
Bumper
_" Nozzle
Base Slot
End Cap
Press firmly, checking to see that each end is
completely inserted.
Check to see that the belt is centered on the
belt pulley. Turn the agitator with your fingers to
see that it turns freely.
Replacethe nozzle cover and securethe
latches.
Latches
Nozzle Cover
-15-
Page 16
WARNING
ENecttic Sh_ck or Personali _njury
Ha_rd
Disconnect etectrica_ suppty before
serv_dng oF cleaning the uniL
Faiiure to do so could tesutt in
etectric shock or persona| injury
from cleaner suddeniy sta_:ing.
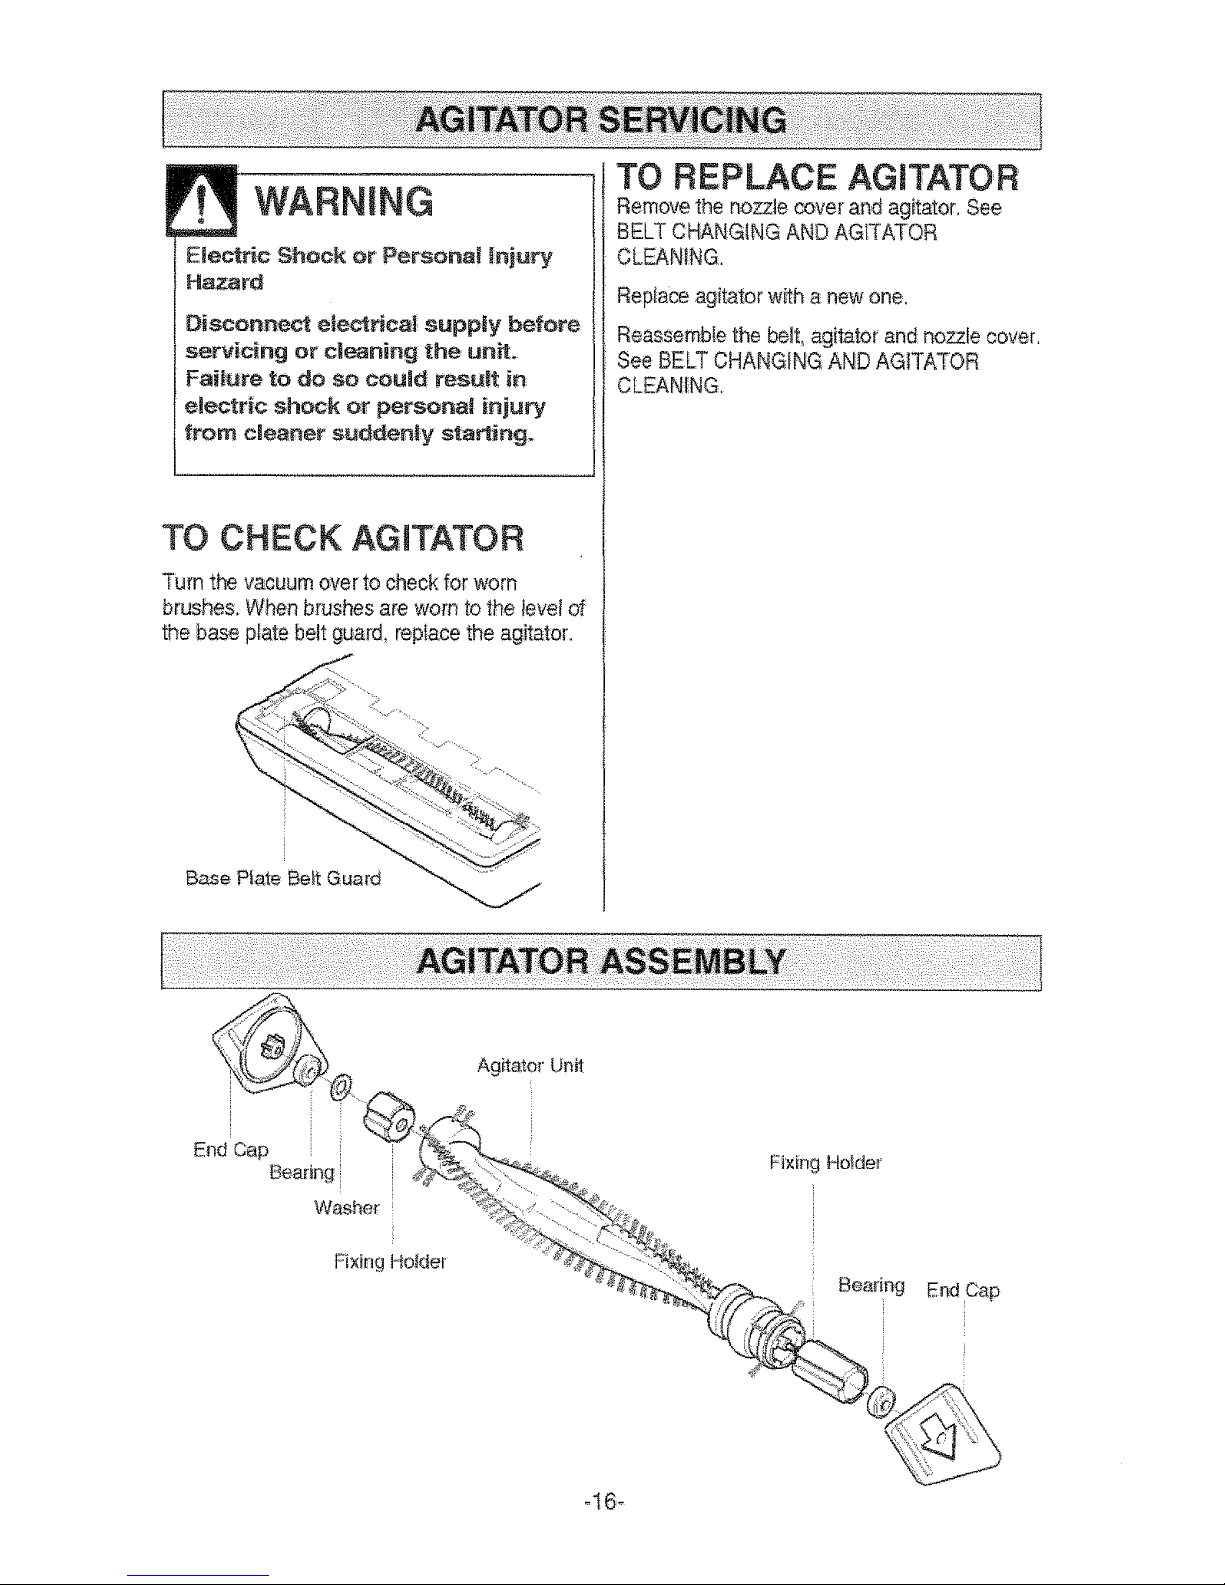
TO CHECK AGITATOR
Turn the vacuum over to check for worn
brushes. When brushes are worn to the levef of
the base ptate belt guard, repIace the agitator_
Base Ptate Belt Guard
TO REPLACE AGITATOR
Remove the nozzle cover and ag_ator, See
BELT CHANGING AND AGITATOR
CLEANING.
Reptace agitator with a new one,
Reassemble the belt, agitator and nozzle cover.
See BELT CHANGING AND AGITATOR
CLEANING,
Fixing Holde_'
Fixing Hotder
Bearing E_ Cap
o16_
Page 17
Alwaysfol}owallsafetyprecautionswher_
cleaningandservicingthevacuumc}eaner.
WARNING
Etectric Shock Or Personam Injury
Hazard:
Disconnect eSectricai suppty before
serviicing or clean_ng the, unit°
Faiiure to do so couid resut.t in
electric shock or personal injury
from: cteaner suddenly starting,
If tile cteaner does not seem to have adequate
suction, first check to see if the bag is ful! or if a
filter is ciogged. See instructions in DUST BAG
CHANGING and MOTOR SAFETY FILTER
CLEANING,
If the bag and filter areas are free of clogs,
check the hose area. Remove the bwer end d
the hose from _e cleaner by gras#ng the hose
connector; t"_visting,and pufii,ng straight out:.
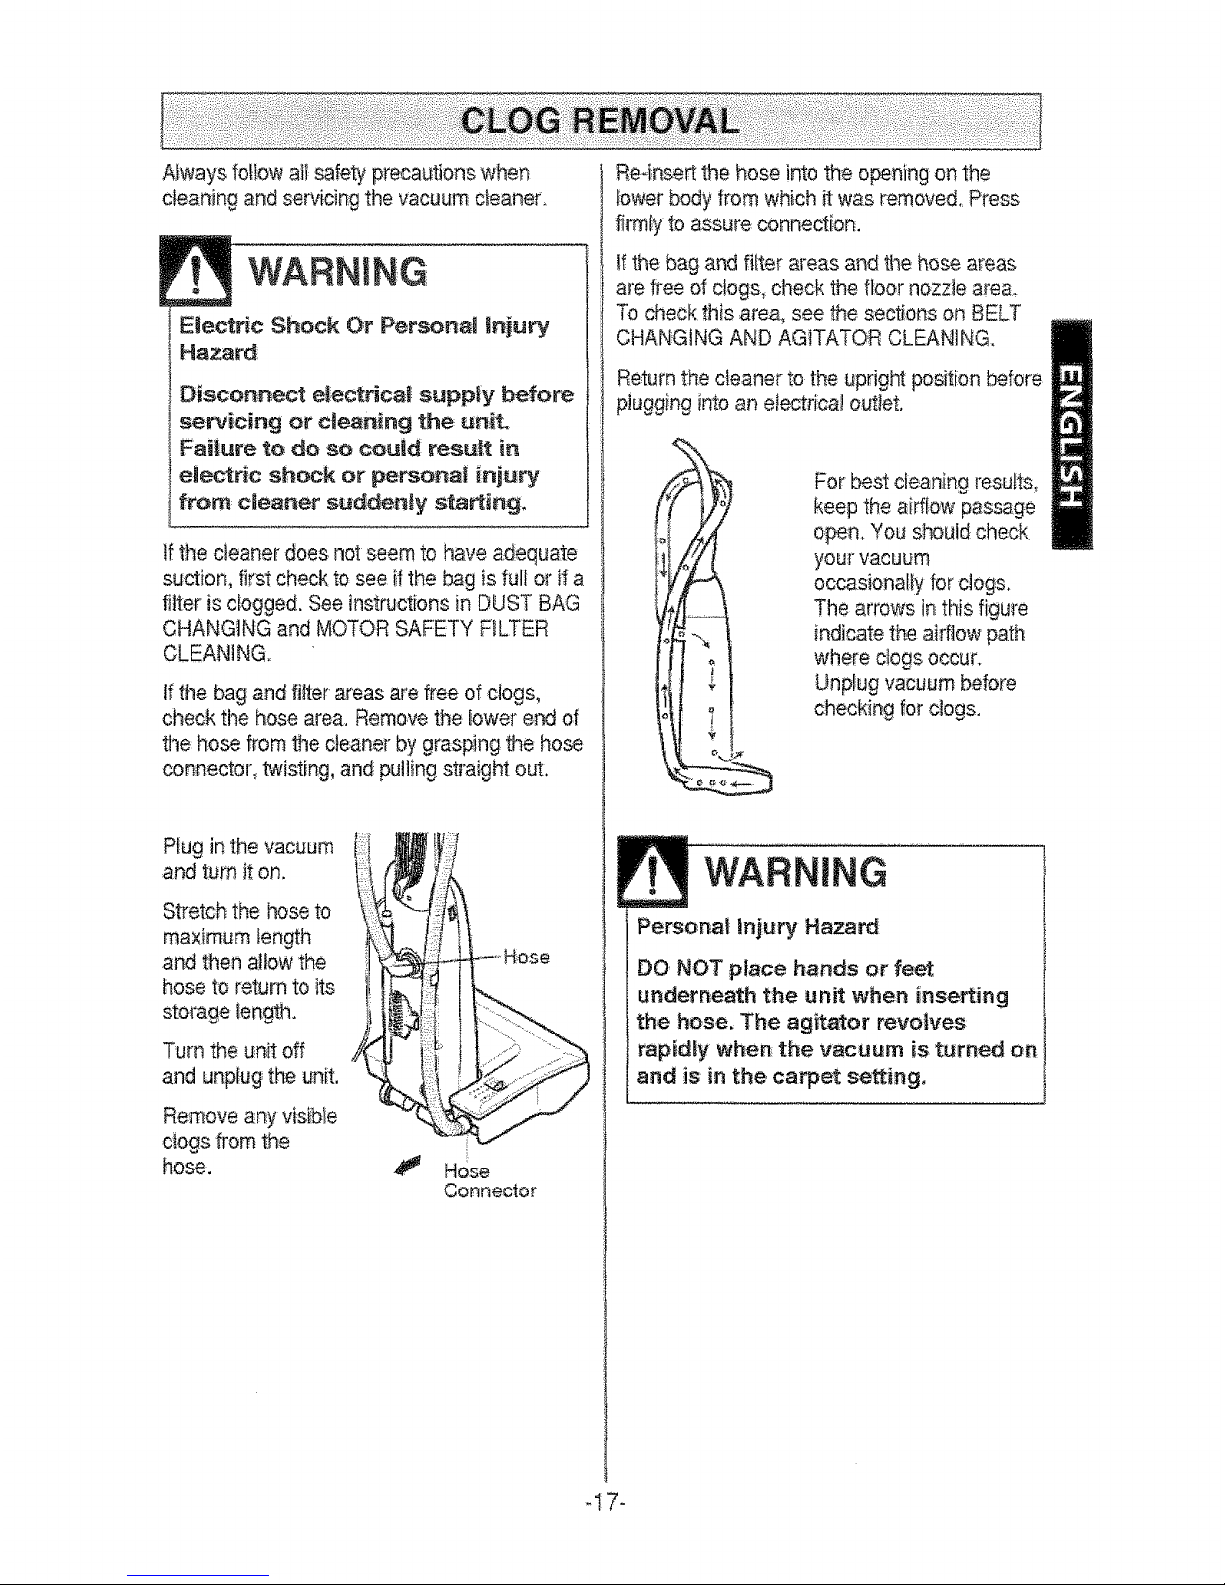
Plug inthe vacuum
and turn it on.
Stretch the hose to
maximum length
and then aJlow the
hose to return to its
storage length.
Turn the unit off
and unplug, the unit.
Remove any visible
ciogs from the
hose.
f
Hose
Connector
Re4nsert the hose into the opening on the
Iower body from which it was removed. Press
firmly to assure conn,ection.
if the bag and fitter areas and the hose areas
are free of clogs, check the floor nozzle area.
To check this area, see the sections on BELT
CHANGING AND AGITATOR CLEANING.
Re€urn the cteaner to the updght position before
plugging into an e_ectrical outlet,
For best cleaning results,
keep the airffow passage
o_n+ You should check
your vacuum
occasionally for clogs.
The arrows in this figut'e
indicate the airflow path
where c_ogsoccur.
Unplug vacuum before
checking for clogs.
WARNING
Personal injury Hazard
DO NOT place hands or feet
underneath the unit when inserting
the hose, The agitator revo|ves
rapidly whert the vacuum is turned on
and is in the carpet setting,
_t7-
Page 18
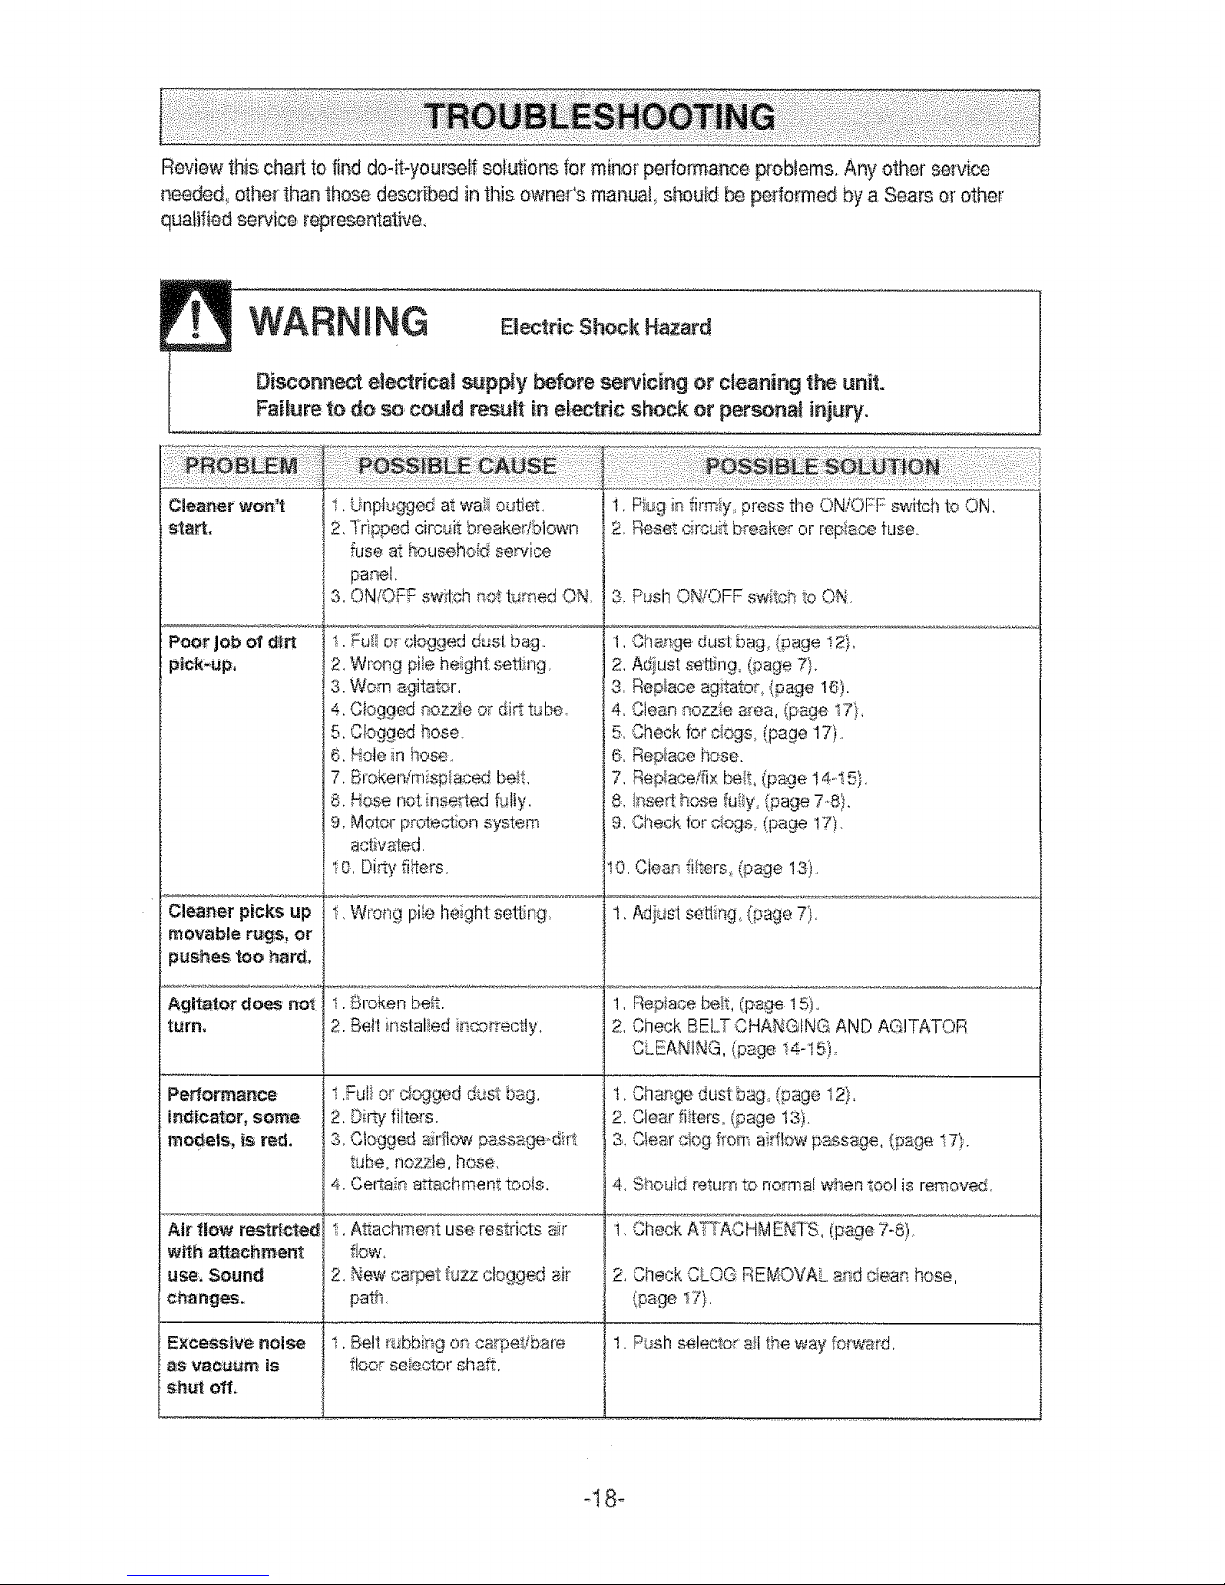
Review this chart to find do-it-youraeff solutions for mine{' pertormance problems Any other sewice
needed_ otl_er than 1hosedescribed in this owneCs manual should be performed by a Sears o_'otheF
quaBfled service _epfe_ntatk_e_
WARNING
Etectdc Shock Hazard
Disconnect eiectricai supply before sewicing or cleaning the un_it.
Faiture, to do so, coutd resu_ in electric shock or persona!: injury.
Clea#er wen t ] I, Linpk_gged at wa_i out_et.
slarL } 2, :l"rip-ae;dcircuit breakedbiown
Poor Job ol et_
plck-up0
l fuse at househoid service
f panel.
3, ON/OFF switch r_._>!k_med ON.
I. Ful__>_ologged dus[ bag,.
2, Wrong pi_eheiight setting,,
3. Worn ag:ita_._l',
4, Cbgged nozzle or di_ tulle,
5, Cbgged hose.
6, Hole in ho_
7. B!oken!mispiaced be_1,
8. Hose not inseded Dlfy.
9, Motor prote_ion system
activ&ted,
o, Dirty fi_ers.
Cleaner picks up
movable rugs: or
pushes too hard:,
Agitator does not
turn,
Pe_ormat_c_
in_|ea_or, some
models, _sred,
Air flowre_r_e_e_
with attachment
use, ,Sound
changes.
Exce_ive noise
_s vae_m is
shut off_
i, Wroag piieheiglqtsetting,
I. £}l\oken be_t. 1,
2. Bell instalied iacorrec!:ty, 2,
I ,Futi or c_c_ged dL;_stb_g, t.
2,Di_ fiiters. 2.
3. Ctogged airfl_:_ passage..difi 3,
tube° no_x,zle, hose.
4. Certai_ attachment tools. 4.
i[, A_achrneht use re_tricts a_i i.
flow,
2, New ca£aet fuzz clogged air 2,
pail's,
i, Belt R_bbi;r_go_ ca_pedbare 1.
floor seieotor shaft,.
i. Piug in _h'miy,,_ress the ON/OFF switch to ON.
2, Reset _rcuit b_'eake_or iep_ce fuse.
3, PushON/OFF switch toON_
1. Change. dus[ bag _'{page!2}.
2, Adiust se't_na_{#age 7}.
4,
Clean aezz_e aea, (pace !7},
._.heckfor c_cg:s,_page 17L
Rep ace hose.
7, Rep!ace#ix L'_t, (page t4-I 52,
8, ln_rt hose fui_y, {page 7,,81,
9, Check for c_cgs, (page 17).
I0, Ciean iitters, (page 13),
1.Adi_:_s_ttir_g°(page 7).
Repia_e belt, (ps£e 15),
_h_ck BEL.T_HANGINL;_ AND AGITATOR
CLEANING, (page _ ' <'
I _-1Jt,,
Char_ge,dust b_g_ (page 12!,
Clear fiiters_ {page 13).
Clear c_og from ai..fftowpaisa,go, {p_ge !7}.
Should return to no_a{ w_en ioo! is removed,
Check,A'F_ACHMENTS,(pa_e 7-8)
CheckCLOG REMOVALand cIea_ hose,
{page _7},
P_sh selector aHthe way forwatt,
-I8-
Page 19

Master Protection Agreements:
Congratulationson making_ smart:purchase,
Yo_ new Kenmore_;produ_ is,designed and
manufactured for yearsof de#endabteoperation..
Butiike atiprod_Jc_,itm_y requireprevent ve
maintenanceor repair _omtime to line,
That's when h_ving aMaster ProtectionAgreement
c_n s:_veyou money a_d _ggr_vation_
Purchase a Master PromotionAgreeme_ now and
p_3teotyourself fromu_expectedhass:ieand
expense.
The MasterProtect o#Agreement a!,soheipsexter_d
the life of your r_ewproduc_.Here'swl_at'si_ciuded i#
the A_reement:
_ Experl se_ioe by ou_i2,000 professiionairepair
specialists
Unl:irnited serviceand no chargefor .._rt._,_,_d
labor on _l cove_'edrepairs.
"No-lemon" g_a_antee_ repia.ceme_tof your
covered product if four or more productfaiiures
occur within twelve months
Product replacement If y,_,, oo__redoroduct
cam'tbe fixed
_ A_n:ua[Preventive _aintenat_ce Check at your
r_u _: _ extra charge
Fast he|p by phone - phonesupport _roma
Searstechnician o_produ:ctsrequ_irin9 in-home
re _
_pa,_,plusconvenient repairscheduii_9
Power surge prot_ion s_ai_steie_tica
damage=d_e to powerfi*_a,tio,qs
Retrial reimbarsemen_ if repair of your coveted
product _kes/oP_gerthan p_omised
O_ceyou purcha_the AgreemenI. asimpie phone
cs_tis al!that it takes _oryou to schedule service,
You can cali anylime day or nig_hi,or scheduiea
servi_ appointmentonline
Searshasover i 2,000 profession_i repairs-_ecialists
who h_ve_ccess to over 45 mii_ionqusiity pa_s and
accessorl;es,Th_:t"sthe kitedd professionalism you
ca_ counto£.to b;elpprolong_theiife d your new
pu_ch_sefor yea_ to come,,P_rchase your M_ste:
_rotection A9r_ment today!
Some llmitalions and exciusio_s appt_,
For pricesand ad_!_jenal in,lormationcall
1.8004;27_6655,
Sears lnstaltalion Service
For'_a_s p_o_ssion_ insta!iationof home
ap,piisqce.s,g_r_oedoor opepers w_ter he_ers, and
oiher m_}orhome items:_in _;e U ,S,A,cail
1-800.4-_Y-HOME _
-!9-
Page 20

Your Home
For repair - in your home - of 8U major brand appliances,
lawn and garden equipment, or heating and cooling systems,
no ma_er who made it, no manet who so_d it!
For the replacement parts, accessories and
owne#s manuals that you need to do-tt-your_eff.
For Sears professionaM }nstaHation of home appl_ances
_nd items tike garage door openers and water hea_e.rs.
!-800-4oHY-HOHE ® 24/ 7/ 3s5
(_-_00-469_4663) (U.S.A. and Canada)
www,sears.com www.sears.r.a
Our Home
For repair of carry-in products like vacuums, lawn equipment,
and electronics, call or go on-line for the nearest:
S_rs Parts and RepaiT Center.
1 ,_0€_8,,1 2_ 24 / 7 / 365 (U.S.A. on_y)
_.sGEmrs.co_
To purchase a protection agreement (U.S.A.)
or maintenance _reeme_ (Canada) on a productserviced by _a_:
1_00-827-6655 (U_S.AJ 1-800-361-6665 (_
Para pedirse_cio de reparaci6n
a domicilio,y parao_ar piezas:
1:-888_S_HOGAI:{_'I
Au Canada pour ser_atceenfran_s::
1.80_LE.FOYEI_ _c
WWW,Se_F_S_C_
© Reg_J:eredTrademark i_M T_,a_ / _ S_'i_ _ of SeatS, R_k _nd Ce:,
© M_ca Reg.L_,_d_ / T_a:M_rc_ de Fdbrica / s_ Marc_ de Servicio de Se_s, Floeb_ck and Co.
_" M_zque de commem_ / _ Marque d_pos_ de Seam, Roebu_; an_ Co,
Page 21

Owner's Manual
Manual del Propietario
Vacuum Cteaner
Aspiradora
iViodei, Modelo
721.33078
72! .33079
CAUTION: Read and follow a!l safety
and operating instructions before first
use of this product.
CUIDADO: Lea y sigue todas tas
instrucciones de operaci6n y seguridad
antes del uso de este producto.
Directions for Use
It is a violation of Federal law to use this
product in a manner inconsistent with its
labeling.
Direcciones de uso
Es una viotaci6n a ta fey Federal utitizar
este producto de una manera contraria
con su etiquetado.
Sears, Roebuck and Co., Hoffman Estates, IL 60179 U.S.A
www,sesrs.com
PART No. • 3828FI3841A Printed in China
Page 22

Before Using Your New Vacuum ........................2
Kenmore Vacuum Cfeanet Warranty ................ 2
impo_ant Safety fnstruct:ions ...............................3
Par_sand Features ...............................................4
Assembly instructions ........................................ 5,
Operatir_g lnst_Jctions ........................................ 6
Cord Re_ease..........................................................6
Autornatic Height Adjustment ........................... 7
Handie Release al_d Positions ...........................7
O_/Off Switch ..................................................... 7
Atlachmelts ....................................................... 7
At_.achme:n;tsUse Chart ...................................... 9
Vacuuming Tips ................................................ 9
Performance Features ..................................... !0
Vacuum Cleaner Care.............................................11
Vacuum Storage ................................................t t
Cleaning E×_eriorand Attachments ..................t t
Dust Bag Changing ............................................i2
Motor Safety Fil!_erC[eanhlg ...............................I3
Exhaust Filter C_eaning and Replacement .....13
Bell Changing and Agitator Qeaning ...............14
Agitate_ Servicing ............................................ ! 6
Agitato_'Assembly ...............................................16
Ciog Remora! ................................................... i7
Tro_b!eshooting ......................................................18
Master Protection_ Agreements. ....................... t 9
Service ..................................................Back Cover
Ptease read this guide. 11will help you assemble and operate your new Kenmore vacuum in the safesl
and most e_feclive way.
For more intermation about the care al_doperation, c_! your nearest Sears store.
You wi!l need _hecomplete model and seria_ numbers wher_ requesting information.
Your vacuum's model_and serial numbers are Iocated on the Model and Sofia! Number PIale.
Use the space below to record the model number and serial number el your new Ket_morevacuum.
Modet No,
Serial No,
Date d Purchase
Keep this book and your sales check (receipt) in a safe #ace for Mute re!erence,
UM|TED ONE Y_:R WARRANTY ON KENMORE VACUUM CLEANER
This warranty is for one yea_' firo:mthe date of purchase, and inciudes only private household
vacuum cleaner use, During the warra_y year, when this vacuum cleaner is o_rated and
m_ntained according to:the owner's manua_ instructbns, Sears will repair any defects in materiat
or workmanship free of charge.
Thiswarranty excludes vacuum bags, be_ts,t[gh_bulbs, and filters, which are expendable parts
and become worn during normat use_
For warranly service, return this vacuum cleaner to the neares! Sears Parts and Repair
Center in the Uni!ed Steres.
This warranty applies only white this product isin use in the United States.
This warranty gives you specific legaf rights, and you may atso have other rights which vary from
state to: state.
Sears, Reeb_k and Co., D!817WA, Hoffra8n Estate, |L 60179
Page 23

WA
G-To reduce the risk of fire, etectric shock, or injury:
Your safety is important te us. To reduce the risk of fire, electric shock, injury to
persons or damage when using your vacuum cleaner, foltow basic safety precautions
including the following:
Read this manual before assembling or using
your vacuum cleaner.
Use your cleaner only as described in this
manual. Use oniy with supplied attachments.
To reduce the risk of electric shock- Do not
use outdoors or on wet surfaces.
Disconnect electrical supply before servicing
or cleaning out brush area. Failure to do so
could result in electric shock or brush suddenly
starting.
Always turn cleaner off before connecting or
disconnecting the hose.
Always turn cleaner off before unplugging.
Do not unplug by pulling on cord. To unplug,
grasp the plug, not the cord.
Hold plug when rewinding onto cord reel.
Do not allow plug to whip when rewinding.
Do not use with damaged cord or plug. If
cleaner is not working as it should, has been
dropped, damaged, left outdoors, or dropped
into water, return it to a Sears Service Center.
De net pull or carry by cord, use cord as a
handle, close door on cord, or pull cord around
sharp edges or corners. Do not run cleaner over
cord. Keep cord away from heated surfaces.
De not leave cleaner when plugged in,Unplug
from outlet when not in use and before servicing.
Do not allow to be used as atoy. Closeattention
is necessarywhen used byor near children.
Do not handle plug or cleaner with wet hands.
Do not operate the cleaner with a punctured
hose. Replace if cut or worn. Avoid vacuuming
sharp objects.
Do not use with any opening blocked; keep
free of dust, lint, hair and anything that may
reduce air flow.
Keep hair, loose clothing, fingers, and all parts
of body away from openings and moving parts.
Do not use cleaner without dust bag andlor
filters in place.
Always change the dust bag after vacuuming
carpet cleaners or freshener, powders and fine
dust. These products clog the bag, reduce
airflow and can cause the bag to burst. Failure
to change bag could cause permanent damage
to the cleaner.
Do not use the cleaner to pick up sharp hard
objects, small toys, pins, paper, etc. They may
damage the cleaner or dust bag.
Do net pick upanything thatisburning orsmoking,
such ascigarettes,matches,or hot ashes.
Do not use vacuum cleaner
to pick up flammable or combustible liquids
(gasoline, cleaning fluids, perfumes, etc.), or use
in areas where they may be present. The fumes
from these substances can create a fire hazard
or explosion.
Use extra care when cleaning on stairs. Do not
put on chairs, tables, etc. Keep on floor.
You are responsible for making sure that your
vacuum cleaner is not used by anyone unable
to operate it properly.
SAVETHESE i STRUCT
Proper assembly and safe use of your vacuum cleaner are your responsibilities. Your cleaner is
intended only for household use. Read this Owner's Manual carefully for important use and
safety information. This guide contains safety statements under warning and caution symbols.
Please pay special attention to these boxes and follow any instructions given. WARNtNG
statements alert you to such hazards as fire, electric shock, burns and serious personal injury.
CAUTION statements alert you to such hazards as moderate personal injury andlor property
damage.
-3-
Page 24

_t:is important to know your vacuum cleaneCs parts an_ features to assure its proper and: safe
use, Review these before, _sing your cleaner.
_tem Pa_SNo.
Dust Bag 5O688
Bait 5275
Handle
Hose Hotder
Quick Release
Cord Hanger
Power Cord
Exhaust Panel
Lower
Cord Hanger
On/Off Switch
Extension
Wand
Dusting Brush/
Upholstery Tool
E-Z Belt Check
Crevice Too_
Floor Nozzle
Motor
Hose
Agitator
_4_
Page 25

Before assembling your vacuum, check the
PACKING UST on the cover of the separate
Parts List. Use this {_stte verify that you have
received aJlthe components of your nmv
Kenmore v_uum.
WARNING
Electric Shock Hazard
Do not plug _nt_the electrical supply until
the assembly is complete.
Failure to do so could result ir_electric
shock or iniury.
HANDLE ASSEMBLY
Remove the screw located just bel:ow the top
edge of the back of the vacuum.
Position the handle as shown befow and slide
the handle into the opening at the top of the,
vacuum,
inse_thescrew so itpasses1_hroughthe
handle intothevacuum,
Tighten: fl_e screw setupely witha screwdrive:l.
It may be necessary to adiust the handle
slightly,
CAUTION
Do,not overtighten:,
Overtightening coutd strip the screw holes.
Do not operate the c_eaner w_thout the
screw in place.
-5o
Page 26

HOSE ASSEMBLY
After the handle has been assembled to.the
body and power cord has been wrapped
a'ound the cord hangers_ inser_ the upper end
of the hose i_o the opening on the body and
place the hose over the hose hoBer.
Hose
Holder
l-- Hose
_ r.Lower_
'__|Hose
'J Coupling
And then a_ach the lower hose holder Fovided
in the aceessory bag to the body and clip hose
into the holder and slide: hose onto the hose
coupling on floor nozzle and twist hose°
Make: sure hose is firmty connected before
_sing the vacuum.
CORD ASSEMBLY
Make sure the quick release cord hange_ is in
the upright pos_ion.
Lock the cord into
Locking
place by forcing _ Notch
into the _ocking
notch on the body
of the upper cord
hanger as shown.
This helps keep the
power coli out of
Cord
the path of the floor
r)ozzie.
Cord
Wrap the
power cord
around the
quick release
cord hanger
and Iower cord
hanger, and
clip the pt_g
onto the power
cord,
OPERATING INSTRUCTIONS
1, Turn the quick
release cord hanger
to either side and
down to release: the
power cord.
2, Unc_ipthe power cord plug from the power
cord and pult the cord off the quick release cord
hanger. Check to be sure the power cord is sill}
locked into the locking notch. See CORD
ASSEMBLY.
3, Check to see if the cleaner has bag
installed, See: DUST BAG CHANGING,
4, Plug the polarized pow,_rcord., into a t20
Vo_ elec_'ical out_et.
NOTE: To reduce the risk of electric shock, flis
vacuum cleaner has a polarized plug, one blade is
wider than the o_:hel.This ptug will fit in a_polarized
out,e1 onty one wa_y./flhe plug does not:f_tfully in
the outleL [everse the plug, If it still:does no¢fit,
conlact a qualified elect!'ician to [l_sta]lthe proper
outlet, 9o not change the p_ugin any way.
WARNING
Personal injury and Prodect Damage
Hazard!
DO NOT pteg.in if s_ftch is in ON pesi_iot_,
Personal inlury o_ producl damage could
reSUft,
, DO NOTuse outle_s,above touters, Damage
to items ia surto_#d_ng area co£td occur.
Page 27

This vacuum ciea_er is designedwith s_ Automatic
Height Ad!ustment which adjuststhe floor nozzleto
the proper height of a_qyca_et pile..
The height of floor nozzle is in_an_y and
automaticallyadi_,_stedwhen yo_ move from one
carpeted area to ano_ser.
Release the handle by stepping, on the
embossed pal1 on either" side of the fbor nozzle
and pulling back and dow_ on the handle with
your hand.
The vacuum
cteaner has three
positions:
iJpright forstorage
and when using
_,_ea_tr_gtoolso
- Angled _orcarpet
and floor ctesni_g.
- Low for roaching
under rum[lure.
The On/Off switch is located on the vacuum
cleaner body just below and to the si_e of the
handle, Push the switch to ON to start the
cleaner and to OFF to stop it.
Cerd
Hat, die
On/Off
Swilch
Wa_d
Dusting --
Brush
Hose
Hose Connector
J
TO USE ATTACHMENTS
Remove the !ower end of the hose fi'orn the
cleaner by gras#ng the hose connector,
twisting and pulling straight out.
:::::::'::: : ::: :[: :: :
NOTE: The motor protector may open cau_sing
poor p_ck up, when using attachments or when
cleaning new carpet, due: to reduced ai#t:ow
caused by the a_,achments themselves, or by
new carpet i_uzzflIfing the: bag quickiy. See
CLOG REMOVAL
WARNING
Page 28

Wand
Remove the extension wand from its storage
position.
Remove the crevice tool from its storage
position in the wand. Attach the extension wand
onto the open end of the hose.
Add the crevice tool to the end of the wand by
inserting and twisting slightly. The crevice tool
doubles as another wand, because the dusting
brushtupholstery tool will fit onto its tip, allowing
for maximum cleaning reach. The brushttool
may also be attached directly to the extension
wand.
HOSe
//- Extension
Wand
i/f Crevice
Tool
The dusting brush has two options. When the
front brush is removed the remaining part can
be used as an upholstery tool.
Upholstery __
Tool "__:/f,_
Dusting
Brush
CAUTION
When using attachments, be carefu_
not to overextend the hose when
reaching. Trying to reach beyond the
hose stretch capability couRd cause
the cleaner to tip over.
TO STORE ATTACHMENTS
Remove dusting brush/upholstery tool from
wand. Snap into its storage location.
Remove crevice tool from the wand by twisting.
Remove the extension wand from the hose.
Twist the wand and pull from the hose end,
Place the crevice tool down into the extension
wand. Snap wand into its storage location.
Be sure the unit is turned off. Reinsert the hose
fully into hose coupling from which itwas
removed. Press firmly to assure connection.
WARNING
Personal Injury Hazard
DO NOT ptace hands or feet
underneath the unit when inserting the
hose. The agitator revolves rapidly
when the vacuum is turned on,
-8-
Page 29

A]3"ACHMENT
DUSTING _,_
BRUSH
CREVICE
TOOL
t .. _: I*._ ¸
JPHOL_T_d
TOOL
Furniture*
X
X
CLEANING AREA
Betweel_
Gush ons* Drapes_
×
X
Smi_
X
X
X
X
Wails
X
A_wayscban attachments _bre using on fabdcs,
Carpet edges
Guide efther side or the front of the nozzle
abng a baseboard. The full length brushes he_p
remove dirt at carpet edges.
Stairs
Put handle in _uL!upright position. Use the
crevice too_or dusting bfushiuphoistery tool.
WARNING
Personal In_ury Hazard
Use care if vacuum cleaner is ptac_ on
stairs, if it falls_ personal injury or property
damage couW result,
For best cleaning results, keep the airfbw
passage clear.
Occasionally, check each of the areas indicated
for chgs.
Always _nplug _e cleaner from the outlet
before checking for clogs,
-9-
Page 30

WARNING
Electric Shock And, Persona! injury
Hazard
Disconnect efectricai supply before
,servicing or cleaning the ur_it.
Failure to do so could resu_ in
emectric shock or personal injury from
cleaner suddenly starting°
E-Z BELT CHECK
The E-Z Belt Check consists of two latches on
the top of the fioor nozzte. These latches aliow
br easy removal of tt_e nozzfe cove_' to change
the beit orcle_n the agitator.
Place thumbs on latches, push out_,,a]'d, and
raise cover.
To reptace nozzle covel._ insetl tabs into.slots,
Iower cover onto nozzle, 8nd push tatches in to
secure,
MOTOR PROTECTION
SYSTEM
This vacuum has a motor protector by-pass
valve which automaticatfy opens to provide
cooling air to the motor when a clog prevents
the: nomlal flow of air to: the motor. If the by-
pass. valve opens to prevent motor overheating
and possible damage to the vacuum, you will
notice a change of sourd as air rushes through
the vak_e opening.
Motor
Protector
To correct prebllem:
Check fo[ and remove clogs.
See CLOG REMOVAL.
-10-
Page 31

VACUUM CLEANER CARE
Always fotiow al_safety precautions when
o_eaning and servicing the vacuum cteaner.
Gather the cord and wrap it loosely around the
WARNING
Etectric Shock And, Persona_ injury
Hazard
Disconnecl etectricai supply before
servicing or clieaning the unit.
Failure to do so could resullt in
electric shock or personal injury from
cleaner suddenly starting.
quick release cordhar_er and tower cord
hanger,
Stere the cl.eaner in a
dry, indoor area, on the
floor with the handie
_ocked in the upright
position.
WARNING
Eiectric Shock And Persona! injury
Hazard
Wrapping the eo_ too tightly puts
stress on the cord and can cause
cord damage.. A damaged cord is an
electric shock hazard and could
cause persona| injury or damage.
Unplug cord from wall outlet. DO NOT
drip water on clea_er.
Clean extedor using a clean, soft cloth thai has
been dipped in a sotution of mild liquid
detergent and water, then wrung dry. Wipe dry
after cleaning,
Wash; attachments in wa_'msoapy water rinse
and: ait-dry. Do not: ctesn in d_shwasher.
::: ::::::[:::::[:::: ::::::: ::::::::[
CAUTION
Do not use attachments if they are
wet, Attachments used in dirty areas,
such as under a refrigerant, should
not be used on other surfaces untit
they are washed, They could leave
marks.
Page 32

TO REMOVE BAG
WARNING
Pull the dust cover
gr{p forward.
Remove cover and
lay aside.
/
Dust --
Cover
Grasp the dust bag
collar and puit
gentty, carefulFy
removing the dust
bag.
Throw away the
used dust bag,
notreuse:.
Bag
CAUTION
NEVER REUSE A DUST BAG. Very
fine materials, such as carpet
freshener, face powder, fine dust,
piaster, soot, etc. can clog the bag
and cause _ to burst before it is fuN.
Change: bag: more omen when
vacuuming these materials.
BOO ....
Motor--
Safety :_t'l
Check the bag,
holder and the
motor safety filter.
If either is:bbcked,
check them. See,
MOTOR SAFETY
FILTER
CLEANING.
TO REPLACE
Un_oId the new dust bag,
BAG
ii lnsell the dust bag:
onto the bag hotde[
completely by
holding the bag
'" collar as sho_,m and
snapping it into
position.
Be sure bottom of dust, bag, is completely within
dust bag cavity prior to replacing the dust
oovefl
PosRion the dust
cover so its
positioning tab fits
into the slot on the
vacuum body base,
Dust _'_
Cover
,......
i
Close the dust
cover.
You wit!;hear a
distinct snap when
cover is securefy
closed,
Page 33

Checkmotorsafetyfi_erfrequently.,
ff the motor safety filter, local_ed in the bottom of
the dust bag cavity is dirty, remove it by pulling
forward out from under the ribs.
; j
FilterFoam...........
Wash the foam fitter in wal'm soapy waNr.
Rinse and dry thoroughly by squeezing the fifter
in your hand and Ietting it air dry,
DO NOT wash f_ller in the, dishwasher.
DO NOT install damp f_l'ter.
Replace the foam filter by sliding it back into
place under the ribs in the dust bag cav_y.
WARNING
Etectric Shock Hazard
Do no_: operate the cl_ner without:
the motor safety fi_tero Be sure the
filter is d:_ and properly installed to
prevent motor failure and/or electric
shock.
Always unplug power cord from
electrical outlet before performing
ar_y service on vac_J#m.
WARNING
Do not operate without exhaust filter.
Clean the exhaust filter when it becomes di_y,
or repiace it with a new one. Wash the dirty
filter beneath co_d, running water to clean it.
Atlow to ai_"dry before returning it to the
vacuum.
Do not attempt to clean the filter wRha brush,
A brush wi!! permanently damage the filter_
causing dustto bbw back into the _om wher_
you are vacuuming.
If you use vacuum freque_ity, yo_ should
replace the filter every 6 months.
Check filter frequently.
Dust
Cover
PUl! the dust cover foP_,ard, Remove and lay
aside_
Remove the exhaust: filter" by
Ex:hau
/>
)u_ling it out.
Replace the fi_er so that the _ite side faces
out.
Ca_'efu_}yreplace the dust cover by placing tabs
in slots and pushing in unti! cover snaps into
place_
-13-
Page 34

WARNING
Frequently check and remove hair, string and
Iint buitd-up in the brush area. _fbuitd-up
becomes excessive, fc41owthe steps below.
TO:REMOVE BELT
Disconnect power cord from e}ectricat outlet.
Slide E-Z Belt
Check taters
outward and
remove nozzle
cover.
D3tches
/!/
Position bands on the agitator, if the belt is s_iil
attached to the agitatoL sever with scissors and
remove it. CaretuHy fift the right end o1the
agkator and then the ldt end.
Belt
Note: :itmay be necessaq_, to pu_l on the: edge
of the bumper to allow the ends of the agitator
to be removed easily..
WARNING
Persona_ tn}ury Hazard
Be carefut when remo:ving the
ag_t_r as the belt tension is h_gh.
Failure to do so coul_d result in
personaf injury from: the agitator
releasing q_ick|y and snapping away,
TO CLEAN AGFATOR
Note: in order to keep ctea.ning efficiency high
and to prevent damage to your vacuu:m, the:
agitator m_st be cieaned every time the belt [s
changed.:
The agitator must be cteaned according to the
following schedule:
Vacuum Use
HEAVY
(used daily)
MODERATE
(used 2-3 times/week)
UG_
(used t tJmdweek)
C_ean Agitator
every week
every month
every 2 months
End Cap
-I4-
Page 35

TO REPLACE BELT
Loop the new belt on the motor shaft.
Belt
Pulley
Belt
Note: See PARTS AND FEATURES for belt
number.
Loop the other end of the belt on the belt pulley
on the agitator.
Insert the left end cap, arrow down, into its slot
in the nozzle base. Pull the agitator forward and
insert the right end cap, arrow down, into its slot
in the nozzle base.
Note: Care must be taken due to the belt
tension during reassernbly.
Agit __
Bumper
_" Nozzle
Base Slot
End Cap
Press firmly, checking to see that each end is
completely inserted.
Check to see that the belt is centered on the
belt pulley. Turn the agitator with your fingers to
see that it turns freely.
Replacethe nozzle cover and securethe
latches.
Latches
Nozzle Cover
-15-
Page 36

WARNING
ENecttic Sh_ck or Personali _njury
Ha_rd
Disconnect etectrica_ suppty before
serv_dng oF cleaning the uniL
Faiiure to do so could tesutt in
etectric shock or persona| injury
from cleaner suddeniy sta_:ing.
TO CHECK AGITATOR
Turn the vacuum over to check for worn
brushes. When brushes are worn to the levef of
the base ptate belt guard, repIace the agitator_
Base Ptate Belt Guard
TO REPLACE AGITATOR
Remove the nozzle cover and ag_ator, See
BELT CHANGING AND AGITATOR
CLEANING.
Reptace agitator with a new one,
Reassemble the belt, agitator and nozzle cover.
See BELT CHANGING AND AGITATOR
CLEANING,
Fixing Holde_'
Fixing Hotder
Bearing E_ Cap
o16_
Page 37

Alwaysfol}owallsafetyprecautionswher_
cleaningandservicingthevacuumc}eaner.
WARNING
Etectric Shock Or Personam Injury
Hazard:
Disconnect eSectricai suppty before
serviicing or clean_ng the, unit°
Faiiure to do so couid resut.t in
electric shock or personal injury
from: cteaner suddenly starting,
If tile cteaner does not seem to have adequate
suction, first check to see if the bag is ful! or if a
filter is ciogged. See instructions in DUST BAG
CHANGING and MOTOR SAFETY FILTER
CLEANING,
If the bag and filter areas are free of clogs,
check the hose area. Remove the bwer end d
the hose from _e cleaner by gras#ng the hose
connector; t"_visting,and pufii,ng straight out:.
Plug inthe vacuum
and turn it on.
Stretch the hose to
maximum length
and then aJlow the
hose to return to its
storage length.
Turn the unit off
and unplug, the unit.
Remove any visible
ciogs from the
hose.
f
Hose
Connector
Re4nsert the hose into the opening on the
Iower body from which it was removed. Press
firmly to assure conn,ection.
if the bag and fitter areas and the hose areas
are free of clogs, check the floor nozzle area.
To check this area, see the sections on BELT
CHANGING AND AGITATOR CLEANING.
Re€urn the cteaner to the updght position before
plugging into an e_ectrical outlet,
For best cleaning results,
keep the airffow passage
o_n+ You should check
your vacuum
occasionally for clogs.
The arrows in this figut'e
indicate the airflow path
where c_ogsoccur.
Unplug vacuum before
checking for clogs.
WARNING
Personal injury Hazard
DO NOT place hands or feet
underneath the unit when inserting
the hose, The agitator revo|ves
rapidly whert the vacuum is turned on
and is in the carpet setting,
_t7-
Page 38

Review this chart to find do-it-youraeff solutions for mine{' pertormance problems Any other sewice
needed_ otl_er than 1hosedescribed in this owneCs manual should be performed by a Sears o_'otheF
quaBfled service _epfe_ntatk_e_
WARNING
Etectdc Shock Hazard
Disconnect eiectricai supply before sewicing or cleaning the un_it.
Faiture, to do so, coutd resu_ in electric shock or persona!: injury.
Clea#er wen t ] I, Linpk_gged at wa_i out_et.
slarL } 2, :l"rip-ae;dcircuit breakedbiown
Poor Job ol et_
plck-up0
l fuse at househoid service
f panel.
3, ON/OFF switch r_._>!k_med ON.
I. Ful__>_ologged dus[ bag,.
2, Wrong pi_eheiight setting,,
3. Worn ag:ita_._l',
4, Cbgged nozzle or di_ tulle,
5, Cbgged hose.
6, Hole in ho_
7. B!oken!mispiaced be_1,
8. Hose not inseded Dlfy.
9, Motor prote_ion system
activ&ted,
o, Dirty fi_ers.
Cleaner picks up
movable rugs: or
pushes too hard:,
Agitator does not
turn,
Pe_ormat_c_
in_|ea_or, some
models, _sred,
Air flowre_r_e_e_
with attachment
use, ,Sound
changes.
Exce_ive noise
_s vae_m is
shut off_
i, Wroag piieheiglqtsetting,
I. £}l\oken be_t. 1,
2. Bell instalied iacorrec!:ty, 2,
I ,Futi or c_c_ged dL;_stb_g, t.
2,Di_ fiiters. 2.
3. Ctogged airfl_:_ passage..difi 3,
tube° no_x,zle, hose.
4. Certai_ attachment tools. 4.
i[, A_achrneht use re_tricts a_i i.
flow,
2, New ca£aet fuzz clogged air 2,
pail's,
i, Belt R_bbi;r_go_ ca_pedbare 1.
floor seieotor shaft,.
i. Piug in _h'miy,,_ress the ON/OFF switch to ON.
2, Reset _rcuit b_'eake_or iep_ce fuse.
3, PushON/OFF switch toON_
1. Change. dus[ bag _'{page!2}.
2, Adiust se't_na_{#age 7}.
4,
Clean aezz_e aea, (pace !7},
._.heckfor c_cg:s,_page 17L
Rep ace hose.
7, Rep!ace#ix L'_t, (page t4-I 52,
8, ln_rt hose fui_y, {page 7,,81,
9, Check for c_cgs, (page 17).
I0, Ciean iitters, (page 13),
1.Adi_:_s_ttir_g°(page 7).
Repia_e belt, (ps£e 15),
_h_ck BEL.T_HANGINL;_ AND AGITATOR
CLEANING, (page _ ' <'
I _-1Jt,,
Char_ge,dust b_g_ (page 12!,
Clear fiiters_ {page 13).
Clear c_og from ai..fftowpaisa,go, {p_ge !7}.
Should return to no_a{ w_en ioo! is removed,
Check,A'F_ACHMENTS,(pa_e 7-8)
CheckCLOG REMOVALand cIea_ hose,
{page _7},
P_sh selector aHthe way forwatt,
-I8-
Page 39

Master Protection Agreements:
Congratulationson making_ smart:purchase,
Yo_ new Kenmore_;produ_ is,designed and
manufactured for yearsof de#endabteoperation..
Butiike atiprod_Jc_,itm_y requireprevent ve
maintenanceor repair _omtime to line,
That's when h_ving aMaster ProtectionAgreement
c_n s:_veyou money a_d _ggr_vation_
Purchase a Master PromotionAgreeme_ now and
p_3teotyourself fromu_expectedhass:ieand
expense.
The MasterProtect o#Agreement a!,soheipsexter_d
the life of your r_ewproduc_.Here'swl_at'si_ciuded i#
the A_reement:
_ Experl se_ioe by ou_i2,000 professiionairepair
specialists
Unl:irnited serviceand no chargefor .._rt._,_,_d
labor on _l cove_'edrepairs.
"No-lemon" g_a_antee_ repia.ceme_tof your
covered product if four or more productfaiiures
occur within twelve months
Product replacement If y,_,, oo__redoroduct
cam'tbe fixed
_ A_n:ua[Preventive _aintenat_ce Check at your
r_u _: _ extra charge
Fast he|p by phone - phonesupport _roma
Searstechnician o_produ:ctsrequ_irin9 in-home
re _
_pa,_,plusconvenient repairscheduii_9
Power surge prot_ion s_ai_steie_tica
damage=d_e to powerfi*_a,tio,qs
Retrial reimbarsemen_ if repair of your coveted
product _kes/oP_gerthan p_omised
O_ceyou purcha_the AgreemenI. asimpie phone
cs_tis al!that it takes _oryou to schedule service,
You can cali anylime day or nig_hi,or scheduiea
servi_ appointmentonline
Searshasover i 2,000 profession_i repairs-_ecialists
who h_ve_ccess to over 45 mii_ionqusiity pa_s and
accessorl;es,Th_:t"sthe kitedd professionalism you
ca_ counto£.to b;elpprolong_theiife d your new
pu_ch_sefor yea_ to come,,P_rchase your M_ste:
_rotection A9r_ment today!
Some llmitalions and exciusio_s appt_,
For pricesand ad_!_jenal in,lormationcall
1.8004;27_6655,
Sears lnstaltalion Service
For'_a_s p_o_ssion_ insta!iationof home
ap,piisqce.s,g_r_oedoor opepers w_ter he_ers, and
oiher m_}orhome items:_in _;e U ,S,A,cail
1-800.4-_Y-HOME _
-!9-
Page 40

Your Home
For repair - in your home - of 8U major brand appliances,
lawn and garden equipment, or heating and cooling systems,
no ma_er who made it, no manet who so_d it!
For the replacement parts, accessories and
owne#s manuals that you need to do-tt-your_eff.
For Sears professionaM }nstaHation of home appl_ances
_nd items tike garage door openers and water hea_e.rs.
!-800-4oHY-HOHE ® 24/ 7/ 3s5
(_-_00-469_4663) (U.S.A. and Canada)
www,sears.com www.sears.r.a
Our Home
For repair of carry-in products like vacuums, lawn equipment,
and electronics, call or go on-line for the nearest:
S_rs Parts and RepaiT Center.
1 ,_0€_8,,1 2_ 24 / 7 / 365 (U.S.A. on_y)
_.sGEmrs.co_
To purchase a protection agreement (U.S.A.)
or maintenance _reeme_ (Canada) on a productserviced by _a_:
1_00-827-6655 (U_S.AJ 1-800-361-6665 (_
Para pedirse_cio de reparaci6n
a domicilio,y parao_ar piezas:
1:-888_S_HOGAI:{_'I
Au Canada pour ser_atceenfran_s::
1.80_LE.FOYEI_ _c
WWW,Se_F_S_C_
© Reg_J:eredTrademark i_M T_,a_ / _ S_'i_ _ of SeatS, R_k _nd Ce:,
© M_ca Reg.L_,_d_ / T_a:M_rc_ de Fdbrica / s_ Marc_ de Servicio de Se_s, Floeb_ck and Co.
_" M_zque de commem_ / _ Marque d_pos_ de Seam, Roebu_; an_ Co,
Page 41

Owner's Manual
Manual del Propietario
Vacuum Cteaner
Aspiradora
iViodei, Modelo
721.33078
72! .33079
CAUTION: Read and follow a!l safety
and operating instructions before first
use of this product.
CUIDADO: Lea y sigue todas tas
instrucciones de operaci6n y seguridad
antes del uso de este producto.
Directions for Use
It is a violation of Federal law to use this
product in a manner inconsistent with its
labeling.
Direcciones de uso
Es una viotaci6n a ta fey Federal utitizar
este producto de una manera contraria
con su etiquetado.
Sears, Roebuck and Co., Hoffman Estates, IL 60179 U.S.A
www,sesrs.com
PART No. • 3828FI3841A Printed in China
Page 42

Before Using Your New Vacuum ........................2
Kenmore Vacuum Cfeanet Warranty ................ 2
impo_ant Safety fnstruct:ions ...............................3
Par_sand Features ...............................................4
Assembly instructions ........................................ 5,
Operatir_g lnst_Jctions ........................................ 6
Cord Re_ease..........................................................6
Autornatic Height Adjustment ........................... 7
Handie Release al_d Positions ...........................7
O_/Off Switch ..................................................... 7
Atlachmelts ....................................................... 7
At_.achme:n;tsUse Chart ...................................... 9
Vacuuming Tips ................................................ 9
Performance Features ..................................... !0
Vacuum Cleaner Care.............................................11
Vacuum Storage ................................................t t
Cleaning E×_eriorand Attachments ..................t t
Dust Bag Changing ............................................i2
Motor Safety Fil!_erC[eanhlg ...............................I3
Exhaust Filter C_eaning and Replacement .....13
Bell Changing and Agitator Qeaning ...............14
Agitate_ Servicing ............................................ ! 6
Agitato_'Assembly ...............................................16
Ciog Remora! ................................................... i7
Tro_b!eshooting ......................................................18
Master Protection_ Agreements. ....................... t 9
Service ..................................................Back Cover
Ptease read this guide. 11will help you assemble and operate your new Kenmore vacuum in the safesl
and most e_feclive way.
For more intermation about the care al_doperation, c_! your nearest Sears store.
You wi!l need _hecomplete model and seria_ numbers wher_ requesting information.
Your vacuum's model_and serial numbers are Iocated on the Model and Sofia! Number PIale.
Use the space below to record the model number and serial number el your new Ket_morevacuum.
Modet No,
Serial No,
Date d Purchase
Keep this book and your sales check (receipt) in a safe #ace for Mute re!erence,
UM|TED ONE Y_:R WARRANTY ON KENMORE VACUUM CLEANER
This warranty is for one yea_' firo:mthe date of purchase, and inciudes only private household
vacuum cleaner use, During the warra_y year, when this vacuum cleaner is o_rated and
m_ntained according to:the owner's manua_ instructbns, Sears will repair any defects in materiat
or workmanship free of charge.
Thiswarranty excludes vacuum bags, be_ts,t[gh_bulbs, and filters, which are expendable parts
and become worn during normat use_
For warranly service, return this vacuum cleaner to the neares! Sears Parts and Repair
Center in the Uni!ed Steres.
This warranty applies only white this product isin use in the United States.
This warranty gives you specific legaf rights, and you may atso have other rights which vary from
state to: state.
Sears, Reeb_k and Co., D!817WA, Hoffra8n Estate, |L 60179
Page 43

WA
G-To reduce the risk of fire, etectric shock, or injury:
Your safety is important te us. To reduce the risk of fire, electric shock, injury to
persons or damage when using your vacuum cleaner, foltow basic safety precautions
including the following:
Read this manual before assembling or using
your vacuum cleaner.
Use your cleaner only as described in this
manual. Use oniy with supplied attachments.
To reduce the risk of electric shock- Do not
use outdoors or on wet surfaces.
Disconnect electrical supply before servicing
or cleaning out brush area. Failure to do so
could result in electric shock or brush suddenly
starting.
Always turn cleaner off before connecting or
disconnecting the hose.
Always turn cleaner off before unplugging.
Do not unplug by pulling on cord. To unplug,
grasp the plug, not the cord.
Hold plug when rewinding onto cord reel.
Do not allow plug to whip when rewinding.
Do not use with damaged cord or plug. If
cleaner is not working as it should, has been
dropped, damaged, left outdoors, or dropped
into water, return it to a Sears Service Center.
De net pull or carry by cord, use cord as a
handle, close door on cord, or pull cord around
sharp edges or corners. Do not run cleaner over
cord. Keep cord away from heated surfaces.
De not leave cleaner when plugged in,Unplug
from outlet when not in use and before servicing.
Do not allow to be used as atoy. Closeattention
is necessarywhen used byor near children.
Do not handle plug or cleaner with wet hands.
Do not operate the cleaner with a punctured
hose. Replace if cut or worn. Avoid vacuuming
sharp objects.
Do not use with any opening blocked; keep
free of dust, lint, hair and anything that may
reduce air flow.
Keep hair, loose clothing, fingers, and all parts
of body away from openings and moving parts.
Do not use cleaner without dust bag andlor
filters in place.
Always change the dust bag after vacuuming
carpet cleaners or freshener, powders and fine
dust. These products clog the bag, reduce
airflow and can cause the bag to burst. Failure
to change bag could cause permanent damage
to the cleaner.
Do not use the cleaner to pick up sharp hard
objects, small toys, pins, paper, etc. They may
damage the cleaner or dust bag.
Do net pick upanything thatisburning orsmoking,
such ascigarettes,matches,or hot ashes.
Do not use vacuum cleaner
to pick up flammable or combustible liquids
(gasoline, cleaning fluids, perfumes, etc.), or use
in areas where they may be present. The fumes
from these substances can create a fire hazard
or explosion.
Use extra care when cleaning on stairs. Do not
put on chairs, tables, etc. Keep on floor.
You are responsible for making sure that your
vacuum cleaner is not used by anyone unable
to operate it properly.
SAVETHESE i STRUCT
Proper assembly and safe use of your vacuum cleaner are your responsibilities. Your cleaner is
intended only for household use. Read this Owner's Manual carefully for important use and
safety information. This guide contains safety statements under warning and caution symbols.
Please pay special attention to these boxes and follow any instructions given. WARNtNG
statements alert you to such hazards as fire, electric shock, burns and serious personal injury.
CAUTION statements alert you to such hazards as moderate personal injury andlor property
damage.
-3-
Page 44

_t:is important to know your vacuum cleaneCs parts an_ features to assure its proper and: safe
use, Review these before, _sing your cleaner.
_tem Pa_SNo.
Dust Bag 5O688
Bait 5275
Handle
Hose Hotder
Quick Release
Cord Hanger
Power Cord
Exhaust Panel
Lower
Cord Hanger
On/Off Switch
Extension
Wand
Dusting Brush/
Upholstery Tool
E-Z Belt Check
Crevice Too_
Floor Nozzle
Motor
Hose
Agitator
_4_
Page 45

Before assembling your vacuum, check the
PACKING UST on the cover of the separate
Parts List. Use this {_stte verify that you have
received aJlthe components of your nmv
Kenmore v_uum.
WARNING
Electric Shock Hazard
Do not plug _nt_the electrical supply until
the assembly is complete.
Failure to do so could result ir_electric
shock or iniury.
HANDLE ASSEMBLY
Remove the screw located just bel:ow the top
edge of the back of the vacuum.
Position the handle as shown befow and slide
the handle into the opening at the top of the,
vacuum,
inse_thescrew so itpasses1_hroughthe
handle intothevacuum,
Tighten: fl_e screw setupely witha screwdrive:l.
It may be necessary to adiust the handle
slightly,
CAUTION
Do,not overtighten:,
Overtightening coutd strip the screw holes.
Do not operate the c_eaner w_thout the
screw in place.
-5o
Page 46

HOSE ASSEMBLY
After the handle has been assembled to.the
body and power cord has been wrapped
a'ound the cord hangers_ inser_ the upper end
of the hose i_o the opening on the body and
place the hose over the hose hoBer.
Hose
Holder
l-- Hose
_ r.Lower_
'__|Hose
'J Coupling
And then a_ach the lower hose holder Fovided
in the aceessory bag to the body and clip hose
into the holder and slide: hose onto the hose
coupling on floor nozzle and twist hose°
Make: sure hose is firmty connected before
_sing the vacuum.
CORD ASSEMBLY
Make sure the quick release cord hange_ is in
the upright pos_ion.
Lock the cord into
Locking
place by forcing _ Notch
into the _ocking
notch on the body
of the upper cord
hanger as shown.
This helps keep the
power coli out of
Cord
the path of the floor
r)ozzie.
Cord
Wrap the
power cord
around the
quick release
cord hanger
and Iower cord
hanger, and
clip the pt_g
onto the power
cord,
OPERATING INSTRUCTIONS
1, Turn the quick
release cord hanger
to either side and
down to release: the
power cord.
2, Unc_ipthe power cord plug from the power
cord and pult the cord off the quick release cord
hanger. Check to be sure the power cord is sill}
locked into the locking notch. See CORD
ASSEMBLY.
3, Check to see if the cleaner has bag
installed, See: DUST BAG CHANGING,
4, Plug the polarized pow,_rcord., into a t20
Vo_ elec_'ical out_et.
NOTE: To reduce the risk of electric shock, flis
vacuum cleaner has a polarized plug, one blade is
wider than the o_:hel.This ptug will fit in a_polarized
out,e1 onty one wa_y./flhe plug does not:f_tfully in
the outleL [everse the plug, If it still:does no¢fit,
conlact a qualified elect!'ician to [l_sta]lthe proper
outlet, 9o not change the p_ugin any way.
WARNING
Personal injury and Prodect Damage
Hazard!
DO NOT pteg.in if s_ftch is in ON pesi_iot_,
Personal inlury o_ producl damage could
reSUft,
, DO NOTuse outle_s,above touters, Damage
to items ia surto_#d_ng area co£td occur.
Page 47

This vacuum ciea_er is designedwith s_ Automatic
Height Ad!ustment which adjuststhe floor nozzleto
the proper height of a_qyca_et pile..
The height of floor nozzle is in_an_y and
automaticallyadi_,_stedwhen yo_ move from one
carpeted area to ano_ser.
Release the handle by stepping, on the
embossed pal1 on either" side of the fbor nozzle
and pulling back and dow_ on the handle with
your hand.
The vacuum
cteaner has three
positions:
iJpright forstorage
and when using
_,_ea_tr_gtoolso
- Angled _orcarpet
and floor ctesni_g.
- Low for roaching
under rum[lure.
The On/Off switch is located on the vacuum
cleaner body just below and to the si_e of the
handle, Push the switch to ON to start the
cleaner and to OFF to stop it.
Cerd
Hat, die
On/Off
Swilch
Wa_d
Dusting --
Brush
Hose
Hose Connector
J
TO USE ATTACHMENTS
Remove the !ower end of the hose fi'orn the
cleaner by gras#ng the hose connector,
twisting and pulling straight out.
:::::::'::: : ::: :[: :: :
NOTE: The motor protector may open cau_sing
poor p_ck up, when using attachments or when
cleaning new carpet, due: to reduced ai#t:ow
caused by the a_,achments themselves, or by
new carpet i_uzzflIfing the: bag quickiy. See
CLOG REMOVAL
WARNING
Page 48

Wand
Remove the extension wand from its storage
position.
Remove the crevice tool from its storage
position in the wand. Attach the extension wand
onto the open end of the hose.
Add the crevice tool to the end of the wand by
inserting and twisting slightly. The crevice tool
doubles as another wand, because the dusting
brushtupholstery tool will fit onto its tip, allowing
for maximum cleaning reach. The brushttool
may also be attached directly to the extension
wand.
HOSe
//- Extension
Wand
i/f Crevice
Tool
The dusting brush has two options. When the
front brush is removed the remaining part can
be used as an upholstery tool.
Upholstery __
Tool "__:/f,_
Dusting
Brush
CAUTION
When using attachments, be carefu_
not to overextend the hose when
reaching. Trying to reach beyond the
hose stretch capability couRd cause
the cleaner to tip over.
TO STORE ATTACHMENTS
Remove dusting brush/upholstery tool from
wand. Snap into its storage location.
Remove crevice tool from the wand by twisting.
Remove the extension wand from the hose.
Twist the wand and pull from the hose end,
Place the crevice tool down into the extension
wand. Snap wand into its storage location.
Be sure the unit is turned off. Reinsert the hose
fully into hose coupling from which itwas
removed. Press firmly to assure connection.
WARNING
Personal Injury Hazard
DO NOT ptace hands or feet
underneath the unit when inserting the
hose. The agitator revolves rapidly
when the vacuum is turned on,
-8-
Page 49

A]3"ACHMENT
DUSTING _,_
BRUSH
CREVICE
TOOL
t .. _: I*._ ¸
JPHOL_T_d
TOOL
Furniture*
X
X
CLEANING AREA
Betweel_
Gush ons* Drapes_
×
X
Smi_
X
X
X
X
Wails
X
A_wayscban attachments _bre using on fabdcs,
Carpet edges
Guide efther side or the front of the nozzle
abng a baseboard. The full length brushes he_p
remove dirt at carpet edges.
Stairs
Put handle in _uL!upright position. Use the
crevice too_or dusting bfushiuphoistery tool.
WARNING
Personal In_ury Hazard
Use care if vacuum cleaner is ptac_ on
stairs, if it falls_ personal injury or property
damage couW result,
For best cleaning results, keep the airfbw
passage clear.
Occasionally, check each of the areas indicated
for chgs.
Always _nplug _e cleaner from the outlet
before checking for clogs,
-9-
Page 50

WARNING
Electric Shock And, Persona! injury
Hazard
Disconnect efectricai supply before
,servicing or cleaning the ur_it.
Failure to do so could resu_ in
emectric shock or personal injury from
cleaner suddenly starting°
E-Z BELT CHECK
The E-Z Belt Check consists of two latches on
the top of the fioor nozzte. These latches aliow
br easy removal of tt_e nozzfe cove_' to change
the beit orcle_n the agitator.
Place thumbs on latches, push out_,,a]'d, and
raise cover.
To reptace nozzle covel._ insetl tabs into.slots,
Iower cover onto nozzle, 8nd push tatches in to
secure,
MOTOR PROTECTION
SYSTEM
This vacuum has a motor protector by-pass
valve which automaticatfy opens to provide
cooling air to the motor when a clog prevents
the: nomlal flow of air to: the motor. If the by-
pass. valve opens to prevent motor overheating
and possible damage to the vacuum, you will
notice a change of sourd as air rushes through
the vak_e opening.
Motor
Protector
To correct prebllem:
Check fo[ and remove clogs.
See CLOG REMOVAL.
-10-
Page 51

VACUUM CLEANER CARE
Always fotiow al_safety precautions when
o_eaning and servicing the vacuum cteaner.
Gather the cord and wrap it loosely around the
WARNING
Etectric Shock And, Persona_ injury
Hazard
Disconnecl etectricai supply before
servicing or clieaning the unit.
Failure to do so could resullt in
electric shock or personal injury from
cleaner suddenly starting.
quick release cordhar_er and tower cord
hanger,
Stere the cl.eaner in a
dry, indoor area, on the
floor with the handie
_ocked in the upright
position.
WARNING
Eiectric Shock And Persona! injury
Hazard
Wrapping the eo_ too tightly puts
stress on the cord and can cause
cord damage.. A damaged cord is an
electric shock hazard and could
cause persona| injury or damage.
Unplug cord from wall outlet. DO NOT
drip water on clea_er.
Clean extedor using a clean, soft cloth thai has
been dipped in a sotution of mild liquid
detergent and water, then wrung dry. Wipe dry
after cleaning,
Wash; attachments in wa_'msoapy water rinse
and: ait-dry. Do not: ctesn in d_shwasher.
::: ::::::[:::::[:::: ::::::: ::::::::[
CAUTION
Do not use attachments if they are
wet, Attachments used in dirty areas,
such as under a refrigerant, should
not be used on other surfaces untit
they are washed, They could leave
marks.
Page 52

TO REMOVE BAG
WARNING
Pull the dust cover
gr{p forward.
Remove cover and
lay aside.
/
Dust --
Cover
Grasp the dust bag
collar and puit
gentty, carefulFy
removing the dust
bag.
Throw away the
used dust bag,
notreuse:.
Bag
CAUTION
NEVER REUSE A DUST BAG. Very
fine materials, such as carpet
freshener, face powder, fine dust,
piaster, soot, etc. can clog the bag
and cause _ to burst before it is fuN.
Change: bag: more omen when
vacuuming these materials.
BOO ....
Motor--
Safety :_t'l
Check the bag,
holder and the
motor safety filter.
If either is:bbcked,
check them. See,
MOTOR SAFETY
FILTER
CLEANING.
TO REPLACE
Un_oId the new dust bag,
BAG
ii lnsell the dust bag:
onto the bag hotde[
completely by
holding the bag
'" collar as sho_,m and
snapping it into
position.
Be sure bottom of dust, bag, is completely within
dust bag cavity prior to replacing the dust
oovefl
PosRion the dust
cover so its
positioning tab fits
into the slot on the
vacuum body base,
Dust _'_
Cover
,......
i
Close the dust
cover.
You wit!;hear a
distinct snap when
cover is securefy
closed,
Page 53

Checkmotorsafetyfi_erfrequently.,
ff the motor safety filter, local_ed in the bottom of
the dust bag cavity is dirty, remove it by pulling
forward out from under the ribs.
; j
FilterFoam...........
Wash the foam fitter in wal'm soapy waNr.
Rinse and dry thoroughly by squeezing the fifter
in your hand and Ietting it air dry,
DO NOT wash f_ller in the, dishwasher.
DO NOT install damp f_l'ter.
Replace the foam filter by sliding it back into
place under the ribs in the dust bag cav_y.
WARNING
Etectric Shock Hazard
Do no_: operate the cl_ner without:
the motor safety fi_tero Be sure the
filter is d:_ and properly installed to
prevent motor failure and/or electric
shock.
Always unplug power cord from
electrical outlet before performing
ar_y service on vac_J#m.
WARNING
Do not operate without exhaust filter.
Clean the exhaust filter when it becomes di_y,
or repiace it with a new one. Wash the dirty
filter beneath co_d, running water to clean it.
Atlow to ai_"dry before returning it to the
vacuum.
Do not attempt to clean the filter wRha brush,
A brush wi!! permanently damage the filter_
causing dustto bbw back into the _om wher_
you are vacuuming.
If you use vacuum freque_ity, yo_ should
replace the filter every 6 months.
Check filter frequently.
Dust
Cover
PUl! the dust cover foP_,ard, Remove and lay
aside_
Remove the exhaust: filter" by
Ex:hau
/>
)u_ling it out.
Replace the fi_er so that the _ite side faces
out.
Ca_'efu_}yreplace the dust cover by placing tabs
in slots and pushing in unti! cover snaps into
place_
-13-
Page 54

WARNING
Frequently check and remove hair, string and
Iint buitd-up in the brush area. _fbuitd-up
becomes excessive, fc41owthe steps below.
TO:REMOVE BELT
Disconnect power cord from e}ectricat outlet.
Slide E-Z Belt
Check taters
outward and
remove nozzle
cover.
D3tches
/!/
Position bands on the agitator, if the belt is s_iil
attached to the agitatoL sever with scissors and
remove it. CaretuHy fift the right end o1the
agkator and then the ldt end.
Belt
Note: :itmay be necessaq_, to pu_l on the: edge
of the bumper to allow the ends of the agitator
to be removed easily..
WARNING
Persona_ tn}ury Hazard
Be carefut when remo:ving the
ag_t_r as the belt tension is h_gh.
Failure to do so coul_d result in
personaf injury from: the agitator
releasing q_ick|y and snapping away,
TO CLEAN AGFATOR
Note: in order to keep ctea.ning efficiency high
and to prevent damage to your vacuu:m, the:
agitator m_st be cieaned every time the belt [s
changed.:
The agitator must be cteaned according to the
following schedule:
Vacuum Use
HEAVY
(used daily)
MODERATE
(used 2-3 times/week)
UG_
(used t tJmdweek)
C_ean Agitator
every week
every month
every 2 months
End Cap
-I4-
Page 55

TO REPLACE BELT
Loop the new belt on the motor shaft.
Belt
Pulley
Belt
Note: See PARTS AND FEATURES for belt
number.
Loop the other end of the belt on the belt pulley
on the agitator.
Insert the left end cap, arrow down, into its slot
in the nozzle base. Pull the agitator forward and
insert the right end cap, arrow down, into its slot
in the nozzle base.
Note: Care must be taken due to the belt
tension during reassernbly.
Agit __
Bumper
_" Nozzle
Base Slot
End Cap
Press firmly, checking to see that each end is
completely inserted.
Check to see that the belt is centered on the
belt pulley. Turn the agitator with your fingers to
see that it turns freely.
Replacethe nozzle cover and securethe
latches.
Latches
Nozzle Cover
-15-
Page 56

WARNING
ENecttic Sh_ck or Personali _njury
Ha_rd
Disconnect etectrica_ suppty before
serv_dng oF cleaning the uniL
Faiiure to do so could tesutt in
etectric shock or persona| injury
from cleaner suddeniy sta_:ing.
TO CHECK AGITATOR
Turn the vacuum over to check for worn
brushes. When brushes are worn to the levef of
the base ptate belt guard, repIace the agitator_
Base Ptate Belt Guard
TO REPLACE AGITATOR
Remove the nozzle cover and ag_ator, See
BELT CHANGING AND AGITATOR
CLEANING.
Reptace agitator with a new one,
Reassemble the belt, agitator and nozzle cover.
See BELT CHANGING AND AGITATOR
CLEANING,
Fixing Holde_'
Fixing Hotder
Bearing E_ Cap
o16_
Page 57

Alwaysfol}owallsafetyprecautionswher_
cleaningandservicingthevacuumc}eaner.
WARNING
Etectric Shock Or Personam Injury
Hazard:
Disconnect eSectricai suppty before
serviicing or clean_ng the, unit°
Faiiure to do so couid resut.t in
electric shock or personal injury
from: cteaner suddenly starting,
If tile cteaner does not seem to have adequate
suction, first check to see if the bag is ful! or if a
filter is ciogged. See instructions in DUST BAG
CHANGING and MOTOR SAFETY FILTER
CLEANING,
If the bag and filter areas are free of clogs,
check the hose area. Remove the bwer end d
the hose from _e cleaner by gras#ng the hose
connector; t"_visting,and pufii,ng straight out:.
Plug inthe vacuum
and turn it on.
Stretch the hose to
maximum length
and then aJlow the
hose to return to its
storage length.
Turn the unit off
and unplug, the unit.
Remove any visible
ciogs from the
hose.
f
Hose
Connector
Re4nsert the hose into the opening on the
Iower body from which it was removed. Press
firmly to assure conn,ection.
if the bag and fitter areas and the hose areas
are free of clogs, check the floor nozzle area.
To check this area, see the sections on BELT
CHANGING AND AGITATOR CLEANING.
Re€urn the cteaner to the updght position before
plugging into an e_ectrical outlet,
For best cleaning results,
keep the airffow passage
o_n+ You should check
your vacuum
occasionally for clogs.
The arrows in this figut'e
indicate the airflow path
where c_ogsoccur.
Unplug vacuum before
checking for clogs.
WARNING
Personal injury Hazard
DO NOT place hands or feet
underneath the unit when inserting
the hose, The agitator revo|ves
rapidly whert the vacuum is turned on
and is in the carpet setting,
_t7-
Page 58

Review this chart to find do-it-youraeff solutions for mine{' pertormance problems Any other sewice
needed_ otl_er than 1hosedescribed in this owneCs manual should be performed by a Sears o_'otheF
quaBfled service _epfe_ntatk_e_
WARNING
Etectdc Shock Hazard
Disconnect eiectricai supply before sewicing or cleaning the un_it.
Faiture, to do so, coutd resu_ in electric shock or persona!: injury.
Clea#er wen t ] I, Linpk_gged at wa_i out_et.
slarL } 2, :l"rip-ae;dcircuit breakedbiown
Poor Job ol et_
plck-up0
l fuse at househoid service
f panel.
3, ON/OFF switch r_._>!k_med ON.
I. Ful__>_ologged dus[ bag,.
2, Wrong pi_eheiight setting,,
3. Worn ag:ita_._l',
4, Cbgged nozzle or di_ tulle,
5, Cbgged hose.
6, Hole in ho_
7. B!oken!mispiaced be_1,
8. Hose not inseded Dlfy.
9, Motor prote_ion system
activ&ted,
o, Dirty fi_ers.
Cleaner picks up
movable rugs: or
pushes too hard:,
Agitator does not
turn,
Pe_ormat_c_
in_|ea_or, some
models, _sred,
Air flowre_r_e_e_
with attachment
use, ,Sound
changes.
Exce_ive noise
_s vae_m is
shut off_
i, Wroag piieheiglqtsetting,
I. £}l\oken be_t. 1,
2. Bell instalied iacorrec!:ty, 2,
I ,Futi or c_c_ged dL;_stb_g, t.
2,Di_ fiiters. 2.
3. Ctogged airfl_:_ passage..difi 3,
tube° no_x,zle, hose.
4. Certai_ attachment tools. 4.
i[, A_achrneht use re_tricts a_i i.
flow,
2, New ca£aet fuzz clogged air 2,
pail's,
i, Belt R_bbi;r_go_ ca_pedbare 1.
floor seieotor shaft,.
i. Piug in _h'miy,,_ress the ON/OFF switch to ON.
2, Reset _rcuit b_'eake_or iep_ce fuse.
3, PushON/OFF switch toON_
1. Change. dus[ bag _'{page!2}.
2, Adiust se't_na_{#age 7}.
4,
Clean aezz_e aea, (pace !7},
._.heckfor c_cg:s,_page 17L
Rep ace hose.
7, Rep!ace#ix L'_t, (page t4-I 52,
8, ln_rt hose fui_y, {page 7,,81,
9, Check for c_cgs, (page 17).
I0, Ciean iitters, (page 13),
1.Adi_:_s_ttir_g°(page 7).
Repia_e belt, (ps£e 15),
_h_ck BEL.T_HANGINL;_ AND AGITATOR
CLEANING, (page _ ' <'
I _-1Jt,,
Char_ge,dust b_g_ (page 12!,
Clear fiiters_ {page 13).
Clear c_og from ai..fftowpaisa,go, {p_ge !7}.
Should return to no_a{ w_en ioo! is removed,
Check,A'F_ACHMENTS,(pa_e 7-8)
CheckCLOG REMOVALand cIea_ hose,
{page _7},
P_sh selector aHthe way forwatt,
-I8-
Page 59

Master Protection Agreements:
Congratulationson making_ smart:purchase,
Yo_ new Kenmore_;produ_ is,designed and
manufactured for yearsof de#endabteoperation..
Butiike atiprod_Jc_,itm_y requireprevent ve
maintenanceor repair _omtime to line,
That's when h_ving aMaster ProtectionAgreement
c_n s:_veyou money a_d _ggr_vation_
Purchase a Master PromotionAgreeme_ now and
p_3teotyourself fromu_expectedhass:ieand
expense.
The MasterProtect o#Agreement a!,soheipsexter_d
the life of your r_ewproduc_.Here'swl_at'si_ciuded i#
the A_reement:
_ Experl se_ioe by ou_i2,000 professiionairepair
specialists
Unl:irnited serviceand no chargefor .._rt._,_,_d
labor on _l cove_'edrepairs.
"No-lemon" g_a_antee_ repia.ceme_tof your
covered product if four or more productfaiiures
occur within twelve months
Product replacement If y,_,, oo__redoroduct
cam'tbe fixed
_ A_n:ua[Preventive _aintenat_ce Check at your
r_u _: _ extra charge
Fast he|p by phone - phonesupport _roma
Searstechnician o_produ:ctsrequ_irin9 in-home
re _
_pa,_,plusconvenient repairscheduii_9
Power surge prot_ion s_ai_steie_tica
damage=d_e to powerfi*_a,tio,qs
Retrial reimbarsemen_ if repair of your coveted
product _kes/oP_gerthan p_omised
O_ceyou purcha_the AgreemenI. asimpie phone
cs_tis al!that it takes _oryou to schedule service,
You can cali anylime day or nig_hi,or scheduiea
servi_ appointmentonline
Searshasover i 2,000 profession_i repairs-_ecialists
who h_ve_ccess to over 45 mii_ionqusiity pa_s and
accessorl;es,Th_:t"sthe kitedd professionalism you
ca_ counto£.to b;elpprolong_theiife d your new
pu_ch_sefor yea_ to come,,P_rchase your M_ste:
_rotection A9r_ment today!
Some llmitalions and exciusio_s appt_,
For pricesand ad_!_jenal in,lormationcall
1.8004;27_6655,
Sears lnstaltalion Service
For'_a_s p_o_ssion_ insta!iationof home
ap,piisqce.s,g_r_oedoor opepers w_ter he_ers, and
oiher m_}orhome items:_in _;e U ,S,A,cail
1-800.4-_Y-HOME _
-!9-
Page 60

Your Home
For repair - in your home - of 8U major brand appliances,
lawn and garden equipment, or heating and cooling systems,
no ma_er who made it, no manet who so_d it!
For the replacement parts, accessories and
owne#s manuals that you need to do-tt-your_eff.
For Sears professionaM }nstaHation of home appl_ances
_nd items tike garage door openers and water hea_e.rs.
!-800-4oHY-HOHE ® 24/ 7/ 3s5
(_-_00-469_4663) (U.S.A. and Canada)
www,sears.com www.sears.r.a
Our Home
For repair of carry-in products like vacuums, lawn equipment,
and electronics, call or go on-line for the nearest:
S_rs Parts and RepaiT Center.
1 ,_0€_8,,1 2_ 24 / 7 / 365 (U.S.A. on_y)
_.sGEmrs.co_
To purchase a protection agreement (U.S.A.)
or maintenance _reeme_ (Canada) on a productserviced by _a_:
1_00-827-6655 (U_S.AJ 1-800-361-6665 (_
Para pedirse_cio de reparaci6n
a domicilio,y parao_ar piezas:
1:-888_S_HOGAI:{_'I
Au Canada pour ser_atceenfran_s::
1.80_LE.FOYEI_ _c
WWW,Se_F_S_C_
© Reg_J:eredTrademark i_M T_,a_ / _ S_'i_ _ of SeatS, R_k _nd Ce:,
© M_ca Reg.L_,_d_ / T_a:M_rc_ de Fdbrica / s_ Marc_ de Servicio de Se_s, Floeb_ck and Co.
_" M_zque de commem_ / _ Marque d_pos_ de Seam, Roebu_; an_ Co,
 Loading...