

Kenmore 26823 - Progressive Bagless Canister Vacuum, 721.26822, 721.26823 Use And Care Manual
USE AND CARE GUIDE
Progressive
Bagless Canister
Vacuum Cleaner
Model 721.26822
721.26823
Sears, Roebuck and Co.,
Hoffman Estates, IL 60179 U.S.A.
www.sears.com
Part No. 3828815002A Printed in KOREA
Before Using Your New Vacuum ................. 2
Kenmore Vacuum Cleaner Warranty .......... 2
Important Safety Instructions ...................... 3
Parts and Features ....................................... 4
Assembly ...................................................... 5-6
Use and Care ................................................ 6
How Your Vacuum Works ............................... 6
How to Start Your Vacuum .............................. 7
Attachments ................................................... 8
Attachments Use Chart .................................. 8
Vacuuming Tips .............................................. 9
Performance Features ............................................. 9-10
Emptying and Cleaning the Cyclonic Dust
Container ................................................................. 11
Cleaning the Pre Filter and Exhaust Filter ............... 12
Cleaning the Dirt Sensor ......................................... 13
Cleaning Exterior and Attachments ......................... 13
Storing Your Vacuum ............................................... 13
Belt Changing and Brush Cleaning .......................... 14
Troubleshooting ..................................................... t5
Master Protection Agreements ............................. 16
Service ....................................................... Back Cover
Please read this guide. It will help you assemble and operate your new Kenmore vacuum in the safest and
most effective way.
For more information about vacuum care and operation, call your nearest Sears store. You will need the
complete model and serial numbers when requesting information Your vacuum's model and serial numbers
are located on the Model and Serial Number Plate
Use the space below to record the model number and serial number of your new Kenmore vacuum.
Model No.
Serial No.
Date of Purchase
Keep this book and your sales check (receipt) in a safe place for future reference.
One Year Limited Warranty
When assembled, operated and maintained according to all instructions supplied with the product, if the is
appliance fails due to a defect in material or workmanship within one year from the date of purchase, return
it to any Sears store, Sears Parts & Repair Center or other Kenmore outlet for free repair
If this appliance is used for other than private family purposes, this warranty applies for only 90 days from
the date of purchase.
This warranty covers only defects in material and workmanship. Sears wilt NOT pay for :
1 Expendable items that can wear out from normal use, including but not limited to filters, belts, light bulbs, and bags.
2. A service technician to instruct the user in correct product assembly, operation or maintenance
3. A service technician to clean or maintain this product.
4. Damage to for failure of this product if it is not assembled, operated or maintained according to all
instructions supplied with the product.
5. Damage to or failure of this product resulting from accident, abuse, misuse or use for other than its
intended purpose.
6. Damage to or failure of this product caused by the use of detergents, cleaners, chemicals or utensils other
than those recommended in all instructions supplied with the product.
7. Damage to or failure of parts or systems resulting from unauthorized modifications made to this product.
Disclaimer of implied warranties: limitation of remedies
Customer's sole and exclusive remedy under this limited warranty shall be product repair as provided herein.
Implied warranties, including warranties of merchantability or fitness for a particular purpose, are limited to
one year or the shortest period allowed by law. Sears shall not be liable for incidental or consequential
damages. Some states and provinces do not allow the exclusion or limitation of incidental or consequential
damages, or limitations on the duration of implied warranties of merchantability or fitness, so these exclusions
or limitations may not apply to you.
This warranty applies only while this appliance is used in the United States and Canada.
This warranty gives you specific legal rights, and you may also have others rights which vary from state to state.
Sears, Roebuck and Co., Dept. 817WA, Hoffman Estates, IL60179
Sears Canada Inc., Toronto, Ontario, Canada M5B 2B8
I_1 WARNING: Your safety is important to us. To reduce the risk of fire, electrical
shock, injury to persons or damage when using your vacuum cleane r, follow basic
safety precautions including the following:
Read this guide before assembling or
using your vacuum cleaner.
Use your vacuum cleaner only as
described in this manual.
Use onty with supplied attachments.
To reduce the risk of electrical shock, do
not use outdoors or on wet surfaces.
Disconnect electrical supply before
servicing or cleaning out the brush area.
Failure to do so could result in injury from
electrical shock or the brush suddenly
starting.
Always turn cleaner off before connecting
or disconnecting the hose.
Always turn cleaner off before unplugging.
Do not unplug by pulling on cord. To
unplug, grasp the plug, not the cord.
Hold ptug when rewinding cord onto cord
reel.
Do not allow plug to whip when rewinding.
Do not use: with damaged cord or plug, if
vacuum cleaner is not working as it
should, has been dropped, damaged, left
outdoors or dropped into water.
Do not pull or carry by cord, use cord as a
handle, close door on cord or pull cord
around sharp edges or corners.
Do not run cleaner over cord. Keep cord
away from heated surfaces.
Do not leave the cleaner unattended when
it is plugged in. Unplug it from outlet when
not in use and before servicing.
Do not allow cleaner to be used as a toy.
Close attention is necessary when used by
or near children.
Do not handle plug or cleaner with wet
hands.
Do not operate the cleaner with a
punctured hose.
Replace it if cut or worn.
Avoid vacuuming sharp objects.
Do not use when any openings are
blocked. Keep free of dust, lint, hair or
anything that may reduce air flow.
Keep hair, loose clothing, fingers, and all
parts of body away from openings and
moving parts.
Do not use cleaner without Cyclone dust
bin in place or without HEPA filters
properly installed.
Always empty Cyclone dust bin after
vacuuming applied carpet cleaners or
fresheners, powders and fine dust.
Do not use the cleaner to pick up sharp
hard objects, small toys, pins, paper, etc.
They may damage the cleaner.
Do not vacuum anything that is burning or
smoking, such as cigarettes, matches, or
hot ashes.
Do not use cleaner to pick up flammable
or combustible liquids (gasoline, cleaning
fluids, perfumes, etc.) or use it in areas
where they may be present. The fumes
from these substances can create a fire
hazard or explosion.
Use extra care when vacuuming on stairs.
Do not put the cleaner on chairs, tables,
etc. Keep the cleaner on the floor.
You are responsible for making sure that
your vacuum cleaner is not used by
anyone unable to operate it properly.
SAVE THESE INSTRUCTION S
Proper assembly and safe use of your vacuum cleaner are your responsibilities. Your cleaner
is intended only for household use. Read this Guide carefully for important use and safety
information. This Guide contains safety statements under warning and cautions symbols.
Please pay special attention to these boxes and follow any instructions given. WARNING
statements alert you to such hazards as fire, electrical shock, burns and serious personal
injury. CAUTION statements alert you to such hazards as moderate personal injury and/or
property damage.

It is important to know your vacuum cleaner's parts and features to assure its proper
and safe use. Review these before using your vacuum cleaner.
Handle
Hose Handle
3-in-1
Accessory
Holder
4-button
handle-mounted
control panel
Telescopic
Wand
Easy HEPA
Empty Bil Exhaust
Power Cord
Release Pedal
inteliCLEAN
Automatic
Booster Sensor
LED Display
Power
Cord Reel
Button
Cyclonic Bust Container
Reset Height
Button adjustment
Handle
Release
Pedal
Canister
Hose Port
Easy Glide
Front Wheel
(
BoftRear
Wheels
Pre-Filter
Filter (washable)
ATTACHMENTS
Turbine-_
powered HandiMate
Jr. Accessory
3-in-1 Attachment
(Crevice Tool, Dusting
Brush, and Upholstery Tool)

Before assembling your vacuum cleaner, be sure you have all the parts shown in
PARTS AND FEATURES.
Canister
1. Inspect canister.
2. Check to see that the Cyclonic Dust
Container is properly installed. See
EMPTING AND CLEANING THE
CYCLONIC DUST CONTAINER for
instructions.
3. Check to see that the vacuum pre-filter
and exhaust filters are properly installed.
See CLEANING THE PRE-FI LTER and
CLEANING THE EXHAUST FILTER for
instructions.
Telescopic Wand
1.Graspandholdthe latchassembly.
2. Pullout the wand tothe desired length.
latch
Hose
1. Insert the hose into the canister until it
locks into place. To remove hose from
canister: Press the release button and
putt hose out.
2. Line up the electrical connectors
and insert telescopic wand /
firmly into hose handle. / /_J
/
/
/
PowerMate® Nozzle
Line up the electrical connectors and
push the PowerMate ® Nozzle onto
the telescopic wand until it clicks
into place.
Before assembling your vacuum cleane r, be sure you have all the parts shown in
PARTS AND FEATURES.
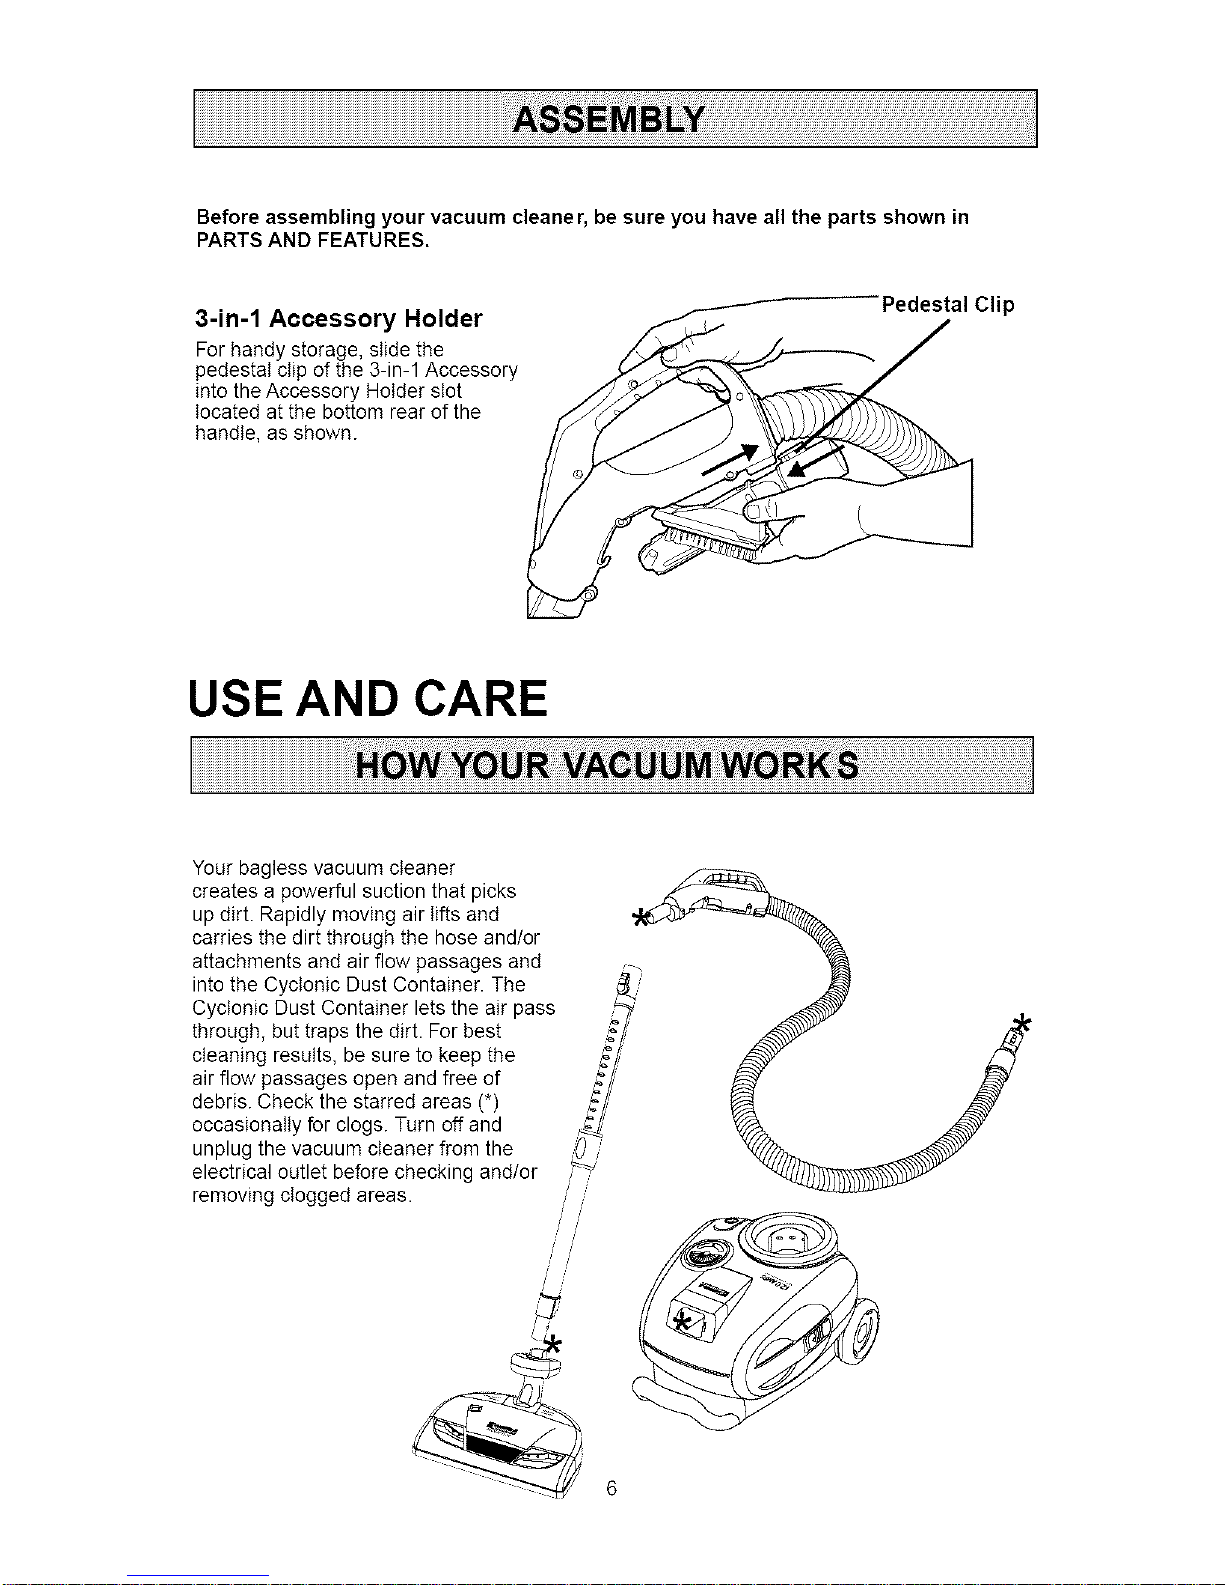
3-in-1 Accessory Holder
For handy storage, siide the
pedestal clip of the 3-in-1 Accessory
into the Accessory Holder slot
located at the bottom rear of the
handle, as shown.
Clip
USE AND CARE
Your bagless vacuum cleaner
creates a powerful suction that picks
up dirt. Rapidly moving air lifts and
carries the dirt through the hose and/or
attachments and air flow passages and
into the Cyclonic Dust Container. The
Cyclonic Dust Container lets the air pass
through, but traps the dirt. For best
cleaning results, be sure to keep the
air flow passages open and free of
debris. Check the starred areas (*)
occasionally for clogs. Turn off and
unplug the vacuum cleaner from the
electrical outlet before checking and/or
removing clogged areas.
6

IWARNING
Personal injury and Product Damage Hazard!
* DO NOT plug in if switch is in ON position. Personal injury or product
damage could result.
*The power cord moves rapidly whe n rewinding. Keep children away and provide a
clear path when rewinding the power cord to prevent personal injury.
* DO NOT use outlets above counters. Damage to items in the surrounding
area could occur.
NOTE: To reduce the risk of electric shock, this vacuum cleaner has a polarized
plug. One btade of the polarized plug is wider than the other. This plug wilt fit into
a polarized outlet only one way. If the plug does not fit securely and completely into the
outtet, reverse the plug. If it still does not fit, contact a qualified electri clan to instatt the
proper outlet. DO NOT change the plug in any way.
Putt out the power cord to the desired length.
When you unwind the power cord, you will
see a yellow mark and a red mark on the
power cord. The yellow mark is 28
inches from the end of the power cord.
The red mark is at the very end
of the power cord.
(_ Plug the polarized power cord into a 12g-volt
outlet located near the floor. To Rewind: (_
Unplug the vacuum cleaner from the outlet.
Hold the plug while rewinding to prevent //,..._
damage or injury from the moving cord. if!
Press on the power cord reel button to 1_'_-_
rewind the power cord. _11_
IntetiCLEAN (indicator) sensor lights _._\_L_ _ _,
green to indicate unit is plugged in and -- '*_4_Y_.--_,,
power is available.
(_) TO START the vacuum cleaner, press the
desired function button on the handle.
TO STOP the vacuum cleaner, press the
OFF button.
i
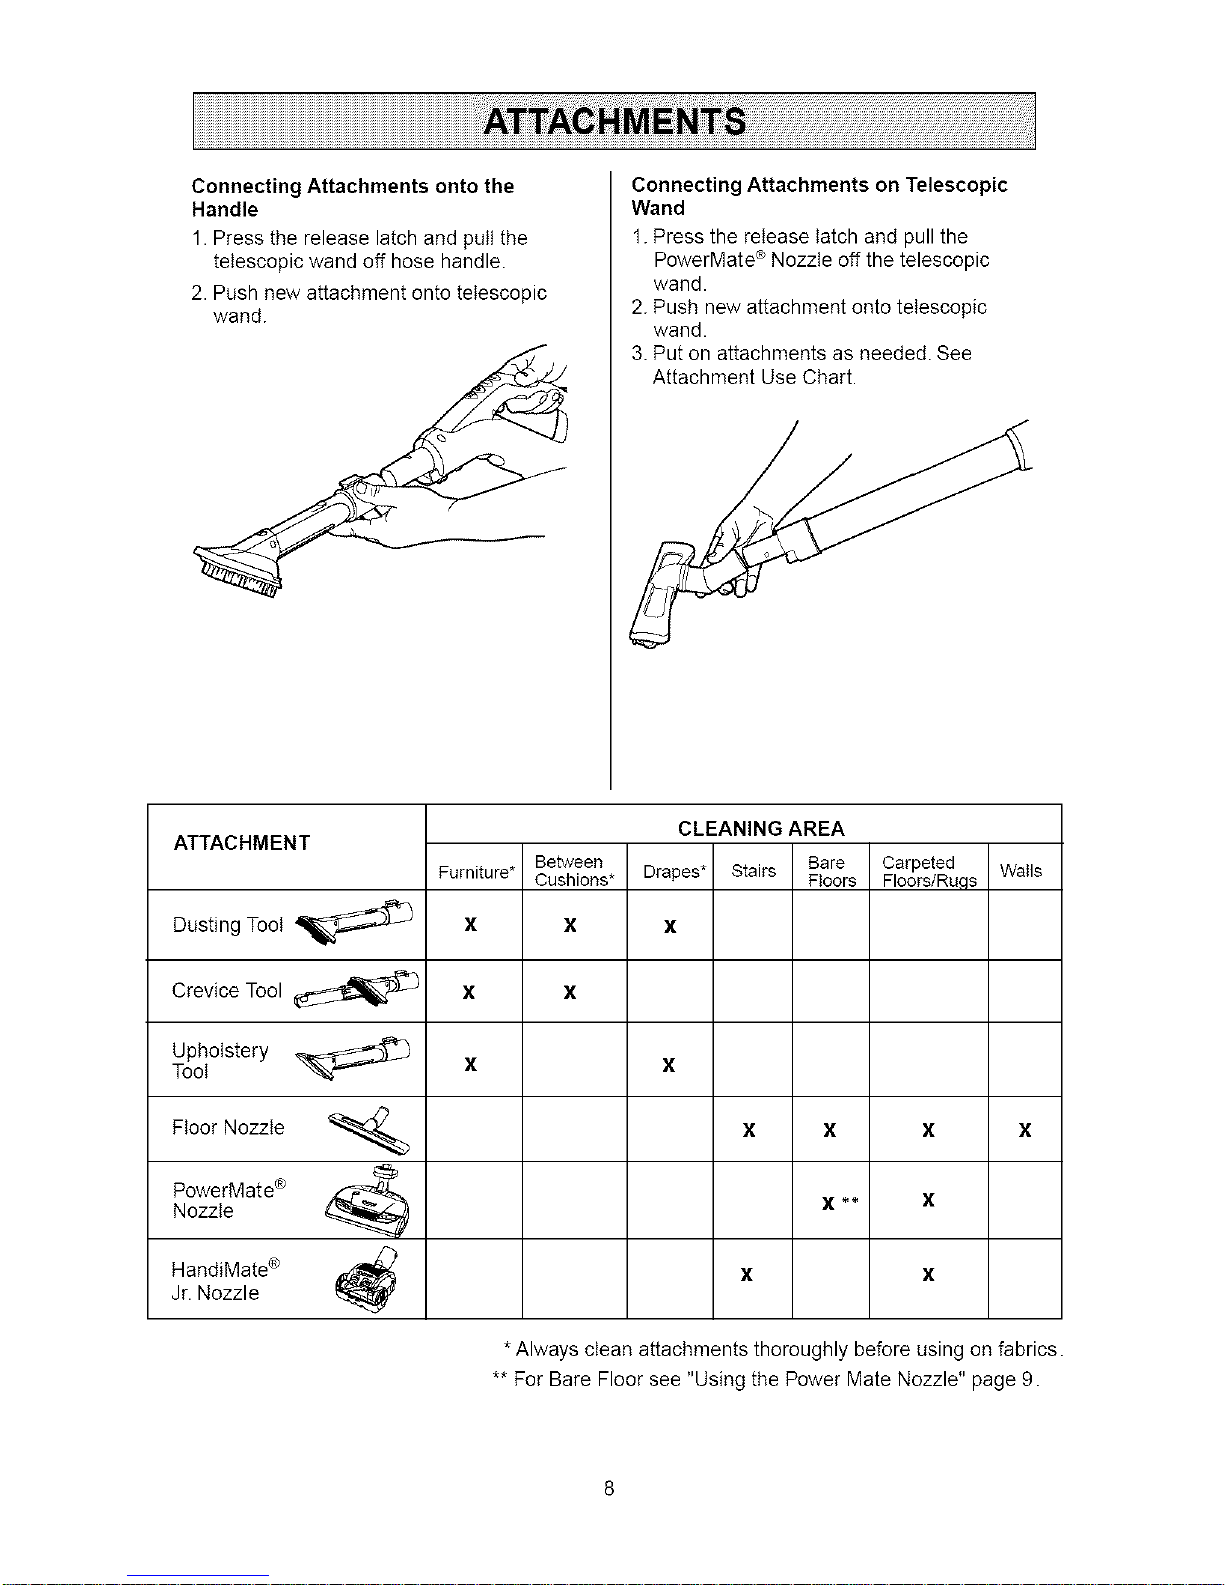
Connecting Attachments onto the
Handle
1. Press the release latch and putt the
telescopic wand off hose handle.
2. Push new attachment onto telescopic
wand.
Connecting Attachments on Telescopic
Wand
1. Press the release latch and pull the
PowerMate ® Nozzle off the telescopic
wand.
2. Push new attachment onto telescopic
wand.
3. Put on attachments as needed. See
Attachment Use Chart.
ATTACHMENT
Dusting Toot
Crevice Tool
Upholstery
Toot
Floor Nozzle
PowerMate ®
Nozzle
HandiMate®
Jr. Nozzle
Furniture*
X
X
X
Between
Cushions*
CLEANING AREA
Drapes* Stairs Bare
Fteers
X
X
X X
X **
x
Carpeted Walls
Floors/Rags
*Always clean attachments thoroughly before using on fabrics.
** For Bare Floor see "Using the Power Mate Nozzle" page 9.
Suggested Sweeping Pattern
For best cleaning action, the PowerMate ®
Nozzle should be pushed straight away from
you and pulled straight back. This pattern
should be continued across the rug with stow,
gliding motions. NOTE: Fast, jerky strokes do
not provide complete cleaning.
Carpeted stairs need to be vacuumed regularly.
For best cleaning results, keep all airflow
passages openand free of clogs.
Check occasionally for clogs.
See HOW YOUR VACUUMWORKS section.
Unplug the vacuum cleaner from the
electrical outlet before checkingfor clogs.
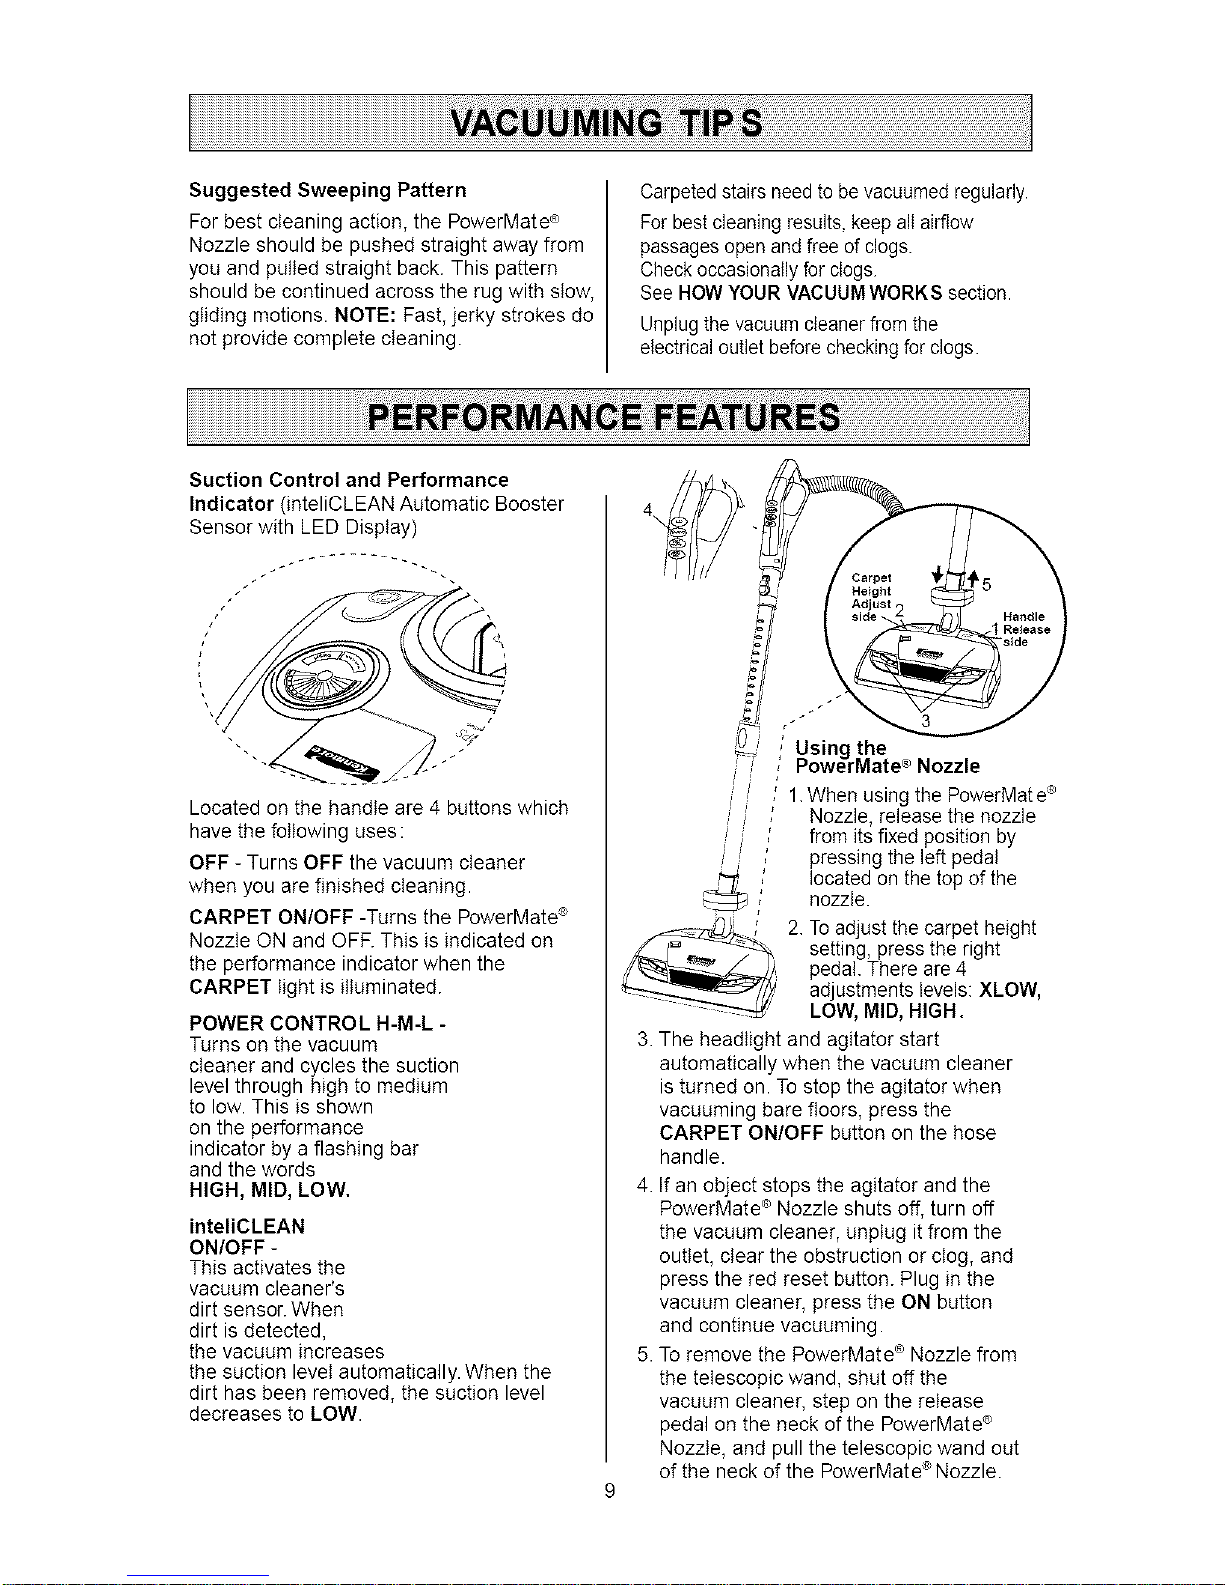
Suction Control and Performance
Indicator (inteliCLEAN Automatic Booster
Sensor with LED Display)
/
'7
Located on the handle are 4 buttons which
have the following uses:
OFF - Turns OFF the vacuum cleaner
when you are finished cleaning.
CARPET ON/OFF -Turns the PowerMate '_
Nozzle ON and OFF. This is indicated on
the performance indicator when the
CARPET light is illuminated.
POWER CONTROL H-M-L -
Turns on the vacuum
cleaner and cycles the suction
level through high to medium
to low. This is shown
on the performance
indicator by a flashing bar
and the words
HIGH, MID, LOW,
inteliCLEAN
ON/OFF -
This activates the
vacuum cleaner's
dirt sensor. When
dirt is detected,
the vacuum increases
the suction level automatically. When the
dirt has been removed, the suction level
decreases to LOW.
UoSiwngrthete ° Nozzle
1.When using the PowerMat e®
Nozzle, release the nozzle
from its fixed position by
pressing the left pedal
located on the top of the
nozzle.
2. To adjust the carpet height
setting, press the right
pedal. There are 4
adjustments levels: XLOW,
LOW, MID, HIGH.
3. The headlight and agitator start
automatically when the vacuum cleaner
is turned on. To stop the agitator when
vacuuming bare floors, press the
CARPET ON/OFF button on the hose
handle.
4. If an object stops the agitator and the
PowerMate ®Nozzle shuts off, turn off
the vacuum cleaner, unplug it from the
outlet, clear the obstruction or clog, and
press the red reset button. Plug in the
vacuum cleaner, press the ON button
and continue vacuuming.
5. To remove the PowerMate ®Nozzle from
the telescopic wand, shut off the
vacuum cleaner, step on the release
pedal on the neck of the PowerMate ®
Nozzle, and pull the telescopic wand out
of the neck of the PowerMate ®Nozzle.
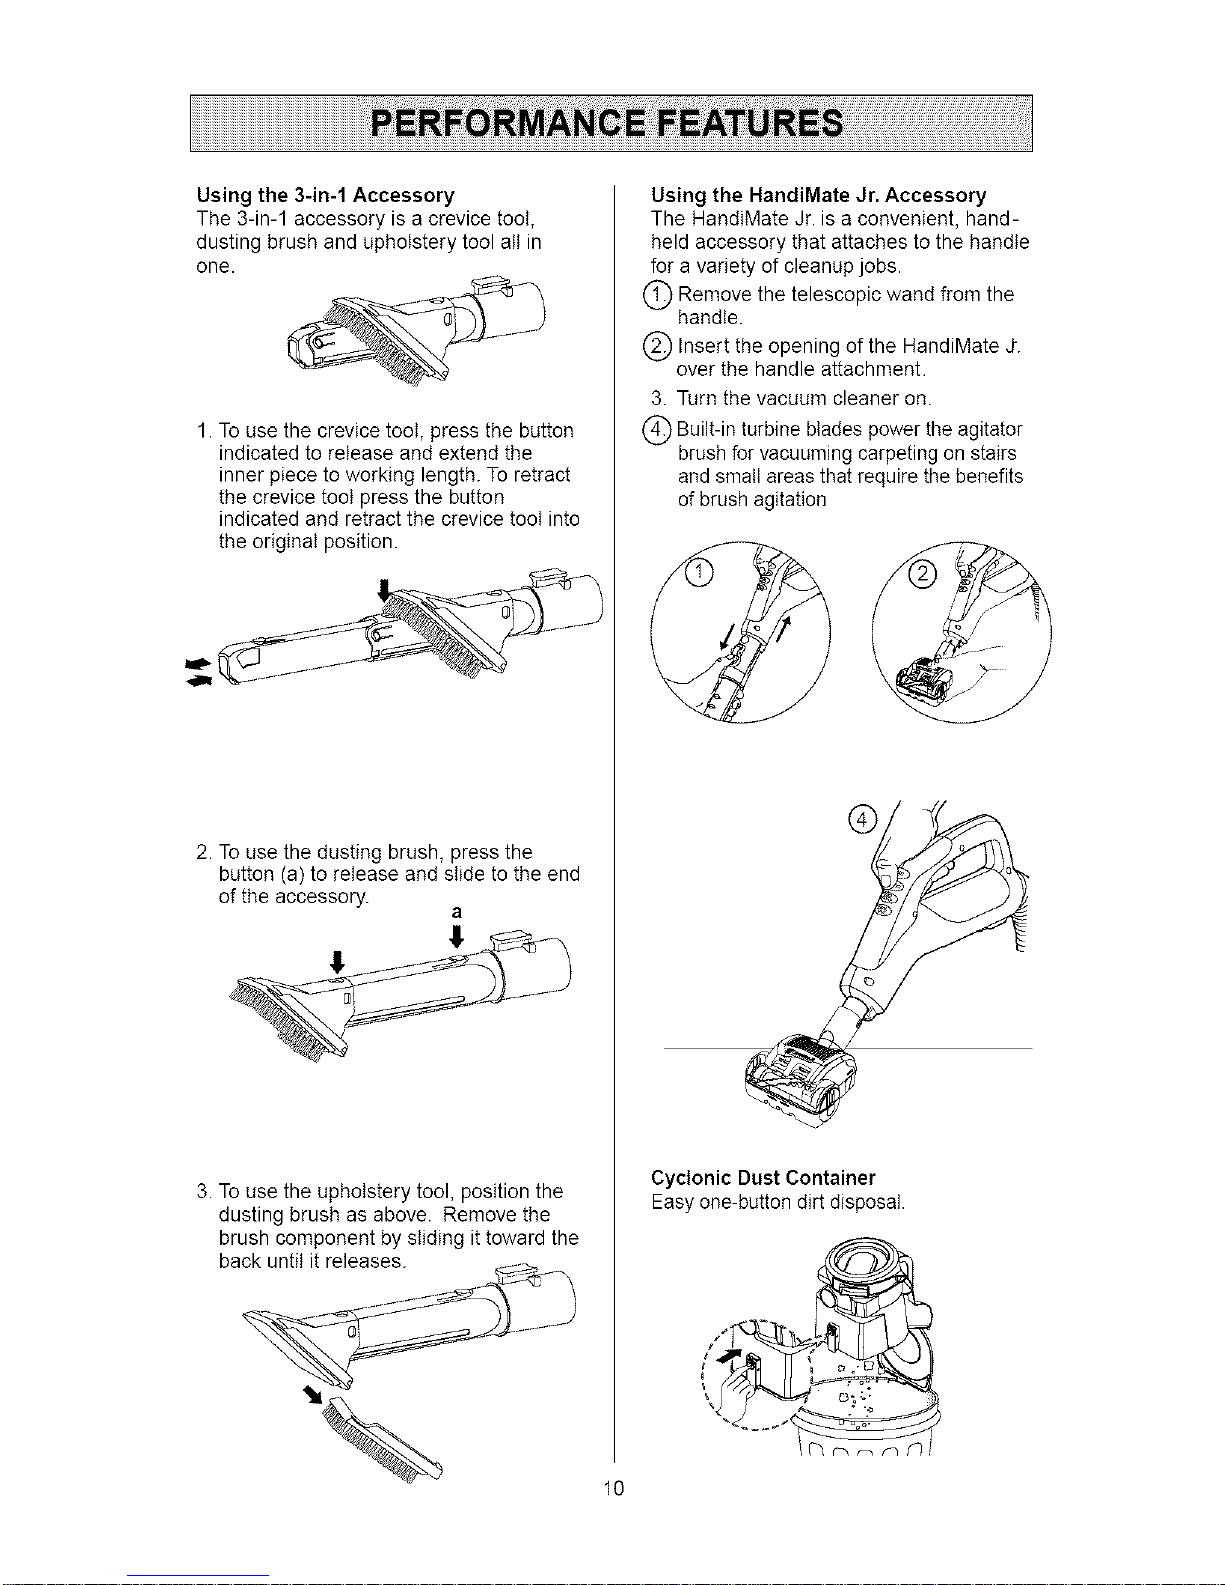
Usingthe3-in-1Accessory
The3-in-1accessoryisacrevicetoot,
dustingbrushandupholsterytoolallin
one.
1.Tousethecrevicetoot,pressthebutton
indicatedtoreleaseandextendthe
innerpiecetoworkinglength.Toretract
thecrevicetootpressthebutton
indicatedandretractthecrevicetootinto
theoriginalposition.
2.Tousethedustingbrush,pressthe
button(a)toreleaseandslidetotheend
oftheaccessory.
a
fj/J _
3. To use the upholstery tool, position the
dusting brush as above. Remove the
brush component by sliding it toward the
back until it releases.
Using the HandiMate Jr. Accessory
The HandiMate Jr. is a convenient, hand-
held accessory that attaches to the handle
for a variety of cleanup jobs.
Q Remove the wand from thetelescopic
handle.
Q Insert the of the HandiMate J-.
opening
over the handle attachment.
3. Turn the vacuum cleaner on.
Q Built-in turbine blades thepower
agitator
brush for vacuuming carpeting on stairs
and small areas that require the benefits
of brush agitation
©
10
Cyclonic Dust Container
Easy one-button dirt disposal.
J
/
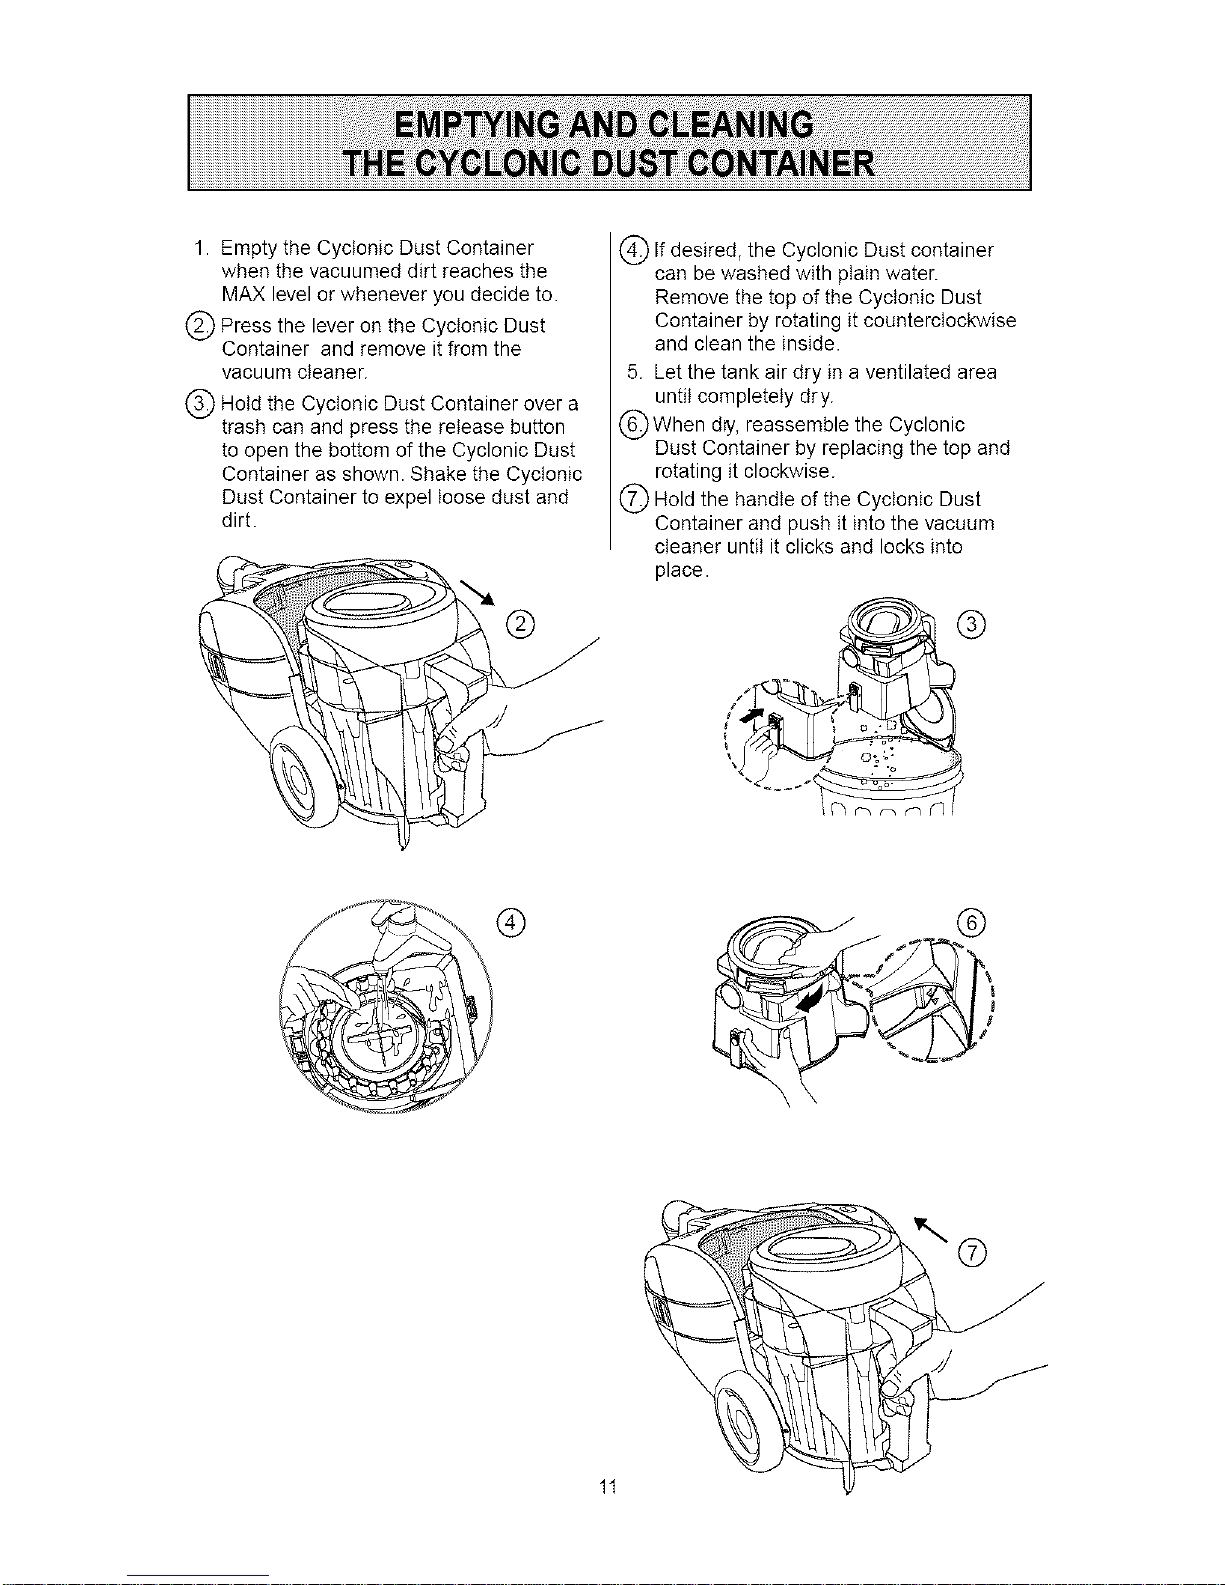
1. Empty the Cyclonic Dust Container
when the vacuumed dirt reaches the
MAX level or whenever you decide to.
Press the lever the Dust
on
Cyclonic
Container and remove it from the
vacuum cleaner.
(_ Hold the Cyclonic Dust Container over a
trash can and press the release button
to open the bottom of the Cyclonic Dust
Container as shown. Shake the Cyclonic
Dust Container to expel loose dust and
dirt.
If the Dust container
desired,
Cyclonic
can be washed with plain water.
Remove the top of the Cyclonic Dust
Container by rotating it counterclockwise
and clean the inside.
5. Let the tank air dry in a ventilated area
until completely dry.
When dry, Cyclonic
reassemble the
Dust Container by replacing the top and
rotating it clockwise.
Hold the handle of the Cyclonic Dust
Container and push it into the vacuum
cleaner until it clicks and locks into
place.
, ®
®
1t
 Loading...