

Kenmore 721.26244200 Owner's Manual
®
Microwave Hood Combination
Use & Care Guide
Combinaci6n Microondas Campana
Gui'a de uso y cuidado
Models/Modelos 721.62642 / 721.62643
721.62644 / 721.62649
, vJI --
3828W5A2621 Sears, Roebuck and Co., Hoffman Estates, IL 60179 www.sears.corn
Table of
MicrowaveHood
Contents
Warranty ........................................................... 2
Sears Service .................................................. 3
Microwave Oven Safety .................................. 4
Getting to Know Your
Microwave Oven .............................................. 7
How your microwave oven works ................... 7
Radio interference .......................................... 7
For the best cooking results ........................... 7
Testing your microwave oven ......................... 7
Testing your dinnerware or cookware ............ 8
Operating safety precautions .......................... 8
Electrical connection ...................................... 8
Microwave oven features ............................... 9
Control panel features ................................... 10
Using Your Microwave Oven ....................... 12
Audible Signals ............................................. 12
Interrupting Cooking ...................................... 12
Clock ............................................................. 12
Child Lock ..................................................... 12
Kitchen Timer ................................................ 13
Exhaust Fan .................................................. 13
Cooktop Light ................................................ 13
Turntable On/Off ........................................... 13
Express Defrost ............................................ 13
Add Minute .................................................... 14
Timed Cooking .............................................. 14
Multi-stage Cooking ...................................... 14
Microwave Power Levels .............................. 15
Auto Defrost .................................................. 16
Auto defrost table .......................................... 17
Auto defrost table (Cont.) .............................. 18
Defrosting tips .............................................. 19
Hold Warm .................................................... 19
Using Sensor Cooking ......................... 20-21
Sensor Cooking ............................................ 20
Potato (Example) .......................................... 20
More/Less ..................................................... 20
Sensor Cooking Table .................................. 21
Auto Cook ..................................................... 22
Auto Reheat .................................................. 22
Auto Cook Table ........................................... 23
Auto Reheat Table ........................................ 23
Caring for Your Microwave Oven ................. 24
Caring for the filters ................................ 25-26
Replacing the cooktop and oven lights ...26~27
Microwave Cooking Tips ......................... 28-29
Questions and Answers ................................ 30
Troubleshooting ....................................... 31-32
Service ............................................. Back cover
2
Combination
Warranty
FULL ONE-YEAR WARRANTY ON
MICROWAVE HOOD COMBINATION
For oneyear from the date of purchase,if this
Kenmore Microwave Hood Combination fails due to
a defect in material or workmanship,Sears will
repair it free of charge.
FULL FIVE-YEAR WARRANTY ON THE
MAGNETRON
For fiveyears from the date of purchase, if the
magnetron in this Kenmore Microwave Hood
Combination fails due to a defect in material or
workmanship, Sears will repair itfree of charge.
The above warranty coverage applies only to
Microwave Hood Combinations which are used for
private household purposes.
WARRANTY SERVICE IS AVAILABLE BY
SIMPLY CONTACTING SEARS SERVICE AT
1-800-4-MY-HOME _
This warranty applies only while this product is in
use in the United States.
This warranty gives you specific legal rights, and
you may also have other rights which vary from
state to state.
Sears, Roebuck and Co.,
Dept. 817WA,
Hoffman Estates, IL 60179
For service call:
1-800-4-MY-HOME _
(1-800-469-4663)
Please record your model's information.
Whenever you call to request service for your
appliance, you need to know your complete model
number and serial number. You can find this
informationon the model and serial number
label/plate at the upper side of cavity front inyour
Microwave oven. Also, record the other information
shown below.
Model Number
Serial Number
Purchase Date

Sears Service
Master Protection Agreements
Congratulations on making a smart purchase.
Your new Kenmore ®product is designed and manufactured for years of dependable operation.
But like all products, it may require preventive maintenance or repair from time to time.
That's when having a Master Protection Agreement can save you money and aggravation.
Purchase a Master Protection Agreement now and protect yourself from unexpected hassle
and expense.
The Master Protection Agreement also helps extend the life of your new product. Here's
what's included in the Agreement:
Expert service by our 12,000 professional repair specialists
[_ Unlimited service and no charge for parts and labor on all covered repairs
"No-lemon" guarantee - replacement of your covered product if four or more product failures
occur within twelve months
Product replacement if your covered product can't be fixed
[_ Annual Preventive Maintenance Check at your request- no extra charge
Fast help by phone - phone support from a Sears technician on products requiring in-home
repair, plus convenient repair scheduling
[_ Power surge protection against electrical damage due to power fluctuations
[_ Rental reimbursement if repair of your covered product takes longer than promised
Once you purchase the Agreement, a simple phone call is all that it takes for you to schedule service.
You can call anytime day or night, or schedule a service appointment online.
Sears has over 12,000 professional repair specialists, who have access to over 4.5 million quality
parts and accessories. That's the kind of professionalism you can count on to help prolong the life of
your new purchase for years to come. Purchase your Master Protection Agreement today!
Some limitations and exclusions apply. For prices and additional information call 1-800-827-
6655.
Sears Installation Service
For Sears professiona/insta//ation of home appliances, garage door openers, water heaters, and
other major home items, in the U.S.A. call
1-800-4-MY-HOME ®
Microwave Oven Safety
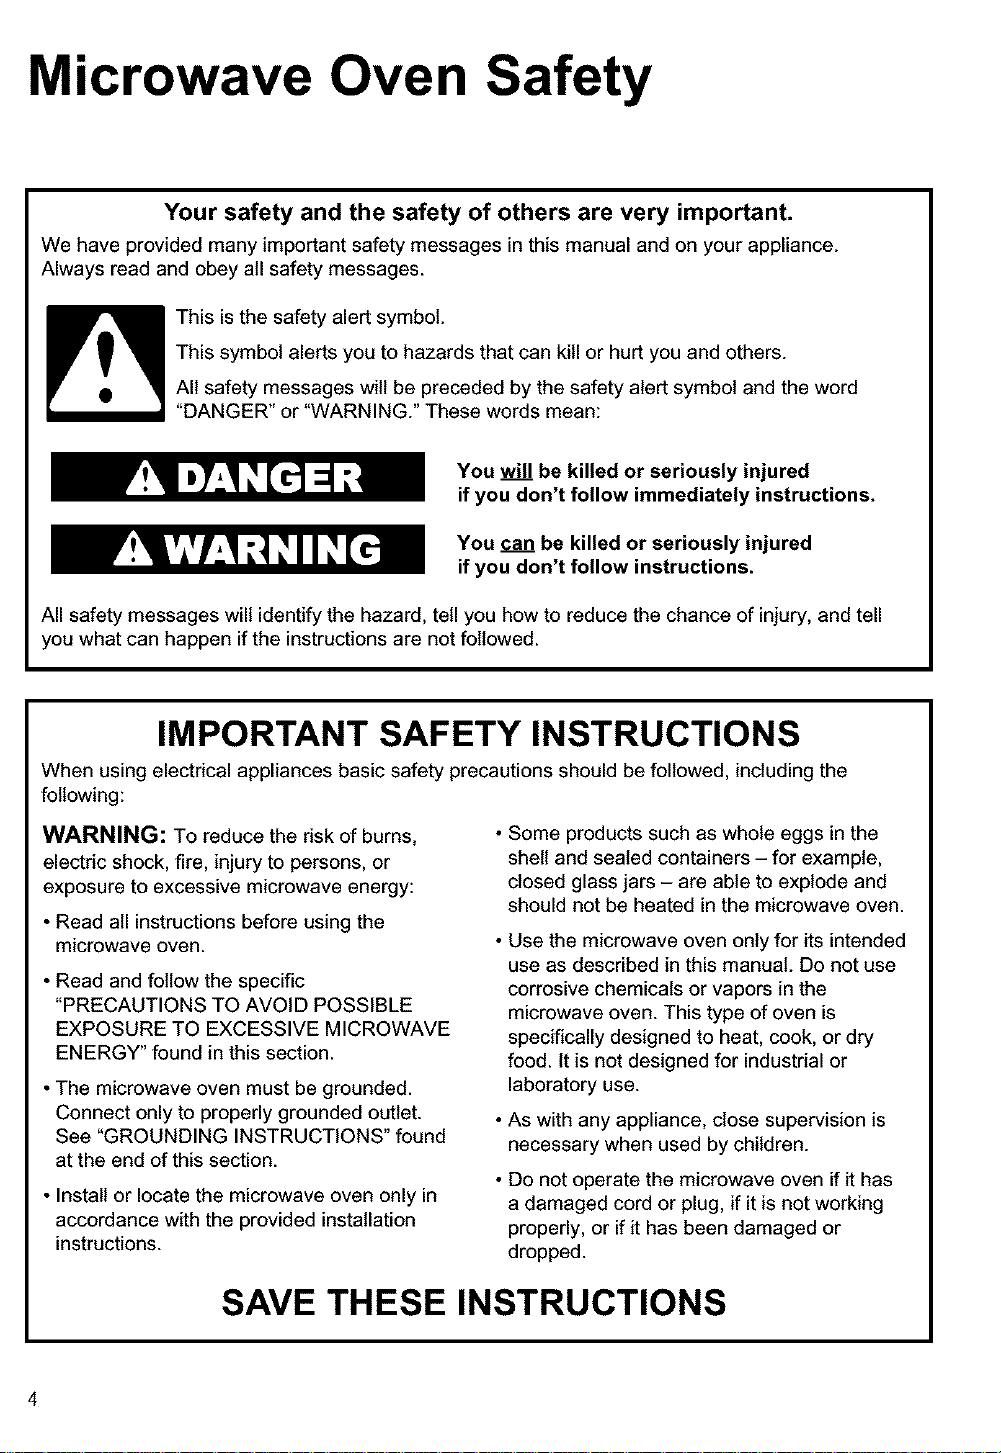
Your safety and the safety of others are very important.
We have provided many important safety messages in this manual and on your appliance.
Always read and obey all safety messages.
This isthe safety alert symbol.
This symbol alerts you to hazards that can kill or hurt you and others.
All safety messages will be preceded by the safety alert symbol and the word
"DANGER" or "WARNING." These words mean:
You will be killed or seriously injured
if you don't follow immediately instructions.
You can be killed or seriously injured
if you don't follow instructions.
All safety messages will identify the hazard, tell you how to reduce the chance of injury, and tell
you what can happen if the instructions are not followed.
IMPORTANT SAFETY INSTRUCTIONS
When using electrical appliances basic safety precautions should be followed, including the
following:
WARNING: To reduce the risk of burns,
electric shock, fire, injury to persons, or
exposure to excessive microwave energy:
• Read all instructions before using the
microwave oven.
• Read and follow the specific
"PRECAUTIONS TO AVOID POSSIBLE
EXPOSURE TO EXCESSIVE MICROWAVE
ENERGY" found in this section.
• The microwave oven must be grounded.
Connect only to properly grounded outlet.
See "GROUNDING INSTRUCTIONS" found
at the end of this section.
• Install or locate the microwave oven only in
accordance with the provided installation
instructions.
• Some products such as whole eggs in the
shell and sealed containers - for example,
closed glass jars - are able to explode and
should not be heated in the microwave oven.
• Use the microwave oven only for its intended
use as described in this manual. Do not use
corrosive chemicals or vapors in the
microwave oven. This type of oven is
specifically designed to heat, cook, or dry
food. It is not designed for industrial or
laboratory use.
• As with any appliance, close supervision is
necessary when used by children.
• Do not operate the microwave oven if it has
a damaged cord or plug, if it is not working
properly, or if it has been damaged or
dropped.
SAVE THESE INSTRUCTIONS
4

IMPORTANT SAFETY INSTRUCTIONS
• Themicrowaveovenshouldbeservicedonly by
qualifiedservicepersonnel.Callan authorized
servicecompanyfor examination,repair,or
adjustment.
• Seedeersurfacecleaninginstructionsinthe "Caring
forYourMicrowaveOven"sectbn.
• Toreducetheriskof firein the oven cavity:
- Donotoverceokfood.Carefullyattendthe
microwaveovenwhenpaper,plastic,or other
combustiblematerialsareplacedinsidetheovento
facilitatecooking.
- Removewiretwist-tiesfrom paperorplasticbags
beforeplacing bagsin oven.
- If materialsinsidetheoven ignite,keepovendeer
closed,turn ovenoff,and disconnectthe power
cord,or shutoff poweratthefuseorcircuitbreaker
panel.
- Donotusethecavityforstoragepurposes.Donot
leavepaperproducts,cookingutensils,orfeed in
thecavitywhennotinuse.
• Suitablefor useabovebothgas and electriccooking
equipment.
• Intendedtobeusedaboverangeswith maximum
widthof 36inches(91 cm).
• CleanVentilatingHoodsFrequently-Greaseshould
notbeallowedto accumulateon hoodor filter.
• Whenflamingfoodsunderthehood,tum thefanon.
• Usecarewhencleaningthevent-hoedfilter.
Corrosivecleaningagents,suchaslye-basedoven
cleaners,maydamagethefilter.
• Oversizedfoodsor oversizedmetal utensilsshould
notbeinsertedinthe microwaveovenas they may
createa fireor riskofelectricshock.
• Donotcleanwith metalscouringpads.Piecescan
burnoffthe padandtouchelectricalpartsinvolvinga
riskofelectricshock.
• Do not store anything directly on top of the
microwave oven when the microwave oven is in
operation.
• Do not cover or block any openingson the
microwave oven.
• Do not store this microwave oven outdoors. Do not
use the microwave oven near water - for example,
near a kitchen sink, in a wet basement, near a
swimming pool, or similar location.
• Do not immerse cord or plug in water.
• Keep cord away from heated surfaces.
• Do not let cord hang over edge of table or counter.
• Do not mount over a sink.
• Do not cover racks or any other part of the oven with
metal foil. This will cause overheating of the oven.
• Liquids such as water, coffee, or tea are able to
be overheated beyond the boiling point without
appearing to be boiling due to surface tension of
the liquid. Visible bubbling or boiling when the
container is removed from the microwave oven is
not always present. This could result in very hot
liquids suddenly boiling over when a spoon or
other utensil is inserted into the liquid. To reduce
the risk of injury to persons;
1) Do not overheat the liquid.
2) Stir the liquid both before and halfway through
heating it.
3) Do not use straight-sided containers with
narrow necks.
4) After heating, allow the container to stand in the
microwave oven for a short time before
removing the container.
5) Use extreme care when inserting a spoon or
other utensil into the container.
SAVE THESE INSTRUCTIONS
PRECAUTIONS TO AVOID POSSIBLE
EXPOSURE TO EXCESSIVE MICROWAVE
ENERGY
(a) Do not attempt to operate this oven with the
door open since open-door operation can
result in harmful exposure to microwave
energy. It is important not to defeat or tamper
with the safety interlocks.
(b) Do not place any object between the oven
front face and the door or allow soil or cleaner
residue to accumulate on sealing surfaces.
Electrical
requirements
Observe alt governing codes and
ordinances. A 120 Volt, 60 Hz, AC only,
15 or 20 amp fused electrical supply is
required. (A time-delay fuse is recommended.)
It is recommended that a separate circuit
serving only this appliance be provided.
(c) Do not operate the oven if itisdamaged. It is
particularly important that the oven door close
properly and that there is no damage to the:
(1) Door (bent),
(2) Hinges and latches (broken or loosened),
(3) Door seals and sealing surfaces.
(d) The oven should not be adjusted or repaired
by anyone except properly qualified service
personnel.
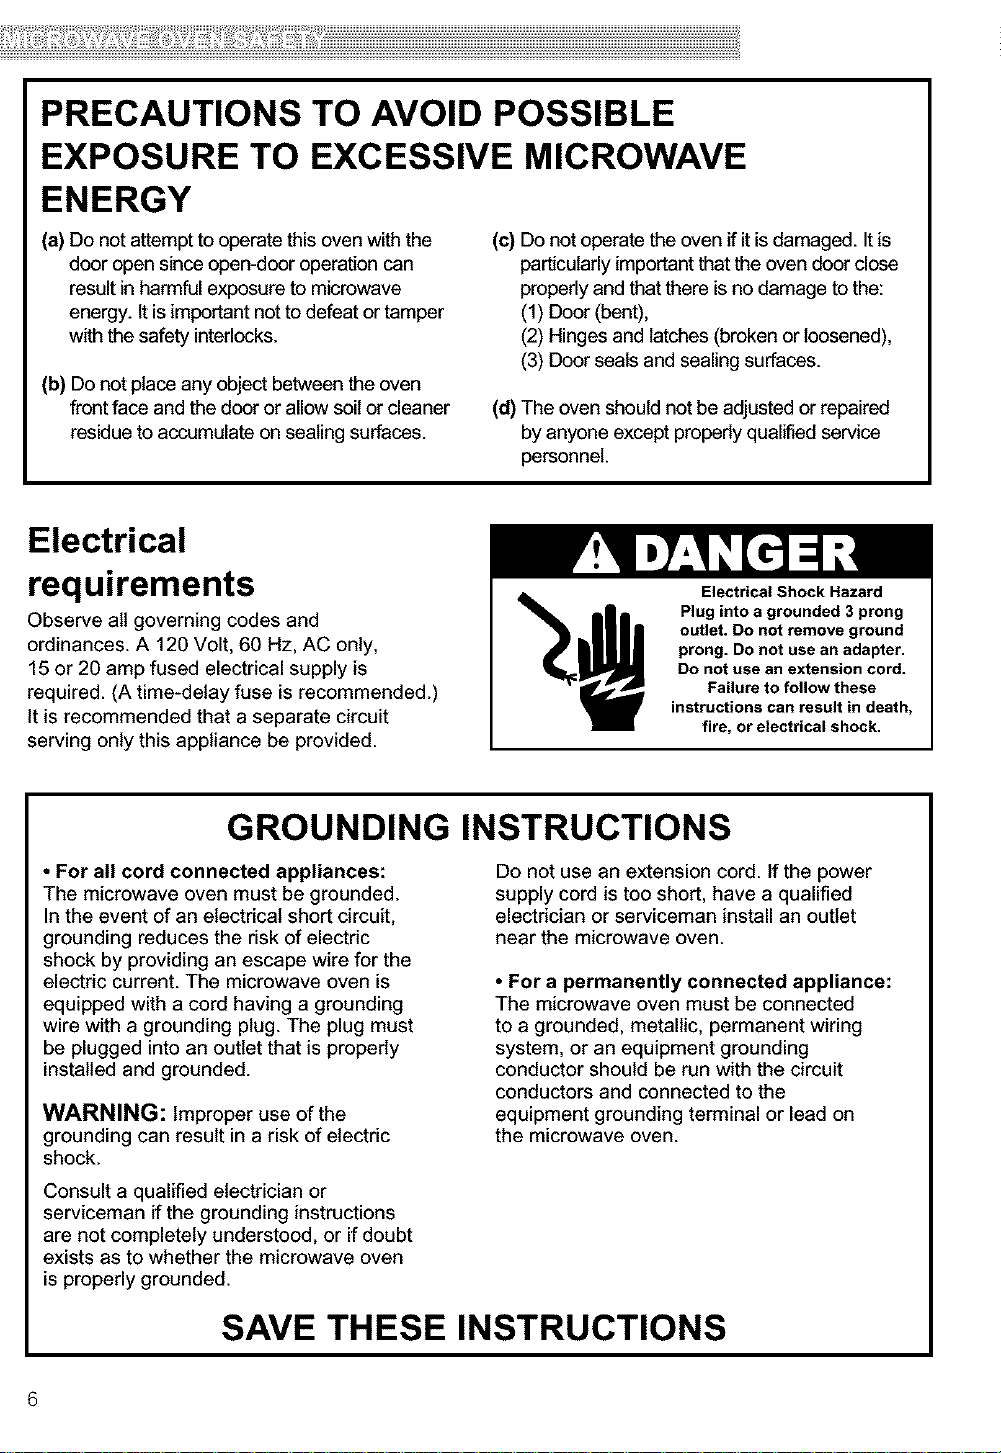
Electrical Shock Hazard
Plug into a grounded 3 prong
outlet. Do not remove ground
prong. Do not use an adapter.
Do not use an extension cord.
Failure to follow these
instructions can result in death,
fire, or electrical shock.
GROUNDING INSTRUCTIONS
• For all cord connected appliances:
The microwave oven must be grounded.
In the event of an electrical short circuit,
grounding reduces the risk of electric
shock by providing an escape wire for the
electric current. The microwave oven is
equipped with a cord having a grounding
wire with a grounding plug. The plug must
be plugged into an outlet that is properly
installed and grounded.
WARNING: Improper use of the
grounding can result in a risk of electric
shock.
Consult a qualified electrician or
serviceman if the grounding instructions
are not completely understood, or if doubt
exists as to whether the microwave oven
is properly grounded.
SAVE THESE INSTRUCTIONS
6
Do not use an extension cord. If the power
supply cord is too short, have a qualified
electrician or serviceman install an outlet
near the microwave oven.
• For a permanently connected appliance:
The microwave oven must be connected
to a grounded, metallic, permanent wiring
system, or an equipment grounding
conductor should be run with the circuit
conductors and connected to the
equipment grounding terminal or lead on
the microwave oven.
Getting to Know Your
Microwave Oven
This section discusses the concepts behind microwave cooking. It also shows you the
basics you need to know to operate your microwave oven. Please read this information before you
use your oven.
How your microwave oven works
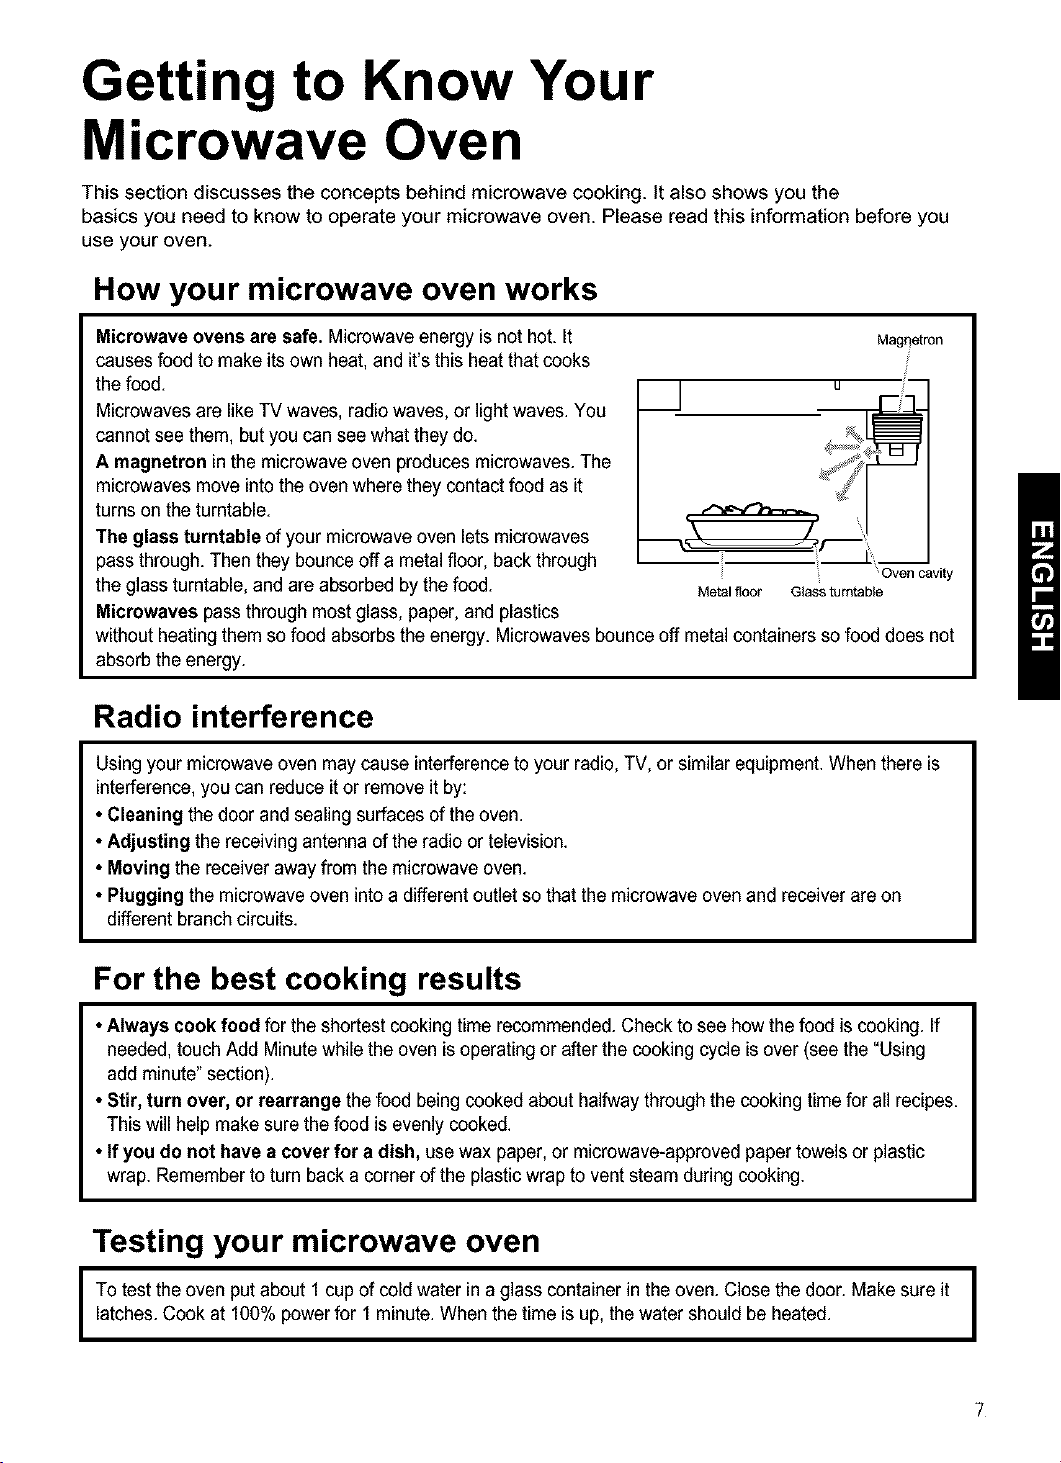
Microwave ovens are safe. Microwaveenergy isnot hot. It
causes food to makeits own heat, and it's this heat that cooks
the food.
Microwavesare like TV waves, radio waves,or light waves.You
cannot see them, but you can see what they do.
A magnetron inthe microwaveoven produces microwaves. The
microwaves moveintothe oven where they contactfood as it
turns on the turntable.
The glass turntable of your microwave oven lets microwaves
pass through. Then they bounce off a metal floor, backthrough
the glass turntable, and areabsorbed by the food.
Microwaves pass through mostglass, paper,and plastics
without heating them so food absorbsthe energy. Microwavesbounce off metalcontainers so food does not
absorb the energy.
Metal floor Glass turntable
u
Magqetron
/
i
Oven cavity
Radio interference
Using your microwave oven may cause interference to your radio,TV, or similar equipment. When there is
interference, you can reduce it or remove it by:
• Cleaning the door and sealing surfaces of the oven.
• Adjusting the receiving antenna ofthe radioor television.
• Movingthe receiver awayfrom the microwave oven.
• Pluggingthe microwaveoven into a different outlet sothat the microwave ovenand receiver are on
different branch circuits.
For the best cooking results
• Always cook food for the shortest cooking time recommended.Check to see how the food is cooking. If
needed, touch Add Minutewhile the oven is operating or afterthe cooking cycle is over (see the "Using
add minute" section).
• Stir, turn over, or rearrange the food being cooked about halfwaythrough the cooking time for all recipes.
This will helpmake surethe food is evenly cooked.
• If you do not have a cover for a dish, use wax paper,or microwave-approved paper towels or plastic
wrap. Rememberto turn back a cornerof the plastic wrap to vent steam during cooking.
Testing your microwave oven
latches. Cook at 100% power for 1minute.When the time is up, the water should be heated.
I o test the oven putabout 1 cup of cold water ina glass container in the oven. Close the door. Make sure it
I
Testing your dinnerware or cookware
Test dinnerware or cookwara before using.To test a dishfor safe use, put it into the oven witha cup of
water beside it.Cook at 100% cook power for one minute. Ifthe dish gets hot, do not use it.
Some dishes (melamine, some ceramic dinnerware, etc.)absorb microwave energy,becomingtoo hot to
handle and slowing cookingtimes. Cooking in metalcontainersnot designed for microwaveuse could damage
the oven,as could containers with hidden metal(twist-ties,foil lining, staples, metallic glaze or trim).
Operating safety precautions
• Never lean on the door orallow achild to swing on itwhen the door is open.
• Use hot pads. Microwave energy does not heat containers, butthe heat fromthe food can make the
container hot.
• Do not use newspaper or other printed paper in the oven.
• Do notdry flowers,fruit, herbs,wood, paper, gourds, or clothes inthe oven.
• Do not start amicrowave oven when it isempty. Product lifemay be shortened. If you practice programming
the oven, put a containerof water inthe oven. It isnormal for the oven door to look wavy afterthe oven has
been running for a while.
• Do not try to melt paraffinwax inthe oven. Paraffinwax will notmelt ina microwave oven because it allows
microwavesto passthrough it.
• Do not operate the microwaveoven unlessthe glassturntable issecurely in placeand can rotatefreely. The
turntable can rotatein either direction. Make sure theturntable is correct-sideup inthe oven.Handle your
turntable with carewhen removing itfrom the ovento avoid possibly breakingit. If your turntable cracks or
breaks,contactyour dealerfor a replacement.
•When you use a browning dish, the browningdish bottom must be at least 3/16 inch above the turntable.
Follow the directionssupplied withthe browning dish.
• Never cook or reheat a whole egg inside the shell. Steam buildupinwhole eggs maycause them to burst,
and possibly damage the oven. Slice hard-boiledeggs before heating. In rare cases,poached eggs have
been known to explode. Cover poachedeggs and allow astandingtime ofone minute before cutting into
them.
• For best results, stir any liquid several times during heating or reheating. Liquids heatedin certain
containers (especially containers shaped like cylinders)may become overheated. The liquid may splash out
with a loud noise during or afterheatingor when adding ingredients(coffee granules,tea bags,etc.). This can
harmthe oven.
• Microwaves may not reachthe centerof a roast.The heat spreadsto the center fromthe outer,cooked
areas justas inregular oven cooking.This isone of the reasons for lettingsome foods (for example, roastsor
baked potatoes)stand for a while after cooking, or for stirring somefoods during the cooking time.
• Do not deep fry in the oven. Microwavable utensilsare not suitable and itis difficult to maintain appropriate
deep-frying temperatures.
• Do not overcook potatoes. At the endof the recommended cooking time, potatoes should beslightlyfirm
because they will continue cookingduringstanding time. After microwaving, let potatoes stand for 5
minutes.They will finish cooking while standing.
Electrical connection
If your electric power line or outletvoltage is less than 110volts,cookingtimesmay be longer. Have a
qualified electrician check your electrical system.
8
Microwave oven features
Q
®® o
®® ® ® ®
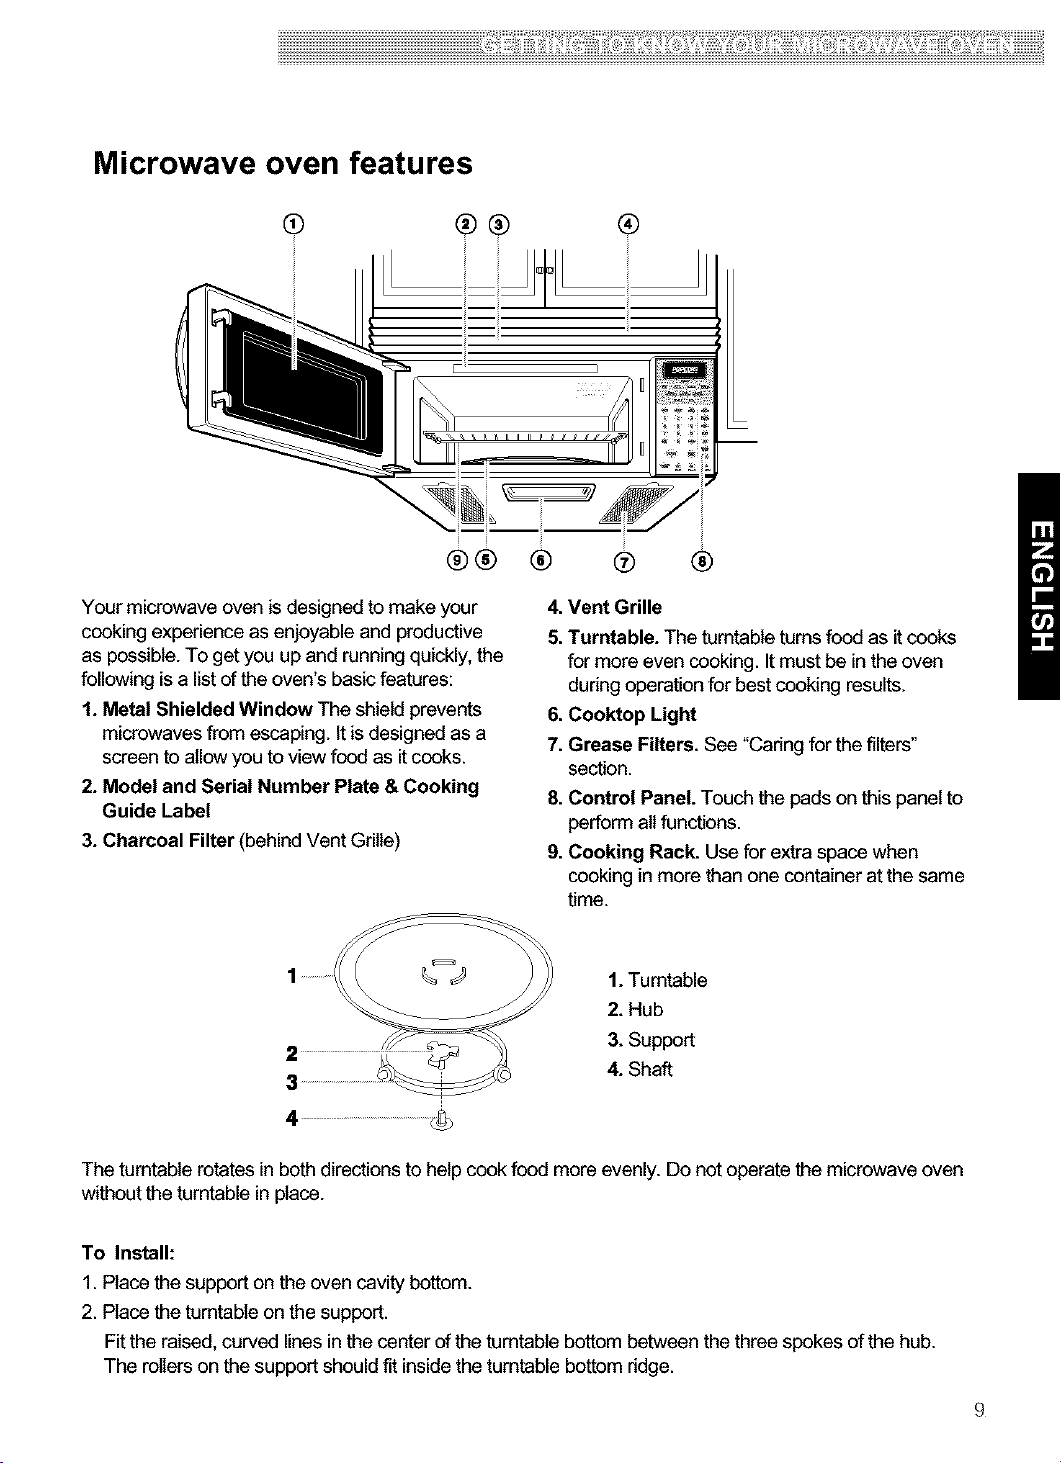
Your microwave oven is designed to make your
cooking experience as enjoyable and productive
as possible. To get you upand running quickly, the
following is a list of the oven's basic features:
1. Metal Shielded Window The shieldprevents
microwaves from escaping. It is designed as a
screen to allow you to view food as it cooks.
2. Model and Serial Number Plate & Cooking
Guide Label
3. Charcoal Filter (behind Vent Grille)
®
m
4. Vent Grille
5. Turntable. The turntable turns food as it cooks
for more even cooking. Itmust be in the oven
during operation for best cooking results.
6. Cooktop Light
7. Grease Filters. See "Caring for the filters"
section.
8. Control Panel. Touch the pads on this panel to
perform all functions.
9. Cooking Rack. Use for extra space when
cooking in more than one container at the same
time.
1.Turntable
2. Hub
3. Support
3
The turntable rotates in both directions to help cook food more evenly. Do not operate the microwave oven
without the turntable in place.
To Install:
1. Place the support on the oven cavity bottom.
2. Place the turntable on the support.
Fit the raised, curved lines in the center of the turntable bottom between the three spokes of the hub.
The rollers on the support should fit inside the turntable bottom ridge.
4. Shaft
Control panel features
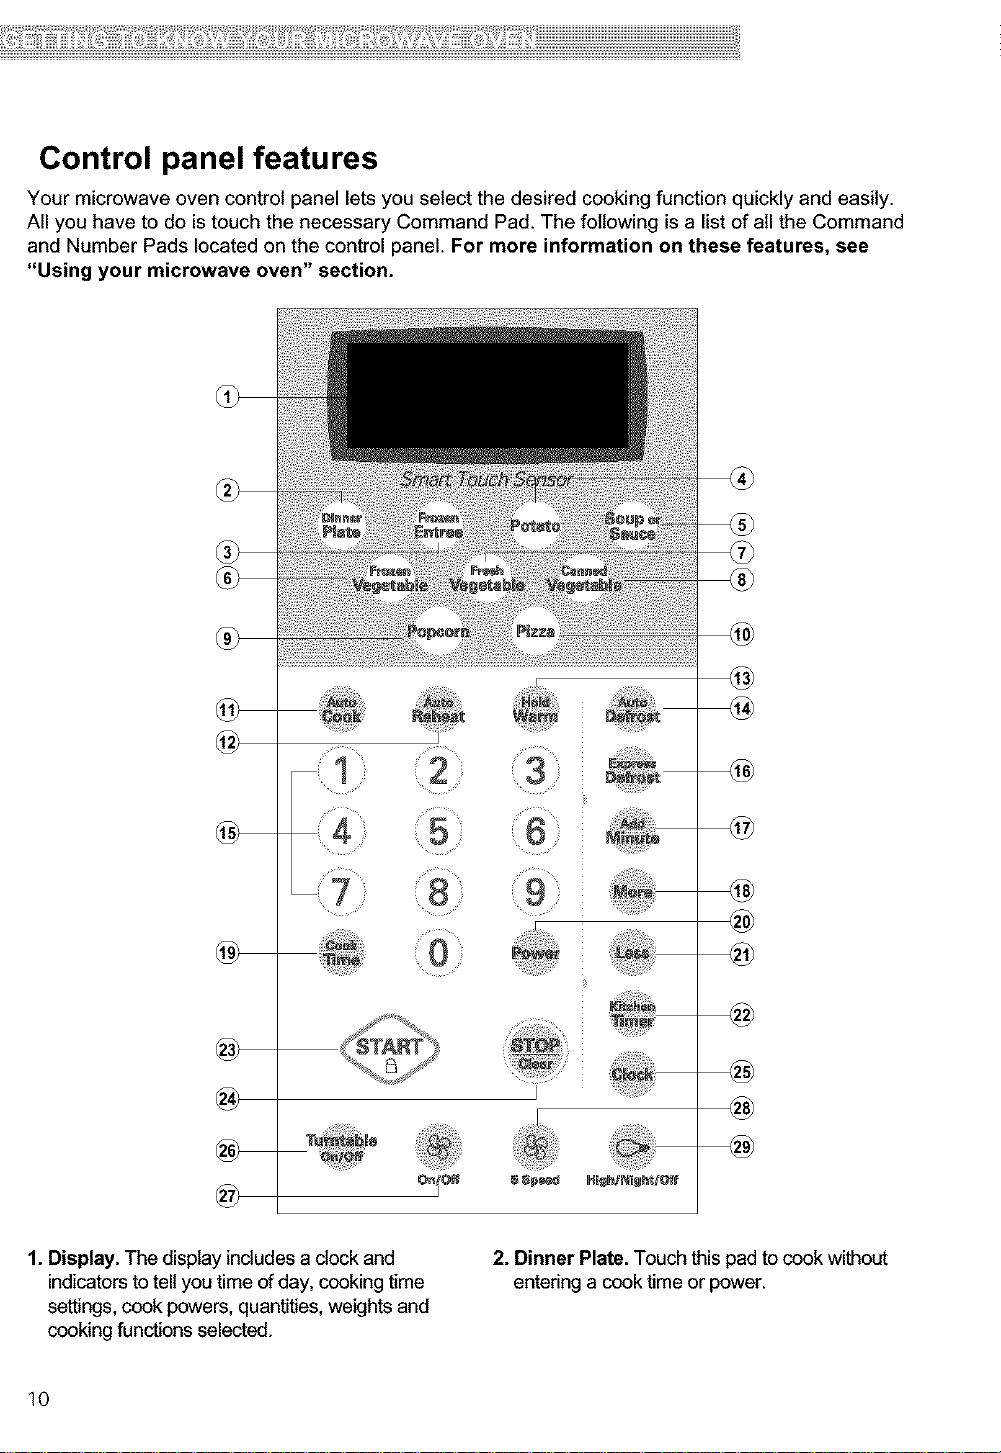
Your microwave oven control panel lets you select the desired cooking function quickly and easily.
All you have to do is touch the necessary Command Pad. The following is a list of all the Command
and Number Pads located on the control panel. For more information on these features, see
"Using your microwave oven" section.
@
@
{13}¸
1. Display. The display includes a clock and
indicators to tell you time of day, cooking time
settings, cook powers, quantities, weights and
cooking functions selected.
10
{6 }
@
@
I
2. Dinner Plate. Touch this pad to cook without
entering acook time or power.
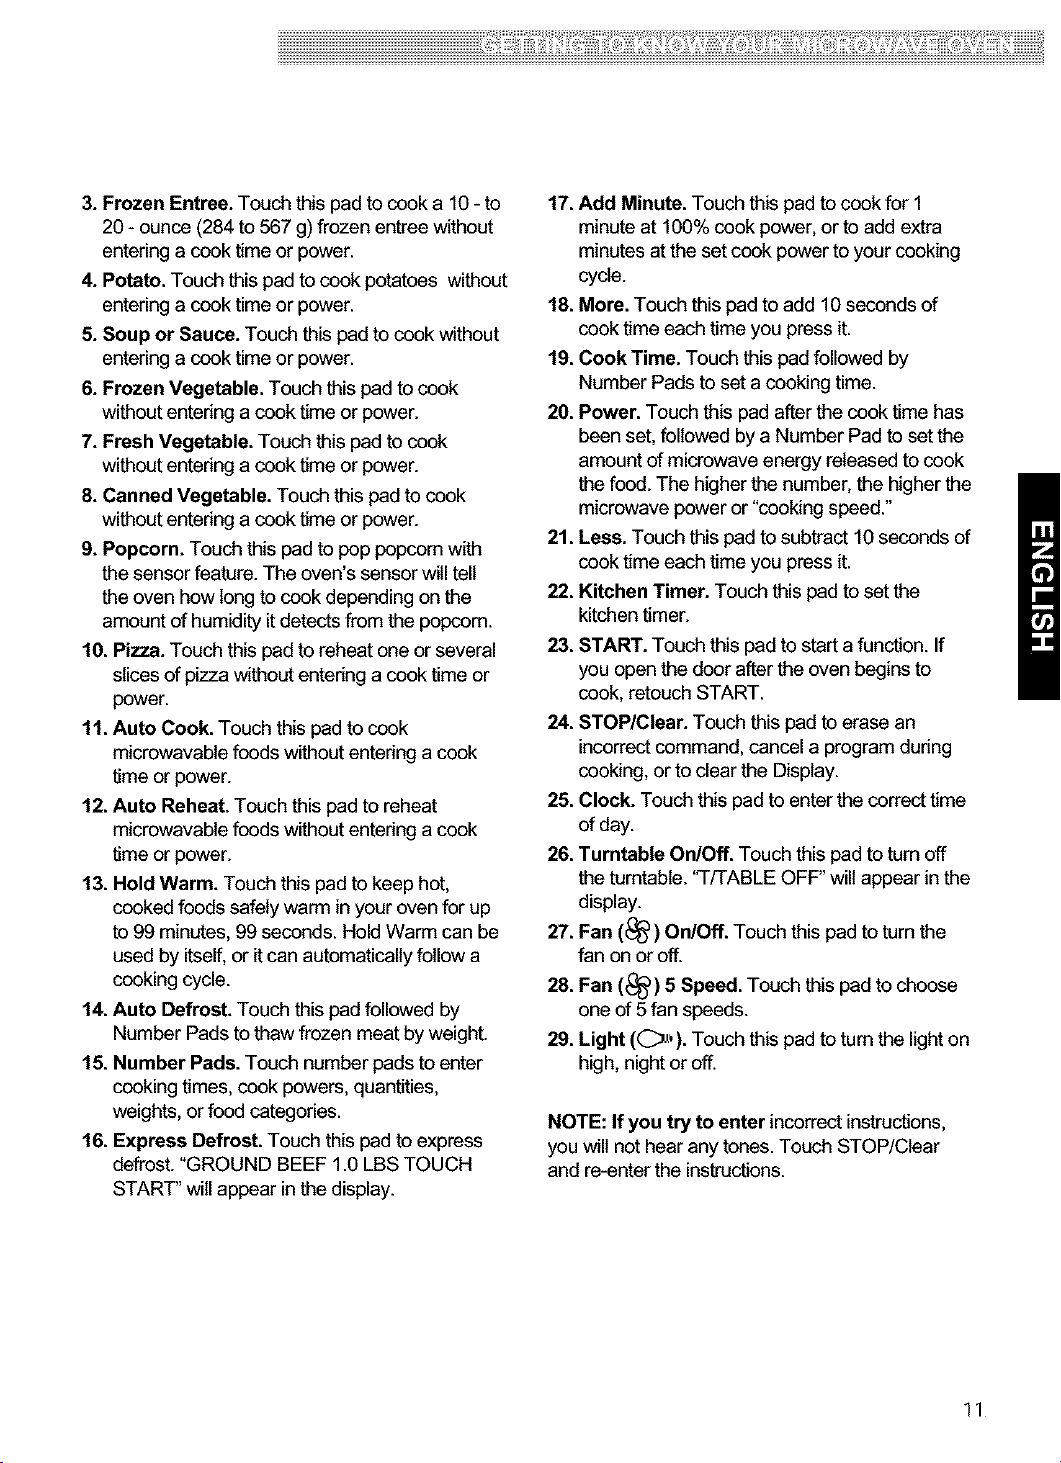
3. Frozen Entree. Touch this pad to cook a 10- to
20 - ounce (284 to 567 g) frozen entree without
entering a cook time or power.
4. Potato. Touch this pad to cook potatoes without
entering a cook time or power.
5. Soup or Sauce. Touch this pad to cook without
entering a cook time or power.
6. Frozen Vegetable. Touch this pad to cook
without entering a cook time or power.
7. Fresh Vegetable. Touch this pad to cook
without entering a cook time or power.
8. Canned Vegetable. Touch this pad to cook
without entering a cook time or power.
9. Popcorn. Touch this pad to pop popcem with
the sensor feature. The oven's sensor will tell
the oven how long to cook depending on the
amount of humidity it detects from the popcorn.
10. Pizza. Touch this pad to reheat one or several
slices of pizza without entering a cook time or
power.
11. Auto Cook. Touch this pad to cook
microwavable foods without entering a cook
time or power.
12. Auto Reheat. Touch this pad to reheat
microwavable foods without entering a cook
time or power.
13. Hold Warm. Touch this pad to keep hot,
cooked foods safely warm in your oven for up
to 99 minutes, 99 seconds. Hold Warm can be
used by itself, or it can automatically follow a
cooking cycle.
14. Auto Defrost. Touch this pad followed by
Number Pads to thaw frozen meat by weight.
15. Number Pads. Touch number pads to enter
cooking times, cook powers, quantities,
weights, or food categories.
16. Express Defrost. Touch this pad to express
defrost. "GROUND BEEF 1.0 LBS TOUCH
START" will appear in the display.
17. Add Minute. Touch this pad to cook for 1
minute at 100% cook power, or to add extra
minutes at the set cook power to your cooking
cycle.
18. More. Touch this pad to add 10 seconds of
cook time each time you press it.
19. Cook Time. Touch this pad followed by
Number Pads to set a cooking time.
20. Power. Touch this pad after the cook time has
been set, followed by a Number Pad to set the
amount of microwave energy released to cook
the food. The higher the number, the higher the
microwave power or "cooking speed."
21. Less. Touch this pad to subtract 10 seconds of
cook time each time you press it.
22. Kitchen Timer. Touch this pad to set the
kitchen timer.
23. START. Touch this pad to start a function. If
you open the door after the oven begins to
cook, retouch START.
24. STOPIClear. Touch this pad to erase an
incorrect command, cancel a program during
cooking, or to clear the Display.
25. Clock. Touch this pad to enter the correct time
of day.
26. Turntable On/Off. Touch this pad to turn off
the turntable. 'q/TABLE OFF" will appear in the
display.
27. Fan (_) On/Off. Touch this pad to turn the
fan on or off.
28. Fan (_) 5 Speed. Touch this pad to choose
one of 5 fan speeds.
29. Light (_,). Touch this pad to turn the light on
high, night or off.
NOTE: If you try to enter incorrect instructions,
you will not hear any tones. Touch STOP/Clear
and re-enter the instructions.
11
Using Your Microwave
Oven
This section gives you instructions for operating
each function. Please read these instructions
carefully.
AUDIBLE SIGNALS
Audible signals are available to guide you when
setting and using your oven:
•A programming tone will sound each time
you touch a pad.
• Seven tones signalthe end of a KitchenTimer
countdown.
• Four tones signal the end of a cooking cycle.
CLOCK
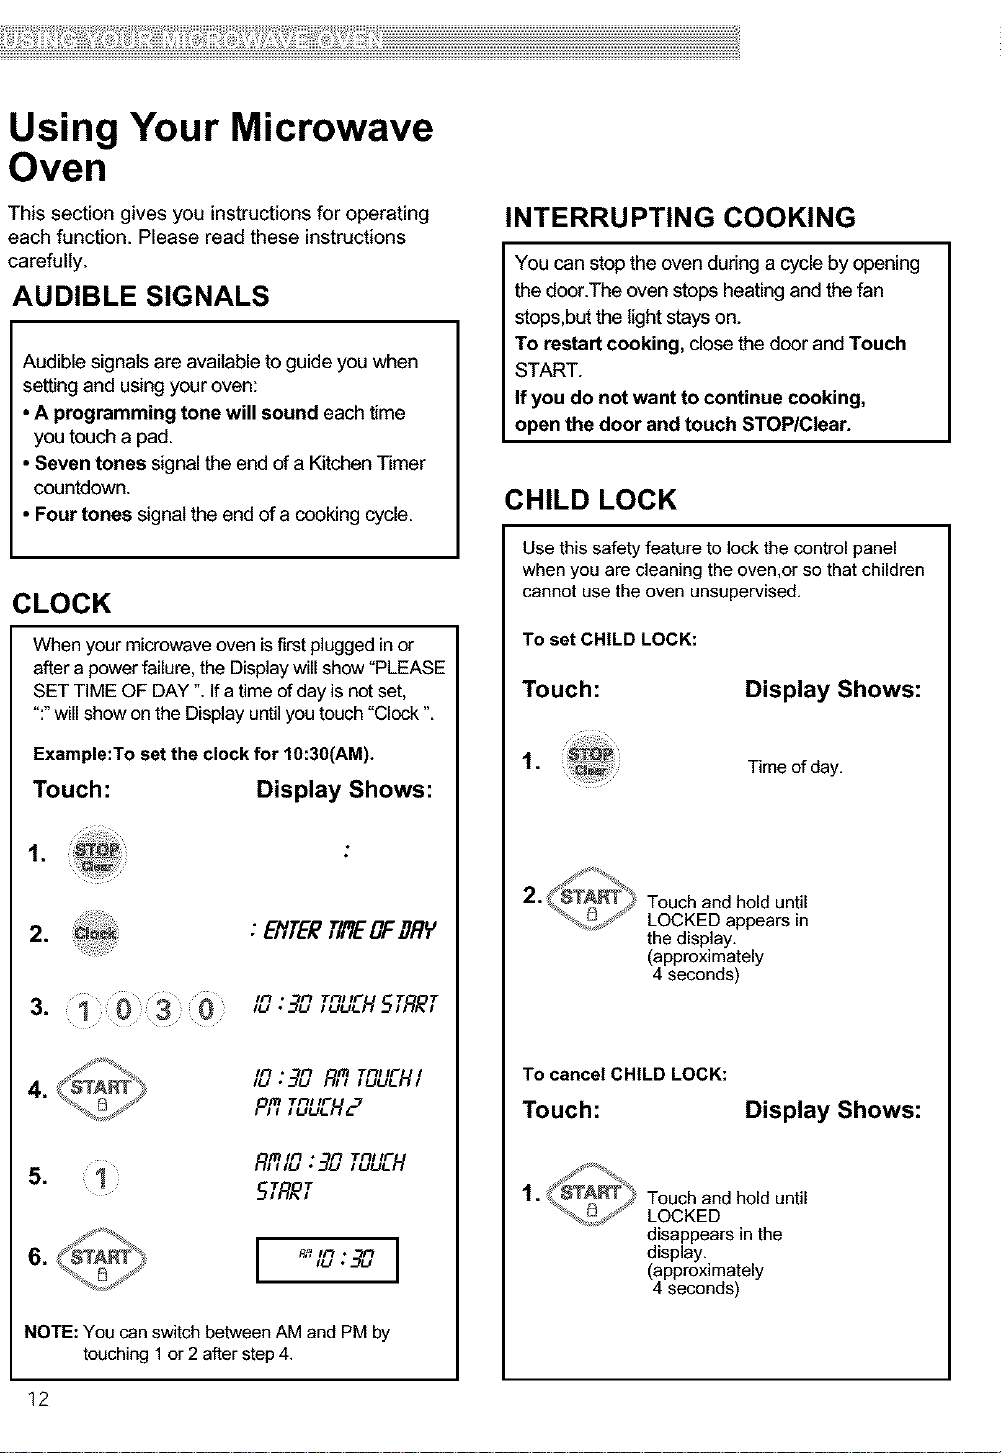
When your microwave oven isfirst pluggedinor
after a powerfailure, the Displaywillshow "PLEASE
SET TIME OF DAY". Ifa time of day is not set,
":" will show on the Display untilyou touch"Clock ".
Example:To set the clock for 10:30(AM).
Touch: Display Shows:
INTERRUPTING COOKING
You can stop the oven during a cycle by opening
the door.The oven stops heating and the fan
stops,but the light stays on.
To restart cooking, close the door and Touch
START.
If you do not want to continue cooking,
open the door and touch STOP/Clear.
CHILD LOCK
Use this safety featureto lock the control panel
whenyou are cleaning the oven,or sothat children
cannot use the oven unsupervised.
To set CHILD LOCK:
Touch:
1.
Display Shows:
Timeof day,
1.
2.
: EffTERfiFEOF#flY
113 • 13 Tf31 IF T T
IFI * 13 Tf31 IF I
pil_l T_/I Ir
[_l 113 • 13 Tf31 IF
Rh,_ .30 ,uuLH
1 5rR_r
6. I R'_'n:90I,u
NOTE: You can switch between AM and PM by
touching 1or 2 after step 4.
12
Touch and hold until
LOCKED appears in
the display.
(approximately
4 seconds)
To cancel CHILD LOCK:
Touch: Display Shows:
Touch and hold until
LOCKED
disappears in the
display.
(approximately
4 seconds)

KITCHEN TIMER
COOKTOP LIGHT
Your microwave oven can be used as a kitchen
timer. You can set upto 99 minutes, 99 seconds.
Example: To set 3 minutes.
Touch: Display Shows:
:E/'ITEETI_Elhl filhl
1.
2, 3 0 0
,
FlfiDSEE
• nn Tnl IF T T
3 "nn
* UU
TIMER and time
counting down.
EXHAUST FAN
The two pads on the bottom center of the control
panel control the 5-speed exhaust fan.
Example: To set exhaust fan speed to level 4
The pad on the bottom right of the control panel
controls the cooktop light.
Example: To set the Lamp for HIGH.
Touch:
1.
H_gh/NIgP_jco
once for HIGH light
twice for NIGHT light
2.
To turn off, touch pad one
or two times depending on
light setting.
Display Shows:
I-I16/-I
OFF
TURNTABLE ON/OFF
For best cooking results, leave the tumtable on.
Itcon be turned off for large dishes.
Touch: Display Shows:
Tu _m_ ,, ,RSLEoFF
1.
T/7 I n
Touch:
Display Shows:
I II I l
_.EbEL,
1.
O_fco
This SHOWSthe last level until you
select the fan speed level,
,
Touch until Level 4
I II I
_.EbELq
3, unFF
OnlO_
Turn off fan when desired
NOTE: if the temperature from the range or cooktop
below the oven gets too hot, the exhaust fan in the
vent hood will automatically turn on at the LEVEL 5
setting to protect the oven.
it may stay on up to an hour to cool the oven.
When this occurs, the FAN pad will not turn the fan
off. You cannot turn the exhaust fan off during
microwave cooking.
2. Tu _!_ ,5,,TRf_LEBh,
Press Turntable On/Off to turn the turntable
on or off,
NOTE: Sometimes the turntable can become hot
to touch. Be careful touching the turntable during
and after cooking.
Do not run the oven empty without food in it.
EXPRESS DEFROST
One express defrost sequence is preset in the oven,
The Express Defrost feature provides you with the quick
defrosting method for 1.0 pound "GROUND BEEF"
only.
Example: To defrost lib of Ground beef
Touch:
1. TDUEH5TRRT
Display Shows:
5ROUIt#BEEFI.OLB5
Time counting down and
EXPRE55DEFR2,ST
scrolls across display.
13
ADD MINUTE
MULTI-STAGE COOKING
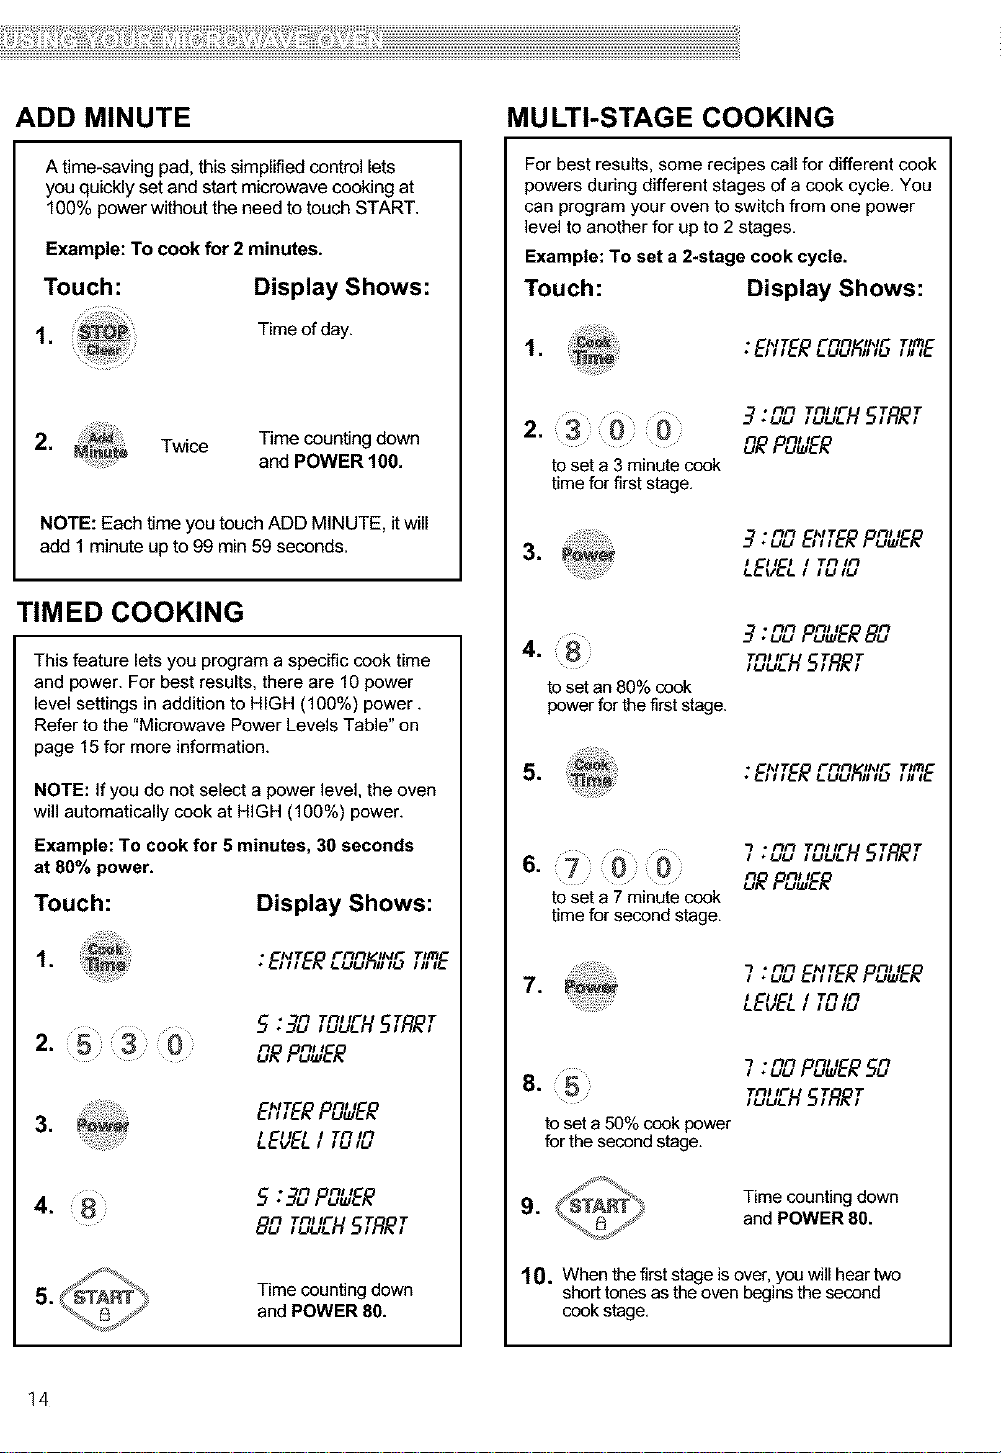
A time-saving pad, this simplified control lets
you quickly set and startmicrowave cooking at
100% power withoutthe need to touch START.
Example: To cook for 2 minutes.
Touch: Display Shows:
1, Time of day.
,
Twice Time counting down
and POWER 100.
NOTE: Each time you touch ADD MINUTE, itwill
add I minute upto 99 min 59seconds.
TIMED COOKING
This feature lets you program a specific cook time
and power. For best results, there are 10 power
level settings in addition to HIGH (100%) power.
Refer to the "Microwave Power Levels Table" on
page 15 for more information.
NOTE: If you do not select a power level, the oven
will automatically cook at HIGH (100%) power.
For best result_ some recipes call for different cook
powers during different stages of a cook cycle. You
can program your oven to switch from one power
level to another for up to 2 stages.
Example: To set a 2-stage cook cycle.
Touch:
,
2. 3 0 :: 0
to set a 3 minute cook
time for first stage.
3,
4. 8
to set an 80% cook
power for the first stage.
Display Shows:
• kit rnn lklE TIITI
* E_ I I'E# L UU'_I It_I I II IIE
Tnl IF T T
n nl I
JE PO_,EE
9".uunnEJS'TEEPOWER
I II I I T_I II'_
_E_EL, ,_,_
3"._nnPOWER80
Tnl IF
,u_H 5TRET
* kit rnn lklE TIITI
* E_ I I'E_ L UU'_I It_I I II IIE
nl I n
Example: To cook for 5 minutes, 30 seconds
at 80% power.
Touch:
,
Display Shows:
• ;',IT F_I_I $141F" Tim
5:30 ,,_,_,,.HS,FIE,
Tnl IF T T
2. :5 3 0 O#PO"E#
,
4. 8
14
EhlTEEPDWEE
I III I
LEVEL, Tn,n
5.30 PO,,,ER
Bun,_H 5,RE,
Time counting down
and POWER 80.
IUIU
• n nl I
Tnl IF T T
* UU Tnl IF T T
n nl I
to set a 7 minute cook
time for second stage.
8. 5
to set a 50% cook power
for the second stage.
9. Time counting down
JRPC,=EE
•nn kit nll
7 .uu Eh,EEPC,,_EE
I II I I Tnln
LEVEL, ,_ ,_
•nn nl I n
7 •_,_P_,_EE5E_
Tnl IF
,_H 5TRET
and POWER 80.
10. When the first stage is over, you will hear two
short tones as the oven begins the second
cook stage.
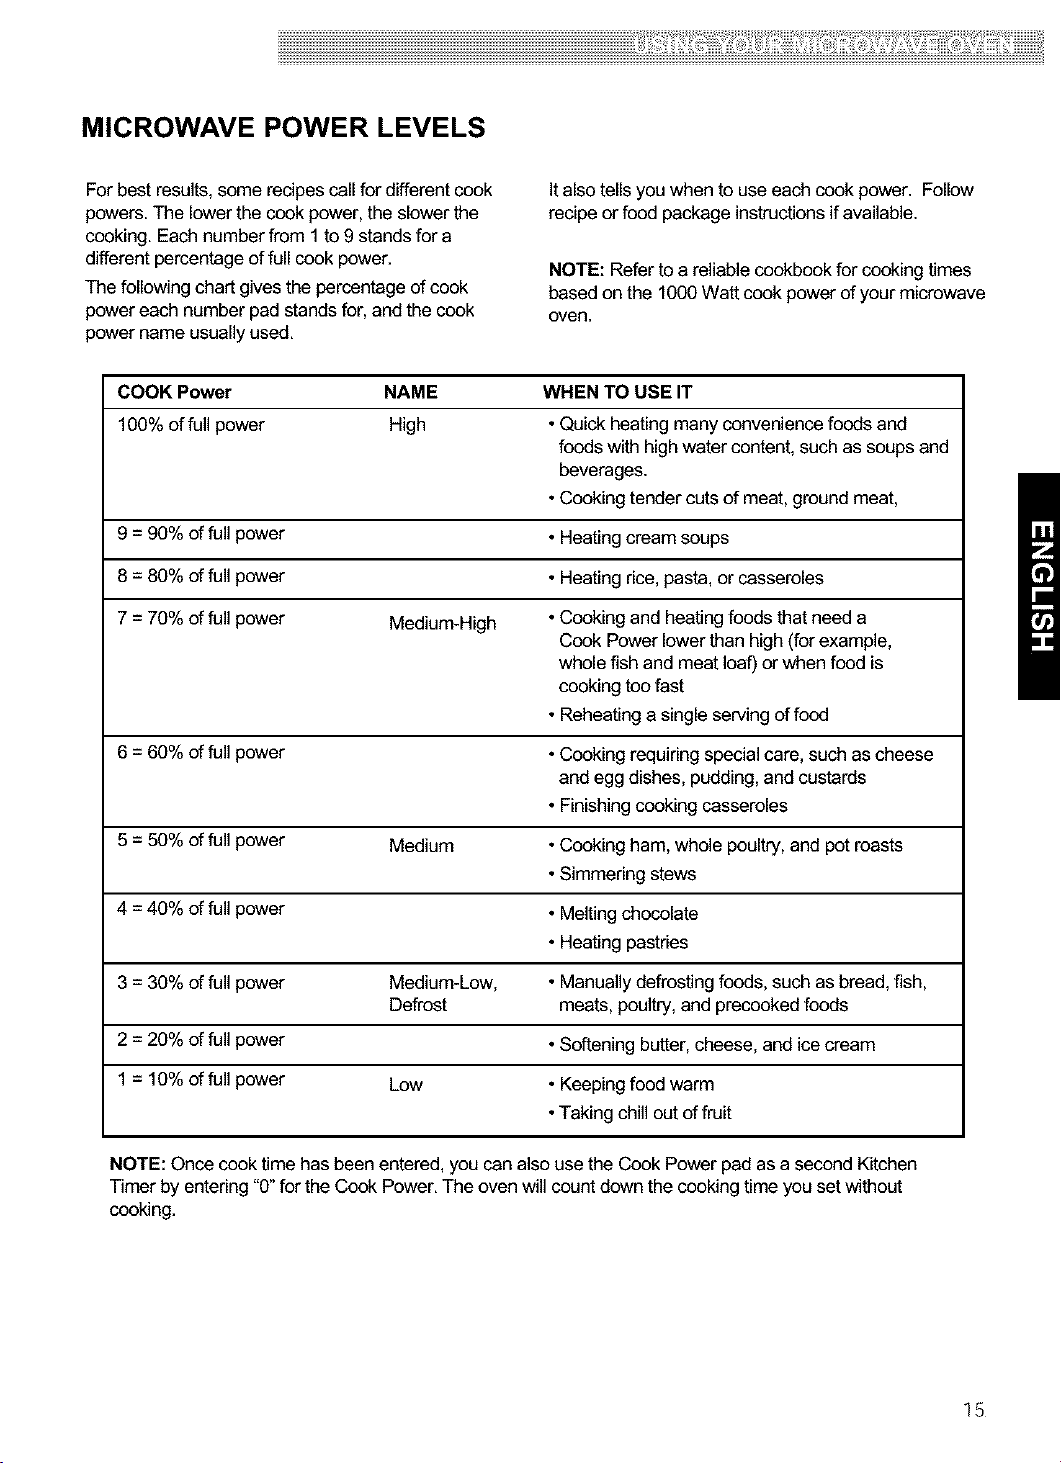
MICROWAVE POWER LEVELS
Forbest results,some recipes cell fordifferent cook
powers. The lower the cookpower,the slowerthe
cooking. Each number from I to9 stands for a
different percentageoffull cook power.
The followingchart gives the percentage of cook
power each number pad standsfor, and the cook
power name usuallyused.
COOK Power NAME WHEN TO USE IT
100% offull power High • Quick heatingmany conveniencefoods and
9 =90% of fullpower • Heatingcream soups
8 =80% of fullpower • Heating rice,pasta, or casseroles
7 =70% of fullpower Medium-High •Cooking and heatingfoods that need a
6 =60% of fullpower •Cooking requiring specialcare, such as cheese
It alsotells you when to use each cook power. Follow
recipeor food packageinstructionsif available.
NOTE: Referto a reliable cookbookfor cooking times
basedon the 1000Watt cook powerofyour microwave
oven,
foods with highwater content, such as soups and
beverages.
•Cooking tender cuts of meat, ground meat,
Cook Power lowerthan high (for example,
wholefish and meat loaf) or when food is
cooking too fast
• Reheatinga single serving offood
and egg dishes, pudding,and custards
• Finishingcooking casseroles
5 =50% of fullpower Medium •Cooking ham, whole poultry,and pot roasts
•Simmering stews
4 =40% of fullpower • Meltingchocolate
• Heating pastries
3 =30% of fullpower Medium-Low, • Manuallydefrosting foods,such as bread,fish,
Defrost meats, poultry, and precooked foods
2 =20% of fullpower •Softening butter,cheese, andice cream
1 = 10% of fullpower Low • Keepingfood warm
•Taking chill out offruit
NOTE: Once cook time has been entered, you can also usethe Cook Power pad asa second Kitchen
Timer by entering"0" for the Cook Power.The oven willcount down the cookingtime you set without
cooking.
15
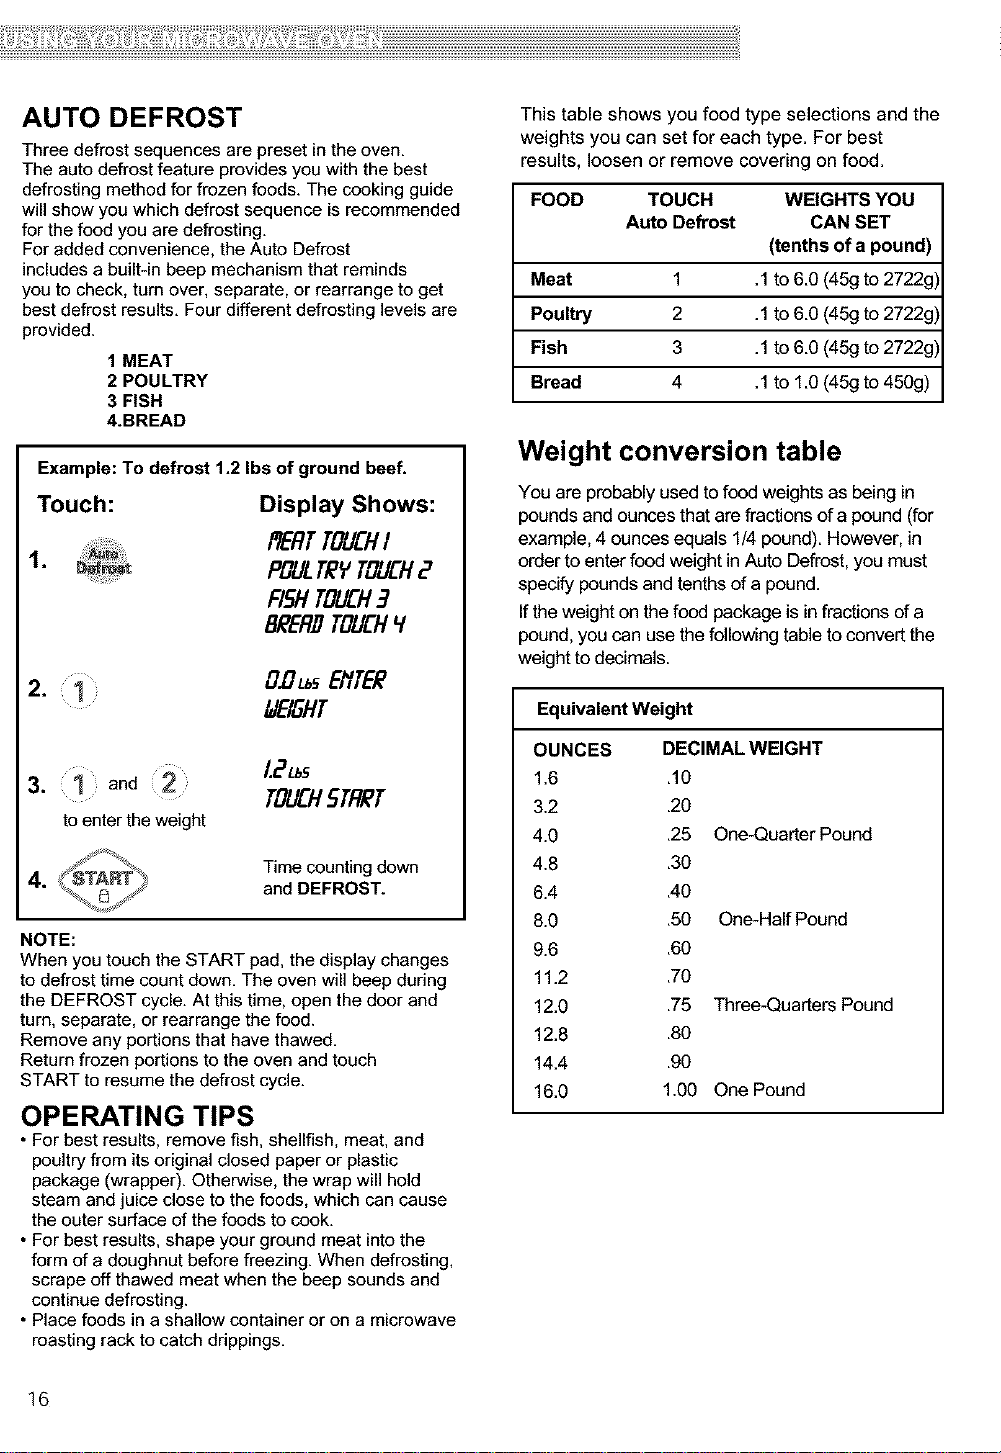
AUTO DEFROST
Three defrost sequences are preset in the oven.
The auto defrost feature provides you with the best
defrosting method for frozen foods. The cooking guide
will show you which defrost sequence is recommended
for the food you are defrosting.
For added convenience, the Auto Defrost
includes a built-in beep mechanism that reminds
you to check, turn over, separate, or rearrange to get
best defrost results. Four different defrosting levels are
provided.
1 MEAT
2 POULTRY
3 FISH
4.BREAD
This table shows you food type selections and the
weights you can set for each type. For best
results, loosen or remove covering on food.
FOOD TOUCH WEIGHTS YOU
Auto Defrost CANSET
(tenths of a pound)
Meat 1 .1to 6.0 (45g to 2722g)
Poultry 2 .1 to 6,0 (45gto 2722g)
Fish 3 .1to 6,0 (45g to 2722g)
Bread 4 .1to 1,0(45g to 450g)
Example: To defrost 1.2 Ibs of ground beef.
Touch: Display Shows:
f/ERTTOU£HI
1. POULTE¥TOUEH2
FISHTOUEH-,-7
BEERJ#TOUEH
2.
OJ]L_5EflTEE
gEIEHT
3. 1 : and 2 L2_s
TOUEH5TRRT
to enter the weight
Time counting down
4. and DEFROST.
NOTE:
When you touch the START pad, the display changes
to defrost time count down. The oven will beep during
the DEFROST cycle. At this time, open the door and
turn, separate, or rearrange the food.
Remove any portions that have thawed.
Return frozen portions to the oven and touch
START to resume the defrost cycle.
OPERATING TIPS
• For best results, remove fish, shellfish, meat, and
poultry from its original closed paper or plastic
package (wrapper). Otherwise, the wrap will hold
steam and juice close to the foods, which can cause
the outer surface of the foods to cook.
• For best results, shape your ground meat into the
form of a doughnut before freezing. When defrosting.
scrape off thawed meat when the beep sounds and
continue defrosting.
• Place foods in a shallow container or on a microwave
roasting rack to catch drippings.
Weight conversion table
You are probablyused to food weights as being in
poundsand ounces that are fractionsofa pound (for
example, 4 ouncesequals 1/4pound). However, in
order to enter food weight inAuto Defrost, you must
specify pounds andtenths of a pound.
If theweight on the food packageis infractions of a
pound,you can use the followingtableto convert the
weight to decimals.
Equivalent Weight
OUNCES
1.6
3.2
4.0
4.8
6.4
8.0
9.6
11.2
12.0
12.8
14.4
16.0
DECIMAL WEIGHT
,10
,20
,25 One-Quarter Pound
,30
,40
,50 One-Half Pound
,60
,70
,75 Three-Quarters Pound
,80
,90
1.00 One Pound
16
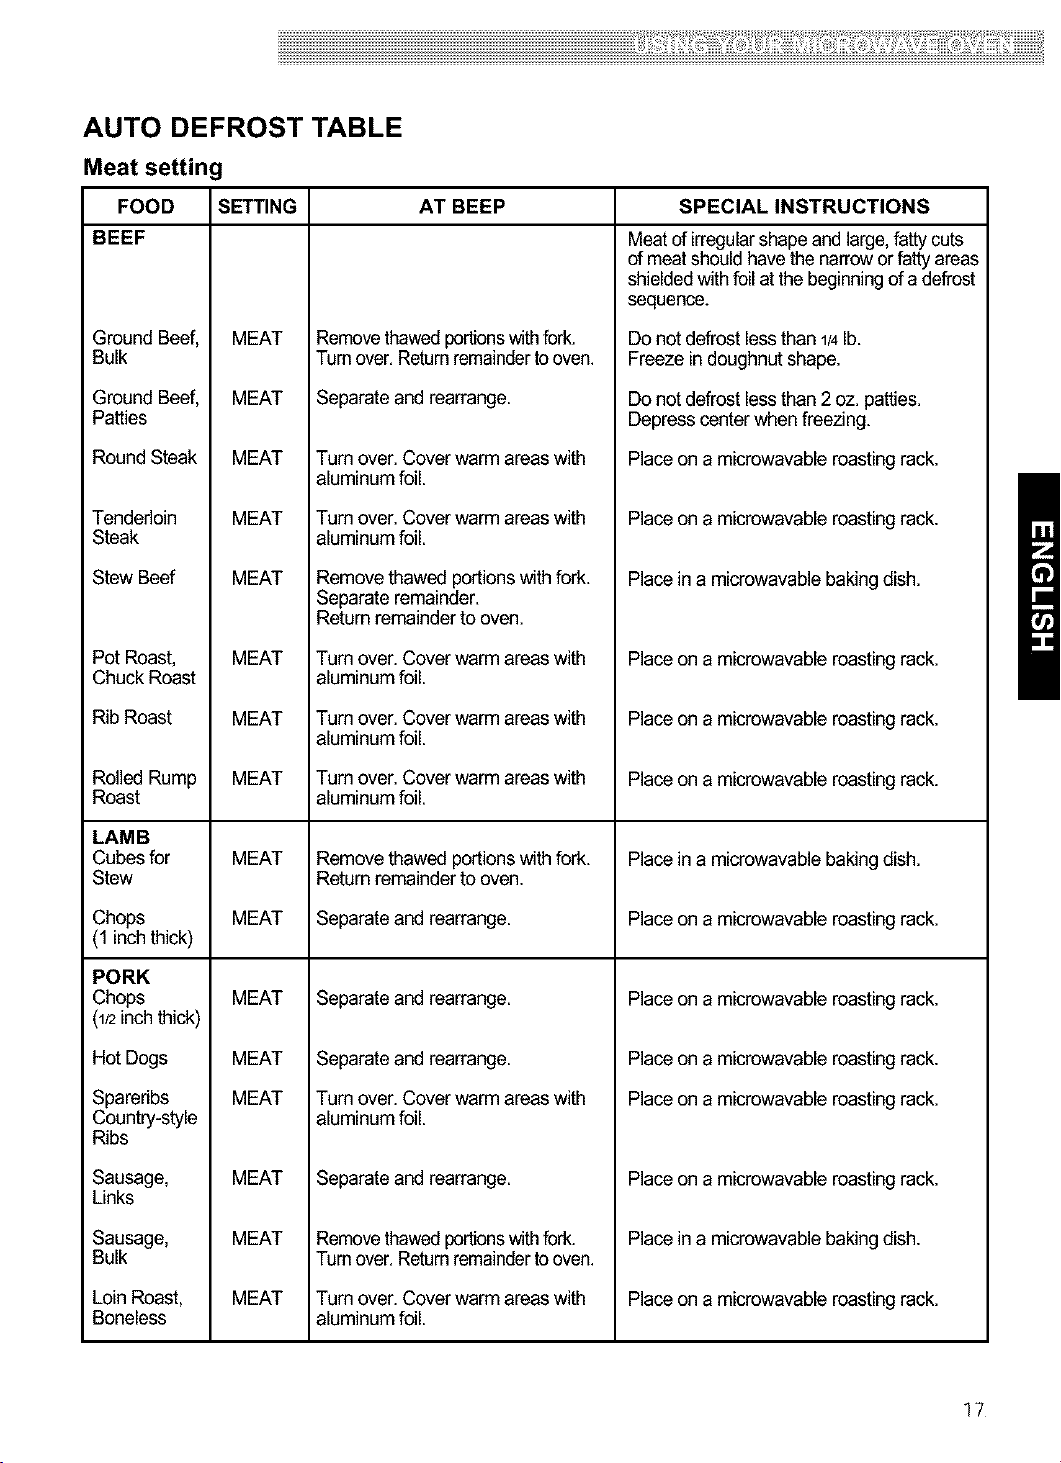
AUTO DEFROST TABLE
Meat setting
FOOD SETTING AT BEEP
BEEF
Ground Beef,
Bulk
Ground Beef,
Patties
Round S_ak
Tendedoin
S_ak
Stew Beef
Pot Roast,
Chuck Roam
Rib Roast
Roiled Rump
Roast
MEAT
MEAT
MEAT
MEAT
MEAT
MEAT
MEAT
MEAT
Removethawedportionswithfork.
Turnover. Returnremaindertooven.
Separateand rearrange.
Turnover. Cover warm areas with
aluminum foil.
Turnover. Cover warm areas with
aluminum foil.
Remove thawed portionswith fork.
Separate remainder.
Return remainder to oven.
Turnover. Cover warm areas with
aluminum foil.
Turnover. Cover warm areas with
aluminum foil.
Turnover. Cover warm areas with
aluminum foil.
SPECIAL INSTRUCTIONS
Meatof irregularshapeand large,fatty cuts
of meatshouldhavethe narrowor fatty areas
shieldedwithfoilat thebeginningof adefrost
sequence.
Donot defrost less than 1/4lb.
Freeze in doughnut shape.
Donot defrost less than 2 oz. patties.
Depresscenterwhen freezing.
Placeon a microwavable roasting rack.
Placeon a microwavable roasting rack.
Placeina microwavable baking dish.
Placeon a microwavable roasting rack.
Placeon a microwavable roasting rack.
Placeon a microwavable roasting rack.
LAMB
Cubes for
Stew
Chops
(1 inch thick)
PORK
Chops
(1_inchthick)
Hot Dogs
Spareribs
Country-style
Ribs
Sausage,
Links
Sausage,
Bulk
Loin Roast,
Boneless
MEAT
MEAT
MEAT
MEAT
MEAT
MEAT
MEAT
MEAT
Remove thawed portionswith fork.
Return remainder to oven.
Separateand rearrange.
Separateand rearrange.
Separateand rearrange.
Turnover, Cover warm areas with
aluminum foil.
Separateand rearrange.
Removethawedportionswithfork.
Turnover. Returnremaindertooven.
Turnover, Cover warm areas with
aluminum foil.
Placeina microwavable baking dish.
Placeon a microwavable roasting rack.
Placeon a microwavable roasting rack.
Placeon a microwavable roasting rack.
Placeon a microwavable roasting rack.
Placeon a microwavable roasting rack.
Placeina microwavable baking dish.
Placeon a microwavable roasting rack.
17
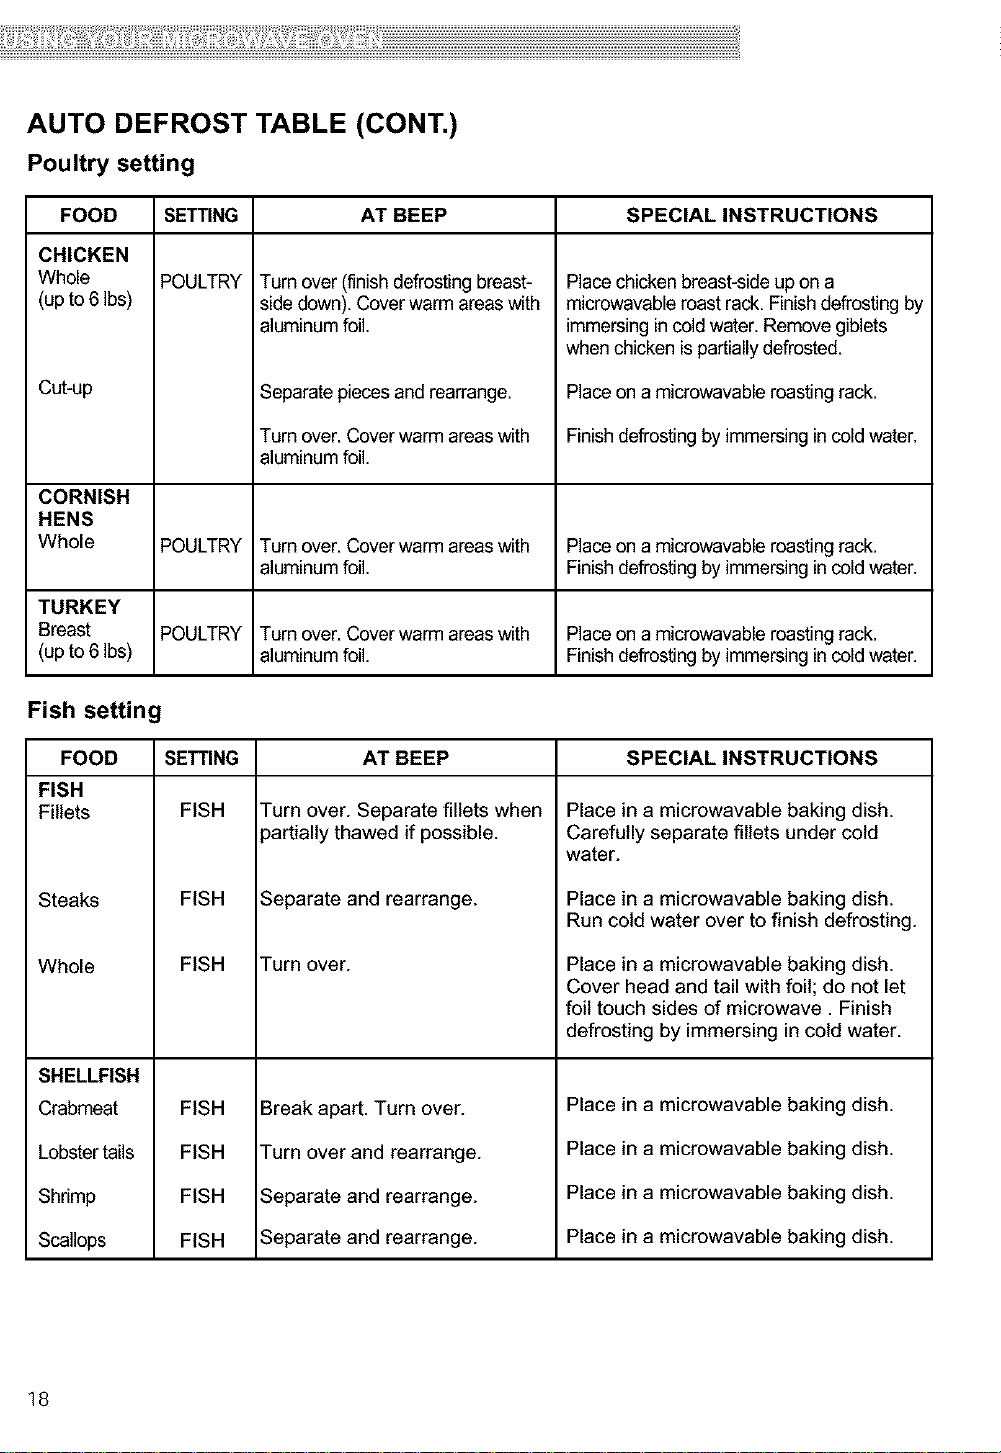
AUTO DEFROST TABLE (CONT.)
Poultry setting
FOOD SETTING AT BEEP SPECIAL INSTRUCTIONS
CHICKEN
Whole
(up to 6 Ibs)
POULTRY
Turn over (finish defrosting breast-
side down). Coverwarmareas with
aluminum foil,
Placechicken breast-side up ona
microwavable roast rack. Finish defrosting by
immersing incold water. Remove giblets
when chicken is partiallydefrosted.
Cu#up
CORNISH
HENS
Whole POULTRY Turn over. Coverwarm areas with Placeon a microwavableroasting rack,
TURKEY
Breast POULTRY Turn over. Cover warm areas with Placeon a microwavable roasting rack.
(up to 6 Ibs) aluminum foil. Finishdefrosting by immersing in cold water.
Fish setting
FOOD SETTING SPECIAL INSTRUCTIONS
FISH
Fillets FISH
Steaks
Whole
FISH
FISH Turn over.
Separate piecesand rearrange.
Turn over. Coverwarm areas with
aluminum foil,
aluminum foil, Finishdefrosting by immersing in cold water,
AT BEEP
Turn over. Separate fillets when
partially thawed if possible.
Separate and rearrange.
Placeon a microwavable roasting rack.
Finishdefrosting by immersing incold water.
Place in a microwavable baking dish.
Carefully separate fillets under cold
water.
Place in a microwavable baking dish.
Run cold water over to finish defrosting.
Place in a microwavable baking dish.
Cover head and tail with foil; do not let
foil touch sides of microwave. Finish
defrosting by immersing in cold water.
SHELLFISH
Crabmeat
Lobster tails
Shnmp
Scallops
18
FISH
FISH
FISH
FISH
Break apart. Turn over.
Turn over and rearrange.
Separate and rearrange.
Separate and rearrange.
Place in a microwavable baking dish.
Place in a microwavable baking dish.
Place in a microwavable baking dish.
Place in a microwavable baking dish.
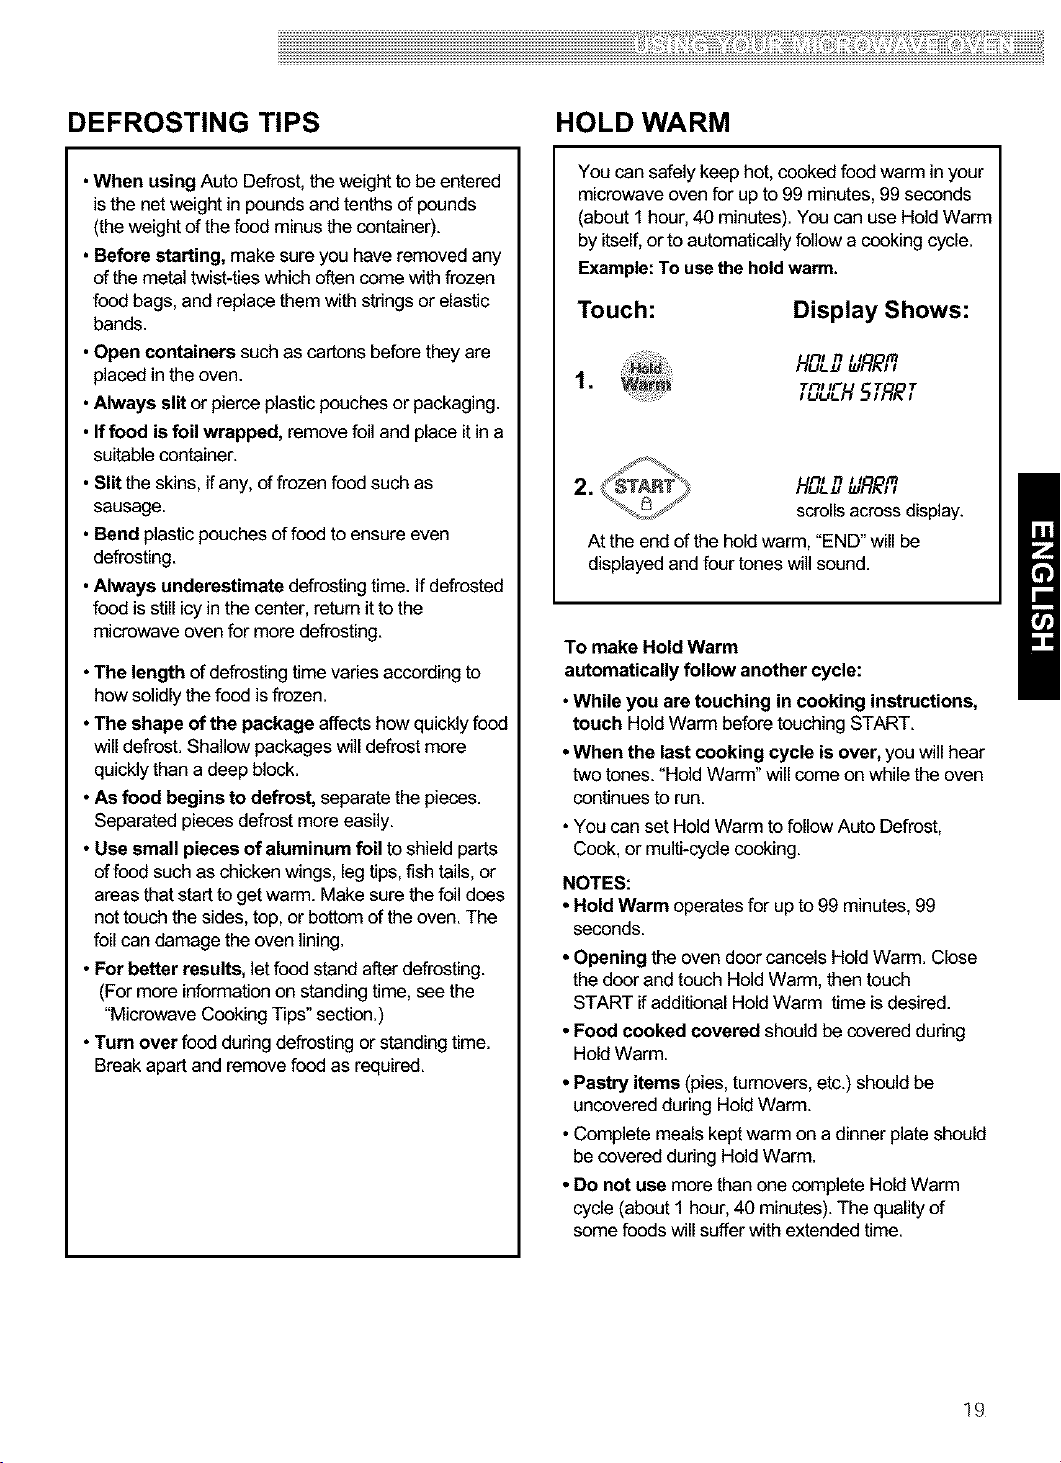
DEFROSTING TIPS
HOLD WARM
•When usingAuto Defrost,the weight to be entered
is the net weight in pounds and tenths of pounds
(the weightof the food minus the container).
• Before starting, make sure you have removedany
of the metal twist-tieswhich often come withfrozen
food bags,and replacethem with strings or elastic
bands.
•Open containers such as cartons beforethey are
placed inthe oven.
•Always slit orpierce plasticpouchesor packaging.
• If food is foil wrapped, remove foil and place itin a
suitable container.
• Slitthe skins,if any,of frozenfood such as
sausage.
• Bend plasticpouchesof food to ensure even
defrosting.
•Always underestimate defrostingtime. Ifdefrosted
food is still icyin the center,return it to the
microwave ovenfor more defrosting.
•The length ofdefrosting time varies accordingto
howsolidlythe food is frozen.
•The shape of the package affects how quicklyfood
will defrost.Shallow packages will defrost more
quicklythan adeep block.
• Asfood begins to defrost, separate the pieces.
Separated piecesdefrost moreeasily.
• Use small pieces of aluminum foil to shieldparts
offood suchas chicken wings, leg tips, fish tails,or
areasthatstart to getwarm. Make sure thefoil does
nottouch thesides, top,or bottomof the oven. The
foil can damage the oven lining.
• For better results, letfood stand after defrosting.
(For more informationon standing time, seethe
"MicrowaveCooking Tips" section.)
• Turn over food dudng defrosting or standing time.
Break apartand remove food as required.
You can safelykeep hot, cooked food warm in your
microwave oven for upto99 minL_es,99 seconds
(about I hour, 40 minutes). Youcan use Hold Warm
byitself,orto automaticallyfollow a cooking cycle.
Example: Tousethe holdwarm.
Touch:
1. ,_H 5,RR,
Display Shows:
f't/ _ II /R
Tf'_l IF T T
FII _ II [R
scrollsacross display.
At the end of the hold warm, "END"will be
displayed and four tones will sound.
To make Hold Warm
automaticallyfollow another cycle:
•While you are touching incooking instructions,
touch Hold Warm before touching START.
•When the last cooking cycle is over, you will hear
two tones. "Hold Warm" will come on whilethe oven
continuesto run.
•You can set Hold Warm to follow AL_ODefrost,
Cook, ormulti-cycle cooking.
NOTES:
•Hold Warm operates for upto 99 minutes, 99
seconds.
•Opening the oven doorcancels Hold Warm. Close
the doorand touch Hold Warm, then touch
START ifadditional HoldWarm time isdesired.
•Food cooked covered should becovered during
Hold Warm.
•Pastry items (pies, turnovers,etc.) shouldbe
uncovered during Hold Warm.
•Complete meals keptwarm on a dinnerplate should
be covered dudng Hold Warm.
•Do not use more than one complete Hold Warm
cycle (about I hour,40 minutes). The quality of
some foods will suffer with extended time.
lg
Using Sensor Cooking
SENSOR COOKING
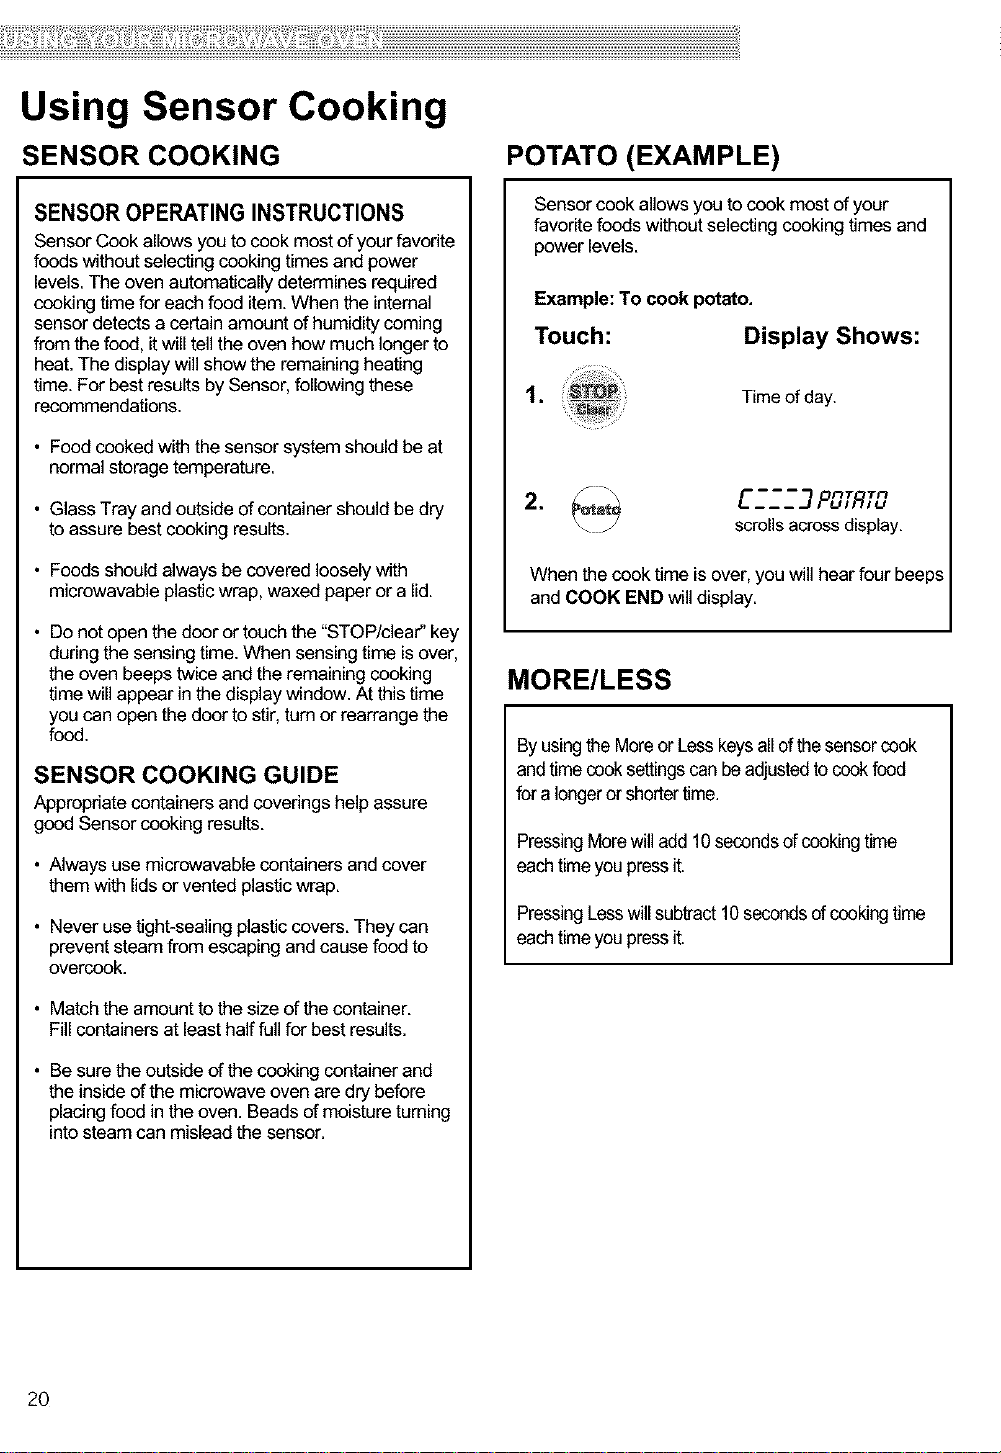
SENSOR OPERATING INSTRUCTIONS
SensorCook allows you to cookmost of your favorite
foods without selectingcooking times and power
levels.The oven automaticallydetermines required
cooking time for each food item. When the internal
sensor detects a certainamount of humiditycoming
from thefood, itwill tellthe oven how much longer to
heat.The display will show the remainingheating
time. For best results by Sensor, following these
recommendations.
• Foodcooked with the sensorsystem should be at
normal storagetemperature.
• Glass Tray andoutside ofcontainer shouldbe dry
to assure bestcooking results.
• Foodsshould alwaysbe covered loosely with
microwavable plasticwrap, waxed paper or alid.
• Donot open the door or touchthe "STOP/clear"key
during the sensing time. When sensingtime is over,
the oven beeps twiceand the remaining cooking
time will appear in the display window. At this time
you can open the door to stir,turnor rearrange the
food.
SENSOR COOKING GUIDE
Appropriate containers and coverings help assure
good Sensor cookingresults.
• Always use microwavable containers and cover
them with lids or vented plasticwrap.
• Neveruse tight-sealingplastic covers. They can
prevent steam from escaping and cause foodto
overcook.
POTATO (EXAMPLE)
Sensorcook allows you tocook most of your
favorite foodswithout selectingcooking times and
power levels.
Example: To cook potato.
Touch: Display Shows:
1. Time of day.
2, C_.-_-_-_7POTRTO
scrollsacross display.
When the cook time is over, you will hear four beeps
and COOK END will display.
MORE/LESS
Byusingthe Moreor Lesskeys allof thesensorcook
andtime cooksettingscanbeadjustedtocookfood
for alongeror shortertime.
PressingMorewilladd10 secondsof cookingtime
eachtime youpressit.
PressingLesswillsubtract10secondsofcookingtime
eachtime youpressit.
• Matchthe amount tothe sizeof the container.
Fill containersat least half fullfor bestresults.
• Besurethe outside ofthe cooking containerand
the inside of the microwave ovenare dry before
placing food in the oven. Beads of moistureturning
into steam can mislead the sensor.
2O
 Loading...