

Kenmore 721.24195 Owner's Manual
Owner's Manual
Manual del Propietario
Canister Vacuum Cleaner
Aspiradora
Model, Modelo 721.24195
Sears, Roebuck and Co., Hoffman Estates, IL 60179 U.S.A
www. sears, corn
Part No.: 3828Fi3849A Printed in CHINA
BeforeUsingYour NewVacuum ...................2
KenmoreVacuumCleanerWarranty.............2
ImportantSafety Instructions........................3
Partsand Features...........................................4
Assembly .........................................................5
Useand Care ...................................................6
HowYourVacuumWorks .................................6
Howto StartYourVacuum ................................6
Attachments......................................................7
AttachmentsUseChart......................................7
VacuumingTips .................................................8
PerformanceFeatures ......................................8
ChangingTheDustBag ....................................9
CleaningMotorSafetyFilter ..............................9
CleaningExteriorandAttachments.................10
StoringYour Vacuum......................................10
CleaningAir-Turbine BrushNozzle..................11
Beltchangingand brushcleaning....................11
Troubleshooting ............................................13
PartsList ..................................................14~16
MasterProtectionAgreements ....................17
Service .............................................BackCovet
Please read this guide. It will help you assemble and operate your new Kenmore vacuum in the
safest and most effective way.
For more information about vacuum care and operation, call your nearest Sears store.
You will need the complete model and serial numbers when requesting information.
Your vacuum's model and serial numbers are located on the Model and Serial Number Plate.
Usethe spacebelowto recordthe model numberand serial numberof yournew Kenmorevacuum.
Model No.
Serial No.
Date of Purchase
Keep this book and your sales check (receipt) in a safe place for future reference.
LIMITED ONE YEAR WARRANTY ON KENMORE VACUUM CLEANER
This warranty is for one year from the date of purchase, and includes only private household
vacuum cleaner use. During the warranty year, when this vacuum cleaner is operated and
maintained according to the owner's manual instructions, Sears will repair any defects in
material or workmanship free of charge.
This warranty excludes vacuum bags, belts, light bulbs, and filters, which are expendable
parts and become worn during normal use.
For warranty service, return this vacuum cleaner to the nearest Sears Service Center in
the United States.
This warranty applies only while this product is in use in the United States.
This warranty gives you specific legal rights, and you may also have other rights which vary
from stste to state.
Sears, Roebuck and Co., D/817WA, Hoffman Estates, IL 60179
-2-
WARNING
Your safety is important to us. To reduce the risk of fire, electrical shock, injury to
oersons or damage when using your vacuum cleaner, follow basic safety precautions
including the following:
Readthis manualbeforeassemblingor using
yourvacuumcleaner.
Useyourcleaneronlyasdescribedinthis
manual.Useonlywithsuppliedattachments.
To reducethe riskofelectricalshock- Do not
useoutdoorsor on wetsurfaces.
Disconnectelectricalsupply beforeservicing
or cleaningout brusharea. Failureto doso
couldresultin electricalshock or brush
suddenlystarting.
Always turn cleaneroffbefore connectingor
disconnectingthe hose.
Always turn cleaneroffbefore unplugging.
Donot unplug by pullingoncord.To unplug,
graspthe plug,notthe cord.
Hold plugwhen rewindingonto cordreel.
Donot allow plugto whipwhen rewinding.
Do notuse withdamagedcordor plug.If
cleaneris notworking asit should,hasbeen
dropped,damaged, leftoutdoors,or dropped
intowater.
Donot pullorcarrybycord,usecordas a
handle,closedooroncord,or pullcordaround
sharpedgesorcorners.Donot runcleanerover
cord.Keepcordawayfromheatedsurfaces.
Donot leavecleanerwhenpluggedin.Unplug
from outletwhennot inuseand beforeservicing.
Do notallowtobeusedasa toy.Closeattention
isnecessarywhenusedbyor nearchildren.
Donot handle plugor cleanerwith wethands.
Donot operatethe cleanerwith apunctured
hose.Replaceifcut or worn.Avoidvacuuming
sharp objects.
Donot usewith any openingblocked;keep
free ofdust, lint, hairand anythingthat may
reduceairflow.
Keep hair,looseclothing,fingers, andall parts
of bodyawayfromopeningsand movingparts.
Donot usecleanerwithout dustbag and/or
filters inplace.
Always changethe dust bagaftervacuuming
carpetcleanersor freshener,powdersandfine
dust.These productsclogthe bag, reduce
airflowand cancausethe bagto burst.Failure
to changebag couldcausepermanentdamage
to the cleaner.
Donot usethe cleanerto pick upsharp hard
objects,small toys,pins,paper,etc.Theymay
damagethe cleaneror dustbag.
Donotpickupanythingthatisburningorsmoking,
suchascigarettes,matches,or hotashes.
Donot usevacuumcleaner
to pick upflammableor combustibleliquids
(gasoline,cleaningfluids,perfumes,etc.),or use
in areaswheretheymaybe present.Thefumes
fromthese substancescancreateafire hazard
orexplosion.
Use extracare when cleaningon stairs.Donot
puton chairs,tables,etc. Keeponfloor.
You are responsiblefor makingsure thatyour
vacuum cleaneris notused byanyoneunable
to operateit properly.
SAVE THESE INSTRUCTIONS
Proper assembly and safe use of your vacuum cleaner are your responsibilities. Your
cleaner is intended only for household use. Read this Owner's Manual carefully for
important use and safety information. This guide contains safety statements under warning
and caution symbols. Please pay special attention to these boxes and follow any
instructions given. WARNING statements alert you to such hazards as fire, electrical
shock, burns and serious personal injury. CAUTION statements alert you to such hazards as
moderate personal injury and/or property damage.
-3-
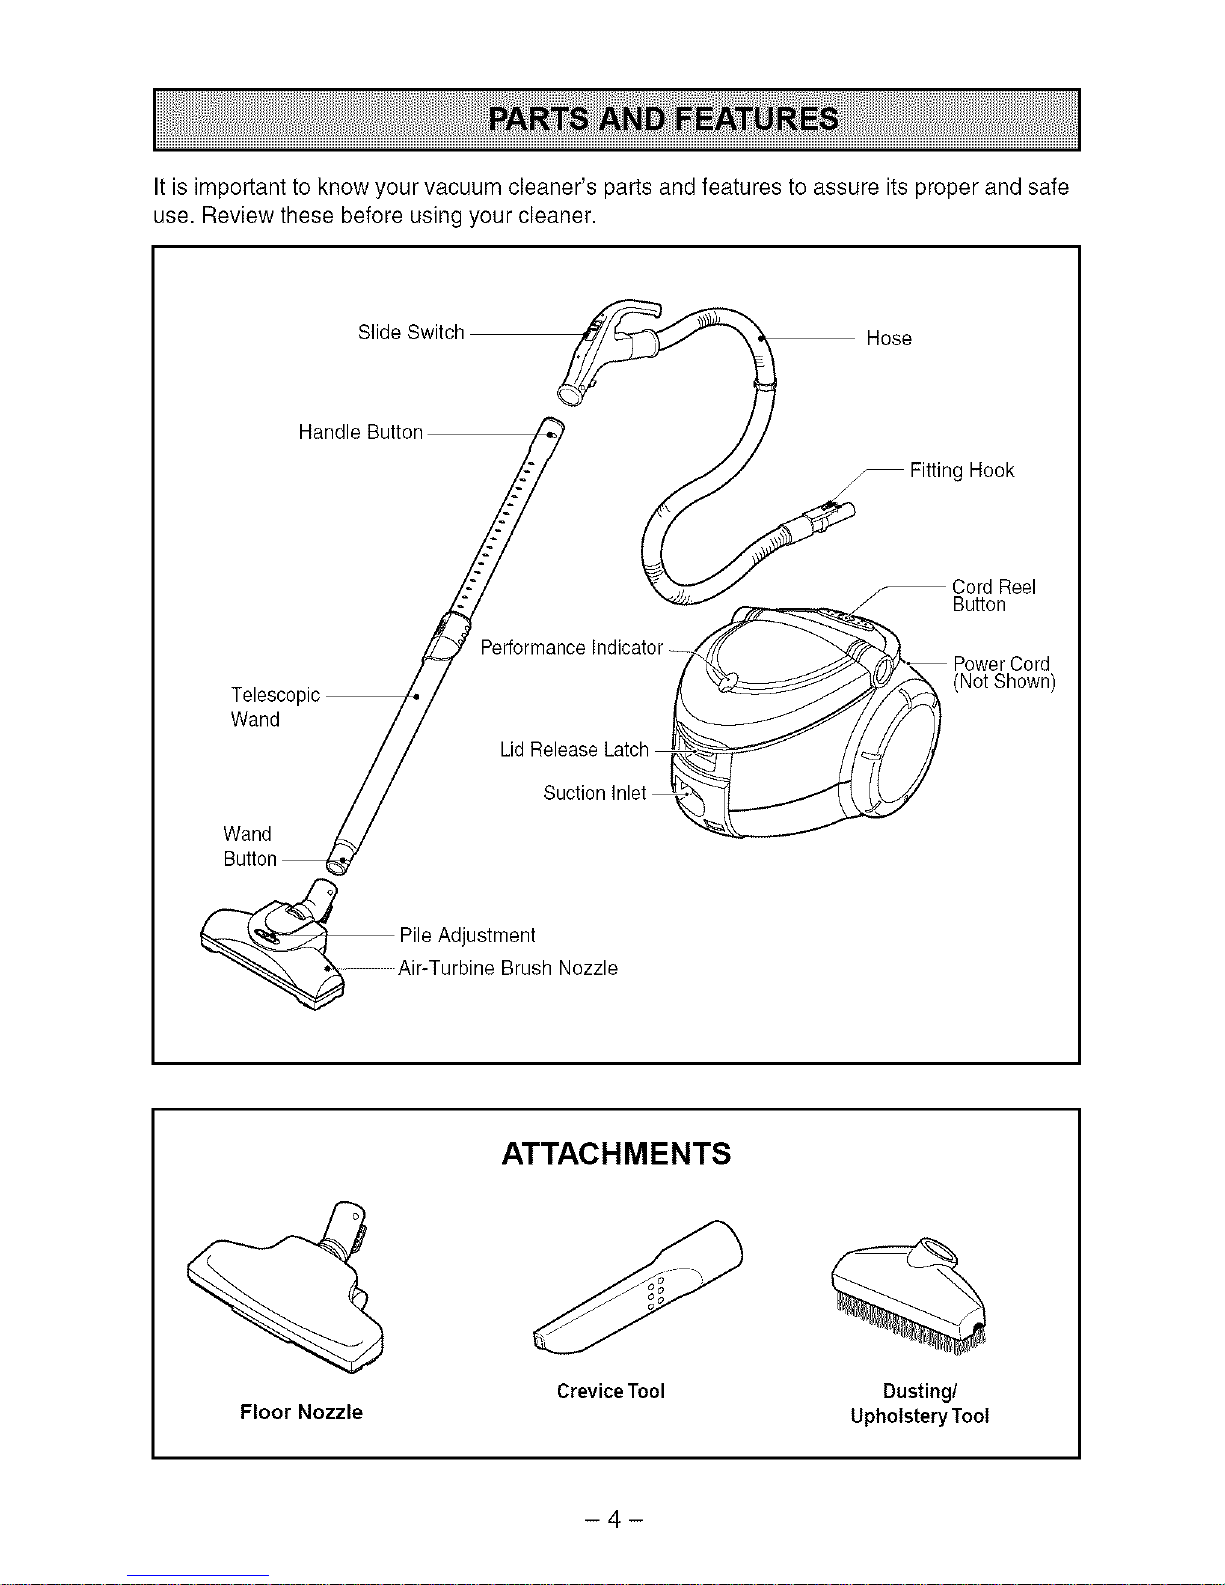
It is important to know your vacuum cleaner's parts and features to assure its proper and safe
use. Review these before using your cleaner.
Slide Switch ___ Hose
M
Handle Button/" __ Fitting Hook
/_ _o mance Indicato
Telescopic _ /
Wand //
// Lid Release Latch
// Suction Inlet
Wand A-,/
Button
Pile Adjustment
Air-Turbine Brush Nozzle
Cord Reel
Button
Power Cord
(Not Shown)
ATTACHMENTS
Crevice Tool Dusting/
Floor Nozzle Upholstery Tool
-4-
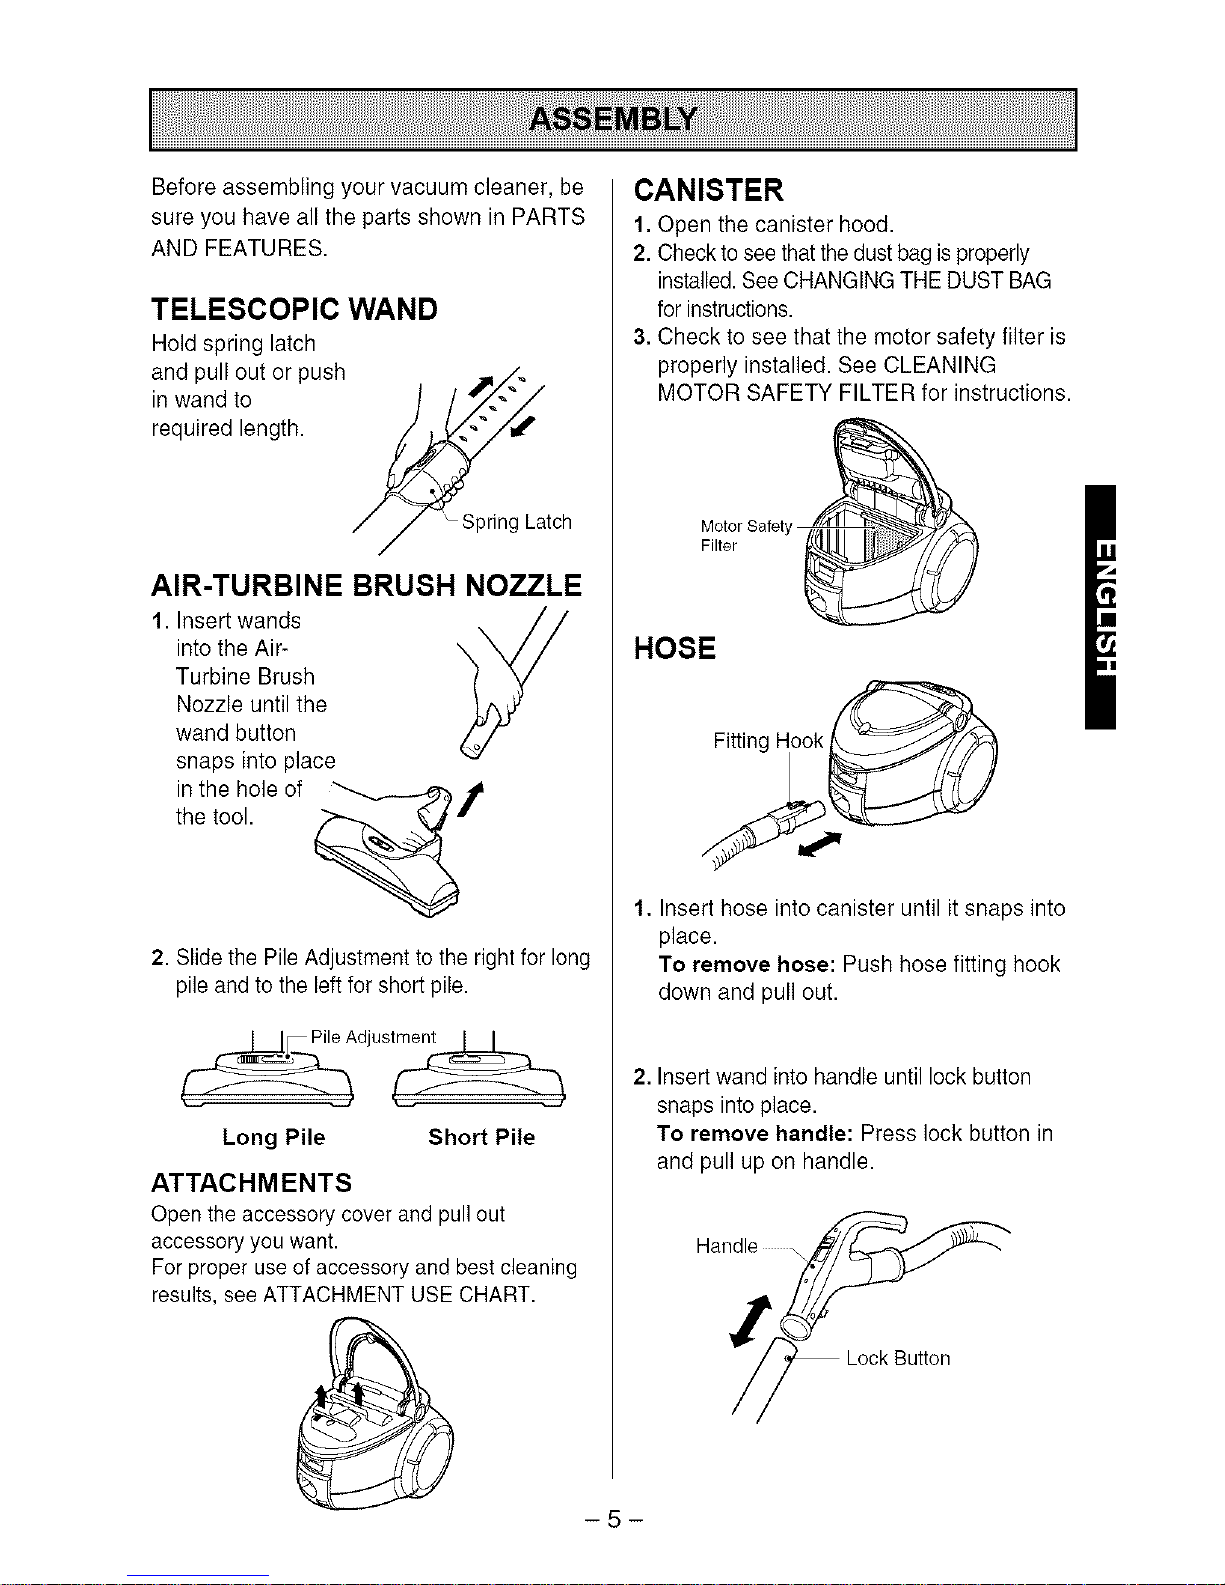
Before assembling your vacuum cleaner, be
sure you have all the parts shown in PARTS
AND FEATURES.
TELESCOPIC WAND
Hold spring latch
and pull out or push
in wand to
required length.
'_ Spring Latch
AIR-TURBINE BRUSH NOZZLE
1. Insert wands
into the Air- X
Turbine Brush
Nozzle until the
wand button
snaps into place
in the hole of _ #
the tool.
2. Slide the Pile Adjustment to the right for long
pile and to the leftfor short pile.
,_Pile Adjustment 1 I
Long Pile Short Pile
ATTACHMENTS
Open the accessory cover and pull out
accessory you want.
For proper use of accessory and best cleaning
results, see ATTACHMENT USE CHART.
CANISTER
1. Open the canister hood.
2. Checkto seethat the dustbag is properly
installed.See CHANGING THE DUST BAG
forinstructions.
3. Check to see that the motor safety filter is
properly installed. See CLEANING
MOTOR SAFETY FILTER for instructions.
MotorSatety /_ _ _
Filter
HOSE
FittingHook
1. Insert hose into canister until it snaps into
place.
To remove hose: Push hose fitting hook
down and pull out.
2. Insert wand into handle until lock button
snaps into place.
To remove handle: Press lock button in
and pull up on handle.
Handle
Lock Button
-5-
USE AND CARE
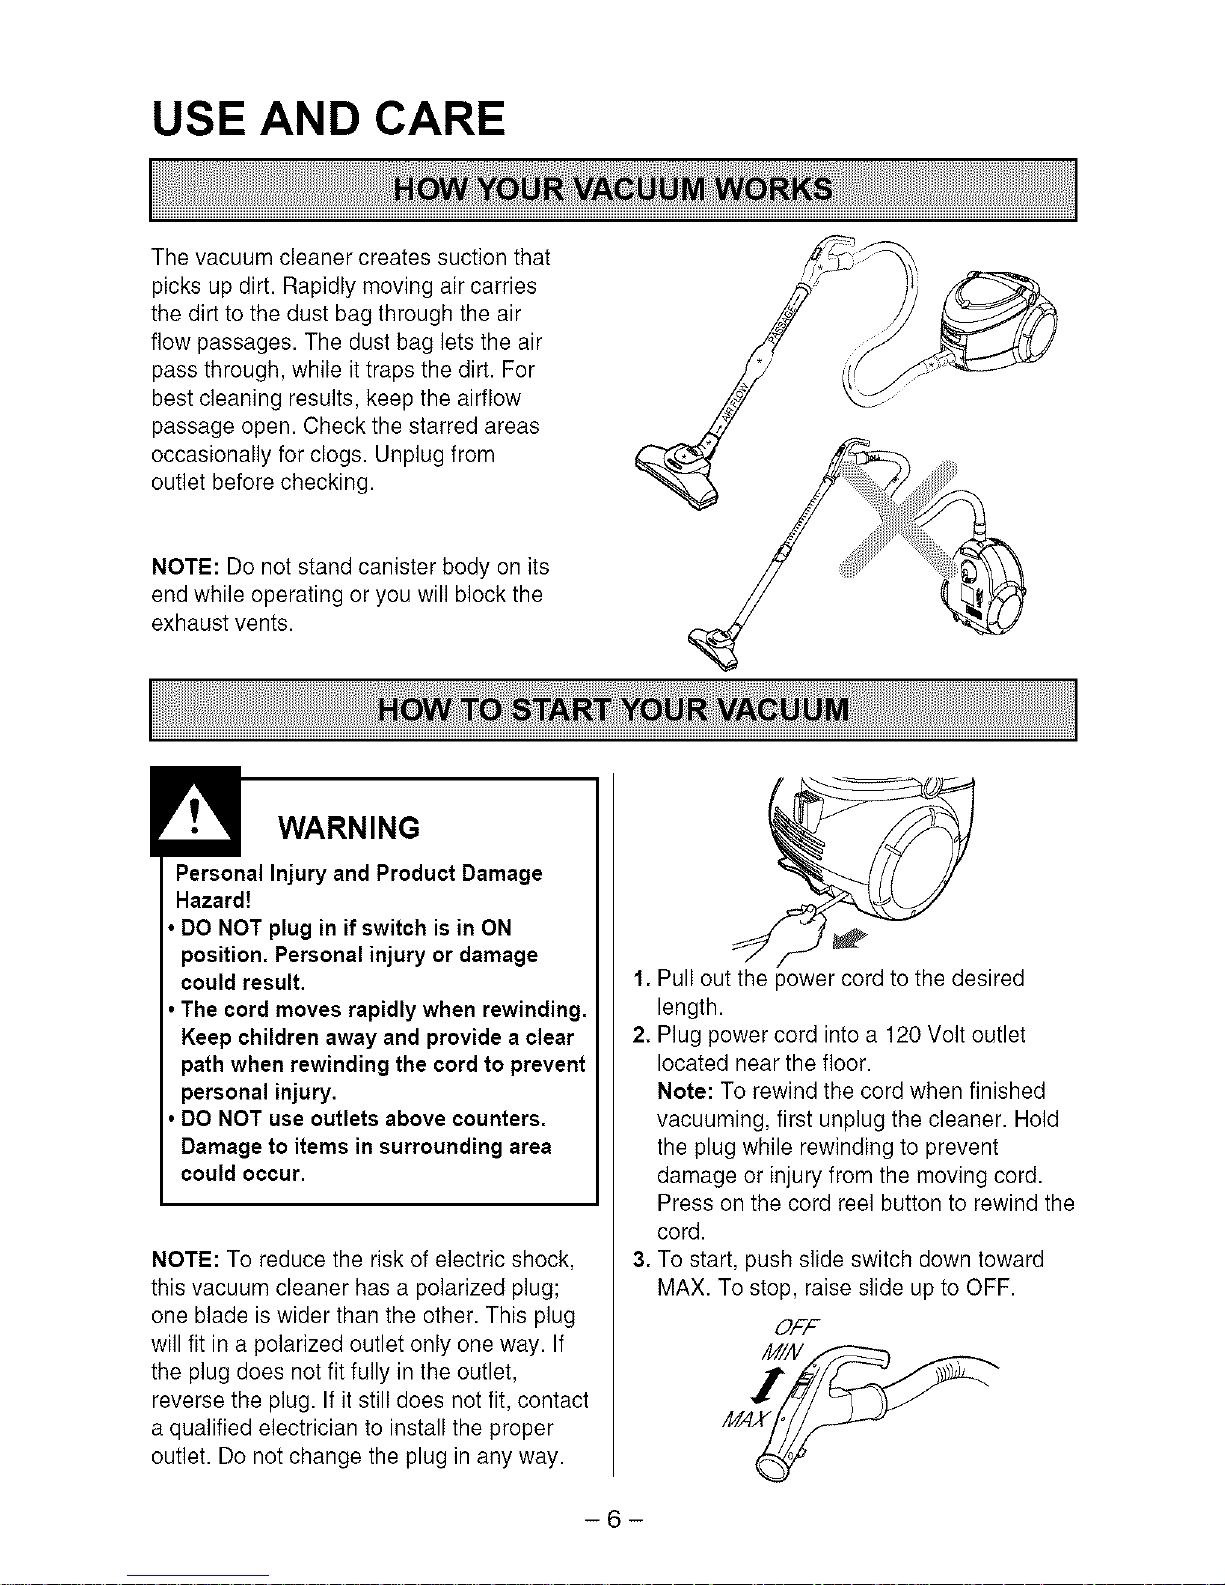
The vacuum cleaner creates suction that
picks up dirt. Rapidly moving air carries
the dirt to the dust bag through the air
flow passages. The dust bag lets the air
pass through, while it traps the dirt. For
best cleaning results, keep the airflow
passage open. Check the starred areas
occasionally for clogs. Unplug from
outlet before checking.
NOTE: Do not stand canister body on its
end while operating or you will block the
exhaust vents.
WARNING
Personal Injury and Product Damage
Hazard!
• DO NOT plug in if switch isin ON
position. Personal injury or damage
could result,
• The cord moves rapidly when rewinding.
Keep children away and provide a clear
path when rewinding the cord to prevent
personal injury,
• DO NOT use outlets above counters.
Damage to items in surrounding area
could occur.
NOTE: To reduce the risk of electric shock,
this vacuum cleaner has a polarized plug;
one blade is wider than the other. This plug
will fit in a polarized outlet only one way. If
the plug does not fit fully in the outlet,
reverse the plug. If it still does not fit, contact
a qualified electrician to install the proper
outlet. Do not change the plug in any way.
1. Pull out the power cord to the desired
length.
2. Plug power cord into a 120 Volt outlet
located near the floor.
Note: To rewind the cord when finished
vacuuming, first unplug the cleaner. Hold
the plug while rewinding to prevent
damage or injury from the moving cord.
Press on the cord reel button to rewind the
cord.
3. To start, push slide switch down toward
MAX. To stop, raise slide up to OFF.
OFF
-6-
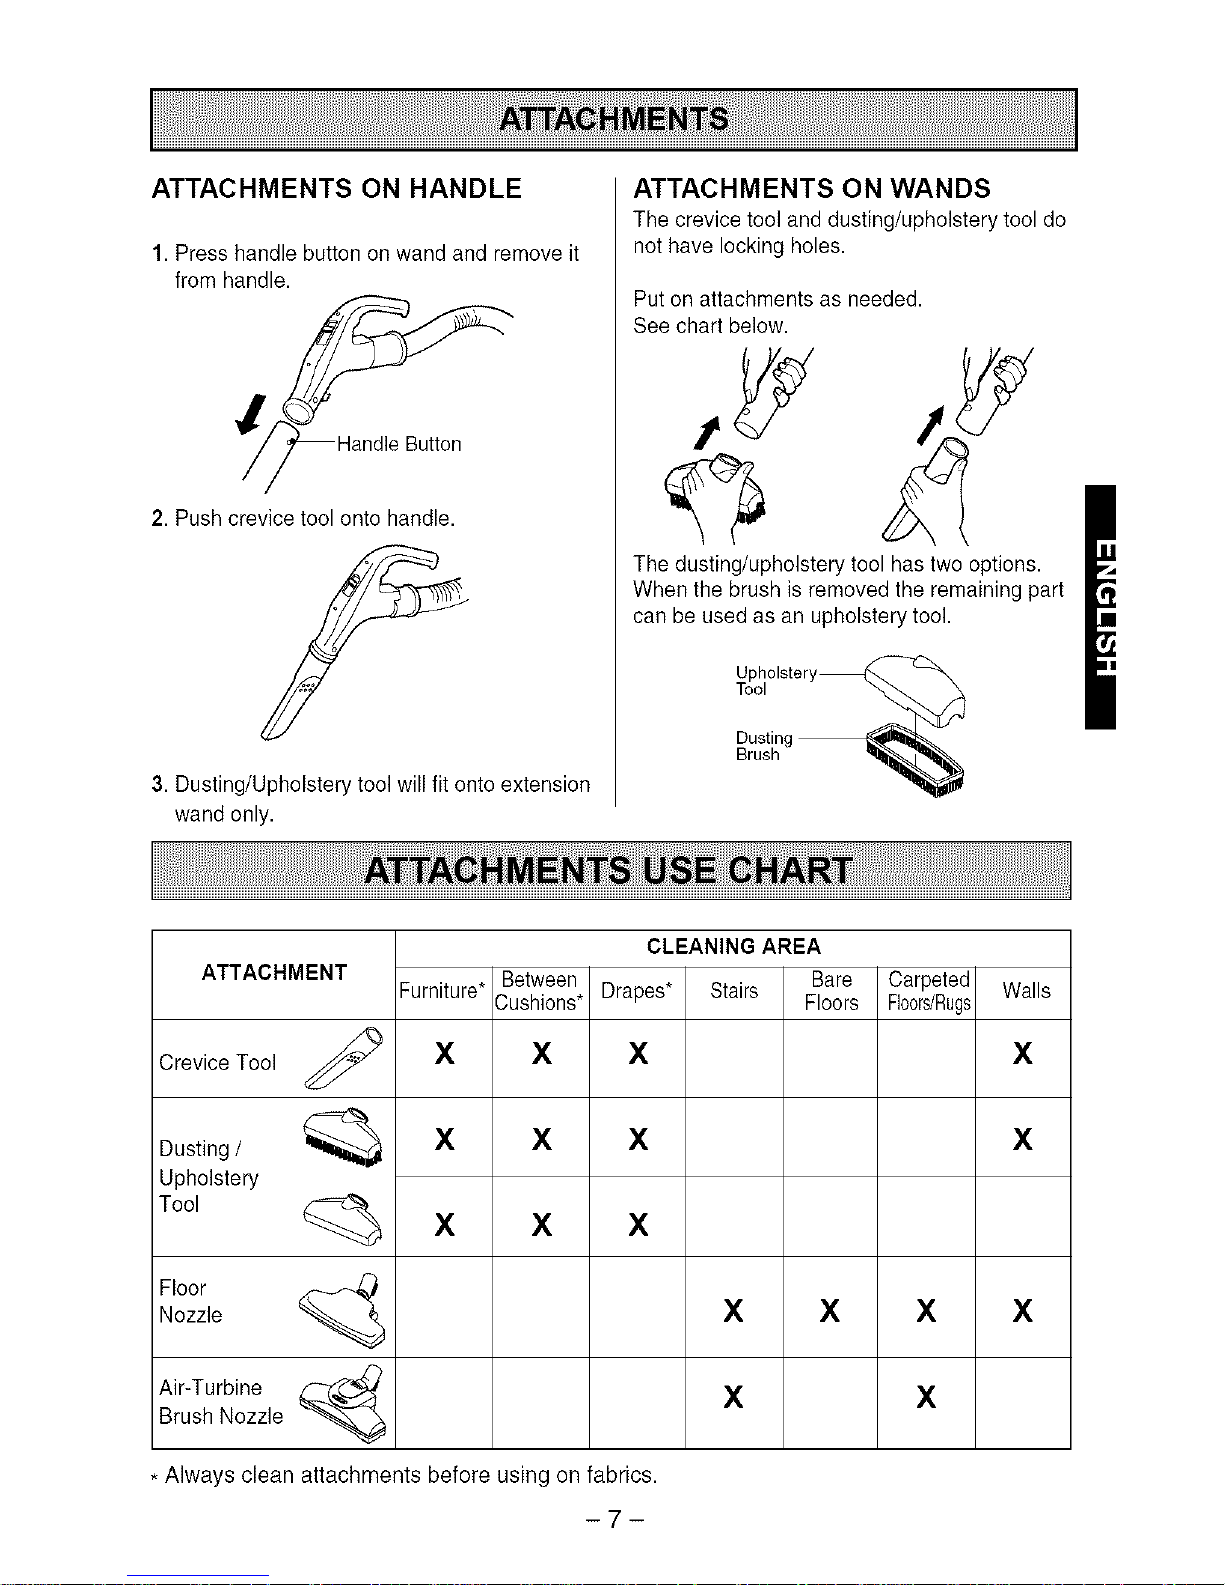
ATTACHMENTS ON HANDLE
1. Press handle button on wand and remove it
from handle.
2. Push crevice tool onto handle.
3. Dusting/Upholstery tool will fit onto extension
wand only.
ATTACHMENTS ON WANDS
The crevice tool and dusting/upholstery tool do
not have locking holes.
Put on attachments as needed.
See chart below.
The dusting/upholstery tool has two options.
When the brush is removed the remaining part
can be used as an upholstery tool.
Uph,
Tool
Dusting
Brush
CLEANING AREA
ATTACHMENT Furniture* Between Drapes* Stairs Bare Carpeted Walls
Cushions* Floors Floors/Rugs
X X X X
Crevice Tool
Dusting / _ X X X X
Upholstery
Tool
X X X
Floor
Nozzle X X X X
Air-Turbine _ X X
Brush Nozzle
* Always clean attachments before using on fabrics.
-7-
Suggested sweeping pattern
For best cleaning action, the Air-Turbine
Brush Nozzle should be pushed straight
forward from you and pulled straight back.
This pattern should be continued across the
rug with slow, gliding motions.
NOTE: Fast, jerky strokes do not provide
complete cleaning.
Carpeted stairs need to be vacuumed
regularly. For best cleaning results, put the
slide switch on MAX.
For best cleaning results, keep the airflow
passage open. Check occasionally for clogs.
See HOW YOUR VACUUM WORKS
section. Unplug from outlet before
checking.
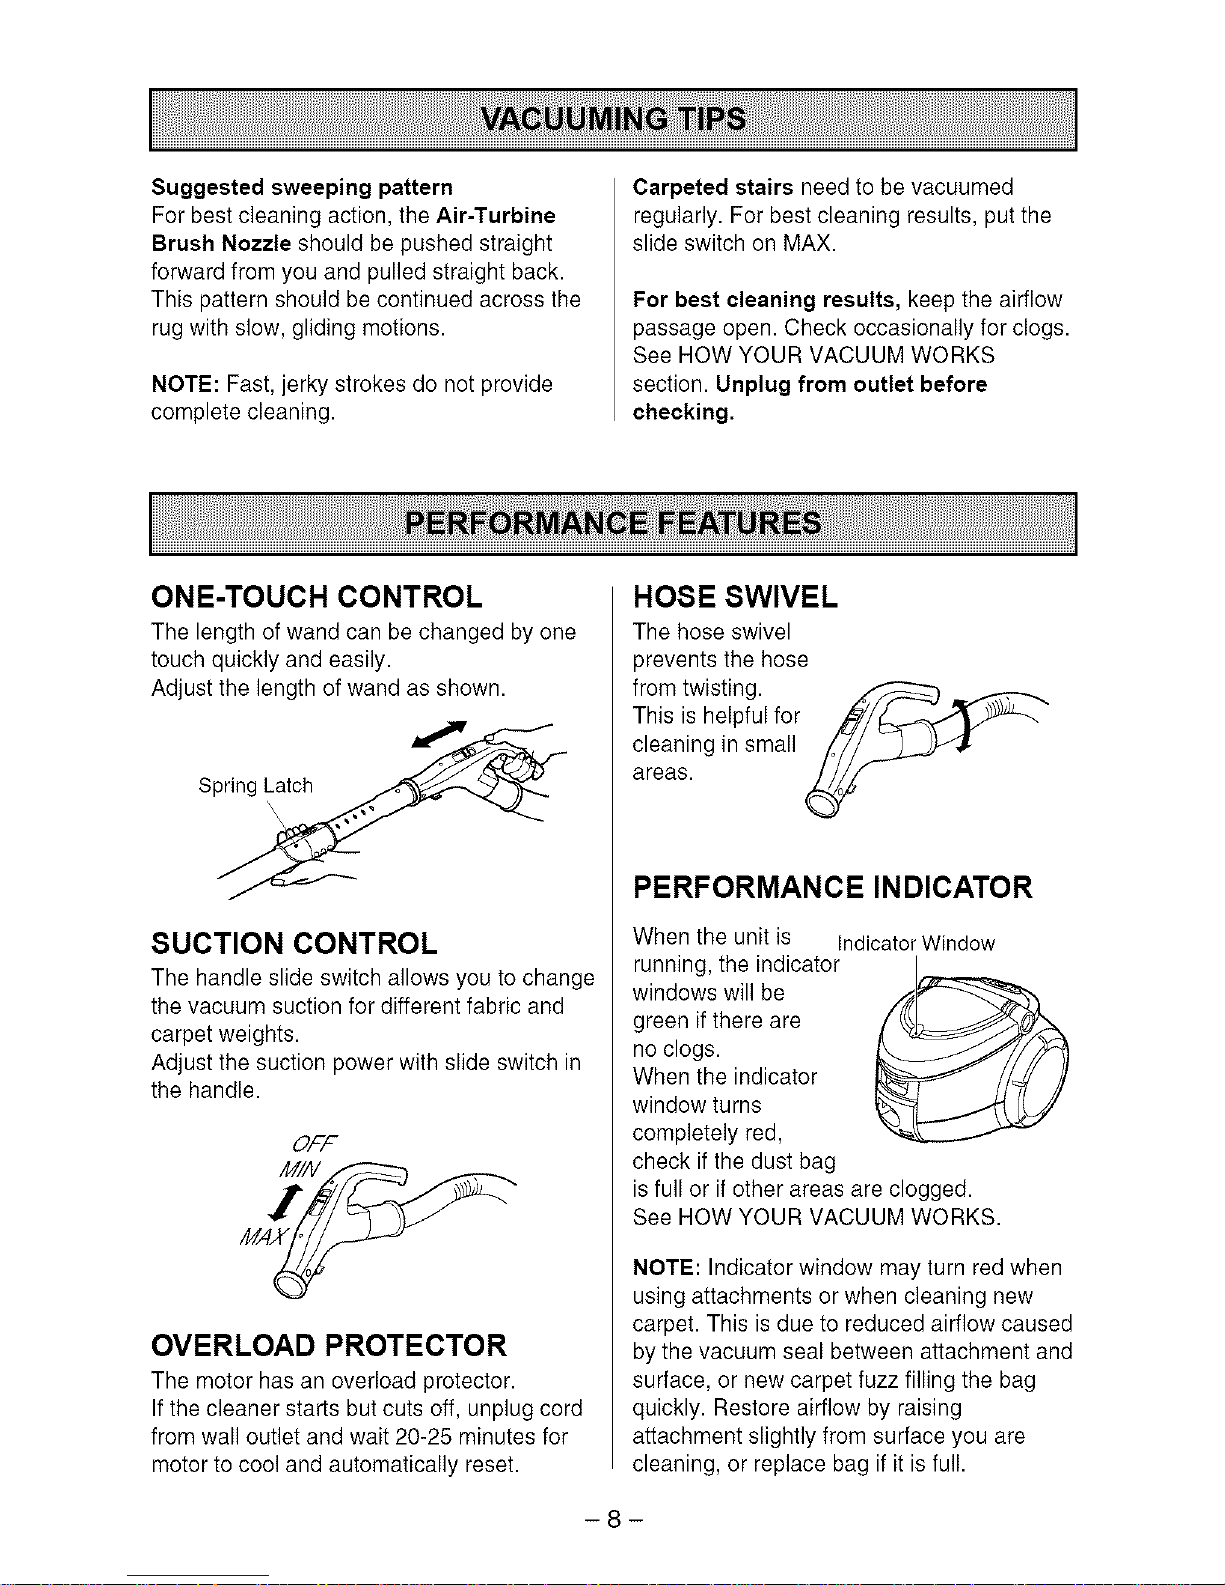
ONE-TOUCH CONTROL
The length of wand can be changed by one
touch quickly and easily.
Adjust the length of wand as shown.
SUCTION CONTROL
The handle slide switch allows you to change
the vacuum suction for different fabric and
carpet weights.
Adjust the suction power with slide switch in
the handle.
OFF
OVERLOAD PROTECTOR
The motor has an overload protector.
If the cleaner starts but cuts off, unplug cord
from wall outlet and wait 20-25 minutes for
motor to cool and automatically reset.
HOSE SWIVEL
The hose swivel
prevents the hose
from twisting. _
This is helpful for
cleaning in small
areas.
PERFORMANCE INDICATOR
When the unit is IndicatorWindow
running, the indicator _::--
windows will be _,-
green if there are
no clogs.
When the indicator
window turns
completely red,
check if the dust bag
is full or if other areas are clogged.
See HOW YOUR VACUUM WORKS.
NOTE: Indicator window may turn red when
using attachments or when cleaning new
carpet. This is due to reduced airflow caused
by the vacuum seal between attachment and
surface, or new carpet fuzz filling the bag
quickly. Restore airflow by raising
attachment slightly from surface you are
cleaning, or replace bag if it is full.
-8-
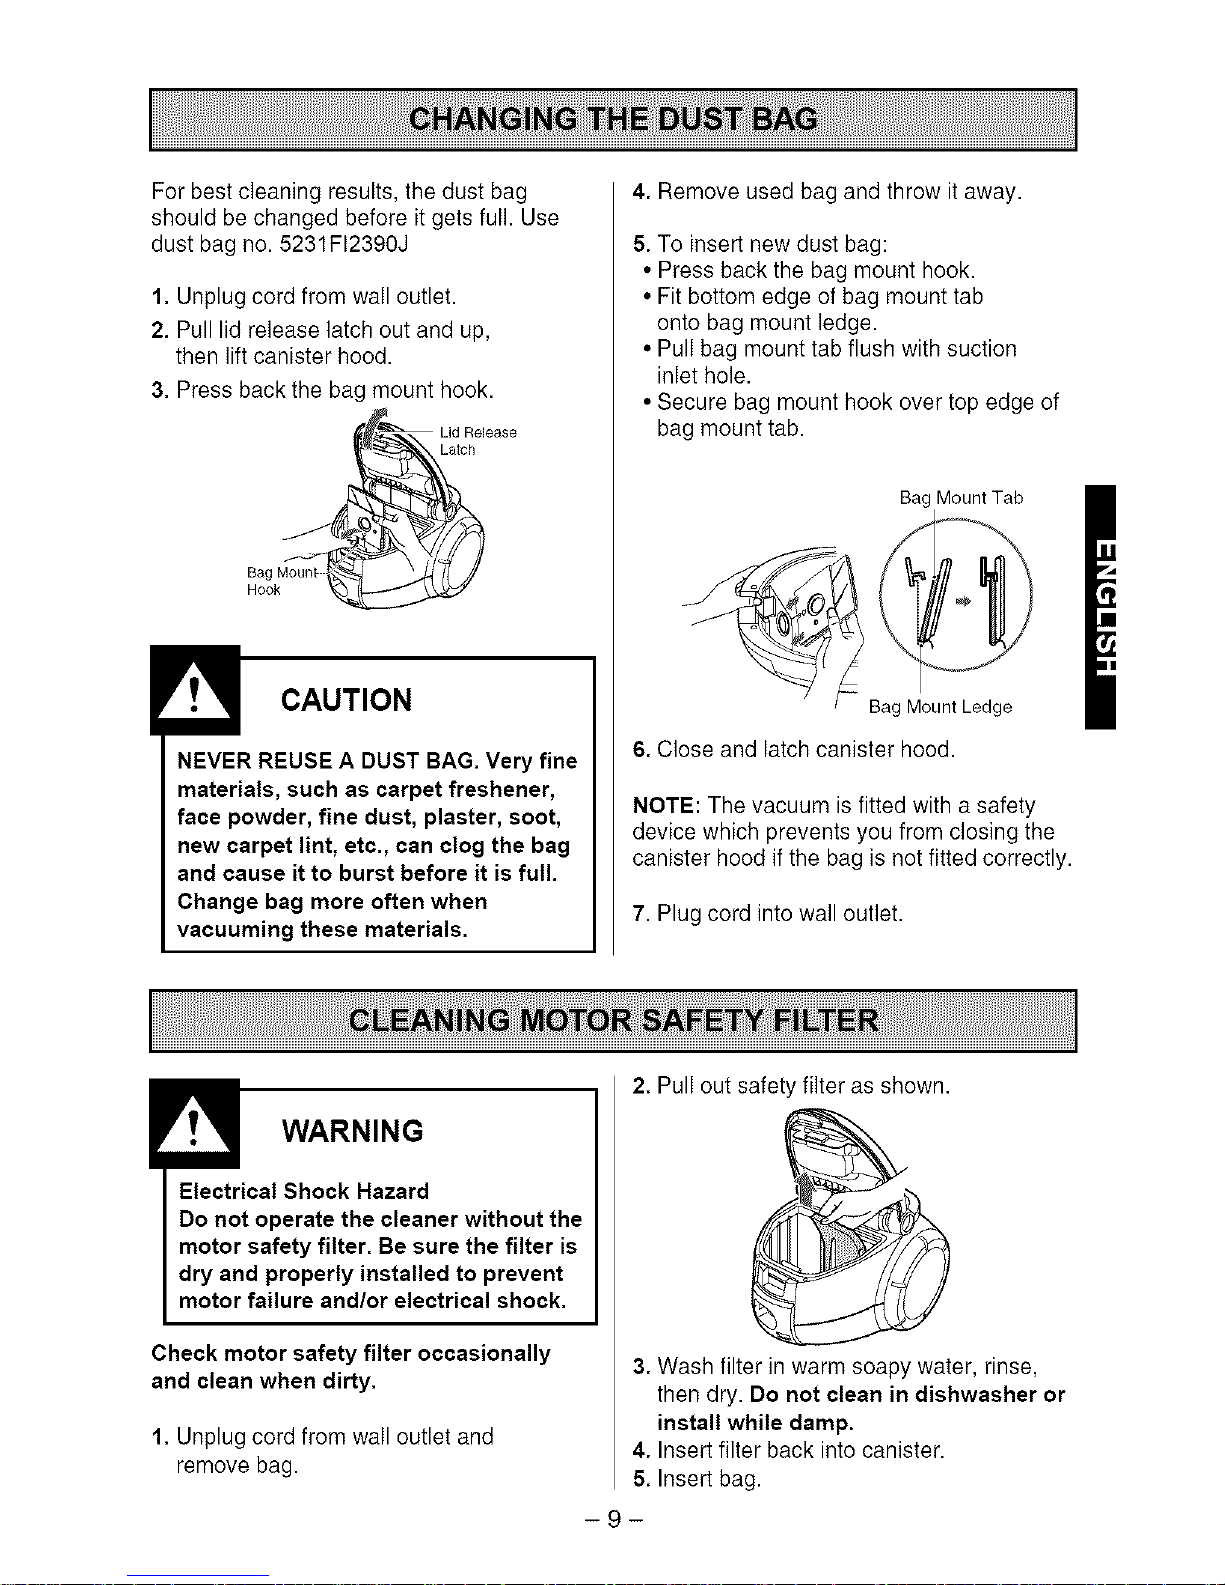
For best cleaning results, the dust bag
should be changed before it gets full. Use
dust bag no. 5231FI2390J
1. Unplug cord from wall outlet.
2. Pull lid release latch out and up,
then lift canister hood.
3. Press back the bag mount hook.
_Lid Release
_!_ CAUTION
NEVER REUSE A DUST BAG. Very fine
materials, such as carpet freshener,
face powder, fine dust, plaster, soot,
new carpet lint, etc., can clog the bag
and cause it to burst before it is full.
Change bag more often when
vacuuming these materials.
4. Remove used bag and throw it away.
5. To insert new dust bag:
• Press back the bag mount hook.
• Fit bottom edge of bag mount tab
onto bag mount ledge.
• Pull bag mount tab flush with suction
inlet hole.
• Secure bag mount hook over top edge of
bag mount tab.
Bag Mount Tab
Bag Mount kedge
6. Close and latch canister hood.
NOTE: The vacuum is fitted with a safety
device which prevents you from closing the
canister hood if the bag is not fitted correctly.
7. Plug cord into wall outlet.
_!_ WARNING
Electrical Shock Hazard
Do not operate the cleaner without the
motor safety filter. Be sure the filter is
dry and properly installed to prevent
motor failure and/or electrical shock.
Check motor safety filter occasionally
and clean when dirty.
1. Unplug cord from wall outlet and
remove bag.
2. Pull out safety filter as shown.
3. Wash filter in warm soapy water, rinse,
then dry. Do not clean in dishwasher or
install while damp.
4. Insert filter back into canister.
5. Insert bag.
--9--
1. Unplug cord from wall outlet. DO NOT
drip water on cleaner,
2. Clean vacuum exterior using a clean, soft
cloth that has been dipped in clean water,
then wrung out. Wipe dry after cleaning.
NOTE: Regular cleaning helps to reduce
static electricity and dust buildup on outer
surfaces of cleaner and attachments.
_I_ CAUTION
DO NOT use attachments if they are
wet. Damage to dust bag and motor
may occur.
Attachments used in dirty areas, such
as under a refrigerator, should not be
used on other surfaces until they are
washed since they could leave marks.
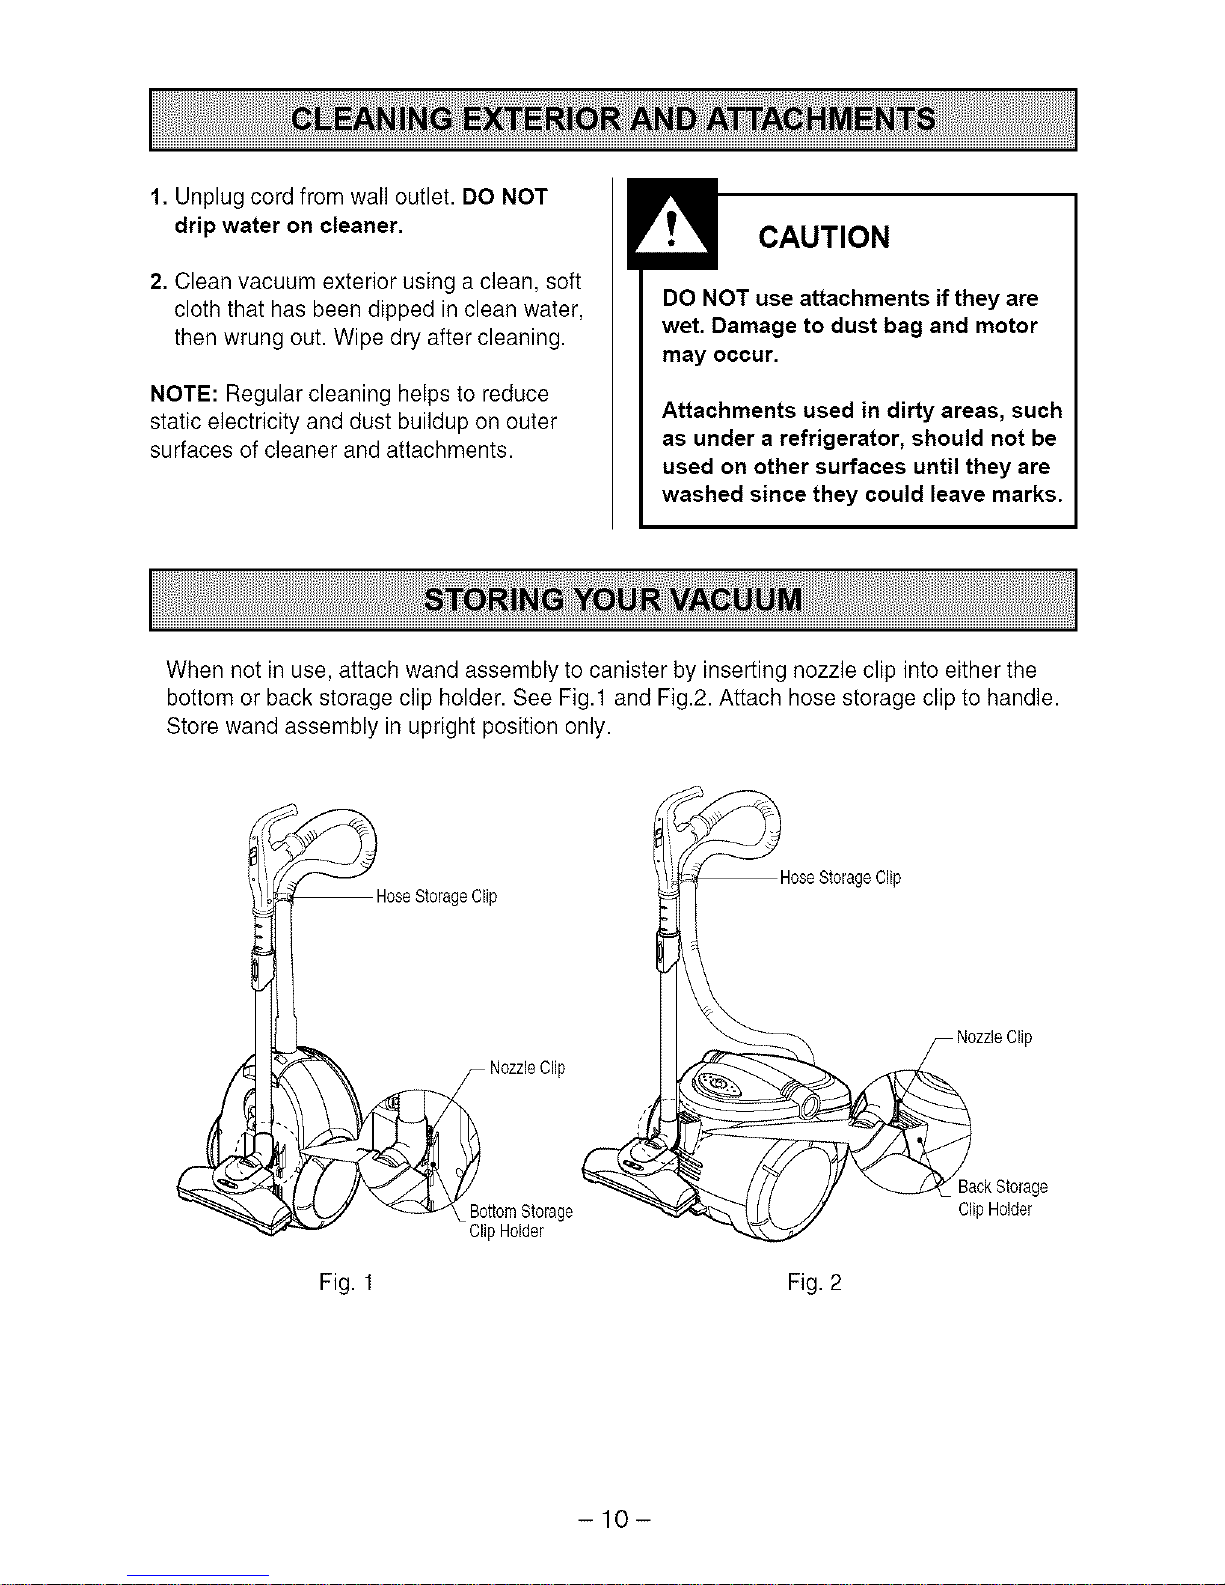
When not in use, attach wand assembly to canister by inserting nozzle clip into either the
bottom or back storage clip holder. See Fig.1 and Fig.2. Attach hose storage clip to handle.
Store wand assembly in upright position only.
©
HoseStorageClip
_ NozzleClip
C'k,_._ _ BottomStorage
ClipHolder
Fig. 1 Fig. 2
BackStorage
ClipHolder
-10-
 Loading...