

Kenmore 721.23195 Owner's Manual
Owner's Manual
Manual del Propietario
®
Canister Vacuum Cleaner
Aspiradora
Model, Modelo 721.23195
Sears, Roebuck and Co., Hoffman Estates,lL 60179 U.S.A
www. sears, corn
PART No.: 3828Fi3763V Printed in KOREA
Before Using Your NewVacuum ......................2
KenmoreVacuum Cleaner Wa_anty ...............2
Im_an,t Safety Instructions ..................................3
Par_ and Features...........................................4
Assembly _ 5
Use and Care .......................................................6
HowYour VacuumWorks ..................................6
Howto Sta_ Your Vacuum ...................................6
Attachments ............................................................................7
A_tachmentsU_ Chart......................................7
VacuumingTip .................................................8
Please read this guide, it will help you assemble and operate your r.,ewKenmore vacuum inthe
_fest a_ most:effective 'way.
For more info_ation a_ut vacuum _re and o_ration, call your Ilea[est Sears store,
You will need _e complete model and seria_humors when requesting information°
Your vacuums model and seria_num_rs are located on the Model and _rial Num_r Plate..
Usethe space belowItore_rd the model!num_r and serial numbe_of your _w Kenmorevacuum,
Pedormar_e Features ...........................................8
C_ngi_ The Dust:Bag ..................................................9
Qeaning Motor Safety Filler ...................................9
CleaningExterior ar_ Attachments ..................10
Storing Your Vacuum ......................................t0
CleaningAir-Turbine Br_h NozzJe..................11
Beltchanging and _ush cleaning....................11
Trouble Shooting ......................................... t 3
Parts List ...................................................t4_16
Es_5oJ 17
Se_ice ................................................_ck Cover
M_el No.
SeriaUNo
Date of Purcha_
Keep this _.ok and your sales check (receipt) in a safe place for future reference.
LIMITED ONE Y_R WARRANTY ON KENIMORE VACUUM CLEANER:
This warran_ is for one year from the date of purchase., and includes only _ivate household
vacuum clieaner use.. Dudng the warranty year, _en this vacuum cleaner is operated and
maintained according to _e owner's manuaJ instructions,Sears will repair any defects in
material! or workmanship free of charge,
This warran_ excludes vacuum bags, belts, light bulbs, and filters, which are ex_n, da_:4e
parts and _come worn during normaJ ,use,
For warranty service, return this. vacuum cleaner to the nearest Sears Service Center in
the United States.
This warranty applies only whi_ethis product is in use in the United S_ateso
This warranty g_ves you specific legaJrights, and you may aUsohave other rights 'which vary
from stste to state.
Sears, Roebuck and Co,, D/817W& Hoffman Estates, !L _179,
-2-
WARNING
Your safety is important to us. To reduce the risk of fire, electrical shock, injury to
persons or damage when using your vacuum cleaner, follow basic safety precautions
including the following:
Readthis manual beforeassembling or using
your vacuum cleaner.
Useyourcleaneronlyas describedinthis
manual.Useonlywith suppliedattachments.
To reducethe riskof electricalshock - Do not
use outdoors or on wet surfaces.
Disconnect electrical supply beforeservicing
orcleaning out brush area. Failureto do so
could resultin electrical shock or brush
suddenlystarting.
Always turn cleaner off beforeconnecting or
disconnectingthe hose.
Always turn cleaner off before unplugging.
Do not unplug by pulling on cord.To unplug,
graspthe plug, not the cord.
Hold plug when rewinding onto cord reel.
Do not allowplug towhip when rewinding.
Do not usewith damaged cord or plug. If
cleaner is not working as itshould, has been
dropped, damaged, leftoutdoors, or dropped
intowater.
Do not pullor carryby cord,usecordas a
handle,close door oncord, or pullcord around
sharpedgesor corners.Donotrun cleanerover
cord.Keepcordawayfromheatedsurfaces.
Do not leavecleanerwhen pluggedin. Unplug
fromoutletwhen not in use and before servicing.
Donot allowtobe usedas atoy.Closeattention
is necessarywhen usedbyornearchildren.
Do not handleplug or cleaner with wet hands.
Do not operate the cleaner with a punctured
hose. Replace if cut or worn. Avoid vacuuming
sharpobjects.
Do not use with any opening blocked;keep
freeof dust, lint, hair and anything that may
reduce airflow.
Keep hair, loose clothing, fingers, and all parts
of body away from openings and moving parts.
Do not use cleanerwithout dust bagand/or
filtersin place.
Always change thedust bag after vacuuming
carpet cleaners or freshener, powders and fine
dust. These products clogthe bag, reduce
airflowand can cause the bagto burst. Failure
to change bag could cause permanent damage
tothe cleaner.
Do not use the cleaner to pick up sharp hard
objects,small toys, pins, paper, etc. They may
damagethe cleaner or dust bag.
Do not pickupanythingthat isburningorsmoking,
suchascigarettes,matches,or hotashes.
Do not use vacuum cleaner
to pick upflammable or combustibleliquids
(gasoline,cleaning fluids,perfumes,etc.),or use
in areaswherethey may be present.Thefumes
fromthese substancescan createa fire hazard
orexplosion.
Use extra care when cleaning on stairs. Do not
puton chairs,tables, etc. Keep on floor.
You are responsiblefor making sure that your
vacuumcleaner is not used by anyone unable
to operate it properly.
SAVErHESEINSTRUCTIONS
Proper assembly and safe use of your vacuum cleaner are your responsibilities. Your
cleaner is intended only for household use. Read this Owner's Manual carefully for
important use and safety information. This guide contains safety statements under warning
and caution symbols. Please pay special attention to these boxes and follow any
instructions given. WARNING statements alert you to such hazards as fire, electrical
shock, burns and serious personal injury. CAUTION statements alert you to such hazards as
moderate personal injury and/or property damage.
-3-

it is impo_ant to know your vacuum cleaneCs parts and features to assure its proper and safe
use, Review these before using your cleaner,
Slide Sw_ch
Handle Butto,n
Hose
F_tling Hook
Reel
Bu_on
Cord
(Not Shown)
iPedoirma_e Indicator
Floor Noffle
Brush/CreviceiTool Up,holstery Nozzle Ac_s_ry Holder
-4-
Before assembling your vacuum cleaner,
sure you have all the pa_s shown in PARTS
AND, FEATURES..
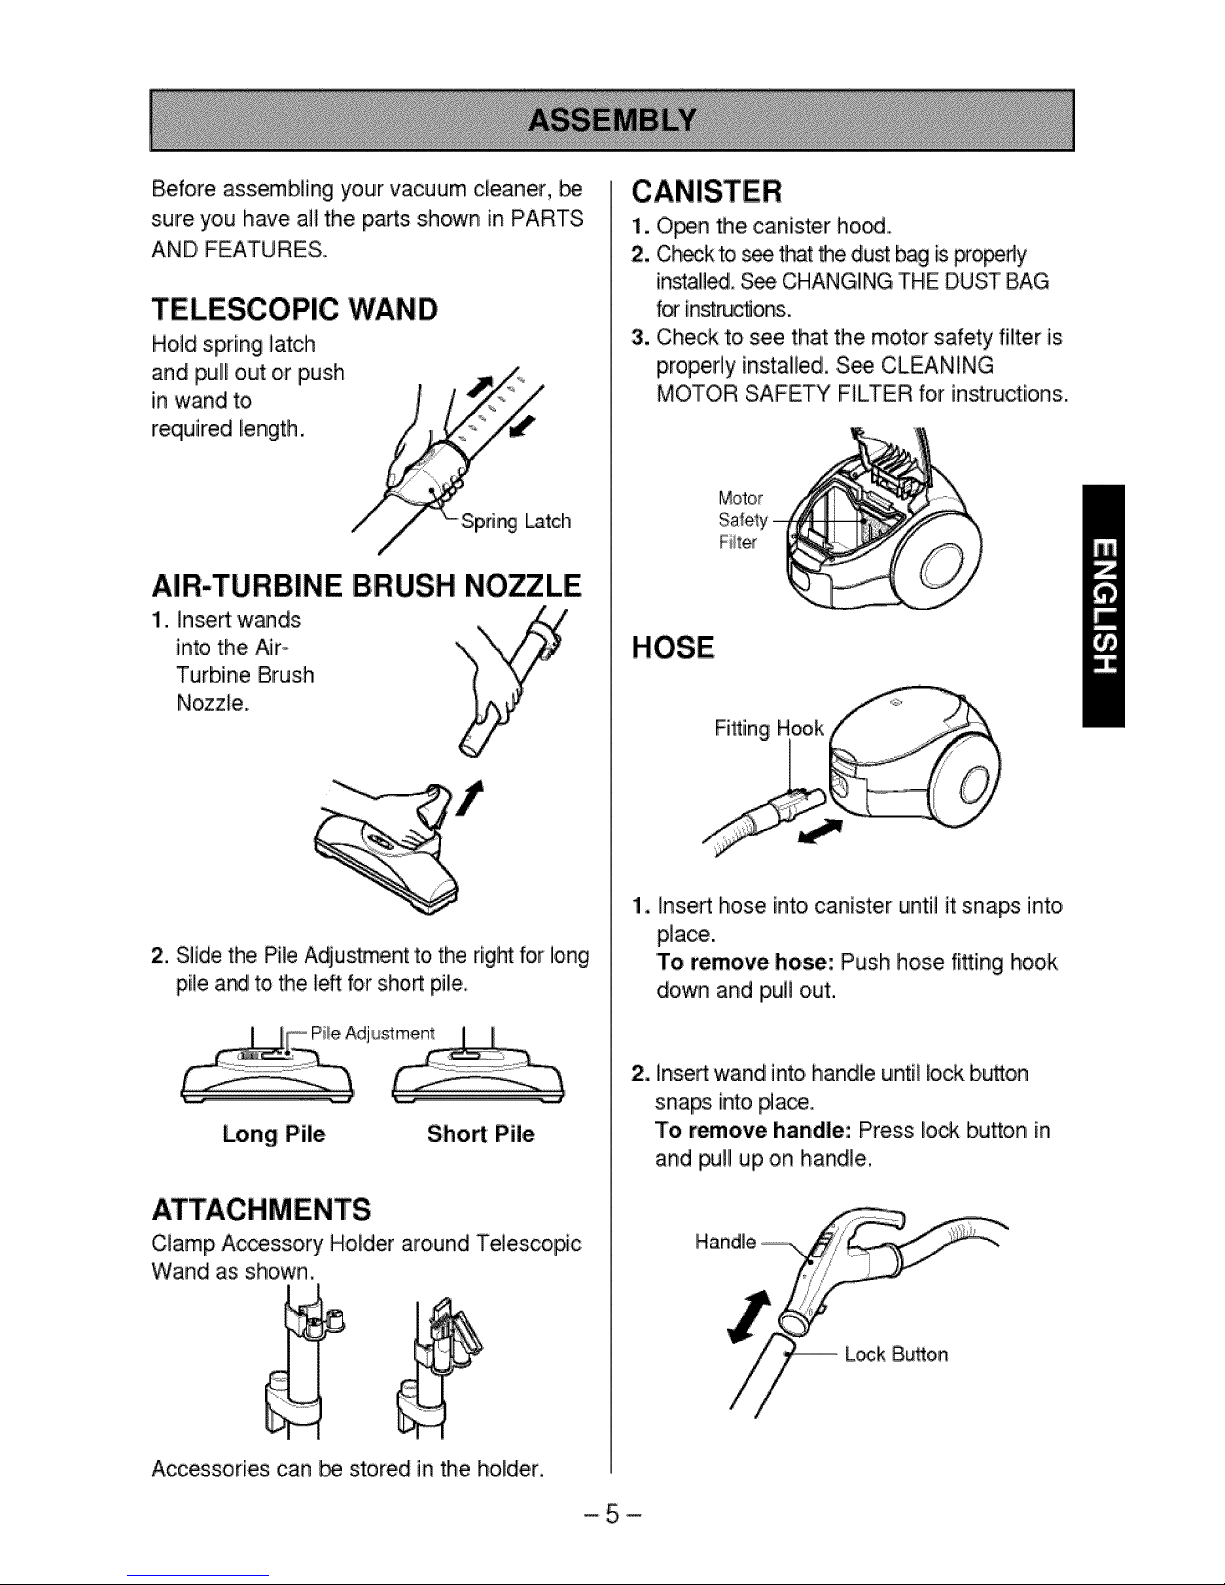
TELESiCOPIC WAND
Hold spring latch
and pull out or push
in wand to
required length.
Latch
AIR-TURBINE BRUSH NOZZLE
1. in_ w_ds
into the Air-
Turbine Brush
Nozzle.
1. O_n the canister hood.
2. C_k to _ _at _e dust bag is #o_dy
[n_lled. S_ CHANGING THE DUST BAG
f_ inactions.
3. Check to see that the motor safety filter is:
properly installed. S_ CLEANING
MOTOR SAFETY FILTER for instructions.
2. Slide the PHeAdius_ent to the right for long
pile aM to the left for sho_ pile_
Long Pile Sho_ Pile
Qamp Accessory Holder around Telescopic
Wand as shown,
Accessories can _ stored in the holder.
1. Insert hose into,canister until it snaps into,
place.
To remove hose: Push hose fi_ing hook
down and p,uHout.
2. inse_ wand into handle until lock b_on
sna_ into #ace.
To remove handle: Press lock bu_on in
and _]1 up on handle.
L_k B_o,n
5 !
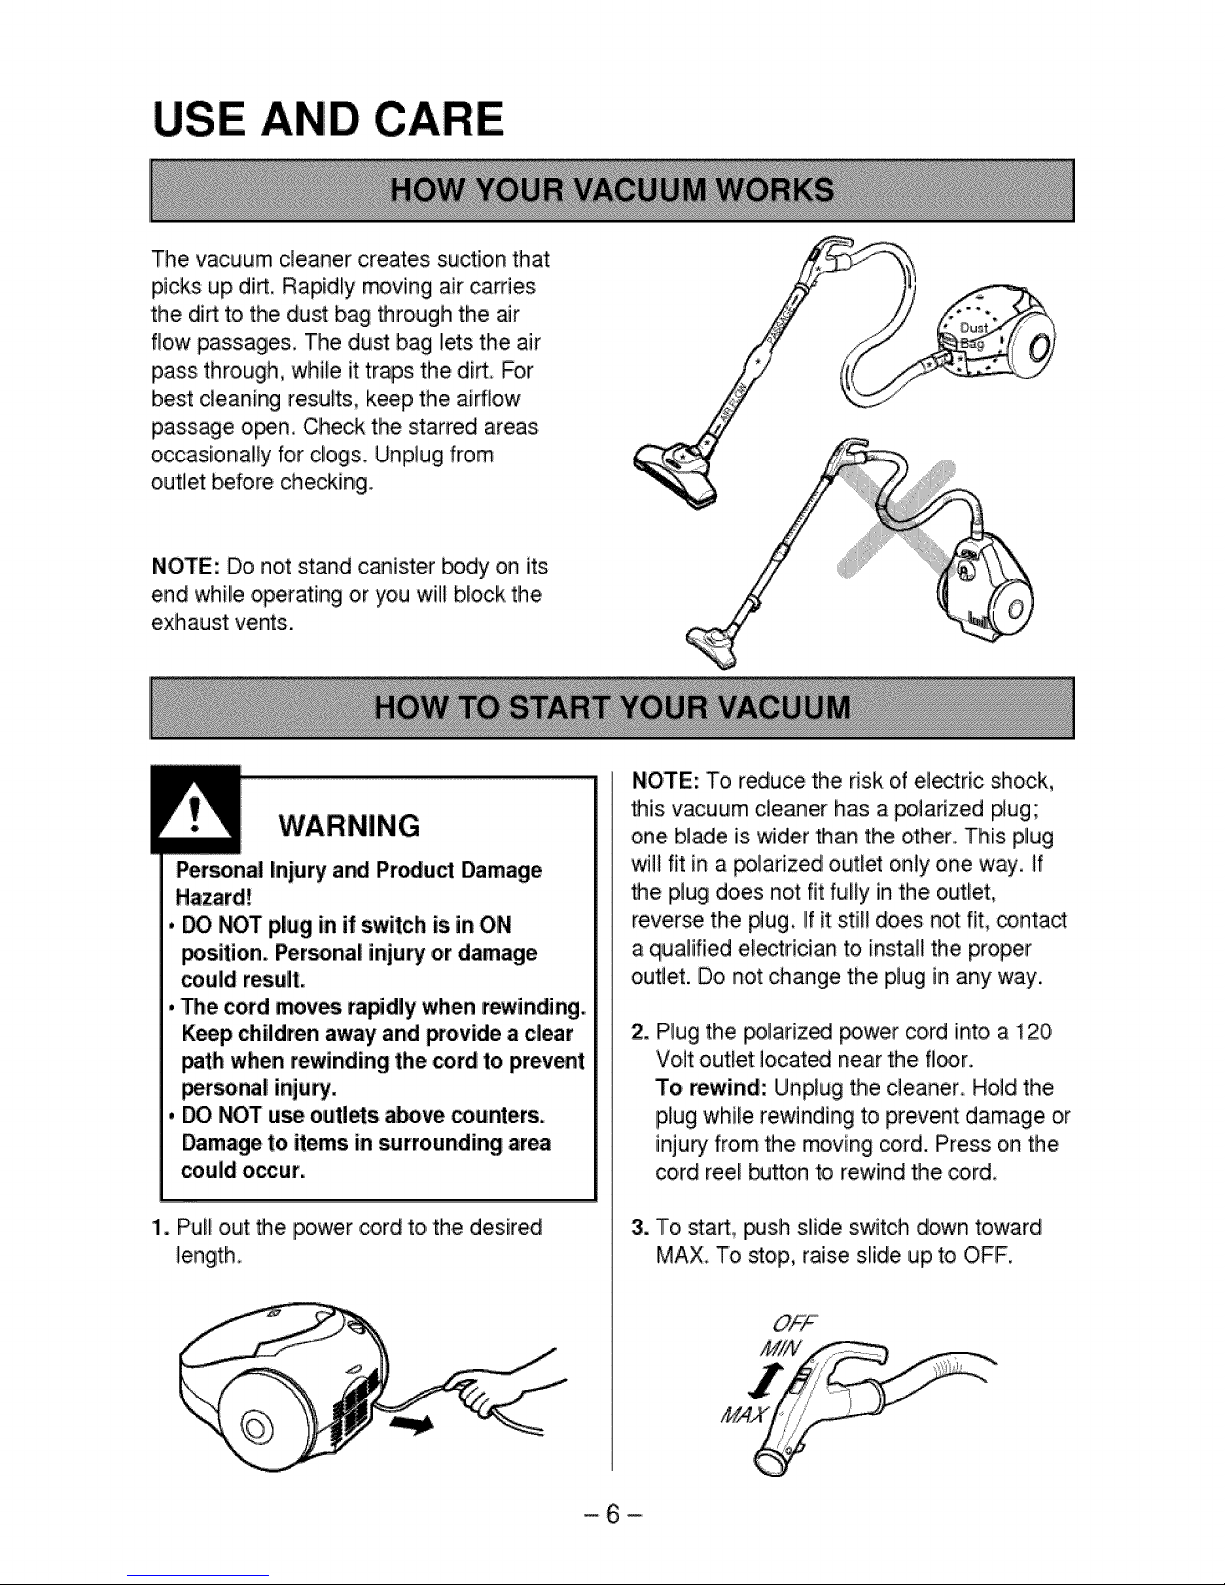
The vacuum cleaner creates suction that
picks up di_, Rapidly moving air carries
the dirt to the dust bag _rough the air
flow passages:, The dui_ bag lets the air
pass through, while it traps the diR For
best c_eaning results, keep the airflow
passage o_n. Check the starred areas
occasionally for clogs. Unplug from
outlet _fore checking.
NOTE: Do not stand canister _dy on its
end while operating or you will bbck the
exhaust vents.
Personal Injury a_ Pr_uct Damage
, DO NOT plug in if switch is,in ON
_sition. Per_nal injury or damage
could result,
• De cord moves, ra_dly when rewinding.,
Keep _ildren away and provide a clear
_th when rewinding the _,rd to prev_t
_r_nal injury,
, DO NOT use outl_s a_ve _unters.
Damage to items in surrounding area
could occur,
NOTE: To reduce the risk of electric shock,
• is vacuum cleaner has a polarized p4ug;
one blade is wider than the other. This plug
will fit in a _larized outlet only one way. if
the plug does not fit fully in the outlet,
reverse the #ug, If it still does not fiL _nta_
a qualified electrician to install the proper
outlet. Do not change the plug in any way.
2. Plug the _lariz_ _wer cord into a 120
Volt outlet iocat_ near the floor,
To rewind: Unplug the cleaner, Hold the
plug while rewinding to prevent damage or
injury from the moving cord. Press on the
cord ree! _J_on to rewind the oord,
1. Pull out the power cord to the desired
_ength,_
3. To start, _sh slide switch down toward
MAX To _op, raise slide up to OFF.
-6-
 Loading...