

Kenmore 665.75022 User Manual

Kenmore
Seif-Cieaning Gas Range
Use Si Cae" Giede
Cocina de gas con autolimpieza
t>‘. y-..uidado
Models, Modeios 665.72022 665.72024 665.72029
665.75022 665.75025 665J5029
TO THE iNSTALteR; PLEASE LEAVE THIS 1NSTRUCT50N BOOK WJTH THE UNIT,
TO THE CONSUMER; PLEASE READ AND KEEP THÍS BOOK TOR SUTURE REFERENCE.
PARA EL INSTALADOR: FAVOR OE DEJAR ESTE mNUAL OE INSTRUCCIONES CON LA UNIDAD.
PARA HL CONSUMIDOR; FAVOR DE LEER Y GUARDAR ESTE MANUAL PARA FUTURAS REFERENCIAS.
Super Capacity with ULTRABAKE^** System
Capacidad extra con ei Sistema ULTRABAKE^^
8274077
Sears Roebuck and Co., Hoffman Estates, ÌL 80179 USA
www.saars.com

TABLE OF CONTENTS INDICE
WE SERVICE WHAT WE SELL..................................................3
WARRANTY................................................................................3
RANGE SAFETY
The Anti-Tip Bracket................................................................5
PARTS AND FEATURES
COOKTOP USE..........................................................................7
Control Knobs..........................................................................7
Cooktop Lockout......................................................................7
Sealed Surface Burners
SURESIMMER™
Home Canning
Cookware
ELECTRONIC OVEN CONTROL
Display...................................................................................10
Start/Enter
Off/Cancel..............................................................................10
Clock......................................................................................10
Tones.....................................................................................10
Fahrenheit and Celsius.........................................................11
Timer.....................................................................................11
Oven Lockout........................................................................11
Oven Temperature Control
OVEN USE................................................................................12
Aluminum Foil........................................................................12
Positioning Racks and Bakeware..........................................12
STURDIGLIDE™ Oven Racks
Bakeware
Oven Vent..............................................................................13
Baking and Roasting
Broiling
RECIPE RECALL™
Serve Warm Feature
Timed Oven Control
12-Hour Shut-Off...................................................................17
RANGE CARE...........................................................................17
Self-Cleaning Cycle...............................................................17
General Cleaning
Oven Light.............................................................................20
Oven Door.............................................................................20
Storage Drawer.....................................................................21
TROUBLESHOOTING..............................................................21
........................................................................
...........................................................
..........................................................
....................................................................
........................................................................
................................................................................
.............................................
.............................................................................
...................................................
..............................................
..............................................................................
.............................................................
..................................................................................
..............................................................
.............................................................
..............................................................
..................................................................
10
10
11
12
13
13
14
15
15
16
19
REPARAMOS LO QUE VENDEMOS............................................23
GARANTÍA.....................................................................................23
4
SEGURIDAD DE LA COCINA
El Soporte antivuelco............................................................25
6
PIEZAS Y CARACTERÍSTICAS....................................................26
USO DE LA SUPERFICIE DE COCCIÓN......................................27
Perillas de control.................................................................27
Bloqueo de la superficie de cocción
8
9
9
9
Quemadores exteriores sellados
SURESIMMER™..................................................................29
Enlatado casero....................................................................29
Utensilios de cocina..............................................................29
CONTROL ELECTRÓNICO DEL HORNO
Pantalla.................................................................................30
Start/Enter (Inicio/lngreso)....................................................30
Off/Cancel (Apagado/Anulado).............................................30
Reloj......................................................................................30
Señales audibles...................................................................30
Fahrenheit y Centígrados.....................................................31
Tempo rizador
Bloqueo del horno................................................................31
Control de temperatura del horno
USO DEL HORNO
Papel de aluminio.................................................................32
Posición de las parrillas y los utensilios para hornear
Parrillas del horno STURDIGLIDE™....................................32
Utensilios para hornear
Conducto de ventilación del horno
Cómo hornear y asar............................................................33
Cómo asar
RECIPE RECALL'^'^ (Repetición de recetas)
Característica “Servir caliente”
Control temporizado de! horno
Interruptor de 12 horas.........................................................38
CUIDADO DE LA COCINA............................................................38
Ciclo de autolimpieza............................................................38
Limpieza general
Luz del homo........................................................................40
Puerta del horno...................................................................40
Gaveta de almacenamiento
SOLUCIÓN DE PROBLEMAS.......................................................42
......................................................................
.........................................................................
............................................................................
..................................................................
.......................................................
.....................................
..........................................
....................................
........................................
........................................................
.......................................
......................
.............................................
.............................................
.................................................
..........
24
27
28
30
31
31
32
32
33
33
34
35
36
37
39
41

WE SERVICE
WARRANTY
WHAT WE SELL
Your purchase has added value because you can depend on
Sears HomeCentral® for service. With over 12,000 trained repair
specialists and access to over 4.2 million parts and accessories,
we have the tools, parts, knowledge and skills to ensure our
pledge: We Service What We Sell.
Sears Maintenace Agreements
Your Kenmore appliance is designed, manufactured and tested
to provide years of dependable operation. Yet any major
appliance may require sen/ice from time to time. The Sears
Maintenace Agreement offers you an outstanding service
program, affordably priced.
The Sears Maintenance Agreement
■ Is your way to buy tomorrow’s service at today's prices.
■ Eliminates repair bills resulting from normal wear and tear.
■ Provides non-technical and instructional assistance.
■ Even if you don’t need repairs, provides an annual Preventive
Maintenance Check, at your request, to ensure that your
appliance is in proper running condition.
Some limitations apply. For more information, call
1-800-827-6655.
FULL ONE-YEAR WARRANTY ON ALL PARTS
For one year from the date of purchase, when this range is
installed and operated according to instructions provided in the
Installation Instructions and Use & Care Guide, Sears will repair
this range, free of charge, if defective in material or workmanship.
WARRANTY RESTRICTION
If the range is subject to other than private family use, the above
warranty coverage is effective for only 90 days.
WARRANTY SERVICE
WARRANTY SERVICE IS AVAILABLE BY CONTACTING THE
NEAREST SEARS SERVICE CENTER IN THE UNITED STATES.
This warranty applies only while the product is in use in the
United States. This warranty gives you specific legal rights and
you may also have other rights which vary from state to state.
For Sears warranty information in the United States call
1-800-469-4663.
Sears, Roebuck and Co.
D/817WA, Hoffman Estates, IL 60179
PRODUCT RECORD
In the space below, record your complete model number, serial
number, and purchase date. You can find this information on the
model and serial number label, located as shown in the Parts and
Features section of this book. Have this information available to
help you quickly obtain assistance or service when you contact
Sears concerning your appliance.
Model number 665.
Serial number
Purchase date
______________________________________
Save these instructions and your sales receipt for future
reference.

RANGE SAFETY
Your safety and the safety of others are very important.
We have provided many important safety messages in this manual and on your appliance. Always read and obey all
safety messages.
This is the safety alert symbol.
This symbol alerts you to potential hazards that can kill or hurt you and others.
All safety messages will follow the safety alert symbol and either the word “DANGER” or
“WARNING." These words mean:
You can be killed or seriously injured if you don't
ÂDANGER
AWARNING
All safety messages will tell you what the potential hazard is, tell you how to reduce the chance of injury, and tell you
what can happen if the instructions are not followed.
immediateiy foiiow instructions.
You can be kiiied or seriousiy injured if you don't
foiiow instructions.
WARNING: If the information in this manual is not foilowed exactly, a fire or explosion
may result causing property damage, personal injury or death.
Do not store or use gasoline or other fiammable vapors and liquids in the vicinity of this
or any other appliance.
WHAT TO DO IF YOU SMELL GAS:
• Do not try to light any appliance.
• Do not touch any eiectricai switch.
• Do not use any phone in your building.
• Immediately call your gas supplier from a neighbor's phone. Follow the gas supplier's
instructions.
• If you cannot reach your gas supplier, call the fire department.
■ Installation and service must be performed by a quaiified installer, service agency or
the gas supplier.
The California Safe Drinking Water and Toxic Enforcement Act requires the Governor of California to publish a list
of substances known to the State of California to cause cancer, birth defects, or other reproductive harm, and
requires businesses to warn of potential exposure to such substances.
WARNING: This product contains a chemical known to the State of California to cause cancer, birth defects, or
other reproductive harm.
This appliance can cause low-level exposure to some of the substances listed, including benzene, formaldehyde,
carbon monoxide, toluene, and soot.
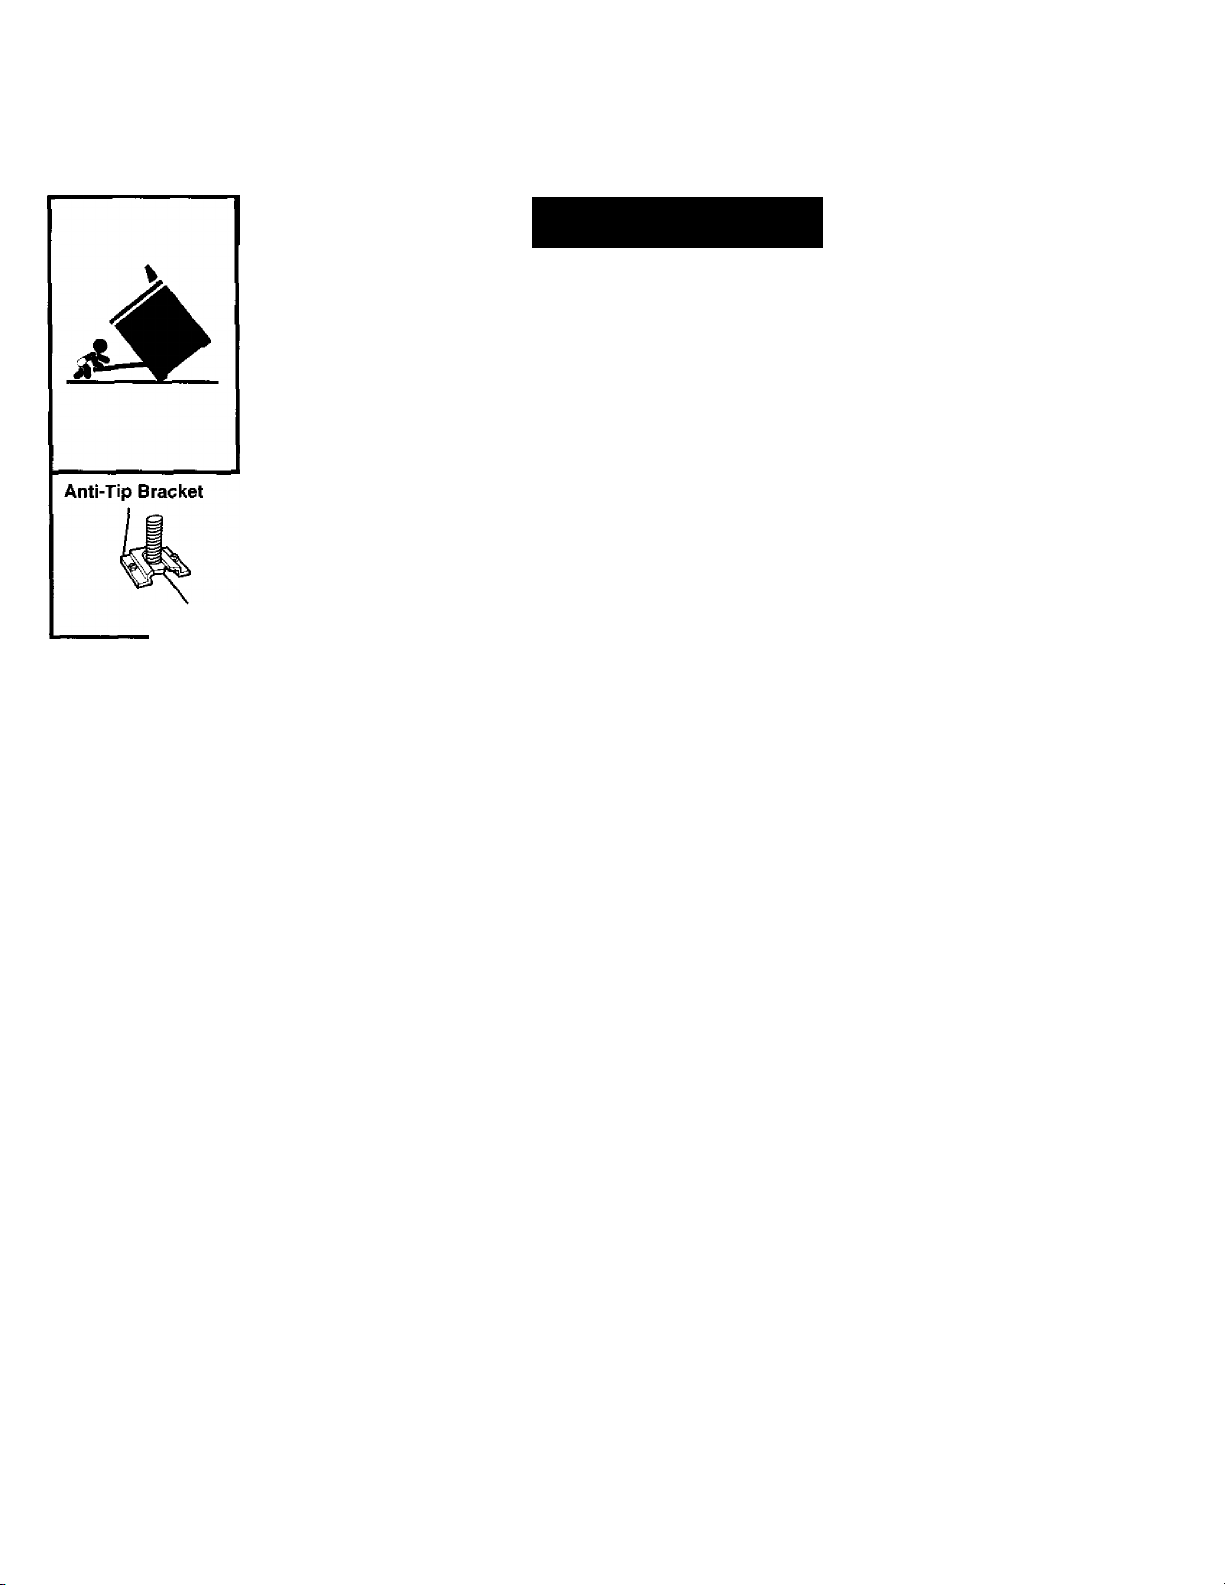
Tlie Anii- up kec
The range will not tip during normal use. However, the range can tip if you apply too much force or weight to the open door
without the anti-tip bracket fastened down properly.
WARNING
Tip Over Hazard
A child or adult can tip the range and be killed.
Connect anti-tip bracket to rear range foot.
Reconnect the anti-tip bracket, if the range is moved.
See the installation instructions for details.
Failure to follow these instructions can result in death or serious burns to children
and adults.
Making sure the anti-tip bracket is installed:
• Slide range forward.
• Look for the anti-tip bracket securely attached to floor.
• Slide range back so rear range foot is under anti-tip bracket.
Range Foot
IMPORTANT SAFETY INSTRUCTIONS
WARNING: To reduce the risk of fire, electrical
shock, injury to persons, or damage when using the
range, follow basic precautions, including the
following:
■ WARNING: to reduce the risk of
TIPPING OF THE RANGE, THE RANGE MUST BE
SECURED BY PROPERLY INSTALLED ANTI-TIP
DEVICES. TO CHECK IF THE DEVICES ARE
INSTALLED PROPERLY, SLIDE RANGE FORWARD,
LOOK FOR ANTI-TIP BRACKET SECURELY
ATTACHED TO FLOOR. AND SLIDE RANGE BACK
SO REAR RANGE FOOT IS UNDER ANTI-TIP
BRACKET.
■ CAUTION: Do not store items of interest to
children in cabinets above a range or on the
backguard of a range - children climbing on the
range to reach items could be seriously injured.
■ Proper Installation - The range, when installed, must
be electrically grounded in accordance with local
codes or, in the absence of local codes, with the
National Electrical Code, ANSI/NFPA 70. Be sure the
range is properly installed and grounded by a
qualified technician.
■ This range is equipped with a three-prong grounding
plug for your protection against shock hazard and
should be plugged directly into a properly grounded
receptacle. Do not cut or remove the grounding prong
from this plug.
■ Disconnect the electrical supply before servicing the
appliance.
■ Never Use the Range for Warming or Heating the
Room.
■ Injuries may result from the misuse of appliance doors
or drawers such as stepping, leaning, or sitting on the
doors or drawers.
■ Maintenance - Keep range area clear and free from
combustible materials, gasoline, and other flammable
vapors and liquids.
■ Storage in or on the Range - Flammable materials
should not be stored in an oven or near surface units.
■ Top burner flame size should be adjusted so it does
not extend beyond the edge of the cooking utensil.
For self-cleaning ranges -
■ Before Self-Cleaning the Oven - Remove broiler pan
and other utensils. Wipe off all excessive spillage
before initiating the cleaning cycle.
SAVE THESE INSTRUCTIONS
PARTS AND FEATURES
This manual covers several different models. The range you have purchased may have some or all of the items listed. The locations and
appearances of the features shown here may not match your model.
Control Panel
1 2 3 4 5
2. Left Rear Control 5, Right Rear Control
(SURESIMMER™)
Range
2
3
4
7
8
9
10
1. Oven Vent
2.
Sealed Surface Burner
3. Burner Grate System
4.
Power Burner
5. STURDIGLIDE™ Half Rack 9. Model and Serial Number 14.Automatic Oven Light
(with removable insert) Plate (behind left side of Switch
6. STURDIGLIDE Oven Rack
(with integrated handle)
7. Anti-Tip Bracket
8. Door Stop clip 12. SURESIMMER Burner
storage drawer)
10. Storage Drawer
11. Electronic Oven Control
13. Control Panel
Broil Element (not shown)
15.
16, Gasket
17. Self-Clean Latch
Gas Regulator
18.
17
18
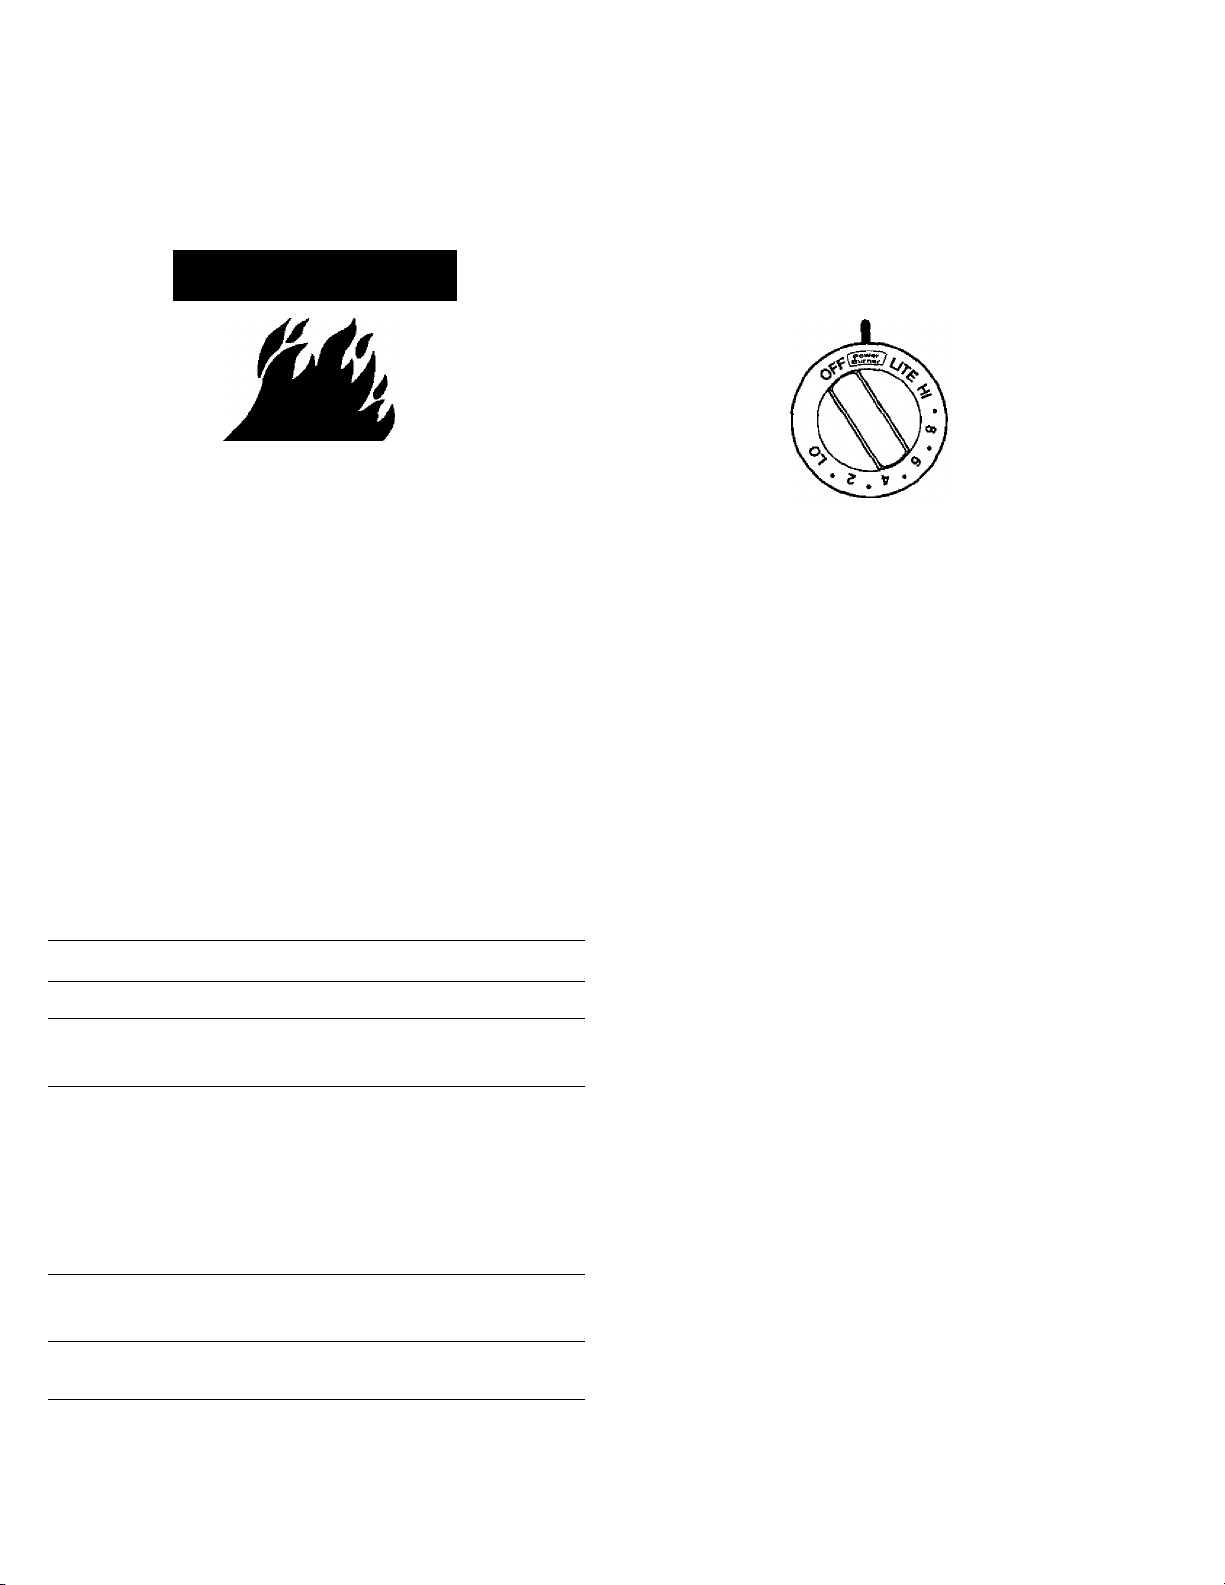
CCXJKTOP USE
REMEMBER: When range is in use or during the
Self-Cleaning cycle, the entire cooktop area may
become hot.
Control Knobs
ikWARNING
Fire Hazard
Do not let the burner flame extend beyond the
edge of the pan.
Turn off all controls when not cooking.
Failure to follow these instructions can result in
death or fire.
Electric ignitors automatically light the surface burners when
control knobs are turned to LITE.
Before setting a control knob, place filled cookware on the grate.
Do not operate a burner using empty cookware or while the grate
is vacant.
To Set;
1. Push in and turn knob counterclockwise to LITE.
All four surface burners will click. Only the burner with the
control knob turned to LITE will produce a flame.
2. Turn knob anywhere between HI and LO. Use the following
chart as a guide when setting heat levels.
Power Burner
The left front burner is designed to give ultra-high power when it
is fully on. It can be used to rapidly bring liquid to a boil and to
cook large quantities of food.
Cooktop Lockout
The Cooktop Lockout prevents unintended use of the surface
burners. When the cooktop is locked out, the surface burners
cannot be turned on by the control knobs.
The cooktop will remain locked after a power failure if it was
locked before the power failure. If the product loses power,
appliance will automatically go into the lockout position. The
surface burners cannot be activated until power is restored and
the Cooktop Lockout is disengaged.
To LockAJnlock Cooktop:
Before using, turn all control knobs to OFF. Press and hold the
TOP keypad for 5 seconds until a single tone and “Loc on” will
appear on the display. After 5 seconds, “Loc on” will disappear
from the display, and a picture of the cooktop will appear.
Repeat to unlock cooktop. "Loc OFF” will appear on the display
for 5 seconds and the picture of the cooktop will disappear from
the display.
SETTING RECOMMENDED USE
LITE ■ Light the burner.
HI
Mid-range ■ Hold a rapid boil.
(between HI and LO)
LO ■ Keep food warm.
Power Burner
(left front burner)
SURESIMMER™ ■
(right rear burner) setting.
Start food cooking.
■
■ Bring liquid to a boil.
■ Quickly brown or sear food.
■ To fry chicken.
■ Maintain a slow boil.
■ Fry or sauté foods.
■ Cook soups, sauces and gravies.
■ To simmer.
■ Provide highest heat setting
Provide lowest simmer/heat
Melt chocolate or butter.
 Loading...