

Page 1

KGnmorG
Self-Cleaning Gas Range
..U.se..&.Care. Guide
Estufa de gas con autplinipie?a
Maniial:cle.''iiso y cuidado -
Models/Modelos 665.72002/72004/72012/72014/72022/72023/72024/72029
665.75002/75004/75012/75014/75022/75023/75024/75029
665.75032/75033/75034/75039/75842/75843/
To the installer please leave this instruction book with the unit.
To the consumer: please read and keep this book for future reference.
Para ei instalador: favor de Dejar este manual de instrucciones con la unidad
Para el consumidor: favor de Leer y guardar este manual para futuras referencias.
Super Capacity with ULTRABAKE™ System
Capacidad extra con el Sistema ULTRABAKE™
8274077B
Sears Roebuck and Co-, Hoffman Estates, IL 60179 U.S.A
........
Page 2

TABLE OF CONTENTS
||\|0|Q£
WE SERVICE WHAT WE SELL
WARRANTY...... ..
RANGE SAFETY..
.......
......
The Anti-Tip Bracket.............................................................5
PARTS AND FEATURES....
COOKTOP USE....................................
Control Knobs
......................................... ..,..,.„..,.„.,..,..,,...,...,,7
Cooktop Lockout...........................................................................7
Sealed Surface Burners,,
SURESIMMER'f'^..,,....9
Home Canning..,.,,,.,..,,..,..,..,..,..,.
Cookware......................................................................... .....9
ELECTRONIC OVEN CONTROL.. .. . .... .. ............. .. ... . . ... 10
Display
...........
.................
Start/Enter :,.L............................................................. 10
Off/Cancel
......................................
Clock...,;,.,;,;,.,,;;;:,,......
Tones......................................................................................... 10
Fahrenheit and. Celsius..........................
Timer,;;
...........
...............................
Oven Lockout.......................................................... 11
Oven Temperature Control.............................................. 11
OVEN USE..... .
......... ..
Aluminum Foil................................
Positioning Racks and Bakeware...................................
: STURDIGLIDE™ Oven Racks
Bakeware
........................................................................
Meat Thermometer.,,...
Oven Vent
...................................................................... 13
Baking and Roasting
Broiling............................................................................... 14
RECIPE RECALL™.....
Serve Warm............
Timed Oven Control............................................................16
Using Warm & Ready .Drawer
: ..12-Hour Shut-Off................................
RANGE CARE
....
..........................................................................................18
Seif-Cleaning Cycle.;,,.......,...........,.,.,..,...........,,............,.....,.,... 18
General Cleaning...;;....,,,..,,.................,..........,......,,,,..,,.,....,,,.20
Oven Light
...................................................
Console Night.Light,.
Oven Door ...............
Storage Drawer...,...,,,
: Warming Drawer
TROUBLESHOOTING.
........
............................................................
.................................................................. .........3
........
.............................................................................4
................................................................
....................
......................................7
.........3
........6
................................ ,,..,.,/..,,..8
............................
.......................................
....................
...........................................
,..,.,,.,.,9.
10
,.,
.....
....,,,.10
........
10
11
......................................
..........................................................................
.................................
11
. ..12
12
12
............................................
,. 12
13
...................................................
.......................................................
...................................................
..........................................................
...........................................
................................
13
^ 3
15
...15
17
18.
,,,.....,.,..,,.,.,..,.21
.........
....................
................
..................21
,22
,23
,23
REPARAMOS LO QUE VENDEMOS............
GARANTÍA
SEGURIDAD DE LA ESTUFA......
El Soporte antivuelco............................................................29
PIEZAS Y CARACTERÍSTICAS..
USO DE LA SUPERFICIE DE COCCION
Perillas de control.................................................................31
Bloqueo déla superficie de cocción31
Quemadores exteriores sel lados
SURESIMMER™,.......
Enlatado casero.,
Utensllios.de cocina
CONTROL ELECTRONICO DEL HORNO .34
.Pantalla............................................................................... 34
Start/Enter (Inicio/Ingreso)...........,....34
Off/Cancel (Apagado/Anuiado)....................................
Reloj
Señales audibles
Fahrenheit y Centígrados.
Temporizador
Bloqueo del horno............
Control de temperatura del horno
USO DEL HORNO..
Papel de aluminio
Posición de las parrillas y los utensilios para hornear
: Parrillas del horno STURDIGLIDE™....................................... 36
Utensilios para hornear........................................................., 37
Termómetro para carnes
Ducto de ventilación del horno.............
Cómo hornear y asar,
Cómo asar
RECIPE RECALL™ (Repetición de recetas)........... 39
Característica "Servir caliente''
Control temporizado del homo
Cómo usar la gaveta Warm & Ready (Caliente y listo)41
interruptor de 12 horas
CUIDADO DE LA ESTUFA .... .... .... .. ......................... .......
Ciclo de autolimpieza.,„.,, 43
Limpieza general.....,,. 45.
Luz del horno..
La luz nocturna de la consola...............................
Puerta del horno
Gaveta de almacenamiento 49
Gaveta calentadora
.24
SOLUCIÓN DE PROBLEMAS.......................................... 50
...........................................
....
........................................................................................
.......................................................... 28
....................................................... 30
............
............................ 31
..........................
....
................................................
.........
......................................................
..........
....................
...,..,,..,,,„,.....,,..,...,,.33 :
27
27
3 2
,„.33
33
..,,.34
................................................................................... 34
.................
......
.
.......
..............
.
.
.................................35
......................................... 35
.............................
...........35
..........................................
.........
............................................................................ 35
.................................................. 36
......
..... 36
....................................... 37
...........
................
...........................................................
.......................................................................
..........................................
.........................................
.........
......,,
......
.....
..........................
...............
....... 47.
...
.....38
.,..,40
............
.....37
37
., 39
,.42.
47
..... 48
................
......
.....
.................................
35
49
Page 3

WE SERVICE
WARRANTY
WHAT WE SELL
Your purchase has added value because you can depend on
Sears HomeCentral® for service. With over 12,000 trained repair
specialists and access to over 4.2 million parts and accessories,
we have the tools, parts, knowledge and skills to ensure our
pledge: We Service What We Sell.
Sears Maintenance Agreements ^
Your Kenmore® appliance is designed, manufactured and tested
to provide years of dependable operation. Yet any major 1:
appliance may require service from time to time. The Sears : ;
Maintenance Agreement offers you an outstanding service
program, .affordably, priced,.. :::
....
: : '
The Sears Maintenance Agreement
■.. ■ Is your way to. buy. tomorrow's service at today's price.
Eliminates, repair bills resulting from normal wear and tear.
Provides for non-technicaf and instructional assistance. : Y ,
Even if you don't need repairs, provides an annual Preventive
Maintenance Check, at your request, to ensure that your ;
appliance is in proper running condition............ ...........
Some limitations apply. For mwe information, call
1-800-827-6655. ^
For information concerning Sears Canada Maintenance
Agreements, call 1-800-36T-6665.
....
FULL ONE-YEAR ON ALL PARTS
For one year from the date of purchase, when this range is
installed and operated according to instructions provided in the
Installation Instructions and Use & Care Guide, Sears will repair
this range, free of charge, if defective In material or workmanship.
WARRANTY RESTRICTION
If the range is subject to other than private family use, the above
warranty coverage Is effective for only 90 days.
WARRANTY SERVICE
WARRANTY SERVICE IS AVAILABLE BY CONTACTING THE
NEAREST SEARS SERVICE CENTER IN THE UNITED STATES.
This warranty applies only while the product is in use in the
United States. This warranty gives you specific legal rights and
you may also have other rights which vary from state to state.
For Sears warranty information in the United States, please
reference the .service .numbers located on the back page of this
manual,. Y ^
^ ^ ^ Sears, Roebuck and Co.
D/817WA, Hoffman Estates, IL 60179
PRODUCT RECORD
In the space below, record your complete model number, serial
number, and purchase date. You can find this information on the
model and serial number label, located as shown in the Parts and
Features section of this book. Have this information available to
help you quickly obtain assistance or service when you contact
Sears concerning your appliance.
.............. ........................
Mode! number fifiS
Sériai number
Purchase date.
Save these instructions and your sales receipt for future reference.
___________________________________________
_________________________________________________
___
Page 4

RANGE SAFETY
Your safety and the safety of others are very important.
We have provided many important safety messages in this manual and on your appliance. Always read and obey ail
safety messages.
This is the safety alert symbol.
This symbol alerts you to potential hazards that can kill pr hurt you and others.
Ail safety messages will follow the safety alert symbol and either the word “DANGER” or
“WARNING.” These words mean:
You can be killed or seriously injured if you don't
ADANGER
AWARNING
All safety messages will tell you what the potential hazard is, tel! you how to reduce the chance of injury, and tell you
what can happen if the instructions are not followed. ■^ ^ ^ ^ ^ ^ ^ ^ ^ ^ ^ ^ ^ ^
immediately follow instructions.
You can be killed or seriously injured if you don't follow instructions.
WARNING: If the information in this manuai is not followed exactly, a fire or explosion
may result causing property damage, personai injury or death.
Do not store or use gasoline or other flammable vapors
and liquids in the vicinity of this
or any other appliance.
WHAT TO DO IF YOU SMELL GAS:
• Do not fry to light any appliance.
• Do not touch any eiectricai switch.
Do not use any phone in your building,
Irnmediately call your gas supplier from a neighbor's phone. Follow the gas supplier's instructions.''■■ v■ V':/■■■.^■ ■■ ■'■■■'■■ ■■■
If you cannot reach your gas supplier, cal! the fire department.
a qualified installer, service agency orInstaliation and service must be performed by
the gas supplier...................................................
The California Safe Drinking Water and Toxic Enforcement Act requires the Governor of California to publish a list
of substances known to the State of California to cause cancer, birth defects, or other reproductive harm, and
requires businesses to warn of potential exposure to such substances. .............................................
WARNING: This product contains a chemical known to the State of California to cause cancer, birth defects, or
Other reproductive harm.
This appliance can cause low-level exposure to some of the substances listed, including benzene, formaldehyde,
carbon monoxide, toiuene, and soot. ....................................................
Page 5

"í Anti-“Tip Bracket
The range will not tip during normal use. However, the range can tip if you apply too much force or weight to the open door without the
anti-tip bracket fastened down properly. ^ ^ ^ ^ ^ ^ ^ ^ ^ ^ ^ ^ ^ ^
A child or adult can tip the range and be killed.
Connect anti-tip bracket to rear range foot.
Reconnect the anti-tip bracket, if the range is moved.
See the installation instructions for details. ; ^ ^
Failure to follow these Instructions can result in death or serious burns to children
'and adults..............................................................................................................................
Anti-Tip Bracket
Range Foot
Making sure the anti-tip bracket is installed:
• Slide range forward. ^
• Look for the anti-tip bracket securely attached tofloor,
• Slide range back so rear range foot is under anti-tip bracket
IMPORTANT SAFETY INSTRUCTIONS
WARNING: To reduce the risk of fire, electrical
shock, injury to persons, or damage when using the
range, follow basic precautions, including the
following:
■ WARNING: to reduce the risk of
TIPPING OF THE RANGE, THE RANGE MUST BE
SECURED BY PROPERLY INSTALLED ANTI-TIP
DEVICES. TO CHECK IF THE DEVICES ARE
INSTALLED PROPERLY, SLIDE RANGE FORWARD,
LOOK FOR ANTI-TIP BRACKET SECURELY
ATTACHED TO FLOOR, AND SLIDE RANGE BACK
SO REAR RANGE FOOT IS UNDER ANTI-TIP
.BRACKET t,;v„
■ CAUTION: Do not store items of interest to
children in cabinets above a range or on the
backguard of a range - children climbing on the
range to reach items could be seriously injured. :
Proper installation - The range, when installed, must:
be electrically grounded in accordance with local
codes or, in the absence of locai codes, with the
National Electrical Code, ANSI/NFPA 70. Be sure the :
range is properiy instalied and grounded by a
qualified technician. ' : :: ::: : ^: : ' ;; : :.::
This range is equipped with a three-prong grounding
plug for your protection against shock hazard and
should be plugged directly into a properiy grounded
receptacle. Do not cut or remove the grounding prong
from this plug.
....
...............
■ Disconnect the electrical supply before servicing the
appiiance.^^^^ T ^
■ Never Use the Range for Warming or Heating the
Room.
■ Injuries may result from the misuse of appliance doors
or drawers such as stepping, leaning, or sitting on the
doors or drawers.
■ Maintenance -- Keep range area ciear and free from
combustibie materials, gasoline, and other flammable
vapors and liquids.
■ Storage in or on the Range - Flammable materials
should not be stored in an oven or near surface units.
■ Top burner flame size should be adjusted so it does
not extend beyond the edge of the cooking utensii.
For sei^cleaning ranges -
Before Seif-Cleaning the Oven - Remove broiler pan
and other utensils. Wipe off ail excessive spillage
before initiating the cleaning cycle,
.... ......
...............................
SAVE THESE INSTRUCTIONS
Page 6

PARTS AND FEATURES
This manual covers several different models. The range you have purchased may have some or all of the items listed. The locations and
appearances of the features shown here may not match your model. .......................................
Coniix}i Panel
Surface Burner Indicator
Left Rear. Burner Control
Range
3.: Left Front Burner Control (Ppyyer
Burner) . . .
4. Right Front Burner Control
{Power Burner on some models)
5. Right Rear Burner Control
(SURESIMMER™) :: :
6. Warm & Ready Selector Switch (on
.. some models)
Oven Vent
Sealed Surface Burner
Center Grate (on some
models) v
Burner Grate System
Povver Burner::
Anti-Tip Bracket
7. Door Stop dip V ■■
8. Mode! and Serial Number
Plate (behind left side of
storage drawer)
9. Warm & Ready Warming
Drawer (on some models);
Storage Drawer (on some
models) ::::::
,10. Console Night Light (on
some models) t
11. Electronic Oven Control
12. SURESIMMER Burner
13. Control Panel :::
14. Automatic Oven Light
L L L Switch L L L L L;;;;;;;;;;;;
15. Door Gasket
16. STURDIGLIDE™ Half
Rack with removable
insert (on some models)
17. STURDIGLIDE Oven Rack
with integrated handle (on
some models)
Page 7

COOKTOP USE
Contol Knobs
ik WARNING
■” ■■ ■■■.. 'V;;' fire, Haza.rd ;;;;
Do not lei the burner flame extend beyond the
edge of the pan.
Turn off all controls when not cooking.
Faiiure to foilow these instructions can resuit in
death or fire.
Eiectric ignitors automatically light the surface burners when
control knobs are turned to LITE.
Before setting a control knob, place filled cookware on the grate.
Do not operate a burner using empty cookware or while the grate
is vacant. , , :
...............................................................
To Set: y
1. Push in and turn knob counterclockwise to LITE.
All four surface burners will click. Only the burner with the
control knob turned to LITE will produce a flame.
2. Turn knob anywhere between HI and LO. Use the following
chart as a guide when setting heat levels.
SETTING
.
...............
............... I grKJ VKiWim I
LITE
HI
Mid-range
(between Hi and LO).
RECOMMENDED USE
...
Light the burner.
Start food cooking.
Bring liquid to a boil.
Hold a rapid boil. ::
Quickly brown or sear food.
To fry chicken. : : .
Maintain a slow boil. V \
Fry or sauté foods. : : : : : .
Cook soups, sauces and gravies
.....
REMEMBER: When range is in use or (on some
models) during the Seif-Cleaning cycle, the entire
cooktop area may become hot.
Power failure
in case of prolonged power failure, the surface burners can be lit
manually. Hold a lit match near a burner and turn knob
counterclockwise to LITE. After burner lights, turn knob to :
setting. T T C
..................... ................................
Power Biffner-. .v- ■ ■■■, •: ■■ ■■.■,,:'::: .
The left front burner is designed to give ultra-high power when it
is turned to HI, It can be used to rapidly bring liquid to a boil and
to cook large quantities of food. On some models both front
burners are Power Burners.
Coofctop Lockoyt
; : : (on some mode!s|
The Cooktop Lockout prevents unintended use of the surface
burners. When the cooktop is locked out, the surface burners
cannot be turned on by the control knobs.
When power is first supplied to the range, or If the range loses
power, the surface burners will be in the Cooktop Lockout
position. The surface burners cannot be activated until power is
restored to the range and/or the Cooktop Lockout is disengaged
To Lock/Unlock Cooktop;
Before using, turn all control knobs to OFF. Press and hold the
TOP. keypad for 5 seconds until a single tone and "Loc on" will
appear on the display. After 5 seconds, "Loc On" will disappear
from, the display, and. a picture of the cooktop will appear. /
Repeat to unlock cooktop. "Loc OFF" will appear on the display
for 5 seconds.and the picture of the cooktop will disappear from
the display, .............................
LO
Power Burner
(left front burner)
SURESIMMER™
(right rear burner)
Keep food warm.
To simmer.
Provide highest heat setting
Provide lowest simmer/heat
setting.
Melt chocolate or butter.
Page 8

; : : : : : : : Sealed Syîface Byrners
IMPORTANT: Do not obstruct the flow of combustion and
ventiiation air around the burner grate edges.
To Clean:
IMPORTANT: Before cleaning, make sure all controls are off and
the oven and cooktop are cool. Do not use oven cleaners, bleach
or rust removers. :::
1. Remove the burner cap from the burner base and clean :
according to "General Cleaning" section.
2. Clean the gas tube opening with a damp cloth.
3.
Clean clogged burner ports with a straight pin as shown. Do
not enlarge or distort the port. Do not use a wooden
toothpick. If the burner needs to be adjusted, contact a Sears
trained repair specialist.
1. Burner cap
2. Burner base
3. Alignment pins
■ 4. Ignitor
5. Gas tube opening
Burner cap: Always keep the burner cap in place when using a
surface burner. A clean burner cap will help prevent poor ignition
and uneven flames. Always dean the burner cap after a spill-over
and routinely remove and clean the caps according to the
"General Cleaning" section. :::
.....
Gas tube opening: Gas must flow freely throughout the gas tube
opening for the burner to light properly. Keep this area free of soil
and do not allow spills, food, cleaning agents or any other
material to enter the gas tube opening. Protect it from spillovers :
by always using a burner cap.
7. 1-1 Vs" (25-38 mm)
■ 2. Burner ports
Burner ports:. Check burner flames occasionally for proper.size
and shape as shown above. A good flame is blue in color, not ..
yellow. Keep this area free of soil and do not allow spills, food,
cleaning agenis .or any other material to enter the burner ports.:
4, Replace the burner cap, making sure the alignrnent pins.are
properly .aligned.with the burner cap, t t C
7. Incorrect
2. Correct
Turn on the burner. If the burner does not light, check cap
5.
alignment. If the burner still does not light, do not service the
sealed burner yourself, but contact a trained repair specialist.
Page 9

SURESIMMER-
The SURESIMMER burner is an adjustable heat setting for more
precise simmering and low temperature cooking. It is the right
rear burner.
rt^\
1 trV /'"/
To Use: ^ ^
1.. Push the right rear burner control knob in and turn counter-
clockwise.to ''LITE,"then to "LO." : / : : .....................
2. Push in and turn knob to OFF when finished.
TM
........................
Cookware
IMPORTANT: Never leave empty cookware on a hot surface
cooking area, element or surface burner. T
Ideal cookware should have a flat bottom, straight sides, a well
fitting lid and the material should be of medium-to-heavy
thickness. r
Rough finishes may scratch the cooktop. Aluminum and copper
may be used as a core or base in cookware. However, when used
as a base it can leave permanent marks on the cooktop or grates.
Cookware material is a factor in how quickly and evenly heat is .
transferred, which affects.cooking results. A non-stick finish has
the same characteristics as its base material. For example,:
aluminum cookware with a non-stick finish will take on the
properties of aluminum..;.. ::: : ; ::::: :
Use the following chart as a.guide for cookware material
characteristics. .
COOKWARE
..........
........................
CHARACTERISTICS
v -
■.HoroeGaririirig
.When canning for long periods, alternate the use of surface ;
cooking areas, elements or surface burners between batches. .
This allows time for the most recently used areas to cool. : :;;
■ Center the canner on the grate or largest surface cooking
: area or element. Canners should not extend more than 1 in.
{2.5 cm) outside the cooking area. ::
■ Do not place canner on two surface cooking areas, elements
or surface burners at the same time.
■ On ceramic glass models, only use flat-bottomed canners.
■ On coil element models, the installation of a Canning Unit Kit
: is recommended. If not installed, the life of the coil element
: will be shortened. See back cover for ordering instructions.
■ For more information, contact your local U.S. Government
: Agricultural Department Extension Office. Companies who
manufacture home canning products can also offer
assistance. \ :
Aluminum
Oast iron
Ceramic or
Ceramic glass
Copper
Earthenware
Porcelain
ename!-onsteel or cast
iron
..............
Stainless steel
Heats quickly and evenly. : ^
Suitable for all types of cooking. ::::
Medium or heavy thickness is best for.
most cooking tasks.
Heats slowly and evenly.
Good for browning and frying.
Maintains heat for slow cooking.
Follow manufacturer’s instructions.
Heats slowly, but unevenly.
Ideal results on low to medium heat
settings.
Heats very quickly and evenly.
Follow manufacturer's instructions.
Use on low heat settings.
See stainless steel or cast iron.
Heats quickly, but unevenly.
A core or base of aluminum or copper
on stainless steel provides even ;
heating. , , ,
Page 10

ELECTRONIC OVEN CONTROL
1. RECIPE.RECALL™ (on some models)
2., Display
3. Clock.:
4. Timer
5. Cooktop Lockout (on some models)/
L L Cooktop Light (on some models)
Display
When power is first suppiied to the appiiance, make sure the
surface burners are in the OFF position. Everything on the display
will light up for 5 seconds. Then the time, ”PF" will appear on the
display. : . : L l
Any other time "PF" appears, a power failure occurred. To
remove "PF" and to reset the clock, press OFF/CANCEL. : : : :
When the oven is in use, this display shows time, temperature
and.what.command pads have been pressed. : -
When the oven is not in use, the display will show the time of day.
; ■ ■:.v. :. L': :.v;; - Stait/Ellter /; :: ;: ; y ■
The START/ENTER pad. begins any oven function. If not pressed
within 5 seconds after pressing a pad, "START?" wii! appear on
the display as a reminder. If not pressed within 5 minutes after
: pressing a pad, the display will show the time of day and the..:
programmed function will be canceled.
....................................
6. Oven Light/Oven Lockout
7. Oven Selectors. (SERVE WARM on
some models). L' ... ;;' .. ; . ...;.;
8. Self-Clean ■ . . .L
SENS-A-CLEAN™ (on some models)
LOGI-CLEAN™ (on some models)
SELECT CLEAN™ (on some models)
CLEAN (on some models)
0 Clock : /
This is a 12-hour clock and does not show a.m. or p.m.
To Set: ^ ^ ^
1. Press CLOCK. :
2. Press the FiOUR/MIN "up" or "down" arrow pads until the
/ correct time of day shows on the display.
3. Press CLOCK or START/ENTER.
Tones are audible.signals, indicating the following:
One tone
Valid pad. press. / ; . : : : : : : : L : v
Oven is preheating, or has been preheated
FMnction.ha.s been.e.ntered :
.....
.................
9. Temperature Setting
10. Timed Cooking
12. Minute
13. START/ENTER
14. OFF/CANCEL
............
....
:;Off/Cancel;
. The OFF/CANCEL pad stops any oven function except for the
..Clock, Timer and Cooktop or Oven Lockouts. :: / : -.
After pressing OFF/CANCEL, the display will show the time of
day op if the minute timer is also being used, the time remaining. : Reminder; repeating each minute after the end-of-cycie tones
Three tones V
■ . Invalid pad press.
Four tones
: End-of-cycie
Error Tones........
Error tones indicate a problem with the electronic oven control.
An error code will appear in the display. ......
10
Page 11

Tone Volume
The volume can be adjusted between high and low.
To Change: Press and hold DELAY START for 5 seconds. A short
tone will sound and either ”Snd HI" or "Snd Lo” will appear on the
display. Press and hold DELAY START again for 5 seconds to
change to desired setting.
To remove "Snd on," "Snd OFF," "rEP on," "rEP off," "Snd HI" or
"Snd Lo" press any pad, and the keyed function will appear on
the display. : :
Reminder Tones
Reminder tones are four 1 -second tones which indicate that the.
set time has expired for.a.timer or a timed oven control function.
Timer-
..................................
To Turn Tones Off/On: Press and hold SET for 5 seconds. A
short tone will sound and
Repeat.to turn back on.
,'■ ■ ■ Lj: L,--,
rEP OFF" wil! appear on the display.
Timed Cooking
To Turn Tones Off/On: Press and hold COOK TIME. A short tone
will sound and "Snd.OFF", will appear on the display. Repeat to :
turn back on.
................................................................................
. ■ j r. Falirentieìt ani Celsius ■ r ■ ■ : : : : : ■ ;
The temperature is preset at Fahrenheit, but can be changed to
Celsius, r , :: ::: :
To Change: Press and hoid BROIL for 5 seconds. A short tone
wil! sound and the temperatures displayed will switch to ""C". : :
Repeat to change back to Fahrenheit.
Owiihii^rkoyt
The Oven Lockout prevents unintended use of the control panel
command keypads. The oven can only be locked out when the
oven is not in use or the oven control has not been set.
The oven will remain locked out after a power failure if it was
locked before the power failure.
To Enable/Disable Oven Lockout
Press and hold OVEN for 5 seconds. A single tone will sound,
and "Loc on” and a lock icon will appear on the display. After 5
seconds, "Loc on" will disappear from the display and "Loc” will
■appear,.L'----L''----.jL.L'--.L':'-'..LL
Three tones will sound when the oven is locked and any
command pad other than .CLOCK, TIMER, START/ENTER, OFF/.
CANCEL or O.VEN has been, pressed. ::::: : .
To unlock oven, press and hold OVEN for 5 seconds. "Loc OFF"
will appear, on the .display and lock icon will disappear from the ::
display. ■........................................................................................
...
Owe.n.Température Control
IMPORTANT: Do not use a thermometer to measure oven
temperature because opening the oven door and element or
burner, cycling may give incorrect readings. : ; : : :
The oven provides accurate temperatures: however. It may cook,
faster or slower than your previous oven, so the temperature
calibration can be adjusted. It can be changed in Fahrenheit or :
Celsius.
A minus sign means the oven wiil cook cooler by the adjustment
amount. No sign means the oven wiil cook warmer by the
adjustment amount. Use the following chart as a guide.
............
The Timer can be set in minutes and seconds or hours and
minutes and counts down the set time. The Timer does not start
or stop the oven. L : : :
To Set:
1.
Press TIMER SET. L : ; ;
2.
Press the HOUR/MIN "up” or "down" arrow pads until the
correct length of time shows on the display. '
Press START/ENTER or TIMER SET.:: : j ^ ^ L j::;
3.
The Timer will begin counting down after the Timer is started. ■
The display will count down In hours and minutes if remaining
time is one hour or more, and in minutes and seconds if .j
remaining time is less than one hour. : ::::: ..:
When the set time ends, four 1 -second tones, if enabied, will
sound, then reminder tones will sound every minute. : :...
4, Press TIMER OFF anytime to cancel the Timer and/or stop
remindertones...........................................................................
ADJUSTMENT °F
(ADJUSTMENT °C)
10"F (5°C)
: 20°F (10"C)
....
30°F (15°C) ................... ...much more L
. .-10“F (-5“C)................... ..................a little less
.-.30“F.(-15.X) ...much less
.................
To Adjust Oven Temperature Calibration:
;1-. Press and hoid BAKE for 5 seconds until the oven display
shows.the current.calibration, for example, ''0°:CAL.” : : : :
2. Press the TEMP "up” or "down" arrow pad to increase or to.
decrease the temperature in 10°F (5°C) amounts. The :
adjustment can be set between 30°F (15°C) and -30°F ■
:v..;(-i5°c).--
3. ■-Press START/ENTER. --V: : : : : : : : : : : : : : : : : : : : : : : : : : : : : : : : : : L
COOKS FOOD
...a little more
...moderately more
..........................
..
. ..j
......
11
Page 12

USE
Odors are normal when the range is new. This happens the first
time the oven is used or when the oven is heavily soiled.
IMPORTANT: The health of some birds is extremely sensitive to
the fumes given off. Exposure to the fumes may result in death to
certain birds. Always move birds to another closed and well 1111
ventilated room.
............
.........
BAKEWARE
To cook food evenly, hot air must be able to circulate. Allow 2 in,
(5 cm) of space around bakeware and oven walls. Use the :::::::
following chart as a guide.
NUMBEROF
RAN(S)
1 Center of rack.
.........
POSITION ON RACK
Side by side or slightly staggered.
.......
;AiiJminym Foil
IMPORTANT: Do not line the oven bottom with any type of foil,
liners or cookware because permanent damage will occur to the
,pven bottom finish. ■; ; ■ :: ; : ;;; ; ; ; : ::; ■ ' ■
■ , Do not block or. cover the oven bottom vents. V : . . ^ ^ .
;■ TDo. not cover entire rack with foil because air must be able to
; :move freely for best cooking results, : ' " t:
■ . To catch spiils, place foil on rack below dish. Make sure foil is
:;; at least 1 in. (2.6 cm) larger than the dish and that it is turned
■■ V .' ■ ■up at the edges.11::::::::::::::::::::::::::::::::::::::::::: t
"Positioning Racks and Bakeware
IMPORTANT: Never place food or bakeware directly on the oven
door or bottom. Permanent damage will occur to the porcelain
.3.or 4
Opposite corners on each rack. Make sure
that no bakeware piece is directly over........
: another .v.rrrrrrrrrrrrrrrrrrrrr::::
STURDIGLIDE™ OwenRacks
■ ■ ■ V: '.Icin some modelsj . :
Rack vsflth Integrated Handle
The integrated.handle area makes pulling out the rack easy. The
opening is large, enough for a potholder or oven mitt,
Half-Rack with Removable insert
The half-rack with removable insert is a space maximizer. When
the two are attached, they make a full rack. The insert can also he
used on the counter for a cooling rack.
Do not place more than 25 lbs. (11.4 kg) on the half-rack.
................
Position racks before turning the oven on. Do not move racks
with bakeware on them:. Make sure racks are level. To move a
rack, pull it out to the stop position, raise the front edge, then lift
out. Use the following Illustration and chart as a guide.
FOOD RACK POSITION
.Frozen pies, large rp.asts, turkeys, :::::::::::::: 1 or 2
. angel food cakes
Bundt cakes, most quick breads, yeast
. breads, casseroles, meats
: Cookies, biscuits,, mufffns, cakes, non-
frozen pies..................
Extra large items
......................................................
...................
2 or3
12
?. Half-Rack
2, Removable Insert
To Position Racks:
1, Place a full rack. pn position 1 or 2, and the half-rack on
.' t '; position 3 or 4. ■.. t.V; : 11 ( ■ '; ■ ■ ::
2, t Pla.ce large .items.on the right side of the full rack.
3, ; Place deeper, covered dishes on the left side of the full rack,
4, Place .shallow, dishes on the half-rack. :::::
5, ...When finished cooking, carefully remove items.
Page 13

;; Bakeware
The bakeware material affects cooking results. Foliow
manufacturer's recommendations and use the bakeware size
recommended in the recipe. Use the foilowing chart as a guide.
BAKEWARE/
RESULTS
Light colored
elurninum
■ ..Light golden
. crusts
Even browning
Dark aluminum
and other
bakeware with
dark, dull and/or
non-stick finish
Brown,.crisp
crusts
............
Insulated cookie
sheets or baking
pans
■ Little or no
bottom
....
browning
Stainless steel
■ Light, golden
crusts
■ Uneven
....
browning
Stoneware
■ Crisp crusts
Ovenproof
glassware,
ceramic glass or
ceramic
Brown, crisp
crusts
.......
......
RECOMMENDATIONS
Use temperature and time
recommended in recipe.
May need to reduce baking / ;
temperatures 25°F :(15°C). : :
Use suggested baking time. :: ?;
For pies, breads and casseroles, use
temperature recommended in : ::
recipe. '■.'•■• ■."•■•„
Place rack In center of oven.
..Place in the bottom third of oven.
May need to increase baking time.
May need to increase baking time.
Foliow manufacturer's instructions.
May need to reduce baking
temperatures 25°F (15°C).
............
■Meati tiermometer
On modeis without a temperature probe, always rely on a meat
thermometer to determine doneness of meat and poultry. The
internal temperature, not appearance, is what counts. A meat
thermometer, is not supplied, with this appliance. :: :
■ Ihsert the thermometer into the center of the thickest portion
: of the meat or inner thigh or breast of poultry. The tip of the
: thermometer should not touch fat, bone or gristle.
After reading the thermometer once, push it into the meat ::
% in. (1,25 cm) more and read again. If the temperature
drops, cook the meat or poultry longer.
Check all meat in two or three places. ::
The oven vent releases hot air and moisture from the oven, and
should not be blocked or covered. Doing so will cause poor air
circulation, affecting cooking and cleaning results. Never set
plastics, paper.or.other.items that could melt or burn near the
oven vent. ...................................................................................
Bateiig ;aiid: Roasting ;
ULTR/^AKE™ Temperature Management System
The ULTRABAKE system electronically regulates the oven heat
levels during preheat and bake to maintain a precise temperature
range for optima! cooking results. The bake and broil burners
cycle on and off in intervals. This feature is automatically
activated when the oven is in use.
■ When using the oven for the first time, It is necessary to light
; the surface burners first to purge air from the gas lines. :
;■ Do not try to light the oven burner during a power failure. :
■ Do not place food or bakeware directly on oven door or oven
bottom. : :: :
To Bake or Roast;
Before baking and roasting, position the racks according to the
"Positioning Racks and Bakeware” section. When roasting, it is
not necessary to wait for the oven to preheat before putting food
in, unless recommended in the recipe.
1, Press BAKE. ^
....
Press the TEMP "up" or "down" arrow pad to enter a
temperature other than 350°F (175°C), The bake range can be
set between. 170.°F and 500°F {75°C and 260“C). : ; : : ' ;
2.
..Press .START/ENTER. ^ ' T : ' ^ : : ■ ■ : : : : ;; ■
A preheat time will count down and "PrE HEAt" will appear on
the oven display if the actual oven temperature is under : F
.i.70°F (75“.C).L
When the.actual oven temperature reaches 170°F (75°C), the
timer will continue counting down. The temperature setting
can be. changed any ..time after pressing START/ENTER, : :
While the oven is in the preheat mode, the set temperature
can be seen for 5.seconds by pressing BAKE. :
When the set temperature is reached, if tones are enabled,
one..tone will sound. ^ ..
3. Press OFF/CANCEL when finished cooking.
...........................................
...
; ; ' ' '
..................
13
Page 14

Use only the broiler pan and grid provided with the range. It is
designed to drainjuices and help prevent spatter and smoke.
For proper draining, do not cover the grid with foil. The
bottom of the pan may be lined with aluminum foil for easier
cleaning. T
■ Trim excess fat to reduce spattering. Slit the remaining fat on
the edges to prevent curling, ......
■ Puli out oven rack to stop position before turning or removing
.. food. Use tongs to turn food to avoid the loss of juices. Very.
thin cuts of fis.h, poultry or meat may not need to be turned
After broiling, remove the pan from the oven when removing
the food. Drippings will bake on the pan if left in the heated
oven, making cleaning more difficult. V: ::: ■
■Broiling uses direct radiant heat to cook food. Before broiling, .
position rack according to Broiling chart. It is not necessary to
..preheat the oven before putting food in unless recommended in
the recipe. Position food on grid in the broiler pan, then place it in
the.center of the oven rack. Close oven door. : .
BROILING CHART
For best results, place food 3 in. (7 cm) or more from the broil
element. Times are guidelines only and may need to be adjusted
for individual tastes. Recommended rack positions are numbered
from the bottom {1) to the top (5). For diagram, see the
"Positioning Racks and Bakeware" section.
::::: /
TOTAL
FOOD
Steak
/ . ; 1 in. (2.5 .cm) ..
.. thick
... medium rare. /
medium
. well done
*Groundrneat j
patties
% in. .(2 cm). ...;;;4.
thick . ;;;;;;;;;;
well done
..........
...............
RACK
POSITION TEMP
....4 .....
....4 .........
....4..........
..............
.........
..........
..........HI.....
Hi
HI
HI 13-14 :6-7.
MINUTES
Sidel Side 2
14-15 7-8 ..
.....
15-16 8-9 ■■: ■■■ ■
.....
18-19 9-10. .
';Tq.Broil:'
Press .BROIL. ^.V;t
2, Press .START/ENTER. : > ; V .. ..
The temperature setting can be changed any time before or
: after pressing START/ENTER.
3. Press OFF/CANCEL when finished.
Precision Broiling
Precision Broiling allows more precise temperature control while
cooking. The lower the temperature, the slower the cooking.
Thicker cuts and unevenly shaped pieces of meat, fish and
poultry may cook better at lower broiling temperatures.
..............
To Precision Broil:
1. / Press BROIL. : V : L /
2. Press the TEMP "down" arrow pad to lower the temperature
in 5°F amounts. The broil range is 300°F to 525°F (150X to
275°C). .. .. ...... :
■ 3.. Press START/ENTER. / : / l: /; : - ,
4,. Press OFF/CANCEL when finished.
Pork chops
.1 in. (2.5 cm)
thick //////////
Ham slice
[precooked] 4
y2in. (1,25 cm)
thick
.......................
Bacon
Frankfurters
Lamb chops
1 in. (2.5 cm)
thick........................
Chicken
bone-in pieces
boneless
Fish :. : ■ ■■. ^
Y2 in. {1.25 cm.) ; 4
thick . ..//
1 in. (2,5.cm) ;;;;;;4.
thick........................
.Place.up.to 9 patties, equally spaced, on broiler pan grid..
.........
.....
.......
.......
......
4
4
4
Hi 18-21
HI 8-10 4-5
500T 8-9
(260*0)
HI 6-7 3-4
Hi 15-17 8-9
HI
HI
HI
500T 13-15
(260*0)
20-24 15-18
12-16 11-16
8-10 :4-5 . ;. .
.............
8-10
1-2
10-13
14
Page 15

/RECIPE RECALL™
: : : |ori some inodelsl
RECIPE RECALL makes cooking favorite foods faster and easier.
The temperatures and times have been chosen to cover a variety
of choices in each food category. Cooking times are adjustable
for individual recipes and can be saved. Temperatures can be
changed but not saved. When changed, the display will not show
’’PrEHEAf vi/hile the oven is preheating.
If recipe recommends no preheat is needed, put food in oven.
Use the following chart as a guide when using RECIPE RECALL:
Keypad Set
Temperature
Preset Time
SePfe Warm
: ion some mcxfeis)
Food Poisoning Hazard
Do not let food sit in oven more than one hour
before or after cooking.
Doing so can result in food poisoning or
sickness.
................................................................
MEATS/POULTRY
3 lb. (6.6 kg)
CASSEROLES*
2,qt. (5.00 mL)...
COOKIES
PIZZA
*The MEATS/POULTRY and CASSEROLES functions do not have
a programmed pre-heat. If your recipe suggests you pre-heat
before cooking meats, poultry or casseroles, pre-heat using the
BAKE function. Once the pre-heat temperature has been
reached, cancel BAKE and select MEATS/POULTRY or
CASSEROLES function. : :
325“F{165°C)
350“F (175°C) 45 minutes
375T{i90X)^^^^
40QT (205°C) : : 20 minutes
1 hour
To Use recipe RECALL:
1. Press one of the four keypads MEATS POULTRY,
2. Press START/ENTER. / '
The cook time can be changed after pressing START/ENTER,
: by pressing the HOUR/MIN pads. The oven will finish cooking
with the new time. / ' ; :
When cook time ends, the oven will automatically shut off.
. ''End" and COOK TIME will appear on the display. Four tones.
■ will sound, then four 1 -second reminder tones will sound ..
; /every minute .after. . ; ; ; : : : : : :
COOKIES and.PIZZA keypads include a preheat. When the ..
preheat ends, a single tone will sound and the cooking time
: will, appear counting down on the display. : : : : . : :
3. Press OFF/CANCEL or open the oven door to stop reminder
. tones and remove "End" from display. The time of day will
. :. /appear, on the display.. : / : : : : .
To Change Preset Cook Time:
The length of cooking time for each of the 4 keypads can be
changed, and the rarige will store the new information for the
next use. ..J--.. ■■■../'.■■.//
1. Press one of the four keypads MEATS POULTRY,
CASSEROLES, COOKIES or PIZZA.
2. Press the HOUR/MIN "up” or "down" arrow pads until the
: length of cooking time shows on the display. : :
3. Press same pad selected In step 1 to save the change for the
next use. L : /
A single tone will sound.
4. Press OFF/CANCEL if only changing the stored preset cook
/ : time. Press START/ENTER if proceeding to cook with new set
cooktimb.
COOKIES or PIZZA. :
......
: : .
...
.............
., /
.....
., : / / . ., ; ■
IMPORTANT: Food must be at serving temperature before
placing it in the warmed.oven. Food may be held up to one hour.
Serve Warm allows hot cooked foods to stay warm before
serv.ing. .It can also be used at the end of a timed cook.
To Use:
Press SERVE WARM.
Set the temperature.(optional)
Press the TEMP "up" or."down" arrow pad to raise or lower
the temperature in 5°F (5°C) amounts to set a temperature
other than 150°F (65‘’C). The warm range is 100°F-200°F
(35“c-9o°c). c / : ;
Press START/ENTER. : j
Press OFF/CANCEL when finished.
To Add to the End of a Set Cook Time:
1. Press BAKE.\ VT : V
2. Set the temperature (optional).
/ Press the TEMP "up" or "down" arrow pad to set a
: temperature other than 350°F (175°C).
3. Press COQKTiME. /: : :
: Press the HOUR/MIN "up" or "down" arrow pads to set cook
time. ::
.........
: : :: :
.5. .. Press SERVE WARM.. . :.
.. /. A.pne.hour.warm time will automatically be set.
Set the .warm temperature (optional) .
6.
Press the TEMP "up" or "down" arrow pad to raise or lower
the temperature in 5°F {5°C) amounts to set a temperature
other than 150°F (65°C). The warm range is 100°F-200°F
(3.5"C-90"C).
Press START/ENTER. /V' / ■ ; : / ■ / j : / : : : ■
7.
The display will show the cook time counting down. When
cook time, ends, the display will show a warming time.
When warming time ends, the oven will automatically shut off
and "End" and COOK TIME will show on the display. Four
tones will sound and then four 1-second reminder tones will
sound every , minute thereafter. :
Press OFF/CANCEL or open the oven door to stop reminder
8.
tones and remove "End" from display. The time of day will
return to the display. / / /
....
: : /
....
: :
15
Page 16

To
Add to the End of a Delay Start/Set Cook Time:
1.
Press BAKE.
2.
Set the temperature (optional).
Press the TEMP "up" or "down" arrow pad to set a
temperature other than 350°F (175°C).
Press COOK TIME.
3.
Press the HOUR/MIIM "up" or "down" arrow pads to set cook
time.
.....
/
4.
Press DELAY START. ;
Press the HOUR/MIN "up" or "down" arrow pads to set the
time. of.day to.start cooking. \
5.
Press SERVE WARM.^ ^ :
A one hour warm time will automatically be set. .
6.
Set the warm temperature (optional). :: :
Press the TEMP "up" or "down" arrow pad to raise or lower
the temperature in 5°F (5°C) amounts to set a temperature
other than 150°F (65°C). The warm range is 100°F-200°F.
(35°c-90“C).: ^
7.
Press.START/ENTER. i i i i ::: ;; ::: : : ii..:.:
When the start time is reached, the display will show the cook
time counting down. When cook time ends, the display will .
show.a warming .time. : ' ;' ' : ' : :. . ...
When warming time ends, the oven will automatically shut off
and "End" and COOK TIME wilt show on the display. Four
tones will sound and then four 1 -second reminder tones will :
sound every minute thereafter. :: ::
Press OFF/CANCEL or open the oven door to stop reminder
8.
tones and remove "End” from display. The time of day will ::::
return to the display.
.......
: :.
Timed Oven Control T ■ ■ ■ ■ ■ ■
.........
4,
Press START/ENTER.
The cook time will appear on the oven display. The display
will count down the baking/roasting time in hours and
minutes (if cook time is more than 1 hour), or in minutes and
seconds (if cook time is less than 1 hour).
The time settings can be changed any time after pressing
START/ENTER by repeating step 3. /
When the countdown Is complete, the oven will shut off
automatically and "End" and COOK TIME will appear on the
oven display. Four tones will sound, then four 1 -second i
reminder tones will sound every minute thereafter.
5.
Press OFF/CANCEL or open the oven door to remove "End"
from display, The. time of day will appear on the display.
To Set a Cook Time and Stop Time [Delay Start]:
1. ■■..Press.BAKE. V. ■■■ ■.. / i ■::: ' /:' /' / ; ;; ::' ; ■
. ; Press the TEMP "up" or "down" arrow pad to set a
...: temperature other than 350°F (175°C). ' : '
t. - Press COOK TIME..' / ': :': \::: ; :; : :;
.3- Press the HOUR/MIN "up" or "down” arrow pads to enter the
..; length of time to cook. \
4.. (Press DELAY START , ' / : :
5.. ( Press the HOUR/MIN "up" or "down”
: . .time of day to start. / ( /
6. Press START/ENTER.
("DELAY" and the time of day will appear on the oven display.
When the start time is reached, the oven will automatically ((
turn on, display the cook time, and immediately start
counting down, ^
::::: When cook time ends, four tones will sound, then four 1 -
second reminder tones will sound every minute. i i
7, ' Press OFF/CANCEL or open the oven door to remove "End"
::: from display. The time of day will appear on the display.
arrow pads to enter the
.... ............
(::
ikWARNING
^ ^ ^ ^ ^ ^ Food Poisoning Hazard
Do not let food sit in oven more than one hour
before or after cooking.
Doing so can result in food poisoning or
sickness.
The Timed Oven Control allows the oven to be set to turn on at a
certain time of.day cook for a set length of time, and/or shut off
(automatically Delay start should not be used for foods such as.
breads and cakes.because they may not bake properly. ...' ..
.................................................................
To Set a Cook Time:
Before setting, make sure the clock is set to the correct time of
day. .See "Clock”.section, : (:: / :
1. ■■■Press BAKE. ■■. ■ (■■.. ( ( / / / / : ( : (
Press the TEMP "up" or "down" arrow pad to set a
350°F (175°C).
2. Press COOK TIME.:
3. Press the HOUR/MIN "up" or "down" arrow pads to enter the
ength of time to cook.
........
To Recall R-ogrammed Timed Settings (displayed for 5
seconds):
To Recall Set Press
:Cook Time
Delay Start.
..Temperature..
*lf cook time has begun, when DELAY START is pressed, the.. ...(
display will show the time it started. When COOK TIME is
pressed, the display will remove the seconds from the remaining
countdown time, i ...........................................................................
.....
.................................
................................
COOK TIME*
DELAY START
BAKE
16
Page 17
To Change Programmed Timed Settings:
To Change Set Press Setting Displayed
Cook Time ^ ^ COOK TIME Press HOUR/MIN
:
................................
^ ^ ^ ^ Press START/
/ / / ENTER
"up/down" arrow
4, Place container with food into the warming drawer.
5. Turn selector switch to OFF when finished warming. :
WARM & READY TEMPERATURE CHART
Different foods require different settings In order to maintain the
idea! serving temperature. Use the following chart as a guide.
FOOD SETTING
Delay starf ^ ^ DELAY START
Temperature.
‘Cannot change the.set. delay start time once it has been
■reached. '
..........................................................................
BAKE
Press HOUR/MIN
"up/down" arrow
Press START/
ENTER
Press TEMP "up/
down" arrow /
Press START/
ENTER ::: ;v :
...............
;Usiiig- Warin :& fieadf Dra wer ;
: : : : : : : : : : : : : : : : : : : (on some mwiéisì ■ c : : : : : : : : : : : : : :
A WARNING
Food Poisoning Hazard
Do not let food sit for more than one hour before
or after cooking.
Doing so can result in food poisoning or
sickness.
.....................
Bacon*
Beef, medium and weil done
Bread, hard roils
Bread, soft roils
Casseroles
. Coffee cake, pastries
Cooked cereal
Eggs
Fish, Seafood (No breading) MED
Fish, Seafood (Breaded)*
Fried foods
Gravy Cream Sauces HI
Ham MED
Hors d'oeuvres (soft)
.....................................................
.......................................................
..............................................
HI
LO
LO
HI
LO
MED
MED
MED
HI
The Warm & Ready warming drawer Is idea! for keeping hot
cooked foods at serving temperature. It may also be used for
warming breads and pastries.
Different types of food may be placed in the warming drawer at
the same time. For best results, do not hold foods longer than
one hour. For smaller quantities or heat-sensitive foods (such as
eggs), do not hold, longer than 30 minutes. : ' : : ;
Food must be at serving temperature before being placed in the
warming drawer. (Breads, pastries, and fruit pies may be heated
from room temperature on the HI setting.)
Remove food from plastic bags and place in oven-safe container.
Do not cover with plastic wrap. Cover foods with a lid or
aluminum foil. Empty serving dishes and dinner plates can be :
heated while the warming drawer Is preheating.
To Use:
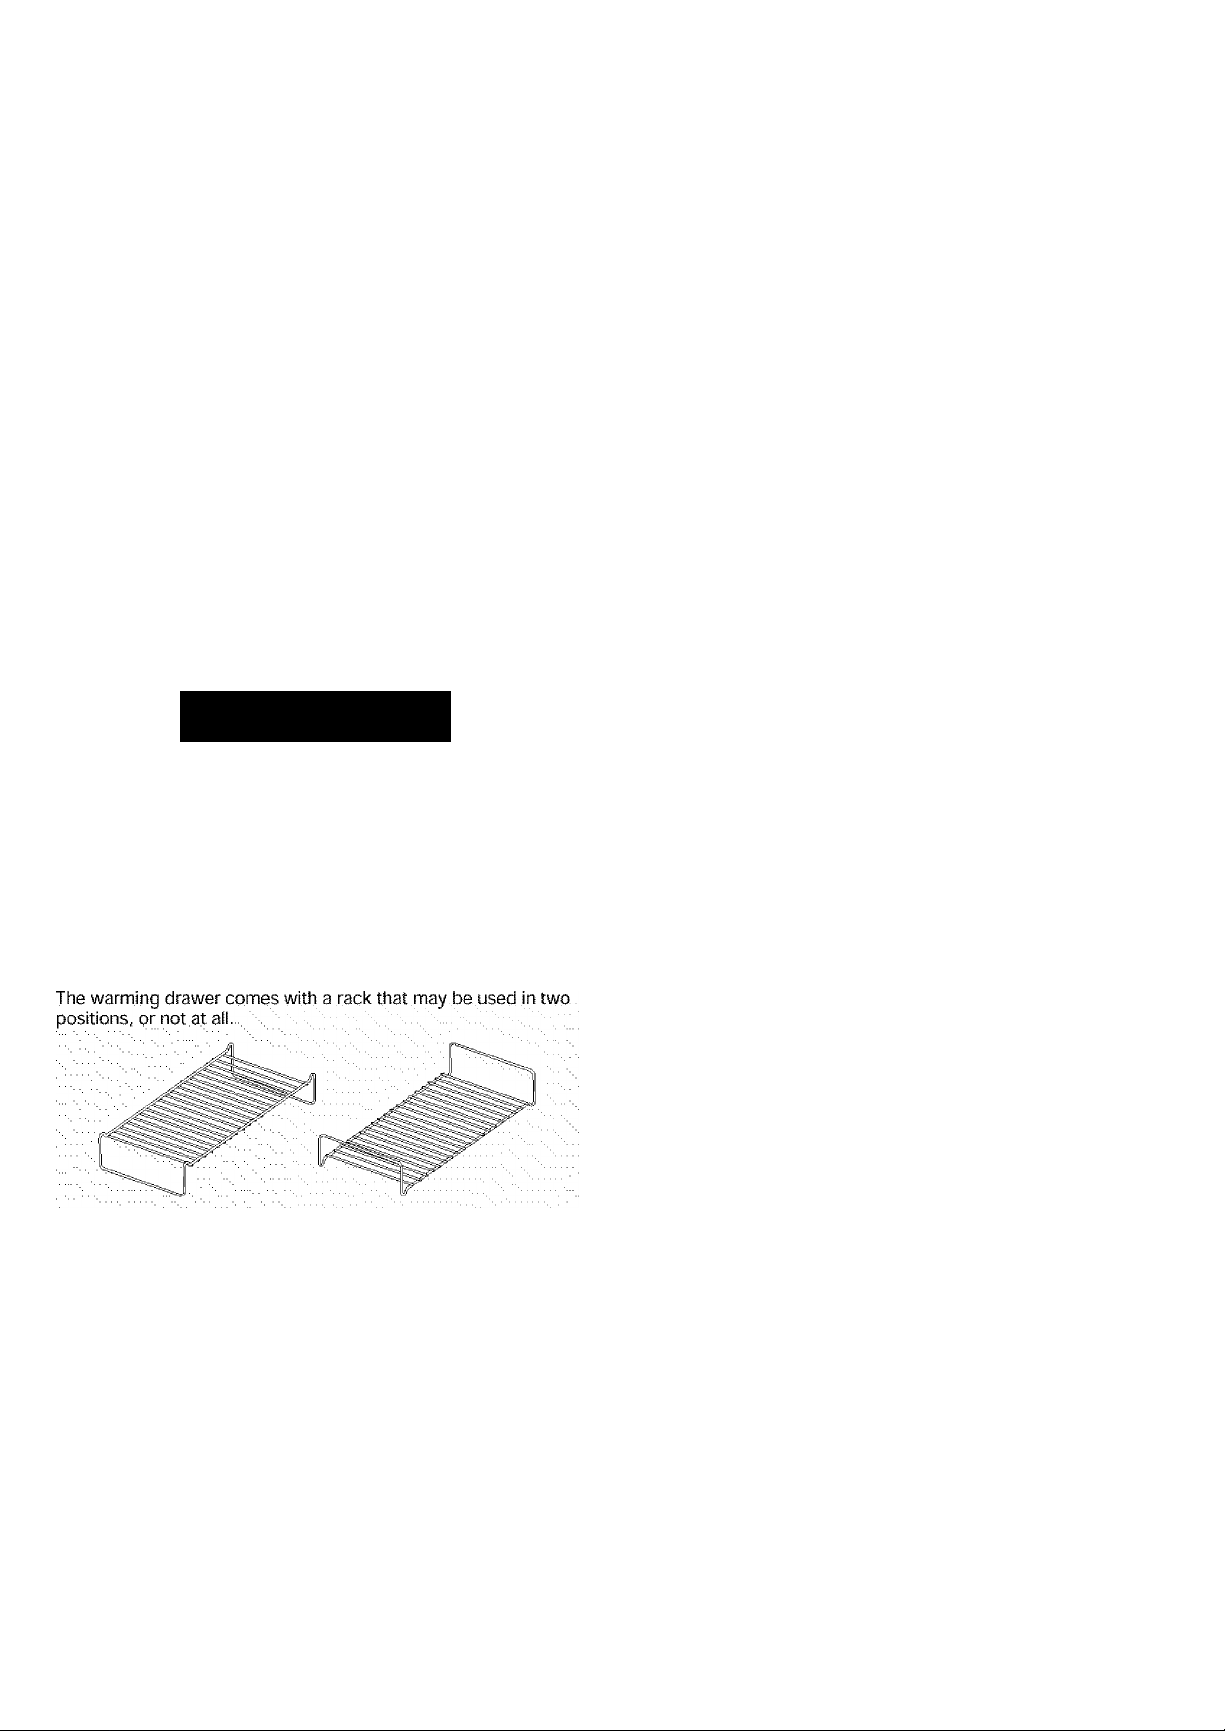
Position rack, if needed, in the warming drawer.
Turn the WARM & READY selector switch to choose HI, MED,
or LO temperature setting. ::
Allow warming drawer to preheat for 10 minutes.
3.
Hors d'oeuvres (crisp)
Lamb
Pancakes, waffles*
. Pies, custard
Pies, single crust LO
. Pies, double crust
Pizza
Pork MED
. Potatoes, baked
: Potatoes, mashed
Poultry HI
Quiche
Vegetables
All foods should be covered, except those marked with an
asterisk :
...................................................
HI
MED
MED
MED
LO
HI
HI
MED
MED
MED
17
Page 18

: 12-Hour Shyt-Off
The oven control is set to automatically shut the oven off 12
hours after the oven turns on. This will not interfere with any
tirned or delayed cook function. :
The oven light will come on when the oven door is opened. To
keep the light on continuously, turn the light on by pressing
OVEN.: :
....
To Override:
For longer cooking periods that require oven usage longer than
12 hours,.press and hold CLOCK for 5 seconds. A single tone wi:
sound and "12H OFF''will appear on the display. The oven will
remain.on until turned off, :: : : :::::: .: ...
■■To Reset: L.:':......................... ■■ ..,,;■,■
"Press and hold CLOCK for 5 seconds. A single tone will sound :
and ”12H on" will appear on the display.
....
..
.......
RANGE CARE
:Seif-Clea:niiig Cf de ■
: ion some models)
Prepare Oven:
Remove the broiler pan, grid, cookware and bakeware and,
on some models, the temperature probe from the oven. /
Remove any foil from the oven because it may burn or melt,
damaging the oven.
Remove oven racks to keep them shiny and easy to slide.
See "General Cleaning’' section for more information.
Hand dean inside door edge and the 1 '/2 in. (3.8 cm) area
around the inside oven cavity frame, being careful not to
move or bend the gasket. This area does not get hot enough
during self-cleaning to remove soil. Do not let water, cleaner,
etc. enter slots on door frame. Use a damp cloth to clean this
'area.''■■ "
Wipe out any loose soil to reduce smoke and avoid damage.
At high temperatures, foods react with porcelain. Staining,
etching, pitting or faint white spots can result. This will not
affect cooking performance, ::: : :
FTepare Cooktop and Storage Drawer:
■ Remove plastic items from the cooktop because
''melt.."::v..L: L : ,
■ .: Remove all items from the storage drawer.
IMPORTANT: The heating and cooling of porcelain on steel in the
oven may result irr .discoloring, loss of gloss, hairline cracks and.
popping sounds...'
..... :: : : - :: : : : .■
they FTiay.
clean™ Self-Cleaning Cycle
ik WARNING
(on some models)
How the Cycle Works
The SELECT CLEAN Self-Cleaning cycle uses very high ::
temperatures and dissolves soil to a powdery ash. :
SELECT CLEAN will set the clean time automatically, once the
ÀÉlià)
....
Burn Hazard
Do not touch the oven during the
Self^Cleaning cycle.
....
Keep children aviray from oven during
Sel^Cleaning cycle. c
Failure to follow these instructions can result
soil level is set. ::::: : : ::::
The soil level can be manually set to light, average or heavy soil
levels by repeatedly pressing SELECT CLEAN. :::
The oven will automatically shut off once it is clean. The door will
not unlock until the oven cools.
Once the oven has completely cooled, remove ash with a damp
cloth. Do not wipe down any of the inside surfaces until the oven
has completely cooled down. Applying a cool, damp cloth to the
inner door glass before it has cooled completely could result in
the glass breaking. ..:: . : :;
The oven light will not work during the Self-Cleaning cycle.
....
:: :::
in burns.
To Set SELECT CLEAN:
:iMPORTANT:.The health of some birds is extremely sensitive to.
the fumes given off during the Self-Cleaning cycle. Exposure to
the fumes rnay result in death to certain birds. Always move birds
to. another closed and well ventilated room. :
results in longer .cleaning and more smoke. , ^ :: ; .
Keep the kitchen well-ventilated during the Self-Cleaning cycle to
help get rid of heat, odors, and smoke. : : :
Do not block the oven vent(s) during the Self-Cleaning cycle. Air
must be able to move freely. See "Oven Vent(s)" section.
Do not clean, rub, damage or move the oven door gasket. The a Press the HOUFi/MIN "up’' or "down" arrow pads to set a
door gasket is essential for a good seal. ......................Self-Cleaning cycle longer or shorter than the 3 hour 30
.................................
.................................................................................minute cycle
........
. . .
.Press once for light soils, and "SoilL" will appear on the
.display.. l:
Press two times for average soils, and "SoiiA" will appear on.
the display. ...............................
Press three time.s. for heavy soils,
■the display,
To Set CLEAN:
■ Press CLEAN. This will automatically set a 3 hour 30 minute
: : Self-Cleaning cycle. :
.............
............ ..................................
a nd"Spi IH " w¡ II a ppear on.Self-clean the oven before it becomes heavily soiled. Heavy soil.
18
Page 19

To Start Self-Clean:
Before self-cleaning, make sure the door is closed completely or
it will not lock and the cycle will not begin.
1. Set SELECT CLEAN (on some models) or CLEAN.
2. Press START/ENTER. ; :
The oven door will lock in 6 seconds and "LOCKED," the start
time and stop time will appear on the display. The door will
not unlock until the oven cools. The cycle time includes a 30
minute cool down time.
When the cycle is complete and the oven coois, "End" will
appear on the display and "LOCKED" will disappear.
Press OFF/CANCEL or open the door to remove "End” from
the display.;- -:
Close door■■■■■■ ; : ^ s .The. time of day will appear on the display. :
......
::
To Self-Clean:
Before self-cleaning, make sure the door Is closed completely or
it will not lock and the cycle will not begin.
Press LOGICLEAN. ,
Press START/ENTER. :
The oven door will lock in 6 seconds and "CLN SENS,"
"HEAT," "ON," "LOCKED," and "CLEAN" will appear on the
display. The door will not unlock until the oven cools. The
cycle time includes a 30 minute cool down time.
When the cycle is complete and the oven cools, "End" will
appear on the display and "LOCKED" will disappear.
Press OFF/CANCEL or open the door to remove "End" from
the.display, ;
Close door
The.time of day will, appear on the display.
.....
........
To Delay Start Self-Clean: ^ ^
Before delay starting Self-Clean, make sure the clock is set to the
.correct time of day. See "Clock" section. Also, make sure the
door is. closed completely or it will not lock and the cycle will not.
.begin. ■■■.-.■■.. .. ■
.1. . Set SELECT CLEAN (on some models) or CLEAN. ; ^ ;
2. ■■■ Press.DELAY.START.; :: ;;:: ^ ? L s ; : ::: : :;':
Press the HOUR/MIN "up" or "down" arrow pad to set time of
day to start the Seif-Cleaning cycle. - ^ ^ .
3. : Press START/ENTER. '':: ;
:: The start time is automatically calculated and displayed. The
door will automatically lock, and "LOCKED," "DELAY" and
: the time of day will appear on the display.
:: When the start time is reached, the oven will automatically
turn on. C ^
When the cycle is complete and the oven cools, "End" will ::
: appear on the display and "LOCKED" will disappear.
4. Press OFF/CANCEL or open the door to remove "End" from
the display. : : V :
5. Close door. / / / : -
The time of day will appear on the dispiay.
.........
To Stop Self-Clean any time:
Press OFF/CANCEL, and "cin," "ON," "cool," and "LOCKED" will
appear on the display until the oven cools. Then "End" will /
appeararid the.door.w.iii .unlock. ::: :::
.......
..............
:...;; . ■ . .
....
^
LOGiCLEAN™ Self-Cleaning Cycle
(on some models) . . -
......
How the Cycle Works y ^ ...................
The LOGICLEAN Self-Cleaning cycle is a "one-touch" step that
uses, very high temperatures and dissolves soil to a powdery ash.
"SEnS" setting will automatically determine the length of cleaning
time needed based on the number of times the oven has been
used since the last self-clean cycle. Maximum clean time is4 /
hours 30 minutes, and minimum is 2 hours.
The oven will automatically shut off once it is clean. The door will
not unlock until the oven cools.
Once the oven has completely cooled, remove ash with a damp
cloth. Do not wipe down any of the inside surfaces until the oven
has completely cooled down. Applying a cool, damp cloth to the
inner door glass before it has cooled completely could result in
the glass breaking. :: /
The soil level can be manually set to light, average or heavy soil
levels by repeatedly pressing LOGICLEAN.
To Delay Start Self-C!ean:
Before delay starting Self-Clean, make sure the clock is set to the
correct time of day. See "Clock" section. Also, make sure the
door is.closed, completely or it will not lock and the cycle will not .,
begin,.. .. .: .
1. . Press. LOGICLEAN. - (
2. Press DELAY. START (/ (
■ -. Press the HOUR/MIN "up” or "down" arrow pad to set time of
day to start the Self-Cleaning cycle.
3. Press START/ENTER. ( ' (
The door will automatically lock, and "LOCKED," "DELAY"
and the time of day wii! appear on the display.
When the start time is reached, the oven will automatically
turn on. / p ^
When the cycle is complete and the oven cools, "End" will
appear on the display and "LOCKED" will disappear,
4. Press OFF/CANCEL or open the door to remove "End" from
: the display. -
; Close door.; \ :
: The time of day will appear on the display.
To Manually Set Soil Level:
Press twice for light.soils, and "SoilL" will appear on the ^
display, t -
Press three times for average soils, and "SoilA" will appear
pn.the display...' ;■ ■;; T; ■ ■ -...: ; ::: : ; ■
Press four times for .heavy soils, and "SoilH" will appear on
the display. ;; : ' ;; ' ■ ■ ■ ;;: '; ::;
The oven light will not work during the Self-Cleaning cycle.
To Stop Self-Ciean any lime: ^ ^
Press OFF/CANCEL, and "cIn," "ON," "cool,” and "LOCKED'
appear on the display until the oven cools. Then "End” will
appear and the door will.unlock. : /
will
SENS-A-CLEAN™ Self-Cleaning Cycle
(on some models)
........
How the Cycle Works
The SENS-A-CLEAN Self-Cleaning cycle uses very high
temperatures, and dissolves soil to a powdery ash.
The sophisticated electronic sensor continuously monitors by
: products of the burning off of the baked-on foods, and adjusts
the cleaning time accordingly. The maximum clean time is 4
hours 30 minutes, and the minimum is 2 hours.
19
Page 20

The oven will automatically shutoff once it senses it is clean. The
door will not unlock until the oven cools.
Once the oven has completely cooled, remove ash with a damp
cloth. Do not wipe down any of the inside surfaces until the oven
has completely cooled down. Applying a coo!, damp cloth to the
inner door glass before it has cooled completely could result in
the glass breaking. : ' :
The soil level can be manually set to light, average or heavy soil
levels by repeatedly pressing SENS-A-CLEAN.
To Start Self-Clean:
Before self-cleaning, make sure the door ¡s closed completely.or
it will not lock and .the cycle will not begin. ' .
; 1. Press SENS-A-CLEAN. T ::: ; : ;; :::: : :; : V;
; The SEnS setting will automatically determine the length.of
■■■.:: ■ cleaning time. ■ ;; ; ; :::::: '^ : ■ ' ■ ■■
2.
Press START/ENTER. ;; ; ; ; : ; :
The oven door will lock in 6 seconds and "CLN SENS,"
•'HEAT," "ON," "LOCKED," and "CLEAN" will appear on the
display. The door will not unlock until the oven cools. The.
cycle time.include.s a
When the cycle is complete and the oven cools, "End" will
appear on the display and ’'LOCKED” will disappear. .: .;
3.
Press OFF/CANCEL or open the door to remove "End" from
thedisplay.. ■■ ■■L'.:.' v : ^ , ■ ' '
4.
Close door.
The time of day will appear on the display.
30 minute cool down time. ..;
To Delay Start Self-Clean;
Before delay starting Self-Clean, make sure the clock is set to the
correct time of day. See "Clock" section. Also, make sure the
door is closed completely or it will not lock and the cycle will not
begin.
.......
: ::
1. Press SENS-A-CLEAN. : L
The SEnS setting will automatically determine the length of
cleaning time. ' :
If desired, set the approriate soil level by repeatedly pressing
:: the SENS-A-CLEAN pad. ......
2.. Press DELAY START. , ,
Press HOUR/MIN "up" or "down" arrow pads to set the time,
of .day to start the Self-Cleaning cycle. : : .. .^
.3.: Press START/ENTER. ^ L ;::: '' / ^ :: ? .!::
The door will automatically lock, and "LOCKED," "DELAY"
and the time of day will appear pn the display. /: : /: /
When the start time is reached, the oven will automatically
turnon....................................................,
When the cycle is complete and the oven cools, "End" will..
appear on the display and "LOCKED" will disappear. ; ; ;;
;4, Press O.FF/CANCEL or open the door to remove "End" from
thedisplay
..5, '■ Close door. ■. ■■...:■■ : ::: : : ■ : :
The time of day will appear on the display.
....
■■■...:.vf , l:/ 'p : -
.....
.........
::: . .
To Stop Self-Clean any time:
Press OFF/CANCEL, and "cin," "ON," "cool,” and "LOCKED" will
appear on the display until the oven cools. Then "End” will ::::::
appear and the door will unlock.
IMPORTANT: Before cleaning, make sure all controls are off and
the oven and cooktop are cool. Always follow label instructions
on cleaning products.
Soap, water and a soft cloth or sponge are suggested first unless
otherwise noted.
Food spills containing acids, such as vinegar and tomato, should,
be cleaned as soon as the entire appliance is cool. These spills .
may. affect.the..finish, .. / / / : : :: / .:. / / .
Food spills containing acids, such as vinegar and tomato, should
be cleaned as soon as the cooktop, grates and caps are cool.
These spills may affect the finish. :
To avoid chipping, do not bang grates and caps against each :
other or hard surfaces such as cast iron cookware.
Do not reassemble caps on burners while wet.
Do not clean in the Self-Cleaning cycle.
■ Non-abrasive plastic scrubbing pad and mildly abrasive
■ Dishwasher (grates only, not caps): /
Sealed Burner models
See "Sealed.Surface Burners" section.
Do not. use. steel wool, abrasive cleansers or oven cleaner. .... .. ^
Do not. soak, knobs,. :.V'.;; '' ■ ■ ■ : ;; : : : : L.. ■
When.replacing knobs, make sure knobs are in the OFF position.
On some models, do not remove seals under knobs.
■ Soap, and water, or dishwasher: :" ^ ...........
To Manually Set Soil Level:
■ Press twice for light soils, and "SoiiL" will appear on the
/display. p
Press three times for average soils, and "SoilA" will appear
on the display. :::::::
Press four times for heavy soils, and "SoilH" will appear on
the display. /
The oven light will not work during the Self-Cleaning cycle.
Do not use abrasive cleaners, steel-wool pads, gritty wash cloths
or some paper towels. Damage may occur.
General Cleaning
EXTERIOR PORCELAIN ENAMEL SURFACES
(on some models)
Glass cleaner, mild liquid cleaner or non-abrasive scrubbing i i
pad;..
Gently dean around the model and serial number plate
because, scrubbing may remove numbers. : / / / L:
PORCELAIN-COATED GRATES AND CAPS
cleanser: :
: Clean as soon as cooktop, grates and caps are cool.
Use the most aggressive cycle. : :
SURFACE BURNERS
COOKTOP CONTROLS
pull .knobs straight away from control panel to remove.
CONTROL PANEL
Glass cleaner and soft cloth or sponge: ::
Apply glass cl
panel
............
.................
,............... ,
........... ....
eaner to soft cloth or sponge, not directly on
.......
........
...
:
20
Page 21
OVEN DOOR EXTERIOR
Glass cleaner and paper towels or non-abrasive plastic
scrubbing pad: ^
Apply glass cleaner to soft cloth or sponge, not directly on
panel. : : : :
For models with stainless steel oven doors, see "Stainless
Steel’' section in "General Cleaning."
Drawer Liner (on some models)
Remove ail stored items from drawer and lift out drawer liner.
■ Clean with mild detergent.
WARMING DRAWER
(on some models)
Make sure drawer is cool.
■ Mild detergent
...............
STAINLESS STEEL (on some models)
Do not use soap-filled scouring pads, abrasive cleaners, Cooktop
Polishing Creme, steel-wool pads, gritty wash cloths or some
paper towels. Damage may occur. :: ::::
Rub in direction of grain to avoid damaging. : :::
■ .Stainless.Steel Cleaner & Polish (not included): ' ::
. See back coyer for ordering information.
Liquid detergent or all-purpose cleaner: :
Rinse.with clean water and dry with soft, lint-free cloth.
Vinegar.for hard water spots :: :: :: : l l : ::::
OVEN CAVITY
Do not use oven cleaners. '
Food spills should be cleaned when oven cools. At high
temperatures, foods react with porcelain and staining, etching,
pitting or faint white spots can result.
■ Self-Cleaning cycle: ::: ::
See "Self-Cleaning Cycle" first.
OVEN AND ROASTING RACKS
Self-Cleaning cycle:: :'
See "Self-Cleaning Cycle" first. Remove racks or they will
discolor and become harder to slide. If this happens, a light
coating of vegetable oil applied to the rack guides will help
them slide, : ..L.
Steel, vvool pad
.........
^ :
BROILER PAN AND GRID
Do not clean in the. SelteCleaning cycle. : .
Mildly .abrasive cleanser: :::
Scrub, with wet.scouring pad, :: :
Solution of V2 cup.(1.25.rnL) ammonia to 1 gal. (3.75 L) water:
Soak for 20 minutes, then scrub with scouring or steel wool
pad. ■ ■■■ "■■■ " ^ ■ ..............................
■ .Oven cleaner; .L . \
Follow product label instructions.
Porcelain enamel only, not chrome
■ Dishwasher : 7
.....
::
.....
: :
;;0.feri Light
The oven light is a standard 40-watt appliance bulb. It will come,
on when the oven door is open. It will not work during the Self-.
Cleaning cycle. When the oven door is closed, press the OVEN ;
pad to turn on and.off.' ■ ::::::: :: :: : :: : .
Before replacing, make sure .the oven and cooktop are cool and
the control knobs, are ..off..
To Replace: V
1.. Unplug range or disconnect power.
2.
Turn the glass bulb cover In the back of the oven
counterclockwise to remove.
3, Turn bulb counterclockwise to remove from socket.
4. Replace bulb, then bulb cover by turning clockwise.
: 5. Plug in range or reconnect power,
: V:: ::: Console Night Light ::
;:::::::::: ; fonsome modeis)
The console night light is located at the top of the Electronic
: Oven Control panel. It has two replaceable parts. The fluorescent
light bulb is a standard F8T5 miniature fluorescent lamp. The
starter is the knob-shaped part to the left of the light bulb. It is a
standard FS-5C starter. The console night light will not work
during the self-cleaning cycle. : i
To. turn on and off: Press.the TOP pad.
To Remove Starter and/or Bulb:
1- . Unplug range or disconnect power. :
2,- Push down with thumbs on the front of the lens cover while
pMlIing up.with fingers on the back of the lens cover.
......
STORAGE DRAWER
(on some models)
Make sure drawer is cool and empty before cleaning.
For more iriformation, see "Storage Drawer" section.
Mild detergent
.........
21
Page 22
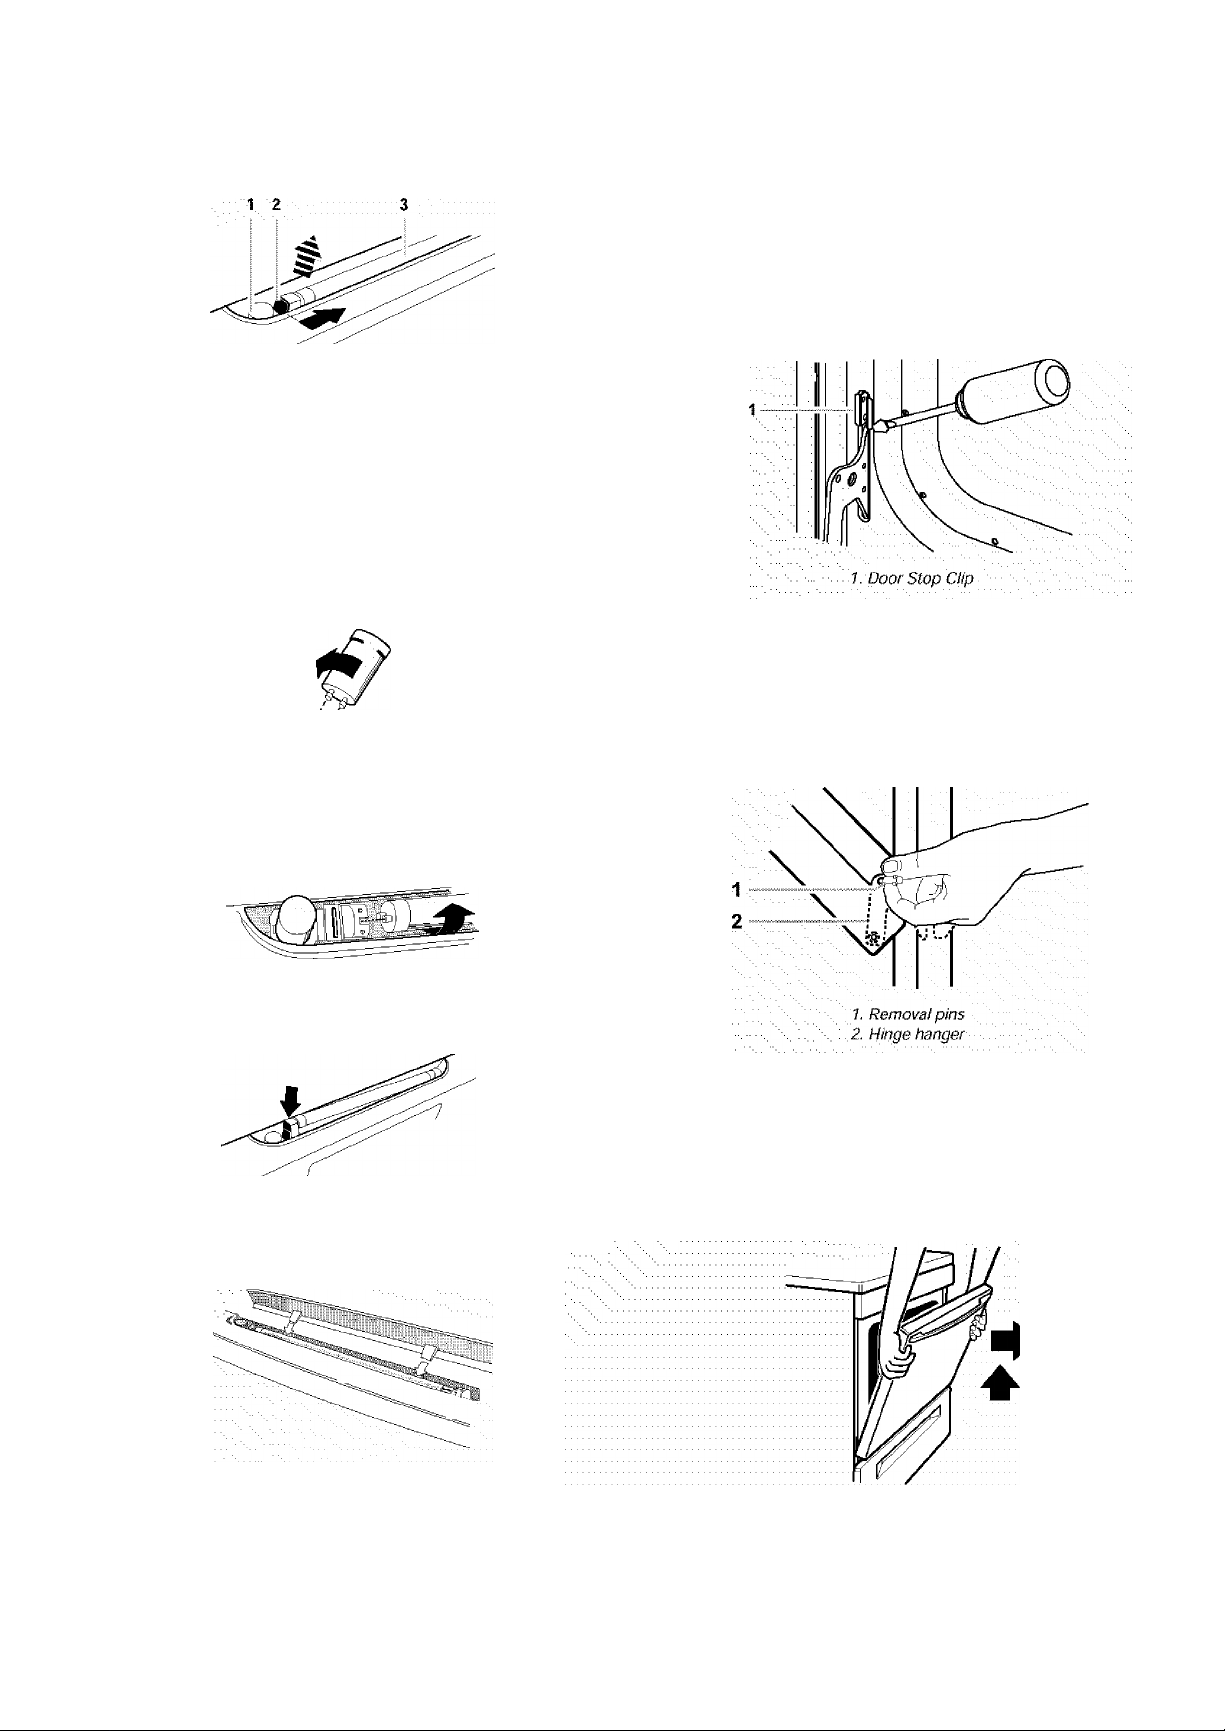
3.
Push release lever toward bulb. The left end of the light
assembly will raise up.
7. Starter
2. Release lever
3. Bu!b :
4
To remove starter, turn it counterclockwise and lift out of its
mounting base.: ■ ■: : ; ■ :: ■ ■ ■ T::
S. To remove bulb, roil it forward or backward 90° until it clicks,
■■■■■ then lift out,
....
::
...........
: ' : -
For normal range use, it is not suggested to remove the oven :
door. However, if necessary, follow these instructions. The oven
door is heavy.
Before Removing:
1. Use a putty knife or screwdriver and insert it at the bottom
corner of the door stop clip,
To Install Starter and/cff Bulb: ^
Fit starter prongs into starter mounting base and turn
clockwise.
2.
Slide bulb prongs into bulb mounting base ends. Roll the bulb
forward or backward 90° until it clicks. ::
3. Push down on the left end of the bulb mounting base. Whei
the assembly latches, it will click.
Replace lens cover. Position the two rear lens cover tabs In
front of the two metal spring clips (located directly behind, the.
bulb). Push back and down on the lens cover to lock into .
position
.........
....................
::::::: f
Pry door stop clip free and remove from front frame hinge
slot..Take care not to scratch finish.
Repeat, procedure fpr other door stop clip.
^Tb-Remove:
1. Open the oven door. Insert door removal pins, included with
your range, into both hinge hangers. Do not remove the pins
while the door is removed from the range. : ;
2.
Carefully close the door until it rests against the door remova
■■pins.,fT
3.
. Grasp the door on the sides with your fingers on the front of
The dopr and your thumbs on the inside surface. : f:
Pull door straight up, then toward you. Hinge hangers will
. slide out of front frame hinge slot. Do not remove door
removal pins.until the door is replaced on the range,
....
■- T':
.
„v---,'--
Plug in range or reconnect power.
22
Page 23
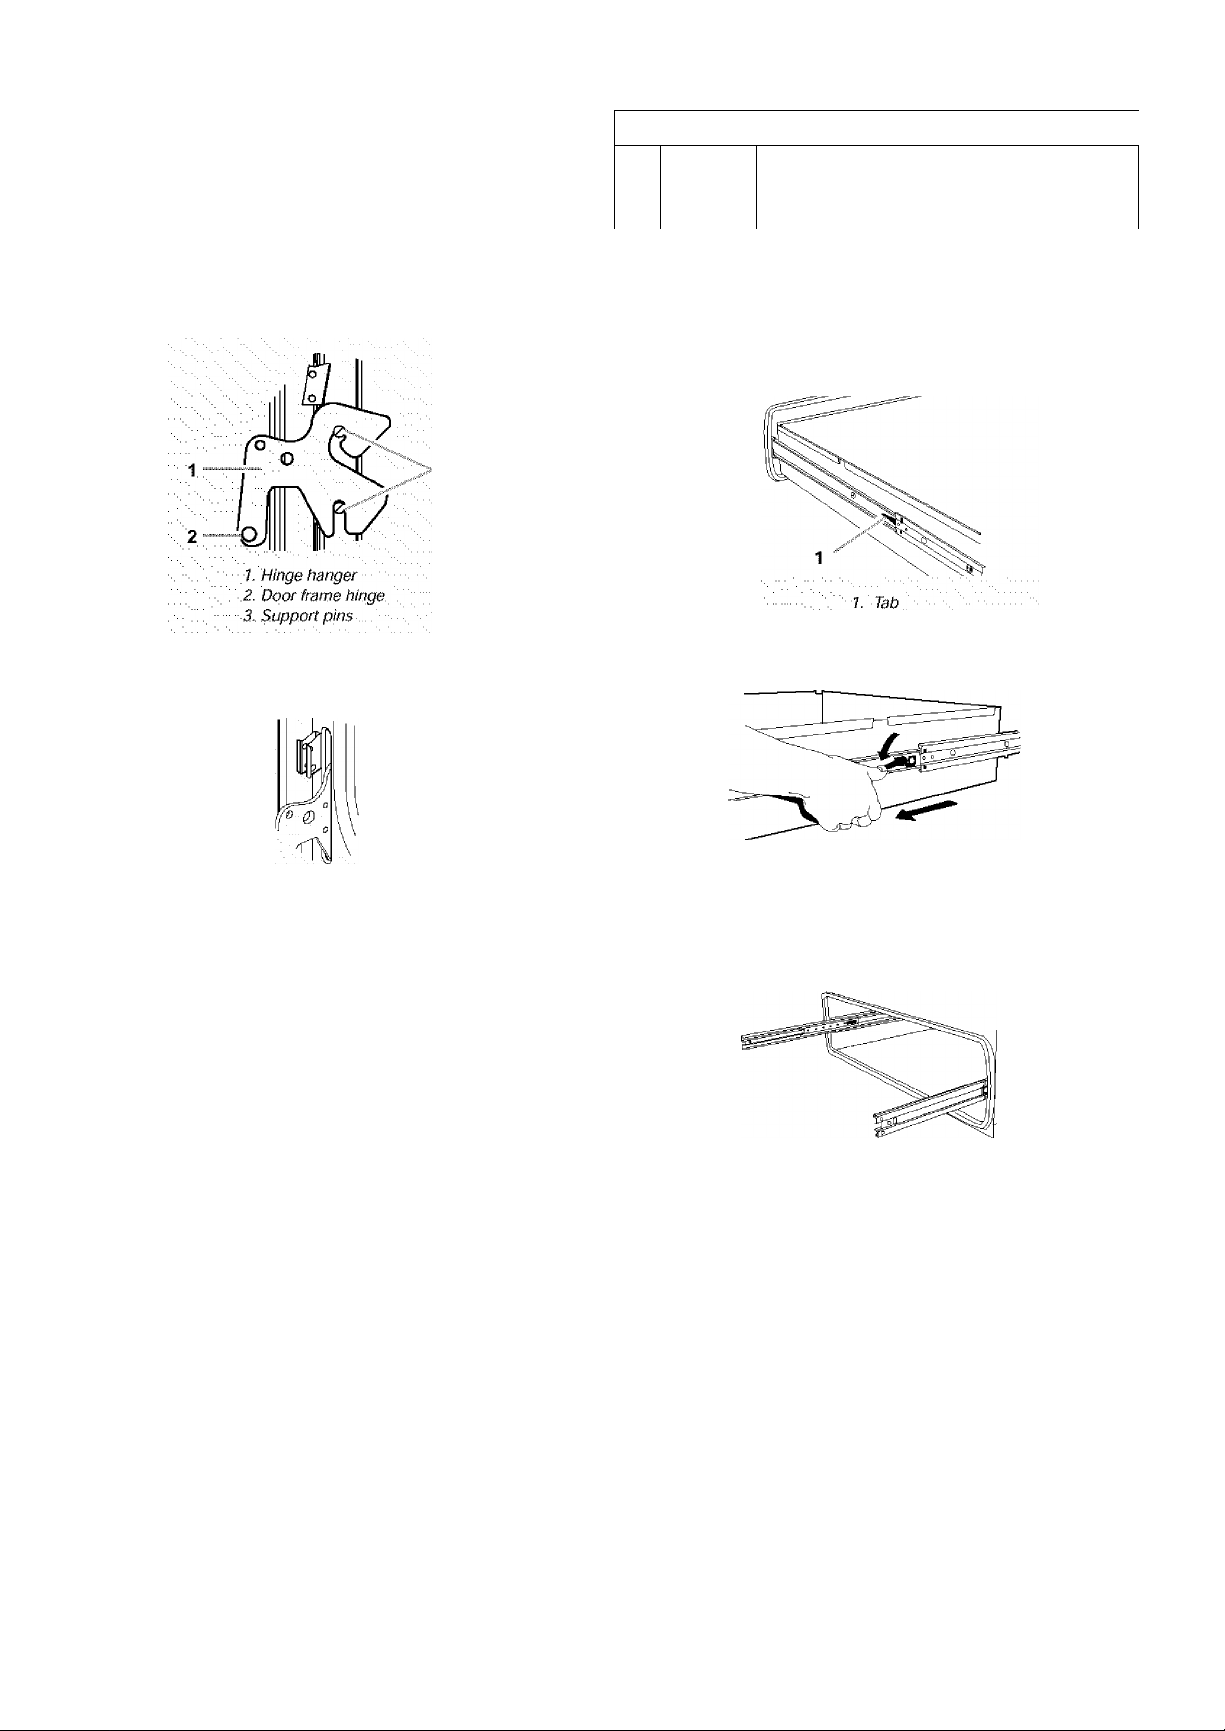
To Replace: ^ ^
1. Grasp the door on the sides with your fingers on the front of
the door and your thumbs on its inside surface. ::
2. : Hold oven door so that the top edge of each hinge hanger is
: horizontal. Insert hinge hangers into the front frame hinge
slots. , :
3. Tilt top of door toward range. Slide hinge hangers down onto
front frame support pins. Make sure the hinge hangers are
fully seated and engaged on the support pins.
Warming Drawer t
Tfon some models)
Remove all items from inside the warming drawer, and allow the
unit to cool completely before attempting to remove the drawer.
To Remove:
Open drawer to its full open position.
Locate the black triangle-shaped tabs on both sides of the
drawer.
4. Insert the door stop clip with its angular surface at the top of
.. the frame hinge slot, then push in the bottom of the clip until
its flanges are flush with the front frame. ; \ .
5. Open the door completely and remove the door removal pins.
Save door removal pins for future use.
6. Close the door.
.............
storage Drawer
The storage drawer can be.removed. Before removing, make sure
drawer.is.cool, and.empty. . : : ::::::
iQ.Remove: ■..■..■... .^
1. .Pull.drawer straight out to the first stop.
2. .Lift .up the back of the.drawer and pull out. :::::::::::: T ::;.;
To Replace; .r---;'"
1. Fit the ends of the drawer rails into the guides in the cavity.
2. .Slide the drawer.closed. T \ ::::::::::::::::::
..........
.....
.v ■ ■■...
................
...........
■■.. '■■■
"
3. Press the tab down on the right side, and lift tab up on the left:
.:: side at the same time, then pull drawer out another Inch.
: 4. Holding the drawer by its sides, not its front, carefully pul! it
all the way out. '
To Replace:
1, Align the drawer glides with the receiving guides.
Push drawer.in all the way.
Gently open and dose. the drawer to ensure it is
properly on the slides.
....
....
seated
23
Page 24

TROUBLESHOOTING
Try the solutions suggested here first in order to avoid the
cost of an unnecessary service call.
Nothing vnrill operate
Is ttie power outlet properly wired and polarized?
Try another outlet to check for proper wiring and polarity.
Is the power supply cord unplugged?
Plug into a properly grounded 3 prong outlet. : ::::
Has a household fuse been blown or has the circuit
breaker been tripped?
Replace the fuse or reset the circuit.
Is die main or regulator gas shutoff valve in the off
position? ■■ ■■■■■ ■
See. Installation instructions. : ::: : : :
■ Is die range properly connected to the gas supply?
Contact a Sears trained repair speciaiist or see Installation.
Instructions. -
Surface tairners will not operate
■ Is this the first time the surface burners have been used?
:; Turn on any one of the surface burner knobs to release air
from the gas lines, i
■ On some models, is the Cooktop Lockout set?
- See ''Cooktop Lockout" section.
■ Is die control knob set correctly?
: Push in knob before turning to a setting.
■ Are die burner ports clogged?
: :See "Sealed Surface Burners" section. ;:
Surface tairner flames are uneven, yellow and/or noisy
Are die burner ports clogged?
. Se.e"S.eaieci.Surface Burners" section.
Are die burner caps positioned properly?
See..’’Seaied .Surface Burners" section. ::
Is die burner damaged? ................
On models with caps, look for a warped cap. If cap will spin
freely on a flat surface, painted side down, the cap is warped.
Switch cap with a different surface burner to check for further
warping. Contact a Sears trained repair specialist. See back
cover.■■■■ ......
Is propane gas being used?
The appliance may have been converted improperly. L .
Contact a .Sears .trained repair specialist. See back coyer,.
.......
......
■■■■" "■
.....
, ;
...........
...........
....
^i
..........
. ■
Surface burn^ makes popping noises
Is the burner wet?
Letitdry, :: ::
Excessive heat around cookware on cooktop
Is the cookware the proper size?
Use cookware about the same size as the surface cooking
area, element or surface burner. Cookware should not extend
more than 1 in. (2.5 cm) outside the cooking area. : :::
■ Is the power outlet properly wired and polarized? T
; . Try another o.utletto check for proper wiring and polarity.
■ Is this the first time the oven has been used?
Turn any one of the surface burner knobs on to release air.
from the .gas .lines," : : : : ; ; ; : ; ;
Is the electronic oven control set correctly?
See "Electronic .Oven Control” section.
On some models, is the Oven Lockout set?
;Se.e."Oven Lockput" section. ; ;; f;
Oven burner fails to light
A household fuse has blown or a circuit breaker has been
tripped. V ) ::: ■
The ignition system is broken. Contact a Sears trained repair
technician. See back cover. :
Oven makes muffled ticking noise when in use
■ This is normal and occurs when the oven burner cycles on
:: and off to hold the set oven temperature. :::::::
Oven burner lights, then goes cait after 1 minute
■ . Press OFF/CANCE.L, then wait 1 minute before trying again...
■ Is the power outlet properly wired and polarized?
;;; Try another outlet tp check for proper wiring and polarity.
Oven burner flames are yellow or noisy
■ Is propane gas being used?
.. .\The appliance may have been converted improperly. Contact
.
. ; ; ; a. Sears.traitied repair specialist. See back cover. : ;
........
^ ^
Oven temperature too high cff too low
■ Does the oven temperature calibration need adjustment?
; ; ; ; ;; See "Oyen Temperature Control” section,
....
24
Page 25

Display shows messages
Slow baking or roasting
Is ttie display showing "PF"?
There has been a power failure. Press OFF/CANCEL to clear
the display. Reset the clock, if needed. See "Clock” section.
■ On some models, is the display showing a "PF" and a
cooktop icon?
The Cooktop Lockout feature is engaged. See "Cooktop
Lockout" section.
Is the display showing "F" followed by a number?
Press OFF/CANCEL to clear the display. If an "F" code
reappears, contact a Sears trained repair specialist.
See.back cover.;;7 '7': :: : 7
Is the display showing a "EO F5"?
The Self-Cleaning latch is interferring with the oven door
closing. Press OFF/CANCEL to clear display. Depress and
hold door switch plunger (located on the oven front frame).
Latch, mechanism, will .unlock after 6 seconds. 7 7
...
....
Self-Cleaning Cycle will not operate
■ Is the oven door open?
. Close the oven, door aii the way. \
■ Has START/ENTER been pressed?
.7 Press START/ENTER.;;; : 7
■ Has a delay start been set?
See 'Timed Oven Control" section.
Was the oven preheated?
Wait for oven to preheat before placing food in oven.
■ Is there proper air circulation around bakeware?
See "Positioning Racks and Bakeware” section.
Is the proper length ottime being used?
Increase baking or roasting time.
Is the proper temperature set?
increase temperature 25°F (15°C).
Has the oven door been opened while cooking?
Peeking into the oven while cooking releases oven heat and
can result in longer cooking times.
7 7
Cooktop cooking results not what expected
■ Is die proper cookware being used?
See "Cookware" section.
■ Is die control knob set to the proper heat level?
:See "Control Knobs” section.
■ Is die appliance level?
...
Level the appliance. See the installation Instructions.
Baking results not what expected
Was the oven preheated?
Wait for oven to preheat before placing food in oven.
Are die racks positioned properly?
S.ee.'.’Pos.ition.ing .Racks.anci Bakeware": section. :::
Is there proper air circulation around bakeware?
See "Positioriing Racks and Bakeware” section.
Is the batter evenly distributed in the pan?
Check to make sure.batter is level in the pan. :
Is the appliance level?
Level the appliance.. See the Installation Instructions.
Are baked items too brown on the bottom?
Decrease.oven temperature 15°F to 25°F (5°C to 15°C).
Are crust edges browning early?
Use aluminum foil to cover the edge of the crust.
.............
.....
^ ^
25
Page 26

26
Page 27

REPARAMOS LO QUE
GARANTÍA
GARANTIA COMPLETA DE UN AÑO PARA TODAS LAS
Su compra adquiere un nuevo valor ya que usted puede confiar
en Sears HomeCentral® para obtener servicio de reparación.
Con más de 12,000 especialistas capacitados en reparaciones :
y acceso a más de 4.2 millones de piezas de repuesto y
accesorios, contamos con las herramientas, piezas,
conocimiento y la destreza para asegurarnos de cumplir nuestra
prornesa de que: Reparamos lo que vendemos.
........
.
Conb'atos de mantenimiento Sears
Su electrodoméstico Kenmore® está disertado, fabricado y
sometido.a prueba para proporcionarte años de funcionamiento
confiable. No obstante, cualquier electrodoméstico moderno
puede necesitar servicio técnico dé vez en cuando. El contrato
de mantenimiento Sears le ofrece un programa de servicio
excepcional, a un precio accesible. : : : ' ■
El contrato de rriantenimiento Sears
Es la manera de.adquinr el servicio técnico del mañana a
■precios.de .hoy,. ..V;;; ' t: :: :: :: : ::
Elimina las facturas de reparación producidas por el uso
normal y el desgaste. '
■ Proporciona asistencia no técnica y educativa.
■ Aún cuando no necesite reparaciones, le proporciona una
revisión anual de mantenimiento preventivo a solicitud suya,
para asegurarse de que su electrodoméstico está en
condiciones apropiadas de funcionamiento. :
.......... ............ ................
Se aplican ciertas restricciones. Para obtener más
infcH'mación, llame al 1-888-784-6427.
Para obtener información referente a los contratos de
mantenimiento de Sears Canadá, llame al 1-800-361-6665.
Durante un año a partir de la fecha de compra, siempre y cuando
la estufa sea instalada y operada de acuerdo con las
instrucciones proporcionadas en el Manual de uso y cuidado y
las instrucciones de instalación, Sears reparará esta estufa, sin r
costo alguno, si tuviese defectos de materiales o de mano de
obra...'
............... ....................
.
RESTRICCIÓN DE LA GARANTÍA
Si se somete a la estufa a un uso ajeno al doméstico privado, la
cobertura.de las garantías arriba citadas queda restringida a sólo
'90 días. - ■ : r.
....
r ■ r
SERVICIO DE REPARACION DE LA GARANTÍA
EL SERVICIO DE REPARACIÓN DE LA GARANTÍA ESTÁ A SU
DISPOSICIÓN AL CONTACTARSE CON EL CENTRO DE
SERVICIO SEARS DE SU LOCALIDAD EN LOS ESTADOS
UNIDOS. .Esta garantía corresponde sólo mientras se use e!
producto en los Estados Unidos. Esta garantía le otorga
derechos legales específicos y es posible que usted tenga
también otros.derechos que.pueden variar de un estado a otro.
Para recibir información acerca de la garantía de Sears en los
Estados Unidos, sírvase tomar como referencia los números de
servicio técnico ubicados en la contraportada del manual.
Sears, Roebuck and Co.
D/817WA, Hoffman Estates, IL 60179
REGISTRO DEL PRODUCTO
En et espacio a continuación anote el número completo del
modelo y de la serie así como la fecha de compra. Usted podrá
encontrar esta información en la etiqueta con el número del
modelo y de la serie, localizada tal como se ilustra en la sección
de Piezas y características de este manual. Siempre que se
ponga en contacto con Sears respecto a su electrodoméstico,
tenga esta información a mano para facilitar la obtención de
asistencia o servido-
NUmero..de modelo 665.
_________________
_______________________
Número de serie.
Fecha de compra
Guarde estas instrucciones y su comprobante de ventas para
: consulta futura.
27
Page 28

SEGURIDAD DE LA ESTUFA
Su seguridad y la seguridad de los demás es muy importante
Hemos inciuido muchos mensajes importantes de seguridad en este manual y en su electrodoméstico.
Lea y obedezca siempre todos los mensajes de seguridad. :
Este es el símbolo de advertencia de seguridad. —
Este símbolo ie llama ia atención sobre peligros potenciales que pueden ocasionar la muerte o una
lesión a usted y a los demás.
Todos los mensajes de seguridad irán a continuación de! símbolo de advertencia de seguridad
y de ia palabra "PELIGRO” o “ADVERTENCIA”. Estas palabras significan:
A PELIGRO
AADVERTENCIA
Todos ios mensajes de seguridad le dirán el peligro potencial, le dirán cómo reducir fas posibilidades de sufrir
una lesión y lo que puede suceder si no se siguen las instrucciones, :^ ^ ^ ^ ^ ^ ^ ^ ^ ^ ^ ^ ^ ^
ADVERTENCIA: Para su seguridad, la información en este manual debe ser observada
para minimizar el riesgo de incendio o expiosión, o para prevenir daños a propiedades,
heridas o ia muerte. ..........................................
.....
: :
Si no sigue las instrucciones de inmediato, usted
puede morir o sufrir una lesión grave.
Si no sigue las instrucciones, usted puede morir
o sufrir una lesión grave.
.................
.....................
No almacene o use gasolina u otros líquidos y vapores inflamables cerca de este u otro
aparato electrodoméstico.
PASOS QUE USTED DEBE SEGUIR SI HUELE A GAS:
• No trate encender ningún aparato eiectrodoméstico.^^^^
• No toque ningún enchufe eléctrico.
• No use ningún teléfono en su casa o edificio.
• Llame inmediatamente a su proveedor de gas desde el teléfono de un vecino
Siga las instrucciones de su proveedor de gas.
• Si usted no puede comunicarse con su proveedor de gas, Mame ai departamento
de bomberos. :■ ■■■ ■ >■■ V':;;■■ ■ .....
La instalación y el servicio deben ser efectuados po'" un instalador
calificado, una
agencia de servicio o por el proveedor de gas. ..................................
La California Safe Drinking Water and Toxic Enforcement Act (La ley de ia protección del agua potable y
ia eliminación de sustancias tóxicas de California) exige que el gobernador de California publique una lista de
aquellas sustancias identificadas por el estado de California como causantes de cáncer, defectos congénitos
o algún otro tipo de daños en ia función reproductora y exige a ios comerciantes que adviertan de los posibles
riesgos de exposición a tales sustancias.
ADVERTENCIA: Este producto contiene una sustancia química identificada por el estado de California como
causante de cáncer, defectos congénitos o algún otro tipo de daños en la función reproductora.
Este electrodoméstico puede producir una exposición de bajo nivel a alguna de las sustancias enumeradas,
incluyendo el benceno, formaldehído, monóxido de carbono, tolueno y hollín.
28
.............
Page 29
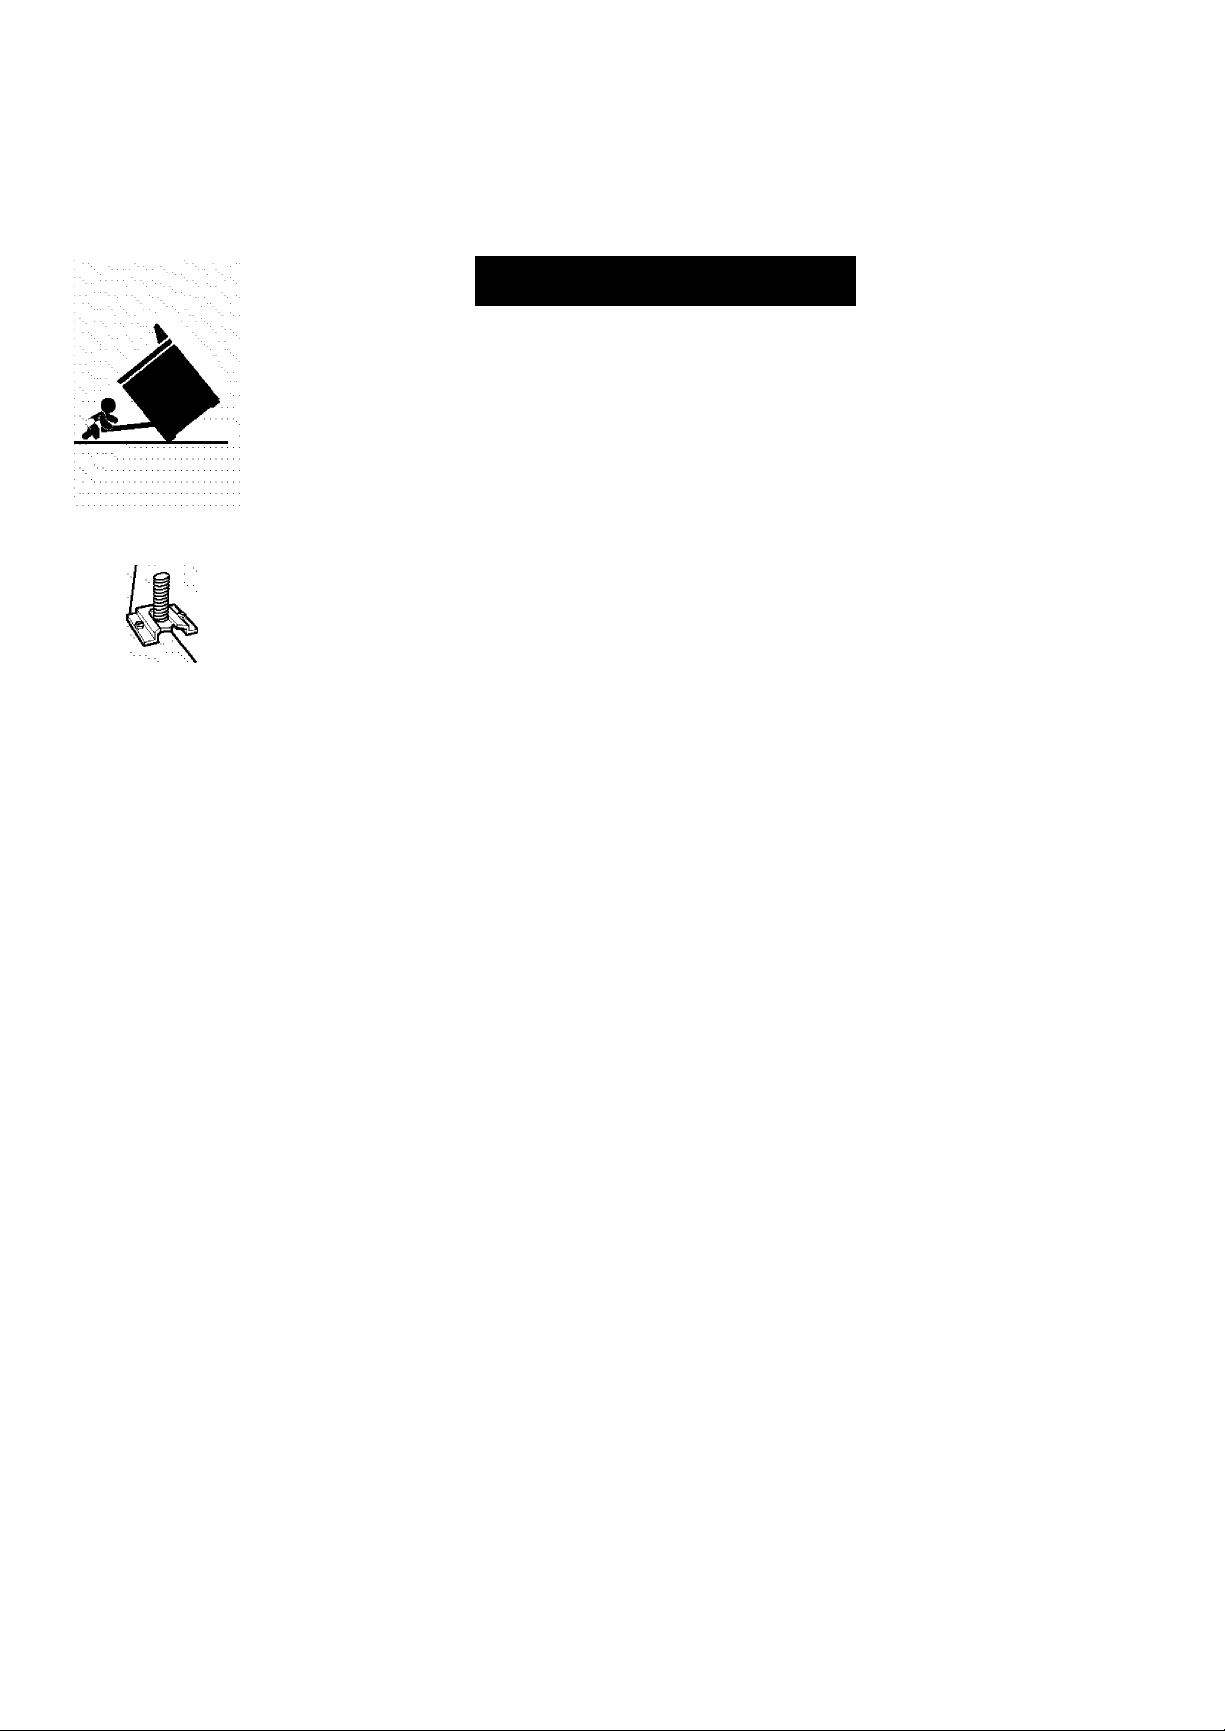
El Soporte aniwyelco' :
La estufa no se volteará durante el uso normal. Sin embargo, si usted aplica mucha fuerza o peso a la puerta abierta sin haber fjjado
adecuadamente el soporte antivuelco, la estufa puede voltearse.
....................................................
A ADVERTENCIA
Peligro de Vuelco
Un niño o un adulto puede volcar accidentalmente la estufa y resultar muerto.
Conect® el soporte anti-yuelco a la pata trasera de la estufa.
Si traslada de lugar la estufa, vuelva a conectar el soporte anti-vuelco.
Consulte las instrucciones de instalación paramás detalles.
No seguir estas instrucciones puede ocasionar la muerte o quemaduras graves en niños
y adultos. '......................................................................................................................................
.......
El soporte antbvuelco
La pata trasera
Asegúrese de que el soporte anti-vuelco haya sido instalado:
• Deslice la estufa hacia adelante. ;
• Verifique que el soporte anti-vuelco esté bien asegurado al piso.
• Deslice la estufa para colocarla de nuevo en su lugar asegurándose de que la pata
trasera quede debajo del soporte anti-vuelco. ^ ^ ^ ^ ^ ^ ^ ^ ^ ^ ^ ^ ^ ^
INSTRUCCIONES IMPORTANTES DE SEGURIDAD
ADVERTENCIA; Para reducir e! riesgo de
incendio, electrocución, lesiones a personas o daños ai
usar la cocina de gas, siga precauciones básicas,
incluyendo las siguientes:
■ ADVERTENCIA: PARA REDUCIR EL RIESGO DE
VOLTEO DE LA COCINA DE GAS, ÉSTA DEBE ASE
GURARSE EN EL PiSO MEDÍANTE LA INSTALACIÓN
DE DiSPOSmVOS DE ANTi-VUELCO. PARAVERi
FICAR SI LOS DISPOSITIVOS ESTÁN INSTALADOS
ADECUADAMENTE, DESLICE LA COCINA DE GAS
HACIA ADELANTE, CERCIÓRESE QUE EL SOPORTE
ANTI-VUELCO ESTÉ BIEN FIJO EN EL PISO Y DE
SLICE LA COCINA DE GAS HACIA ATRÁS DE MA
ÑERA QUE LA PATA TRASERA DE LA COCINA DE :
GAS QUEDE FIJA DE BAJO DEL SOPORTE DE ANTI
VUELCO. T-.': 't': ■■■■■■■■■■■■■ ■;■■■■■ "■ ■
AVISO: No aimacene artícuios que interesen a los
niños en ios armarios que están encima de una cocina
de gas o en el respaldo de protección de una cocina ::
de gas - al trepar los niños encima de la cocina para
alcanzar algún objeto, podrían lastimarse seriamente.
instaiación Apropiada - Instalar la cocina de gas
debe hacer la conexión eléctrica a tierra de acuerdo
con las normas locales o, en ausencia de normas
locales, con el Código Eléctrico Nacional (National
Eléctrica! Code), ANSI/NFPA 70. En Canadá, la
cocina de gas debe tener su conexión eléctrica a
tierra de conformidad con el Código Eléctrico
Canadiense. Cerciórese que la instaiación y puesta a
tierra de la cocina de gas sean efectuadas
adecuadamente por un técnico competente.
Esta cocina de gas está equipada con un enchufe de
tres puntas con contacto a tierra para su protección
contra riesgo de electrocución y debería enchufarse
directamente a un tomacorriente que tiene conexión
a tierra. No corte ni quite la punta para conexión a
tierra de este enchufe.
Desconecte la energía eléctrica antes de hacer
una revisión a! aparato electrodoméstico.
Nunca use la cocina de gas como calefacción del
cuarto. : V
E! mal uso de las puertas o gavetas de! aparato
electrodoméstico, tales como pisar, recostarse o
sentarse en las puertas o gavetas, puede ocasionar
(heridas.( ■ TV-^'.'V:^
■ Mantenimiento - Mantenga el área de la cocina de
gas despejada y libre de materiales combustibles,
gasolina y otros vapores y líquidos inflamables.
■ Almacenaje dentro o encima de la cocina de gas No se debe almacenar materiales inflamables en
el horno o cerca de las unidades que estári en la
V-superficie.V;: ,
■ El tamaño de la llama del quemador superior debe
ajustarse de manera que no se extienda más allá
de los bordes del utensilio de cocina.
Para cocinas de gas de limpieza automática -
■ Antes de efectuar !a limpieza automática del horno quite la charola para asar y otros utensilios. Limpie
con un trapo húmedo todo derrame excesivo antes
de iniciar el ciclo de autolimpieza.
....................
G U ARD E E STAS I N STRU CCI O N ES
29
Page 30
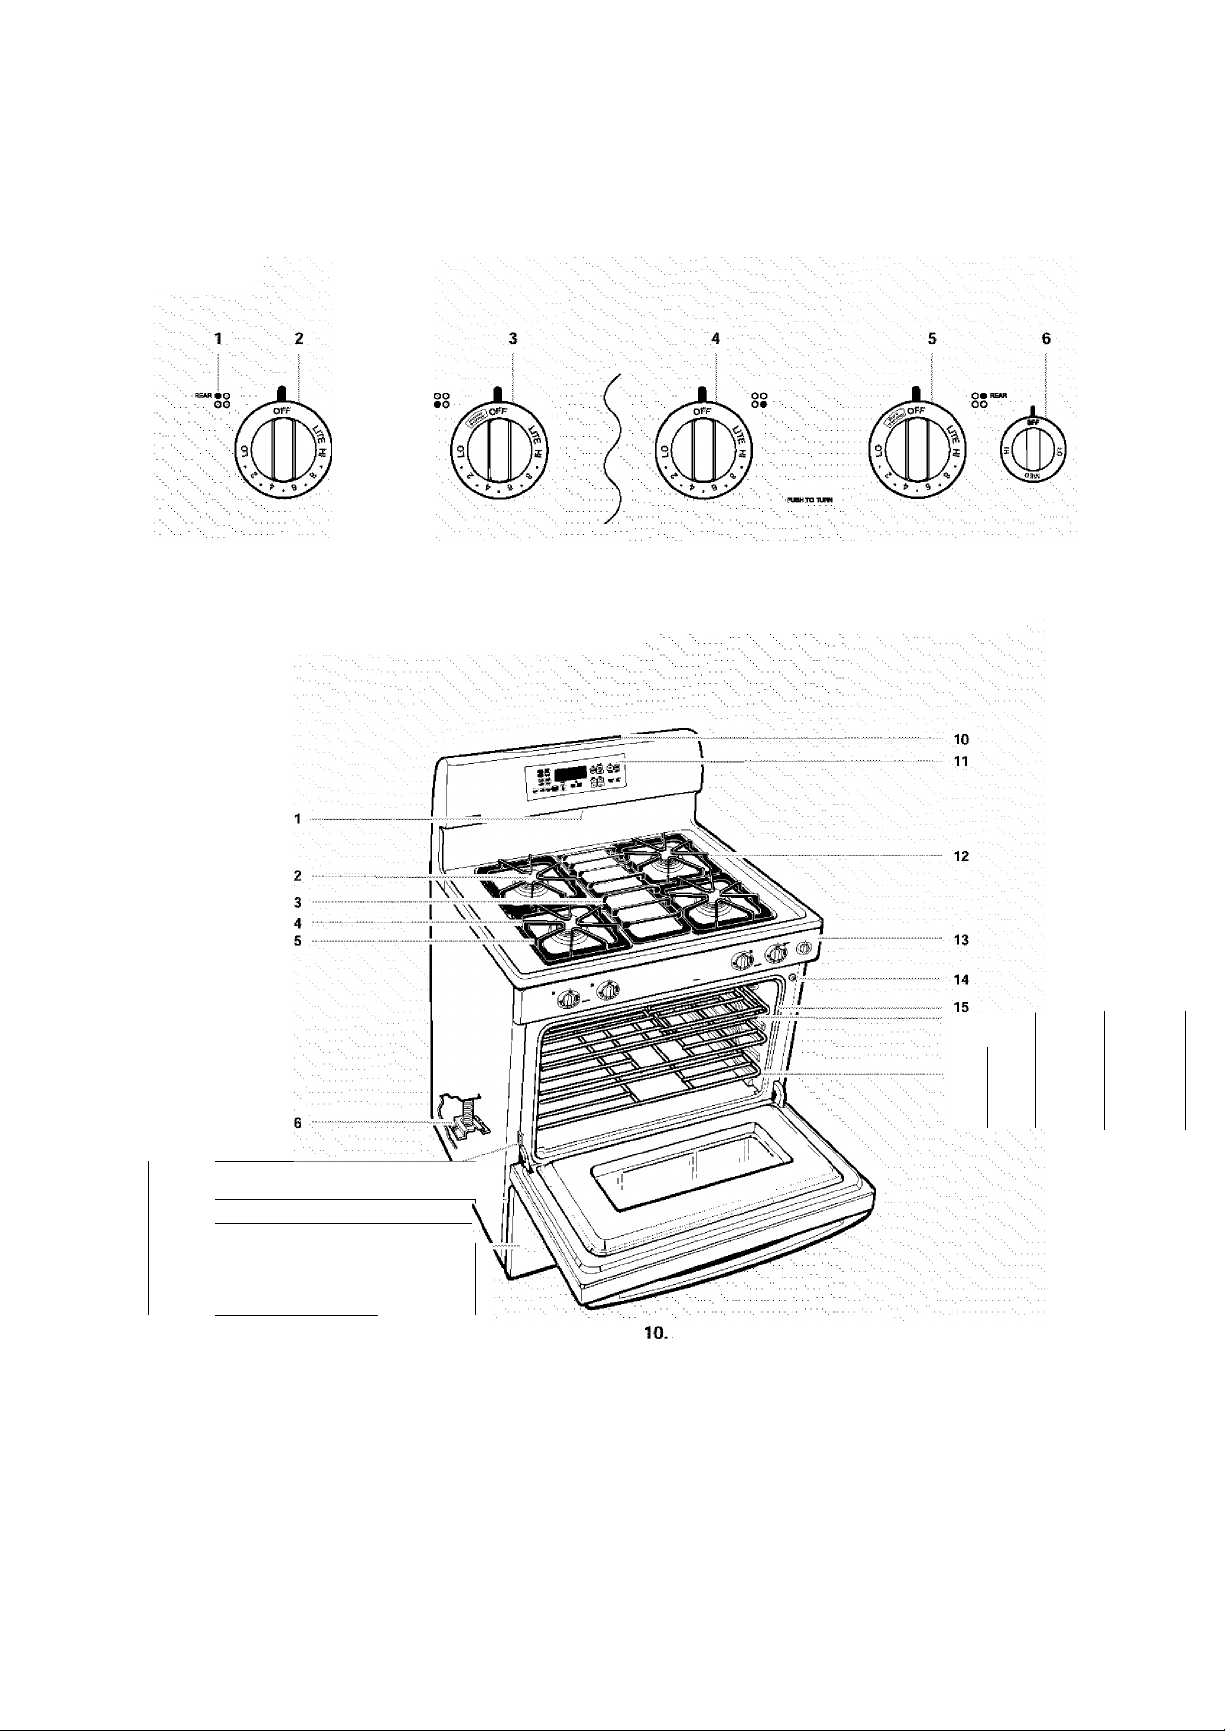
Este manual abarca varios modelos distintos. La estufa que usted ha adquirido puede tener algunos o todos los artículos que se
enumeran. Las ubicaciones y aspecto de las características que aquí se ilustran quizás no coincidan con su modelo.
Tablero de control
Indicador del quemador exterior
Control del quemador trasero
izquierdo
Estufa
3. Control del quemador delantero
izquierdo (Quemador de potencia.). ■
4. Control del quemador delantero ■. ■.
: derecho {Quemador de. potencia en
algunos modelos)
..........................
5. Control del quemador trasero derecho
... (SURESIMMER™) : :
.......
: : \
6. Interruptor selector de Warm & Ready
. (en algunos modelos)
16
17
■■■■. 1
Conducto de ventilación
del horno
Quemador exterior sellado
Parilla central (en algunos
modelos) : : :
Sistema de parrilla del
quemador : ;
Quemador de potencia
Soporte a ntivuelco
30
•. ... .8 .
..........-..
...........
................\
■
...
Ì
:•
Gancho de tope de la :
puerta L
8. Placa del número de
modelo y de serie {detrás
del lado izquierdo de la
gaveta de /
almacenamiento)
9. Gaveta calentadora Warm
& Ready (en algunos :
modelos); Gaveta de L L
almacenamiento (en
algunos modelos)
............
Luz nocturna de la consola
{en algunos modelos)
11. Control electrónico del
horno L >
12. Quemador a fuego lento
; SURESIMMER : ::::::
13. Tablero de control :
14. Interruptor automático de
.....
luz del horno
.............
15. Junta de la puerta
16. Media parrilla
STURDIGLIDE™ con
inserto desmontable (en
algunos modelos) :
17. Parrilla del horno
STURDIGLIDE con
agarradera integrada (en
algunos modelos)
Page 31
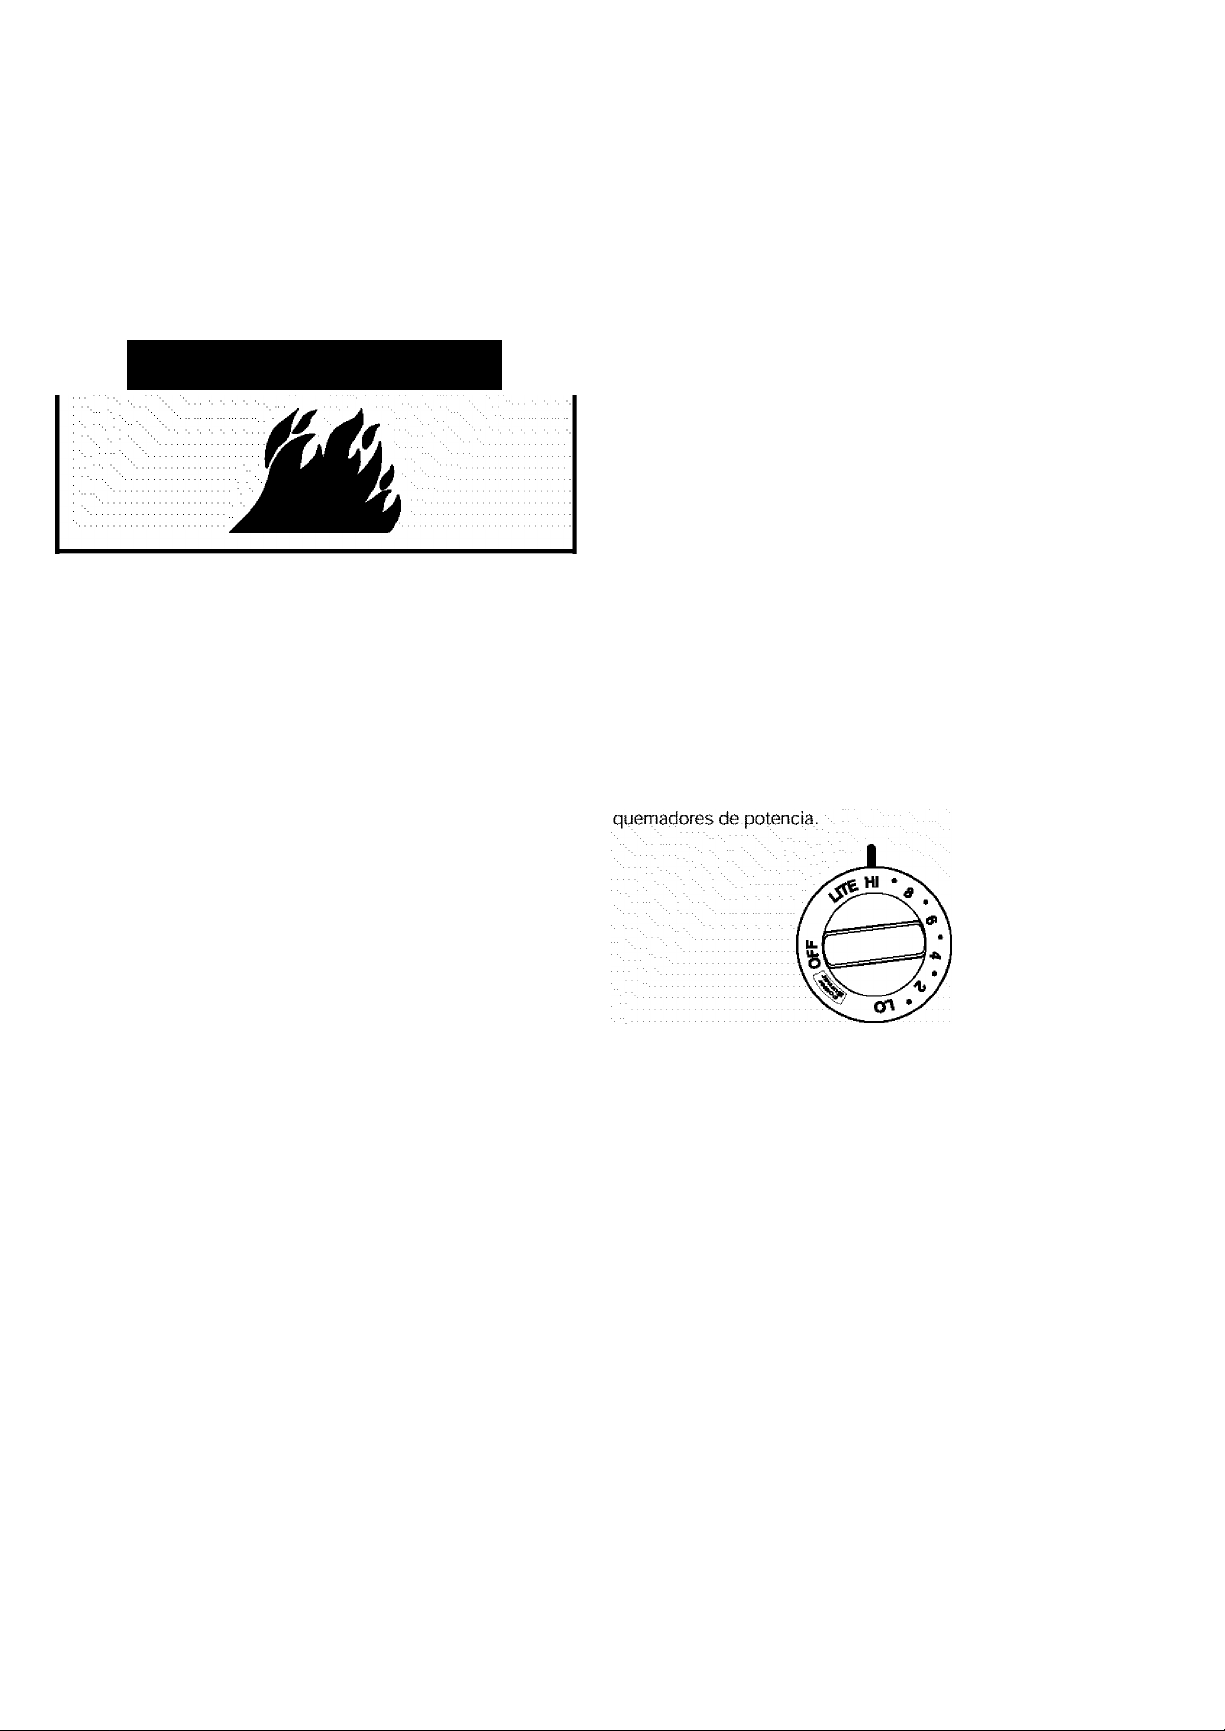
AJUSTE
USO RECOMENDADO PARA
uso DE LA SUPERFICIE
DE COCCIÓN
■ Perillas de confrol
^ADVERTENCIA
Peligro de Incendio
No permita que la ¡lama del quemador extienda
más allá que la prilla de la cacerola.
Apague todas las perillas de los controles
; cuando no esté cocinando.
No seguir estas instrucciones puede ocasionar la
muerte o incendio.
Los encendedores eléctricos encienden automáticamente los L
quemadores exteriores al girar las perillas de control hacia LITE.
Antes de fijar una perilla de control, coloque el utensilio de cocina
lleno en la parrilla. No ponga a funcionar un quemador con un j
utensilio de cocina vacío o si la parrilla está libre.
Quemador de
potencia
{quemador delantero
izquierdo)
SURESIMMER™
(quemador trasero
derecho) { j j j j
.................
....
Proporcionar el ajuste de calor
más alto.
Proporcionar el ajuste para hervor
a fuego lento/calor más bajo. :
Derretir chocolate o mantequilla.
RECUERDE: Cuando se esté usando ia estufa o (en
algunos modelos) durante ei dcio de auto limpieza,
toda la superficie de cocción se calienta. ^ ^
Corte de corriente
En el caso de un corte de corriente prolongado, se pueden
encender los quemadores exteriores manualmente. Sostenga un
cerillo encendido cerca del quemador y gire la perilla a la ^ ^
izquierda hacia LITE. Después de que el quemador se encienda,
gire la perilla ai.ajuste.deseado. ; ■
Quemador de potencia
El quemador delantero izquierdo está diseñado para
proporcionar energía ultra alta cuando está encendido en toda su
potencia. Puede ser utilizado para hacer hervir un líquido
rápidamente y para cocinar grandes cantidades de alimentos. En
....
Para fijar;
1. Oprima y gire la perilla a la izquierda hacia LITE.
: Los cuatro quemadores exteriores harán un chasquido pero
sólo el quemador cuya perilla de control esté en LITE
producirá una llama. :
2.
Giré la perilla hacia cualquier posición entre Hl (alto) y LO
(bajo). Use el.siguiente cuadro como gula para fijar los niveles.
de calor. ■ ■
AJUSTE
LITE Encender el quemador.
Hl
Escala media
(entre Hl y L<D).
LO
..................■ .......... ............. ................. ...........
..........................
..............
. Freír polio. \ \
...........................
...........................
USO RECOMENDADO PARA
Comenzar a cocinar los
alirnentos. ::: '
Hacer hervir un liquidó.
Mantener un hervor rápido.
^ Dorar rápidamente los alimentos.
■ Mantener un hervor lento.
Freír o sofreír los alimentos.
■ Preparar sopas y salsas.
Mantener los alimentos calientes. L L pantalla. Después de 5 segundos, "Loe On" desaparecerá de la
Para hervir a fuego lento.
..................... ^ aparecerá la figura de la superficie de cocción.
■ ; y.Bfociijeo tíe.la-superieie de cocción :
■■■■ ■ ■ j■ .VV:;■ ;-^n.#c|ünosmodeto^,, : : :,:. :
El bloqueo de la superficie de cocción impide e! uso accidental
de los quemadores exteriores. Cuando la superficie de cocción
está bloqueada, ios quemadores exteriores no pueden '
.ericenderse.cori las perillas de control. : : : : : : : :
Cuando se suministre energía a la estufa por primera vez, o si la
misma se ha quedado sin.energía, los quemadores de la
superficie estarán en la posición de bloqueo de la superficie de.
cocción. Los quemadores de la superficie no podrán ser : : : : : : : : .
activados hasta que se restablezca la energía al
electrodoméstico, y/o hasta que esté desactivado el bloqueo de
la superficie de cocción.
Para bioquear/desbloquear la sup^cie de cocción:
Antes del uso, ponga todas las perillas de control en OFF.
Presione y sostenga el botón TOP 5 segundos hasta que se
escuche una sola señal audible y "Loe on" aparezca en la
.........
Repita el procedimiento para desbloquear la superficie de
:::::::: cocción. "Loe OFF" aparecerá en la pantalla 5 segundos y la
.........
figura de una superficie de cocción desaparecerá de la pantalla.
..................
31
Page 32
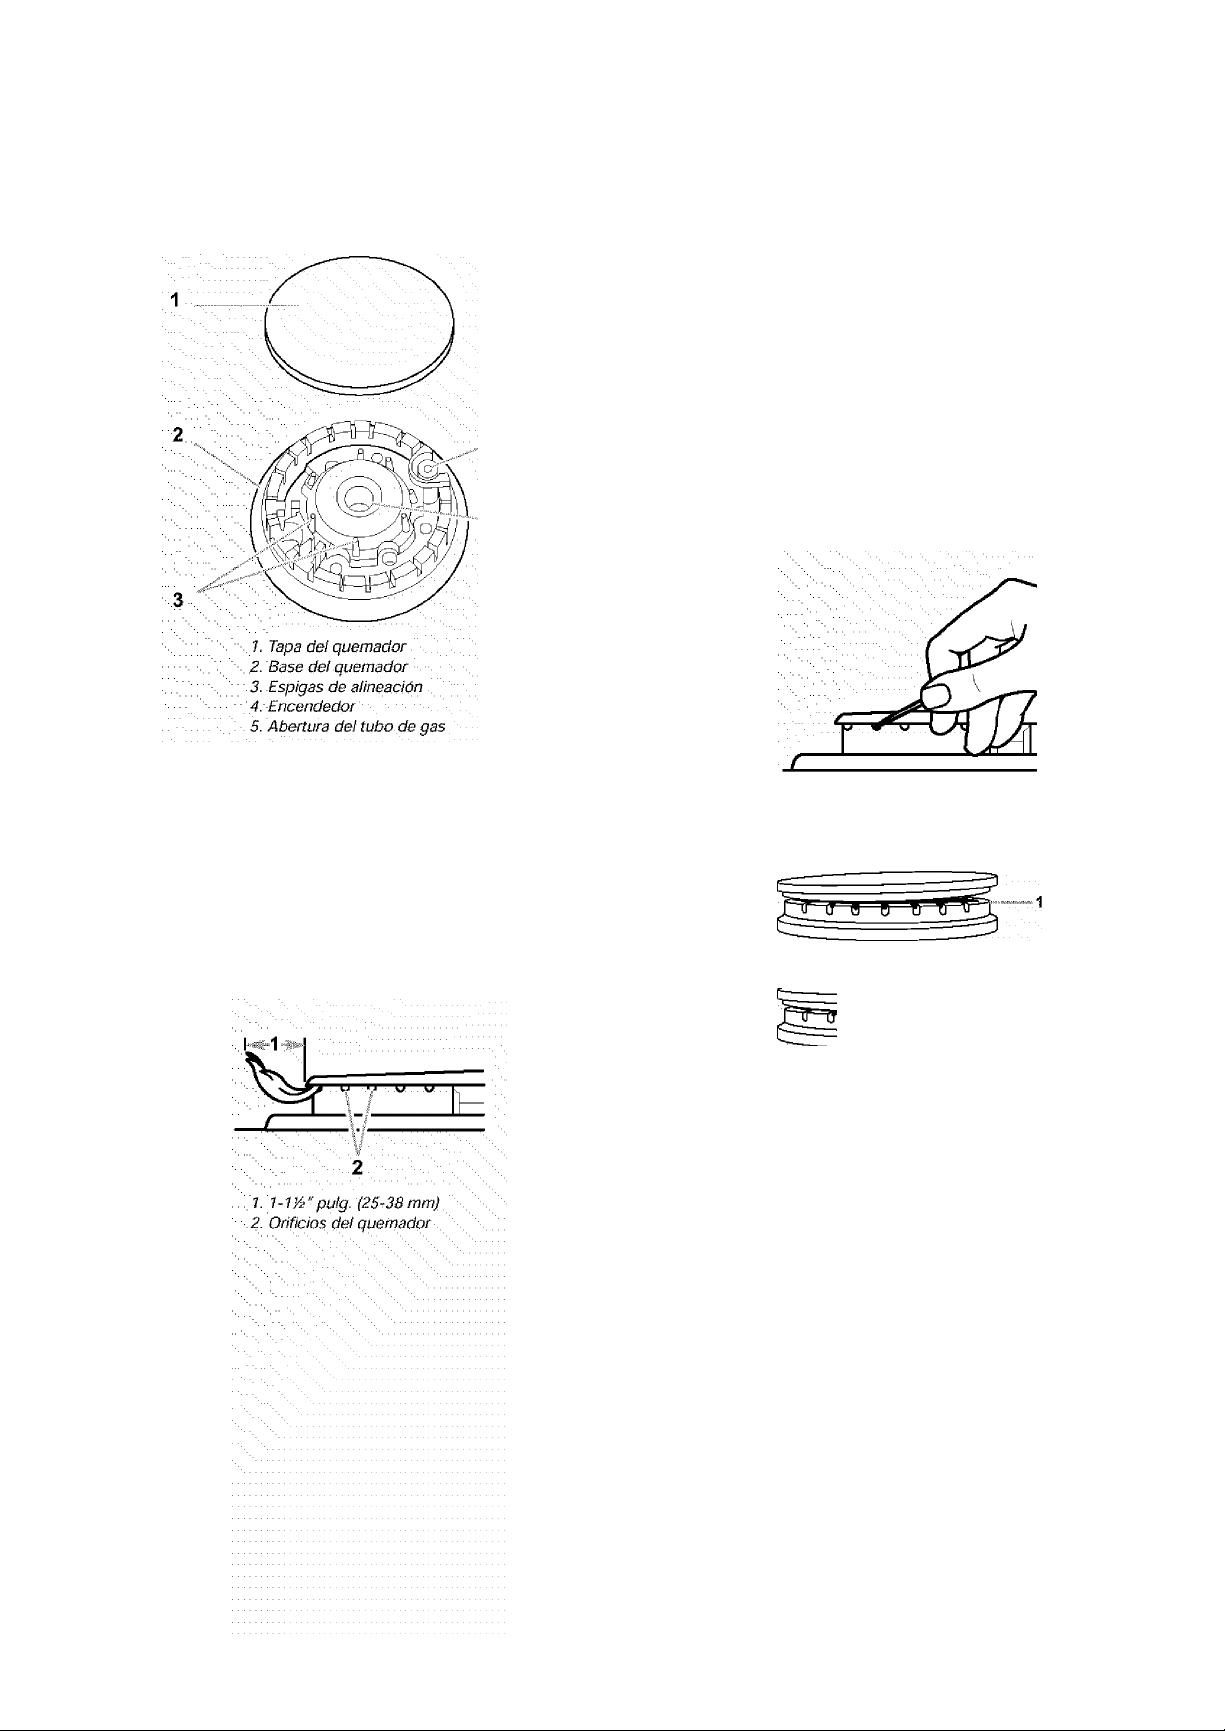
Qiiemaí>', / í rteriores sellados : ■
IMPORTANTE: No obstruya el flujo de aire de ventilación y
combustión alrededor de los bordes de la parrilla del quemador.
Orificios del quemador: Verifique de vez en cuando que las
llamas del quemador sean del tamaño y forma apropiada tal
como se muestra arriba. Una buena llama es de color azul, no
amarillo. Mantenga esta área libre de suciedad y no permita que
los derrames, alimentos, productos de limpieza o cualquier otro
materia! se introduzca en los orificios del quemador.
Para limpiar:
IMPORTANTE: Antes de limpiar, asegúrese de que todos los
controles estén apagados y que el horno y la superficie de
cocción estén fríos. No use limpiadores de horno, blanqueador o
productos para quitar óxido. :: ::
1. Quite la tapa del quemador de la base del mismo y limpie dé
. .. acuerdo con ¡a sección "Limpieza general." : : : :::
2. Limpie la abertura dei tubo de gas con un paño húmedo.
3.
Limpie los orificios obstruidos del quemador con un alfiler
recto tal como se Ilustra. No agrande ni distorsione el orificio.
No use palillos de dientes de madera. Si el quemador
necesita ser regulado, póngase en contactó con un
especialista de reparaciones competente de Sears.
Tapa de! quemador: Mantenga siempre la tapa del quemador en
su lugar cuando use un quemador exterior. Una tapa de
quemador limpia ayudará a prevenir un encendido inadecuado y
una llama desigual. Limpie siempre la tapa del quemador
después de un derrame y como rutina quite las tapas y limpíelas
de acuerdo con la sección "Limpieza general." : : :
Abertura de! tubo de gas: El gas debe fluir con libertad a través
de la abertura del tubo de gas para que el quemador se encienda
adecuadamente. Mantenga esta area libre de suciedad y no :
permita que derrames, alimentos, productos de limpieza o
cualquier otro materia! se introduzca en la abertura del tubo de
gas. Use siempre la tapa del quemador para protegerla de
derrames.
4.
Vuelva a colocar la tapa dei quemador, asegurándose de que
las espigas de alineación de la tapa estén debidamente
alineados con la base del quemador. :
Я В t) ТГ
7. Incorrecto
2. Correcto
5.
Encienda el quemador. Si el quemador no se enciende,
verifique la alineación de la tapa. Si el quemador todavía no
se enciende, no intente reparar el quemador sellado usted
mismo; póngase en contacto con un especialista de
reparaciones, competente.
32
Page 33
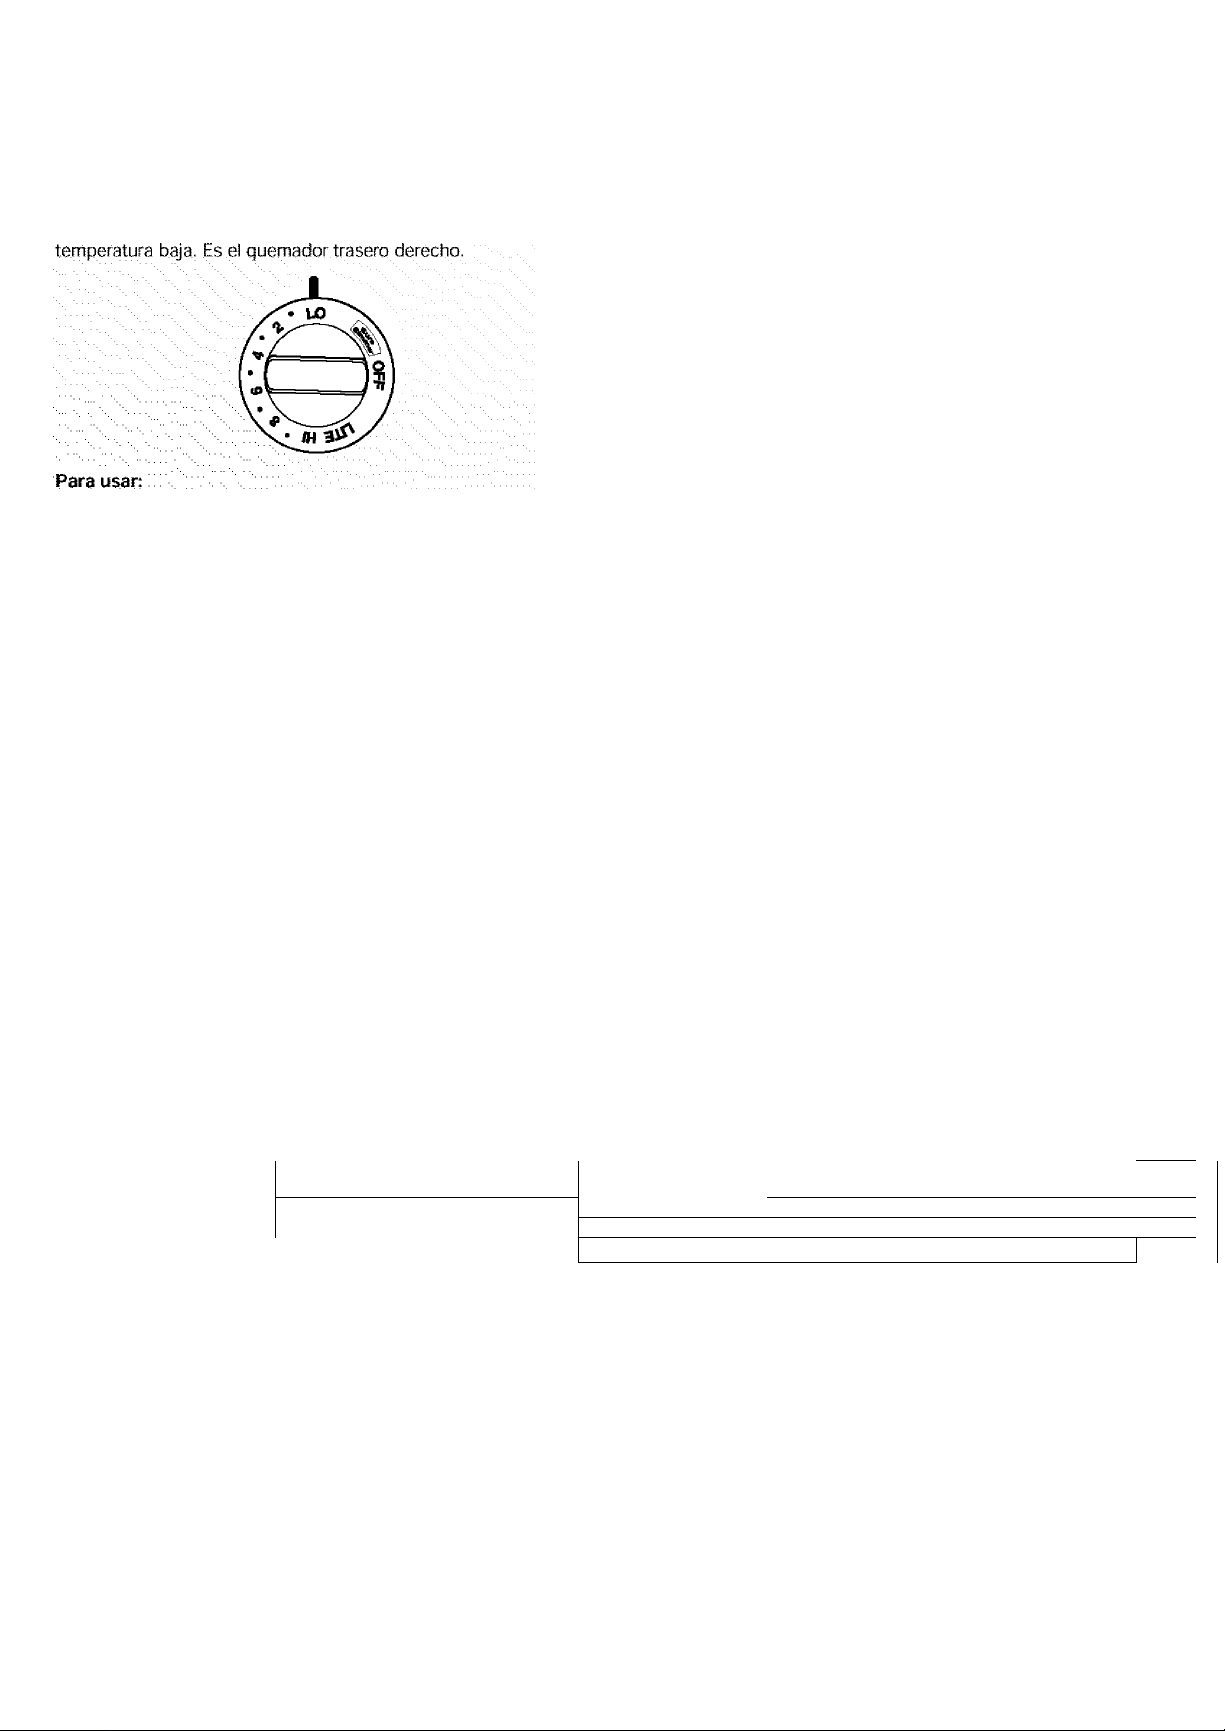
Ei quemador SURESIMMER es un ajuste de calor regulable para
lograr un hervor a fuego lento preciso y una cocción a
1.. Oprima la perilla del quemador trasera derecha y gírela a la
izquierda hacia."LITE", luego hacia "LO".' : :::
2. Oprima y gire la perilla hacia OFF cuando termine. .............
;;; T; ■>.; : ■ 'MrÉBMÚQ Caseró :::: V: ■ ;; V::: ;■
.Al preparar enlatados durante períodos prolongados, alterne el
uso de las áreas de cocción exteriores, elementos o quemadores
exteriores entre cada lote..Esto da tiempo para que las áreas ;
usadas recientemente.se enfríen. ;;;; ' ; ■.
■ Centre el envasador en la parrilla o el área o elemento de :
cocción exterior más grande. Los envasadores no deben
: extenderse más de 1 pulg. {2,5 cm) fuera del área de cocción.
■ No coloque el envasador sobre dos áreas de cocción
exteriores, elementos o quemadores exteriores a la vez.
■ En modelos con cerámica vitrificada, use únicamente :
envasadores de fondo llano.
■ En modelos con elementos en espiral, se recomienda la
instalación de un equipo para envasar. De no instalarlo, la
duración del elemento en espiral se acortará. Vea la '
: contraportada para obtener las instrucciones de cómo
pedirlo,
■ Para mayor información, póngase en contacto con la Oficina
de Extensión del Departamento de Agricultura del Gobierno
: de los EE,UL), Las compañías que fabrican productos para
enlatado casero también pueden ayudarle. /
.........
::: L: ::: :: Utensilios de cocifia
IMPORTANTE; Nunca deje utensilios de cocina vacíos encima
de un área de cocción exterior, elemento o quemador exterior
caliente. : : V /
Los utensilios de cocina ideales deben tener un fondo piano,
lados rectos, una tapa que encaje bien y el material debe ser de
un espesor mediano a grueso.
Las superficies ásperas pueden arañar la superficie de cocción.
El aluminio y el cobre pueden emplearse como núcleo o base en
los utensilios de cocina. Sin embargo, al ser usados como base,
pueden dejar rnarcas permanentes en la superficie de cocción o
las.parrillas.. ::: :: L ■.
El material de los utensilios de cocina es un factor que repercute,
en la rapidez y uniformidad en que se transmite el calor, lo cual
afecta los resultados de cocción. Un acabado antiadherente: {
tiene las mismas características de su material base. Por
ejemplo, utensilios de aluminio con un acabado antiadherente
tendrán las propiedades del.aluminio. :
Use el siguiente cuadro como gula respecto a las características
del material de los utensilios de cocina.
CARACTERÍSTICASUTENSILIOS DE
COCINA
Alurninio Calienta rápida y uniformemente.
...................................
Hierro fundido p Calienta lenta y uniformemente.
: : L L L L L L ^ ^ ^ ^ ^ ^ ^ ^ ^ ^ ^ Mantiene el calor para una cocción
...................................
Cerámica o
cerámica
vitrificada
Cobre. ; calienta muy rápidamente y
.....................................uniformemente.
.............
...................
: : : : : : : : : : : : : : : : : : : : : : ^ Espesor mediano o grueso es mejor
...................
■ Adecuado para todo tipo de cocción.
para la mayoría de tareas culinarias.
■ : Bueno para dorar y freír.
lenta.
Siga las instrucciones del fabricante.
Calienta lentamente pero no
uniformemente.
Resultados ideales en ajustes de
fuego bajo a mediano.
................ ........
..... ........
....................
:
Loza de barro Siga las instrucciones del fabricante.
Use en ajustes de calor bajo.
........
Acero o hierro
........
fundido
........
esmaltado de
.....
porcelana
Acero . .. Calienta rápidamente pero no .
inoxidable
...........
. ■ Vea acero inoxidable o hierro fundido.
.....
...............
uniformemente, \
' Un centro o base de aluminio o cobre
sobre el acero inoxidable proporciona ;
un calor uniforme.
33
Page 34
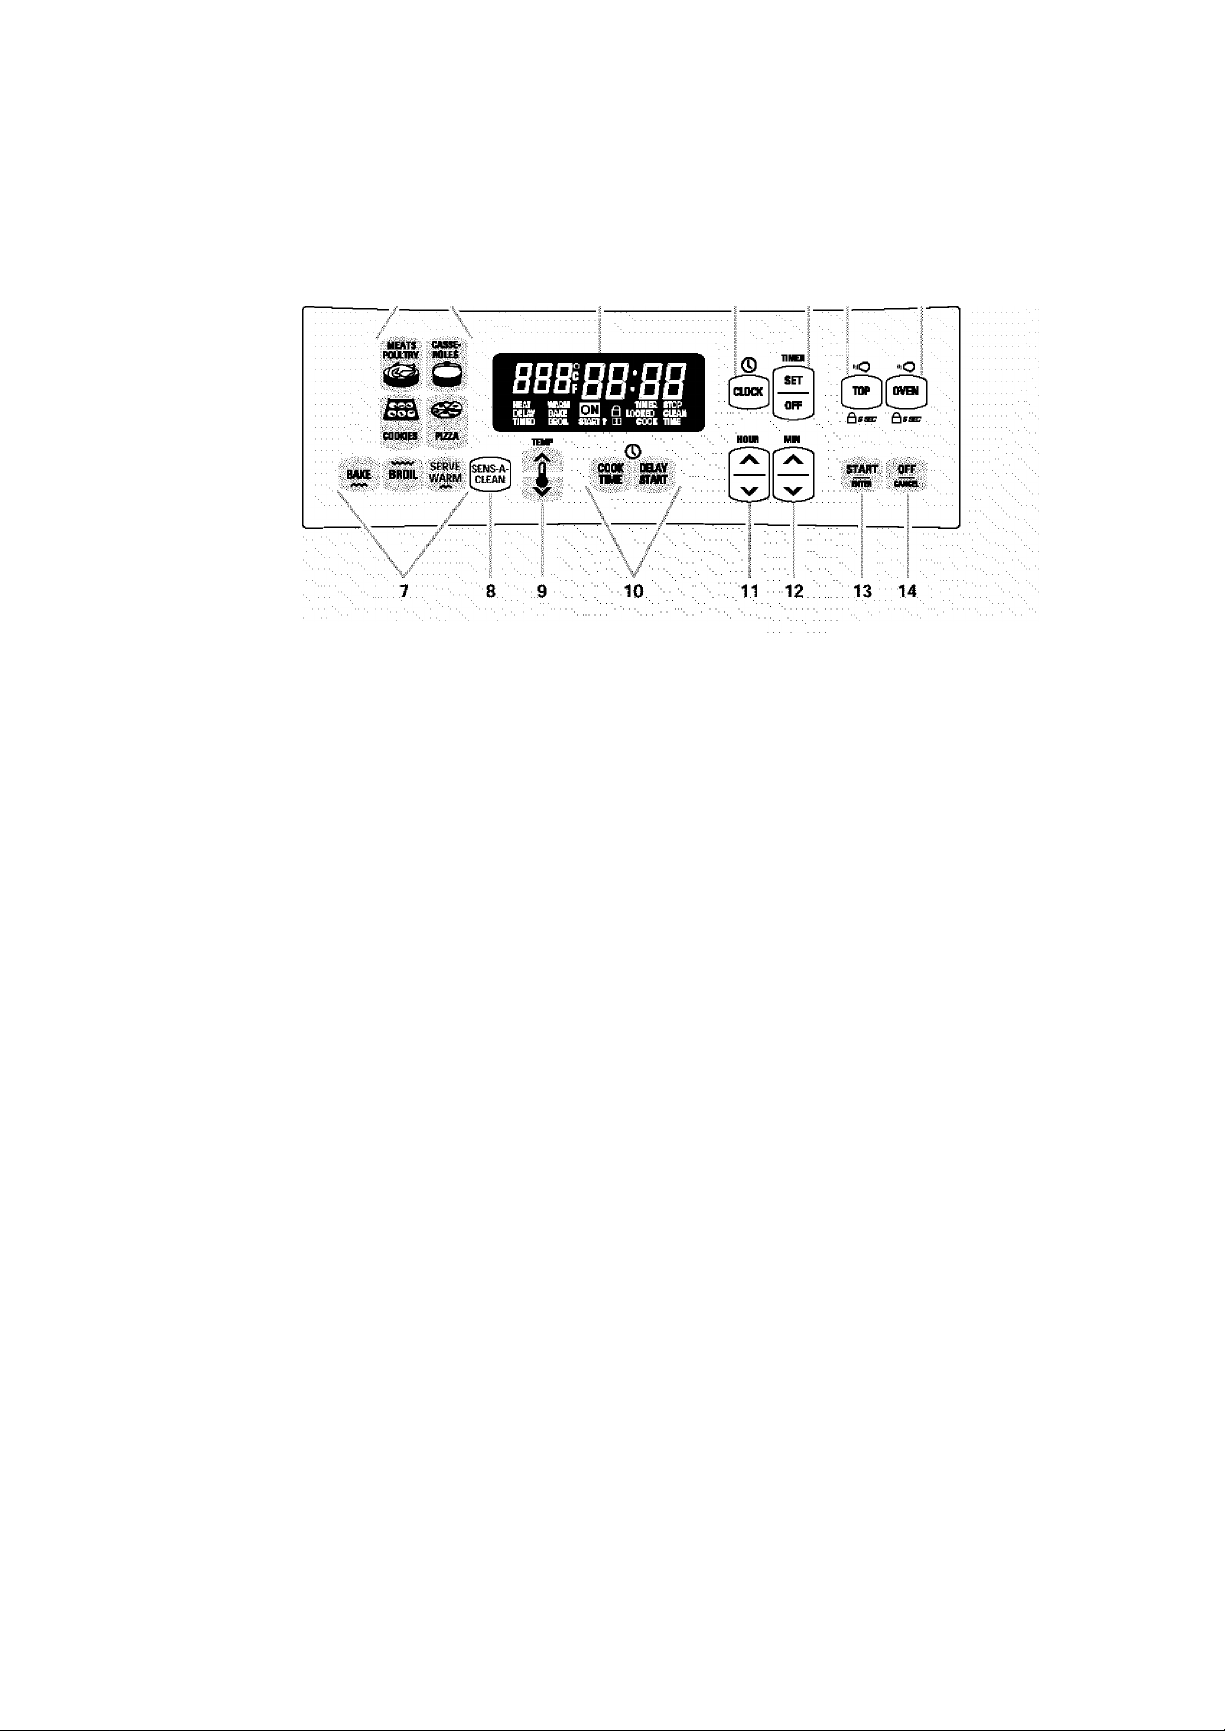
CONTROL ELECTRÓNICO DEL HORNO
1.. RECIPE RECALE™ {Repetición de
; recetas -, en.algunps modelos)
2. Pantalla. L ' ; ;
3. Reloj, ;
4. Temporizador
5. Bloqueo de la superficie de cocción
(en algunos modelos)/Luz de la
superficie de cocción (en algunos
modelos)..............
G. Luz del horno/bloqueo de! horno
7. Selectores del horno (SERVE WARM
en algunos modelos) ;
8. Autolimpieza .
SENS-A-CLEAN™ (en algunos
modelos)
LOGI-CLEAN™ (en algunos :
modelos)
SELECT clean™ (en algunos
modelos) ^
CLEAN (en algunos modelos)
...............
: Pantalla P; -
Al conectar la electricidad por primera vez a! electrodoméstico,
cerciórese de que los quemadores exteriores estén en la posición
OFF. Todo en la pantalla se encenderá durante 5 segundos. :
Luego aparecerán en la pantalla la hora, y "pf".
En cualquier otra ocasión en que aparezca en la pantalla "PF’'
significa.que ha ocurrido un corte de corriente. Para despejar;
"PF" y para.volver a .poner la hora en el reloj, presione OFF/
:.CANCEL.;:...;;;v.;;;--..-..j- ó
Cuando el horno está en uso, esta pantalla muestra la hora, .
temperatura y qué botones de mando se han presionado. ;. .
Cuando.el. horno, no está en uso, la pantalla mostrará la hora, del.
..día. ■..............................................................................................
...
:Start/Énter;|iiicío|ngre^ ';■ ■ ■: ■
El botón START/ENTER pone en marcha cualquier función del . .. .
horno. . Si no se presiona dentro de los 5 segundos después de .
haber presionado un botón, "START?" aparecerá en la pantalla.);
Cómo un recordatorio. Si no se presiona dentro de 5 minutos .
después de haber oprimido un botón, la pantalla mostrará la.hora,
del día y la función programada quedara anulada.
.........
.9. Ajuste de temperatura
10. Cocción tempórizada
11..Hora.'. ■
12. Minuto
....
^ ^
13. Inicio/Ingreso
14. Apagado/Anulado
: Reloj : :0
Ésteesun reloj de 12 horas y no muestra a.m. op.m.
Para poner ia hora:
1. Presione CLOCK,
2. Presione los botones HOUR/MIN con flechas "hacia arriba'' o
.:. "hacia abajo" ;hasta que la hora correcta del día aparezca en
ja pantalla.
3. Presione CLOCK o START/ENTER. ó ó
.......
."■■ ■ ■./ ' ' ...........................
;; ;'.L \ : ■■■Señales ay dibtes : ; ■ é ■■ /
Las.señaíes audibles son señales que indican lo siguiente:
Una señal audible
■ Presionó el botón válido
El horno está.precalentando o ha sido precalentado
.Se ha ingresado una función
Tres señales audibles
■ : Presionó un botón inválido
(Apagado/Anylado) ■:; ■
El botón OFF/CANCEL detiene cualquier función del horno a
excepción del reloj, temporizador y los bloqueos de la superficie
de cocción y del horno. /
Luego de presionar OFF/CANCEL, la pantalla mostrará la hora
de! día o en su defecto, el tiempo restante si el temporizador de
minutos también está en uso.
34
.........
Cuahx) señales audibles
■ Fin de ciclo
■ Recordatorio, repitiendo cada minuto después de las señales
de fin de ciclo
......
L /
........
Page 35

Señales audibles de ^ror
Las señales audibles de error indican un problema del control
electrónico del horno. Un código de error aparecerá en la
pantalla. ^
Volumen de la señal audible
El volumen puede regularse entre alto y bajo.
Para cambiar: Presione y sostenga DELAY START 5 segundos.
Se escuchará una señal audible corta y "Snd HI" o "Snd Lo"
aparecerá en la pantalla. Presione y sostenga DELAY START :
nuevamente 5 segundos para cambiar ai ajuste deseado.
Para despejar "Snd on", "Snd OFF", "rEP on", 'YEP off”, "Snd HI",
o "Snd Lo".presione cualquier botón, y la función presionada
.aparecerá en.|a pantalla.. : I
Señales audibles recordatorias
Las señales audibles recordatorias son cuatro señales audibles .
de 1 segundo de duración, las cuales indican que el tiempo fijado
para una función del .tempohzador o del control temporizado de!
horno.haterrnjnad.o,. .. .. Y \
Temporizador Y ^ ^ ^
Para encender o apagar las señales audibles (Off/On):
Presione y sostenga SET 5 segundos. Se escuchará una señal
audible corta y "rEP OFF" aparecerá en la pantalla. Repita el
procedimiento, para volver a encenderlas. : : : : : : : : :
Cocción temporizada
Para encender o apagar las señales audibles: Presione y
sostenga COOK TIME. Se escuchará una señal audible corta y
"Snd OFF" aparecerá en la pantalla. Repita el procedimiento para
volver a encenderlas. ..........
■ : ; V y Centígrados
La temperatura está prefijada en Fahrenheit pero puede
cambiarse a Centígrados.
Para cambiar: Presione y sostenga BROIL 5 segundos. Una : :
señal audible corta sonará y las temperaturas que están en la
pantalla cambiarán a "°C". Repita el procedimiento para volver a
Fahrenheit.
.........................
■Bloqy^ Xí ( Vil horno
El bloqueo del horno impide el uso accidental de los botones de
mando del tablero de control. El horno sólo puede ser bloqueado
cuando no está en uso o el control del mismo no ha sido fijado.
El horno permanecerá bloqueado luego de un apagón si fue
bloqueado antes de! apagón.
Para bloquear/desbloquear el horno:
Presione y sostenga OVEN 5 segundos. Se escuchará una sola
seña! audible, y "Loe on" (bloqueado) y la figura de un candado
aparecerán en la pantalla. Luego de 5 segundos, "Loe on"
desaparecerá de la pantalla y aparecerán "Loe". : :::
Se escucharán tres señales audibles cuando el horno esté :
bloqueado y cualquier otro botón de mando exceptuando
CLOCK (Reloj), TIMER (Temporizador), START/ENTER (iniciar/
ingresar), 0FF/CANC.E;L (Ap.agado/Anulado), u OVEN (Horno) ha
sido presionado.... ' ■■... j : '' Y / / :: : ■
Para desbloquear el horno, oprima y sostenga OVEN por 5
segundos. "Loc.OFF” (desbloqueado) aparecerá en la pantalla y
la figura de un candado desaparecerá de la pantalla.
.................
V-Controf de.tetiiperatúra dél horn^ : : ■ ;
IMPORTANTE: No use un termómetro para medir la temperatura.,
del horno porque e! abrir la puerta del horno y el cambio de . :
ciclos del elemento o quemador puede dar lecturas incorrectas.
El horno proporciona temperaturas precisas. Sin embargo,
quizás cocine más rápido o más lento que su horno anterior, de
modo que se puede regular la calibración de la temperatura. Se
puede cambiar a Fahrenheit o Centígrados.
Un signo de menos significa que el horno estará más frío en la
proporción indicada por la cifra que aparece en la pantalla. La
ausencia dei signo significa que el horno estará más caliente en
la proporción indicada por la cifra que aparece en la pantalla. Use
el siguiente cuadro a manera de guia.
AJUSTE "F
(AJUSTE X)
10°F(5"C)
COCINA LOS
ALIMENTOS
...un poco más
:;Terriporizadorj
E! temporizador puede ser fijado en minutos y segundos u horas
y minutes y hace la cuenta regresiva del tiempo fijado, El
.te.mpori.za.dór no pone el .horno en marcha ni lo detiene.
Para fijar: .V ■■ ■■■■■ ""■■■■ ■■■■■■■■■, v'."'
1. - Presione TIMER. SET (ajuste de! temporizador), :
2. F Presione los botones HOUR/MIN con las flechas "hacia
arriba" .o "hacia abajo" hasta que la duración correcta del
tiempo, a parezca en la pantalla. : : : : : : : : : : :
Presione START/ENTER o TIMER SET. : : : : : : : : ^ y
El temporizador comenzará a hacer la cuenta regresiva
después de que se ponga a funcionar. La pantalla hará la
cuenta regresiva en horas y minutos si el tiempo restante es
una hora o mas, y en minutos y segundos si el tiempo
restante es menos de una hora.
Cuando se termine el tiempo fijado, si está activado, se
escucharán cuatro señales audibles de 1 segundo, luego las
señales audibles recordatorias sonarán cada minuto.
Presione TIMER OFF (Temporizador apagado) en cualquier
momento para anular el temporizador y /o detener las : F
señales audibles recordatorias. : : :
.20°F (10°C)
.30°F (15°C)
-10°F (-5°C)
-20°F (-10°C)
.-3D°F.(-.15".C)
...................................
..................................
....................................
...................................
...moderadamente más
...mucho más
...un poco menos
.moderadamente menos
.mucho menos
Para regular la calibración de temperatura del horno:
1. Presione y sostenga BAKE 5 segundos hasta que la pantalla
. . ..del horno.muestre la calibración actual, por ejemplo, 0° CAL.'
2. Presione el botón TEMP con la flecha "hacia arriba" o "hacia,
abajo" para aumentar o disminuir la temperatura en
proporciones de 10°F (5°C). El ajuste puede fijarse entre SO^F
Y (15“C)y-30'’F(-15°C).
3. Presione START/ENTER.
35
Page 36
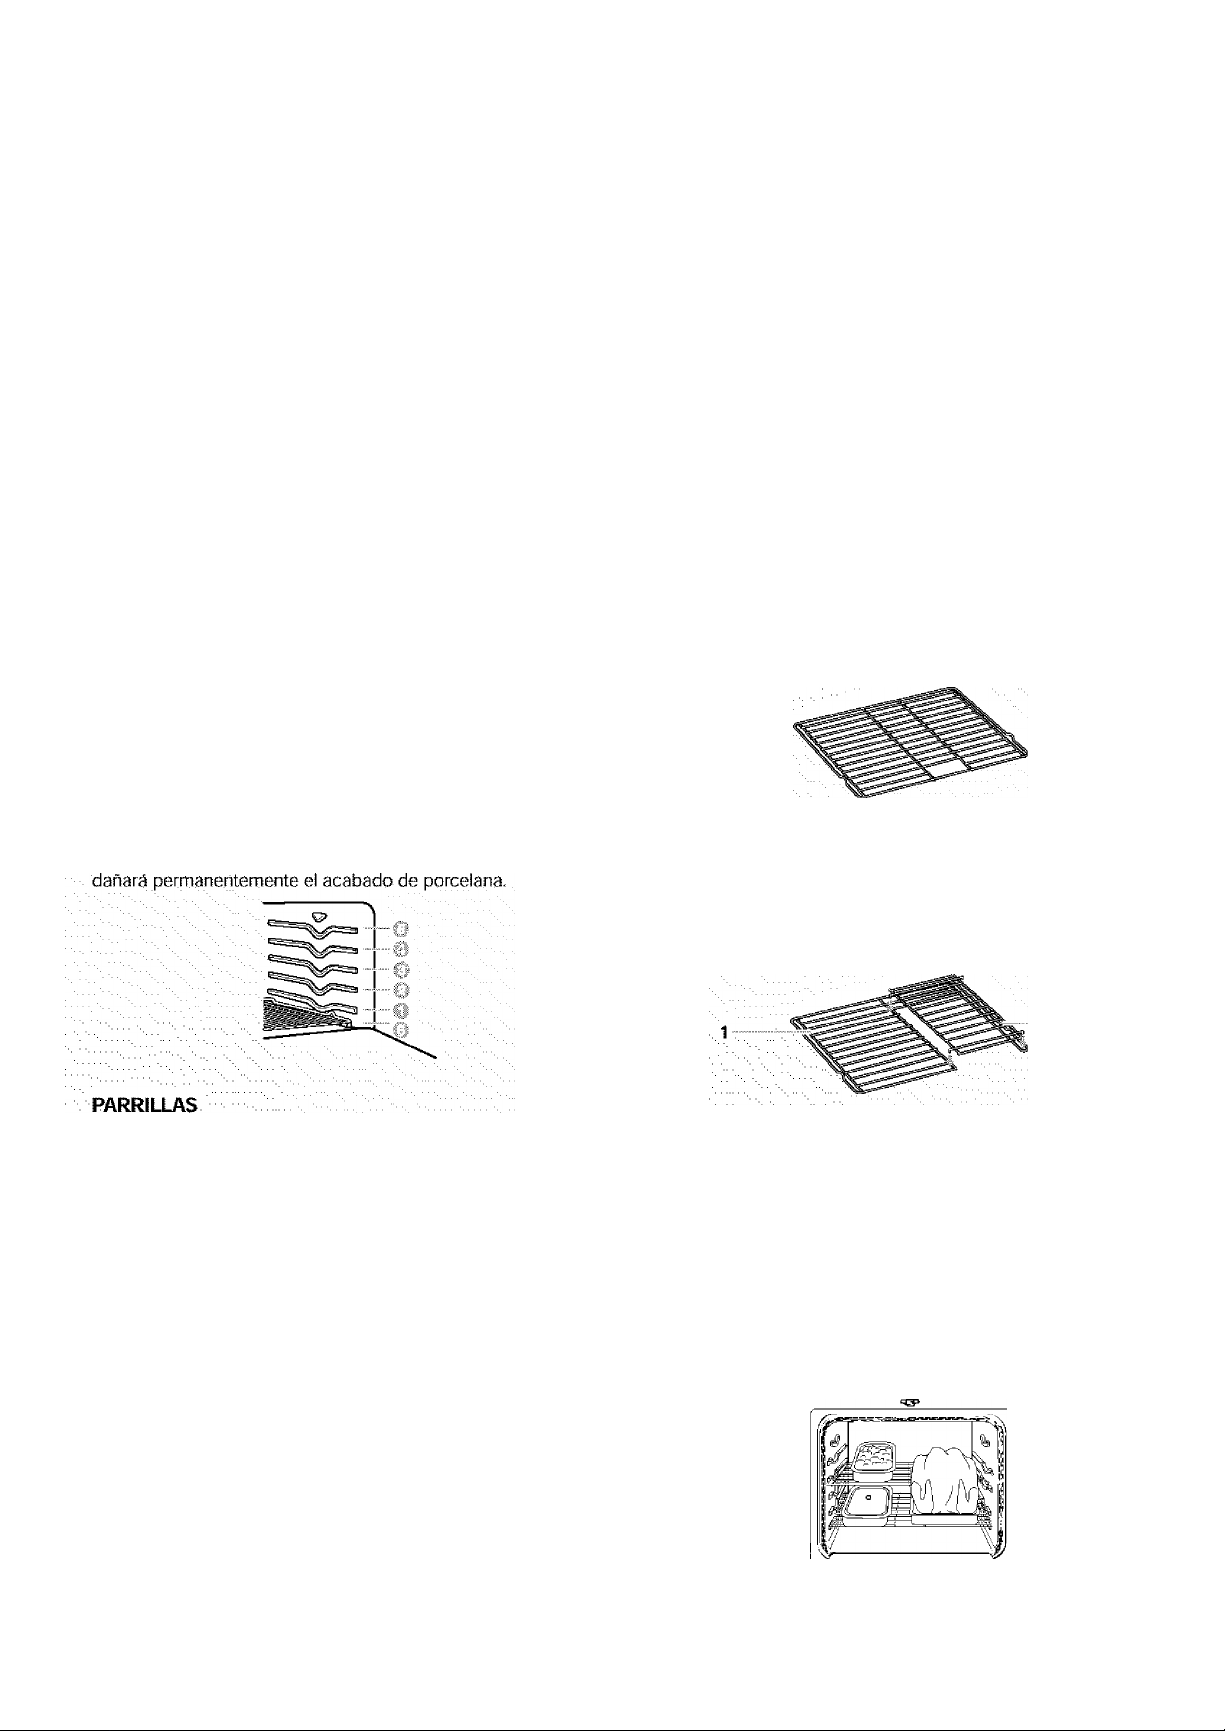
uso DEL HORNO
Los olores son normales cuando la estufa es nueva. Esto sucede
la primera vez que se usa el horno o cuando éste tiene suciedad
pesada. L : L:
IMPORTANTE: La salud de algunas aves es sumamente sensible
a los gases emanados. La exposición a los gases puede
ocasionar la muerte de ciertas aves. Mude siempre las aves a
otro cuarto cerrado y bien ventilado.
UTENSILIOS PARA HORNEAR
Para la cocción uniforme, el aire caliente debe poder circular.
Deje 2 pulg. (5 cm) de espacio alrededor del utensilio para
hornear y las paredes del horno. :
Use el siguiente cuadro como gula.
NO. DE
CACEROLA(S)
1
UBICACIÓN EN LA PARRILLA
Centro de la parrilla.
Lado a lado o ligeramente en zigzag.
Papel dé âlyiiiinfe
IMPORTANTE: No. forre el fondo del horno con ningún tipo de.
.. papel de .aluminio, revestimiento o utensilio de cocina ya que
dañaría permanentemente el acabado del fondo del horno... : :
■ No obstruya ni tape ios conductos de ventilación inferiores.
■■■■ del horno. "" /
No cubra toda la parrilla con papel de aluminio, ya que para
lograr óptimos, resultados de cocción el aire debe circular.cqn
libertad...j'-L,
Para recoger los derrames, coloque papel de aluminio en la
parrilla que está debajo del recipiente de hornear. Asegúrese
de que el forro sea porlo menos 1 pulg. (2,5 cm) más grande
que el recipiente de hornear y que ios bordes estén doblados
hacia arriba.............
......
^ ....
.........
;para hornear
IMPORTANTE: Nunca coloque alimentos o utensilios para
hornear directamente en la puerta o en el fondo del horno ya que
:.3 Ó.4 En esquinas opuestas en cada parriila. .
Cerciórese de que ningún utensilio para .
^hornear esté directamente encima del otro.
Parriilásáeí horno ST
■ ■'v.'v.; ■■. ■ V: fefl.alguros: modeló^
Parrilla con agarradera integrada
El área de. la agarradera integrada hace que se jale la parrilla con
facilidad. La abertura es lo suficientemente grande para un
agarrador de ollas o.unos guaníes para hornear.
Media parrílla con inserto desmontable
La media parrilla con inserto desmontable ahorra espacio al
máximo. Cuando ios dos están unidos, se convierten en una
parrilla completa. El accesorio puede ser usado también en el
mostrador como parrilla para enfriar.
No ponga más de 25 libras (11,4 kg) en la media parrilla.
. Ubique las parrillas antes de encender el horno. No retire las
parrillas con los utensilios para hornear sobre ellas. Cerciórese. ;;
de que .las parrillas estén niveladas. Para mover una parrilla,
jálela hasta la posición de tope, levante el borde delantero, luego
Lsáquela. Use como guía la ilustración siguiente y el cuadro.
ALIMENTO
Pays congelados, asados gra ndes, ^ ^ 1 ó 2
pavos, pasteles de ángel..........................................
Roscas Bundt, la mayoría de panes
rápidos, panes de levadura, guisados,
carnes ........................
Galletas, pastelillos, panecillos,
pasteles y pays no congelados
: Artículos extragrandes
36
POSICION DE LA
PARRILLA
2ó3
.......
7. Media parriila
2. inserto desmontable
...........
Para ubicar las pairillas:
1.
Coloque una parrilla completa en la guia 1 ó 2, y la media
parrilla en .la.guía 3.ó4. : :: : V:: :: V: .
2.
Coloque los artículos grandes en el lado derecho de la parrilla
completa...: ■ ■ : : ■ : , : : : : ; :
3. Coloque los recipientes más profundos y con tapa en el lado
.. izquierdo deja parrilla completa. : : : .. ■
4. Coioque los recipientes llanos en la media parrilla.
5. Al terminar de cocinar, retire cuidadosamente los artículos.
Page 37
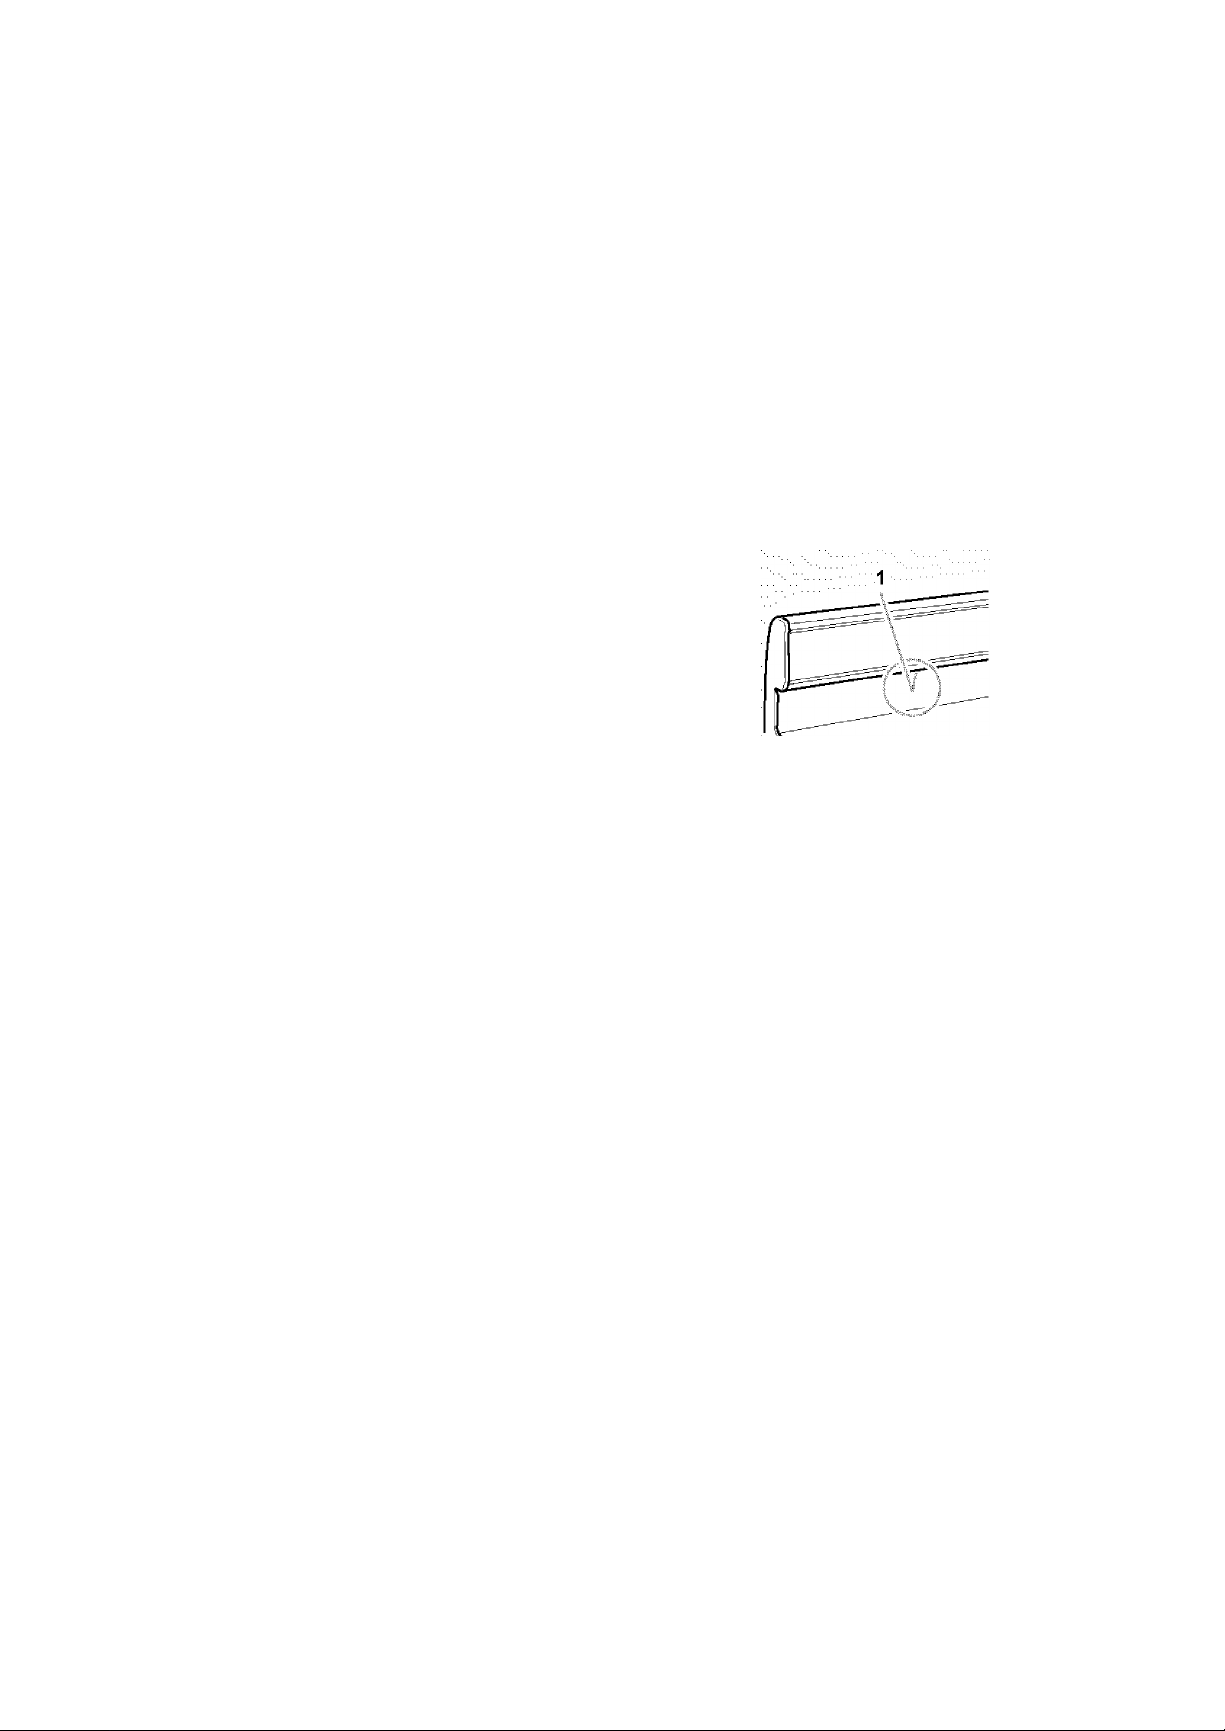
utensilios para hornear
Ei material de los utensilios para hornear afecta los resultados de
coccidn. Siga las recomendaciones de! fabricante y emplee el
tamaño de utensilio para hornear recomendado en la receta de :
cocina. Use ei siguiente cuadro como guia.
UTENSILIO PARA
HORNEAR/
RESULTADOS
Aluminio de color
claro
Cortezas.
doradas claras
Dorado ; ; ; ; ;
uniforme
Aluminio oscuro
y otros utensilios
para hornear con
acabado oscuro,
mate y/o antiadherente
■ ; Cortezas bien
:.rdoradas, ■
crujientes
Moldes o
bandejas para
hornear
termoaislados
m Poco o nada
de dorado en
el fondo
Acero inoxidable
■ Cortezas
: : doradas, . ..
claras ..
■ Dorado
C desigual
Cerámica de
gres
■Cortezas
. : crujientes
Utensilios de
vidrio resistente
al horno, ^
cerámica
vitrificada o
cerámica
Cortezas
doradas,
crujientes
.......
.........
......
.........
RECOMENDACIONES
Use la temperatura y el tiempo
recomendados en la receta.
Puede necesitar reducir la
temperatura para hornear 25°F
■n5“C).. 't:
; Use el tiempo recomendado de
horneado. : : : : : : : : : : : :
Para pays, panes y guisados, use la
temperatura recomendada en la
.............................
receta.
Coloque la parrilla en el centro del
horno.
Colóquelos en la 3ra posición
inferior del horno.
: Puede necesitar aumentar el tiempo
de horneado.
Puede necesitar aumentar el tiempo
de horneado.
Siga las instrucciones de! fabricante.
Puede necesitar reducir la
temperatura para hornear 25°F
.{15“C). ^
■ : : : ■ ; : ; ; ■ Termometro para carnes ■ ■
En modelos sin una sonda de temperatura, siempre confíe en un
termómetro para carnes para determinar la cocción de las carnes
y las aves. Lo que cuenta es la temperatura interna, no la
apariencia. Este electrodoméstico no viene provisto de un
termómetro para carnes.
Inserte el termómetro en el centro de la parte más gruesa de
la carne, o en el muslo interno o la pechuga de! ave. La punta
del termómetro no debe tocar la grasa, el hueso o e!
cartílago. ::L
Después de haber leído el termómetro una vez, empújelo
dentro de la carne Vi pulg. {1,25 cm) y léalo de nuevo. Si baja
la. temperatura,.cocine la carne o el ave por más tiempo. ;
F|ese en todas las carnes en dos o tres lugares.
...................
Dóeto. de wentiladón dél horno
; : :
.........
7. Ducto de ventilación del horno
El ducto de ventilación del horno libera aire caliente y humedad
del horno y no debe bloquearse ni taparse. El hacerlo dará lugar
a una circulación de aire insatisfactoria, afectando los resultados
de cocción y de limpieza. Nunca coloque objetos de plástico,
papei u otros artículos que podrían derretirse o quemarse cerca
del conducto de ventilación del horno.
; : :: : y asar ■ ■
Sistema regulador de temp^atura ULTRABAKE™
El sistema ULTRABAKE regula electrónicamente los niveles de :
calor del horno durante las etapas de precalentamiento y
horneado a fin de mantener una escala de temperatura precisa .
para, lograr óptimos resultados de cocción. Los elementos para
hornear y asar se encienden y se apagan en intervalos. Esta .
característica se activa automáticamente cuando e! horno está
en.uso,' . L ,j ,,J : , ,,J;.
Cuando utilice ei horno por primera vez, es necesario
encender los quemadores de la superficie; de esa manera se
liberará el aire dé las iineas de gas. : :
Nunca encienda el quemador del horno durante un corte de ■
electricidad... . : ' ■ J ■■ ■ ■■ ■■ F L ; L : '
Nunca coloque ningún alimento o utensilio para hornear
di.rectamente .so.bre l.á ptierta o el fondo del horno.
Para hornear o asar:
Antes de hornear o asar, coloque las parrillas según la sección
"Posición de las parrillas y los utensilios para hornear." Al asar,
no es necesario esperar a que el horno se precaíiente antes de
colocar los alimentos en él, a menos que la receta culinaria lo
recomiende. : : :
1. Presione BAKE (hornear).
.....
Presione el botón TEMP con flechas "hacia arriba" o "hacia
: : : : : abajo" para ingresar una temperatura que no sea 350®F
.....
(175®C). La escala del horneado puede fijarse entre 170®F y
.....
500®F (75°C y 260®C).
......
..
37
Page 38

2.
Presione START/ENTER. : : : ;
Un tiempo de precalentamiento hará la cuenta regresiva y
"PrE HEAT" aparecerá en la pantalla del horno si la :
temperatura real del horno está debajo de 170°F (75®C).
Cuando la temperatura rea! del horno alcanza 170°F (75°C),
el temporizador continuará haciendo la cuenta regresiva. El
ajuste de la temperatura puede cambiarse en cualquier :
momento luego de presionar START/ENTER. : : :
Mientras el horno está en el modo de precalentámiento, lá
temperatura fijada se puede ver por 5 segundos al presionar
BAKE.^: ::: :
Una vez alcanzada la temperatura fijada, si se han activado
las señales.audibles, se escuchará una sola señal audible,. : :
3. Presione OFF/CANCEL al terminar de cocinar.
■Cómo asar
Use únicamente la charola y la rejilla para asar, provistas con .
la estufa. Éstas están diseñadas para drenar los Jugos y: .
ayudar a prevenir salpicaduras y humo, ; ;.. .;
Para lograr un drenado apropiado, no forre la rejilla con papel;
de aluminio. El fondo de la charola puede forrarse con papel.
de.ajumlriio para facilitar su limpieza. : : J T :: : ; .i.
Quite el exceso de grasa para reducir las salpicaduras. Corte
la grasa restante.de los bordes para evitar que se ondulen.
■ Jale la parrilla del horno a su posición de tope antes de dar
vuelta o sacar los alimentos. Use tenazas para dar vuelta la
carne a fin de evitar la pérdida de Jugos. Quizás no tenga que
: : dar vuelta los cortes muy finos de pescado, aves o carne, :
■ Luego de asar, saque la charola del horno a! retirar los
alimentos. Los goteos se hornearán si se deja la charola en el
j r horno caliente, dificultando más la limpieza.
El ciclo de asado usa el calor radiante directo para cocinar los
alimentos. Antes de asar, coloque la parrilla según el cuadro para
asar. No es necesario precalentar el horno antes de colocar los
alimentos a menos que la receta culinaria lo recomiende.
Coloque los alimentos en la charola para asar sobre la rejilla,
luego ubíquelos en el centro de la parrilla del horno. Cierre la :
puerta del horno. :
■■Para asar:
■1. ;■ Presione BROiL. L; ; ;V
2. ■ Presione.START/ENTER. : : : : ; : : : : : : : : :
El ajuste de temperatura puede cambiarse en cualquier
momento antes o después de presionar start/enter.
3. Presione OFF/CANCEL al terminar de asar. :
Asado con precisión ^ ^
El cambiar la temperatura al asar con precisión permite un
/control más exacto de la cocción. Cuanto más baja la
temperatura, más lenta será la cocción. Los cortes más gruesos
y trozos no uniformes de carne, pescado y aves se pueden
cocinar mejor a temperaturas para asar más bajas. .
Para e! asado con precisión;
1.
Presione BROIL.
2.
Presione el botón TEMP con la flecha "hacia abajo" para
bajar la temperatura en proporciones de 5®F. La escala para
asar es de 300°f a 525°F {150®C a 275®C).
3.
Presione START/ENTER. :::: ::
4.
Presione OFF/CANCEL al terminar.
.......
.......
CUADRO PARA ASAR
Para lograr óptimos resultados, coloque los alimentos a 3 pulg. {7
cm) de distancia o más del elemento para asar. Los tiempos :
indicados sirven únicamente de pautas y quizás tengan que
regularse al gusto del individuo. Las ubicaciones recomendadas
de las parrillas están enumeradas comenzando por el fondo (1)
hasta la parte superior (5). Para obtener el diagrama, vea la
sección "Posición de las parrillas y los utensilios para hornear."
ALIMENTO
POSICION
DE LA
PARRILLA
TEM
PERA
TURA
TOTAL DE
MINUTOS
Lado 1 Lado 2
Bistec
1 pulg. (2,5 ■
cm) de grosor
medio crudo
término medio
bien cocido
*Hamburguesas de carne
molida O
% pulg. . .. . ..
[2 cm) de . ..
grosor bien
cocidas
Chuletas de
cerdo
1 pulg. (2,5
cm) de grosor
Trozo de
Jamón
[precocido]
Чг pulg.
(1,25 cm)
de grosor
Tocino
Salchichas
alemanas
Chuletas de
cordero
1 pulg. (2,5 cm) de grosor
\ Polio
. . :Trozos.con.
L.. .................................
Pescado
. . ; : .. . ; I^pulg. (1,25 .. .;..
■ xm) de grosor :
cm) de grosor
:: * Coloque hasta 9 hamburguesas, separadas a igual
distancia, en la rejilla para asar. :::
...........
.hueso .
V : : : (2,5 :
4^
..::::3
...
'■■
....4........
4
....
4 500“F
HI
...........
HI ::::::: 15-16
HI ............18-19
HI 13-14 6-7
HI 18-21 8-10
Hi
500T 8-9
(260°C)
Hi 6-7 3-4
....HI....
.....
HI.........
HI :
(260-C)
14-15
8-10 4-5
: : 20-24 15-1.8,.:::
12-16 11-16 .
8-10
13-15 10-13
7- 8
8- 9
9- 10
1-2
4-5 ■..■■.■■■■■ ■
..........
38
Page 39

RECIPE RECALE™
(Repeicíón de recetas)
' : : íen atgonos modeíos)
RECIPE RECALE agiliza y facilita la tarea de cocinar sus
alimentos favoritos. Las temperaturas y duraciones han sido
seleccionadas a fin de incluir una variedad de opciones en cada
categoría de alimentos. Las duraciones de cocción son
regulables para las recetas individuales y se pueden guardar. Las
temperaturas se pueden cambiar pero no guardar. Ai cambiarlas,
la pantalla no mostrará "PrEHEAt" (precalentamiento) mientras el
horno esté precalerrtando., . : : : ; ; ;
Si la receta indica que no es necesario precalentar, ponga los
alimentos .en el horno,. : : ) : ) : : )
Use el cuadro siguiente como guía cuando emplee RECIPE
■RECALE: ^ ^ ^ ^ ^ ^
Para cambiar el Tiempo de cocción prefijado:
La duración del tiempo de cocción para cada uno de los 4
botones puede cambiarse, y la estufa guardará en la memoria la
nueva información para un uso posterior.
1. Presione uno de los cuatro botones MEATS POULTRY,
....
CASSEROLES, COOKIES O PIZZA.
Presione los botones HOUR/MIN con las flechas "hacia
arriba" o "hacia abajo" hasta que la duración del tiempo de
cocción aparezca en la pantalla.
Presione el mismo botón seleccionado en el paso 1 para
guardar el cambio para un uso posterior.
Se escuchará un .solo, sonido. : : : T : : : : : : : ^ ::::::::
4. Presione OFF/CANCEL sólo s¡ está cambiando el tiempo de
. / cocción prefyado que tiene en la memoria. Presione START/..
ENTER si va a continuar .cocinando con el nuevo tiempo de. :
./ cocción fijado. ............................................................................
BOTÓN
*MEATS/POULTRY
(CARNES/AVES)
3 lb .{6,6 kg). .
*CASSEROLES
CGUISADOS)
2 cuartos (500 mL)
COOKIES (GALLETAS)
PIZZA
*Las funciones MEATS/POULTRY (carnes/aves) y CASSE ROLES
(guisados) no tienen un precalentamiento progamado. Si su :
receta sugiere que se precaliente el horno antes de cocinar
carnes, aves o guisados, precaliénteto usando la función BAKE.
Una vez alcanzada la temperatura de precalentamiento, anule
BAKE y seleccione la función MEATS/POULTRY o ^
CASSEROLES.
TEMPERATURA TIEMPO
FIJADA PREFIJADO
325“F (165“C)
..350“F (175°C)
:375“F (190“C)
400-F (205X)
1 hora
45 minutos
10 minutos
20 minutos
Para usar RECIPE RECALL (Repetición de recetas):
1.. Presione uno de los cuatro botones: MEATS/POULTRY,
;. . CASSEROLES, COOKIES o PIZZA. ) : / : / ; ,
2.. ; Presione.START/ENTER. ) ))) ^ T / ::: ) /; ; ;
El tiempo de cocción puede cambiarse luego de presionar
START/ENTER, presionando los botones HOUR/MIN (hora/
miriuto). El horno.terminará de cocinar con el nuevo tiempo.
Al terminar el tiempo de cocción, e! horno se apagará
automáticamente. "End" (Fin) y COOK TIME (Tiempo de
cocción).aparecerán en la pantalla. Se escucharán cuatro
■señales audibles, luego cuatro señales audibles repetidas de
;1 segundo de duración se escucharán cada minuto de allí en
..adelante,:.:. .. ■
: Los botones COOKIES (galletas) y PIZZA, incluyen un : ..
precalentamiento. Al cabo del precalentamiento, se
escuchará una sola señal audible y el tiempo de cocción
aparecerá en la pantalla haciendo la cuenta regresiva.
3.
Presione OFF/CANCEL o abra la puerta del horno para
detener las señales audibles de repetición y despejar "End"/
de la pantalla. La hora del día aparecerá en la pantalla.
.....
.
■.CaractériMica - Séwir Gaiiénte" :
................
|en algunos modelos)...................
^ADVERTENCIA
Peligro de Intoxicación Alimentaria
No deje sus alimentos en el horno por más de
una hora antes o después de su cocción.
No seguir esta instrucción puede ocasionar
intoxicación alimentaria o enfermedad.
IMPORTANTE; Los alimentos deben estar ya calientes antes de
colocarlos en el horno caliente. Los alimentos pueden
conservarse hasta una hora.
La función Serve Warm (Servir caliente) permite que los : /
alimentos cocidos calientes permanezcan calientes antes de
servirlos. También se puede usar al final de un ciclo de cocción
temporizada. : : :
Para usar: .................................................
1. /Presione SERVE ..WARM, ; ' T ; ; ; , ; : . ■
2. . Fije la.temperatura (opcional). g / g
Presione el botón TEMP con la flecha "hacia arriba" o "hacia
abajo" para aumentar o bajar la temperatura en proporciones,
de 5°F (5°C) para fijar una temperatura que no sea ISO^F
(6.5°C). La escala de calor es de 10Q°F-200:'’F (35°C-90'’C)
3-. : Presione START/ENTER. : / / ; : :
4... : Presione .OFF/CANCEL. cuando termine.
Para agregar al final de un tiempo de cocción fijado:
1.. (Presione BAKE. ( : : / / : : : : :
2. Fije la temperatura (opcional). :
Presione el botón.TEMP con la flecha "hacia arriba" o "hacia.
- abajo" para fijar una temperatura que no sea 350°F (175°C).
3. Presione COOK TIME. /; ;
4. Presione los botones HOUR/MIN con flechas "hacia arriba" o
"hacia abajo" para fijar el tiempo de cocción.
5. /Presione SERVE WARM (Servir caliente).
....
Una hora de calentamiento se fijará automáticamente.
...........
/
39
Page 40

6.
Fije la temperatura de calentamiento (opcional). : :
Presione el botón TEMP con las flechas "hacia arriba" o
"hacia abajo" para aumentare bajar la temperatura en :
proporciones de S^F (5®C) para fijar una temperatura que no
sea 150°F (65°C). La escala de calor es de 100°F-200®F
(35°C-90°C). :
7.
Presione START/ENTER.
La pantalla mostrará la cuenta regresiva del tiempo de
cocción. Una vez terminado e! tiempo de cocción, la pantalla
mostrará un tiempo de calentamiento.
Una vez que termine el tiempo de calentamiento, el horno se
apagará automáticamente y "End" y COOK TIME aparecerán
en la pantalla. Se escucharán cuatro señales audibles y luego
las cuatro.señales audibles repetitivas de un segundo
sonarán cada minuto de allí en adelante. ::::::
8.
Presione OFF/CANCEL o abra la puerta del horno para
detener las señales audibles repetitivas y despejar "End" de.
la pantalla. La hora, del día aparecerá nuevamente en la .
parrtalla.j ■; ■.. j '■ Lj ;:: T
....
Para agregar al final de un tiempo de cocción fyado^nicio
diferido: ■■.
■■ I. -Presione BAKE. j.'LL: : j; : L
2.
Fije la temperatura (opcional). : , ■ : ■ /
Presione el botón TEMP con la flecha "hacia arriba" o "hacia
abajo" para fijar una temperatura que no sea 350®F (175“C).
3.
Presione COOK TIME.
Presione los botones HOUR/MIN con las flechas "hacia :
arriba” o "hada abajo" para fijar un tiempo de cocción. :
4.
Presione DELAY/START. ;
Presione los botones HOUR/MIN con las flechas "hacia
arriba" o "hacia abajo" para ingresar la hora del día para
poner en marcha. :
5.
Presione SERVE WARM. j
Una hora de calentamiento se fyará automáticamente. : :
6.
Fije la temperatura de calentamiento (opcional). / j
Presione el botón TEMP con las flechas "hacia arriba" o : : : :
"hacia abajo" para aumentar o bajar la temperatura en
proporciones de 5®F (5®C) para fijar una temperatura que.no
sea 15.0°F (65®C). La escala de calor es de 100®F-200®F . L
(35®Cr90®C)..Y; : : Y Y j j Y : Y
Presione START/ENTER, : : : ) Y : ; ; ; ^ Y : Y ■
7.
Cuando alcance ei tiempo de inicio, la pantalla mostrará la
cuenta regresiva del tiempo de cocción. Una vez terminado el
tiempo de cocción, ia pantaíia mostrará un tiempo de . ■ ■. j
calentamiento, Y y) ' Y ' ■ ■ ■ ■ : : :': : ■ ■ ■.. ■
Una vez que termine el tiempo de calentamiento, el horno se.
apagará automáticamente y "End" y COOK TIME aparecerán,
en íá pantaila. Se escucharán cuatro señales audibles y luego,
las cuatro, señales audibles repetitivas de un segundo .
sonarán cada minuto de a!!( en adeiante, Y Y\ . Y "
8.
Presione OFF/CANCEL o abra ia puerta del horno para ;
detener las señales audibles repetitivas y despejar "End" de
la pantalla. La hora del día aparecerá nuevamente en la
pantaila
..................
...
■■■■
.......
;
Control temporizado del o ím
^ADVERTENCIA
O Peligro de Intoxicación Alimentaria
No deje sus alimentos en el horno por más de
una hora antes o después de su cocción.
No seguir esta instrucción puede ocasionar
intoxicación alimentaria o enfermedad.
El Control temporizado dei horno permite fijar el horno para .
encenderío a cierta hora de! d(a, cocinar durante un lapso de .
tiempo determinado, y/o apagarlo automáticamente. El inicio .
diferido no debe usarse para alimentos como panes y pasteles.
porqueno.se hornearán adecuadamente. Y Y .)
Para fijar un tiempo de cocción: ro ^
Antes de hacer el ajuste, cerciórese de que ei reloj tenga ia hora
correcta del día. Vea la.sección "Reloj." ..
1. . . Presione.BAKE.
// Presione el botón TEMP con la flecha "hacia arriba" o "hacia
abajo." para.fijar.una.temperatura que no sea 350°F {175°C). .
Presione COOK TIME.
Presione los botones HOUR/MIN con las flechas "hacia
arriba" o "hacia abajo" para ingresar la duración del tiempo
de cocción.
Presione START/ENTER.
El tiempo de cocción aparecerá en la pantalla dei horno. La
pantalla hará la cuenta regresiva dei tiempo de horneado/
asado en horas y minutos (si e! tiempo de cocción excede
una hora), o en minutos y segundos (si el tiempo de cocción
es inferior a una hora).
Los ajustes de tiempo pueden cambiarse en cualquier
momento luego de presionar START/ENTER al repetir
ei paso 3Y Y^
. Una vez la cuenta regresiva, el horno se apagará
automáticamente y ."End" y COOK TIME aparecerán en la
pantalla del horno. Se escucharán cuatro señales audibles,
. luego las cuatro señales audibles repetitivas de 1 segundo
sonarán cada .minuto de allí en adelante. : :::
.5.. . Presione OFF/CANCEL o abra la puerta del horno para
despejar "End" de la pantaila. La hora de! día aparecerá en la
pantalla. ^....
Para fijar el tiempo de cocción y el tiempo de parada
[inicio diferido]:
1. Presiorie BAKE.
Presione el botón TEMP con la flecha "hacia arriba" o "hacia
abajo." para fijar una temperatura que no sea 350°F (17S°C).
Presione .COOK TÍME. ' Y ) Y / .
Presione los botones HOUR/MIN con las flechas "hacia
arriba" o "hacia abajo" para ingresar la duración del tiempo
de cocción. : Y —
Presione DELAY START (inicio diferido).
Presione los botones HOUR/MIN con las flechas "hacia
arriba" o "hacia abajo" para ingresar la hora del día para
poner en marcha.
......... ............. ...........................
.................................................
....
: / Y Y Y / / Y :. ..
; '
40
Page 41
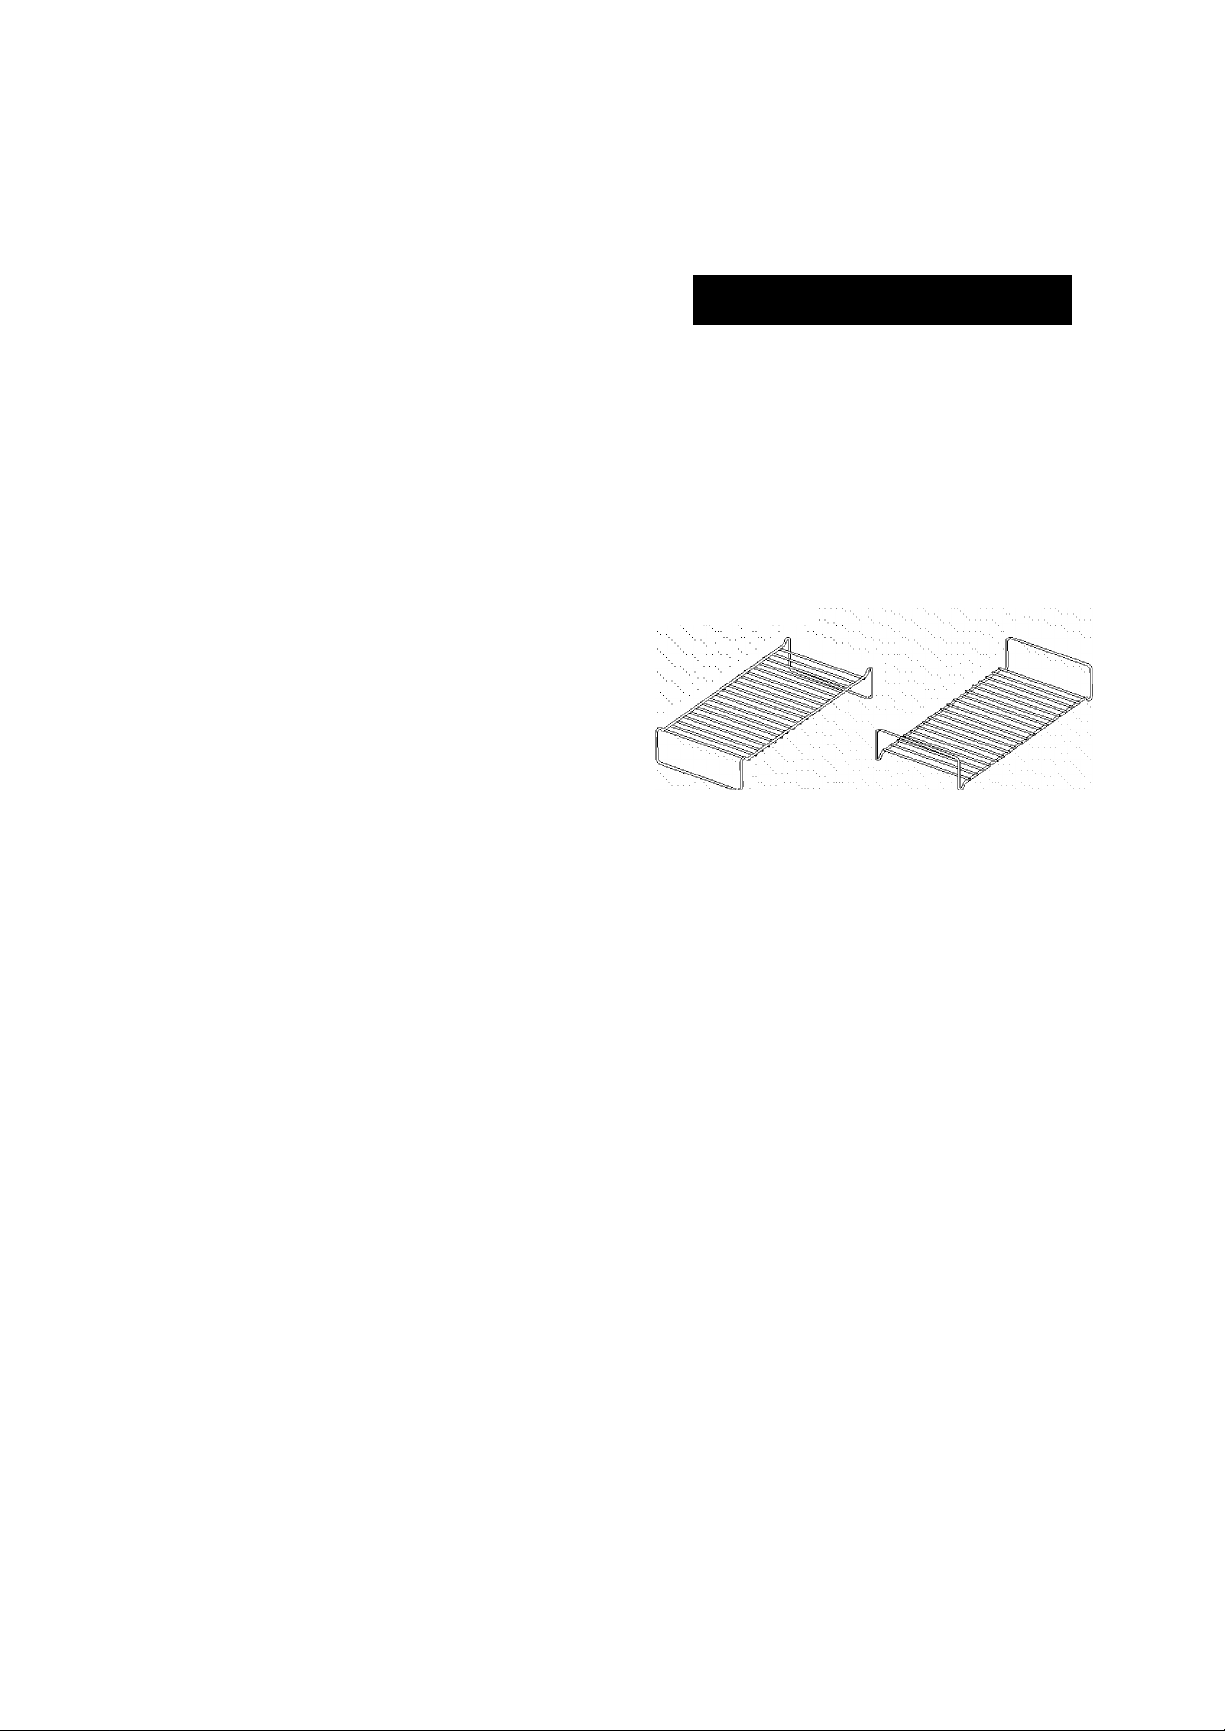
Presione START/ENIER. :
6.
"DELAY" (diferido) y la hora del día también aparecerán en la
pantalla del horno. :
Una vez alcanzado el tiempo de inicio, el horno se encenderá
automáticamente, mostrará el tiempo de cocción y iniciará
inmediatamente la cuenta regresiva.
Al terminar el tiempo de cocción, se escucharán cuatro
señales audibles, luego cuatro señales audibles repetitivas de
1 segundo sonarán cada minuto.
7.
Presione OFF/CANCEL o abra la puerta de! horno para
despejar "End" de la pantalla. La hora del día aparecerá en la
pantalla..:'-.jL.j'-.- -..Y : \ ' L
Cómo usar la gaweta Warm & Ready
; : : : : : : : : : : : : : : : : : : : : : :(ео algunos modelos)
AADVERTENCIA
Peligro de Intoxicación Alimentaria
No deje sus alimentos por más de una hora antes
o después; de su cocción.
para repetir ajustes temporizados programados {aparece
en la pantalla 5 segundos);
Para repetir e! ajuste
.Tiempo de cocción
inicio diferido
. Temperatura.
: *Si el tiempo dé cocción ha empezado, en el momento de
presionar DELAY START, la pantalla mostrará el tiempo en que
comenzó. Al presionar COQK TIME, la pantalla despejará los
segundos del tiempo de la cuentá regresiva restante.
..............................
.........
.... .............
Presione
COOK TIME*
DELAY START
BAKE
L
Para cambiar los ajustes temporizados programados:
Para cambiar el
^uste
Tiempo de
cocción
Inicio diferido'
Presione
COOK TIME
DELAY START
Ajuste en la
pantalla
Presione la flecha
"hacia arriba/hacia
abajo" de HOUR/
MIN
Presione START/
ENTER
Presione la flecha
"hacia arriba/hacia
abajo" de HOUR/
MIN : : :: :
Presione START/
enter ::::::::::::::
No seguir esta instrucción puede ocasionar
intoxicación alimentaria o enfermedad.
La gaveta calentadora Warrn & Ready (caliente y listo) es ¡dea!
para conservar la comida cocinada caliente a la temperatura de
sery.irta. y entibiar panes y bizcochos. : : : : : :
La gaveta calentadqra.viene con la parrilla, se puede usar en dos
posiciones, o no.. .. . ^
Se pueden colocar en la gaveta calentadora tipos distintos de
comida simultáneamente. Para obtener los mejores resultados, la
mayoría de la comida no debe conservarse por mas de una hora.
Los alimentos sensibles a la temperatura, como serían los
huevos, así como cantidades pequeñas no deberán conservarse
por más de 30 minutos. .
Antes de colocarla en la gaveta calentadora, la comida deberá :
estar a la temperatura a la que se va a servir. (Los panes,
bizcochos y pasteles de frutas pueden calentarse por encima de
la temperatura ambiente usando la posición Hl.) :
Quite ios alimentos de las bolsas de plástico y colóquelos en un .
: recipiente apropiado para el horno. No cubra con envoltorios de
; plástico. Cubra los. alimentos con una tapa o con papel de
: aluminio. Mientras se precalienta la gaveta, pueden entibiarse los
piatpnes de servicio y los platos de comida vacíos.:::::::::::::::::
................................
.....
Temperatura
: 'Una vez alcanzado, el tiempo fijado de inicio diferido ya no : : : : : : : :
puedecambiarlo.
BAKE
...............................
Presione la flecha
"hacia arriba/hacia
abajo" de TEMP
Presione START/
ENTER : -
41
Page 42

Para usarla:
1. Si usa la parrilla, ubiquela en dónde sea necesario. :
2. Gire ei interruptor WARM & READY para seleccionar un
ajuste de temperatura HI, MED o LO. :
3.
Permita que la gaveta se precaliente durante diez minutos.
4.
Coloque el recipiente con comida en la gaveta calentadora.
Una vez que termine, gire el botón hasta OFF.
5.
CUADRO DE TEMPERATURAS PARA WARM & READY
Tipos distintos de comida requieren programaciones distintas
para mantener la temperatura ideal. Use el siguiente cuadro
.como gula. ^ ^
COMIDA AJUSTE
..Alimentos fritos ........................................................H¡
Aves
Carne de res, tèrmi no medio y bien ; ; ; ; ; ; ; ; ; ; ; ; ; ; ; ; ; ; ; ; ^ ^
: cocido...........................................................................
.................................. -.................
HI
COMIDA AJUSTE
Pasteles, una corteza
: Pasteles, doble corteza LO
Pescado, mariscos (sin empanizar)
mariscos (empanizados)*
Pizza
Queques, bizcocho LO
Quiches
Salsa gravy, salsas cremosas
.Tocino*
"Vegetales.
..................................................................
.....................................................................
LO
MED ........
MED
HI
MED
HI
MED
........
.........
.......
Cerdo .....................................................................MED
Cereales cocidos
Cordero
: Entremeses (suaves)
Entremeses (dorados)*
: Guisados
Huevos
Jamón MED
Pan, bollos duros
Pan, bollos suaves
Panqueques, waffies*. : L L L L L : ^ ^ ^ ^ ^ ^ ^ ^ ^ ^ ^ ^ ^ ^ ^ ^ ^ ^ ^ ^ ^ ^ ^ ^ ^ ^
Papas, horneadas
Papas, puré............................................................MED
Pasteles,..flanes
....................................................
MED
MED
HI
HI
H!
MED
LO
LO
HI
MED
Todos los alimentos, a excepción de los que están marcados^
con (*), deben estar tapados. ...................................................
:; ■:;"::: Interruptor de 12 horas 1:
El control del horno está fijado para un apagado automático del
horno 12 horas después de haberse encendido. Esto no
obstaculizará fundón alguna de cocción temporizada o diferida.
La luz de! horno se encenderá al abrir la puerta del horno. Para
mantener la luz encendida continuamente, encienda la luz ;
presionando OVEN (Horno).
Para anular:
Para periodos de cocción prolongados que necesitan usar el
horno por más de 12 horas, presione y sostenga CLOCK (Reloj) 5
segundos. Se escuchará una sola señal audible y "12H OFF''
aparecerá en la pantalla. El horno permanecerá encendido hasta
que se le apague manualmente.
Para reajustar:
Presione y sostenga CLOCK 5 segundos. Se escuchará una sola
seña! audible y "12H on" aparecerá en la pantalla.
.....................
Todos los alimentos, a excepción de los que están marcados
con (*), deben estar tapados, ::::::::::::::::::::::
42
Page 43
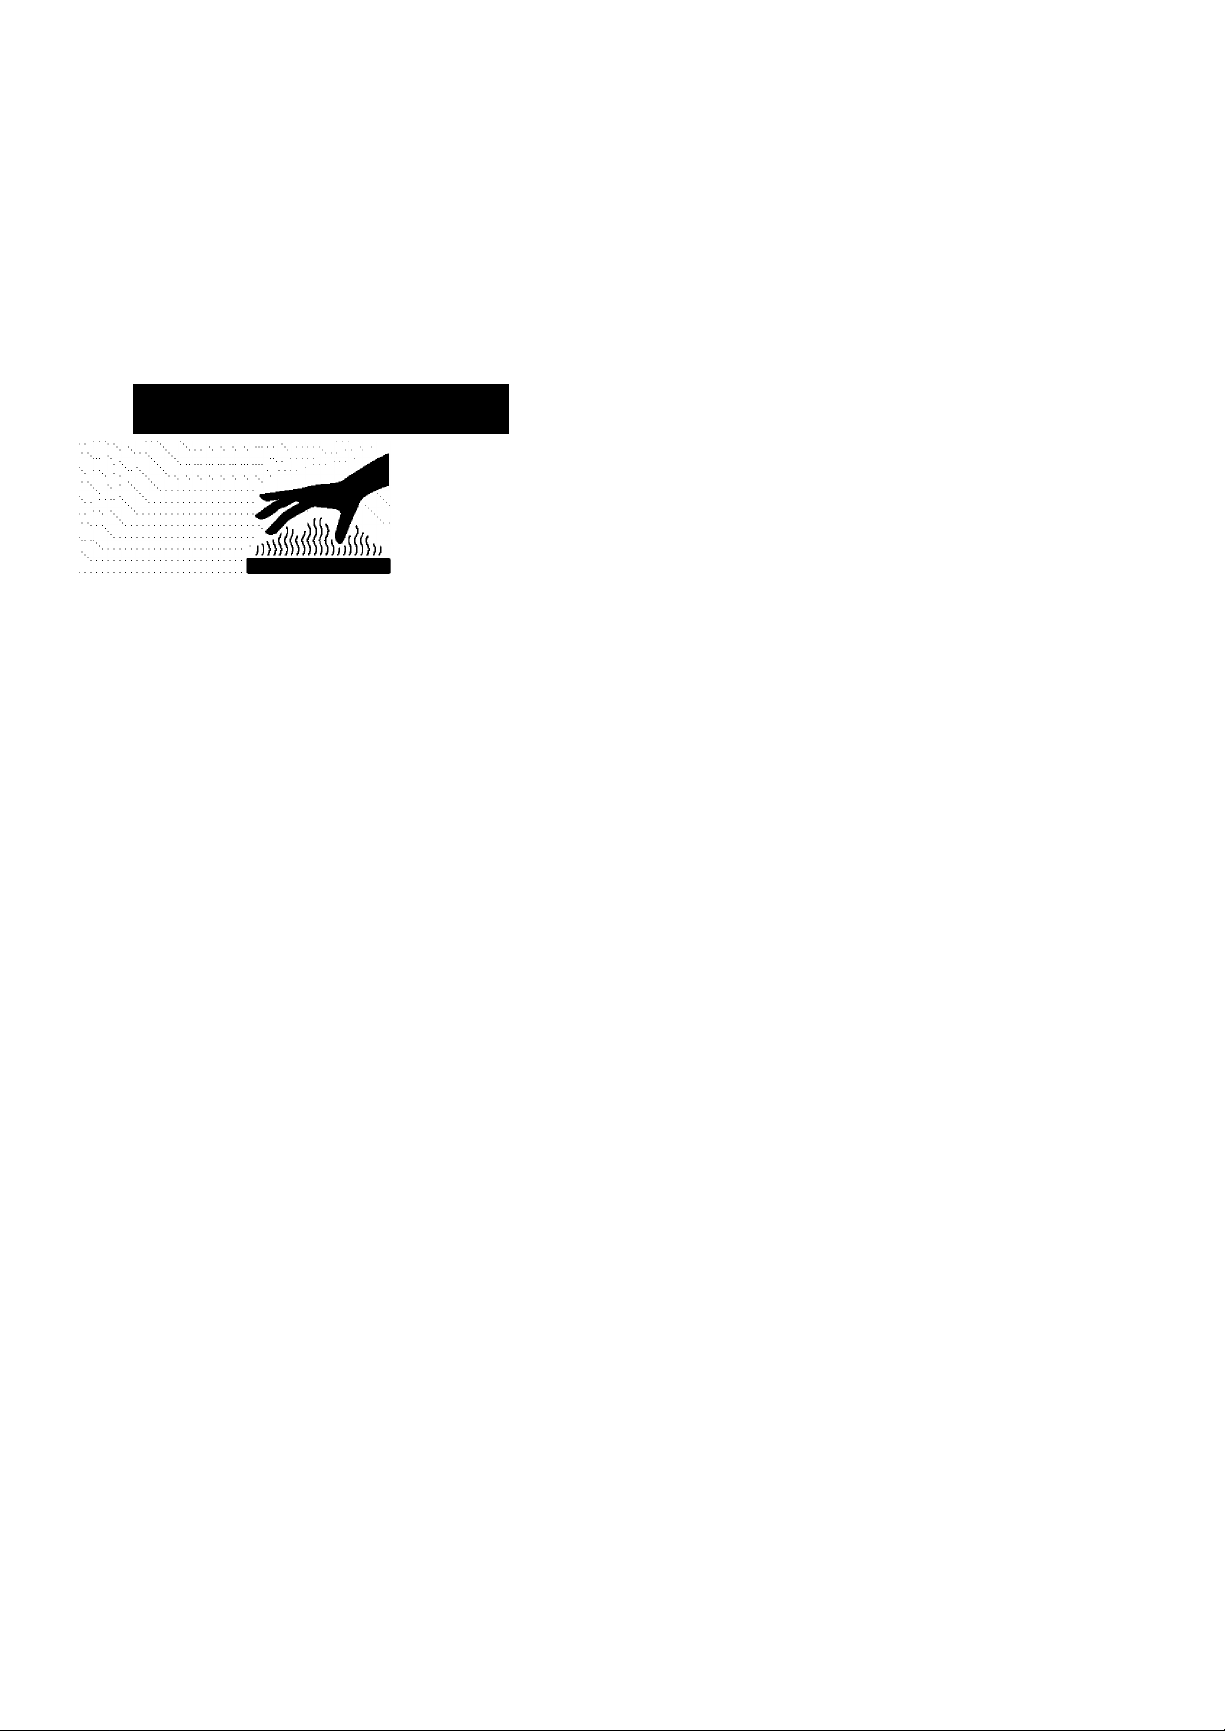
ESTUFA
F^epare ia aiperficie de cocción y la gaveta de
almacenamiento:
: CiciO: ie aytolinipieza
......
fen algynos nwdelosi
IMPORTANTE; El calentamiento y enfriamiento de la porceíana
^ADVERTENCIA
Peligro de Quemadura
No toque el horno durante el ciclo de
autpiimpieza.. ; ■ ■ '■ "V: : \ : ' ■■■„ ■ .'V: : : " '■ ■ ■ '■ ■ ■
Mantenga a los niños lejos del horno durante el
ciclo de auíolimpieza.
No seguir estas instrucciones puede ocasionar
quemaduras o enfermedades por inhalación de
gases peligrosos.
IMPORTANTE: La salud de algunas aves es sumamente sensible
a los gases emanados durante el ciclo de autolimpieza. La
exposición a los gases puede ocasionar la muerte de ciertas
aves. Mude siempre las aves a otro cuarto cerrado y bien
ventilado. L
Haga la autolimpieza de! horno antes de que esté muy sucio. La
suciedad profunda da lugar a una limpieza más prolongada y
más humo.......................................
Mantenga la cocina bien ventilada durante el ciclo de
autolimpieza.para facilitar, la.eliminación del calor, olores y humq.
.No bloquee el (los) ducto(s) de ventilación del horno durante el ;
ciclo de autolimpieza. El aire debe poder moverse con libertad. ■
Vea la sección ".Ductp(s) de ventilación de! horno." : ;;
No limpie, frote, dañe o mueva la junta de la puerta de! horno. La
junta de la puerta es .esencial para un buen cierre. : :: ■ .
Prepare el horno:
Retire la charola, para asar, la rejilla, los utensilios de cocina y
de hornear y, en algunos modelos, el medidor de temperatura
del.horno.. ■.;' ■■ .;; :: : : ) :: f: L t^
Retire todo forro de aluminio del horno ya que podría
quemarse o derretirse, dañando el horno. : ^ L
Retire las parrillas del horno para mantenerlas lustrosas y
fáciles de deslizarse. Para mayor información, vea "Limpieza
general." ó L
Limpie manualmente el borde interior de la puerta y el área de
1 pulg. {3,8 cm) alrededor del marco de la cavidad interna
del horno, asegurándose de no mover ni doblar la junta. Esta
área no se calienta lo suficiente como para eliminar la
suciedad durante la autolimpieza. No deje que el agua,
producto de limpieza, etc. penetre en las ranuras del marco
de la puerta. Use un paño húmedo para limpiar este área.
..............
....
............
....
sobre el acero en el horno puede dar lugar a decoloración, '
pérdida del lustre, agrietamientos finos y estallidos.
Cómo funciona el ciclo
El ciclo de autolimpieza SELECT CLEAN usa temperaturas muy
altas y disuelve la suciedad hasta convertirla en cenizas. .
SELECT .CLEAN fijará automáticamente el tiempo de limpieza,
una vez que se haya fijado el nivel de suciedad, :: : ::: ,
El nivel de suciedad puede fijarse manualmente en niveles de
suciedad ligera, media o profunda al presionar continuamente
SELEC.T.CLEAN.'■: j:'■ ;::::: j ;: j :; j :: / : ■■
El horno se apagará automáticamente una vez que esté limpio.
La puerta no se desbloqueará hasta que el horno se enfríe.
Una vez que el horno esté completamente frío, quite la ceniza
con un paño húmedo. No limpie superficie interna alguna hasta
que el horno se haya enfriado por completo. El pasar un paño
húmedo frío en el vidrio interior de la puerta antes de que se haya
enfriado por completo podría ocasionar la ruptura del vidrio.
La luz de! horno no funcionará durante el ciclo de
autolimpieza.
Para fijar SELECT CLEAN:
■ Presione una vez para suciedad ligera, y "SoilL" aparecerá
■ Presione dos veces para suciedad media, y "SoilA"
Para fijar la LIMPIEZA;
Para iniciar la autolimpieza:
Antes de la autolimpieza, asegúrese de que la puerta esté
completamente cerrada, de lo contrario no se bloqueará y e!
ciclo no comenzará. ; ;
1. Fije SELECT CLEAN (en algunos modelos) o CLEAN.
2. Presione START/ENTER.
....
::: LUna vez que el ciclo esté completo y el horno se enfríe, "End”
:::: aparecerá en la pantalla y "LOCKED" desaparecerá.
Limpie cualquier suciedad suelta para reducir el humo y
evitar daños. A altas temperaturas, los alimentos reaccionan
con la porcelana, pudiendo ocasionar manchas, picaduras,
corrosiones o manchas blancas tenues. Esto no afectará el
rendimiento de la cocción.
Quite los artículos de plastico de la superficie de cocción ya
que pueden derretirse. :
: Quite todos los artículos de la gaveta de almacenamiento.
Ciclo de autolimpieza select CLEAN ™
(en algunos modelos)
en la pantalla. : : j '
aparecerá en la .pantalla,. :: / j j : , : : Lj .
Presione tres veces para suciedad profunda y "SoíIH"
aparecerá en la pantalla.. : ; '
Presione CLEAN. Esto fijará automáticamente un ciclo de : .
aútolimpieza de 3 horas y 30 minutos, : l : .
; Presione los botones HOU R/ M1N con las flechas " hacia
arriba" o "hacia.abajo" para fijar un ciclo de autolimpieza más
prolongado o más corto que el ciclo de 3 horas y 30 minutos.
La puerta del horno se bloqueará en 6 segundos y
aparecerán en la pantalla "LOCKED" (bloqueado), la hora de
: inicio y la hora de parada. La puerta no se desbloqueará
hasta que e! horno se enfrie. La duración del ciclo incluye un
tiempo de enfriamiento de 30 minutos.
........... ......
Pl
43
Page 44

Presione OFF/CANCEL para despejar "End" o abra !a puerta
del horno. :
Cierre la puerta.
La hora dei día aparecerá en la pantalla.
Para diferir el inicio de la autolimpieza:
Antes de diferir el inicio de la autolimpieza, cerciórese de que el
reloj tenga la hora correcta del día. Vea la sección "Reloj."
Asimismo, asegúrese de que la puerta esté cerrada por
completo, de lo contrario no se bloqueará y el ciclo no
comenzará. ::
1.
Presione SELECJ CLEAN (en algunos modelos) o CLEAN.
2.
Presione DELAY..START (inicio diferido). : t : L j
Presione el botón HOUR/MiN con las flechas "hacia arriba” o
"hacia abajo" para poner la hora del día y comenzar e! ciclo
de autpiimpieza..: ... :
:3. Presionestart/enter, :' :: ; j L : ^; ;::; : :::).; ■.;;
La hora de inicio se calcula automáticamente y aparece en la
pantalla. La puerta se bloqueará automáticamente y también
aparecerán en la pantalla "LOCKED" (bloqueado), "DELAY
(diferido).y .la.hora del día. j :::
Al alcanzar la hora de inicio, el horno se encenderá
automáticamente. ..
Cuando el ciclo esté completo y el horno se enfríe, "End".
aparecerá en la pantalla y "LOCKED” desaparecerá. ..
4.
Presione OFF/CANCEL para despejar "End” o abra la puerta
:: del horno. : :::: :::
5. Cierre la puerta.: : >
:: La hora dei día aparecerá en la pantalla. ::
Para detener ia autolimpieza en cualquier momento:
Presione OFF/CANCEL y aparecerán en la pantalla "cin,” "ON,”
"cool," y "LOCKED" hasta que el horno se enfríe. Después : :
aparecerá "End" y la puerta se desbloqueará.
.......
:: : ; .
..... ^.......
^
....
:
.
Ciclo de autolimpieza LOGICL£AN™
(en algunos modelos)
Cómo funciona el ciclo
..El ciclo de autolimpieza LOGICLEAN es un paso "de un solo
toque” que usa temperaturas muy altas y disuelve la suciedad.::
;hasta convertirla en cenizas polvorientas. : : ; . /
El ajuste ”SEns’'determinará automáticamente el tiempo de .;;
limpieza necesario basado en la cantidad de veces que se ha
usado e! horno desde el último ciclo de autolimpieza. El tiempo
de limpieza máximo es de 4 horas 30 minutos y un mínimo.de 2
■■horas. / ..:.. ■
Eí horno automáticamente se apagará una vez que esté limpio,.
La puerta no .se desbloqueará hasta que el horno se enfríe..
Una vez que eí horno esté completamente frío, quite la ceniza
:con un paño húmedo. No limpie superficie interna alguna hasta
que el horno se haya enfriado por completo. El pasar un paño
..húmedo frío en el vidrio interior de la puerta antes de que se haya
enfriado por completq podría ocasionar la ruptura del vidrio.. ■. . :
E! nivel de suciedad puede fijarse manualmente desde niveles de
suciedad ligera, media o profunda ai presionar continuamente
LOGICLEAN
Para hacer la autolimpieza:
Antes de la autolimpieza, asegúrese de que la puerta esté
completamente cerrada, de lo contrario no se bloqueará y ei
ciclo no comenzará,
1. Presione LOGICLEAN.
2. : Presione START/ENTER.
La puerta del horno se bloqueará en 6 segundos y
aparecerán en la pantalla "CLN SENS,” "HEAT," "ON,”
"LOCKED," y "OLEAN". La puerta no se desbloqueará hasta
que eí horno se enfríe. La duración del ciclo incluye un
tiempo de enfriamiento de 30 minutos.
Una vez que él ciclo esté completo y el horno se enfríe, ” End”
aparecerá en la pantalla y "LOCKED" desaparecerá,
3. Presione OFF/CANCEL para despejar "End" o abra la puerta
; .bel horno..' .. V
4.. Cierre la .puerta.... .. :
■.. La.hora.del día aparecerá en la pantalla
Para diferir el inicio de la autolimpieza:
Antes de diferir el inicio de la autolimpieza, cerciórese de que el.
reloj tenga la hora correcta de! día. Vea la sección "Reloj,"
Asimismo, asegúrese de que la puerta esté cerrada por completo
o.de lo contrario .no se bloqueará y e! ciclo no comenzará
1.. . Presione. LOGICLEAN. Y A ,
2. Presione DELAY START (inicio diferido). Y V
Presione el botón HOUR/MIN con las flechas "hacia arriba” o
"hacia abajo" para poner la hora del día y comenzar el ciclo
; de autolimpieza. :
3. Presione START/ENTER. ; '
: La puerta se bloqueará automáticamente y asimismo :
( aparecerán en la pantalla "LOCKED" (bloqueado), "DELAY"
(diferido) y !a hora del día, /:
Al llegar la hora de inicio, e! horno se encenderá
automáticamente.:
Cuando el ciclo esté completo y el horno se enfríe, "End"
aparecerá en la pantalla y "LOCKED" desaparecerá. : :
4. Presione OFF/CANCEL para despejar "End" o abra la puerta
( dei horno, ( : ( ,
Cierre la .puerta..,: (
La hora.del día aparecerá en la pantalla.
.
Para fijar manualmente el ajuste de nivel de suciedad:
Presione dos veces para suciedad ligera, y "SoilL" aparecerá
■enia..pantaiia, : ( : y Y '
Presione tres veces para suciedad media, y "SoilA"
aparecerá en la pantalla. : : : ; : : : : : : :
Presione cuatro veces para suciedad profunda,
;. ; aparecerá ein la.pantana. ' / : : ' Y/ '( '
y "SoilH”
La luz dei horno no funcionará durante el ciclo de
autolimpieza- ■■■./ ■■ ■■■,■■ / ; ■: (' / '■■„. '■■ ■■, ( : : '■, ; ■, '
Para detener la autolimpieza en cualquio' momento:
Presione OFF/CANCEL y aparecerán en la pantalla "cin,” "ON
"cool," y "LOCKED" hasta que el horno se enfrie. Después :
aparecerá "End" y la puerta del horno quedará sin bloqueo
44
Page 45

Cicio de autolimpieza SENS-A-CLEAN™
(en algunos modelos)
Cómo funciona el ciclo
E! ciclo de autolimpieza SENS-A-CLEAN usa temperaturas muy
altas y disuelve la suciedad hasta convertirla en cenizas.
El sensor electrónico sofisticado, controla continuamente los
residuos emanados por la calcinación de los alimentos cocidos
en el horno y regula el tiempo de limpieza como corresponde. El
tiempo máximo de limpieza es de 4V2 horas y el mínimo es de 2
horas. : ; : : : L - :
En cuanto sienta que está.completamente limpio, el horno se
apagará. La puerta no se. desbloqueará hasta que el horno se '
enfríe..■■■'■■ . ..l: . .L.l: L, . ■■
Una vez que el horno esté completamente frío, quite la ceniza
con un paño húmedo. No limpie superficie interna alguna hasta..
que el horno se haya enfriado por completo. El pasar on paño . ■
húmedo frío en el vidrio interior de la puerta antes de que se haya
enfriado por.completo, podría ocasionar la ruptura del vidrio.
Eí nivel de suciedad puede fijarse manualmente desde niveles de
suciedad ligera, media o profunda ai presionar continuamente .
SENS-A-CLEAN. ..: .. ... . : :: :: : : ..
Para iniciar la autolimpieza:
Antes de la autolimpieza, asegúrese de que la puerta esté
completamente cerrada, de lo contrario no se bloqueará y el
ciclo no comenzará. :::: ■
1. Presione SENS-A-CLEAN.
El programa SenS determinará automáticamente el tiempo
de limpieza necesario.
2. Presione START/ENIER.
La puerta del horno se bloqueará en 6 segundos y ::
aparecerán en la pantalla "CLN SENS," "HEAT," "ON,"
"LOCKED," y "CLEAN". La puerta no se desbloqueará hasta
que el horno se enfríe. La duración del ciclo incluye un
: tiempo de enfriamiento de 30 minutos. 7
7 Una vez que ei ciclo esté completo y el horno se enfríe," End"
aparecerá en la pantalla y "LOCKED" desaparecerá. ::
3. : Presione OFF/CANCEL para despejar "End” o abra la puerta
■■ ■■... ..del. horno.'.:: ■■ ■ 7--: .'7 ■■. 7 7 ; : : 7 ..'
■4.7Cierre.la.puerta, ■■.: 7.7 ; : ; ■■ ■
..: La hora.del día aparecerá en la pantalla. 7
....
c
Para diferir el inicio de la autolimpieza:
Antes de diferir el inicio de la autolimpieza, cerciórese de que el.
reloj tenga la hora correcta del día. Vea la sección "Reloj".
Asimismo, asegúrese de que la puerta esté cerrada por completo
o.de lo contrario no.s.e.bloqueará y el ciclo no comenzará. :::
.1.. Presione SENS-A-CLEAN. j ; j; : j :: ; 7:: ::::
El programa SEnS determinará automáticamente el tiempo
■ de limpieza necesario,.:; ■ ; : : ;; ;; ; :: ;;; .
Si lo desea, fije el nivel de suciedad apropiado presionando,
repetidamente el botón SENS-A-CLEAN.
2.
Presione DELAY START (inicio diferido)
Presione el botón HOUR/MIN con las flechas "hacia arriba" o
"hacia abajo" para poner la hora del día y comenzar el ciclo
de autolimpieza.
.....
.
3. Presione START/ENTER.
La puerta se bloqueará automáticamente y asimismo
aparecerán en la pantalla "LOCKED" (bloqueado), "DELAY"
(diferido) y la hora deí día.
Al llegar la hora de inicio, el horno se encenderá
automáticamente. 7 7
Cuando ei ciclo esté completo y el horno se enfrie, "End"
aparecerá en la pantalla y "LOCKED” desaparecerá.
4. Presione OFF/CANCEL para despejar "End" o abra la puerta
del horno. : 7 7 7 7
5... Cierre.la.puerta. , 7 ^
j .La hora del día aparecerá en la pantalla. - 7'
......
:
Para fijar manualmente el ajuste de nivel de suciedad:
Presione dos veces para suciedad ligera, y ''SpilL" aparecerá
en ia..pantal!a. ■■■ ■■■■■7;'■■■.; 7:^^^^ 777
Presione tres veces para suciedad media, y "SoilA"
aparecerá en.la .pantalla. 7 / ' 7 7 7 7 7 : : 7: 7
Presione cuatro veces para suciedad profunda, y "SoilH"
aparecerá, en.la pantalla, 7 7L / 7 : 7 7 7 7
La luz del horno no funcionará durante el ciclo de
autolimpieza. : : : 7.7^ '7..: '■ ■■ -, ■. 7 j / ; 7..'. : : '7' ■... :. j:
Para detener la autolimpieza en cualqui^ momento:
Presione OFF/CANCEL y aparecerán en la pantalla "cin," "ON,
"cool," y "LOCKED" hasta que el horno se enfríe. Después
aparecerá "End" y la puerta del horno quedará sin bloqueo.
Lifiipieza general
IMPORTANTE; Antes de limpiar, asegúrese de que todos los :
controles estén apagados y que el horno y la superficie de
cocción estén fríos. Siga siempre las instrucciones que vienen en
las etiquetas de los productos de limpieza. ::
A menos que se indique lo contrario, se sugiere primero el Jabón,
agua y un paño suave o una esponja.
PORCELANA (en algunos modelos)
Los derrames de aiimeníos que contienen ácidos, tales como
vinagre y tomate, deberán limpiarse tan pronto se enfrie el
electrodoméstico... Estos derrames pueden afectar el acabado.
Producto para limpiar vidrios, producto de limpieza líquido
suave q estropajo, no.abrasivo: 7
Limpie cuidadosamente alrededor de la placa con ei número
de modelo.y de serie.porque el refregar puede borrar los
números..
PARRILLAS Y TAPAS REVESTIDAS DE PORCELANA
Los derrames de alimentos que contienen ácidos tales como
virtagre y tomate se deben limpiar tan pronto la superficie de
: cocción, las parrillas y las tapas se hayan enfriado. Estos
derrames pueden afectar el acabado.
: Para evitar que se piquen, no golpee las parrillas y las tapas entre
: sí o con superficies duras como utensilios de estufa de hierro
fundido. 7777 7 7 7
No vuelva a montar las tapas en ios quemadores mientras estén
mojados. 7 7 7
No las limpie en ei ciclo de autolimpieza.
..............
. ^
.......
^ ,
45
Page 46

Estropajo de plástico no abrasivo y producto de limpieza
ligeramente abrasivo;
Limpie tan pronto la superficie de cocción, las parrillas y las
tapas se hayan enfriado.
Lavavajillas (sólo las parrillas, no las tapas):
Use el ciclo más fuerte.
QUEMADORES EXTERIORES
Modelos con quemadores sellados
Vea la sección "Quemadores exteriores sellados."
........
CAVIDAD DEL HORNO
No use productos comerciaies de limpieza para hornos.
Los derrames de alimentos deberán limpiarse cuando el horno se
enfríe. A altas temperaturas, la reacción química de los alimentos
con la porcelana puede dar lugar a manchas, corrosión,
picaduras o tenues puntos blancos.
Ciclo de autoümpieza:
Vea primero la sección "Ciclo de autoümpieza."
PARRILLAS DEL HORNO Y PARA ASAR
CONTROLES DE LA SUPERFICIE DE COCCIÓN
No use productos de limpieza abrasivos, de fibra metálica o para
limpiar.hornos,..:::: .. ( : : : ( :: ::: ::
;No remoje las .periiias...: 11 : :: : :: : :: : : ; :: .
Al volver a montar las perillas, asegúrese de que las mismas
estén en. la posición OFF (Apagado), 111 : ;
En algunos modelos, no quite los obturadores que están debajo,
de las perillas.. ..V'.L(.' :::::::: L : : :.... ■; ■..
Agua yjabóri o. lavavajillas: :: : :: :::: : : . .; .
.Jale las perillas en sentido recto para quitarlas del tablero de
control..
TABLERO DE CONTROL
No use productos de limpieza abrasivos, estropajos de fibra de
acero, paños ásperos o ciertas toailas de papel ya que podrían
dañare! tablero. : (
■ Producto para limpiar vidrios y un paño suave o esponja:
Aplique el producto para limpiar vidrios al paño suave o :::::
esponja, no lo haga directamente sobre el tablero,
..............
; Ciclo. d.e autpümpieza: ' : “ :: '' ..
;Vea primero la sección "Ciclo de autoümpieza". Quite las
parrillas o se decolorarán y será más difícil deslizarías. Luego
de la limpieza, una ligera capa de aceite vegetal aplicado a
:las.guías. de..l.as parrillas las ayudará a deslizarse, t “
.Estropajo de.fibra metálica ::: : :::: ::: ;: ( : ;..
CHAROLA Y REJILLA PARA ASAR
No.las .limpie.en.e! ciclo de autoümpieza.
Producto de ümpieza ligeramente abrasivo:
Refriegue con un estropajo húmedo.
■ Solución de Уг taza (125 mL) de amoníaco por un galón : “ :
(3,75 L) de agua: :
Remoje 20 minutos, luego refriegue con un estropajo o una
esponja de fibra metálica. : : :
■ Producto para limpiar hornos: :
' Siga las instrucciones de la etiqueta del producto.
Sóio esmalte de porcelana, no cromo :
■ Lavavajillas :
p|j||^|;j“|“^ Q|^|_ HOI^NO
GAVETA DE ALMACENAMIENTO
■ Producto para limpiar vidrios y toallas de papel o estropajo
de plástico no abrasivo:
Aplique el producto para limpiar vidrios al paño suave o ..
esponja, no.l.o haga directamente sobre el tablero, . ;
En los modelos de horno con puerta de acero inoxidable, vea
la sección. .".Acero Inoxidable” en “Limpieza general". :::::: .::
.................................................
':
(en algunos modelos)
Asegúrese de que la gaveta esté fha y vacía antes de limpiarla.
Para mayor informació.n, vea la sección "Gaveta de .;;;;;
almacenamiento."... : (' 11:
■ .Detergente.suave..;.:: :
Revestimiento {en algunos modelos)
ACERO INOXIDABLE (en algunos modelos)
No use estropajos que vienen con Jabón, productos de limpieza ;
abrasivos, crema para pulir la superficie de cocción, estropajos .
de metal, pañós.ásperos o ciertos tipos de papel. Daños pueden
(ocurrir, ( '■. t:'-'--.., ( '■■■. ■■
frote en la. dirección del hilo para evitar que se dañe. :
■ Producto de.limpieza y para pulir acero inoxidable (no
.....
incluido): ( ; ■ ; ■ ,
Vea la contraportada para información sobre pedidos.
Detergente en liquido o producto de limpieza general:
Enjuague con agua limpia y seque con un paño suave y sin
pelusas.
Vinagre para manct'46has de agua dura.
.....
..........................................................................
....
,
Desocupe la gaveta y saque el revestimiento.
■ :: Limpie, con detergente suave “:: : “::
(on algunos modelos)
Asegúrese de que la gaveta esté fría.
■ Detergente suave
........
.......
: :
Page 47
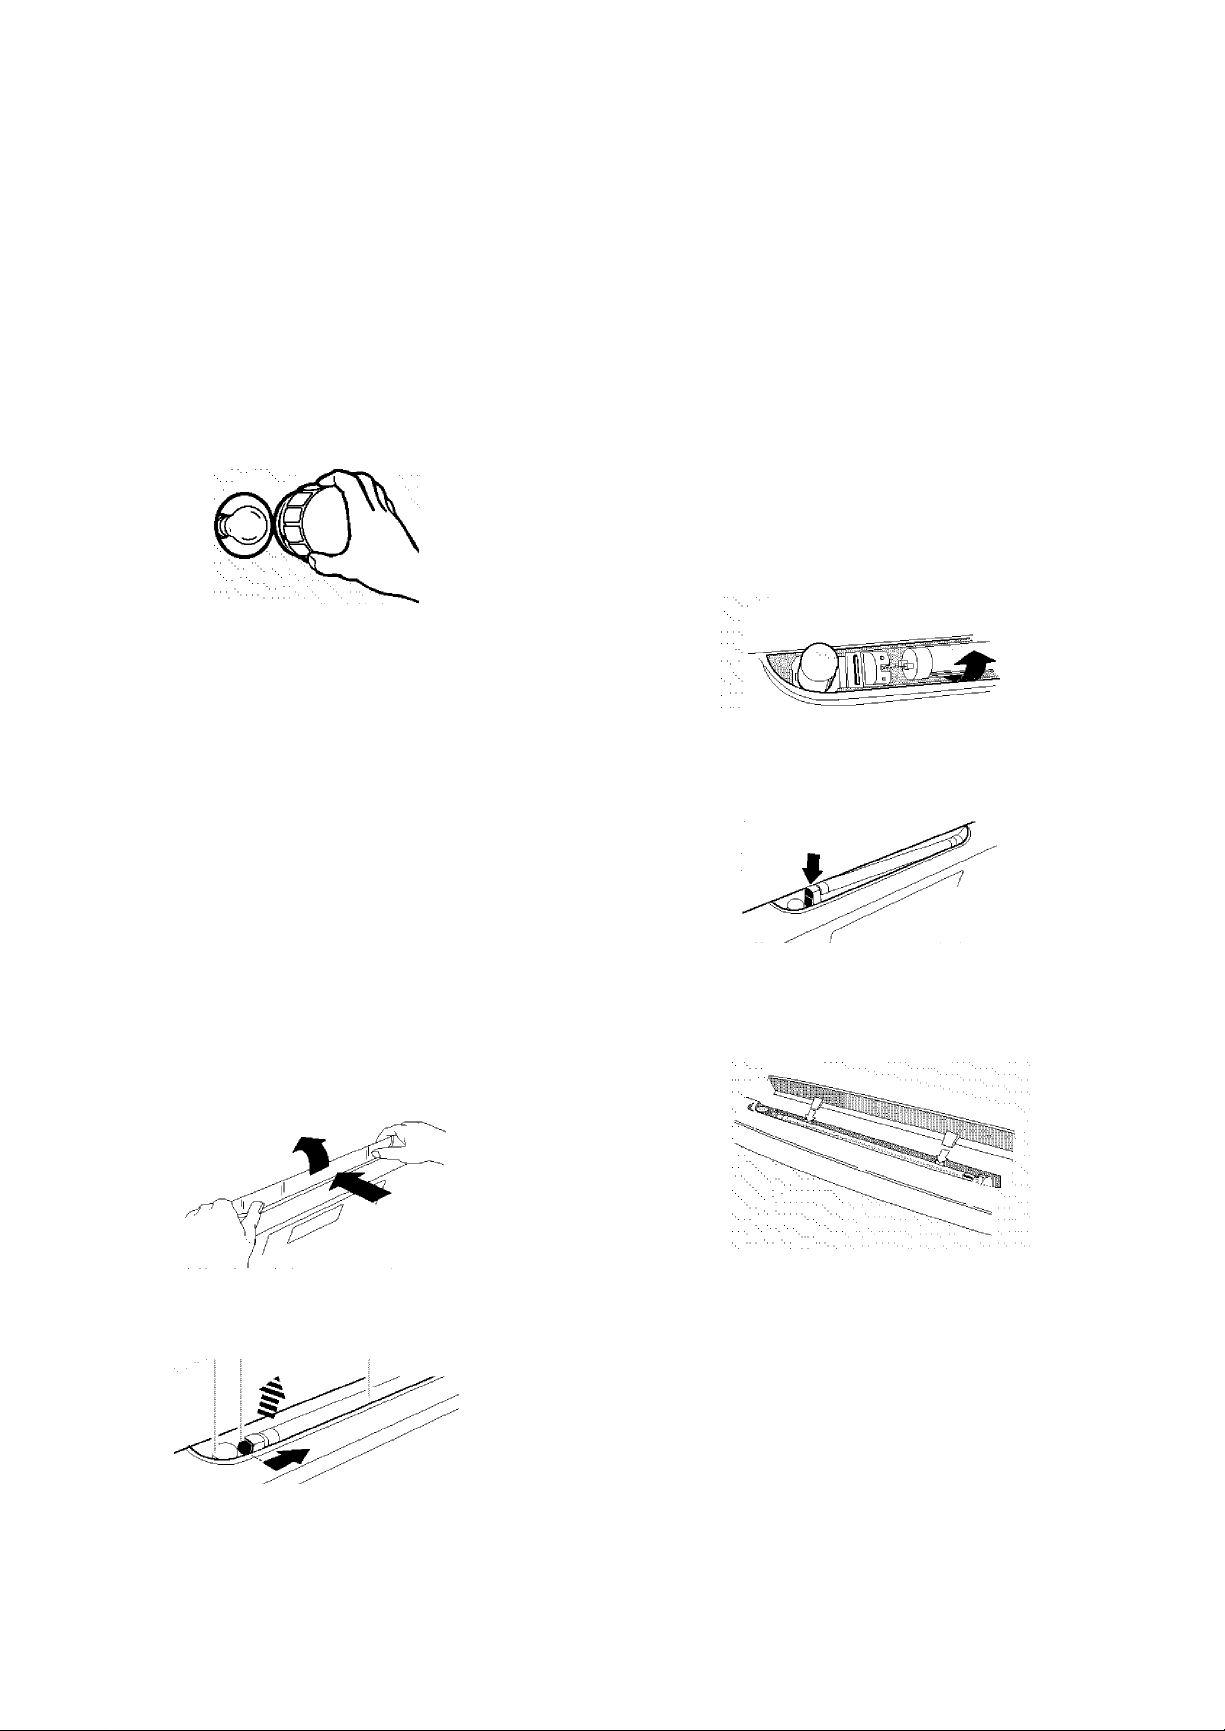
;Lyzdel horno
La luz del horno es una bombilla estándar para
electrodomésticos de 4Q vatios. Se encenderá cuando se abra la
puerta del horno. No funcionará durante el ciclo de Autolimpieza.
Cuando la puerta del horno esté cerrada, presione el botón
OVEN para encender y apagar.
Antes de cambiarla, asegúrese de que el horno y la superficie de
cocción estén fríos y que las perillas de control estén apagadas.
Para reemplazar:
.1. Desenchufe la estufa, o desconecte la electricidad.:
2. Para quitarla, gire a ia izquierda la pantalla de vidrio de la
; bombilla que está en la parte posterior de! horno.
3. .Gire la bombilla, a la izquierda para sacarla del casquilio. ■
4. Reemplace la bombilla, luego la pantalla de la bombilla ;;
■ girándolas.hacia la derecha. ;;
5. Enchufe ia estufa o vuelva a conectar la electricidad.
.....
............
4, Para quitar el arrancador, gírelo en sentido contrario a las
: manecillas del reloj y levántelo de su base de instaiación.
5. Para quitar el foco, gire el foco 90° hacia delante o hacia
atrás hasta que se escuche un clic. Luego levántelo hacia
afuera,
............
Para instalar el arrancadcH* y/o el foco:
1,
Ajuste las patas del arrancador en la base de instalación del
arrancador y gire en sentido de las manéenlas del reloj.
2... Deslice las .patas del foco en los extremos de base de
instaiación del foco. Gire el foco 90° hacia adelante o atrás
hasta que se escuche un clic.
La i uz nocturna de la consola ■
:: : |en aigynos modeios| :
La luz nocturna de la consola está ubicada en la parte superior :
del tablero de control electrónico del horno. Cuenta con dos
partes reemplazables. La luz fluorescente es un foco miniatura
fluorescente estándar modelo F8T5. El arrancador es la parte en
forma de botón a la izquierda del foco. Es un arrancador :
estándar FS-5C. La luz nocturna de la consola no funcionará
durante el ciclo de auto limpieza.
Para encender y apagar: Presione el botón TOP.
Para quitar el arrancador y/o el foco:
Desenchufe la estufa o desconecte la energía eléctrica. :
1.
2.
Presione hacia abajo con los pulgares en el frente del
protector deí lente, mientrasjala hada arriba Con los dedos
.en.la parte posterior deí protector del lente.
3.
Oprima la palanca de liberación en dirección del foco. Eüado.
izquierdo de! ensamblaje del foco se levantará. ' : ' : L ; ■
1 2 3
....... .............................
.............
:::::::
Presione hacia abajo en el lado izquierdo de la base de
3.
instaiación de! foco. Usted oirá un chasquido para Indicar
que el montaje ha quedado asegurado.
4.
Reponga la tapa del lente. Ubique las dos lengüetas
posteriores del protector del lente frente a los dos
sujetadores de resorte metálicos (localizados justo detrás
foco). Empuje.el lente hacia atrás y hacia abajo para
asegurarlo en su sitio. ;;; ;
5.. Enchufe la estufa o reconecte la energía eléctrica.
.'
7. Arrancador
2. Palanca de liberación
3. FOCO
47
Page 48
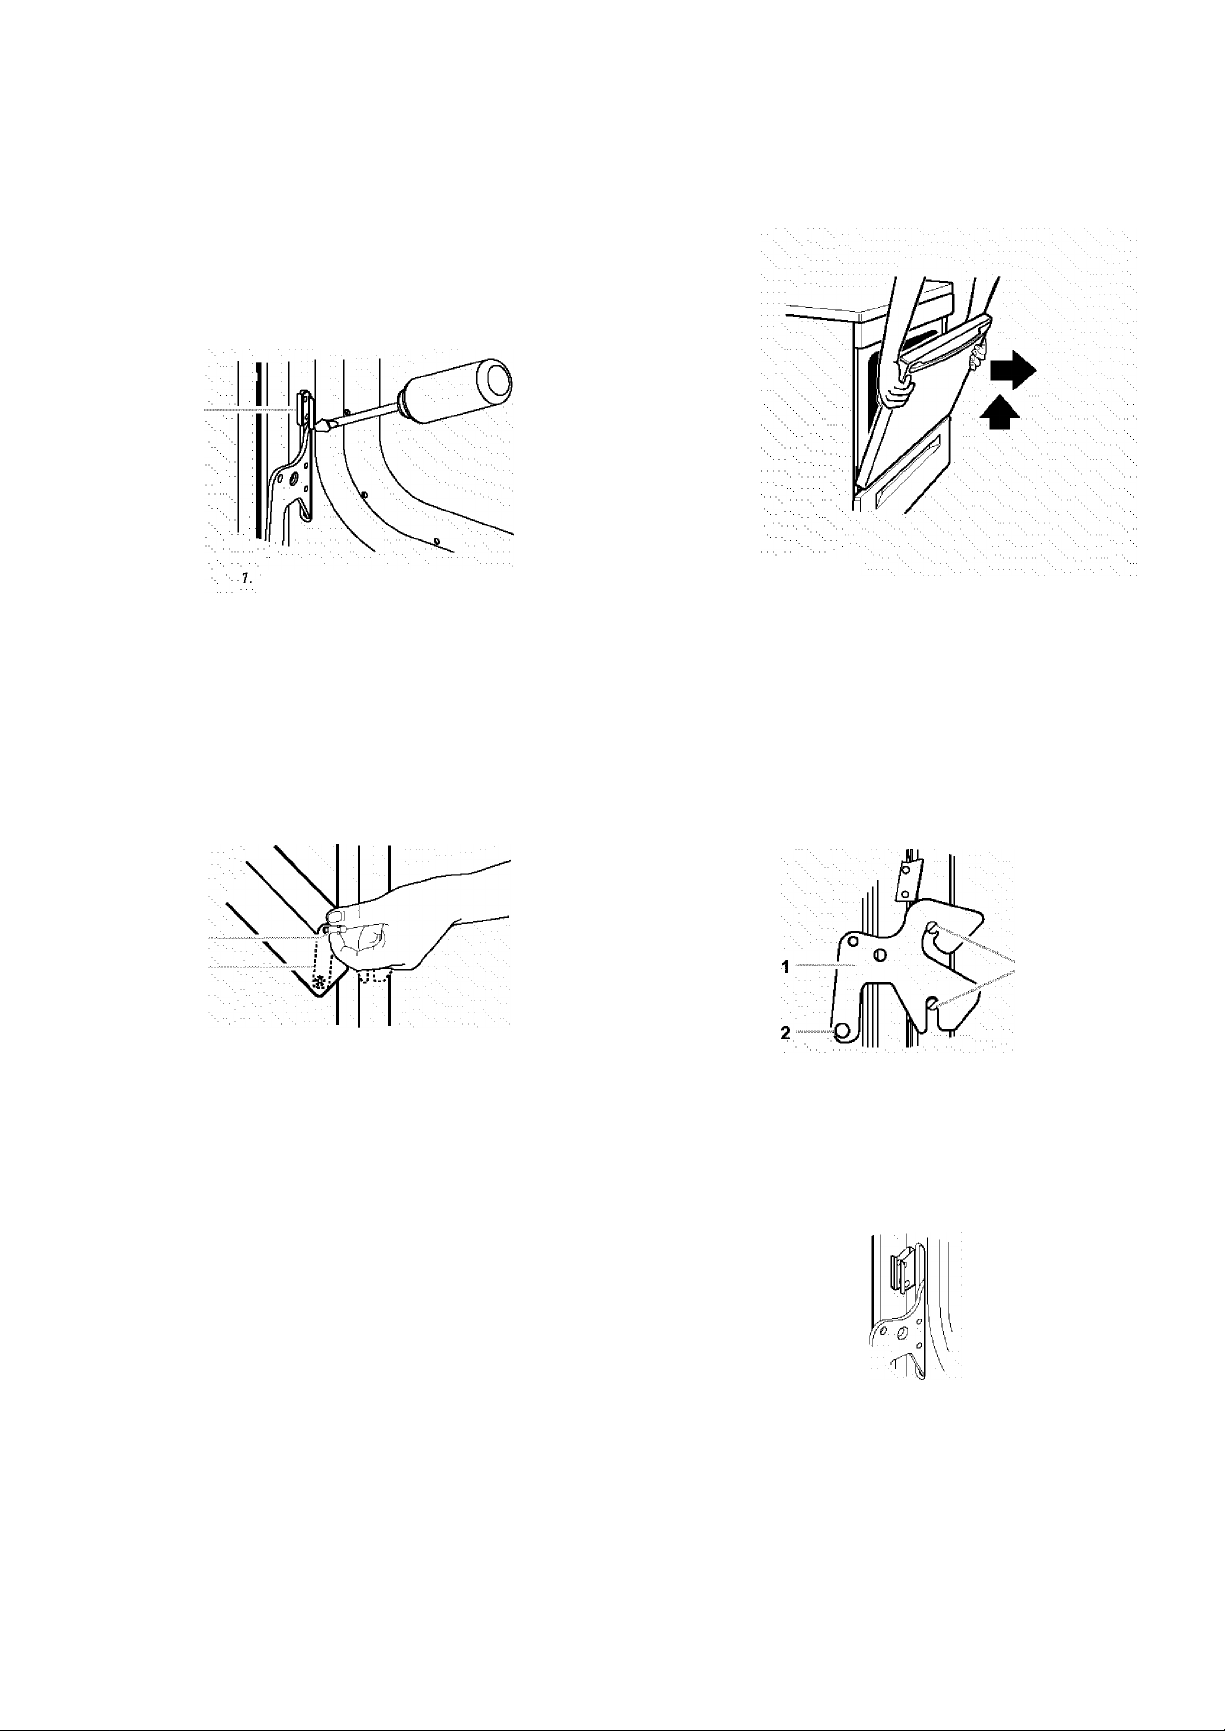
Puerta del horno
Para uso normal de la estufa, no se aconseja quitar la puerta del
horno. Sin embargo, de ser necesario, siga estas instrucciones.
La puerta del horno es pesada. '
Antes de quitarla:
1. : Use una espátula o un destornillador e introdúzcalo en la
esquina inferior del gancho de tope de la puerta.
4. Jale la puerta hacia arriba y luego hacia usted. Los ganchos
de suspensión de la bisagra se deslizarán de la ranura de la
bisagra del marco delantero. No quite los pernos para quitar
la puerta hasta que ésta haya sido colocada de nuevo en la
estufa
Gancho de tope de la puerta
2.
Palanquee y libere el gancho de tope de la puerta y sáqueio
dé la ranura de ia bisagra de! marco delantero. Asegúrese de
no arañar el acabado. \ :
3.
Repita el,procedimiento para e! otro gancho de tope de ja,
puerta. l
......
......
: :
........ .,
■
Para quitarla:
1.
Abra la puerta de! horno, introduzca los pernos para quitar la
puerta, los cuales vienen con su estufa, en los ganchos de t
suspensión de la bisagra. No quite los pernos mientras esté
sacando la puerta de la estufa. ::
.7. Pernos para quitar la puerta
.2. Ganchos de suspensión de ¡a bisagra
2.
Cierre la puerta cuidadosamente hasta que descanse contra
los pernos para quitar la puerta.
3.
Sujete ambos lados de la parte delantera de la puerta con.
sus dedos y.use sus pulgares en la superficie interior.
.............
: :::
.....
..: ;
Para volvra- a colocarla:
.1. Sujete ambos lados déla parte delantera de la puerta con
. .. sus dedos y use.sus pulgares en la superficie interior. ..
2. Sostenga la puerta del homo de modo que e! borde superior
.. de cada gancho de suspensión esté en posición horizontal. ..
... Introduzca los ganchos de suspensión de la bisagra en las
. ranuras de bisagras del marco delantero. : j :
3. Incline la parte superior de la puerta hacia la estufa. Deslice
los ganchos de suspensión de la bisagra hacia donde se
encuentran los pernos de apoyo dei marco delantero.
Asegúrese que los ganchos de suspensión de las bisagras
estén debidamente sentados y enganchados en los pernos
de apoyo. j ^
7. Ganchos de suspensión de las bisagras
,2. Bisagra del marco de la puerta
3. Pernos de apoyo ' ^
4.
introduzca eí gancho de tope de la puerta con la superficie
angular en la parte superior de la ranura de la bisagra deí
marco, luego oprima la parte inferior del gancho hasta qu.e
las pestañas estén, niveladas con el marco delantero.
48
5.
Abra la puerta por completo y quite los pernos para quitar la
puerta. Guarde los pernos para quitar la puerta para un uso
posterior.
6.
Cierre la i uerta.
Page 49
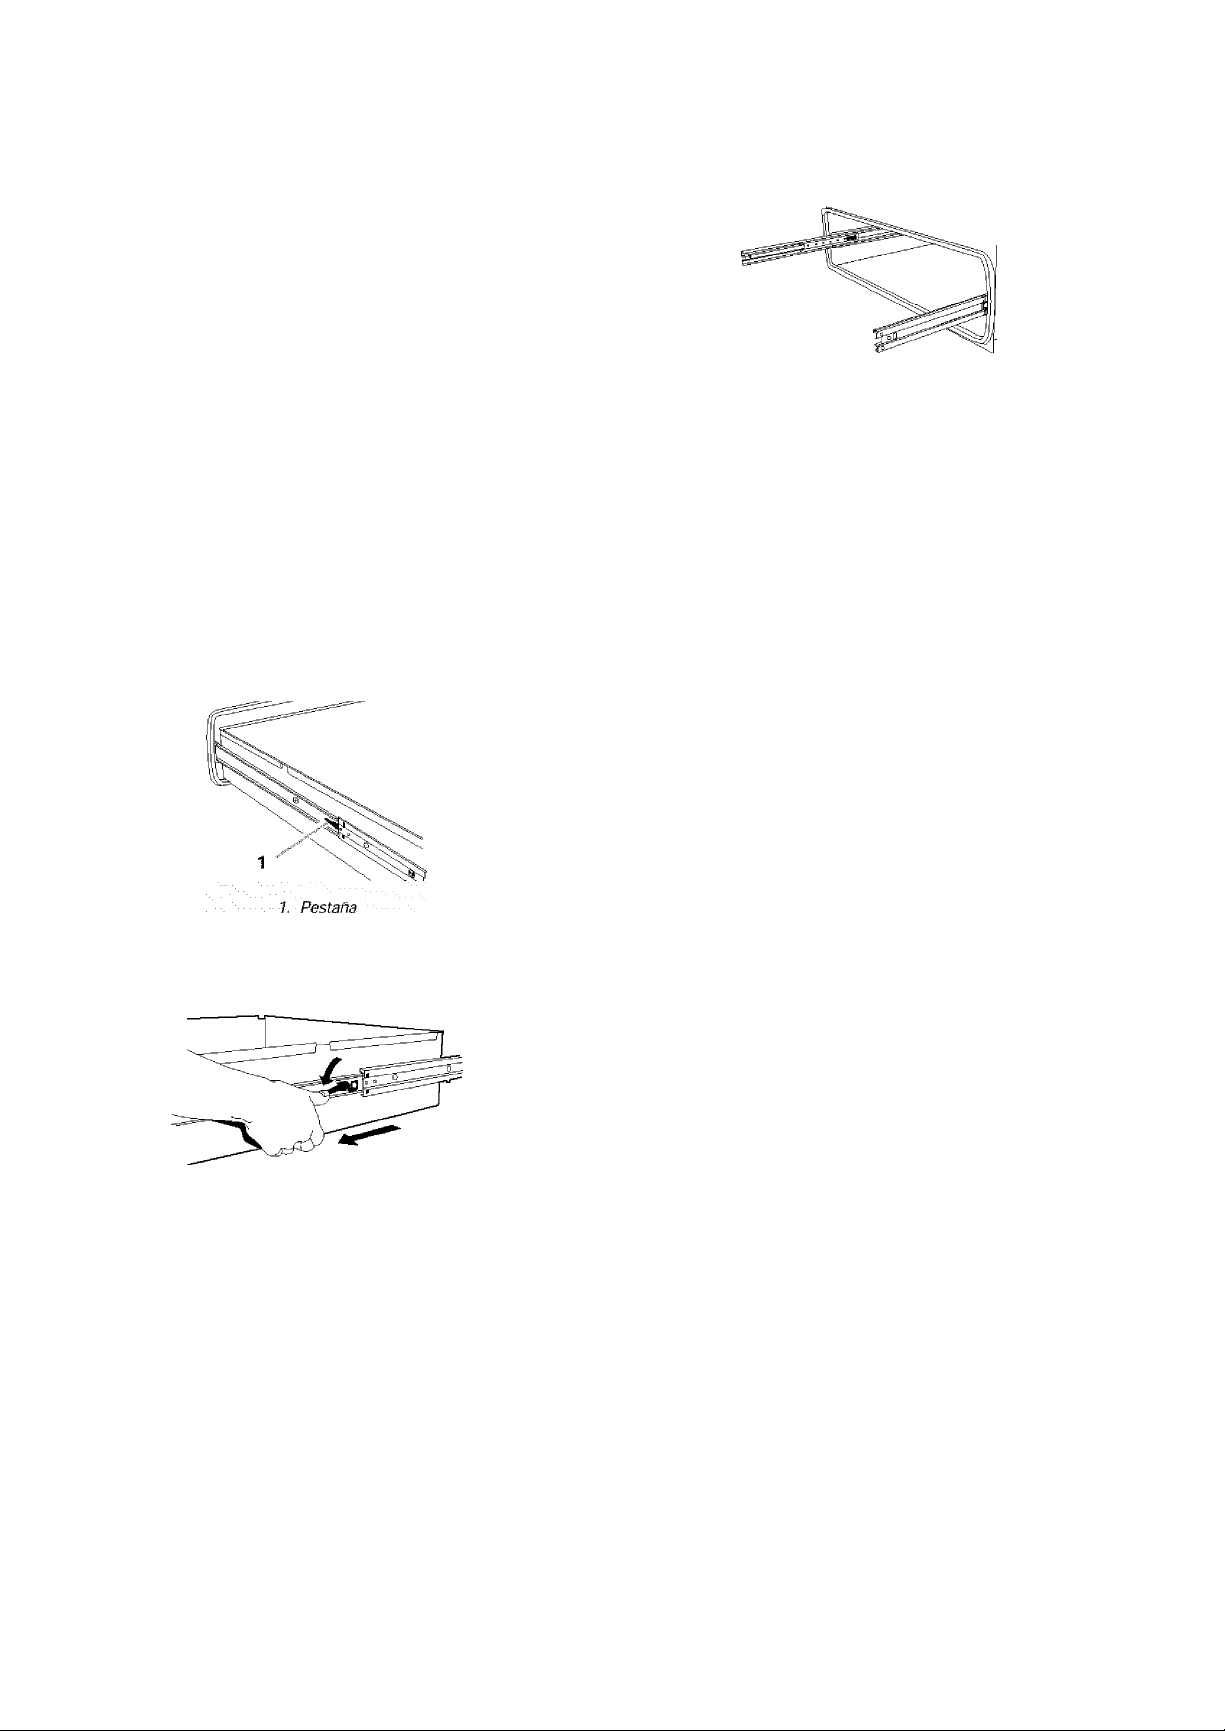
Gaveta de aliTtacenamíento
La gaveta de almacenamiento es desmontable. Antes de quitarla,
cerciórese de que la gaveta esté fría y vacia.
Para quitarla:
1. Jale la gaveta en sentido recto hasta el primer tope.
2. Levante la parte trasera de la gaveta yjálela hacia afuera.
Para volver a montarla:
1, Encaje los extremos de los rieles de la gaveta en las guías
. . . ;qLie están en la cavidad, L
2. Deslice la gaveta para cerrarla.............................................
................................................
; 'Gaveta ealentadoraL' ^ -:;::
...algynps.modeips),,: : :::: „; ■'
Desocupe la gaveta calentadora y permita que la unidad se enfrie
completamente .ante.s.de intentar quitar la gaveta. : :: 7
Cómo reinstalar:
1. Alinee los rieles déla gaveta con los rieles gula.
Empuje la.gaveta, hasta que tope completamente.
Con mucho cuidado, abra y cierre la gaveta p,
de que asentó correctamente en los heles
.....
ara cerciorarse
Cómo quitar: ^
1.. Jale. la.gaveta hasta que esté abierta completamente. ' V .
2. : Encuentre las pestañas triangulares negras a ambos lados de
''' '-.la gaveta. ...77777777777777777777777777777777"''
3, Presione hacia abajo la pestaña del lado derecho y levante la
pestaña del lado izquierdo simultáneamente. Luego Jale la
gaveta hacia afuera otra pulgada más.
..... ............... ................
4. Con mucho cuidado, Jale la gaveta totalmente hacia afuera,
. sosteniéndola de los. lados y no del frente de la gaveta.
49
Page 50

SOLUCIÓN DE
PROBLEMAS
Pruebe primero las soluciones aquí sugeridas para evitar el
costo de una visita de servicio técnico innecesaria.
Nada funciona
¿Está dañado el quemador?
En modelos con tapas, revise si la tapa está torcida. Si la
tapa gira libremente en una superficie plana, con la parte
pintada hacia abajo, la tapa está torcida. Cambie la tapa con
un quemador exterior diferente para verificar ei nivel de
torcimiento. Póngase en contacto con un especialista
competente en reparación de Sears. Vea la contra portada.
¿Se está usando gas propano?
El electrodoméstico puede haber sido convertido
incorrectamente. Póngase en cóntacto con un especialista
competente en reparación de Sears. Vea la contra portada.
¿Se ha cableado y polarizado debidamente el contacto
de suministro eléctrico? ^ ^ ^ ^ ^ ^ ^ ^ ^ ..........................
Pruebe otro contacto para verificar el cableado y la polaridad,
adecuados. ■■ ■:::: :: ' :: : ::: : ■ ■■ ■ ■
¿Está desenchufado el cable eléctrico?
Enchúfelo.en un contacto de tres terminales con debida . ■
conexión a tierra.
El quemador exteriOT hace estallidos
¿Está mojado el quemador?
. Déjeio..secar.. ■ / :
Calor excesivo alrededor del utensilio de cocina en la
superficie de ctKción ^ ^ ^ ^
¿Se ha quemado un fusible en casa o se ha disparado el
disyuntor? ■ ■ ■■■ ■■
Cambie el fusible, o.vuelva a conectar el circuito. :: .. .;;;
¿Está la válvula principal o la válvula reguladora de ciérre
de! gas en la posición "off" (apagado)? ^ ^
Vea las instrucciones de Instalación, : . ;
¿Está la estufa debidamente conectada al suministro de
gas?
....
................................................................
Póngase en contacto con un especialista competente en
reparaciones de Sears o vea las instrucciones de instalación
Los quemadores extericB-es no funcionan
¿Es ésta la primera vez que se usan ios quemadores
exteriores?
Encienda cualquiera de las perillas de los quemadores
exteriores para liberar el aire proveniente de la tubería del
gas.: : : :v^ : : :
En algunos modelos, ¿se ha fijado el Bloqueo de la
Superficie de cocción?
: Vea Ja sección "Bloqueo de la Superficie de cocción."
.....
¿Es el utensilio de cocina del tamaño apropiado?
Use el utensilio de cocina de tamaño similar ai área, elementó
de cocción exterior o quemador exterior. El utensilio de .
cocina no debe extenderse más de 1 pulg. (2,5 cm) fuera, dei.
.área de cocción, ■....' : : : ::: :: :: /
El horno no funciona
¿Se ha cableado y polarizado debidamente el contacto
de suministro eléctrico?
Pruebe otro contacto para verificar si el cableado y la ::
polaridad son los adecuados.
¿Es ésta la primera vez que usa ei horno?
Encienda cualquiera de las perillas del quemador exterior
para liberar el aire proveniente de la tubería de gas.
¿Sé ha fijado debidamente ei control electrónico del
horno? ^
Vea la sección "Control electrónico del horno." :: :
En algunos modelos, ¿se ha fijado ei Bloqueo del horno?
Vea la sección "Bloqueo del horno." :::::
¿Se ha fijado correctamente la perilla de control?
Oprima.la perilla.antes de girar a un ajuste. y
¿Están obstruidos los orificios del quemador?
Vea la sección "Quemadores exteriores sellados." :
Las llamas del quemador exterior están desiguales,
amarillas y/o ruidosas
...........
......... ............. ........
Ei quemador del horno no se enciende
Se ha quemado el fusible de la casa o se ha disparado .un
disyuntor. ■■.■.: '' : : : J ; ■.■
Está.averiado el.sistema de encendido. Póngase en contacto
con un técnico .de.reparación capacitado de Sears. Vea la ...
■ ■ ■. contraportada,. ■ ■;;; ; :: ::: : : : ::;' ■ ■■ ■..
¿Están obstruidos los orificios dei quemador?
Vea.la.sección "Quemadores exteriores sellados."
¿Están las tapas del quemador colocadas
adecuadamente?..
Vea. la sección "Quemadores exteriores sellados."
.... ..................
El horno hace un ruido sordo acompasado cuando está
■ en uso ■■■■ ■ ■■■ ■■..............■
; Esto es norma! y ocurre cuando el quemador del horno se
; enciende y apaga para mantener la temperatura fijada del
horno.....................................................................................
...........
..... .................
.......
■ ■.■.;;;;;;
.........
.............
.
50
Page 51

El quemador del horno se enci^de y después de un
minuto se apaga
........
Los resultados de cocción de la ^petficie de cocción
no son los que se esperaba
Presione OFF/CANCEL, luego espere un minuto antes de
intentarlo de nuevo.
¿Se ha cableado y polarizado debidamente e! contacto
de suministro eléctrico?
Pruebe otro contacto para verificar si el cableado y la
: polaridad son los adecuados.
Las llamas del quemadt»- del horno son amarillas o
ruidosas
¿Se está usando gas propano? ^ ^ ^ ^ ^ ^ ^ ^ ^ ^ ^ ^
Eí electrodoméstico puede haber sido convertido '
incorrectamente. Póngase en contacto con un especialista
.competente.en reparación de Sears. Vea la contraportada.
La temperatura del horno es demasiado alta o
demasiado baja ^
¿La calibración de temperatura del horno necesita un
■■..Vajuste?"- ■■ ■■■■■, ■ ■ '■■■■■■■
.. Vea la sección ."Control de temperatura del horno." : : : v
.............. .................... ^................
..................
^ ^ ^ ^ ^ ^ ^ ^ ^ ^ ^......... ^
...........
La pantalla muestra mensajes
¿Está la pantalla mostrando "PF"?
Ha ocurrido un corte de electricidad. Presione OFF/CANCEL
para despejar la pantalla. Vuelva a poner el reloj a la hora de
ser necesario. Vea la sección "Reloj."
¿En algunos modelos, está la pantalla mostrando "PF" y
un Icono de la superficie de cocción?
Se está usando e! bloqueo de la superficie de cocción. Vea la
sección "Bloqueo de la superficie de cocción".
¿Está la pantalla mostrando "F" seguida de un número?
Presione OFF/CANCEL para despejar la pantalla. Si vuelve a
aparecer el código "F", póngase en contacto con un
especialista competente en reparationes de Sears. Vea la
contraportada. : / : :
¿Muestra la pantalla "EO F5"?
El pestillo de autolimpieza está impidiendo que la puerta del.
. horno se .cierre. Presione OFF/CANCEL para despejar la / .
. pantalla. Baje y sostenga el desatascador del interruptor de
la puerta (ubicado en el marco delantero del horno). El /
mecanismo del pestillo se desbloqueará después de 6 ::: :::
.'.segundos.
..... .....
....
El ciclo de autolimpieza no funciona
¿Está la puerta del horno abierta?
Cierre bien la puerta del horno. :) /:: j
¿Se ha presionado START/ENTER?
Presione START7ENIER :::::: ; :
¿Se ha fijado un inicio diferido?
Vea la sección "Control temporizado del horno.'
¿Se está usando el utensilio de estufa apropiado?
Vea la sección "Utensilios de estufa."
¿Se ha fijado la perilla de conu-ol en el nivel apropiado de
calor? ^
Vea la sección "Perillas de control."
¿Está nivelado el electrodoméstico?
Nivele el electrodoméstico. Vea las instrucciones de
instalación.
......................
................ .........................
Los resultados del horneado no son los que se esperaba
¿Se ha precálentado el horno?
Espere que el. horno se precaliente antes de colocar los
alimentos en .él... F.'.'; ■.'.....::: ■ ■ : :: /::: /: ; :: ■ ■
¿Se han ubicado las parrillas adecuadamente?
Vea la sección "Posición de las parrillas y ios utensilios para
hornear." : :
¿Hay circulación de aire aprópiáda alrededor del utensilio
para hornear? ^ ^ ^ ^ ^ ^ ^ ^ ^ ^
Vea la sección."Posición, de las parrilias
hornear" ..;;
¿Se ha distribuido Ja masa en forma pareja en el molde
para hornear?
Revise para asegurarse de que la masa esté nivelada en el
molde para hornear. F /
¿Está nivelado el electrodoméstico?
Nivele el electrodoméstico. Vea las instrucciones de
instalación. FF
¿Están los artrculos horneados demasiado dorados en el
fondo?
Disminuya la temperatura del horno de 15°F a 25°F (5°C a
15®C). F :F :
¿Se están dorando ios bordes de las cortezas antes de
tiempo?
Use papel de aluminio para cubrir el borde de la corteza. :
.............
........
..............
Horneado o asado lento
¿Se ha precalentado el horno?
Espere que el horno se caliente antes de colocar los
alimentos, en .él. .. . .. : F: F : f
¿Hay circulación de aire apropiada alrededor del utensiliq
para hornear? ■ '-■.'■■..'
Vea la sección.’.’Pos.ición.de las parrillas y los utensilios para
hornear." ; ;-; ■ F'-.'F F F F F F F F F F FV^: ' ^
¿Se está usando un lapso de tiempo apropiado?
Aumente, el tiertipo para hornear o asar. :
¿Se ha lijado la temperatura apropiada?
Aumente la. temperatura 25°F (15°C). f : F F F F F
¿Se ha abierto la puerta de! horno durante la cocción?
Abrir el horno para mirar los alimentos disminuye el calor del
horno y puede prolongar los tiempos de cocción.
.....
^ ^
y los utensilios para
.....
■ ■■ ■ ■ ■ ■■
■.S
■m
■M
'm
.......
.F"f:: ■■ ■ ■
51
Page 52

Get it fixed, at your home or ours!
For repair of major brand appliances in your own home,
no matter who made it, no matter who soid it!
1 -800-4-M Y-HOM E® Anytime, day or night
(1 -800-469-4663) (U S A and Canada)
www.sears.com
www.sears.ca
For repair of carry-in products iike vacuums, iawn equipment,
and electronics, cali for the location of your nearest
Sears Parts and Repair Center.
1 -800-488-1222 Anytime, day or night (U.SA. only)
www.sears.com
For the repiacement parts, accessories and owner’s manuais
that you need to do-it-yourseif, cali Sears PartsDirect^^!
1-800-366-PART
(1-800-366-7278)
www.sears.com/partsdirect
To purchase or inquire about a Sears Service Agreement
or Sears Maintenance Agreement:
6 a.m. -11 p.m. CST, 7 days a week
(U.SAonly)
Pata pedir servicio de reparación a
domicilio, y para ordenar piezas:
1-888-SU-HOGAR^»<
8Z74077B
© Sears Roebuck and Co
1-800-827-6655 (U.SA) 1-800-361-6665 (Canada)
7 a.m. - 5 p.m. CST, Mon. - Sal. 9 a.m. - 8 p.m. EST, M - F, 4 p.m. Sat.
Au Canada pour service en français:
1-800-LE-FOYER^*=
(1-800-533-6937)
(1-888-784-6427)
^ Marca Registrada t ^ Marca de Fábrica ^ ‘"''^Marca de Servicie de Sears Roebuck and Co
@ Registered Trademark I Trademark/ Service Mark of Sears Roebuck and Co
TCI SPI
www.sears.ca
impreso en EE UU
4/02
Printed in U S A
 Loading...