

Kenmore 640-82960819-9 User Manual

Use and Care Guide
Liquid Propane Gas Grill
Sears Model No. 122.16648900
Kmart item No. 640-82960819-9
A WARNING:
Read this Owner’s manual carefully and be sure your
gas grill is properly assembled, installed and
maintained. Failure to follow these instructions could
result in serious injury and/or property damage. This
gas grill is intended for outdoor use only and is not
intended to be installed in or on recreational vehicles
or boats.
Note to Installer
Leave this Owner’s Manual with the customer after
delivery and/or installation.
• Parts
• Assembly
• Safety Rules
• Use and Care
• Troubleshooting
Note to Consumer
Leave this Owner’s Manual in a convenient place for
future reference.
Customer Service Helpline:
For parts ordering, call:
1-800-4-MY-HOME^
For assembly questions, call:
1-800-913-8999
MFC No: 720-0650A
Date: 10/20/2008
Sears, Roebuck and Co., Hoffman Estates, IL 60179 U.S.A.

Table of Contents
Precautions
Warranty
Safety Precautions
Parts Diagram----------------------------------------------------5
Parts List----------------------------------------------------------6
Assembly Instructions
Lighting Instructions------------------------------------10-~11
Light Operation Instruction
Cleaning and Maintenance
Troubleshooting------------------------------------------------15
Cooking Instruction
Cooking Chart--------------------------------------------------17
-----------------------------------------------------------
-----------------------------------------
-------------------------------------
-----------------------------
----------------------------
-------------------------------------------
2~-4
7~9
12-13
14~15
2
16
Kenmore Grill Warranty
One-Year Full Warranty on Kenmore Grill
If this grill fails due to a defecting material or
workmanship within one year from the date of
purchase, call 1-800-4-MY-HOME to arrange for
free repair (or replacement if repair proves
impossible).
Ten-Year Limited Warranty on Stainless Steel Burners
For ten years from the date of purchase, any
stainless steel burner that rusts through will be
replaced free of charge. After the first year from
the date of purchase, you pay for labor if you
wish to have it installed.
WARNING
Combustion by products produced when using
this product contain chemicals known to the
State of California to cause cancer, birth defects,
or other reproductive harm.
WARNING
Failure to comply with these instructions could
result in a fire or explosion that could cause
serious bodily injury, death, or property damage.
^WARNING
Your grill will get very hot. Never lean over the
cooking area while using your grill. Do not touch
cooking surfaces, grill housing, iid or any other
grill parts while the grill is in operation, or until
the gas grill has cooled down after use.
Failure to comply with these instructions may
result in serious bodily injury.
At
'WARNING
1. Do not store or use gasoline or
other flammable liquids or
vapors in the vicinity of this or
any other appliance.
2. An LP cylinder not connected for
use shall not be stored in the
vicinity of this or any other
appliance.
All warranty coverage excludes ignitor batteries
and grill part paint ioss, discoloration or rusting,
which are either expendable parts that can wear
out from normal use within the warranty period,
or are conditions that can be the result or normal
use, accident or improper maintenance.
All warranty coverage is void if this grill is ever
used for commercial or rental purposes.
All warranty coverage applies only if this grill is
used in the United States.
This warranty gives you specific legal rights, and
you may have other right which vary from state to
state.
Sears, Roebuck and Co.,
Hoffman Estates, IL 60179
U.S.A.
A
DANGER
If you smell gas:
1. Shut off gas to the appliance.
2. Extinguish any open flame.
3. Open lid.
4. If the odor continues, keep away
from the appliance and
immediately call your gas
supplier or your fire department.
Grill Installation Codes
The installation must conform with local codes or,
in the absence of local codes, with either the
national fuel gas code, ANSI Z 223.1/NFPA S4,
Natural gas and propane installation code, CSA
B149.1, or propane storage and handling code,
B149.2, or the standard for Recreational vehicles,
ANSI A 119.2, and CSA Z240 RV series
recreational vehicle code, as applicable.
LP gas grill models are designed for use with a
standard 20 lb. Liquid Propane Gas tank, not
included with grill. Never connect your gas grill to
an LP gas tank that exceeds this capacity.

Precautions
A tank of approximately 12 inches in diameter by 18-
1/2 inches high is the maximum size LP gas tank to
use. You must use an OPD gas tank which offers
an Overfill Prevention Device.
This safety feature prevents the tank from being
overfilled which can cause malfunction of the LP gas
tank, regulator and/or grill.
The LP gas tank must be constructed and marked in
accordance with specifications of the U.S. Dept, of
Transportation (DOT). In Canada, the LP gas tank
must meet the National Standard of Canada ,Can
CSA-B339 , Cylinders , spheres and Tubes for
Transportation of Dangerous Goods and Commission .
1. The LP gas tank must have a shutoff valve,
terminating in an LP gas supply tank valve outlet, that
is compatible with a Type 1 tank connection device.
The LP gas tank must also have a safety relief device
that has a direct connection with the vapor space of
the tank.
2. The tank supply system must be arranged for vapor
withdraw.
3. The LP gas tank used must have a collar to protect
the tank valve.
Proper Placement and Clearance of Grill
Never use your gas grill in a garage, porch, shed,
breezeway or any other enclosed area. Your gas grill
is to be used outdoors only, at least 24 inches from
the back and side of any combustible surface. Your
gas grill should not be used under overhead
combustible construction. Do not obstruct the flow of
ventilation air around the gas grill housing.
• Do not install this outdoor gas grill in or on
recreational vehicles or boats
• Keep outdoor gas grill area clear and free from
combustible materials, gasoline and other flammable
vapors and liquids
•Do not obstruct the flow of combustion and ventilation
air. Check for this each time prior to using grill.
• Never connect an unregulated LP gas tank to your
gas grill. The gas regulator assembly supplied with
your gas grill is adjusted to have an outlet pressure of
11” water column (W.C.) for connection to an LP gas
tank.
• Only use the regulator and the hose assembly
supplied with your gas grill. Replacement regulators
and hose assemblies must be those specified in this
manual.
Have your LP gas tank filled by a reputable propane
gas dealer and visually inspected and re-qualified at
each filling.
Do not store a spare LP gas tank under or
near this appliance.
Never fill the tank beyond 80 percent full . If this
information is not followed exactly, a fire causing
death or serious injury may occur.
Always keep LP gas tanks in an upright position.
Do not store (or) or use gasoline or other flammable
vapors and liquids in the vicinity of this gas grill.
Do not subject the LP gas tank to excessive heat.
Never store an LP gas tank indoors. If you store your
gas grill in the garage or other indoor location,
always disconnect the LP gas tank first and store it
safely outside.
Place dust cap on cylinder valve outlet whenever the
cylinder is not in use. Only install the type of dust
cap on the cylinder valve outlet that is provided with
the cylinder valve. Other types of caps or plugs may
result in leakage of propane.
LP gas tanks must be stored outdoors in a wellventilated area and out of reach of children.
Disconnected LP gas tanks must not be stored in a
building, garage or any other enclosed area.
When your gas grill is not in use the gas must be
turned off at the LP gas tank.
The regulator and hose assembly must be inspected
before each use of the grill. If there is excessive
abrasion or wear or if the hose is cut, it must be
replaced prior to the grill being used again.
Keep the gas regulator hose away from hot grill
surfaces and dripping grease. Avoid unnecessary
twisting of hose. Visually inspect the hose prior to
each use for cuts, cracks, excessive wear or other
damage. If the hose appears damaged do not use
the gas grill. Call 1-800-4-MY-HOME for assistance.
Never light your gas grill with the lid closed or before
checking to ensure the burner tubes are fully seated
over the gas valve orifices.
Never allow children to operate your grill.
Warning: The grilling unit, including, if applicable,
built in refrigerator, built in lights, should never be left
unattended while in use. After use of the grill, always
turn off all burners and the main gas supply on the
propane tank, remove the tank and unplug all
electronic components before covering your grill for
storage, to prevent personal injuries or property
damage.
ж
A strong gas smell, or the hissing sound of gas
Indicates a serious problem with your gas grill or
the LP gas tank. Failure to Immediately follow the
steps listed below could result in a fire or
explosion that could cause serious bodily injury,
death, or property damage.
• Shut off gas supply to the gas grill.
• Turn the control knobs to OFF position.
• Put out any flame with a proper fire extinguisher.
• Open Grill Lid.
• Get away from the LP gas tank.
• Do not try to fix the problem yourself.
• If odor continues or you have a fire you can not
extinguish, call your fire department. Do not call
near the LP gas tank because your telephone is
a form of electrical device and could create a
spark resulting in fire and/or explosion.
NOTE: The normal flow of gas through the regulator
and hose assembly can create a humming noise. A
low volume of noise is perfectly normal and will not
interfere with operation of the grill. If humming noise
is loud and excessive you may need to purge air from
the gas line or reset the regulator excess gas flow
device. This purging procedure should be done every
time a new LP gas tank is connected to your grill. For
help with this procedure refer to page 11, Item 4 of “If
Grill Still Fails To Light”, or call the Customer Service
Helpline 8 AM to 5 PM PST at: 1-800-913-8999
WARNING
CAUTION: Beware of Flash-Back
CAUTION: Spiders and small insects occasionally
spin webs or make nests in the grill burner tubes
during transit and warehousing. These webs can lead
to gas flow obstruction which could result in a fire in
and around burner tubes. This type of fire is known as
“FLASH-BACK” and can cause serious damage to
your grill and create an unsafe operating condition for
the user.
Although an obstructed burner tube is not the only
cause of “FLASH-BACK”, it is the most common
cause.
To reduce the chance of “FLASH-BACK”, you must
clean the burner tubes before assembling your grill,
and at least once a month in late summer or early fall
when spiders are most active. Also perform this
burner tube cleaning procedure if your grill has not
been used for an extended period of time.
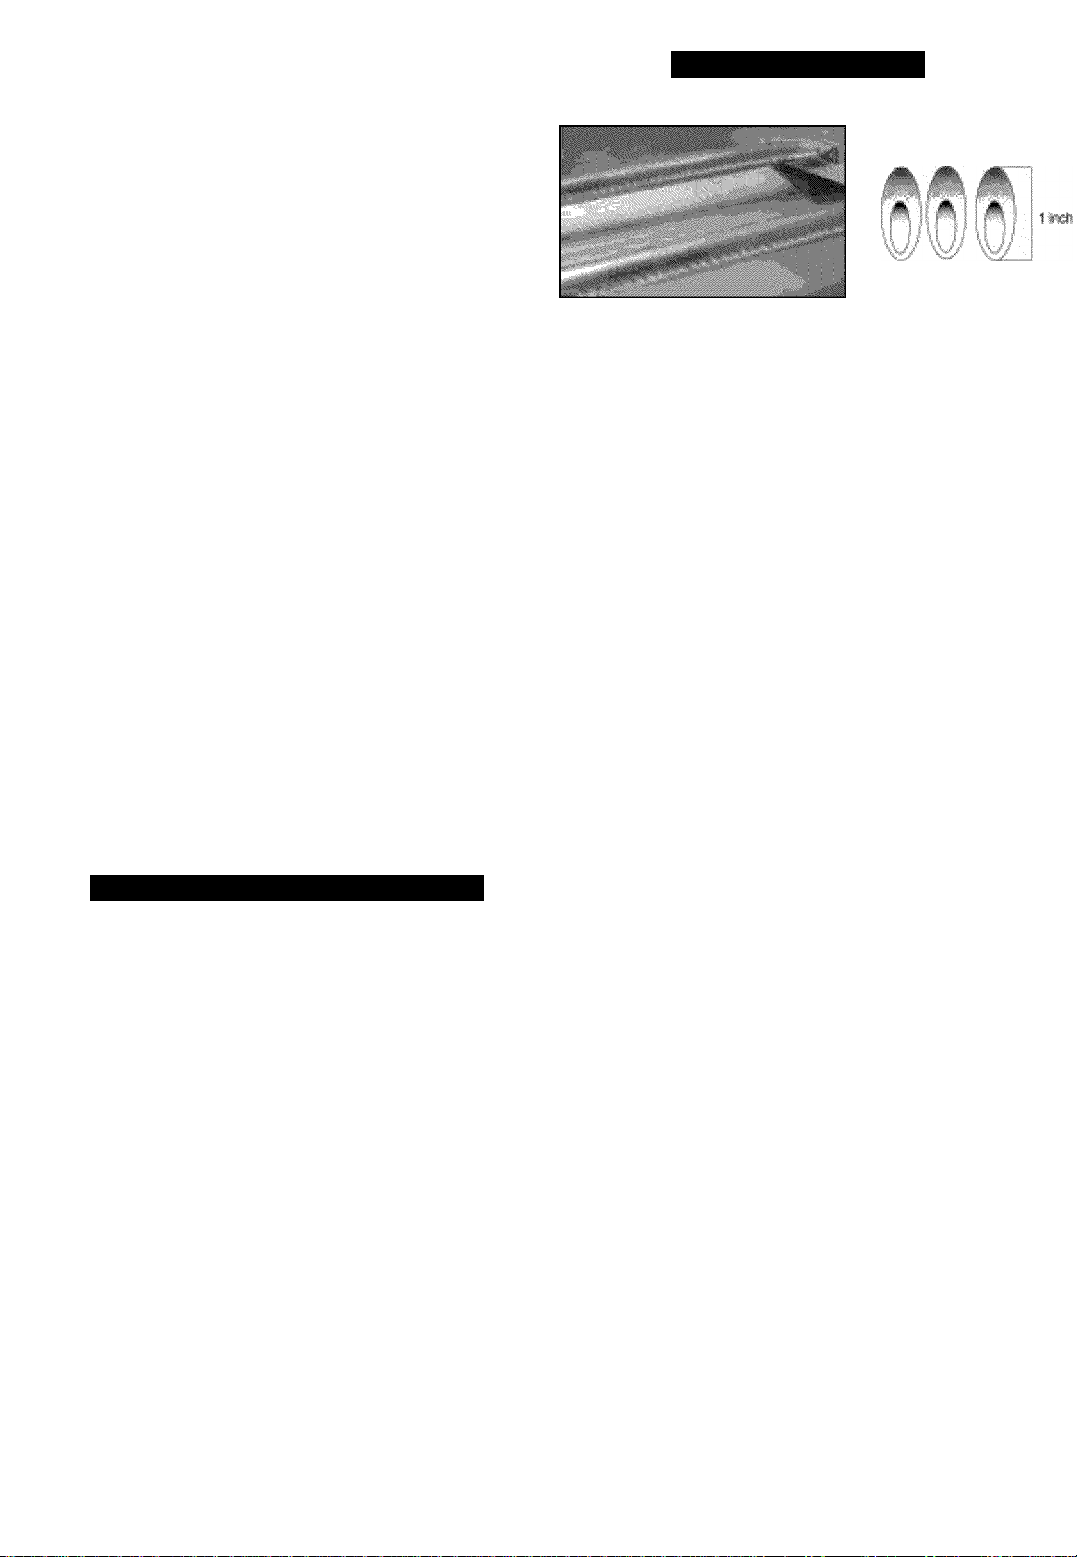
Burner Flame Check
Visually check the burner flames prior to each use. The
flames should look like picture, if they do not, refer to the
cleaning burner tubes and ports, see page 17 of this
manual.
Repair Protection Agreements
Congratulations on m aking a sm art purchase. Your new
Kenmore product is designed and manufactured for
years of dependable operation. But like all products, it
may require repair from time to time. That's when having
a Repair Protection Agreement can save you money and
aggravation.
Here’s what the Repair Protection Agreement *
includes:
V Expert service by our 10,000 professional repair
specialists
V Unlimited service and no charge for parts and labor
on all covered repairs
V Product replacement up to $1500 if your covered
product can’t be fixed
V Fast help by phone - we call it Rapid Resolution -
phone support from a Sears representative. Think of
us as a “talking owner’s manual”
Once you purchase the Repair Protection Agreement, a
simple phone call is all that it takes for you to schedule
service. You can call anytime day or night, or schedule a
service appointment online.
The Repair Protection Agreement is a risk-free purchase.
If you cancel for any reason during the product warranty
period, we will provide a full refund. Or, a prorated refund
anytime after the product warranty period expires.
Purchase your Repair Protection Agreement today!
Some limitations and exclusions apply. For prices
and additional information in the U.S.A. call
1 -800-827-6655.
*Coverage in Canada varies on some items. For Full
details call Sears Canada at 1-800-361-6665
Sears Installation Service
For Sears professional installation of home appliances,
garage door openers, water heaters, and other major
home items, in the U.S.A. or Canada call 1-800-4-MY-
HOME
See Cleaning Burner Tubes and Ports on page # 14.
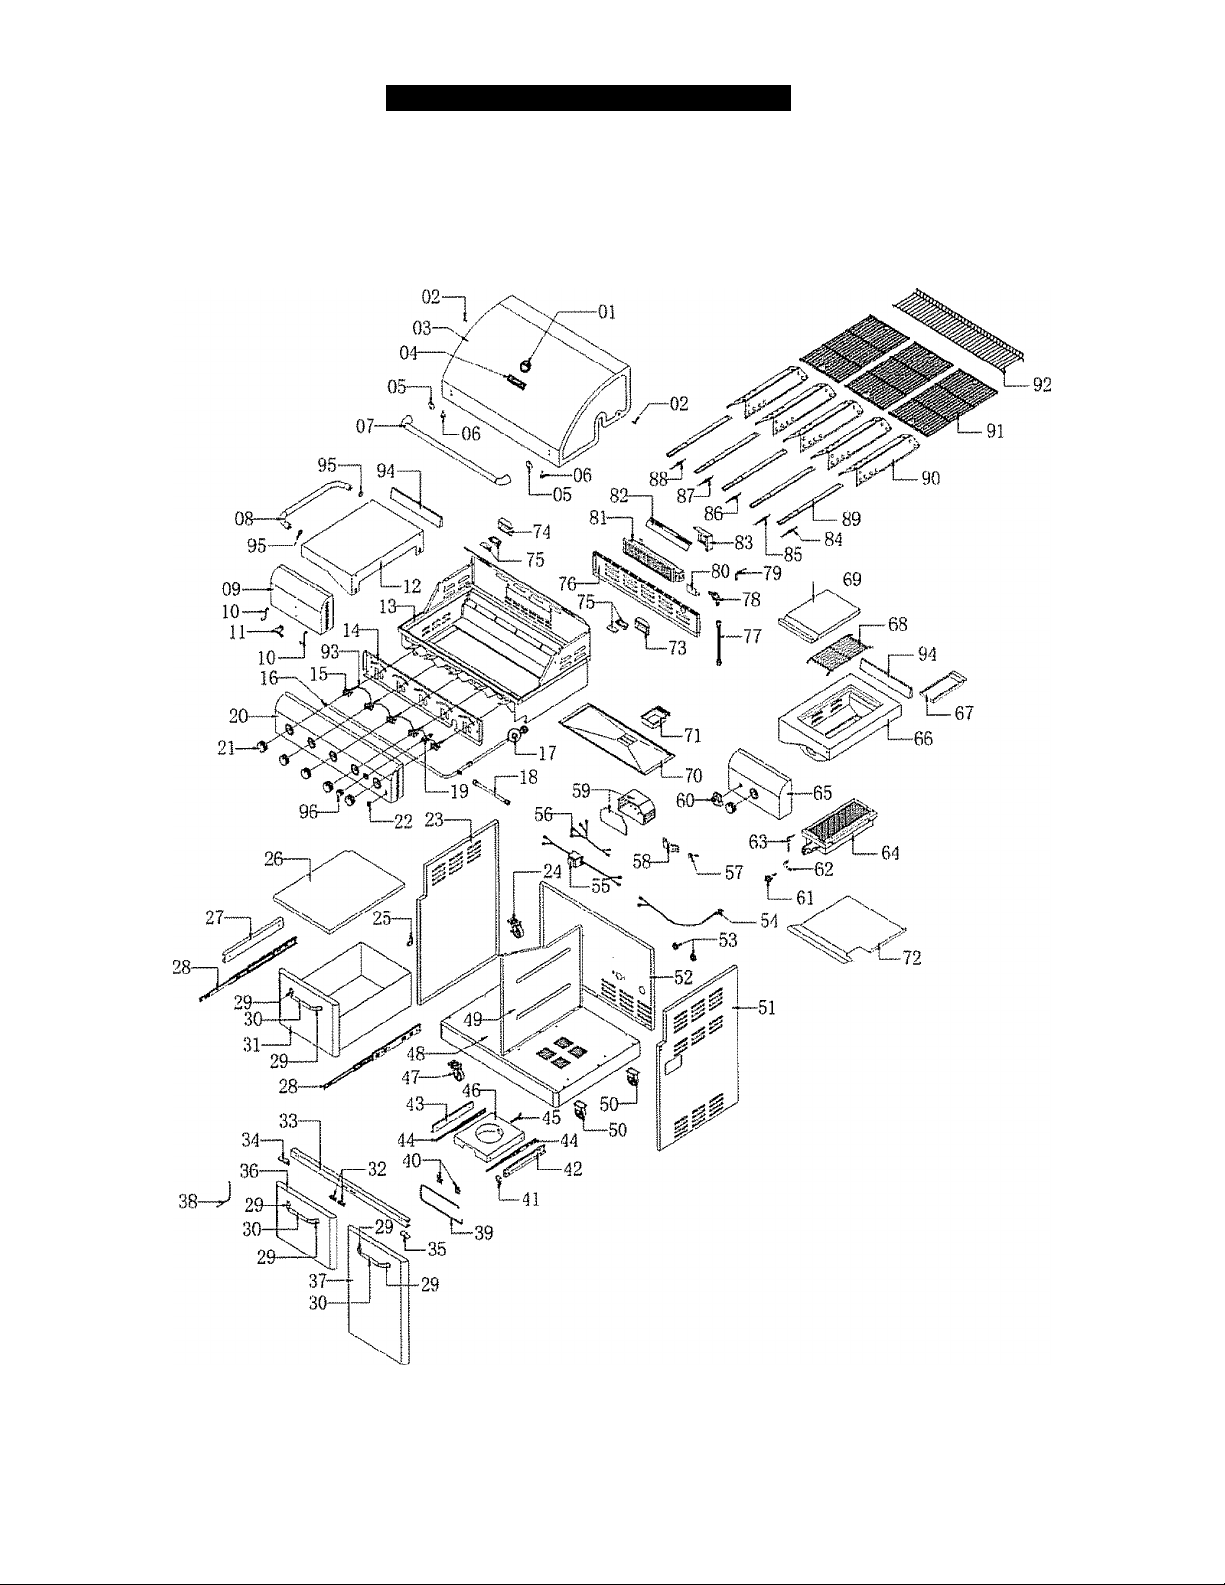
Model 122.16648900 Parts Diagram
Modell22.16648900 Parts List
PARTS
KEY#
Б50А-001Tennperatyfe Gauge
1
650A-002
2
6S0A-èÙ3
3
650A-004
4
650A-005 Main Lid Handle Heal Insulating Spacer
6
650A-0D6Hood Buffer
6
6S0A-D07
7
660A-008SUe SheB Handle, Left
8
в50А-009
В
650A-010
10
6SOA-011
11
65DA-012
12
650A-013
13
650A-014
14
6S0A-01S
15
Б50А-016
16
650A-017
17
6S0A-01B
18
650A-01B
19
65DA.020
20
650A-021Control Knob
21
Б50А-022Liqh Sw Itch
22
eSOA-023side Panel, Leit
23
650A-D24
24
25 650A-D2S
650A-026
26
6S0A-O27
27
"6S0A-D28
28
65DA-02S
2B
5S0A-030Drawer, Door Handel Tube
30
6SOA-O31
31
660A-D32
32
650A-033
33
650A-034
34
650А-03Й
35
'Sg ■g55Â-03é’
"65OA-037Left Door. Right
37
6S0À-03B
38
650A-039
38
6S0A-040
40
650A-041
41
650A-042
42
Б50А-043
43
6èOA-044
44
'ШШШ
45
650A-046
46
65DA-047
47
660A-04B
4è
650A-049
4B
1
Main Lid Screw
Main Lid
Logo
Main Lid Handle
Side Shelf Front i=anei, Left
Hooks
Bottle Opener
Side Shell. Left
Mairr Burner Bow t Assetiribiy
Front Baffle
Main Gas Valve
Main Manifold
Rsouiaiof. LP
Side Burner Hose
Rôtisserie Gas Valve
Main Control RinBl
Swivel Caster with Brake
Door Hinge
Door Oapboard
Draw er Slide Bracket. Left
Drawer Slide
Drawer, Door Handle Seat
Drawer
Door' ffignet
Carl Frame
Door hinqe bracket. Left
Door hinae bracket, Riahl
Left Door, Front
Lighting Rod
Towel Rack
Towel Rack Bracket
Tank Trav Lock Slip
Tank Tray Slide Braokei. Left
Tank TraySitde Bracket, Right
Tank Tray Slide
Tank Boil
Tank Tray
Sv/fvel Caster
Bottom Panel
Cart aapboard
_____________________________J----------------^------
DSCRIPTÎON
QUANTITYKEY#
50
1
51
2
52
1
53
1
54
2
55
2
1 56
57
1
1 58
2
1 60
1
1 62
1
g
1
1 66
1
1
1
6 70
1 71
1 72
1
1
1 75
1
2
6
3 79
1
2
1
-gj-
1
1 86
1
1
2
1
1
1 92
2
1
2
1 96
1
1
59
61
63
64
65
67
6S
69
‘73
74
76
77
78
80
81
62
83
84
67
BS
89
SO
91
83
94
S5 6S0A-Q9fe
PARTS
65DA-050
650A-051
650A-052
65DA-053
650A-054
650A-055
Б50А-056
650A-0S7
65GA-058
65DA-059
650A-Q60
650A-061
650A-D62
650A-D63
6S0A-064
650A-065
65DA-0S6
650А-0Б7
650A-068
650А-0БЭ
Б60А-070
650A-071
650A-072
65QA-073
650A-074
650A-D7feLarrp
650А-07Б
650A-077
650A-078
esoA-ote
650A-080
650A-081
650A-082
650A-083
650A-0B4
ISÖS-Ö'BS“
6S0A-0B6
6S0A-087
650A-088
65OA-D0S
6SOA-O0O
650A-031
650A-092
65DA-093
6SÖÄ-Ö94
6S0A-096
Caster
Side Panel. Right
Back Panel
Rubber Grommet
R3W er cord fix brocket
Transtorirer
Asserrtiled Bower Cord
Cable Strainer
Row er Cord Fix Bracket
Transformer Supporting Box
Bectronic Igniter Module
Sear Gas Valve
Side Manilold
Sear Burner Igniter Wire
Sear Burner
Side Burner Control Parcel
Sear Burner Bow l Assembly Frame
Side Borne Grease fray
Side Burner Cooking Grid
Side Burner Lid
Grease Slide Panel. Bottom
Grease Tray
Firebox Heat Shield
Larrp Fix Cover, Right
Lanp Fix Cover. Left
Back ftsnel, Top
Rôtisserie Burner Flex Gas Line
Rôtisserie Orrfice w / brass elbow
Rôtisserie Burner igniter Wire
Rôtisserie Burner Gas Colieclof
Rôtisserie Burner
Rôtisserie Heat Siiieid
Rear baffle
Main Buner Igniter Wire A
Iwtain Buner Igniter Wire fe
WUIn Buner Igniter Wire C
tvfein Buner igniter Wire D
№tn Buner Igniter Wire E
tein Burner
Heat Dili user
Cookirrg Grid With Hole
Wa'rrnng Rack
gniler Junction Wire
Side Shell, Side burner back bracket
Side shelf handle bezei
Rôtisserie Control kr\ob
DESCRIPTION
QUANTITY
2
1
1
2
1
1
1
1
1
1
1
1
1
1
1
1
1
1
1
1
1
1
1
1
1
2
1
1
1
1
1
1
1
1
1
1
1
1
1
5
5
3
1
1
2
1
1
i
.............
-
For assembly questions, cal!;
1-800-913-8999
For parts ordering, please call;
1-800-4-MY-HOME
To make sure you obtain the correct replacement
parts for your Kenmc^ gas grill, please refer to
the part numbers on this page.
Important: Keep this Owner’s Manual for
convenient reference and for part replacement
Important: Use only parts listed above When ordering
parts, providing the following information:
1, Model #
2, Part Number (see PART# in chart)
3, Part Description
4 Quantity of parts needed
You can purchase the Kenmore
rôtisserie kit, item # 15803 at your
local Sear's or Kmart store.
Also this grill can be converted to a
NG grill. Please call 1-800-4-MY-
HOME and request part# 710-0650,
 Loading...