

Kenmore 640-06174031-2, 14803447410 Owner’s Manual
Use & Care Guide
Manual de Uso y Cuidado
English / Espa_ol
I(enmore
@ @ @
Model/Modelo: 148.03447410
Item / Articulo: 640-06174031-2
P/N RB2518TK-Manual
Sears Brands Management Corporation
Hoffman Estates, IL 60179 U.S.A.
www.kenmore.com
www.sears.com
www.kmart.com
@

Ifyou smell gas:
1. Shutoff gas to the appliance.
2. Extinguishanyopenflame.
3. Open lid.
4. Ifodor continues,keep away fromthe
applianceand immediatelycallyour gas
supplier or your fire department.
1. Do notstoreor use gasolineor other
flammable liquids or vapors in the vicinity
of this or any other appliance.
2. An LP cylinder notconnectedfor use shall
not bestored inthevicinity of this or any
other appliance.
Installation Safety Precautions
• Use grill, as purchased, only with LP (propane) gas and the
regulator/valve assembly supplied.
• Grill installation must conformwith local codes,or in their
absence of local codes, with either the NationalFuel Gas
Code,ANSI Z223. 1/NFPA 54, Natural Gas andPropane
Installation Code, CSA B149.1,or Propane Storage and
Handling Code,B149.2, or the Standard for Recreational
Vehicles,ANSl A 119.2/NFPA 1192,and CSA Z240 RV
Series, Recreational Vehicle Code,as applicable.
•All electrical accessories (such as rotisserie) must be
electrically grounded in accordance with local codes, or
National Electrical Code,ANSI / NFPA 70 or Canadian
Electrical Code, CSA C22.1. Keep any electrical cords
and/or fuel supply hoses away from any hot surfaces.
•This grill is safety certified for use in the United States
and/or Canada only. Do not modify for use in any other
location. Modificationwill result inasafety hazard.
Call Grill Service Center For HelpAnd Parts
If you havequestions or needassistance during assembly,
please call 1-800-482-0131.Youwill bespeakingto a
representativeof the grill manufacturerand not a Sears
employee.To order new parts call Sears at
1-800-4-MY-HOME.
Product Record
IMPORTANT: Fill outthe product recordinformation
below.
Model Number
Serial Number
See rating label on grill for serialnumber.
Date Purchased
Safety Symbols
The symbols and boxes shown below explain what each
heading means. Readand follow allof the messages found
throughout the manual.
DANGER: Indicates an imminently hazardous
situation which, if not avoided,will result in death or
serious injury.
WARNING: Indicates an potentially hazardous
situation which, if not avoided, could result in death
or serious injury.
.............................................CAUTION...............................................
Forresidentialuse only. Do not use for
commercialcooking.
@ 2014SearsBrands,LLC
CAUTION: Indicates a potentially hazardous
situation or unsafe practicewhich, if not avoided,
may result in minor or moderate injury.
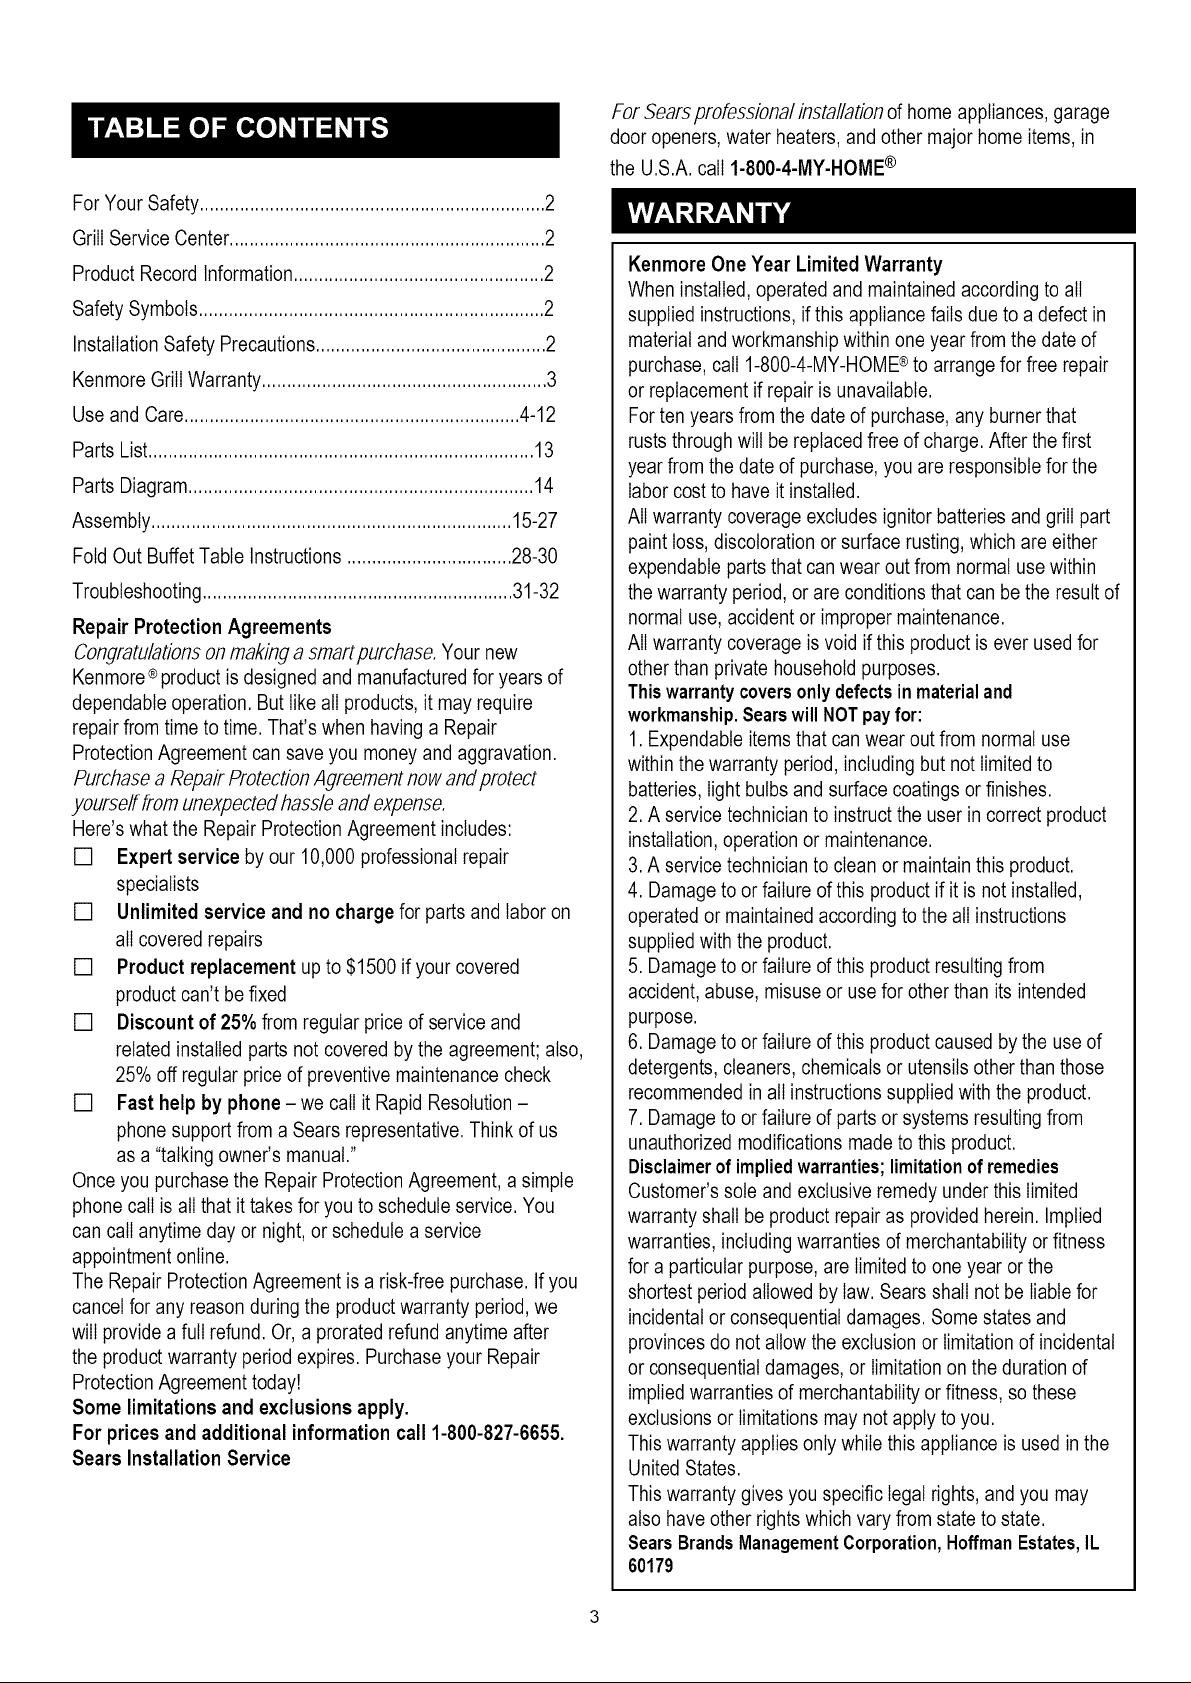
ForYourSafety.....................................................................2
GrillServiceCenter...............................................................2
ProductRecordInformation..................................................2
SafetySymbols.....................................................................2
InstallationSafetyPrecautions..............................................2
KenmoreGrillWarranty.........................................................3
UseandCare...................................................................4-12
PartsList.............................................................................13
PartsDiagram.....................................................................14
Assembly........................................................................15-27
FoldOutBuffetTableInstructions.................................28-30
Troubleshooting..............................................................31-32
Repair ProtectionAgreements
Congratulations on making a smart purchase. Your new
Kenmore®product isdesigned and manufactured for years of
dependable operation. But like all products,it mayrequire
repair from time to time. That's when having a Repair
ProtectionAgreement can save you money andaggravation.
Purchase a Repair ProtectionAgreement now and protect
yourself from unexpected hassle and expense.
Here's what the Repair ProtectionAgreement includes:
[] Expert service by our 10,000 professional repair
specialists
[] Unlimited service and no charge for parts and labor on
all covered repairs
[] Product replacement up to $1500 if your covered
product can't be fixed
[] Discount of 25% from regular price of service and
related installed partsnot covered by the agreement; also,
25% off regular price of preventive maintenance check
[] Fast help by phone -we call it Rapid Resolution -
phone support from a Sears representative. Think of us
as a "talking owner's manual."
Once you purchase the Repair Protection Agreement, a simple
phone call is all that it takes for you to schedule service. You
can call anytime day or night, or schedule a service
appointment online.
The Repair Protection Agreement is a risk-free purchase. If you
cancel for any reason during the productwarranty period, we
will provide a full refund. Or, a prorated refund anytime after
the product warranty period expires. Purchase your Repair
Protection Agreement today!
Some limitations and exclusions apply,
For prices and additional information call 1-800-827-6655.
Sears Installation Service
For Sears professiona/ installation of home appliances, garage
door openers, water heaters, and other major home items, in
the U.S.A. call 1-800-4-MY-HOME®
Kenmore One Year Limited Warranty
When installed, operated and maintained according to all
supplied instructions,if this appliance fails due to a defect in
material and workmanship within oneyear from the date of
purchase, call 1-800-4-MY-HOME®to arrange for free repair
or replacement if repair is unavailable.
Forten years from the date of purchase, any burner that
rusts through will be replaced free of charge. After the first
year from the date of purchase, you are responsible for the
labor cost to have it installed.
All warranty coverage excludes ignitor batteries and grill part
paint loss, discoloration or surface rusting, which are either
expendable partsthat canwear outfrom normal usewithin
the warranty period, or are conditions that can be the result of
normal use, accident or improper maintenance.
All warranty coverage is void if this product is ever used for
other than private household purposes.
This warranty coversonlydefects in materialand
workmanship.SearswillNOTpayfor:
1. Expendable itemsthat can wear out from normal use
within the warranty period, including but not limited to
batteries, light bulbs and surface coatings or finishes.
2. A service technician to instruct the user in correct product
installation, operation or maintenance.
3.A service technician to clean or maintainthis product.
4. Damageto or failure of this product if it is not installed,
operated ormaintained according to the all instructions
supplied with the product.
5. Damage to or failure of this product resulting from
accident, abuse, misuse or use for other than its intended
purpose.
6. Damageto or failure of this product caused by the use of
detergents, cleaners, chemicals or utensils other than those
recommended in all instructions supplied with the product.
7. Damage to or failure of parts or systems resulting from
unauthorized modifications madeto this product.
Disclaimerof impliedwarranties; limitation of remedies
Customer'ssole and exclusive remedy under this limited
warranty shall be product repairas provided herein. Implied
warranties, including warranties of merchantability or fitness
for a particular purpose, are limited to one year or the
shortest period allowed by law. Sears shall not be liable for
incidental or consequential damages. Some states and
provincesdo not allow the exclusion or limitation of incidental
or consequential damages, or limitation on the duration of
impliedwarranties of merchantability or fitness, so these
exclusions or limitations may not apply to you.
This warranty applies only while this appliance is used in the
United States.
This warranty gives you specific legal rights, and you may
also haveother rights which vary from state to state.
SearsBrandsManagementCorporation,HoffmanEstates,IL
60179
• NEVERstore a spare LP cylinderunder or near
the grill appliance or in an enclosed area.
• Never fill a cylinder beyond80% full.
• Ifthe information in the two points aboveis not
followed exactly, a fire causing death or serious
injurymay occur.
• An over filled or improperlystored cylinder is a
hazarddue to possible gas release from the
safety relief valve. This could cause an intense
fire with risk of property damage,serious injury
or death.
° If you see, smell or hear gas escaping,
immediatelyget away from the LP cylinderand
grill appliance and callyour fire department.
LP Cylinder
• The LP cylinder used with your grill must meet the
following requirements:
• Use LP cyIinders only with these required measurements: 12"
(30.5cm) (diameter) x 18" (45.7 cm) (tall) with 20 Ib. (9kg.)
capacity maximum.
• LP cylinders must be constructedand marked inaccordance
with specifications for LP cylinders of the U.S. Department of
Transportation (DOT) or for Canada, CAN/CSA-B339,
cylinders, spheres and tubes for transportation of dangerous
goods. Transport Canada (TC). See LP cylinder collarfor
marking.
• LP cylinder valve must have:
•Type 1 outlet compatible with
regulator or grill.
• Safety reliefvalve.
• ULlisted Overfill Protection OPDHandWheel
Device(OPD). ThisOPD safety
feature is identified bya unique triangular hand wheel. Use
only LP cylinders equipped with this type of valve.
• LP cylinder must be arranged for vaporwithdrawal and
include collar to protect LPcylinder valve. Always keep LP
cylinders in upright position during use,transit orstorage.
LP Tank Removal, Transport and Storage
• Turn OFFall control knobs and LP tankvalve. Turncoupling
nut counterclockwise by hand only - do not usetools to
disconnect. LiftLP tank wire upward off of LP tank collar,then
lift LP tank up and off ofsupport bracket. Install safety cap
onto LPtank valve.Always use cap andstrap supplied with
valve.
Failure to use safety cap as directed may result in
serious personal injury and/or property damage.
LPTankValve
@_ Safety Cap
RetainerStrap
•A disconnected LP tank instorage or being transported must
havea safety cap installed (as shown). Donot store an LP
tank in enclosed spaces such as a carport, garage, porch,
covered patio orother building. Never leave an LP tank inside
a vehicle which may becomeoverheated by the sun.
• Do not store an LPtank in an area where children play.
LP cylinder in upright position for vapor withdrawal
LP (Liquefied Petroleum Gas)
• LP gas is nontoxic, odorlessand colorlesswhen produced.
For Your Safety, LP gas has beengiven an odor(similar to
rotten cabbage) so that it can be smelled.
• LP gas is highly flammable and may ignite unexpectedly
when mixedwith air.
LP Cylinder Filling
• Use only Iicensed and experienced dealers.
• LP dealer must purge new cylinder before filling.
• Dealershould NEVER fill LP cylinder more than 80% of LP
cylinder volume. Volume of propane in cylinder will vary by
temperature.
•A frosty regulator indicates gas overfill. Immediately close LP
cylinder valve and call local LP gas dealer for assistance.
• Donot release liquid propane (LP) gas intothe atmosphere.
This is a hazardous practice.
•To removegas from LPcylinder, contact an LP dealer or call
a localfire department for assistance. Check thetelephone
directory under"Gas Companies" for nearest certified LP
dealers.

LP Tank Exchange
•Many retailers that sell grills offeryou the option of replacing
your empty LP tank through an exchange service. Use only
those reputable exchange companies thatinspect, precision
fill, test and certify their cylinders. Exchange your tank only
for an OPD safety feature-equipped tank as described in
the "LP Tank" section of this manual.
•Always keep new and exchanged LP tanks in upright position
during use, transit or storage.
,Leak test new and exchanged LP tanks BEFORE
connecting to grill.
Connecting Regulator To The LP Tank
1. LP tank must be properlysecured onto grill. (Refer to
assembly section.)
2. Turn all control knobsto the OFF position.
3. Turn LP tank OFF byturning OPD hand wheel clockwise to
a full stop.
4. Remove the protective capfrom LP tank valve. Always use
cap and strap suppliedwith valve.
OPDHand Wheel
LP Tank Leak Test
Foryoursafety
•Leak test must be repeated each time LPtank is exchanged
or refilled.
•Do not smoke during leak test.
•Do not use an open flame to check for gas leaks.
•Grill must beleak tested outdoors in a well-ventilatedarea,
away from ignition sources such as gas fired or electrical
appliances. During leak test, keep grill away from open
flames or sparks.
•Usea clean paintbrush and a 50/50 mild soap and water
solution. Brushsoapy solution onto areas indicated byarrows
in figure below. Leaks are indicated by growing bubbles.
If "growing" bubbles appear do not useor move the LP
tank. Contactan LP gas supplier or your fire department!
• Do not use household cleaning agents. Damage to gas
train components (valve/hose/regulator) can result.
.I./I Type1outletwith
threadonoutside
SafetyReliefValve
StrapandCap
Do notinsert a POL transport plug
(plastic part with external threads)
into the Type 1 tank valve outlet. It
will defeat the Safety Relief Valve
feature.
5. Hold regulator and insert nipple into LP tank valve.
Hand-tighten the coupling nut, holding regulator in a straight
line with LP tank valveso as notto crossthread the
connection.
Nipplehasto be centered
into the LP tank valve.
J
S
s
,f
J
Holdcouplingnutandregulator
asshownfor properconnection
toLP tankvalve.
Leak Testing Valves, Hoseand Regulator
1. Turn all grill control knobs to OFF.
2. Be sure regulator is tightly connected to LP tank.
.
Completely open LP tank valve byturning OPD hand wheel
counterclockwise. If you hear a rushing sound, turn gas off
immediately. There is a major leak at the connection.
Correct before proceeding bycalling Sears for
replacement parts at 1-800-4-MY-HOME®.
4. Brush soapy solution onto areas where bubbles are shown
in picture below:
6. Turn the coupling nut clockwise and tighten to a full stop.
The regulator will seat on the back-checkfeature inthe LP
tank valve, resulting in some resistance. An additional
one-half to three-quarters turn is required to complete
the connection. Tighten by hand only - do not use tools.
NOTE:
If you cannot complete the connection, disconnect regulator
and repeatsteps 5 and 6. If you are still unable to complete the
connection, do not use this regulatod Call 1-800-482-0131
for assistance.
• Do not insertany toolor foreign object into the valve
outlet or safety relief valve.You may damagethevalve
and cause a leak. Leaking propanemay result in
explosion,fire, severe personal injury,or death.
• Neverremovethreaded
orificeatendofvalve.
5. If "growing" bubblesappear, there isa leak. Close LP tank
valve immediately and retighten connections. If leaks
cannot be stopped do not try to repair. Call Searsfor
replacement parts at 1-800-4-MY-HOME®.
• Outdoor gas applianceis not intendedto beinstalled
in or on a boat.
• Outdoor gas applianceis not intendedto beinstalled
in or on an RV.
• Never attemptto attach this grill to theself-contained
LPgas system of a campertrailer or motor home.
• Do not use grill untilleak-tested.
• If a leak is detectedat any time, STOPand call the
fire department.
• If you cannot stop a gas leak, immediate/yclose
LPcylindervalve and call LPgas supplieror yourfire
department!
6.Always close LP tank valve after performing leak test by
turning hand wheel clockwise.
ForSafe Use ofYour Grill and to Avoid Serious
Injury:
• Donot let children operate or play neargrill.
• Keepgrill area clear and free from materials that
burn.
• Donot block holes in sidesor backof grill.
• Check burnerflames regularly.
• Usegrill only in well-ventilatedspace. NEVER usein
enclosedspace such as carport, garage, porch,
covered patio,or under anoverhead structure of any
kind.
• Donot use charcoal or ceramic briquets in a gas grill.
(Unlessbriquets are supplied withyour grill.)
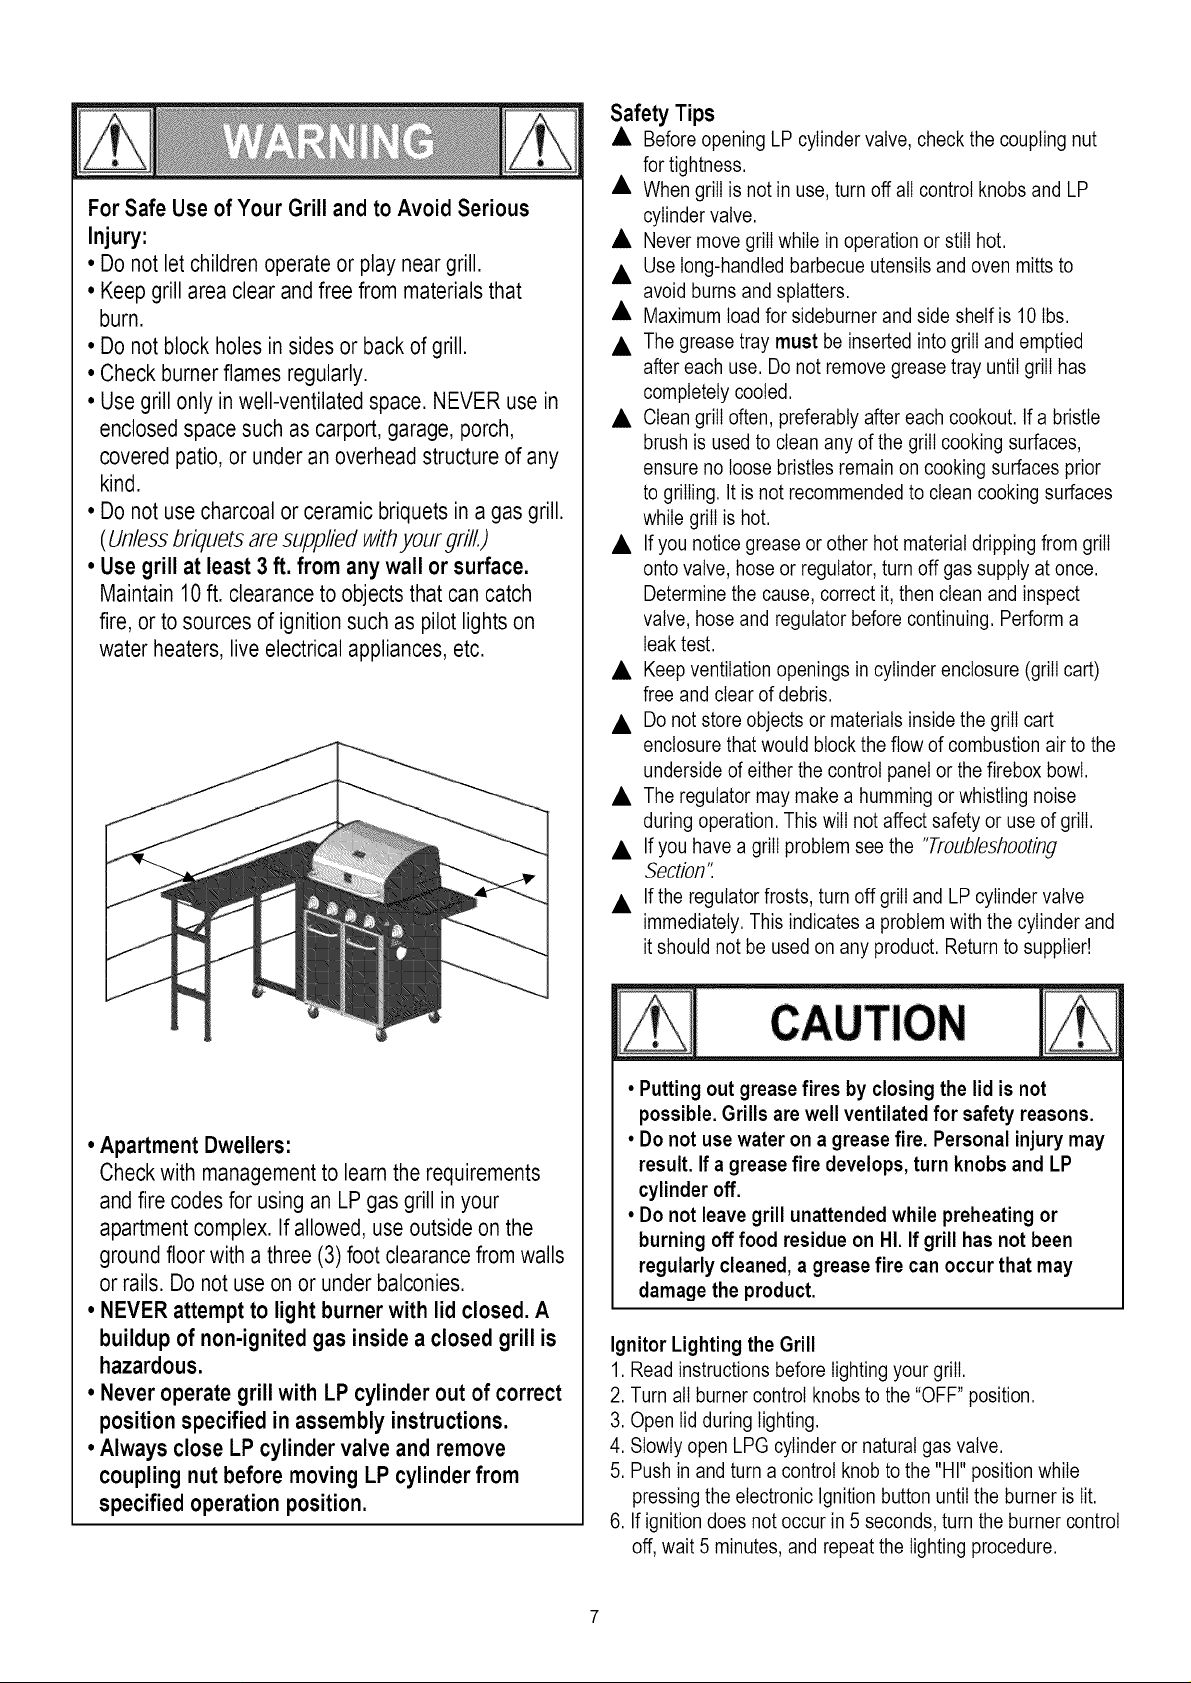
• Use grill at least 3 ft. from any wall or surface.
Maintain 10 ft. clearanceto objects that cancatch
fire, or to sourcesof ignition such as pilot lightson
water heaters, liveelectrical appliances,etc.
Safety Tips
• Beforeopening LP cylinder valve, check the coupling nut
for tightness.
• When grill is not in use, turn off all control knobs and LP
cylinder valve.
• Never move grill while in operation or still hot.
• Use long-handled barbecue utensils and oven mitts to
avoid burns and splatters.
• Maximum load for sideburner and side shelf is 10Ibs.
• The grease tray must be inserted into grill and emptied
after each use. Donot remove grease tray until grill has
completely cooled.
• Clean grill often, preferably aftereach cookout. Ifa bristle
brush is used to cleanany of the grill cooking surfaces,
ensure no loose bristles remain on cooking surfaces prior
to grilling. It is not recommended to clean cooking surfaces
while grill is hot.
• If you notice grease or other hot material dripping from grill
onto valve, hose or regulator, turn off gas supply at once.
Determinethe cause, correct it, then clean and inspect
valve, hose and regulator before continuing. Performa
leak test.
• Keep ventilation openings in cylinder enclosure (grill cart)
free and clear of debris.
• Donot store objects or materials inside the grillcart
enclosure that would block the flow of combustionair to the
underside of either the controlpanel or the firebox bowl.
• The regulator may make a hummingor whistling noise
during operation. This will not affect safety or use of grill.
• If you have a grill problem see the "Troubleshooting
Section".
• If the regulatorfrosts, turn off grill and LP cylinder valve
immediately. This indicates a problemwith the cylinder and
it should not be used on any product. Return to supplier!
• Apartment Dwellers:
Checkwith managementto learnthe requirements
andfire codesfor usingan LPgas grill in your
apartmentcomplex.If allowed, use outside on the
ground floorwith a three (3) foot clearancefrom walls
or rails. Do not use on or under balconies.
° NEVERattempt to light burner with lid closed. A
buildup of non-ignited gas inside a closed grill is
hazardous.
• Never operate grill with LP cylinder out of correct
position specified in assembly instructions.
• Always close LP cylinder valve and remove
coupling nut before moving LP cylinder from
specified operation position.
CAUTION
• Putting out grease fires by closing the lid is not
possible. Grills are well ventilated for safety reasons.
• Do not use water on a grease fire. Personal injury may
result. Ifa grease fire develops, turn knobs and LP
cylinder off.
• Do not leave grill unattendedwhile preheating or
burning off food residue on HI. If grill has not been
regularly cleaned, a grease fire can occur that may
damage the product.
Ignitor Lighting the Grill
1. Read instructions before lighting your grill.
2. Turn all burner control knobs to the "OFF" position.
3. Open lid during lighting.
4. Slowlyopen LPG cylinder or natural gas valve.
5. Push in and turn a control knob to the "HI" position while
pressing the electronic Ignition button untilthe burner is lit.
6. If ignition does not occur in 5 seconds, turn the burner control
off,wait 5 minutes, and repeat the lighting procedure.
7.Tolightotherburners,repeatabovesteps.
NOTE:Ifignitordoesnotwork,followMatchLighting
instructions.
Turn controls and gas source or tank OFF when
not in use.
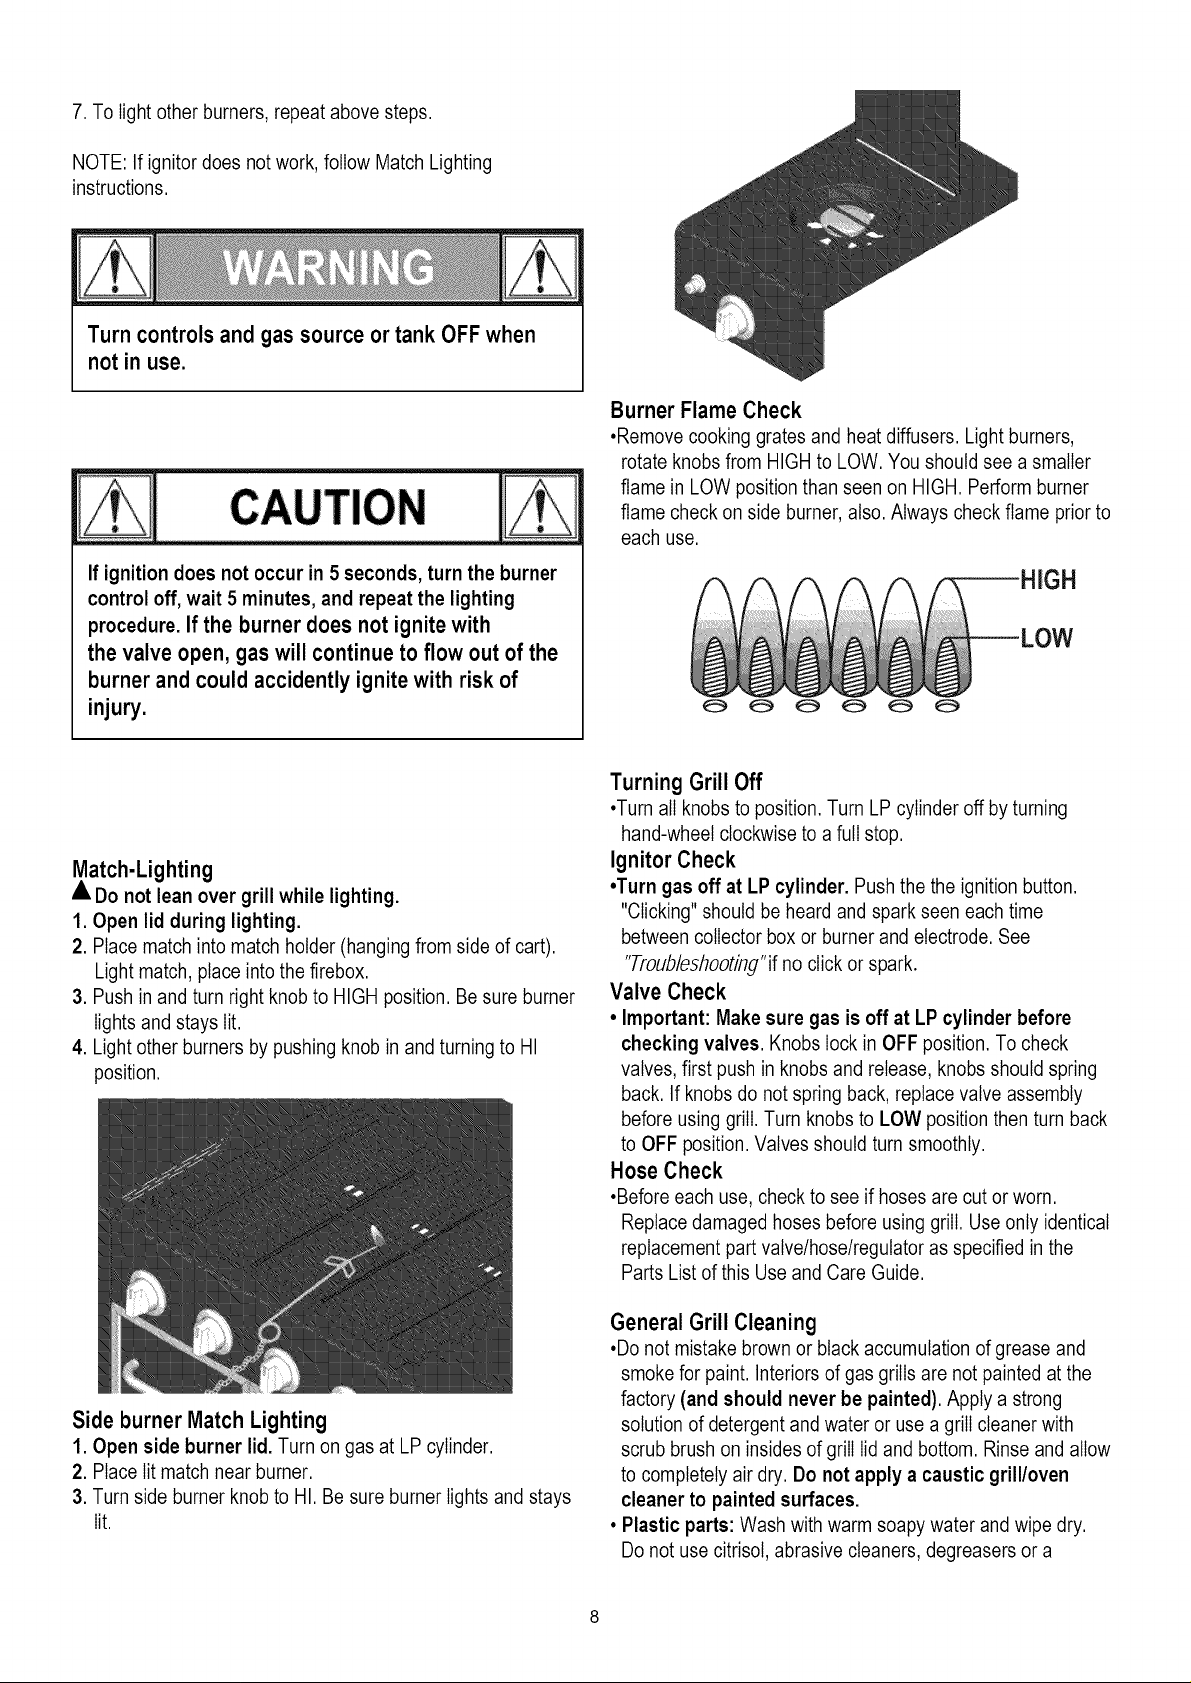
Burner Flame Check
•Remove cooking gratesand heat diffusers. Light burners,
rotate knobs from HIGH to LOW. You should see a smaller
flame in LOW position than seen on HIGH. Perform burner
flame check on side burner,also. Always check flame prior to
each use.
Ifignitiondoesnotoccurin5 seconds,turntheburner
controloff,wait5 minutes,andrepeatthe lighting
procedure.If the burner does not ignitewith
the valve open, gaswill continueto flow out of the
burner and could accidently ignitewith risk of
injury.
Match-Lighting
• Do not lean over grill while lighting.
1. Open lid during lighting.
2. Place match into match holder (hanging from side of cart).
Light match, place into the firebox.
3. Push in and turn right knob to HIGH position. Besure burner
lights and stays lit.
4. Light other burners by pushing knob in and turning to HI
position.
3H
TurningGrillOff
•Turn all knobsto position. Turn LP cylinder off by turning
hand-wheel clockwiseto a full stop.
Ignitor Check
•Turn gas off at LP cylinder. Push the the ignition button.
"Clicking" should be heard and spark seen each time
between collector box or burnerand electrode. See
"Troubleshooting"if noclick or spark.
Valve Check
• Important: Makesure gas is off at LP cylinder before
checking valves. Knobs lock in OFF position. To check
valves, first push in knobsand release, knobs should spring
back. Ifknobsdo not spring back, replace valve assembly
before using grill. Turn knobsto LOW position then turn back
to OFF position. Valves should turn smoothly.
Hose Check
•Before each use, checkto see if hoses are cut or worn.
Replace damaged hoses before using grill. Use only identical
replacement part valve/hose/regulator as specified in the
Parts List of this Use and Care Guide.
Side burner Match Lighting
1. Open side burner lid. Turn on gas at LP cylinder.
2. Place lit match near burner.
3. Turn side burner knob to HI. Be sure burner lights and stays
lit.
General Grill Cleaning
•Do not mistake brown or black accumulation of grease and
smoke for paint. Interiors of gas grills are not painted at the
factory (and should never be painted). Apply a strong
solution of detergent and water or use a grill cleaner with
scrub brush on insides of grill lid and bottom. Rinseand allow
to completely airdry. Do not apply a caustic grill/oven
cleaner to painted surfaces.
• Plastic parts: Wash with warm soapywater and wipe dry.
Donot use citrisot, abrasive cleaners,degreasers or a
concentratedgrillcleaneronplasticparts.Damagetoand
failureofpartscanresult.
•Porcelainsurfaces:Becauseofglass-likecomposition,most
residuecanbewipedawaywithbakingsoda/watersolutionor
speciallyformulatedcleaner.Usenonabrasivescouring
powderforstubbornstains.
*Painted surfaces: Washwith mild detergentor nonabrasive
cleanerand warmsoapy water. Wipe dry with a soft
nonabrasive cloth.
•Stainless steel surfaces: To maintain your grill's high quality
appearance, wash with mild detergent and warm soapywater
and wipe dry with asoft cloth aftereach use. Baked-on
grease deposits may require the use of anabrasive plastic
cleaning pad. Use only in direction of brushedfinish to avoid
damage. Do not use abrasive pad on areas with graphics.
• Cooking surfaces: If a bristle brush isused to cleanany of
the grill cooking surfaces,ensure no loose bristles remainon
cooking surfaces prior to grilling. It is not recommended to
cleancooking surfaceswhile grill is hot.
Storing Your Grill
•Clean cooking grates.
•Store in dry location.
•When LP cylinderis connected to grill, store outdoors in a
well-ventilated space and out of reach of children.
•Covergrill if stored outdoors. Choosefrom a variety of grill
covers offered by manufacturer.
•Store grill indoors ONLY if LPcylinder is turned off and
disconnected, removed fromgrill and stored outdoors.
•When removing grill fromstorage, follow "C/eaning the Burner
Assemb/7 instructions before starting grill
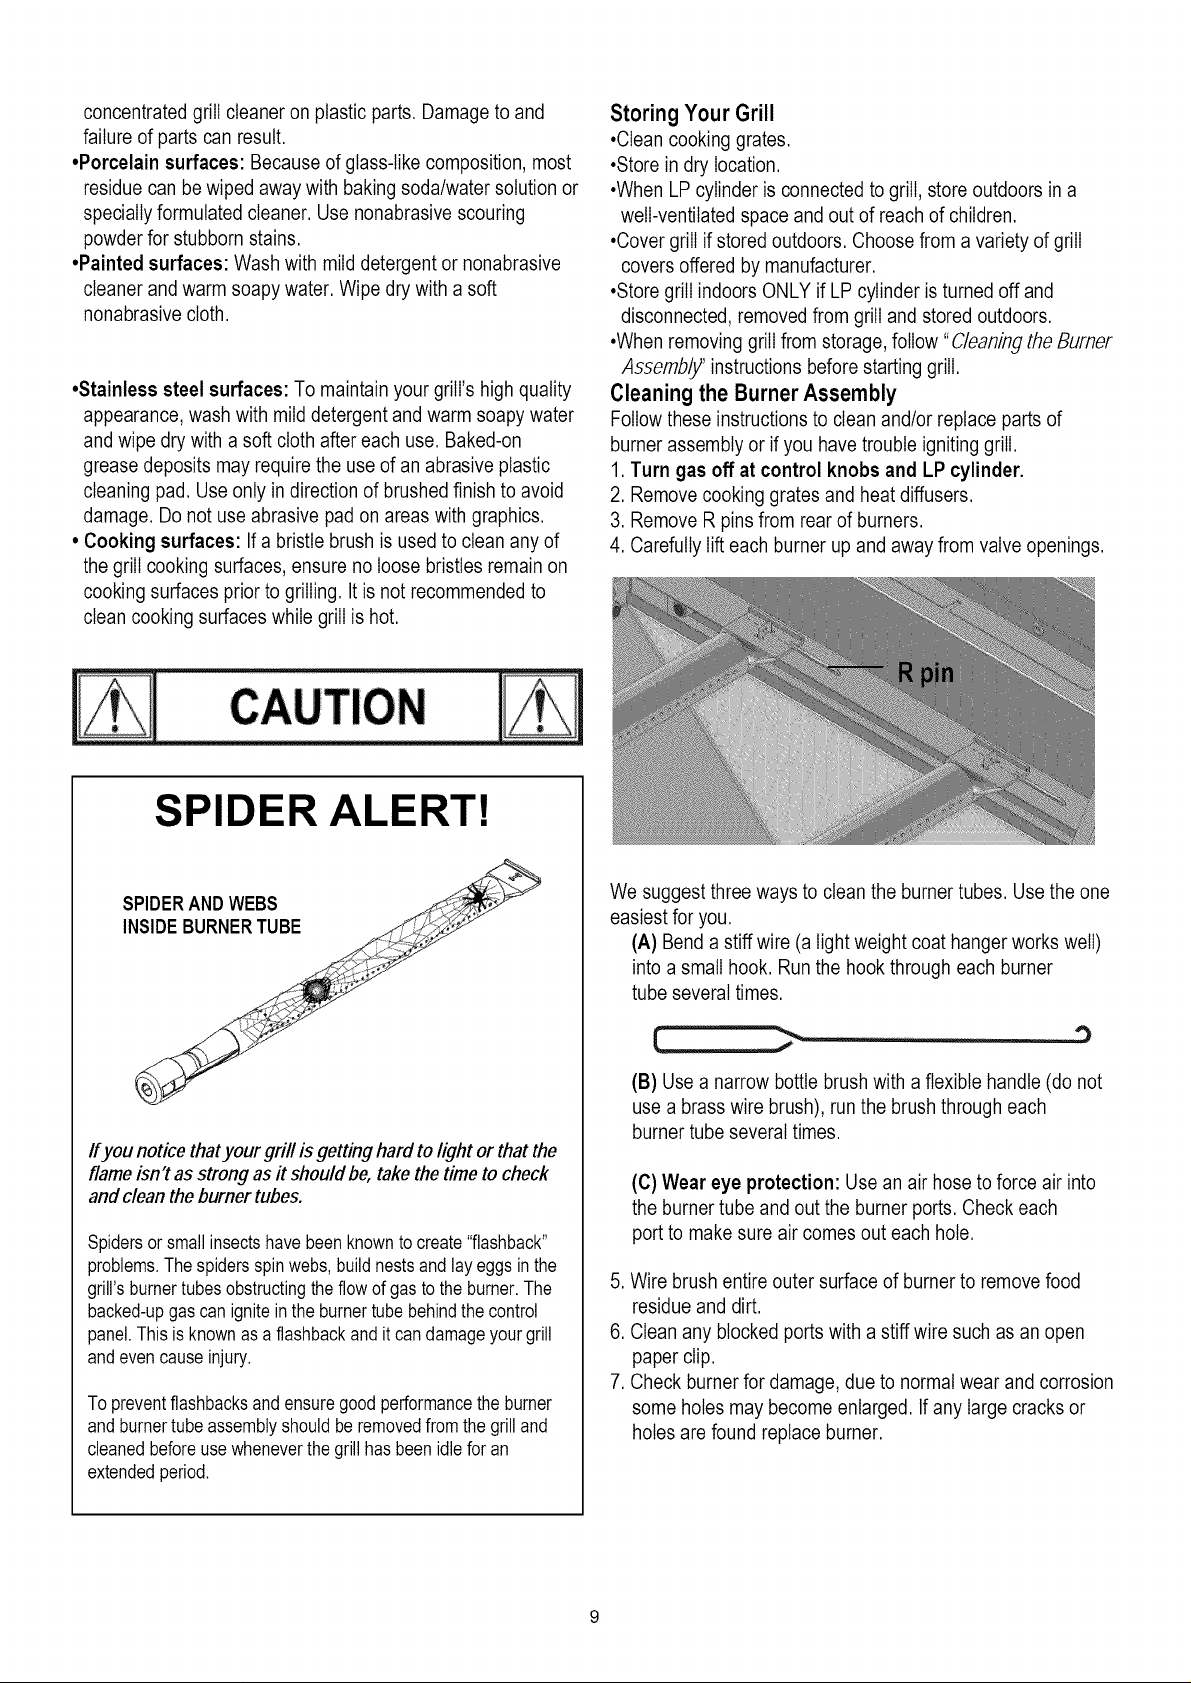
Cleaning the Burner Assembly
Follow these instructions to clean and/or replace parts of
burner assembly or if you have trouble igniting grill.
1. Turn gas off at control knobs and LP cylinder.
2. Remove cooking grates and heat diffusers.
3. Remove R pinsfrom rear of burners.
4. Carefully lift each burner up and awayfrom valve openings.
SPIDER ALERT!
SPIDERANDWEBS
INSIDEBURNERTUBE
Ifyou notice thatyour grill is gettinghard to light or that the
flame isn't as strong as it should be, take thetime to check
and cleanthe burner tubes.
Spidersor smallinsectshavebeenknowntocreate"flashback"
problems.Thespidersspinwebs,buildnestsandlay eggsin the
grill'sburnertubesobstructingtheflow of gasto theburner.The
backed-upgascan igniteinthe burnertubebehindthecontrol
panel.Thisis knownasa flashbackanditcandamageyourgrill
andevencauseinjury.
Topreventflashbacksandensuregoodperformancetheburner
and burnertubeassemblyshouldbe removedfromthegrilland
cleanedbeforeusewheneverthegrillhasbeenidlefor an
extendedperiod.
We suggest three ways to clean the burner tubes. Usethe one
easiest for you.
(A) Bend a stiff wire (a light weight coat hanger works well)
into a small hook. Runthe hook through each burner
tube several times.
(B) Use a narrow bottle brush with a flexible handle(do not
use a brass wire brush), run the brush through each
burner tube several times.
(C)Wear eye protection: Use an air hose to force air into
the burner tube and out the burner ports. Check each
port to make sure air comes out each hole.
5. Wire brush entire outer surface of burner to removefood
residue and dirt.
6. Clean any blocked ports with a stiffwire such as an open
paper clip.
7. Check burner for damage, due to normalwear and corrosion
some holes may become enlarged. If any large cracks or
holes are found replace burner.

VERY IMPORTANT: Burner tubes must reengage valve
openings.
_::__....... ..................................
Correct burner-to-valve engagement
Grilling Guide
Times and temperaturesshown below are only a guide.
Factorssuch as outside temperature, wind, humidity,
altitude, size andthickness of the meat effects your cooking
times and temperatures. To accurately determine if food is
done, use a meat thermometer. And don't forget to preheat
your grill for 15 minutes on High with the hood down.
FOOD
Steaks- 3/4"Thick
Hamburgers-3/4" Thick
Hot Dogs
PorkChops - 3/4"Thick
Porkloin, Boned
PorkSausage
SpareRibs
LambChops
ChickenParts
Fish(1 lb.)
Lobster-Fresh(1-1/2
Ibs.)
Shrimp-RawShelled
Potatoes
Corn-on-the-Cob
Onions
FrozenVegetables
CONTROLSETTING
High
High
Medium
(on grillor Highifon shelf)
High
High(on shelf)
Medium(on shelf)
High5 rain.
Lowto finish
High5 rain.
Mediumtofinish
Low(on grill orMediumif on
shelf)
Medium-low
Medium-low
Medium-low
Medium-low
Medium-low
Medium-low
Medium-low
COOKINGTIMES
5-7min. per side
4-5min. per side
5-7rain.
8 min.perside
10 min.perside
4 min.perside
15 min.perside
7 min.perside
20 min.perside
8 min.perside
15 min.perside
2-3 min.per side
45-60min.
20-30min.
20-30min.
30-45min.
SPECIALINSTRUCTIONSAND SUGGESTIONS
Removeexcessfat salt aftergrilling.
Use leanground meatonly.
Seasonafter grilling.
Selectlarge-sizewieners.
Slitskin before grilling.
Removeexcessfat. Selectmedium-thickchops.
Salt, pepperand garlicsaltto taste.
Takeprecautionsagainstexcessiveflare ups.
Selectlean meatyribs.Turn often.Grilluntilmeat pull
awayfrom bones.
Removeexcessfat. Selectextra-thickchops.
Coatwith butter,paprika andturn onceafter 20-25
minutes.Grill meatsidefirst.
Brushwith butter-seasonand wrapin foil.
Brushwith butter-seasonandwrapin foil.
Marinatein Italiandressingovernightin refrigerator.
Brushwith garlic butterandfoil wrap.
Wrapin foil-puncturewith a fork.
Brushwith butterandwrap in foil.
Cut or scoresurface-seasonandbrushwith butter.
Wrapin foil.
Add butterand smallamountofwaterin heavyfoil
3acket.
Kabobs
Medium-low
5 min.per side (2
sides)
Cut meatin 1"cubes,marinateand placeon skewers
with vegetables.Parboilonionsand peppersprior to
placingon spit.
Casseroles
High
30-45min.
Placeon cookingshelfon lowestlevel. Coverwith lid
or foil.
ItalianSausagesor
High
618min.
Placeon cookingshelf.
GermanSausages
WARNING: KEEPHOODOPENWHEN GRILLING.THISWILL STOPALLOT OF FIRES.
10
Indirect Cooking
Poultry and large cuts of meat cook slowly to perfection on the
grill by indirect heat. Placefood over unlit burner(s); the heat
from lit burners circulates gently throughoutthe grill, cooking
meat or poultry without thetouch of a direct flame.
This method greatly reduces flare-ups when cooking extra fatty
cuts because there is no direct flame to ignite the fats and
juices that drip during cooking.
1 Burner Cooking
Cook with direct or indirect heat.
Best for smallermeals or foods.
Consumes less fuel.
Indirect Cooking Instructions
• Always cook with the lid closed.
• Due to weather conditions, cooking times may vary.
During cold and windy conditions the temperature setting
may need to be increased to insure sufficient cooking
temperatures.
• Place food over unlit burner(s)
Experiment, be creative and havefun. Here are a few delicious
resultswe tried:
FOOD ITEM WEIGHT SUGGESTEDTIMES/ TEMP F
Turkey 12Ib 2 hours/ 180F
Boston PorkRoast 4 Ib 1 1/2hours/ 160F
Duckling 6 Ib 13/4 hours/ 160F
Beef 7 Ib 2 hours/ 160F
Chickens(2) 6 Ib 1 1/2hours/ 180F
The above meat probe themometer internaltemperatures are
the USDA minimum recommended, andwe suggest the use of
a meat thermometer.
Food Safety
Food safety is a veryimportant part of enjoying the outdoor
cooking experience. To keep food safe from harmful bacteria,
follow these four basic steps:
Clean: Wash hands, utensils, and surfaces with hot soapy
water before and after handling raw meat and poultry.
Separate: Separate raw meats and poultry from ready-to-eat
foods to avoid cross contamination. Use a clean platter and
utensilswhen removing cooked foods.
Cook: Cook meat and poultry thoroughlyto kill bacteria. Use a
thermometer to ensure proper internal food temperatures.
Chill: Refrigerate prepared foods and leftoverspromptly.
For more information call: USDA Meat and Poultry Hotline
at 1-800-535-4555(In Washington, DC (202)720-3333, 10:00
am-4:00 pm EST).
2 Burner Cooking
Great indirect cookingon tow.
Produces slow, even heating.
Idealfor slow roasting and baking.
How To Tell If Meat Is Grilled Thoroughly
• Meat and poultry cooked ona grill often browns very fast on
the outside. Use a meat thermometerto besure food has
reached a safeinternal temperature, andcut into food to
check for visual signs of doneness.
•Whole poultryshould reach 180° F; breasts, 170° F. Juices
should run clear and flesh should not be pink.
• Hamburgers madeof any ground meat or poultry should
reach 160° F, and be brown in the middlewith no pink juices.
Beef,veal andlamb steaks, roasts and chops can be cooked
to 145°F. All cuts of pork should reach 160° F.
• NEVER partially grill meat or poultry and finish cooking later.
Cook food completelyto destroy harmful bacteria.
•When reheating takeoutfoods or fully cooked meats like hot
dogs, grill to 165° F,oruntil steaming hot.
11

WARNING: To ensure that it is safe to eat, food must be
cooked to the minimum internal temperatures listed in the table
below.
USDA*Recommended Safe Minimum InternalTemperatures
Beef,Veal, Lamband Pork- WholeCuts**
Fish
Beef,Veal, Lamband Pork- Ground
EggDishes
Turkey,Chicken& Duck- Whole,Pieces& Ground
145° F
145° F
160° F
160° F
165° F
* United States Department of Agriculture
**Allow meat to rest three minutes before carving or consuming.
Gas Requirements
LP Gas
If your grill is for LP Gas,the regulator supplied isset for an
11-in.water column (WC) and is for use with LPgas only. The
factory-supplied regulator and hose must be usedwith a 20-tb.
LP gas tank.
self-cleaning, grease burn off.
Care and MaintenanceTime TableChart
Grill Item FrequencyBased
on Normal Use CleaningMethod
Paintedsurface Twiceyearly Carwax
Stainlesssurface Twiceyearly Stainlesscleaner
All grates Aftereach use Burn offand wipe
Wirebrush/
Stainlessgrates 15days Dishwashersafe
Scrubpadsoapy water
Porcelaingrates 15days /Dishwashersafe
Burnerheattents 30days Wirebrush
Burners 90 days Wirebrush
Burnerbox Interiorgrill cleaning
120days products(availableat
interior sears)
Excess Flow Control and Low Heat
The propane regulatorassembly incorporates an excess flow
device designed to supply the grill with sufficient gas flow
under normalconditions yet control excess gas flow.
Rapid changes inpressure can trigger the excess flow device
providing a lowflame and low temperature. Ifthe tank valve is
turned open to allow gasflow while a burner valve is open, the
surge of pressure will cause the device to activate. The device
will remain closed until the pressure is equalized. This should
occur within 5 seconds.
To ensure this does not cause difficulty in lighting the grill,
follow these instructions:
1. Make sure all burner valves are "OFF".
2. Open the tank valve and wait 5 seconds.
3. Light the burners one at a timefollowing the lighting
instructions.
Helpful Care and Maintenance Hints
Before grilling, pre-heat grill for 15 minutes on "HI" with hood
down. To avoid uncontrolled flare-ups or grease fires, grill
meats with hoodopen. Close hood if meatsare thick or
weather is cold, or if you are using a rotisserie or indirect
cooking.
CALIFORNIA PROPOSITION 65
This product contains chemicals, including lead and
Ieadcompounds in brass fittings. It also produces
combustion by-products when used. These
substances are knownto the State of California to
cause cancer,birth defects or other reproductive harm.
Washyour hands after using this product.
Always protect your hand with a pot holder or cookingglove
when coming into contact with ahot surface.
Hood up when grilling meats, especially chicken. Hooddown
when indirect or rotisserie cooking.
NEVER leaveyour grill unattendedwhile cooking.
After use, close hood, turn burners to HI for 15 min. for
12

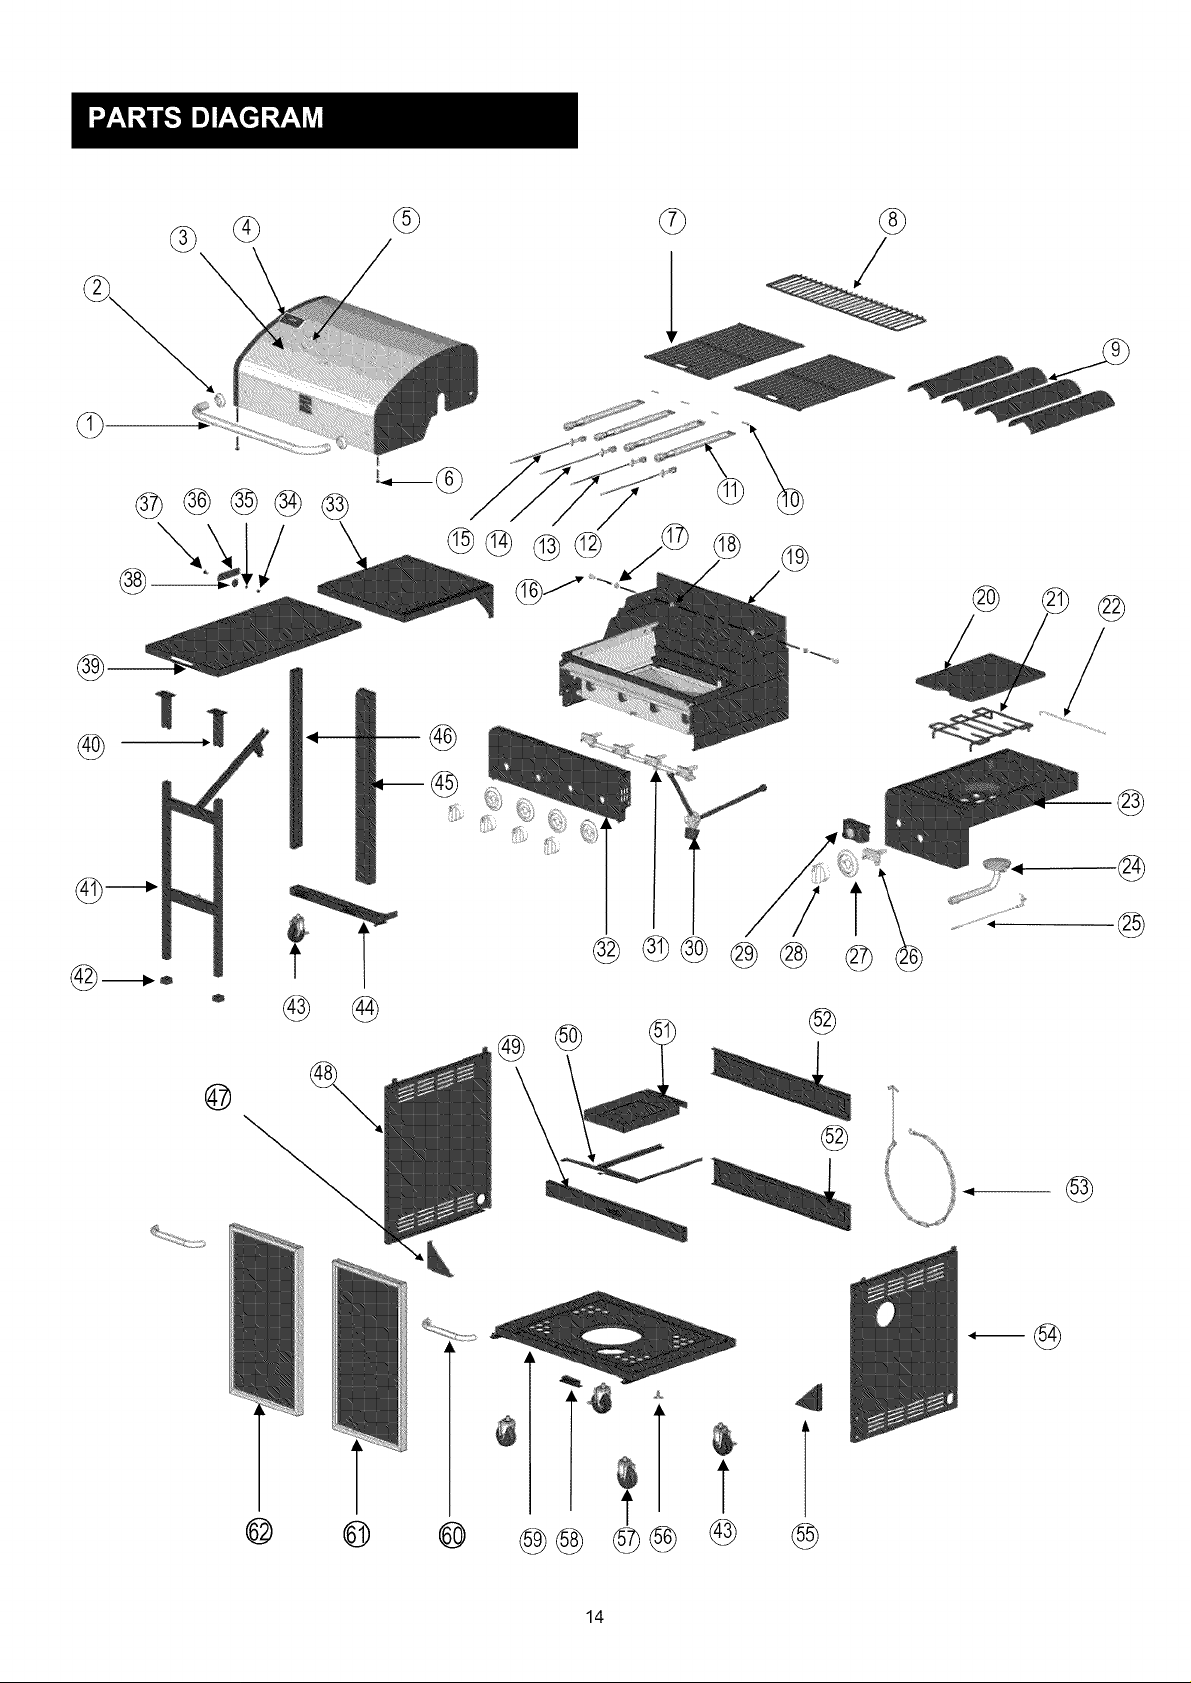
Key
1
2
3
4
5
6
7
8
9
I0
11
12
13
14
15
16
17
16
19
2O
21
22
23
24
25
26
27
28
29
30
31
32
33
34
35
36
37
38
39
4O
41
42
43
44
Qty
Description
I
HOOD HANDLE
2
HANDLE BASE
I
HOOD
I
TEMPERATURE GAUGE
I
WASHER
4
RUBBER PLUG
2
COOKING GRID ( MAIN BURNER )
I
WARMING RACK
4
HEAT DIFFUSER
4
R PIN
4
MAIN BURNER
1
IGNITION PIN ( MAIN BURNER )
1
IGNITION PIN ( MAIN BURNER )
1
IGNITION PIN ( MAIN BURNER )
1
IGNITION PIN ( MAIN BURNER )
2
SCREW
2
HOOD SLEEVE
2
NUT
I
BURNER BOX
I
SIDE HOOD
I
SIDE BURNER GRID
I
SIDE BURNER SHAFT
1
SIDE BURNER SHELF
I
SIDE BURNER
I
IGNITION PiN ( SIDE BURNER )
I
SIDE BURNER VALVE
5
BEZEL
5
KNOB
I
IGNITER
I
LP GAS PRESSURE REGULATOR
I
MANIFOLD
I
CONTROL PANEL
I
SIDE SHELF
1
NUT
1
SPRING LOCK WASHER 6
I
SIDE SHELF BRACKET
1
SCREW 1/4-20 UNC x 1/2"
I
WASHER 6
I
SIDE SHELF TABLE
2
TABLE SUPPORT
I
TABLE LEG
2
TABLE LEG PAD
3
LOCKING CASTER
I
SIDE SHELF BOTTOM SUPPORT
Manufacturer
Part#
RB2518TK-00-4300
L3018SN-00-4001
RB2518TK-00-4000
2818-2T-A300
2518SL-6002
3219B-8083
RB2518TK-06-2001
RB2518TK-06-2002
L3018S-06-2007
R PiN 1.6x30
3618ST-2004
P3018-06-8003
P3018-06-8004
P3018-06-8005
P3018-06-8006
5/16-18 UNC x 3/4"
2818-2T-0601
5/16-18 UNC
RB2518TK-06-2060
RB2518TK-06-6001
L3018S-06-6201
SH3118B-5003-06
RB2518TK-00-6000
L3018SN-00-8306
RB2518TK-00-8063
RB2518TK-00-8001
L3018SN-00-3302
L3018SN-00-3301
RB2518TK-00-8007
RB2518TK-06-8002
RB2518TK-00-3200
RB2518TK-06-3000
RB2518TK-06-5110
1/4-20 UNC
SPRING LOCK
WASHER 6
RB2518TK-00-5001
RB2818T-OO-8063
WASHER 6
RB2518TK-06-5210
RB2818T-00-5240
RB2818T-01-5306
RB2818T-06-5303
3218LTN-06-8013
RB2818T-06-5120
Key
Qty Description
45
46
47
48
49
50
51
52
53
54
55
56
57
58
59
60
61
62
I SIDE SHELF RIGHT SUPPORT
1 SIDE SHELF LEFT SUPPORT
1 LEFT PANEL BRACKET
1 LEFT PANEL
I BEAM
I DRIP TRAY SUPPORT
I DRIP TRAY
2 REAR PANEL
1 HAND IGNITOR
I RIGHT PANEL
I RIGHT PANEL BRACKET
1 WINGBOLT
2 CASTER
I MAGNET
I BOTTOM PANEL
2 DOOR HANDLE
I RIGHT DOOR
1 LEFT DOOR
1 HARDWARE PACK
1 PRODUCT MANUAL
Part#
RB2518TK-06-5130
RB2818T-06-5101
2818-2T-1601
RB2518TK-06-1700
RB2518TK-06-1200
2818-2T-1500
2818-2T-1001
RB2518TK-00-1301
3019L-1710
RB2518TK-00-1800
2818-2T-1701
1/4-20 UNC x2"
3218LTN-00-8012
L3018S-06-1310
RB2518TK-00-1100
L3018S-06-1410
RB2518TK-OO-1600
RB2518TK-00-1400
RB2518TK-06-9090
RB2518TK-
MANUAL
Ifyou are missinghardwareor have
damagedpartsafterunpackinggrill,call
1-800-482-0131for replacement.
To orderreplacementpartsafter usinggrill,
call 1-800-4-MY-HOME®
Manufacturer
13
©
@@@®@
@
_D
@
@-ml_ o
®®@@
@7
®
®
@
@
@
®
®
@®@@@
0
@
@
@
@ © @
@
@
.m@
4_
@
14

UNPACKING
After removingall parts and hardware packfrom the top of the shipping box, andwhen the only part showing is
thegrill head,use a boxcutting knife to slice down thesides of the box. Be careful of staples along shippingbox
edges.
Removethe steeland cardboardcornersupports from the box and the styrofoamside piecesfrom the grill head.
Open grill lid and removeall packagedparts and packing material.Allowgrill head to reston cardboard until
placing grill headon cart inStep 10.
WARNING:Assemblethe grill on aflat level surface.Compare the parts and hardwarewith the list and
diagrams. Donot attempt assemblyif any part is missing or damaged.
Use the supplied wrench to attach the casters to the bottom panel as shown below.Attach thetwo
lockingcasters atthe backof the grill.After attachingall casters,turn the bottom panel over.
LockingCaster
Bottom Panel
Caster
Attach the door magnet to the holes inthe front of the bottom panelwith 2 screws each. Do not fully
tightenat this time.
Bottom Panel
"_ Qty.2
5/32-32x 1/2" Screw
Door Ma
15

Attach theleft and right panelto the bottompanel with two screws on each side.
Left Panel
-- Right Panel
3/16-24x 1/2" Screw
Qty.4
Attach the rear panelsto the left and right panels. There are 4 screwsfor each rear panel, plus 2
additional screws for thebottom rearpanel. Insert the two bottomrear panelscrews first. Make sure
the tapped holesface upwards.
Rear Panel
3/16-24x 1/2" Screw
Qty.10
1t
J
16
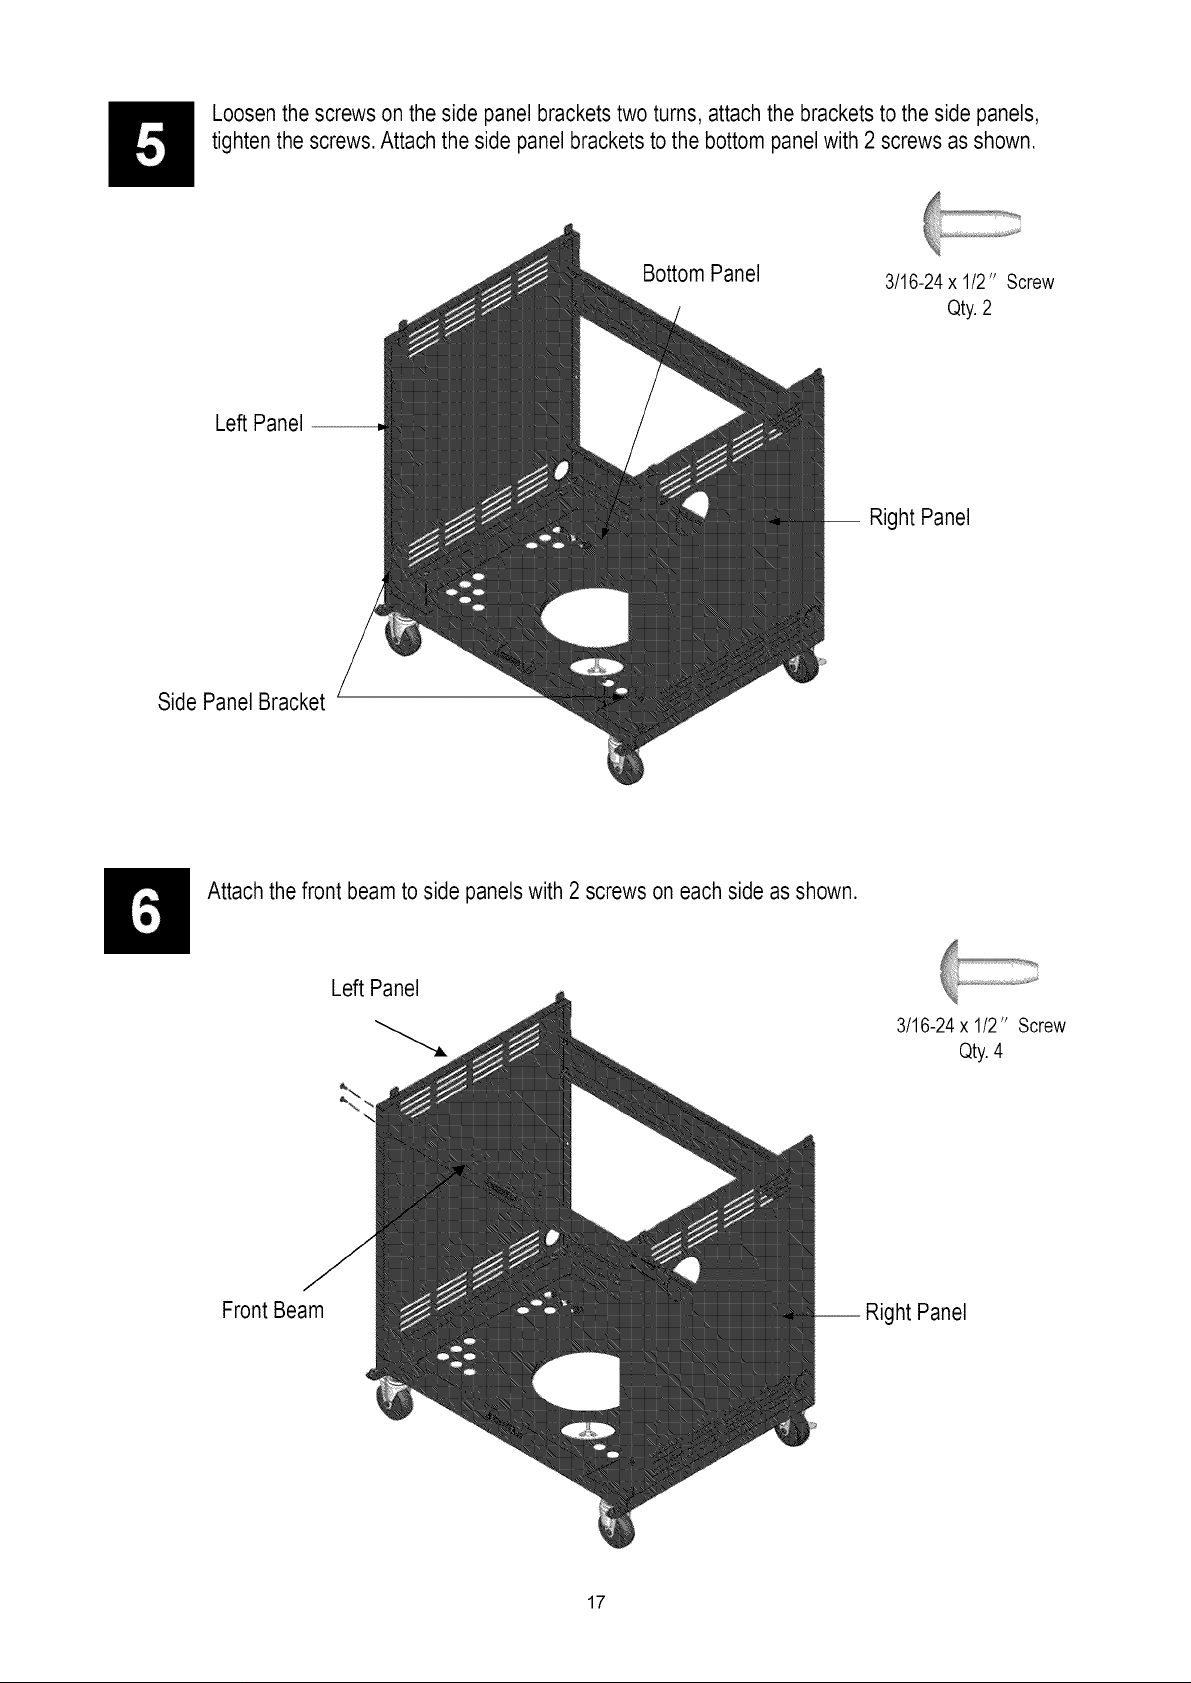
Loosen the screws on the side panel bracketstwo turns, attachthe bracketsto the side panels,
tightenthe screws. Attach the side panel bracketsto the bottom panelwith 2 screws asshown.
LeftPanel
SidePanel Bracket
Bottom Panel
3/16-24x 1/2" Screw
Qty.2
-- Right Panel
Attach thefront beamto side panels with 2 screws on eachside as shown.
Left Panel
Front Beam
i Right Panel
3/16-24x 1/2" Screw
Qty.4
17
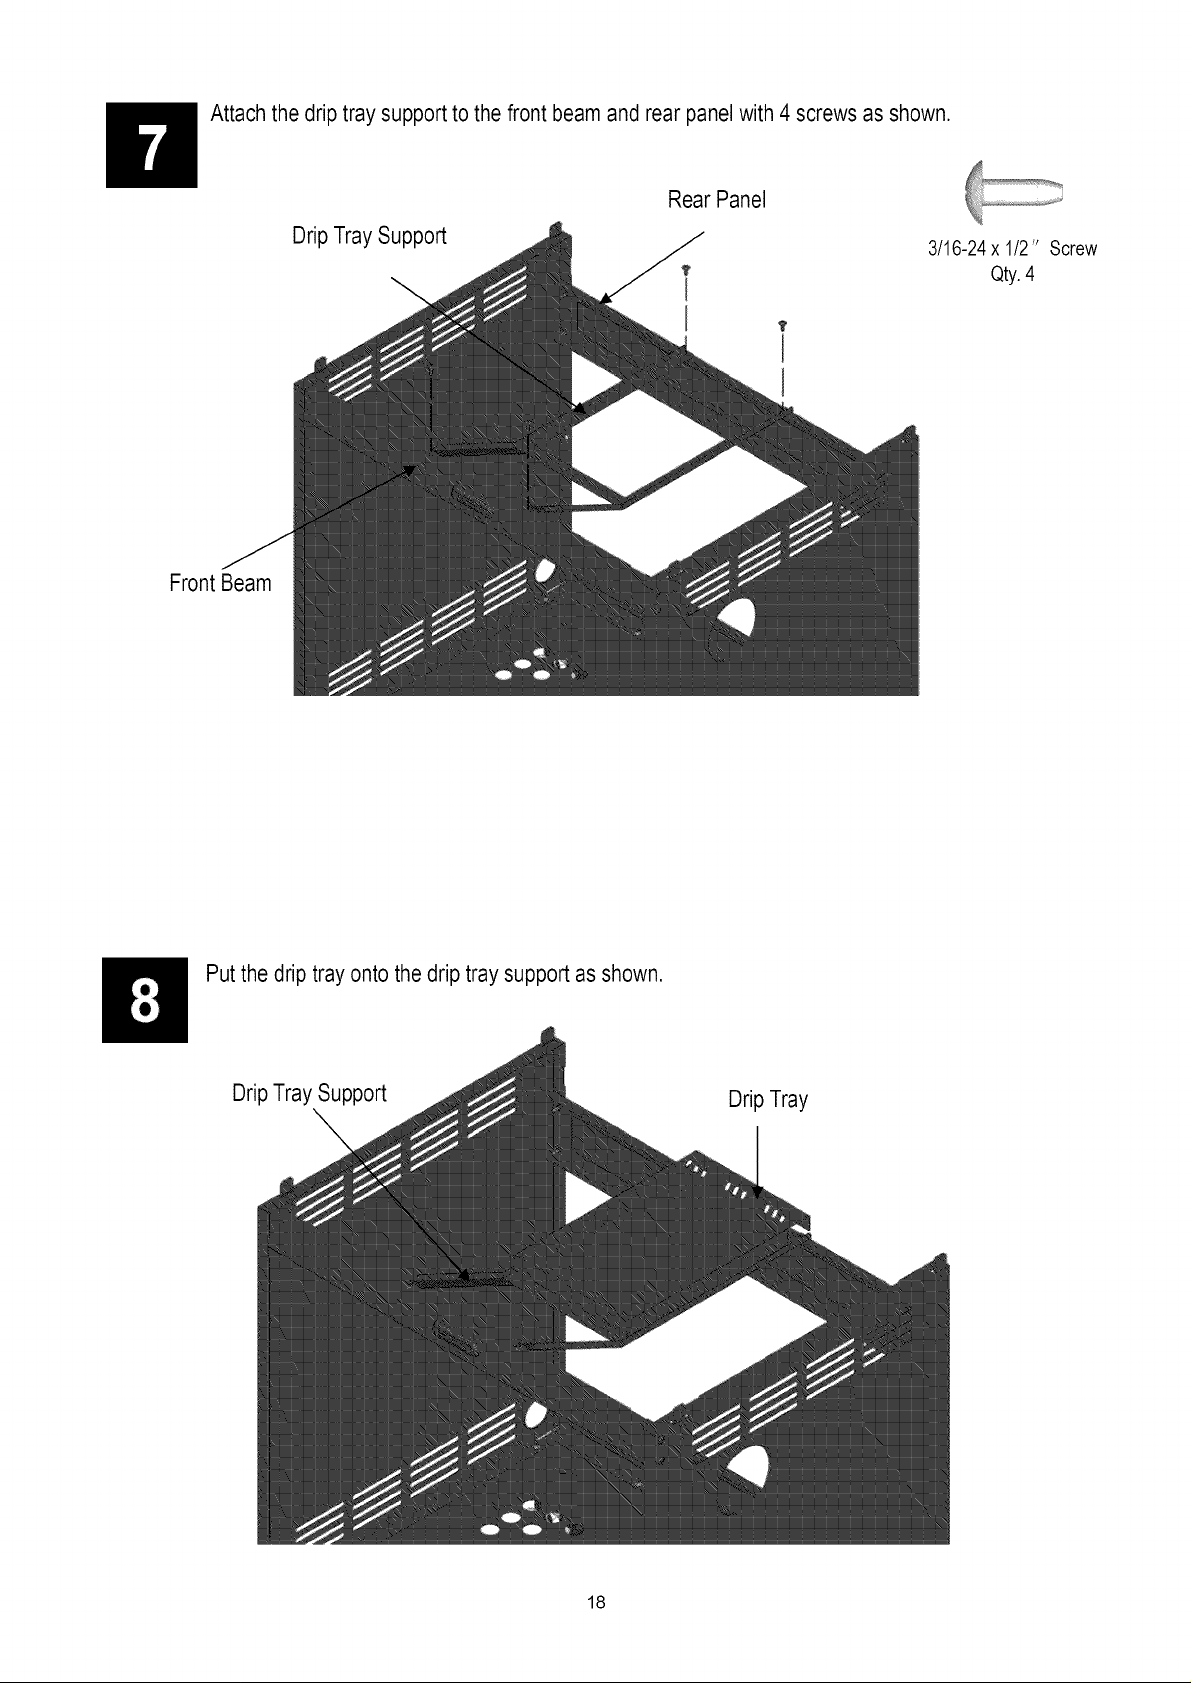
Attachthe drip tray support to thefront beam and rear panelwith 4 screws as shown.
Rear Panel
FrontBeam
Support
3/16-24x 1/2" Screw
Qty.4
Putthe drip tray onto the drip tray support as shown.
DripTray Support
DripTray
18
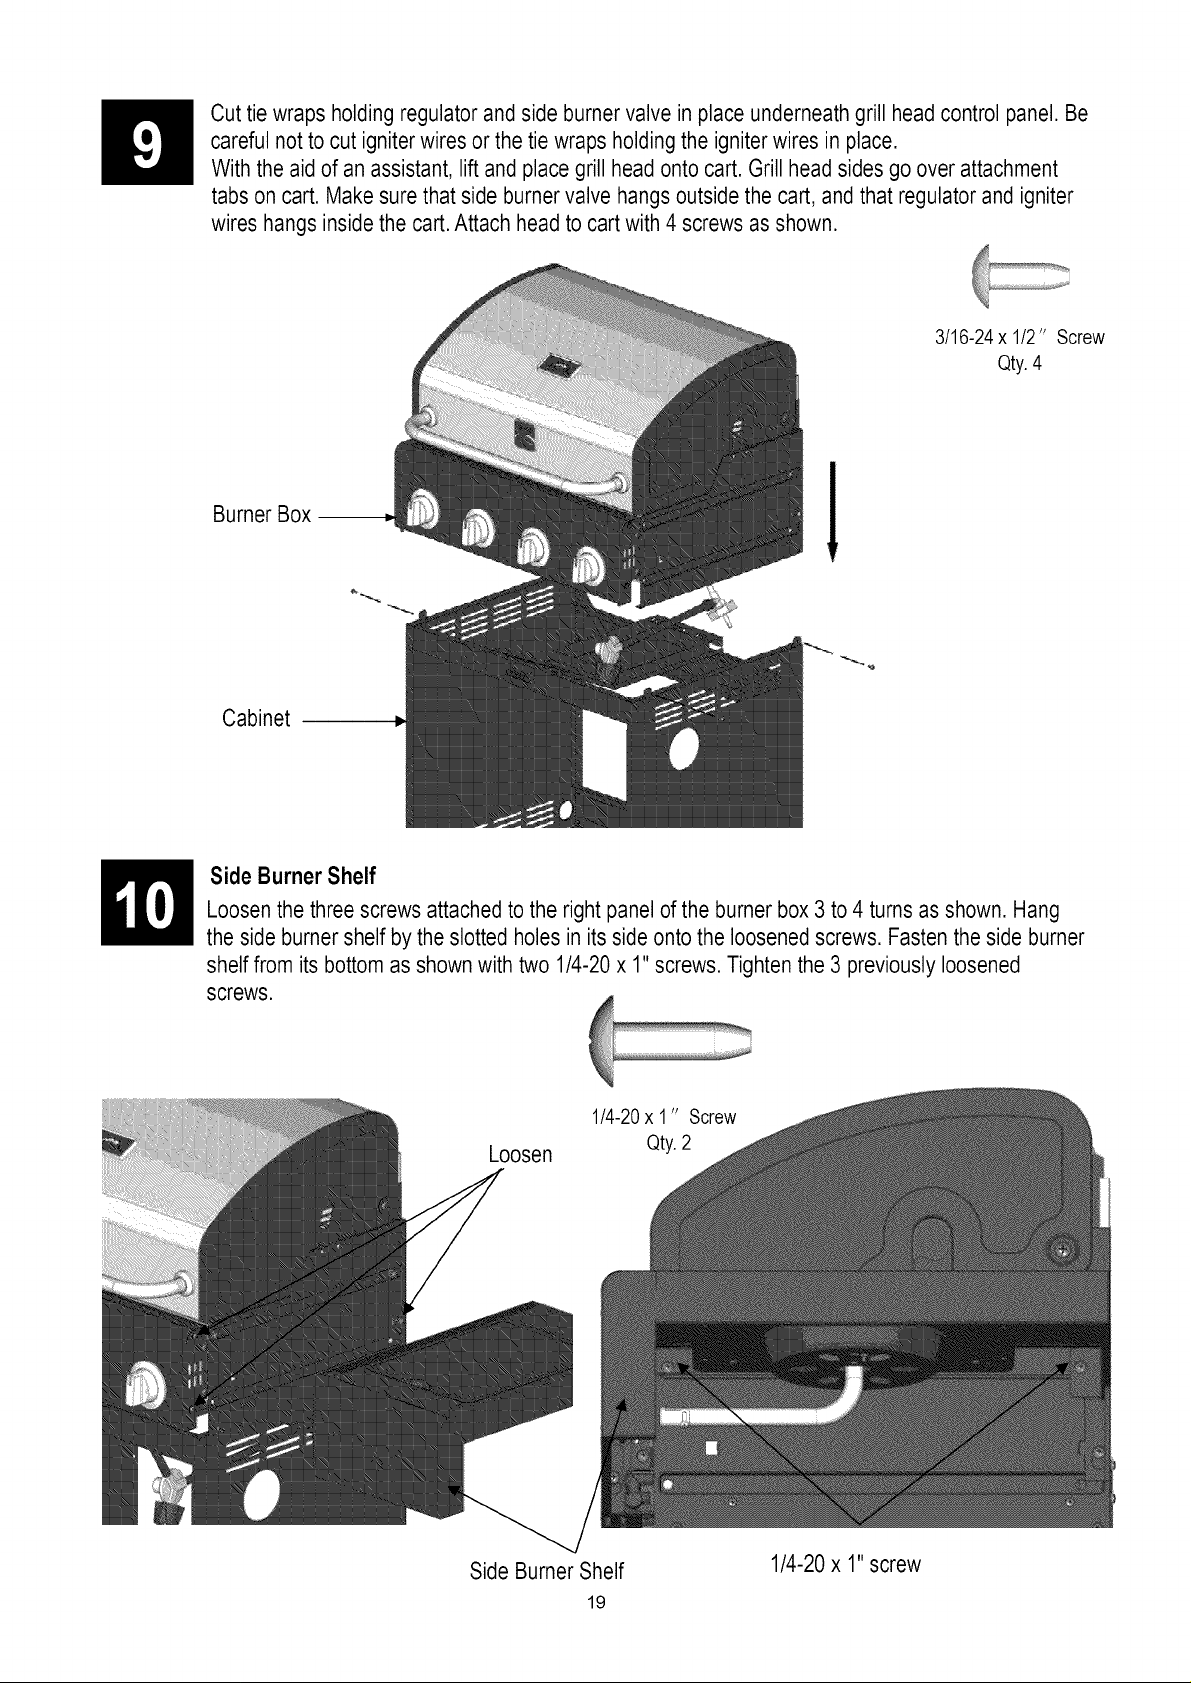
Cut tie wraps holdingregulator and side burner valve inplace underneathgrill headcontrol panel.Be
carefulnot to cut igniterwiresor the tiewraps holdingthe igniterwires in place.
With the aid of an assistant, lift and place grill headonto cart. Grill head sides go over attachment
tabs on cart. Makesure that side burner valve hangsoutside the cart,and that regulatorand igniter
wires hangsinsidethe cart.Attach head to cart with 4 screwsas shown.
3/16-24x 1/2" Screw
Qty.4
BurnerBox
Cabinet
Side BurnerShelf
Loosen the three screwsattachedto the right panel ofthe burner box 3 to 4 turns as shown. Hang
the sideburner shelf by the slotted holes in its sideonto the loosenedscrews. Fastenthe side burner
shelffrom its bottom as shownwith two 1/4-20x 1"screws. Tightenthe 3 previouslyloosened
screws.
1/4-20x 1" Screw
Loosen
Qty.2
Side Burner Shelf
19
1/4-20x 1"screw
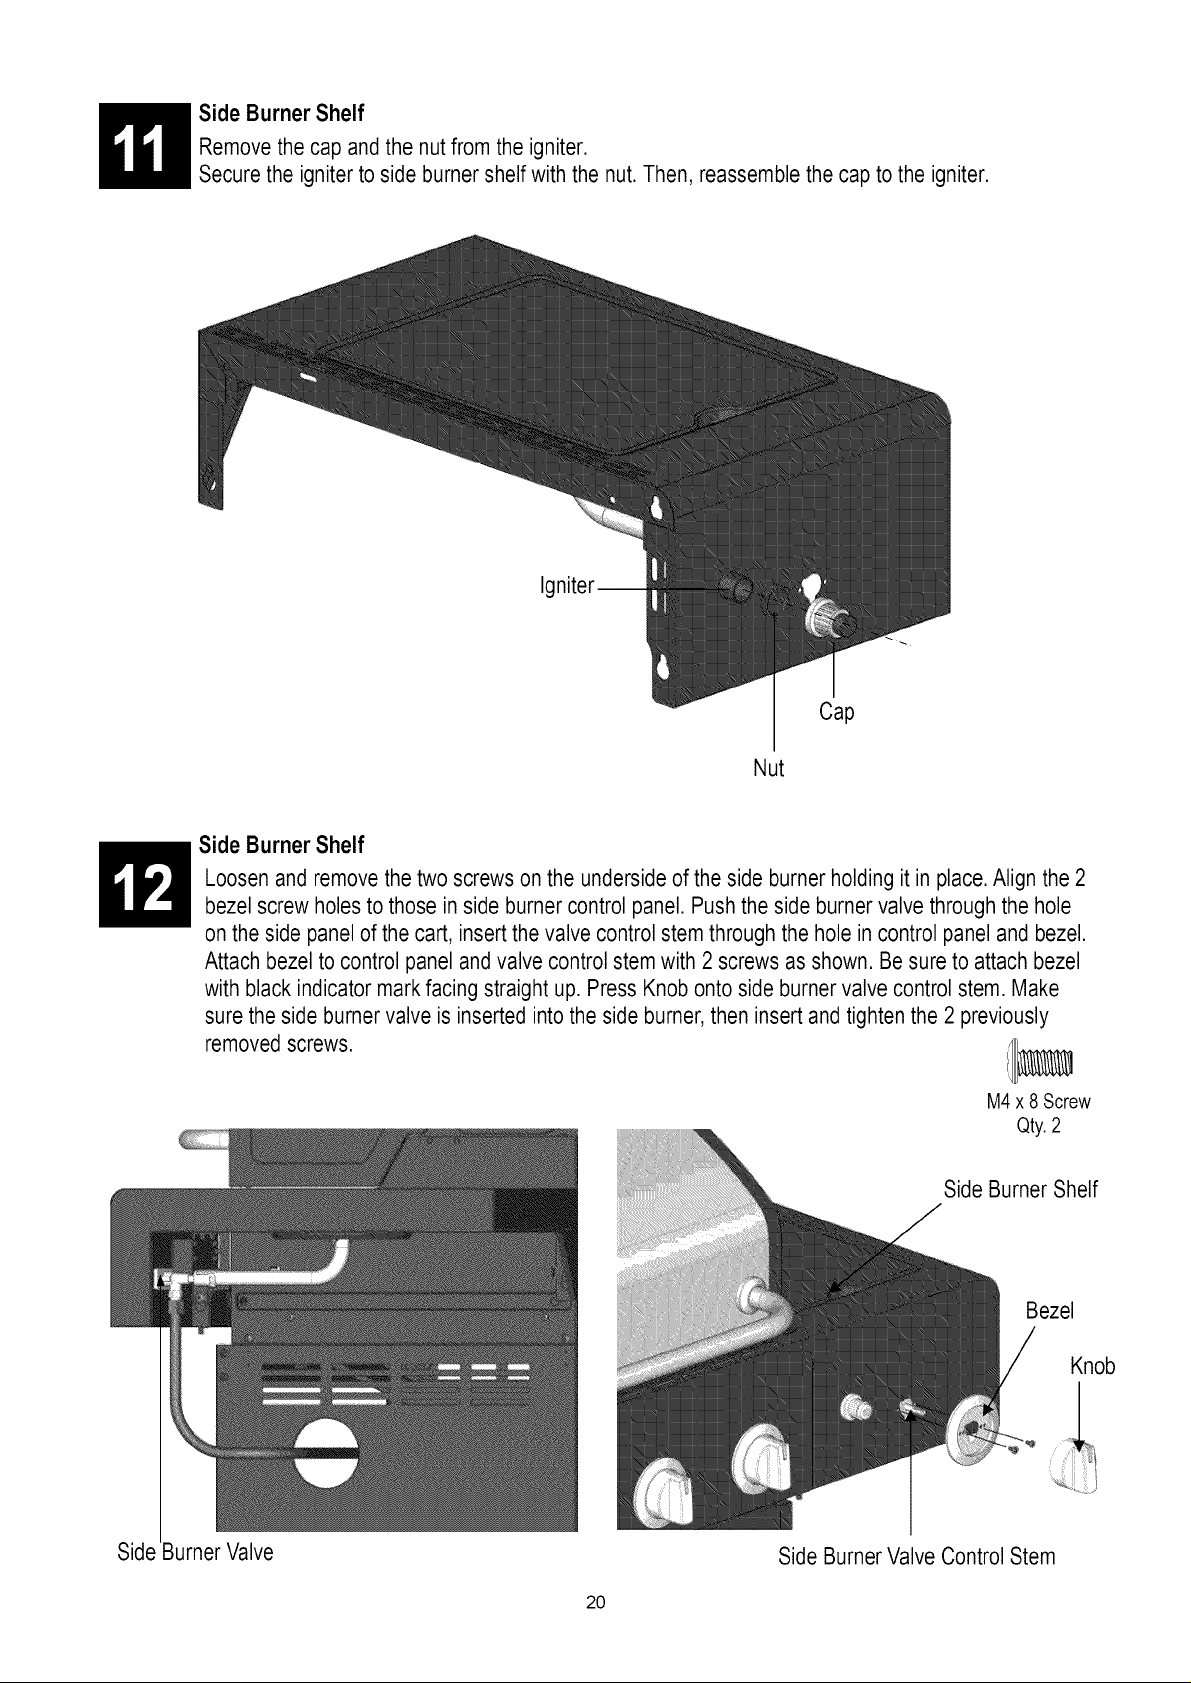
Removethecapandthenutfromtheigniter.
SideBurnerShelf
Securetheignitertosideburnershelfwiththenut.Then,reassemblethecaptotheigniter.
Ig
Cap
Nut
Side Burner Shelf
Loosen and removethe two screws on the undersideof the side burner holding it in place.Align the 2
bezelscrew holes to those in side burner control panel.Pushthe side burnervalve through the hole
on the side panel of thecart, insert the valve controlstem through the holein control panel and bezel.
Attach bezelto control paneland valve control stem with2 screwsas shown. Be sureto attach bezel
with black indicator mark facing straight up. Press Knob ontoside burner valve controlstem. Make
sure the side burnervalve is inserted into the side burner,then insert and tighten the 2 previously
removedscrews, t_]
M4x 8 Screw
Qty.2
Side Burner Shelf
Bezel
Side Burner Valve
Knob
SideBurnerValve ControlStem
20
 Loading...