

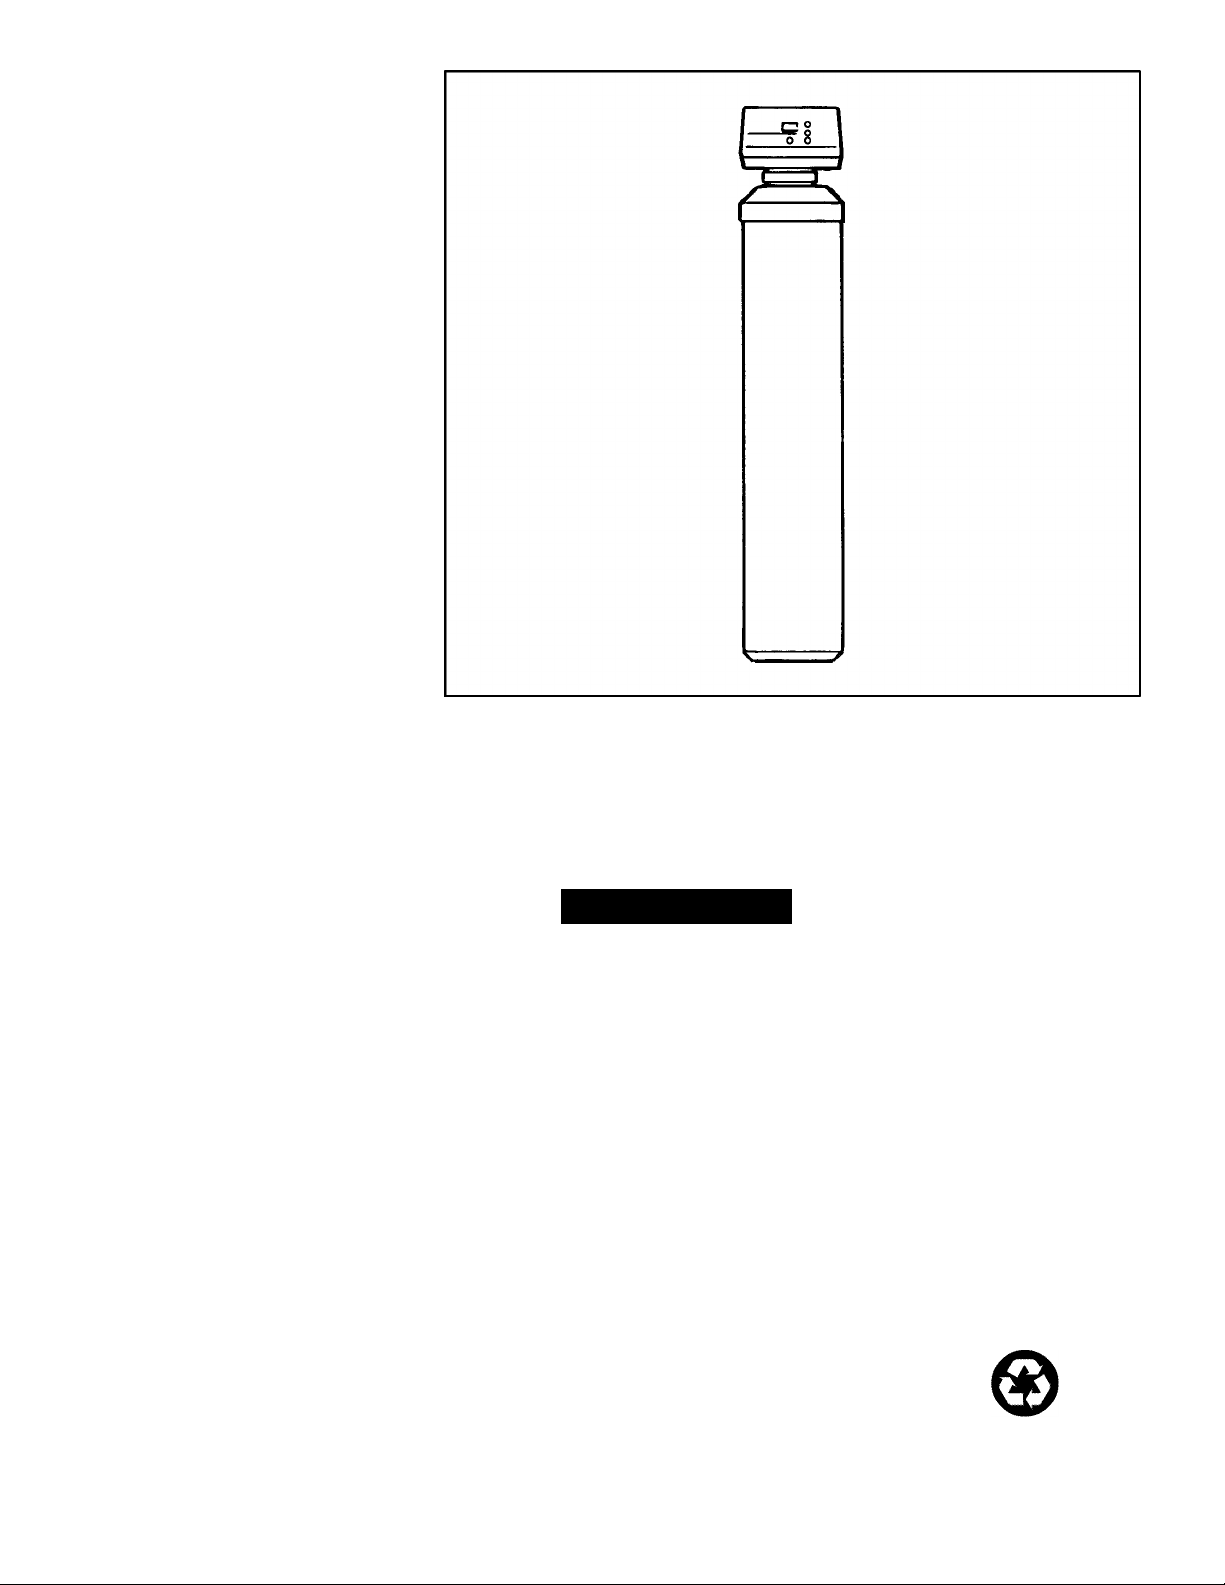
Kenmore 625.348235 User Manual
OWNER’S
MANUAL
MODEL NOS.
625.348235
Clarifier
625.348242
Neutralizer
625.348252
Taste & Odor
Caution:
Read and Follow
All Safety Rules and
Operating Instructions
Before First Use of
This Product.
If you have questions when
installing, operating or main
taining your filter, and when
setting the timer, call this
toll-free number...
1-800-426-9345
(M - F, 7 am - 8 pm, CST)
For repair or replacement
parts, call this toll-free num
ber...
1-800-366-7278
See back cover for other
Sears service numbers.
www.KenmoreWater.com
SAVE THIS MANUAL
ICefifiiore
Water Filters
♦ Warranty
♦ Start Up / Setting Timer
♦ How It Works
♦ Care Of
♦ Specifications
♦ Repair Parts
Printed on recycled paper
Sears, Roebuck and Co., 3333 Beverly Road, Hoffman Estates, IL 60179 USA
PRINTED IN U.S.A.
7282661 (Rev, C 10/15/09)

WARRANTY
SEARS RESIDENTIAL WATER FILTER
FULL ONE YEAR WARRANTY ON FILTER
For one year from the date of purchase, when this filter is installed and maintained
in accordance with our instructions, Sears will repair, free of charge, defects in
material or workmanship in this water softener.
FULL FIVE YEAR WARRANTY AGAINST LEAKS
For five years from the date of purchase. Sears will furnish and install a new current
model water filter tank, free of charge, if the tank develops a leak.
TO OBTAIN WARRANTY SERVICE, SIMPLY CONTACTTHE NEARESTSEARS
SERVICE CENTER THROUGHOUT THE UNITED STATES. This warranty
applies only while this product is in use in the United States.
This warranty gives you specific legal rights, and you may have other rights which
vary from state to state.
Sears, Roebuck and Co., D/817 WA, Hoffman Estates, IL 60179
If you want your water filter professionally installed, talk to your Sears Salesman. He will arrange for a
prompt, quality installation by Sears Authorized installers.
SEARS INSTALLATION POLICY
All installation labor arranged by Sears shall be per
formed in a neat, workmanlike manner in accor
dance with generally accepted trade practices. Fur
ther, all installations shall comply with all local laws,
codes, regulations and ordinances. Customer shall
also be protected, during installation, by insurance
relating to Property Damage, Workman's Com
pensation and Public Liability.
FACTS AND FIGURES TO KEEP
Fill in the blanks below and keep this book in a safe place so you always have
these facts.
Water Filter Model No.t_______________________________________
Serial Number
Date Installed_
Iron Content
pH
___________
Water Pressure
Water Flow Rate
_______________________________________________
___
Taste And / Or Odor
In addition to any warranty extended to you on the
Sears merchandise involved, which warranty be
comes effective the date the merchandise is
installed, should the workmanship of any Sears ar
ranged installation prove faulty within one year.
Sears will, upon notice from you, cause such faults
to be corrected at no additional cost to you.
SEARS INSTALLATION WARRANTY
Parts Per Million
Pounds / Square Inch
Gallons Per Minute
t The model number is on the rating decal, located on the rim, under the salt hole cover.
TABLE OF CONTENTS
SECTION 1 FILTER START UP
A. SAFETY GUIDES
B. CHECK LIST OF STEP-BY-STEP GUIDES TO INSTALL
C. PROGRAM THE TIMER
D. SANITIZING THE WATER FILTER
SECTION 2 HOW YOUR WATER EILTER WORKS
A. FACEPLATE TIMER FEATURES
B. FILTER APPLICATIONS
C. FILTERED WATER SERVICE, AND BACKWASH
SECTION 3 CARE OE YOUR EILTER
A. KEEP THE FILTER FROM FREEZING
B. ADDING MINERAL - NEUTRALIZING FILTER
C. REPLACING MINERAL - TASTE & ODOR FILTER
D. HELPFUL HINTS CHECKLIST
PAGE NO.
1-1
1-2
1-3 to 1-4
1-5
2-1 to 2-2
2-3
2-4
3-1
3-1 to 3-2
3-3
3-4
SECTION 4 OTHER THINGS TO KNOW
A. DIMENSIONS / SPECIFICATIONS
SECTION 5 SERVICER'S TECH INEORMATION
A. TROUBLESHOOTING
B. ROTARY VALVE SERVICE
C. WATER FLOW THROUGH THE FILTER VALVE
5-1 to 5-4
SECTION 6 REPAIR PARTS 6-1 to 6-4
4-1
5-5
5-6
B

SECTION 1
WATER FILTER START UP
A. SAFETY GUIDES
^ Read all steps, guides and rules carefully before Installing and us
ing your new water filter. Follow all steps exactly to correctly Install.
Failure to follow them could cause personal Injury or property dam
age. Reading this book will also help you to get all of the benefits from
your water filter.
^ Your water filter will Improve you water as described on page 2-3.
It will not soften water or remove Iron. It will not purify polluted water
or make It safe to drink. Also see the specifications on page 4-1.
^ Protect the filter and piping from freezing. Damage from freezing
voids the filter warranty. See page 3-1.
CAUTIONS
PLEASE READ AND COMPLY WITH THE FOLLOWING GUIDES
TO PREVENT DAMAGE TO THE FILTER OR OTHER PROPERTY,
PERSONAL INJURY, OR POSSIBLE FATAL SHOCK.
A THIS FILTER WORKS ON 24 VOLTS ONLY. BE SURE TO USE
THE TRANSFORMER INCLUDED, AND PLUG IT INTO A
GROUNDED 120V OUTLET.
A Unplug the transformer right away If the power cable should
become damaged or frayed. Make repairs before plugging back
Into the power outlet.
A Always unplug the filter from electrical power before remov
ing outer valve covers.
European Directive 2002/96/EC requires all electrical and elec-
^ A tronic equipment to be disposed of according to Waste Electri
cal and Electronic Equipment (WEEE) requirements. This direc
tive or similar laws are In place nationally and can vary from
region to region. Please refer to your state and local laws for proper
disposal of this equipment.
1-1
Problems, Questions? Call 1-800-426-9345 Kenmore Water Line
SECTION 1
WATER FILTER START UP
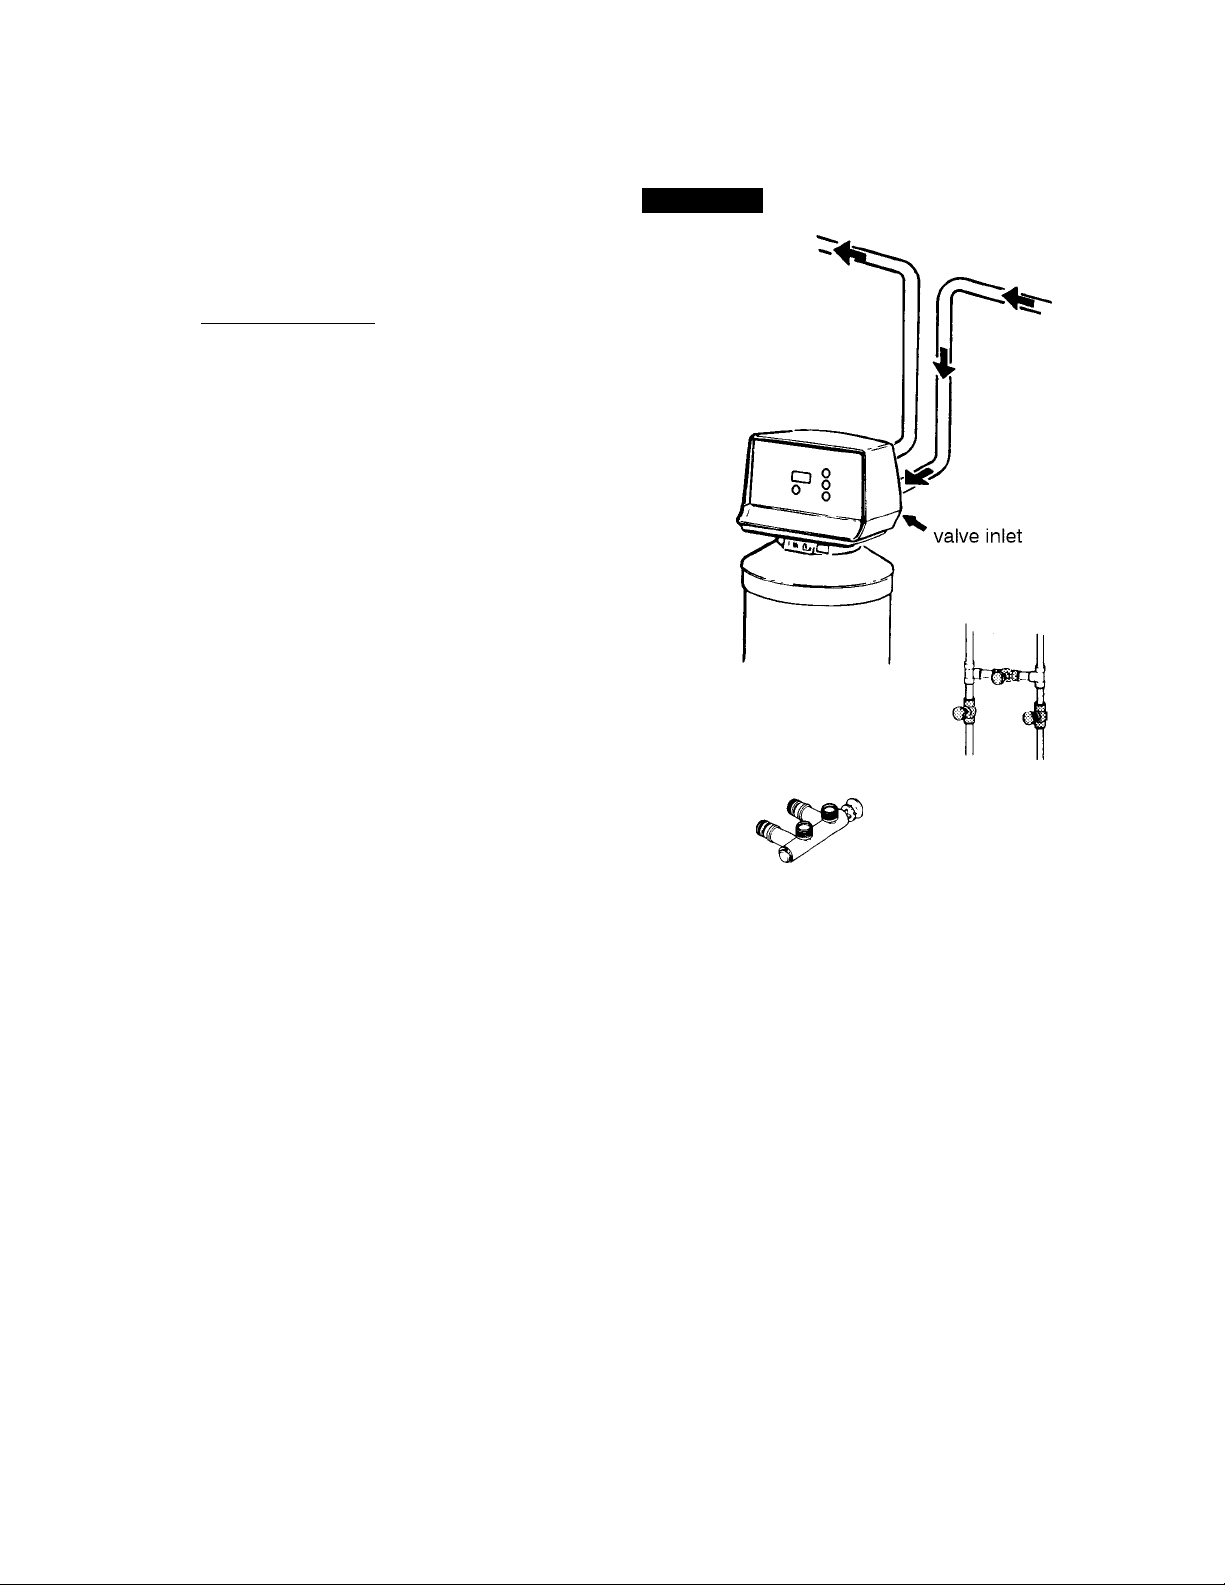
B. CHECK LIST OF ALL STEP-BY-STEP GUIDES TO INSTALL
Refer to the Installation Manual, part number
7146611, for step-by-step guides.
To be sure you have done all the steps to install the
filter, read the following list. Page numbers referred
to are in the Installation Manual.
y* Is the house water flow going INTO the filter
valve INLET? Trace piping to be sure ... page 9.
y* Is the plumbing bypass valve (or three valves)
set for SERVICE?... See Figure 9, page 4-1 of this
manual.
y* Is the valve drain hose connected the right way,
and without sharp bends or kinks that could
stop or reduce water flow? . . . page 14.
y* Is the transformer plugged into an inside, con
tinuously "live", grounded, 120V-60Hz electri
cal outlet. . . page 17.
y* Be sure to restart the water heater . . . page 18.
FIGURE 1
water
supply
1-2
Problems, Questions? Call 1-800-426-9345 Kenmore Water Line
SECTION 1
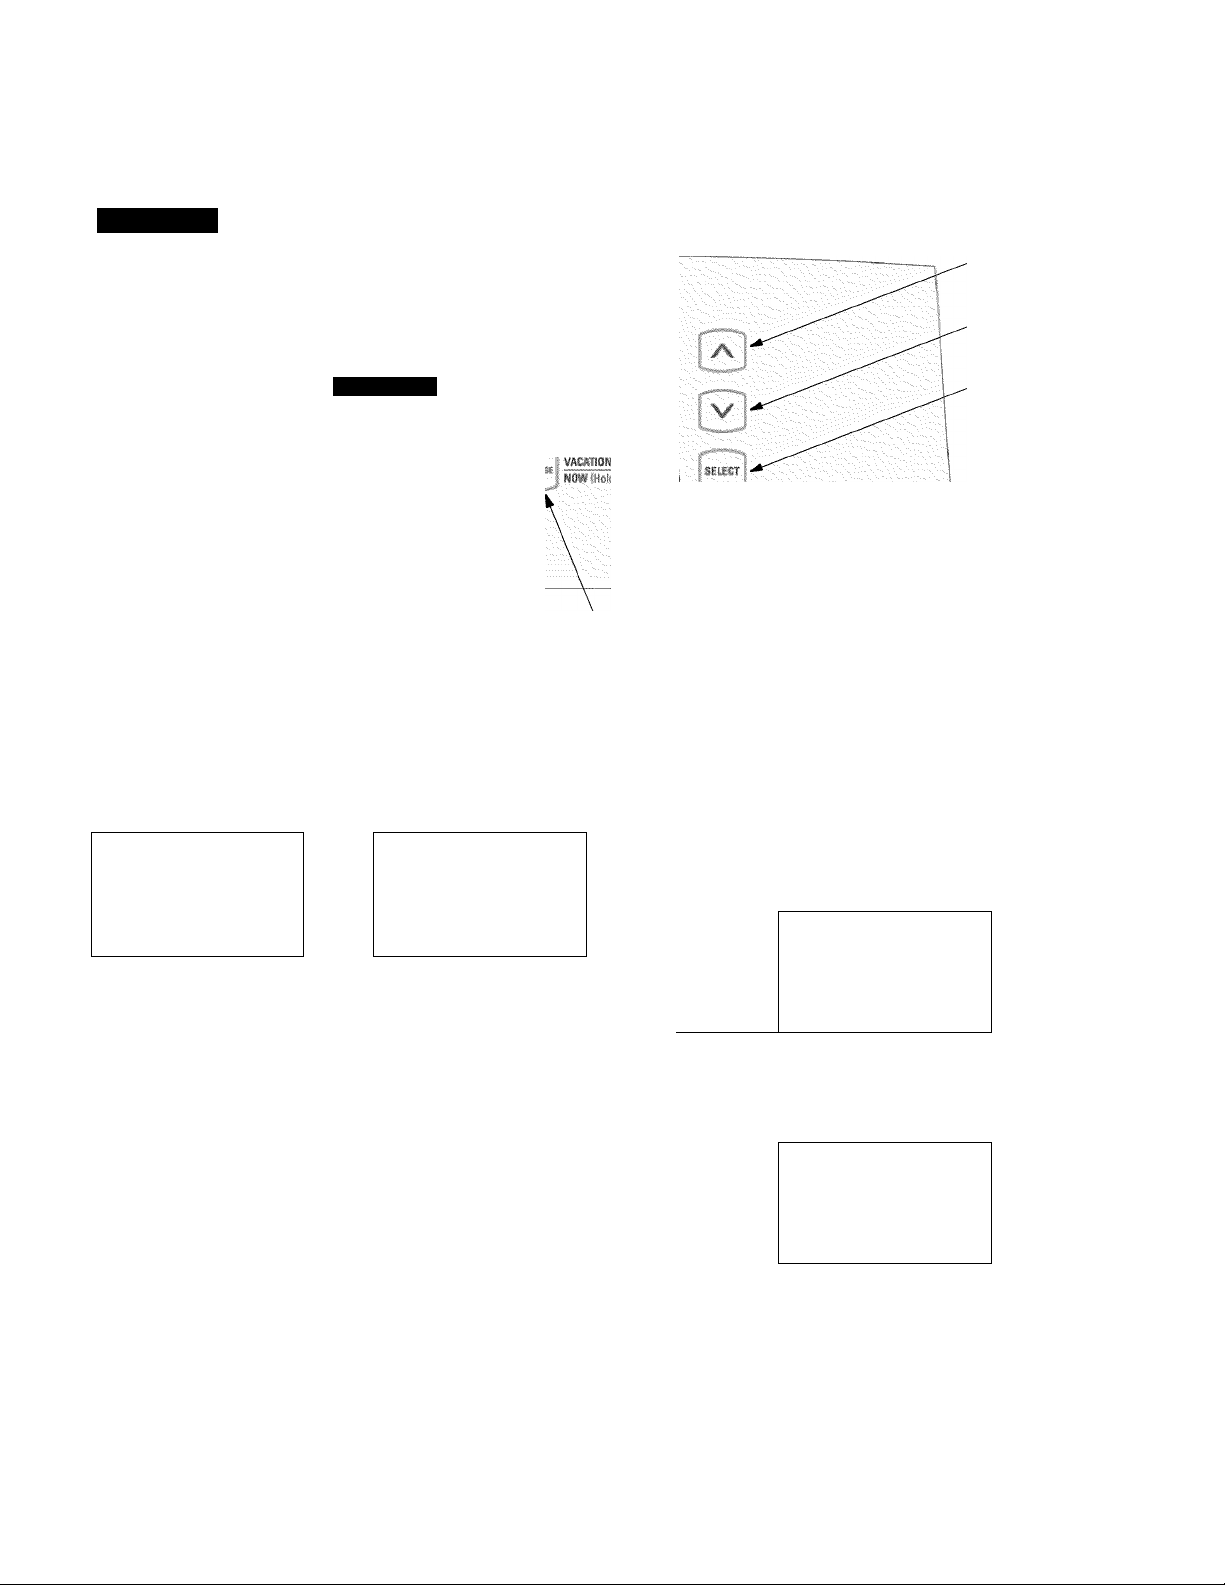
C. PROGRAM THE TIMER
WATER FILTER START UP
FIGURE 2
Kffiirro#«-
Süi'c'mSSi,' fiH'.itici:}
When the transformer is plugged into the electrical
outlet a model code is displayed for a few seconds
followed by a test number (example: Jl.l). Then,
12:00 PM and the words PRESENT TIME will begin
to flash in the time display.
display
UP button
DOWN button
SELECT button
RECHARGE button
1. SET PRESENT TIME OE DAY
Press the UP or DOWN buttons to set the present
time. Press UP to move the display ahead; press
DOWN to move the time backward.
C 0 c
III r
Notes:
If - - - - - shows in the display, press the UP or
DOWN button until SPF shows in the display. Then,
press the SELECT button to set, and change to the
flashing
To check the model code, unplug the transformer at
the wall outlet and plug in again, if other than this
code (SPF) shows, see page 5-2 to reset.
If the words PRESENT TIME do not show in the dis
play, press the SELECT button (Figure 2) until they
do.
SOUND "BEEPER": A "beeper" sounds while
pressing buttons for set-up. One beep signals a
change in the face plate display. Repeated beeps
mean the timer will not accept a change from the
button you have pressed, telling you to use another
button.
PRESENT TIME display.
1 t 1
IJ 1. 1
a. If the present time is between noon and mid
night, be sure PM shows.
ucp
1-30 «
PRESENI ri/W£
If the present time is between
noon, be sure AM shows.
t AM
1 lOO
PflESENI n/WE
Each press of the UP or DOWN buttons changes
the time by 1 minute. Holding the buttons in
changes the time 32 minutes each second.
C. Press the SELECT button once to set the present
time of day and advance to the next set up
screen.
1-3
Problems, Questions? Call 1-800-426-9345 Kenmore Water Line
SECTION 1
C. PROGRAM THE TIMER
WATER FILTER START UP
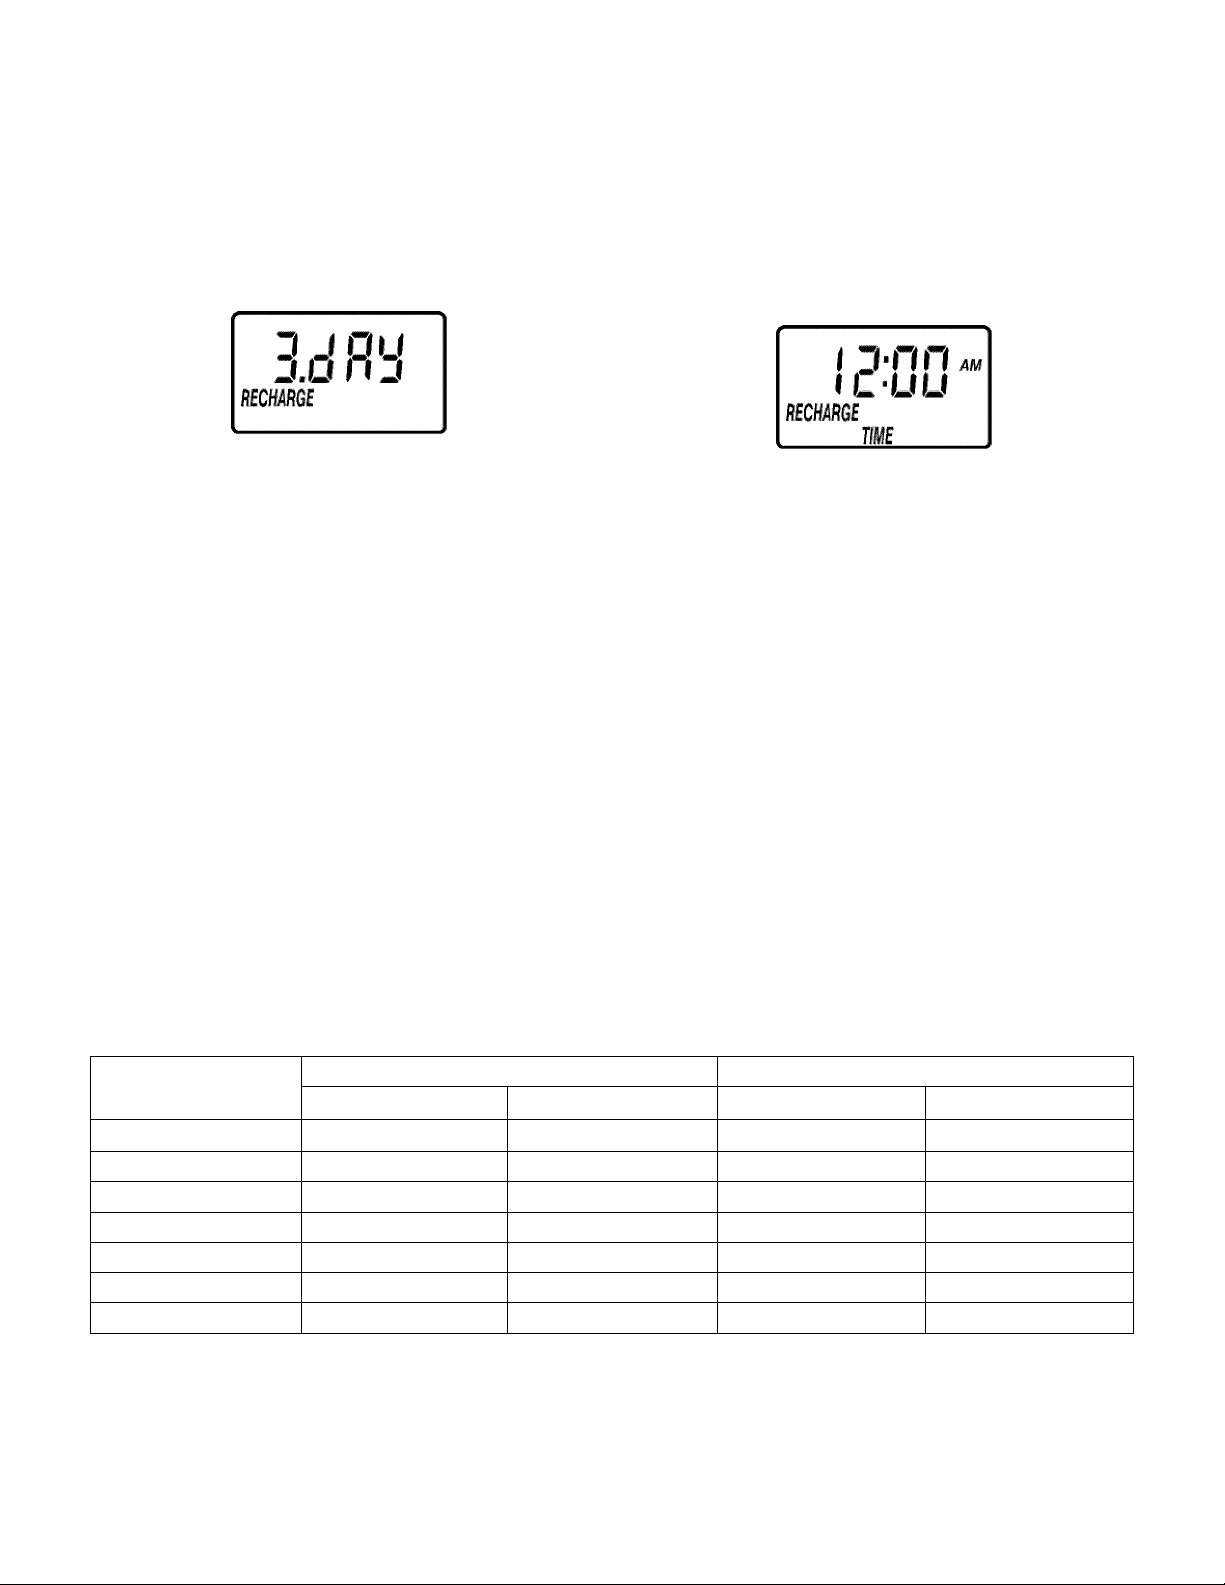
2. SET DAYS TO RECHARGE
This setting is the number of days the filter will go
between recharges. The default setting is 3 days,
with a maximum setting of 99.
a. Press the UP or DOWN buttons until the correct
number of days between recharges is shown in
the display.
b. Press the SELECT button once to set the days to
recharge and advance to the next set up screen.
For iron applications, see the chart below to deter
mine the frequency of recharges. Find the number of
people living in the household, and then going
across the chart, find the amount of iron (in parts per
million) that is in the water supply. The number of
days that shows in the chart is the number of days
the filter should be set for recharges.
NOTE: Carbon and neutralizing filters may only
need to backwash using the default schedule (3
days), depending on application. If the water sup
ply has high turbidity (sand, silt, sediments, etc.) set
the filter to regenerate more often than the 3 day
schedule.
3. SET RECHARGE TIME
The filter is factory set to begin recharge at 12:00 AM.
If a different recharge time is desired, or needed, do
the following.
a. Press the UP or DOWN buttons until the correct
recharge time is shown in the display.
Press the SELECT keypad once to set the re
charge time and return the display to the nor
mal operating screen with the present time of
day shown.
For oxidizing iron applications:
Number of People
1 4 days 3 days 2 days 1 day
2 4 days 3 days 2 days 1 day
3 4 days 3 days 1 day 1 day
4 3 days 2 days 1 day 1 day
5 3 days 2 days 1 day 1 day
6 2 days 1 day 1 day 1 day
7 2 days 1 day 1 day 1 day
Problems, Questions? Call 1-800-426-9345 Kenmore Water Line
Iron (parts ?er million)
1 - 2 3 - 4 5 - 7 8 - 20
1-4
SECTION 1
WATER FILTER START UP
D. SANITIZING THE WATER FILTER
Care is taken at the factory to keep your water filter
as clean and sanitary as possible. However, it is sug
gested that the sanitizing procedure below is follo
wed ®.
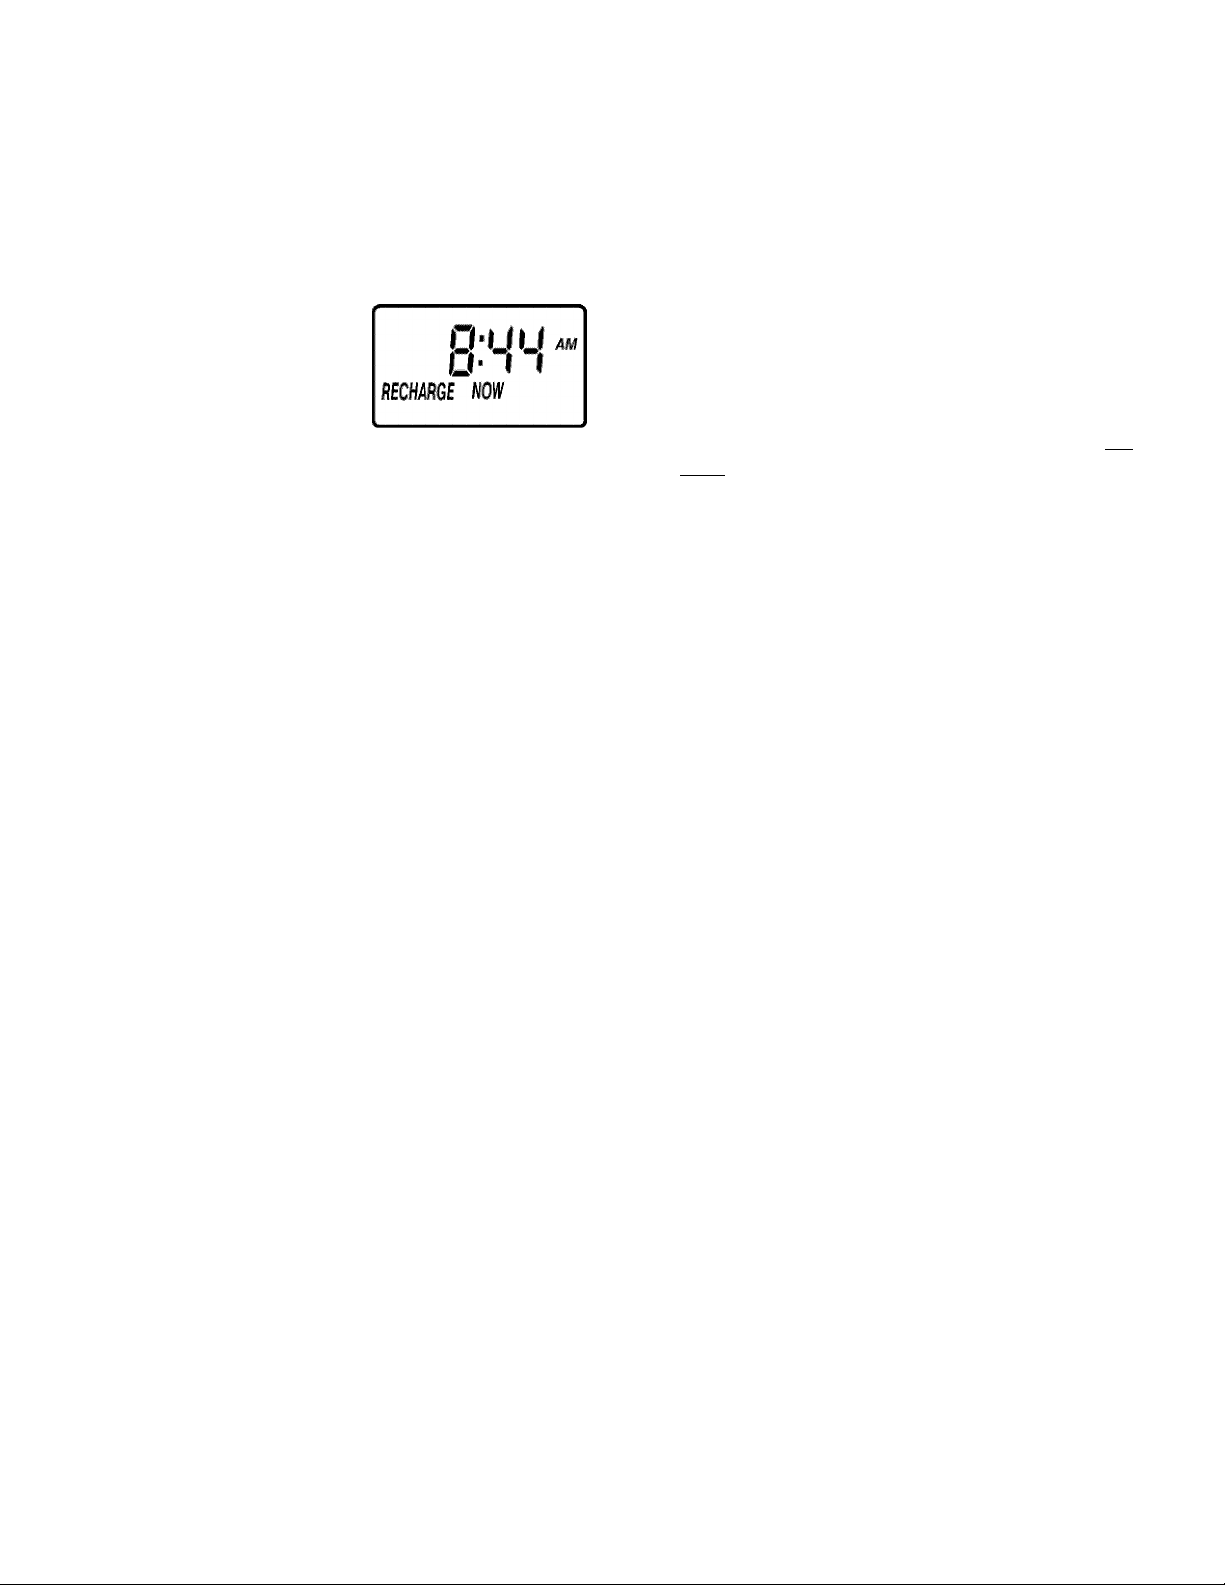
1. Press and hold the RE
CHARGE button until
"RECHARGE NOW"
begins to flash in the
display. Water will be
gin to run from the drain hose as the filter valve
moves into backwash position.
After 5 to 10 minutes, press the RECHARGE
button again to move the valve into fast rinse
position (water stops, then begins to run from
drain hose again).
2. In about two minutes, put the bypass valve(s)
in bypass position (see Figure 9, page 4-1).
Then press the RECHARGE button once again
to return the filter to service position. Doing this
releases water pressure in the filter.
3. Carefully remove the large plastic clip at the fil
ter valve inlet (pages 6-3 and 6-4). Pull the
valve adaptor from the valve inlet.
5. Be sure the valve inlet is clean, for a good seal
ing surface for the valve adaptor o-ring. Then,
reconnect plumbing to the filter. AFTER
INSTALLING THE LARGE PLASTIC CLIP,
PULL OUTWARD ON THE VALVE ADAPTOR
TO BE SURE IT'S PROPERLY HELD IN
PLACE.
6. SLOWLY, reposition the bypass valve(s) to ser
vice, Figure 9, page 4-1. Open the nearest fil
tered water faucet until you can smell chlorine,
then close.
7. Again, put the bypass valve(s) in bypass posi
tion. Allow the filter to stand idle for about 45
minutes, while the chlorine sanitizes.
8. After 45 minutes, return the bypass valve(s) to
service position.
9. Repeat steps 1, la and lb to advance the filter to
backwash. The timer will automatically ad
vance the filter through the backwash and fast
rinse cycles, during which the sanitizing bleach
is flushed to the drain.
NOTE: If bypass valve. Sears Stock No. 42-3437 is
installed, or if plumbing is too rigid to move, also
disconnect the outlet side and move the filter away
from plumbing.
4. Put one teaspoon (0.1 ounce) of calcium hypo
chlorite into the valve inlet as far as possible.
NOTE: You can buy calcium hypochlorite in tablet
or granular form under trade names such as Perchloron and HTH.
NOTE: The backwash and fast rinse cycles take
about 30 minutes. When over, the timer automati
cally returns the filter to service (water flow from the
drain hose stops).
10. Open house filtered water faucets and allow to
run until the chlorine odor is gone.
V
“ Recommended by the Water Quality Association. On some water sup
plies, the water filter may need periodic disinfecting.
1-5
Problems, Questions? Call 1-800-426-9345 Kenmore Water Line
SECTION 2
HOW YOUR WATER FILTER WORKS
A. FACEPLATE TIMER FEATURES
RECHARGE NOW
For times you expect to use more
water than usual, use the RE
CHARGE NOW feature. Press the
RECHARGE button and hold in
for three seconds. "RECHARGE
NOW" begins to flash in the dis
play and a recharge starts right
away. You will have filtered water
when the recharge is over in about
two hours.
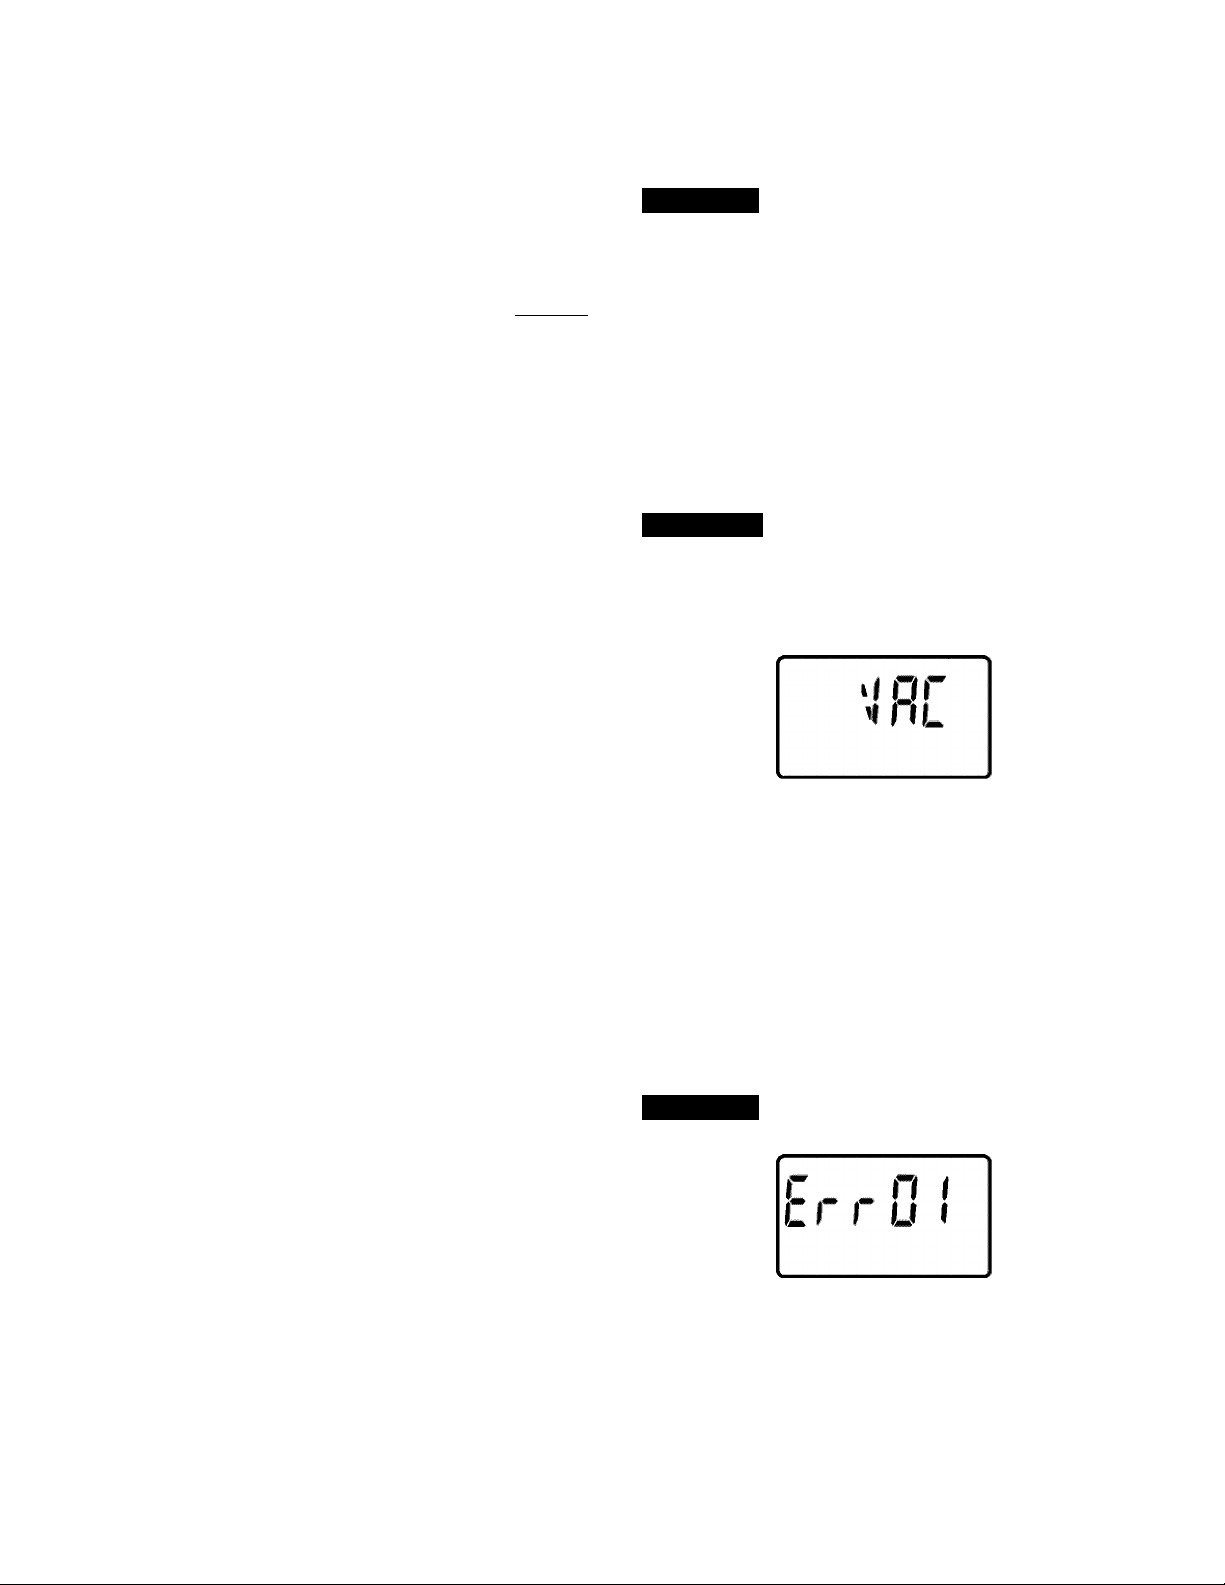
VACATION
The day you leave on vacation or
other long absence, press and re
lease (do not hold) the RE
CHARGE button. "VAC" begins
to flash in the display. The timer
will keep time, but the filter will
not recharge and waste water.
FIGURES
I l. I I
fi£CH^RG£~ NOir
FIGURE 4
When you return, press and release the RECHARGE
button again to return the filter to service, and the
correct time of day will show in the display. Remem
ber to do this or the filter will not recharge and you
will soon have unfiltered water.
NOTE: While in VACATION, the filter will go
through a recharge if the RECHARGE NOW feature
is used.
To shut off the water supply to the filter, use the
plumbing bypass valve(s). Figure 9 on page 4-1.
ERROR CODE
An error code could appear in the faceplate display
if a problem occurs in the filter electronics. If you see
and error code instead of the present time of day,
please call the Kenmore Water Line at
1-800-426-9345.
FIGURES
2-1
Problems, Questions? Call 1-800-426-9345 Kenmore Water Line
 Loading...