

Page 1

Owner's Manual
Manual del Propietario
Ken more
ROOM AIR CONDITIONER
ACONDICIONADOR DE AIRE DE VENTANA
Model, Modelo 580.75050
Sears, Roebuck and Co., Hoffman Estates, IL 60179 U.S.A.
www.sears.com
Page 2

TABLE OF CONTENTS
TABLE OF CONTENTS
WARRANTY
.........................................
.......................
SAFETY...............................................................3
Important Safety Instructions
ELECTRICAL REQUIREMENTS
.............................
..............
INSTALLATION...............................................5
Installation Requirements
Installation..........................................................6
How to Install
Removal from Window.......................................7
.....................................................
..................................
OPERATION................................................8
How and Why
Normal Sounds..................................................8
Capacity and Running Time
....................................................
..............................
2
2
3
4
5
6
8
8
Features.............................................................9
Using the Air Conditioner...................................9
Air Conditioner Features
MAINTENANCE
Air Filter Cleaning............................................11
Air Conditioner Cleaning
How to Remove the Front Grille......................11
How to Replace the Front Grille......................11
TROUBLESHOOTING
Before Calling for Service................................12
ESPAÑOL
........................................................
..................................
.................................
.................................
............................
11
11
12
MASTER PROTECTION
AGREEMENTS
..............................................
SERVICE NUMBERS..................Back Cover
10
14
27
WARRANTY
FULL ONE YEAR WARRANTY ON
ROOM AIR CONDITIONER
For one year from the date of purchase, when this
air conditioner is operated and maintained for
normal room cooling according to instructions in this
owner's manual, Sears will repair this air
conditioner, free of charge, if defective in material or
workmanship.
FULL FIVE-YEAR WARRANTY ON
SEALED REFRIGERATION SYSTEM
For five years from the date of purchase, when this
air conditioner is operated and maintained for
normal room cooling according to instructions in this
owner's manual. Sears will repair the sealed
refrigeration system (consisting of refrigerant,
connecting tubing, and compressor), free of charge,
if defective in material or workmanship.
WARRANTY SERVICE IS AVAILABLE BY
CONTACTING SEARS SERVICE AT
1-800-4-MY-HOME®.
Warranty coverage applies only to air conditioners
used for non-commercial, private household
purposes.
This warranty applies only while this product is in
use in the United States.
This warranty gives you specific legal rights, and
you may also have other rights which vary from
state to state.
Sears, Roebuck and Co., D/817WA,
Hoffman Estates, IL 60179 U.S.A.
-2-
Page 3
SAFETY
IMPORTANT SAFETY INSTRUCTIONS
damage to your ROOM AIR CONDITIONER.
Awarnin g
Do not store or use gasoline or other flammable
vapors and liquids in the vicinity of this or any other
appliance. Read product labels for flammability and
other warnings.
r!Ti7J;k^lknel PREVENT ACCIDENTS
To reduce the risk of fire, electrical shock, or injury
to persons when using your air conditioner, follow
basic precautions, including the following:
• Be sure the electrical service is adequate for the
model you have chosen.
• If the air conditioner is to be installed in a window,
you will probably want to clean both sides of the
glass first. If the window is a triple-track type with a
screen panel included, you may want to remove
the screen completely before installation.
• Be sure the air conditioner has been securely and
correctly installed according to the separate
installation instructions provided with this manual.
Save this manual and installation instructions for
possible future use in removing or reinstalling this
unit.
• Use gloves when handling the air conditioner.
Be careful to avoid cuts from sharp metal fins on
front and rear coils.
The complete electrical rating of your new room air
conditioner is stated on the serial plate. Refer to the
rating when checking the electrical requirements.
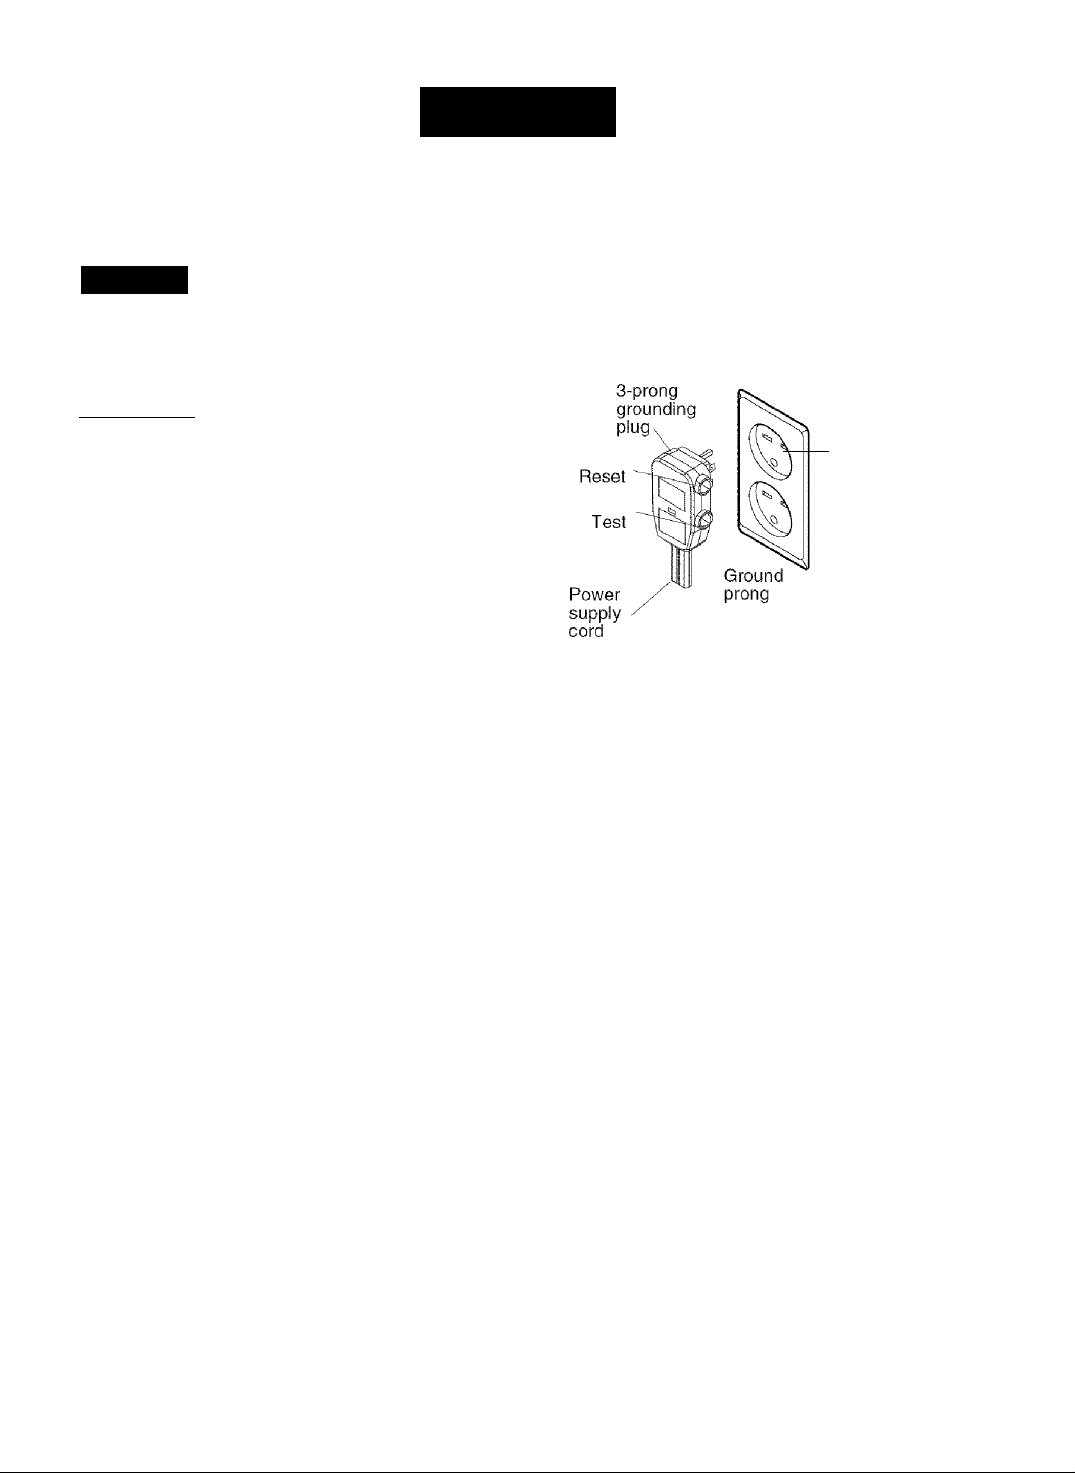
• Be sure the air conditioner is properly grounded.
To minimize shock and fire hazards, proper
grounding is important. The power cord is
equipped with a three-prong grounding plug for
protection against shock hazards.
• Your air conditioner must be plugged into a
properly grounded wall receptacle. If the wall
receptacle you intend to use is not adequately
grounded or protected by a time delay fuse or
circuit breaker, have a qualified electrician install
the proper receptacle.
• Do not run air conditioner with a protective
covering. This could result in mechanical damage
within the air conditioner.
• Do not use an extension cord or an adapter
plug.
FOR YOUR SAFETY
ELECTRICAL INFORMATION
your room air conditioner to avoid harm to yourself orThe safety instructions below will tell you how to use
I Avoid fire hazard or electric shock.
Do not use an extension cord or an adapter plug.
Do not remove any prong from the power cord.
-3-prong
grounding
type wall
receptacle
ENERGY SAVING IDEAS
• The capacity of the room air conditioner must fit
the room size for efficient and satisfactory
operation.
• Install the room air conditioner on the shady side
of your home. A window that faces north is best
because it is shaded most of the day.
• Do not block air flow inside with blinds, curtains, or
furniture; or outside with shrubs, enclosures, or
other buildings.
• Close the floor and wall registers and the fireplace
damper so cool air does not escape up the
chimney and into the duct work.
• Keep blinds and drapes in other windows closed
during the sunniest part of the day.
• Clean the air filter as recommended in the
MAINTENANCE section of this manual.
• Proper insulation and weather stripping in your
home will help keep warm air out and cool air in.
• External house shading with trees, plants or
awnings will help reduce the air conditioner's work
load.
• Operate heat producing appliances such as
ranges, washers, dryers, and dishwashers during
the coolest part of the day.
-3-
Page 4
ELECTRICAL REQUIREMENTS
OBSERVE ALL LOCAL CODES AND
ORDINANCES.
DO NOT, UNDER ANY CIRCUMSTANCES,
REMOVE THE POWER SUPPLY CORD
GROUND PRONG.
ELECTRICAL GROUND IS REQUIRED ON
THIS APPLIANCE.
A 250-volt 60 Hz, AC only, 20A fused and
properly grounded electrical supply is required.
A time delay fuse or time delay circuit breaker
is recommended. Use a dedicated circuit,
serving only this appliance.
DO NOT USE AN EXTENSION CORD.
115V~
r
w
c
i
—
\
1
/
1
230V-
RECOMMENDED GROUNDING METHOD
For your personal safety, this appliance must
be grounded. This appliance has a power
supply cord with a 3-prong grounding plug. To
minimize possible shock hazard, the cord must
be plugged into a mating grounding type wall
receptacle and grounded in accordance with
the National Electrical Code (ANSI/NFPA 70)
latest edition and all local codes and
ordinances. If a mating wall receptacle is not
available, it is the personal responsibility and
obligation of the customer to have a properly
grounded 3-prong wall receptacle installed by a
qualified electrician.
Power cord may include a current interrupter
device. A test and reset button is provided on the
piug case. The device should be tested on a
periodic basis by first pressing the TEST button
and then the reseT button. If the TEST button
does not trip or if the RESET button will not stay
engaged, discontinue use of the air conditioner and
contact a qualified service technician.
NOTE; The shape may be different according to its model.
Use Wall Receptacle Power Supply
X X Standard 125V,
/1 1 ) 3-wire grounding
V ^ y
receptacle rated
^ 15A, 125VAC
"X Standard 250V,
/^ 3-wire grounding
\ A / receptacle rated
V™15A, 250VAC
yX Standard 250V,
I 1 3-wire grounding
1 _ y receptacle rated
V3..X 20A, 250V AC
Use 15 AMP. time
delay fuse or 15 AMP.
circuit breaker.
Use 20 AMP. time
delay fuse or 20 AMP.
circuit breaker.
Awarning
Electrical Shock Hazard
Plug into a grounded 3 prong outlet.
Do not remove ground prong.
Do not use an adapter.
Do not use an extension cord.
Failure to follow these instructions can result in
death, fire, or electrical shock.
-4-
Page 5
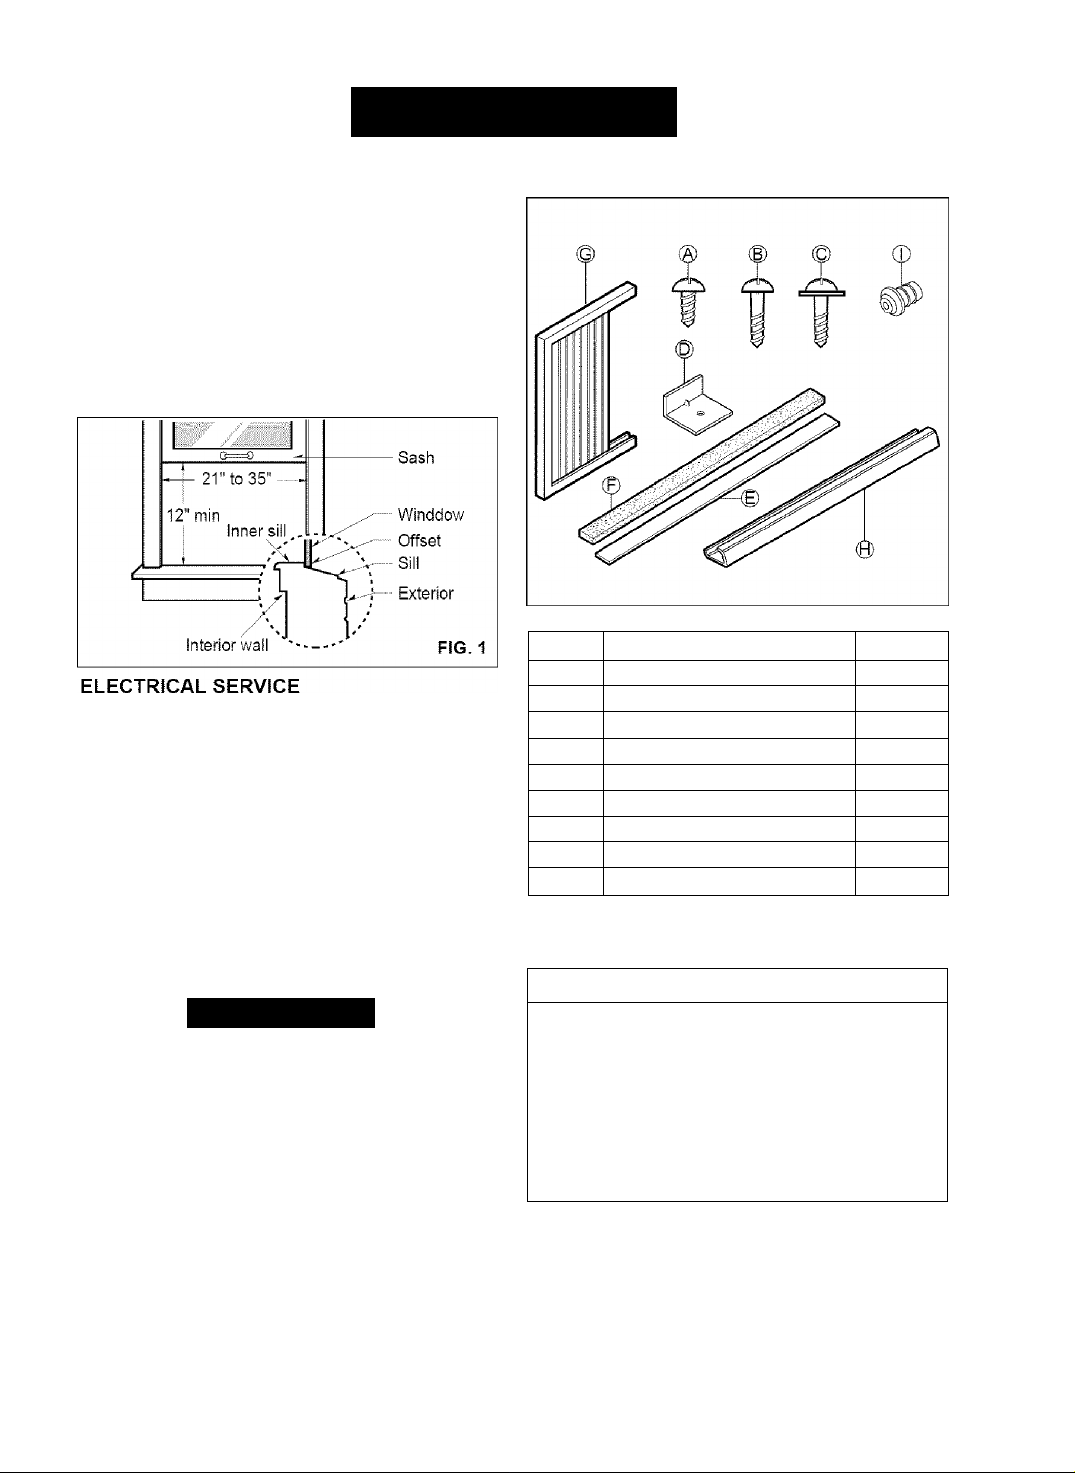
INSTALLATION
INSTALLATION REQUIREMENTS installation hardware
Your air conditioner will install into standard double
hung windows with actual clear opening widths of
21 to 35 inches (533mm to 889mm) (FIG. 1).
Lower sash must open sufficiently to allow a clear
vertical opening of 12 inches (305mm). Side louvers
and the rear of the air conditioner must have clear
air space to allow enough airflow through the
condenser for heat removal. The rear of the unit
must be outdoors, not inside a building or garage.
ITEM NAME OF PARTS Q'TY
A SHORT SCREW 14
Check your available electrical service. The power
supply available must be the same as that shown
on the unit nameplate (found on left side of cabinet).
All models are equipped with a 3-prong service plug
to provide proper service and safe positive
grounding. Do not change plug in any way. Do not
use an adapter plug. If your present wall outlet does
not match your plug, call a qualified electrician to
make the necessary corrections. SAVE CARTON
and this OWNER'S MANUAL for future reference.
The carton is the best way to store unit during
winter or when not in use.
A CAUTION
To avoid risk of persona! injury, property damage, or
product damage due to the weight of this device and
sharp edges that may be exposed:
• Air conditioners covered in this manual pose an
excessive weight hazard. Two or more people are
needed to move and install the unit.
To prevent injury or strain, use proper lifting and
carrying techniques when moving unit.
• Carefully inspect location where air conditioner will
be installed. Be sure it will support the weight of
the unit over an extended period of time.
• Handle air conditioner with care. Wear protective
gloves whenever lifting or carrying the unit, AVOID
the sharp metal fins of front and rear coils.
• Make sure air conditioner does not fall during
installation.
B WOOD SCREW 2
C WOOD SCREW 2
D L BRACKET 3
E FOAM STRIP 1
F FOAM SEAL 1
G SIDE CURTAIN 2
H UPPER GUIDE 1
1 DRAIN PIPE 1
REQUIRED TOOLS:
• Tight Fitting gloves
• Standard screwdriver
• Phillips screwdriver
• Pliers
• Sharp knife
• 3/8-inch open end
wrench or adjustable
wrench
• 1/4-inch hex socket
and ratcher
• Tape measure
• Electric drill
• 1/4-inch drill bit
-5-
Page 6

INSTALLATION
INSTALLATION
Pick a location which will allow you to blow the cold
air into the area you want. Windows used for
installation must be strong enough to support the
weight of the air conditioner. Good installation with
special attention to the proper position of the unit will
lessen the chance that service will be needed.
If air conditioner is blocked by a storm window frame,
see step 9 on page 7 before beginning to install.
HOW TO INSTALL
[SIDE CURTAINS
Insert the side curtains into the guides of the air
conditioner. Fasten the curtains to the unit with
screws (ITEM A), as shown in FIG. 2.
ITEM A
FOAM STRIP
Cut the adhesive-backed foam strip (ITEM E) to the
window width.
Remove the backing from the foam strip and attach the
foam strip to the underside of the bottom window. (FiG. 3)
FIG. 2
ATTACH L BRACKET
• Use screws (ITEM A) to install the L brackets on
the outer sill as shown. See FIG. 5.
• The bracket helps to hold unit securely in place.
Be sure to place bracket edge flush against back
of inner sill. See FIG. 5.
• If air conditioner is blocked by storm window
frame, see step 9.
DRAINAGE
First, be sure to insert the drain pipe into base pan
before installation. The air conditioner must be
installed with a slight tilt (V4”)downward for proper
drainage of excess condensed water through the
drain pipe.
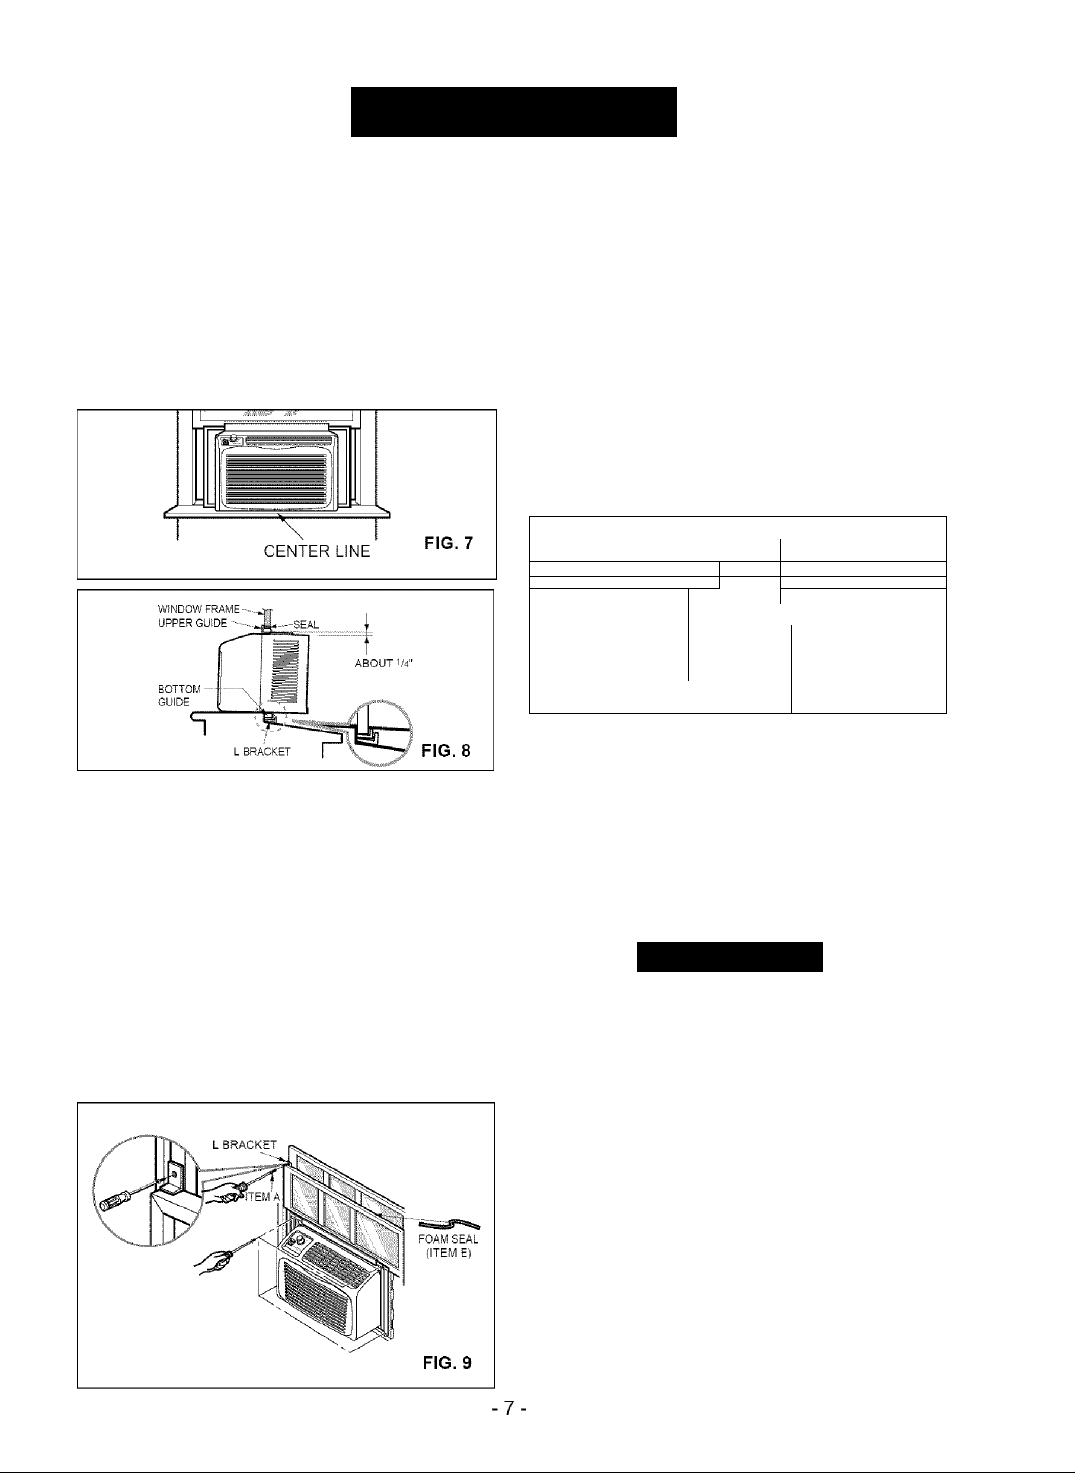
El LOCATING UNIT IN WINDOW
Open the window and mark center line with pencil
on the center of the inner sill, as shown in FIG. 4.
Page 7
INSTALLATION
Q INSTALL THE AIR CONDITIONER IN THE
WINDOW
• Carefully lift the air conditioner and slide it into the open
window. Make sure the bottom guide of the air
conditioner drops into the notches of the L brackets.
• When the air conditioner drops into the L brackets, the
air conditioner wiii be centered in window opening as
shown in FiG. 7.
• While steadying the air conditioner, carefully bring the
window sash down behind the upper guide of the air
conditioner, as shown in FIG. 8.
SECURE THE GUIDE PANELS
Extend the guide panels (ITEM G) to fill the window
opening using 2 ITEM B and 2 ÍTEM C screws to secure
them, as shown in FIG. 9.
INSTALL THE FOAM SEAL AND SASH LOCK
Cut the foam seal (ITEM F) to the window width.
Stuff the foam seal between the lower and upper
window sash to prevent air and insects from getting into
the room, as shown in FIG. 9.
Fasten the remaining L bracket on either side of the
window using screw (ITEM A). See FIG. 9 inset.
Installing this bracket prevents unit falling from window
being raised.
IF AIR CONDITIONER IS BLOCKED BY STORM
El
WINDOW FRAME
If storm window presents interference, fasten a 2" wide
wood strip to the inner window sill across the full width of
the sill. The wood strip should be thick enough to raise
the height of the window sill so that the unit can be
installed without interference from the the storm window
frame. See FIG. 10.
Top of wood strip should be approximately 3/4" higher
than the storm window frame to help condensation to
drain properly to the outside.
Install a second wood strip (approximately 6" long by
1V2" wide and same thickness as first strip) in the center
of the outer sill flush against the back of the inner sill.
Screw the L brackets into this strip.
This will raise the L bracket as shown in FIG. 10.
WOOD STRIP MOUNTED
ON TOP Of INNER SILL
L
INNER
SILL
INSIDE 1 OUTSIDE FIG. 10
1" MAX
LBRACKEy
WOOD STRIP
FORI BRACKET V
-
------
OUTER
3/4" I
CLEARANCE f
WINDOW
L FRAME
SILL
REMOVAL FROM WINDOW
Turn the air conditioner off, and disconnect the power
cord. Remove the L bracket and the screws installed
through the top and bottom of the guide panels, and save
for reinstallation later. Close the guide panels. Keeping a
firm grip on the air conditioner, raise the sash, and
carefully tilt the air conditioner away from you to drain any
condensate water. Lift the air conditioner from the window
and remove the foam seal from between the windows.
A CAUTION
■ Air conditioners covered in this manual pose an
excessive weight hazard. Two or more people are
needed to move and install the unit.
To prevent injury or strain, use proper lifting and
carrying techniques when moving unit.
’ When handling the air conditioner, be careful to avoid
cuts from sharp metal fins on front and rear coils.
■ Make sure air conditioner does not fall during removal.
Page 8
OPERATION
HOW AND WHY
Your room air conditioner provides the following
functions to make hot weather living more
comfortable:
• Cools and circulates room air.
• Lowers humidity by removing excess moisture.
• Filters out summertime dust, dirt, and some
airborne impurities.
The air conditioner performs these functions by
drawing room air through a filter which traps dust
and dirt particles. The air then passes over a
cooling coil which refrigerates the air and removes
excess moisture. The same air is then returned to
the room- cooler, drier, and cleaner. Moisture
removed from the room air is carried to the outside
and evaporated.
Your air conditioner is designed to be easy to
operate and to provide plenty of cooling power.
NORMAL SOUNDS fig.
Aside from the regular fan motor and compressor
sounds coming from your air conditioner, you will
once in a while hear a pinging sound. This is the
result of moisture being picked up from the air in the
room and thrown against the air conditioner's fan.
This is normal and should not be cause for concern.
Also, do not be alarmed if you hear a slight hissing or
gurgling sound coming from your air conditioner after
it is off. These are normal coolant noises.
11
Compressor
The modern high efficiency
compressor may have a high
pitched hum or pulsating
noise that cycles on and off.
Fan
You may hear air
movement from the
fan.
r Unit Vibration
The unit may vibrate
and make noise
because of poor wall
or window
construction.
Condenser
You may hear
droplets of water
hitting the condenser,
causing a pinging or
clicking sound.
CAPACITY AND RUNNING TIME
Proper unit size is important in deciding the desired
comfort for the area you want to cool. The proper
size is determined by the number of square feet in
the area to be cooled.
Whenever the heat or humidity load is above normal
the air conditioner must run longer and more often
to keep the desired temperature you have selected.
Under heavy heat load conditions the air conditioner
may need to run constantly to keep the temperature
you want.
At times using the HIGH FAN setting to circulate the
room air may make it comfortable even though you
do not have the air conditioner set to cool the air.
This will decrease your cost of use.
FIG. 11
8-
Page 9
OPERATION
FEATURES
117 8 1
10
3
2
USING THE AIR CONDITIONER
[ To reduce the risk of fire, electric
shock, or injury to persons, read the important
SAFETY instructions section before operating this
appliance.
To begin operating the air conditioner after
installation, follow these steps:
1. Plug in the air conditioner. (To prevent electrical
hazards, do not use an extension cord or an
adapter plug.)
2. Turn Power Switch on.
3. Set the Control Knob control to the coolest setting.
4. Set the Fan Speed Switch control at the high level.
5. Adjust the air direction control tabs for comfortable
air flow.
6. Once the room has cooled, adjust the Control
Knob and Fan Speed Switch control to the setting
you find most comfortable.
NOTE : If the air conditioner is turned off, wait 3
minutes before restarting. This allows pressure
inside the compressor to equalize. Failure to wait 3
minutes before restarting may cause inefficient
operation.
If you move the Control Knob control to a warmer,
then immediately back to a cooler setting, the unit
will shut off. Wait 3 minutes before restarting.
1. Cabinet
2. Horizontal Air Direction Control Tab
3. Cool Air Discharge
4. Inlet Grille
5. Air Filter
6. Front Grille
7. Control Knob
8. Upper Guide
9. Curtain
10. Power Switch
11. Fan Speed Switch
Refer to the AIR CONDITIONER FEATURES
section for other settings.(See page 10)
-9-
Page 10

OPERATION
AIR CONDITIONER FEATURES
The controls featured in this manual are
representative of the many models available. Your
model may look slightly different.
AIR DIRECTION ADJUSTMENT
Using the Control Tabs, the air flow can be directed
to the left, right, straight ahead, or any combination
of these directions.
Power
Turns air conditioner on and off.
NOTE: If the air conditioner is off and is then turned on while set in the Cool On mode, it wil take
aproximately 3 minutes for the compressor to start and cooling to begin.
Fan Speed
Use to set the fan speed to LOW or HI.
Mode/Temp Control
Use to set the air conditioner to the Fan Only or the Cool On mode.
Fan Only Mode
Use Fan Only at HI or LOW Fan Speed to provide air circulation and filtering without cooling.
Cool On Mode
The mode/Temp control is used to maintain the room temperature. When set in the Cool On mode, the
compressor wil! cycle on and off to keep the room at the desired level of comfort.
Use Cool On with HI or LOW Fan Speed for cooling. Turn the knob toward the cooler area for the indoor air
to become cooler. Turn the knob toward the Cool On area for the indoor air to become warmer.
Cooling Descriptions
For Normal Cooling - Select the Cool On mode with the Mode/Temp knob set at the midpoint(5).
For Maximum Cooling - Select the Cool On Mode with the Mode/Temp knob set toward the cooler area(9).
For Quieter & Nighttime Cooling - Select the Cool On mode with the Mode/Temp knob set toward the Cool
On. area(1).
NOTE: If you move the mode/Temp control knob from the Cool On setting to the Fan Only setting, wait least
3 minutes before switching back to a Cool On setting.
- 10-
Page 11

MAINTENANCE
AIR FILTER CLEANING
The Air Filter will become dirty as it removes dust
from the inside air. It should be washed at least
every 2 weeks. If the Air Filter remains full of dust,
the air flow will decrease and the cooling capacity
will be reduced, possibly damaging the unit.
• Open the inlet grille forward and pull out the air
filter.
• Wash the Air Filter under the faucet with warm
water. Be sure to shake off all the water before
replacing the filter.
HOW TO REMOVE THE FRONT
GRILLE
• Remove two screws securing the Front Grille.
• Pull the grille up from the bottom and pull the top
of the grille away from the case to lift the top tabs
out of their stots.
AIR CONDITIONER CLEANING
Clean the front grille and inlet grille by wiping with a
doth dampened in a mild detergent solution (FIG. 16).
The cabinet may be washed with mild soap or
detergent and lukewarm water, then polished with
liquid appliance wax.
To ensure continued peak efficiency, the condenser
coils (outdoor side of the unit) should be checked
periodically and cleaned if they become clogged
with soot or dirt from the atmosphere. Brush or
vacuum exterior coils to remove debris from fins.
FIG. 16
HOW TO REPLACE THE FRONT GRILLE
Attach the front grille to the cabinet by inserting the
tabs on the grille into the slots on the front of the
cabinet. Push the grille in until side ribs insert into
case.
------
SideRib FIG.18
- 11 -
Page 12

TROUBLESHOOTING
BEFORE CALLING FOR SERVICE
Check the following list to be sure a service call is really necessary. A quick reference to this manual may
help you avoid an unneeded service call.
THE AIR CONDITIONER WILL NOT OPERATE
Check If... Then...
Wall plug disconnected. Push plug firmly into wall outlet.
House fuse blown or circuit breaker tripped. Replace fuse with time delay type or reset circuit breaker.
MODE selector is OFF position. Turn MODE selector to the desired COOL setting.
Unit was turned off and then on too quickly. Turn unit oft and wait 3 minutes before restarting.
TEMP Control set warmer than room temperature. Turn TEMP Control clockwise to a cooler setting (higher number).
The current interrupter device is triped Press the RESET button located on the power cord plug
If the RESET button will not stay engaged, discontinue use of the air
conditioner and contact a qualified service technician.
AIR FROM UNIT DOES NOT FEEL COLD ENOUGH.
Check If... Then...
Fan Speed Switch in LOW position. Turn Fan Speed Switch to HI position
Control Knob set too warm. Turn Mode/Temp Control Knob clockwise to a cooler setting.
Room temperature below 70°F (21 "C). Cooling may not occur until room temperature rises above 70"F (21°C).
Temperature sensing tube touching evaporator coil,
located behind front grille.
THE AIR CONDITIONER COOLING, BUT ROOM IS TOO WARM - ICE FORMING ON COOLING COIL BEHIND INl^T GRILLE.
Check If... Then...
Outdoor temperature below 70°F (21 °C).
Air filter may be dirty. Clean filter. Refer to Maintenance section of owner's manual. To defrost,
Mode/Temp control Knob set too cold for
night-time cooling.
THE AIR CONDITIONER COOLING, BUT ROOM IS TOO WARM
Check If...
Dirty air filter - air restricted. Clean air filter. Refer to Maintenance section of owner's manual.
Mode/Temp control Knob set too warm. Control Knob clockwise to a COOLER setting.
Front of unit is blocked by drapes, blinds, furniture,
etc. Air distribution is restricted.
Doors, windows, registers, etc. open. Cold air escapes. Close doors, windows, registers, etc.
Unit recently turned on in hot room. Allow additional time to remove stored heat from walls, ceiling, floor, and furniture.
THE AIR CONDITIONER TURNS ON AND OFF RAPIDLY.
Check If... Then...
Outside temperature is extremely hot. Set Fan Speed Switch on HIGH speed to bring air past cooling coils faster.
Remove front grille, and straighten tube away from evaporator coil.
To defrost the coil, set Mode/Temp Control Knob to Fan Only position.
set Mode/Temp control to Fan Only position.
To defrost the coil, set Mode/Temp control to Fan Only position.
Then...
Clear blockage in front of unit.
NOISE WHEN UNIT IS COOLING.
Check If...
Sound of fan hitting water-from the moisture removal system.This is normal when humidity is high. Close doors, windows, and registers.
Window vibration - poor installation. Refer to instaiiation instructions or check with installer.
Then..
WATER DRIPPING INSIDE ROOM WHEN UNIT IS COOLING.
Check If... Then...
The air conditioner is improperly installed. Tilt air conditioner slightiy to the outside to allow water drainage. Refer to
installation instructions or check with installer.
WATER DRIPPING OUTSIDE WHEN UNIT IS COOLING.
Check If... Then...
The unit is removing large quantities of moisture
from humid room.
This is normal during excessively humid days.
- 12-
Page 13

ENGLISH
CO
Page 14

INDICE DE MATERIAS
INDICE DE MATERIAS
GARANTÍA...
SEGURIDAD.........................................................15
Importantes instrucciones de seguridad
REQUERIMIENTOS ELÉCTRICOS
INSTALACIÓN......................................................17
Requerimientos para instalación
Instalación.......................................................18
Cómo instalarlo...............................................18
La eliminación de la ventana
OPERACIÓN
Cómo y por qué
Sonidos normales
Capacidad y tiempo de funcionamiento ...20
................................................... .14
........................................................
........................................
..........
....................
...................
..........................
..............................................
...........................................
14
16
17
19
20
20
20
15
Características
Uso del equipo de aire acondicionado ..21
Características del equipo de aire
acondicionado.................................................22
MANTENIMIENTO
Limpieza del filtro del aire
Limpieza del equipo de aire acondioionado ....23
Cómo quitar la parrilla frontal
Cómo reinstalar la parrilla frontal
CORRECCIÓN DE FALLAS
Antes de Llamar para Servicio........................24
..............................................
............................................
...............................
.........................
....................
...........................
21
23
23
23
23
24
ACUERDOS DE PROTECCIÓN
ESPECIALIZADA
...............................................
27
PARA PEDIR SERVICIO •Cubierta Trasera
GARANTIA
GARANTIA DE UN ANO POR EL
EQUIPO DE AIRE ACONDICIONADO
DE HABITACIÓN
Durante un año completo a partir de la fecha de
compra, si este equipo de aire acondicionado recibe
mantenimiento y se utiliza para el enfriamiento
normal de habitación según las instrucciones
indicadas en este manual del propietario, Sears
reparará gratuitamente este equipo de aire
acondicionado, si tiene algún defecto en materiales
o fabricación.
GARANTÍA TOTAL DE CINCO ANOS
POR EL SISTEMA DE REFRIGERACIÓN
HERMETICAMENTE SELLADO
Durante cinco años a partir de la fecha de compra,
si este equipo de aire acondicionado recibe
mantenimiento y se utiliza para el enfriamiento
normal de habitación según las instrucciones
indicadas en este manual del propietario, Sears
reparará gratuitamente el sistema de refrigeración
herméticamente sellado (que consiste en el agente
refrigerante, los tubos de conexión y el compresor),
si tiene algún defecto en materiales o fabricación.
EL SERVICIO DE GARANTIA ESTA A SU
DISPOSICIÓN CON SÓLO PONERSE EN
CONTACTO CON EL CENTRO DE SERVICIO
SEARS AL 1-800-4-MY-HOME®.
La protección de garantía cubre unicamente a los
equipos de aire acondicionado usados para uso
domestico y no para uso comercial.
Esta garantía sólo tiene validez mientras el producto
se esté usando en los Estados Unidos.
Esta garantía !e da derechos legales específicos y
usted puede tener otros derechos que varían de
estado en estado.
Sears, Roebuck and Co., D/817WA,
Hoffman Estates, IL 60179 U.S.A.
- 14-
Page 15

SEGURIDAD
IMPORTANTES INSTRUCCIONES DE SEGURIDAD
Las siguientes instrucciones de seguridad le indicarán cómo usar su equipo de aire acondicionado de
habitación para evitar daños para usted mismo y para su EQUIPO DE AIRE ACONDICIONADO.
Aadvertencia
No almacene ni use gasolina u otros vapores y
líquidos inflamables cerca de éste o cualquier otro
electrodoméstico. Lea las etiquetas de los
productos para ver si contienen advertencias sobre
el carácter inflamable de los mismos y otras
advertencias.
POR su SEGURIDAD
ARA PREVENIR ACCIDENTES
Para reducir el riesgo de incendios, descargas
eléctricas o lesiones personales al usar su equipo
de aire acondicionado, tome las precauciones
básicas, entre las que están las siguientes:
• Asegúrese de que la alimentación eléctrica sea la
apropiada para el modelo que usted ha elegido.
• Si el equipo de aire acondicionado debe instalarse
en una ventana, a usted probablemente le
conviene limpiar primero ambos lados del vidrio.
Si la ventana es del tipo de tres paneles con un
panel incluido de pantalla, le conviene sacar la
ventana completamente antes de la instalación.
• Asegúrese de que el equipo de aire
acondicionado ha sido instalado correctamente y
con seguridad según se señala en las
instrucciones separadas de instalación que vienen
en este manual. Conserve este manual y las
instrucciones de instalación para usarlos
posiblemente en el futuro al sacar o volver a
instalar esta unidad.
• Utilice guantes al manejar el equipo de aire
acondicionado; tenga cuidado para evitar cortadas
con las afiladas aletas metálicas que se hallan en
los serpentines frontales y postreiores.
Aadvertencia
En la placa de serie del fabricante se indica cuál es
la capacidad eléctrica nominal completa de su nuevo
equipo de aire acondicionado para habitación. Consulte
esta placa cuando vaya a verificar los requerimientos
eléctricos,
• Asegúrese de que el equipo de aire acondicionado
tenga una conexión correcta a tierra. Para reducir al
mínimo los riesgos de descargas eléctricas e incendio,
es importante conectar el equipo correctamente a tierra.
El cordón de alimentación eléctrica está equipado con
un enchufe de tres espigas con conexión a tierra para
protegerle contra riesgos de descargas eléctricas.
• Su aire acondiciondo debe ser enchufado en una toma
de la pared debidamente conectado a la tierra. Si la
toma de corriente de pared que usted piensa usar no
está conectada correctamente a tierra o no está
protegida con un fusible de acción retardada o con un
interruptor de circuito, haga que un electricista calificado
le instale la toma de corriente de pared en forma
correcta.
• No ponga a funcionar el equipo de aire acondicionado
con la cubierta protectora. Esto podría ocasionar daños
mecánicos dentro del aire acondicionado.
• No use un cable de extensión ni un enchufe
adaptador.
INFORMACION ELECTRICA
Aadvertencia
descargas eléctricas. No use un cable de extensión ni un
enchufe adaptador. No elimine ninguna de las espigas
del enchufe del cordón de alimentación eléctrica.
Toma de corriente
Reponga-^
Prueba
Bajo ninguna circunstancia corte, quite o evite
el uso de la conexión a tierra de esta clavija.
Evite los peligros de Incendios y
de pared con
conexión a tierra.
Terminal de
conexión a tierra.
Cable de
alimentación
con clavija
dotada de
conexión a
tierra de 3
terminales.
IDEAS PARA AHORRAR ENERGIA
• La capacidad del equipo de aire acondicionado
debe corresponder al tamaño de la habitación
para el funcionamiento eficiente y satisfactorio del
equipo.
• Instale el equipo de aire acondicionado de
habitación en el lado sombreado de su hogar. Una
ventana orientada hacia el norte es la mejor
porque tiene sombra la mayor parte del día.
• No bloquee el flujo de aire hacia el interior con
persianas, cortinas o muebles; o la parte de
afuera con arbustos, paredes u otras
construcciones.
• Cierre el regulador de tiro de la chimenea, las
rejillas de calefacción del piso y la pared, de tal
modo que el aire frío no se escape ni por la
chimenea ni por los conductos.
• Mantenga las persianas y las cortinas de otras
ventanas cerradas durante la parte más soleada
del día.
• Limpie el filtro del aire como se recomienda en la
sección “MANTENIMIENTO” de este manual.
• El aislamiento correcto y las juntas herméticas en
puertas y ventanas en su hogar le ayudarán a
mantener el aire caliente afuera y el aire frío
adentro.
• Al darle sombra externamente a la casa con
árboles, plantas o toldos ayudará a reducir la
carga de trabajo del equipo de aire acondicionado.
• Opere los aparatos que producen calor como, por
ejemplo, hornos, lavadoras, secadoras y
lavaplatos durante la parte más fría del día.
- 15-
Page 16

REQUERIMIENTOS ELECTRICOS
RESPETE TODOS LOS CODIGOS Y
REGLAMENTOS.
BAJO NINGUNA CIRCUNSTANCIA CORTE,
QUITE O EVITE EL USO DE LA CONEXIÓN
A TIERRA DE ESTA CLAVIJA.
ESTE APARATO NECESITA SER
CONECTADO ATIERRA.
Se requiere una alimentación eléctrica CA,
adecuadamente conectada a tierra con un
fusible de 20 A, de 60 Hz y de 250 V.
Se recomienda un fusible de retardo o un
disyuntor de circuito que alimente solamente a
este aparato.
NO USE CABLE ELÉCTRICO DE
EXTENSIÓN.
115V~
230V-
§
i
í 1
^ I
\
í r.
METODO RECOMENDADO DE CONEXION A
TIERRA
Por su propia seguridad este aparato debe
conectarse a tierra. Este aparato viene
equipado con un cable de alimentación y una
clavija de tres terminales. Para reducir al
máximo el peligro de choque eléctrico, el cable
debe estar conectado a una conexión de pared
con conexión a tierra, y esta conexión debe
hacerse de acuerdo con la última edición del
Código Eléctrico Nacional (ANSI/NFPA 70), así
como con los códigos y reglamentos locales. Si
no existe una conexión de pared adecuada, el
cliente tiene la responsabilidad y la obligación
de mandar instalar, con un electricista
calificado, una conexión de pared adecuada de
tres terminales con conexión a tierra.
El cable de alimentación puede incluir un dispositivo
interruptor de corriente. La carcasa del enchufe cuenta
con un botón de prueba y otro de reinicio. El dispositivo
debe comprobarse periódicamente presionando
primero el botón TEST y después RESET.
Si el botón TEST no se desconecta o si el botón
RESET no permanece activo, suspenda el uso del aire
acondicionado y póngase en contacto con un técnico
de servicio cualificado.
NOTA: La forma puede ser diferente según su modelo.
utilice el enchufe de la pared Consumo de Energía
^ X standard 125V,
I i 1 \ enchufe de 3
y _ y Líneas de
\ J
Líneas de
X ^ Standard 250V,
I 1 enchufe de 3
\ • / Líneas de
V.3X 20A, 250V AC
15A, 125VAC
"X Standard 125V,
enchufe de 3
15A, 125VAC
utilice un fusible de
15AMP. 0 un
Interruptor de 15AMP.
Utilice un fusible de
20AMP. 0 un
Interruptor de 20AMP.
A ADVERTENCIA
%r
Peligro de choque eléctrico
Conecte en una conexión de pared de 3 termínales
No quite la terminal de conexión a fierra
No use adaptadores
No use cable eléctrico de extensión
Si no se siguen estas instrucciones, puede ocasionarse
la muerte, un incendio o un choque eléctrico.
- 16-
Page 17

INSTALACION
REQUERIMIENTOS PARA INSTALACIÓN
Su equipo de aire acondicionado se instaiará en ventanas
estándar de doble pane! con anchos de abertura libre de 533 mm
a 889mm (21 a 35 pulgadas), (Figura 1)
El marco inferior debe abrirse lo suficiente para permitir una
abertura vertical libre de 305 mm (12 pulgadas). Las rejillas
desviadoras lateraies y la parte posterior del equipo de aire
acondicionado deben tener un espacio iibre de aire para permitir
suficiente flujo de aire a través del condensador para así eliminar
el calor. La parte posterior de la unidad debe quedar al aire libre,
no dentro de un edificio o garaje.
Compruebe cuál es la alimentación eléctrica que llega a su
domiciüo. La alimentación eléctrica disponible debe ser ia misma
que se muestra en la placa del fabricante de la unidad (que se
halla en el lado izquierdo dei gabinete de corriente alterna).
Todos los modelos están equipados con un enchufe de tres
espigas para suministrar un servicio correcto y una conexión a
tierra segura y positiva. No cambie el enchufe de ninguna forma.
No use un enchufe adaptador. Si su toma de corriente de pared
actual no puede usarse con el enchufe del equipo, llame a un
electricista calificado para que efectúe las correcciones
necesarias.
CONSERVE LA CAJA y este MANUAL DEL PROPIETARIO para
que le sirva como referencia en el futuro. La caja es la mejor
manera de conservar ia unidad durante el invierno o cuando no
está en uso.
INSTALACION PIEZAS DE MONTAJE
CUIDADO
Para evitar el riesgo de heridas personales, daños en
los bienes, o daño en el producto debe ser expuesto el
agudez de los bordes y el peso apto del aparato:
• El aire acondicionado del que se habla en este
manual afirma peligro de peso excesivo.
Dos o mas personas se requiere para mover e instalar
la unidad. Para evitar heridas o agotamiento, use
técnicas apropiadas para levntar y mover la unidad.
• Cuidadosamente inspeccione el lugar donde el aire
acondicionado sera puesto. Asegúrese que el lugar
sostenga el peso de la unidad sobre un periodo de
tiempo prolongado.
• Mantenga su aire acondicionado con cuidado. Use
guantes protectores cuando levante o mueva la
unidad. EVITE las aletas filosas de metal en el
serpentín delantero y de atras.
• Asegúrese que el aire acondicionado no se caiga
durante la instalación.
- 17-
Page 18

INSTALACION
INSTALACION
Escoja un jugar en ei que el aparato de aire acondicionado soplará e!
aire frío al área que desea. Las ventanas que se utilicen para la
instaiación deben ser lo suficientemente fuertes como para poder
soportar e! peso del aparato de aire acondicionado. Una buena
instalación con especial atención a un emplazamiento adecuado de
la unidad reducirá la posibilidad de necesitar servicio.
Si su aparato de aire acondicionado queda bloqueado por el
marco antitormentas de una ventana, consulte el paso 9 de la
página 7 antes de comenzar la instalación.
CÓMO INSTALARLO
CORTINAS LATERALES
Introduzca las cortinas laterales en las guías del aire
acondicionado. Fije las cortinas a la unidad con los
tornillos (TIPO A) como se muestra en la Figura 2.
CINTA DE ESPUMA
Corte la cinta de espuma adhesiva (TIPO E) a la anchura
de la ventana.
Quite el dorso de la cinta de espuma y peque la cinta de
espuma a la superficie inferior de la ventana de abajo.
Vea la Figura 3.
ACOPLE LA ESCUADRA
Instale las escuadras en la repisa exterior con el lado
corto de la escuadra apoyado contra la parte posterior
de la repisa interior, instale una escuadra de 7,5” en
cada lado de la línea central. Consulte la Figura 5.
La escuadra la ayuda a mantener con seguridad la
unidad en su lugar. Asegúrese de colocar la escuadra
nivelada contra la parte posterior de la repisa interior.
Consulte la Figura 5.
Si el aparato de aire acondicionado queda bloqueado
por un marco antitormenta de la ventana, vaya al paso 9.
DRENAJE
En primer lugar, asegúrese de insertar la tubería de
drenaje en el colector antes de la instalación.
El aparato de aire acondicionado debe instalarse
con una ligera inclinación hacia abajo. El aparato de
aire acondicionado drenará el exceso de agua
condensada por la tubería de drenaje.
COLOCAR LA UNIDAD EN LA
VENTANA
Abra la ventana y marque la linea central en el centro del
alféizar interior como se muestra en la Figura 4.
ANTEPECHO
INTERIOR
TABURETE
Figura 4
- 18-
t TUYAU
TUBO DE D’EVACUATION '
DRENAJE parte POSTERIOR
TUBO DE
DRENAJE
DEL RECIPIENTE
^DEBASE
PARTE INFERIOR DEL
|raV RECIPIENTE DE BASE
Figura 6
Page 19

INSTALACION
INSTALE EL ACONDICIONADOR DE AIRE
□
EN LA VENTANA
' Levante cuidadosamente el acondicionador de aire y
deslíceio en la ventana abierta. Asegúrese de que la guia
inferior del acondicionador de aire encaje en del soporte L.
' Al encajar en del soporte L, el acondicionador de aire
estará centrado en la abertura de la ventana, como se
muestra en la Figura 7.
' Mientras sujeta el acondicionador de aire, baje
cuidadosamente el marco corredizo de la ventana
detrás de la guía superior del acondicionador de aire,
como se muestra en la Figura 8.
FIJE LOS PANELES CORREDIZOS
Extienda los paneles guía (TIPO G) para llenar la
abertura de la ventana usando los 2 tornillos {TIPO B), 2
tornillos (TIPO C) para asegurarlos como puede apreciar
en la Figura 9.
INSTALE EL SELLADOR DE ESPUMA CORREDIZA
Y EL SEGURO DE VENTANA CORREDIZA
Corte el burlete (TIPO F) de acuerdo con la anchura de la
ventana. Rellene el burlete entre el cristal y la ventana para
evitar que el aire y los insectos puedan entrar en la sala,
como se muestra en la Figura 9.
Amarre la otra escuadra al otro lado de la ventana usando
el tornillo (TIPO A). Consulte la pequeña ilustración de la
FIG. 9. Instalar esta escuadra evitará que la ventana pueda
abrirse hacia arriba, lo que provocaría la caída de la
unidad.
El SI EL ACONDICIONADOR DE AIRE ESTA BLOQUEADO
POR EL MARCO DE LA CONTRAVENTANA
• Si la contraventana interfiere, fije un listón de madera de 2" de
ancho al alféizar interior de la ventana, que atraviese la
anchura total del alféizar. El listón de madera debe ser
suficientemente grueso para levantar la altura del alféizar de la
ventana de tai manera que la unidad pueda ser instalada sin la
interferencia del marco de la contraventana. Vea la Figura 10.
La parte superior del listón de madera debe ser
aproximadamente 3/4” más alto que el marco de la
contraventana o el listón de madera (fuera de la casa) para
que el vapor emanado de la unidad pueda drenar
adecuadamente hacia el exterior.
• Instale un segundo listón de madera (de aproximadamente 6"
de largo y 1" de ancho y del mismo grosor del primer listón) en
el centro del alféizar exterior nivelado con la parte posterior del
alféizar interior. Atornille los soportes L entre la faja. Esto
levantará el soporte L como se muestra en la Figura 10.
FRAÍJJA DE MADERA
MONTADA SOBRE
LA PARTE SUPERIOR
DEL DESCANSO
INTERIOR
TIRA DE MADERA
PARA LA MENSULA
L Y MENSULA DE
ANTEPECHO
oT]
Figura 10
LA ELIMINACION DE LA VENTANA
Apague el equipo de aire acondicionado, desconecte el
cordón de alimentación eléctrica, saque el seguro de marco
y los tornillos instalados a través de la parte superior e
inferior de los paneles deslizantes y guarde toda las para
volver a instalarlos más tarde. Cierre los paneles
deslizantes. Agarre firmemente el equipo de aire
acondicionado, eleve el marco e incline cuidadosamente el
equipo de aire acondicionado hacia atrás, drenando
cualquier agua que se haya condensado. Deslice el equipo
de aire acondicionado 1" pulgada hacia la derecha y
seguidamente levante el equipo de aire acondicionado de la
ventana y saque la junta hermética de entre las ventanas.
^ CUIDADO
■ El aire acondicionado del que se habla en este manual afirma peligro
de peso excesivo.
Dos o mas personas se requiere para mover e instalar la unidad. Para
evitar heridas o agotamiento, use técnicas apropiadas para levntar y
mover la unidad.
■ Ai manejar la unidad, tenga cuidado para evitar cortarse con las alertas
metálicas afiladas que están en los serpentines frontal y posterior,
' Asegúrese que e! aire acondicionado no se caiga durante la instalación.
Figura 9
- 19-
Page 20

OPERACION
COMO Y POR QUE
Su equipo de aire acondicionado de habitación
brinda las siguientes funciones para hacer que la
vida en climas cálidos sea más confortable:
• Enfría y hace circular el aire por la habitación
• Disminuye la humedad eliminando la humedad
excesiva.
• Filtra el polvo, el sucio y algunas impurezas
transportadas en el aire del clima veraniego.
El equipo de aire acondicionado realiza estas
funciones haciendo pasar el aire del medio
ambiente a través de un filtro que atrapa las
partículas de polvo y sucio. El aire pasa entonces
por un serpentín de enfriamiento que refrigera el
aire y elimina el exceso de humedad. El mismo aire
regresa entonces al enfriador, secador y limpiador
del aire del ambiente. La humedad extraída del aire
ambiente es llevada al exterior y evaporada.
Su aire acondicionado está diseñado para operar y
suministrar una enorme potencia de enfriamiento.
SONIDOS NORMALES Figura 11
Además de los sonidos regulares del motor del
ventilador y el compresor que salen de su equipo
de aire acondicionado, usted escuchará de vez en
cuando un sonido metálico. Este sonido es
producido por la humedad que es recogida del aire
en el ambiente y es lanzada contra el ventilador del
equipo de aire acondicionado. Esto es algo normal
que no debe ser motivo de preocupación. De igual
modo, no se alarme si usted escucha un ligero
sonido de silbido o borboteo proveniente de su
equipo de aire acondicionado después que lo
apaga. Estos son ruidos normales del refrigerante.
Compresor
El moderno compresor de gran
eficiencia puede producir un ruido
agudo de murmullo o un ruido de
pulsación que viene y se va.
Ventilador
Usted puede
escuchar el
movimiento del
aire proveniente
del ventilador.
Vibraciones de la unidad
La unidad puede vibrar y
hacer ruido debido a la
deficiente construcción
de ia pared o la ventana.
Condensador
Usted puede escuchar
gotas de agua que caen
sobre el condensador
causando un sonido
metálico o un sonido
de chasquido.
Figura 11
CAPACIDAD Y TIEMPO DE
FUNCIONAMIENTO
Al decidir cuál debe ser !a comodidad deseada para el área que
usted quiere enfriar, es importante determinar el tamaño correcto de
la unidad. El tamaño adecuado es determinado por el número de
metros cuadrados que tiene el área que se desea enfriar, así como
por la temperatura interior y exterior y por la humedad.
Siempre que la carga térmica del ventilador esté por encima de lo
normal, el equipo de aire acondicionado debe funcionar más tiempo
para mantener la temperatura deseada que usted ha seleccionado.
Bajo condiciones de una carga térmica muy pesada, puede ser
necesario que el equipo de aire acondicionado funcione
constantemente para mantener la temperatura deseada.
En ocasiones, el uso de HIGH FAN para hacer circular el aire por la
habitación hace que el ambiente sea más confortable aun cuando el
equipo no esté enfriando el aire. Mientras más tiempo y con mayor
frecuencia funcione el equipo de aire acondicionado, más
electricidad consumirá y mayores serán los costos de su uso.
-20-
Page 21

OPERACION
CARACTERISTICAS USO DEL EQUIPO DE AIRE
ACONDICIONADO
Aadvertencia
descargas eléctrica o lesiones personales, lea las
IMPORTANTES INSTRUCCIONES DE
SEGURIDAD antes de operar este aparato.
Para comenzar a utilizar el equipo de aire
acondicionado, siga estos pasos:
1. Enchufe el aparato de aire acondicionado. (Para
evitar posibles peligros eléctricos, no use un
alargador ni un adaptador).
2. Encienda el aparato usando el interruptor.
4. Ajuste el interruptor de control de la velocidad del
ventilador al nivel más alto.
5. Ajuste las lengüetas de control de la dirección del
aire para conseguir un flujo de aire cómodo .
6. Una vez que la sala se haya enfriado, ajuste la
perilla de control y el interruptor de control de la
velocidad del ventilador al ajuste que encuentre
más cómodo,
I Para reducir el riesgo de incendio,
1. Gabinete
2. Lengüetas de control del aire horizontal
3. Descarga del aire frío
4. Parrilla de entrada
5. Filtro de aire
6. Grille anterior
7. Perilla de control
8. Guía superior
9. Cortina
10. Interruptor de encendido
11. Interruptor de velocidad del ventilador
NOTA: Si se apaga el aire acondicionado, espere 3
minutos antes de volver a encenderlo. Esto permite
que se estabilice la presión dentro del compresor.
Si usted mueve el control de la TEMP a cálido, y
luego lo regresa al ajuste de enfriador de forma
inmediata, la unidad se apará.
Espere 3 minutos antes de reiniciar.
Revise la sección CARACTERISTICAS DEL
EQUIPO DE AIRE ACONDICIONADO donde
hallará instrucciones para otras graduaciones.
(Página 22)
-21 -
Page 22

OPERACION
CARACTERISTICAS DEL EQUIPO
DE AIRE ACONDICIONADO
Los controles que se explican en este manual son
representativos de muchos modelos disponibles a
la venta en el mercado. Su modelo puede tener un
aspecto ligeramente diferente.
AJUSTE PARA LA DIRECCION DEL AIRE
Usando las lengüetas de control, el flujo de aire
puede dirigirse hacia la izquierda, la derecha, recto,
o en cualquier combinación de estas direcciones.
Encendido
Enciende y apaga el aparato de aire acondicionado.
NOTA: Si el aparato de aire acondicionado está apagado y se enciende mientras está en el modo Frío activado,
se tardarán unos 3 minutos para que el compresor arranque y comience a enfriar
Velocidad del ventilador
Use para ajustar la velocidad del ventilador a BAJO o ALTO.
Control del modo/Temp
Use para ajustar el aparato de aire acondicionado a Sólo ventilador o modo Frío activado.
Modo Sólo ventilador
Use Sólo ventilador en Velocidad de ventilador ALTA o BAJA para proporcionar circulación de aire y filtración sin
enfriamiento.
Modo Frío activado
Use Frío activado con Velocidad de ventilador ALTA o BAJA para enfriar. Gire la perilla hacia el área más frío
para que el aire de interior sea más frío. Gire la perilla hacia el área Frío activado para que el aire interior sea más
caliente.
El control de Modo/Temp se utiliza para mantener la temperatura de la sala. Cuando el ajuste es Frío activado, el
compresor realizará un ciclo activado/desactivado para mantener la sala en el nivel de confort deseado.
Descripciones para el enfriamiento
Para enfriamiento normal - Seleccione el modo Frío activado con la perilla Modo/Temp en el punto medio (5).
Para un máximo enfriamiento - Seleccione el modo Frío activado con la perilla Modo/Temp situada hacia el
área más frío(9).
Para enfriamiento más silencioso y nocturno - Seleccione el modo Frío activado con la perilla Modo/Temp
situada hacia el área Frío activado (1).
NOTA: Si mueve la perilla de control de Modo/Temp desde el ajuste Frío activado al ajuste Sólo ventilador,
aguarde al menos 3 minutos antes de volver a cambiar al ajuste Frío activado.
-22-
Page 23

MANTENIMIENTO
LIMPIEZA DEL FILTRO DEL
AIRE
El filtro del aire se Irá ensuciando a medida que va
atrapando el polvo proveniente del aire interior. Es
preciso lavar el filtro del aire al menos cada dos
semanas. Si el filtro del aire permanece lleno de
polvo, el flujo de aire disminuirá y se reducirá la
capacidad de enfriamiento del equipo, con posibles
daños para la unidad.
• Estire hacia adelante de la parrilla de entrada y tire
del filtro de aire hacia el exterior.
• Lave el filtro del aire en agua tibia a. Asegúrese de
eliminar toda el agua sacudiendo el filtro antes de
volver a ponerlo en su posición.
COMO QUITAR LA PARRILLA
FRONTAL
• Quite los dos tornillos que aseguran la parrilla
frontal.
• Tire de la parrilla hacia arriba desde la parte
inferior y estire para sacar la parrilla de la carcasa
para sacar las lengüetas superiores de sus
ranuras.
LIMPIEZA DEL EQUIPO DE
AIRE ACONDICIONADO
Limpie la rejilla frontal y la rejilla de entrada del aire
con un paño humedecido en una solución de
detergente suave (Figura 16). El gabinete puede
lavarse con un jabón o detergente suave y agua tibia,
seguidamente puede pulirse con cera líquida especial
para electrodomésticos.
Para asegurarse de la eficiencia maxima y continua, el
serpentín del condensor(lado de enfrente de la unidad)
tiene que ser chequeado periodicamente y limpiarse si
se llega a obstruir con tizne o tierra de la atmósfera.
Cepille o aspire el serpentín exterior para sacar
escombros de las aletas.
COMO REINSTALAR LA
PARRILLA FRONTAL
Acople la parrilla frontal al armazón (armario) insertando
las lengüetas de la parrilla a las ranuras de la parte frontal
del armazón. Empuje la parrilla hasta que la costilla
lateral quede insertada en la carcasa .
Figura 18
Costilla del lado
-23-
Page 24

CORRECCION DE FALLAS
ANTES DE LLAMAR PARA SERVICIO
Cheque la siguiente lista para asegurarse si en realidad es necesario llamar para servicio. Una referencia rapida a
este manual puede evitar una llamada para servicio innecesaria.
EL EQUIPO DE AIRE ACONDICIONADO NO FUNCIONA.
El enchute no está conectado en la toma de corriente de pared. Conecte el enchufe firmemente en la toma de corriente de pared.
El fusible está quemado o el interruptor de circuito se ha disparado. Reemplace el fusible dañado con un fusible de acción retardada o reajuste el
El selector del ventilador MODE está en la posición de OFF. Ponga el selector en la posición de COOL.
La unidad se apagó y se volvió a encender demasiado rápido. Apague la unidad y espere 3 minutos antes de volver a encenderla.
El control de temperatura TEMP se ajustó más cálido que la
temperatura ambiente.
El dispositivo interruptor de corriente está desconectado. Presione el botón RESET situado en el enchufe del cable de alimentación
EL AIRE DE LA UNIDAD NO SALE BASTANTE FRÍO.
0 selector a una oosición más LOW COOL.
El control de temperatura TEMP se ajustó demasiado cálido (numero mas baio).
La temperatura ambiente está por debajo de los 70° F (21 °C)
EL tubo sensor de temperatura está tocando el serpentín evaporador
que está situado detrás del panel frontal.
EL AIRE ACONDICIONADO ENFRIA, PERO LA HABITACION SE SIENTE DEMASIADO CALIDA; SE FORMA HIELO EN EL SERPENTIN DE ENFRIAMIENTO
DETRÁS DEL PANEL DECORATIVO FRONTAL
La temperatura ambiente en el exterior está por debajo de los 70“F (21°C). Para descongelar la bobina, ajuste la perilla de control a la posición de
El filtro del aire puede estar sucio.
Perilla de control ajusfada demasiado fría para enfriar en la noche.
interruptor de circuito.
Gire el control de temperatura en el sentido de las agujas del reloj hasta una
graduación más fría (numero mas alto).
Si el botón RESET no permanece activo, suspenda el uso del aire acondicionado
y póngase en contacto con un técnico de servido cualificado.
Gire el selector a una posición HI.
Gire el control de temperatura en el sentido de las agujas del reloj para
No puede producirse el enfriamiento hasta que la temperatura ambiente suba
por encima de los 70° F (2rC).
Enderece el tubo para alejarlo de la bobina del evaporador.
Ventilador sólo.
Limpie el filtro. Consulte la sección de mantenimiento del manual del
propietario. Para descongelar, ajuste la perilla de control a la posición de
Ventilador sólo.
Para descongelar el serpentín, lleve el selector a la posición FAN.
EL AIRE ACONDICIONADO ENFRIA, PERO LA HABITACION SE SIENTE DEMASIADO CALIDA;
El filtro del aire está sucio con !o que se restringe el flujo del aire. Limpie el filtro del aire. Consulte la sección “Mantenimiento”.
Gire la perilla de control en sentido horario a un ajuste MÁS FRÍO.
La parte frontal de la unidad está bloqueada por cortinas, persianas,
muebles etc. que restringen la distnbución del aire.
Las puertas, ventanas, rejillas de calefacción, etcétera, están abiertas con
lo que se permite el escape del aire frío.
La unidad acaba de encenderse en una habitación caliente.
Gire la perilla de control en sentido horario a un ajuste MAS FRIO.
Elimine el bloqueo enfrente de la unidad.
Cierre las puertas, ventanas, rejillas de calefacción, etcétera.
Permita que transcurra un poco más de tiempo para eliminar el “calor almacenado"
en las paredes, el techo, el piso y los muebles.
EL EQUIPO DE AIRE ACONDICIONADO SE APAGA Y SE ENCIENDE RAPIDAMENTE .
La temperatura exterior es extremadamente caliente.
Ajuste el interruptor de la velocidad del ventilador a velocidad ALTA para que el
aire pase por las bobinas de enfriamiento con mayor rapidez.
SE ESCUCHAN RUIDOS CUANDO LA UNIDAD ESTA ENFRIANDO.
El sonido del ventilador al chocar contra el agua del sistema de
eliminación de humedad.
Vibración de la ventana; instalación deficiente.
Esto es normal cuando la humedad es alta. Cierre las puertas, ventanas y rejillas
de calefacción.
Lea las instrucciones de instalación o consulte al instalador.
EL AGUA GOTEA DENTRO DE LA HABITACION CUANDO LA UNIDAD ESTA ENFRIANDO.
Instalación inadecuada.
incline ligeramente el equipo de aire acondicionado hada la parte exterior para permitir el
drenaje del agua. Lea las instrucciones de instaladón o consufte al instalador.
EL AGUA GOTEA AFUERA CUANDO LA UNIDAD ESTA ENFRIANDO.
La unidad está extrayendo grandes cantidades de humedad de una
habitación húmeda.
Esto es algo normal durante los días excesivamente húmedos.
-24-
Page 25

ESPAÑOL
LO
CN
Page 26

NOTA
-26-
Page 27

Master Protection Agreements
Congratulations on making a smart purchase.
Your new Kenmore® product is designed and
manufactured for years of dependable operation.
But like all products, it may require preventive
maintenance or repair from time to time.
That's when having a Master Protection Agreement
can save you money and aggravation.
Purchase a Master Protection Agreement now and
protect yourself from unexpected hassle and
expense.
The Master Protection Agreement also helps extend
the life of your new product. Here's what's included
in the Agreement:
^ Expert service by our 12,000 professional
repair specialists
Q Unlimited service and no charge for parts and
labor on all covered repairs
"No-lemon" guarantee - replacement of your
covered product if four or more product failures
occur within twelve months
^ Product replacement if your covered product
can't be fixed
g Annual Preventive Maintenance Check at your
request - no extra charge
Q Fast help by phone - phone support from a
Sears technician on products requiring in-home
repair, plus convenient repair scheduling
Power surge protection against electrical
damage due to power fluctuations
Q Rental reimbursement if repair of your covered
product takes longer than promised
Once you purchase the Agreement, a simple phone
cal! is all that it takes for you to schedule service.
You can call anytime day or night, or schedule a
service appointment online.
Sears has over 12,000 professional repair
specialists, who have access to over 4.5 million
quality parts and accessories. That's the kind of
professionalism you can count on to help prolong
the life of your new purchase for years to come.
Purchase your Master Protection Agreement today!
Some limitations and exclusions apply.
For prices and additionai information call
1-800-827-6655.
Sears Installation Service
For Sears professional installation of home
appliances, garage door openers, water
heaters, and other major home items, in the
U.S.A. call 1-800-4-MY-HOME®
Acuerdos de Protección Especializada
¡Enhorabuena! Ha realizado una compra inteligente.
Su nuevo aparato Kenmore® está diseñado y fabricado
para ofrecerle años de buen funcionamiento.
Sin embargo, al igual que todos los productos, puede
precisar un mantenimiento preventivo o inciuso alguna
reparación de vez en cuando. En esas ocasiones, un
Master Protection Agreement puede ayudarle a ahorrar
dinero e inconvenientes.
Adquiera un Maser Protection Agreement ahora, y
protéjase a si mismo de molestias y gastos inesperados.
Ei Master Protection Agreement le ayudará también a
prolongar la vida de su nuevo aparato. Los siguientes
servicios están incluidos:
pj Servicio experto por parte de cualquiera de
nuestros 12.000 técnicos profesionales especialistas
de Sears.
Prestación de servicios sin limitaciones y sin
cargarle las piezas o la mano de obra en todas las
reparaciones cubiertas por el acuerdo.
|L7| Garantía seria de sustitución de las piezas del
producto cubierto por el acuerdo, si cuatro o más
piezas se mostrasen defectuosas en un periodo de
doce meses.
Sustitución del producto por otro nuevo, si el
defectuoso no pudiese repararse.
Control de mantenimiento anual preventivo,
siempre que lo desee y sin gasto adicional alguno.
Q Asistencia telefónica inmediata de un técnico
especialista en productos que han de ser reparados a
domicilio, además de una programación adecuada de
la reparación.
p] Protección contra subidas de tensión que
provoquen daños eléctricos debidos a las
fluctuaciones en el suministro.
p| Reintegro dei alquiler si la reparación del producto
lleva más tiempo del promtetido
Una vez que haya adquirido el Agreement, no necesitará
más que una simple llamada para solicitar el servicio de
su aparato. Además, podrá hacerlo en cualquier momento
del día o de la noche, o solicitar una cita para prestación
de servicios Online.
Sears cuenta con más de 12.000 técnicos profesionales
especialistas en reparaciones, con acceso a más de 4,5
millones de piezas de sustitución y accesorios de calidad.
Éste será el tipo de profesionalidad y servicio con el que
podrá contar para prolongar la vida de su nuevo producto
por muchos años. ¡Adquiera hoy mismo su
Protection Agreement!
Se aplicarán algunas limitaciones y
restricciones.
Si desea hacer alguna consulta sobre los
precios u otra información adicional, le rogamos
llame al teléfono 1-800-827-6655.
Master
Servicios de Instalación Sears
Para solicitar servicios de instalación profesionales
de Sears de electrodomésticos, mandos de apertura
de puertas de garajes, calentadores de agua y otros
aparatos en los Estados Unidos, puede llamar a
1-800-4-MY-HOME®
-27-
Page 28

Get it fixed, at your home or ours!
Your Home
For repair - in your home-of all major brand appliances,
lawn and garden equipment, or heating and cooling systems,
no matter who made it, no matter who sold it!
For the replacement parts, accessories and
owner’s manuals that you need to do-it-yourself.
For Sears professional installation of home appliances
and items like garage door openers and water heaters.
1-800-4-MY-HOME® (1-800-469-4663)
Call anytime, day or night (U.S.A. and Canada)
www.sears.com www.sears.ca
Our Home
For repair of carry-in items like vacuums, lawn equipment,
and electronics, call or go on-line for the location of your nearest
Sears Parts & Repair Center.
1-800-488-1222
Call anytime, day or night (U.S.A. only)
www.sears.com
To purchase a protection agreement (U.S.A.)
or maintenance agreement (Canada) on a product serviced by Sears:
1-800-827-6655 (U.S.A.) 1-800-361-6665 (Canada)
Para pedir servicio de reparación
a domicilio, y para ordenar piezas:
1-888-SU-HOGAR"“
(1-888-784-6427)
® Registered Trademark / ™ Trademark ¡ Service Mark of Sears, Roebuck and Co.
® Marca Registrada / Marca de Fábrica / Marca de Servicio de Sears, Roebuck and Co.
Marque de commerce / “° Marque déposée de Sears, Roebuck and Co.
Au Canada pour service en français:
1-800-LE-FOYER“^
(1-800-533-6937)
www.sears.ca
© Sears, Roebuck and Co.
Part No.: 3828A21004H
 Loading...