

Page 1
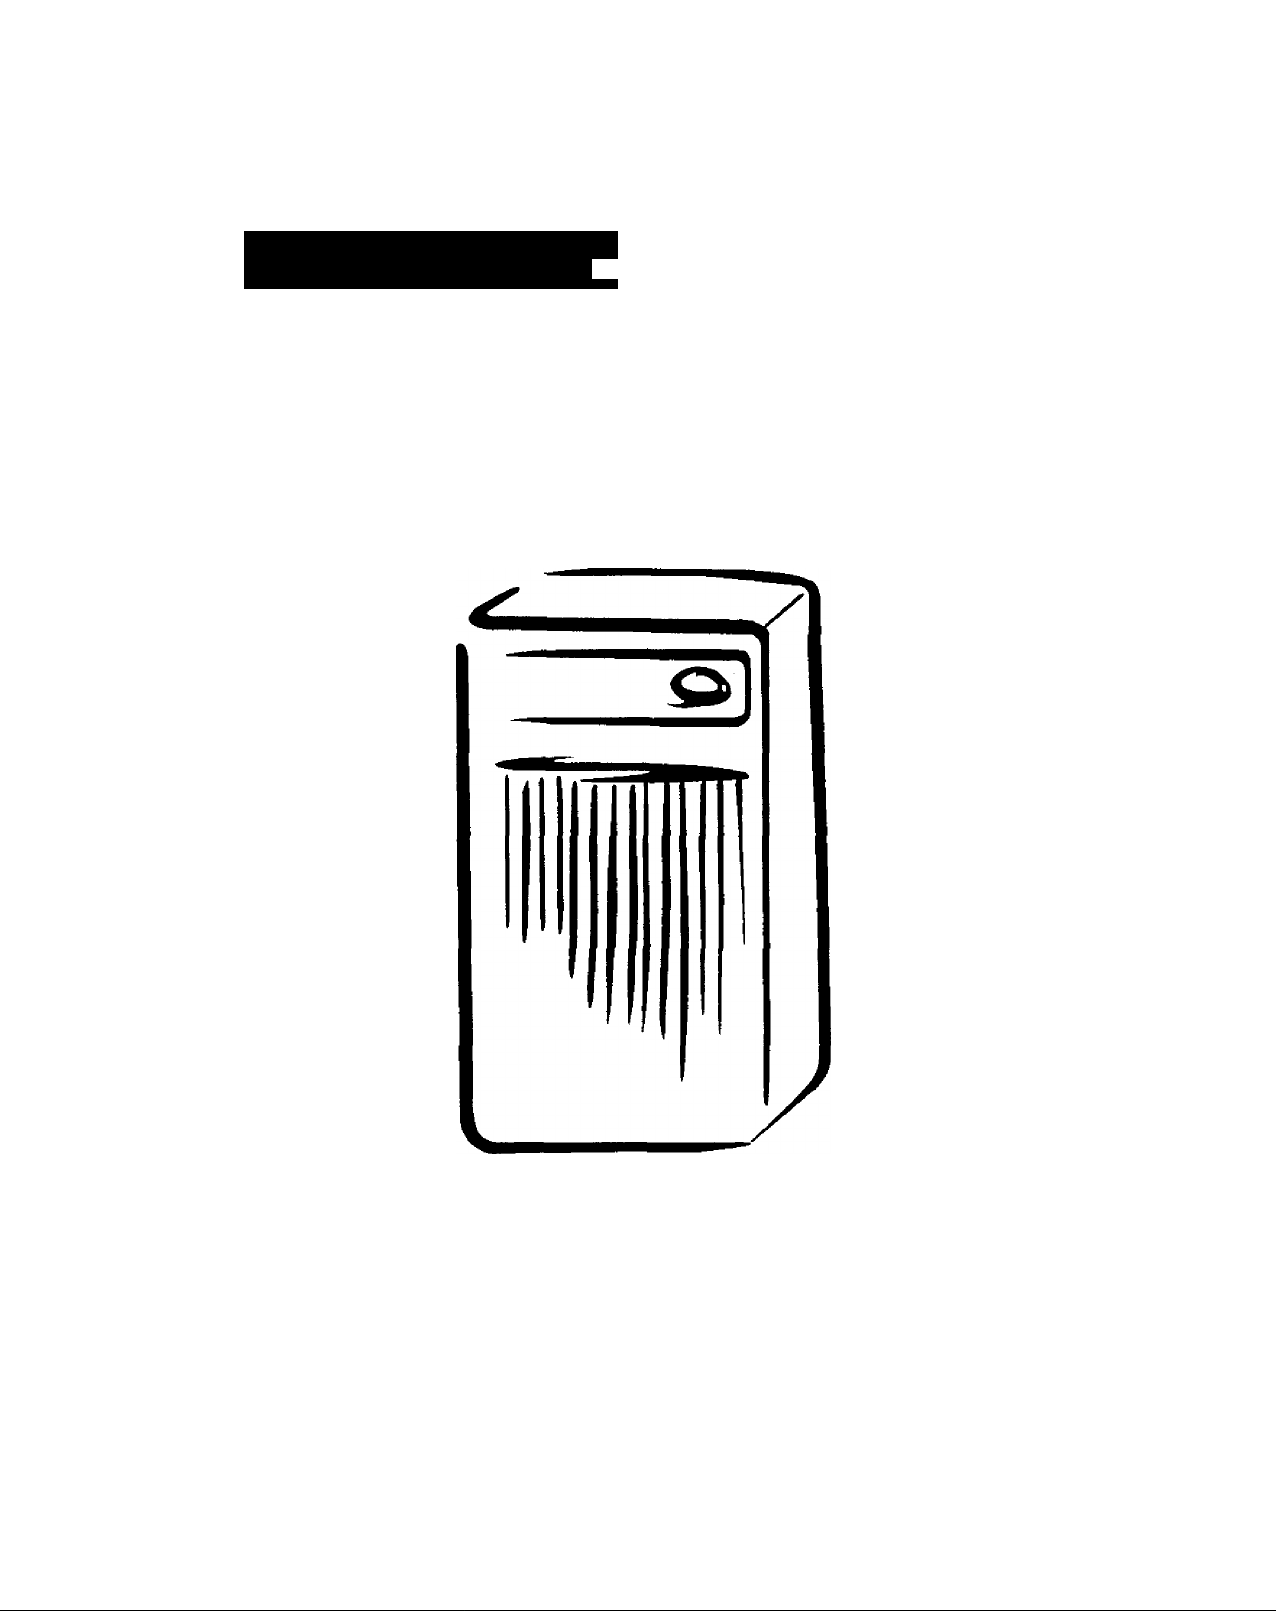
Owner's Manual
Manual del Propietario
Ken more
DEHUMIDIFIER
DESHUMIDIFICADOR
Model, Modelo 580.51300
Sears, Roebuck and Co., Hoffman Estates, IL 60179 U.S.A.
www.sears.com
Page 2

TABLE OF CONTENTS
TABLE OF CONTENTS................................
WARRANTY
SAFETY .......................................................
Important Safety Instructions
ELECTRICAL REQUIREMENTS
OPERATION.................................................
Features
Control Panel
INSTALLING YOUR DEHUMIDIFIER.
Defrost control......................................
CHOOSING THE PROPER LOCATION
.................................................
.............
.................
................................................
........................................
......................
-2
-3
-4
...6
...7
...7
ADJUSTABLE WATER LEVEL AND
AUTOMATIC SHUTOFF.............................................8
REMOVING AND EMPTYING
THE WATER BUCKET...............................................8
MAINTENANCE
Grille and case
Air filter................................................................9
Cleaning inside the unit
General cleaning.................................................9
Water bucket cleaning........................................9
7
TROUBLESHOOTING..............................................10
REPAIR PARTS.......................................................11
ESPAÑOL.................................................................14
SERVICE NUMBERS
.........................................................
....................................................
.....................................
..............................
Back Cover
9
9
9
WARRANTY
FULL ONE YEAR WARRANTY ON DEHUMIDIFIER
For one year from the date of purchase, if the Dehumidifier is operated and maintained
according to the owner's instructions furnished with the product, Sears will repair the
Dehumidifier free of charge, if defective in materials or workmanship.
FULL FIVE YEAR WARRANTY ON SEALED
REFRIGERATION SYSTEM
For five years from the date of purchase, when this Dehumidifier is operated and maintained according
to owner's instructions furnished with the product, Sears witi repair the sealed refrigeration system
(consisting of refrigerant, connecting tubing, and compressor motor) free of charge, if defective in
material or workmanship.
WARRANTY SERVICE IS AVAILABLE BY RETURNING UNIT TO THE NEAREST SEARS
SERVICE CENTER IN THE UNITED STATES.
This warranty applies only while this Dehumidifier is used in the United States.
This warranty gives you specific legal rights, and you may also have other rights which vary from state to
state.
Sears, Roebuck and Co., D/817WA, Hoffman Estates, IL 60179 U.S.A,
2^
Page 3
SAFETY
IMPORTANT SAFETY INSTRUCTIONS
The safety instructions below will tell you how to use your dehumidifier to avoid harm to yourself
or damage to your dehumidifier.
Awarning
Do not store or use gasoline or other
flammable vapors and liquids in the vicinity of
this or any other appliance. Read product
labels for flammability and other warnings.
Awarning
To reduce the risk of fire, electrical shock, or
injury to persons when using your
dehumidifier, follow basic precautions,
including the following:
• Be sure the electrical service is adequate for
the model you have chosen.
Awarning
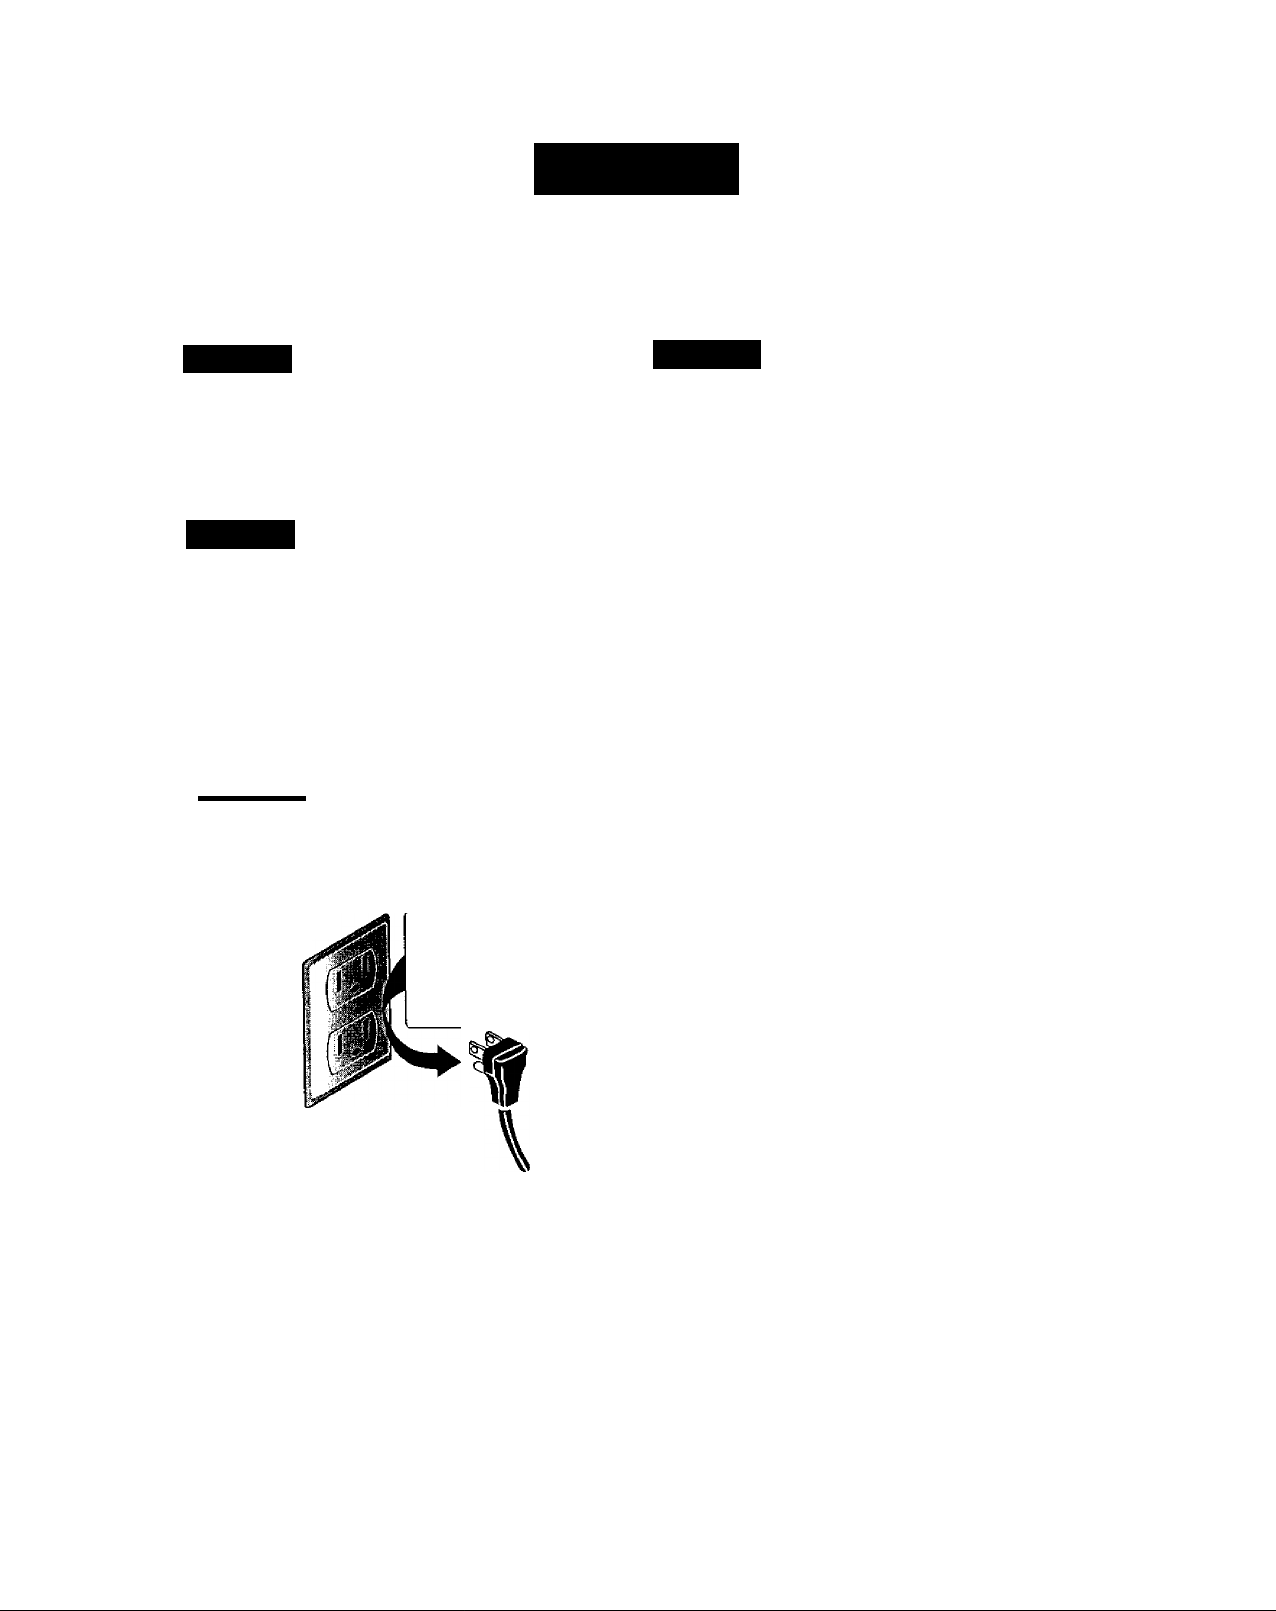
Do not use an extension cord or an adapter plug.
Do not remove any prong from the power cord.
Grounding type
wall receptacle
FOR YOUR SAFETY
PREVENT ACCIDENTS
Avoid fire hazard or electric shock.
Do not under any
circumstances cut,
remove, or bypass
the grounding prong
from this plug.
Awarning
The complete electrical rating of your new
dehumidifier is stated on the serial plate. Refer
to the rating when checking the electrical
requirements.
• Be sure the dehumidifier is properly
grounded. To minimize shock and fire
hazards, proper grounding is important. The
power cord is equipped with a three-prong
grounding plug for protection against shock
hazards.
• Your dehumidifier must be used in a properly
grounded wall receptacle. If the wall
receptacle you intend to use is not
adequately grounded or protected by a time
delay fuse or circuit breaker, have a qualified
electrician install the proper receptacle.
ELECTRICAL INFORMATION
• Do not use an extension cord or an
adapter plug.
Power supply cord
with 3-prong
grounding plug
-3-
Page 4
ELECTRICAL REQUIREMENTS
OBSERVE ALL LOCAL CODES AND
ORDINANCES.
DO NOT, UNDER ANY CIRCUMSTANCES,
REMOVE THE POWER SUPPLY CORD
GROUND PRONG.
ELECTRICAL GROUND IS REQUIRED ON
THIS APPLIANCE.
A 115-volt 60 Hz, AC only, 15A fused and
properly grounded electrical supply is required
A time delay fuse or time delay circuit breaker
IS recommended. Use a dedicated circuit,
serving only this appliance
DO NOT USE AN EXTENSION CORD.
RECOMMENDED GROUNDING METHOD
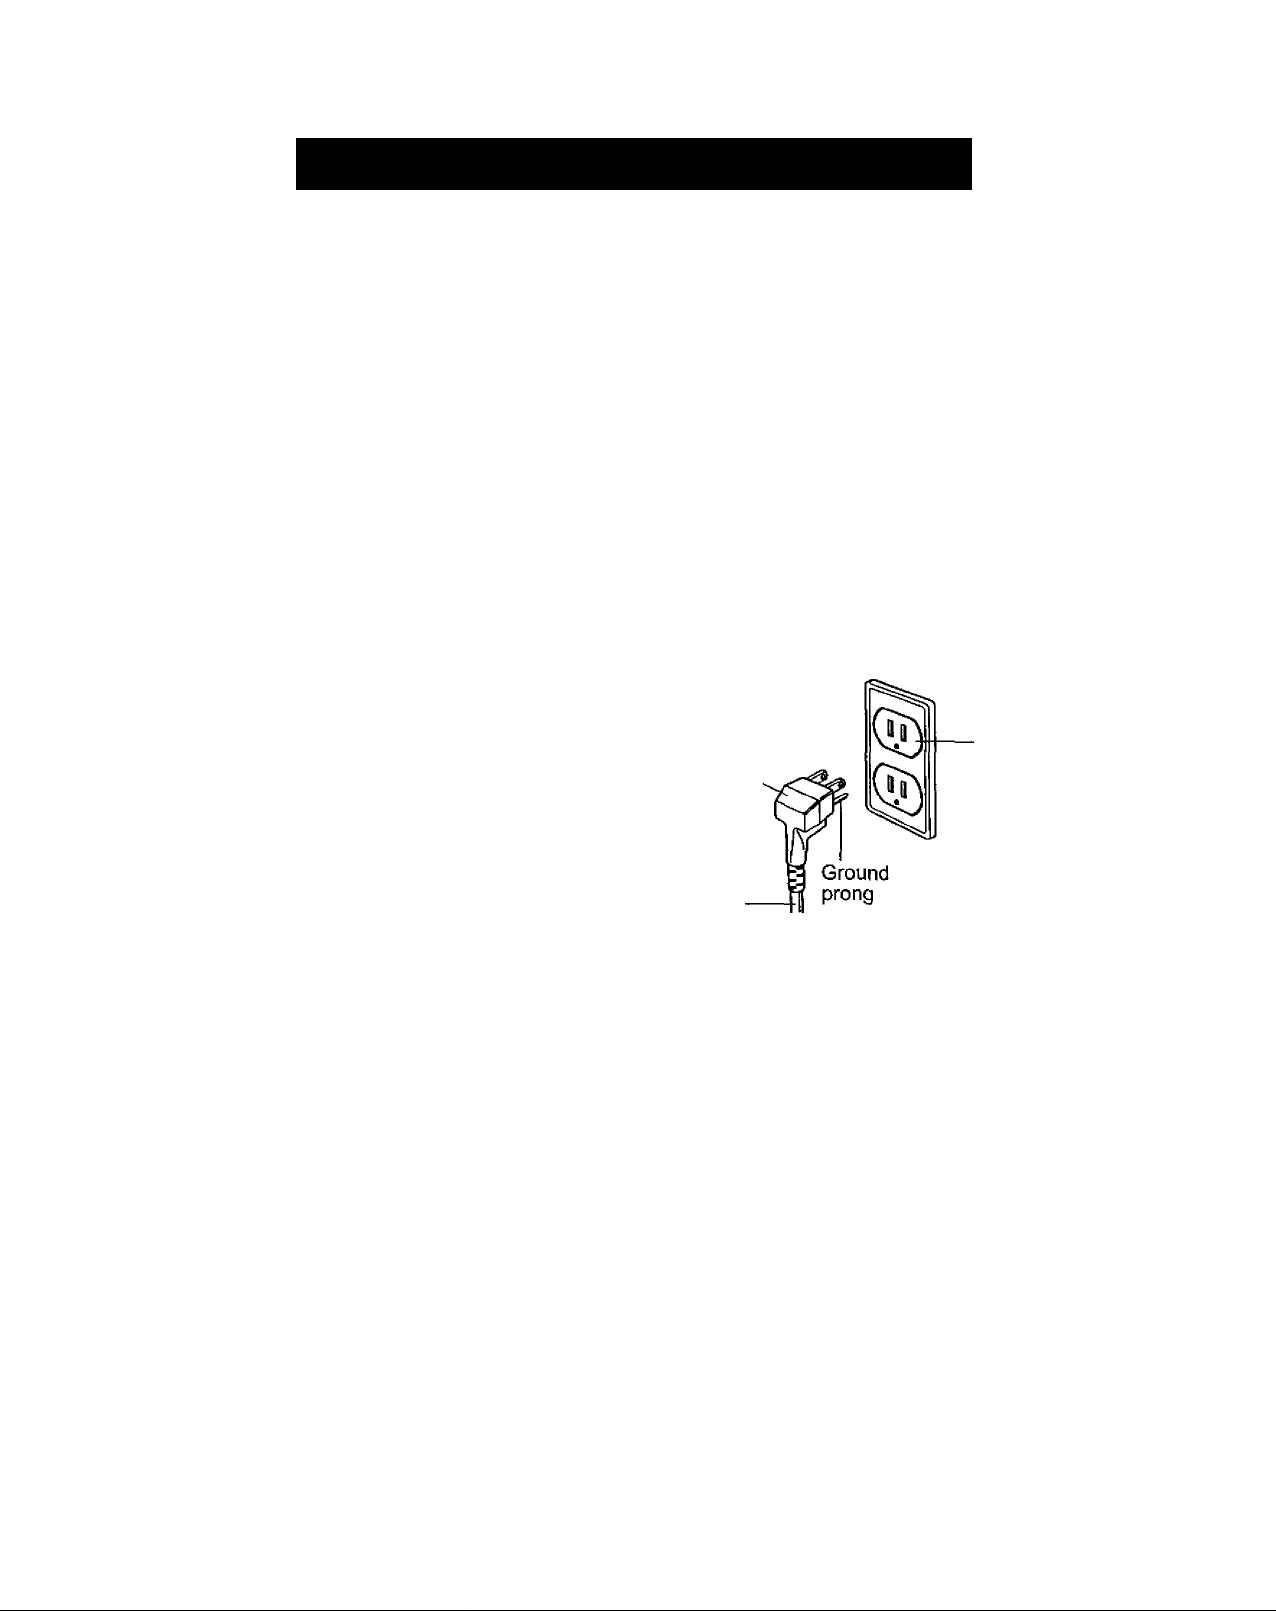
For your personal safety, this appliance must
be grounded. This appliance has a power
supply cord with a 3-prong grounding plug To
minimize possible shock hazard, the cord must
be plugged into a mating grounding type wall
receptacle and grounded in accordance with
the National Electrical Code (ANSI/NFPA 70)
latest edition and all local codes and
ordinances If a mating wall receptacle is not
available, it is the personal responsibility and
obligation of the customer to have a properly
grounded 3-prong wall receptacle installed by a
qualified electrician
i.'i'
AWARNING:
Electrical Shock Hazard
Plug into a grounded 3 prong outlet
Do not remove ground prong.
Do not use an adapter.
Do not use an extension cord.
Failure to follow these instructions can result
in death, fire, or electrical shock.
3-prong
3-prong
grounding
plug
Power
supply
cord
grounding
type wall
receptacle
-4 -
Page 5
OPERATION
FEATURES
, AwARNiNG
To reduce the risk of fire, electric shock, or injury to persons, read the important SAFETY
instructions section before operating this appliance
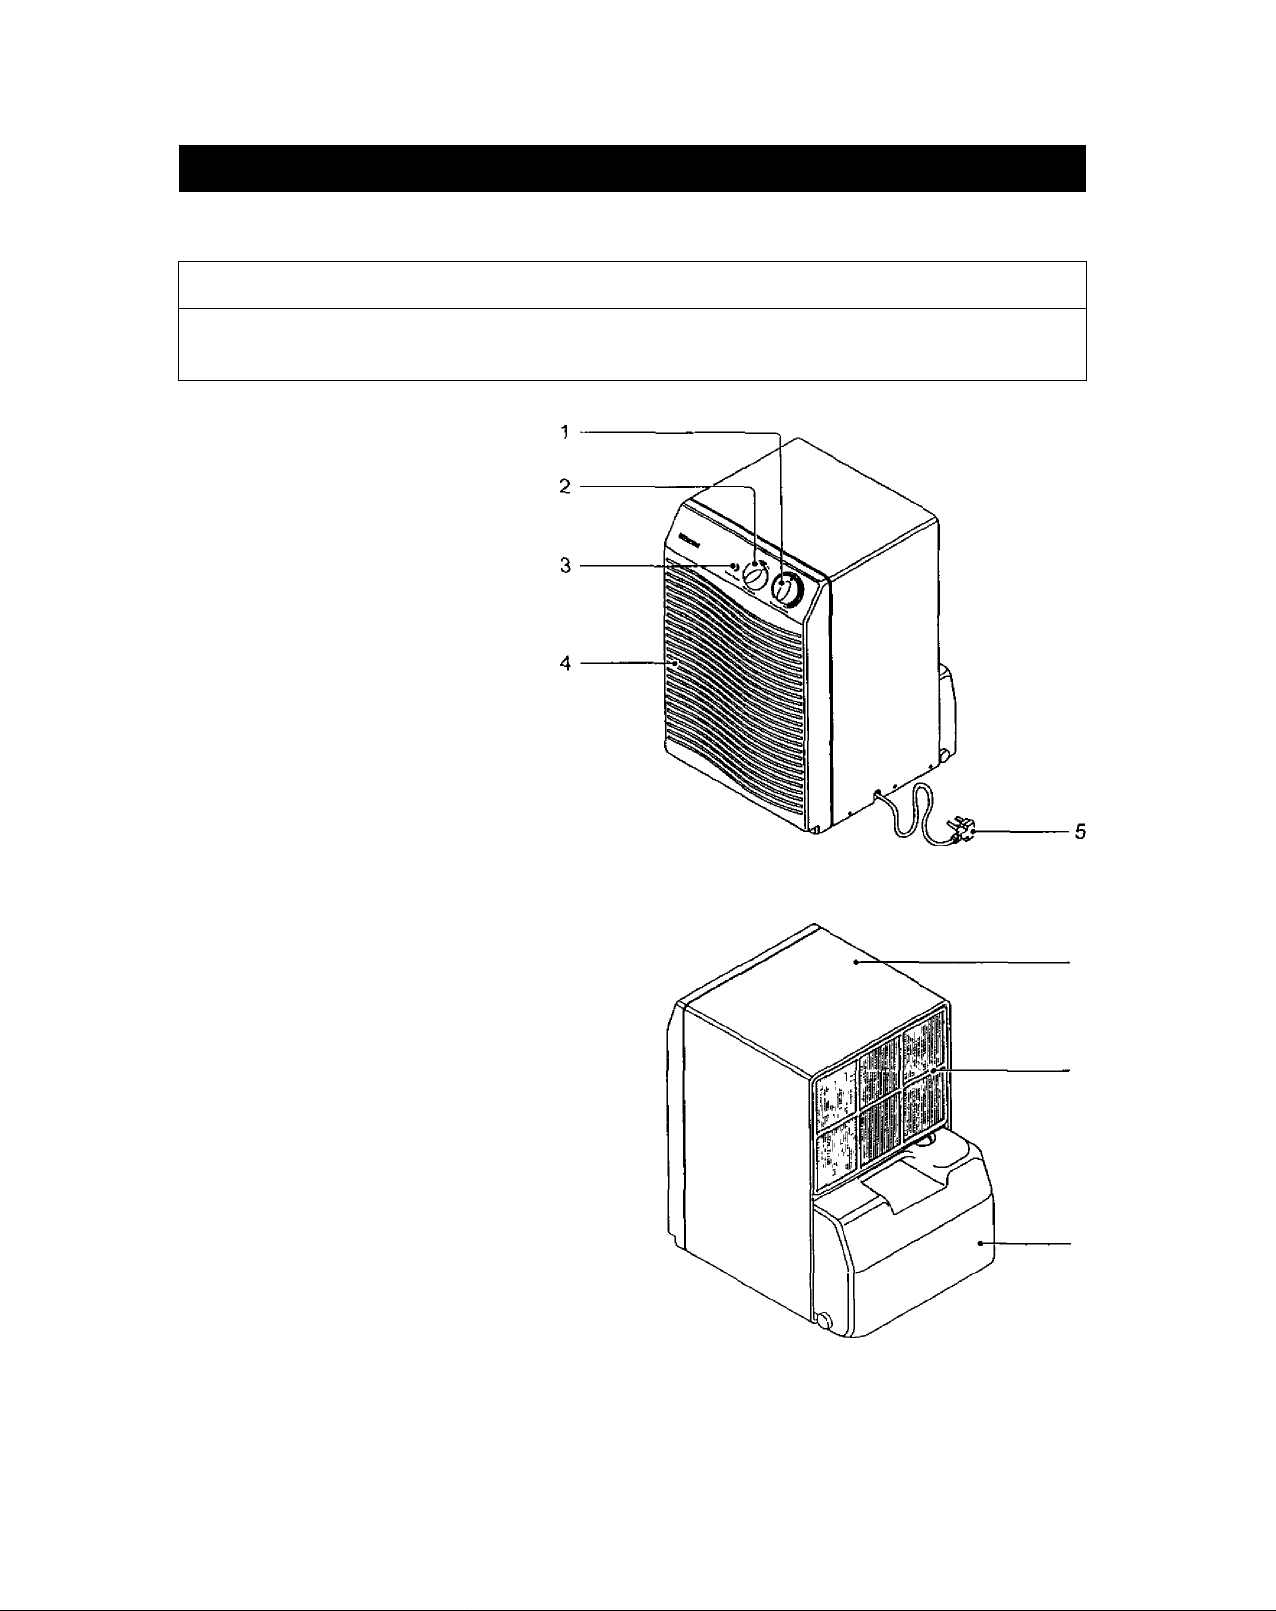
1 Fan speed knob
2. Dryness control knob
3. Empty Bucket indicator
4. Front grille assembly
5. Power cord
6. Cabinet
7. Air filter
8. Water Bucket
Page 6
OPERATION
Empty Bucket
Dryness Control
CONTROL PANEL
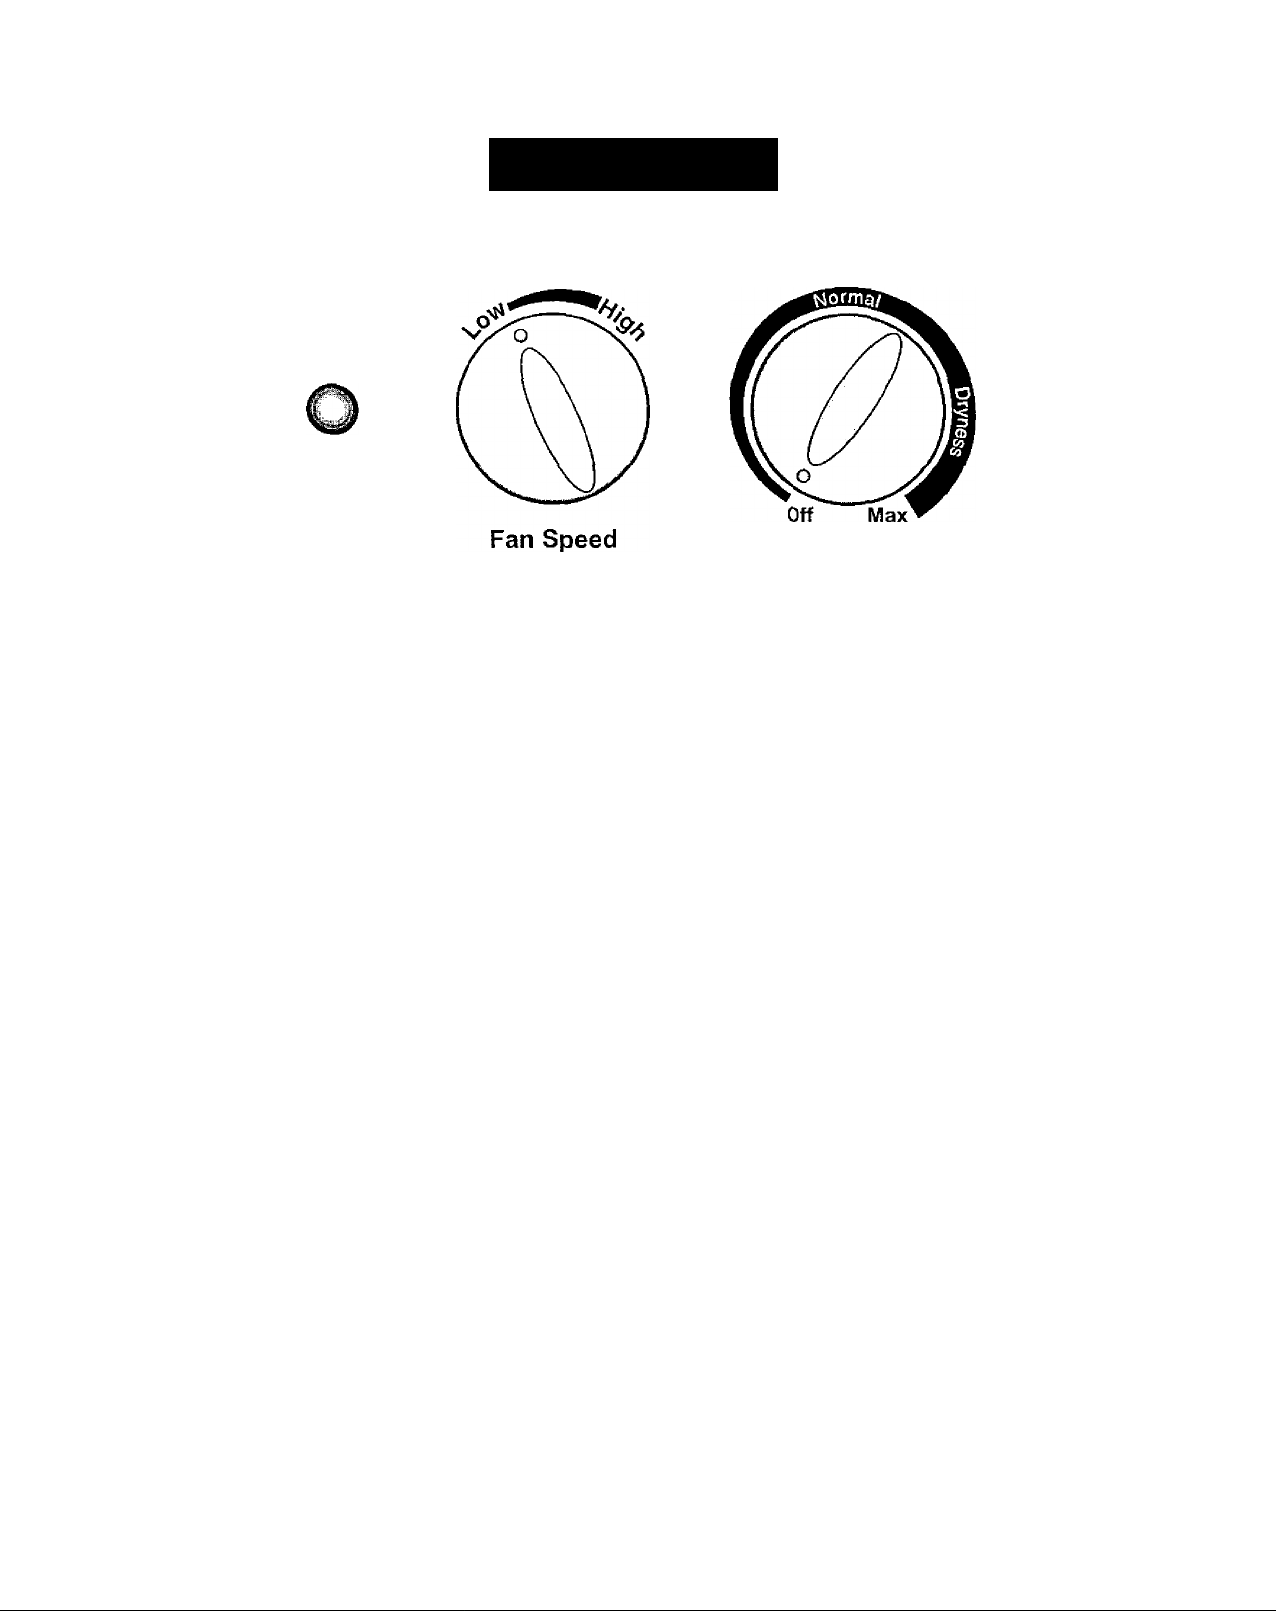
Your dehumidifier control panel contains an Empty Bucket indicator, a Fan Speed control and
a Dryness Control.
Empty Bucket indicator --This light glows when the water bucket is full and needs to be emptied. It also
glows when the bucket is not properly positioned.
Fan Speed — This controls the speed of the airflow.
Dryness Control-- This controls the moisture in the room.
TO OPERATE THE DEHUMIDIFIER:
1. Turn the Dryness Control to Off. Plug the power cord into an electrical outlet.
2. Set the Dryness Control anywhere between Off and Max for normal operation.
If you need more dehumidification (drier air), turn the Dryness Control toward Max. If you need less
dehumidification (moister air), turn the Dryness Control toward Off.
3. Turn the Dryness Control to Off to stop the unit manually.
4. To control the speed of air flow, turn the Fan Speed toward Low or High.
Note; Be careful not to lose the water bucket.
This dehumidifier doesn't run if the water bucket is not installed properly.
6-
Page 7
INSTALLING YOUR DEHUMIDIFIER
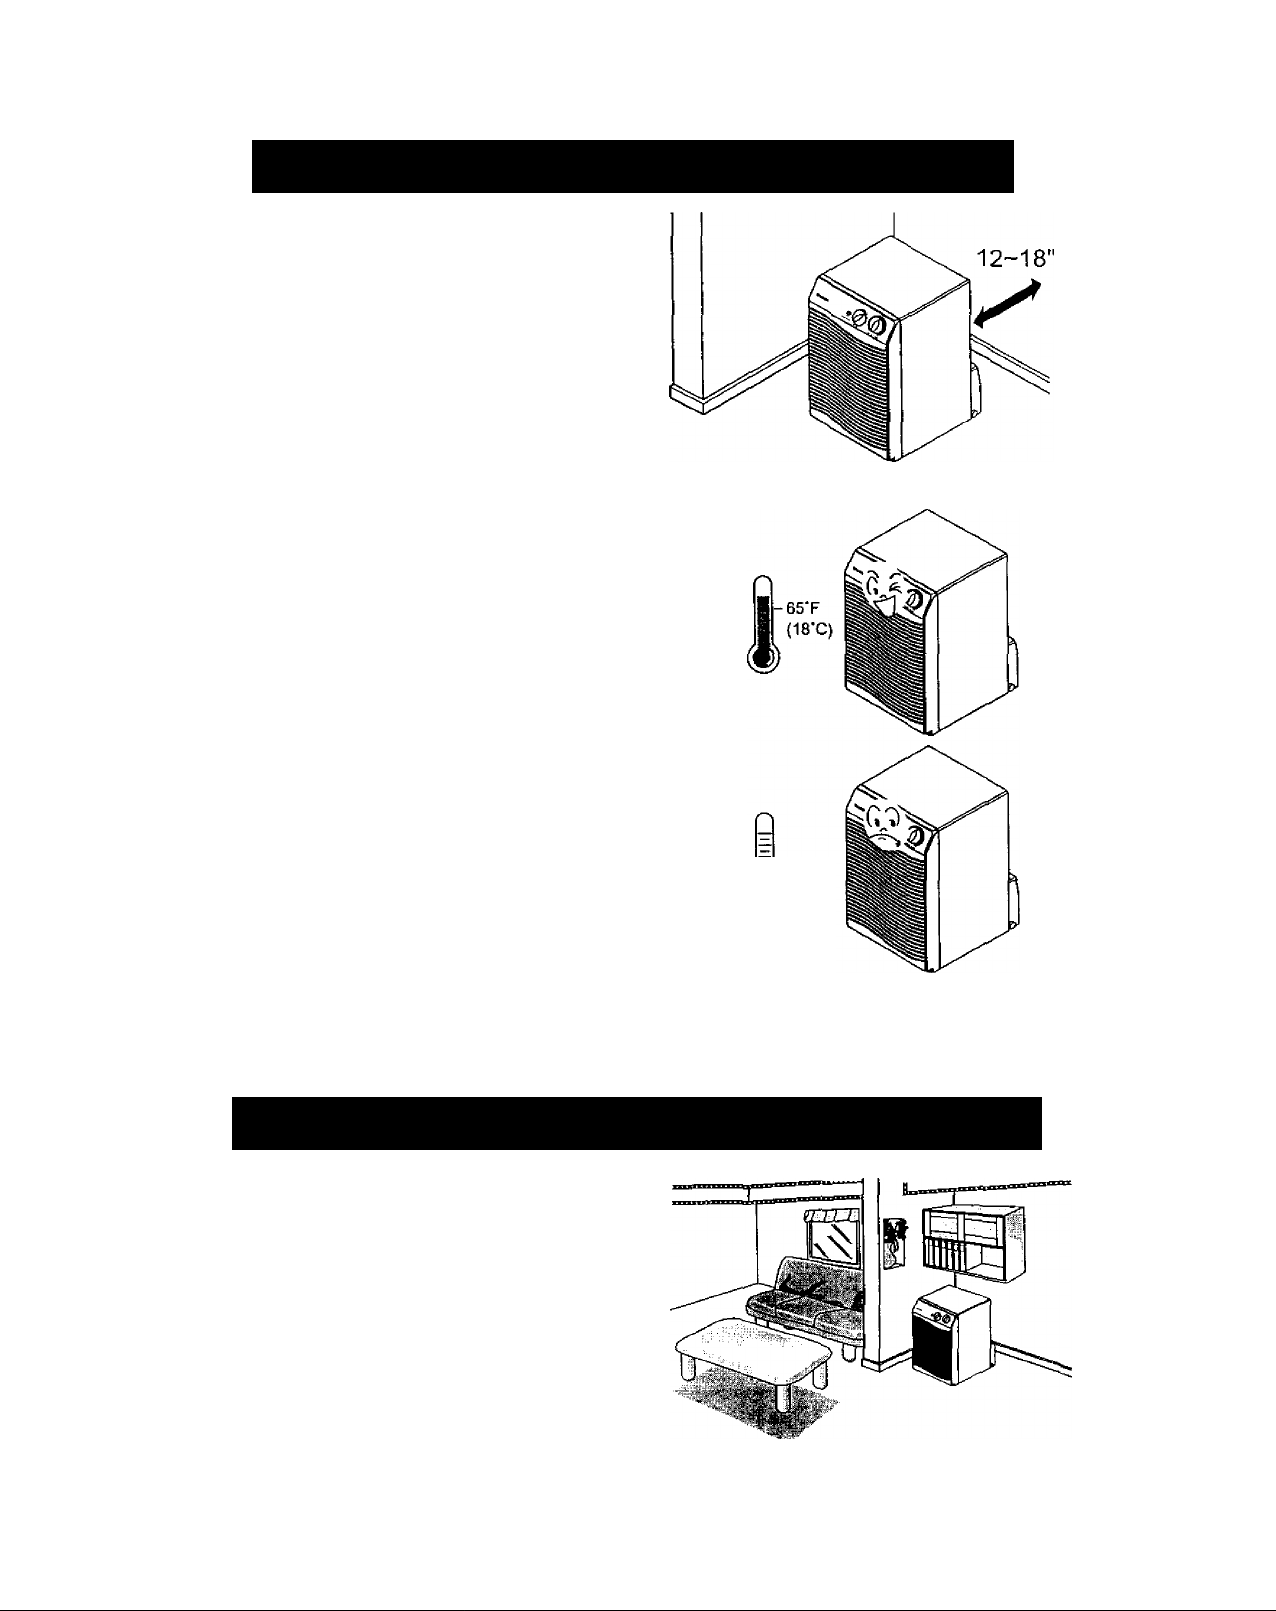
Install the dehumidifier on a level floor strong
enough to support the unit \with a full bucket
of water.
■ For best performance, allow at least 12-18
inches of air space on ail sides of the unit for
good air circulation.
' Keep all outside doors, windows, and other
openings closed when operating the
dehumidifler. Humid outdoor air will add to the
unit's work load.
■ Install your dehumidifier in an area where the
temperature will not fall below 65°F (IS^C). At
temperatures below this, the coils can
become covered with frost.
DEFROST CONTROL
When the defrost control senses frost build-up
on the evaporator coil, it will automatically
shuts off the compressor. The fan will continue
to cycle on and off to draw air across the coil
and melt the frost. When the coil is defrosted,
the compressor will automatically restart and
dehumidifying resume.
J-65'F
i 08'C)
CHOOSING THE PROPER LOCATION
Use the dehumidifier in a basement to help
prevent moisture damage.
Use the dehumidifier in cooking, laundry,
bathing, and dishwashing areas that have
excessive moisture.
Use the dehumidifier to prevent moisture
damage anywhere books or valuables are
stored.
-7-
Page 8
AUTOMATIC SHUT OFF
When the bucket is full, or when the bucket is not in the proper position, the Bucket Full light turns on
and the unit automatically shuts off. Also, when bucket is out of position, the unit will beep 3 times.
The bucket must be replaced in the proper position for the dehumidifier to work. The
bucket full light will be on and the dehumidifier will not run if the bucket is not in the proper
position.
REMOVING AND EMPTYING THE WATER BUCKET
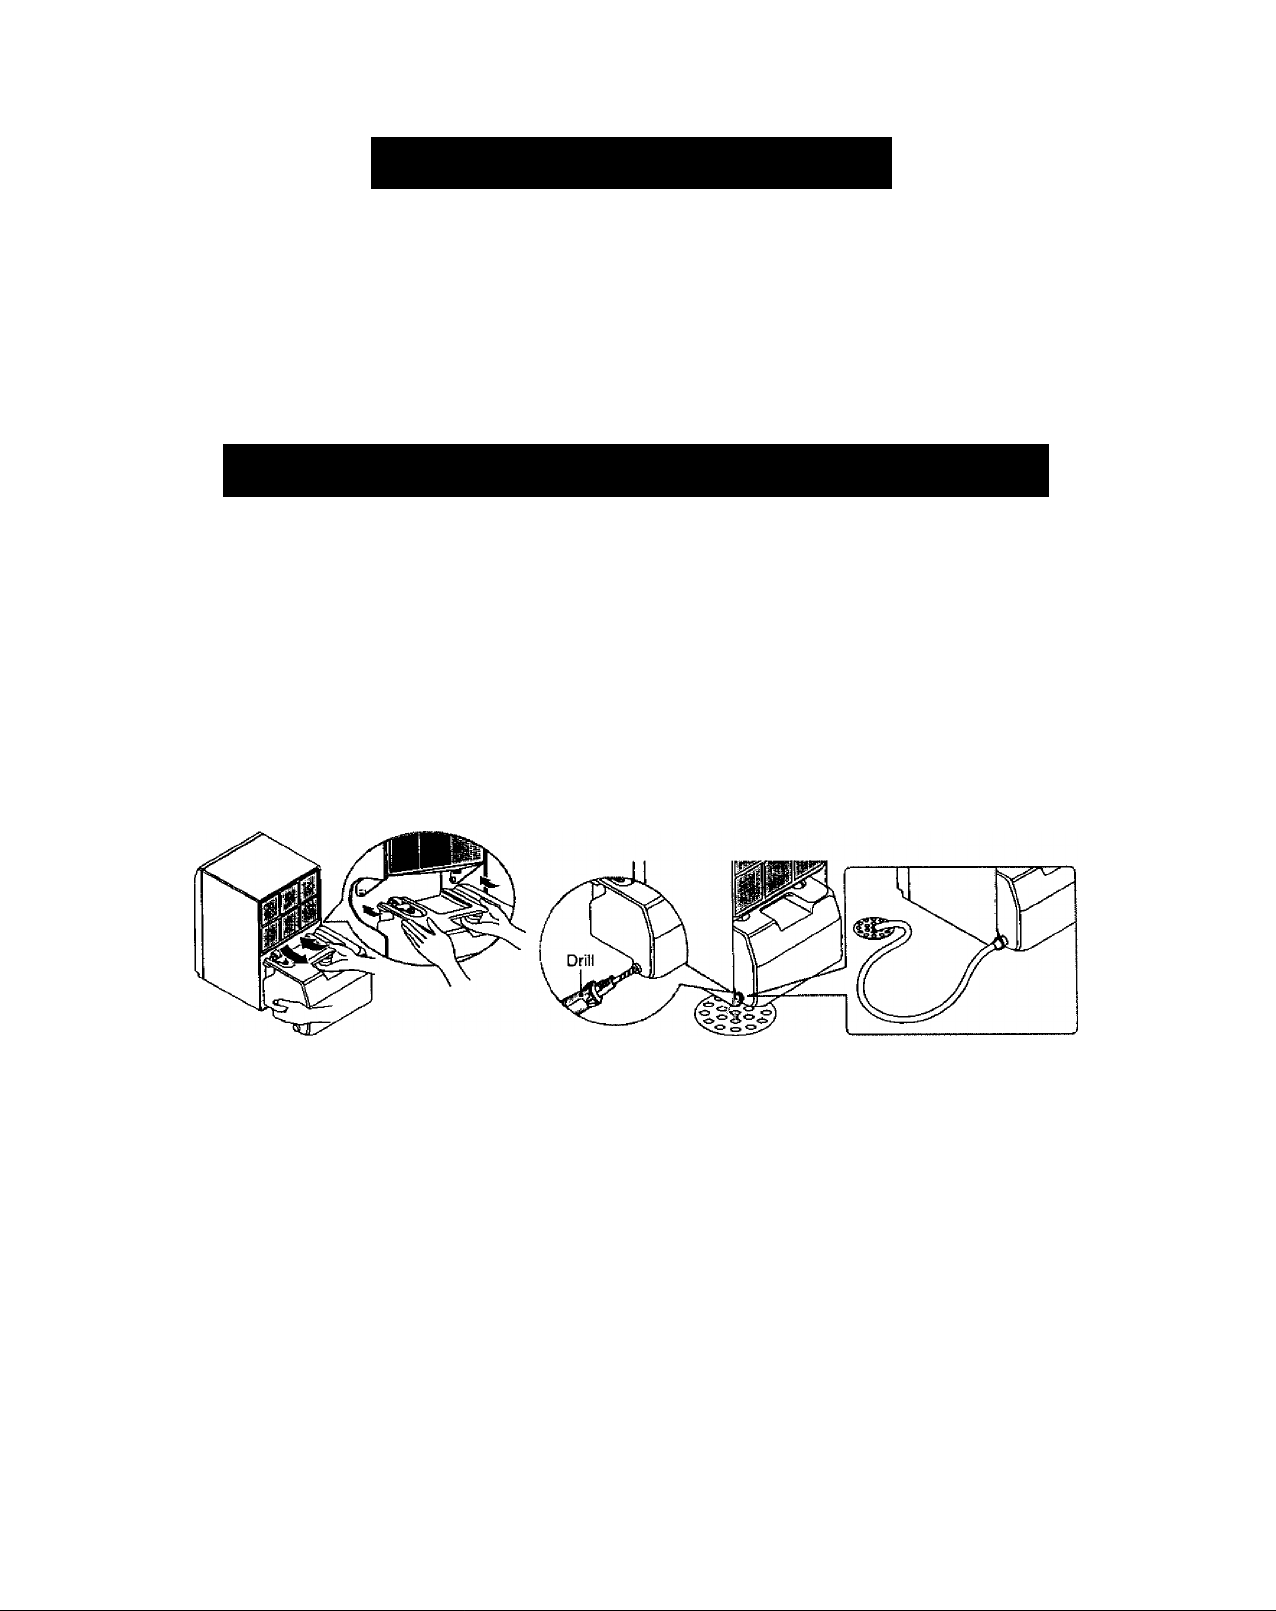
The water bucket can be emptied
Empty the bucket manually.
When the bucket is full,
remove and empty it into a
large sink or tub. When
finished, replace it properly.
NOTE; To replace the bucket
properly, make sure the
slots on the back of bucket
are positioned correctly.
in one of three ways:
Place the dehumidifler
directly over drain.
Open the threaded bucket drain
hose connection in the bucket
by drilling a 3/8" (10mm) to 3/4"
(19mm) hole in the center of the
connection.
Once opened, the bucket drain
hose connection will continually
drain water from the bucket.
Attach a garden hose to the
threaded bucket drain hose
connection to carry water to
the drain.
When being attached to the
bucket drain hose connection,
be sure the hose doesn't kink
or bend. It should lie flat from
the dehumidifier to the drain.
-8
Page 9
MAINTENANCE
GRILLE AND CASE
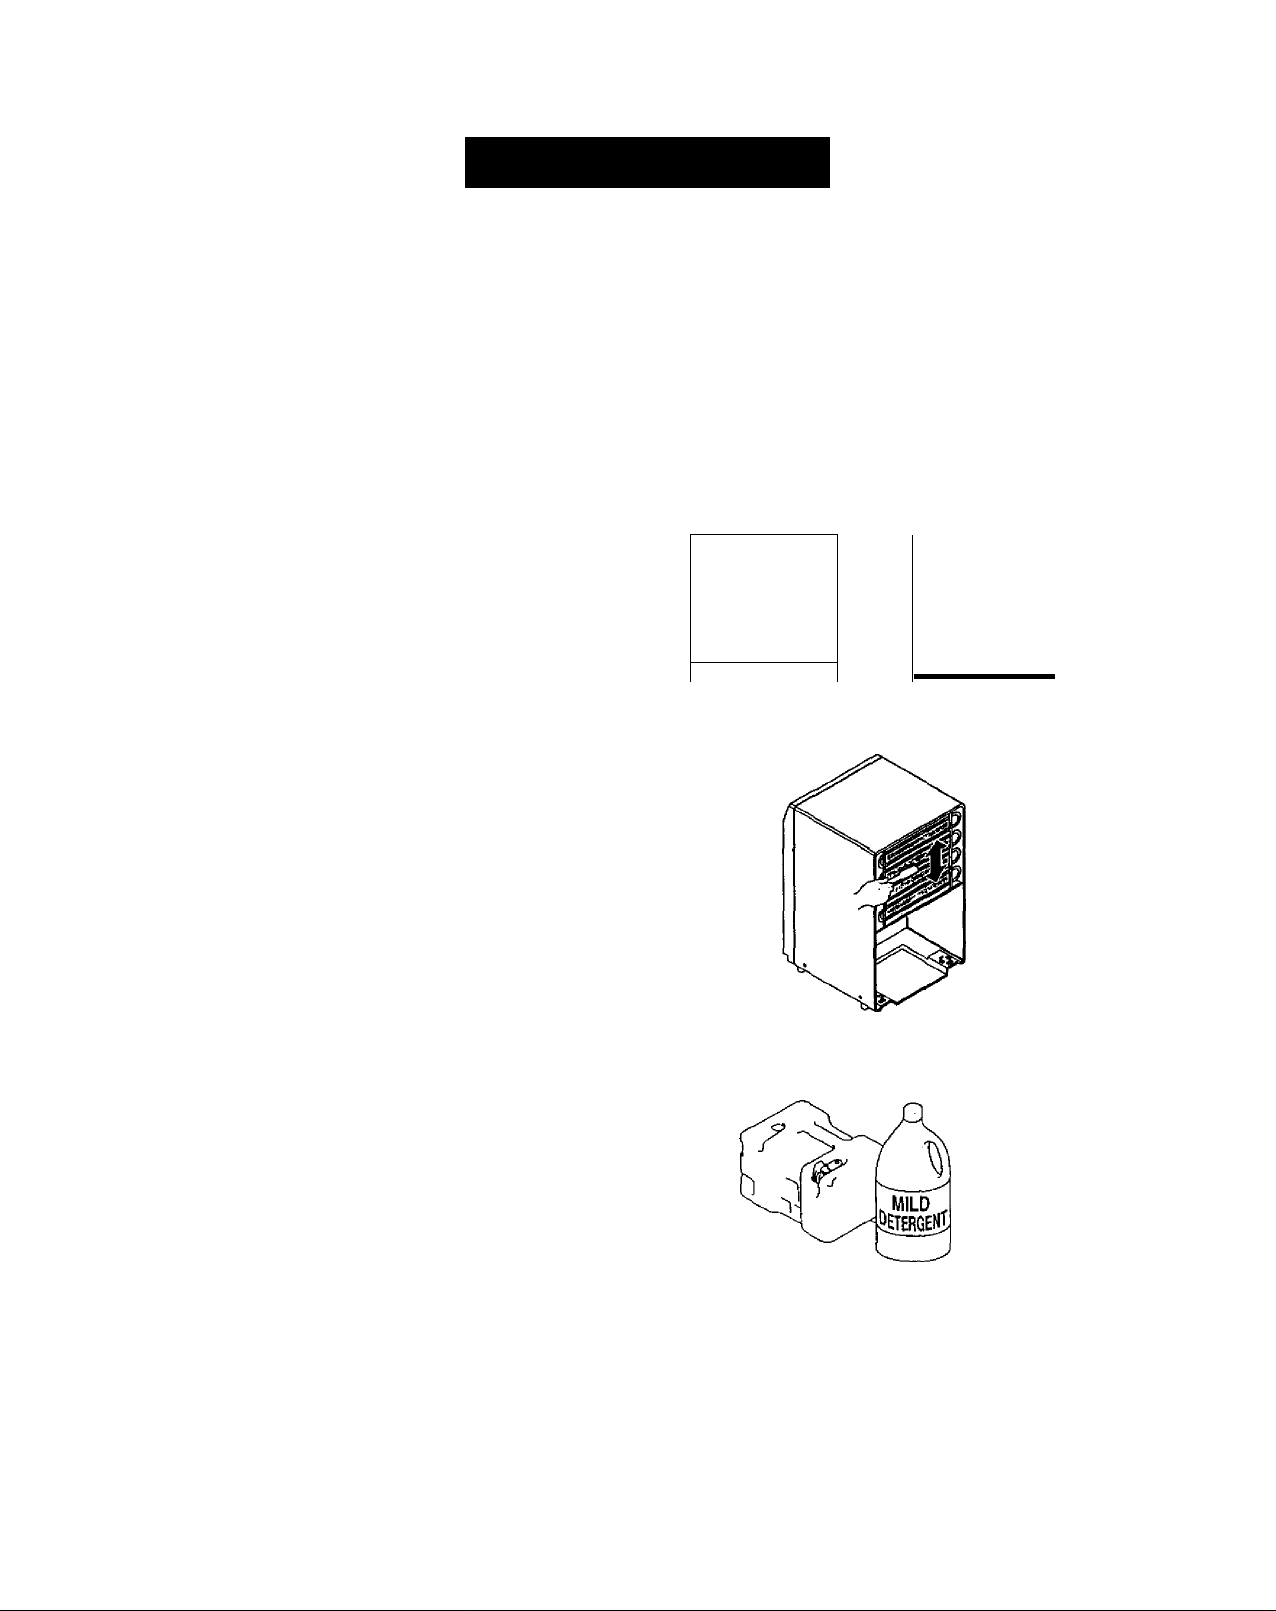
To clean the case: Use water and a mild
detergent. Do not use bleach or an abrasive
cleaner.
To clean the grille: Use a vacuum with an
attachment or brush.
AIR FILTER
The air filter is on the back of the dehumidifier.
It should be checked and cleaned at least
every 30 days or more often if necessary.
TO REMOVE:
Flex the filter at the lower right corner and slide
the upper right side to the left. Release all of
the tabs and remove the filter. Wash it in warm
soapy water. Rinse and let the filter dry before
replacing it.
CLEANING INSIDE THE UNIT
After removing the air filter, dean the coil on
the inside with a soft brush to remove any soft
and wet soil.
NOTE: Do not allow water to enter the
electrical/machine compartment through the
circular opening behind the coil.
Do not spray the coll with a hose.
KJ
■Wl,
irai
1
■all
GENERAL CLEANING
• Dust the front grille and the side panels with a
soft brush or use the dusting attachment of
your vacuum.
• If cabinet paint chips, you can touch up the
paint with a good grade enamel to prevent rust.
WATER BUCKET CLEANING
• Every few weeks, rinse the inside of the water
bucket with a mild detergent to prevent
growth of mold, mildew, and bacteria.
-9 -
Page 10

TROUBLESHOOTING
, Pjobfem' ^ ^ ‘
Dehumidifier
does not start
Dehumidifier
does not dry the
air as it should
Dehumidifier runs
too much
Frost appears on
the coils
Fan noise
Wafer on floor
'V- r Possible Causes
The dehumidifier power
cord is unplugged
The fuse is blown or circuit
breaker is tripped.
Water bucket ts full ■ The dehumidifier automatically turns off
Bucket is not installed.
Did not allow enough time
to remove the moisture.
Airflow is restricted.
The Dryness Control may
not be set high enough.
Doors and windows may
not be closed tightly.
Clothes dryer may be blowing
moisture-laden air into the room.
Room temperature is too
low.
Doors and windows are open.
Dehumidifier has been
recently turned on or room
temperature is below 65°F.
(18'C.).
Air is moving through the
dehumidifier.
Bucket drain hose
connection may be loose.
Water bucket is not ail the
way in.
■ Make sure the dehumidifier plug is pushed
completely into the outlet
• Check the house fuse or circuit breaker box
and replace the fuse or reset the breaker
when this occurs Empty the bucket.
• Make sure a bucket in the right place.
• When first installed, allow at least 3 or 4
days to maintain the desired dryness.
• Make sure there are no curtains, blinds or
furniture blocking the front or back of the
dehumidifier.
• Turn the Dryness Control knob closer to the
Max position.
• Check that ali doors, windows and other
openings are securely closed
• Install the dehumidifier away from the dryer
The dryer should be vented to the outside.
• The unit will not operate satisfactorily if the
room temperature is below 65“F. (IS^C.)
• Close all doors and windows to the outside.
• This is normal Frost will usually disappear
within 60 minutes
• This is normal.
• Check the hose if one is attached.
See the Removing and Emptying The Water
Bucket,
-10
Page 11
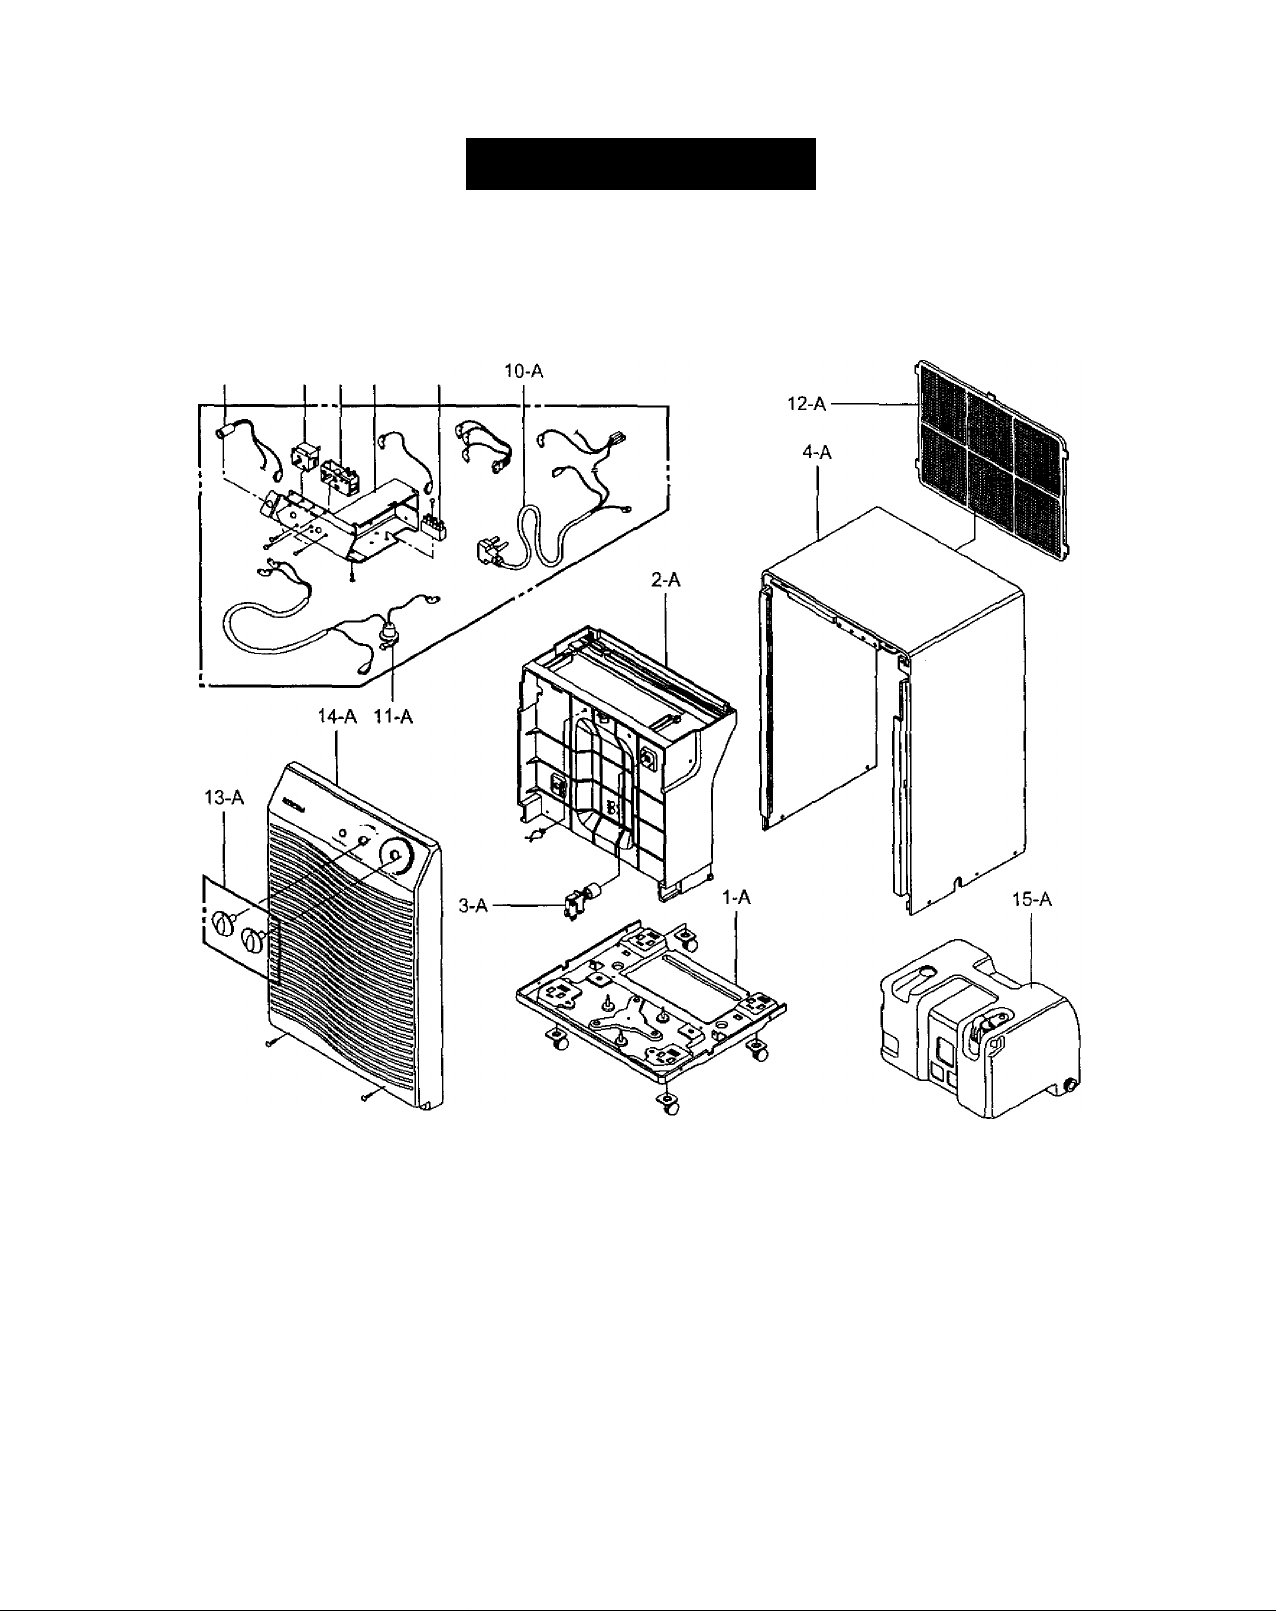
REPAIR PARTS
Dehumidifier To order Parts call Toll Free
Model No. 580.51300 1-800-4-MY-HOME®(1-800-469-4663)
CAUTION; Use the Kenmore part number on all orders, not the illustration number.
OUTER CASE PARTS AND CONTROL PART
9-A 8-A 7-A 5-A
POS.
fjo. PART NO
1- A
3041AD2007B
2- A
4791A10002B
3- A
6600A30003C
4- A
3090A10001J
5- A
6640A40001A
6- A
6912A30001F
7- A
3720AD3004A
8- A
5216A20001A
9- A
6600A20001A
DESCRIPTION
BASE ASSY, WELD [SINGLE]
BARRIER, ASSY
SWITCH ASSY, MICRO
CABINET
TERMINAL BLOCK
LAMP, NEON
PANEL, CONTROL
HUMIDISTAT
SWITCH, ROTARY
-11 -
POS.
NO. PART NO
10- A 6411A20001Q
11- A 6614A30001H
12- A 5230AD3005A
13- A 4941A30008A
14- A 3531A20014A
15- A 4838A20005A
DESCRIPTION
POWER CORD ASSY
CONTROL, DEFROST
FILTER(MECH)
KNOB ASSY
GRILLE ASSY, FRONT
TANK BUCKET
Page 12
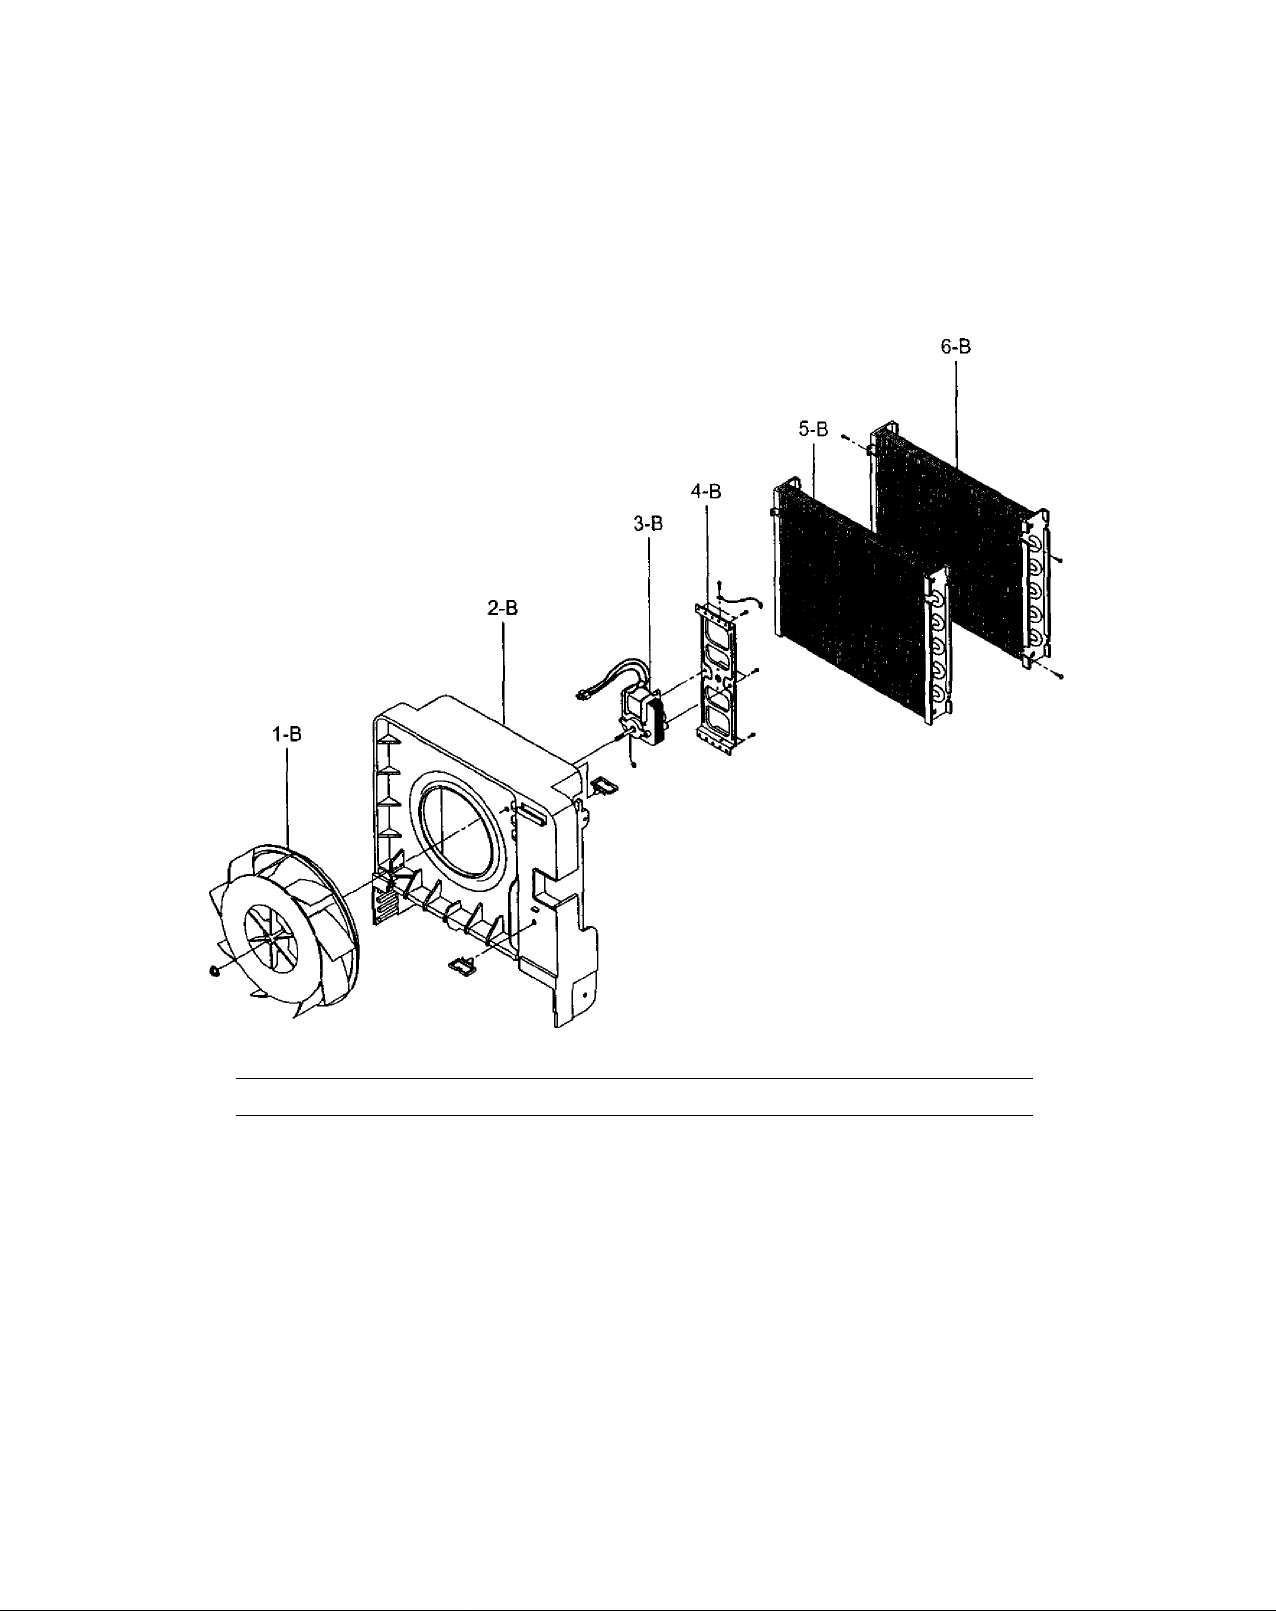
580.51300
CAUTION; When ordering parts, use the Kenmore part number not the location number.
CYCLE PARTS
POS. NO. PART NO
1-B
2-B
3-B
4-B
5-B
6-B
5900A20007A FAN
4999A10001A
4681A20040A
4960A20009A
5403A10008B
5421A10009B
DESCRIPTION
SHROUD ASSY
MOTOR ASSY, SINGLE
MOUNT, MOTOR
CONDENSER ASSY
EVAPORATOR ASSY
- 12 -
Page 13
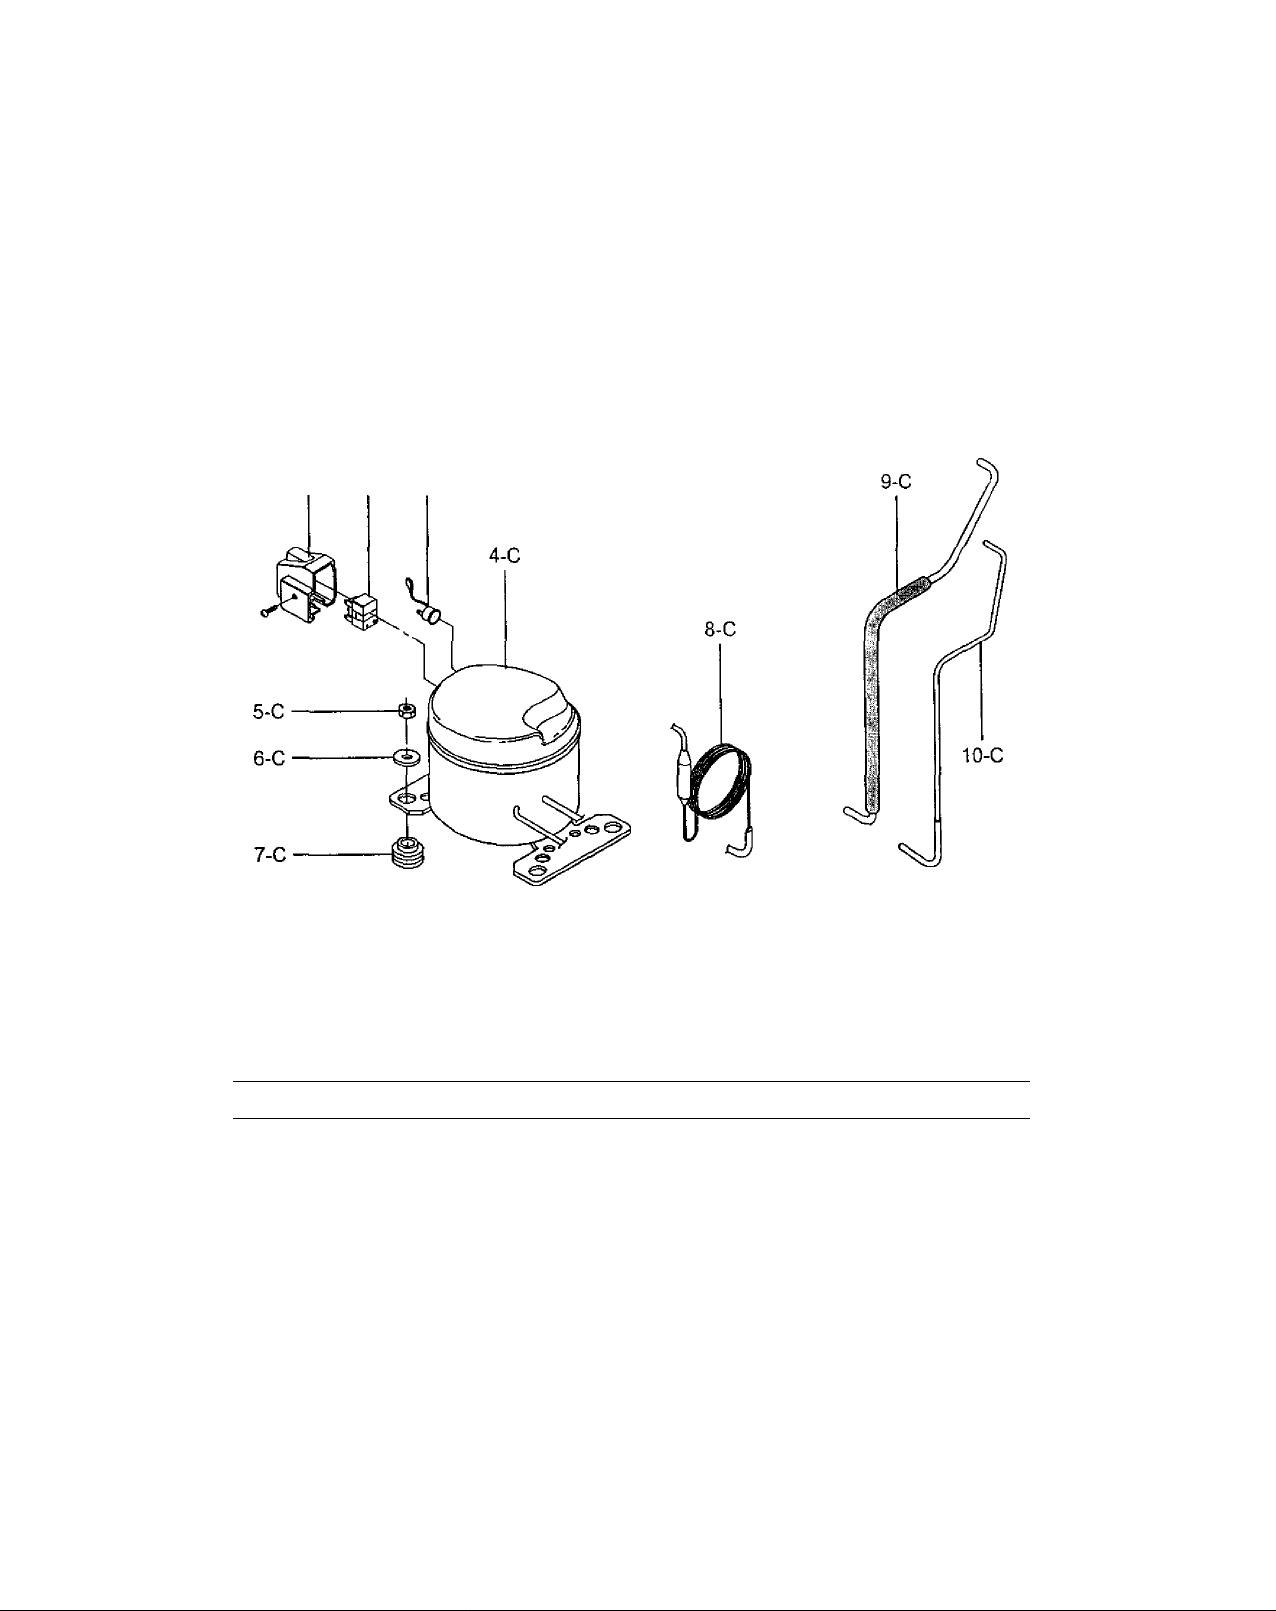
580.51300
CAUTION: When ordering parts, use the Kenmore part number not the location number.
COMPRESSOR PARTS
1-C 2-C 3-C
POS. NO. PART NO
1-C
2-C
3-C 6750C-0002S O.L.P.
4-C
5-C
6-C
7-C 5040AR4195A ISOLATOR, COMP.
8-C
9-C
10-C
3550C-0013A TERMINAL COVER
6748C-0003A R.T.C
2521C-A8605
1NHA0801206
4H00972G WASHER
5425AP3074C
5211A30373B
5211A30367A
DESCRIPTION
RE-COMPRESSOR, SET
NUT, HEXAGON (1)
TUBE ASSY, CAPILLARY
TUBE ASSY, SUCTION
TUBE ASSY, DISCHARGE
^ 13-
 Loading...