

Page 1
OWNER’S MANUAL
KGnmorG
TOASTER OVEN/BROILER
Model 48449
CAUTION:
Before using this toaster oven, read this
manual and follow all its Safety Rules
and Operating Instructions.
Sears, Roebuck and Co., Hoffman Estates, )L 60179 USA
Safety
Operation
Cleaning
Page 2

IMPORTANT SAFEGUARDS
When using electric£d at^&ances, basic safety precautions shoukJ always be followed,
including the foOowing:
READ ALL INSTRUCTIONS BEFORE. USING.
Do not touch hot surfaces. Use
1.
handles or knobs.
To protect against fire, electric shock
2.
and injury to persons do not immerse
cord, plugs, or the appliance in water
or other liquid.
3.
Close supervision is necessary
when any appliance is used by or
near children.
Unplug from outlet when not in use and
4.
before cleaning. Allow to cool before
puttirtg on or taking off parts, and
before cleaning the appliance.
Do not operate any appliance with a
5.
damaged cord or plug or after the
appliance malfunctions, or has been
damaged in any manner. Return appli
ance to the nearest authorized service
facility for examination, repair, or
adjustment.
The use of accessory attachments not
recommended by the manufacturer
may result in fire, electric shock, or
injury to persons.
Do not use outdoors.
Do not let cord hang over edge of table
or counter, or touch hot surfaces.
Do rtot place on or near a hot gas or
electric burner, or in a heated oven.
10. To cBsconnect, turn timer to the “0*
position and the temperature control to
the lowest position, №en remove plug
from wall ouflet.
11. Do not use the appliance for other than
intended use.
12. Oversize foods, metal foR packages oi
utensils must not be inserted into this
appliarx^, as they may involve a fire c
electrical shock.
13. A fire rrtay occur if toaster oven is cov
ered or touching flammable material,
including curtains, draperies, walls, ar
the like when in operation.
14. Do not clean with scouring pads.
Pieces can break off the pad and touc
electrical parts involving a risk of elec
trie shock.
15. Extreme caution should be exercised
when using containers constructed of
other than metal or glass.
16 Do not store any materials, other than
manufacturers recommended acces
sories, in this oven when not in use
17. Do not place any of the following mat«
rials in the oven: paper cardboard,
plastic, and the like.
18. Do not cover the crumb tray or any p8
of the toaster oven with metal foil. Thir
will cause overheating of the oven.
19. Always turn off toaster oven by either
pressing the Toast “STOP* button or b
turning the timer to *0* and the tempei
ature control to the lowest setting. Do
not use the elecrtrical plug as a means
of switching off the appliance.
SAVE THESE INSTRUCTIONS
Page 3

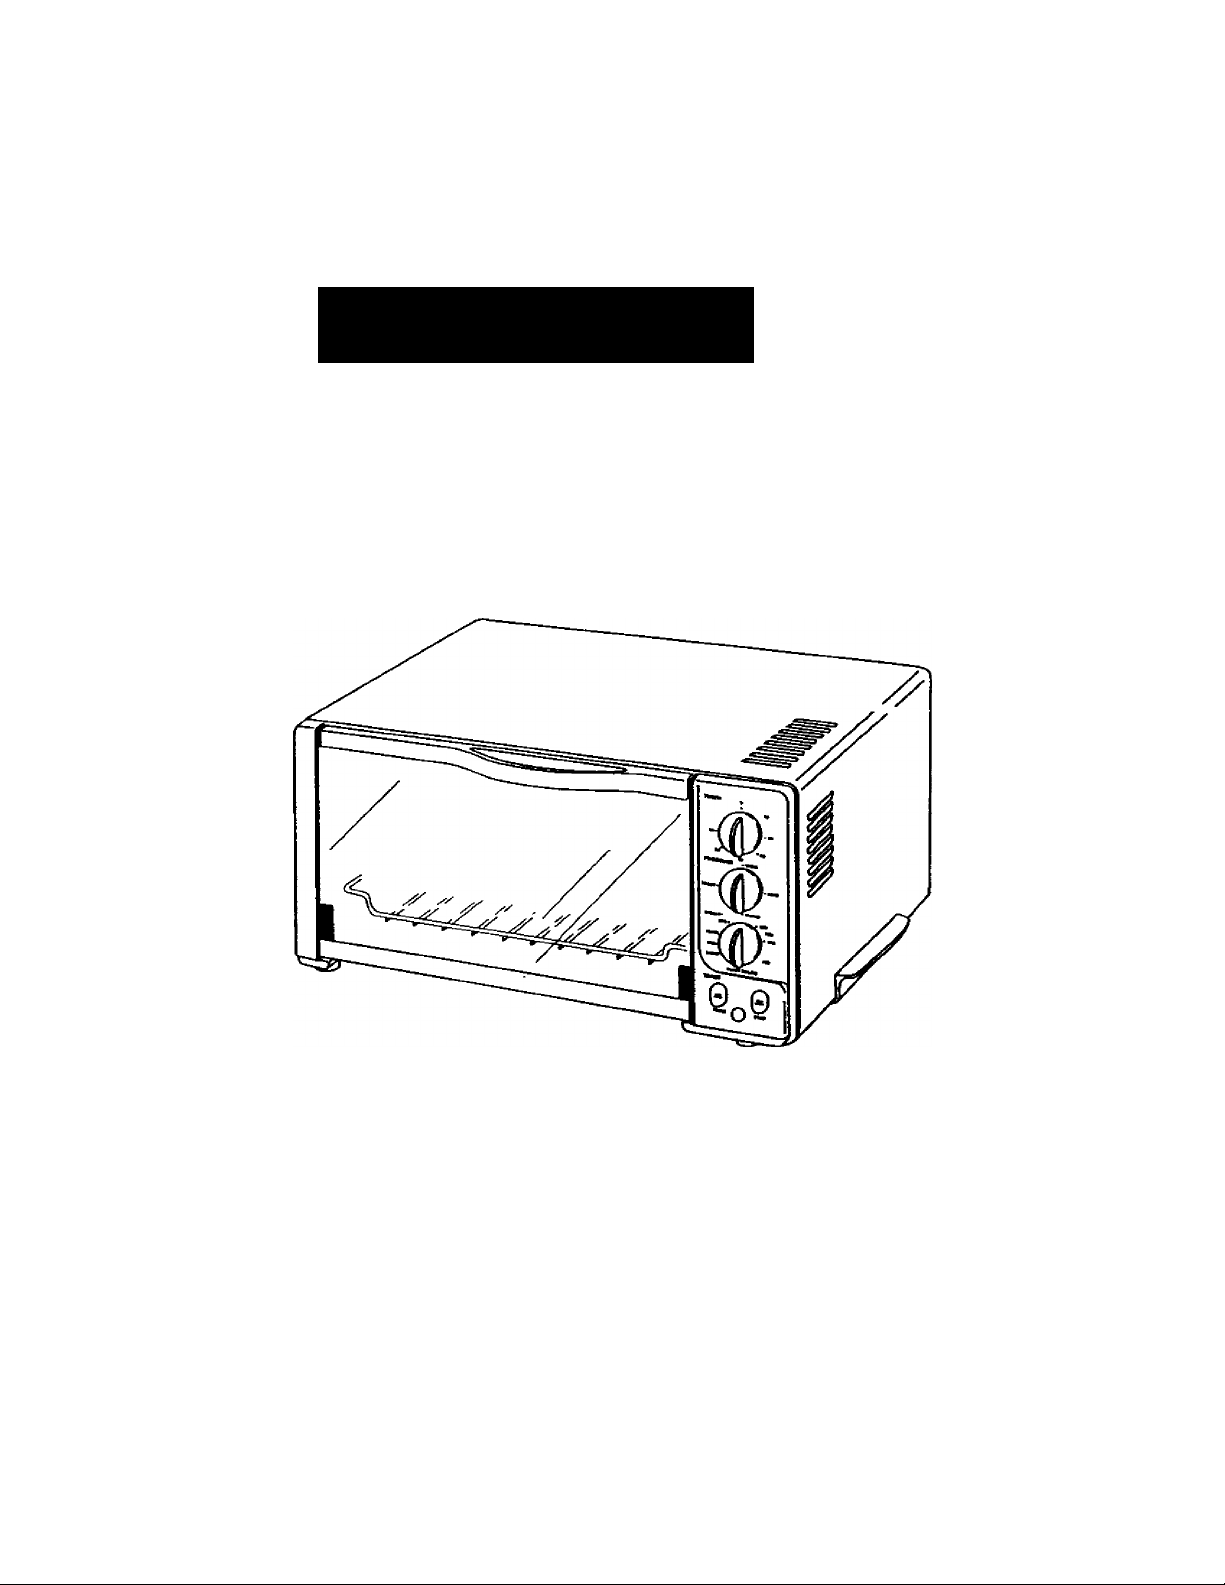
YOUR KENMORE TOASTER OVEN
. A.',
___
rift;'----'.
A. Wipe-dean exterior
B. Easy-grip handes
C. Control Panel
D. SRde-out crumb tray/
cookie sheet
E Door Viewing Window
F. Oven Rack
G. Lower Heating
Elements
H. Upper Heating
Elements
I. Oven Pan
J. Oven Pan Wire Rack
THE CONTROL PANEL
1. Timer—^Allows you to set the desired
cooking time from 0-60 minutes. At
end of cooking time, bel sounds and
toaster oven shuts off automaticaliy.To
set timer for less than 10 minutes, turn
dial past ‘Iff* arKl thOT turn dial back.
2.. Program—Allows you to choose a cook^ method of broil, bake, warm,
or toast
3. Oven *F—Allows you to set the toaster
oven to brdt, bake, or warm at a spe
cific temperature. Also allows you to
choose between Kgfrt, medum, and
dark for toasting.
4. Toast—Allows you to rrwiually start or
stop the toaster oven.
Page 4

OPERATING INSTRUCTIONS
This appliance is tor HOUSEHOLD USE ONLY
and may be plugged into any 120V AC electri
cal ouUeL Do not use any other type of outlet
POLARIZED PLUG
This appliarwe has a polarized plug (one
blade is wider than the other). To reduce the
risk of electric shock, this plug is intended to
fit into a polarized outlet only one way. If the
plug does not fit fully into the outlet, reverse
the plug. If it still does not fit contact a
qualified electrician. Do not attempt to modify
the plug in any way.
SHORT POWER CORD
The toaster oven’s power cord is short to
reduce your risk of becoming entangled in or
tripping over a long cord. You can obtain a
longer, detachable power-supply cord or
extension cord, but be careful when using
toaster oven equipped with extra cord length.
If you are using a longer detachable powersupply cord or extension cord, (1) the marked
electrical rating of the extension cord should
be at least as great as the electrical rating of
the appliarwe, and (2) arrange the longer
cord so that it will not drape over the counter
top or table top where it can be pulled on by
children or tnpped over unintentionally.
TO USE AS AN OVEN
You have two cooking options when using
this appliance as an over>—bake and broil.
Baking is the fastest and safest cooking
method. It uses both the upper and lower
heating elements. This fast-cooks many
foods and nfHJSt be used for cooking chops,
chicken, hamburgers, steaks, etc. Broiling is ‘
a cooking rrtedtod which uses the top heat
ing elements only to cook food. This is
especially useful for top browning foods.
CAUTION:
• DO NOT use paperboard containers in
this toaster oven, even if they are
“approvecT for oven use.
• DO NOT lirte the Oven Pan Wire Rack
with foil. This prevents fats and juices
from dripping into the Oven Pan below.
• DO NOT leave appliance unattended
white in use.
Position Oven Rack or Cookie Sheet
Oven Rack: The tfndmess of food to be ’
bakki or bro^ determines its cooking '
time and distance from the heabng ele-.,
mente. To allow cooking a wide variety of
foods, this Toaster Oven has two Oven
Rack positions. High and Low.
For thinner foods (e.g. thin meats, toast),
place Oven Rack in the High portion, clos
est to tc^ heating element See Figure 1.
For thicker foods (e.g. thick meats, bread
loaves), place Oven Rack in the Low po^
tion, furthest from top heating element. Sc
Figure 2.
Cookie Sheet; The crumb tray doubles a
a cookie sheet. DO NOT use cookie shee
to bake or broil meats When using crumt
tray as a cookie sheet, gently pull it out
from bottom of oven. Slide cookie sheet
into Low position only. DO NOT use cooi
ie sheet in High position. Always replace
tray into bottom of oven after using it as a
cookie sheet.
Figure
Prepare Oven Pan
To prepare Oven Pan tor Baking or ВгоШгн
meats, place the Oven Pan Wire Rack into
the Oven Ffon. DO NOT use Oven Pan wit)
out its Wire Rack insert
CAimON: Always use the Oven Pan wh<
baking or broiling meats. The Oven Pan w
hold the food and collect all fat and juice
dnpptngs. Using any pan besides this
Oven Pan may create a fire hazard.
Page 5

Cooking in the Toaster Oven
NOTE: Tfim fatty meats to mMmize spiatter.
1. Select Oven Rack portion. Pail^
close oven door to the preset
position.
2. Turn Program Control to ‘BROllT or
"BAKE.’
Turn "OVEN 'P Control to desired
3.
setting. (For tostest cooking, use
highest setting.)
Turn "TIMER" to desired tìme setting.
4.
NOTE: For best resuits, allow oven to
preheat for 2-3 minutes.
Arrange meat on prepared Oven Pan.
Place Oven Pan on Oven Rack.
Partially close oven door to the preset
"ajar* position. The heating elements
will cycle on and off to maintain the
proper temperature.
Turn food over about halfway through
7.
cooking time (see “Cooking Guide”).
Partially dose door to "ajar^ position,
vyhen cooking is complete, turn timer to
8.
“0" and temperature control to
lowest position. Open door fully and
remove food carefully.
TO USE FOR WARMING
1. Place oven rack in low position.
2. Turn ‘PROGRAM’ control to “WARM."
3. Turn “OVEN *P control to desired
temperature.
4. Turn TIMER’ control to desired time
setting.
COOKING GUIDE
The following “Cooking Guide* uses approximate cooking times for fast-cooking with
"Bake,“ and should only be used as a guide,
longer cooking times.
Food
Pork Chops
Hamburgers
Lamb Chops
Chicken Pieces
Steak
Approximate
Thickness
1"(2.5 cm)
1/2" (1 25 cm)
r (2.5 cm)
1-1/210 2" (4-5 cm)
1-1/2" (4 cm)
TO USE AS A TOASTER
Experience will tell you the best setting for
various bread types. Generally speaking,
raisin bread or bread which is several days
old will usually require a lighter setting./
Close-textured bread, such as whole whea
or rye, may require a darker setting. TbasT
waffles on a lighter setting; muffins and
En^ish mufftos on a darker setting.
For best results on some toast settings, yo>
may pre-heat toaster oven for one c^e
before toasting.
Place food on Oven Rack using high
rack position. Close oven door.
2. Turn ■PROGRAM’ control to TOAST
3. Turn “OVEN 'P control to desired toast
color setting: Dark, Medium, or Light
4. Press TOAST-Starf button. Attheem
of the toasting cycle, the light wilt turn
off and a “beep’ will sound.
The toast cycle can be stopped at any time
by pressing the TOAST-Stop’ button. To
continue toastir>g, close oven door and
press TOAST-Start.*
The door may become clouded with conden
sation during the first toast cycle. This is nor
mal and should clear after a few minutes.
TO USE FOR TOP BROWNING
Top browning is ideal for melting, olsping,
and toasting food surfaces. Use for open
faced sandwiches, au gratin dishes, maca
roni and cheese, or for adding color to the
tops of cooked casseroles. When top browr
ing, turn “PROGRAM" control to “BROIL’ ant
place Oven Rack bi high position.
NOTE: Keep food and edges of giass
bakeware at least 1" (2.5 cm) from heatingi
elements.
'BroiP (top heating element only) requires
Rack Position
High
High
High
Low
Low
Total Baking
Time
12-16 min.
12-16 min.
7-15 min.
30-35 min.
20-25 min.
Page 6

MAINTENANCE, CLEANING, AND STORAGE
MAINTENANCE
This toaster oven/broiler requires little
maintenance. It contains no userserviceable parts inside the housir^. E>o
not remove the cover. Contact quaiified
personnei if the product requires servicing.
CLEANING
CAUTION: Never immerse the toaster oven
in water. Always unplug the toaster oven
and let It cool completely before attempt
ing to clean it
Exterior: Wipe surface with a soft, clean,
sudsy, damp cloth. Remove stubborn spots
using a cleaner for polished surfaces.
Never use abrasive cleaners or scouring
pads as they may scratch the surface.
Interior: Your Kenmore Toaster Oven/
Broiler has an easy-clean interior for fast
and easy clean up.
Wipe away spilt and splatter from inside
surfaces after each use to prevent build-up.
Use a damp, sudsy cloth only.
CAUTION: DO NOT use spray-on or other
oven cleaners. Using these types of clean
ers may cause electrical damage.
After cleaning, dry inside surfaces thoroughly.
To erasure toaster is coirq^letely dry, run toast
cycle at merfitmi setting with rx>thtng in the
oven.
Crumb TVaiy/Cookie Sheet: Clean crumbtray/cookie sheet often; wipe away crumbs
and food spills. To renfx)ve. gently pull out
crumb tray/cookie sheet from bottom of
oven. Wipe Surface with a soft, clean,
sudsy, damp doth. Always dry the tray
thoroughly. When slidirtg the crumb tray
back into place be sure to feel/hear it snap
into position.
Oven Pan and Oven Pan Wire Rack :
Wash in soapy water after each use. Avoid
using metal scouring pads. Use nylon
brush or pad for stubborn spots.
Removable Oven Rack: Pull fonward and
remove. Wash in soapy water.
Oven Glass Door: Use glass cleaner to
remove spots. DO NOT use abrasive
cleaners that wilt scratch the glass.
STORAGE
Unplug toaster oven/broiler and let cod.
Store in original box or in a clean, dry
place. Never store toaster oven/broiler
while it is hot or plugged in. Do not wrap
cord tightly around the appliance. Never
place any stress on cord, especially where
the cord enters the unit, as this could
cause cord to fray and break.
SEARS WARRANTY
FULL ONE YEAR WARRANTY ON KENMORE TOASTER OVEN
If this Kenmore Toaster Oven ^Is due to a defect in material or workmanship within one
year from date of purchase, Sears will replace it free of charge.
WARRANTY SERVICE
To obtain replacement under this warranty, return this Kenmore Toaster Oven to your
nearest Sears Store in the United States.
This warranty applies only while this Kenmore Toaster Oven is used in the United States.
This warranty gives you specific legal rights, and you may also have other rights which
vary from state to state
Sears, Roebuck and Co., Dept. 81 TWA, Hoffman Estates, IL 60179
Customer Service Department 1-800-233-9054
 Loading...