

Kenmore 463351505, 415162110 Owner’s Manual
AssemblyInstructions/Useand CareManual
LiquidPropaneGasGrill
ModelNo. 415.162110
This Grill is For
Outdoor UseOnly
®
ASSEMBLY
• Read this manual before cooking on
grill. Failure to follow all
manufacturer's instructions could
result in fire or explosion which could
cause property damage, personal
injury or death.
• Combustion by=products produced
when using this product contain
chemicals known to the State of
California to cause cancer, birth
• Parts
• Assembly
• Use and Care
• Troubleshooting
defects, or other reproductive harm.
• Safety Rules
__ m
• Espafiol, p. 33
Assembly Questions?
Call 1=800=241=7548
• Read and follow all Safety
Statements, Assembly instructions
Parts Ordering:
Call 1=800=4=MY=HOME ®
and Use & Care Directions before
attempting to assemble and cook.
m
c_
• Some parts may contain sharp edges,
especially as noted in these
instructions. Wear protective gloves
c_
if necessary.
To InstalledAssembler: Leave
these instructions with
consumer.
To Consumer: Keep this
manual for future reference.
Lo
Sears, Roebuck and Co., Hoffman Estates, IL 60179 U.S.A.
©2005Sears,RoebuckandCo.,AllRightsReserved
Printedin USA
FOR YOUR SAFETY
1. Do not store or use gasoline or other
flammable vapors and liquids in the
vicinity of this or any other appliance.
2. An LP tank not connected for use shall
not be stored in the vicinity of this or any
other appliance.
FOR YOUR SAFETY
if you smell gas:
1. Shut off gas to the appliance.
2. Extinguish any open flame.
3. Open lid.
4. if odor continues, immediately call your
gas supplier or your fire department.
Safety Symbols
The symbols and boxesshown below explain what each heading
means. Read and follow allof the messages found throughout
the manual.
DANGER: Indicates an imminently hazardous situation
which, if not avoided, will result indeath or serious injury.
WARNING: Be alert to the possibility ofserious bodily injury
if the instructions are not followed. Be sureto read and
carefully follow allof the messages.
cAuTio.
Call Grill Service Center For Help And Parts
Ifyou havequestions orneed assistance during assembly,
please call 1-800-241-7548.Youwill bespeaking to a
representative of the grill manufacturer and nota Sears
employee. To order new parts call Sears at 1-800-4-MY-HOME®.
Product Record
IMPORTANT:Fill out the product record information below.
Model Number
Serial Number
See ratinglabelongrillfor serialnumber.
Date Purchased
CAUTION
CAUTION: indicatesa potentially hazardous situation which,
if not avoided, may result in minor or moderate injury.
Installation Safety Precautions
* Usegrill only with LP (propane) gas and the regulator/valve
assembly supplied.
* Grill installation must conform with local codes, orintheir
absence with National Fuel Gas Code, NFPA 54/ ANSI
Z223.1. Handlingand storage of LPcylinders must conform to
LP Gas Code NFPA/ANSl 58. Grill is not for use in or on
recreational vehicles and/or boats.
, All electrical accessories (such as rotisserie) must be
electrically grounded in accordancewith local codes, or
National Electrical Code, ANSI / NFPA 70. Keep any
electrical cords and/orfuel supply hoses away from any hot
surfaces.
, This grill is safety certified for outdoor use in the United States
only. Do not modify for usein any other location. Modification
will result ina safety hazard.
For residential use only. Do not use for commercial
cooking.
2.463351505
For Your Safety ...................................... 2
Grill Service Center................................... 2
KENMORE GRILL WARRANTY
Product Record Information ............................ 2
Safety Symbols ...................................... 2
Installation Safety Precautions .......................... 2
Kenmore Grill Warranty ............................... 3
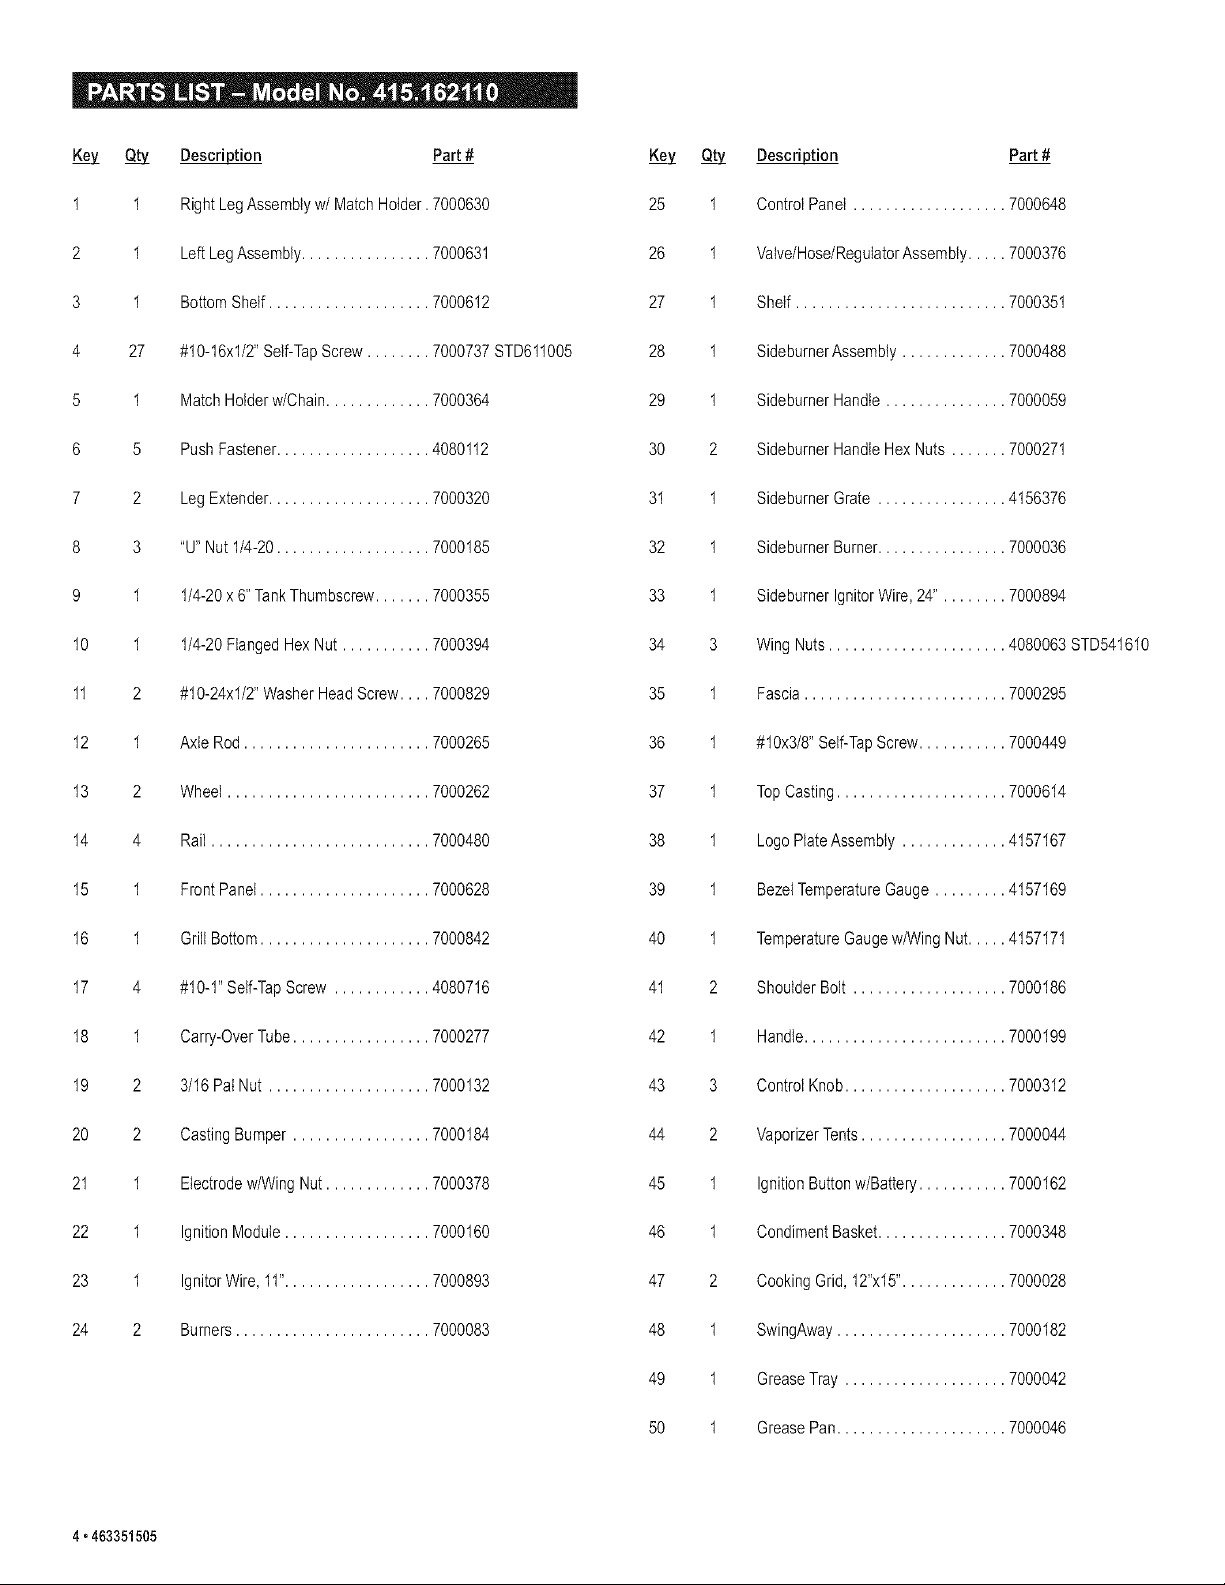
Parts List........................................... 4
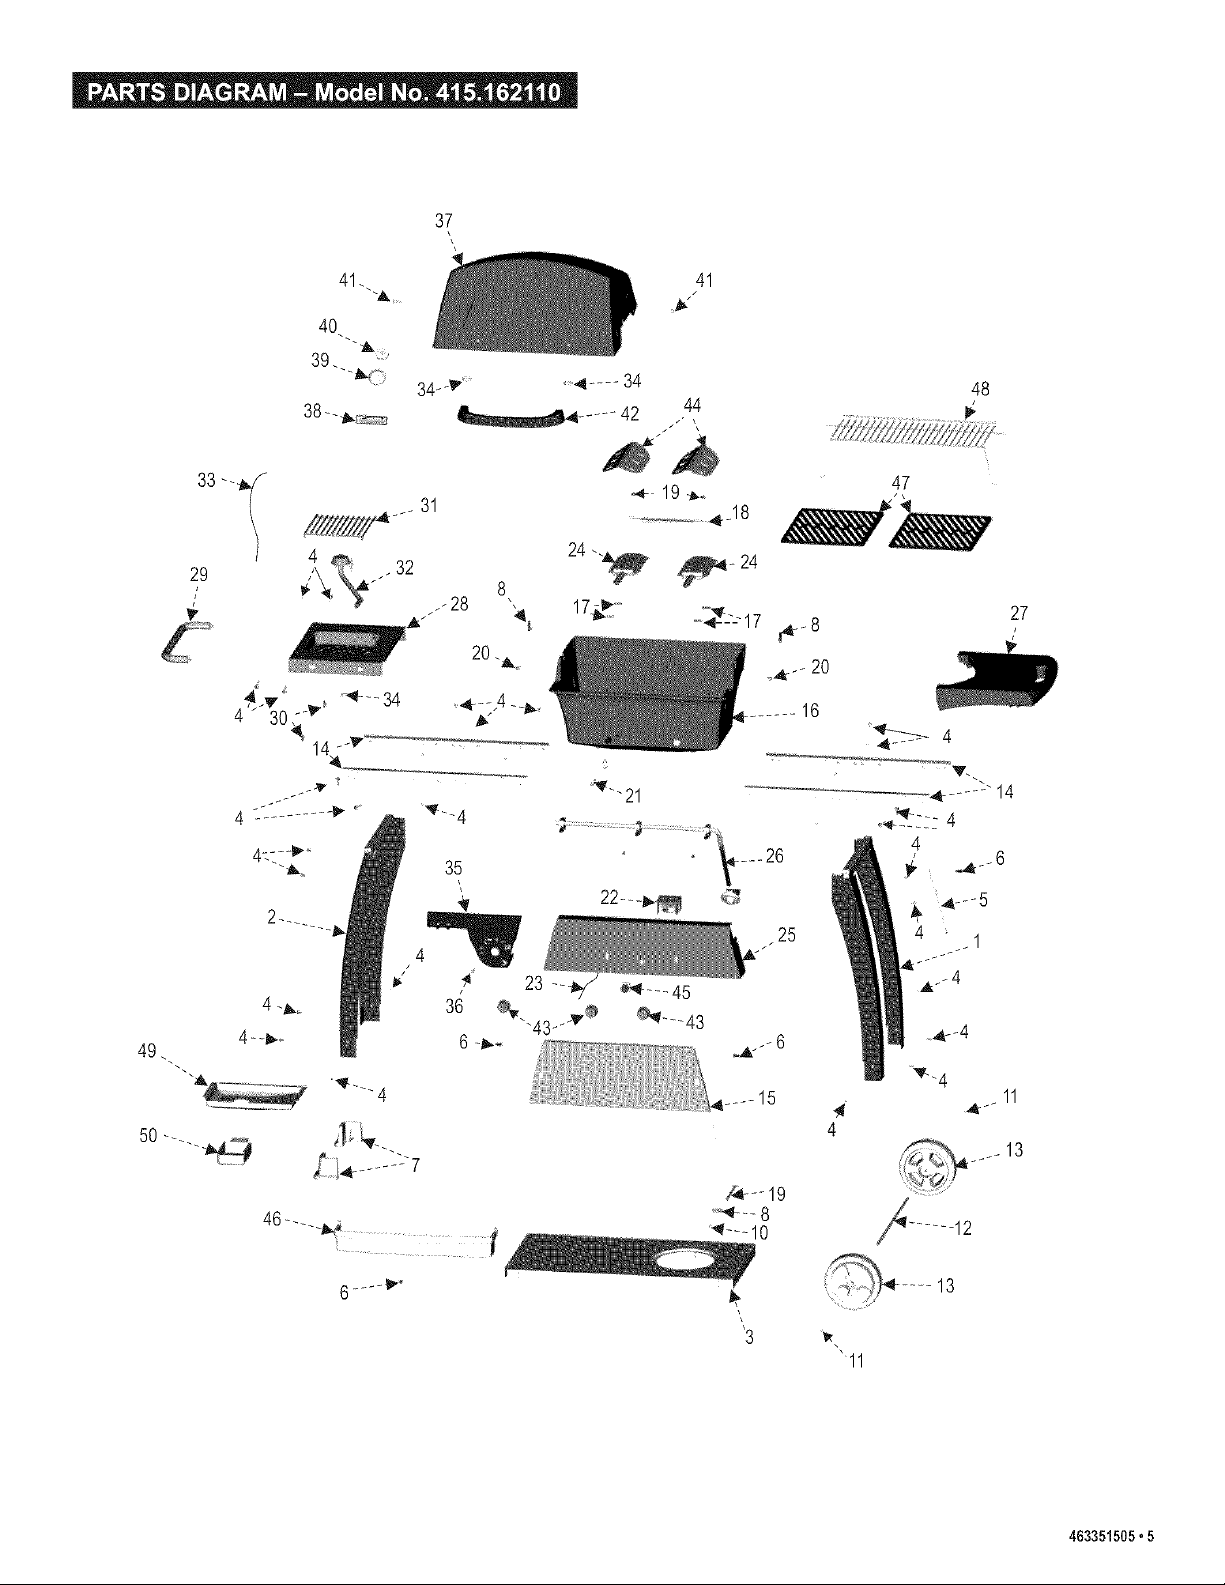
Parts Diagram....................................... 5
Assembly ........................................ 6-18
Use and Care ................................... 19-26
Cooking Table............................... 27
Troubleshooting........................... 28-30
Repair Protection Agreements
Congratulations on making asmart purchase. Your new
Kenmore®product is designed and manufacturedfor years of
dependable operation. But like all products, it may require repair
from time to time. That's when having a Repair Protection
Agreement can save you money andaggravation.
Purchase a Repair ProtectionAgreement now and protect
yourself from unexpectedhassle and expense.
Here's what's included in theAgreement:
[] Expert service by our 12,000 professional repair specialists
[] Unlimited service and no charge for parts and labor on all
covered repairs
[] Product replacement if your covered product can't be fixed
[] Discount of 10%from regular price of service and service-
related parts not covered by the agreement; also, 10% off
regular price of preventive maintenance check
[] Fast help by phone- phone support from a Sears
technician on products requiring in-home repair,plus
convenient repair scheduling
Once you purchase the Agreement, a simple phonecall is all that
it takes for you to schedule service.You can call anytime day or
night, or schedule aservice appointment online.
Sears has over 12,000 professional repair specialists,who have
access to over 4.5 millionquality parts and accessories. That's
the kind of professionalism you can count onto help prolong the
life of your new purchase for yearsto come. Purchase your
Repair Protection Agreement today!
Some limitations and exclusions apply.
For prices and additional information call 1-800-827-6655.
Sears installation Service
One Year Full Warranty on Kenmore Grill
If this grill is defective in material or workmanship within one
year from the date of purchase, call 1-800-4-MY HOME®to
have it repaired free of charge.
Additional Limited Warranty on Specific Grill Parts
Forthe time periods listed below, the following specificgrill
parts will be replacedfree of charge if they aredefective in
material or workmanship. You will be charged for labor.
. Lifetime on Aluminum Topand Bottom Castings.
, Two years from purchase date on Stainless Burner
Assembly.
All warranty coverage excludes batteries and any grill part
paint loss or rusting,which are either expendable parts that
can wear outfrom normaluse in lessthan a year, or are
conditions thatcan be the result of normal use, accident or
improper maintenance.
All warranty coverage is void if this grill is used for
commercial or rental purposes.
This warranty gives you specific legal rights, and you may
also have other rights which vary from state to state.
Sears, Roebuck and Co., Dept. 817WA,
Hoffman Estates, IL 60179
For Sears professional installation of home appliances, garage
door openers, water heaters, and other major home items, in the
U.S.A. call 1-800-4-MY-HOME®
463351505,3
_ Description Part#
_ Description Part#
1 1 RightLegAssemblyw/Match Holder.7000630
2 1 LeftLegAssembly................ 7000631
3 1 BottomShelf.................... 7000612
4 27 #10-16xl/2" Self-TapScrew ........ 7000737STD611005
5 1 MatchHolderw/Chain............. 7000364
6 5 PushFastener................... 4080112
7 2 LegExtender.................... 7000320
8 3 "U"Nut1/4-20................... 7000185
9 1 1/4-20x6" TankThumbscrew....... 7000355
10 1 1/4-20FlangedHexNut ........... 7000394
11 2 #10-24xl/2" WasherHeadScrew.... 7000829
12 1 AxleRod ....................... 7000265
25 1 ControlPanel ................... 7000648
26 1 Valve/Hose/RegulatorAssembly..... 7000376
27 1 Shelf .......................... 7000351
28 1 SideburnerAssembly............. 7000488
29 1 SideburnerHandle ............... 7000059
30 2 SideburnerHandleHexNuts ....... 7000271
31 1 SideburnerGrate ................ 4156376
32 1 SideburnerBurner................ 7000036
33 1 SideburnerIgnitorWire,24". ....... 7000894
34 3 WingNuts...................... 4080063STD541610
35 1 Fascia......................... 7000295
36 1 #10x3/8"Self-TapScrew........... 7000449
13 2 Wheel......................... 7000262
14 4 Rail........................... 7000480
15 1 FrontPanel..................... 7000628
16 1 GrillBottom..................... 7000842
17 4 #10-1"Self-TapScrew ............ 4080716
18 1 Carry-OverTube................. 7000277
19 2 3/16PatNut .................... 7000132
20 2 CastingBumper................. 7000184
21 1 Electrodew/WingNut............. 7000378
22 1 IgnitionModule.................. 7000160
23 1 IgnitorWire,11".................. 7000893
24 2 Burners........................ 7000083
37 1 TopCasting..................... 7000614
38 1 LogoPlateAssembly............. 4157167
39 1 BezelTemperatureGauge......... 4157169
40 1 TemperatureGaugew/WingNut..... 4157171
41 2 ShoulderBolt ................... 7000186
42 1 Handle......................... 7000199
43 3 ControlKnob.................... 7000312
44 2 VaporizerTents.................. 7000044
45 1 IgnitionButtonw/Battery........... 7000162
46 1 CondimentBasket................ 7000348
47 2 CookingGrid,12"x15"............. 7000028
48 1 SwingAway..................... 7000182
4,463351505
49 1 GreaseTray .................... 7000042
50 1 GreasePan..................... 7000046
37
\\
33 --_"
29
st
4::- -_`
4O
39.
41.
"'A,
3& -_" 4 .... 34
..... 42 .44,
2O
/
41
48
47
27
/
49.
50 _
.... 15
I;¸
.... _
'3
"11
463351505,5
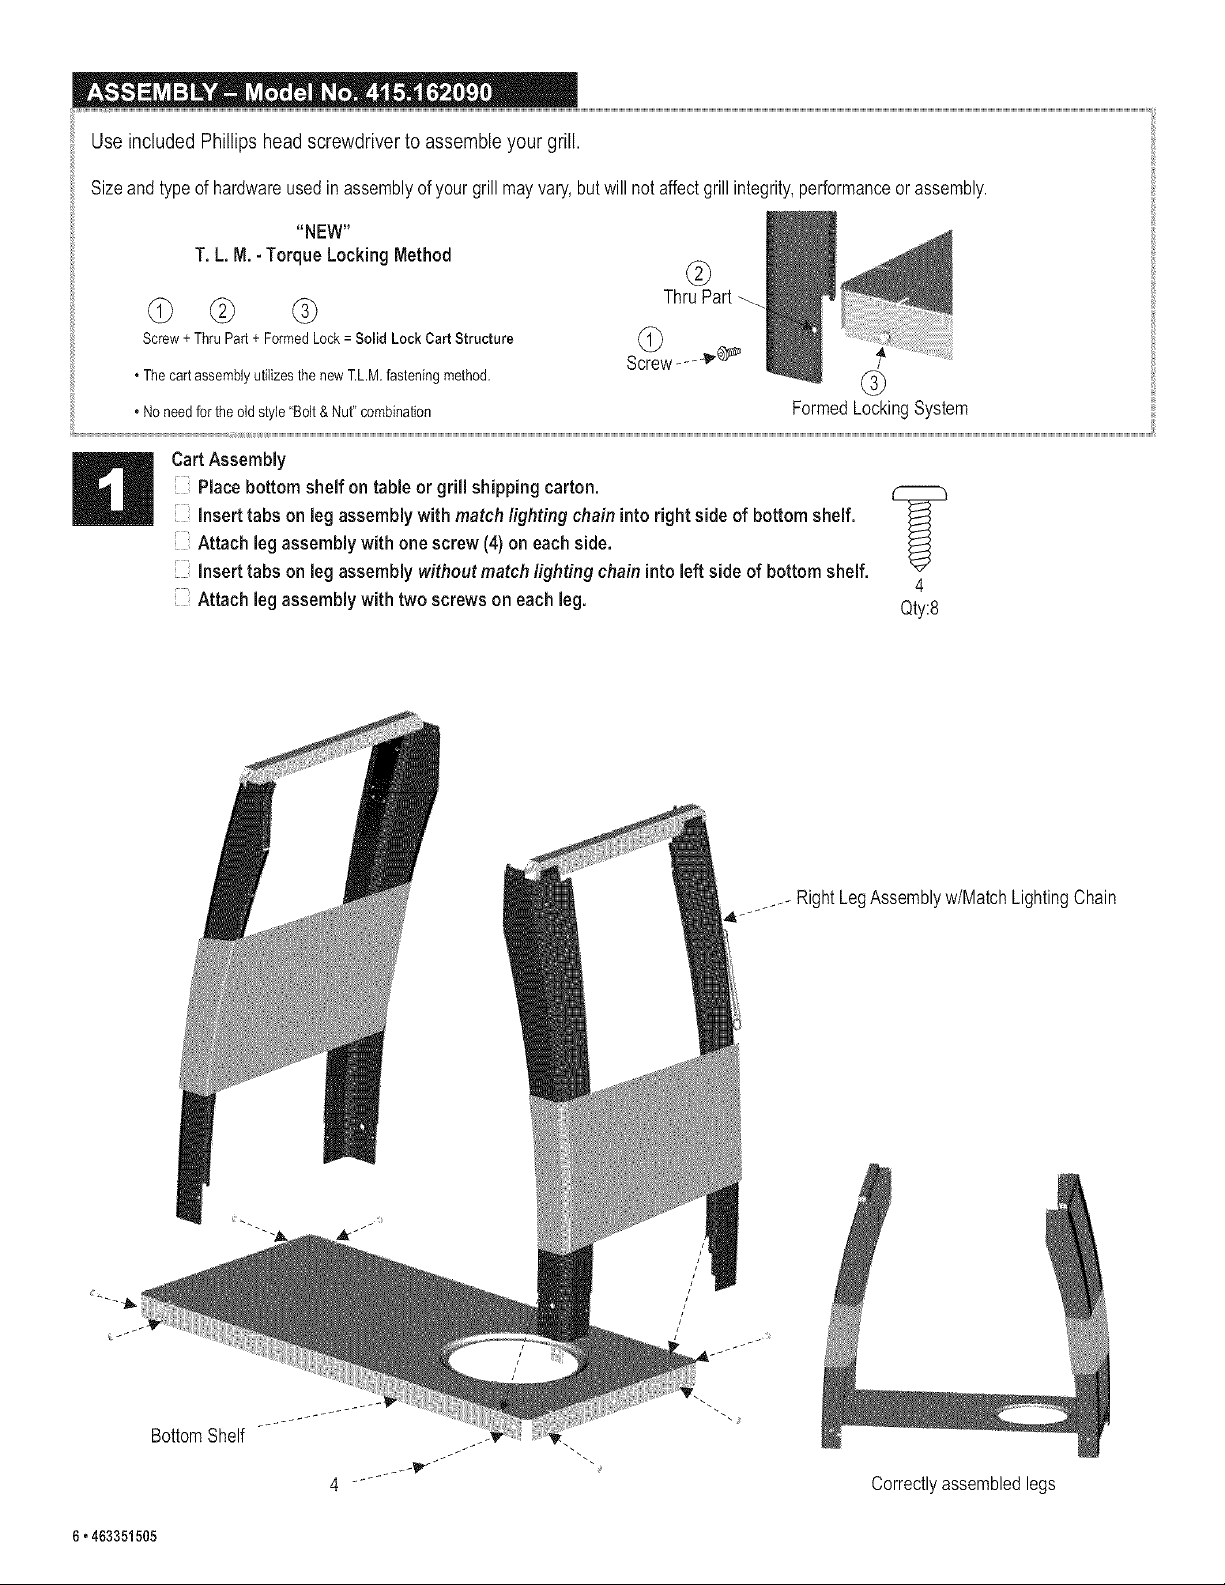
Use included Phillips head screwdriver to assemble your grill.
Sizeandtypeof hardwareusedinassemblyofyour grillmayvary,butwillnotaffectgrillintegrity,performanceor assembly.
"NEW"
T. L.M.- TorqueLockingMethod
ThruPart
Screw+ ThruPart+ FormedLock= Solid Lock Cart Structure
, ThecartassemblyutilizesthenewT.L.M.fasteningmethod.
, Noneedfor the oldstyle"Bolt& Nut" combination
FormedLockingSystem
I
@
Cart Assembly
Placebottom shelf on tableor grill shipping carton. CZZZC3
insert tabs on leg assemblywith match lighting chainintoright side of bottom shelf,
Attach legassemblywith onescrew (4) on eachside,
insert tabs on leg assembly without matchlighting chain intoleft sideof bottomshelf,
4
Attach legassemblywith two screws on each leg, Qty:8
BottomShelf
LegAssemblyw/MatchLightingChain
6,463351505
Correctlyassembledlegs
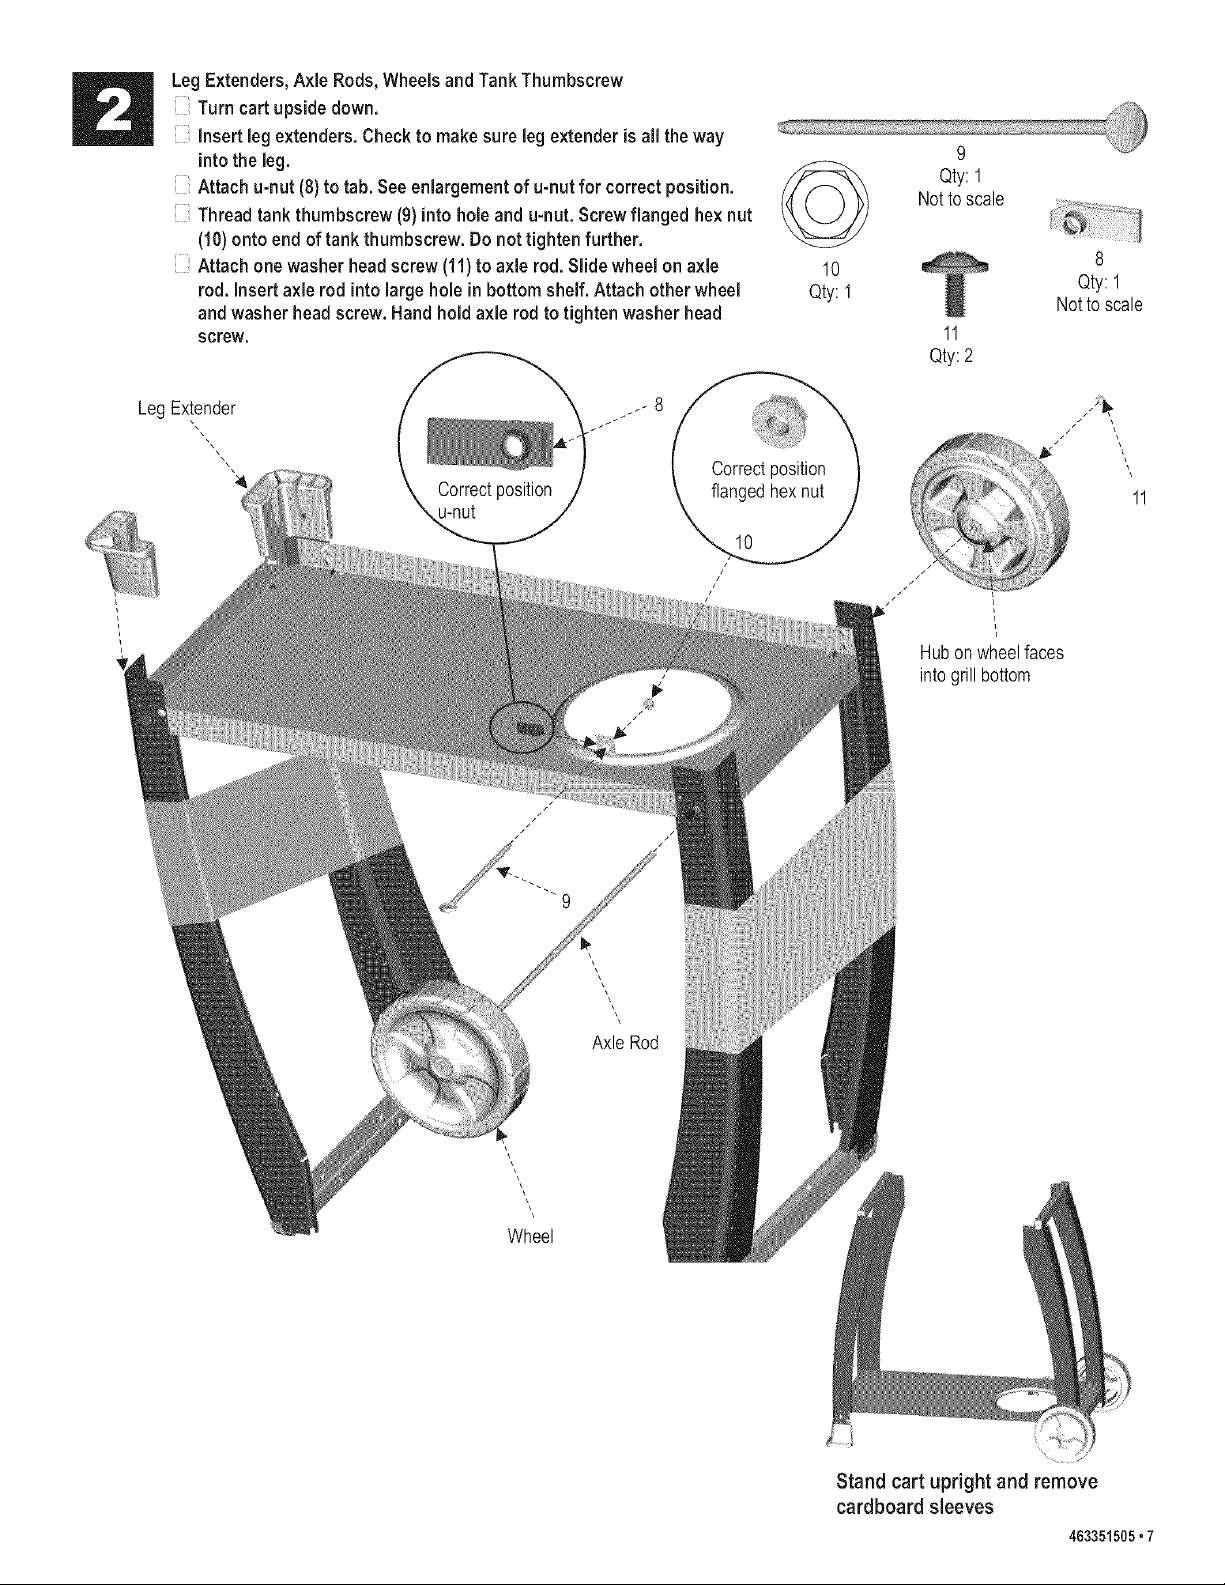
LegExtenders,Axle Rods, WheelsandTankThumbscrew
Turncart upsidedown.
insertlegextenders. Checkto makesure legextenderis ail theway
intothe leg.
Attach u-nut(8)to tab. Seeenlargementof u-nut for correct position.
Threadtank thumbscrew (9)into hole and u-nut. Screwflanged hexnut
(10)onto end of tank thumbscrew.Donottighten further.
Attach onewasher headscrew (11)to axle rod.Slide wheel on axle 10
rod. Insert axlerod intolarge hole in bottom shelf.Attach other wheel Qty:1
andwasher headscrew. Handhold axle rod to tighten washer head
screw.
LegExtender .J 8
\
9
Qty:l
Nottoscale
8
Qty:l
Notto scale
11
Qty:2
Correctposition
u-nut
11
Hubon wheelfaces
intogrillbottom
\
AxleRod
Wheel
-_ _:i_¸_
Stand cart upright and remove
cardboard sleeves
463351505,7
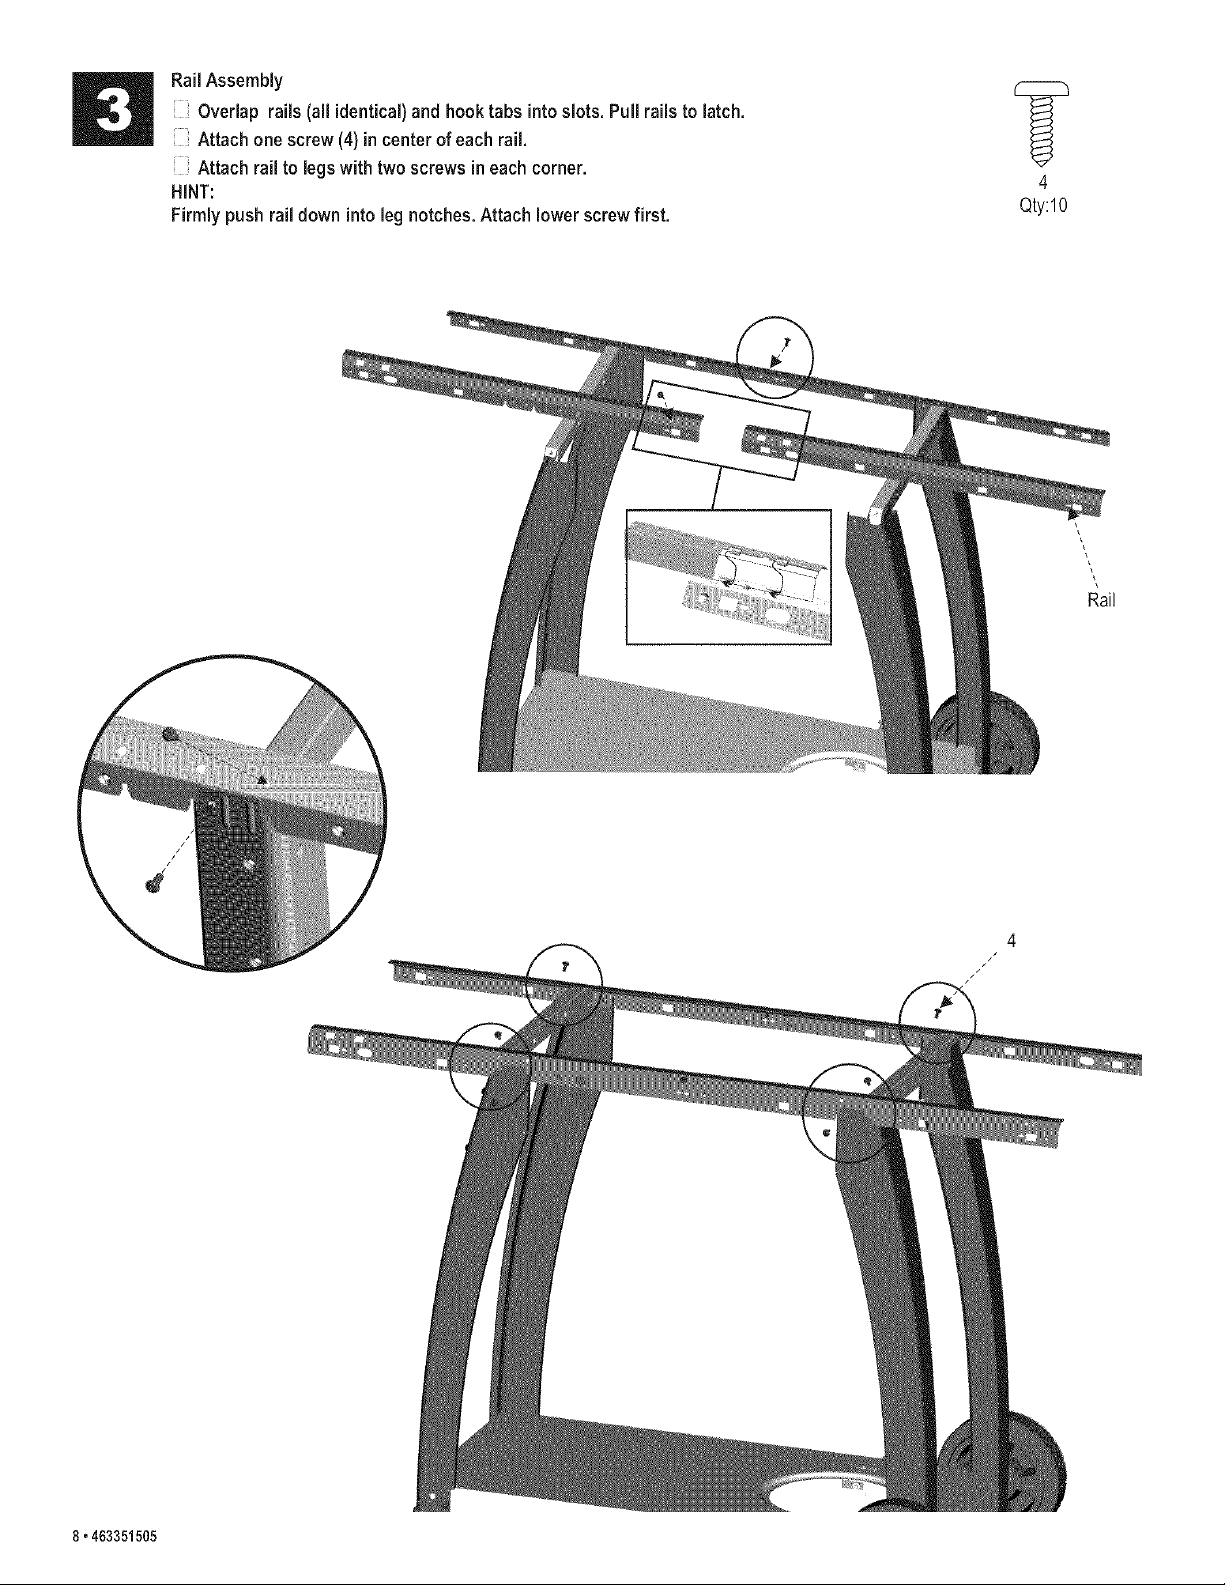
RailAssembly
Overlap rails (allidentical)and hook tabs intoslots.Pull rails to latch.
Attach one screw(4)incenterofeach rail.
Attach railto legswith two screws ineachcorner.
HINT:
Firmly push rail down intolegnotches.Attach lowerscrewfirst.
4
Qty:10
\
\
\
Rail
4
8.463351505
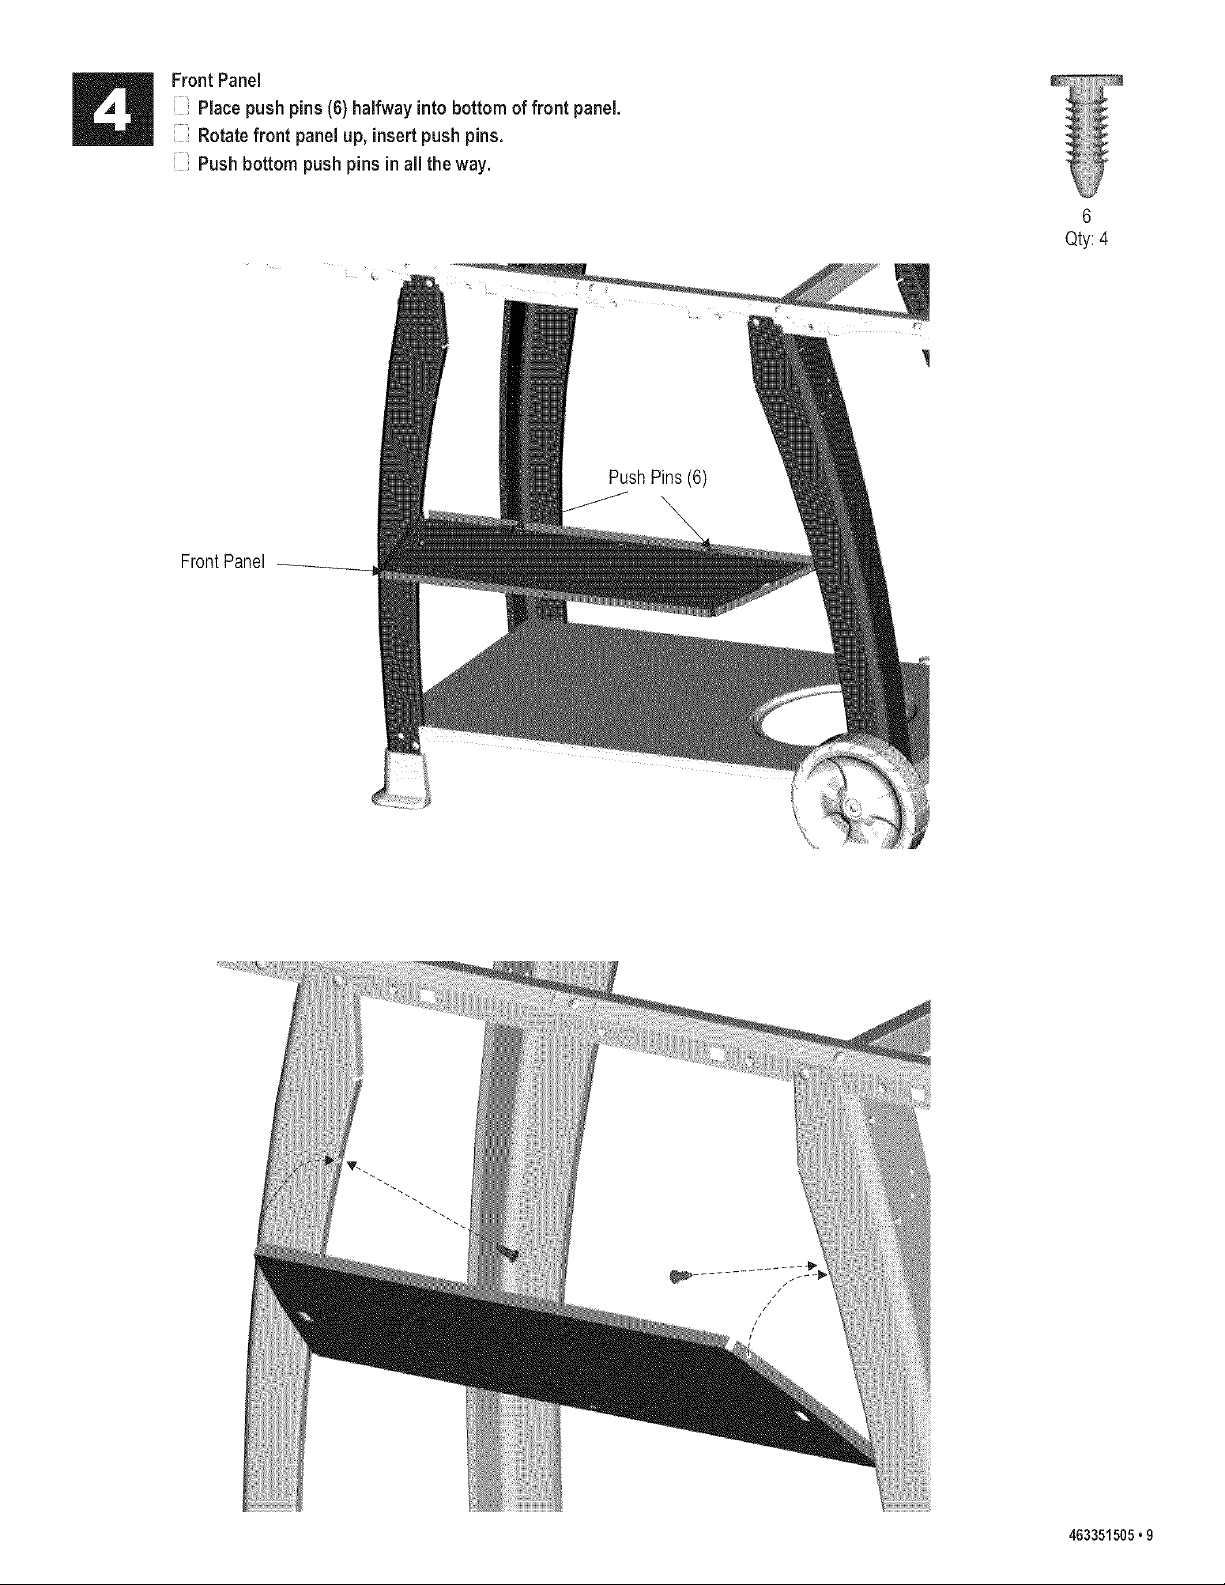
Front Panel
Placepush pins (6) halfwayintobottomof front panel.
Rotatefront panelup, insertpush pins.
Pushbottom push pins inall theway.
FrontPanel
6
Qty:4
\
463351505,9
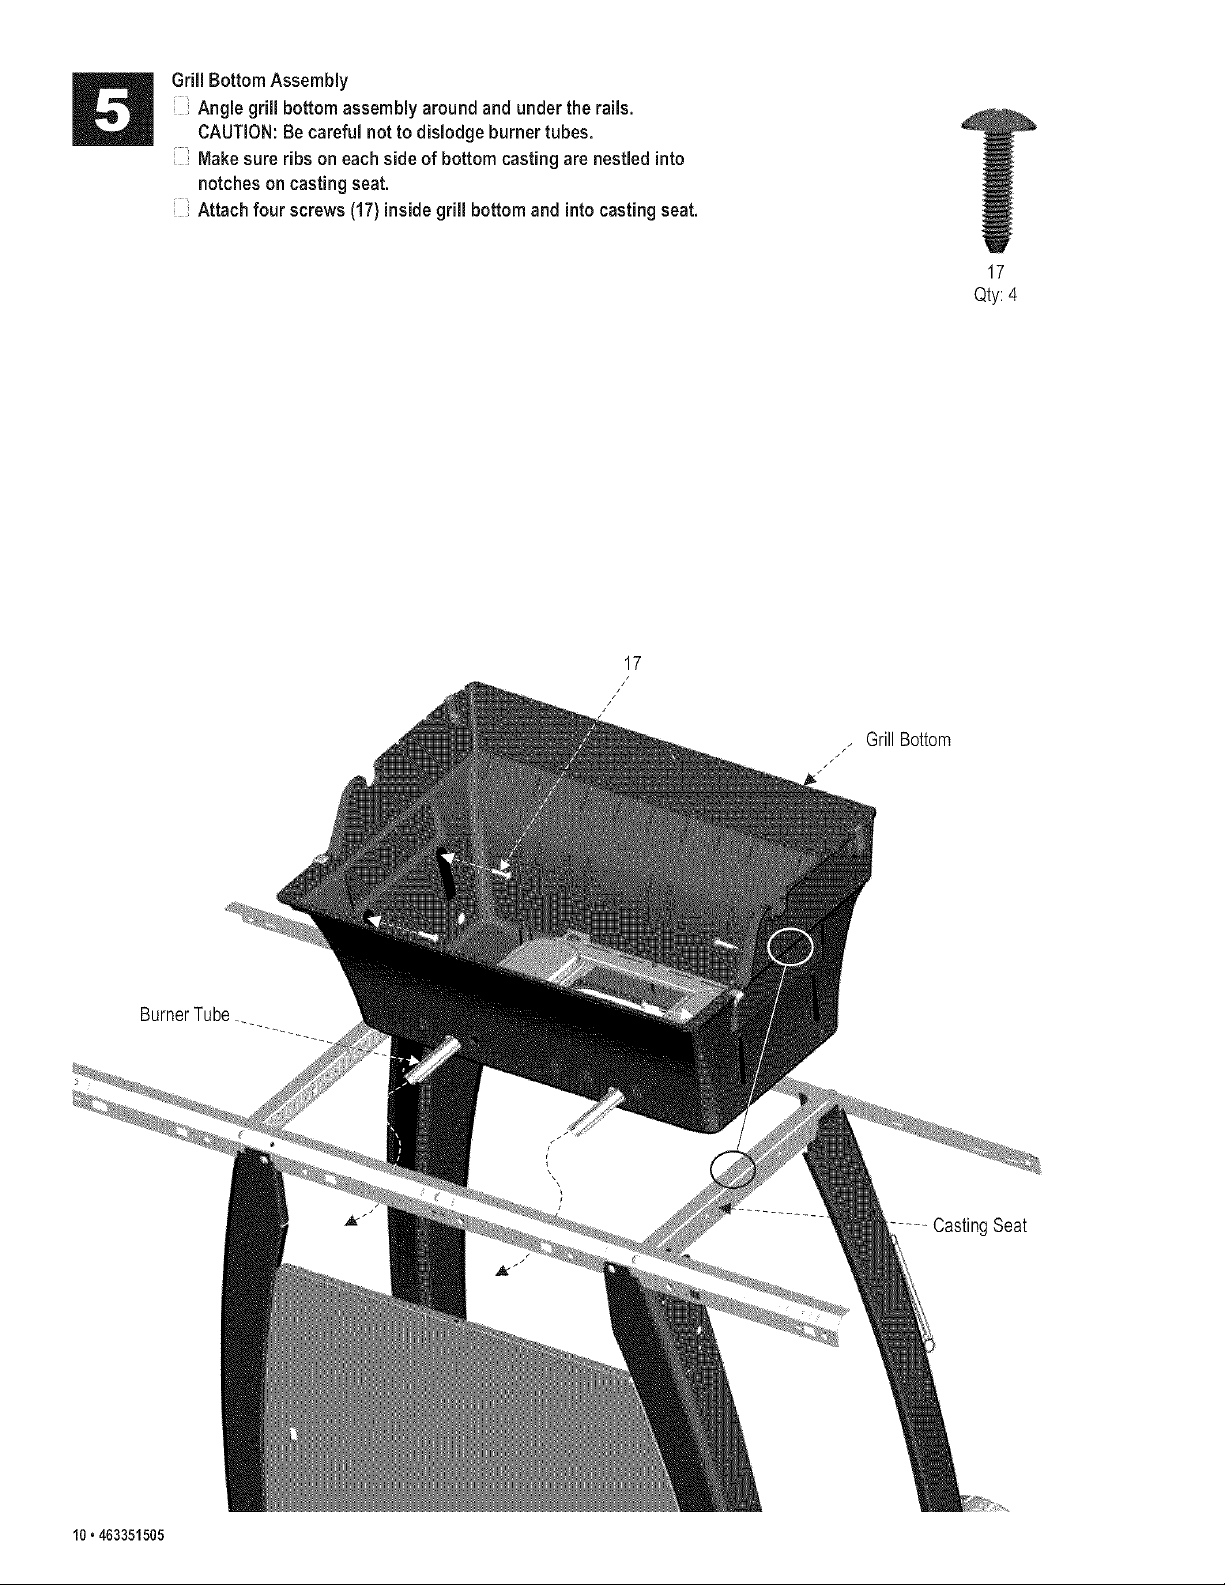
Grill Bottom Assembly
Angle grill bottom assembly around and under therails.
CAUTION:Be careful not to dislodge burner tubes.
Makesure ribs on eachsideof bottom casting are nestled into
notcheson casting seat.
Attach four screws(17)insidegrill bottom and intocasting seat.
17
17
Qty:4
BurnerTube
. GrillBottom
J
CastingSeat
10,463351505
 Loading...