

Kenmore 41516115, 640-122390-115 Owner’s Manual
Assembly Instructions/UseandCareManual
LiquidPropaneGasGrill
Model No. 415.16115 and 640-122390-115
ThisGrillisFor
Outdoor UseOnly
®
• Read this manual before cooking on
grill. Failure to follow all
manufacturer's instructions could
result in fire or e×plosion which could
cause property damage, personal
injury or death.
- Combustion by-products produced
when using this product contain
chemicals known to the State of
California to cause cancer, birth
defects, or other reproductive harm.
CAUTION
- Read and follow all Safety
Statements, Assembly instructions
and Use & Care Directions before
attempting to assemble and cook.
• Some parts may contain sharp edges,
especially as noted in these
instructions. Wear protective gloves
if necessary.
• Parts
• Assembly
• Safety Rules
Assembly Questions?
Call 1-800-241-7548
Parts Ordering:
Call 1-800-4-MY-HOME ®
To InstallerlAssembler: Leave
these instructions with
consumer,
To Consumer: Keep this
manual for future reference.
• Use and Care
• Troubleshooting
• EspaSol
Sears, Roebuck and Co., Hoffman Estates, IL 60179 U.S.A.
@2006Sears,RoebuckandCo.,All RightsReserved PrintedinChina 464321607and464321407°80009281,11-01-06
ifyou smell gas:
1. Shut off gas to the appliance.
2. Extinguish any open flame.
3. Open lid.
4. If odor continues, keep away from the
appliance and immediatelycall your gas
supplier or your fire department,
Safety Symbols
The symbolsand boxesshown below explain what each heading
means.Read andfollow all of the messagesfound throughout
the manual.
DANGER: Indicatesan imminentlyhazardoussituation
which, if notavoided,will result in death or serious injury.
WARNING: Be alertto the possibilityof seriousbodily injury
ifthe instructionsare not followed.Be sure to read and
carefullyfollow allof the messages.
1. Do not store or use gasoline or other
flammable liquids or vapors inthe vicinity of
this or any otherappliance.
2. An LP cylinder not connected for use shall not
be stored in the vicinity of this or any other
appliance.
Call Grill Service Center For Help And Parts
Ifyou havequestions or needassistance during assembly,
pleasecall 1-800-241-7548.Youwill bespeakingto a
representativeof thegrill manufacturerand not a Sears
employee.Toorder new parts call Sears at 1-800-4-MY-HOME®.
Product Record
iMPORTANT:Filloutthe productrecord informationbelow.
Model Number
Serial Number
See ratinglabel on grillfor serial number.
CAUTION
CAUTION: Indicatesa potentiallyhazardous situationwhich,
ifnot avoided, mayresultin minor or moderate injury.
Installation Safety Precautions
• Use grill, as purchased,onlywith LP (propane)gas and the
regulator/valveassembly supplied.
• Grill installationmust conformwith local codes,or in their
absence of localcodes,with either the NationalFuel Gas
Code,ANSI Z223.1/NFPA 54, Natural Gasand Propane
Installation Code, CSA B149.1,or PropaneStorageand
Handling Code,B149.2,or the Standardfor Recreational
Vehicles,ANSlA 119.2/NFPA1192,andCSAZ240RV Series,
Recreational VehicleCode,as applicable.
, All electricalaccessories(such as rotisserie)mustbe
electrically groundedin accordancewith local codes, or
National ElectricalCode,ANSl/ NFPA70. Keepany electrical
cords and/orfuel supply hoses awayfrom any hot surfaces.
, Grill isnotfor usein or on recreationalvehiclesand/or boats.
, This grill issafety certifiedfor use in the UnitedStatesonly. Do
not modifyfor use in any other location.Modificationwill result
in a safety hazard.
Date Purchased
CAUTION
For residential use only. Do not use for commercial
cooking.
2• 464321607and464321407
ForYour Safety...................................... 2
Grill Service Center................................... 2
Product Record Information ............................ 2
SafetySymbols...................................... 2
InstallationSafetyPrecautions .......................... 2
KenmoreGrill Warranty ............................... 3
Use and Care..................................... 4-11
One-YearFullWarrantyon KenmoreGrill
Ifthisgrillfailsduetoadefectinmaterialorworkmanshipwithin
oneyearfromthedateof purchase,call1-800-4-MY-HOME®to
arrangeforfree repair(orreplacementifrepairprovesimpossible).
Five-Year LimitedWarranty on Stainless Steel Burners
For five years from the date of purchase, any stainlesssteel burner
that ruststhrough will be replacedfree ofcharge. After thefirst
year from the date of purchase,you payfor labor if you wish to
have it installed.
Parts List.......................................... 12
Parts Diagram...................................... 13
Assembly ....................................... 14-23
Troubleshooting.................................. 24-26
Repair Protection Agreements
Congratulationson makinga smartpumhase. Your new
Kenmore®productisdesignedand manufacturedfor years of
dependableoperation. Butlike all products, it may requirerepair
from time to time. That's when havinga Repair Protection
Agreementcan saveyou moneyand aggravation.
Purchasea RepairProtectionAgreementnow and protect
yourselffrom unexpectedhassleand expense.
Here'swhat's included in the Agreement:
[] Expert service by our12,000professionalrepairspecialists
Unlimited service and no charge for partsand labor on all
coveredrepairs
[] Product replacement if your covered product can't befixed
[] Discount of 10%from regular priceof serviceand service-
relatedparts notcovered by the agreement; also, 10%off
regularpriceof preventivemaintenancecheck
[] Fast help by phone - phone supportfrom a Sears
technicianon productsrequiring in-homerepair,plus
convenientrepair scheduling
Onceyou purchasethe Agreement,a simple phonecall is all that
it takesfor youto scheduleservice. Youcan call anytimeday or
night, or schedulea serviceappointmentonline.
Sears hasover 12,000professionalrepair specialists,who have
access toover4.5 millionquality parts and accessories.That's
the kindof professionalismyou can count onto help prolong the
lifeof your new purchasefor yearsto come. Purchaseyour
RepairProtectionAgreement today!
Some limitationsand exclusions apply.
For pricesand additional informationcall 1-800-827-6655.
SearsInstallation Service
All warranty coverage excludes ignitor batteriesand grill part paint
loss, discoloration or rusting, which are either expendableparts
that canwear out from normal usewithin the warranty period, or
are conditions that can be the result of normal use, accidentor
improper maintenance.
Allwarrantycoverageis voidifthisgrilliseverusedforcommercial
or rentalpurposes.
AllwarrantycoverageappliesonlyifthisgrillisusedintheUnited
States.
Thiswarrantygivesyouspecificlegalrights,andyoumayhave
otherrightswhichvaryfromstatetostate.
Sears, Roebuck and Co., Hoffman Estates, IL 60179
For Searsprofessionalinstallationof homeappliances,garage
door openers,water heaters,and othermajorhome items, inthe
U.S.A. call 1-800-4-MY-HOME®
464321607and464321407• 3
• NEVERstore aspare LP tank under or near grill or in
enclosed areas
hi, _ _Siii_ i_
• Never fill the cylinder beyond 80% full,
• An overfilled or improperly stored tank is ahazard due
to possiblegas release from the safety relief valve.
LP Tank
• The LP tank used with your grill must meetthe following
requirements:
• Use LPtanks onlywith these required measurements:12"
(30.5cm)(diameter) x 18"(45.7 cm) (tall)with 20 Ib. (9 kg.)
capacity maximum.
, LP tanks mustbe constructed and marked in accordancewith
specificationsfor LPtank of the U.S. Departmentof
Transportation(DOT).See LP tank collar for marking.
• LP tankvalve must have:
, Type1 outlet compatiblewith
regulatoror grill.
, Safety relief valve.
, UL listedOverfillProtection
OPDHandWheel
Device (OPD).This OPDsafety
feature is identifiedby a unique triangularhand wheel. Use
only LPtanks equipped with this type of valve.
, LP tank must bearrangedfor vaporwithdrawal and include
collarto protectLP tank valve.
LP (Liquefied Petroleum Gas)
• If you see, smell or hear escaping gas, immediatelyget
away from the LP tank/grill and call your fire
department.
• If the above is not followed exactly, a fire causing
death or serious injury may occur.
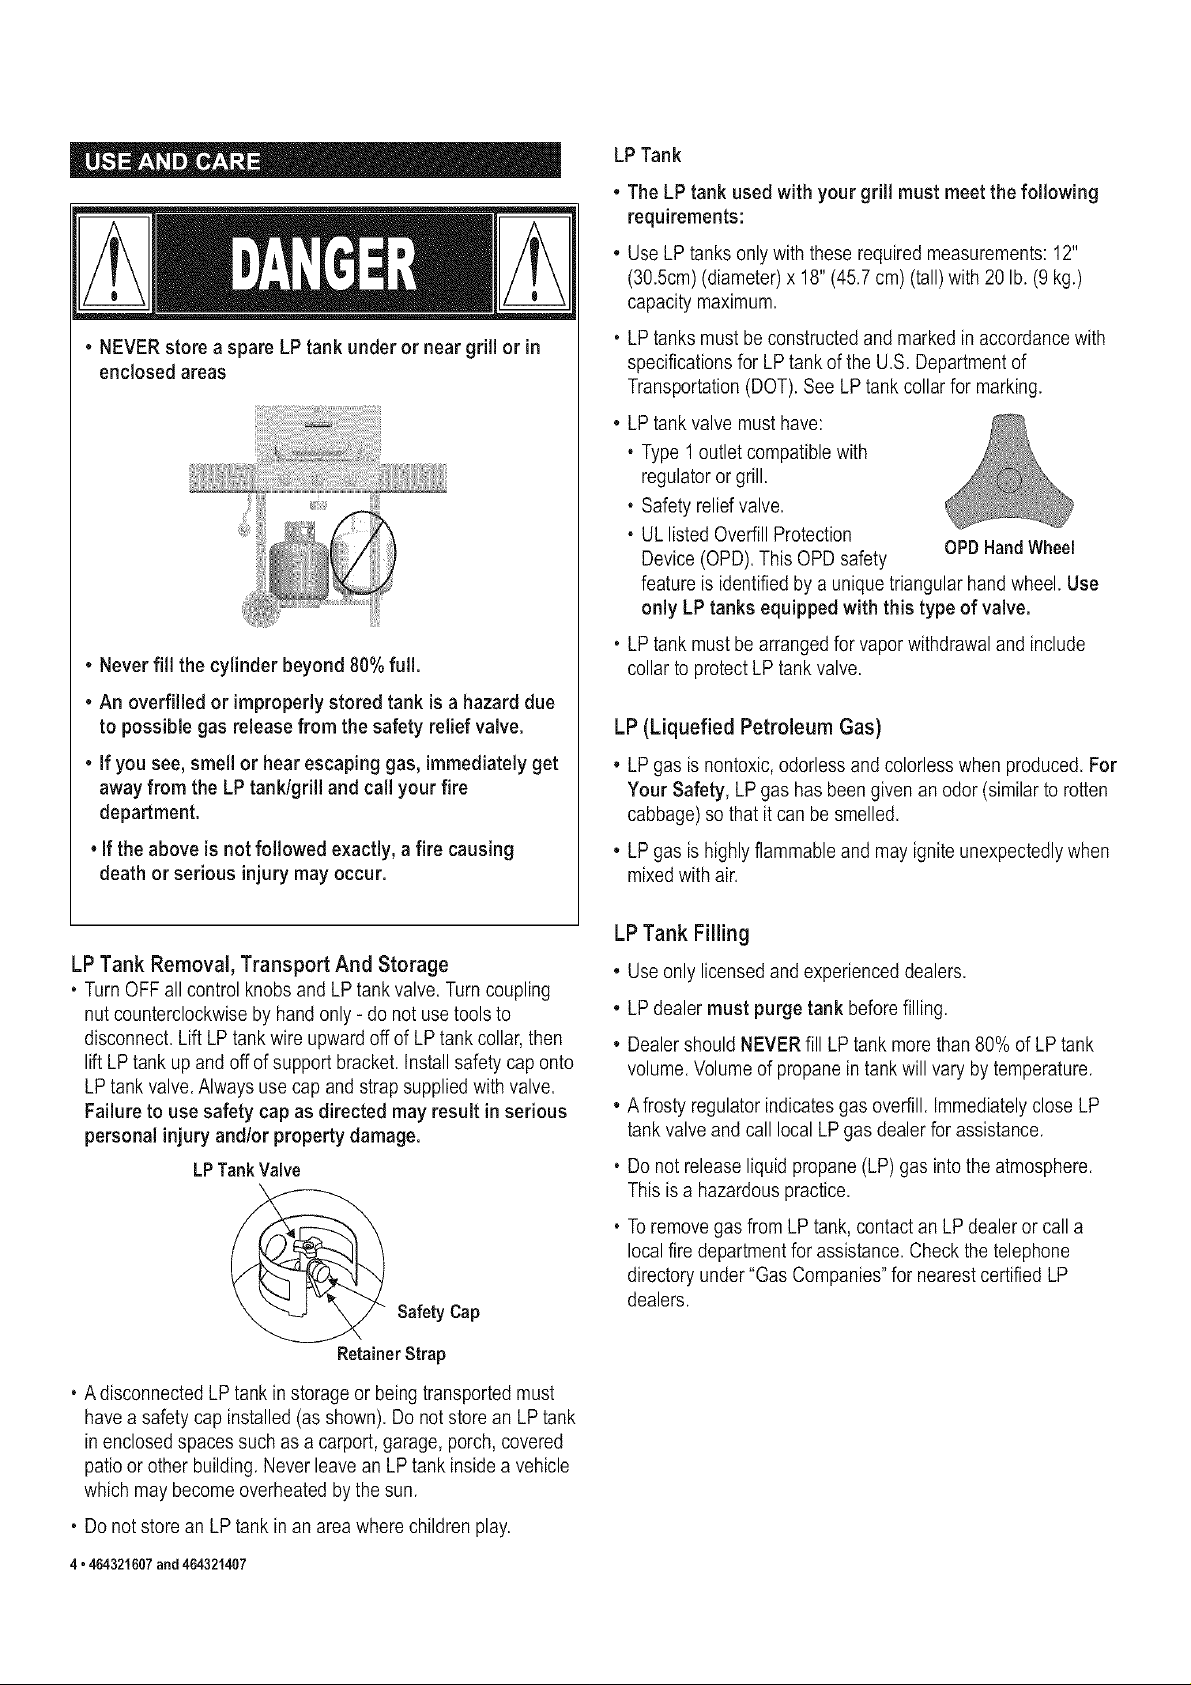
LP Tank Removal, Transport And Storage
, Turn OFF allcontrol knobs andLP tank valve.Turncoupling
nut counterclockwiseby handonly - do notuse tools to
disconnect.Lift LPtank wire upwardoff of LPtank collar,then
lift LP tankup and offof supportbracket. Install safety cap onto
LP tank valve. Always use capand strap supplied with valve.
Failure to use safety cap as directed may result in serious
personalinjury andlor propertydamage.
LPTankValve
Salty Cap
• LP gas is nontoxic,odorless and colorlesswhen produced. For
Your Safety, LP gas has been given an odor (similarto rotten
cabbage)so that it can be smelled.
• LP gas is highlyflammable and may ignite unexpectedlywhen
mixedwith air.
LP Tank Filling
• Use only licensedandexperienced dealers.
• LP dealermust purge tank beforefilling.
• Dealer should NEVERfill LP tank morethan 80% of LP tank
volume.Volume of propane intank will varyby temperature.
• A frostyregulatorindicatesgas overfill. Immediatelyclose LP
tank valve and call localLP gas dealerfor assistance.
, Do not releaseliquid propane(LP)gas intothe atmosphere.
This is a hazardouspractice.
, Toremovegas fromLP tank, contact an LPdealer or call a
localfire departmentfor assistance.Checkthe telephone
directoryunder "Gas Companies"for nearestcertified LP
dealers.
Retainer Strap
, A disconnectedLPtank in storageor being transportedmust
havea safety cap installed (asshown). Donot storean LP tank
in enclosedspaces such as a carport,garage, porch,covered
patioor otherbuilding.Never leavean LPtank inside a vehicle
which may becomeoverheatedbythe sun.
, Do notstore an LPtank in an areawhere childrenplay.
4 • 464321607and 464321407
LP Tank Exchange
Connecting Regulator To The LP Tank
, Many retailersthatsell grillsoffer you theoption of replacing
yourempty LP tankthroughan exchange service.Use only
those reputableexchangecompaniesthat inspect, precisionfill,
test andcertifytheir cylinders. Exchange your tank only for
an OPDsafety feature-equipped tank as described in the
"LP Tank" section of this manual,
• Always keep newand exchanged LPtanksin upright position
during use, transit or storage.
, Leak test new and exchanged LP tanks BEFORE
connecting to grill.
LP Tank Leak Test
For your safety
• Leak test mustbe repeatedeach timeLP tank is exchangedor
refilled.
• Do notsmokeduring leak test.
• Do notuse an openflame tocheck for gas leaks.
• Grill must beleaktested outdoors ina well-ventilatedarea,
awayfrom ignitionsourcessuch as gasfired or electrical
appliances.During leaktest, keep grill awayfrom openflames
or sparks.
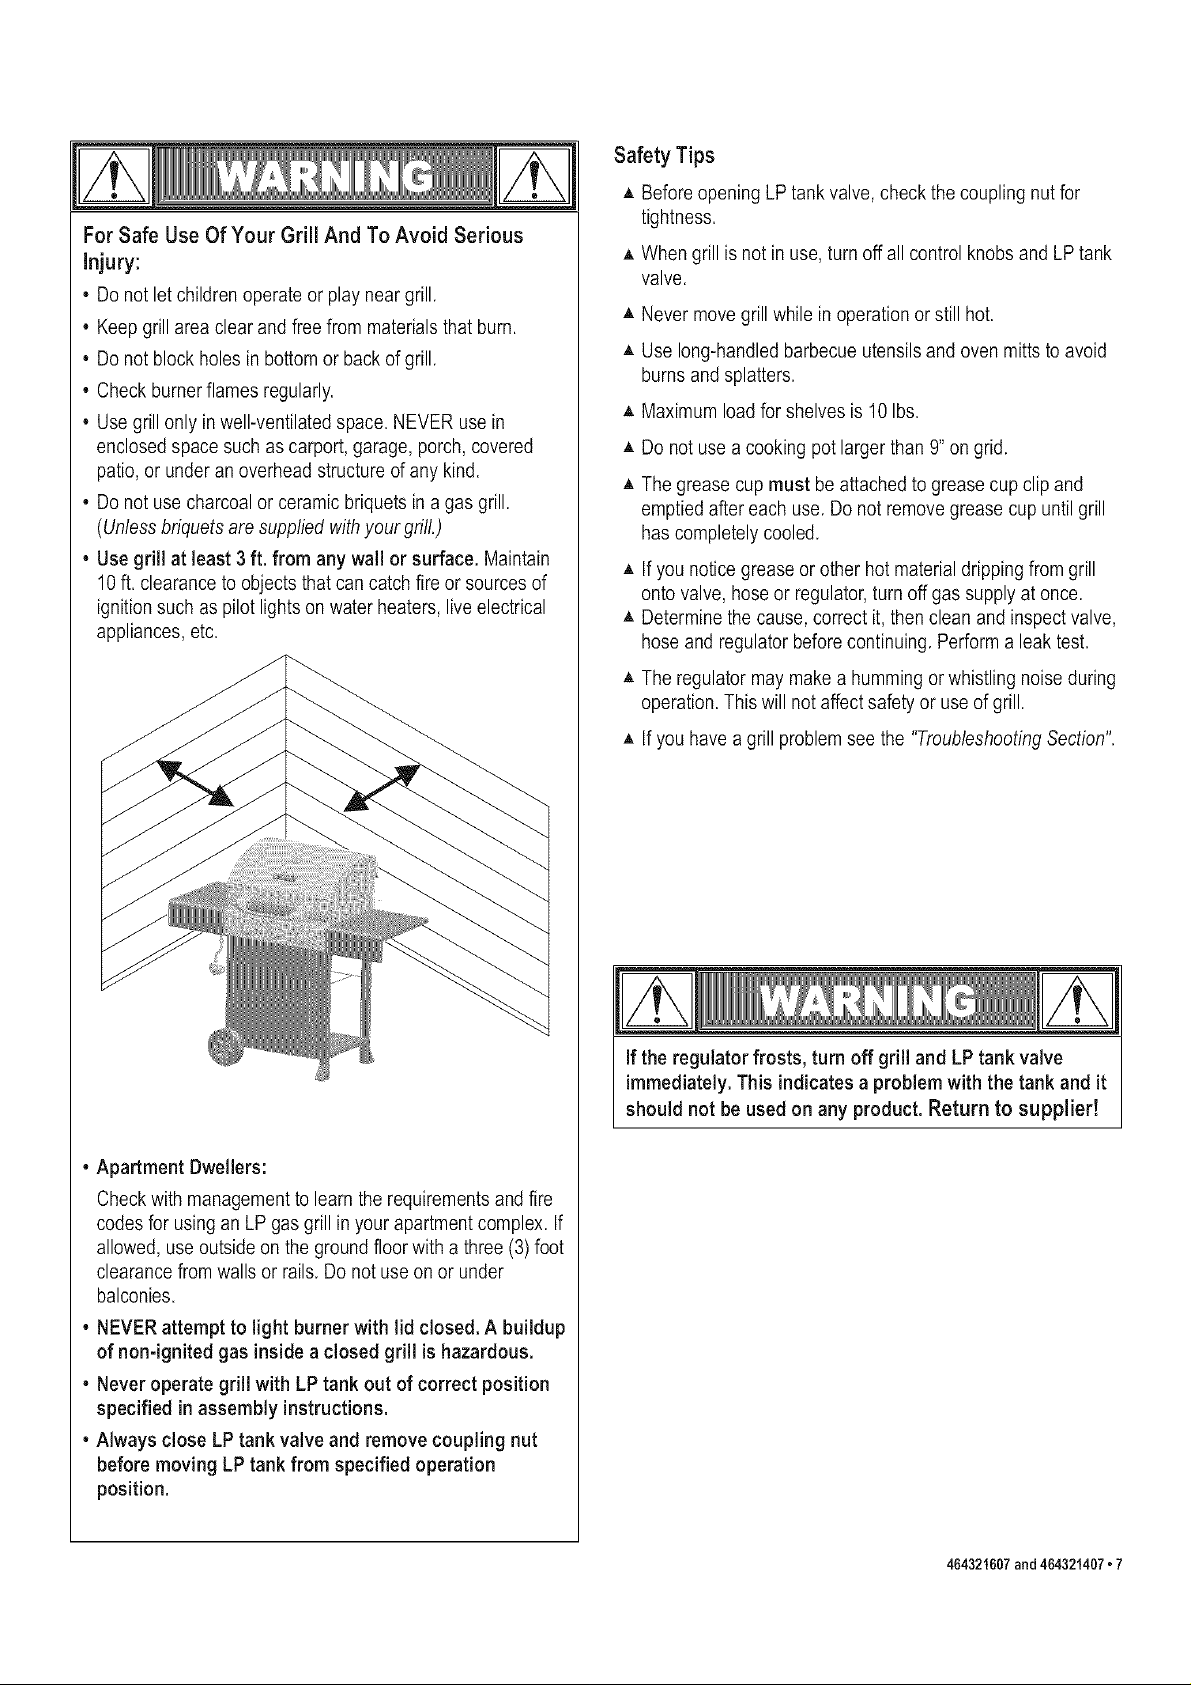
, Use aclean paintbrushand a 50/50 mild soap andwater
solution.Brush soapy solutionontoareas indicated byarrows
in figure below.Leaks are indicatedbygrowingbubbles.
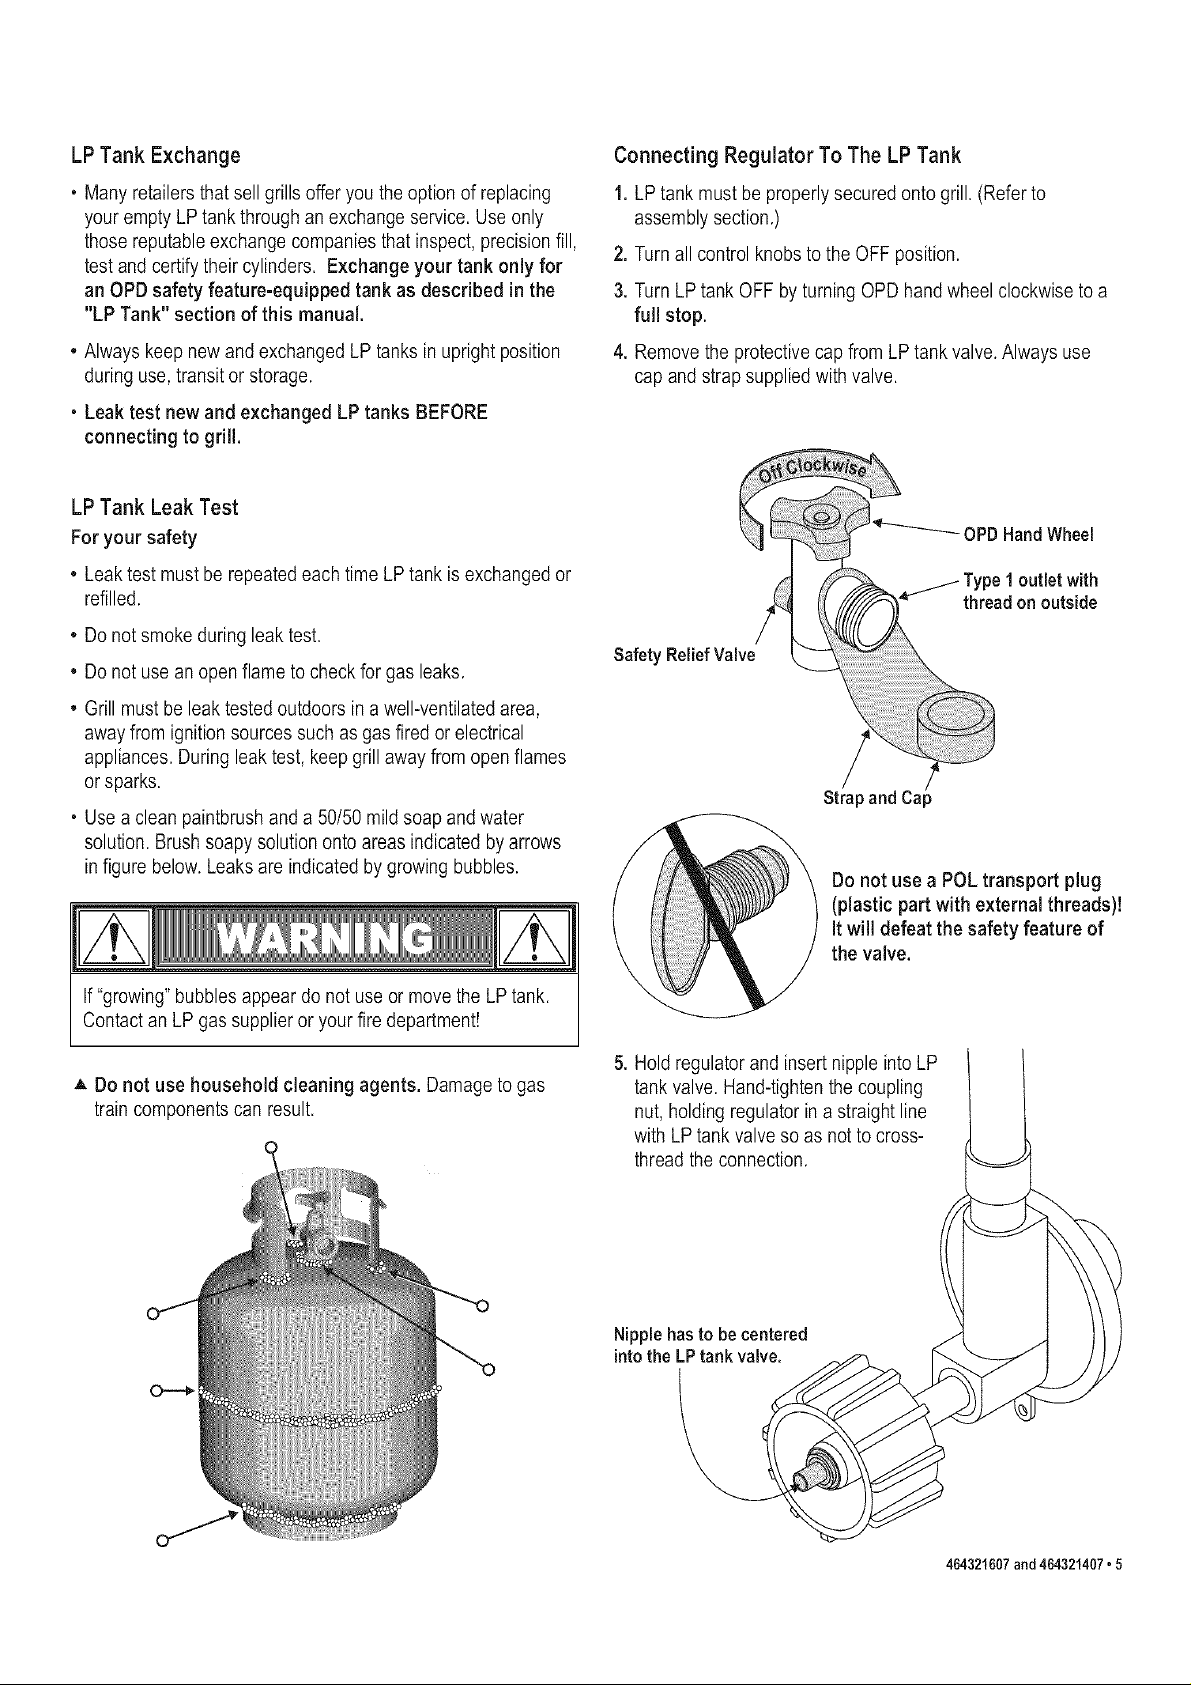
1. LPtank must be properlysecured onto grill. (Refer to
assemblysection.)
2. Turnall control knobsto the OFF position.
3. TurnLP tank OFF byturning OPDhand wheel clockwiseto a
ful! stop.
4. Removethe protectivecapfrom LPtank valve. Always use
capand strapsuppliedwith valve.
Type 1 outlet with
thread on outside
Safety Relief Valve
Strap and Cap
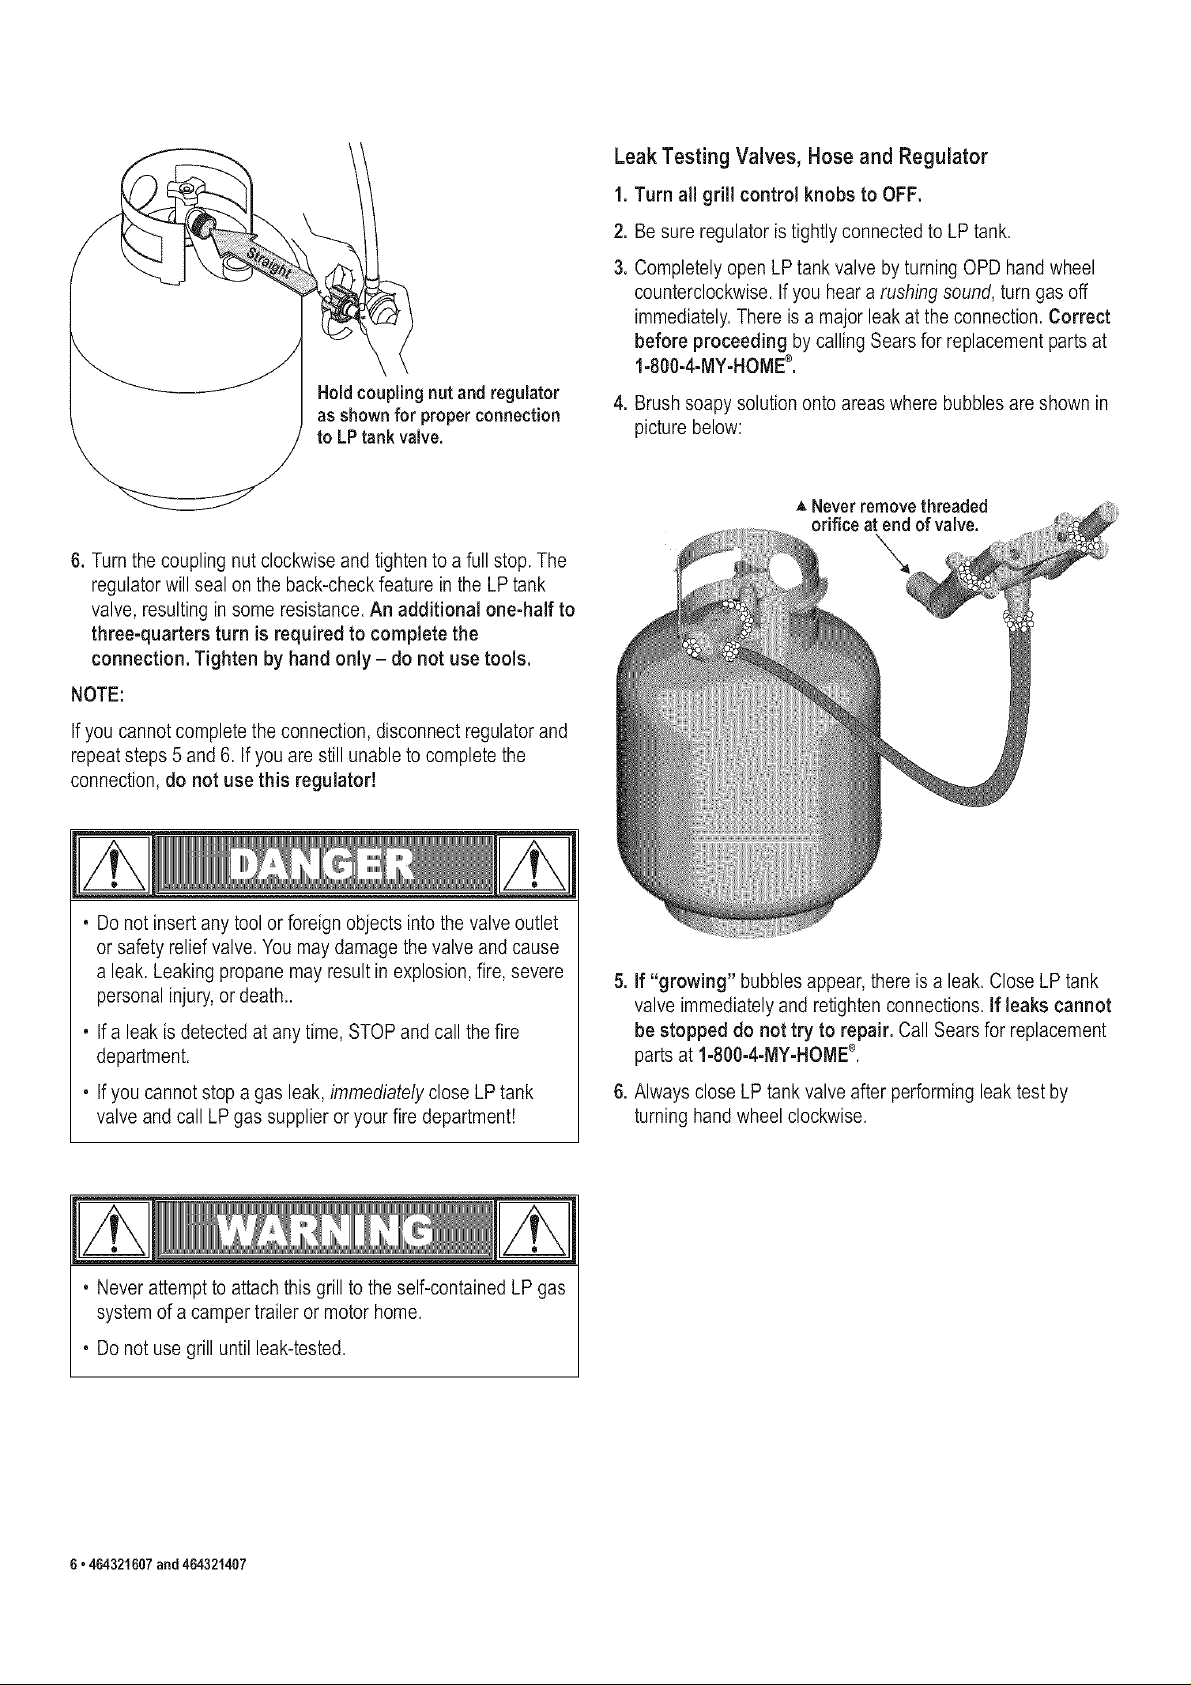
Do not use a POL transport plug
(plastic part with external threads)!
It will defeat the safety feature of
the valve.
If"growing"bubblesappear do notuse or movethe LPtank.
Contact an LP gassupplier or yourfire department!
,L Do not use householdcleaning agents. Damageto gas
traincomponentscan result.
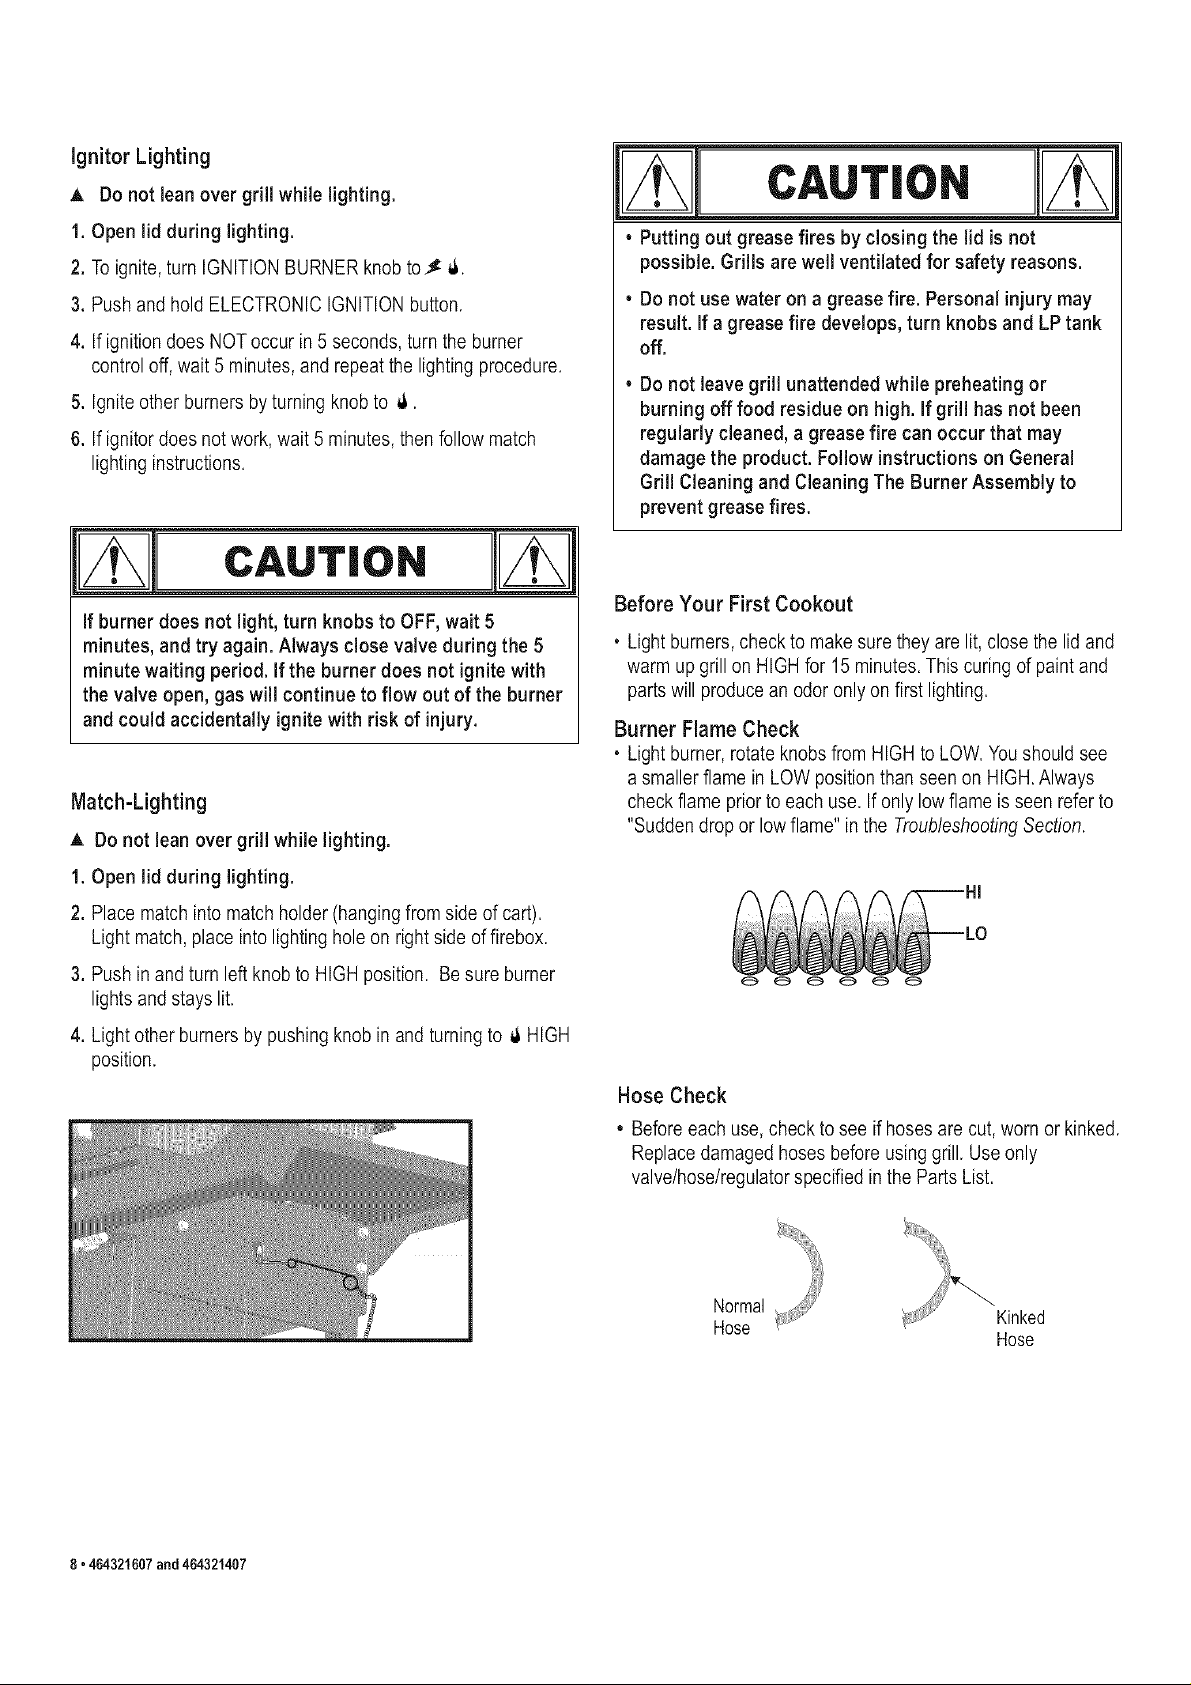
5. Holdregulatorand insert nippleinto LP
tank valve.Hand-tightenthecoupling
nut, holding regulator in astraightline
with LP tankvalveso as notto cross-
threadthe connection.
Nipplehasto becentered
intotheLPtank valve.
464321607and464321407• 5
Hold coupling nut and regulator
as shownfor proper connection
to LP tank valve.
Leak Testing Valves, Hose and Regulator
1. Turn all grill control knobs to OFF.
2. Be sure regulator istightlyconnected to LP tank.
3. Completelyopen LP tankvalve by turning OPDhand wheel
counterclockwise,Ifyou hear a rushing sound,turn gasoff
immediately,There is a major leakatthe connection,Correct
before proceeding bycalling Searsfor replacement partsat
1-800-4-MY-HOME®.
4. Brushsoapy solutiononto areaswhere bubblesare shownin
picture below:
,ANeverremovethreaded
orificeatend ofvalve.
6. Turnthe coupling nutclockwise and tightento afull stop. The
regulatorwill seal on the back-checkfeaturein the LP tank
valve, resultingin some resistance.An additional one-half to
three-quarters turn is requiredto complete the
connection, Tighten by hand only - do not use tools,
NOTE:
Ifyou cannotcompletethe connection, disconnectregulatorand
repeatsteps 5 and6. Ifyou are still unabletocomplete the
connection,do not use this regulator!
, Do notinsert any toolor foreign objectsinto thevalve outlet
or safety reliefvalve. Youmay damagethevalve and cause
a leak. Leaking propanemay resultin explosion, fire, severe
personalinjury,or death..
, If a leakis detectedat anytime, STOPand callthe fire
department.
, If you cannotstop a gas leak, immediatelyclose LPtank
valve and call LPgas supplieror your fire department!
\
5. if "growing" bubbles appear, thereis a leak. Close LP tank
valve immediatelyand retightenconnections.If leaks cannot
be stopped do not try to repair, CallSearsfor replacement
partsat 1-SO0-4-iVIY-HOME®.
6. Always closeLP tank valveafter performingleak testby
turninghand wheelclockwise.
, Never attemptto attachthis grillto theself-containedLP gas
systemof a campertraileror motor home.
, Do notuse grill until leak-tested.
6• 464321607and464321407
For Safe Use Of Your Grill And To Avoid Serious
injury:
• Do notlet childrenoperate or playnear grill.
• Keep grillarea clear and free from materialsthat burn.
• Do notblock holes in bottomor back of grill.
• Check burnerflames regularly.
• Use grillonly in well-ventilatedspace. NEVER use in
enclosedspace such as carport, garage, porch,covered
patio, or under an overheadstructure d any kind.
• Do notuse charcoalor ceramic briquets in a gas grill.
(Unlessbriquets aresuppliedwith yourgrill.)
• Use grill at least 3ft. from any wall or surface. Maintain
10 ft. clearanceto objectsthat can catchfire or sources of
ignitionsuch as pilot lightson water heaters, liveelectrical
appliances,etc.
Safety Tips
Beforeopening LPtank valve, check thecoupling nutfor
tightness.
A Whengrill is not in use, turn offall control knobsand LP tank
valve.
A Never movegrill whilein operation or stillhot.
,_Use long-handledbarbecue utensilsand oven mitts to avoid
burns andsplatters.
,_Maximum loadfor shelves is 10 Ibs.
A Do not usea cooking pot largerthan 9"on grid.
A The greasecup must be attachedto greasecup clip and
emptied after each use. Donot removegreasecup untilgrill
has completelycooled.
,= If younotice greaseor other hot materialdrippingfrom grill
onto valve,hoseor regulator,turn off gas supply atonce.
,_Determine the cause,correct it,then cleanand inspectvalve,
hose andregulatorbeforecontinuing. Performa leaktest.
,_The regulatormay make ahummingor whistling noise during
operation.This will not affectsafety or useof grill.
• Apartment Dwellers:
Checkwith managementto learn the requirements and fire
codes for usingan LP gas grill inyourapartmentcomplex. If
allowed, useoutside on the groundfloorwith a three (3)foot
clearancefrom walls or rails. Do not useon or under
balconies.
• NEVERattempt to light burner with lid closed. A buildup
of non-ignited gas inside a closed grill is hazardous.
• Never operate grill with LPtank out of correct position
specified in assembly instructions.
• Always close LP tank valve and remove coupling nut
before moving LP tank from specified operation
position.
A If youhave a grill problemsee the "TroubleshootingSection".
ifthe regulatorfrosts, turn off grill and LP tank valve
immediately.This indicatesa problemwith the tank and it
should not be used on any product. Return to supplier!
464321607and464321407• 7
Ignitor Lighting
A Do not lean over grill while lighting.
m
c.uTio.
1.Open lid during lighting,
2. Toignite, turn IGNITIONBURNER knobto_ _.
3. Pushand hold ELECTRONICIGNITION button.
4. If ignition does NOToccur in 5 seconds,turn the burner
control off,wait 5 minutes,and repeat the lightingprocedure.
5. Igniteother burnersby turning knobto _.
6. If ignitor does notwork,wait 5 minutes,then follow match
lightinginstructions.
CAUTION
If burner does not light, turn knobs to OFF,wait 5
minutes, and try again. Always close valve during the 5
minute waiting period. If the burner does not ignite with
the valve open, gas will continue to flow out of the burner
and could accidentally ignitewith risk of injury.
Match-Lighting
,A Do not lean over grill whilelighting.
• Putting out grease fires by closing the lid is not
possible. Grills are well ventilated for safety reasons.
• Do not use water on a grease fire. Personal injurymay
result. If a grease fire develops, turn knobs and LP tank
off.
• Do not leave grill unattended while preheating or
burning off food residue on high. If gril! has not been
regularly cleaned, a grease fire can occur that may
damage the product.Follow instructions on General
Grill Cleaning and Cleaning The Burner Assembly to
preventgrease fires.
Before Your First Cookout
, Light burners,checkto make sure they are lit, close the lidand
warm up grillon HIGHfor 15 minutes.This curing d paint and
parts will producean odor onlyon first lighting.
Burner Flame Check
, Light burner,rotateknobs from HIGHto LOW.Youshould see
a smaller flamein LOWpositionthan seenon HIGH.Always
checkflame priorto each use. If only low flame is seen referto
"Suddendrop or lowflame" in the TroubleshootingSection.
1.Open lid during lighting.
2. Placematchinto matchholder (hangingfrom side of cart).
Lightmatch, placeinto lightinghole on rightside offirebox.
3. Pushin and turn left knobto HIGH position. Be sure burner
lightsand stays lit.
4. Lightotherburners bypushing knobin and turningto _ HIGH
position.
Hose Check
• Before each use, check to see ifhoses are cut,worn or kinked.
Replace damagedhoses before usinggrill. Use only
valve/hose/regulatorspecified inthe PartsList.
Normal
Hose
Kinked
Hose
8• 464321607and464321407
Turning GrillOff
, Turn all knobsto OFF position.Turn LP tankoff by turning
OPD handwheel clockwisetoa full stop.
m m
cAuT,o.
Ignitor Check
• Turn gas off at LP tank. Press andhold ignitor button. "Click"
shouldbe heardand spark seen eachtime between collector
box orburner and electrodes.See "Troubleshooting"if no click
or spark.
Valve Check
• important: Make sure gas is off at LP tank before checking
valves. Knobs lock in OFF position.Tocheck valves,first
push inknobsand release,knobs shouldspring back. If knobs
do not spring back,replace valve assemblybefore using grill.
Turnknobs to LO positionthen turnback to OFF position.
Valvesshouldturn smoothly.
General Grill Cleaning
, Keep theoutside of your grill lookingnew bycleaningit oncea
monthwith warm soapand water or a non-abrasivecleaner. If
you don'thave agrill cover, wipeoffdust and grime before
startingyour grill.
, Coatingthe cooking gridswith spray-oncooking oil will keepthe
foodfrom stickingand make clean upeasier.After cooking,
scrape thegrates with a long handled, brasswire bristle brush.
, Check insidethegrill bottomfor grease buildup and clean
often,especially after cookingfatty meat.
, Do notmistake brown or blackaccumulationof greaseand
smokefor paint. Apply astrong solution d detergentand water
or usea grill cleanerwith scrub brushon insidesof grill lid and
bottom. Rinseand allowto completelyair dry.Do not apply a
caustic gril!/oven cleaner to painted surfaces.
• Plated wire grates: Wash grateswith concentratedgrill
cleaneror usesoapand water solution. Dry thoroughlyand
store indoors betweencookouts.
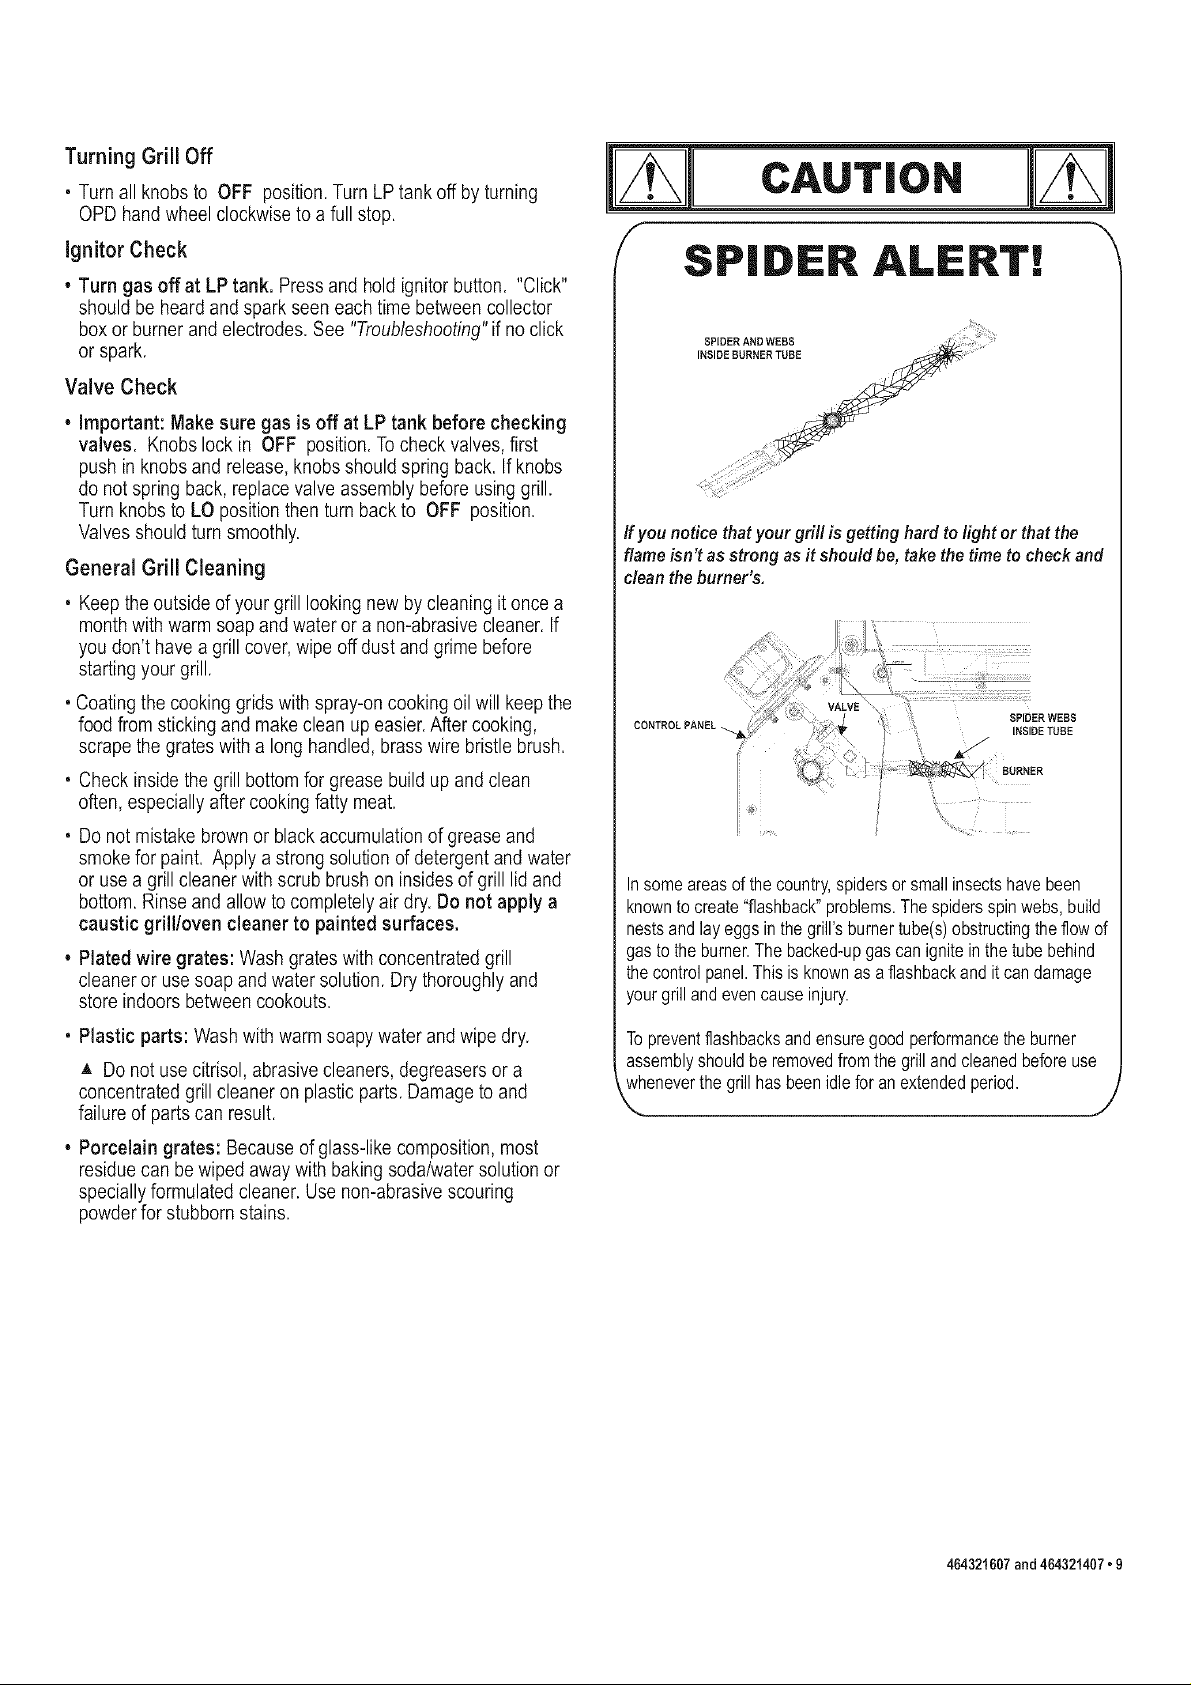
/ SPIDER ALERT! -"
SPIDERANDWEBS,=o_ J,
INSIDEBURNER TUBE _'_*_:
If you notice that your grill is getting hard to light or that the
flame isn't as strong as it should be, take the time to check and
clean the burner's,
I,
...............................t
CONTROLPANEL.
Insomeareasofthecountry,spidersor smallinsectshavebeen
knowntocreate"flashback"problems.Thespidersspinwebs,build
nestsandlayeggsinthe grill'sburnertube(s)obstructingtheflowof
gastotheburner.Thebacked-upgascanigniteinthetubebehind
thecontrolpanel.Thisisknownasaflashbackanditcandamage
yourgrillandevencauseinjury.
SPIDERWEBS
INSIDETUBE
, Plastic parts: Washwith warm soapywater andwipe dry.
A Do not usecitrisol, abrasivecleaners,degreasersor a
concentratedgrill cleaneron plastic parts.Damage to and
failureof parts can result.
• Porcelain grates: Becauseof glass-likecomposition, most
residuecan be wipedaway with baking soda/watersolutionor
speciallyformulated cleaner.Use non-abrasivescouring
powderfor stubbornstains.
Topreventflashbacksandensuregoodperformancetheburner
assemblyshouldberemovedfromthegrillandcleanedbeforeuse
wheneverthegrillhasbeenidleforanextendedperiod.
\ 1'
464321607and464321407• 9
 Loading...