

Page 1
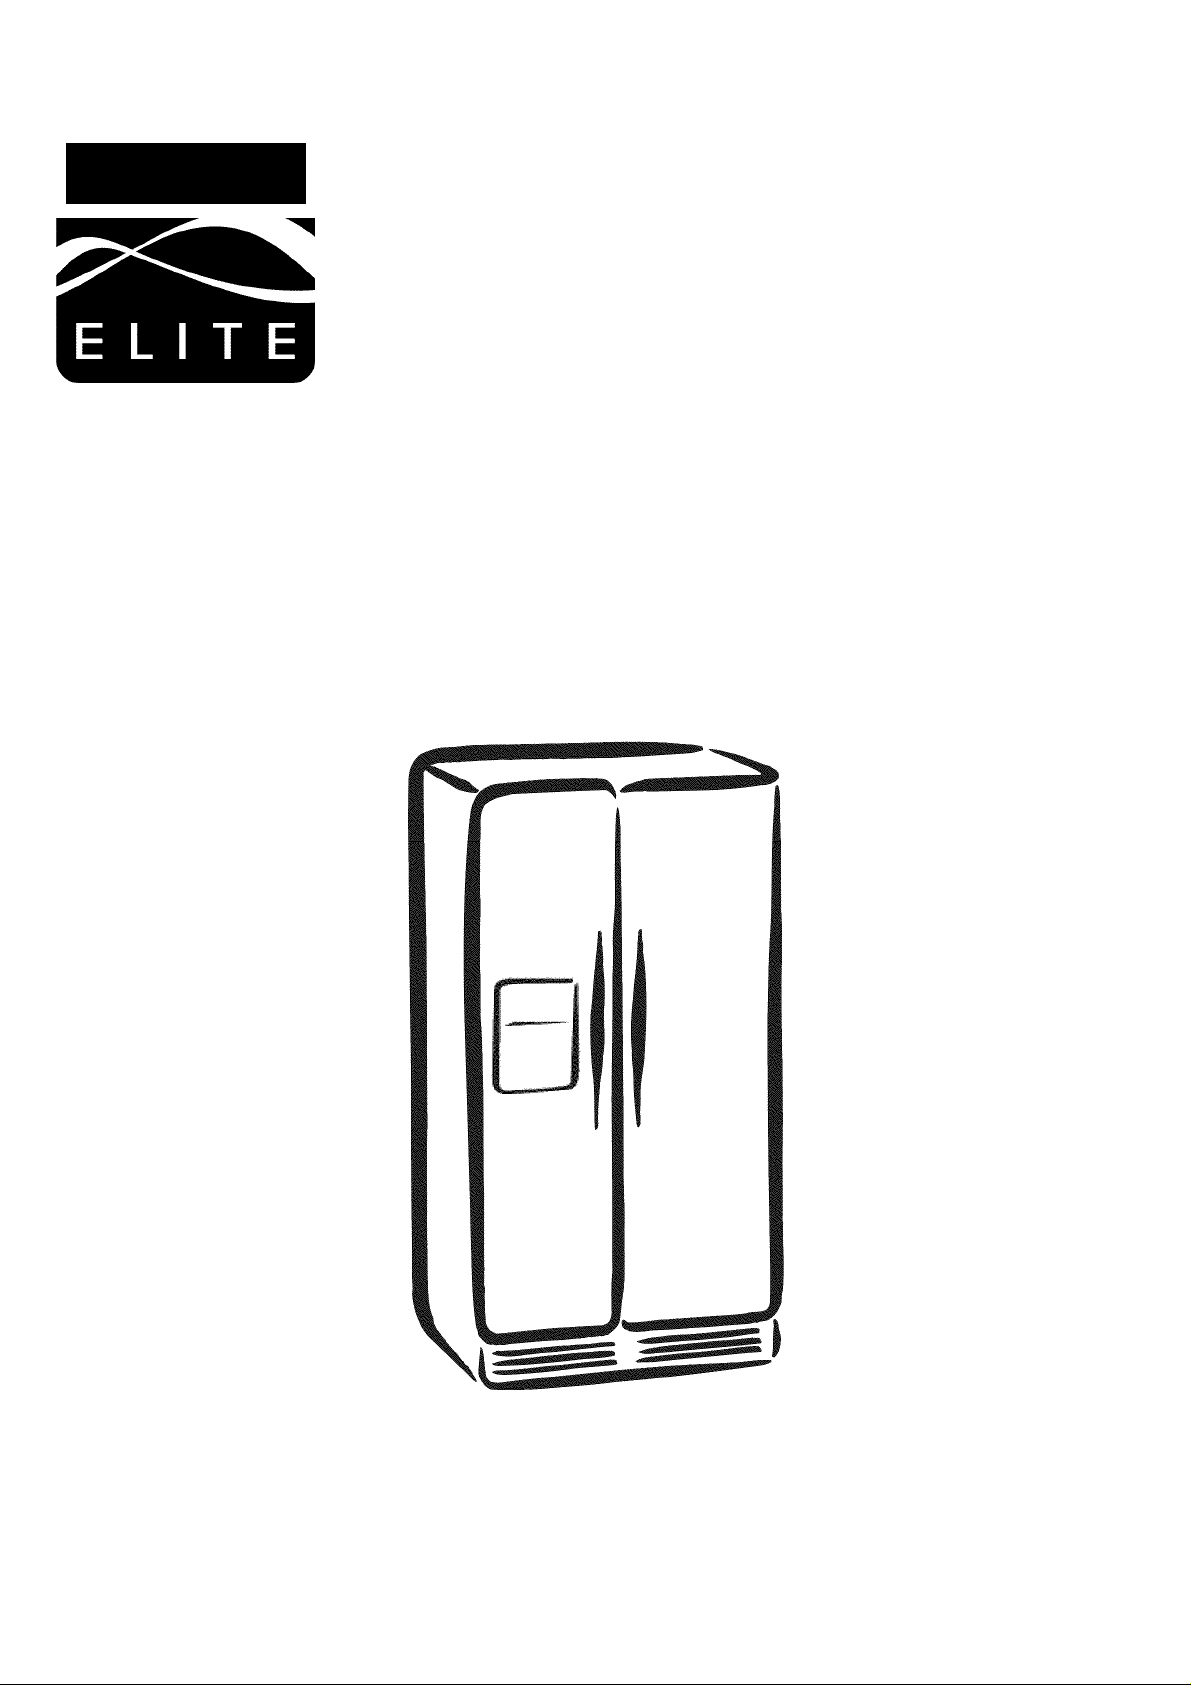
Kenmore
SIDE-BY-SIDE REFRIGERATOR
REFRIGERADOR DE DOS PUERTAS
Guia para el Uso y Cuidado
Models/Modelos 41002, 41003, 41009
DA99-01746C
Printed in Korea
Sears, Roebuck and Co., Hoffman Estates, IL 60179 U.S.A.
WWW. sea rs.com
Page 2
TABLE OF CONTENTS
English Version
Spanish Version
Warranty
Protection Agreements
Important Safety Instructions
CFG Refrigerant Disposal
Grounding Requirements
Parts and Features
Refrigerator Installation
Getting Ready to Install
Clearances
Flooring
Unpacking Your Refrigerator
Supplied Parts
Required Tools
Refrigerator and Freezer Door Removal
and Installation
Water Line Requirements
Connecting to the Water Supply Line
Installing the Water Filter
Positioning and Leveling the Refrigerator
Making Minor Door Adjustments
Using Your Refrigerator
Digital Panel
Setting the Time
Calibrating the Stylus Touch Point
Using Home
Using Slide Show
Using the Child Lock Function
Dispenser Controls
Using the Dispenser Lighting
Using the Dispenser Accent Lighting
2 Turning Off the Ice Dispenser
51
3
4
5
7 Calendar 21
7 How to Enter a Calendar Memo 21,22
8 How to Enter a New Special Day 23
9-16 How to Change a Calendar Memo
9
Q
y
9
10
10
10
11
12
12, 13
13, 14
15
16
17-44
17-40
17
18
18
19
19
20
20
20
Selecting and Dispensing Ice
Selecting and Dispensing Water 21
Cooling Off (Demo Mode)
Door Open Alarm 21
or Special Day
How to Delete a Calendar Memo
or Special Day 25, 26
Calendar Memo Alarm
Temp Control
About the Automatic Icemaker 28
Setting Fast Freeze or Rapid Cool 29
Water Filter
Photo Album
Message
Settings 37-40
Storing Food in the Refrigerator 41
Storing Food in the Freezer 41
Using the Doors
Removing the Refrigerator/Freezer
Accessories
Care and Cleaning 44-46
Cleaning the Refrigerator 44, 45
Replacing the Interior Lights
Changing the Water Filter
Power Interruptions 46
When You Go on Vacation
When You Move
Troubleshooting Guide
20
20
21
24
26
27
29, 30
31-34
35-37
41
42, 43
45
45
46
46
47-49
Customer Service Back Cover
Page 3
WARRANTY
^ TM
Kenmore
REFRIGERATOR WARRANTY
Kenmore Elite™ Limited Warranty
When installed, operated, and maintained according to all instructions supplied with the product, if any non
expendable part of this appliance other than the sealed refrigerant system fails due to a defect in material and
workmanship within one year from the date of purchase, call 1-800-4-MY-HOME® to arrange for free repair. This
coverage applies for only 90 days from the date of purchase if this appliance is ever used for other than private
family purposes.
If the sealed refrigerant system is defective within five years from the purchase date, call 1-800-4-MY-HOME® to
arrange for free repair. This coverage applies for only one year from the date of purchase if this appliance is ever
used for other than private family purposes.
This warranty covers only defects in material and workmanship. Sears will NOT pay for:
1. Expendable items that can wear out from normal use, including but not limited to filters, belts, light bulbs, and
bags.
2. A service technician to instruct the user in correct product installation, operation, or maintenance.
3. A service technician to clean or maintain this product.
4. Damage to or failure of this product if it is not installed, operated, or maintained according to all the instructions
supplied with the product.
5. Damage to or failure of this product resulting from accident, abuse, misuse, or use for other than its intended
purpose.
6. Damage to or failure of this product caused by the use of detergents, cleaners, chemicals, or utensils other
than those recommended in all instructions supplied with the product.
7. Damage to or failure of parts or systems resulting from unauthorized modification made to this product.
Disclaimer of implied warranties, limitation of remedies
Customer’s sole and exclusive remedy under this limited warranty shall be product repair as provided herein.
Implied warranties, including warranties of merchantability or fitness for a particular purpose, are limited to one
year or the shortest period allowed by law. Sears shall not be liable for incidental or consequential damages.
Some states do not allow the exclusion or limitation of incidental or consequential damages, or limitations on the
duration of implied warranties of merchantability or fitness, so these exclusions or limitations may not apply to you.
This warranty applies only while this appliance is used in the United States.
This warranty gives you specific legal rights, and you may also have other rights which vary from state to state.
Sears, Roebuck and Co., Hoffman Estates, IL 60179
Page 4
PROTECTION AGREEMENTS
Master Protection Agreements
Congratulations on making a smart purchase. Your new
Kenmore* product is designed and manufactured for
years of dependable operation. But like all products, it
may require preventive maintenance or repair from time to
time. That’s when having a Master Protection Agreement
can save you money and aggravation.
The Master Protection Agreement also helps extend the
life of your new product. Here’s what the Agreement
includes:
Parts and labor needed to help keep products
operating properly under normal use, not just defects.
Our coverage goes well beyond the product
warranty. No deductibles, no functional failure
excluded from coverage—real protection.
Expert service by a force of more than 10,000
authorized Sears service technicians, which means
someone you can trust will be working on your product.
Unlimited service calls and nationwide service, as
often as you want us, whenever you want us.
“No-lemon” guarantee—replacement of your covered
product if four or more product failures occur within
twelve months.
Product replacement if your covered product can’t be
fixed.
Annual Preventive Maintenance Check at your
request—no extra charge.
Once you purchase the Agreement, a simple phone call is
all that it takes for you to schedule service. You can call
anytime day or night, or schedule a service appointment
online.
The Master Protection Agreement is a risk-free purchase.
If you cancel for any reason during the product warranty
period, we will provide a full refund or a prorated refund
anytime after the product warranty period expires.
Purchase your Master Protection Agreement today!
Some limitations and exclusions apply.
For prices and additional information in the U.S.A.,
call 1-800-827-6655.
Sears Installation Service
For Sears professional installation of home appliances,
garage door openers, water heaters, and other major
home items, in the U.S.A. call 1-800-MY-HOME®.
Fast help by phone—we call it Rapid Resolution-
phone support from Sears representatives on all
products. Think of us as a “talking owner’s manual.”
Power surge protection against electrical damage
due to power fluctuations.
$250 Food Loss Protection annually for any food
spoilage that is the result of mechanical failure of any
covered refrigerator or freezer.
Rental reimbursement if repair of your covered
product takes longer than promised.
10% discount off the regular price of any noncovered
repair service and related installed parts.
PRODUCT RECORD
In the space below, record the date of purchase, model, and serial number of your product. You will find the model and
serial number printed on an identification label located on the right-hand side of the refrigerator compartment. Have
these items of information available whenever you contact Sears concerning your product.
Model No.
Serial No.
Date of Purchase
Dealer
_________
Save these instructions and attach your sales receipt for future reference.
Page 5
MPORTANT SAFETY INSTRUCTIONS
BASIC SAFETY PRECAUTIONS
This guide contains many important safety messages. Aiways read and obey aii safety messages.
This is the safety aiert symboi. it aierts you to safety messages that inform you
of hazards that can kiii or hurt you or others, or cause damage to the product.
Aii safety messages wiii be preceded by the safety aiert symboi and the hazard
A
signai word DANGER, WARNiNG, or CAUTiON. These words mean:
You will be kiiied or seriousiy injured if you don’t foiiow instructions.
A DANGER
You can be kiiied or seriousiy injured if you don’t foiiow instructions.
A WARNING
indicates an imminentiy hazardous situation which, if not avoided,
A CAUTION
Aii safety messages wiii identify the hazard, teii you how to reduce the chance of injury, and teii you what can happen
if the instructions are not foiiowed. Keep this guide in a safe piace for future reference.
may resuit in minor or moderate injury, or product damage oniy.
A DANGER: risk of child entrapment
Chiid entrapment and suffocation are not probiems of
the past. Junked or abandoned refrigerators are stiii
dangerous...even if they wiii sit for “just a few days.”
if you are getting rid of your oid refrigerator, piease
foiiow the instructions at right to heip prevent
accidents.
A WARNING
To reduce the risk of fire, electric shock, or injury
to persons when using your product, basic safety
precautions should be followed, including the
following.
Read all instructions before using this appliance.
• DO NOT piug severai appliances into the same power
receptacle. Large appliances draw a lot of power.
Powering more than one appliance or machine from a
single power source could cause overheating and cause
a fire.
• Make sure that the power plug is not kinked or damaged
by the back of the refrigerator. A damaged power plug
may overheat and cause a fire.
BEFORE YOU THROW
AWAY YOUR OLD
REFRIGERATOR
OR FREEZER
• Take off the doors.
• Leave the sheives in piace so that
chiidren may not easiiy ciimb inside.
DO NOT spray water directly into or on the outside of
the refrigerator/freezer drawer. Water could get into the
interior machine parts and cause electric shock.
DO NOT use aerosols near the refrigerator. Aerosols
used near the refrigerator may cause an explosion or fire.
DO NOT put undue stress on the power cord or place
heavy articles on it. Placing heavy articles on the power
cord creates the risk of explosion or fire.
DO NOT insert the power plug with wet hands. It may
cause electric shock.
DO NOT put a container filled with water on the
refrigerator. If it spills, it may cause fire or electric shock.
Page 6
IMPORTANT SAFETY INSTRUCTIONS
A WARNING
DO NOT install the refrigerator in a damp place or place
where it may come in contact with water. Wet and/or
deteriorated insulation of the internal electrical parts may
cause electric shock or fire.
DO NOT store volatile or flammable substances in the
refrigerator. Storing benzene, thinner, alcohol, ether, LP
gas, and other such products may cause explosions.
DO NOT disassemble or repair the refrigerator by
yourself. You may run the risk of fire, appliance
malfunctions, and/or personal injury. Call your nearest
service center for help from a qualified service
technician.
Unplug the refrigerator before changing the interior light.
Changing the light while the refrigerator is plugged in
may cause electric shock.
A CAUTION
Use good judgment when filling the refrigerator with food
and drinks. In an overfull refrigerator, heavy, fragile,
bulky, or breakable items may fall out and cause
personal injury and/or damage to surrounding objects.
DO NOT put bottles or glass containers in the freezer.
When the contents freeze and then expand, the glass
may break and cause personal injury or leave
dangerous glass shards in the freezer.
If the electrical wall socket is loose, do not insert the
power plug. There is a risk of electric shock or fire. Have
the plug looked at by a licensed electrician.
NEVER unplug your refrigerator by pulling on the power
cord.
- Always grip the power plug firmly and pull straight out
from the outlet. Yanking or pulling on the power cord
may cause a short circuit, fire, and/or electric shock.
- A damaged power cord must be replaced by the
manufacturer, a certified service agent, or qualified
service personnel.
DO NOT store articles on the top of the appliance.
When you open or close the door, the articles may
fall and cause personal injury and/or damage to
surrounding objects.
DO NOT store pharmaceutical products, scientific
materials, and temperature-sensitive products in the
refrigerator. Products that require exact temperature
controls should not be stored in the refrigerator.
DO NOT allow children to climb, stand, or hang on
shelves and handles of the refrigerator. DO NOT sit on
the freezer door. DO NOT allow children to climb into
The refrigerator must be safely grounded. ALWAYS
make sure that you have grounded the refrigerator
before attempting to investigate or repair any part of the
appliance. Power leakages can cause severe electric
shock.
NEVER use gas pipes, telephone lines, or other
potential lightning attractors as an electrical ground.
Improper use of the grounding plug can result in a risk
of electric shock. If it is necessary to use an extension
cord to power the refrigerator, use only a 3-wire
extension cord that has a 3-blade ground plug and
a 3-slot receptacle that will accept the plug on the
appliance. The marked rating of the extension cord
should be AC 115V/120V, 15A, or more. Additionally,
if a grounding adapter is used, make sure the receptacle
box is also fully grounded.
the freezer. They could damage the refrigerator and/or
seriously injure themselves.
If you notice a chemical or burning plastic smell or see
smoke, unplug the refrigerator immediately and contact
your Sears Service Center.
After your refrigerator is in operation, do not touch the
cold surfaces in the freezer compartment. Particularly
when hands are damp or wet, skin may adhere to these
extremely cold surfaces. Skin may stick to the surface
and you may get frostbite.
DO NOT put your hands under the appliance. Any sharp
edges may cause personal injury.
NEVER put fingers or other objects into the water
dispenser hole or ice chute. It may cause personal injury
and/or material damage.
If the refrigerator will not be used for a long period of
time (for example, over several months), unplug the
power from the wall. Over time, deterioration in the
power cord insulation may cause fire.
DO NOT use a wet or damp cloth when cleaning plug.
Remove any dust or foreign matter from the power plug
pins. A dirty power plug can increase the risk of fire.
If the refrigerator is disconnected from the power supply,
you should wait for at least five minutes before plugging
it back in.
DO NOT place the refrigerator directly in sunlight.
The appliance must be positioned for easy access to the
power source.
Page 7
IMPORTANT SAFETY INSTRUCTIONS
A CAUTION
If you have a long vacation planned, empty the
refrigerator and turn it off. Wipe excess moisture from
the inside and leave the doors open to keep odor and
mold from developing.
Service Warranty and Modification
Any changes or modifications performed by a third party
on this finished appliance are not covered under Sears
warranty service, nor can Sears be responsible for
safety issues that result from third-party modifications.
SAVE THESE INSTRUCTIONS
CFC REFRIGERANT DISPOSAL
Your old refrigerator may have a cooling system that used
CFOs (chlorofluorocarbons). CFOs are believed to harm
stratospheric ozone.
GROUNDING REQUIREMENTS
This appliance is not intended for use by small children
or infirm persons without capable, adult supervision.
Small children should be supervised when using the
appliance.
DO NOT block air holes in the refrigerator. If the air
holes are blocked, especially with a plastic bag, the
refrigerator can become overcooled. Prolonged periods
of overcooling will break the water filter and cause water
leakage.
If you are throwing away your old refrigerator, make sure
the CFC refrigerant is removed for proper disposal by a
qualified servicer. If you intentionally release the CFC
refrigerant, you can be subject to fines and imprisonment
under provisions of environmental legislation.
IMPORTANT: Please read carefully.
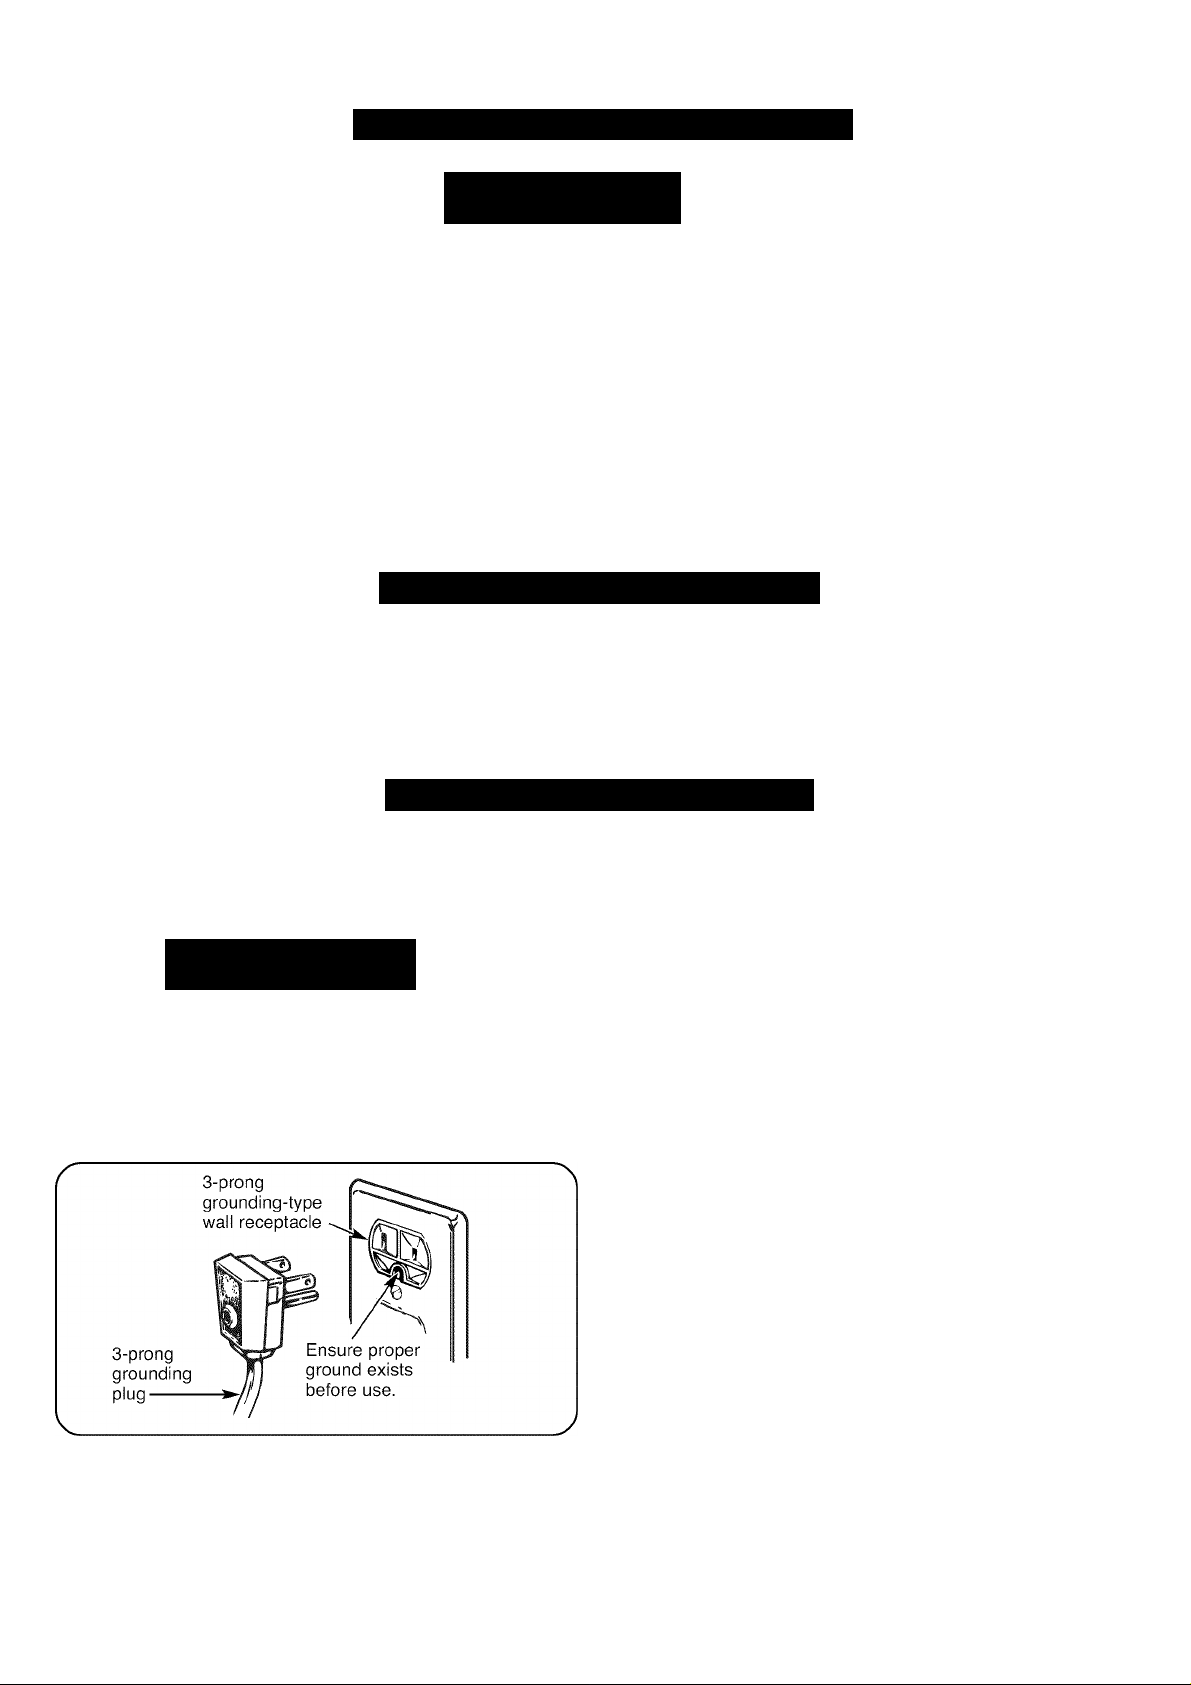
TO CONNECT ELECTRICITY
A WARNING
Electrical Shock Hazard
FOR PERSONAL SAFETY, this appliance must be
properly grounded. Have the wall outlet and the
circuit checked by a qualified electrician to make
sure the outlet is properly grounded.
RECOMMENDED GROUNDING METHOD
The refrigerator should always be plugged into its own
individual properly grounded electrical outlet rated for
115 volts, 60 Hz, AC only and fused at 15 or 20 amperes.
This provides the best performance and also prevents
overloading house wiring circuits which could cause a fire
hazard from overheated wires. It is recommended that a
separate circuit serving only this appliance be provided.
Use a receptacle which cannot be turned off with a switch
or pull chain. Do not use an extension cord.
Where a standard two-prong wall outlet is encountered,
it is your personal responsibility and obligation to have it
replaced with a properly grounded three-prong wall outlet.
Do not, under any circumstances, cut or remove the
third (ground) prong from the power cord.
USE OF EXTENSION CORDS
Because of potential safety hazards under certain
conditions, we strongly recommend against the use
of an extension cord. However, if you still elect to use
an extension cord, it is absolutely necessary that it be
a UL-listed, 3-wire grounding-type appliance extension
cord having a grounding-type plug and outlet and an
electrical rating of the cord of 15 amperes (minimum)
and 120 volts.
Use of an extension cord will increase the clearance
needed for the back of the refrigerator.
Page 8
PARTS AND FEATURES
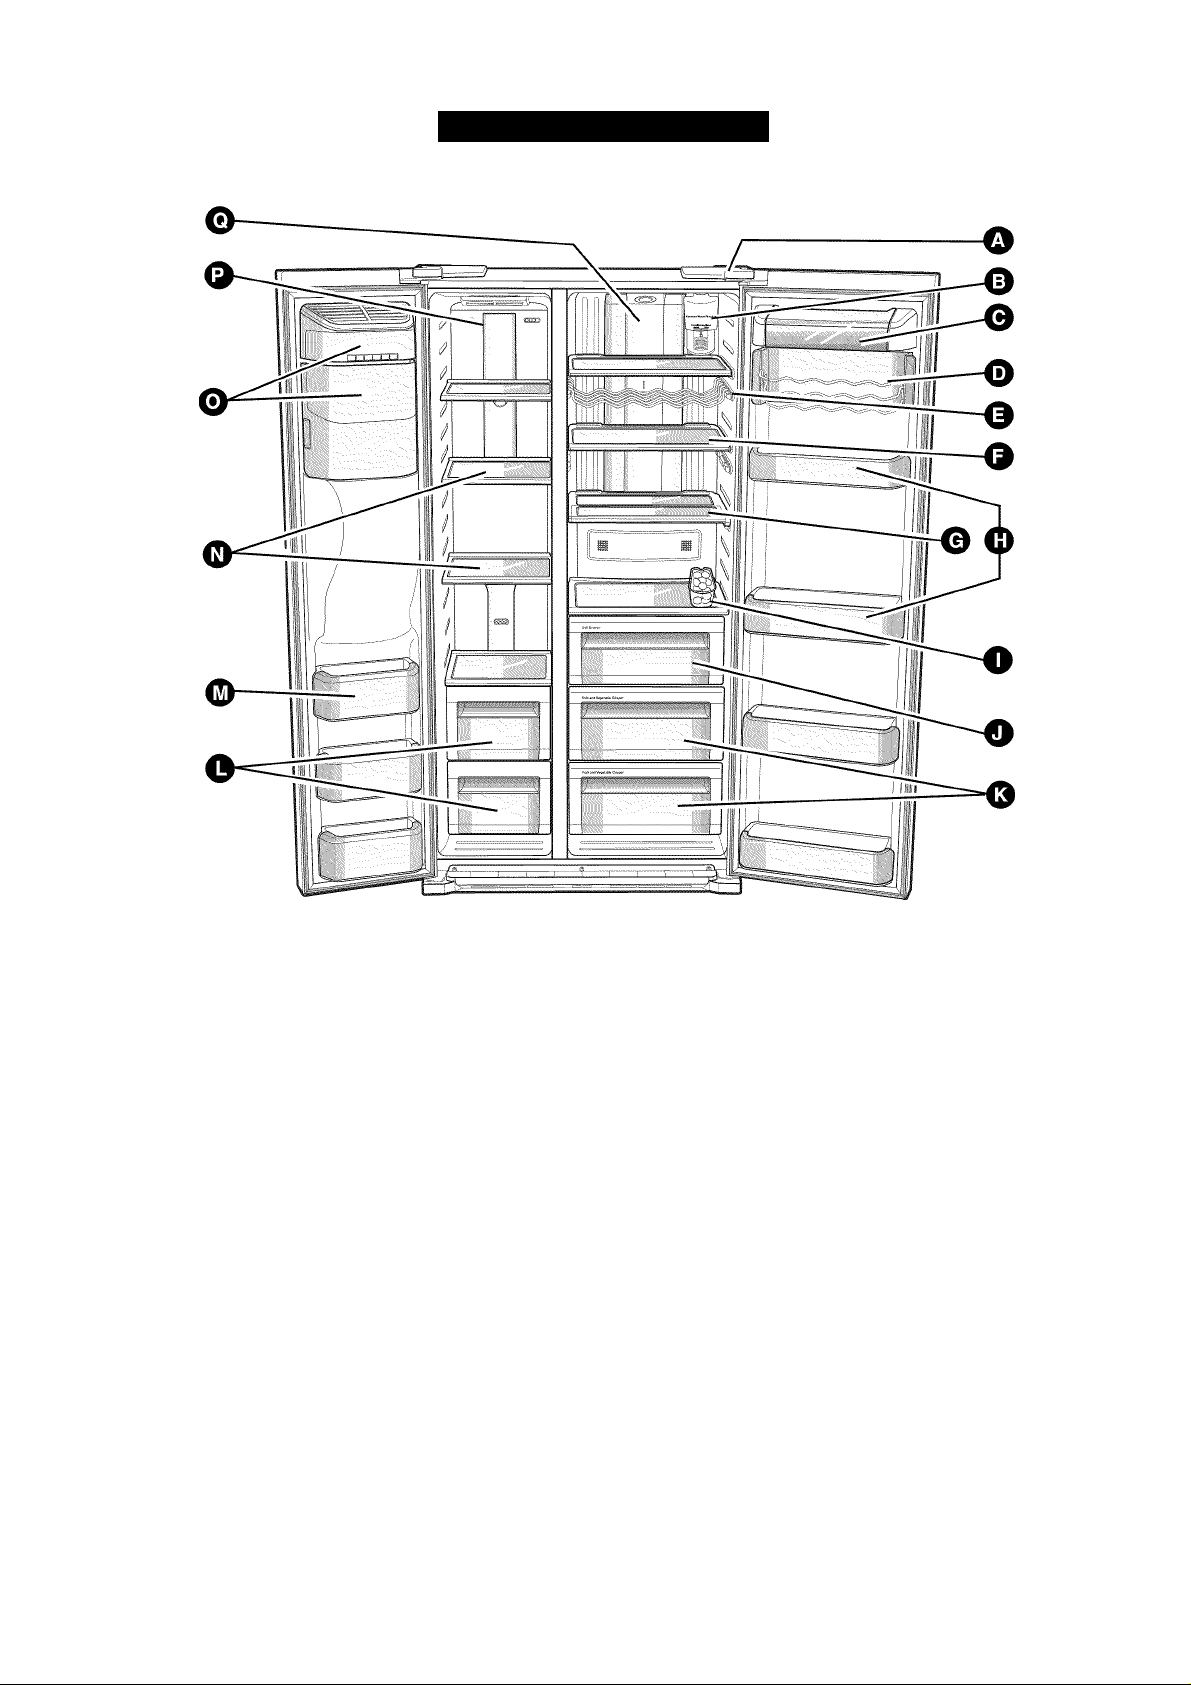
Use this section to become more famiiiar with the parts and features. Page references are inciuded for your
convenience.
NOTE: The refrigerator you have purchased may have some or aii of the items iisted beiow.
^Auto Door Cioser (p. 41) 0 Deii Drawer (p. 41,42)
^ Water Fiiter (p. 45)
0 Dairy Bin (p. 41) 0 Freezer Drawers (p. 41,42)
0Tiit Can Carry (p. 41) 0 Freezer Door Bins (p. 41,42)
0Optionai Wine Rack (p. 41) 0Siide-Sheives (p. 41)
0Giass Sheives (p. 41,42)
0Foidabie Sheif (p. 41)
0 Refrigerator Door Bins (p. 41,42) 0 Refrigerator Light (p. 45)
0Egg Container (p. 41)
NOTES:
The door handie may become ioose over time, if this happens, tighten the boits found on the inside of the door,
if you ciose one door with a iot of force, the other door may open.
0 Fruit and Vegetabie Crispers (p
0 icemaker and ice Bucket (p. 41
0 Freezer Light (p. 45)
Page 9
REFRIGERATOR INSTALLATION
GETTING READY TO INSTALL THE REFRIGERATOR
Congratulations on your purchase of the Kenmore Elite™
Side-By-Side Refrigerator. We hope you enjoy the many
state-of-the-art features and efficiencies that this new
appliance offers.
Selecting the best location for the refrigerator.
• A location with easy access to the water supply.
• A location without direct exposure to sunlight.
• A location with level (or nearly level) flooring.
• A location with enough space for the refrigerator doors
to open easily.
• Allow sufficient space for air circulation of the internal
cooling system. If the refrigerator is not level or does not
have enough space, the internal cooling system may not
work properly.
CLEARANCES
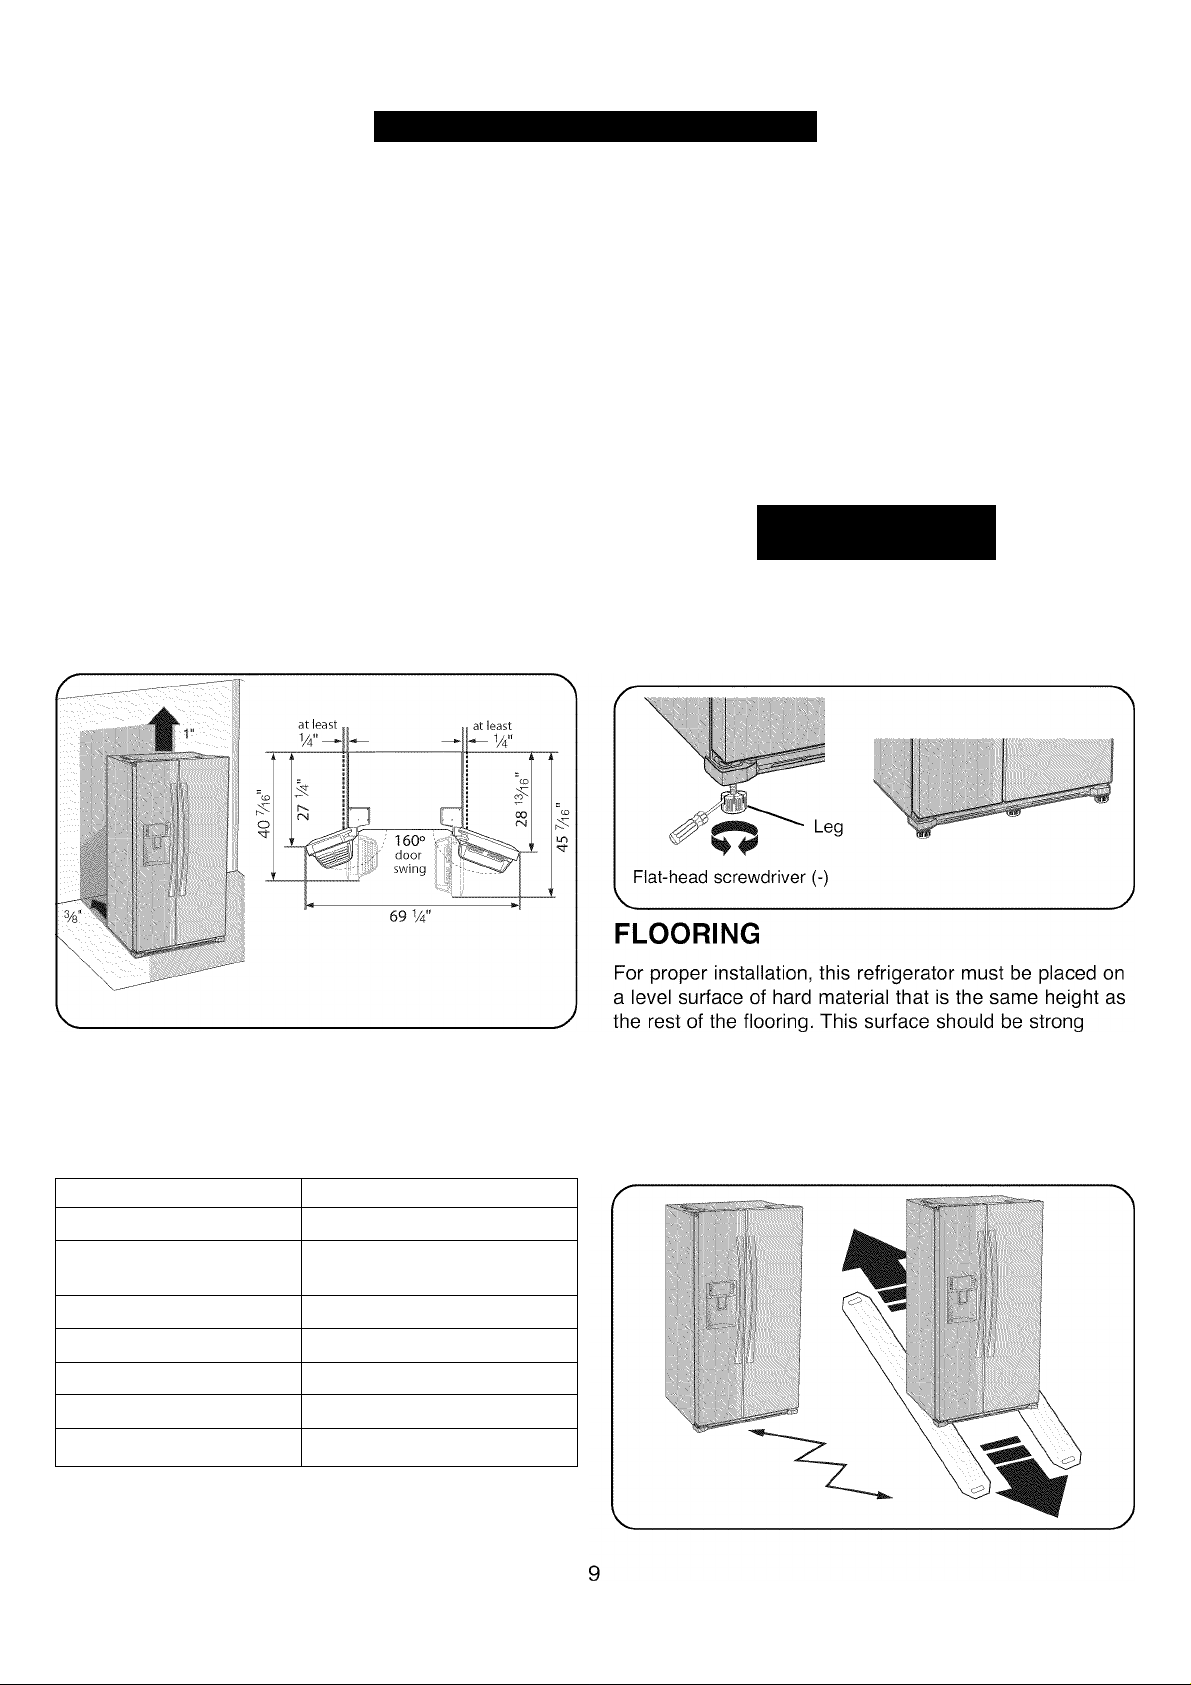
• Allow clearance to the right, left, back, and top when
installing. (See drawing in column 1.) This will help
reduce power consumption and keep your energy bills
lower.
• Do not install the refrigerator where the temperature will
go below 50°F (10°C).
• Make sure to disconnect the water supply line BEFORE
removing the freezer door. See “Refrigerator and
Freezer Door Removal and Installation” on page 11 to
avoid damage.
A CAUTION
To prevent damage to the floor while moving the
refrigerator, always make sure the front leveling legs
are in the up position (above the floor). Refer to
“Positioning and Leveling the Refrigerator” on page 15.
First thing! Make sure that you can easily move your
refrigerator to its final location by measuring doorways
(both width and height), thresholds, ceilings, stairways, etc.
The following chart details the exact height and depth of
your new Kenmore Elite™ Side-By-Side Refrigerator.
MODEL
Capacity (Cu. Ft.) 24.1
Dimensions (inch)
Width, Overall
Cabinet Only 35%
Height, Overall
Cabinet Only 685/8
Depth, Overall 30
Cabinet Only 235/8
41002, 41003, 41009
3515/16
70
enough to support a fully loaded refrigerator or
approximately 309 lbs (140 kg). To protect the finish of the
flooring, cut a large section of the cardboard carton and
place under the refrigerator where you are working. When
moving, be sure to pull the unit straight out and push the
unit straight in.
Page 10
REFRIGERATOR INSTALLATION
A WARNING
Excessive Weight Hazard
Use two or more people to move and install the
refrigerator. Failure to do so can result in back or
other injury.
UNPACKING YOUR REFRIGERATOR
Remove tape and any temporary labels from the
refrigerator before using. Do not remove any warning-type
labels, the model and serial number label, or the tech
sheet that is attached to the back wall of the refrigerator.
To remove any remaining tape or glue, rub the area
briskly with your thumb. Tape or glue residue can also be
easily removed by rubbing a small amount of liquid dish
soap over the adhesive with your fingers. Wipe with warm
water and dry.
Do not use sharp instruments, rubbing alcohol, flammable
fluids, or abrasive cleansers to remove tape or glue.
These products can damage the surface of the
refrigerator. For more information, see the “Important
Safety Instructions” section.
Refrigerator shelves are installed in the shipping position.
Please reinstall the shelves according to your individual
storage needs.
A CAUTION
Avoid placing the refrigerator near a heat source,
direct sunlight, or moisture.
SUPPLIED PARTS
The following parts should be supplied with the
refrigerator. Please verify before installing.
Water filter
(DA29-00003B)
Compression nut Screw
(DA74-00070B) (6001-000541)
REQUIRED TOOLS
Hex wrench
(DA80-00002C)
Compression fitting
(DA62-00305A)
A WARNING
When Moving Your Refrigerator:
Your refrigerator is heavy. When moving the
refrigerator for cleaning or service, be sure to protect
the floor. Always pull the refrigerator straight out
when moving it. Do not wiggle or walk the
refrigerator when trying to move it, as floor damage
could occur.
A WARNING
Explosion Hazard
Keep flammable materials and vapors, such as
gasoline, away from the refrigerator. Failure to do so
can result in death, explosion, or fire.
To reduce the risk of electric shock, do not install the
refrigerator in a wet or damp area.
Select a place where a water supply can be easily
connected for the automatic icemaker.
The following tools are needed to install and adjust the
refrigerator.
Phillips-head
screwdriver
Pliers
Flat-head
screwdriver
Alien wrench (3/16")
Wrench
10
Page 11
REFRIGERATOR INSTALLATION
REFRIGERATOR AND FREEZER DOOR REMOVAL AND INSTALLATION
If the refrigerator is too large to pass through your
doorway easily, you can remove the refrigerator and
freezer doors.
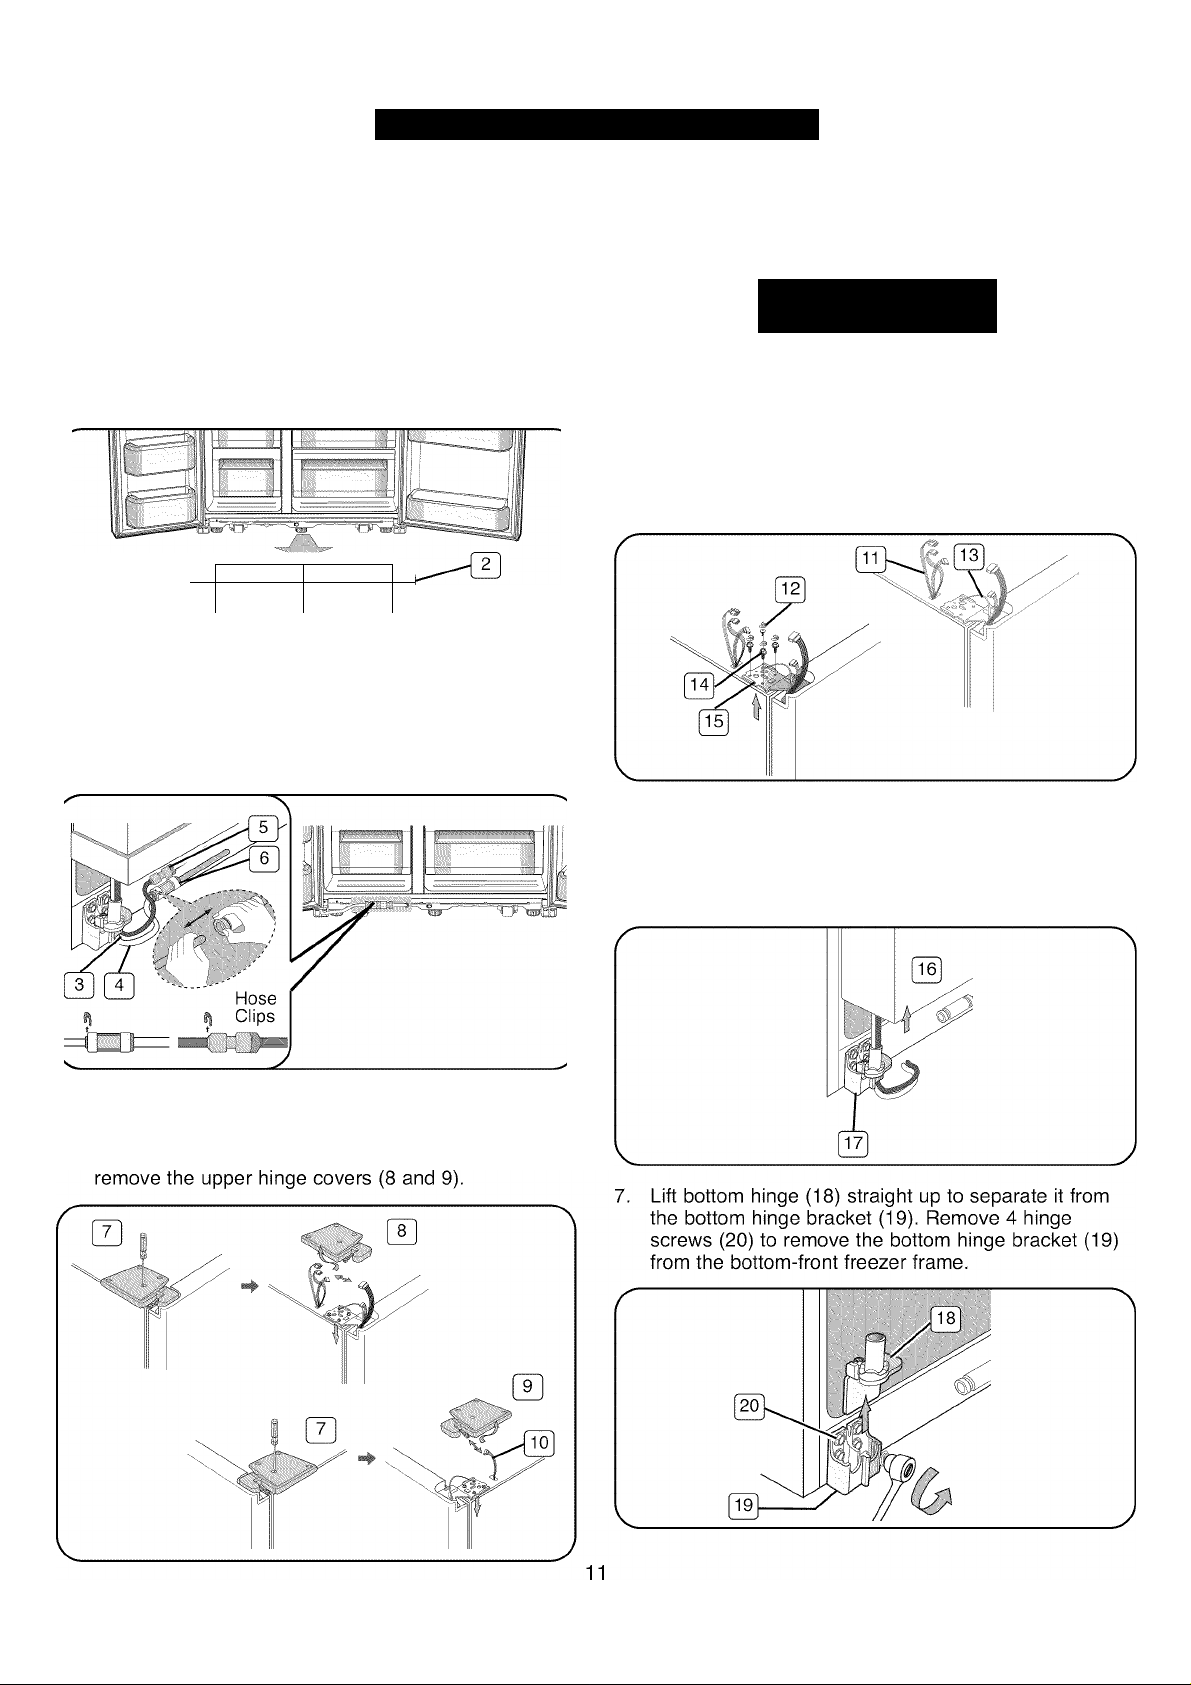
1. Open the refrigerator and freezer door. Remove the 3
screws (1) and the front leg cover (2) from the front-
bottom of the refrigerator. Close the refrigerator and
freezer doors.
- V-4
17—
L
Q—
2. Remove 2 clips from the 2 couplers (5 and 6).
Disconnect the 2 water supply lines (3 and 4) from the
2 couplers (5 and 6) under the freezer door. Press the
coupler while pulling the water line to disconnect.
NOTE: Do not cut the water line to remove it.
/ '
To remove the freezer door:
4. Disconnect the 3 wire connectors (11) by gently
pulling them apart at the connectors.
A CAUTION
Support the door during upper hinge removal to
prevent possible personal injury and/or product
damage from a falling, unsupported door.
5.
Remove the ground screw (12) and disconnect the
freezer ground wire (13). Remove the remaining 3
hinge screws (14) and the upper hinge (15) from the
top of the refrigerator.
3. With the doors closed, remove 8 screws (7) securing
the 2 upper hinge covers (8 and 9) with a flat-head
screwdriver. Carefully disconnect any wire connector
(10) attached to the upper hinge cover (9) and
6. Lift the freezer door (16) straight up to disengage it
from the bottom hinge (17) and carefully place the
door to one side.
NOTE: Be careful not to pinch the water tubing and
wire harness during door removal.
Page 12
REFRIGERATOR INSTALLATION
To remove the refrigerator door:
A CAUTION
Support the door during upper hinge removal to
prevent possible personal injury and/or product
damage from a falling, unsupported door.
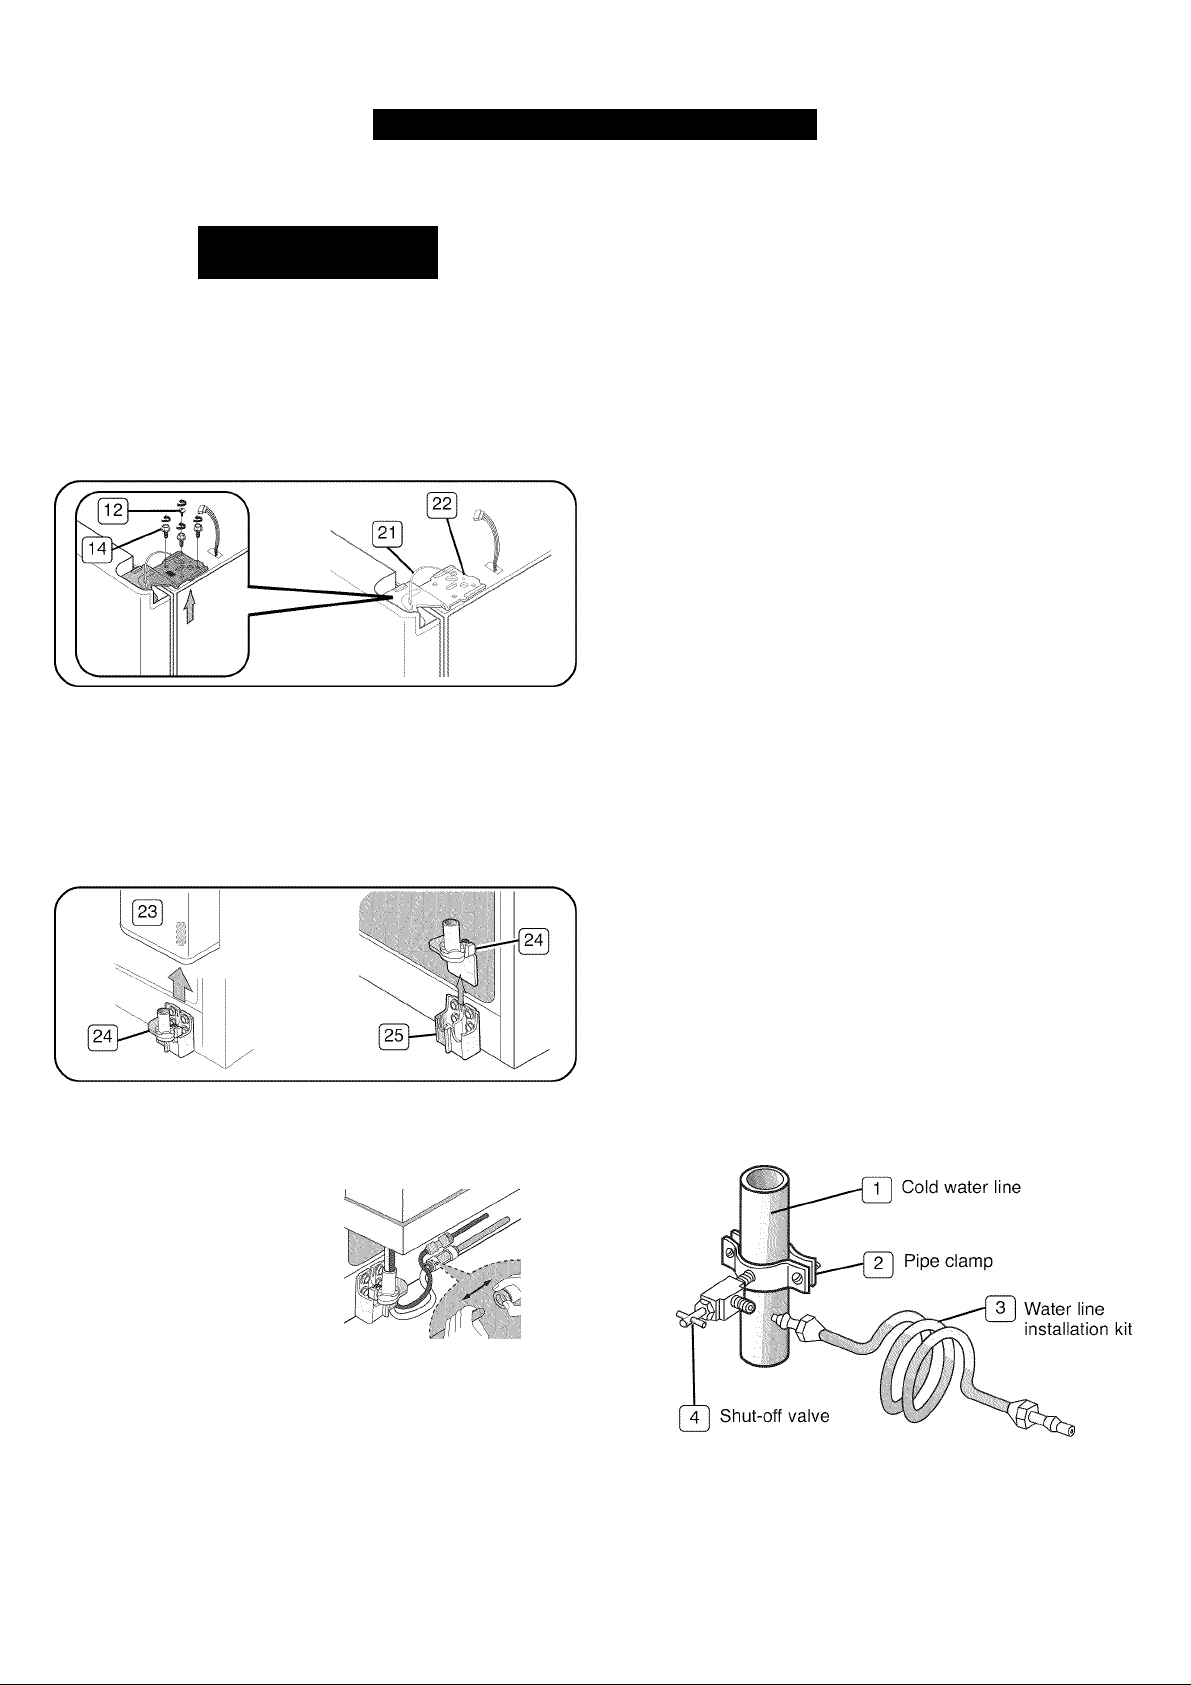
8. Remove the ground screw (12) and disconnect the
refrigerator ground wire (21). Remove the remaining 3
hinge screws (14) and the upper hinge (22) from the
top of the refrigerator.
9. Lift the refrigerator door (23) straight up to disengage
it from the bottom hinge (24) and carefully place the
door to one side.
WATER LINE REQUIREMENTS
A water dispenser is one of the helpful features on your
new Kenmore Elite™ Side-By-Side Refrigerator. To help
promote better health, the water filter removes unwanted
particles from your water. However, it does not sterilize or
destroy microorganisms. You may need to purchase a
water purifying system to do that.
In order for the icemaker to operate properly, a water
pressure of 20~125 psi (pounds per square inch) is
required.
Under normal conditions, a 170-cc (5.75-oz.) cup can be
filled in 10 seconds.
If the refrigerator is installed in an area with low water
pressure (below 20 psi), you can install a booster pump to
compensate for the low pressure.
Make sure the water storage tank inside the refrigerator is
properly filled. To do this, press the water dispenser lever
until the water runs from the water outlet.
NOTE: Water line installation kits are available at extra
cost from your dealer. We recommend using a water
supply kit that contains copper tubing.
NOTE: Keep track of all loose parts to prevent
misplacing or losing them during disassembly.
10. Lift bottom hinge (24) straight up to separate it from
the bottom hinge bracket (25).
11. Reattach the refrigerator and freezer doors by
reversing the order of the steps 10 to 3.
Reattaching the water supply lines:
1.
The water supply line
must be fully inserted to
the marked line to
prevent water leakage
from the dispenser.
NOTE: The water supply
lines are color-coordinated,
so the line color should
always match. One
supplies the icemaker
and the other supplies the
water dispenser.
2.
Insert the 2 clips and check that each clip holds the
line firmly.
CONNECTING TO THE WATER SUPPLY LINE
1. Shut off the main water supply line and make sure the
icemaker is turned off.
2. Locate the nearest cold water line (1).
NOTE: Only connect to a drinkable cold water source.
3. Install pipe clamp (2) on cold water line (1).
4. Cover threads of shut-off valve (4) with pipe thread
tape or compound; then thread into pipe clamp (2)
and cold water line (1).
5. Connect water line installation kit (3) to shut-off valve (4).
3. Install the front leg cover (2) and secure with 3 screws.
12
Page 13
REFRIGERATOR INSTALLATION
CONNECTING THE WATER SUPPLY
LINE TO THE REFRIGERATOR
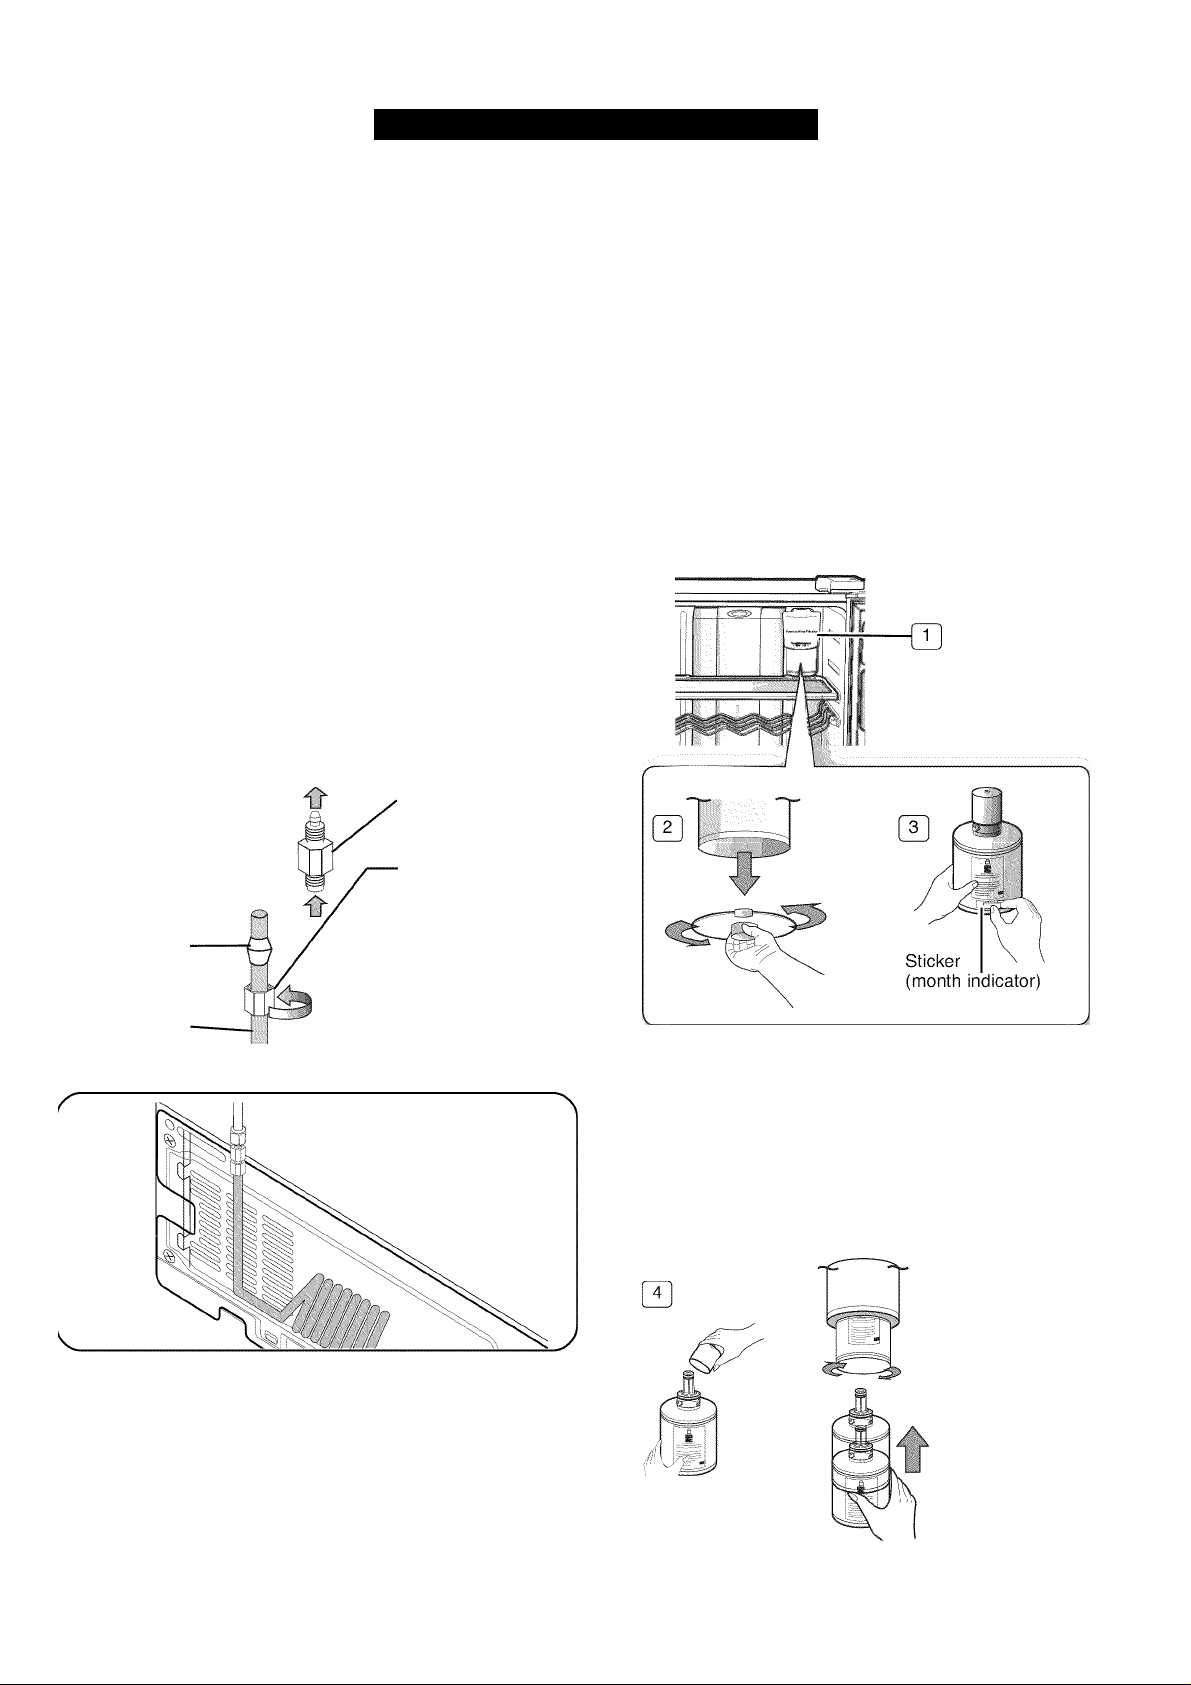
There are several items that you need to purchase to
complete this connection. You may find these items sold
as a kit at your local hardware store.
• 1/4" compression nut
• copper tubing
• ferrule
1. Slip the compression nut (A) on the supplied plastic
tubing (B).
2. Tighten the compression nut (A) onto the 1/4"
compression fitting.
- Slip the compression nut (C) (not included) and
ferrule (not included) on copper tubing (not
included) as shown.
3. Tighten the compression nut onto the compression
fitting. Do not overtighten the compression nut (C).
Plastic tubing (B)(Supplied)
Compression nut (A)
(1/4") (Supplied)
INSTALLING THE WATER FILTER
1. Remove the water filter cover (1).
2. Remove the fixed cap by turning it counterclockwise.
Keep the cap in a safe place for later use if you don’t
use the filter.
3. Remove the water filter from the box and put a
replacement indicator sticker on the filter as shown.
Place the sticker on the filter that dates 6 months in
the future. For example, if you install the water filter in
March, put the “SEP” sticker on the filter to remind
you to replace it in September. That way you’ll know
when it is time to replace the filter. Normally, a filter
life is about 6 months.
NOTE: You should remove the upper glass shelf
before installing water filters.
Compression fitting
(Supplied)
Compression nut (C)
(1/4") (Not supplied)
Ferrule
----------
(Not supplied)
Copper tubing
(Not supplied)
4. Turn on water and check for any leakage.
4. Remove the filter cap and insert the filter into the filter
housing.
5. Slowly turn the water filter 90° clockwise to align with
the printing mark on the cover, locking the filter in
position. Make sure to align the water filter label mark
with the center of the cover filter printing as illustrated.
Remember, do not overtighten.
Cover filter.
Kenmore 3№)tei: Filtration
13
Separation
of red cap.
e
Turn until the
is aligned.
abel
Page 14
REFRIGERATOR INSTALLATION
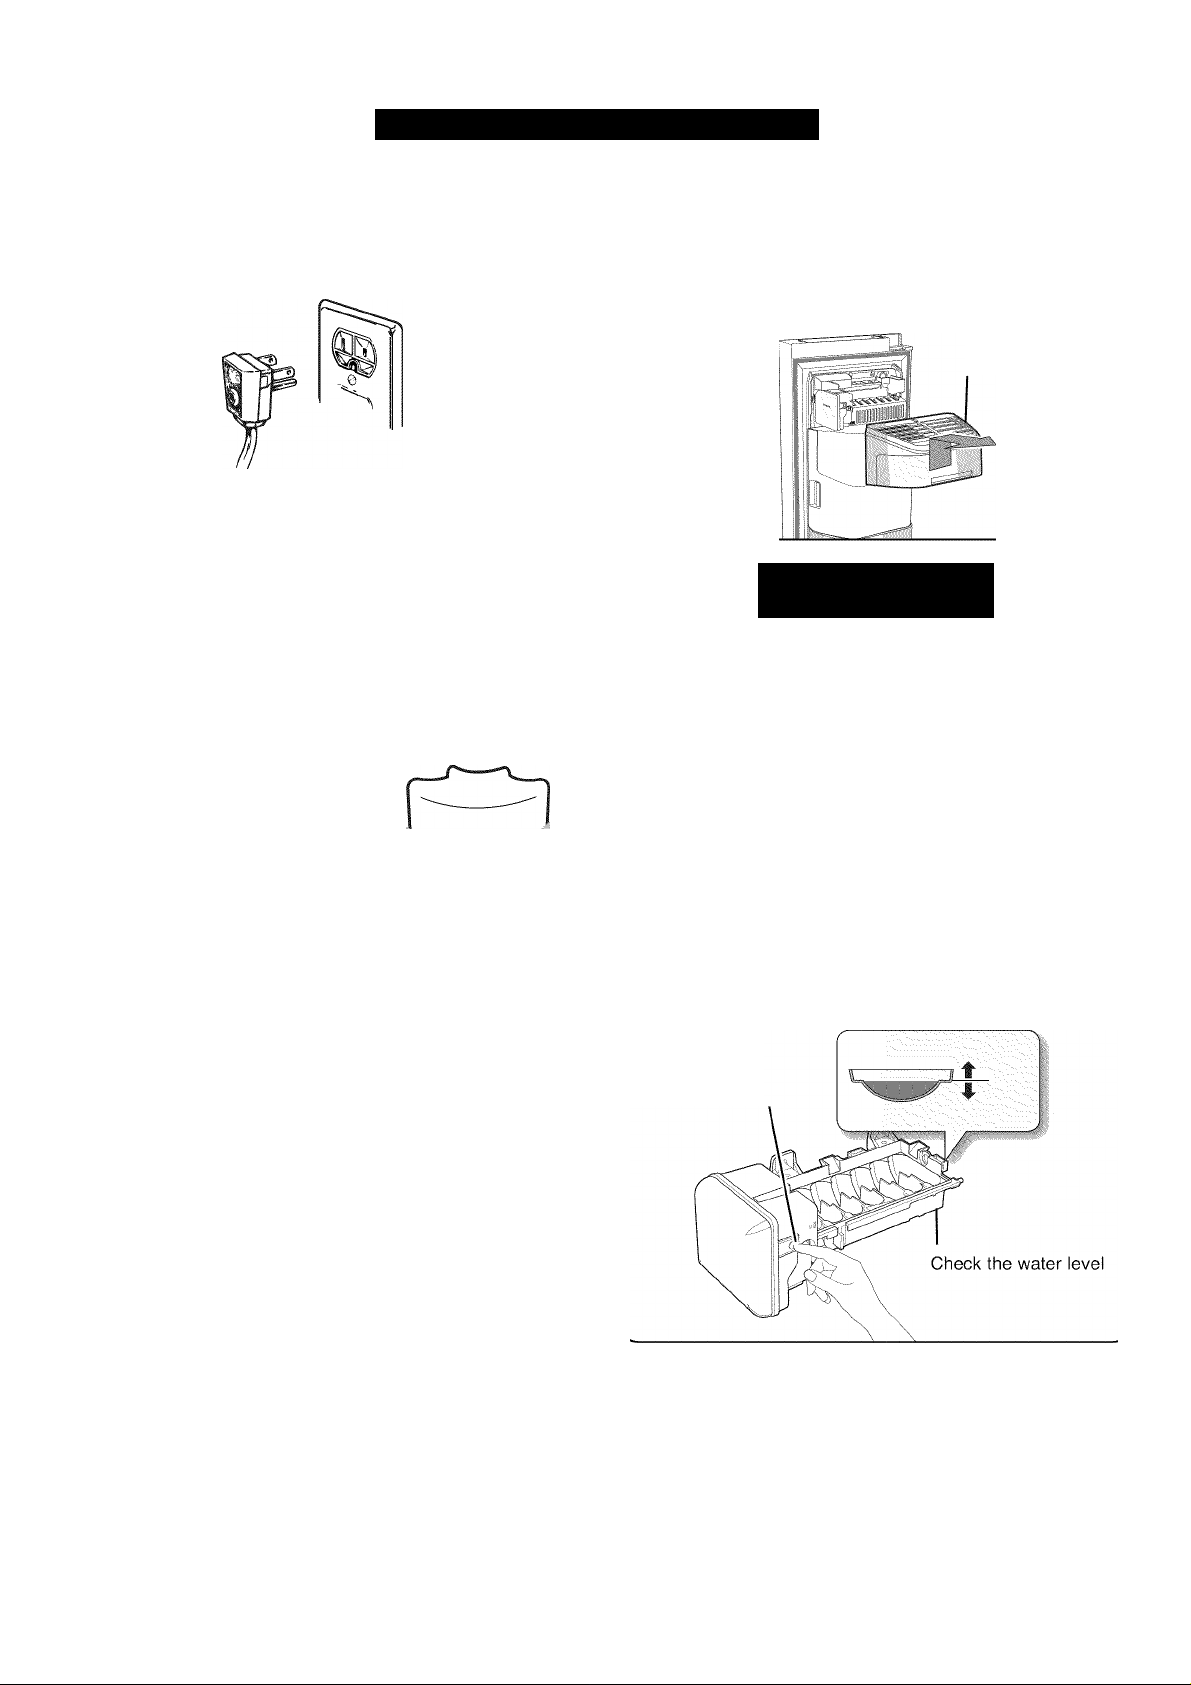
Remove any residual matter inside the water supply line after installing the water filter.
1. Plug the refrigerator’s power cord into a 3-prong
grounded outlet.
2. Turn ON the main water supply and turn ON the valve
to the water supply line.
3. Flush 3 gallons (11.4 liters) of water through the
dispenser (approximnately 6 minutes). This removes
any contaminants and purges any air in the water
lines.
4. Additional flushing may be required in some
households.
5. Open the refrigerator door and make sure there are
no water leaks coming from the water filter.
Water
I K ''re Westor Fi'' .»n
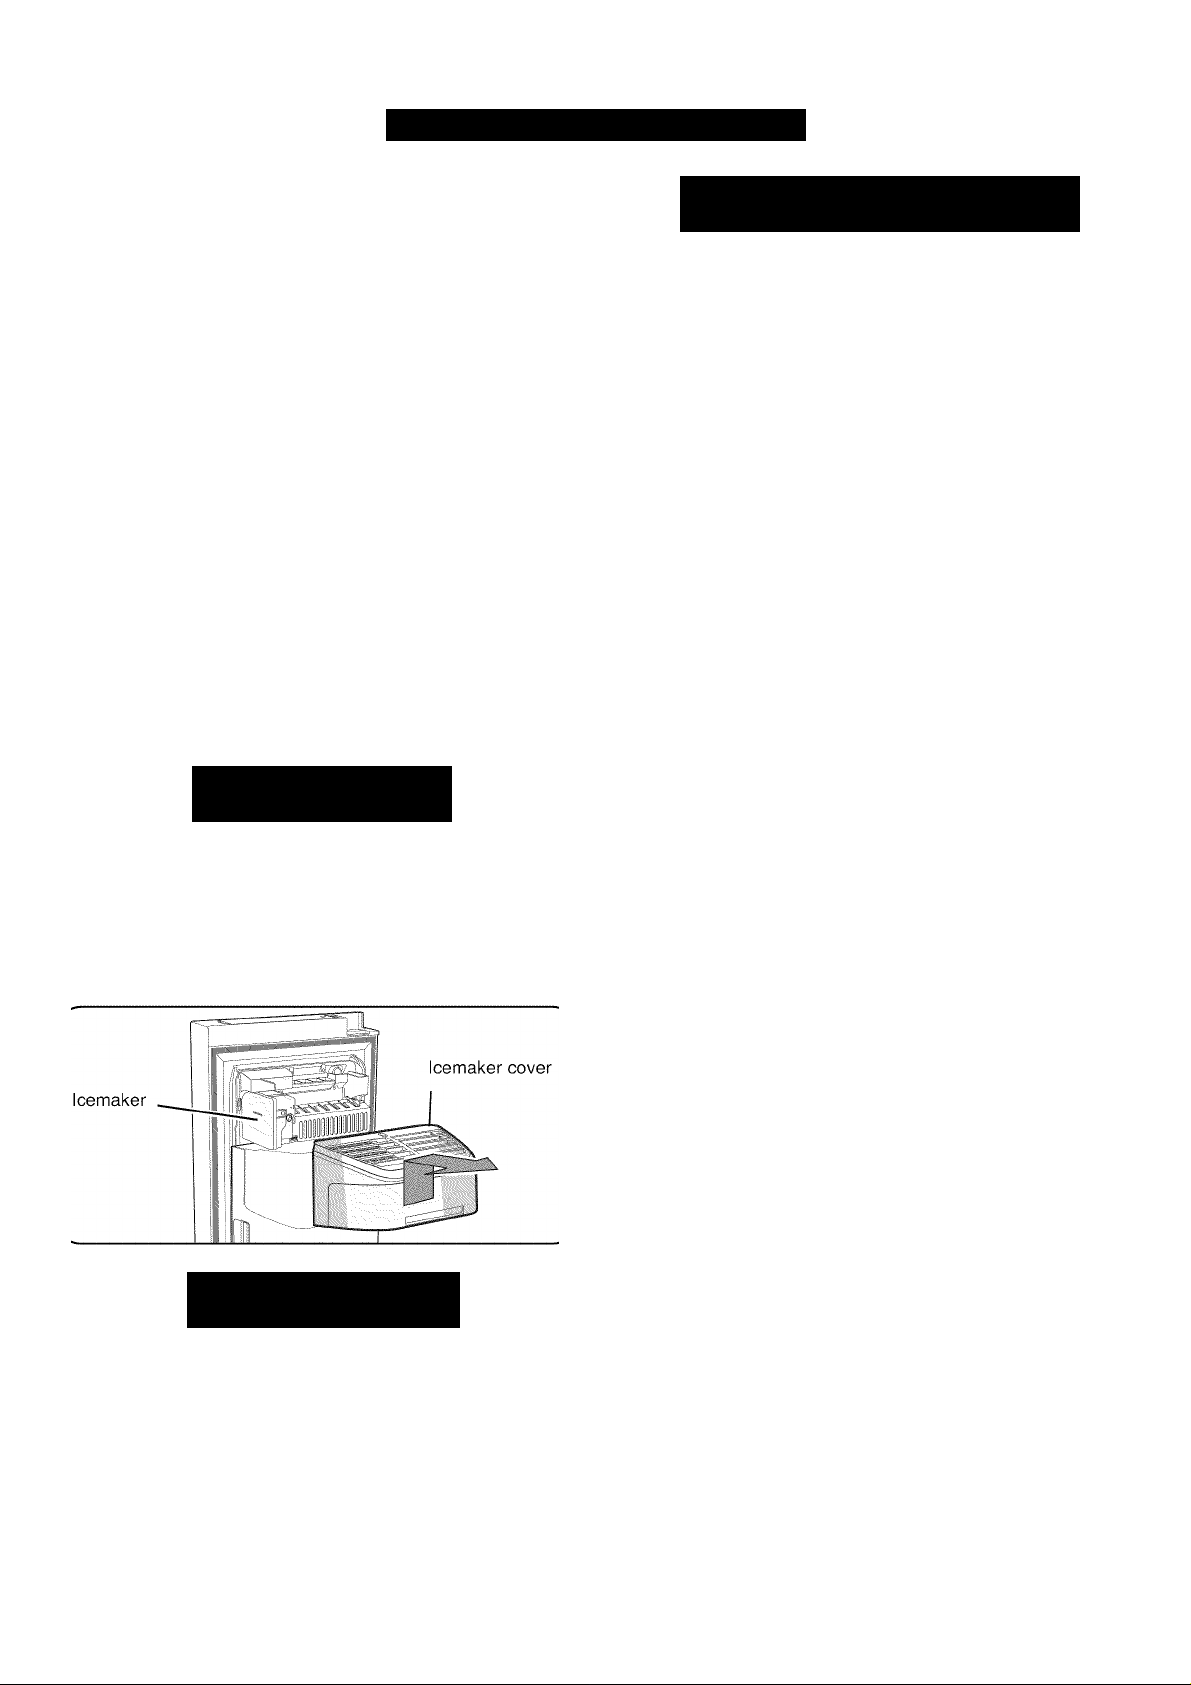
Check the amount of water supplied to the icemaker.
1. Open the freezer door.
2. Lift the icemaker cover up and out to remove it from
the freezer door.
Icemaker cover
A CAUTION
It will take a few minutes to fill the icemaker with
water.
Do not press the test button continuously when the
tray is filled with ice or water. Water could overflow
or ice jamming could occur.
When the bucket is not installed, the icemaker
does not work.
If ICE OFF blinks on the LCD display panel,
reinsert the bucket and/or make sure it is installed
properly.
<:k»
NOTE: Be sure to flush 3 gallons (11.4 liters) approximately
6 minutes). This purges any air in the water lines that
could cause the dispenser to drip.
Press and hold the test button on the icemaker for
3.
3 seconds. The icemaker will automatically fill with
supplied tap water. After the icemaker has completed
filling, check to make sure the amount of water is
correct.
Test button
If the water level is too low, the ice cubes will be
small. Contact a plumber to increase the water
pressure to the refrigerator.
4.
Replace the icemaker cover and close the freezer
door.
14
Page 15
REFRIGERATOR INSTALLATION
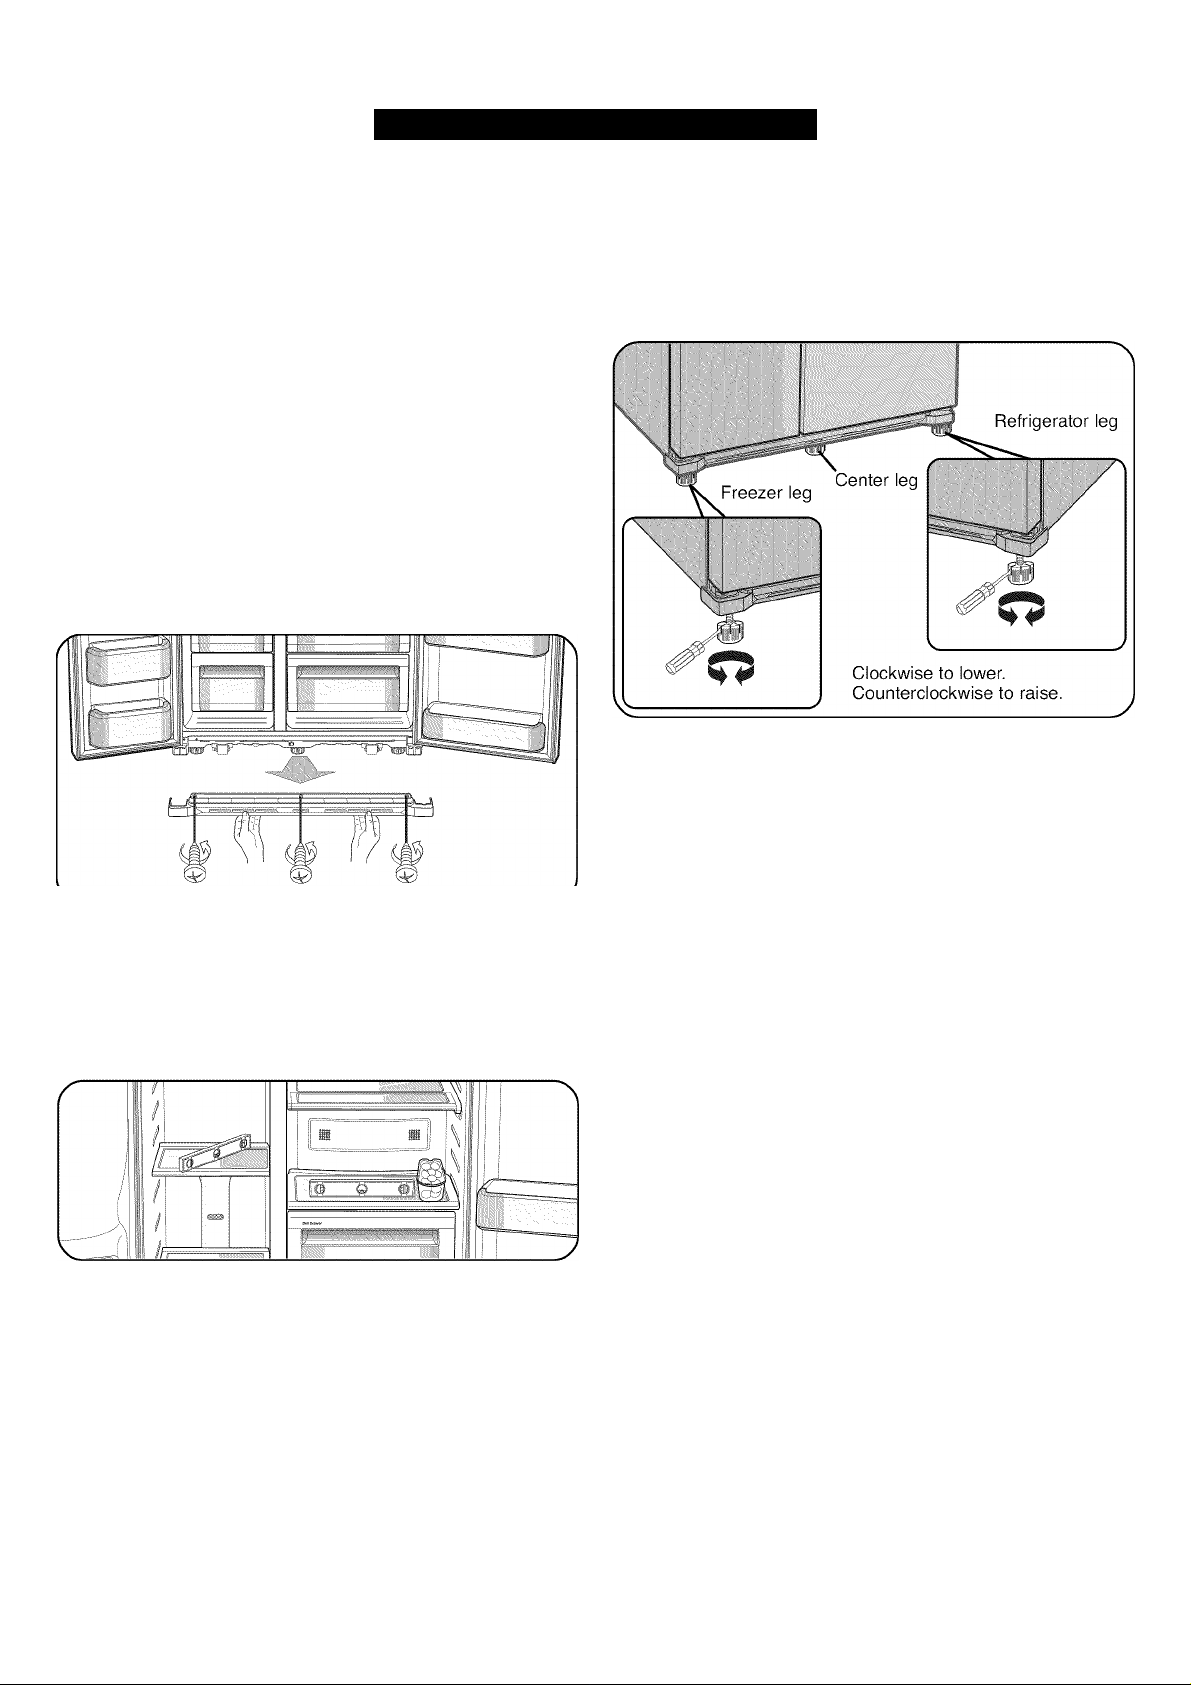
POSITIONING AND LEVELING THE REFRIGERATOR
Now that the refrigerator has been assembled and
connected to a water supply source, position and level the
the refrigerator.
The refrigerator has three front leveling legs—one on the
right, one on the left, and one in the middle. Adjust legs to
alter tilt from front to back or side to side. If the
refrigerator seems unsteady or you want the doors to
close easier, adjust the refrigerator’s tilt using the
instructions below:
NOTE: Make sure the location meets all the requirements
listed on page 9.
1. Move the refrigerator into its final position.
2. Open the refrigerator and freezer doors and remove
the 3 screws and the front leg cover.
4. If it is not level, adjust the front leveling legs until the
refrigerator is level. Using a flat-head screwdriver, turn
the leg counterclockwise to extend the leg and raise
the refrigerator at that point. Turn the leg clockwise to
retract the leg and lower the refrigerator at that point.
It may take several turns of the leveling leg to adjust
the tilt of the refrigerator.
5. Replace the front leg cover and secure with 3 screws.
6. Close the refrigerator and freezer doors.
3. Place a level on the lower shelves or drawer covers.
Check to make sure the refrigerator and freezer
sections are level from side to side and front to back.
NOTE: Having someone push backward against the
top of the refrigerator takes some weight off the
leveling legs. This makes it easier to adjust the legs.
15
Page 16
REFRIGERATOR INSTALLATION
MAKING MINOR DOOR ADJUSTMENTS
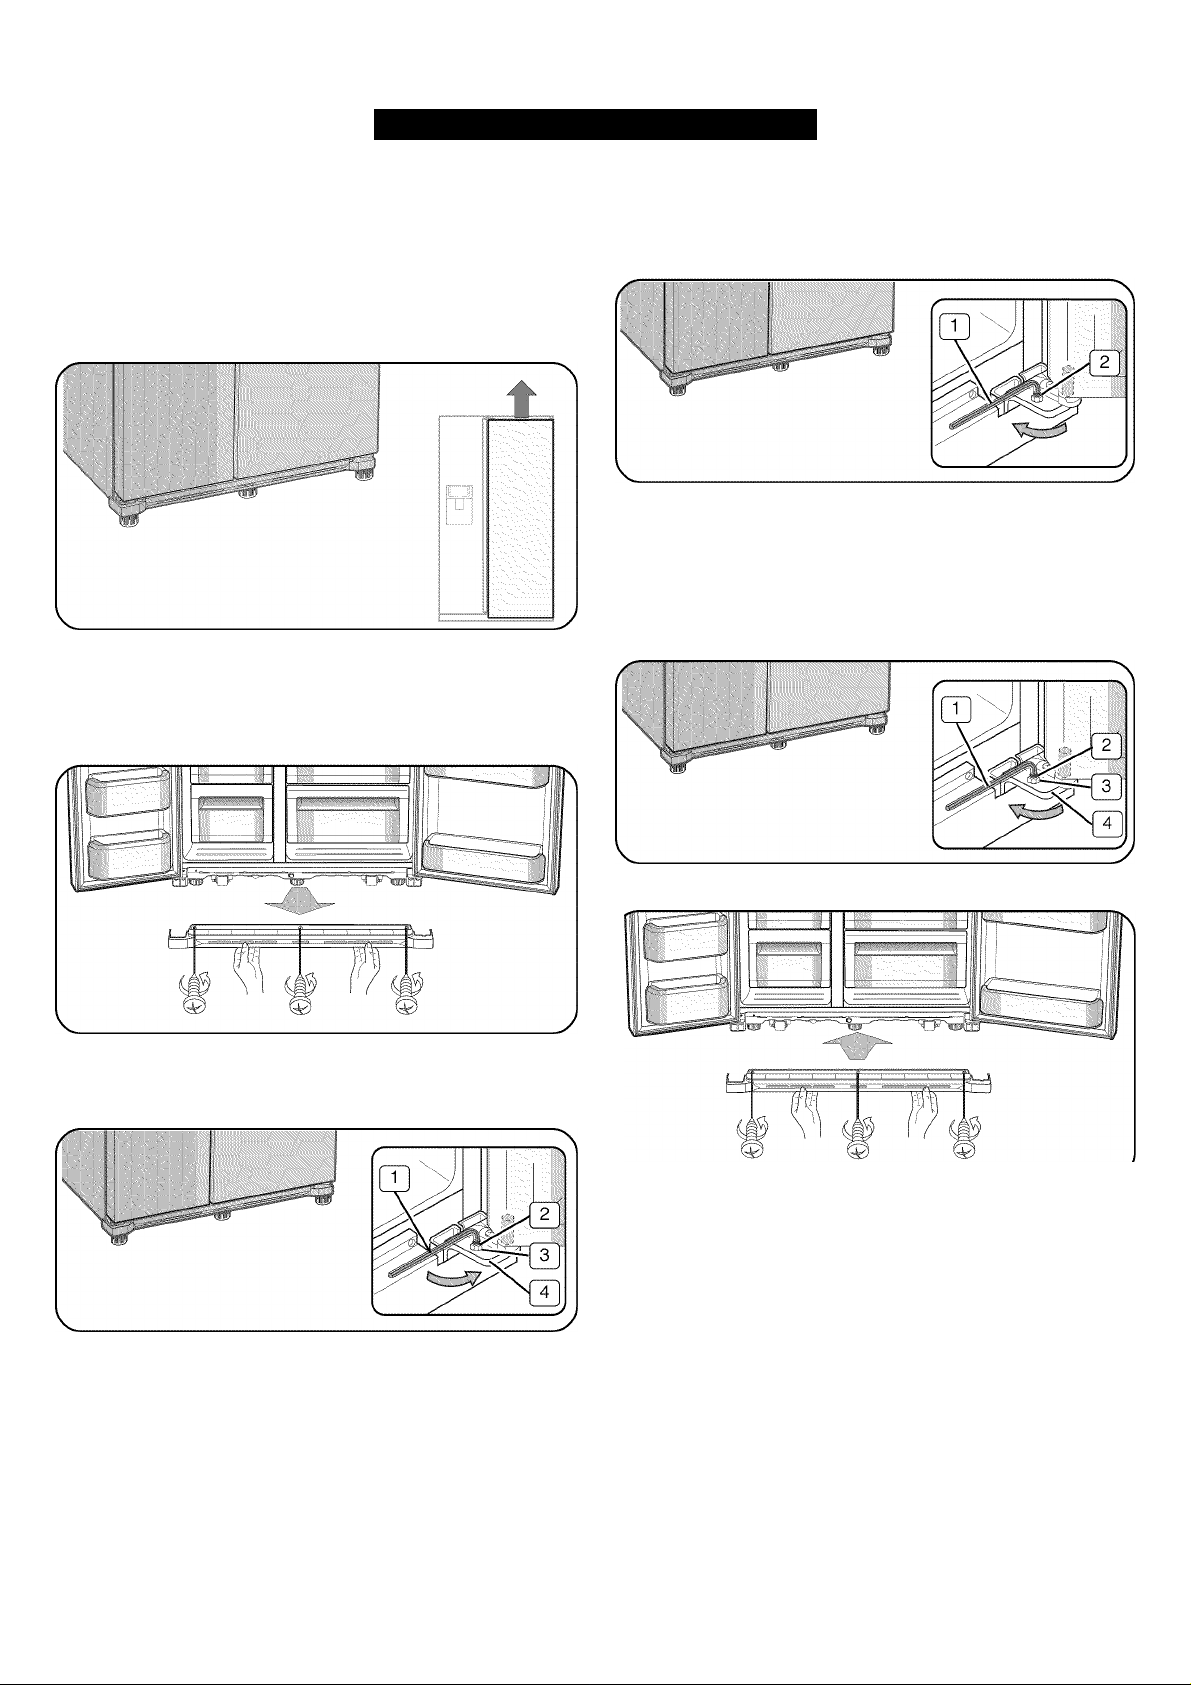
Remember, a level refrigerator is necessary for getting
the doors perfectly even. If you need help, review the
previous section on leveling the refrigerator.
When the freezer door is higher than the refrigerator door,
adjust the refrigerator leg to level the two doors.
The following process is used when correcting the level of
either door.
1. Open the refrigerator and freezer doors and remove
the 3 screws and the front leg cover.
3. Using the Allen wrench (1), turn the bolt (2) clockwise
to raise the door or counterclockwise to lower the
door. Close the doors to check the level. Repeat step
3 until the doors are level.
4. After the door is adjusted and the doors are leveled,
thread the nut (3) down the bolt (2) until it touches the
lower hinge (4). Tighten the bolt with the Allen wrench
(1) to lock the nut and screw in place.
NOTE: If the nut and bolt are not securely tightened, they
can come loose, causing the doors to be misaligned.
2. Use an Allen wrench (1) to loosen the bolt (2) and nut
(3) on top of the lower hinge (4). Unthread the nut to
the upper end of the bolt.
5. Replace the front leg cover and secure with 3 screws.
6. Close the refrigerator and freezer doors.
16
Page 17
USING YOUR REFRIGERATOR
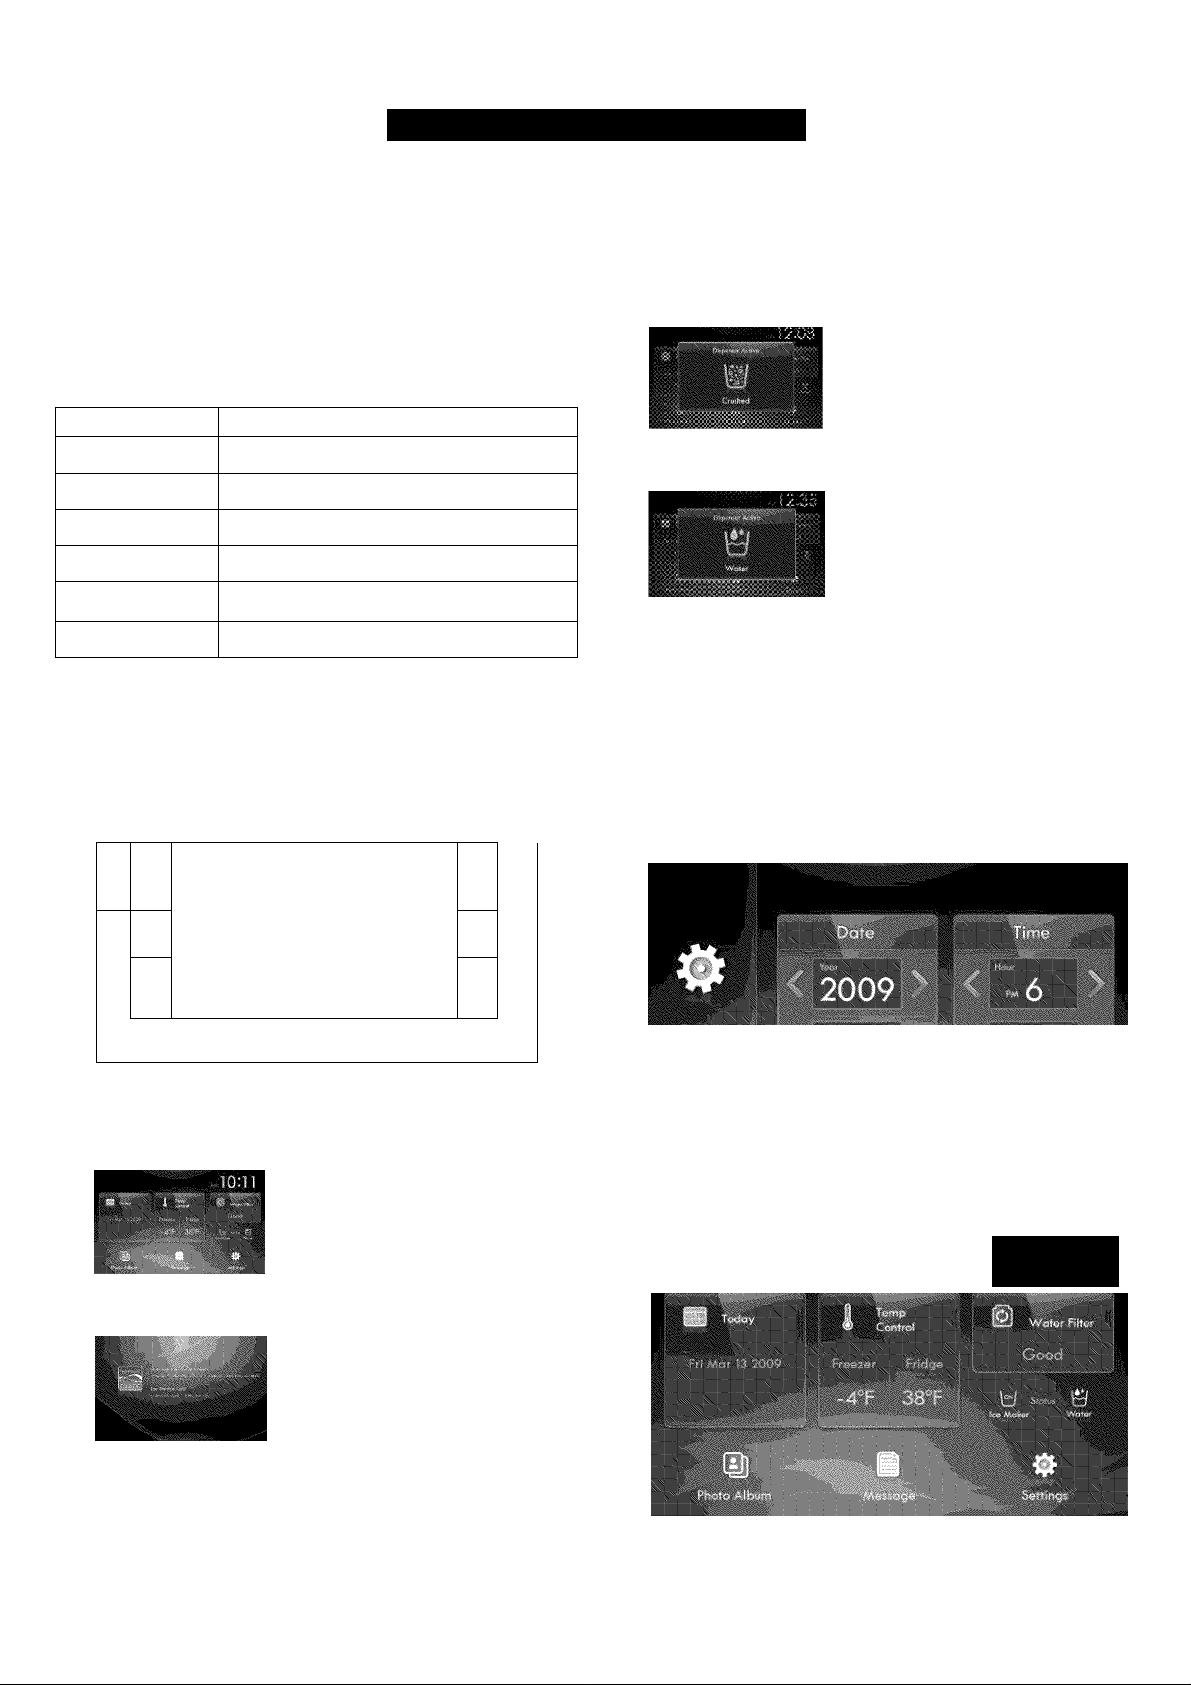
DIGITAL PANEL
The digital panel on the freezer door is a Graphic User
Interface (GUI). This panel with LCD screen provides an
easy-access interface for the user. The touch screen
allows the user to access all display functions, including
an interactive message board system.
The following chart provides important operating
information and specifications for the digital panel:
FUNCTION DESCRIPTION
Processor Samsung S3C2440A 400 MHz
RAM SDRAM (64 MB)
ROM NAND Flash (128 MB)
OS Windows CE 5.0
Display
Interface Secure Digital (SD) Card Slot
The panel has six touch buttons on the sides of the panel.
These buttons perform the following operations when they
are touched by a finger.
800 X 480 T TFT-LCD
4. Accent Lighting - Turns the accent lamp ON and
OFF.
5. Ice Type/lce Off - Allows you to select the type of ice
being dispensed. This button toggles between cubed
and crushed ice. When pressed for more than 3
seconds, it will turn OFF the icemaker.
6. Water - Press this button to dispense water from the
dispenser.
When the refrigerator is plugged in or the display reset
button is pressed, the “Current Date/Time” screen will be
displayed.
Setting the Time
NOTE: Buttons are very sensitive. They can be triggered
by just brushing off the panel.
f
©
Slide
Show
Accent
Lighting
Water
/
Cooling off
0
0
toM
(3
|5
h£.
Child
Lock
IceType
3^
Display reset button
1. Home - Brings up the initial screen view showing the
refrigerator’s main functions.
2. Slide Show - Use this function to see images saved
in the electronic photo album.
1. Choose the desired date and time by pressing the
< or > buttons on the screen.
2. Press the OK button on the screen to apply the new
date and time.
3. When the OK button is pressed, the “Home” screen
will be displayed, showing the new set date and time.
10:11
3. Child Lock - When pressed for more than 3
seconds, it activates the child lock option.
17
Page 18
USING YOUR REFRIGERATOR
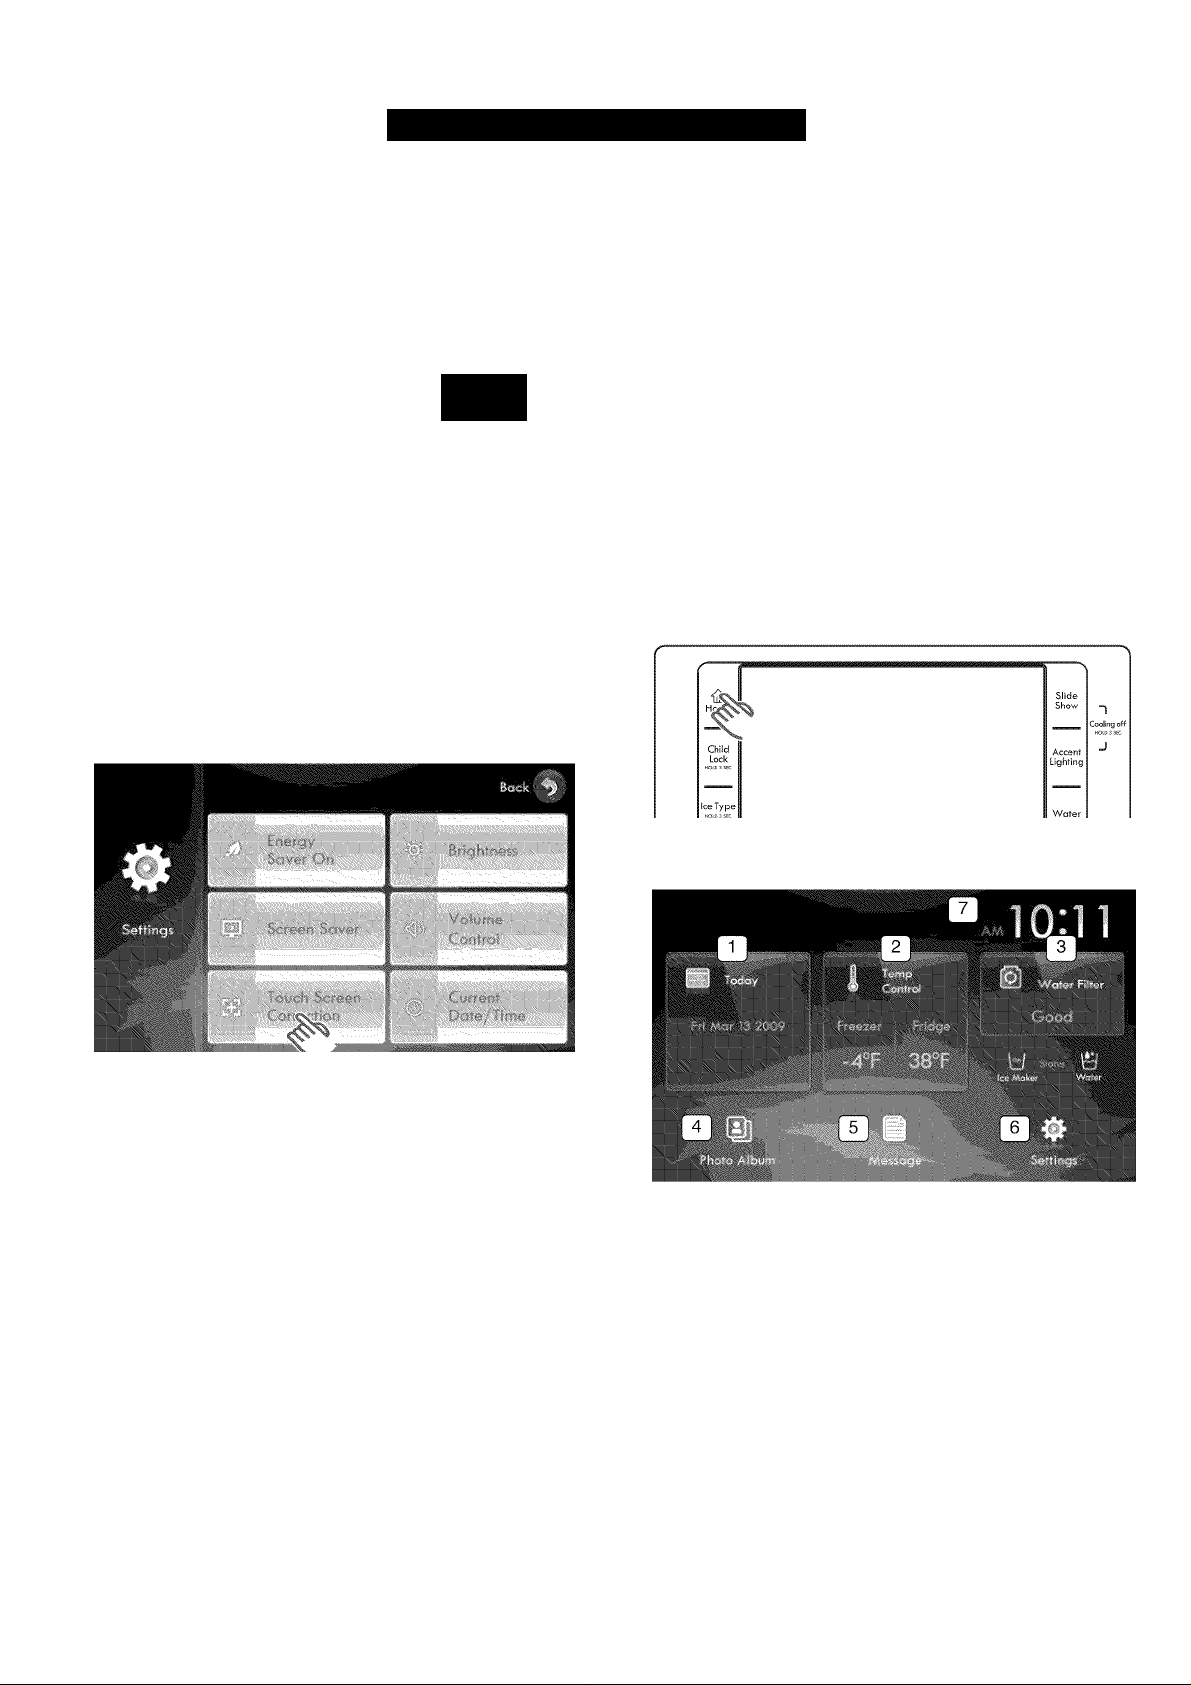
Calibrating the Styius Touch Point
The stylus touch point can be calibrated to best meet the
user’s needs. To adjust the stylus touch point on the touch
screen:
1. Press the Settings button on the “Home” screen. The
display will show the adjustable settings on the
screen.
i u“ I
2. Press the Touch Screen Correction button. The
display will show pointer instructions and a “+” on the
screen.
Tap thw Kfmm to sav« ywf scitting.» or
woit 20 ujccwids la revurt back to origteol s«ising=
Tim-0 lirrrit: 28 s-
NOTE: If the screen is not touched within 30 seconds,
the settings will revert back to the existing settings.
Using Home
When the Home button is pressed, the screen displays
the “Home” screen.
1. Press the Home button.
3. Using the stylus, lightly press on the center of the “+”
mark. The “+” mark will move on the screen. Repeat
this step 3 until the “+” mark no longer appears.
Carufgfly lap on coniur of Ihu iarg«t.
KepsioT as th-s forger mov«s arourid ih«? scr»«r>.
+
4. To save the new calibration data, touch the screen
within 30 seconds of the last “+” mark. This will save
the new settings and return the screen back to the
“Settings” screen.
2. Choose the desired function by pressing it on the
“Home” screen.
1. Today: You can manage your daily schedule.
2. Temp Control: You can set the freezer and
refrigerator temperatures. (See page 27.)
3. Water Filter: It shows the current status of the
water filter and dispenser.
4. Photo Album: Save favorite photos and images
to make your own slide show.
5. Message: You can save or check necessary
messages.
6. Settings: Allows you to set the energy saver,
brightness, screen saver, volume control, touch
screen correction, and current time.
7. Task Bar: Indicates the current time.
18
Page 19
USING YOUR REFRIGERATOR
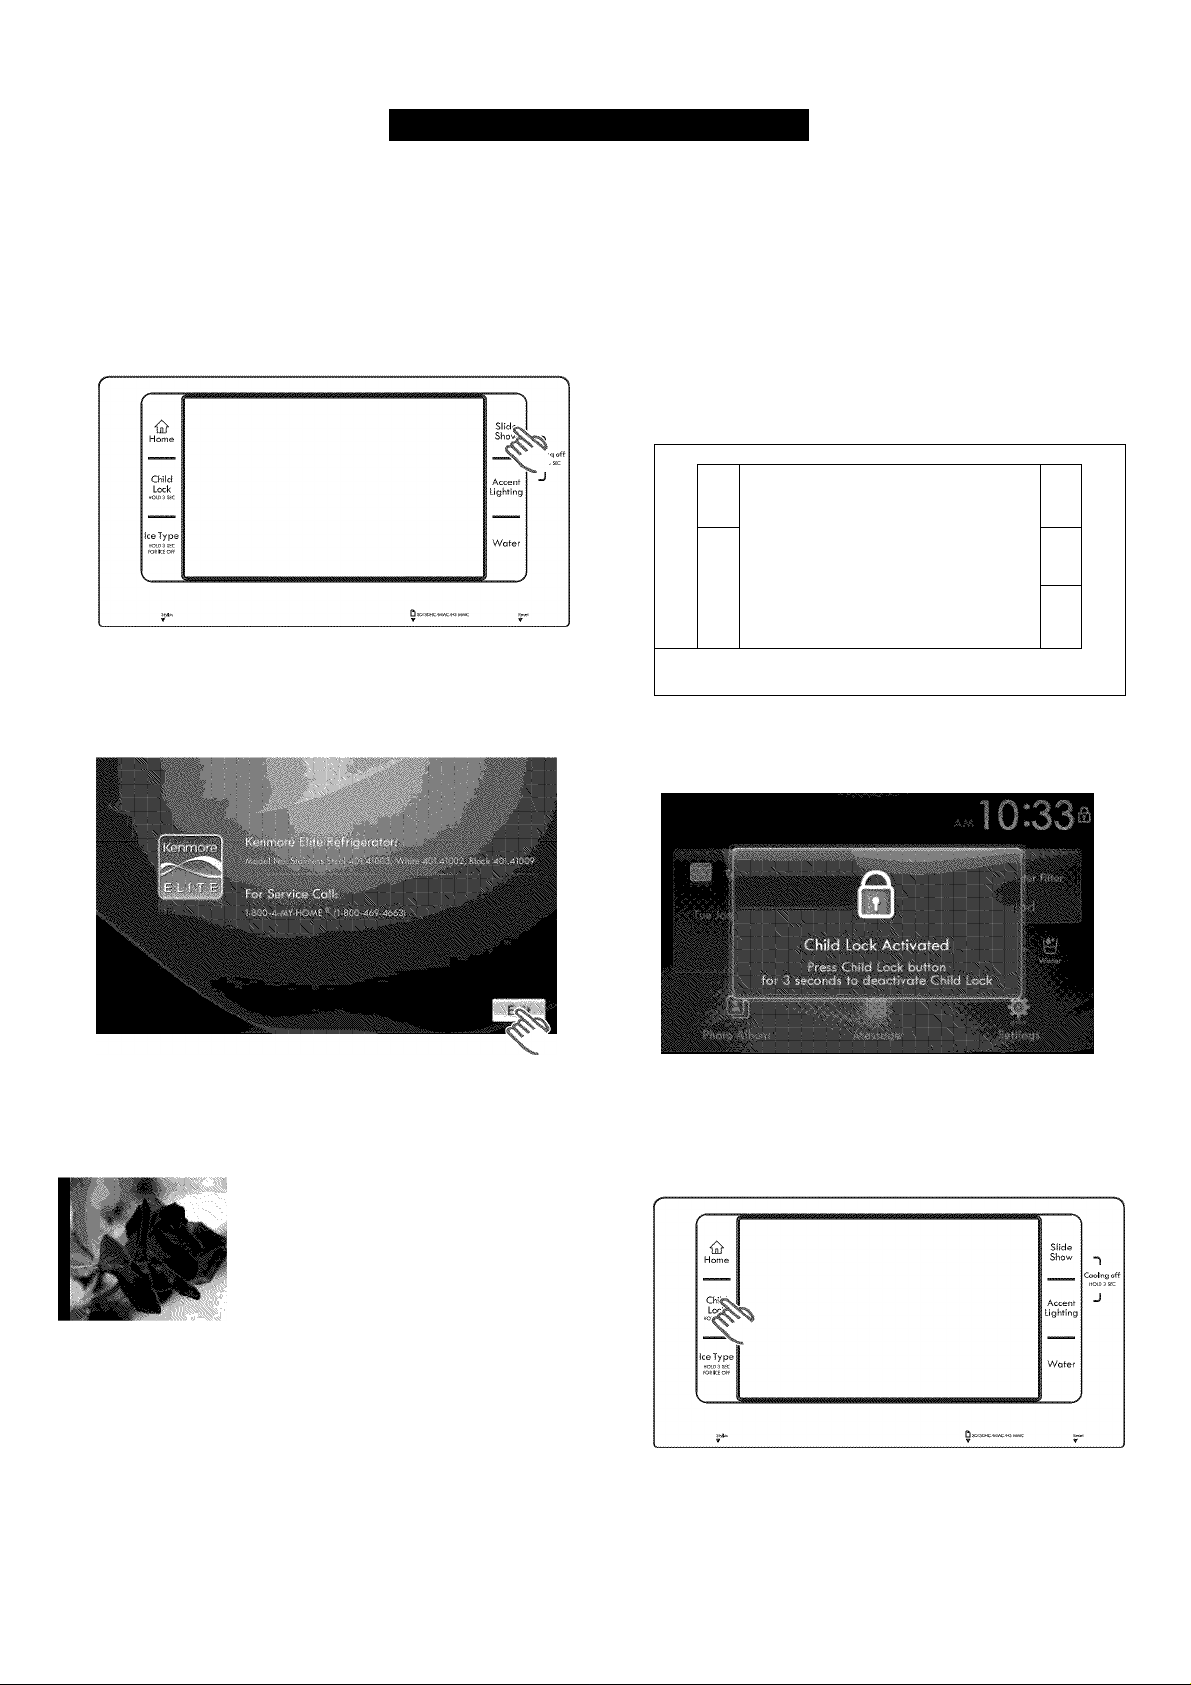
Using Slide Show
When Slide Show is selected, it shows the slides that are
saved in an electronic photo album. See page 33 for
instructions on setting up a slide show. If slides are not
selected from the photo album, the screen will show a
Kenmore Elite™ default slide.
1. Press the Slide Show button.
NOTE: The sliding photos option can be selected at
“Photo Album.”
2. Press the Exit button to stop the slide show and
return to the “Home” screen.
Using the Child Lock Function
Activate the child lock function by pressing and holding
the Child Lock button for more than 3 seconds. All control
panel buttons, the touch-screen controls, and the
dispenser will be deactivated. To reactivate the control
buttons, the touch-screen controls, and the dispenser,
press and hold the Child Lock button for more than
3 seconds.
1. Press and hold the Child Lock button for more than
3 seconds.
/
'
tir
Home
Chr
ice Type
2. The “Child Lock Activated” message will be displayed
and the lock icon will show up in the upper-right
corner.
Slide
Show
Accent
Lighting
Water
J
%
■ Based on the photo size, there could be black
background around the photo.
■ The photo is automatically optimized for a 16:9
wide-screen format.
NOTE: Saved images can be
stretched out or reversed. To
use a reversed image,
download it to your PC, flip
the image horizontally, and
then save it before uploading
it to the photo album.
3. Press and hold the Child Lock button for more than
3 seconds to deactivate the child lock function and
reactivate all operating controls. The “Child Lock
Deactivated” message will be displayed and the lock
icon will disappear.
19
Page 20
USING YOUR REFRIGERATOR
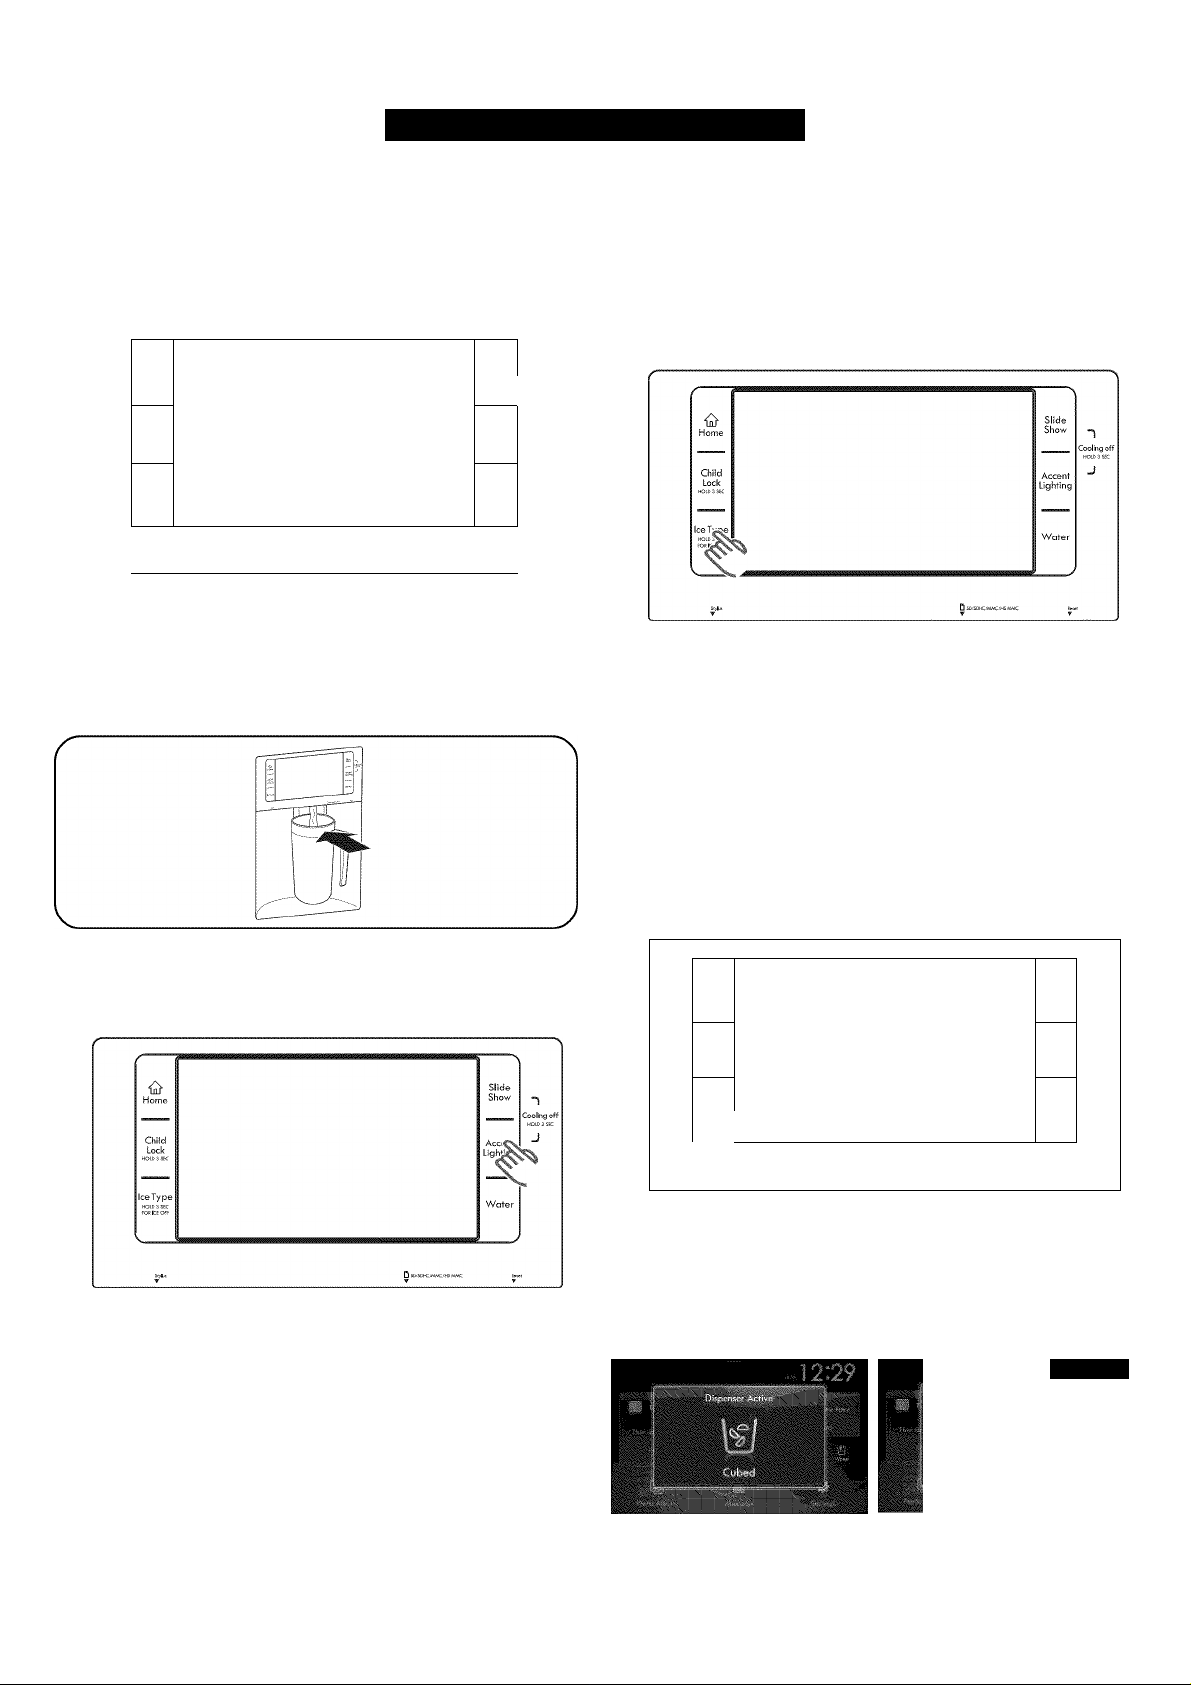
Dispenser Controls
The last three buttons on the control panel control the
dispenser functions. These buttons include Accent
Lighting around the dispenser (1), Ice Type/lce Off (2),
and Water dispensing (3).
\
■a
Home
Child
Lock
НОШ 3 ЙС
ice Type
FOSKEOfF
Slide
Show
Lighting
Water
Cooling oft
Using the Dispenser Lighting
Dispenser lighting turns ON whenever the dispenser is
operating. Five seconds after the dispenser stops
dispensing, the lighting turns OFF.
Turning Off the ice Dispenser
The Ice Type/lce Off button controls two functions. The
length of time the control is held determines which
function it controls.
1.
Press and hold the Ice Type/lce Off button for more
than 3 seconds to turn OFF the icemaker. “Ice Maker
Off” will show on the display.
1
NOTE: Pressing the Ice Type/lce Off button for less
than 3 seconds will toggle the type of ice being
dispensed.
2.
Press the Ice Type/lce Off button for more than
3 seconds to restart ice production.
Using the Dispenser Accent Lighting
1. Press the Accent Lighting button to have the accent
lamp stay on.
NOTES:
• Light OFF is the default mode. The accent lamp
stays off.
• Light ON allows the accent lamp to stay on.
• The accent lamp turns off whenever the dispenser
is operating. Five seconds after the dispenser stops
dispensing, the accent lamp turns back on.
Seiecting and Dispensing ice
1.
Press the Ice Type/lce Off button for less than 3
seconds. The screen will show “Dispenser Active
Cubed” or “Dispenser Active Crushed.” Pressing the
Ice Type/lce Off button for less than 3 seconds again
will toggle between the selections.
/ S
'
Slide
Home
Child
2. Place glass in dispenser to dispense selected ice.
NOTES:
• The dispenser always defaults to the last setting
that was used (Ice or Water).
• The selected dispenser function will be displayed as
the ice is being dispensed.
Show
Lighting
Water
1
Cooling off
HOI D3 SEC
J
2. Press the Accent Lighting button a second time to
turn off the accent lamp.
20
Page 21
USING YOUR REFRIGERATOR
Selecting and Dispensing Water
1. Press the Water button. The screen will show
“Dispenser Active Water.”
-----------N
Slide
Home
Child
Lock
HOlC- 3 SEC
Ice Type
V
2.
Place glass in dispenser to dispense refrigerated water.
NOTES:
• The dispenser always defaults to the last setting
that was used (Water or Ice).
• The dispenser function will be displayed as the
refrigerated water is being dispensed.
Show
Accent
Lighting
"1
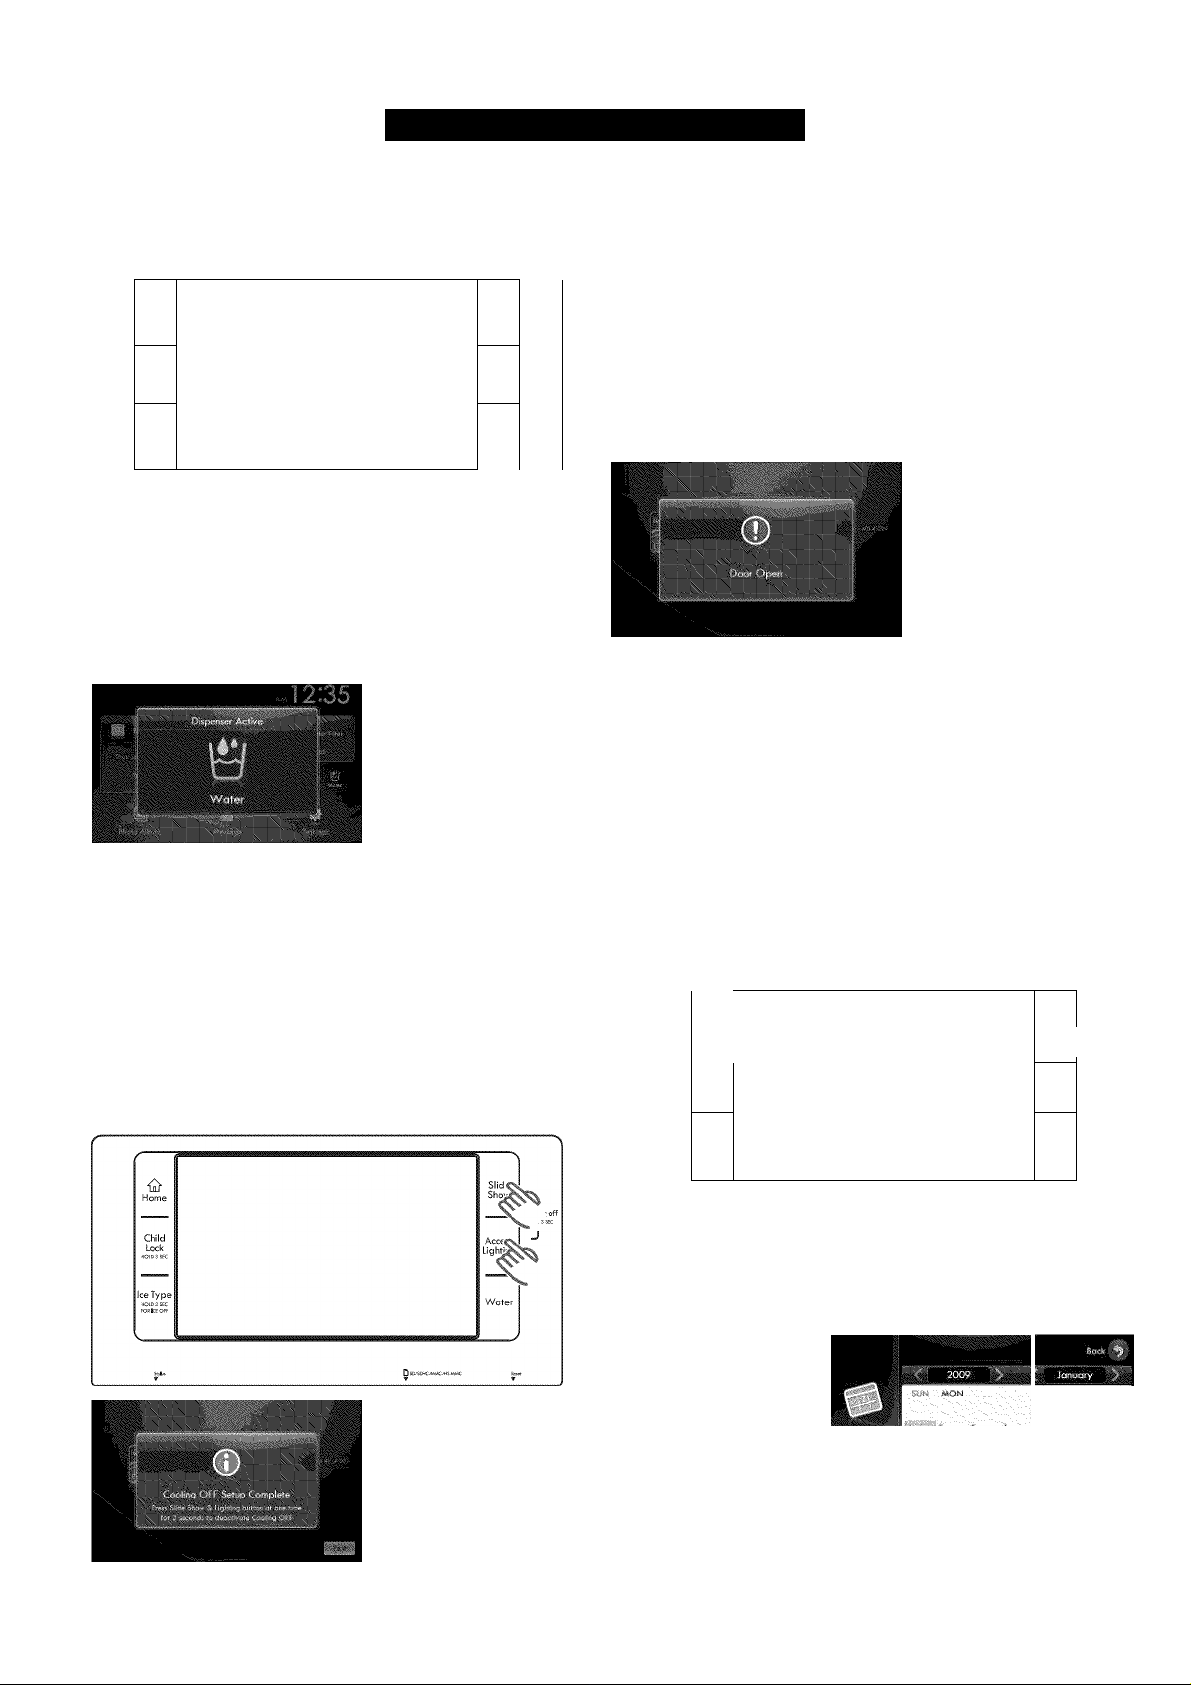
2. Press and hold the Slide Show and the Accent
Lighting buttons simultaneously again for 3 or more
seconds to reactivate the refrigerator compressor
functions. The screen will show “Cooling OFF Deactivated.”
Door Open Alarm
1
J
When the door is left open for more than 2 minutes, the
door open alarm goes off and the display shows “Door
Open.” The pop-up will disappear when the door is closed
properly. The alarm will beep for about 10 seconds; then it
will keep beeping every minute until the door is closed.
Calendar
The calendar is designed to interact with you and your
schedule. Besides telling you what day it is, the calendar
can also show you special days like holidays and
birthdays and display calendar memos to post instructions
for others to view or use. You will never forget or miss
another important function.
Cooiing Off (Demo Mode)
The cooling off function shuts off the cooling to the
refrigerator and freezer compartments, but does not shut
off the electrical power to the refrigerator. This is only
used to demo refrigerator models on showroom floors.
1. Press and hold the Slide Show and the Accent
Lighting buttons simultaneously for 3 or more
seconds. The screen will show “Cooling OFF Setup
Complete” and the refrigerator compressor functions
will be deactivated.
How to Enter a Calendar Memo
1. Press the Home button. The display screen will show
the “Home” screen.
Slide
—
1:
Child
V.
2. Press the Today button on the touch screen. The
screen will show the “Calendar” screen.
INC WE2 ■'(UP rCl /Т
Show
Lighting
Water
Cooling off
)
“1
21
■
Page 22
USING YOUR REFRIGERATOR
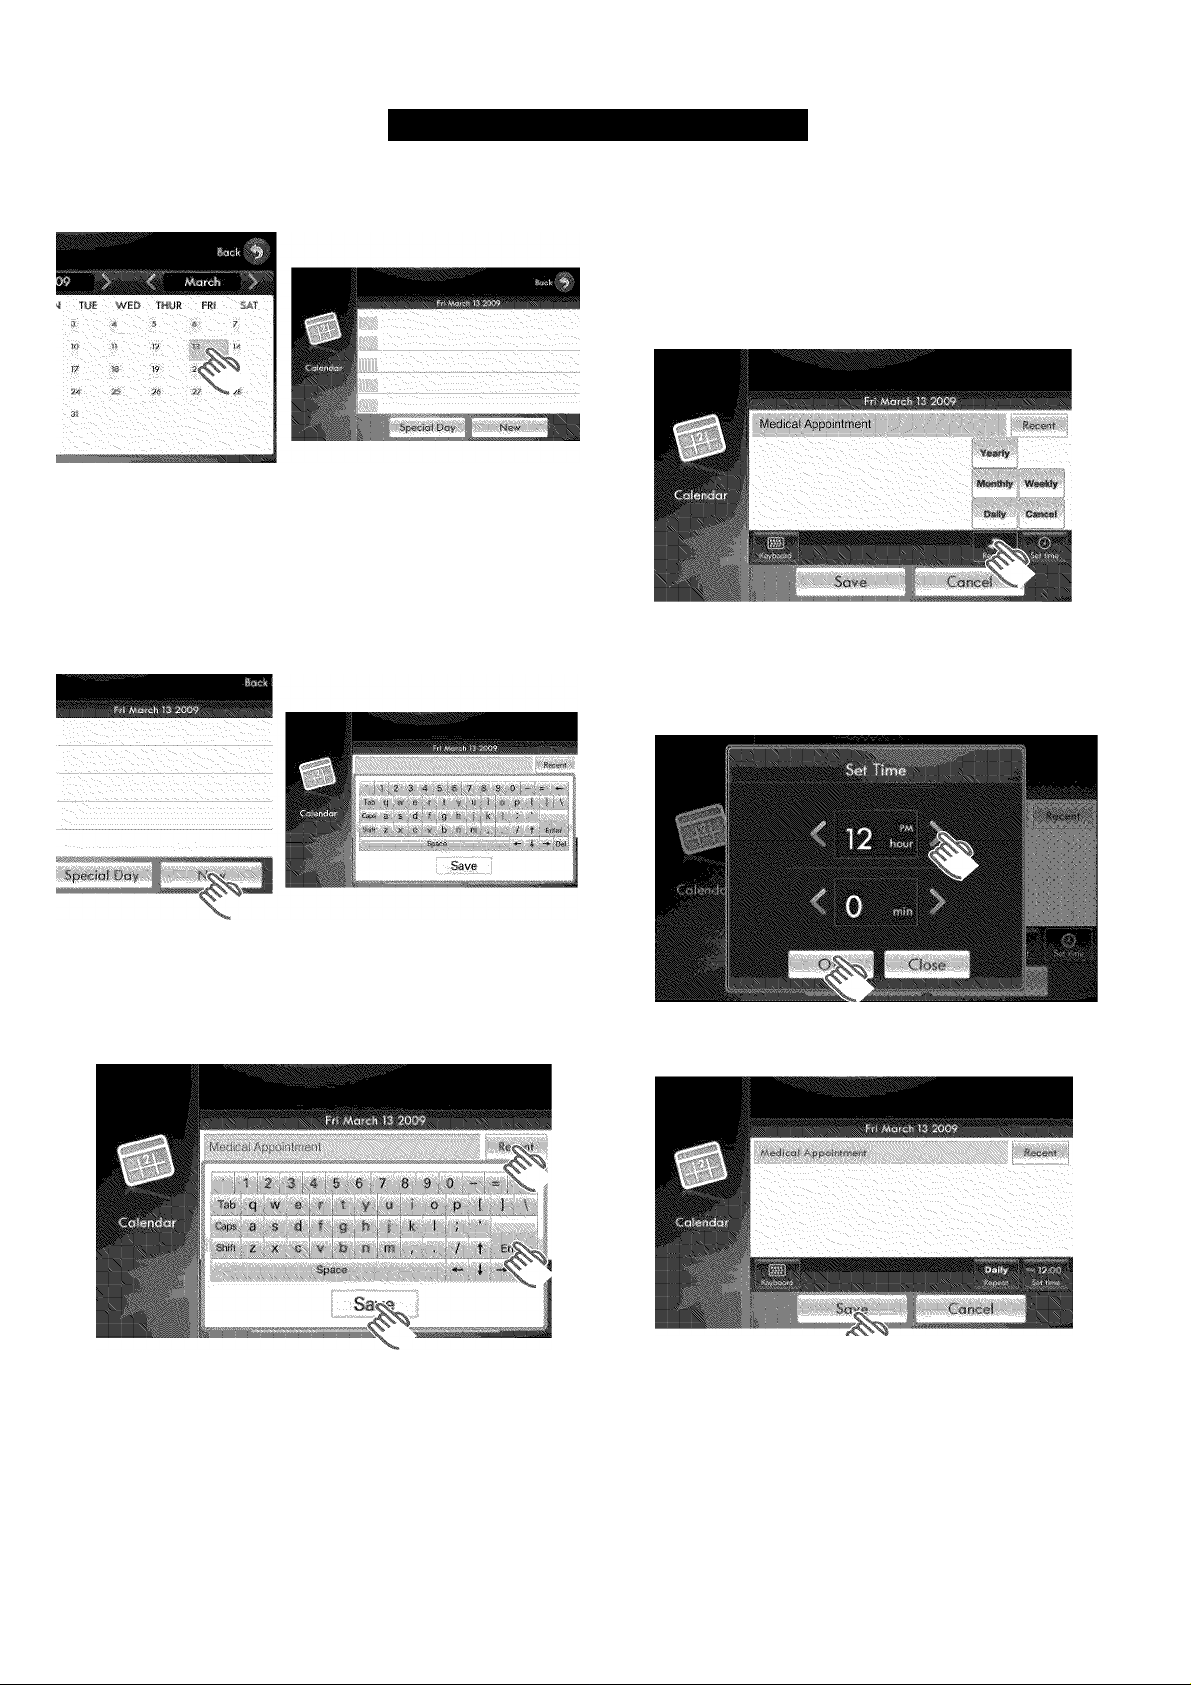
3. Choose the desired date to input a calendar memo. A
blank memo pad will show on the screen for that day.
NOTES:
• Today is highlighted in blue.
• Special days are highlighted in green.
• Calendar memos are highlighted in orange.
• Up to 5 memos can be saved in a day.
4. Press the New button. A keyboard will be displayed
on the screen.
6. If you want to repeat your memo within the calendar
system, touch the Repeat button on the screen. This
enables you to choose the repetition period
(daily/weekly/monthly/yearly).
NOTE: The yearly button maintains and repeats the
information for 10 years. All other selections maintain
and repeat the information for one year.
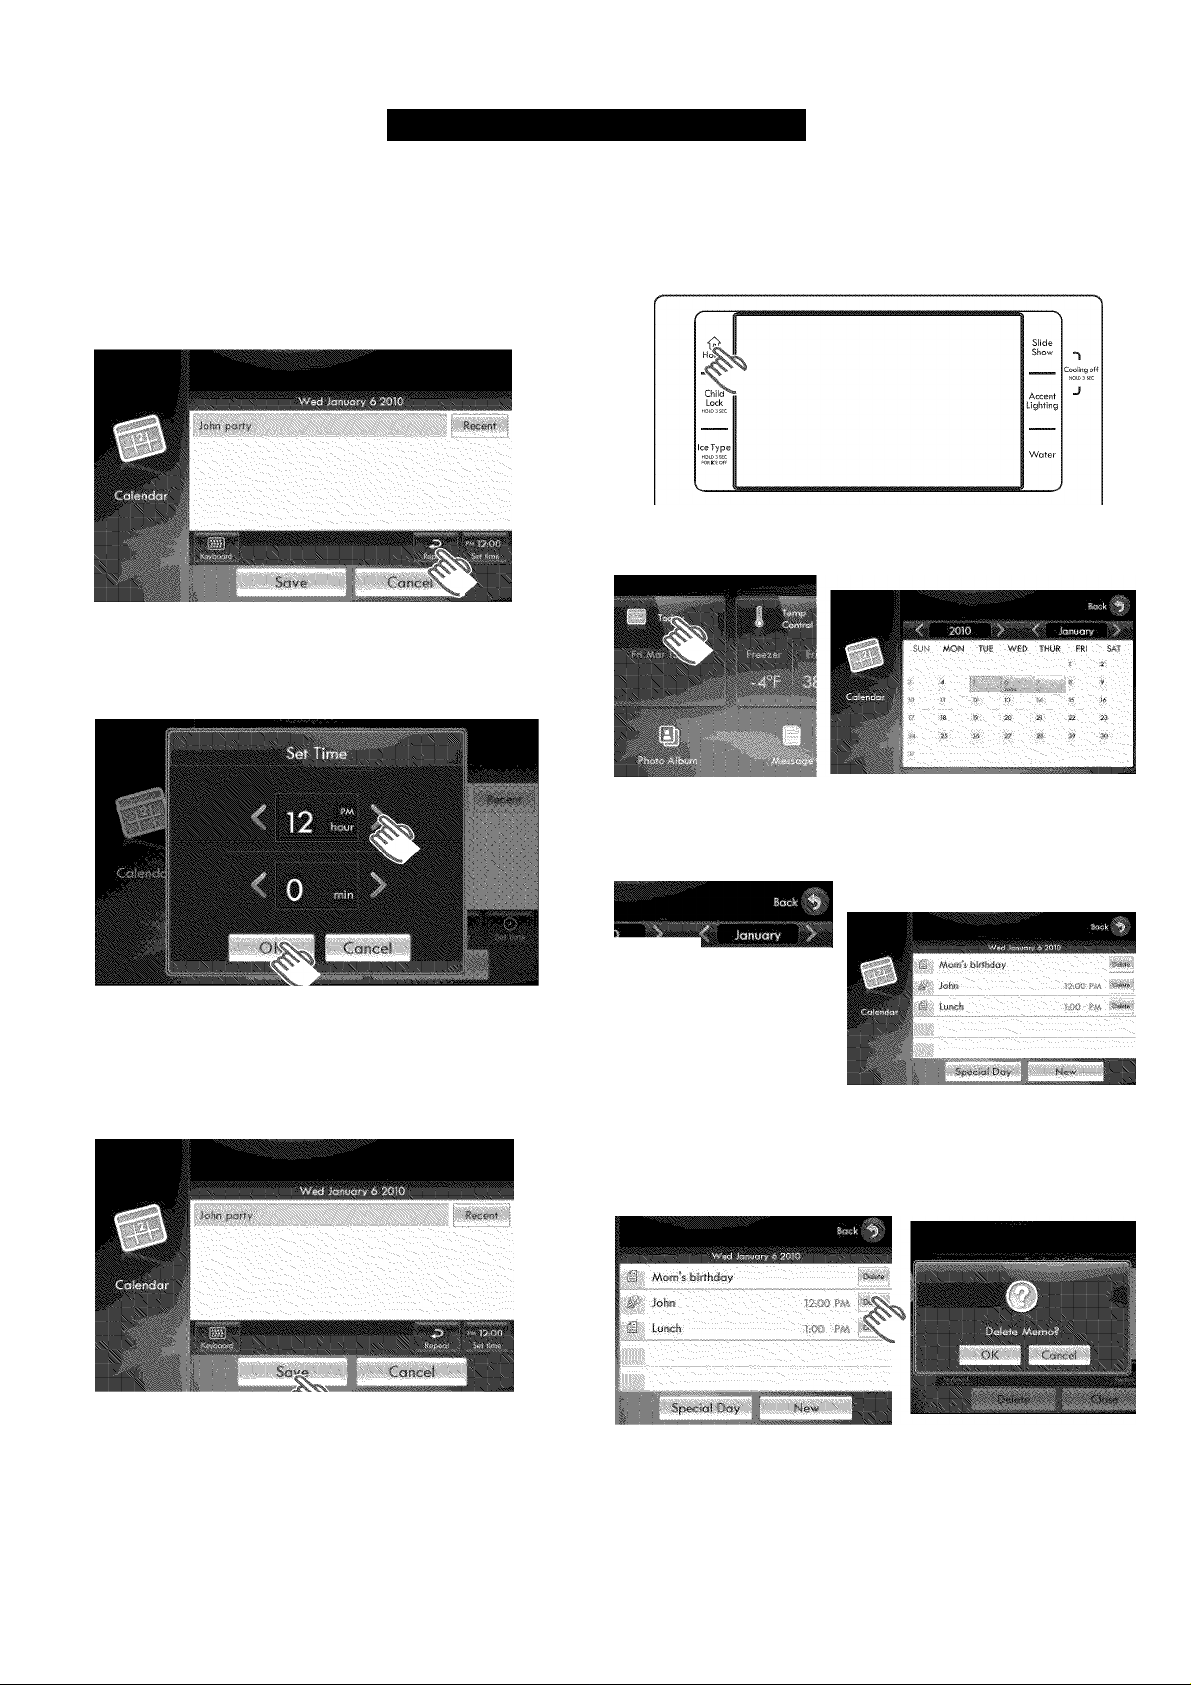
7.
To set an alarm time, press the set time button on the
screen. Using the < and > buttons, set the time in
hours and minutes when you would like the alarm to
sound. The alarm is to let you know there is a memo.
Touch the OK button to enter the time.
5. Using the screen keyboard, type the contents of your
memo. Save the memo by touching the Save button
or Enter key.
NOTE: To view the content of recently entered
memos, touch the Recent key.
8. Touch the Save button to enter the information into
the calendar.
22
Page 23
USING YOUR REFRIGERATOR
How to Enter a New Special Day
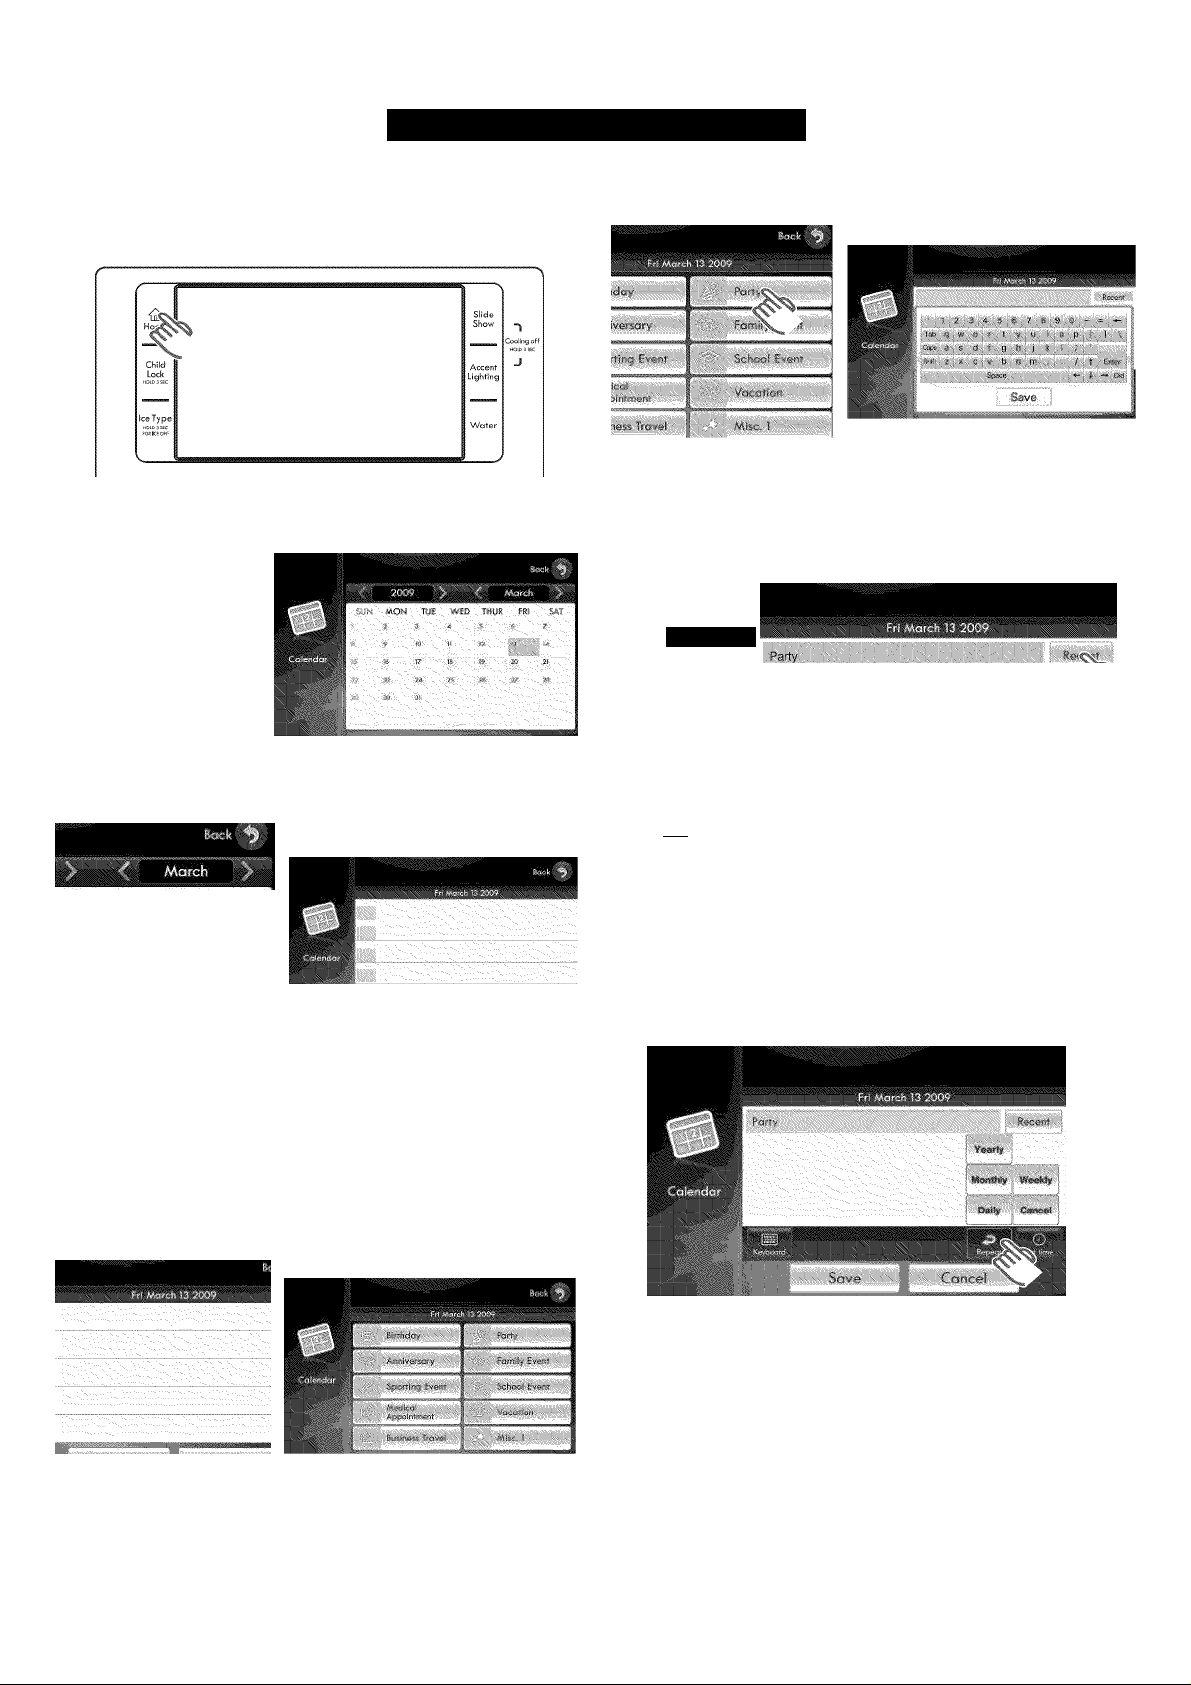
1. Press the Home button. The display screen will show
the “Home” screen.
2. Touch the Today button on the touch screen. The
screen will show the “Calendar” screen.
5. Touch the screen button for the special day you want
to use. A keyboard will be displayed on the screen.
6. Using the screen keyboard, type the contents of your
special day memo. Save the memo by touching the
Save button or Enter key.
NOTE: To view the content of recently entered
memos, touch the Recent key.
11 f
3. Choose the desired date to input a special day memo.
A memo pad will show on the screen for that day.
E WED THUR FRf SA1
U 'i
NOTES:
• Today is highlighted in blue.
• Special days are highlighted in green.
• Calendar memos are highlighted in orange.
• Up to 5 memos can be saved in a day.
4. Touch the Special Day button. A list of special days
will be displayed on the screen.
Mm:
7. If you want to repeat your special day memo within
the calendar system, touch the Repeat button on the
screen. This enables you to choose the repetition
period (daily/weekly/monthly/yearly).
NOTE: The yearly button maintains and repeats the
information for 10 years. All other selections maintain
and repeat the information for one year.
New
23
Page 24
USING YOUR REFRIGERATOR
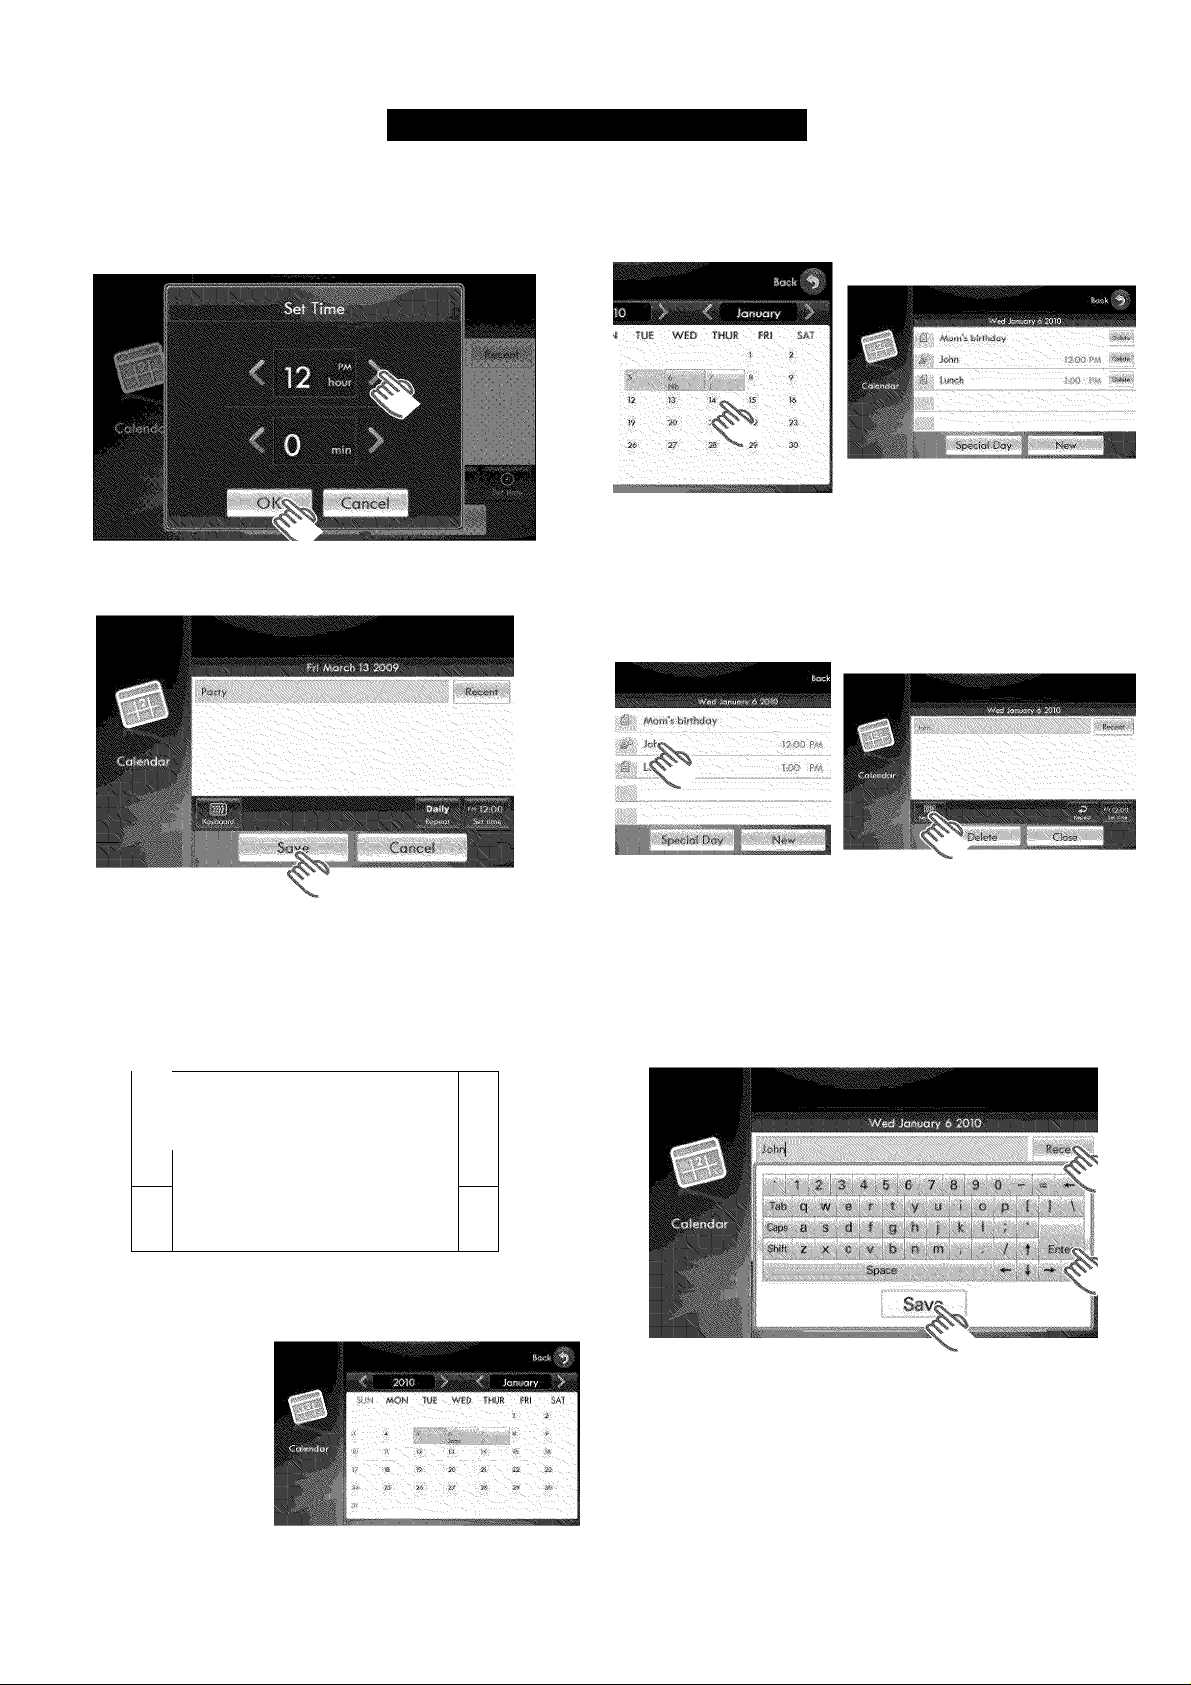
8. To set an alarm time, touch the set time button on the
screen. Using the < and > buttons, set the time in
hours and minutes when you would like the alarm to
sound. Touch the OK button to enter the alarm time.
9. Touch the Save button to enter the information into
the calendar.
3. Choose the desired date to change a calendar memo
or special day. The memos for that day will appear on
the screen.
4. Touch the listing for the memo or special day you
want to change. The present message will be shown
on the screen.
NOTE: If an alarm time is set, the alarm time will be
shown at the end of the memo or special day.
How to Change a Calendar Memo or Special Day
1. Press the Home button. The display screen will show
the “Home” screen.
iii
Chifd
lock
Ice Type
2. Touch the Today button on the touch screen. The
screen will show the “Calendar” screen.
Slide
Show
Lighting
Wafer
Cooling off
J
1
5. Touch the keyboard button on the screen. The screen
will show a screen keyboard. Using the screen
keyboard, change the memo or special day message.
Save the new memo or special day by touching the
Save button or Enter key.
NOTE: To view the content of recently entered
memos, touch the Recent key.
24
Page 25
USING YOUR REFRIGERATOR
If you want to change or select a repeat for your
6.
memo or special day, touch the Repeat button on the
screen. This enables you to choose the repetition
period (daily/weekly/monthly/yearly).
NOTE: The yearly button maintains and repeats the
information for 10 years. All other selections maintain
and repeat the information for one year.
7. To change or set an alarm time, touch the Set Time
button on the screen and use the < and > buttons to
set the time in hours and minutes. Touch the OK
button to save and set the new alarm time.
How to Delete a Calendar Memo or Special Day
1. Press the Home button. The display screen will show
the “Home” screen.
2. Touch the Today button on the touch screen. The
screen will show the “Calendar” screen.
8. Touch the Save button to enter the revised
information into the calendar.
NOTE: If you modified the contents in steps 5-7, the
Delete and Close buttons will replace the Save and
Cancel buttons.
3. Choose the desired date to delete a calendar memo
or special day. The memos for that day will appear on
the screen.
I—Bi
TUE WED THUR FRä SAT
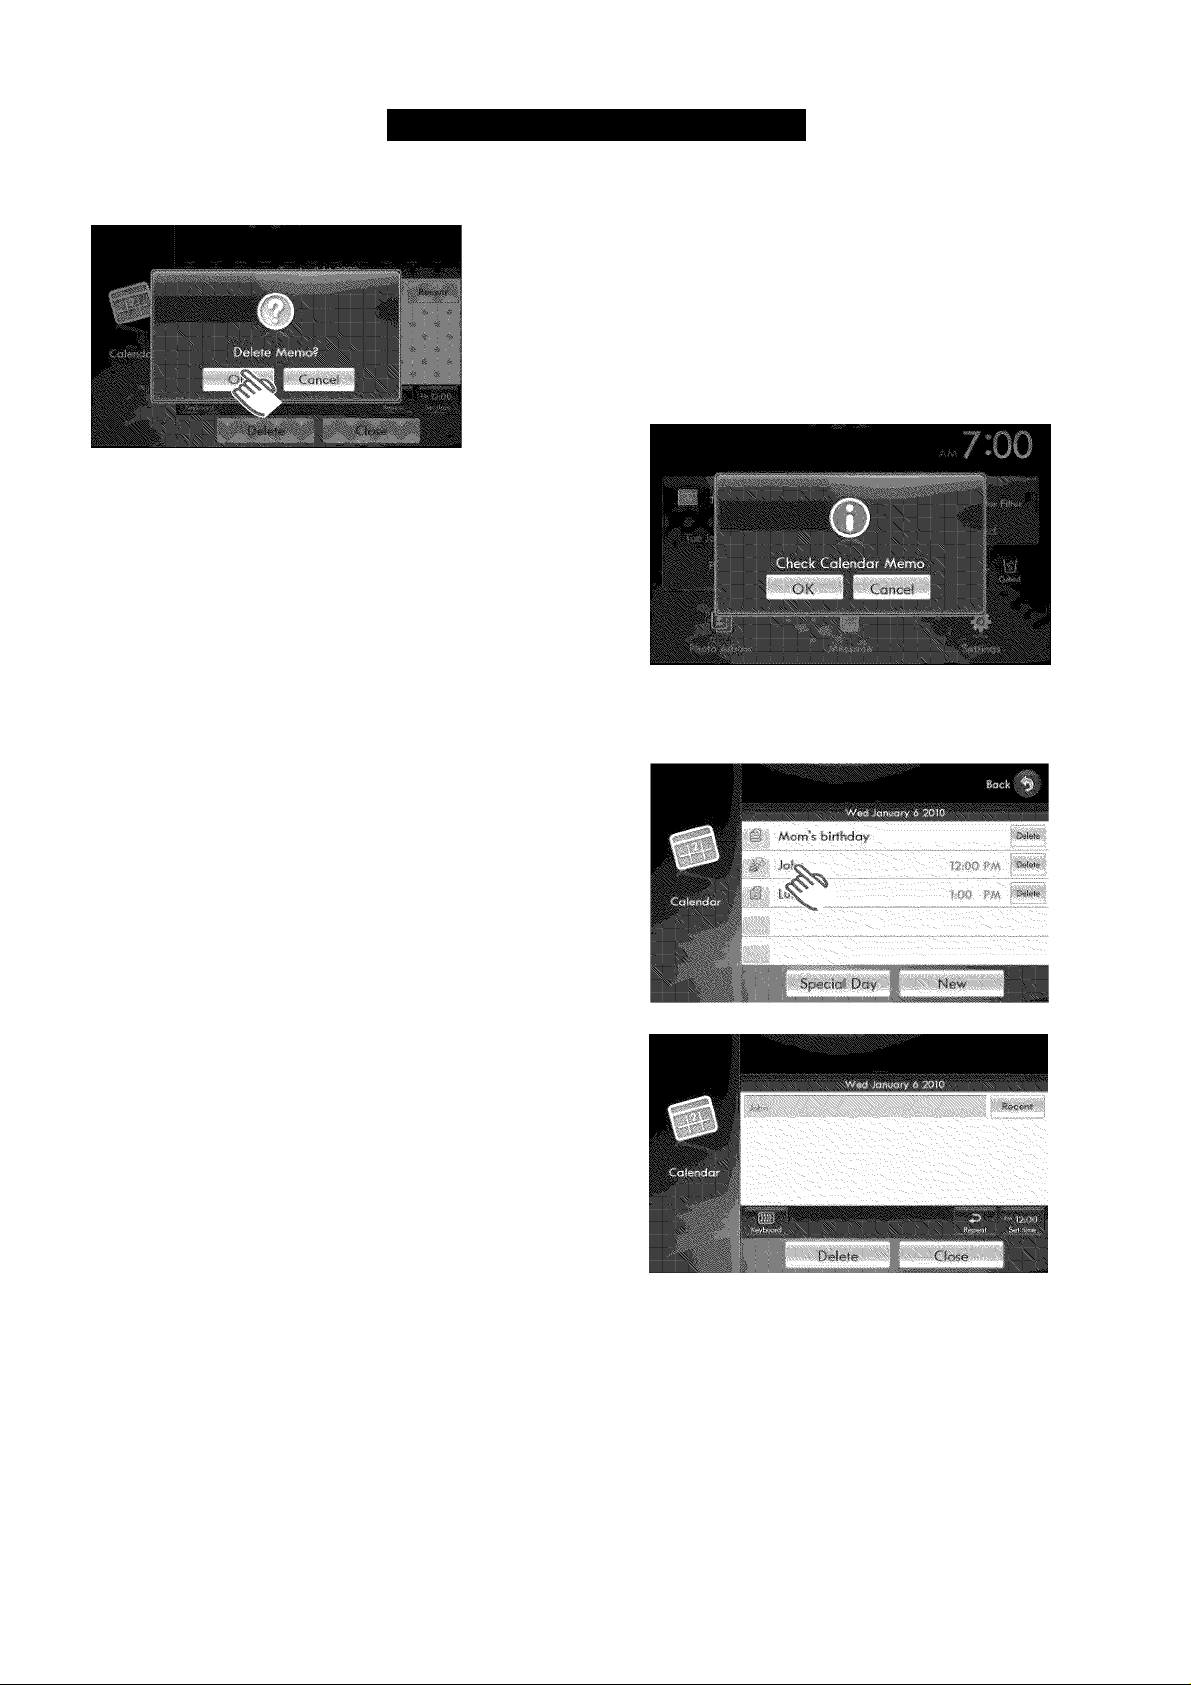
4. Touch the Delete button at the end of the memo or
special day you want to delete. A “Delete Memo?”
screen will be displayed.
25
Page 26
USING YOUR REFRIGERATOR
5. Touch the OK button to complete deleting the memo
or special day.
Calendar Memo Alarm
The calendar alarm is designed to remind you there is a
calendar memo or special day event for that day. At the
scheduled time, the calendar alarm will sound and the
“Check Calendar Memo” screen will appear on the
screen.
1. Touch the OK button on the screen to view the
calendar memo or special day event. The memo
for that day will appear on the screen.
2. Touch the memo or special day you want to check.
The selected memo or special day will appear on the
screen.
26
Page 27
USING YOUR REFRIGERATOR
Temp Control
The temperature control allows you to set the freezer and
the refrigerator temperatures. Use the following Instructions
to change and set these temperatures.
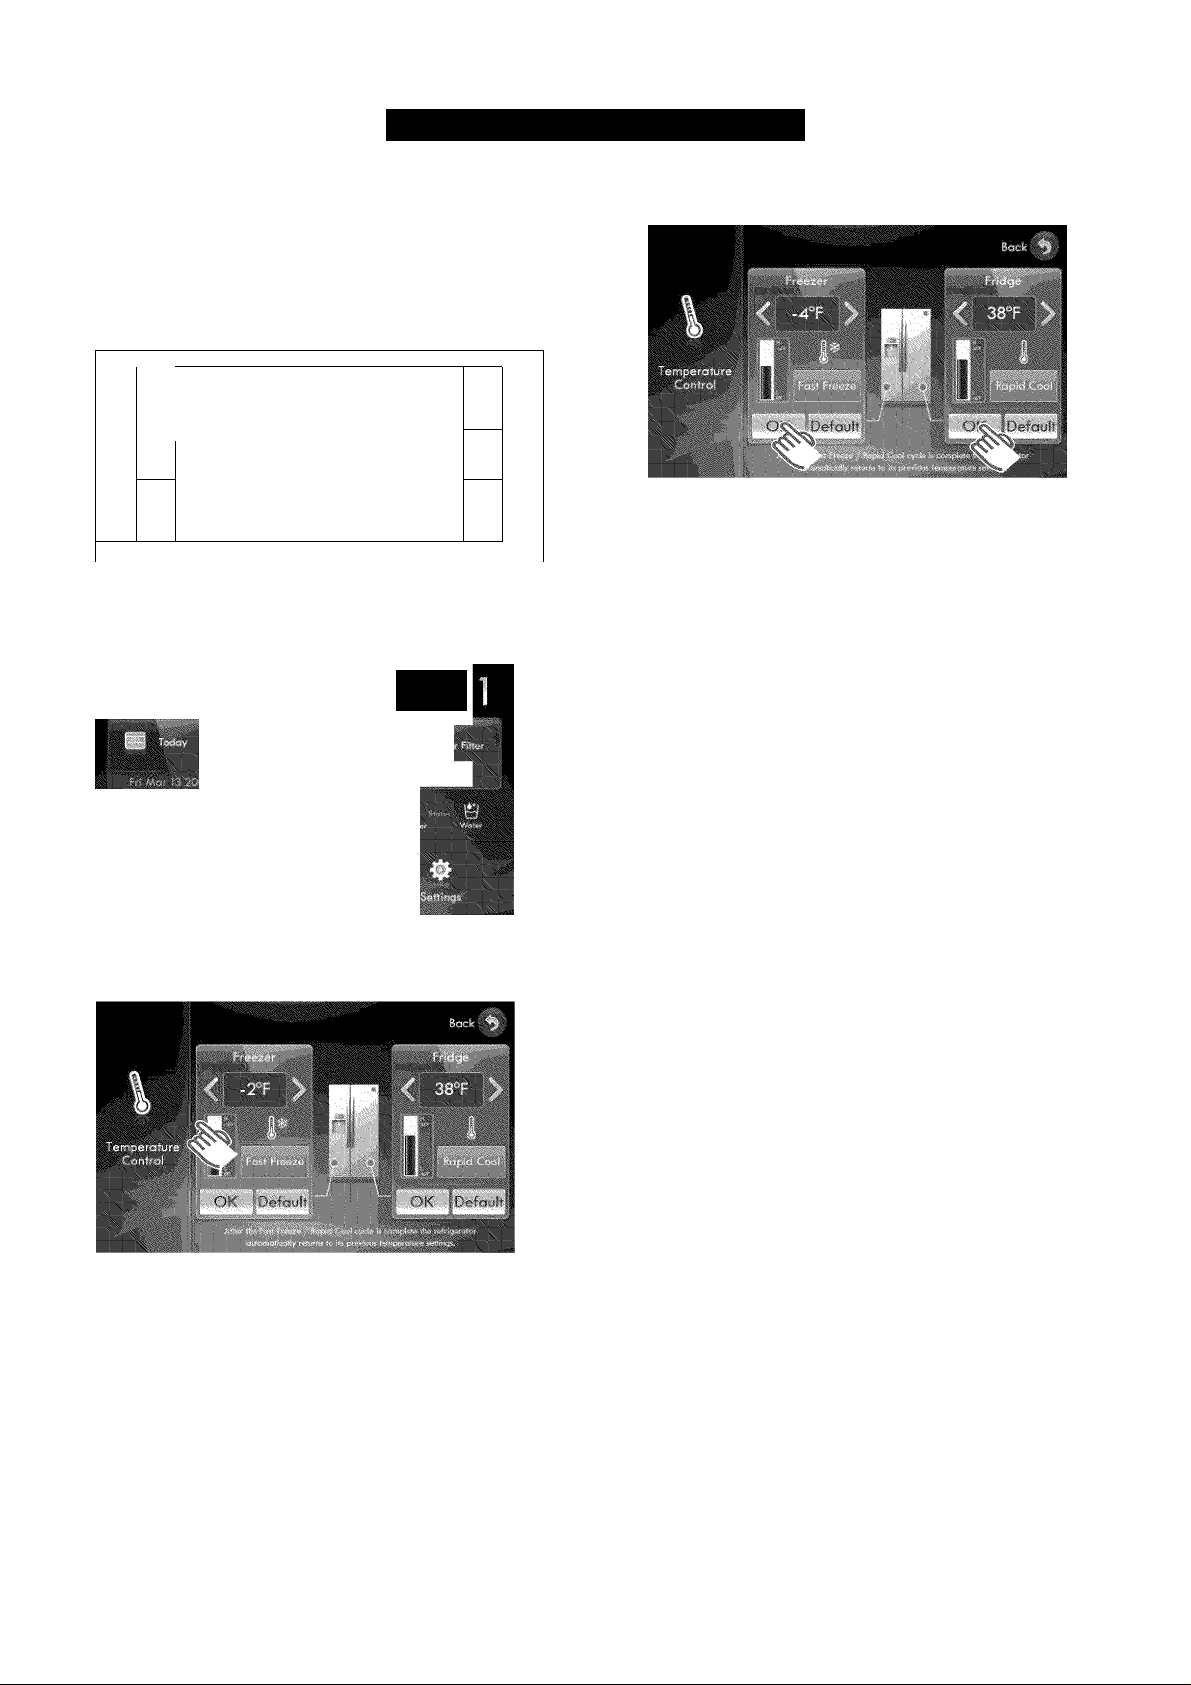
1. Press the Home button. The display screen will show
the “Home” screen.
Slide
aow
-Ì
Cooling off
Chiid
Lock
Ice Type
2. Touch the Temp Control button on the touch screen.
NOTE: When ice cream is stored at a temperature
above 4°F (-16°C) in the freezer, it may melt.
i U- I
Accent
Lighting
Water
J
4. Touch the OK button(s) under the new temperature(s)
to set and save the setting(s).
NOTES:
• The freezer or refrigerator temperature may change
depending on the door opening/closing frequencies,
the food quantity, the ambient temperature, etc.
• Temperatures vary at each food storage section in the
freezer and refrigerator compartments.
• When power comes back after a short outage and the
refrigerator temperature is lower than 42°F (6°C), the
refrigerator and freezer will adjust to the last
temperatures that were set. If the refrigerator
temperature is higher than 42°F (6°C), it will revert
back to the default temperatures of 38°F (3°C) and
-2°F (-19°C) respectively.
3. Choose the desired freezer and/or refrigerator
temperatures using the < and > buttons to the left and
right of the currently set temperatures.
NOTE: The freezer temperature can be set between
8°F (-13°C) and -14°F (-26°C). The refrigerator
temperature can be set between 46°F (8°C) and
34°F (1°C). The default freezer and refrigerator
temperatures are -2°F (-19°C) and 38°F (3°C)
respectively.
• Changing a temperature setting requires 3-4 hours for
the stored food to reach the new temperature setting.
• See page 28 for important icemaker operating
information.
27
Page 28
USING YOUR REFRIGERATOR
About the Automatic Icemaker
Ice is made in the automatic icemaker and sent to the
dispenser. The automatic icemaker is designed to make
ice cubes 24-hours per day. The quantity will vary
depending on the freezer compartment temperature, room
temperature, number of door openings, freezer load, and
other operating conditions.
• Ice takes about 12 to 24 hours for a newly installed
refrigerator to make ice.
• Icemaking stops when the ice bucket is full.
• To turn off the automatic icemaker, press the Ice Off
button on the digital panel on the front of the left
refrigerator door.
• The cube size will vary depending on the water pressure
of the connected water line.
NOTE: It is normal that a noise is produced when the
ice drops into the ice bucket.
• Even when the water pipe is not connected and the
icemaker is turned on, the water valve operates. The
noise is generated because the water pipe is not
connected, which does not mean the icemaker is
defective.
A WARNING
Personal Injury Hazard
Avoid contact with the moving parts of the ejector
mechanism and/or with the heating element that
releases the cubes. DO NOT place fingers or hands
on the automatic icemaker mechanism while the
refrigerator is plugged in.
A CAUTIONS (cont.)
• Never store beverage cans or other foods in the
ice bucket for the purpose of rapid cooling. Doing
so may damage the icemaker or the containers
may burst.
• If discolored ice is dispensed, check the water filter
and water supply. If the problem continues, contact
an authorized service center. Do not use the ice or
water until the problem is corrected.
• If you only dispense crushed ice, the ice passage
could become blocked with frost. Remove the frost
that accumulates.
• Never use crystal glass or crockery to collect ice.
Such glasses or containers may break, and glass
fragments could be in the ice.
• Dispense ice into a glass before filling with liquid to
avoid splashing.
• Never use a glass that is exceptionally narrow or
deep. Ice may jam in the ice passage and the
refrigerator performance may be affected.
• Keep the glass at a proper distance from the ice
outlet to ensure proper ice dispensing.
• To avoid personal injury, keep hands out of the ice
door and passage.
When Should the Icemaker Be Turned Off?
• When the water supply will be shut off for several hours.
• When the ice bucket is removed for more than a minute
or two.
• When the refrigerator will not be used for several days.
NOTE: Ice bucket should be emptied anytime the
icemaker is turned off.
A CAUTIONS
The first ice and water may include particles or
odor from the water supply line or the water tank.
Throw away the first few batches of ice and purge
the dispenser for 2 minutes after a refrigerator
installation or if the refrigerator has not been used
for a long period.
Keep children away from the dispenser. Children
may damage the controls.
Normal Sounds You May Hear
• The icemaker water will buzz as the icemaker fills with
water. If the icemaker is turned on, it will buzz even if it
has not been hooked up to water. To stop the buzzing,
turn off the icemaker.
NOTE: Icemaker bucket should be emptied anytime the
icemaker is turned off.
NOTE: Turning on the icemaker before the water line is
connected can damage the icemaker.
• You will hear the sound of cubes dropping into the ice
bucket and water running in the pipes as the icemaker
refills.
28
Page 29
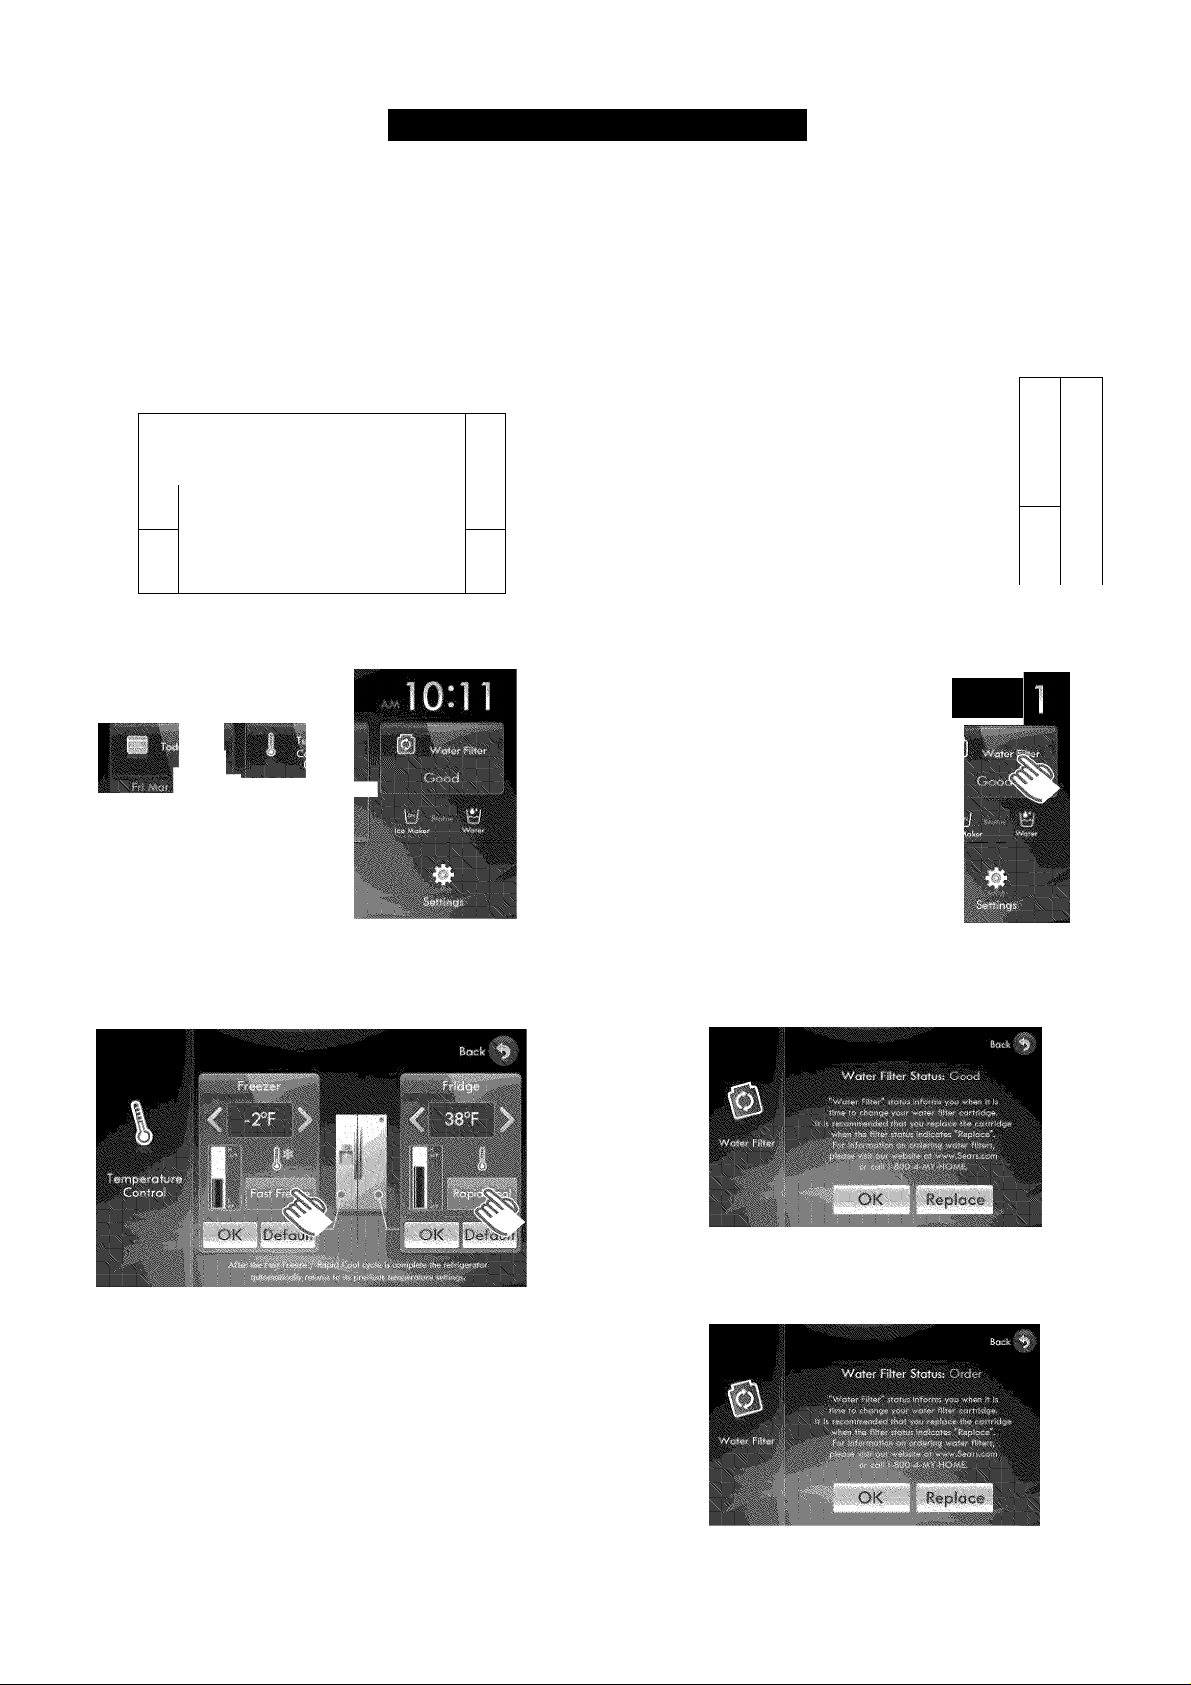
USING YOUR REFRIGERATOR
Setting Fast Freeze or Rapid Cooi
The Fast Freeze and Rapid Cool functions can be used
to quickly lower the temperature of the freezer and
refrigerator compartments. These buttons are found on
the “Temp Control” touch screen. Use the following
instructions to activate these functions.
1. Press the Flome button. The display screen will show
the “Flome” screen.
’—i----------------------------------------------------------------------
'M'
Child
Lock
IceType
2. Touch the Temp Control button on the touch screen.
Slide
Show
Lighting
Water
\
J
Water Filter
The Water Filter button on the “Home” touch screen
enables you to check the current status of the water filter.
Use the following instructions to check and/or replace the
water filter.
1. Press the Home button. The display screen will show
the “Home” screen.
\
Slide
Show
Accent
Lighting
Water
Cooling off
J
“Ì
J
"|l
2. Touch the Water Filter button on the touch screen.
One of the following water filter status screens will
be displayed.
i u. i
Tl
3. Touch the Fast Freeze and/or Rapid Cool button(s);
then touch the OK button(s) under the selected
butte n(s).
NOTES:
• While the Fast Freeze and/or Rapid Cool is activated,
the temperature setting buttons are deactivated.
The filter does not need replacement. It is normal:
Good
The filter needs replacement:
Order
• When Fast Freeze and/or Rapid Cool functions are
finished, the temperature settings are reactivated so
they can be changed.
• Energy consumption increases during Fast Freeze
and/or Rapid Cool usage.
29
Page 30
USING YOUR REFRIGERATOR
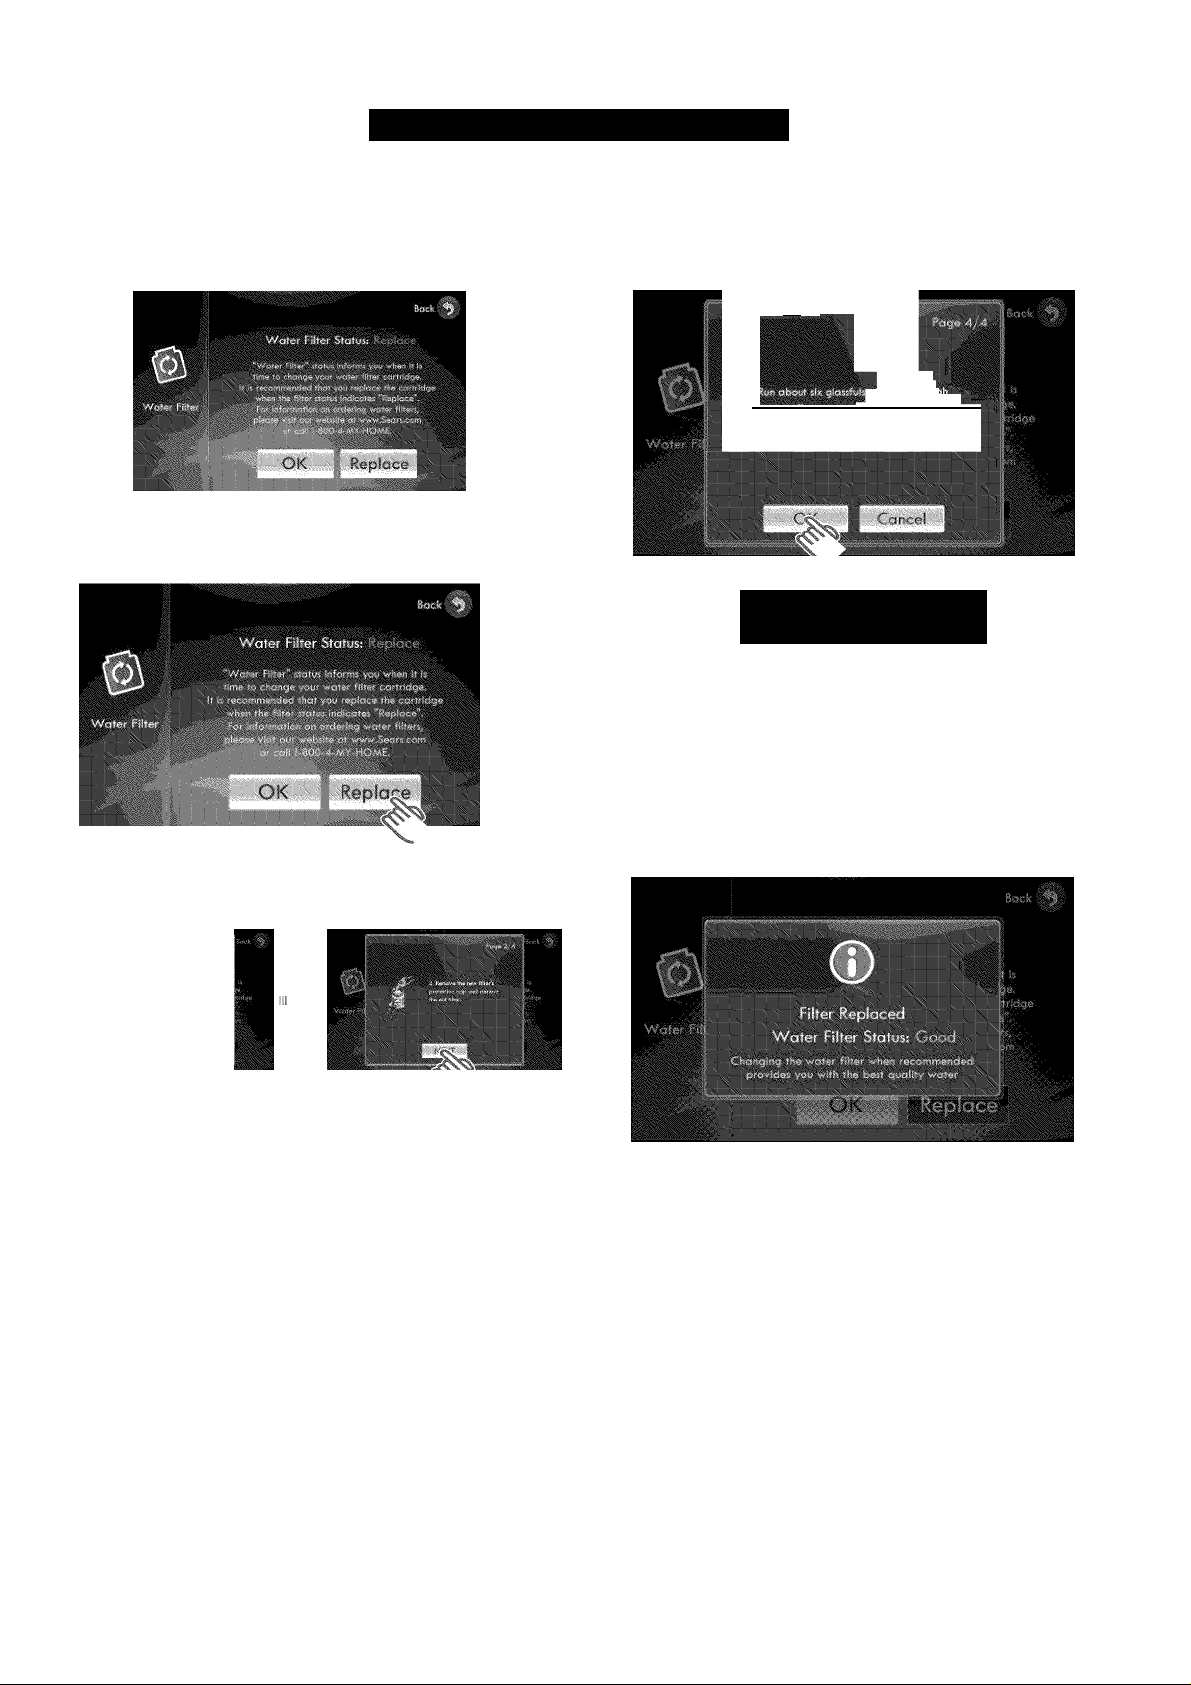
The filter needs replacement immediately:
Replace
3. If the status reads “Order” or “Replace,” touch the
Replace button on the bottom of the screen to
access the replacement instructions.
4.
When the replacement is done, touch the OK button
at the bottom of the screen. The display screen will
show the “Home” screen.
I—
___________________________
A CAUTION
DO NOT use the water or ice dispenser without a
water filter cartridge because the water line may
become blocked or damage the dispenser.
Touching the Next button at the bottom of the screen
will continue the instructions.
V
NOTE: Refer to the water filter replacement guide and
replace the water filter at the right-upper corner of the
refirgerator. (See pages 13 and 14.)
NOTE: Be sure to flush the dispenser thoroughly to avoid
possible water dripping from the dispenser. This means
that there is still air in the line.
5. Filter replacement is done.
Ordering Replacement Water Filter
To purchase replacement water filter cartridges,
call 1-800-4-MY-HOME®.
30
Page 31
USING YOUR REFRIGERATOR
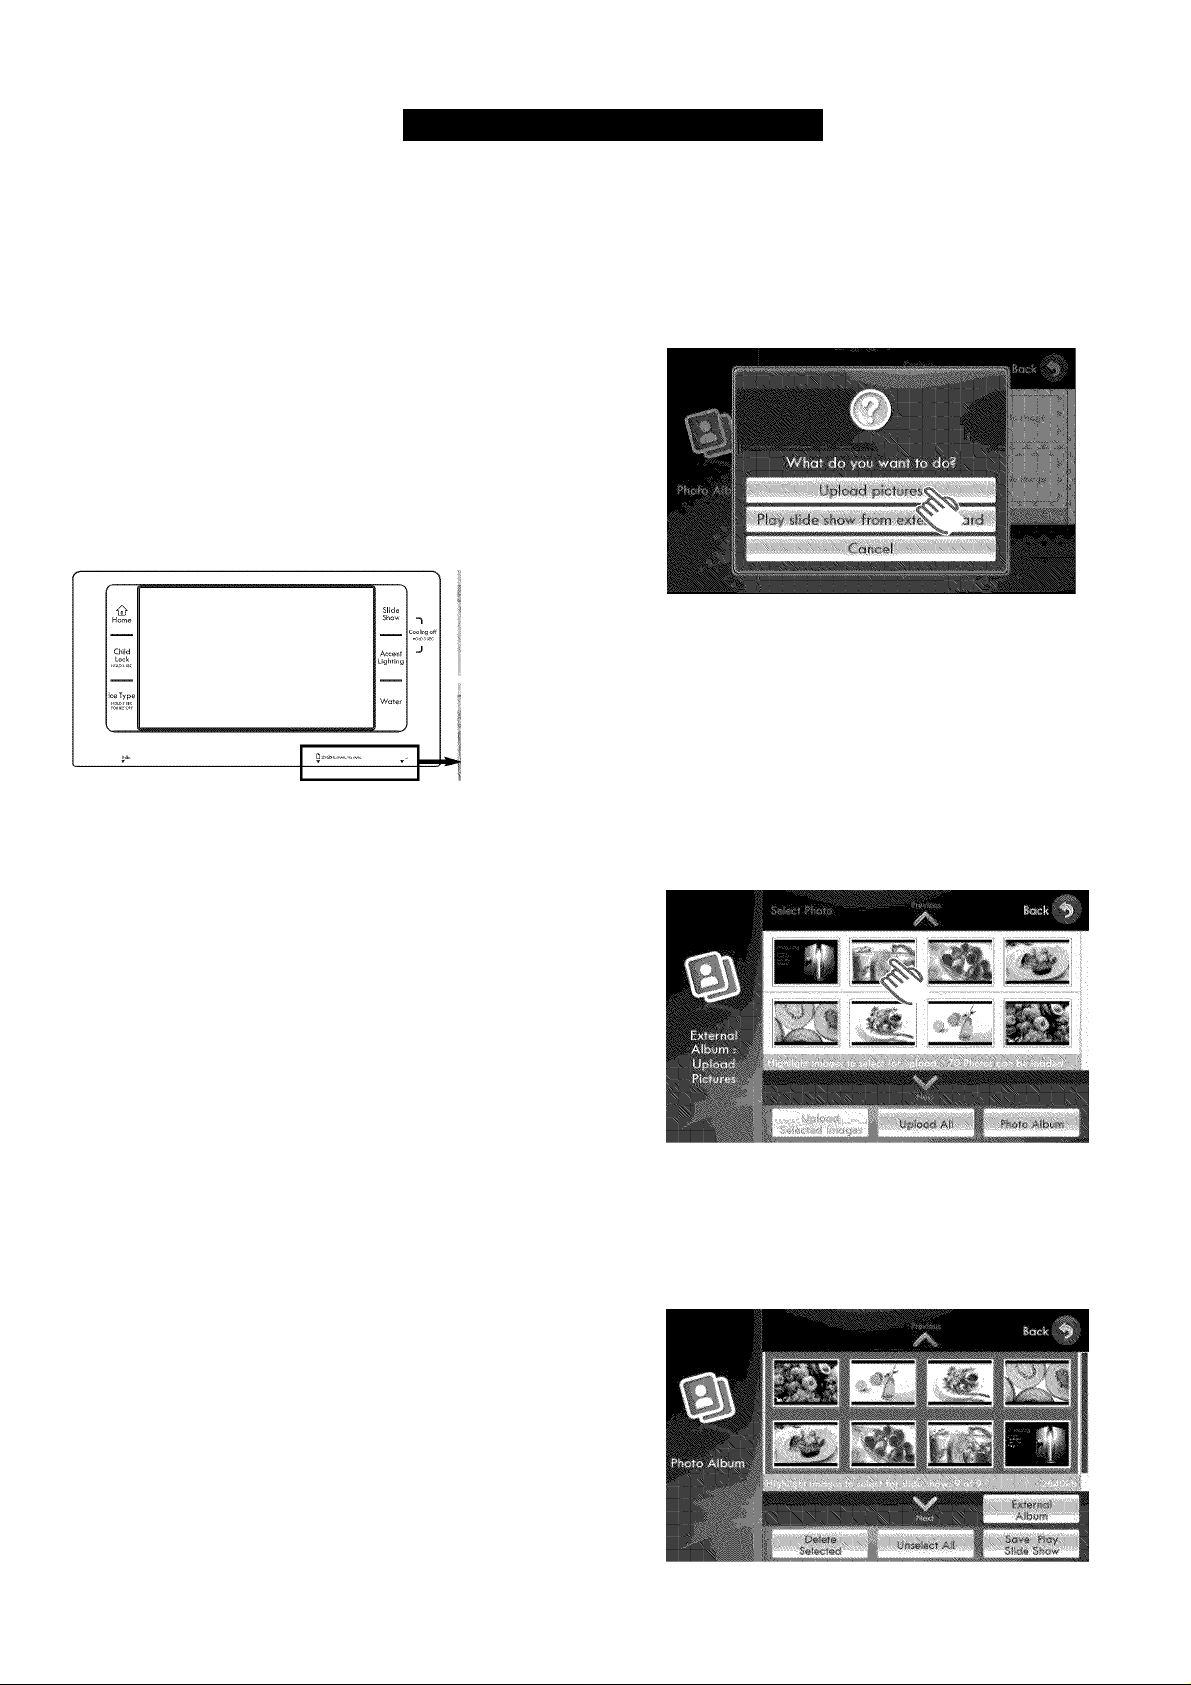
Photo Album
Save photos you shot yourself or images you want and
make your own slide show. When the memory card is
inserted, the photo album is automatically run.
Uploading Images
1. Pull out the cover over the card slot and move it to
the side.
2. Insert the memory card (SD/SDHC/MMC/HS MMC)
with images saved into the card slot.
• The photo album automatically runs after the
“Memory Card Connected” message appears.
• If there are no images saved on the memory card,
the photo album will not run.
256..
NOTES:
• The card slot is only for SD/SDHC/MMC/HS MMC-type
memory cards.
• It reads only JPEG images.
• It can save up to 10 megapixel JPEG images (3,872 x
2,592 pixels, 24 bit). (When images are more than 10
megapixels or their definitions are changed, the images
will not display on the screen.)
• If there are many photos saved on the memory card, it
will take awhile for the preview function to load.
• When the memory card is removed before the image
transferring is complete, the photo album shows the
images that have completed transfer in the left-upper
corner.
• The saved images will be displayed to fit the screen
size. Depending on image sizes, these could be
displayed with black bars on the top or sides.
• A memory card is not supplied with the refrigerator.
• Depending on the type of SD/SDHC/MMC/HS MMC
memory cards, there could be unreadable cards.
(SanDisk 1GB and Transcend MMC PLUS are
recommended.)
• The memory capacity for the refrigerator panel is
128MB. This will hold a maximum of 70 photos.
• When saving photos from a memory card to the panel,
the photo size is automatically changed to 800 x 480
pixels, regardless of the original size.
3. Choose the Upload pictures button. The display
screen will show the “External Album : Upload
Pictures” screen.
• The Upload pictures button will load and store
pictures in the screen panel memory.
• Touch the Play slide show from external card
button to use the photos on the card as a slide show.
NOTE: An “External Album : Play Slide Show” screen
will appear to set up the slide show from the external
card.
4. Select images to save in the photo album among the
images saved in the memory card.
• Multiple images can be selected.
• It shows the possible number of images at the
bottom of the image list.
• “External Album : Upload Pictures” screen provides
a preview function of up to 100 saved images in the
memory card.
5. Choose the Upload Selected Images button.
• To save all the images in the memory card to the
photo album, touch the Upload All button.
• Up to 70 photos can be saved.
• When the Photo Album button is selected, the
current images in the photo album are shown.
31
Page 32
USING YOUR REFRIGERATOR
• If the External Album button below the photo album
images is touched, the screen will go back to the
“What do you want to do?” screen.
NOTE: This product uses parts of the software from
the independent JPEG Group.
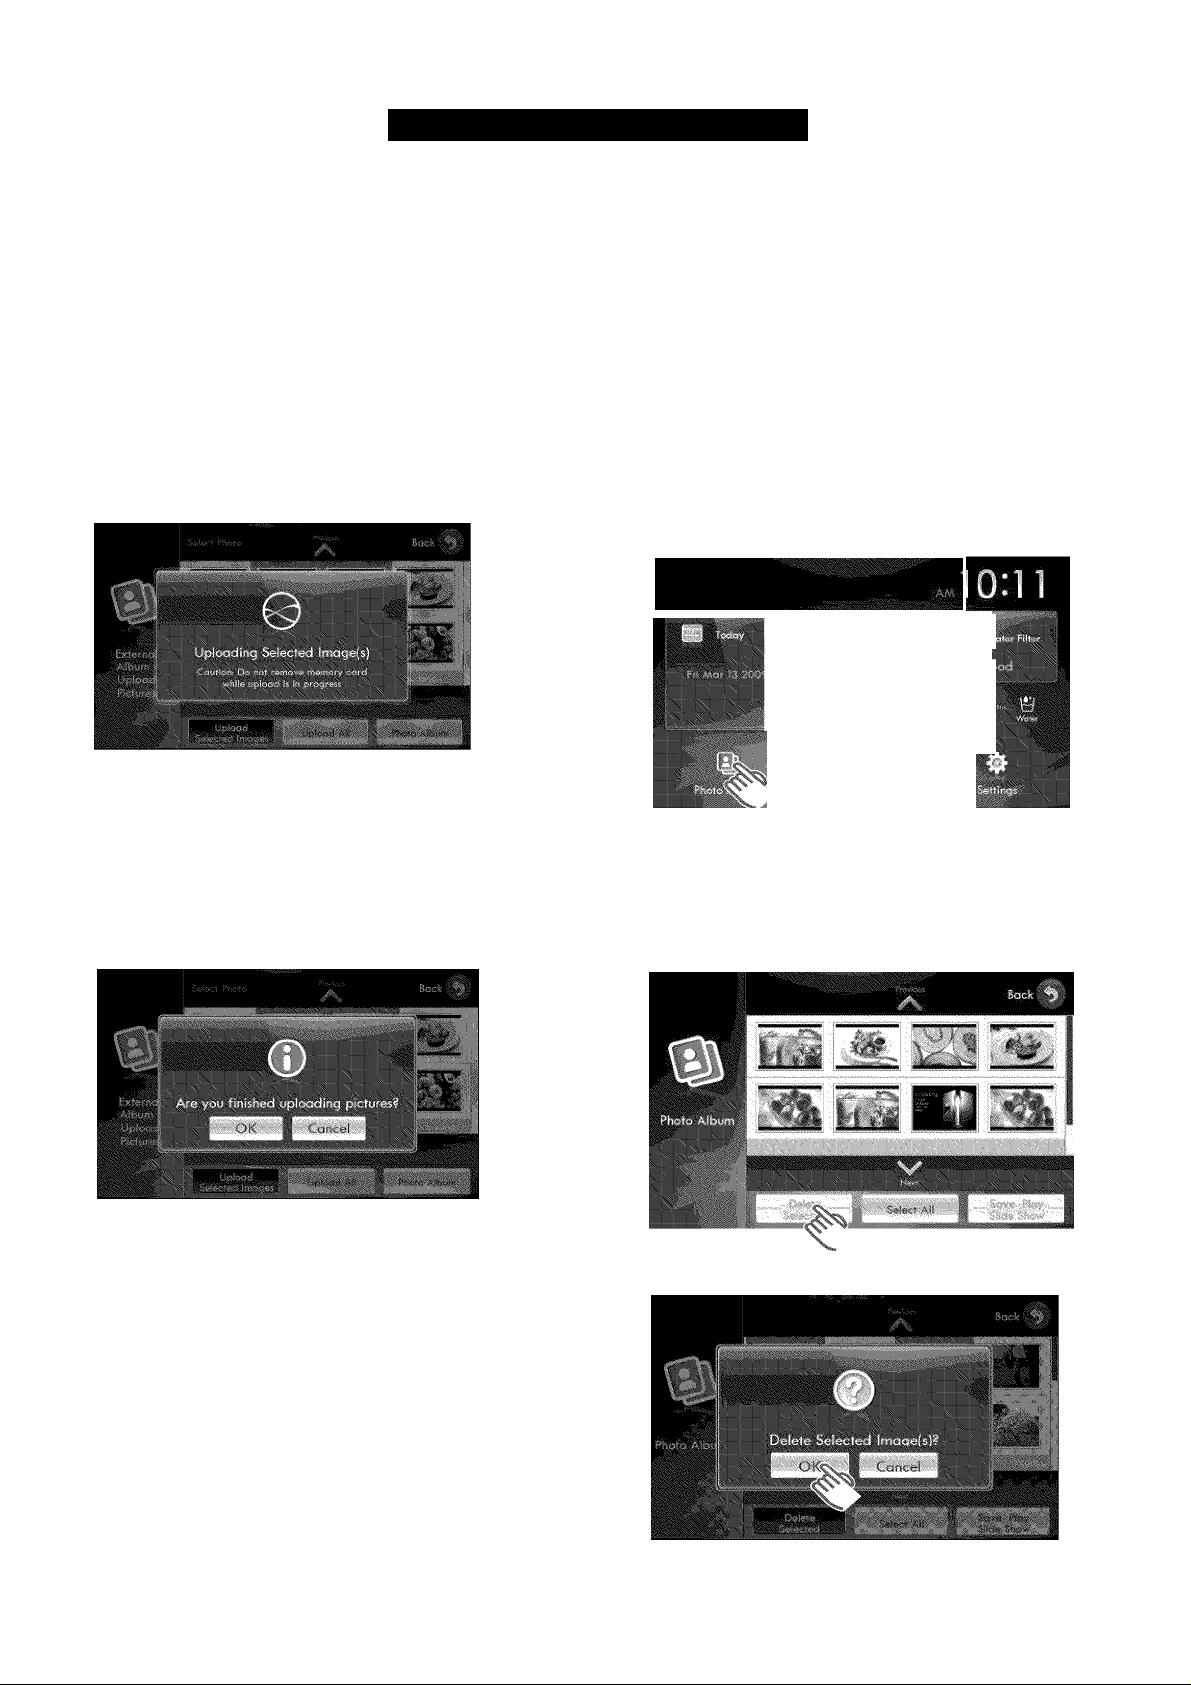
6.
The screen displays “Uploading Selected Image(s)”
while the images are uploading from the memory card.
NOTES:
• Large photo file sizes will slow down the uploading
speed. Reformatting photos to their smallest file
sizes before they are uploaded will ensure the
fastest uploading speeds.
• High-definition or horizontal images (landscape)
could be distorted.
Deleting Images
1. Press the Home button. The display screen will show
the “Home” screen.
1
Cooling off
Accent
Lighting
Water
________^
2. Touch the Photo Album button in the left bottom
corner of the touch screen. The images in the photo
album will appear on the screen.
■BB
7. After the images have been uploaded, “Are you
finished uploading pictures?” will be displayed on
the screen.
• Touch the OK button when there are no more
images to be uploaded.
• Touch the Cancel button to upload more images.
The display will go back to the “External Album :
Upload Pictures” screen. Repeat steps 4-7.
8. DO NOT remove the memory card from the slot under
the display until the screen shows “Please Remove
Memory Card.”
9. Replace the cover over the card slot.
3. Select the images you want to have deleted; then
touch the Delete Selected button. “Delete Selected
Image(s)?” will appear on the screen.
NOTES:
• Multiple images can be selected and deleted.
• The Kenmore Elite™ default slide cannot be deleted.
4. Touch the OK button to complete the deletion process.
32
Page 33
USING YOUR REFRIGERATOR
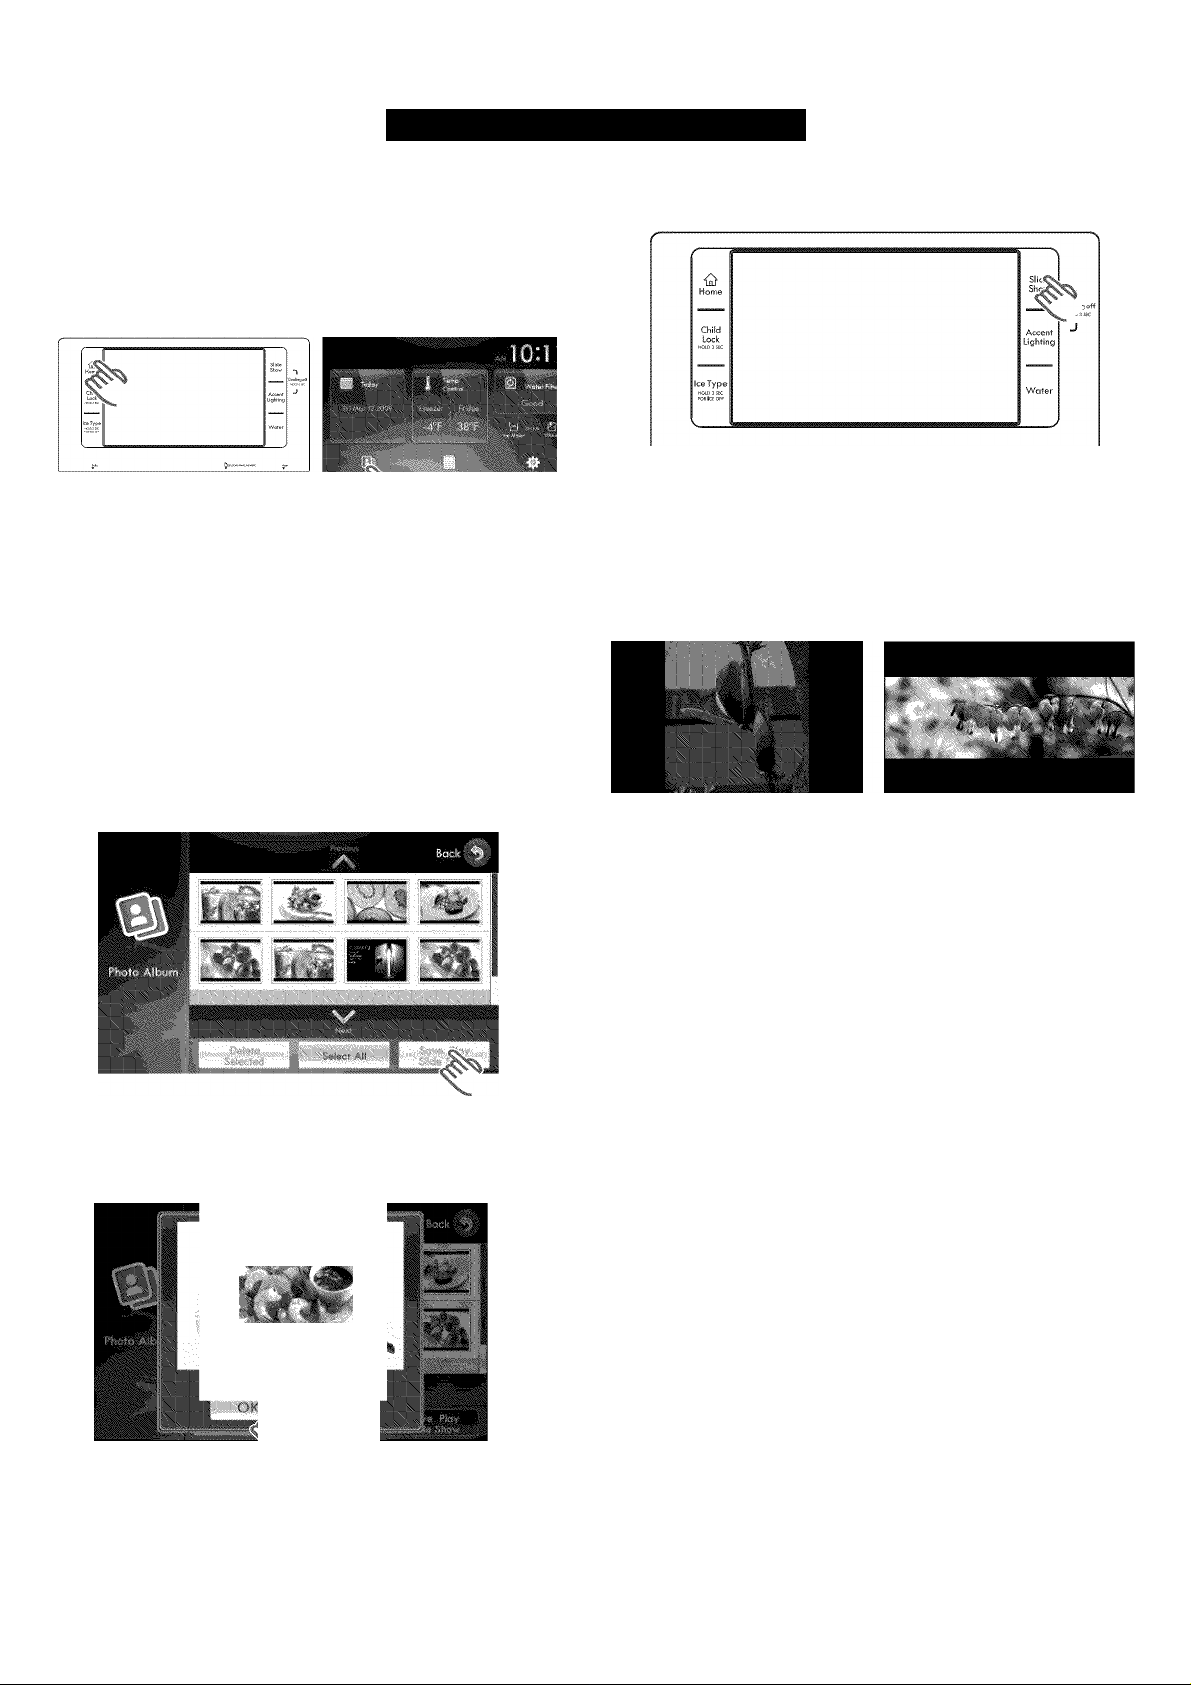
Setting Up a Slide Show From the Photo Album
1. Press the Home button. The display screen will show
the “Home” screen.
2. Touch the Photo Album button on the touch screen.
The images in the photo album will appear on the
screen.
V
3. Select images to be used in the Slide Show; then
touch the Save Play Slide Show button. The slide
show will preview the selected slides.
• Multiple images can be selected.
• Depending on the photo size (width and height),
there could be black bars on the top/bottom and/or
sides of the image.
• The screen is optimized for 16:9 image size
(horizontal format).
• When only the original default image is in the
photo album, it will automatically show in the
slide show.
5. To view the slide show, press the Slide Show button
on the upper right.
ADDITIONAL IMAGING NOTES:
• When stationary images, same-size images, or images
with black bars are displayed for extended periods of
time, they can cause screen burn. Selecting and using
different-sized images throughout the slide show will
prevent screen burn.
• The warranty does not cover damage from screen burn.
(Image with left and right
black bars)
(Image with top and bottom
biack bars)
4. Touch the OK button to save the slide show as it is.
Touch the Cancel button and repeat Step 3 to add
more slides.
33
Page 34
USING YOUR REFRIGERATOR
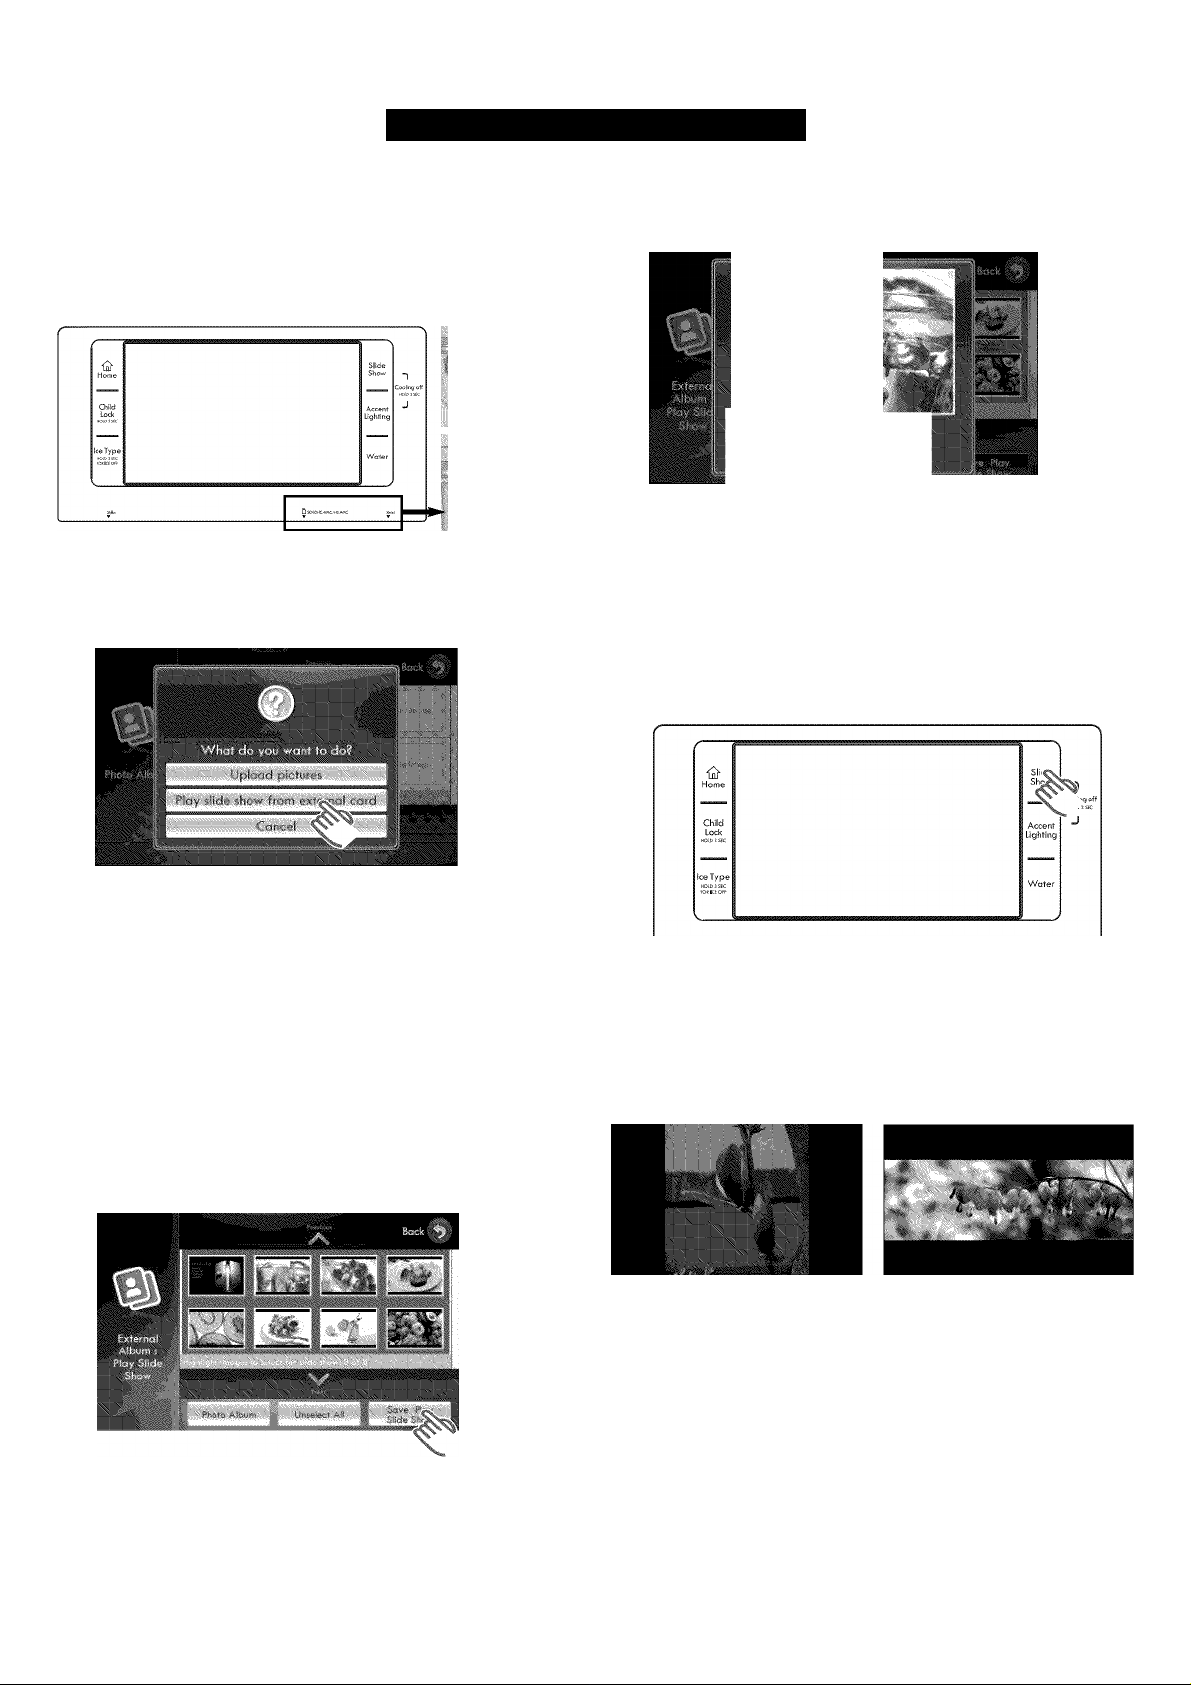
Setting Up a Slide Show from an External Card
1. Insert the memory card (SD/SDHC/MMC/HS MMC)
with the saved images in the card slot at the bottom
of the screen. “What do you want to do?” will be
displayed on the screen.
256.,
2. Touch the Play slide show from external card button
on the screen. The images on the external card will
be displayed on the screen.
4. Touch the OK button to save the slide show as it is.
Touch the Cancel button and repeat step 3 to add
more slides.
5. To view the slide show, press the Slide Show button
on the upper right.
NOTES:
• Loading can take 4-30 seconds depending on the
size of the image files saved on the memory card.
• When the memory card is removed from the card
slot, the slide show will go back to the previously set
slide show or the default-image slide show.
3. Select the photos you want to be used in the slide
show; then touch the Save Play Slide Show button.
The slide show will preview the selected slides.
• Multiple images can be selected.
• Depending on the photo size (width and height),
there could be black bars on the top/bottom and/or
sides of the image.
• The screen is optimized for 16:9 image size
(horizontal format).
• When the Photo Album button is selected, it goes
to the current images in the photo album.
• The “External Album : Play Slide Show” screen can
preview up to 2,000 saved images from a memory card.
ADDITIONAL IMAGING NOTES:
• When stationary images, same-size images, or images
with black bars are displayed for extended periods of
time, they can cause screen burn. Selecting and using
different-sized images throughout the slide show will
prevent screen burn.
• The warranty does not cover damage from screen burn.
(Image with left and right
black bars)
(Image with top and bottom
biack bars)
34
Page 35
USING YOUR REFRIGERATOR
Message
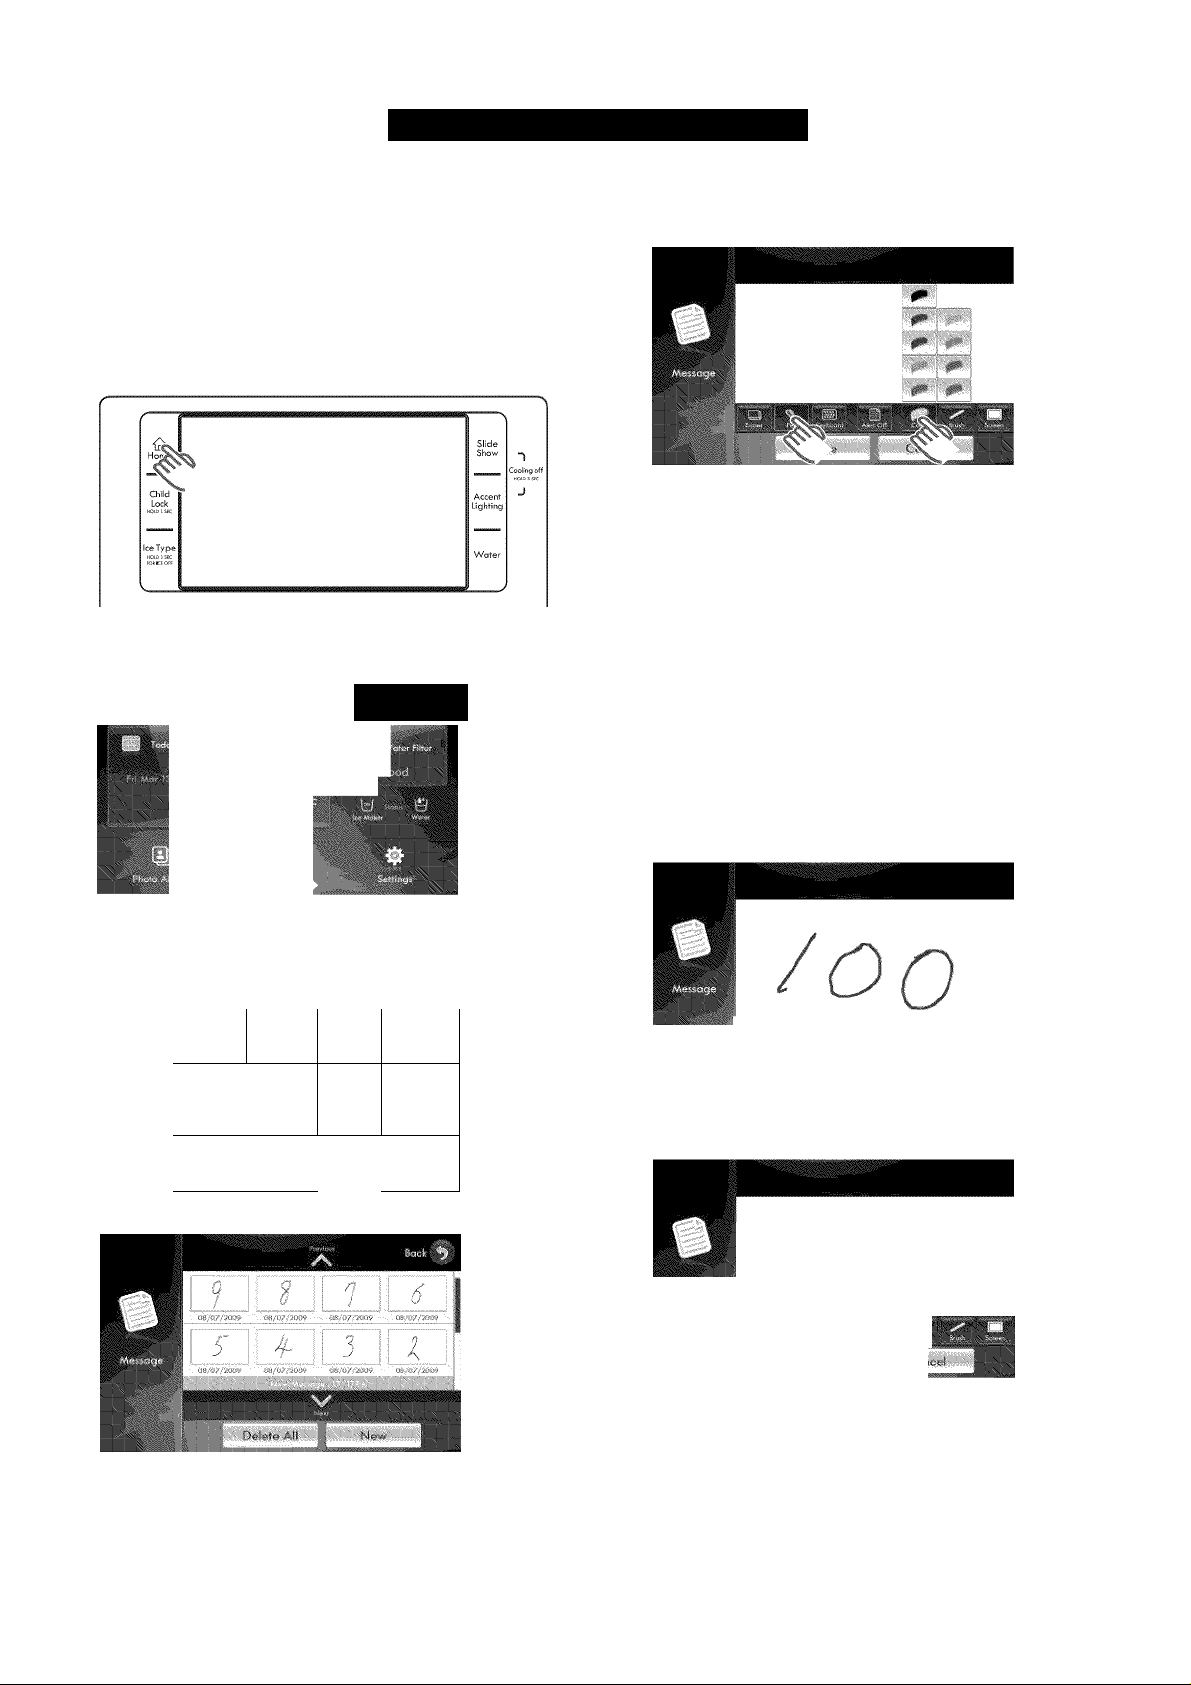
The message feature allows you to leave handwritten or
typed messages on the screen for yourself or someone
else.
Leaving a new message
1. Press the Home button. The display screen will show
the “Home” screen.
2. Touch the Message button in the center bottom of the
touch screen. The “Message” screen will appear.
1
4.
Select the messaging tools as needed by touching
the buttons under the message screen. Enter the
message contents with the selected tools.
• Eraser - Select to erase any part of an inputted pen
message.
• Pen - Select to input a message with the stylus.
• Keyboard - Select to input a typed message.
• Alert On/Off - Signals there is a new message on
the home screen.
• Screen - Selects the background for the message.
• Brush - Selects the thickness for the stylus.
• Color - Selects the color of the stylus.
• All Eraser - Select to erase an entire pen message.
NOTE: When Eraser is selected, the All Eraser
appears on the screen above the Color button.
3. Touch the New button. A blank message screen will
appear.
I
ii——
5. If you want to alert someone of this new message,
touch the Alert On/Off button.
6. Touch the Save button to enter and save the
message information.
/no
NOTE: The new message is highlighted.
NOTES:
• Up to 100 messages can be saved.
• If a message has been saved with an alert, the
Message button on the “Home” screen will blink.
35
Page 36
USING YOUR REFRIGERATOR
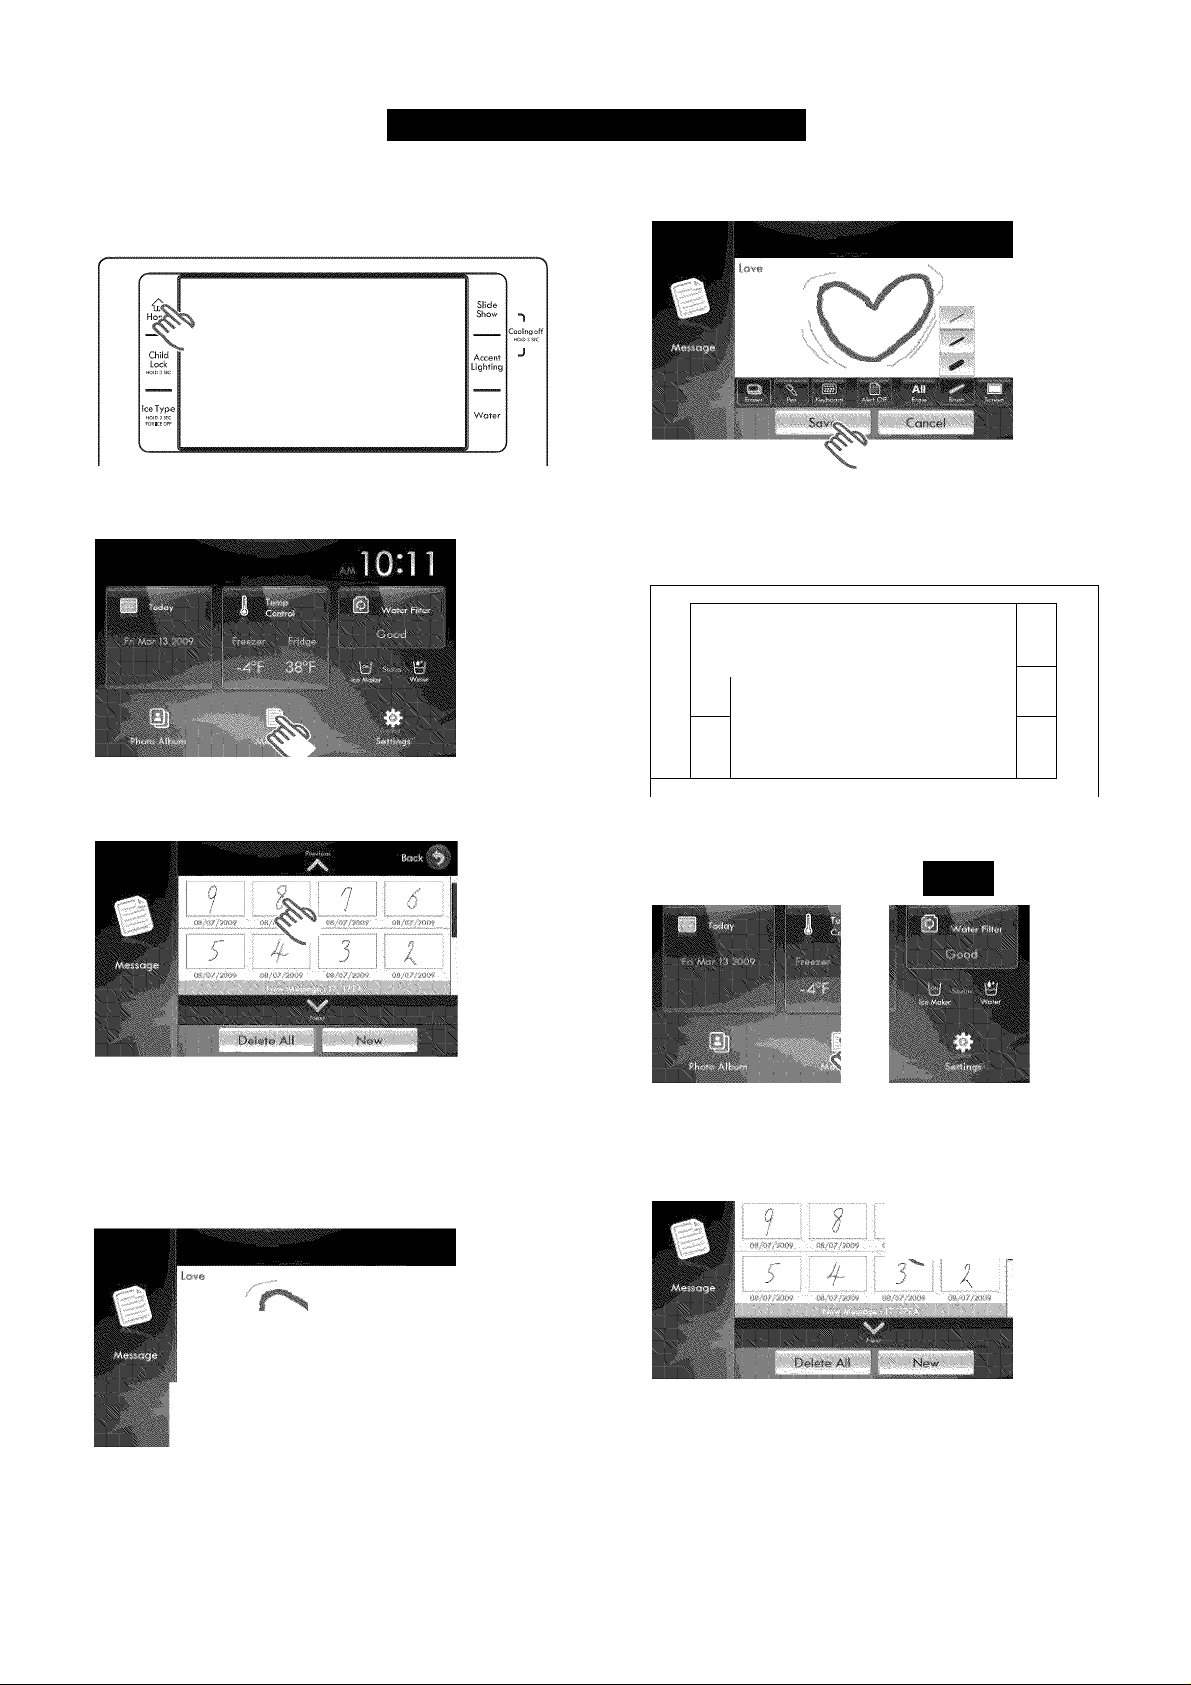
Changing a message
1. Press the Home button. The display screen will show
the “Home” screen.
2. Touch the Message button in the center bottom of the
touch screen. The “Message” screen will appear.
5. Touch the Save button to save and enter the changed
message.
Deleting a message
1. Press the Home button. The display screen will show
the “Home” screen.
S
'J
Child
Lock
Ice Type
Slide
Show
Accent
Lighting
Wafer
Cooling off
J
3. Select the message you want to change by touching
it on the screen. The selected message will appear.
4. Select the tools to make the desired changes to the
message. The message changes will appear on the
screen as they are entered.
NOTE: When you modify the message contents, the
Delete and Close buttons will replaced with Save and
Cancel buttons.
^ / -
2. Touch the Message button in the center bottom of the
touch screen. The “Message” screen will appear.
I I
3. Select the message you want to delete. The selected
message will appear on the screen.
36
Page 37
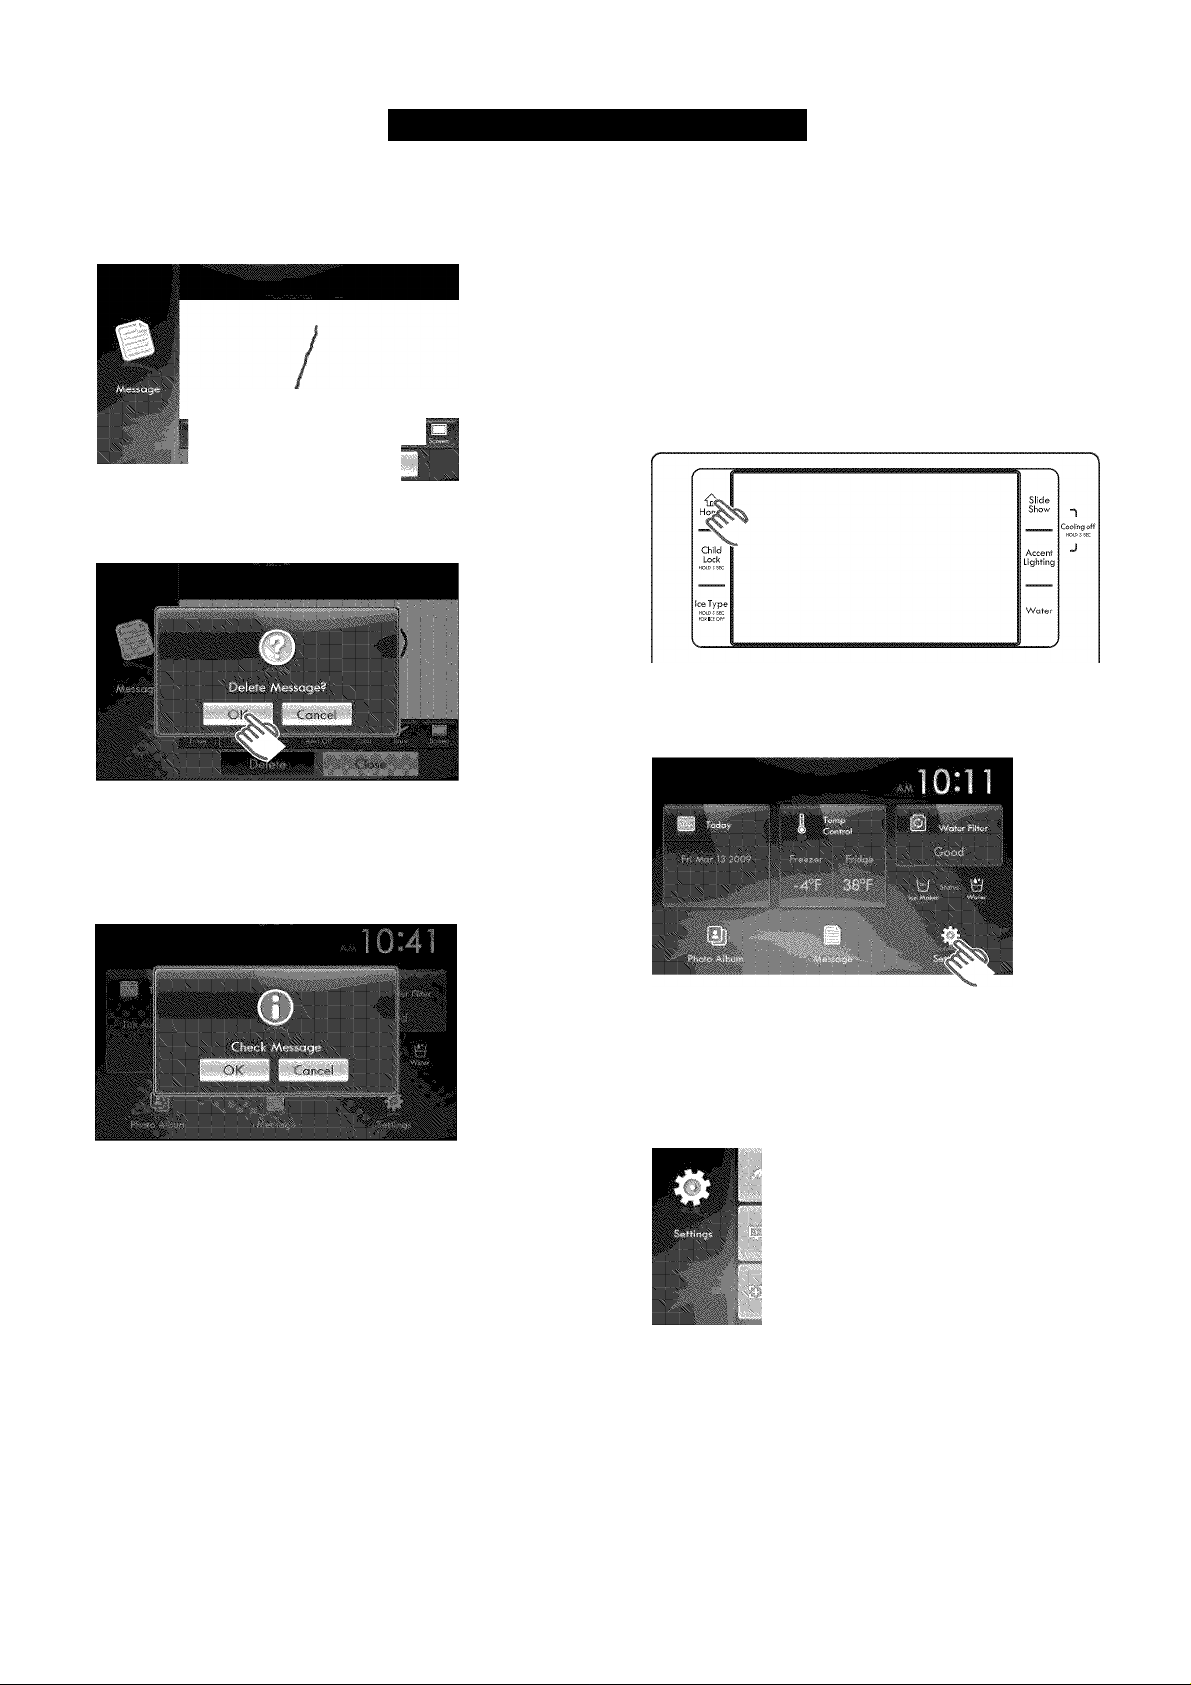
USING YOUR REFRIGERATOR
Deleting a message (cent.)
4. Touch the Delete button under the message screen.
The “Delete Message?” screen will appear.
5. Touch the OK button to delete the message.
Settings
You can customize the following areas under the Settings
button: Energy Saver, Brightness, Screen Saver, Volume
Control, Touch Screen Correction, and Current Date/Time.
How to toggle the energy saver function.
If condensation occurs on the doors, turn the energy
saver function off.
1. Press the Home button. The display screen will show
the “Home” screen.
2. Touch the Settings button in the lower-right corner of
the touch screen. The “Settings” selection screen will
be displayed.
New Message Alert
If the Alert On button Is selected and saved with a
message, “Check Message” appears on the screen when
the LCD turns on.
Touch the OK button to view the new message.
Touch the Cancel buton to clear the alert.
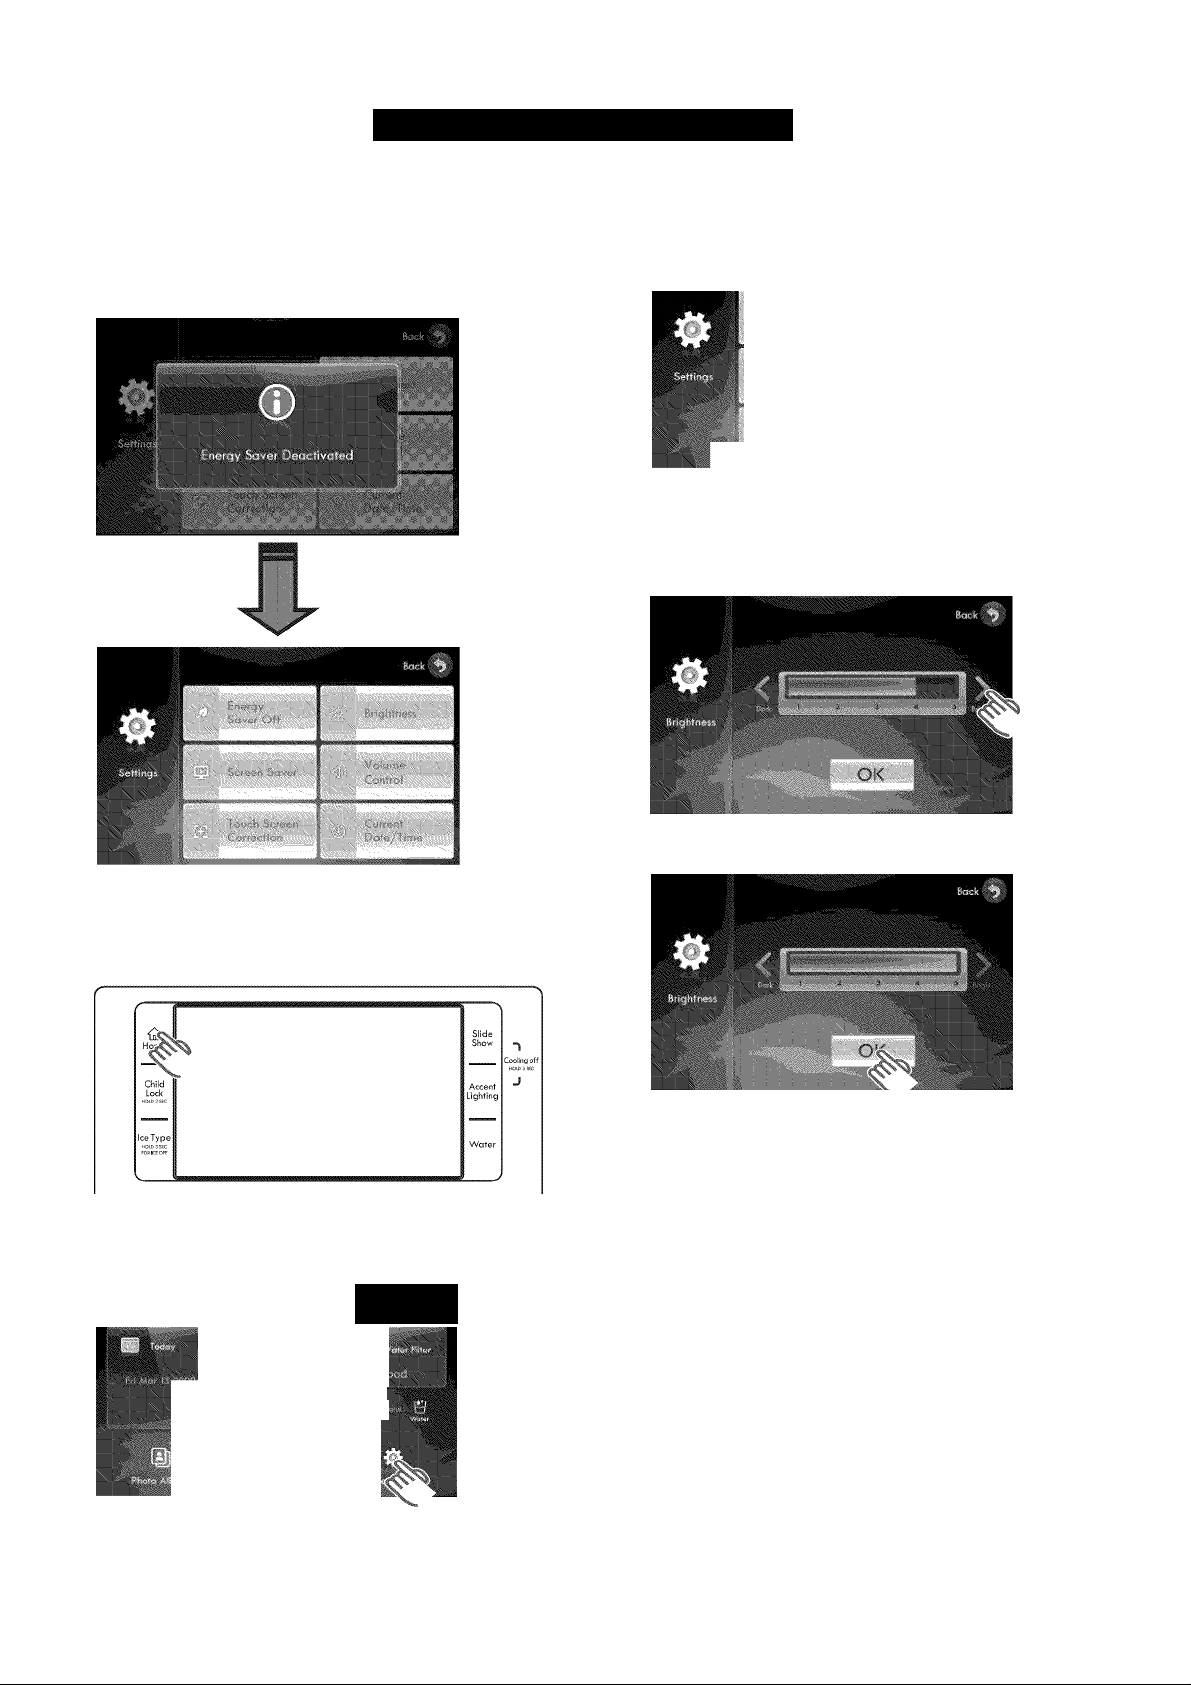
3. Touch the Energy Saver Cn button to deactivate the
energy saver feature. “Energy Saver Deactivated” will
appear on the screen.
NOTE: “Energy Saver Cn” is the default setting.
37
Page 38
USING YOUR REFRIGERATOR
4. After “Energy Saver Deactivated” is displayed on the
screen, the settings screen will display the Energy
Saver Off button, indicating the energy saver function
is OFF.
NOTE: The Energy Saver button shows the current
set condition.
3. Touch the Brightness button in the upper-right corner
of the touch screen. The brightness control will
appear on the screen.
L.
_
...........
.................
.......
.....—............
...................................-.......
-liiiiiiiCTTir
I
4. Adjust the screen brightness by touching the Dark
and Bright < and > buttons on the touch screen.
• Each time an arrow is touched, the screen
brightness will change.
How to set the screen brightness.
1. Press the Home button. The display screen will show
the “Home” screen.
2. Touch the Settings button in the lower right corner of
the touch screen. The “Settings” selection screen will
be displayed.
,10:11
5. To apply your new settings, touch the OK button.
38
Page 39
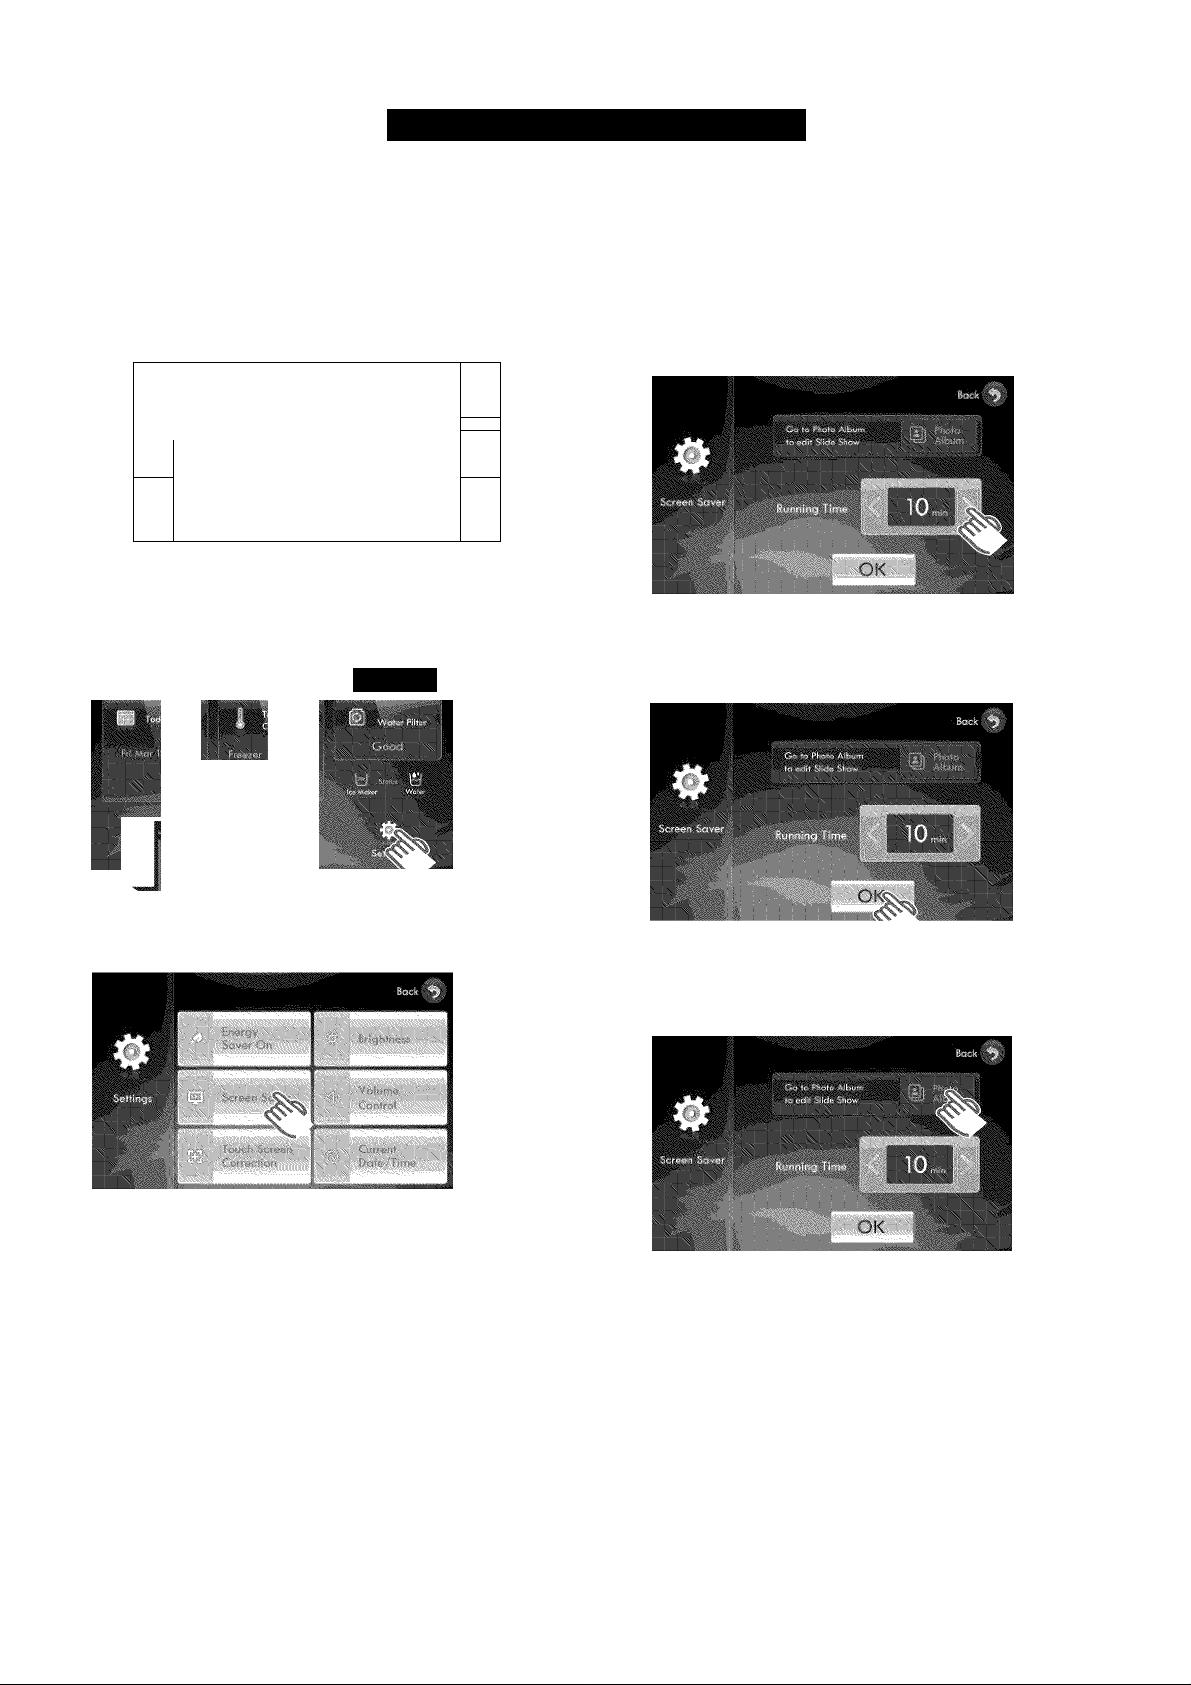
USING YOUR REFRIGERATOR
How to set the screen saver.
If the screen saver is left on for extended periods, it is a
good idea to set the slide show at the photo album as the
screen saver.
1. Press the Home button. The display screen will show
the “Home” screen.
'—i
--------------------------------------------
Show
Child
Ice Type
2. Touch the Settings button in the lower-right corner of
the touch screen. The “Settings” selection screen will
be displayed.
Iw- I i
Lighting
Wafer
__
J
4. Use the < and > buttons to choose one of the six
preset settings (0/3/5/10/30/60 minutes). The selected
running time will appear on the screen.
NOTES:
• After 60 seconds, the screen saver runs for the
time you set; then the LCD panel turns OFF.
• If the screen saver running time is set for
0 minutes, the slide show will not run.
5. Touch the OK button to apply the new time setting.
NOTE: If the OK button is not touched before moving
to other functions, the new time setting will not apply.
3. Touch the Screen Saver button
on the left center of the touch screen.
The Screen Saver screen will appear.
6. To change the slide show for the screen saver, select
the Photo Album button. Refer to page 33 for “Setting
Up a Slide Show From the Photo Album” instructions.
39
Page 40
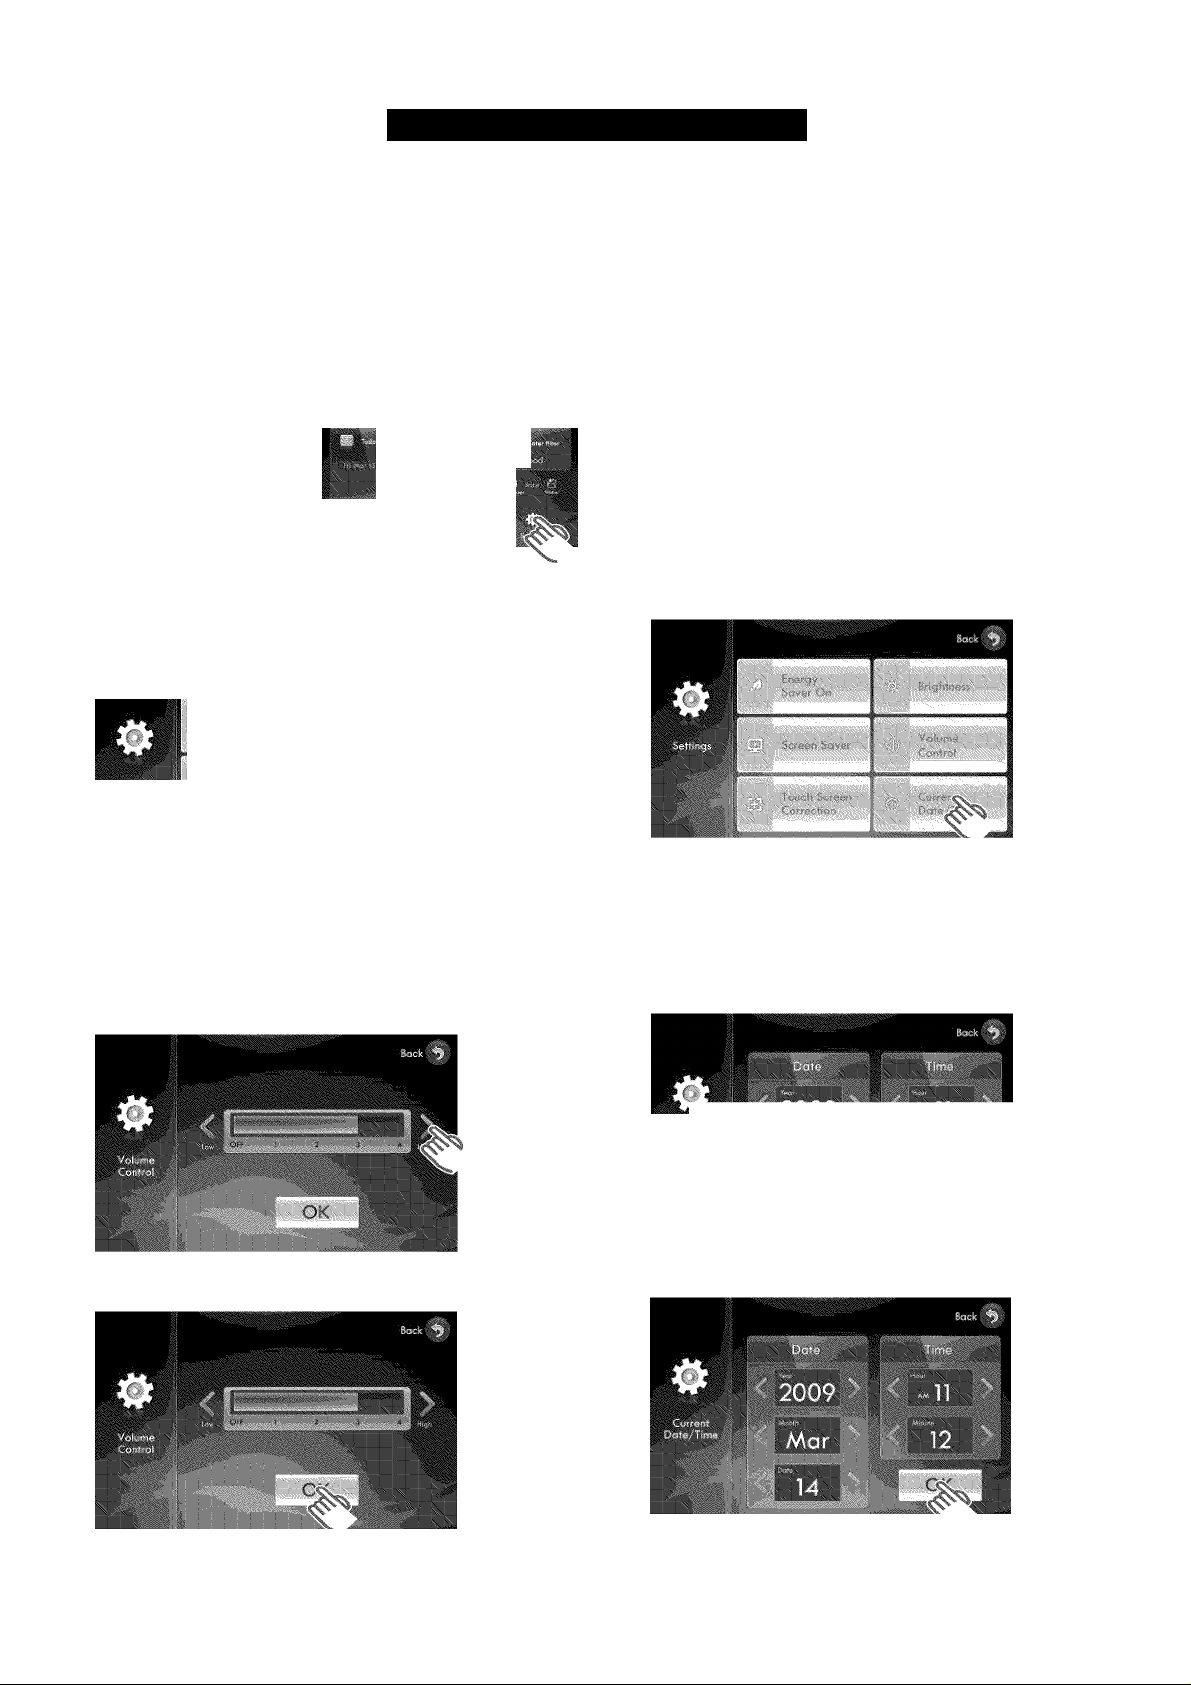
USING YOUR REFRIGERATOR
How to set the volume control.
You can control the volume of the alert sounds.
1. Press the Home button. The display screen will show
the “Home” screen.
2. Touch the Settings button in the lower-right corner of
the touch screen. The “Settings” selection screen will
appear.
'-V
3. Touch the Volume Control button on the right-center
of the touch screen. The “Volume Control” screen with
the current setting will appear.
How to change the current date and time.
1. Press the Home button. The display screen will show
the “Home” screen.
2. Touch the Settings button in the lower-right corner of
the touch screen. The “Settings” selection screen will
appear on the screen.
J
3. Touch the Current Date/Time button in the lower-right
corner of the touch screen. The current date and time
settings will appear on the screen.
'
4. Touch the High and Low < and > buttons to adjust the
alert sound level. The volume level bar will change as
the volume changes.
NOTE: An alert sounds whenever a button is touched
or a message window or menu list appears.
5. Touch the OK button to set the new volume level.
4. Use the < and > buttons to revise the date and time
settings. The “Current Date/Time” screen will show
the changes as they are made.
• Date settings display the year, month, and date.
• Time settings display the hours (AM or PM) and
minutes.
5. To apply your new settings, press the OK button.
40
Page 41
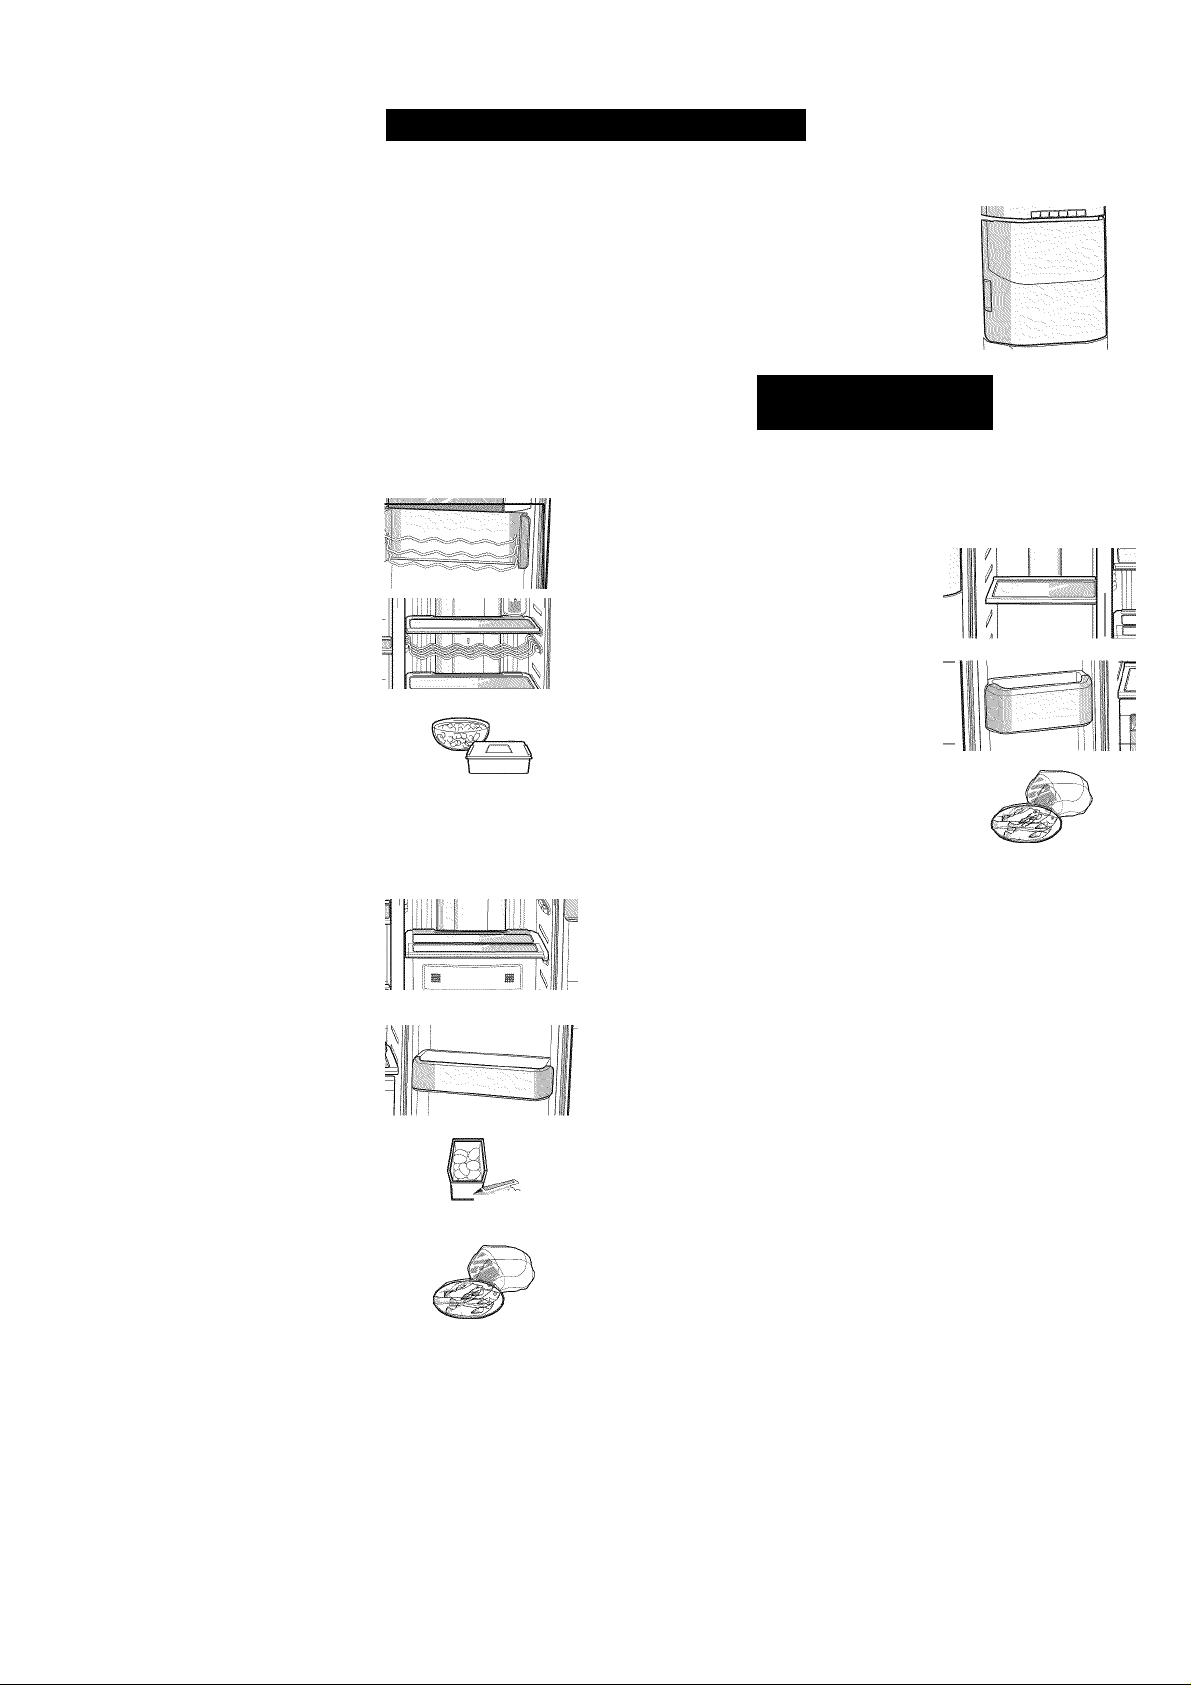
USING YOUR REFRIGERATOR
STORING FOOD IN THE REFRIGERATOR
The Kenmore Elite™ Side-By-Side Refrigerator has been
designed with features and functions that maximize space
saving. The following customized compartments help
keep your food fresher longer. In order to further prevent
odor from seeping into the ice, securely wrap stored foods
as airtight as possible.
DAIRY BIN
Can be used to store small dairy
items like butter, margarine, yogurt,
and cream cheese.
TILT CAN CARRY
Can be used to store beverage
cans or bottles.
OPTIONAL WINE RACK
Helps wines maintain their taste by
providing an optimized place for
storing your wine bottles.
TEMPERED GLASS SHELVES
Designed to be crack-resistant, the
shelves can be used to store all
types of food and drinks. Circular
marks on the glass surface are a
normal phenomenon and can usually
be wiped clean with a damp cloth.
FOLDABLE SHELF
This shelf folds to let the user
quickly change the usable storage
space to accommodate tall bottles
and containers.
REFRIGERATOR DOOR BINS
Designed to handle large, bulky
items such as gallons of milk or
other large bottles and containers.
EGG CONTAINER
Best place to keep eggs. Place the
container on the shelf for easy
access.
DELI DRAWER
Designed to store and preserve
deli items such as cold cuts and
cheeses, and cuts of fresh meat.
FRUIT AND VEGETABLE CRISPERS
Used to preserve the freshness of
your stored vegetables and fruits.
This drawer has been specifically
designed to control the level of
humidity within the compartment.
Keep vegetables and fruits
separate, when possible.
STORING FOOD IN THE FREEZER
ICE BUCKET
Designed to store large amounts
of ice.
A CAUTION
Do not use your fingers, hands, or any other objects in
the ice chute or the icemaker bucket. This may result
in personal injury or material damage.
SLIDE-SHELVES
Can be used to store all types of
frozen food.
FREEZER DOOR BINS
Can be used for small packages of
frozen food.
FREEZER DRAWERS
Best used to store meats or dry
foods. Stored food should be
wrapped securely using foil or
other suitable wrapping materials
or containers.
FOOD STORAGE TIPS:
• DO NOT place any large items of food under the lamp
in the refrigerator. An air sensor is located near the
lamp and if the sensor is blocked, the refrigerator may
become too cold.
• ALWAYS place vegetables and fruits in the vegetable
and fruit crispers to avoid freezing.
• If the food in the refrigerator becomes frozen, please set
the temperature higher.
• Bottles should be stored tightly together so that they do
not tip and fall out when the refrigerator door is opened.
• If you plan to go away for an extended period, empty
the refrigerator and turn it OFF. Wipe excess moisture
from the inside of the appliance and leave the doors
open. This helps keep odor and mold from developing.
USING THE DOORS
The refrigerator and freezer doors have automatic door
closers to ensure that the doors close and seal
completely.
When a door is opened or closed to less than 3 inches, it
will automatically close and seal. When a door is opened
more than 3 inches, it will stay open until it is closed.
41
Page 42
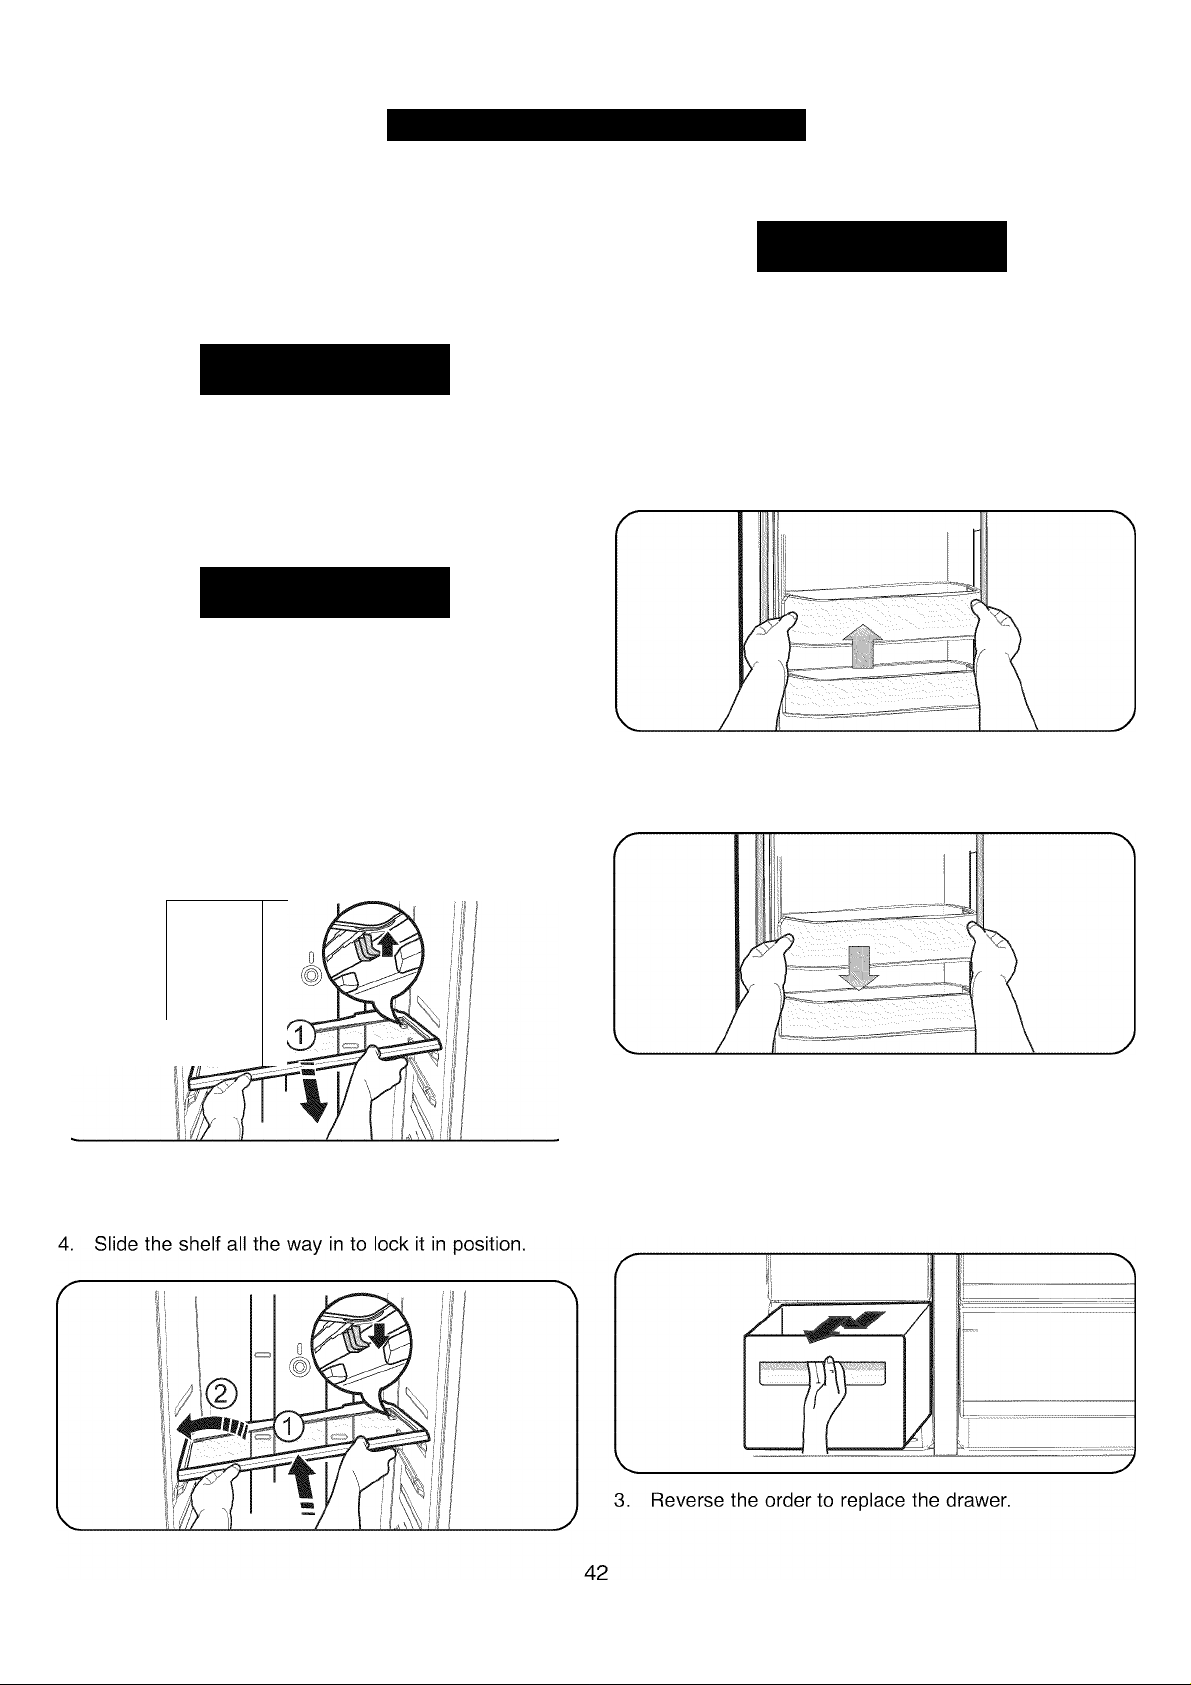
USING YOUR REFRIGERATOR
REMOVING THE REFRIGERATOR/ FREEZER ACCESSORIES
The Kenmore Elite Side-By-Side Refrigerator accessories
can be easily removed and/or rearranged to maximize the
use of interior space and provide ease of cleaning.
A CAUTION
Before removing any accessories, remove all food
from the accessory being removed. This will avoid
breakage and/or personal injury.
Shelves (Refrigerator and Freezer)
A CAUTION
The tempered glass shelves are heavy. Use special
care when removing them to avoid breaking them
and/or personal injury.
To remove and relocate:
1. Slide the shelf out until the shelf support lines up with
the opening in the side shelf retainer as shown.
2. Using both hands, tilt the shelf by lifting the right side
as shown; then carefully remove the shelf from the
refrigerator or freezer compartment.
Door Bins (Refrigerator and Freezer)
A CAUTION
Injury may occur if the door bins are not firmly
installed. Do not allow children to play with the bins.
Sharp corners of the bins may cause personal injury.
NOTE: DO NOT adjust a bin full of food.
To remove and relocate:
1. Lift up on the bin to unlatch; then pull it straight out to
remove from the door.
2. After relocating the bin, slide it in the door above the
desired location and then push down until it stops.
This will lock the bin in place.
' ii
:j. i Ii
; li
; li
'i! : li
i'i li
i'i ! li
'i! 'i(D
ii—?
ill i ill
- *
3. Holding the shelf in a tilted position, insert the left side
of the shelf on the desired shelf support; then lower
the right side of the shelf until it is also supported.
Drawers/Crispers (Refrigerator and Freezer)
To remove and replace a drawer:
1. Slide the drawer out until it stops.
2. Slightly lift up on the front of the drawer and slide it
out to remove it from the refrigerator or freezer
compartment.
Page 43
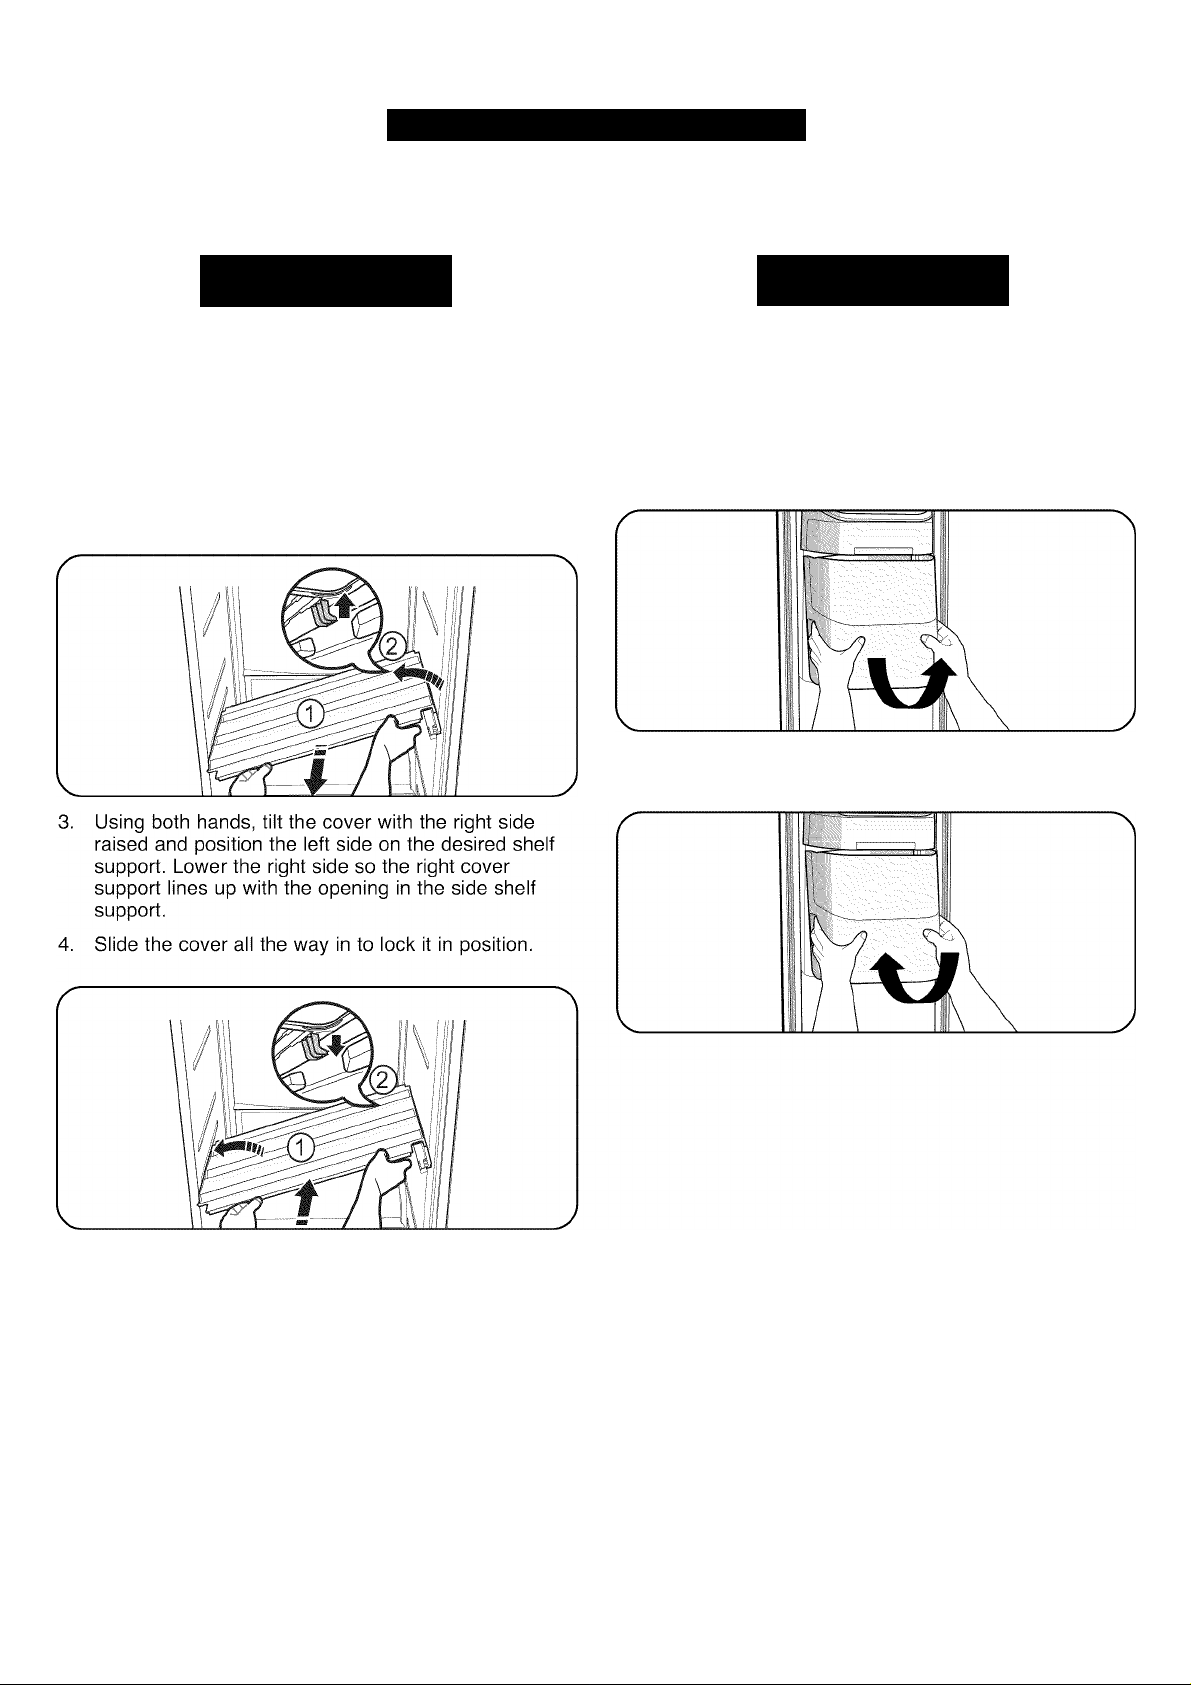
USING YOUR REFRIGERATOR
Drawers/Crispers (cont.)
To remove and replace a drawer cover:
A CAUTION
Do not use excessive force when removing a drawer
cover. Forced drawer covers can break and/or cause
personal injury.
1. Remove all the drawers as described on page 41.
2. Slide the drawer cover out until the cover supports
line up with the openings in the side supports as
shown; then carefully remove the drawer cover from
the refrigerator or freezer compartment.
Ice Bucket (Freezer)
To remove and replace:
A CAUTION
Do not force the ice bucket during removal.
Unnecessary force could cause damage to the
icemaker.
, Using both hands as shown, lift the ice bucket up
while slowly pulling it out. Do not force the ice bucket
during removal to prevent possible damage to the
icemaker.
2. Replace the ice bucket by slightly tilting in the top of
the ice bucket and sliding it into place.
43
Page 44
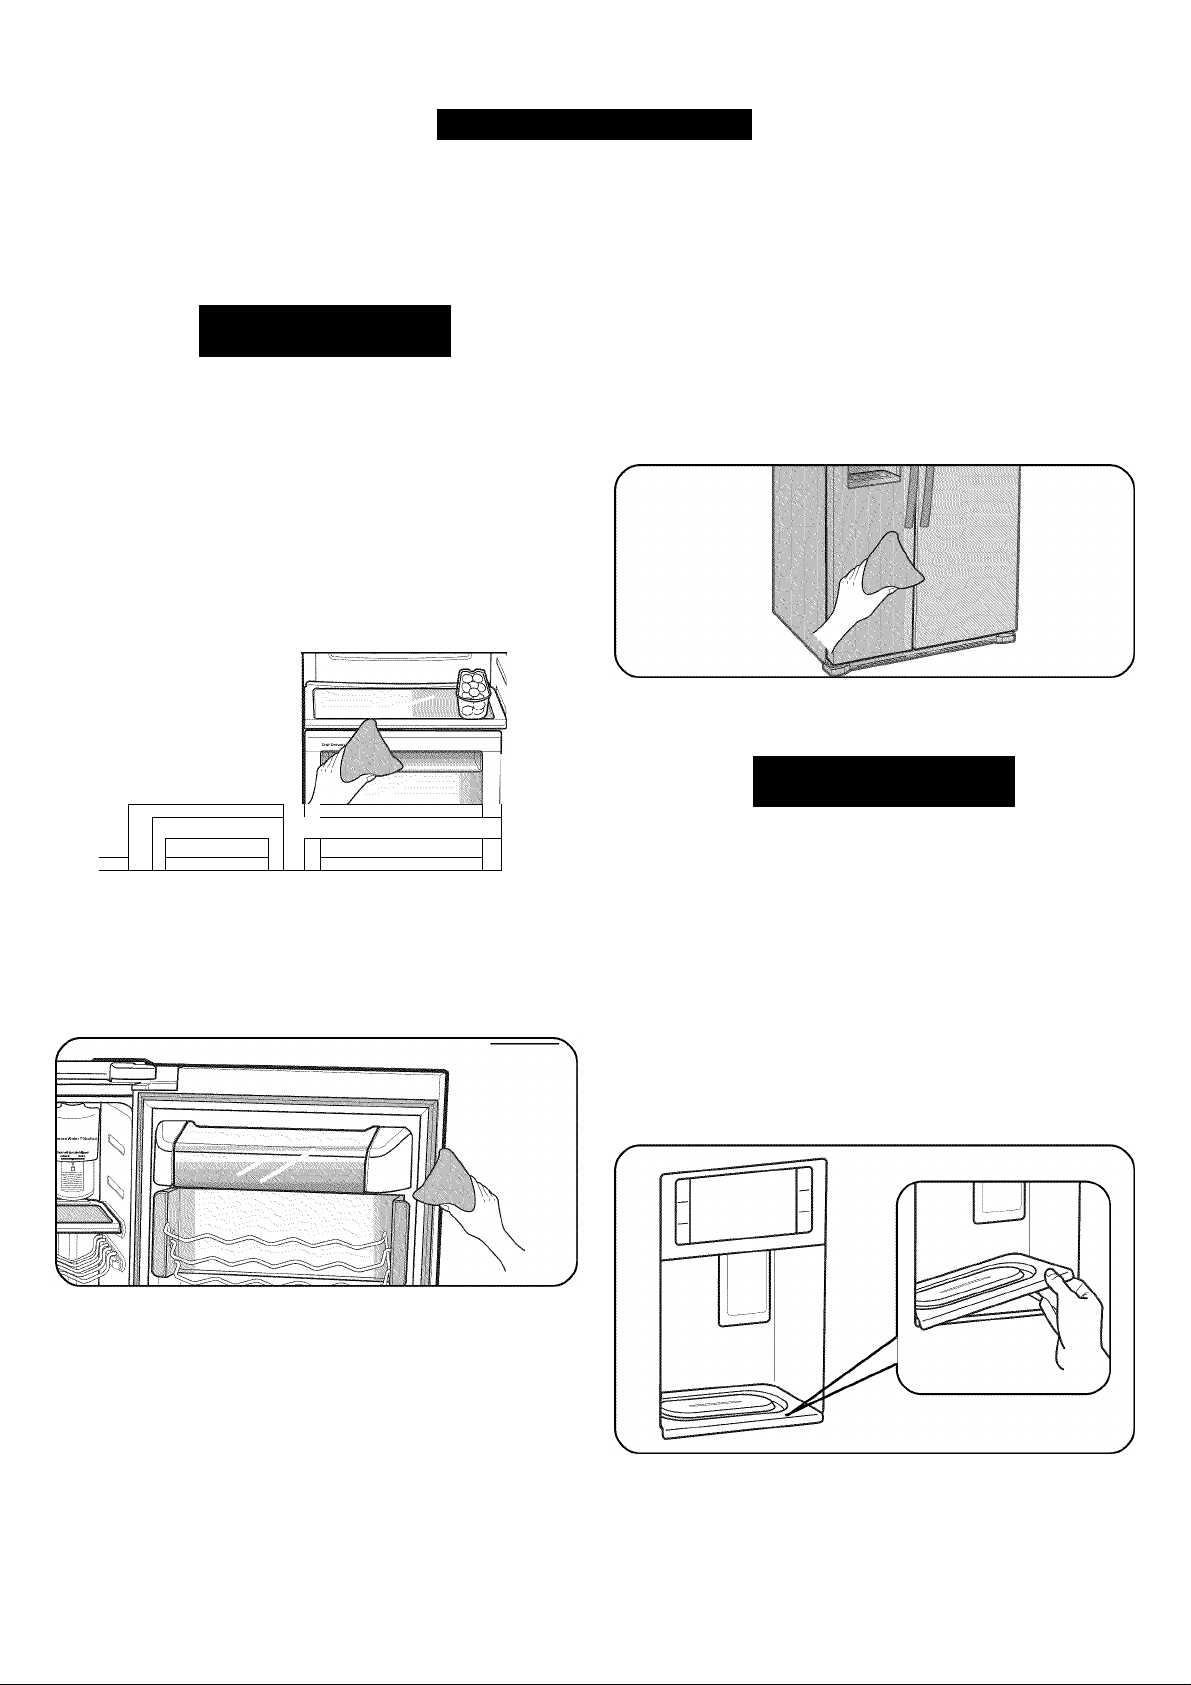
CARE AND CLEANING
CLEANING THE REFRIGERATOR
Caring for your Kenmore Elite™ Side-By-Side
Refrigerator prolongs the life of your appliance and helps
keep it odor- and germ-free.
A CAUTION
Do not use benzene, thinner, or bleach for cleaning.
They could cause a fire or damage the surface of the
appliance.
Cleaning the Interior
Clean the inside walls and accessories with a mild
detergent and then wipe dry with a soft cloth. You can
remove the drawers and shelves for a more thorough
cleaning. Make sure to dry the drawers and shelves
before putting them back into place.
I
Cleaning the Exterior
Wipe the digital panel and LCD display panel with a
clean, soft cloth. Spray water onto the cleaning cloth
instead of spraying directly on the surface of the
refrigerator.
The doors, handles, and cabinet surfaces should be
cleaned with a mild detergent and then wiped dry with
a soft cloth.
To keep your appliance looking its best, the exterior
should be polished once or twice a year.
Cleaning the Ice/Water Dispenser
/
/
! i
Cleaning the Rubber Door Seals
Dirty door seals can prevent the doors from closing
properly and lower the refrigerator’s operating efficiency.
Clean the door seals with a mild detergent and a damp
cloth; then wipe dry with a clean, soft cloth.
A WARNING
Electric Shock Hazard
Do not spray water on the refrigerator while it is
plugged in. It could cause an electric shock resulting
in death, personal injury, or damage to the appliance.
1. Push down one end of the tray in the bottom of the
dispenser. Grasp the other end of the tray and
remove it.
2. Wipe the dispenser with a clean, damp cloth; then dry
with a soft cloth.
3. Wash the bottom tray in warm, soapy water; rinse and
dry. Replace the tray in the bottom of the dispenser.
44
Page 45
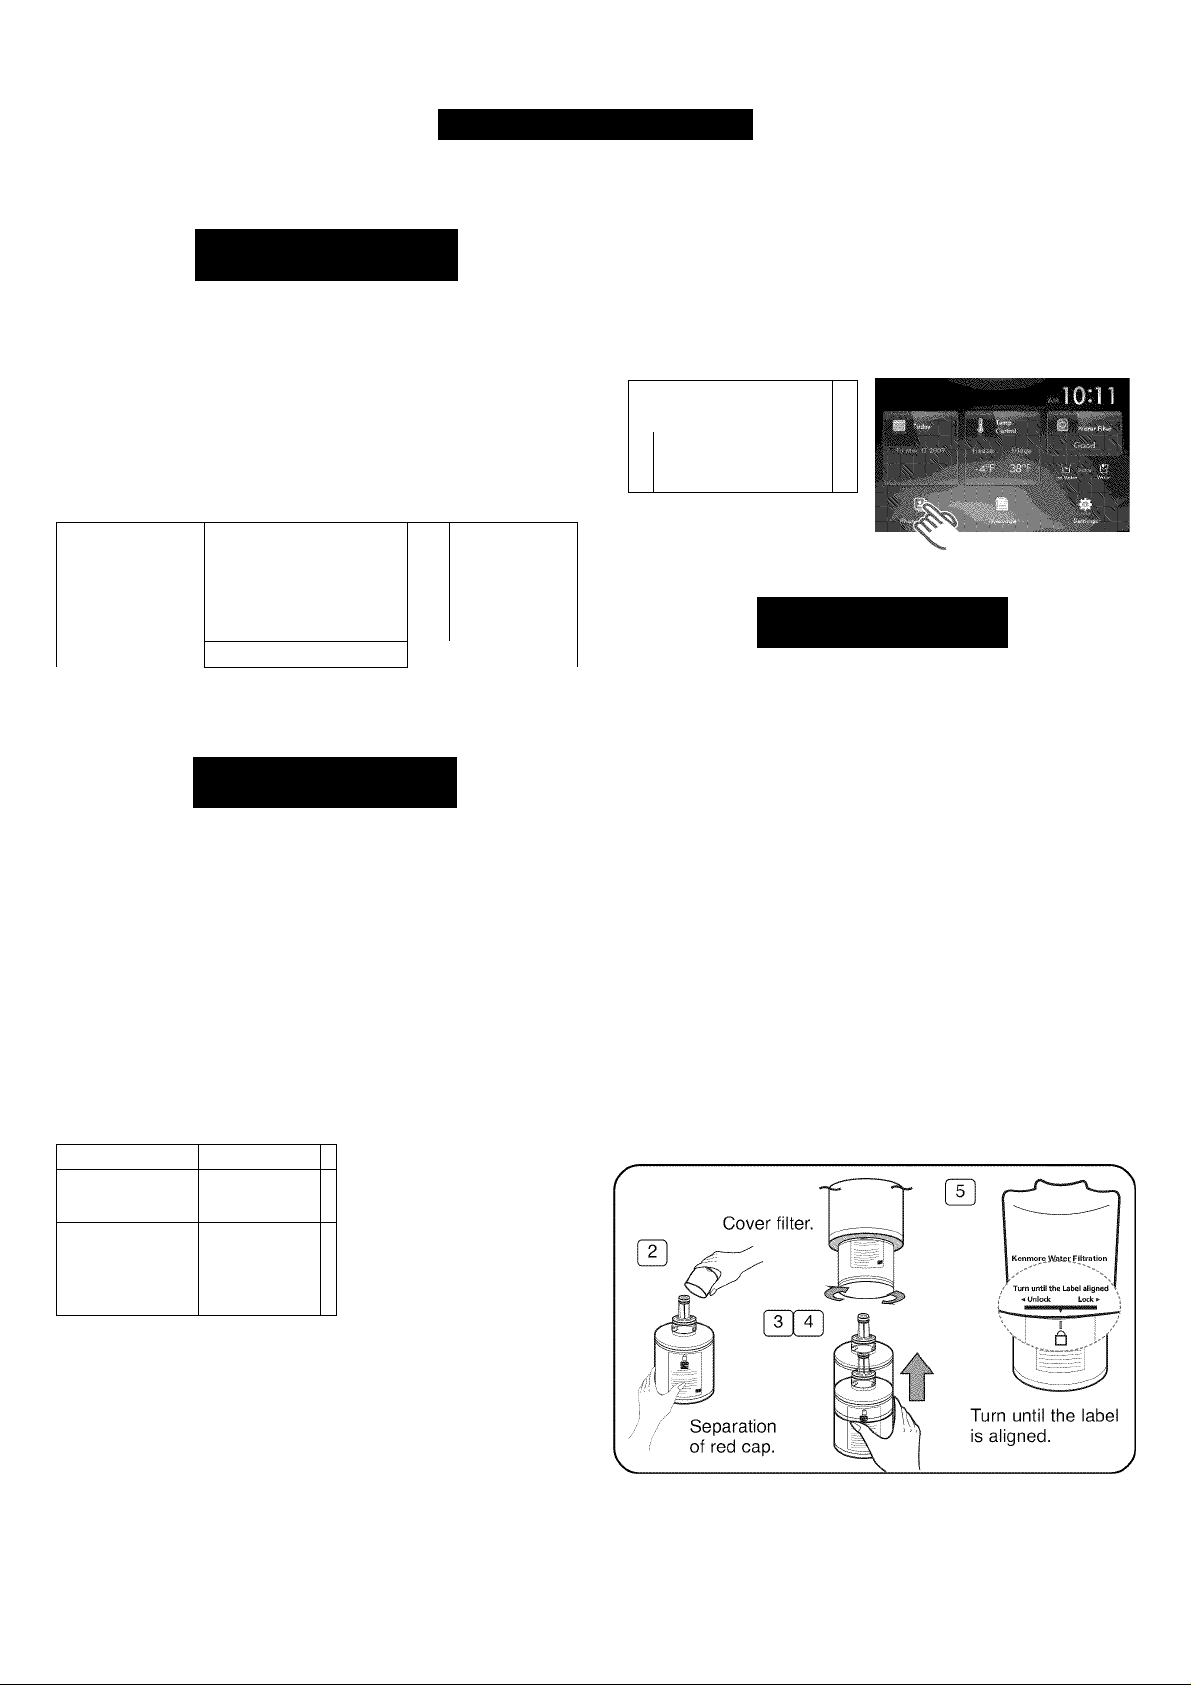
CARE AND CLEANING
Cleaning Behind the Refrigerator
A WARNING
Electric Shock Hazard
Do not remove the back cover. Doing so could cause
an electric shock resulting in death, personal injury,
or damage to the appliance.
To keep the cords and exposed parts free of dust and dirt
accumulation, vacuum behind the appliance once or twice
a year.
llp-2^s^ ^ riniiiiilii I
E iiifflUIiniuP
111 æSrâsaw 11y 0 Iflimiril
REPLACING THE INTERIOR LIGHTS
A WARNING
Electric Shock Hazard
Do not attempt to replace any interior lights. Doing so
could cause an electric shock resulting in death,
personal injury, or damage to the appliance.
The interior lighting for this model uses LED lighting.
DO NOT try to change an LED. LED lighting should only
be replaced by a qualified Sears service technician.
LED Lights,
r -—h
^ Ψ 1
CHANGING THE WATER FILTER
To check the condition of the water filter, press the Home
button and then touch the Water Filter button on the top
right of the touch screen. The current water filter status
will be displayed on the screen followed by step-by-step
servicing instructions. (See page 29.)
,
-
£;
—-
lSS
w...
A CAUTION
DO NOT use the water or ice dispenser without a
water filter cartridge because the water line may
become blocked or damage the dispenser.
1.
Remove the replacement water filter from the box and
apply the appropriate month indicator sticker as
shown. The sticker should show the month 6 months
in the future. The normal filter life is about 6 months.
2.
Remove the protective cap from the top of the new
filter.
3. Remove the old filter by turning it counterclockwise
and pulling down to remove it from the filter housing.
4. Position and insert the new filter into the filter housing.
5. Slowly turn the water filter clockwise to lock the filter
in place and align it with the printed mark on the
cover. Do not overtighten.
NOTE: Be sure to flush 3 gallons (11.4 liters) (approximately
6 minutes). This purges any air in the water lines that
could cause the dispenser to drip.
I--'
t
/ 1
45
Page 46
CARE AND CLEANING
POWER INTERRUPTIONS
1. If the power will be out for 24 hours or less, keep all
refrigerator doors closed to help foods stay cold and
frozen.
2. If the power will be out for more than 24 hours,
remove all frozen food and store it in a frozen food
locker.
WHEN YOU GO ON VACATION
If you choose to leave the refrigerator on while you
are away:
1. Use up any perishables and freeze other items.
2. Empty the ice bin.
3. Turn off the icemaker.
If you choose to turn the refrigerator off before you
leave:
1. Remove all food from the refrigerator.
2. Unplug the power cord or turn off the circuit breaker
or fuse box.
3. Clean the refrigerator interior. Make sure it has been
thoroughly cleaned and wiped dry.
WHEN YOU MOVE
When you are moving your refrigerator to a new home,
follow these steps to prepare it for the move.
1. Remove all food from the refrigerator and pack all
frozen food in dry ice.
2. Unplug the power cord.
3. Clean the refrigerator interior. Make sure it has been
thoroughly cleaned and wiped dry.
4. Take out all removable parts, wrap them well, and
tape them together so they don’t shift and rattle
during the move. Refer to sections in “Using Your
Refrigerator” for removing instructions.
5. Raise the front leveling legs by turning them
clockwise as far as they will go. This will expose all
the rollers to make it easier to move.
6. Turn off the water supply line to the refrigerator.
Disconnect the water line behind the refrigerator.
7. Tape the doors shut and the power cord to the back
of the refrigerator.
When you get to your new home, put everything back and
refer to the “Refrigerator Installation” section for
installation instructions.
4. Tape rubber or wood blocks to the top of each door to
prop them open far enough for air to get in. This stops
odor and mold from building up.
46
Page 47
TROUBLESHOOTING GUIDE
REFRIGERATOR DOES NOT OPERATE
Check if... Then...
The power supply cord is unplugged.
A household fuse has blown or circuit
breaker tripped.
Refrigerator is in defrost cycle.
REFRIGERATOR DOES NOT CHILL SUFFICIENTLY
Check if... Then...
The power supply cord is unplugged.
The temperature control on the display panel
is not set to the correct temperature.
Refrigerator is located in direct sunlight or
near a heat source.
The back of the refrigerator is located too close
to the rear wall.
FROZEN FOOD IN THE REFRIGERATOR
Check if... Then...
The temperature control on the display panel
is not set to the correct temperature.
Firmly plug the cord into a live outlet with proper voltage.
Replace the fuse or reset the circuit breaker.
Wait about 30 minutes for defrost cycle to end.
Firmly plug the cord into a live outlet with proper voltage.
Reset the temperature control to a lower temperature.
Relocate away from heat source.
Make sure there is at least 3/8" of clearance between the
back of refrigerator and rear wall.
Reset the temperature control to a warmer temperature.
Room temperature is too low. Make sure refrigerator is installed in a temperature control
room.
Food is NOT stored properly in the refrigerator. Relocate food to warmer section in the refrigerator. Example:
Foods with high water content should not be stored in a Deli
Drawer or a Fruit and Vegetable Crisper.
UNUSUAL NOISE OR SOUNDS
Check if... Then...
The refrigerator is level and stable. Level and secure the refrigerator.
The back of the refrigerator is located too close
to the rear wall.
Anything was dropped behind or under the
refrigerator.
A “ticking” sound is heard from inside the refrigerator.
“Clunking” and “hissing” sounds are heard from inside
the freezer.
Make sure there is at least 3/8" of clearance between the
back of the refrigerator and the rear wall.
Remove the dropped object.
It is normal and occurs when various accessories contact
or expand due to temperature changes inside the
refrigerator.
They are normal and occur when ice drops into the ice
bucket and water refills the icemaker.
47
Page 48
TROUBLESHOOTING GUIDE
FRONT CORNERS AND VERTICAL HINGED SURFACES ARE HOT OR HAVE CONDENSATION
Check if... Then...
Vertical hinged surfaces feel hot. Some heat is normal due to installed anti-condensators.
These prevent condensation buildup.
Refrigerator door is ajar. Condensation can occur when you leave a door open
for a long time.
ICEMAKER NOT PRODUCING ICE
Check if... Then...
The refrigerator was just installed.
The water line is connected and water supply is
turned on.
The icemaker is turned off. Check the digital display panel to make sure the icemaker is
The freezer temperature is too warm. Reset the temperature control to a lower temperature.
The refrigerator must run for at 12 to 24 hours before
making ice.
Connect the water supply line and open the shut-off valve.
turned on.
WATER BUBBLING SOUND
Check if... Then...
There is a bubbling water sound in the refrigerator.
This is normal. The bubbling comes from the refrigerator
coolant liquid circulating through the refrigerator.
BAD SMELL IN REFRIGERATOR
Check if... Then...
There is food spoiled in the refrigerator. Throw away spoiled food.
Food is properly stored and wrapped. Foods with strong odors, like fish, should be stored in airtight
containers.
Old or spoiled food is in the freezer. Clean out freezer compartment periodically. Throw away
any spoiled or suspicious food.
FROST ON WALLS OF THE FREEZER
Check if... Then...
The air vent is blocked. Remove any obstructions so air can circulate freely.
There is sufficient space around the food.
Allow sufficient space between foods stored for efficient air
circulation.
WATER DISPENSER IS NOT FUNCTIONING
Check if... Then...
The water line is connected and/or the shut-off
valve is open.
The water supply line has been crimped or crushed. Replace the water supply line.
The temperature in the freezer is too low. Reset the temperature control to a warmer temperature.
Connect the water supply line and open the shut-off valve.
48
Page 49
TROUBLESHOOTING GUIDE
THE DISPLAY FUNCTIONS DO NOT WORK
Check if... Then...
The display lock function is set to Locked. Reset the display lock function to Unlocked.
The display lock function is set to Unlocked.
Push the display reset button with a sharp tool. This
initializes the display. (Please note the user’s information is
not removed.)
NOTHING ON THE “EXTERNAL ALBUM : UPLOAD PICTURES” OR “EXTERNAL ALBUM :
PLAY SLIDE SHOW” SCREEN AFTER INSERTING MEMORY CARD
Check if... Then...
The images are saved on your memory card
(SD/SDHC/MMC/HS MMC).
The images are saved as JPEG files. Only JPEG files are compatible with this screen. Resave files
You waited long enough for the screen to read the
memory card.
Save the images on the memory card before inserting as an
“External Album.” If no images are saved on the memory card,
no images will appear on the screen.
on memory card as JPEG files.
Depending on the card type, it takes between 4-30 seconds
for images to load.
LCD SCREEN IS FREQUENTLY OFF
Check if... Then...
The LCD Backlight Off function is not set properly.
It is normal for the LCD screen to go blank after a period of
time. This reduces the refrigerator’s power consumption.
The “External Album : Upload Pictures,” “External
Album : Play Slide Show,” or “What do you want to
do?” screen turns off automatically.
The LCD goes blank before you are done using it. The default time is 1 minute for all other screen uses. The
The default time is 20 minutes for this screen use. This
screen will go blank after the set screen saver time or if
there is no user operation for 20 minutes.
screen will go blank after the set screen saver time or if
there is no user operation for 1 minute.
AFTERIMAGE OR BORDER LINES OCCUR ON THE SCREEN
Check if... Then...
The image sizes are the same in Slide Show and
Screen Saver modes.
If all displayed images are the same size with blacked out
borders on top, bottom, left, or right of the screen, the image
can burn border lines and/or images into the screen. Always
use a variety of image sizes in Slide Show and Screen
Saver and change frequently to avoid this problem.
If photos are not placed and rotated properly, permanent
damage can occur to the LCD screen. This type of damage
is not covered by the warranty.
INPUT POINT IN THE TOUCH SCREEN IS NOT CORRECT
Check if... Then...
The input point in the touch screen is correctly set. Do the touch screen correction from the “Settings” screen.
49
Page 50
 Loading...